camera supraveghere video -...
TRANSCRIPT

Video surveillance camera
PNI IP801W
Manual de utilizare User manual
Camera supraveghere video
1
1 2 3
ButonRESET
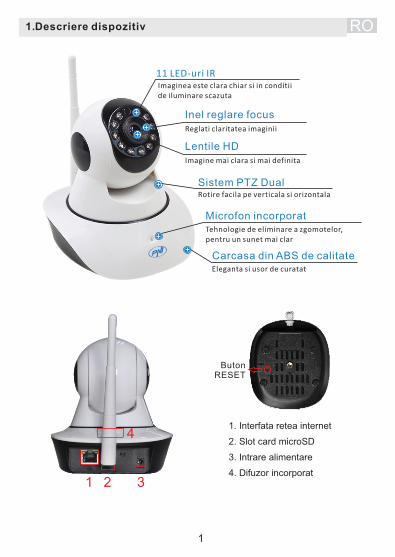
1. Interfata retea internet
2. Slot card microSD
3. Intrare alimentare
4. Difuzor incorporat
11 LED-uri IRImaginea este clara chiar si in conditii de iluminare scazuta
Lentile HD
Microfon incorporat
Carcasa din ABS de calitate
Imagine mai clara si mai definita
Sistem PTZ DualRotire facila pe verticala si orizontala
Tehnologie de eliminare a zgomotelor, pentru un sunet mai clar
Eleganta si usor de curatat
4
Inel reglare focus Reglati claritatea imaginii
1. Descriere dispozitiv RO
2
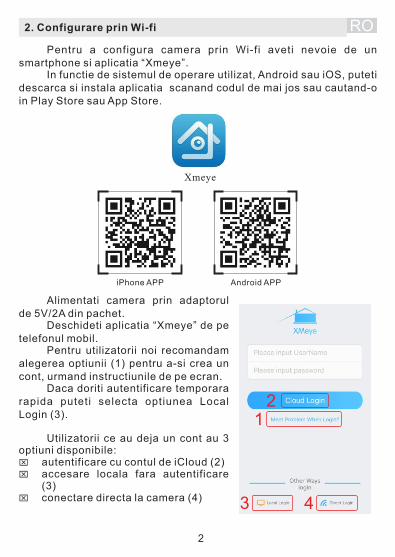
2. Configurare prin Wi-fi
Pentru a configura camera prin Wi-fi aveti nevoie de un smartphone si aplicatia “Xmeye”. In functie de sistemul de operare utilizat, Android sau iOS, puteti descarca si instala aplicatia scanand codul de mai jos sau cautand-o in Play Store sau App Store.
Xmeye
Alimentati camera prin adaptorul de 5V/2A din pachet. Deschideti aplicatia “Xmeye” de pe telefonul mobil. Pentru utilizatorii noi recomandam alegerea optiunii (1) pentru a-si crea un cont, urmand instructiunile de pe ecran. Daca doriti autentificare temporara rapida puteti selecta optiunea Local Login (3).
Utilizatorii ce au deja un cont au 3 optiuni disponibile:x autentificare cu contul de iCloud (2)x accesare locala fara autentificare
(3)x conectare directa la camera (4)
12
3 4
RO

3
Pentru mai multe detalii despre utilizarea aplicatiei Xmeye consultati manualul de pe CD.
In urmatoarea interfata apasati pe “+” pentru a adauga o camera in lista. S e l e c t a t i o p t i u n e a “ Q u i c k C o n f i g u r a t i o n ( i O S ) / W i F i C o n f i g (Android)”
A s i g u r a t i - v a c a t e l e f o n u l e s t e conectat la reteaua wireless in care doriti in ro larea camere i . Ver i f i ca t i numele retelei Wi-fi (1) sa coincida cu reteaua dumneavoastra si apoi introduceti parola de acces a retelei (2).
Daca este prima pornire a camerei procedati in felul urmator pentru o seta:x apasati scurt butonul Reset de pe
camera s i as tep ta t i mesa ju l de confirmare vocala din partea acesteia (wait to be conf igured) ; daca nu primiti confirmare prin mesaj vocal refacet i procedura de resetare a c a m e r e i ( d e s c r i s a m a i j o s ) s i procedura curenta de la capat.
x cititi cele 2 mesaje de pe ecran si confirmati conditiile cu cele 2 bife (3)
x selectati pe telefon “Done/Complete all the above operations” pentru a continua procedura se setare (4)
12
33
3
4NOTA: acest model de camera nu are LED indicator de conectare la wifi. Daca ati mai incercat anterior setarea fara succes a camerei va rugam sa efectuati procedura de resetare completa a acesteia: ź tineti apasat butonul Reset pana veti auzi un mesaj vocal de
confirmare a resetarii (restore to factory settings)ź procedura de reset dureaza cateva minute, asteptati un sunet de
confirmare a resetariiź repetati procedura de setare
RO
4
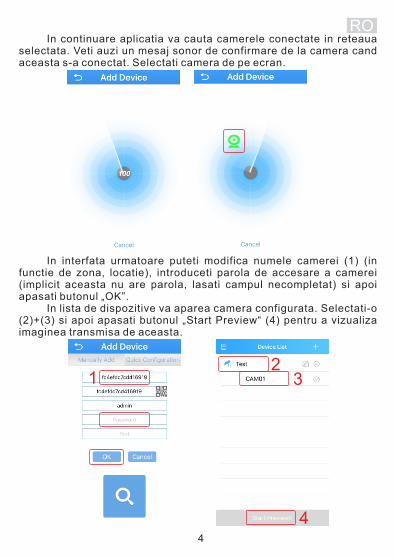
In interfata urmatoare puteti modifica numele camerei (1) (in functie de zona, locatie), introduceti parola de accesare a camerei (implicit aceasta nu are parola, lasati campul necompletat) si apoi apasati butonul „OK”. In lista de dispozitive va aparea camera configurata. Selectati-o (2)+(3) si apoi apasati butonul „Start Preview“ (4) pentru a vizualiza imaginea transmisa de aceasta.
12
3
RO
4
In continuare aplicatia va cauta camerele conectate in reteaua selectata. Veti auzi un mesaj sonor de confirmare de la camera cand aceasta s-a conectat. Selectati camera de pe ecran.

5
RO Imaginile transmise de camera pot fi vizualizate pe telefon. Puteti schimba campul vizual al camerei (pan-tilt) prin glisarea cu degetul direct pe imaginea afisata pe ecran.
1
2.1
Pentru a accesa un meniu complet de setari apasati simbolul Home (1) de pe ecran. Puteti controla camera si din comenzile disponibile pe 3 pagini in partea de jos a ecranului (2).
2.2 2.3
Pentru a vizualiza inregistrarile salvate pe cardul introdus in camera apasati butonul . ATENTIE: Camera nu poate fi utilizata si prin Wi-fi si prin cablu. Alegeti modul dorit de conectare la internet, resetati camera daca ati facut deja setarile in alt mod, si efectuati procedura de setare corespunzatoare modului de conectare dorit.
6
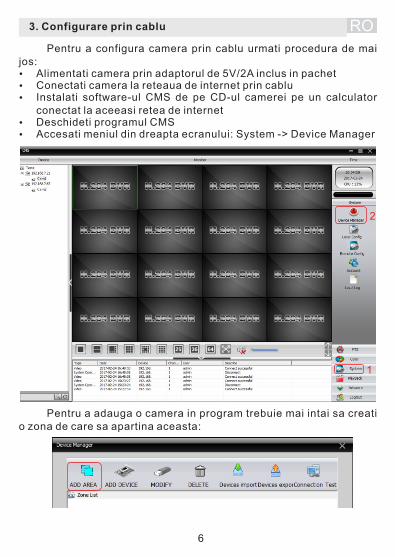
3. Configurare prin cablu
Pentru a configura camera prin cablu urmati procedura de mai jos:ź Alimentati camera prin adaptorul de 5V/2A inclus in pachetź Conectati camera la reteaua de internet prin cabluź Instalati software-ul CMS de pe CD-ul camerei pe un calculator
conectat la aceeasi retea de internetź Deschideti programul CMSź Accesati meniul din dreapta ecranului: System -> Device Manager
1
2
RO
Pentru a adauga o camera in program trebuie mai intai sa creati o zona de care sa apartina aceasta:

7
RO Dupa crearea zonei selectati-o (1) si apoi dati click pe butonul „ADD DEVICE“ (2) pentru a adauga o camera in zona:
1
2
In interfata de adaugare dispozitiv apasati butonul „IP Search“ pentru a cauta camerele din retea.
IP-ul implicit al camerei este 192.168.1.10. Selectati camera dorita din lista si apoi apasati butonul „EditDevice“

8
RO In interfata de editare ii puteti seta IP-ul camerei in conformitate cu reteaua interna de internet sau apasa pe butonul „Auto Get“ (1) pentru a-si lua automat informatii le necesare din retea. Dupa stabilirea IP-ului corect completati datele de acces ale camerei (2) (implicit „Name“=admin iar la „password“ nu completati nimic). Pentru a salva setarile apasati butonul „Modify“.
Programul va reveni inapoi la interfata de adaugare dispozitiv. Apasati din nou pe butonul „IP Search“ si selectati camera dupa IP-ul nou alocat de retea. Acum ii puteti schimba numele camerei in campul “Device Name“. Confirmati setarile apasand butonul OK“ din interfata de adaugare dispozitiv si apoi cel din „Device Manager“. Camera adaugata va aparea in lista de dispozitive din stanga.
1
2
3
NOTE: - Daca ati selectat optiunea „Auto Get“ retineti IP-ul alocat de retea pentru a putea gasi camera ulterior.- Pentru routerele cu IP fix de i n t e r n e t r e c o m a n d a m forwardarea porturi lor 81 si 34567 ca t re IP -u l l oca l a l camerei pentru a fi vizualizata din exterior- Daca nu ave t i IP f i x se foloseste functia P2P
9
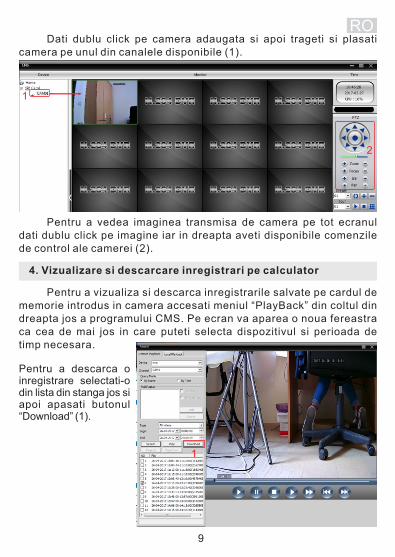
RO Dati dublu click pe camera adaugata si apoi trageti si plasati camera pe unul din canalele disponibile (1).
Pentru a vedea imaginea transmisa de camera pe tot ecranul dati dublu click pe imagine iar in dreapta aveti disponibile comenzile de control ale camerei (2).
1
2
4. Vizualizare si descarcare inregistrari pe calculator
Pentru a vizualiza si descarca inregistrarile salvate pe cardul de memorie introdus in camera accesati meniul “PlayBack” din coltul din dreapta jos a programului CMS. Pe ecran va aparea o noua fereastra ca cea de mai jos in care puteti selecta dispozitivul si perioada de timp necesara.
Pentru a descarca o inregistrare selectati-o din lista din stanga jos si apoi apasati butonul “Download” (1).
1

10
6 Indicatii de utilizare.
RO
x Camera este destinata utilizarii la interior. Evitati contactul acesteia cu apa sau umezeala.
x Evitati lovirea sau scaparea camerei pe jos.x Util izati doar al imentatorul din pachet pentru al imentarea
camerei. x Nu indreptati lentilele spre surse puternice de lumina (cum ar fi
soarele sau un corp de iluminat etc), acest lucru va determina imagini supra-expuse si va scurta durata de viata a senzorului de imagine.
x Nu montati camera in medii umede, cu mult praf, temperaturi ridicate sau prea mici, in zone cu radiatii electromagnetice, etc.
x Evitati atingerea directa a lentilelor. Curatarea camerei se efectueaza cu o carpa moale putin umezita, fara substante chimice.
x Daca apar situatii in care camera nu functioneaza corespunzator, scoateti-o din priza, resetati-o complet si refaceti setarile. Daca problema persista contactati furnizorul.
x In zonele predispuse furtunilor cu descarcari electrice asigurati-
5. Accesare camera din alta retea sau locatie
Daca doriti adaugarea si accesarea camerei din alta locatie:ź De pe telefonul mobil: efectuati aceiasi pasi ca la configurarea
prin Wi-fi dar cand adaugati dispozitivul selectati optiunea „Manual Add“ -> Introduceti numele dorit pentru dispozitiv -> introduceti IP-ul alocat camerei sau ID-ul gasit pe dispozitiv (exemplu: fc4efdc7cd416919).
ź De pe calculator: efectuati aceiasi pasi ca la configurarea prin cablu dar cand adaugati dispozit ivul selectati optiunea de adaugare prin Cloud (1) si apoi introduceti ID-ul gasit pe dispozitiv (2) (exemplu: fc4efdc7cd416919).
1
2
NOTA: Aceasta procedura este posibila doar dupa configurarea locala a camerei prin Wi-fi sau prin cablu.

11
7. Specificatii tehnice
RO
Senzor imagine
Rezolutie
Tip lentila
Iluminare minima
Unghi de vizualizare
Filtru IR-Cut
Frecventa video
Conexiune la internet
Wireless
Protocoale suportate
Pan/Tilt
Iluminare infrarosu
Detectie de miscare
Inregistrare video
Microfon
Difuzor
Dimensiuni / Greutate
Tensiune alimentare
Putere consumata
CMOS ¼"
720P, 1280 x 720px
f:3.6mm
0.3 Lux
Orizontala: 350°; Verticala: 90°
Da
50 Hz, 60 Hz
Ethernet 10/100 Mbps RJ-45
Da, 802.11 b/g/n
HTTP, FTP, TCP/IP, UDP, SMTP, DHCP,
PPPoE, UPnP
Da
11 LED-uri
Da
Local pe microSD si la distanta pe NVR
Da
Da
145 x 142 x 116 mm / 313 g
5 V
6 W
va ca priza la care ati alimentat camera are impamantare.x Este interzisa or ice intervent ie/desfacere a camerei sau
prelungire a cablului de alimentare, acestea duc la pierderea garantiei.
x Daca semnalul wifi este prea slab pot aparea pierderi de semnal, deconectari de la internet, erori de comunicare etc. Asigurati-va ca telefonul si camera se afla in aria de actiune a router-ului.
x Pentru a imbunatati experienta utilizatorului cu produsul nostru, vom actualiza aplicatia periodic.
x Daca apasati butonul “RESET” timp de 10s camera va confirma cu un mesaj vocal ca a revenit la setarile implicite din fabrica.
x Daca pe telefonul mobil ruleaza prea multe aplicatii pot aparea probleme de comunicare intre acesta si camera, insa acest lucru nu va dauna inregistrarea pe cardul microSD.
x ATENTIE: Aceasta camera nu poate f i accesata pr in intermediul browser-ului de internet.
12
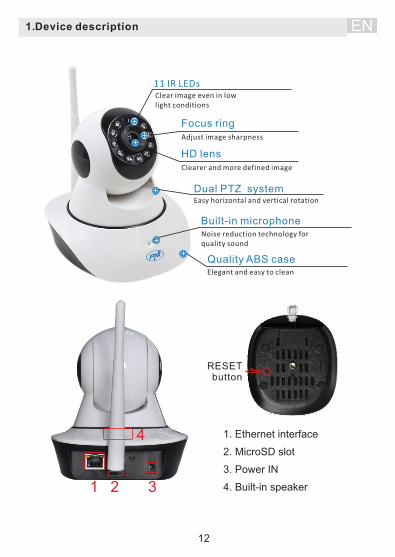
EN 1. Device description
1 2 3
RESETbutton
1. Ethernet interface
2. MicroSD slot
3. Power IN
4. Built-in speaker
11 IR LEDsClear image even in lowlight conditions
HD lens
Built-in microphone
Quality ABS case
Clearer and more defined image
Dual PTZ systemEasy horizontal and vertical rotation
Noise reduction technology forquality sound
Elegant and easy to clean
4
Focus ring Adjust image sharpness
13
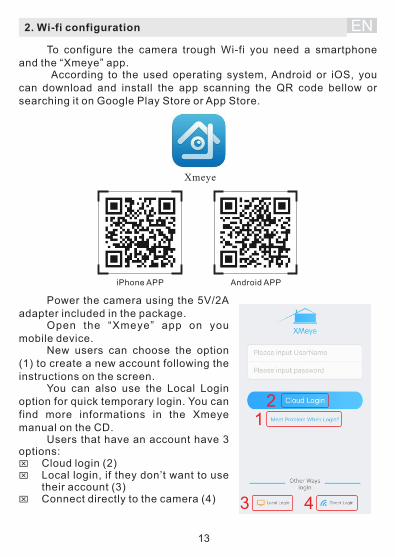
2. Wi-fi configuration
To configure the camera trough Wi-fi you need a smartphone and the “Xmeye” app. According to the used operating system, Android or iOS, you can download and install the app scanning the QR code bellow or searching it on Google Play Store or App Store.
Xmeye
Power the camera using the 5V/2A adapter included in the package. Open the “Xmeye” app on you mobile device. New users can choose the option (1) to create a new account following the instructions on the screen. You can also use the Local Login option for quick temporary login. You can find more informations in the Xmeye manual on the CD. Users that have an account have 3 options:x Cloud login (2)x Local login, if they don’t want to use
their account (3)x Connect directly to the camera (4)
12
3 4
EN
14
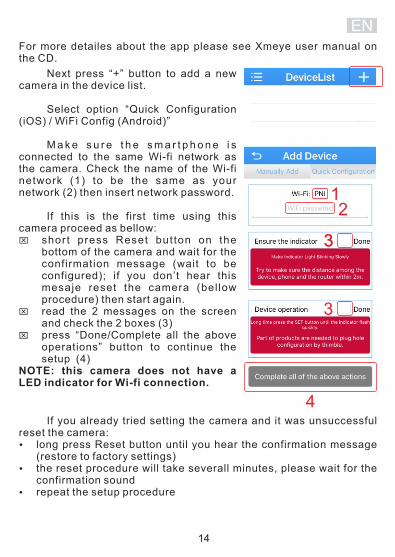
ENFor more detailes about the app please see Xmeye user manual on the CD.
Next press “+” button to add a new camera in the device list. Select option “Quick Configuration (iOS) / WiFi Config (Android)”
M a k e s u r e t h e s m a r t p h o n e i s connected to the same Wi-fi network as the camera. Check the name of the Wi-fi network (1) to be the same as your network (2) then insert network password.
If this is the first time using this camera proceed as bellow:x short press Reset but ton on the
bottom of the camera and wait for the confirmation message (wait to be configured); if you don’t hear this mesaje reset the camera (bel low procedure) then start again.
x read the 2 messages on the screen and check the 2 boxes (3)
x press “Done/Complete all the above operations” button to continue the setup (4)
NOTE: this camera does not have a LED indicator for Wi-fi connection.
12
33
3
4 If you already tried setting the camera and it was unsuccessful reset the camera:ź long press Reset button until you hear the confirmation message
(restore to factory settings)ź the reset procedure will take severall minutes, please wait for the
confirmation sound ź repeat the setup procedure

15
EN
Next you can modify the name of the camera (1) (depending on area or location), insert the access password of the camera (default there is no password) then press „OK”. In the device list you will be able to see the new camera. Select it (2)+(3) then press „Start Preview“ (4) button to view the live image.
12
3
4
The App will search all the cameras in the same network. You will hear a confirmation message from the camera when the setup is successful. Select the camera on the screen.
16
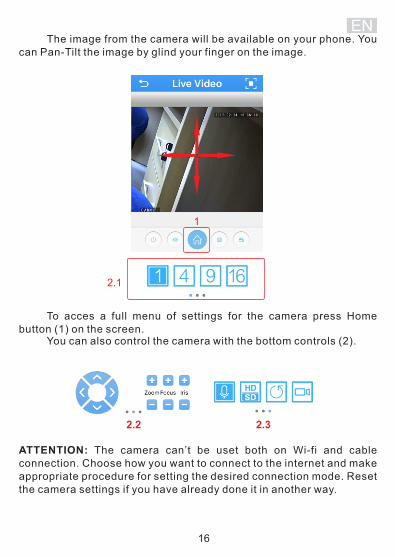
The image from the camera will be available on your phone. You can Pan-Tilt the image by glind your finger on the image.
1
2.1
To acces a full menu of settings for the camera press Home button (1) on the screen. You can also control the camera with the bottom controls (2).
2.2 2.3
ATTENTION: The camera can’t be uset both on Wi-fi and cable connection. Choose how you want to connect to the internet and make appropriate procedure for setting the desired connection mode. Reset the camera settings if you have already done it in another way.
EN

17
EN3. Wired configuration
To configure the camera trough cable connection proceed as bellow:ź Power the camera using the included 5V/2A adapterź Concect the camera to the wired network ź Instal l CMS software from the camera CD on a computer
connected to the same network ź Open CMS ź Access the right side menu: System -> Device Manager
1
2
To add a new camera you must first create an area to add it to:
18
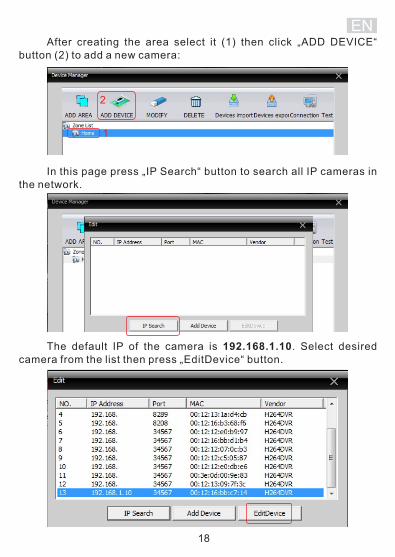
EN After creating the area select it (1) then click „ADD DEVICE“ button (2) to add a new camera:
1
2
In this page press „IP Search“ button to search all IP cameras in the network.
The default IP of the camera is 192.168.1.10. Select desired camera from the list then press „EditDevice“ button.
19
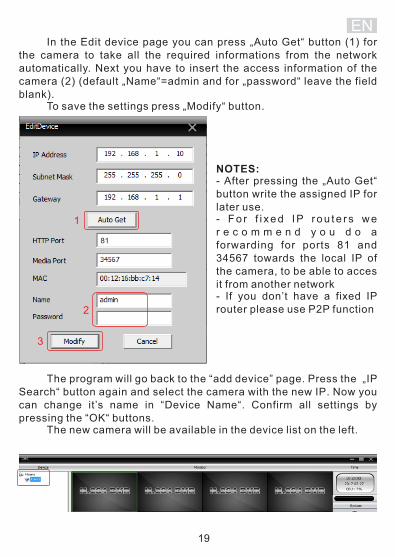
EN In the Edit device page you can press „Auto Get“ button (1) for the camera to take all the required informations from the network automatically. Next you have to insert the access information of the camera (2) (default „Name“=admin and for „password“ leave the field blank). To save the settings press „Modify“ button.
The program will go back to the “add device” page. Press the „IP Search“ button again and select the camera with the new IP. Now you can change it’s name in “Device Name“. Confirm all settings by pressing the “OK“ buttons. The new camera will be available in the device list on the left.
1
2
3
NOTES: - After pressing the „Auto Get“ button write the assigned IP for later use. - F o r f i x e d I P r o u t e r s w e r e c o m m e n d y o u d o a forwarding for ports 81 and 34567 towards the local IP of the camera, to be able to acces it from another network- If you don’t have a fixed IP router please use P2P function
20
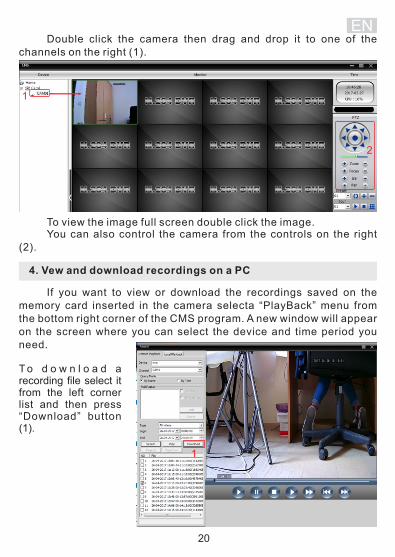
Double click the camera then drag and drop it to one of the channels on the right (1).
To view the image full screen double click the image. You can also control the camera from the controls on the right (2).
1
2
EN
4. Vew and download recordings on a PC
If you want to view or download the recordings saved on the memory card inserted in the camera selecta “PlayBack” menu from the bottom right corner of the CMS program. A new window will appear on the screen where you can select the device and time period you need.
T o d o w n l o a d a recording file select it from the left corner list and then press “Download” button (1).
1

21
6. User notes
EN
ź The camera is for indoor use only and avoid water or moisture;ź Avoid dropping or hitting the camera.ź Check the voltage before connecting the poweradapter to the
camera.ź Do not point the lens to high light sources (like the sun, a lamp
etc), because that will make the image over-bright and shorten the life of the CMOS sensor.
ź Do not mount the camera in moist, dusty, high or low temperature, electromagnetic radiation environement, etc.
ź Avoid direct touch to the lens. If cleaning is needed use a soft wet cloth, without chemical substances.
ź If the camera acts abnormal, unplug it from the power source and contact the supplier.
ź Please ground the equipment completely in the areas where lightning is frequent.
ź Do not dismantle or open the equipment when it fails to work properly. Contact the supplier.
ź Any intrusion/undoing of the camera or improvisation to the power source will cause warranty loss.
ź If the Wi-fi signal is not strong enough you may experience video
5. Remote access of the camera
If you wish to remotely access the camera proceed as bellow: ź From smartphone: follow the same procedure as for Wi-fi
configuration but select option „Manual Add“ -> insert the desired name fo r the camera -> i nse r t t he IP o r ID (examp le : fc4efdc7cd416919) of the camera .
ź From PC: follow the same procedure as for wired configuration but select option Cloud (1) the insert the camera ID (2) (example: fc4efdc7cd416919).
1
2
NOTE: This procedure is only available after the local setting of the camera, Wi-fi or wired configuration.

22
7 Technical specification.
EN
Image sensorResolution Lens Min lightingView angle IR-CutVideo frequency Ethernet connectionWireless Protocols Pan/Tilt IR Motion detection Video recording Microphone Speaker Size / Weight Power voltage Power consumption
CMOS ¼"720P, 1280 x 720pxf:3.6mm0.3 LuxHorizontal: 350°; Vertical: 90°Yes50 Hz, 60 Hz10/100 Mbps RJ-45 Yes, 802.11 b/g/nHTTP, FTP, TCP/IP, UDP, SMTP, DHCP, PPPoE, UPnPYes11 LEDsYesOn microSD card and/or on NVR by internetYesYes145 x 142 x 116 mm / 313 g5 V6 W
loss, interrupted internet connection, etc. Make sure your mobile device is the range of the wireless network.
ź To improve product user experience we will update the app for camera periodically.
ź If you press the “RESET” button for 10 sec the camera will be restored to factory settings. This will be confirmed by a vocal mesage.
ź If you use to many apps at the same time on your phone you may experience communication problems with the camera, but this will not affect video recording on the microSD card.
ź ATTENTION: This camera can’t be accessed by internet browser.

23