calpads fall 1 certification survival · pdf filecalpads fall 1 certification survival guide...
TRANSCRIPT

1
CALPADS Fall 1 Certification Survival Guide
FIRST EDITION
Revised: October 21st 2012
Table of Contents CALPADS Fall 1 Introduction ........................................................................................... 2
When is the Fall 1 deadline? ........................................................................................... 2 Where to Start? (Creating Mr/Ms CERT) ....................................................................... 2
Login to the CALPADS website..................................................................................... 3
Fall 1 File Submission Process Outline ........................................................................ 10 Fall 1 File Submission Step by Step ................................................................................. 13 STEP I – Obtain SSID numbers for ALL students ........................................................... 13
STEP 2 – Check your Data ............................................................................................... 13 CALPADS - Student Information Check Form ............................................................ 14
CALPADS - Student Program Check Form ................................................................. 14 STEP 3 – Create the Extract Files..................................................................................... 15
(Step 1 – CALPADS) SSID Enrollment ....................................................................... 15
(Step 2 – CALPADS) Student Information .................................................................. 21 (Step 3 – CALPADS) Student Program (Exits Only) ................................................... 22
(Step 3 – CALPADS) Student Program (Fall 1) ........................................................... 24 STEP 4 – Upload and Post the Extract Files..................................................................... 25
Part 1 (Uploading the file) ............................................................................................ 26 Part 2 (Viewing the Results & Posting) ........................................................................ 27
STEP 5 – Wait for your Snapshot to be Created .............................................................. 32
STEP 6 – Review & (PRINT) the Certification Reports .................................................. 33 STEP 7 – Certify your Fall 1 Numbers ............................................................................. 34

2
CALPADS Fall 1 Introduction The CALPADS Fall 1 submission includes data for; Enrollment Counts for the new year,
Grads and Drops from the previous year & Immigrant Counts.
The purpose of this documentation is to show you where in
SchoolWise to enter the required data for these categories and how
to create the extract files required for CALPADS. We will also go
over the submission process in detail to help you get certified for
Fall 1.
Essentially, the steps to any CALPADS submission are:
Get all the necessary data accurately entered in SchoolWise
Run the file exports in the SchoolWise Report Explorer
Upload the files to the CALPADS website.
Certify Data on the CALPADS website.
When is the Fall 1 deadline?
As of November 1st 2011 the Fall 1 Certification Deadline December 15
th 2011. Below is
a link to the CALPADS official calendar in case things change.
http://www.cde.ca.gov/ds/sp/cl/rptcalendar.asp
CALPADS Census
Day Primary Data Submitted Official
Submission Window
Certification Deadline
Amendment Window
Fall 1 October 5th, 2011
11-12 Enrollment Counts
October 6th, 2011 to
December 14th, 2011
December 14th, 2011
December 15th, 2011 to
February 22nd, 2012
10-11 Grads and Drops
Immigrant Counts
Where to Start? (Creating Mr/Ms CERT)
Welcome to the wonderful world of CALPADS! To begin this amazing journey of fun
and adventure, a CALAPDS user must be created to handle all of the many tasks that are
required for Fall 1. SchoolWise likes to call this CALPDS Power User: Mr Cert! The
name really doesn’t matter; Captain Calpads or Dread Pirate Roberts would work too, but
let’s keep it simple.
When your LEA first signed up for CALPADS they were issued an ADMIN username
and password. This ADMIN account has the ability to create new users. (But oddly can’t
certify or view snapshots) Please locate this ADMIN account info and login to
CALPADS to proceed.

3
Login to the CALPADS website
Using an internet browser like: Internet Explorer, Google Chrome or Firefox, please
connect to the Link below:
https://www.calpads.ca.gov/
The main CALPADS login screen will look like the picture below:
1. Enter your username in position 1.
2. Enter your case sensitive (this means that capitol letters and symbols matter)
password in position 2.
3. Click the box in position 3 so you see a checkmark in it.
4. The Login button should be lit up now and available to click on.
5. Click Login and the website should bring you to the next page; you can tell you
are logged in when you see your name and school name in the upper right hand
corner of the screen.
If you can’t login to the website, please call CALPADS and find out what might
be wrong. CALPADS support is the only one that can help with login issues.
CALPADS Operations Office Phone: 916-324-6738.
Once you have logged into the CALPADS website with the ADMIN account, you will
have access to the Admin Menu – User Security selection. Click on this to proceed.

4
Once you have clicked on the User Security menu selection you will see the screen
below:
Click on the Create User menu item and then fill in all of the required fields. In the
example below I used Mr Cert and for a UserID MrCertYOURCDSCODE where you
would put your district CDS code after the MrCert name.
When you come to the Autopost Flag it is up to you which choice is best, but SchoolWise
would recommend the setting of Both. When you submit for SSID’s this will Autopost
100% matches for you and save time. Set the User Level to LEA.

5
Once the user level has been set to LEA, you will see the following screen show up under
the previous screen. You may have to scroll down to see the Select Roles section as seen
here below:
To select the correct roles for the MrCert user Click on the word ALL as seen above.
Once ALL is highlighted Click the Assign Roles button as seen below:

6
Once you have clicked on the Assign Roles button you will see all of the roles move over
to the box on the right. As seen below in the example:
Click on the SAVE button to save these changes. After a few seconds of waiting you will
see the following message display above the form:

7
Once the user has been added you will receive an email from CALPADS that looks like
the one show below.
In this email is the temporary password that CALPADS has issued the new user you just
created. Please write this password down and remember that it is case sensitive. Now
that you have written the password down, you are ready to log back into the CALPADS
website and finish the new user setup.

8
Login to CALPADS again now using your newly created MrCert username and enter the
temporary password that CALPADS issued you.
https://calpads.ca.gov/
Once you are logged in you will get a screen like the one below asking to reset your
password. Enter the password that CALPADS sent you into the Current Password field,
and then enter your new password into the New and Confirm field.
Make sure to write down your new password before you click the Submit button!

9
Once you click submit you will see the message display: Password Successfully changed.
After it has been changed you can click on the Login to CALPADS button to proceed.
When you login to CALPADS for the first time with the MrCert user you will be asked to
fill out security questions. Please do this and write down the answers along with your
passwords in a safe location.
Now you may use this user to do ALL of your submissions and CERTIFICATIONS in
CALPADS.

10
Fall 1 File Submission Process Outline
There are many steps to the CALPADS Fall 1 file submission process. The outline below
will show you an overview of the entire process. You may choose to skip this overview
and go directly to the detailed Step by Step instructions that begin on page #13.
Outline Overview of the Fall 1 Submission
1. The very first step in the process it to make sure all of your students have SSID
numbers. Please download this document if you need help with obtaining SSID’s.
http://www.schoolwise.com/calpads_obtaining_new_ssid_numbers.pdf
2. Next, run each of the following Info Check Forms in the SchoolWise Report
Writer and correct the data. Once each of these reports runs and returns the
message: The query “Results” did not return any data records. No output will be
generated for this report. Then you are ready to move on.
a. CALPADS Student Information Check Form b. CALAPDS Student Program Check Form (For help with resolving
these errors please download this document:
http://www.schoolwise.com/Fixing_Program_Enrollment.pdf
3. In this step we will create the extract files that will be sent to CALAPDS. Below
is a list of each extract and the standard parameters that you need to set.
a. Step 1 - CALPADS SSID Enrollment
i. Choose the Date = (Run with the CBEDS date 10/03/2012)
ii. Data Collection = Fall 1 or Spring
iii. Option 2 = Exclude Non-ADA Students
iv. Option 2 = Exclude Secondary Enrollment Students
v. Current Grade != (PS)
vi. Reporting LEA = (Blank) Unless you are a Charter School
reporting under your district CDS code.
b. Step 2 - CALPADS Student Information
i. Choose the Date = (Run with the CBEDS date 10/03/2012)
ii. Data Collection = Fall 1 or Spring
iii. Option 2 = Exclude Non-ADA Students
iv. Current Grade != (PS)
v. Reporting LEA = (Blank) Unless you are a Charter School
reporting under your district CDS code.
c. Step 3a - CALPADS Student Program (Last Year Exits)
(This step is required for sending up the previous year’s meal program
exits. You must be logged into the previous schoolyear to run this report.
Only exits from the Meal Program are required.)
i. Date Range = (01/01/2012 – 06/30/2012)
ii. Data Collection = Fall 1 or Spring
iii. Option 2 = Exclude Non-ADA Students
iv. Current Grade != (PS)
v. Override = None

11
vi. Reporting LEA = (Blank) Unless you are a Charter School
reporting under your district CDS code.
vii. Student Filter * Select All
viii. Program Filter * Select All
d. Step 3b (Step 3 – CALPADS Student Program) For the second time
running this extract you must be logged into the Current school year. This
time use a date range from: the first day of the school year to CBEDS day
10/05/2011) All other parameters are the same as Step 3.
4. Once all of your extract files have been created it’s time to login to the
CALPADS website and begin the process. Sending up each file IN ORDER and
POSTING each file IN ORDER is critical! If files are not sent up and processed
IN ORDER and ONE AT A TIME you will get errors.
Below you will see the correct order to send and process the files in
CALPADS. Remember… each file must POST and have a status of
(Complete) BEFORE sending the Next file up.
In each file submission there will be records that PASS and records that FAIL, it
is highly recommended in most cases to work on the files one at a time and
correct ALL errors BEFORE moving onto the next file submission. While
SchoolWise support may be able to assist you with some error corrections, you
may need to call CALPADS to get assistance in solving some errors.
In some cases (like the first submission of the Program Exits in Step3a) you may
POST only the records that passed, but it is best practice to correct ALL errors
before moving on.
Follow this sequence:
a. Upload and then POST (when the file shows no errors) “Step 1 -
CALPADS SSID Enrollment” (SDEM) file first. Only when the status of
the transaction says “Complete” move on to step 2. (If you are having
trouble resolving errors in this file, you may need to look at your
Anomalies and correct some of those first.) The Anomaly reports can be
found on the CALPADS website in the SSID Enrollment File Menu –
under SSID Anomaly Reports.
b. Upload and then POST (when the file shows no errors) “Step 2 -
CALPADS Student Information” (SINF) file next. Only when the status
of the transaction says “Complete” move on to step 3.
c. Upload and then POST (Passed Records Only – IGNORE the failed
records here – just POST only the passed records) “Step 3a - CALPADS
Student Program” (Program Exits Extract) file next.
(This step is required for sending up the previous year’s meal program
exits. Only exits from the Meal Program are required.)
Only when the status of the transaction says “Complete” move on to the
next step.

12
d. Upload and then POST (when the file shows no errors) “Step 3b -
CALPADS SSID Enrollment” (Fall 1 Program Extract) file first. When
the status of the transaction says “Complete” you are done with the file
upload process.
5. Depending on when you complete the file upload process, you will have to wait
overnight for a snapshot to generate on the CALAPDS website. Snapshots are
created automatically every morning. Once you have waited, Login to the
CALPADS website and review the details of the snapshot at the menu below:
State Reporting – Manage Certifications – View Certification Status
6. You have to view each of the three certification reports before the CERTIFY
button will become active.
7. If you are happy with all of your numbers and want to certify, you may no click
the CERTIFY button. Remember that you have to certify TWO TIMES, the first
time that you click the button it will show up as L1 certify, then second time it
will show up as L2. Both certifications must be done for the Fall 1 Certification
Process to be Complete. CERTIFICATION COMPLETE! Now PRINT OUT
THE REPORTS - Pat yourself on the back, high five your co-workers and put in
for some time off, you deserve it!

13
Fall 1 File Submission Step by Step The first step to resolving Program enrollment errors before submitting your files to
CALPADS is to print out a list of the errors. To check your data please open the Report
Explorer by clicking on the Reports button on the left side toolbar, then selecting – Open
Report Explorer.
STEP I – Obtain SSID numbers for ALL students The very first step in the process it to make sure all of your students have SSID numbers.
Please Click the link below to download our Help document. This doc contains step by
step instructions for obtaining SSIDs.
How to get SSID Numbers - Step by Step Instructions
http://www.schoolwise.com/calpads_obtaining_new_ssid_numbers.pdf
STEP 2 – Check your Data The Student Information and Program Information Check forms detailed below will help
you to locate and correct any missing data before you send your files to CALAPDS. Run
each of the following Info Check Forms in the SchoolWise Report Writer and correct the
data. Once each of these reports runs and returns the message: The query “Results” did
not return any data records. No output will be generated for this report. Then you are
ready to move on.

14
CALPADS - Student Information Check Form
If you already have your SSID numbers, you should have run this check form and
corrected all of the missing data already. For detailed instructions on how to do that you
will find them located on Page 5 of the Obtaining New SSID Numbers help doc.
Obtaining New SSID Numbers
http://www.schoolwise.com/calpads_obtaining_new_ssid_numbers.pdf
CALPADS - Student Program Check Form
The Student Program Check Form will give you a list of errors that you can correct
before you send your files to CALPADS. For detailed instructions on running this report
and correcting errors please read the Fixing Program Enrollment help document.
Fixing Program Enrollment
http://www.schoolwise.com/Fixing_Program_Enrollment.pdf
For additional understanding of how programs in SchoolWise work you may want to read
the Using Programs help document below:
Using Programs
http://www.schoolwise.com/Using_Programs.pdf
15
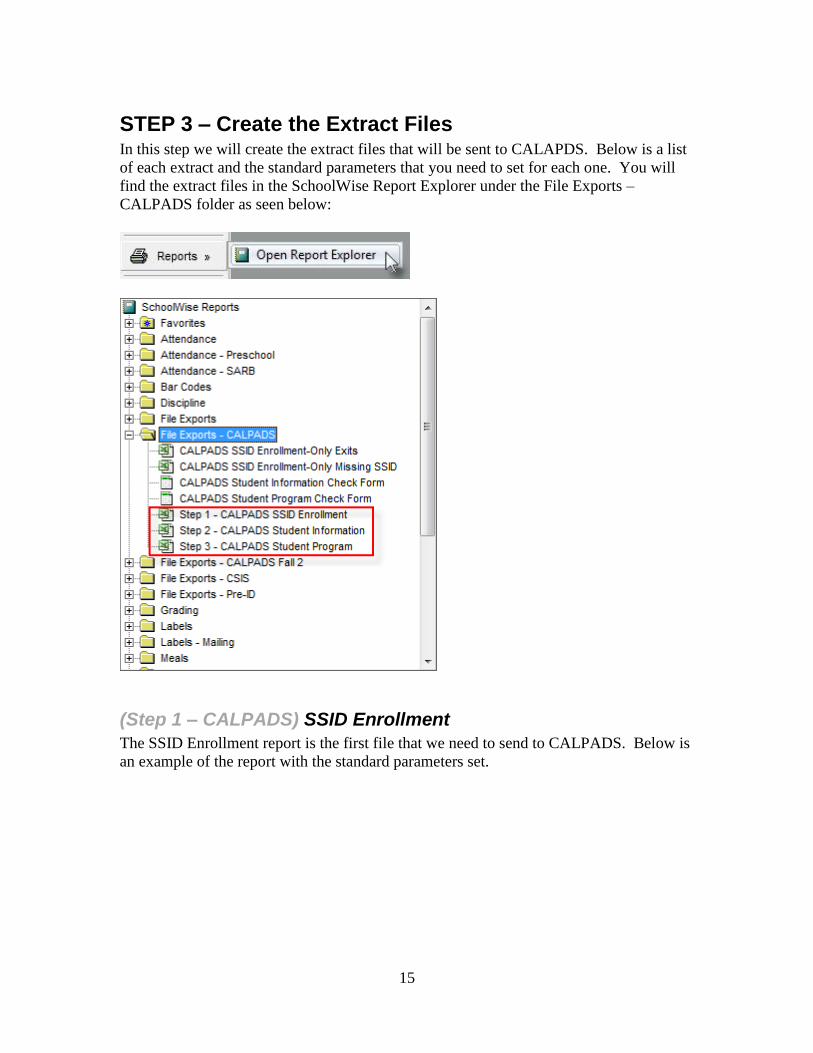
STEP 3 – Create the Extract Files In this step we will create the extract files that will be sent to CALAPDS. Below is a list
of each extract and the standard parameters that you need to set for each one. You will
find the extract files in the SchoolWise Report Explorer under the File Exports –
CALPADS folder as seen below:
(Step 1 – CALPADS) SSID Enrollment
The SSID Enrollment report is the first file that we need to send to CALPADS. Below is
an example of the report with the standard parameters set.

16
Use the Parameters as set below:
1. Choose the Date = (Run with the CBEDS date 10/03/2012)
2. Data Collection = Fall 1 or Spring
3. Option 2 = Exclude Non-ADA Students
4. Option 2 = Exclude Secondary Enrollment Students
5. Current Grade != (PS)
6. Reporting LEA = (Blank) Unless you are a Charter School reporting under your
district CDS code.

17
Once you Click the Export button to create the file, the following dialog box will pop up.
(#1) The location of the file on your computer. You should save the files in a folder that
you can remember easily. Here you can see that I am in the root SchoolWise folder.

18
Rather than put the files there I click on the Create New Folder Icon (See #2) to create a
new folder under the SchoolWise one as seen below:
19
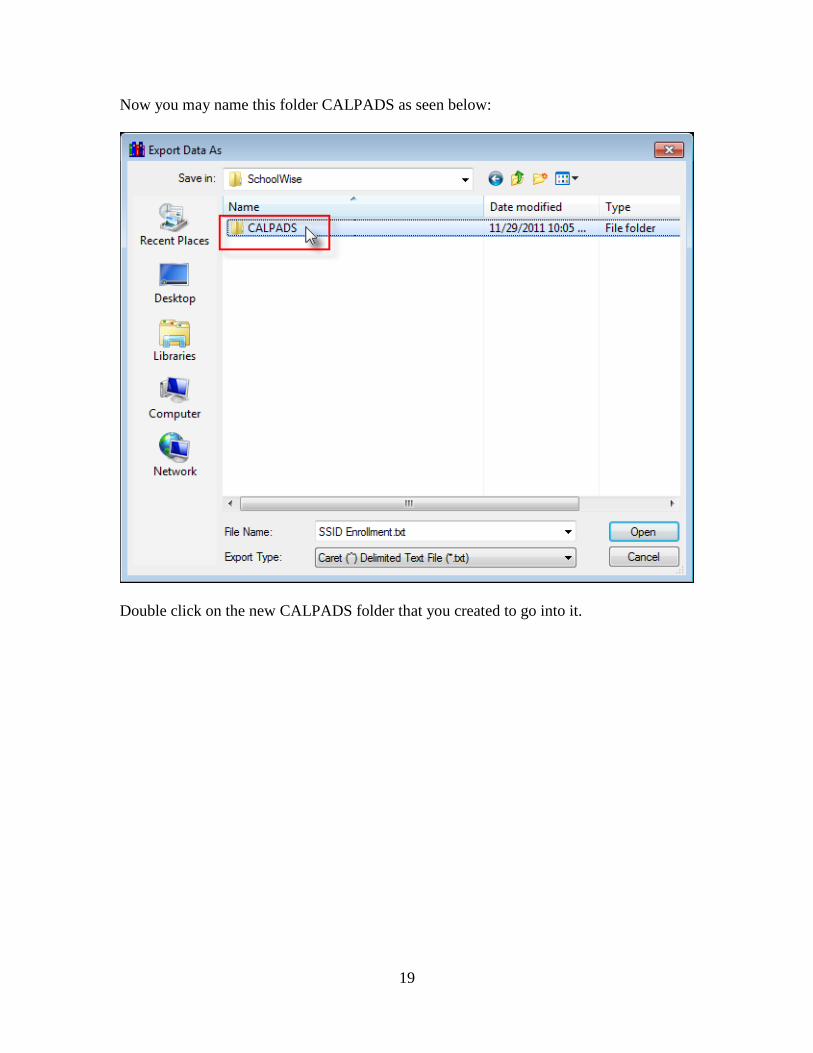
Now you may name this folder CALPADS as seen below:
Double click on the new CALPADS folder that you created to go into it.

20
(#3) The File Name. SchoolWise puts a default name in for each export, but you can
click on this name to edit it before you click the export button if you choose.
(#4) Export – this will create the file. Once you have clicked on the Export button the
file has been created and you may move on to the next step.
21
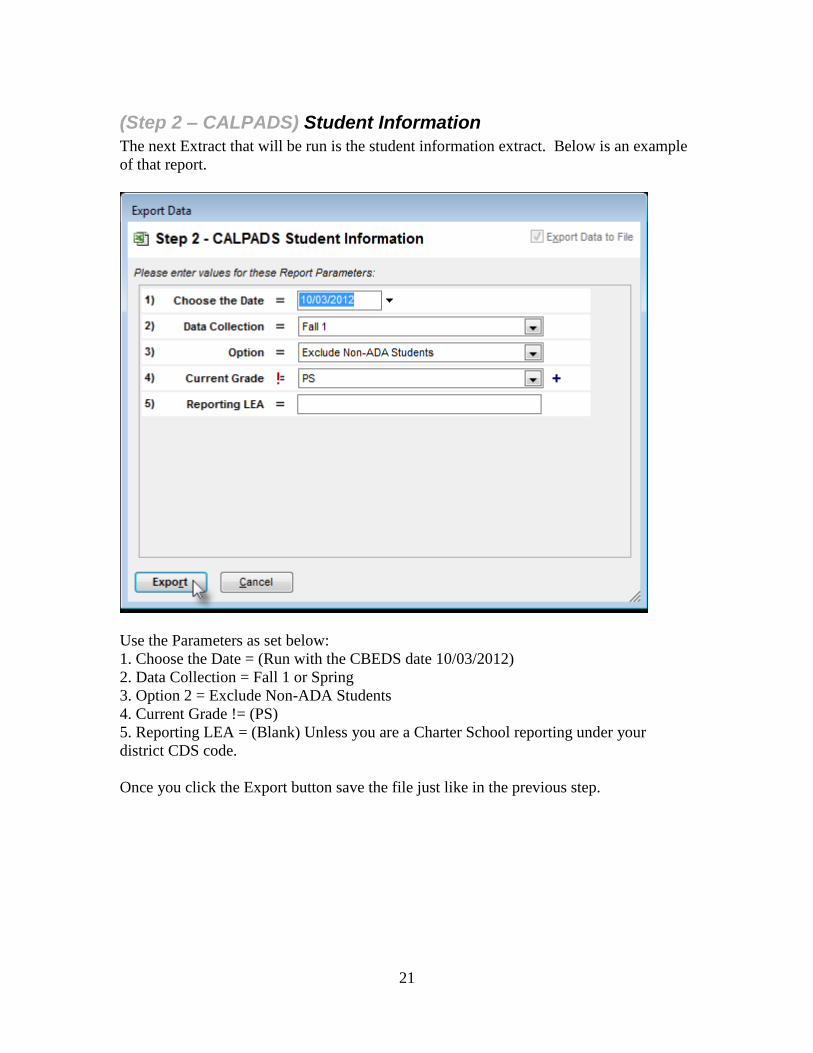
(Step 2 – CALPADS) Student Information
The next Extract that will be run is the student information extract. Below is an example
of that report.
Use the Parameters as set below:
1. Choose the Date = (Run with the CBEDS date 10/03/2012)
2. Data Collection = Fall 1 or Spring
3. Option 2 = Exclude Non-ADA Students
4. Current Grade != (PS)
5. Reporting LEA = (Blank) Unless you are a Charter School reporting under your
district CDS code.
Once you click the Export button save the file just like in the previous step.

22
(Step 3 – CALPADS) Student Program (Exits Only)
The next extract that needs to be created is the Student Program extract for last year’s
Exits from the student Lunch Program or (NSLP). This “Exits Only” extract is created
using the CALPADS Student Program Extract in the report explorer. It is the same
extract used for the next step, but run from the previous year to include all of the exits
from the NSLP program.
Because of the way that the Federal Government requires students to be exited each year
from the Meal Program - this extra step is required. It sends up the previous year’s meal
program exits. You must be logged into the previous schoolyear to run this report. Only
exits from the Meal Program are required.
To run this extract you must be logged into the previous school year in the main toolbar
as seen below:
Now that you are logged into the 2011-2012 school year open the report explorer and
choose make sure the default dates of 01/01/2012 to 06/30/2012 are in the date range
parameter. As seen below:

23
Use the Parameters as set below:
1.Date Range = (You must be logged into the previous school year in SchoolWise to run
this extract. Use the date range from 01/01/2012 to 06/30/2012)
2. Data Collection = Fall 1 or Spring
3. Option 2 = Exclude Non-ADA Students
4. Current Grade != (PS)
5. Override = None
6. Reporting LEA = (Blank) Unless you are a Charter School reporting under your
district CDS code.
7. Student Filter * Select All
8. Program Filter * Select All
Click on the Extract button and the following dialog box will appear:
In this step, click on the File Name of this extract and rename it to: Student Program
Exits Only.txt. (This will help you during the file submission later on) Click Export to
create the file. Proceed to the next step.

24
(Step 3 – CALPADS) Student Program (Fall 1)
For the last step in the file extract process please log back into the current school year and
run the Student Program extract again but with the following parameters instead:
Use the Parameters as set below:
1.Date Range = (The first day of the school year to CBEDS day 10/03/2012) All other
parameters are the same as Step 3.)
2. Data Collection = Fall 1 or Spring
3. Option 2 = Exclude Non-ADA Students
4. Current Grade != (PS)
5. Override = None
6. Reporting LEA = (Blank) Unless you are a Charter School reporting under your
district CDS code.
7. Student Filter * Select All
8. Program Filter * Select All

25
Click on the Extract button and the following dialog box will appear:
In this step, click on the File Name of this extract and rename it to: Student Program Fall
1.txt. (This will help you during the file submission later on) Click Export to create the
file. Proceed to the next step.
STEP 4 – Upload and Post the Extract Files Once all of your extract files have been created it’s time to login to the CALPADS
website and begin the process. Sending up each file IN ORDER and POSTING each
file IN ORDER is critical! If files are not sent up and processed IN ORDER and ONE
AT A TIME you will get errors.
Below you will see the correct order to send and process the files in
CALPADS. Remember… each file must POST and have a status of
(Complete) BEFORE sending the Next file up.
In each file submission there will be records that PASS and records that FAIL, it is highly
recommended in most cases to work on the files one at a time and correct ALL errors
BEFORE moving onto the next file submission. While SchoolWise support may be able

26
to assist you with some error corrections, you may need to call CALPADS to get
assistance in solving some errors.
In some cases (like the first submission of the Program Exits in Step3a) you may POST
only the records that passed, but it is best practice to correct ALL errors before moving
on.
Part 1 (Uploading the file)
Each of the extract files that were created have to be sent up to the CALPADS website.
The steps below will demonstrate how to do this. Once you are successfully logged into
the CALPADS website, you are now ready to upload the file that you created from
SchoolWise.
In the top menu of CALPADS please hover your mouse over the State Reporting menu
– then down to Manage Submissions – then Left click on: Upload Files.
Below you will the File Upload page marked with 4 position indicators.
1. Select SSID Enrollment.
2. Type in a Job name for the file you are sending.

27
3. Click the Browse button to locate the file that you created from SchoolWise. In
my case mine was in a folder called c:\SchoolWise
4. Click the Submit button to send the file up to CALPADS for processing as seen
below:
5. You should see a blue message on the top of the screen saying File Uploaded.
Part 2 (Viewing the Results & Posting)
Once the file is sent up to CALPADS there is no notification sent back to you - that lets
you know at what process the file is at, you just have to keep checking back with the
website. In our experience between 20 minutes and an hour you should see the status
change to Ready for Review.

28
To check the status of your file, login to CALPADS (see red arrow below).
1. When you login to the CALPADS website you should see the most recent file
submissions (jobs) down in the bottom left of the screen (seen above). To review
the file results click on the name of the Job that you want (it looks like a link)
That will bring you to the screen below:

29
2. Next, Click on the Passed records number to bring you to the Next Screen.
(Remember, you should only be proceeding with posting of passed records, in
most cases, if there are NO rejected records) Even though in this screenshot
example you can still see a rejected record. If you need help with a specific
error SchoolWise support may be able to assist you, but a support call into
CALPADS might be required for some errors.
3. Now Click on the Enroll Summary total number to view the screen on the next
page.

30
4. Click on the POST button to POST the records to CALPADS. This process is the
same for all four file submissions. Make sure to do one at a time and in the
correct Order. As shown Below:
Follow this sequence when Uploading and Posting the files…
a. Upload and then POST (when the file shows no errors) “Step 1 -
CALPADS SSID Enrollment” (SDEM) file first. Only when the status of
the transaction says “Complete” move on to step 2. (If you are having
trouble resolving errors in this file, you may need to look at your
Anomalies and correct some of those first.) The Anomaly reports can be
found on the CALPADS website in the SSID Enrollment File Menu –
under SSID Anomaly Reports.
b. Upload and then POST (when the file shows no errors) “Step 2 -
CALPADS Student Information” (SINF) file next. Only when the status
of the transaction says “Complete” move on to step 3.
c. Upload and then POST (Passed Records Only – IGNORE the failed
records here – just POST only the passed records) “Step 3a - CALPADS
Student Program” (Program Exits Extract) file next.
(This step is required for sending up the previous year’s meal program
exits. Only exits from the Meal Program are required.)
Only when the status of the transaction says “Complete” move on to the
next step.

31
Only when the status of the transaction says “Complete” move on to the
next step.
d. Upload and then POST (when the file shows no errors) “Step 3 -
CALPADS SSID Enrollment” (Fall 1 Program Extract) file first. When
the status of the transaction says “Complete” you are done with the file
upload process.

32
STEP 5 – Wait for your Snapshot to be Created Depending on when you complete (Step 4) the file upload process, you will have to wait
24-48 hours for a snapshot to generate on the CALAPDS website. Snapshots are created
automatically every morning. Once you have waited, Login to the CALPADS website
and review the details of the snapshot at the menu below:
State Reporting – Manage Certifications – View Certification Status
It will look something like this:
The Most Important thing to look at is the Fatal Errors Column. If this column has any
number in it but 0 you CANNOT certify. All fatal errors must be corrected and a new
snapshot generated (which takes overnight) showing 0 Fatal Errors before the
button will become active.
To view your Erros Click on the Total Errors/Warnings number to see a summary screen
of the errors. The second item that needs attention is the Anomalies Percent column.
Total Anomalies have to be LESS THAN 2% for the button to become active.
CALPADS offers some very good self-paced training videos on how to correct
Anomalies and other certification errors. You can click on the link below to view these:
http://www.csis.k12.ca.us/e-learning/sp-training/CALPADS/sp-training.asp

33
STEP 6 – Review & (PRINT) the Certification Reports Once you can see that a snapshot has been created and there are no more Fatal Errors,
Click on the blue Fall 1 Annual Enrollment Update link under the Snapshot menu to
bring up the following screen:
Each of the Aggregate Report links needs to be clicked on and viewed to see the final
numbers Samples are below:
PLEASE TAKE THE TIME TO PRINT OUT EACH OF THE REPORTS! They are
paper evidence of your submitted data! You can type CTRL P to print directly from the
web page. You may also download each of the reports and print them that way. But Be
sure to KEEP A PRINTED COPY for your records!

34
STEP 7 – Certify your Fall 1 Numbers Once you have verified the individual reports, and all checks are showing as green, your
Certify Button should become active.
The Certify button looks like this.
If you are happy with all of your numbers and want to certify, you may now click the
CERTIFY button.

35
Remember that you have to certify TWO TIMES, the first time that you click the button
it will show up as L1 certify, then second time it will show up as L2. Both certifications
must be done for the Fall 1 Certification Process to be Complete.