calibration of a mobile mapping camera … · the main calibration of the mobile mapping car is...
TRANSCRIPT

CALIBRATION OF A MOBILE MAPPING CAMERA SYSTEM WITH PHOTOGRAMMETRIC METHODS
S. Scheller a, , P. Westfeld a, D. Ebersbach b
a Institute of Photogrammetriy and Remote Sensing, Technische Universität Dresden, 01062 Dresden , Germany (Steffen.Scheller, Patrick.Westfeld)@mailbox.tu-dresden.de
b Institute of Road Design, Technische Universität Dresden, 01062 Dresden , Germany [email protected]
5th International Symposium on Mobile Mapping Technology (MMT 2007)
KEY WORDS: Mobile Mapping, Photogrammetric Calibration, Reference Bar Calibration
ABSTRACT:
The road network is an essential economic factor for the German industry. Until now, the whole horizontal and vertical alignment parameters are not known. To determine these parameters the Technische Universität Dresden has implemented a measurement system which is realised in a mobile mapping vehicle. The car includes the following sensors: Position and orientation system Applanix POS LV 420, radar sensor, eye movement gaze detection and stereo cameras. The two cameras record the road parameters as well as traffic signs with high accuracy. To assure a high accuracy over time it is necessary to calibrate the stereoscopic camera system. The stationary calibration is carried out on a self-made calibration field with thirty control points. A retro reflecting marking material allows an easy and robust detecting and measuring even without additional light sources. The vector from vehicle’s origin to the principle points of the two cameras can be calculated based on the local calibration and the UTM coordinates of the control points. Finally, this vector and the IMU angles define the orientation of the two cameras during the measurement drive. During operational use, the stationary calibration is not practicable. Mainly a new calibration is necessary if one of the cameras has to be detached during operation. The reference bar calibration is a technique where a bar with a known length is moved in object space. The targets will be detected with a matching algorithm, followed by an adjustment to determine the centres of those with subpixel accuracy. A self-calibration bundle adjustment is used to evaluate the relative orientation parameters. On every position, the constant length of the reference bar describes additional restriction equations. These restrictions stabilise the whole adjustment and should allow a complete calibration of both cameras, including the interior orientation parameters.
1.INTRODUCTION
The measurement car TU was developed by the chair of road design. The car has two duties and responsibilities, the kinematic survey of streets and the measure driving behaviourwith high precision. The goal of this vehicle is to measure for example the road design, the signs on the road or to control the track of the car (Novak 1991). For these tasks it is necessary to calibrate the included system, so that all components were fixed in the car coordinate system.
1.1Hardware of the Mobile Mapping Car
The car has the following systems included:• Position and orientation system Applanix (POS),• Gaze vector detection Smart Eye• Two colour digital cameras for photogrammetric
survey
Figure 1. Mobile Mapping car (BMW) of the chair of road design (left) and the view to the server rack (right)
Figure 2. (left) Applanix System LV and the two Marlin Cameras (right) were installed at the vehicle
The main system is the Applanix POS LV 420 system. This system provides the position with a very high accuracy (less than 10 cm). The position is calculated in post processing from different sensors. Two GPS antennas (the second antenna calculate the heading of the vehicle), Inertial Measurement Unit (IMU) and Distance Measurement Unit (DMI) are included in the system. For the best solution for the position a GPS base station is needed. All sensors in the car are referenced to the applanix system. After the test drive and calculating the driving path (trajectory) all other sensor data has a position and a direction with a high accuracy.The cameras are two MarlinTM progressive scan cameras with a resolution of 1039 x 1392 pixels. During the test track the images are saved in bayer format to the hard disk. The CCD cameras are more and more important for documentation and post processing data collection.

2.GPS TEST FIELD CALIBRATION OF A MOBILE MAPPING VEHICLE
2.1Presupposition for a Geo-Reference
The main calibration of the mobile mapping car is divided into three parts. The first part pictures the creation of an optimised calibration field, its dimensions and point sizes. The following part is the calibration of the two video cameras on top of the vehicle with photogrammetric methods. The chapter 2.3 explains the basic strategy roughly. The last chapter describes the transformation between the three main coordinate systems and set the bore side alignment from the fix components of the sensor platform.
2.2Creating a Calibration Field
The condition for creation a calibration field was to determine the control point accumulation with a point size which is visible in 7-15m distance and with the possibility to measure it by twilight. With the distance from the camera to the test field and with the focal length of the camera it is possible to calculate the target size.For the targets were used retro reflective material with a point diameter of 5 cm, so the points have a size of nearly ten pixel in the pictures. The background of the targets is covered with black material. This is important for good contrast between the target and the background. If it is not possible to measure in daylight, the calibration field can be illuminated, so that the points reflect the external light. In this case the grey tone of the targets is over two hundred by a 8 bit gray image (Figure 4). With the external illumination it is possible to work with a shorter exposure time, so that the extraction of the targets get easier.The calibration field exist of thirty points. Ten points of it get a 10bit code ring for a better point allocation by the analysis. The location of the test field is a stair at a corner of two buildings (Figure 4). The main geometry consists of two intersection planes (the two facades of the buildings). The stair is located in front of them and added a third plane. With this constellation the calibration field has a good allocation of all points in different distances. The targets were allocated randomly within the visible area of fifteen square meters.Each point was measured two times. The first step was to determine the coordinates of the points by means of a special photogrammetric software. More than forty images (taken with a Nicon D100 camera) were used for the self calibration bundle adjustment. The adjustment yielded 3D coordinates for all targets with an accuracy better then 1mm. Consequently all points were determined in a local mathematical coordinate system with the origin point at the left side of the calibration field.
Figure 3. Calibration field with retro reflective targets (left) and Image from the Marlin camera with external illumination
The next step was to get all points in GPS coordinates (for more informations SEBER 1989). For the GPS measurement were set three ground points with a distance more than 30m in front of the test field. The exact calculation of these three ground points took place in a network of six SAPOS stations with more then 30 baselines. The network had a dimension of hundred square meters. The accuracy of the three points were calculated better than 5mm in location and 10mm in height.By means of the ground points it was possible to measure all points in the calibration field with a tachymeter with a mean accuracy of 9mm. Consequently all points are also located in the left hand geodetic coordinate system.
2.3Photogrammetric Calibration of two Marlin Cameras
The two MarlinTM cameras were mounted on top of the vehicle. The pictures were taken in front of the calibration field and from three different distances. The calibration configuration is draft in figure 5.
Figure 5. Positions of the two cameras in front of the calibration field
It is important to dispense the different camera positions equable, so that the backward intersection has redundant information. It is also possible to use only one image for the calculation of inner and outer camera parameters with a lower accuracy. The collinearity equations contain the transformation between the image coordinate system x ' y ' and the object coordinates XYZ (equation 1, 2). The values dx and dy are the summed distortion parameters.
x '= x0−c r11 X−X0 r12 Y− Y0 r31 Z− Z0 r13 X−X0 r22 Y− Y0 r33 Z− Z0 dx
(1)
y '= y0−c r12 X− X0 r22 Y− Y0 r32 Z− Z0 r13 X− X0 r22 Y− Y0 r33 Z− Z0
dy
(2)
More than fifteen pictures were taken to get a good result for calculation of the inner and outer camera parameters. The discrete calculation steps are described in detail in LUHMANN 2000. The camera parameters and their accuracy is shown in table 1. The distortion parameters A1, A2, B1 and B2 could be calculated significantly. All other distortion parameters were set to zero. The GPS position and the direction of the car were recorded for each image. This was necessary for the calculation of the bore side alignment.

parameterrelative
orientation
valuescamera 1
standard deviation
valuescamera 2
standard deviation
c [mm] 8,3548 0,00369 8,3869 0,00602
xh [mm] 0,0947 0,00776 -0,0025 0,01189
yh [mm] 0,0096 0,00481 0,0583 0,00741
A1 -3,12*10-3 3,98*10-5 -3,24*10-3 9,14*10-5
A2 6,19*10-5 2,89*10-6 7,35*10-5 7,91*10-6
B1 2,32*10-5 2,02*10-5 -4,27*10-5 3,36*10-5
B2 9,32*10-5 1,78*10-5 5,81*10-5 2,81*10-5
r0 2,4273 - 2,4273 -
X0 [mm] 0,0 0,00331 0,6178 0,00558
Y0 [mm] 0,0 0,00162 0,0025 0,00295
Z0 [mm] 0,0 0,00095 -0,0030 0,00147
omega [rad] 0,0 0,00135 0,0067 0,00984
phi [rad] 0,0 0,00092 0,0177 0,00140
kappa [rad] 0,0 0,00125 0,0041 0,00177
Table 1. inner an outer camera parameter of the photogrammetric calibration
It was not feasible to get an optimal configuration of the camera positions, because the vehicle is moving horizontal in front of the test field. The convergent angle between both cameras has a value of 1°. This inauspicious configuration makes room for improvements.The finally simultaneous calibration of the two Marlin cameras was done with Aicon3DTM Studio. The results of the calibration were the basic for the calculation of the bore side alignment and of the relative coordinate system between both cameras.This solution is not very comfortable and not flexible enough to recalibrate the cameras during a measurement drive far away from the calibration field. In this case a reference bar calibration would be optimal (chapter 3).
2.4Bore Side Alignment
Four coordinate systems are necessary for the bore side alignment:
• Camera coordinate system• Local coordinate system of the calibration field• Local coordinate system of the car• Global coordinate system GPS
Figure 6. four coordinate systems of the mobile mapping car
The main goal is the determination of all transformation parameters between the different coordinate systems. All necessary camera parameters are known from the bundle adjustment (chapter 2.3). By means of the the outer orientation of both cameras the principal point can be calculated in the local coordinate system of the calibration field. All targets in the calibration field have also GPS coordinates. So it was possible to calculate the translation and the rotation between the global and the local coordinate system of the calibration field with a Helmert transformation (formula 3).
X 2v= X0 1∗ IdR ∗X 1 (3)
with: v :correction to the start value1 :scaleI :unit matrixdR :rotation matrix with small angels so that
dR=[ 0 − − 0 − 0 ]
transform (3) with: ∗dR∗X1≈0
v=X0∗X1dR∗X1− X2−X 1 (4)
The linking from the car to the global coordinate system was fixed by installation of the Applanix system, so that the orientation angels of the IMU specify the different rotations between the two systems. The distances between the GPS antennas and the origin point of the car system were measured with a tachymeter with an average accuracy of 2mm.These distances and the rotation angle from the IMU determine the transformation between the car coordinate system and the global system.
XGPS=T Car−GPS m R IMU XCar with m=1.0 (5)
In the result all coordinate systems have a mathematical relation to each other. The bore side alignment has to be specified in the car coordinate system. Thence, it is necessary to transform all relations from the GPS coordinate system into the car coordinate system.The outer orientation parameters of the two cameras are known in the GPS coordinate system by the 3D Helmert transformation. With these values the bore side alignment can be retransformed into the car system. This transformation for is shown in formula 6.
XCar= R IMUT T Local −GPS R Local −GPS X Local−T CAR−GPS (6)
with: R : rotation matrixT : translation vectorX : 3D point
The repeat accuracy form different camera positions is smaller than 3cm. This imprecision results of the drifting IMU of the Applanix System at a stopped car and of the standard deviation of the GPS positions which is < 10cm.The offsets between the primary GPS antenna and the origin point of the car coordinate system are shown in table 2.

offsetcomponents
primary GPS antenna
IMU camera 1(left)
X [cm] 115,0 62,8 86,3
Y [cm] -30,5 -65,7 -97,4
Z [cm] 156,6 30,5 145,0
Table 2. Offsets in the car coordinate system
The bore side alignment for linking the cameras with the car coordinate system was calculated with an photogrammetric calibration field. The accuracy is limited by the GPS positions of the vehicle. Only the measurement with the camera system yields an accuracy better than 1cm by a distance at 20m. With the bore side alignment it is possible to transform the camera measurements into GPS coordinates.
3.REFERENCE BAR CALIBRATION
Primarily because of the non-availability of a suitable point field, the stationary calibration is not practicable during operational use. Mainly a new calibration strategy is necessary if one of the cameras or their objectives has to be detached on the job. The goal of this section is to assign MAAS’S (1998) proposed »Multi-camera System Calibration Techniques« – an extended approach of a »Moved Reference Bar« (HEIKKILÄ 1990, PETTERSEN, 1990) – to a stereoscopic mobile mapping camera system. Furthermore, occurred problems using two cameras only as well as proposed solutions were shown.A 3D point field can be simulated while moving a single signalised target through the object space (measurement volume) and track the recorded feature in image sequences. Disadvantage of a »moved single point calibration« is the fact that the interior orientation of both cameras cannot be obtained of a single point only (MAAS 1998). Therefore, an extension of a single point to two or – for easier feature classification – three signalised targets is necessary. Similar to the single point variant, the reference bar has to be moved randomly through the object space by an operator in front of the mobile mapping vehicle (Figure 7.a). The detection/tracking of the three targets in both camera images represents the first part of the off-line analysis (Chapter 3.1). With the achieved subpixel image coordinates as well as preliminary values for the interior and exterior camera orientation, the 3D approximate values for all temporarily generated object points can be determined (Figure 7.b; Chapter 3.2). The results of the following self-calibrating bundle adjustment are the improved parameters of camera orientation as well as accuracy data (Chapter 3.3).
Figure 7.a Part of an image sequence
Advantages of this method are the simplicity of realisation and the resultant flexibility for mobile mapping vehicles on the job. Furthermore, tracking the signalised targets through image sequences is often easier than the computation of homologous image points.
Figure 7.b Spanned spatial point field with variable depth expansion
3.1Image Point Measurement
For all images of the stereoscopic sequence the (semi-) automatic determination of the targeted image coordinates was delivered by photogrammetric image analysis functions. Semi-automatic, because of the manual detection of the targets in the first image of the sequences. This interactive step was necessary to determine the scale of the target templates.In the face of a suitable computing time, an in general two-level image pyramid was used for the calculation of the similarity coefficient between template image (Figure 8.a left) and size-reduced images. Figure 8.b shows the result of this template matching.
Figure 8.a Smoothed template for Cross-Correlation and Least-Squares Matching (left) Least-Squares adjustment (right)
Figure 8.b Cross-Correlation coefficients xy (left: , right: > 0.5)
After the estimation of the approximate positions of the targets, a least-squares adjustment (least-squares matching, LSM) followed to determine the centres of those with subpixel accuracy (Figure 8.a right). LSM based on a 2D affine transformation with six parameters (translations, rotation, shear and scales). At this it was necessary to factor out shear in the face of an over-parametrisation (transformation of a circle into a rotated ellipse; see LUHMANN 2000). The accuracy of the translation parameters in x and y direction of image coordinates can be denoted by ±0.01 pixel.
3.2Determination of Approximate Values
The achieved subpixel image coordinates as well as preliminary values for the interior and exterior camera orientation provide a basis for the determination of approximate values for 3D object points. The computation based on the determination of the intersection of two skew straight lines (projection rays). The shortest vector between these straight lines is defined as
d d x ,d y ,d z =P02−P01∗a 1×a2
∣a1×a2∣2 ∗a 1×a2 (7)
with i={1,2} : Camera positionsx , y : Image coordinatesc : Focal lengthP0 iP0x , P0 y , P0 z : Perspective centreRi , , : Rotary matrix
a iax , ay , az =Ri∗[xyc] : Direction of the projection rays
The specification of a layer , defined by the direction of the image ray a1 and the vector d , and the computation of the intersection of a1 with yield the sought target coordinates in object space:
X X p , Y p , Z p=P02D−n∗P02
n∗a 2∗a 2−
d2 (8)
with : nn x ,n y ,n z =a2×a D=n∗PO2
3.3Bundle Adjustment
A self-calibration bundle adjustment is used to evaluate the relative orientation parameters. The geodetic datum for the object coordinate system was set into one camera (e.g. i=1 ). This means that
Figure 9. Image and object coordinate systems
• 1=1=1≝0• POX1=P0Y1=P0 Z2≝0• X-axis points at P02
• Z-axis points contrary at direction of exposure axis
On every position, the constant length of the reference bar describes additional restriction equations (scale of the system), at which the influence on the whole adjustment model is controlled by means of weights. These restrictions stabilise the whole adjustment and allow a complete calibration of both cameras, including the interior orientation parameters.First test configurations yielded the results shown in Table 3.a and 4.a. A significant determination of all parameters was not possible. Especially the correlations between rotation angles
and focal lengths c1, c2 as well as principal points yp1, yp2suggest a geometric instability. Reasons for that are an unsuitable ratio between horizontal and vertical reference bar arrangements, a bad base-distance ratio (1:10) and poor intersection angles because of less convergent stereoscopic camera orientation (determined by the mobile mapping system). At least partially, the recording configuration can be optimized.Further trials using a 1:10 model resulted in a more stable configuration (base-distance ratio: 1:5; good measurement volume cover; Table 3.b). Nevertheless, large correlations between interior and exterior orientation parameters appeared (Table 4.b). Therefore, the reference bar approach was extended by one target to a reference triangle.
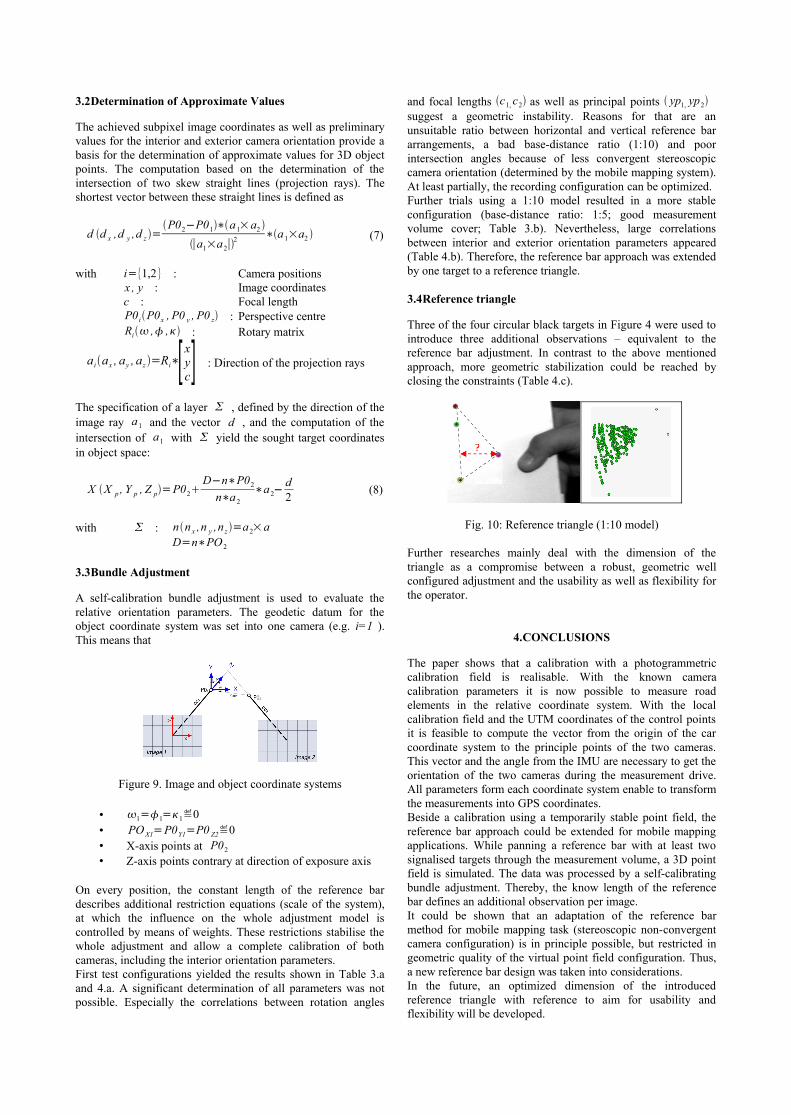
3.4Reference triangle
Three of the four circular black targets in Figure 4 were used to introduce three additional observations – equivalent to the reference bar adjustment. In contrast to the above mentioned approach, more geometric stabilization could be reached by closing the constraints (Table 4.c).
Fig. 10: Reference triangle (1:10 model)
Further researches mainly deal with the dimension of the triangle as a compromise between a robust, geometric well configured adjustment and the usability as well as flexibility for the operator.
4.CONCLUSIONS
The paper shows that a calibration with a photogrammetric calibration field is realisable. With the known camera calibration parameters it is now possible to measure road elements in the relative coordinate system. With the local calibration field and the UTM coordinates of the control points it is feasible to compute the vector from the origin of the car coordinate system to the principle points of the two cameras. This vector and the angle from the IMU are necessary to get the orientation of the two cameras during the measurement drive. All parameters form each coordinate system enable to transform the measurements into GPS coordinates.Beside a calibration using a temporarily stable point field, the reference bar approach could be extended for mobile mapping applications. While panning a reference bar with at least two signalised targets through the measurement volume, a 3D point field is simulated. The data was processed by a self-calibrating bundle adjustment. Thereby, the know length of the reference bar defines an additional observation per image.It could be shown that an adaptation of the reference bar method for mobile mapping task (stereoscopic non-convergent camera configuration) is in principle possible, but restricted in geometric quality of the virtual point field configuration. Thus, a new reference bar design was taken into considerations.In the future, an optimized dimension of the introduced reference triangle with reference to aim for usability and flexibility will be developed.

/[mm] [quaternions] [mm] [mm] [mm]
a.
Camera 1
Camera 20.0013
fix fix 0.5594 0.08290.2200 0.0019
2.07141.11647.4650
0.00100.00200.0007
0.5615 0.07760.2175 0.0018
58.74154.37406.96
b.
Camera 1
Camera 20.0024
fix fix 0.0481 0.02730.0251 4.2∙E-4
0.33780.12390.6293
0.00110.00140.0005
0.0483 0.02610.0240 3.6∙E-4
2.422.224.31
c.
Camera 1
Camera 20.0046
fix fix 0.06720.03230.0292 5.2∙E-4
0.53270.17070.9390
0.00170.00220.0006
0.0662 0.03530.0293 4.6∙E-4
2.822.535.96
Table 3: A posterior accuracy of the orientation parameters
a.
1 0,57 0,92 0,92 -0,61 -0,60,57 1 0,51 0,51 -0,99 -0,990,92 0,51 1 0.99 -0,55 -0,540,92 0,51 0.99 1 -0,56 -0,55-0,61 -0,99 -0,55 -0,56 1 0.99-0,60 -0,99 -0,54 -0,55 0.99 1
b.
1 -0,34 0,74 0,75 0,35 0,34-0,34 1 -0,35 -0,39 -0,94 -0,930,74 -0,35 1 0,98 0,36 0,340,75 -0,39 0,98 1 0,41 0,380,35 -0,94 0,36 0,41 1 0,830,34 -0,93 0,34 0,38 0,83 1
c.
1 -0,27 0,64 0,66 0,31 0,25-0,27 1 -0,32 -0,35 -0,88 -0,880,64 -0,32 1 0,97 0,37 0,340,66 -0,35 0,97 1 0,39 0,370,31 -0,88 0,37 0,39 1 0,740,25 -0,88 0,34 0,37 0,74 1
Table 4: Correlations between parameters (abridgement)
5.REFERENCES
Heikkilä, J., 1990: Update calibration of a photogrammetric station. Close-Range Photogrammetry Meets Machine Vision, SPIE Proceedings, Vol. 1395. Edited by A. Gruen and E. P. Baltsavias. Bellingham, WA: Society for Photo-Optical Instrumentation Engineers. pp. 1234-1241.
Luhmann, T., 2000: Nahbereichsphotogrammetrie. Wichmann Verlag, Heidelberg.
Novak, K, 1991: Integration von GPS und digitalen Kameras zur automatischen, Vermessung von Verkehrswegen. In: ZPF, 4/1991, S.112-120
Maas, H.-G., 1998: Image sequence based automatic multi-camera system calibration techniques. International Archives of Photogrammetry and Remote Sensing Vol. 32, Part V.
Pettersen, A., 1992: Metrology Norway System – An on-line industrial photogrammetry system. International Archives of Photogrammetry and Remote Sensing, Vol. 24, B5, pp. 43-49.
Seber, G., 1989: Satellitengeodaesie – Grundlagen, Methoden und Anwendungen, Walter de Gruyter, Berlin, New York.