calibration and fault finding for lal20x...
TRANSCRIPT

CALIBRATION AND FAULT FINDING FOR DUMPY LEVELS
CALIBRATIONAND FAULT FINDINGAND FAULT FINDING
FOR LAL20X & LAL24XDUMPY LEVELSDUMPY LEVELS
MEASURING EXPERTSSINCE 1869

CALIBRATION AND FAULT FINDING FOR DUMPY LEVELS
• The Automatic level is called “Automatic” because it requires only a simple
• How The LAL20X & LAL24X Works
basic set-up using the external circular leveling vial.• The final fine adjustment is then made by an internal pendulum mechanism
called the compensator.• This enables a very accurate set-up to be performed by personnel with onlyThis enables a very accurate set up to be performed by personnel with only
basic training in the use of surveying instruments.• The compensator is quite delicate and is protected from damage by a
compensator lock that is activated by closing the lid of the travel case. It can also be manually activated by squeezing the button below the eyepiecealso be manually activated by squeezing the button below the eyepiece.
Compensator

CALIBRATION AND FAULT FINDING FOR DUMPY LEVELS
• Place the Dumpy Level on a tripod or other solid stable surface.• Setting up a Dumpy Level
• Adjust the three black leveling screws until the bubble in the circular vial is within the black circle. This vial can be viewed through the prism on the left hand side of the Level if required. Note; The bubble does not have to be exactly in the center of the circle.
• Turn the level in the direction required using the alignment sight on the top of the levelTurn the level in the direction required using the alignment sight on the top of the level as a guide.
• Look through the eyepiece and adjust the focus of the cross hairs by turning the eyepiece. Then adjust the focus of the target using the Focusing knob on the right hand side of the levelside of the level.
• The horizontal cross hair now shows a line that is exactly level with the Dumpy.
P iAlignment SightPrism
Circular setting Vial
Focus Knob
Sight
Eyepiece
Vial
Leveling screws

CALIBRATION AND FAULT FINDING FOR DUMPY LEVELS
• The most common fault is the circular or setting vial being
• Common faults
out of alignment. Further on we will discuss how this can be checked and re-aligned.
• Not focusing correctly is mostly caused by the focus travel being adjusted incorrectly.g j y
• Compensator accuracy can only be properly checked over a suitable range. We can however easily check that the compensator is functioning.
• Physical damage usually from being dropped is common• Physical damage, usually from being dropped is common and often requires replacement of the compensator and sometimes the whole unit has to be exchanged.

CALIBRATION AND FAULT FINDING FOR DUMPY LEVELS
• To check the operation of the circular leveling vial.• Circular Setting vial
• Firstly we place the Dumpy on a solid stable surface. • We then adjusting the three black leveling screws while viewing the
bubble through the prism on the left hand side of the Level, until the bubble in the circular vial is close to the center of the black circle.

CALIBRATION AND FAULT FINDING FOR DUMPY LEVELS
• Now rotate the level 180 degrees while holding the base firmly. If the circular vial is
• Circular Setting vial
set up correctly, the bubble will remain within the circle. • Note; Some customers believe that the bubble must remain precisely in the center
of the circle, but this is not correct. The bubble only has to remain within the circle.• If the bubble remains inside the circle then no adjustment is requiredIf the bubble remains inside the circle then no adjustment is required.

CALIBRATION AND FAULT FINDING FOR DUMPY LEVELS
• If you the circular vial requires adjustment then it is best if the orange cover is
• Removing the Orange Cover
removed so it is easier to see the circular vial.• Unscrew the Eyepiece Ring.• Using two slim straight bladed screwdrivers, insert the ends under the cover as
shown below This will release the front of the covershown below. This will release the front of the cover.• The cover should lift at the large lens end allowing you to gently pull the top off.
ScrewdriverEyepiece Ring
Screwdriver Tip here
Screwdriver Tip here
Eyepiece

CALIBRATION AND FAULT FINDING FOR DUMPY LEVELS
• Place the Dumpy level on a firm solid surface so that the Objective (big end) is on
• Circular Setting vial Adjustmentace t e u py e e o a so d su ace so t at t e Object e (b g e d) s o
the left and the Eyepiece is on the right.• Adjust the three Black leveling screws until the bubble is as close to the center of the
circle as you can.

CALIBRATION AND FAULT FINDING FOR DUMPY LEVELS
• Holding the base of the level so that it does not move at all, rotate the top part of
• Circular Setting vial Adjustment
the level by 180 degrees (Half a turn).• We now adjust the two silver Hex screws to correct the bubble position using a
2.0mm Hex driver or key.• Note that when you turn the screw clockwise (tighten) you will move the bubbleNote that when you turn the screw clockwise (tighten) you will move the bubble
towards the screw and when you turn the screw counterclockwise you will move the bubble away from the screw.
• See arrows below.
CALIBRATION AND FAULT FINDING FOR DUMPY LEVELS
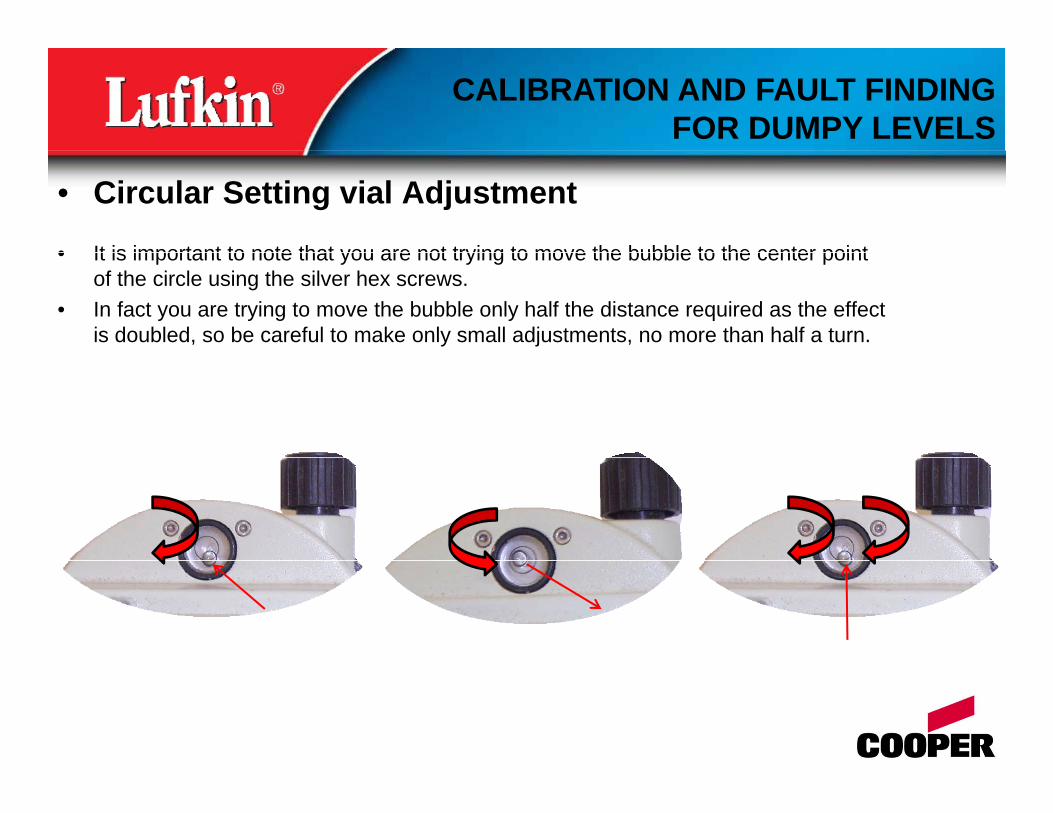
• It is important to note that you are not trying to move the bubble to the center point
• Circular Setting vial Adjustment
• It is important to note that you are not trying to move the bubble to the center point of the circle using the silver hex screws.
• In fact you are trying to move the bubble only half the distance required as the effect is doubled, so be careful to make only small adjustments, no more than half a turn.

CALIBRATION AND FAULT FINDING FOR DUMPY LEVELS
• Holding the base of the level so that it does not move at all, rotate the top part level by 180 degrees (Half a turn) back to the original position with the Objective (big end) on
• Circular Setting vial Adjustment
180 degrees (Half a turn) back to the original position with the Objective (big end) on the left and the Eyepiece on the right.
• Again we adjust the Black leveling screws until the bubble is as close to the center of the circle possible.
• We now repeat the process adjusting the three black leveling screws while the eyepiece is on the right and adjusting the two silver hex screws while the eyepiece is on the left until the bubble remains inside the circle in both positions.
• It is quite normal to repeat this several times to get a good result.q p g g
Adjust Black Screws Adjust Silver Screws

CALIBRATION AND FAULT FINDING FOR DUMPY LEVELS
• Problems that you may find are as follows;
• Problems with vial Adjustmentob e s t at you ay d a e as o o s;
• The hex in the silver screw is stripped and the driver slips. In this case the screw should be replaced. If you cannot remove the screw then it is a workshop job.
• The screw is turning but the bubble is not moving or the screw is so tight that it will not turn These both mean that the screw has run out of adjustment The problemnot turn. These both mean that the screw has run out of adjustment. The problem can be addressed by tightening the spring under the circular vial or adjusting the third mounting screw but that is usually a job for the workshop.
• The bubble will not settle in the center of the circle. This is a fault with the vial it lf d ll th t i l t b l ditself and usually means that vial must be replaced.

CALIBRATION AND FAULT FINDING FOR DUMPY LEVELS
• If the Dumpy will cannot be focused then;-
• Adjusting the Focus travel
• Firstly check that the slide is moving inside the tube. The slide can be seen through the objective (big) lens and should move when the focus knob is turned. If the slide does not move then it is a workshop job.
• If the slide does move then the focus travel limit will be stopping the slide tooIf the slide does move then the focus travel limit will be stopping the slide too soon. This can be fixed as follows;-
• Remove the top cover as described previously. Focus clamp screws• Undo the two Focus clamp screws by about 1
lturn only.• While looking through the eyepiece, turn the
focusing knob clockwise until it an object at least 20m away comes into focus.
• The knob will feel gritty but this is normal.• Continue turning the knob for a quarter of a turn
past the point of focus.• Retighten the two clamping screws• Retighten the two clamping screws.

CALIBRATION AND FAULT FINDING FOR DUMPY LEVELS
• If there is any doubt that the Compensator is functioning correctly
• Testing the Compensator operationt e e s a y doubt t at t e Co pe sato s u ct o g co ect y
then is can be tested as follows.• Set up the dumpy level on a firm stable surface and adjust the three
black leveling screws so that the bubble in the circular vial is within the black circlethe black circle.
• Look through the eyepiece and make sure that the cross hairs are clearly in focus and adjust if required by turning the eyepiece.
• Look through the eyepiece and focus the level using the knob on the i ht h d id bj t th t b l lright hand side, on any object that can be seen clearly.
• While looking through the level turn the black leveling screw nearest to you by approximately a quarter of a turn.
• If the compensator is functioning correctly then the cross hair will p g ymove either up or down and then return to the original position. This is the compensator, correcting for the error as the screw was moved.
• If the line moves and does not recover then the compensator is not functioning and this is a job for the workshopfunctioning and this is a job for the workshop.

CALIBRATION AND FAULT FINDING FOR DUMPY LEVELS
• Screw the Eyepiece Ring onto the level by placing it over the end of the
• Reassembly
level and turning anticlockwise until the thread engages with a small click, then turn clockwise for approximately 2 turns.
• Place the orange cover onto the level noting the piece that fits between the Eyepiece Ring and the body and then press the cover firmly y p g y p ydownwards. It should clip into place. Note this may require some force.
• Complete tightening the Eyepiece Ring by turning clockwise . • Note; it is quite difficult to fit the Eyepiece Ring if the cover has already
been installedbeen installed.• Replace the lens cover, place the level in the travel case and close the lid
firmly to lock the compensator.
Eyepiece Ring