cailin’s lpic-102 summary - kilala.nl · cailin’s lpic-102 summary this document ain’t much...
TRANSCRIPT
Cailin’s LPIC-102 summary This document ain’t much special :) Just a summary of all the stuff I’m learning about Linux that I didn’t already know from Solaris. Do not use this summary exclusively to study for your LPIC certification! It doesn’t cover everything you need to know and most definitely is not a good replacement for a complete book. This summary was based on the following two books and a lot of mucking about using a basic Linux install.
• Ross Brunson – “Exam cram 2: LPIC 1”, 0-7897-3127-4 • Roderick W. Smith – “LPIC 1 study guide”, 978-0-7821-4425-3
Contents Objectives and their weight in scoring your exam...................................2 Objectives and their chapters in the books.............................................3 The kernel and modules .......................................................................4 Boot loaders........................................................................................8 The boot process and system startup ..................................................10 The user environment and scripting ....................................................12 Basic networking ...............................................................................14 Printing.............................................................................................20 Sendmail ..........................................................................................24 Apache .............................................................................................26 NFS server........................................................................................28 Samba server....................................................................................29 DNS server .......................................................................................31 SSH server........................................................................................32 Documentation..................................................................................33 Security ............................................................................................34 System administration .......................................................................37
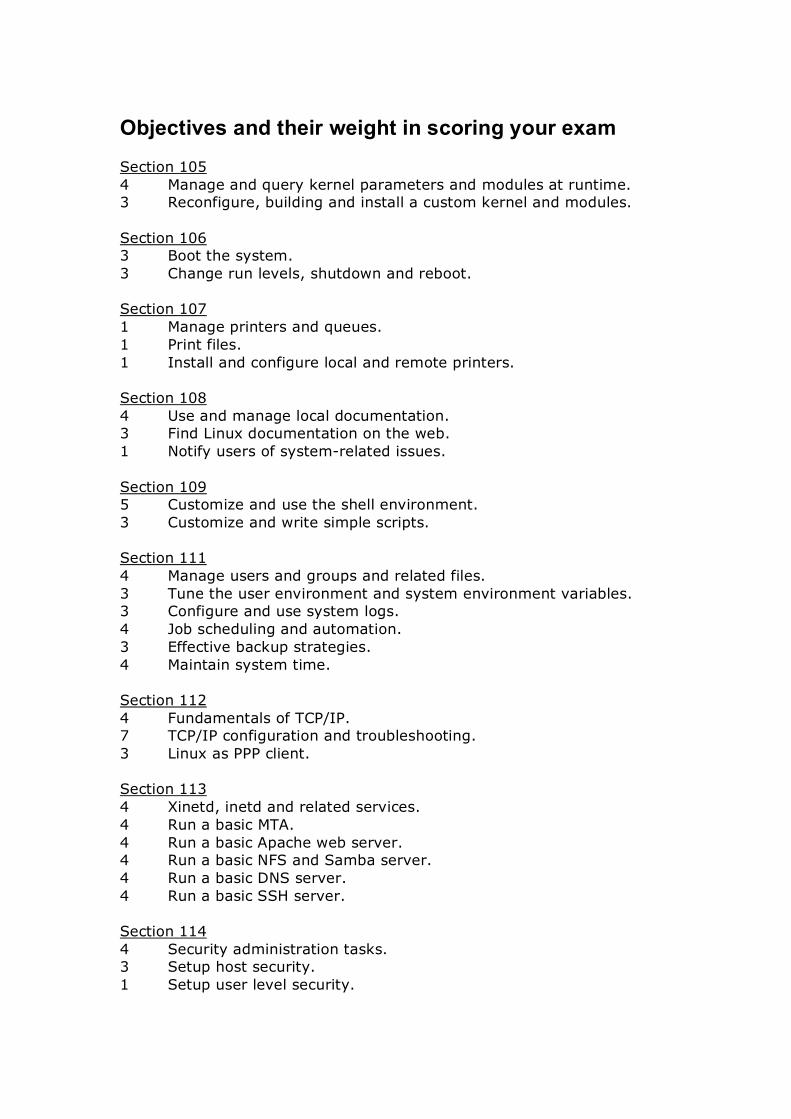
Objectives and their weight in scoring your exam Section 105 4 Manage and query kernel parameters and modules at runtime. 3 Reconfigure, building and install a custom kernel and modules. Section 106 3 Boot the system. 3 Change run levels, shutdown and reboot. Section 107 1 Manage printers and queues. 1 Print files. 1 Install and configure local and remote printers. Section 108 4 Use and manage local documentation. 3 Find Linux documentation on the web. 1 Notify users of system-related issues. Section 109 5 Customize and use the shell environment. 3 Customize and write simple scripts. Section 111 4 Manage users and groups and related files. 3 Tune the user environment and system environment variables. 3 Configure and use system logs. 4 Job scheduling and automation. 3 Effective backup strategies. 4 Maintain system time. Section 112 4 Fundamentals of TCP/IP. 7 TCP/IP configuration and troubleshooting. 3 Linux as PPP client. Section 113 4 Xinetd, inetd and related services. 4 Run a basic MTA. 4 Run a basic Apache web server. 4 Run a basic NFS and Samba server. 4 Run a basic DNS server. 4 Run a basic SSH server. Section 114 4 Security administration tasks. 3 Setup host security. 1 Setup user level security.
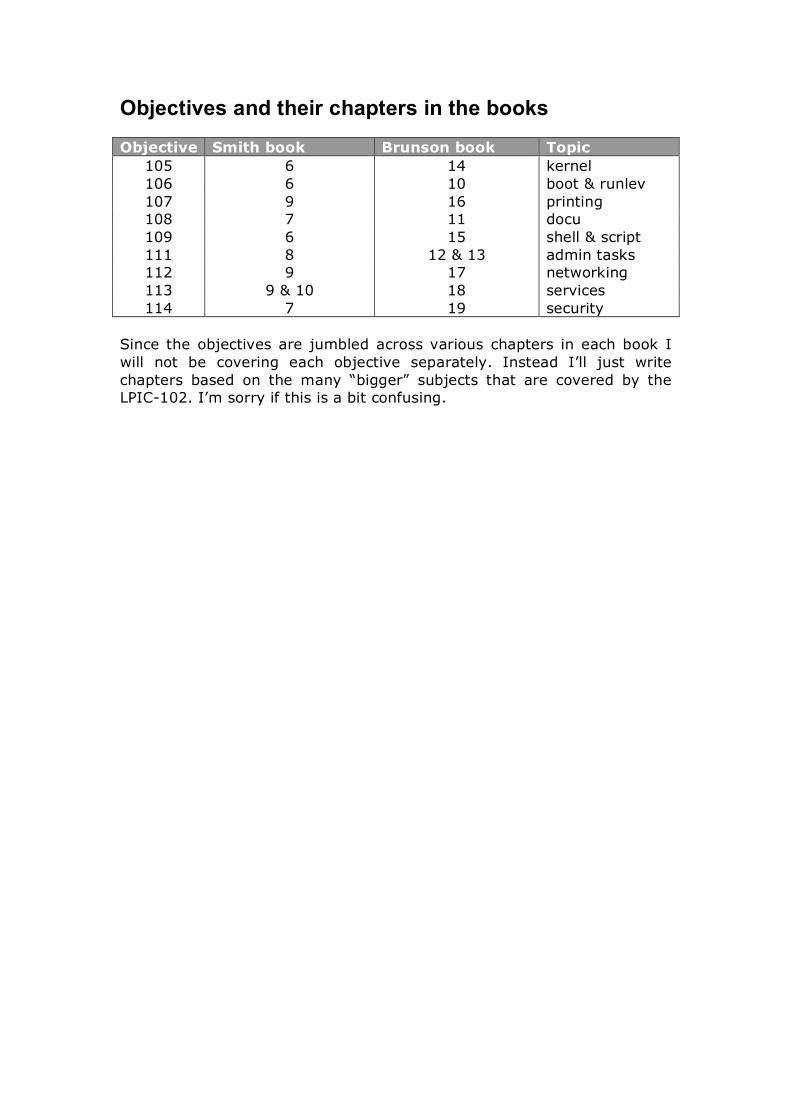
Objectives and their chapters in the books Objective Smith book Brunson book Topic
105 6 14 kernel 106 6 10 boot & runlev 107 9 16 printing 108 7 11 docu 109 6 15 shell & script 111 8 12 & 13 admin tasks 112 9 17 networking 113 9 & 10 18 services 114 7 19 security
Since the objectives are jumbled across various chapters in each book I will not be covering each objective separately. Instead I’ll just write chapters based on the many “bigger” subjects that are covered by the LPIC-102. I’m sorry if this is a bit confusing.
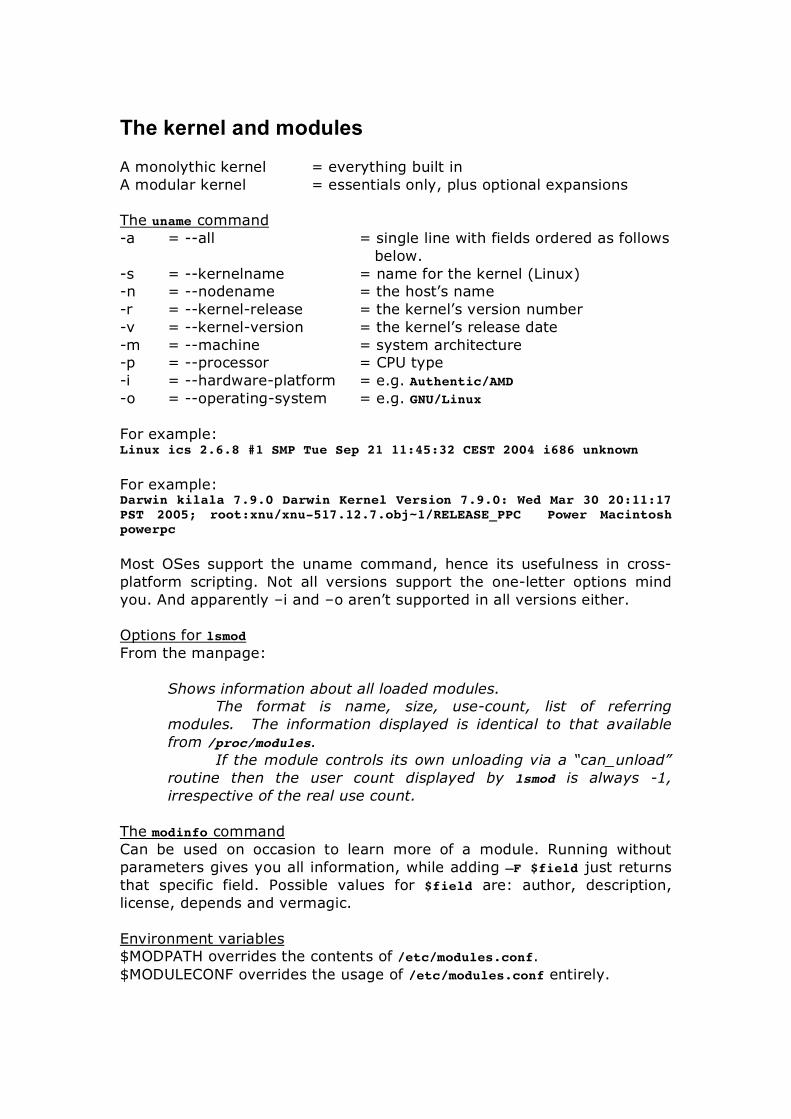
The kernel and modules A monolythic kernel = everything built in A modular kernel = essentials only, plus optional expansions The uname command -a = --all = single line with fields ordered as follows
below. -s = --kernelname = name for the kernel (Linux) -n = --nodename = the host’s name -r = --kernel-release = the kernel’s version number -v = --kernel-version = the kernel’s release date -m = --machine = system architecture -p = --processor = CPU type -i = --hardware-platform = e.g. Authentic/AMD -o = --operating-system = e.g. GNU/Linux For example: Linux ics 2.6.8 #1 SMP Tue Sep 21 11:45:32 CEST 2004 i686 unknown For example: Darwin kilala 7.9.0 Darwin Kernel Version 7.9.0: Wed Mar 30 20:11:17 PST 2005; root:xnu/xnu-517.12.7.obj~1/RELEASE_PPC Power Macintosh powerpc Most OSes support the uname command, hence its usefulness in cross-platform scripting. Not all versions support the one-letter options mind you. And apparently –i and –o aren’t supported in all versions either. Options for lsmod From the manpage:
Shows information about all loaded modules. The format is name, size, use-count, list of referring
modules. The information displayed is identical to that available from /proc/modules.
If the module controls its own unloading via a “can_unload” routine then the user count displayed by lsmod is always -1, irrespective of the real use count.
The modinfo command Can be used on occasion to learn more of a module. Running without parameters gives you all information, while adding –F $field just returns that specific field. Possible values for $field are: author, description, license, depends and vermagic. Environment variables $MODPATH overrides the contents of /etc/modules.conf. $MODULECONF overrides the usage of /etc/modules.conf entirely.
Module file versus module name The module named floppy makes use of the file called floppy.ko. Information on the depmod command depmod determines all cross-dependencies between loadable modules, to ensure that loading these modules can be an automatic process. From the man-page:
depmod will not flag an error if a module without a GPL compatible license refers to a GPL only symbol (EXPORT_SYMBOL_GPL in the kernel). However insmod will refuse to resolve GPL only symbols for non-GPL modules so the actual load will fail.
Files used:
• /etc/modules.conf • /lib/modules/*/modules.dep, • /lib/modules/*
-a = update dependency file (run at boot time through an rc-script) -A = update dependency file, only if there are changed modules -C = alternate configuration file -b = base directory for /lib/modules -r = allow non-root owned modules Options for insmod Loads a single module and requires the full path to the module file. -f = --force = force if mismatch in kernel and module version -k = --autoclean = allow kernel to unload unused modules -m= --map = show modules map, for debugging -n = --noload = dry run -p = --probe = verify that module could be loaded -r = --root = allow non-root owned modules Options for modprobe Loads a module and its dependencies and requires the module name. The use of this command requires /etc/modprobe.conf. -a = --all = load all matching modules, not just the first -c = --showconfig = show current configuration -d = --debug = show debugging information for the stack -f = --force = load, even if the kernel version doesn’t match -k = --autoclean = allow kernel to unload unused modules -l = --list $regexp = show all modules matching the regexp -n = --show = dry run (aka --dry-run) -r = --remove = unload specific module, or autoclean all -t = --type = load all of this type (part of directory path) e.g. –t drivers/net -C = --config = alternate configuration file -v = --verbose = verbose mode = --show-depends = show all dependencies for one module
Options for rmmod Removes an unused module and requires the module’s name. -a = --autoclean = mark unused modules for autoclean clean currently marked modules -r = --stacts = remove a complete modules stack -f = --force = unload even if in use. Requires kernel option CONFIG_MODULE_FORCE_UNLOAD -v = --verbose = verbose mode -w = --wait = wait for the module to quiesce Files related to modules
• /lib/modules/$kernver/modules.dep Lists all module dependencies and is rebuilt by the depmod command, manually or when the kernel is rebuild.
• /etc/modules.conf Replaces /etc/conf.modules as a repository for aliases, options and more.
• /etc/modules.d/ and the modules-update command Used by Debian and Gentoo to rebuild dependencies.
Passing options to modules
• Automatically through /etc/modules.conf. • Manually through insmod and depmod. • Options differ per driver, so refer to the relevant documentation.
Linux kernel driver options can be found in /usr/src/Linux/Documentation.
Kernel version numbers < 2.6 2. = major version number 4. = odd numbers are development, even numbers are stable 9 = minor upgrade Depending on where you got it, the same version of a kernel can contain different features due to patching. Kernel version numbers ≥ 2.6 2. = major version number 6. = minor version number 11. = significant upgrade to official codebase 10 = minor upgrade Getting a new kernel
• Download from kernel.org. • Import public key: gpg --keyserver wwwkeys.pgp.net --recv-keys
0x517D0F0E • Verify download: gpg --verify linux*bz2.sign linux*.bz2 • You can get it from our distro’s website, but it will be modified. On
the upside this means that the configuration will match your current kernel config quite closely.
Configuring the kernel The make command has four important options:
• config, which asks you an unending list of questions. • menuconfig, which presents you with a CLI menu. • oldconfig, which loads your old configuration file and asks about
new options. • xconfig, which presents you with a GUI menu.
The most important options to configure are:
• CPU type, for CPU optimizations. • Hard disk controllers. The default ATA is slow so pick the proper
driver. SATA is filed under SCSI. • File systems. Be sure to pick the ones you need and to bake the
root file system right into the kernel (must not be a module). • USB. The use of a keyboard and mouse requires the use of USB and
USB HID. Before kernel 2.6 you needed to run separate make commands to build the kernel; these days that’s changed and you can run a single command. The resulting kernel image can be found in /usr/src/linux/arch/$arch/boot/ and is called either bzImage, vmlinuz or vmlinux. How to install the new kernel
• Copy the kernel image into /boot and give it a proper name. For example, call is bzImage-2.6.11.10-scsi for a kernel with SCSI support.
• Reconfigure your boot loader • Copy /usr/src/linux/System.map to /boot/System.map. • Run make modules_install.
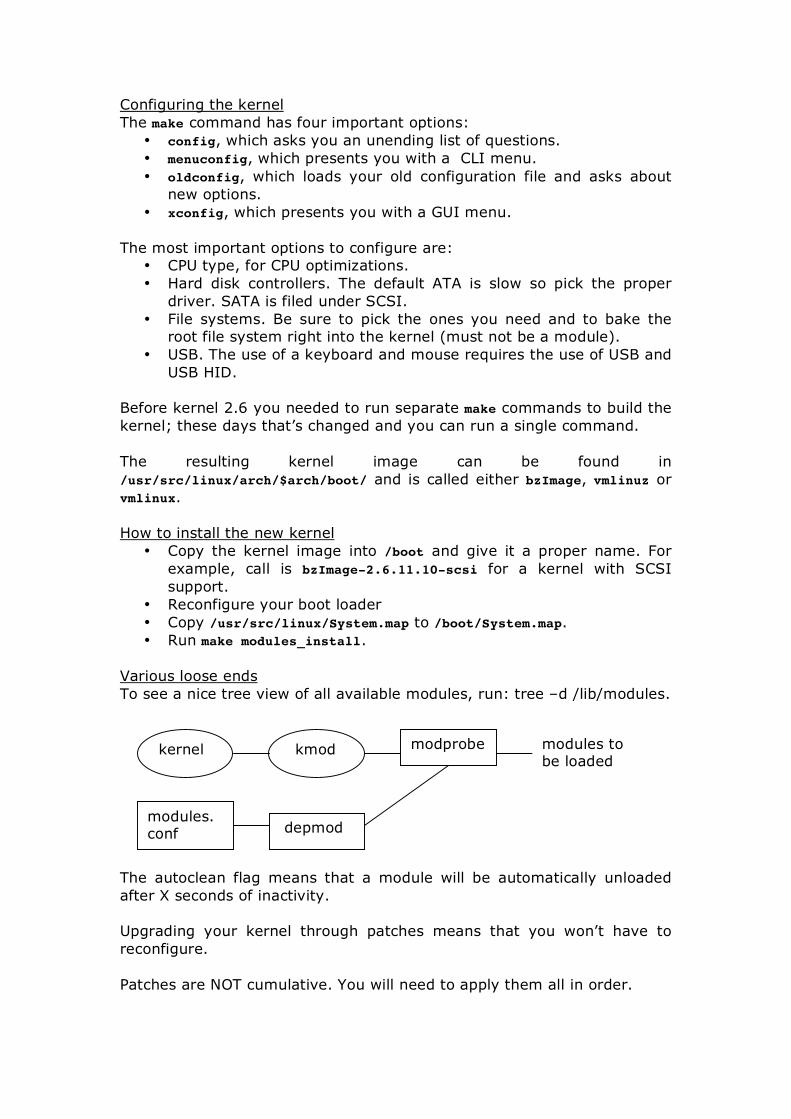
Various loose ends To see a nice tree view of all available modules, run: tree –d /lib/modules.
The autoclean flag means that a module will be automatically unloaded after X seconds of inactivity. Upgrading your kernel through patches means that you won’t have to reconfigure. Patches are NOT cumulative. You will need to apply them all in order.
kernel kmod modprobe
modules. conf depmod
modules to be loaded
Boot loaders The /etc/lilo.conf file Contains global options, followed by stanzas per kernel image. boot = loader location, /dev/hdn = MBR, /dev/hdnx = partition default = default OS label to boot, else boot the first stanza prompt = wait for user selection timeout = wait for N 1/10th seconds till booting the default OS lba32 = allow image above the 1024th cylinder vga = video text mode, should be left alone root = /dev/hdnx, the root partition for the OS password = password required to boot this OS A number of options only apply to images: image = kernel image file other = partition with custom boot loader, required for DOS,
Windows, OS/2, BeOS and all BSDs label = name for the stanza, to be used at the boot prompt append = extra kernel options in double quotes, one option per line. very useful option: “init=/bin/sh” in case of corruption. The lilo command After modifying the configuration file you should rerun lilo in order to modify the boot loader. -C = alternate configuration file -t = test, don’t write -v = verbose mode -b = override “boot=” line in lilo.conf The /boot/grub/menu.lst and grub.conf files Grub doesn’t use device names as Linux does. /dev/hda1 becomes (hd0,0), /dev/hdb3 becomes (hd1,4) and so on. In the case of a mixed SCSI and SATA environment the SATA disks are usually numbered before the SCSI disks. default = the number of the OS’s title (first = 0) timeout = wait N seconds at the prompt spashimage = background image at the prompt. the path is relative to
“root=” The following options only apply to images: title = image label, may contain spaces root = grub root, the partition for /boot kernel = image file + kernel options, all options on one line. “root=” in this case points to the partition for / rootnoverify = same as “root=”, used for non-Linux OSes. chainloader+1=non-Linux OS boot loader at first sector of “rootnoverify=” init = alternative init command, eg /bin/sh.
Installing grub for the first time This is only needed after installing, or after making serious modifications to the system.
• grub-install /dev/hda, or • grub-install ‘(hd0)’
Boot messages and logs The dmesg command /var/log/syslog /var/log/messages /var/log/boot (Debian) /var/log/boot.log (Red Hat) /var/log/dmesg The boot process BIOS -> BIOS instructions -> primary boot loader -> secondary boot loader (optional) -> kernel -> devices and root file system -> init
The boot process and system startup Linux’s run levels 0 shutdown hardware 4 undefined 1 single user mode 5 multi-user + X11 + XDM 2 undefined 6 reboot 3 multi-user mode Debian uses run level 2 for multi-user mode + X11 + XDM. Gentoo allows for many run levels with names instead of numbers. The /etc/inittab file Each line is built as follows: [1-4 char id]:[levels]:[action]:[process] Possible values for $action are: wait, respawn, once, boot, bootwait, off, ondemand (for levels a, b and c), initdefault, sysinit (before boot and bootwait), powerwait (before power down), powerfail (before power down), powerokwait, powerfailnow, ctrlaltdel and kbrequest. After making changes to inittab you will need to restart the init daemon, either by running telinit q or kill –HUP 1. System V boot scripts The location for the run level scripts varies: /etc/rc?.d, /etc/init.d/rc?.d or /etc/rc.d/rc?.d. This is rather annoying of course. The location where the scripts are actually stored also varies: /etc/rc.d, /etc/init.d, /etc/init.d/rc.d. There are multiple tools at your disposal for managing the run level scripts. Aside from making the modifications by hand you can also use chkconfig, ntsysv, update-rc.d and rc-update. The chkconfig command --list = current configuration --level = turn on/off a service for level X --add = add a new service with suggested levels from the config file The ntsysv command --level = CLI menu for run level X The shutdown command -r reboot -h halt -c cancel +N wait N minutes MSG wall message -F force fsck -t N Nsec before MSG -f no force fsck -a use /etc/shutdown.allow

Various loose ends Instead of rebooting you can also just bounce a run level. This saves time and keeps your uptime, which could save your ass in an SLA-battle. Running daemons and applications should use .pid files in /var/run or /var/lock/subsys. This will allow for better bookkeeping and killing. The chkconfig command also shows services monitored by inetd. Run levels s and S run the scripts before completing the transfer to run level 1. Making a boot disk: mkbootdisk --device /dev/fd0 $kernver Or on Debian: mkboot /boot/vmlinuz

The user environment and scripting /bin/sh is often not an actual shell but a link to the default shell for Linux. User environment configuration files /etc/profile and /etc/profile.d /etc/bashrc and /etc/bash.bashrc ~/.bash_login and ~/.profile ~/.bashrc ~/.bash_profile ~/.bash_logout The test command -n non-zero -z zero = strings equal != strings not equal -eq integer equal -ne integer not equal -lt, -le, -ge, -gt less than, less equal, greater than, greater equal -nt, -ot, file is newer than, older than -b block device -c character device -d directory -e exists -f normal file -g set-GID file -G owned by $group -k sticky-bit file -L symlink -O owned by $user -p pipe -r readable -s bigger than 0 bytes -S socket -u set-UID file -w writable -x executable Quoting “ allows for variable expansion ‘ disallows variable expansion and prints the string exactly Functions declare –F show all defined functions declare –f $funct show contents of function type –all $funct show as much information as possible unset $funct disable a function Creating a patch
• diff –Naur $file1 $file2 > patchfile • cat $patchfile | patch
The second command takes $patchfile and applies all noted changes to the original $file1. After this $file1 and $file2 should be identical. Beware file paths! And used zcat or bzcat for compressed patches.

Various loose ends It’s a good idea to run the following command immediately after installing: find / -perm +7000 –exec ls –l {} > /root/specialbits.txt. Then at regular intervals run the command again and search for new files. Handy command for numbered loops: seq -> for n in $(seq –w 1 20) Besides the familiar while-loop, there’s also the until-loop. To escape an alias run \$ALIAS, eg \ls. The –F flag to ls suffixed names with their type: / directory = socket * executable | fifo, or pipe @ symbolic link To run a script inside your current shell: source $script.
Basic networking For completion’s sake please also read parts of my NSCA summary on TCP/IP. This covers everything from frame layout to timing and windows. Go to http://www.kilala.nl/Sysadmin for the file. The nslookup command The nslookup command is deprecated. It should no longer be used. The host command Syntax: host [options] query [server] -a verbose for type ANY -d/-v debug / verbose -C show SOA for auth servers -l list, do a zone transfer -R number of retries -r non-recursive -T use TCP instead of UDP -t query type -w wait forever -W wait N seconds Valid query types are: CNAME, NS, SOA, SIG, KEY, AXFR, etc. For a hostname the default action is to look for an A record, for an IP address the default is to look for a PTR record. The dig command Syntax: dig [@server] [options] query [type] [query options] -b set source IP for query -f batch lookup from $file -p set port number -t query type -x reverse lookup Valid query types are: ANY, A, MX, CNAME, SIG, KEY, AXFR, etc. +[no]tcp force UDP or TCP +domain= set domain name search order +[no]search use or ignore /etc/resolv.conf search order +[no]recursive disable recursion +[no]nssearch show SOA record for authorative servers +[no]trace trace query path across DNS servers +[no]short default behaviour is to print a verbose answer +[no]identify default behaviour is to show which server answered +[no]comments default behaviour is to print comments +[no]stats default behaviour is to print query statistics … +[no]all disable / enable all answer sections I guess you’d get the most useful info if you do +noall +answer.
The whois command Syntax: whois [options] object -H hide legal disclaimer -p port -h connect to host -V verbose mode DHCP There are three common DHCP clients: pump, dhclient and dhcpcd. The dhclient daemon Makes use of /etc/dhclient.conf, /var/run/dhclient.pid, /sbin/dhclient-script and /var/state/dhcp/dhclient.leases. -d debug / run in foreground (when used from inittab) -q quiet mode, show only errors -r explicitly release the lease, informing the server -1 tries once, then fail Telling the daemon which interfaces can be done:
• from the command line by passing a name • from the command line by not passing any names • from /etc/dhclient.conf
Old leases are kept in the database as a fallback mechanism when the DHCP server dies. Non-expired leases are then tried one by one. New leases get appended at the bottom of the file. The dhcpcd daemon Starts through either the SysV init scripts, /etc/sysconfig/network-scripts/ifup (Red Hat), or /etc/network/interfaces (Debian). Renew your lease: dhcpcd –k Red Hat NIC configuration Use /etc/sysconfig/network-scripts/ifcfg-$NIC or the netconfig utility. DEVICE=ethN BOOTPROTO=[dhcp|static] IPADDR=$ip-addr NETMASK=$netmask NETWORK=$network-addr (optional) BROADCAST=$broadcast-addr (optional) GATEWAY=$router-ip ONBOOT=[yes|no]
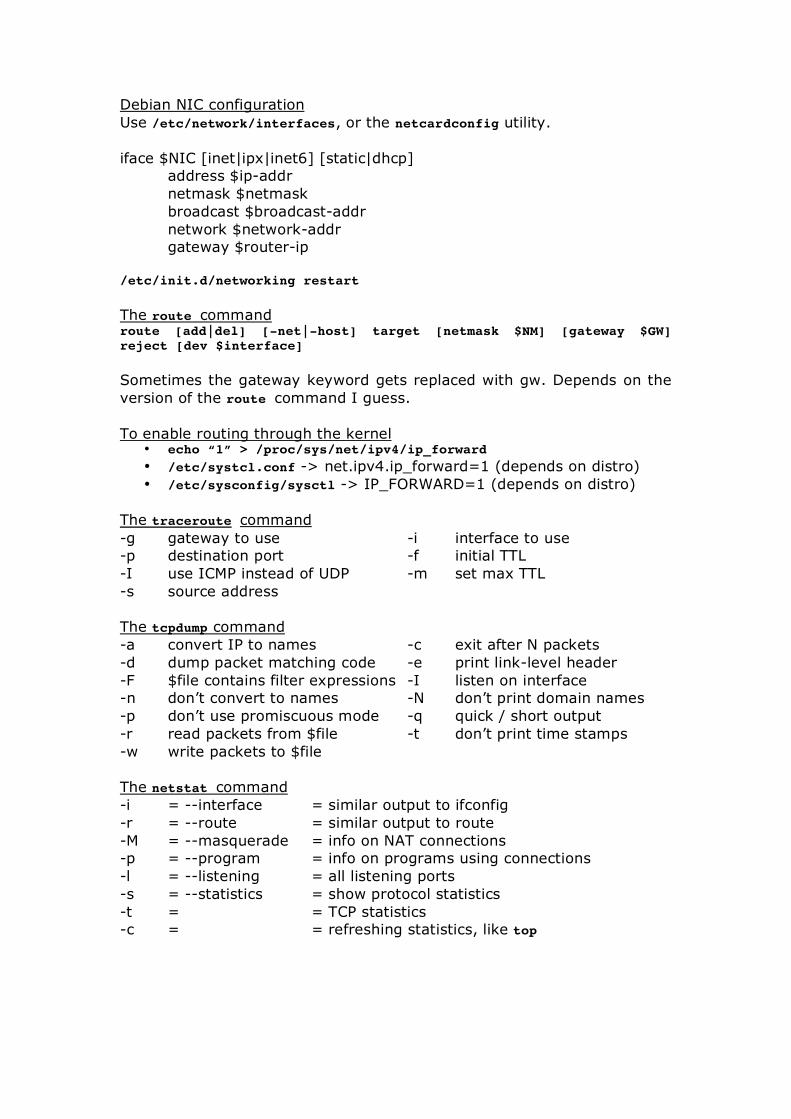
Debian NIC configuration Use /etc/network/interfaces, or the netcardconfig utility. iface $NIC [inet|ipx|inet6] [static|dhcp] address $ip-addr netmask $netmask broadcast $broadcast-addr network $network-addr gateway $router-ip /etc/init.d/networking restart The route command route [add|del] [-net|-host] target [netmask $NM] [gateway $GW] reject [dev $interface] Sometimes the gateway keyword gets replaced with gw. Depends on the version of the route command I guess. To enable routing through the kernel
• echo “1” > /proc/sys/net/ipv4/ip_forward • /etc/systcl.conf -> net.ipv4.ip_forward=1 (depends on distro) • /etc/sysconfig/sysctl -> IP_FORWARD=1 (depends on distro)
The traceroute command -g gateway to use -i interface to use -p destination port -f initial TTL -I use ICMP instead of UDP -m set max TTL -s source address The tcpdump command -a convert IP to names -c exit after N packets -d dump packet matching code -e print link-level header -F $file contains filter expressions -I listen on interface -n don’t convert to names -N don’t print domain names -p don’t use promiscuous mode -q quick / short output -r read packets from $file -t don’t print time stamps -w write packets to $file The netstat command -i = --interface = similar output to ifconfig -r = --route = similar output to route -M = --masquerade = info on NAT connections -p = --program = info on programs using connections -l = --listening = all listening ports -s = --statistics = show protocol statistics -t = = TCP statistics -c = = refreshing statistics, like top
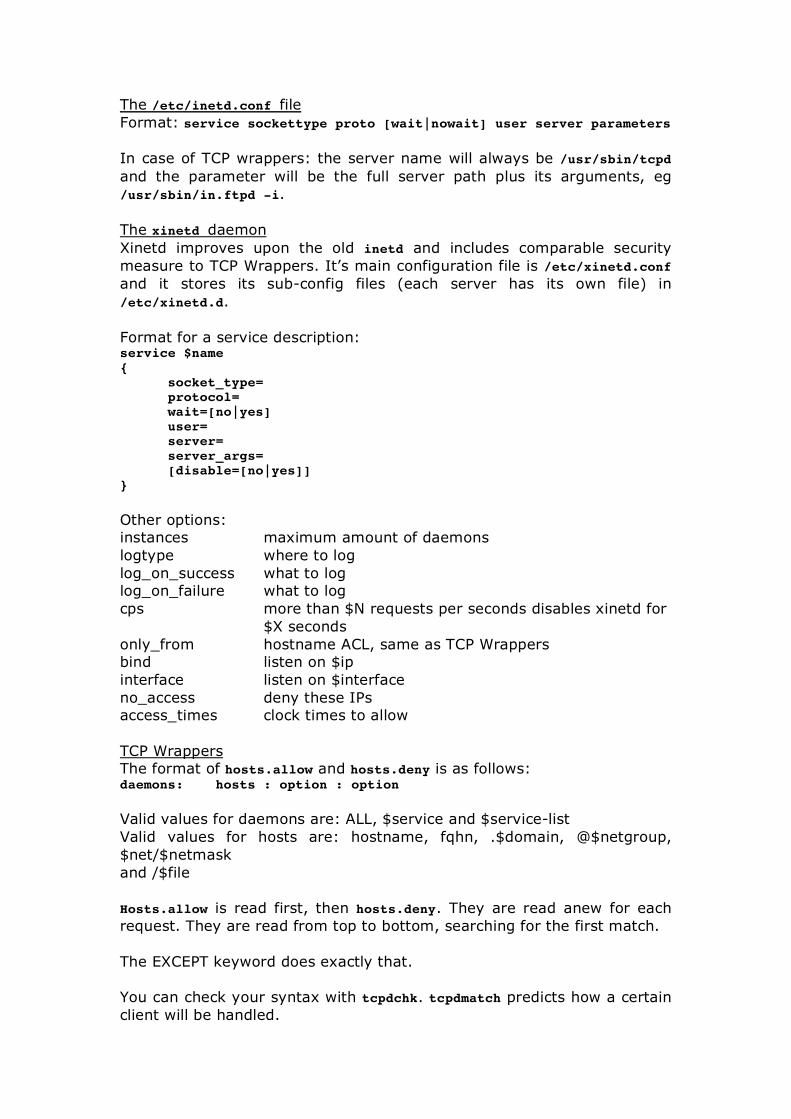
The /etc/inetd.conf file Format: service sockettype proto [wait|nowait] user server parameters In case of TCP wrappers: the server name will always be /usr/sbin/tcpd and the parameter will be the full server path plus its arguments, eg /usr/sbin/in.ftpd -i. The xinetd daemon Xinetd improves upon the old inetd and includes comparable security measure to TCP Wrappers. It’s main configuration file is /etc/xinetd.conf and it stores its sub-config files (each server has its own file) in /etc/xinetd.d. Format for a service description: service $name { socket_type= protocol= wait=[no|yes] user= server= server_args= [disable=[no|yes]] } Other options: instances maximum amount of daemons logtype where to log log_on_success what to log log_on_failure what to log cps more than $N requests per seconds disables xinetd for
$X seconds only_from hostname ACL, same as TCP Wrappers bind listen on $ip interface listen on $interface no_access deny these IPs access_times clock times to allow TCP Wrappers The format of hosts.allow and hosts.deny is as follows: daemons: hosts : option : option Valid values for daemons are: ALL, $service and $service-list Valid values for hosts are: hostname, fqhn, .$domain, @$netgroup, $net/$netmask and /$file Hosts.allow is read first, then hosts.deny. They are read anew for each request. They are read from top to bottom, searching for the first match. The EXCEPT keyword does exactly that. You can check your syntax with tcpdchk. tcpdmatch predicts how a certain client will be handled.
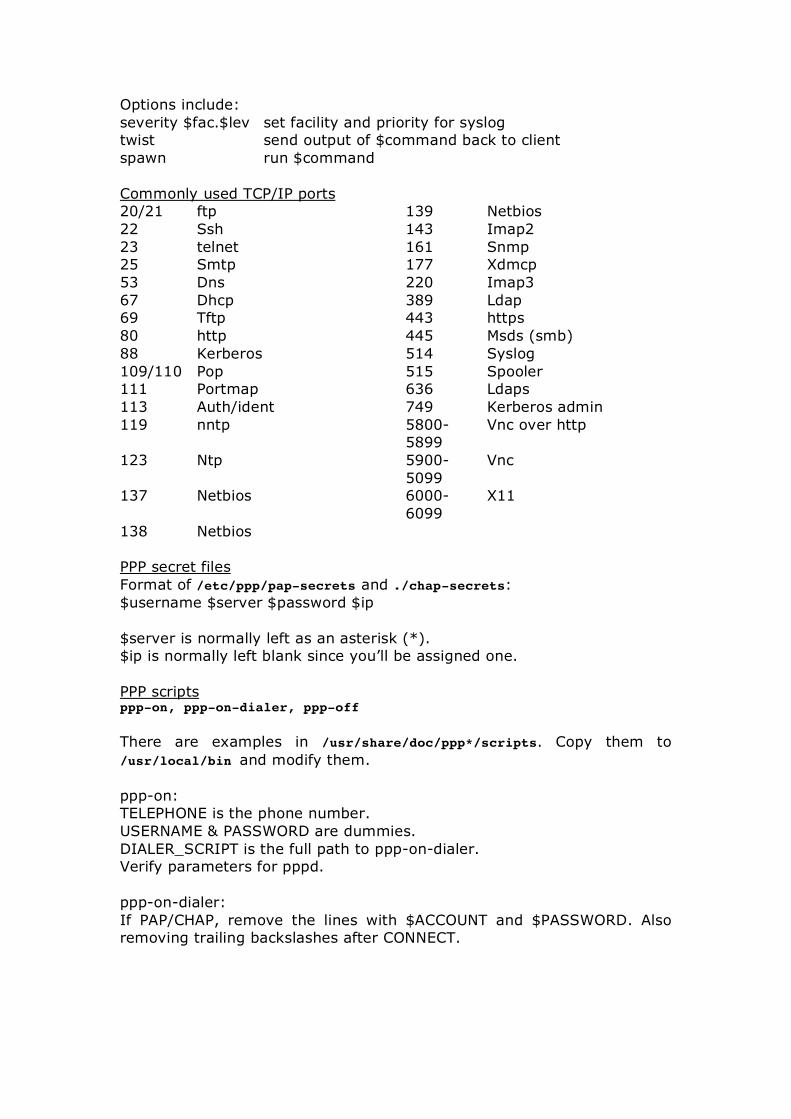
Options include: severity $fac.$lev set facility and priority for syslog twist send output of $command back to client spawn run $command Commonly used TCP/IP ports 20/21 ftp 139 Netbios 22 Ssh 143 Imap2 23 telnet 161 Snmp 25 Smtp 177 Xdmcp 53 Dns 220 Imap3 67 Dhcp 389 Ldap 69 Tftp 443 https 80 http 445 Msds (smb) 88 Kerberos 514 Syslog 109/110 Pop 515 Spooler 111 Portmap 636 Ldaps 113 Auth/ident 749 Kerberos admin 119 nntp 5800-
5899 Vnc over http
123 Ntp 5900-5099
Vnc
137 Netbios 6000-6099
X11
138 Netbios PPP secret files Format of /etc/ppp/pap-secrets and ./chap-secrets: $username $server $password $ip $server is normally left as an asterisk (*). $ip is normally left blank since you’ll be assigned one. PPP scripts ppp-on, ppp-on-dialer, ppp-off There are examples in /usr/share/doc/ppp*/scripts. Copy them to /usr/local/bin and modify them. ppp-on: TELEPHONE is the phone number. USERNAME & PASSWORD are dummies. DIALER_SCRIPT is the full path to ppp-on-dialer. Verify parameters for pppd. ppp-on-dialer: If PAP/CHAP, remove the lines with $ACCOUNT and $PASSWORD. Also removing trailing backslashes after CONNECT.

The wvdial command Uses /etc/wvdial.conf, which has sections heads like [$name]. You can call a certain configuration by running: wvdial $name. Per section you can configure the following: Modem Phone Baud Username Init Password Init2 Auto reconnect [on|off]

Printing Queues One system can have multiple print queues for each defined printer. This accommodates various paper sizes and duplexing units. This cannot be handled in a way similar to Windows, since most of those options are handled by drivers. The print queues are usually to be found in /var/spool/lpd and /var/spool/cups. Tasks of the printing system
• accepts jobs from lpr • accepts jobs from remote computers • monitors print queues • directs jobs from queues to printers
Even local jobs are submitted through the network stack. Hence, every LPD and CUPS system can both be client and a server. LPD cannot inform applications of a printer’s capabilities: the application just dumps Postscript and the printer is supposed to cope. CUPS can provide printer specific details and makes for a more elegant process. Comparing printing work flows Windows: Application -> driver -> queue -> printer Unix: Applications -> output -> lpr -> lpd -> queue -> filter -> printer The output of an application depends on how it’s been configured. Possibilities are Postscript, RAW, CPL and graphical. The filter translates the output into a form that the printer itself will understand. Ghostscript is one example, others include RHS-Printfilters, Apsfilter, MagicFilter and CUPS’ own filters. Ghostscript files can be very large. A 10kB Postscript can become a 40 MB bitmap. N dpi x size x colours = large!
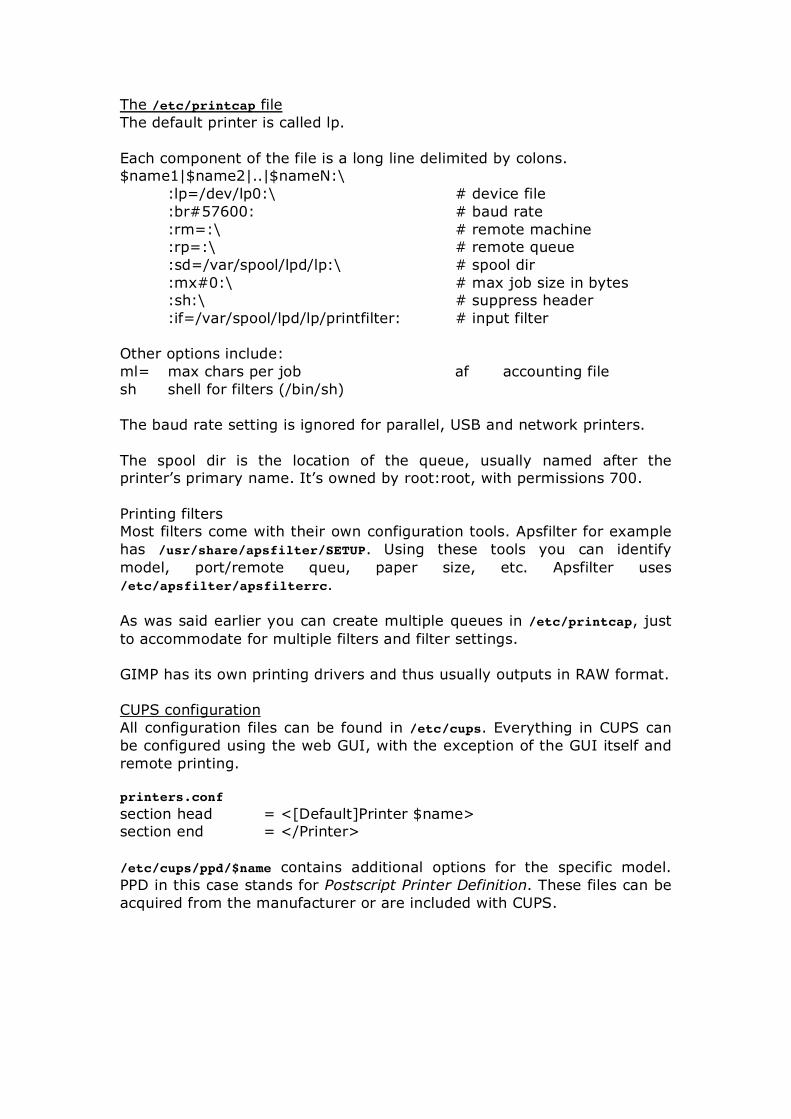
The /etc/printcap file The default printer is called lp. Each component of the file is a long line delimited by colons. $name1|$name2|..|$nameN:\ :lp=/dev/lp0:\ # device file :br#57600: # baud rate :rm=:\ # remote machine :rp=:\ # remote queue :sd=/var/spool/lpd/lp:\ # spool dir :mx#0:\ # max job size in bytes :sh:\ # suppress header :if=/var/spool/lpd/lp/printfilter: # input filter Other options include: ml= max chars per job af accounting file sh shell for filters (/bin/sh) The baud rate setting is ignored for parallel, USB and network printers. The spool dir is the location of the queue, usually named after the printer’s primary name. It’s owned by root:root, with permissions 700. Printing filters Most filters come with their own configuration tools. Apsfilter for example has /usr/share/apsfilter/SETUP. Using these tools you can identify model, port/remote queu, paper size, etc. Apsfilter uses /etc/apsfilter/apsfilterrc. As was said earlier you can create multiple queues in /etc/printcap, just to accommodate for multiple filters and filter settings. GIMP has its own printing drivers and thus usually outputs in RAW format. CUPS configuration All configuration files can be found in /etc/cups. Everything in CUPS can be configured using the web GUI, with the exception of the GUI itself and remote printing. printers.conf section head = <[Default]Printer $name> section end = </Printer> /etc/cups/ppd/$name contains additional options for the specific model. PPD in this case stands for Postscript Printer Definition. These files can be acquired from the manufacturer or are included with CUPS.
CUPS network browsing The advantage of CUPS: it uses Internet Printing Protocol, which supports browsing the network for printers. To enable browsing as a client, edit cupsd.conf and add “Browsing on”. The IPP part of CUPS also comes with ACL options in cupsd.conf. Order [ Deny, Allow | Allow, Deny] Deny from [All | $address] BrowseAllow from [All | $address] Allow from [All | $address] $address can also be a network address (IP/netmask notation). If you set @LOCAL as the $address, then you’re allowing all local subnets access. These ACL’s can be applied to /printers, to / and to /admin in cupsd.conf. CUPS global options Browsing [on|off] BrowseAddress $broadcastaddress Getting more CUPS definitions
• Your distribution’s website • The FooMatic website (linuxprinting.org) • GIMP Print • EPS Print Pro
Networking and security CUPS runs on port 631 by default. This port can also be used for the web interface, which unfortunately requires the root account and does NOT provide encryption. Printing to Windows’ shared printers requires the following URI smb://$user:$passwd@$host/$share. This requires local filters because they usually do not support Postscript (unless it’s a Linux box running an SMB server). The lpr command -P queue name -r delete original file -h suppress banner -J job name -m mail $user when complete -# print # copies -b disable filter -K# print # copies -V verbose mode Multi-page printing is also an option: mpage –Pqueue -# $file. Here, # is the amount of pages you want printed on one sheet of paper. The lp command is usually a symbolic link to the lpr command. Also, lpstat, lpinfo, lpmove and the likes are not real commands. These are often aliases and are NOT valid answers on the exam.
The lpq command -P queue name -a all queues -l verbose mode -L Über-verbose mode -t repeat every N secs -all verbose, split into lines Shows job number, job owner, job file, job size and extras. The lprm command -P queueu name $job job number $user all for $user -a all for $user -a all all jobs -U all for $UID -D debugging mode -V verbose mode The lpc command -P queue -a -P all -S server -U run as $user -V version info -D debug mode abort stop all start resume all disable disable new jobs down disable print queue enable enable new jobs stop same as disable topq move job to top up enable print queue status show status defaultq show default queue defaults show all defaults hold accept jobs, don’t run release release all held jobs kill kill LPD for queue client show local printcap redirect forward jobs to $prntr Additionally, stop and start also affect the lpd itself. CUPS’ version of lpc only supports the status command. Controlling CUPS queues uses command names that you usually pass to lpc on its own command line, eg: enable, start, stop, etc. The lpmove command Moves a job to a different queue. Various loose ends USB printers are usually /dev/usb/lpN.
Sendmail Three tasks regarding e-mail MTA transport between servers: sendmail, exim and postfix MDA delivery to user account: procmail and mail MUA enable user to get mail: various mail clients Configuration files sendmail.cf Primary configuration file. Relay options, hostname,
etc. Found in /etc/mail. the m4 file Used to generate the .cf file. Usually ends in .mc. aliases Holds username translations. Stored in /etc or in
/etc/mail. The newaliases command converts it into aliases.mc and aliases.db.
access Controls mail relaying. In /etc or in /etc/mail. local-host-names All names in this list are treated as if they were the local host. Mail for these boxen is delivered locally. Configuring Sendmail Run: m4 $file > sendmail.cf /etc/init.d/sendmail reload The sendmail.cf file Lines starting in “dnl” are comments. The value for most options is enclosed in a backquote and a quote, eg MASQUERADE_AS(`$name’). Please make absolutely sure that you don’t mix this up! Making sendmail only available for local programs: DAEMON_OPTIONS(`Port=SMTP,Addr=127.0.0.1,Name=MTA’) The use of local-host-names requires: FEATURE(`use_cw_file’). The use of the acces file requires: FEATURE(`access_db’). Using a relay server for sending your e-mail Remove: MAILER(local) and MAILER(smtp) Add: FEATURE(`nullclient’, `$server’) Or add: FEATURE(`SMART_HOST’, `$server’) Forwarding e-mail Either use the aliases file or ~/.forward (which contains one name or e-mail address).

Format of the aliases file: $name: $target1,$target2,….,$targetN Valid targets are: $user, /$file, |$command, :include:$FILE, and $address. The included file contains a list of e-mail addresses. The mailq command Lists the contents of the mail queue. Pipe it to wc –l to see how many messages are waiting to be sent. If things are stuck, run sendmail –q to get things going again. The access file localhost.localdomain RELAY localhost RELAY 127.0.0.1 RELAY 172.25.98 RELAY # local network Mail queues /var/spool/mqueue undelivered, remote mail /var/spool/mail undelivered, local mail Various loose ends Sendmail has other, dangerous relaying options like relay_entire_domain and promiscuous_relay. Needless to say, these shouldn’t be turned on. Regularly check for unsafe settings in sendmail.cf and in the access file. The mailstats command will return loads of interesting information.

Apache Configuration files The location for the config files varies wildly: /etc/apache, /etc/apache2, /etc/httpd, or /etc/httpd2. The name of the config file itself also varies: httpd.conf, httpd2.conf, apache.conf, or apache2.conf. Search for the default location by running: rpm –ql apache | grep conf Daemon control /etc/init.d/apache, /etc/init.d/httpd, or apachectl. The apachectl command knows the following options: start, stop, graceful (restart), configtest and fullstatus. Fullstatus requires the lynx browser and the mod_status module. Format of the main configuration file directive value directive value value <block> directive value </block> Interesting directives LoadModule enable optional features Include load additional file at this point User run as $user Group run as $group DocumentRoot location used to search for files for $server-instance UserDir folder in homedir for person DocRoot (requires
userdir_module) BindAddress either *, or a list of IP addresses to listen on Listen port to listen on ServerAdmin admin e-mail address ServerRoot configuration directory Servertype [standalone | inetd] StartServers number of children started at boot MaxClients number of clients before returning “Server busy” Redirect redirect old URL to new URL DirectoryIndex set valid names for index.* files. [Min|Max]SpareServers number of additional children to keep in RAM for
surges in traffic If you don’t use it, kill cgi_module.

Old configuration files access.conf access control lists srm.conf parameters and directives Various loose ends Starting from version 2, Apache cannot be run from the inetd daemons. Apache runs on daemon as root, while its children (running as a different user) handle all the incoming requests.

NFS server The use of NFS requires that all users involved have the same numeric UID across all systems involved. The /etc/exports file $dir $host($options) $host($options) … Valid values for $host are: hostname, fqhn, *.$domain, ip address, $net/$netmask, or @$netgroup (NIS and NIS+). DO NOT put spaces between hosts and options! This royally fucks you over! Why? Because an option without hosts is understood to apply to ALL hosts. Interesting options (comma separated) secure only allow requests from ports <1024 ro/rw read only / read write sync/async write to disk before responding (or not) root_squash use $anonuid/$anongid for remote root users (default) no_root_squash antonym of the above all_squash similar, but for all remote users anonuid the UID for the above options anongid the GID for the above options Rereading the configuration Run: exportfs –ra, or /etc/init.d/nfs reload. NFS daemons portmap general RPC daemon rpc.nfsd nfs daemon rpc.mountd incoming mount requests rpc.rquotad quota support for NFS rpc.lockd locking of in-use files rpc.statd manage handing locks after a crash Mounting of NFS exports Either manually with mount, or through /etc/fstab. NFS options in the /etc/fstab file rsize/wsize read and write block sizes. default is 4096 hard hang and wait if mount is unavailable soft error and exit if mount is unavailable udp / tcp for which protocol to use. tcp is slower but reliable
Samba server Samba uses NetBIOS names, instead of TCP/IP hostnames. It’s better if you keep them in sync. Samba daemons smbd file and printer sharing nmbd NetBIOS resolution swat web gui (runs from inetd) Samba configuration Either /etc/smb.conf or /etc/samba.db/smb.conf. Each section starts with [$name]. The defaults section starts with [global]. Comment lines start with a # or with a ;. Interesting options: workgroup NetBIOS workgroup name / domain netbios name NetBIOS hostname security [Share|User|Server|Domain] encrypt passwords [Yes|No] local master [Yes|No], usually no domain master [Yes|No], usually no wins server IP of NetBIOS name server name resolve order [Wins, lmhosts, bcast, host] The [homes] block is special as it is used to automatically share all home directories. Interesting sharing options: available [Yes|No] comment description read only [Yes|No] writable [Yes|No] path directory to share (same as directory option) printable [Yes|No] printer name for local queue (same as printer name) server comment string hosts allow ACL guest account just that password server Windows domain controller interfaces listen on these NICs
NetBIOS name resolution Wins WINS server lmhosts /etc/smb/lmhosts bcast NetBIOS broadcast host nsswitch.conf nsswitch.conf allows you to set: hosts files dns wins Security Samba’s password encryption is incompatible with Linux. Hence Samba requires its own password file or database. PAM can be used to use the Samba database instead of the normal Linux passwd file, but… Who would want that? :( Linux’s local file permissions supercede Samba’s ACLs. Explicitly defined shares take precedence over generic ones. Various loose ends Samba shared printers are Postscript printers, unless you specify a RAW queue. SWAT runs on port 901. Samba itself on ports 137, 138 and 139. Using SWAT completely overwrites all your customizations made to the text configuration files. The testparms command tests your configuration for you. You can monitor connections using smbstatus. You can list remote shares with smbclient –L $host. Fstab entries are as follows: //$host/$share $mount smb user=user 1 1

DNS server For completion’s sake please also read parts of my NSCA summary on DNS. This covers everything basic configuration to record types. Go to http://www.kilala.nl/Sysadmin for the file. The /etc/named.conf file Used to be called named.boot in previous versions of Bind. A forwarding server only requires the following options { directory “/var/named”; forwarder { $IP1; $IP2; }; }; In Bind 4 this was: forwarders $IP1 $ip2 options forward-only Other configuration options Instead of forward only you can use “forward first”. If forwarding fails Bind will do a normal lookup. Want DHCP to announce the local DNS address? Edit /etc/dhcpd.conf and add: option domain-name-servers $IP;
SSH server Configuration files Files are stored in /etc/ssh. ssh_config client configuration sshd_config server configuration Interesting options: protocol preferably set to 2 Permit Root Login preferably set to no X11 Forwarding yes is nice Keys An SSH server has six keys: 2 RSA1, 2 RSA and 2 DSA. You generate these keys using: ssh-keygen –q –t $type –f $file –C ‘’ –N ‘’ SSH agent
• ssh-agent $SHELL • ssh-add, followed by your passphrase
Documentation Searching through man-pages whatis man –f searches one line summaries apropos man –k searches name and detail descriptions man –a successively view all pages for $query Setting up a man search path One time man –path $path Always /etc/man.conf, MANPATH=$path One line per man-directory
MANSECT 1:1p:8:2:3….. sets the search order Man sections 1 executables and commands 6 games 2 system calls 7 miscellaneous 3 library calls 8 system administration commands 4 special files 9 kernel routines 5 file formats and conventions The info browser Run: info $command arrows navigation enter select link *$word* a link n/p next/prev topic u/l/t up/last/top q quit Other documentation /usr/share/doc is a veritable grab-bag of random stuff thrown together. Online resources
• Linux documentation project = http://tlpd.org • The website for that piece of software • Your distro’s website • Google ;)
Communicating with your users /etc/issue /etc/issue.net /etc/motd shutdown wall talk (two-way) write (one-way)
Security Linux firewalls 2.0.x ipfwadm 2.2.x ipchains 2.4.x iptables 2.6.x iptables Firewall configuration
• manual, through scripted commands • gui, like Firestarter or Guarddog • through a helpful website, http://linux-firewall-tools.com/linux
The iptables tables
• nat • mangle • filter
The filter chains
• INPUT, to local processes • FORWARD, for routed traffic • OUTPUT, from local processes
Chain policies Chain policies can be set to three targets:
• ACCEPT, allow traffic (default default value) • DROP, ignore, results in “link down” • REJECT, refuse, results in “host up, but port not available”
The iptables command -L list current config -t table -F flush $chain -P set policy for $chain to $target -A $chain $criteria –j $target = add rule Possible criteria -p = --protocol -s = --source -sport = --source-port -d = --destination -dport = --destination-port -I = --in-interface -O = --out-interface -m = --state Possible states NEW, RELATED, ESTABLISHED and INVALID.
Dumping your configuration • iptables-save dumps your ruleset to /etc/sysconfig/iptables. • this file is used at the next reboot to reload (Red Hat and Debian). • iptables-restore < $file restores your configuration
Firewall stuff in /proc/net ip_fwchains ip_fwnames ip_tables_matches ip_tables_names ip_tables_targets ip_masquerade Finding open ports
• Check your SysV scripts and super server • Use netstat –lp • Use a scanner like nmap or nessus
Finding risky files permission file directory 1000 non-swappable non-owners can’t delete 2000 run as $group force $group own on all files 4000 run as $user - It’s a good idea to run the following command immediately after installing: find / -perm +7000 –exec ls –l {} > /root/specialbits.txt. Then at regular intervals run the command again and search for new files. The + in the above find command indicates that it should find all files that have any of the bits set, hence 1000, 2000, 4000, 6000 and 7000. Tripwire /etc/tripwire/twcfg.txt and ./twpol.txt are plain text files that are parsed into binary files by tripwire --init. The resulting files are tw.cfg and tw.pol. Loading a new configuration asks for a password, which also protects the database making it tamper proof. Run tripwire --update after an official change to the system. Run tripwire --check to keep track of changes made to the system. Verifying RPM packages rpm –V $package verifies checksums and other stuff for you. --verify is the same -Va checks all packages Eight characters per file tell you what’s changed 1 size 5 link path 2 mode 6 user ownership 3 MD5 sum 7 group ownership 4 major / minor number 8 time
rpm –K $package verifies the GPG key of a package file. Getting the proper key can be done as follows: gpg --recv-keys --keyserver $server $key-id. Unlike Tripwire’s the RPM database is NOT protected. Sources for security information CERT general security and latest threats US-CERT same as CERT, but local to USA CIAC US DoE = less general info, more on threats CVE dictionary of exploit names, little to no details SecurityFocus general info, host to the BugTraq ML Linux Security similar to CERT, but focuses on Linux $distribution patches and alerts for your distribution $product patches and alerts for your applications It’s a good idea to subscribe to RSS feeds for the relevant websites. That makes gathering the new information very easy. Updating your system
• apt-get upgrade and apt-get dist-upgrade, -s is a trial run • Red Hat and Fedora use Update Agent • Suse has YAST
Enable shadow passwords
• pwck, followed by pwconv • grpck, followed by grpconv
PAM limits Format of /etc/security/limits.conf: $domain $type $item $value $domain $user, @$group, or * $type hard, soft, or – $item core, data, fsize, nofile (number of open files), rss, stack cpu, nproc, maxlogins, or priority $value the value, depends on the metric Various loose ends The chrootkit tool (http://chrootkit.org) helps you find root kits. /etc/securetty and /etc/usertty define TTYs that root can login to and set TTY parameters for normal users: days, times and source systems.
System administration The useradd command -c comment -m make home directory -d home directory -k skeleton directory -e expire -M don’t make homedir -f inactive -p encrypted password -g primary group -s shell -G secondary group -u UID -r system account -n no group for itself -D show defaults from /etc/default/useradd -D $option $value set default value The /etc/login.defs file CONSOLE a colon delimited list of ports that root can login on ENVIRON_FILE a file containing lines of env. variables to set at login ENV_PATH the default $PATH for all users except root ENV_SUPATH the default $PATH for root FAILLOG_ENAB if enabled, logs login failures in /var/log/faillog FAIL_DELAY delay in seconds after a failed login LOGIN_RETRIES the number of login attempts allowed before it exits NOLOGINS_FILE the path to the file that blocks remote logins ULIMIT system wide file size limit UMASK system wide umask setting MD5_CRYPT_ENAB enables MD5 passwd encryption MAIL_CHECK_ENAB if enabled a user’s mailbox is checked at login CRACKLIB_DICTPATH dictionary path for crack The passwd command -l lock -d remove password -k update expired account -S display password info -u unlock -f force unlock wo. password The usermod command Supports most usersadd options. $user –l $newname changes $user’s login name -L/-U lock or unlock -m move files to new homedir The chage command -l show acct expiry info -d set last day passwd changed -I set inactive days -E set expiration date -W set warning days -m/-M set min/max days between passwd change
The /etc/shadow file $user:$passwd:$last-pwd-chg:$min-days:$max-days:$warn-days: $days-from-exp-to-deact:$exp-date:<empty> The userdel command -r remove homedir The groupadd command -g GID -r private group -o allow duplicate GID -f allow duplicatie name The gpasswd command -a add $user -d remove $user -R lock group, no new users -r remove passwd from group -A admin users $user-list -M -a and –A The /etc/syslog.conf file Format: $facility.$priority $action Possible facilities are: auth, authpriv, cron, daemon, kern, lpr, mail, mark, news, security (deprec), syslog, user, uucp and local[0-7]. Possible priorities are: debug, info, warning, warn (deprec), error (deprec), err, crit, alert, emberg, and panic (deprec). Possible actions are: /$file, /$device, $user, * (all users) or @$host. =$prio only this priority !$prio all below $prio Multiple selectors on one line are separated by a semi-colon. The logger command inserts messages into syslog: logger –p $fac.$pri $message The /etc/logrotate.conf file You have a list of options in the default section, or options per (list of) files in curly braces. Options: [daily|weekly|monthly] the frequency for rotating rotate N keep N old copies size N rotate when size reaches N create create empty log file after rotation compress zip old files compresscmd [gzip|bzip2|compress] dateext use date instead of .0, .1, .2 and so on nomail, or mail $address mail old log file prerotate script before rotation postrotate script after rotation /etc/logrotate.d can contain per-file or per-application configuration files.
Login log-files /var/log/wtmp login times and duration of users /var/log/utmp current information on logins /var/log/lastlog login dates, times and duractions wtmp -> last, w, updwtmp utmp -> finger, who, login, last lastlog -> lastlog System time The system’s software clock is always in UTC, the OS just presents the time differently to applications and users. This way all Linux boxen in the world agree on the same time. Kind of like Zulu time in the military. /usr/share/timezone/ contains subdirs for the various regions of this world. Each region contains files for time zones, which are binary files and should not be edited. Link the proper file to /etc/localtime. Tools to help: tzsetup and tzselect. Setting the date: date MMDDhhmmCCYY.ss. Use –u, --utc, or –universal to set UTC time instead of local time. The hwclock command -r = --show = show current local time
--set --newdate = set time and date --systohc = copy software clock to hardware --hctosys = copy hardware clock to software NTP commands ntpq is an interactive NTP status tool. The peers command show current statistics. Correcting the time can be done with ntpdate $server (deprecated), or by ntpd –g. Editing ntp.conf and setting “restrict default ignore” will block clients from using your box as NTP server. Other commands: ntpdc online reconfiguration of ntpd ntptrace trace a channel of servers to their original source tickadj change time-related kernel variables through /dev/kmem ntptime read kernel time variables ntp-genkeys generate public and private keys ntp.drift describes the local clock’s error rate

Crontab time selection * all n-p all from n through p n,o at n and o */n every N instances @reboot @monthly @midnight @daily @annually @yearly @weekly When not using cron tabs per user the format changes to $times $user $command. This occurs in the daily/weekly/monthly files. These tables are stored in either /etc/cron.$interval/ or /etc/cron.d/$interval/. These scripts are called by run-parts or cronloop in the normal crontab. The anacron command Anacron is a nice alternative that decides whether it should run a job based on the time since that job was last run. It uses /etc/anacrontab. The format: $period $delay-from-start $identifier $command The at command at [-f $file] $time $time can be: hh:mm [am|pm], noon/midnight/teatime, MMDDYY / MM/DD/YY / DD.MM.YY, now + n [minutes|hours|days|weeks|etc] atq shows the queue of jobs. atrm removes a job. atrun depends on load, running a job when the system drops below a certain load. The tar command c create d compare arcive to files A append t list contents r append non-tar files x extract u appends newer files Additional options: C cd to $dir before start P absolute paths f [host:]/$file v verbose g increment against $file W verify after write l only one file system X exclude all in list $file M multi-tape archive z gzip L tape length in kB j bzip2 p preserve permissions --exclude $files
The cpio command -o = --create = create an archive -i = --extract = extract an archive -p = --pass-through = copy directory tree to new location Options: -a reset access time -A append to archive -E $file lists files to extract -F $file is the archive -H format [bin|crc|tar] -I $file is stdin -O $file is stdout -t list contents -u replace without asking -v verbose The dump command dump -f $file $filesystem The restore command is its counter part. None of this is very reliable in kernels ≥ 2.4.x. The dd command if $file or $device is input of $file or $device is output dd backs up a partition, not a file system, thus it includes all the empty space which really is a waste. It is also impossible to restore single files unless the location you’re backing up to can be mounted. Various loose ends Use newgrp command to change your current primary group. The ~/.hushlogin file ensures that your mailbox doesn’t get checked and that the system doesn’t show your last login information.