ca workload automation ae administration guide workload...ca workload automation agent for...
TRANSCRIPT

Administration Guide Release 11.3.6
CA Workload Automation AE

This Documentation, which includes embedded help systems and electronically distributed materials, (hereinafter referred to as the “Documentation”) is for your informational purposes only and is subject to change or withdrawal by CA at any time. This Documentation is proprietary information of CA and may not be copied, transferred, reproduced, disclosed, modified or duplicated, in whole or in part, without the prior written consent of CA.
If you are a licensed user of the software product(s) addressed in the Documentation, you may print or otherwise make available a reasonable number of copies of the Documentation for internal use by you and your employees in connection with that software, provided that all CA copyright notices and legends are affixed to each reproduced copy.
The right to print or otherwise make available copies of the Documentation is limited to the period during which the applicable license for such software remains in full force and effect. Should the license terminate for any reason, it is your responsibility to certify in writing to CA that all copies and partial copies of the Documentation have been returned to CA or destroyed.
TO THE EXTENT PERMITTED BY APPLICABLE LAW, CA PROVIDES THIS DOCUMENTATION “AS IS” WITHOUT WARRANTY OF ANY KIND, INCLUDING WITHOUT LIMITATION, ANY IMPLIED WARRANTIES OF MERCHANTABILITY, FITNESS FOR A PARTICULAR PURPOSE, OR NONINFRINGEMENT. IN NO EVENT WILL CA BE LIABLE TO YOU OR ANY THIRD PARTY FOR ANY LOSS OR DAMAGE, DIRECT OR INDIRECT, FROM THE USE OF THIS DOCUMENTATION, INCLUDING WITHOUT LIMITATION, LOST PROFITS, LOST INVESTMENT, BUSINESS INTERRUPTION, GOODWILL, OR LOST DATA, EVEN IF CA IS EXPRESSLY ADVISED IN ADVANCE OF THE POSSIBILITY OF SUCH LOSS OR DAMAGE.
The use of any software product referenced in the Documentation is governed by the applicable license agreement and such license agreement is not modified in any way by the terms of this notice.
The manufacturer of this Documentation is CA.
Provided with “Restricted Rights.” Use, duplication or disclosure by the United States Government is subject to the restrictions set forth in FAR Sections 12.212, 52.227-14, and 52.227-19(c)(1) - (2) and DFARS Section 252.227-7014(b)(3), as applicable, or their successors.
Copyright © 2013 CA. All rights reserved. All trademarks, trade names, service marks, and logos referenced herein belong to their respective companies.

CA Technologies Product References
This document references the following CA Technologies products:
■ CA Automation Suite for Data Centers (formerly named CA Spectrum® Automation Manager)
■ CA ControlMinder™ (formerly named CA eTrust® Access Control)
■ CA Embedded Entitlements Manager (CA EEM)
■ CA IT Client Manager
■ CA Job Management Option
■ CA Jobtrac™ Job Management (CA Jobtrac)
■ CA Network and Systems Management (CA NSM)
■ CA Process Automation
■ CA Scheduler® Job Management (CA Scheduler)
■ CA Service Desk
■ CA Systems Performance for Infrastructure Managers (formerly named CA SystemEDGE)
■ CA Universal Job Management Agent (CA UJMA)
■ CA Workload Automation AE (formerly named Unicenter® AutoSys® Job Management (Unicenter AutoSys JM))
■ CA Workload Automation AE Connect Option
■ CA Workload Automation Agent for Application Services (CA WA Agent for Application Services)
■ CA Workload Automation Agent for Databases (CA WA Agent for Databases)
■ CA Workload Automation Agent for i5/OS (CA WA Agent for i5/OS)
■ CA Workload Automation Agent for Linux (CA WA Agent for Linux)
■ CA Workload Automation Agent for Micro Focus (CA WA Agent for Micro Focus)
■ CA Workload Automation Agent for Oracle E-Business Suite (CA WA Agent for Oracle E-Business Suite)
■ CA Workload Automation Agent for PeopleSoft (CA WA Agent for PeopleSoft)
■ CA Workload Automation Agent for Remote Execution (CA WA Agent for Remote Execution)
■ CA Workload Automation Agent for SAP (CA WA Agent for SAP)
■ CA Workload Automation Agent for UNIX (CA WA Agent for UNIX)
■ CA Workload Automation Agent for Web Services (CA WA Agent for Web Services)

■ CA Workload Automation Agent for Windows (CA WA Agent for Windows)
■ CA Workload Automation Agent for z/OS (CA WA Agent for z/OS)
■ CA Workload Automation CA 7® Edition (formerly named CA Workload Automation SE)
■ CA Workload Automation ESP Edition (formerly named CA Workload Automation EE)
■ CA Workload Control Center (CA WCC)
Contact CA Technologies
Contact CA Support
For your convenience, CA Technologies provides one site where you can access the information that you need for your Home Office, Small Business, and Enterprise CA Technologies products. At http://ca.com/support, you can access the following resources:
■ Online and telephone contact information for technical assistance and customer services
■ Information about user communities and forums
■ Product and documentation downloads
■ CA Support policies and guidelines
■ Other helpful resources appropriate for your product
Providing Feedback About Product Documentation
If you have comments or questions about CA Technologies product documentation, you can send a message to [email protected].
To provide feedback about CA Technologies product documentation, complete our short customer survey which is available on the CA Support website at http://ca.com/docs.

Contents 5
Contents
Chapter 1: Introduction 11
Intended Audience ..................................................................................................................................................... 11
CA Workload Automation AE ..................................................................................................................................... 12
Instance ...................................................................................................................................................................... 12
CA Workload Automation AE Components ................................................................................................................ 13
Event Server ........................................................................................................................................................ 14
Application Server ............................................................................................................................................... 15
Scheduler ............................................................................................................................................................ 15
Agent ................................................................................................................................................................... 16
Legacy Agent Replaced by CA Workload Automation Agent .............................................................................. 16
Client ................................................................................................................................................................... 17
Web Server .......................................................................................................................................................... 17
Interface Components ........................................................................................................................................ 17
How the Event Server, Scheduler, and Agent Interact ........................................................................................ 18
How the Event Server, Application Server, and Client Utilities Interact ............................................................. 20
How the Event Server, Web Server, and Web Service Consumer Interact ......................................................... 21
How the Local Scheduler Interacts with Other Schedulers when Multiple Instances of CA Workload Automation AE Run ............................................................................................................................................. 21
Communications ........................................................................................................................................................ 24
Data Encryption .......................................................................................................................................................... 24
Chapter 2: Configuring CA Workload Automation AE 27
Overview .................................................................................................................................................................... 27
The Configuration File ................................................................................................................................................ 28
Sample Configuration File ................................................................................................................................... 29
Parameters in the Configuration File .................................................................................................................. 30
The auto.profile File on UNIX ..................................................................................................................................... 33
Sample auto.profile File ...................................................................................................................................... 33
The agentparm.txt File ............................................................................................................................................... 34
The WAAE.txt File ....................................................................................................................................................... 35
Environment Variables ............................................................................................................................................... 35
Defining Environment Variables to Customize Logging ...................................................................................... 36
Defining Environment Variables to Customize Network Communication .......................................................... 37
Defining Environment Variables to Customize the Scheduler ............................................................................ 40
Defining Environment Variables to Customize the Application Server ............................................................... 45
Defining Environment Variables to Customize the Client Utilities or SDK Behavior ........................................... 47
The CA Workload Automation AE Administrator ....................................................................................................... 48

6 Administration Guide
Alarm Notifications .................................................................................................................................................... 49
Set Alarm Notifications on UNIX ......................................................................................................................... 50
Configure CA Workload Automation AE to Send Email Notifications on UNIX .......................................................... 52
Send Email Notifications Using CA Workload Automation AE ............................................................................ 55
Configure CA Workload Automation AE to Send SNMP Traps on UNIX ..................................................................... 56
SNMP Traps ......................................................................................................................................................... 58
Disable IP Address Caching on UNIX .......................................................................................................................... 63
Chapter 3: Modifying the Scheduler Settings on UNIX 65
Set the Minimum Scheduler Log Disk Space .............................................................................................................. 66
FileSystemThreshold Parameter ......................................................................................................................... 67
Define the Load Balancing Method ............................................................................................................................ 67
Verify that the Remote Kernel Statistics Daemon is Running ............................................................................. 69
Configure the Scheduler Heartbeat Interval .............................................................................................................. 70
Set the Values to Calculate the Wait Time Between Restart Attempts ..................................................................... 71
Specify the Signals for a KILLJOB Event ...................................................................................................................... 72
Set the Maximum Number of Job Restart Attempts .................................................................................................. 74
Configure the MaxRestartTrys Parameter to be Machine-Specific..................................................................... 75
Set the Event Transfer Time-Out for Dual Event Server Mode .................................................................................. 76
Set the Interval Between Job Heartbeat Checks ........................................................................................................ 77
Check_Heartbeat Parameter .............................................................................................................................. 78
Specify a Local Machine to Run Jobs .......................................................................................................................... 78
Configure the Resource Wait Poll Interval ................................................................................................................. 80
ResourceWaitPollInterval Parameter.................................................................................................................. 81
Control the Starting of Jobs in PEND_MACH Status ................................................................................................... 81
GlobalPendMachInterval Parameter .................................................................................................................. 83
Control the Status of Jobs Scheduled on an Offline Machine .................................................................................... 87
GlobalPendMachStatus Parameter ..................................................................................................................... 88
GlobalPendMachDelay Parameter ...................................................................................................................... 89
Define the Communication Ports for the Scheduler .................................................................................................. 91
AutoRemPort Parameter .................................................................................................................................... 92
SchedAuxiliaryListeningPort Parameter .............................................................................................................. 93
Verify Whether Jobs and Agents are Running at Scheduler Startup .......................................................................... 94
Start the Scheduler in Global Auto Hold Mode .......................................................................................................... 95
Configure CA Workload Automation AE to Skip Starting Condition Evaluation for Queued Jobs ............................. 97
Redirect Job Profile Information to a File................................................................................................................... 98
RemoteProFiles Parameter ............................................................................................................................... 100
Append Information to Standard Error and Standard Output Files ......................................................................... 102
AutoInstWideAppend Parameter ...................................................................................................................... 103
Append Event Message Text to Event Messages ..................................................................................................... 104
Aggregate Statistics Automatically ........................................................................................................................... 105

Contents 7
Set Job Attribute Environment Variables ................................................................................................................. 107
Specify the Scheduler Role ....................................................................................................................................... 109
Specify the Primary Scheduler Failback Mode ......................................................................................................... 110
Activate the Cross-Platform Interface ...................................................................................................................... 111
Chapter 4: Modifying the Application Server Settings on UNIX 113
Define the Application Server Host Name ............................................................................................................... 113
Define a Unique Identifier to Communicate with the Agent ................................................................................... 114
Define a Unique Communication Alias ..................................................................................................................... 115
Define Communication Ports for the Application Server ......................................................................................... 116
Set the Maximum Number of Lines to Retrieve from a Log File .............................................................................. 119
Chapter 5: Maintaining the Scheduler 121
How the Scheduler Starts Processes ........................................................................................................................ 121
How to Back Up Definitions ..................................................................................................................................... 122
Back Up Calendar Definitions ............................................................................................................................ 123
Back Up Machine, Resource, User-defined Job Type, Job, and Monitor Report Definitions ............................ 124
Back Up Global Variable Values ........................................................................................................................ 125
Restore Definitions ................................................................................................................................................... 126
View the Scheduler Log File ..................................................................................................................................... 127
Scheduler Log File Location ............................................................................................................................... 127
Specify the Scheduler or Application Server Log Rollover on UNIX ......................................................................... 128
How Shadow Scheduler Backup Works .................................................................................................................... 130
Restore the Primary Scheduler After a Failover on UNIX ......................................................................................... 131
Run the Scheduler in Test Mode on UNIX ................................................................................................................ 132
Run the Scheduler in Test Mode on Windows ......................................................................................................... 134
Chapter 6: Maintaining the Event Server 137
Single Event Server Mode ........................................................................................................................................ 138
Dual Event Server Mode........................................................................................................................................... 139
Define the Event Server Information on UNIX ......................................................................................................... 141
Provider Parameter ........................................................................................................................................... 142
DBAccess Parameter ......................................................................................................................................... 143
EventServer_1 and EventServer_2 Parameters ................................................................................................ 143
Configure CA Workload Automation AE to Run in Dual Event Server Mode on UNIX ............................................. 145
autobcpDB Script—Synchronize Databases ...................................................................................................... 147
Synchronize the Event Servers on Oracle ......................................................................................................... 150
Event Server Synchronization ........................................................................................................................... 152
Handle Event Server Synchronization Errors .................................................................................................... 153
Configure CA Workload Automation AE to Run in Single Event Server Mode on UNIX ........................................... 154

8 Administration Guide
Event Server Rollover Recovery ............................................................................................................................... 155
Database Storage Requirements .............................................................................................................................. 156
General Database Maintenance ............................................................................................................................... 156
Automate Database Maintenance on UNIX ...................................................................................................... 157
How the DBMaint.bat Batch File or DBMaint Script Runs ................................................................................ 158
Modify the DBMaint Script on UNIX ................................................................................................................. 159
Modify the DBMaint.bat File on Windows ........................................................................................................ 160
Configure the Event Server Time-Out Period on UNIX ............................................................................................. 161
High Availability Recovery ........................................................................................................................................ 162
Set the Number of Scheduler or Application Server Connection Attempts on UNIX........................................ 162
Configure the Scheduler Heartbeat Interval on UNIX ....................................................................................... 165
Recovery Scenarios .................................................................................................................................................. 166
Non-High Availability in Single Event Server Mode .......................................................................................... 167
Non-High Availability in Dual Event Server Mode ............................................................................................. 167
High Availability in Single Event Server Mode .................................................................................................. 168
High Availability in Dual Event Server Mode ..................................................................................................... 168
Rebuild Table Indexes for a CA Workload Automation AE Database ....................................................................... 171
reindexDB Script—Rebuild Table Indexes ......................................................................................................... 171
How to Tune the Sybase Server ............................................................................................................................... 172
Configure the Sybase Server ............................................................................................................................. 173
Tune the Sybase Server ..................................................................................................................................... 173
How to Tune the Oracle Database ........................................................................................................................... 175
Configure the Oracle Database ......................................................................................................................... 175
Tune the Oracle Database ................................................................................................................................. 176
Chapter 7: Maintaining the Agent 179
Agent Log Files ......................................................................................................................................................... 179
Log File Maintenance ............................................................................................................................................... 180
Spool File Maintenance ............................................................................................................................................ 180
Clean Spool and Job Log Files on UNIX ..................................................................................................................... 181
Clean Spool and Job Log Files on Windows .............................................................................................................. 183
How to Obtain the Job Log ID................................................................................................................................... 184
Obtain the Job Run Number and Job ID ............................................................................................................ 185
Obtain the Job Log ID ........................................................................................................................................ 186
Delete Legacy Agent Log Files .................................................................................................................................. 187
AutoRemoteDir Parameter ............................................................................................................................... 188
Remove Temporary Legacy Agent Log Files ............................................................................................................. 189
CleanTmpFiles Parameter ................................................................................................................................. 190
Chapter 8: Controlling Services 191
Controlling Services on Windows ............................................................................................................................. 191

Contents 9
Start the Scheduler on UNIX .................................................................................................................................... 192
Start the Application Server on UNIX ....................................................................................................................... 192
Start the Agent on UNIX ........................................................................................................................................... 193
Start the Web Server on UNIX .................................................................................................................................. 193
Stop the Scheduler on UNIX ..................................................................................................................................... 194
Stop the Agent or Application Server on UNIX ......................................................................................................... 196
Stop the Web Server on UNIX .................................................................................................................................. 197
Restart the Web Server on UNIX .............................................................................................................................. 197
Pause the Scheduler or Application Server Service on UNIX ................................................................................... 197
Verify the Status of a Service on UNIX ..................................................................................................................... 199
Chapter 9: Aggregating Statistics 201
How to Retrieve Aggregated Job, Alarm, and Scheduler Statistics .......................................................................... 201
Aggregation Considerations .............................................................................................................................. 202
Aggregate Statistics Manually ........................................................................................................................... 203
Configure CA Workload Automation AE to Aggregate Statistics Automatically on UNIX ................................. 204
Configure CA Workload Automation AE to Aggregate Statistics Automatically on Windows .......................... 205
Verify the Resulting Statistical Data .................................................................................................................. 206
Delete Aggregated Statistics .................................................................................................................................... 213
Chapter 10: Troubleshooting 215
How the Components Are Affected When a Job Is Defined .................................................................................... 215
Windows Services Troubleshooting ......................................................................................................................... 216
Event Server Troubleshooting .................................................................................................................................. 216
Event Server Is Down ........................................................................................................................................ 217
Deadlocks .......................................................................................................................................................... 218
Not Enough User Connections .......................................................................................................................... 218
Scheduler Troubleshooting ...................................................................................................................................... 219
Scheduler Is Down ............................................................................................................................................. 220
Scheduler Will Not Start .................................................................................................................................... 221
Scheduler Will Not Start .................................................................................................................................... 223
Agent Troubleshooting ............................................................................................................................................. 227
Agent Not Responding ...................................................................................................................................... 228
Agent Not Responding ...................................................................................................................................... 229
Agent Starts, Command Runs: No RUNNING Event Is Sent .............................................................................. 230
Agent Starts, Command Runs: No RUNNING Event Is Sent .............................................................................. 231
Legacy Agent Temporary Files .......................................................................................................................... 232
Job Troubleshooting ................................................................................................................................................. 232
Agent Will Start: Command Job Will Not Run ................................................................................................... 232
Agent Not Found ............................................................................................................................................... 236
Job Fails: Multiple Interactive Log in Sessions .................................................................................................. 237

10 Administration Guide
Jobs Run Only From the Command Line ........................................................................................................... 238
Jobs To Legacy Agent Run Twice ....................................................................................................................... 239
Job Remains in STARTING or RUNNING State ................................................................................................... 241
Unable to Run Jobs Using Cross Platform Scheduling ....................................................................................... 242
Application Server Troubleshooting ......................................................................................................................... 243
Application Server Is Down ............................................................................................................................... 244
Application Server Is Down ............................................................................................................................... 245
Application Server Will Not Start ...................................................................................................................... 246
Application Server Will Not Start ...................................................................................................................... 247
Application Server Starts, Client on Remote Machine Times out ..................................................................... 249
Application Server Starts, Client on Remote Machine Times out ..................................................................... 251
Chapter 11: Tuning CA Workload Automation AE 253
Define the Tuning Parameters for the Scheduler on UNIX ...................................................................................... 254
Define the Tuning Parameters for the Scheduler on Windows ............................................................................... 256
Define the Tuning Parameter for the Application Server on UNIX .......................................................................... 258
Define the Tuning Parameter for the Application Server on Windows ................................................................... 259
Appendix A: General Debugging 261
Trace Settings ........................................................................................................................................................... 261
ISDBGACTIV .............................................................................................................................................................. 261
Configure the Client Utilities to Generate Run-time Traces..................................................................................... 263
Configure the Scheduler and Application Server to Generate Run-time Traces on UNIX ........................................ 264
Configuring Agent Log File Properties ...................................................................................................................... 265
Index 267

Chapter 1: Introduction 11
Chapter 1: Introduction
This section contains the following topics:
Intended Audience (see page 11) CA Workload Automation AE (see page 12) Instance (see page 12) CA Workload Automation AE Components (see page 13) Communications (see page 24) Data Encryption (see page 24)
Intended Audience
This document is for administrators who are responsible for installing, configuring, setting up security, and maintaining the scheduler, event server, and agents.
To use this document, you must be familiar with the operating systems and with the database server you use. This document assumes that you have already installed and are running CA Workload Automation AE.
Notes:
■ The term Windows refers to any Microsoft Windows operating system supported by CA Workload Automation AE unless otherwise noted. For information about which specific Microsoft operating systems CA Workload Automation AE supports, see the Release Notes.
■ The UNIX instructions in this document also apply to Linux systems unless otherwise noted.
■ Most of the procedures in this document apply to UNIX. For information about how to perform these tasks on Windows, see the Online Help.
■ For information about setting up security in CA Workload Automation AE, see the CA Workload Automation Security Guide.

CA Workload Automation AE
12 Administration Guide
CA Workload Automation AE
CA Workload Automation AE is an automated job control system for scheduling, monitoring, and reporting.
A job is any single command, executable, script, or batch file. These jobs can reside on any configured machine that is attached to a network. Corresponding job definitions contain a variety of qualifying attributes for associated jobs, including the conditions specifying when and where a job should run.
As with most control systems, there are many ways to correctly define and implement jobs. It is likely that the way you use CA Workload Automation AE to address your distributed computing needs will evolve over time. As you become more familiar with the CA Workload Automation AE features and the characteristics of your jobs, you can refine your use of CA Workload Automation AE.
Instance
A CA Workload Automation AE instance is a licensed version of CA Workload Automation AE software running as a server with one or more clients or agents. Clients and agents can run on a single computer or on multiple computers. An instance uses its own scheduler, application server, and event server and operates independently of other instances.
The instance ID (an uppercase, three-character alphanumeric name) that is referenced by the AUTOSERV environment variable identifies a CA Workload Automation AE server installation on a particular computer. The default instance ID is ACE. However, you can specify a different instance ID only during installation.
Multiple instances can run on the same computer, but they must have different instance IDs. For example, you can have one instance for production and another for development. Multiple instances can run on the same computer using a single copy of the binaries, and can schedule jobs on the same computers without interfering or affecting other instances.

CA Workload Automation AE Components
Chapter 1: Introduction 13
CA Workload Automation AE Components
The main CA Workload Automation AE components are as follows:
■ Event server (database)
■ Application server
■ Web server
■ Scheduler
■ Agent
■ Client
The following illustration shows the components in a basic configuration, and displays the communication paths between them:

CA Workload Automation AE Components
14 Administration Guide
Event Server
The event server (database) stores all the objects that are used by CA Workload Automation AE. The job, machine, and calendar object definitions comprise a subset of the data contained in the event server as do job events. The application server manages the creation, update, and deletion of the CA Workload Automation AE objects in the event server. The scheduler polls the event server for job events and fetches the corresponding object definitions that are referenced by the event when necessary.
CA Workload Automation AE supports various databases including Oracle, Sybase, and Microsoft SQL Server. Only the scheduler and the application server processes interface directly with the database. Therefore, these processes require a vendor database client installation to access the database. All other CA Workload Automation AE processes interface with the application server and do not require database client installations. The scheduler and the application server interact with the database using vendor-specific native code libraries.
Note: While CA Workload Automation AE uses the database solely as a SQL engine, it does use Sybase Open Client C Library communications protocol, Oracle Common Interface, or Microsoft SQL Server Multi-Protocol Net-Library to communicate with the vendor database server installation. For more information, see the vendor documentation.
Dual Event Servers
You can configure a CA Workload Automation AE instance to run using two event servers (databases), and this configuration is named dual event server mode. The dual event server mode provides high availability by running two event servers that are synchronized to maintain identical data, including object definitions and events. CA Workload Automation AE reads from one event server and writes to both the event servers simultaneously. If you lose one event server due to hardware, software, or network problems, operations can continue on the second event server without losing data or functionality. This feature is independent of any replication or redundancy offered by the database.
For various reasons, database users often run multiple instances of servers that are unaware of the other servers on the network. When implementing CA Workload Automation AE, the database can run for CA Workload Automation AE only, or it can be shared with other applications.
Note: For more information about how to install and configure dual event servers, see the UNIX Implementation Guide or Windows Implementation Guide.

CA Workload Automation AE Components
Chapter 1: Introduction 15
Application Server
The application server acts as the communication interface between the event server and the client utilities. It receives requests from the client utilities, queries the event server, and returns the responses to the client utilities.
Scheduler
The scheduler is the program, running either as a UNIX daemon process or a Windows service, that runs CA Workload Automation AE. It processes all the events it reads from the event server.
When you start the scheduler, it continually scans the database for events to process. For example, when the scheduler finds a STARTJOB event, it verifies whether the event satisfies the starting conditions for that job in the database. Based on this information, the scheduler determines the actions to take and instructs the appropriate agent to perform the actions. These actions may include starting or stopping jobs, checking for resources, monitoring existing jobs, or initiating corrective procedures.
High Availability
To detect and recover from failure, you can configure CA Workload Automation AE with a second scheduler, named the shadow scheduler. This shadow scheduler must run on a separate computer, and it takes over if the primary scheduler fails. This configuration is named high availability.
If CA Workload Automation AE is running in high availability and dual event server mode, a third scheduler named the tie-breaker scheduler is required. The tie-breaker scheduler is a scheduler process that runs on a third computer. It remains permanently idle and periodically updates its heartbeat in the event servers to indicate its presence. The tie-breaker scheduler resolves contentions and eliminates situations where one scheduler takes over because of network problems.
Note: Shadow and tie-breaker schedulers and dual event servers are independent features. If you configure CA Workload Automation AE to run in high availability mode, these components run together. For more information about shadow and tie-breaker schedulers, installing dual event servers, and configuring high availability, see the UNIX Implementation Guide or Windows Implementation Guide.
CA Workload Automation AE Components
16 Administration Guide
Agent
The agent is the key integration component of CA Workload Automation AE that lets you automate, monitor, and manage workload on different operating environments, applications, and databases. You can extend the core functionality of the agent by installing one or more agent plug-ins. For example, if you have a relational database such as Oracle, you can install the Database Agent plug-in along with the agent to query and monitor the database. Other agent plug-ins, such as Application Services, Oracle, PeopleSoft, SAP, and Web Services, are available. You can perform all actions for the agent plug-ins, such as starting and stopping them, on the agent.
The agent lets you perform tasks such as the following:
■ Run Windows command files and UNIX scripts.
■ Execute UNIX commands.
■ Monitor file activity and release jobs based on that activity.
■ Transfer files using FTP.
■ Monitor the agent computer for CPU usage, disk space, IP address, process execution, and text files.
■ Monitor the Windows agent computer for Windows event logs and the status of Windows services.
■ Retrieve or set the value of an SNMP variable.
■ Subscribe for SNMP trap information or publish.
Notes:
■ CA Workload Automation AE also works with agents that run on different operating environments such as i5/OS. The agent plug-ins only work with the agent for Windows and UNIX operating environments.
■ For more information about agents and agent plug-ins, see the CA Workload Automation Agent for UNIX, Linux, or Windows Implementation Guide.
More Information:
The agentparm.txt File (see page 34)
Legacy Agent Replaced by CA Workload Automation Agent
The CA Workload Automation Agent for UNIX, Linux, or Windows replaces the Remote Agent (auto_remote) that was provided with Unicenter AutoSys JM 4.5.1 and r11. The Release 11.3.6 documentation refers to auto_remote as the legacy agent.

CA Workload Automation AE Components
Chapter 1: Introduction 17
The new agent provides additional job types, including monitoring and FTP jobs. The agent is automatically installed on the computer where CA Workload Automation AE is installed. You can also install the agent on remote computers to run jobs on those computers.
Client
A client is any executable that interfaces with the application server. This includes CA Workload Automation AE Command Line Interface (CLI) applications such as Job Information Language (JIL) and autorep. It also includes the CA WCC services, which are clients of the application server and service the CA WCC GUI components, and any user-defined binaries that link to the CA Workload Automation AE SDK.
Client applications work by calling Application Programming Interfaces (APIs) that are available in the application server. A client can run anywhere in the enterprise provided it can reach the computer where the application server is running. It does not require the installation of a database vendor client. Clients are the means by which users control the scheduling environment by creating and monitoring the scheduling resources.
Web Server
Apache Tomcat is the designated web server that is used to host web services. This web server is installed and configured as part of the CA Workload Automation AE installation. Apache Tomcat uses the CA Workload Automation AE configuration parameters for database access and security. By default, web services use port 9443 to communicate with the Apache Tomcat server. The Apache Tomcat server uses port 5250 to communicate with CA EEM.
Interface Components
You can use the client utilities or CA WCC to define, monitor, and report on jobs.
On Windows, CA Workload Automation AE also provides CA Workload Automation AE Administrator using which you can view or modify the configuration parameters of all the CA Workload Automation AE instances that you have installed. You can also define the job profiles that contain the environment variables that must be set for a job to run.
Note: For more information about how to view or modify the configuration parameters of a CA Workload Automation AE instance on Windows using CA Workload Automation AE Administrator, see the Online Help.

CA Workload Automation AE Components
18 Administration Guide
More Information:
The CA Workload Automation AE Administrator (see page 48)
How the Event Server, Scheduler, and Agent Interact
The following steps explain the interactions between the event server, scheduler, and agent:
1. From the event server, the scheduler reads a new event, which is a STARTJOB event with a start time condition that has been met. Then, the scheduler reads the appropriate job definition from the database and, based on that definition, determines what action to take. In the example, the scheduler runs the following command on WorkStation_2:
■ On UNIX:
rm /tmp/mystuff/*
■ On Windows:
del C:\tmp\*.*
2. The scheduler communicates with the agent on WorkStation_2. The agent receives the instructions to run the job.
3. The agent performs resource checks and creates a process that actually runs the specified command.
4. The agent communicates the job execution information (such as the process ID, agent log file name, job output log file name, and so on) to the scheduler.
5. The scheduler converts the job execution information into a job event and updates the event server with the event information.
6. The command completes and exits, and the agent captures the command’s exit code.
7. The agent communicates the job completion information (such as exit code, status, and so on) to the scheduler.
8. The scheduler converts the job completion information into a job event and updates the event server with the event information.
The scheduler and the event server must be running to make CA Workload Automation AE fully operational.

CA Workload Automation AE Components
Chapter 1: Introduction 19
Example: Interaction Between the Event Server, Scheduler, and Agent
This example illustrates the event server, scheduler, and agent running on different computers. At a start date and time specified in the job definition, suppose you run the command shown in the illustration on WorkStation_2 (WS2):
Notes:
■ The application server communicates with the agent only when client utilities like chase and autoping are run or when jobs contain globs or blobs as input or output.
■ The scheduler and the event server typically run on the same computer.

CA Workload Automation AE Components
20 Administration Guide
How the Event Server, Application Server, and Client Utilities Interact
The following steps explain the interactions between the event server, application server, and client utilities:
1. The client utilities send requests to the application server.
2. The application server executes the request by contacting the event server. This results in the information either being inserted, updated, retrieved, or removed from the event server. The responses are returned to the client as the operation executes or after the operation completes.
The following illustration shows how the event server, application server, and client utilities interact.
Note: The application server communicates with the agent only when client utilities like chase and autoping are run or when jobs contain globs or blobs as input or output.
Example: Interaction Between the Event Server, Application Server, and Client Utilities
Suppose that you issue the autorep command at an UNIX operating system prompt or the Windows instance command prompt, the event server, application server, and the client utilities interact with each other as follows:
1. The autorep client sends a request to the application server.
2. The application server queries the database, receives the data from the event server, prepares one or more responses, and sends all the responses to the autorep client.
3. The autorep client receives all the responses and displays the report.

CA Workload Automation AE Components
Chapter 1: Introduction 21
How the Event Server, Web Server, and Web Service Consumer Interact
The following steps explain the interactions between the event server, web server, and web service consumer:
1. The web service consumer sends requests to the web server.
2. The web server executes the request by contacting the event server. This results in information being either inserted, updated, retrieved, or removed from the event server. The responses are returned to the web service consumer as the operation executes or after the operation completes.
The following illustration shows how the event server, web server, and web service consumer interact:
Example: Interaction Between the Event Server, Web Server, and Web Service Consumer
Suppose that your application program invokes the web service to get information on jobs defined, the event server, web server, and the web service consumer interact with each other as follows:
1. Your application program sends a request to the web server.
2. The web server queries the database, receives the data from the event server, prepares the response, and sends it back to your application program.
3. Your application program receives the response and processes it.
How the Local Scheduler Interacts with Other Schedulers when Multiple Instances of CA Workload Automation AE Run
A CA Workload Automation AE instance is one licensed version of CA Workload Automation AE software running as a server and as one or more clients, on one or more computers. An instance uses its own scheduler, one or more application servers, and event server, and operates independently of other instances.
Different instances can run from the same executables and can have the same value for $AUTOSYS. However, each instance must have different values for $AUTOUSER and $AUTOSERV. Different instances can also be run on the same computer.

CA Workload Automation AE Components
22 Administration Guide
Multiple CA Workload Automation AE instances are not connected, but they can communicate with one another. This communication lets you schedule workload across instances in your enterprise. You can define jobs that have dependencies on jobs running on other instances (cross-instance job dependencies). A CA Workload Automation AE job with these dependencies conditionally starts based on the status of the job on the other instance. In this situation, the local instance scheduler acts as a client and issues sendevent commands to the external instance. The other instance's application server processes the sendevent request and stores the dependency request or status update in its database. You can also manually send events from one instance to another.
When the status of a job with cross-instance dependencies changes, the scheduler sends a CHANGE_STATUS event to the remote instance event server while the job in the local instance runs.
Reporting Status Changes for Jobs with Cross-Instance Dependencies
The cross-instance interface design now supports reporting status changes to the remote instance for jobs with cross-instance dependencies when those changes result from one of the following:
■ The scheduler changes the status of the job when unavailable machine load units, resources or agents prevent a job from running.
■ The user changes the status of the job by issuing a sendevent command for one of the following events: JOB_ON_HOLD, JOB_OFF_HOLD, JOB_ON_ICE, JOB_OFF_ICE, JOB_ON_NOEXEC, JOB_OFF_NOEXEC
If the local instance scheduler does not report these status changes to the remote instance scheduler, downstream jobs dependent on the remote jobs may not run when they should, or may run when they should not.
The scheduler internally generates an equivalent CHANGE_STATUS event to report the status change to the remote instance. This helps ensure that the remote scheduler accurately evaluates downstream jobs dependent on the remote jobs, including the job status and exit code conditions of the dependent jobs.
The equivalent CHANGE_STATUS event represents the actual status change that occurs in the local instance, and the event includes text specifying the actual status change. The remote scheduler log records this information. The remote scheduler reports a representative status and exit code for the dependent job based on the actual status change that occurs in the local instance:
Actual Status Change (Local Instance) Reported Status (Remote Instance)
A job is placed on hold via the JOB_ON_HOLD event
INACTIVE with exit code -656
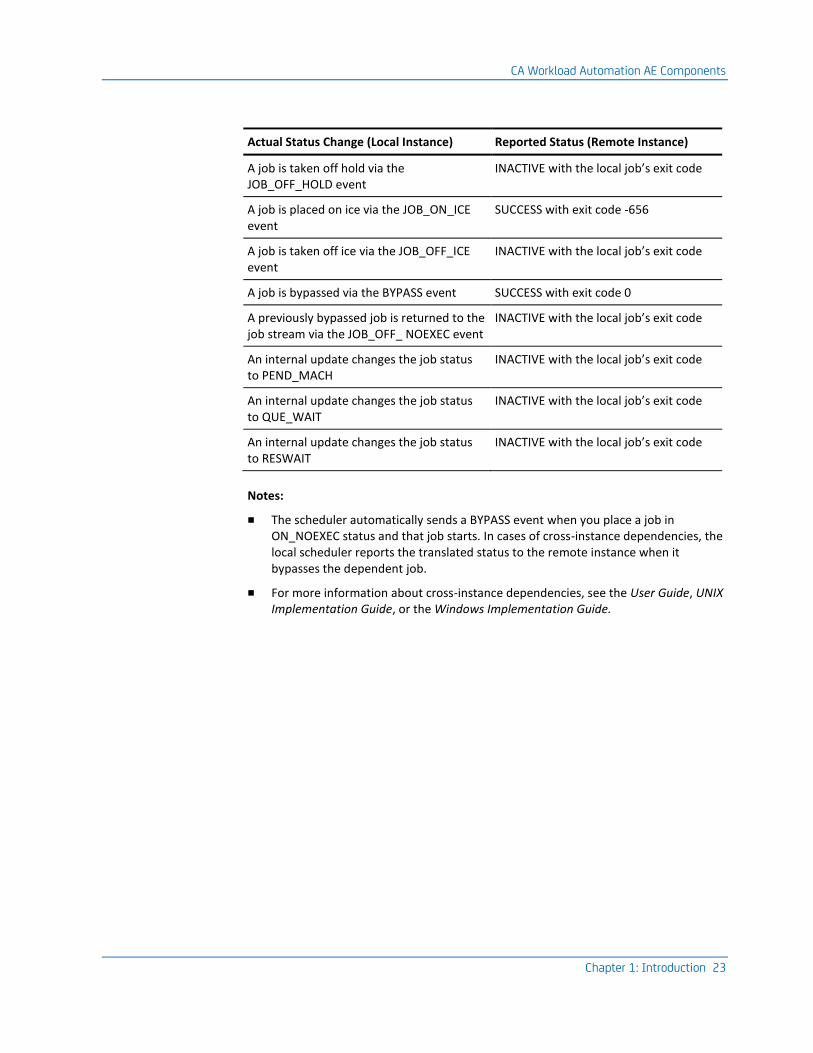
CA Workload Automation AE Components
Chapter 1: Introduction 23
Actual Status Change (Local Instance) Reported Status (Remote Instance)
A job is taken off hold via the JOB_OFF_HOLD event
INACTIVE with the local job’s exit code
A job is placed on ice via the JOB_ON_ICE event
SUCCESS with exit code -656
A job is taken off ice via the JOB_OFF_ICE event
INACTIVE with the local job’s exit code
A job is bypassed via the BYPASS event SUCCESS with exit code 0
A previously bypassed job is returned to the job stream via the JOB_OFF_ NOEXEC event
INACTIVE with the local job’s exit code
An internal update changes the job status to PEND_MACH
INACTIVE with the local job’s exit code
An internal update changes the job status to QUE_WAIT
INACTIVE with the local job’s exit code
An internal update changes the job status to RESWAIT
INACTIVE with the local job’s exit code
Notes:
■ The scheduler automatically sends a BYPASS event when you place a job in ON_NOEXEC status and that job starts. In cases of cross-instance dependencies, the local scheduler reports the translated status to the remote instance when it bypasses the dependent job.
■ For more information about cross-instance dependencies, see the User Guide, UNIX Implementation Guide, or the Windows Implementation Guide.

Communications
24 Administration Guide
Communications
Network data between the CA Workload Automation AE Software Development Kit (SDK) client and the application server is prepared using the proprietary CA Workload Automation AE Request Response Protocol (RRP). The SDK clients include the following:
■ CA Workload Automation AE CLI utilities
■ CA WCC
■ The scheduler when transmitting external instance information to the application server of another instance
■ Any product that links with the CA Workload Automation AE SDK libraries.
Network data between the scheduler and the agent, the application server and the agent, the application server and the scheduler, or between the scheduler and the CA Workload Automation EE manager is prepared using the proprietary Automation Framework Message (AFM) protocol.
Both the RRP and AFM protocols are implemented using proprietary technology known as the CA Workload Automation AE Network Messaging Library (libmsg) over SSA. libmsg is a high-performance, multi-threaded library that manages delivery and acknowledgement of data using SSA.
SSA is an application that lets CA components use a single multiplexed communication port to ease firewall administration and minimize conflicts with other applications. SSA provides port multiplexing and SSL encryption.
Together, these technologies provide a robust, flexible, high-performance, portable method of communication for CA Workload Automation AE applications.
Note: For more information about configuring CA Workload Automation AE to work with SSA, see the UNIX Implementation Guide or the Windows Implementation Guide.
Data Encryption
CA Workload Automation AE supports the encryption of data and messages shared between the command line utilities, agent, scheduler, and the application server. CA Workload Automation AE uses the Advanced Encryption Standard (AES) algorithm to encrypt and decrypt data. This algorithm requires an encryption key to encrypt data.

Data Encryption
Chapter 1: Introduction 25
CA Workload Automation AE encrypts data in the following communication scenarios:
■ Application server and client utilities—The data exchanged between the command line utilities and the application server is encrypted using an instance-wide encryption key. This key is specific to an instance and must be the same on all computers where the server and clients are installed. During the CA Workload Automation AE installation, a default instance-wide encryption key is created and stored in the $AUTOUSER/cryptkey.txt (on UNIX) or %AUTOUSER%/cryptkey.txt (on Windows) file. However, you can define a user-specific encryption key using the as_config command or using CA Workload Automation AE Administrator on Windows.
Note: For more information about the as_config command, see the CA Workload Automation AE Reference Guide. For more information about CA Workload Automation AE Administrator, see the CA Workload Automation AE Administrator Online Help.
■ Application server and agent or scheduler and agent—The data exchanged between the application server and the agent or the scheduler and the agent is encrypted based on the encryption type and the encryption key specified in the machine definition and the agent encryption setting specified in the agentparm.txt file. On CA Workload Automation AE, you can set the encryption type and encryption key to be used for each agent using the encryption_type and key_to_agent JIL attributes. The encryption key specified on CA Workload Automation AE must match the encryption key specified in the agentparm.txt file.
Note: For more information about the encryption_type and key_to_agent JIL attributes, see the CA Workload Automation AE Reference Guide.
Notes:
■ For information about setting the encryption type and encryption key on CA Workload Automation AE, see the UNIX Implementation Guide or the Windows Implementation Guide.
■ For more information about setting up encryption on the agent, see the CA Workload Automation Agent for UNIX, Linux, or Windows Implementation Guide.
■ For more information about setting instance-wide encryption, see the CA Workload Automation Security Guide.


Chapter 2: Configuring CA Workload Automation AE 27
Chapter 2: Configuring CA Workload Automation AE
This section contains the following topics:
Overview (see page 27) The Configuration File (see page 28) The auto.profile File on UNIX (see page 33) The agentparm.txt File (see page 34) The WAAE.txt File (see page 35) Environment Variables (see page 35) The CA Workload Automation AE Administrator (see page 48) Alarm Notifications (see page 49) Configure CA Workload Automation AE to Send Email Notifications on UNIX (see page 52) Configure CA Workload Automation AE to Send SNMP Traps on UNIX (see page 56) Disable IP Address Caching on UNIX (see page 63)
Overview
You can configure CA Workload Automation AE to control the run-time behavior of each instance, including which database to connect to and how to react to error conditions. You can also set up the Notification feature to communicate problems to users in your enterprise.
You can define environment variables on CA Workload Automation AE to customize logging, network communication, or the behavior of the scheduler, application server, client utilities, or the SDK.
On UNIX, you configure CA Workload Automation AE by modifying the configuration file, the agentparm.txt file, or the WAAE.txt file.
On Windows, you configure CA Workload Automation AE by using CA Workload Automation AE Administrator or by modifying the agentparm.txt file or the WAAE.txt file.
Note: On Windows, you can configure CA Workload Automation AE by using the CA Workload Automation AE Administrator or the configuration file. However, we recommend that you use the CA Workload Automation AE Administrator to configure CA Workload Automation AE on Windows. For information about using the CA Workload Automation AE Administrator, see the Online Help.

The Configuration File
28 Administration Guide
The Configuration File
You can configure CA Workload Automation AE by setting the parameters in the configuration file. The configuration file is specific to an instance. On startup, CA Workload Automation AE reads the configuration file to verify its behavior, including which database to connect to and how to react to certain error conditions.
On Windows, you can configure CA Workload Automation AE by using the CA Workload Automation AE Administrator or the configuration file. The parameters in the configuration file have a corresponding field on the CA Workload Automation AE Administrator. We recommend that you use the CA Workload Automation AE Administrator to set the configuration parameters on Windows. The configuration parameters and the environment variables set in the CA Workload Automation AE Administrator and the environment variables set in the WAAE file control the run-time behavior of CA Workload Automation AE.
On UNIX, you can configure CA Workload Automation AE by using the configuration file. The parameters in the configuration file and the environment variables set in the /etc/auto.profile file and the WAAE file control the run-time behavior of CA Workload Automation AE.
Important! The scheduler and the application server read the settings in the configuration file only on startup. Therefore, if you make a change that you want to implement immediately, you must either restart the scheduler and application server or pause and resume the scheduler and application server.
The configuration file has the following name:
■ On UNIX—$AUTOUSER/config.$AUTOSERV
■ On Windows—%AUTOUSER\config.%AUTOSERV
AUTOSERV
Defines the name of the instance that is associated with the configuration file. This value is a capitalized three-letter name and must be unique to each instance. You specify the name during the CA Workload Automation AE installation.
Default: ACE
AUTOUSER
Identifies the path of the CA Workload Automation AE directory associated with a specific instance. This directory contains the instance-wide configuration files, scheduler or application server output files, encryption files, archive output files generated during database maintenance, and sound files (for operating environments supporting audio functionality).

The Configuration File
Chapter 2: Configuring CA Workload Automation AE 29
Notes:
■ Events are associated with a specific instance. They have a unique ID, named an eoid, which is prefixed to the three-letter instance name. This naming convention helps ensure the uniqueness and traceability of an event across multiple instances.
■ Before you can issue commands at the UNIX operating system prompt, the CA Workload Automation AE environment must be sourced in the shell and your UNIX user ID and password must be defined on CA Workload Automation AE. For more information about sourcing the environment and defining user IDs, see the UNIX Implementation Guide.
More information:
Stop the Scheduler on UNIX (see page 194) Start the Scheduler on UNIX (see page 192) The CA Workload Automation AE Administrator (see page 48) Start the Application Server on UNIX (see page 192) Stop the Agent or Application Server on UNIX (see page 196)
Sample Configuration File
CA Workload Automation AE includes a sample configuration file that is located at $AUTOSYS/install/data/config.ACE (on UNIX) or %AUTOSYS%\install\data\config.ACE (on Windows). You can use this file as the basis for your own configuration file. We recommend that you make a copy of the sample configuration file before you modify it.

The Configuration File
30 Administration Guide
Parameters in the Configuration File
The configuration file includes the following parameters:
■ DateFormat (see page 33)
■ AutoRemoteDir (see page 188)
■ UseEncryption
■ EnableFIPSMode
Note: For more information about the UseEncryption and EnableFIPSMode parameters, see the Security Guide.
■ UseCommAliasEncryption
Note: For more information about the UseCommAliasEncryption parameter, see the UNIX Implementation Guide.
■ Provider (see page 142)
■ DBAccess (see page 143)
■ EventServer_1 (see page 143)
■ EventServer_2 (see page 143)
■ DBEventReconnect (see page 162)
■ DBLibWaitTime (see page 161)
■ AutoServer (see page 113)
■ AutoServerId (see page 114)
■ AutoServerAliasId (see page 115)
■ AutoServerPort (see page 116)
■ AppSrvAuxiliaryListeningPort (see page 116)
■ LogMaxEndLines (see page 119)
■ FileSystemThreshold (see page 66)
■ MachineMethod (see page 67)
■ HAPollInterval (see page 70)
■ RestartConstant, RestartFactor, and MaxRestartWait (see page 71)
■ KillSignals (see page 72)
■ MaxRestartTrys (see page 74)
■ EvtTransferWaitTime (see page 76)
■ Check_Heartbeat (see page 77)
■ LocalMachineDefinition (see page 78)
■ ResourceWaitPollInterval (see page 80)
The Configuration File
Chapter 2: Configuring CA Workload Automation AE 31
■ AutoRemPort (see page 91)
■ SchedAuxiliaryListeningPort (see page 91)
■ GlobalPendMachDelay (see page 87)
■ GlobalPendMachInterval (see page 81)
■ GlobalPendMachStatus (see page 87)
■ PrimaryFailbackMode (see page 110)
■ AggregateStatistics (see page 105)
■ EvaluateQueuedJobStarts (see page 97)
■ DBMaintTime and DBMaintCmd (see page 157)
■ ChaseOnStartup (see page 94)
■ GlobalAutoHold (see page 95)
■ CleanTmpFiles (see page 189)
■ RemoteProFiles (see page 98)
■ AutoInstWideAppend (see page 102)
■ AppendEventMessageText (see page 104)
■ RoleDesignator (see page 109)
■ CrossPlatformScheduling (see page 111)
■ ManagerHostAlias
Note: For more information about the ManagerHostAlias parameter, see the UNIX Implementation Guide.
■ NotifyMethod (see page 52)
■ NotifySMTPHost (see page 52)
■ UseSMTPAuthentication (see page 52)
■ NotifySMTPUser (see page 52)
■ NotifyServerNode and NotifyAckTimeout
■ UnicenterEvents
■ ServiceDeskURL, ServiceDeskUser, and ServiceDeskCust
■ DCAURL and DCAUser
Note: For more information about the NotifyServerNode, NotifyAckTimeout, UnicenterEvents, ServiceDeskURL, ServiceDeskUser, ServiceDeskCust, DCAURL, and DCAUser parameters, see the UNIX Implementation Guide.
■ ISDBGACTIV (see page 264)
■ LOGROLLOVER (see page 128)
■ SnmpManagerHosts (see page 56)

The Configuration File
32 Administration Guide
■ SnmpCommunity (see page 56)
■ InetdSleepTime (see page 32)
■ SetJobAttributeEnvironmentals (see page 107)
Notes:
■ The parameter values are set during the CA Workload Automation AE installation. You can modify these values as required.
■ The following topics describe parameters that apply to the legacy agent and other general parameters. All other parameters are described in procedures throughout the guide. For more information about a parameter, see the related topic.
InetdSleepTime Parameter
The InetdSleepTime parameter in the configuration file defines the time interval (in seconds) that the scheduler waits before contacting the UNIX computer's internet service daemon (inetd) for consecutive job starts to the same agent computer. The default value is .05 seconds.
Notes:
■ The InetdSleepTime parameter applies to Unicenter AutoSys JM 4.5.1 UNIX agents only.
■ Setting the InetdSleepTime value too low for your hardware adversely affects performance. You must also make sure your computer has a processor fast enough to handle job starts at a shorter interval. Otherwise, frequent socket connection failures occur, causing numerous job restarts.
Example: Set the InetdSleepTime Parameter to One Second
This example changes the InetdSleepTime parameter to one second.
InetdSleepTime=1

The auto.profile File on UNIX
Chapter 2: Configuring CA Workload Automation AE 33
DateFormat Parameter
The DateFormat parameter in the configuration file specifies the date format for entering and displaying dates.
The configuration file contains the following entry:
DateFormat=date_format
date_format
Specifies the date format for entering and displaying dates.
Default: MM/DD/YYYY
Note: On Windows, you can select the equivalent value using the Date Format drop-down list on the Instance - CA Workload Automation AE Administrator window of CA Workload Automation AE Administrator. For more information, see the Online Help.
The auto.profile File on UNIX
The /etc/auto.profile file is one of the several objects that source the environment for a job. The /etc/auto.profile file is automatically created during installation and contains variable definitions such as AUTOUSER. The file is located on the computer where CA Workload Automation AE is installed.
System environment variables are automatically set in the environment for a job. When a job is submitted, the agent processes the following additional information to source the environment, in the following order:
1. /etc/auto.profile
2. Environment variables defined using the envvars attribute in the job definition (if specified)
3. The job profile defined using the profile attribute (if specified)
Note: For more information about the envvars and profile attributes, see the Reference Guide. For more information about how job profiles work, see the User Guide.
Sample auto.profile File
CA Workload Automation AE includes a sample auto.profile file that is located at $AUTOSYS/install/data/auto.profile file. We recommend that you make a copy of this file before you modify it.

The agentparm.txt File
34 Administration Guide
The agentparm.txt File
You can configure the agent by editing the parameters in the agentparm.txt file. When you install the agent, the installation program adds commonly-configured agent parameters to the agentparm.txt file. Other agent parameters exist, which you must manually add to the agentparm.txt file to configure the agent. You can modify these parameter values as required.
The agentparm.txt file is located in the following directory:
install_directory/SystemAgent/agent_name
install_directory
Specifies the root directory where CA Workload Automation AE is installed.
agent_name
Specifies the name of the agent.
Notes:
■ If the agent was installed using a program that was not provided with CA Workload Automation AE (for example, the installation program provided on the CA Workload Automation Agent DVD), the path to the agentparm.txt may be different. In this case, the agentparm.txt file is located in the root directory where the agent is installed.
■ For information about the parameters in the agentparm.txt file and how to configure them to work with the scheduling manager, see the CA Workload Automation Agent for UNIX, Linux, or Windows Implementation Guide.

The WAAE.txt File
Chapter 2: Configuring CA Workload Automation AE 35
The WAAE.txt File
The WAAE.txt file defines the environment settings for jobs started on behalf of all managers for all instances of CA Workload Automation AE. You can define the environment variables on a single line as a variable=value pair. The jobs that are run by the agent inherit these environment variables.
Note: The WAAE.txt file applies to the CA Workload Automation Agent for UNIX, Linux, or Windows.
The WAAE.txt file is located as follows:
■ Windows—%AUTOROOT%\SystemAgent\agent_name\Profiles
■ UNIX—$AUTOROOT/SystemAgent/agent_name/profiles
agent_name
Define the name of the agent.
Note: For more information about how to set up the environment variables for the agent, see the CA Workload Automation Agent for UNIX, Linux, or Windows Implementation Guide.
Environment Variables
You can define environment variables on CA Workload Automation AE to customize:
■ How the CA Workload Automation AE components generate and manage the output log files
■ How the CA Workload Automation AE components communicate with each other over the network
■ The behavior of the scheduler, application server, client utilities, or SDK
On UNIX, you can define the environment variables by issuing either the setenv or the export command (depending on your UNIX operating system) at the operating system prompt.
On Windows, you can define the environment variables using one of the following ways:
■ Using the System - CA Workload Automation AE Administrator window of the CA Workload Automation AE Administrator. Use this method when you define environment variables to customize the scheduler or application server behavior. For more information about defining environment variables using the CA Workload Automation AE Administrator, see the Online Help.
■ Issuing the set command at the instance command prompt. Use this method when you define environment variables to configure the client utilities.

Environment Variables
36 Administration Guide
Defining Environment Variables to Customize Logging
You can define the following environment variables to customize how the CA Workload Automation AE components generate and manage the output log files:
APIJNI_LOGPATH
Specifies the full path to the directory where the libapijni.JNI_process_ID.out output log file is created.
JNI_process_ID
Specifies the ID of the Java process that invokes the Java Native Interface (JNI) to execute the routines that the CA Workload Automation AE Java SDK uses.
Notes:
■ Use this variable with the ISDBGACTIV variable to capture debug traces to troubleshoot issues with the native component of the CA Workload Automation AE Java SDK.
■ For CA WCC, set this variable in the $CA_WCC_INSTALL_LOCATION/tomcat_32/conf/wrapper.conf file as follows:
set.APIJNI_LOGPATH=output_logfile_path
AUTOSYS_LOG
Specifies that the client utilities direct all output to the client_name.process_ID.out log file in the $AUTOUSER/out (UNIX) or %AUTOUSER%\out (Windows) directory.
client_name
Specifes the name of the client.
process_ID
Specifies the process ID of the client process.
Notes:
■ If you set this variable, the client utilities direct all output to the client_name.process_ID.out log file. To stop directing all trace output to the log file, unset this variable.
■ Use this variable with the ISDBGACTIV variable to capture debug traces to troubleshoot issues with the client utilities.
ISDBGACTIV
Identifies the debug level to use. The valid values are LIGHT, HEAVY, JOB, DUMP, AFM, DBQUERY, EXTVJ, COMM, MS, GBE, OFF, and RESOURCEn.
Default: OFF

Environment Variables
Chapter 2: Configuring CA Workload Automation AE 37
LOGROLLOVER
Identifies when the scheduler, application server, or aggregator log rolls over. The log can roll over at midnight or when the log file size is equal to the specified size. The valid values are OFF, SIZE(x), MIDNIGHT, and SIZE(x),MIDNIGHT.
Default: MIDNIGHT
Note: If you do not specify a value for the SIZE(x) parameter, it is set to 100 MB by default. The scheduler, application server, or aggregator log rolls over when the log file size reaches 100 MB.
More information:
Configure the Client Utilities to Generate Run-time Traces (see page 263) Configure the Scheduler and Application Server to Generate Run-time Traces on UNIX (see page 264) Specify the Scheduler or Application Server Log Rollover on UNIX (see page 128) ISDBGACTIV (see page 261)
Defining Environment Variables to Customize Network Communication
You can define the following environment variables to customize how the CA Workload Automation AE components communicate with each other over the network:
AS_RESOLVEHOST_TIMEOUT
(UNIX only) Specifies the time (in seconds) the CA Workload Automation AE component waits for the system to resolve a hostname into an IP address. The CA Workload Automation AE component waits for an extra 15 seconds to the time you specify in this variable. For example, if you set this variable to 20 seconds, the CA Workload Automation AE component waits for 35 seconds to resolve a hostname into an IP address.
Default: 15
Limits: 1-120

Environment Variables
38 Administration Guide
CONNECTION_TIMEOUT
Specifies the time (in seconds) the CA Workload Automation AE component waits to complete the initial connection with another CA Workload Automation AE component. Increasing this value may delay recovery during a network failure. Decreasing this value may result in connection failures.
Default: 20
Limits: 1 or higher.
Notes:
■ For communications between the application server and the scheduler, this variable applies to the chk_auto_up request. For communications between the application server and the agent, this variable applies to the agent autoping and chase requests.
■ If you define the AGENT_RECV_TIMEOUT variable, this variable is ignored for communications between the scheduler or application server and the agent.
MAX_BUFFER
Specifies the maximum number of bytes to allocate for buffered responses in the application server to client communications. Increasing this value may place a greater demand on the system memory. Decreasing this value may result in more network activity.
Default: 65,536 (UNIX); 32,768 (Windows)
Limits: 1 or higher.
MSGSVC_LISTEN_BACKLOG
Specifies the maximum length of the queue of outstanding connections that are associated with a socket listen operation. The underlying service provider responsible for the socket sets the backlog to a maximum reasonable value for the operating system. Increasing this value may silently reduce to a value imposed by the operating system. Decreasing this value may result in a loss of socket connections.
Limits: 1 or higher.
Note: For more information about the backlog parameter of the listen function, see the appropriate operating system sockets documentation.

Environment Variables
Chapter 2: Configuring CA Workload Automation AE 39
RECV_TIMEOUT
Specifies the time (in seconds) that the CA Workload Automation AE component waits to complete a request-response exchange with another CA Workload Automation AE component. The CA Workload Automation AE component doubles the time that you specify in this variable to wait for each response to arrive. If no network activity is detected during this time, the waiting component times out the request. Increasing this value may delay the execution time of the component during a network failure. Decreasing this value may result in more component time outs.
Default: 30
Limits: 1 or higher.
Note: For communications between the application server and the scheduler, this variable applies to the scheduler log retrieval and autoping requests. For communications between the application server and the agent, this variable applies to the agent job log retrieval and user authentication requests and to the requests made on behalf of CA WCC.

Environment Variables
40 Administration Guide
Defining Environment Variables to Customize the Scheduler
You can define the following environment variables to customize the behavior of the scheduler:
AGENT_RECV_TIMEOUT
Specifies the time (in seconds) that the scheduler waits for a response from the agent or the legacy agent. Increasing this value may delay the scheduler in placing a machine in the offline state when the corresponding legacy agent becomes unresponsive. Decreasing the value may result in more time outs.
Default: 20
Limits: 1 or higher.
Notes:
■ For communications between the scheduler and the agent, this variable applies to the agent autoping, chase, and CPU utilization (load balancing jobs) requests.
■ If you define this variable, the CONNECTION_TIMEOUT variable is ignored for communications between the scheduler and the agent.
■ This variable does not affect the following job requests to the agent:
– Starting a job
– Killing a job
– Issuing a UNIX signal to a job or signaling a Windows event that a job is listening on
– Restarting a job
– Replying to a job that has paused execution

Environment Variables
Chapter 2: Configuring CA Workload Automation AE 41
AUTO_ALARM
Specifies the time (in seconds) that the scheduler waits to complete the initial connection with the 4.5.1 legacy agent. Increasing this value may delay recovery during a network failure. Decreasing this value may result in more connection failures.
Default: Varies based on the following types of agent requests that the scheduler makes:
■ autoping—15
■ chase—45
■ chk_auto_up—180
■ clean_files—30
■ job start—30
■ CPU utilization (load balancing jobs)—30
Limits: 1 or higher.
Note: If you define this variable, the USAGE_TIMEOUT variable is ignored.
AUTO_ALARM_READ
Specifies the time (in seconds) that the scheduler waits for a response from the 4.5.1 legacy agent. Increasing this value may delay the scheduler when the agent becomes unresponsive. Decreasing this value may result in more time outs.
Default: Five times the number of seconds you specified in the AUTO_ALARM variable. If you did not set a value for the AUTO_ALARM variable, the value varies based on the following types of agent requests that the scheduler makes:
■ autoping—75
■ chase—225
■ chk_auto_up—900
■ clean_files—150
■ job start—150
■ CPU utilization (load balancing jobs)—150
Limits: 1 or higher.
BOX_NO_SUCCESS
Specifies whether the scheduler keeps the box in the RUNNING state if all the jobs in the box enter the INACTIVE state. Valid values are 0 and 1.
Default: 0; the scheduler does not keep the box in the RUNNING state if all the jobs in the box enter the INACTIVE state.
Note: If you do not define this variable, the scheduler evaluates the status of the box to SUCCESS when all jobs in the box enter the INACTIVE state.

Environment Variables
42 Administration Guide
CHASE_SLEEP
Specifies the time (in seconds) that the scheduler pauses in between attempts to resend the chase information to an agent following a communication failure. Increasing this value may delay recovery during a network failure. Decreasing this value may result in premature chase failures.
Default: 5
Limits: 1 or higher.
CONTINUE_JOB_COND_JOID_MISSING
Specifies that the scheduler continues to evaluate the starting conditions of other downstream dependent jobs even when it fails to evaluate the starting conditions of one of the downstream dependent jobs. Valid values are 0 and 1.
Default: 0; the scheduler interrupts the evaluation of other downstream dependent jobs when it fails to evaluate the starting conditions of one of the downstream dependent jobs.
Note: The scheduler raises an EVENT_HDLR_ERROR alarm after it completes the evaluation of the downstream dependent jobs.
DB_CONNECTIONS
Defines the maximum number of database connections that the scheduler can connect to. Increasing this value may increase the ability of the scheduler to perform simultaneous database operations.
Default: 16
Limits: 1-128
EMSEC_EXIT_CRYPT
Specifies that the scheduler dynamically loads the $CAIGLBL0000/sche/lib/libcacrexit (UNIX) or %CAIGLBL0000%\bin\cacrexit.dll (Windows) library. This library contains routines to encrypt or decrypt user passwords for cross-platform job submissions to and from the remote managers using CAICCI. The valid values are ON and OFF.
Default: OFF; the scheduler does not dynamically load the library.
Note: If you set this variable to ON, ensure that you run the scheduler in an environment where the CAIGLBL0000 variable is defined.

Environment Variables
Chapter 2: Configuring CA Workload Automation AE 43
PE_AUTO_DISABLE
Specifies whether the scheduler disables the auto offline machine feature. The valid values are 0 and 1.
Default: 0; the scheduler enables the auto offline machine feature.
Notes:
■ When the auto offline feature is enabled, the scheduler takes the following actions:
– Places all machines in the unqualified or missing state when it fails to connect to the corresponding agents.
– Places the machines in the offline state when it receives a message from an agent that is shutting down.
– Periodically tests the agents corresponding to the machines in the unqualified and missing states to determine if it can automatically bring the machine online when the agent becomes responsive.
■ When the auto offline feature is disabled, the scheduler takes the following actions:
– Maintains all machines in the online state; regardless of whether the machines can connect to the agent or not.
– Restarts jobs that are scheduled to agents with connection problems until it exhausts the number of retries allotted to the job.
– Generates an automatic MACH_OFFLINE event when it receives a message from an agent that is shutting down. Although, the scheduler generates an automatic MACH_OFFLINE event, it keeps the machine in online state.
– Places jobs scheduled to machines that are manually placed offline in the PEND_MACH state. You can manually send a MACH_OFFLINE event to place a machine in the offline state. Jobs remain in the PEND_MACH state until you manually send a MACH_ONLINE event to bring the machine back online.
RESTRICT_FORCE_STARTJOB
Specifies that the scheduler restricts you from running multiple instances of a job while the job is in the RUNNING state. The valid values are 0 and 1.
Default: 0; the scheduler restricts you from running multiple instances of a job while the job is in the RUNNING state.

Environment Variables
44 Administration Guide
SCHED_SCALE
Defines the maximum limit of process threads that can be started dynamically. This value does not represent the total number of process threads that are active. Rather, it is a scale value that the scheduler uses to calculate the maximum limit of process threads that can be started dynamically as the workload demands. Therefore, a SCHED_SCALE value of 1 represents the lowest ceiling of extra dynamic threads that can be started to process job events (some arbitrary ceiling not necessarily equal to one). Increasing this value may increase the ability of the scheduler to process job events.
Default: 5
Limits: 1-64
UA_PORT
Specifies the port number of the r11 legacy agent.
Default: 49152 (SSA virtual port)
Limits: 1-50176
USAGE_TIMEOUT
Specifies the time (in seconds) that the scheduler waits to complete the initial connection with the 4.5.1 legacy agent for load balancing jobs. Increasing the value may delay recovery during a network failure. Decreasing this value may result in more connection failures.
Default: 30
Limits: 1 or higher.
Note: If you set the AUTO_ALARM variable, this variable is ignored.
More information:
Define the Tuning Parameters for the Scheduler on UNIX (see page 254) Define the Tuning Parameters for the Scheduler on Windows (see page 256)

Environment Variables
Chapter 2: Configuring CA Workload Automation AE 45
Defining Environment Variables to Customize the Application Server
You can define the following environment variables to customize the behavior of the application server:
AGENT_RECV_TIMEOUT
Specifies the time (in seconds) that the application server waits for a response from the scheduler or the agent. Increasing this value may delay the application server when the scheduler or agent becomes unresponsive. Decreasing the value may result in more time outs.
Default: 20
Limits: 1 or higher.
Notes:
■ If you set this variable, the CONNECTION_TIMEOUT variable is ignored.
■ For communications between the application server and the scheduler, this variable applies to the chk_auto_up request. For communications between the application server and the agent, this variable applies to the autoping and chase requests.
AS_IAM_CACHE_UPDATE
Specifies the time (in seconds) that the application server polls the external security server for modified security policies.
Default: -2
Limits: -2, -1, or higher.
Note: If you set this variable to -1, the application server does not poll the external security server for policies. If you set this variable to -2, the application server obtains the poll interval from the external security server configuration.
AS_IAM_MAX_POLICIES
Specifies the maximum number of security policies that the application server collects from the external security server.
Default: 10,000
Limits: 2001 or higher.
Note: If you do not define this variable or you set this variable to a value less than 2001, the application server uses the default value.

Environment Variables
46 Administration Guide
ASQMAX
Specifies the maximum length of the application server queue of outstanding client requests. If a client request arrives when the queue is full, the application server discards the request and the client times out. Increasing this value may place a greater demand on the system memory. Decreasing this value may result in more client time outs when the application server is busy.
Default: 32,768
Limits: 0 or higher.
Note: If you set this variable to 0 (zero), the queue length is set to the default.
DB_CONNECTIONS
Defines the maximum number of database connections that the application server can connect to. Increasing this value may increase the ability of the application server to process simultaneous CA Workload Automation AE client and agent requests.
Default: 32
Limit: 1-128
RESTRICT_DELETE_DEPENDENT_JOB
Specifies that the application server restricts you from deleting a job with dependencies. The valid values are 0 and 1.
Default: 0
Note: If you set this variable to 1, the application server restricts you from deleting a job with dependencies.
RESTRICT_DELETE_JOB
Specifies that the application server restricts you from deleting a job when the job is in the ACTIVATED, RUNNING, or STARTING state. The valid values are 0 and 1.
Default: 0
Note: If you set this variable 1; the application server restricts you from deleting a job when the job is in the ACTIVATED, RUNNING, or STARTING state.
More information:
Define the Tuning Parameter for the Application Server on UNIX (see page 258) Define the Tuning Parameter for the Application Server on Windows (see page 259)

Environment Variables
Chapter 2: Configuring CA Workload Automation AE 47
Defining Environment Variables to Customize the Client Utilities or SDK Behavior
You can define the following environment variables to customize the behavior of the client utilities or the SDK:
AS_FC_THREADS
Specifies the maximum number of worker threads that the forecast utility uses at any given time. When all worker threads are occupied, the forecast utility postpones new work until the worker thread completes its processing and becomes available. Increasing this value may place a greater demand on system resources. Decreasing this value may delay the processing of the forecast request.
Default: 7
Limits: 1 or higher.
CHASE_SLEEP
Specifies the time (in seconds) that the chase utility pauses between successive sends of chase data to an agent following a connection failure. Increasing this value may delay recovery during a network failure. Decreasing this value may result in premature chase failures.
Default: 5
Limits: 1 or higher.
DBSPACE_ALARM_SPACE
Specifies the maximum space (in MB) that all the database tables CA Workload Automation AE uses can occupy before the dbspace utility raises an alarm. If the total space used by all the database tables exceeds the value that you specify in this variable, the dbspace utility raises the DB_PROBLEM alarm. Increasing this value may result in the delayed notification of potential database issues due to lack of space. Decreasing this value may result in the premature raising of alarms.
Default: 1000
Limits: 1 or higher.
UA_PORT
Specifies the port number of the r11 legacy agent.
Default: 49152 (SSA virtual port)
Limits: 1-50176
Note: This variable applies to the job log retrieval and user authentication r11 legacy agent requests.

The CA Workload Automation AE Administrator
48 Administration Guide
The CA Workload Automation AE Administrator
On Windows, you can view or modify the configuration parameters or the environment variables of all the CA Workload Automation AE instances that you have installed by using the CA Workload Automation AE Administrator. The configuration parameters are stored in the configuration file. The environment variables are stored in the Windows Registry. The only exceptions are the LOGROLLOVER and ISDBGACTIV environment variables, which are stored in the configuration file.
Important! The scheduler and the application server read the settings in the configuration file only on startup. Therefore, if you make a change that you want to implement immediately, you must either restart the scheduler and application server or pause and resume the scheduler and application server using the Services - CA Workload Automation AE Administrator window of CA Workload Automation AE Administrator.
To open CA Workload Automation AE Administrator, click Start, Programs, CA, Workload Automation AE, Administrator.
Notes:
■ You must have Windows Administrators group privileges to view or modify the configuration parameters of a CA Workload Automation AE instance using CA Workload Automation AE Administrator.
■ On Windows, you can set the configuration parameters by using the CA Workload Automation AE Administrator or the configuration file. The parameters in the configuration file have a corresponding field on the CA Workload Automation AE Administrator. We recommend that you use the CA Workload Automation AE Administrator to set the configuration parameters on Windows.
■ For information about configuring CA Workload Automation AE on Windows using CA Workload Automation AE Administrator, see the Online Help.
More information:
The Configuration File (see page 28)

Alarm Notifications
Chapter 2: Configuring CA Workload Automation AE 49
Alarm Notifications
The Alarm Notification feature provides a method for communicating problems to administrators who are outside of the CA Workload Automation AE event system. You can configure CA Workload Automation AE to call user-defined routines that communicate alarms to specific users in your enterprise. For example, by using email or a command line pager utility, you can notify the administrator when there is a database problem, when the scheduler shuts down, or when the scheduler notifies all application servers to shut down.
You can configure CA Workload Automation AE to call user-defined routines for the following types of system alarms:
■ APP_SERVER_SHUTDOWN
■ DB_PROBLEM
■ DB_ROLLOVER
■ EP_HIGH_AVAIL
■ EP_ROLLOVER
■ EP_SHUTDOWN

Alarm Notifications
50 Administration Guide
Set Alarm Notifications on UNIX
You can configure CA Workload Automation AE to call user-defined routines for system alarms. For example, CA Workload Automation AE can call a routine when there is a database problem, when the scheduler shuts down, or when the scheduler notifies all application servers to shut down.
Follow these steps:
1. Create a file named notify.$AUTOSERV in the $AUTOUSER directory of the computer where the primary or shadow scheduler is running.
2. Copy the sample notification file from $AUTOSYS/install/data/notify.ACE to the $AUTOUSER/notify.$AUTOSERV directory.
3. Edit the following parameters in the notify.$AUTOSERV file as appropriate:
APP_SERVER_SHUTDOWN
Defines the user-defined routine (complete path and executable name) that CA Workload Automation AE calls when all the application servers are shutting down because of a shutdown request received when the sendevent -E STOP_DEMON command with the -v ALL or -v ROLE=A option is issued.
DB_PROBLEM
Defines the user-defined routine (complete path and executable name) that CA Workload Automation AE calls when there is a problem with one of the CA Workload Automation AE databases.
DB_ROLLOVER
Defines the user-defined routine (complete path and executable name) that CA Workload Automation AE calls when it rolls over from dual event server mode to single event server mode.

Alarm Notifications
Chapter 2: Configuring CA Workload Automation AE 51
EP_HIGH_AVAIL
Defines the user-defined routine (complete path and executable name) that CA Workload Automation AE calls when the scheduler is shutting down and the shadow scheduler does not see an update in the event server from the primary scheduler, or when other scheduler takeover problems occur.
EP_ROLLOVER
Defines the user-defined routine (complete path and executable name) that CA Workload Automation AE calls when the shadow scheduler takes over processing.
EP_SHUTDOWN
Defines the user-defined routine (complete path and executable name) that CA Workload Automation AE calls when the active scheduler (the primary or shadow scheduler after failing over in high availability mode) is shutting down because of a normal shutdown process or an error condition.
The alarm notifications are set.
Note: On Windows, you can set the alarm notifications by using the following fields on the Alarm Notification - CA Workload Automation AE Administrator window of CA Workload Automation AE Administrator:
■ Application Server Shutdown
■ Database Problem
■ Database Rollover
■ Scheduler High Availability
■ Scheduler Rollover
■ Scheduler Shutdown
For more information, see the Online Help.
Example: Call the /usr/local/bin/pager Program when the Scheduler Shuts Down
Suppose that you want CA Workload Automation AE to call the program /usr/local/bin/pager when the scheduler shuts down. You must copy the sample notification file from $AUTOSYS/install/data/notify.ACE to the $AUTOUSER/notify.$AUTOSERV directory, and modify the EP_SHUTDOWN line in the notification file as follows:
EP_SHUTDOWN /usr/local/bin/pager $@
If the scheduler shuts down, CA Workload Automation AE passes the pager program a numeric code and a text message. You must code the pager program to accept these parameters.

Configure CA Workload Automation AE to Send Email Notifications on UNIX
52 Administration Guide
Configure CA Workload Automation AE to Send Email Notifications on UNIX
You can configure CA Workload Automation AE to send email notifications to operators or administrators who resolve problems or attend to emergencies.
Follow these steps:
1. Log in to CA Workload Automation AE as a user authorized to stop the scheduler and run the shell that is sourced to use CA Workload Automation AE.
2. Enter the following command at the operating system prompt:
unisrvcntr status waae_sched.$AUTOSERV
The scheduler process ID is displayed as follows:
CA Services Status Report
Component Name Pid Status
------------------------------------ ------- --------------
WAAE Scheduler (ACE) 32220 running
3. Edit the following parameters in the configuration file, and save the file:
NotifyMethod=0|1
0
Specifies that CA Workload Automation AE does not send notifications to operators or administrators even if you specify the notification attributes in the job definition. This is the default.
1
Specifies that CA Workload Automation AE sends email notifications to operators or administrators.
Note: If you set this parameter to 1, you must specify the Simple Mail Transfer Protocol (SMTP) server host name and port number in the NotifySMTPHost parameter.
NotifySMTPHost=hostname:port
hostname
Defines the host name of the SMTP server.
port
Defines the port number the SMTP server uses to send email notifications. Do not specify this value if the SMTP server is using the default port.
Default: 25
Example: SMTPserver:333

Configure CA Workload Automation AE to Send Email Notifications on UNIX
Chapter 2: Configuring CA Workload Automation AE 53
UseSMTPAuthentication=0|1
0
Specifies that the SMTP server does not require authentication to send an email. This is the default.
1
Specifies that the SMTP server requires authentication to send an email.
Note: Check with your administrator and set this parameter to 1 only if the SMTP server requires authentication to send an email.
NotifySMTPUser=user@email_domain.com/password
user@email_domain.com/password
Defines the user name, and associated password, used to connect to the SMTP server.
Note: Specify the user name in the form of an email address. For example, specify [email protected].
NotifySMTPFromAddress
Defines a valid SMTP from email address.
Default: CA WAAE.XXX.DO_NOT_REPLY; XXX specifies the name of the CA Workload Automation AE instance.
Note: You can use $$XXX$$ to specify the name of the CA Workload Automation AE instance. For example, if you set the value to [email protected], the SMTP from email address is displayed as [email protected], where ACE is the name of the CA Workload Automation AE instance.
4. Enter the following command at the operating system prompt:
kill –HUP scheduler_pid
scheduler_pid
Defines the process ID of the scheduler to pause and resume.
The scheduler resumes. CA Workload Automation AE is configured to send email notifications.

Configure CA Workload Automation AE to Send Email Notifications on UNIX
54 Administration Guide
Notes:
■ On Windows, you can enter the equivalent values using the Integration - CA Workload Automation AE Administrator window of CA Workload Automation AE Administrator. For information about configuring CA Workload Automation AE to send email notifications on Windows, see the Online Help.
■ If you specify an invalid email address, CA Workload Automation AE does not send the email notification. A login denied error message is displayed in the scheduler log after the terminal status events are processed. CA Workload Automation AE does not send the email notification even if one of the multiple email addresses you specified is invalid.

Configure CA Workload Automation AE to Send Email Notifications on UNIX
Chapter 2: Configuring CA Workload Automation AE 55
Send Email Notifications Using CA Workload Automation AE
You can configure CA Workload Automation AE to send email notifications to operators or administrators who resolve problems or attend to emergencies. When a job is defined to send an email notification, the scheduler sends the email notification during terminal status processing. The scheduler prepares and sends the email notification. Messages are written to the scheduler log indicating whether the email notification was sent successfully.
To send an email notification using CA Workload Automation AE, specify the following attributes in the job definition:
■ send_notification
■ notification_emailaddress
■ notification_msg
Note: For more information about the notification job attributes, see the Reference Guide.
Example: Send an Email Notification when a Job Completes
This example specifies that an email notification should be sent to [email protected] when job email_job_1 completes.
insert_job: email_job_1
machine: localhost
job_type: c
command: as_test -t 2
send_notification:1
notification_emailaddress:[email protected]
notification_msg:"email_job_1 has completed"
Example: Send an Email Notification when a Job Fails
This example specifies that an email notification should be sent to [email protected] when job email_job_fails fails.
insert_job: email_job_fails
machine: localhost
job_type: c
command: as_test -t 2 -e 2
send_notification:F
notification_emailaddress:[email protected]
notification_msg:"email_job_fails has failed"

Configure CA Workload Automation AE to Send SNMP Traps on UNIX
56 Administration Guide
Configure CA Workload Automation AE to Send SNMP Traps on UNIX
CA Workload Automation AE uses Simple Network Management Protocol (SNMP) to send alarms and signals to SNMP managers. The SNMP trap mechanism is used to post alarms and signals.
When you configure the SnmpManagerHosts and SnmpCommunity parameters, CA Workload Automation AE sends traps to the SNMP manager. You can monitor the alarms and signals generated by CA Workload Automation AE.
For example, CA Workload Automation AE can be integrated with Hewlett-Packard's Node Manager software, versions 4.10 through 7.0x. This enables OpenView users to do the following:
■ Monitor all alarms generated by CA Workload Automation AE.
■ Monitor all signals received by the scheduler.
■ Specify that certain commands be issued when an alarm or signal is received by OpenView.
Suppose that the scheduler receives a STOP_DEMON event. The scheduler posts the SNMP event to OpenView. This can be particularly useful if the STOP_DEMON event is sent to shut down the scheduler. The event is posted to OpenView before the scheduler shuts down.
Follow these steps:
1. Run the shell that is sourced to use CA Workload Automation AE.
2. Enter the following command at the operating system prompt:
unisrvcntr stop waae_sched.$AUTOSERV
The scheduler stops.
3. Edit the following parameters in the configuration file, and save the file:
SnmpManagerHosts=hostname1,hostname2,...
hostname1,hostname2,...
Defines the host names to which the scheduler sends SNMP traps. You can specify a list of host names on the network that are running as the SNMP managers, such as HP's OpenView or IBM's NetView, and to which you want to send SNMP traps (for example, post SNMP events).
SnmpCommunity=public
public
Defines the SNMP community that is associated with all the SNMP traps sent by the scheduler.

Configure CA Workload Automation AE to Send SNMP Traps on UNIX
Chapter 2: Configuring CA Workload Automation AE 57
Notes:
■ The SnmpCommunity parameter is effectively a keyword that is used to filter the SNMP traps that CA Workload Automation AE sends to SNMP managers.
■ The SNMP community is mostly public, and so the value of this parameter is set to public in the configuration file.
4. Enter the following command at the operating system prompt:
unisrvcntr start waae_sched.$AUTOSERV
The scheduler starts. CA Workload Automation AE is configured to send SNMP traps.
Note: On Windows, you can enter the equivalent values using the Integration - CA Workload Automation AE Administrator window of CA Workload Automation AE Administrator. For more information about configuring CA Workload Automation AE to send SNMP traps on Window, see the Online Help.

Configure CA Workload Automation AE to Send SNMP Traps on UNIX
58 Administration Guide
SNMP Traps
CA Workload Automation AE uses the SNMP trap mechanism to post alarms and signals. SNMP traps notify you about events or alarms that are generated during job processing.
The SNMP trap passes the following values:
■ alarmName—The name of the alarm generated.
■ alarmJobName—The job that generated the alarm.
■ alarmText—The message that describes the cause of the alarm.
■ alarmCode—The integer code for the alarm.
■ trapMessage—The trap description. This description includes the instance name and the machine name where the trap is generated from. If the machine name cannot be resolved, NO MACHINE is displayed.
■ trapDate—The date and time the trap is generated.
CA Workload Automation AE generates the following SNMP traps:
trapEventProcessor
Indicates that the scheduler received a fatal signal.
Trap number: 1
Note: The trapEventProcessor trap only passes the trapMessage and trapDate values.
trapForkFail
Indicates that the legacy agent cannot start a user process because no process slots are available.
Trap number: 501
trapMinRunAlarm
Indicates that the job completed in less than the minimum run time. You can specify the minimum run time for a job using the min_run_alarm attribute.
Note: For more information about the min_run_alarm attribute, see the Reference Guide.
Trap number: 502
trapJobFailure
Indicates that the job failed.
Trap number: 503

Configure CA Workload Automation AE to Send SNMP Traps on UNIX
Chapter 2: Configuring CA Workload Automation AE 59
trapMaxRetrys
Indicates that the number of application restarts exceeded the n_retrys limit for the job.
Note: The n_retrys attribute specifies the number of times to restart the job after it exits with a FAILURE status. For more information about the n_retrys attribute, see the Reference Guide.
Trap number: 505
trapStartJobFail
Indicates that the job cannot start.
Trap number: 506
trapEventHdlrError
Indicates that the scheduler generated an error while processing an event.
Trap number: 507
trapEventQueError
Indicates that the event cannot be marked as processed.
Trap number: 508
trapJobNotOnHold
Indicates that the job cannot be placed on hold even after the JOB_ON_HOLD event occurred.
Trap number: 509
trapMaxRunAlarm
Indicates that the job exceeded the maximum run time limit. You can specify the maximum run time for a job using the max_run_alarm attribute.
Note: For more information about the max_run_alarm attribute, see the Reference Guide.
Trap number: 510
trapResource
Indicates that the resources required to run the job are not available.
Trap number: 512
trapMissingHeartbeat
Indicates that the job did not send a heartbeat within the interval specified for the job.
Trap number: 513

Configure CA Workload Automation AE to Send SNMP Traps on UNIX
60 Administration Guide
trapChaseAlarm
Indicates that a chase alarm has been generated.
Trap number: 514
trapDatabaseCommAlarm
Indicates that the legacy agent cannot send an event to the database.
Trap number: 516
trapAppServerComm
Indicates that the autoping command is not successful. The agent cannot communicate with the application server.
Trap number: 517
trapVersionMismatch
Indicates that the legacy agent version is different from the version of the routine or process calling it.
Trap number: 518
trapDbRollover
Indicates that CA Workload Automation AE rolled over from dual event server mode to single event server mode.
Trap number: 519
trapEpRollover
Indicates that the shadow scheduler is taking over.
Trap number: 520
trapEpShutdown
Indicates that the scheduler is shutting down.
Trap number: 521
trapEpHighAvail
Indicates that CA Workload Automation AE running in high availability mode detected a system or network problem.
Trap number: 522

Configure CA Workload Automation AE to Send SNMP Traps on UNIX
Chapter 2: Configuring CA Workload Automation AE 61
trapDbProblem
Indicates a problem with one of the CA Workload Automation AE databases.
Trap number: 523
trapDuplicateEvent
Indicates that the event server processed a duplicate event.
Trap number: 524
trapInstanceUnavailable
Indicates that the event server of the receiving CA Workload Automation AE instance cannot be reached.
Trap number: 525
trapAutoPing
Indicates that the autoping -M -A command cannot connect to the client.
Trap number: 526
trapExternalDepsError
Indicates that the cross-platform interface cannot send external dependencies to the remote node.
Trap number: 529
trapMachineUnavailable
Indicates that the machine the scheduler communicates with is not responding or has been deleted.
Trap number: 532
trapServiceDeskFail
Indicates that the scheduler cannot open a service desk ticket for a failing job.
Trap number: 533
trapUninotifyFailure
Indicates that the scheduler cannot send a notification to the requesting job.
Trap number: 534

Configure CA Workload Automation AE to Send SNMP Traps on UNIX
62 Administration Guide
trapBadCPIJobName
Indicates that the cross-platform interface received a job name that is not valid for the agent it is submitting the job to.
Trap number: 535
trapCPIUnavailable
Indicates that the CA Workload Automation AE cross-platform interface is not running.
Trap number: 536
trapMustStartAlarm
Indicates that the must start alarm has been generated.
Trap number: 537
trapMustCompleteAlarm
Indicates that the must complete alarm has been generated.
Trap number: 538
trapKillJobFail
Indicates that the KILLJOB event failed for a job.
Trap number: 540
trapSendSigFail
Indicates that the SEND_SIGNAL event failed.
Trap number: 541
trapReplyResponseFail
Indicates that the REPLY_RESPONSE event failed because the job status is not WAIT_REPLY.
Trap number: 542
trapReturnResourceFail
Indicates that the job failed to release resources.
Trap number: 543
trapRestartJobFail
Indicates that the RESTARTJOB event failed.
Trap number: 544

Disable IP Address Caching on UNIX
Chapter 2: Configuring CA Workload Automation AE 63
Disable IP Address Caching on UNIX
By default, CA Workload Automation AE caches the IP addresses of the computers that it connects to for running jobs or any other communication. CA Workload Automation AE automatically recovers from a dynamic IP address when the old IP address change in the cache become invalid. CA Workload Automation AE does not function properly when a cached IP address is still valid but points to another machine with a CA Workload Automation AE installation on it. To avoid potential loss of productivity in dynamic environments, disable IP address caching.
Note: CA Workload Automation AE verifies the IP address on every network request when IP address caching is disabled. These verifications impact system performance. We recommend that you disable IP address caching only in dynamic environments.
Follow these steps:
1. Run the shell that is sourced to use CA Workload Automation AE.
2. Enter the following commands at the operating system prompt:
unisrvcntr status waae_sched.$AUTOSERV
unisrvcntr status waae_server.$AUTOSERV
The scheduler and application server process IDs are displayed as follows:
CA Services Status Report
Component Name Pid Status
------------------------------------ ------- --------------
WAAE Scheduler (ACE) 32220 running
CA Services Status Report
Component Name Pid Status
------------------------------------ ------- --------------
WAAE Application Server (ACE) 33330 running
3. Edit the following parameter in the configuration file, and save the file:
EnableIPCaching=0
Note: You can resume IP address caching by setting this parameter to value of 1.

Disable IP Address Caching on UNIX
64 Administration Guide
4. Enter the following commands at the operating system prompt:
kill –HUP scheduler_pid
kill –HUP applicationserver_pid
scheduler_pid
Defines the process ID of the scheduler that you want to pause and resume.
applicationserver_pid
Defines the process ID of the application server that you want to pause and resume.
The scheduler and application server resume. IP address caching is disabled.

Chapter 3: Modifying the Scheduler Settings on UNIX 65
Chapter 3: Modifying the Scheduler Settings on UNIX
This section contains the following topics:
Set the Minimum Scheduler Log Disk Space (see page 66) Define the Load Balancing Method (see page 67) Configure the Scheduler Heartbeat Interval (see page 70) Set the Values to Calculate the Wait Time Between Restart Attempts (see page 71) Specify the Signals for a KILLJOB Event (see page 72) Set the Maximum Number of Job Restart Attempts (see page 74) Set the Event Transfer Time-Out for Dual Event Server Mode (see page 76) Set the Interval Between Job Heartbeat Checks (see page 77) Specify a Local Machine to Run Jobs (see page 78) Configure the Resource Wait Poll Interval (see page 80) Control the Starting of Jobs in PEND_MACH Status (see page 81) Control the Status of Jobs Scheduled on an Offline Machine (see page 87) Define the Communication Ports for the Scheduler (see page 91) Verify Whether Jobs and Agents are Running at Scheduler Startup (see page 94) Start the Scheduler in Global Auto Hold Mode (see page 95) Configure CA Workload Automation AE to Skip Starting Condition Evaluation for Queued Jobs (see page 97) Redirect Job Profile Information to a File (see page 98) Append Information to Standard Error and Standard Output Files (see page 102) Append Event Message Text to Event Messages (see page 104) Aggregate Statistics Automatically (see page 105) Set Job Attribute Environment Variables (see page 107) Specify the Scheduler Role (see page 109) Specify the Primary Scheduler Failback Mode (see page 110) Activate the Cross-Platform Interface (see page 111)

Set the Minimum Scheduler Log Disk Space
66 Administration Guide
Set the Minimum Scheduler Log Disk Space
You can set the minimum amount of disk space that must be available to write to the scheduler log.
Follow these steps:
1. Log in to CA Workload Automation AE as a user authorized to stop the scheduler and run the shell that is sourced to use CA Workload Automation AE.
2. Enter the following command at the operating system prompt:
sendevent -E STOP_DEMON
The scheduler completes any processing it is currently performing and stops.
3. Edit the following parameter in the configuration file, and save the file:
FileSystemThreshold=value
value
Defines the minimum amount of disk space that must be available to write to the scheduler log.
Default: 20480KB (20MB)
Limits: 8192KB (8MB)-102400KB (100MB)
Note: If the specified value is not in the valid range, the scheduler issues a warning message and resets the value to the default.
4. Enter the following command at the operating system prompt:
eventor
The scheduler starts. The minimum scheduler log disk space is configured.
Note: On Windows, you can enter the equivalent value using the FileSystem Threshold KB field on the Scheduler - CA Workload Automation AE Administrator window of CA Workload Automation AE Administrator. For information about setting the minimum scheduler log disk space on Windows, see the Online Help.

Define the Load Balancing Method
Chapter 3: Modifying the Scheduler Settings on UNIX 67
FileSystemThreshold Parameter
The FileSystemThreshold parameter in the configuration file defines the minimum amount of disk space that must be available to write to the scheduler log file (event_demon.$AUTOSERV).
If the available disk space falls below the specified value, the scheduler issues warning messages (every minute) similar to the following:
CAUAJM_W_40358 The disk partition containing the CA WAAE Scheduler log file is full
CAUAJM_W_40359 The CA WAAE Scheduler will shutdown if partition has less than 8,388,608
bytes available.
If the disk space falls below 8192KB (8MB), the scheduler issues an EP_SHUTDOWN alarm, shuts down, and displays messages similar to the following:
CAUAJM_W_40360 Error: No disk space left to write the CA WAAE Scheduler log file.
CAUAJM_I_40247 CA WAAE Scheduler processing of events complete.
CAUAJM_I_40248 CA WAAE Scheduler shutdown complete. Exiting.
The scheduler passes the FileSystemThreshold setting to the legacy agents when running a job. If the available disk space falls below the specified value, the legacy agents write dots in the agent log file. If the available disk space falls below 8192KB (8MB), the legacy agents issue a warning and stop writing to the log file, but the legacy agent service keeps running.
Define the Load Balancing Method
You can define the method that determines the percentage of CPU cycles available on a real machine belonging to a virtual machine. This method is used to achieve load balancing.
Follow these steps:
1. Log in to CA Workload Automation AE as a user authorized to stop the scheduler and run the shell that is sourced to use CA Workload Automation AE.
2. Enter the following command at the operating system prompt:
sendevent -E STOP_DEMON
The scheduler completes any processing it is currently performing and stops.

Define the Load Balancing Method
68 Administration Guide
3. Edit the following parameter in the configuration file, and save the file:
MachineMethod=cpu_mon|vmstat|rstatd|job_load
cpu_mon
Specifies that the cpu_mon method is used to determine the percentage of available CPU cycles on the agent. The scheduler runs the CPU Monitoring (OMCPU) job on the target computer to get the available CPU cycles. This is the default.
Notes:
■ The cpu_mon machine method does not apply to z/OS machines (CA Workload Automation Agent on z/OS) because the OMCPU job is not supported on z/OS.
■ If the load balancing request is sent to a legacy agent, CA Workload Automation AE uses the vmstat method to obtain the available CPU cycles.
vmstat
Specifies that the vmstat method is used to determine the percentage of available CPU cycles on the legacy agent. This method applies to legacy agents only. The scheduler invokes the legacy agent in a specialized mode to calculate the available CPU cycles. The UNIX legacy agents invoke the virtual memory statistics tool (vmstat) to get the available CPU cycles. The Windows legacy agents utilize Windows performance counters to get the available CPU cycles.
Note: If the load balancing request is sent to an agent, CA Workload Automation AE uses the cpu_mon method to obtain the available CPU cycles.
rstatd
Specifies that the rstatd method is used by the UNIX schedulers to determine the percentage of available CPU cycles on UNIX computers. The scheduler makes a UNIX remote procedure call to the remote kernel statistics daemon (rstatd) on the target computer to get the available CPU cycles.
Notes:
■ You cannot configure the rstatd method for the Windows scheduler.
■ You must ensure that the rstatd daemon is running on the UNIX scheduler and on all target UNIX computers.
■ You must set the value of the opsys attribute for type 'a' machines to one of the following values that support the rstatd method: aix, hpux, linux, openvms, or solaris.
■ If the load balancing request is sent to an agent with an opsys attribute value that does not support the rstatd method, CA Workload Automation AE uses the cpu_mon method to obtain the available CPU cycles.
■ If the load balancing request is sent to a Windows legacy agent, CA Workload Automation AE uses the vmstat method to obtain the available CPU cycles.

Define the Load Balancing Method
Chapter 3: Modifying the Scheduler Settings on UNIX 69
job_load
Specifies that the job_load method is used to determine the percentage of available CPU cycles. The scheduler uses the job_load and max_load attributes to calculate the available load for a computer.
Note: The cpu_mon, vmstat, or rstatd settings check the CPU usage statistics of candidate machines, whereas the job_load setting checks only the job load and no real time usage of machine is required.
4. Enter the following command at the operating system prompt:
eventor
The scheduler starts. The load balancing method is defined.
Notes:
■ The cpu_mon and vmstat default values are interchangeable. Based on the machine to which the load balancing request is sent, CA Workload Automation AE uses cpu_mon or vmstat method. If the load balancing request is sent to the agent, the cpu_mon method is invoked. If the load balancing request is sent to a legacy agent, the vmstat method is invoked.
■ On Windows, you can enter the equivalent value using the Machine Method field on the Scheduler - CA Workload Automation AE Administrator window of CA Workload Automation AE Administrator. For information about defining the load balancing method on Windows, see the Online Help.
Verify that the Remote Kernel Statistics Daemon is Running
If you set the MachineMethod parameter to rstatd, you must verify that the remote kernel statistics daemon is running on the scheduler and on all the target computers.
Follow these steps:
1. Edit the internet services daemon (inetd) configuration file (/etc/inetd.conf) on all client computers, and uncomment the rstatd entry.
2. Send a SIGHUP signal (kill -1).
The running inetd process is reset.
Note: Sometimes a kill -1 command is not sufficient to reset the inetd. If rstatd fails, you might have to issue a kill -9 command, and restart inetd. If necessary, check with your systems administrator.

Configure the Scheduler Heartbeat Interval
70 Administration Guide
Configure the Scheduler Heartbeat Interval
In high availability mode, the primary, shadow, and tie-breaker schedulers update the database with their heartbeats at regular intervals. If a scheduler does not update the database after two intervals, that scheduler is deemed unavailable and the system either fails over to the available scheduler or leaves high availability mode. You can configure the length of each interval (in seconds).
Note: If CA Workload Automation AE runs in high availability mode with dual event servers, the specified high availability poll interval value doubles. The increased interval provides enough time for both databases to be updated before the schedulers poll for one another's status. For example, when you set the interval to 15 seconds, the schedulers refresh their status every 15 seconds in single event server mode and every 30 seconds in dual event server mode.
Follow these steps:
1. Log in to CA Workload Automation AE as a user authorized to stop the scheduler and run the shell that is sourced to use CA Workload Automation AE.
2. Enter the following command at the operating system prompt:
sendevent -E STOP_DEMON
The scheduler completes any processing it is currently performing and stops.
3. Edit the following parameter in the configuration file, and save the file:
HAPollInterval=value
value
Defines the time interval (in seconds) between status polls when the scheduler runs in high availability mode.
Default: 15
4. Enter the following command at the operating system prompt:
eventor
The scheduler starts. The scheduler heartbeat interval is configured.
Note: On Windows, you can enter the equivalent value using the HA Poll Interval field on the Scheduler - CA Workload Automation AE Administrator window of CA Workload Automation AE Administrator. For information about configuring the scheduler heartbeat interval on Windows, see the Online Help.

Set the Values to Calculate the Wait Time Between Restart Attempts
Chapter 3: Modifying the Scheduler Settings on UNIX 71
Set the Values to Calculate the Wait Time Between Restart Attempts
You can set the RestartFactor, RestartConstant, and MaxRestartWait parameter values to calculate the maximum amount of time (in seconds) that CA Workload Automation AE waits before it tries to restart a job.
The following formula is used to calculate the wait time:
WaitTime=RestartConstant+(Num_of_Trys*RestartFactor)
if WaitTime > MaxRestartWait,
then WaitTime = MaxRestartWait
The Num_of_Trys value is specified by the internal job starter counter, which indicates the number of times CA Workload Automation AE has already tried to start the job. If the calculated wait time is greater than the specified value for the MaxRestartWait parameter, then the wait time is set to the value of the MaxRestartWait parameter.
Follow these steps:
1. Log in to CA Workload Automation AE as a user authorized to stop the scheduler and run the shell that is sourced to use CA Workload Automation AE.
2. Enter the following command at the operating system prompt:
sendevent -E STOP_DEMON
The scheduler completes any processing it is currently performing and stops.
3. Edit the following parameters in the configuration file, and save the file:
RestartConstant=constant
constant
Defines the Restart Constant value used for calculating the wait time (in seconds) between attempts to restart a job.
Default: 10
RestartFactor=factor
factor
Defines the Restart Factor value used for calculating the wait time (in seconds) between attempts to restart a job. This value multiplies with every job restart and is used to gradually increase the number of seconds per retry attempt.
Default: 5

Specify the Signals for a KILLJOB Event
72 Administration Guide
MaxRestartWait=wait_time
wait_time
Defines the maximum amount of time (in seconds) that CA Workload Automation AE waits before it tries to restart a job.
Default: 300
4. Enter the following command at the operating system prompt:
eventor
The scheduler starts. The wait time between restart attempts is calculated based on the values set.
Note: On Windows, you can enter the equivalent values using the Restart Constant, Restart Factor, and Max Restart Wait fields on the Scheduler - CA Workload Automation AE Administrator window of CA Workload Automation AE Administrator. For information about calculating the wait time between restart attempts on Windows, see the Online Help.
Specify the Signals for a KILLJOB Event
You can specify a comma-separated list of signals to send to a job whenever the KILLJOB event is sent to a legacy UNIX agent.
Note: This procedure applies to UNIX legacy agents only.
Follow these steps:
1. Log in to CA Workload Automation AE as a user authorized to stop the scheduler and run the shell that is sourced to use CA Workload Automation AE.
2. Enter the following command at the operating system prompt:
sendevent -E STOP_DEMON
The scheduler completes any processing it is currently performing and stops.

Specify the Signals for a KILLJOB Event
Chapter 3: Modifying the Scheduler Settings on UNIX 73
3. Edit the following parameter in the configuration file, and save the file:
KillSignals=value,value,...
value,value,...
Defines one or more signals to send to a job whenever the KILLJOB event is sent.
Default: 2,9
Notes:
■ The signals are referenced by numeric process IDs (PIDs). Each signal has a default set of effects on a program.
■ You can specify multiple signals. Separate each value with a comma. The signals are sent in the order listed, with a five-second interval between each call.
■ We recommend that you set the KillSignals parameter to 2,9. In most cases, this configures CA Workload Automation AE to return a TERMINATED state for the target job. If it does not, set the KillSignals parameter to 9.
■ The KillSignals parameter applies to UNIX legacy agents only.
4. Enter the following command at the operating system prompt:
eventor
The scheduler starts. The signals for the KILLJOB event are configured for legacy UNIX agents.
Notes:
■ The KillSignals listed in the configuration file are overridden when you issue the sendevent command with the -k option.
■ On Windows, you can enter the equivalent value using the Legacy Kill Signals field on the Scheduler - CA Workload Automation AE Administrator window of CA Workload Automation AE Administrator. For information about specifying the signals for the KILLJOB event on Windows, see the Online Help.

Set the Maximum Number of Job Restart Attempts
74 Administration Guide
Set the Maximum Number of Job Restart Attempts
You can set the maximum number of times the scheduler tries to restart a job. CA Workload Automation AE may be unable to start a job due to system problems including computer unavailability, a timed-out socket connect, an inability to create new processes, or failure of the file system space resource check.
Follow these steps:
1. Log in to CA Workload Automation AE as a user authorized to stop the scheduler and run the shell that is sourced to use CA Workload Automation AE.
2. Enter the following command at the operating system prompt:
sendevent -E STOP_DEMON
The scheduler completes any processing it is currently performing and stops.
3. Edit the following parameter in the configuration file, and save the file:
MaxRestartTrys=value
value
Defines the maximum number of times the scheduler tries to restart a job.
Default: 10
Note: When the MaxRestartTrys value is zero, the job is not restarted.
4. Enter the following command at the operating system prompt:
eventor
The scheduler starts. The maximum number of job restart attempts is configured.
Notes:
■ The MaxRestartTrys parameter is instance-specific. You can configure it to be agent-specific for a CA Workload Automation AE instance.
■ The MaxRestartTrys parameter governs retries due to system or network problems. This value is different from the n_retrys job definition attribute, which controls restarts when a job fails due to application failure (for example, when CA Workload Automation AE cannot find a file or a command, or permissions are not properly set). For more information about the n_retrys job definition attribute, see the Reference Guide.
■ On Windows, you can enter the equivalent value using the Max Restart Trys field on the Scheduler - CA Workload Automation AE Administrator window of CA Workload Automation AE Administrator. For information about setting the maximum number of job restart attempts on Windows, see the Online Help.

Set the Maximum Number of Job Restart Attempts
Chapter 3: Modifying the Scheduler Settings on UNIX 75
Configure the MaxRestartTrys Parameter to be Machine-Specific
The MaxRestartTrys parameter is instance-specific. You can configure the MaxRestartTrys parameter to be machine-specific for a CA Workload Automation AE instance.
Follow these steps:
1. Create a configuration file named MaxRestartTrys.%AUTOSERV% (on Windows) or MaxRestartTrys.$AUTOSERV (on UNIX) in the AUTOUSER directory on the scheduler machine.
2. In the configuration file, enter the following:
machine_name: value
machine_name
Specifies the name of the CA Workload Automation AE machine where you want to define the MaxRestartTrys value.
value
Defines the maximum number of times the scheduler tries to restart a job after a system or network problem occurs.
3. Repeat Step 2 for each CA Workload Automation AE machine where you want to define the MaxRestartTrys value.
Note: Each entry must begin on a new line.
4. Save the file.
The MaxRestartTrys parameter is defined and is now machine-specific for a CA Workload Automation AE instance.
Notes:
■ If you do not create the MaxRestartTrys.%AUTOSERV% (on Windows) or MaxRestartTrys.$AUTOSERV (on UNIX) configuration file and add entries for CA Workload Automation AE machines where you want to define the MaxRestartTrys value, the instance-wide MaxRestartTrys parameter is applied.
■ After you define the machine-specific MaxRestartTrys value, you must restart the scheduler for the settings to take effect.
■ When the MaxRestartTrys value is zero, the job is not restarted.
■ If the entry for the machine does not follow the correct syntax or the value is either non-numerical or less than zero, the entry is ignored.
■ If multiple entries exist for a machine, the last occurring entry takes effect.

Set the Event Transfer Time-Out for Dual Event Server Mode
76 Administration Guide
Set the Event Transfer Time-Out for Dual Event Server Mode
You can set the time-out delay (in seconds) for transferring events when you run CA Workload Automation AE in dual event server mode. An event that is missing from one event server is copied over to the second event server after this time-out delay.
Follow these steps:
1. Log in to CA Workload Automation AE as a user authorized to stop the scheduler and run the shell that is sourced to use CA Workload Automation AE.
2. Enter the following command at the operating system prompt:
sendevent -E STOP_DEMON
The scheduler completes any processing it is currently performing and stops.
3. Edit the following parameter in the configuration file, and save the file:
EvtTransferWaitTime=value
value
Defines the time-out delay for transferring events in dual event server mode.
Default: 5
4. Enter the following command at the operating system prompt:
eventor
The scheduler starts. The event transfer time-out for dual event server mode is configured.
Note: On Windows, you can enter the equivalent value using the Event Transfer Wait field on the Scheduler - CA Workload Automation AE Administrator window of CA Workload Automation AE Administrator. For information about setting the event transfer time-out for dual event server mode on Windows, see the Online Help.

Set the Interval Between Job Heartbeat Checks
Chapter 3: Modifying the Scheduler Settings on UNIX 77
Set the Interval Between Job Heartbeat Checks
You can set the time interval (in minutes) that the scheduler uses when checking for late or missing heartbeats from jobs that are running. The scheduler issues the MISSING_HEARTBEAT alarm for every job that has not issued the HEARTBEAT event within the job’s heartbeat interval.
Note: The Check_Heartbeat is an optional parameter. If there are no applications that send heartbeats, you do not need to set this parameter.
Follow these steps:
1. Log in to CA Workload Automation AE as a user authorized to stop the scheduler and run the shell that is sourced to use CA Workload Automation AE.
2. Enter the following command at the operating system prompt:
sendevent -E STOP_DEMON
The scheduler completes any processing it is currently performing and stops.
3. Edit the following parameter in the configuration file, and save the file:
Check_Heartbeat=value
value
Defines the time interval (in minutes) that the scheduler uses when checking for heartbeats.
Default: 2
4. Enter the following command at the operating system prompt:
eventor
The scheduler starts. The interval between job heartbeat checks is configured.
Note: On Windows, you can enter the equivalent value using the Job Heartbeat Interval field on the Scheduler - CA Workload Automation AE Administrator window of CA Workload Automation AE Administrator. For information about setting the interval between heartbeat checks on Windows, see the Online Help.

Specify a Local Machine to Run Jobs
78 Administration Guide
Check_Heartbeat Parameter
The Check_Heartbeat parameter in the configuration file defines the time interval (in minutes) that the scheduler uses when checking for late or missing heartbeats from jobs that are running.
A heartbeat is a job event that is sent at regular intervals to the application server by a user application started by an agent. User applications can be programmed to issue heartbeats by linking with the CA Workload Automation AE Software Development Kit (SDK) library. Thus, heartbeats can be used to monitor the progress of user applications. The scheduler checks that the HEARTBEAT event has occurred during the heartbeat interval specified in the heartbeat_interval attribute in a job definition. The scheduler issues the MISSING_HEARTBEAT alarm for every job that has not issued the HEARTBEAT event within the job’s heartbeat interval.
Note: The scheduler (not the agent) checks for heartbeats. If there is a problem between the user application and the application server, the HEARTBEAT event is not sent and the scheduler issues an alarm at the next check heart beat interval. Therefore, the HEARTBEAT event can indicate whether the network is working properly.
Specify a Local Machine to Run Jobs
You can specify the host name of the type 'a' machine that acts as the localhost. This machine must be defined in the event server.
Note: An empty value is allowed.
On startup, the scheduler checks the value of the LocalMachineDefinition parameter that is defined in the configuration file. If a value is specified, the scheduler uses the specified machine to run jobs if the job's machine attribute is localhost.
Follow these steps:
1. Log in to CA Workload Automation AE as a user authorized to stop the scheduler and run the shell that is sourced to use CA Workload Automation AE.
2. Enter the following command at the operating system prompt:
sendevent -E STOP_DEMON
The scheduler completes any processing it is currently performing and stops.

Specify a Local Machine to Run Jobs
Chapter 3: Modifying the Scheduler Settings on UNIX 79
3. Edit the following parameter in the configuration file, and save the file:
LocalMachineDefinition=name
name
Specifies the host name of the type 'a' machine that acts as the localhost. This machine must be defined in the event server.
Notes:
■ If the LocalMachineDefinition parameter has an empty value, CA Workload Automation AE performs system calls to get the host name of the machine. The clients can add a machine definition using the resolved name as the machine name while the scheduler is running. The scheduler detects the presence of this machine definition and uses this machine definition when it starts running jobs on the localhost.
■ When you define a job, if you set the machine attribute to localhost and the LocalMachineDefinition parameter has an empty value and no machine definition exists for the resolved host name of the scheduler, a warning message is issued and CA Workload Automation AE fails to start the job on the localhost.
■ The LocalMachineDefinition parameter value may differ on the primary scheduler and the shadow scheduler. If the shadow scheduler fails over due to the loss of the primary scheduler, the jobs that are scheduled to run on the localhost are redirected to run either on the machine defined in the LocalMachineDefinition parameter or on the machine with the resolved host name of the shadow scheduler (if defined).
4. Enter the following command at the operating system prompt:
eventor
The scheduler starts. A local machine is defined.
Note: On Windows, you can enter the equivalent value using the Local Machine Definition field on the Scheduler - CA Workload Automation AE Administrator window of CA Workload Automation AE Administrator. For information about defining a local machine on Windows, see the Online Help.

Configure the Resource Wait Poll Interval
80 Administration Guide
Configure the Resource Wait Poll Interval
You can configure how frequently the scheduler polls for resource availability. The scheduler polls at the specified intervals to determine the resource availability for all jobs in RESWAIT state. The eligible jobs are started when the resources are available.
Follow these steps:
1. Log in to CA Workload Automation AE as a user authorized to stop the scheduler and run the shell that is sourced to use CA Workload Automation AE.
2. Enter the following command at the operating system prompt:
sendevent -E STOP_DEMON
The scheduler completes any processing it is currently performing and stops.
3. Edit the following parameter in the configuration file, and save the file:
ResourceWaitPollInterval=value
value
Defines the poll interval value (in seconds) for how frequently the scheduler polls for resource availability.
Default: 15
4. Enter the following command at the operating system prompt:
eventor
The scheduler starts. The resource wait poll interval is configured.
Note: On Windows, you can enter the equivalent value using the Res Wait Poll Interval field on the Scheduler - CA Workload Automation AE Administrator window of CA Workload Automation AE Administrator. For information about configuring resource wait poll interval on Windows, see the Online Help.

Control the Starting of Jobs in PEND_MACH Status
Chapter 3: Modifying the Scheduler Settings on UNIX 81
ResourceWaitPollInterval Parameter
The ResourceWaitPollInterval parameter in the configuration file defines how frequently (in seconds) the scheduler polls for resource availability.
When you send a STARTJOB event to a job that is defined to use a real or virtual resource, the scheduler queries for the availability of the required resources. If the required resource is unavailable, the job enters RESWAIT state because the job's resource condition is not met. The job remains in RESWAIT state until the resources are available. The scheduler polls at the specified intervals to determine the resource availability for all jobs in RESWAIT state. The eligible jobs are started when the resources are available.
Note: More virtual resources can be made available by increasing their quantity using jil. Otherwise, resources become available when other jobs that are using specific resources go into SUCCESS, FAILURE, or TERMINATED state and the resources are released.
Control the Starting of Jobs in PEND_MACH Status
The scheduler puts a machine in the offline state if it is unable to contact the agent to run a job. You can manually put a machine in the offline state by issuing the sendevent command to send a MACH_OFFLINE event. Jobs that are scheduled to start on offline machines are placed in PEND_MACH status by default.
When an offline machine returns to service, the scheduler immediately starts all jobs in PEND_MACH status on that machine. Starting too many jobs in PEND_MACH status on the machine at a time places a heavy demand for resources on both the scheduler and agent computers. This may introduce performance problems that affect all scheduled workload.
You can control the starting of jobs in PEND_MACH status to reduce the load on the scheduler and agent computers.
Follow these steps:
1. Log in to CA Workload Automation AE as a user authorized to stop the scheduler and run the shell that is sourced to use CA Workload Automation AE.
2. Enter the following command at the operating system prompt:
unisrvcntr status waae_sched.$AUTOSERV
The scheduler process ID is displayed as follows:
CA Services Status Report
Component Name Pid Status
------------------------------------ ------- --------------
WAAE Scheduler (ACE) 32220 running

Control the Starting of Jobs in PEND_MACH Status
82 Administration Guide
3. Edit the following parameter in the configuration file, and save the file:
GlobalPendMachInterval=interval,burst
interval
Defines the time interval (in seconds) that the scheduler waits before starting jobs in PEND_MACH status when an offline machine returns to service.
Default: 0; if 0, the scheduler starts all jobs in PEND_MACH status with no delay between job starts and the burst value is ignored.
Limits: 0-3600
burst
Defines the number of jobs in PEND_MACH status that the scheduler starts after waiting for the specified interval.
Note: Use caution when you specify the burst value. For example, if you set the GlobalPendMachInterval value to 1,100 and three offline machines return to service, the scheduler tries to start 300 jobs per second, which may not be supported in all environments due to system constraints.
4. Enter the following command at the operating system prompt:
kill –HUP scheduler_pid
scheduler_pid
Defines the process ID of the scheduler to pause and resume.
The scheduler resumes. The jobs in PEND_MACH status start based on the values specified.
Note: On Windows, you can enter the equivalent values using the Global Pend Mach Interval field on the Scheduler - CA Workload Automation AE Administrator window of CA Workload Automation AE Administrator. For information about controlling the starting of jobs in PEND_MACH status on Windows, see the Online Help.

Control the Starting of Jobs in PEND_MACH Status
Chapter 3: Modifying the Scheduler Settings on UNIX 83
GlobalPendMachInterval Parameter
The GlobalPendMachInterval parameter in the configuration file defines the following:
■ The time interval (in seconds) that the scheduler waits before starting jobs in PEND_MACH status when an offline machine returns to service.
■ The burst value, that is, the number of jobs in PEND_MACH status that the scheduler starts after waiting for the specified interval.
The scheduler starts the specified number of jobs, waits for the specified interval, starts the specified number of jobs, waits for the specified interval, and so on. This process repeats until all jobs in PEND_MACH status for that machine are started.
When an offline machine returns to service, the scheduler updates the status of all jobs scheduled for that machine from PEND_MACH to ACTIVATED unless the jobs fail their starting condition checks. If a job fails its starting condition checks, the scheduler updates its status to INACTIVE, unless it is in a box. All jobs contained in boxes are placed in the ACTIVATED state, even if they fail their starting condition checks.
Note: You can configure CA Workload Automation AE to skip re-evaluation of starting conditions for queued jobs. If you use this configuration option, the scheduler immediately updates jobs in the PEND_MACH state to ACTIVATED when the required machine returns to service. For more information about this configuration option, see the Administration Guide or the Online Help.
If the ACTIVATED jobs meet their starting conditions or if CA Workload Automation AE is configured to skip starting condition evaluation for queued jobs, the scheduler verifies the following before starting the jobs:
■ Manual changes to the status of the job—If you send a manual CHANGE_STATUS event for a job and the status of the job is updated, the scheduler detects the status change and does not run the job on the machine. A message is written in the scheduler log and the scheduler proceeds with the next job start.
■ Issuing a FORCE_STARTJOB event—If you issue a FORCE_STARTJOB event for a job, the scheduler detects the status change and does not run the job on the machine. A message is written in the scheduler log and the scheduler proceeds with the next job start.

Control the Starting of Jobs in PEND_MACH Status
84 Administration Guide
■ Reevaluation of the scheduled machine—The scheduler runs a job on a different machine (any machine other than the machine that was used to bring the job out of the PEND_MACH status) during the following situations:
– If a job is defined to run on a virtual machine and one or more component machines in the virtual machine return to service, the scheduler determines the best machine for the job from one of the component machines in the virtual machine. The same applies for jobs that are defined to run against a comma-separated list of machines. When one or more machines in the comma-separated list of machines return to service, the scheduler determines the best machine for the job from one of the machines in the list.
– If a job is initially defined against a single machine and you define a one-time override against the machine attribute while the job is in PEND_MACH status and the initial single machine returns to service, the scheduler starts the job on the machine specified by the override. If the scheduler cannot contact the machine specified by the override, it puts the job in PEND_MACH status until the machine specified by the override becomes available.
– If a job is initially defined against a virtual machine and you define a one-time override against the machine attribute while the job is in PEND_MACH status and one or more component machines in the initial virtual machine return to service, the scheduler starts the job on the machine specified by the override. If the scheduler cannot contact the machine specified by the override, it puts the job in PEND_MACH status until the machine specified by the override becomes available.
– If a job is initially defined against a comma-separated list of machines and you define a one-time override against the machine attribute while the job is in PEND_MACH status, the scheduler behaves as follows:
– If you define a one-time override to a single machine while the job is in PEND_MACH status, the scheduler starts the job when the overridden single machine returns to service.
– If you define a one-time override to a virtual machine while the job is in PEND_MACH status, the scheduler starts the job when one or more component machines in the overridden virtual machine return to service. The scheduler determines the best machine for the job from one of the component machines in the overridden virtual machine.

Control the Starting of Jobs in PEND_MACH Status
Chapter 3: Modifying the Scheduler Settings on UNIX 85
– If you define a one-time override to a different list of machines while the job is in PEND_MACH status, the scheduler starts the job when one or more machines in the overridden list return to service. The scheduler determines the best machine for the job from one of the machines in the overridden list.
If the scheduler cannot contact the machine specified by the override, it puts the job in PEND_MACH status until the machine specified by the override becomes available.
Note: Overriding the machine attribute of a job in PEND_MACH status does not cause the scheduler to start the job. The job remains in PEND_MACH status regardless of the status of the machine specified by the override. The scheduler only evaluates jobs in PEND_MACH status when it processes the MACH_ONLINE events.
■ Online machine status—If the scheduler loses contact with the machine, the machine is put in offline state and all remaining jobs are put back in PEND_MACH status.
Notes:
■ The GlobalPendMachInterval parameter is applied at the global level and not at the machine level or job level. That is, this parameter value applies to all machines that return to service and have jobs in PEND_MACH status that are scheduled to start on them.
■ If you set the interval to 0 (the default value), the scheduler starts all jobs in PEND_MACH status with no delay between job starts and the burst value is ignored.
■ The order in which the jobs are started depends on the job priority and amount of time the job has been in PEND_MACH status. For example, if JOB1, JOB2, and JOB3 have the same priority and they enter the PEND_MACH status at 08:00:00 a.m., 08:00:01a.m., and 08:00:02 a.m. respectively, the order in which they are started is JOB1, JOB2, and JOB3. Once the scheduler determines the starting order of jobs that are coming out of the PEND_MACH status, you cannot modify the starting order by using the sendevent command to send the CHANGE_PRIORITY event. If you send the CHANGE_PRIORITY event, the job priority changes do not apply to the run of the job exiting in PEND_MACH status. The job priority changes apply to the next run of the job.
■ If jobs enter PEND_MACH status at the same time and have the same priority, their starting order is not guaranteed. If the job priority is set to 0, it overrides the duration the job has been in PEND_MACH status and starts immediately.
■ If the GlobalPendMachInterval parameter is set to a new value while the scheduler is starting jobs in PEND_MACH status, the scheduler applies the new interval only after it completes the current wait cycle.
■ For more information about controlling jobs in PEND_MACH status, see the User Guide.

Control the Starting of Jobs in PEND_MACH Status
86 Administration Guide
Example: Start 100 Jobs in PEND_MACH Status with an Interval of 30 Seconds
Suppose that you want the scheduler to wait for 30 seconds before starting each of the 100 jobs in PEND_MACH status when an offline machine returns to service. Specify the GlobalPendMachInterval parameter as follows:
GlobalPendMachInterval=30
The scheduler takes 50 minutes (100 jobs multiplied by 1/2 minute each) to start all of the jobs.
Example: Incrementally Start 600 Jobs in PEND_MACH Status
Suppose that you have 600 jobs in PEND_MACH status for a machine that is currently offline. When the machine returns to service, you want the scheduler to start 5 jobs at 5 second intervals. Specify the GlobalPendMachInterval parameter as follows:
GlobalPendMachInterval=5,5
The scheduler takes 10 minutes to start all of the jobs.

Control the Status of Jobs Scheduled on an Offline Machine
Chapter 3: Modifying the Scheduler Settings on UNIX 87
Control the Status of Jobs Scheduled on an Offline Machine
You can control the status of jobs that are scheduled on a machine that is currently offline. You can also control how long jobs scheduled to offline machines remain in PEND_MACH status before the scheduler updates their status.
Note: If the scheduler changes the status of a job from PEND_MACH to any other valid status because of the GlobalPendMachStatus setting or a manual CHANGE_STATUS event, the job is not run when the machine returns to service. Only jobs in PEND_MACH status are eligible to start on the machine that returns to service.
Follow these steps:
1. Log in to CA Workload Automation AE as a user authorized to stop the scheduler and run the shell that is sourced to use CA Workload Automation AE.
2. Enter the following command at the operating system prompt:
unisrvcntr status waae_sched.$AUTOSERV
The scheduler process ID is displayed as follows:
CA Services Status Report
Component Name Pid Status
------------------------------------ ------- --------------
WAAE Scheduler (ACE) 32220 running
3. Edit the following parameters in the configuration file, and save the file:
GlobalPendMachStatus=value
value
Defines the completion status that the scheduler assigns to jobs that are scheduled on an offline machine. Valid values are FAILURE, INACTIVE, ON_ICE, PEND_MACH, SUCCESS, and TERMINATED.
Default: PEND_MACH
GlobalPendMachDelay=value
value
Defines the time interval (in seconds) that the scheduler waits before updating the status of the job to the status specified in the GlobalPendMachStatus parameter.
Default: 0; if you use the default value, the scheduler immediately sends a CHANGE_STATUS event to update the status of the job to the status specified in the GlobalPendMachStatus parameter.
Limits: 0-3600

Control the Status of Jobs Scheduled on an Offline Machine
88 Administration Guide
4. Enter the following command at the operating system prompt:
kill –HUP scheduler_pid
scheduler_pid
Defines the process ID of the scheduler to pause and resume.
The scheduler resumes. The status of jobs is set based on the values specified.
Note: On Windows, you can enter the equivalent values using the Global Pend Mach Status and Global Pend Mach Delay fields on the Scheduler - CA Workload Automation AE Administrator window of CA Workload Automation AE Administrator. For information about controlling the status of jobs that are scheduled on a machine that is currently offline on Windows, see the Online Help.
GlobalPendMachStatus Parameter
The GlobalPendMachStatus parameter in the configuration file defines the completion status that the scheduler assigns to jobs that are scheduled on an offline machine. The jobs temporarily remain in PEND_MACH status before the scheduler assigns the status specified in the GlobalPendMachStatus parameter.
Valid values are FAILURE, INACTIVE, ONICE, PEND_MACH, SUCCESS, and TERMINATED.
Notes:
■ The GlobalPendMachStatus parameter is applied at the global level and not at the machine level or job level. That is, this parameter value applies to all jobs that are scheduled on an offline machine.
■ If you set the GlobalPendMachStatus parameter to a valid status (other than PEND_MACH), it results in a CHANGE_STATUS event being sent for the desired completion status. The scheduler records this event in its log as an event that was the result of setting the GlobalPendMachStatus parameter.
■ If the scheduler changes the status of a job from PEND_MACH to any other valid status because of the GlobalPendMachStatus setting or a manual CHANGE_STATUS event, the job is not run when the machine returns to service. Only jobs in PEND_MACH status are eligible to start on the machine that returns to service.

Control the Status of Jobs Scheduled on an Offline Machine
Chapter 3: Modifying the Scheduler Settings on UNIX 89
GlobalPendMachDelay Parameter
The GlobalPendMachDelay parameter in the configuration file defines the time interval (in seconds) that the scheduler waits before updating the status of the job to the status specified in the GlobalPendMachStatus parameter.
Note: The GlobalPendMachDelay parameter is applied at the global level and not at the machine level or job level. That is, this parameter value applies to all jobs that are scheduled on an offline machine.
If you use the default value, the scheduler immediately sends a CHANGE_STATUS event to update the status of jobs in PEND_MACH status to the status specified in the GlobalPendMachStatus parameter. If you specify a value other than the default, jobs remain in PEND_MACH status until the delay interval expires, and are then assigned the status specified in the GlobalPendMachStatus parameter. If the machine returns to service within the delay interval, the scheduler does not set the status of the job to the status specified in the GlobalPendMachStatus parameter. Since the job is in PEND_MACH status when the machine returns to service, the scheduler reschedules it to run on the online machine based on the interval specified in the GlobalPendMachInterval parameter.
The following table shows job status based on some sample values set for the GlobalPendMachDelay and GlobalPendMachStatus parameters:
GlobalPendMachDelay Value
GlobalPendMachStatus Value
Job Status
0 (default) PEND_MACH (default) The scheduler puts the jobs in PEND_MACH status when the machine is offline.
0 (default) INACTIVE The scheduler puts the jobs in PEND_MACH status when the machine is offline.
The scheduler immediately sends a CHANGE_STATUS event to put the jobs in INACTIVE state. Jobs are put in INACTIVE status when the scheduler processes the CHANGE_STATUS event.

Control the Status of Jobs Scheduled on an Offline Machine
90 Administration Guide
GlobalPendMachDelay Value
GlobalPendMachStatus Value
Job Status
30 INACTIVE The scheduler puts the jobs in PEND_MACH status when the machine is offline.
If the machine returns to service within 30 seconds, jobs are started based on the interval specified in the GlobalPendMachInterval parameter.
If the machine does not return to service within 30 seconds, the scheduler sends a CHANGE_STATUS event to put the jobs in INACTIVE state. Jobs are put in INACTIVE status when the scheduler processes the CHANGE_STATUS event.

Define the Communication Ports for the Scheduler
Chapter 3: Modifying the Scheduler Settings on UNIX 91
Define the Communication Ports for the Scheduler
You can define the communication ports for the scheduler. These ports let the scheduler communicate with agents and managers.
Follow these steps:
1. Log in to CA Workload Automation AE as a user authorized to stop the scheduler and run the shell that is sourced to use CA Workload Automation AE.
2. Enter the following command at the operating system prompt:
sendevent -E STOP_DEMON
The scheduler completes any processing it is currently performing and stops.
3. Edit the following parameters in the configuration file, and save the file:
AutoRemPort=port
port
Defines the port number the scheduler uses to communicate with 4.5 legacy agents (4.0, 4.5, 4.5.1).
Default: 0, which indicates that the scheduler only communicates with agents (type 'a' machines) or r11 legacy agents.
Note: If you set this parameter to a value other than the default, the scheduler communicates with 4.5 legacy agents based on the port number you set for this parameter. For example, if you set the port number to 5280, the scheduler only communicates with 4.5 legacy agents that are running on 5280 port.
SchedAuxiliaryListeningPort=sch_port
sch_port
Defines the port number the scheduler uses to listen for inbound Automation Framework Message (AFM) protocol data using non-SSA communication.
Default: 7507
4. Enter the following command at the operating system prompt:
eventor
The scheduler starts. The communication ports for the scheduler are defined.
Note: On Windows, you can enter the equivalent values using the Legacy Remote Agent Port and Auxiliary Listening Port fields on the Scheduler - CA Workload Automation AE Administrator window of CA Workload Automation AE Administrator. For information about defining the communication ports for the scheduler on Windows, see the Online Help.

Define the Communication Ports for the Scheduler
92 Administration Guide
AutoRemPort Parameter
The AutoRemPort parameter in the configuration file defines the port number the scheduler uses to communicate with legacy agent computers (4.0, 4.5, and 4.5.1). In addition to setting the port number, the type attribute of the machine definition for each legacy agent must be defined as either l or L.
The inetd on the client computer uses the port number to point to the name of the service in /etc/services. The service name is located in the inetd configuration file (/etc/inetd.conf), where the client computer finds the path to the legacy agent binary.
It is possible to have different CA Workload Automation AE releases installed on the same computer, where the versions are not cross-compatible between the scheduler and the agent. You can maintain multiple releases by setting up multiple services and using different port numbers.
Notes:
■ The AutoRemPort value is set during the CA Workload Automation AE installation. If you change it, you must change the AutoRemPort value and the port numbers in all the /etc/services files on all CA Workload Automation AE client and server computers.
■ If you use NIS or NIS+ and want to change the AutoRemPort value, you must modify /etc/services on your NIS or NIS+ master and push it to all client computers, and run a kill -1 process on inetd.

Define the Communication Ports for the Scheduler
Chapter 3: Modifying the Scheduler Settings on UNIX 93
SchedAuxiliaryListeningPort Parameter
The SchedAuxiliaryListeningPort parameter in the configuration file defines the port number the scheduler uses to listen for inbound AFM protocol data using non-SSA communication. Network data between the scheduler and the agent or the scheduler and the CA Workload Automation EE manager is prepared using the proprietary AFM protocol. The scheduler auxiliary listening port is used primarily to receive inbound messages from agents running on non-SSA ports.
Note: The scheduler auxiliary listening port must be different from the application server auxiliary listening port. The scheduler and application server auxiliary listening ports must be physical ports. So, we recommend that you configure the SSA port setting to disable port multiplexing (EnablePmux=False), otherwise CA Workload Automation AE uses the virtual ports provided by SSA. If EnablePmux is set to True or the scheduler or application server auxiliary listening port is not defined, CA Workload Automation AE does not initiate communication with agents that are configured to run on physical ports. For more information about configuring CA Workload Automation AE to work with SSA, see the UNIX Implementation Guide.
The scheduler auxiliary listening port is also used to receive job dependencies and statuses from the mainframe scheduling managers. For example, the scheduler uses this port to receive messages from the CA Workload Automation EE manager or CA WA Agent for z/OS (a mainframe manager with minimal agent capabilities).
Notes:
■ By default, CA Workload Automation AE does not enable SSL communication for any of its ports (physical or virtual). When you configure the SSA port settings of the scheduler auxiliary listening port, ensure that you do not enable SSL communication.
■ During the CA Workload Automation AE installation, the scheduler auxiliary listening port is set to 7507 by default. If you are performing a custom installation, you can specify a different scheduler auxiliary listening port using the Scheduler Properties page. CA Workload Automation AE uses both the virtual ports and the auxiliary ports at the same time. The scheduler log displays the ports used by CA Workload Automation AE as follows:
CAUAJM_I_20366 CA WAAE Scheduler operational on agent listener port 49161.
CAUAJM_I_20367 CA WAAE Scheduler operational on auxiliary agent listener port
7507.

Verify Whether Jobs and Agents are Running at Scheduler Startup
94 Administration Guide
Verify Whether Jobs and Agents are Running at Scheduler Startup
You can specify whether the chase command runs when the scheduler starts. The chase command verifies whether jobs and agents are running.
You can track network problems if you run the chase command at regular intervals. For example, if a computer is unreachable while running a job, the chase command detects that the computer is down and sends an alarm to alert you about the problem.
Note: For more information about the chase command, see the Reference Guide.
Follow these steps:
1. Log in to CA Workload Automation AE as a user authorized to stop the scheduler and run the shell that is sourced to use CA Workload Automation AE.
2. Enter the following command at the operating system prompt:
sendevent -E STOP_DEMON
The scheduler completes any processing it is currently performing and stops.
3. Edit the following parameter in the configuration file, and save the file:
ChaseOnStartup=0|1
0
Specifies that the chase command does not run when the scheduler starts. This is the default.
1
Specifies that the chase command runs when the scheduler starts.
4. Enter the following command at the operating system prompt:
eventor
The scheduler starts, and the chase command verifies whether jobs and agents are running.
Note: On Windows, you can select the equivalent value using the Chase on Startup check box on the Scheduler - CA Workload Automation AE Administrator window of CA Workload Automation AE Administrator. For information about running the chase command on scheduler startup on Windows, see the Online Help.
More information:
How the Scheduler Starts Processes (see page 121)

Start the Scheduler in Global Auto Hold Mode
Chapter 3: Modifying the Scheduler Settings on UNIX 95
Start the Scheduler in Global Auto Hold Mode
You can specify whether to start the scheduler in Global Auto Hold mode. If you restart a scheduler after a period of down time, you might want to start it in Global Auto Hold mode. Starting the scheduler in Global Auto Hold mode prevents the system from being flooded with jobs that were scheduled to run during the down time. The scheduler evaluates all the jobs whose starting conditions are met and eligible to run. Instead of starting the jobs, the scheduler puts them in ON_HOLD status.
This approach lets you decide which jobs should run and selectively start them by using the sendevent command to send a FORCE_STARTJOB event. The only way to start a job when you start the scheduler in Global Auto Hold mode is to send a FORCE_STARTJOB event.
Follow these steps:
1. Log in to CA Workload Automation AE as a user authorized to stop the scheduler and run the shell that is sourced to use CA Workload Automation AE.
2. Enter the following command at the operating system prompt:
sendevent -E STOP_DEMON
The scheduler completes any processing it is currently performing and stops.
3. Edit the following parameter in the configuration file, and save the file:
GlobalAutoHold=0|1
0
Specifies that the scheduler does not start in Global Auto Hold mode. This is the default.
1
Specifies that the scheduler starts in Global Auto Hold mode.
4. Enter the following command at the operating system prompt:
eventor
The scheduler starts in Global Auto Hold mode.

Start the Scheduler in Global Auto Hold Mode
96 Administration Guide
Notes:
■ To send a FORCE_STARTJOB event, enter the following command at the operating system prompt:
sendevent -E FORCE_STARTJOB -J job_name
job_name
Defines the name of the job to send the FORCE_STARTJOB event.
The specified job starts.
■ Global autohold mode affects jobs in ON_NOEXEC status. On startup, CA Workload Automation AE places these jobs in ON_HOLD status. The same applies to any child jobs in boxes that utilize the auto_hold job attribute.
■ On Windows, you can select the equivalent value using the Global Auto Hold check box on the Scheduler - CA Workload Automation AE Administrator window of CA Workload Automation AE Administrator. For information about starting the scheduler in Global Auto Hold mode on Windows, see the Online Help.

Configure CA Workload Automation AE to Skip Starting Condition Evaluation for Queued Jobs
Chapter 3: Modifying the Scheduler Settings on UNIX 97
Configure CA Workload Automation AE to Skip Starting Condition Evaluation for Queued Jobs
CA Workload Automation AE starts a job only after it meets the starting conditions specified in the job definition. Some external conditions may prevent jobs that meet their starting conditions from running. Depending on the reason, CA Workload Automation AE places the job in one of the following queued states:
■ When an offline machine prevents the job from running, the job enters PEND_MACH status.
■ When held resources prevent the job from running, the job enters RES_WAIT status.
■ When unavailable load units prevent the job from running, the job enters QUE_WAIT status.
When queued jobs leave the queue, they may no longer meet their starting conditions. Starting jobs that no longer meet their starting conditions may result in scheduling conflicts or related problems. However, skipping job starts may result in the loss of critical work.
By default, CA Workload Automation AE re-evaluates starting conditions for these jobs before running them. If a job fails its starting condition checks after leaving a queued state, the scheduler places the job in an INACTIVE state. If the job meets its starting conditions, the scheduler starts the job. If the job is in a box, the scheduler places it in the ACTIVATED state, even if the job fails its starting condition checks.
You can configure CA Workload Automation AE to skip starting condition evaluation for jobs leaving a queued state. When you use this configuration option, queued jobs start immediately upon leaving a queued state.
Follow these steps:
1. Run the shell that is sourced to use CA Workload Automation AE
2. Enter the following command at the operating system prompt:
unisrvcntr stop waae_sched.$AUTOSERV
The scheduler stops.

Redirect Job Profile Information to a File
98 Administration Guide
3. Edit the following parameter in the configuration file, and save the file:
EvaluateQueuedJobStarts=0|1
0
Specifies that the scheduler immediately starts the job without evaluating the starting conditions of the job.
1
Specifies that the scheduler evaluates the starting conditions of the job before starting the job. This is the default.
4. Enter the following command at the operating system prompt:
unisrvcntr start waae_sched.$AUTOSERV
The scheduler starts. CA Workload Automation AE skips starting condition evaluation of queued jobs.
Redirect Job Profile Information to a File
You can specify whether the legacy agent redirects the job profile information to the auto.rem* log file for all jobs started by the scheduler. The job profile information is generated by the legacy agent when the /etc/auto.profile file is sourced.
Follow these steps:
1. Log in to CA Workload Automation AE as a user authorized to stop the scheduler and run the shell that is sourced to use CA Workload Automation AE.
2. Enter the following command at the operating system prompt:
sendevent -E STOP_DEMON
The scheduler completes any processing it is currently performing and stops.

Redirect Job Profile Information to a File
Chapter 3: Modifying the Scheduler Settings on UNIX 99
3. Edit the following parameter in the configuration file, and save the file:
RemoteProFiles=1|0
1
Specifies that the legacy agent redirects the job profile information to the auto.rem* log file for all jobs started by the scheduler.
0
Specifies that the legacy agent does not redirect the job profile information to the auto.rem* log file for all jobs started by the scheduler. This is the default.
4. Enter the following command at the operating system prompt:
eventor
The scheduler starts. The job profile information is redirected to a file.
Note: On Windows, you can select the equivalent value using the Legacy Remote Profile Logging check box on the Scheduler - CA Workload Automation AE Administrator window of CA Workload Automation AE Administrator. For information about redirecting job profile information to a file on Windows, see the Online Help.
More Information:
The auto.profile File on UNIX (see page 33)

Redirect Job Profile Information to a File
100 Administration Guide
RemoteProFiles Parameter
The RemoteProFiles parameter in the configuration file specifies whether the legacy agent redirects the job profile information to the auto.rem* log file for all jobs started by the scheduler. The output information is generated when the /etc/auto.profile file is sourced.
Notes:
■ The RemoteProFiles parameter applies only to jobs that the scheduler sends to a UNIX computer.
■ The RemoteProFiles parameter applies to legacy agents only.
The name of the file where the output is written is based on the log file name. The name has the following format:
auto_rem_pro.joid.run_number.ntry
joid
Defines the unique job object ID associated with the job.
run_number
Defines the job’s run number.
ntry
Defines the number of tries or restarts.

Redirect Job Profile Information to a File
Chapter 3: Modifying the Scheduler Settings on UNIX 101
This output file contains entries if anything specified in the profile fails. For example, suppose that the profile tries to use the setenv command to set an environment variable and the Bourne shell cannot process the C shell syntax. The output file contains the following record:
setenv: not found
Note: Non-fatal errors that occur when a profile is sourced are not recorded and do not appear in the output file.
To view the output file, you must issue the autosyslog command on the client computer as follows:
autosyslog -J job_name –t P
job_name
Specifies the name of the job you want to display the log file for.
-t P
Displays the log file by type where P represents the profile output, if there is any.
If no profile output file exists, the log file contains the following record:
File: profile_output_file Does Not Exist.
Notes:
■ If you set the CleanTmpFiles parameter to 1, the output file is removed when the job completes successfully and the profile log information is not available. If you set the CleanTmpFiles parameter to 0 (zero), the file remains until you use the clean_files command to remove it.
■ For more information about the autosyslog command, see the Reference Guide.
More information:
CleanTmpFiles Parameter (see page 190) Remove Temporary Legacy Agent Log Files (see page 189) The auto.profile File on UNIX (see page 33)

Append Information to Standard Error and Standard Output Files
102 Administration Guide
Append Information to Standard Error and Standard Output Files
You can specify whether the agent overwrites or appends job command output or error information to the standard error and standard output files.
Follow these steps:
1. Log in to CA Workload Automation AE as a user authorized to stop the scheduler and run the shell that is sourced to use CA Workload Automation AE.
2. Enter the following command at the operating system prompt:
sendevent -E STOP_DEMON
The scheduler completes any processing it is currently performing and stops.
3. Edit the following parameter in the configuration file, and save the file:
AutoInstWideAppend=0|1|2
0
Specifies that the agent overwrites information to the standard output and standard error files. This is the default.
1
Specifies that the agent appends new information to the standard output and standard error files.
2
Specifies that the information is forcefully appended to the standard output and standard error files; the agent setting is overridden.
4. Enter the following command at the operating system prompt:
eventor
The scheduler starts. The new error and output information is appended to the standard error and standard output files.
Note: On Windows, you can select the equivalent value on the Scheduler - CA Workload Automation AE Administrator window of CA Workload Automation AE Administrator. For information about appending information to standard error and standard output files on Windows, see the Online Help.

Append Information to Standard Error and Standard Output Files
Chapter 3: Modifying the Scheduler Settings on UNIX 103
AutoInstWideAppend Parameter
The AutoInstWideAppend parameter in the configuration file specifies whether the agent overwrites or appends job command output or error information to the standard error and standard output files.
Note: If you are running jobs across operating environments, the scheduler of the issuing CA Workload Automation AE instance controls the default behavior. For Windows, the default scheduler behavior is to overwrite the standard error and standard output files.
To determine whether the information is appended to the files or the files are overwritten, CA Workload Automation AE does the following in this order:
■ Checks the CA Workload Automation AE job definition for append or overwrite notation. If there is a notation, CA Workload Automation AE uses the indicated behavior and does not check other settings.
To set the behavior at the job definition level, place the appropriate notation as the first characters in the std_err_file and std_out_file specification in JIL. Use the following notation to specify whether the files should be appended or overwritten:
> Overwrite file
>> Append file
■ Checks the AutoMachWideAppend variable setting in the /etc/auto.profile file. The AutoMachWideAppend variable is set as follows:
#AUTOENV#AutoMachWideAppend=TRUE
If this variable is set for the computer where the job runs, CA Workload Automation AE uses the indicated behavior and does not check other settings.
Note: This applies to legacy agents only.
■ Checks the AutoInstWideAppend parameter in the configuration file and uses this setting.

Append Event Message Text to Event Messages
104 Administration Guide
Append Event Message Text to Event Messages
You can specify whether the text associated with an event is appended to the corresponding event message or printed as a standalone message in the scheduler log file.
Follow these steps:
1. Log in to CA Workload Automation AE as a user authorized to stop the scheduler and run the shell that is sourced to use CA Workload Automation AE.
2. Enter the following command at the operating system prompt:
sendevent -E STOP_DEMON
The scheduler completes any processing it is currently performing and stops.
3. Edit the following parameter in the configuration file, and save the file:
AppendEventMessageText=1|0
1
Specifies that the event message text is appended to the corresponding event message in the scheduler log file. In the event message, the text is displayed after the keyword TEXT.
0
Specifies that the event message text is printed as a standalone message. This is the default.
4. Enter the following command at the operating system prompt:
eventor
The scheduler starts. When an event message is written to the scheduler log file, the corresponding text is appended to the message.
Note: On Windows, you can select the equivalent value using the Append Event Message Text check box on the Scheduler - CA Workload Automation AE Administrator window of CA Workload Automation AE Administrator. For information about appending event message text to the event message on Windows, see the Online Help.

Aggregate Statistics Automatically
Chapter 3: Modifying the Scheduler Settings on UNIX 105
Aggregate Statistics Automatically
You can configure CA Workload Automation AE to aggregate the job, alarm, and scheduler statistics automatically at a specified interval. The job, alarm, and scheduler statistics are aggregated into the ujo_rep_hourly, ujo_rep_daily, ujo_rep_weekly, and ujo_rep_monthly database tables. You can display these aggregated statistics in a report format in CA Workload Automation AE. Other applications, such as CA WCC, can also retrieve these aggregated statistics to generate predefined and custom reports.
The scheduler automatically aggregates the job, alarm, and scheduler statistics as follows:
■ Hourly—At the start of every hour
■ Daily—At midnight every day
■ Weekly—At midnight on the first day of every week, taken as Sunday
■ Monthly—At midnight on the first day of every month
Note: In all cases, the scheduler aggregates statistics in smaller intervals before starting the specified aggregation. For example, if you schedule a monthly aggregation process, the scheduler aggregates the hourly, daily, and weekly statistics before starting the monthly aggregation.
Follow these steps:
1. Log in to CA Workload Automation AE as a user authorized to stop the scheduler and run the shell that is sourced to use CA Workload Automation AE.
2. Enter the following command at the operating system prompt:
unisrvcntr status waae_sched.$AUTOSERV
The scheduler process ID is displayed as follows:
CA Services Status Report
Component Name Pid Status
------------------------------------ ------- --------------
WAAE Scheduler (ACE) 32220 running
3. Edit the following parameter in the configuration file, and save the file:
AggregateStatistics=0|1
0
Specifies that the job, alarm, and scheduler statistics are not aggregated. This is the default.
1
Specifies that the job, alarm, and scheduler statistics are aggregated automatically. The ujo_rep_hourly, ujo_rep_daily, ujo_rep_weekly, and ujo_rep_monthly tables are updated.

Aggregate Statistics Automatically
106 Administration Guide
4. Enter the following command at the operating system prompt:
kill –HUP scheduler_pid
scheduler_pid
Defines the process ID of the scheduler to pause and resume.
The scheduler resumes. The statistics are aggregated automatically.
Notes:
■ The scheduler does not aggregate monthly statistics for the current month, week, day, or hour. For example, if the oldest event in the ujo_proc_event table is 09/27/2011 00:05:10 and you schedule the aggregation process on 10/11/2011 at 18:30:00, the statistics are aggregated as follows:
– Hourly statistics—From 09/27/2011 00:00:00 through 10/11/2011 17:59:59
– Daily statistics—From 09/27/2011 00:00:00 through 10/10/2011 23:59:59 (14 days)
– Weekly statistics—From 09/25/2011 00:00:00 through 10/08/2011 23:59:59 (two weeks)
– Monthly statistics—From 09/01/2011 00:00:00 through 09/30/2011 17:59:59 (one month)
■ You can aggregate statistics manually by sending an aggregation event using the sendevent command. You do not need to set the AggregateStatistics parameter to aggregate statistics manually. For more information about the sendevent command, see the Reference Guide.
■ When aggregation is scheduled automatically, starting and completed messages are written in the scheduler log file. Detailed messages are written in the aggregation log file (aggregator.instance) located in the $AUTOUSER/out directory. The aggregation log file has the same properties as the scheduler log file and it rolls over based on the LOGROLLOVER parameter value in the configuration file.
■ If the scheduler is shut down while the aggregation process is active, the aggregation process is terminated. A message is displayed to indicate the same.
■ On Windows, you can select the equivalent value using the Aggregate Statistics check box on the Scheduler - CA Workload Automation AE Administrator window of CA Workload Automation AE Administrator. For information about aggregating statistics automatically on Windows, see the Online Help.

Set Job Attribute Environment Variables
Chapter 3: Modifying the Scheduler Settings on UNIX 107
Set Job Attribute Environment Variables
You can configure CA Workload Automation AE to automatically set the supported job definition JIL attributes as environment variables. The scheduler prepares the environment variables for the agent to source based on the job definition JIL attributes. The agent sources the environment variables to provide applications with knowledge of the supported job definition JIL attributes.
The SetJobAttributeEnvironmentals configuration parameter supports setting the following environment variables based on job definition JIL attribute values:
__job_name=job_name
__box_name=box_name
__machine=machine
__run_machine=run_machine
__max_exit_success=max_exit_success
job_name
Specifies the name of the job in the job definition.
box_name
Specifies the name of the container box in the job definition.
Note: The __box_name environment variable is set only if the job is contained within a box.
machine
Specifies the value of the machine attribute in the job definition.
run_machine
Specifies the CA Workload Automation AE machine name that the scheduler resolves after processing the machine attribute.
max_exit_success
Specifies the value of the max_exit_success job attribute in the job definition.
Note: The __max_exit_success environment variable is set only for command jobs.
Notes:
■ This procedure applies only to CA Workload Automation AE Release 11.3.5 and Release 11.3.6. The legacy agent supports the setting of job definition JIL attributes as environment variables, which are sourced as part of running a job.
■ Custom job applications that require knowledge of additional job attributes should be rewritten to invoke the GetJobsWithFilter class of the C++ or Java SDK.

Set Job Attribute Environment Variables
108 Administration Guide
Follow these steps:
1. Log in to CA Workload Automation AE as a user authorized to stop the scheduler and run the shell that is sourced to use CA Workload Automation AE.
2. Enter the following command at the operating system prompt:
unisrvcntr status waae_sched.$AUTOSERV
The scheduler process ID is displayed as follows:
CA Services Status Report
Component Name Pid Status
------------------------------------ ------- --------------
WAAE Scheduler (ACE) 32220 running
3. Edit the following parameter in the configuration file, and save the file:
SetJobAttributeEnvironmentals=0|1
0
Specifies that CA Workload Automation AE does not automatically set the supported job definition JIL attributes as environment variables.
1
Specifies that CA Workload Automation AE automatically sets the supported job definition JIL attributes as environment variables.
4. Enter the following command at the operating system prompt:
kill –HUP scheduler_pid
scheduler_pid
Defines the process ID of the scheduler to pause and resume.
The scheduler resumes. CA Workload Automation AE is configured to automatically set the supported job definition JIL attributes as environment variables and the agent passes information to custom job applications as required.

Specify the Scheduler Role
Chapter 3: Modifying the Scheduler Settings on UNIX 109
Specify the Scheduler Role
You can specify whether the scheduler is the primary scheduler, a shadow scheduler, or a tie-breaker scheduler.
Follow these steps:
1. Log in to CA Workload Automation AE as a user authorized to stop the scheduler and run the shell that is sourced to use CA Workload Automation AE.
2. Enter the following command at the operating system prompt:
sendevent -E STOP_DEMON
The scheduler completes any processing it is currently performing and stops.
3. Edit the following parameter in the configuration file, and save the file:
RoleDesignator=1|2|3
1
Specifies that the scheduler is the primary scheduler. This is the default.
2
Specifies that the scheduler is the shadow scheduler.
3
Specifies that the scheduler is the tie-breaker scheduler.
4. Enter the following command at the operating system prompt:
eventor
The scheduler starts as the primary, shadow, or tie-breaker scheduler depending on the role that you specified in the configuration file.
Note: On Windows, you can select the equivalent value using the options in the Scheduler Role pane on the Scheduler - CA Workload Automation AE Administrator window of CA Workload Automation AE Administrator. For information about specifying the scheduler role on Windows, see the Online Help.

Specify the Primary Scheduler Failback Mode
110 Administration Guide
Specify the Primary Scheduler Failback Mode
You can define the mode the primary scheduler enters when you restart CA Workload Automation AE after a failover.
High-availability mode is disabled when the primary scheduler fails over to the shadow scheduler, but you can return to high-availability mode by restoring the primary scheduler. How the primary scheduler resumes processing events after you restore it depends on the primary failback mode.
By default, the primary failback mode is off and cannot resume processing events while the shadow scheduler is processing events. In this case, you can restart the primary scheduler only after you shutdown the shadow scheduler. To minimize downtime, we recommend that set one of the following primary failback mode options:
Follow these steps:
1. Log in to CA Workload Automation AE as a user authorized to stop the scheduler and run the shell that is sourced to use CA Workload Automation AE.
2. Enter the following command at the operating system prompt:
sendevent -E STOP_DEMON
The scheduler completes any processing it is currently performing and stops.
3. Edit the following parameter in the configuration file, and save the file:
PrimaryFailbackMode=0|1|2
0
Specifies that the primary scheduler cannot restart while the shadow scheduler processes events. In this mode, you must stop the shadow scheduler and restart the primary scheduler.
1
Specifies that the primary scheduler runs dormant and resumes processing events only when a failback occurs. A failback occurs when the shadow scheduler fails or when you initiate a manual failback. If a failback occurs because the shadow scheduler fails, high-availability mode is disabled. In this case, return to high-availability mode by restoring the shadow scheduler.
2
Specifies that the primary scheduler resumes processing events as soon as it detects activity from the other schedulers.

Activate the Cross-Platform Interface
Chapter 3: Modifying the Scheduler Settings on UNIX 111
4. Enter the following command at the operating system prompt:
eventor
The primary scheduler restarts in the specified mode.
Note: On Windows, you can select the equivalent value using the Scheduler - CA Workload Automation AE Administrator window of CA Workload Automation AE Administrator. For information about specifying the primary failback mode on Windows, see the Online Help.
Activate the Cross-Platform Interface
You can specify whether a CA Workload Automation AE instance can submit job requests to or receive job requests from an external scheduling manager or agent.
Follow these steps:
1. Log in to CA Workload Automation AE as a user authorized to stop the scheduler and run the shell that is sourced to use CA Workload Automation AE.
2. Enter the following command at the operating system prompt:
unisrvcntr status waae_sched.$AUTOSERV
The scheduler process ID is displayed as follows:
CA Services Status Report
Component Name Pid Status
------------------------------------ ------- --------------
WAAE Scheduler (ACE) 32220 running
Activate the Cross-Platform Interface
112 Administration Guide
3. Edit the following parameter in the configuration file, and save the file:
CrossPlatformScheduling=0|1|2
0
Disables cross-platform scheduling. This is the default.
1
Enables outbound cross-platform scheduling (manager only). When you select this option, a CA Workload Automation AE instance can dispatch job requests to an agent.
2
Enables outbound and inbound cross-platform scheduling (manager and agent). When you select this option, a CA Workload Automation AE instance can dispatch job requests to an agent and receive job start requests from a manager.
Note: This option takes effect only when you initialize the scheduler.
4. Enter the following command at the operating system prompt:
kill –HUP scheduler_pid
scheduler_pid
Defines the process ID of the scheduler to pause and resume.
The scheduler resumes. The cross-platform interface is activated.
Note: On Windows, you can select the equivalent value using the options in the Cross Platform Scheduling pane on the Scheduler - CA Workload Automation AE Administrator window of CA Workload Automation AE Administrator. For information about activating the cross-platform interface on Windows, see the Online Help.
Chapter 4: Modifying the Application Server Settings on UNIX 113
Chapter 4: Modifying the Application Server Settings on UNIX
This section contains the following topics:
Define the Application Server Host Name (see page 113) Define a Unique Identifier to Communicate with the Agent (see page 114) Define a Unique Communication Alias (see page 115) Define Communication Ports for the Application Server (see page 116) Set the Maximum Number of Lines to Retrieve from a Log File (see page 119)
Define the Application Server Host Name
To specify the application server to which clients within an instance connect, define the application server host name.
Follow these steps:
1. Log in to CA Workload Automation AE as a user authorized to stop the application server and run the shell that is sourced to use CA Workload Automation AE.
2. Enter the following command at the operating system prompt:
unisrvcntr stop waae_server.$AUTOSERV
The application server stops.
3. Open the configuration file and edit the following parameter:
AutoServer=hostname
hostname
Specifies the host name of the application server to which all clients in the instance connect.
4. Save and close the configuration file.
The application server host name is defined.
5. Enter the following command at the operating system prompt:
unisrvcntr start waae_server.$AUTOSERV
The application server starts. All clients within the instance connect to the specified application server.

Define a Unique Identifier to Communicate with the Agent
114 Administration Guide
Define a Unique Identifier to Communicate with the Agent
You can define a unique identifier that the application server uses to communicate with the agent.
If the CA Workload Automation AE instance has multiple application servers, the identifier for each application server must be unique. If an identifier is not unique, you must define another identifier for that application server. The application server does not start if it detects another application server with the same identifier.
Note: The scheduler also requires an identifier to communicate with the agent. However, the identifier for the scheduler is automatically set to INSTANCENAME_SCH (in uppercase). You cannot change this value.
Follow these steps:
1. Log in to CA Workload Automation AE as a user authorized to stop the application server and run the shell that is sourced to use CA Workload Automation AE.
2. Enter the following command at the operating system prompt:
unisrvcntr stop waae_server.$AUTOSERV
The application server stops.
3. Edit the following parameter in the configuration file, and save the file:
AutoServerId=unique_ID
unique_ID
Defines a unique identifier that the application server uses to communicate with the agent.
Default: INSTANCENAME_APP_MachineName.
4. Enter the following command at the operating system prompt:
unisrvcntr start waae_server.$AUTOSERV
The application server starts. The unique communication identifier is defined. The application server uses this unique identifier to communicate with the agent.
Note: On Windows, you can enter the equivalent value using the Communication Identifier field on the Application Server - CA Workload Automation AE Administrator window of CA Workload Automation AE Administrator. For information about defining a unique identifier to communicate with the agent on Windows, see the Online Help.

Define a Unique Communication Alias
Chapter 4: Modifying the Application Server Settings on UNIX 115
Define a Unique Communication Alias
The application server requires an additional communication alias to communicate with CA Workload Automation EE and CA WA Agent for z/OS. The communication alias is set to INSTANCENAME_ABBREVIATEDHOSTNAME during the CA Workload Automation AE installation.
If the CA Workload Automation AE instance has multiple application servers, the communication alias for each application server must be unique. If an alias is not unique, you must define another alias for that application server. The application server does not start if it detects another application server with the same communication alias.
Note: The scheduler also requires a communication alias to communicate with CA Workload Automation EE and the agent on z/OS. However, the communication alias for the scheduler is automatically set to INSTANCENAME_AGT (in uppercase). You cannot change this value.
Follow these steps:
1. Log in to CA Workload Automation AE as a user authorized to stop the application server and run the shell that is sourced to use CA Workload Automation AE.
2. Enter the following command at the operating system prompt:
unisrvcntr stop waae_server.$AUTOSERV
The application server stops.
3. Edit the following parameter in the configuration file, and save the file:
AutoServerAliasId=unique_alias
unique_alias
Defines a unique communication alias that the application server uses to communicate with CA Workload Automation EE and the agent on z/OS.
Default: INSTANCENAME_ABBREVIATEDHOSTNAME. The abbreviated hostname consists of the last 12 characters of the node name excluding the domain name. For example, the communication alias of the application server on myhost.ca.com is set to ACE_MYHOST, where ACE is the name of the CA Workload Automation AE instance.
Limits: Up to 16 uppercase characters
Note: If you specify the value in lowercase or mixed case, the value is automatically changed to uppercase.

Define Communication Ports for the Application Server
116 Administration Guide
4. Enter the following command at the operating system prompt:
unisrvcntr start waae_server.$AUTOSERV
The application server starts. The unique communication alias is defined for the application server. The application server uses this alias to communicate with CA Workload Automation EE and the agent on z/OS.
Notes:
■ On Windows, you can enter the equivalent value using the Communication Alias Identifier field on the Application Server - CA Workload Automation AE Administrator window of CA Workload Automation AE Administrator. For information about defining a unique communication alias for the application server on Windows, see the Online Help.
■ For information about configuring CA Workload Automation EE or the agent on z/OS to work with CA Workload Automation AE, see the UNIX Implementation Guide or Windows Implementation Guide.
Define Communication Ports for the Application Server
You can configure the application server to listen on a different virtual port. Both the CA Workload Automation AE application server and the agent require a port to listen to for incoming connections. By default, the CA Workload Automation AE installation configures SSA to recognize virtual port 9000 for the application server. You might want to reconfigure the application server to listen on a different virtual port if another CA Technologies product is using the default virtual port and you want that product to continue using that port.
Follow these steps:
1. Log in to CA Workload Automation AE as a user authorized to stop the application server and run the shell that is sourced to use CA Workload Automation AE.
2. Enter the following command at the operating system prompt:
unisrvcntr stop waae_server.$AUTOSERV
The application server stops.
3. Edit the following parameters in the configuration file, and save the file:
AutoServerPort=server_port
server_port
Defines the application server listening port for all SSA communication.
Default: 9000

Define Communication Ports for the Application Server
Chapter 4: Modifying the Application Server Settings on UNIX 117
AppSrvAuxiliaryListeningPort=appsrv_port
appsrv_port
Defines the port number the application server uses to listen for inbound AFM protocol data using non-SSA communication. Network data between the scheduler and the agent or the scheduler and the CA Workload Automation EE manager is prepared using the proprietary AFM protocol. The application server auxiliary listening port is used primarily to receive inbound messages from agents running on non-SSA ports.
Default: 7500
Notes:
■ The application server auxiliary listening port must be different from the scheduler auxiliary listening port. The scheduler and application server auxiliary listening ports must be physical ports. So, we recommend that you configure the SSA port setting to disable port multiplexing (EnablePmux=False), otherwise CA Workload Automation AE uses the virtual ports provided by SSA. If EnablePmux is set to True or the scheduler or application server auxiliary listening port is not defined, CA Workload Automation AE does not initiate communication with agents that are configured to run on physical ports. For more information about configuring CA Workload Automation AE to work with SSA, see the UNIX Implementation Guide.
■ By default, CA Workload Automation AE does not enable SSL communication for any of its ports (physical or virtual). When you configure the SSA port settings of the application server auxiliary listening port, ensure that you do not enable SSL communication.
■ During the CA Workload Automation AE installation, the application server auxiliary listening port is set to 7500 by default. If you are performing a custom installation, you can specify a different application server auxiliary listening port using the Application Server Information page. CA Workload Automation AE uses both the virtual ports and the auxiliary ports at the same time. The application server log displays the ports used by CA Workload Automation AE as follows:
CAUAJM_I_20366 CA WAAE Application Server operational on agent listener port
49169.
CAUAJM_I_20367 CA WAAE Application Server operational on auxiliary agent
listener port 7500.

Define Communication Ports for the Application Server
118 Administration Guide
4. Enter the following command at the operating system prompt:
unisrvcntr start waae_server.$AUTOSERV
The application server starts. The communication ports for the application server are defined.
Note: On Windows, you can enter the equivalent values using the Client Communication Port and Auxiliary Listening Port fields on the Application Server - CA Workload Automation AE Administrator window of CA Workload Automation AE Administrator. For information about defining the communication ports for the application server on Windows, see the Online Help.

Set the Maximum Number of Lines to Retrieve from a Log File
Chapter 4: Modifying the Application Server Settings on UNIX 119
Set the Maximum Number of Lines to Retrieve from a Log File
You can set the maximum number of lines to retrieve from a log file.
Follow these steps:
1. Log in to CA Workload Automation AE as a user authorized to stop the application server and run the shell that is sourced to use CA Workload Automation AE.
2. Enter the following command at the operating system prompt:
unisrvcntr status waae_server.$AUTOSERV
The application server process ID is displayed as follows:
CA Services Status Report
Component Name Pid Status
------------------------------------ ------- --------------
WAAE Application Server (ACE) 33330 running
3. Edit the following parameter in the configuration file, and save the file:
LogMaxEndLines=value
value
Defines the maximum number of lines to retrieve from a log file.
Default: 0; the application server retrieves the entire contents of the log file.
Limits: 0-10000
Notes:
■ If the specified value is not in the valid range, the application server resets the value to the default.
■ If the specified value is in the valid range, the application server passes the request to the agent. The agent retrieves the specified number of lines starting from the end of the log file.
4. Enter the following command at the operating system prompt:
kill –HUP applicationserver_pid
applicationserver_pid
Defines the process ID of the application server that you want to pause and resume.
The application server resumes. The specified number of lines are retrieved from the log file.
Note: On Windows, you can enter the equivalent value using the Log Max End Lines field on the Application Server - CA Workload Automation AE Administrator window of CA Workload Automation AE Administrator. For information about setting the maximum number of lines to retrieve from a log file on Windows, see the Online Help.


Chapter 5: Maintaining the Scheduler 121
Chapter 5: Maintaining the Scheduler
This section contains the following topics:
How the Scheduler Starts Processes (see page 121) How to Back Up Definitions (see page 122) Restore Definitions (see page 126) View the Scheduler Log File (see page 127) Specify the Scheduler or Application Server Log Rollover on UNIX (see page 128) How Shadow Scheduler Backup Works (see page 130) Restore the Primary Scheduler After a Failover on UNIX (see page 131) Run the Scheduler in Test Mode on UNIX (see page 132) Run the Scheduler in Test Mode on Windows (see page 134)
How the Scheduler Starts Processes
The scheduler (the event_demon binary) is the engine of CA Workload Automation AE.
You must start the scheduler to schedule and run jobs. If the scheduler is not running, you cannot initiate new job flows. If you stop the scheduler, any job flows that have already started run to completion.
Note: The event server must be available, running, and properly identified before you can start the scheduler.
After you start the scheduler, it performs the following tasks before it begins processing:
■ Verifies that no other scheduler is running on that computer.
■ Runs the chase command with the -A and -E parameters. The chase command verifies whether jobs and agents are running. For each client computer, the chase command passes a list of jobs that are supposed to be running on the agent. The agent then verifies that the processes are running. If the chase command detects errors, it sends an alarm. If a job is not running as expected, the scheduler sends the necessary corrective event for the job, if the job definition allows it.
■ If a STARTJOB event is being processed and the job it started is still active, the scheduler does not restart the job. The purpose of running the chase command is to guarantee that the scheduler starts with all the processes in a known state. Problems are detected on scheduler startup. This method is similar to a database checkpointing and rolling forward or back upon recovery.
Note: For information about running the chase command or starting the scheduler on Windows, see the Online Help.

How to Back Up Definitions
122 Administration Guide
More information:
Start the Scheduler on UNIX (see page 192) Verify Whether Jobs and Agents are Running at Scheduler Startup (see page 94)
How to Back Up Definitions
We recommend that you back up the following definitions periodically so you have files to restore from in the event of a system failure:
■ Calendar definitions
■ Machine definitions
■ Resource definitions
■ User-defined job type definitions
■ Job definitions
■ Monitor report definitions
■ Global variables
To back up definitions, follow these steps:
1. Back up calendar definitions (see page 123).
2. Back up machine, resource, user-defined job type, job, and monitor report definitions (see page 124).
3. Back up global variable definitions (see page 125).

How to Back Up Definitions
Chapter 5: Maintaining the Scheduler 123
Back Up Calendar Definitions
We recommend that you back up your calendar definitions periodically so you have files to restore from in the event of a system failure.
To back up calendar definitions, enter the following commands at the UNIX operating system prompt or the Windows instance command prompt:
autocal_asc –E /directory/autosys.ecal –e ALL
autocal_asc –E /directory/autosys.ccal –c ALL
autocal_asc –E /directory/autosys.scal –s ALL
directory
Defines a directory outside of the CA Workload Automation AE directory structure.
A backup of the calendar definitions is created in the specified directory.
Note: For more information about the autocal_asc command, see the Reference Guide.

How to Back Up Definitions
124 Administration Guide
Back Up Machine, Resource, User-defined Job Type, Job, and Monitor Report Definitions
We recommend that you back up your machine, resource, user-defined job type, job, and monitor report definitions periodically so you have files to restore from in the event of a system failure.
Follow these steps:
1. Enter the following command at the UNIX operating system prompt or the Windows instance command prompt:
autorep -M ALL -q > /directory/autosys.jil
directory
Defines a directory outside of the CA Workload Automation AE directory structure. We recommend that you use the same directory where you saved your calendar definitions.
Your machine definitions are saved to a file named autosys.jil in the specified directory.
Note: To append definitions to an existing file, you must enter >> (instead of >) in the command. We recommend that you append your machine, resource, user-defined job type, job, and monitor report definitions to the same file so you have only one file to restore following a system failure.
2. Enter the following command at the UNIX operating system prompt or the Windows instance command prompt:
autorep -V ALL -q >> /directory/autosys.jil
Your resource definitions are saved to a file named autosys.jil in the specified directory.
3. Enter the following command at the UNIX operating system prompt or the Windows instance command prompt:
autorep –Y ALL –q >> /directory/autosys.jil
Your user-defined job type definitions are saved to a file named autosys.jil in the specified directory.

How to Back Up Definitions
Chapter 5: Maintaining the Scheduler 125
4. Enter the following command at the UNIX operating system prompt or the Windows instance command prompt:
autorep -J ALL -q >> /directory/autosys.jil
Your job definitions are saved to a file named autosys.jil in the specified directory.
5. Enter the following command at the UNIX operating system prompt or the Windows instance command prompt:
monbro -N ALL -q >> /directory/autosys.jil
Your monitor report definitions are appended to the file that contains your backed-up machine, resource, user-defined job types, and job definitions. A backup of the machine, resource, user-defined job types, jobs, and monitor report definitions is created.
Note: For more information about the autorep and monbro commands, see the Reference Guide.
Back Up Global Variable Values
We recommend that you back up your global variable values periodically so you have files to restore from in the event of a system failure.
To back up global variable values, enter the following command at the UNIX operating system prompt or the Windows instance command prompt:
autorep -G ALL > /directory/globals.txt
directory
Defines a directory outside of the CA Workload Automation AE directory structure. We recommend that you use the same directory where you saved your calendar, machine, resource, user-defined job type, job, and monitor report definitions.
A backup of the global variable values is created. Your global variable values are saved to a file named globals.txt in the specified directory. This file is a record of what you must redefine after a system failure.
Note: For more information about the autorep command, see the Reference Guide.

Restore Definitions
126 Administration Guide
Restore Definitions
You must restore backed-up definitions if you have lost data during a system failure or you want to reset the definitions in your database to a previous level. This procedure assumes that you have previously backed up your global variables and your calendar, machine, resource, user-defined job type, job, and monitor report definitions.
Follow these steps:
1. Log in to CA Workload Automation AE and enter the following commands at the UNIX operating system prompt or the Windows instance command prompt:
autocal_asc –I /directory/autosys.ecal
autocal_asc –I /directory/autosys.ccal
autocal_asc –I /directory/autosys.scal
directory
Defines the directory where you previously backed up the definitions.
Your calendar definitions are restored to the database.
2. Enter the following command at the operating system prompt:
jil < /directory/autosys.jil
Your machine, resource, user-defined job type, job, and monitor report definitions are restored to the database.
3. Open the globals.txt file that contains your backed-up global variables and manually redefine any global variables according to the values in the globals.txt file by entering the following command for each global variable:
sendevent –E SET_GLOBAL –g VARIABLE=VALUE
Your global variables are restored.
View the Scheduler Log File
Chapter 5: Maintaining the Scheduler 127
View the Scheduler Log File
The scheduler log file contains a record of all the actions taken by the scheduler, including startup and shutdown information.
To view the scheduler log file, enter the following command at the UNIX operating system prompt or the Windows instance command prompt:
autosyslog -e
The last ten lines of the scheduler log file are displayed and all subsequent additions to the log are automatically displayed as they occur.
Notes:
■ To terminate autosyslog, press Ctrl+C.
■ For more information about the autosyslog command, see the Reference Guide.
Scheduler Log File Location
When the scheduler encounters starting problems, it logs errors to a location that is dependent on when the starting process fails. You can find the error description in one of the following locations:
■ If the scheduler fails early in startup, it writes errors to the Windows Event Log.
■ If the scheduler fails during startup or encounters problems while running, it writes errors to the following location:
– On UNIX—$AUTOUSER/out/event_demon.$AUTOSERV
Note: If the $AUTOUSER directory is NFS mounted, you can view the output from any computer on the network.
– On Windows—%AUTOUSER%/out/event_demon.%AUTOSERV%

Specify the Scheduler or Application Server Log Rollover on UNIX
128 Administration Guide
Specify the Scheduler or Application Server Log Rollover on UNIX
You can specify when the scheduler or the application server log rolls over. The log can roll over at midnight or when the log file size is equal to the specified size.
Note: The aggregator log file has the same properties as the scheduler log file and it rolls over based on the LOGROLLOVER parameter value in the configuration file.
Follow these steps:
1. Log in to CA Workload Automation AE as a user authorized to stop the scheduler and application server and run the shell that is sourced to use CA Workload Automation AE.
2. Enter the following commands at the operating system prompt:
unisrvcntr status waae_sched.$AUTOSERV
unisrvcntr status waae_server.$AUTOSERV
The scheduler and application server process IDs are displayed as follows:
CA Services Status Report
Component Name Pid Status
------------------------------------ ------- --------------
WAAE Scheduler (ACE) 32220 running
CA Services Status Report
Component Name Pid Status
------------------------------------ ------- --------------
WAAE Application Server (ACE) 33330 running
3. Edit the following parameter in the configuration file, and save the file:
LOGROLLOVER=OFF | SIZE(x) | MIDNIGHT | SIZE(x),MIDNIGHT
OFF
Disables the log roll over.
SIZE(x)
Specifies that the log rolls over when the log file size is equal to the specified size.
Note: You can specify the log file size in megabytes. CA Workload Automation AE checks the log file size every second.
MIDNIGHT
Specifies that the log rolls over at midnight. This is the default.

Specify the Scheduler or Application Server Log Rollover on UNIX
Chapter 5: Maintaining the Scheduler 129
SIZE(x),MIDNIGHT
Specifies that the log rolls over at midnight and when the log file size is equal to the specified size.
Note: If you do not specify a value for the SIZE(x) parameter, it is set to 100 MB by default. The scheduler, application server, or aggregator log rolls over when the log file size reaches 100 MB.
4. Enter the following commands at the operating system prompt:
kill –HUP scheduler_pid
kill –HUP applicationserver_pid
scheduler_pid
Defines the process ID of the scheduler that you want to pause and resume.
applicationserver_pid
Defines the process ID of the application server that you want to pause and resume.
The scheduler and the application server resume. The scheduler or the application server log rollover is configured.
Note: On Windows, you can specify the equivalent value by setting the LOGROLLOVER environment variable using the System - CA Workload Automation AE Administrator window of CA Workload Automation AE Administrator. For more information about adding, modifying, or deleting environment variables using CA Workload Automation AE Administrator, see the Online Help.
Example: Specify the Scheduler Log Rollover
This example rolls over the scheduler log at midnight and when the log file size is equal to 100 MB.
LOGROLLOVER=SIZE(100),MIDNIGHT

How Shadow Scheduler Backup Works
130 Administration Guide
How Shadow Scheduler Backup Works
You can configure a shadow scheduler to use as a backup scheduler. In this scenario, both the primary and shadow schedulers periodically update their heartbeats in the event server to indicate that they are active. The shadow scheduler remains dormant, checking the event server for heartbeats from the primary scheduler. These heartbeats indicate that the primary scheduler is running. If the primary scheduler fails to update the event server, the shadow scheduler takes over and processes events.
If the primary scheduler and the event server are on the same computer, the scheduler failure could also mean an event server failure. In this case, if dual event servers are configured, CA Workload Automation AE rolls over to single event server mode and fails over to the shadow scheduler. CA Workload Automation AE uses the tie-breaker scheduler to resolve contentions and eliminates situations where one scheduler takes over because of network problems. However, the shadow scheduler is not guaranteed to take over in every case. For example, in the case of network problems, CA Workload Automation AE might not be able to determine which scheduler works and might shut down both the schedulers. In such cases, you must resolve the network problems so that the primary, shadow, and tie-breaker schedulers can update both event servers, and start CA Workload Automation AE.
Restore the Primary Scheduler After a Failover on UNIX
Chapter 5: Maintaining the Scheduler 131
Restore the Primary Scheduler After a Failover on UNIX
If you run CA Workload Automation AE with a shadow scheduler, the shadow scheduler takes over processing events if the primary scheduler fails. You can configure the primary scheduler to do one of the following after a failover:
■ Automatically failback
■ Failback only after you do one of the following:
a. Manually restore the primary scheduler
b. Restart CA Workload Automation AE
■ Failback only after you manually restore the primary scheduler
Follow these steps:
1. Log in to a shadow scheduler as a user authorized to stop the scheduler and run the shell that is sourced to use CA Workload Automation AE.
2. Enter the following command at the operating system prompt:
sendevent -E STOP_DEMON
The shadow scheduler completes any processes it is currently performing and stops.
Note: If you are running with dual event servers, the tie-breaker scheduler must also be stopped.
3. On the primary scheduler, enter the following command at the operating system prompt:
eventor
The primary scheduler is restored.
4. On the shadow scheduler, enter the following command at the operating system prompt:
eventor
The shadow scheduler is restarted.
Note: If you are running with dual event servers, the tie-breaker scheduler must also be restarted.

Run the Scheduler in Test Mode on UNIX
132 Administration Guide
Run the Scheduler in Test Mode on UNIX
You can run the scheduler in test mode to troubleshoot problems and check your configuration. For example, you can check whether the scheduler and the agent are installed and configured properly. Running in test mode uses the same mechanisms of starting jobs and sending events that CA Workload Automation AE uses in normal mode.
You can also test the setup and execution of the jil command without running the defined jobs. For example, you can check whether the conditional logic for jobs, including nested boxes, is functioning correctly. In test mode, the scheduler runs a simple test job instead of the defined jobs.
Follow these steps:
1. Run the shell that it sourced to use CA Workload Automation AE.
2. Enter the following command at the operating system prompt:
setenv AUTOTESTMODE=1|2
1
Runs each job with the following test mode variations:
■ The as_test command runs on the remote computer instead of the command specified in the job definition.
Note: If you performed an agent-only install on the remote computer, you can run the as_test command on the remote computer only if you installed the agent using the CA Workload Automation AE media. If you installed the agent using the CA Workload Automation Agent DVD, the as_test command is not available on the remote computer. We recommend that you install the agent using the CA Workload Automation AE media as it configures the agent specifically for communication with CA Workload Automation AE.
■ The scheduler redirects standard output and standard errors for the command to the /tmp/autotest.$AUTO_JOB_NAME file, where $AUTO_JOB_NAME is the job name as defined to CA Workload Automation AE.
■ If the type of the job being run in test mode is not a command job, the job is not disabled. The scheduler runs it as it would in normal mode.
■ If the opsys attribute of the type 'a' machine is set to a value other than aix, hpux, linux, solaris, or windows, the job is not disabled. The scheduler runs it as it would in normal mode. If the opsys attribute of the type ‘a’ machine is not set, the job runs as if it is running on a machine with a UNIX opsys attribute value.
This test mode disables the following functions:
■ Minimum and maximum run alarms
■ Job terminations after job run exceeds the maximum runtime

Run the Scheduler in Test Mode on UNIX
Chapter 5: Maintaining the Scheduler 133
■ Sourcing a user-defined job profile file
■ Minimum disk space verifications
2
Runs each job with the same behaviors as $AUTOTESTMODE = 1, and also includes the following functions:
■ Minimum disk space verifications are performed.
■ Alarms are sent if job run completes either before the minimum runtime or after the maximum runtime.
■ Job runs exceeding the maximum runtime are terminated.
■ A user-defined job profile is sourced.
■ The scheduler redirects output from the as_test command to the user-defined standard output and standard error files (if they are defined). Otherwise, the scheduler redirects output to the /tmp/autotest.$AUTO_JOB_NAME file.
The level the test mode must run in is set.
Notes:
■ You must use either the setenv command or the export command (depending on your UNIX operating system) to set the $AUTOTESTMODE variable.
■ The as_test command is new in r11.3 and obsoletes the ntgetdate command from previous releases. When running test mode jobs to legacy agents, the agents invoke the ntgetdate command instead of the command specified in the job definition.
■ When a test mode job runs on a machine of type ‘r’ or ‘n’, the output is written to the legacy agent override logging directory (if defined) or to the enterprise-wide logging directory.
3. Enter the following command at the operating system prompt:
unisrvcntr start waae_sched.$AUTOSERV
The scheduler starts and runs in test mode.
Note: The scheduler cannot run partially in test mode, and CA Workload Automation AE does not provide a test mode for the database. You must use caution when you run the scheduler in test mode on a live production system.

Run the Scheduler in Test Mode on Windows
134 Administration Guide
Run the Scheduler in Test Mode on Windows
You can run the scheduler in test mode to troubleshoot problems and check your configuration. For example, you can check whether the scheduler and the agent are installed and configured properly. Running in test mode uses the same mechanisms of starting jobs and sending events that CA Workload Automation AE uses in normal mode.
You can also test the setup and execution of the jil command without running the defined jobs. For example, you can check whether the conditional logic for jobs, including nested boxes, is functioning correctly. In test mode, the scheduler runs a simple test job instead of the defined jobs.
Follow these steps:
1. Click Start, Programs, CA, Workload Automation AE, Administrator.
The Instance - CA Workload Automation AE Administrator window opens.
2. In the Instance drop-down list, select the instance that you want to add the %AUTOTESTMODE% environment variable to.
3. Click the System icon on the toolbar.
The System - CA Workload Automation AE Administrator window appears.
4. Enter AUTOTESTMODE in the Variable field and its value in the Value field. You can set the value to one of the following:
1
Runs each job with the following test mode variations:
■ The as_test command runs on the remote computer instead of the command specified in the job definition.
Note: If you performed an agent-only install on the remote computer, you can run the as_test command on the remote computer only if you installed the agent using the CA Workload Automation AE media. If you installed the agent using the CA Workload Automation Agent DVD, the as_test command is not available on the remote computer. We recommend that you install the agent using the CA Workload Automation AE media as it configures the agent specifically for communication with CA Workload Automation AE.
■ The scheduler redirects standard output and standard errors for the command to the %TEMP%\autotest.%AUTO_JOB_NAME% file, where %AUTO_JOB_NAME% is the job name as defined to CA Workload Automation AE.

Run the Scheduler in Test Mode on Windows
Chapter 5: Maintaining the Scheduler 135
■ If the type of the job being run in test mode is not a command job, the job is not disabled. The scheduler runs it as it would in normal mode.
■ If the opsys attribute of the type 'a' machine is set to a value other than aix, hpux, linux, solaris, or windows, the job is not disabled. The scheduler runs it as it would in normal mode. If the opsys attribute of the type ‘a’ machine is not set, the job runs as if it is running on a machine with a UNIX opsys attribute value.
This test mode disables the following functions:
■ Minimum and maximum run alarms
■ Job terminations after job run exceeds the maximum runtime
■ Sourcing a user-defined job profile file
■ Minimum disk space verifications
2
Runs each job with the same behaviors as %AUTOTESTMODE% = 1, and also includes the following functions:
■ Minimum disk space verifications are performed.
■ Alarms are sent if job run completes either before the minimum runtime or after the maximum runtime.
■ Job runs exceeding the maximum runtime are terminated.
■ A user-defined job profile is sourced.
■ The scheduler redirects output from the as_test command to the user-defined standard output and standard error files (if they are defined). Otherwise, the scheduler redirects output to the %TEMP%\autotest.%AUTO_JOB_NAME% file.
5. Click Set.
The %AUTOTESTMODE% environment variable is listed in the Environment Variables pane. The level the test mode must run in is set.
Notes:
■ The as_test command is new in r11.3 and obsoletes the ntgetdate command from previous releases. When running test mode jobs to legacy agents, the agents invoke the ntgetdate command instead of the command specified in the job definition.
■ When a test mode job runs on a machine of type ‘r’ or ‘n’, the output log files are written to the legacy agent override logging directory (if defined) or to the enterprise-wide logging directory.

Run the Scheduler in Test Mode on Windows
136 Administration Guide
■ To ensure that the as_test command runs properly, set the value of the opsys attribute of the type 'a' machine to windows for each Windows agent.
■ When a test mode job runs on a machine of type ‘a’ with the opsys attribute value set to windows, the output log files are written to the %TEMP% location as defined by the job owner’s environment.
6. Click the Services icon on the toolbar.
The Services - CA Workload Automation AE Administrator window appears, displaying a list of services installed on the selected instance.
7. Right-click the scheduler service, and click Start.
The scheduler starts and runs in test mode.
Note: The scheduler cannot run partially in test mode, and CA Workload Automation AE does not provide a test mode for the database. You must use caution when you run the scheduler in test mode on a live production system.

Chapter 6: Maintaining the Event Server 137
Chapter 6: Maintaining the Event Server
This section contains the following topics:
Single Event Server Mode (see page 138) Dual Event Server Mode (see page 139) Define the Event Server Information on UNIX (see page 141) Configure CA Workload Automation AE to Run in Dual Event Server Mode on UNIX (see page 145) Configure CA Workload Automation AE to Run in Single Event Server Mode on UNIX (see page 154) Event Server Rollover Recovery (see page 155) Database Storage Requirements (see page 156) General Database Maintenance (see page 156) Configure the Event Server Time-Out Period on UNIX (see page 161) High Availability Recovery (see page 162) Recovery Scenarios (see page 166) Rebuild Table Indexes for a CA Workload Automation AE Database (see page 171) How to Tune the Sybase Server (see page 172) How to Tune the Oracle Database (see page 175)
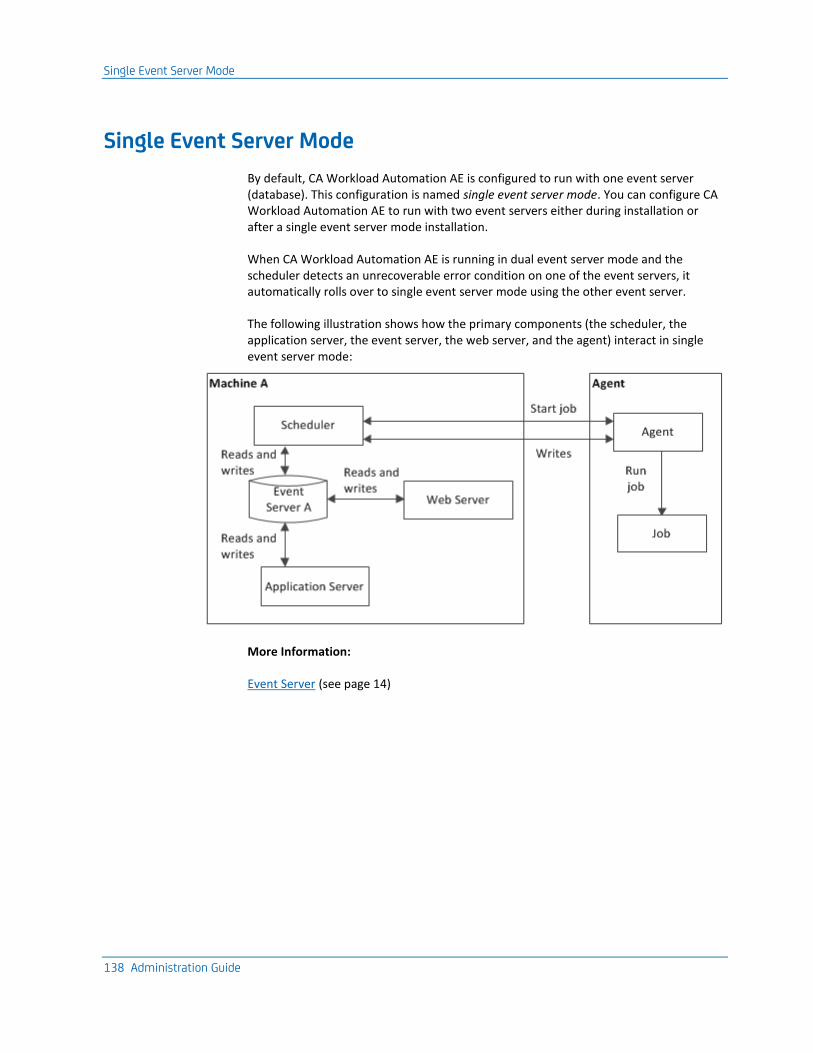
Single Event Server Mode
138 Administration Guide
Single Event Server Mode
By default, CA Workload Automation AE is configured to run with one event server (database). This configuration is named single event server mode. You can configure CA Workload Automation AE to run with two event servers either during installation or after a single event server mode installation.
When CA Workload Automation AE is running in dual event server mode and the scheduler detects an unrecoverable error condition on one of the event servers, it automatically rolls over to single event server mode using the other event server.
The following illustration shows how the primary components (the scheduler, the application server, the event server, the web server, and the agent) interact in single event server mode:
More Information:
Event Server (see page 14)

Dual Event Server Mode
Chapter 6: Maintaining the Event Server 139
Dual Event Server Mode
CA Workload Automation AE can run in dual event server mode, which means that it runs with two event servers or databases.These two event servers contain identical data, including object definitions and events. CA Workload Automation AE reads from one event server and writes to both the event servers simultaneously.
We recommend that you synchronize the event servers when you configure CA Workload Automation AE to run in dual event server mode. Event server synchronization ensures that CA Workload Automation AE recovers after one of the event servers fails.
The scheduler reads from both event servers when it processes events. Sometimes the scheduler detects an event on one event server but not on the other event server. The scheduler copies any missing events to the other event server to prevent temporary problems from interrupting event processing.
Note: To avoid a single point of failure, ensure that the two event servers reside on two different data servers that are running on two different computers.

Dual Event Server Mode
140 Administration Guide
The following diagram illustrates how dual event server mode operates:
■ How the databases are laid out
■ How CA Workload Automation AE verifies which database to use
■ How the primary components (the scheduler, the application server, the event server, the agent, and the web server) interact
More Information:
Dual Event Servers (see page 14)

Define the Event Server Information on UNIX
Chapter 6: Maintaining the Event Server 141
Define the Event Server Information on UNIX
You can define the event server information used by CA Workload Automation AE during or after installation. To define the event server information after the installation, modify the parameters in the configuration file. The scheduler, application server, web server, and some client utilities such as dbstatistics, archive_events, and archive_jobs use the event server information to connect to the event server.
Follow these steps:
1. Run the shell that is sourced to use CA Workload Automation AE.
2. Enter the following commands at the operating system prompt:
unisrvcntr stop waae_sched.$AUTOSERV
unisrvcntr stop waae_server.$AUTOSERV
unisrvcntr stop waae_webserver.$AUTOSERV
The scheduler, application server, and the web server stop.
3. Open the $AUTOUSER/config.$AUTOSERV file, modify the following parameters, and save the file:
Provider=ORA|SYB
ORA
Identifies Oracle as the database provider.
SYB
Identifies Sybase as the database provider.
DBAccess=username/password
username/password
Defines the user name and the password (in encrypted format) the scheduler, application server, or the web server use to connect to the database.
EventServer_1=SYBASE_SVR:SYBASE_DB,DBPORT,DBHOST | ORACLE_SVR,DBPORT,DBHOST
SYBASE_SVR:SYBASE_DB,DBPORT,DBHOST
Identifies the Sybase database for a specific event server.
ORACLE_SVR,DBPORT,DBHOST
Identifies the Oracle database for a specific event server.
Note: If CA Workload Automation AE is running in dual event server mode, edit the EventServer_2 parameter to define the event server information for the second event server.

Define the Event Server Information on UNIX
142 Administration Guide
4. Enter the following commands at the operating system prompt:
unisrvcntr start waae_sched.$AUTOSERV
unisrvcntr start waae_server.$AUTOSERV
unisrvcntr start waae_webserver.$AUTOSERV
The scheduler, application server, and the web server start. The event server information is defined.
Note: On Windows, you can define the event server information using the Event Server - CA Workload Automation AE Administrator window of CA Workload Automation AE Administrator. For more information, see the Online Help.
Provider Parameter
The Provider parameter in the configuration file specifies the database provider of the Relational Database Management System (RDBMS) that is used by CA Workload Automation AE.
The configuration file contains the following entry:
Provider=ORA|SYB|MSQ
ORA
Identifies Oracle as the database provider.
SYB
Identifies Sybase as the database provider.
MSQ
Identifies Microsoft SQL Server as the database provider.
Note: On Windows, you can select the equivalent value using the Provider drop-down list on the Event Server - CA Workload Automation AE Administrator window of CA Workload Automation AE Administrator. For more information, see the Online Help.

Define the Event Server Information on UNIX
Chapter 6: Maintaining the Event Server 143
DBAccess Parameter
The DBAccess parameter in the configuration file defines the user name and password (in encrypted format) the scheduler, application server, or the web server uses to connect to the database. This database user name and password are defined during the CA Workload Automation AE installation.
The configuration file contains the following entry:
DBAccess=username/password
username/password
Defines the user name and password (in encrypted format) the scheduler, application server, or the web server uses to connect to the database.
Notes:
■ When you install CA Workload Automation AE, a database user is added. Typically, this database user is named autosys. The database user is granted rights to the CA Workload Automation AE objects and can make changes to specific information in the database.
■ You can generate the DBAccess parameter password in AES encrypted format using the autosys_secure command (using option 6 and then option 1). However, if you change the password using option 3 of the autosys_secure command, the local configuration file is automatically updated. To update the configuration files on other machines with server installations, you can either copy the new password in all configuration files or issue the autosys_secure command on all server machines. For more information about the autosys_secure command, see the Reference Guide.
■ On Windows, you can enter the equivalent values using the User and Password fields on the Event Server - CA Workload Automation AE Administrator window of CA Workload Automation AE Administrator. For more information, see the Online Help.
EventServer_1 and EventServer_2 Parameters
The EventServer_1 parameter in the configuration file specifies the database for a specific event server. When CA Workload Automation AE runs in single event server mode, only one event server is required. If you want to run CA Workload Automation AE in dual event server mode, configure the EventServer_2 parameter in the configuration file by specifying the database that the second event server must be connected to.
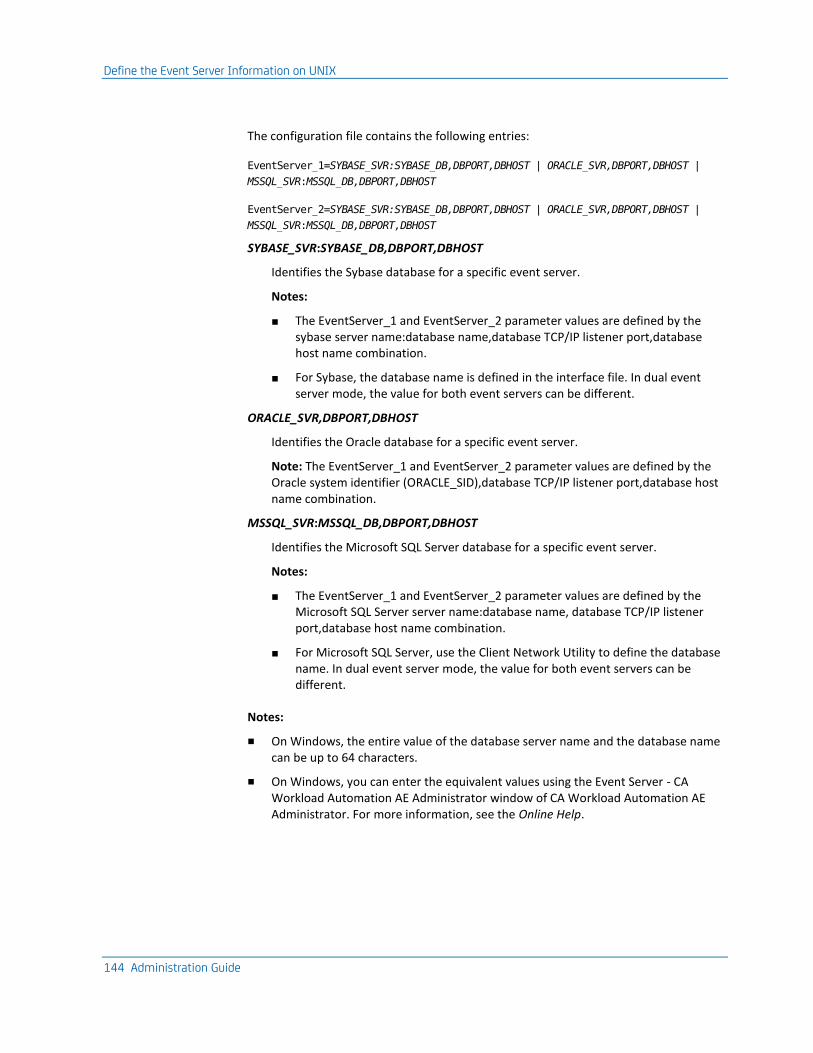
Define the Event Server Information on UNIX
144 Administration Guide
The configuration file contains the following entries:
EventServer_1=SYBASE_SVR:SYBASE_DB,DBPORT,DBHOST | ORACLE_SVR,DBPORT,DBHOST |
MSSQL_SVR:MSSQL_DB,DBPORT,DBHOST
EventServer_2=SYBASE_SVR:SYBASE_DB,DBPORT,DBHOST | ORACLE_SVR,DBPORT,DBHOST |
MSSQL_SVR:MSSQL_DB,DBPORT,DBHOST
SYBASE_SVR:SYBASE_DB,DBPORT,DBHOST
Identifies the Sybase database for a specific event server.
Notes:
■ The EventServer_1 and EventServer_2 parameter values are defined by the sybase server name:database name,database TCP/IP listener port,database host name combination.
■ For Sybase, the database name is defined in the interface file. In dual event server mode, the value for both event servers can be different.
ORACLE_SVR,DBPORT,DBHOST
Identifies the Oracle database for a specific event server.
Note: The EventServer_1 and EventServer_2 parameter values are defined by the Oracle system identifier (ORACLE_SID),database TCP/IP listener port,database host name combination.
MSSQL_SVR:MSSQL_DB,DBPORT,DBHOST
Identifies the Microsoft SQL Server database for a specific event server.
Notes:
■ The EventServer_1 and EventServer_2 parameter values are defined by the Microsoft SQL Server server name:database name, database TCP/IP listener port,database host name combination.
■ For Microsoft SQL Server, use the Client Network Utility to define the database name. In dual event server mode, the value for both event servers can be different.
Notes:
■ On Windows, the entire value of the database server name and the database name can be up to 64 characters.
■ On Windows, you can enter the equivalent values using the Event Server - CA Workload Automation AE Administrator window of CA Workload Automation AE Administrator. For more information, see the Online Help.

Configure CA Workload Automation AE to Run in Dual Event Server Mode on UNIX
Chapter 6: Maintaining the Event Server 145
Configure CA Workload Automation AE to Run in Dual Event Server Mode on UNIX
By default, CA Workload Automation AE is configured to run in single event server mode during installation. You can configure CA Workload Automation AE to run in dual event server mode during installation or later by modifying the parameters in the configuration file.
If you configured CA Workload Automation AE to run in dual event server mode and one event server goes down, CA Workload Automation AE automatically rolls over to the second event server and continues running in single event server mode. After you recover the event server that failed, you can reconfigure CA Workload Automation AE to run in dual event server mode.
Important! Do not try to run CA Workload Automation AE in dual event server mode if it was previously running in single event server mode or if it rolled over to single event server mode. You must synchronize the two event servers before configuring CA Workload Automation AE to run in dual event server mode.
Note: For more information about how to install and configure dual event servers, see the UNIX Implementation Guide.
Follow these steps:
1. Run the shell that is sourced to use CA Workload Automation AE.
2. Enter the following commands at the operating system prompt:
unisrvcntr stop waae_sched.$AUTOSERV
unisrvcntr stop waae_server.$AUTOSERV
The scheduler and the application server stop.
3. Open the configuration file and add the following parameter after the EventServer_1 parameter that corresponds to the first event server:
EventServer_2=SYBASE_SVR:SYBASE_DB,DBPORT,DBHOST | ORACLE_SVR,DBPORT,DBHOST
SYBASE_DB,DBPORT,DBHOST
Identifies the Sybase database for the second event server.
ORACLE_SVR,DBPORT,DBHOST
Identifies the Oracle database for the second event server.
Note: When the scheduler automatically rolls over to single event server mode, it creates a backup of the configuration file and modifies the existing file by commenting out the EventServer_1 or EventServer_2 parameter based on the event server that experienced the unrecoverable error. Uncomment the parameter to recover the event server. Alternatively, you can delete the modified configuration file and rename the backed up copy to config.INSTANCENAME.

Configure CA Workload Automation AE to Run in Dual Event Server Mode on UNIX
146 Administration Guide
4. Specify the database reconnect behavior for the second event server by modifying the following parameter in the configuration file:
DBEventReconnect=value, value2
value
Identifies the database reconnect behavior for the first event server.
Limits: 0-99
value2
Identifies the database reconnect behavior for the second event server.
Limits: 0-99
Note: During typical installation, CA Workload Automation AE sets the reconnect value for the single event server to 50 by default. During a custom installation in which you enable dual event server mode, CA Workload Automation AE sets the reconnect value for both event servers to 50.5 by default. Ensure that you add a reconnect value for the second event server when you configure CA Workload Automation AE to run in dual event server mode after running it in single event server mode. Optionally, you can modify the default reconnect value for the first event server.
5. Save and exit the configuration file.
The database information and reconnect behavior for the second event server is defined. The database configuration changes from single event server mode to dual event server mode.
6. Run the CA Workload Automation AE bulk copy script (autobcpORA or autobcpSYB) based on your database type.
The event servers are synchronized.
7. Enter the following commands at the operating system prompt:
unisrvcntr start waae_sched.$AUTOSERV
unisrvcntr start waae_server.$AUTOSERV
The scheduler and the application server start. CA Workload Automation AE is configured to run in dual event server mode.
Note: On Windows, you can enable dual event server mode using the Event Server - CA Workload Automation AE Administrator window of CA Workload Automation AE Administrator. For information about enabling dual event server mode using CA Workload Automation AE Administrator on Windows, see the Online Help. For more information about how to install and configure dual event servers on Windows, see the Windows Implementation Guide.

Configure CA Workload Automation AE to Run in Dual Event Server Mode on UNIX
Chapter 6: Maintaining the Event Server 147
autobcpDB Script—Synchronize Databases
The autobcpDB script synchronizes data servers on different computers to prepare them for dual event server mode. This script uses the information on the source data server to create two identical servers.
Notes:
■ The autobcpDB script deletes all of the data in the target database and replaces it with the data in the source database. If you want to save the data in the target database, archive it before you run the autobcpDB script.
■ You must stop the scheduler and application server before you run the autobcpDB script.
■ You can enter the autobcpDB script on a single line or in interactive mode which prompts you for the required information line by line.
An autobcpDB script for each database vendor is included in the following directories:
■ Oracle
$AUTOSYS/dbobj/ORA/autobcpORA.pl
■ Sybase
$AUTOSYS/dbobj/SYB/autobcpSYB.pl
■ Microsoft SQL Server
$AUTOSYS/dbobj/MSQ/autobcpSQL.pl
The autobcpDB script that you use to synchronize the event servers depends on your database platform:
■ Oracle
perl autobcpORA.pl source_server target_server source_userid source_password
target_userid target_password dump_file oracle_directory
■ Sybase
perl autobcpSYB.pl source_server source_db target_server target_db source_userid
source_password target_userid target_password dump_file blk_size
■ Microsoft SQL Server
perl autobcpMSQ.pl source_server source_db target_server target_db source_userid
source_password target_userid target_password dump_file

Configure CA Workload Automation AE to Run in Dual Event Server Mode on UNIX
148 Administration Guide
source_server
Defines the name of the source Oracle System ID (for example, AEDB), Sybase server (for example, SourceServer), or Microsoft SQL Server server (for example, SourceServer). For Sybase, the source server name is defined in the interfaces file. For Microsoft SQL Server, you can view the source server name using Microsoft SQL Enterprise Manager.
Note: On Windows, the entire value of the database server name and the database name can be up to 64 characters.
source_db
Defines the source Microsoft SQL Server or Sybase database (for example, AEDB).
source_userid
Defines the user ID that is used to connect to the source Oracle System ID, Microsoft SQL Server server, or Sybase server.
Note: On Oracle, use aebadmin as the source user ID.
source_password
Defines the password that corresponds to the user ID that is used to connect to the source Oracle System ID, Microsoft SQL Server server, or Sybase server.
target_server
Defines the target Oracle System ID (for example, AEDB2), Microsoft SQL Server server (for example, DestinationServer), or Sybase server (for example, DestinationServer). For Sybase, the target server name is defined in the interfaces file. For Microsoft SQL Server, you can view the target server name using Microsoft SQL Enterprise Manager.
Notes:
■ For Oracle, the source server must be different from the target server.
■ On Windows, the entire value of the database server name and the database name can be up to 64 characters.
target_db
Defines the target Microsoft SQL Server or Sybase database (for example, AEDB2).
Note: The autobcpDB script deletes all of the data in the target database and replaces it with the data in the source database. If you want to save the data in the target database, archive it before you run the autobcpDB script.
target_userid
Defines the user ID that is used to connect to the target Oracle System ID, Microsoft SQL Server server, or Sybase server.
Note: On Oracle, use aedbadmin as the target user ID.

Configure CA Workload Automation AE to Run in Dual Event Server Mode on UNIX
Chapter 6: Maintaining the Event Server 149
target_password
Defines the password that corresponds to the user ID that is used to connect to the target Oracle System ID, Microsoft SQL Server server, or Sybase server.
dump_file
Defines the temporary file that is used in the transfer of data from one database to the other database.
Note: Specify a file that is local to the computer where this script is running.
oracle_directory
Defines the path to the Oracle home directory.
blk_size
(Optional) Specifies the number of rows that can be inserted from the dump_file to the destination database at a time.
Default: 5000
Note: The default value is used if you run the autobcpSYB.pl script in the interactive mode or you do not specify the blk_size value. Do not specify a large value because the transaction log encounters problems when it becomes too full.
Note: While running the autobcpSYB.pl script on Sybase, ensure the following:
■ Both event servers use the same ‘Character set’.
■ The ‘LANG’ environment variable is unset from the shell or the command prompt window (from which the autobcpSYB.pl script is executed) using the following command:
– On UNIX, use the following command:
$ unset LANG
– On Windows, use the following command:
C:\PROGRA~1\CA\UNICEN~1> set LANG=
The autobcpSYB.pl script may have problems while copying data from one event server to another, and may fail with errors if the environment variables are different. For more information, see the Sybase documentation.
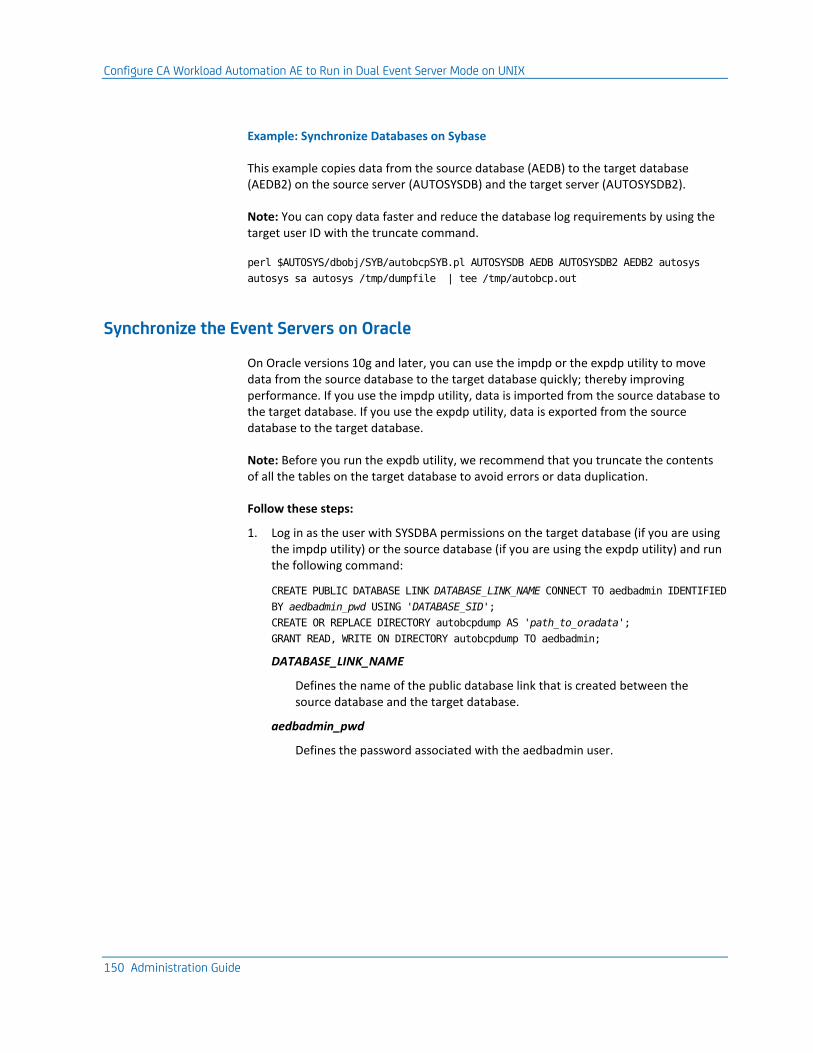
Configure CA Workload Automation AE to Run in Dual Event Server Mode on UNIX
150 Administration Guide
Example: Synchronize Databases on Sybase
This example copies data from the source database (AEDB) to the target database (AEDB2) on the source server (AUTOSYSDB) and the target server (AUTOSYSDB2).
Note: You can copy data faster and reduce the database log requirements by using the target user ID with the truncate command.
perl $AUTOSYS/dbobj/SYB/autobcpSYB.pl AUTOSYSDB AEDB AUTOSYSDB2 AEDB2 autosys
autosys sa autosys /tmp/dumpfile | tee /tmp/autobcp.out
Synchronize the Event Servers on Oracle
On Oracle versions 10g and later, you can use the impdp or the expdp utility to move data from the source database to the target database quickly; thereby improving performance. If you use the impdp utility, data is imported from the source database to the target database. If you use the expdp utility, data is exported from the source database to the target database.
Note: Before you run the expdb utility, we recommend that you truncate the contents of all the tables on the target database to avoid errors or data duplication.
Follow these steps:
1. Log in as the user with SYSDBA permissions on the target database (if you are using the impdp utility) or the source database (if you are using the expdp utility) and run the following command:
CREATE PUBLIC DATABASE LINK DATABASE_LINK_NAME CONNECT TO aedbadmin IDENTIFIED
BY aedbadmin_pwd USING 'DATABASE_SID';
CREATE OR REPLACE DIRECTORY autobcpdump AS 'path_to_oradata';
GRANT READ, WRITE ON DIRECTORY autobcpdump TO aedbadmin;
DATABASE_LINK_NAME
Defines the name of the public database link that is created between the source database and the target database.
aedbadmin_pwd
Defines the password associated with the aedbadmin user.

Configure CA Workload Automation AE to Run in Dual Event Server Mode on UNIX
Chapter 6: Maintaining the Event Server 151
DATABASE_SID
Defines the service name of the database. If you are using the impdp utility, specify the service name of the source database. If you are using the expdp utility, specify the service name of the target database.
path_to_oradata
Defines the absolute directory path on the computer where you run the command to create the public database link.
A public database link is created. autobcpdump is set as an alias to the path_to_oradata directory. The aedbadmin user is granted read and write access to autobcpdump.
2. Run the following command on the target database (if you are using the impdp utility) or the source database (if you are using the expdp utility) to test the database link:
SELECT * FROM ujo_alamode@DATABASE_LINK_NAME;
3. Run the following command on the target database (if you are using the impdp utility) or the source database (if you are using the expdp utility) if the database link test was successful:
■ If you are using impdp utility:
$ORACLE_HOME/bin/impdp aedbadmin/aedbadmin_pwd@DEST_ORA_SID
network_link=aedb_dblink table_exists_action=replace
directory=autobcpdump exclude=view,package,function,procedure
■ If you are using the expdp utilty:
$ORACLE_HOME/bin/expdp aedbadmin/aedbadmin_pwd@SOURCE_ORA_SID
network_link=aedb_dblink directory=autobcpdump
exclude=view,package,function,procedure
DEST_ORA_SID
Defines the service name of the target database.
SOURCE_ORA_SID
Defines the service name of the source database.
The data is moved from the source database to the target database.

Configure CA Workload Automation AE to Run in Dual Event Server Mode on UNIX
152 Administration Guide
Event Server Synchronization
CA Workload Automation AE provides the CA Workload Automation AE bulk copy scripts (autobcpORA, autobcpSYB, and autobcpMSQ) to synchronize the event servers. These scripts identify one event server as the source and the other event server as the target for the synchronization process.
Notes:
■ You must synchronize the event servers before enabling dual event server mode.
■ The greater the data that must be synchronized, the longer the CA Workload Automation AE bulk copy script runs.
Before you synchronize the event servers, do the following:
■ Check that both event servers are running.
■ Check that no CA Workload Automation AE schedulers, application servers, or client utilities like archive_events, sendevent, and so on are running.
■ For Microsoft SQL Server, check that both databases are defined correctly. Use the Microsoft SQL Enterprise Manager to view the information.
■ For Oracle, check that the $TNS_ADMIN/tnsnames.ora (on UNIX) or %TNS_ADMIN%\tnsnames.ora (on Windows) file contains valid entries for both event servers.
Note: If you installed Oracle Instant Client with the SQL*Plus package, you need not configure the tnsnames.ora file. Check that you can sqlplus to both the Oracle databases using the proper Oracle Net connection identifier.
■ For Sybase, check that the $SYBASE/interfaces (on UNIX) or %SYBASE%\ini\sql.ini (on Windows) file contains entries for both event servers.
■ Note the path to the database software so you can provide it when you run the CA Workload Automation AE bulk copy script.
■ Check that you have at least as much free disk space as the size of your database to store the temporary file that the CA Workload Automation AE bulk copy script creates. The script deletes this temporary file after the synchronization process is complete.
Note: When you stop the scheduler, any jobs that are running on the agent run to completion. Although it is recommended that you stop all jobs before synchronizing the databases, you can run the CA Workload Automation AE bulk copy script while the jobs are running on the agent.

Configure CA Workload Automation AE to Run in Dual Event Server Mode on UNIX
Chapter 6: Maintaining the Event Server 153
Handle Event Server Synchronization Errors
Sometimes the autobcpDB script encounters errors when it is running. In these cases, the script exits and CA Workload Automation AE displays the following message:
The CA WAAE data server is not accessible.
Please check the data server and rerun this script.
You can handle errors by correcting data server problems and rerunning the script.
Follow these steps:
To handle errors, verify the following and rerun the autobcpORA, autobcpSYB, or autobcpMSQ script:
■ Are both event servers running?
To verify this, ensure that you can connect to the event server.
– For Microsoft SQL Server, look for the MSSQLSERVER and SQLSERVERAGENT services.
– For Oracle, look for the OracleService*, OracleStart*, and OracleTNSListener services (where * indicates the Oracle SID).
– For Sybase, the service name is user-configurable.
■ Did you specify the source and the target event servers correctly in the autobcpORA, autobcpSYB, or autobcpMSQ script?
■ Did you enter the passwords correctly in the autobcpORA, autobcpSYB, or autobcpMSQ script?
■ Did you set the Sybase or Oracle environment variables correctly?
– The Oracle environment variable, ORACLE_HOME, defines the path to the top-level Oracle directory.
– The Sybase environment variables are DSQUERY and SYBASE. The DSQUERY variable defines the name of the Sybase event server. The SYBASE variable defines the complete path to the Sybase software directory.
■ Did you specify the event server names and ports correctly?
– For Microsoft SQL Server, you can view this information using the Microsoft SQL Enterprise Manager.
– For Oracle, this information is located in the TNSNAMES.ORA file.
– For Sybase, this information is located in the interfaces file.

Configure CA Workload Automation AE to Run in Single Event Server Mode on UNIX
154 Administration Guide
Configure CA Workload Automation AE to Run in Single Event Server Mode on UNIX
You can configure CA Workload Automation AE to run in single event server mode from dual event server mode.
Follow these steps:
1. Run the shell that is sourced to use CA Workload Automation AE.
2. Enter the following commands at the operating system prompt:
unisrvcntr stop waae_sched.$AUTOSERV
unisrvcntr stop waae_server.$AUTOSERV
The scheduler and the application server stop.
3. Open the configuration file, comment out the EventServer_1 or EventServer_2 parameter (corresponding to the event server that you do not want to use), and save the file.
4. Enter the following commands at the operating system prompt:
unisrvcntr start waae_sched.$AUTOSERV
unisrvcntr start waae_server.$AUTOSERV
The scheduler and the application server start. CA Workload Automation AE is now configured to run in single event server mode.
Note: On Windows, you can configure CA Workload Automation AE to run in single event server mode using the Event Server - CA Workload Automation AE Administrator window of CA Workload Automation AE Administrator. For information about configuring CA Workload Automation AE to run in single event server mode on Windows, see the Online Help.

Event Server Rollover Recovery
Chapter 6: Maintaining the Event Server 155
Event Server Rollover Recovery
When CA Workload Automation AE is running in dual event server mode and the scheduler detects an unrecoverable error condition on one of the event servers, it automatically rolls over to single event server mode on the other event server.
An unrecoverable error is defined as one of the following:
■ The connection to the database is lost, and after the configured number of reconnect attempts, the database remains unconnected.
■ A database has an unrecoverable error (for example, database corruption or media failure).
Notes:
■ On Sybase, a full transaction log is considered as an unrecoverable error. If you do not allocate sufficient log space for the level of database activity, the transaction log fills up under heavy load resulting in a severe error. In dual event server mode, CA Workload Automation AE rolls over to single event server mode using the database with available transaction log space. In single event server mode, CA Workload Automation AE shuts down.
■ On Oracle, if you do not allocate sufficient log space for the level of database activity, the transactions are suspended indefinitely without any error until the transaction log space becomes available. CA Workload Automation AE does not change the event server mode, but may halt until Oracle releases the control back to it.
When an event server rollover occurs, CA Workload Automation AE does the following:
■ On UNIX, the configuration file indicates whether a database rollover has occurred from dual event server mode to single event server mode by commenting out (prefixes #AUTO-ROLLOVER#) the EventServer_1 or EventServer_2 parameter that defines the event server that went offline.
Notes:
■ A backup of the original configuration file is saved in $AUTOUSER/config.$AUTOSERV.rollover.
■ The configuration file is modified on the primary or shadow scheduler or both. The configuration file on the client computers is not modified.
■ On Windows, the Event Server - CA Workload Automation AE Administrator window of CA Workload Automation AE Administrator indicates whether a database rollover has occurred from dual event server mode to single event server mode. If there has been a database rollover and a switch to single event server mode, the A Database Rollover Has Occurred check box is selected and the Status field displays which event server is DOWN.
Note: For more information about switching to single event server mode on Windows, see the Online Help.

Database Storage Requirements
156 Administration Guide
CA Workload Automation AE makes these changes so that the scheduler or the application server trying to access the database is aware that it is now running in single event server mode.
Database Storage Requirements
The limit on how much disk space a database can use is based on the underlying operating system and its file size limitations. Databases need disk space for more than just the database tables and stored procedures. They require sufficient disk space for sorting temporary and transient files. In addition, product operation and database backups can require a lot of space.
The size requirements for your database depend on the following:
■ The number of jobs you define.
■ The number of jobs that have dependencies.
■ How often the jobs run.
■ How often the database is cleaned.
Note: Every time a job runs, it generates at least three events and an entry in both the ujo_job_runs and ujo_extented_jobrun_info tables.
The standard sizes for databases are as follows:
■ Microsoft SQL Server—800 MB
■ Oracle—800 MB for the data tablespace and 80 MB for an index tablespace.
■ Sybase—800 MB for the data device and 100 MB for the log device.
The database tables are created with the option that automatically extends as long as there is space in the file system. The database sizes specified are the recommended initial size. If your job load is large, create a larger database.
General Database Maintenance
Periodic database maintenance helps ensure that CA Workload Automation AE is working correctly. Each run of each job generates several events. If you do not remove these events from the database periodically, the database eventually reaches its size limit, bringing CA Workload Automation AE and its jobs to a halt. Therefore, periodic database maintenance is recommended.

General Database Maintenance
Chapter 6: Maintaining the Event Server 157
Automate Database Maintenance on UNIX
You can automate the database maintenance. The scheduler performs internal database maintenance once a day. It does not process any events during maintenance, and it waits for the maintenance activities to complete before resuming normal operations.
Follow these steps:
1. Log in to CA Workload Automation AE as a user authorized to stop the scheduler and run the shell that is sourced to use CA Workload Automation AE.
2. Enter the following command at the operating system prompt:
sendevent -E STOP_DEMON
The scheduler completes any processing it is currently performing and stops.
3. Edit the following parameters in the configuration file, and save the file:
DBMaintTime=HH:MM
HH:MM
Defines the time when the database maintenance command runs the maintenance script.
Default: 3:30
Limits: 24-hour format
DBMaintCmd=pathed_command
pathed_command
Defines the location of the DBMaint script.
Default: $AUTOSYS/bin/DBMaint
4. Enter the following command at the operating system prompt:
eventor
The scheduler starts. The database maintenance is automated.
Notes:
■ You must schedule the maintenance command to run when the system activity is minimal. We recommend that you configure your system to back up the database during the maintenance cycle.
■ On Windows, you can enter the equivalent values using the Scheduler - CA Workload Automation AE Administrator window of CA Workload Automation AE Administrator. For information about automating database maintenance on Windows, see the Online Help.

General Database Maintenance
158 Administration Guide
More Information:
Modify the DBMaint Script on UNIX (see page 159)
How the DBMaint.bat Batch File or DBMaint Script Runs
By default, CA Workload Automation AE runs the DBMaint script on UNIX or the DBMaint.bat batch file on Windows during the daily maintenance cycle. The DBMaint command runs the dbstatistics, archive_events, and archive_jobs commands to perform maintenance on the CA Workload Automation AE database.
The DBMaint command runs the dbstatistics command to perform the following tasks:
■ Update statistics in the database for optimal performance. For Oracle and Sybase databases, it computes statistics for all the tables.
■ Run the dbspace command to check the available space in the database. If the amount of free space is insufficient, the dbspace command issues warning messages and generates a DB_PROBLEM alarm.
Note: The DB_PROBLEM alarm is issued if the database space exceeds the value specified in the DBSPACE_ALARM_SPACE environment variable. The default value is 1000 MB.
■ Calculate and update the average job run statistics in the ujo_avg_job_run table. When the dbstatistics command runs, it overwrites old data with the new data.
The DBMaint command runs the archive_events command to remove old information from various database tables. Specifically, the archive_events command removes the following:
■ Events and associated alarms from the ujo_event table
■ Job run information from the ujo_job_runs table
■ autotrack log information from the ujo_audit_info and ujo_audit_msg tables
The DBMaint command runs the archive_jobs command to delete obsolete job versions from the database tables. It specifically removes the obsolete information from the job type database tables.
The output from the DBMaint command reports the amount of space remaining in your database so you can monitor whether the event tables are filling up. By monitoring these values, you can calculate how many events you can safely maintain in a day before archiving.
Note: For more information about the DBMaint, dbspace, dbstatistics, archive_events, and archive_jobs commands, see the Reference Guide.

General Database Maintenance
Chapter 6: Maintaining the Event Server 159
Modify the DBMaint Script on UNIX
You can modify the $AUTOSYS/bin/DBMaint script. For example, you might want to modify the script to perform database backups.
Follow these steps:
1. Make a copy of the $AUTOSYS/bin/DBMaint script and modify the copied version.
2. Log in to CA Workload Automation AE and run the shell that is sourced to use CA Workload Automation AE.
3. Check that the modified DBMaint script is placed in the location specified by the following parameter of the configuration file:
DBMaintCmd=pathed_command
pathed_command
Defines the location of the DBMaint script.
Default: $AUTOSYS/bin/DBMaint
CA Workload Automation AE uses the modified DBMaint script to perform database maintenance.
Note: When you upgrade from Unicenter AutoSys JM r11 to CA Workload Automation AE r11.3, Release 11.3.5, or Release 11.3.6 you will not lose the changes you made in the copied version. You can modify the DBMaint script that is installed when you upgrade to CA Workload Automation AE r11.3, Release 11.3.5, or Release 11.3.6 to match your copied version.

General Database Maintenance
160 Administration Guide
Modify the DBMaint.bat File on Windows
You can modify the %AUTOSYS%\bin\DBMaint.bat file. For example, you might want to modify the batch file to perform database backups.
Follow these steps:
1. Make a copy of the DBMaint file and modify the copied version.
2. Click Start, Programs, CA, Workload Automation AE, Administrator.
The Instance - CA Workload Automation AE Administrator window opens.
3. Select an instance from the Instance drop-down list.
4. Click the Scheduler icon on the toolbar.
The Scheduler - CA Workload Automation AE Administrator window appears.
5. Click the Database Maintenance tab, enter the location of the modified DBMaint.bat batch file in the Command field, and click Apply.
CA Workload Automation AE uses the modified DBMaint script to perform database maintenance.
Note: When you upgrade from Unicenter AutoSys JM r11 to CA Workload Automation AE r11.3, Release 11.3.5, or Release 11.3.6, you will not lose the changes you made in the copied version. You can modify the DBMaint file that is installed when you upgrade to CA Workload Automation AE r11.3, Release 11.3.5, or Release 11.3.6 to match your copied version.

Configure the Event Server Time-Out Period on UNIX
Chapter 6: Maintaining the Event Server 161
Configure the Event Server Time-Out Period on UNIX
You can specify the time (in seconds) the scheduler, application server, or web server waits before breaking the connection with an event server in an unknown state. That is, the scheduler, application server, or web server maintain and check connections with the databases, and if an event server is in an unknown state, the connection is broken after the specified time.
Follow these steps:
1. Log in to CA Workload Automation AE as a user authorized to stop the scheduler and run the shell that is sourced to use CA Workload Automation AE.
2. Enter the following commands at the operating system prompt:
unisrvcntr stop waae_sched.$AUTOSERV
unisrvcntr stop waae_server.$AUTOSERV
unisrvcntr stop waae_webserver.$AUTOSERV
The scheduler, application server, and web server stop.
3. Edit the following parameter in the configuration file, and save the file:
DBLibWaitTime=value
value
Defines the time (in seconds) the scheduler, application server, or web server waits before breaking the connection with an event server in an unknown state.
Default: 90
Note: If you set the DBLibWaitTime parameter to 0 (zero), the scheduler, application server, or web server does not time out. They wait until the database responds. We do not recommend setting this parameter to 0 because the scheduler may stop responding.
4. Enter the following commands at the operating system prompt:
unisrvcntr start waae_sched.$AUTOSERV
unisrvcntr start waae_server.$AUTOSERV
unisrvcntr start waae_webserver.$AUTOSERV
The scheduler, application server, and web server start. The event server time-out period is configured.

High Availability Recovery
162 Administration Guide
Notes:
■ On Windows, you can enter the equivalent value using the Wait Time field on the Event Server - CA Workload Automation AE Administrator window of CA Workload Automation AE Administrator. For more information, see the Online Help.
■ Typically, the database should never time out. However, if it does, CA Workload Automation AE tries to reconnect to the database the number of times specified in the DBEventReconnect parameter. If the database connections are frequently timing out, it probably indicates a system or event server contention problem.
High Availability Recovery
Running CA Workload Automation AE with high availability and dual event server options helps protect the service from being interrupted due to application, network, and database failures. This section describes the behavior of the scheduler and the application server when a failure is detected and how CA Workload Automation AE tries to recover.
Note: For more information about the high availability options and how to configure them, see the UNIX Implementation Guide or the Windows Implementation Guide.
More Information:
Scheduler (see page 15) Application Server (see page 15)
Set the Number of Scheduler or Application Server Connection Attempts on UNIX
When the scheduler or application server fails to update one of the event servers while running in dual event server mode, CA Workload Automation AE stops processing events while it tries to re-establish the connection with the event server. You can set the number of times the scheduler or application server tries to connect (or reconnect) to an event server before shutting down or switching over to single event server mode.
Follow these steps:
1. Log in to CA Workload Automation AE as a user authorized to stop the scheduler and run the shell that is sourced to use CA Workload Automation AE.
2. Enter the following commands at the operating system prompt:
unisrvcntr stop waae_sched.$AUTOSERV
unisrvcntr stop waae_server.$AUTOSERV
The scheduler and application server stop.

High Availability Recovery
Chapter 6: Maintaining the Event Server 163
3. Edit the following parameter in the configuration file, and save the file:
DBEventReconnect=value [,value2]
value
Defines the number of times the scheduler or application server tries to connect (or reconnect) to the event server before shutting down or before rolling over to single event server mode.
value2
(Optional) Defines the number of times the scheduler or application server tries to connect (or reconnect) to the second event server before shutting down or before rolling over to single event server mode.
Default: 50 in single event server mode; 50,5 in dual event server mode
Notes:
■ Ensure that you specify value2 when you configure CA Workload Automation AE to run in dual event server mode.
■ In single event server mode, the default setting specifies that the scheduler tries to connect to the event server 50 times before shutting down. That is, the scheduler tries to reconnect 50 times both on startup or when there is a connection problem.
■ In dual event server mode, the default setting specifies that the scheduler tries to connect to the event server (that is not responding) 5 times before switching over to single event server mode. On startup, CA Workload Automation AE makes 50 attempts to create a pool of connections to both event servers. If CA Workload Automation AE exhausts all its attempts to either create a pool of connections or restore its lost connections to both event servers, it assumes that there is a connection or configuration problem and shuts down.
4. Enter the following commands at the operating system prompt:
unisrvcntr start waae_sched.$AUTOSERV
unisrvcntr start waae_server.$AUTOSERV
The scheduler and application server start. The number of scheduler or application server connection attempts is set.
Notes:
■ In dual event server mode, the DBEventReconnect parameter is set to the default only if you initially install dual event servers. If you add a second event server after the CA Workload Automation AE installation, you must set the DBEventReconnect value appropriately.
■ On Windows, you can enter the equivalent value using the Event Reconnect field on the Event Server - CA Workload Automation AE Administrator window of CA Workload Automation AE Administrator. For more information about setting the number of scheduler or application server connection attempts on Windows, see the Online Help.

High Availability Recovery
164 Administration Guide
DBEventReconnect Parameter
The DBEventReconnect parameter in the configuration file controls the number of times the scheduler or application server tries to connect (or reconnect) to an event server before shutting down or before rolling over to single event server mode. This parameter is used on startup and when there is a connection problem at run time.
Notes:
■ Only the primary and shadow schedulers roll over to single event server mode when the number of reconnection attempts is exceeded. The primary or shadow scheduler performs the following actions during a database rollover:
– Sends a DB_ROLLOVER alarm to the event server.
– Updates the event server to reflect that CA Workload Automation AE is running in single event server mode.
– A copy of the current configuration file is saved as config.rollover.$AUTOSERV (on UNIX), where AUTOSERV defines the name of the instance. The EventServer_1 or EventServer_2 parameter in the configuration file is updated to include the active event server.
– On Windows, the status of the failed event server is updated in the configuration file. This configuration file entry activates the Enable button corresponding to the failed event server on the Event Server - CA Workload Automation AE Administrator window of CA Workload Automation AE Administrator.
■ The tie-breaker scheduler and the application server do not automatically roll over to single event server mode. They maintain both their connections to the event server and try to reconnect until they receive notification from either the primary or shadow scheduler to roll over. The application server does not service API requests from CA Workload Automation AE clients from the time the application server detects the failure of one of the event servers until the time it receives notification to roll over.
■ If any of the CA Workload Automation AE components lose their database connectivity to all event servers, either before or after the database rollover occurs, the components shut down. If the scheduler or the application server receives a request to shut down, the database reconnection process is interrupted immediately after the active connection attempt is completed.
More information:
Set the Number of Scheduler or Application Server Connection Attempts on UNIX (see page 162)

High Availability Recovery
Chapter 6: Maintaining the Event Server 165
Configure the Scheduler Heartbeat Interval on UNIX
In high availability mode, the primary, shadow, and tie-breaker schedulers update the database with their statuses at regular intervals. If a scheduler does not update the database after two intervals, that scheduler is unavailable and the system leaves high availability mode. You can configure the length of each interval.
Follow these steps:
1. Log in to CA Workload Automation AE as a user authorized to stop the scheduler and run the shell that is sourced to use CA Workload Automation AE.
2. Enter the following command at the operating system prompt:
sendevent -E STOP_DEMON
The scheduler completes any processing it is currently performing and stops.
3. Edit the following parameter in the configuration file, and save the file:
HAPollInterval=value
value
Defines the time interval between status polls when the scheduler runs in high availability mode.
Default: 15 seconds
4. Enter the following command at the operating system prompt:
eventor
The scheduler starts. The scheduler heartbeat interval is configured.

Recovery Scenarios
166 Administration Guide
Notes:
■ In single event server mode, CA Workload Automation AE enters high availability mode when both the primary and shadow schedulers are running. If the shadow scheduler does not update the database for two consecutive intervals after entering high availability mode, the primary scheduler issues an EP_HIGH_AVAIL alarm with a message to indicate that the shadow scheduler has not updated its status. If the shadow scheduler returns and posts updates at regular intervals, CA Workload Automation AE re-enters high availability mode. If the primary scheduler does not update the database for two consecutive intervals, the shadow scheduler issues an EP_ROLLOVER alarm with a message to indicate that the primary scheduler has not updated its status. It proceeds to failover and starts processing events. If the original primary scheduler returns, it detects that the shadow scheduler has failed over and shuts down. CA Workload Automation AE remains in failover status until the shadow scheduler is shut down. If the primary or shadow scheduler loses its connection to the event server, the high availability evaluations stop until the scheduler restores its connection to the event server.
■ In dual event server mode, CA Workload Automation AE enters high availability mode when the primary, shadow, and tie-breaker schedulers are running. The detection and failover procedure is the same as in single event server mode. However, before either of the schedulers make the final decision to failover, CA Workload Automation AE verifies the tie-breaker scheduler has sent regular updates. If either the primary or shadow scheduler fails to detect two consecutive updates from both its counterparts and the tie-breaker scheduler, the scheduler shuts down. If the primary, shadow, or tie-breaker scheduler loses its connection to one or both event servers, the high availability evaluations stop until the scheduler restores its connection to the event server or rolls over to single event server mode. In the meantime, the scheduler continues to update the accessible database at regular intervals.
■ On Windows, you can enter the equivalent value using the HA Poll Interval field on the Scheduler - CA Workload Automation AE Administrator window of CA Workload Automation AE Administrator. For more information about configuring the scheduler heartbeat interval on Windows, see the Online Help.
Recovery Scenarios
The following sections describe the recovery behavior of CA Workload Automation AE after a point of failure. The recovery scenarios apply to single event server mode and dual event server mode, as well as to non-high availability and high availability modes.
Note: In the dual event server mode scenarios documented in this section, the primary or shadow scheduler notifies the tie-breaker scheduler and the application server to roll over by updating the accessible database. The tie-breaker scheduler and the application server receive the notification when they fetch the updated database entry. If both the databases are unavailable, the notification cannot be written and the tie-breaker scheduler and the application server do not roll over.

Recovery Scenarios
Chapter 6: Maintaining the Event Server 167
Non-High Availability in Single Event Server Mode
If the connection to the single event server is lost, CA Workload Automation AE does the following:
■ The scheduler tries to reconnect to the event server for the configured number of times. If the scheduler cannot reconnect, it shuts down.
■ The application server tries to reconnect to the event server for the configured number of times. If the application server cannot reconnect, it shuts down.
Non-High Availability in Dual Event Server Mode
If the connection to one of the event servers is lost, CA Workload Automation AE does the following:
■ The scheduler tries to reconnect to the event server for the configured number of times. If the scheduler cannot reconnect, it rolls over and notifies the application server.
■ The application server tries to reconnect to the event server for the configured number of times. It continues to try to reconnect to the event server at regular intervals until one of the following occurs:
– It re-establishes a connection.
– It receives notification to roll over.
– It receives a shutdown request.
If the connections to both event servers are lost, CA Workload Automation AE does the following:
■ The scheduler tries to reconnect to the event server for the configured number of times. If the scheduler cannot reconnect, it rolls over and fails to notify the application server. If the scheduler fails to connect to the second event server after the configured number of times, it shuts down.
■ The application server tries to reconnect to the event server for the configured number of times. It continues to try to reconnect to the event server at regular intervals until one of the following occurs:
– It re-establishes a connection.
– It receives a shutdown request.
– It detects the loss of connection to the second event server and shuts down.

Recovery Scenarios
168 Administration Guide
High Availability in Single Event Server Mode
If the primary scheduler becomes unavailable, the shadow scheduler issues an EP_ROLLOVER alarm, fails over, and starts processing events.
If the shadow scheduler becomes unavailable, the primary scheduler issues an EP_HIGH_AVAIL alarm and continues to run.
If the event server connection is lost, CA Workload Automation AE does the following:
■ The scheduler tries to reconnect to the event server for the configured number of times. If the scheduler cannot reconnect, it shuts down.
■ The application server tries to reconnect to the event server for the configured number of times. If the application server cannot reconnect, it shuts down.
High Availability in Dual Event Server Mode
If the primary scheduler becomes unavailable, the shadow scheduler issues an EP_ROLLOVER alarm, fails over, and starts processing events.
If the shadow scheduler becomes unavailable, the primary scheduler issues an EP_HIGH_AVAIL alarm and continues to run.
If the tie-breaker scheduler becomes unavailable, the primary scheduler issues an EP_HIGH_AVAIL alarm and continues to run.
If the connection to one of the event servers is lost, CA Workload Automation AE does the following:
■ The primary scheduler tries to reconnect to the event server for the configured number of times. If the primary scheduler cannot reconnect, it rolls over and notifies the tie-breaker scheduler and the application server. The primary scheduler then checks for status updates from the shadow and tie-breaker schedulers. If the shadow and tie-breaker schedulers have updated the event server, the primary scheduler continues to run. If neither the shadow scheduler nor the tie-breaker scheduler has updated the event server in two consecutive poll intervals, the primary scheduler shuts down. If only the shadow scheduler has not updated the event server in two consecutive poll intervals, the primary scheduler issues an EP_HIGH_AVAIL alarm and continues to run.

Recovery Scenarios
Chapter 6: Maintaining the Event Server 169
■ The shadow scheduler tries to reconnect to the event server for the configured number of times. If the shadow scheduler cannot reconnect, it rolls over and notifies the tie-breaker scheduler and the application server. The shadow scheduler then checks for status updates from the primary and tie-breaker schedulers. If the primary and tie-breaker schedulers have updated the event server, the shadow scheduler continues to run. If neither the primary scheduler nor the tie-breaker scheduler has updated the event server in two consecutive poll intervals, the shadow scheduler shuts down. If only the primary scheduler has not updated the event server in two consecutive poll intervals, the shadow scheduler fails over and starts processing events.
■ The tie-breaker scheduler tries to reconnect to the event server for the configured number of times. It continues to try to reconnect to the event server at regular intervals until one of the following occurs:
– It re-establishes a connection.
– It receives notification to roll over.
– It receives a shutdown request.
In the meantime, it continues to update the accessible event server with its heartbeat.
■ The application server tries to reconnect to the event server for the configured number of times. It continues to try to reconnect to the event server at regular intervals until one of the following occurs:
– It re-establishes a connection.
– It receives notification to roll over.
– It receives a shutdown request.

Recovery Scenarios
170 Administration Guide
If the connections to both event servers are lost, CA Workload Automation AE does the following:
■ The primary and shadow schedulers try to reconnect to the event server for the configured number of times. If the primary and shadow schedulers cannot reconnect, they roll over and fail to notify the tie-breaker scheduler and the application server. If the primary and shadow schedulers fail to connect to the second event server after the configured number of times, they shut down.
■ The tie-breaker scheduler tries to reconnect to the event server for the configured number of times. It continues to try to reconnect to the event server at regular intervals until one of the following occurs:
– It re-establishes a connection.
– It receives a shutdown request.
– It detects the loss of connection to the second event server and shuts down.
■ The application server tries to reconnect to the event server for the configured number of times. It continues to try to reconnect to the event server at regular intervals until one of the following occurs:
– It re-establishes a connection.
– It receives a shutdown request.
– It detects the loss of connection to the second event server and shuts down.

Rebuild Table Indexes for a CA Workload Automation AE Database
Chapter 6: Maintaining the Event Server 171
Rebuild Table Indexes for a CA Workload Automation AE Database
Over time, the database table indexes can become inefficient while you run jobs and update them. You can rebuild the table indexes of a specified CA Workload Automation AE database to renew the efficiency.
Note: We recommend that you run the reindexDB script when the system activity is minimal. Otherwise, CA Workload Automation AE may experience a slow down or time-out condition while performing database transactions.
To rebuild indexes for a CA Workload Automation AE database, you must run the reindexDB script at the UNIX operating system prompt or the Windows instance command prompt.
Example: Rebuild Tables Indexes for a CA Workload Automation AE database on Sybase
This example rebuilds table indexes for a CA Workload Automation AE database on Sybase where SYBASESRV is the name of the Sybase server.
perl /opt/CA/WorkloadAutomationAE/autosys/dbobj/reindexDB.pl SYB SYBASESRV sa
password AEDB
Example: Rebuild Tables Indexes for a CA Workload Automation AE database on Oracle
This example rebuilds table indexes for a CA Workload Automation AE database on Oracle where ORACLESRV is the Oracle System ID.
perl /opt/CA/WorkloadAutomationAE/autosys/dbobj/reindexDB.pl ORA ORACLESRV
aedbadmin password
reindexDB Script—Rebuild Table Indexes
The reindexDB script rebuilds the table indexes of a specified CA Workload Automation AE database.
The reindexDB script is located as follows:
■ On UNIX—$AUTOSYS/dbobj
■ On Windows—%AUTOSYS%\dbobj

How to Tune the Sybase Server
172 Administration Guide
This script has the following format:
reindexDB.pl database_type server_name server_userid server_password database_name
database_type
Specifies the database type. This value can be one of the following:
ORA
Identifies Oracle as the database.
SYB
Identifies Sybase as the database.
MSQ
Identifies Microsoft SQL Server as the database.
server_name
Defines the name of the Oracle System ID, Sybase server, or Microsoft SQL Server server.
server_userid
Defines the user ID that is used to connect to the Oracle, Sybase, or Microsoft SQL Server server.
Default: sa (Sybase, Microsoft SQL Server)
Note: For Oracle, you must use aedbadmin as the server user ID.
server_password
Defines the password that corresponds to the user ID that is used to connect to the Oracle, Sybase , or Microsoft SQL Server server.
Default: autosys
database_name
Defines the name of the Sybase or Microsoft SQL Server database.
Note: The database_name parameter does not apply to Oracle.
How to Tune the Sybase Server
If you run a large number of jobs every day in your enterprise, you must tune the Sybase server to prevent database errors and improve the performance.
To tune the Sybase server, do the following:
1. Configure the Sybase server (see page 173).
2. Tune the Sybase server (see page 173).

How to Tune the Sybase Server
Chapter 6: Maintaining the Event Server 173
Configure the Sybase Server
When you install CA Workload Automation AE or create a new Sybase server, you must configure the database size, data file size, and log device size based on the number of jobs that run every day. For example, if you run 50,000 jobs every day, you must set the following values:
■ Database size—2000 MB
■ Data file size (AEDB_DATA)—1760 MB
■ Log device size (AEDB_LOG)—240 MB
Tune the Sybase Server
You must tune the Sybase server to prevent database errors and improve the performance.
Note: You can tune the Sybase server based on the number of jobs that run every day in your enterprise. In this procedure, the Sybase server is tuned to run 50,000 jobs every day.
Follow these steps:
1. Select an 8 KB page size when you install the Sybase server.
2. Create a 2000 MB CA Workload Automation AE database.
3. Run the following SQL commands:
sp_configure 'max memory',120000
go
sp_configure 'user connections',250
go
sp_configure "procedure cache size",30000
go
sp_configure 'max online engines',2
go
sp_configure 'number of engines at startup',2
go
Notes:
■ The max online engines and number of engines at startup parameters specify the number of CPUs on the database server computer.
■ You must increase the kernel shared memory if it is not sufficient to increase the Adaptive Server Enterprise (ASE) memory. Kernel shared memory is an operating system specific variable. For more information about modifying the kernel shared memory value, contact your UNIX administrator.
■ If you increase the number of user connections, you must increase the ASE physical memory that is allocated to the server.

How to Tune the Sybase Server
174 Administration Guide
4. Increase the database (tempdb) size from 12 MB (default) to 100 MB as follows:
a. Issue the following commands:
disk resize
name="master",
size="180M"
go
The master device size is extended from 120 MB (default) to 300 MB.
b. Issue the following commands:
sp_helpdevice
go
The master device size is displayed.
c. Issue the following commands:
alter database tempdb on master=88
go
The database (tempdb) size is extended from 12 MB (default) to 100 MB.
d. Issue the following commands:
sp_helpdb
go
The database size is displayed.
e. Issue the following commands:
sp_cacheconfig 'default data cache', '16M'
go
The default data cache size is increased to 16 M.
f. Issue the following commands:
sp_helpcache
go
The cache size is displayed.
Note: You must increase the database size because you installed the Sybase server with 8 KB page size.
5. Stop and restart the Sybase server.
The Sybase server is tuned to run 50,000 jobs every day.

How to Tune the Oracle Database
Chapter 6: Maintaining the Event Server 175
How to Tune the Oracle Database
If you run a large number of jobs every day in your enterprise, you must tune the Oracle database to prevent database errors and improve the performance.
To tune the Oracle database, do the following:
1. Configure the Oracle database (see page 175).
2. Tune the Oracle database (see page 176).
Configure the Oracle Database
When you install CA Workload Automation AE, you must configure the database size, data file size, and index file size based on the number of jobs that run every day. For example, if you run 50,000 jobs every day, you must set the following values:
■ Database size—2000 MB
■ Data file size (AEDB_DATA)—2000 MB
■ Index file size (AEDB_INDEX)—200 MB

How to Tune the Oracle Database
176 Administration Guide
Tune the Oracle Database
To tune the Oracle database to run a large number of jobs every day, you must increase the default value of the processes parameter that is installed with Oracle.
Note: The processes parameter specifies the maximum number of operating system processes that can be connected to the Oracle database concurrently. For more information about the processes parameter that is installed with Oracle, see the Oracle documentation.
Follow these steps:
1. Issue the following commands:
# sqlplus /nolog
SQL> connect sys/sys_password as sysdba
SQL> shutdown
SQL> exit
sys_password
Defines the password that corresponds to the Oracle system user ID.
The Oracle database stops.
2. Issue the following commands:
# cd $ORACLE_HOME/dbs
# cp -rfp spfileORACLE_SID.ora spfileORACLE_SID.ora.orig
A backup of the SPFILE binary file is created.
3. Issue the following commands:
# sqlplus /nolog
SQL> connect sys/sys_password as sysdba
SQL> create pfile from spfile;
SQL> exit
The PFILE text file is created from the SPFILE binary file.
4. Issue the following commands:
# cd $ORACLE_HOME/dbs
# cp -rfp initORACLE_SID.ora initORACLE_SID.ora.orig
A backup of the initORACLE_SID.ora text file is created.
5. Edit the initORACLE_SID.ora file to make the following changes, and save the file:
# vi initORACLE_SID.ora
*.processes=value
value
Defines the number of processes. The recommended value is 300.

How to Tune the Oracle Database
Chapter 6: Maintaining the Event Server 177
6. Issue the following commands:
# sqlplus /nolog
SQL> connect sys/sys_password as sysdba
SQL> create spfile from pfile;
The SPFILE binary file is created from the PFILE text file.
7. Issue the following command:
SQL> startup
The database starts. The default value for the processes parameter is increased to 300.
8. Issue the following command:
SQL> show parameter processes;
An output similar to the following is displayed:
NAME TYPE VALUE
------------------------------------ ----------- ------
aq_tm_processes integer 0
db_writer_processes integer 1
gcs_server_processes integer 0
job_queue_processes integer 10
log_archive_max_processes integer 2
processes integer 300
You can verify the number of processes has been changed to 300.


Chapter 7: Maintaining the Agent 179
Chapter 7: Maintaining the Agent
This section contains the following topics:
Agent Log Files (see page 179) Log File Maintenance (see page 180) Spool File Maintenance (see page 180) Clean Spool and Job Log Files on UNIX (see page 181) Clean Spool and Job Log Files on Windows (see page 183) How to Obtain the Job Log ID (see page 184) Delete Legacy Agent Log Files (see page 187) Remove Temporary Legacy Agent Log Files (see page 189)
Agent Log Files
The agent writes all log files to the following directories:
■ installation_directory/SystemAgent/agent_name/log
■ installation_directory/SystemAgent/agent_name/spool (for job spool files)
installation_directory
Specifies the directory where the agent is installed.
agent_name
Specifies the name of the agent.
In Unicenter AutoSys JM 4.5.1 and r11, the legacy agent's log files are written to the directory specified in the following locations:
■ On UNIX, the AutoRemoteDir parameter in the configuration file.
■ On Windows, the Enterprise Wide Logging Directory field in CA Workload Automation AE Administrator.
Note: In Unicenter AutoSys JM 4.5.1 and r11, you had to override the default log file directory on operating systems that do not support the locking of files in the /tmp directory. This is because the agent used the locks to check whether a job was running. You no longer have to change the default log file directory in the current release because the agent stores the job spool files in the installation_directory/SystemAgent/agent_name/spool directory by default. However, you must change the default log file directory if you run jobs on legacy agents and the operating system on any of the legacy agent computers does not support the locking of files in the /tmp directory.
Log File Maintenance
180 Administration Guide
More Information:
AutoRemoteDir Parameter (see page 188)
Log File Maintenance
The agent keeps a set of logs that must be cleared periodically to maintain disk space availability. The log files contain records of all messages between the agent and CA Workload Automation AE as well as internal messages. These files are located in the log directory by default and are updated continually while the agent is running. The types and number of logs that are generated depend on the log.level parameter set in the agentparm.txt file.
You can configure agent log file properties that control the log file size, the types and number of log files that are generated, and how the agent archives the log files.
Note: For information about configuring the agent log file properties or enabling or disabling job logs, see the CA Workload Automation Agent for UNIX, Linux, or Windows Implementation Guide or the CA Workload Automation Agent for i5/OS Implementation Guide.
More Information:
The agentparm.txt File (see page 34)
Spool File Maintenance
The output for workload is stored in spool files that the agent software generates. Depending on the type of workload the agent runs, the spool files are stored in and accessed from different locations.
Spool files are limited in size by the available space on the file system where they reside. To maintain storage space, the agent immediately clears the spool files for successfully completed jobs. After seven days, the agent clears the spool files for failed jobs. You can change these default settings.

Clean Spool and Job Log Files on UNIX
Chapter 7: Maintaining the Agent 181
Clean Spool and Job Log Files on UNIX
The spool and job log files are stored in the agent spool directory. To maintain disk space availability, the agent immediately clears the spool and log files for successfully completed jobs. After seven days, the agent clears the files for failed jobs. You can change these default settings on the agent.
Follow these steps:
1. Run the shell that is sourced to use CA Workload Automation AE.
2. Enter the following command at the operating system prompt:
unisrvcntr stop waae_agent-WA_AGENT
WA_AGENT
Defines the name of the agent to stop.
The agent stops.
3. Open the agentparm.txt file located in the agent installation directory.
4. Add or edit the following parameters:
oscomponent.joblog.success.autocleanup=true
agent.spool.success.autocleanup=true
runnerplugin.spool.clean.enable=true
These settings configure the agent to immediately clear log and spool files for successfully completed jobs.
5. Add or edit the following parameter:
runnerplugin.spool.expire=expire_time
expire_time
Specifies how long to keep the spool files for. The files are cleared after the specified period of time. Options are the following:
nd
Specifies that spool files are kept for n days. This is the default.
Default: 7d (7 days)
nh
Specifies that spool files are kept for n hours.
Example: 10h

Clean Spool and Job Log Files on UNIX
182 Administration Guide
nm
Specifies that spool files are kept for n minutes.
Example: 50m
ns
Specifies that spool files are kept for n seconds.
Example: 30s
Note: You cannot specify combinations of time periods. For example, 12d3h is not valid. If you specify a number only, the agent uses days by default.
This setting configures the agent to clear the spool files for failed jobs after the specified expiration time.
6. Save the file.
7. Enter the following command at the operating system prompt:
unisrvcntr start waae_agent-WA_AGENT
WA_AGENT
Defines the name of the agent to start.
The agent starts. The agent is configured to clean the spool and job log files.
Notes:
■ Spool and log files of jobs that completed successfully before the cleanup are not affected.
■ For more information about the agent spool or job log files or the parameters in the agentparm.txt file, see the CA Workload Automation Agent for UNIX, Linux, or Windows Implementation Guide or the CA Workload Automation Agent for i5/OS Implementation Guide.

Clean Spool and Job Log Files on Windows
Chapter 7: Maintaining the Agent 183
Clean Spool and Job Log Files on Windows
The spool and job log files are stored in the agent spool directory. To maintain disk space availability, the agent immediately clears the spool and log files for successfully completed jobs. After seven days, the agent clears the files for failed jobs. You can change these default settings on the agent.
Follow these steps:
1. Do the following:
a. Click Start, Programs, CA, Workload Automation AE, Administrator.
The Instance - CA Workload Automation AE Administrator window opens.
b. Click the Services icon on the toolbar.
The Services - CA Workload Automation AE Administrator window appears, displaying a list of services installed on the selected instance.
c. Right-click the agent service, and click Stop.
The agent stops.
2. Open the agentparm.txt file located in the agent installation directory.
3. Add or edit the following parameters:
oscomponent.joblog.success.autocleanup=true
agent.spool.success.autocleanup=true
runnerplugin.spool.clean.enable=true
These settings configure the agent to immediately clear log and spool files for successfully completed jobs.
4. Add or edit the following parameter:
runnerplugin.spool.expire=expire_time
expire_time
Specifies how long to keep the spool files for. The files are cleared after the specified period of time. Options are the following:
nd
Specifies that spool files are kept for n days. This is the default.
Default: 7d (7 days)
nh
Specifies that spool files are kept for n hours.
Example: 10h

How to Obtain the Job Log ID
184 Administration Guide
nm
Specifies that spool files are kept for n minutes.
Example: 50m
ns
Specifies that spool files are kept for n seconds.
Example: 30s
Note: You cannot specify combinations of time periods. For example, 12d3h is not valid. If you specify a number only, the agent uses days by default.
This setting configures the agent to clear the spool files for failed jobs after the specified expiration time.
5. Save the file.
6. Do the following:
a. Click Start, Programs, CA, Workload Automation AE, Administrator.
The Instance - CA Workload Automation AE Administrator window opens.
b. Click the Services icon on the toolbar.
The Services - CA Workload Automation AE Administrator window appears, displaying a list of services installed on the selected instance.
c. Right-click the agent service, and click Start.
The agent starts. The agent is configured to clean the spool and job log files.
Notes:
■ Spool and log files of jobs that completed successfully before the cleanup are not affected.
■ For more information about the agent spool or job log files or the parameters in the agentparm.txt file, see the CA Workload Automation Agent for UNIX, Linux, or Windows Implementation Guide.
How to Obtain the Job Log ID
The job log ID is used to track a job in the spool file.
To obtain the job log ID, follow these steps:
1. Obtain the job run number and job ID (see page 185).
2. Obtain the job log ID (see page 186).

How to Obtain the Job Log ID
Chapter 7: Maintaining the Agent 185
Obtain the Job Run Number and Job ID
You can use this procedure to obtain the job run number and job ID, which you require to locate the job log ID.
Follow these steps:
1. Enter the following command at the UNIX operating system prompt or the Windows instance command prompt:
autorep -J job_name -d
A detailed report is generated. This report displays the job run number in the Run column.
2. Connect to the database, and run the following query:
select joid from ujo_job where job_name='job_name'
job_name
Defines the name of the job.
The job ID is displayed.
Notes:
■ You can also obtain the job run number for command jobs by viewing the log returned by the autosyslog command. For more information about the autosyslog command, see the Reference Guide.
■ You can also obtain the job run number and the job ID by extracting the most recent CAUAJM_I_10082 message for the job name from the scheduler log file. The CAUAJM_I_10082 message is displayed as follows:
CAUAJM_I_10082 [machine_name connected for job_name
job_ID.run_number.retry_number]

How to Obtain the Job Log ID
186 Administration Guide
Example: Obtain the Job Run Number and Job ID
This example obtains the job run number and job ID of the payload job.
1. Enter the following command at the UNIX operating system prompt or the Windows instance command prompt:
autorep -J payload -d
A detailed report is generated. The payload job run number (50130) is displayed in the Run column, as follows:
Job Name Last Start Last End ST Run/Ntry Pri/Xit
_____________________________ ____________________ __ ________ _______
payload 07/16/2009 10:45:09 07/16/2009 10:45:09 FA 50130/1 20005
2. Connect to the database, and run the following query:
select joid from ujo_job where job_name='payload'
The payload job ID is displayed, as follows:
joid
-----------
172
Note: In the scheduler log file, the CAUAJM_I_10082 message for the payload job is displayed as follows:
CAUAJM_I_10082 [mymachine connected for payload 172.50130.1]
Obtain the Job Log ID
You must obtain the job log ID to track the job in the spool file.
To obtain the job log ID, connect to the database, and run the following query:
select run_info from ujo_extended_jobrun_info where joid=job_ID and run_num=run_num
and type=1 and seq_num=1
job_ID
Defines the job ID.
run_num
Defines the job's run number.
The job log ID is displayed. You can now use the job log ID to track the job.

Delete Legacy Agent Log Files
Chapter 7: Maintaining the Agent 187
Example: Obtain the Job Log ID
This example obtains the job log ID of the payload job. Connect to the database and run the following query:
select run_info from ujo_extended_jobrun_info where joid=172 and run_num=50130 and
type=1 and seq_num=1
The job log ID of the payload job is displayed, as follows:
WobId(172.50130_1/WAAE_WF0.1/MAIN)
JobLogId(9D7F247C63C2D21061CB83AB7AADDFFAD9563A10)
Delete Legacy Agent Log Files
You can delete the legacy agent log files to maintain disk space availability.
To delete the legacy agent log files, enter the following command at the UNIX operating system prompt or the Windows instance command prompt:
clean_files -d days
-d days
Defines the threshold for deleting legacy agent log files. When you run the command, files older than the specified number of days are deleted.
The clean_files command searches the database for all computers that have had jobs started on them. The command instructs the agents on the returned machines to delete all log files from each machine’s agent log directory.
Notes:
■ The clean_files command applies to legacy agents only.
■ For more information about the clean_files command, see the Reference Guide.

Delete Legacy Agent Log Files
188 Administration Guide
AutoRemoteDir Parameter
The AutoRemoteDir parameter in the configuration file defines the enterprise wide logging directory on the scheduler computer where CA Workload Automation AE writes the legacy agent's (4.0, 4.5, 4.5.1, and r11) log files to. This directory must be writable and must exist on startup. For legacy agents, you can override the enterprise wide logging directory by setting the local agent logging directory.
Notes:
■ For some operating systems, locking of files located in the /tmp directory is not supported. For example, on SunOS platforms when /tmp is mounted on tmpfs. In such cases, you must use the AutoRemoteDir parameter to specify a different directory because legacy agents use the locks to check if a job is running.
■ The agent on the local computer uses its own logging directory, which is created during the CA Workload Automation AE installation.
The configuration file contains the following entry:
AutoRemoteDir=directory
directory
Defines the enterprise wide logging directory on the scheduler computer where CA Workload Automation AE writes the legacy agent's log files to.
Default: /opt/CA/WorkloadAutomationAE/autouser.instance_name/tmp
instance_name
Defines the name of the CA Workload Automation AE instance.
Notes:
■ In a cross-platform environment where a UNIX scheduler starts a legacy Windows agent (or a Windows scheduler starts a legacy UNIX agent), the path to the log files directory is translated into the format expected by the recipient operating environment. A UNIX agent removes the drive letter and colon, if present, and replaces \ characters with / characters. For example, C:\tmp becomes /tmp. A Windows remote agent adds the system drive letter and colon (if none is present), and replaces all / characters with \ characters. For example, /tmp becomes C:\tmp.
■ On Windows, you can enter the equivalent value using the Legacy Enterprise Wide Logging Directory field on the Instance - CA Workload Automation AE Administrator window of CA Workload Automation AE Administrator. For more information, see the Online Help.
More Information:
Agent Log Files (see page 179)

Remove Temporary Legacy Agent Log Files
Chapter 7: Maintaining the Agent 189
Remove Temporary Legacy Agent Log Files
A file is created in the agent log directory for every job that CA Workload Automation AE runs. You can specify whether the legacy agents remove the temporary log files when a job completes successfully.
Follow these steps:
1. Log in to CA Workload Automation AE as a user authorized to stop the scheduler and run the shell that is sourced to use CA Workload Automation AE.
2. Enter the following command at the operating system prompt:
sendevent -E STOP_DEMON
The scheduler completes any processing it is currently performing and stops.
3. Edit the following parameter in the configuration file, and save the file:
CleanTmpFiles=1|0
1
Specifies that the legacy agents remove the temporary log files (/tmp/auto_rem*) from the local agent logging directory when a job completes successfully. This is the default.
0
Specifies that the legacy agents do not remove the temporary logs files when a job completes successfully. The files remain in the directories until you run the clean_files process.
4. Enter the following command at the operating system prompt:
eventor
The scheduler starts. The temporary legacy agent log files are removed when jobs complete successfully.
Note: On Windows, you can select the equivalent value using the Legacy Clean Temporary Files check box on the Scheduler - CA Workload Automation AE Administrator window of CA Workload Automation AE Administrator. For information about removing temporary legacy agent log files on Windows, see the Online Help.

Remove Temporary Legacy Agent Log Files
190 Administration Guide
CleanTmpFiles Parameter
A file is created in the agent log directory for every job that CA Workload Automation AE runs. The CleanTmpFiles parameter in the configuration file specifies whether the legacy agents remove these temporary log files when a job completes successfully.
Note: The CleanTmpFiles parameter applies to legacy agents only.
The auto_rem* file has the following format:
auto_rem.joid.run_number.ntry
joid
Defines the unique job object ID associated with the job.
run_number
Defines the job’s run number.
ntry
Defines the number of tries or restarts.
If a job is not successful, the files remain in the directory for diagnostic purposes regardless of the setting. Therefore, we recommend that you run the clean_files process periodically to remove files after unsuccessful job completions.
To view the agent log file, you must issue the autosyslog command on the client computer as follows:
autosyslog -J job_name
job_name
Specifies the name of the job you want to display the log file for.
Note: For more information about the autosyslog command, see the Reference Guide.

Chapter 8: Controlling Services 191
Chapter 8: Controlling Services
This section contains the following topics:
Controlling Services on Windows (see page 191) Start the Scheduler on UNIX (see page 192) Start the Application Server on UNIX (see page 192) Start the Agent on UNIX (see page 193) Start the Web Server on UNIX (see page 193) Stop the Scheduler on UNIX (see page 194) Stop the Agent or Application Server on UNIX (see page 196) Stop the Web Server on UNIX (see page 197) Restart the Web Server on UNIX (see page 197) Pause the Scheduler or Application Server Service on UNIX (see page 197) Verify the Status of a Service on UNIX (see page 199)
Controlling Services on Windows
You can control the scheduler, application server, agent, and web server services on Windows using the Windows Services dialog or CA WAAE Administrator.
Note: The procedures in this chapter describe how to control the scheduler, application server, web server, and agent services on UNIX. For information about performing the equivalent procedures on Windows, see the Online Help.

Start the Scheduler on UNIX
192 Administration Guide
Start the Scheduler on UNIX
You must start the scheduler before you can schedule and run jobs.
Notes:
■ The event server must be available, running, and properly identified before you can start the scheduler.
■ If you make changes to your configuration settings, you must restart the scheduler and the application server for the configuration settings to take effect.
To start the scheduler on UNIX, enter the following command at the operating system prompt:
unisrvcntr start waae_sched.$AUTOSERV
The scheduler starts.
Notes:
■ You can also start the scheduler using the eventor command. For more information about the eventor command, see the Reference Guide.
■ For information about starting the scheduler on Windows, see the Online Help.
Start the Application Server on UNIX
To manage communication between the event server, agent, and client utilities, start the application server.
Note: To change application server configuration settings, stop the application server and then edit the configuration file. The changes take effect when you restart the application server.
To start the application server on UNIX, enter the following command at the operating system prompt:
unisrvcntr start waae_server.$AUTOSERV
The application server starts.
Note: For more information about starting the application server on Windows, see the Online Help.

Start the Agent on UNIX
Chapter 8: Controlling Services 193
Start the Agent on UNIX
You must start the agent before you can use it to run workload on the computer where the CA Workload Automation AE server is installed.
Notes:
■ During the installation, if you select the Set the Agent to Start Automatically at System Startup check box, the agent starts automatically on system startup.
■ If you modify the agent's agentparm.txt file, you must restart the agent for the configuration settings to take effect.
Follow these steps:
1. Run the shell that is sourced to use CA Workload Automation AE
The operating system command prompt appears.
2. Enter the following command:
unisrvcntr start waae_agent-WA_AGENT
WA_AGENT
Defines the name of the agent to start.
The agent starts.
Note: For information about starting the agent on Windows, see the Online Help.
More Information:
The agentparm.txt File (see page 34)
Start the Web Server on UNIX
You must start the web server before you can schedule and run web service jobs.
Follow these steps:
1. Run the shell that is sourced to use CA Workload Automation AE
The operating system command prompt appears.
2. Enter the following command:
unisrvcntr start waae_webserver.$AUTOSERV
The web server starts.
Note: For information about starting the web server on Windows, see the Online Help.

Stop the Scheduler on UNIX
194 Administration Guide
Stop the Scheduler on UNIX
You must stop the scheduler if you want to configure it.
Stopping the scheduler does not affect jobs that are already running. They continue to run to completion, at which time their exit events are stored until the scheduler is restarted. When you stop the scheduler, jobs dependent on the events processed at the time of shut down are scheduled but are not run until you start the scheduler.
Note: Only a user authorized to stop the scheduler can stop the scheduler. It is safe to stop the scheduler at any time if you do it properly.
Follow these steps:
1. Log in to CA Workload Automation AE as a user authorized to stop the scheduler and run the shell that is sourced to use CA Workload Automation AE.
2. Enter one of the following commands at the operating system prompt:
■ Using the unisrvcntr command:
unisrvcntr stop waae_sched.$AUTOSERV
The scheduler stops.
■ Using the sendevent command:
sendevent -E STOP_DEMON
The STOP_DEMON event is sent to the database. The scheduler reads the STOP_DEMON event, enters an orderly shutdown cycle by completing any processing it is currently performing, and stops.
Note: There might be a delay between when you send the STOP_DEMON event and when the scheduler reads it and shuts down. If the scheduler does not stop immediately, do not send another STOP_DEMON event because the scheduler will process that event the next time it starts and promptly shuts down. To assign a high priority to the sendevent command, include the -P 1 option as follows:
sendevent -E STOP_DEMON -P 1

Stop the Scheduler on UNIX
Chapter 8: Controlling Services 195
■ Using the sendevent -E STOP_DEMON -v option:
sendevent -E STOP_DEMON -v ROLE=value
ROLE=value
Stops the scheduler according to the role or combination of roles specified. Specify the value as follows:
P
Stops the primary scheduler.
S
Stops the shadow scheduler.
T
Stops the tie-breaker scheduler.
The specified scheduler stops.
Note: You can specify any combination of roles. For example, if you specify ROLE=PST, the primary, shadow, and tie-breaker scheduler are shut down. For more information about the -E STOP_DEMON -v options, see the Reference Guide.
Notes:
■ Do not attempt to stop the scheduler by terminating the process. This method stops the scheduler immediately, even if it is processing an event. Also, if you are using dual event servers and you terminate the process in any way other than issuing the sendevent command, the databases can lose synchronization. For more information, see the Reference Guide.
■ For information about stopping the scheduler on Windows, see the Online Help.

Stop the Agent or Application Server on UNIX
196 Administration Guide
Stop the Agent or Application Server on UNIX
You cannot configure the agent or the application server while they are running. If you have the appropriate authorization, you can stop the agent or application server using the unisrvcntr command. You can also use the sendevent command to stop the application server and other scheduler processes.
Note: Jobs that are processing when you stop the agent continue to run, but the agent cannot track the process of those jobs.
Follow these steps:
1. Run the shell that is sourced to use CA Workload Automation AE.
The operating system command prompt appears.
2. Enter the following command:
{unisrvcntr stop {waae_agent-WA_AGENT|waae_server.$AUTOSERV}|sendevent -E
STOP_DEMON -v ROLE=A}
WA_AGENT
Defines the name of the agent to stop.
The agent or application server stop.
Notes:
■ You can stop other server processes with the STOP_DEMON event by specifying different arguments for the -v parameter. For more information the unisrvcntr command and the sendevent command, see the Reference Guide.
■ For information about stopping the agent or application server on Windows, see the Online Help.

Stop the Web Server on UNIX
Chapter 8: Controlling Services 197
Stop the Web Server on UNIX
You cannot configure the web server while it is running. You can using the unisrvcntr command to stop the web server.
Follow these steps:
1. Log in to CA Workload Automation AE as a user authorized to stop the scheduler and run the shell that is sourced to use CA Workload Automation AE.
The operating system command prompt appears.
2. Enter the following command:
unisrvcntr stop waae_webserver.$AUTOSERV
The web server stops.
Note: For information about stopping the web server on Windows, see the Online Help.
Restart the Web Server on UNIX
To run web services jobs after reconfiguring the web server, restart the web server.
Follow these steps:
1. Run the shell that is sourced to use CA Workload Automation AE.
The operating system command prompt appears.
2. Enter the following command:
unisrvcntr restart waae_webserver.$AUTOSERV
The web server restarts and the changes take effect.
Pause the Scheduler or Application Server Service on UNIX
You can pause and resume the scheduler or the application server service to read the modified values of the following parameters in the configuration file at runtime:
■ CrossPlatformScheduling
■ GlobalPendMachDelay
■ GlobalPendMachStatus

Pause the Scheduler or Application Server Service on UNIX
198 Administration Guide
■ GlobalPendMachInterval
■ AggregatorStatistics
■ EnableIPCaching
■ ISDBGACTIV
■ LOGROLLOVER
■ NotifyMethod
■ NotifySMTPHost
■ UnicenterEvents
■ ServiceDeskUser
■ ServiceDeskCust
■ ServiceDeskURL
■ DCAUser
■ DCAURL
■ UseSMTPAuthentication
■ NotifySMTPUser
■ NotifySMTPFromAddress
■ SetJobAttributeEnvironmentals
Note: The scheduler and application server also refresh the internal components responsible for managing real resources.
Follow these steps:
1. Run the shell that is sourced to use CA Workload Automation AE.
The operating system command prompt appears.
2. Enter the following command:
kill -HUP {scheduler_pid|applicationserver_pid}
scheduler_pid
Defines the process ID of the scheduler that you want to pause and resume.
applicationserver_pid
Defines the process ID of the application server that you want to pause and resume.
The scheduler or application server service pauses and resumes.

Verify the Status of a Service on UNIX
Chapter 8: Controlling Services 199
More information:
Specify the Scheduler or Application Server Log Rollover on UNIX (see page 128)
Verify the Status of a Service on UNIX
You can verify the status of a service associated with a CA Workload Automation AE instance. The following services can be active if they are installed for the instance:
■ Agent
■ Scheduler
■ Application server
■ Web server
Follow these steps:
1. Log in to CA Workload Automation AE as a user authorized to stop the scheduler and run the shell that is sourced to use CA Workload Automation AE.
The operating system command prompt appears.
2. Enter the following commands at the operating system prompt:
{=unisrvcntr status
{CA-WAAE|waae_agent-WA_AGENT|waae_sched.$AUTOSERV|waae_webserver.$AUTOSERV}
CA-WAAE
Displays the status of the agent, scheduler, application server, and the web server.
waae_agent-WA_AGENT
Displays the status of the specified agent.
waae_sched.$AUTOSERV
Displays the status of the scheduler.
waae_server.$AUTOSERV
Displays the status of the application server.
waae_webserver.$AUTOSERV
Displays the status of the web server.
The status of the specified services has been verified.

Verify the Status of a Service on UNIX
200 Administration Guide
Notes:
■ For information about verifying the status of a service on Windows, see the Online Help.
■ You can start, stop, or verify the status of the web server service only if you installed a web server during the custom installation.

Chapter 9: Aggregating Statistics 201
Chapter 9: Aggregating Statistics
This section contains the following topics:
How to Retrieve Aggregated Job, Alarm, and Scheduler Statistics (see page 201) Delete Aggregated Statistics (see page 213)
How to Retrieve Aggregated Job, Alarm, and Scheduler Statistics
As an administrator, you can retrieve aggregated job, alarm, and scheduler statistics from the CA Workload Automation AE database and can display them in a report format.
You can use the statistical data to determine, for example, how many of your jobs are ending in a failure status each month, alarms get acknowledged or closed on average in an hour, the average daily latency in event processing, and so on.
When you aggregate statistics for the first time, depending on the hardware the product is installed on, the current active workload and the total number of events stored in the database, the aggregation process may take a considerable amount of time. Therefore, we recommend that you schedule a manual aggregation process and then configure the scheduler to aggregate statistics automatically at a specified interval. When you configure the scheduler to aggregate statistics automatically after the manual aggregation process is complete, the scheduler aggregates new statistics for hourly aggregation from the point where the manual aggregation process was completed. The scheduler uses the existing aggregated statistics for the daily, weekly, and monthly aggregation.
This scenario walks you through the recommended aggregation process and then shows you how to generate reports on the resulting data. Separate reports are generated for hourly, daily, weekly, and monthly data.

How to Retrieve Aggregated Job, Alarm, and Scheduler Statistics
202 Administration Guide
To retrieve the aggregated statistics, follow these steps:
1. Aggregate statistics manually (see page 203).
Perform a one-time manual aggregation of the data.
Note: Schedule the manual aggregation process at a time when the system activity is minimal.
2. Configure CA Workload Automation AE to aggregate statistics automatically on UNIX (see page 204) or Windows (see page 205).
Set up CA Workload Automation AE to do a regular aggregation (hourly, daily, weekly, or monthly).
3. Verify the resulting statistical data (see page 206).
Generate reports and verify the output.
Aggregation Considerations
The following are the important considerations for aggregating statistics:
■ The scheduler does not aggregate statistics for the current month, week, day, or hour. For example, if the oldest event in the ujo_proc_event table is 09/27/2011 00:05:10 and you schedule the aggregation process on 10/11/2011 at 18:30:00, the statistics are aggregated as follows:
– Hourly statistics—From 09/27/2011 00:00:00 through 10/11/2011 23:59:59
– Daily statistics—From 09/27/2011 00:00:00 through 10/10/2011 23:59:59 (14 days)
– Weekly statistics—From 09/25/2011 00:00:00 through 10/08/2011 23:59:59 (two weeks)
– Monthly statistics—From 09/01/2011 00:00:00 through 09/30/2011 23:59:59 (one month)
■ When aggregation is scheduled, starting and completed messages are written in the scheduler log file. Detailed messages are written in the aggregation log file (aggregator.instance) located in the $AUTOUSER/out (on UNIX) or %AUTOUSER%/out (on Windows) directory. The aggregation log file has the same properties as the scheduler log file and it rolls over based on the LOGROLLOVER parameter value (on UNIX) or LOGROLLOVER environment variable setting (on Windows).
■ In all cases, the scheduler aggregates statistics in smaller intervals before starting the specified aggregation. For example, if you schedule a monthly aggregation process, the scheduler aggregates the hourly, daily, and weekly statistics before starting the monthly aggregation.

How to Retrieve Aggregated Job, Alarm, and Scheduler Statistics
Chapter 9: Aggregating Statistics 203
■ You can aggregate statistics manually by sending an aggregation event using the sendevent command. You do not need to select the Aggregate Statistics check box to aggregate statistics manually. For more information about the sendevent command, see the Reference Guide.
■ If the scheduler is shut down while the aggregation process is active, the aggregation process is terminated. A message is displayed to indicate this.
Aggregate Statistics Manually
You can aggregate the job, alarm, and scheduler statistics manually by sending an AGGREGATE event using the sendevent command. The job, alarm, and scheduler statistics are aggregated into the ujo_rep_hourly, ujo_rep_daily, ujo_rep_weekly, and ujo_rep_monthly database tables. You can display these aggregated statistics in a report format in CA Workload Automation AE. Other applications, such as CA WCC, can also retrieve these aggregated statistics to generate predefined and custom reports.
To aggregate statistics manually, run the following command in a CA Workload Automation AE Windows instance command prompt (on Windows) or in a shell where CA Workload Automation AE environment is sourced (on UNIX):
sendevent -E AGGREGATE -l option
-l option
Specifies the type of statistics to aggregate, where option is as follows:
HOURLY
Aggregates hourly statistics.
DAILY
Aggregates daily statistics.
WEEKLY
Aggregates weekly statistics.
MONTHLY
Aggregates monthly statistics.
Notes:
■ The HOURLY, DAILY, WEEKLY, and MONTHLY options are mutually exclusive. You must specify one of these options.
■ You can also aggregate automatically by setting the AggregateStatistics parameter to 1 (on UNIX) or selecting the Aggregate Statistics check box (on Windows).

How to Retrieve Aggregated Job, Alarm, and Scheduler Statistics
204 Administration Guide
Example: Aggregate Hourly Statistics
This example sends a manual aggregation event to aggregate hourly statistics.
sendevent -E AGGREGATE -l HOURLY
Example: Aggregate Weekly Statistics
This example sends a manual aggregation event to aggregate weekly statistics.
sendevent -E AGGREGATE -l WEEKLY
Configure CA Workload Automation AE to Aggregate Statistics Automatically on UNIX
You can configure CA Workload Automation AE to aggregate the job, alarm, and scheduler statistics automatically at a specified interval. The job, alarm, and scheduler statistics are aggregated into the ujo_rep_hourly, ujo_rep_daily, ujo_rep_weekly, and ujo_rep_monthly database tables. You can display these aggregated statistics in a report format in CA Workload Automation AE. Other applications, such as CA WCC, can also retrieve these aggregated statistics to generate predefined and custom reports.
The scheduler automatically aggregates the job, alarm, and scheduler statistics as follows:
■ Hourly—At the start of every hour
■ Daily—At midnight every day
■ Weekly—At midnight on the first day of every week, taken as Sunday
■ Monthly—At midnight on the first day of every month
Follow these steps:
1. Use the shell script and source CA Workload Automation AE environment.
2. Enter the following command at the operating system prompt:
unisrvcntr status waae_sched.$AUTOSERV
The scheduler process ID is displayed as follows:
CA Services Status Report
Component Name Pid Status
------------------------------------ ------- --------------
WAAE Scheduler (ACE) 32220 running

How to Retrieve Aggregated Job, Alarm, and Scheduler Statistics
Chapter 9: Aggregating Statistics 205
3. Set AggregateStatistics to 1 in the configuration file and save the file.
4. Enter the following command at the operating system prompt:
kill –HUP scheduler_pid
scheduler_pid
Defines the process ID of the scheduler to pause and resume.
The scheduler resumes. The statistics are aggregated automatically.
Note: On Windows, the equivalent configuration parameter is Aggregate Statistics.
Configure CA Workload Automation AE to Aggregate Statistics Automatically on Windows
You can configure CA Workload Automation AE to aggregate the job, alarm, and scheduler statistics automatically at a specified interval. The job, alarm, and scheduler statistics are aggregated into the ujo_rep_hourly, ujo_rep_daily, ujo_rep_weekly, and ujo_rep_monthly database tables. You can display these aggregated statistics in a report format in CA Workload Automation AE. Other applications, such as CA WCC, can also retrieve these aggregated statistics to generate predefined and custom reports.
The scheduler automatically aggregates the job, alarm, and scheduler statistics as follows:
■ Hourly—At the start of every hour
■ Daily—At midnight every day
■ Weekly—At midnight on the first day of every week, taken as Sunday
■ Monthly—At midnight on the first day of every month
Follow these steps:
1. Click Start, Programs, CA, Workload Automation AE, Administrator.
The Instance - CA Workload Automation AE Administrator window opens.
2. Select an instance from the Instance drop-down list in the Settings pane.
3. Click the Scheduler icon on the toolbar.
The Scheduler - CA Workload Automation AE Administrator window appears.
4. Click the Options tab, select the Aggregate Statistics check box in the Settings pane, and click Apply.

How to Retrieve Aggregated Job, Alarm, and Scheduler Statistics
206 Administration Guide
5. Click the Services icon on the toolbar.
The Services - CA Workload Automation AE Administrator window appears, displaying a list of services installed on the selected instance.
6. Right-click the scheduler service, and click Pause.
The scheduler pauses.
7. Right-click the scheduler service, and click Resume.
The scheduler resumes. The statistics are aggregated automatically.
Note: On UNIX, the equivalent configuration parameter is AggregateStatistics.
Verify the Resulting Statistical Data
You can generate a report of each database table (ujo_rep_hourly, ujo_rep_daily, ujo_rep_weekly, and ujo_rep_monthly) and can verify that the resulting statistics are aggregated correctly using the autoaggr command.
The autoaggr command is a client component utility that generates reports based on the aggregated job, alarm, and scheduler statistics retrieved from the database.
To generate a report, log in to CA Workload Automation AE and enter one of the following commands at the UNIX operating system prompt or the Windows instance command prompt:
■ For daily statistics:
autoaggr [-d]
[-A] [-J] [-S]
[-o filename]
[-F from_date_time]
[-T to_date_time]
[-c] [-x] [?]
■ For hourly statistics:
autoaggr [-h]
[-A] [-J] [-S]
[-o filename]
[-F from_date_time]
[-T to_date_time]
[-c] [-x] [?]

How to Retrieve Aggregated Job, Alarm, and Scheduler Statistics
Chapter 9: Aggregating Statistics 207
■ For weekly statistics:
autoaggr [-w]
[-A] [-J] [-S]
[-F from_date_time]
[-T to_date_time]
[-o filename]
[-c] [-x] [?]
■ For monthly statistics:
autoaggr [-m]
[-A] [-J] [-S]
[-o filename]
[-F from_date_time]
[-T to_date_time]
[-c] [-x] [?]
-d
(Optional) Generates a report on daily aggregated statistics.
-h
(Optional) Generates a report on hourly aggregated statistics.
-m
(Optional) Generates a report on monthly aggregated statistics.
-w
(Optional) Generates a report on weekly aggregated statistics.
-A
(Optional) Generates a report only on alarm statistics.
-J
(Optional) Generates a report only on job statistics.
-S
(Optional) Generates a report only on scheduler statistics.

How to Retrieve Aggregated Job, Alarm, and Scheduler Statistics
208 Administration Guide
-o "filename"
(Optional) Defines the path and file name where you want to direct all standard output.
Notes:
■ You can specify only the file name in this option. If you specify only the file name, the file is written to the current directory.
■ For readability purposes, we recommend that you direct the output to a file by using either the –o parameter or the command shell redirection command (“>” or “>>”).
■ Enclose the file name in double quotation marks.
-F "from_date_time"
(Optional) Specifies the aggregation start date and time in "MM/dd/yyyy hh:mm" format. The report displays the aggregated statistics starting from this specified date and time.
Notes:
■ If you do not specify the –F from_date_time parameter, it defaults to the oldest processed event in the database.
■ Enclose the start date and time in double quotation marks.
-T "to_date_time"
(Optional) Specifies the aggregation end date and time in "MM/dd/yyyy hh:mm" format. The report displays the aggregated statistics up to this specified date and time.
Notes:
■ If you do not specify the –T to_date_time parameter, it defaults to the current time.
■ Enclose the end date and time in double quotation marks.
-c
(Optional) Generates the output in a comma-separated format.
-x
(Optional) Returns the autoaggr version number to standard output.
-?
(Optional) Displays help for the command.

How to Retrieve Aggregated Job, Alarm, and Scheduler Statistics
Chapter 9: Aggregating Statistics 209
Notes:
■ The -d, -h, -m, and -w options are mutually exclusive. You must specify one of these options.
■ The -A, -J, and -S options can be specified in any combination. If you do not specify the -A, -J, or -S options, the report includes job, alarm, and scheduler statistics.
■ Verify that you issue the autoaggr command after the time range (specified using the -F and -T parameters) for which you want to generate a report has passed. For example, to generate a report on aggregated hourly statistics from 10/13/2011 16:00 to 10/13/2011 16:59:59, issue the autoaggr command after 17:00 on 10/13/2011.
■ You can run these reports at any later time to view this output on a regular basis.
Example: Generate a Report for Hourly Statistics on Windows
This example generates a report that displays the hourly job, alarm, and scheduler statistics from 09/26/2011 00:00 to 10/03/2011 00:00. The output is directed to the c:\all.out file.
autoaggr -h -o "c:\all.out" -F "09/26/2011 00:00" -T "10/03/2011 00:00"
Example: Generate a Report for Hourly Job Statistics in Comma-separated Format on UNIX
This example generates a report that displays the hourly job statistics in a comma-separated format from 09/26/2011 00:00 to 10/03/2011 00:00. The output is directed to the /tmp/job.csv file.
autoaggr -h -c -J -o "/tmp/job.csv" -F "09/26/2011 00:00" -T "10/03/2011 00:00"
Example: Generate a Report for Daily Alarm Statistics on Windows
This example generates a report that displays the daily alarm statistics from 09/26/2011 00:00 to 09/29/2011 00:00. The output is directed to the c:\alarm.out file.
autoaggr -d -A -o "c:\alarm.out" -F "09/26/2011 00:00" -T "09/29/2011 00:00"

How to Retrieve Aggregated Job, Alarm, and Scheduler Statistics
210 Administration Guide
Statistics Reported by the autoaggr Command
The autoaggr command generates reports on the aggregated job, alarm, and scheduler statistics.
Note: The time column in the report represents the hourly time after the reported time. For example, if the reported time is 10:00:00, it represents the aggregated statistics generated from the activity that occurred from 10:00:00 to 10:59:59.
The reports display job statistics that show the total number of jobs in STARTING, RUNNING, SUCCESS, BYPASS, FAILURE, TERMINATED, ON_HOLD, OFF_HOLD, ON_ICE, OFF_ICE, ON_NOEXEC, OFF_NOEXEC, INACTIVE, and RESTART status.
The reports display the following alarm statistics:
AVERAGE RESPONSE TIME
Displays the average time taken to respond to an alarm.
TOTAL ALARMS
Displays the total number of alarms irrespective of alarm status.
Note: The statistics displayed in the report includes the count of all the alarms that CA Workload Automation AE generates.
UNANSWERED
Displays the total number of alarms that are open. This does not include alarms that are acknowledged or closed.
JOB FAILURE
Displays the total number of JOBFAILURE alarms due to jobs that are in FAILURE or TERMINATED state.
START FAILURE
Displays the total number of STARTJOBFAIL alarms.
MAX RETRY
Displays the total number of MAX_RETRY alarms.
MAX RUNTIME
Displays the total number of MAXRUNALARM alarms.
MIN RUNTIME
Displays the total number of MINRUNALARM alarms.
DATABASE ROLLOVER
Displays the total number of DB_ROLLOVER alarms.

How to Retrieve Aggregated Job, Alarm, and Scheduler Statistics
Chapter 9: Aggregating Statistics 211
SCHEDULER FAILOVER
Displays the total number of EP_ROLLOVER alarms.
SCHEDULER SHUTDOWN
Displays the total number of EP_SHUTDOWN alarms.
The reports display the following scheduler statistics:
JOB RUNS
Displays the total number of job runs.
JOB FAILURES
Displays the total number of jobs that are in FAILURE or TERMINATED status.
JOB FORCE START
Displays the total number of jobs that were force started.
KILL JOB
Displays the total number of jobs that are killed using the KILLJOB event.
SERVICE DESK REQUESTS
Displays the total number of jobs for which service desk issues were opened.
TOTAL EVENTS
Displays the total number of events (including internal events) that CA Workload Automation AE generates.
AVERAGE LATENCY
Displays the average latency (in seconds) in processing events, which is the average processing time that is required for all the events. The latency for an event is calculated by subtracting the time the event was inserted into the database from the time it was picked up and processed by the scheduler. The average latency value is calculated by adding all the event latencies and then dividing the total latency by the number of events.
MAX LATENCY
Displays the highest latency (in seconds) for processed events within a given time range. The latency for an event is calculated by subtracting the time the event was inserted into the database from the time it was picked up and processed by the scheduler.

How to Retrieve Aggregated Job, Alarm, and Scheduler Statistics
212 Administration Guide
AVERAGE LAG TIME
Displays the average lag time (in seconds) in processing events, which is the average processing time that is required for all the events. The lag time for an event is calculated by subtracting the time the internal processing starts for the event from the time the scheduler completes processing it. Unlike average latency, the average lag time does not include the time that is required to fetch the event from the database. The average lag time value is calculated by adding all the event lag times and then dividing the total lag time by the number of events.
MAX LAG TIME
Displays the highest lag time (in seconds) for processed events within a given time range. The lag time for an event is calculated by subtracting the time the internal processing starts for the event from the time the scheduler completes processing it. Unlike max latency, the max lag time does not include the time that is required to fetch the event from the database.

Delete Aggregated Statistics
Chapter 9: Aggregating Statistics 213
Delete Aggregated Statistics
You can delete the aggregated job, alarm, and scheduler statistics in the following situations:
■ When you want the aggregation process to regenerate all statistics.
■ When you no longer want to store the aggregated statistics in the database.
When you delete aggregated statistics, the statistics in the ujo_rep_hourly, ujo_rep_daily, ujo_rep_weekly, and ujo_rep_monthly tables are deleted.
Follow these steps:
1. Open the operating system or instance command prompt as follows:
■ (UNIX) Run the shell that is sourced to use CA Workload Automation AE.
The operating system command prompt appears.
■ (Windows) Click Start, Programs, CA, Workload Automation AE, Command Prompt (instance_name).
The instance command prompt appears.
2. Enter the following command:
sendevent –E AGGREGATE [-l {HOURLY|DAILY|WEEKLY|MONTHLY} -d
Example: Delete All Statistics from the Database
This example sends a manual aggregation event to delete all statistics from the database.
sendevent –E AGGREGATE –d
Example: Delete Statistics Before Aggregating Hourly Statistics
This example sends a manual aggregation event to delete the statistics from the ujo_rep_hourly, ujo_rep_daily, ujo_rep_weekly, and ujo_rep_monthly tables and then aggregates hourly statistics.
sendevent –E AGGREGATE –l HOURLY -d


Chapter 10: Troubleshooting 215
Chapter 10: Troubleshooting
This section contains the following topics:
How the Components Are Affected When a Job Is Defined (see page 215) Windows Services Troubleshooting (see page 216) Event Server Troubleshooting (see page 216) Scheduler Troubleshooting (see page 219) Agent Troubleshooting (see page 227) Job Troubleshooting (see page 232) Application Server Troubleshooting (see page 243)
How the Components Are Affected When a Job Is Defined
Problems with CA Workload Automation AE usually involve interactions between the four primary components (that is, the application server, the scheduler, the agent, and the event server) instead of the individual components themselves.
This chapter describes a number of common problems, their symptoms, and possible solutions. It provides useful information about troubleshooting the primary CA Workload Automation AE components.
To troubleshoot CA Workload Automation AE more effectively, you must understand the stages in the life of a job, the order in which they occur, and the roles played by the four primary components.
When you define a job, CA Workload Automation AE saves its starting conditions to the event server (database), and the following occur:
■ When the job's starting conditions are met, the scheduler submits the job to an agent.
■ The agent runs the job and returns the job's exit status to the application server.
■ The application server updates the event server.
■ After the job completes, it does not run again until its starting conditions are met.
Note: On UNIX, Sybase and Oracle are supported. On Windows, Microsoft SQL Server, Oracle, and Sybase are supported. Database specific tools like SQLPLUS (Oracle) and ISQL (Sybase/Microsoft SQL Server) are recommended for any database-specific tasks. You must use OSQL for Microsoft SQL Server 2005, because ISQL is not available; however, for the purposes of this documentation, the group ISQL contains OSQL. The XQL and ZQL database tools installed by the previous releases of CA Workload Automation AE are deprecated and have been phased out in the current release.

Windows Services Troubleshooting
216 Administration Guide
Windows Services Troubleshooting
You can start the application server, scheduler, and agents using the Services - CA Workload Automation AE Administrator window of CA Workload Automation AE Administrator. You can start the event server (the Microsoft SQL Server, Oracle, or Sybase service) using the Windows Control Panel Services dialog. You can find details as to why a service did not start using the Event Viewer option in the Windows Control Panel Administrative Tools dialog.
Typically, problems with starting services using CA Workload Automation AE Administrator indicate that the software is not installed successfully. In such cases, the best approach is to remove the existing CA Workload Automation AE installation and reinstall it.
Note: For more information about how to remove CA Workload Automation AE, see the Windows Implementation Guide. For more information about starting CA Workload Automation AE services using CA Workload Automation AE Administrator, see the Online Help.
To verify whether the event server service (the database service) is started, look at the Windows Control Panel Services dialog. You can verify the following:
■ If you are running Microsoft SQL Server, verify the status of the MSSQLServer service.
■ If you are running Oracle, verify the status of the following services (substitute your Oracle SID for the asterisk): OracleService*, OracleStart*, and OracleTNSListener.
■ If you are running Sybase, verify that a service with a name that starts with SYBSQL is started. It is possible that a different name was selected for the service when Sybase was installed.
Event Server Troubleshooting
This section describes scenarios for troubleshooting the event server.

Event Server Troubleshooting
Chapter 10: Troubleshooting 217
Event Server Is Down
Valid on UNIX and Windows
Symptom:
When I issue the chk_auto_up command, a message similar to the following is displayed:
Couldn't connect with Server: AUTOSYS:autosys
Solution:
Either the database server is down or the process in question cannot access the database server.
To verify whether the database server is down, log in to the event server and check if the database processes are active.
If the database is running, the problem could be that CA Workload Automation AE is configured to the wrong event server or communication between CA Workload Automation AE and the event server is not configured correctly.

Event Server Troubleshooting
218 Administration Guide
Deadlocks
Valid on UNIX and Windows
Symptom:
The database server error log or the scheduler log (the output of the autosyslog -e command) displays a message similar to the following:
Your server command (process id #11) was deadlocked with another process and has been
chosen as deadlock victim. Re-run your command.
Solution:
A deadlock is a condition that occurs when two users have a lock on separate objects, and they each want to acquire an additional lock on the other user's object. The first user is waiting for the second user to release the lock, but the second user will not release it until the lock on the first user's object is released.
The database server detects the situation and selects the user whose process has accumulated the least amount of CPU time. The database server rolls back that user's transaction, notifies the application with the indicated error message, and lets the other user's processes continue.
CA Workload Automation AE tries to rerun the command until it is successful or until it has exceeded the maximum number of retries.
Note: CA Workload Automation AE defines database table indices to optimize the performance of database queries. A database deadlock is an indication that the database table index definitions have been manually altered or removed.
Not Enough User Connections
Valid on UNIX and Windows
Symptom:
CA Workload Automation AE processes cannot make connections to the database; they cannot start the CA WCC GUI or send events.
Solution:
Verify the maximum number of user connections your system can support. If the current number of connections does not exceed the capacity of your environment, you can increase the number of user connections.
Note: For more information about increasing the maximum number of user connections, contact your database administrator or see the database documentation.

Scheduler Troubleshooting
Chapter 10: Troubleshooting 219
Scheduler Troubleshooting
This section describes scenarios for troubleshooting the scheduler.
Output from the scheduler is redirected to the following log file:
■ On UNIX—$AUTOUSER/out/event_demon.$AUTOSERV
■ On Windows— %AUTOUSER%\out\event_demon.%AUTOSERV%
You must issue the autosyslog -e command to view the scheduler log file. This log file contains a record of all the actions taken by the scheduler (in the order performed). Network problems are usually reflected in this log file. This log file is very useful for reconstructing what happened when a problem occurs.
Note: For more information about the autosyslog command, see the Reference Guide. To terminate autosyslog, press Ctrl+C.
More Information:
View the Scheduler Log File (see page 127)

Scheduler Troubleshooting
220 Administration Guide
Scheduler Is Down
Valid on UNIX and Windows
Symptom:
■ Jobs do not start.
■ When I issue the chk_auto_up command, a message similar to the following is displayed:
No Scheduler is RUNNING.
■ The scheduler log has not registered a date and time stamp for a while. The scheduler log should register date and time stamps each minute.
Solution:
Do one of the following to verify whether the scheduler is down:
■ Issue the chk_auto_up command. This command verifies if the scheduler is running.
■ Issue the autosyslog -e command. This command displays the scheduler log file. Check for date and time stamps.
On UNIX, check for running CA Workload Automation AE scheduler processes. If the scheduler is down, you must issue the eventor command to start it.
On Windows, verify the status of the scheduler using the Services - CA Workload Automation AE Administrator window of CA Workload Automation AE Administrator. If the scheduler is down, you must start it using the Services - CA Workload Automation AE Administrator window of CA Workload Automation AE Administrator.
Note: For more information about how to verify the scheduler status or start the scheduler using CA Workload Automation AE Administrator, see the Online Help.

Scheduler Troubleshooting
Chapter 10: Troubleshooting 221
Scheduler Will Not Start
Valid on UNIX
Symptom:
The autosyslog -e command displays messages indicating that it cannot connect to the database.
Solution:
This problem occurs if the database is down or there are database problems. To correct this problem, verify that the database is running and that you can connect to it by issuing the autoping command. After the database is accessible, the scheduler should be able to connect to the database.
Symptom:
■ The autosyslog -e command displays messages indicating that the scheduler log file does not exist, or that no entries were made when the scheduler service was started.
■ The scheduler service does not remain running or never starts.
Solution:
To correct this problem
1. Check for a file named event_demon.$AUTOSERV in the $AUTOUSER/out directory.
2. If the file exits, enter the following command at the operating system prompt:
type $AUTOUSER/out/event_demon.$AUTOSERV | more
You can view the event_demon.$AUTOSERV file.
3. Identify the problems at the end of the file, correct them, and restart the scheduler.
The problem is corrected.
Note: The scheduler appends the event_demon.$AUTOSERV file each time it starts.

Scheduler Troubleshooting
222 Administration Guide
Symptom:
The scheduler does not remain running and does not write log output to the $AUTOUSER/out/event_demon.$AUTOSERV file.
Solution:
This problem could have various causes and the solution depends on which of the following message is displayed:
The log file $AUTOUSER/out/event_demon.$AUTOSERV is missing!
The scheduler must have been started on the computer at least once or this message is displayed. If the scheduler has been started, ensure that permissions are set on the log file that enables a system program to read and write to it.
The environment variable AUTOSYS is not set.
This message is displayed if the $AUTOSYS system environment variable is not available to the scheduler. You must ensure that the CA Workload Automation AE source file has been sourced in your session.
The CA Workload Automation AE environment has not been installed correctly.
This message is displayed when the scheduler runs the chk_auto_up command on initialization, and it reports that the setup is incorrect. You must ensure that the CA Workload Automation AE source file has been sourced in your session.
The primary, shadow, or the tie-breaker scheduler is already running. Startup aborted.
This message is displayed when the scheduler starts, and it detects another scheduler running with the same instance ID. Only one scheduler can run in an instance. Either stop the other scheduler, or do not try to start this scheduler.
Scheduler cannot open its log file event_demon.$AUTOSERV. Some directory in the path is not accessible to the SYSTEM.
This message is displayed when the scheduler cannot create the event_demon.$AUTOSERV log file. You must ensure that the log file has permissions that enable a system program to read and write it. Also, verify that the disk drive has not run out of space.
Could not rename the LARGE scheduler file: event_demon.$AUTOSERV to backup archive file: event_demon.$AUTOSERV.date. Fix file and directory permissions so accessible by SYSTEM, or remove the files.
This message is displayed when the scheduler starts and checks the size of the event_demon.$AUTOSERV log file. If this file is larger than 100 MB, the scheduler tries to rename it to event_demon.$AUTOSERV.date and creates a new event_demon.$AUTOSERV log file. If the scheduler cannot do this, verify that event_demon.$AUTOSERV has permissions that enable a system program to read and write it. Also, verify that the disk drive has not run out of space.
Note: You can use the LOGROLLOVER environment variable to specify when the scheduler or the application server log rolls over.

Scheduler Troubleshooting
Chapter 10: Troubleshooting 223
Scheduler Will Not Start
Valid on Windows
Symptom:
The autosyslog -e command displays messages indicating that it cannot connect to the database.
Solution:
This problem occurs if the database is down or there are database problems. To correct this problem, verify that the database is running and that you can connect to it by issuing the autoping command. After the database is accessible, the scheduler should be able to connect to the database.
Symptom:
■ The autosyslog -e command displays messages indicating that the scheduler log file does not exist, or that no entries were made when the scheduler service was started.
■ The scheduler service does not remain running or never starts.
Solution:
To correct this problem
1. Check for a file named event_demon.%AUTOSERV% in the %AUTOUSER%\out directory.
2. If the file exits, enter the following command at the instance command prompt:
type %AUTOUSER%\out\EVENT_DEMON.%AUTOSERV% | more
You can view the event_demon.%AUTOSERV% file.
3. Identify the problems at the end of the file, correct them, and restart the scheduler.
The problem is corrected.
Note: The scheduler appends the event_demon.%AUTOSERV% file each time it starts.

Scheduler Troubleshooting
224 Administration Guide
Symptom:
The scheduler does not remain running and does not write log output to the %AUTOUSER%\out\event_demon.%AUTOSERV% file.
Solution:
This problem could have various causes; and the solution depends on which of the following message is displayed on the Event Log Viewer dialog. You can access the Event Log Viewer dialog using the Windows Control Panel Administrative Tools dialog.
The log file %AUTOUSER%\out\event_demon.%AUTOSERV% is missing!
The scheduler must have been started on the computer at least once or this message is displayed. If the scheduler has been started, ensure that permissions are set on the log file that enables a system program to read and write to it.
The environment variable AUTOSYS is not set.
This message is displayed if the %AUTOSYS% system environment variable is not available to the scheduler. You must ensure that the %AUTOSYS% system environment variable is set properly by using the Windows Control Panel or the System - CA Workload Automation AE Administrator window of CA Workload Automation AE Administrator.
Note: For more information about how to add, modify, or delete a system environment variable using CA Workload Automation AE Administrator, see the Online Help.
The environment variable AUTOSYS is too long.
This message is displayed if the %AUTOSYS% system environment variable value is set to a path that is more than 80 characters in length. You must uninstall CA Workload Automation AE, and reinstall it to a directory path that is fewer than 80 characters in length.

Scheduler Troubleshooting
Chapter 10: Troubleshooting 225
chk_auto_up process is missing. Scheduler not operational. Call Tech support.
This message is displayed when the scheduler runs the chk_auto_up command on initialization, and that process is terminated without properly notifying the scheduler. This indicates a serious problem with your local system account. You must try setting the scheduler to log in as the administrator. If this is successful, you can run the scheduler. However, we recommend that you uninstall and reinstall CA Workload Automation AE.
chk_auto_up times out while waiting for response from application server
This message is displayed when the application server does not respond. You must verify whether the application server is running by using the Services - CA Workload Automation AE Administrator window of CA Workload Automation AE Administrator.
Note: For more information about how to verify the status of the application server using CA Workload Automation AE Administrator, see the Online Help.
chk_auto_up is taking a while to complete...
This message is displayed when the scheduler runs the chk_auto_up command on initialization, and it takes more than five minutes to complete. This might occur on large or slow networks where the chk_auto_up command must query every machine listed in the Authorized Manager List pane on the Agent - CA Workload Automation AE Administrator window of CA Workload Automation AE Administrator. To test this problem, issue the chk_auto_up command at the instance command prompt, and check how long it takes to complete. This message is only a warning, and the scheduler waits for the command to complete before starting.
Wait for chk_auto_up process failed. Windows Error Code
This message is displayed when the scheduler runs the chk_auto_up command on initialization, and it terminates prematurely with a Windows error code. You must verify that chk_auto_up.exe is located in the %AUTOSYS%\bin directory and has the proper permissions for system programs to execute.
The CA Workload Automation AE environment has not been installed correctly.
This message is displayed when the scheduler runs the chk_auto_up command on initialization, and it reports that the setup is incorrect. You must uninstall and reinstall CA Workload Automation AE.

Scheduler Troubleshooting
226 Administration Guide
The primary, shadow, or tie-breaker scheduler is already running. Startup aborted.
This message is displayed when the scheduler starts, and it detects another scheduler running with the same instance ID. Only one scheduler can run in an instance. Either stop the other scheduler, or do not try to start this scheduler.
Scheduler cannot open its log file event_demon.%AUTOSERV%. Some directory in the path is not accessible to the SYSTEM.
This message is displayed when the scheduler cannot create the event_demon.%AUTOSERV% log file. You must ensure that the log file has permissions that enable a system program to read and write it. Also, verify that the disk drive has not run out of space.
Could not rename the LARGE scheduler file: event_demon.%AUTOSERV% to backup archive file: event_demon.%AUTOSERV%.date. Fix file and directory permissions so accessible by SYSTEM, or remove the files.
This message is displayed when the scheduler starts and checks the size of the event_demon.%AUTOSERV% log file. If this file is larger than 256 KB, the scheduler tries to rename it to event_demon.%AUTOSERV%.date and creates a new event_demon.%AUTOSERV% log file. If the scheduler cannot do this, verify that event_demon.%AUTOSERV% has permissions that enable a system program to read and write it. Also, verify that the disk drive has not run out of space.
Note: You can use the LOGROLLOVER environment variable to specify when the scheduler or the application server log rolls over.

Agent Troubleshooting
Chapter 10: Troubleshooting 227
Agent Troubleshooting
This section describes scenarios for troubleshooting the agent.
You can use the autoping command to verify the agent and the agent’s database connection from the application server are functioning correctly. The autoping command also verifies whether the server and client computers are properly configured and are communicating successfully.
To verify whether the agent is functioning correctly, issue the following command at the UNIX operating system prompt or the Windows instance command prompt:
autoping -m machine_name
machine_name
Identifies the machine to verify. The machine must be defined in the database and accessible over the network. Specify -m ALL to verify all machines.
The IP address or DNS name of the machine must be listed in the /etc/hosts file (on UNIX) or accessible through TCP/IP (on Windows) on the machine from which you issue the autoping command.
Notes:
■ When you issue the autoping command to a machine of type 'a', the client (the machine from which you issued autoping) sends a request to the application server and waits for the application server to respond. The application server contacts the scheduler and notifies it to ping the agent and waits for the scheduler to respond. The application server then pings the agent and prepares a response to autoping. If successful, the autoping command writes the following message to standard output on the server:
AutoPinging Machine [machine]
AutoPing WAS SUCCESSFUL!
■ When you issue the autoping command to a machine of type 'r', 'n', ’l’, or ‘L’ (legacy agent), the client (the machine from which you issued autoping) establishes a connection with the legacy agent and waits for the legacy agent to respond. If successful, the autoping command writes the following message to standard output on the server:
AutoPinging Machine [machine]
AutoPing WAS SUCCESSFUL!
■ If there is a configuration problem, the autoping command writes a message indicating that the remote machine did not respond or that a more serious problem (such as a socket read error) exists. It also writes messages on behalf of the scheduler and the application server.
■ For more information about the autoping command, see the Reference Guide.

Agent Troubleshooting
228 Administration Guide
Example: Verify Database Access
This example verifies that the machine “venice” is properly configured and that the agent's database connection from the application server is functioning properly.
autoping -m venice -S
CAUAJM_I_50023 AutoPinging Machine [venice]
CAUAJM_I_50031 Checking the Agent's connectivity to the Application Server.
CAUAJM_I_50025 AutoPing WAS SUCCESSFUL.
Agent Not Responding
Valid on UNIX
Symptom:
The autosyslog -e command displays a message similar to the following:
COMM_ERR_5 Communication attempt with Agent on machine [machine_name] has failed.
CAUAJM_E_40157 System Restart Job [Jobxxx] was unable to start
CAUAJM_W_40290 Machine <machine_name> is in question. Placing machine in the
unqualified state.
Solution:
To verify the status of the agent
1. Run the shell that is sourced to use CA Workload Automation AE.
2. Enter the following command at the operating system prompt:
unisrvcntr status waae_agent-WA_AGENT
WA_AGENT
Defines the name of the agent for which you are verifying the status.
The agent's current status is displayed.
3. If the agent is not running, enter the following command at the operating system prompt:
unisrvcntr start waae_agent-WA_AGENT
WA_AGENT
Defines the name of the agent to start.
The agent starts.
Note: You must verify the machine definition to ensure that the parameters you specify when you define an agent on CA Workload Automation AE match the corresponding parameters in the agentparm.txt file. If the agent_name, node_name, port, and key_to_agent attribute values do not match, it can result in communication problems.

Agent Troubleshooting
Chapter 10: Troubleshooting 229
Agent Not Responding
Valid on Windows
Symptom:
The autosyslog -e command displays a message similar to the following:
COMM_ERR_5 Communication attempt with Agent on machine [machine_name] has failed.
CAUAJM_E_40157 System Restart Job [Jobxxx] was unable to start
CAUAJM_W_40290 Machine <machine_name> is in question. Placing machine in the
unqualified state.
Solution:
To verify the status of the agent
1. Click Start, Programs, CA, Workload Automation AE, Administrator.
The Instance - CA Workload Automation AE Administrator window opens.
2. Click the Services icon on the toolbar.
The Services - CA Workload Automation AE Administrator window appears, displaying a list of services installed on the selected instance. The Status column indicates the status of the agent.
3. If the agent is not running, right-click the agent service, and click Start.
The agent starts. The Status column indicates the status.
Note: You must verify the machine definition to ensure that the parameters you specify when you define an agent on CA Workload Automation AE match the corresponding parameters in the agentparm.txt file. If the agent_name, node_name, port, and key_to_agent attribute values do not match, it can result in communication problems.

Agent Troubleshooting
230 Administration Guide
Agent Starts, Command Runs: No RUNNING Event Is Sent
Valid on UNIX
Symptom:
■ Job does not advance from STARTING state.
■ The scheduler log or the output of the autorep command on the job contains the following event with nothing after it, but the job runs to completion on the client computer:
CHANGE_STATUS Status: STARTING Job: test_install
Solution:
This is a common problem and occurs when the agent is unable to contact the scheduler. You must verify the following:
■ Ensure that network problems are not preventing the communication between the agent and the scheduler computers.
■ Verify the encryption settings between the scheduler and the agent in the receiver.log file. The receiver.log file is located in the log subdirectory in the SystemAgent directory. If the agent detects a problem with encryption, the receiver.log file will include messages related to the encryption problem.
Note: For the communication between the scheduler and the agent to be successful, you must ensure that the agent encryption settings on CA Workload Automation AE match the encryption settings defined in the agentparm.txt file on the agent. If you detect any encryption problems, you must modify the encryption type and encryption key on CA Workload Automation AE to match the encryption settings defined in the agentparm.txt file on the agent. For more information about modifying the encryption type and encryption key on CA Workload Automation AE, see the UNIX Implementation Guide.
The agent must be able to contact the scheduler, and the scheduler must be able to connect to the database to send the RUNNING, SUCCESS, FAILURE, or TERMINATED status events.
To verify the problem, issue the following command at the operating system prompt:
autosyslog -J job_name
job_name
Defines the name of the job.
The agent log for the job is displayed.

Agent Troubleshooting
Chapter 10: Troubleshooting 231
Agent Starts, Command Runs: No RUNNING Event Is Sent
Valid on Windows
Symptom:
■ Job does not advance from STARTING state.
■ The scheduler log or the output of the autorep command on the job contains the following event with nothing after it, but the job runs to completion on the client computer:
CHANGE_STATUS Status: STARTING Job: test_install
Solution:
This is a common problem and occurs when the agent is unable to contact the scheduler. You must verify the following:
■ Ensure that network problems are not preventing the communication between the agent and the scheduler computers.
■ Verify the encryption settings between the scheduler and the agent in the receiver.log file. The receiver.log file is located in the log subdirectory in the SystemAgent directory. If the agent detects a problem with encryption, the receiver.log file will include messages related to the encryption problem.
Note: For the communication between the scheduler and the agent to be successful, you must ensure that the agent encryption settings on CA Workload Automation AE match the encryption settings defined in the agentparm.txt file on the agent. If you detect any encryption problems, you must modify the encryption type and encryption key on CA Workload Automation AE to match the encryption settings defined in the agentparm.txt file on the agent. For more information about modifying the encryption type and encryption key on CA Workload Automation AE, see the Windows Implementation Guide.
The agent must be able to contact the scheduler, and the scheduler must be able to connect to the database to send the RUNNING, SUCCESS, FAILURE, or TERMINATED status events.
To verify the problem, issue the following command at the Windows instance command prompt:
autosyslog -J job_name
job_name
Defines the name of the job.
The agent log for the job is displayed.

Job Troubleshooting
232 Administration Guide
Legacy Agent Temporary Files
Valid on UNIX
Symptom:
When the legacy agent started, the auto_remote memory increased significantly, and the following messages were displayed:
In univagent.out: "sar: fork failed! Not enough space."
Outputs of prstat command show that auto_remote process takes more than 1 GB of memory.
Solution:
The problem can be resolved by removing all files under the AutoSys_Install_Directory/agent/tx/* directories. We recommend that you do the following:
■ When possible, let the job agents processes complete before recycling the autosys or agent service.
■ If the files under agent/tx/jobst, agent/tx/request, and agent/tx/response are invalid or out-of-date (for example, multiple days ago), remove them.
■ If there is no job agent process running, remove all files under agent/tx/request.
■ If a clean startup is needed, remove all files under tx/*/.
Note: If you delete the data files in the tx directory while job agents are running, it may result in jobs being stuck in the STARTING state or in a delay in updating the job status.
Job Troubleshooting
This section describes scenarios for troubleshooting job failures and problems.
Agent Will Start: Command Job Will Not Run
Valid on UNIX and Windows
Each time the agent starts on a computer, it creates a log file for command jobs in the spool subdirectory in the SystemAgent directory. This log file contains all the instructions passed to the agent by the scheduler, the results of any resource checks, and a record of all actions taken. Any problems encountered by the agent are recorded in this log file.

Job Troubleshooting
Chapter 10: Troubleshooting 233
To retrieve the most recent instance of the agent log for a given job, enter the following command on the computer where the job last ran:
autosyslog -J job_name
job_name
Defines the name of the job.
To retrieve a particular instance of the agent log for a given job run, enter the following command on the computer where the job last ran:
autosyslog -J job_name -r run_num –n ntry
run_num
Defines the job's run number.
ntry
Defines the number of tries or restarts.
Symptom:
When I issue the autosyslog -e command, the scheduler log displays a message similar to one of the following:
Owner UserId/Password error! ERROR: The password specified for USER@HOSR_OR_DOMAIN
is invalid! Run "autosys_secure" to enter the correct password.
or
Owner UserId/Password error! ERROR: No valid password was found for USER@HOST or
USER@DOMAIN. Cannot run job for user USER! Run "autosys_secure" to enter the user
password.
When I issue the autorep -J job_name command, the agent log might also display a message similar to one of the following:
The password specified for USER@DOMAIN is invalid! Run "autosys_secure" to enter the
correct password.
or
No valid password was found for USER@HOST or USER@DOMAIN. Cannot run job for user USER!
Run "autosys_secure" to enter the user password.
Solution:
The password for user@host_or_domain does not exist or is invalid. To fix this problem, issue the autosys_secure command to enter or change the user ID and password.
Note: For more information about the autosys_secure command, see the Reference Guide or the CA Workload Automation Security Guide.

Job Troubleshooting
234 Administration Guide
Symptom:
When I issue the autosyslog -e command, the scheduler log indicates that the job immediately returned a FAILURE status.
Solution:
To verify this problem, issue the autosyslog -e command on the scheduler computer and the autorep -J job_name command on the computer where the job should have run, and review the resultant error messages.
For example, if the job's standard output file was read-only, a message indicating this is included in the scheduler log.
You should also verify the following:
■ Ensure that the default profile or the job's specified user-defined profile defines the appropriate job environment. In particular, ensure that the path variable, if defined in a job profile, is correct. You should always include the following in any job profile that defines a path variable to help ensure that all system path directories are accessible:
– On UNIX—$PATH
– On Windows— %PATH%
■ Ensure that the file system where the job command resides is accessible from the computer where the job should have run.
■ Ensure that the system permissions are correct for the command job to run.
■ Ensure that the permissions are correct on any standard input and output files specified for redirection.
Note: A valuable debugging technique is to specify a file to use for standard output and standard error for a job that is having run problems. If there are any command problems, most of the error messages are recorded in that file.

Job Troubleshooting
Chapter 10: Troubleshooting 235
Symptom:
When I issue the autosyslog -e command, the scheduler log displays a message similar to the following when a job starts:
COMM_ERR_5 Communication attempt with Agent on machine [machine_name:49154] has
failed.
Solution:
This message is displayed in the following situations:
■ Performance problems with the network or machine
■ Network problems
■ Incompatible encryption settings between the scheduler and agent
■ Machine definition for the agent is not correct
■ Port number that is used by the agent is not correct
Occasionally, performance problems on the network or computer might cause communication failures. The network might be down or slow due to high traffic volume. The computer might be underpowered, or you are trying to do too much on it at one time.
Note: For the communication between the scheduler and the agent to be successful, you must ensure that the agent encryption settings on CA Workload Automation AE match the encryption settings defined in the agentparm.txt file on the agent. If you detect any encryption problems, you must modify the encryption type and encryption key on CA Workload Automation AE to match the encryption settings defined in the agentparm.txt file on the agent. For more information about modifying the encryption type and encryption key on CA Workload Automation AE, see the UNIX Implementation Guide or the Windows Implementation Guide.

Job Troubleshooting
236 Administration Guide
Agent Not Found
Valid on UNIX
Symptom:
When I issue the autosyslog -e command, the scheduler log displays the following message when I try to start a job or try to start the scheduler with a shadow scheduler:
COMM_ERR_2 Hostname for machine [machine_name] is invalid or unreachable over the
network.
Solution:
This message is displayed in the following situations:
1. There is a network problem and the scheduler cannot connect to the agent computer.
2. The agent computer is not in /etc/hosts or DNS.
3. The CA Workload Automation AE configuration file lists the computer; however, there is a space after the computer name. Check /etc/hosts or DNS for the computer name, and correct it if necessary.
Follow these steps:
1. Check the node_name attribute of the CA Workload Automation AE machine definition corresponding to the machine in question.
2. Enter the following command at the operating system prompt:
autorep –m machine -q
The machine definition is exported to a text file.
3. Edit the configuration file (remove anything after the name of the computer and before the $ that marks the end of the line) using an editor, such as vi (with the :set list option).
4. If a problem is found with the node_name attribute of the machine, re-create the machine definition using the jil utility.

Job Troubleshooting
Chapter 10: Troubleshooting 237
Job Fails: Multiple Interactive Log in Sessions
Valid on Windows
Symptom:
When a command job with the interactive attribute set to true is scheduled, the job fails when the userid defined to run the job is currently logged on to Windows with more than one session. The autorep -d command displays the following error message:
More than one interactive logon session
The job status appears as a failure.
Solution:
The agent works according to Microsoft restrictions. To schedule interactive jobs, follow these two rules:
1. The user specified to run the job MUST be logged on with an active session.
2. The user can have ONLY one active session.
If more than one session exists for the specified user, the agent cannot determine which session to use and therefore fails the job.

Job Troubleshooting
238 Administration Guide
Jobs Run Only From the Command Line
Valid on UNIX
Symptom:
Jobs run from the command line, but they fail when run.
Solution:
This problem is nearly always in the shell environment where the job runs. The following are the possible reasons:
■ The profile in the job definition is not a Bourne shell (sh) type profile. If this is the case, the profile fails.
■ The default profile does not produce the proper environment for the job to run. The default profile for all jobs is /etc/auto.profile, not the job owner's log in profile $HOME/.profile. If the job owner's profile is not specified in the job definition, it is never sourced.
■ The oscomponent.defaultshell.force parameter is set to true in the agentparm.txt file for the agent. This loads the /etc/auto.profile in the shell specified in the oscomponent.defaultshell parameter rather than the job owner’s login shell.
To verify the difference between the job definition and the user environment
1. Log in as the owner of the job on the computer where the job runs, and enter the following command at the operating system prompt:
env >user.env
The current owner's environment is written to a file.
2. Enter the following commands at the operating system prompt:
insert_job: auto_env
machine: client_hostname
owner: owner
command: env
std_out_file: /tmp/auto.env
std_err_file: /tmp/auto.err
client_hostname
Defines the host name of the computer where the problem job runs.
owner
Defines the owner of the job that will not run.
The agent environment is written to a file.

Job Troubleshooting
Chapter 10: Troubleshooting 239
3. Enter the following command at the operating system prompt:
sendevent -E STARTJOB -J auto_env
The problem job runs.
4. Enter the following command at the operating system prompt:
diff /tmp/auto.env user.env
The differences in the two files (std_out_file and std_err_file) are verified. The diff command displays where the environment and the user environment files differ. Make the necessary changes in the job definition and the user profile.
It is also useful to define the std_err_file file for the job that fails, because you can check the errors from the shell to get an indication about what is missing.
Note: No spaces are allowed between the >> characters and the full path or file name in the std_out_file or std_err_file fields in a job definition.
Jobs To Legacy Agent Run Twice
Valid on UNIX
Symptom:
The scheduler failed to connect due to socket errors that occur during a job run and the job runs more than once.
Solution:
This problem includes the following sequence of events:
1. The scheduler opens a connection to the legacy agent to run the job.
2. The legacy agent starts the job, and tries to respond to the scheduler.
3. The scheduler issues a failed to connect to socket error because the agent took longer than 20 seconds (the time-out value) to start the job and respond.
4. The scheduler checks whether the job can be restarted, and (if possible) restarts the job. Meanwhile, the job is running and perhaps completed by the legacy agent.
5. The scheduler opens another connection to the legacy agent to run the job a second time.
6. The legacy agent starts the job and responds to the server in time.
7. The job runs again.

Job Troubleshooting
240 Administration Guide
The main reason for this problem to occur is severe performance problems on the legacy agent computer. For example, the following might affect performance:
■ Running a full system backup on the legacy agent computer at the same time as jobs are starting might slow the system down and cause the timeout because it cannot respond to the server.
■ Network problems. If a job's home directory is on an NFS drive and there are bandwidth problems, the job might take so long to start that the socket times out.
Because socket time-out is not a customizable parameter, there is little you can do to avoid this situation from a CA Workload Automation AE perspective. However, you can analyze the performance of the client by asking these questions:
■ Are there too many processes running on the legacy agent computer when you run jobs?
■ Are you having network problems?
■ Are you using NFS-mounted directories?
■ Do you need more memory or processors on the legacy agent computer?
■ Does the legacy agent computer have the latest maintenance?
Notes:
■ You must install the latest maintenance on the legacy agent to ensure that it receives the updates required to solve this problem.
■ The architecture of the r11.3, Release 11.3.5, or Release 11.3.6 agent is different from that of the legacy agent. The sequence of events (documented in this topic) no longer apply.

Job Troubleshooting
Chapter 10: Troubleshooting 241
Job Remains in STARTING or RUNNING State
Valid on UNIX and Windows
Symptom:
The state of a job remains in STARTING or RUNNING.
Solution:
A job remaining in the STARTING or RUNNING state is indicative of the following issues:
■ Agent is unable to communicate with the scheduler on the agent listener port of the scheduler
Verify that the Secure Sockets Adapter port configurations are identical on both the agent machine and on the scheduler machine for the 49152-50176 port range.
Run chk_auto_up to exercise the agent listener port of the scheduler. If chk_auto_up reports that the scheduler is running, then the scheduler is capable of accepting communications on its agent listener port.
Run autoping –m <machine> to exercise the communication path between the agent and the scheduler If autoping reports success then the agent is capable of communicating with the scheduler on its agent listener port. Autoping returns the following to indicate that the agent is experiencing an internal delay:
CAUAJM_W_10496 Agent on [<machine>] has not responded in a timely fashion. Try
again later.
■ Agent has encountered an internal limitation preventing it from executing the job or sending status
The agent logs in both the SystemAgent/<agent_name> and SystemAgent/<agent_name>/logs subdirectories of the install path need to be consulted to determine the nature of the limitation:
1) The nohup.stderr file may contain miscellaneous operating system error messages.
2) The default_agent.log file may contain agent-specific errors not applicable to any one agent component.
3) The various agent component logs contain errors specific to a function of the agent.
The agent may have temporarily exhausted all of its internal initiators. This means that the agent is trying to start too many jobs at once. Consult the CA Workload Automation Agent for UNIX, Linux, or Windows Implementation Guide for information on how to increase the number of initiators.
Check that the SystemAgent/<agent_name> subdirectory of the install path on the agent machine has sufficient disk space.

Job Troubleshooting
242 Administration Guide
Unable to Run Jobs Using Cross Platform Scheduling
Valid on UNIX
Symptom:
When running a job from a cross platform scheduling manager to CA Workload Automation AE, the job does not start. The scheduler log displays the following error message:
CAUAJM_E_40320 User authentication failure for {0}. User does not exist or bad password
has been specified.
Solution:
The problem is with the agent associated with the job. To correct the problem, add the following line to the agentparm.txt file for the agent.
oscomponent.auth.pam.svc=sshd
Note: By default, the agent verifies the user password using the default service, for example login. The sshd service changes the way the agent verifies the password.
For more information about the oscomponent.auth.pam.svc parameter, see the CA Workload Automation Agent for UNIX, Linux, or Windows Implementation Guide.

Application Server Troubleshooting
Chapter 10: Troubleshooting 243
Application Server Troubleshooting
This section describes scenarios for troubleshooting the application server.
The output from the application server is redirected to the following log file:
■ On UNIX—$AUTOUSER/out/as_server.$AUTOSERV
■ On Windows—%AUTOUSER%\out\as_server.%AUTOSERV%
To view the application server log file, enter the following command at the UNIX operating system prompt or the Windows instance command prompt:
autosyslog -s
The application server log file displays error messages as they occur.
Notes:
■ You can enable run-time traces to view incoming client requests in the order they were received by the application server and use them for troubleshooting communications with the CA Workload Automation AE client or an application using the SDK.
■ To terminate autosyslog, press Ctrl+C.

Application Server Troubleshooting
244 Administration Guide
Application Server Is Down
Valid on UNIX
Symptom:
■ CA Workload Automation AE client utilities on the local machine time out.
■ When I issue the chk_auto_up command, a message similar to the following is displayed:
CAUAJM_E_50033 Error initializing tx subsystem: CAUAJM_E_10527 Timed out waiting
for response from the Unicenter AutoSys JM Application Server.
CAUAJM_E_10062 Failed to get initial configuration Unicenter AutoSys JM
Application Server: [<application server machine>:9,000]
■ The application server log has not registered an error message since it was started.
Solution:
Do one of the following to verify whether the application server is down:
■ Issue the chk_auto_up command. This command verifies if the application server is running.
■ Issue the autosyslog -s command. This command displays the application server log file. Check for date and time stamps of the last run and any other error messages.
■ Issue the following command to verify the status of the application server:
unisrvcntr status waae_server.$AUTOSERV
■ To test that communication from the application server to the event server is set up properly, log in to the event server from the computer where the application server is available by using the following:
– For Oracle, use the SQL*Plus command language interface.
– For Sybase, use the ISQL utility.
Note: Use the CA Workload Automation AE user name and password to log on to the event server.
■ Check for running as_server processes for the given $AUTOSERV using the ps command.
If the application server is down, enter the following command at the operating system prompt:
unisrvcntr start waae_server.$AUTOSERV
The application server starts.
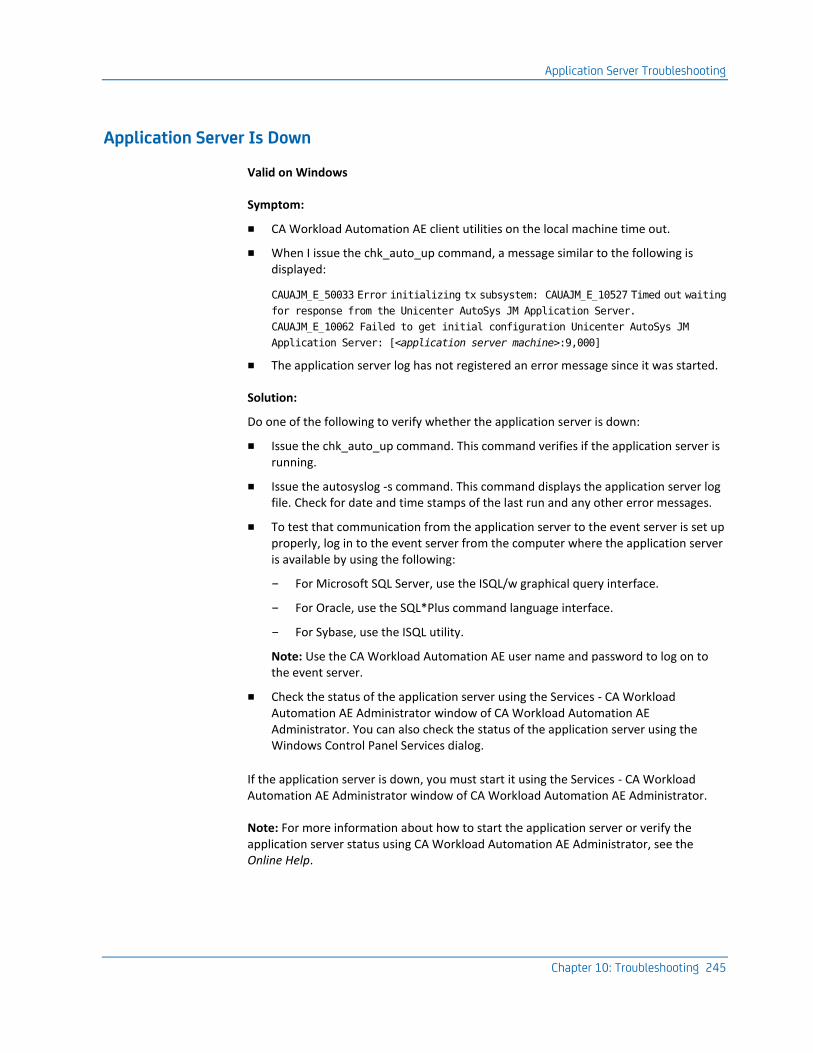
Application Server Troubleshooting
Chapter 10: Troubleshooting 245
Application Server Is Down
Valid on Windows
Symptom:
■ CA Workload Automation AE client utilities on the local machine time out.
■ When I issue the chk_auto_up command, a message similar to the following is displayed:
CAUAJM_E_50033 Error initializing tx subsystem: CAUAJM_E_10527 Timed out waiting
for response from the Unicenter AutoSys JM Application Server.
CAUAJM_E_10062 Failed to get initial configuration Unicenter AutoSys JM
Application Server: [<application server machine>:9,000]
■ The application server log has not registered an error message since it was started.
Solution:
Do one of the following to verify whether the application server is down:
■ Issue the chk_auto_up command. This command verifies if the application server is running.
■ Issue the autosyslog -s command. This command displays the application server log file. Check for date and time stamps of the last run and any other error messages.
■ To test that communication from the application server to the event server is set up properly, log in to the event server from the computer where the application server is available by using the following:
– For Microsoft SQL Server, use the ISQL/w graphical query interface.
– For Oracle, use the SQL*Plus command language interface.
– For Sybase, use the ISQL utility.
Note: Use the CA Workload Automation AE user name and password to log on to the event server.
■ Check the status of the application server using the Services - CA Workload Automation AE Administrator window of CA Workload Automation AE Administrator. You can also check the status of the application server using the Windows Control Panel Services dialog.
If the application server is down, you must start it using the Services - CA Workload Automation AE Administrator window of CA Workload Automation AE Administrator.
Note: For more information about how to start the application server or verify the application server status using CA Workload Automation AE Administrator, see the Online Help.

Application Server Troubleshooting
246 Administration Guide
Application Server Will Not Start
Valid on UNIX
Symptom:
The autosyslog -s command displays messages indicating that it cannot connect to the database.
Solution:
This problem occurs if the database is down or there are problems with the database installation. To test that communication from the application server to the event server is set up properly, log in to the event server from the application server computer by using the following:
■ For Oracle, use the SQL*Plus command language interface.
■ For Sybase, use the ISQL utility.
Note: Use the CA Workload Automation AE user name and password to log in to the event server.
Symptom:
The application server is not running and does not write log output to the $AUTOUSER/out/as_server.$AUTOSERV file.
Solution:
This problem could have various causes and the solution depends on which of the following message is displayed:
■ The environment variable AUTOSYS is not set.
This message is displayed if the $AUTOSYS system environment variable is not available to the application server. You must ensure that the CA Workload Automation AE source file has been sourced in your session.
■ The environment variable AUTOSYS is too long.
This message is displayed if the $AUTOSYS system environment variable value is set to a path that is more than 80 characters in length. You must uninstall CA Workload Automation AE, and reinstall it to a directory path that is fewer than 80 characters in length.
■ Application server cannot open its log file as_server.$AUTOSERV. Some directory in the path is not accessible to the SYSTEM.
This message is displayed when the application server cannot create the as_server.$AUTOSERV log file. You must ensure that the log file has permissions that enable a system program to read and write it. Also, verify that the disk drive has not run out of space.
Application Server Troubleshooting
Chapter 10: Troubleshooting 247
Application Server Will Not Start
Valid on Windows
Symptom:
The autosyslog -s command displays messages indicating that it cannot connect to the database.
Solution:
To verify whether the application server is down, log on to the event server computer and issue the chk_auto_up command. If the database is running, there is a possibility that CA Workload Automation AE is configured to the wrong application server or communication between CA Workload Automation AE and the application server is not successful.
To test that communication from the application server to the event server is set up properly, log on to the event server from the application server computer by using the following:
■ For Microsoft SQL Server, use the ISQL/w graphical query interface.
■ For Oracle, use the SQL*Plus command language interface.
■ For Sybase, use the ISQL utility.
Note: Use the CA Workload Automation AE user name and password to log in to the event server.

Application Server Troubleshooting
248 Administration Guide
Symptom:
The application server does not remain running and does not write log output to the %AUTOUSER%\out\as_server.%AUTOSERV% file.
Solution:
This problem could have various causes; and the solution depends on which of the following message is displayed on the Event Log Viewer dialog. You can access the Event Log Viewer dialog using the Windows Control Panel Administrative Tools dialog.
■ The environment variable AUTOSYS is not set.
This message is displayed if the %AUTOSYS% system environment variable is not available to the application server. You must ensure that the %AUTOSYS% system environment variable is set properly by using the Windows Control Panel or the System - CA Workload Automation AE Administrator window of CA Workload Automation AE Administrator.
Note: For more information about how to add, modify, or delete a system environment variable using CA Workload Automation AE Administrator, see the Online Help.
■ The environment variable AUTOSYS is too long.
This message is displayed if the %AUTOSYS% system environment variable value is set to a path that is more than 80 characters in length. You must uninstall CA Workload Automation AE, and reinstall it to a directory path that is fewer than 80 characters in length.
■ Application server cannot open its log file as_server.%AUTOSERV%. Some directory in the path is not accessible to the SYSTEM.
This message is displayed when the application server cannot create the as_server.%AUTOSERV% log file. You must ensure that the log file has permissions that enable a system program to read and write it. Also, verify that the disk drive has not run out of space.

Application Server Troubleshooting
Chapter 10: Troubleshooting 249
Application Server Starts, Client on Remote Machine Times out
Valid on UNIX
Symptom:
When I issue the chk_auto_up command from a remote machine, a message similar to the following is displayed:
CAUAJM_E_50033 Error initializing tx subsystem: CAUAJM_E_10527 Timed out waiting for
response from the Unicenter AutoSys JM Application Server.
CAUAJM_E_10062 Failed to get initial configuration Unicenter AutoSys JM Application
Server: [<application server machine>:9,000]
Solution:
You must ensure that network problems are not preventing communication between the client and the application server computers through the Operating System ping command.
Follow these steps:
1. On the client computer, change to the $CSAM_SOCKADAPTER/bin directory, and enter the following command at the operating system prompt:
csamconfigedit Port=value display
value
Defines the port number to display.
Default: 9000
2. On the application server computer , change to the $CSAM_SOCKADAPTER/bin directory, and enter the following command at the operating system prompt:
csamconfigedit Port=value display
value
Defines the port number to display.
Default: 9000

Application Server Troubleshooting
250 Administration Guide
3. Compare the outputs in Step 1and Step 2, and ensure that both the EnablePmux and EnableSSL settings are identical.
4. On both the client and application server computers, enter the following command at the operating system prompt:
csamconfigedit PortRange=49152-50176 display
The port settings are compared. If the settings do not match, change the settings such that the settings match on both the computers, and restart the CA Workload Automation AE services.
If the settings match, verify that physical port 7163 is not being blocked by a firewall software on either of the computers.

Application Server Troubleshooting
Chapter 10: Troubleshooting 251
Application Server Starts, Client on Remote Machine Times out
Valid on Windows
Symptom:
When I issue the chk_auto_up command from a remote machine, a message similar to the following is displayed:
CAUAJM_E_50033 Error initializing tx subsystem: CAUAJM_E_10527 Timed out waiting for
response from the Unicenter AutoSys JM Application Server.
CAUAJM_E_10062 Failed to get initial configuration Unicenter AutoSys JM Application
Server: [<application server machine>:9,000]
Solution:
You must ensure that network problems are not preventing communication between the client and the application server computers through the Operating System ping command.
Follow these steps:
1. On the client computer, change to the %CSAM_SOCKADAPTER/bin directory, and enter the following command at the instance command prompt:
csamconfigedit Port=value display
value
Defines the port number to display.
Default: 9000
2. On the application server computer , change to the %CSAM_SOCKADAPTER/bin directory, and enter the following command at the instance command prompt:
csamconfigedit Port=value display
value
Defines the port number to display.
Default: 9000

Application Server Troubleshooting
252 Administration Guide
3. Compare the outputs in Step 1and Step 2, and ensure that both the EnablePmux and EnableSSL settings are identical.
4. On both the client and application server computers, enter the following command at the instance command prompt:
csamconfigedit PortRange=49152-50176 display
The port settings are compared. If the settings do not match, change the settings such that the settings match on both the computers, and restart the CA Workload Automation AE services.
If the settings match, verify that physical port 7163 is not being blocked by a firewall software on either of the computers.

Chapter 11: Tuning CA Workload Automation AE 253
Chapter 11: Tuning CA Workload Automation AE
CA Workload Automation AE supports scalability. If run on high-end computers, you can configure CA Workload Automation AE to make efficient use of the computer’s CPU, memory, and database connections in order to increase the overall productivity.
This section contains the following topics:
Define the Tuning Parameters for the Scheduler on UNIX (see page 254) Define the Tuning Parameters for the Scheduler on Windows (see page 256) Define the Tuning Parameter for the Application Server on UNIX (see page 258) Define the Tuning Parameter for the Application Server on Windows (see page 259)

Define the Tuning Parameters for the Scheduler on UNIX
254 Administration Guide
Define the Tuning Parameters for the Scheduler on UNIX
You can define the SCHED_SCALE and DB_CONNECTIONS parameters to tune the scheduler.
On UNIX, the SCHED_SCALE and DB_CONNECTIONS parameters are operating system environment variables. Depending on your UNIX operating system, you can use either the setenv or the export command to define these tuning parameters.
Follow these steps:
1. Log in to CA Workload Automation AE as the EXEC superuser and enter the following command at the operating system prompt:
sendevent -E STOP_DEMON
The scheduler completes any processing it is currently performing and stops.
2. Enter the following commands at the operating system prompt based on your UNIX shell command interpreter:
setenv SCHED_SCALE=limit
setenv DB_CONNECTIONS=max_number
Or
export SCHED_SCALE=limit
export DB_CONNECTIONS=max_number
limit
Defines the maximum limit of process threads that can be started dynamically. This value does not represent the total number of process threads that are active. Rather, it is a scale value used by the scheduler to calculate the maximum limit of process threads that can be started dynamically as the workload demands. Therefore, a SCHED_SCALE value of 1 represents the lowest ceiling of additional dynamic threads that can be started to process job events (some arbitrary ceiling not necessarily equal to one). Increasing this value increases the ability of the scheduler to process job events.
Default: 5
Limits: 1-64

Define the Tuning Parameters for the Scheduler on UNIX
Chapter 11: Tuning CA Workload Automation AE 255
max_number
Defines the maximum number of database connections that the scheduler can connect to. Increasing this value increases the ability of the scheduler to perform simultaneous database operations.
Default: 16
Limits: 1-128
3. Enter the following command at the operating system prompt:
eventor
The scheduler starts. The tuning parameters for the scheduler are defined. On startup, the scheduler reads and applies the tuning parameters and these parameter values persist throughout the life of the process.
Notes:
■ You can also define the SCHED_SCALE and DB_CONNECTIONS parameters in any of the environment script files (autosys.UNIX shell.computer name) located in the $AUTOUSER directory.
■ The application server also shares the same DB_CONNECTIONS tuning parameter. The DB_CONNECTIONS parameter value is applied to both the scheduler and the application server on startup under the following conditions:
– You set this value in the environment script files located in the $AUTOUSER directory.
– You start the scheduler and the application server on the same computer after sourcing the environment.
Example: Set the Maximum Limit of Process Threads That the Scheduler Can Start Dynamically
This example sets the value used in the algorithm for controlling the maximum number of process threads that the scheduler can start dynamically to seven.
setenv SCHED_SCALE 7
Example: Set the Maximum Number of Database Connections That the Scheduler Can Connect To
This example sets the maximum number of database connections that the scheduler can have to 17.
export DB_CONNECTIONS=17

Define the Tuning Parameters for the Scheduler on Windows
256 Administration Guide
Define the Tuning Parameters for the Scheduler on Windows
You can define the SCHED_SCALE and DB_CONNECTIONS parameters to tune the scheduler. On Windows, the SCHED_SCALE and DB_CONNECTIONS parameters are registry keys.
Follow these steps:
1. Click Start, Programs, CA, Workload Automation AE, Administrator.
The Instance - CA Workload Automation AE Administrator window opens.
2. Select the instance to which you want to define the tuning parameters for the scheduler from the Instance drop-down list.
3. Click the Services icon on the toolbar.
The Services - CA Workload Automation AE Administrator window appears, displaying a list of services installed on the selected instance.
4. Right-click the scheduler service, and click Stop.
The scheduler stops.
5. Click the System icon on the toolbar.
The System - CA Workload Automation AE Administrator window appears.
6. Enter the following variable in the Variable field and its value in the Value field, and click Set.
SCHED_SCALE
Defines the maximum limit of process threads that can be started dynamically. This value does not represent the total number of process threads that are active. Rather, it is a scale value used by the scheduler to calculate the maximum limit of process threads that can be started dynamically as the workload demands. Therefore, a SCHED_SCALE value of 1 represents the lowest ceiling of additional dynamic threads that can be started to process job events (some arbitrary ceiling not necessarily equal to one). Increasing this value increases the ability of the scheduler to process job events.
Default: 5
Limits: 1-64
The SCHED_SCALE variable is listed in the Environment Variables pane.

Define the Tuning Parameters for the Scheduler on Windows
Chapter 11: Tuning CA Workload Automation AE 257
7. Enter the following variable in the Variable field and its value in the Value field, and click Set.
DB_CONNECTIONS
Defines the maximum number of database connections that the scheduler can connect to. Increasing this value increases the ability of the scheduler to perform simultaneous database operations.
Default: 16
Limits: 1-128
The DB_CONNECTIONS variable is listed in the Environment Variables pane.
8. Click the Services icon on the toolbar.
The Services - CA Workload Automation AE Administrator window appears, displaying a list of services installed on the selected instance.
9. Right-click the scheduler service, and click Start.
The scheduler starts. The tuning parameters for the scheduler are defined. On startup, the scheduler reads and applies the tuning parameters and these parameter values persist throughout the life of the process.
Note: The application server also shares the same DB_CONNECTIONS tuning parameter. On startup, if the scheduler and application server are running on the same computer, the DB_CONNECTIONS parameter value is applied to both the scheduler and the application server.
Example: Set the Maximum Limit of Process Threads That the Scheduler Can Start Dynamically
Suppose that you want to set the value used in the algorithm for controlling the maximum number of process threads that the scheduler can start dynamically to seven, enter SCHED_SCALE in the Variable field and 7 in the Value field and click Set on the System - CA Workload Automation AE Administrator window of the CA Workload Automation AE Administrator.
Example: Set the Maximum Number of Database Connections That the Scheduler Can Connect To
Suppose that you want to set the maximum number of database connections that the scheduler can have to 17, enter DB_CONNECTIONS in the Variable field and 17 in the Value field and click Set on the System - CA Workload Automation AE Administrator window of the CA Workload Automation AE Administrator.

Define the Tuning Parameter for the Application Server on UNIX
258 Administration Guide
Define the Tuning Parameter for the Application Server on UNIX
You can define the DB_CONNECTIONS parameter to tune the application server.
On UNIX, the DB_CONNECTIONS parameter is an operating system environment variable. Depending on your UNIX operating system, you can use either the setenv or the export command to define the DB_CONNECTIONS parameter.
Follow these steps:
1. Log in to CA Workload Automation AE as the EXEC superuser and enter the following command at the operating system prompt:
unisrvcntr stop waae_server.$AUTOSERV
The application server stops.
2. Enter the following command at the operating system prompt based on your UNIX shell command interpreter:
setenv DB_CONNECTIONS=max_number
Or
export DB_CONNECTIONS=max_number
max_number
Defines the maximum number of database connections that the application server can connect to. Increasing this value increases the ability of the application server to process simultaneous CA Workload Automation AE client and agent requests.
Default: 32
Limit: 1-128
3. Enter the following command at the operating system prompt:
unisrvcntr start waae_server.$AUTOSERV
The application server starts. The application server tuning parameter is defined. On startup, the application server reads and applies the DB_CONNECTIONS parameter and this parameter value persists throughout the life of the process.

Define the Tuning Parameter for the Application Server on Windows
Chapter 11: Tuning CA Workload Automation AE 259
Notes:
■ You can also define the DB_CONNECTIONS tuning parameter in any of the environment script files (autosys.UNIX shell.computer name) located in the $AUTOUSER directory.
■ The scheduler also shares the same DB_CONNECTIONS tuning parameter. The DB_CONNECTIONS parameter value is applied to both the scheduler and the application server on startup under the following conditions:
– You set this value in the environment script files located in the $AUTOUSER directory.
– You start the scheduler and the application server on the same computer after sourcing the environment.
Example: Set the Maximum Number of Database Connections That the Application Server Can Connect To
This example sets the maximum number of database connections that the application server can have to 42.
export DB_CONNECTIONS=42
Define the Tuning Parameter for the Application Server on Windows
You can define the DB_CONNECTIONS parameter to tune the application server. On Windows, the DB_CONNECTIONS parameter is a registry key.
Follow these steps:
1. Click Start, Programs, CA, Workload Automation AE, Administrator.
The Instance - CA Workload Automation AE Administrator window opens.
2. Select the instance to which you want to define the tuning parameter for the application server from the Instance drop-down list.
3. Click the Services icon on the toolbar.
The Services - CA Workload Automation AE Administrator window appears, displaying a list of services installed on the selected instance.
4. Right-click the application server service, and click Stop.
The application server stops.

Define the Tuning Parameter for the Application Server on Windows
260 Administration Guide
5. Click the System icon on the toolbar.
The System - CA Workload Automation AE Administrator window appears.
6. Enter the following variable in the Variable field and its value in the Value field, and click Set.
DB_CONNECTIONS
Defines the maximum number of database connections that the application server can connect to. Increasing this value increases the ability of the application server to process simultaneous CA Workload Automation AE client and agent requests.
Default: 32
Limit: 1-128
The DB_CONNECTIONS variable is listed in the Environment Variables pane.
7. Click the Services icon on the toolbar.
The Services - CA Workload Automation AE Administrator window appears, displaying a list of services installed on the selected instance.
8. Right-click the application server service, and click Start.
The application server starts. The tuning parameter for the application server is defined. On startup, the application server reads and applies the DB_CONNECTIONS parameter and this parameter value persists throughout the life of the process.
Note: The scheduler also shares the same DB_CONNECTIONS tuning parameter. On startup, if the scheduler and application server are running on the same computer, the DB_CONNECTIONS parameter value is applied to both the scheduler and the application server.
Example: Set the Maximum Number of Database Connections That the Application Server Can Connect To
Suppose that you want to set the maximum number of database connections that the application server can have to 42, enter DB_CONNECTIONS in the Variable field and 42 in the Value field and click Set on the System - CA Workload Automation AE Administrator window of the CA Workload Automation AE Administrator.

Appendix A: General Debugging 261
Appendix A: General Debugging
This section contains the following topics:
Trace Settings (see page 261) ISDBGACTIV (see page 261) Configure the Client Utilities to Generate Run-time Traces (see page 263) Configure the Scheduler and Application Server to Generate Run-time Traces on UNIX (see page 264) Configuring Agent Log File Properties (see page 265)
Trace Settings
The scheduler, application server, agent, client utilities, and communication and database infrastructure routines generate trace messages.
For the scheduler, application server, or the agent that generate their own log files, trace messages are added to the log files when the components encounter them.
For applications (such as jil, autorep, and sendevent client utilities) that are executed interactively or in batches, trace messages are written to the active window or to a file if streamed.
ISDBGACTIV
The ISDBGACTIV setting controls the display of trace messages. This setting is different for the various CA Workload Automation AE components as follows:
■ For the client utilities, it is an operating system environment variable.
■ For the scheduler and application server, it is a parameter in the configuration file.
■ For the agent, it is a parameter in the agentparm.txt file.
Note: For more information about the parameters in the agentparm.txt file, see the CA Workload Automation Agent for UNIX, Linux, or Windows Implementation Guide.
CA Workload Automation AE interprets the ISDBGACTIV values as follows:
AFM
Traces Automation Framework Messages (AFM).
COMM
Traces network communication activity at the sockets level.

ISDBGACTIV
262 Administration Guide
DBQUERY
Traces and measures the elapsed time of calls to the database.
DUMP
Traces data that CA Workload Automation AE sends or receives when communication occurs through the internal communication interface or the cross-platform interface.
Note: The dump files are located in the $AUTOUSER/out (on UNIX) or %AUTOUSER%\out (on Windows) directory. The dump files with a prefix libmsg.* are created when communication occurs through the internal communication interface. The dump files with a prefix event_demon_dump.* are created when communication occurs through the cross-platform interface.
EXTVJ
Generates trace data pertaining to user-defined job validation.
GBE
Traces scheduler events as they are read from the ujo_event table.
HEAVY
Returns full trace information.
JOB
Traces the run time of a job.
LIGHT
Returns light trace information.
MS
Adds milliseconds to the time in the log output.
OFF
Returns no trace information. This is the default.
RESOURCEn
Traces CA Automation Suite for Data Centers SDK.
Notes:
■ n specifies the level of tracing. This value can be a number in the range 1 to 10, where 1 is the lowest level of tracing and 10 is the highest.
■ The dcam_appsrvr.log and dcam_scheduler.log log files are created in the $AUTOUSER/out (on UNIX) or %AUTOUSER%/out (on Windows) directory.
Note: To combine trace settings, separate each setting with a comma (,). If you use the OFF setting with other settings, the traceable applications will not display a trace.

Configure the Client Utilities to Generate Run-time Traces
Appendix A: General Debugging 263
More Information:
The Configuration File (see page 28)
Configure the Client Utilities to Generate Run-time Traces
You can configure the client utilities to generate run-time traces.
To configure the client utilities to generate run-time traces, set the ISDBGACTIV value as follows:
■ On UNIX, issue either the setenv or export command (depending on your UNIX operating system) at the operating system prompt.
■ On Windows, issue the set command at the instance command prompt.
Notes:
■ You must set the ISDBGACTIV value before initiating the client utilities.
■ On startup, the traceable applications search for the specified ISDBGACTIV value and output the appropriate trace messages according to the value assigned.
Example: Configure the Client Utilities to Generate Light Traces on UNIX
This example configures the client utilities to generate light trace information on UNIX.
export ISDBGACTIV=LIGHT
Example: Configure the Client Utilities to Generate Light Traces on Windows
This example configures the client utilities to generate light trace information on Windows.
set ISDBGACTIV=LIGHT
More Information:
ISDBGACTIV (see page 261)

Configure the Scheduler and Application Server to Generate Run-time Traces on UNIX
264 Administration Guide
Configure the Scheduler and Application Server to Generate Run-time Traces on UNIX
You can configure the scheduler and application server to generate run-time traces.
Follow these steps:
1. Log in to CA Workload Automation AE as a user authorized to stop the scheduler and application server and run the shell that is sourced to use CA Workload Automation AE.
2. Enter the following commands at the operating system prompt:
unisrvcntr status waae_sched.$AUTOSERV
unisrvcntr status waae_server.$AUTOSERV
The scheduler and application server process IDs are displayed as follows:
CA Services Status Report
Component Name Pid Status
------------------------------------ ------- --------------
WAAE Scheduler (ACE) 32220 running
CA Services Status Report
Component Name Pid Status
------------------------------------ ------- --------------
WAAE Application Server (ACE) 33330 running
3. Edit the following parameter in the configuration file, and save the file:
ISDBGACTIV=value,value,...
value, value,...
Defines the level of trace information to return to the scheduler and application server logs.
4. Enter the following commands at the operating system prompt:
kill –HUP scheduler_pid
kill –HUP applicationserver_pid
scheduler_pid
Defines the process ID of the scheduler that you want to pause and resume.
applicationserver_pid
Defines the process ID of the application server that you want to pause and resume.
The scheduler and the application server resume. The scheduler and the application server are configured to generate run-time traces. The new trace level is displayed in the log file for confirmation.

Configuring Agent Log File Properties
Appendix A: General Debugging 265
Notes:
■ You can modify the ISDBGACTIV value at any time while the traceable applications are running. On startup, the traceable applications search for the specified ISDBGACTIV value and output the appropriate trace messages.
■ On Windows, you can configure the scheduler and application server to generate run-time traces by setting the ISDBGACTIV value using the System - CA Workload Automation AE Administrator window of CA Workload Automation AE Administrator. After you modify the ISDBGACTIV value, you must pause and resume the services using the System - CA Workload Automation AE Administrator window of CA Workload Automation AE Administrator. For more information about adding, modifying, or deleting environment variables or pausing and resuming a service using CA Workload Automation AE Administrator, see the Online Help.
More information:
ISDBGACTIV (see page 261)
Configuring Agent Log File Properties
The agent keeps the log files that contain records of communication with CA Workload Automation AE, as well as internal messages. By default, these files are located in the log directory and are updated continually while the agent is running. You can configure the agent log file properties by editing the log.level, log.archive, and log.maxsize parameters in the agentparm.txt file.
Note: For more information about the log.level, log.archive, and log.maxsize parameters and configuring agent log file properties, see the CA Workload Automation Agent for UNIX, Linux, or Windows Implementation Guide.
More Information:
Agent Log Files (see page 179)


Index 267
Index
$
$AUTOUSER/config.$AUTOSERV • 28
A
Administrator utility on Windows • 48 agent log files
cleaning log files • 181, 183 deleting legacy agent log files • 187 log file maintenance • 180 overview • 179 properties • 265 removing legacy agent log files • 189 spool file maintenance • 180
agentparm.txt file • 34 agents
log file maintenance • 180 log files directory • 179, 188 overview • 16 spool file maintenance • 180 starting • 193 troubleshooting • 227, 230, 232
AggregateStatistics • 30, 105, 204 aggregating statistics
automatically on UNIX • 105, 204 automatically on Windows • 205 considerations • 202 deleting • 213 manually • 203 overview • 201
alarm notifications on UNIX • 50 overview • 49
alarms callbacks • 49 DB_PROBLEM • 49 DB_ROLLOVER • 49 EP_HIGH_AVAIL • 49 EP_ROLLOVER • 49 EP_SHUTDOWN • 49
AppendEventMessageText • 104 application servers
communication alias • 115 communication identifier • 114 communication ports • 116
overview • 15 server host • 113 starting • 192 stopping • 196 troubleshooting • 243, 244, 246, 249 tuning • 258, 259
AppSrvAuxiliaryListeningPort • 116 audience • 11 auto.profile file
overview • 33 sample file • 33
autoaggr command • 206 autobcpDB script • 147 AutoInstWideAppend • 102, 103 autoping command • 227 AutoRemoteDir • 188 AutoRemPort • 91, 92 AUTOSERV variable • 12 AutoServer • 113 AutoServerAliasId • 115 AutoServerId • 114 AutoServerPort • 116 autosyslog command • 228, 229
B
backing up calendar definitions • 123 definitions • 124 global variable definitions • 125 shadow scheduler works • 130
C
CA Workload Automation AE communications • 24 components • 13 data encryption • 24 instances • 12 overview • 12
calendars backing up • 123 restoring definitions • 126
ChaseOnStartup • 94 Check_Heartbeat • 77, 78 cleaning agent log files • 181, 183 CleanTmpFiles • 189, 190

268 Administration Guide
commands autoaggr • 206
components agent • 16 application server • 15 clients • 17 event server • 14 example scenario • 18, 20 interacting • 18, 20 overview • 13 schedulers • 15 troubleshooting • 215 web server • 17
configuration files file on UNIX • 28 parameters • 30 sample • 29
configuring agent log file properties • 265 CA Workload Automation AE to send SNMP traps
on UNIX • 56 CA Workload Automation AE to skip starting
condition evalauation for queued jobs • 97 client utilities • 263 event server time-out • 161 file on UNIX • 28 Oracle database • 175 overview • 27 resource wait poll interval • 80 scheduler heartbeat interval • 70, 165 SNMP traps • 56 Sybase server • 173
controlling job starts • 81 job status • 87
CrossPlatformScheduling • 111
D
database connections • 164 daily maintenance • 157 defined • 14 general maintenance • 156 maintenance • 157 maintenance command • 157 maintenance time • 157 rebuilding table indexes • 171 storage requirements • 156
synchronizing • 147 tuning • 172, 175 verifying connection • 227
Database Problem • 50 Database Rollover • 50 DateFormat • 33 DBAccess • 143 DBAccess Parameter • 143 DBEventReconnect • 162, 164 DBLibWaitTime • 161 DBMaint script • 158, 159 DBMaint.bat batch file • 158, 159 DBMaintCmd • 157 DBMaintTime • 157 DCAURL • 30 DCAUser • 30 deadlock • 218 debugging • 261 defining
application server host name • 113 communication alias • 115 communication ports • 91, 116 event server information • 141 load balancing method • 67 unique identifier • 114
deleting aggregated statistics • 213 dual event server mode • 139 dual event servers • 14
E
email notifications on UNIX • 52 using CA Workload Automation AE • 55
enabling IP address caching • 63 event servers
defining the information on UNIX • 141 dual event server mode • 139 maintaining • 137 overview • 14 rollover recovery • 155 single event server mode • 138, 154 synchronizing • 152 troubleshooting • 217, 218
EventServer • 30, 143 EventServer parameters • 143 EvtTransferWaitTime • 76

Index 269
F
FileSystemThreshold • 66, 67
G
generating run-time traces configuring application server • 264 configuring client utilities • 263 configuring scheduler • 264
Global Pend Mach Delay • 30 Global Pend Mach Interval • 30 Global Pend Mach Status • 30 GlobalAutoHold • 95 GlobalPendMachDelay • 30, 89 GlobalPendMachInterval • 30, 83 GlobalPendMachStatus • 30, 88
H
handling errors • 153 HAPollInterval • 70, 165 heartbeats • 78 high availability options • 15 high availability recovery
overview • 162 scenarios • 167, 168
I
InetdSleepTime • 32 instances • 12 interface components • 17 ISDBGACTIV • 261
J
jobs backing up definitions • 123 restoring definitions • 126
K
KillSignals • 72
L
legacy agents • 16, 232 LocalMachineDefinition • 78 LOGROLLOVER • 128
M
MachineMethod • 67, 69
MaxRestartTrys • 74, 75 MaxRestartWait • 71 modifying DBMaint.bat file • 159, 160
N
notifications alarm notifications • 49, 50 email notifications • 52, 55 overview • 49 setting • 50
NotifyAckTimeout • 30 NotifyMethod • 30 NotifyServerNode • 30 NotifySMTPHost • 30 NotifySMTPUser • 30
O
obtaining job log ID • 184, 185, 186
P
parameters in the configuration file AggregateStatistics • 30 AppSrvAuxiliaryListeningPort • 116 AutoInstWideAppend • 102, 103 AutoRemoteDir • 188 AutoRemPort • 91, 92 AutoServer • 113 AutoServerAliasId • 115 AutoServerId • 114 AutoServerPort • 116 ChaseOnStartup • 94 Check_Heartbeat • 77, 78 CleanTmpFiles • 189, 190 CrossPlatformScheduling • 111 DateFormat • 33 DBAccess • 143 DBEventReconnect • 162, 164 DBLibWaitTime • 161 DBMaintCmd • 157 DBMaintTime • 157 DCAURL • 30 DCAUser • 30 EventServer • 30, 143 EvtTransferWaitTime • 76 FileSystemThreshold • 66, 67 GlobalAutoHold • 95 GlobalPendMachDelay • 30, 89 GlobalPendMachInterval • 30, 83

270 Administration Guide
GlobalPendMachStatus • 30, 88 HAPollInterval • 70, 165 InetdSleepTime • 32 ISDBGACTIV • 261 KillSignals • 72 LocalMachineDefinition • 78 LOGROLLOVER • 128 MachineMethod • 67 MaxRestartTrys • 74, 75 MaxRestartWait • 71 NotifyAckTimeout • 30 NotifyMethod • 30 NotifyServerNode • 30 NotifySMTPHost • 30 NotifySMTPUser • 30 overview • 30 PrimaryFailbackMode • 30 Provider • 142 RemoteProFiles • 98, 100 ResourceWaitPollInterval • 80, 81 RestartConstant • 71 RestartFactor • 71 RoleDesignator • 109 SchedAuxiliaryListeningPort • 91, 93 ServiceDeskCust • 30 ServiceDeskURL • 30 ServiceDeskUser • 30 SnmpCommunity • 30, 56 SnmpManagerHosts • 30, 56 UnicenterEvents • 30 UseEncryption • 30
pausing services • 197 PrimaryFailbackMode • 30 PrimaryFailbackMode file • 30 Provider • 142 provider parameter • 142
Q
queuing jobs • 97
R
reindexDB script • 171 RemoteProFiles • 98, 100 reporting aggregated statistics • 210 ResourceWaitPollInterval • 80, 81 RestartConstant • 71 RestartFactor • 71 restoring
definitions • 126 primary scheduler after a failover • 131
restoring definitions • 126 RoleDesignator • 109 rstatd daemon • 67, 69
S
sample configuration file • 29 sample files • 29, 33 SchedAuxiliaryListeningPort • 91, 93 schedulers
log disk space • 67 log file location • 127 maintaining • 121 monitoring • 127 overview • 15 restoring primary • 131 rollover notification • 130 running in test mode • 132, 134 start processing • 121 starting • 192 starting in global mode • 95 stopping • 194 troubleshooting • 219, 220 tuning • 254, 256
ServiceDeskCust • 30 ServiceDeskURL • 30 ServiceDeskUser • 30 services
pausing • 197 restarting • 197 starting • 192, 193 status • 199 stopping • 194, 196, 197
setting connection attempts • 162 event transfer time-out • 76 job heartbeat interval • 77 job restart attempts • 74 notifications • 50 scheduler log disk space • 66
single event server mode • 138 SNMP traps • 56, 58 SnmpCommunity • 30, 56 SnmpManagerHosts • 30, 56 specifying
local machine • 78 log roll over • 128

Index 271
scheduler role • 109 signals for KILLJOB event • 72
synchronizing databases • 152
T
trace messages • 261 troubleshooting
agent • 228, 229, 230, 231 application server • 244, 245, 246, 247, 249, 251 components • 215 event server • 217, 218 job failure • 232, 236, 237, 238, 239, 241, 242 scheduler • 220, 221, 223 Windows services • 216
tuning application server • 258, 259 Oracle database • 175, 176 scheduler • 254, 256 Sybase server • 172, 173
U
UnicenterEvents • 30 UNIX
defining the event server information • 141 UseEncryption • 30
V
verifying service status • 199
viewing scheduler log file • 127
W
WAAE.txt file • 35 Windows
controlling services • 191