ca network and systems management system monitoring … · management system monitoring option for...
TRANSCRIPT

CA® Network and SystemsManagement System Monitoring Option for OpenVMS
Using the Log Agent r3.2
This documentation and any related computer software help programs (hereinafter referred to as the “Documentation”) is for the end user’s informational purposes only and is subject to change or withdrawal by CA at any time.
This Documentation may not be copied, transferred, reproduced, disclosed, modified or duplicated, in whole or in part, without the prior written consent of CA. This Documentation is confidential and proprietary information of CA and protected by the copyright laws of the United States and international treaties.
Notwithstanding the foregoing, licensed users may print a reasonable number of copies of the documentation for their own internal use, and may make one copy of the related software as reasonably required for back-up and disaster recovery purposes, provided that all CA copyright notices and legends are affixed to each reproduced copy. Only authorized employees, consultants, or agents of the user who are bound by the provisions of the license for the product are permitted to have access to such copies.
The right to print copies of the documentation and to make a copy of the related software is limited to the period during which the applicable license for the Product remains in full force and effect. Should the license terminate for any reason, it shall be the user’s responsibility to certify in writing to CA that all copies and partial copies of the Documentation have been returned to CA or destroyed.
EXCEPT AS OTHERWISE STATED IN THE APPLICABLE LICENSE AGREEMENT, TO THE EXTENT PERMITTED BY APPLICABLE LAW, CA PROVIDES THIS DOCUMENTATION “AS IS” WITHOUT WARRANTY OF ANY KIND, INCLUDING WITHOUT LIMITATION, ANY IMPLIED WARRANTIES OF MERCHANTABILITY, FITNESS FOR A PARTICULAR PURPOSE OR NONINFRINGEMENT. IN NO EVENT WILL CA BE LIABLE TO THE END USER OR ANY THIRD PARTY FOR ANY LOSS OR DAMAGE, DIRECT OR INDIRECT, FROM THE USE OF THIS DOCUMENTATION, INCLUDING WITHOUT LIMITATION, LOST PROFITS, BUSINESS INTERRUPTION, GOODWILL, OR LOST DATA, EVEN IF CA IS EXPRESSLY ADVISED OF SUCH LOSS OR DAMAGE.
The use of any product referenced in the Documentation is governed by the end user’s applicable license agreement.
The manufacturer of this Documentation is CA.
Provided with “Restricted Rights.” Use, duplication or disclosure by the United States Government is subject to the restrictions set forth in FAR Sections 12.212, 52.227-14, and 52.227-19(c)(1) - (2) and DFARS Section 252.227-7014(b)(3), as applicable, or their successors.
All trademarks, trade names, service marks, and logos referenced herein belong to their respective companies.
Copyright © 2009 CA. All rights reserved.

Contact CA Contact Technical Support
For online technical assistance and a complete list of locations, primary service hours, and telephone numbers, contact Technical Support at http://ca.com/support.
Provide Feedback
If you have comments or questions about CA product documentation, you can send a message to [email protected].
If you would like to provide feedback about CA product documentation, please complete our short customer survey, which is also available on the CA Support website.

Contents
Chapter 1: Introduction
About Agents................................................................................. 1-1 Monitored Resources.......................................................................... 1-2
Chapter 2: Using the Log Agent Log Watcher Monitoring ....................................................................... 2-1
Read from End of File Option for Status Policy .............................................. 2-2 Support for Files Containing Null Characters ................................................ 2-2 Event Log Monitoring for Windows ......................................................... 2-2 Extended Regular Expressions ............................................................. 2-3 The Filtering Process ...................................................................... 2-3
File Watcher Monitoring ....................................................................... 2-5 Call-Back Mechanism ......................................................................... 2-5
Chapter 3: Configuring the Node for the Log Agent Basic Steps .................................................................................. 3-1 System Requirements ........................................................................ 3-1 Installing the Log Agent....................................................................... 3-2 Configuring the SNMP Administrator ........................................................... 3-4
Changing Community Definitions........................................................... 3-5 Changing Trap Destinations ............................................................... 3-7
Prerequisites for Sending Match Traps ......................................................... 3-8 Starting the Log Agent .......................................................................3-10 Configuring the Log Agent....................................................................3-12
Chapter 4: Configuring the Log Agent Using Node View ............................................................................. 4-1 Methods of Configuring the Log Agent.......................................................... 4-2
Using Configuration Sets .................................................................. 4-2 Using Log Agent View ..................................................................... 4-3 Using MIB Browser........................................................................ 4-3
Configuring Call-Backs ........................................................................ 4-4
Contents v

vi Using the Log Agent
Example ................................................................................. 4-7 Security Issues........................................................................... 4-8 Using a Call-Back Script ................................................................. 4-10
Configurable MIB Attributes.................................................................. 4-10 Structure of the Log Agent MIB........................................................... 4-12 Saving Runtime Changes ................................................................ 4-12 Log Watcher Attributes .................................................................. 4-13 File Watcher Attributes .................................................................. 4-31 Trap History Attributes .................................................................. 4-34 Adding and Removing Watchers during Runtime........................................... 4-35
Chapter 5: Configuring the DSM for the Log Agent Removing a Node Type for the Log Agent...................................................... 5-1
Appendix A: Log Agent Traps and Evaluators
Log Agent Traps ............................................................................. A-1 Rediscovery Traps........................................................................ A-1 Generic SNMP Trap Descriptions........................................................... A-2 Enterprise-Specific Trap Descriptions ...................................................... A-3
Evaluated Traps, Responses, and Events....................................................... A-8
Index
Chapter 1: Introduction
This chapter introduces the Log Agent and the resources that can be monitored.
About Agents An agent is an application that supports network management. An agent, such as the Log Agent, typically resides on a managed software node (machine) and provides information to a management application, such as CA NSM, with a simplified and standardized view of monitored data.
Management information is standardized according to a management protocol that is understood by both managers and agents and transmitted according to a communications protocol. The Log Agent is based upon the Agent Technology architecture, which uses the following management and communications protocols:
The communications protocol is the user datagram protocol (UDP) of the transmission control protocol/Internet protocol (TCP/IP) suite.
The network management protocol is the Simple Network Management Protocol (SNMP) designed to run on top of TCP/IP.
Both the agent and the management application view the managed resource’s collection of data items, called the management information base (MIB). Each MIB has attributes that represent aspects of the managed resource.
The network management platform accesses MIB data through SNMP. In order to achieve access, both the manager and the agent must implement SNMP. For more information about SNMP, see the Working with Agents guide.
Chapter 1: Introduction 1–1

Monitored Resources
1–2 Using the Log Agent
Monitored Resources The Log Agent can be configured to monitor log watchers and file watchers. By default, the Log Agent is not configured to monitor any log watchers or file watchers.
The agent uses installation default values for the MIB attributes to determine the status of these watchers. For detailed descriptions of these resources on any platform, see the “Using the Log Agent” chapter in this guide.
You can further configure the agent using the Log Agent View, MIB Browser, or a configuration set. Each method is discussed in further detail in the “Configuring the Log Agent” chapter of this guide.
Chapter 2: Using the Log Agent
This chapter describes the managed objects that the Log Agent can monitor and how this monitoring works.
Log Watcher Monitoring The Log Agent can be configured to monitor ASCII log files and to facilitate the detection of faults in applications running under the operating system.
Besides the monitoring of single log files the agent offers the monitoring of all files in a subdirectory, where the subdirectory name may contain wildcards. Furthermore, the Log Agent can monitor the Windows Event Log, the UNIX/Linux Console and files with ASCII control characters.
Some applications only ever write one entry into a log file. A subsequent entry overwrites the existing one. The Log Agent is able to monitor these log files with single lines.
The Log Agent uses log watchers to monitor log file data. A log watcher is a condition-action set that looks for a pattern in a log file. The agent processes the text contained in the log file in a filter, which compares the text to regular expressions (patterns). When the filtering condition applies the log watcher’s state can change from UP to DOWN or from DOWN to UP, and/or the agent can send an SNMP trap.
A trap contains its name and type, the log watcher’s current state, information on the monitored log file, and the text found in the log file. A trap can be a state change trap or a match trap:
The Log Agent sends the state change traps through the SNMP Administrator to the DSM. A state change trap is only generated if the state of the log watcher changes from UP to DOWN or from DOWN to UP.
The Log Agent sends the match traps through the SNMP Administrator to the CA NSM Event Agent on the same system. A match trap is used to forward the text string found in a log file. It is generated independently from the log watchers’ state change.
You can configure whether the Log Agent will send state change traps, match traps or both.
Chapter 2: Using the Log Agent 2–1
Log Watcher Monitoring
When you have defined a filter for a particular event in the log file, which sets the log watcher’s state to DOWN, it is possible to define a toggle filter for the complementary event. This toggle filter sets the log watcher’s state to UP again.
For example: A filter with the pattern "user jsmith logged on" and the toggle filter with the pattern "user jsmith logged off" are defined. The Log Agent would indicate a DOWN status when "user jsmith logged on" appeared in the log and remain in a DOWN status until "user jsmith logged off" appeared. At that point, the log watcher would change to an UP status.
Read from End of File Option for Status Policy
When defining a watcher the monitored log file often exists with a considerable size and cannot be reset. For example, database alert file, or the Windows Event Log. If the content of the file is not of interest you can now get rid of it by using the EOF-option. Thus only new entries to the file are inspected sparing unwanted outdated alerts and performance.
When adding a new watcher the EOF-option of the LogStatusPolicy attribute lets the agent start reading at the end of the monitored log file instead of the beginning. The following options can be used: PollEOF, StartFromPreviousReadEOF and ToggledEOF.
Support for Files Containing Null Characters
While reading a log file null characters (0x00) are substituted by blank characters. Each null character is substituted by exactly one blank character to preserve position in the corresponding line. These blank characters are shown in any resulting traps containing the line as varbind element.
The blank character substitution now ensures that pattern matching works reliably in textfiles with null characters. Log Agent offers no support for binary data besides the support for ASCII control characters.
Event Log Monitoring for Windows
Event Log Monitoring is using the same keywords as Windows Event Log by default: Type, Source, Category, Event, User, Computer and Description. In this case the environment variable CAILOGA2_COMPAT2 is not set or set to "0". If the variable is set to a value that is different from "0" the Log Agent uses the same keywords as older versions (< 3.0): Source, Type, Event-ID, User and Message. For more information see the section Log Watcher Attributes.
2–2 Using the Log Agent

Log Watcher Monitoring
Extended Regular Expressions
Extended regular expressions are supported only if there is platform support available, for example on UNIX/Linux platforms like Solaris, HP-UX and AIX but not on Windows.
Sometimes it is more convenient to use extended regular expressions (ERE) in defining a pattern than to use basic regular expressions (BRE). If you are looking for ERROR or WARNING to trigger an alert you may use BRE notation and a pattern file with two entries (one for ERROR and one for WARNING) or you can use ERE notation directly in the MIB attribute with the pattern (ERROR|WARNING).
Note: The default notation is BRE and in pattern files only BRE’s are allowed. The use of ERE notation can only be specified in the mib attributes for the patterns.
The Filtering Process
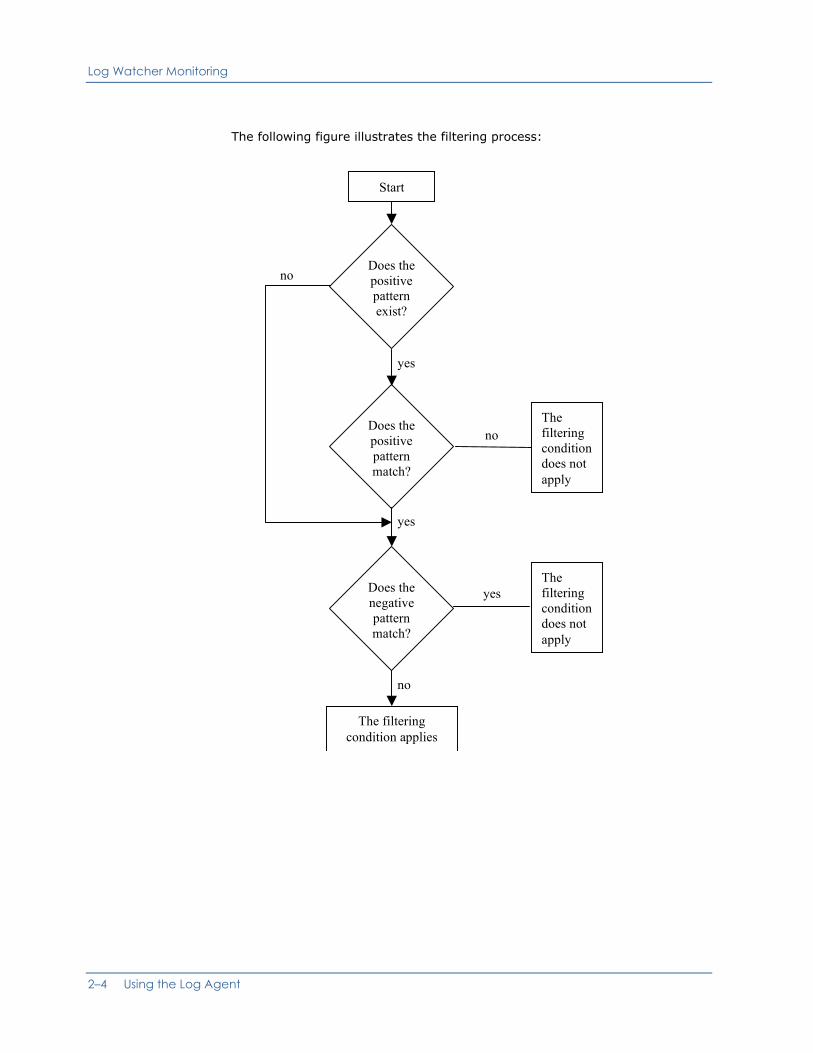
The filters which process a text string from a log file consist of a positive and a negative pattern. Both patterns are regular expressions. Together they define the filtering condition or the toggle filtering condition. The filtering process works in the following way:
When the regular expression of the positive pattern matches the text string and the regular expression of the negative pattern does not, the filtering condition applies and the string will be processed further, for instance, a trap will be sent.
When the regular expression of the positive pattern does not match the text string or the regular expression of the negative pattern matches it, the filtering condition does not apply.
A positive and/or negative pattern must be defined. If the positive pattern is not defined, the filtering process passes directly on to the negative pattern. If the negative pattern does not exist, the process continues with the assumption that “No match of the negative pattern”.
Chapter 2: Using the Log Agent 2–3
Log Watcher Monitoring
The following figure illustrates the filtering process:
Start
Does thepositivepatternexist?
Does thepositivepatternmatch?
Does thenegativepatternmatch?
no
yes
yes
yes
noThefilteringconditiondoes notapply
no
The filteringcondition applies
Thefilteringconditiondoes notapply
2–4 Using the Log Agent

File Watcher Monitoring
File Watcher Monitoring The Log Agent can be configured to check for the existence or non-existence of user-specified files. This is a particularly useful feature if, for example, certain files must be present for the system to function properly, and the removal of any of those files should be made known immediately to the management application.
The Log Agent log watchers are condition-action sets that look for whether files exist or do not exist on the system. The agent maps each file’s existence condition against the configured expected condition. When the watcher determines that the monitored file does not conform to the expected condition (either existence or non-existence), the agent changes the file watcher’s state to DOWN CRITICAL and issues an SNMP trap.
On Windows
Because the Log Agent runs as a service on Windows, and services cannot see connected network drives, files located on network drives are not available for existence monitoring.
Call-Back Mechanism The call-back facility of the Log Agent enables Systems Administrators to assign an automated task or action to a particular event or alarm generated when a monitored resource exceeds threshold boundaries. These call backs are typically client defined scripts or programs, which are called in the event of a status change within the agent.
Clients can use these scripts to automatically resolve the problem that triggered the status change, thereby negating the need for any manual interaction.
These call back references can be defined only in the agent’s call back configuration file (caiLogA2.cbc) that can be secured by access rights. It is stored in the Install_Path\agents\config\cbc directory. This configuration file contains an entry for each call back reference, and associates with this reference the full path and name of the script or application to run. Additional parameter information can be passed to the script or application, as well as a user ID that should be used to execute the script or application.
The advantage of using this additional level of indirection, or call back reference, is that the name of this reference can be safely shown in the MIB without causing any security exposure, because the actual path and name of the call back script or application is hidden within a secured file. This reference also enables you to remotely check in a secure way if a call back reference has been configured for the respective monitored area.
Chapter 2: Using the Log Agent 2–5
Call-Back Mechanism
2–6 Using the Log Agent
Note: In the MIB the call back reference name is defined as read only. Therefore it cannot be changed or modified by a MIB Browser (AgentView). Using configuration sets can only change the reference name. For more information on using configuration sets, see the Working with Agents guide.
To provide improved functionality, you can specify that the agent pass a set of predefined or user defined parameters to the call back script or application upon instigation. These predefined parameters contain the following information:
New Watcher state: OK, Unknown, Warning, Critical
Type of element being watched.
Instance name of element being watched.
Name of the monitored resource property that caused this status change.
Other miscellaneous varbind information sent with the trap.
By passing these parameters to the call back script or application, you can build powerful scripts or applications, which can perform different actions depending on the state of the monitored resource. For example, if a log file is missing, then it is possible to create a call back to perform a search for that file.
Chapter 3: Configuring the Node for the Log Agent
This chapter provides step-by-step instructions for installing the Log Agent.
Basic Steps After you install and minimally configure the agent to monitor a small set of system resources, you can use the Log Agent View, MIB Browser, or configuration sets to try different runtime configurations. For more information on agent configuration, see the “Configuring the Log Agent” chapter of this guide.
The basic installation and configuration steps are:
1. Check the system requirements.
2. Install the Log Agent.
3. Configure the SNMP Administrator.
4. Start the Log Agent and the Agent Technology services.
5. Modify the default settings.
System Requirements You must have the following hardware and software installed and running:
On Windows
Pentium 100 or higher
At least 32 MB memory
5 MB disk space for Common Services
1 MB disk space for agent
Before you install the Log Agent on a Windows system (either server or workstation) the system must be configured so that foreground and background applications are equally responsive.
Chapter 3: Configuring the Node for the Log Agent 3–1
Installing the Log Agent
On UNIX/Linux
At least 32 MB memory (64 MB recommended)
47 MB disk space for Common Services
33 MB disk space for Agent Factory
2 MB disk space for agent
On OpenVMS I64
At least 60,000 blocks of free disk space to install
At least 15,000 blocks of free disk space to run
HP OpenVMS
CA NSM Agent Technology Services 3.1, installed and running
On OpenVMS Alpha
At least 60,000 blocks of free disk space to install
At least 10,000 blocks of free disk space to run
HP OpenVMS
CA NSM Agent Technology Services 3.1, installed and running
Installing the Log Agent The following steps describe how to install the Log Agent.
On UNIX/Linux
Use the CA NSM installation wizard to install the Log Agent and any other required Agent Technology files on Windows or UNIX/Linux systems. For more information on starting the wizard, see the Unicenter Network and Systems Management Getting Started guide.
On OpenVMS
On OpenVMS systems that do not have Agent Technology installed, you must install it first. See the section Installing Agent Technology on OpenVMS in the Using the System Monitoring Option guide. The installation is aborted if you begin the installation without Agent Technology Services running on the system.
1. Mount the CD.
The CD is cut in such a manner that it can be mounted on any operating system. For OpenVMS, insert the CD in the CD reader and type the command:
$ mount/over=id device
3–2 Using the Log Agent
Installing the Log Agent
where device is the name of the CD reader device. For example, if the CD reader is DQA0, the command would be:
$ mount/over=id dqa0
2. Run the installation procedure.
Log into the system account on the OpenVMS system. Type:
$ run device:[000000]setup_platform.exe
Where platform is the platform on which you are installing, i.e. either “alpha” or “ia64”.
This command launches an installation menu where you can install the Log Agent.
Upgrading from the former Log Agents (caiNtLog, logAgent)
The Log Agent (caiLogA2) replaces the former Log Agents on Windows (caiNtLog ) and UNIX/Linux (logAgent).
The Log Agent (caiLogA2) supersedes the former Log Agents, and provides superior features and functionality.
In order to easily migrate from the former Log Agents to the new Log Agent (caiLogA2), an old and a new agent can be run in parallel on the same machine, providing they are both at the same CA NSM release level.
You can transfer your existing Log Agent (caiNtLog or logAgent) monitoring configurations (configuration sets) to the new Log Agent (caiLogA2) using the Agent Configuration Set conversion tool (logtoA2). This tool allows you to convert a caiNtLog or logAgent configuration set to the new caiLogA2 format. It uses the following syntax:
logtoA2 <OLD CONFIG SET> <NEW CONFIG SET>
On UNIX/Linux
During the installation process, if an old Log Agent (logAgent) is already installed on your CA NSM machine, and the new Log Agent (caiLogA2) is selected for installation, you are presented with an option to uninstall the old Log Agent and convert its configuration sets to the new Log Agent format. If you want to convert the configuration sets the logtoA2 command is processed internally.
If you select the uninstall old Log Agent (logAgent), the agent is unregistered from the Agent Technology Common Services. However, any binaries, configuration sets, and other associated files are not removed.
On Windows
After the installation of caiLogA2 you can manually use the logtoA2 command from the command prompt to convert the configuration sets of an old Log Agent (caiNtLog).
Chapter 3: Configuring the Node for the Log Agent 3–3
Configuring the SNMP Administrator
Configuring the SNMP Administrator The Log Agent relies on a set of Agent Technology services that provide the functions common to all CA NSM Agent Technology agents. One of these services is the SNMP Administrator (aws_sadmin). The functions of the SNMP Administrator are:
Checking the community string and IP address of get, get-next, and set requests to make sure they come from authenticated management applications
Forwarding trap messages to the appropriate destinations
When the SNMP Administrator needs to authenticate an incoming request or send a trap message on behalf of the Log Agent, the SNMP Administrator determines what community definitions and trap destinations it should use based on the following questions:
1. Has a Log Agent’s configuration set that contains the community definitions and/or trap destinations been loaded into the SNMP Administrator store and restored to the agent’s internal memory?
If so, use those community definitions and/or trap destinations.
2. If either the Log Agent’s configuration set is not restored to the agent’s internal memory, or the configuration set that is restored contains neither community definitions nor trap destinations, is the SNMP Administrator’s configuration file (aws_sadmin.cfg) present in
On Windows
Install_Path\SERVICES\CONFIG\AWS_SADMIN
On UNIX/Linux
Install_Path/SERVICES/CONFIG/AWS_SADMIN
On OpenVMS
Install_Path:[SERVICES.CONFIG.AWS_SADMIN]
If so, use the necessary community definitions and/or trap destinations.
If not, use the hardcoded defaults:
SNMP_COMMUNITY public|0.0.0.0|read SNMP_COMMUNITY admin|0.0.0.0|write
3–4 Using the Log Agent

Configuring the SNMP Administrator
The SNMP Administrator’s configuration file is an ASCII text file named aws_sadmin.cfg. Following is the contents of a sample aws_sadmin.cfg file:
# # Default SNMP Policy for CA NSM Agents # #==================================================== #Type Data Comments #==================================================== SNMP_COMMUNITY public|0.0.0.0|read # Any host read with public SNMP_COMMUNITY admin|0.0.0.0|write # Any host write using admin SNMP_TRAP 127.0.0.1|162 # traps to local host
As installed, aws_sadmin.cfg reflects the default community definitions and trap destinations that the SNMP Administrator uses. These hardcoded values are the defaults for any agent running on the system:
The community definition public allows management applications on any node read access to the agent’s MIB.
The community definition admin allows management applications on any node write access to the agent’s MIB.
A single trap destination of port 162 on the local system.
You can change these default values at any time by using any text editor to edit the aws_sadmin.cfg file. Changes made to the aws_sadmin.cfg file affect all agents on the machine (node), not just the Log Agent. To change the community string or trap destination for only the Log Agent you must define a configuration set for the specific agent. For more information on creating and modifying the Log Agent’s configuration set, see the “Configuring the Log Agent” chapter of this guide.
Note: Do not change the name of aws_sadmin.cfg if you edit it. The SNMP Administrator recognizes only the aws_sadmin.cfg file.
Changing Community Definitions
SNMP community definitions determine how much access management applications running on specific hosts can have to the agent’s MIB. An SNMP community definition maps a unique combination of a community name and a host to one of the following access levels:
read — allows the agent to respond to get and get-next requests from the SNMP management application (MIB Browser or Log Agent View).
write — allows the agent to respond to set, get, and get-next requests from the SNMP management application. (Write access implies read access.)
Chapter 3: Configuring the Node for the Log Agent 3–5

Configuring the SNMP Administrator
The access that any SNMP management application has to a specific MIB attribute is determined by:
The management application’s community definition, as retrieved by the SNMP Administrator
The attribute’s access definition in the MIB definition file
In other words, if a MIB attribute’s access is read-only, even an SNMP management application with write access to the MIB cannot set its value. Similarly, management applications with read access to the MIB cannot set the values of attributes whose access is defined as read-write.
The community definitions in aws_sadmin.cfg have the following format:
SNMP_COMMUNITY community|host or ipAddr|access
community — The community string used by the management applications accessing the agents’ MIBs.
host or ipAddr — The name or IP address of the host on which your management application runs. Use the universal IP address 0.0.0.0 to indicate that a management application on any node can specify this community.
access — Either read or write to denote the type of access being granted.
As installed, there are two community definitions:
SNMP_COMMUNITY public|0.0.0.0|read SNMP_COMMUNITY admin|0.0.0.0|write
Note:
Any management application that sends a request with the community string public is granted read access to the Log Agent’s MIB.
Any management application that sends a request with the community string admin is granted both read and write access to the Log Agent’s MIB.
You can change the existing community definitions or add new ones. For example, to leave the default read community intact and restrict the default write community to only one management node using a different community string, you could specify the following:
SNMP_COMMUNITY public|0.0.0.0|read SNMP_COMMUNITY manage|101.24.16.3|write
Note: If you change the community definitions specified in the SNMP Administrator’s configuration file any time after starting the Log Agent, you must stop and restart all agents on the node and the SNMP Administrator in order for those changes to take effect.
3–6 Using the Log Agent

Configuring the SNMP Administrator
Changing Trap Destinations
SNMP trap destinations determine where an agent sends trap protocol data units (PDUs) to alert SNMP management applications of significant agent and resource events. Each trap destination must identify:
The host system to which traps are sent.
The number of the UDP port where the SNMP management application on the host system listens for traps (usually port number 162).
Additionally, particular traps (for example all match traps) can be selected and directed to any host.
The format of the trap destination statements is:
SNMP_TRAP host|port [type|subtype|agent] #comment
host — The name or IP address of a host on which a management application runs, usually the DSM that is managing the agents.
Note: If these traps are not sent to the host on which the DSM is running, the DSM cannot display the agent’s state changes in real time. The DSM must, instead, rely on polling the agent to determine status.
port — The number of the UDP port where the management application (usually DSM) listens for traps.
type|subtype|agent — Type and sub type of traps and the agent which generates the traps. With this optional parameter you can direct particular traps to a host. Type and sub type are numbers or regular expressions for numbers. The agent is identified by its OID or the name of its MIB.
As installed, there is one trap destination:
SNMP_TRAP localhost|162
This statement sends traps only to UDP port number 162 on the local system (that is, the node where your agent is running). The community string included in these trap PDUs is public.
You can change the existing destination or add new ones. For the Log Agent you should have the following:
SNMP_TRAP 101.24.16.3|162 #Host where DSM is running SNMP_TRAP localhost|162 6|8$|caiLogA2 #Match traps to Event Agent
Chapter 3: Configuring the Node for the Log Agent 3–7

Prerequisites for Sending Match Traps
With the first destination you define that, in general, traps are sent to port 162 of the host, where the DSM is running. With the second destination you select the match traps: type 6, sub type number ending with 8, generated by the Log Agent. These traps are sent to port 162 on the local system so that the Event Agent can forward them to the Event Console on the manager system (For more information, see the Prerequisites for Sending Match Traps section). The traps are not directly sent to the host where the DSM is running because the second (more specific) destination has priority.
Note: If you change the trap destinations specified in the SNMP Administrator’s configuration file any time after starting the Log Agent, you must stop and restart all agents on the node and the SNMP Administrator in order for those changes to take effect.
Prerequisites for Sending Match Traps The Log Agent can send match traps through the SNMP Administrator to the Event Agent on the local system. Then the Event Agent can forward these traps to the Event Management Console at the manager system. In this way a secure sending of match traps is realized: The communication between the Log Agent and the Event Agent takes place on one machine and the Event Agent communicates through the connection oriented protocol CCI with its manager, so that loss of data is impossible.
The Event Management Console displays the match traps as unformatted SNMP traps, whereas state change traps are displayed formatted. This is because the Console does not get the state change traps directly but as formatted messages from the DSM.
To put this sending of match traps into effect the following prerequisites must be matched:
The SNMP Administrator is configured to send match traps to port 162 of the local machine (see the Changing Trap Destinations section).
The CA NSM Event Agent is installed as described in the CA NSM installation wizard and the environment variable CAIACTTRAPD is set to YES.
On Windows
Edit the fwsetup.bat file to set the variable before you run fwsetup.
The catrapd service is installed on the agent system.
3–8 Using the Log Agent

Prerequisites for Sending Match Traps
On Windows
The catrapd.exe file must be available in the bin directory of the Event Agent installation directory and the catrapd.cfg file in the Caiuser directory.
On the manager machine a message record and a message action are defined to select match traps and to forward them to the manager system. (You define message actions and message records by using the Event Management GUI or the cautil command.)
define msgrec msgid="%CATD_I_60,SNMPTRAP: –c * * * * 6 10988" type="MSG" msgnode="*" cont='N' msgact='Y' wcsingle='?' wcmany='*' case="y" regexp="n"
define msgact name=(*,10) action="FORWARD" attrib="DEFAULT" color="RED" condop=" " evaluate='Y' node="<manager>" quiet='N' status="ACTIVE" sim='N'
Note:
After defining the message record and the message action on the manager system put the definitions into effect by the opreload command. (Type in opreload in the Management Console command line or oprcmd opreload in a command shell.)
The Event Agent loads the current configuration from the Event Management database of the manager machine when it is started. In this way the defined message record and message action are set into effect on the agent system. When the Event Agent already runs the opreload command can be used in a command shell on the agent system (type in oprcmd opreload).
catrapd and the Event Agent are running on the agent system.
Chapter 3: Configuring the Node for the Log Agent 3–9
Starting the Log Agent
Starting the Log Agent To start the Log Agent, the following Agent Technology services must be running:
The Service Control Manager (awservices)
The Distributed Services Bus (aws_orb)
The SNMP Administrator (aws_sadmin)
Use the awservices start command as follows to start all Agent Technology services and all the agents installed on the node:
awservices start
Note: If DSM is also installed on the node, awservices start starts the DSM services as well.
On OpenVMS
Note: To define the awservices command as a foreign command symbol, first run the command
$ @sys$startup:aws$services$startup.com define_symbols
To define the cailoga2 command as a foreign command symbol, first run the command
$ @sys$startup:cailoga2$startup.com define_symbols.
You can insert these commands in your user LOGIN.COM file, or the system SYLOGIN.COM file, for other users to use.
To start the Log Agent and any required Agent Technology services, issue the following commands at the command prompt:
awservices start -m cailoga2 start
Additionally you can use the following options when you start the Log Agent:
cailoga2 start
[-c configSetName]
[-l logLevel]
[-f logFile]
[-r]
[-d]
[-u]
[-w]
-c configSetName — The name of a configuration set defined in a configuration file that you have created for this agent. For more information on using the agent configuration files, see the Working with Agents guide.
3–10 Using the Log Agent
Starting the Log Agent
-l logLevel — A number indicating the severity of messages that will be recorded in the agent's log file.
All messages at this level or below (that is, more severe) will be logged. The levels are:
0 Fatal 1 Critical 2 Warning 3 Information 4 Debug 5 Debug 1 6 Debug 2 7 Debug 3
Default: 3
-f logFile — The name of the agent's log file. You can specify a full path name or a single file name. In the latter case the file is created in following directory:
UNIX/Linux Install_Path/AGENTS/log Windows Install_Path\AGENTS\log OpenVMS Install_Path:[AGENTS.Log]
Default: caiLogA2.log
This option is not associated with specifying which log files the agent will monitor.
-r — This option specifies that the agent retains a successfully loaded configuration set in the sadmin Store. If you do not use this option, the agent deletes a configuration set after it has been loaded successfully. For information about using agent configuration sets, see the Working with Agents guide.
This option should be used in conjunction with the logA2ConfigAutoSave attribute set to no.
Using the –r option you ensure, that configuration changes made during runtime are not restored when the agent is started again.
-d — The –d option specifies that the agent is started with its internal default configuration and not with the previously stored configuration. This is especially useful, if you want to discard the current configuration information in sadmin Store. For information about using agent configuration sets, see the Working with Agents guide.
Chapter 3: Configuring the Node for the Log Agent 3–11

Configuring the Log Agent
3–12 Using the Log Agent
This option is ignored, when the –c option is used to define the name of a configuration set.
-u — This option enables the call-back mechanism.
-w — Warmstart traps are sent if attributes of the config group are changed.
Note: Use the awservices stop command to stop all the Agent Technology services and all the agents installed on the node:
awservices stop
On OpenVMS
Note: It is not necessary to run a separate command if the Log Agent is installed using installauto. The command “awservices start” will start all installed agents as well. The “cailoga2 start” and “cailoga2 stop” commands are used if you need to start and stop the Log Agent only.
Configuring the Log Agent After you start the Log Agent for the first time, you can experiment with different configuration values until you decide on:
The set of system resources that you always want to monitor
The filters and threshold values that will determine the status of those resources
The messages you want to send to the Event Agent.
You can use the Log Agent View, MIB Browser, and configuration sets to define these values. For more information on agent configuration, see the Configuring the Log Agent chapter in this guide.
Chapter 4: Configuring the Log Agent
The configuration of an agent determines what objects the agent monitors, how the agent gathers resource data, and how the agent assesses the state of managed objects. The agent’s MIB defines the attributes of the managed objects instrumented by the agent. The MIB contains the default behavior of the agent.
This chapter explains how to use configuration sets, Log Agent View, and MIB Browser to change agent configuration. Configuration of the agent determines the types of resources to monitor, as well as the instances of each resource type (managed object).
Using Node View After the Common Object Repository has been populated, you can use the 2-D (or 3-D) map of WorldView to view your discovered nodes. When you open a node on which a CA NSM agent resides, the agent objects appear on the map.
To view the agents on the node, right-click on an agent object then select View Node from the pop-up menu. This opens the Node View.
Node View displays in tree form all the managed objects known to the DSM on a system. From Node View you can see both the overall status of the node and the status of individual agent objects at the same time. The icons in the Node View tree represent the following types of managed objects:
The node itself
Agents installed and running on the node
Subsystems or groups of objects for which an agent is responsible
Individual objects monitored by an agent
From Node View, you can access both MIB Browser and the Log Agent View.
To open MIB Browser, right-click a resource and click MIB Browser from the pop-up menu.
To open an individual agent view, right-click an object and click View Agent from the pop-up menu.
Note: If you are monitoring a system by using a Log Agent that does not provide the callback facility, MIB Browser will display the callback reference attributes in red color.
Chapter 4: Configuring the Log Agent 4–1
Methods of Configuring the Log Agent
For more information on using Log Agent View or MIB Browser, see the Using Log Agent View and Using MIB Browser sections later in this chapter. For more information on using Node View, see the Working with Agents guide and the online help.
Methods of Configuring the Log Agent You can configure the Log Agent in three ways:
Using configuration set(s)
Using MIB Browser (mibbrowse)
Using Log Agent View (abrowser)
You can modify the resources being monitored by the Log Agent while the agent is running using the Log Agent View and MIB Browser. Log Agent View graphically displays the status of monitored Log system resources, while MIB Browser displays the logical structure of any specified MIB. Changes made through these GUIs take effect during runtime without the need for restart, so this is a good method to use while you are testing various configurations.
You can use the Log Agent View to determine how the default attribute values portray the status of your monitored resources. You can add and delete resources to monitor without having to look up the definition of each MIB attribute, and you can see configuration changes reflected graphically in the Log Agent View’s displays. You can also configure how the agent processes log file data. Once you have a better knowledge of the MIB’s structure, it may be easier to find precisely the attribute you need using MIB Browser.
Configuration sets allow you to set the initial values for the Log Agent’s MIB attributes, community definitions, and trap destinations, and load these values into the SNMP Administrator store. When a configuration set is specified during the starting of the Log Agent, information about the resources being monitored is taken from the SNMP Administrator store.
Using Configuration Sets
Configuration sets identify:
SNMP trap destinations
SNMP community definitions
MIB attribute settings
It is not necessary to define a configuration set. However, unless one is defined, the agent’s behavior is based on either the default attributes or the most recently saved runtime values.
4–2 Using the Log Agent
Methods of Configuring the Log Agent
The syntax of the configuration sets and the configuration files that contain configuration sets are described in the Working with Agents guide. Descriptions and examples of configuration sets specific to the Log Agent are given in the Configurable MIB Attributes section of this chapter.
Using Log Agent View
For a graphical display of the agent state of system objects, use Log Agent View. The syntax to start the Log Agent View from the command prompt is as follows:
abrowser -c browser.caiLogA2 -h agenthost -s community -p port-number
After entering this command, the main Log Agent View window is displayed. This window shows a summary of the overall status of the system.
For more information about how to use the Log Agent View, see the online help.
Using MIB Browser
Each agent has its own MIB that defines which resources the agent monitors on the node and how they are monitored.
The agent’s MIB contains additional information about the agent’s objects. For a view of the logical structure of the Log Agent’s MIB, use the MIB Browser. The syntax to start MIB Browser for the Log Agent from the command prompt is as follows:
mibbrowse -m caiLogA2 -h agenthost -c community -p port-number
After entering this command, the main MIB Browser window is displayed. This window shows all of the groups defined in the Log Agent MIB.
Note: The MIB Browser dynamically changes the values of MIB attributes for the agent. It does not modify the MIB itself, which is defined in the file caiLogA2.txt. Do not modify the caiLogA2.txt file. This file contains the definitions for the agent’s MIB attributes.
From this window, you can select the group you want to work with. For example, selecting logA2ConfigGroup opens a window showing all groups belonging to logA2ConfigGroup.
You can then access the individual attributes for a particular group. For example, selecting logA2ConfigFileGroup opens a window from which configurable attributes in this group can be changed.
Chapter 4: Configuring the Log Agent 4–3
Configuring Call-Backs
Note: All changes made through MIB Browser take effect at the next polling interval. Changing the polling interval leads to an immediate poll.
If you access the new Log Agent from a manager system that is not upgraded to that new version, MIB Browser displays new MIB attributes in red color. New Log Agent MIB attributes are as follows:
logA2ConfigOsType
logA2StatusLogCallbackRef
logA2StatusFileCallbackRef
For more information on how to use MIB Browser, see the online help system.
Configuring Call-Backs The configuration details of each call-back reference are located in the agent’s call-back configuration file caiLogA2.cbc that is stored in the Install_Path\agents\config\cbc directory on Windows platforms or in the Install_Path/agents/config/cbc directory on UNIX/Linux platforms. The name of this file is fixed.
The call-back configuration file contains an entry for each call-back reference, and associates with this reference the full path and name of the script or application to run. Additionally, a parameter information can be passed to the script or application, as well as a user ID that should be used to execute the script or application.
The association of which call-back reference should be invoked for each monitored resource area is held in a read-only attribute in the MIB and can only be configured by a definition in a configuration set. Like configuration sets the configuration file for the call-back references will be read only once at startup of the agent.
Therefore, this functionality can only be configured by editing the agent's call-back configuration file, and by editing and loading a configuration set. Both of these files can be secured for read and write access by the native security on the machine.
The following is an example entry of a call-back configuration file:
[LogA2 log file not found] # Call-back reference
application=d:\Program Files\Myapps\lfsearch.bat
user=Administrator,top-secret
args=userarg1 @AG_TYPE @AG_PROPERTY @AG_NAME @AG_STATUS -u userarg2
[ <any string> ]
4–4 Using the Log Agent

Configuring Call-Backs
A string surrounded by square brackets [ ] denotes the name of the call-back reference followed by up to three configuration parameters. These parameters may appear in any order. If a parameter appears multiple times in the same call-back reference section, only the first parameter definition will apply. Subsequent definitions will be ignored.
The following MIB attribute is an example for a corresponding call-back reference attribute. The attribute’s access is set to read-only, and its value is either empty in the case where no call-back reference has been associated with that monitored group (for example: Log), or contains the name of the call-back reference as detailed in the call-back configuration file
(for example: LogA2 log file not found).
logA2StatusLogCallbackRef OBJECT-TYPE
SYNTAX DisplayString
ACCESS read-only
STATUS mandatory
DESCRIPTION
"&<caiLogA2.199>The name of the Call-Back reference that should be invoked
in case of a status change."
::= { logA2StatusLogEntry 25 }
application
The application parameter is mandatory and designates the name of a script or executable file to run. If the file name does not contain a directory path, the script or executable file will be searched for in the sequence as defined by the underlying operating system.
The application parameter may contain environment-variable strings, which will be replaced with their defined values. References to environment-variable strings must have the following form:
%variable% (Windows), $variable or ${variable} (UNIX/Linux)
user
The user option is an optional configuration parameter to specify which user ID should be used to execute the call-back script or application. On Windows platforms the value of this option must match the syntax [domain\]user[,password], where domain specifies the name of the domain or server whose account database contains the user account and where password specifies the clear-text password for that account.
On UNIX/Linux platforms the user option is an optional configuration parameter to specify which user ID should be used to execute the call-back script or application. The value of this option denotes the name of a user in the passwd databases (file, NIS) configured on the local machine.
args
Chapter 4: Configuring the Log Agent 4–5

Configuring Call-Backs
The args option is an optional configuration parameter to specify if a custom set of parameters is to be passed to the callback script or application upon instigation. This is a way of overriding the standard parameters (see below). If you wish to use some of the pre-defined information the following reserved keywords can be included. The third column of the table describes how the keywords are evaluated and passed to the script or application:
Name Description Evaluates to
@AG_STATUS The name of the status: Unknown, OK, Warning, Critical
-s <status>
@AG_NAME The name of the resource
(for example logA2StatusLogWatcherName)
-n <name>
@AG_TYPE The type of the resource (for example Log)
-t <type>
@AG_PROPERTY The metric that caused the state change (only Status)
-p <property>
@AG_VARBIND Miscellaneous var-bind information sent with the state change trap (for example logA2StatusLogOwner)
-v <var-bind>
[-v <var-bind>]
The resource name parameter @AG_VARBIND may represent multiple key values, whereby each individual value may contain white space. If the args option is not specified, the script or application will be invoked with a set of standard parameters; these parameters utilize the reserved keywords described above and pass them in the following order:
@AG_INSTANCE @AG_STATUS @AG_NAME @AG_TYPE @AG_PROPERTY @AG_VARBIND
The following tables list the possible settings of the pre-defined keywords @AG_TYPE, @AG_NAME, @AG_PROPERTY, @AG_VARBIND, and @AG_STATUS.
Note: Attribute names shown in italics represent the corresponding value of that attribute.
@AG_TYPE: Log
@AG_NAME: logA2StatusLogWatcherName
@AG_PROPERTY: Status
@AG_VARBIND: logA2StatusLogFileName, logA2StatusLogposPattern, logA2StatusLogLastTrapMessage,
4–6 Using the Log Agent
Configuring Call-Backs
logA2StatusLogOwner
@AG_STATUS: Unknown, OK, Warning, Critical
@AG_TYPE: File
@AG_NAME: logA2StatusFileWatcherName
@AG_PROPERTY: Status
@AG_VARBIND: logA2StatusFileName
@AG_STATUS: Unknown, OK, Critical
Example
To configure the agent to use call backs permanently
1. Stop the agent, for example:
caiLogA2 stop
2. Remove the agent as a registered Agent Technology component:
caiLogA2 remove
3. Install the Log Agent as a registered Agent Technology component by using the –u switch, which enables the call back facility, for example:
caiLogA2 installauto --options=”–u” --dependOn=aws_sadmin
4. Create a configuration set by using the mkconfig command, for example:
mkconfig –s caiLogA2 > d:\caiLogA2.cfg
5. Edit the configuration set. For example, insert “LogA2 log file not found” as a value of the logA2StatusLogCallBackRef attribute:
#SNMPTABLE logA2StatusLogTable logA2StatusLogWatcherName eventlog3
logA2StatusLogFileName SYSTEM_LOG\system logA2StatusLogPosPattern Type: Information logA2StatusLogPosStart -1 logA2StatusLogPosEnd -1 logA2StatusLogNegPattern logA2StatusLogNegStart -1 logA2StatusLogNegEnd -1 … logA2StatusLogMonitorStatus 1 logA2StatusLogStatus 1 logA2StatusLogLastTrapMessage logA2StatusLogLastTrapLine logA2StatusLogOwner caiLogA2 logA2StatusLogButton 1 logA2StatusLogCallbackRef LogA2 log file not found
6. Save the configuration set.
Chapter 4: Configuring the Log Agent 4–7
Configuring Call-Backs
7. Create a call-back entry by using the same attribute value specified above. Store this entry in a new configuration file or append it to an existing one. For example, to execute a search application in the case of a missing log file, you can use the following entry:
[LogA2 log file not found] # calls lfsearch.bat if the file is not found.
application=”d:\Program Files\Myapps\lfsearch.bat”
Note: A path or application name containing white space characters must be surrounded by quotes.
8. Save the file as caiLogA2.cbc in the following directory:
Install_Path\agents\config\cbc on Windows platforms or Install_Path\agents\config\cbc on UNIX/Linux platforms, for example:
c:\TND\agents\config\cbc\caiLogA2.cbc
9. Secure the caiLogA2.cbc file by assigning appropriate access rights. Do not use “Everyone” to set any permission!
10. Load the modified configuration set into the admin store, for example:
ldconfig d:\caiLogA2.cfg
11. Start the agent, for example by using caiLogA2 start.
Now the Log Agent uses the call back facility permanently.
Security Issues
The following features minimize the risk of the agent running an application or script that was not intended to be used by the administrator:
The call-back will not be configurable by a MIB browser or AgentView, only from configuration sets.
No details of the used application, script or user ID are visible from the agent’s MIB.
A separate configuration file contains the application, script and user ID details.
The configuration file must have restrictive permissions, or the entire call-back operation will be disabled and a warning message will be written to the agent’s error log.
If the specified user ID does not exist or the agent cannot change identity to run as this user ID then the operation of that particular call-back reference is disabled and a warning message will be written to the agent’s error log.
By default, the call-backs feature in the agent is disabled. To enable this feature the agent must be started with the “-u” command line option.
4–8 Using the Log Agent
Configuring Call-Backs
The ability to run the scripts as a specific user ID also helps reduce security exposure as some agents need to run with root permissions to collect their information. The proposed user ID option allows you to design and implement call-back actions in the confidence that their scope of effect can be limited by securing them to only be invoked with a given user ID. If the user ID specified for a given call-back reference does not exist or the agent cannot change identity to run as this user ID then the operation of that particular call-back reference is disabled and a warning message will be written to the agent’s error log.
To prevent any accidental security exposure, the agent will check that the call-backs configuration file does not have completely open file permissions. In the Windows environment, the agent will ensure that the file is resident on a securable file system type (i.e. NTFS) and that the file’s permissions do not contain the Everyone group.
If the call-back configuration file does not match these minimum security requirements, the operation of call-backs within the entire agent is disabled and a warning message will be written to the agent’s error log.
In addition to these checks the normal remote configuration set security also provides security from attack.
If the user parameter is used anywhere in the call-back configuration file, some precautions must be taken in order to run an application or script in a context other than that of the caiLogA2 process providing the call-back feature.
On Windows, the account that the agent process is running on needs to have the following user rights enabled:
Act as part of the operating system
Increase quotas
Replace a process level token
The recommended method is to use the call-back feature in a service running in the local system account because it has primary rights by definition.
Since the CA NSM Agent Technology service usually logs on to the system account (this is the default setting after Agent Technology has been installed), CA NSM Agents are automatically eligible to switch user context without any further configuration.
On UNIX/Linux platforms, the executable image file of the agent process must be owned by the super-user and the set-user-ID bit flag must have been turned on.
For maximum security you can do the following:
The application or script should always be specified with its full path name.
Chapter 4: Configuring the Log Agent 4–9

Configurable MIB Attributes
The application or script specification should not include any environment variables.
The application or script should be secured for read and write access by the native security on the machine (where applicable).
Using a Call-Back Script
The proposed solution is to implement a method of calling the call-back for every state change and passing a state parameter to the application or script. Typically, this will be one of the following:
Unknown
OK
Up
Down
Warning
Critical
In addition to this, the information that is passed on a trap’s var-bind will also be passed to the application or script.
These parameters will enable you to build powerful scripts that can perform different functions depending on the state of the resource. However a situation could arise that would need the constant checking and correcting of a resource. Adding a cron job may be an appropriate method. With the status being sent as well then the script can remove the cron job once the status has returned to up or ok.
It is important to note that the agent will start the applications in a background mode and will not wait for a response, a fire and forget mode of operation.
Configurable MIB Attributes You can set the values of MIB attributes that tell the agent:
What objects to monitor.
The level of monitoring: Do Not Monitor, Monitor Critical and Monitor Warning.
How to determine the states of the monitored objects.
How often to scan log files or to monitor files for their existence.
4–10 Using the Log Agent
Configurable MIB Attributes
Whether it should save configuration values in sadmin Store for use the next time the agent is started.
A limit on the number of trap records it preserves in its history table.
The object’s corresponding MIB attributes can be set through either MIB Browser or the Log Agent View. For more information on how to use these applications, see their online help systems.
The easiest way to create a new log watcher or to configure an existing one is to use the corresponding functionality provided by the Agent View of the Log Agent. For more information refer to the Log Agent View Help System.
Another possibility to create a new watcher or to configure an existing one is to use the MIB Browser. Each MIB attribute, which is necessary for adding a new log watcher in this way, belongs to the MIB’s Config Group and can be set through the MIB Browser. For each of these MIB attributes in the Config Group a corresponding MIB attribute in the Status Group exists. However, changing the values of the corresponding writeable MIB attributes in the Status Group only modifies the configuration of an existing watcher.
If new watchers have been added, the agent will create a new table entry for each of these watchers in the configuration set by using MIB attributes of the Status Group. Therefore, it is also possible to specify a new log watcher by creating such table entries in the configuration set. This method may also be of advantage in a production environment. A configuration set can be used to specify large numbers of log watchers that are implemented over multiple systems, rather than having to enter the watchers one-by one on each system during runtime. Refer to the following sections for a description of these attributes:
Saving Runtime Changes
Log Watcher Attributes
File Watcher Attributes
History Table Attributes
There are also some attributes you can only set during runtime that is with Log Agent View or MIB Browser. Refer to the following sections for a description of these attributes:
Trap History Attributes
Adding and Removing Watchers during Runtime
Chapter 4: Configuring the Log Agent 4–11
Configurable MIB Attributes
4–12 Using the Log Agent
Structure of the Log Agent MIB
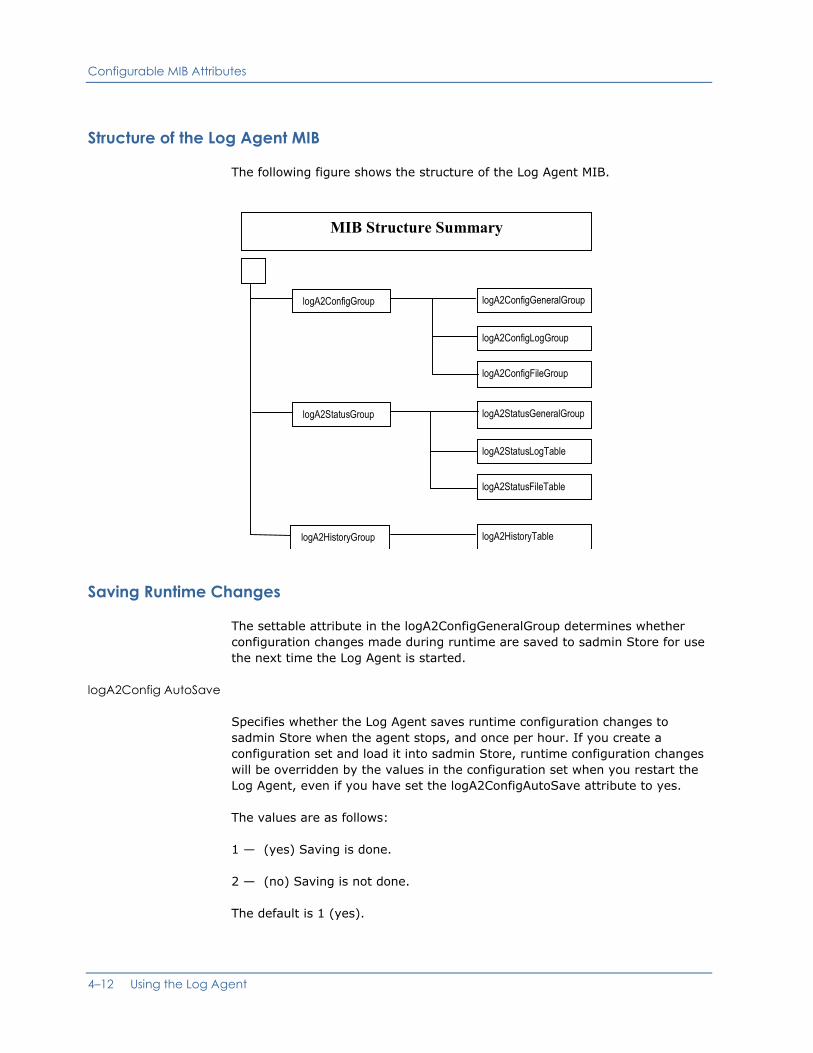
The following figure shows the structure of the Log Agent MIB.
logA2StatusGroup
logA2ConfigGroup
logA2HistoryGroup
MIB Structure Summary
logA2StatusLogTable
logA2StatusFileTable
logA2StatusGeneralGroup
logA2ConfigGeneralGroup
logA2ConfigLogGroup
logA2ConfigFileGroup
logA2HistoryTable
Saving Runtime Changes
The settable attribute in the logA2ConfigGeneralGroup determines whether configuration changes made during runtime are saved to sadmin Store for use the next time the Log Agent is started.
logA2Config AutoSave
Specifies whether the Log Agent saves runtime configuration changes to sadmin Store when the agent stops, and once per hour. If you create a configuration set and load it into sadmin Store, runtime configuration changes will be overridden by the values in the configuration set when you restart the Log Agent, even if you have set the logA2ConfigAutoSave attribute to yes.
The values are as follows:
1 — (yes) Saving is done.
2 — (no) Saving is not done.
The default is 1 (yes).

Configurable MIB Attributes
Recommendation: Set logA2ConfigAutoSave to 2 (no) in your configuration set if you want to prevent the agent from wasting the resources needed to save configuration values in sadmin Store.
To change the setting in the logA2ConfigGeneralGroup, create an entry like the sample below in your configuration set for the Log Agent.
/* ==================================================== /* Log Agent Save Flag
/* ==================================================== #SNMPGROUP logA2ConfigGeneralGroup logA2ConfigAutoSave 2 /* no
Log Watcher Attributes
The entries in the Log Status Table (logA2StatusLogTable — part of the logA2StatusGroup) specify the logs the Log Agent monitors. The table attributes that make up each log watcher entry describe:
The log file the agent scans.
The pattern for which the agent looks.
The actions the agent takes if the filtering condition applies.
In the sample below, two log watchers are configured, the second of which uses default values for many of the watcher’s attributes. Default attribute values do not need to be specified in the table entry. For more information on these attributes, see the individual descriptions and recommendations that follow. If the attribute’s name contains an asterisk (*) the description refers to both, the Status Group attribute and it’s corresponding attribute of the Config Group.
Note: The #SNMPTABLE tag line must be repeated for each entry in the table.
#SNMPTABLE logA2StatusLogTable logA2StatusLogPollIntervall 360 /* interval in seconds logA2StatusLogWatcherName watchLogApplA logA2StatusLogFileName d:\applLogs\applA logA2StatusLogPosPattern FILE:g:\dataApplA\PosPatApplA logA2StatusLogNegPattern FILE:g:\dataApplA\NegPatApplA logA2StatusLogPosStart 10 /* begin at position 10 logA2StatusLogPosEnd 99 /* end at position 99 logA2StatusLogNegStart 10 /* begin at position 10 logA2StatusLogNegEnd 99 /* end at position 99 logA2StatusLogTogglePosPattern FILE:g:\dataApplA\TogPosPatApplA logA2StatusLogToggleNegPattern FILE:g:\dataApplA\TogNegPatApplA logA2StatusLogTogglePosStart 10 /* begin at position 10 logA2StatusLogTogglePosEnd 99 /* end at position 99 logA2StatusLogToggleNegStart 10 /* begin at position 10 logA2StatusLogToggleNegEnd 99 /* end at position 99 logA2StatusLogStatusPolicy 5 /* first line only logA2StatusLogTrapSendPolicy 2 /* once
Chapter 4: Configuring the Log Agent 4–13

Configurable MIB Attributes
logA2StatusLogHistoryPolicy 1 /* generate history logA2StatusLogMonitorStatus 1 /* send state change traps logA2StatusLogMatchTrapPolicy 1 /* send match traps logA2StatusLogCallbackRef LogA2 log file not found
#SNMPTABLE logA2StatusLogTable logA2StatusLogWatcherName watchLogApplX logA2StatusLogFileName d:\applLogs\applX logA2StatusLogPosPattern file g:\dataApplX\in not found
logA2*LogPoll Interval
Specifies the number of seconds between successive scans of the watched log files for specified patterns.
The values are as follows:
-1 — Polling is disabled. Disabling the polling interval disables the agent’s monitoring of the log files.
n (integer) — Length of the poll interval in seconds. Minimum is 30, maximum is 2,147,483,647.
The default is 120.
Recommendations:
Set this polling interval long enough to accommodate the average size and activity of the logs that are to be scanned.
Make sure you coordinate the polling interval setting with the trap policies and the status policies of the individual watchers. For example, if you wanted to be made aware of security violations, such as if a specific user attempted to log on to the system, you would want a relatively short polling interval with the trap policy set for trapping on every occurrence of the security violation pattern, and the status policy set for start-from-previous-read.
logA2*LogWatcherName
Specifies the name of the watcher. The name must be unique and should be meaningful to the user.
You must specify a value for logA2StatusLogWatcherName for each table entry you define. The maximum length of the name is 128 characters.
logA2*LogFileName
Specifies the full path and file name of the file to monitor or the name of a directory which contains the files to monitor.
4–14 Using the Log Agent

Configurable MIB Attributes
You must specify a value for logA2StatusLogFileName for each log entry you define. The maximum length of the name is 128 characters.
On Windows
Because the Log Agent runs as a service, and services cannot see network drives, files located on network drives are not available for monitoring.
If the application that is creating the log file creates and opens it in a non-sharing (exclusive access) mode, the Log Agent will not be able to open the log and it will not be available for monitoring.
The name of the directory and/or the files may contain wildcards. In this case the log watcher monitors multiple log files in one or more directories.
Only the characters "*" and "?" are valid wildcard characters.
The log watcher goes into the state UNKNOWN if no file matches the pattern specified in the logA2StatusLogFileName attribute. If there are more than 256 files that match the wildcard for one watcher the watcher’s state is set to UNKNOWN. The maximum number of files that can be monitored for all watchers is 410.
If the number of monitored files is greater than 410 no new log watcher with new log files can be added. Furthermore a warning is sent during each poll interval if the number of monitored files is greater than 410. The warning is written into the file:
On Windows
Install_Path\agents\log\caiLogA2.log
On UNIX/Linux
Install_Path/agents/log/caiLogA2.log
On OpenVMS
Install_Path:[agents.log]caiLogA2.log
For example, to search for a path with wildcards, you must specify the file name as follows:
On Windows
D:\temp\log*.txt to monitor the files D:\temp\log051024.txt, D:\temp\log051025.txt, and so forth.
On UNIX/Linux
/tmp/log*.txt to monitor the files /tmp/log051024.txt, /tmp/log051025.txt, and so forth.
On OpenVMS
TMPDIR:log*.txt to monitor the files TMPDIR:log051024.txt, TMPDIR:log051025.txt, and so forth.
Chapter 4: Configuring the Log Agent 4–15
Configurable MIB Attributes
Recommendations:
Using wildcards is especially useful if an application writes a new log file every day, such as log051024.txt, log051025.txt and so forth.
Wildcards should not be used to monitor two or more log files with one log watcher, if the log files have no relation with respect to the monitoring tasks to each other.
For watching the Event Logs on Windows or the Console Log on UNIX/Linux the following names have to be used in the logA2StatusLogFileName attribute:
SYSTEM_LOG — System, application and security logs on Windows or console log on UNIX/Linux
SYSTEM_LOG\system — System log on Windows
SYSTEM_LOG\security — Security log on Windows
SYSTEM_LOG\application — Application log on Windows
SYSTEM_LOG/console — Console on UNIX/Linux
On UNIX/Linux
If SYSTEM_LOG or SYSTEM_LOG/console is specified for the UNIX/Linux console log, the following files are watched as console log:
On HP-UX: /usr/adm/syslog/syslog.log
On AIX: No default console log file
On Solaris 2.5: /var/adm/messages
On Reliant Unix: /var/adm/log/messages
If these files are inappropriate, the filename of the console log can be defined within the following file:
Install_Path/agents/config/caiLogA2/console.cfg
On AIX you need to configure the system to write console messages into a file. The name of this log file has to be added to the console.cfg file.
Note: When the Log Agent creates the watcher the keyword is replaced by the file name in the console.cfg file. Therefore the file names may not be changed after creating a watcher.
If a new watcher with the filename ‘SYSTEM_LOG’ is added, this watcher will be in the state unknown until the next poll.
4–16 Using the Log Agent

Configurable MIB Attributes
logA2*LogPos Pattern, logA2*LogNegPattern
Specify the pattern, with which the Log Agent searches for text strings in the watched log file. A single basic or extended regular expression or the keyword FILE: followed by the name of a file with a list of regular expressions can be the value of this attribute. The default for pattern evaluation is basic regular expressions. For using extended regular expressions the pattern must be prefixed by ‘EREGEX:’.
Note:
Extended regular expressions are supported only if there is platform support available, for example on UNIX/Linux platforms like Solaris, HP-UX and AIX but not on Windows.
The maximum length of the pattern is 128 characters. Use a pattern file, as described below, if you want to define a longer pattern.
If you want to use the string FILE: as a pattern (and not as a keyword) you need to prefix the string REGEX: or EREGEX:. For internal reasons it is the same for the string REGEX: or EREGEX: itself. For example, type in REGEX:FILE: or REGEX:REGEX: if you want to define FILE: or REGEX: as patterns.
If you use a pattern file only basic regular expressions are allowed.
A pattern cannot span several lines. Positive and negative pattern must be in the same line.
The filters which process a text string from a log file consist of a positive (logA2StatusLogPosPattern) and a negative (logA2StatusLogNegPattern) pattern. Both patterns are regular expressions. Together they define the filtering condition. The filtering process works as described in the “Using the Log Agent” chapter.
A regular expression is a description of a pattern or sequence of characters that implies a concatenation as its basic operation. A regular expression is not limited to alphanumeric characters. Metacharacters can also be used to expand or limit the possible matches.
For example, a period (.) can be used as a wildcard to match any character in the pattern. If you specify the following regular expression as the search pattern:
C.T
Chapter 4: Configuring the Log Agent 4–17

Configurable MIB Attributes
That regular expression will match:
CAT
CxT
C6T
or a similar string with any character in the position between C and T. It is important to remember that regular expressions are case sensitive.
The backslash \ is the escape character that must be used with the following metacharacters in a regular expression for the metacharacters to be read for their literal meanings:
backslash \ brackets [ ] dollar sign $ asterisk * caret ^ pipeline | period . question mark ?
For example, to search for the directory path in a log file on a Windows system:
C:\TNGAWS\AGENTS\LOG\sqlagent.log
You must specify the regular expression as:
C:\\TNGAWS\\AGENTS\\LOG\\sqlagent\.log
Instead of a single positive or negative pattern (regular expression) a list of patterns can define a filter. A match with this list of patterns occurs, if one of the patterns of the list has matched. The list of patterns is stored in a pattern file.
Using those pattern files instead of direct pattern offers the following possibilities:
Using a pattern with more than 128 characters.
Using more than one pattern instead of a complex regular expression.
The original message can be replaced by a new message using subexpressions.
If you assign a pattern file instead of a single pattern to a logA2StatusLogxxxPattern attribute you have to precede the filename with the keyword FILE:, for example FILE:exmp.txt. You can also type the keyword in lowercase (file), but not uppercase and lowercase mixed.
4–18 Using the Log Agent
Configurable MIB Attributes
The pattern files have to be located in the directory:
On Windows
Install_Path\agents\config\caiLogA2
On UNIX/Linux
Install_Path/agents/config/caiLogA2
On OpenVMS
Install_Path:[agents.config.caiLogA2]
The pattern files have the following format:
regular expression
[>message text]
[#comment]
[...]
regular expression — Regular expression as pattern. Each regular expression must appear in a line on it’s own.
>message text — Message text for replacing. In this text you can incorporate parts of the original line in the form of placeholders (\<digit>). If these placeholders have been defined in one of the regular expressions and that regular expression is matching, the placeholders are replaced by the corresponding parts of the line.
Each message text must appear in a line on its own, and each message text must follow the associated regular expression.
Message lines must start with the > character.
#comment — Comment lines must begin with the # character.
If the pattern file is empty or only contains comment lines, the behavior is as if the pattern file is not defined. The following example shows how a pattern file works. The file contains three lines:
\(.*\)not found by\(.*\)
>Error from \2: \1 not found
# Application errors
Each text string that contains the string “not found by” matches the pattern in the first line, for example
file1 not found by application1
Chapter 4: Configuring the Log Agent 4–19
Configurable MIB Attributes
The second line in the pattern file generates a new message text. The strings before and after the string “not found by” are taken over from the given text string. The given string is replaced by
Error from application1: file1 not found
The third line of the pattern list is a comment.
Note: The text strings from the log file and the new message texts may contain special national characters, for example ü in Germany, å in Denmark. MULTIBYTE characters (MBCs) however are not supported.
If you define a pattern for a log watcher to monitor the Windows Event Log please consider that the Log Agent processes a structured entry of the Event Log as one string.
If the value of the environment variable CAILOGA2_COMPAT2 is not set (default) or set to "0", you can use the following keywords of the Event Log entries: Type, Source, Category, Event, User, Computer, Description and regular expressions for the values assigned to these keywords to define the pattern.
The Type keyword has a defined list of possible values, which allow filtering out entries of particular types. The possible values are:
Error Warning Information Success – Audit Failure - Audit
For example you can define the following pattern:
Computer: .* Source: MSSQLSERVER Type: Info.* Event-ID: .* User: .* Category: ODS Description: .*Start.*
A Category is a classification of the event, as defined by the source. If possible, the caiLogA2 agent converts category numbers to strings otherwise it uses numbers. Instead of None it uses -.
For example, the categories for Security event logs are Logon and Logoff, Policy Change, Privilege Use, System Event, Object Access, Detailed Tracking, and Account Management.
Note: For discrepancies between EventViewer and caiLogA2 agent you can use the regular expression Category:.* to see what the agent outputs for categories.
4–20 Using the Log Agent
Configurable MIB Attributes
If the value of the environment variable CAILOGA2_COMPAT2 is different from "0", you can use the following keywords of the Event Log entries: Host, Source, Type, Event-ID, User, Message and regular expressions for the values assigned to these keywords to define the pattern.
The Type keyword has a defined list of possible values, which allow filtering out entries of particular types. The possible values are:
Error Warning Information Success – Audit Failure - Audit
For example you can define the following pattern:
\$<HOST=MYHOST>\$ Source: .* Type: [eEwW].* Event-ID: 1001 User: .* Message:
This pattern matches all Event Log entries on the computer MYHOST of the types Error and Warning and the Event-ID 1001.
logA2*LogTogglePosPattern, logA2*LogToggleNegPattern
Specify the pattern, with which the Log Agent searches for text strings in the watched log file. A single basic or extended regular expression or the name of a file with a list of regular expressions can be the value of this attribute. The default for pattern evaluation is basic regular expressions. For using extended regular expressions the pattern must be prefixed by ‘EREGEX:’.
Extended regular expressions are supported only if there is platform support available, for example on UNIX/Linux platforms like Solaris, HP-UX and AIX but not on Windows.
Note: The maximum length of the pattern is 128 characters. Use a pattern file, if you want to define a longer pattern.
The positive and negative toggle pattern together define a toggle filtering condition for the text strings of a log file. The toggle filter works in the same way as described for the logA2StatusLogPosPattern and the logA2StatusLogNegPattern attributes.
If the toggle filtering condition applies the log watcher’s state is set to UP, if it has been DOWN before.
Recommendations:
Set the values of logA2StatusLogTogglePosPattern and logA2StatusLogToggleNegPattern to complement the values of logA2StatusLogPosPattern and logA2StatusLogNegPattern.
Chapter 4: Configuring the Log Agent 4–21

Configurable MIB Attributes
If you specify a value for logA2StatusLogTogglePosPattern or logA2StatusLogToggleNegPattern, make sure you also set the value of logA2StatusLogStatusPolicy to 4 (toggled).
logA2*LogPosStart, logA2*LogPosEnd, logA2*LogNegStart, logA2LogNegEnd, logA2*LogTogglePosStart, logA2*LogTogglePosEnd, logA2*LogToggleNegStart, logA2*LogToggleNegEnd
Specify the starting and ending character positions in the lines of a log file. The part of the line defined in this way, is passed over to the filtering process
Specified by the logA2StatusLogPattern attributes. The log watcher scans the lines of a log file from the starting to the ending position.
The values are as follows:
-1 — Beginning of the line for Start attributes,
end of the line for End attributes
n — (integer) Start or end position in a line. The start position must be smaller than the end position.
If the value –1 is assigned to a Start attribute and the accompanying End attribute, the whole line is taken.
Recommendation: If you specify a value for ToggleStart or ToggleEnd attributes, make sure that you also specify a value for TogglePattern attributes and that the value of logA2StatusLogStatusPolicy is set to 4 (toggled).
logA2*LogStatusPolicy
Specifies the way the watcher behaves with regards to the file handling.
The values are as follows:
1 — (poll) When a log watcher is added, the Log Agent reads the log file from its beginning. If, during a polling interval, the filtering condition applies, the Log Agent sets the state of the watched log to DOWN. At the beginning of the next polling interval, the log watcher’s state automatically transitions to UP. The agent then reads the log file from the position in the file where it stopped reading during the previous polling interval. If the Log Agent is stopped and restarted, the agent resumes reading the log file where it left off.
2 — (historical) When a log watcher is added, the Log Agent reads the log file from its beginning. If, during a polling interval, the filtering condition applies, the Log Agent sets the state of the watched log to DOWN. The watched log’s state remains DOWN during subsequent polling intervals. If the Log Agent is stopped and restarted, the agent begins reading the file from its beginning again.
4–22 Using the Log Agent

Configurable MIB Attributes
3 — (startFromPreviousRead) When a log watcher is added, the Log Agent reads the log file from its beginning. If, during a polling interval, the filtering condition applies, the Log Agent sets the state of the watched log to DOWN. The state remains DOWN during subsequent polling. If the Log Agent is stopped and restarted, the agent resumes reading the log file where it left off.
4 — (toggled) When a log watcher is added, the Log Agent reads the log file from its beginning. If, during a polling interval, the filtering condition applies, the Log Agent sets the state of the watched log to DOWN. The state remains DOWN during subsequent polling intervals until the toggle filtering condition applies. At that poll, the log watcher’s state is reset to UP. If the Log Agent is stopped and restarted, the agent resumes reading the log file where it left off.
5 — (firstLineOnly) The Log Agent reads only the first line of a file every time a poll is send. If, during a polling interval, the filtering condition applies, the Log Agent sets the state of the watched log to DOWN. At the beginning of the next polling interval, the log watcher's state automatically changes to UP.
6 — (pollEOF) Same as poll but for a new watcher reading starts at the end of the file.
7 — (startFromPreviousReadEOF) Same as startFromPreviousRead but for a new watcher reading starts at the end of the file.
8 — (toggledEOF) Same as toggled but for a new watcher reading starts at the end of the file.
The default is 1 (poll).
The values are illustrated in the following example. For the example, assume the following:
The Log Agent has a polling interval of 30 minutes.
The log watcher is looking for the pattern Login failed.
The log file and agent timeline is as follows:
Log Starts 8:00 a.m. Agent Starts 9:00 a.m. Agent Stops 10:00 a.m. Login failed 10:15 a.m. Agent Restarts 11:00 a.m. First Poll 11:30 a.m. Current Poll 12:00 p.m.
If the value of logA2StatusLogStatusPolicy is 1 (poll), the value of logA2StatusLogStatus at the current poll is UP. When logA2StatusLogStatusPolicy is set to poll, the status of the log watcher depends only upon any occurrence of the pattern in the portion of the log file written between the previous poll (11:30 a.m.) and the current poll (12:00 p.m.).
Chapter 4: Configuring the Log Agent 4–23
Configurable MIB Attributes
If the value of logA2StatusLogStatusPolicy is 2 (historical), the value of logA2StatusLogStatus at the current poll is DOWN. When logA2StatusLogStatusPolicy is set to historical, the status of the log watcher depends upon any occurrence of the pattern between the beginning of the log file (8:00 a.m.) and the current poll (12:00 p.m.).
If the value of logA2StatusLogStatusPolicy is 3 (start-from-previous-read), the value of logA2StatusLogStatus at the current poll is DOWN. When logA2StatusLogStatusPolicy is set to start-from-previous-read, the status of the log watcher depends upon any occurrence of the pattern in the portion of the log file written between the time the agent was last stopped (10:00 a.m.) and the current poll (12:00 p.m.).
When the value of logA2StatusLogStatusPolicy is set to 4 (toggled), the Log Agent begins scanning the file from the beginning. If the filtering condition applies during this polling cycle or one subsequent to it, the watcher’s state goes DOWN and stays DOWN until the toggle filtering condition applies. When the toggle filtering condition applies, the watcher’s status changes to UP. If another filtering condition applies, the watcher’s state returns to DOWN. It can then be reset to UP again when another toggle filtering condition applies.
When the value of logA2StatusLogStatusPolicy is set to 5 (firstLineOnly) the Log Agent behaves in the same way as for the value 1 (poll).
Recommendations:
If a log watcher is added that will search the same log file as an existing log watcher, in most cases, the last log watcher added will search the log file from the point that the first log watcher had reached when the last watcher was added, regardless of the last log watcher’s policy value. The only exception to this occurs if the first log watcher’s policy is 2 (historical). In that case, both watchers will scan the file from the beginning.
A log watcher’s DOWN state can be changed to ACKNOWLEDGED, and a DOWN or an ACKNOWLEDGED state can be reset to UP.
If you have used the logA2StatusLogTogglePattern attributes to define a filter that resets the state of a watcher, you must set the logA2StatusLogStatusPolicy attribute to 4 (toggled) to effect the agent’s finding the toggle pattern.
On Windows
If the application that is creating the log file creates and opens it in a non-sharing (exclusive access) mode, the Log Agent will not be able to open the log and the status of the log watcher will be set to UNKNOWN.
4–24 Using the Log Agent
Configurable MIB Attributes
logA2*LogTrapSendPolicy
Specifies the frequency with which the agent sends state change traps regarding the value of the logA2StatuslogStatus attribute.
If a text string in the monitored log file matches the defined filter, the agent will set the attribute logA2StatusLogStatus to 2 (down). This may be accompanied by the sending of a state-down-trap (6:10985). The attribute logA2StatusLogTrapSendPolicy controls whether or not state change traps are sent; and if they are sent, when, what kind, and how many traps are sent upon detection of filtering conditions. Setting of this attribute has no effect on how the log watcher’s status is determined.
logA2StatusLogTrapSendPolicy does not influence the sending of match traps (6:10988). Sending match traps is determined by the logA2StatusLogMatchTrapPolicy.
The circumstances governing when the logA2LogAdded (6:10986) and logA2LogDeleted (6:10987) traps are sent are not affected by any of the logA2StatusLogTrapSendPolicy settings.
The values are as follows:
1 — (never) The log watcher’s state changes never cause traps to be sent.
2 — (once) A state change trap is sent only when the watcher’s state changes. If the filtering condition which caused the state change trap is detected again no additional state change trap is sent as long as the state does not change.
3 — (per poll) One state change trap is sent, if the filtering condition applies, even if the state does not change.
4 — (each) The state change trap is sent each time the filtering condition applies. For a toggle, once the watcher goes DOWN the next condition which will be looked for is the toggle condition. So subsequent DOWN conditions will not apply.
The default is 2 (once).
If logA2StatusLogTrapSendPolicy is set to 2 (once), 3 (per poll), or 4 (each), the circumstances governing when the logA2LogStateUp (6:10984) and logA2LogStateDown (6:10985) traps are sent are controlled by logA2StatusLogStatusPolicy.
Chapter 4: Configuring the Log Agent 4–25
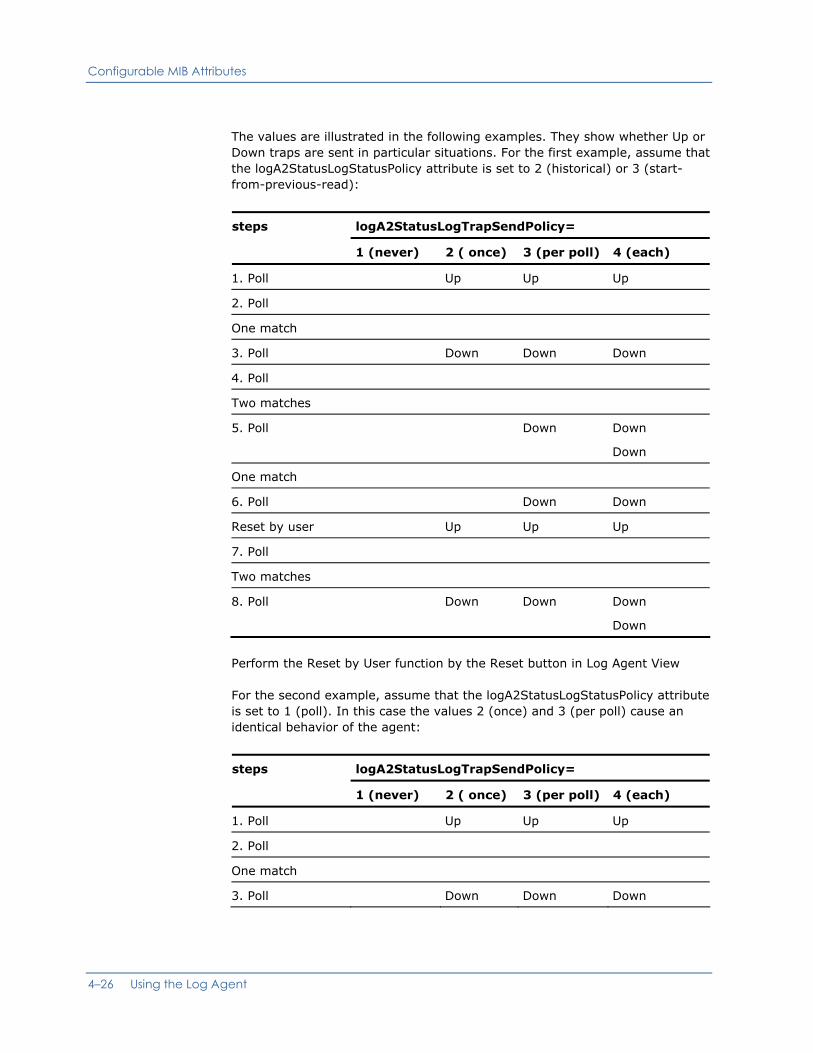
Configurable MIB Attributes
The values are illustrated in the following examples. They show whether Up or Down traps are sent in particular situations. For the first example, assume that the logA2StatusLogStatusPolicy attribute is set to 2 (historical) or 3 (start-from-previous-read):
logA2StatusLogTrapSendPolicy= steps
1 (never) 2 ( once) 3 (per poll) 4 (each)
1. Poll Up Up Up
2. Poll
One match
3. Poll Down Down Down
4. Poll
Two matches
5. Poll Down Down
Down
One match
6. Poll Down Down
Reset by user Up Up Up
7. Poll
Two matches
8. Poll Down Down Down
Down
Perform the Reset by User function by the Reset button in Log Agent View
For the second example, assume that the logA2StatusLogStatusPolicy attribute is set to 1 (poll). In this case the values 2 (once) and 3 (per poll) cause an identical behavior of the agent:
logA2StatusLogTrapSendPolicy= steps
1 (never) 2 ( once) 3 (per poll) 4 (each)
1. Poll Up Up Up
2. Poll
One match
3. Poll Down Down Down
4–26 Using the Log Agent

Configurable MIB Attributes
Chapter 4: Configuring the Log Agent 4–27
logA2StatusLogTrapSendPolicy= steps
1 (never) 2 ( once) 3 (per poll) 4 (each)
4. Poll Up Up Up
Two matches
5. Poll Down Down Down
Down
One match
6. Poll Up
Down
Up
Down
Up
Down
Reset by user Up Up Up
7. Poll
Two matches
8. Poll Down Down Down
Down
logA2*LogHistoryPolicy
Specifies whether the log watcher’s enterprise-specific traps are written in the trap history table (logA2HistoryTable).
The values are as follows:
1 — (generateHistory) The traps are recorded in the history table.
2 — (noGenerateHistory) The traps are not recorded in the history table.
The default is 2 (noGenerateHistory).
Recommendation: Use the attribute logA2HistoryMaxEntries in the logA2HistoryGroup to change the size of the history table. If you enable the collection of traps for logs, you can increase the size of the table to accommodate the number of traps typically of interest to you. If you disable the collection of traps for both log watchers (logA2StatusLogHistoryPolicy) and file watchers (logA2StatusFileHistoryPolicy), you can reset the size of the table to zero entries to save space.
logA2*LogMonitorStatus
Specifies whether state change traps are sent as defined in the logA2*LogTrapSendPolicy attribute. The attribute does not influence the sending of match traps.
Configurable MIB Attributes
The values are as follows:
1 — (downCritical) The state change works as configured and a critical alert is raised.
2 — (doNotMonitor) The log file is monitored but the log watcher always remains in the state UP and state change traps are not sent.
3 — (downWarning) The state change works as configured and a warning alert is raised.
The default is 1 (downCritical).
logA2*LogMatchTrapPolicy
Specifies whether match traps are sent. The attribute does not influence the sending of state change traps.
The values are as follows:
1 — (send) A trap is sent each time the filtering condition applies.
Note: Do not create a log watcher which sends status traps caused by a toggle filter and which also sends match traps. Such a log watcher would send different match traps, which could not be assigned properly. This is because, depending on the current state either the pattern or the toggle pattern would be used for filtering.
2 — (doNotSend) No match trap is sent.
The default is 2 (doNotSend).
Example
Log watchers can be used for a lot of monitoring tasks. When you create a log watcher you need to think about the following questions with respect to the task of the watcher:
Do you want the Log Agent to inform you about the log watcher’s state changes?
If No: Create a match trap.
If Yes: How will the watcher’s state be set to UP again after it goes to DOWN?
– Automatically at the beginning of a new poll interval?
– Automatically when a toggle pattern matches the string in the log file?
– Manually by using the reset function? (Reset button in Log Agent View)
How you define log watchers depends on the answers to these questions. The following examples show typical possibilities for the different answers.
4–28 Using the Log Agent

Configurable MIB Attributes
The following log watcher causes match traps but no state change traps. Its state will always remain UP.
logA2StatusLogWatcherName lwMat
logA2StatusLogFileName D:\appl1\log.txt
logA2StatusLogPosPattern error
logA2StatusLogTogglePosPattern
logA2StatusLogStatusPolicy 1 /* Poll
logA2StatusLogTrapSendPolicy 1 /* Never
logA2StatusLogMonitorStatus 1 /* Do Not Monitor
logA2StatusLogMatchTrapPolicy 1 /* Send
The following log watcher causes state change traps. Its state is set to UP again automatically at the beginning of a new poll interval:
logA2StatusLogWatcherName lwSta1
logA2StatusLogFileName D:\appl1\log.txt
logA2StatusLogPosPattern error
logA2StatusLogTogglePosPattern
logA2StatusLogStatusPolicy 1 /* Poll
logA2StatusLogTrapSendPolicy 2 /* Once
logA2StatusLogMonitorStatus 1 /* Monitor
logA2StatusLogMatchTrapPolicy 2 /* Do not send
The following log watcher causes state change traps. Its state is set to UP again automatically when a toggle pattern matches the string in the log file:
logA2StatusLogWatcherName lwSta2
logA2StatusLogFileName D:\appl1\log.txt
logA2StatusLogPosPattern error
logA2StatusLogTogglePosPattern started
logA2StatusLogStatusPolicy 4 /* Toggled
logA2StatusLogTrapSendPolicy 2 /* Once
logA2StatusLogMonitorStatus 1 /* Monitor
logA2StatusLogMatchTrapPolicy 2 /* Do not send
The following log watcher causes state change traps. Its state is set to UP again manually by using the reset function:
logA2StatusLogWatcherName lwSta3
logA2StatusLogFileName D:\appl1\log.txt
logA2StatusLogPosPattern error
logA2StatusLogTogglePosPattern
logA2StatusLogStatusPolicy 3 /* Start-from-previous-read
logA2StatusLogTrapSendPolicy 2 /* Once
logA2StatusLogMonitorStatus 1 /* Monitor
logA2StatusLogMatchTrapPolicy 2 /* Do not send
Chapter 4: Configuring the Log Agent 4–29
Configurable MIB Attributes
logA2*LogOwner
Class name of the Agent whose DSM Policy handles the status traps for this watcher. Default value is caiLogA2.
logA2StatusLogStatus
The attribute that shows the current status of the watcher.
The values are as follows:
1 — (up) The watcher is in a up state, i.e. the pattern has not been matched or for a toggle watcher the up pattern has been matched to change from a down state to an up state.
2 — (downCritical) The watcher is in a down state, i.e. the pattern has been matched and a critical alert is raised.
3 — (unknown) The watcher is a new watcher that has not been polled for the first time or file is not readable.
4 — (reset) The user may reset the watcher which is in a down state using the reset state.
5 — (downWarning) The watcher is in a down state, i.e. the pattern has been matched and a warning alert is raised.
logA2*LogButton
The attribute that is used to add or delete watchers.
The values are as follows:
1 — (none) No action.
2 — (delete) Use the current value of the watcher name attribute to delete the watcher with that name.
3 — (add) Use the current contents of the ConfigLogGroup to add a watcher.
4–30 Using the Log Agent

Configurable MIB Attributes
File Watcher Attributes
The entries in the File Status Table (logA2StatusFileTable — part of the logA2StatusGroup), specify the files the Log Agent monitors for either existence or non-existence. The table attributes that make up each file watcher entry describe the:
File name of the file the agent checks to verify its existence or non-existence.
Actions the agent takes if the file is in a variant existence condition.
To specify a file watcher, create a table entry in the Log Agent’s configuration set. In a production environment, you may want to use a configuration set to specify large numbers of file watchers that are implemented over multiple systems, rather than having to enter the watchers one-by-one on each system during runtime.
The sample below shows the configuration of a file watcher. Default attribute values do not need to be specified in the table entry. For more information on these attributes, see the individual descriptions and recommendations that follow. If the attribute’s name contains an asterisk (*) the description refers to both, the Status Group attribute and it’s corresponding attribute of the Config Group.
Note: The #SNMPTABLE tag line must be repeated for each entry in the table.
/* =====================================
/* File Watchers
/* =====================================
#SNMPTABLE logA2StatusFileTable
logA2StatusFileName X:\winnt\system32\cache\event.log
logA2StatusFileName Cache Event Logs
logA2StatusFileExist 2 /* does not exist
logA2StatusFileTrapSendPolicy 3 /* per poll
logA2StatusFileHistoryPolicy 2 /* Do not generate trap history
logA2StatusFileCallbackRef File does not exist
logA2*FileName
Specifies the full path and name of the file to be monitored for existence or non-existence.
You must specify a value for logA2StatusFileName for each table entry you define. The maximum length of the name is 128 characters.
Chapter 4: Configuring the Log Agent 4–31

Configurable MIB Attributes
logA2*FileWatcherName
Specifies the name of the watcher. The name must be unique and should be meaningful to the user.
You must specify a value for logA2StatusWatcherName for each table entry you define. The maximum length of the name is 128 characters.
logA2*FileExist
Specifies the policy for monitoring either the existence or non-existence of the file. The value set for this attribute will control which status will be set for the file watcher in the event that the specified file is found to exist or not exist.
The values are as follows:
1 — (file exists) - The expected condition is that the file watcher will find the specified file in the monitored system’s directory.
If the file does not exist, the attribute logA2StatusFileStatus will be set to DOWN, and the logA2FileStateDown (6:11985) will be issued at the frequency dictated by the logA2StatusFileSendTrapPolicy attribute.
If the file does exist, the logA2StatusFileStatus attribute will be set to UP and remain up for as long as the file exists. In the latter case, the logA2FileStateUp (6:11984) will only be issued once, unless the logA2StatusFileSendTrapPolicy attribute is set to 1 (never).
2 — (file does not exist) - The expected situation is that the file watcher will not find the specified file in the monitored system’s directory.
If the file does exist, the attribute logA2StatusFileStatus will be set to DOWN, and the logA2FileStateDown (6:11985) will be issued at the frequency dictated by logA2StatusFileSendTrapFreq.
If, on the other hand, the file does not exist, logA2StatusFileStatus will be set to UP and remain UP for as long as the file does not exist. In the latter case, the logA2FileStateUp (6:11984) will only be issued once, unless the logA2StatusFileSendTrapPolicy attribute is set to 1 (never).
logA2*FileHistoryPolicy
Specifies whether the file watcher’s enterprise-specific traps are written in the Trap History Table (logA2HistoryTable)
The values are as follows:
1 — (generateHistory) The traps are recorded in the history table.
2 — (noGenerateHistory) The traps are not recorded in the history table.
The default is 2 (noGenerateHistory).
4–32 Using the Log Agent
Configurable MIB Attributes
Recommendation: Use the attribute logA2HistoryMaxEntries in the logA2HistoryGroup to change the size of the history table. If you enable the collection of traps for files, you can increase the size of the table to accommodate the number of traps typically of interest to you. If you disable the collection of traps for both log watchers (logA2StatusLogHistoryPolicy) and file watchers (logA2StatusFileHistoryPolicy), you can reset the size of the table to zero entries to save space.
logA2*FileTrapSendPolicy
The value controlling whether or not traps are sent; and if they are sent, when, what kind, and how many traps are sent upon detection of a variant file-existence condition. Setting of this attribute has no effect on how the watched file’s status is determined. The values are as follows:
The values are as follows:
1 — (never) The state traps are never sent, regardless of the existence of a variant file-existence condition and regardless of the setting of logA2StatusFileStatusPolicy. That is, the logA2StatustFileStatus attribute status transitions are available to management applications only when the attribute is polled or in response to a management request.
2 — (once) The logA2FileStateDown trap (6:11985) is sent only once after the initial detection of the file’s variant existence condition. No additional logA2FileStateDown traps are sent during subsequent polling intervals if the watched file’s variant existence condition persists.
3 — (per poll) The logA2FileStateDown trap (6:11985) is sent once per polling interval for each poll during which the file’s variant existence condition is detected.
The default is 2 (once).
Note: The circumstances governing when the logA2FileAdded (6:11986) and logA2FileDeleted trap (6:11987) are sent are not affected by any of the logA2StatusFileTrapSendPolicy settings.
logA2StatusFileStatus
The attribute that shows the current status of the watcher.
The values are as follows:
1 — (up) The file is in the expected state.
2 — (down) The file is not in the expected state.
3 — (unknown) The watcher is a new watcher that has not been polled for the first time.
4 — (acknowledged) The watcher was in a down state but the user has acknowledged this state.
Chapter 4: Configuring the Log Agent 4–33

Configurable MIB Attributes
logA2*FileButton
The attribute that is used to add or delete watchers.
The values are as follows:
1 — (none) No action.
2 — (delete) Use the current value of the watcher name attribute to delete the watcher with that name.
3 — (add) Use the current contents of the ConfigFileGroup to add a watcher.
logA2ConfigFilePollInterval
Specifies the number of seconds between successive scans of the watched log files for specified patterns.
The values are as follows:
-1 — Polling is disabled. Disabling the polling interval disables the agent’s monitoring of the log files.
n (integer) — Length of the poll interval in seconds. Minimum is 30, maximum is 2,147,483,647.
The default is 120.
Recommendations:
Set this polling interval long enough to accommodate the average size and activity of the logs that are to be scanned.
Make sure you coordinate the polling interval setting with the trap policies and the status policies of the individual watchers. For example, if you wanted to be made aware of security violations, such as if a specific user attempted to log on to the system, you would want a relatively short polling interval with the trap policy set for trapping on every occurrence of the security violation pattern, and the status policy set for start-from-previous-read.
Trap History Attributes
The logA2HistoryGroup contains two settable attributes, logA2HistoryMaxEntries and logA2HistoryRefresh, and a table of the traps the agent has sent, logA2HistoryTable.
logA2HistoryRefresh
Specifies whether the trap data currently in the logA2HistoryTable will be deleted.
4–34 Using the Log Agent
Configurable MIB Attributes
The values are as follows:
1 — (refresh) The table will be refreshed. All current entries will be deleted.
2 — (none) The table remains as it is. No entry will be deleted.
Note: This attribute should only be set during runtime using applications such as MIB Browser or the Log Agent View.
logA2HistoryMaxEntries
Specifies the maximum number of rows that the logA2HistoryTable can contain.
The value is as follows:
n — (integer) Number
The default is 50 entries.
Note: If you change the value of logA2MaxHistoryEntries, the history table will automatically be refreshed.
To change the value of logA2HistoryMaxEntries, create an entry like the following sample in your configuration set for the Log Agent.
/* ============================================
/* Trap History Table Size
/* ============================================
#SNMPGROUP logA2HistoryGroup
logA2HistoryMaxEntries 30
Adding and Removing Watchers during Runtime
You can add and delete watchers during runtime with either the Log Agent View or MIB Browser. The information in the following section explains how to add and delete watchers with MIB Browser.
For more information on how to use the application to add and delete watchers, see the Log Agent View online help.
Adding and Removing Log Watchers during Runtime
To add a log watcher for the Log Agent to monitor
1. Set the values of the following attributes in the logA2ConfigLogGroup (part of the logA2ConfigGroup) so that they describe the log to be scanned, the regular expression the watcher is looking for, and what the agent is to do if the filtering condition applies:
Chapter 4: Configuring the Log Agent 4–35

Configurable MIB Attributes
logA2ConfigLogPollIntervall
logA2ConfigLogWatcherName
logA2ConfigLogFileName
logA2ConfigLogPosPattern
logA2ConfigLogPosStart
logA2ConfigLogPosEnd
logA2ConfigLogNegPattern
logA2ConfigLogNegStart
logA2ConfigLogNegEnd
logA2ConfigLogTogglePosPattern
logA2ConfigLogTogglePosStart
logA2ConfigLogTogglePosEnd
logA2ConfigLogToggleNegPattern
logA2ConfigLogToggleNegStart
logA2ConfigLogToggleNegEnd
logA2ConfigLogStatusPolicy
logA2ConfigLogTrapSendPolicy
logA2ConfigLogHistoryPolicy
logA2ConfigLogMatchTrapPolicy
logA2ConfigLogMonitorStatus
2. Set the value of logA2ConfigLogButton to ADD.
The Log Agent adds an entry to the Log Status Table (logA2StatusLogTable).
To remove an individual log watcher from the status log table
1. In the logA2StatusLogTable, select the log watcher table entry you want to remove.
2. Set the value of logA2StatusLogButton to DELETE.
The log watcher is removed.
4–36 Using the Log Agent
Configurable MIB Attributes
Chapter 4: Configuring the Log Agent 4–37
Adding and Removing File Watchers during Runtime
You can add and remove file watchers during runtime.
To add a file watcher for the Log Agent to monitor
1. Set the values of the following attributes in the logA2ConfigFileGroup (part of the logA2ConfigGroup) so that they describe what file is to be monitored and what the agent is to do if the file is found to exist (or not exist):
logA2ConfigFilePollIntervall
logA2ConfigFileWatcherName
logA2ConfigFileName
logA2ConfigFileExist
logA2ConfigFileTrapSendPolicy
logA2ConfigFileHistoryPolicy
2. Set the value of LogA2ConfigFileButton to ADD.
The Log Agent adds an entry to the file status table (logA2StatusFileTable).
You can remove a file watcher with the delete option in either the logA2ConfigFileGroup or the logA2StatusFileTable. The easier of the two options involves the use of the option in the logA2StatusFileTable.
To remove a file watcher from the file status table
1. In the logA2StatusFileTable, access the file watcher table entry you want to remove.
2. Set the value of LogA2StatusFileButton to DELETE.
The file watcher is removed.

Chapter 5: Configuring the DSM for the Log Agent
This chapter describes how to configure the DSM for Log Agent.
Removing a Node Type for the Log Agent Note: The .dat file and the .cnf file residing on the DSM, determine the behavior of an agent with respect to all the managed objects an agent may monitor. For the Log Agent, it is not reasonable to change any configuration information in these files, with the exception of the node types in the .dat file. Therefore this chapter only describes how to remove node types from the .dat file.
Before you edit the .dat file make sure you save an original version of the file so that you can restore the DSM to its default behavior if necessary.
Using the default policy for the Log Agent, the DSM looks for the agent on the following classes of nodes:
Host:WindowsNT_Server
Workstation:WindowsNT
ManagedPC:WindowsNT_ManagedPC
Host:DG_UX
Host:NCRUnix
Host:HPServer
Host:HPUnix
Host:RISC6000
Host:Sequent_Server
Host:Solaris
Host:UnixWare
Workstation:SCOUnix
Workstation:SunOS
Workstation:DECSystem
Host:SiemenUX
Host:Silicon
Chapter 5: Configuring the DSM for the Log Agent 5–1

Removing a Node Type for the Log Agent
5–2 Using the Log Agent
To keep the DSM from looking for the Log Agent on all the systems
1. In the caiLogA2.dat file, locate the #mochild statements that specify the Log Agent as the child of the node type you want to remove (for example, Windows NT workstations):
#mochild
mochild_parent :Workstation:WindowsNT
mochild_index :NextIndex
mochild_child :Agent:caiLogA2
2. Add ! to the beginning of each line to comment them out:
!#mochild
!mochild_parent :Workstation:WindowsNT
!mochild_index :NextIndex
!mochild_child :Agent:caiLogA2
Note: Be careful not to comment out any part of the node class definition when you edit the file.

Appendix A: Log Agent Traps and Evaluators
This Appendix describes the Log Agent traps and evaluators.
Log Agent Traps The DSM is configured to listen for traps issued by the Log Agent and respond appropriately. Although SNMP traps are classified based on whether they are generic (trap types 0 through 5) or enterprise-specific (trap type 6), DSM policy is based on the type of information the traps convey:
Rediscovery traps indicate conditions under which the DSM should rediscover managed objects on the node.
State change traps indicate that the state of a managed object at the bottom of the hierarchy has changed. State change traps are linked to the event descriptions in finite state machine definitions for the system object classes. State change traps pertain to a specific agent object class. The DSM’s action upon receiving a state change trap is determined by the finite state machine defined for that class.
Besides these types of traps, the Log Agent sends match traps through the SNMP Administrator to the CA NSM Event Agent on the same system.
Rediscovery Traps
The following Log Agent traps are rediscovery traps, each with an enterprise OID of 1.3.6.1.4.1.791.2.9.5.5 :
Cold start traps (type 0, subtype 0) indicate that a Log Agent has been restarted. When the DSM receives this trap, it attempts a complete rediscovery of the agent object on the node where the trap originated and all its children.
Warm start traps (type 1, subtype 0) indicate that the Log Agent has been reconfigured. When the DSM receives this trap, it attempts a complete rediscovery of the Log Agent object on the node where the trap originated and all its children.
Appendix A: Log Agent Traps and Evaluators A–1

Log Agent Traps
Log watcher add traps (type 6, subtype 10986) indicate that the agent administrator has added a new log object to be monitored. When the Distributed State Machine receives this trap, it rediscovers the Monitored Logs branch of the object tree on the specified node and all instances below it of the Log Watcher class.
Log watcher delete traps (type 6, subtype 10987) indicate that the agent administrator has deleted a monitored log object. When the Distributed State Machine receives this trap, it rediscovers the Monitored Logs branch of the object tree on the specified node and all instances below it of the Log Watcher class.
File watcher add traps (type 6, subtype 11986) indicate that the agent administrator has added a new file object to be monitored. When the Distributed State Machine receives this trap, it rediscovers the Monitored Files branch of the object tree on the specified node and all instances below it of the File Watcher class.
File watcher delete traps (type 6, subtype 11987) indicate that the agent administrator has deleted a monitored file object. When the Distributed State Machine receives this trap it rediscovers the Monitored Files branch of the object tree on the specified node and all instances below it of the File Watcher class.
Generic SNMP Trap Descriptions
This table lists the generic SNMP traps that the Log Agent sends to alert the DSM of the agent’s status:
Trap Name/Type Event Description
coldStart(0:0) Reconfiguration events
Cold start traps with an enterprise OID of 1.3.6.1.4.1.791.2.9.5.5 indicate that the Log Agent has been restarted. When the DSM receives this trap, it attempts a complete rediscovery of the agent object on the node where the trap originated and all its children.
warmStart(1:0) Reconfiguration events
Warm start traps with an enterprise OID of 1.3.6.1.4.1.791.2.9.5.5 indicate that the Log Agent has been reconfigured. When the DSM receives this trap, it attempts a complete rediscovery of the agent object on the node where the trap originated and all its children.
linkDown(2:0) Reconfiguration events
Link down traps with an enterprise OID of 1.3.6.1.4.1.791.2.10.2.43 indicate that the Log Agent is stopping. When the DSM receives this trap, it attempts a complete rediscovery of the agent object on the node where the trap originated to verify that the agent is no longer running.
A–2 Using the System Monitoring Option
Log Agent Traps
Appendix A: Log Agent Traps and Evaluators A–3
Trap Name/Type Event Description
authenticationFailure (4:0)
None Authentication failure traps indicate that the SNMP Administrator on an agent node has received an SNMP request with a community string that it does not recognize. Authentication failure traps are not specific to any one agent, such as the Log Agent, but are generated by the SNMP Administrator on behalf of all the Agent Technology agents running on the node. The DSM takes no action in response to an authentication failure trap.
Enterprise-Specific Trap Descriptions
This section lists the traps that the Log Agent sends:
to alert the DSM of a change in the state of a managed object (state change traps) or
to hand over a text string of a monitored log file to the Event Management (match traps)
All these traps are enterprise-specific traps (generic trap type 6). Each trap has the following format:
| SubType | OID | VarBindList |
SubType — Number that identifies the sub type of the trap. See the tables in the following sections for explanations on the different subtypes of match traps and state change traps.
OID — All traps are identified by the Object Identifier of the Log Agent (1.3.6.1.4.1.791.2.9.5.5).
VarBindList — List or table of VarBinds which contain MIB attributes.
A MIB attribute consists of the attribute OID and the instance OID followed by the attribute value. The instance OID starts with a length field followed by the watcher name (character encoded).

Log Agent Traps
The VarBinds contain the following MIB attributes:
Name of the monitored file
Pattern with which the filtering process is defined (log watcher) or existence condition (file watcher)
String that has been found in a log file (only for match traps and down traps caused by a log watcher). If a pattern file is used to replace the log file string by another text string this other text string is sent in the trap.
Owner of the trap
Name of the watcher
For example the following trap may be sent:
10985:1.3.6.1.4.1.791.2.9.5.5
S=1.3.6.1.4.1.791.2.9.5.5.2.2.1.2.8.119.97.116.99.104.101.114.49:
d#3a#5cmyfiles#5clic.txt:
1.3.6.1.4.1.791.2.9.5.5.2.2.1.3.8.119.97.116.99.104.101.114.49:
error:
1.3.6.1.4.1.791.2.9.5.5.2.2.1.21.8.119.97.116.99.104.101.114.49:
Application error detected:
1.3.6.1.4.1.791.2.9.5.5.2.2.1.23.8.119.97.116.99.104.101.114.49:
caiLogA2:
1.3.6.1.4.1.791.2.9.5.5.2.2.1.1.8.119.97.116.99.104.101.114.49:
watcher1:
10985 — Sub type of the trap: In this example it is a DOWN trap.
1.3.6.1.4.1.791.2.9.5.5 — Object Identifier of the Log Agent
S= ... — VarBind list containing the names and values of the following MIB attributes.
Log file name:
1.3.6.1.4.1.791.2.9.5.5.2.2.1.2: Attribute OID of
logA2StatusLogFileName
8: Length field, the watcher’s name has a length of 8 bytes
119.97.116.99.104.101.114.49: Instance OID
w a t c h e r 1
d#3a#5cmyfiles#5clic.txt: Value of the attribute
d : \myfiles \lic.txt
A–4 Using the System Monitoring Option
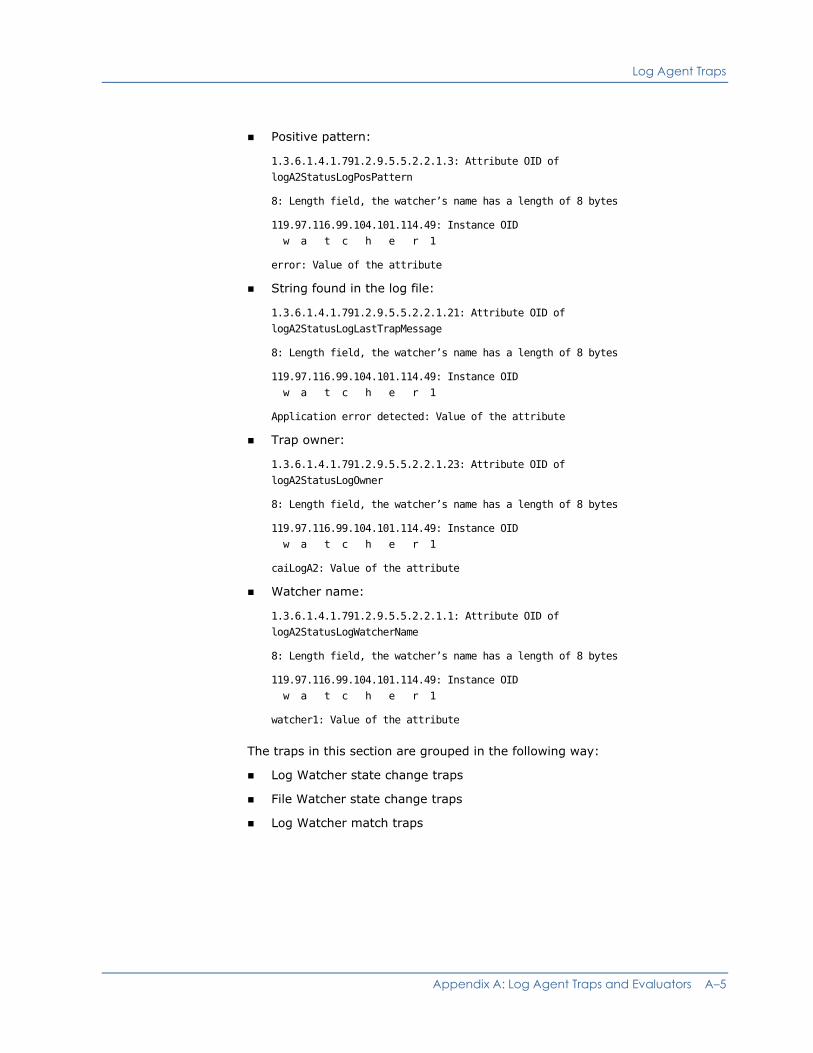
Log Agent Traps
Positive pattern:
1.3.6.1.4.1.791.2.9.5.5.2.2.1.3: Attribute OID of
logA2StatusLogPosPattern
8: Length field, the watcher’s name has a length of 8 bytes
119.97.116.99.104.101.114.49: Instance OID
w a t c h e r 1
error: Value of the attribute
String found in the log file:
1.3.6.1.4.1.791.2.9.5.5.2.2.1.21: Attribute OID of
logA2StatusLogLastTrapMessage
8: Length field, the watcher’s name has a length of 8 bytes
119.97.116.99.104.101.114.49: Instance OID
w a t c h e r 1
Application error detected: Value of the attribute
Trap owner:
1.3.6.1.4.1.791.2.9.5.5.2.2.1.23: Attribute OID of
logA2StatusLogOwner
8: Length field, the watcher’s name has a length of 8 bytes
119.97.116.99.104.101.114.49: Instance OID
w a t c h e r 1
caiLogA2: Value of the attribute
Watcher name:
1.3.6.1.4.1.791.2.9.5.5.2.2.1.1: Attribute OID of
logA2StatusLogWatcherName
8: Length field, the watcher’s name has a length of 8 bytes
119.97.116.99.104.101.114.49: Instance OID
w a t c h e r 1
watcher1: Value of the attribute
The traps in this section are grouped in the following way:
Log Watcher state change traps
File Watcher state change traps
Log Watcher match traps
Appendix A: Log Agent Traps and Evaluators A–5

Log Agent Traps
Log Watcher State Change Traps
Trap Name/ Type
Event Attribute Description
logA2LogStateUp (6:10984)
LOGA2_LOG_UP_TRAP logA2StatusLog Status
The filtering condition has not applied, and the log file is accessible. The status of the watcher is UP.
logA2LogState DownWarningl (6:10982)
LOGA2_LOG_WAR_TRAP logA2StatusLog Status
The filtering condition has applied, and the log file is accessible. The status of the watcher is DOWN WARNING.
logA2LogState DownCritical (6:10985)
LOGA2_LOG_CRI_TRAP logA2StatusLog Status
The filtering condition has applied, and the log file is accessible. The status of the watcher is DOWN CRITICAL.
logA2LogState Unknown (6:10980)
LOGA2_LOG_NOFILE_TRAP
logA2StatusLog Status
The log file is not accessible, and the status of the log watcher is UNKNOWN.
logA2LogAdded (6:10986)
No event defined logA2ConfigLog Button
A new log watcher has been added to the agent’s log watcher table.
logA2LogDeleted (6:10987)
No event defined logA2ConfigLog Button, logA2Status LogButton
A log watcher has been deleted from the agent’s log watcher table.
A–6 Using the System Monitoring Option
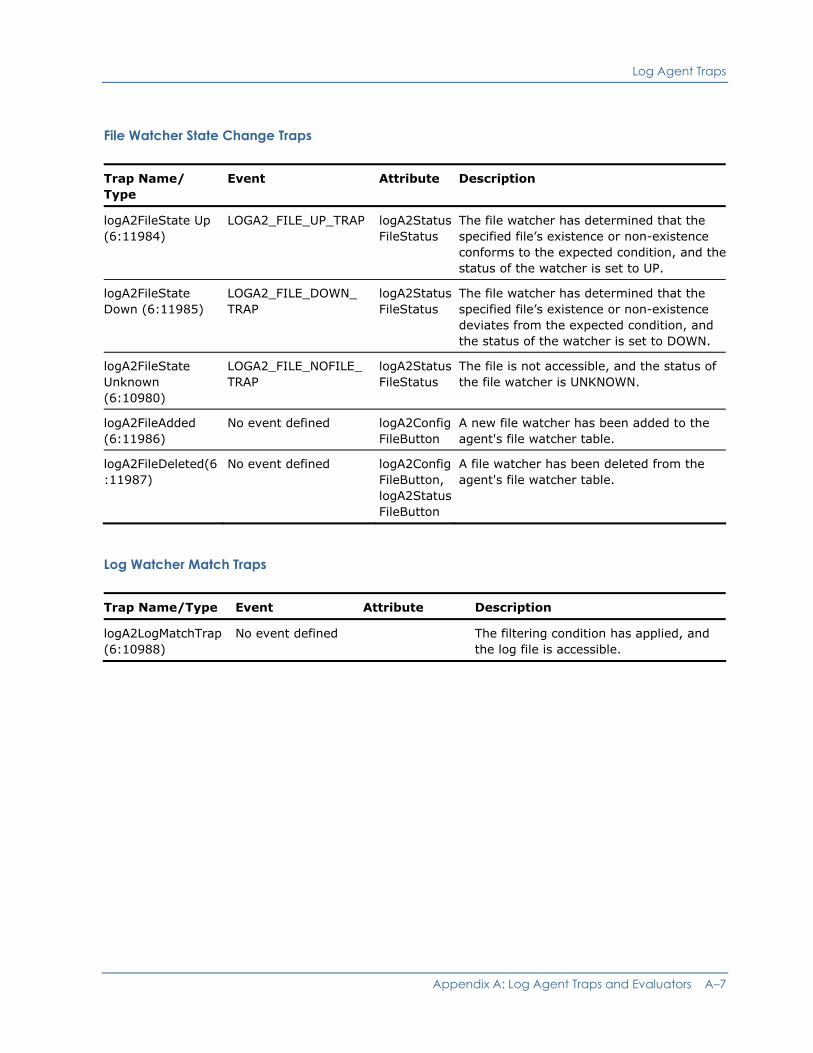
Log Agent Traps
File Watcher State Change Traps
Trap Name/ Type
Event Attribute Description
logA2FileState Up (6:11984)
LOGA2_FILE_UP_TRAP logA2Status FileStatus
The file watcher has determined that the specified file’s existence or non-existence conforms to the expected condition, and the status of the watcher is set to UP.
logA2FileState Down (6:11985)
LOGA2_FILE_DOWN_ TRAP
logA2StatusFileStatus
The file watcher has determined that the specified file’s existence or non-existence deviates from the expected condition, and the status of the watcher is set to DOWN.
logA2FileState Unknown (6:10980)
LOGA2_FILE_NOFILE_ TRAP
logA2StatusFileStatus
The file is not accessible, and the status of the file watcher is UNKNOWN.
logA2FileAdded (6:11986)
No event defined logA2ConfigFileButton
A new file watcher has been added to the agent's file watcher table.
logA2FileDeleted(6:11987)
No event defined logA2ConfigFileButton, logA2StatusFileButton
A file watcher has been deleted from the agent's file watcher table.
Log Watcher Match Traps
Trap Name/Type Event Attribute Description
logA2LogMatchTrap (6:10988)
No event defined The filtering condition has applied, and the log file is accessible.
Appendix A: Log Agent Traps and Evaluators A–7
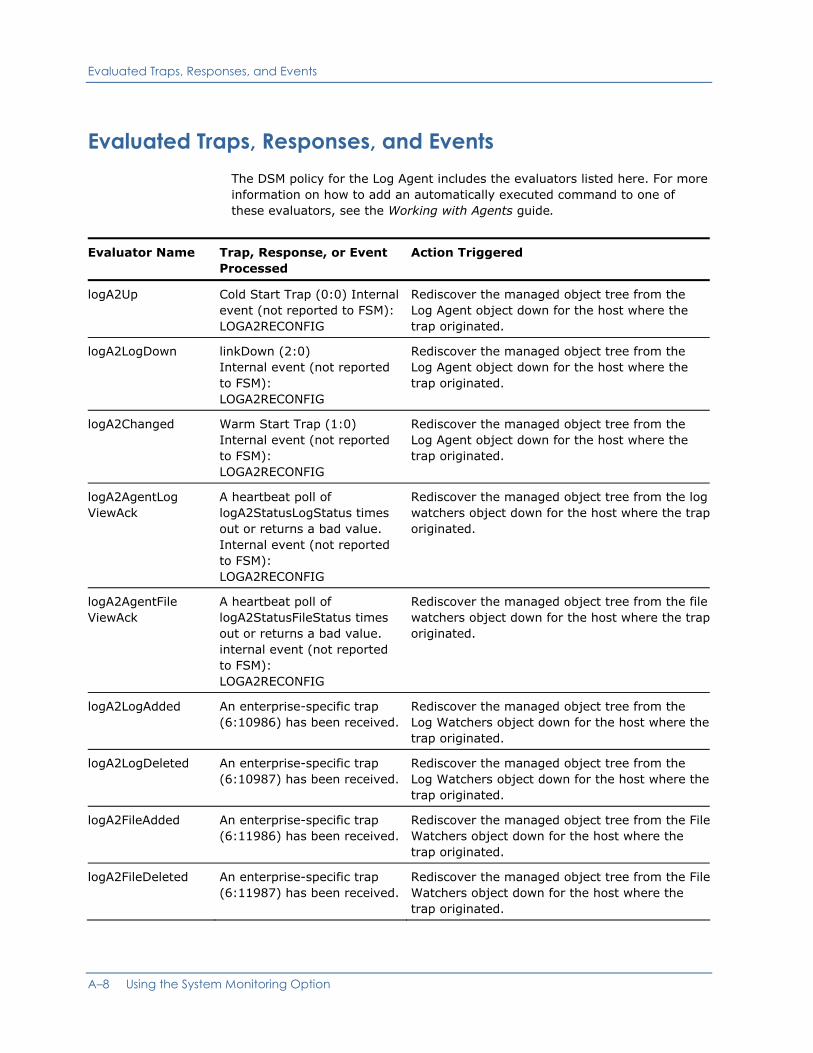
Evaluated Traps, Responses, and Events
Evaluated Traps, Responses, and Events The DSM policy for the Log Agent includes the evaluators listed here. For more information on how to add an automatically executed command to one of these evaluators, see the Working with Agents guide.
Evaluator Name Trap, Response, or Event Processed
Action Triggered
logA2Up Cold Start Trap (0:0) Internal event (not reported to FSM): LOGA2RECONFIG
Rediscover the managed object tree from the Log Agent object down for the host where the trap originated.
logA2LogDown linkDown (2:0) Internal event (not reported to FSM): LOGA2RECONFIG
Rediscover the managed object tree from the Log Agent object down for the host where the trap originated.
logA2Changed Warm Start Trap (1:0) Internal event (not reported to FSM): LOGA2RECONFIG
Rediscover the managed object tree from the Log Agent object down for the host where the trap originated.
logA2AgentLog ViewAck
A heartbeat poll of logA2StatusLogStatus times out or returns a bad value. Internal event (not reported to FSM): LOGA2RECONFIG
Rediscover the managed object tree from the log watchers object down for the host where the trap originated.
logA2AgentFile ViewAck
A heartbeat poll of logA2StatusFileStatus times out or returns a bad value. internal event (not reported to FSM): LOGA2RECONFIG
Rediscover the managed object tree from the file watchers object down for the host where the trap originated.
logA2LogAdded An enterprise-specific trap (6:10986) has been received.
Rediscover the managed object tree from the Log Watchers object down for the host where the trap originated.
logA2LogDeleted An enterprise-specific trap (6:10987) has been received.
Rediscover the managed object tree from the Log Watchers object down for the host where the trap originated.
logA2FileAdded An enterprise-specific trap (6:11986) has been received.
Rediscover the managed object tree from the File Watchers object down for the host where the trap originated.
logA2FileDeleted An enterprise-specific trap (6:11987) has been received.
Rediscover the managed object tree from the File Watchers object down for the host where the trap originated.
A–8 Using the System Monitoring Option

Evaluated Traps, Responses, and Events
Appendix A: Log Agent Traps and Evaluators A–9
Evaluator Name Trap, Response, or Event Processed
Action Triggered
logA2UpTrap logA2LogStateUp trap (6:10984) — state changed to UP.
Generate a trap state change event, LOGA2_LOG_UP_TRAP, for input to the finite state machine for the class LogAgentLogReq.
logA2AgentLog StateWarningTrap
logA2LogStateCritical trap (6:10982) — state changed to DOWN WARNING.
Generate a trap state change event, LOGA2_LOG_WAR_TRAP, for input to the finite state machine for the class LogAgentLogReq.
logA2AgentLog StateCriticalTrap
logA2LogStateCritical trap (6:10985) — state changed to DOWN CRITICAL.
Generate a trap state change event, LOGA2_LOG_CRI_TRAP, for input to the finite state machine for the class LogAgentLogReq.
logA2UnknownTrap logA2LogStateUnknown trap (6:10980) — state changed to UNKNOWN.
Generate a trap state change event, LOGA2_LOG_NOFILE_TRAP, for input to the finite state machine for the class LogAgentLogReq.
logA2Status StatusUp
The response to a poll of logA2StatusLogStatus indicates the state of a monitored log is UP.
Generate a poll state change event, LOGA2_LOG_UP_POLL, for input to the finite state machine for the class LogAgentLogReq.
logA2Status Status DownWarning
The response to a poll of logA2StatusLogStatus indicates the state of a monitored log is DOWN WARNING.
Generate a poll state change event, LOGA2_LOG_WAR_POLL, for input to the finite state machine for the class LogAgentLogReq.
logA2Status StatusDownCritical
The response to a poll of logA2StatusLogStatus indicates the state of a monitored log is DOWN CRITICAL.
Generate a poll state change event, LOGA2_LOG_CRI_POLL, for input to the finite state machine for the class LogAgentLogReq.
logA2StatusStatus Ack
The response to a poll of logA2StatusLogStatus indicates the state of a monitored log is ACK.
Generate a poll state change event, LOGA2_LOG_DOWN_ACK_POLL, for input to the finite state machine for the class LogAgentLogReq.
logA2StatusStatus FileNotFound
The response to a poll of logA2StatusLogStatus indicates the state of a monitored log is UNKNOWN.
Generate a poll state change event, LOGA2_LOG_NOFILE_POLL, for input to the finite state machine for the class LogAgentLogReq.
logA2FileUpTrap logA2FileStateUp trap (6:11984) — state changed to UP.
Generate a trap state change event, LOGA2_FILE_UP_TRAP, for input to the finite state machine for the class LogAgentFileReq.
logA2FileState DownTrap
logA2FileStateDown trap (6:11985) — state changed to DOWN.
Generate a trap state change event, LOGA2_FILE_DOWN_TRAP, for input to the finite state machine for the class LogAgentFileReq

Evaluated Traps, Responses, and Events
A–10 Using the System Monitoring Option
Evaluator Name Trap, Response, or Event Processed
Action Triggered
logA2FileStatusUp The response to a poll of logA2StatusFileStatus indicates the state of a monitored file according to the agent is UP.
Generate a poll state change event, LOGA2_FILE_UP_POLL, for input to the finite state machine for the class LogAgentFileReq.
logA2FileStatus Down
The response to a poll of logA2StatusFileStatus indicates the state of a monitored file according to the agent is DOWN.
Generate a poll state change event, LOGA2_FILE_DOWN_POLL, for input to the finite state machine for the class LogAgentFileReq.
logA2FileStatus Ack The response to a poll of logA2StatusFileStatus indicates the state of a monitored file according to the agent is ACKNOWLEDGED.
Generate a poll state change event, LOGA2_FILE_DOWN_ACK_POLL, for input to the finite state machine for the class LogAgentFileReq.

Index
logA2*LogNegPattern, 4-17 logA2*LogNegStart, 4-22
A logA2*LogOwner, 4-30 logA2*LogPoll Interval, 4-14 logA2*LogPos Pattern, 4-17
abrowser command, 4-3 logA2*LogPosEnd, 4-22 logA2*LogPosStart, 4-22 access levels, read and write, 3-5 logA2*LogStatusPolicy, 4-22
accessing logA2*LogToggleNegEnd, 4-22 Agent View from node view, 4-1 logA2*LogToggleNegPattern, 4-21 MIB Browser from node view, 4-1 logA2*LogToggleNegStart, 4-22
logA2*LogTogglePosEnd, 4-22 adding logA2*LogTogglePosPattern, 4-21 file watcher, 4-37 logA2*LogTogglePosStart, 4-22 log watcher, 4-35 logA2*LogTrapSendPolicy, 4-25
admin community definition, 3-5 logA2*LogWatcherName, 4-14 logA2Config AutoSave, 4-12 agent logA2ConfigFilePollInterval, 4-34 configuration, 4-1 logA2HistoryMaxEntries, 4-35 default behavior, 4-1, 4-2, 4-1, 4-2 logA2HistoryRefresh, 4-34 installation, 3-2 logA2LogNegEnd, 4-22 monitored resources, 1-2 logA2StatusFileStatus, 4-33 overview, 1-1 logA2StatusLogStatus, 4-30 preinstallation, 3-1
protocol, 1-1 aws_orb, 3-10 starting and stopping, 3-10
aws_sadmin.cfg, 3-4, 3-5, 3-4, 3-5 Agent Technology, 3-2, 3-4, 3-2, 3-4
aws_sadmin.cfg community definitions, 3-6 start, 3-10 stop, 3-12 awservices command, 3-10
Agent View, 4-1, 4-3, 4-1, 4-3 overview, 4-2
B using, 4-3
AgentView, 4-8 basic regular expressions. See BRE, See BRE
attributes logA2*FileButton, 4-34 BRE, 2-3 logA2*FileExist, 4-32 logA2*FileHistoryPolicy, 4-32
C logA2*FileName, 4-31 logA2*FileTrapSendPolicy, 4-33 logA2*FileWatcherName, 4-32
caiLogA2, 3-3 logA2*LogButton, 4-30 logA2*LogFileName, 4-14 caiNtLog, 3-3 logA2*LogHistoryPolicy, 4-27
call-back logA2*LogMatchTrapPolicy, 4-28 configuration, 4-4 logA2*LogMonitorStatus, 4-27
Index–1
E example configuration file, 4-4 mechanism, 2-5 reference, 4-4
Enterprise-Specific Trap, A-3 using a script, 4-10
EOF-option, 2-2 catrapd, 3-9
ERE, 2-3 Cold start traps, A-1
Event Agent, 3-8 command CA NSM, 2-1 abrowser, 4-3
awservices, 3-10 Event Log, 2-2, 4-16, 4-20, 2-2, 4-16, 4-20 logtoA2, 3-3
existence condition, 2-5, 4-31, 2-5, 4-31 mibbrowse, 4-3
extended regular expressions. See ERE, See ERE
community definition, 3-4, 4-2, 3-4, 4-2 admin, 3-5 public, 3-5
condition, file existence, 4-32 F configurable MIB attributes, 4-11
configuration file existence, 2-5 agent, 4-1
File name, 4-31 Event Agent, 3-8 SNMP Administrator, 3-4 File Status Table, 4-31
Configuration sets, 4-1, 4-2, 4-8, 4-1, 4-2, 4-8 file watcher, 2-5 add traps, A-2 Console, 2-1 adding, 4-37
Console Log, 4-16 attributes, 4-11 delete traps, A-2 existence condition, 4-31
D removing, 4-37
file with patterns, 4-19 default behavior, 4-2 filter, 2-1
agent, 4-1, 4-2, 4-1, 4-2 filtering condition, 2-3, 4-17, 2-3, 4-17
defining attributes for managed objects, 4-1 filtering process, 2-3, 4-17, 2-3, 4-17
delete former Log Agents, 3-3 file watcher, 4-37
log watcher, 4-36 forwarding trap messages, 3-4 directory, log file, 4-14 frequency, state change traps, 4-25, 4-32, 4-
25, 4-32 Distributed Services Bus, 3-10
DSM, 5-1 from looking for the Log Agent, 5-2 G starting services, 3-10
generic SNMP traps, A-2
Index–2 Using the Log Agent
log watcher, 2-1, 4-11, 2-1, 4-11 get request, 3-4, 3-5, 3-4, 3-5 add traps, A-2
get-next request, 3-4, 3-5, 3-4, 3-5 adding, 4-35 attributes, 4-11, 4-13, 4-11, 4-13 behavior, 4-22 H delete traps, A-2 match trap, A-7 monitoring, 2-1 History Table name, 4-15 attributes, 4-11 removing, 4-36 file log watcher, 4-27 UP and DOWN status, 2-2 file watcher, 4-32
maximum entries, 4-35 logA2*FileButton, 4-34 refresh, 4-34
logA2*FileExist, 4-32
logA2*FileHistoryPolicy, 4-32 I
logA2*FileName, 4-31
logA2*FileTrapSendPolicy, 4-33 installation
logA2*FileWatcherName, 4-32 Event Agent, 3-8 Log Agent, 3-2 logA2*LogButton, 4-30
logA2*LogFileName, 4-14
L logA2*LogHistoryPolicy, 4-27
logA2*LogMatchTrapPolicy, 4-28 line position, 4-20 logA2*LogMonitorStatus, 4-27 list of patterns, 4-20 logA2*LogNegPattern, 4-17 Log Agent, 1-2, 2-1 logA2*LogNegStart, 4-22
call-back mechanism, 2-5 logA2*LogOwner, 4-30 default policy, 5-1
definition, 1-1 logA2*LogPoll Interval, 4-14 former versions, 3-3
logA2*LogPos Pattern, 4-17 installing, 3-2 MIB structure, 4-12 logA2*LogPosEnd, 4-22 migrate from previous versions, 3-3
logA2*LogPosStart, 4-22 start, 3-10 stop, 3-12 logA2*LogStatusPolicy, 4-22 traps, A-1
logA2*LogToggleNegEnd, 4-22 watcher, 2-5
logA2*LogToggleNegPattern, 4-21 Log Agent View, 4-3, 4-11, 4-3, 4-11
logA2*LogToggleNegStart, 4-22 log file, 2-1 directory, 4-14 logA2*LogTogglePosEnd, 4-22 name, 4-15
logA2*LogTogglePosPattern, 4-21 position in line, 4-22
logA2*LogTogglePosStart, 4-22 log status policy, 4-22
logA2*LogTrapSendPolicy, 4-25
Index–3
monitored resources agent, 1-2 logA2*LogWatcherName, 4-14
monitoring, 2-1 logA2Config AutoSave, 4-12 Console, 2-1
logA2ConfigFilePollInterval, 4-34 Event Log, 2-1 file watcher, 2-5 logA2HistoryMaxEntries, 4-35
logA2HistoryRefresh, 4-34
N logA2LogNegEnd, 4-22
logA2StatusFileStatus, 4-33
name logA2StatusLogStatus, 4-30 file watcher, 4-31
logAgent, 3-3 log file, 4-15 log watcher, 4-15 logtoA2 command, 3-3 monitored files, 4-31
negative pattern, 2-3, 4-17, 2-3, 4-17 M
node type, removing, 5-1
Node View, 4-1 managed objects, 4-1
null characters, support, 2-2 monitoring, 2-1 viewing, 4-1
match trap O prerequisites, 3-8 secure sending, 3-8 sending, 4-28 og watcher, example, 4-28
Metacharacters, 4-17
MIB, 1-1, 4-3 P attributes and configuration sets, 4-2 purpose, 4-1 viewing, 4-3 pattern, 2-1
positive and negative, 2-3, 4-17, 2-3, 4-17 MIB attributes, A-4 toggle, 4-21 access level, 3-6
configurable, 4-10, 4-11, 4-10, 4-11 pattern files, 4-19 file watcher, 4-32
PDUs, 3-7 log watcher, 4-13 read and write, 3-5 poll interval, 4-14, 4-34, 4-14, 4-34 trap history, 4-34
port number, 3-7 MIB Browser, 2-6, 4-1, 4-8, 4-11, 2-6, 4-1, 4-8, 4-11 position in line, 4-22
overview, 4-3 positive pattern, 2-3, 4-17, 2-3, 4-17 starting, 4-3
protocol, 1-1 using, 4-3
protocol data units. See PDUs, See PDUs MIB trap history attribute, 4-34
public community definition, 3-5 mibbrowse command, 4-3
Index–4 Using the Log Agent

R SNMP Administrator, 2-1, 3-4, 4-2, 2-1, 3-4, 4-2
configuration file, 3-5 read access level, 3-5 restarting, 3-6
store, 4-2 refresh history table, 4-35 SNMP traps, generic, A-2 regular expressions, 2-1, 2-3, 4-18, 2-1, 2-3,
4-18 Starting Agent Technology services, 3-10 remove node types, 5-1 Log Agent, 3-10
removing state, 2-1 file watcher, 4-37
log watcher, 4-36 state change traps, 2-1 monitored node types, 5-1 frequency, 4-25, 4-32, 4-25, 4-32 watches during runtime, 4-35 sending, 4-29
requests, 3-4, 3-5, 3-4, 3-5 Status Table, 4-13
runtime changes, saving, 4-12 Stopping Agent Technology services, 3-10 Runtime Changes, saving, 4-11 Log Agent, 3-10
runtime, adding and removing watches, 4-35 structure of the Log Agent MIB, 4-12
S T
sadmin, 3-4, 4-12, 3-4, 4-12 TCP/IP, 1-1
Saving Runtime Changes, 4-11 toggle filter, 2-2
secure sending of match traps, 3-8 toggle filtering condition, 2-3, 4-21, 2-3, 4-21
Service Control Manager, 3-10 toggle pattern, 4-21
set request, 3-4, 3-5, 3-4, 3-5 transmission control protocol/Internet protocol. See TCP/IP settable MIB attributes, 4-11
setting trap, 2-1 file watcher attributes, 4-33 cold start, A-1 log watcher attributes, 4-14 destination, 3-4, 3-5, 3-7, 3-4, 3-5, 3-7
enterprise-specific, A-1, A-3, A-1, A-3 Simple Network Management Protocol. See SNMP file watcher, A-7
file watcher add, A-2 SNMP, 1-1, 4-2 file watcher delete, A-2
community definitions, 4-2 format, A-3 community definitions, 3-5 forwarding, 3-4 community definitions, 3-5 frequency of state change, 4-25, 4-32, 4-
25, 4-32 management application, 3-6 trap destinations, 4-2 generic, A-2 trap destinations, 3-7 log watcher add, A-2 trap destinations, 3-7 log watcher change, A-6 traps, A-2 log watcher delete, A-2
Index–5
Index–6 Using the Log Agent
sending of match traps, 4-27 warm start, A-1
Trap History Table file watcher, 4-32 log file watcher, 4-27
traps, responses, and events, evaluated, A-8
U
UDP, 1-1 port, 3-7
upgrading from the former Log Agents, 3-3
user datagram protocol. See UDP
using Agent View, 4-3 MIB Browser, 4-3 Node view, 4-1
V
viewing managed object, 4-1 MIB, 4-3
W
Warm start traps, A-1
wildcard, 4-15
Windows Event Log Monitoring, 2-2
write access, 3-5