c285 cover wwstorage.avermedia.com/web_release_www/c285/c285_um.../ ec, low voltage directive (lvd)...
TRANSCRIPT

Italiano
English
Français
Deutsch
Italiano
Español
Português
User Manual
Game Capture HD IIC285


i
European Community Compliance Statement
Class B
This product is herewith confirmed to comply with the requirements set out in the Council Directives on the
approximation of the laws of the Member States relating to Electromagnetic Compatibility Directive (EMC) 2004 /
108 / EC, Low Voltage Directive (LVD) 2006/95/EC and Energy-related Products Directive (ErP)
2009 / 125 / EC.
Responsible manufacturer:
AVerMedia Technologies, Inc.
No. 135, Jian 1st Rd.,Zhonghe Dist., New Taipei City 23585, Taiwan
TEL: +886-2-2226-3630
European Community contact:
AVerMedia Technologies Europe B.V.
Kwartsweg 50, 2665 NN, Bleiswijk, The Netherlands
Technical Support: http://www.avermedia.com/avertv/Support/
FCC Compliance Statement (United States)
FCC NOTICE
This device complies with Part 15 of the FCC Rules. Operation is subject to the following two conditions: (1) this device may not
cause harmful interference, and (2) this device must accept any interference received, including interference that may cause
undesired operation.
Federal Communications Commission Statement
NOTE- This equipment has been tested and found to comply with the limits for a Class B digital device, pursuant to Part 15 of the
FCC Rules. These limits are designed to provide reasonable protection against harmful interference in a residential installation.
This equipment generates uses and can radiate radio frequency energy and, if not installed and used in accordance with the
instructions, may cause harmful interference to radio communications. However, there is no guarantee that interference will not
occur in a particular installation. If this equipment does cause harmful interference to radio or television reception, which can be
determined by tuning the equipment off and on, the user is encouraged to try to correct the interference by one or more of the
following measures:
Reorient or relocate the receiving antenna.
Increase the separation between the equipment and receiver.
Connect the equipment into an outlet on a circuit different from that to which the receiver is connected.
Consult the dealer or an experienced radio/television technician for help.
CAUTION ON MODIFICATIONS
To comply with the limits for the Class B digital device, pursuant to Part 15 of the FCC Rules, this device must be installed in
computer equipment certified to comply with the Class B limits. All cables used to connect the computer and peripherals must
be shielded and grounded. Operation with non-certified computers or non-shielded cables may result in interference to radio or
television reception.
Changes and modifications not expressly approved by the manufacturer or registrant of the equipment can void your authority
to operate the equipment under Federal Communications Commission rules.
新增製造商及當地聯絡方式

ii
Responsible manufacturer:
AVerMedia Technologies, Inc.
No. 135, Jian 1st Rd.,Zhonghe Dist., New Taipei City 23585, Taiwan
TEL: +886-2-2226-3630
USA Office contact:
AVerMedia Technologies U.S.A.
47358 Fremont Blvd., Fremont, CA 94538
Technical Support: http://www.avermedia.com/avertv/Support/
WASTE ELECTRICAL AND ELECTRONIC EQUIPMENT (WEEE) The mark of Crossed-out wheeled bin indicates that this product must not be disposed of with your other
household waste. Instead, you need to dispose of the waste equipment by handing it over to a designated
collection point for the recycling of waste electrical and electronic equipment. For more information about where
to drop off your waste equipment for recycling, please contact your household waste disposal service or the shop
where you purchased the product.
Battery Safety Information Use of carbon-zinc battery for remote control is strongly recommended.
Use of other types of batteries, such as alkaline or rechargeable (nickel-cadmium), may cause battery current overload or
battery leakage and corrosion which can damage the remote control.
Store the batteries in a cool dry place.
Do not dispose of used batteries in domestic waste. Dispose of batteries at special collection points or return to point of
sale if applies.
Remove the batteries during long periods of non-use. Always remove exhausted batteries from the remote control. Battery
leakage and corrosion can damage this remote control, dispose of batteries safely.
Do not mix old and new batteries.
Do not mix different types of batteries: alkaline, standard (carbon-zinc) or rechargeable (nickel-cadmium).
Do not dispose of batteries in a fire. The batteries may explode or leak.
Never short circuit the battery terminals.
ICES-003 (Canada)
CES-003 Issue 5 Class B: C285
GOST-R Certification (Russia)
№ РОСС TW. AГ98.B06472
Срок действия с
14.02.2013 г по 13.02.2015 г
Москва
AГ98
新增製造商及當地聯絡方式
新增製造商及當地聯絡方式
iii
Disclaimer & Copyright © 2013 by AVerMedia Technologies, Inc. All rights reserved. No part of this document may be reproduced or transmitted in any
form, or by any means (Electronic, mechanical, photocopy, recording, or otherwise) without prior written permission of
AVerMedia Technologies, Inc. Information in this document is subject to change without notice. AVerMedia Technologies, Inc.
reserves the right to modify, change, improve or enhance its products and to make changes in the content without obligation to
notify any person or organization of such changes. Please visit avermedia.com to get the updates of the operation and use of
AVerMedia products.
"AVerMedia" is trademark and logo of AVerMedia Technologies, Inc. Apple, the Apple logo, iPod, iPhone, iPad and Apple TV are
trademarks and/or registered trademark of Apple Inc., registered in the U.S. and other countries. Other trademarks used herein
for description purpose only belong to each of their companies.
Picture shown may vary from actual product.
This product uses Arphic Font.
This software uses libraries from the Libav project under the LGPLv2.1.
International Headquarter Office Address No.135, Jian 1st Rd., Zhonghe Dist., New Taipei City 23585, Taiwan (R.O.C.)
Website www.avermedia.com/
Tel +886-2-2226-3630
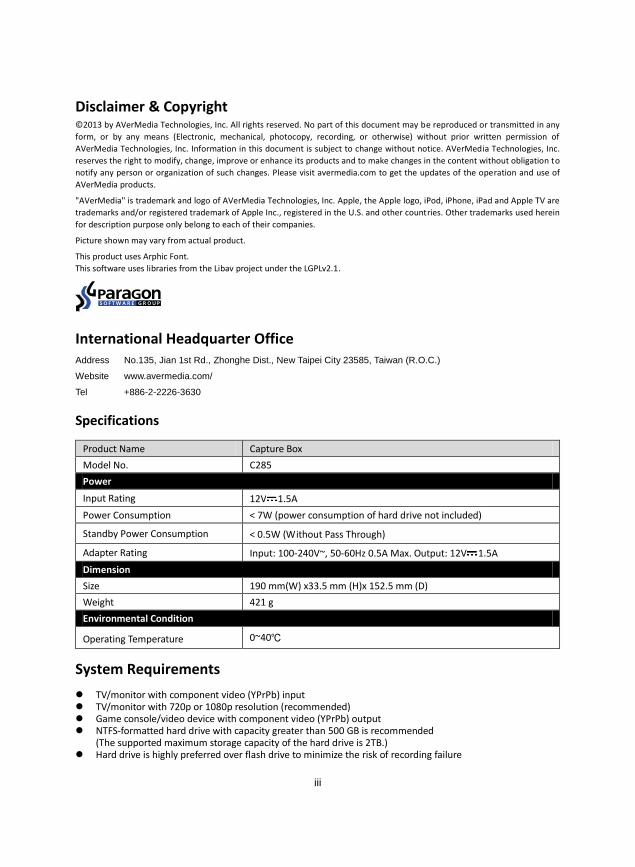
Specifications
Product Name Capture Box
Model No. C285
Power
Input Rating 12V 1.5A
Power Consumption < 7W (power consumption of hard drive not included)
Standby Power Consumption < 0.5W (Without Pass Through)
Adapter Rating Input: 100-240V~, 50-60Hz 0.5A Max. Output: 12V 1.5A
Dimension
Size 190 mm(W) x33.5 mm (H)x 152.5 mm (D)
Weight 421 g
Environmental Condition
Operating Temperature 0~40℃
System Requirements
TV/monitor with component video (YPrPb) input TV/monitor with 720p or 1080p resolution (recommended) Game console/video device with component video (YPrPb) output NTFS-formatted hard drive with capacity greater than 500 GB is recommended
(The supported maximum storage capacity of the hard drive is 2TB.) Hard drive is highly preferred over flash drive to minimize the risk of recording failure

English-1
Table of Content
Chapter 1 Package Contents ................................................................... 2 1.1 Other Items You Need ......................................................................... 4
Chapter 2 The Unit Parts .......................................................................... 5 2.1 Front Panel .......................................................................................... 5 2.2 Infrared Sensor .................................................................................... 5 2.3 LED Indicator ....................................................................................... 6 2.4 Connection Ports ................................................................................. 7
2.4.1 Front View ...................................................................................................... 7 2.4.2 Rear View ...................................................................................................... 8
Chapter 3 The Remote Control ................................................................ 9 Chapter 4 Installation & First Time Setup ............................................ 12
4.1 Supported Resolutions ...................................................................... 12 4.2 Hardware Installation ......................................................................... 14 4.3 Storage Device Installation ................................................................ 20
4.3.1 USB Storage Device Insertion .................................................................. 20 4.3.2 HDD Installation and Removal .................................................................. 20
4.4 Setup Wizard ..................................................................................... 25 4.5 Video Output Settings for Game Consoles ........................................ 28
4.5.1 Video Output Settings for PlayStation 3 .................................................. 28 4.5.2 Video Output Settings for Xbox 360 ......................................................... 29
Chapter 5 Basic Operation ..................................................................... 31 5.1 Record and Capture .......................................................................... 31 5.2 Adding Commentary .......................................................................... 33
Chapter 6 OSD Menu .............................................................................. 35 6.1 Media Studio ...................................................................................... 36 6.1.1 Post- Edit Capture Box Recorded Videos ............................................ 37 6.2 File Management ............................................................................... 43 6.3 Settings .............................................................................................. 47
Chapter 7 Pairing Capture Box and GameMate by AVerMedia ......... 61 Appendix A How to Set Your Gameplay Snapshot as PS3 Wallpaper63 Appendix B Troubleshooting ................................................................. 65 Appendix C Measuring Your HDD Height Before Installation ............ 70

English-2
Thank you for purchasing the Capture Box. Please read this user manual carefully to ensure proper use
of this product. We recommend you to keep it for future reference.
Introduction
The Capture Box, a stand-alone video capture box specially designed for TV gamers, allows you to
capture HD content up to 1080p from various video game consoles, such as PlayStation®3, Xbox 360
and Wii U.
The Capture Box records HD gameplays directly to your hard disk drive (HDD) for later viewing and
further editing, eschewing the hassle of setting up a PC nearby your TV set.
Most attractively, the one-press capture button allows you to instantly grab high score screen and
record your exciting gameplay footage with nearly no effort. The Capture Box can record from either
HDMI (without HDCP protection) or Component Video at up to 1080p.
Other than that, the Capture Box can pair up with the dedicated app GameMate, which turns your
smartphone into a second screen remote controller. You can view capture and uploading status on the
screen of your smartphone.
Chapter 1 Package Contents
Please confirm that the package contains the following items. If any of the package contents are missing
or damaged, please contact the distributor immediately.
Game Capture HD II
Power Adapter
Power Adapter Outlet Module
Engl
ish
English-3
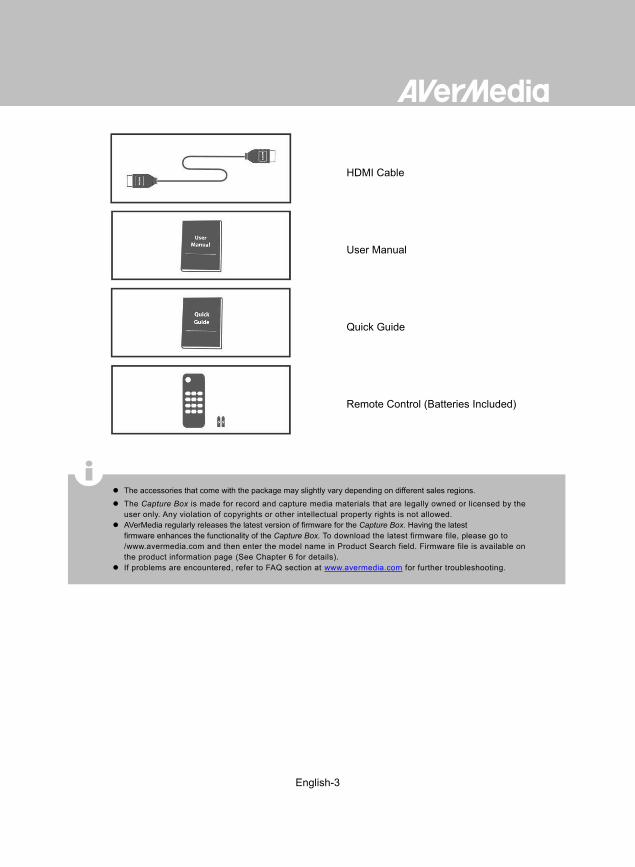
HDMI Cable
User Manual
Quick Guide
Remote Control (Batteries Included)
The accessories that come with the package may slightly vary depending on different sales regions.
The Capture Box is made for record and capture media materials that are legally owned or licensed by the
user only. Any violation of copyrights or other intellectual property rights is not allowed.
AVerMedia regularly releases the latest version of firmware for the Capture Box. Having the latest
firmware enhances the functionality of the Capture Box. To download the latest firmware file, please go to
/www.avermedia.com and then enter the model name in Product Search field. Firmware file is available on
the product information page (See Chapter 6 for details).
If problems are encountered, refer to FAQ section at www.avermedia.com for further troubleshooting.

English-4
1.1 Other Items You Need
In order to fully enjoy the recording, the capturing functions of the Capture Box and the dedicated
iPhone application, you will need to have the following items prepared:
Item You need the item to…
Storage Device Save recordings and
snapshots.
Play Station 3 AV
Component Cable Connect with PS3 console.
Router (DHCP IP Network
Recommended) Pair up with GameMate.
iPhone 4/ 5, 4s Use GameMate.
Headset / Microphone Record live commentary.
RJ45 Cable To upload captured content
Other than iPhone, 4, iPhone 4s, iPhone 5, GameMate also supports iPad and iPod touch.
For further smartphone support, refer to www.avermedia.com for latest update.

English-5
Chapter 2 The Unit Parts
2.1 Front Panel
The button panel found on the front of the unit provides quick access to commonly used functions.
# Buttons Descriptions
1
Record
Press to start / stop recording.
Hold down the button for 4 seconds to force shut down the Capture Box
2
Power
Press to turn the unit on
2.2 Infrared Sensor
When using the remote control, aim it at the infrared (IR) sensor located at the front panel of the unit. The remote control must be held at an angle within 30 degrees perpendicular to the IR sensor to function correctly. The distance between the remote control and the sensor should not exceed 6 meters (20 feet).
English-6
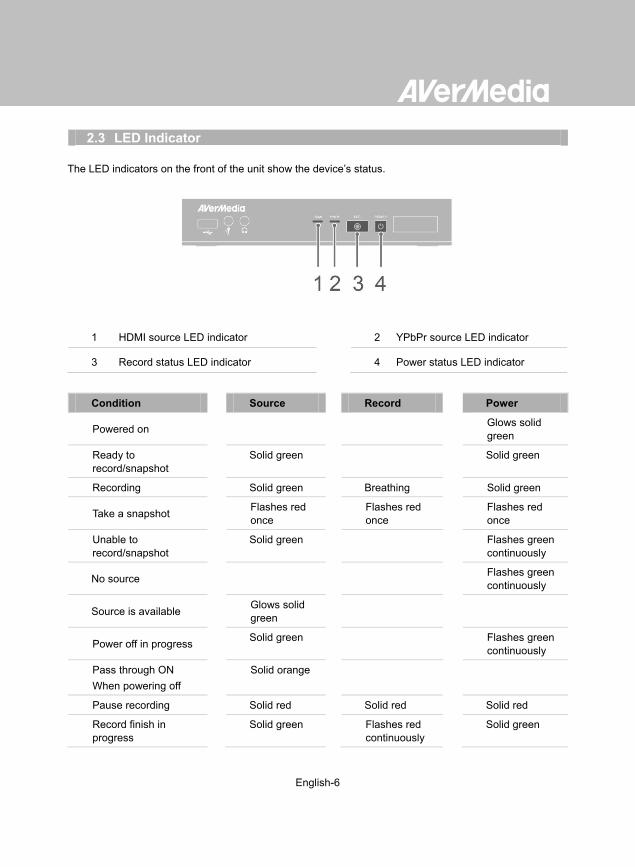
2.3 LED Indicator
The LED indicators on the front of the unit show the device’s status.
1 HDMI source LED indicator 2 YPbPr source LED indicator
3 Record status LED indicator 4 Power status LED indicator
Condition Source Record Power
Powered on Glows solid
green
Ready to
record/snapshot
Solid green Solid green
Recording Solid green Breathing Solid green
Take a snapshot Flashes red
once
Flashes red
once
Flashes red
once
Unable to
record/snapshot
Solid green Flashes green
continuously
No source Flashes green
continuously
Source is available Glows solid
green
Power off in progress Solid green Flashes green
continuously
Pass through ON
When powering off
Solid orange
Pause recording Solid red Solid red Solid red
Record finish in
progress
Solid green Flashes red
continuously
Solid green

English-7
Condition Source Record Power
Storage space is low Solid green Glows at a
slowly pace
Solid green
Device is not ready Flashes green
continuously
Problems like no
storage/ no signal/
protected content
Flashes green
continuously
Accepting a remote
control command
Flashes green
once
Press [F1] to obtain LED light indicator status.
2.4 Connection Ports
1 USB slot 3 Headphone output
2 MIC input
2.4.1 Front View
USB slot is for external HDD storage device connection as well as for firmware upgrade via storage device.
USB hub is not supported.
There will be no function or reply when connecting the Capture Box to the computer via USB.

English-8
1 Component video input 4 HDMI output
2 Audio L/R input 5 LAN port
3 HDMI input 6 DC-IN
2.4.2 Rear View

English-9
Chapter 3 The Remote Control
The descriptions below show the deployment of the keys on the remote control.

English-10
# Buttons
Descriptions
1 Press to turn the unit on / into stand-by mode.
2 Press to access the main menu. Press again to exit.
3
Press the navigation keys to move among options.
Press OK to confirm a selection.
Press OK to mark/ unmark segment in post- editing.
4 Press to play the latest recorded file or view the last captured image.
5 Press to start / stop recording.
6
Press to start playing the selected file.
Press to play the file at normal (1x) speed when slow motion, rewind, or
fast-forward is active.
7
Press to stop the playback.
Press to stop the recording.
8 Press to rewind (2x, 4x, 8x, 16x, 32x).
9 Press to return to the previous page.
10
Press to display the video/snapshot quality adjustment screen. Press again to
exit.
11
Press to safely remove external hard disk in Menu
(Follow the on-screen instruction)
12 (Follow the on-screen instruction)
13 (Follow the on-screen instruction)
14 Press to switch between Component and HDMI sources.
15
Press to display the on-screen information, including mode, source and audio
sources.
16 Press to exit the current page and return to the previous page.
17 Press to take a snapshot during gameplay or video playback.

English-11
18
Press to pause the playback. Press OK or to resume playback.
Press to pause the recording.
19
Press to play the video in slow motion (1/2x). Press again to enter
frame- by- frame mode (See Chapter 5 for details).
20 Press to fast-forward (2x, 4x, 8x, 16x, 32x).
21
Press to go to the next page.
22 Press to delete the selected files.
23 Press to display the disk information. Press again to hide it.
English-12
Chapter 4 Installation & First Time Setup
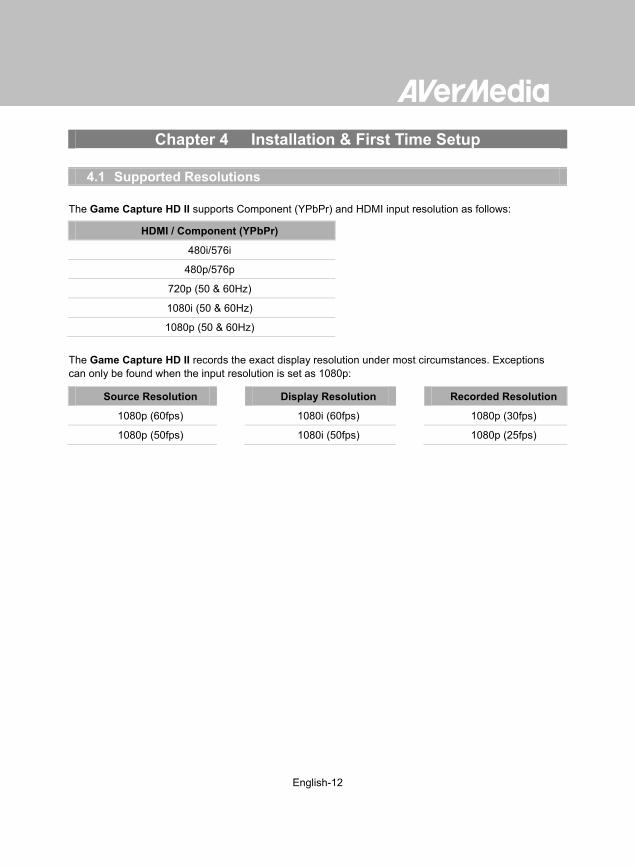
4.1 Supported Resolutions
The Game Capture HD II supports Component (YPbPr) and HDMI input resolution as follows:
HDMI / Component (YPbPr)
480i/576i
480p/576p
720p (50 & 60Hz)
1080i (50 & 60Hz)
1080p (50 & 60Hz)
The Game Capture HD II records the exact display resolution under most circumstances. Exceptions
can only be found when the input resolution is set as 1080p:
Source Resolution Display Resolution Recorded Resolution
1080p (60fps) 1080i (60fps) 1080p (30fps)
1080p (50fps) 1080i (50fps) 1080p (25fps)

English-13
Estimated recording duration for different video quality settings:
HD 1080p
Optimal
(20 Mbps)
Good
(18 Mbps)
Maximum Recording
Length (15 Mbps)
1TB 100 hrs 110 hrs 125 hrs
2TB 200 hrs 220hrs 250hrs
HD 720P
Optimal
(20 Mbps)
Good
(15 Mbps)
Maximum Recording
Length (10 Mbps)
1TB 100 hrs 125hrs 200 hrs
2TB 200 hrs 250 hrs 400hrs
HD 1080i
Optimal
(15 Mbps)
Good
(12 Mbps)
Maximum Recording
Length (10 Mbps)
1TB 125 hrs 150 hrs 200 hrs
2TB 250 hrs 300 hrs 400 hrs
SD 480i(576i)/480P(576P)
Optimal
(7.5 Mbps)
Good
(5 Mbps)
Maximum Recording
Length (3 Mbps)
1TB 250 hrs 400 hrs 650 hrs
2TB 500 hrs 800 hrs 1300 hrs
*Recording with higher video quality takes up more disk space.
Video Quality
Storage Capacity
Video Quality
Storage Capacity
Video Quality
Storage Capacity
Storage Capacity
Video Quality

English-14
4.2 Hardware Installation
Please follow the steps below to properly connect the Capture Box and your TV/ video game consoles.
Step 1
Check the Connection of Your Game Consoles and TV
Make sure all cables connecting the Capture Box to your game consoles and TV are well-connected.
Doing so will save you a lot of time from locating problems later. First, please check the connection of
your game consoles. Second, make sure that the connection to TV is good.
Step 2
Connect the Device to Your Wii U / Xbox 360 Using HDMI Cable
Connect one end of the HDMI cable to the HDMI IN port on the rear of the device and the other end to
the HDMI OUT port on your Xbox 360/ Wii U.
Connect the Device to Your PlayStation 3 / Wii Using Component AV Cable
Plug the green, blue, red connectors into the COMPONENT VIDEO IN port and white and red
connectors into the AUDIO IN port on the rear of the device. Then, plug the other end to your game
console.
If you would like to install internal hard drive, install it before turning on the Capture Box.
Make sure that the cables are firmly connected and that neither of the cables is loose. If any of the cables are
loose or disconnected, there may be a loss of signal or screen color problems.

English-15
Step 3
Connecting the Device to Your TV Using HDMI Cable
Connect one end of the HDMI cable to the HDMI OUT port on the rear of the device and the other end
to the HDMI IN port on your TV.
Step 4
Power on Your Game Console
Turn on your game console.
“PlayStation 3 Component AV Cable” and Wii Component Cable is NOT Included. Please purchase
separately if needed.

English-16
Step 5
Install and Connecting the Power Adapter
Slide the Power Adapter Outlet Module into the groove on the Power Adapter. Connect the Power
Adapter connector to the DC-IN port on the rear of the device. Then plug the power adapter to a wall
outlet.

English-17
Step 6
Connecting to the Network
To automatically obtain time and other information, you need to connect the Capture Box to an Ethernet
LAN. Make sure the LAN wire is well-connected before you continue to the next step. Meanwhile, a
router which supports DHCP IP network is recommended for you to pair up the Game Capture HD II
with your iPhone.
Step 7
Plug in USB Hard Drive/ HDD
Connect your portable USB hard drive or hard disk drive (HDD) to the USB port on the front of the
Capture Box. Please make sure you use an NTFS format USB hard drive or hard disk drive (HDD).
Under the condition that no hard drive is connected to the device, the power light will continue to flash.
Therefore, it is advised that you plug in USB hard drive or hard disk drive (HDD). Please see Chapter
4.3.2 for further details about installing an internal hard drive.
It is recommended that you connect the Capture Box before running first time setup.
English-18
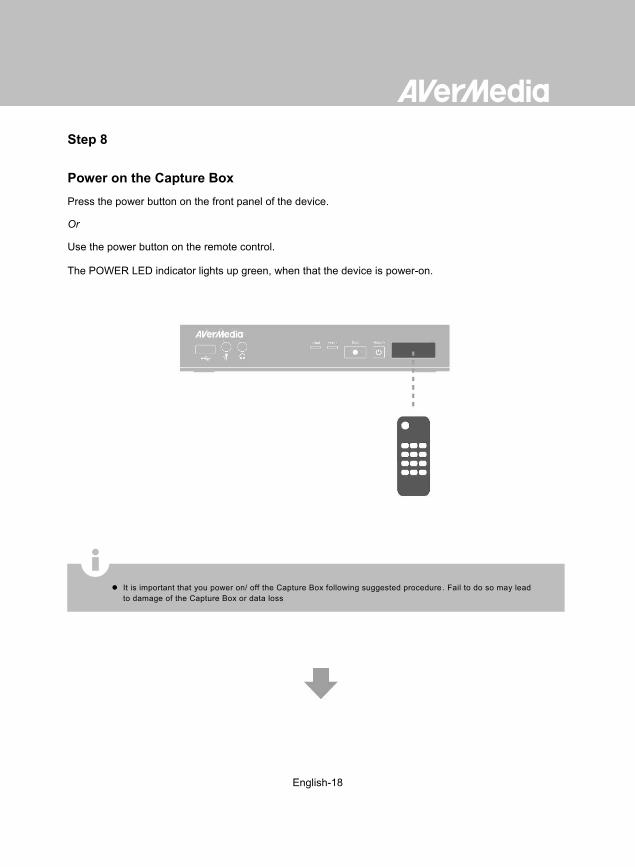
Step 8
Power on the Capture Box
Press the power button on the front panel of the device.
Or
Use the power button on the remote control.
The POWER LED indicator lights up green, when that the device is power-on.
It is important that you power on/ off the Capture Box following suggested procedure . Fail to do so may lead
to damage of the Capture Box or data loss

English-19
Step 9
Check Video on TV screen
Make sure that there is game console video content displayed on TV screen.
Connecting the Device to Your Microphone and Headset
Plug in the microphone connector into the MIC Input port on the front panel of the device. Same as
microphone, plug in the headset connectors into the headphone and microphone ports on the front
panel of the device. This procedure is only needed when you intend to add commentary to your
gameplay video. Please refer to Chapter 6 for details.
When headphone is connected to the Capture Box, the gameplay will be muted as sound will come out from
the headphone.
Hereafter a headset refers to the device you use to record while headphone refers to the headphone port on
the front panel of the Capture Box.
If your TV is not displaying video properly, please check the followings:
Supported resolutions vary depending on the TV in use. For details, please refer to the documentation that
comes with your TV.
Power off Capture Box and then make sure that the device is connected properly and with the proper cables.
If there is still no video signal on TV, refer to FAQ section at www.avermedia.com for further troubleshooting.
English-20
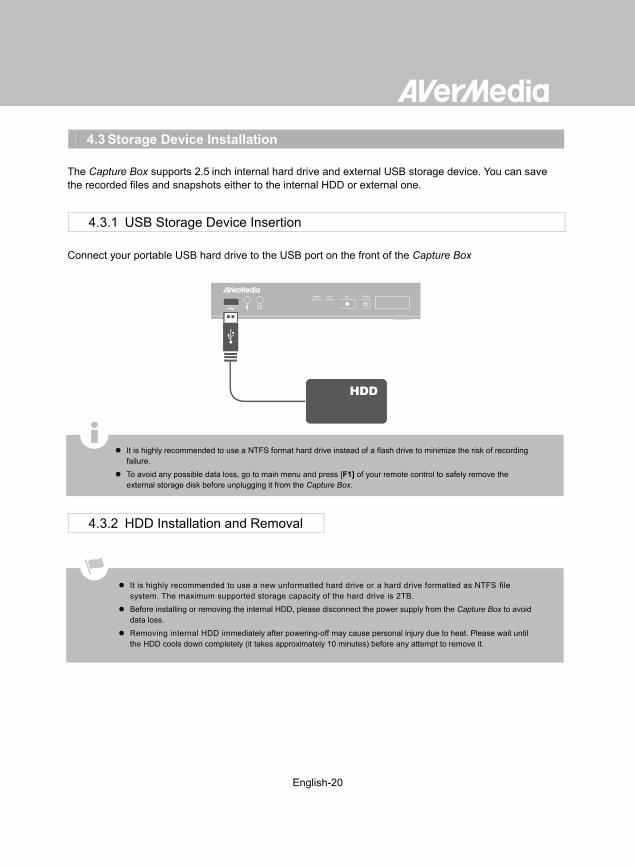
4.3 Storage Device Installation
The Capture Box supports 2.5 inch internal hard drive and external USB storage device. You can save
the recorded files and snapshots either to the internal HDD or external one.
Connect your portable USB hard drive to the USB port on the front of the Capture Box
4.3.1 USB Storage Device Insertion
4.3.2 HDD Installation and Removal
It is highly recommended to use a new unformatted hard drive or a hard drive formatted as NTFS file
system. The maximum supported storage capacity of the hard drive is 2TB.
Before installing or removing the internal HDD, please disconnect the power supply from the Capture Box to avoid
data loss.
Removing internal HDD immediately after powering-off may cause personal injury due to heat. Please wait until
the HDD cools down completely (it takes approximately 10 minutes) before any attempt to remove it.
It is highly recommended to use a NTFS format hard drive instead of a flash drive to minimize the risk of recording
failure.
To avoid any possible data loss, go to main menu and press [F1] of your remote control to safely remove the
external storage disk before unplugging it from the Capture Box.

English-21
To install the internal HDD:
Step 1
Remove the HDD Lid
Open the HDD lid on the bottom of the Capture Box.
Step 2
Before Installing Internal HDD
Use the measuring card to measure the height of your HDD (7mm or 9.5mm).
Please refer to the Appendix C for the measuring card.

English-22
Adjust the rotary knob attached to the inner side of the lid to fit the height of your HDD.
The default position of the rotary knob fits HDD with 9.5mm height. If you use HDD with 7mm/
9.5mm height, rotate the rotary knob to the other direction.
Using a 9.5mm HDD:
Using a 7mm HDD:
Step 3
Inserting the HDD
Place the HDD on the slot with the sticker-side facing up and the HDD connector end facing to the
left.
Align and insert the HDD connectors all the way into the SATA connector. Push in firmly to secure
them.

English-23
Step 4
Replace the HDD Lid
Place the HDD lid back and snap it into place.
To remove the internal HDD:
Step 1
Remove the HDD Lid
Use your fingertip to flip open the HDD lid, located on the bottom of the Capture Box.
Please wait until the HDD cools down completely (it takes approximately 10 minutes) before any attempt to
remove it.

English-24
Lift off the lid and set it aside.
Step 2
Removing the HDD
Pull the HDD out in the direction of the arrow. Then lift the HDD out of the slot.
Step 3
Replacing the HDD Lid
Place the HDD lid back and snap it into place.

English-25
4.4 Setup Wizard
When the first time you power on the Capture Box unit, the setup wizard appears. The following steps
guide you through the initial configuration process.
Step 1
Setting up Language
When the welcome page appears, use ▲/▼ to
select your preferred language. Press OK to
confirm.
Make sure to install a hard drive (internal or external) and to connect to the internet beforehand.
For the first-time initialization, a short duration of black screen (approximately 20 seconds) is followed by
AVerMedia logo. The blinking green status light indicates that the Game Capture HD II is starting up.
Please wait until the welcome screen appears.
It is typical that after a hard drive is formatted, the actual disk space of the drive would be slightly less than its unformatted
capacity.
English-26
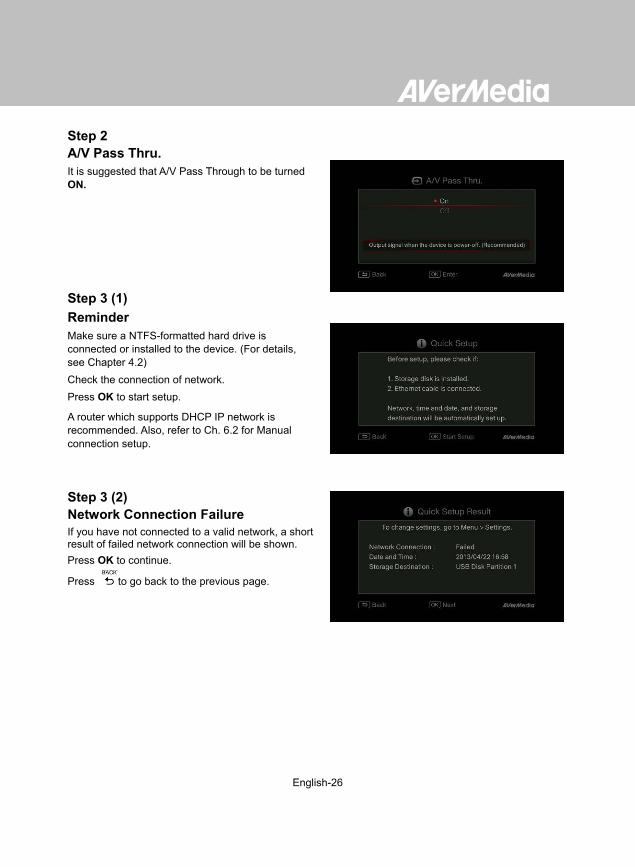
Step 2
A/V Pass Thru.
It is suggested that A/V Pass Through to be turned
ON.
Step 3 (1)
Reminder
Make sure a NTFS-formatted hard drive is
connected or installed to the device. (For details,
see Chapter 4.2)
Check the connection of network.
Press OK to start setup.
A router which supports DHCP IP network is
recommended. Also, refer to Ch. 6.2 for Manual
connection setup.
Step 3 (2)
Network Connection Failure
If you have not connected to a valid network, a short result of failed network connection will be shown.
Press OK to continue.
Press to go back to the previous page.

English-27
Step 4 (1)
No Hard Drive Detected
If you have not yet installed any storage device, install it before continuing the setup process.
Then press to go to the previous screen and press OK to run disk checking process.
Step 4 (2)
Finishing Setup Wizard
Once a NTFS-formatted hard drive is connected, a
Settings Complete notice will be shown.
You can start to record and take snapshot right
away. Press OK to exit the wizard and start using
Capture Box. The game screen then appears.
Unplug the Capture Box from the power supply before installing an internal HDD.
Sometimes the connection test in Wizard will appear to be failed even though you have connected the RJ45 cable to the Capture Box. Go to Menu> Network> Network Settings> Manually Setup to set the network manually.

English-28
4.5 Video Output Settings for Game Consoles
The Capture Box supports YPbPr / HDMI input resolution up to 1080p.
Step 1
Power on your PlayStation 3 console.
On your console, go to Settings > Display
Settings > Video Output Settings.
Step 2
Select Component/D-terminal and confirm the
selection. Then your TV screen goes blank
immediately.
Now use your TV remote to switch the TV input
source to Component (YPbPr). The screen then
comes back on again.
4.5.1 Video Output Settings for PlayStation 3
English-29
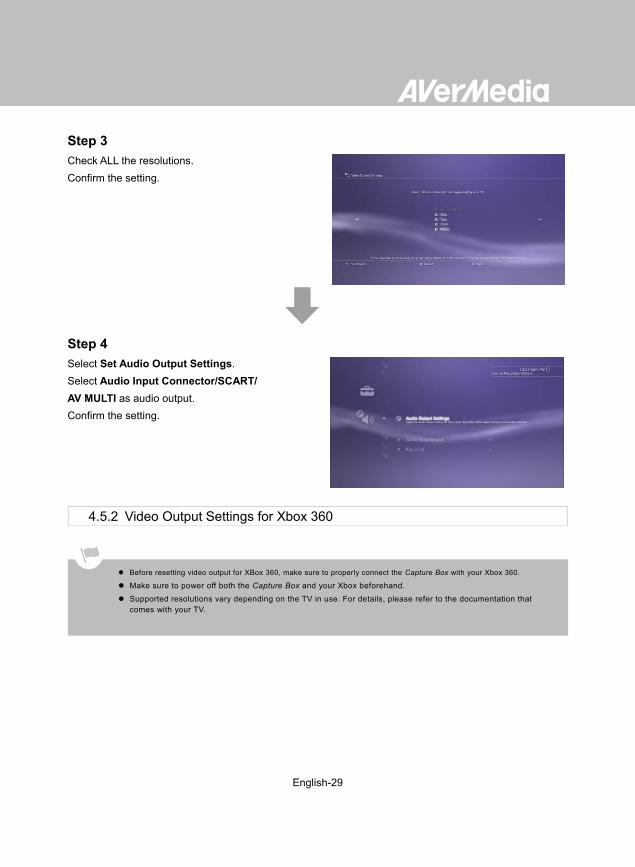
Step 3
Check ALL the resolutions.
Confirm the setting.
Step 4
Select Set Audio Output Settings.
Select Audio Input Connector/SCART/
AV MULTI as audio output.
Confirm the setting.
4.5.2 Video Output Settings for Xbox 360
Before resetting video output for XBox 360, make sure to properly connect the Capture Box with your Xbox 360.
Make sure to power off both the Capture Box and your Xbox beforehand.
Supported resolutions vary depending on the TV in use. For details, please refer to the documentation that
comes with your TV.

English-30
Power on your Xbox console.
On your console, go to My Xbox on the
dashboard and scroll all the way to the right to
System Settings.
Then select Console Settings > Display >
HDTV Settings.
Please set the audio output of all game consoles as auto.
Although the Capture Box do not support DOLBY 5.1 and 24p resolution video/ audio format, you can still pass through these format while the Capture Box is off.

English-31
Chapter 5 Basic Operation
This chapter guides you to record gameplay, capture images, add voice commentary to videos,
and instantly play files.
5.1 Record and Capture
The Capture Box lets you record, capture and adds voice commentary to the videos. Instructions
are given as follows.
OSD Menu Descriptions
Instant Recording During Gameplay
- Press to activate instant recording.
- Press again or to stop recording.
Pause and resume recording
You can skip unwanted footages and resume
recording. Only the footages you recorded will
be saved and those skipped clips will be
deleted automatically.
- Press to pause recording.
- Press or to continue recording.
All the recorded files or snapshots will be saved to the default hard drive destination automatically. Please
see Chapter 6 for details.
The Capture Box displays gameplay in real-time and standard mode. You can change the default real-time
mode to standard mode. Go to Menu> Settings> Display Mode. (Refer to Chapter 6.2 for details.)

English-32
Quick Snapshot During Gameplay
- Press to capture current image.
Long Press to activate continuous capture
mode. The Capture Box will take 5 snapshots
at one time.
Instant Playback
- Press to play the latest recorded file or
view the last captured image.
- Press to stop the playback.
- Press ►to skip forward 30 seconds.
- Press ◄ to skip backward 10 seconds.
Image Capture During Video Playback
Way 1:
- Press to capture current image.
Way 2:
Step 1:
- Press to play the video in slow motion
(1/2x). Press again to view the video frame
by frame.
-
or
- Press to pause the playback. Press
to go to previous frame; press to go to
next frame.
Step 2:
- Press to capture your desired image.

English-33
Disk Information
Press then press OK to display the disk
information. Press again to hide it.
5.2 Adding Commentary
This section shows you how voice commentary is added to your video recording.
Requirements for headset/microphone:
Headset
Connector: 3.5mm jack
Microphone
Frequency Response : 20-16kHz
Impedance: 2.0 KΩ
Working Voltage: 3V
Connector: 3.5mm jack
OSD Menu Descriptions
Microphone On
An OSD will be shown if you connected
microphone/ to the Capture Box. Your
commentary will only be recorded when you
press .
- Press to record your gameplay with
commentary.
- Press or to stop recording.

English-34
If headset or microphone is plugged in during the Wizard Setup, the sound can only be heard from your
headphone and instructions on voice commentary will not be displayed. Therefore, plug in headset or
microphone after you complete Wizard setup so as to follow the headphone/ microphone instructions.
All commentary added will be mixed with the gameplay sound. Also, as long as the headphone is connected
to the device, all your commentary and background sound will be recorded. Therefore, remember to stop
recording and remove the headphone when no commentary is needed.
If the microphone is disconnected/ connected to the Capture Box during recording, the sound will also be
recorded. To make sure the Please avoid plugging off the microphone during recording process.
The volume you hear in the commentary test may be slightly different from the actual recording. It is
recommended that you run an mock test beforehand to be familiar with the recorded volume.
It is normal to hear your own voice when recording with HDMI input source.
No OSD will be shown when you connect only the headphone to the Capture Box.

English-35
Chapter 6 OSD Menu
Under the menu, you can check and manage both your recorded files and snapshots, and customize
your preferences.
1 Remaining Time for Recording 3 Network Connection
2 Connecting to GameMate 4 Current Time
OSD Menu Descriptions
Basic Operation
- Press to bring up the menu.
- Press or to return to the game
screen.
- Use ▲/▼ to make selection on the menu and
OK to enter a submenu.
- In the submenu, use ▲/▼ to make selection
and OK to confirm. Press to return to the
previous page.

English-36
Press F1 to safely remove the storage device..
- *The upper left corner shows your current default
storage device and available remaining recording
6.1 Media Studio
You can check both recordings and snapshots captured by the Capture Box in “Media Studio”.
Capture Format:
Video MP4 (Codec: H.264 format with AAC audio)
Image JPEG
OSD Menu Descriptions
Navigating
- Use the navigation keys ◄/►/▲/▼ to select
among items.
- Press F1 to sort the files by file name, file size,
or file format.
- Press F2 to switch between list mode and
thumbnail mode.
- Press F3 to rename, edit, share the highlighted
file.
- Press to go to the next page.
- Press return to the previous page.
- Press to directly access the main menu.
It is recommended that you view only videos and snapshots that are recorded by the Capture Box. Attempt
to open files taken by other equipment (such as a camera) on the Capture Box is very likely to fail.

English-37
Video Playback
- Press or OK to start playing the selected
video.
- Press or OK to pause the playback. Press
or OK to resume playback.
- Press to play the video in slow motion
(1/2x).
- Press to rewind at 2x, 4x, 8x, 16x, 32x speed.
- Press to fast forward at 2x, 4x, 8x, 16x,
32x speed.
- Press to play the file at normal (1x) speed
when slow motion, rewind, or fast-forward is
active.
- Press to stop the playback.
- Press to display the playback
information, including storage disk, recording
resolution, duration, elapsed and remaining
time, and file name.
* Only video files captured by the Capture Box are
supported.
Snapshots Viewing
- Press or OK to view the selected image.
Press or to return.
* Only image files captured by the Capture Box are
supported.
6.1.1 Post- Edit Capture Box Recorded Videos
This section shows you how to cut, recombine and share videos on YouTube recorded by the Capture
Box.
English-38
OSD Menu Descriptions
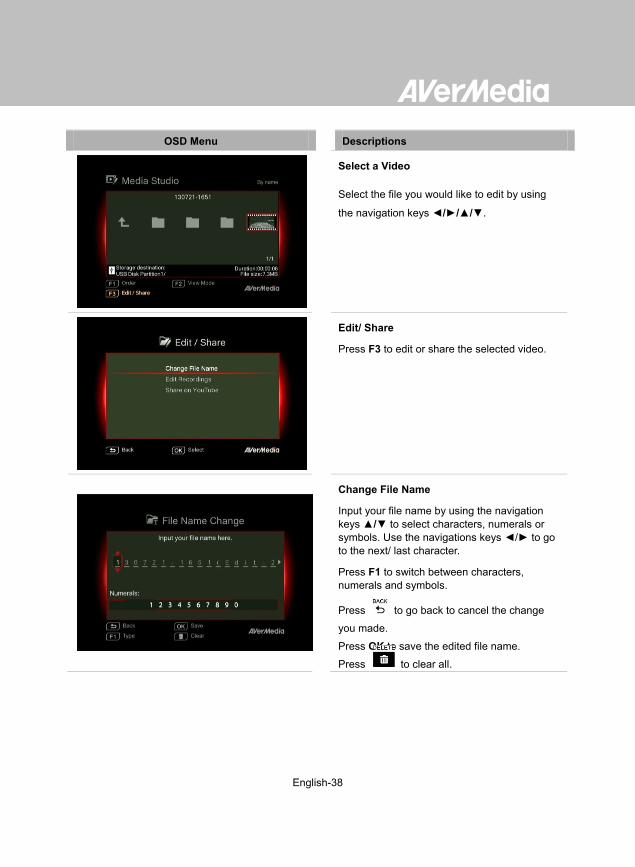
Select a Video
- Select the file you would like to edit by using
the navigation keys ◄/►/▲/▼.
Edit/ Share
Press F3 to edit or share the selected video.
Change File Name
Input your file name by using the navigation
keys ▲/▼ to select characters, numerals or
symbols. Use the navigations keys ◄/► to go
to the next/ last character.
Press F1 to switch between characters,
numerals and symbols.
- Press to go back to cancel the change
you made.
- Press OK to save the edited file name.
- Press to clear all.

English-39
How to Edit
An instruction on how to edit a video will be
displayed, press OK to start editing.
Edit Mode
You can cut and recombine your selected video
in Edit Mode.
- To cut the video, you will need to create one or
more segments within the video.
- Step 1:
- To locate a scene, use direction keys or to
search the scene.
You can also use navigation keys ▲/▼ to
search scene by specific hour, minute, and
second on the left hand side of the screen.
- Press OK to mark or unmark the scene.
-
Step 2:
Repeat Step 1 so as to create a segment.
Press OK to keep or delete the segment.
Press F1 to switch between Search Scene and
Segment search.
Press F2 to clear all marks you made on the
video.
Press F3 to export the video.
English-40
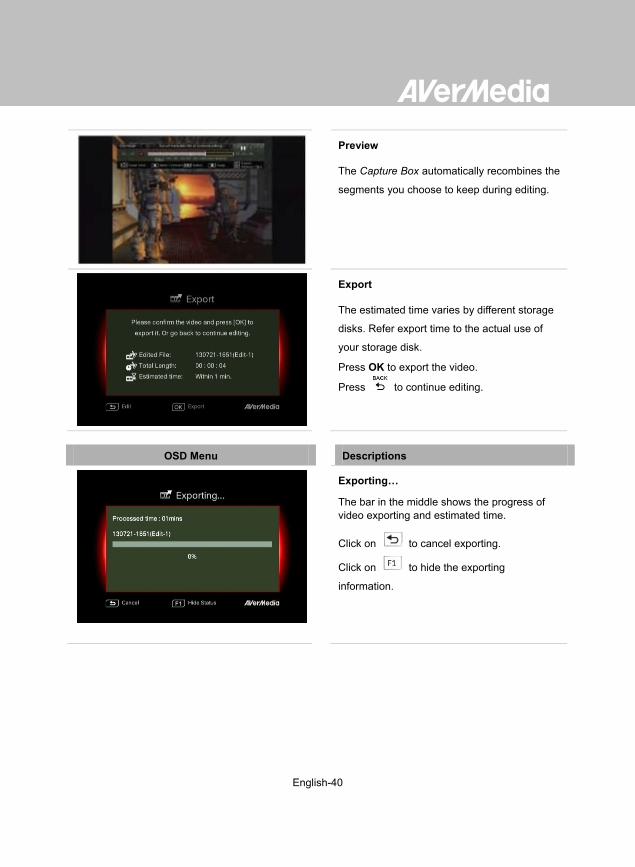
Preview
- The Capture Box automatically recombines the
segments you choose to keep during editing.
Export
- The estimated time varies by different storage
disks. Refer export time to the actual use of
your storage disk.
- Press OK to export the video.
- Press to continue editing.
OSD Menu Descriptions
Exporting…
The bar in the middle shows the progress of
video exporting and estimated time.
- Click on to cancel exporting.
- Click on to hide the exporting
information.

English-41
Exit
Press OK to exit from the editing mode.
- Press to exit
Press F1 to continue editing.
OSD Menu Descriptions
Share Videos on YouTube
Use ▲/▼ to select the task you would like to
undergo. Select ‘Share on YouTube’ to share
your videos.
Share On YouTube
Before you share your recorded videos on
YouTube, make sure you:
1. Built a YouTube account and also a
personal channel.
2. Have your PC/ NB next to you if you
activate two- step verification of your
YouTube account.
To ensure the stability of uploading, upload
videos that are within one hour.
Make sure the YouTube account is verified to
upload videos that are longer than 15 minutes.
- Press to continue editing.
English-42
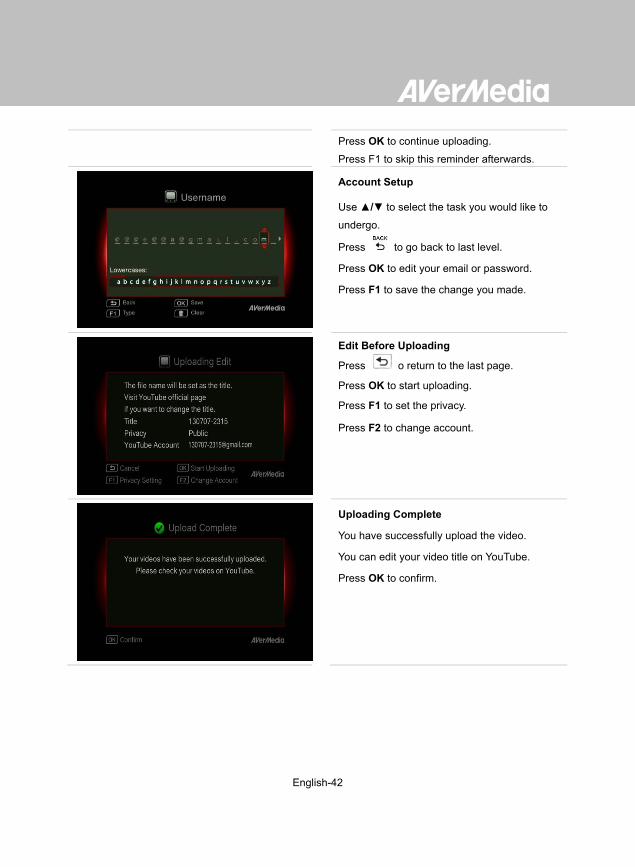
- Press OK to continue uploading.
- Press F1 to skip this reminder afterwards.
Account Setup
- Use ▲/▼ to select the task you would like to
undergo.
Press to go back to last level.
Press OK to edit your email or password.
Press F1 to save the change you made.
- Edit Before Uploading
- Press o return to the last page.
- Press OK to start uploading.
- Press F1 to set the privacy.
Press F2 to change account.
Uploading Complete
You have successfully upload the video.
You can edit your video title on YouTube.
Press OK to confirm.

English-43
6.2 File Management
“File Management” lets you manage videos and snapshots captured by the Capture Box. You can
copy files between internal hard drive and external USB storage device, and delete unwanted files.
Before entering this submenu, insert your storage device first (USB 2.0/ 3.0 storage device / 2.5” HDD
in NTFS format).
OSD Menu Descriptions
Select Partition
- Use the navigation keys ◄/►/▲/▼ to select the
partition.
- Press to playback the video.
- Press F1 to change the file sorting rule.
The recommended length of each video should be less than 1 hour.
The Capture Box is made for record and capture media materials that are legally owned or licensed by the
user only. Uploading videos that are protected by copyright and other laws is not allowed. YouTube may
shut down the account for copyright protection reason.
YouTube account verification is required when you upload video that are longer than 15 minutes. Refer to
YouTube website for further details.
Occasionally, it takes two to three days for your videos to be shown on YouTube. Please wait for a few days
if you did not see the uploaded videos online.

English-44
File Management User Interface:
1 A list displaying files located on the internal hard disk
2 A set of editing tools
3 A list displaying files located on the USB disk
4 Information display area
Descriptions on Editing Tools:
# Buttons Descriptions
1
Copy files to USB disk
2 Copy files to internal hard disk
3 Select all
4 Deselect all
5 Delete
OSD Menu Descriptions

English-45
Copying Files from Internal HDD to USB
Disk
Step 1:
- On the left-side list, use ▲/▼ to highlight the
file that you want to copy to USB disk. Press
OK to select / unselect an item.
- Select and press OK to select all files.
- Select and press OK to deselect all files.
Step 2:
- Select and press OK to copy selected
file(s) to USB disk.
- Press to cancel copying the files in a
progress.
Step 3:
- Press OK.
Copying Files from USB Disk to Internal
HDD works in the opposite way as above
mentioned.
*If the file is comparably large, press F1 to hide
the copying or deleting status.
Deleting Files
Step 1:
- Use ▲/▼ to highlight the file(s) that you want to
delete. Press OK to select/unselect an item.
- Select and press OK to select all files.
- Select and press OK to deselect all files.
Step 2:
- Select and press OK to remove the file
from the list.

English-46
or
Press on the remote and then press OK
to remove the file from the list.
- Press to cancel deleting the files in a
progress.
Step 3:
- Press OK.
USB Storage Device Removal
In order to avoid data loss, it is highly
recommended to safely remove your external
storage device. Please follow the steps below:
Step 1:
Press on the remote control.
Step 2:
Press F2 to remove it.
English-47
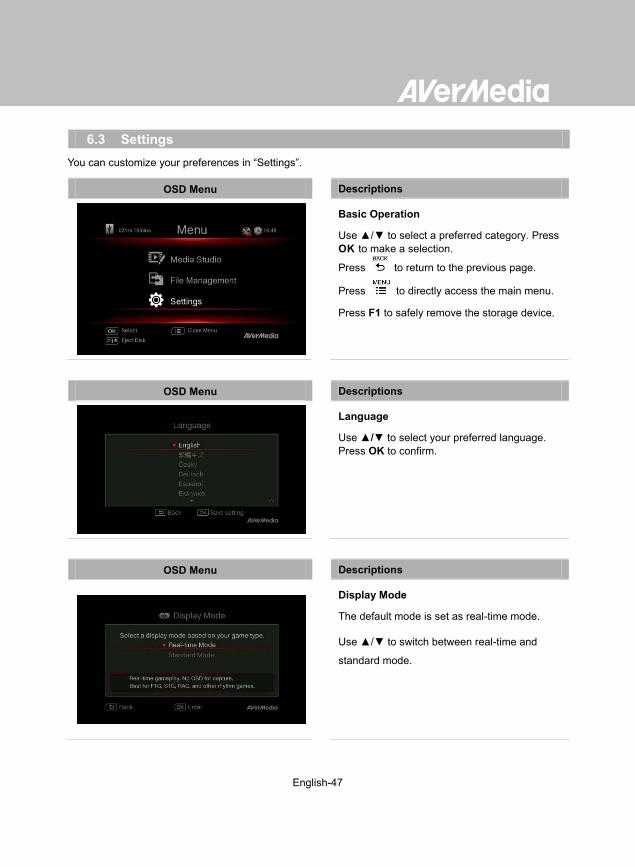
6.3 Settings
You can customize your preferences in “Settings”.
OSD Menu Descriptions
Basic Operation
- Use ▲/▼ to select a preferred category. Press
OK to make a selection.
- Press to return to the previous page.
Press to directly access the main menu.
- Press F1 to safely remove the storage device.
OSD Menu Descriptions
Language
Use ▲/▼ to select your preferred language.
Press OK to confirm.
OSD Menu Descriptions
Display Mode
The default mode is set as real-time mode.
- Use ▲/▼ to switch between real-time and
standard mode.
English-48
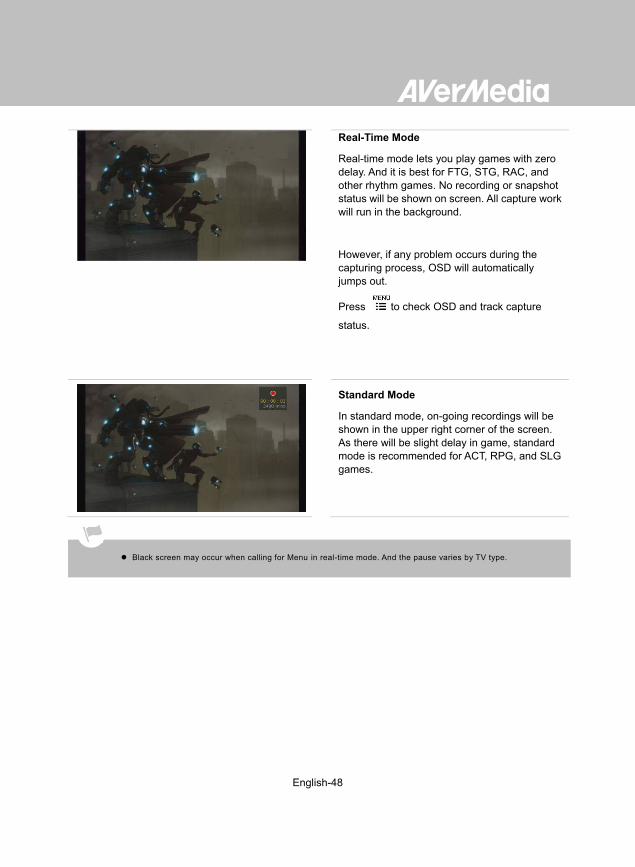
Real-Time Mode
Real-time mode lets you play games with zero
delay. And it is best for FTG, STG, RAC, and
other rhythm games. No recording or snapshot
status will be shown on screen. All capture work
will run in the background.
However, if any problem occurs during the
capturing process, OSD will automatically
jumps out.
- Press to check OSD and track capture
status.
Standard Mode
In standard mode, on-going recordings will be
shown in the upper right corner of the screen.
As there will be slight delay in game, standard
mode is recommended for ACT, RPG, and SLG
games.
Black screen may occur when calling for Menu in real-time mode. And the pause varies by TV type.
English-49
OSD Menu Descriptions
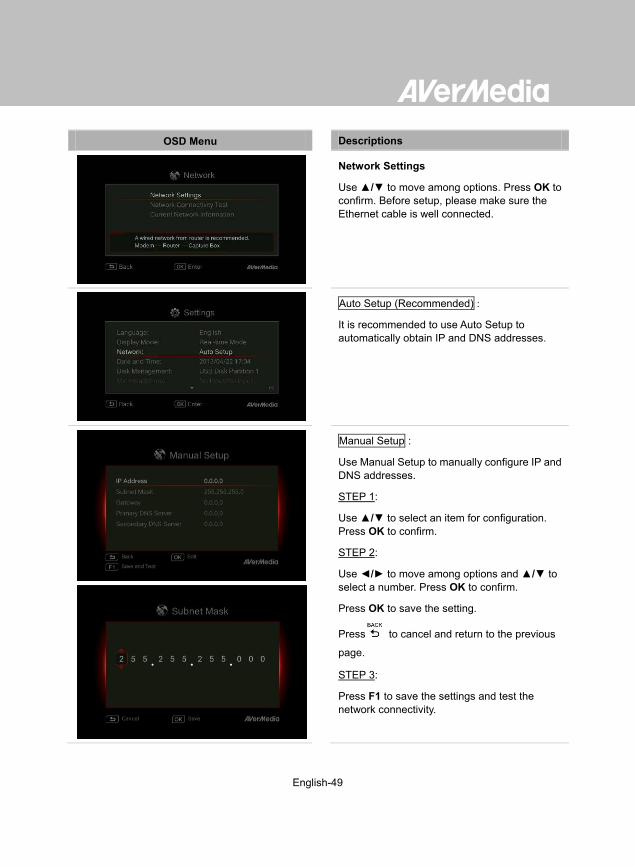
Network Settings
Use ▲/▼ to move among options. Press OK to
confirm. Before setup, please make sure the
Ethernet cable is well connected.
Auto Setup (Recommended) :
It is recommended to use Auto Setup to
automatically obtain IP and DNS addresses.
Manual Setup :
Use Manual Setup to manually configure IP and
DNS addresses.
STEP 1:
Use ▲/▼ to select an item for configuration.
Press OK to confirm.
STEP 2:
Use ◄/► to move among options and ▲/▼ to
select a number. Press OK to confirm.
Press OK to save the setting.
- Press to cancel and return to the previous
page.
STEP 3:
Press F1 to save the settings and test the
network connectivity.

English-50
PPPoE :
Use username and password provided by ISP
for connection.
STEP 1:
Use ▲/▼ to select an item for configuration.
Press OK to confirm.
STEP 2:
Use ◄/► to move among options and ▲/▼ to
select a character.
Press F1 to switch among capital letters, lower
cases, numbers, or signs.
Press OK to save the setting.
- Press to cancel and return to the previous
page.
Press to delete selected characters and
the character to the right.
STEP 3:
Press F1 to save the settings and test the
network connectivity.
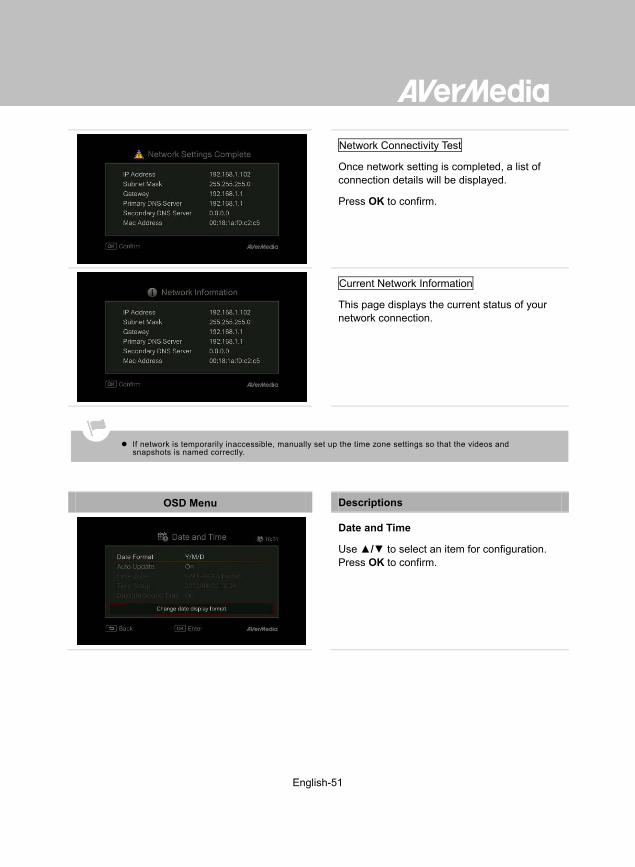
Network Connectivity Test
Select to test your network connectivity.
Please check the result and fix the problem
indicated.
Press OK to confirm.
English-51
Network Connectivity Test
Once network setting is completed, a list of
connection details will be displayed.
Press OK to confirm.
Current Network Information
This page displays the current status of your
network connection.
OSD Menu Descriptions
Date and Time
Use ▲/▼ to select an item for configuration.
Press OK to confirm.
If network is temporarily inaccessible, manually set up the time zone settings so that the videos and snapshots is named correctly.

English-52
Date Format :
Use ▲/▼ to select a preferred date format.
Press OK to confirm.
Auto Update :
Use ▲/▼ to enable/disable automatic date and
time update. Press OK to confirm.
*To use this function, a network connection is required.
Time Zone :
STEP 1:
Use ▲/▼ to move among options and select
your area. Press OK to confirm.
STEP 2:
Use ▲/▼ to move among options and select
your time zone. Press OK to confirm.
Time Setup :
Use ◄/► to move among options and ▲/▼ to
adjust date and time. Press OK to confirm.

English-53
Daylight Saving Time :
Use ▲/▼ to enable/disable Daylight Saving
Time. Press OK to confirm.
*To use this function, a network connection is required.
OSD Menu Descriptions
Disk Management
Storage Destination
Step 1:
Select and press OK to change your current
desired default storage device for both
recorded files and snapshots.
* indicates normal write speed of selected partition;
indicates low write speed of selected partition. To
make sure recording functions properly, be sure to select
partition with normal write speed.
Step 2:
Use ▲/▼ to select the preferred default
storage device.
Step 3:
Use ▲/▼ to select a folder and press OK to
confirm.
Step 4:
Press F1 to save the setting.
OSD Menu Descriptions
A/V Management

English-54
Use ▲/▼ to move among options. Press OK to confirm.
Press to switch from component and
HDMI input sources.
Video Input:
Use ▲/▼ to toggle between various video input
source options (Component / / HDMI).
Press OK to confirm.
Audio Input:
Use ▲/▼ to toggle between various audio input
source options (Stereo Audio/ HDMI).
Press OK to confirm.

English-55
OSD Menu Descriptions
A/V Pass Through:
Use ▲/▼ to enable/disable A/V Pass Through.
Press OK to confirm.
*The default setting is set Off to yield to the power-saving
regulation. If this function is enabled, Capture Box still output
signal when the Capture Box is off. If this function is disabled,
Capture Box does not output signal when the Capture Box is
off.
Color Range Setup
Use ▲/▼ to toggle between off, limited, and
full. Press OK to confirm.
OSD Menu Descriptions
Watermark
Add your selected watermark to your videos.
You can customize the display of the watermark
by setting up the type, position and also scale.
- Press to go back to last level.
Press OK to enter the next level.
Press F1 to preview the display.

English-56
Watermark Type:
Use to ▲/▼ select from the listed watermark
types.
Press OK to save the change.
- Press to go back to last level.
Position:
Use ▲/▼ to select from the listed watermark
positions.
Press OK to save the change.
- Press to go back to last level.
Display Scale:
Use ▲/▼ to select the display scale.
Press OK to save the change.
- Press to go back to last level.

English-57
OSD Menu Descriptions
Auto Save
Use ▲/▼ to switch from enable or disable the
Auto Save function.
Recording/ Snapshot
Video Quality:
Use ▲/▼ to toggle among various video quality
options (Optimal/ Good/ Maximum recording
length). Press OK to confirm.
Snapshot Quality:
Use ▲/▼ to toggle among various snapshot
quality options (Best /Better / Good). Press OK to
confirm.

English-58
Live Commentary
A short demonstration will be played in this
section.
Press OK to continue.
Volume:
Use ▲/▼ to move among options and ◄/► to
adjust the volume.
Press OK to save the setting.
Press F1 to restore to the default setting.
Sound Mode:
Use ▲/▼ to select a preferred mode for mic
recording. Press OK to confirm.
Gameplayer Mode will automatically switch
game sound output to your headphone.
To ensure the optimal quality, please use both
microphone and headphone for voice
commentary recording.
Commentator Mode will record both game
sound and voice commentary or voice chat
from microphone during gameplay.
It is recommended to use an omni-directional or
high-sensitive microphone.

English-59
OSD Menu Descriptions
Firmware Upgrade
Follow the steps below to upgrade the
firmware via USB storage device:
Step 1:
To download the latest firmware binary
package, please go to www.avermedia.com,
and then enter the model name in Product
Search field. Firmware file is available on the
product information page.
Step 2:
Extract the files by unzipping the package.
Copy the firmware files to the root directory of
your USB storage device, and then connect it
to the Capture Box.
Step 3:
Press F1 to start the firmware upgrade
process. Press to abort the operation and
return to the previous page.
Step 4:
The Capture Box automatically detects
whether a different version of firmware is
available for upgrade or rollback. Once the
firmware upgrade process has completed,
press OK to restart the Capture Box.
The firmware upgrade process takes up approximately 10-14 minutes.
Firmware upgrade requires at least 256MB free space of the storage device (USB/HDD).
If problems encountered during firmware upgrade, please clear all the data stored on your USB storage device
and repeat the process above.
NEVER power off the device or unplug the power supply or remove the USB storage device during the
firmware upgrade process. If the firmware upgrade is interrupted for any reason, the device may crash.

English-60
Restore to Factory Settings
Press F1 to restore to original factory
settings. Press to abort the operation and
return to the previous page.
Product Information
This page provides information about this
product, including product name, model no.,
and firmware version.
Press F1 to edit the display name.
OSD Descriptions
Name your own Capture Box.
Press navigation keys Up and Down to
select characters.
Press navigation keys Left and Right to
shift to the former or later character.
Press to switch to the next input menu.
Press to delete the character.
Press OK to save the name.
To change product name, go to Menu
>Product Name.
* The display name will not only show up when you enable
watermark function but also on the pair up list with
GameMate by AVerMedia.

English-61
Chapter 7 Pairing Capture Box and GameMate by AVerMedia
GameMate by AVerMedia is the dedicated app for smart phones. It allows you to use your smart phone as
remote control. You are only a few steps from pairing up the Capture Box with GameMate.
OSD Descriptions
It is recommended that the Capture Box and
GameMate share a wireless AP. After
downloading the GameMate; tap on GameMate
on your smartphone. You will see that
GameMate is searching available device.
A set of pairing number will be shown on TV
screen.
Please download GameMate by AVerMedia from app store first.
To pair up successfully, make sure the Capture Box and GameMate share the same network. To do so, you will also
need a wireless access point for GameMate. Make sure the LAN is well -connected and you are ready to pair up!

English-62
Tap to input the provided four-digit pairing
number correctly.
You will see GameMate as shown left hand
side when it successfully pairs up with Capture
Box.
You can also check the connection of
GameMate from the Menu. You will see sign on the upper level of the Menu.
If the connection is lost, please restart the wireless AP or the Capture Box and try again.
English-63
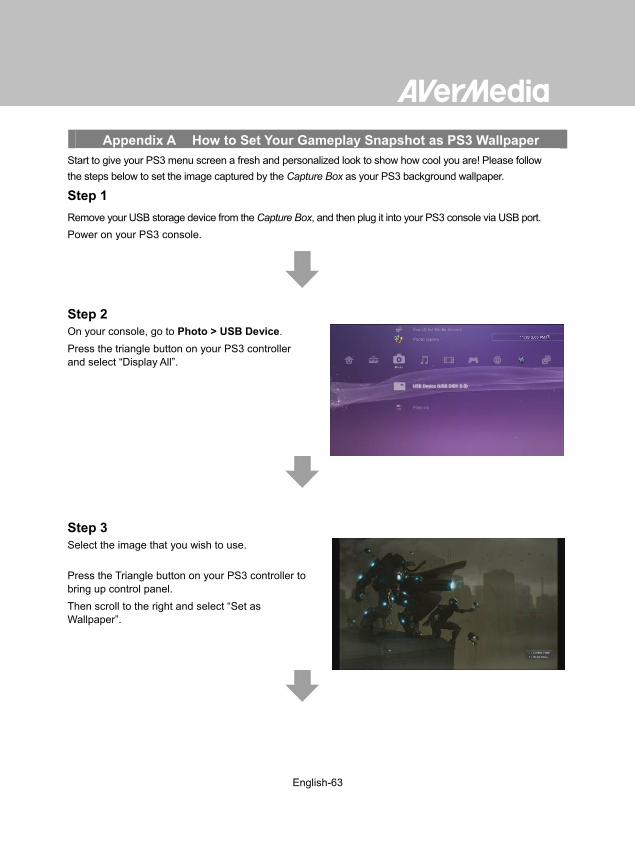
Appendix A How to Set Your Gameplay Snapshot as PS3 Wallpaper
Start to give your PS3 menu screen a fresh and personalized look to show how cool you are! Please follow
the steps below to set the image captured by the Capture Box as your PS3 background wallpaper.
Step 1
Remove your USB storage device from the Capture Box, and then plug it into your PS3 console via USB port.
Power on your PS3 console.
Step 2
On your console, go to Photo > USB Device.
Press the triangle button on your PS3 controller
and select “Display All”.
Step 3
Select the image that you wish to use.
Press the Triangle button on your PS3 controller to
bring up control panel.
Then scroll to the right and select “Set as
Wallpaper”.

English-64
Step 4
Use the right joystick to zoom in/out and left
joystick to frame the image. When it is the proper
size, press○(Enter).
Confirm with○(Enter) if you are prompted to
overwrite your current wallpaper.
Step 5
Done! The snapshot that you have chosen is now
set as your PS3 wallpaper.
On your PS3 console, you can go to Settings > Theme Settings > Background to turn wallpaper on or off.
English-65
To download the latest firmware for the Capture Box:
Go to www.avermedia.com.
Enter the model no. (C285) in Product Search field.
The latest firmware file is available on the “AP & Driver” section on the product information page.
Hard Drive Problem Actions
Hard drive not detected
Make sure that the storage destination is
properly set up.
Go to Menu Settings Disk Management
Storage Destination to set storage
destination.
Make sure the hard drive is connected /
installed and restart the Capture Box.
Make sure the Capture Box has stable
power supply while recording or the
recording mail fail. Failure of recording
may stop the Capture Box from detecting
hard disk.
Format current drive to NTFS file system.
It is likely that the hard drive is not set to NTFS
format. You can check the hard drive and
reformat it by downloading HP USB Disk
Storage Format Tool.
Unknown files are found on my hard
disk after connecting to the Capture
Box
The Capture Box will automatically generate
files that help boost the operation. Files that
have file name extension like
‘.avm_chk_tmp’,
‘.avm_speed_test’, ‘.hd_keepalive’aim
at preserving hard disk speed as well as other
crucial record. Please don’t remove them.
Video Display Problems Actions
“No input signal”
message appears on screen
Make sure that all the cables are firmly
connected.
Power off the Capture Box and then make
Appendix B Troubleshooting
English-66
sure that the device is connected with the
proper cables (See 3.1 Hardware
Installation in user manual for details).
Screen color appears abnormal using
component input
Green screen color with buzzing noise:
Make sure that the red and blue connectors do not come loose.
Mono screen color:
Make sure that the red and blue connectors do not come loose.
Unsuccessful recording of
HDMI-input-videos
The Capture Box supports all HDMI input except those in HDCP (protected video) form.
Blacken screen using HDMI input
If screen is blacken when using HDMI input, please try:
1. Reconnect the HDMI cable from the input source device and also the Capture Box. Also, connect to HDMI port 1 of your TV at all times.
2. Change HDMI cable and try again.
The recording is fast-forwarded or
stopped when recording complicated
gameplay frames in HD resolution
(720p or above)?
When recording gameplay in HD resolution
(720p or above), fast-forward may be found
due to the complicated video content.
Follow the tips below to ensure good
recording quality:
1. Install a format tool. It is recommended that
you format hard disk into NTFS format using
HP USB Disk Storage Format Tool. Please
find the link:
http://download.cnet.com/HP-USB-Storage-
Tool/3000-2094_4-1
Be sure to backup your data before start
formatting. All data will be erased once the
formatting process begins.
2. Lower gameplay output resolution. Details
can be found in C285 user manual. Please
refer to PS3/ Xbox 360 video output setting.
3. Lower C285 video quality at Menu>
Settings> Edit/ Share
4. Use another high- performance storage disk
(For example, another NTFS hard disk).
Playback Problems Actions

English-67
Poor quality of captured video
Check video output settings of your game
console.
For PS3, set 1080p, 1080i and 720p as video
output resolutions. If you only select 1080i, the
screen resolution automatically goes to 480i
when you play a game that supports 720p.
(See 3.5 Video Output Settings for Game
Consoles in user manual for details).
Jittery/Jerky video playback on PC
Enable the “De-interlace” function of your
media player before playback.
Some media players cannot process the
interlaced video (1080i / 576i /480i) well.
This problem does not persist after video
uploaded to YouTube.
Stuttering local video playback
Try recording video again using another
NTFS-formatted hard drive.
When this problem occurs, it is recommended
to play the videos on PC. Alternatively, you
can record at a lower bit rate to solve this
problem.
This problem does not persist after video
uploaded to YouTube.
Microphone volume not loud enough
Turn on Microphone volume via Menu.
Turn down game console input volume.
Adjust volume via in-game setting.
Gain Microphone amplifier.
No A/V Pass Through when game
console and TV ON
Make sure that your TV supports 1080p.
Turn on A/V Pass through via Setting.
File Management Problems Actions
Difficulty in locating files
All files are named after the date and time
they are recorded. In the file management,
you can sort files out by its name, the time
recorded, and the file size. Make sure the
time zone is set correctly or manually setup
to obtain correct file name.
For example, a video which recorded at 9:30
a.m., 15 of April, 2013 will be named as:

English-68
130415-0930
A recorded videos with commentary will be
called:
130415-0930 (Mic)
An edited recorded video will be named as :
130415-0930 (Edit-1)
A videos that has been edited for the second
time will be named as :
130415-0930 (Edit-2)
An edited video with commentary will be
named as :
130415-0930 (Mic-Edit-1)
Difficulty in locating the folder on your
PC/ laptop
The Game Capture HD II detects all kinds of
folder that built in your hard drive; as a
result, it is likely that the destination is set
to a non-standard folder, for example, a
hidden folder.
If you cannot locate the folder that saves the recordings and snapshots, please check if:
1. You have set the destination of recordings
and snapshots to a standard folder, making
sure that it is not hidden, locked, etc..
2. You load the folder with a Microsoft
Windows system. A Linux system does not
read non-standard folder like a hidden folder.

English-69
Other Problems Actions
Firmware upgrade turns out
unsuccessful
Solutions are as follows:
A. Power off the Capture Box if an internal
storage disk is installed. Remove internal
storage disk and power on the Capture Box.
Connect the USB to your Capture Box to
undergo FW upgrade. (*If you are using a
SATA storage disk or the temperature of the
hard disk appears high; please wait for 10
minutes for the hard disk to cool down.)
B. Save the unzipped firmware file to the file
root of your USB.
C. To enable firmware upgrade, make sure a
minimum space of 256MB on your USB.
D. The detection of firmware file may be
disrupted by other files on your USB. It is
recommended that you wipe the USB or
reformat it to NTFS format.
Reformat your USB by using HP USB
Storage Format Tool:
1. Disconnect your USB from the Capture
Box. Connect it to a computer.
2. Download HP USB Storage Format Tool at
the following link:
http://download.cnet.com/HP-USB-Disk-Stor
age-Format-Tool/3000-2094_4-10974082.ht
ml
3. Undergo HP USB Storage Format Tool.
Select your USB and format it to NTFS
format.
Save the firmware file into the NTFS USB
and reconnect it to the Capture Box to upgrade firmware.
If the problem still persists, refer to FAQ at www.avermedia.com for further troubleshooting.


English-70
Appendix C Measuring Your HDD Height Before Installation

English-71
Open Source Code Notice
The following GPL executables and LGPL, MPL libraries used in this product are subject to the BSD/FreeBSD/
GPL/GPLv2/GPLv2+/GPLv3 with GCC/ RLE/jpeg/LGPLv2/LGPLv2.1/LGPLv2.1/ GPLv2/LGPLv2.1+/LGPLv2+/
libpng/MIT/NewBSD/OPENSSL/PD/zlib License Agreements:
BSD
cppstub/db/libpcre0/JSONKit
FreeBSD
thttpd
GPL
makedevs
GPLv2
busybox/dbus/dbus-x11/devmem2/dosfstools/fbset/i2c-tools/iproute2/libblkid1/libdbus-1-3/libfreetype6/libpam/
libuuid1/linux-kernel/module-init-tools/module-init-tools-depmod/mtd-utils/netbase/u-boot/update-modules/
usbutils/util-linux-ng
GPLv2+
iptables/sysvinit/tinylogin/udev/update-rc.d
GPLv3 with GCC RLE
libgcc1/libstdc++6
jpeg
libjpeg8/libjpeg-tools
LGPLv2
Libjson/libts-1.0-0/tslib
LGPLv2.1
libav/libmicrohttpd/libusb-1.0-0
LGPLv2.1/GPLv2
alsa

English-72
LGPLv2.1+
ldd/libc6/libthread-db1
LGPLv2+
libglib-2.0-0
libpng
libpng12-0
MIT
cocos2d-x/curl/e2fsprogs/fbset-modes/graphmagic/libcom-err2/libcurl4/libe2p2/libexpat1/libext2fs2/libformw/
libmenuw/libpanelw5/libss2/libtic5/libtinfo5/libxml2/ncurses/pointercal
New BSD
iperf
OPENSSL
openssl
PD
modutils-initscripts
zlib
libz1
AVerMedia Technologies Inc. offers to provide source code to you for a charge covering the cost of performing such
distribution, such as the cost of media, shipping and handling upon e-mail request to AVerMedia Technologies Inc. at
http://www.avermedia.com
For more information, please visit our website:
http://www.avermedia.com
Français-1
Table des matières
Chapitre 1. Pièces de l’appareil ................................................................. 2 1.1 Panneau avant..................................................................................... 2 1.2 Détecteur infrarouge ............................................................................ 2 1.3 Indicateur LED ..................................................................................... 3 1.4 Ports de connexion .............................................................................. 4
1.4.1 Vue avant ....................................................................................................... 4 1.4.2 Vue arrière ..................................................................................................... 5
Chapitre 2. La télécommande .................................................................... 6
Chapitre 3. Assistant d’installatio ............................................................. 8
Chapitre 4. Fonctionnement de base ...................................................... 11 4.1 Enregistrement et capture ................................................................. 11 4.2 Ajout de commentaires ...................................................................... 13
Chapitre 5. Menu OSD .............................................................................. 15 5.1 Enregistrements et photos (Media Studio) ......................................... 16
5.1.1 Postédition de vidéos enregistrés .................................................. 18 5.2 Gestionnaire de Fichiers (File Management) ..................................... 23
Chapitre 6. Jumelage de l'appareil avec le GameMate d'AVerMedia .... 27

Français-2
Chapitre 1. Pièces de l’appareil
1.1 Panneau avant
Le panneau à touches se trouvant sur le devant de l’appareil fournit un accès rapide aux fonctions
communément utilisées.
Touches
numérotées Descriptions
1
Enregistrer
Appuyez sur démarrer/arrêter l’enregistrement.
2
Alimentation (Power)
Appuyez pour allumer l’appareil
Maintenez le bouton enfoncé pendant 4 secondes pour forcer l'arrêt le Capture
Box.
1.2 Détecteur infrarouge
Lorsque vous utilisez la télécommande, pointez celle-ci vers le capteur infrarouge (IR) situé sur le panneau avant de l'appareil. La télécommande doit être maintenue à un angle perpendiculaire de 30 degrés vers le capteur IR pour fonctionner correctement. La distance entre la télécommande et le capteur ne doit pas excéder 6 mètres (20 pieds).
Français

Français-3
1.3 Indicateur LED
Les indicateurs LED sur le devant de l’appareil affichent le statut de celui-ci.
1 Voyant LED source HDMI 2 Voyant LED source YPbPr
3 Voyant LED d'état d'enregistrement 4 Voyant LED d'état de l'alimentation
Condition Source Enregistrer Alimentation
(Power)
Allumé Est illuminé en
vert
Prêt à
enregistrer/instantané
Vert solide Vert solide
Enregistrement Vert solide Modulation Vert solide
Prendre un instantané Clignote rouge
une fois
Clignote rouge
une fois
Clignote rouge
une fois
Impossible
d'enregistrer/instantané
Vert solide Clignotement vert
en continu
Aucune source Clignotement vert
en continu
Source disponible Illuminé en vert
Hors tension en cours Vert solide Clignotement vert
en continu
Transit en fonction lors de
la mise hors tension
Orange solide
Pause d'enregistrement Rouge solide Rouge solide Rouge solide
Fin d'enregistrement en
cours
Vert solide Clignote rouge en
continu
Vert solide

Français-4
Condition Source Enregistrer Alimentation
(Power)
L'espace de stockage est
faible
Vert solide Brille lentement Vert solide
L'appareil n'est pas prêt Clignotement vert
en continu
Problèmes tels qu'aucun
stockage/aucun
signal/contenu protégé
Clignotement vert
en continu
Accepter une commande
de la télécommande
Clignote vert une
fois
Appuyez sur [F1] pour obtenir le statut du voyant LED.
1.4 Ports de connexion
1 Port USB 3 Sortie casque d'écoute
2 Entrée MIC
1.4.1 Vue avant
Le port USB est pour la connexion de l'appareil de stockage du disque dur externe ainsi que pour la mise à
niveau de micrologiciels via le périphérique de stockage.
Le concentrateur USB n'est pas pris en charge.
Il n'y aura pas de fonction ou de réponse lors de la connexion de Capture Box à l'ordinateur via l'USB.

Français-5
1 Entrée composante vidéo 4 Sortie HDMI
2 Entrée audio RCA G/D 5 Port LAN
3 Entrée HDMI 6 DC-IN
1.4.2 Vue arrière

Français-6
Chapitre 2. La télécommande
Les descriptions ci-dessous présentent les touches de la télécommande.
# Boutons
Descriptions
1 Appuyez pour allumer l’appareil/le mettre en veille.
2 Appuyez pour accéder au menu principal. Appuyez à nouveau pour quitter.
3
Appuyez sur les touches de direction pour vous déplacer parmi les options.
Appuyez sur OK pour confirmer une sélection.
Appuyez sur OK pour marquer/enlever le marquage d’un segment en
post-édition.
4
Appuyez pour lire le dernier fichier enregistré ou visualiser la dernière image
capturée.
5 Appuyez pour démarrer/arrêter l’enregistrement.
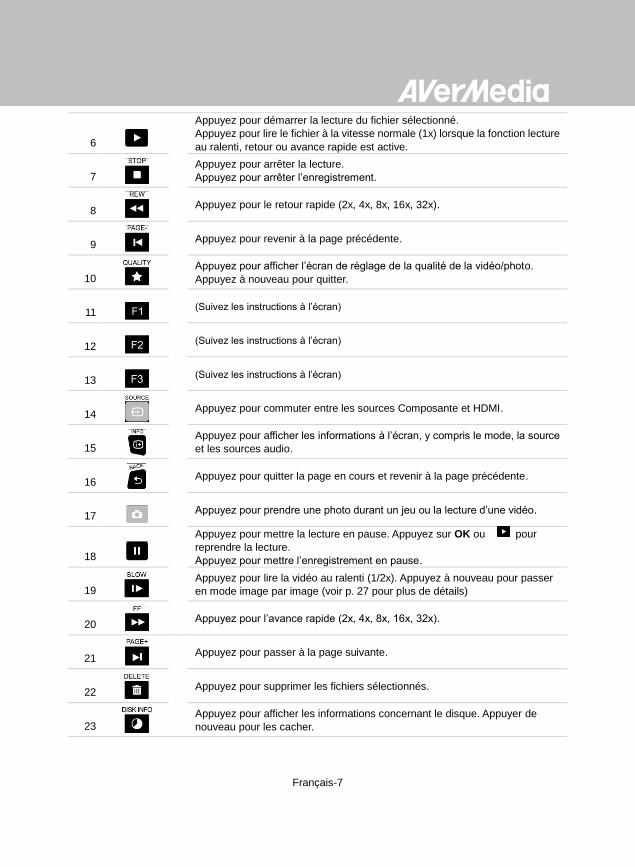
Français-7
6
Appuyez pour démarrer la lecture du fichier sélectionné.
Appuyez pour lire le fichier à la vitesse normale (1x) lorsque la fonction lecture
au ralenti, retour ou avance rapide est active.
7
Appuyez pour arrêter la lecture.
Appuyez pour arrêter l’enregistrement.
8 Appuyez pour le retour rapide (2x, 4x, 8x, 16x, 32x).
9 Appuyez pour revenir à la page précédente.
10
Appuyez pour afficher l’écran de réglage de la qualité de la vidéo/photo.
Appuyez à nouveau pour quitter.
11 (Suivez les instructions à l’écran)
12 (Suivez les instructions à l’écran)
13 (Suivez les instructions à l’écran)
14 Appuyez pour commuter entre les sources Composante et HDMI.
15
Appuyez pour afficher les informations à l’écran, y compris le mode, la source
et les sources audio.
16 Appuyez pour quitter la page en cours et revenir à la page précédente.
17 Appuyez pour prendre une photo durant un jeu ou la lecture d’une vidéo.
18
Appuyez pour mettre la lecture en pause. Appuyez sur OK ou pour
reprendre la lecture. Appuyez pour mettre l’enregistrement en pause.
19
Appuyez pour lire la vidéo au ralenti (1/2x). Appuyez à nouveau pour passer
en mode image par image (voir p. 27 pour plus de détails)
20 Appuyez pour l’avance rapide (2x, 4x, 8x, 16x, 32x).
21
Appuyez pour passer à la page suivante.
22 Appuyez pour supprimer les fichiers sélectionnés.
23
Appuyez pour afficher les informations concernant le disque. Appuyer de
nouveau pour les cacher.

Français-8
Chapitre 3. Assistant d’installatio
Lorsque vous branchez votre Boîtier d’Acquisition pour la première fois, l’assistant d’installation
apparaît. Les étapes suivantes vous guident tout au long de la procédure de configuration initiale.
Etape 1
Réglage de la Langue
Lorsque la page apparaît, utilisez ▲/▼ pour choisir
la langue de votre choix. Appuyez ensuite sur OK
pour confirmer.
Etape 2
Passerelle Audio/Vidéo (Pass-Thru)
Sélectionnez ON pour la passerelle A/V.
Assurez-vous que vous avez installé un disque dur (interne ou externe) et connecté le boîtier à Internet
avant de démarrer la procédure.
Pour la première initialisation, vous aurez un écran noir pendant une courte période (environ 20 secondes),
suivi par le logo AVerMedia. La lumiére verte qui clignote indique le Game Capture HD II est en train de
démarrer. Attendez ensuite l’apparition de l’écran de bienvenue.
Français-9
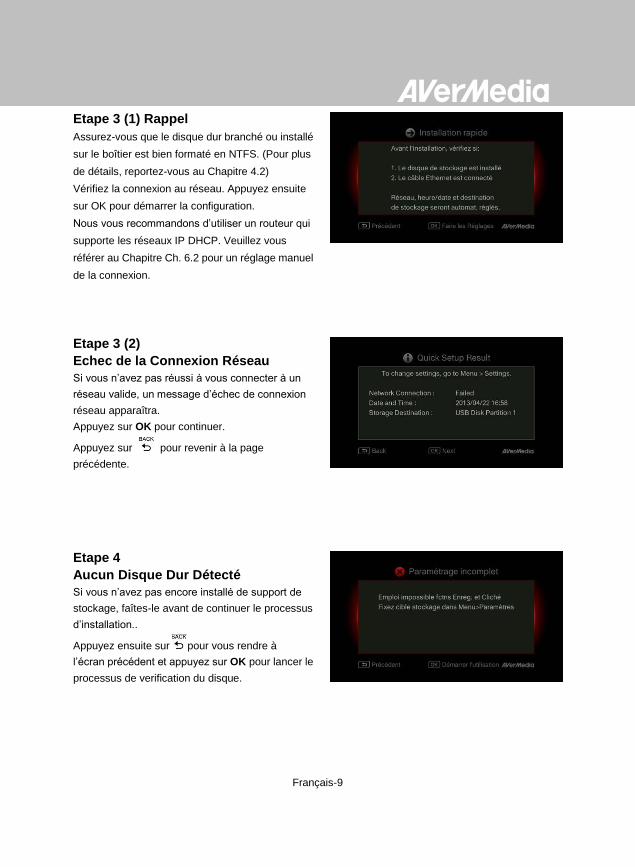
Etape 3 (1) Rappel
Assurez-vous que le disque dur branché ou installé
sur le boîtier est bien formaté en NTFS. (Pour plus
de détails, reportez-vous au Chapitre 4.2)
Vérifiez la connexion au réseau. Appuyez ensuite
sur OK pour démarrer la configuration.
Nous vous recommandons d’utiliser un routeur qui
supporte les réseaux IP DHCP. Veuillez vous
référer au Chapitre Ch. 6.2 pour un réglage manuel
de la connexion.
Etape 3 (2)
Echec de la Connexion Réseau
Si vous n’avez pas réussi à vous connecter à un
réseau valide, un message d’échec de connexion
réseau apparaîtra.
Appuyez sur OK pour continuer.
Appuyez sur pour revenir à la page
précédente.
Etape 4
Aucun Disque Dur Détecté
Si vous n’avez pas encore installé de support de
stockage, faîtes-le avant de continuer le processus
d’installation..
Appuyez ensuite sur pour vous rendre à
l’écran précédent et appuyez sur OK pour lancer le
processus de verification du disque.

Français-10
Etape 4 (2)
Fin du Processus d’Installation
Une fois qu’un disque dur formaté en NTFS est
connecté au boîtier, un message de fin
d’installation s’affiche.
Vous pouvez commencer à enregistrer dès
maintenant. Appuyez sur OK pour sortir de
l’assistant d’installation et commencer à utiliser
votre boîtier. Votre jeu apparaît à l’écran.

Français-11
Chapitre 4. Fonctionnement de base
Ce chapitre vous guide pour l'enregistrement de jeux en cours, la capture d'images, l'ajout de
commentaires vocaux pour vidéos et la lecture instantanée de fichiers.
4.1 Enregistrement et capture
Capture Box vous permet d'enregistrer, de capturer et ajouter des commentaires vocaux aux
vidéos. Les directives sont données comme suit.
Menu OSD Descriptions
Enregistrement instantané en cours de jeu
- Appuyez sur pour activer l'enregistrement
instantané.
- Appuyez de nouveau sur ou pour
arrêter l'enregistrement.
Faire une pause et reprendre
l'enregistrement
Vous pouvez sauter les séquences vidéo
indésirables et reprendre l'enregistrement.
Seules les séquences que vous avez
enregistrées seront enregistrées et les clips
sautés seront automatiquement supprimés.
- Appuyez sur pour interrompre
l'enregistrement. Appuyez sur ou pour
poursuivre l'enregistrement.
Capture Box affiche le déroulement du jeu en temps réel et en mode standard. Vous pouvez changer le mode en
temps réel par défaut pour le mode standard. Allez dans Menu> Paramètres> Mode d'affichage. (Veuillez vous
référer au chapitre 6.2 pour plus de détails.)
Tous les fichiers ou photos enregistrés seront sauvegardés sur le DD par défaut automatiquement. Veuillez
vous référer au chapitre 6 pour plus de détails.

Français-12
Aperçu rapide en cours de jeu
- Appuyez sur pour capturer l’image actuelle.
Appuyez longuement sur pour activer le
mode de capture en continu. Capture Box
prendra 5 photos à la fois.
Lecture instantanée
- Appuyez pour la lecture du dernier fichier
enregistré ou voir la dernière image acquise.
- Appuyez pour arrêter la lecture.
- Appuyez sur ► pour avancer de 30 secondes.
- Appuyez sur ◄ pour reculer de 10 secondes.
Capture d’image lors de la lecture vidéo
Façon 1 :
- Appuyez sur pour capturer l’image actuelle.
Façon 2 :
É tape 1:
- Appuyez sur pour lire la vidéo au ralenti
(1/2x). Appuyez sur à nouveau pour voir la
vidéo image par image.
- ou
- Appuyez sur pour mettre la lecture à pause.
Appuyez sur pour aller à l’image
précédente; appuyez sur pour aller à
l’image suivante.
É tape 2:
- Appuyez sur pour capturer l’image
souhaitée.

Français-13
Information du disque
Appuyez puis appuyez sur OK pour afficher
l’information sur le disque. Appuyez de nouveau
pour masquer.
4.2 Ajout de commentaires
Cette section vous explique comment ajouter des commentaires vocaux à votre enregistrement
vidéo.
Exigences pour casque/microphone:
Casque à écouteurs
Connecteur: Connecteur 3,5 mm
Microphone
Réponse en fréquence: 20-16kHz
Impédance: 2,0 KΩ
Tension de fonctionnement: 3V
Connecteur: Connecteur 3,5 mm
Menu OSD Descriptions
Microphone ouvert (Microphone On)
Un menu OSD s'affiche si vous avez connecté
le microphone/ à Capture Box. Vos
commentaires ne seront enregistrés que
lorsque vous aurez appuyé sur .
- Appuyez sur pour enregistrer votre
déroulement de jeu commenté.
- Appuyez sur ou pour arrêter
l'enregistrement.

Français-14
Si le casque ou le micro sont branchés lors du déroulement avec l'assistant de configuration, le son ne
pourra être entendu à partir de votre casque et les instructions sur les commentaires vocaux ne seront pas
affichés. Par conséquent, branchez le casque ou le micro après l'installation complète de l'assistant afin de
suivre les instructions pour casque/microphone.
Tout commentaire ajouté sera mixé avec le son du déroulement du jeu. De plus, tant que le casque est
connecté à l'appareil, tous vos commentaires et le bruit de fond seront enregistrés. N'oubliez donc pas
d'arrêter l'enregistrement et de retirer le casque lorsqu'aucun commentaire n'est nécessaire.
Si le microphone est déconnecté/connecté au Capture Box lors de l'enregistrement, le son sera également
enregistré. En guise de sécurité, veuillez éviter de brancher le microphone pendant le processus
d'enregistrement.
Le volume que vous entendez lors du test commentaire peut être légèrement différent de l'enregist rement
proprement dit. Il est recommandé que vous fassiez un test de simulation à l'avance pour vous familiariser
avec le volume enregistré.
Il est normal d'entendre votre propre voix lors de l'enregistrement avec la source d'entrée HDMI.
Aucun OSD ne sera affiché lorsque vous vous connecterez, seulement le casque à Capture Box.
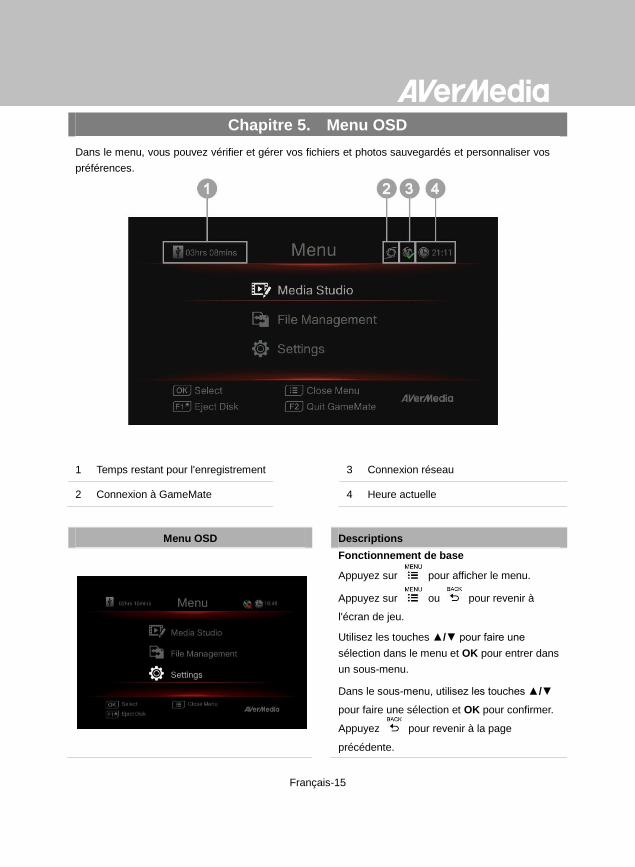
Français-15
Chapitre 5. Menu OSD
Dans le menu, vous pouvez vérifier et gérer vos fichiers et photos sauvegardés et personnaliser vos
préférences.
1 Temps restant pour l'enregistrement 3 Connexion réseau
2 Connexion à GameMate 4 Heure actuelle
Menu OSD Descriptions
Fonctionnement de base
- Appuyez sur pour afficher le menu.
- Appuyez sur ou pour revenir à
l'écran de jeu.
- Utilisez les touches ▲/▼ pour faire une
sélection dans le menu et OK pour entrer dans
un sous-menu.
- Dans le sous-menu, utilisez les touches ▲/▼
pour faire une sélection et OK pour confirmer.
Appuyez pour revenir à la page
précédente.

Français-16
Appuyez sur F1 pour retirer le périphérique de
stockage en toute sécurité.
- *Le coin supérieur gauche montre votre périphérique
de stockage par défaut actuel et l'enregistrement
restant disponible
5.1 Enregistrements et photos (Media Studio)
Vous pouvez vérifier les enregistrements et photos prises par Capture Box dans «Enregistrements et
photos (Media Studio)»
Format d'acquisition:
Vidéo MP4 (Codec: Format H.264 avec audio AAC)
Image JPEG
Menu OSD Descriptions
Navigation
- Utilisez les touches ◄/►/▲/▼ pour
sélectionner les items.
- Appuyez sur F1 pour trier les fichiers par nom,
taille ou format.
- Appuyez sur F2 pour aller en mode liste ou
mode onglet.
- Appuyez sur F3 pour renommer, modifier,
partager le fichier sélectionné.
- Appuyez sur pour aller à la page suivante.
- Appuyez sur pour revenir à la page
précédente.
- Appuyez sur pour accéder au menu
principal.
Il est recommandé que vous affichiez seulement les vidéos et les photos qui sont enregistrées par Capture Box.
Si vous essayez d'ouvrir des fichiers pris par un autre appareil (comme un appareil photo), il est très probable
qu'il y ait un échec.

Français-17
Lecture vidéo
- Appuyez sur ou OK pour débuter la lecture
du vidéo sélectionné.
- Appuyez sur ou OK pour mettre la lecture
à pause. Appuyez sur ou OK pour
reprendre la lecture.
- Appuyez pour lire la vidéo au ralenti
(1/2x).
- Appuyez sur pour reculer en 2x, 4x, 8x, 16x, 32x.
- Appuyez sur pour l’avance rapide à 2x,
4x, 8x, 16x, 32x.
- Appuyez pour lire le fichier à la vitesse
normale (1x) lorsque les fonctions de ralenti,
rembobinage ou avance rapide sont actives.
- Appuyez pour arrêter la lecture.
- Appuyez sur pour afficher l’information de
lecture, y compris l’espace de stockage du
disque, résolution d’enregistrement, durée,
temps écoulé et restant et nom de fichier.
*Seuls les fichiers vidéos captés par Capture Box sont
pris en charge.
Visionnement des photos
- Appuyez sur ou OK pour voir l’image
sélectionnée. Appuyez sur ou pour
revenir.
*Seuls les fichiers image captés par Capture Box sont
pris en charge.
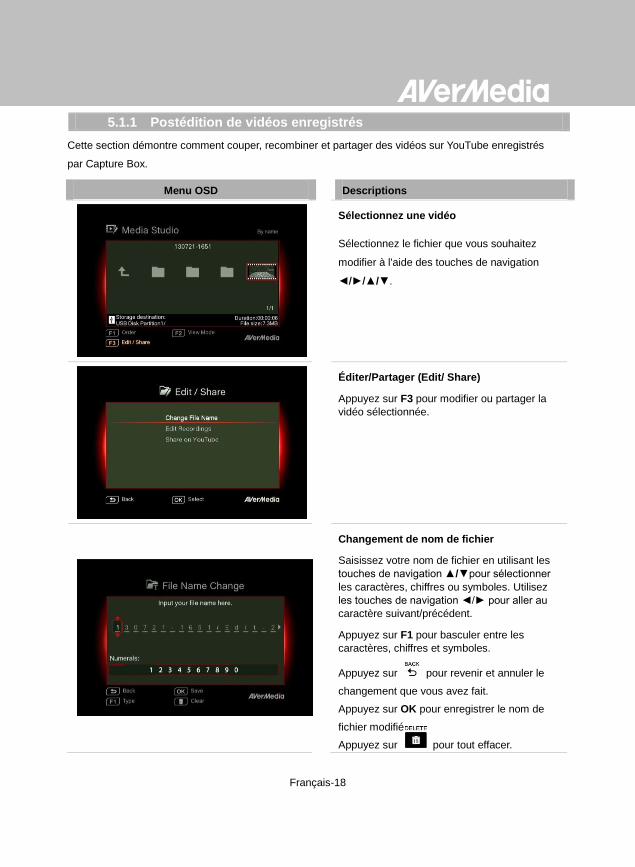
Français-18
5.1.1 Postédition de vidéos enregistrés
Cette section démontre comment couper, recombiner et partager des vidéos sur YouTube enregistrés
par Capture Box.
Menu OSD Descriptions
Sélectionnez une vidéo
- Sélectionnez le fichier que vous souhaitez
modifier à l'aide des touches de navigation
◄/►/▲/▼.
É diter/Partager (Edit/ Share)
Appuyez sur F3 pour modifier ou partager la
vidéo sélectionnée.
Changement de nom de fichier
Saisissez votre nom de fichier en utilisant les
touches de navigation ▲/▼pour sélectionner
les caractères, chiffres ou symboles. Utilisez
les touches de navigation ◄/► pour aller au
caractère suivant/précédent.
Appuyez sur F1 pour basculer entre les
caractères, chiffres et symboles.
- Appuyez sur pour revenir et annuler le
changement que vous avez fait.
- Appuyez sur OK pour enregistrer le nom de
fichier modifié.
- Appuyez sur pour tout effacer.

Français-19
Comment modifier (How to Edit)
Des directives sur la façon de modifier une
vidéo seront affichées; appuyez sur OK pour
commencer l'édition.
Mode É dit
Vous pouvez couper et recombiner votre vidéo
sélectionnée en mode É dit.
- Pour couper la vidéo, vous aurez besoin de
créer un ou plusieurs segments de la vidéo.
- É tape 1:
- Pour localiser une scène, utilisez les touches
de direction ou pour rechercher la scène.
Vous pouvez également utiliser les touches de
navigation ▲/▼pour chercher les scènes par
heure spécifique, minute et seconde sur le côté
gauche de l'écran.
- Appuyez sur OK pour sélectionner ou
désélectionner la scène.
-
É tape 2:
Répétez l'étape 1 pour créer un segment.
Appuyez sur OK pour conserver ou
supprimer le segment.
Appuyez sur F1 pour basculer entre
Recherche de scène et Recherche de
segment.
Appuyez sur F2 pour effacer toutes les
marques faites sur la vidéo.
Appuyez sur F3 pour exporter la vidéo.

Français-20
Aperçu
- Capture Box recombine automatiquement les
segments que vous choisissez de garder
pendant le montage.
Export
- Le temps estimé peut varier selon les disques
de stockage. Référez le temps d'exportation à
l'utilisation réelle de votre disque de stockage.
- Appuyez sur OK pour exporter la vidéo.
- Appuyez sur pour continuer l'édition.
Menu OSD Descriptions
Exportation... (Exporting…)
La barre au milieu montre la progression de
l'exportation vidéo et le temps estimé.
- Cliquez sur pour annuler l'exportation.
- Cliquez sur pour masquer les
informations d'exportation.

Français-21
Quitter (Exit)
Appuyez sur OK pour quitter le mode d'édition.
- Appuyez sur pour sortir.
Appuyez sur F1 pour continuer l'édition.
Menu OSD Descriptions
Partager des vidéos sur YouTube
Utilisez ▲/▼pour sélectionner la tâche que
vous souhaitez effectuer. Sélectionnez
«Partager sur YouTube (Share on Youtube)»
pour partager vos vidéos.
Partagez sur YouTube (Share on Youtube)
Avant de partager vos vidéos enregistrées sur
YouTube, assurez-vous que vous avez:
1. Créé un compte YouTube et aussi un
canal personnel.
2. Ayez votre PC/NB tout près si vous
activez la vérification en deux étapes de
votre compte YouTube.
Pour assurer la stabilité du téléchargement,
téléchargez des vidéos qui ne dépassent pas
une heure.
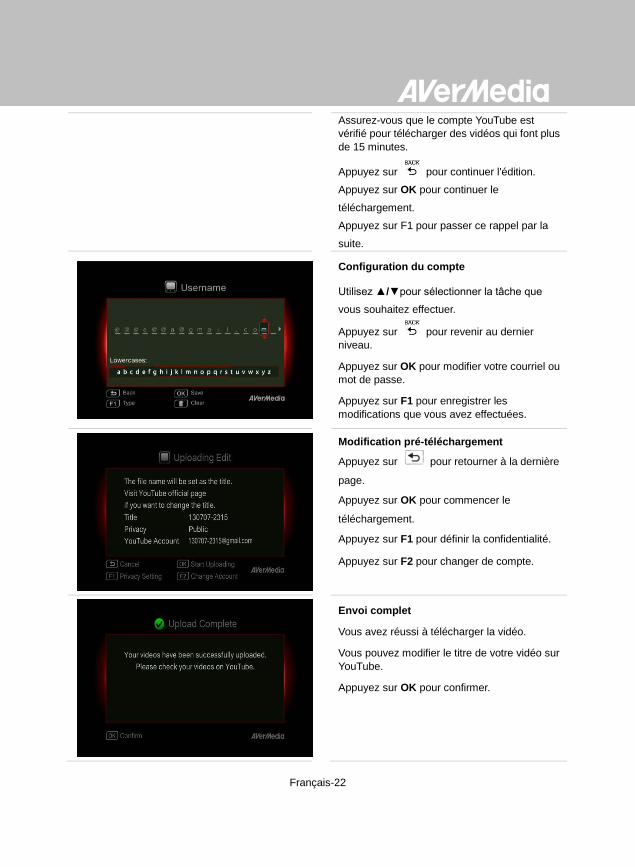
Français-22
Assurez-vous que le compte YouTube est
vérifié pour télécharger des vidéos qui font plus
de 15 minutes.
- Appuyez sur pour continuer l'édition.
- Appuyez sur OK pour continuer le
téléchargement.
- Appuyez sur F1 pour passer ce rappel par la
suite.
Configuration du compte
- Utilisez ▲/▼pour sélectionner la tâche que
vous souhaitez effectuer.
Appuyez sur pour revenir au dernier
niveau.
Appuyez sur OK pour modifier votre courriel ou
mot de passe.
Appuyez sur F1 pour enregistrer les
modifications que vous avez effectuées.
- Modification pré-téléchargement
- Appuyez sur pour retourner à la dernière
page.
- Appuyez sur OK pour commencer le
téléchargement.
- Appuyez sur F1 pour définir la confidentialité.
Appuyez sur F2 pour changer de compte.
Envoi complet
Vous avez réussi à télécharger la vidéo.
Vous pouvez modifier le titre de votre vidéo sur
YouTube.
Appuyez sur OK pour confirmer.

Français-23
«La Gestionnaire de Fichiers (File Management)» vous permet de gérer les vidéos et images de
Capture Box. Vous pouvez copier des fichiers entre le disque dur interne et le dispositif de stockage
USB externe, et supprimer les fichiers indésirables. Avant d'entrer dans ce sous-menu, insérez
d'abord votre périphérique de stockage (périphérique USB de stockage 2.0/3.0/2.5" Disque dur au
format NTFS).
Menu OSD Descriptions
Sélectionnez la partition
- Utilisez les touches ◄/►/▲/▼ pour
sélectionner la partition.
- Appuyez sur pour lire la vidéo.
- Appuyez sur F1 pour modifier la règle de tri de
fichiers.
5.2 Gestionnaire de Fichiers (File Management)
La longueur recommandée de chaque vidéo doit être inférieure à 1 heure.
Capture Box est conçu pour l'enregistrement et l'acquisition de matériel média détenus légalement ou
autorisés par l'utilisateur seulement. Le téléchargement de vidéos qui sont protégées par droit d'auteur et
autres lois n'est pas autorisé. YouTube peut fermer un compte pour des raisons de protection de droit
d'auteur.
Assurez-vous que votre compte YouTube est vérifié pour télécharger des vidéos qui font plus de 15
minutes. Reportez-vous au site Web YouTube pour plus de détails.
Parfois, il faut deux à trois jours pour que vos vidéos soient affichées sur YouTube. Veuillez attendre
quelques jours pour que vos vidéos apparaissent en ligne.

Français-24
Interface utilisateur de gestion de fichiers :
1 Liste affichant les fichiers sur le disque dur interne
2 Ensemble d’outils d’édition
3 Liste affichant les fichiers sur le disque USB
4 Zone d’affichage de l’information
Description des outils d’édition :
Touches
numérotées Description
1
Copie de fichier sur le disque USB
2 Copie de fichiers sur le disque dur interne
3 Sélectionnez tous
4 Désélectionnez tous
5 Supprimer

Français-25
Menu OSD Description
Copie de fichier du DD interne vers le disque USB
É tape 1:
- Sur le côté gauche de la liste, utilisez les touches
▲/▼ pour sélectionner le fichier que vous désirez
copier vers le disque USB. Appuyez sur OK pour
sélectionner/désélectionner un item.
- Sélectionnez puis appuyez sur OK pour
sélectionner tous les fichiers.
- Sélectionnez puis appuyez sur OK pour
désélectionner tous les fichiers.
É tape 2:
- Sélectionnez et appuyez sur OK pour copier les fichiers sélectionnés vers le disque USB.
- Appuyez pour annuler la copie de fichiers en
progression.
É tape 3:
- Appuyer sur OK.
La copie de fichiers à partir du disque USB vers le
disque dur interne fonctionne dans le sens
inverse, tel que mentionné ci-dessus.
*Si le fichier est plutôt gros, appuyez sur F1 pour
cacher le statut de copie ou de suppression.
Suppression de fichiers
É tape 1:
- Utilisez les touches ▲/▼ pour sélectionner les
fichiers que vous souhaitez supprimer. Appuyez
sur OK pour sélectionner/désélectionner un item.
- Sélectionnez puis appuyez sur OK pour sélectionner tous les fichiers.
- Sélectionnez puis appuyez sur OK pour

Français-26
désélectionner tous les fichiers.
É tape 2:
- Sélectionnez et appuyez sur OK pour
supprimer le fichier de la liste.
ou
Appuyez sur la télécommande, puis sur
OK pour supprimer le fichier de la liste.
- Appuyez sur pour annuler la copie de
fichiers en cours.
É tape 3:
- Appuyer sur OK.
Enlèvement du dispositif de stockage USB
Pour éviter une perte de données, il est
hautement recommandé de retirer en toute
sécurité votre dispositif de stockage externe.
Veuillez suivre les étapes ci-dessous :
É tape 1:
Appuyez sur sur la télécommande.
É tape 2:
Appuyez sur F2 pour masquer.

Français-27
Chapitre 6. Jumelage de l'appareil avec le GameMate d'AVerMedia
GameMate d'AVerMedia est l'application dédiée pour les téléphones intelligents. Elle vous permet
d'utiliser votre smartphone comme télécommande. Vous n'êtes qu'à quelques pas de jumeler Capture
Box au GameMate.
OSD Description
Il est recommandé que Capture Box et le
GameMate partagent un accès sans fil AP.
Après avoir téléchargé le GameMate, appuyez
sur GameMate sur votre smartphone. Vous
verrez que le GameMate recherche le dispositif
disponible.
Un ensemble de nombres de jumelage sera
affiché à l'écran.
Veuillez d'abord télécharger le GameMate d'AVerMedia à partir de la boutique app.
Pour réussir le jumelage, assurez-vous que Capture Box et le GameMate partagent le même réseau. Pour ce faire,
vous aurez également besoin d'un point d'accès sans fil pour GameMate. Assurez-vous que le LAN est bien
connecté et que vous êtes prêt pour le jumelage!
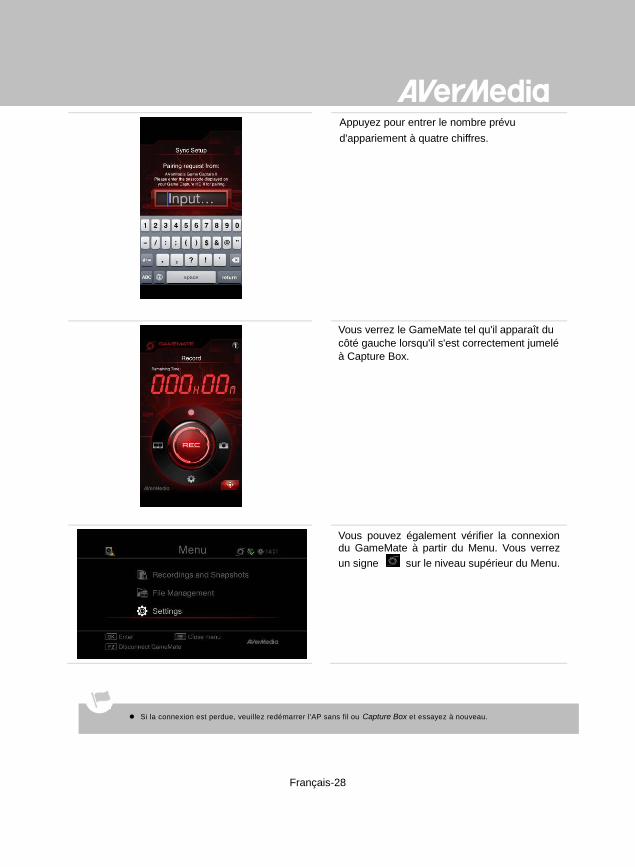
Français-28
Appuyez pour entrer le nombre prévu
d'appariement à quatre chiffres.
Vous verrez le GameMate tel qu'il apparaît du
côté gauche lorsqu'il s'est correctement jumelé
à Capture Box.
Vous pouvez également vérifier la connexion du GameMate à partir du Menu. Vous verrez
un signe sur le niveau supérieur du Menu.
Si la connexion est perdue, veuillez redémarrer l'AP sans fil ou Capture Box et essayez à nouveau.
Deutsch -1
Inhalt
Kapitel 1. Die Geräteteile ......................................................................... 2 1.1 Frontblende .......................................................................................... 2 1.2 Infrarotsensor ....................................................................................... 2 1.3 LED-Indikator ....................................................................................... 3 1.4 Anschlussports .................................................................................... 4
1.4.1 Vorderansicht ................................................................................................ 4 1.4.2 Rückansicht ................................................................................................... 5
Kapitel 2. Fernbedienung ........................................................................ 6
Kapitel 3. Einrichtungsassistent ............................................................. 8
Kapitel 4. Grundfunktionen ................................................................... 11 4.1 Aufnahme und Bilderfassung ............................................................. 11 4.2 Hinzufügen von Kommentaren .......................................................... 13
Kapitel 5. Bildschirmmenü .................................................................... 15 5.1 Aufnahmen/Schnappschüsse (Media Studio) .................................... 16
5.1.1 Mit Capture Box aufgenommene Videos im Nachhinein bearbeiten.. 18 5.2 Dateiverwaltung (File Management) .................................................. 23
Kapitel 6. Capture Box und GameMate von AVerMedia koppeln ...... 27

Deutsch -2
Kapitel 1. Die Geräteteile
1.1 Frontblende
Das Tastenfeld an der Vorderseite des Gerätes bietet schnellen Zugriff auf häufig verwendete
Funktionen.
Nr. Tasten Beschreibungen
1
Aufnahme
Startet/beendet die Aufnahme
2
Ein/Aus (Power)
Schaltet das Gerät ein
Zum Erzwingen einer Abschaltung der Capture Box 4 Sekunden gedrückt halten
1.2 Infrarotsensor
Wenn Sie die Fernbedienung verwenden, richten Sie diese auf den Infrarot- (IR) Sensor an der Vorderseite des Gerätes. Die Fernbedienung muss in einem Winkel von maximal 30 Grad lotrecht zum IR-Sensor gehalten werden, damit sie richtig funktioniert. Der Abstand zwischen Fernbedienung und Sensor darf 6 Meter nicht überschreiten.
Deuts
ch
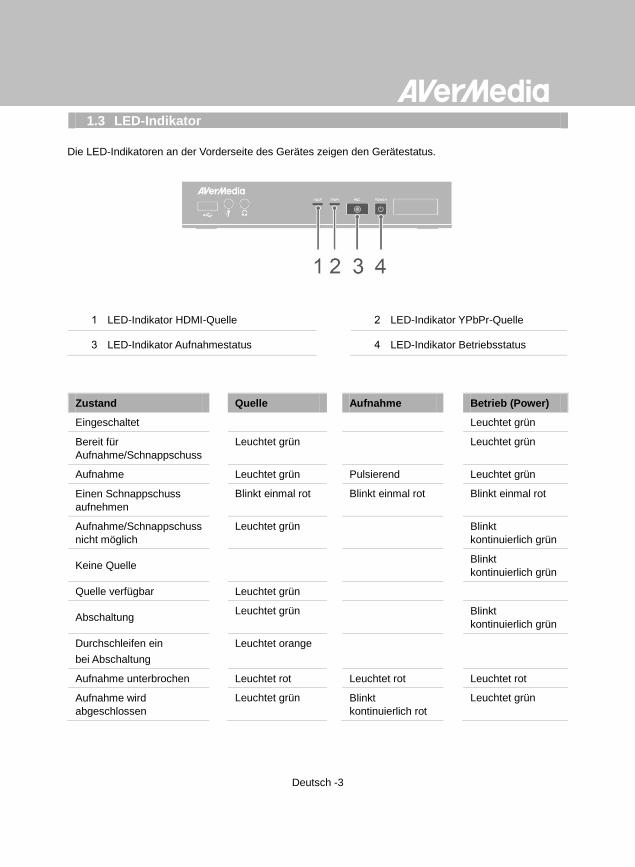
Deutsch -3
1.3 LED-Indikator
Die LED-Indikatoren an der Vorderseite des Gerätes zeigen den Gerätestatus.
1 LED-Indikator HDMI-Quelle 2 LED-Indikator YPbPr-Quelle
3 LED-Indikator Aufnahmestatus 4 LED-Indikator Betriebsstatus
Zustand Quelle Aufnahme Betrieb (Power)
Eingeschaltet Leuchtet grün
Bereit für
Aufnahme/Schnappschuss
Leuchtet grün Leuchtet grün
Aufnahme Leuchtet grün Pulsierend Leuchtet grün
Einen Schnappschuss
aufnehmen
Blinkt einmal rot Blinkt einmal rot Blinkt einmal rot
Aufnahme/Schnappschuss
nicht möglich
Leuchtet grün Blinkt
kontinuierlich grün
Keine Quelle Blinkt
kontinuierlich grün
Quelle verfügbar Leuchtet grün
Abschaltung Leuchtet grün Blinkt
kontinuierlich grün
Durchschleifen ein
bei Abschaltung
Leuchtet orange
Aufnahme unterbrochen Leuchtet rot Leuchtet rot Leuchtet rot
Aufnahme wird
abgeschlossen
Leuchtet grün Blinkt
kontinuierlich rot
Leuchtet grün

Deutsch -4
Zustand Quelle Aufnahme Betrieb (Power)
Speicherplatz fast
erschöpft
Leuchtet grün Blinkt langsam Leuchtet grün
Gerät nicht bereit Blinkt kontinuierlich
grün
Probleme wie: Kein
Speicher/ kein Signal/
geschützter Inhalt
Blinkt kontinuierlich
grün
Fernbedienungsbefehl
wird empfangen
Blinkt einmal grün
Drücken Sie zum Beziehen des LED-Indikatorstatus [F1].
1.4 Anschlussports
1 USB-Port 3 Kopfhörerausgang
2 Mikrofoneingang
1.4.1 Vorderansicht
USB-Port zum Anschließen eines externen Festplattenspeichergerätes sowie zur Firmware-Aktualisierung
via Speichergerät.
USB-Hub nicht unterstützt.
Keine Funktion oder Antwort, wenn die Capture Box per USB mit einem Computer verbunden wird.

Deutsch -6
Kapitel 2. Fernbedienung
Die nachstehenden Beschreibungen zeigen die Funktionen der Fernbedienungstasten.
# Tasten
Beschreibungen
1 Schaltet das Gerät ein bzw. versetzt es in den Bereitschaftsmodus.
2 Ruft das Hauptmenü auf. Zum Verlassen noch einmal drücken.
3
Drücken Sie zum Bewegen zwischen den Optionen die Navigationstasten.
Mit OK bestätigen Sie eine Auswahl.
Mit OK fügen Sie dem Segment in der Nachbearbeitung eine Markierung
hinzu/entfernen sie.
4
Gibt die zuletzt aufgenommene Datei bzw. das zuletzt aufgenommene Bild
wieder.
5 Startet/beendet die Aufnahme.

Deutsch -7
6
Startet die Wiedergabe der ausgewählten Datei.
Gibt die Datei bei normaler (1facher) Geschwindigkeit wieder, wenn Zeitlupe,
Rücklauf oder Schnellvorlauf aktiv sind.
7
Beendet die Wiedergabe.
Beendet die Aufnahme.
8 Aktiviert den Rücklauf (2fach, 4fach, 8fach, 16fach, 32fach).
9 Ruft die vorherige Seite auf.
10
Blendet den Bildschirm zur Einstellung der Video/Schnappschuss-Qualität ein.
Zum Verlassen noch einmal drücken.
11 (Folgen Sie den Bildschirmhinweisen)
12 (Folgen Sie den Bildschirmhinweisen)
13 (Folgen Sie den Bildschirmhinweisen)
14 Schaltet zwischen Component- und HDMI-Quellen um.
15 Zeigt Bildschirminformationen, inklusive Modus, Quelle und Audioquelle, an.
16 Verlässt die aktuelle Seite und kehrt zur vorherigen Seite zurück.
17
Nimmt einen Schnappschuss während des Spielens oder der
Videowiedergabe auf.
18
Unterbricht die Wiedergabe. Mit OK oder setzen Sie die Wiedergabe fort. Unterbricht die Aufnahme.
19
Gibt das Video in Zeitlupe (1/2fach) wieder. Bei erneuter Betätigung gelangen
Sie in den Bild-für-Bild-Modus (siehe Einzelheiten auf S. 27).
20 Aktiviert den Schnellvorlauf (2fach, 4fach, 8fach, 16fach, 32fach).
21
Ruft die nächste Seite auf.
22 Löscht die ausgewählten Dateien.
23 Zeigt Informationen zum Medium an. Zum Ausblenden noch einmal drücken.
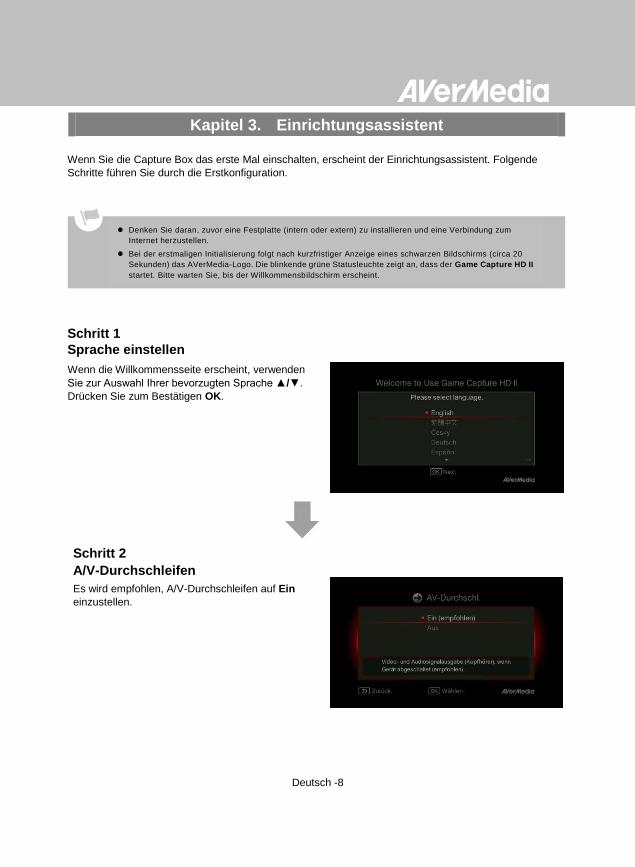
Deutsch -8
Kapitel 3. Einrichtungsassistent
Wenn Sie die Capture Box das erste Mal einschalten, erscheint der Einrichtungsassistent. Folgende
Schritte führen Sie durch die Erstkonfiguration.
Schritt 1
Sprache einstellen
Wenn die Willkommensseite erscheint, verwenden
Sie zur Auswahl Ihrer bevorzugten Sprache ▲/▼.
Drücken Sie zum Bestätigen OK.
Schritt 2
A/V-Durchschleifen
Es wird empfohlen, A/V-Durchschleifen auf Ein
einzustellen.
Denken Sie daran, zuvor eine Festplatte (intern oder extern) zu installieren und eine Verbindung zum
Internet herzustellen.
Bei der erstmaligen Initialisierung folgt nach kurzfristiger Anzeige eines schwarzen Bildschirms (circa 20
Sekunden) das AVerMedia-Logo. Die blinkende grüne Statusleuchte zeigt an, dass der Game Capture HD II
startet. Bitte warten Sie, bis der Willkommensbildschirm erscheint.
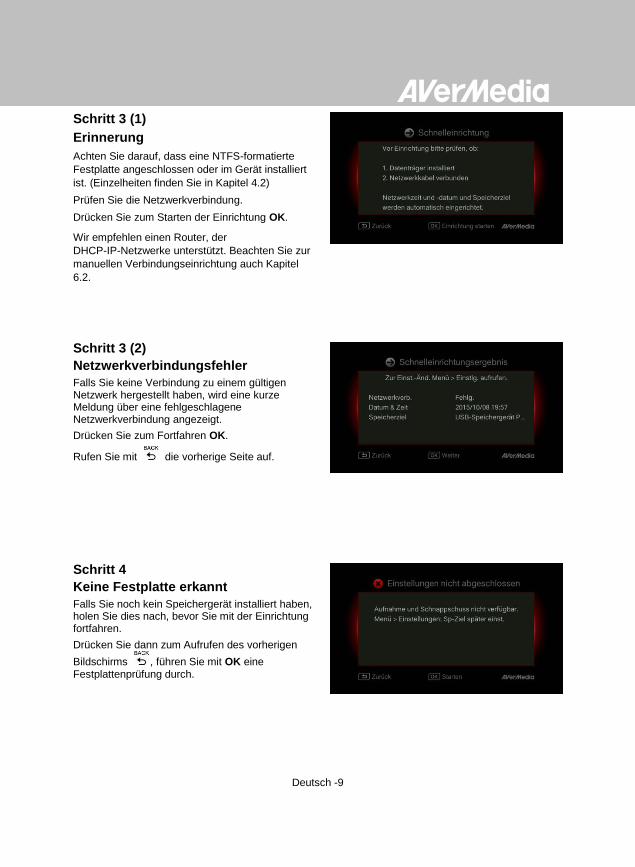
Deutsch -9
Schritt 3 (1)
Erinnerung
Achten Sie darauf, dass eine NTFS-formatierte
Festplatte angeschlossen oder im Gerät installiert
ist. (Einzelheiten finden Sie in Kapitel 4.2)
Prüfen Sie die Netzwerkverbindung.
Drücken Sie zum Starten der Einrichtung OK.
Wir empfehlen einen Router, der
DHCP-IP-Netzwerke unterstützt. Beachten Sie zur
manuellen Verbindungseinrichtung auch Kapitel
6.2.
Schritt 3 (2)
Netzwerkverbindungsfehler
Falls Sie keine Verbindung zu einem gültigen Netzwerk hergestellt haben, wird eine kurze Meldung über eine fehlgeschlagene Netzwerkverbindung angezeigt.
Drücken Sie zum Fortfahren OK.
Rufen Sie mit die vorherige Seite auf.
Schritt 4
Keine Festplatte erkannt
Falls Sie noch kein Speichergerät installiert haben, holen Sie dies nach, bevor Sie mit der Einrichtung fortfahren.
Drücken Sie dann zum Aufrufen des vorherigen
Bildschirms , führen Sie mit OK eine Festplattenprüfung durch.

Deutsch -10
Schritt 4 (2)
Einrichtungsassistenten abschließen
Sobald eine NTFS-formatierte Festplatte
verbunden ist, zeigt eine Benachrichtigung an, dass
die Einrichtung abgeschlossen ist.
Sie können nun direkt mit der Aufnahme und
Erstellung von Schnappschüssen beginnen.
Drücken Sie OK; dadurch verlassen Sie den
Assistenten und können mit der Nutzung der
Capture Box beginnen. Der Spielbildschirm
erscheint.
Deutsch -11
Kapitel 4. Grundfunktionen
Dieses Kapitel beschreibt Gameplay-Aufnahme, Bilderfassung, das Hinzufügen von
Sprachkommentaren zu Videos und die sofortige Dateiwiedergabe.
4.1 Aufnahme und Bilderfassung
Die Capture Box ermöglicht Ihnen Aufnahme, Bilderfassung und Hinzufügen von
Sprachkommentaren zu Videos. Nachstehend folgen die Anweisungen.
Bildschirmmenü Beschreibungen
Sofortige Aufnahme während des Spielens
- Drücken Sie zum Aktivieren der sofortigen
Aufnahme .
- Drücken Sie zum Beenden der Aufnahme noch
einmal oder .
Unterbrechen und Fortsetzen der Aufnahme
Sie können unerwünschtes Videomaterial
überspringen und die Aufnahme fortsetzen. Nur
von Ihnen aufgenommenes Videomaterial wird
gespeichert; unerwünschte Clips werden
automatisch übersprungen.
- Drücken Sie zum Unterbrechen der Aufnahme
.
- Drücken Sie zum Fortsetzen der Aufnahme
oder
Alle aufgenommenen Dateien oder Schnappschüsse werden automatisch im Standardzielpfad auf der
Festplatte gespeichert. Einzelheiten finden Sie in Kapitel 6.
Die Capture Box zeigt das Gameplay im Echtzeit- und Standardmodus. Sie können vom Standardechtzeitmodus in den
Standardmodus wechseln. Rufen Sie Menü > Einstellungen > Anzeigemodus auf. (Einzelheiten finden Sie in Kapitel 6.2.)

Deutsch -12
Schneller Schnappschuss während des
Spielens
- Drücken Sie zur Aufnahme des aktuellen Bildes
.
Drücken Sie zum Aktivieren des kontinuierlichen
Bildaufnahmemodus lange . Die Capture Box
nimmt 5 Schnappschüsse auf einmal auf.
Sofortige Wiedergabe
- Drücken Sie zur Wiedergabe der zuletzt
aufgenommenen Datei bzw. zur Anzeige des
zuletzt aufgenommenen Bildes .
- Mit beenden Sie die Wiedergabe.
- Drücken Sie zum Vorwärtsspringen um 30
Sekunden ►.
- Drücken Sie zum Rückwärtsspringen um 10
Sekunden ◄.
Bildaufnahme während der Videowiedergabe
Methode 1:
- Drücken Sie zur Aufnahme des aktuellen Bildes
.
Methode 2:
Schritt 1:
- Drücken Sie zur Wiedergabe des Videos in
Zeitlupe (1/2fach) . Drücken Sie zur
Bild-für-Bild-Anzeige des Videos noch einmal .
-
oder
- Drücken Sie zum Unterbrechen der Wiedergabe
. Mit rufen Sie das vorherige Einzelbild auf;
mit gelangen Sie zum nächsten Einzelbild.
Schritt 2:
- Drücken Sie zur Aufnahme des gewünschten
Bildes .

Deutsch -13
Festplatteninformationen
Drücken Sie und dann zur Anzeige der
Festplatteninformationen OK. Zum Ausblenden
noch einmal drücken.
4.2 Hinzufügen von Kommentaren
Dieser Abschnitt beschreibt, wie Sie Sprachkommentare zu Ihrer Videoaufnahme hinzufügen.
Anforderungen an Headset/Mikrofon:
Headset
Anschluss: 3,5-mm-Anschluss
Mikrofon
Frequenzreaktion: 20 – 16 kHz
Impedanz: 2,0 kΩ
Betriebsspannung: 3 V
Anschluss: 3,5-mm-Anschluss
Bildschirmmenü Beschreibungen
Mikrofon aktivieren (Microphone On)
Eine Anzeige erscheint, wenn Sie ein Mikrofon
an die Capture Box anschließen. Ihr
Kommentar wird nur aufgenommen, wenn Sie
drücken.
- Drücken Sie zur Aufnahme Ihres Gameplay mit
Kommentar .
- Drücken Sie zum Beenden der Aufnahme
oder .

Deutsch -14
Falls während des Einrichtungsassistenten ein Headset oder Mikrofon angeschlossen wird, kann der Ton nur
über Ihren Kopfhörer gehört werden und Anweisungen zum Kommentieren werden nicht angezeigt.
Schließ en Sie das Headset oder Mikrofon daher erst nach Abschluss des Einrichtungsassistenten ein, damit
Sie den Kopfhörer/Mikrofon-Anweisungen folgen können.
Alle hinzugefügten Kommentare werden mit dem Gameplay-Ton vermischt. Solange der Kopfhörer mit dem
Gerät verbunden ist, werden all Ihre Kommentare und Hintergrundgeräusche aufgenommen. Denken Sie
daher daran, die Aufnahme zu beenden und den Kopfhörer zu trennen, wenn keine Kommentare erforderlich
sind.
Falls das Mikrofon während der Aufnahme von der Capture Box getrennt oder daran angeschlossen wird,
wird das Geräusch ebenfalls aufgezeichnet. Bitte trennen Sie das Mikrofon daher nicht während der
Aufnahme.
Die im Kommentartest ausgegebene Lautstärke kann leicht von der Lautstärke während der tatsächlichen
Aufnahme abweichen. Sie sollten sich vorab mit Hilfe eines Mock-Tests mit der Aufnahmelautstärke vertraut
machen.
Es ist normal, dass Sie bei Aufnahme mit einer HDMI-Eingangsquelle Ihre eigene Stimme hören.
Wenn Sie nur den Kopfhörer an der Capture Box anschließen, wird kein Bildschirmtext angezeigt.

Deutsch -15
Kapitel 5. Bildschirmmenü
Im Menü können Sie Ihre aufgenommenen Dateien und Schnappschüsse prüfen und verwalten sowie
Ihre Präferenzen anpassen.
1 Restliche Aufnahmezeit 3 Netzwerkverbindung
2 GameMate-Verbindung 4 Aktuelle Uhrzeit
Bildschirmmenü Beschreibungen
Grundfunktionen
- Rufen Sie mit das Menü auf.
- Mit oder kehren Sie zum
Spielbildschirm zurück.
- Treffen Sie mit ▲/▼ Ihre Auswahl im Menü und
drücken zum Aufrufen eines Untermenüs OK.
- Treffen Sie im Untermenü mit ▲/▼ eine
Auswahl und bestätigen diese mit OK. Mit
kehren Sie zur vorherigen Seite zurück.
Drücken Sie zum sicheren Auswerfen des
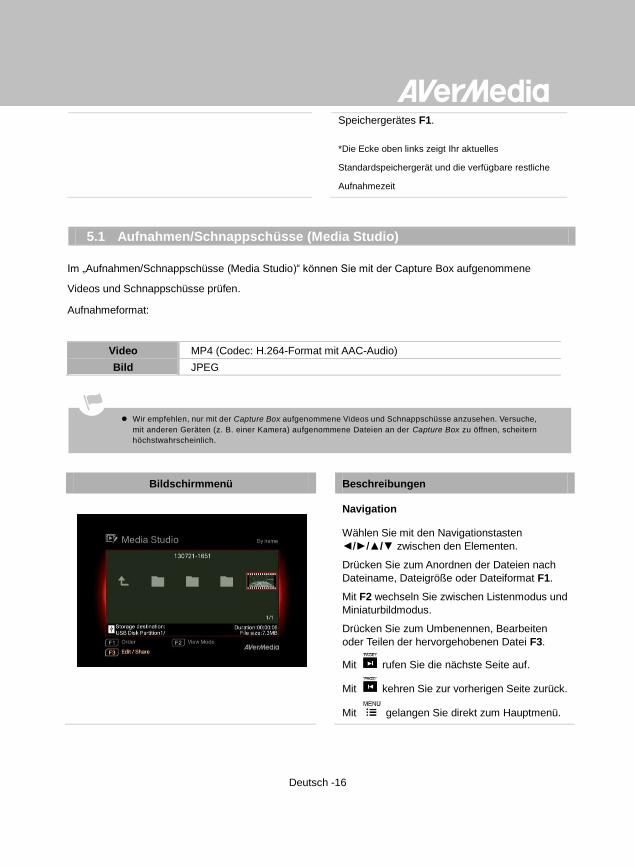
Deutsch -16
Speichergerätes F1.
- *Die Ecke oben links zeigt Ihr aktuelles
Standardspeichergerät und die verfügbare restliche
Aufnahmezeit
5.1 Aufnahmen/Schnappschüsse (Media Studio)
Im „Aufnahmen/Schnappschüsse (Media Studio)“ können Sie mit der Capture Box aufgenommene
Videos und Schnappschüsse prüfen.
Aufnahmeformat:
Video MP4 (Codec: H.264-Format mit AAC-Audio)
Bild JPEG
Bildschirmmenü Beschreibungen
Navigation
- Wählen Sie mit den Navigationstasten
◄/►/▲/▼ zwischen den Elementen.
- Drücken Sie zum Anordnen der Dateien nach
Dateiname, Dateigröße oder Dateiformat F1.
- Mit F2 wechseln Sie zwischen Listenmodus und
Miniaturbildmodus.
- Drücken Sie zum Umbenennen, Bearbeiten
oder Teilen der hervorgehobenen Datei F3.
- Mit rufen Sie die nächste Seite auf.
- Mit kehren Sie zur vorherigen Seite zurück.
- Mit gelangen Sie direkt zum Hauptmenü.
Wir empfehlen, nur mit der Capture Box aufgenommene Videos und Schnappschüsse anzusehen. Versuche,
mit anderen Geräten (z. B. einer Kamera) aufgenommene Dateien an der Capture Box zu öffnen, scheitern
höchstwahrscheinlich.
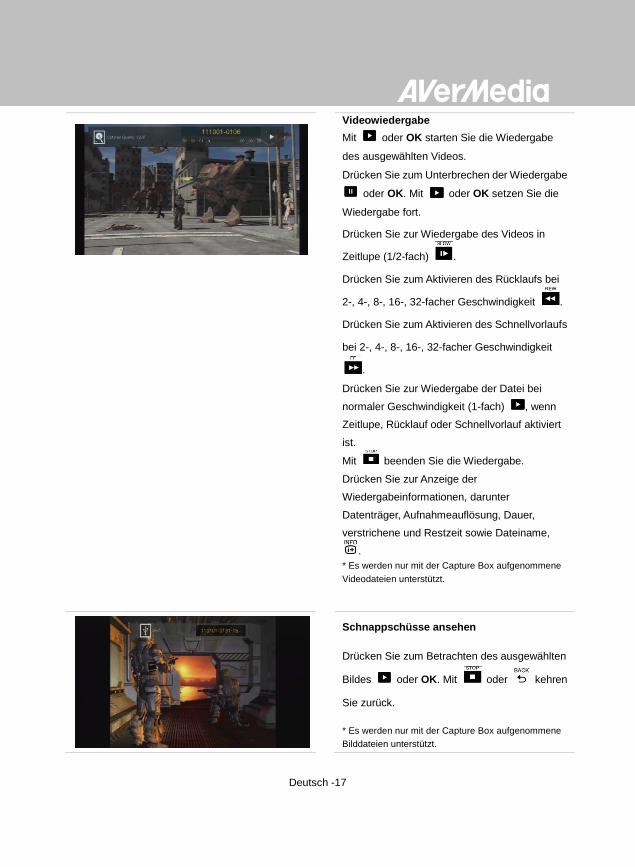
Deutsch -17
Videowiedergabe
- Mit oder OK starten Sie die Wiedergabe
des ausgewählten Videos.
- Drücken Sie zum Unterbrechen der Wiedergabe
oder OK. Mit oder OK setzen Sie die
Wiedergabe fort.
- Drücken Sie zur Wiedergabe des Videos in
Zeitlupe (1/2-fach) .
- Drücken Sie zum Aktivieren des Rücklaufs bei
2-, 4-, 8-, 16-, 32-facher Geschwindigkeit .
- Drücken Sie zum Aktivieren des Schnellvorlaufs
bei 2-, 4-, 8-, 16-, 32-facher Geschwindigkeit
.
- Drücken Sie zur Wiedergabe der Datei bei
normaler Geschwindigkeit (1-fach) , wenn
Zeitlupe, Rücklauf oder Schnellvorlauf aktiviert
ist.
- Mit beenden Sie die Wiedergabe.
- Drücken Sie zur Anzeige der
Wiedergabeinformationen, darunter
Datenträger, Aufnahmeauflösung, Dauer,
verstrichene und Restzeit sowie Dateiname,
.
* Es werden nur mit der Capture Box aufgenommene
Videodateien unterstützt.
Schnappschüsse ansehen
- Drücken Sie zum Betrachten des ausgewählten
Bildes oder OK. Mit oder kehren
Sie zurück.
* Es werden nur mit der Capture Box aufgenommene
Bilddateien unterstützt.

Deutsch -18
5.1.1 Mit Capture Box aufgenommene Videos im Nachhinein bearbeiten
Dieser Abschnitt zeigt, wie Sie mit der Capture Box aufgenommene Videos schneiden, neu kombinieren
und auf YouTube teilen.
Bildschirmmenü Beschreibungen
Ein Video wählen
- Wählen Sie mit den Navigationstasten ◄/►/▲/▼
die Datei, die Sie bearbeiten möchten.
Bearbeiten / Teilen (Edit/ Share)
Drücken Sie zum Bearbeiten oder Teilen des
ausgewählten Videos F3.
Dateinamen ändern
Geben Sie Ihren Dateinamen ein, indem Sie mit
den Navigationstasten ▲/▼ die gewünschten
Buchstaben, Ziffern oder Symbole wählen. Mit
den Navigationstasten ◄/► rufen Sie die nächste
oder vorherige Stelle auf.
Drücken Sie zum Umschalten zwischen
Buchstaben, Ziffern und Symbolen F1.
- Mit kehren Sie zum Abbrechen der von
Ihnen durchgeführten Ä nderungen zurück.
- Mit OK speichern Sie den bearbeiteten
Dateinamen.
- Mit löschen Sie alles.

Deutsch -19
Anleitung zur Bearbeitung (How to Edit)
Anweisungen zur Bearbeitung eines Videos
erscheinen; drücken Sie zum Starten der
Bearbeitung OK.
.
Bearbeitungsmodus
Sie können Ihr ausgewählten Video im
Bearbeitungsmodus schneiden und neu
kombinieren.
- Zum Schneiden des Videos müssen Sie ein oder
mehrere Segmente innerhalb des Videos
erstellen.
- Schritt 1:
- Lokalisieren Sie eine Szene, indem Sie die
gewünschte Szene mit den Richtungstasten oder
suchen.
Sie können eine Szene auch mit Hilfe der
Navigationstasten ▲/▼ nach einer spezifischen
Stunden-, Minuten- und Sekundenangabe auf der
linken Bildschirmseite suchen.
- Drücken Sie OK, wenn Sie die Szene markieren
bzw. die Markierung aufheben möchten.
-
Schritt 2:
Wiederholen Sie Schritt 1 zur Erstellung eines
Segments.
Drücken Sie zum Behalten oder Löschen des
Segments OK.

Deutsch -20
Mit F1 wechseln Sie zwischen Szene suchen und
Segment-Suche.
Drücken Sie zum Löschen aller im Video
vorgenommenen Markierungen F2.
Mit F3 exportieren Sie das Video.
Vorschau
- Die Capture Box kombiniert die zum Behalten
ausgewählten Segmente während der
Bearbeitung automatisch neu.
Exportieren (Export)
- Die geschätzte Zeit variiert je nach Datenträger.
Die Dauer des Exports richtet sich nach dem
verwendeten Speichergerät.
- Drücken Sie zum Exportieren des Videos OK.
- Mit setzen Sie die Bearbeitung fort.
Bildschirmmenü Beschreibungen
Exportiere…(Exporting...)
Die Leiste in der Mitte zeigt den Fortschritt des
Videoexports und die geschätzte Dauer.
- Klicken Sie zum Abbrechen des Exports auf
.
- Klicken Sie zum Ausblenden der
Exportinformationen auf .

Deutsch -21
Verlassen (Exit)
Drücken Sie zum Verlassen des
Bearbeitungsmodus OK.
- Drücken Sie zum Verlassen
Mit F1 setzen Sie die Bearbeitung fort.
Bildschirmmenü Beschreibungen
Videos auf YouTube teilen
Wählen Sie mit ▲/▼ die Aufgabe, die Sie
ausführen möchten. Wählen Sie zum Teilen
Ihrer Videos „Auf YouTube teilen (Share on
YouTube)“.
Auf YouTube teilen (Share on YouTube)
Bevor Sie Ihre aufgenommenen Videos auf
YouTube teilen, müssen Sie:
1. Ein YouTube-Konto sowie einen
persönlichen Kanal erstellen.
2. Ihren Desktop/Notebook-PC in
Reichweite haben, falls Sie die
Verifizierung Ihres YouTube-Kontos in
zwei Schritten aktivieren.
Laden Sie zur Gewährleistung der
Upload-Stabilität Videos mit einer Länge von
maximal einer Stunde hoch.
Stellen Sie zum Hochladen von Videos mit
einer Länge von mehr als 15 Minuten sicher,
dass das YouTube-Konto verifiziert ist.

Deutsch -22
- Mit setzen Sie die Bearbeitung fort.
- Drücken Sie zum Fortfahren des Upload OK.
- Drücken Sie F1, wenn diese Erinnerung
anschließend übersprungen werden soll.
Konteneinrichtung
- Wählen Sie mit ▲/▼ die Aufgabe, die Sie
ausführen möchten.
Rufen Sie mit den vorherigen Schritt auf.
Drücken Sie zum Bearbeiten von eMail oder
Kennwort OK.
Mit F1 speichern Sie die von Ihnen
vorgenommenen Ä nderungen.
- Bearbeitung vor dem Upload
- Drücken Sie zum Zurückkehren zur letzten
Seite .
- Mit OK starten Sie den Upload.
- Drücken Sie zum Einstellen der Privatsphäre
F1.
Mit F2 ändern Sie das Konto.
Upload abgeschlossen
Sie haben das Video erfolgreich hochgeladen.
Sie können Ihren Videotitel auf YouTube
bearbeiten.
Drücken Sie zum Bestätigen OK.

Deutsch -23
5.2 Dateiverwaltung (File Management)
„Dateimanagement (File Management)“ ermöglicht Ihnen das Verwalten der mit Hilfe der Capture Box
aufgenommenen Videos und Schnappschüsse. Sie können Dateien zwischen der internen Festplatte
und einem externen USB-Speichergerät kopieren und unerwünschte Dateien löschen. Stecken Sie
zunächst Ihr Speichergerät (USB 2.0/3.0-Speichergerät / 2,5-Zoll-Festplatte im NTFS-Format) ein,
bevor Sie dieses Untermenü aufrufen.
Bildschirmmenü Beschreibungen
Partition wählen
- Wählen Sie mit den Navigationstasten
◄/►/▲/▼ die Partition.
- Drücken Sie zum Wiedergeben des Videos .
- Mit F1 ändern Sie die Dateianordnungsregel.
Die empfohlene Länge eines einzelnen Videos beträgt weniger als 1 Stunde.
Die Capture Box dient der Aufnahme und Erfassung von Medienmaterialien, die rechtlich ausschließ lich dem
Nutzer gehören bzw. durch ihn lizenziert sind. Das Hochladen von urheberrechtlich oder durch andere
Gesetze geschützten Videos ist nicht erlaubt. YouTube kann das Konto zum Schutz von Urheberrechten
einstellen.
Wenn Sie Videos mit einer Länge von mehr als 15 Minuten hochladen möchten, muss das YouTube-Konto
verifiziert werden. Weitere Einzelheiten finden Sie auf der YouTube-Website.
Gelegentlich dauert es zwei bis drei Tage, bis Ihre Videos auf YouTube angezeigt werden. Bitte warten Sie
einige Tage, falls Sie die hochgeladenen Videos nicht online sehen.

Deutsch -24
Dateiverwaltungsschnittstelle:
1 Eine Liste mit den Dateien auf der internen Festplatte
2 Eine Auswahl an Bearbeitungswerkzeugen
3 Eine Liste mit den Dateien auf dem USB-Datenträger
4 Informationsanzeigebereich
Beschreibungen zu den Bearbeitungswerkzeugen:
Nr. Tasten Beschreibungen
1
Dateien auf den USB-Datenträger kopieren
2 Dateien auf die interne Festplatte kopieren
3 Alles auswählen
4 Alles abwählen
5 Löschen

Deutsch -5
1 Component-Videoeingang 4 HDMI-Ausgang
2 Audio-L/R-Eingang 5 LAN-Port
3 HDMI-Eingang 6 Netzeingang
1.4.2 Rückansicht
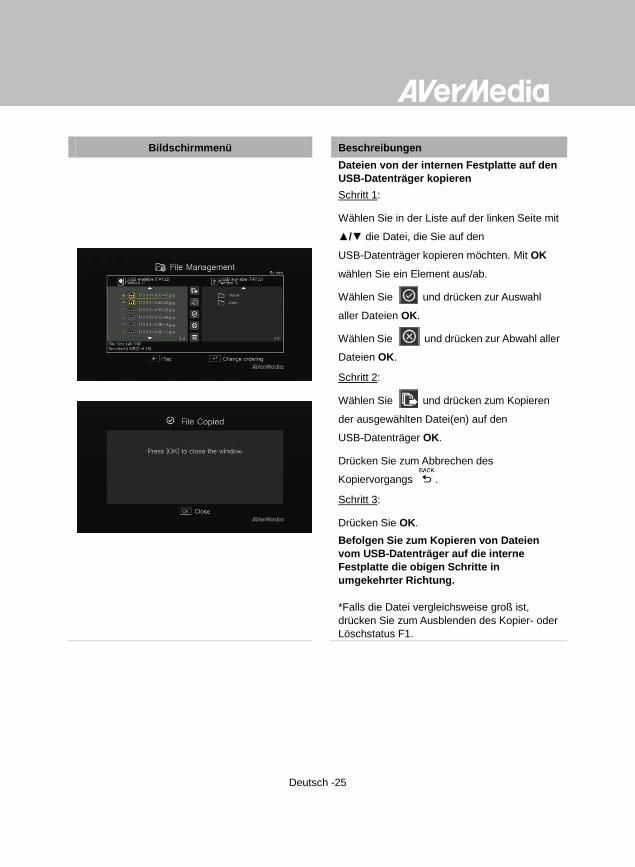
Deutsch -25
Bildschirmmenü Beschreibungen
Dateien von der internen Festplatte auf den
USB-Datenträger kopieren
Schritt 1:
- Wählen Sie in der Liste auf der linken Seite mit
▲/▼ die Datei, die Sie auf den
USB-Datenträger kopieren möchten. Mit OK
wählen Sie ein Element aus/ab.
- Wählen Sie und drücken zur Auswahl
aller Dateien OK.
- Wählen Sie und drücken zur Abwahl aller
Dateien OK.
Schritt 2:
- Wählen Sie und drücken zum Kopieren
der ausgewählten Datei(en) auf den
USB-Datenträger OK.
- Drücken Sie zum Abbrechen des
Kopiervorgangs .
Schritt 3:
- Drücken Sie OK.
Befolgen Sie zum Kopieren von Dateien
vom USB-Datenträger auf die interne
Festplatte die obigen Schritte in
umgekehrter Richtung.
*Falls die Datei vergleichsweise groß ist,
drücken Sie zum Ausblenden des Kopier- oder
Löschstatus F1.

Deutsch -26
Dateien löschen
Schritt 1:
- Wählen Sie mit ▲/▼ die Datei(en), die Sie
löschen möchten. Mit OK wählen Sie ein Element
aus/ab.
- Wählen Sie und drücken zur Auswahl
aller Dateien OK.
- Wählen Sie und drücken zur Abwahl aller
Dateien OK.
Schritt 2:
- Wählen Sie und drücken zum Entfernen
der Datei aus der Liste OK.
oder
Drücken Sie an der Fernbedienung und
entfernen die Datei anschließend mit OK aus
der Liste.
- Drücken Sie zum Abbrechen des
Löschvorgangs .
Schritt 3:
- Drücken Sie OK.
USB-Speichergerät entfernen
Zur Vermeidung von Datenverlust empfehlen
wir dringend, Ihr externes Speichergerät sicher
auszuwerfen. Bitte befolgen Sie dazu die
nachstehenden Schritte:
Schritt 1:
Drücken Sie an der Fernbedienung.
Schritt 2:
Drücken Sie zum Auswerfen F2.

Deutsch -27
Kapitel 6. Capture Box und GameMate von AVerMedia koppeln
GameMate von AVerMedia ist die spezielle App für Smartphones. Sie ermöglicht Ihnen die Nutzung Ihres
Smartphones als Fernbedienung. Sie sind nur wenige Schritte von der Kopplung der Capture Box mit
GameMate entfernt.
Bildschirmanzeige Beschreibungen
Wir empfehlen, dass sich Capture Box und
GameMate einen WLAN-Zugangspunkt teilen.
Tippen Sie nach Herunterladen von GameMate
an Ihrem Smartphone auf GameMate. Sie
sehen, dass GameMate nach verfügbaren
Geräten sucht.
Eine Kopplungsnummer erscheint am
TV-Bildschirm.
Bitte laden Sie zunächst GameMate von AVerMedia aus dem App Store herunter.
Stellen Sie zur erfolgreichen Kopplung sicher, dass sich Capture Box und GameMate dasselbe Netzwerk teilen.
Dazu benötigen Sie auch einen WLAN-Zugangspunkt für GameMate. Stellen Sie sicher, dass das LAN richtig
verbunden ist und Sie zur Kopplung bereit sind!

Deutsch -28
Geben Sie den bereitgestellten vierstelligen
Kopplungsnummer durch Antippen ein.
Bei erfolgreicher Kopplung mit der Capture Box
sehen Sie GameMate wie links dargestellt.
Sie können die Verbindung von GameMate auch über das Menü (Menu) prüfen. Sie sehen
das Zeichen im oberen Bereich des Menüs (Menu).
Falls die Verbindung getrennt wird, starten Sie den WLAN-Zugangspunkt oder die Capture Box bitte neu und
versuchen es noch einmal.
Italiano-1
Indice
Capitolo 1. Componenti dell'unità ................................................................... 2 1.1 Pannello anteriore ....................................................................................... 2 1.2 Sensore a infrarossi .................................................................................... 2 1.3 Indicatore LED ............................................................................................ 3 1.4 Porte di collegamento ................................................................................. 4
1.4.1 Vista anteriore ....................................................................................................... 4 1.4.2 Vista posteriore ..................................................................................................... 5
Capitolo 2. Telecomando ................................................................................. 6
Capitolo 3. Installazione guidata ..................................................................... 8 Capitolo 4. Operazioni di base ....................................................................... 11
4.1 Registrazione e acquisizione .................................................................... 11 4.2 Aggiunta di commenti ............................................................................... 13
Capitolo 5. Menu OSD .................................................................................... 15 5.1 Registrazioni e snapshot (Media Studio) .................................................. 16
5.1.1 Post-editing di video registrati con Capture Box ....................................... 18 5.2 Gestione file (File Management) ............................................................... 23
Capitolo 6. Accoppiamento di Capture Box e GameMate by AverMedia...27

Italiano-2
Capitolo 1. Componenti dell'unità
1.1 Pannello anteriore
Il pannello del tasto, situato nella parte anteriore dell'unità, garantisce l'accesso rapido alle funzioni più
utilizzate.
N. Tasti Descrizioni
1
Registra
Premere per avviare/arrestare la registrazione
2
Accensione (Power)
Premere per accendere l'unità
Tenere premuto il tasto per 4 secondi per forzare lo spegnimento di Capture Box
1.2 Sensore a infrarossi
Quando si utilizza il telecomando, puntarlo verso il sensore a infrarossi (IR) situato sul pannello
anteriore dell'unità. Il telecomando deve essere tenuto ad un angolo di 30 gradi rispetto al sensore IR
per il corretto funzionamento. La distanza tra il telecomando e il sensore non deve superare i 6 metri (20
piedi).
Italia
no

Italiano-3
1.3 Indicatore LED
Gli indicatori LED sulla parte anteriore dell'unità mostrano lo stato del dispositivo.
1 Indicatore LED sorgente HDMI 2 Indicatore LED sorgente YPbPr
3 Indicatore LED stato Registrazione 4 Indicatore LED stato Accensione
Condizione Sorgente Registra Accensione
(Power)
Acceso Acceso di colore
verde
Pronto per
registrazione/snapshot
Verde fisso Verde fisso
Registrazione Verde fisso Lampeggio lento Verde fisso
Scattare snapshot Lampeggia in rosso
una volta
Lampeggia in rosso
una volta
Lampeggia in rosso
una volta
Impossibile registrare/scattare
snapshot
Verde fisso Lampeggia
continuamente in
verde
Nessuna sorgente
Lampeggia
continuamente in
verde
Sorgente disponibile Acceso di colore
verde
Spegnimento in corso
Verde fisso Lampeggia
continuamente in
verde
Pass Through ON
Durante lo spegnimento
Arancione fisso
Interruzione registrazione Rosso fisso Rosso fisso Rosso fisso
Fine registrazione in corso
Verde fisso Lampeggia
continuamente in
rosso
Verde fisso

Italiano-4
Condizione Sorgente Registra Accensione
(Power)
Spazio di archiviazione scarso Verde fisso Acceso con una
cadenza lenta
Verde fisso
Il dispositivo non è pronto
Lampeggia
continuamente in
verde
Problemi quali mancanza di
spazio di
archiviazione/nessun
segnale/contenuti protetti
Lampeggia
continuamente in
verde
Accettazione di un comando
del telecomando
Lampeggia in verde
una volta
Premere [F1] per ottenere lo stato dell'indicatore LED.
1.4 Porte di collegamento
1 Slot USB 3 Uscita cuffie
2 Ingresso MIC
1.4.1 Vista anteriore
Lo slot USB è per il dispositivo di archiviazione HDD esterno, oltre che per l'aggiornamento firmware tramite
il dispositivo di archiviazione.
L'hub USB non è supportato.
Non vi è alcuna funzione o risposta quando si collega Capture Box al computer tramite USB.

Italiano-5
1 Ingresso video component 4 Uscita HDMI
2 Ingresso L/R audio 5 Porta LAN
3 Ingresso HDMI 6 DC-IN
1.4.2 Vista posteriore

Italiano-6
Capitolo 2. Telecomando
Le descrizioni di seguito mostrano l'utilizzo dei tasti sul telecomando.
.
# Tasti
Descrizioni
1 Premere per accendere/mettere in standby l'unità.
2 Premere per accedere al menu principale. Premere di nuovo per uscire.
3
Premere i tasti di navigazione per spostarsi tra le opzioni.
Premere OK per confermare una selezione.
Premere OK per selezionare/deselezionare il segmento in fase di post-editing.
4
Premere per riprodurre l'ultimo file registrato o visualizzare l'ultima immagine
acquisita.
5 Premere per avviare/arrestare la registrazione.

Italiano-7
6
Premere per avviare la riproduzione del file selezionato.
Premere per riprodurre il file a velocità normale (1x) quando sono attivi slow
motion, riavvolgimento o avanzamento rapido.
7
Premere per arrestare la riproduzione.
Premere per arrestare la registrazione.
8 Premere per riavvolgere (2x, 4x, 8x, 16x, 32x).
9 Premere per tornare alla pagina precedente.
10
Premere per visualizzare la schermata di regolazione della qualità
video/istantanea. Premere di nuovo per uscire.
11 (Attenersi alle istruzioni sullo schermo)
12 (Attenersi alle istruzioni sullo schermo)
13 (Attenersi alle istruzioni sullo schermo)
14 Premere per passare tra le sorgenti Component e HDMI.
15
Premere per visualizzare le informazioni su schermo, tra cui modalità,
sorgente e sorgenti audio.
16 Premere per uscire dalla pagina attuale e tornare alla pagina precedente.
17 Premere per scattare una instantanea durante il gioco o la riproduzione video.
18
Premere per interrompere la riproduzione. Premere OK o per riprendere
la riproduzione.
Premere per interrompere la riproduzione.
19
Premere per riprodurre il video in slow motion (1/2x). Premere di nuovo per
accedere alla modalità fotogramma per fotogramma (vedere p. 27 per i
dettagli).
20 Premere per avanzare rapidamente (2x, 4x, 8x, 16x, 32x).
21
Premere per andare alla pagina successiva.
22 Premere per eliminare i file selezionati.
23
Premere per visualizzare le informazioni sul disco. Premere di nuovo per
nasconderle.
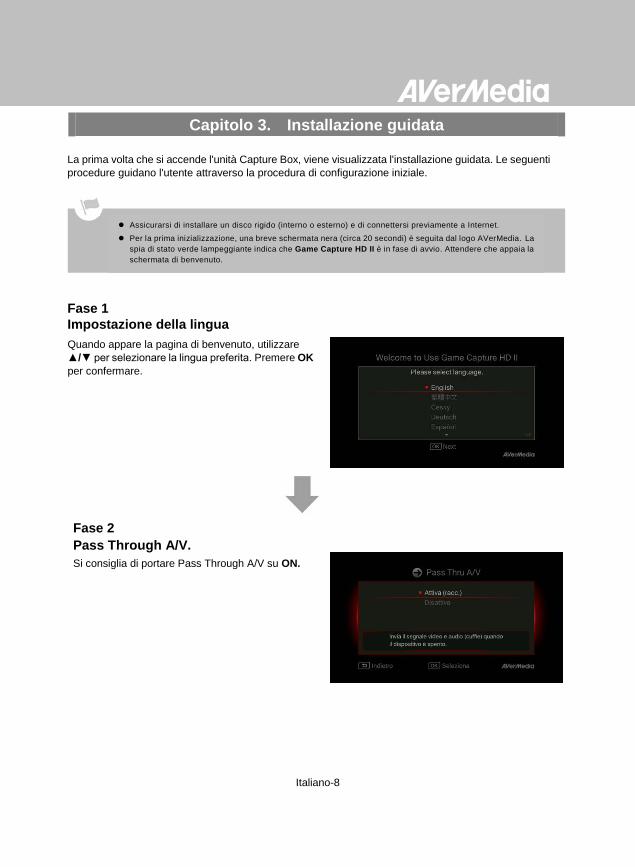
Italiano-8
Capitolo 3. Installazione guidata
La prima volta che si accende l'unità Capture Box, viene visualizzata l'installazione guidata. Le seguenti
procedure guidano l'utente attraverso la procedura di configurazione iniziale.
Fase 1
Impostazione della lingua
Quando appare la pagina di benvenuto, utilizzare
▲/▼ per selezionare la lingua preferita. Premere OK
per confermare.
Fase 2
Pass Through A/V.
Si consiglia di portare Pass Through A/V su ON.
Assicurarsi di installare un disco rigido (interno o esterno) e di connettersi previamente a Internet.
Per la prima inizializzazione, una breve schermata nera (circa 20 secondi) è seguita dal logo AVerMedia. La
spia di stato verde lampeggiante indica che Game Capture HD II è in fase di avvio. Attendere che appaia la
schermata di benvenuto.

Italiano-9
Fase 3 (1)
Promemoria
Assicurarsi che un disco rigido con formattazione
NTFS sia collegato o installato sul dispositivo (per i
dettagli, consultare il Capitolo 4.2).
Controllare la connessione di rete.
Premere OK per avviare la configurazione.
Si consiglia di utilizzare un router che supporti la
rete IP DHCP. Inoltre, consultare il Capitolo 6.2 per
la configurazione della connessione manuale.
Fase 3 (2)
Errore di connessione di rete
Se non ci si è connessi ad una rete valida, viene visualizzato un breve risultato dell'errore di connessione di rete.
Premere OK per continuare.
Premere per tornare alla pagina precedente.
Fase 4
Nessun disco rigido rilevato
Se non si è ancora installato un dispositivo di archiviazione, installarlo prima di procedere con l'installazione.
Quindi, premere per andare alla schermata precedente e premere OK per eseguire la procedura di verifica del disco.

Italiano-10
Fase 4 (2)
Termine dell'installazione guidata
Una volta collegato un disco rigido con
formattazione NTFS, viene visualizzato un avviso di
impostazioni completate.
È possibile avviare la registrazione e scattare
immediatamente istantanee. Premere OK per
uscire dalla procedura guidata e iniziare ad usare
Capture Box. Viene quindi visualizzata la
schermata del gioco.

Italiano-11
Capitolo 4. Operazioni di base
Il presente capitolo guida l'utente alla registrazione del gioco, all'acquisizione di immagini,
all'aggiunta di commenti vocali ai video e alla riproduzione immediata di file.
4.1 Registrazione e acquisizione
Capture Box consente di registrare, acquisire e aggiungere commenti vocali ai video. Le istruzioni
sono fornite di seguito.
Menu OSD Descrizioni
Registrazione immediata durante il gioco
- Premere per attivare la registrazione
immediata.
- Premere di nuovo o per arrestare la
registrazione.
Interruzione e ripresa della registrazione
È possibile saltare le riprese video indesiderate e
riprendere la registrazione. Solo le riprese
registrate vengono salvate, mentre i clip saltati
vengono automaticamente eliminati.
- Premere per interrompere la registrazione.
- Premere o per continuare la
registrazione.
I file o gli snapshot registrati vengono salvati automaticamente sulla destinazione predefinita del disco rigido.
Per i dettagli, consultare il capitolo 6.
Capture Box visualizza il gioco in modalità tempo reale e standard. È possibile passare dalla modalità tempo
reale predefinita alla modalità standard. Andare a Menu> Impostazioni> Modalità di visual. (per i dettagli, fare
riferimento al capitolo 6.2).

Italiano-12
Istantanea rapida durante il gioco
- Premere per acquisire l'immagine corrente.
Premere a lungo per attivare la modalità di
acquisizione continua. Capture Box effettua 5
snapshot per volta.
Riproduzione immediata
- Premere per riprodurre l'ultimo file
registrato o visualizzare l'ultima immagine
acquisita.
- Premere per arrestare la riproduzione.
- Premere ► per saltare in avanti di 30 secondi.
- Premere ◄ per saltare all'indietro di 10 secondi.
Acquisizione immagini durante la
riproduzione video
Metodo 1:
- Premere per acquisire l'immagine corrente.
Metodo 2:
Fase 1:
- Premere per riprodurre il video al rallentatore
(1/2x). Premere di nuovo per visualizzare il
video fotogramma per fotogramma.
-
oppure
- Premere per mettere in pausa la
riproduzione. Premere per passare al
fotogramma precedente; premere per
passare al fotogramma successivo.
Fase 2:
- Premere per acquisire l'immagine voluta.
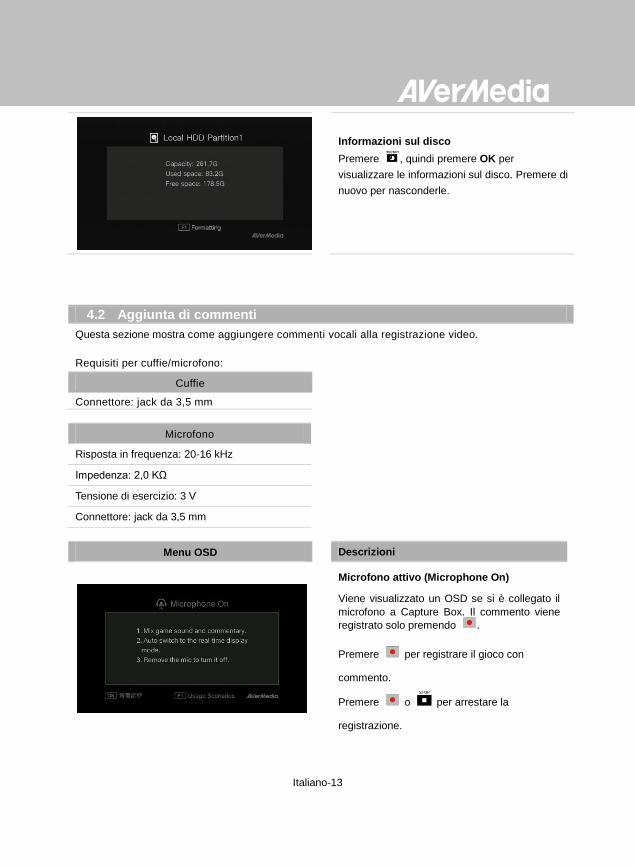
Italiano-13
Informazioni sul disco
Premere , quindi premere OK per
visualizzare le informazioni sul disco. Premere di
nuovo per nasconderle.
4.2 Aggiunta di commenti
Questa sezione mostra come aggiungere commenti vocali alla registrazione video.
Requisiti per cuffie/microfono:
Cuffie
Connettore: jack da 3,5 mm
Microfono
Risposta in frequenza: 20-16 kHz
Impedenza: 2,0 KΩ
Tensione di esercizio: 3 V
Connettore: jack da 3,5 mm
Menu OSD Descrizioni
Microfono attivo (Microphone On)
Viene visualizzato un OSD se si è collegato il
microfono a Capture Box. Il commento viene
registrato solo premendo .
- Premere per registrare il gioco con
commento.
- Premere o per arrestare la
registrazione.

Italiano-14
Se le cuffie o il microfono vengono inseriti durante l'installazione guidata, l'audio può essere ascoltato solo
dalle cuffie e le istruzioni sui commenti vocali non vengono visualizzate. Quindi, collegare cuffie o microfono
al termine dell'installazione guidata, in modo da osservare le istruzioni per cuffie/microfono.
Tutti i commenti aggiunti verranno mixato con l'audio del gioco. Inoltre, finché le cuffie sono collegate al
dispositivo, verranno registrati tutti i commenti e l'audio di sottofondo. Ricordarsi, pertanto, di arrestare la
registrazione e scollegare le cuffie se non sono necessari commenti.
Se il microfono è scollegato/collegato a Capture Box durante la registrazione, anche l'audio viene registrato.
Evitare di scollegare il microfono durante la procedura di registrazione.
Il volume che si sente nel test di commento potrebbe essere leggermente diverso dalla registrazione
effettiva. Si consiglia di eseguire previamente un test di simulazione per acquisire familiarità con il volume
registrato.
È normale ascoltare la propria voce quando si registra con una sorgente di ingresso HDMI.
Non viene visualizzato alcun OSD quando si collegano solo le cuffie a Capture Box.

Italiano-15
Capitolo 5. Menu OSD
Nel menu, è possibile selezionare e gestire i file e gli snapshot registrati, nonché personalizzare le
preferenze.
1 Tempo restante per la registrazione 3 Connessione di rete
2 Connessione a GameMate 4 Ora attuale
Menu OSD Descrizioni
Operazioni di base
- Premere per visualizzare il menu.
- Premere o per tornare alla
schermata del gioco.
- Usare ▲/▼ per effettuare la selezione sul
menu e OK per accedere ad un sottomenu.
- Nel sottomenu, usare ▲/▼ per effettuare la
selezione OK per confermare. Premere
per tornare alla pagina precedente.
-

Italiano-16
Premere F1 per rimuovere in modo sicuro il
dispositivo di archiviazione.
- *Nell'angolo superiore sinistro viene visualizzato il
dispositivo di archiviazione predefinito e il tempo
restante per la registrazione disponibile
5.1 Registrazioni e snapshot (Media Studio)
È possibile selezionare registrazioni e snapshot acquisiti da Capture Box in “Registrazioni e snapshot
(Media Studio)”.
Formato di acquisizione:
Video MP4 (Codec: formato H.264 con audio AAC)
Immagine JPEG
Menu OSD Descrizioni
Spostamento
- Usare i tasti di spostamento ◄/►/▲/▼ per
selezionare tra le voci.
- Premere F1 per ordinare i file per nome,
dimensioni o formato.
- Premere F2 per passare tra la modalità elenco e
la modalità miniature.
- Premere F3 per rinominare, modificare e
condividere il file evidenziato.
- Premere per andare alla pagina
successiva.
- Premere per tornare alla pagina
precedente.
- Premere per accedere direttamente al
menu principale.
Si consiglia di visualizzare solo video e snapshot registrati da Capture Box. È molto probabile che non si
riesca ad aprire i file presenti in altri dispositivi (ad esempio, una fotocamera) su Capture Box.

Italiano-17
Riproduzione video
- Premere o OK per avviare la riproduzione
del video selezionato.
- Premere o OK per mettere in pausa la
riproduzione. Premere o OK per riprendere
la riproduzione.
- Premere per riprodurre il video al
rallentatore (1/2x).
- Premere per riavvolgere a 2x, 4x, 8x, 16x, 32x.
- Premere per andare avanti rapidamente a
2x, 4x, 8x, 16x, 32x.
- Premere per riprodurre il file a velocità
normale (1x) quando è attiva la funzione
rallentatore, indietro veloce o avanti veloce.
- Premere per arrestare la riproduzione.
- Premere per visualizzare le informazioni di
riproduzione, tra cui disco di archiviazione,
risoluzione di registrazione, durata, tempo
trascorso e restante, e nome file.
* Sono supportati solo i file video acquisiti da Capture
Box.
Visualizzazione di snapshot
- Premere o OK per visualizzare l'immagine
selezionata. Premere o per tornare
indietro.
* Sono supportati solo i file immagine acquisiti da
Capture Box.

Italiano-18
5.1.1 Post-editing di video registrati con Capture Box
Questa sezione mostra come tagliare, ricombinare e condividere video su YouTube registrati da Capture
Box.
Menu OSD Descrizioni
Selezione di un video
- Selezionare il file da modificare tramite i tasti di
spostamento ◄/►/▲/▼.
Modifica/ Condividi (Edit/ Share)
Premere F3 per modificare o condividere il
video selezionato.
Nome file cambiato
Immettere il nome file con i tasti di spostamento
▲/▼ per selezionare caratteri, numeri o
simboli. Usare i tasti di spostamento ◄/► per
andare al successivo/all'ultimo carattere.
Premere F1 per passare tra caratteri, numeri e
simboli.
- Premere per tornare indietro e annullare
la modifica apportata.
- Premere OK per salvare il nome file modificato.
- Premere per cancellare tutto.

Italiano-19
Come modificare (How to Edit)
Quando vengono visualizzate istruzioni su
come modificare un video, premere OK per
avviare la modifica.
Modalità di modifica
In Modalità di modifica è possibile tagliare e
ricombinare il video selezionato.
- Per tagliare il video, è necessario creare uno o
più segmenti all'interno del video.
- Fase 1:
- Per individuare una scena, usare i tasti di
direzione o per cercare la scena.
È inoltre possibile usare i tasti di spostamento
▲/▼ per cercare la scena in base all'ora, i
minuti e i secondi specifici sul lato sinistro della
schermata.
- Premere OK per selezionare o deselezionare la
scena.
-
Fase 2:
Ripetere la Fase 1 per creare un segmento.
Premere OK per mantenere o eliminare il
segmento.
Premere F1 per passare tra Cerca scena e
ricerca Segmento.
Premere F2 per cancellare tutte le selezioni
effettuate sul video.
Premere F3 per esportare il video.

Italiano-20
Anteprima
- Capture Box ricombina automaticamente i
segmenti scelti per mantenerli durante l'editing.
Esporta (Export)
- Il tempo stimato varia in base ai diversi dischi di
archiviazione. Per il tempo di esportazione, fare
riferimento all'uso effettivo del disco di
archiviazione.
- Premere OK per esportare il video.
- Premere per continuare l'editing.
Menu OSD Descrizioni
Esportazione... (Exporting…)
La barra centrale mostra lo stato
dell'esportazione video e il tempo stimato.
- Fare clic su per annullare l'esportazione.
- Fare clic su per nascondere le
informazioni di esportazione.

Italiano-21
Esci (Exit)
Premere OK per uscire dalla modalità di
editing.
- Premere per uscire.
Premere F1 per continuare l'editing.
Menu OSD Descrizioni
Condivisione di video su YouTube
Usare ▲/▼ per selezionare l'operazione da
eseguire. Selezionare ‘Condividi su YouTube
(Share on YouTube)’ per condividere i video.
Condividi su YouTube (Share on Youtube)
Prima di condividere i video registrati su
YouTube, assicurarsi di:
1. Creare un account YouTube e un canale
personale.
2. Utilizzare PC/notebook per attivare la
verifica in due fasi dell'account YouTube.
Per garantire la stabilità di upload, caricare i
video che durano meno di una ora.
Assicurarsi che l'account YouTube sia verificato
per caricare video che durano oltre 15 minuti.

Italiano-22
- Premere per continuare l'editing.
- Premere OK per continuare l'upload.
- Premere F1 per saltare in seguito questo
promemoria.
Configurazione dell'account
- Usare ▲/▼ per selezionare l'operazione da
eseguire.
Premere per tornare all'ultimo livello.
Premere OK per modificare e-mail o password.
Premere F1 per salvare le modifiche apportate.
- Editing prima dell'upload
- Premere per tornare all'ultima pagina.
- Premere OK per avviare l'upload.
- Premere F1 per impostare la privacy.
Premere F2 per modificare l'account.
Completamento dell'upload
Il video è stato caricato correttamente.
È possibile modificare il titolo del video su
YouTube.
Premere OK per confermare.

Italiano-23
5.2 Gestione file (File Management)
“Gestione file (File Management)” consente di gestire video e snapshot acquisiti da Capture Box. È
possibile copiare file tra il disco rigido interno e il dispositivo di archiviazione USB esterno, nonché
eliminare i file indesiderati. Prima di accedere al sottomenu, inserire il dispositivo di archiviazione
(dispositivo di archiviazione USB 2.0/3.0 / HDD da 2,5” in formato NTFS).
Menu OSD Descrizioni
Selezione di una partizione
- Usare i tasti di spostamento ◄/►/▲/▼ per
selezionare la partizione.
- Premere per riprodurre il video.
- Premere F1 per modificare la regola di
ordinamento dei file.
La durata consigliata di ciascun video deve essere inferiore a 1 ora.
Capture Box è destinato alla registrazione e all'acquisizione solo dei materiali multimediali che sono
giuridicamente di proprietà o concessi in licenza dall'utente. Non è consentito caricare video protetti da
copyright e altre leggi. YouTube potrebbe chiudere l'account per la protezione del copyright.
È necessaria la verifica dell'account YouTube quando si caricano video di durata superiore a 15 minuti. Per
ulteriori dettagli, fare riferimento al sito web YouTube.
A volte, la visualizzazione di video su YouTube potrebbe richiedere da due a tre giorni. Attendere qualche
giorno se i video caricati online non vengono visualizzati.
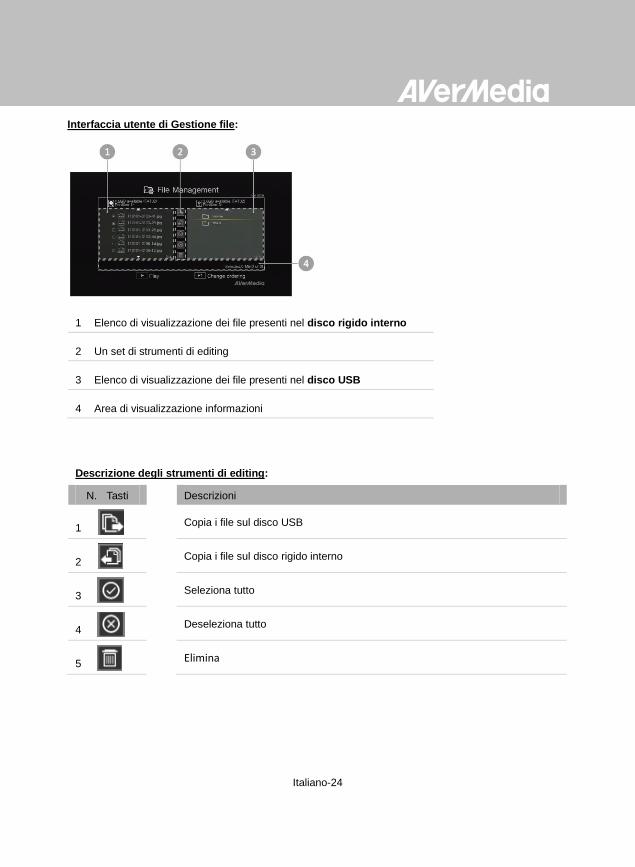
Italiano-24
Interfaccia utente di Gestione file:
1 Elenco di visualizzazione dei file presenti nel disco rigido interno
2 Un set di strumenti di editing
3 Elenco di visualizzazione dei file presenti nel disco USB
4 Area di visualizzazione informazioni
Descrizione degli strumenti di editing:
N. Tasti Descrizioni
1
Copia i file sul disco USB
2 Copia i file sul disco rigido interno
3 Seleziona tutto
4 Deseleziona tutto
5 Elimina

Italiano-25
Menu OSD Descrizioni
Copia di file dall'HDD interno al disco USB
Fase 1:
- Nell'elenco a sinistra, usare ▲/▼ per
evidenziare il file da copiare sul disco USB.
Premere OK per selezionare/deselezionare
una voce.
- Selezionare e premere OK per
selezionare tutti i file.
- Selezionare e premere OK per
deselezionare tutti i file.
Fase 2:
- Selezionare e premere OK per copiare i
file selezionati sul disco USB.
- Premere per annullare la copia dei file in
corso.
Fase 3:
- Premere OK.
La copia dei file dal disco USB all'HDD
interno funziona in modo opposto rispetto a
quanto menzionato in precedenza.
*Se il file è relativamente di grandi dimensioni,
premere F1 per nascondere lo stato di copia o
eliminazione.
Eliminazione di file
Fase 1:
- Usare ▲/▼ per evidenziare i file da eliminare.
Premere OK per selezionare/deselezionare una
voce.
- Selezionare e premere OK per
selezionare tutti i file.

Italiano-26
- Selezionare e premere OK per
deselezionare tutti i file.
Fase 2:
- Selezionare e premere OK per rimuovere
il file dall'elenco.
oppure
Premere sul telecomando, quindi
premere OK per rimuovere il file dall'elenco.
- Premere per annullare l'eliminazione dei
file in corso.
Fase 3:
- Premere OK.
-
Rimozione del dispositivo di archiviazione
USB
Per evitare la perdita di dati, si consiglia di
rimuovere in modo sicuro il dispositivo di
archiviazione esterno. Si prega di attenersi alle
seguenti procedure:
Fase 1:
Premere sul telecomando.
Fase 2:
Premere F2 per rimuoverlo.

Italiano-27
Capitolo 6. Accoppiamento di Capture Box e GameMate by AVerMedia
GameMate by AVerMedia è un'app dedicata per smartphone, che consente di utilizzare lo smartphone come
telecomando. Con poche procedure è possibile accoppiare Capture Box e GameMate.
OSD Descrizioni
Si consiglia che Capture Box e GameMate
condividano l'AP wireless. Dopo il download di
GameMate, toccare su GameMate sullo
smartphone. GameMate cercherà il dispositivo
disponibile.
Sullo schermo del televisore viene visualizzato
un set di numeri di accoppiamento.
Prima scaricare GameMate by AVerMedia dall'App Store.
Per una accoppiamento corretto, assicurarsi che Capture Box e GameMate siano sulla stessa rete. A tal fine, è
necessario un access point wireless per GameMate. Assicurarsi che la LAN sia connessa per essere pronti per
l'accoppiamento!

Italiano-28
Toccare per immettere correttamente il numero di
accoppiamento a quattro cifre fornito.
GameMate viene visualizzato come mostrato a
sinistro al termine dell'accoppiamento corretto
con Capture Box.
È inoltre possibile controllare la connessione di GameMate da Menu. Nel livello superiore di
Menu, viene visualizzato il simbolo .
Se si perde la connessione, riavviare l'AP wireless o Capture Box e riprovare.
Español-1
Tabla de contenido
Capítulo 1. Partes de la unidad ................................................................. 2 1.1 Panel frontal......................................................................................... 2 1.2 Sensor de infrarrojos ........................................................................... 2 1.3 Indicador LED ...................................................................................... 3 1.4 Puertos de conexión ............................................................................ 4
1.4.1 Vista frontal .................................................................................................... 4 1.4.2 Vista posterior ............................................................................................... 5
Capítulo 2. El mando a distancia .............................................................. 6 Capítulo 3. Asistente de instalación ......................................................... 8 Capítulo 4. Funcionamiento básico ........................................................ 11
4.1 Grabar y capturar ............................................................................... 11 4.2 Agregar comentarios ......................................................................... 13
Capítulo 5. Menú OSD .............................................................................. 15 5.1 Grabaciones e instantáneas (Media Studio) ...................................... 16
5.1.1 Poseditar vídeos grabados con su Capture Box ................................ 18 5.2 Administración de archivos (File Management) ................................. 23
Capítulo 6. Asociar su Capture Box y GameMate de AVerMedia ......... 27

Español-2
Capítulo 1. Partes de la unidad
1.1 Panel frontal
El panel de botones que se encuentra en la parte frontal de la unidad proporciona acceso rápido a las
funciones que se utilizan con mucha frecuencia.
Nº Botones Descripciones
1
Grabar
Presione este botón para iniciar y detener la grabación.
2
Alimentació n (Power)
Presione este botón para encender la unidad.
Mantenga presionado el botón durante 4 segundos para forzar el apagado de su
Capture Box.
1.2 Sensor de infrarrojos
Cuando utilice el mando a distancia, apunte con él al sensor de infrarrojos (IR) que se encuentra en el
panel frontal de la unidad. El mando a distancia debe mantenerse con un ángulo de 30 grados
perpendicular al sensor de infrarrojos para que funcione correctamente. La distancia entre el mando a
distancia y el sensor debe ser inferior a 6 metros (aprox. 20 pies).
Español

Español-3
1.3 Indicador LED
Los indicadores LED situados en la parte frontal de la unidad muestran el estado del dispositivo.
1 Indicador LED de la fuente HDMI 2 Indicador LED de la fuente YPbPr
3 Indicador LED del estado de grabación 4 Indicador LED del estado de alimentación
Condición Fuente Grabación Alimentación
(Power)
Encendido
Se ilumina
permanentemente
en verde
Preparado para grabar o
capturar instantánea
Verde permanente Verde permanente
Grabando Verde permanente Respirando Verde permanente
Tomar una instantánea Parpadea en rojo
una vez
Parpadea en rojo
una vez
Parpadea en rojo
una vez
No se puede grabar o
capturar instantánea
Verde permanente Parpadea en verde
continuamente
No hay fuente Parpadea en verde
continuamente
Fuente disponible
Se ilumina
permanentemente
en verde
Apagado en curso Verde permanente Parpadea en verde
continuamente
Paso a través ACTIVADO
Durante el apagado
Naranja
permanente
Pausar la grabación Rojo permanente Rojo permanente Rojo permanente
Finalización de grabación
en curso
Verde permanente Parpadea en rojo
continuamente
Verde permanente

Español-4
Condición Fuente Grabación Alimentación
(Power)
Espacio de almacenamiento
escaso
Verde permanente Se ilumina a un
ritmo lento
Verde permanente
El dispositivo no está
preparado
Parpadea en verde
continuamente
Problemas como falta de
almacenamiento, no hay
señal o contenido protegido
Parpadea en verde
continuamente
Aceptando un comando del
mando a distancia
Parpadea en verde
una vez
Presione [F1] para obtener el estado del indicador luminoso LED.
1.4 Puertos de conexión
1 Ranura USB 3 Salida de auriculares
2 Entrada MIC
1.4.1 Vista frontal
La ranura USB se utiliza para conexiones de dispositivos de almacenamiento de disco duro externos así
como para actualizar el firmware a través de un dispositivo de almacenamiento.
No se admiten concentradores USB.
No hay función o respuesta cuando su Capture Box se conecta al equipo a través de USB.
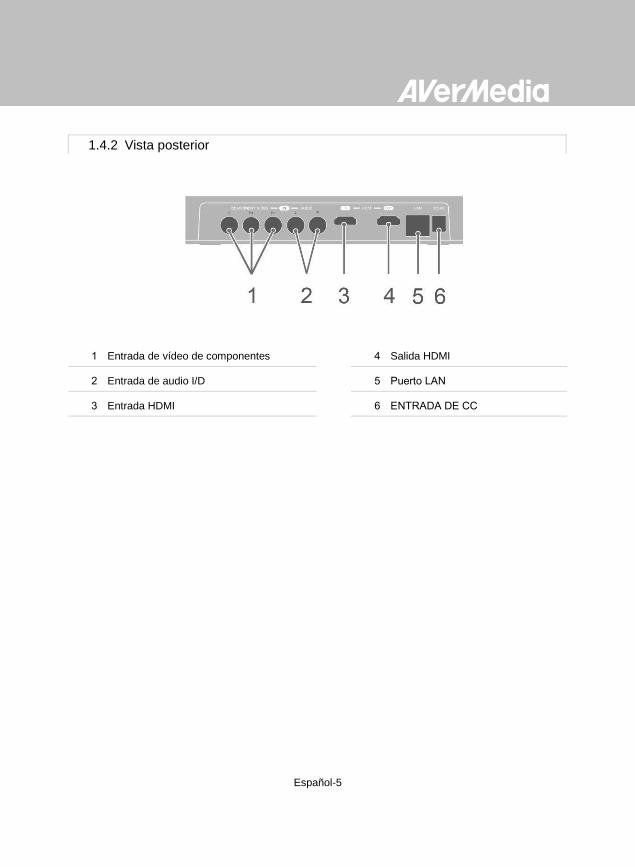
Español-5
1 Entrada de vídeo de componentes 4 Salida HDMI
2 Entrada de audio I/D 5 Puerto LAN
3 Entrada HDMI 6 ENTRADA DE CC
1.4.2 Vista posterior

Español-6
Capítulo 2. El mando a distancia
Las descripciones siguientes muestran el desarrollo de los botones del mando a distancia.
Nº Botones
Descripciones
1
Presionen este botón para encender la unidad o activar el modo de espera en la
misma.
2
Presione este botón para acceder al menú principal. Presiónelo de nuevo para
salir.
3
Presione los botones de navegación para moverse por las opciones.
Presione OK (Aceptar) para confirmar una selección.
Presione OK (Aceptar) para marcar o anular la marca un segmento en
posedición.
4
Presione este botón para reproducir el último archivo grabado o ver la última
imagen capturada.
5 Presione este botón para iniciar y detener la grabación.
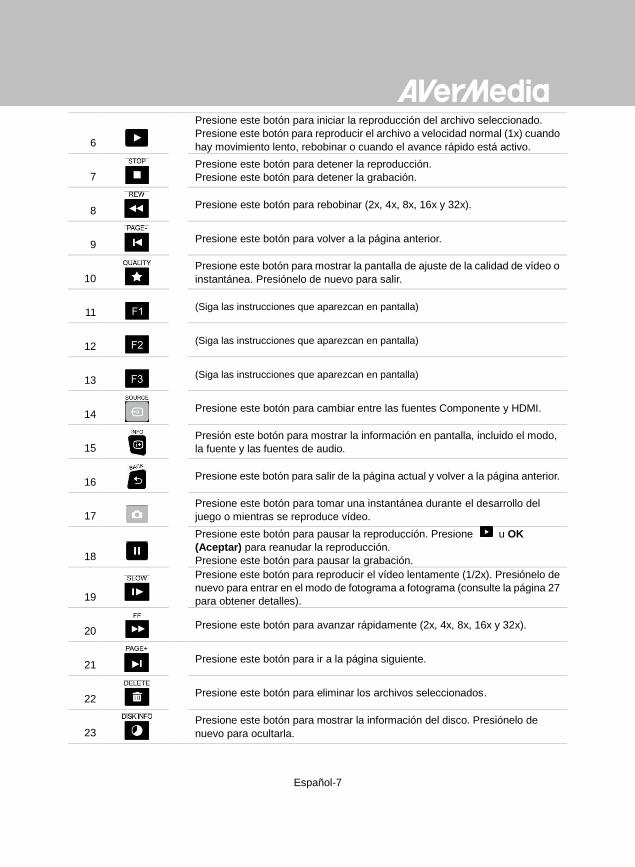
Español-7
6
Presione este botón para iniciar la reproducción del archivo seleccionado.
Presione este botón para reproducir el archivo a velocidad normal (1x) cuando
hay movimiento lento, rebobinar o cuando el avance rápido está activo.
7
Presione este botón para detener la reproducción.
Presione este botón para detener la grabación.
8 Presione este botón para rebobinar (2x, 4x, 8x, 16x y 32x).
9 Presione este botón para volver a la página anterior.
10
Presione este botón para mostrar la pantalla de ajuste de la calidad de vídeo o
instantánea. Presiónelo de nuevo para salir.
11 (Siga las instrucciones que aparezcan en pantalla)
12 (Siga las instrucciones que aparezcan en pantalla)
13 (Siga las instrucciones que aparezcan en pantalla)
14 Presione este botón para cambiar entre las fuentes Componente y HDMI.
15
Presión este botón para mostrar la información en pantalla, incluido el modo,
la fuente y las fuentes de audio.
16 Presione este botón para salir de la página actual y volver a la página anterior.
17
Presione este botón para tomar una instantánea durante el desarrollo del
juego o mientras se reproduce vídeo.
18
Presione este botón para pausar la reproducción. Presione u OK
(Aceptar) para reanudar la reproducción.
Presione este botón para pausar la grabación.
19
Presione este botón para reproducir el vídeo lentamente (1/2x). Presiónelo de
nuevo para entrar en el modo de fotograma a fotograma (consulte la página 27
para obtener detalles).
20 Presione este botón para avanzar rápidamente (2x, 4x, 8x, 16x y 32x).
21
Presione este botón para ir a la página siguiente.
22 Presione este botón para eliminar los archivos seleccionados.
23
Presione este botón para mostrar la información del disco. Presiónelo de
nuevo para ocultarla.

Español-8
Capítulo 3. Asistente de instalación
La primera vez que encienda la unidad Capture Box, se mostrará el asistente de instalación. Los
siguientes pasos le guiarán en el proceso de configuración inicial.
Paso 1
Configuración del idioma
Cuando aparezca la página de bienvenida, utilice
▲/▼ para seleccionar el idioma que desee.
Presione OK (Aceptar) para confirmar.
Paso 2
Conector A/V
Se recomienda que el conector A/V esté en
posición ON (Encendido).
Asegúrese de instalar una unidad de disco duro (interna o externa) y conectarla a Internet previamente.
La primera vez que inicie la unidad, aparecerá una pantalla con fondo negro (aproximadamente durante 20 segundos) y, a
continuación, se mostrará el logotipo de AVerMedia. La luz de estado verde parpadeante indica que Game Capture HD II se
está iniciando. Espere hasta que aparezca la pantalla de bienvenida.

Español-9
Paso 3 (1)
Recordatorio
Asegúrese de que una unidad de disco duro con
formato NTFS está conectada o instalada en el
dispositivo. (Para obtener más información,
consulte el Capítulo 4.2)
Compruebe la conexión de la red.
Presione OK (Aceptar) para iniciar la instalación.
Se recomienda utilizar un enrutador que admita la
red IP de DHCP. Consulte el Capítulo 6.2 para
obtener información sobre la configuración de la
conexión manual.
Paso 3 (2)
Error de conexión de la red
Si no se ha conectado a una red válida, se mostrará brevemente un mensaje de error de conexión de la red.
Presione OK (Aceptar) para continuar.
Presione para volver a la página anterior.
Paso 4
No se ha detectado ninguna unidad de disco duro
Si todavía no ha instalado ningún dispositivo de almacenamiento, hágalo antes de continuar con el proceso de instalación.
A continuación presione para ir a la pantalla anterior y presione OK (Aceptar) para ejecutar el proceso de comprobación de disco.

Español-10
Paso 4 (2)
Finalización del asistente de instalación
Una vez conectada una unidad de disco duro con
formato NTFS, se mostrará un aviso de instalación
finalizada.
Puede empezar a grabar y tomar instantáneas
cuando desee. Presione OK (Aceptar) para salir
del asistente y empezar a utilizar Capture Box. Se
mostrará la pantalla de juegos.
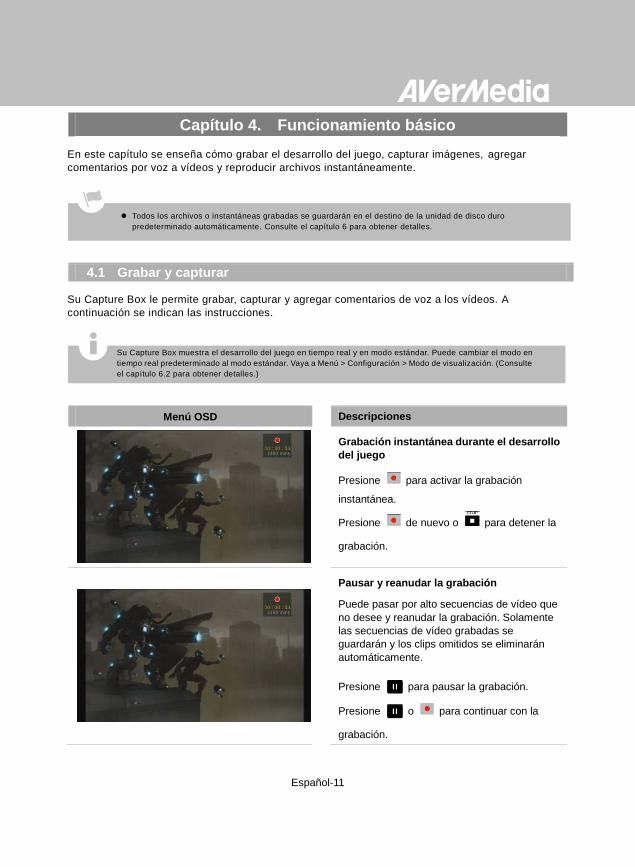
Español-11
Capítulo 4. Funcionamiento básico
En este capítulo se enseña cómo grabar el desarrollo del juego, capturar imágenes, agregar
comentarios por voz a vídeos y reproducir archivos instantáneamente.
4.1 Grabar y capturar
Su Capture Box le permite grabar, capturar y agregar comentarios de voz a los vídeos. A
continuación se indican las instrucciones.
Menú OSD Descripciones
Grabación instantánea durante el desarrollo
del juego
- Presione para activar la grabación
instantánea.
- Presione de nuevo o para detener la
grabación.
Pausar y reanudar la grabación
Puede pasar por alto secuencias de vídeo que
no desee y reanudar la grabación. Solamente
las secuencias de vídeo grabadas se
guardarán y los clips omitidos se eliminarán
automáticamente.
- Presione para pausar la grabación.
- Presione o para continuar con la
grabación.
Su Capture Box muestra el desarrollo del juego en tiempo real y en modo estándar. Puede cambiar el modo en
tiempo real predeterminado al modo estándar. Vaya a Menú > Configuración > Modo de visualización. (Consulte
el capítulo 6.2 para obtener detalles.)
Todos los archivos o instantáneas grabadas se guardarán en el destino de la unidad de disco duro
predeterminado automáticamente. Consulte el capítulo 6 para obtener detalles.

Español-12
Instantánea rápida durante el desarrollo del
juego
- Presione para capturar la imagen actual.
Presione prolongadamente para activar el
modo de captura continuo. Su Capture Box
tomará 5 instantáneas simultáneamente.
Reproducción instantánea
- Presione para reproducir el último
archivo grabado o ver la última imagen
capturada.
- Presione para detener la reproducción.
- Presione ► para avanzar 30 segundos
directamente.
- Presione ◄ para retroceder 10 segundos
directamente.
Captura de imagen durante la reproducción
de vídeo
Método 1:
- Presione para capturar la imagen actual.
Método 2:
Paso 1:
- Presione para reproducir el vídeo
lentamente (1/2x). Presione de nuevo para
ver el vídeo fotograma a fotograma.
- o
- Presione para pausar la reproducción.
Presione para ir al fotograma anterior;
presione para ir al fotograma siguiente.
Paso 2:
- Presione para capturar la imagen
deseada.

Español-13
Información del disco
Presione y, a continuación, OK para
mostrar la información del disco. Presiónelo de
nuevo para ocultarla.
4.2 Agregar comentarios
En esta sección se muestra cómo se agregan comentarios de voz a la grabación de vídeo.
Requisitos para auriculares y micrófono:
Auriculares
Conector: conector de 3,5 mm
Micrófono
Respuesta de frecuencia: 20-16 kHz
Impedancia: 2,0 KΩ
Voltaje de funcionamiento: 3 V
Conector: conector de 3,5 mm
Menú OSD Descripciones
Micrófono encendido (Microphone On)
Se mostrará un menú OSD si conecta el
micrófono a su Capture Box. Los comentarios
solamente se grabarán si presiona .
- Presione para grabar el desarrollo del
juego con comentarios.
- Presione o para detener la
grabación.

Español-14
Si enchufa unos auriculares o un micrófono durante el asistente de configuración, solamente se podrá
escuchar sonido en los auriculares y no se mostrarán las instrucciones sobre los comentarios de voz. Por
tanto, enchufe unos auriculares o un micrófono después de completar el asistente de configuración para
seguir las instrucciones de dichos auriculares o micrófono.
Todos los comentarios agregados se mezclarán con el sonido del juego. Asimismo, mientras los auriculares
estén conectados al dispositivo, todos los comentarios y el sonido de fondo se grabarán. Por tanto, recuerde
detener la grabación y desconectar los auriculares cuando no necesite comentarios.
Si el micrófono se desconecta o conecta a su Capture Box durante la grabación, el sonido también se
grabará. Evite desenchufar el micrófono durante el proceso de grabación.
El volumen que escuche en la prueba de comentarios puede ser ligeramente diferente a la grabación real. Es
recomendable que realice una prueba previamente para familiarizarse con el volumen grabado.
Es normal escuchar su propia voz cuando grabe con la fuente de entrada HDMI.
No se mostrará ningún menú OSD cuando solamente conecte los auriculares a su Capture Box.
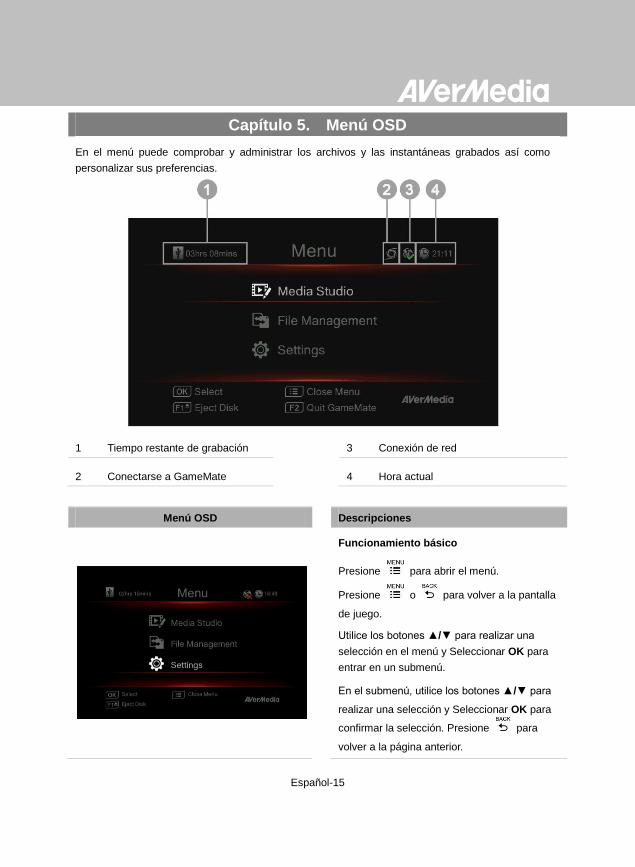
Español-15
Capítulo 5. Menú OSD
En el menú puede comprobar y administrar los archivos y las instantáneas grabados así como
personalizar sus preferencias.
1 Tiempo restante de grabación 3 Conexión de red
2 Conectarse a GameMate 4 Hora actual
Menú OSD Descripciones
Funcionamiento básico
- Presione para abrir el menú.
- Presione o para volver a la pantalla
de juego.
- Utilice los botones ▲/▼ para realizar una
selección en el menú y Seleccionar OK para
entrar en un submenú.
- En el submenú, utilice los botones ▲/▼ para
realizar una selección y Seleccionar OK para
confirmar la selección. Presione para
volver a la página anterior.
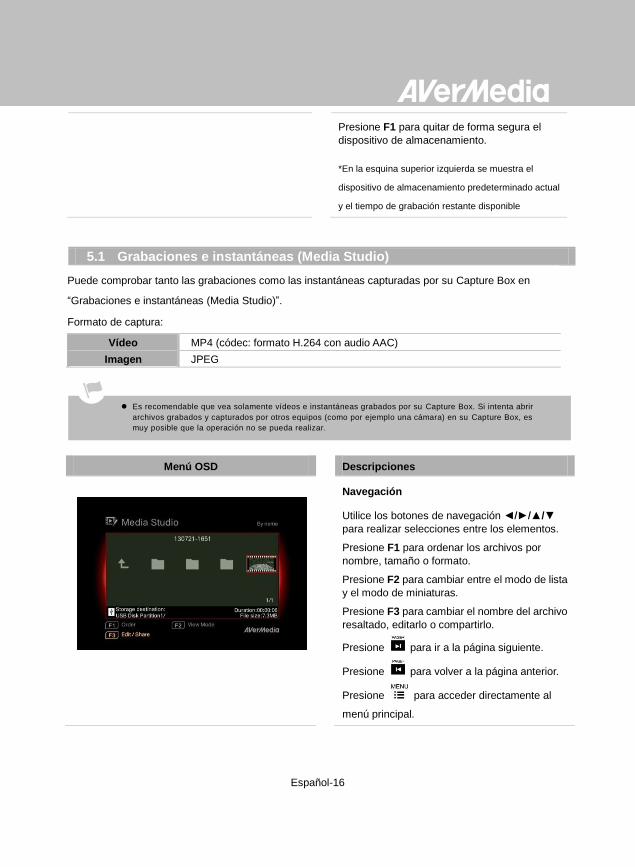
Español-16
Presione F1 para quitar de forma segura el
dispositivo de almacenamiento.
- *En la esquina superior izquierda se muestra el
dispositivo de almacenamiento predeterminado actual
y el tiempo de grabación restante disponible
5.1 Grabaciones e instantáneas (Media Studio)
Puede comprobar tanto las grabaciones como las instantáneas capturadas por su Capture Box en
“Grabaciones e instantáneas (Media Studio)”.
Formato de captura:
Vídeo MP4 (códec: formato H.264 con audio AAC)
Imagen JPEG
Menú OSD Descripciones
Navegación
- Utilice los botones de navegación ◄/►/▲/▼
para realizar selecciones entre los elementos.
- Presione F1 para ordenar los archivos por
nombre, tamaño o formato.
- Presione F2 para cambiar entre el modo de lista
y el modo de miniaturas.
- Presione F3 para cambiar el nombre del archivo
resaltado, editarlo o compartirlo.
- Presione para ir a la página siguiente.
- Presione para volver a la página anterior.
- Presione para acceder directamente al
menú principal.
Es recomendable que vea solamente vídeos e instantáneas grabados por su Capture Box. Si intenta abrir
archivos grabados y capturados por otros equipos (como por ejemplo una cámara) en su Capture Box, es
muy posible que la operación no se pueda realizar.
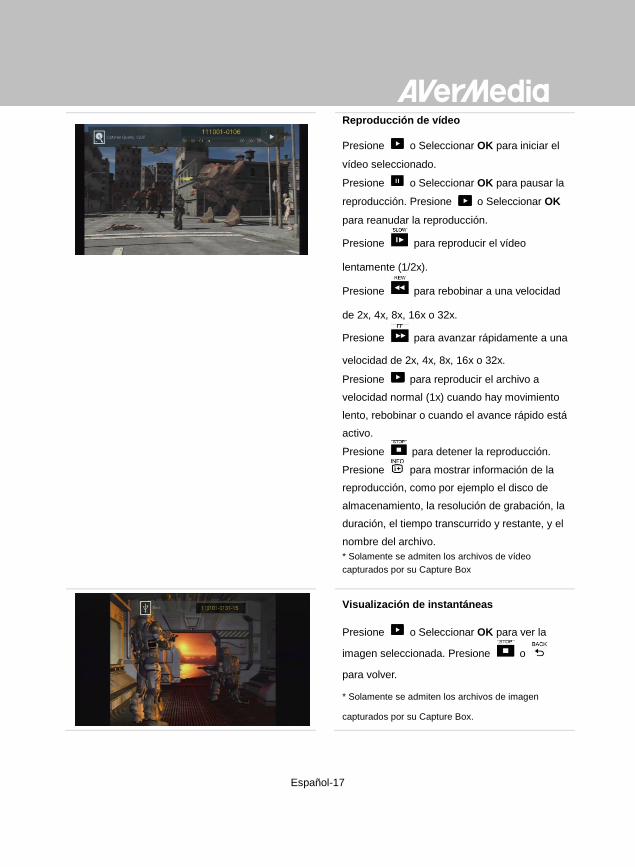
Español-17
Reproducción de vídeo
- Presione o Seleccionar OK para iniciar el
vídeo seleccionado.
- Presione o Seleccionar OK para pausar la
reproducción. Presione o Seleccionar OK
para reanudar la reproducción.
- Presione para reproducir el vídeo
lentamente (1/2x).
- Presione para rebobinar a una velocidad
de 2x, 4x, 8x, 16x o 32x.
- Presione para avanzar rápidamente a una
velocidad de 2x, 4x, 8x, 16x o 32x.
- Presione para reproducir el archivo a
velocidad normal (1x) cuando hay movimiento
lento, rebobinar o cuando el avance rápido está
activo.
- Presione para detener la reproducción.
- Presione para mostrar información de la
reproducción, como por ejemplo el disco de
almacenamiento, la resolución de grabación, la
duración, el tiempo transcurrido y restante, y el
nombre del archivo.
* Solamente se admiten los archivos de vídeo
capturados por su Capture Box
Visualización de instantáneas
- Presione o Seleccionar OK para ver la
imagen seleccionada. Presione o
para volver.
* Solamente se admiten los archivos de imagen
capturados por su Capture Box.

Español-18
5.1.1 Poseditar vídeos grabados con su Capture Box
En esta sección se muestra cómo cortar, recombinar y compartir vídeos en YouTube grabados por su
Capture Box.
Menú OSD Descripciones
Seleccionar un vídeo
- Seleccione el archivo que desea editar
utilizando los botones de navegación
◄/►/▲/▼.
Editar/Compartir (Edit/Share)
Presione F3 para editar o compartir el vídeo
seleccionado.
Cambiar el nombre de archivo
Especifique el nombre de archivo utilizando los
botones de navegación ▲/▼ para seleccionar
caracteres, números o símbolos. Utilice los
botones de navegación ◄/► para ir al último
carácter o al siguiente.
Presione F1 para cambiar entre caracteres,
números y símbolos.
- Presione para volver y cancelar el cambio
realizado.
- Presione Seleccionar OK para guardar el
nombre de archivo editado.
- Presione para borrar todo.

Español-19
Cómo editar (How to Edit)
Se mostrará una instrucción sobre cómo editar
un vídeo. Presione Seleccionar OK para iniciar
la edición.
Modo Editar
Puede cortar y recombinar el vídeo
seleccionado en Modo Editar.
- Para cortar el vídeo, necesitará crear uno o
varios segmentos dentro del vídeo.
- Paso 1:
- Para buscar una escena, utilice los botones de
dirección o para buscar la escena.
Puede utilizar los botones de navegación
▲/▼ para buscar una escena por una hora, un
minuto y un segundo específicos en la parte
izquierda la pantalla.
- Presione Seleccionar OK para marcar o
desmarcar la escena.
-
Paso 2:
Repita el Paso 1 para crear un segmento.
Presione Seleccionar OK para conservar o
eliminar el segmento.
Presione F1 para cambiar entre el tipo de
búsqueda Buscar escena y Segmento.
Presione F2 para borrar todas las marcas
realizadas en el vídeo.
Presione F3 para exportar el vídeo.

Español-20
Vista previa
- Su Capture Box recombina automáticamente
los segmentos que elija conservar durante la
edición.
Exportar (Export)
- El tiempo estimado varía en función de los
discos de almacenamiento. Remita el tiempo
de exportación al uso real del disco de
almacenamiento.
- Presione Seleccionar OK para exportar el
vídeo.
- Pulse para continuar con la edición.
Menú OSD Descripciones
Exportando...(Exporting...)
La barra del medio muestra el progreso de la
exportación del vídeo y el tiempo estimado.
- Haga clic en para cancelar la
exportación.
- Haga clic en para ocultar la información
de exportación.
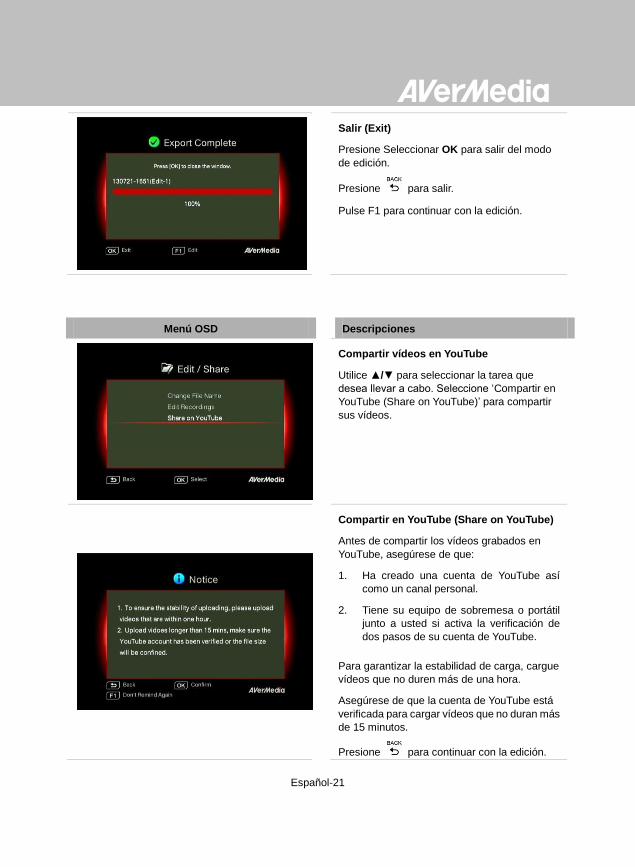
Español-21
Salir (Exit)
Presione Seleccionar OK para salir del modo
de edición.
- Presione para salir.
Pulse F1 para continuar con la edición.
Menú OSD Descripciones
Compartir vídeos en YouTube
Utilice ▲/▼ para seleccionar la tarea que
desea llevar a cabo. Seleccione ‘Compartir en
YouTube (Share on YouTube)’ para compartir
sus vídeos.
Compartir en YouTube (Share on YouTube)
Antes de compartir los vídeos grabados en
YouTube, asegúrese de que:
1. Ha creado una cuenta de YouTube así
como un canal personal.
2. Tiene su equipo de sobremesa o portátil
junto a usted si activa la verificación de
dos pasos de su cuenta de YouTube.
Para garantizar la estabilidad de carga, cargue
vídeos que no duren más de una hora.
Asegúrese de que la cuenta de YouTube está
verificada para cargar vídeos que no duran más
de 15 minutos.
- Presione para continuar con la edición.

Español-22
- Presione Seleccionar OK para continuar con la
carga.
- Presione F1 para omitir este recordatorio en lo
sucesivo.
Configurar la cuenta
- Utilice ▲/▼ para seleccionar la tarea que
desea llevar a cabo.
Presione para volver al último nivel.
Presione Seleccionar OK para editar el correo
electrónico o la contraseña.
Presione F1 para guardar el cambio realizado.
- Editar antes de cargar
- Presione para volver a la última página.
- Presione Seleccionar OK para iniciar la carga.
- Presione F1 para establecer la privacidad.
Presione F2 para cambiar la cuenta.
Carga completada
El vídeo se ha cargado correctamente.
Puede editar el título de vídeo en YouTube.
Presione Seleccionar OK para confirmar.

Español-23
5.2 Administración de archivos (File Management)
La opción “Administración de archivos (File Management)” le permite administrar vídeos e
instantáneas capturados por su Capture Box. Puede copiar archivos entre la unidad de disco duro
interna y el dispositivo de almacenamiento USB externo, así como eliminar archivos que ya no
necesite. Antes de entrar en este submenú, inserte el dispositivo de almacenamiento (dispositivo de
almacenamiento USB 2.0/3.0 o unidad de disco duro de 2,5” con el formato NTFS).
Menú OSD Descripciones
Seleccionar partición
- Utilice los botones de navegación ◄/►/▲/▼
para seleccionar la partición.
- Presione para reproducir el vídeo.
- Presione F1 para cambiar la regla de
ordenación de archivos.
La longitud recomendada de cada vídeo debe ser inferior a 1 hora.
Su Capture Box se ha diseñado para grabar y capturar materiales multimedia cuyos derechos de autor o
licencia solamente posee el usuario. No se permite cargar vídeos protegidos por leyes de propiedad
intelectual y otras leyes. YouTube puede cerrar la cuenta por motivos de protección de propiedad intelectual.
Es necesario realizar la verificación de cuenta de YouTube cuando se carga un vídeo con una duración
inferior a 15 minutos. Consulte el sitio Web de YouTube para obtener más detalles.
Ocasionalmente, los vídeos pueden tardar de dos a tres días en mostrarse en YouTube. Espere unos pocos
días si no ve los vídeos cargados en Internet.

Español-24
Interfaz de usuario de la administración de archivos:
1 Lista que muestra los archivos que se encuentran en la unidad de disco
duro interna
2 Conjunto de herramientas de edición
3 Lista que muestra los archivos que se encuentran en el disco USB
4 Á rea de visualización de información
Descripciones de las herramientas de edición:
Nº Botones Descripciones
1
Copiar archivos al disco USB
2 Copiar archivos al disco duro interno
3 Seleccionar todo
4 No seleccionar nada
5 Eliminar

Español-25
Menú OSD Descripciones
Copiar archivos desde la unidad de disco duro
interna al disco USB
Paso 1:
- En la lista de la izquierda, utilice los botones ▲/▼ para
resaltar el archivo que desea copiar en el disco USB.
Presione Seleccionar OK para seleccionar un elemento
o anular la selección del mismo.
- Seleccione y presione Seleccionar OK para
seleccionar todos los archivos.
- Seleccione y presione Seleccionar OK para
anular la selección de todos los archivos.
Paso 2:
- Seleccione y presione Seleccionar OK para
copiar los archivos seleccionados al disco USB.
- Presione para cancelar la copia de archivos en
curso.
Paso 3:
- Presione Seleccionar OK.
La copia de archivos desde el disco USB al disco
duro interno funciona al contrario a como se
describió anteriormente.
*Si el archivo grande, presione F1 para ocultar el estado
de copia o de eliminación.
Eliminar archivos
Paso 1:
- Utilice los botones ▲/▼ para resaltar los archivos que
desea eliminar. Presione Seleccionar OK para seleccionar
un elemento o anular la selección del mismo.
- Seleccione y presione Seleccionar OK para
seleccionar todos los archivos.
- Seleccione y presione Seleccionar OK para anular
la selección de todos los archivos.

Español-26
Paso 2:
- Seleccione y presione Seleccionar OK para quitar
el archivo de la lista.
o
Presione el botón del mando a distancia y, a
continuación, presione Seleccionar OK para quitar el
archivo de la lista.
- Presione para cancelar la eliminación de archivos
en curso.
Paso 3:
- Presione Seleccionar OK.
-
Quitar el dispositivo de almacenamiento USB
Para evitar la pérdida de datos, es muy recomendable
quitar el dispositivo de almacenamiento externo de
forma segura. Siga los pasos que se indican a
continuación:
Paso 1:
Presione el botón del mando a distancia.
Paso 2:
Presione F2 para quitarlo.

Español-27
Capítulo 6. Asociar su Capture Box y GameMate de AVerMedia
GameMate de AVerMedia es la aplicación dedicada para teléfonos inteligentes. Permite utilizar el teléfono
inteligente como mando a distancia. Solo necesita unos pocos pasos para asociar su Capture Box a
GameMate.
OSD Descripciones
Es recomendable que su Capture Box y
GameMate compartan un PA inalámbrico.
Después de descargar GameMate, toque
GameMate en el teléfono inteligente. Verá que
GameMate busca un dispositivo disponible.
Se mostrará un número de asociación en la
pantalla del televisor.
En primer lugar, descargue GameMate de AVerMedia de la tienda de aplicaciones.
Para que la asociación se realice correctamente, asegúrese de que su Capture Box y GameMate comparten la
misma red. Para ello, también necesitará un punto de acceso inalámbrico para GameMate. Asegúrese de que la
LAN está bien conectada y ¡estará preparado para realizar la asociación!

Español-28
Pulse para introducir el número de asociación de
cuatro dígitos proporcionado correctamente.
Verá GameMate tal y como se muestra a la
izquierda cuando la asociación se realice
correctamente con su Capture Box.
También puede comprobar la conexión de GameMate desde Menú (Menu). Verá el icono
en el nivel superior de Menú (Menu).
Si la conexión se pierde, reinicie el PA inalámbrico o su Capture Box e inténtelo de nuevo.

Português-1
Índice
Capítulo 1. As Peças da Unidade .............................................................. 2 1.1 Painel frontal ........................................................................................ 2 1.2 Sensor Infravermelho .......................................................................... 2 1.3 Indicador LED ...................................................................................... 3 1.4 Portas de Conexão .............................................................................. 4
1.4.1 Vista Frontal .................................................................................................. 4 1.4.2 Vista Traseira ................................................................................................ 5
Capítulo 2. O Controle Remoto ................................................................. 6
Capítulo 3. assistente de configuração .................................................... 8 Capítulo 4. Operações Básicas ............................................................... 11
4.1 Gravar e Capturar .............................................................................. 11 4.2 Adicionando Comentário ................................................................... 13
Capítulo 5. Menu OSD .............................................................................. 15 5.1 Gravações e Capturas (Media Studio) ............................................... 16
5.1.1 Pós- Editar os vídeos gravados na Caixa de Captura ....................... 18 5.2 Gestão de Arquivo (File Management) .............................................. 23
Capítulo 6. Emparelhamento da Caixa de Captura e GameMate by AVerMedia .............................................................................. 27

Português-2
Capítulo 1. As Peças da Unidade
1.1 Painel frontal
O painel de botão encontrado na frente da unidade fornece acesso rápido às funções comumente
utilizadas.
N.º de
Botões Descrições
1
Gravar
Pressione para iniciar / parar a gravação.
2
Energia (Power)
Pressione para ligar a unidade
Segure o botão durante 4 segundos para forçar o encerramento da Caixa de
Captura
1.2 Sensor Infravermelho
Quando utilizando o controle remoto, mirar o sensor infravermelho (IR) localizado no painel frontal da
unidade. O controle remoto deve ser mantido em um ângulo dentro de 30 graus perpendicular ao
sensor IR para funcionar corretamente. A distância entre o controle remoto e o sensor não deve
exceder 6 metros (20 pés).
Port
uguês
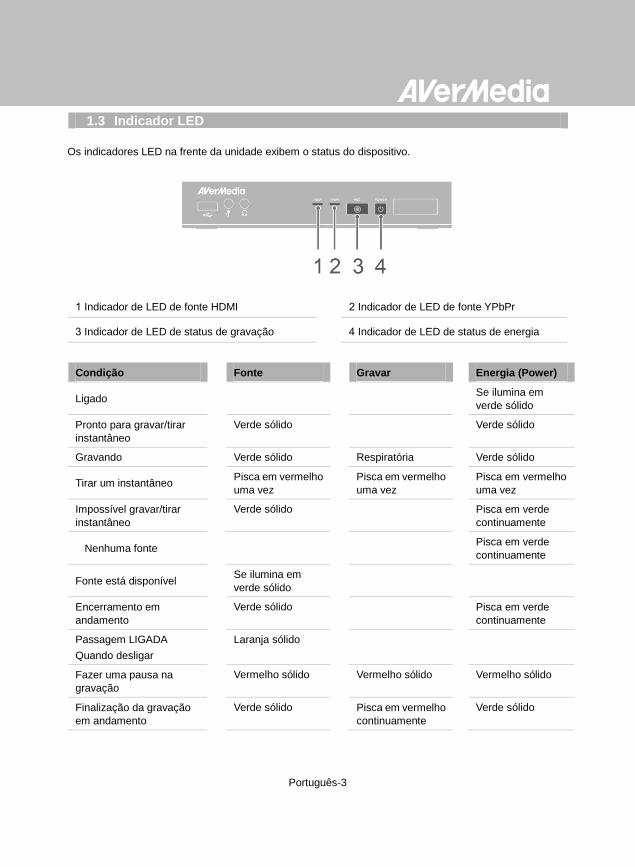
Português-3
1.3 Indicador LED
Os indicadores LED na frente da unidade exibem o status do dispositivo.
1 Indicador de LED de fonte HDMI 2 Indicador de LED de fonte YPbPr
3 Indicador de LED de status de gravação 4 Indicador de LED de status de energia
Condição Fonte Gravar Energia (Power)
Ligado Se ilumina em
verde sólido
Pronto para gravar/tirar
instantâneo
Verde sólido Verde sólido
Gravando Verde sólido Respiratória Verde sólido
Tirar um instantâneo Pisca em vermelho
uma vez
Pisca em vermelho
uma vez
Pisca em vermelho
uma vez
Impossível gravar/tirar
instantâneo
Verde sólido Pisca em verde
continuamente
Nenhuma fonte Pisca em verde
continuamente
Fonte está disponível Se ilumina em
verde sólido
Encerramento em
andamento
Verde sólido Pisca em verde
continuamente
Passagem LIGADA
Quando desligar
Laranja sólido
Fazer uma pausa na
gravação
Vermelho sólido Vermelho sólido Vermelho sólido
Finalização da gravação
em andamento
Verde sólido Pisca em vermelho
continuamente
Verde sólido

Português-4
Condição Fonte Gravar Energia (Power)
Espaço de
armazenamento está
baixo
Verde sólido Brilha em um ritmo
lento
Verde sólido
Dispositivo não está
pronto
Pisca em verde
continuamente
Problemas como o
armazenamento de
dados/sem sinal/conteúdo
protegido
Pisca em verde
continuamente
Aceitando um comando do
controle remoto
Pisca em verde
uma vez
Pressione [F1] para obter status de indicador da luz de LED.
1.4 Portas de Conexão
1 Slot USB 3 saída do fone de ouvido
2 Entrada do MIC
1.4.1 Vista Frontal
O slot USB é uma conexão de dispositivo de armazenamento HDD externo e assim como para atualização
do firmware através do dispositivo de armazenamento.
Hub USB não é suportado.
Não haverá nenhuma função ou resposta ao conectar a Caixa de Captura ao computador via USB.

Português-5
1 Entrada de vídeo componente 4 Saída HDMI
2 Entrada L/R de áudio 5 Porta LAN
3 Entrada HDMI 6 ENTRADA DC
1.4.2 Vista Traseira

Português-6
Capítulo 2. O Controle Remoto
As descrições abaixo mostram a distribuição das teclas do controle remoto.
# Botões
Descrições
1 Pressione para ligar a unidade/entrar em modo stand-by.
2 Pressione para acessar o menu principal. Pressione novamente para sair.
3
Pressione as teclas de navegação para se mover entre as opções.
Pressione OK para confirmar uma seleção.
Pressione OK para marcar/desmarcar segmento em pós-edição.
4
Pressione para reproduzir o último arquivo gravado ou ver a última imagem
capturada.
5 Pressione para iniciar/parar a gravação.

Português-7
6
Pressione para começar a reproduzir o arquivo selecionado.
Pressione para reproduzir o arquivo em velocidade (1x) normal quando
movimento lento, retroceder ou avançar rapidamente está ativo.
7
Pressione para parar a reprodução.
Pressione para parar a gravação.
8 Pressione para retroceder (2x, 4x, 8x, 16x, 32x).
9 Para retornar à página anterior.
10
Pressione para exibir a tela de ajuste de qualidade de vídeo/instantâneo.
Pressione novamente para sair.
11 (Siga as instruções na tela)
12 (Siga as instruções na tela)
13 (Siga as instruções na tela)
14 Pressione para alternar entre fontes Componente e HDMI.
15
Pressione para exibir a informação na tela, incluindo o modo, fonte e fontes de
áudio.
16 Pressione para sair da página atual e retornar à página anterior.
17 Pressione para tirar uma foto durante o jogo ou reprodução de vídeo.
18
Pressione para pausar a reprodução. Pressione OK ou para retomar a
reprodução.
Pressione para pausar na gravação.
19
Pressione para reproduzir o vídeo em câmera lenta (1/2x). Pressione
novamente para entrar modo quadro a quadro (Ver p.27 para detalhes).
20 Pressione para avançar (2x, 4x, 8x, 16x, 32x).
21
Pressione para ir à próxima página.
22 Pressione para apagar os arquivos selecionados.
23
Pressione para exibir as informações do disco. Pressione novamente para
ocultar.

Português-8
Capítulo 3. assistente de configuração
Quando for a primeira vez que você ligar a unidade placa de captura, aparecerá o assistente de
configuração. Os passos a seguir irão guiá-lo através do processo de configuração inicial.
Passo 1
Configurando o Idioma
Quando a página de boas-vindas abrir, use ▲ / ▼
para selecionar o idioma preferido. Pressione OK
para confirmar.
Passo 2
A/V Pass Thru.
Sugere-se que o A / V Pass Thru esteja ligado.
Certifique-se de instalar um disco rígido (interno ou externo) e para se conectar à internet com
antecedência.
Para a inicialização pela primeira vez, um curto período de tela preta (aproximadamente 20 segundos) é
seguido pelo logotipo da AVerMedia. A luz de status verde piscando indica que a GAME CAPTURE HD II
está iniciando. Por favor, aguarde até que a tela de boas vindas aparece.

Português-9
Passo 3 (1)
Lembre - se
Certifique-se de um disco rígido formatado com
NTFS está ligado ou instalado no aparelho. (Para
mais detalhes, consulte o Capítulo 4.2)
Verifique a conexão de rede.
Pressione OK para iniciar a instalação.
Um roteador que suporta a rede IP DHCP é
recomendado. Além disso, consulte Ch. 6.2 para a
configuração da conexão Manual.
Passo 3 (2)
Falha de conexão de rede
Se você não tiver conectado a uma rede válida, a uma curta resultado da conexão de rede não serão mostrados.
Pressione OK para continuar.
Pressione para voltar à página anterior.
Passo 4
Nenhum disco rígido conectado
Se você ainda não tiver instalado qualquer dispositivo de armazenamento, instale-o antes de continuar o processo de configuração.
Em seguida, pressione para ir para a tela anterior e
pressione OK para executar o processo de
verificação de disco.
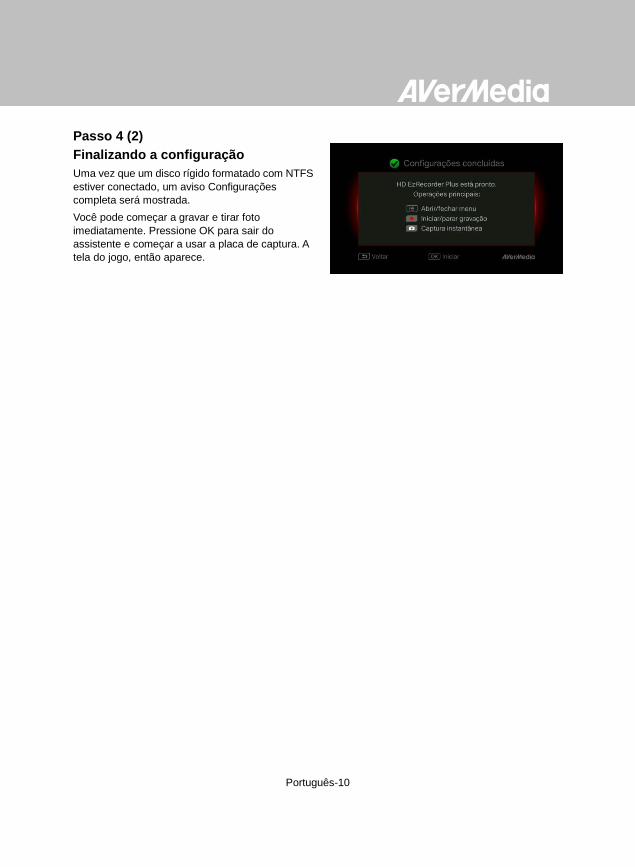
Português-10
Passo 4 (2)
Finalizando a configuração
Uma vez que um disco rígido formatado com NTFS
estiver conectado, um aviso Configurações
completa será mostrada.
Você pode começar a gravar e tirar foto
imediatamente. Pressione OK para sair do
assistente e começar a usar a placa de captura. A
tela do jogo, então aparece.

Português-11
Capítulo 4. Operações Básicas
Este capítulo orienta você para gravar jogos, captura de imagens, adicionar comentário de voz
para vídeos e reproduzir instantaneamente os arquivos.
4.1 Gravar e Capturar
A Caixa de Captura permite gravar, capturar e adicionar comentário de voz aos vídeos. As
instruções são dadas a seguir.
Menu OSD Descrições
Gravação de Instantâneo Durante o Jogo
- Pressione para ativar a gravação
instantânea.
- Pressione novamente ou para parar
a gravação.
Faça uma pausa e reinicie a gravação
Você pode ignorar gravações indesejadas e
reiniciar a gravação. Apenas as gravações que
você registrou serão salvas e os clipes
ignorados serão eliminados automaticamente.
- Pressione para dar pausa na gravação.
- Pressione ou para continuar a
gravação.
A Caixa de Captura apresenta jogos em tempo real e modo padrão. Você pode alterar o modo padrão tempo real
para modo padrão. Vá ao Menu> Configurações> Modo de Exibição. (Consulte a Seção 6.2 para detalhes.)
Todos os arquivos gravados ou instantâneos serão salvos no disco rígido padrão de destino
automaticamente. Consulte o Capítulo 6 para detalhes.
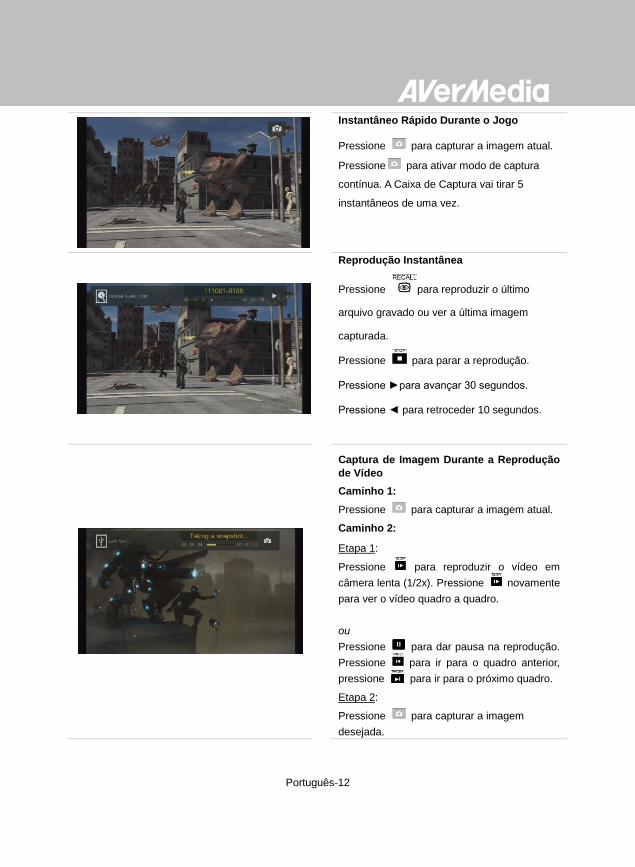
Português-12
Instantâneo Rápido Durante o Jogo
- Pressione para capturar a imagem atual.
Pressione para ativar modo de captura
contínua. A Caixa de Captura vai tirar 5
instantâneos de uma vez.
Reprodução Instantânea
- Pressione para reproduzir o último
arquivo gravado ou ver a última imagem
capturada.
- Pressione para parar a reprodução.
- Pressione ►para avançar 30 segundos.
- Pressione ◄ para retroceder 10 segundos.
Captura de Imagem Durante a Reprodução
de Vídeo
Caminho 1:
- Pressione para capturar a imagem atual.
Caminho 2:
Etapa 1:
- Pressione para reproduzir o vídeo em
câmera lenta (1/2x). Pressione novamente
para ver o vídeo quadro a quadro.
-
ou
- Pressione para dar pausa na reprodução.
Pressione para ir para o quadro anterior,
pressione para ir para o próximo quadro.
Etapa 2:
- Pressione para capturar a imagem
desejada.

Português-13
Informações do Disco
Pressione e pressione OK para exibir as
informações do disco. Pressione novamente
para ocultar.
4.2 Adicionando Comentário
Esta seção mostra a você como comentário de voz é adicionado à sua gravação de vídeo.
Requisitos para fone de ouvido/microfone.
Fone de ouvido
Conector: entrada 3,5mm
Microfone
Resposta de Frequência: 20-16kHz
Impedância: 2,0 KΩ
Tensão de Trabalho: 3V
Conector: entrada 3,5mm
Menu OSD Descrições
Microfone ligado (Mircophone On)
Um OSD será mostrado se você microfone
conectado à Caixa de Captura. O seu
comentário só será registrado quando você
pressionar .
- Pressione para gravar o jogo com
comentários.
- Pressione ou para parar a gravação.

Português-14
Se o fone de ouvido ou microfone estiver conectado durante o Assistente de Configuração, o som só pode
ser ouvido no fone de ouvido e instruções sobre comentário de voz não serão exibidas. Portanto, ligue o fone
de ouvido ou microfone depois que você concluir o Assistente de Configuração para seguir as instruções
para fone de ouvido/microfone.
Todos os comentário adicionados será misturados com o som do jogo. Além disso, contanto que o fone de
ouvido esteja conectado ao dispositivo, todos os seus comentários e sons de fundo serão gravados.
Portanto, não se esqueça de parar a gravação e retirar o fone de ouvido quando o comentário é necessário.
Se o microfone estiver desconectado/conectado à Caixa de Captura durante a gravação, o som também será
gravado. Para certificar-se, evite desconectar o microfone durante processo de gravação.
O volume que você ouve no teste de comentário pode ser ligeiramente diferente da gravação real. É
recomendável que você execute um teste antes para estar familiarizado com o volume de gravação.
É normal ouvir sua própria voz em uma gravação com fonte de entrada HDMI.
Nenhum OSD será mostrado se você conectar apelas o fone de ouvido à Caixa de Captura.

Português-15
Capítulo 5. Menu OSD
Sob o menu, você pode verificar e gerenciar seus arquivos e capturas instantâneas gravados, e
personalizar suas preferências.
1 Tempo Restante para Gravação 3 Conexão de Rede
2 Conectando ao GameMate 4 Hora Atual
Menu OSD Descrições
Operações Básicas
- Pressione para abrir o menu principal.
- Pressione ou para voltar à tela de
jogo.
- Use ▲/▼ para fazer uma seleção no menu e
OK para entrar em um submenu.
- No submenu, use ▲/▼ para fazer a seleção e
OK para confirmar. Pressione para
retornar à página anterior.
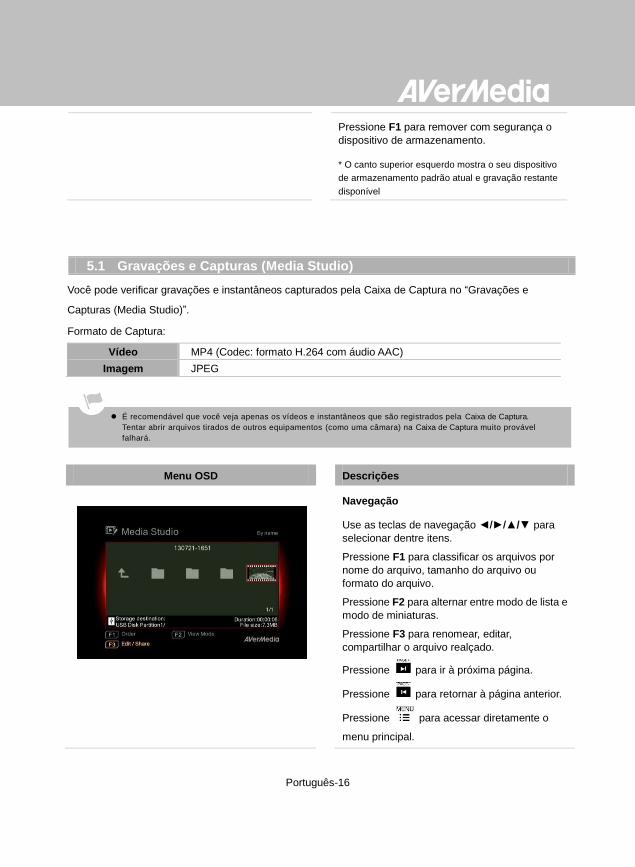
Português-16
Pressione F1 para remover com segurança o
dispositivo de armazenamento.
- * O canto superior esquerdo mostra o seu dispositivo
de armazenamento padrão atual e gravação restante
disponível
5.1 Gravações e Capturas (Media Studio)
Você pode verificar gravações e instantâneos capturados pela Caixa de Captura no “Gravações e
Capturas (Media Studio)”.
Formato de Captura:
Vídeo MP4 (Codec: formato H.264 com áudio AAC)
Imagem JPEG
Menu OSD Descrições
Navegação
- Use as teclas de navegação ◄/►/▲/▼ para
selecionar dentre itens.
- Pressione F1 para classificar os arquivos por
nome do arquivo, tamanho do arquivo ou
formato do arquivo.
- Pressione F2 para alternar entre modo de lista e
modo de miniaturas.
- Pressione F3 para renomear, editar,
compartilhar o arquivo realçado.
- Pressione para ir à próxima página.
- Pressione para retornar à página anterior.
- Pressione para acessar diretamente o
menu principal.
É recomendável que você veja apenas os vídeos e instantâneos que são registrados pela Caixa de Captura.
Tentar abrir arquivos tirados de outros equipamentos (como uma câmara) na Caixa de Captura muito provável
falhará.
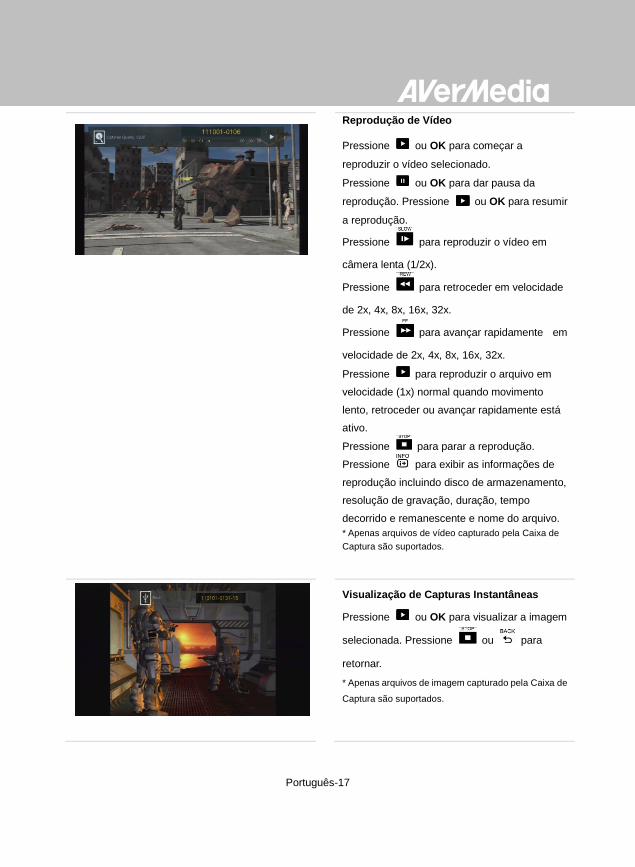
Português-17
Reprodução de Vídeo
- Pressione ou OK para começar a
reproduzir o vídeo selecionado.
- Pressione ou OK para dar pausa da
reprodução. Pressione ou OK para resumir
a reprodução.
- Pressione para reproduzir o vídeo em
câmera lenta (1/2x).
- Pressione para retroceder em velocidade
de 2x, 4x, 8x, 16x, 32x.
- Pressione para avançar rapidamente em
velocidade de 2x, 4x, 8x, 16x, 32x.
- Pressione para reproduzir o arquivo em
velocidade (1x) normal quando movimento
lento, retroceder ou avançar rapidamente está
ativo.
- Pressione para parar a reprodução.
- Pressione para exibir as informações de
reprodução incluindo disco de armazenamento,
resolução de gravação, duração, tempo
decorrido e remanescente e nome do arquivo.
* Apenas arquivos de vídeo capturado pela Caixa de
Captura são suportados.
Visualização de Capturas Instantâneas
- Pressione ou OK para visualizar a imagem
selecionada. Pressione ou para
retornar.
* Apenas arquivos de imagem capturado pela Caixa de
Captura são suportados.

Português-18
5.1.1 Pós- Editar os vídeos gravados na Caixa de Captura
Esta seção mostra como cortar, recombinar e compartilhar vídeos no YouTube gravados pela Caixa de Captura
Menu OSD Descrições
Selecione um Vídeo
- Selecione o arquivo que você gostaria de
editar, utilizando as teclas de navegação
◄/►/▲/▼.
Editar/Compartilhar (Edit/ Share)
Pressione F3 para editar ou compartilhar o
arquivo de vídeo.
Alteração de Nome do Arquivo
Introduza o seu nome do arquivo, utilizando as
teclas de navegação ▲/▼ para selecionar
caracteres, números ou símbolos. Use as
teclas de navegações ◄/► para ir para o
próximo e último caractere.
Pressione F1 para alternar entre os caracteres,
números e símbolos.
- Pressione para voltar para cancelar a
mudança que você fez.
- Pressione OK para salvar o arquivo editado.
- Pressione para limpar tudo.

Português-19
Como Editar (How to Edit)
Uma instrução sobre como editar um vídeo
será exibida, pressione OK para iniciar a
edição.
Modo de Edição
Você pode cortar e recombinar seu vídeo
selecionado no Modo de Edição.
- Para cortar o vídeo, você terá de criar um ou
mais segmentos dentro do vídeo.
- Etapa 1:
- Para localizar uma determinada cena, use as
teclas de direção ou para pesquisar a cena.
Você também pode usar as teclas de
navegação ▲/▼ para busca de cena
específica, hora, minuto e segundo do lado
esquerdo da tela.
- Pressione OK para marcar ou desmarcar a
cena.
-
Etapa 2:
Repita o Passo 1, de modo a criar um
segmento.
Pressione OK para manter ou excluir o
segmento.
Pressione F1 para alternar entre Pesquisar
Cena e pesquisa de Segmento.
Pressione F2 para apagar todas as marcas que
você fez no vídeo.
Pressione F3 para exportar o vídeo.

Português-20
Visualização
- A Caixa de Captura automaticamente reúne os
segmentos que você escolher para manter
durante a edição.
Exportar (Export)
- O tempo estimado varia por diferentes discos
de armazenamento. Consulte o tempo de
exportação para o uso efetivo do seu disco de
armazenamento.
- Pressione OK para exportar o vídeo.
- Pressione para continuar a edição.
Menu OSD Descrições
Exportando... (Exporting...)
A barra no meio mostra a evolução da
exportação do vídeo e o tempo estimado.
- Clique em para cancelar a exportação.
- Clique em para ocultar a exportação das
informações.

Português-21
Sair (Exit)
Pressione OK para sair do modo de edição.
- Pressione para sair.
Pressione F1 para continuar a edição.
Menu OSD Descrições
Compartilhar vídeos no YouTube
Use ▲/▼ para selecionar a tarefa que você
gostaria de executar. Selecione 'Compartilhar
no YouTube (Share on youtube)' para
compartilhar os seus vídeos.
Compartilhar no YouTube (Share on
Youtube)
Antes que você compartilhe os vídeos
gravados no YouTube, certifique-se de que
você:
1. Construiu uma conta no YouTube e
também um canal pessoal.
2. Tem o seu PC/ NB junto a você se você
ativar a verificação de duas etapas de sua
conta no YouTube.
Para garantir a estabilidade do carregamento,
carregue vídeos têm até uma hora.
Certifique-se de que a conta do YouTube é
verificada para carregar vídeos com mais de 15
minutos.
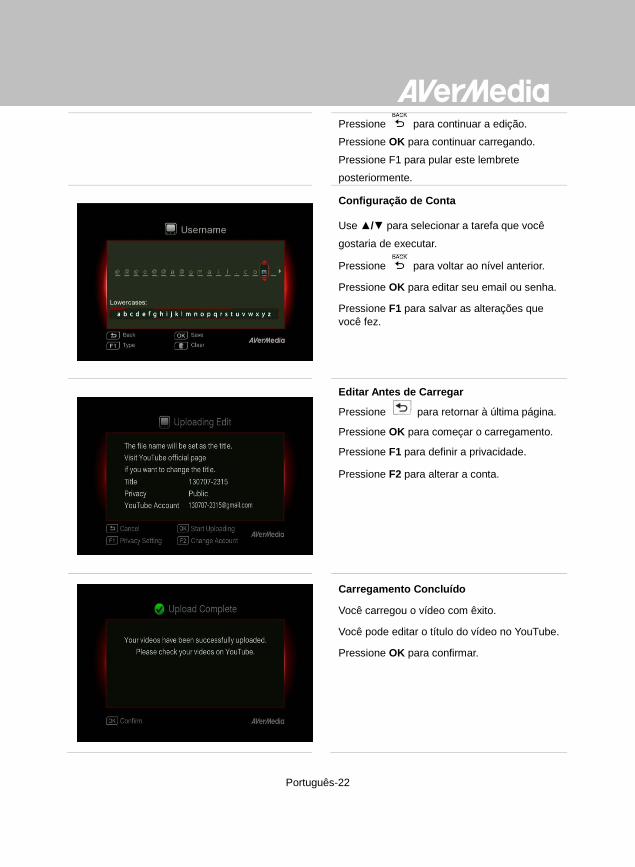
Português-22
- Pressione para continuar a edição.
- Pressione OK para continuar carregando.
- Pressione F1 para pular este lembrete
posteriormente.
Configuração de Conta
- Use ▲/▼ para selecionar a tarefa que você
gostaria de executar.
Pressione para voltar ao nível anterior.
Pressione OK para editar seu email ou senha.
Pressione F1 para salvar as alterações que
você fez.
- Editar Antes de Carregar
- Pressione para retornar à última página.
- Pressione OK para começar o carregamento.
- Pressione F1 para definir a privacidade.
Pressione F2 para alterar a conta.
Carregamento Concluído
Você carregou o vídeo com êxito.
Você pode editar o título do vídeo no YouTube.
Pressione OK para confirmar.

Português-23
“Gestão de Arquivo (File Management)” te permite gerenciar vídeos e insantâneos capturados pela
Caixa de Captura. Você pode copiar arquivos entre o disco rígido interno e o dispositivo de
armazenamento USB externo, e excluir arquivos indesejados. Antes de entrar neste submenu, insira
o seu primeiro dispositivo de armazenamento (USB 2.0 / dispositivo de armazenamento 3.0 / HDD 2,5
" no formato NTFS).
Menu OSD Descrições
Selecione a Partição
- Use as teclas de navegação ◄/►/▲/▼ para
selecionar a partição.
- Pressione para reproduzir o vídeo.
- Pressione F1 para alterar a ordenação dos
arquivos.
5.2 Gestão de Arquivo (File Management)
O comprimento recomendado para cada vídeo deve ser inferior a 1 hora.
A Caixa de Captura é feita para gravação e captura de conteúdo multimídia que são legalmente de
propriedade ou licenciados pelo usuário apenas. Carregar vídeos que são protegidos por direitos autorais e
outras leis não é permitido. O YouTube pode encerrar a conta para proteção de direitos autorais.
A verificação da conta no YouTube é necessária quando você carregar o vídeo que tem mais de 15 minutos.
Consulte o website do YouTube para detalhes adicionais.
Ocasionalmente, leva de dois a três dias para os vídeos serem exibidos no YouTube. Por favor, aguarde
alguns dias, se você não conseguir ver os vídeos online.

Português-24
Interface do Usuário de Gerenciamento de Arquivo:
1 Uma lista exibindo os arquivos localizados no disco rígido interno
2 Um conjunto de ferramentas de edição
3 Uma lista exibindo os arquivos localizados no disco USB
4 Á rea de exibição de informações
Descrições das Ferramentas de Edição:
N.º de
Botões Descrições
1
Copiar arquivos ao disco USB
2 Copiar arquivos ao disco rígido interno
3 Selecionar tudo
4 Desselecionar tudo
5 Excluir

Português-25
Menu OSD Descrições
Copiando Arquivos do HDD Interno ao
Disco USB
Etapa 1:
- Na lista do lado esquerdo, use ▲/▼ para
destacar o arquivo que você deseja copiar para
o disco USB. Pressione OK para selecionar /
desselecionar um item.
- Selecione e pressione OK para
selecionar todos os arquivos.
- Selecione e pressione OK para
desselecionar todos os arquivos.
Etapa 2:
- Selecione e pressione OK para copiar
arquivo(s) selecionado ao disco USB.
- Pressione para cancelar a cópia de
arquivos em progresso.
Etapa 3:
- Pressione OK.
Copiar arquivos do disco USB para disco
rígido interno funciona no sentido inverso,
como acima mencionado.
* Se o arquivo for razoavelmente grande,
pressione F1 para ocultar o status de cópia ou
exclusão.
Excluindo Arquivos
Etapa 1:
- Use ▲/▼ para destacar o arquivo(s) que você
deseja excluir. Pressione OK para selecionar /
desselecionar um item.
- Selecione e pressione OK para
selecionar todos os arquivos.
- Selecione e pressione OK para
desselecionar todos os arquivos.

Português-26
Etapa 2:
- Selecione e pressione OK para remover
o arquivo da lista.
ou
Pressione no controle remoto e então
pressione OK para remover o arquivo da lista.
- Pressione para cancelar a exclusão dos
arquivos em progresso.
Etapa 3:
- Pressione OK.
Remoção do Dispositivo de
Armazenamento USB
Para evitar perda de dados, é altamente
recomendável remover com segurança seu
dispositivo de armazenamento externo. Siga as
etapas abaixo:
Etapa 1:
Pressione no controle remoto.
Etapa 2:
Pressione F2 para removê-lo.

Português-27
Capítulo 6. Emparelhamento da Caixa de Captura e GameMate by
AVerMedia
GameMate by AVerMedia é o aplicatico dedicado a smart phones. Ele permite que você use seu smart
phone como controle remoto. Você está apenas a alguns passos do emparelhamento da Caixa de
Captura com GameMate.
OSD Descrições
É recomendável que a Caixa de Captura e o
GameMate compartilhem um ponto de acesso
sem fio. Depois de fazer o download do
GameMate; toque no GameMate no seu
smartphone. Você vai ver que o GameMate está
pesquisando o dispositivo disponível.
Um conjunto de número de emparelhamento
será mostrado na tela da TV.
Faça o download do GameMate by AVerMedia no app store primeiro.
Para emparelhar com sucesso, certifique-se de que a Caixa de Captura e o GameMate compartilham a mesma rede.
Para fazer isso, você vai precisar também de um ponto de acesso sem fio para o GameMate. Certifiq ue-se de que
a LAN está bem-conectada e você está pronto para esmparelhar!

Português-28
Toque para inserir o número de
emparelhamento de quatro dígitos
corretamente.
Você vai ver o GameMate como mostrado ao
lado esquerdo quando emparelhado com
sucesso até com a Caixa de Captura.
Você também pode verificar a conexão do
GameMate no Menu. Você vai ver o sinal no nível superior do Menu.
Se a conexão for perdida, por favor reinicie o AP sem fio ou a Caixa de Captura e tente novamente.
