c kit raspberry pi q -s g - who are we...
TRANSCRIPT

CANAKIT RASPBERRY PI QUICK-START GUIDE
WWW.CANAKIT.COM
Cana Kit

Congratulations on your purchase from CanaKit and welcome to the exciting world of the Raspberry Pi! To setup your Raspberry Pi, you will typically need the following items:
• MicroSD Card loaded with “NOOBS”• HDMI monitor • HDMI cable • USB Keyboard and Mouse• MicroUSB Power Adapter• [Optional] Ethernet cable for connection to a wired network• [Optional] Raspberry Pi Compatible USB WiFi Adapter• [Optional] A case to hold and protect your Raspberry Pi
If you purchased one of CanaKit's Raspberry Pi Starter Kits, it will include many of the above items depending on the specific kit.
WELCOME!
1
© 2015 Cana Kit Corporation. All Rights Reserved.

Your purchase comes with a CanaKit Limited Warranty. In order to take advantage of this warranty, you must activate it within 30-days of purchase by registering at:
www.canakit.com/warranty
At CanaKit, we would like to ensure your complete satisfaction. If you purchased a kit from us, please inspect the contents of your kit and do not hesitate to contact us should you have any issues. You can reach us at:
To learn more about the Raspberry Pi, refer to the Raspberry Pi Foundation Resources page at:
www.raspberrypi.org/resources
For Raspberry Pi related technical support, a great place to start is the official Raspberry Pi Foundation forums at:
www.raspberrypi.org/forums
CANAKIT WARRANTY REGISTRATION
SUPPORT & RESOURCES
2

1.You can find video instructions for CanaKit Raspberry Pi cases at:
www.canakit.com/pi-case
2. Insert a pre-programmed MicroSD card into the MicroSD card slot on the bottom side of the Raspberry Pi.
3. Connect a USB keyboard and mouse to the USB ports.
4. Connect a HDMI monitor or TV to the Raspberry Pi using a HDMI cable. Ensure your monitor or TV is turned on and that you have selected the correct input.
5. If you intend to use an Operating System other than Raspbian, connect the Raspberry Pi to your network using an Ethernet cable. If a wired Internet connection is detected during the first boot, you will be presented with additional choices of Operating Systems to install.
If you have a case, start by installing the Raspberry Pi inside the case.
GETTING STARTED
3
40-Pin GPIO Header
Broadcom CPU
DSI DisplayConnector
USBPorts
EthernetPort
CSI Camera ConnectorHDMIPort
5V MicroUSB
MicroSDCard Slot
(On Underside)4-Pole 3.5mm Audio & Composite Video
Cana Kit

6. Once all connections have been made, it is now time to connect the MicroUSB Power Supply to the board. When the power is connected, the Raspberry Pi will start to boot and you should be presented with the following menu. If the Raspberry Pi detected an active wired Internet connection, the list will include additional choices of Operating Systems to install.
7. Select your Language and Keyboard Layout on this screen and then select “Raspbian” or your choice of Operating System(s) from the menu. Click “Install” to begin the installation process.
8. NOOBS will now start the installation of the selected Operating System(s). This process will take a few minutes. Once completed, you will see a message indicating the installation has completed. Press OK and the Raspberry Pi will reboot.
4
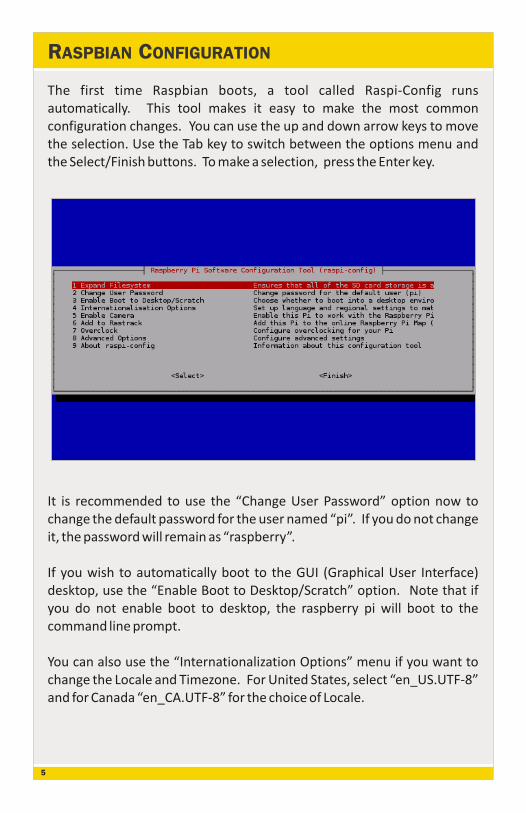
The first time Raspbian boots, a tool called Raspi-Config runs automatically. This tool makes it easy to make the most common configuration changes. You can use the up and down arrow keys to move the selection. Use the Tab key to switch between the options menu and the Select/Finish buttons. To make a selection, press the Enter key.
It is recommended to use the “Change User Password” option now to change the default password for the user named “pi”. If you do not change it, the password will remain as “raspberry”.
If you wish to automatically boot to the GUI (Graphical User Interface) desktop, use the “Enable Boot to Desktop/Scratch” option. Note that if you do not enable boot to desktop, the raspberry pi will boot to the command line prompt.
You can also use the “Internationalization Options” menu if you want to change the Locale and Timezone. For United States, select “en_US.UTF-8” and for Canada “en_CA.UTF-8” for the choice of Locale.
RASPBIAN CONFIGURATION
5

Once you have made your desired changes use the Finish button to save the changes. If you made any changes, you will be asked whether you want to reboot or not; otherwise, you will be taken to the Raspbian command line prompt.
Tip: You can run the Raspi-Config tool any time you like. To do so, type the following at a Raspbian command line prompt:
sudo raspi-config
If you are at the Raspbian command line prompt and would like to load the graphical desktop interface, simply type “startx” and press the Enter key.
6
SHUTTING DOWN THE RASPBERRY PI
The Raspberry Pi must be shutdown properly so that the MicroSD card File System is not corrupted. To do so, type the following at a Raspbian command line prompt:
sudo shutdown -h now
If you are in the graphical desktop, you can simply click “Menu” and then select “Shutdown”.

If you have a Raspberry Pi compatible WiFi adapter, such as the CanaKit WiFi Adapter, the easiest way to configure it is through the graphical desktop interface. To do so, use the WiFi Configuration tool available under the Preferences menu.
RASPBIAN WIFI CONFIGURATION
7

Click on the “Scan” button and new window will open. On this new windows, you can click “Scan” to update the list of available wireless networks.
Find your desired wireless network and double click it. A new window will open that will allow you to enter your network settings. Enter your wireless network password in the “PSK” field and then click “Add”.
8

Click “Close” to close the “San results” window showing the list of available networks. You should now see a successful connection shown on the original WiFi Configuration window.
9

10
© 2015 Cana Kit Corporation. All Rights Reserved.

Raspberry Pi is a trademark of the Raspberry Pi Foundation. CanaKit is a registered trademark of Cana Kit Corporation. This manual is copyright of Cana Kit Corporation. No part of this manual may be sold, licensed, transferred, copied or reproduced in whole or in part in any manner or form in or on any media without the prior written consent of Cana Kit Corporation.
Revision 1.0
© 2015 Cana Kit Corporation. All Rights Reserved.
WWW.CANAKIT.COM
Cana Kit