by larissa holland, mmmcrafts.blogspot -...
TRANSCRIPT
!""#$%&'"#()*#+%&'"### By Larissa Holland, mmmcrafts.blogspot.com
m m m crafts.blogspot.com © 2012, Larissa Holland. All rights reserved. = wrong side = right side
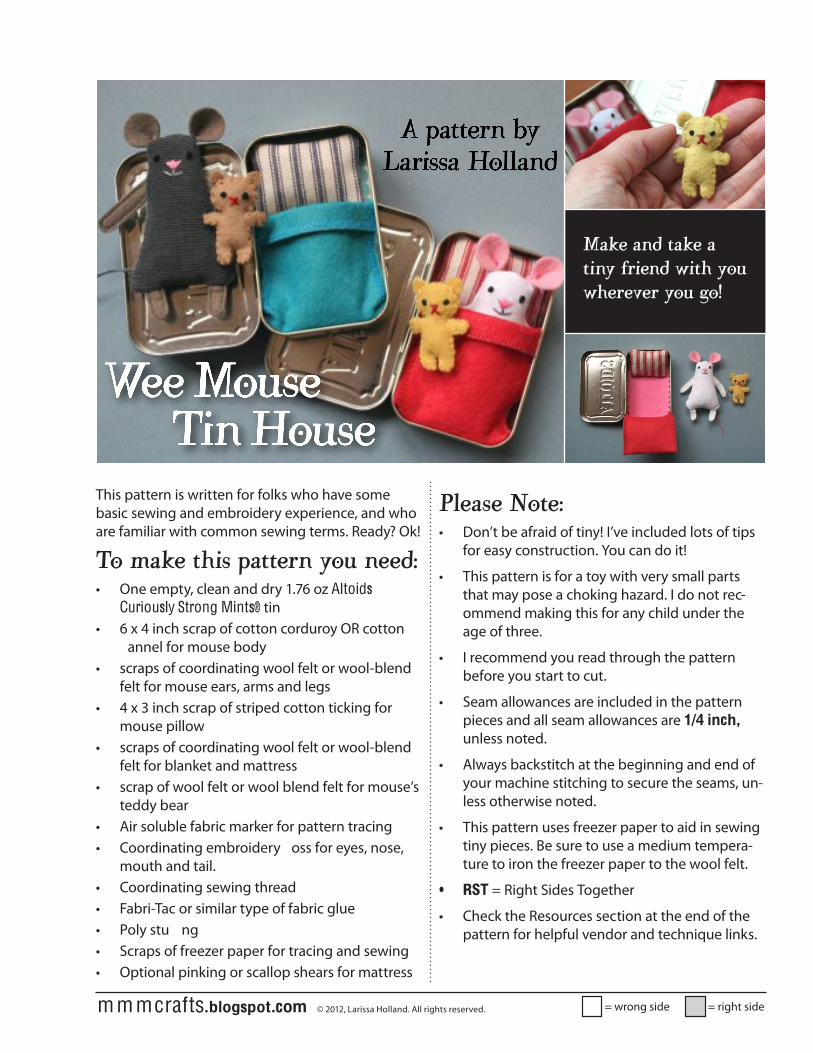
This pattern is written for folks who have some basic sewing and embroidery experience, and who are familiar with common sewing terms. Ready? Ok!
(%#,-."#/0)'#1-//"2*#3%&#*""45• One empty, clean and dry 1.76 oz Altoids
Curiously Strong Mints® tin • 6 x 4 inch scrap of cotton corduroy OR cotton
annel for mouse body• scraps of coordinating wool felt or wool-blend
felt for mouse ears, arms and legs• 4 x 3 inch scrap of striped cotton ticking for
mouse pillow• scraps of coordinating wool felt or wool-blend
felt for blanket and mattress• scrap of wool felt or wool blend felt for mouse’s
teddy bear• Air soluble fabric marker for pattern tracing• Coordinating embroidery oss for eyes, nose,
mouth and tail.• Coordinating sewing thread• Fabri-Tac or similar type of fabric glue• Poly stu ng• Scraps of freezer paper for tracing and sewing• Optional pinking or scallop shears for mattress
67"-'"#8%/"5#• Don’t be afraid of tiny! I’ve included lots of tips
for easy construction. You can do it!
• This pattern is for a toy with very small parts that may pose a choking hazard. I do not rec-ommend making this for any child under the age of three.
• I recommend you read through the pattern before you start to cut.
• Seam allowances are included in the pattern pieces and all seam allowances are 1/4 inch, unless noted.
• Always backstitch at the beginning and end of your machine stitching to secure the seams, un-less otherwise noted.
• This pattern uses freezer paper to aid in sewing tiny pieces. Be sure to use a medium tempera-ture to iron the freezer paper to the wool felt.
• RST = Right Sides Together
• Check the Resources section at the end of the pattern for helpful vendor and technique links.
$-."#-*4#/-."#-#/)*3#92)"*4#:)/0#3%&#:0"2";"2#3%&#<%=
!""#$%&'"#()*#+%&'"### By Larissa Holland, mmmcrafts.blogspot.com
m m m crafts.blogspot.com © 2012, Larissa Holland. All rights reserved. = wrong side = right side
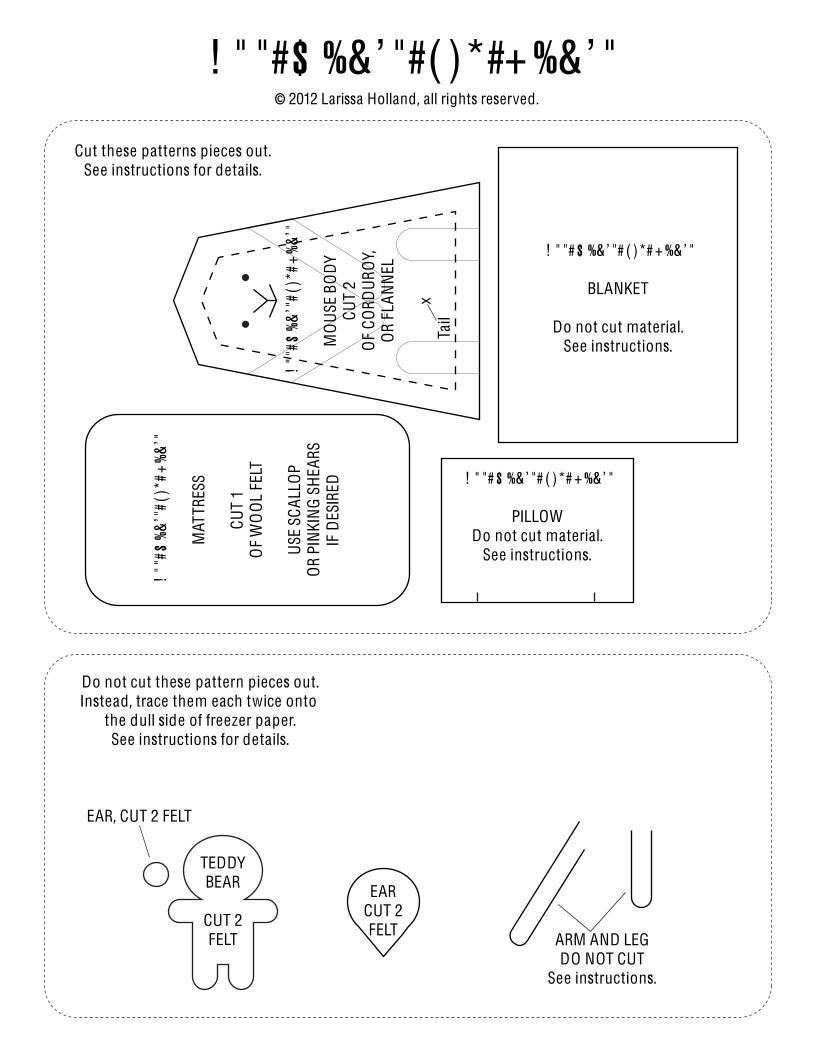
>"/#?/-2/"451. Print pattern pieces on card stock. Cut out the
body, pillow, blanket and mattress pattern pieces. Leave the rest of the pattern pieces uncut.
2. Use a large needle to poke holes in the body pattern piece at the tail, eyes, nose and corners of the mouth so that when you are tracing the body pieces you can mark the face on one and tail placement on the other through the holes.
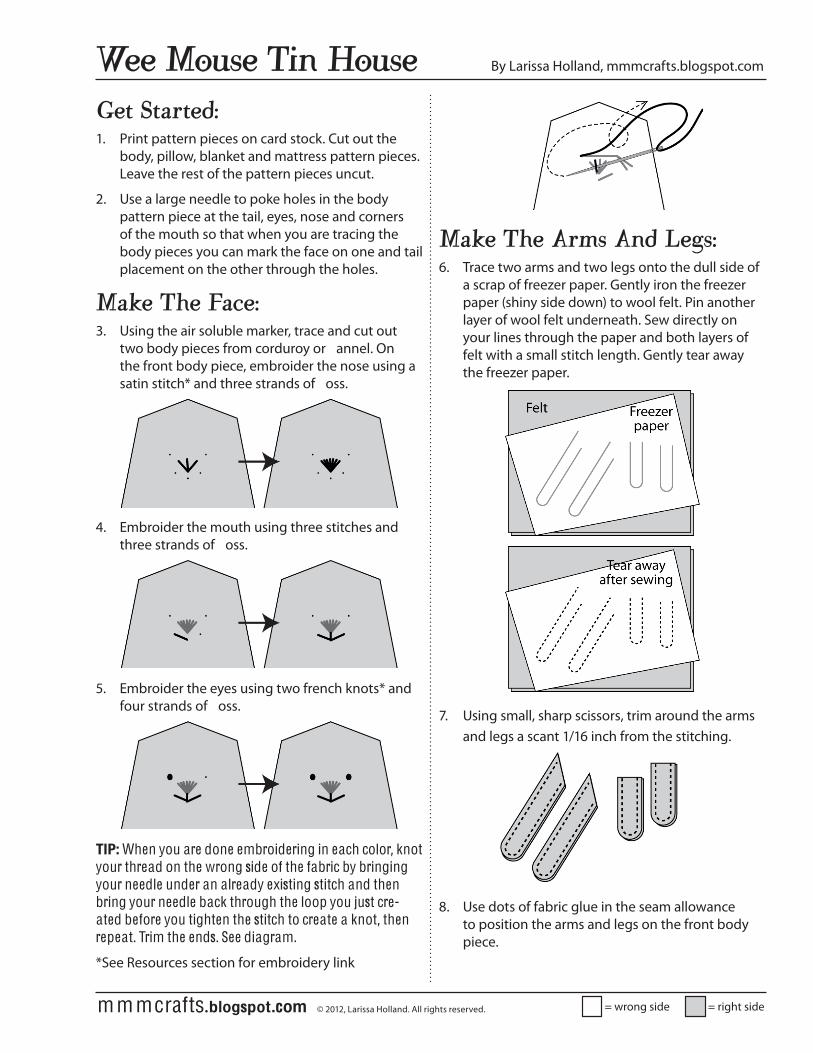
$-."#(0"#@-A"53. Using the air soluble marker, trace and cut out
two body pieces from corduroy or annel. On the front body piece, embroider the nose using a satin stitch* and three strands of oss.
4. Embroider the mouth using three stitches and three strands of oss.
5. Embroider the eyes using two french knots* and four strands of oss.
TIP: When you are done embroidering in each color, knot your thread on the wrong side of the fabric by bringing your needle under an already existing stitch and then bring your needle back through the loop you just cre-ated before you tighten the stitch to create a knot, then repeat. Trim the ends. See diagram.
*See Resources section for embroidery link
$-."#(0"#B2,'#B*4#C"<'56. Trace two arms and two legs onto the dull side of
a scrap of freezer paper. Gently iron the freezer paper (shiny side down) to wool felt. Pin another layer of wool felt underneath. Sew directly on your lines through the paper and both layers of felt with a small stitch length. Gently tear away the freezer paper.
7. Using small, sharp scissors, trim around the arms and legs a scant 1/16 inch from the stitching.
8. Use dots of fabric glue in the seam allowance to position the arms and legs on the front body piece.
!""#$%&'"#()*#+%&'"### By Larissa Holland, mmmcrafts.blogspot.com
m m m crafts.blogspot.com © 2012, Larissa Holland. All rights reserved. = wrong side = right side
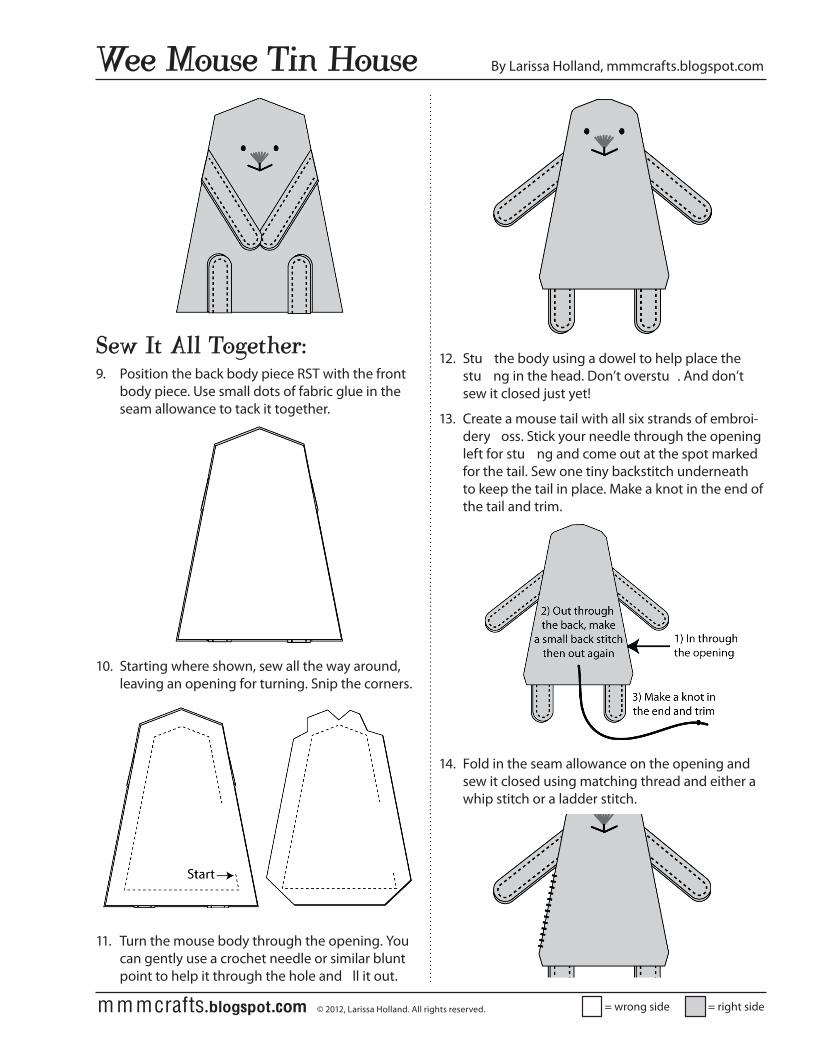
12. Stu the body using a dowel to help place the stu ng in the head. Don’t overstu . And don’t sew it closed just yet!
13. Create a mouse tail with all six strands of embroi-dery oss. Stick your needle through the opening left for stu ng and come out at the spot marked for the tail. Sew one tiny backstitch underneath to keep the tail in place. Make a knot in the end of the tail and trim.
14. Fold in the seam allowance on the opening and sew it closed using matching thread and either a whip stitch or a ladder stitch.
?":#D/#B77#(%<"/0"259. Position the back body piece RST with the front
body piece. Use small dots of fabric glue in the seam allowance to tack it together.
10. Starting where shown, sew all the way around, leaving an opening for turning. Snip the corners.
11. Turn the mouse body through the opening. You can gently use a crochet needle or similar blunt point to help it through the hole and ll it out.
!""#$%&'"#()*#+%&'"### By Larissa Holland, mmmcrafts.blogspot.com
m m m crafts.blogspot.com © 2012, Larissa Holland. All rights reserved. = wrong side = right side
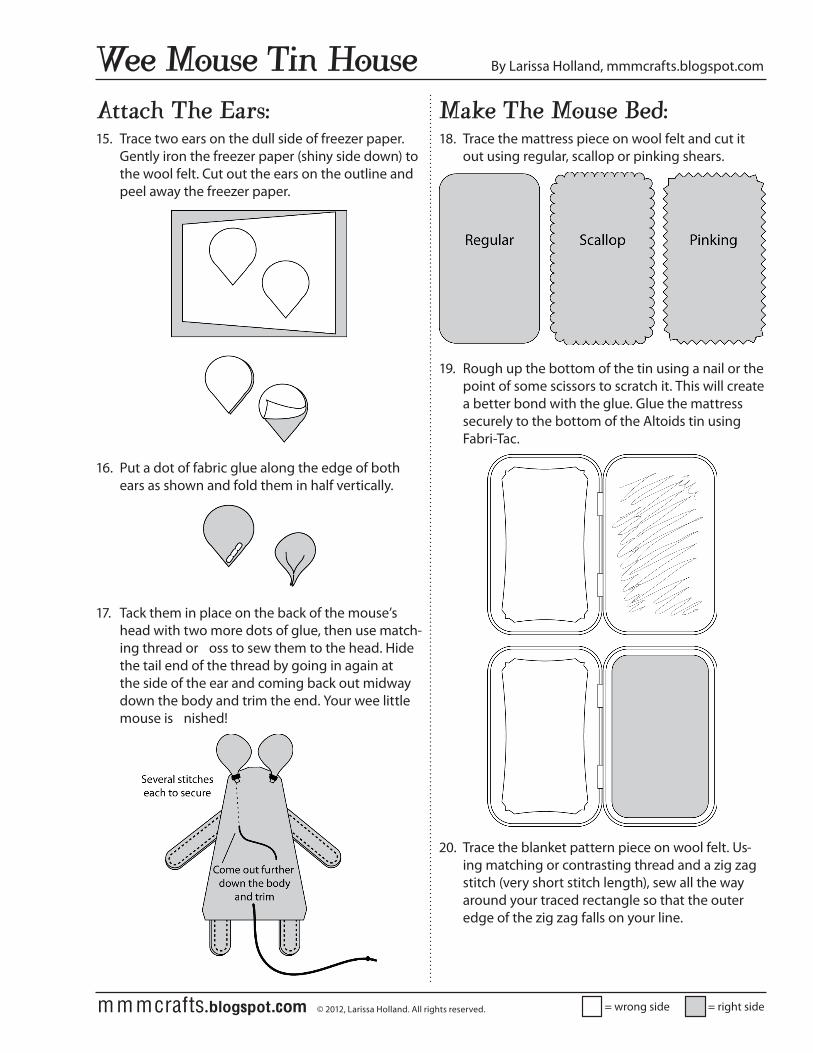
$-."#(0"#$%&'"#E"4518. Trace the mattress piece on wool felt and cut it
out using regular, scallop or pinking shears.
19. Rough up the bottom of the tin using a nail or the point of some scissors to scratch it. This will create a better bond with the glue. Glue the mattress securely to the bottom of the Altoids tin using Fabri-Tac.
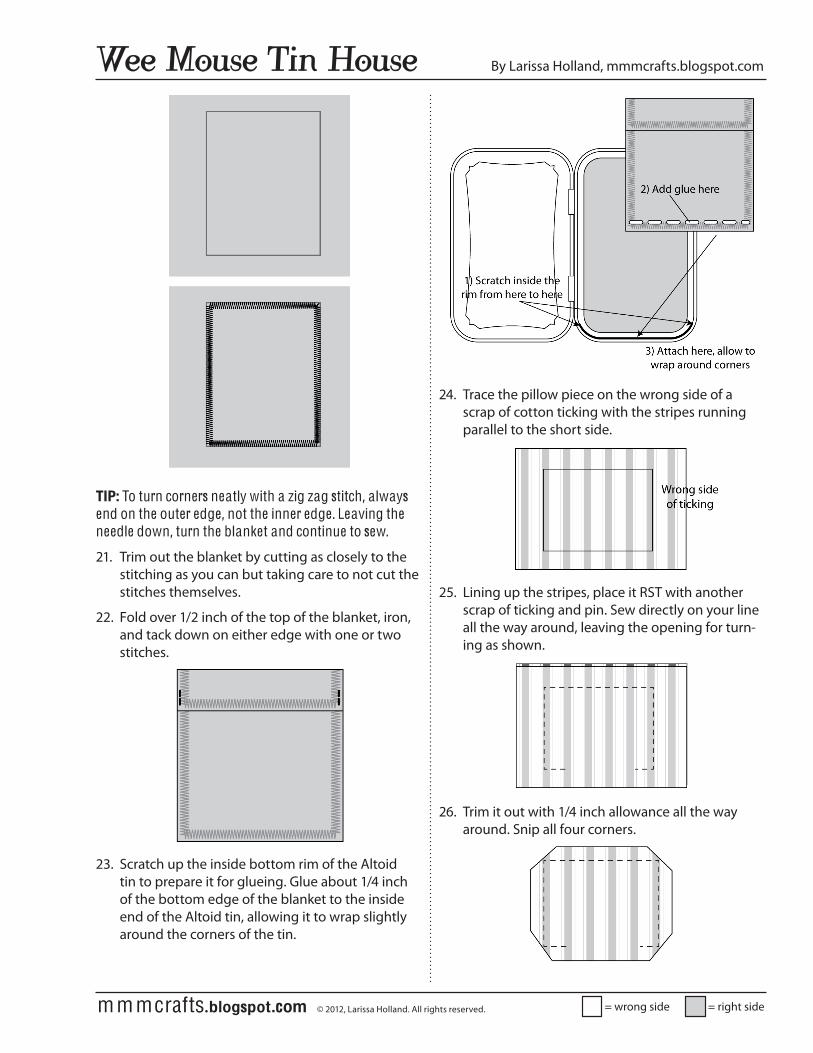
20. Trace the blanket pattern piece on wool felt. Us-ing matching or contrasting thread and a zig zag stitch (very short stitch length), sew all the way around your traced rectangle so that the outer edge of the zig zag falls on your line.
B//-A0#(0"#F-2'515. Trace two ears on the dull side of freezer paper.
Gently iron the freezer paper (shiny side down) to the wool felt. Cut out the ears on the outline and peel away the freezer paper.
16. Put a dot of fabric glue along the edge of both ears as shown and fold them in half vertically.
17. Tack them in place on the back of the mouse’s head with two more dots of glue, then use match-ing thread or oss to sew them to the head. Hide the tail end of the thread by going in again at the side of the ear and coming back out midway down the body and trim the end. Your wee little mouse is nished!
!""#$%&'"#()*#+%&'"### By Larissa Holland, mmmcrafts.blogspot.com
m m m crafts.blogspot.com © 2012, Larissa Holland. All rights reserved. = wrong side = right side
24. Trace the pillow piece on the wrong side of a scrap of cotton ticking with the stripes running parallel to the short side.
25. Lining up the stripes, place it RST with another scrap of ticking and pin. Sew directly on your line all the way around, leaving the opening for turn-ing as shown.
26. Trim it out with 1/4 inch allowance all the way around. Snip all four corners.
TIP: To turn corners neatly with a zig zag stitch, always end on the outer edge, not the inner edge. Leaving the needle down, turn the blanket and continue to sew.
21. Trim out the blanket by cutting as closely to the stitching as you can but taking care to not cut the stitches themselves.
22. Fold over 1/2 inch of the top of the blanket, iron, and tack down on either edge with one or two stitches.
23. Scratch up the inside bottom rim of the Altoid tin to prepare it for glueing. Glue about 1/4 inch of the bottom edge of the blanket to the inside end of the Altoid tin, allowing it to wrap slightly around the corners of the tin.
!""#$%&'"#()*#+%&'"### By Larissa Holland, mmmcrafts.blogspot.com
m m m crafts.blogspot.com © 2012, Larissa Holland. All rights reserved. = wrong side = right side
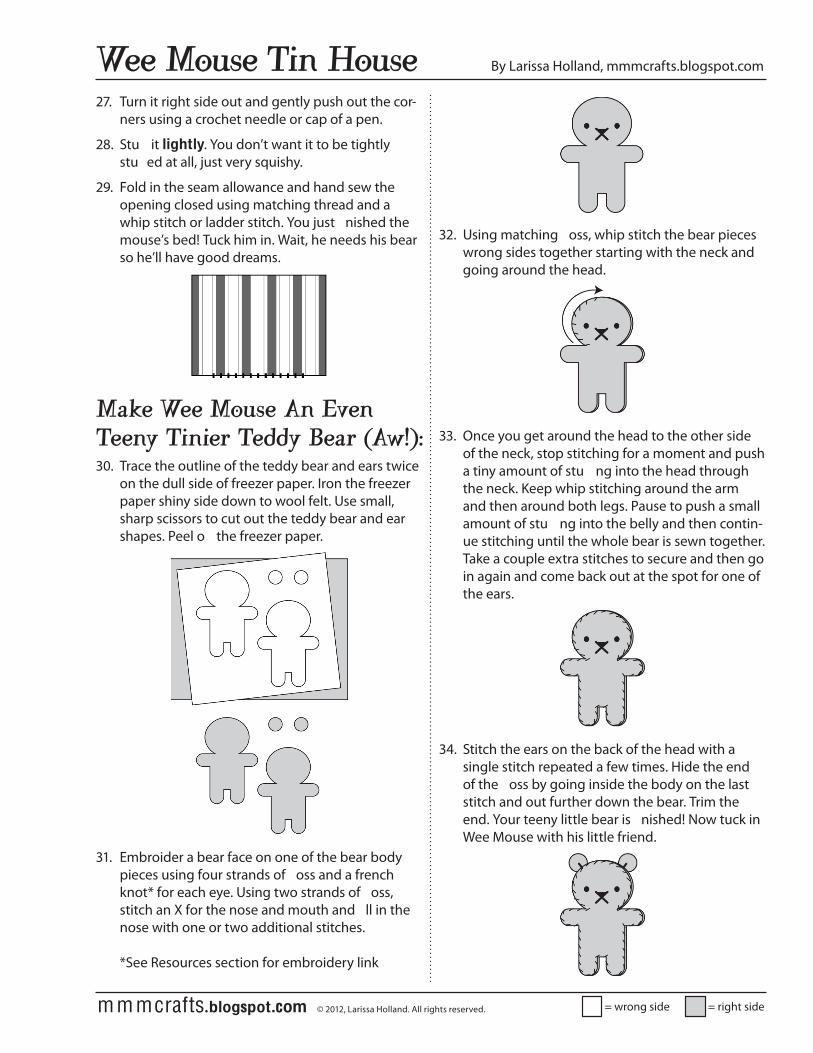
32. Using matching oss, whip stitch the bear pieces wrong sides together starting with the neck and going around the head.
33. Once you get around the head to the other side of the neck, stop stitching for a moment and push a tiny amount of stu ng into the head through the neck. Keep whip stitching around the arm and then around both legs. Pause to push a small amount of stu ng into the belly and then contin-ue stitching until the whole bear is sewn together. Take a couple extra stitches to secure and then go in again and come back out at the spot for one of the ears.
34. Stitch the ears on the back of the head with a single stitch repeated a few times. Hide the end of the oss by going inside the body on the last stitch and out further down the bear. Trim the end. Your teeny little bear is nished! Now tuck in Wee Mouse with his little friend.
27. Turn it right side out and gently push out the cor-ners using a crochet needle or cap of a pen.
28. Stu it lightly. You don’t want it to be tightly stu ed at all, just very squishy.
29. Fold in the seam allowance and hand sew the opening closed using matching thread and a whip stitch or ladder stitch. You just nished the mouse’s bed! Tuck him in. Wait, he needs his bear so he’ll have good dreams.
$-."#!""#$%&'"#B*#F;"*##(""*3#()*)"2#("443#E"-2#GB:=H530. Trace the outline of the teddy bear and ears twice
on the dull side of freezer paper. Iron the freezer paper shiny side down to wool felt. Use small, sharp scissors to cut out the teddy bear and ear shapes. Peel o the freezer paper.
31. Embroider a bear face on one of the bear body pieces using four strands of oss and a french knot* for each eye. Using two strands of oss, stitch an X for the nose and mouth and ll in the nose with one or two additional stitches. *See Resources section for embroidery link
!""#$%&'"#()*#+%&'"### By Larissa Holland, mmmcrafts.blogspot.com
m m m crafts.blogspot.com © 2012, Larissa Holland. All rights reserved. = wrong side = right side
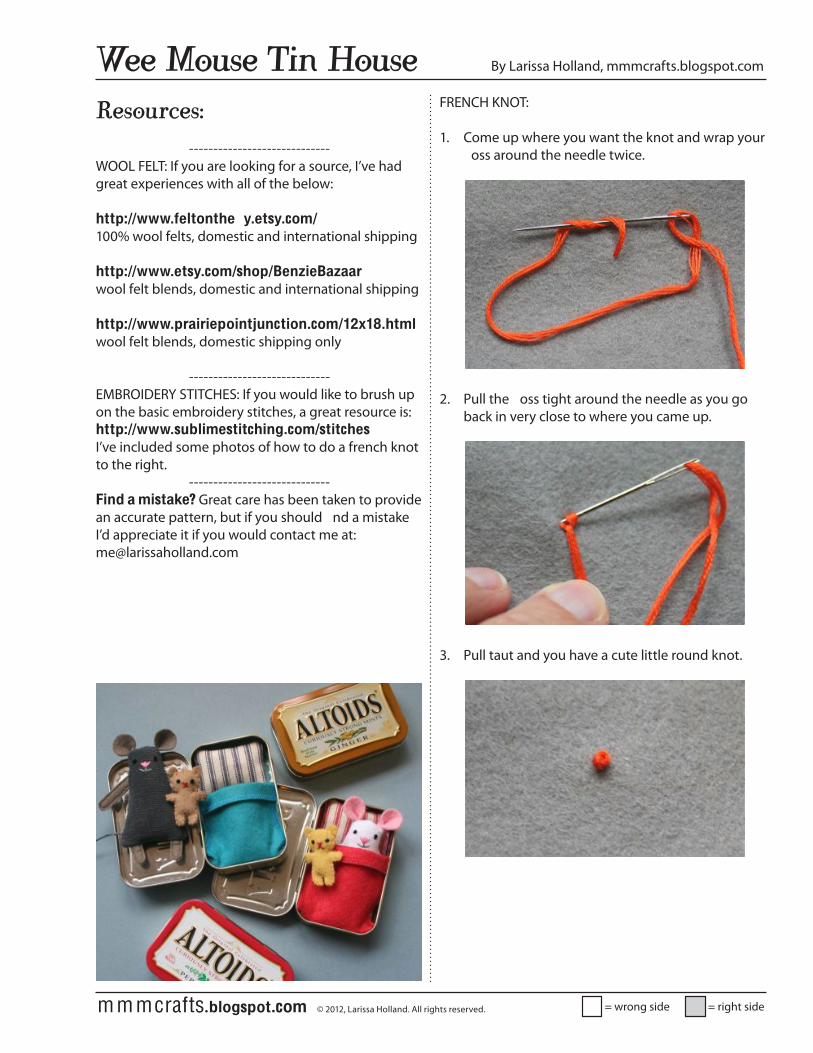
FRENCH KNOT:
1. Come up where you want the knot and wrap your oss around the needle twice.
2. Pull the oss tight around the needle as you go back in very close to where you came up.
3. Pull taut and you have a cute little round knot.
I"'%&2A"'5-----------------------------
WOOL FELT: If you are looking for a source, I’ve had great experiences with all of the below:
http://www.feltonthe y.etsy.com/ 100% wool felts, domestic and international shipping
http://www.etsy.com/shop/BenzieBazaar wool felt blends, domestic and international shipping
http://www.prairiepointjunction.com/12x18.html wool felt blends, domestic shipping only
-----------------------------EMBROIDERY STITCHES: If you would like to brush up on the basic embroidery stitches, a great resource is:http://www.sublimestitching.com/stitchesI’ve included some photos of how to do a french knot to the right.
-----------------------------Find a mistake? Great care has been taken to provide an accurate pattern, but if you should nd a mistake I’d appreciate it if you would contact me at:[email protected]
!""
#$%&
’"#(
)*#+
%&’"
MAT
TRES
S
CUT
1O
F W
OO
L FE
LT
USE
SCA
LLO
PO
R PI
NKI
NG
SH
EARS
IF D
ESIR
ED
! " " # $ %& ’ " # ( )*# + %& ’ "
BLANKET
Do not cut material.See instructions.
ARM AND LEGDO NOT CUT
See instructions.
EARCUT 2FELT
x
!""
#$%&
’"#(
)*#+
%&’"
MO
USE
BO
DYCU
T 2
OF
CORD
URO
Y,O
R FL
ANN
EL
! " " # $ %& ’ " # ( )*# + %& ’ "
PILLOWDo not cut material.
See instructions.
Do not cut these pattern pieces out.Instead, trace them each twice onto
the dull side of freezer paper.See instructions for details.
Cut these patterns pieces out.See instructions for details.
TEDDYBEAR
CUT 2FELT
EAR, CUT 2 FELT
! " " # $ %&’ " #( )*#+ %&’ "© 2012 Larissa Holland, all rights reserved.
Tail