by karen washburn-maki november 8, 2009 operating system 1 my virtual machine
TRANSCRIPT

BY KAREN WASHBURN-MAKINOVEMBER 8 , 2009
OPERATING SYSTEM 1
My Virtual Machine

Introduction
This paper will describe the definition of, requirements for, and set up of a virtual machine on my
Windows Vista Home Premium host. A virtual machine is a computer operating system functioning
within another operating system. The main computer is called the host while the virtual machine is
called the guest. There are several purposes of having a virtual machine (VM) on a computer
according to Sun VirtualBox. First, a company or individual can test whether or not they like a new
operating system (OS) and are willing to change over to it. Second, one can run “software written
for one OS on another without having to reboot to use it” (Sun Microsystems Inc. 2009). Second, it
can significantly reduce hardware and electricity cost as one computer or server can be a host to
several guests instead of having multiple computers. Last, the user can take a “snapshot and save a
particular state of a VM and revert back to that state if necessary” (Sun Microsystems Inc. 2009).
It is very easy to basically do a system restore on the VM if settings go awry.

Technical
In order to set up the VM, software had to be acquired in order to run the VM.
I chose to download Sun’s VirtualBox (Sun Microsystems Inc. 2009) as
VirtualBox supports the Vista OS as a host OS. The size of VirtualBox.exe is
3.4MB. The whole file is 80MB. The file includes settings and ways to tweak
the settings if one is an experienced user. After I installed the program, I
chose to put Linux as the guest OS and specifically Ubuntu 9.04 (Jaunty
Jackalope) as the particular program.

Technical
I chose Ubuntu for a few reasons. The main reason I was drawn to Ubuntu was due to
word of mouth. One of my IT friends had recently installed it on one of her work
computers. Second, I saw that it was Linux based and the programs it has are open
source and free. Open source programs, according to the Open Source Initiative, “must
include source code, which must allow distribution in source code as well as compiled
form. The source code must be the preferred form in which a programmer would modify
the program and cannot be obscured” (Open Source Initiative n.d.). The main points
about open source code are that it is free and can be modified by the user.

Technical
I went to Ubuntu’s web site (Canonical Ltd. 2009) and downloaded the OS onto a Memorex
double layer DVD+R. The DVD has 8.5GB of memory. It took seven hours to download the
program onto the DVD from my 1.5 Mbps DSL connection. The Ubuntu file Ubuntu-9.04-
desktop-i386 is a ISO Image file and is 6.98GB in size. I chose to place the program on the
DVD instead of my hard drive because of the size. Also, the disk is portable, and I could easily
set another person’s computer up with Ubuntu system without spending another seven hours
downloading it. This makes sense in terms of an IT position because I could take the disk to an
organization that uses Ubuntu to boot off the disk or if test it if they want to use this Linux
version.

Program Set Up
VirtualBox provides a very user friendly
GUI for setting up the VM. I named the
VM Karen123 and also Karen123_. The
next slides will demonstrate the program
set up for Virtual Box. The first screen is
the “Create New Virtual Machine” dialog
box. The set up screens are typical for
most programs and requires the user to
press “next” to continue to the next step.

Program Set Up
The second set up screen asks the user to name the VM and also to determine the OS and the version. Here, I chose Linux as the OS and Ubuntu as the version of Linux.

Program Set Up
I went with the recommended base memory of 384MB of RAM (random access memory) for the VM. I recently updated my computer and it now has 3GB of RAM. I could have increased the RAM on the VM, but chose to keep it at the standard size.

Program Set Up
This step created a new boot hard disk and labeled it as the primary master. If an existing disk were already established, this could have been selected. However, this screen shot shows that I chose to create a new hard disk. This hard disk is stored on my C drive.

Program Set Up
In this next step, the user can choose to set up dynamic or fixed memory for storage. Due to simplicity, I chose to use dynamically expanding storage. I chose this as the
amount of space the virtual hard disk would be the size it needs.
This next step determines where the virtual hard disk will be stored. I chose to put it in my program files within my C drive. It also asks what size the guest OS should be.
Again, I chose the default of 8GB.

Virtual Machine Settings
The next step opens up the GUI of VirtualBox. This is normally the first screen the user would see when starting VirtualBox after everything has been set up.
On the left side, the name of the VM is listed and on the right side, are the settings for the VM that can be altered by double clicking the links. Or, the user can alter the settings by clicking the gear shaped above the name of the VM.

Virtual Machine Settings
I clicked the ‘system’ tab on the left and the system settings loaded. The middle of the box shows the boot order. I de-selected the floppy drive as my PC does not have a floppy drive. The rest of the choices on this screen were left as default.
This screen determines which disk should be booted from first. Here, I have chosen the DVD and then hard disk option.

Virtual Machine Settings
In order to make a computer system fully functional, drivers need to be established. In VirtualBox, drivers are set up within the settings menu. Getting the CD/DVD-Rom driver correctly set up was the most important function to get this VM to be operational.
The default of this screen is to have the mounted CD/DVD drive map to the E drive, or where the CD/DVD driver is located on the host machine. A mount point is the “connection of a partition or volume to a folder” (Holcombe and Holcombe 2006, 153). By selecting the CD/DVD drive to be mounted, I am also able to use it on the VM.
I was unable to set up my VM with this choice and received error messages to the effect of driver not found. I looked at the Ubuntu file on the DVD and found the extension on it was .iso. I remembered this setting and found I could mount the CD/DVD ROM via the ISO image file found on the DVD.

Virtual Machine Settings
The next drivers to be set were the ones that are based on USB drives. In VirtualBox, filters need to be created and edited in order for the USB drivers to be used in the VM. As an aside, this was the most frustrating part of setting up the VM. Theoretically, once a user presses the add filter button, the program should be able to determine all of the USB drives on the computer and have them linked onto the VM. I have two such drivers which are my flash drive and HP printer.

Virtual Machine Settings
However, I could only see the flash drive on VirtualBox and not the printer. When the VM was launched, I could not mount and use the flash drive. The user manual didn’t contain information other than what I already tried. I went back into the USB settings. The drop box called ‘remote’ has three selections: yes, no, and any. The default is yes. I changed the selection to any.
With any changes to hardware or selections, sometimes it is best to reboot. I rebooted both the guest and host computers. After the VM was launched, I was able to access the flash drive on the guest system. However, only one system can access the flash drive at a given time. When I am logged into and am using both Ubuntu and Vista, I can only mount the flash drive to one OS.

Virtual Machine Settings
It is very important to un-mount this drive before logging out of the VM so the data isn’t lost and the driver can be used on the host machine. Unfortunately, this was learned by trial and error.
When I didn’t un-mount the flash drive on the guest OS and powered the VM down, my host computer did not recognize that a flash driver was on the computer. I was unable to use the ‘safely remove’ hardware feature on Vista because the host OS didn’t think there was hardware attached. I ended up removing the stick and inserting it again.
Another USB drive I operate on my host and guest systems is a mouse. This did not need to be mounted using t his setting. To toggle between the host and the guest, the right <ctrl> key needs to be pressed.

Virtual Machine Settings
However, attaching the printer driver to the VM was not as intuitive. I researched on Ubuntu’s web site but did not find the information I needed to attach the driver.
There are user groups on the internet for Ubuntu which provide support for its members. According to one of these sites, typing the following code into Ubuntu Terminal (equivalent to DOS prompt) would install the driver for the printer “sudo apt-get install hplip hplip-gui” (GNU FDL Free Doc License 2009).

Virtual Machine Settings
Again, I rebooted the host and guest computers. I removed the USB plug from my system unit and re-plugged it back in and turned the printer on. The host computer recognized the new USB driver. I loaded the VM and opened the Terminal.
The code worked and I was able to attach the printer via the USB filter settings. I tested the printer by opening the open source word processing application on Ubuntu and printed the document.
.

Virtual Machine
After all of the settings had been applied, I was able to launch the VM by double clicking the name of the VM. I was unable to get screen shots on what occurred next, unfortunately. A blue screen loads and the F12 key is pressed in order to run the boot process. Ubuntu then asks a series of questions asking what language the user wants, what time zone one is in, and how to partition the disk. I chose the default to partition the whole disk out to 8 GB.
In a professional or non-theoretical setting, I could partition the disk for hard drive normally labeled C and partition another for a recovery disk labeled D. If I were to set up an actual OS for a company, the recovery disk would be part of the set up.
Next, the OS asked the user to establish a user id and password for the system. The OS is established and the computer needed to be restarted.
Virtual Machine
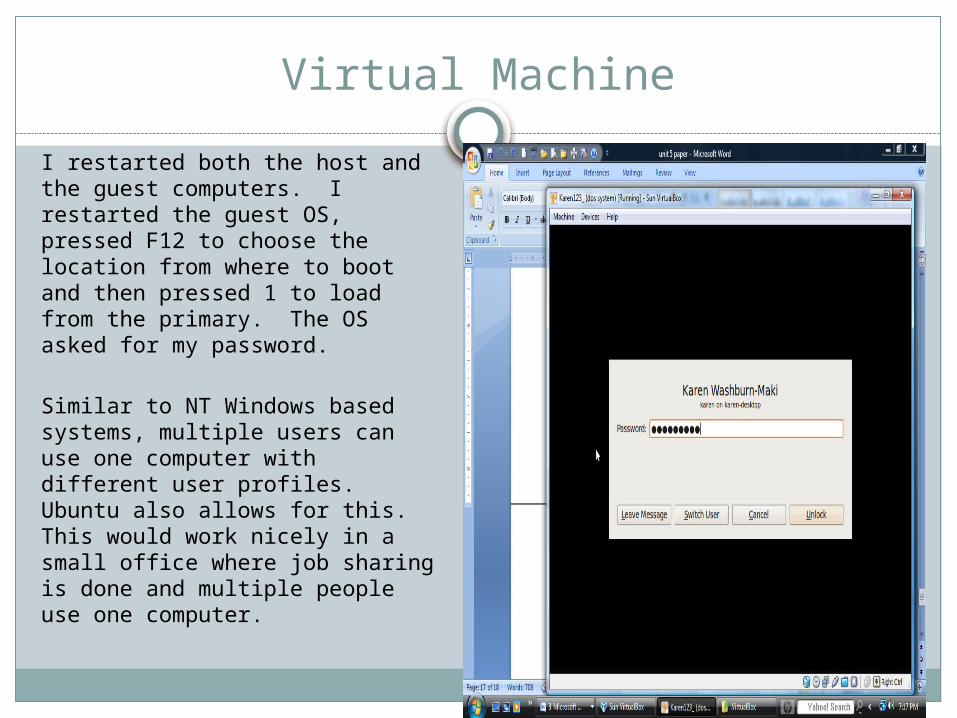
I restarted both the host and the guest computers. I restarted the guest OS, pressed F12 to choose the location from where to boot and then pressed 1 to load from the primary. The OS asked for my password.
Similar to NT Windows based systems, multiple users can use one computer with different user profiles. Ubuntu also allows for this. This would work nicely in a small office where job sharing is done and multiple people use one computer.

Virtual Machine
The desktop of Ubuntu opened and the menu is found in the top left corner of the window. This is in contrast to Windows systems 9.x and beyond where the start button is in the bottom left corner.
The screen shot here shows both systems, Vista and Ubuntu, being run on my computer at the same time. The picture can be expanded to read the fine detail in the Vista window.

Virtual Machine
The standard internet browser for Ubuntu is the free program Firefox. I was able to log into my Facebook account in the VM. Firefox has advantages over Internet Explorer as it is less vulnerable to viruses because it not as widely distributed. Also, Firefox “will block many websites from trying to install spyware and malware which is an issue with other browsers” (University of South Carolina - Beaufort 2009).

Virtual Machine
Free programs can be easily downloaded without going on the internet. On the menu Applications | Accessories | Add/Remove, users can locate different programs for games, utilities, programming, and media. I downloaded a program to assist with CSS and HTML documents. Users can search for programs also by who created the program between Canonical and non-Canonical maintained applications. A description of the program plus the ratings also appears on this menu

Virtual Machine
I downloaded two programs from this service. The first would allow me to install a virtual machine on my OS. However, I did not install a VM on top of my VM. The second program helped with editing CSS and XML pages.

Virtual Machine
The last maintenance I did was changing the appearance of the desktop. I loaded a picture from the flash drive and used it as the desktop background.

Afterthoughts
If I had to repeat this procedure in a professional setting, I would choose a different program than VirtualBox. It was more than challenging to get the drivers set up and to remain on the VM once the session ended. Theoretically, according to the VirtualBox documentation, if I select the ‘save machine state’ button instead of ‘power off the machine’, the settings would remain. However, I did not find this to be the case. For the drivers to stay on the VM, I needed to remove the USB devices from the system box, reboot my host computer completely, and attach the USB devices to their ports. The host computer then had to acknowledge the driver installation. Only then the guest OS would allow the drivers to be acknowledged.
In the future, I would also read absolutely everything I could on the bulletin boards established for VirtualBox and Ubuntu users. I did read many of the posts, but much of the data was above my current knowledge level.
I understand that this is probably a very simple mistake on my part on not completely understanding the way VMs should be set up.
However, I did learn a great deal on how wonderful open source code programs are. I would definitely recommend smaller companies and organizations who do not want to spend a great deal of money on Microsoft or Apple products to go to Linux based OS and programs such as Ubuntu. Canonical Ltd programs are very similar to Microsoft Office programs. Also, if one is astute, one can modify the open source programs to make them tailored for the specific business needs.

Conclusion
To summarize, establishing a Virtual Machine on one’s computer can be a time consuming process if the internet connection is relatively slow and the OS file is large. Setting up a VM on a computer helps a business be able to test new software or operating systems without buying new computers or expending more energy. Having a VM is easier than having a dual boot OS computer as removing the VM is as easy as deleting a regular program without having to maintenance any partitions on the C drive. External drivers normally used for the host computer including the mouse, flash drive, and printer can be used in the guest computer. Programs within Ubuntu 9.04 can be downloaded easily from the developer Canonical Ltd and other non-Canonical sources. Switching operating systems helps users obtain a new perspective on how other operating systems function.

Works Cited
Works Cited
Canonical Ltd. Ubuntu Home Page. 2009. http://www.ubuntu.com/ (accessed November 1, 2009).
Holcombe, Jan, and Charles Holcombe. Survey of Operating Systems. New York: McGraw-Hill, 2006.
Open Source Initiative. The Open Source Definition. http://www.opensource.org/docs/osd (accessed November 2009, 2009).
Sun Microsystems Inc. Welcome to VirtualBox.org. 2009. http://www.virtualbox.org/ (accessed November 1, 2009).
University of South Carolina - Beaufort. Introduction to Open Source Software. 2009. http://www.uweb.ucsb.edu/~mguidry/firefox/ (accessed November 6, 2009).