by: beau wallace [email protected] april 19th...
TRANSCRIPT

Designing and Configuring Cisco Zone - Based Policy
Firewalls(ZFW)
By: Beau Wallace
April 19th 2011
ICTN4040
Wallace 1
Firewall technology has been around for some time, and it has changed since its origins
as basic packet filtering firewalls. There are several types of firewalls and are more and more
being integrated with Intrusion Protection Systems(IPS). A basic packet filtering firewall works
at layer 3 on the OSI model, and is implemented on Cisco devices as interface-based Access
Control Lists(ACL). These packet filtering rules allow administrators to allow or deny based on
source or destination IP Address, protocol type, and port number. Firewalls implemented in
this method tend to be low-overhead, but run into several issues, including cumbersome
configuration, the inability to track connection state, and the inability to inspect traffic at higher
layers of the OSI stack.
The next type of firewall addresses some of these concerns. A stateful packet filter is
similar to a packet filter in that it too can filter based on the information detailed above,
however, it has the ability to track IP sessions and allow return traffic without the need for the
inherent insecurities of allowing static return traffic ACLs. With TCP, stateful firewalls depend
on the TCP handshake. With connectionless protocols such as UDP, traffic between a specific
pair of IPs and port numbers is allowed for a short time. Stateful packet inspection is handled
by Cisco's Context-Based Access Control(CBAC), or "Cisco IOS Classic Firewall" as you might see
it in product literature. It makes use of both stateless, static ACLs, and dynamic traffic
inspection rules. While the advantages over static access control lists is obvious, you run into
issues of complexity in large environments. Policies are applied per-interface, and the
Wallace 2
interactions between your statically defined access lists and CBAC's dynamic inspection can be
hard to determine.
So where does the Zone-Based Policy Firewall(henceforth abbreviated ZFW) fit
into the world of stateless and stateful firewalls? ZFW is a hybrid of these, and does
other things as well. CBAC from above was technically a hybrid as well, but had a few
disadvantages too. Both CBAC and ZFW are capable of application layer filtering, in
addition to their duties at the network and transport layers, however, ZFW is fully
capable of deep packet inspection, and has the advantage of being able to apply policy
across groups of interfaces. Additionally, where as previously a combination of static
ACLs with CBAC policies were necessary, ZFWs integrate the functions of dropping
packets inside policy definitions, allowing both more granularity in configuration, and the
addition of a deny-by-default approach. In CBAC, it was possible to configure
inspection, but forget that access-lists were necessary, and allow everything by default.
Inexperienced engineers making these configurations could then think they were safe.
In this paper, we will explore some design recommendation that may seem like
common sense to some, but needs to be said anyways. We will also explore the
configuration of Zone-Based Policy Firewalls.
Architecture
Cisco's Zone-Based Policy Firewall feature was introduced in IOS version
12.4(6)T and enhanced in 12.4(9)T. The enhanced features include all of the features
explained later, plus enhanced HTTP application inspection, P2P and IM inspection,
and rate-limiting features. The idea behind ZFW was that companies already owning
Wallace 3
Cisco routers would not need to purchase an additional firewall appliance to use
advanced stateful inspection and application layer features. In fact, ZFW operates in a
similar fashion to a Cisco Adaptive Security Appliance, where interfaces are give
security levels and associated with policies. Obviously a hardware firewall has both
overhead and feature benefits over a ZFW implemented on a router, but ZFW can often
be implemented at a significantly reduced cost. Cisco's website defines ZFW as " Cisco
IOS unidirectional firewall policy between groups of interfaces known as zones."[4]
ZFW is just that: it's an network architecture decision as much as it is a security
decision. Cisco's website even says that this is a prerequisite: "Before you create
zones, think about what should constitute the zones. The general guideline is that you
should group together interfaces that are similar when they are viewed from a security
perspective."[4] Although configuration will be discussed in this paper, it is absolutely
important that you consider the security needs of your organization before you
implement any security feature.
We often hear that the "onion" approach, or layered approach to security is best.
This is more formally known as "Defense in depth." However, enabling features
randomly without looking at your overall security architecture first can be just as
dangerous as making your root password "root." I can't stress design enough. If you are
a security engineer looking at implementing this in your network, make sure it matches
up with your needs. One highly advantageous feature that prevents this technology from
being miss-configured easily is it's deny-by-default policy. This can take a network
offline if it is implemented incorrectly, but it is better than everything working because
the firewall is set to allow everything.
Wallace 4
To talk about network architecture when implementing firewalls, it is best to look
at your topology and look for sources of threat. The internet is our obvious choice here,
but there are also internal threats. The zone-based approach comes into play at this
point. Why would the employees in your sales department need access to the
engineering server with the companies source code on it? Do the administrative staff
need access to IT's management network? These are questions that only your
organizational security policy can really answer.
Another thing that should be examined is what traffic should be moving across
the network. This is usually called taking a baseline of network traffic. This is normally
something done for Intrusion Protection Systems when they are analyzing the network
to determine what constitutes anomalous activity. This can give you information on what
some of your policies to define later on should be. Traffic from HR's payroll server to a
database server is expected activity. A workstation attempting to make database
queries is not.
Something many people ignore or forget about is that there is nothing wrong with
multiple firewalls in an environment. Another large advantage of ZFW is that it is run on
a router rather than a dedicated hardware firewall. This means that it is possible to
deploy firewalls at different points throughout your organization without buying new
hardware. Although multiple firewalls increase the complexity of managing the network,
there is reduced overhead any single router. Additionally, it is always advisable to
design the network redundantly, and in the case of multi-homing of multiple firewalls,
proper steps must be taken to ensure correct policy application.
Wallace 5
To summarize, before any configuration is done, you need to know what your
security policy is, how the network is designed, and what traffic normally moves across
it. The information you gather will allow you to determine your zones. Policies are
applied to traffic moving between zones, so remember that intra-zone traffic does not
have policy applied to it(except from static interface ACLs, which still work with ZFW in
place). Sometimes, when there are enough zones, or the zones are distributed across
the network, multiple firewalls are the best option. Pay heed to how much traffic goes
across each router, as the added duties of maintaining the session tables and
inspecting traffic can slow a router down.
Configuration
Now that you have determined how ZFW should fit in your network by
determining policies and zones, it comes down to configuration. Command wise, there
are 5 steps do configuring ZFW on a single router:
1. Define zones.
2. Define the traffic classes you wish to inspect.
3. Define the policies.
4. Assign policies to zone pairs.
5. Assign the interfaces to the proper zones.
Wallace 6
These steps seem pretty simple at first glance, however, there are many sub-
commands and rules to these configurations. I will provide screenshots directly from the
command line of possible subcommands where necessary.
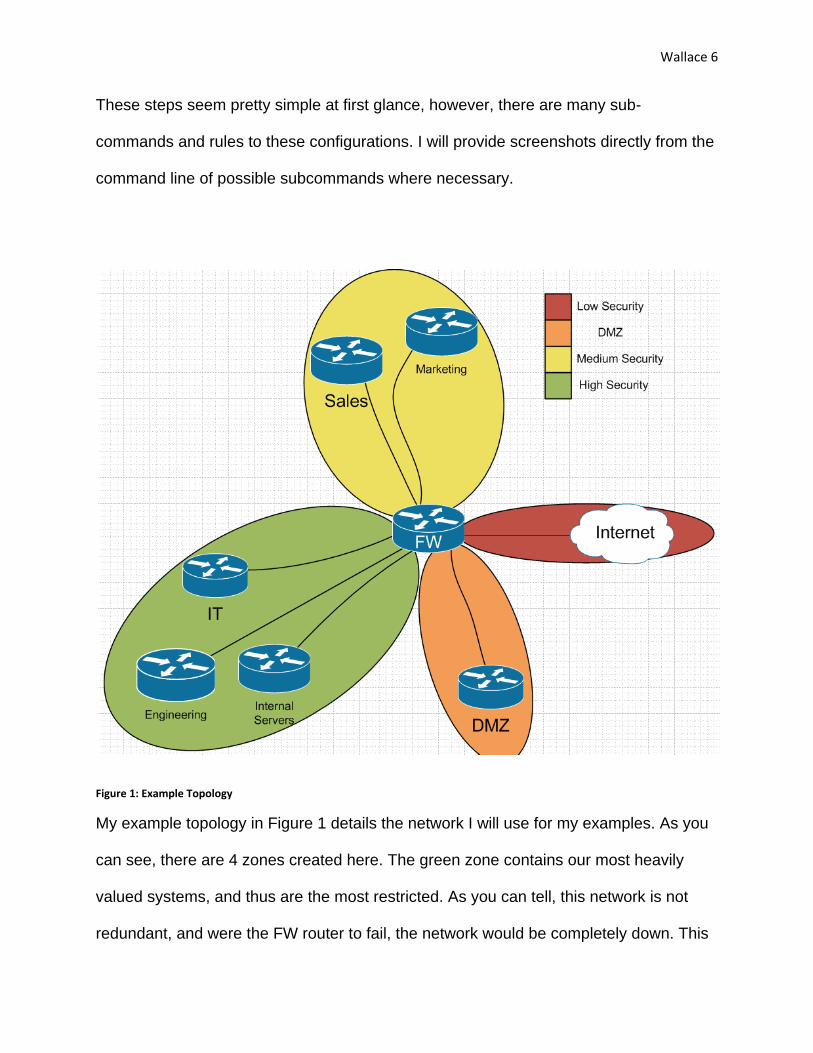
Figure 1: Example Topology
My example topology in Figure 1 details the network I will use for my examples. As you
can see, there are 4 zones created here. The green zone contains our most heavily
valued systems, and thus are the most restricted. As you can tell, this network is not
redundant, and were the FW router to fail, the network would be completely down. This
Wallace 7
is only an example. Speaking to the design section, however, there would be the
opportunity here to use multiple firewalls for each department, and break zones up into
individual work units, if necessary.
Our first step to setting up a ZFW is to define our zones. This is the simplest of
steps, since we just create the zones we specified in the planning phase. For the above
topology, the configuration is:
zone security red
description Internet Connection
zone security orange
description DMZ
zone security yellow
description Sales and marketing desktops
zone security green
description High security, internal servers, IT, Engineering workstations
This specifies the zone and the description, which is about all there is to it. Sub-
commands are:
FW(config)#zone security test
FW(config-sec-zone)#?
Zone configuration commands:
description Zone description
exit Exit from zone configuration mode
no Negate or set default values of a command
Many people working with Cisco devices use descriptions to easily identify interfaces or
configuration and easily determine the purpose of a command. This is about all we can
do when defining a zone, but it must be done first for other commands to reference the
zones.

Wallace 8
The next step is to define traffic classes. Class maps allow us to match traffic
types we'd like to apply policy too. These are similar to class maps when using QoS,
however the keyword "inspect" is used to differentiate it from a QoS policy. Command
syntax is:
FW(config)#class-map type inspect match-any test
FW(config-cmap)#?
Class-map configuration commands:
description Class-Map description
exit Exit from class-map configuration mode
match classification criteria
no Negate or set default values of a command
rename Rename this class-map
FW(config-cmap)#match ?
access-group Access group
class-map Class map
not Negate this match result
protocol PAM Protocol
Above, you can see that the main purpose of the class-map is the match
statement. The match statement defines what packets will match this class-map, and
thus have policy applied to them. You may also notice that when defining a class-map,
you have the option to 'match-any' or 'match-all.' The default is match-all, meaning that
the traffic must match all match statements in that class-map to match the traffic class
as a whole. Match-any, on the other hand, means that the traffic must match only one
match statement in the traffic class.
class-map type inspect match-any redtoorange
description Internet connections Destined to the DMZ should allow only HTTP,
HTTPS, and SSH.
match protocol http
match protocol https
match protocol ssh

Wallace 9
Above is a class map from my test environment. As you can see, ssh, http, and https
will all fall under the 'redtoorange' class, and be subject to whatever policy is applied to
the traffic class. Here we use match-any, so all of that traffic will match. Were we to use
match-all, a packet would need to be ssh, http, and https at the same time to ever
match this statement.
Match statements in and of themselves have a lot of options. You have the
ability to match based on access-lists, or even other class-maps. The protocol function
allows us to utilize Cisco's PAM protocol database to identify and match traffic. This is a
large list of protocols, with everything from iSCSI to x11 protocols on it. You can also
match based on TCP, UDP, and ICMP. Care should be taken as to the order of match
statements, as it can affect performance.
Now that class-maps are defined, we move on to step 3, defining our policy. This
is where we decide what to do with traffic matching the class map it applies to.
Command syntax here is even more complicated than match statements, because
Cisco's IOS give us so many options to take with traffic. Syntax for defining inspect type
policy maps is:
FW(config)#policy-map type inspect test
FW(config-pmap)#?
Policy-map configuration commands:
class policy criteria
description Policy-Map description
exit Exit from policy-map configuration mode
no Negate or set default values of a command
rename Rename this policy-map
At the policy map level, we can see that the only relevant command is class. It
has several options which merit discussion:

Wallace 10
FW(config-pmap)#class ?
WORD class-map name
class-default System default class matching otherwise unclassified packets
type type of the class-map
Our definition for our class-map would be named here, but there is also class-default.
When typing out the class, it is necessary to use "class type inspect NAME" to specify
the correct class type. Class-default, as you can see, is a default class for traffic not
matched elsewhere. This is where the idea of deny-by-default comes in, as class-
default's default action is drop. Policies can be defined for class-default if necessary.
FW(config-pmap)#class type inspect test
FW(config-pmap-c)#?
Policy-map class configuration commands:
drop Drop the packet
exit Exit from class action configuration mode
inspect Context-based Access Control Engine
no Negate or set default values of a command
pass Pass the packet
service-policy Deep Packet Inspection Engine
urlfilter URL Filtering Engine
<cr>
Here at the class policy definition level, we find our three main options: inspect,
pass, and drop. Here we can also define Deep Packet Inspection parameters and URL
filtering using parameter maps.
FW(config-pmap-c)#inspect ?
WORD Parameter-map (inspect) name
<cr>
Using the inspect option provides stateful packet inspection for that class of traffic, so
that return traffic is allowed on a dynamic basis. The additional option to name a
Wallace 11
parameter map allows us to modify inspection. Parameter maps are defined separately
from global configuration mode, and allow us a number of options:
FW(config)#parameter-map type inspect test
FW(config-profile)#?
parameter-map commands:
alert Turn on/off alert
audit-trail Turn on/off audit trail
dns-timeout Specify timeout for DNS
exit Exit from parameter-map
icmp Config timeout values for icmp
max-incomplete Specify maximum number of incomplete connections before
clamping
no Negate or set default values of a command
one-minute Specify one-minute-sample watermarks for clamping
tcp Config timeout values for tcp connections
udp Config timeout values for udp flows
As you can see, stateful inspection is highly configurable, and allows for many options
including auditing the trail of a packet, configuring TCP and UDP options, and several
other useful features. As you can tell, configuration can become highly granular.
Our next step is to define zone pairs and assign our policies to these zones. This
step is relatively straightforward. The syntax is:
FW(config)#zone-pair security testToSelf source test destination self
FW(config-sec-zone-pair)#?
Zone configuration commands:
description Zone description
exit Exit from zone pair configuration mode
no Negate or set default values of a command
service-policy Configure CBAC Service Policy
FW(config-sec-zone-pair)#service-policy type inspect test
As you can see, we define a zone pair with a name and the a source and destination,
referring to the path packets are taking. Traffic moving from test to self in this example
Wallace 12
will have the policy 'test' applied to it. Note that traffic originating from self destined to
test would be dropped unless a reverse policy is defined.
Our last step is to assign our interfaces to a zone. This is a single command. This
is what links our policies to an interface:
FW(config)#int fa0/1
FW(config-if)#zone-member security ?
WORD Name of zone defined
Once the interfaces are members of zones on a router, they will begin applying zone
policies to traffic moving between zones.
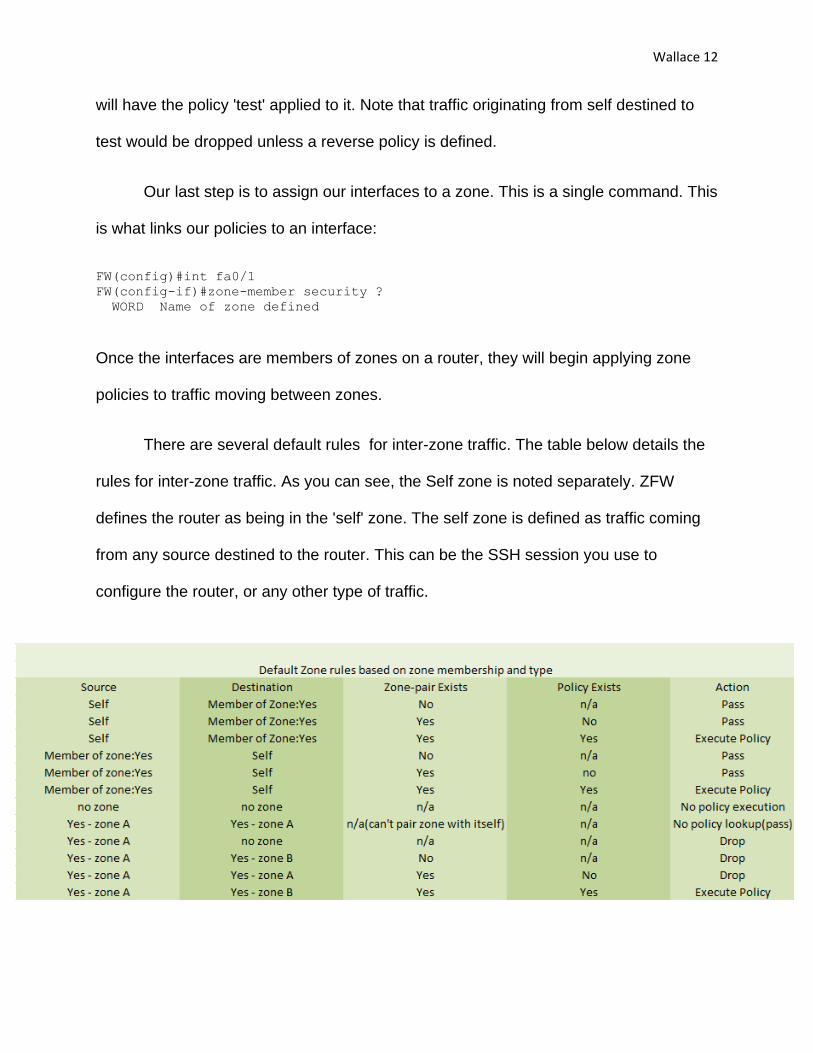
There are several default rules for inter-zone traffic. The table below details the
rules for inter-zone traffic. As you can see, the Self zone is noted separately. ZFW
defines the router as being in the 'self' zone. The self zone is defined as traffic coming
from any source destined to the router. This can be the SSH session you use to
configure the router, or any other type of traffic.

Wallace 13
The self-zone being defined separately allows us to apply policy to traffic
destined to the router. For instance, stopping Denial of Service attacks with rate-limiting.
As you can see, the self-zone is default-allow, making it necessary to define policy for
this specifically, because it is wide open otherwise.
Some other rules in the table above include dropping everything going between
zones unless there is define policy, and dropping traffic between a zone and non-zone
interfaces.
Now that ZFW is setup, there are several show commands that will allow you to
view the status and troubleshoot the implementation:
Show zone security – Shows zones and interfaces assigned to them.
Show zone-pair security – Shows zone pair source, destination, and policy
name
Wallace 14
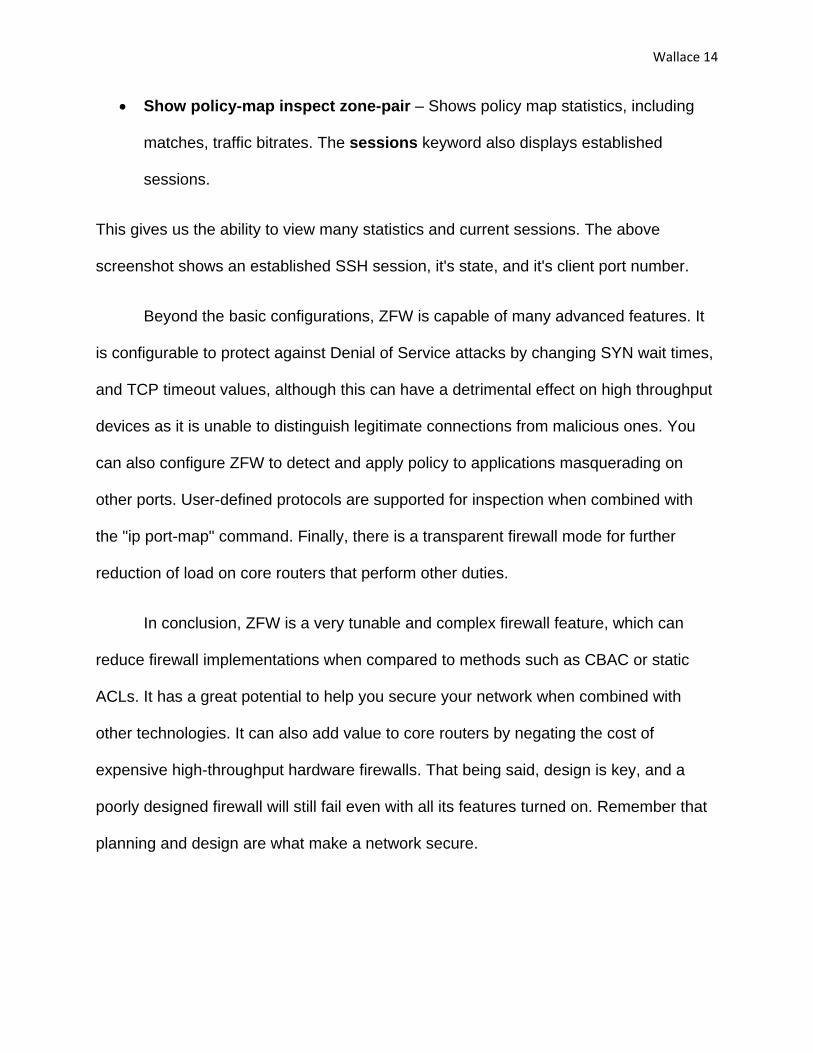
Show policy-map inspect zone-pair – Shows policy map statistics, including
matches, traffic bitrates. The sessions keyword also displays established
sessions.
This gives us the ability to view many statistics and current sessions. The above
screenshot shows an established SSH session, it's state, and it's client port number.
Beyond the basic configurations, ZFW is capable of many advanced features. It
is configurable to protect against Denial of Service attacks by changing SYN wait times,
and TCP timeout values, although this can have a detrimental effect on high throughput
devices as it is unable to distinguish legitimate connections from malicious ones. You
can also configure ZFW to detect and apply policy to applications masquerading on
other ports. User-defined protocols are supported for inspection when combined with
the "ip port-map" command. Finally, there is a transparent firewall mode for further
reduction of load on core routers that perform other duties.
In conclusion, ZFW is a very tunable and complex firewall feature, which can
reduce firewall implementations when compared to methods such as CBAC or static
ACLs. It has a great potential to help you secure your network when combined with
other technologies. It can also add value to core routers by negating the cost of
expensive high-throughput hardware firewalls. That being said, design is key, and a
poorly designed firewall will still fail even with all its features turned on. Remember that
planning and design are what make a network secure.

Wallace 15
Sources
1. Pepelnjak, Ivan. Deploying Zone-Based Firewalls. Indianapolis, IN: Cisco Press, 2007. eBook. *
2. Odom, Wendell, Rus Healy, and Denise Donohue. CCIE Routing and Switching Certification Guide. 4th. Cisco Systems, 2009. Print. *
3. "Cisco IOS Firewall Zone-Based Policy Firewall Release 12.4(6)T Technical Discussion February 2006." Cisco.com. Cisco Systems, Feb. 2006. Web. 21 March 2011. <http://www.cisco.com/en/US/prod/vpndevc/ps5708/ps5710/ps1018/prod_configuration_example0900aecd804f1776.pdf>.
4. "Zone-Based Policy Firewall." Cisco.com. Cisco, 19 June 2006. Web. 17 Apr 2011. <http://www.cisco.com/en/US/products/ps6441/products_feature_guide09186a008060f6dd.html>.
5. Carroll, Brandon. "Cisco IOS Zone Based Firewalls."ipExpert. ipExpert, 18 January 2010. Web. 17 Apr 2011. <http://blog.ipexpert.com/2010/01/18/cisco-ios-zone-based-firewalls/>.