business process procedures - sap service …sapidp/... · web viewsap fiori apps for sap customer...
TRANSCRIPT

SAP NetWeaver Gateway 2.0
October 2014
English
SAP Fiori Apps for SAP Customer Relationship Management (CRM) (MFH)
SAP SEDietmar-Hopp-Allee 1669190 WalldorfGermany
Test Script
SAP Best Practices SAP Fiori Apps for SAP Customer Relationship Management (CRM) (MFH): Test Script
Icons
Icon Meaning
Caution
Note
Typographic Conventions
Icon Meaning
Example text Words or characters that appear on the screen. These include field names, screen titles, pushbuttons as well as menu names, paths and options.
Example text Exact user entry. These are words or characters that you enter in the system exactly as they appear in the documentation.
<Example text> Variable user entry. Pointed brackets indicate that you replace these words and characters with appropriate entries.
© SAP SE PublicPage 2 of 60
SAP Best Practices SAP Fiori Apps for SAP Customer Relationship Management (CRM) (MFH): Test Script
Copyright
© 2014 SAP SE or an SAP affiliate company. All rights reserved.
No part of this publication may be reproduced or transmitted in any form or for any purpose without the express permission of SAP SE or an SAP affiliate company.
SAP and other SAP products and services mentioned herein as well as their respective logos are trademarks or registered trademarks of SAP SE (or an SAP affiliate company) in Germany and other countries. Please see http://global.sap.com/corporate-en/legal/copyright/index.epx#trademark for additional trademark information and notices.
Some software products marketed by SAP SE and its distributors contain proprietary software components of other software vendors.
National product specifications may vary.
These materials are provided by SAP SE or an SAP affiliate company for informational purposes only, without representation or warranty of any kind, and SAP SE or its affiliated companies shall not be liable for errors or omissions with respect to the materials. The only warranties for SAP SE or SAP affiliate company products and services are those that are set forth in the express warranty statements accompanying such products and services, if any. Nothing herein should be construed as constituting an additional warranty.
In particular, SAP SE or its affiliated companies have no obligation to pursue any course of business outlined in this document or any related presentation, or to develop or release any functionality mentioned therein. This document, or any related presentation, and SAP SE’s or its affiliated companies’ strategy and possible future developments, products, and/or platform directions and functionality are all subject to change and may be changed by SAP SE or its affiliated companies at any time for any reason without notice. The information in this document is not a commitment, promise, or legal obligation to deliver any material, code, or functionality. All forward-looking statements are subject to various risks and uncertainties that could cause actual results to differ materially from expectations. Readers are cautioned not to place undue reliance on these forward-looking statements, which speak only as of their dates, and they should not be relied upon in making purchasing decisions.
© SAP SE PublicPage 3 of 60
SAP Best Practices SAP Fiori Apps for SAP Customer Relationship Management (CRM) (MFH): Test Script
Contents
1 Purpose................................................................................................................................................................................................................ 52 Prerequisites......................................................................................................................................................................................................... 53 My Accounts......................................................................................................................................................................................................... 64 My Tasks............................................................................................................................................................................................................ 125 My Appointments................................................................................................................................................................................................ 176 My Contacts (CRM Role).................................................................................................................................................................................... 247 My Opportunities................................................................................................................................................................................................. 298 My Leads............................................................................................................................................................................................................ 369 My Notes............................................................................................................................................................................................................. 4410 Simulate Sales Pipeline................................................................................................................................................................................... 4811 Track Sales Pipeline........................................................................................................................................................................................ 53
© SAP SE PublicPage 4 of 60
SAP Best Practices SAP Fiori Apps for SAP Customer Relationship Management (CRM) (MFH): Test Script
SAP Fiori Apps for SAP Customer Relationship Management (CRM)
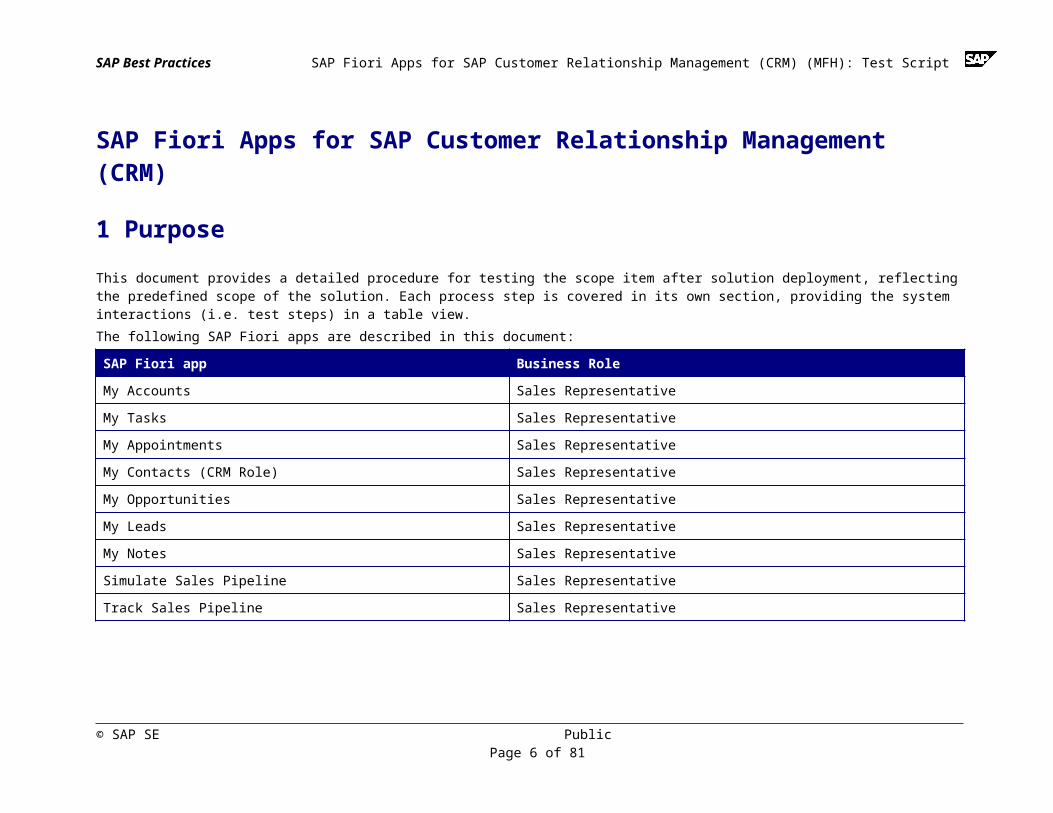
1 Purpose This document provides a detailed procedure for testing the scope item after solution deployment, reflecting the predefined scope of the solution. Each process step is covered in its own section, providing the system interactions (i.e. test steps) in a table view. The following SAP Fiori apps are described in this document:
SAP Fiori app Business Role
My Accounts Sales Representative
My Tasks Sales Representative
My Appointments Sales Representative
My Contacts (CRM Role) Sales Representative
My Opportunities Sales Representative
My Leads Sales Representative
My Notes Sales Representative
Simulate Sales Pipeline Sales Representative
Track Sales Pipeline Sales Representative
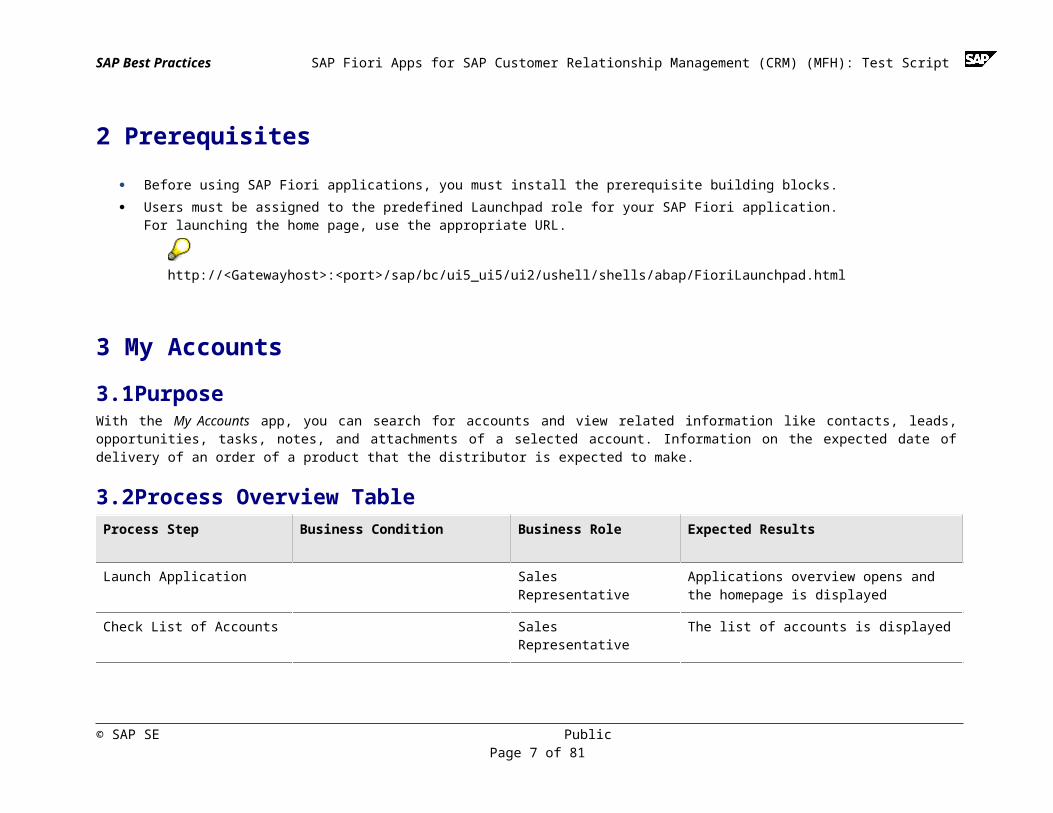
2 Prerequisites Before using SAP Fiori applications, you must install the prerequisite building blocks. Users must be assigned to the predefined Launchpad role for your SAP Fiori application.
For launching the home page, use the appropriate URL.
© SAP SE PublicPage 5 of 60
SAP Best Practices SAP Fiori Apps for SAP Customer Relationship Management (CRM) (MFH): Test Script
http://<Gatewayhost>:<port>/sap/bc/ui5_ui5/ui2/ushell/shells/abap/FioriLaunchpad.html
3 My Accounts3.1 Purpose With the My Accounts app, you can search for accounts and view related information like contacts, leads, opportunities, tasks, notes, and attachments of a selected account. Information on the expected date of delivery of an order of a product that the distributor is expected to make.
3.2 Process Overview TableProcess Step Business Condition Business Role Expected Results
Launch Application Sales Representative Applications overview opens and the homepage is displayed
Check List of Accounts Sales Representative The list of accounts is displayed
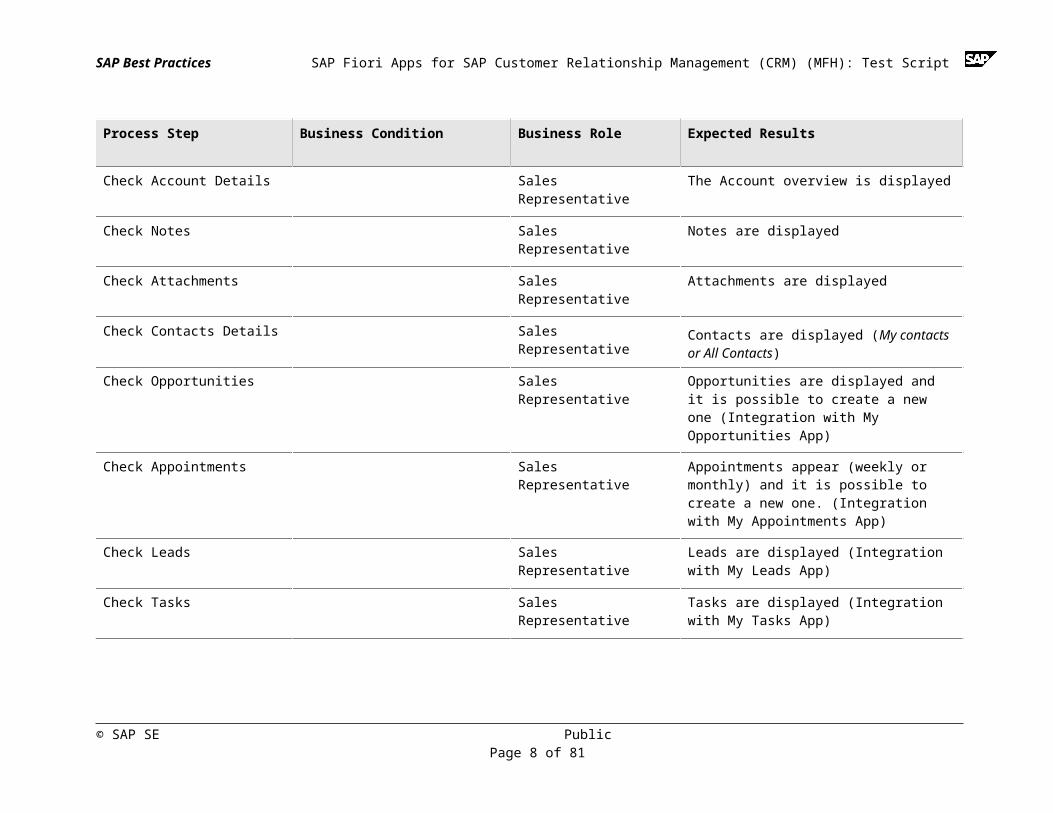
Check Account Details Sales Representative The Account overview is displayed
Check Notes Sales Representative Notes are displayed
Check Attachments Sales Representative Attachments are displayed
Check Contacts Details Sales Representative Contacts are displayed (My contacts or All Contacts)
© SAP SE PublicPage 6 of 60
SAP Best Practices SAP Fiori Apps for SAP Customer Relationship Management (CRM) (MFH): Test Script
Process Step Business Condition Business Role Expected Results
Check Opportunities Sales Representative Opportunities are displayed and it is possible to create a new one (Integration with My Opportunities App)
Check Appointments Sales Representative Appointments appear (weekly or monthly) and it is possible to create a new one. (Integration with My Appointments App)
Check Leads Sales Representative Leads are displayed (Integration with My Leads App)
Check Tasks Sales Representative Tasks are displayed (Integration with My Tasks App)
3.3 Testing the Process Steps in the SAP Fiori AppThis section describes test procedures in the frontend for each process step that belongs to this scope item.
Test Step #
Test Step Name Instruction User Entries:Field Name: Value
Expected Result Pass / Fail / Comment
1 Launch the FIORI system
Launch the SAP Fiori home page via the appropriate URL (https://<> <>…) and log on with the appropriate user and password.
The Home page with all the applications the user has assigned is displayed in a tiled layout.
2 Enter SAP My Accounts
Navigate on the Application’s Homepage and choose the option My Accounts
The SAP My Accounts app is displayed
3 Check and Search List of Accounts
A list of accounts appears. Select one or use the Search field to find a customer (search by account
A list of accounts is displayed
© SAP SE PublicPage 7 of 60
SAP Best Practices SAP Fiori Apps for SAP Customer Relationship Management (CRM) (MFH): Test Script
Test Step #
Test Step Name Instruction User Entries:Field Name: Value
Expected Result Pass / Fail / Comment
name or account ID), and then select the account.
4 Select Account and display details
The file of the customer appears. The following details are displayed: General information, Contacts, Opportunities, Appointments, Leads, Tasks, Notes, and Attachments.
For the Account selected the overview appears
5 Select Contacts 1. Select Contacts2. A list of contacts is displayed
Display Contacts
6 Select Opportunities
1. Select Opportunities2. A list of Opportunities is displayed
Display Opportunities
7 Select Appointments
1. Select Appointments2. A list of Appointments is displayed
Display Appointments
8 Select leads 1. Select Leads2. A list of Leads is displayed
Display Leads
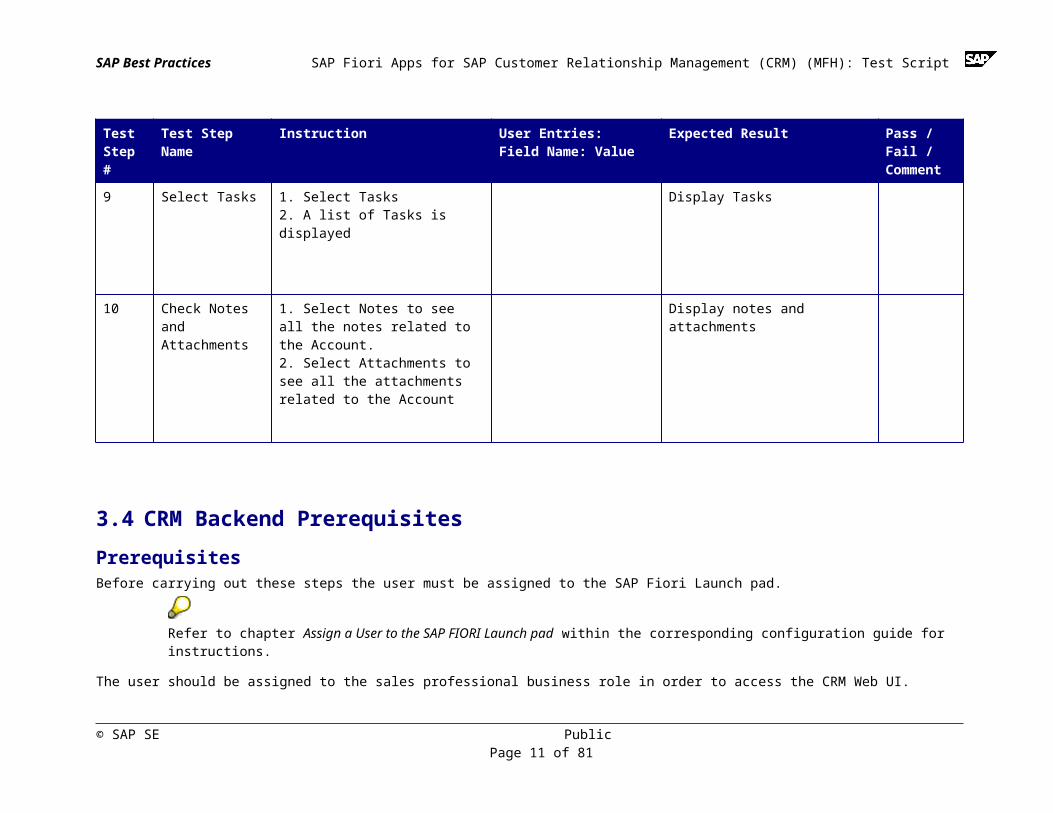
9 Select Tasks 1. Select Tasks2. A list of Tasks is displayed
Display Tasks
© SAP SE PublicPage 8 of 60

SAP Best Practices SAP Fiori Apps for SAP Customer Relationship Management (CRM) (MFH): Test Script
Test Step #
Test Step Name Instruction User Entries:Field Name: Value
Expected Result Pass / Fail / Comment
10 Check Notes and Attachments
1. Select Notes to see all the notes related to the Account.2. Select Attachments to see all the attachments related to the Account
Display notes and attachments
3.4 CRM Backend PrerequisitesPrerequisitesBefore carrying out these steps the user must be assigned to the SAP Fiori Launch pad.
Refer to chapter Assign a User to the SAP FIORI Launch pad within the corresponding configuration guide for instructions.
The user should be assigned to the sales professional business role in order to access the CRM Web UI.
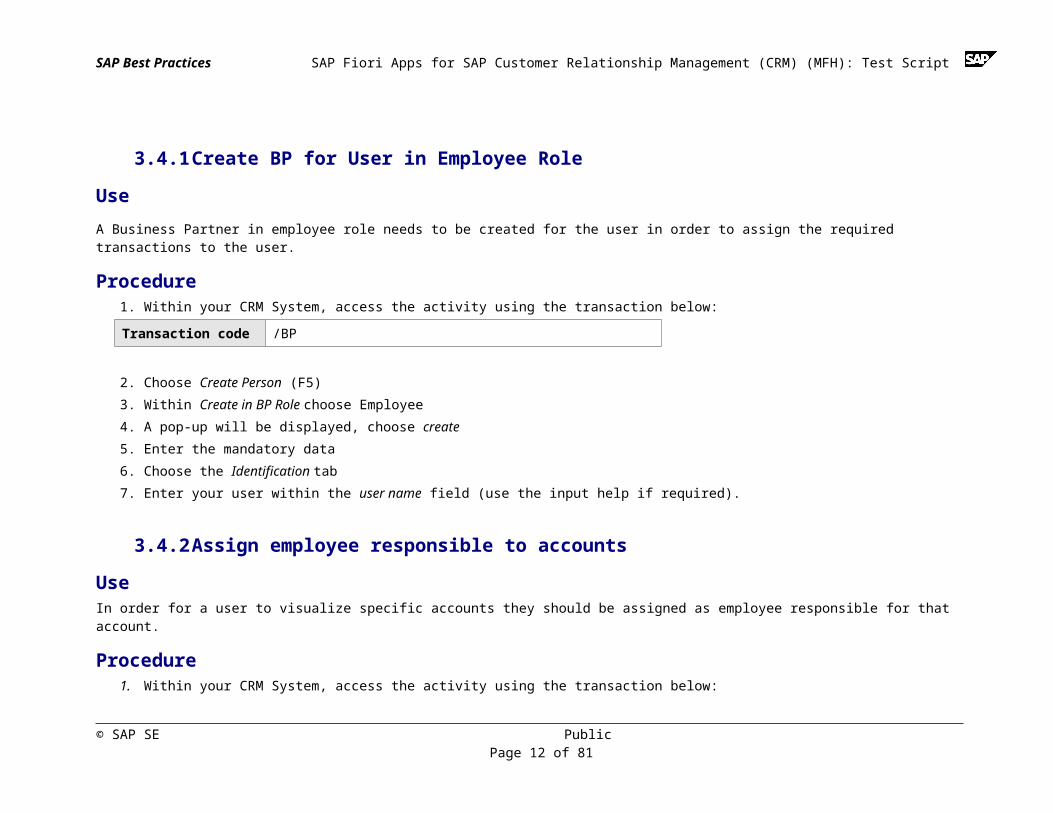
3.4.1 Create BP for User in Employee Role
UseA Business Partner in employee role needs to be created for the user in order to assign the required transactions to the user.
Procedure1. Within your CRM System, access the activity using the transaction below:
© SAP SE PublicPage 9 of 60

SAP Best Practices SAP Fiori Apps for SAP Customer Relationship Management (CRM) (MFH): Test Script
Transaction code /BP
2. Choose Create Person (F5)3. Within Create in BP Role choose Employee4. A pop-up will be displayed, choose create5. Enter the mandatory data 6. Choose the Identification tab7. Enter your user within the user name field (use the input help if required).
3.4.2 Assign employee responsible to accounts
UseIn order for a user to visualize specific accounts they should be assigned as employee responsible for that account.
Procedure1. Within your CRM System, access the activity using the transaction below:
Transaction code /WUI
2. Navigate to Account Management → Accounts3. In the Account ID field, enter the ID of the account you want to visualize within FIORI My Accounts.
If you do not know the Account ID, you can search for all accounts or filter the result list by providing a search criteria. For example: Role is Sold-To Party or City is New York.
4. Choose Search. The required account (or the list of all accounts) is displayed in the Result List.5. To view the details of the account, select the hyperlink in the column Name.6. Choose Edit in the Account Details section.7. In the Employee Responsible section, assign your user in the Employee field and
Use Input Help and search for partner according to user. Choose Save.
© SAP SE PublicPage 10 of 60
SAP Best Practices SAP Fiori Apps for SAP Customer Relationship Management (CRM) (MFH): Test Script
8. Note down the Account ID for reference.9. Repeat steps 2 to 8 to assign more accounts to your user.
3.5 Testing the Process Steps in the BackendThis section describes the underlying SAP backend process. It describes the source of the data for the app. In addition, it is a way to check if the app is properly connected by changing data in the SAP system and checking if these changes are subsequently displayed by the app.
Test Step #
Test Step Name Instruction User Entries:Field Name: Value
Expected Result Pass / Fail / Comment
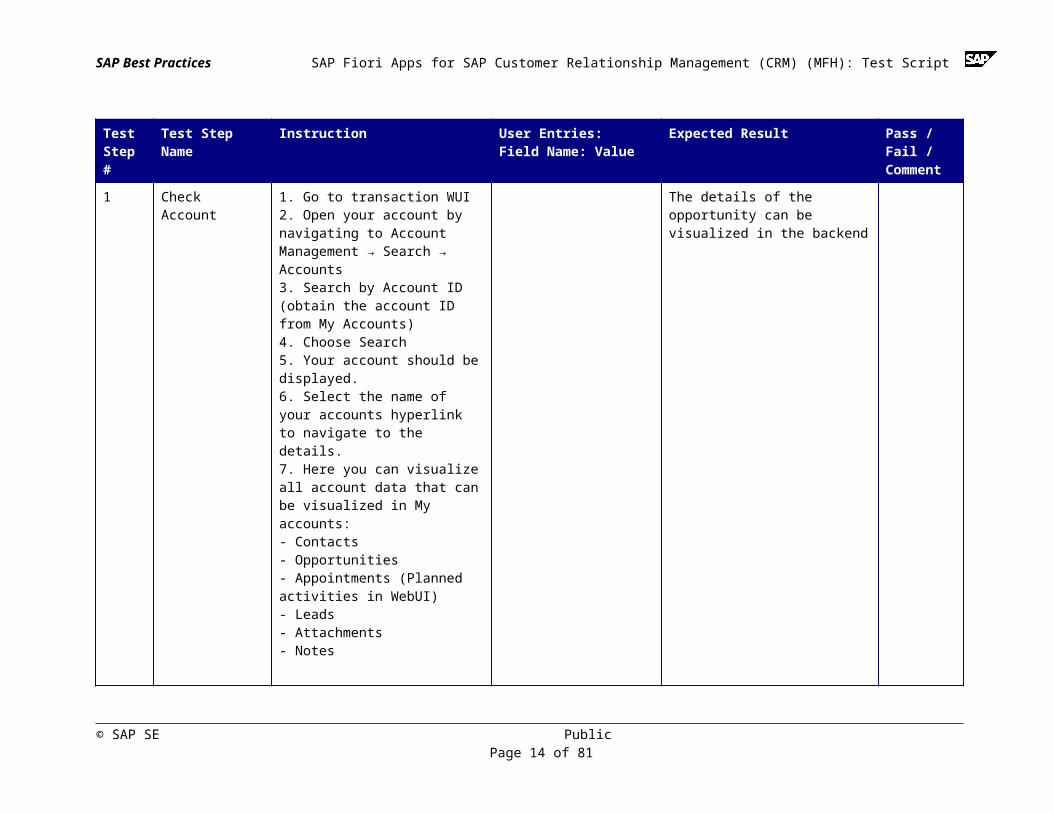
1 Check Account 1. Go to transaction WUI2. Open your account by navigating to Account Management → Search → Accounts3. Search by Account ID (obtain the account ID from My Accounts)4. Choose Search5. Your account should be displayed. 6. Select the name of your accounts hyperlink to navigate to the details.7. Here you can visualize all account data that can be visualized in My accounts:- Contacts- Opportunities- Appointments (Planned activities in WebUI)- Leads- Attachments
The details of the opportunity can be visualized in the backend
© SAP SE PublicPage 11 of 60
SAP Best Practices SAP Fiori Apps for SAP Customer Relationship Management (CRM) (MFH): Test Script
Test Step #
Test Step Name Instruction User Entries:Field Name: Value
Expected Result Pass / Fail / Comment
- Notes
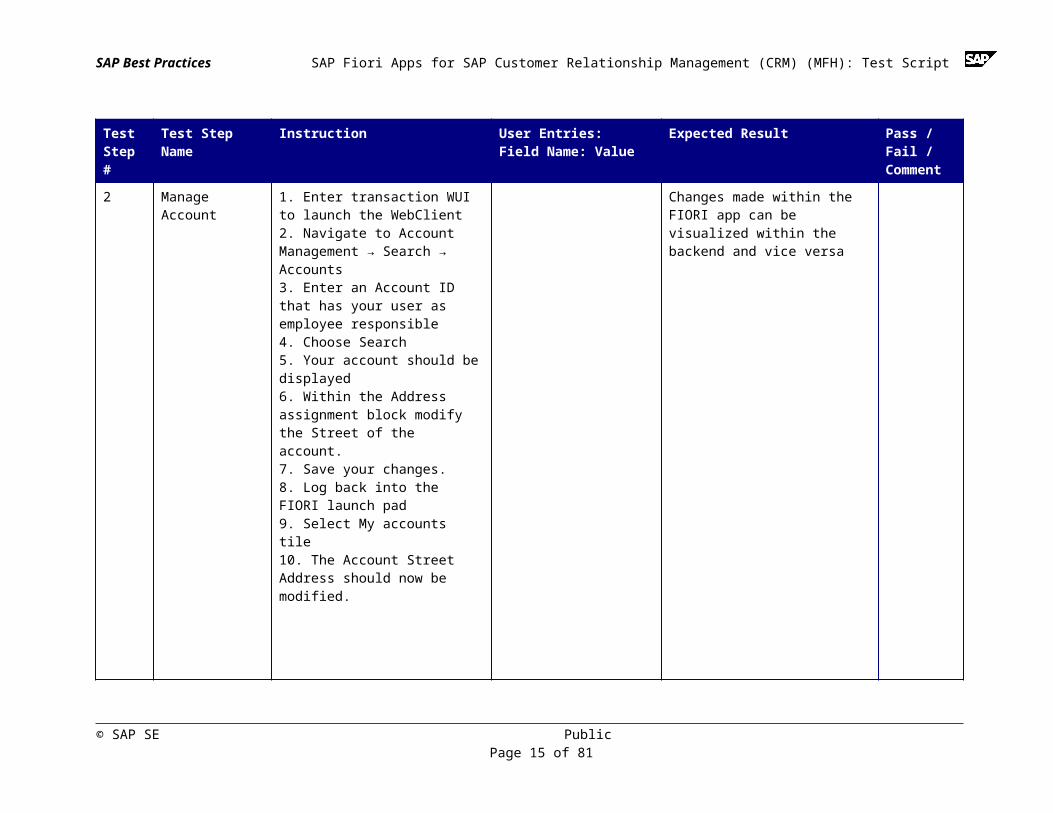
2 Manage Account 1. Enter transaction WUI to launch the WebClient2. Navigate to Account Management → Search → Accounts 3. Enter an Account ID that has your user as employee responsible 4. Choose Search5. Your account should be displayed6. Within the Address assignment block modify the Street of the account. 7. Save your changes. 8. Log back into the FIORI launch pad9. Select My accounts tile10. The Account Street Address should now be modified.
Changes made within the FIORI app can be visualized within the backend and vice versa
© SAP SE PublicPage 12 of 60

SAP Best Practices SAP Fiori Apps for SAP Customer Relationship Management (CRM) (MFH): Test Script
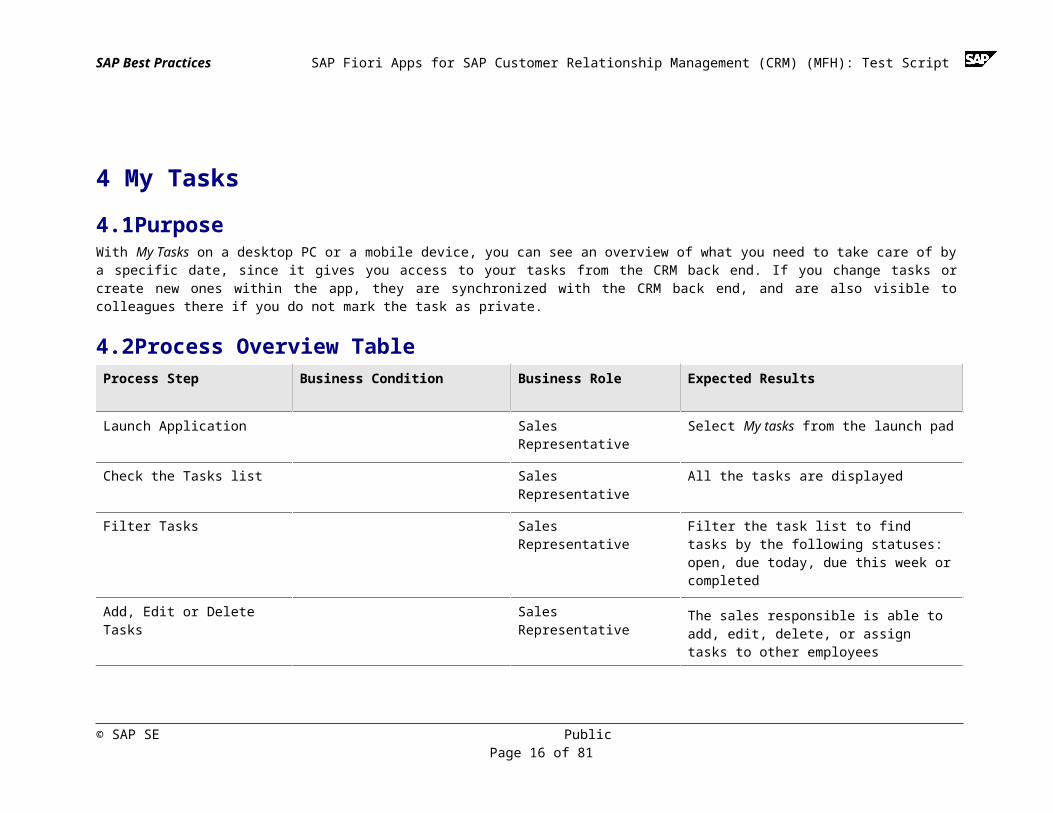
4 My Tasks4.1 Purpose With My Tasks on a desktop PC or a mobile device, you can see an overview of what you need to take care of by a specific date, since it gives you access to your tasks from the CRM back end. If you change tasks or create new ones within the app, they are synchronized with the CRM back end, and are also visible to colleagues there if you do not mark the task as private.
4.2 Process Overview TableProcess Step Business Condition Business Role Expected Results
Launch Application Sales Representative Select My tasks from the launch pad
Check the Tasks list Sales Representative All the tasks are displayed
Filter Tasks Sales Representative Filter the task list to find tasks by the following statuses: open, due today, due this week or completed
Add, Edit or Delete Tasks Sales Representative The sales responsible is able to add, edit, delete, or assign tasks to other employees
4.3 Testing the Process Steps in the SAP Fiori AppThis section describes test procedures in the frontend for each process step that belongs to this scope item.
Test Step #
Test Step Name Instruction User Entries:Field Name: Value
Expected Result Pass / Fail / Comment
1 Launch the Launch the SAP Fiori home page The Home page with all the
© SAP SE PublicPage 13 of 60
SAP Best Practices SAP Fiori Apps for SAP Customer Relationship Management (CRM) (MFH): Test Script
Test Step #
Test Step Name Instruction User Entries:Field Name: Value
Expected Result Pass / Fail / Comment
FIORI system via the appropriate URL (https://<> <>…) and log on with the appropriate user and password.
applications the user has assigned is displayed in a tiled layout.
2 Select My Tasks Navigate to the Application’s Homepage and choose My Tasks
A list of tasks is displayed
3 Search Tasks 1. Select a task or use the Search field to find a task (search by task title), and then select the task.2. The following details are displayed: title, due date, priority, private, account, contact and note.
3. You can edit this task and Save you changes
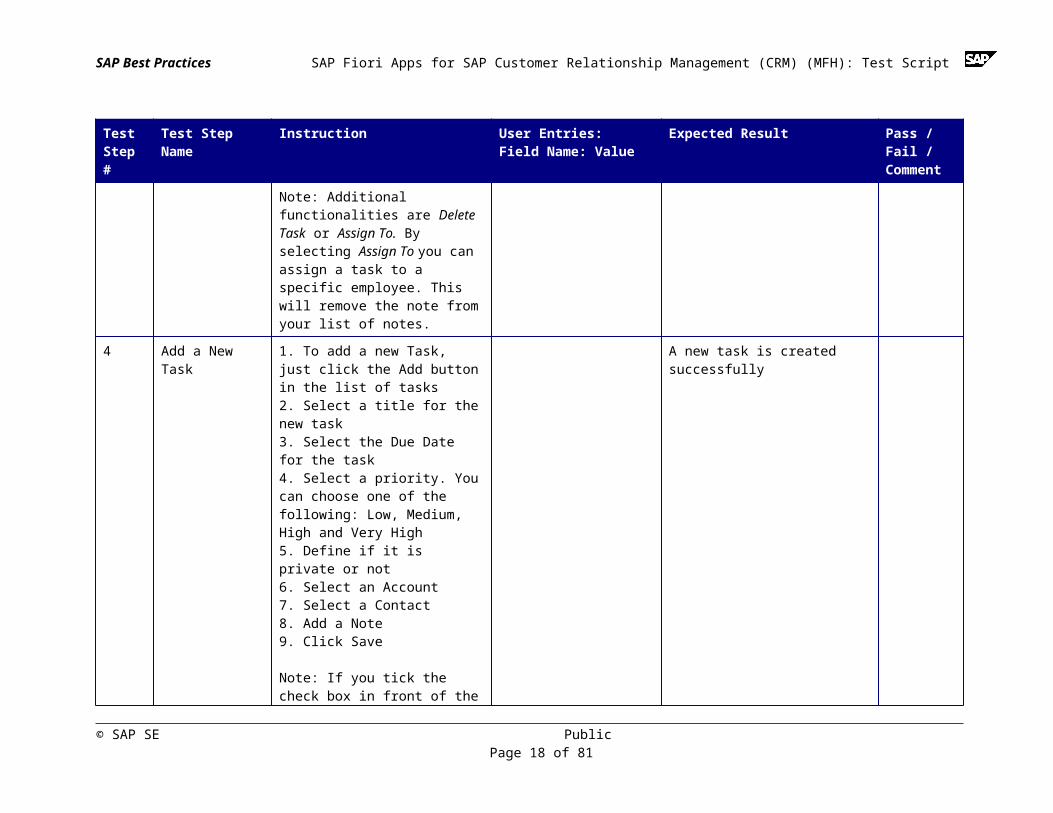
Note: Additional functionalities are Delete Task or Assign To. By selecting Assign To you can assign a task to a specific employee. This will remove the note from your list of notes.
The task is found and displays the correct fields
4 Add a New Task 1. To add a new Task, just click the Add button in the list of tasks2. Select a title for the new task3. Select the Due Date for the task4. Select a priority. You can choose one of the following: Low, Medium, High and Very High5. Define if it is private or not6. Select an Account7. Select a Contact8. Add a Note
A new task is created successfully
© SAP SE PublicPage 14 of 60
SAP Best Practices SAP Fiori Apps for SAP Customer Relationship Management (CRM) (MFH): Test Script
Test Step #
Test Step Name Instruction User Entries:Field Name: Value
Expected Result Pass / Fail / Comment
9. Click Save
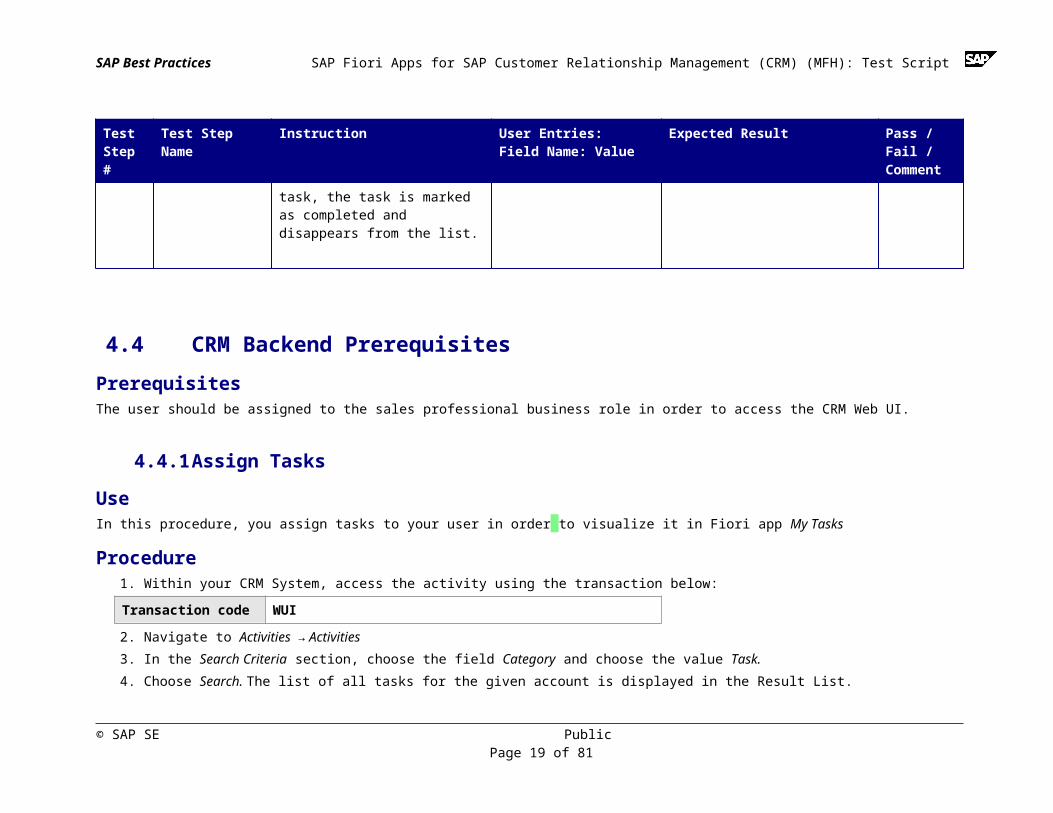
Note: If you tick the check box in front of the task, the task is marked as completed and disappears from the list.
4.4 CRM Backend PrerequisitesPrerequisitesThe user should be assigned to the sales professional business role in order to access the CRM Web UI.
4.4.1 Assign Tasks
UseIn this procedure, you assign tasks to your user in order to visualize it in Fiori app My Tasks
Procedure1. Within your CRM System, access the activity using the transaction below:
Transaction code WUI
2. Navigate to Activities → Activities3. In the Search Criteria section, choose the field Category and choose the value Task.4. Choose Search. The list of all tasks for the given account is displayed in the Result List.
© SAP SE PublicPage 15 of 60
SAP Best Practices SAP Fiori Apps for SAP Customer Relationship Management (CRM) (MFH): Test Script
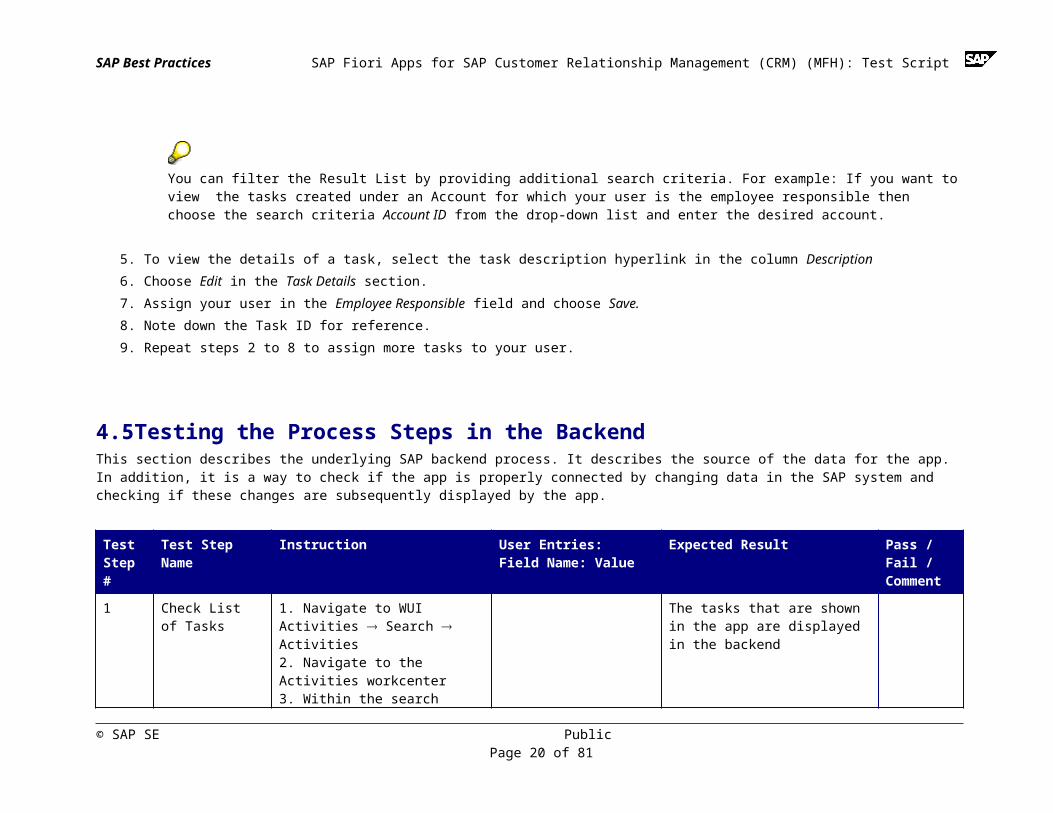
You can filter the Result List by providing additional search criteria. For example: If you want to view the tasks created under an Account for which your user is the employee responsible then choose the search criteria Account ID from the drop-down list and enter the desired account.
5. To view the details of a task, select the task description hyperlink in the column Description 6. Choose Edit in the Task Details section.7. Assign your user in the Employee Responsible field and choose Save.8. Note down the Task ID for reference.9. Repeat steps 2 to 8 to assign more tasks to your user.
4.5 Testing the Process Steps in the BackendThis section describes the underlying SAP backend process. It describes the source of the data for the app. In addition, it is a way to check if the app is properly connected by changing data in the SAP system and checking if these changes are subsequently displayed by the app.
Test Step #
Test Step Name Instruction User Entries:Field Name: Value
Expected Result Pass / Fail / Comment
1 Check List of Tasks
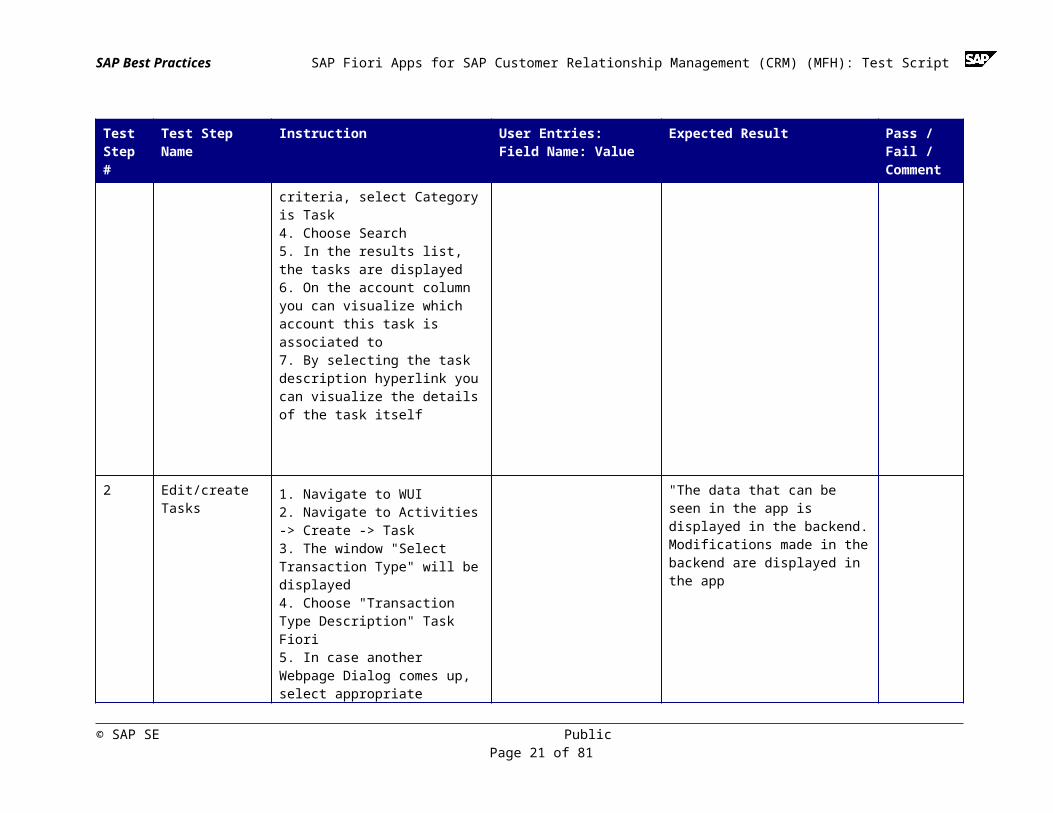
1. Navigate to WUIActivities Search Activities2. Navigate to the Activities workcenter3. Within the search criteria, select Category is Task4. Choose Search5. In the results list, the tasks are displayed6. On the account column you can visualize which account this task is associated to7. By selecting the task description
The tasks that are shown in the app are displayed in the backend
© SAP SE PublicPage 16 of 60

SAP Best Practices SAP Fiori Apps for SAP Customer Relationship Management (CRM) (MFH): Test Script
Test Step #
Test Step Name Instruction User Entries:Field Name: Value
Expected Result Pass / Fail / Comment
hyperlink you can visualize the details of the task itself
2 Edit/create Tasks 1. Navigate to WUI2. Navigate to Activities -> Create -> Task3. The window "Select Transaction Type" will be displayed4. Choose "Transaction Type Description" Task Fiori5. In case another Webpage Dialog comes up, select appropriate attributes.6. On the "Tasks fiori: New screen" enter a Description (Title) and fill the mandatory fields "Account" and "Contact".7. Save your data.8. Verify that this newly created task can be visualized within the SAP My Tasks Fiori App
Note: Ensure that you re-enter the My Tasks App before you check whether the task has been created.
"The data that can be seen in the app is displayed in the backend. Modifications made in the backend are displayed in the app
© SAP SE PublicPage 17 of 60
SAP Best Practices SAP Fiori Apps for SAP Customer Relationship Management (CRM) (MFH): Test Script
5 My Appointments5.1 Purpose With My Appointments, you can create and manage appointments. The sales representative is able to display details about accounts and contacts, create new appointments, enter internal and external attendees, assign an account and contact, enter notes for an appointment and attach documents to an appointment.
5.2 Process Overview TableProcess Step Business Condition Business Role Expected Results
Launch Application Sales Representative Select My Appointments from the launch pad
Check Calendar Overview Sales Representative Weekly Appointments are displayed
Manage Existing Appointments Sales Representative Edit Appointments; add attendees, notes, attachments, and create new appointments
Create New Appointment Sales Representative Create a new Appointment
5.3 Testing the Process Steps in the SAP Fiori AppThis section describes test procedures in the frontend for each process step that belongs to this scope item.
© SAP SE PublicPage 18 of 60
SAP Best Practices SAP Fiori Apps for SAP Customer Relationship Management (CRM) (MFH): Test Script
Test Step #
Test Step Name Instruction User Entries:Field Name: Value
Expected Result Pass / Fail / Comment
1 Launch the FIORI system
Launch the SAP Fiori home page via the appropriate URL (https://<> <>…) and log on with the appropriate user and password.
The Home page with all the applications the user has assigned is displayed in a tiled layout.
2 Launch Application
On the Launchpad, choose the option My Appointments
A appointment calendar is displayed
3 Check Appointments
1. A weekly view of your appointments will be displayed as blocks below.2. To view you appointments monthly choose month within the toolbar, located on the bottom of the screen. 3. To view your daily appointments, select today within the toolbar.4. Use the lateral arrows to shift from week to week (if you have week selected) or month to month (if you have month selected).5. For more details on an appointment, select the appointment itself. 6. The appointment details are displayed: a. Appointment title b. Account assigned to the appointment - select it to obtain further details c. Contact assigned to the appointment - select it to obtain further details d. Status
Appointment details can be visualized successfully
© SAP SE PublicPage 19 of 60
SAP Best Practices SAP Fiori Apps for SAP Customer Relationship Management (CRM) (MFH): Test Script
Test Step #
Test Step Name Instruction User Entries:Field Name: Value
Expected Result Pass / Fail / Comment
e. Date and time f. Attendees g. Notes h. Attachments7. To make additions to the appointment such as important attachments select Edit8. Add more detail to the appointment such as adding attendees (internal and external), notes, and attachments. If you change appointments or create new ones within the app, they are synchronized with the CRM back end, and are also visible to colleagues there if they are entered as attendees.9. Select Save, the main page will be displayed
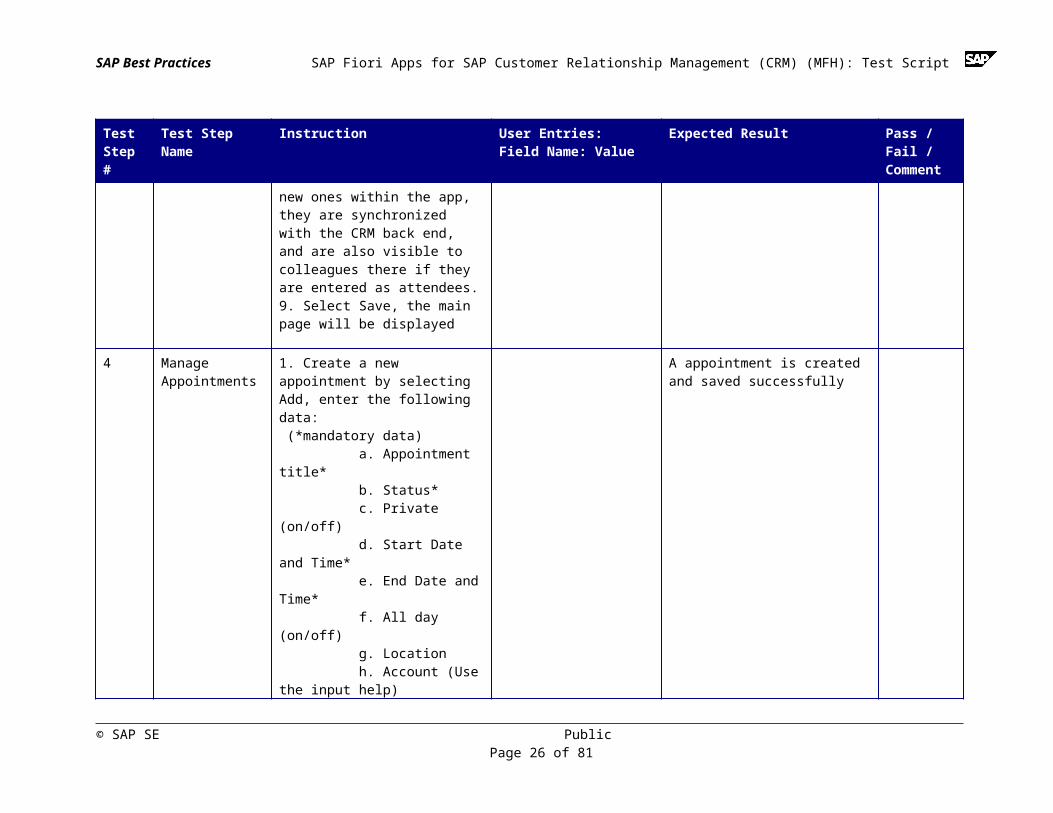
4 Manage Appointments
1. Create a new appointment by selecting Add, enter the following data: (*mandatory data) a. Appointment title* b. Status* c. Private (on/off) d. Start Date and Time* e. End Date and Time* f. All day (on/off) g. Location h. Account (Use the input help) I. Contact (Use the input
A appointment is created and saved successfully
© SAP SE PublicPage 20 of 60
SAP Best Practices SAP Fiori Apps for SAP Customer Relationship Management (CRM) (MFH): Test Script
Test Step #
Test Step Name Instruction User Entries:Field Name: Value
Expected Result Pass / Fail / Comment
help) j. Notes k. Attachments2. Select Save3. The appointment created will now be displayed in the appointment calendar.
5.4 CRM Backend PrerequisitesPrerequisites
The user should be assigned to the sales professional business role in order to access the CRM Web UI.
5.4.1 Assign Appointments
UseIn this procedure, you assign Appointments to your user in order to visualize it in Fiori app My Appointments
Procedure1. Within your CRM System, access the activity using the transaction below:
Transaction code WUI
2. Navigate to Activities → Activities3. In the Search Criteria section, choose the field Activity Type and choose the value Appointment.4. Choose Search. The list of all appointments is displayed in the Result List.
© SAP SE PublicPage 21 of 60

SAP Best Practices SAP Fiori Apps for SAP Customer Relationship Management (CRM) (MFH): Test Script
You can filter the Result List by providing additional search criteria. For example: If you want to view the appointments created under an Account for which your user is the employee responsible then choose the search criteria Account ID from the drop-down list and enter the desired account.
5. To view the details of an appointment, select the description hyperlink in the column Description 6. Choose Edit.7. Go to the Attendees assignment block.8. In the Partner Function column choose a required partner function, for example, Owner or Attendee
The function Owner can be assigned in the Appointment Details assignment block also in the Employee Responsible field.9. In the Name column, assign your user and choose Save 10. Note down the Appointment ID for reference.
5.5 Testing the Process Steps in the BackendThis section describes the underlying SAP backend process. It describes the source of the data for the app. In addition, it is a way to check if the app is properly connected by changing data in the SAP system and checking if these changes are subsequently displayed by the app.
Test Step #
Test Step Name Instruction User Entries:Field Name: Value
Expected Result Pass / Fail / Comment
1 Manage Existing Appointments
1. Go to transaction WUI2. Navigate to Home3. Daily appointments are visible within the home WorkCentre4. To view all appointments related to this user or to which this user is assigned (attendee) navigate to Activities → Search → Activities5. Choose activity type
Appointments displayed within the application can be verified and are the same as those displayed in the backend
© SAP SE PublicPage 22 of 60

SAP Best Practices SAP Fiori Apps for SAP Customer Relationship Management (CRM) (MFH): Test Script
Test Step #
Test Step Name Instruction User Entries:Field Name: Value
Expected Result Pass / Fail / Comment
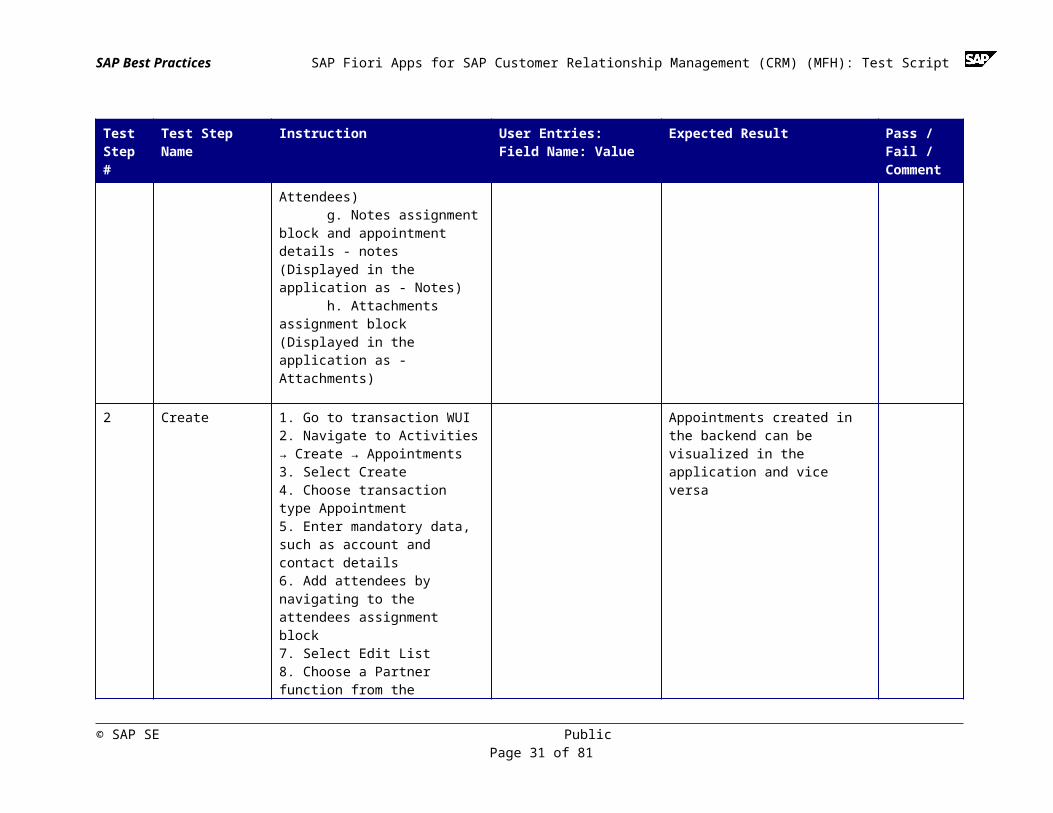
Appointment, select search6. The status of the appointment is displayed (represented by symbols)7. Select one appointment by selecting the description hyperlink8. The appointment details are displayed9. Here you can verify that the following information is consistent with the details displayed in My appointments: a. General Data - Description (Displayed in the application as - Appointment title) b. References - Account (Displayed in the application as - Account assigned to the appointment) c. References - Contact (Displayed in the application as - Contact assigned to the appointment) d. General Data - Active Status (Displayed in the application as - Status) e. General Data – Start Date and Time/ End Date and Time (Displayed in the application as - Date and time) f. Attendees assignment block (Displayed in the application as - Attendees) g. Notes assignment block and
© SAP SE PublicPage 23 of 60

SAP Best Practices SAP Fiori Apps for SAP Customer Relationship Management (CRM) (MFH): Test Script
Test Step #
Test Step Name Instruction User Entries:Field Name: Value
Expected Result Pass / Fail / Comment
appointment details - notes (Displayed in the application as - Notes) h. Attachments assignment block (Displayed in the application as - Attachments)
2 Create 1. Go to transaction WUI2. Navigate to Activities → Create → Appointments3. Select Create4. Choose transaction type Appointment5. Enter mandatory data, such as account and contact details 6. Add attendees by navigating to the attendees assignment block7. Select Edit List8. Choose a Partner function from the dropdown menu9. Enter the name of the attendee (use the input help)10. Save your appointment11. Log into the transaction launcher and open my appointments12. Verify that this newly created appointment can be visualized within the FIORI My appointments
Appointments created in the backend can be visualized in the application and vice versa
© SAP SE PublicPage 24 of 60

SAP Best Practices SAP Fiori Apps for SAP Customer Relationship Management (CRM) (MFH): Test Script
6 My Contacts (CRM Role)6.1 Purpose SAP My Contacts is a quick way to allow sales representatives to search and manage (display/change/create) all existing contacts at company level. It also allows the sales representatives to start follow up activities (initiate call, initiate email, attach documents, maintain notes) for a given contact.
6.2 Process Overview TableProcess Step Business Condition Business Role Expected Results
Launch application Sales Representative Applications overview opens and the homepage is displayed
Check list of contacts Sales Representative The list of contacts is displayed
Check contact details Sales Representative Basic data for the selected contact is displayed. You can initiate call or initiate email.
Manage contact details Sales Representative Add or change data for a particular contact. Attach documents and maintain notes for a particular contact
Create a new contact Sales Representative The new contact is created with the data you choose to enter
6.3 Testing the Process Steps in the SAP Fiori AppThis section describes test procedures in the frontend for each process step that belongs to this scope item.
© SAP SE PublicPage 25 of 60
SAP Best Practices SAP Fiori Apps for SAP Customer Relationship Management (CRM) (MFH): Test Script
Test Step #
Test Step Name Instruction User Entries:Field Name: Value
Expected Result Pass / Fail / Comment
1 Launch the FIORI system
Launch the SAP Fiori home page via the appropriate URL (https://<> <>…) and log on with the appropriate user and password.
The Home page with all the applications the user has assigned is displayed in a tiled layout.
2 Select SAP My Contacts
1.Navigate on the Application’s Homepage and choose the option My Contacts
The SAP My Contacts app is displayed
3 List of contacts 1.A list of contacts is displayed in alphanumeric order. Select Filter in order to select if you want to display All Contacts or My Contacts. 2.Select Sort by in order to sort the contacts by Last Name, First Name or Account.
The contacts list is displayed
4 Check contact details
1.Select one particular contact from the list or use the Search field to find and select a particular contact (search by contact name or contact account). 2.The basic data for the selected contact is displayed. You can save this contact as a tile on the application’s home page, just press Save as Tile (right lower corner). 3. You can perform follow up activities for the selected contact. You can initiate a call or an email directly from the app by clicking on the contact mobile/phone number or on the contact email.
The contact basic data is displayed
© SAP SE PublicPage 26 of 60
SAP Best Practices SAP Fiori Apps for SAP Customer Relationship Management (CRM) (MFH): Test Script
Test Step #
Test Step Name Instruction User Entries:Field Name: Value
Expected Result Pass / Fail / Comment
5 Manage contact details
1. Add or change data to the selected contact by clicking Edit. The following information can be edit (Last Name and Account information are mandatory): Title, Academic Title. First Name, Last Name, Function, Department, Address, Mobile, Phone, Email, Date of Birth, Contact Photo. 2.Edit Academic Title and Date of Birth. 3. You can attach documents by clicking Attachments, a list of the contact attachments is displayed, you can open them or add a new one by choosing the + button. 4.You can maintain notes by clicking Notes, a list of the contact notes displayed, you can add a new one by writing in the appropriated box.
The contact basic data was changed
6 Create a new contact
1. To create a new contact record click Add Contact. Fill the mandatory fields: Last Name and Account. Fill other fields you wish (listed above) and click Save.
Note: Note that once you associate an account to a contact this information cannot be
A new contact was created
© SAP SE PublicPage 27 of 60

SAP Best Practices SAP Fiori Apps for SAP Customer Relationship Management (CRM) (MFH): Test Script
Test Step #
Test Step Name Instruction User Entries:Field Name: Value
Expected Result Pass / Fail / Comment
modified.
6.4 CRM Backend PrerequisitesPrerequisites
The user should be assigned to the sales professional business role in order to access the CRM Web UI.
6.4.1 Assign Contacts
UseIn this procedure, you create Contacts in order to visualize it in Fiori app My Contacts
Procedure1. Within your CRM System, access the activity using the transaction below:
Transaction code /WUI
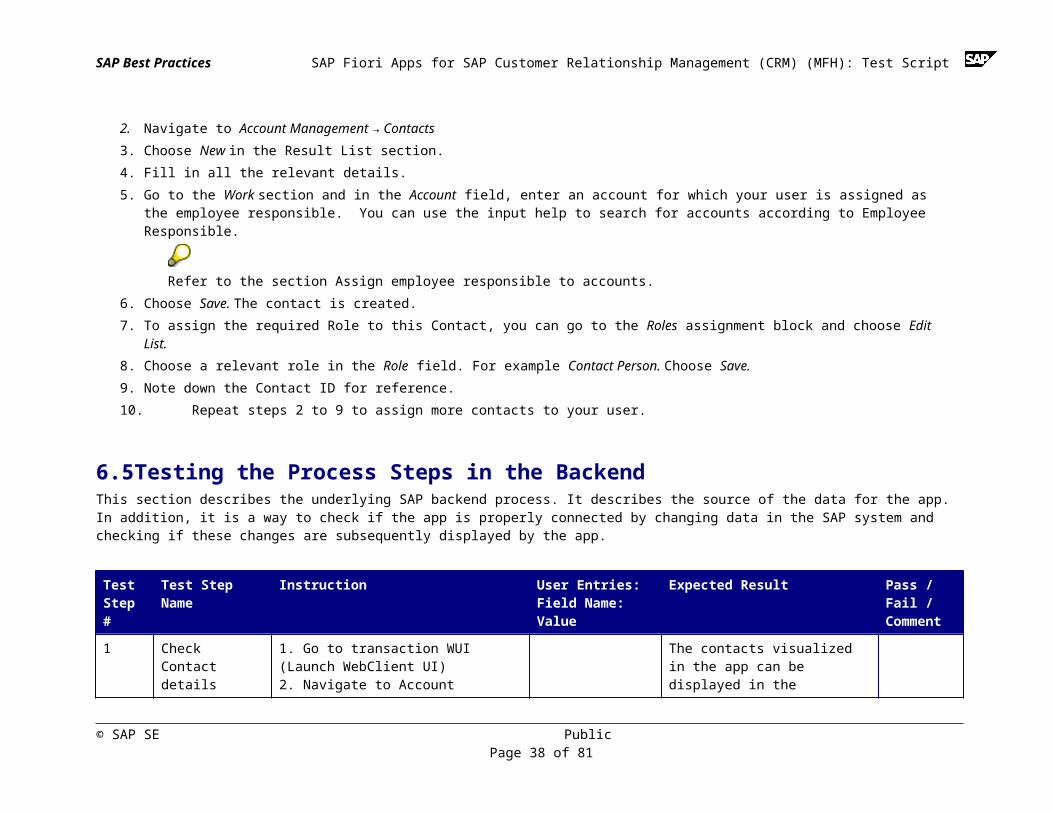
2. Navigate to Account Management → Contacts3. Choose New in the Result List section. 4. Fill in all the relevant details. 5. Go to the Work section and in the Account field, enter an account for which your user is assigned as the employee responsible. You can
use the input help to search for accounts according to Employee Responsible.
Refer to the section Assign employee responsible to accounts.
© SAP SE PublicPage 28 of 60

SAP Best Practices SAP Fiori Apps for SAP Customer Relationship Management (CRM) (MFH): Test Script
6. Choose Save. The contact is created.7. To assign the required Role to this Contact, you can go to the Roles assignment block and choose Edit List.8. Choose a relevant role in the Role field. For example Contact Person. Choose Save.9. Note down the Contact ID for reference.10. Repeat steps 2 to 9 to assign more contacts to your user.
6.5 Testing the Process Steps in the BackendThis section describes the underlying SAP backend process. It describes the source of the data for the app. In addition, it is a way to check if the app is properly connected by changing data in the SAP system and checking if these changes are subsequently displayed by the app.
Test Step #
Test Step Name Instruction User Entries:Field Name: Value
Expected Result Pass / Fail / Comment
1 Check Contact details
1. Go to transaction WUI (Launch WebClient UI)2. Navigate to Account Management → Search → Contacts2. Search for a contact that you created within the My Contacts app3. Search by last name for example4. Select search5. Your contacts will be displayed below. 6. Select your contact by pressing the last name hyperlink7. All the contact details will be displayed.
The contacts visualized in the app can be displayed in the Webclient UI
2 Edit Contacts details
1. Within the My Contacts app, select a contact 2. Press Edit 3. And enter an e-mail address4. Save your changes5. Log into the WebUI (Transaction WUI)
Changes performed in the app are displayed in the Webclient UI
© SAP SE PublicPage 29 of 60

SAP Best Practices SAP Fiori Apps for SAP Customer Relationship Management (CRM) (MFH): Test Script
Test Step #
Test Step Name Instruction User Entries:Field Name: Value
Expected Result Pass / Fail / Comment
6. Choose the contact you just edited 7. Verify that the e-mail you added for the contact is now visible.
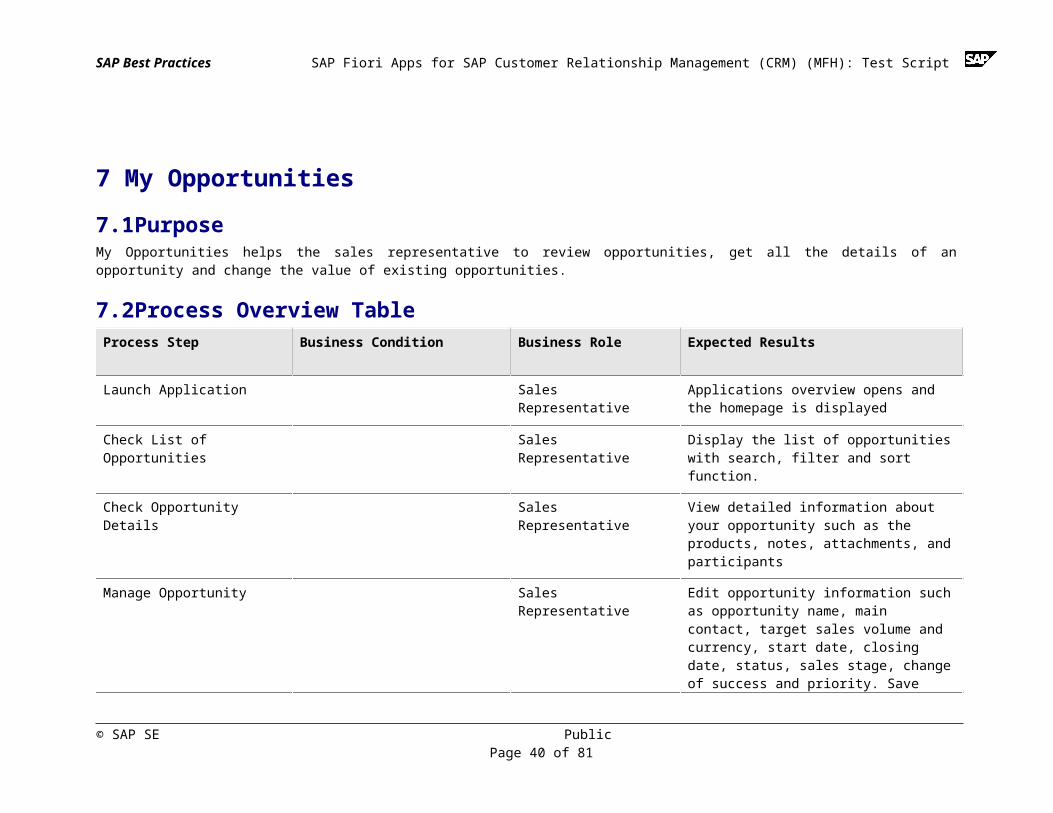
7 My Opportunities7.1 Purpose My Opportunities helps the sales representative to review opportunities, get all the details of an opportunity and change the value of existing opportunities.
7.2 Process Overview TableProcess Step Business Condition Business Role Expected Results
Launch Application Sales Representative Applications overview opens and the homepage is displayed
Check List of Opportunities Sales Representative Display the list of opportunities with search, filter and sort function.
Check Opportunity Details Sales Representative View detailed information about your opportunity such as the products, notes, attachments, and participants
Manage Opportunity Sales Representative Edit opportunity information such as opportunity name, main contact, target sales volume and currency, start date, closing
© SAP SE PublicPage 30 of 60
SAP Best Practices SAP Fiori Apps for SAP Customer Relationship Management (CRM) (MFH): Test Script
Process Step Business Condition Business Role Expected Results
date, status, sales stage, change of success and priority. Save opportunities as new tiles, share opportunities within a SAP JAM group and discuss a specific opportunity on Jam
Create New Opportunity Sales Representative Create an opportunity
7.3 Testing the Process Steps in the SAP Fiori AppThis section describes test procedures in the frontend for each process step that belongs to this scope item.
Test Step #
Test Step Name Instruction User Entries:Field Name: Value
Expected Result Pass / Fail / Comment
1 Launch the FIORI system
Launch the SAP Fiori home page via the appropriate URL (https://<> <>…) and log on with the appropriate user and password.
The Home page with all the applications the user has assigned is displayed in a tiled layout.
© SAP SE PublicPage 31 of 60

SAP Best Practices SAP Fiori Apps for SAP Customer Relationship Management (CRM) (MFH): Test Script
2 Check List of Opportunities
1. Navigate on the Application’s Homepage and choose My Opportunities2. A list of Opportunities is displayed.Note: Use the search field to search using Opportunity ID.You can also sort the list of opportunities, select the double arrow icon and sort Account (Ascending), Account (Descending), Status (Ascending), Status (Descending), Closing Date (Ascending) and Closing Date (Descending).
A list of opportunities is displayed on the left-hand side of the screen
3 Check Opportunity Details
1. Select an opportunity from the list 2. The opportunity details will be displayed on the left-hand side of the screen3. Select the Info icon to obtain further details regarding the specific opportunity such as opportunity ID, starting date, closing date, status, sales stage, chance of success, priority, expected sales volume (weighted), forecast relevance and log of changes. 4. Select the Products icon, a list of products will be displayed. 5. Select edit to add products and to modify already existing products (only quantities can be modified). Note: If no products are assigned to an opportunity the product icon will not be displayed. 6. Select the notes icon to add notes
Opportunity details can be verified successfully
© SAP SE PublicPage 32 of 60

SAP Best Practices SAP Fiori Apps for SAP Customer Relationship Management (CRM) (MFH): Test Script
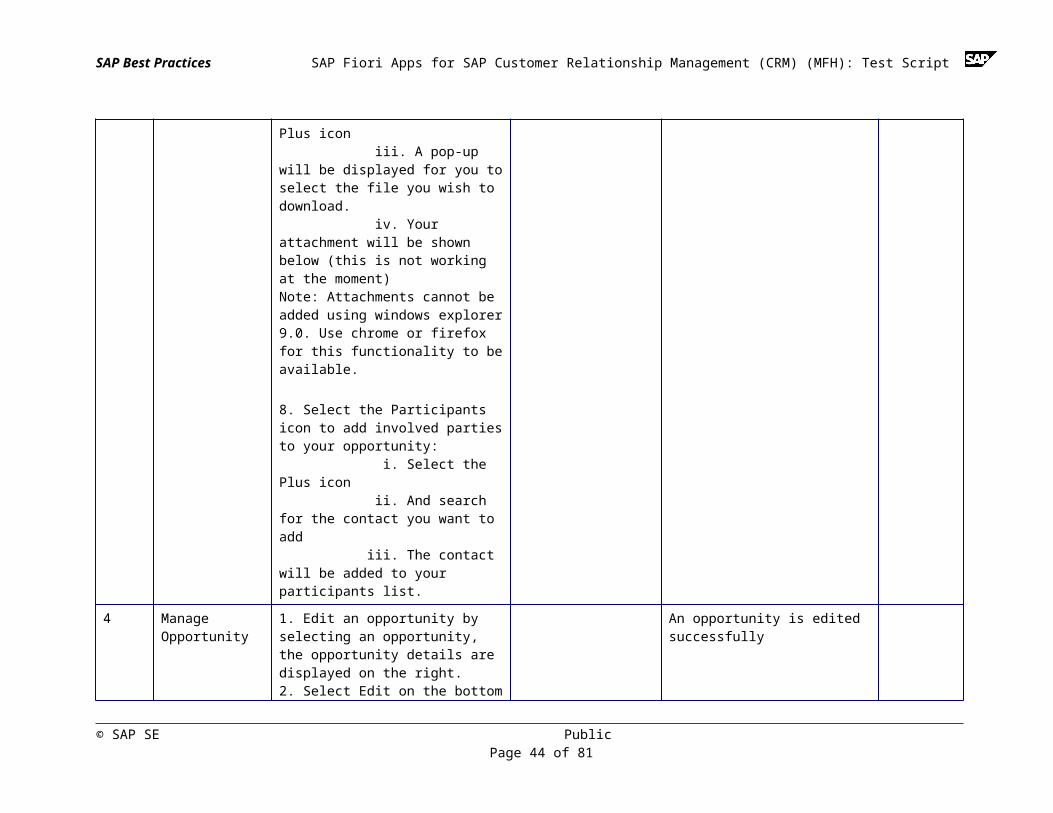
to your opportunity: i. Add your note within the box ii. Select the plus icon iii. Your note will be displayed below7. Select the attachments icon to add attachments to your opportunity: i. Select the attachments icon ii. Select the Plus icon iii. A pop-up will be displayed for you to select the file you wish to download. iv. Your attachment will be shown below (this is not working at the moment)Note: Attachments cannot be added using windows explorer 9.0. Use chrome or firefox for this functionality to be available.
8. Select the Participants icon to add involved parties to your opportunity: i. Select the Plus icon ii. And search for the contact you want to add iii. The contact will be added to your participants list.
4 Manage Opportunity
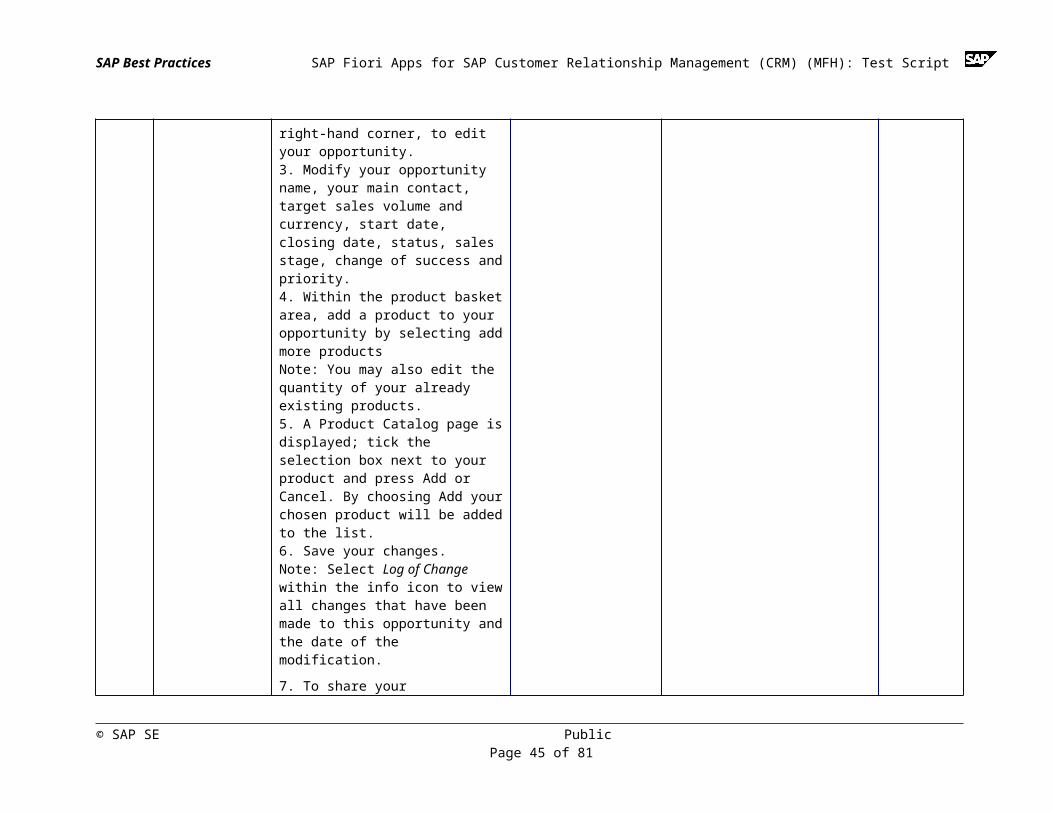
1. Edit an opportunity by selecting an opportunity, the opportunity details are displayed on the right. 2. Select Edit on the bottom right-hand corner, to edit your opportunity.3. Modify your opportunity name, your main contact, target sales volume and currency, start date, closing date,
An opportunity is edited successfully
© SAP SE PublicPage 33 of 60

SAP Best Practices SAP Fiori Apps for SAP Customer Relationship Management (CRM) (MFH): Test Script
status, sales stage, change of success and priority. 4. Within the product basket area, add a product to your opportunity by selecting add more products Note: You may also edit the quantity of your already existing products.5. A Product Catalog page is displayed; tick the selection box next to your product and press Add or Cancel. By choosing Add your chosen product will be added to the list.6. Save your changes.Note: Select Log of Change within the info icon to view all changes that have been made to this opportunity and the date of the modification.
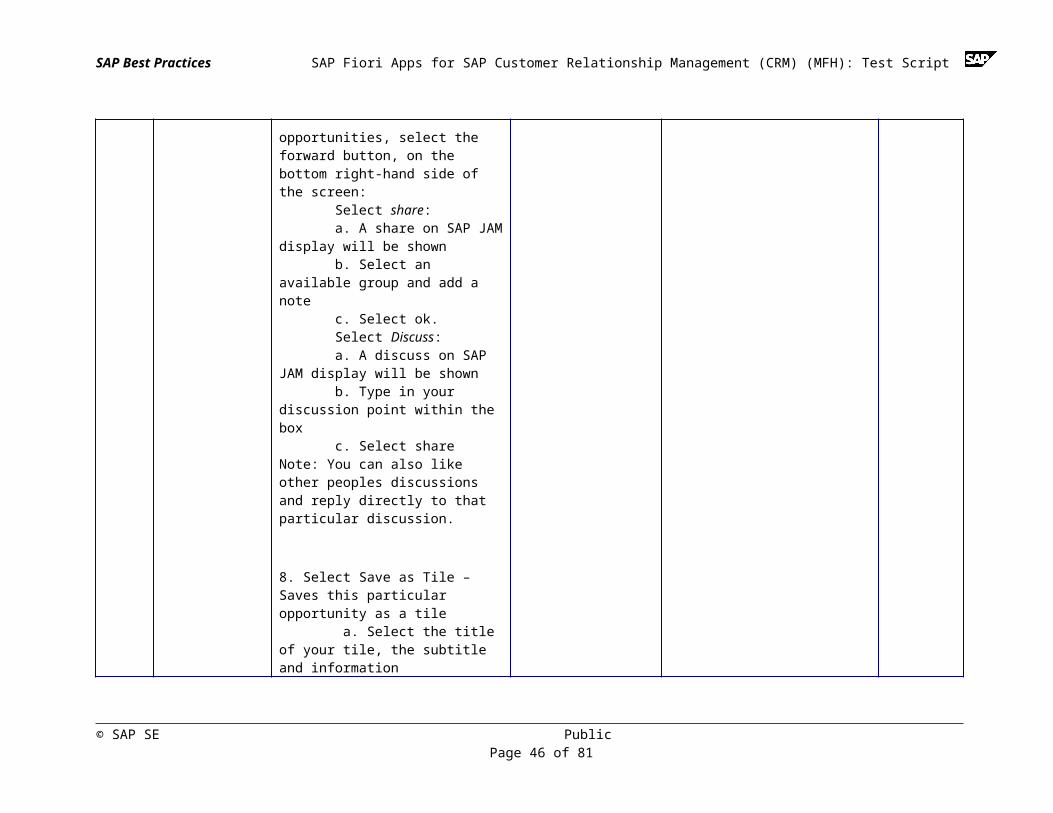
7. To share your opportunities, select the forward button, on the bottom right-hand side of the screen: Select share: a. A share on SAP JAM display will be shown b. Select an available group and add a note c. Select ok. Select Discuss: a. A discuss on SAP JAM display will be shown b. Type in your discussion point within the box c. Select shareNote: You can also like other peoples discussions and reply directly to that particular discussion.
© SAP SE PublicPage 34 of 60

SAP Best Practices SAP Fiori Apps for SAP Customer Relationship Management (CRM) (MFH): Test Script
8. Select Save as Tile – Saves this particular opportunity as a tile a. Select the title of your tile, the subtitle and information b. Select ok
5 Create New Opportunity
1. Selecting the Plus icon on the toolbar.2. Select a transaction type such as OPPT3. A new opportunity screen will be displayed4. Enter your opportunity Name, account, main contact and other opportunity relevant information. 5. Select save, your new opportunity will be displayed.
An opportunity is created successfully
7.4 CRM Backend PrerequisitesPrerequisitesThe user should be assigned to the sales professional business role in order to access the CRM Web UI.
7.4.1 Assign Opportunity
UseIn this procedure, you assign opportunity to your user in order to visualize it in Fiori My Opportunities
Procedure1. Within your CRM System, access the activity using the transaction below:
© SAP SE PublicPage 35 of 60

SAP Best Practices SAP Fiori Apps for SAP Customer Relationship Management (CRM) (MFH): Test Script
Transaction code WUI
2. Navigate to Sales Cycle → Opportunities3. In the Prospect Name field, enter the account or contact for which your user is assigned as the employee responsible.4. Choose Search. The list of all opportunities for the given prospect is displayed in the Result List.5. To view the details of an opportunity, select the opportunity description hyperlink in the column Description 6. Choose Edit 7. Go to the Sales Team assignment block. 8. In the Function column, choose a required partner function, for example, Employee Responsible or Sales Representative
The function Employee Responsible can be assigned in the Opportunity Details assignment block also. 9. In the Name column, assign your user and choose Save 10. Note down the opportunity ID for reference.11. Repeat steps 2 to 10 to assign more opportunities to your user.
7.5 Testing the Process Steps in the BackendThis section describes the underlying SAP backend process. It describes the source of the data for the app. In addition, it is a way to check if the app is properly connected by changing data in the SAP system and checking if these changes are subsequently displayed by the app.
Test Step #
Test Step Name Instruction User Entries:Field Name: Value
Expected Result Pass / Fail / Comment
1 Check Opportunity
1. Go to transaction WUI2. Navigate to Sales Cycle → Search → Opportunities3. Enter an opportunity ID (one that is visible within FIORI My Opportunities)4. Select your opportunity by selecting the hyperlink 5. The opportunity that you see within the tile My opportunities is displayed.
The details of the opportunity can be visualized in the backend
© SAP SE PublicPage 36 of 60

SAP Best Practices SAP Fiori Apps for SAP Customer Relationship Management (CRM) (MFH): Test Script
Test Step #
Test Step Name Instruction User Entries:Field Name: Value
Expected Result Pass / Fail / Comment
2 Manage Opportunity
1. Go to transaction WUI2. Navigate to Sales Cycle → Search → Opportunities3. Search for and Select your opportunity4. Modify the description of your Opportunity by selecting edit mode5. Enter a new opportunity description
6. Save your changes7. Navigate back to the FIORI My Opportunity application and verify that the description has been modified. 8. Within Info icon in My Opportunity edit your opportunity by selecting the edit pushbutton9. Modify the closing date 10. Return to the WebClient UI and verify that the closing date has been modified.
Changes made within the FIORI app can be visualized within the
backend and vice versa
© SAP SE PublicPage 37 of 60
SAP Best Practices SAP Fiori Apps for SAP Customer Relationship Management (CRM) (MFH): Test Script
8 My Leads8.1 Purpose The SAP My Leads app allows sales representatives to manage their leads and follow up on potential accounts. This analytical app is based on the customer profile and the embedded analytics provided by SAP HANA Live and it allows you to view operational sales analysis related to lead origin, qualification, and status. The sales representative can search, view, and edit leads their involved in; view and edit header data; add, edit, and delete products and obtain information on the expected date of delivery of an order of a product that the distributor is expected to make.
8.2 Process Overview TableProcess Step Business Condition Business Role Expected Results
Launch Application Sales Representative The My Leads application is displayed
Check List of Leads Sales Representative The list of Leads is displayed
Check Lead Details Sales Representative The header data is changed and displayed, the products are added, edited and deleted
Manage Lead Sales Representative View and add Notes, Attachments and Contacts
Receive open leads assigned to you with the option to accept or reject them
Sales Representative Accept or Reject leads assigned
8.3 Testing the Process Steps in the SAP Fiori AppThis section describes test procedures in the frontend for each process step that belongs to this scope item.
© SAP SE PublicPage 38 of 60

SAP Best Practices SAP Fiori Apps for SAP Customer Relationship Management (CRM) (MFH): Test Script
Test Step #
Test Step Name Instruction User Entries:Field Name: Value
Expected Result Pass / Fail / Comment
1 Launch Home Page
Launch the SAP Fiori home page via the appropriate URL (https://<> <>…) and log on with the appropriate user and password.
The Home page with all the applications the user has assigned is displayed in a tiled layout.
2 Select SAP My Leads
1.Navigate on the Application’s Homepage and choose the option My Leads
The SAP My Leads app is displayed
3 Search List of Leads
1. A list of Leads appears in alphanumeric order. 2. Select Filter in order to select 'All Leads' or 'Open Leads'.
3. Select Sort by in order to sort the leads by End Date (Descending), End Date (Ascending), Status (Descending), Status (Ascending), Account (Descending) or Account (Ascending).
The list of Leads is displayed
4 Select a Lead 1.Select one lead from the list (use the Search field if required), search by Lead name or Lead ID.
The selected Lead is displayed
5 View and Edit Leads
1. The Lead information is displayed, if you wish to add or change information regarding this lead select Edit.
Note: If the Product icon does not appear it is because the Lead does not have Products associated. You can add products by editing the lead, select the edit push button, scroll down to the product basket and select Add more
Leads are edited successfully
© SAP SE PublicPage 39 of 60
SAP Best Practices SAP Fiori Apps for SAP Customer Relationship Management (CRM) (MFH): Test Script
Test Step #
Test Step Name Instruction User Entries:Field Name: Value
Expected Result Pass / Fail / Comment
products pushbutton.
2. The following information can be edited (note that main Contact, start date and end date information are mandatory): Name, Main Contact, Start Date, End Date, Origin, Priority, Qualification, Status, and Products. 3. To maintain alterations just press Save.
6 Select Product icon
1. Select the Product icon, the products associated to this lead are displayed (if no product icon is displayed its because no products are associated to this lead).2. Add a product by choosing edit and scrolling down to the product basket section select Add more Products:I. You can use the search to find your productii. When you find your product, simply tick the Check Box provided next to your product and select Add.iii. Now you can change the Quantity of each Productiv. If you no longer what to associate the Product to your Lead just select Delete (X button located to the right of your product).
The product is added
7 Select Notes Icon
1. Select the Notes icon, the notes associated to this lead are displayed2. Write a note on ‘Add note’ and then
The lead notes are displayed
© SAP SE PublicPage 40 of 60

SAP Best Practices SAP Fiori Apps for SAP Customer Relationship Management (CRM) (MFH): Test Script
Test Step #
Test Step Name Instruction User Entries:Field Name: Value
Expected Result Pass / Fail / Comment
click on Add3. Now you can see your note below
8 Select Attachments
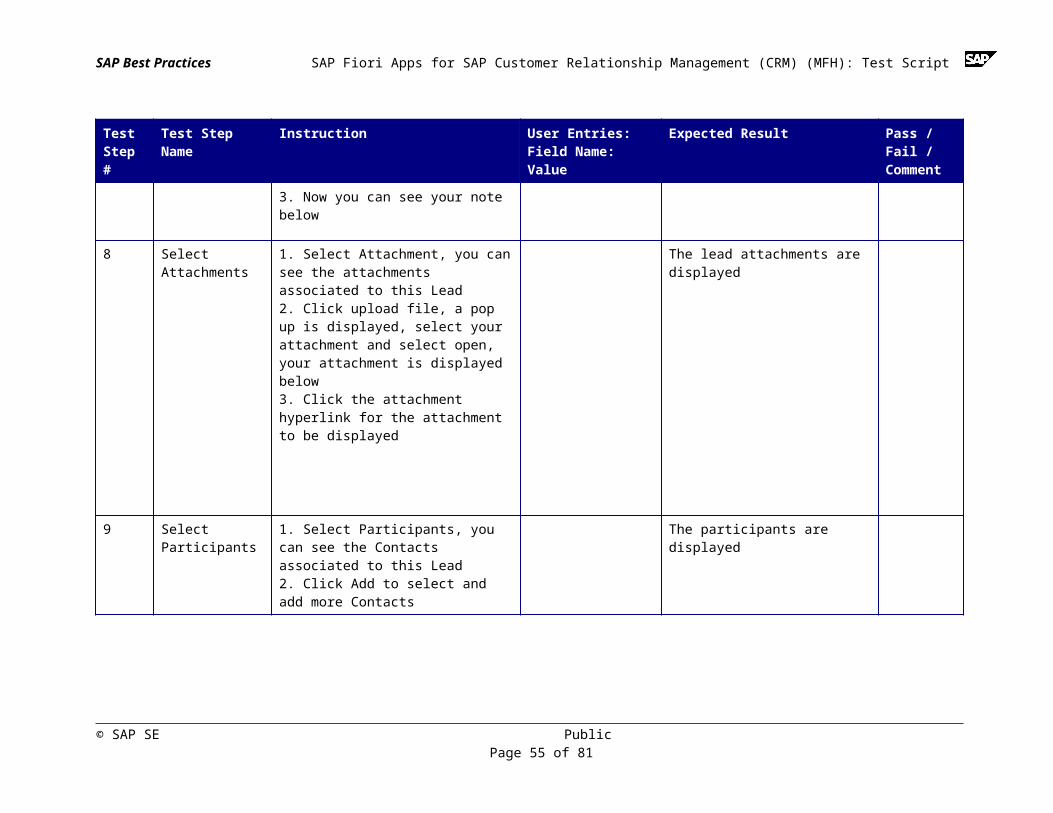
1. Select Attachment, you can see the attachments associated to this Lead2. Click upload file, a pop up is displayed, select your attachment and select open, your attachment is displayed below3. Click the attachment hyperlink for the attachment to be displayed
The lead attachments are displayed
9 Select Participants
1. Select Participants, you can see the Contacts associated to this Lead2. Click Add to select and add more Contacts
The participants are displayed
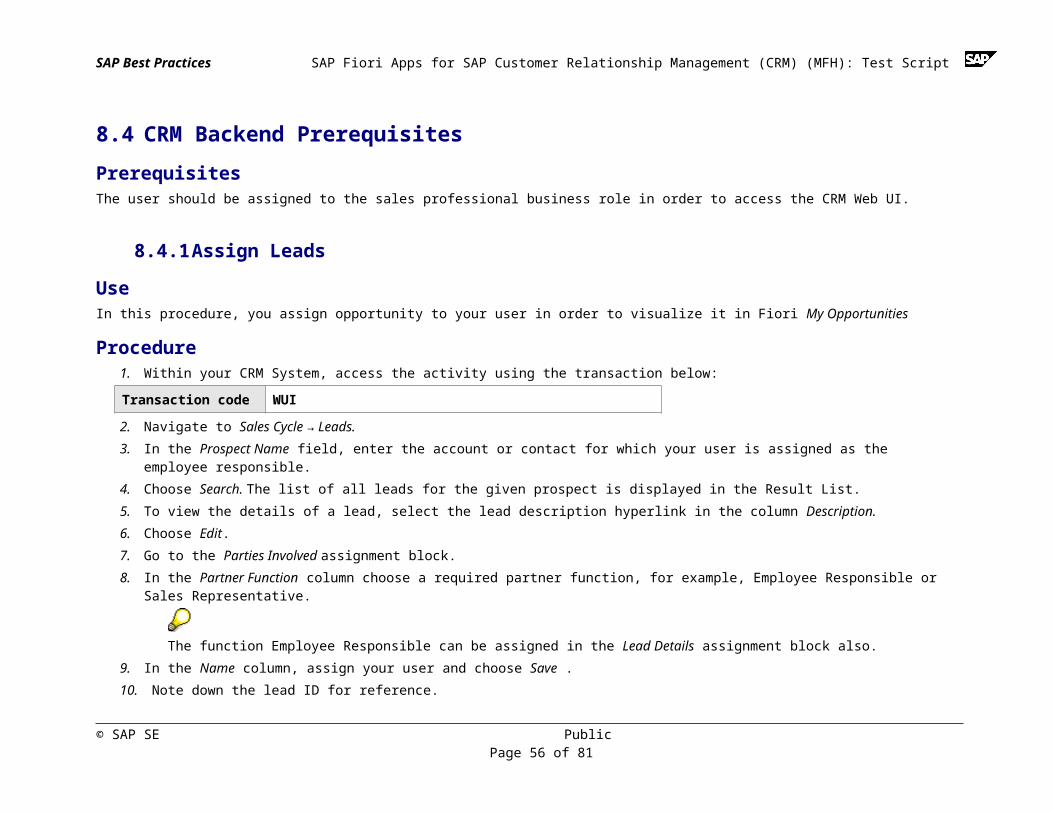
8.4 CRM Backend PrerequisitesPrerequisitesThe user should be assigned to the sales professional business role in order to access the CRM Web UI.
8.4.1 Assign Leads
UseIn this procedure, you assign opportunity to your user in order to visualize it in Fiori My Opportunities
© SAP SE PublicPage 41 of 60

SAP Best Practices SAP Fiori Apps for SAP Customer Relationship Management (CRM) (MFH): Test Script
Procedure1. Within your CRM System, access the activity using the transaction below:
Transaction code WUI
2. Navigate to Sales Cycle → Leads.3. In the Prospect Name field, enter the account or contact for which your user is assigned as the employee responsible.4. Choose Search. The list of all leads for the given prospect is displayed in the Result List.5. To view the details of a lead, select the lead description hyperlink in the column Description. 6. Choose Edit.7. Go to the Parties Involved assignment block. 8. In the Partner Function column choose a required partner function, for example, Employee Responsible or Sales Representative.
The function Employee Responsible can be assigned in the Lead Details assignment block also. 9. In the Name column, assign your user and choose Save .10. Note down the lead ID for reference.11. Repeat steps 2 to 10 to assign more leads to your user.
8.5 Testing the Process Steps in the BackendThis section describes the underlying SAP backend process. It describes the source of the data for the app. In addition, it is a way to check if the app is properly connected by changing data in the SAP system and checking if these changes are subsequently displayed by the app.
Test Step #
Test Step Name Instruction User Entries:Field Name: Value
Expected Result Pass / Fail / Comment
1 Check/ Edit Lead Details
1. Go to transaction WUI2. Navigate to: Sales Cycle → Search → Leads3. Enter the Lead ID within Search Criteria Lead ID field.4. Select Search
The lead details that can be seen within the app are displayed in the backend
© SAP SE PublicPage 42 of 60

SAP Best Practices SAP Fiori Apps for SAP Customer Relationship Management (CRM) (MFH): Test Script
Test Step #
Test Step Name Instruction User Entries:Field Name: Value
Expected Result Pass / Fail / Comment
5. Your lead will be displayed below6. Select your lead description hyperlink, your lead details are displayed.7. Within the Lead Details assignment block the following data can be visualized: - General Data and Dates (WebUI) - Info (My Leads)
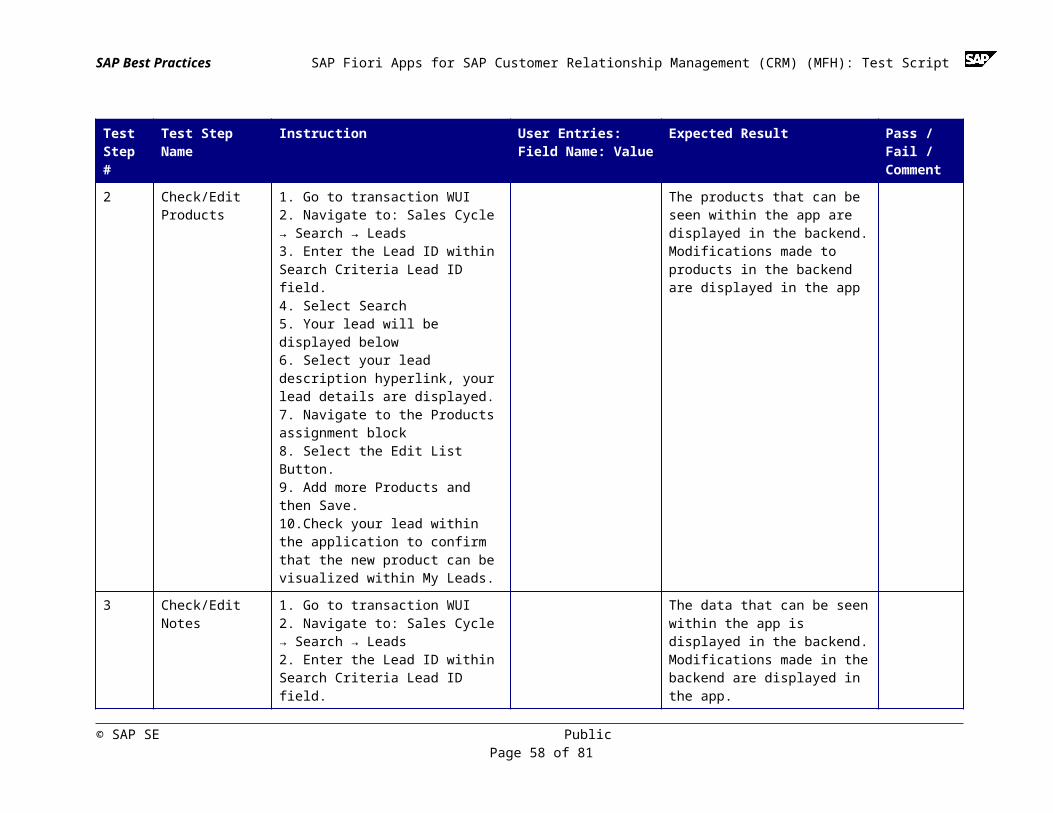
2 Check/Edit Products
1. Go to transaction WUI2. Navigate to: Sales Cycle → Search → Leads3. Enter the Lead ID within Search Criteria Lead ID field.4. Select Search5. Your lead will be displayed below6. Select your lead description hyperlink, your lead details are displayed.7. Navigate to the Products assignment block 8. Select the Edit List Button.9. Add more Products and then Save.10.Check your lead within the application to confirm that the new product can be visualized within My Leads.
The products that can be seen within the app are displayed in the backend. Modifications made to products in the backend are displayed in the app
3 Check/Edit Notes 1. Go to transaction WUI2. Navigate to: Sales Cycle → Search → Leads2. Enter the Lead ID within Search Criteria Lead ID field.
The data that can be seen within the app is displayed in the backend. Modifications made in the backend are displayed in the app.
© SAP SE PublicPage 43 of 60
SAP Best Practices SAP Fiori Apps for SAP Customer Relationship Management (CRM) (MFH): Test Script
Test Step #
Test Step Name Instruction User Entries:Field Name: Value
Expected Result Pass / Fail / Comment
3. Select Search4. Your lead will be displayed below5. Navigate to the Notes assignment block6. Select the Text hyperlink within the Notes assignment block7. Confirm that the notes you visualize here are displayed within the My leads app8. Select back9. Select New10. Select text type Note11. Enter a message within the text block 12. Select Back 13. Save your changes. 14. Once you have added your new note check your lead within the application to confirm that the new note can be visualized within My Leads.
4 Check/Edit Attachments
1. Go to transaction WUI2. Navigate to : Sales Cycle → Search → Leads3. Enter the Lead ID within Search Criteria Lead ID field.4. Select Search5. Your lead will be displayed below6. Navigate to the Attachments assignment block7. Confirm that the attachments you visualize here are displayed within the
The attachments that can be seen within the app are displayed in the backend. Modifications made to attachments in the backend are displayed in the app.
© SAP SE PublicPage 44 of 60
SAP Best Practices SAP Fiori Apps for SAP Customer Relationship Management (CRM) (MFH): Test Script
Test Step #
Test Step Name Instruction User Entries:Field Name: Value
Expected Result Pass / Fail / Comment
My leads app8. Select new Attachment. 9. Select an attachment from content management 10. Select Attach11. Save your changes.12. Once you have added your new attachment check your lead within the application to confirm that the new attachment can be visualized within My Leads.
5 Check/Edit Participants
1. Go to transaction WUI2. Navigate to : Sales Cycle → Search → Leads3. Enter the Lead ID within Search Criteria Lead ID field.4. Select Search5. Your lead will be displayed below6. Navigate to the Parties involved assignment block7. View the existing Parties Involved8. Compare the data of the parties involved assignment block to what is displayed by the My leads app. 9. Select the Edit List Button.10. Add a new contact to your involved parties list.11. Select Partner function, Contact.12. Enter the name of your contact (use the input help function)13. Press Enter14. Save your changes.15. Log into My leads, open the lead
The participant data that can be seen within the app is displayed in the backend. Modifications made in the backend are displayed in the app.
© SAP SE PublicPage 45 of 60
SAP Best Practices SAP Fiori Apps for SAP Customer Relationship Management (CRM) (MFH): Test Script
Test Step #
Test Step Name Instruction User Entries:Field Name: Value
Expected Result Pass / Fail / Comment
you edited on the WebClient UI and verify that the contact person you added is present.
9 My Notes9.1 Purpose The SAP My Notes app enables the user to create notes with several items. The app allows the user to choose which note items to assign to an opportunity, appointment or task from an existing note. It is possible to select the account and the person responsible for that account when assigning the notes. It’s also possible to add or remove items from the note and also edit them.
9.2 Process Overview TableProcess Step Business Condition Business Role Expected Results
Launch Application Sales Representative Applications overview opens and the homepage is displayed
Check List of Notes Sales Representative A list of notes is displayed
Manage Existing Note Sales Representative The note is updated
Create New Note Sales Representative The note is created
© SAP SE PublicPage 46 of 60

SAP Best Practices SAP Fiori Apps for SAP Customer Relationship Management (CRM) (MFH): Test Script
Process Step Business Condition Business Role Expected Results
Create New Appointment for Note
Sales Representative The Appointment is created from a note
Assign Note to an Opportunity Sales Representative The note is assigned to an opportunity
Create New Task for a Note Sales Representative The Task is created from a note
9.3 Testing the Process Steps in the SAP Fiori AppThis section describes test procedures in the frontend for each process step that belongs to this scope item.
Test Step #
Test Step Name Instruction User Entries:Field Name: Value
Expected Result Pass / Fail / Comment
1 Launch Home Page
Launch the SAP Fiori home page via the appropriate URL (https://<> <>…) and log on with the appropriate user and password.
The Home page with all the applications the user has assigned is displayed in a tiled layout.
2 Enter SAP My Notes
Navigate on the Application’s Homepage and choose the option My Notes
The SAP Note app is displayed
3 Check List of Notes and Search note
1. A list of notes appears. 2. Select one or use the Search field to find a note (search by note title), and then select the note. It is possible to order them by date or alphabetical.
A list of notes is displayed
4 Create New Note Add a note by pressing the plus sign and add several items to the note (by double clicking)
A note is added with several items
© SAP SE PublicPage 47 of 60
SAP Best Practices SAP Fiori Apps for SAP Customer Relationship Management (CRM) (MFH): Test Script
Test Step #
Test Step Name Instruction User Entries:Field Name: Value
Expected Result Pass / Fail / Comment
5 Remove itemRemoves items by ticking the check box and pressing Delete push button
An item is removed from the note
6 Assign Note to an Opportunity
Add items to opportunity by ticking the check box and selecting the Add to button. After it’s possible to choose the relevant opportunity.
A note is assigned to an opportunity
7 Create New Appointment for Note
Add items to an appointment by ticking the check box and selecting the Create Appointment button. After it’s possible to choose a title, start date, end date, all day, privacy, account, and contact.
A note is assigned to an appointment
8 Create New Task for a Note
Add items to a task by ticking the check box and selecting the Create task button. After it’s possible to choose a title, due date, priority, privacy, account, and contact.
A note is added to a task
9 Manage Existing Note
When managing the note the following actions are possible:a. Share a note on Sap JAM by pressing Share button and selecting Share.b. Send note to email by pressing Share button and selecting Send Email.c. Save the note to homepage by pressing the Share button and selecting save as tile. It is also possible to give a subtitle and an info to the tile.
The note is updated
© SAP SE PublicPage 48 of 60
SAP Best Practices SAP Fiori Apps for SAP Customer Relationship Management (CRM) (MFH): Test Script
9.4 Testing the Process Steps in the BackendThis section describes the underlying SAP backend process. It describes the source of the data for the app. In addition, it is a way to check if the app is properly connected by changing data in the SAP system and checking if these changes are subsequently displayed by the app.
Test Step #
Test Step Name Instruction User Entries:Field Name: Value
Expected Result Pass / Fail / Comment
1 Check assigning note to opportunity
1. Go to transaction WUI2. Navigate to: Sales Cycle→ Search → Opportunities3. Enter the Opportunity ID within Search Criteria Opportunity ID field.4. Select Search5. Your Opportunity will be displayed below6. Select an opportunity; your opportunity details will be displayed.7. Navigate to the Notes assignment block8. Or view the Notes area within the opportunities details assignment block.9. Verify that the note you added to the opportunity is present.
Verify that the note seen in backend is the same as what is displayed within My Notes app
© SAP SE PublicPage 49 of 60
SAP Best Practices SAP Fiori Apps for SAP Customer Relationship Management (CRM) (MFH): Test Script
10 Simulate Sales Pipeline10.1 Purpose Simulate Sales Pipeline helps the sales representative to see current target achievements and adjust opportunities with respect to Expected Value, Probability, and Closing Date.
10.2 Process Overview TableProcess Step Business Condition Business Role Expected Results
Launch Application Sales Representative Applications overview opens and the homepage is displayed
Check Current Target Achievements
Sales Representative A graph of current target achievements are displayed
Check Opportunity Details Sales Representative Opportunity ID, Account information, main contact, and employee responsible data is displayed
Manage Opportunity Details Sales Representative Edit start date, end date, expected sales volume, chance of success, sales stage, and status
10.3 Testing the Process Steps in the SAP Fiori AppThis section describes test procedures in the frontend for each process step that belongs to this scope item.
Test Step #
Test Step Name Instruction User Entries:Field Name: Value
Expected Result Pass / Fail / Comment
1 Launch Home Page
Launch the SAP Fiori home page via the appropriate URL (https://<> <>…)
The Home page with all the applications the user has
© SAP SE PublicPage 50 of 60

SAP Best Practices SAP Fiori Apps for SAP Customer Relationship Management (CRM) (MFH): Test Script
Test Step #
Test Step Name Instruction User Entries:Field Name: Value
Expected Result Pass / Fail / Comment
and log on with the appropriate user and password.
assigned is displayed in a tiled layout.
2 Select SAP Simulate Sales Pipeline
Navigate on the Application’s Homepage and choose the option Simulate Sales Pipeline
The SAP Simulate Sales Pipeline app is displayed
3 Check the Current Target Achievements
1. The graph shows all the current Target Achievements. 2. The circles represent the opportunities. 3. The graph display shows the current quarter and to shift from one quarter to the next simply scroll to the bottom of the screen, a bar can be seen, drag that bar to the left or the right depending on which quarter you wish to visualize.
A graph with Target Achievements is displayed
4 View Opportunities
1. Select a circle by clicking on it. 2. Select the ‘I’ icon. To deselect the opportunity simply select the grey circle. 3. Here account data and contact information can be visualized
Opportunity details are displayed
5 Edit Opportunities (a)
You can edit the Target Sales Pipeline in two ways:-Within the 'i' icon (a)- By dragging and dropping (b)
1. When you select the icon ‘I’ the opportunities can be edited, the start date, end date, expected sales volume and chance of success may be edited. 2. Further information such as
Opportunity details are edited and saved correctly
© SAP SE PublicPage 51 of 60

SAP Best Practices SAP Fiori Apps for SAP Customer Relationship Management (CRM) (MFH): Test Script
Test Step #
Test Step Name Instruction User Entries:Field Name: Value
Expected Result Pass / Fail / Comment
opportunity ID, account, main contact and employee responsible for this specific opportunity are displayed. 3. Select okay to accept your changes or cancel to ignore your changes.
6 Edit Opportunities (b)
You can edit the Target Sales Pipeline in two ways:-Within the 'i' icon (a)- By dragging and dropping (b)
1. Select the opportunity circle2. Drag it to the right or left to modify the expected date3. Drag it up or down to modify the chances of success. 4. When you make changes three buttons will be displayed on the bottom right-hand corner of the screen view changes, save and reset. 5. Reset ignores your opportunity movement; Save saves your changes and View changes shows you a log of what you have modified, showing you the old value and the new value. 6. To save or to discard the changes tick the check box and select Save or Discard within the log.
Opportunity details are edited and saved correctly
© SAP SE PublicPage 52 of 60

SAP Best Practices SAP Fiori Apps for SAP Customer Relationship Management (CRM) (MFH): Test Script
10.4 CRM Backend PrerequisitesPrerequisitesThe user should be assigned to the sales professional business role in order to access the CRM Web UI.
10.4.1Maintain Opportunities
UseIn this procedure, you maintain Opportunities in order to visualize it in Fiori app Simulate Sales Pipeline
Procedure1. Within your CRM System, access the activity using the transaction below:
Transaction code /WUI
2. Navigate to Sales Cycle → Opportunities3. Choose the search criteria Opportunity ID. Provide the opportunity ID noted in the section Assign Opportunity.4. Choose Search. The Opportunity is listed in the result list. 5. Choose opportunity description hyperlink in the column Description.6. Choose Edit.7. Maintain the Opportunity Closing Date under the Date section to a value which, is in the current year. 8. Maintain the Exp. Sales Volume and Rel. for Forecast fields in the Forecast section.9. Maintain the Chance of Success, Sales Stage and Status fields in the Sales Cycle section.10. Choose Save.11. Repeat steps 3 to 8 for all the opportunities assigned to your user.
10.5 Testing the Process Steps in the BackendThis section describes the underlying SAP backend process. It describes the source of the data for the app. In addition, it is a way to check if the app is properly connected by changing data in the SAP system and checking if these changes are subsequently displayed by the app.
© SAP SE PublicPage 53 of 60
SAP Best Practices SAP Fiori Apps for SAP Customer Relationship Management (CRM) (MFH): Test Script
Test Step #
Test Step Name Instruction User Entries:Field Name: Value
Expected Result Pass / Fail / Comment
1 Check/Edit Pipeline details
1. Go to transaction WUI2. Navigate to: Pipeline Performance → Target to Date3. The opportunities displayed here are equivalent to those displayed within the Simulate Sales Pipeline App4. Select one of the opportunities by selecting the drop-down tab to the left of the opportunity.5. Compare this opportunity to the data that is displayed in the app.6. Modify the closing date of the opportunity within the WebClient.7. Select over the closing date, within the opportunity row. 8. Press Enter, to Save9. Verify that the closing date has been modified within Simulate Sales Pipeline app for your specific opportunity.
Changes made within the Simulate Sales Pipeline app can be seen within the WebUI and vice versa
11Track Sales Pipeline11.1 Purpose Track Sales Pipelines offers a quick and easy way for sales representatives to track and manage the pipeline of a sales team with respect to Dates, Expected Value and Probability.
© SAP SE PublicPage 54 of 60
SAP Best Practices SAP Fiori Apps for SAP Customer Relationship Management (CRM) (MFH): Test Script
11.2 Process Overview TableProcess Step Business Condition Business Role Expected Results
Launch application Sales Representative Applications overview opens and the homepage is displayed
Check Current Target Achievements
Sales Representative A graphical overview of sales pipelines is displayed. You can filter Target Achievements presented in the graphic by employee responsible and accounts. You can also manage sales target settings: periodicity, expected value, currency and time span
Check Opportunity Details
Sales Representative Opportunity ID, Account information, main contact, employee responsible, time span, expected value and probability is displayed
11.3 Testing the Process Steps in the SAP Fiori AppThis section describes test procedures in the frontend for each process step that belongs to this scope item.
Test Step #
Test Step Name Instruction User Entries:Field Name: Value
Expected Result Pass / Fail / Comment
1 Launch Home Page
Launch the SAP Fiori home page via the appropriate URL (https://<> <>…) and log on with the appropriate user and password.
The Home page with all the applications the user has assigned is displayed in a tiled layout.
2 Select SAP Track Sales Pipeline
Navigate on the Application’s Homepage and choose the option Track Sales Pipeline
The SAP Track Sales Pipeline app is displayed
© SAP SE PublicPage 55 of 60
SAP Best Practices SAP Fiori Apps for SAP Customer Relationship Management (CRM) (MFH): Test Script
Test Step #
Test Step Name Instruction User Entries:Field Name: Value
Expected Result Pass / Fail / Comment
3 Check the Current Target Achievements
1. The graph shows all the current Target Achievements. 2. The circles represent the opportunities. 3. The periodicity shown can be quarterly, yearly, weekly or monthly according to you sales target settings. a. To modify the graphic view periodicity use the dropdown arrow and select among quarterly, yearly, weekly or monthly 4. You can filter target achievements you want to see. Use the dropdown arrow and select among Team’s Sales Pipeline and Top 10 Opportunities.
5.Bellow the graph there is a scroll bar, drag and drop it to change the opportunity time frame.
A graph with Target Achievements is displayed
4 Filter Target Achievements
1.To filter the current Target Achievements displayed on the graph select Filter (right upper corner). Two new buttons appear - All Employees Responsible and All Accounts. 2.Choose All Employees Responsible. A scroll down menu with employee names and a search field are displayed. Select which employees current Target Achievements you want to see. 3. Choose Accounts, a scroll down menu with accounts and a search field are displayed. Select which
Target Achievements graph is filtered
© SAP SE PublicPage 56 of 60

SAP Best Practices SAP Fiori Apps for SAP Customer Relationship Management (CRM) (MFH): Test Script
Test Step #
Test Step Name Instruction User Entries:Field Name: Value
Expected Result Pass / Fail / Comment
accounts current Target Achievements you want to see
5 Manage sales target settings
1. Choose Settings, a pop-up window appears. 2. Choose Sales Targets, another pop-up window appears. 3. Here you can edit the following information: Sales Target Periodicity, Sales Target for Current Period, Currency, Time Span (From, To).
Settings are changed
6 Check Opportunity Data
1. To view an opportunity details select the opportunity circle from the graphic and double-click it. 2.Here you can view the following information: Opportunity ID, Account, Main Contact, Employee Responsible, Start Date, End Date, Expected Sales Volume (Unweighted and Weighted), Relevant for Forecast, Chance of Success, Sales Stage, and Status. 3.You can access detailed information of Opportunity ID, Account and Main Contact by single clicking on of this options.Note: By selecting Opportunity ID the user will be diverted to the My opportunities app, by selecting Account the user will be diverted to My accounts application and by selecting main Contact the user will be diverted the My Contacts
Opportunity data is displayed
© SAP SE PublicPage 57 of 60
SAP Best Practices SAP Fiori Apps for SAP Customer Relationship Management (CRM) (MFH): Test Script
Test Step #
Test Step Name Instruction User Entries:Field Name: Value
Expected Result Pass / Fail / Comment
application.
11.4 CRM Backend PrerequisitesPrerequisitesThe user should be assigned to the sales professional business role in order to access the CRM Web UI.
11.4.1Maintain Opportunities
UseIn this procedure, you maintain Opportunities in order to visualize it in Fiori app Track Sales Pipeline.This app is for the
Procedure1. Within your CRM System, access the activity using the transaction below:
Transaction code /WUI
1. Navigate to Sales Operations → Organizational Model2. Choose Search.
If you do not know the Organizational Unit name, you can choose Find by User in the Search criteria, provide your user, and choose Search.
3. Choose the Name hyperlink in the column Organizational Unit.4. The Organizational unit details are displayed. Make a note of the users assigned to your organizational unit and reporting to you.5. Navigate to Sales Cycle → Opportunities
© SAP SE PublicPage 58 of 60

SAP Best Practices SAP Fiori Apps for SAP Customer Relationship Management (CRM) (MFH): Test Script
6. Choose the relevant search criteria and choose Search.7. For the desired opportunity, choose the hyperlink in the column Description8. Choose Edit.9. Maintain the Opportunity Closing Date under the Date section to a value which, is in the current year. 10. Maintain the Exp. Sales Volume and Rel. for Forecast fields in the Forecast section.11. Maintain the Chance of Success, Sales Stage, and Status fields in the Sales Cycle section.12. Go to the Sales Team assignment block. 13. In the Function column choose a required partner function, for example, Employee Responsible or Sales Representative
The function Employee Responsible can be assigned in the Opportunity Details assignment block also. 14. In the Name column, assign one of users as noted in step 4 above.15. Choose Save.16. Repeat steps 5 to 15 for all the opportunities you want to visualize in the Fiori app.
11.5 Testing the Process Steps in the BackendThis section describes the underlying SAP backend process. It describes the source of the data for the app. In addition, it is a way to check if the app is properly connected by changing data in the SAP system and checking if these changes are subsequently displayed by the app.
Test Step #
Test Step Name Instruction User Entries:Field Name: Value
Expected Result Pass / Fail / Comment
1 Check/Edit Pipeline details
1. Go to transaction WUI2. Navigate to : Pipeline Performance → Target to Date3. The opportunities displayed here are equivalent to those displayed within the Track Sales Pipeline App4. Select one of the opportunities by selecting the drop-down tab to the left of the opportunity.
Changes made within the Track Sales Pipeline app can be seen within the WebUI and vice versa
© SAP SE PublicPage 59 of 60

SAP Best Practices SAP Fiori Apps for SAP Customer Relationship Management (CRM) (MFH): Test Script
Test Step #
Test Step Name Instruction User Entries:Field Name: Value
Expected Result Pass / Fail / Comment
5. Compare this opportunity to the data that is displayed in the app.6. Modify the closing date of the opportunity within the WebClient.7. Select over the closing date, within the opportunity row. 8. Press Enter, to Save9. Verify that the closing date has been modified within Track Sales Pipeline app for your specific opportunity.
© SAP SE PublicPage 60 of 60