business intelligence reporting system - creating … · using the business intelligence reporting...
TRANSCRIPT

North Carolina Community CollegesBusiness Intelligence Reporting System
College User Manual

Contact Info• To log in to Business Intelligence system:
– https://bi.nccommunitycolleges.edu
– If you have any questions about this document or need assistance using the Business Intelligence Reporting System please contact the State-Level Reporting team using the [email protected]
4/26/2016 2

Introduction• This user guide has been developed to assist all users of the North Carolina Community Colleges
Data Warehouse (NCCCSDW) in the use of Business Objects 4.1 LAUNCHPAD to retrieve system level reports, and to create reports using Web Intelligence (Java web version). The intended audience of this guide is any user that executes documents from Business Objects 4.1 LAUNCHPAD.
• NOTE: LaunchPad users should have a basic understanding of navigation techniques and conventions used in Microsoft Windows and Microsoft Office.
• College users will now use ONLY ONE ID to build custom reports and retrieve canned reports/documents. In previous versions, users were issued two ID’s, SKW and EIS, to gain access to two different systems; Web Intelligence Desktop Client, and Infoview (EIS). Users will now have ONLY one ID, which will allow the user to retrieve prepared reports, and also create custom reports within a web browser.
• The first section of this training manual will walk you through accessing canned reports. The second section will walk you through using the system to create your own reports (with only YOUR college’s data)
4/26/2016 3
System Requirements• To access the system, you should be using a current (and updated) web browser. Internet Explorer,
Mozilla Firefox, and Google Chrome are all supported browsers.
• Your system should have at least 4GB or memory, and Windows 7 or later. Earlier operating systems with a current browser installed may work, but could have limited functionality.
• To use the system to create your own reports, you will have to have the most current version of JAVA installed on your system. To verify your installed JAVA version is the most current, go to: https://www.java.com/en/download/installed.jsp . As always, we ask that you advise your local IT staff before installing or changing any software on your PC.
4/26/2016 4

Initial Login• Go to https://bi.nccommunitycolleges.edu
• Enter your initial username and password (supplied to you by a member of the NCCCS Business Intelligence Team). If you do not have an ID, you can request an ID by following Step One here: http://www.nccommunitycolleges.edu/analytics/data-warehouse-access-and-training
• The first time you login you will be required to create a new password. The password requirements are:
– Rules for New Passwords • Minimum of eight characters. • Must use letters and numbers. • Cannot re-use a password.
• After you have entered your new password, click “OK” to login to the reporting system.
4/26/2016 5

Accessing Reports
The following section will walk you through accessing high-level canned reports through our Business Intelligence Reporting System (similar to the EIS system in our previous system).
For instructions on building your own custom reports, please proceed to Page 12 of this training manual.
4/26/2016 6

NCCCS BI Reporting System• Your initial login screen will resemble the screenshot below. You’ll see a listing of the available
folders, which contain high-level “canned” reports that can be run as needed.
4/26/2016 7

NCCCS BI Reporting System• You can use the “+” on the left to expand folders, or double click the folder in the window to the right.
This will allow you to navigate to the appropriate report, which you’ll double click to run.
4/26/2016 8

NCCCS BI Reporting System• Once you double click a report name, the system will open the report. If there are any filters
associated with the report (such as reporting year, etc.), choose the appropriate value and click “Ok.” Your report should open in the viewing area.
4/26/2016 9

NCCCS BI Reporting System• Once the report is open, you can click the print icon, which will save the report as a PDF.
4/26/2016 10
• You can also export the data in a variety of formats by clicking the small icon with an arrow pointing to the right, and choosing the format.

NCCCS BI Reporting System• You can refresh the data in a report by clicking the icon with two arrows.
4/26/2016 11
• You can also search the report’s text by clicking the icon that looks like binoculars. It will open a small search window at the bottom left of the report in view.

Creating Custom Reports
The following section will show you how to create custom reports in your browser using the NCCCS Business Intelligence Reporting System.
NOTE: When creating your custom reports, you will not be able to access data from other colleges. You will only be able to build reports using your College’s data.
4/26/2016 12
Creating Custom Reports
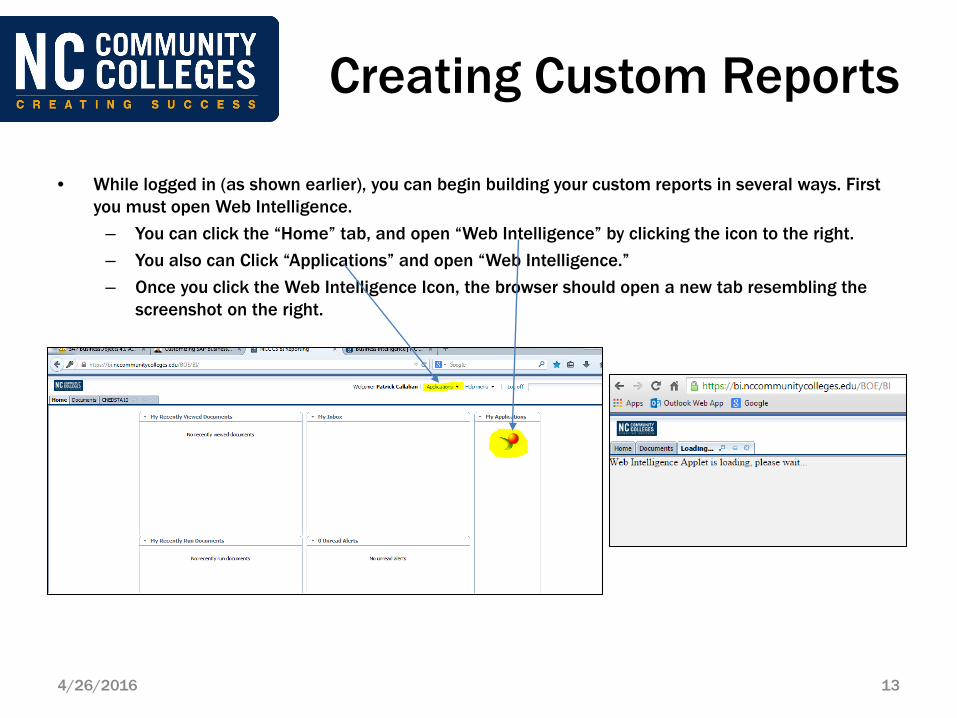
• While logged in (as shown earlier), you can begin building your custom reports in several ways. First you must open Web Intelligence.
– You can click the “Home” tab, and open “Web Intelligence” by clicking the icon to the right. – You also can Click “Applications” and open “Web Intelligence.”– Once you click the Web Intelligence Icon, the browser should open a new tab resembling the
screenshot on the right.
4/26/2016 13
Creating Reports
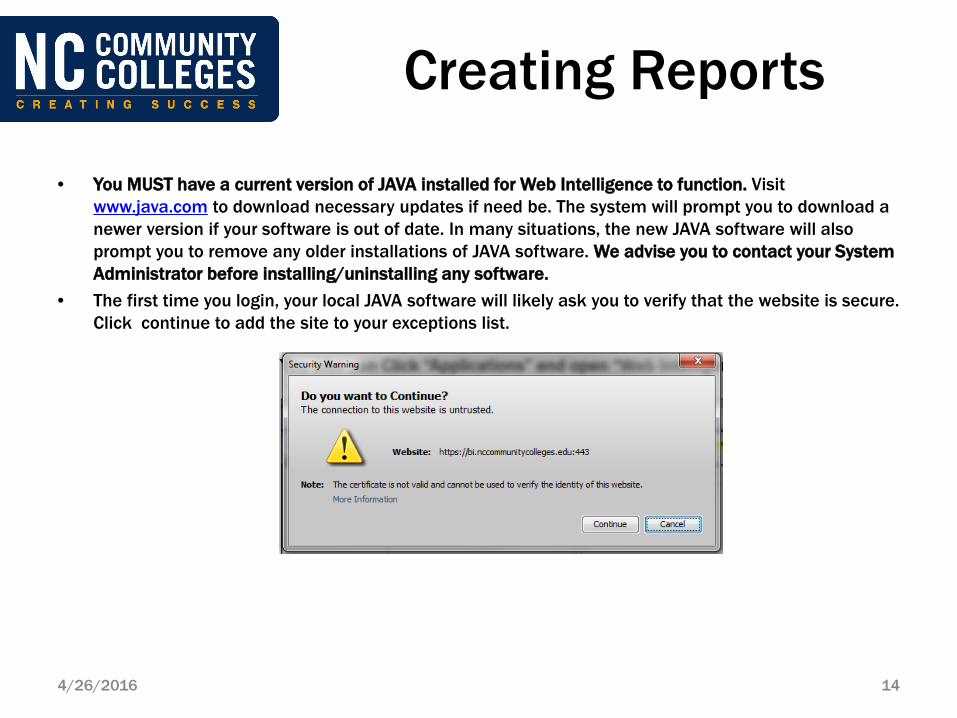
• You MUST have a current version of JAVA installed for Web Intelligence to function. Visit www.java.com to download necessary updates if need be. The system will prompt you to download a newer version if your software is out of date. In many situations, the new JAVA software will also prompt you to remove any older installations of JAVA software. We advise you to contact your System Administrator before installing/uninstalling any software.
• The first time you login, your local JAVA software will likely ask you to verify that the website is secure. Click continue to add the site to your exceptions list.
4/26/2016 14

Creating Reports
• To begin a new report, click the new report icon in the top left of the Web Intelligence portal.
• When you begin creating a new report, the system will first prompt you to choose a data source. In most situations you will choose “Universe,” and then choose the appropriate universe.
• You can also use the Web Intelligence software to build reports from other data sources (such as an Excel spreadsheet).
4/26/2016 15

Creating Reports• Choose the Universe you would like to use as your data source for your report. The table below gives
a description of each Universe. The screenshot to the right displays the Universes you can choose.
4/26/2016 16
Universe Description
Con-Ed Student -College
This Universe is used to obtain Continuing Education Student information.
For most users, only information for their own College Id is available. The College ID is locked in by Supervisor Row Security.
For the NCCCS IT Staff Users, all colleges and their Con-Ed information is available with this Universe.
Course_FTE Contains "College Courses" and "Full Time Equivalent" Information.
Curriculum Student Info II - College
Data begins with the Reporting Year 2002 (2001-2002). Semesters are Fall 2001, Spring 2002, and Summer2002. The universe contains student demographics and enrollment counts related to curriculum students within the NC Community College system.
Staff - College Faculty and Staff Employed in the NC Community College System

Creating Reports
• Once you have chosen a Universe as your data source, the software will open a Query panel. The example below shows that the “Course_FTE,” Universe was chosen. The query panel will allow you to choose what data, or “Result Objects,” you want in your report, as well as giving you the option to include filters and/or prompts.
4/26/2016 17
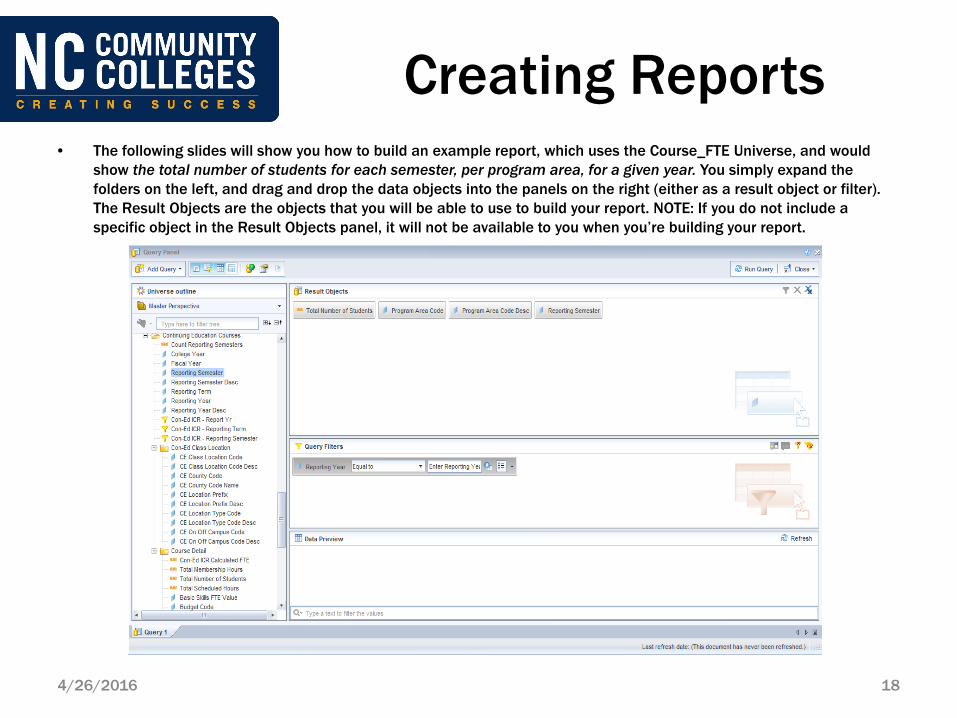
Creating Reports• The following slides will show you how to build an example report, which uses the Course_FTE Universe, and would
show the total number of students for each semester, per program area, for a given year. You simply expand the folders on the left, and drag and drop the data objects into the panels on the right (either as a result object or filter). The Result Objects are the objects that you will be able to use to build your report. NOTE: If you do not include a specific object in the Result Objects panel, it will not be available to you when you’re building your report.
4/26/2016 18

Creating Reports• In many situations you’ll want to include a filter in your query. This will limit the results of your query, which will give
you a more manageable dataset and will also decrease the time it takes to run the report. You’ll see that you can choose the operator for your filter in dropdown list (equal to, not equal to, etc.). The next field allows you to either specify a value, pick from a list of values (pulled from the database), or create a prompt that will ask the user to provide a value each time the report is run.
4/26/2016 19

Creating Reports• The Filter window below shows that this query will have a filter for “Reporting Year.” The operator is set to “Equal to,”
and the it’s set to prompt the user to enter a value when the report/query is run. When you are finished selecting your result objects and filters, you’ll click the arrows that say “Run Query.” This will run your query and return a dataset, and will automatically open the report design window.
4/26/2016 20

Creating Reports• Once you’ve clicked “Run Query,” the system will execute the query. If you include a prompt, such as in the example
below, the system will open a window to allow the user to select a reporting year value. Double click the appropriate value, and click “Ok” to proceed.
4/26/2016 21

Creating Reports• The system will run your query and open the report design window. It will try to automatically create a basic report for
you, based on the result objects you choose in your query. You can keep this table, and change it as needed, or you can delete the table and build your own report. We will build a new table for this report in the following example. To delete the table that was automatically generated, select the table and right click, then choose “Delete.”
4/26/2016 22

Creating Reports• In the panel on the left, you should see a window that says “Available Objects.” These are the result objects that you
choose when building your query, and are now available for use in your report. If you don’t see an object that you’ll need to build your report, you can add objects to your query by clicking the “Data Access” tab, and then clicking “Edit.” It will open a the query window and will allow you to add the necessary result objects to your query (as shown in previous slides), which will make them available for use in your report.
4/26/2016 23

Creating Reports• We will now begin building a basic report. In the example we’ll use a reporting element called a Crosstab. You’ll begin
by clicking the “Reporting Elements” tab, and then choosing the type of table you would like to include in your report (Crosstab). Click on the type of table you want to include, and then click within the reporting area to add it to your report.
4/26/2016 24

Creating Reports• We’ll now begin adding objects to
your report. To do this, we’ll simply drag the appropriate objects from the “Available Objects” window to the reporting window. We’ll place the objects in the appropriate row or column in the crosstab, or displayed elsewhere in the report if need be.
Follow the Example below to build a sample report:
• Drag “Program Area Desc” to the crosstab row on the left.
• Now drag “Reporting Semester Desc” to the column header in the crosstab.
• Lastly, we’ll add the measure we included, “Total Number of Students” to the body of the table. This will use a predefined equation to calculate and display the count of students per Area and Semester.
4/26/2016 25

Creating Reports• You’ve now created a basic crosstab
that displays the number of students per Program Area for each Semester in selected Reporting year. Now we will work on the layout and formatting of the report.
• There are several ways to open the Report’s formatting options.
– Click the Page Setup tab, which contains the most common formatting options.
– Or, right click within the reporting area (not within a table) and select “Format Report.”
4/26/2016 26

Creating Reports• If you clicked the “Page Setup” tab, you’ll see the following options. This tab will allow you to set the following
options:– Page Layout (Portrait or Landscape)– Page Size (A4, A3, Letter, Legal, etc.)– The size of year header and footers– Allows you to add reports (pages) to your document.– Rename the report– Set your top, bottom, left, and right margins. – Toggle the display settings (Page or Quick display). HINT: Choosing the “Page” option will display the entire page of your report (which helps
greatly when formatting and choosing the layout of your report).
4/26/2016 27

Creating Reports• If you choose to right click in the report area and clicked “Format Report” then the Report Formatting window will open,
allowing you to make changes to the basic layout of your report, including margins, footers, report name, etc. The screenshots below show each of the formatting windows. Notice that in the “Layout” window we’ve changed the report to be Landscape orientation, and to have .25” margins.
4/26/2016 28

Creating Reports
Saving your Report to the Repository (for future use)– You can save your report to the server’s repository, or you can export your report in various other formats (see
following slide). For storage reasons, please only save reports to the repository that you’ll likely use often. – If you will need to run this report again, you’ll want to save it as a Web Intelligence Document (WID). This will
save your report to the server (in your own folder) and will make it available to you in the future. Follow the instructions below to save the file for the first time.
• Click the disk in the top left corner of the screen, and click “Save As”• Click the “Favorites Folder” • Click the “Add New Folder” icon to create a new folder to store your reports.• Name your report and click “Save.”
4/26/2016 29

Creating Reports
You can also export/save your reports in a variety of other useful formats
• Once the report is open, you can click the print icon, which will save the report as a PDF.
4/26/2016 30
• You can also export the data in a variety of formats by clicking the small icon with an arrow pointing to the right, and choosing the format.

Creating ReportsRetrieving your custom report from the repository
– After save your report to the Business Intelligence server’s repository, you can easily retrieve it by following the steps below:
• When you first login, click the “Documents” tab in the top left portion of the window.• If it’s not already expanded, click on the “My Documents” option.• Click “My Favorites” to access the folder you created when saving your document. • You should now see your report listed in the window on the right of your screen. Double click the report to view. It will initially open in
“Reading” mode, which does not allow editing. If you want to edit your document, you’ll simply have to click the “Design” option, which will open the report in an editable mode.
• Be sure to save any changes you make to the report.
4/26/2016 31
Creating Reports
You can now build, format, and save a basic Web Intelligence report. The following slides contain some tips and tricks for building more dynamic reports, and applying some additional formatting.
If you need additional help, or have any questions, please feel free to reach out to the NCCCS Business Intelligence team: [email protected]
You can access the BI reporting system at: https://bi.nccommunitycolleges.edu
4/26/2016 32

Creating Reports
You can easily add logos or images to your report for branding, etc. To add a logo to your report’s header, follow the directions below.
4/26/2016 33
• Click the “Formatting” tab to open your various formatting options.
• Click the “Style” tab, which is contained with the “Formatting” tab.
• Click within the report in the area where you would like to insert the logo or image. In this case, we’ll click in the report header.
• Click the image icon on the “Style” tab.
• Click “Appearance” to edit the appearance settings
• Choose the “Image from file” radio button.
• Click “Add” to browse for the image on your PC.
• Toggle the display settings to change where and how the image is displayed. The settings in the example (Normal, Left, Top) will center the logo in the top left portion of the header (as shown in the example report).

Creating Reports
Using Pre-defined objects in your report
• You can easily add common report elements by using the predefined cells. You can simply place these cells on your report, and they will automatically display the appropriate information. Below are some examples of predefined cells:
– Document Name– Last Refresh Date (will display the last time the query was refreshed)– Page Number– Page Number/Total Pages– Total Number of Pages– Any prompt filters used in your report
4/26/2016 34

Creating Reports
Adding Graphics (Charts) to your reports
• You can also easily add charts to your report. There area variety of pre-configured chart types to choose from. Follow the steps below to add a basic chart to your report.
– Click the “Report Elements” tab, and then the “Chart” tab. – Choose the type of chart you want to insert, and drag it to your report (the example is a “Column” chart). The chart will resemble the image on the
right.
4/26/2016 35

Creating Reports
Adding Graphics (Charts) to your reports
– Now select the objects and measure you want to be displayed in your graph. You can add them to the graph by simply dragging them from the “Available Objects” tab to the chart you inserted into your report. You can also hold down ctrl and click multiple objects (to add them all at once).
– For this example, hold ctrl and click “Program Area Code Desc,” “Reporting Semester Desc,” and “Total Number of Students,” and drag them to the chart.
4/26/2016 36

Creating Reports
Adding Graphics (Charts) to your reports
– Your chart should have updated to resemble the following image. You can expand the chart to display all the program areas. – You’ve now created a basic chart which shows the total number of students per program area, broken out by semester. – Select the chart, right click and choose “Format Chart” for a variety of options including the chart title, legends, data labels, chart colors, etc.
4/26/2016 37