bureau of indian standards subject: up gradation of bis ... · 1 annex 1 procedure for use of bis...
TRANSCRIPT

BUREAU OF INDIAN STANDARDS
(Laboratory Policy & Planning Department)
Our Ref: LPPD/9:1 30.04.2015
Subject: Up gradation of BIS Lab Software as LIMS
This is in continuation to the circular No. LPPD/9:1 dated 22.10.2014 and 30.10.2014 w.r.t.
the development of BIS Lab Software for management of testing of samples by IOs/BOs/Labs
and related information. The use of BIS Lab Software with above functionalities was
implemented w.e.f. 01.11.2014. Operation and usage of the system by users (BOs and BIS
Labs) was reviewed and accordingly instructions were given to all BOs for use of BIS Lab
Software.
Feedbacks and difficulties from BOs and BIS Labs were received at LPPD, on the basis of
which, several modifications have been made and additional features have been added in the
software to make the system more user-friendly and easy to operate.
The modified BIS Lab Software has now been renamed as “Lab Information Management
System” (LIMS). BIS Lab Software was initially entrusted with the provision for receiving
the samples till generation of Lab Code of the sample only. In LIMS, further provisions for
forwarding the samples to testing laboratories including outside labs and uploading of test
report by BIS Labs and Outside Labs directly, against the samples received and tested by
them, has been added. OSLs have also been given access to receive and accept the test
request/samples, online, and then uploading the test reports against the received test
requests/samples and to perform other functions alike BIS labs. At no stage, licensee details
or license No. would be visible to any lab, BIS or outside. These details will stay at the back
end and can be visible only to the BOs.
Further, as decided, functionality of „Sample Room‟ at BOs has been removed from BIS
LIMS. Hence, „Sample Rooms‟ shall just function as holding place for samples under control of respective BOs and not under the control of BIS Labs.
Login module for individual officers, with separate login for each officer in BO, is under
development and till it is done, common login, as already provided to BOs, may be used.
Many more features have been added in the LIMS which have been described in detail, step
by step, along with the respective screenshots for ease of the use of the system in the form of a
user manual/guide separately for BOs, BIS Labs and OSLs.
Most important feature which eliminates one business process altogether at the end of BIS
Labs and BOs, relates to recoding and decoding of test reports. BIS Labs would no longer
need to recode the test reports with BO code. This would be automatic. Thus it would save
time and effort on the part of BIS Labs. Similarly BOs would get Test Reports with their code
and Licence No./Application No. watermarked on the test report saving their time for
decoding.

Efforts have been made to give complete step by step details of the procedure to be followed
by IO/BO and BIS Labs, along with the screenshots as attached at Annex 1 & Annex 2
respectively. However, in case of any difficulty/query, Ms. Varsha Gupta, Sc-B, Nodal
Officer, LPPD may be contacted (Mobile No. 09810393403).
The software has now been made functional by ITS Deptt. and the system becomes
operational for implementation with immediate effect.
P K Batra
Sc.-G & DDG (Labs)
Circulated to : DDG (Cert.)/CMDs/DDGRs/All BIS Labs/ROs/BOs/SBOs
Copy to : ADG (AP), CVO
PS to DG for DG's kind information
Head (ITSD) for hosting on BIS Intranet

1
ANNEX 1
PROCEDURE FOR USE OF BIS LAB INFORMATION MANAGEMENT SYSTEM (LIMS) BY BOs
This is in continuation to the earlier version of the BIS Lab Software which was made functional w.e.f. 01.11.2014 for use by BOs and BIS Laboratories. Several modifications have been made and additional features have been added in the software after getting feedbacks from users to make the system more user-friendly and easy to operate. To mention specifically, some of the salient features of this software are mentioned a sunder:
Provision has been made for uploading of test report by BIS Labs and Outside Labs directly, against the samples received and tested by them. Hence, labs need not to enter the details of the sample, separately, while uploading the test reports.
Also, provision has been made to mark the BO code of the sample on the test report, automatically by the system. Therefore, labs need not manually link the sample code to the original BO code before uploading the test reports to BOs and the respective sample codes (both BO Code & Code Given By Lab) would be marked on the first page of the test report at the time of downloading the test reports by BOs.
Provision has also been made to mark the Licensee / Applicant No., to whom the sample belongs, on
the test report along with BO code, at the time of downloading the test reports by BOs.
BOs can find out the total number of samples sent to any lab for a given period of time. Provision has also been made in the system to know „Types‟ of samples (FS, MS, AS, VS etc) dawn for a given period of time.
System is also entrusted with the facility to split the samples by Sample Cell, if the need arises to make the samples in parts and send it to different testing sections/labs.
In the current version of the software, outside labs have also been given access to receive the online test requests, uploading the test reports directly against the received test requests/samples and to perform other functions alike BIS labs.
For generation of test requests, provision has been added to sort the licensee/applicant name by selecting IS No. and Licensee/Applicant No.
Efforts have also been made to incorporate the provisions minimizing difficulties being faced by IOs/BOs using the software. Feature of mandatory requirement of „Date of manufacture‟ for generation of test request has been removed. In this improved version, BOs can view all the test requests generated at any point of time and also take printout of test requests. Further, till the time system progresses to link CMMS with BIS Lab Software, facility has been made to sort and count the particular type of sample (MS, FS, VS, AS, IN, CS etc.) drawn by the IOs/BOs at any point of time. Further, as decided by Competent Authority, functionality of „Sample Room‟ has been removed from BIS LIMS. Hence, „Sample Rooms‟ shall just function as holding place for samples under control of respective BOs and there shall be no link between sample Room and BIS Labs. The detail, step by step process of using this version of “BIS Lab Information Management System” by BOs is described as under:
PROCEDURE OF ACCESSING THE SOFTWARE
1. The same webpage is to be accessed which is being used for downloading the test reports by BOs and uploading the test reports by BIS Labs / OSLs. The URL of webpage is as under:
http://59.177.180.144:8080/TRU/ 2. Main page of „Lab Information Management System‟ will open. Login to the BO home page using
„User Name‟ and „Password‟ already given to the respective BOs.

2
3. “Branch Home Page” will open. It has three options on upper left side, i.e. „Add‟, „Edit‟ and
„View/Search‟.
4. i) Drop down menu of “Add” option has “New Test Request” and “IS Test Details”.
ii) „New Test Request” can be clicked for the generation of test request (Please refer the
Screenshot placed below).
iii) First option has “Branch Name” which will be displayed by default.

3
iv) Next to branch code is to enter “Official Initials”. For Example, “SG” for the officer name “Sanjay Gupta”. Provision has been made, in this version, to enter initials of two officers also, separated by „/‟, eg. SG/VG, if it is required so.
v) After that „IS No.‟ is to be selected from dropdown list by entering first few digits.
vi) Next to it is „Licence No/Applicant No.‟ which is to enter manually. This will enable appearing name of Licensee/Applicant.
vii) “Sample Description” option is available to mention the product details. Provision has been
made, in this version of the software, to enter most of the „commonly used special characters‟ to describe the sample details.
viii) Next is the dropdown list to select “Sample Type” giving 9 options, i.e. AS, CP, CS, FS, IN, MS,
others, SM and VS. This option provides facility to select any of the type of samples generally being drawn during operation of certification scheme including “CP” and “others”. “CP” stands for “Complaint Sample”. On selecting the option “others”, the next box will be enabled, which will provide space to mention the details of the sample if other than the 8 types of samples mentioned therein.
ix) Next to sample type is the “Priority” option providing dropdown list of “Priority / Non-Priority /
Tatkal”. Any of the one option may be chosen according to the sample. x) “Mode of Disposal” has two options, i.e. “To be disposed off” and “To be returned to
Manufacturer” which is to be chosen as per the case. xi) Then, in the last of the screen, two options are available for selection. “Single” and
“Composite”.
(a) “Single” is to be chosen when there is only one item comprising the sample against the particular product under Inspection/Certification. For example, “Common Salt” as per IS 797, “Domestic Gas Stoves for Use with LPG” as per IS 4246 or “Ceiling Roses” as per IS 371.
(b) “Composite” option is to be chosen when more than one item/parts of a sample has been
drawn against one sample. In other words, one sample is drawn in one/two/three/four and so on parts. For example, sample of Domestic Pressure Cooker comprises of two items, i.e. DPC for Mechanical Testing as per IS 2347 and Aluminium Drillings, for raw material testing as per IS 21). Similarly, for sample of Electric Iron, one piece is to be taken for testing as per IS 366 and other, as per IS 302 (P-2, S-3). Disinfectant Fluid Phenolic Type also requires one pack, for testing of all the requirements except keeping property test and other, for testing of keeping property as per IS 1061.
xii) In the last of the screen, four options are available; „Save‟, „Save and Continue‟, „Reset‟ and „Exit‟.
Use of these options is according to their names. Any of these can be used as per the need. 5. A. Please refer the Screenshot placed below, in case of "Single” sample and proceed as per the
details below:

4
i) First option is for “Sample Date” which is to be selected from the calendar. ii) Next is the option for mentioning “Batch No./Control Unit” of the sample. iii) “Date of Manufacturing” is to be selected from the calendar. This option is Not mandatory to
move further for entering the sample details in test request generation. iv) After this is the option to mention “Shelf Life/Expiry” which is to be mentioned in the space
provided. v) “Additional Requirement” is provided to mention the additional details of sample, if required
and available. vi) Below the option of additional requirement, is “Grade/Type/Category etc.” which is to be
mentioned in the given option. vii) Next is to mention the “Declared Value”, if any, of the sample. viii) The quantity drawn for the sample is to be mentioned in the option “Quantity”. ix) Next, option is “Test to be done”. This gives a dropdown list with nine options, i.e. Acceptance,
All, Chemical, Electrical, Mechanical, Microbiological, Others, Radioactive and Type. The option is to be chosen as per the requirements of the sample to be tested. On selecting the option “others”, the next box will be enabled, which will provide space to mention the information regarding test to be done, other than the rest of the 8.
5
x) Provision is also available to select combination of "tests to be done" by providing an extra box with the dropdown list of the same options of „tests to be done‟.
xi) “Nature of Packing” option is to be filled in with details of the type of packing used to pack the
sample. xii) “Manner of sealing” will provide a dropdown list with three options, i.e. “Waxed”, “Punched” and
“Only Signed”. Anyone of these may be chosen as per the case. xiii) Last column of the table prescribes for the name of the lab where the sample is to be sent. It will
provide two options as dropdown list, i.e. “BIS Labs” and “OSL”. Any of the options may be chosen as required.
xiv) It is to be noted here that the samples falling under Annex 1, as per Order No. BIS/DGO
(406)/2014 dated 31.07.2014, will have options for sending those to BIS labs only. For such Products/ISS, option of OSL will be disabled. However, the remaining products covered under Certification (other than those listed in Annex 1) will be having both the options (BIS labs/OSL) to choose. IS 14543, IS 15410 and IS 15609 has not been included in Annex 1 here as exception.
xv) Selecting the option BIS labs/OSL, a box next to it will give the option to choose further
destination of the sample.
xvi) In the last of the screen, “Save and Continue”, “Submit” and “Exit” can be selected as per the need.
xvii) On choosing the “Save and Continue”, the information entered in current screen will be saved
and next screen will appear. Please see third screen at S. No. 6 for further continuation.
B. Please refer the Screenshot placed below, in case of "Composite” sample and proceed as described below:

6
i) The first five options will be same as for “Single” sample and entries are to be made as per 5, A, i) to v) above, till “Additional Requirements”.
ii) Just below it, a table can be seen with headers, but “no records found” as content. Fields have
been provided below the table to enter the details of the respective items of a composite sample. These details will be displayed in the table after making requisite entries.
iii) Below the table is the option of “Part Description” wherein details/description of the particular
item/part is to be mentioned. iv)

7
v) Next is the option "Is part to be tested Against Different IS". Accordingly, "Yes" or "No" can be chosen.
vi) In case of selecting "Yes", the boxes for mentioning "IS No" will be enabled for making entry of IS No. of the respective part of the composite sample. It is to be filled in only when the testing of respective item/part is to be done as per IS No. other than as mentioned for main product at first screen. For example, in case of Domestic Pressure Cooker (IS 2347), the raw material testing is to be done as per IS 21.
vii) For each item/part, the respective "Grade/Type/Variety/Size/Class/Rating” is to be mentioned
in the given option. viii) Then, in the subsequent options, “Declared Value”, “Quantity”, “Tests to be done”, “Nature
of Packing”, “Manner of sealing” for respective item/part of the sample is to be entered. ix) Next to it is again the option of “Additional Information” wherein the additional details of the
part of the sample is to be provided, if required. x) Then, lab can be chosen in the same way as are 5, A, xiii) and xiv) above. xi) Entries in these options are to be made item by item for a composite sample. For example, if, for
a composite sample, three items are drawn, then details of one item is to be entered at a time, in all the fields available below the table.
xii) In this screen, next is the option “Add Sample Part”. On clicking it, the details which have been
entered for respective item of a composite sample will display in the table as under. xiii) The item no. of the sample will display as “Part No.” along with other details. The same
terminology will be used for item no. of a composite sample, i.e. “Part No.”, while generating the code of the sample.
xiv) As can be seen on the screen (Please refer the Screenshot placed below), the last column of
the table gives option for editing details of the specific sample item, if required.

8
xv) A small box with option “Add More Sample Part” will appear now below the table. It is to be
clicked for making entries for other items of the composite sample. xvi) Details of next part of the composite sample may further be entered, in the options available
below the table, the same way as for first item and “Add Sample Part” is to be clicked for adding the details in the table. Details of this item will be displayed in third row as Part No. “2”.
xvii) Again, in the last of the screen, four options are available in the last of the screen, i.e. “Save and
Continue”, “Reset” and “Exit”. Any of these can be chosen as per the need.
6. i) Next screen (Please refer the Screenshot placed below) will show the details of the samples entered so far with three options at the bottom, i.e. “Submit as Finalized”, “Save as Tentative” and “Edit”.

9
ii) By using the option “Submit as Finalized”, the test request will be sent to BIS Lab‟s / OSL‟s
portal. Message will appear “Test Request(s) successfully sent. Sample Code(s) is BO/IO/YYYYMMDD/
PR/NP/Sample No., Please click to view Test Request” (Please refer the
Screenshot). Message can be clicked to view a single, consolidated test request with details of all the parts of the sample entered. Hard copy of the test request can also be saved and print be taken here.

10
iii) However, if the option “Save as Tentative” is selected, test request will be saved as “Tentative Test Request” and message will appear “Test Request Tentatively Saved, Please Click to View Test Request”. Same may be clicked to view the tentative test request and the hard copy of the test request may be taken for further use.
iv) “Tentative Test Request” can also be accessed through option “Edit”. Process of accessing
and further using this option is mentioned at S. No. 7 below.
7. i) Next to “Add” option, at Brach Home Page, is the option “Edit” which gives further two options in dropdown list, “Edit Password” and “Tentative Test Requests” (Please refer the Screenshot placed below).
ii) On using the option “Tentative Test Requests”, screen will appear with details of all tentative
test requests in a tabulated manner (Please refer the Screenshot placed below).

11
iii) The sixth row of the table provides the option to “View” the tentative test request. The hard copy
of the same may be taken from here also for further use. iv) The eighth row gives two options, i.e. “Finalize” and “Cancel”. v) Using the option “Finalize” will take you to the screen at S. No. 4 ii) again, with all the details, as
was entered earlier for this particular sample. Changes may be made in the details already entered in these screens (as described at S. No. 4 and 5 above) as per the requirement. However, the third/final screen, at this stage, has only two options, i.e. “Finalize” or “Edit” for editing/finalizing the test request. (Please refer the Screenshot placed below).
vi) Clicking the option “Cancel” (Please refer 7 iv above) will lead to cancellation of this test request
and it will not appear further in the option “Edit”.
8. Before going for inspection, IO shall carry with him a system generated Test Request, by filling in the maximum informations available with IO, following the process as mentioned above. The IO shall take hard copy of this test request, duly filled (though incomplete) with him to the inspection site and need to be completed by mentioning the rest of the information manually. In case IO has access to BIS LIMS at inspection site, he/she could make entries at one go at site itself and generate completed test request for sending with the sample.
9. Thus, one copy of the completed test request, generated at the inspection site (Manually or online), is
to be sent along with the sample(s) to the respective laboratory(s). 10. If IO has no access to Lab Software system at inspection site, the IO shall complete the test request
online through BIS Lab Software within three days of the inspection and test request shall be

12
confirmed as finalized in Lab Software and data shall be frozen. No change shall be allowed to be made in the test request after finalization.
11. In case of any mistake/error in the test request observed subsequently by IO/BO, information in this
regard is to be provided to respective BIS Lab or OSL through e-mail, till provision for sending such information is made in the software.
12. i) The third option at “Branch Home Page” is “View/Search” option. Provision has been added in current version of LIMS to view all the details of the samples sent to BIS labs/ OSLs by BOs.
ii) The dropdown list of View/Search comprises “Search Test Reports”, “Samples sent to SCs”, “Samples sent to OSLs”, “Samples Not Yet Received by SCs”, “Samples Not Yet Received by OSLs”, “Samples Referred Back by SC”, “Samples Referred Back by OSL” and “Test Reports Uploaded by BIS labs/OSL” options (Please refer the Screenshot placed below)..
iii) “Search Test Reports” gives option to search the test reports by selecting various options available therein (Please refer the Screenshot placed below).

13
iv) Options “Samples sent to SCs” and “Samples sent to OSLs” can be selected to know the details of the samples sent to BIS labs and OSLs respectively at any point of time (Please refer the two successive Screenshots placed below).

14
v) Sixth column of the table (Please refer the above two Screenshots) has the provision to sort the samples according to their types. Eg, to know the „Verification Samples” sent by BO to BIS labs at any point of time, „VS‟ is to be mentioned in the space provided in the sixth column which will display details of all the „VSs‟ sent to BIS labs. Similarly, detailed information of types (AS, FS, VS, FS etc.) of samples sent to OSLs can also be made available through the system. Details of test request can also be viewed/printout be taken from “View” option in tenth column of both the screens.
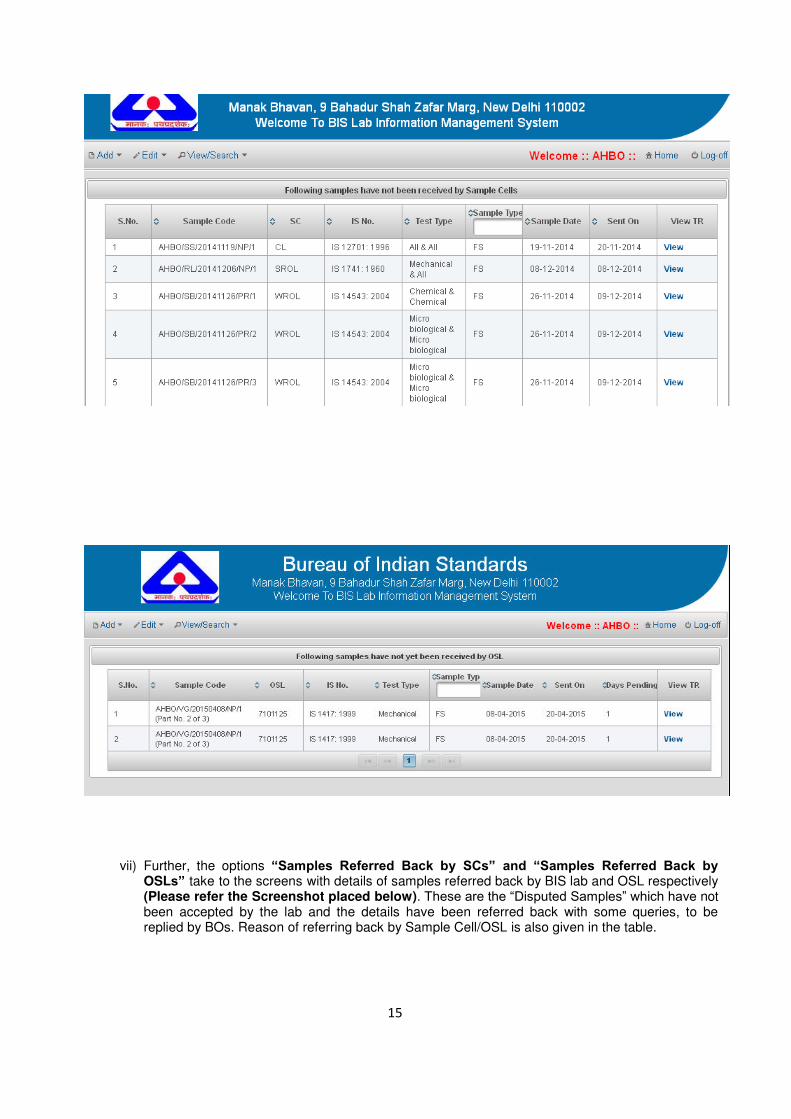
vi) The options “Samples Not Yet Received by SCs” and “Samples Not Yet Received by OSLs”, will give a screen showing details of samples which have not been received by BIS labs and Outside labs respectively, in a tabulated manner (Please refer the two successive Screenshots placed below). Once the respective BIS lab /OSL receive the samples physically at their end and make corresponding entries in the software, the sample will disappear from the table. Here also, the sixth and tenth columns have similar options to sort the types of the samples and to view the details of the test request of samples, as mentioned in 12 (v) above.
15
vii) Further, the options “Samples Referred Back by SCs” and “Samples Referred Back by
OSLs” take to the screens with details of samples referred back by BIS lab and OSL respectively (Please refer the Screenshot placed below). These are the “Disputed Samples” which have not been accepted by the lab and the details have been referred back with some queries, to be replied by BOs. Reason of referring back by Sample Cell/OSL is also given in the table.

16
viii) In the table, in last row (“Action”), the option “Reply” is available against each sample which is to
be used for replying by BO.
ix) On using the option “Reply”, a new screen (Please refer the Screenshot placed below) will appear with “Reason of Refer Back” and an empty box for stating the reason.

17
x) Reply is to be given in the provided space and “Submit” is to be clicked. Message will appear as “Reply Successfully Sent”.
xi) Last option “Test Reports uploaded by BIS lab/OSL” takes to the screen showing the samples drawn
by BOs against which test reports have been uploaded by BIS labs/OSLs along with their complete details. Here, the test reports can be downloaded (Please refer the Screenshot placed below). Provision has been in the current version of the software to display BO code of the sample by the system itself, on the upper right corner of first page of the test report. License No./Application No. of the Licensee/Applicant will also display beside the code of the sample minimizing the efforts of the BO to link the test report with the respective file.

18
Note: Though efforts have been made to give the complete step by step details of the procedure to be followed by IO/BO/BIS labs, along with the screenshots, however, in case of any difficulty/query, LPPD may be contacted.

1
ANNEX 2
PROCEDURE FOR USE OF BIS LAB INFORMATION MANAGEMENT SYSTEM (LIMS) BY BIS LABS
This is in continuation to the earlier version of the BIS Lab Software which was made functional w.e.f. 01.11.2014 for use by BOs and BIS Laboratories. Several modifications have been made and additional features have been added in the software after getting feedbacks from users to make the system more user-friendly and easy to operate. To mention specifically, some of the salient features of this software are mentioned a sunder:
Provision has been made for uploading of test report by BIS Labs and Outside Labs directly, against the samples received and tested by them. Hence, labs need not to enter the details of the sample, separately, while uploading the test reports.
Also, provision has been made to mark the BO code of the sample on the test report, automatically by the system. Therefore, labs need not manually link the sample code to the original BO code before uploading the test reports to BOs and the respective sample codes (both BO Code & Code Given By Lab) would be marked on the first page of the test report at the time of downloading the test reports by BOs.
Provision has also been made to mark the Licensee / Applicant No., to whom the sample belongs, on the test report along with BO code, at the time of downloading the test reports by BOs.
BOs can find out the total number of samples sent to any lab for a given period of time. Provision has also been made in the system to know „Types‟ of samples (FS, MS, AS, VS etc) dawn for a given period of time.
System is also entrusted with the facility to split the samples by Sample Cell, if the need arises to make the samples in parts and send it to different testing sections/labs.
In the current version of the software, outside labs have also been given access to receive the online test requests, uploading the test reports directly against the received test requests/samples and to perform other functions alike BIS labs.
For generation of test requests, provision has been added to sort the licensee/applicant name by selecting IS No. and Licensee/Applicant No.
Efforts have also been made to incorporate the provisions minimizing difficulties being faced by IOs/BOs using the software. Feature of mandatory requirement of „Date of manufacture‟ for generation of test request has been removed. In this improved version, BOs can view all the test requests generated at any point of time and also take printout of test requests. Further, till the time system progresses to link CMMS with BIS Lab Software, facility has been made to sort and count the particular type of sample (MS, FS, VS, AS, IN, CS etc.) drawn by the IOs/BOs at any point of time. Further, as decided by Competent Authority, functionality of „Sample Room‟ has been removed from BIS LIMS. Hence, „Sample Rooms‟ shall just function as holding place for samples under control of respective BOs and there shall be no link between sample Room and BIS Labs. The detail, step by step process of using this version of “BIS Lab Information Management System” by BIS Labs is described as under:
PROCEDURE OF ACCESSING THE SOFTWARE
1. Main page of „Lab Information Management System‟ can be opened by the following URL. http://59.177.180.144:8080/TRU/ 2. Login to the BIS Lab home page using „User Name‟ and „Password‟ given to the respective BIS labs.

2
3. “Lab Home Page” will open. It has five options on upper left side (Please refer the Screenshot placed below):
i) „Receive‟ ii) „Forward‟ iii) „Refer back‟ iv) „Test Reports‟ v) „Others‟
4. Drop down menu of „Receive‟ has two options (Please refer the Screenshot placed below). a) Samples from BO b) Samples from Other Testing Labs
5. a) “Samples from BO”
i) “Samples from BO” facilitates viewing the test requests sent by BOs to BIS labs. Details of test
requests/samples can be viewed in a tabulated manner (Please refer the Screenshot placed below). The last two columns of the table will display “View TR” and “Action” respectively.

3
ii) On receiving the samples physically at Sample Cell of the lab, further actions may be taken with
this option available here (e.g. acceptance of samples for further encoding and asking for clarification/query, in case of disputed sample etc.).
iii) Option “View” in the “View TR” column will open the Test Request of respective sample in a new
window. Copy of the test request can be used by BIS lab for further action at their end. iv) “Receive and Refer Back” in the “Action” column (last one) will give a screen displaying details of
the sample along with a blank box, meant for mentioning the discrepancy noticed by BIS lab and required to communicate to BO back (Please refer the Screenshot placed below). After mentioning the details of discrepancy associating with the sample in the provided space, the “Submit” option is to be click which will send the details back to the BO, through the system, for necessary action at their end. Message will appear as “Sample successfully referred back” (Please refer the successive Screenshot placed below).

4
v) If sample details are found to be “OK” by Sample Cell of BIS Labs, the particular sample is
required to be selected and Receipt & Accepted for further action. For the purpose, the small check box, displaying in the first column (Please refer the Screenshot placed below), is to be clicked which will enable selection of that sample.

5
vi) On clicking “Receive and Accept”, a new screen (Please refer the Screenshot placed below)
will appear showing the details of this sample. It has option of “Mode of Receipt”. By clicking the “Select Field” option, a dropdown list will appear having two options, i.e. “Transportation/Courier” and “Others” any of one may be selected as the case may be.
vii) “Other” option will facilitate enabling a box against “Select Field” wherein the details related to
“others” mode of transfer may be mentioned. viii) After clicking the option “Submit”, the sample will be accepted by the BIS lab, through the
system and this sample will now appear in the option “forward” as mentioned at 3 (ii) above.
b) “Samples from Other Testing Labs” are the samples which have been forwarded by other BIS labs to your lab for testing (Please refer the Screenshot placed below). Hence, same options are available for processing of these samples as with BO samples. Process will be same as described in 5 a. i) to viii).

6
6. Drop down menu of „Forward‟ has three options (Please refer the Screenshot placed below):
a) Forward BO Samples b) Forward Other Testing Labs Samples c) Already Forwarded samples
7. a) “Forward BO Samples”
i) “Forward BO Samples” will show a table with details of the samples received and accepted by
the lab (Please refer the Screenshot placed below).

7
ii) The second last column of the table shows the number of days, sample is pending with BIS lab.
Last column has the option “Forward” which will show a new screen with details of the original BO Code of the sample and automatically generated Lab Code against the BO code (Please refer the Screenshot placed below).
iii) Lab Code, so generated automatically, bears the coding format as “Name of BIS lab/Date of
forwarding of sample/Priority or Non-Priority sample/Sample No. of the day”. For example,

8
if CL encodes a „third‟ „priority sample‟ on 20.10.2014, it will be encoded as “CL/20141020/PR/03.
iv) System is also entrusted with the facility to split the samples by Sample Cell, if required. Option
is available to select „Single‟ or „Split‟ (If sample is to be forwarded as such, without making further parts, „Single‟ is to be selected and in case splitting/parting of sample is needed, „Split‟ is to be selected).Samples can be split into parts and sent to different testing sections/labs (Please refer the Screenshot placed below).
v) On selecting „Single‟, option will appear to select type of lab where the sample is to be sent. It
will provide three options as dropdown list, i.e. “Own Lab”, “BIS Lab” and “OSL”. Any of the options may be chosen.
vi) Selecting the option BIS labs/OSL will show a box having options for further destination of the
sample, i.e. list of either BIS labs or Outside labs.
vii) After choosing the destination lab, again four options are available in the last of the screen, i.e. “Submit”, „Reset‟ and “Exit”. Any of these can be selected as per the requirement.
viii) On selecting the “Submit” option, sample will be forwarded to destination lab (testing section)
through the system and message will appear “Sample successfully forwarded” along with the code of the sample which can be clicked to view the test request details forwarded to the testing section/lab (Please refer the Screenshot placed below).
ix) In case, sample is required to split, „Next‟ is to be clicked (Please refer the Screenshot placed below).

9
x) On selection of „Next‟, screen will appear (Please refer the Screenshot placed below) for entering the details of the part samples. Fields available therein will have the details filled in as mentioned by BO for main sample. Changes can be made in the entered data of the sample as per the requirement. For example, there will be some fields wherein the main sample and the part sample will have similar information (eg, date of manufacturing and date of expiry of PDW sample for Chemical testing and Microbiological testing). Whereas in case of other fields, information may be different, e.g., quantity or type/size/grade/variety of sample for mechanical testing and Chemical testing.

10
xi) „Encoded Sample Code‟ will be generated by system. Details can be entered/or remained same from „Batch No. / Control Unit No.' till „Nature of Packing‟. „IS No.‟ of the part sample can also be selected if the same is different from main sample.
xii) After selecting the IS No., the option “Test to be done” is to be selected. This gives a dropdown
list with nine options, i.e. Acceptance, All, Chemical, Electrical, Mechanical, Microbiological, Others, Radioactive and Type. The option is to be chosen as per the requirements of the sample to be tested. On selecting the option “others”, the next box will be enabled, which will provide space to mention the information regarding test to be done, other than the rest of the 8.
xiii) Provision is also available to select combination of "tests required to be done" by providing two
such boxes with the same options of „tests to be done‟. xiv) “Manner of sealing” will provide a dropdown list with three options, i.e. “Waxed”, “Punched”
and “Only Signed”. Anyone of these may be chosen as per the case. xv) Next is the option “Send to” wherein the destination lab of the part sample can be selected as
described at 7 a) v) and vi) above. Then „Add‟ is to be selected which will enable display of the details of the part sample in a table with „Edit‟ option in the last column (Please refer the Screenshot placed below).

11
xvi) „Edit‟ option can be used if any change is required in the details already entered for the part of the sample.
xvii) To add the details of next “Part Sample”, option available below the table, i.e. “Add another
Sample” is to be selected which will display the same screen as mentioned below 7 a) x) for entering the details of next „part sample‟. On selecting „add‟ option, the next part sample will also display in the table in next row (Please refer the Screenshot placed below).
12
xviii) In the same way, as many part samples can be added as required by selecting the various options described from 7 a) x) to xvii) above.
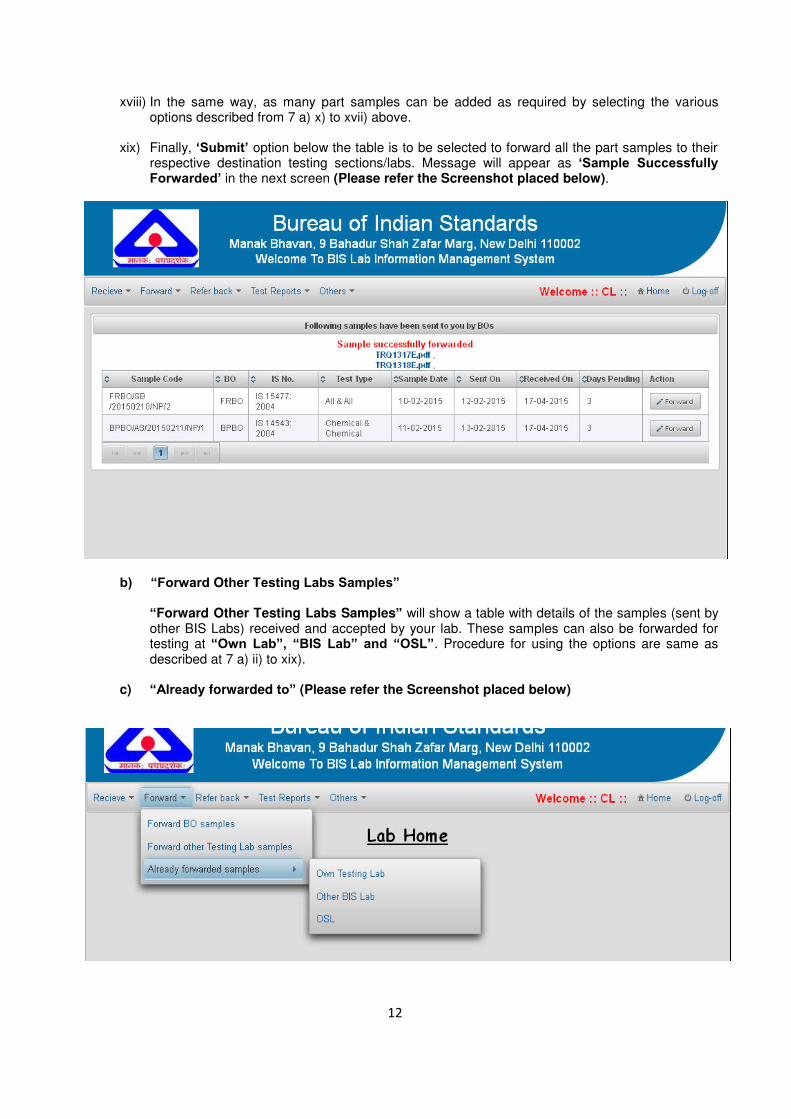
xix) Finally, „Submit‟ option below the table is to be selected to forward all the part samples to their
respective destination testing sections/labs. Message will appear as „Sample Successfully Forwarded‟ in the next screen (Please refer the Screenshot placed below).
b) “Forward Other Testing Labs Samples”
“Forward Other Testing Labs Samples” will show a table with details of the samples (sent by other BIS Labs) received and accepted by your lab. These samples can also be forwarded for testing at “Own Lab”, “BIS Lab” and “OSL”. Procedure for using the options are same as described at 7 a) ii) to xix).
c) “Already forwarded to” (Please refer the Screenshot placed below)

13
i) The details of the samples which have already been forwarded to i) Own Lab‟, ii) „BIS Labs‟ and iii) „OSLs‟ can be viewed here in a tabulated manner. Test Request can be viewed by „View TR‟ option (Please refer the Screenshots placed below).
8. Drop down menu of „Refer Back‟ has four options (Please refer the Screenshot placed below): a) Clarification provided by b) Clarification Still not provided by c) Clarification to be given by own Lab d) Clarification already given own Lab
9. Details of Screenshot 40:
a) “Clarification Provided By”
i) “Clarification provided by” again has two sources, i.e., „BO‟ and „Other Testing Labs‟
(Please refer the Screenshot placed below).

14
ii) On using the option “BO”, samples with clarifications as provided by the BO (Please refer the
Screenshot placed below) can be viewed. These will be the same samples which were received and referred back by your lab to BOs. Again, there will be details of samples in a table with option “Receive & Accept” which is to be selected and rest of the process will be same as prescribed from 5. A) v) to viii) above.
iii) On selecting “Other Testing Labs”, samples with clarifications as provided by the other testing
lab can be viewed. These will be the same samples which were received and referred back by your lab to other BIS Labs. Again, there will be details of samples in a table with last column having option “Receive & Accept”, as mentioned in the above screen [Please refer 9 a) ii)],which is to be selected and rest of the process will be same as prescribed from 5. a) v) to viii) above.
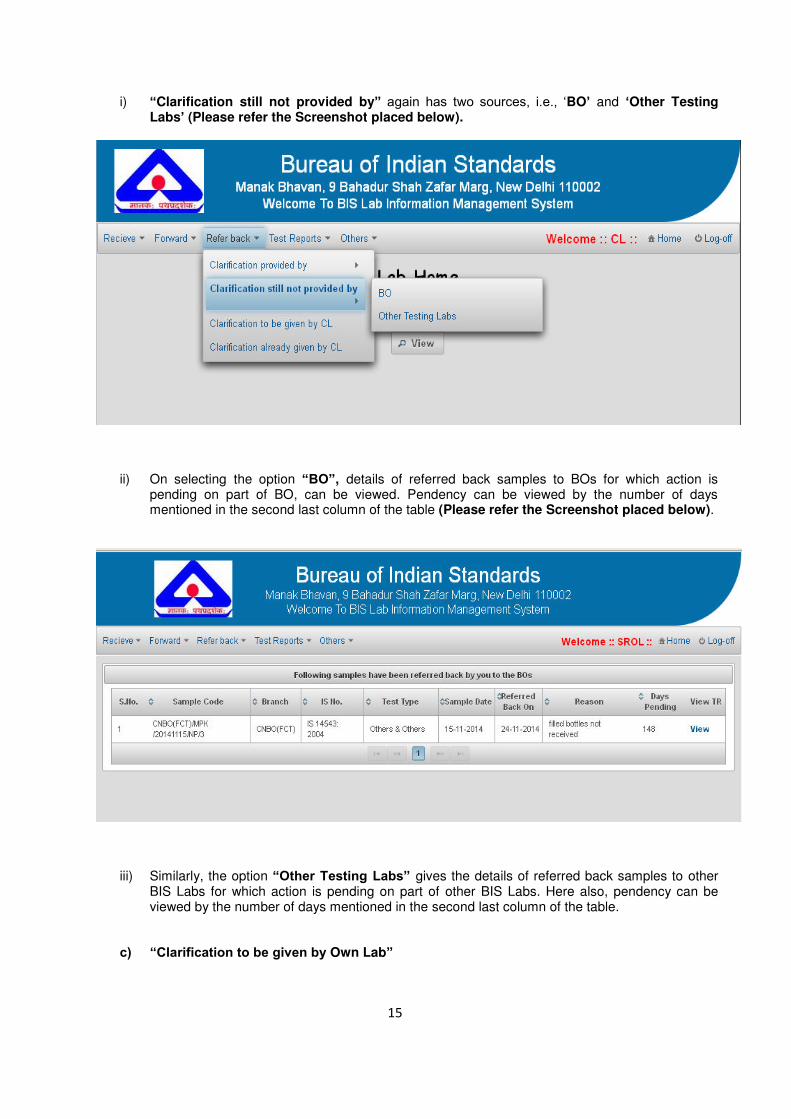
b) “Clarification still not provided by”
15
i) “Clarification still not provided by” again has two sources, i.e., „BO‟ and „Other Testing Labs‟ (Please refer the Screenshot placed below).
ii) On selecting the option “BO”, details of referred back samples to BOs for which action is
pending on part of BO, can be viewed. Pendency can be viewed by the number of days mentioned in the second last column of the table (Please refer the Screenshot placed below).
iii) Similarly, the option “Other Testing Labs” gives the details of referred back samples to other
BIS Labs for which action is pending on part of other BIS Labs. Here also, pendency can be viewed by the number of days mentioned in the second last column of the table.
c) “Clarification to be given by Own Lab”

16
i) “Clarification to be given by Own Lab, eg., CL, SROL, NROL etc.” shows the details of the samples which have been referred back by other BIS Labs and OSLs with some queries, to be replied by your lab. Such samples can be viewed in a table with the option to view the test request and „Reply‟ in the last column. Reason of referring the sample back by other testing lab is also given in the table (Please refer the Screenshot placed below).
ii) On selecting the option “Reply”, a new screen (Please refer the Screenshot placed below)
will appear with “Reason of Refer Back” and an empty box for stating the reason.
17
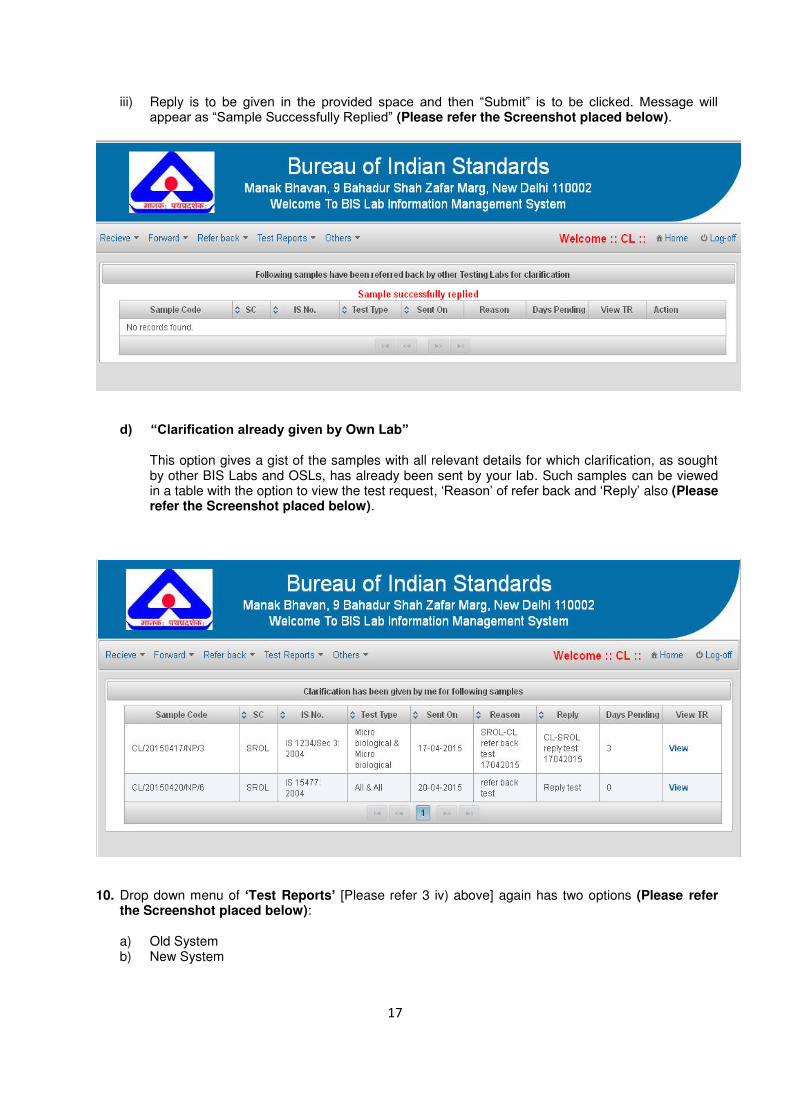
iii) Reply is to be given in the provided space and then “Submit” is to be clicked. Message will appear as “Sample Successfully Replied” (Please refer the Screenshot placed below).
d) “Clarification already given by Own Lab”
This option gives a gist of the samples with all relevant details for which clarification, as sought by other BIS Labs and OSLs, has already been sent by your lab. Such samples can be viewed in a table with the option to view the test request, „Reason‟ of refer back and „Reply‟ also (Please refer the Screenshot placed below).
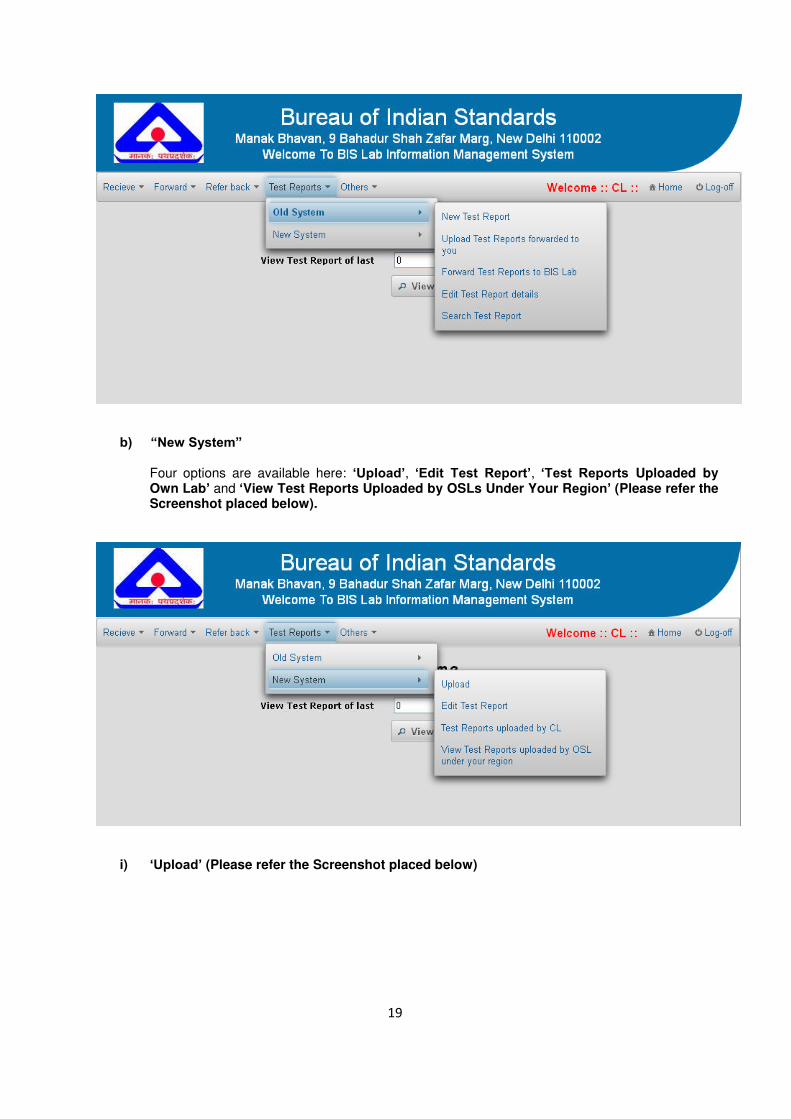
10. Drop down menu of „Test Reports‟ [Please refer 3 iv) above] again has two options (Please refer the Screenshot placed below): a) Old System b) New System

18
Note: i) In the current version of the software, there are two systems for uploading the test reports, the „Old System‟ and the „New System‟. „Old System‟ consists of provisions where the data w.r.t. to the samples, is to be entered manually by the labs and then test reports to be uploaded. So, this system would be used for those samples / test requests which have NOT been sent by BOs or BIS Labs through the system (online). This system was already being used by labs and kept intact for uploading the test reports. ii) The „New System‟ would be used for the test requests/samples which have been sent by BOs or BIS Labs through the system (online). This system consists of provisions where the details of the samples are already available in the system and lab is to upload the test reports against the sample/test request directly. Therefore, the samples sent by BOs /BIS Labs, online, after 01.11.2014 would thus be available in the system and their test reports may be uploaded directly under new system."
11. a) “Old System”
It has five options, i.e., „New Test Report‟, „Upload Test Report Forwarded to You‟, „Forwarded Test Reports to BIS Labs‟, „Edit Test Report Details‟ and „Search Test Report‟ (Please refer the Screenshot placed below). All the Labs (BIS as well Outside Labs) are already using this part of software for test report processing. No change has been made here and hence detailed procedure for using these options is not being described.
19
b) “New System”
Four options are available here: „Upload‟, „Edit Test Report‟, „Test Reports Uploaded by Own Lab‟ and „View Test Reports Uploaded by OSLs Under Your Region‟ (Please refer the Screenshot placed below).
i) „Upload‟ (Please refer the Screenshot placed below)

20
A. Here all the samples which have been forwarded for testing in own testing sections of your lab will be displayed in a table with all the relevant details of samples. Test reports can be uploaded against all such samples by selecting the option „Upload‟ in the last column.
B. Screen will appear with details of the sample and space for mentioning Test Report Date and Test Report No. against options “TR Date” and “TR No.” respectively (Please refer the Screenshot placed below). Test report can be uploaded by browsing the file at “Upload File Report” and “Submit”. Size of the test report has been restricted to 2 MB. Hence, efforts should be made to choose such options, for scanning the test report, so that size should not reach beyond prescribed limit.
Note: Please ensure that test reports, duly signed, to be uploaded in the system.

21
C. Message will appear after successful uploading of the test report on the main screen as „Report has successfully uploaded‟ with code of the sample (Please refer the Screenshot placed below).
ii) „Edit Test Report‟ (Please refer the Screenshot placed below)
A. Gives option to edit the reference details of the test report, if required by the lab. Lab Code Number of the sample is to enter and „Search‟ is to be selected. Details of the samples can be edited by mentioning TR Date, TR No. and selecting „Revised‟ or „Amended‟ from „File Type‟, as per the case. New test report can be uploaded by selecting „Upload New PDF File‟ and „Submit‟.

22
B. Message will appear „Test report Updated successfully‟ (Please refer the Screenshot
placed below).
iii) „Test Reports Uploaded by Own Lab‟ (Please refer the Screenshot placed below) Details of test reports uploaded by your lab can be viewed here. Sorting can also be done by the types of the concerned column details.

23
iv) „View Test Reports Uploaded By OSLs Under Your Region‟ (Please refer the Screenshot placed below)
A. Please refer the office order BIS/DGO (406)/2014 dated 31.07.2014 and the circular LPPD/5:1 dated 13.02.2015. All the BIS Labs will receive a copy of test reports (of samples) from OSLs under their jurisdiction, for the samples which have been forwarded by BOs directly to such OSLs. Similarly, BIS Labs will also receive a copy of test reports of such samples which have been forwarded by them for testing to other BIS labs/Outside Labs.
B. Hence, BIS Labs need NOT to forward the test reports of such samples to BOs which
have NOT been tested by their own testing sections. Such test reports will automatically be forwarded to BOs once uploaded by concerned testing lab (Other BIS Lab or OSL).
C. The option „View Test Reports Uploaded By OSLs Under Your Region‟‟ facilitates the list and details of such test reports which have been forwarded by OSLs to BOs directly. These will be test reports of the samples which have not been forwarded by your lab to OSLs or other BIS labs. However, the test reports have been made available either for the purpose of payment of testing charges or monitoring the performance of OSLs under your region.
Note: W.r.t. to EROL, a Copy of Test Reports of samples, sent by PBOL and GBOL to BOs, shall also be available on their portal.

24
12. On Lab Home Page, next option is “Others”. It further has options „IS Test Details‟ and „Edit
Password‟ which can be used for entering details of „Unified Test Report Formats‟ and editing password respectively (Please refer the Screenshot placed below).
Note: Though efforts have been made to give the complete step by step details of the procedure to be followed by IO/BO/BIS labs, along with the screenshots, however, in case of any difficulty/query, LPPD may be contacted.