building up 3:2:1zone defence
TRANSCRIPT

BUILDING UP 3:2:1 ZONE
DEFENCE
Zoltan Marczinka
IHF / EHF Lecturer

About the learning procedure…
1. The characteristics of 3:2:1 Zone Defence
2. Defence positions and task of individual defenders
3. The process of building up 3:2:1 Zone defence, step by step
4. Summary: the basic principles and the rules of 3:2:1 Zone defence
5. Variations of 3:2:1 Zone defence
6. Examples of effective 3:2:1 Zone defence - practice
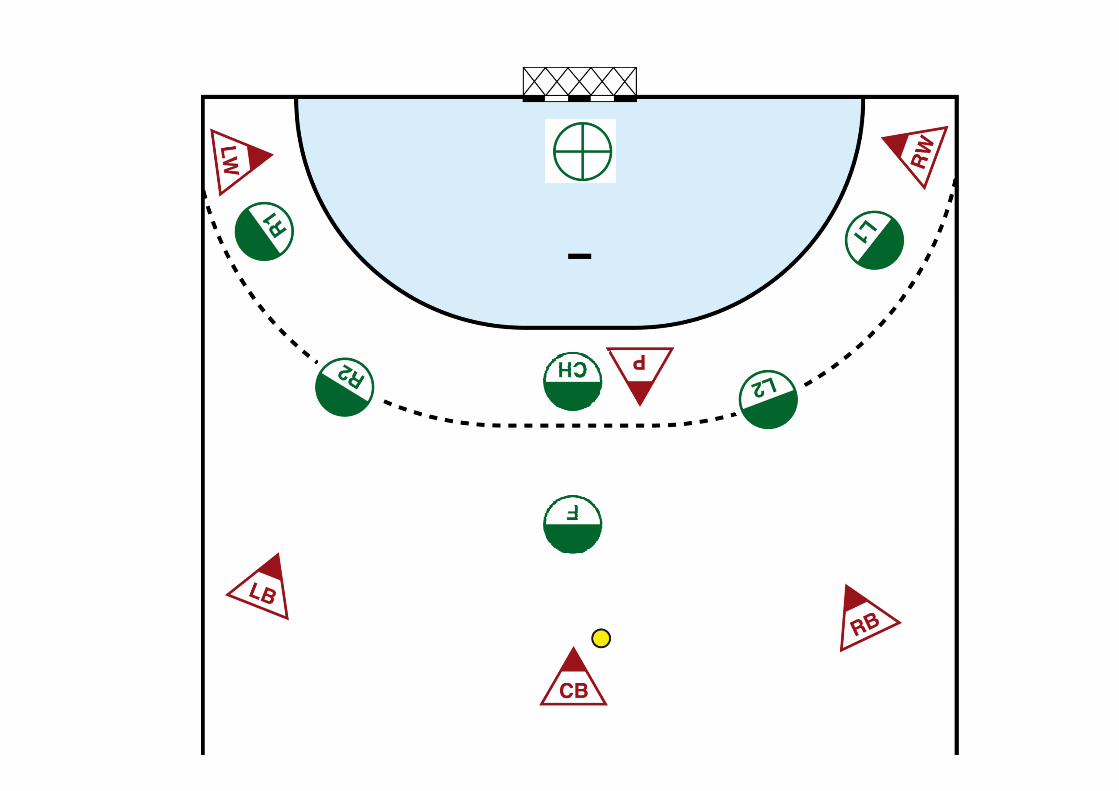


R1
R2 CH
F
L2
L1

R1 L1
Tasks of the No.1 defender:
o controls his winger with the ball within his own area, 1vs1
o helps to his No.2 defender teammate, on the border of his area
o stops or divert the winger running-in, by checking
Tasks of the No.1 defender:
o controls his winger with the ball within his own area, 1vs1
o helps to his No.2 defender teammate, on the border of his area
o stops or divert the winger running-in, by checking

R2 L2
Tasks of the No. 2 defender:
o checks the attacker if he moves with the ball towards the wing and
o passes him on to the F defender if he moves towards the centre
o controls the area and/or the pivot left behind by the CH defender

CH
Tasks of the Centre Half defender:
o takes on the Pivot, or a player moves to the goal-area line
o guides the whole defence
o controls the area and/or the pivot left behind by No.2 defender

F
Tasks of the Forward defender:
o takes on the attacker with the ball if he moves towards the centre
o frustrate the attack organisation in the middle section with good
positioning
o try to steel the ball by intercepting the pass

Building up 3:2:1 zone defence (Level I.)
Level I. (5 attackers vs. 6 defenders – position play)
1.When passing from side to side
� LW with ball : R1 controls him 1 on 1, R2 secures the area behind
� LB with ball : R2 moves out, R1 secures the area behind and F secures towards the centre
� CB with ball : F moves out, L2 and R2 secure the area behind, on both sides
� RB with ball : L2 moves out, F secures towards the centre and R1 secures the area behind
� RW with ball : L1 controls him 1 on 1, L2 secures the area behind
Defending triangle:
always the closest defender controls the attacker with the ball, while the two neighbouring defenders secures the area
2. Waving from wing to wing and then applying counter and long passes
� After waving, RW passes the ball to LW : the whole defence wall moves towards the direction of passing
� CB passes back to LB : R2 controls LB, while F secures the area from the centre and R1 from behind
� LB passes to RW : L1 controls RW attacks the goal, while L2 secures the area towards the centre

Building up 3:2:1 zone defence (Level II.)
Level II. (6 attackers vs. 6 defenders – position play with Pivot)
1.Pivot moves along the goal-area line
� LB with the ball: R2 controls LB, then moves back, secures the area behind, while CH controls the Pivot
� CB with the ball: F controls CB, then moves back, secures the area behind, while CH controls the Pivot
� RB with the ball: L2 controls RB, then moves back, and secures the area behind, while CH controls the Pivot
Defending square:
always the closest defender controls the attacker with the ball, while the two neighoruing defenders secures the area, then CH covers the Pivot
(For example when CB has the ball: F controls CB, R2 moves back towards the direction of the ball passed and secures the area, L2 also secures defensively and CH controls the Pivot
2. Pivot moves out from the goal-area line
� LB with the ball: Pivot moves to block R2 controls LB, CH stays on the line, secures the area behind, and takes on a player
running – in (LB or CB)

Building up 3:2:1 zone defence (Level III-IV.)
Level III. (6 attackers vs. 6 defenders – backs changing position)
1.Centre Back delivers the ball for Left or Right Back
� CB with ball changes position with LB: R2 takes on the CB, F takes on the LB while CH secures the Pivot
2. Ball-trap from the wing
� CB with ball changes position with LB: R2 takes on the CB, F takes on the LB while CH secures the Pivot
• If the long pass is foreseen and the Pivot is on the other side, L2 defender can fall-out for the ball
• If the long pass is foreseen and the Pivot is on the same side, L2 defender starts back but RW can fall-out for the ball
Level IV. (6 attackers vs. 6 defenders – winger/backs run-in)
1.Winger runs-in
� LW runs-in when the ball is on the other side: L2 takes on LW, CH takes on the Pivot while R1 falls out LB
2. Back court player runs-in
� LB runs-in when the ball is on the other side: L2 takes on LB, CH takes on the Pivot

Summary: the basic principles and the rules of 3:2:1
• Each defender should follow and control his attacker with the ball, within his area
• Always one defender falls out, while the neighbouring teammates protect the area next to or behind him
• The whole defence should shift towards the direction of the ball passed, as a whole unit
• The defenders should not change position, rather taking over and passing on within their defending zone
• The pivot should be cut off from receiving the ball from the back-court
• Don’t let be blocked by the pivot or an attacker runs into the defence wall
• Don’t leave the goal-area line too far out, unless there is a danger of scoring
• The forward defender should neutralise at least one attacker, and take the impetus of the backs away
• The Centre Half defender should not fall out, unless is very necessary
• Ball should not be passed behind the Forward defender
• Defenders in different defence line should keep contact with each other
• Forward defender should move between the goalposts, unless checking

Variations of 3:2:1 Zone Defence1. Closed zone
• Flexible and easy to transfer to other forms of zone defence(5:1,3:3,4:2)
• Tight and compact in the middle (defending square)
• Effective against through shots (defenders are close to the backs)
• Offensive and well divided in depth (three defence line)
• Always 2 defender for 1 attacker with the ball (double guarding)

R1
R2CH
F
L2
L1

R1
R2CH
F
L2
L1


ESP 3:2:1
•Ball oriented
•Offensive behaviour
•Eliminates long distance shots
•Focusing on the middle
•Well coordinated

Variations of 3:2:1 Zone Defence
2. Open zone
• Frustrates attack organisation (at it’s initial stage)
• Eliminates through shots (keeping shoters far from the goal)
• Very offensive and extensive in depth (half court pressing)
• Forces the attackers to make technical mistakes (ball loss)

R1
R2
CH
F
L2
L1

R1
R2
CH
F
L2
L1


FRA 3:2:1
• Ball oriented
• Very offensive behaviour
• Eliminates attack organisation at backcourt
• Focusing on the player with the ball
• Put pressure on the attackers