building owasp zap using eclipse ide for java… pen … · building owasp zap using eclipse ide...
TRANSCRIPT
Copyright © 2012 Taddong S.L. www.taddong.com 1
Building OWASP ZAP Using Eclipse IDE for Java… Pen-Testers
Author: Raul Siles (raul @ taddong.com) Taddong – www.taddong.com Version: 3.0 Date: December 17, 2012
This guide details the process required to build the OWASP Zed Attack Proxy (ZAP)1 from source
code using the Eclipse IDE for Java Developers. The guide has been developed for Windows 7 but the
Eclipse build process should be very similar for other operating systems, such as Linux or Mac OS X.
The official version of this document is available in PDF format for easy download, distribution, and
use at Taddong’s Lab: http://www.taddong.com/en/lab.html.
The original guide detailing how to build ZAP is available from the OWASP ZAP project Wiki:
http://code.google.com/p/zaproxy/wiki/Building.
Changelog: v3.0 (from version 2.0 of this guide)
Significant document update, including:
o New requirements (updates): Java 7 (JDK 1.7.10), Subclipse v1.8.16, and Eclipse Juno
(v4.2) SR1 (including multiple screenshots updates).
o Guide fully updated for Java 7 (JDK 1.7.10), as the current ZAP source code trunk (as
of September 2012) requires Java 7 for the build process.
o Added link to the full list of OWASP ZAP extensions currently available.
1 https://www.owasp.org/index.php/OWASP_Zed_Attack_Proxy_Project
Building OWASP ZAP Using Eclipse IDE for Java… Pen-Testers (v3.0)
Copyright © 2012 Taddong S.L. www.taddong.com 2
Contents
Software Requirements .......................................................................................................................... 3
Installing the Software ............................................................................................................................ 4
Starting Eclipse ........................................................................................................................................ 4
Checking the Java Environment (JRE or JDK) Detected by Eclipse .......................................................... 5
Installing Subclipse .................................................................................................................................. 6
Adding the ZAP SVN Repository to Eclipse ............................................................................................. 7
Creating the ZAP Project in Eclipse ......................................................................................................... 8
Adding the ZAP Project Libraries to the Build Path .............................................................................. 10
Configuring the ZAP Runtime Environment in Eclipse .......................................................................... 12
Building ZAP .......................................................................................................................................... 15
ZAP Project Development ..................................................................................................................... 16
Updating the Local ZAP Working Copy from SVN using Eclipse ........................................................... 16
Committing Your Local ZAP Changes to SVN using Eclipse ................................................................... 17
OWASP ZAP Extensions ......................................................................................................................... 19
Appendix: Java Version Updates and Eclipse ........................................................................................ 20
Building OWASP ZAP Using Eclipse IDE for Java… Pen-Testers (v3.0)
Copyright © 2012 Taddong S.L. www.taddong.com 3
Software Requirements The following software is required to obtain the latest OWASP ZAP (ZAP from now on) source code
revision from the official SVN repository, and build a working copy of ZAP using Eclipse:
Base operating system: Windows 7 (64 bits)
Java Development Kit (JDK) 7 Update 10 - 32 bits:
http://www.oracle.com/technetwork/java/javase/downloads/
OWASP Zed Attack Proxy (ZAP): https://code.google.com/p/zaproxy/
OWASP ZAP SVN repository: https://code.google.com/p/zaproxy/source/checkout
svn co https://zaproxy.googlecode.com/svn/trunk zaproxy-read-only
Eclipse IDE for Java Developers Juno SR1 (v4.2 – 32 bits) 2:
http://www.eclipse.org/downloads/packages/eclipse-ide-java-developers/junosr1
Subclipse (v1.8.16): http://subclipse.tigris.org
NOTE: The Java Development Kit (JDK) and Eclipse must use the same version architecture, 32 or 64 bits, independently of the OS version used. The proposed environment makes use of the 32 bits version of Java and Eclipse over Windows 7 64 bits in order to be able to make use of the Java smartcard capabilities, but other combinations might work.
If you find any improvement to this guide, or have any related comment to make it a more valuable resource for the web application development and pen-testing communities, do not hesitate to contact me and contribute to future versions of this “Building OWASP ZAP…” guide.
2 Older versions of Eclipse: http://wiki.eclipse.org/Older_Versions_Of_Eclipse
Building OWASP ZAP Using Eclipse IDE for Java… Pen-Testers (v3.0)
Copyright © 2012 Taddong S.L. www.taddong.com 4
Installing the Software Install the Java Development Kit (JDK) following the default Windows installation. Install Eclipse by
uncompressing the official ZIP file and placing the “eclipse” folder in the selected destination
location, such as “C:\eclipse”.
NOTE: This version of the guide uses Subclipse, integrated within the Eclipse IDE, to retrieve a copy of the latest ZAP source code revision, available at the Google Code URL detailed on the “Software Requirements” section. The installation of Subclipse is detailed in the “Installing Subclipse” section.
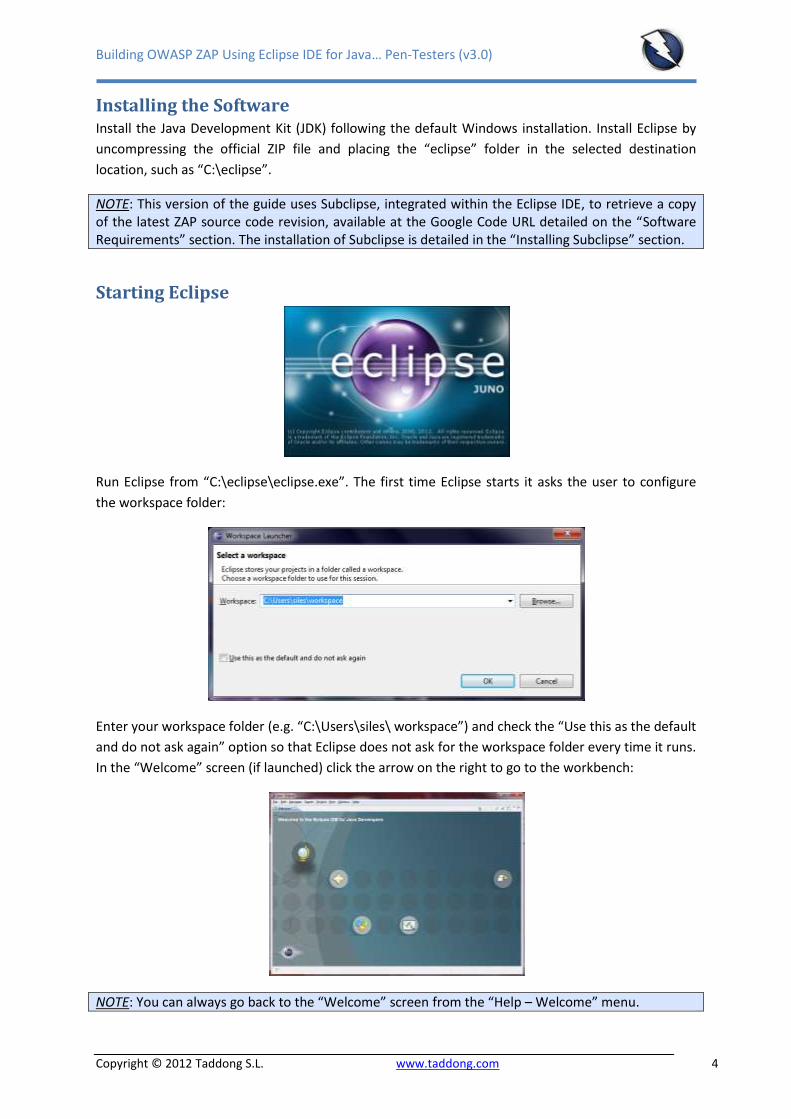
Starting Eclipse
Run Eclipse from “C:\eclipse\eclipse.exe”. The first time Eclipse starts it asks the user to configure
the workspace folder:
Enter your workspace folder (e.g. “C:\Users\siles\ workspace”) and check the “Use this as the default
and do not ask again” option so that Eclipse does not ask for the workspace folder every time it runs.
In the “Welcome” screen (if launched) click the arrow on the right to go to the workbench:
NOTE: You can always go back to the “Welcome” screen from the “Help – Welcome” menu.
Building OWASP ZAP Using Eclipse IDE for Java… Pen-Testers (v3.0)
Copyright © 2012 Taddong S.L. www.taddong.com 5
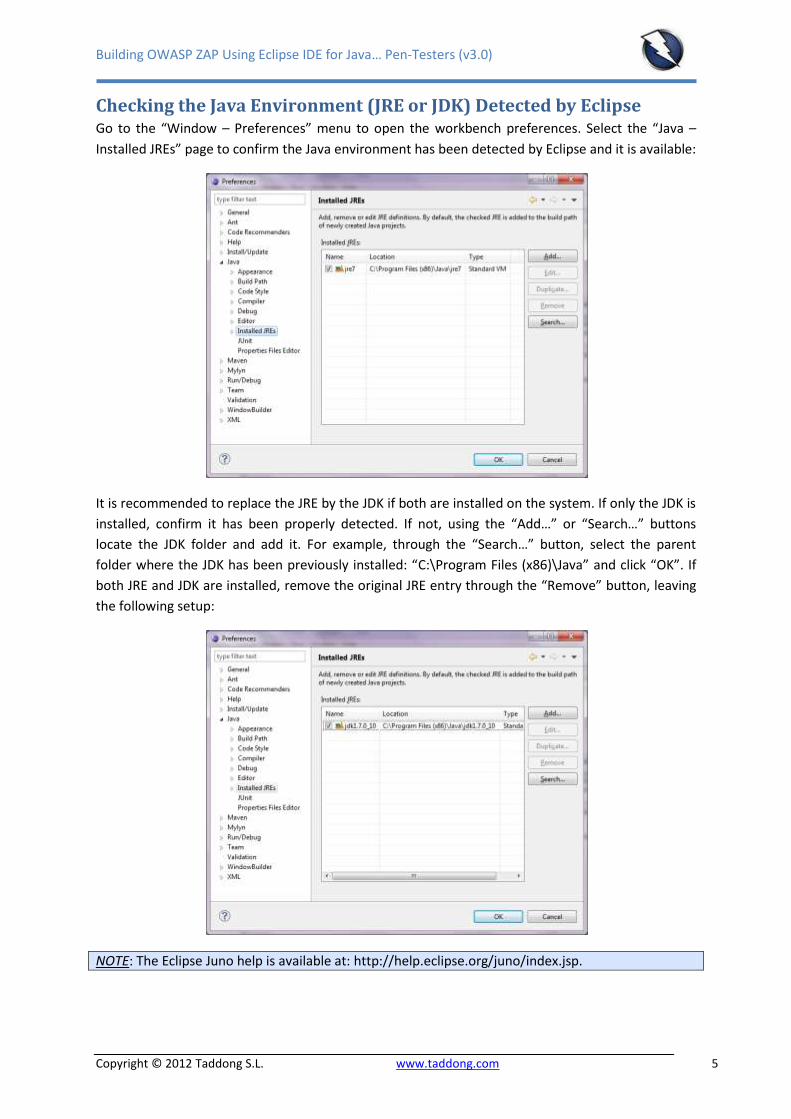
Checking the Java Environment (JRE or JDK) Detected by Eclipse Go to the “Window – Preferences” menu to open the workbench preferences. Select the “Java –
Installed JREs” page to confirm the Java environment has been detected by Eclipse and it is available:
It is recommended to replace the JRE by the JDK if both are installed on the system. If only the JDK is
installed, confirm it has been properly detected. If not, using the “Add…” or “Search…” buttons
locate the JDK folder and add it. For example, through the “Search…” button, select the parent
folder where the JDK has been previously installed: “C:\Program Files (x86)\Java” and click “OK”. If
both JRE and JDK are installed, remove the original JRE entry through the “Remove” button, leaving
the following setup:
NOTE: The Eclipse Juno help is available at: http://help.eclipse.org/juno/index.jsp.
Building OWASP ZAP Using Eclipse IDE for Java… Pen-Testers (v3.0)
Copyright © 2012 Taddong S.L. www.taddong.com 6
Installing Subclipse If you plan not only to use ZAP from SVN but to contribute to the ZAP project, by adding new
features or capabilities to this tool or fixing known issues3, the ZAP project lead (psiinon)
recommends using Subclipse (http://subclipse.tigris.org), a plug-in providing support for Subversion
(SVN) within the Eclipse IDE. Subclipse allows you to easily integrate the current SVN ZAP revision in
Eclipse and be able to manage source code changes from within Eclipse.
NOTE: The current Subclipse download and install instructions from within the Eclipse IDE (for v3.2+) are available at http://subclipse.tigris.org/servlets/ProjectProcess?pageID=p4wYuA.
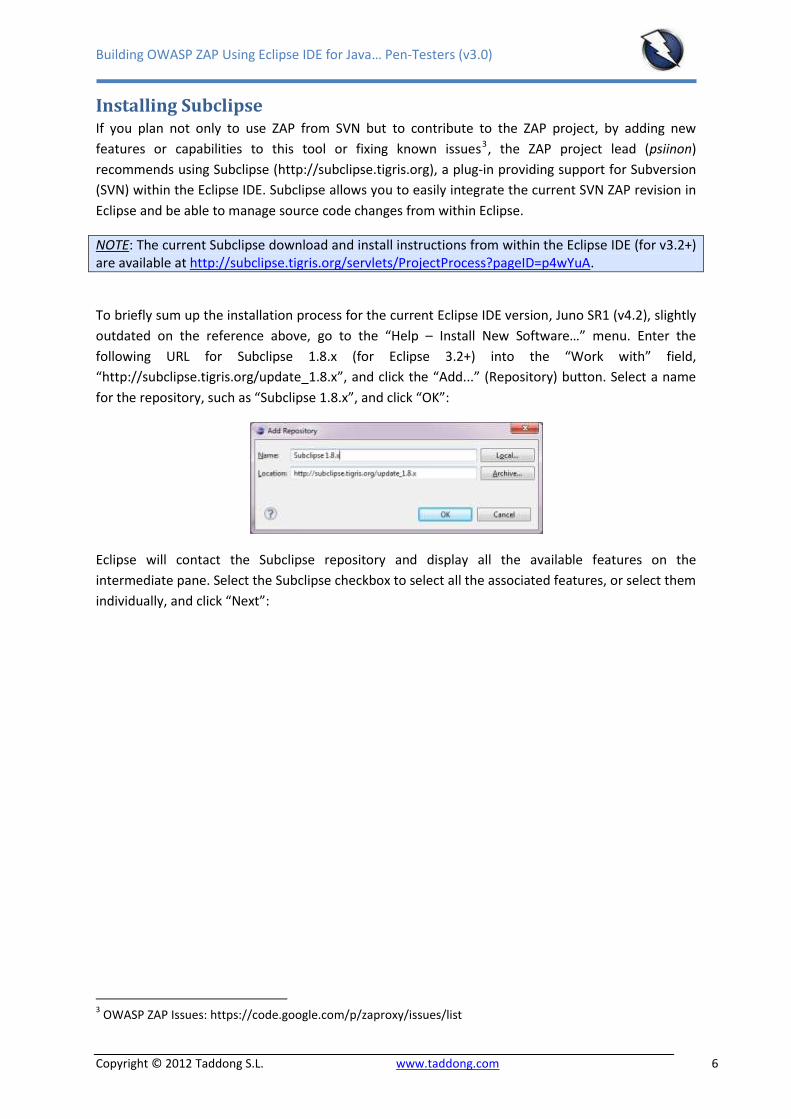
To briefly sum up the installation process for the current Eclipse IDE version, Juno SR1 (v4.2), slightly
outdated on the reference above, go to the “Help – Install New Software…” menu. Enter the
following URL for Subclipse 1.8.x (for Eclipse 3.2+) into the “Work with” field,
“http://subclipse.tigris.org/update_1.8.x”, and click the “Add...” (Repository) button. Select a name
for the repository, such as “Subclipse 1.8.x”, and click “OK”:
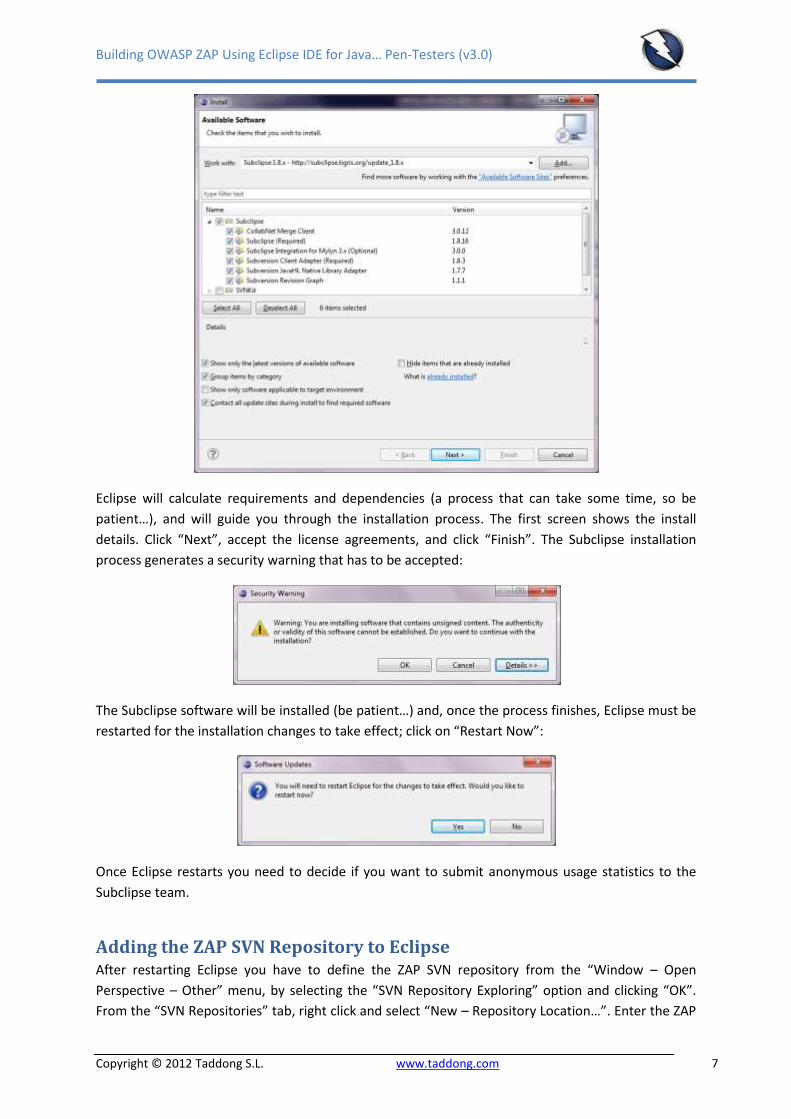
Eclipse will contact the Subclipse repository and display all the available features on the
intermediate pane. Select the Subclipse checkbox to select all the associated features, or select them
individually, and click “Next”:
3 OWASP ZAP Issues: https://code.google.com/p/zaproxy/issues/list
Building OWASP ZAP Using Eclipse IDE for Java… Pen-Testers (v3.0)
Copyright © 2012 Taddong S.L. www.taddong.com 7
Eclipse will calculate requirements and dependencies (a process that can take some time, so be
patient…), and will guide you through the installation process. The first screen shows the install
details. Click “Next”, accept the license agreements, and click “Finish”. The Subclipse installation
process generates a security warning that has to be accepted:
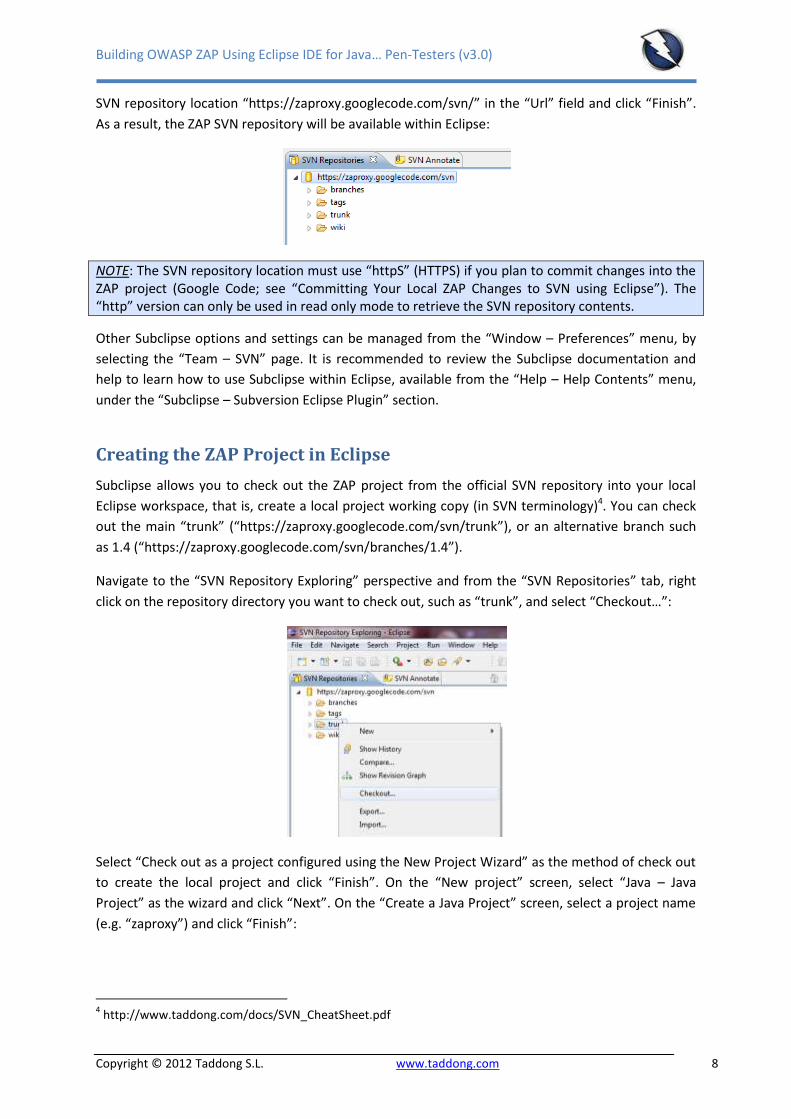
The Subclipse software will be installed (be patient…) and, once the process finishes, Eclipse must be
restarted for the installation changes to take effect; click on “Restart Now”:
Once Eclipse restarts you need to decide if you want to submit anonymous usage statistics to the
Subclipse team.
Adding the ZAP SVN Repository to Eclipse After restarting Eclipse you have to define the ZAP SVN repository from the “Window – Open
Perspective – Other” menu, by selecting the “SVN Repository Exploring” option and clicking “OK”.
From the “SVN Repositories” tab, right click and select “New – Repository Location…”. Enter the ZAP
Building OWASP ZAP Using Eclipse IDE for Java… Pen-Testers (v3.0)
Copyright © 2012 Taddong S.L. www.taddong.com 8
SVN repository location “https://zaproxy.googlecode.com/svn/” in the “Url” field and click “Finish”.
As a result, the ZAP SVN repository will be available within Eclipse:
NOTE: The SVN repository location must use “httpS” (HTTPS) if you plan to commit changes into the ZAP project (Google Code; see “Committing Your Local ZAP Changes to SVN using Eclipse”). The “http” version can only be used in read only mode to retrieve the SVN repository contents.
Other Subclipse options and settings can be managed from the “Window – Preferences” menu, by
selecting the “Team – SVN” page. It is recommended to review the Subclipse documentation and
help to learn how to use Subclipse within Eclipse, available from the “Help – Help Contents” menu,
under the “Subclipse – Subversion Eclipse Plugin” section.
Creating the ZAP Project in Eclipse
Subclipse allows you to check out the ZAP project from the official SVN repository into your local
Eclipse workspace, that is, create a local project working copy (in SVN terminology)4. You can check
out the main “trunk” (“https://zaproxy.googlecode.com/svn/trunk”), or an alternative branch such
as 1.4 (“https://zaproxy.googlecode.com/svn/branches/1.4”).
Navigate to the “SVN Repository Exploring” perspective and from the “SVN Repositories” tab, right
click on the repository directory you want to check out, such as “trunk”, and select “Checkout…”:
Select “Check out as a project configured using the New Project Wizard” as the method of check out
to create the local project and click “Finish”. On the “New project” screen, select “Java – Java
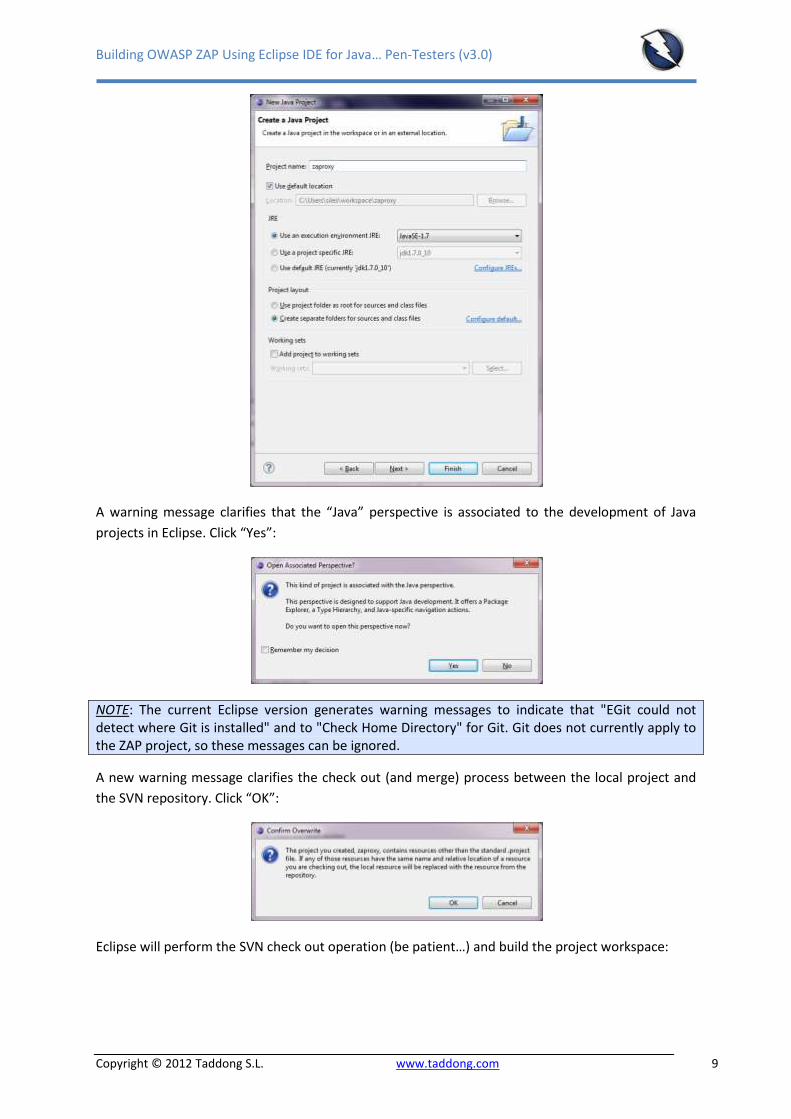
Project” as the wizard and click “Next”. On the “Create a Java Project” screen, select a project name
(e.g. “zaproxy”) and click “Finish”:
4 http://www.taddong.com/docs/SVN_CheatSheet.pdf
Building OWASP ZAP Using Eclipse IDE for Java… Pen-Testers (v3.0)
Copyright © 2012 Taddong S.L. www.taddong.com 9
A warning message clarifies that the “Java” perspective is associated to the development of Java
projects in Eclipse. Click “Yes”:
NOTE: The current Eclipse version generates warning messages to indicate that "EGit could not detect where Git is installed" and to "Check Home Directory" for Git. Git does not currently apply to the ZAP project, so these messages can be ignored.
A new warning message clarifies the check out (and merge) process between the local project and
the SVN repository. Click “OK”:
Eclipse will perform the SVN check out operation (be patient…) and build the project workspace:
Building OWASP ZAP Using Eclipse IDE for Java… Pen-Testers (v3.0)
Copyright © 2012 Taddong S.L. www.taddong.com 10
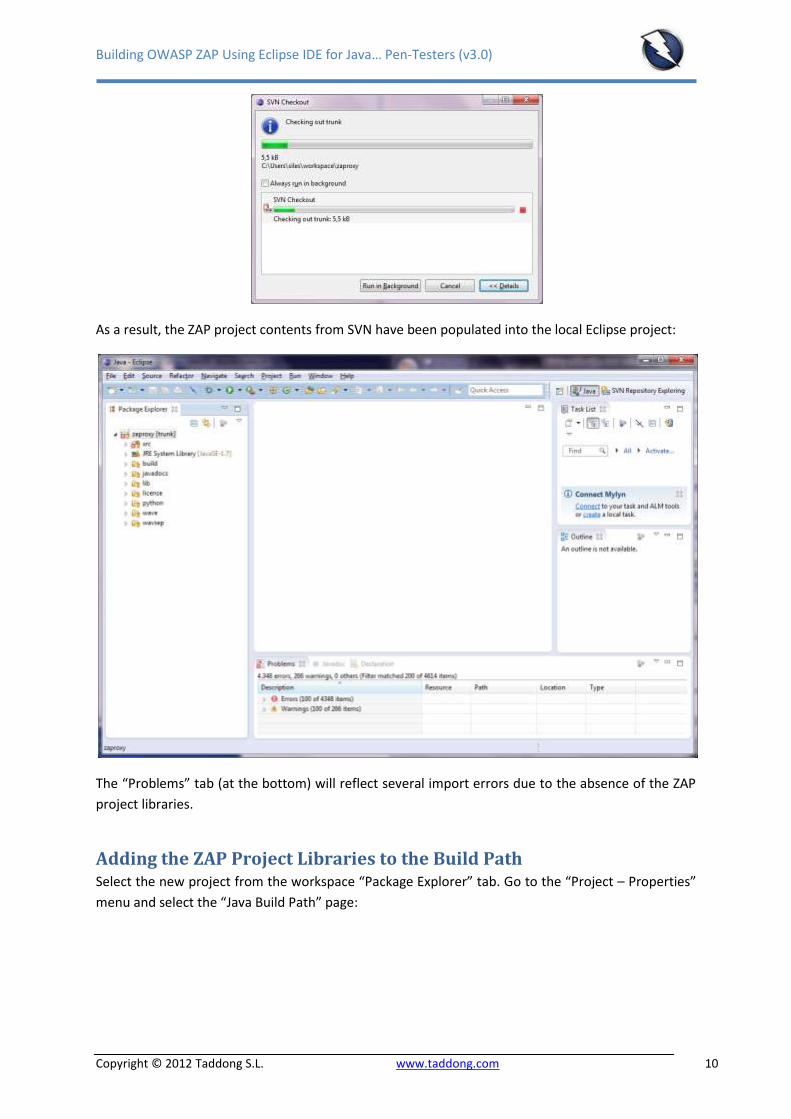
As a result, the ZAP project contents from SVN have been populated into the local Eclipse project:
The “Problems” tab (at the bottom) will reflect several import errors due to the absence of the ZAP
project libraries.
Adding the ZAP Project Libraries to the Build Path Select the new project from the workspace “Package Explorer” tab. Go to the “Project – Properties”
menu and select the “Java Build Path” page:
Building OWASP ZAP Using Eclipse IDE for Java… Pen-Testers (v3.0)
Copyright © 2012 Taddong S.L. www.taddong.com 11
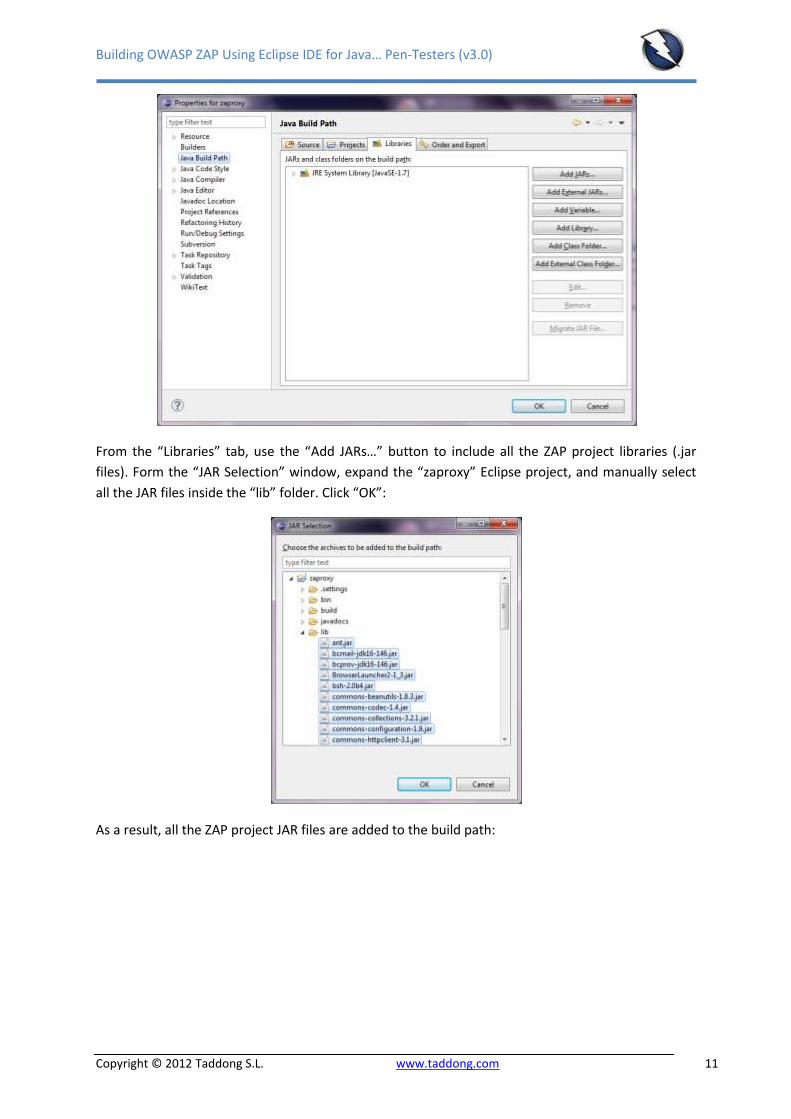
From the “Libraries” tab, use the “Add JARs…” button to include all the ZAP project libraries (.jar
files). Form the “JAR Selection” window, expand the “zaproxy” Eclipse project, and manually select
all the JAR files inside the “lib” folder. Click “OK”:
As a result, all the ZAP project JAR files are added to the build path:
Building OWASP ZAP Using Eclipse IDE for Java… Pen-Testers (v3.0)
Copyright © 2012 Taddong S.L. www.taddong.com 12
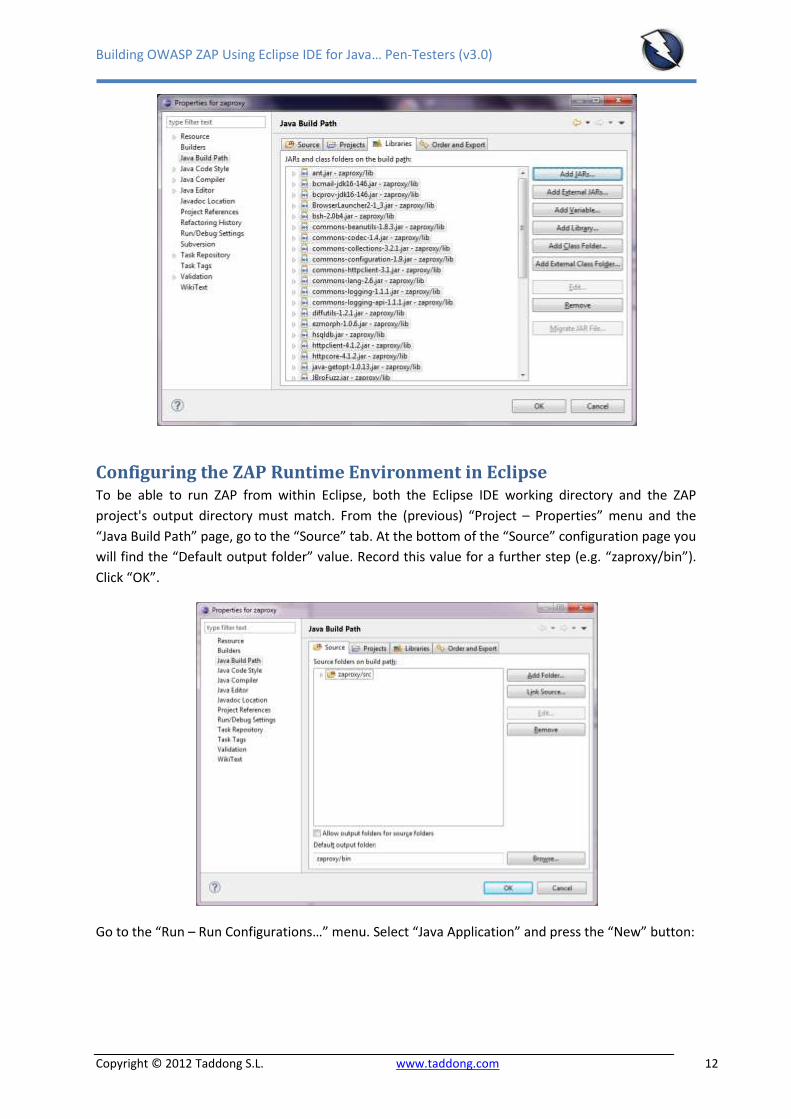
Configuring the ZAP Runtime Environment in Eclipse To be able to run ZAP from within Eclipse, both the Eclipse IDE working directory and the ZAP
project's output directory must match. From the (previous) “Project – Properties” menu and the
“Java Build Path” page, go to the “Source” tab. At the bottom of the “Source” configuration page you
will find the “Default output folder” value. Record this value for a further step (e.g. “zaproxy/bin”).
Click “OK”.
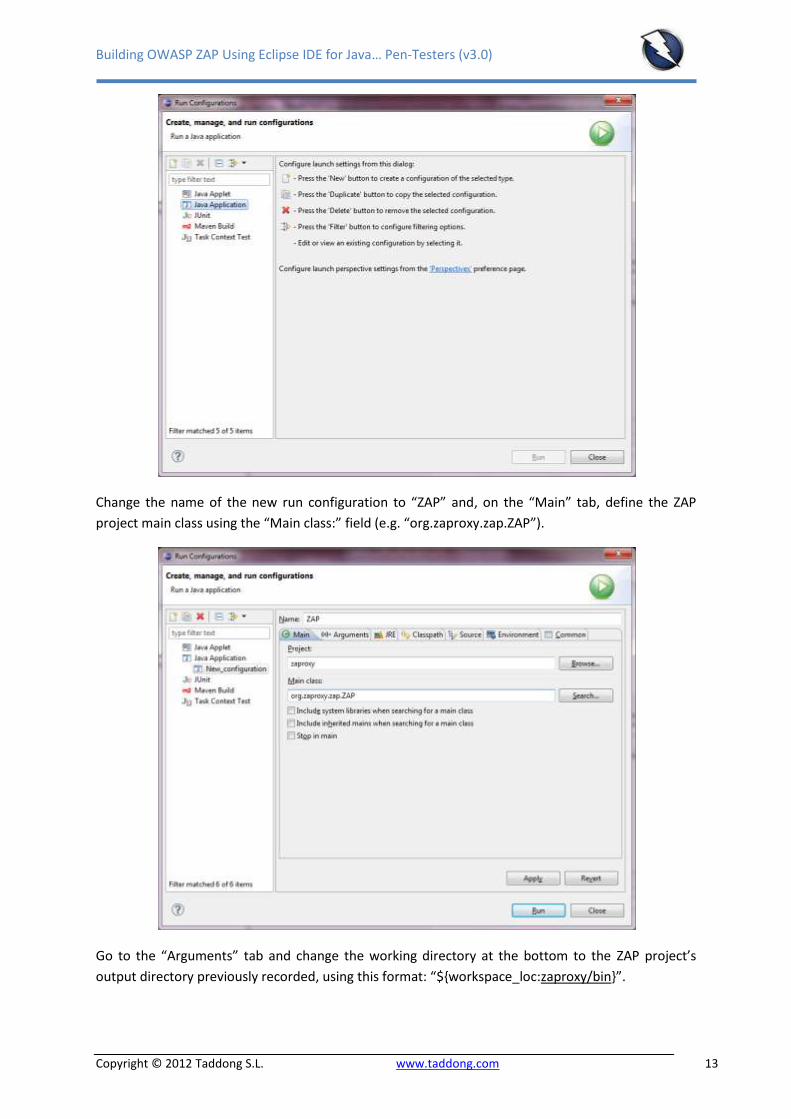
Go to the “Run – Run Configurations…” menu. Select “Java Application” and press the “New” button:
Building OWASP ZAP Using Eclipse IDE for Java… Pen-Testers (v3.0)
Copyright © 2012 Taddong S.L. www.taddong.com 13
Change the name of the new run configuration to “ZAP” and, on the “Main” tab, define the ZAP
project main class using the “Main class:” field (e.g. “org.zaproxy.zap.ZAP”).
Go to the “Arguments” tab and change the working directory at the bottom to the ZAP project’s
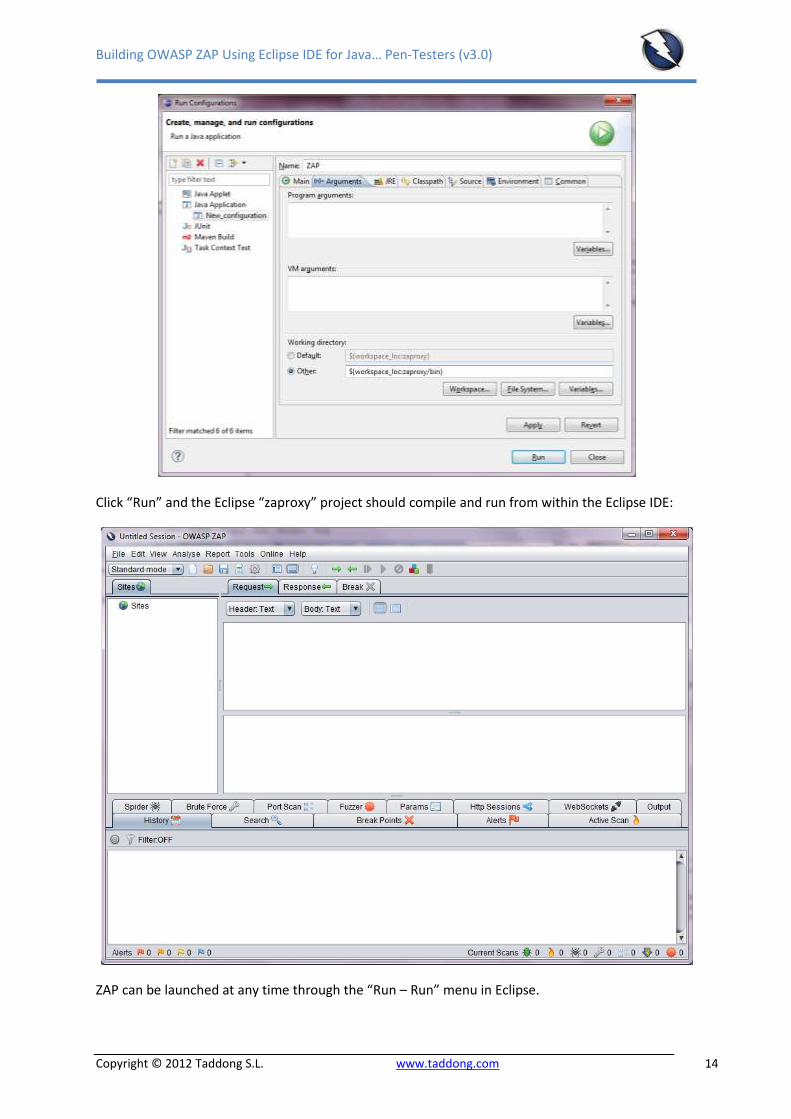
output directory previously recorded, using this format: “${workspace_loc:zaproxy/bin}”.
Building OWASP ZAP Using Eclipse IDE for Java… Pen-Testers (v3.0)
Copyright © 2012 Taddong S.L. www.taddong.com 14
Click “Run” and the Eclipse “zaproxy” project should compile and run from within the Eclipse IDE:
ZAP can be launched at any time through the “Run – Run” menu in Eclipse.
Building OWASP ZAP Using Eclipse IDE for Java… Pen-Testers (v3.0)
Copyright © 2012 Taddong S.L. www.taddong.com 15
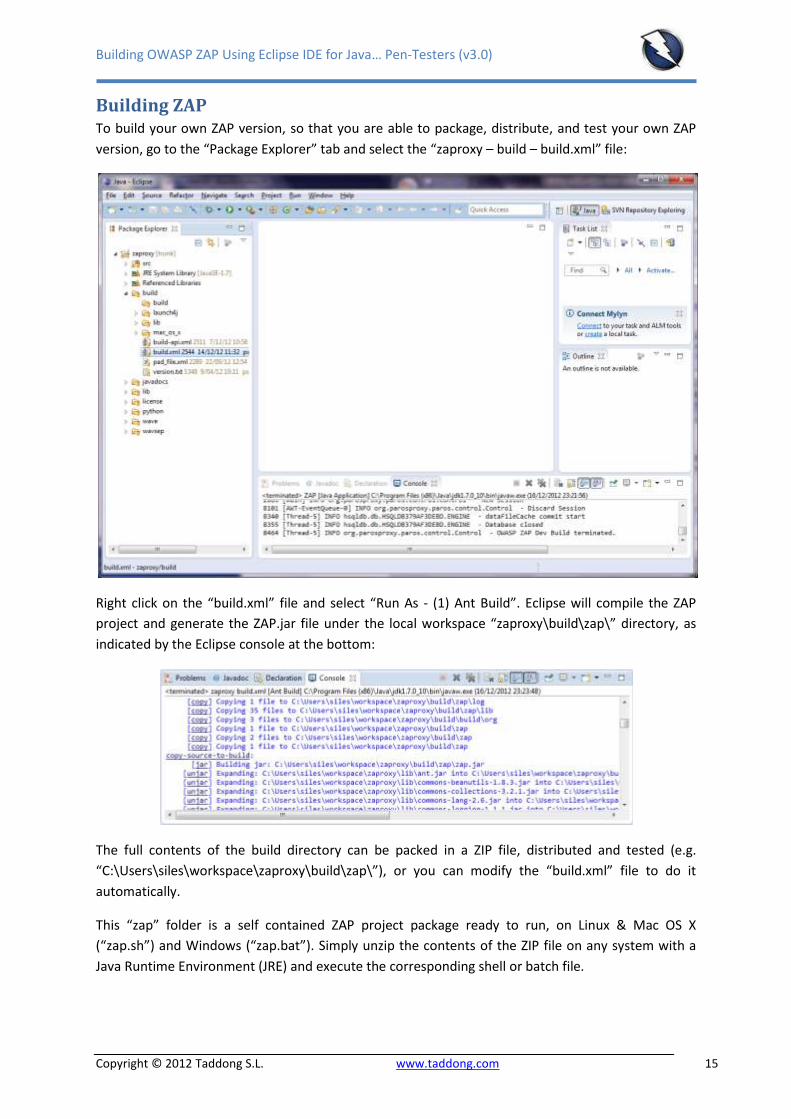
Building ZAP To build your own ZAP version, so that you are able to package, distribute, and test your own ZAP
version, go to the “Package Explorer” tab and select the “zaproxy – build – build.xml” file:
Right click on the “build.xml” file and select “Run As - (1) Ant Build”. Eclipse will compile the ZAP
project and generate the ZAP.jar file under the local workspace “zaproxy\build\zap\” directory, as
indicated by the Eclipse console at the bottom:
The full contents of the build directory can be packed in a ZIP file, distributed and tested (e.g.
“C:\Users\siles\workspace\zaproxy\build\zap\”), or you can modify the “build.xml” file to do it
automatically.
This “zap” folder is a self contained ZAP project package ready to run, on Linux & Mac OS X
(“zap.sh”) and Windows (“zap.bat”). Simply unzip the contents of the ZIP file on any system with a
Java Runtime Environment (JRE) and execute the corresponding shell or batch file.
Building OWASP ZAP Using Eclipse IDE for Java… Pen-Testers (v3.0)
Copyright © 2012 Taddong S.L. www.taddong.com 16
ZAP Project Development The latest ZAP development version is always available in the SVN trunk (“/svn/trunk”, all references
belong to “https://zaproxy.googlecode.com/”), including fixes and new functionality, although
important fixes are sometimes also applied to specific branches, such as the 1.4 branch
(“/svn/branches/1.4/”), if the ZAP project is working on releasing a minor version, such as 1.4.1.
The SVN trunk is always updated when a new version is about to be released.
Updating the Local ZAP Working Copy from SVN using Eclipse Typically, after a few days using or working with your local ZAP project you might be interested on
integrating the latest changes from the official SVN repository into your local working copy within
Eclipse.
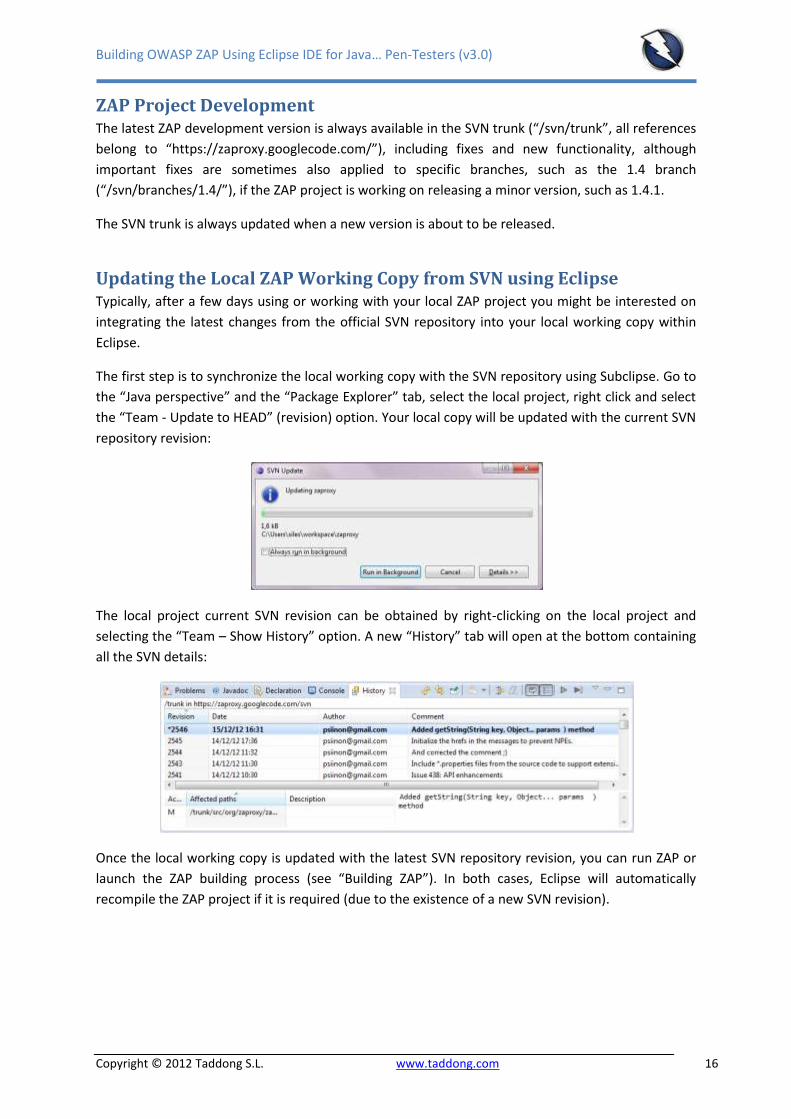
The first step is to synchronize the local working copy with the SVN repository using Subclipse. Go to
the “Java perspective” and the “Package Explorer” tab, select the local project, right click and select
the “Team - Update to HEAD” (revision) option. Your local copy will be updated with the current SVN
repository revision:
The local project current SVN revision can be obtained by right-clicking on the local project and
selecting the “Team – Show History” option. A new “History” tab will open at the bottom containing
all the SVN details:
Once the local working copy is updated with the latest SVN repository revision, you can run ZAP or
launch the ZAP building process (see “Building ZAP”). In both cases, Eclipse will automatically
recompile the ZAP project if it is required (due to the existence of a new SVN revision).
Building OWASP ZAP Using Eclipse IDE for Java… Pen-Testers (v3.0)
Copyright © 2012 Taddong S.L. www.taddong.com 17
Committing Your Local ZAP Changes to SVN using Eclipse
NOTE: In order to be able to commit any changes to the official ZAP SVN repository you must have permissions and a proper set of credentials (username and password). Contact the ZAP project leader to ask for these permissions and become a ZAP project contributor.
If you have been working on your ZAP project local working copy and want to share your changes
with the rest of the world (ok, just with the ZAP project… :-), you need to commit your modifications.
Before committing any changes, it is always recommended to synchronize the working copy with the
most current updates (latest revision) from the official SVN repository (as described in “Updating the
Local ZAP Working Copy from SVN using Eclipse”).
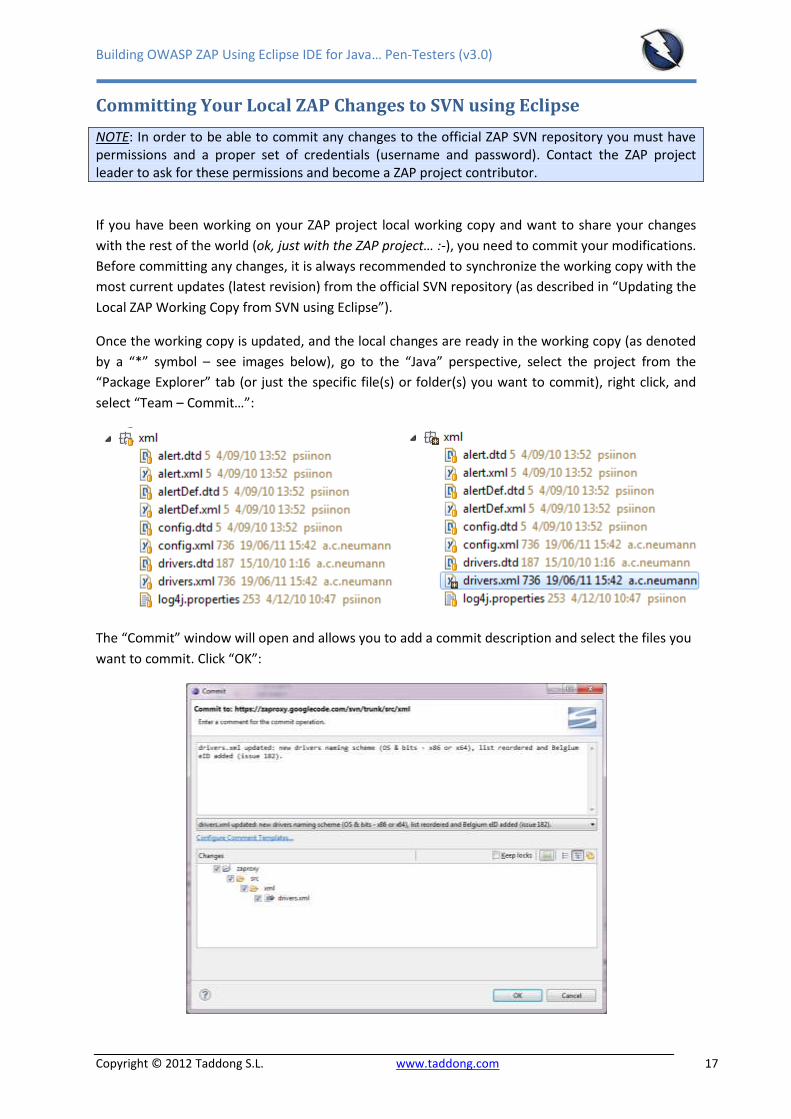
Once the working copy is updated, and the local changes are ready in the working copy (as denoted
by a “*” symbol – see images below), go to the “Java” perspective, select the project from the
“Package Explorer” tab (or just the specific file(s) or folder(s) you want to commit), right click, and
select “Team – Commit…”:
The “Commit” window will open and allows you to add a commit description and select the files you
want to commit. Click “OK”:

Building OWASP ZAP Using Eclipse IDE for Java… Pen-Testers (v3.0)
Copyright © 2012 Taddong S.L. www.taddong.com 18
Eclipse will request the credentials (username and password) required to complete the commit
operation:
If you are using a Google Account to contribute to the ZAP project, the username is your Google
Account username, and the password is the randomly generated Google Code password available at
“https://code.google.com/hosting/settings” after logging in with your Google Account.
The Google Code password used for SVN access is not your Google Account password.
NOTE: The SVN repository location must use “httpS” (HTTPS) if you plan to commit changes into the ZAP project (Google Code). If you selected by mistake the “http” version when adding the SVN repository to Eclipse, the commit operation will fail with a “405 Method Not Allowed” error. However, you can relocate the SVN repository from the “SVN Repository Exploring” perspective. Right-click in the SVN repository and select the “Relocate…” option. Eclipse will show the affected projects (click “Next”) and will allow you to change the SVN repository location through the “New URL” field.
NOTE: If you select the “Save Password” checkbox in the window asking for the SVN credentials, Eclipse and Subclipse will store your SVN username and password (using wincrypt) in a file under the following folder “C:\Users\<username>\AppData\Roaming\Subversion\auth\svn.simple” in Windows 7. The location changes in Eclipse for Linux and Mac OS X: “~/.subversion/auth/svn.simple”. You must decide if you allow Eclipse to store your username and password in your local file system, and know that this is the location where the credentials are stored. In case you decide to regenerate (change) your Google Code password, delete the file.
If the commit is successful, Eclipse will not generate any message. You can verify that the commit
has been added to the project by updating your working copy to the latest SVN revision and verifying
the SVN history (as explained in “Updating the Local ZAP Working Copy from SVN using Eclipse”):
Building OWASP ZAP Using Eclipse IDE for Java… Pen-Testers (v3.0)
Copyright © 2012 Taddong S.L. www.taddong.com 19
OWASP ZAP Extensions Recently, the OWASP ZAP project has been enhanced through the OWASP ZAP Extensions project.
The ZAP Extensions project contains templates for extending OWASP ZAP without rebuilding it,
including, for example, active or passive scanners, or extensions with right or top menu items:
OWASP ZAP Extensions: https://code.google.com/p/zap-extensions/
Full list of OWASP ZAP extensions currently available: https://code.google.com/p/zap-
extensions/wiki/Introduction
OWASP ZAP Extensions SVN repository:
https://code.google.com/p/zap-extensions/source/checkout
svn co https://zap-extensions.googlecode.com/svn/trunk/ zap-extensions-ro
The ZAP Extensions project can be built following the same process described throughout this guide
for the OWASP ZAP project, starting with section “Adding the ZAP SVN Repository to Eclipse”, by
simply changing the associated SVN repository URL: “https://zap-extensions.googlecode.com/svn/”.
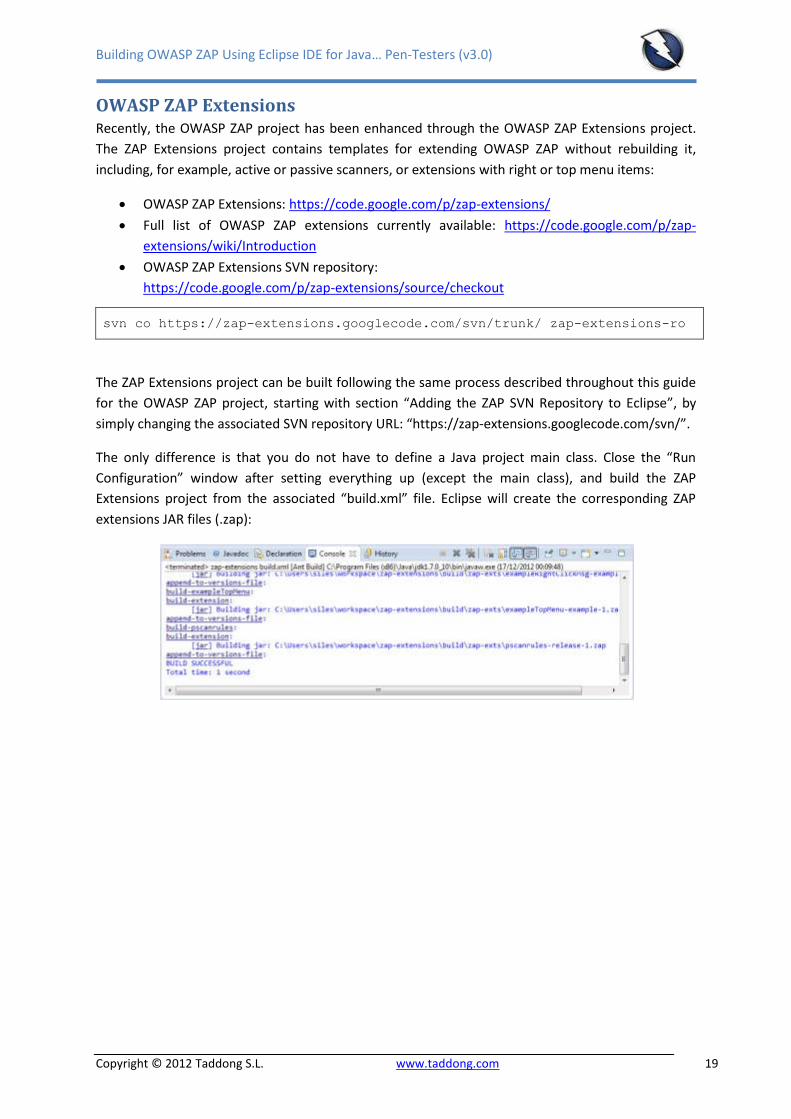
The only difference is that you do not have to define a Java project main class. Close the “Run
Configuration” window after setting everything up (except the main class), and build the ZAP
Extensions project from the associated “build.xml” file. Eclipse will create the corresponding ZAP
extensions JAR files (.zap):
Building OWASP ZAP Using Eclipse IDE for Java… Pen-Testers (v3.0)
Copyright © 2012 Taddong S.L. www.taddong.com 20
Appendix: Java Version Updates and Eclipse Every time you update your (Java) JDK version, for example from Java 6 Update 27 to Update 29, it is
mandatory to change the general Eclipse Java VM settings, as well as the specific references in all
your Java projects to the new folder where the new Java version has been installed (e.g.” C:\Program
Files (x86)\Java\jdk1.6.0_29”).
If the specific Java projects references are not changed, when the project Ant building process is
launched, the following error is generated: “Specified VM install not found: …”:
After completing all the steps below, you need to restart Eclipse so the new project settings are
reloaded.
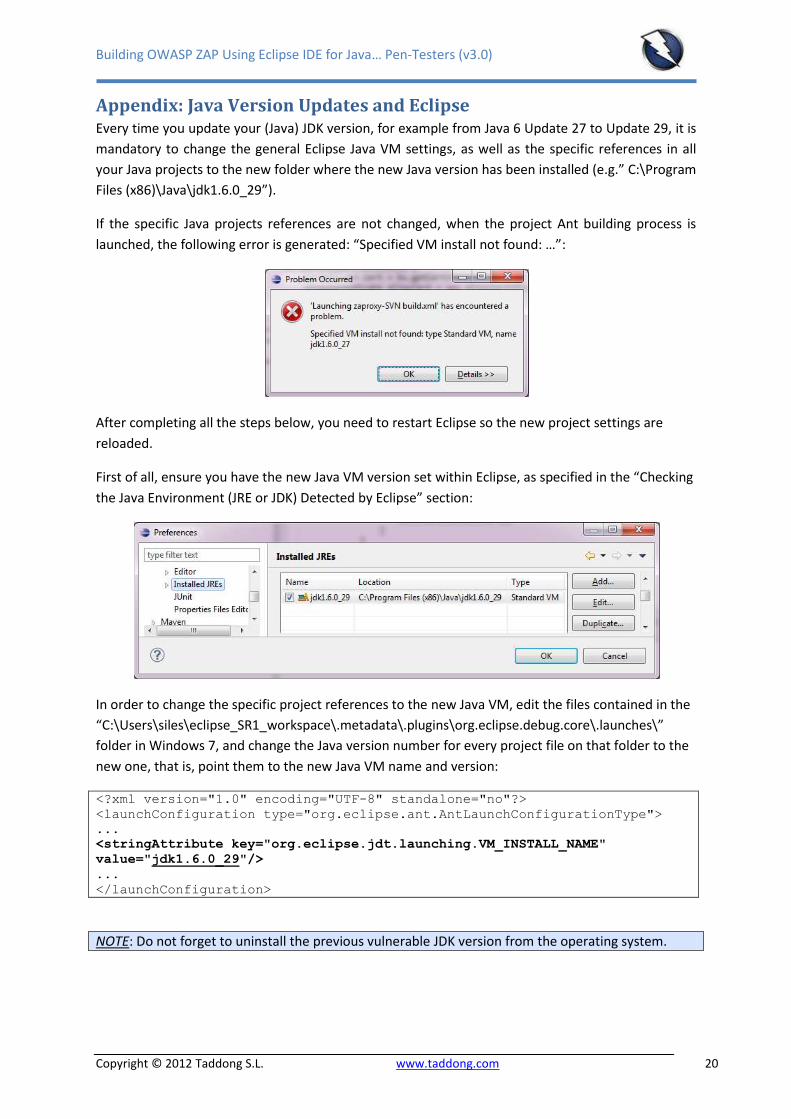
First of all, ensure you have the new Java VM version set within Eclipse, as specified in the “Checking
the Java Environment (JRE or JDK) Detected by Eclipse” section:
In order to change the specific project references to the new Java VM, edit the files contained in the
“C:\Users\siles\eclipse_SR1_workspace\.metadata\.plugins\org.eclipse.debug.core\.launches\”
folder in Windows 7, and change the Java version number for every project file on that folder to the
new one, that is, point them to the new Java VM name and version:
<?xml version="1.0" encoding="UTF-8" standalone="no"?>
<launchConfiguration type="org.eclipse.ant.AntLaunchConfigurationType">
...
<stringAttribute key="org.eclipse.jdt.launching.VM_INSTALL_NAME"
value="jdk1.6.0_29"/>
...
</launchConfiguration>
NOTE: Do not forget to uninstall the previous vulnerable JDK version from the operating system.