building comma-separated files - nolapro
TRANSCRIPT
NolaPro can import the following from MS Office Accounting:
Customers
Employees
General Ledger Totals
Inventory Categories
Inventory Items
Vendors
This information will first need to be exported from MS Office Accounting to Excel and then
saved as a CSV file. This guide provides more information on CSV files as well as instructions to
import into NolaPro.
Building Comma-Separated Files
Many software programs are able to "read" (better known as import) information if the values
are separated by commas. This is known as a Comma-Separated Values (CSV) file. Building one
of these files by type in each one of the values followed by a comma can be daunting task even
for an accomplished typist.
Here are a few suggestions for building a CSV file so you can import the information into
NolaPro.
Building the File from a Different Software Package
If your software has this feature, export or extract the information into a comma-separated file
format. Many times this option is not available, so if you can copy the information into a
spreadsheet program, such as Microsoft Excel®, this will allow you to easily build the file.
Working with the Information before Importing
To easily work with the data before you import, it is recommended to view and edit the data in a
spreadsheet program, such as Microsoft Excel®. Follow the recommendations below to easily
proofread your data before importing into NolaPro.
1. Open the CSV file in the spreadsheet program or copy and paste the information into a
blank spreadsheet.
2. Enter Headings in the first row of the spreadsheet immediately above the first row of
data. Insert a header row at the top (if not already there), making sure all requested fields
have a heading if the field is empty. An example would be an import for the Chart of

Accounts. See the Ledger -> Setup-Ledger -> Import Accounts screen for more
information.
3. If you have unusual characters in your data such as end-of-record characters or other
hidden characters, you can do the following to easily "clean up" the information.
a. In a blank column to the right of the last colum, insert the following formula on
the second row, =clean(B2)&"'" (assuming column B is the data with the
characters that need removed)
b. Copy this formula down the entire list of entries.
c. Highlight all the entries in the new column and select Edit -> Copy (or Ctrl-C in a
Windows environment.
d. Highlight all of the entries in the column referenced in the formula (column B in
this example). Select Edit -> Paste Special -> Values.
e. Delete the column to the far right you created.
4. Remove Quote Marks From Within Text Fields
5. Monetary Columns Should Not Contain Monetary Symbol or commas in thousands
positions.
You can also do a Find and Replace in most spreadsheet programs to eliminate troublesome
characters such as quotes within a text field.
1. Save the file as a CSV file format (File -> Save As, changing the file Type to CSV). This
file should now be ready to bring into NolaPro.

Import Customers
This utility allows you to import your customers from another application via a comma-
separated (CSV), a tab-delimited, or a pipe(|)-delimited file. Follow the restrictions noted in red
and place the fields in the order shown below.
1. From the Main Menu, select Admin -> Imports -> Import Customers.
2. Your screen should look similar to this:
3. URL File For CSV Format Items: Enter the path to the file you would like to import.
You can either manually type the file path or click the Browse button to find an outside
source.
4. Field Separator: Select how the fields are delimited from the drop-down list.
5. Text Delimiter: Select between text surrounded by quote marks, and no quotes around
text fields.
6. Full Import: Choose whether the records being imported are to replace anything
currently in the system, or whether they are a partial import -- which will not delete any
existing data. NOTE: A Full Import will delete ALL customer data for ALL Companies.
7. To import the file, click the Import button.
NOTE: The order of the fields to be imported, and which fields are to be imported will depend
on certain settings in your system. For this reason, be sure to follow your ON-SCREEN
information as to fields and order of fields.

Import General Ledger Totals
Import your current General Ledger Balances from another software package via a comma-
separated (CSV), a tab-delimited, or a pipe(|)-delimited file. Place the fields in the order shown
below.
1. From the Main Menu, select Admin -> Imports -> Import GL Totals.
2. Your screen should look similar to this:
3. URL File For CSV Format Items: Enter the path to the file you would like to import.
You can either manually type the file path or click the Browse button to find an outside
source.

4. Field Separator: Select how the fields are delimited from the drop-down list.
5. Text Delimiter: Select between text surrounded by quote marks, and no quotes around
text fields.
6. Full Import: Choose whether the records being imported are to replace anything
currently in the system, or whether they are a partial import -- which will not delete any
existing data. NOTE: A Full Import will delete ALL General Ledger Totals for ALL
Companies.
7. To import the file, click the Import button.
NOTE: The order of the fields to be imported, and which fields are to be imported will depend
on certain settings in your system. For this reason, be sure to follow your ON-SCREEN
information as to fields and order of fields.

Import Inventory Categories
Create your Inventory Categories from another application via a comma-separated (CSV), a
tab-delimited, or a pipe(|)-delimited file, in preparation for importing Inventory Items into
NolaPro. Follow the restrictions noted in red and place the fields in the order shown below.
1. From the Main Menu, select Admin -> Imports -> Import Inv Categories.
2. Your screen should look similar to this:
3. URL File For CSV Format Items: Enter the path to the file you would like to import.
You can either manually type the file path or click the Browse button to find an outside
source.

4. Field Separator: Select how the fields are delimited from the drop-down list.
5. Text Delimiter: Select between text surrounded by quote marks, and no quotes around
text fields.
6. Full Import: Choose whether the records being imported are to replace anything
currently in the system, or whether they are a partial import -- which will not delete any
existing data. NOTE: A Full Import will delete ALL category data for ALL Companies.
7. To import the file, click the Import button.
NOTE: The order of the fields to be imported, and which fields are to be imported will depend
on certain settings in your system. For this reason, be sure to follow your ON-SCREEN
information as to fields and order of fields.
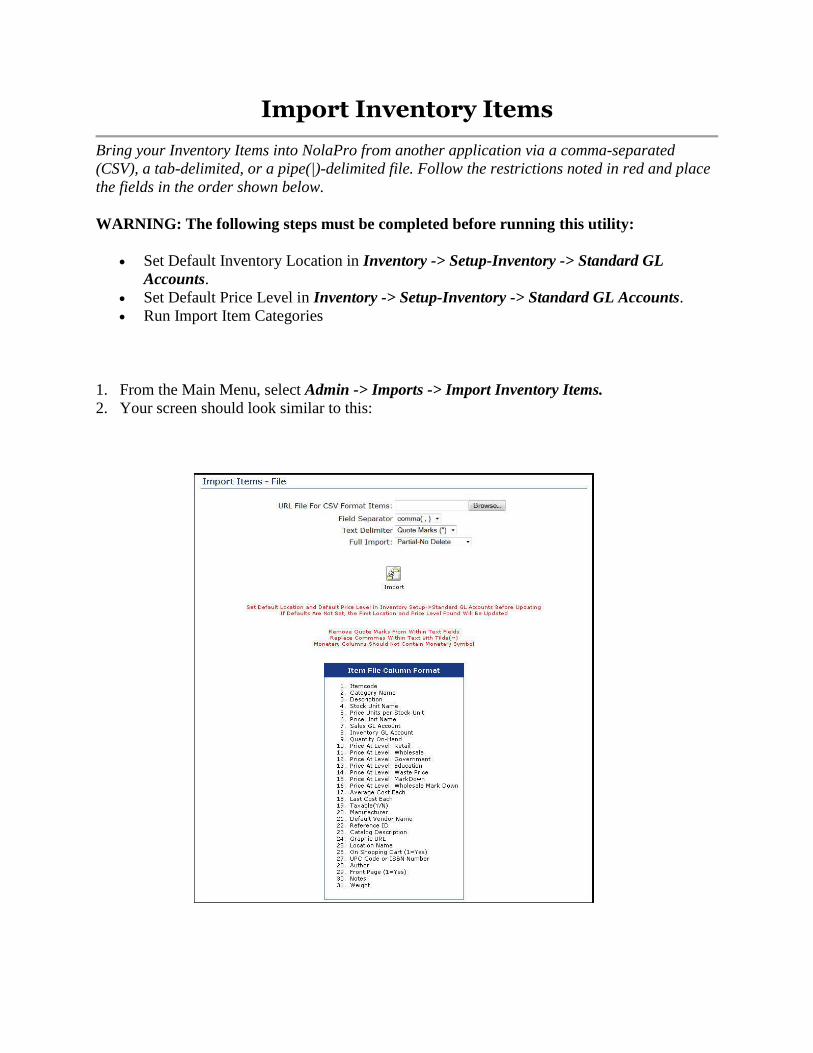
Import Inventory Items
Bring your Inventory Items into NolaPro from another application via a comma-separated
(CSV), a tab-delimited, or a pipe(|)-delimited file. Follow the restrictions noted in red and place
the fields in the order shown below.
WARNING: The following steps must be completed before running this utility:
Set Default Inventory Location in Inventory -> Setup-Inventory -> Standard GL
Accounts.
Set Default Price Level in Inventory -> Setup-Inventory -> Standard GL Accounts.
Run Import Item Categories
1. From the Main Menu, select Admin -> Imports -> Import Inventory Items.
2. Your screen should look similar to this:
3. URL File For CSV Format Items: Enter the path to the file you would like to
import. You can either manually type the file path or click the Browse button to
find an outside source.
4. Field Separator: Select the delimiter (comma, Tab, or Pipe(|)) that separates the
values in your file.
5. Text Delimiter: Select how Text fields are marked in your file. For example, are
long descriptions enclosed in Quote Marks or not enclosed?
6. Full Import: Select a Full Import (this will DELETE all existing items for ALL
Companies) or a Partial Import (this will UPDATE the existing items).
7. To import the file, click the Import button.
NOTE: The order of the fields to be imported, and which fields are to be imported will
depend on certain settings in your system. For this reason, be sure to follow your ON-
SCREEN information as to fields and order of fields.

Import Vendors
Import your vendors via a comma-separated (CSV), a tab-delimited, or a pipe(|)-delimited file.
Place the fields in the order shown below.
1. From the Main Menu, select Admin -> Imports -> Import Vendors.
2. Your screen should look similar to this:
3. URL File For CSV Format Items: Enter the path to the file you would like to import.
You can either manually type the file path or click the Browse button to find an outside
source.

4. Field Separator: Select how the fields are delimited from the drop-down list.
5. Text Delimiter: Select between text surrounded by quote marks, and no quotes around
text fields.
6. Full Import: Choose whether the records being imported are to replace anything
currently in the system, or whether they are a partial import -- which will not delete any
existing data. NOTE: A Full Import will delete ALL vendor data for ALL Companies.
7. To import the file, click the Import button.
NOTE: The order of the fields to be imported, and which fields are to be imported will depend
on certain settings in your system. For this reason, be sure to follow your ON-SCREEN
information as to fields and order of fields.
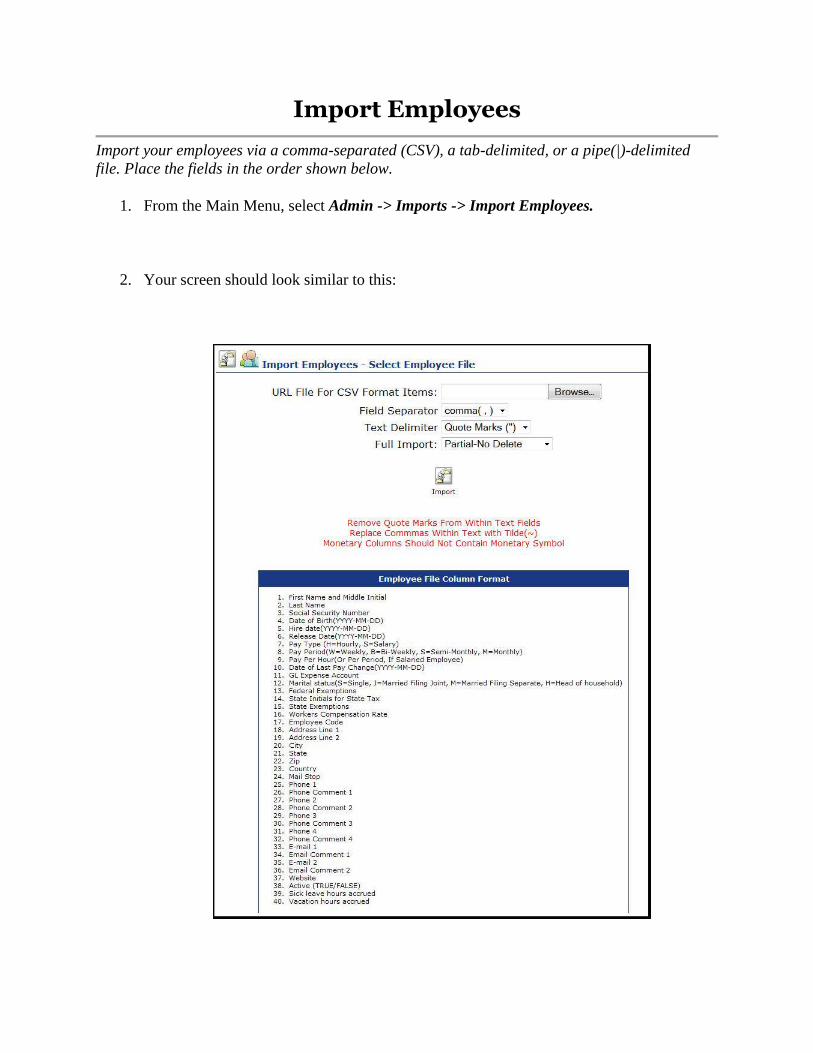
Import Employees
Import your employees via a comma-separated (CSV), a tab-delimited, or a pipe(|)-delimited
file. Place the fields in the order shown below.
1. From the Main Menu, select Admin -> Imports -> Import Employees.
2. Your screen should look similar to this:

3. URL File For CSV Format Items: Enter the path to the file you would like to import.
You can either manually type the file path or click the Browse button to find an outside
source.
4. Field Separator: Select how the fields are delimited from the drop-down list.
5. Text Delimiter: Select between text surrounded by quote marks, and no quotes around
text fields.
6. Full Import: Choose whether the records being imported are to replace anything
currently in the system, or whether they are a partial import -- which will not delete any
existing data. NOTE: A Full Import will delete ALL employee data for ALL Companies.
7. To import the file, click the Import button.
NOTE: The order of the fields to be imported, and which fields are to be imported will depend
on certain settings in your system. For this reason, be sure to follow your ON-SCREEN
information as to fields and order of fields.