building a ynamic ase management application agileapps...
TRANSCRIPT

Building a
Dynamic Case Management Application
in the AgileApps Cloud™
Copyright © 2003-2015 Software AG, Darmstadt, Germany and/or Software AG USA Inc., Reston, VA, USA, and/or its subsidiaries and/or its
affiliates and/or their licensors.
The name Software AG and all Software AG product names are either trademarks or registered trademarks of Software AG and/or Software AG USA Inc. and/or its subsidiaries and/or its affiliates and/or their licensors. Other company and product names mentioned here in may be trademarks of their respective owners.
Detailed information on trademarks and patents owned by Software AG and/or its subsidiaries is located at http://documentation.softwareag.com/legal/.
This software may include portions of third-party products. For third-party copyright notices and license terms, please refer to "License Texts, Copyright Notices and Disclaimers of Third Party Products". This document is part of the product documentation, located at http://documentation.softwareag.com/legal/ and/or in the root installation directory of the licensed product(s).

Building a Case Mgt App AgileApps Cloud 29 May 2015, pg. 2
Contents
Overview ...........................................................................................................................................3
The Goal: Manage the Onboarding Process ..........................................................................................4 Requirements Summary & Overall Strategy ......................................................................................4 Using Processes and Events..............................................................................................................5 Making the System Comprehensible to its Users ...............................................................................6 Summary: Mapping the Requirements to Platform Capabilities..........................................................7
Designing the Application....................................................................................................................8
Adding Your Custom Brand ............................................................................................................... 10
Building the Initial Application ........................................................................................................... 11 Prerequisites ................................................................................................................................. 11 Use the Application Construction Wizard to Create the Onboarding App .......................................... 11 Running the Application................................................................................................................. 12 Use the Application Construction Wizard to Create Relationships .................................................... 13
Customizing the Application .............................................................................................................. 14 Add Additional Case Fields ............................................................................................................. 14 Customize an Existing Field ............................................................................................................ 16 Create the Basic Form for Case Creation and Display ....................................................................... 16 Create the Roles Needed for the Application................................................................................... 20 Create Teams, if Needed................................................................................................................ 21 Add Users ..................................................................................................................................... 22
Automating Communications and Document Creation........................................................................ 23 Create an Email Template .............................................................................................................. 23 Create a Document Template......................................................................................................... 25
Automating Activities with a Process ................................................................................................. 27 Create a Process............................................................................................................................ 27 Set up Measurement Criteria for the Process .................................................................................. 35
Working with the Process.................................................................................................................. 36 Seeing the Process in Action........................................................................................................... 36 Printing the Welcome Letter .......................................................................................................... 37 Taking Stock .................................................................................................................................. 37
Managing Process/User Interactions.................................................................................................. 37 Viewing Task Records .................................................................................................................... 37 Changing the Record Identifier for a Case ....................................................................................... 38
Automate Activities Using Rules and Events ....................................................................................... 39 Create the Event Rule .................................................................................................................... 39 How Rules are Processed ............................................................................................................... 39
Define Service Level Objectives (SLOs) ............................................................................................... 40
Test the Application .......................................................................................................................... 41 Completing Tasks .......................................................................................................................... 41 Debugging Tips.............................................................................................................................. 42
Integrating a Web Service ................................................................................................................. 42 Configuring a Web Service ............................................................................................................. 42 The Many Ways to Use a Web Service ............................................................................................ 42

Building a Case Mgt App AgileApps Cloud 29 May 2015, pg. 3
Learn More ................................................................................................................................... 43
Defining Different Case Types for Different Kinds of Employees .......................................................... 43 See the Difference ......................................................................................................................... 45 Create Different Forms for Different Roles ...................................................................................... 46
Packaging and Publishing the Application........................................................................................... 48
Taking Advantage of Advanced Development Capabilities................................................................... 48 Integration Options ....................................................................................................................... 49
URL-based Data Interchange ...................................................................................................... 49 Web Forms ................................................................................................................................ 49 Java Classes and JSP Pages.......................................................................................................... 49
Java Classes................................................................................................................................... 49 JSP Pages ...................................................................................................................................... 50 REST, Java, and JavaScript APIs ....................................................................................................... 50 SQL Browser and Database Views................................................................................................... 50 Development Tools ....................................................................................................................... 50 And More… ................................................................................................................................... 50
Overview
This paper shows you how to build an Employee Onboarding application--just one example of many kinds of Dynamic Case Management applications (or DCM Apps, for short) that can be built on the AgileApps platform.
Note: If you haven’t already read them, these articles provide important background information:
Introduction to Dynamic Case Management and the AgileApps Cloud™
Choosing a Development Approach in the AgileApps Cloud™
Links to those articles and other useful pages can be found in the support wiki’s Article Index at http://agileappslive.info/wiki/Article_Index.

Building a Case Mgt App AgileApps Cloud 29 May 2015, pg. 4
The Goal: Manage the Onboarding Process
The goal of the implementation is to create a process suitable for onboarding new employees, to make sure that everything that needs to happen is carried out, and that it happens in timely fashion.
Requirements Summary & Overall Strategy
This section summarizes the requirements that were given for the system. (You’ll see more of the details as you read through the article. Here, the idea is to give you an overview.)
Note: Similar requirements exist for a system that could be used to manage voluntary terminations of employment, termination for cause, and/or reductions in force. It’s pretty much the same set of processes, backwards.
The mandatory system requirements were these:
Define the tasks that need to be performed, and capture the information needed to carry out the process at each stage.
Kickoff the process and track its progress.
The optional, additional requirements were these:
Capability to diverge from the set processes. For example, for a high level executive who is transitioning from the Board of Directors, the onboarding process might be handled differently.
Extend the base template to cover specific onboarding needs. For example, when bringing on Sales personnel, enrollment in the financial system responsible for commission payouts would be an extra process step. Similarly, some positions might include a company credit card or car.
Notifications should be sent if the onboarding procedure reaches 90% of its time limit.
Prospects for a successful implementation looked good right from the outset, because most of the requirements mapped directly into the capabilities of the AgileApps case management platform—including all of the optional requirements:
Use business process models to manage the tasks that need to be performed. Each step in the model creates a task for the person or collection of people who can carry it out. The system then records which tasks are completed, by whom, and when. The model, meanwhile, allows task steps to occur in sequence, in parallel, or to take a conditional branch that depends on the nature of the case (defined by data stored in the Case record, or other records connected to it).
Each case has a status that indicates whether it is new, open, closed, or in some intermediate state. The status of each process associated with a case is tracked, as well —making it easy to determine how many cases are open and where they are. Since times are tracked, it is also possible to construct reports to provide insights into case closure rates over time and by person.

Building a Case Mgt App AgileApps Cloud 29 May 2015, pg. 5
Use the capacity to define Service Level Objectives and Escalation policies (for example to send an email or reassign a case) to make sure that things happen in a timely manner.
Use Email Templates and Document Templates to created messages and printed documents, each filled in with the appropriate case-specific data.
For exceptional conditions (like when a board member becomes an executive), the platform allows both single-step and multi-step tasks to be created on the fly by the person handling the case. (A single step task is simply a request for something that needs to be done, assigned to the person or collection of people who can do it. A multi -step task is in reality a mini process, complete with approval-step branching that can be defined and then executed dynamically.)
The capacity for Case Types, meanwhile, allows for variations on a theme. The default
functionality of the main Cases object, along with any customizations or extensions to it are shared by each subtype, using an object-oriented construct known as inheritance.
For the basic requirements, then, success was assured. The only thing left is the implementation!
Using Processes and Events
The following diagram shows how processes and events are used to track the tasks that need to be performed to bring someone on board:
Here’s how it works:
1. When a new case is created, a Case Created event occurs. The Rules associated with that event launch the associated processes. Each process carries out one or more automated tasks, and assigns one or more manual tasks to users, all in the sequence(s) defined by the processes.
2. Track process completion. When the last task in a process is completed, a process completed event occurs. Additional rules carry out the appropriate actions.

Building a Case Mgt App AgileApps Cloud 29 May 2015, pg. 6
3. Close the case. In this case, all onboarding preparations are complete, so the case is closed.
Making the System Comprehensible to its Users
It’s all well and good to know that the onboarding process is really an instance of Case Management, but forcing people to use the terminology of Case Management doesn’t help them to understand that a new, automated system is simply a better way of doing what they already do.
For example, HR doesn’t think in terms of managing “cases”. Rather, HR personnel think in terms of assisting people. Two simple customizations help to make the system more readily comprehensible to its users:
Change the label of the Cases object Depending on the nature of the system, it might be called Incidents, Investigations, Requests, or Onboarding Cases. Here, we’ll keep it short and call it Onboardings.
Change the label of the Summary field In Case Management, each case has a subject line. That field summarizes the information in the case description, and identifies the cases in a list. Simply changing the label of the field from “Subject” to “Employee Name” makes things easier for the folks in HR.
Change the name of the Application Like the label displayed for the main Cases object, the name of the application can be changed whenever it makes sense—something that holds true for applications you install, as well as applications you build.

Building a Case Mgt App AgileApps Cloud 29 May 2015, pg. 7
Summary: Mapping the Requirements to Platform Capabilities
The following table summarizes the system requirements and shows the functional capabilities used to implement them.
Requirement Functional Capability
Use terminology that is familiar to the application’s users.
Change label of Cases object to Onboardings Change label of subject field to Employee Name
Record the source of the new hire. Change label of description field to Recruitment Source
Track process completion, and record the information needed for each step.
Add additional fields to the Cases object
Identify the people responsible for individual tasks Add Teams and Roles to the application
Make sure that every task which needs to be done is carried out.
Set up Process Models for each phase of the onboarding process. In those processes, create tasks and approval steps, assigned to the people (users, roles, teams) who need to carry them out.
Make sure that onboarding tasks are carried out in time to get the new employee oriented and productive as rapidly as possible.
Set up Service Level Objectives that specify the time in which the onboarding tasks must occur.
Accommodate compressed onboarding timelines of a few days, and extended timelines of several weeks, as well as a standard one-week timeline.
Use Case priority levels to specify the amount of time available. Default to the standard, one-week onboarding timeframe.
Send reminder messages when things are nearing their due dates, and reassign cases when time is becoming critical.
Use SLA Escalation procedures to automate those activities.
Prepare a welcome letter for new employees, customized with their personal information.
Create a Print Template that inserts the new employee’s phone number, email address, and login information.
Send a reminder message to the HR Rep, telling them when to expect the new employee.
Create an Email Template for the message. At the end of the onboarding preparation process, invoke a Rule that sends the message to the case owner.
Have differing processes for engineers and sales personnel, for example.
Define Case Types with additional process models, inheriting all of the standard process models from the parent Cases object.
Capability to diverge from the set processes Ad Hoc Processes (multi-step tasks)
Building a Case Mgt App AgileApps Cloud 29 May 2015, pg. 8
Designing the Application
While comprehensive design advice is outside the scope of this article, a few important principles dictate the best design sequence:
1. Design the data model first. While it may be tempting to think in terms of the processes your organization follows, the best way to design the application is to focus on the data model at the outset.
The reason is that processes are attached to the objects that make up the data model. (An object is a data table that provides additional behaviors--such as processes, rules, and email--which can be applied to any record in the table. So any given process is a built-in part of a specific object.)
If you start by building processes, on the other hand, you can easily design one that needs information from different objects. When you discover that problem later on, you’re forced to either revise the model or create a linkage between those objects that would otherwise be unnecessary.
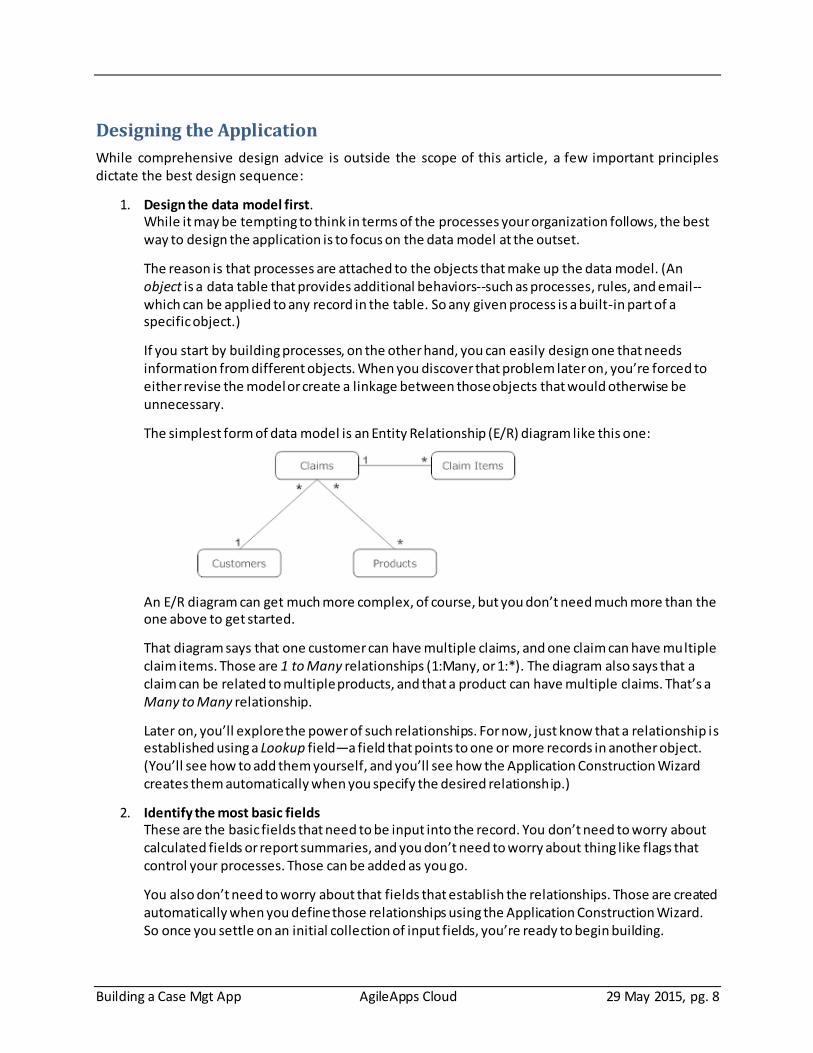
The simplest form of data model is an Entity Relationship (E/R) diagram like this one:
An E/R diagram can get much more complex, of course, but you don’t need much more than the one above to get started.
That diagram says that one customer can have multiple claims, and one claim can have multiple claim items. Those are 1 to Many relationships (1:Many, or 1:*). The diagram also says that a claim can be related to multiple products, and that a product can have multiple claims. That’s a Many to Many relationship.
Later on, you’ll explore the power of such relationships. For now, just know that a relationship is established using a Lookup field—a field that points to one or more records in another object. (You’ll see how to add them yourself, and you’ll see how the Application Construction Wizard creates them automatically when you specify the desired relationship.)
2. Identify the most basic fields These are the basic fields that need to be input into the record. You don’t need to worry about calculated fields or report summaries, and you don’t need to worry about thing like flags that control your processes. Those can be added as you go.
You also don’t need to worry about that fields that establish the relationships. Those are created automatically when you define those relationships using the Application Construction Wizard. So once you settle on an initial collection of input fields, you’re ready to begin building.

Building a Case Mgt App AgileApps Cloud 29 May 2015, pg. 9
Note: It has been suggested that it is beneficial to step through the standard UML design sequence: Object Models (or data structures, in reality), Sequence Diagrams, and the State Model. That is the waterfall (design first) methodology. But can also begin building the application with just the E/R diagram and the basic fields. With that information in hand, you can construct an initial version of the application in a matter of hours, and have a basic version in operation in a matter of days. That is the agile (design as you build) methodology.
In this scenario, we are building a Dynamic Case Management application. Most everything needed is already built into the application, so there is only a few basic fields that need to be added to the Cases object:
(For convenience, you’ll be adding some other fields that are needed for process context as you build the application. But were you building the app from the outset, these fields are all you really need to get started.)
3. Build the App
At this point you have enough information to begin building the application.
You can also begin designing your processes, if you like. But if you build them in the application, the processes you design will never be divorced from the data model. In addition, you’ll be able to make immediate use of the application, minus the automation that the processes will add—that gives you a chance to interact with it as you build, testing as you go.
4. Build the Processes
Building processes directly into the application as you design them ensures that your process design matches the data model—so the information needed at each stage of processing is on hand.

Building a Case Mgt App AgileApps Cloud 29 May 2015, pg. 10
Adding Your Custom Brand
Before doing anything else, you should know that you can customize the application pages by uploading a custom logo and changing the banner background color.
You make those changes in the ServiceDesk application—which just happens to be the initial application you see in your cloud platform. So we’ll do that now, before creating a new application.
1. In ServiceDesk, go to > Channels > Service Portal
2. Under Basic Information, set Title: AllAboard Acme This value sets the name displayed in bookmarks and the browser tab.
3. In the Branding section, specify:
Header Logo Upload your organization's logo image. Standard size is 98 pixels wide by 24 pixels high. A realistic maximum size is up to 600 pixels wide by 32 pixels high.
For example, here’s one that is 220 wide by 32 high:
Note: At 32 pixels high, only very simple images and stylized text are readable.
Web Site Url Enter the URL the users go to when they click on your logo. (Typically, that will be your organization's web site.)
Favicon Upload a small favicon image that displays in the browser's address bar, in bookmarks, and in browser tabs. For example, here’s a scaled up version of an icon file created using the IcoFx editor:
Mobile Logo Upload an image that appears when the application is accessed from a mobile device.
Important! All AgileApps applications are mobile enabled from the moment they are created.
Building a Case Mgt App AgileApps Cloud 29 May 2015, pg. 11
Building the Initial Application This article steps you through the entire development process, with many a screenshot to guide the way. The whole process takes little more than a couple of hours to complete. (Yes. A reasonably -sized application can be developed in that little time. And as you’ll see, a usable application can be created literally in minutes.)
Prerequisites Before you begin, there are a couple of things you will need:
You should be familiar with the AgileApps interface, as described in Using the Agent Portal in the support wiki. You see, you need a separate tool to build an application. The tools you need are built in, so you see the application as you build it. (There is, however, a plugin for the Eclipse development environment that can be used to make sophisticated coding easier. That capability is discussed at the end of this article, along with other development tools.)
If you are the initial admin in a new platform instance, you will automatically have all the privileges you need. If you are a new Designer in an existing platform instance, you will typically need Application Control privileges. If a programmer, you will need Development Control privileges. (Other privileges may be needed, as well, depending on what you do.) Learn more: Access Profiles.
Use the Application Construction Wizard to Create the Onboarding App
1. Go to > Administration > Applications
2. Click [Create New Application]
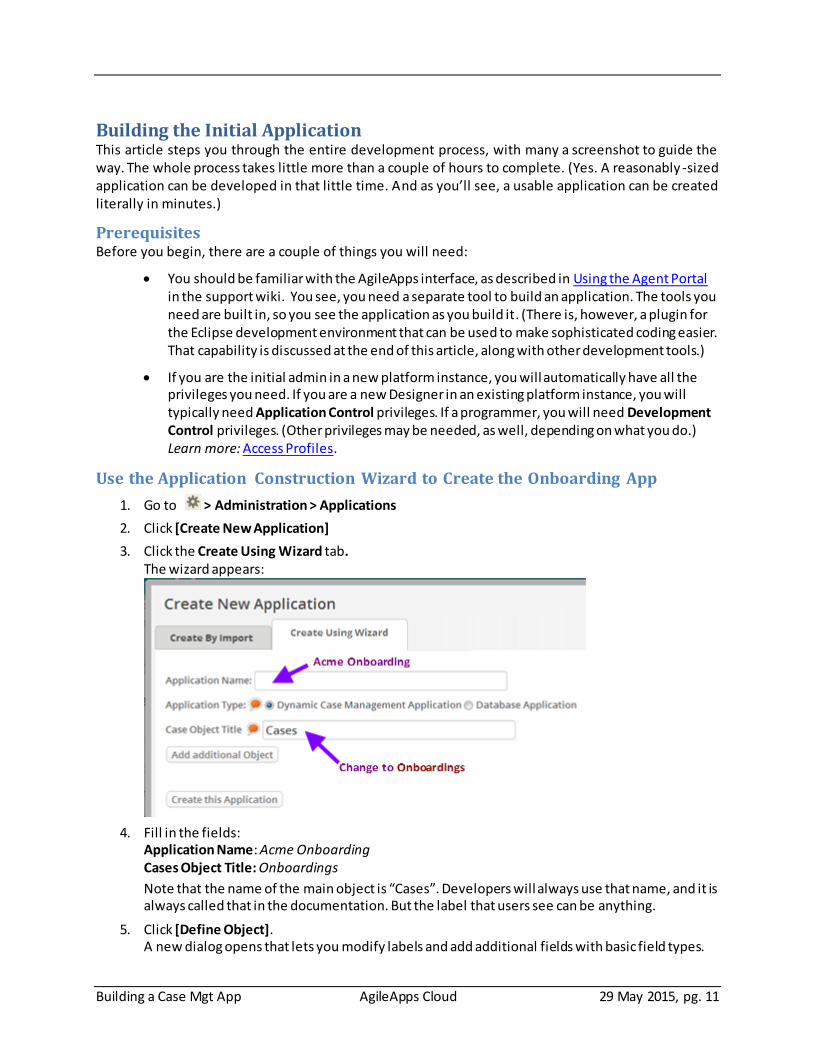
3. Click the Create Using Wizard tab. The wizard appears:
4. Fill in the fields: Application Name: Acme Onboarding Cases Object Title: Onboardings
Note that the name of the main object is “Cases”. Developers will always use that name, and it is always called that in the documentation. But the label that users see can be anything.
5. Click [Define Object]. A new dialog opens that lets you modify labels and add additional fields with basic field types.
Building a Case Mgt App AgileApps Cloud 29 May 2015, pg. 12
6. Change the Display Label (Singular) field from the default (“Onboardings”) to Onboarding. The interface will now look right everywhere a singular label is needed.
7. Change the labels of the Subject and Description fields: subject: Change the label from “Subject”, to Employee Name. description: Change the label from “Description” to Recruiting Notes.
(Once a field is created, its internal name is fixed—but its label can be changed at any time.)
8. Click [Save]. The label changes are saved. (You could also define additional fields before saving, but we’ll do that later.)
9. Click [Create this Application]. A dialog appears, telling you that application was created.
10. Click [Ok]. A basic Dynamic Case Management app is created for you, ready for additional customization.
Running the Application
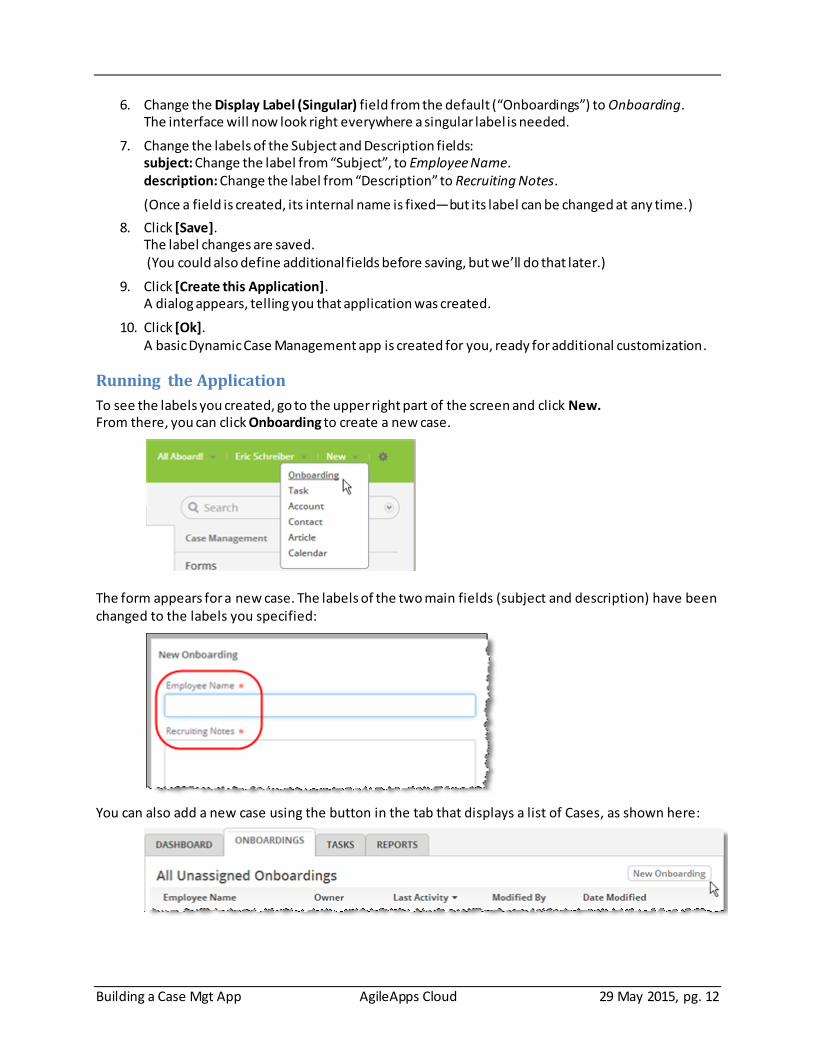
To see the labels you created, go to the upper right part of the screen and click New. From there, you can click Onboarding to create a new case.
The form appears for a new case. The labels of the two main fields (subject and description) have been changed to the labels you specified:
You can also add a new case using the button in the tab that displays a list of Cases, as shown here:
Building a Case Mgt App AgileApps Cloud 29 May 2015, pg. 13
Use the Application Construction Wizard to Create Relationships
When you are creating a DCM app using the wizard, you can also add additional objects, specifying the fields in those objects, and creating relationships among them. This section gives you practice with those options.
Note: This is the easiest way to create a Many to Many relationship, so it’s worth being aware that this mechanism exists. However, you can use it to create relationships only between objects defined in the wizard. To create a relationship to existing system objects (like the Users object), or to create a relationship within an object (where one record links to another in the same object), you need to define Lookup fields directly. Those are two things the relationship mechanism does not do, at this point. Since we need both in the current app, you’ll be adding those fields later.
To create additional objects and relationships:
1. Go to > Administration > Applications
2. Click [Create New Application]
3. Click the Create Using Wizard tab.
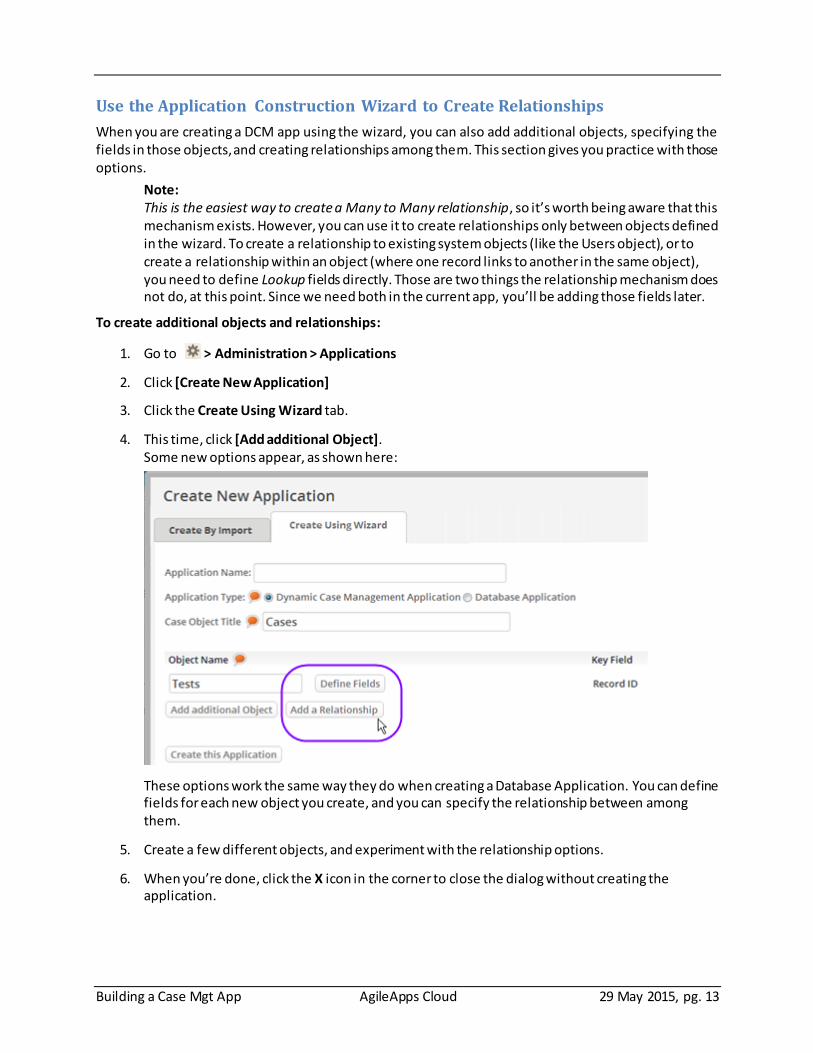
4. This time, click [Add additional Object]. Some new options appear, as shown here:
These options work the same way they do when creating a Database Application. You can define fields for each new object you create, and you can specify the relationship between among them.
5. Create a few different objects, and experiment with the relationship options.
6. When you’re done, click the X icon in the corner to close the dialog without creating the application.

Building a Case Mgt App AgileApps Cloud 29 May 2015, pg. 14
Customizing the Application
With the initial application constructed, it’s time to take the next steps.
Add Additional Case Fields
Next you’ll add some additional fields that the Cases object needs. The need for them will become more apparent when the Business Processes are created. For now, as you go through the process just note the different kinds of fields, and take a moment to examine the many other field types that are available. (Note, too, that adding fields here gives you many more field type choices than you had in the Wizard.)
1. Go to > Case Management > Case Fields
2. Click [New Field] to specify needed fields. As each is defined, click [Save & New]. --Only the minimum customizations are defined here. Note that many more are possible!
Field Label
Display Type
Notes
Due Diligence Checks
Multiple Checkboxes
Ensure a quality hire. Track the status of Phase I processes that must complete before starting Phase II. Values: Background Check, References Check. Maximum Storage Length: 40 Make the field large enough to hold both selections. (A multi checkbox value is stored as a comma-separated list of checkbox labels.) Orientation: Horizontal. Note: These fields could be added as individual checkboxes, but they would appear above one another in the form, with labels to the left of the checkbox, leaving quite a bit of space unused.
Allocated Assets Multiple Checkboxes
Track items provided to the employee. Values: Laptop, Desktop, Cell Phone, Tablet, Credit Card, Leased Car. Maximum Storage Length: 80 Makes the field large enough to hold all of the selections. (A multi checkbox value is stored as a comma-separated list of checkbox labels.) Orientation: Vertical. These fields appear above one another in the form, but individual labels are to the right of each checkbox--a better visual arrangement than individual checkboxes.)
Email Text Field
The information needed to print the new employee’s welcome letter. Login Name Text Field
Phone Text
Hire Date Date Entered by the HR Rep. Included in the heads-up email sent to the Hiring Manager at the end of the process.

Building a Case Mgt App AgileApps Cloud 29 May 2015, pg. 15
Hiring Manager Lookup Object Name: Users Lookup Field Configuration: Move First Name, Last Name, and Email (in that order) from the Available column to the Selected Fields column. (Those fields will be displayed when the agent is selecting a record. Note that some data could also be copied to the Case record for convenience. But here it isn’t necessary. )
This field references a record in the Users object. It requires hiring managers to be users of the system, so that tasks can be assigned to them (for example, to do a reference check, or to make sure that new employees have selected their benefits). It also makes it easier to carry on email conversations that are automatically recorded in the case history.
3. When done adding the last field, click [Save]. Note: Fields like Allocated Assets have a [Manage Values] button that appears after the field is created. Click that button to modify list entries.
4. Click the Fields breadcrumb at the top of the page to see the fields you added (order may vary) :
Note: When you are developing an application, fields you add have names that are easily recognizable, derived from the labels you give them. So when you add a field with label “Phone”, the field name is phone. But when you are customizing an application that was installed from a package, any new fields you add have a name that ends with your tenant ID—a unique number that distinguishes your organization from any others that happen to be running on the same instance of the platform. For example, the name of an added field would be something like phone_1234567. That feature sets your fields apart from any fields that the installer may add, so the application can be safely updated without overwriting any of your customizations.

Building a Case Mgt App AgileApps Cloud 29 May 2015, pg. 16
Customize an Existing Field
Customize the priority field to make priority=2 the default:
1. Go to > Case Management > Case Fields
2. Click the Priority field. That isn’t a custom field you added, but rather a “standard” field that came as part of the application. But you can still customize it.
3. Click [Edit]
Default Value: ‘2’ Be sure to include the single quotes in the expression, as the value is actually a text value. Try entering 2 by itself and click [Check Syntax] to see the difference.
4. Click [Save]
To learn more about object fields, see Fields in the support wiki.
Create the Basic Form for Case Creation and Display
1. Now, when you click New > Onboarding, you see default form with the fields you added:
Note that you didn’t have to do anything special to add those fields. Adding them to the object caused them to be automatically added to the form. The arrangement can be improved, though, and there is one field that isn’t needed. Click [Cancel] to go back to the page you were on, and we’ll fix those things.

Building a Case Mgt App AgileApps Cloud 29 May 2015, pg. 17
To modify the initial default form:
1. Go to > Case Management > Case Forms Only one form exists at the moment, but note that you can create specialized versions for different users.
2. Click the Default Layout form. The form-layout page appears (the order of fields may differ somewhat):
3. Remove the Close Date field by hovering the mouse over it and clicking the delete icon ( ) in the list of icons that appears.
Note: The Priority field will be used later to trigger different Service Level Objectives—so a priority one onboarding will be handled in 3 days, while a priority two case can take up to a week, and so on.

Building a Case Mgt App AgileApps Cloud 29 May 2015, pg. 18
4. Then, click and drag on the Move-arrows icons ( ) to change the position of the remaining fields, to create an arrangement like the one shown here:
Tip: Periodically save your changes and click New > Onboarding to see the results. Then click [Cancel] to continue from where you left off.
5. Next, change the properties of Due Diligence Checks to Read Only, as it will be modified programmatically:
a) Click the Edit Field icon.
b) For Field Attributes, select Read Only.
.
Note that you could also change the display label that appears for this field on this form, and that you could add a field hint users see when they hover over the field. You could also change the orientation of the checkboxes from Horizontal to Vertical.
c) Click [Save].

Building a Case Mgt App AgileApps Cloud 29 May 2015, pg. 19
6. To further refine the application, use the Edit icon for the Hire Date and Hiring Manager fields to specify Field Attributes = Required , since they will be needed when sending a message to the hiring manager in the last step of the onboarding process. With that setting, they appear in the form with a red star next to the label.
7. When done modifying the form layout, click [Save Changes] at the top of the page. (Individual field changes don’t cause that button to appear, as they are saved independently.)
The new arrangement groups most of the standard fields together, balances the layout, and puts the list of assets at the end, so now when you click New > Onboarding, you see this:
To learn more about object forms, see Forms in the support wiki.

Building a Case Mgt App AgileApps Cloud 29 May 2015, pg. 20
Create the Roles Needed for the Application
The tasks that make up the hiring processes need to be assigned to people who have the authority to carry them out. Each person’s Role in the organization identifies the things they are authorized to do. In this step, you’ll create Roles suitable for your organization using the examples as a guide.
The HR Rep will be using the “Agent” role, which gives them all of the privileges they need. A couple of additional roles are needed (without any special privileges), just to make sure that notification -emails for upcoming tasks are delivered to the right person.
To create the new roles:
1. Go to > Customization > Application Roles
2. Click [New Role] and add the additional roles the application needs:
Role Name Additional Permissions
Facilities Manager None
IT Manager None
3. As each role is created, click [Save].
4. When done, click Application Roles. The list now looks like this:
To learn more, see Roles in the support wiki.

Building a Case Mgt App AgileApps Cloud 29 May 2015, pg. 21
Create Teams, if Needed
Teams can also be created. When they exist, a task or a case can be assigned to a team. It can then be picked up by anyone who is a member of that team.
In this case, however, we’re assuming that the HR Reps (agents) are the only team members who will be using the system. (Everyone else will be managers.) In that case, the default team (My Team) will be sufficient.
Note: The default team can be renamed, for example, to HR Reps. But it will be rare for users to see the name, so it isn’t really necessary, as long as there is only one team.
To manage teams:
1. Go to > Access Management > Teams
Click the [+] mark next to an existing Team to expand the hierarchy, displaying members of the team and any sub-teams. (Team members and empty sub teams don’t have the [+] mark.)
2. Click the folder icon ( ) to the right of the Team name to view the team’s details. Then click [Edit] to modify it (for example to change its name).
3. Click [New Team] to create a new one.
To learn more, see Teams in the support wiki.
Building a Case Mgt App AgileApps Cloud 29 May 2015, pg. 22
Add Users
If you have some people in mind to test the new application, now is the time to add them, and to assign them roles. (You can also play all the roles yourself. Just create users with different usernames, all of which have your email address. Then you can log in as different users to play different roles.)
1. Go to > Access Management > Users
2. Click [New User]
3. Add the HR Manager first: Fill in the first name, last name, and email address. Then give them a username.
For real users, enter their email address. For “virtual” users, make something up. Once a user-record is created, both the name and the email address can be modified.
(When users log in, they are associated with their record, even if details changed.)
4. For Access Profile, select Regular User. (As with all Lookup fields, typing in the first three characters makes the selection easier.)
5. For Primary Team, select My Team. (When you create teams, you’ll choose the appropriate team membership here.)
6. Leave the Initial Application defaulted to All ABoard! (To give a user access to additional applications, you use the Application Access settings.)
7. For Role, choose Agent. (This is their initial role. After creating a user, you can change role assignments in the Application Access settings.)
8. Repeat the process for the IT Manager and Facilities Manager, specifying the appropriate Role in each case. (Note that you can type
9. Now add additional HR Reps (agents) who will be onboarding new employees.
10. For each agent you add, fill in the Reports To field by selecting the HR Manager (by name) from the list of existing users.
The Reports To link creates a hierarchy of personnel, which allows an escalation policy to take appropriate action when a deadline is about to be exceeded—for example, by sending an email or reassigning the current case or task.
The Reports To field is used for that purpose—so ideally, it should never be blank, except for the topmost position in the organization, where the buck stops. In real life, however, not everyone will be in a position to interact with the system. In this case, we’re assuming that the Facilities Manager and IT Manager do so, but that the people on their teams do not—or, if they do, they use the manager’s login. (That policy minimizes the number of system users, to keep cloud usage costs down.)
To learn more, see Users in the support wiki.

Building a Case Mgt App AgileApps Cloud 29 May 2015, pg. 23
Automating Communications and Document Creation
Here, you’ll create a couple of templates you’ll use later on.
Create an Email Template
The goal is to send a message to hiring managers when the onboarding preparation is complete, reminding them of the new employee’s start date, and to indicate their next steps.
To do that, create an email template:
1. Go to > Case Management > Email Templates
2. Click [New Email Template]. The new template page appears.
3. Note that there are multiple Types of Email Templates, suitable for different purposes. Here, the default type is the one you want: Case Templates. That template gives you access to the fields that make up an Onboarding case.
4. Start by filling in the Template Name: Hiring Manager Alert
5. Next, provide the From Name. For this value, use the Template Field finder at the top of the page:
a) Category: Onboarding (makes fields from the Onboardings object available) b) Fields: Scroll down until you find the section headed ---Onboarding Owner Fields--- c) Choose the field: Onboarding Owner Full Name
The Variable area is now filled with the name of the variable you can use: $cases.owner.full_name
d) Copy that value and paste into the From Email Address field.
6. Then provide the From Email Address. Again, use the Template Field finder at the top of the page:
a) Category: Onboardings Fields b) Fields: Scroll down until you find the section headed ---Onboarding Owner Fields--- c) Choose the field: Onboarding Owner Email Address
The Variable area is now filled with the name of the variable you can use: $cases.owner.email
d) Copy that value and paste into the From Email Address field.
Building a Case Mgt App AgileApps Cloud 29 May 2015, pg. 24
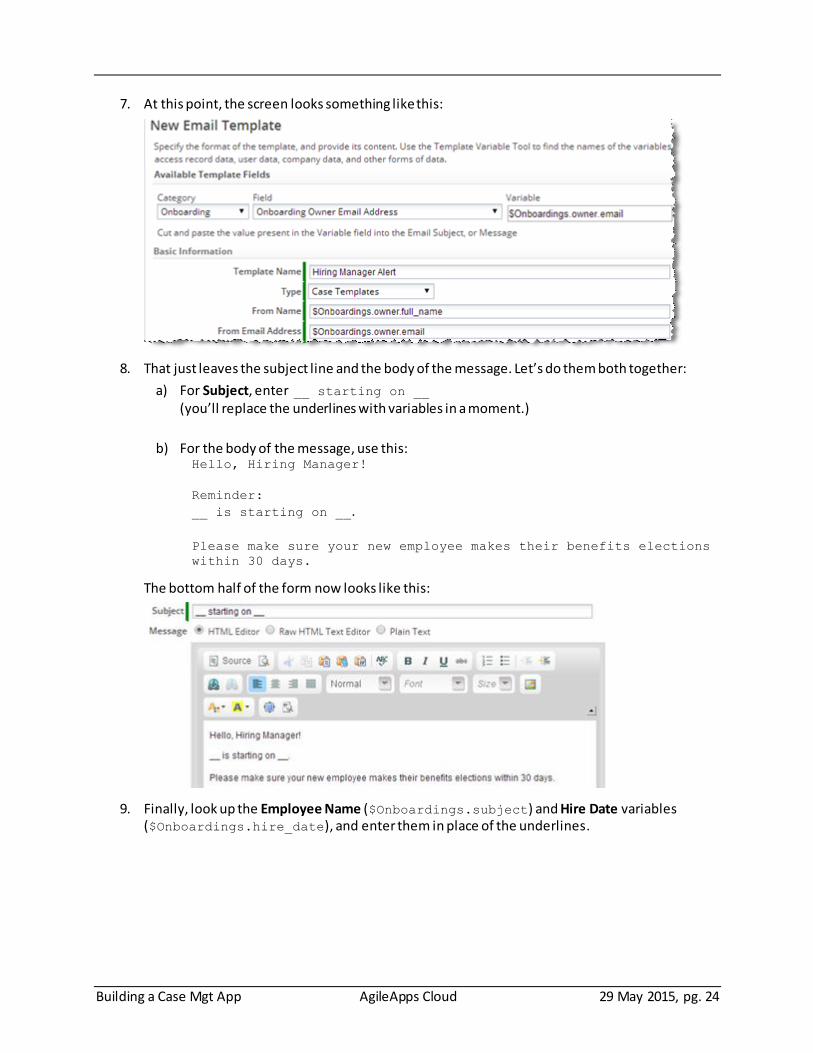
7. At this point, the screen looks something like this:
8. That just leaves the subject line and the body of the message. Let’s do them both together:
a) For Subject, enter __ starting on __ (you’ll replace the underlines with variables in a moment.)
b) For the body of the message, use this: Hello, Hiring Manager!
Reminder:
__ is starting on __. Please make sure your new employee makes their benefits elections
within 30 days.
The bottom half of the form now looks like this:
9. Finally, look up the Employee Name ($Onboardings.subject) and Hire Date variables ($Onboardings.hire_date), and enter them in place of the underlines.

Building a Case Mgt App AgileApps Cloud 29 May 2015, pg. 25
The resulting template looks like this:
10. When finished, click [Save].
To learn more, see Email Templates in the support wiki.
Create a Document Template
The goal is to create a template for a welcome letter that will be used to give the new employee their phone number and login information. The values will be filled in by IT and Facilities. When they’re ready, a task will be created to remind the HR rep to print the form. (Of course, you could also use an email template for this purpose. But we want to show you how document templates work.)
The process for creating a document template is similar to the one used to create an Email Template, except that you can start from an HTML file, Word document, or PowerPoint presentation. Alternatively, you can use a JSP Page hosted on the platform, as discussed under Advanced Development capabilities below. You can even create a compound document that combines multiple templates!
To create a template:
1. Go to > Customization > Objects > Onboardings > Document Templates
2. Click [New Template]
3. Use the Template Field finder at the top of the page to look up the variables you ’ll need. If this is a new application, the variables look like those shown below. But if you are modifying an installed application such as ServiceDesk, the variables end with your company ID. (For example: $cases.subject_12345679)
Field Variable
Employee Name $Onboardings.subject
Email $Onboardings.email
Login Name $Onboardings.login_name
Phone $Onboardings.phone
HR Rep (case owner) $Onboardings.owner.email

Building a Case Mgt App AgileApps Cloud 29 May 2015, pg. 26
4. Then use an HTML editor or Word to create a template that looks something like this:
Welcome aboard, $Onboardings.subject!
Here’s the information you need to help you get started in your new
job:
Your email address is $Onboardings.email
Your phone number is $Onboardings.phone
To use our employee services, you’ll go to
http://OurCompany.com/services, provide your login name
($Onboardings.login_name), and the initial password (xyyzz).
We’re glad to have you with us, and hope you are as excited to be here
as we are to have you!
Your HR Support team representative,
$Onboardings.owner.email
5. Back in the New Template page, give the template a name and select the type: Template Title: Employee Welcome Type: File
6. An upload button appears: [Choose File]. Click it to upload the file.
7. After the file is uploaded, click [Save].
Here is a simple HTML version of the document. Paste it into a file, and it’s ready to be uploaded: <html>
<body>
<p>Welcome aboard, $Onboardings.subject!</p>
<p>Here’s the information you need to help you get started in your new
job:</p>
<blockquote>
<p>Your email address is $Onboardings.email</p>
<p>Your phone number is $Onboardings .phone</p>
<p>To use our employee services, you’ll go to <a
href=”http://OurCompany.com/services”>http://OurCompany.com/services</a>,
provide your login name ($Onboardings.login_name), and the initial
password (xyyzz).</p>
</blockquote>
<p>We’re glad to have you with us, and hope you are as excited to be here
as we are to have you!</p>
<p>Your HR Support team representative,<br>
$Onboardings.owner.email</p>
</body>
</html>
To learn more, see Document Templates in the support wiki.

Building a Case Mgt App AgileApps Cloud 29 May 2015, pg. 27
Automating Activities with a Process
At this point, you have a working application that will store information about employees who are coming on board, and allow it to be accessed and updated using the built in forms. Now, the goal is to bring additional automation to the proceedings, using a combination of processes, rules, events, and SLAs (Service Level Agreements, which encompass service level objectives and escalations).
Create a Process
The idea here is to have the Facilities team and the IT team working in parallel to get the new employee’s infrastructure up and running.
Create the Process Model:
1. Go to > Case Automation > Processes
2. Click [New Process] The Process Model editor opens.
Things to know: A User Task creates an entry in a task owner’s sidebar. When done, the user marks it as
Complete. (You’ll see how that works in a moment.)
An Approval Step gives the task owner two choices: Approve and Reject. You could then create process paths for each choice.
Other options at your disposal include automated tasks like Send Email, Execute Rule Set, and Execute Web Service (to get data from an external service, or send data to it.)
The remaining options like Decision Switch and Parallel Gateway give you ways to manage process flow.
In this process you’ll be working with User Tasks. And of course you’ll need a Start Event and End Event to complete the process.
Building a Case Mgt App AgileApps Cloud 29 May 2015, pg. 28
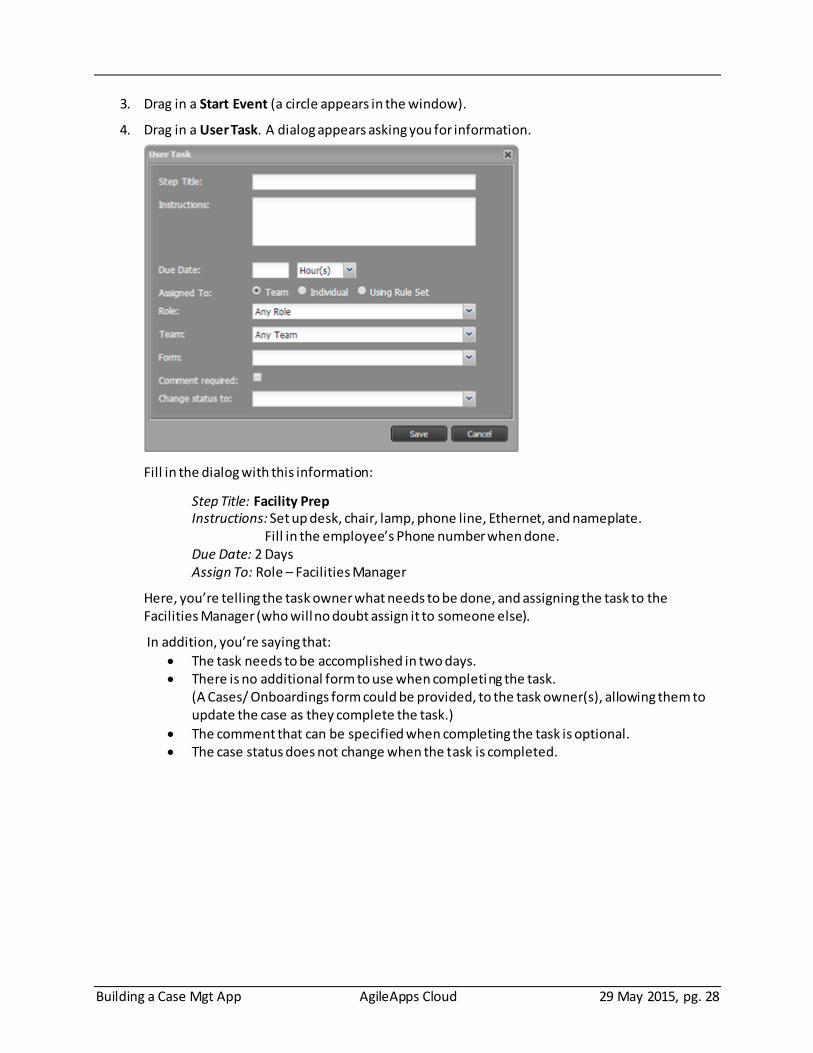
3. Drag in a Start Event (a circle appears in the window).
4. Drag in a User Task. A dialog appears asking you for information.
Fill in the dialog with this information:
Step Title: Facility Prep Instructions: Set up desk, chair, lamp, phone line, Ethernet, and nameplate. Fill in the employee’s Phone number when done. Due Date: 2 Days Assign To: Role – Facilities Manager
Here, you’re telling the task owner what needs to be done, and assigning the task to the Facilities Manager (who will no doubt assign it to someone else).
In addition, you’re saying that:
The task needs to be accomplished in two days. There is no additional form to use when completing the task.
(A Cases/ Onboardings form could be provided, to the task owner(s), allowing them to update the case as they complete the task.)
The comment that can be specified when completing the task is optional. The case status does not change when the task is completed.

Building a Case Mgt App AgileApps Cloud 29 May 2015, pg. 29
5. Click [Save]. The start event and first task now appear in the model:
6. Create a second User Task for the folks in IT:
Step Title: IT Prep Instructions: Set up network and computer systems. Fill in the employee’s email address and username when done. Due Date: 2 Days Assign To: Role – IT Manager
7. Arrange the two User Tasks so they are little way below the start icon, like this:

Building a Case Mgt App AgileApps Cloud 29 May 2015, pg. 30
8. From the sidebar, drag the Parallel Gateway element into position below the Start Event and above the User Tasks. That one will branch out into two flows, one for each of the tasks. Then drag another Parallel Gateway element below the tasks, to join the two flows together.
Note: A gateway creates a branch in the flow. A parallel gateway allows multiple paths to be in operation simultaneously. Flow proceeds from the join point, but only after each path runs to completion.
Next, we want to start wiring things up. You’ll begin by connecting the Start event to the Parallel Gateway branch.
9. Click the Start icon. Several smaller icons appear adjacent to it.
From top to bottom, those icons make it convenient to branch to a decision switch, end the process after the task completes, or add a flow-arrow to some other element. Similar icons appear for other process elements.

Building a Case Mgt App AgileApps Cloud 29 May 2015, pg. 31
Click the small flow control next to the Start icon and drag it to the first Parallel Gateway. Green corners appear to indicate that you’ve selected the endpoint:
10. Release the mouse. The arrow is drawn.
11. Draw the additional connector arrows needed to make the Process Model look like this:
(If the arrows aren’t going in the direction you want, hover over them and you’ll see a red dot in the middle of the line. Drag that dot to rearrange the arrow the way you want it.)
12. Add one more User Task for the HR Rep (case owner) to print the new employee’s welcome letter, which can now include their phone number, login name, and email address:
Print Welcome Letter Instructions: Print the new employee’s welcome letter. Due Date: 1 Day Assign To: Individual – (case) Owner

Building a Case Mgt App AgileApps Cloud 29 May 2015, pg. 32
13. Draw the connector arrow from the gateway-join to the new task:
14. Add one more Send Mail task to deliver an automated “heads up” to the Hiring Manager, using the email template you created earlier:
15. Click the last task to bring up the convenience icons.
16. This time, click the End Event icon (in the middle). The end-event is added to the diagram, and an arrow is drawn to it.

Building a Case Mgt App AgileApps Cloud 29 May 2015, pg. 33
The process now looks something like this:
17. As a matter of good practice, click the Check Syntax button to validate the model:
Tip: It’s a good idea to do that, because sometimes arrows that seem to go to the right location aren’t really connected to their termination point. The syntax check finds those errors.
18. Now press Ctrl+S or click the disk icon in the upper left to save the process model:
The Save dialog appears.

Building a Case Mgt App AgileApps Cloud 29 May 2015, pg. 34
19. In the Save dialog, specify the process Name: Onboarding Prep
You can also provide a description, and include a URL to the process-modeling engine you used to specify and review the original process model, if there is one.
20. Click [Save]. The process page appears:

Building a Case Mgt App AgileApps Cloud 29 May 2015, pg. 35
From here, you can click the process model to edit it, or specify the expected duration for the process as a whole (a value used for reporting. Service Level Objectives specify real deadlines).
Next, you’ll specify the expected duration, in order to set up measurement criteria.
Set up Measurement Criteria for the Process
Since this process doesn’t depend on any outside agencies, we’ll set up measurement criteria for it. Those settings will allow future reports to tell how well the department is doing, relative to their performance criteria. (For now, you’re doing it just to see what options are available.)
1. Click [Edit]
2. Make the target duration 5 days.
3. Calculate the target date from the Process Start (rather than when the case was created).
4. Since this is an internal process, check the box labeled Calculate using Business Hours. The Business Hours Calendar field appears.
5. Choose the Normal Business Hours calendar. That’s the standard calendar used by your organization, defined using
> Company Setup > Business Hours Calendars
A large organization might have several calendars for different divisions. But for most organizations, the one calendar is sufficient. (You could also have chosen the 24x7 calendar, if your organization happens to be one that runs around the clock.)
6. Click [Save]
Your first process is now complete.

Building a Case Mgt App AgileApps Cloud 29 May 2015, pg. 36
Working with the Process
Now it’s time to experiment a bit. Start by creating a new Onboarding case.
Seeing the Process in Action
In a new case, you’ll see the process listed in the sidebar, accompanied by a [Start] button. (The button is displayed because you are in a Role that is empowered to start the process. In a moment, you’ll set up a Rule that starts the process automatically.)
Tip: Once a process has started, you can click the process name to see the model, with the next task(s) to complete outlined in red.
For more information, see Processes in the support wiki.

Building a Case Mgt App AgileApps Cloud 29 May 2015, pg. 37
Printing the Welcome Letter
When the preparation steps have been completed, the Case record has the information needed to print the Welcome letter, with all of the variables filled in. So when viewing an Onboarding case, the HR Rep can choose the Print option:
That option brings up a dialog that lets them choose the Employee Welcome template and generate a document from it. They can then print the document and place it on the employee’s desk, or email it to the employee’s manager.
Taking Stock
The good news at this point is that you are very close to being done! The things that remain are much simpler, so you should find yourself breezing through the remaining steps.
Managing Process/User Interactions
As processes operate, they modify the interface that case agents see. Case agents then interact with that interface to advance the processes. This section shows how it all works, and shows you h ow to perform an additional customization to the agent interface.
Viewing Task Records
You now have a process that automatically creates tasks for users to complete. As tasks are completed, new tasks are created. You see those tasks in the sidebar when viewing case, under My Tasks--if the task has been assigned to you, your team, or your role.
You can also create tasks manually. In the sidebar, in the My TASKS section, click the Add Task link to create a sample task like the one below. (For this example, assign it to yourself.)

Building a Case Mgt App AgileApps Cloud 29 May 2015, pg. 38
Since this is a User Task, there is a [Complete] button under the task description. The task also shows up under the Tasks tab, in a list like the one shown here:
The Related To column in that list shows the Case number, which may not be very helpful to the HR Rep. But the information displayed in that column can be changed! You’ll see how to do that next.
Changing the Record Identifier for a Case
The Record Identifier consists of one or more fields that are displayed when a record is referenced.
To change the default record identifier for the Cases object:
1. Go to > Customization > Objects > cases > Record Locator
2. Click [Edit]. Under Record Identifier Fields, you can see that only Case Number is present. That’s the field that is showing up in the Task list.
(The other options determine which fields are displayed when the user is choosing a record to reference in a Lookup field--a field that references a record in another object--and which fields are used for record searches.)
3. Under Record Identifier Fields, in the Available column, select Employee Name and press the arrow key to move it to the Available column.
4. Click [Save].
Recall that the Subject field is being used for employee name. After refreshing the screen, the Task list now shows both the case number and the person’s name:
To learn more, see Record Id in the support wiki.

Building a Case Mgt App AgileApps Cloud 29 May 2015, pg. 39
Automate Activities Using Rules and Events
For the purposes of this application, there is only one event that needs to be handled:
When a case is created, launch the Onboarding Prep process.
Create the Event Rule
Next, you’ll create an event rule to launch the Onboard Prep process when a case record is created.
1. Go to > Case Automation > Business Rules
2. In the Events tab, chose On Record Created
3. Click [New Rule] Name – Launch Onboarding Process Execution Criteria – Unconditionally (Always) Actions to Perform
Action - Start Process Process – Onboarding Prep
4. Click [Save]. The rule appears in the list.
How Rules are Processed
Rules exist in sets. When you create a Rule Set, you give it a name, which lets you invoke it from other rules. But the rules that are triggered for the Case Created event, for example, also constitute a set.
Each set of rules is processed in two stages:
1. The rule conditions are examined, to see which conditions have been satisfied. All rules with valid conditions are enabled.
2. The enabled rules then execute in the order in which they appear in the set.
It’s worth understanding that sequence because, when a rule action sets a value in a record, that value is available in any actions taken by subsequent rules, and it is available in any rule sets that are invoked by one of those actions, but the value is not used when testing the conditions specified by subsequent rules in the current set --because those conditions were already tested before the first rule executed.
In other words, you can’t set a value in one rule, and then test for that value in a subsequent rule in the same set. To test such a value, you need a different rule set.
To learn more, see Rules and Rule Sets in the support wiki.

Building a Case Mgt App AgileApps Cloud 29 May 2015, pg. 40
Define Service Level Objectives (SLOs)
The last thing left to do for the basic application is to make sure that things happen in a timely manner. Here, we’re going to make sure that the onboarding preparation occurs in time to bring the new employee into a working environment.
To do that, we’ll use the Case priority field to determine the amount of time available:
P1 (Priority 1): This is an emergency setting, for when a new person’s start date is imminent. We’ll ask for the preparations to be completed in 2 business days.
P2 (the default): We’ll assume that this is normal process takes 5 business days to complete.
P3 or lower: No SLA. We’ll assume the organizations have plenty of time, and don’t need any prompting to make sure that get things done.
Of course, additional priorities could be defined to make sure that things get done in two weeks or four weeks (for example), but this simple version is sufficient to show how things are done.
To create the Service Level Objectives:
1. Go to > Case Automation > SLAs
2. Click [New Service Level Objective]
Name: P1 Objective
Resolve In: 2 Days Choose Days first. The initial value changes from 1.0 to 1, telling you to put in a whole number.
Business Hours Calendar: Normal Business Hours
SLA Escalation: 75-90-100 Notification This is the standard escalation policy that comes with the system. It sends a reminder message when 75% of the available time has elapsed. At 90% and 100% of the available time, it sends messages to both the case owner and their manager. (This policy works fine for most purposes, but you can also define your own to send messages at different times, or to take different actions like reassigning the case.)
3. Under Start Condition, next to All of these Conditions, click [Add Condition]
4. Choose field Priority.
5. The [Insert Field] button appears. Click it.
6. Use the default operator (is one of) and select the priority value: P1. 7. Click [Save]. The SLA now shows the objective you added:

Building a Case Mgt App AgileApps Cloud 29 May 2015, pg. 41
You have now added the P1 objective. Repeat the process to add a P2 objective that requires resolution in 5 days, and you’re ready to begin testing!
To learn more about Service Level Objectives (and Service Level Agreements), see SLAs and SLOs in the support wiki.
Test the Application
If you have added users who will help you test the application (particularly users who have the IT Manager and Facilities Manager roles), then you can work with each other to test the application.
If you are testing by yourself, you can easily complete the tasks assigned to others, to put the processes through their paces.
Completing Tasks
Most of the User Tasks created by the process steps are assigned to a particular role, but the default team designation is used: Any Team. That designation applies to everyone, so you see those tasks when you view the case. You don’t have a [Complete] button, because they aren’t assigned to you directly. But when you open the list of Actions available for the task, the first action you see is Claim--because you are on the same team as the person the task is assigned to. After you claim the task, the [Complete] button appears—which lets you advance the process to the next step.
In some cases, there is no Claim option. That situation occurs for tasks that are assigned to an individual, rather than a role. Most of the time, those tasks are assigned to you, because you are the “owner” of the test case you are creating, so you simply click the [Complete] button.
For the references check, though, the Approval step is assigned to a specific individual who may not be you (the hiring manager). For testing, of course, you can always choose to make yourself the hiring manager. But there is another option that is worth exploring:
Because you are administrator in the test account, your Access Profile gives you global visibility of all records.
Because you have that visibility, you see the Hiring Manager’s approval task when you view the case. (Something that would not be true for all users.)
Since the task was not assigned to a team, you don’t have a Claim option, but you can still assign ownership of that Task.
So you can assign the task to yourself, and then complete it.

Building a Case Mgt App AgileApps Cloud 29 May 2015, pg. 42
Debugging Tips
Here are some other things you can do to debug the application you created, and see what it’s doing:
Send yourself messages. This is the easiest way to see which rules have been triggered. Add an action to send yourself an email. In the message, you can identify the rule that fired, and include template variables to give you insights into the state of the case.
Add fields and examine records. Examining the Case record tells you which process flags have been set. You can extend that capability by adding additional fields and setting their values as records are processed. You can then examine the record to see what the fields contain at different stages.
Integrating a Web Service
A Web Service is any server system that responds to SOAP or REST requests. Such services may take information and store it, or retrieve information, or both. It is an important mechanism for integrating the platform with external systems
With AgileApps, you can set up such services by filling out a configuration form. You can then use them in a variety of ways--all without programming. But when programmatic access is necessary, there are code samples to show you how it is done.
Configuring a Web Service
Configuring a web service is essentially a matter of filling out a form. For a REST service, you begin by providing sample inputs and outputs. The samples are parsed to create the Web Service parameters. For SOAP, the parameters are defined in a WSDL file.
Having identified the input and output parameters, you can proceed to simplify things for the designer who uses the service. You can ignore selected parameters, hardcode some of the inputs, or “ask for a mapping”, which passes the choice to the designer. The designer can then map parameters to record fields, specify values, or define expressions.
The Many Ways to Use a Web Service
Using a Web Service in a Process As pointed out during the construction of processes, an external Web Service can be used in a process step. The designer can map outputs from the service directly into fields, or create expressions using them. Outputs can also be mapped into process variables, which can be tested in a decision switch.
Invoking a Web Service from a Rule When a Rule’s conditions are met, the Rule action can execute a Web Service. As part of creating the Rule, the mapping for input and output parameters is defined when the Rule is created.
Using a Web Service to Lookup Read-Only Record Data An External Lookup field lets you display data from a foreign database as though it were part of the current record. Those values can then be displayed in form, used in Rules, and placed into both document templates and email templates.

Building a Case Mgt App AgileApps Cloud 29 May 2015, pg. 43
Using a Web Service to Search for an External Record An External Lookup field can also be used to search for a record. Using inputs you provide, the external Web Service returns records for the user to select from. When the user choses a record, selected fields can be copied into the current record.
Using a Web Service as a Data Source for Related Records Related records are those that have a value that constitutes a “lookup” to the current record. If the current record is a Sales Account, for example, then “daily receipts” records referring to that account number would be related records. Such records could be displayed in the related-records section of a Sales Account form, even if they come from an external database.
Learn More
For more information, see these pages in the support wiki:
Web Services Integration Process Models#Execute Web Service
Rules#Actions to Perform
External Lookups (record search and read-only fields) External Data Sources
Defining Different Case Types for Different Kinds of Employees
Now that the basic application has been created, we’re going to customize it a bit further by creating a different kind of case that requires special handling.
You do that by adding a new case type. The good news is that case types take advantage of a feature called inheritance--so all of the functionality you defined so far is immediately and automatically available in the new case type. So all you have to add are the special features that are appropriate for the new type.
Here, we’re going to add a case type that will be used to bring on a new salesperson. For that case, we’re going to add a new process, and a new field in the case form.
Creating the new case type:
1. Go to > Case Management > Case Types
2. Click [New Case Type]
Case Type Title: Sales Onboarding (Case Type Name is filled in for you when you click in the field. No need to change it.)
3. Click [Save] The new case type appears in the list.

Building a Case Mgt App AgileApps Cloud 29 May 2015, pg. 44
4. Click the case type name to see the object aspects that can be customized. You can always get here using the path you just took, or by going through
> Customization > Objects
Now you’re ready to create a new process with a Send Email task that reminds the Hiring Manager to order business cards and to enroll the salesperson in the appropriate commission plan.
Customize the new object:
1. Click Email Templates on this page, and create a new email template to use as a reminder. Note: Clicking the entry on this page makes a template that is available for this case type, alone. Templates created in the Onboardings object are available for use by all case types.
Template Name: Sales New Hire Alert From Name: $Sales_Onboarding.owner.full_name
This field is down towards the end of the list of Sales Onboardings Fields. Scroll down until you get to the Sales Onboarding Owner Fields. Under that heading, find the Sales Onboarding Owner Full Name.
From Email Address: $Sales_Onboarding.owner.email Subject: Extra Preparation for Sales New Hire Body: Reminder: Order business cards and enroll the new person in the commission plan.
2. In the body, you’ll also want to include a link to the case, to make it easier for the Sales Manager to do the appropriate update. The task reminder messages the system sends out already include such a link. Here’s the HTML code from a similar template in the Cases object, Case Assignment Notification:
<a
href="https://$service_domain/networking/servicedesk/index.jsp#_c
ases/$cases.case_number">View Case Details</a>
The $service_domain variable sends the manager to your instance of the platform, while $cases.case_number sends them directly to the current onboarding case record.
3. After saving the template, click the “breadcrumb” at the top of the page (Sales Onboarding) to go back to the page of object aspects.
4. Click Process Models and create a new model with a Send Email task that sends a message to the Hiring Manager using that template:

Building a Case Mgt App AgileApps Cloud 29 May 2015, pg. 45
The process model now looks like this:
5. Save the process model:
Title: Sales Onboard Prep
6. Click the Sales Onboarding breadcrumb at the top of the page, and then click Processes and create a new process that uses that model:
Name: Sales Onboard Prep
Process Model: Sales Onboard Prep
Target Duration: 2 Days
7. Click [Save]
The extra processes for a sales hire are now in place. At this point, you could add Business rules to launch the process automatically as part of the Onboarding process, but we’ ll stop here, so you can see how the interface changes to accommodate the new case type.
To learn more, see Case Types in the support wiki.
See the Difference
When you go to the Onboardings (cases) tab, and view a list of cases, you can see that the [New Onboarding] button in the upper right has change to [New], with a dropdown list of possible case types (refresh the screen, if necessary):
Before After

Building a Case Mgt App AgileApps Cloud 29 May 2015, pg. 46
Create Different Forms for Different Roles
Next, add a new field to the Sales Onboarding case type:
1. Go to > Case Management > Case Types
2. Click Sales Onboarding
3. Click Fields. Note that the field list is empty.
4. Add a new field: Label: Commission Plan Display Type: Picklist Picklist Values:
Tier1 Tier2
5. Click [Save]
This field will appear only in the Agent Form for a Sales Onboarding case. But let’s take things a step further, and say that only the Sales Manager should see it. It turns out that it is an easy thing to do.
To restrict the Commission Plan field to the Hiring Manager:
1. At the top of the page, click the Sales Onboarding breadcrumb.
2. Click Forms. The list of forms appears, showing the Agent Form. (The other two Cases forms do not appear, as they are for registered users and guest users of the Service Portal.)
3. Click the Agent Form. Note the Commission Plan field is present in the form layout, at bottom right. The trick now is to make it visible only to the Sales Manager.
4. At the top of the page, click [Clone Layout]. Name: Manager’s Form
5. Click [Save]
You now have two identical forms, the Agent Form and the Manager’s Form, currently displayed:

Building a Case Mgt App AgileApps Cloud 29 May 2015, pg. 47
That one is great the way it is. The next step is to adjust the Agent Form to remove the new field.
1. Click the Agent Form tab.
2. Click the circled X on the Commission Plan field to remove it from that form.
3. Click [Save Changes] at the top of the page. The form is saved.
4. Click the Forms breadcrumb at the top of the page. You’re now back to the list of forms, where you can see that the Agent Form is still the default:
That only thing left is to assign the new form to the Sales Manager, to display the additional field:
1. At the top of the page, click the Sales Onboarding breadcrumb.
2. Click Forms Assignment
Each of the roles defined in the system has been given access to the Agent Form, by default.
3. Click [Edit]
4. For the Manager role, under Record Access, choose the Manager’s Form.

Building a Case Mgt App AgileApps Cloud 29 May 2015, pg. 48
5. Click [Save]
That’s all there is to it! We didn’t even have to define an additional role. Virtually by definition, the Hiring Manager for a sales person has the Manager role—so the hiring manager for a Sales Onboarding case is the Sales Manager!
It now becomes apparent why it was important to send the Hiring Manager a reminder to fill in that information—because only the Sales Manager has access to that field.
Of course, there is no real need for that field in the current application, but other applications can be created as easily as this one, and they can all make use of the data stored in this one —given the right permissions.
Packaging and Publishing the Application
You may want to create a package to finish the development process. A package is a zip file that can be saved for a backup. It can also be shared with others, allowing them to install the application in a completely different instance of the AgileApps platform.
For sandboxes, testing tenancies, and production tenancies running on the same instance of the platform, a simply deploy step is all it takes to transmit the updated package. Subscribers (tenants who have installed the package) can then do a simple update to get your changes—while leaving all of their additions and custom modifications intact.
Note: When other tenants install an application, they become subscribers. Any fields they add then have the tenant number appended. So fields that subscribers have added are automatically distinguished from any that you create, and are kept intact during the update process.
That statement is always true, unless the subscribing tenant is a sandbox. Since sandboxes are intended for collaborative development, fields added in a sandbox do not have a tenant number appended to the field name. Instead, those fields simply become part of the application.
So if sandbox1 and sandbox2 happen to add different fields with the same name, and sandbox2 does an update, then sandbox2 will have its field replaced by the one defined in sandbox1. But that is the nature of collaboration! When two people collaborate on a document, only one set of changes in preserved. ( It’s a situation that rarely happens, but one that is worth knowing about.)
To learn more, see Packages in the support wiki.
Taking Advantage of Advanced Development Capabilities
The application developed so far has been developed without doing any programming. Any code needed to run the application has been generated by the platform, behind the scenes. That capability makes it extraordinarily easy to develop an initial application—even one that is fairly sophisticated.
For truly sophisticated applications, however, the ability to write code is imperative. You’ll find a variety
of capabilities at your disposal when you go to > Customization > Developer Resources. This section highlights some of the more significant features. (For more information, see the Developers Index in the support wiki.)

Building a Case Mgt App AgileApps Cloud 29 May 2015, pg. 49
Integration Options
Integrating with existing applications is an important step in any development project. AgileApps provides powerful capabilities to do just that.
URL-based Data Interchange
Simple URL-encodings can be used to add new data to the platform or update existing data. Similarly, REST GET requests can be used over an http(s) connection to fetch data in either XML or JSON format. When an application can be modified to invoke those URLs, it can integrate smoothly with the platform using real-time data interchange.
Web Forms
A web-based application can display a Web Form that a user fills out to submit data to the platform. That form can be hosted on the platform, allowing it handle the details. Or an HTML version of the form can be generated and customized.
Java Classes and JSP Pages
When data that needs to be accessed exists elsewhere on the web, and the application that stores it can’t be modified (for example, because it is some 3rd party application running in the cloud), then a Java class can be used to synchronize application data at scheduled intervals, or JSP pages can be used to access that data in real time, in response to user actions. Those options are discussed further, next.
Java Classes
Java classes stored in the platform can be used to invoke both platform APIs and external APIs. For example, this class could be used to create the Phase II case record using Java code. The Rule that adds the record would invoke the method in this class, instead of adding the record directly:
package com.platform.yourCompany.utils;
import com.platform.api.*;
public class SubCaseCreator
{
public void startPhase2(Parameters requestParams)
throws Exception
{
// Get data from current case
String id= requestParams.get("id");
String subject= requestParams.get("subject");
String num = requestParams.get("case_number");
String owner= requestParams.get("owner_id");
String from = requestParams.get("from_user_id");
// Create the child case
Parameters params = Functions.getParametersInstance();
params.add("cases_parent_case",id);
params.add("subject", subject + " – Phase 2 - " + num);
params.add("description","Refer to parent case for notes");
params.add("cases_onboarding_phase", "Onboarding");
params.add("from_user_id", from);
params.add("owner_id", owner);

Building a Case Mgt App AgileApps Cloud 29 May 2015, pg. 50
Result result = Functions.addRecord("cases", params);
int resultCode = result.getCode();
if (resultCode < 0) {
// Error. Log message and display dialog
String msg = "Phase 2 Case creation failure "
+ requestParams.get("id") ;
Functions.debug(msg+":\n" + result.getMessage()); // Log
Functions.throwError(msg + "."); // Dialog
}
}
}
JSP Pages
JSP pages are HTML pages that can include Java code. That code can access the platform Java APIs directly, or it can invoke methods in Java classes (discussed next). The HTML can also execute JavaScript, taking advantage of the platform’s JavaScript APIs.
REST, Java, and JavaScript APIs
The platform’s Java APIs are available for use in Java classes and JSP pages. The REST APIs are available for use by external programs using the http(s) protocol. (The application must login to access those APIs or, for testing, the APIs can be executed from a browser, after you have logged in to the platform.)
Note: The REST APIs can also be used in classes and JSP pages, but that is generally much less efficient than invoking platform APIs directly.
Finally, a collection of JavaScript APIs makes it possible to create responsive, dynamic pages that take action at the click of a button.
SQL Browser and Database Views
While the functionality that comprises AgileApps objects is extensive, underneath it all there is a database table for each object. That table contains records, and SQL (Standard Query Language —the language of relational databases) can be used to examine those tables.
Similarly, database views can be used to join one or more object-tables into a single, comprehensive entity that can be used for reporting or interactive browsing.
Development Tools
An Eclipse plugin can be used to make sophisticated platform development easier. An integrated Unit Test Framework helps you make sure that classes are operating correctly. And Sandboxes hosted in the cloud make it possible to separate development activi ties for maximum efficiency.
And More…
As much ground as we’ve covered, the simple fact is that the AgileApps Cloud case management platform is actually capable of doing quite a bit more. In the interests of brevity, we’ve limited ourselves to hitting the highlights—but there is much more to discover as you explore the platform.
To learn more about developing applications with even greater sophistication using the AgileApps case management platform, you are encouraged to consult the Developers Index in the support wiki.