building a split-level staircase - the sims...
TRANSCRIPT
Building a Split-Level Staircase by Tiko, 14 November 2006
Page - 1
lights
he staircase we’ll end up with should look something
K, let’s move over to our building plot and get going.
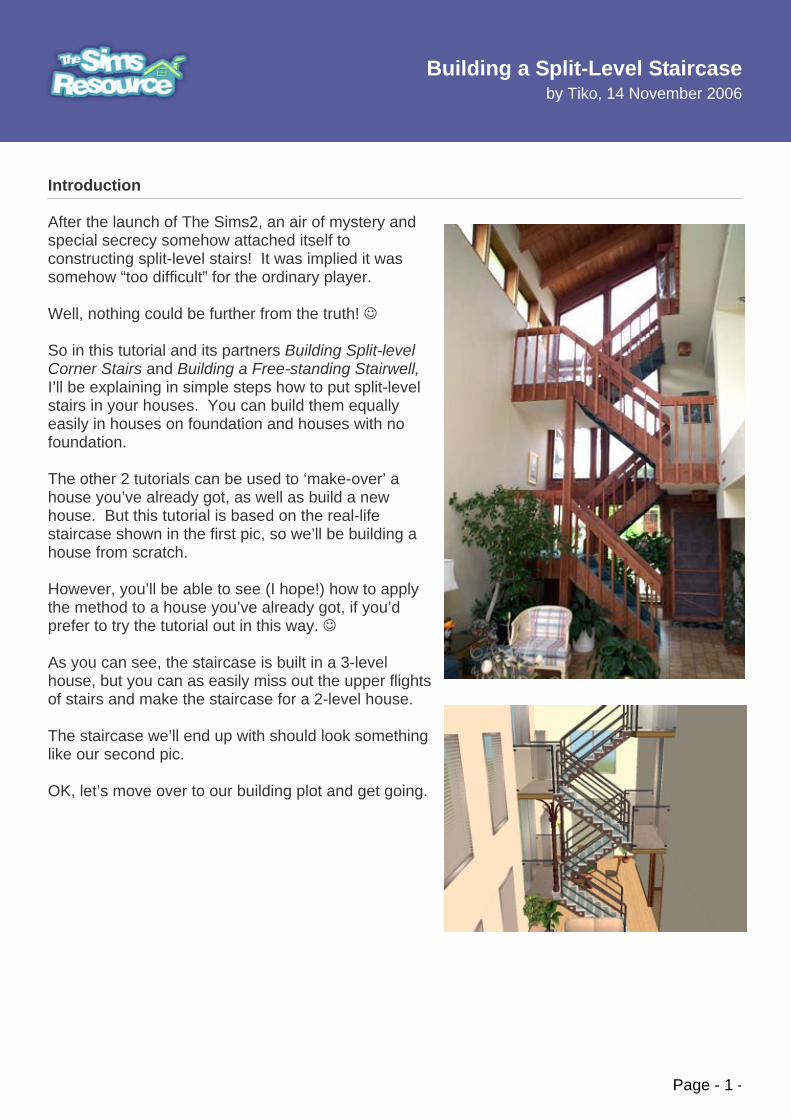
Introduction After the launch of The Sims2, an air of mystery and special secrecy somehow attached itself to constructing split-level stairs! It was implied it was somehow “too difficult” for the ordinary player. Well, nothing could be further from the truth! ☺ So in this tutorial and its partners Building Split-level Corner Stairs and Building a Free-standing Stairwell, I’ll be explaining in simple steps how to put split-level stairs in your houses. You can build them equally easily in houses on foundation and houses with no foundation. The other 2 tutorials can be used to ‘make-over’ a house you’ve already got, as well as build a new house. But this tutorial is based on the real-life staircase shown in the first pic, so we’ll be building a house from scratch. However, you’ll be able to see (I hope!) how to apply the method to a house you’ve already got, if you’d prefer to try the tutorial out in this way. ☺ As you can see, the staircase is built in a 3-level house, but you can as easily miss out the upper fof stairs and make the staircase for a 2-level house. Tlike our second pic. O
-

Building a Split-Level Staircase by Tiko, 14 November 2006
Page - 2
ill t
n
or
Step 1. For a 1-tile width staircase, our half-level platforms wbe 2x1 tiles, serving 1 stair flight upwards and 1 flighdownwards. So build a Foundation and outer walls, and have a look at the area where you’re planning to place the stairs. (If you prefer houses without foundation, just place the walls!) The width of the wall in our house is 11 gridsquares or wall panels – for this design it needs to be at least 10. ;) Step 2. Here we’re placing the base of our first platform-to-be against an outer wall. It’s also at least 4 wall panels ifrom both walls, simply because we’ll be showing howto make special use of roof gables on the side wall. Just make a little 2x1 ‘room’ with wall panels. I’ve added windows to improve the camera lighting – no other reason! (Of course we could remove the near wall for better lighting – but we’d lose some precious gridsquares on upper floors!!!) Step 3. The staircase we’re planning has 4 equal flights, each half of the game’s full 16-step staircase. A standard staircase stretches over 4 floor tiles or gridsquares, so we know that our flights will each be 2 gridsquares in length, and 8 steps or clicks high. So we place a wall 3 gridsquares further in from the platform base, giving us a 4-gridsquare wide space fthe stairs and platforms.
-

Building a Split-Level Staircase by Tiko, 14 November 2006
Page - 3
Step 4. PageUp one level, and add another outer wall, plus a length of inner wall above the wall we’ve just added in Step #3. Step 5. PageUp once more and add a loft or attic space. The default setting for roofs (recent EPs allow us to change the slope angles) means that a roof covers 3 gridsquares for every level it rises – so we’re leaving 3empty white gridsquares each side of the loft. But we’re making sure we have walls at the gable ends, as shown here. Since the lower levels are 11 gridsquares wide, our walls are 5 gridsquares wide. Step 6. Now add the top roof. Make sure you use the Long Gabled Roof, to give us a gable end wall above the stairs.
-
Building a Split-Level Staircase by Tiko, 14 November 2006
Page - 4
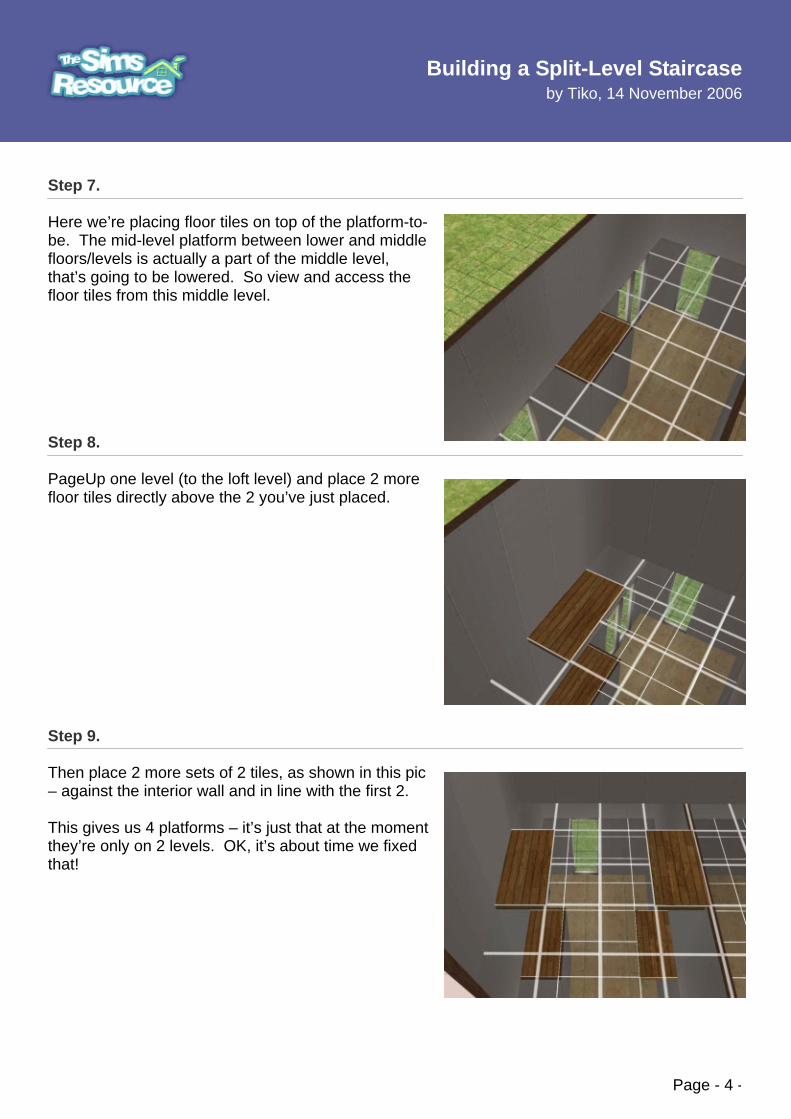
Step 7. Here we’re placing floor tiles on top of the platform-to-be. The mid-level platform between lower and middle floors/levels is actually a part of the middle level, that’s going to be lowered. So view and access the floor tiles from this middle level. Step 8. PageUp one level (to the loft level) and place 2 more floor tiles directly above the 2 you’ve just placed. Step 9. Then place 2 more sets of 2 tiles, as shown in this pic – against the interior wall and in line with the first 2. This gives us 4 platforms – it’s just that at the moment they’re only on 2 levels. OK, it’s about time we fixed that!
-
Building a Split-Level Staircase by Tiko, 14 November 2006
Page - 5
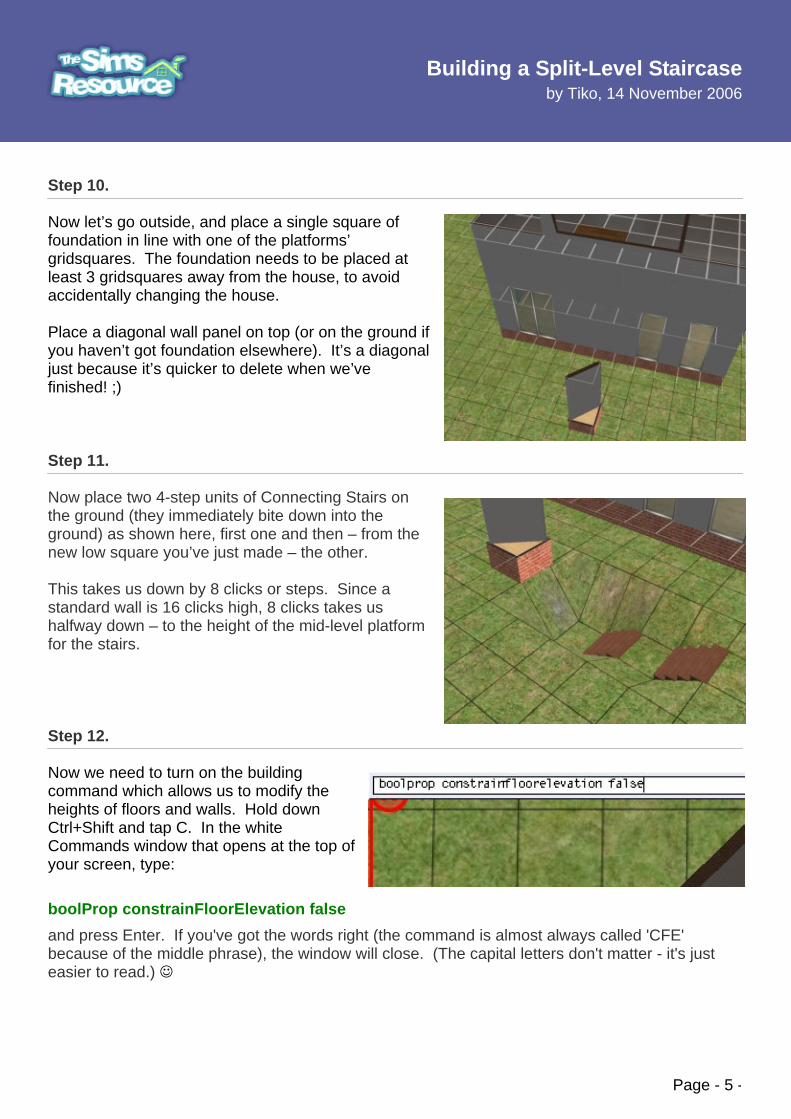
Step 10. Now let’s go outside, and place a single square of foundation in line with one of the platforms’ gridsquares. The foundation needs to be placed at least 3 gridsquares away from the house, to avoid accidentally changing the house. Place a diagonal wall panel on top (or on the ground if you haven’t got foundation elsewhere). It’s a diagonal just because it’s quicker to delete when we’ve finished! ;) Step 11. Now place two 4-step units of Connecting Stairs on the ground (they immediately bite down into the ground) as shown here, first one and then – from the new low square you’ve just made – the other. This takes us down by 8 clicks or steps. Since a standard wall is 16 clicks high, 8 clicks takes us halfway down – to the height of the mid-level platform for the stairs. Step 12. Now we need to turn on the building command which allows us to modify the heights of floors and walls. Hold down Ctrl+Shift and tap C. In the white Commands window that opens at the top of your screen, type: boolProp constrainFloorElevation falseand press Enter. If you've got the words right (the command is almost always called 'CFE' because of the middle phrase), the window will close. (The capital letters don't matter - it's just easier to read.) ☺
-

Building a Split-Level Staircase by Tiko, 14 November 2006
Page - 6
in
Step 13. Now use the LevelTerrain tool to slide across from the low flat gridsquare you’ve created, to somewhere on the far side of the little Foundation square, as shown. If you haven’t slid a tool before, you slide simply by holding the LH mouse button down. It doesn’t matter if you’re not quite in line before you start – just make sure you slide underneath all of the little foundation ..... but NOT the house!!! Step 14. This should be what you end up with. This will be our ’control column’, fixing a new level from which we can modify other levels in the house (this case our stair platform). Step 15. Place the LevelTerrain tool on the empty white gridsquare on top of the control column and slide it carefully across 2 lines of gridsquares, to cover our planned mid-level platform, as shown here.
-

Building a Split-Level Staircase by Tiko, 14 November 2006
Page - 7
Step 16. Let go the mouse button, and here’s the result. Step 17. PageUp one level, and we can see that the upper platform has also come down. Step 18. PageUp one more level to the top of the loft, and of course the walls here have also been lowered. But because we placed the Long Gabled Roof on before starting to construct the staircase .....
-

Building a Split-Level Staircase by Tiko, 14 November 2006
Page - 8
Step 19. ..... the gable end walls kindly drop down to fill in the gap. I’ve papered the top gable just to show its shape. Roofs aren’t affected by the CFE command – just walls and floors. (And builders like you and me, of course – the CFE command can do strange things to builders!!!! ☺ ) Step 20. If we hadn’t placed the roof on first at Step #6 (you did, didn’t you?!) we’d have to level off the wall tops of the loft as shown here, in order to place the roof now. If you need to, just place the LevelTerrain tool on an empty white gridsquare to the side of the dip and slide across. But having the roof on first is a real bonus, because it allows us to place windows in the walls we’ve modified ..... read on! Step 21. OK. So we didn’t level the wall tops. Good. Let’s place some stairs. Most of the Connecting Stairs are solid, and look lovely from above – let’s try the Steadfast Connecting Stairs. Remember that the mid-level platform is actually the floor above, brought down, so view and place stairs from the middle floor level.
-

Building a Split-Level Staircase by Tiko, 14 November 2006
Page - 9
Step 22. Then go up one level, and add 2 more flights of stairs as shown here, giving 4 in all. Looks OK from above?
-
Step 23. Nah!!!! Nargghhh!!!! It looks daft from the side. ☺ The upper flights completely fill up the steps of the lower flights. Using Object Hiding from the game’s Options button doesn’t affect build objects like stairs. Unless you’re playing on the lower house level, this is what you’ll see. Sims will still walk up the stairs, but it can look a bit daft as they disappear!!! Step 20. So we’ll use the Holy Smoke Connecting Stairs instead, and replace the wooden floor tiles on the platforms with interior tile. You can either turn off the CFE command (see Step #30) before placing the new floor tiles, or wait until Steps #29-30 and discover how to correct the kind of changes brought to modified levels by laying tiles. ☺ To keep a cleaner, modern look I’ve also deleted the walled base under the first platform. You may prefer to keep it? Great!

Building a Split-Level Staircase by Tiko, 14 November 2006
Page - 10
n.
Step 25. Now for windows. If we’d levelled off the loft walls as shown at Step #20, when we try to place windows we would find that the wall above the window disappears, and with half-length windows the wall also bleeds up into the lower part of the window. Step 26. And if we try to place windows in the wall panels next to the platforms, the upper wall bleeds down into the window, as you can see here. Step 27. We need walls of standard height to place windows iAnd happily, the wall panels on the first mid-level platform are standard height. (Remember how at Step #17 we saw they brought the level above down with them). So we can place windows without any holes or bleeding.
-

Building a Split-Level Staircase by Tiko, 14 November 2006
Page - 11
lace
Step 28. PageUp one level, and we find that the walls on the platform above are also standard height. Yay! So we can add windows here, too. This is because the roof kindly stretched its gable wall down to cover the dip in the wall below, as we saw at Step #19. So we didn’t need to stretch the walls as we might have done in Step #20 (you didn’t, did you?!) Step 29. When I placed new floor tiles on the platforms at Step #24, the tiles also brought the gridsquares next to them down as well. You can see in this pic – compared with the pic in Step #21 – how the empty white gridsquares outside the platform are now 4 wide rather than 2. Maybe you decided to switch off the CFE command first at Step #24? But if not, to level off the walls pthe LevelTerrain tool on the gridsquare shown here ..... Step 30. ..... and slide it carefully to another level gridsquare next to but outside the wall. If you go inside the wall you’ll raise one edge of the platform too! Repeat on the other side if you need to. Now we just need to switch off the CFE command. Open the white Commands window again and type in boolProp constrainFloorElevation true and press Enter. Now the built levels are locked or ’constrained’.
-
Building a Split-Level Staircase by Tiko, 14 November 2006
Page - 12
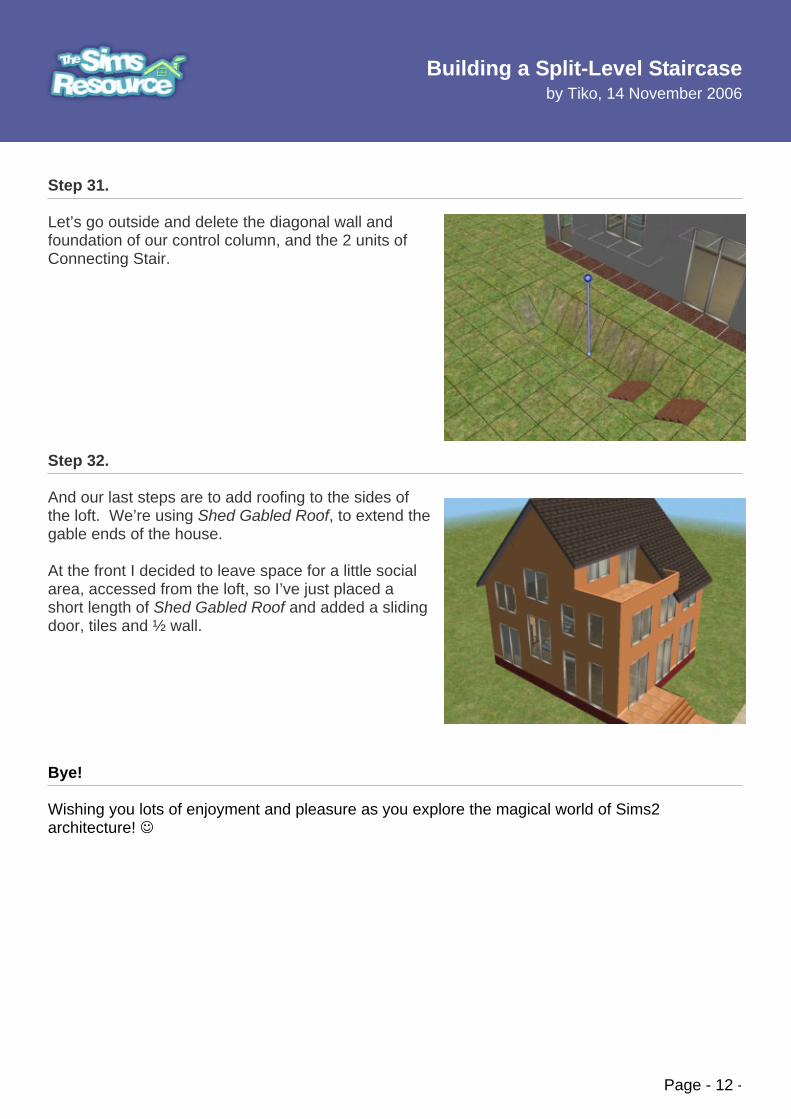
Step 31. Let’s go outside and delete the diagonal wall and foundation of our control column, and the 2 units of Connecting Stair. Step 32. And our last steps are to add roofing to the sides of the loft. We’re using Shed Gabled Roof, to extend the gable ends of the house. At the front I decided to leave space for a little social area, accessed from the loft, so I’ve just placed a short length of Shed Gabled Roof and added a sliding door, tiles and ½ wall. Bye! Wishing you lots of enjoyment and pleasure as you explore the magical world of Sims2 architecture! ☺
-