building a single bike generator - united...
TRANSCRIPT
Building a Single Bike Generator
SYSTEM DESIGN
Designing any off-grid system is a question of matching up your supply of energy with the amount of poweryou will need. A single bicycle generator's capacity for energy production is dependent on the powerproduced by the cyclist and the condition of the bicycle itself. There are many ways to put together a bikegenerator, from cheap to super expensive, from cheap to more complicated. All of them have pros and consand so the choice is really up to you. The generator itself is not the whole story so we have to look at thebigger picture.
The areas we need to take into consideration when we are building our system are:
• Assessing our loads and the potential for reducing these where possible • Storing power with a battery • AC or DC or both• System control• Distribution of power • Safety precautions as electricity can be dangerous• Deciding upon your budget and thinking about a system that you can afford
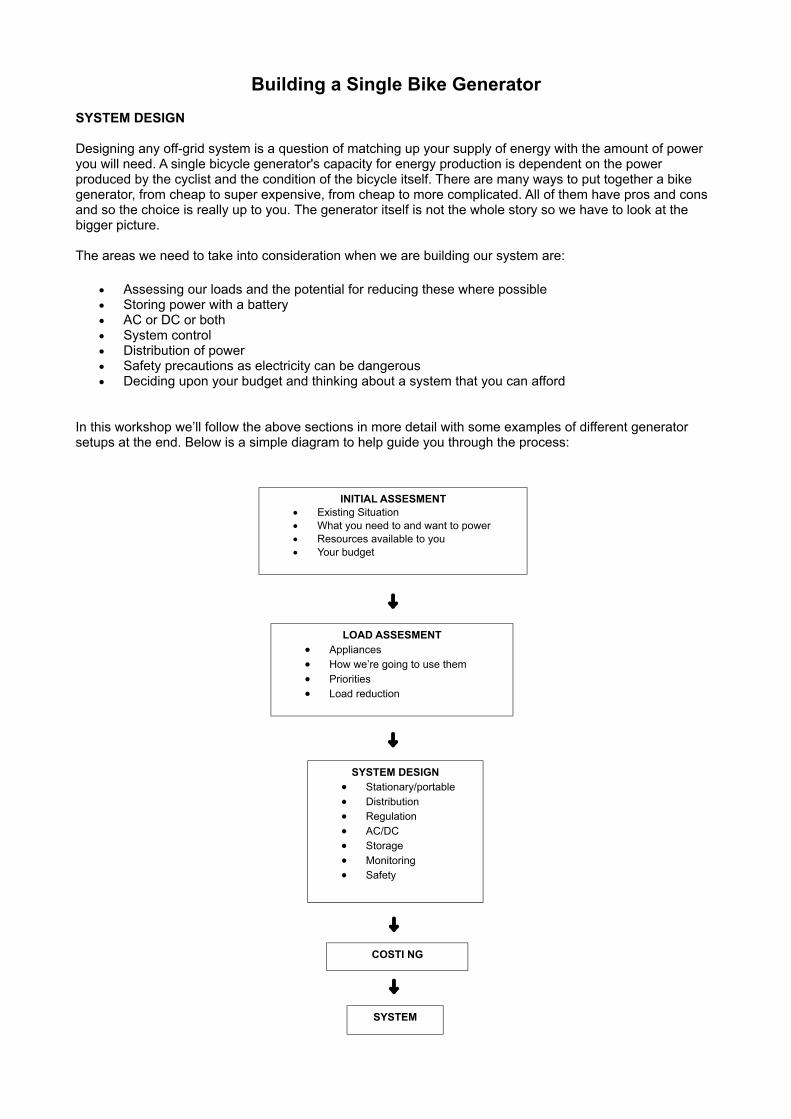
In this workshop we’ll follow the above sections in more detail with some examples of different generatorsetups at the end. Below is a simple diagram to help guide you through the process:
INITIAL ASSESMENT• Existing Situation• What you need to and want to power • Resources available to you • Your budget
LOAD ASSESMENT• Appliances • How we’re going to use them • Priorities • Load reduction
SYSTEM DESIGN• Stationary/portable• Distribution• Regulation• AC/DC• Storage • Monitoring• Safety
COSTI NG
SYSTEM
SYSTEM PARTS
Here is a complete list of the components we use to build a single bicycle generator. You may notnecessarily need all of the items listed below (depending on your budget or requirements) but it's good to getan idea of all the bits and pieces that can go into the system.
• Bicycle (ideally with slick tyres)• Bicycle training stand• DC permanent magnet motor• Plate or wood for mounting motor• Skateboard wheel or roller• Multimeter• Cable & connectors (30 amp Anderson connectors or mains 3 way connectors)• Screws, nuts and bolts• Regulator• Inverter• Capacitor• Heat sink• 12V connectors x 4• 12V sockets• Fuses & fuse holders• RCD• Earthing system• Battery • System housing e.g. wood box• Tools e.g. • Crimp tool• Soldering iron & solder• Terminal blocks• Electrical tape• Electrical screwdriver• Spanner• Needle nose pliers• Wire cutters and strippers• Allen keys• Plug in power meter• Diode or Bridge Rectifier• Battery Charger • Dump Loads
Assessing our loads and the potential for reducing these wherepossible
Load usually refers to the equipment that we need and wish to power with our bicycle generator. A good firststep would be to find out just how much power i.e. its power rating (our load) the different appliances requireto do their job. Most appliances have stickers on the bottom of them that tell us either how many watts, voltsand amps they use. We can use volts and amps to calculate watts via using the equation W = I x V . Loadsare usually measured in watt-hours e.g. a 30 watt DVD player consumes 30 watts every hour it is turned on.
However, it is best to measure appliance consumption with a plug-in power meter (see parts description forfurther details) as that will give us the most precise information. This is especially important when we’rethinking about powering sound equipment, as the equipment specifications don’t reflect its actualconsumption. You may find that sound equipment often runs at much lower wattage with higher peaks,depending upon the levels that the equipment is set to. For example, a sticker on the amp may read 200Wbut the amp may only use 30W at the level you require it at. On the other hand some loads may work onthree times their operating power for short periods when turned on.

Check out the power consumption table below (taken from the Off The Grid book) to see powerconsumptions of various appliances. All of this is information is rather important if we don’t want to damageour equipment and blow fuses.
Since powering loads with a bicycle can often be lot of effort and many loads take more than one bike topower, we need to think about ways that we can reduce our loads if possible. For example, many peoplewould like to power a projector but it’s not possible with just one bicycle as most consumer projectors requiresomewhere between 150W to 350W. One way to deal with this situation is to compromise the size of ourscreen/image quality and use an LED projector that only requires 30W.
Many loads are not possible to power with a bicycle generator as they require too much energy, these aremainly heating loads e.g. AC kettles require about 3000W, DC kettle about 200W.
DC appliances are lot more efficient as you avoid losses due to inversion of electricity from DC to AC.However, DC appliances are more expensive and harder to find. However this may be outweighed by thesavings on not having to buy an inverter and fuses and RCDs and is also much safer than AC, which worksat 240V.
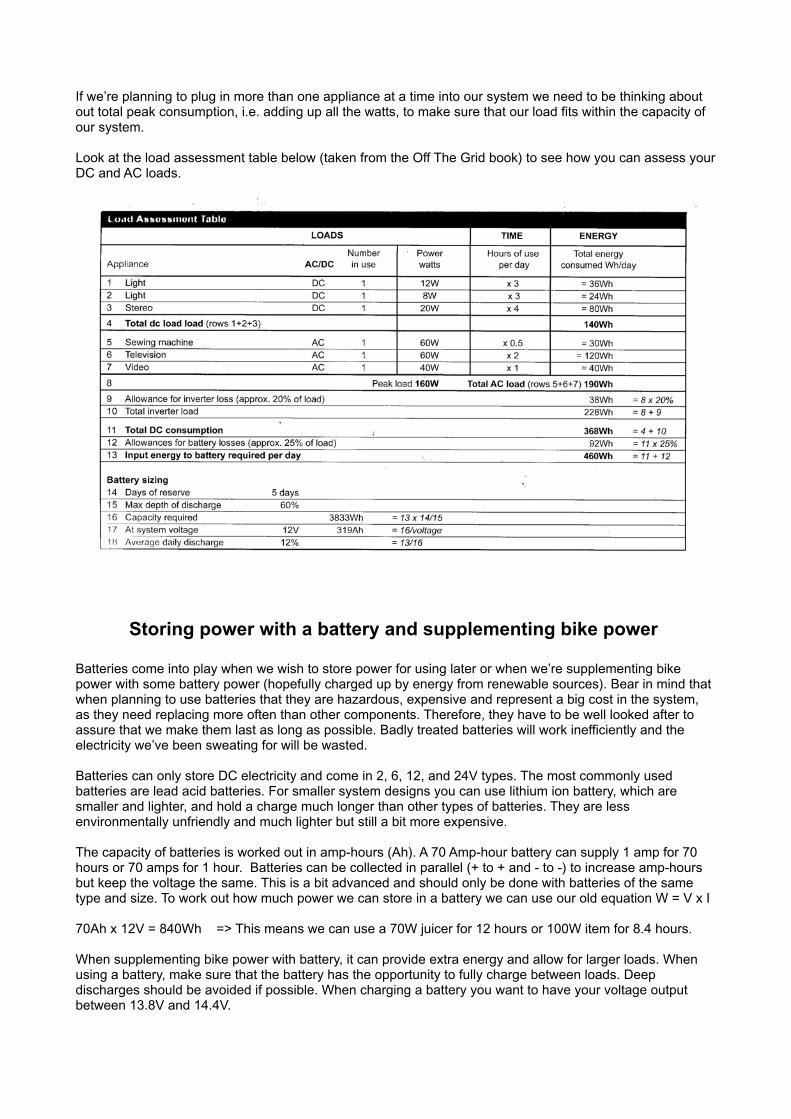
If we’re planning to plug in more than one appliance at a time into our system we need to be thinking aboutout total peak consumption, i.e. adding up all the watts, to make sure that our load fits within the capacity ofour system.
Look at the load assessment table below (taken from the Off The Grid book) to see how you can assess yourDC and AC loads.
Storing power with a battery and supplementing bike power
Batteries come into play when we wish to store power for using later or when we’re supplementing bikepower with some battery power (hopefully charged up by energy from renewable sources). Bear in mind thatwhen planning to use batteries that they are hazardous, expensive and represent a big cost in the system,as they need replacing more often than other components. Therefore, they have to be well looked after toassure that we make them last as long as possible. Badly treated batteries will work inefficiently and theelectricity we’ve been sweating for will be wasted.
Batteries can only store DC electricity and come in 2, 6, 12, and 24V types. The most commonly usedbatteries are lead acid batteries. For smaller system designs you can use lithium ion battery, which aresmaller and lighter, and hold a charge much longer than other types of batteries. They are lessenvironmentally unfriendly and much lighter but still a bit more expensive.
The capacity of batteries is worked out in amp-hours (Ah). A 70 Amp-hour battery can supply 1 amp for 70hours or 70 amps for 1 hour. Batteries can be collected in parallel (+ to + and - to -) to increase amp-hoursbut keep the voltage the same. This is a bit advanced and should only be done with batteries of the sametype and size. To work out how much power we can store in a battery we can use our old equation W = V x I
70Ah x 12V = 840Wh => This means we can use a 70W juicer for 12 hours or 100W item for 8.4 hours.
When supplementing bike power with battery, it can provide extra energy and allow for larger loads. Whenusing a battery, make sure that the battery has the opportunity to fully charge between loads. Deepdischarges should be avoided if possible. When charging a battery you want to have your voltage outputbetween 13.8V and 14.4V.
We have to remember that most batteries cannot withstand being completely discharged. Depending on thebattery they should only be discharged to 50% to 80% of their capacity. If you have a battery that is 70 Amp-hours than you really need to see that available power as 50% (leisure battery) to 80% (deep cycle battery)of 70 depending upon the battery. The best batteries to use with bike power are deep cycle batteries as theyare designed to regularly discharged between 30% to 80% of their capacity. Well-treated deep cyclebatteries will last much longer than a leisure battery. When buying a new battery, the more expensive it is thebetter the quality.
Car batteries are not suitable to use with bike power, as they were made for short bursts of high current.They never get discharged much in the short time it takes to start a car and they are recharged immediately.Therefore deeper discharge of car batteries damages them.
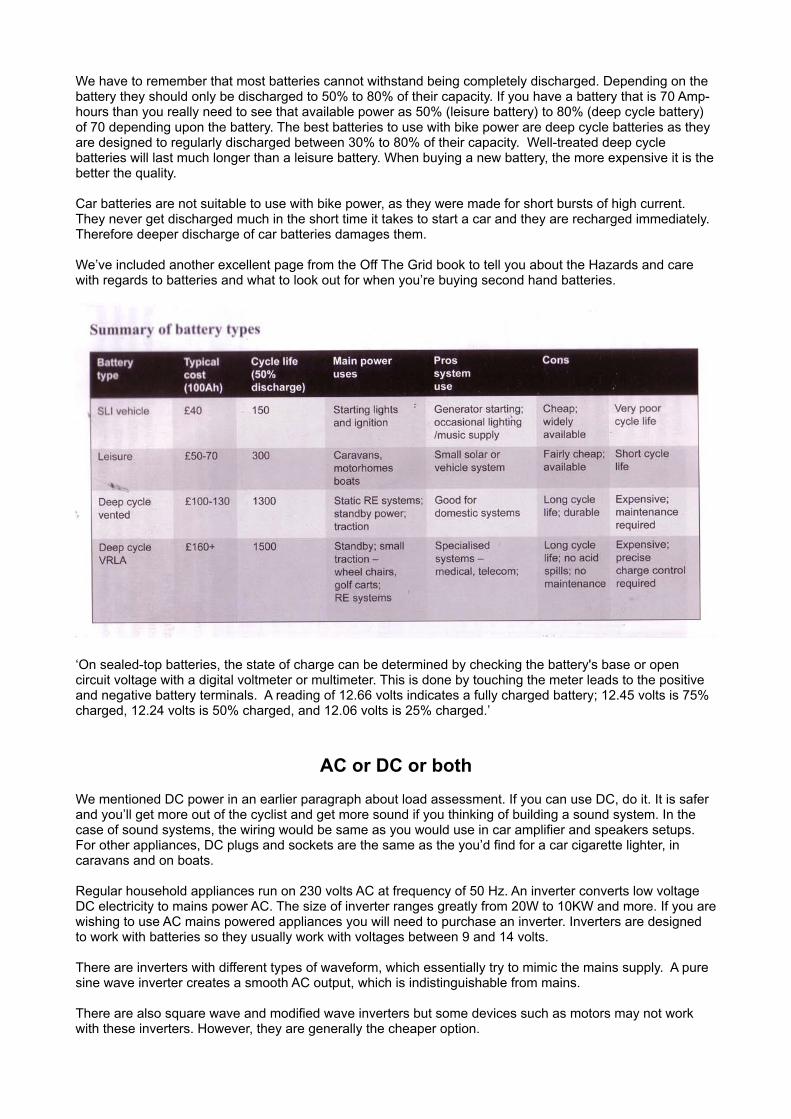
We’ve included another excellent page from the Off The Grid book to tell you about the Hazards and carewith regards to batteries and what to look out for when you’re buying second hand batteries.
‘On sealed-top batteries, the state of charge can be determined by checking the battery's base or opencircuit voltage with a digital voltmeter or multimeter. This is done by touching the meter leads to the positiveand negative battery terminals. A reading of 12.66 volts indicates a fully charged battery; 12.45 volts is 75%charged, 12.24 volts is 50% charged, and 12.06 volts is 25% charged.’
AC or DC or both
We mentioned DC power in an earlier paragraph about load assessment. If you can use DC, do it. It is saferand you’ll get more out of the cyclist and get more sound if you thinking of building a sound system. In thecase of sound systems, the wiring would be same as you would use in car amplifier and speakers setups.For other appliances, DC plugs and sockets are the same as the you’d find for a car cigarette lighter, incaravans and on boats.
Regular household appliances run on 230 volts AC at frequency of 50 Hz. An inverter converts low voltageDC electricity to mains power AC. The size of inverter ranges greatly from 20W to 10KW and more. If you arewishing to use AC mains powered appliances you will need to purchase an inverter. Inverters are designedto work with batteries so they usually work with voltages between 9 and 14 volts.
There are inverters with different types of waveform, which essentially try to mimic the mains supply. A puresine wave inverter creates a smooth AC output, which is indistinguishable from mains.
There are also square wave and modified wave inverters but some devices such as motors may not workwith these inverters. However, they are generally the cheaper option.

Different loads will have different tolerances to inverter characteristic and different inverters will have differenttolerances to load characteristics. This is important to consider when buying an inverter e.g. some inverterscan’t deal well with peaks in sound equipment. Also, all inverters work inefficiently at low loads.
The things to look out for in inverter specifications (example at the back of the hand out):
• Power output • Input voltage• Waveform• Efficiency• Standby• Surge ability• Input Voltage• Load sensing • Interference suppression • Protection mechanism • Cost • Recommendations
System Control
Without control mechanisms our electricity would be all over the place. Controls make sure we don’t blowthings, set them on fire and hurt ourselves and/or other people. Controls also get rid of fluctuations within oursystem. The voltage that person produces on a bicycle is variable and can be as high as 70V and that has tobe kept in check by regulations.
The sorts of controls that we need to know about with bike power are:
• Reverse input current blocking can be achieved with a diode. Our DC motor is a two-waydevice, something must be in place to keep the current from going back the way it came, causingthe motor to act like a motor and not like a generator (a motor performs the opposite job of agenerator when it takes in current and converts it into mechanical energy). The diode will gobetween the generator and the battery or regulator/converter, with only the fuse between it andthe battery/regulator/converter. A diode has both a positive and negative terminal. Make sure youconnect positive-to-positive and negative-to-negative or the device will not work. Look at theinformation that came with your diode to determine which terminal is which, and if you are stillhaving trouble, ask the supplier.
• Voltage regulation can be achieved with:
A. Step down buck converter. Converters are generally used in communicationstechnology and their use in bike power is novel but brings some disadvantages.Buck (or step down) means that the converter can only produce a voltage lowerthan that supplied to it. So, if you require an output voltage of 12V then theconverter will need to be supplied with a voltage constantly equal to or greater than12V in order to work. The voltage created by a permanent magnet (PM) motor isdirectly proportional to the speed that the motor is rotating (RPM). The scootermotors we use in our system are designed to provide a 24V output at 2850RPM, soin order to create a voltage constantly higher than 12V the motor must rotate at aspeed of at least 1425 RPM. How fast the motor rotates depend on:
1. The speed the cyclist is spinning his or her legs (faster = greater motorRMP)
2. The size of the rear wheel of the bike you are using (larger = greatermotor RPM)

3. What gear the bike is in (downhill gears = greater motor RMP)
The disadvantage of the converter is that with the motors we currently use thevoltage can sometimes get a little bit too high if a person jumps on a bike and spins.If not careful this can blow the board. This can be overcompensated with larger rolleror smaller motor. The converter also requires a heat sink attachment to dump excesspower as heat. Running the converter at high loads without a heat sink can blow theboard.
B. Capacitor. A capacitor can be used to smooth the output voltage from the motorand has the added benefit of providing a reservoir of energy for bass notes in soundsystems for the amplifier to use on demand. As a rough estimate every 400W ofsound requires 0.5 farad of capacitance.
There are a couple of disadvantages in using a capacitor. The capacitor doesn'tsupply a constant output voltage. Once charged it corresponds to the voltage outputfrom the motor, which (as discussed above) is relative to its RPM. If you are usingan inverter (designed to work between 9 and 14V) or sensitive 12V equipment youwill need to keep an eye on the voltage across the capacitor and adjust yourpedalling speed or the gear you are in to keep the voltage steady.
Capacitors can be damaged or may cause damage to those nearby if not treatedwith respect. The voltage rating of any capacitor will be written on it. Once thecapacitor is full of charge, if a voltage higher than its rating is supplied to it candamage the capacitor. Some capacitors come with their own built in voltmeter,making monitoring of voltage easier.
C. Battery Charger. This is a slightly more advanced system that still requires theuse of a capacitor in combination with a battery charger charge in diversion modesetting. The capacitor is usually wired after the bikes followed by the battery charger.Every battery charger is different and has different specifications that have to befollowed when deciding about how it will work in the system. This option alsorequires the use of dump loads such as metal coils that heat up in the case ofexcess power is produced. Using battery chargers can be expensive.
• Fuses. If there is a surge in the electrical system that causes too much current to pass throughthe fuse, it pops, which creates disconnects the circuit (known as an open circuit). This breakprevents current from continuing its path and keeps the device from working. It also keeps thedevices from being destroyed by too much current. For the price of a fuse, we can protect ourequipment. When we use batteries, 25 amp fuses are needed to protect our wiring should oursystem short circuit. It should be placed immediately adjacent to the positive terminal of thebattery.
• Earth leakage trip detects the difference between current leaving and the current returning. Ifthis becomes bigger than 30mA (the maximum safe level) it switches of the power. Earth leakagetrips are RCBOs, RCDs, RCCBs and ELCBs. Read the additional pages about RCDs that arepart of the hand out.
• Earthing. Earthing creates a link between our system and the ground. It is standard practice toearth the battery negative and the negative of the inverter. Inverters may require differentearthling. Always follow the inverter manual guidance on earthling! Earthling assures no currentcan flow through our bodies in case we touch a live part of our system, as current will want to runto the ground. In most cases we’ll require a galvanised rod of min length of 1.5m that we can runinto the ground. We need to connect the earth rod to our battery and appliance negative using acopper conductor, with our conductor being at least as thick as the largest one in our circuit.
Distribution of power
Cables for our system are generally chosen on the basis of current-carrying capacity. Cables need to be ableto carry the required current without overheating. Check out the pages below to give you guidance on the

sorts of cable that you’ll need.

DC cables will need to be much thicker as the current in a DC system is much higher than 240V AC. Cablesalso need to be thicker because of voltage drop. Voltage drop is the loss of power as the current runs downthe cable. This is due to the resistance in the copper. The loss of power occurs as heat. Voltage drops will beworse for cable stretching long distances. Voltage drop can also possibly damage appliance that aresensitive to the voltage they receive. The most efficient systems will have the smallest voltage drop. Theformula for working out suitable cables is:
Volt drop (V) = 0.04 x cable length (m) x current (amps) / cable cross sectional area (mm2)
It’s also possible to knock out 25A on a bike for bursts, so our cable should be able to handle those sorts ofcurrents too!
Safety precautions as electricity can be dangerous
Please take all safety precautions mentioned in this hand out such as earths, fuses, RCDs, and more!Read the guidance on working with batteries and be aware that the power coming out of an inverter is240V.
This is not to scare you, but electricity when handled wrong can be deadly. Even though a 12V systemdoesn’t pose an electrocution hazard, there are still other hazards such as electrical fires from too muchcurrent. Keep a fire blanket and a small extinguisher near by if possible. If you’re not sure of anythingask an electrician. If you intend to take you generator to a public event get a certificate from a qualifiedelectrician, which will assure that your installation is safe!
Deciding upon your budget and thinking about a system that you canafford
In the simplest terms you will need a person, a bike, a way of supporting your bike off the ground, a motor,an energy smoothing system and an inverter if you want to use your bike generator to power mainsequipment.
Cost is an issue for many people. When we first stated generating electricity with bikes we were on a reallytight budget. As opposed to buying stands that would cost us £50 with a bit of welding we made our ownbicycle stands that came to about £15 per stand. Instead of using an aluminium roller we used oldskateboard wheels.
There are many ways to do things and it’s all about being resourceful. You can find motors, from old washingmachines, car windshield wipers as long as they are permanent magnet 12V DC motors and within youparameter you should be fine.
You plate for mounting could be old bit of wood that you may find laying around. Stand can be put togetherfrom old discarded bikes. Many, many, many ways…………

Suppliers of parts
Bicycle (ideally with slick tyres)Local bicycle storeGumtree - www.gumtree.co.ukEbay - www.ebay.co.uk
Bicycle training standCycle Store - www.cyclestore.co.ukCycle Sports UK - www.cyclesportsuk.co.ukOn Your Bike - www.onyourbike.co.ukMinoura
DC permanent magnet motorEbay - www.ebay.co.uk - Part no. MY1068Conrad Electronic - www1.conrad-uk.comScience Shareware - http://www.scienceshareware.com/ Campaign For Real Events - http://www.c-realevents.demon.co.uk/
Plate or wood for mounting motorTimber merchantsSteel stockistsDIY store
Skateboard wheel or rollerSkate shopMR - www.magnificentrevolution.org
MultimeterMaplin - www.maplin.co.ukScrewfix - www.screwfix.comDIY store
RegulatorRS - uk.rs-online.comMaplin - www.maplin.co.uk
DC to DC converterpart 445-9787 from RS or part L22BR from Maplin.
InverterMaplin - www.maplin.co.ukOutdoor GB - www.outdoorgb.com
CapacitorCar audio storePassion Auto - www.passionauto.co.ukHalfords - www.halfords.com
Tristar Battery ChargerMysolarshop.co.uk - www.mysolarshop.co.ukWind and Sun - www.windandsun.co.uk
Dump Load CoilsMysolarshop.co.uk - www.mysolarshop.co.ukKaieter - www.kaieteur.uk.com
HeatsinkRS - uk.rs-online.com
12V Connectors x 4

RS - uk.rs-online.comOutdoor GB - www.outdoorgb.com12V Shop - www.the12voltshop.co.uk
12V SocketsRS - uk.rs-online.comOutdoor GB - www.outdoorgb.com12V Shop - www.the12voltshop.co.uk
Fuses & FuseholdersMaplin - www.maplin.co.ukHalfords - www.halfords.comOutdoor GB - www.outdoorgb.com
RCDWickes - www.wickes.co.ukRS - uk.rs-online.com
Earthing SystemCanford - www.canford.co.ukScrewfix - www.screwfix.com
BatteryHalfords - www.halfords.comOutdoor GB - www.outdoorgb.com
System housing e.g. wooden boxDIY storeRS - uk.rs-online.com
Cable & connectorsMaplin - www.maplin.co.ukRS - uk.rs-online.com
Screws, nuts and boltsDIY storeMaplin - www.maplin.co.ukScrewfix - www.screwfix.comRS - uk.rs-online.com
Tools e.g.• Crimp tool• Soldering iron & solder• Terminal blocks• Electrical tape• Electrical screwdriver• Spanner• Needle nose pliers• Wirecutters and strippers• Allen keys• Plug in power meter
DIY StoreMaplin - www.maplin.co.uk
For more information check out these books:
Off The Grid, Managing independent renewable electrical systems – Duncan Kerridge, CAT Publications, ISBN: 978-1-902175-56-0
Advanced Electrical Installations – C Shelton, Addison Welsey Longman, ISBN: 0-582-24618-0

Electronics for Dummies – Gordon McComb & Earl Boysen, Wiley Publishing, ISBN: 0-7645-7660-7
The 12 Volt Bible For Boats – Miner Brotherton, McGraw-Hill, ISBN: 0-07-139233-5


