building a react native application with a ci/cd pipeline
TRANSCRIPT

Phuc Ho Hong
Building a React Native application with a CI/CD pipeline
Metropolia University of Applied Sciences
Bachelor of Engineering
Information Technology
Bachelor’s Thesis
6 April 2019

Abstract
Author Title Number of Pages Date
Phuc Ho Hong Building a React Native application with a CI/CD pipeline 42 pages 11 August 2019
Degree Bachelor of Engineering
Degree Program Information Technology
Professional Major Mobile Solutions
Instructors
Hannu Markkanen, Instructor
The purpose of this research is to demonstrate the process of implementing a continuous integration and continuous delivery/ deployment pipeline for a React Native application in practice. The study is based on the fact that manual application quality assurance has several drawbacks and a solution for automating that process is necessary for both developers and the growth of the product. In this study, five different CI/ CD provider are compared by their advantage and disadvantages and based on framework support, hosting options, configuration process and pricing, one of them is chosen to be implemented for a React Native application in practice. Moreover, the study also provides brief background knowledge on React Native and Redux to help the reader to have a more concrete view of the whole implementation process. Bitrise is the CI service chosen to be used in the project. A basic CI build is put into use with the following steps: clone repository, install dependencies, run unit testing, export Android and iOS native builds, install Android dependencies and finally, deploy to Bitrise.io. The build will be triggered every time a commit is pushed to the project master branch and inform the developers in both cases of a failed build or a successful build. However, the steps of publishing the application to the Appstore have not been completed yet because the developer accounts are not available. As a result, the application quality assurance process has been enhanced with a CI workflow. Further development of the CI/CD can be done by adding a few more steps to the CI workflow such as UI testing, lint checker, or visual testing.
Keywords Continuous integration, continuous delivery, React Native, redux, testing automation

Contents
List of Abbreviations
1 Introduction 1
2 The benefits of an automated pipeline 2
2.1 Manual testing and deployment process 2
2.2 Introducing an automated pipeline 3
2.2.1 Continuous integration 4
2.2.2 Continuous delivery and continuous deployment 5
2.3 CI/CD tools 6
2.3.1 Visual studio app center 7
2.3.2 Bitrise 8
2.3.3 CircleCI 9
2.3.4 TravisCI 9
2.3.5 Nevercode 10
2.3.6 Comparison between the CI/CD tools 10
3 Overview of the GODO application 12
3.1 Application architecture overview 12
3.1.1 React Native 12
3.1.2 Redux 16
3.1.3 Firebase 17
3.2 Demo application features 19
4 Implementation of a CI/CD pipeline for GODO application 24
4.1 Initial continuous integration setup 24
4.2 Custom CI workflow 29
4.3 Continuous delivery and application deployment 33
5 Conclusion 35
References 36

List of Abbreviations
UX User experiences
UI User interface
CI Continuous integration
CD Continuous delivery/deployment
HTTP Hypertext transfer protocol
API Application programming interface
OS Operating system
VCS Version control systems
HTML Hyper Text Markup Language
DOM Document Object Model
JSON Javascript object notation
SDK Software development kit
OAuth Open authentication
npm Node package manager
SSH Secure shell
URL Uniform resource locator

1
1 Introduction
Developing a mobile application is a complicated process which involves many phases:
idea brainstorming, monetize strategy, UX/UI (user experiences/user interface) design,
developing, testing, deploying and maintaining [1]. Specifically, developing, testing and
deploying are the most important steps which result in the actual application. Despite of
minor variants, those steps are usually a repeated cycle: developers implement the code
and ship it to testers for them to perform various kinds of product quality insurance tests.
For example, if bug or problem is discovered, the developer needs to fix them and then
send the code for testing again until the product is qualified to be released to the
customer [2]. As a result, the process of releasing an application requires a great deal of
time, manual work and human resources.
Large software companies usually have several concurrent projects and they need to be
able to deliver new features or bug fixes for their product as soon as possible, which
means a solution is needed to automate that time-consuming and repetitive process.
This is the reason behind a CI/CD (continuous integration and continuous
delivery/deployment) pipeline plays an essential role in the technology stack of an
application.
Continuous integration and continuous delivery are common development practices to
simplify the process of quality assurance and product release. The main idea of CI and
CD is to execute defined tests on each change to the code base to detect any bug and
ensure those changes do not break the existing application, then bundle and deploy it to
the users. All of these tasks will be performed automatically by a CI/CD pipeline
whenever the developers pushed new code to the version control which help them save
time and focus more on the actual development and speed up the delivery process. [3]
This thesis is a research on continuous integration and continuous delivery. The aim of
it is to provide insights and demonstrate how a CI/CD pipeline can stabilize and simplify
the deployment process of an application by implementing a CI/CD pipeline for GODO,
a React Native application which is using manually testing and deployment practices.

2
2 The benefits of an automated pipeline
A thorough grasp of the fundamental concepts of the matter is the first step to understand
it further. This chapter presents the process of mobile application development with
manual testing and deployment approach and then enhances the process with an
automated pipeline to clarify the importance and benefits of it. In addition, a few common
CI/CD tools will be introduced and compared to decide which tool is the most suitable
one to be used in the projects of this research.
2.1 Manual testing and deployment process
The process of developing a mobile application is described in Figure 1 below.
Figure 1. The process of mobile app development. [4]
The figure describes the process of mobile app development which consists of 6 steps:
strategy, analysis and planning, UI/UX design, app development, testing and deployment
and support. In large scale projects, there are several teams with expertise in each field
working on this whole process to be able to deliver the final product. This chapter will
focus on the critical phases which produce the actual application: the app development
step onwards.

3
Based on the UX/UI designed mockups and the determined application technology stack,
the development team will divide the whole project into smaller tasks and assign them to
the developers. Each developer works on the task separately on their own local machine
and pushes the finished code to the version control tool such as GitHub or GitLab to
integrate their code together to form a complete application.
During the development step, it is inevitable that the code from the developers contains
bugs which cause the application to fail to operate correctly. An efficient approach to
avoid that failure is to be able to locate the bugs and debug them promptly. Therefore,
prior to the integration, several forms of testing such as unit testing, integration testing,
functional performance testing, and usability testing need to be conducted to assure the
quality of the product. [5,6]. Each developer is responsible for writing a test script for
each feature that they implemented and manually run the test before pushing it to the
version control. The development, testing and debugging cycle are repeated until every
test is passed to ensure that the feature will not cause any unexpected behavior to the
application before deployment and delivering it to the end users. This approach of
manual testing performed by a developer is a time-consuming and error prone process
because humans make unavoidable mistakes such as typos or accidentally forget one
essential step of the testing process [6].
2.2 Introducing an automated pipeline
The CI/CD pipeline, commonly known as an automated pipeline in software
development, are a set of tools that enable developers to automatically integrate their
code and deliver the products. This pipeline takes over the repetitive tasks in the
application building and deploying process, typically test integration. It will notify the
developers immediately in case any defects occur in their commit, otherwise, the code
will be integrated to the existed codebase and shipped to the end users in an automatic
manner. [2]. This section will go through the basic concepts of CI and CD to provide an
overall understanding of the tools.

4
2.2.1 Continuous integration
During the process of developing an application, changes are made to the codebase by
several developers concurrently. After those modifications, the application built acts as
a compulsory step including testing phase, code inspection phase and deployment
phase to verify that the application is working as expected. Continuous integration is a
software development practice which involves automate those phases by performing
pre-defined automated test script and build script on each change applied to the
codebase. [7]
The CI tool operation steps are illustrated in figure 2 below.
Figure 2. CI operation steps. [8]
As reflected in the figure, the developers first pushed their latest changes to a version
control tool where a CI server has been configured using Webhook, an HTTP push API
[9], to provoke a build in the event of code modified. After that, the automated test and
build script in the CI server configuration are executed on the latest application revision
from the version control. Finally, the CI server either merges the code if every test is
5
passed or informs the developer, if any problem is found in their code via email or an
on-screen notification. [7]
The use of CI in software development has numerous benefits. The CI build behaves
independently from any environment variable or local machine setup. Therefore, it helps
to reduce the risks of application build successfully on one developer machine but does
not work on other machines. Furthermore, the CI build scale down significant time spent
on building and bundling application by automatically running all the repetitive tasks once
new code is pushed to the version control. Furthermore, this also allows the developers
to be able to focus on the actual coding. Last but not least, a proper configured CI build
is a necessary foundation for the implementation of continuous delivery and continuous
deployment. [7]
2.2.2 Continuous delivery and continuous deployment
Continuous delivery and continuous deployment are terms to describe two basically
similar processes, however there is one major difference between the two which is
depicted in the following figure.
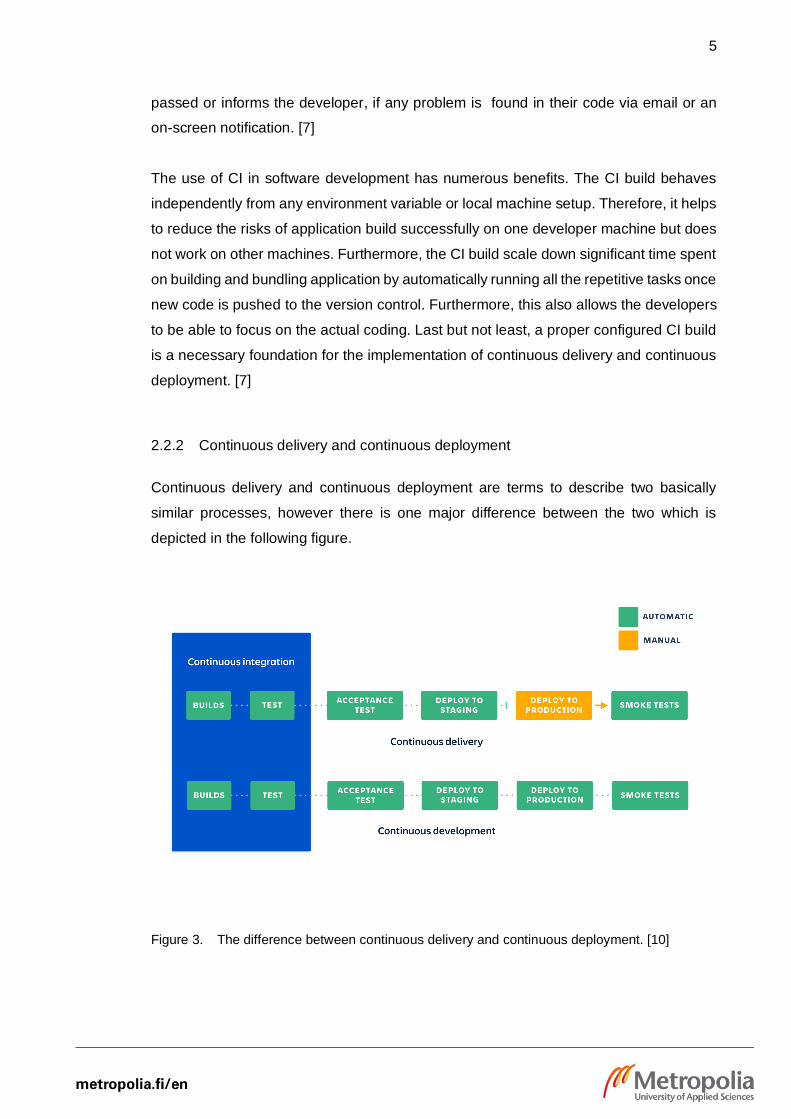
Figure 3. The difference between continuous delivery and continuous deployment. [10]

6
As demonstrated in the figure, the two processes are identical except the deploy to
production step. After the CI server executes the automated test scripts and the
application has been built successfully and approved (CI), the new changes will be
automatically released to the staging environment (a testing environment which is a copy
of the production environment). Finally, the changes will be deployed to the actual
product manually by a developer in the case of continuous delivery or automatically in
the case of continuous deployment. Besides, with continuous deployment, the
developers can see their changes go live in the product within a few minutes if no issue
occurs in the continuous integration step. On the other hand, with continuous delivery,
the development team can choose to release the product periodically, for example: daily,
weekly, or monthly which allows the team to have more control and time to prepare for
the product release. [10]
By combining the use of CI and CD in the development process, the team would benefit
greatly. The CI/CD pipeline is in charge of the most complex tasks which facilitates the
application building, deploying and publishing cycle. This would speed up the release
process thus enhancing user satisfaction significantly.
2.3 CI/CD tools
The decision on which CI/CD tool to use in a project depends on several aspects such
as hosting options, language/framework and integrations support, usability, container
support and pricing model [11]. Since the target application of this research is a React
Native application, the choice of CI/CD tool is based on the most important requirement
which is React Native application support. The other factors to consider are:
• Configuration and setup process: the configuration files are usually written in
YAML (YAML is not a markup language) which is a “human-readable data-
serialization language” [12]. This aspect is evaluated based on the following
criteria: is the tool able to configure the pipeline automatically or do the
developers have to write a manual configuration YAML file to set up the CI/CD
pipeline.

7
• Jest, the React Native basic testing frameworks support.
• Comprehensive level of documentation.
• VCS (version control systems) support.
• Pricing.
This chapter presents a few popular CI/CD tools for mobile application development
which are the results of a Google search for ‘best CI/CD tool for a React Native
application’ [11]: Visual studio app center, Bitrise, CircleCI, TravisCI, and Nevercode.
The purpose of the chapter is to compare the advantages and disadvantages of each
tool and draw a conclusion on which tool will be used in the implementation of the GODO
application.
2.3.1 Visual studio app center
Visual studio app center is a CI/CD product of Microsoft which allows developer to
automate the process of build, test, distribute and supervise their mobile applications.
The tool currently supports several operating systems (OS) such as iOS, Android,
Windows and macOS, and programming languages, for example: Objective-C, Swift,
Javascript (React Native). In addition, it also supports the integration with some common
version control systems (VCS) tools like GitHub or any Git repository on Bitbucket or
Azure DevOps. [13]
According to the documentation on the Visual studio app center websites [13], the tool
might be a suitable candidate regarding the following features:
• Fully support React Native application
• Project is initialized automatically and quickly just by connect connecting to the
project’s repository.

8
• App Center Test supports several popular test frameworks including Jest, the
React Native basic test framework. Besides, tests are executed automatically on
real devices.
• Documentation is detailed and straightforward to follow ranging from easy to
advance guide. They even provide a quick start guide which describe the whole
workflow which would be suitable with developers who do not understand the tool
yet. However, this quick start guide is only available for native android and iOS
application
• Support for the following VCSs: GitHub, Bitbucket or Azure DevOps
• Other minor features which are not in the priority list, but can be beneficial later:
statistics report on users’ behavior through the application usage, crash reports,
bug logs and detailed stack traces.
• The visual studio app center pricing plan is free with 240 build minutes each
month, after that, it starts with 40$ per month for each concurrent build [14].
2.3.2 Bitrise
Bitrise Ltd is a relatively new company which was founded in 2014, their main product is
a CI/CD tool with the same name. It has become a quite popular CI/CD tool recently
because of the wide range of supported platforms, from native mobile application
programming languages like swift, objective-C (iOS app) and kotlin, java (Android app)
to hybrid frameworks like ionic, cordova and React Native. Bitrise has a few highlighted
features which are listed as follows [15]:
• Fully support React Native application
• Automatically configure the project through Bitrise web service and extract a
corresponding configuration YAML file. This YAML file is fully customizable for
developers who want to change their workflow.

9
• Support all kind of Git repositories.
• Highly comprehensive documentation which provide a ‘Get started with React
Native/ Expo app’.
• Bitrise supports a wide range of testing framework including Jest, the framework
that will be use in the GODO application.
• Automatic code signing to reduces the complexity of iOS code signing procedure
which might not be necessary in the beginning but would be convenient in the
long term.
Bitrise provides both free plan and paid plan for their service. The free plan includes
maximum two team members and 200 builds per month for hobby project or freelance
developers. The paid plan starts at 36$ each month and increases by the usage [16].
2.3.3 CircleCI
CircleCI is a cloud-base CI/CD service in the list of popular CI/CD tools. Like every other
tool, it provides the basic features that allow the developers to automate their build, test,
delivery and deploy process. Despite the fact that CircleCI support mobile application
development, it does not specifically support any mobile application development
framework such as Angular or React Native like Bitrise or Visual studio app center. This
might lead to extra complicated configuration for this tool to work seamlessly with React
Native. [17]
CircleCI is free for the first container which consists of 1000 builds per month and 1
concurrent task. After that, the price raises by each container added and it could become
quite expensive (150$ for 4 containers). [18]
2.3.4 TravisCI
TravisCI is a major choice of CI/CD tool among the open source community because it
offers a completely free service for any open sources project. It also provides similar

10
services like other CI/CD tools. Unfortunately, it supports React Native application poorly,
and only allows integrations with GitHub, which might cause problems when trying to
setup the CI/CD pipeline for the GODO application and it also limits its customer
segment.
As mentioned above, TravisCI is free for all open source projects, otherwise, the price
starts from 69$ a month depending on the number of concurrent tasks required. [19]
2.3.5 Nevercode
Nevercode is a relatively new CI/CD tool released in 2017. It is a tool tailored specifically
for mobile application development. Therefore, it supports almost any framework to
develop mobile application. The most outstanding feature of Nevercode is propably the
automatic configuration and step. The developers do not have to write a YAML file to
configure the tool themselves like other tools. Otherwise, it offers similar feature such as
supporting all kind of Git repositories, wide range of supported test framework, detailed
documentation for beginner and professional, public to app store automatically and
various integration options. [20]
Nerver code is a quite expensive tool. It does not provide a free plan, a paid plan starts
at 99$ per month if paid annually, it goes up to 124$ per month in the case of monthly
paid. This plan pricing seems to rather aim at big companies with a generous budget
than small hobby project or start-up companies. [21]
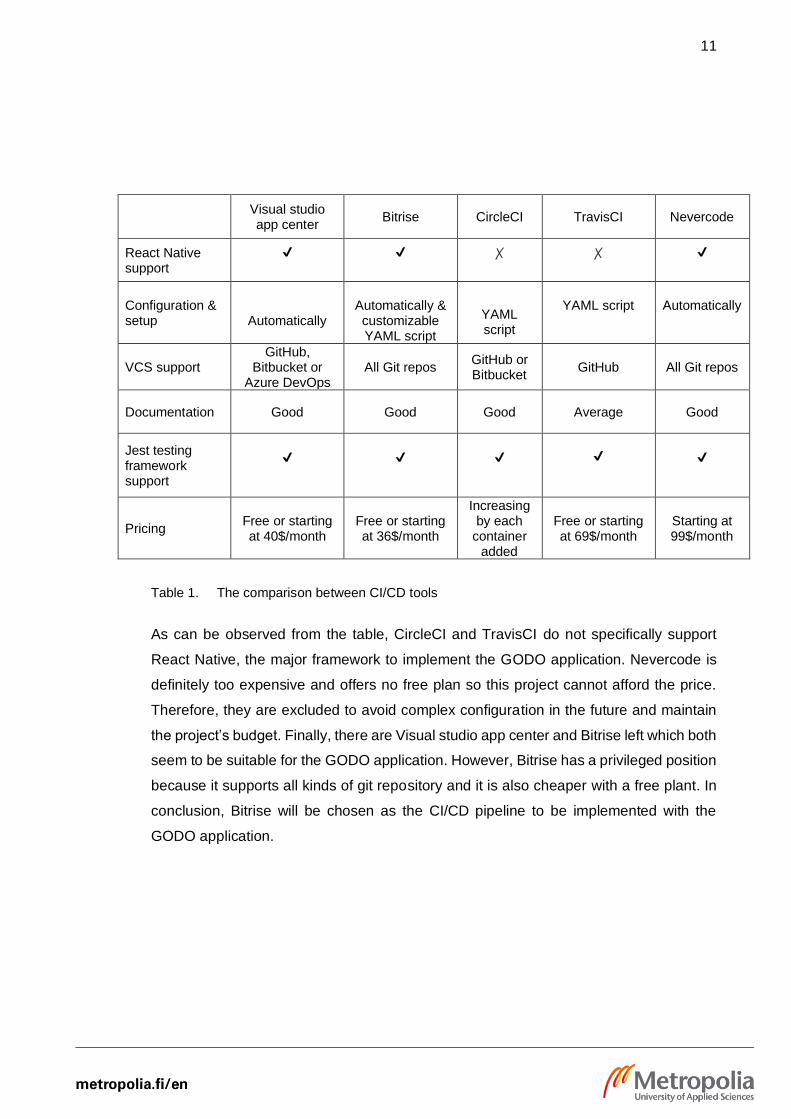
2.3.6 Comparison between the CI/CD tools
The previous sections briefly introduced a few popular CI/CD tools for a React Native
application. This section will provide a comparison to help to make the choice of which
tool will be implemented in the GODO application in the table below.
11
Visual studio app center
Bitrise CircleCI TravisCI Nevercode
React Native support
✔
✔
✗
✗
✔
Configuration & setup
Automatically
Automatically & customizable YAML script
YAML script
YAML script
Automatically
VCS support GitHub,
Bitbucket or Azure DevOps
All Git repos GitHub or Bitbucket
GitHub All Git repos
Documentation Good Good Good Average Good
Jest testing framework support
✔
✔
✔
✔
✔
Pricing Free or starting at 40$/month
Free or starting at 36$/month
Increasing by each
container added
Free or starting at 69$/month
Starting at 99$/month
Table 1. The comparison between CI/CD tools
As can be observed from the table, CircleCI and TravisCI do not specifically support
React Native, the major framework to implement the GODO application. Nevercode is
definitely too expensive and offers no free plan so this project cannot afford the price.
Therefore, they are excluded to avoid complex configuration in the future and maintain
the project’s budget. Finally, there are Visual studio app center and Bitrise left which both
seem to be suitable for the GODO application. However, Bitrise has a privileged position
because it supports all kinds of git repository and it is also cheaper with a free plant. In
conclusion, Bitrise will be chosen as the CI/CD pipeline to be implemented with the
GODO application.

12
3 Overview of the GODO application
GODO is a mobile application which allows users to find companions to join them on
group activities, for example: sport, entertainment or outdoor activities. The initial
concept of the application is based on the fact that people sometimes have to postpone
or cancel their plan to do a group activity simply because they do not have enough friends
with the same hobby to join them. The application is a place where users can create their
own activity for other users to decide to join if they wish. The main purpose of the
application is to encourage young people to participate in outdoor activities, to be
socialize and to have an active lifestyle. This chapter provides a brief introduction about
the application architecture and features.
3.1 Application architecture overview
3.1.1 React Native
In 2015, React Native was introduced by Facebook as a framework for building cross-
platform mobile applications. Although the market was being saturated with many
Javascript frameworks, React Native stood out in the crowd because of its dynamic
features. It enables developers to build powerful mobile applications with less effort
though the application quality and user experience are retained [22 pp. 23]. This chapter
aims to explain the basic concepts of React Native and based on that, provides a general
idea on the popularity of the framework.
3.1.1.1 React Native components
Reusable components are the most fundamental concept of React and React Native.
Unlike React, React Native uses platform-specific React components instead of normal
HTML (Hyper Text Markup Language) element to render native UI component according
to the platform. For example: the <View> component is rendered to UIView and View on
iOS and Android, respectively [22 pp. 30].

13
A mobile screen is a container component which consists of several smaller components.
Figure 1 below demonstrates an example of a mobile application layout which is divided
into components.
Figure 4. Mobile application layout divided into components. [23].
As can be seen in Figure 4, the App is the biggest component and it includes the children
components: HomePage, Header, Search Bar, EmployeeList, and EmployeeListItem.
The Header and EmployeeListItem appear in the application more than once.
The benefit of a component-based application is that these components can be used
across the whole application. Therefore, it is easier to manage the application structure
and save the developer from writing repeated code.
3.1.1.2 Virtual DOM (Document Object Model)
According to the definition from React documentation, “the virtual DOM is a programming
concept where an ideal, or “virtual”, representation of a UI is kept in memory and synced
with the real DOM by a library such as ReactDOM” [24]. In a ReactJS web application,

14
whenever a mutation of data occurs, the whole application UI is re-rendered and stored
in its virtual DOM representation. After that, the differences between the virtual DOM and
the real DOM (browser’s DOM) are computed and the real DOM is updated with only the
mutated parts. The virtual DOM works similarly in a React Native application, but it
triggers native mobile APIs such as Objective-C APIs on iOS and Java APIs on Android
to render the platform native UI elements. [22 pp. 26-27]
The use of virtual DOM is a key factor in React’s and React Native’s popularity. Directly
manipulating the real DOM is problematic and expensive because of the slow update
process of the DOM. Virtual DOM is a more efficient method to update the application UI
and as a result, it enhances the performance of the application.
3.1.1.3 Unidirectional data flow
Unidirectional data flow or one-way data binding is the method to handle data flow in a
React Native application. Usually, in a React Native application, there will be many child
components nested within a parent component (higher order component) which has a
Javascript object to hold the state of the component. Whenever there is a change in the
state, the whole component will be re-rendered and the UI will be updated accordingly.
In a nested component, the child components are not able to access and update the
state of the component unless the parent component passes its state through the props
of the child components. This is the pattern of on-way data binding which means the data
only run from parent component to child components in one direction. Figure 2 shows a
diagram of unidirectional data flow.

15
Figure 5. Internal state update with unidirectional data flow. [25]
As illustrated in the figure, the Component passes its state (this.state) to the View
through the render method. After that the View is able to access the state and trigger the
setState method to update the UI of the component.
3.1.1.4 Introducing JSX
JSX was introduced along with React.js in 2013, it is a Javascript syntax extension which
enables developers to combine the HTML text and the Javascript logic in the same file.
For the web browsers to understand JSX, the developers need a pre-processor tool such
as Babel to compile JSX to traditional Javascript code. Figure 3 shows an example of
JSX.
Figure 6. JSX example

16
As can be seen in the figure, the Javascript variable “name” is used inside the HTML text
<h1>Hello, {name}</h1> by wrapping it with a pair of curly brackets.
3.1.2 Redux
In 2015, Dan Abramov, an engineer at Facebook introduced Redux as a library to handle
mobile application data flow efficiently. Redux is a light-weight library which is only 2 KB.
It is also a robust library with neat architecture and simple to understand code [26 pp. 6].
Due to the increasing of the complexity of data flows in mobile applications, data
mutations are unpredictable. The developers might not able to fully control and handle
the data with the existing tool in a React Native application (the setState function). In
Redux, by following three simple principles, namely single source of truth, state is read-
only and changes are made with pure functions, state mutations and updates can only
be executed as long as some conditions are fulfilled. As a result, it is easier to predict
application state and reproduce potential bugs [27].
Single source of truth means the whole application state is stored in a single store in
form of an object tree. This state will not be mutated directly under any circumstances
(state is read-only). The state mutations are done by dispatching actions and describing
what needs to be changed in the store to the reducers. Reducers are pure functions
(changes are made with pure functions) which take the previous state and an action as
parameters and return the new state object according to the content described in the
action. Finally, the returned new state is sent to the store and the state of the application
is updated accordingly. [27]. Figure 7 below summarizes the above Redux operation
flow.

17
Figure 7. Redux operation flow
3.1.3 Firebase
Firebase is originated from Envolve, a start-up founded in 2011. Envolve’s major product
was an API to implement online chat feature in web application. However, after a time of
operating, the founders James Tamplin and Andrew Lee realized that beside sending
messages, developers also use Envolve to pass application data in real time. As a result,
in April 2012, they came up with a separated service called Firebase which is a Backend-
as-a-Service (BaaS) with real time performance. The acquisition by Google in 2014 has
enhance the growth of Firebase even more rapidly. Nowadays, Firebase is one of the
most popular multifunctional mobile and web app development platforms. It offers both
free plan and paid plan depending on the usage of the service. [28]

18
Figure 8. Firebase products [29]
As depicted in figure 9, Firebase provides several services which is divided into 3
categories: build better apps with backend services such as real time database and
authentication, improve app quality with crash analytics, performance monitoring and
test lab, and finally grow your business with numerous services like in-app messaging
and A/B testing. [29]. This section will focus on analyze real time database and
authentication, the two services that will be use in the GODO application to give an
overall idea on how they work.
3.1.3.1 Real time database
Firebase real time database is a NoSql cloud hosted database and it stores data in JSON
(Javascript object notation) format. It allows data synchronization between every client
connected to the database within seconds. For example: a company provides their
customers both web application and mobile application to access to their service, with
Firebase real time database, whenever a user makes any change in the mobile
application, the data will be saved and sync automatically to the web application almost
instantly. [30]
In addition, there are several other handy features: the ability to build a serverless
application; the data is accessible even when the application is offline to assure that the
application is still operate normally, when the application regain internet connection, the
19
client would receive any missed data from the database; and firebase real time database
security rules which define the data structure, the read/write rights of the data and who
is authorized to access that data. The application in this research employs the next
generation of real time database, Cloud Firestore which have more robust query and the
ability of automatic scaling. [30].
3.1.3.2 Authentication
Normally, it takes quite some time for a developer to write a custom user authentication
system, it also requires that developer to have a solid knowledge of backend
development which is usually complicated. By using Firebase authentication which
consists of ready-made backend service, straightforward SDK (software development
kit) and UI libraries, all of that troublesome tasks will be handle by Firebase. The
developers only need to write a few lines of code to integrate the Firebase authentication
SDK into their application to implement a completely functional user authentication
feature. [31]
Firebase authentication supports almost every common authentication method:
email/password, phone number, and OAuth2 (open authentication) for Facebook,
Google and Twitter. This provides developers with various options to implement their
application authentication system. It is also possible to integrate firebase authentication
with an existed separate back end. [31]
3.2 Demo application features
The whole application is now properly configured with Firebase and Redux, the task now
is merely using React Native to implement the front end of the application. However,
since the main focus area of this research is on the CI/CD pipeline, the implementation
details of GODO using React Native would be omitted because it is quite complicated
with several minor parts to mention. Instead, the final demo application will be presented
and explain briefly to provide readers a clearer visualization of the application.

20
In order to access all the features of the application, the users would need to have an
account. Therefore, the log in or sign up page is the first page appears when they open
the application for the first time. See Figure 9 below:
Figure 9. Log in and sign up screen
Users can create an account with an email and then they will be able to log in to the
application with their credential. The application is able to remember their login by saving
the user authentication token and next time when they open the application again, they
do not have to log in again. After this, the users will be redirected to the main screen, as
shown in Figure 10.

21
Figure 10. GODO main screen
As can be seen from figure 10, there are two main components in this screen: the map
view and the activity list. The map locates the user’s current location using the Google
map API and accordingly shows the nearby activities with the location markers. The
activity list main role is to render the nearby activities list. Both components retrieve data
from the event reducer of the redux store. In addition, there are also other minor
components such as the search button for searching for activity, the create activity button
for add new activity and the navigation bar at the bottom of the screen to navigate user
to other screens.
The users can click/press one of the items from the activity list to navigate to the activity
detail screen to see more information of the activity.

22
Figure 11. Detail view of activity
As depicted in figure 11, the activity screen also contains a map view showing the
location and the exact address of the place where the activity takes place. The users are
able to see more information such as number of attendees, fee (if existed), the activity’s
creator and a brief description of what the activity is about. Besides, if the current user is
the one who created the activity, they will have an option to edit the activity using the edit
button at the top right corner of the screen. On the other hand, other users can decide to
participate in the activity or cancel their participation by pressing the call to action button
below the description.
Furthermore, the application has two other screens which are the browse screen and
user profile screen as shown in the figure below:

23
Figure 12. Browse screen and user profile screen
The browse screen provides users access to all the activities available in the application
sorted by their categories. The categories are separated by playful colors, which is also
the color theme of the whole application since its target user group is young people. In
addition, this screen also has a search bar to search for activity by keyword.
Considering the user profile page, it contains information related to that user: the user’s
full name and avatar, the points and reviews that user receives from other users when
they participate in the same activity, and the list of activities that they joined and will join.
Besides, there is also the log out button at the top right corner of the screen allowing
user to exit the application.
Above is the concise introduction about GODO. All of the main features are ready to be
ship to the users, however, there are still a few minor features that is not implemented
yet such as user’s review and point. The future plan is to implement them to enhance
the user experience with the application.

24
4 Implementation of a CI/CD pipeline for GODO application
The basic application is now in a good shape, however, currently there is no solution to
control the quality of the codebase and publish the application to the app store. In the
scenario of other developers join this project, it would require several hours of manual
quality assurance work. This is where a CI/CD pipeline plays a crucial part in the
development process. This chapter aims to demonstrate a step-by-step implementation
of the CI/CD pipeline using Bitrise.io.
4.1 Initial continuous integration setup
Bitrise.io provides its users with a web UI to perform all of the basic configuration. For
setting up the CI build with Bitrise, the developer’s GitHub account first to be connected
to Bitrise by logging in to Bitrise with GitHub. The first step is to go to Bitrise dashboard
and create a new application, which is describe in the figure 13 below:
Figure 13. Adding a new application in Bitrise dashboard
If the developer has added other applications before, the dashboard will show a list of
projects instead of the screen in the figure above. After clicking the ‘Add your first app’

25
button, the web UI will navigate the user to the initial configuration page for the
application.
Figure 14. Initial configuration page
As can be seen from the figure above, Bitrise fully supports GitHub, Bitbucket and GitLab
repo, this project will use the GODO source code from GitHub. Since the developer
authorized Bitrise to access their GitHub repositories when they logged in, Bitrise is able
to fetch their repositories through GitHub API. The next step is to secure the file transfer
system between the two services by creating an SSH (secure shell) key [32].
Figure 15. Setup repository access

26
According to figure 15, there are two options here: either automatically add the SSH key
as deploy key or add it manually. Only the developer who has the admin right can add it
automatically, otherwise, it needs to be added manually to the repository. After the SSH
key is set up, Bitrise triggers a repository scanner to detect the framework used in the
project, as a result, it will find the most suited initial configuration for the project. [32].
Next, the developer is asked for the source code default branch so that Bitrise can start
validating the repository to make sure it has the proper configuration.
Figure 16. Bitrise is validating the repository
As can be seen in figure 16, the default branch chosen here is the master branch. After
completing the validation process, if it is successful, Bitrise will suggest a default
workflow depending on the project type which is React Native in this case. This workflow
is fully customizable by the developer later. The suggested workflow is depicted in the
figure below.
27
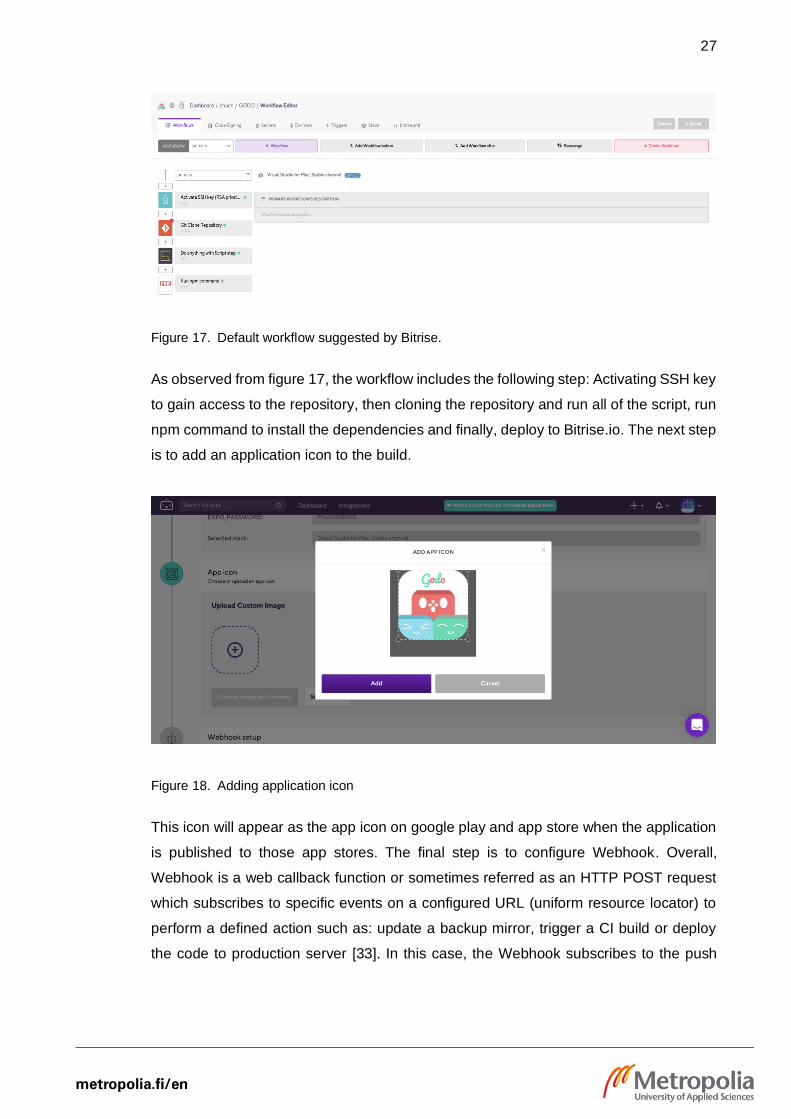
Figure 17. Default workflow suggested by Bitrise.
As observed from figure 17, the workflow includes the following step: Activating SSH key
to gain access to the repository, then cloning the repository and run all of the script, run
npm command to install the dependencies and finally, deploy to Bitrise.io. The next step
is to add an application icon to the build.
Figure 18. Adding application icon
This icon will appear as the app icon on google play and app store when the application
is published to those app stores. The final step is to configure Webhook. Overall,
Webhook is a web callback function or sometimes referred as an HTTP POST request
which subscribes to specific events on a configured URL (uniform resource locator) to
perform a defined action such as: update a backup mirror, trigger a CI build or deploy
the code to production server [33]. In this case, the Webhook subscribes to the push

28
event on the GODO app repository URL in order to provoke a CI build automatically
whenever a commit is pushed to the application source code. It is quite problematic to
set up a Webhook manually, fortunately, Bitrise offers its users a way to register a
webhook straightforwardly.
Figure 19. Webhook setup
As can be seen from figure 19, a Webhook is automatically registered for the application
just by one button click. Bitrise’s users do not have to spend time to write a manual
Webhook configuration.
Figure 20. Finishing the initial configuration
29
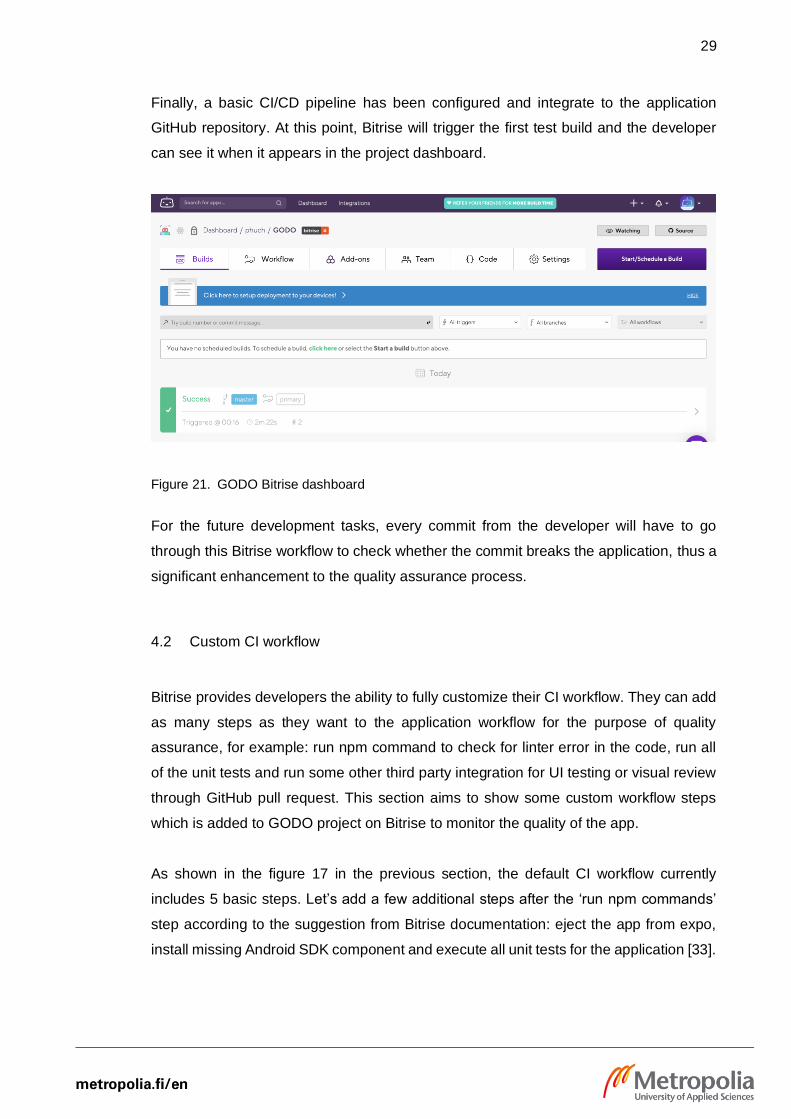
Finally, a basic CI/CD pipeline has been configured and integrate to the application
GitHub repository. At this point, Bitrise will trigger the first test build and the developer
can see it when it appears in the project dashboard.
Figure 21. GODO Bitrise dashboard
For the future development tasks, every commit from the developer will have to go
through this Bitrise workflow to check whether the commit breaks the application, thus a
significant enhancement to the quality assurance process.
4.2 Custom CI workflow
Bitrise provides developers the ability to fully customize their CI workflow. They can add
as many steps as they want to the application workflow for the purpose of quality
assurance, for example: run npm command to check for linter error in the code, run all
of the unit tests and run some other third party integration for UI testing or visual review
through GitHub pull request. This section aims to show some custom workflow steps
which is added to GODO project on Bitrise to monitor the quality of the app.
As shown in the figure 17 in the previous section, the default CI workflow currently
includes 5 basic steps. Let’s add a few additional steps after the ‘run npm commands’
step according to the suggestion from Bitrise documentation: eject the app from expo,
install missing Android SDK component and execute all unit tests for the application [33].

30
A new workflow step can be added by clicking the button with the plus symbol below the
‘run npm command’ step. Bitrise web UI will display a list of steps available where the
users can search for [Beta] Expo Eject step and configure it.
Figure 22. Eject the application from Expo
As can be seen from figure 22, the description of this step is: ‘Creates Xcode and Android
studio porjects for your app’. Since Bitrise demands native modules to build the iOS and
Android app which are not included in the Expo bundle, this step is to help Bitrise
configure the required modules properly. In the case that the developer used Expo SDK
to develop the application, they need to input their Expo credential to allow Bitrise to
have access to the SDK. The next step is ‘Install missing Android SDK components’
which will scan the whole project directory to find any miss Android components and
install it.
Finally, the developers would want to run all of the application unit tests whenever a
commit is pushed to the repository. They can add another step to Bitrise workflow to
automate test running so that they do not have to remember to run test before pushing
their commits. This step can be added right after the ‘run npm command’ step, it is the
same npm step but with different argument: ‘test’ instead of ‘install’ which can be seen
in figure 23 below.

31
Figure 23. Adding testing step to Bitrise workflow
After adding the testing step to the workflow, the CI will run all of the unit tests
automatically whenever a changed is pushed to the master branch. In case of a
successful or a failed build, the developer will receive an email notification. The figure
below illustrates example logs of a success build and a failed build.
Figure 24. Example logs of a success build and a fail build

32
In case of a failed build, the developer can check their commit’s detailed build log on the
Bitrise dashboard to identify the problem. For example, the above failed build due to
‘[email protected]’ step produces the following log:
Figure 25. Bitrise log for failed build
As depicted in the figure 25, there is an issue with GradlewPath that cause this build to
fail. The developer needs to check their project structure and make sure that there is a
path to ./gradlew so that Bitrise can install missing android dependencies. After pushing
a fix for that, the application build should be successful as shown in figure 26 below.
Figure 26. Fixing a failed build
Furthermore, there is an issue tracker link to the place where other developers discuss
the specific step provided at the end of the log. This might be helpful in case the
developers could not find a solution for the bug they are encountering.

33
As a result, the CI workflow of the application is now enhanced significantly. From this
point onward, every commit from the developers would go through this custom CI
workflow to perform the quality assurance process.
4.3 Continuous delivery and application deployment
This section contains information on how to publish the application to different distribution
channels such as Apple Appstore and Google Play Store. To achieve this step in
practical, the developers would need to register their developer account which starting
at 99$ per year for Apple Appstore and 25$ one-time payment for Google Play Store.
Due to the lack of the developer accounts, this section aims to provide a brief guide
based merely on the Bitrise documentation on how to deploy a React Native application
to the app stores.
In order to be able to deploy the application to an Appstore, the developers need to sign
their code both for the Android and iOS projects. Code signing is the term to imply the
act of using a certified digital signature to authenticate the author of an application and
verify the liability of the code. Regarding iOS application, code signing and deployment
can be achieved with the following steps [34, 35]:
• Using the codesigndoc tool provided by Bitrise to acquire the necessary files.
• Uploading the collected files using codesigndoc or the manual web UI.
• Adding the ‘Xcode archive & export for iOS’ step to the CI workflow to export a
signed application file with the .ipa extension.
• Adding the ‘Deploy to iTunes Connect – Application Loader’ step right after the
above step, the developers need to submit their Apple developer account
credentials including Apple ID and password for this step to be able to deploy the
application.
• Start a Bitrise build.

34
Similarly, an Android application APK file also need to be signed properly before it is
published to the Google Play Store. The steps are described below [34, 36]:
• The developers need to acquire a keystore file which contains their identification
using Android Studio and upload it to Bitrise web service for code signing. They
also need to fill in their credentials such as keystore password, keystore alias and
private key password.
• Add the ‘Android Sign’ step to the CI workflow. This step uses the environment
variable resulted from the previous step to sign the application.
• Using the Google Play developer account to set up Google Play API access on
Google developer console. Firstly, choosing either ‘Createing a new API project’
or ‘Using an existing API project’ to link the API project. Next, granting the
deployment manager role to the service account via ‘API access clients’ menu.
Finally, download the JSON key belonging to the service account.
• Upload the JSON key to the ‘Generic file storage’ field in the Bitrise code signing
web service.
• Add the ‘Google Play Deploy’ step after the ‘Android Sign’ step.
• Fill the necessary information including Service account JSON key, package
name and track.
• Start a Bitrise build.
As a result, the application is deployed and distributed through Apple Appstore and
Google Play Store so that the users can download them to their phones.

35
5 Conclusion
The main goal of this research was to implement a CI/ CD pipeline for a React Native
application to automate and enhance the application’s quality assurance process and
the release cycle. Among of serveral CI/ CD providers with their own advantages and
disadvantages, Bitrise was chosen to be used in this project due to the comprehensive
documentation and the excellent support for React Native application.
As a result, a fairly basic CI configuration which automatically runs all of the unit tests,
exports native build and deploys the application was implemented to demonstrate the
benefits of continuous integration and continuous deployment. At this point, the defect
code, broken merge or anything that break the existing code base is detected within a
few minutes since the commit. This allows the developers to be aware of their
application’s problems and find the solution faster. Furthermore, they are also able to
focus more deeply on the actual coding job.
Despite the fact that the step of publishing the application to the Appstore has not been
completed yet due to the lack of Google and Apple developer account, this research
attempts to demonstrate a step-by-step guide on how to set it up based on the
documentation from Bitrise. In addition, a few improvements can be added to the CI
workflow such as lint checker, UI testing or visual check integration to aim for a more
robust CI/CD pipeline.

36
References
1. Francis P. Mobile App Development Process [Internet]. 6 May 2017 [cited 14 April 2019]. Available from: https://thebhwgroup.com/blog/mobile-app-development-process
2. Versluis G. Xamarin continuous integration and delivery: team services, test cloud and hockey app [Internet]. Apress; 2017 [cited 14 April 2019]. Available from: https://learning.oreilly.com/library/view/xamarin-continuous-integration/9781484227152/
3. Rossel S. Continuous integration, delivery and deployment [Internet]. Packt Publishing; 2017 [cited 19 April 2019]. Available from: https://learning.oreilly.com/library/view/continuous-integration-delivery/9781787286610/
4. Invonto. Mobile app development process: a step-by-step guide [Internet]. 25 July 2018 [cited 11 May 2019]. Available from: https://www.invonto.com/insights/mobile-app-development-process/
5. Williams P, Thompson G, Samaroo A, Morgan P, Hambling B. Software testing [Internet]. British informatics society limited; 2010 [cited 11 May 2019]. Available from: https://learning.oreilly.com/library/view/software-testing/9781906124762/
6. Pittet S. The different type of software testing [Internet]. Atlassian; 2019 [cited 11 May 2019]. Available from: https://www.atlassian.com/continuous-delivery/software-testing/types-of-software-testing/
7. Bermont JM. Hands-on continuous integration and delivery [Internet]. Packt Publishing; 2018 [cited 13 May 2019]. Available from: https://learning.oreilly.com/library/view/hands-on-continuous-integration/9781789130485/
8. DevopsCube. Understanding continuous integration, delivery and deployment [Internet]. 3 November 2016 [cited 13 May 2019]. Available from: https://devopscube.com/continuous-integration-delivery-deployment/
9. SendGrid. What’s a webhook? [Internet]. 24 June 2014 [cited 13 May 2019]. Available from: https://sendgrid.com/blog/whats-webhook/
10. Pittet S. Continuous integration vs continuous delivery vs continuous deployment [Internet]. Atlassian; 2019 [cited 14 May 2019]. Available from: https://www.atlassian.com/continuous-delivery/principles/continuous-integration-vs-delivery-vs-deployment

37
11. Jaksman M. Best Jenkins alternatives. Top CI/CD tools for your android and iOS project [Internet]. Hackernoon; 22 August 2018 [cited 29 May 2019]. Available from: https://hackernoon.com/top-ci-cd-tools-for-your-android-and-ios-projects-8d356b983b3b
12. Tutorialspoint. YAML tutorial – Tutorialspoint [Internet]. Tutorialspoint; 2019 [cited 6 September 2019]. Available from: https://www.tutorialspoint.com/yaml/index.htm
13. Microsoft. Visual studio app center – frequently ask question [Internet]. Microsoft; 2019 [cited 29 May 2019]. Available from: https://visualstudio.microsoft.com/app-center/faq/
14. Microsoft. Visual studio app center – pricing [Internet]. Microsoft; 2019 [cited 29 May 2019]. Available from: https://visualstudio.microsoft.com/app-center/pricing/
15. Bitrise. Bitrise - mobile continuous integration and delivery [Internet]. Bitrise; 2019 [cited 30 May 2019]. Available from: https://www.bitrise.io/
16. Bitrise. Bitrise - Pricing [Internet]. Bitrise; 2019 [cited 30 May 2019]. Available from: https://www.bitrise.io/pricing/teams
17. CircleCI. Continuous integration and delivery. CircleCI; 2019 [cited 30 May 2019]. Available from: https://circleci.com/
18. CircleCI. Pricing and plan information. CircleCI; 2019 [cited 30 May 2019]. Available from: https://circleci.com/pricing/
19. TravisCI. Test and deploy with confidence. TravisCI; 2019 [cited 30 May 2019]. Available from: https://travis-ci.com/
20. Nevercode. Continuous integration and delivery for mobile. Nevercode; 2019 [cited 30 May 2019]. Available from: https://nevercode.io/
21. Nevercode. Pricing and plan. Nevercode; 2019 [cited 30 May 2019]. Available from: https://nevercode.io/pricing/
22. Eisenman B. Learning React Native. 1st edition. CA: O’Reilly Media; 2016.
23. Corenraets C. Sample Mobile Application with React and Cordova [Internet]. December 2, 2014 [cited 1 June 2019]. Available from: http://coenraets.org/blog/2014/12/sample-mobile-application-with-react-and-cordova/

38
24. Facebook Inc. Virtual DOM and Internals – React [Internet]. 2018 [cited 1 June
2019]. Available from: https://reactjs.org/docs/faq-internals.html
25. Wieruch R. The road to learn React: your journey to master plain yet pragmatic React.js. CreateSpace Independent Publishing Platform; 2017.
26. Dinkevich B, Gelman I. The complete Redux book [Internet]. 2nd edition. Leanpub; 2017 [cited 1 June 2019]. Available from: https://leanpub.com/redux-book
27. Redux. General – Redux [Internet]. 2018 [cited 1 June 2019]. Available from:
https://redux.js.org/
28. Hackernoon. Introduction to Firebase [Internet]. December 28 2017 [cited 2 June 2019]. Available from: https://hackernoon.com/introduction-to-firebase-218a23186cd7
29. Firebase. Products [Internet]. 2019 [cited 2 June 2019]. Available from: https://firebase.google.com/products
30. Firebase. Firebase real time database [Internet]. 2019 [cited 2 June 2019]. Available from: https://firebase.google.com/docs/database/
31. Firebase. Firebase authentication [Internet]. 2019 [cited 2 June 2019]. Available from: https://firebase.google.com/docs/auth/
32. Bitrise. Getting started – Bitrise Docs [Internet]. 2019 [cited 21 July 2019]. Available from: https://devcenter.bitrise.io/getting-started/adding-a-new-app/
33. GitHub. Webhooks | GitHub Developer [Internet]. 2019 [cited 5 September
2019]. Available from: https://developer.github.com/webhooks/
34. Bitrise. Getting started with Expo apps – Bitrise docs [Internet]. 2019 [cited 27 July 2019]. Available from: https://devcenter.bitrise.io/getting-started/getting-started-with-expo-apps/
35. Bitrise. iOS code signing – Bitrise docs [Internet]. 2019 [cited 3 August 2019]. Available from: https://devcenter.bitrise.io/code-signing/ios-code-signing/code-signing-index/
36. Bitrise. Android code signing using Android Sign step – Bitrise docs [Internet]. 2019 [cited 3 August 2019]. Available from: https://devcenter.bitrise.io/code-signing/android-code-signing/android-code-signing-using-bitrise-sign-apk-step/

Appendix 2
1 (1)