building a mobile browser application for pdas with adf...
TRANSCRIPT
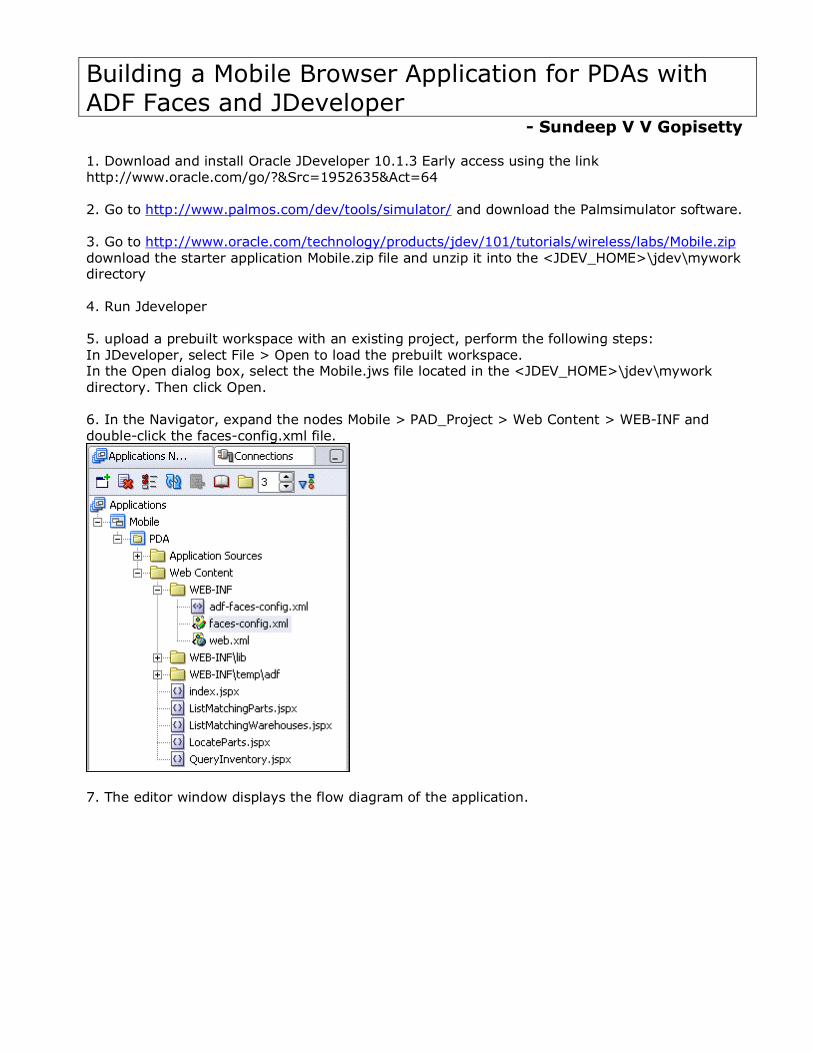
Building a Mobile Browser Application for PDAs with ADF Faces and JDeveloper - Sundeep V V Gopisetty 1. Download and install Oracle JDeveloper 10.1.3 Early access using the link http://www.oracle.com/go/?&Src=1952635&Act=64 2. Go to http://www.palmos.com/dev/tools/simulator/ and download the Palmsimulator software. 3. Go to http://www.oracle.com/technology/products/jdev/101/tutorials/wireless/labs/Mobile.zip download the starter application Mobile.zip file and unzip it into the <JDEV_HOME>\jdev\mywork directory 4. Run Jdeveloper 5. upload a prebuilt workspace with an existing project, perform the following steps: In JDeveloper, select File > Open to load the prebuilt workspace. In the Open dialog box, select the Mobile.jws file located in the <JDEV_HOME>\jdev\mywork directory. Then click Open. 6. In the Navigator, expand the nodes Mobile > PAD_Project > Web Content > WEB-INF and double-click the faces-config.xml file.
7. The editor window displays the flow diagram of the application.
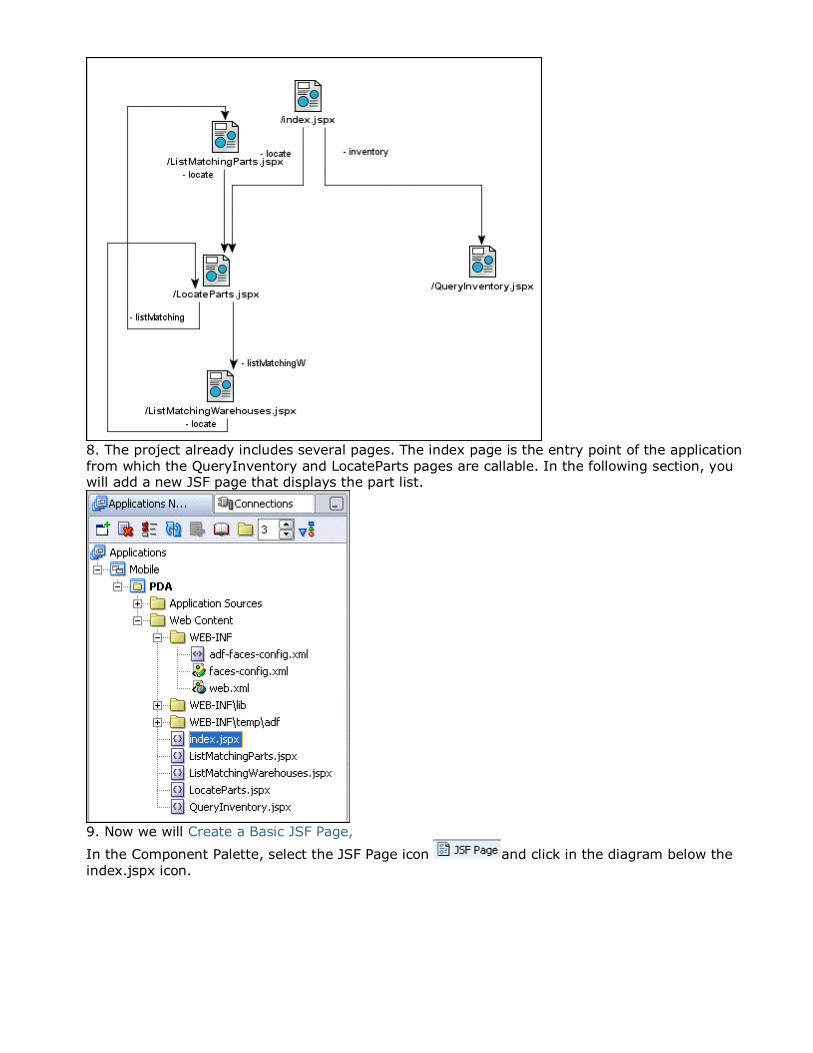
8. The project already includes several pages. The index page is the entry point of the application from which the QueryInventory and LocateParts pages are callable. In the following section, you will add a new JSF page that displays the part list.
9. Now we will Create a Basic JSF Page,
In the Component Palette, select the JSF Page icon and click in the diagram below the index.jspx icon.
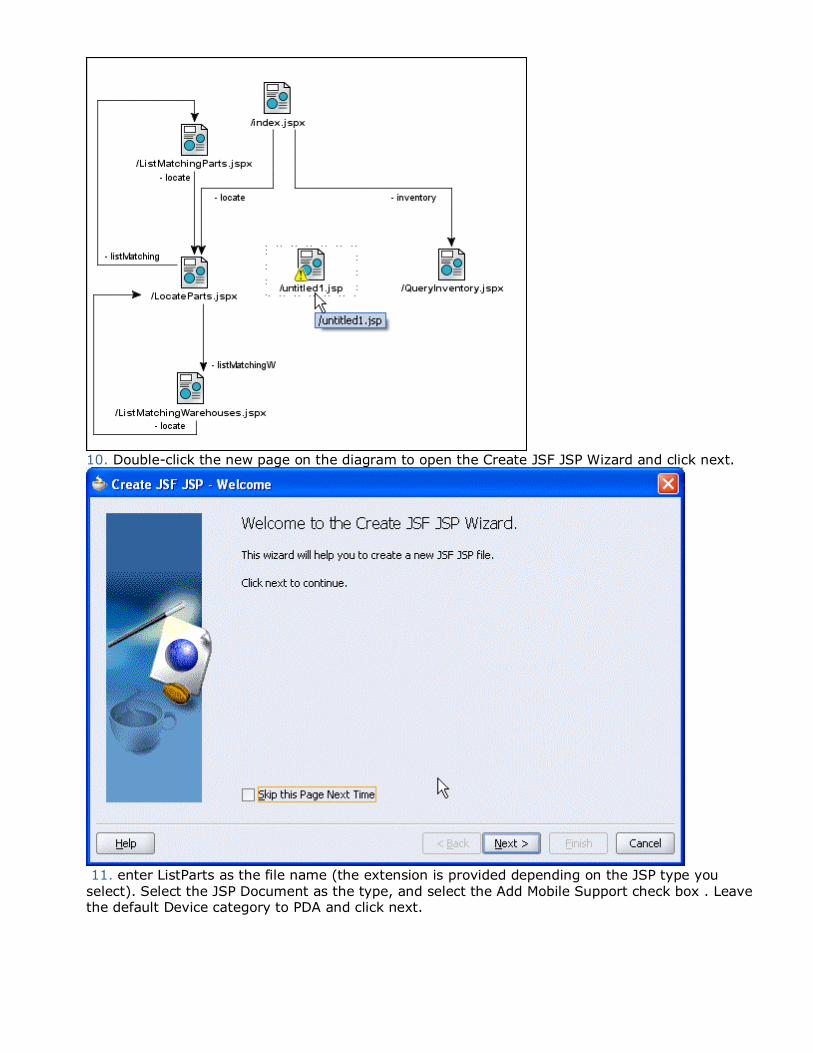
10. Double-click the new page on the diagram to open the Create JSF JSP Wizard and click next.
11. enter ListParts as the file name (the extension is provided depending on the JSP type you select). Select the JSP Document as the type, and select the Add Mobile Support check box . Leave the default Device category to PDA and click next.
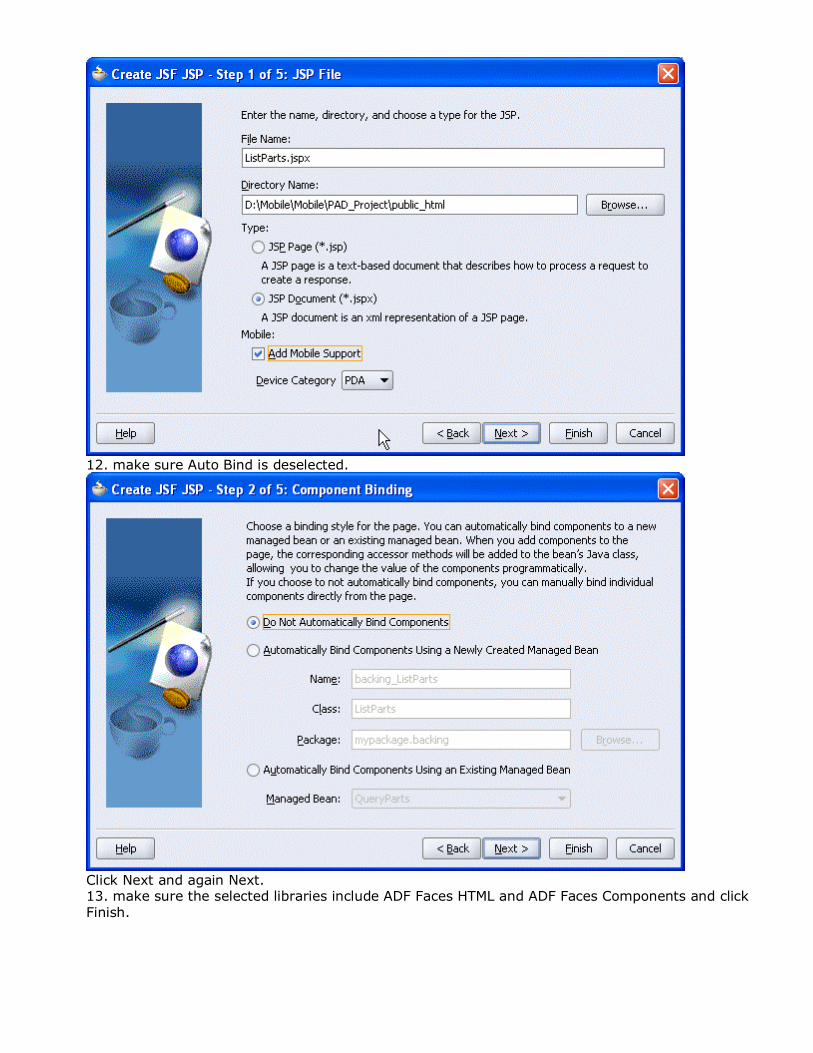
12. make sure Auto Bind is deselected.
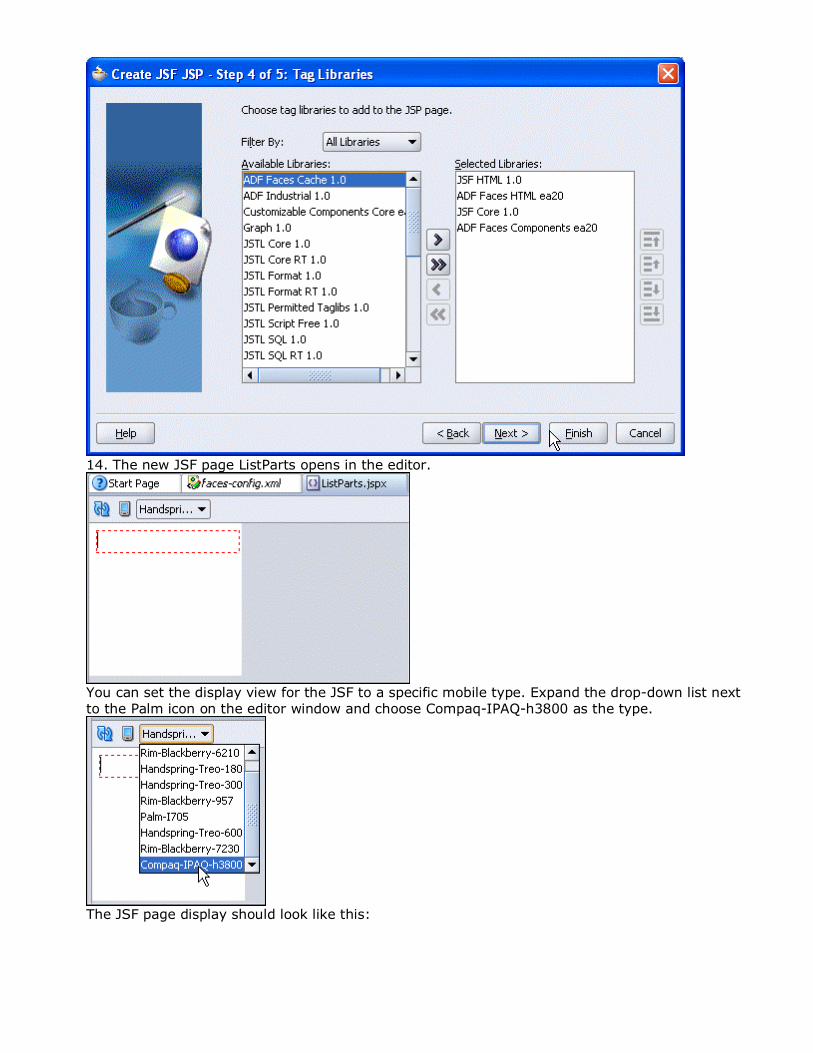
Click Next and again Next. 13. make sure the selected libraries include ADF Faces HTML and ADF Faces Components and click Finish.
14. The new JSF page ListParts opens in the editor.
You can set the display view for the JSF to a specific mobile type. Expand the drop-down list next to the Palm icon on the editor window and choose Compaq-IPAQ-h3800 as the type.
The JSF page display should look like this:
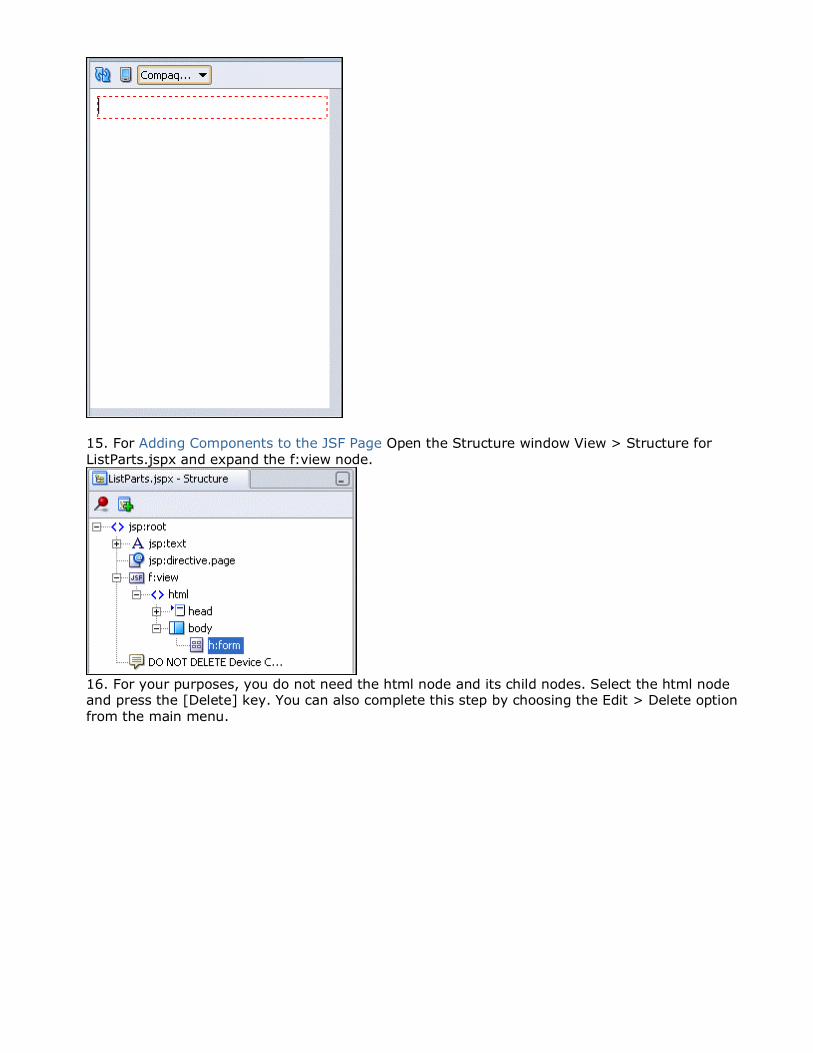
15. For Adding Components to the JSF Page Open the Structure window View > Structure for ListParts.jspx and expand the f:view node.
16. For your purposes, you do not need the html node and its child nodes. Select the html node and press the [Delete] key. You can also complete this step by choosing the Edit > Delete option from the main menu.
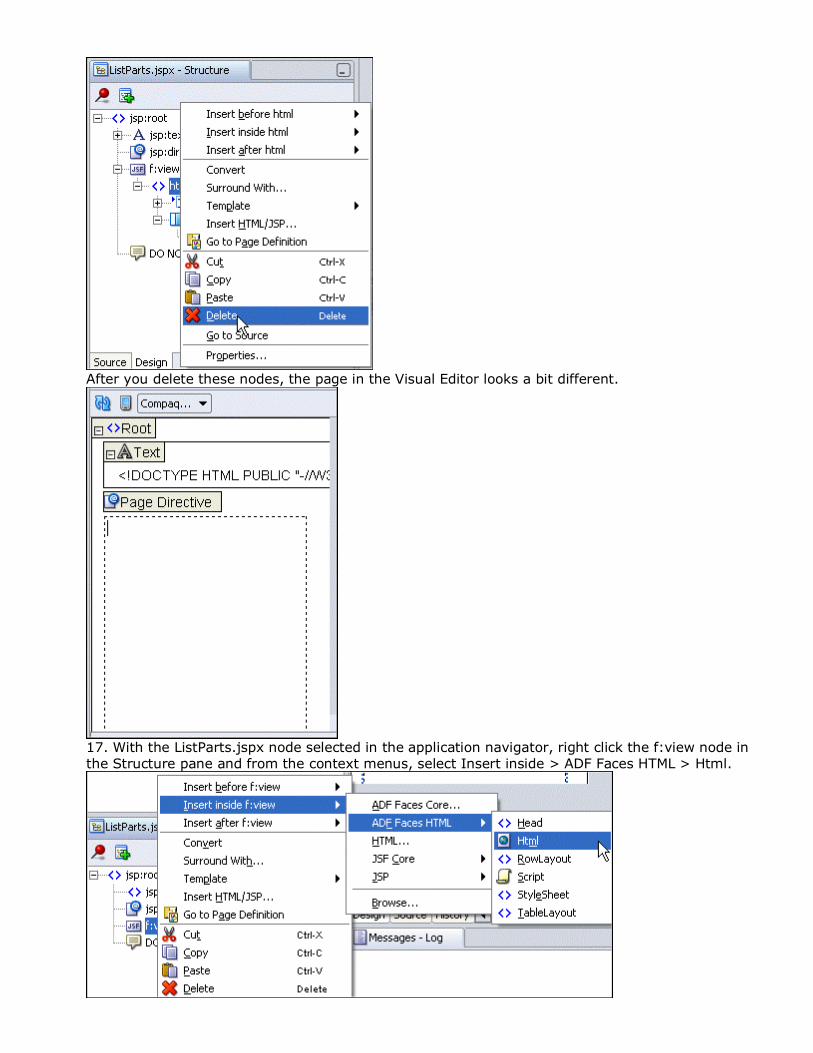
After you delete these nodes, the page in the Visual Editor looks a bit different.
17. With the ListParts.jspx node selected in the application navigator, right click the f:view node in the Structure pane and from the context menus, select Insert inside > ADF Faces HTML > Html.
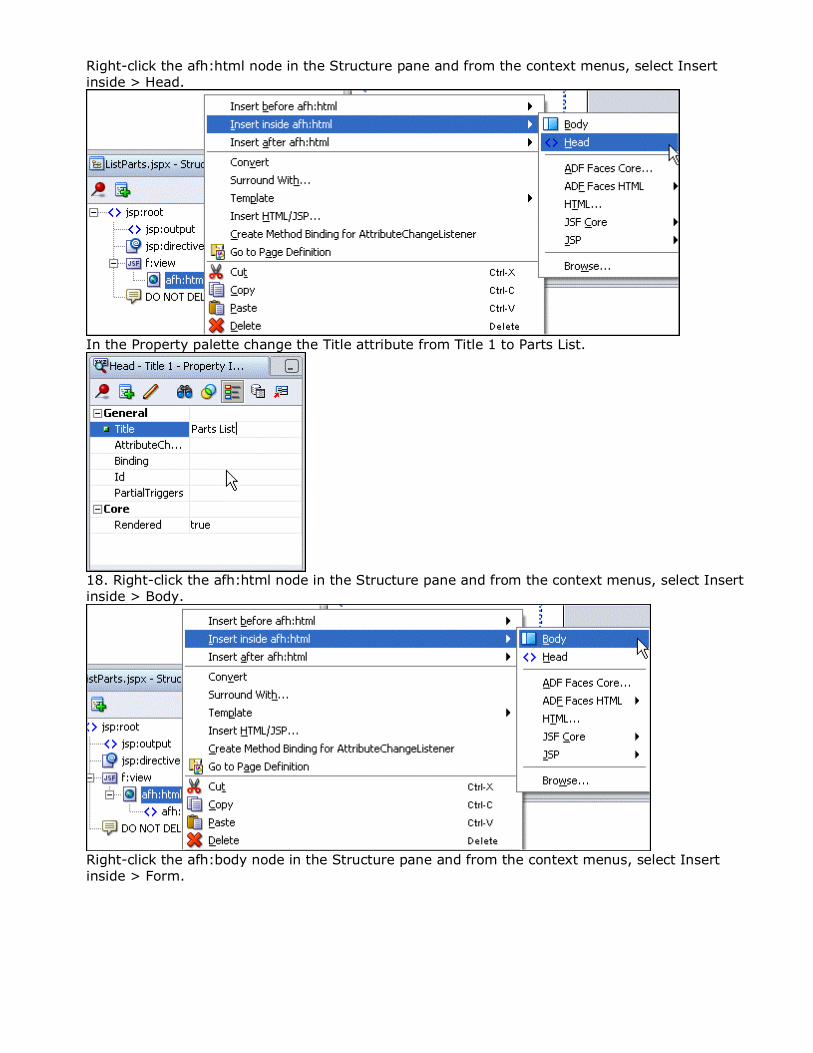
Right-click the afh:html node in the Structure pane and from the context menus, select Insert inside > Head.
In the Property palette change the Title attribute from Title 1 to Parts List.
18. Right-click the afh:html node in the Structure pane and from the context menus, select Insert inside > Body.
Right-click the afh:body node in the Structure pane and from the context menus, select Insert inside > Form.
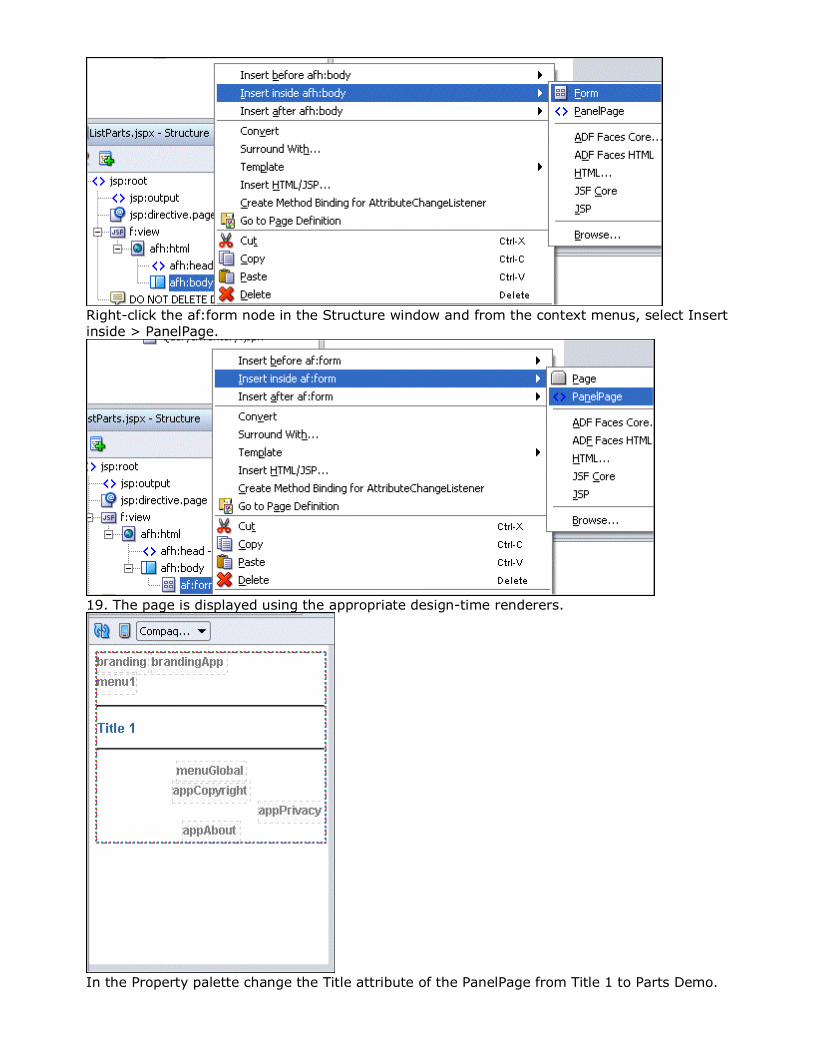
Right-click the af:form node in the Structure window and from the context menus, select Insert inside > PanelPage.
19. The page is displayed using the appropriate design-time renderers.
In the Property palette change the Title attribute of the PanelPage from Title 1 to Parts Demo.
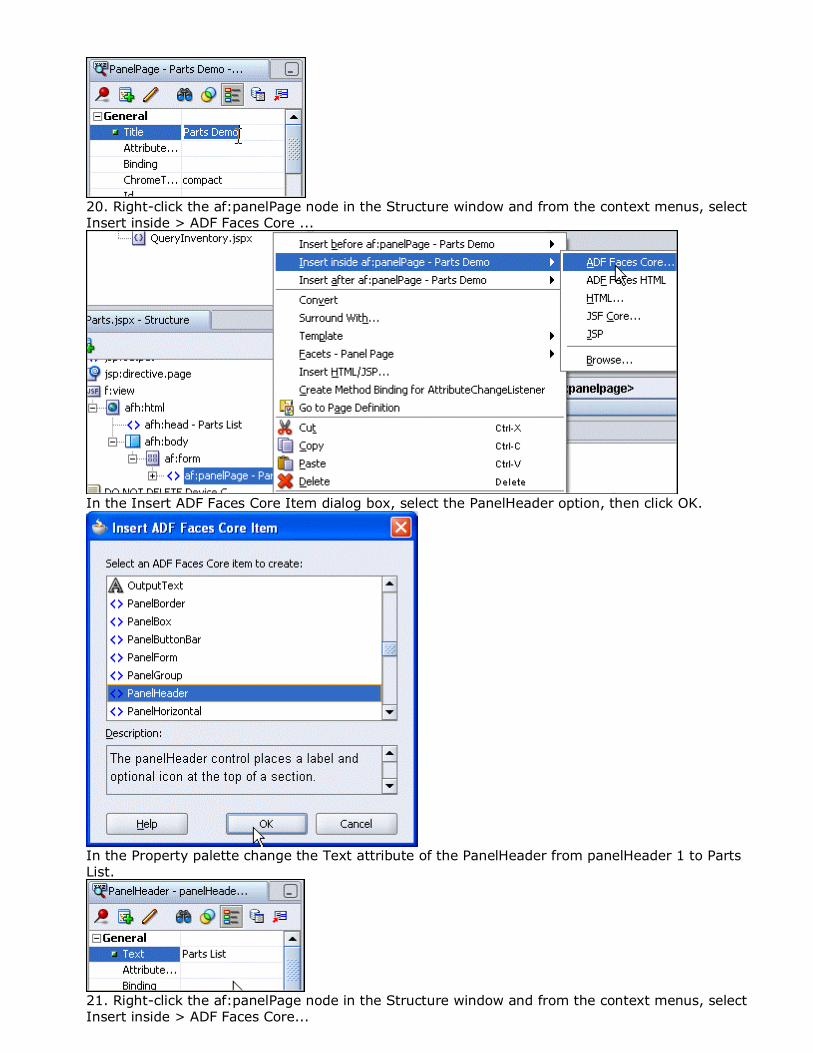
20. Right-click the af:panelPage node in the Structure window and from the context menus, select Insert inside > ADF Faces Core ...
In the Insert ADF Faces Core Item dialog box, select the PanelHeader option, then click OK.
In the Property palette change the Text attribute of the PanelHeader from panelHeader 1 to Parts List.
21. Right-click the af:panelPage node in the Structure window and from the context menus, select Insert inside > ADF Faces Core...
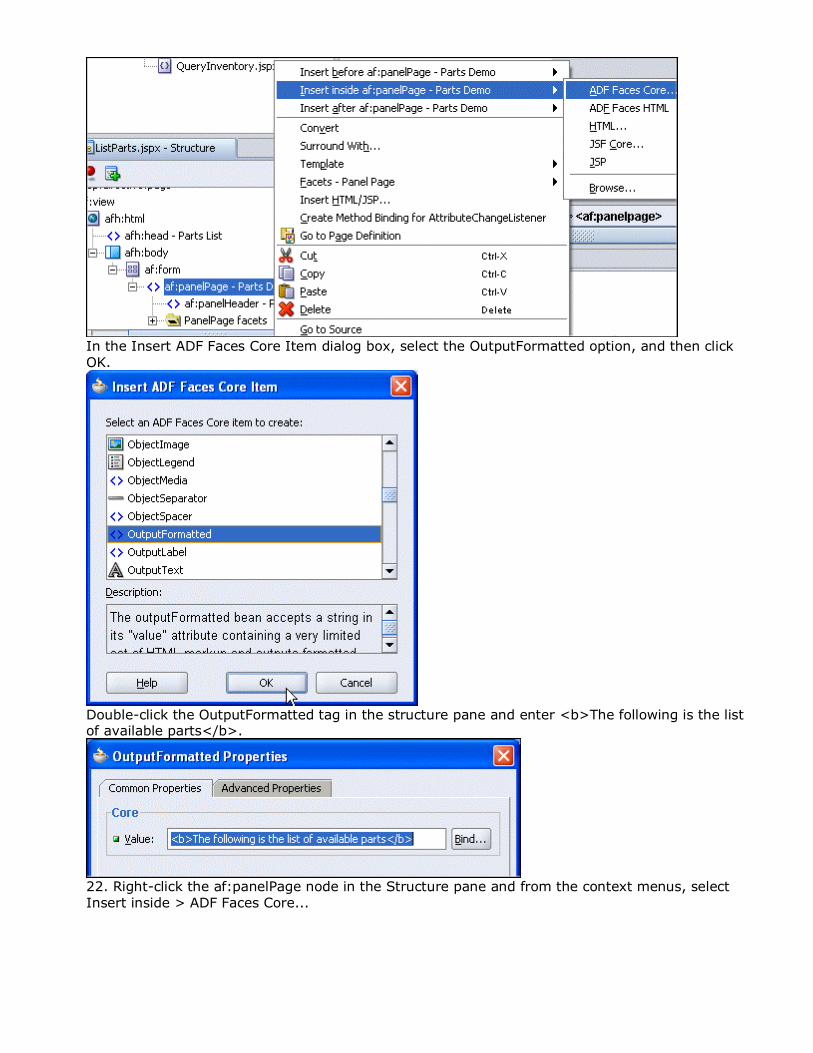
In the Insert ADF Faces Core Item dialog box, select the OutputFormatted option, and then click OK.
Double-click the OutputFormatted tag in the structure pane and enter <b>The following is the list of available parts</b>.
22. Right-click the af:panelPage node in the Structure pane and from the context menus, select Insert inside > ADF Faces Core...
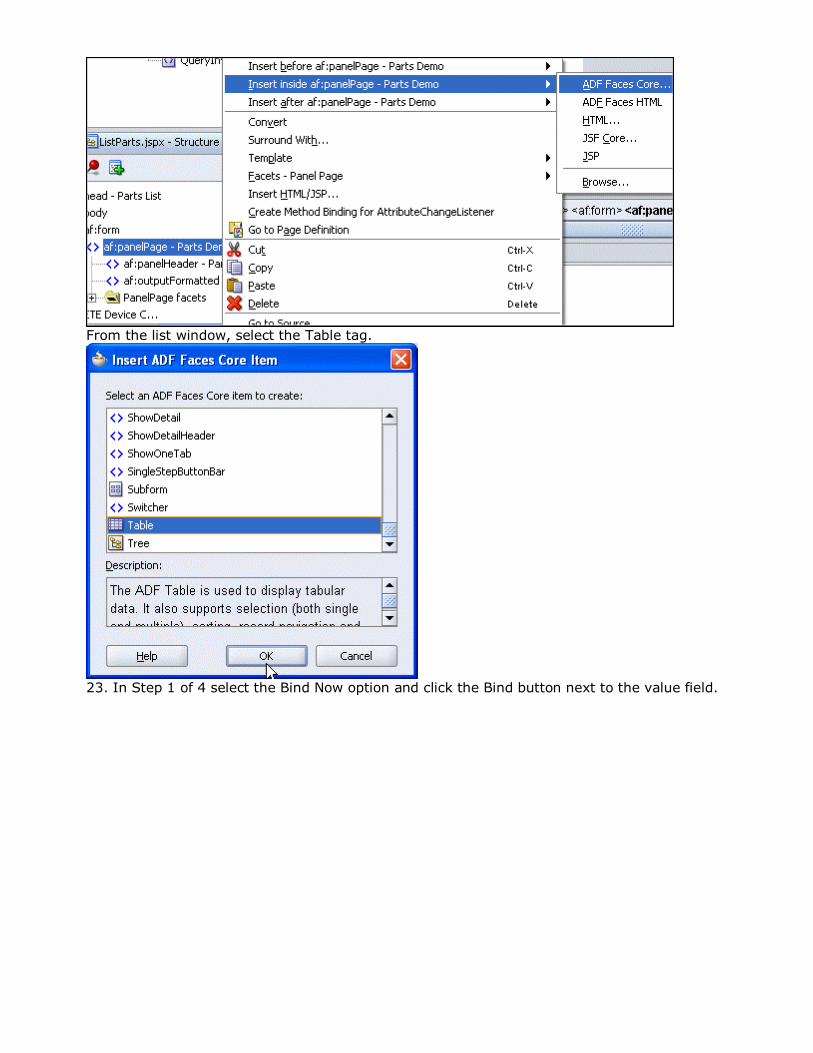
From the list window, select the Table tag.
23. In Step 1 of 4 select the Bind Now option and click the Bind button next to the value field.
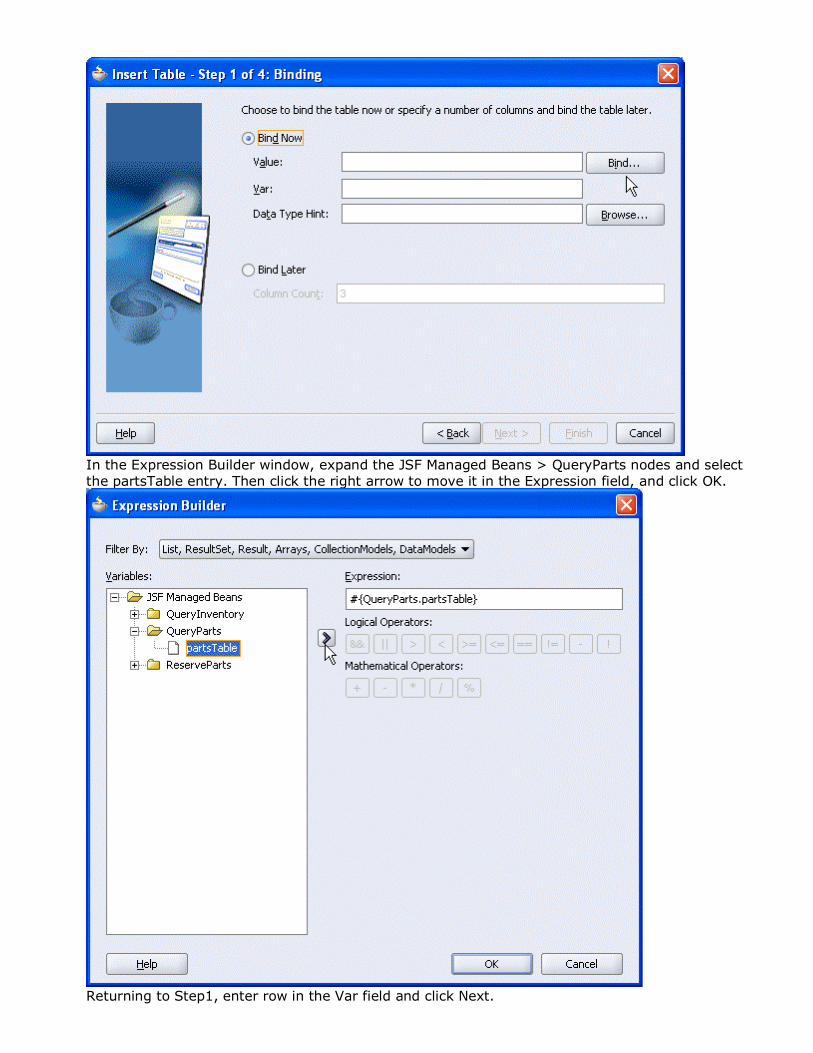
In the Expression Builder window, expand the JSF Managed Beans > QueryParts nodes and select the partsTable entry. Then click the right arrow to move it in the Expression field, and click OK.
Returning to Step1, enter row in the Var field and click Next.
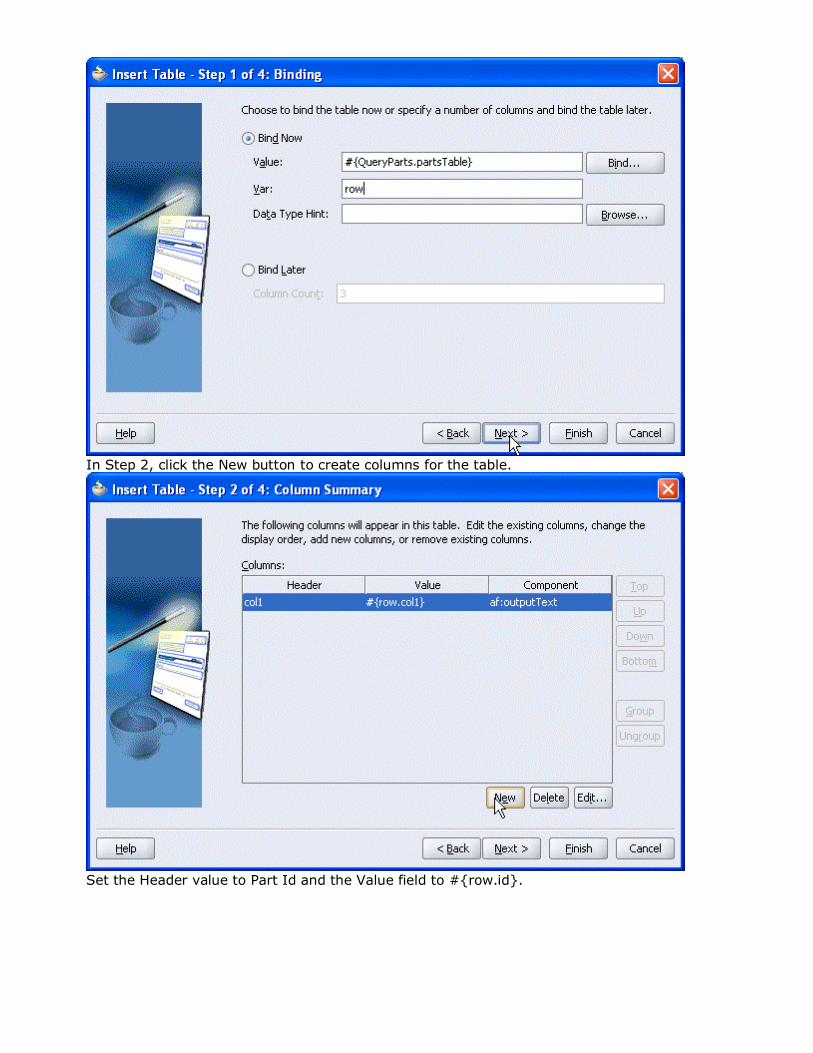
In Step 2, click the New button to create columns for the table.
Set the Header value to Part Id and the Value field to #{row.id}.
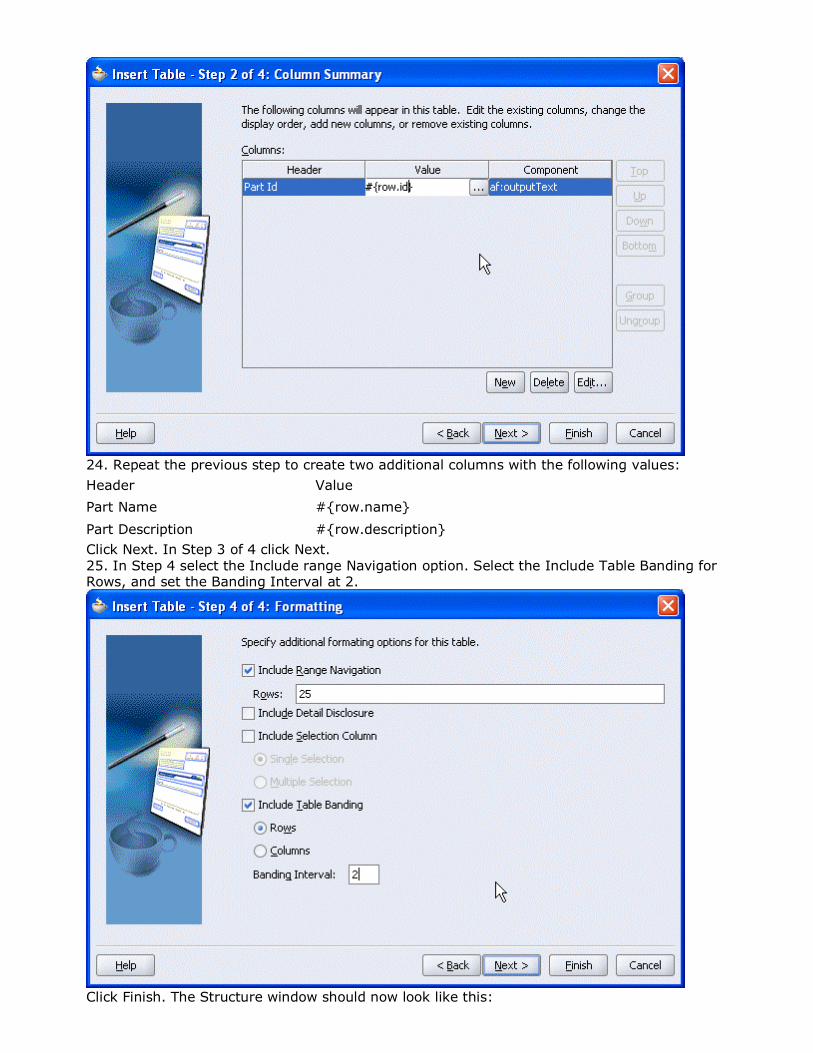
24. Repeat the previous step to create two additional columns with the following values:
Header Value
Part Name #{row.name}
Part Description #{row.description} Click Next. In Step 3 of 4 click Next. 25. In Step 4 select the Include range Navigation option. Select the Include Table Banding for Rows, and set the Banding Interval at 2.
Click Finish. The Structure window should now look like this:
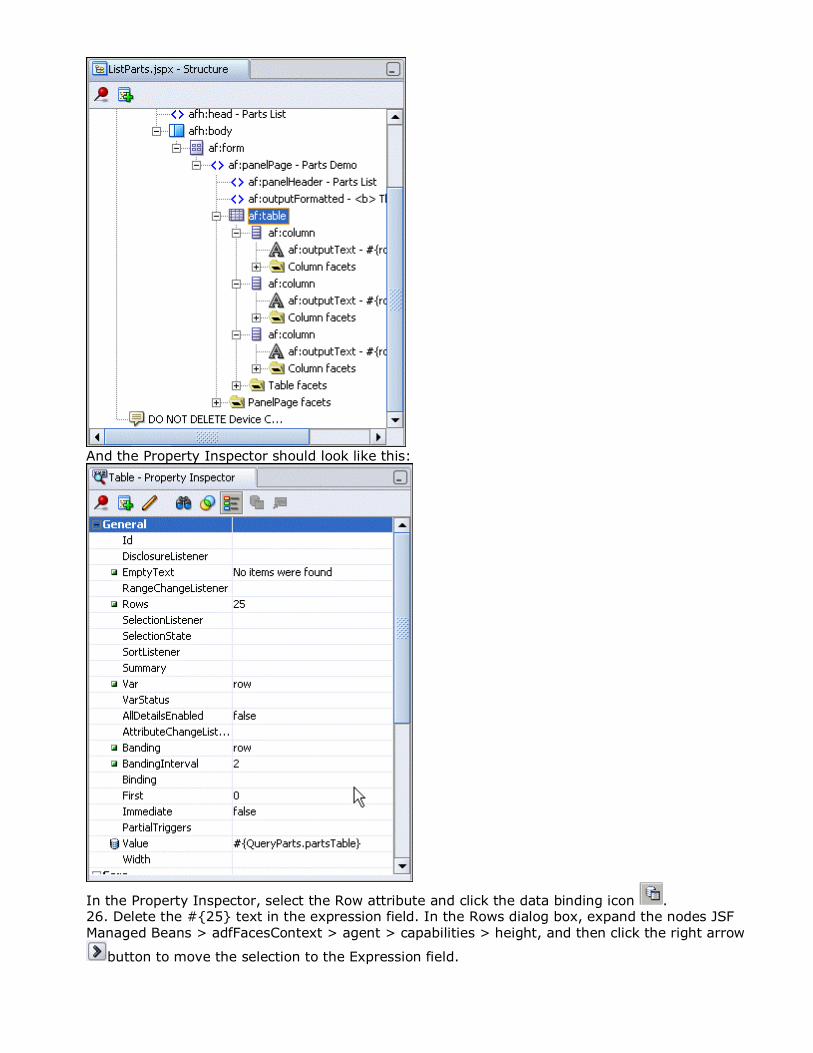
And the Property Inspector should look like this:
In the Property Inspector, select the Row attribute and click the data binding icon . 26. Delete the #{25} text in the expression field. In the Rows dialog box, expand the nodes JSF Managed Beans > adfFacesContext > agent > capabilities > height, and then click the right arrow
button to move the selection to the Expression field.
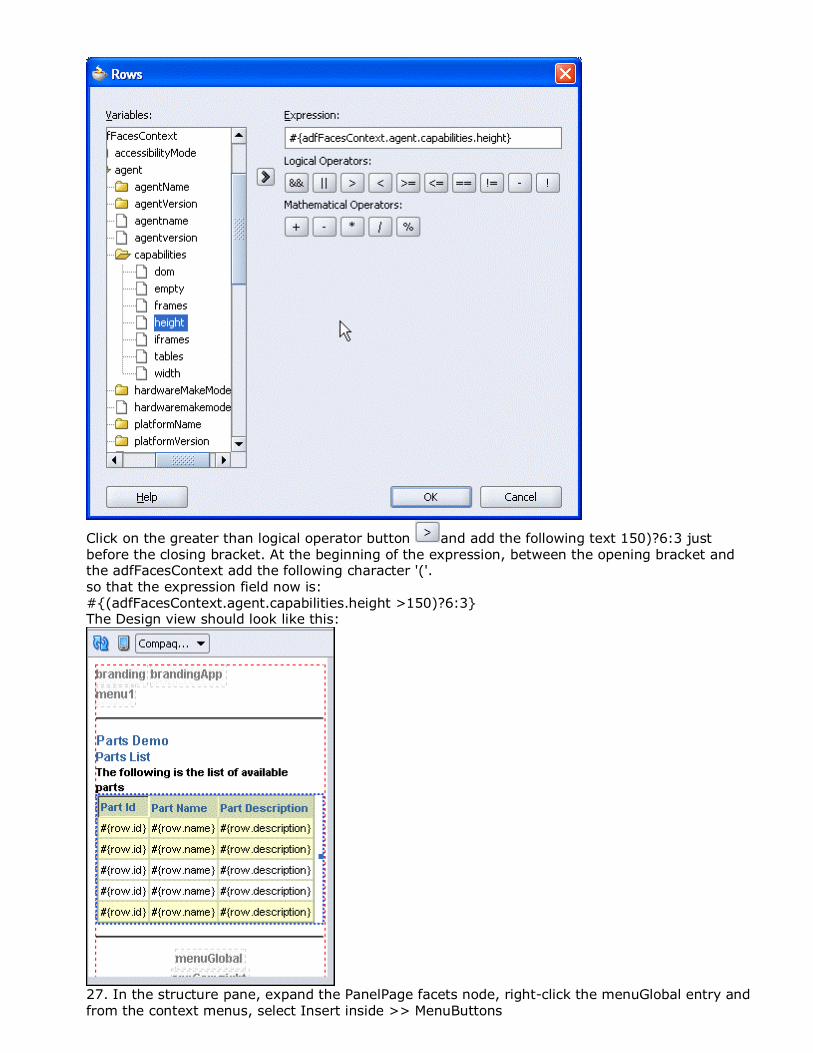
Click on the greater than logical operator button and add the following text 150)?6:3 just before the closing bracket. At the beginning of the expression, between the opening bracket and the adfFacesContext add the following character '('. so that the expression field now is: #{(adfFacesContext.agent.capabilities.height >150)?6:3} The Design view should look like this:
27. In the structure pane, expand the PanelPage facets node, right-click the menuGlobal entry and from the context menus, select Insert inside >> MenuButtons
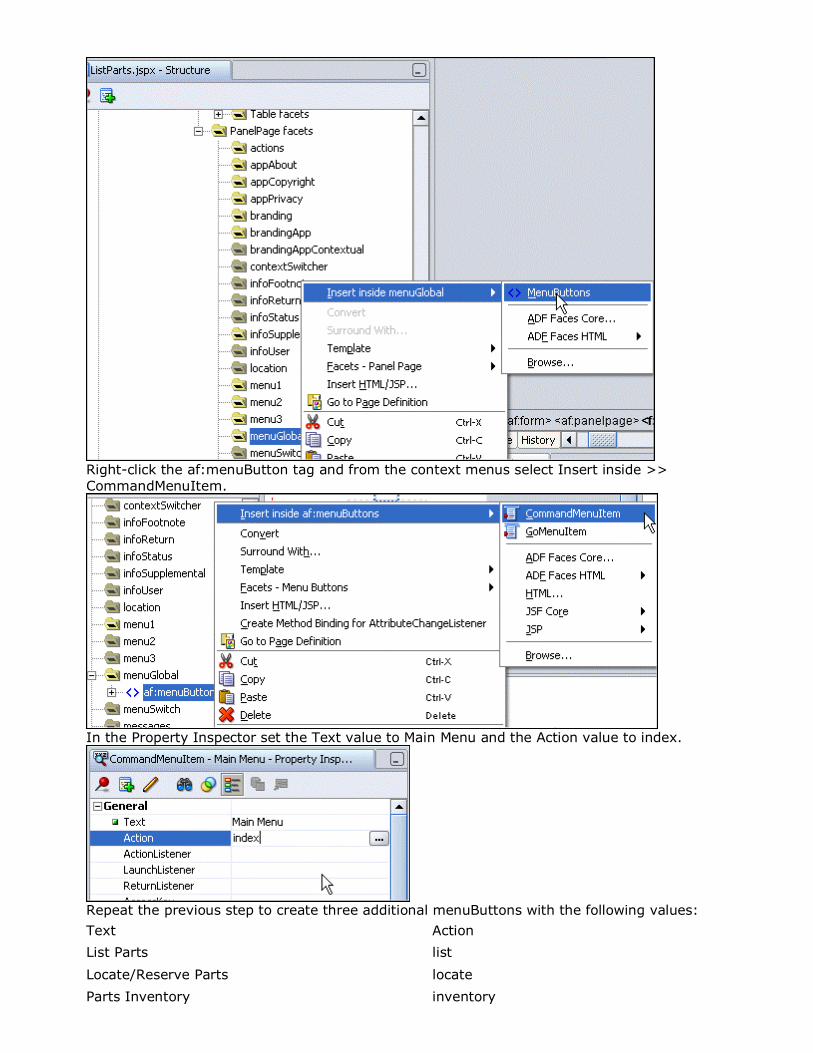
Right-click the af:menuButton tag and from the context menus select Insert inside >> CommandMenuItem.
In the Property Inspector set the Text value to Main Menu and the Action value to index.
Repeat the previous step to create three additional menuButtons with the following values:
Text Action
List Parts list
Locate/Reserve Parts locate
Parts Inventory inventory
The JSF page display should look like this:
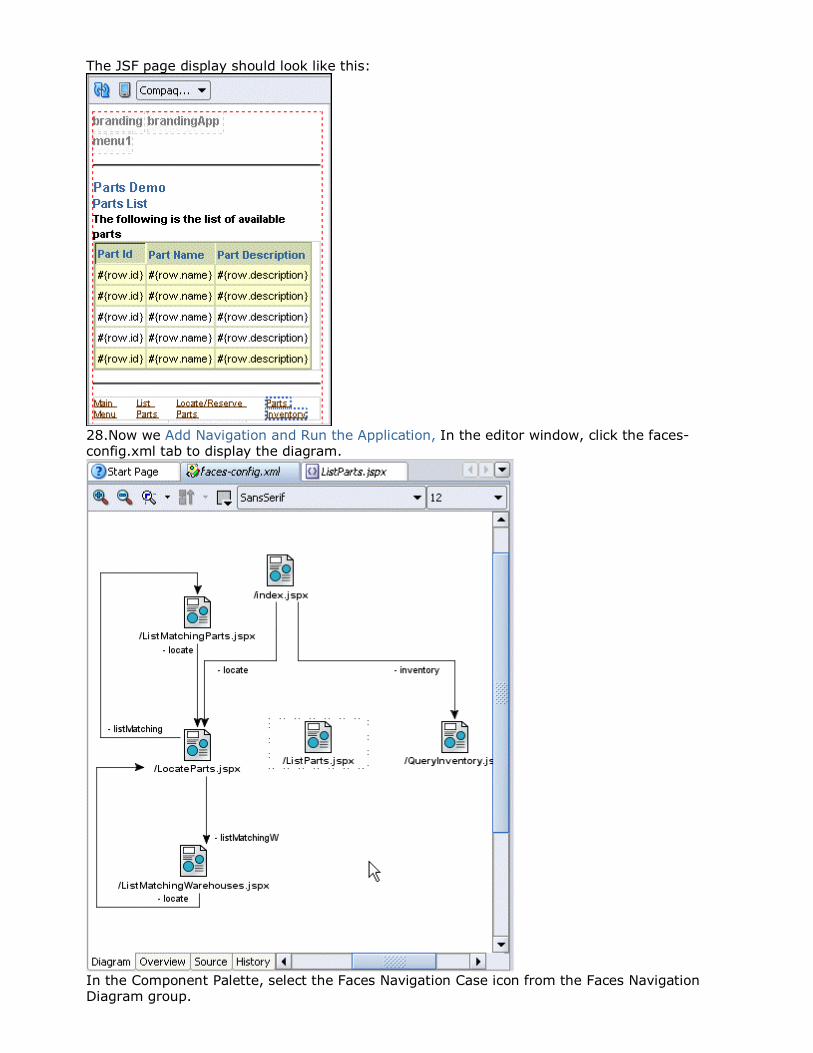
28.Now we Add Navigation and Run the Application, In the editor window, click the faces-config.xml tab to display the diagram.
In the Component Palette, select the Faces Navigation Case icon from the Faces Navigation Diagram group.
In the Visual Editor diagram view, click the index.jspx page, then the ListParts.jspx page. A navigation link is added to the diagram, with a default outcome of success.
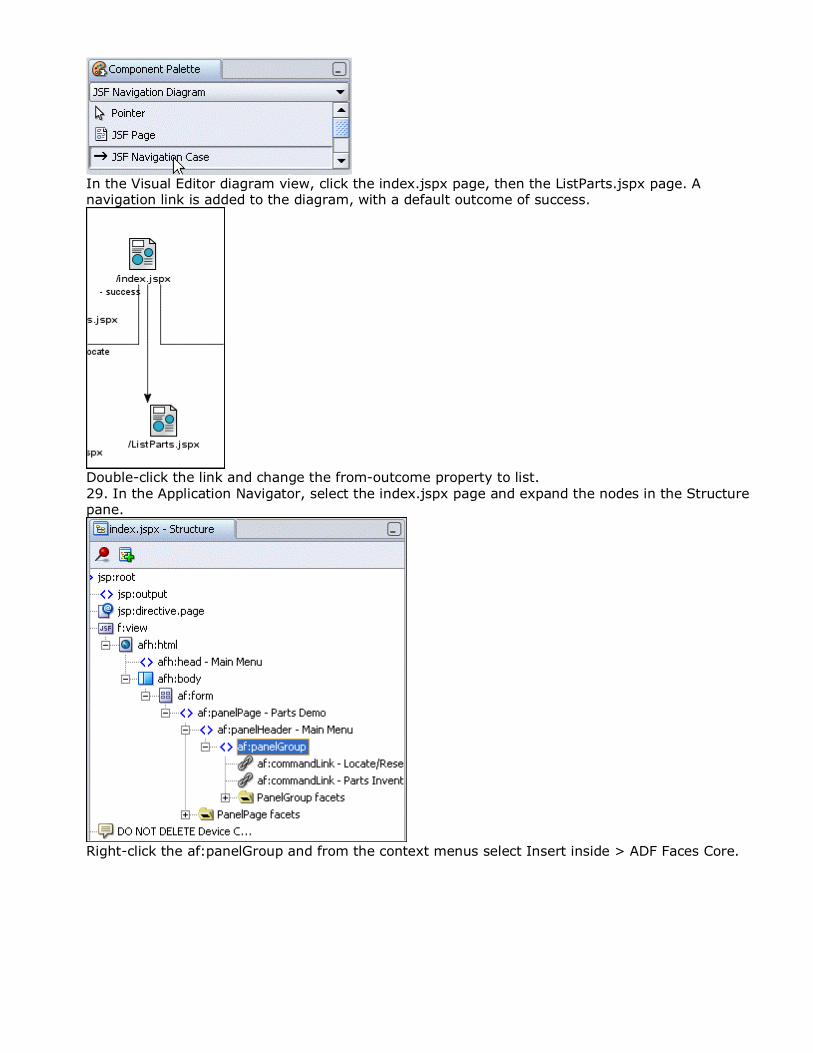
Double-click the link and change the from-outcome property to list. 29. In the Application Navigator, select the index.jspx page and expand the nodes in the Structure pane.
Right-click the af:panelGroup and from the context menus select Insert inside > ADF Faces Core.
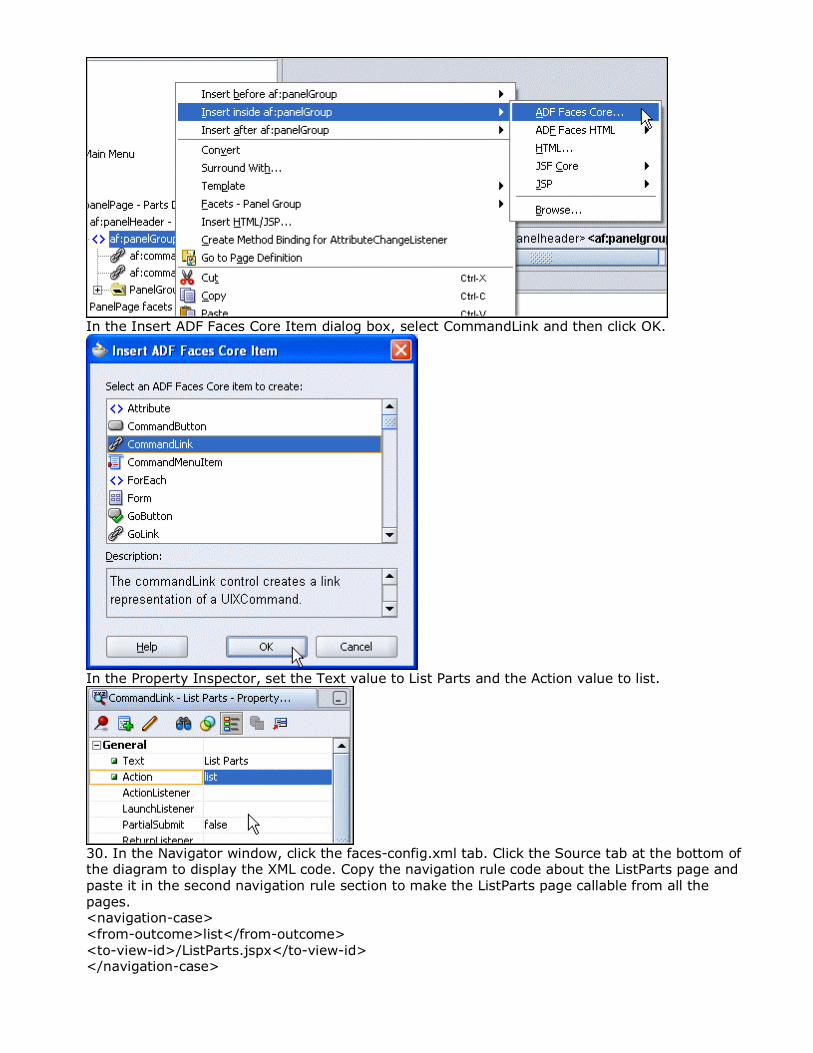
In the Insert ADF Faces Core Item dialog box, select CommandLink and then click OK.
In the Property Inspector, set the Text value to List Parts and the Action value to list.
30. In the Navigator window, click the faces-config.xml tab. Click the Source tab at the bottom of the diagram to display the XML code. Copy the navigation rule code about the ListParts page and paste it in the second navigation rule section to make the ListParts page callable from all the pages. <navigation-case> <from-outcome>list</from-outcome> <to-view-id>/ListParts.jspx</to-view-id> </navigation-case>
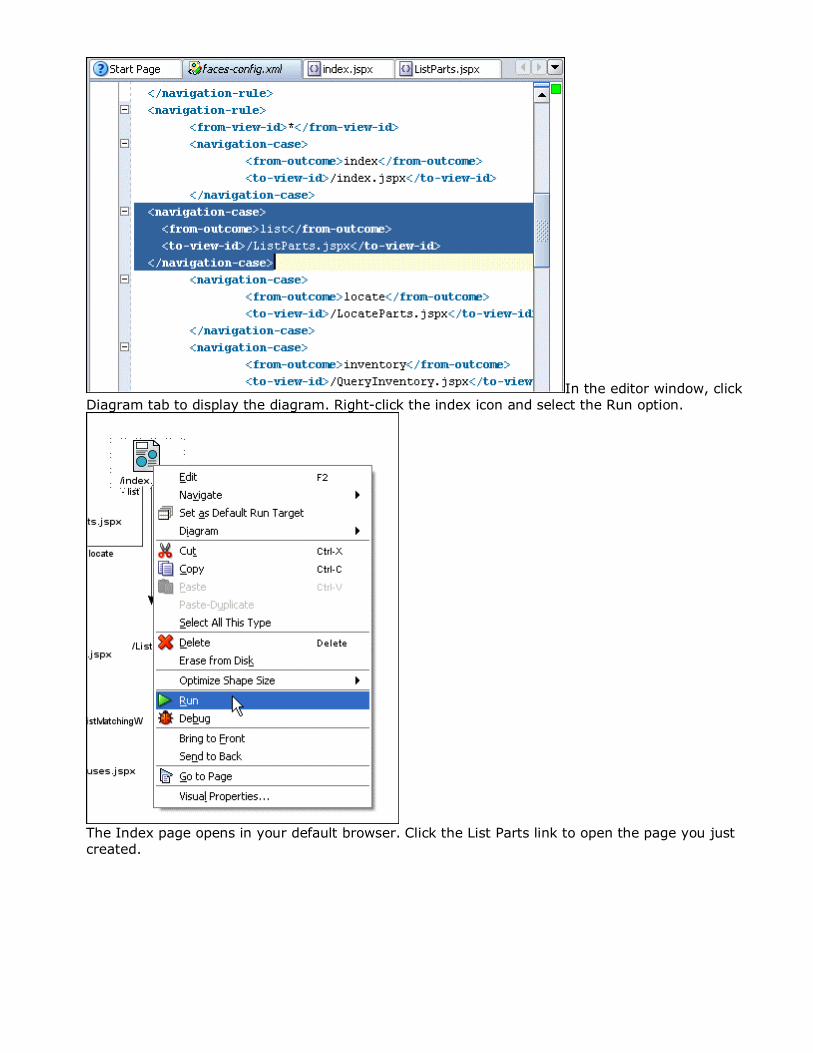
In the editor window, click Diagram tab to display the diagram. Right-click the index icon and select the Run option.
The Index page opens in your default browser. Click the List Parts link to open the page you just created.
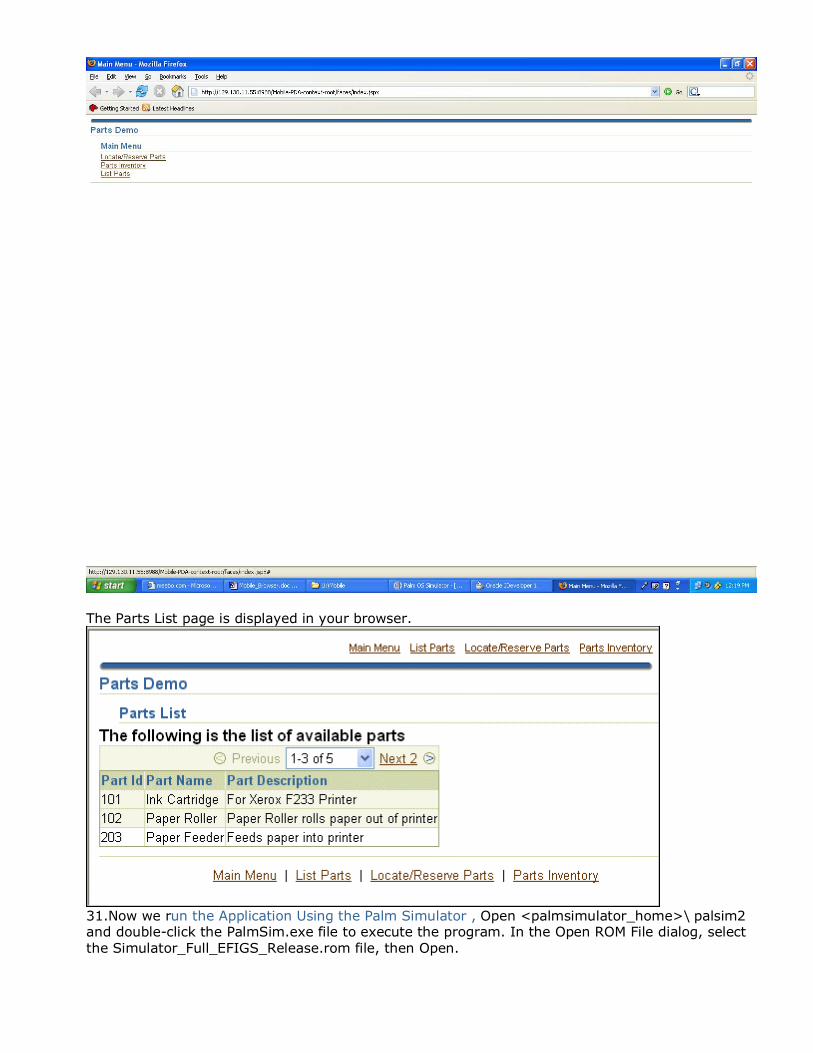
The Parts List page is displayed in your browser.
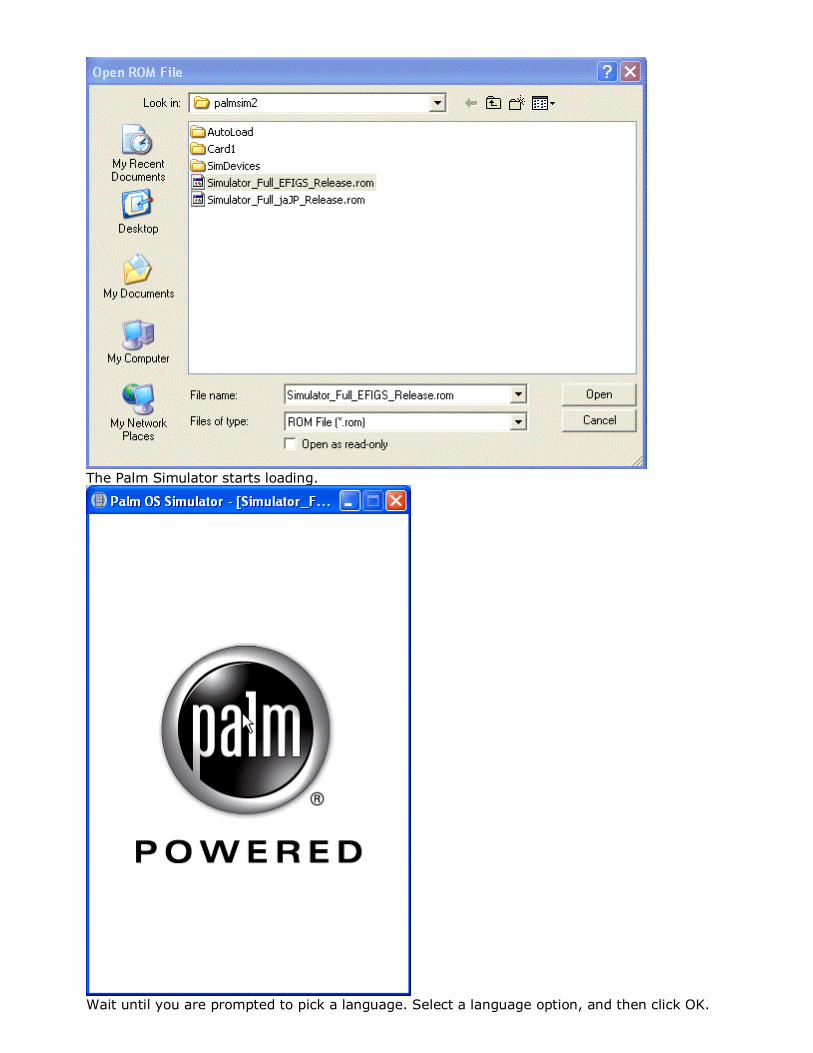
31.Now we run the Application Using the Palm Simulator , Open <palmsimulator_home>\ palsim2 and double-click the PalmSim.exe file to execute the program. In the Open ROM File dialog, select the Simulator_Full_EFIGS_Release.rom file, then Open.
The Palm Simulator starts loading.
Wait until you are prompted to pick a language. Select a language option, and then click OK.
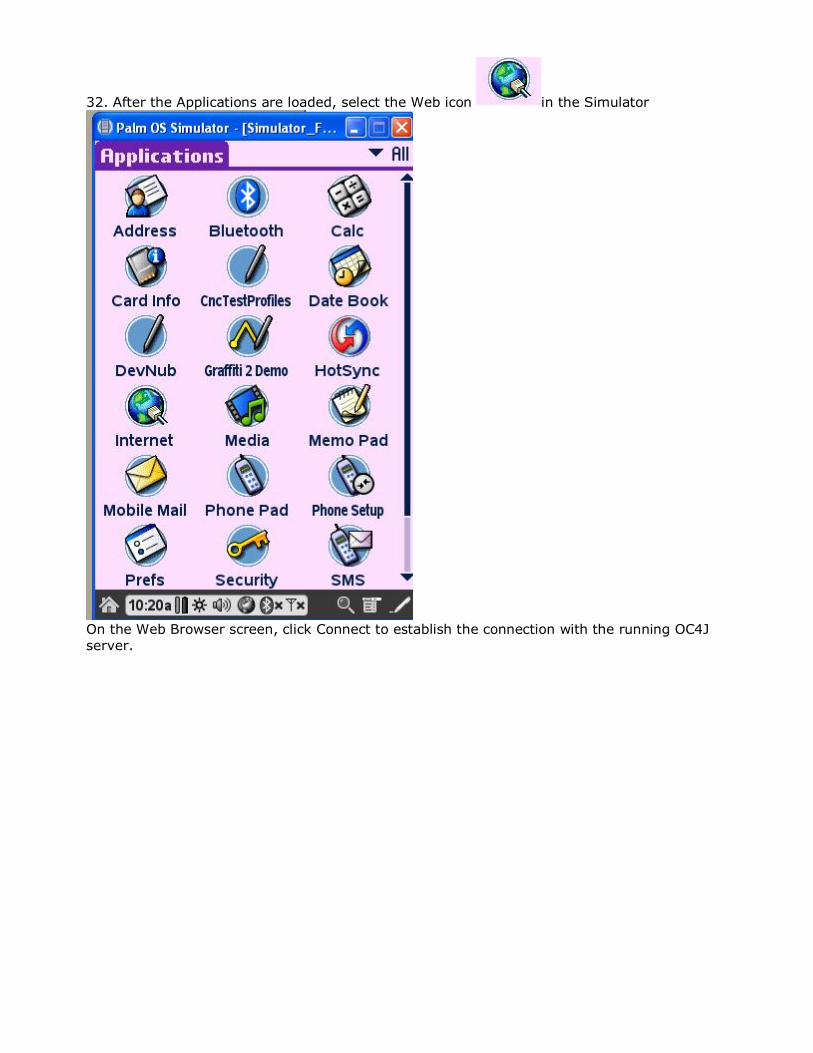
32. After the Applications are loaded, select the Web icon in the Simulator
On the Web Browser screen, click Connect to establish the connection with the running OC4J server.
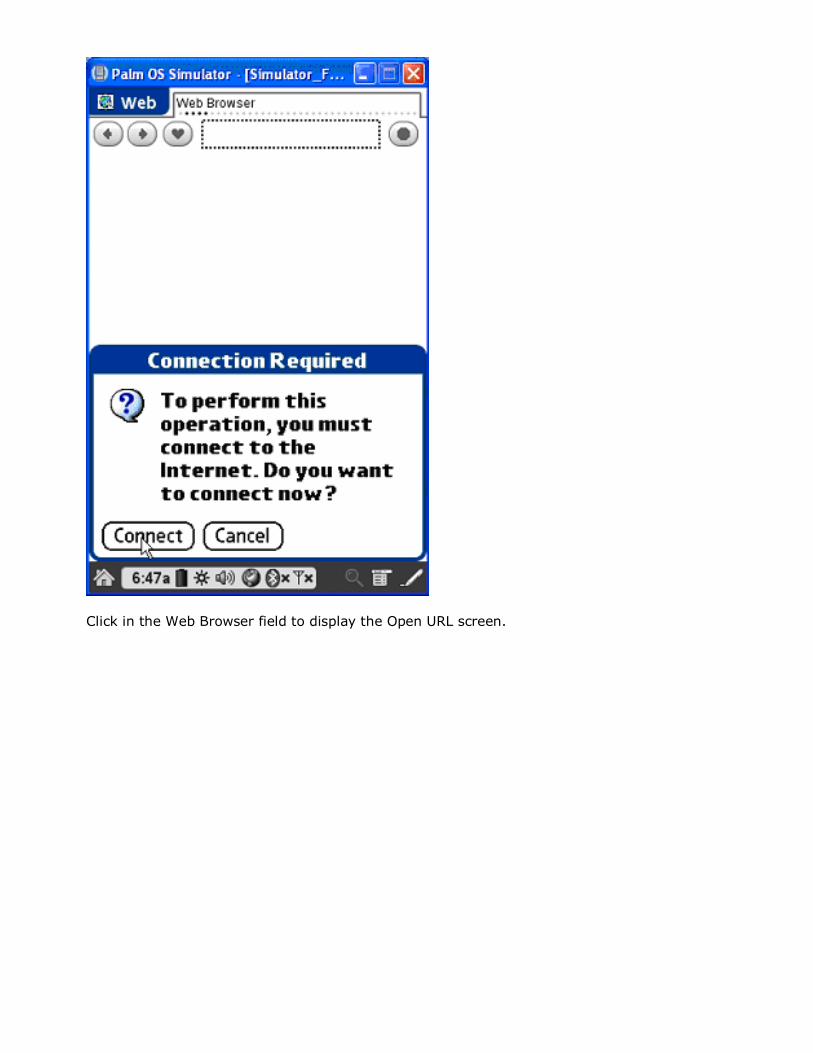
Click in the Web Browser field to display the Open URL screen.
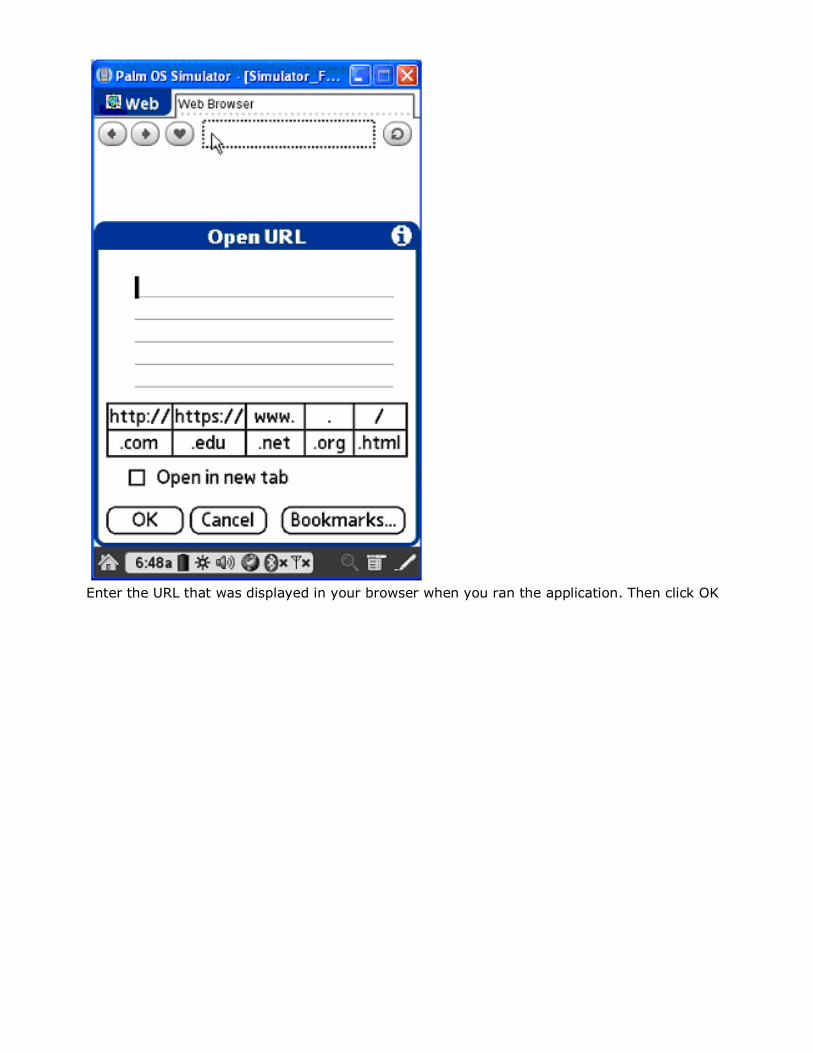
Enter the URL that was displayed in your browser when you ran the application. Then click OK
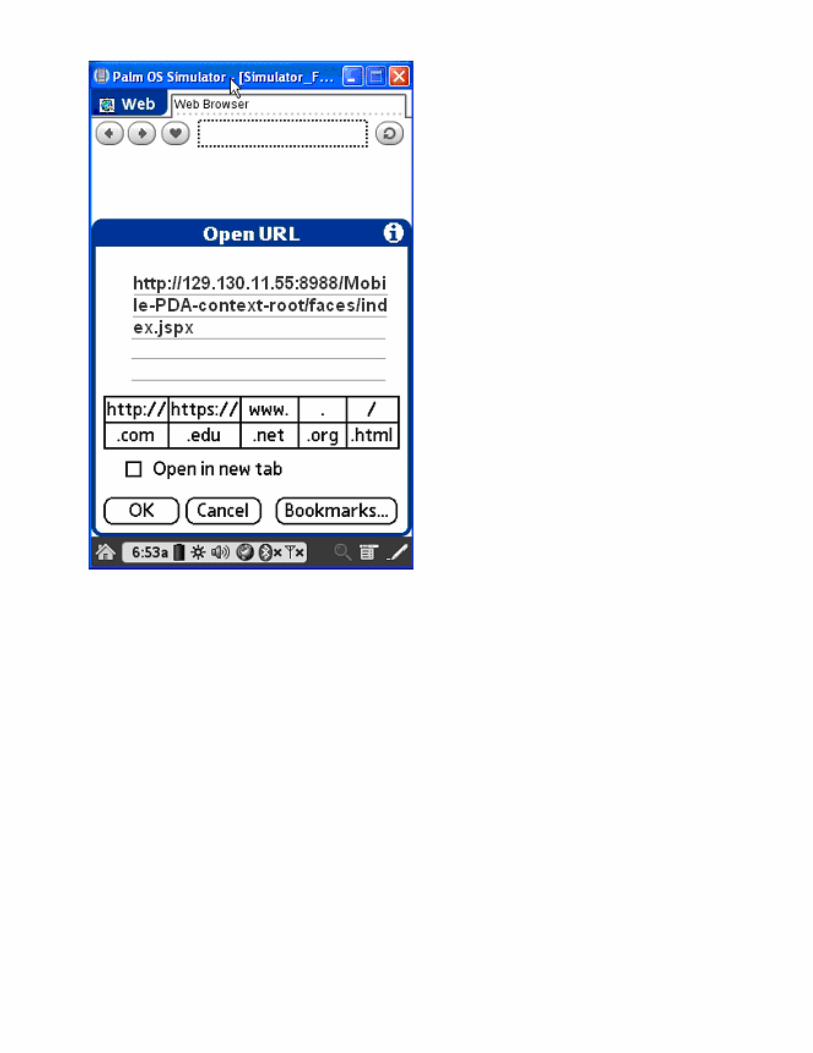
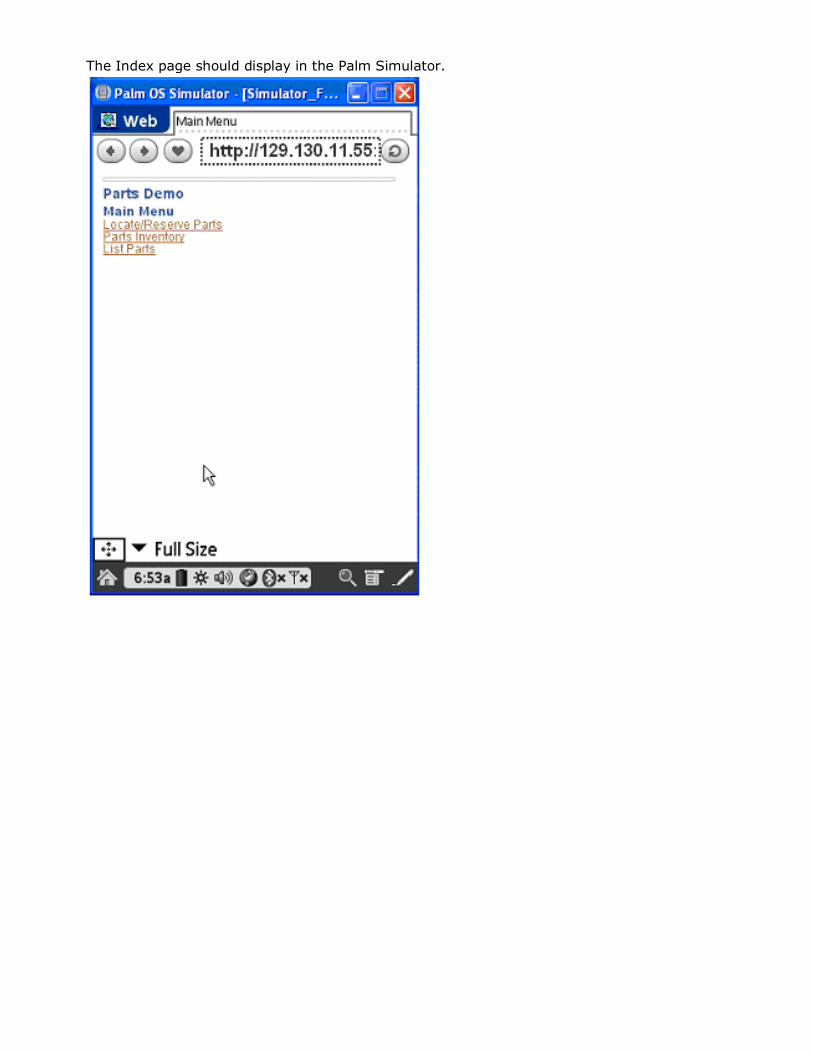
The Index page should display in the Palm Simulator.
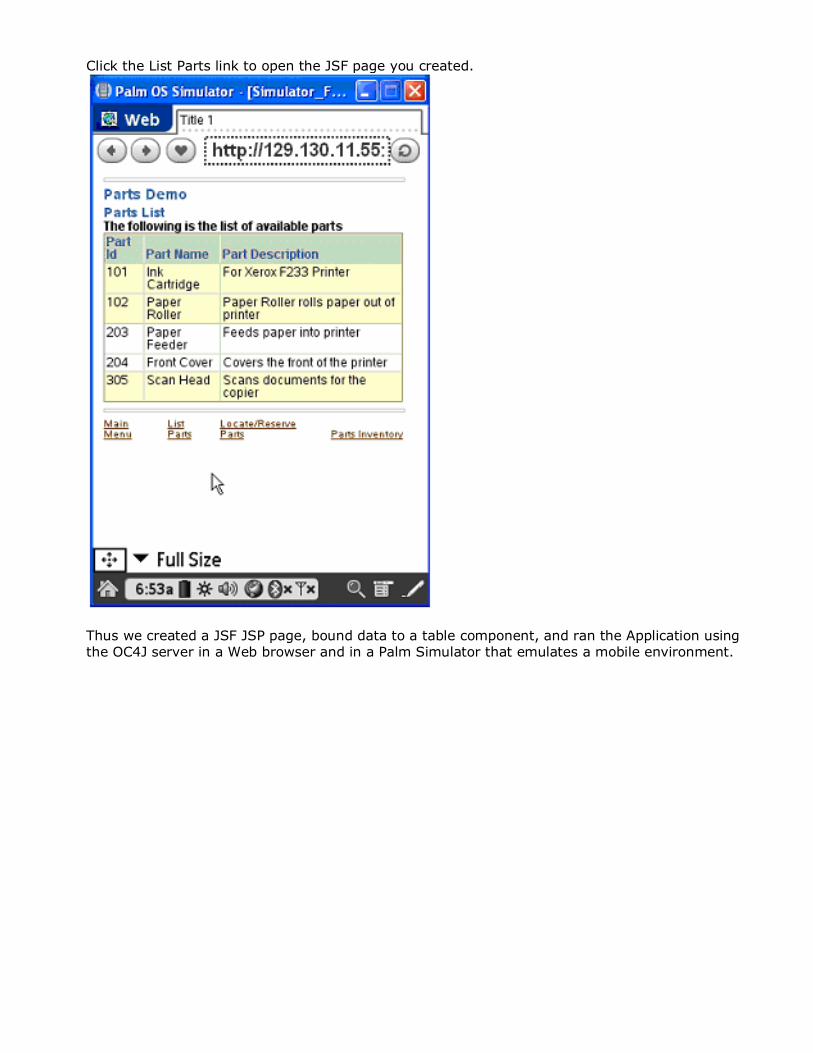
Click the List Parts link to open the JSF page you created.
Thus we created a JSF JSP page, bound data to a table component, and ran the Application using the OC4J server in a Web browser and in a Palm Simulator that emulates a mobile environment.