build your own oracle rac 11g cluster on oracle enterprise linux and iscsi
TRANSCRIPT

28/08/2012Build Your Own Oracle RAC 11g Cluster on Oracle Enterprise Linux and iSCSI
1/30www.oracle.com/technetwork/articles/hunter-rac11gr2-iscsi-088677.html?printOnly=1
Build Your Own Oracle RAC 11g Cluster on Oracle Linux and iSCSIby Jeffrey Hunter
Learn how to set up and configure an Oracle RAC 11g Release 2 development cluster on Oracle Linux for less than US$2,700.
The information in this guide is not validated by Oracle, is not supported by Oracle, and should only be used at your own risk; it is for
educational purposes only.
Updated November 2009
Contents
IntroductionOracle RAC 11g OverviewShared-Storage OverviewiSCSI TechnologyHardware and CostsInstall the Linux Operating SystemInstall Required Linux Packages for Oracle RACNetwork ConfigurationCluster Time Synchronization ServiceInstall OpenfilerConfigure iSCSI Volumes using OpenfilerConfigure iSCSI Volumes on Oracle RAC NodesCreate Job Role Separation Operating System Privileges Groups, Users, and DirectoriesLogging In to a Remote System Using X TerminalConfigure the Linux Servers for OracleConfigure RAC Nodes for Remote Access using SSH - (Optional)All Startup Commands for Both Oracle RAC NodesInstall and Configure ASMLib 2.0Download Oracle RAC 11g Release 2 SoftwarePreinstallation Tasks for Oracle Grid Infrastructure for a ClusterInstall Oracle Grid Infrastructure for a ClusterPostinstallation Tasks for Oracle Grid Infrastructure for a ClusterCreate ASM Disk Groups for Data and Fast Recovery AreaInstall Oracle Database 11g with Oracle Real Application ClustersInstall Oracle Database 11g Examples (formerly Companion)Create the Oracle Cluster DatabasePost Database Creation Tasks - (Optional)Create / Alter TablespacesVerify Oracle Grid Infrastructure and Database ConfigurationStarting / Stopping the ClusterTroubleshootingConclusionAcknowledgements
Downloads for this guide: Oracle Enterprise Linux Release 5 Update 4 (Available for x86 and x86_64) Oracle Database 11g Release 2, Grid Infrastructure, Examples (11.2.0.1.0) (Available for x86 and x86_64)
Openfiler 2.3 Respin (21-01-09) ( openfiler-2.3-x86-disc1.iso -OR- openfiler-2.3-x86_64-disc1.iso) ASMLib 2.0 Library RHEL5 - (2.0.4-1) ( oracleasmlib-2.0.4-1.el5.i386.rpm -OR- oracleasmlib-2.0.4-1.el5.x86_64.rpm)
1. IntroductionOne of the most efficient ways to become familiar with Oracle Real Application Clusters (RAC) 11g technology is to have access to an actual
Oracle RAC 11g cluster. There's no better way to understand its benefits—including fault tolerance, security, load balancing, and scalability—than
to experience them directly.
Unfortunately, for many shops, the price of the hardware required for a typical production RAC configuration makes this goal impossible. A small
two-node cluster can cost from US$10,000 to well over US$20,000. This cost would not even include the heart of a production RAC environment,
the shared storage. In most cases, this would be a Storage Area Network (SAN), which generally start at US$10,000.
For those who want to become familiar with Oracle RAC 11g without a major cash outlay, this guide provides a low-cost alternative to configuring
an Oracle RAC 11g Release 2 system using commercial off-the-shelf components and downloadable software at an estimated cost of US$2,200
to US$2,700. The system will consist of a two node cluster, both running Oracle Enterprise Linux (OEL) Release 5 Update 4 for x86_64, Oracle
RAC 11g Release 2 for Linux x86_64, and ASMLib 2.0. All shared disk storage for Oracle RAC will be based on iSCSI using Openfiler release 2.3
x86_64 running on a third node (known in this article as the Network Storage Server).
Although this article should work with Red Hat Enterprise Linux, Oracle Enterprise Linux (available for free) will provide the same if not better
stability and will already include the ASMLib software packages (with the exception of the ASMLib userspace libraries which is a separate
download).
This guide is provided for educational purposes only, so the setup is kept simple to demonstrate ideas and concepts. For example, the shared
Oracle Clusterware files (OCR and voting files) and all physical database files in this article will be set up on only one physical disk, while in
practice that should be configured on multiple physical drives. In addition, each Linux node will only be configured with two network interfaces one
for the public network ( eth0) and one that will be used for both the Oracle RAC private interconnect "and" the network storage server for shared
iSCSI access ( eth1). For a production RAC implementation, the private interconnect should be at least Gigabit (or more) with redundant paths
and "only" be used by Oracle to transfer Cluster Manager and Cache Fusion related data. A third dedicated network interface ( eth2, for example)
should be configured on another redundant Gigabit network for access to the network storage server (Openfiler).
Oracle Documentation
While this guide provides detailed instructions for successfully installing a complete Oracle RAC 11g system, it is by no means a substitute for
the official Oracle documentation (see list below) . In addition to this guide, users should also consult the following Oracle documents to gain a
full understanding of alternative configuration options, installation, and administration with Oracle RAC 11g. Oracle's official documentation site is
docs.oracle.com.
Oracle Technology Network Articles
Products and Services Solutions Downloads Store Support Training Partners About Technology NetworkOracle
Sign In/Register for Account Help Select Country/Region Communities I am a... I w ant to... Search

28/08/2012Build Your Own Oracle RAC 11g Cluster on Oracle Enterprise Linux and iSCSI
2/30www.oracle.com/technetwork/articles/hunter-rac11gr2-iscsi-088677.html?printOnly=1
Oracle Grid Infrastructure Installation Guide - 11g Release 2 (11.2) for Linux
Clusterware Administration and Deployment Guide - 11g Release 2 (11.2)Oracle Real Application Clusters Installation Guide - 11g Release 2 (11.2) for Linux and UNIX
Real Application Clusters Administration and Deployment Guide - 11g Release 2 (11.2)Oracle Database 2 Day + Real Application Clusters Guide - 11g Release 2 (11.2)
Oracle Database Storage Administrator's Guide - 11g Release 2 (11.2)
Network Storage Server
Powered by rPath Linux, Openfiler is a free browser-based network storage management utility that delivers file-based Network Attached Storage
(NAS) and block-based Storage Area Networking (SAN) in a single framework. The entire software stack interfaces with open source applications
such as Apache, Samba, LVM2, ext3, Linux NFS and iSCSI Enterprise Target. Openfiler combines these ubiquitous technologies into a small,
easy to manage solution fronted by a powerful web-based management interface.
Openfiler supports CIFS, NFS, HTTP/DAV, FTP, however, we will only be making use of its iSCSI capabilities to implement an inexpensive SAN for
the shared storage components required by Oracle RAC 11g. The operating system and Openfiler application will be installed on one internal
SATA disk. A second internal 73GB 15K SCSI hard disk will be configured as a single "Volume Group" that will be used for all shared disk storage
requirements. The Openfiler server will be configured to use this volume group for iSCSI based storage and will be used in our Oracle RAC 11g
configuration to store the shared files required by Oracle grid infrastructure and the Oracle RAC database.
Oracle Grid Infrastructure 11g Release 2 (11.2)
With Oracle grid infrastructure 11g Release 2 (11.2), the Automatic Storage Management (ASM) and Oracle Clusterware software is packaged
together in a single binary distribution and installed into a single home directory, which is referred to as the Grid Infrastructure home. You must
install the grid infrastructure in order to use Oracle RAC 11g Release 2. Configuration assistants start after the installer interview process that
configure ASM and Oracle Clusterware. While the installation of the combined products is called Oracle grid infrastructure, Oracle Clusterware
and Automatic Storage Manager remain separate products.
After Oracle grid infrastructure is installed and configured on both nodes in the cluster, the next step will be to install the Oracle RAC software on
both Oracle RAC nodes.
In this article, the Oracle grid infrastructure and Oracle RAC software will be installed on both nodes using the optional Job Role Separation
configuration. One OS user will be created to own each Oracle software product " grid" for the Oracle grid infrastructure owner and " oracle" for
the Oracle RAC software. Throughout this article, a user created to own the Oracle grid infrastructure binaries is called the grid user. This user
will own both the Oracle Clusterware and Oracle Automatic Storage Management binaries. The user created to own the Oracle database binaries
(Oracle RAC) will be called the oracle user. Both Oracle software owners must have the Oracle Inventory group ( oinstall) as their primary
group, so that each Oracle software installation owner can write to the central inventory (oraInventory), and so that OCR and Oracle Clusterware
resource permissions are set correctly. The Oracle RAC software owner must also have the OSDBA group and the optional OSOPER group as
secondary groups.
Automatic Storage Management and Oracle Clusterware Files
As previously mentioned, Automatic Storage Management (ASM) is now fully integrated with Oracle Clusterware in the Oracle grid infrastructure.
Oracle ASM and Oracle Database 11g Release 2 provide a more enhanced storage solution from previous releases. Part of this solution is the
ability to store the Oracle Clusterware files; namely the Oracle Cluster Registry (OCR) and the Voting Files (VF also known as the Voting Disks)
on ASM. This feature enables ASM to provide a unified storage solution, storing all the data for the clusterware and the database, without the need
for third-party volume managers or cluster file systems.
Just like database files, Oracle Clusterware files are stored in an ASM disk group and therefore utilize the ASM disk group configuration with
respect to redundancy. For example, a Normal Redundancy ASM disk group will hold a two-way-mirrored OCR. A failure of one disk in the disk
group will not prevent access to the OCR. With a High Redundancy ASM disk group (three-way-mirrored), two independent disks can fail without
impacting access to the OCR. With External Redundancy, no protection is provided by Oracle.
Oracle only allows one OCR per disk group in order to protect against physical disk failures. When configuring Oracle Clusterware files on a
production system, Oracle recommends using either normal or high redundancy ASM disk groups. If disk mirroring is already occurring at either
the OS or hardware level, you can use external redundancy.
The Voting Files are managed in a similar way to the OCR. They follow the ASM disk group configuration with respect to redundancy, but are not
managed as normal ASM files in the disk group. Instead, each voting disk is placed on a specific disk in the disk group. The disk and the location
of the Voting Files on the disks are stored internally within Oracle Clusterware.
The following example describes how the Oracle Clusterware files are stored in ASM after installing Oracle grid infrastructure using this guide. To
view the OCR, use ASMCMD:
[grid@racnode1 ~]$ asmcmd
ASMCMD> ls -l +CRS/racnode-cluster/OCRFILE
Type Redund Striped Time Sys NameOCRFILE UNPROT COARSE NOV 22 12:00:00 Y REGISTRY.255.703024853
+CRS/racnode-cluster/OCRFILEREGISTRY.255.703024853crsctl query css votedisk[grid@racnode1 ~]$ crsctl query css votedisk
## STATE File Universal Id File Name Disk group
-- ----- ----------------- --------- --------- 1. ONLINE 4cbbd0de4c694f50bfd3857ebd8ad8c4 (ORCL:CRSVOL1) [CRS]Located 1 voting disk(s).
If you decide against using ASM for the OCR and voting disk files, Oracle Clusterware still allows these files to be stored on a cluster file system
like Oracle Cluster File System release 2 (OCFS2) or a NFS system. Please note that installing Oracle Clusterware files on raw or block devices
is no longer supported, unless an existing system is being upgraded.
Previous versions of this guide used OCFS2 for storing the OCR and voting disk files. This guide will store the OCR and voting disk files on ASM
in an ASM disk group named +CRS using external redundancy which is one OCR location and one voting disk location. The ASM disk group
should be be created on shared storage and be at least 2GB in size.
The Oracle physical database files (data, online redo logs, control files, archived redo logs) will be installed on ASM in an ASM disk group named
+RACDB_DATA while the Fast Recovery Area will be created in a separate ASM disk group named +FRA.
The two Oracle RAC nodes and the network storage server will be configured as follows:
Nodes

28/08/2012Build Your Own Oracle RAC 11g Cluster on Oracle Enterprise Linux and iSCSI
3/30www.oracle.com/technetwork/articles/hunter-rac11gr2-iscsi-088677.html?printOnly=1
Node Name Instance Name Database Name Processor RAM Operating System
racnode1 racdb1 racdb.idevelopment.info 1 x Dual Core Intel Xeon, 3.00 GHz 4GB OEL 5.4 - (x86_64)
racnode2 racdb2 1 x Dual Core Intel Xeon, 3.00 GHz 4GB OEL 5.4 - (x86_64)
openfiler1 2 x Intel Xeon, 3.00 GHz 6GB Openfiler 2.3 - (x86_64)
Network Configuration
Node Name Public IP Private IP Virtual IP SCAN Name SCAN IP
racnode1 192.168.1.151 192.168.2.151 192.168.1.251
racnode-cluster-scan 192.168.1.187racnode2 192.168.1.152 192.168.2.152 192.168.1.252
openfiler1 192.168.1.195 192.168.2.195
Oracle Software Components
Software Component OS User Primary Group Supplementary Groups Home Directory Oracle Base / Oracle Home
Grid Infrastructure grid oinstall asmadmin, asmdba, asmoper /home/grid/u01/app/grid /u01/app/11.2.0/grid
Oracle RAC oracle oinstall dba, oper, asmdba /home/oracle/u01/app/oracle /u01/app/oracle/product/11.2.0/dbhome_1
Storage Components
Storage Component File System Volume Size ASM Volume Group Name ASM Redundancy Openfiler Volume Name
OCR/Voting Disk ASM 2GB +CRS External racdb-crs1
Database Files ASM 32GB +RACDB_DATA External racdb-data1
Fast Recovery Area ASM 32GB +FRA External racdb-fra1
This article is only designed to work as documented with absolutely no substitutions. The only exception here is the choice of vendor hardware
(i.e. machines, networking equipment, and internal / external hard drives). Ensure that the hardware you purchase from the vendor is supported
on Enterprise Linux 5 and Openfiler 2.3 (Final Release).
If you are looking for an example that takes advantage of Oracle RAC 10g release 2 with Oracle Enterprise Linux 5.3 using iSCSI, click here.
2. Oracle RAC 11g OverviewBefore introducing the details for building a RAC cluster, it might be helpful to first clarify what a cluster is. A cluster is a group of two or more
interconnected computers or servers that appear as if they are one server to end users and applications and generally share the same set of
physical disks. The key benefit of clustering is to provide a highly available framework where the failure of one node (for example a database
server running an instance of Oracle) does not bring down an entire application. In the case of failure with one of the servers, the other surviving
server (or servers) can take over the workload from the failed server and the application continues to function normally as if nothing has
happened.
The concept of clustering computers actually started several decades ago. The first successful cluster product was developed by DataPoint in
1977 named ARCnet. The ARCnet product enjoyed much success by academia types in research labs, but didn't really take off in the commercial
market. It wasn't until the 1980's when Digital Equipment Corporation (DEC) released its VAX cluster product for the VAX/VMS operating system.
With the release of Oracle 6 for the Digital VAX cluster product, Oracle was the first commercial database to support clustering at the database
level. It wasn't long, however, before Oracle realized the need for a more efficient and scalable distributed lock manager (DLM) as the one
included with the VAX/VMS cluster product was not well suited for database applications. Oracle decided to design and write their own DLM for the
VAX/VMS cluster product which provided the fine-grain block level locking required by the database. Oracle's own DLM was included in Oracle 6.2
which gave birth to Oracle Parallel Server (OPS) - the first database to run the parallel server.
By Oracle 7, OPS was extended to included support for not only the VAX/VMS cluster product but also with most flavors of UNIX. This framework
required vendor-supplied clusterware which worked well, but made for a complex environment to setup and manage given the multiple layers
involved. By Oracle8, Oracle introduced a generic lock manager that was integrated into the Oracle kernel. In later releases of Oracle, this became
known as the Integrated Distributed Lock Manager (IDLM) and relied on an additional layer known as the Operating System Dependant (OSD)
layer. This new model paved the way for Oracle to not only have their own DLM, but to also create their own clusterware product in future releases.
Oracle Real Application Clusters (RAC), introduced with Oracle9i, is the successor to Oracle Parallel Server. Using the same IDLM, Oracle 9i
could still rely on external clusterware but was the first release to include their own clusterware product named Cluster Ready Services (CRS).
With Oracle 9i, CRS was only available for Windows and Linux. By Oracle 10g release 1, Oracle's clusterware product was available for all
operating systems and was the required cluster technology for Oracle RAC. With the release of Oracle Database 10g Release 2 (10.2), Cluster
Ready Services was renamed to Oracle Clusterware. When using Oracle 10g or higher, Oracle Clusterware is the only clusterware that you need
for most platforms on which Oracle RAC operates (except for Tru cluster, in which case you need vendor clusterware). You can still use
clusterware from other vendors if the clusterware is certified, but keep in mind that Oracle RAC still requires Oracle Clusterware as it is fully
integrated with the database software. This guide uses Oracle Clusterware which as of 11g Release 2 (11.2), is now a component of Oracle grid
infrastructure.
Like OPS, Oracle RAC allows multiple instances to access the same database (storage) simultaneously. RAC provides fault tolerance, load
balancing, and performance benefits by allowing the system to scale out, and at the same time since all instances access the same database,
the failure of one node will not cause the loss of access to the database.
At the heart of Oracle RAC is a shared disk subsystem. Each instance in the cluster must be able to access all of the data, redo log files, control
files and parameter file for all other instances in the cluster. The data disks must be globally available in order to allow all instances to access the
database. Each instance has its own redo log files and UNDO tablespace that are locally read-writeable. The other instances in the cluster must
be able to access them (read-only) in order to recover that instance in the event of a system failure. The redo log files for an instance are only
writeable by that instance and will only be read from another instance during system failure. The UNDO, on the other hand, is read all the time
during normal database operation (e.g. for CR fabrication).
A big difference between Oracle RAC and OPS is the addition of Cache Fusion. With OPS a request for data from one instance to another required
the data to be written to disk first, then the requesting instance can read that data (after acquiring the required locks). This process was called
disk pinging. With cache fusion, data is passed along a high-speed interconnect using a sophisticated locking algorithm.
Not all database clustering solutions use shared storage. Some vendors use an approach known as a Federated Cluster, in which data is
spread across several machines rather than shared by all. With Oracle RAC, however, multiple instances use the same set of disks for storing
data. Oracle's approach to clustering leverages the collective processing power of all the nodes in the cluster and at the same time provides
failover security.
Pre-configured Oracle RAC solutions are available from vendors such as Dell, IBM and HP for production environments. This article, however,
focuses on putting together your own Oracle RAC 11g environment for development and testing by using Linux servers and a low cost shared disk
solution; iSCSI.
For more background about Oracle RAC, visit the Oracle RAC Product Center on OTN.
3. Shared-Storage Overview

28/08/2012Build Your Own Oracle RAC 11g Cluster on Oracle Enterprise Linux and iSCSI
4/30www.oracle.com/technetwork/articles/hunter-rac11gr2-iscsi-088677.html?printOnly=1
Today, fibre channel is one of the most popular solutions for shared storage. As mentioned earlier, fibre channel is a high-speed serial-transfer
interface that is used to connect systems and storage devices in either point-to-point (FC-P2P), arbitrated loop (FC-AL), or switched topologies
(FC-SW). Protocols supported by Fibre Channel include SCSI and IP. Fibre channel configurations can support as many as 127 nodes and have
a throughput of up to 2.12 Gigabits per second in each direction, and 4.25 Gbps is expected.
Fibre channel, however, is very expensive. Just the fibre channel switch alone can start at around US$1,000. This does not even include the fibre
channel storage array and high-end drives, which can reach prices of about US$300 for a single 36GB drive. A typical fibre channel setup which
includes fibre channel cards for the servers is roughly US$10,000, which does not include the cost of the servers that make up the cluster.
A less expensive alternative to fibre channel is SCSI. SCSI technology provides acceptable performance for shared storage, but for administrators
and developers who are used to GPL-based Linux prices, even SCSI can come in over budget, at around US$2,000 to US$5,000 for a two-node
cluster.
Another popular solution is the Sun NFS (Network File System) found on a NAS. It can be used for shared storage but only if you are using a
network appliance or something similar. Specifically, you need servers that guarantee direct I/O over NFS, TCP as the transport protocol, and
read/write block sizes of 32K. See the Certify page on Oracle Metalink for supported Network Attached Storage (NAS) devices that can be used
with Oracle RAC. One of the key drawbacks that has limited the benefits of using NFS and NAS for database storage has been performance
degradation and complex configuration requirements. Standard NFS client software (client systems that use the operating system provided NFS
driver) is not optimized for Oracle database file I/O access patterns. With the introduction of Oracle 11g, a new feature known as Direct NFS Client
integrates the NFS client functionality directly in the Oracle software. Through this integration, Oracle is able to optimize the I/O path between the
Oracle software and the NFS server resulting in significant performance gains. Direct NFS Client can simplify, and in many cases automate, the
performance optimization of the NFS client configuration for database workloads. To learn more about Direct NFS Client, see the Oracle White
Paper entitled " Oracle Database 11g Direct NFS Client ".
The shared storage that will be used for this article is based on iSCSI technology using a network storage server installed with Openfiler. This
solution offers a low-cost alternative to fibre channel for testing and educational purposes, but given the low-end hardware being used, it should
not be used in a production environment.
4. iSCSI Technology
For many years, the only technology that existed for building a network based storage solution was a Fibre Channel Storage Area Network (FC
SAN). Based on an earlier set of ANSI protocols called Fiber Distributed Data Interface (FDDI), Fibre Channel was developed to move SCSI
commands over a storage network.
Several of the advantages to FC SAN include greater performance, increased disk utilization, improved availability, better scalability, and most
important to us support for server clustering! Still today, however, FC SANs suffer from three major disadvantages. The first is price. While the
costs involved in building a FC SAN have come down in recent years, the cost of entry still remains prohibitive for small companies with limited IT
budgets. The second is incompatible hardware components. Since its adoption, many product manufacturers have interpreted the Fibre Channel
specifications differently from each other which has resulted in scores of interconnect problems. When purchasing Fibre Channel components
from a common manufacturer, this is usually not a problem. The third disadvantage is the fact that a Fibre Channel network is not Ethernet! It
requires a separate network technology along with a second set of skill sets that need to exist with the data center staff.
With the popularity of Gigabit Ethernet and the demand for lower cost, Fibre Channel has recently been given a run for its money by iSCSI-based
storage systems. Today, iSCSI SANs remain the leading competitor to FC SANs.
Ratified on February 11, 2003 by the Internet Engineering Task Force (IETF), the Internet Small Computer System Interface, better known as
iSCSI, is an Internet Protocol (IP)-based storage networking standard for establishing and managing connections between IP-based storage
devices, hosts, and clients. iSCSI is a data transport protocol defined in the SCSI-3 specifications framework and is similar to Fibre Channel in
that it is responsible for carrying block-level data over a storage network. Block-level communication means that data is transferred between the
host and the client in chunks called blocks. Database servers depend on this type of communication (as opposed to the file level communication
used by most NAS systems) in order to work properly. Like a FC SAN, an iSCSI SAN should be a separate physical network devoted entirely to
storage, however, its components can be much the same as in a typical IP network (LAN).
While iSCSI has a promising future, many of its early critics were quick to point out some of its inherent shortcomings with regards to
performance. The beauty of iSCSI is its ability to utilize an already familiar IP network as its transport mechanism. The TCP/IP protocol, however,
is very complex and CPU intensive. With iSCSI, most of the processing of the data (both TCP and iSCSI) is handled in software and is much
slower than Fibre Channel which is handled completely in hardware. The overhead incurred in mapping every SCSI command onto an equivalent
iSCSI transaction is excessive. For many the solution is to do away with iSCSI software initiators and invest in specialized cards that can offload
TCP/IP and iSCSI processing from a server's CPU. These specialized cards are sometimes referred to as an iSCSI Host Bus Adaptor (HBA) or a
TCP Offload Engine (TOE) card. Also consider that 10-Gigabit Ethernet is a reality today!
As with any new technology, iSCSI comes with its own set of acronyms and terminology. For the purpose of this article, it is only important to
understand the difference between an iSCSI initiator and an iSCSI target.
iSCSI Initiator
Basically, an iSCSI initiator is a client device that connects and initiates requests to some service offered by a server (in this case an iSCSI target).
The iSCSI initiator software will need to exist on each of the Oracle RAC nodes ( racnode1 and racnode2).
An iSCSI initiator can be implemented using either software or hardware. Software iSCSI initiators are available for most major operating system
platforms. For this article, we will be using the free Linux Open-iSCSI software driver found in the iscsi-initiator-utils RPM. The iSCSI
software initiator is generally used with a standard network interface card (NIC) a Gigabit Ethernet card in most cases. A hardware initiator is an
iSCSI HBA (or a TCP Offload Engine (TOE) card), which is basically just a specialized Ethernet card with a SCSI ASIC on-board to offload all the
work (TCP and SCSI commands) from the system CPU. iSCSI HBAs are available from a number of vendors, including Adaptec, Alacritech, Intel,
and QLogic.
iSCSI Target
An iSCSI target is the "server" component of an iSCSI network. This is typically the storage device that contains the information you want and
answers requests from the initiator(s). For the purpose of this article, the node openfiler1 will be the iSCSI target.
So with all of this talk about iSCSI, does this mean the death of Fibre Channel anytime soon? Probably not. Fibre Channel has clearly
demonstrated its capabilities over the years with its capacity for extremely high speeds, flexibility, and robust reliability. Customers who have strict
requirements for high performance storage, large complex connectivity, and mission critical reliability will undoubtedly continue to choose Fibre
Channel.
Before closing out this section, I thought it would be appropriate to present the following chart that shows speed comparisons of the various types
of disk interfaces and network technologies. For each interface, I provide the maximum transfer rates in kilobits (kb), kilobytes (KB), megabits
(Mb), megabytes (MB), gigabits (Gb), and gigabytes (GB) per second with some of the more common ones highlighted in grey.
Disk Interface / Network / BUSSpeed
Kb KB Mb MB Gb GB

28/08/2012Build Your Own Oracle RAC 11g Cluster on Oracle Enterprise Linux and iSCSI
5/30www.oracle.com/technetwork/articles/hunter-rac11gr2-iscsi-088677.html?printOnly=1
Serial 115 14.375 0.115 0.014
Parallel (standard) 920 115 0.92 0.115
10Base-T Ethernet 10 1.25
IEEE 802.11b wireless Wi-Fi (2.4 GHz band) 11 1.375
USB 1.1 12 1.5
Parallel (ECP/EPP) 24 3
SCSI-1 40 5
IEEE 802.11g wireless WLAN (2.4 GHz band) 54 6.75
SCSI-2 (Fast SCSI / Fast Narrow SCSI) 80 10
100Base-T Ethernet (Fast Ethernet) 100 12.5
ATA/100 (parallel) 100 12.5
IDE 133.6 16.7
Fast Wide SCSI (Wide SCSI) 160 20
Ultra SCSI (SCSI-3 / Fast-20 / Ultra Narrow) 160 20
Ultra IDE 264 33
Wide Ultra SCSI (Fast Wide 20) 320 40
Ultra2 SCSI 320 40
FireWire 400 - (IEEE1394a) 400 50
USB 2.0 480 60
Wide Ultra2 SCSI 640 80
Ultra3 SCSI 640 80
FireWire 800 - (IEEE1394b) 800 100
Gigabit Ethernet 1000 125 1
PCI - (33 MHz / 32-bit) 1064 133 1.064
Serial ATA I - (SATA I) 1200 150 1.2
Wide Ultra3 SCSI 1280 160 1.28
Ultra160 SCSI 1280 160 1.28
PCI - (33 MHz / 64-bit) 2128 266 2.128
PCI - (66 MHz / 32-bit) 2128 266 2.128
AGP 1x - (66 MHz / 32-bit) 2128 266 2.128
Serial ATA II - (SATA II) 2400 300 2.4
Ultra320 SCSI 2560 320 2.56
FC-AL Fibre Channel 3200 400 3.2
PCI-Express x1 - (bidirectional) 4000 500 4
PCI - (66 MHz / 64-bit) 4256 532 4.256
AGP 2x - (133 MHz / 32-bit) 4264 533 4.264
Serial ATA III - (SATA III) 4800 600 4.8
PCI-X - (100 MHz / 64-bit) 6400 800 6.4
PCI-X - (133 MHz / 64-bit) 1064 8.512 1
AGP 4x - (266 MHz / 32-bit) 1066 8.528 1
10G Ethernet - (IEEE 802.3ae) 1250 10 1.25
PCI-Express x4 - (bidirectional) 2000 16 2
AGP 8x - (533 MHz / 32-bit) 2133 17.064 2.1
PCI-Express x8 - (bidirectional) 4000 32 4
PCI-Express x16 - (bidirectional) 8000 64 8
5. Hardware and Costs
The hardware used to build our example Oracle RAC 11g environment consists of three Linux servers (two Oracle RAC nodes and one Network
Storage Server) and components that can be purchased at many local computer stores or over the Internet.
Oracle RAC Node 1 - (racnode1)
Dell PowerEdge T100
Dual Core Intel(R) Xeon(R) E3110, 3.0 GHz, 6MB Cache, 1333MHz4GB, DDR2, 800MHz
160GB 7.2K RPM SATA 3Gbps Hard Drive
Integrated Graphics - (ATI ES1000)Integrated Gigabit Ethernet - (Broadcom(R) NetXtreme IITM 5722)
16x DVD Drive
No Keyboard, Monitor, or Mouse - (Connected to KVM Switch) US$450
1 - Ethernet LAN Card
Used for RAC interconnect to racnode2 and Openfiler networked storage.
Each Linux server for Oracle RAC should contain two NIC adapters. The Dell PowerEdge
T100 includes an embedded Broadcom(R) NetXtreme IITM 5722 Gigabit Ethernet NIC that
will be used to connect to the public network. A second NIC adapter will be used for theprivate network (RAC interconnect and Openfiler networked storage). Select the
appropriate NIC adapter that is compatible with the maximum data transmission speed of
the network switch to be used for the private network. For the purpose of this article, I useda Gigabit Ethernet switch (and a 1Gb Ethernet card) for the private network.
Gigabit EthernetIntel(R) PRO/1000 PT Server Adapter - (EXPI9400PT)
US$90
Oracle RAC Node 2 - (racnode2)
Dell PowerEdge T100
Dual Core Intel(R) Xeon(R) E3110, 3.0 GHz, 6MB Cache, 1333MHz
4GB, DDR2, 800MHz160GB 7.2K RPM SATA 3Gbps Hard Drive
Integrated Graphics - (ATI ES1000)
Integrated Gigabit Ethernet - (Broadcom(R) NetXtreme IITM 5722)16x DVD Drive

28/08/2012Build Your Own Oracle RAC 11g Cluster on Oracle Enterprise Linux and iSCSI
6/30www.oracle.com/technetwork/articles/hunter-rac11gr2-iscsi-088677.html?printOnly=1
No Keyboard, Monitor, or Mouse - (Connected to KVM Switch) US$450
1 - Ethernet LAN Card
Used for RAC interconnect to racnode1 and Openfiler networked storage.
Each Linux server for Oracle RAC should contain two NIC adapters. The Dell PowerEdge
T100 includes an embedded Broadcom(R) NetXtreme IITM 5722 Gigabit Ethernet NIC that
will be used to connect to the public network. A second NIC adapter will be used for theprivate network (RAC interconnect and Openfiler networked storage). Select the
appropriate NIC adapter that is compatible with the maximum data transmission speed of
the network switch to be used for the private network. For the purpose of this article, I useda Gigabit Ethernet switch (and a 1Gb Ethernet card) for the private network.
Gigabit Ethernet
Intel(R) PRO/1000 PT Server Adapter - (EXPI9400PT) US$90
Network Storage Server - (openfiler1)
Dell PowerEdge 1800 Dual 3.0GHz Xeon / 1MB Cache / 800FSB (SL7PE)6GB of ECC Memory
500GB SATA Internal Hard Disk
73GB 15K SCSI Internal Hard Disk
Integrated Graphics
Single embedded Intel 10/100/1000 Gigabit NIC
16x DVD DriveNo Keyboard, Monitor, or Mouse - (Connected to KVM Switch)
Note: The operating system and Openfiler application will be installed on the 500GB
internal SATA disk. A second internal 73GB 15K SCSI hard disk will be configured for the
database storage. The Openfiler server will be configured to use this second hard disk for
iSCSI based storage and will be used in our Oracle RAC 11g configuration to store the
shared files required by Oracle Clusterware as well as the clustered database files.
Please be aware that any type of hard disk (internal or external) should work for database
storage as long as it can be recognized by the network storage server (Openfiler) and has
adequate space. For example, I could have made an extra partition on the 500GB internal
SATA disk for the iSCSI target, but decided to make use of the faster SCSI disk for this
example.
US$800
1 - Ethernet LAN Card
Used for networked storage on the private network.
The Network Storage Server (Openfiler server) should contain two NIC adapters. The DellPowerEdge 1800 machine included an integrated 10/100/1000 Ethernet adapter that will
be used to connect to the public network. The second NIC adapter will be used for the
private network (Openfiler networked storage). Select the appropriate NIC adapter that is
compatible with the maximum data transmission speed of the network switch to be used
for the private network. For the purpose of this article, I used a Gigabit Ethernet switch (and1Gb Ethernet card) for the private network.
Gigabit Ethernet
Intel(R) PRO/1000 MT Server Adapter - (PWLA8490MT) US$125
Miscellaneous Components
1 - Ethernet Switch
Used for the interconnect between racnode1-priv and racnode2-priv which will be on
the 192.168.2.0 network. This switch will also be used for network storage traffic forOpenfiler. For the purpose of this article, I used a Gigabit Ethernet switch (and 1Gb
Ethernet cards) for the private network.
Gigabit Ethernet
D-Link 8-port 10/100/1000 Desktop Switch - (DGS-2208) US$50
6 - Network CablesCategory 6 patch cable - (Connect racnode1 to public network)
Category 6 patch cable - (Connect racnode2 to public network)
Category 6 patch cable - (Connect openfiler1 to public network)
Category 6 patch cable - (Connect racnode1 to interconnect Ethernet switch)
Category 6 patch cable - (Connect racnode2 to interconnect Ethernet switch)
Category 6 patch cable - (Connect openfiler1 to interconnect Ethernet switch)
US$10
US$10
US$10 US$10
US$10
US$10
Optional Components
KVM Switch
This guide requires access to the console of all nodes (servers) in order to install the
operating system and perform several of the configuration tasks. When managing a very
small number of servers, it might make sense to connect each server with its own monitor,keyboard, and mouse in order to access its console. However, as the number of servers to
manage increases, this solution becomes unfeasible. A more practical solution would be
to configure a dedicated computer which would include a single monitor, keyboard, and
mouse that would have direct access to the console of each server. This solution is made
possible using a Keyboard, Video, Mouse Switch better known as a KVM Switch. A KVMswitch is a hardware device that allows a user to control multiple computers from a single
keyboard, video monitor and mouse. Avocent provides a high quality and economical 4-
port switch which includes four 6' cables:
SwitchView 1000 - (4SV1000BND1-001)
For a detailed explanation and guide on the use and KVM switches, please see the article
" KVM Switches For the Home and the Enterprise".US$340
Total US$2,455

28/08/2012Build Your Own Oracle RAC 11g Cluster on Oracle Enterprise Linux and iSCSI
7/30www.oracle.com/technetwork/articles/hunter-rac11gr2-iscsi-088677.html?printOnly=1
We are about to start the installation process. Now that we have talked about the hardware that will be used in this example, let's take a
conceptual look at what the environment would look like after connecting all of the hardware components (click on the graphic below to view larger
image):
Figure 1: Architecture
As we start to go into the details of the installation, note that most of the tasks within this document will need to be performed on both Oracle RAC
nodes (racnode1 and racnode2). I will indicate at the beginning of each section whether or not the task(s) should be performed on both Oracle
RAC nodes or on the network storage server (openfiler1).
6. Install the Linux Operating System
Perform the following installation on both Oracle RAC nodes in the cluster.
This section provides a summary of the screens used to install the Linux operating system. This guide is designed to work with Oracle Enterprise
Linux release 5 update 4 for x86_64 and follows Oracle's suggestion of performing a "default RPMs" installation type to ensure all expected Linux
O/S packages are present for a successful Oracle RDBMS installation.
Before installing the Oracle Enterprise Linux operating system on both Oracle RAC nodes, you should have both NIC interface cards installed that
will be used for the public and private network.
Download the following ISO images for Oracle Enterprise Linux release 5 update 4 for either x86 or x86_64 depending on your hardware
architecture.
Oracle Software Delivery Cloud for Oracle Enterprise Linux32-bit (x86) Installations
V17787-01.zip (582 MB)V17789-01.zip (612 MB)
V17790-01.zip (620 MB)
V17791-01.zip (619 MB)
V17792-01.zip (267 MB)
After downloading the Oracle Enterprise Linux operating system, unzip each of the files. You will then have the following ISO images which will
need to be burned to CDs:
Enterprise-R5-U4-Server-i386-disc1.iso
Enterprise-R5-U4-Server-i386-disc2.isoEnterprise-R5-U4-Server-i386-disc3.iso
Enterprise-R5-U4-Server-i386-disc4.iso
Enterprise-R5-U4-Server-i386-disc5.iso
Note: If the Linux RAC nodes have a DVD installed, you may find it more convenient to make use of the single DVD image:
V17793-01.zip (2.7 GB)
Unzip the single DVD image file and burn it to a DVD:
Enterprise-R5-U4-Server-i386-dvd.iso

28/08/2012Build Your Own Oracle RAC 11g Cluster on Oracle Enterprise Linux and iSCSI
8/30www.oracle.com/technetwork/articles/hunter-rac11gr2-iscsi-088677.html?printOnly=1
64-bit (x86_64) Installations
V17795-01.zip (580 MB)
V17796-01.zip (615 MB)V17797-01.zip (605 MB)
V17798-01.zip (616 MB)
V17799-01.zip (597 MB)
V17800-01.zip (198 MB)
After downloading the Oracle Enterprise Linux operating system, unzip each of the files. You will then have the following ISO images which will
need to be burned to CDs:
Enterprise-R5-U4-Server-x86_64-disc1.iso
Enterprise-R5-U4-Server-x86_64-disc2.isoEnterprise-R5-U4-Server-x86_64-disc3.iso
Enterprise-R5-U4-Server-x86_64-disc4.iso
Enterprise-R5-U4-Server-x86_64-disc5.iso
Enterprise-R5-U4-Server-x86_64-disc6.iso
Note: If the Linux RAC nodes have a DVD installed, you may find it more convenient to make use of the single DVD image:
V17794-01.zip (3.2 GB)
Unzip the single DVD image file and burn it to a DVD:
Enterprise-R5-U4-Server-x86_64-dvd.iso
If you are downloading the above ISO files to a MS Windows machine, there are many options for burning these images (ISO files) to a CD/DVD.
You may already be familiar with and have the proper software to burn images to a CD/DVD. If you are not familiar with this process and do not
have the required software to burn images to a CD/DVD, here are just two (of many) software packages that can be used:
UltraISO
Magic ISO Maker
After downloading and burning the Oracle Enterprise Linux images (ISO files) to CD/DVD, insert OEL Disk #1 into the first server ( racnode1 in
this example), power it on, and answer the installation screen prompts as noted below. After completing the Linux installation on the first node,
perform the same Linux installation on the second node while substituting the node name racnode1 for racnode2 and the different IP addresses
where appropriate.
Boot Screen
The first screen is the Oracle Enterprise Linux boot screen. At the boot: prompt, hit [Enter] to start the installation process.
Media Test
When asked to test the CD media, tab over to [Skip] and hit [Enter]. If there were any errors, the media burning software would have warned us.
After several seconds, the installer should then detect the video card, monitor, and mouse. The installer then goes into GUI mode.
Welcome to Oracle Enterprise Linux
At the welcome screen, click [Next] to continue.
Language / Keyboard Selection
The next two screens prompt you for the Language and Keyboard settings. Make the appropriate selections for your configuration.
Detect Previous Installation
Note that if the installer detects a previous version of Oracle Enterprise Linux, it will ask if you would like to "Install Enterprise Linux" or "Upgrade
an existing Installation". Always select to "Install Enterprise Linux".
Disk Partitioning Setup
Select [Remove all partitions on selected drives and create default layout] and check the option to [Review and modify partitioning layout]. Click
[Next] to continue.
You will then be prompted with a dialog window asking if you really want to remove all Linux partitions. Click [Yes] to acknowledge this warning.
Partitioning
The installer will then allow you to view (and modify if needed) the disk partitions it automatically selected. For most automatic layouts, the installer
will choose 100MB for /boot, double the amount of RAM (systems with <= 2,048MB RAM) or an amount equal to RAM (systems with > 2,048MB
RAM) for swap, and the rest going to the root ( /) partition. Starting with RHEL 4, the installer will create the same disk configuration as just noted
but will create them using the Logical Volume Manager (LVM). For example, it will partition the first hard drive ( /dev/sda for my configuration) into
two partitions — one for the /boot partition ( /dev/sda1) and the remainder of the disk dedicate to a LVM named VolGroup00 ( /dev/sda2). The
LVM Volume Group (VolGroup00) is then partitioned into two LVM partitions - one for the root filesystem ( /) and another for swap.
The main concern during the partitioning phase is to ensure enough swap space is allocated as required by Oracle (which is a multiple of the
available RAM). The following is Oracle's minimum requirement for swap space:
Available RAM Swap Space Required
Between 1,024MB and 2,048MB 1.5 times the size of RAM
Between 2,049MB and 8,192MB Equal to the size of RAM
More than 8,192MB 0.75 times the size of RAM
For the purpose of this install, I will accept all automatically preferred sizes. (Including 5,952MB for swap since I have 4GB of RAM installed.)

28/08/2012Build Your Own Oracle RAC 11g Cluster on Oracle Enterprise Linux and iSCSI
9/30www.oracle.com/technetwork/articles/hunter-rac11gr2-iscsi-088677.html?printOnly=1
If for any reason, the automatic layout does not configure an adequate amount of swap space, you can easily change that from this screen. To
increase the size of the swap partition, [Edit] the volume group VolGroup00. This will bring up the "Edit LVM Volume Group: VolGroup00" dialog.
First, [Edit] and decrease the size of the root file system ( /) by the amount you want to add to the swap partition. For example, to add another
512MB to swap, you would decrease the size of the root file system by 512MB (i.e. 36,032MB - 512MB = 35,520MB). Now add the space you
decreased from the root file system (512MB) to the swap partition. When completed, click [OK] on the "Edit LVM Volume Group: VolGroup00"
dialog.
Once you are satisfied with the disk layout, click [Next] to continue.
Boot Loader Configuration
The installer will use the GRUB boot loader by default. To use the GRUB boot loader, accept all default values and click [Next] to continue.
Network Configuration
I made sure to install both NIC interfaces (cards) in each of the Linux machines before starting the operating system installation. This screen
should have successfully detected each of the network devices. Since we will be using this machine to host an Oracle database, there will be
several changes that need to be made to the network configuration. The settings you make here will, of course, depend on your network
configuration. The key point to make is that the machine should never be configured with DHCP since it will be used to host the Oracle database
server. You will need to configure the machine with static IP addresses. You will also need to configure the server with a real host name.
First, make sure that each of the network devices are checked to [Active on boot]. The installer may choose to not activate eth1 by default.
Second, [Edit] both eth0 and eth1 as follows. Verify that the option "Enable IPv4 support" is selected. Click off the option to use "Dynamic IP
configuration (DHCP)" by selecting the "Manual configuration" radio button and configure a static IP address and Netmask for your environment.
Click off the option to "Enable IPv6 support". You may choose to use different IP addresses for both eth0 and eth1 that I have documented in this
guide and that is OK. Put eth1 (the interconnect) on a different subnet than eth0 (the public network):
eth0:
- Check ON the option to [Enable IPv4 support]
- Check OFF the option to use [Dynamic IP configuration (DHCP)] - (select Manual configuration)
IPv4 Address: 192.168.1.151
Prefix (Netmask): 255.255.255.0
- Check OFF the option to [Enable IPv6 support]
eth1:
- Check ON the option to [Enable IPv4 support]
- Check OFF the option to use [Dynamic IP configuration (DHCP)] - (select Manual configuration)
IPv4 Address: 192.168.2.151
Prefix (Netmask): 255.255.255.0
- Check OFF the option to [Enable IPv6 support]
Continue by manually setting your hostname. I used " racnode1" for the first node and " racnode2" for the second. Finish this dialog off by
supplying your gateway and DNS servers.
Time Zone Selection
Select the appropriate time zone for your environment and click [Next] to continue.
Set Root Password
Select a root password and click [Next] to continue.
Package Installation Defaults
By default, Oracle Enterprise Linux installs most of the software required for a typical server. There are several other packages (RPMs), however,
that are required to successfully install the Oracle software. The installer includes a "Customize software" selection that allows the addition of
RPM groupings such as "Development Libraries" or "Legacy Library Support". The addition of such RPM groupings is not an issue. De-selecting
any "default RPM" groupings or individual RPMs, however, can result in failed Oracle grid infrastructure and Oracle RAC installation attempts.
For the purpose of this article, select the radio button [Customize now] and click [Next] to continue.
This is where you pick the packages to install. Most of the packages required for the Oracle software are grouped into "Package Groups" (i.e.
Application -> Editors). Since these nodes will be hosting the Oracle grid infrastructure and Oracle RAC software, verify that at least the following
package groups are selected for install. For many of the Linux package groups, not all of the packages associated with that group get selected for
installation. (Note the "Optional packages" button after selecting a package group.) So although the package group gets selected for install, some
of the packages required by Oracle do not get installed. In fact, there are some packages that are required by Oracle that do not belong to any of
the available package groups (i.e. libaio-devel). Not to worry. A complete list of required packages for Oracle grid infrastructure 11g Release 2
and Oracle RAC 11g Release 2 for Oracle Enterprise Linux 5 will be provided in the next section. These packages will need to be manually
installed from the Oracle Enterprise Linux CDs after the operating system install. For now, install the following package groups:
Desktop Environments
GNOME Desktop Environment
Applications
Editors
Graphical InternetText-based Internet
Development
Development Libraries
Development Tools
Legacy Software DevelopmentServers
Server Configuration Tools
Base System
Administration Tools
Base
JavaLegacy Software Support
System Tools
X Window System
In addition to the above packages, select any additional packages you wish to install for this node keeping in mind to NOT de-select any of the
"default" RPM packages . After selecting the packages to install click [Next] to continue.
About to Install
This screen is basically a confirmation screen. Click [Next] to start the installation. If you are installing Oracle Enterprise Linux using CDs, you will
be asked to switch CDs during the installation process depending on which packages you selected.
Congratulations
And that's it. You have successfully installed Oracle Enterprise Linux on the first node (racnode1). The installer will eject the CD/DVD from the CD-

28/08/2012Build Your Own Oracle RAC 11g Cluster on Oracle Enterprise Linux and iSCSI
10/30www.oracle.com/technetwork/articles/hunter-rac11gr2-iscsi-088677.html?printOnly=1
ROM drive. Take out the CD/DVD and click [Reboot] to reboot the system.
Post Installation Wizard Welcome Screen
When the system boots into Oracle Enterprise Linux for the first time, it will prompt you with another Welcome screen for the "Post Installation
Wizard". The post installation wizard allows you to make final O/S configuration settings. On the "Welcome" screen, click [Forward] to continue.
License Agreement
Read through the license agreement. Choose "Yes, I agree to the License Agreement" and click [Forward] to continue.
Firewall
On this screen, make sure to select the [Disabled] option and click [Forward] to continue.
You will be prompted with a warning dialog about not setting the firewall. When this occurs, click [Yes] to continue.
SELinux
On the SELinux screen, choose the [Disabled] option and click [Forward] to continue.
You will be prompted with a warning dialog warning that changing the SELinux setting will require rebooting the system so the entire file system
can be relabeled. When this occurs, click [Yes] to acknowledge a reboot of the system will occur after firstboot (Post Installation Wizard) is
completed.
Kdump
Accept the default setting on the Kdump screen (disabled) and click [Forward] to continue.
Date and Time Settings
Adjust the date and time settings if necessary and click [Forward] to continue.
Create User
Create any additional (non-oracle) operating system user accounts if desired and click [Forward] to continue. For the purpose of this article, I will
not be creating any additional operating system accounts. I will be creating the "grid" and "oracle" user accounts later in this guide.
If you chose not to define any additional operating system user accounts, click [Continue] to acknowledge the warning dialog.
Sound Card
This screen will only appear if the wizard detects a sound card. On the sound card screen click [Forward] to continue.
Additional CDs
On the "Additional CDs" screen click [Finish] to continue.
Reboot System
Given we changed the SELinux option (to disabled), we are prompted to reboot the system. Click [OK] to reboot the system for normal use.
Login Screen
After rebooting the machine, you are presented with the login screen. Log in using the "root" user account and the password you provided during
the installation.
Perform the same installation on the second node
After completing the Linux installation on the first node, repeat the above steps for the second node ( racnode2). When configuring the machine
name and networking, ensure to configure the proper values. For my installation, this is what I configured for racnode2:
First, make sure that each of the network devices are checked to [Active on boot]. The installer may choose to not activate eth1.
Second, [Edit] both eth0 and eth1 as follows. Verify that the option "Enable IPv4 support" is selected. Click off the option to use "Dynamic IP
configuration (DHCP)" by selecting the "Manual configuration" radio button and configure a static IP address and Netmask for your environment.
Click off the option to "Enable IPv6 support". You may choose to use different IP addresses for both eth0 and eth1 that I have documented in this
guide and that is OK. Put eth1 (the interconnect) on a different subnet than eth0 (the public network):
eth0:
- Check ON the option to [Enable IPv4 support]
- Check OFF the option to use [Dynamic IP configuration (DHCP)] - (select Manual configuration)
IPv4 Address: 192.168.1.152
Prefix (Netmask): 255.255.255.0
- Check OFF the option to [Enable IPv6 support]
eth1:
- Check ON the option to [Enable IPv4 support]
- Check OFF the option to use [Dynamic IP configuration (DHCP)] - (select Manual configuration)
IPv4 Address: 192.168.2.152
Prefix (Netmask): 255.255.255.0
- Check OFF the option to [Enable IPv6 support]
Continue by setting your hostname manually. I used " racnode2" for the second node. Finish this dialog off by supplying your gateway and DNS
servers.
7. Install Required Linux Packages for Oracle RACInstall the following required Linux packages on both Oracle RAC nodes in the cluster.
After installing Enterprise Linux, the next step is to verify and install all packages (RPMs) required by both Oracle Clusterware and Oracle RAC.
The Oracle Universal Installer (OUI) performs checks on your machine during installation to verify that it meets the appropriate operating system
package requirements. To ensure that these checks complete successfully, verify the software requirements documented in this section before
starting the Oracle installs.
Although many of the required packages for Oracle were installed during the Enterprise Linux installation, several will be missing either because
they were considered optional within the package group or simply didn't exist in any package group!
The packages listed in this section (or later versions) are required for Oracle grid infrastructure 11g Release 2 and Oracle RAC 11g Release 2
running on the Enterprise Linux 5 platform.
32-bit (x86) Installations
binutils-2.17.50.0.6
compat-libstdc++-33-3.2.3
elfutils-libelf-0.125elfutils-libelf-devel-0.125

28/08/2012Build Your Own Oracle RAC 11g Cluster on Oracle Enterprise Linux and iSCSI
11/30www.oracle.com/technetwork/articles/hunter-rac11gr2-iscsi-088677.html?printOnly=1
elfutils-libelf-devel-static-0.125
gcc-4.1.2gcc-c++-4.1.2
glibc-2.5-24
glibc-common-2.5
glibc-devel-2.52
glibc-headers-2.5kernel-headers-2.6.18
ksh-20060214
libaio-0.3.106
libaio-devel-0.3.106
libgcc-4.1.2
libgomp-4.1.2libstdc++-4.1.2
libstdc++-devel-4.1.2
make-3.81
sysstat-7.0.2
unixODBC-2.2.11unixODBC-devel-2.2.11
Each of the packages listed above can be found on CD #1, CD #2, and CD #3 on the Enterprise Linux 5 - (x86) CDs. While it is possible to query
each individual package to determine which ones are missing and need to be installed, an easier method is to run the rpm -Uvh PackageName
command from the five CDs as follows. For packages that already exist and are up to date, the RPM command will simply ignore the install and
print a warning message to the console that the package is already installed.
#
From Enterprise Linux 5.4 (x86)- [CD #1]
mkdir -p /media/cdrommount -r /dev/cdrom /media/cdrom
cd /media/cdrom/Server
rpm -Uvh binutils-2.*
rpm -Uvh elfutils-libelf-0.*
rpm -Uvh glibc-2.*
rpm -Uvh glibc-common-2.*rpm -Uvh kernel-headers-2.*
rpm -Uvh ksh-2*
rpm -Uvh libaio-0.*
rpm -Uvh libgcc-4.*
rpm -Uvh libstdc++-4.*rpm -Uvh make-3.*
cd /
eject
# From Enterprise Linux 5.4 (x86) - [CD #2]
mount -r /dev/cdrom /media/cdrom
cd /media/cdrom/Serverrpm -Uvh elfutils-libelf-devel-*
rpm -Uvh gcc-4.*rpm -Uvh gcc-c++-4.*rpm -Uvh glibc-devel-2.*
rpm -Uvh glibc-headers-2.*rpm -Uvh libgomp-4.*
rpm -Uvh libstdc++-devel-4.*rpm -Uvh unixODBC-2.*cd /
eject
#
From Enterprise Linux 5.4 (x86) - [CD #3]
mount -r /dev/cdrom /media/cdromcd /media/cdrom/Server
rpm -Uvh compat-libstdc++-33*rpm -Uvh libaio-devel-0.*rpm -Uvh sysstat-7.*
rpm -Uvh unixODBC-devel-2.*cd /
eject
64-bit (x86_64) Installations
binutils-2.17.50.0.6compat-libstdc++-33-3.2.3
compat-libstdc++-33-3.2.3 (32 bit)elfutils-libelf-0.125
elfutils-libelf-devel-0.125elfutils-libelf-devel-static-0.125gcc-4.1.2
gcc-c++-4.1.2glibc-2.5-24
glibc-2.5-24 (32 bit)glibc-common-2.5glibc-devel-2.5
glibc-devel-2.5 (32 bit)glibc-headers-2.5
ksh-20060214libaio-0.3.106libaio-0.3.106 (32 bit)
libaio-devel-0.3.106libaio-devel-0.3.106 (32 bit)

28/08/2012Build Your Own Oracle RAC 11g Cluster on Oracle Enterprise Linux and iSCSI
12/30www.oracle.com/technetwork/articles/hunter-rac11gr2-iscsi-088677.html?printOnly=1
libgcc-4.1.2libgcc-4.1.2 (32 bit)libstdc++-4.1.2
libstdc++-4.1.2 (32 bit)libstdc++-devel 4.1.2
make-3.81sysstat-7.0.2unixODBC-2.2.11
unixODBC-2.2.11 (32 bit)unixODBC-devel-2.2.11
unixODBC-devel-2.2.11 (32 bit)
Each of the packages listed above can be found on CD #1, CD #2, CD #3, and CD #4 on the Enterprise Linux 5 - (x86_64) CDs. While it is
possible to query each individual package to determine which ones are missing and need to be installed, an easier method is to run the rpm -
Uvh PackageName command from the six CDs as follows. For packages that already exist and are up to date, the RPM command will simply
ignore the install and print a warning message to the console that the package is already installed.
# From Enterprise Linux 5.4 (x86_64)- [CD #1]
mkdir -p /media/cdrommount -r /dev/cdrom /media/cdromcd /media/cdrom/Server
rpm -Uvh binutils-2.*rpm -Uvh elfutils-libelf-0.*
rpm -Uvh glibc-2.*rpm -Uvh glibc-common-2.*
rpm -Uvh ksh-2*rpm -Uvh libaio-0.*rpm -Uvh libgcc-4.*
rpm -Uvh libstdc++-4.*rpm -Uvh make-3.*
cd /eject
#
From Enterprise Linux 5.4 (x86_64) - [CD #2]
mount -r /dev/cdrom /media/cdromcd /media/cdrom/Server
rpm -Uvh elfutils-libelf-devel-*rpm -Uvh gcc-4.*rpm -Uvh gcc-c++-4.*
rpm -Uvh glibc-devel-2.*rpm -Uvh glibc-headers-2.*
rpm -Uvh libstdc++-devel-4.*rpm -Uvh unixODBC-2.*
cd /eject
#
From Enterprise Linux 5.4 (x86_64) - [CD #3]
mount -r /dev/cdrom /media/cdromcd /media/cdrom/Server
rpm -Uvh compat-libstdc++-33*rpm -Uvh libaio-devel-0.*rpm -Uvh unixODBC-devel-2.*
cd /eject
#
From Enterprise Linux 5.4 (x86_64) - [CD #4]
mount -r /dev/cdrom /media/cdrom
cd /media/cdrom/Serverrpm -Uvh sysstat-7.*cd /
eject
8. Network Configuration
Perform the following network configuration on both Oracle RAC nodes in the cluster.
Although we configured several of the network settings during the Linux installation, it is important to not skip this section as it contains critical
steps to check that you have the networking hardware and Internet Protocol (IP) addresses required for an Oracle grid infrastructure for a cluster
installation.
Network Hardware Requirements
The following is a list of hardware requirements for network configuration:
Each Oracle RAC node must have at least two network adapters or network interface cards (NICs): one for the public network interface, and onefor the private network interface (the interconnect). To use multiple NICs for the public network or for the private network, Oracle recommends that
you use NIC bonding. Use separate bonding for the public and private networks (i.e. bond0 for the public network and bond1 for the privatenetwork), because during installation each interface is defined as a public or private interface. NIC bonding is not covered in this article.
The public interface names associated with the network adapters for each network must be the same on all nodes, and the private interfacenames associated with the network adaptors should be the same on all nodes.
For example, with our two-node cluster, you cannot configure network adapters on racnode1 with eth0 as the public interface, but on racnode2

28/08/2012Build Your Own Oracle RAC 11g Cluster on Oracle Enterprise Linux and iSCSI
13/30www.oracle.com/technetwork/articles/hunter-rac11gr2-iscsi-088677.html?printOnly=1
have eth1 as the public interface. Public interface names must be the same, so you must configure eth0 as public on both nodes. You shouldconfigure the private interfaces on the same network adapters as well. If eth1 is the private interface for racnode1, then eth1 must be the privateinterface for racnode2.
For the public network, each network adapter must support TCP/IP.
For the private network, the interconnect must support the user datagram protocol (UDP) using high-speed network adapters and switches that
support TCP/IP (minimum requirement 1 Gigabit Ethernet).
UDP is the default interconnect protocol for Oracle RAC, and TCP is the interconnect protocol for Oracle Clusterware. You must use a switch forthe interconnect. Oracle recommends that you use a dedicated switch.
Oracle does not support token-rings or crossover cables for the interconnect.
For the private network, the endpoints of all designated interconnect interfaces must be completely reachable on the network. There should be nonode that is not connected to every private network interface. You can test if an interconnect interface is reachable using ping.
During installation of Oracle grid infrastructure, you are asked to identify the planned use for each network interface that OUI detects on your
cluster node. You must identify each interface as a public interface, a private interface, or not used and you must use the same private interfacesfor both Oracle Clusterware and Oracle RAC.
You can bond separate interfaces to a common interface to provide redundancy, in case of a NIC failure, but Oracle recommends that you do notcreate separate interfaces for Oracle Clusterware and Oracle RAC. If you use more than one NIC for the private interconnect, then Oracle
recommends that you use NIC bonding. Note that multiple private interfaces provide load balancing but not failover, unless bonded.
Starting with Oracle Clusterware 11g Release 2, you no longer need to provide a private name or IP address for the interconnect. IP addresses onthe subnet you identify as private are assigned as private IP addresses for cluster member nodes. You do not need to configure these addressesmanually in a hosts directory. If you want name resolution for the interconnect, then you can configure private IP names in the hosts file or the
DNS. However, Oracle Clusterware assigns interconnect addresses on the interface defined during installation as the private interface ( eth1, forexample), and to the subnet used for the private subnet. In practice, and for the purpose of this guide, I will continue to include a private name and
IP address on each node for the RAC interconnect. It provides self-documentation and a set of end-points on the private network I can use fortroubleshooting purposes:
192.168.2.151 racnode1-priv192.168.2.152 racnode2-priv
In a production environment that uses iSCSI for network storage, it is highly recommended to configure a redundant third network interface ( eth2,
for example) for that storage traffic using a TCP/IP offload Engine (TOE) card. For the sake of brevity, this article will configure the iSCSI networkstorage traffic on the same network as the RAC private interconnect ( eth1). Combining the iSCSI storage traffic and cache fusion traffic for OracleRAC on the same network interface works great for an inexpensive test system but should never be considered for production.
The basic idea of a TOE is to offload the processing of TCP/IP protocols from the host processor to the hardware on the adapter or in the system.
A TOE if often embedded in a network interface card (NIC) or a host bus adapter (HBA) and used to reduce the amount of TCP/IP processinghandled by the CPU and server I/O subsystem and improve overall performance.
Assigning IP Address
Recall that each node requires at least two network interfaces configured one for the private IP address and one for the public IP address. Prior to
Oracle Clusterware 11g Release 2, all IP addresses needed to be manually assigned by the network administrator using static IP addresses
never to use DHCP. This would include the public IP address for the node, the RAC interconnect, virtual IP address (VIP), and new to 11g Release
2, the Single Client Access Name (SCAN) IP address(s). In fact, in all of my previous articles, I would emphatically state that DHCP should never
be used to assign any of these IP addresses. Well, in 11g Release 2, you now have two options that can used to assign IP addresses to each
Oracle RAC node Grid Naming Service (GNS) which uses DHCP or the traditional method of manually assigning static IP addresses using DNS.
Grid Naming Service (GNS)
Starting with Oracle Clusterware 11g Release 2, a second method for assigning IP addresses named Grid Naming Service (GNS) was
introduced that allows all private interconnect addresses, as well as most of the VIP addresses to be assigned using DHCP. GNS and DHCP are
key elements to Oracle's new Grid Plug and Play (GPnP) feature that, as Oracle states, eliminates per-node configuration data and the need for
explicit add and delete nodes steps. GNS enables a dynamic grid infrastructure through the self-management of the network requirements for the
cluster. While configuring IP addresses using GNS certainly has its benefits and offers more flexibility over manually defining static IP addresses,
it does come at the cost of complexity and requires components not defined in this guide on building an inexpensive Oracle RAC. For example,
activating GNS in a cluster requires a DHCP server on the public network which I felt was out of the scope of this article.
To learn more about the benefits and how to configure GNS, please see Oracle Grid Infrastructure Installation Guide 11g Release 2 (11.2) for
Linux .
Manually Assigning Static IP Address - (The DNS Method)
If you choose not to use GNS, manually defining static IP addresses is still available with Oracle Clusterware 11g Release 2 and will be the
method used in this article to assign all required Oracle Clusterware networking components (public IP address for the node, RAC interconnect,
virtual IP address, and SCAN).
Notice that the title of this section includes the phrase "The DNS Method". Oracle recommends that static IP addresses be manually configured in
a domain name server (DNS) before starting the Oracle grid infrastructure installation. However, when building an inexpensive Oracle RAC, it is
not always possible you will have access to a DNS server. Previous to 11g Release 2, this would not present a huge obstacle as it was possible
to define each IP address in the host file ( /etc/hosts) on all nodes without the use of DNS. This would include public IP address for the node,
the RAC interconnect, and the virtual IP address (VIP).
Things, however, change a bit in Oracle grid infrastructure 11g Release 2.
Let's start with the RAC private interconnect. It is no longer a requirement to provide a private name or IP address for the interconnect during the
Oracle grid infrastructure install (i.e. racnode1-priv or racnode2-priv). Oracle Clusterware now assigns interconnect addresses on the
interface defined during installation as the private interface ( eth1, for example), and to the subnet used for the private subnet, which for this article
is 192.168.2.0. If you want name resolution for the interconnect, then you can configure private IP names in the hosts file or the DNS. In practice,
and for the purpose of this guide, I will continue to include a private name and IP address on each node for the RAC interconnect. It provides self-
documentation and a set of end-points on the private network I can use for troubleshooting purposes:
192.168.2.151 racnode1-priv

28/08/2012Build Your Own Oracle RAC 11g Cluster on Oracle Enterprise Linux and iSCSI
14/30www.oracle.com/technetwork/articles/hunter-rac11gr2-iscsi-088677.html?printOnly=1
192.168.2.152 racnode2-priv
The public IP address for the node and the virtual IP address (VIP) remain the same in 11g Release 2. Oracle recommends defining the name
and IP address for each to be resolved through DNS and included in the hosts file for each node. With the current release of Oracle grid
infrastructure and previous releases, Oracle Clusterware has no problem resolving the public IP address for the node and the VIP using only a
hosts file:
192.168.1.151 racnode1192.168.1.251 racnode1-vip192.168.1.152 racnode2
192.168.1.252 racnode2-vip
The Single Client Access Name (SCAN) virtual IP is new to 11g Release 2 and seems to be the one causing the most discussion! The SCAN
must be configured in GNS or DNS for Round Robin resolution to three addresses (recommended) or at least one address. If you choose not to
use GNS, then Oracle states the SCAN must be resolved through DNS and not through the hosts file. If the SCAN cannot be resolved through
DNS (or GNS), the Cluster Verification Utility check will fail during the Oracle grid infrastructure installation. If you do not have access to a DNS, I
provide an easy workaround in the section Configuring SCAN without DNS. The workaround involves modifying the nslookup utility and should be
performed before installing Oracle grid infrastructure.
Single Client Access Name (SCAN) for the Cluster
If you have ever been tasked with extending an Oracle RAC cluster by adding a new node (or shrinking a RAC cluster by removing a node), then
you know the pain of going through a list of all clients and updating their SQL*Net or JDBC configuration to reflect the new or deleted node! To
address this problem, Oracle 11g Release 2 introduced a new feature known as Single Client Access Name or SCAN for short. SCAN is a new
feature that provides a single host name for clients to access an Oracle Database running in a cluster. Clients using SCAN do not need to change
their TNS configuration if you add or remove nodes in the cluster. The SCAN resource and its associated IP address(s) provide a stable name for
clients to use for connections, independent of the nodes that make up the cluster. You will be asked to provide the host name and up to three IP
addresses to be used for the SCAN resource during the interview phase of the Oracle grid infrastructure installation. For high availability and
scalability, Oracle recommends that you configure the SCAN name so that it resolves to three IP addresses. At a minimum, the SCAN must
resolve to at least one address.
The SCAN virtual IP name is similar to the names used for a node's virtual IP addresses, such as racnode1-vip. However, unlike a virtual IP, the
SCAN is associated with the entire cluster, rather than an individual node, and can be associated with multiple IP addresses, not just one
address. Note that SCAN addresses, virtual IP addresses, and public IP addresses must all be on the same subnet.
The SCAN should be configured so that it is resolvable either by using Grid Naming Service (GNS) within the cluster, or by using Domain Name
Service (DNS) resolution.
In this article, I will configure SCAN to resolve to only one, manually configured static IP address using the DNS method ( but not actually defining
it in DNS):
192.168.1.187 racnode-cluster-scan
Configuring Public and Private Network
In our two node example, we need to configure the network on both Oracle RAC nodes for access to the public network as well as their private
interconnect.
The easiest way to configure network settings in Enterprise Linux is with the program "Network Configuration". Network Configuration is a GUI
application that can be started from the command-line as the "root" user account as follows:
[root@racnode1 ~]# /usr/bin/system-config-network &
Using the Network Configuration application, you need to configure both NIC devices as well as the /etc/hosts file. Both of these tasks can be
completed using the Network Configuration GUI. Notice that the /etc/hosts settings are the same for both nodes and that I removed any entry
that has to do with IPv6. For example:
::1 localhost6.localdomain6 localhost6
Our example Oracle RAC configuration will use the following network settings:
Oracle RAC Node 1 - (racnode1)
Device IP Address Subnet Gateway Purpose
eth0 192.168.1.151 255.255.255.0 192.168.1.1 Connects racnode1 to the public network
eth1 192.168.2.151 255.255.255.0 Connects racnode1 (interconnect) to racnode2(racnode2-priv)
/etc/hosts
# Do not remove the following line, or various programs# that require network functionality will fail.
127.0.0.1 localhost.localdomain localhost
# Public Network - (eth0)
192.168.1.151 racnode1192.168.1.152 racnode2
# Private Interconnect - (eth1)
192.168.2.151 racnode1-priv192.168.2.152 racnode2-priv
# Public Virtual IP (VIP) addresses - (eth0:1)192.168.1.251 racnode1-vip
192.168.1.252 racnode2-vip
# Single Client Access Name (SCAN)
192.168.1.187 racnode-cluster-scan
# Private Storage Network for Openfiler - (eth1)
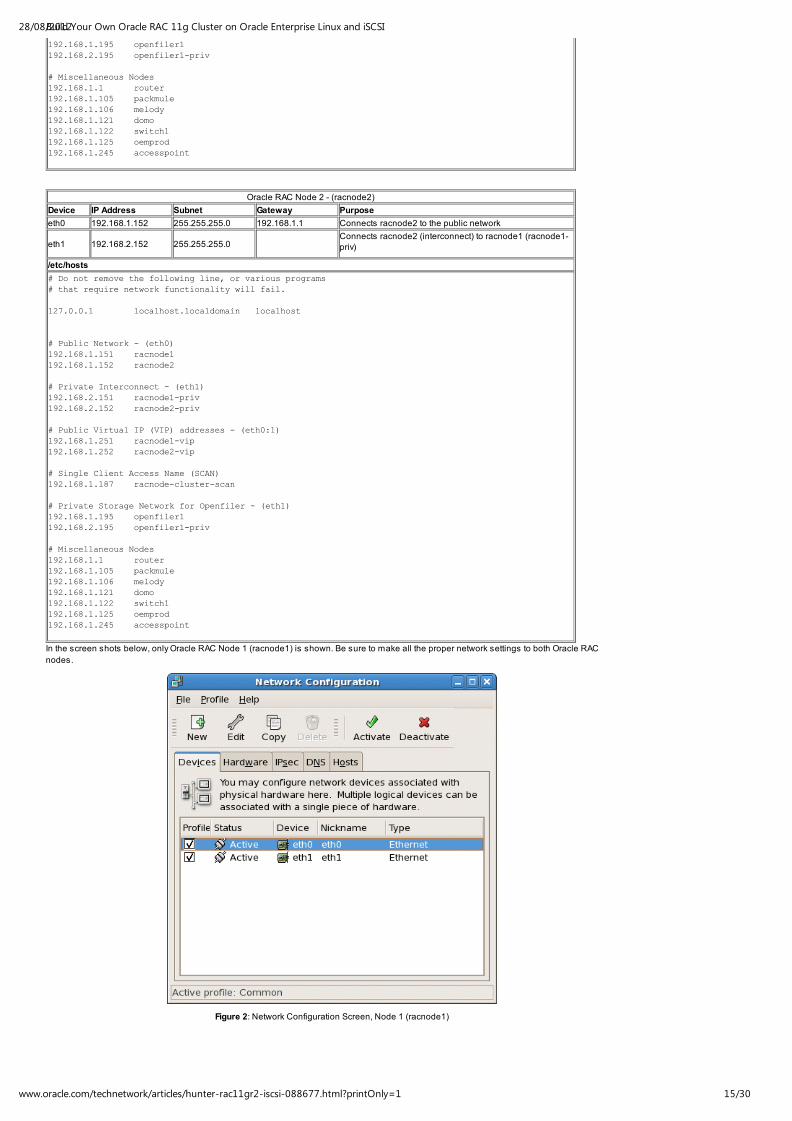
28/08/2012Build Your Own Oracle RAC 11g Cluster on Oracle Enterprise Linux and iSCSI
15/30www.oracle.com/technetwork/articles/hunter-rac11gr2-iscsi-088677.html?printOnly=1
192.168.1.195 openfiler1192.168.2.195 openfiler1-priv
# Miscellaneous Nodes
192.168.1.1 router192.168.1.105 packmule192.168.1.106 melody
192.168.1.121 domo192.168.1.122 switch1
192.168.1.125 oemprod192.168.1.245 accesspoint
Oracle RAC Node 2 - (racnode2)
Device IP Address Subnet Gateway Purpose
eth0 192.168.1.152 255.255.255.0 192.168.1.1 Connects racnode2 to the public network
eth1 192.168.2.152 255.255.255.0 Connects racnode2 (interconnect) to racnode1 (racnode1-priv)
/etc/hosts
# Do not remove the following line, or various programs# that require network functionality will fail.
127.0.0.1 localhost.localdomain localhost
# Public Network - (eth0)
192.168.1.151 racnode1192.168.1.152 racnode2
# Private Interconnect - (eth1)192.168.2.151 racnode1-priv
192.168.2.152 racnode2-priv
# Public Virtual IP (VIP) addresses - (eth0:1)192.168.1.251 racnode1-vip
192.168.1.252 racnode2-vip
# Single Client Access Name (SCAN)
192.168.1.187 racnode-cluster-scan
# Private Storage Network for Openfiler - (eth1)192.168.1.195 openfiler1192.168.2.195 openfiler1-priv
# Miscellaneous Nodes
192.168.1.1 router192.168.1.105 packmule192.168.1.106 melody
192.168.1.121 domo192.168.1.122 switch1
192.168.1.125 oemprod192.168.1.245 accesspoint
In the screen shots below, only Oracle RAC Node 1 (racnode1) is shown. Be sure to make all the proper network settings to both Oracle RAC
nodes.
Figure 2: Network Configuration Screen, Node 1 (racnode1)

28/08/2012Build Your Own Oracle RAC 11g Cluster on Oracle Enterprise Linux and iSCSI
16/30www.oracle.com/technetwork/articles/hunter-rac11gr2-iscsi-088677.html?printOnly=1
Figure 3: Ethernet Device Screen, eth0 (racnode1)
Figure 4: Ethernet Device Screen, eth1 (racnode1)

28/08/2012Build Your Own Oracle RAC 11g Cluster on Oracle Enterprise Linux and iSCSI
17/30www.oracle.com/technetwork/articles/hunter-rac11gr2-iscsi-088677.html?printOnly=1
Figure 5: Network Configuration Screen, /etc/hosts (racnode1)
Once the network is configured, you can use the ifconfig command to verify everything is working. The following example is from racnode1:
[root@racnode1 ~]#
/sbin/ifconfig -a
eth0 Link encap:Ethernet HWaddr 00:14:6C:76:5C:71
inet addr:192.168.1.151 Bcast:192.168.1.255 Mask:255.255.255.0 inet6 addr: fe80::214:6cff:fe76:5c71/64 Scope:Link
UP BROADCAST RUNNING MULTICAST MTU:1500 Metric:1 RX packets:759780 errors:0 dropped:0 overruns:0 frame:0 TX packets:771948 errors:0 dropped:0 overruns:0 carrier:0
collisions:0 txqueuelen:1000 RX bytes:672708275 (641.5 MiB) TX bytes:727861314 (694.1 MiB)
Interrupt:177 Base address:0xcf00
eth1 Link encap:Ethernet HWaddr 00:0E:0C:64:D1:E5
inet addr:192.168.2.151 Bcast:192.168.2.255 Mask:255.255.255.0 inet6 addr: fe80::20e:cff:fe64:d1e5/64 Scope:Link
UP BROADCAST RUNNING MULTICAST MTU:1500 Metric:1 RX packets:120 errors:0 dropped:0 overruns:0 frame:0
TX packets:48 errors:0 dropped:0 overruns:0 carrier:0 collisions:0 txqueuelen:1000 RX bytes:24544 (23.9 KiB) TX bytes:8634 (8.4 KiB)
Base address:0xddc0 Memory:fe9c0000-fe9e0000
lo Link encap:Local Loopback inet addr:127.0.0.1 Mask:255.0.0.0 inet6 addr: ::1/128 Scope:Host
UP LOOPBACK RUNNING MTU:16436 Metric:1 RX packets:3191 errors:0 dropped:0 overruns:0 frame:0
TX packets:3191 errors:0 dropped:0 overruns:0 carrier:0 collisions:0 txqueuelen:0 RX bytes:4296868 (4.0 MiB) TX bytes:4296868 (4.0 MiB)
sit0 Link encap:IPv6-in-IPv4
NOARP MTU:1480 Metric:1 RX packets:0 errors:0 dropped:0 overruns:0 frame:0 TX packets:0 errors:0 dropped:0 overruns:0 carrier:0
collisions:0 txqueuelen:0 RX bytes:0 (0.0 b) TX bytes:0 (0.0 b)
Confirm the RAC Node Name is Not Listed in Loopback Address
Ensure that the node names ( racnode1 or racnode2) are not included for the loopback address in the /etc/hosts file. If the machine name is
listed in the in the loopback address entry as below:
127.0.0.1
racnode1
localhost.localdomain localhost
it will need to be removed as shown below:
127.0.0.1 localhost.localdomain localhost
If the RAC node name is listed for the loopback address, you will receive the following error during the RAC installation:

28/08/2012Build Your Own Oracle RAC 11g Cluster on Oracle Enterprise Linux and iSCSI
18/30www.oracle.com/technetwork/articles/hunter-rac11gr2-iscsi-088677.html?printOnly=1
ORA-00603: ORACLE server session terminated by fatal error
or
ORA-29702: error occurred in Cluster Group Service operation
Check and turn off UDP ICMP rejections
During the Linux installation process, I indicated to not configure the firewall option. By default the option to configure a firewall is selected by the
installer. This has burned me several times so I like to do a double-check that the firewall option is not configured and to ensure udp ICMP
filtering is turned off.
If UDP ICMP is blocked or rejected by the firewall, the Oracle Clusterware software will crash after several minutes of running. When the Oracle
Clusterware process fails, you will have something similar to the following in the <machine_name>_evmocr.log file:
08/29/2005 22:17:19
oac_init:2: Could not connect to server, clsc retcode = 9
08/29/2005 22:17:19a_init:12!: Client init unsuccessful : [32]
ibctx:1:ERROR: INVALID FORMATproprinit:problem reading the bootblock or superbloc 22
When experiencing this type of error, the solution is to remove the UDP ICMP (iptables) rejection rule - or to simply have the firewall option turned
off. The Oracle Clusterware software will then start to operate normally and not crash. The following commands should be executed as the root
user account:
Check to ensure that the firewall option is turned off. If the firewall option is stopped (like it is in my example below) you do not have to proceedwith the following steps.[root@racnode1 ~]# /etc/rc.d/init.d/iptables statusFirewall is stopped.
If the firewall option is operating you will need to first manually disable UDP ICMP rejections:[root@racnode1 ~]# /etc/rc.d/init.d/iptables stopFlushing firewall rules: [ OK ]Setting chains to policy ACCEPT: filter [ OK ]Unloading iptables modules: [ OK ]
Then, to turn UDP ICMP rejections off for next server reboot (which should always be turned off):[root@racnode1 ~]# chkconfig iptables off
9. Cluster Time Synchronization ServicePerform the following Cluster Time Synchronization Service configuration on both Oracle RAC nodes in the cluster.
Oracle Clusterware 11g Release 2 and later requires time synchronization across all nodes within a cluster where Oracle RAC is deployed.
Oracle provide two options for time synchronization: an operating system configured network time protocol (NTP), or the new Oracle Cluster Time
Synchronization Service (CTSS). Oracle Cluster Time Synchronization Service (ctssd) is designed for organizations whose Oracle RAC databases
are unable to access NTP services.
Configuring NTP is outside the scope of this article and will therefore rely on the Cluster Time Synchronization Service as the network time
protocol.
Configure Cluster Time Synchronization Service - (CTSS)
If you want to use Cluster Time Synchronization Service to provide synchronization service in the cluster, then de-configure and de-install the
Network Time Protocol (NTP).
To deactivate the NTP service, you must stop the existing ntpd service, disable it from the initialization sequences and remove the ntp.conf file.
To complete these steps on Oracle Enterprise Linux, run the following commands as the root user on both Oracle RAC nodes:
[root@racnode1 ~]# /sbin/service ntpd stop
[root@racnode1 ~]# chkconfig ntpd off
[root@racnode1 ~]#
mv /etc/ntp.conf /etc/ntp.conf.original
Also remove the following file:
[root@racnode1 ~]# rm /var/run/ntpd.pid
This file maintains the pid for the NTP daemon.
When the installer finds that the NTP protocol is not active, the Cluster Time Synchronization Service is automatically installed in active mode and
synchronizes the time across the nodes. If NTP is found configured, then the Cluster Time Synchronization Service is started in observer mode,
and no active time synchronization is performed by Oracle Clusterware within the cluster.

28/08/2012Build Your Own Oracle RAC 11g Cluster on Oracle Enterprise Linux and iSCSI
19/30www.oracle.com/technetwork/articles/hunter-rac11gr2-iscsi-088677.html?printOnly=1
To confirm that ctssd is active after installation, enter the following command as the Grid installation owner ( grid):
[grid@racnode1 ~]$ crsctl check ctss
CRS-4701: The Cluster Time Synchronization Service is in Active mode.CRS-4702: Offset (in msec): 0
Configure Network Time Protocol - (only if not using CTSS as documented above)
Note: Please note that this guide will use Cluster Time Synchronization Service for time synchronization across both Oracle RAC nodes in the
cluster. This section is provided for documentation purposes only and can be used by organizations already setup to use NTP within their
domain.
If you are using NTP, and you prefer to continue using it instead of Cluster Time Synchronization Service, then you need to modify the NTP
initialization file to set the -x flag, which prevents time from being adjusted backward. Restart the network time protocol daemon after you
complete this task.
To do this on Oracle Enterprise Linux, Red Hat Linux, and Asianux systems, edit the /etc/sysconfig/ntpd file to add the -x flag, as in the
following example:
# Drop root to id 'ntp:ntp' by default.
OPTIONS="-x -u ntp:ntp -p /var/run/ntpd.pid"# Set to 'yes' to sync hw clock after successful ntpdateSYNC_HWCLOCK=no
# Additional options for ntpdateNTPDATE_OPTIONS=""
Then, restart the NTP service.
# /sbin/service ntp restart
On SUSE systems, modify the configuration file /etc/sysconfig/ntp with the following settings:
NTPD_OPTIONS="-x -u ntp"Restart the daemon using the following command:
# service ntp restart
10. Install Openfiler
Perform the following installation on the network storage server (openfiler1).
With the network configured on both Oracle RAC nodes, the next step is to install the Openfiler software to the network storage server (
openfiler1). Later in this article, the network storage server will be configured as an iSCSI storage device for all Oracle Clusterware and Oracle
RAC shared storage requirements.
Powered by rPath Linux, Openfiler is a free browser-based network storage management utility that delivers file-based Network Attached Storage
(NAS) and block-based Storage Area Networking (SAN) in a single framework. The entire software stack interfaces with open source applications
such as Apache, Samba, LVM2, ext3, Linux NFS and iSCSI Enterprise Target. Openfiler combines these ubiquitous technologies into a small,
easy to manage solution fronted by a powerful web-based management interface.
Openfiler supports CIFS, NFS, HTTP/DAV, FTP, however, we will only be making use of its iSCSI capabilities to implement an inexpensive SAN for
the shared storage components required by Oracle RAC 11g. The operating system and Openfiler application will be installed on one internal
SATA disk. A second internal 73GB 15K SCSI hard disk will be configured as a single "Volume Group" that will be used for all shared disk storage
requirements. The Openfiler server will be configured to use this volume group for iSCSI based storage and will be used in our Oracle RAC 11g
configuration to store the shared files required by Oracle Clusterware and the Oracle RAC database.
Please be aware that any type of hard disk (internal or external) should work for database storage as long as it can be recognized by the network
storage server (Openfiler) and has adequate space. For example, I could have made an extra partition on the 500GB internal SATA disk for the
iSCSI target, but decided to make use of the faster SCSI disk for this example.
To learn more about Openfiler, please visit their website at http://www.openfiler.com/
Download Openfiler
Use the links below to download Openfiler NAS/SAN Appliance, version 2.3 (Final Release) for either x86 or x86_64 depending on your hardware
architecture. This guide uses x86_64. After downloading Openfiler, you will then need to burn the ISO image to CD.
32-bit (x86) Installations
openfiler-2.3-x86-disc1.iso (322 MB)
64-bit (x86_64) Installations
openfiler-2.3-x86_64-disc1.iso (336 MB)
If you are downloading the above ISO file to a MS Windows machine, there are many options for burning these images (ISO files) to a CD. You
may already be familiar with and have the proper software to burn images to CD. If you are not familiar with this process and do not have the
required software to burn images to CD, here are just two (of many) software packages that can be used:
UltraISOMagic ISO Maker
Install Openfiler
This section provides a summary of the screens used to install the Openfiler software. For the purpose of this article, I opted to install Openfiler
with all default options. The only manual change required was for configuring the local network settings.
Once the install has completed, the server will reboot to make sure all required components, services and drivers are started and recognized.

28/08/2012Build Your Own Oracle RAC 11g Cluster on Oracle Enterprise Linux and iSCSI
20/30www.oracle.com/technetwork/articles/hunter-rac11gr2-iscsi-088677.html?printOnly=1
After the reboot, any external hard drives (if connected) will be discovered by the Openfiler server.
For more detailed installation instructions, please visit http://www.openfiler.com/learn/. I would suggest, however, that the instructions I have
provided below be used for this Oracle RAC 11g configuration.
Before installing the Openfiler software to the network storage server, you should have both NIC interfaces (cards) installed and any external hard
drives connected and turned on (if you will be using external hard drives).
After downloading and burning the Openfiler ISO image (ISO file) to CD, insert the CD into the network storage server ( openfiler1 in this
example), power it on, and answer the installation screen prompts as noted below.
Boot Screen
The first screen is the Openfiler boot screen. At the boot: prompt, hit [Enter] to start the installation process.
Media Test
When asked to test the CD media, tab over to [Skip] and hit [Enter]. If there were any errors, the media burning software would have warned us.
After several seconds, the installer should then detect the video card, monitor, and mouse. The installer then goes into GUI mode.
Welcome to Openfiler NSA
At the welcome screen, click [Next] to continue.
Keyboard Configuration
The next screen prompts you for the Keyboard settings. Make the appropriate selection for your configuration.
Disk Partitioning Setup
The next screen asks whether to perform disk partitioning using "Automatic Partitioning" or "Manual Partitioning with Disk Druid". Although the
official Openfiler documentation suggests to use Manual Partitioning, I opted to use "Automatic Partitioning" given the simplicity of my example
configuration.
Select [Automatically partition] and click [Next] continue.
Automatic Partitioning
If there were a previous installation of Linux on this machine, the next screen will ask if you want to "remove" or "keep" old partitions. Select the
option to [Remove all partitions on this system]. For my example configuration, I selected ONLY the 500GB SATA internal hard drive [sda] for the
operating system and Openfiler application installation. I de-selected the 73GB SCSI internal hard drive since this disk will be used exclusively in
the next section to create a single "Volume Group" that will be used for all iSCSI based shared disk storage requirements for Oracle Clusterware
and Oracle RAC.
I also keep the checkbox [Review (and modify if needed) the partitions created] selected. Click [Next] to continue.
You will then be prompted with a dialog window asking if you really want to remove all partitions. Click [Yes] to acknowledge this warning.
Partitioning
The installer will then allow you to view (and modify if needed) the disk partitions it automatically chose for hard disks selected in the previous
screen. In almost all cases, the installer will choose 100MB for /boot, an adequate amount of swap, and the rest going to the root ( /) partition for
that disk (or disks). In this example, I am satisfied with the installers recommended partitioning for /dev/sda.
The installer will also show any other internal hard disks it discovered. For my example configuration, the installer found the 73GB SCSI internal
hard drive as /dev/sdb. For now, I will "Delete" any and all partitions on this drive (there was only one, /dev/sdb1). In the next section, I will
create the required partition for this particular hard disk.
Network Configuration
I made sure to install both NIC interfaces (cards) in the network storage server before starting the Openfiler installation. This screen should have
successfully detected each of the network devices.
First, make sure that each of the network devices are checked to [Active on boot]. The installer may choose to not activate eth1 by default.
Second, [Edit] both eth0 and eth1 as follows. You may choose to use different IP addresses for both eth0 and eth1 and that is OK. You must,
however, configure eth1 (the storage network) to be on the same subnet you configured for eth1 on racnode1 and racnode2:
eth0:
- Check off the option to [Configure using DHCP]
- Leave the [Activate on boot] checked
- IP Address: 192.168.1.195
- Netmask: 255.255.255.0
eth1:
- Check off the option to [Configure using DHCP]
- Leave the [Activate on boot] checked
- IP Address: 192.168.2.195
- Netmask: 255.255.255.0
Continue by setting your hostname manually. I used a hostname of " openfiler1". Finish this dialog off by supplying your gateway and DNS
servers.
Time Zone Selection
The next screen allows you to configure your time zone information. Make the appropriate selection for your location.
Set Root Password
Select a root password and click [Next] to continue.
About to Install
This screen is basically a confirmation screen. Click [Next] to start the installation.
Congratulations
And that's it. You have successfully installed Openfiler on the network storage server. The installer will eject the CD from the CD-ROM drive. Take
out the CD and click [Reboot] to reboot the system.
If everything was successful after the reboot, you should now be presented with a text login screen and the URL to use for administering the
Openfiler server.
Modify /etc/hosts File on Openfiler Server
Although not mandatory, I typically copy the contents of the /etc/hosts file from one of the Oracle RAC nodes to the new Openfiler server. This
allows convenient name resolution when testing the network for the cluster.
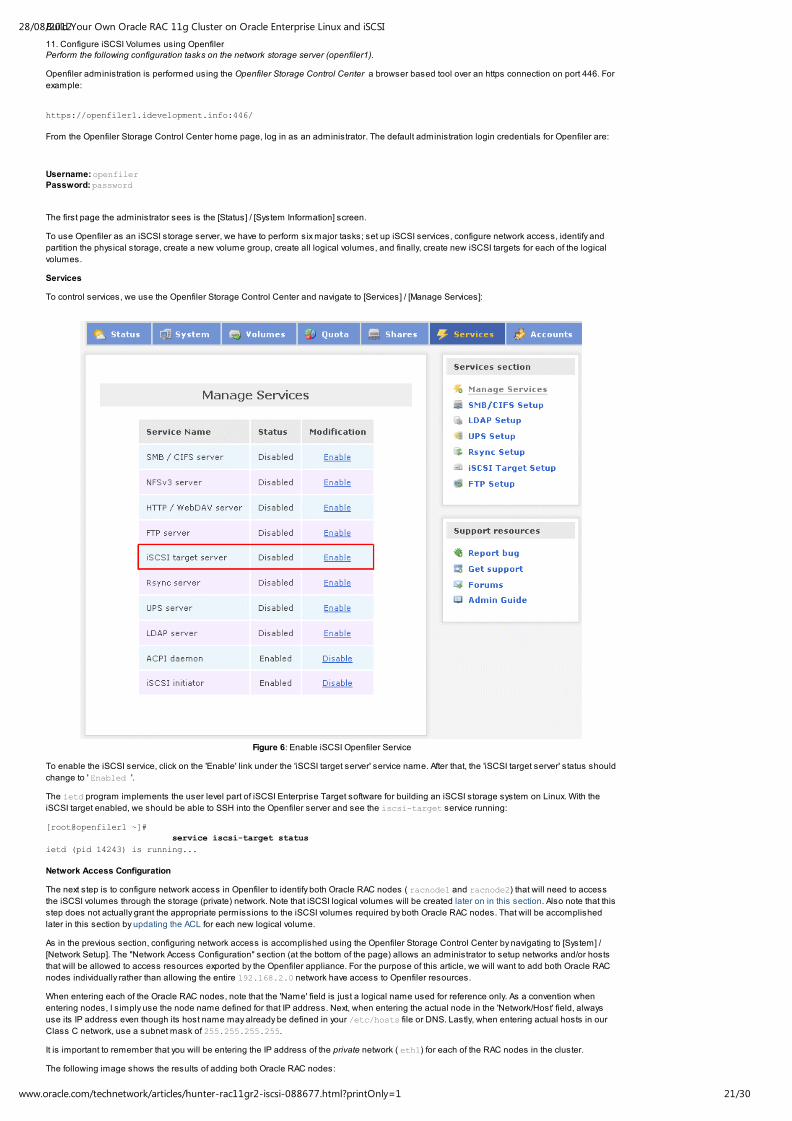
28/08/2012Build Your Own Oracle RAC 11g Cluster on Oracle Enterprise Linux and iSCSI
21/30www.oracle.com/technetwork/articles/hunter-rac11gr2-iscsi-088677.html?printOnly=1
11. Configure iSCSI Volumes using OpenfilerPerform the following configuration tasks on the network storage server (openfiler1).
Openfiler administration is performed using the Openfiler Storage Control Center a browser based tool over an https connection on port 446. For
example:
https://openfiler1.idevelopment.info:446/
From the Openfiler Storage Control Center home page, log in as an administrator. The default administration login credentials for Openfiler are:
Username: openfilerPassword: password
The first page the administrator sees is the [Status] / [System Information] screen.
To use Openfiler as an iSCSI storage server, we have to perform six major tasks; set up iSCSI services, configure network access, identify and
partition the physical storage, create a new volume group, create all logical volumes, and finally, create new iSCSI targets for each of the logical
volumes.
Services
To control services, we use the Openfiler Storage Control Center and navigate to [Services] / [Manage Services]:
Figure 6: Enable iSCSI Openfiler Service
To enable the iSCSI service, click on the 'Enable' link under the 'iSCSI target server' service name. After that, the 'iSCSI target server' status should
change to ' Enabled '.
The ietd program implements the user level part of iSCSI Enterprise Target software for building an iSCSI storage system on Linux. With the
iSCSI target enabled, we should be able to SSH into the Openfiler server and see the iscsi-target service running:
[root@openfiler1 ~]# service iscsi-target status
ietd (pid 14243) is running...
Network Access Configuration
The next step is to configure network access in Openfiler to identify both Oracle RAC nodes ( racnode1 and racnode2) that will need to access
the iSCSI volumes through the storage (private) network. Note that iSCSI logical volumes will be created later on in this section. Also note that this
step does not actually grant the appropriate permissions to the iSCSI volumes required by both Oracle RAC nodes. That will be accomplished
later in this section by updating the ACL for each new logical volume.
As in the previous section, configuring network access is accomplished using the Openfiler Storage Control Center by navigating to [System] /
[Network Setup]. The "Network Access Configuration" section (at the bottom of the page) allows an administrator to setup networks and/or hosts
that will be allowed to access resources exported by the Openfiler appliance. For the purpose of this article, we will want to add both Oracle RAC
nodes individually rather than allowing the entire 192.168.2.0 network have access to Openfiler resources.
When entering each of the Oracle RAC nodes, note that the 'Name' field is just a logical name used for reference only. As a convention when
entering nodes, I simply use the node name defined for that IP address. Next, when entering the actual node in the 'Network/Host' field, always
use its IP address even though its host name may already be defined in your /etc/hosts file or DNS. Lastly, when entering actual hosts in our
Class C network, use a subnet mask of 255.255.255.255.
It is important to remember that you will be entering the IP address of the private network ( eth1) for each of the RAC nodes in the cluster.
The following image shows the results of adding both Oracle RAC nodes:
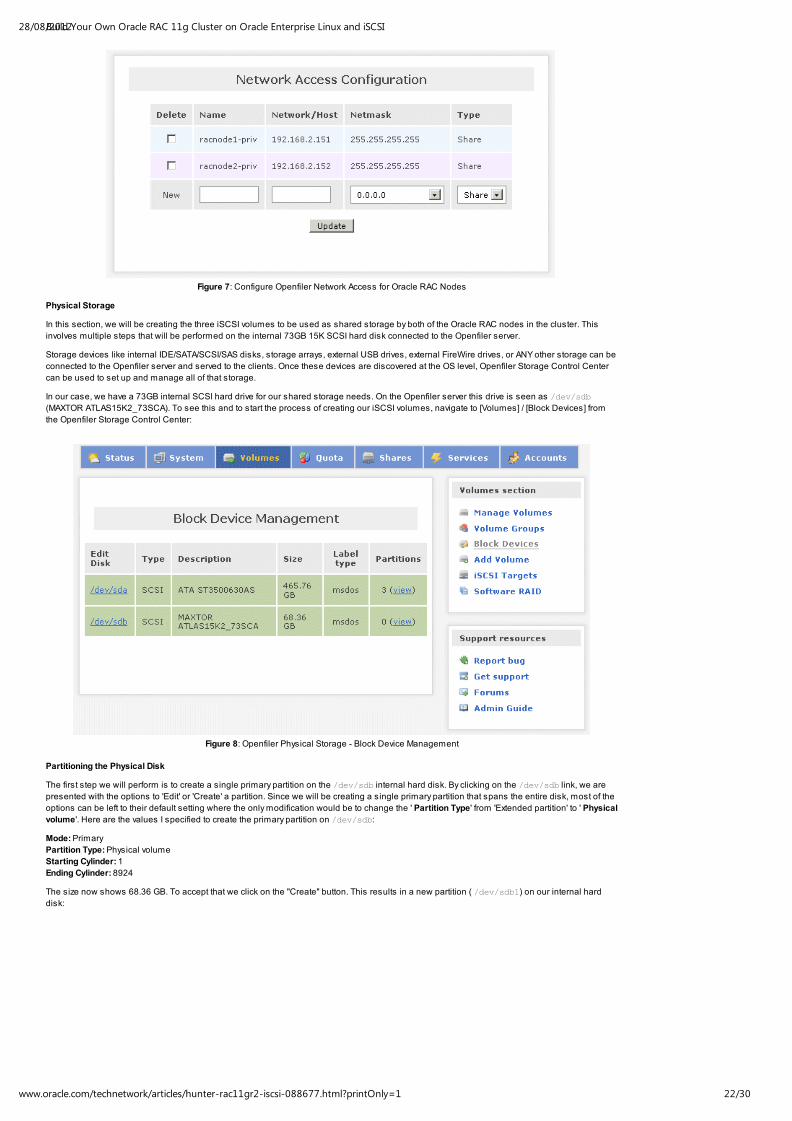
28/08/2012Build Your Own Oracle RAC 11g Cluster on Oracle Enterprise Linux and iSCSI
22/30www.oracle.com/technetwork/articles/hunter-rac11gr2-iscsi-088677.html?printOnly=1
Figure 7: Configure Openfiler Network Access for Oracle RAC Nodes
Physical Storage
In this section, we will be creating the three iSCSI volumes to be used as shared storage by both of the Oracle RAC nodes in the cluster. This
involves multiple steps that will be performed on the internal 73GB 15K SCSI hard disk connected to the Openfiler server.
Storage devices like internal IDE/SATA/SCSI/SAS disks, storage arrays, external USB drives, external FireWire drives, or ANY other storage can be
connected to the Openfiler server and served to the clients. Once these devices are discovered at the OS level, Openfiler Storage Control Center
can be used to set up and manage all of that storage.
In our case, we have a 73GB internal SCSI hard drive for our shared storage needs. On the Openfiler server this drive is seen as /dev/sdb
(MAXTOR ATLAS15K2_73SCA). To see this and to start the process of creating our iSCSI volumes, navigate to [Volumes] / [Block Devices] from
the Openfiler Storage Control Center:
Figure 8: Openfiler Physical Storage - Block Device Management
Partitioning the Physical Disk
The first step we will perform is to create a single primary partition on the /dev/sdb internal hard disk. By clicking on the /dev/sdb link, we are
presented with the options to 'Edit' or 'Create' a partition. Since we will be creating a single primary partition that spans the entire disk, most of the
options can be left to their default setting where the only modification would be to change the ' Partition Type' from 'Extended partition' to ' Physical
volume'. Here are the values I specified to create the primary partition on /dev/sdb:
Mode: Primary
Partition Type: Physical volume
Starting Cylinder: 1
Ending Cylinder: 8924
The size now shows 68.36 GB. To accept that we click on the "Create" button. This results in a new partition ( /dev/sdb1) on our internal hard
disk:

28/08/2012Build Your Own Oracle RAC 11g Cluster on Oracle Enterprise Linux and iSCSI
23/30www.oracle.com/technetwork/articles/hunter-rac11gr2-iscsi-088677.html?printOnly=1
Figure 9: Partition the Physical Volume
Volume Group Management
The next step is to create a Volume Group. We will be creating a single volume group named racdbvg that contains the newly created primary
partition.
From the Openfiler Storage Control Center, navigate to [Volumes] / [Volume Groups]. There we would see any existing volume groups, or none as
in our case. Using the Volume Group Management screen, enter the name of the new volume group ( racdbvg), click on the checkbox in front of
/dev/sdb1 to select that partition, and finally click on the 'Add volume group' button. After that we are presented with the list that now shows our
newly created volume group named " racdbvg":
Figure 10: New Volume Group Created
Logical Volumes
We can now create the three logical volumes in the newly created volume group ( racdbvg).
From the Openfiler Storage Control Center, navigate to [Volumes] / [Add Volume]. There we will see the newly created volume group ( racdbvg)
along with its block storage statistics. Also available at the bottom of this screen is the option to create a new volume in the selected volume
group - (Create a volume in "racdbvg"). Use this screen to create the following three logical (iSCSI) volumes. After creating each logical volume,
the application will point you to the "Manage Volumes" screen. You will then need to click back to the "Add Volume" tab to create the next logical
volume until all three iSCSI volumes are created:
iSCSI / Logical Volumes
Volume Name Volume Description Required Space (MB) Filesystem Type

28/08/2012Build Your Own Oracle RAC 11g Cluster on Oracle Enterprise Linux and iSCSI
24/30www.oracle.com/technetwork/articles/hunter-rac11gr2-iscsi-088677.html?printOnly=1
racdb-crs1 racdb - ASM CRS Volume 1 2,208 iSCSI
racdb-data1racdb - ASM Data Volume 1 33,888 iSCSI
racdb-fra1 racdb - ASM FRA Volume 1 33,888 iSCSI
In effect we have created three iSCSI disks that can now be presented to iSCSI clients ( racnode1 and racnode2) on the network. The "Manage
Volumes" screen should look as follows:
Figure 11: New Logical (iSCSI) Volumes
iSCSI Targets
At this point, we have three iSCSI logical volumes. Before an iSCSI client can have access to them, however, an iSCSI target will need to be
created for each of these three volumes. Each iSCSI logical volume will be mapped to a specific iSCSI target and the appropriate network access
permissions to that target will be granted to both Oracle RAC nodes. For the purpose of this article, there will be a one-to-one mapping between
an iSCSI logical volume and an iSCSI target.
There are three steps involved in creating and configuring an iSCSI target; create a unique Target IQN (basically, the universal name for the new
iSCSI target), map one of the iSCSI logical volumes created in the previous section to the newly created iSCSI target, and finally, grant both of the
Oracle RAC nodes access to the new iSCSI target. Please note that this process will need to be performed for each of the three iSCSI logical
volumes created in the previous section.
For the purpose of this article, the following table lists the new iSCSI target names (the Target IQN) and which iSCSI logical volume it will be
mapped to:
iSCSI Target / Logical Volume Mappings
Target IQN iSCSI Volume Name Volume Description
iqn.2006-01.com.openfiler:racdb.crs1 racdb-crs1 racdb - ASM CRS Volume 1
iqn.2006-01.com.openfiler:racdb.data1racdb-data1 racdb - ASM Data Volume 1
iqn.2006-01.com.openfiler:racdb.fra1 racdb-fra1 racdb - ASM FRA Volume 1
We are now ready to create the three new iSCSI targets - one for each of the iSCSI logical volumes. The example below illustrates the three steps
required to create a new iSCSI target by creating the Oracle Clusterware / racdb-crs1 target ( iqn.2006-01.com.openfiler:racdb.crs1). This
three step process will need to be repeated for each of the three new iSCSI targets listed in the table above.
Create New Target IQN
From the Openfiler Storage Control Center, navigate to [Volumes] / [iSCSI Targets]. Verify the grey sub-tab "Target Configuration" is selected. This
page allows you to create a new iSCSI target. A default value is automatically generated for the name of the new iSCSI target (better known as the
"Target IQN"). An example Target IQN is " iqn.2006-01.com.openfiler:tsn.ae4683b67fd3":
Figure 12: Create New iSCSI Target : Default Target IQN
I prefer to replace the last segment of the default Target IQN with something more meaningful. For the first iSCSI target (Oracle Clusterware /
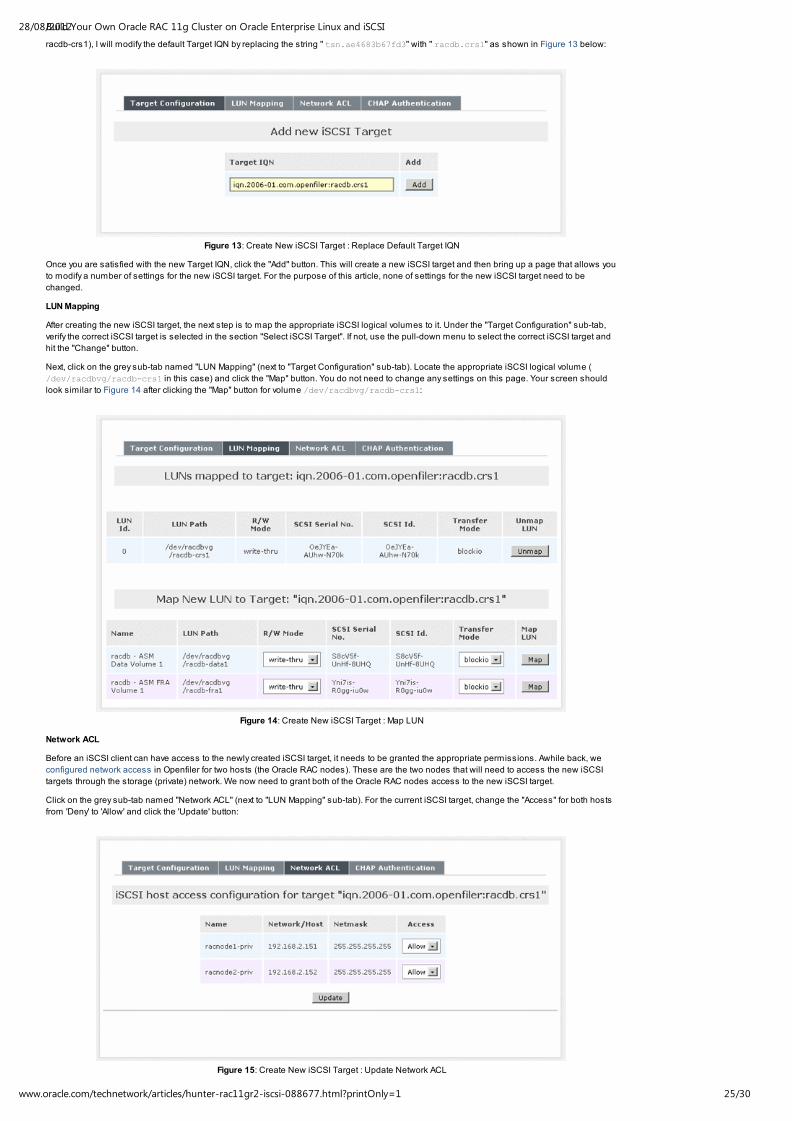
28/08/2012Build Your Own Oracle RAC 11g Cluster on Oracle Enterprise Linux and iSCSI
25/30www.oracle.com/technetwork/articles/hunter-rac11gr2-iscsi-088677.html?printOnly=1
racdb-crs1), I will modify the default Target IQN by replacing the string " tsn.ae4683b67fd3" with " racdb.crs1" as shown in Figure 13 below:
Figure 13: Create New iSCSI Target : Replace Default Target IQN
Once you are satisfied with the new Target IQN, click the "Add" button. This will create a new iSCSI target and then bring up a page that allows you
to modify a number of settings for the new iSCSI target. For the purpose of this article, none of settings for the new iSCSI target need to be
changed.
LUN Mapping
After creating the new iSCSI target, the next step is to map the appropriate iSCSI logical volumes to it. Under the "Target Configuration" sub-tab,
verify the correct iSCSI target is selected in the section "Select iSCSI Target". If not, use the pull-down menu to select the correct iSCSI target and
hit the "Change" button.
Next, click on the grey sub-tab named "LUN Mapping" (next to "Target Configuration" sub-tab). Locate the appropriate iSCSI logical volume (
/dev/racdbvg/racdb-crs1 in this case) and click the "Map" button. You do not need to change any settings on this page. Your screen should
look similar to Figure 14 after clicking the "Map" button for volume /dev/racdbvg/racdb-crs1:
Figure 14: Create New iSCSI Target : Map LUN
Network ACL
Before an iSCSI client can have access to the newly created iSCSI target, it needs to be granted the appropriate permissions. Awhile back, we
configured network access in Openfiler for two hosts (the Oracle RAC nodes). These are the two nodes that will need to access the new iSCSI
targets through the storage (private) network. We now need to grant both of the Oracle RAC nodes access to the new iSCSI target.
Click on the grey sub-tab named "Network ACL" (next to "LUN Mapping" sub-tab). For the current iSCSI target, change the "Access" for both hosts
from 'Deny' to 'Allow' and click the 'Update' button:
Figure 15: Create New iSCSI Target : Update Network ACL

28/08/2012Build Your Own Oracle RAC 11g Cluster on Oracle Enterprise Linux and iSCSI
26/30www.oracle.com/technetwork/articles/hunter-rac11gr2-iscsi-088677.html?printOnly=1
Go back to the Create New Target IQN section and perform these three tasks for the remaining two iSCSI logical volumes while substituting the
values found in the " iSCSI Target / Logical Volume Mappings" table .
12. Configure iSCSI Volumes on Oracle RAC Nodes
Configure the iSCSI initiator on both Oracle RAC nodes in the cluster. Creating partitions, however, should only be executed on one of nodes in
the RAC cluster.
An iSCSI client can be any system (Linux, Unix, MS Windows, Apple Mac, etc.) for which iSCSI support (a driver) is available. In our case, the
clients are two Linux servers, racnode1 and racnode2, running Oracle Enterprise Linux 5.4.
In this section we will be configuring the iSCSI software initiator on both of the Oracle RAC nodes. Oracle Enterprise Linux 5.4 includes the Open-
iSCSI iSCSI software initiator which can be found in the iscsi-initiator-utils RPM. This is a change from previous versions of Oracle
Enterprise Linux (4.x) which included the Linux iscsi-sfnet software driver developed as part of the Linux-iSCSI Project. All iSCSI management
tasks like discovery and logins will use the command-line interface iscsiadm which is included with Open-iSCSI.
The iSCSI software initiator will be configured to automatically log in to the network storage server ( openfiler1) and discover the iSCSI volumes
created in the previous section. We will then go through the steps of creating persistent local SCSI device names (i.e. /dev/iscsi/crs1) for
each of the iSCSI target names discovered using udev. Having a consistent local SCSI device name and which iSCSI target it maps to, helps to
differentiate between the three volumes when configuring ASM. Before we can do any of this, however, we must first install the iSCSI initiator
software.
Note: This guide makes use of ASMLib 2.0 which is a support library for the Automatic Storage Management (ASM) feature of the Oracle
Database. ASMLib will be used to label all iSCSI volumes used in this guide. By default, ASMLib already provides persistent paths and
permissions for storage devices used with ASM. This feature eliminates the need for updating udev or devlabel files with storage device paths
and permissions. For the purpose of this article and in practice, I still opt to create persistent local SCSI device names for each of the iSCSI target
names discovered using udev. This provides a means of self-documentation which helps to quickly identify the name and location of each
volume.
Installing the iSCSI (initiator) service
With Oracle Enterprise Linux 5.4, the Open-iSCSI iSCSI software initiator does not get installed by default. The software is included in the iscsi-
initiator-utils package which can be found on CD #1. To determine if this package is installed (which in most cases, it will not be), perform
the following on both Oracle RAC nodes:
[root@racnode1 ~]#
rpm -qa --queryformat "%{NAME}-%{VERSION}-%{RELEASE} (%{ARCH})\n"| grep iscsi-initiator-utils
If the iscsi-initiator-utils package is not installed, load CD #1 into each of the Oracle RAC nodes and perform the following:
[root@racnode1 ~]# mount -r /dev/cdrom /media/cdrom
[root@racnode1 ~]#
cd /media/cdrom/Server
[root@racnode1 ~]#
rpm -Uvh iscsi-initiator-utils-*
[root@racnode1 ~]# cd /
[root@racnode1 ~]#
eject
Verify the iscsi-initiator-utils package is now installed:
[root@racnode1 ~]# rpm -qa --queryformat "%{NAME}-%{VERSION}-%{RELEASE} (%{ARCH})\n"| grep iscsi-initiator-utils
iscsi-initiator-utils-6.2.0.871-0.10.el5 (x86_64)
Configure the iSCSI (initiator) service
After verifying that the iscsi-initiator-utils package is installed on both Oracle RAC nodes, start the iscsid service and enable it to
automatically start when the system boots. We will also configure the iscsi service to automatically start which logs into iSCSI targets needed at
system startup.
[root@racnode1 ~]# service iscsid start
Turning off network shutdown. Starting iSCSI daemon: [
OK ]
[
OK ]
[root@racnode1 ~]#
chkconfig iscsid on
[root@racnode1 ~]#
chkconfig iscsi on
Now that the iSCSI service is started, use the iscsiadm command-line interface to discover all available targets on the network storage server.
This should be performed on both Oracle RAC nodes to verify the configuration is functioning properly:
[root@racnode1 ~]# iscsiadm -m discovery -t sendtargets -p openfiler1-priv
192.168.2.195:3260,1 iqn.2006-01.com.openfiler:racdb.crs1
192.168.2.195:3260,1 iqn.2006-01.com.openfiler:racdb.fra1192.168.2.195:3260,1 iqn.2006-01.com.openfiler:racdb.data1
Manually Log In to iSCSI Targets
At this point the iSCSI initiator service has been started and each of the Oracle RAC nodes were able to discover the available targets from the
network storage server. The next step is to manually log in to each of the available targets which can be done using the iscsiadm command-line
interface. This needs to be run on both Oracle RAC nodes. Note that I had to specify the IP address and not the host name of the network storage
server ( openfiler1-priv) - I believe this is required given the discovery (above) shows the targets using the IP address.
[root@racnode1 ~]#

28/08/2012Build Your Own Oracle RAC 11g Cluster on Oracle Enterprise Linux and iSCSI
27/30www.oracle.com/technetwork/articles/hunter-rac11gr2-iscsi-088677.html?printOnly=1
iscsiadm -m node -T iqn.2006-01.com.openfiler:racdb.crs1 -p 192.168.2.195 -l
[root@racnode1 ~]#
iscsiadm -m node -T iqn.2006-01.com.openfiler:racdb.data1 -p 192.168.2.195 -l
[root@racnode1 ~]# iscsiadm -m node -T iqn.2006-01.com.openfiler:racdb.fra1 -p 192.168.2.195 -l
Configure Automatic Log In
The next step is to ensure the client will automatically log in to each of the targets listed above when the machine is booted (or the iSCSI initiator
service is started/restarted). As with the manual log in process described above, perform the following on both Oracle RAC nodes:
[root@racnode1 ~]#
iscsiadm -m node -T iqn.2006-01.com.openfiler:racdb.crs1 -p 192.168.2.195 --op update -n node.startup -v automatic
[root@racnode1 ~]#
iscsiadm -m node -T iqn.2006-01.com.openfiler:racdb.data1 -p 192.168.2.195 --op update -n node.startup -v automatic
[root@racnode1 ~]# iscsiadm -m node -T iqn.2006-01.com.openfiler:racdb.fra1 -p 192.168.2.195 --op update -n node.startup -v automatic
Create Persistent Local SCSI Device Names
In this section, we will go through the steps to create persistent local SCSI device names for each of the iSCSI target names. This will be done
using udev. Having a consistent local SCSI device name and which iSCSI target it maps to, helps to differentiate between the three volumes
when configuring ASM. Although this is not a strict requirement since we will be using ASMLib 2.0 for all volumes, it provides a means of self-
documentation to quickly identify the name and location of each iSCSI volume.
When either of the Oracle RAC nodes boot and the iSCSI initiator service is started, it will automatically log in to each of the targets configured in a
random fashion and map them to the next available local SCSI device name. For example, the target iqn.2006-
01.com.openfiler:racdb.crs1 may get mapped to /dev/sdb. I can actually determine the current mappings for all targets by looking at the
/dev/disk/by-path directory:
[root@racnode1 ~]# (cd /dev/disk/by-path; ls -l *openfiler* | awk '{FS=" "; print $9 " " $10 " " $11}')
ip-192.168.2.195:3260-iscsi-iqn.2006-01.com.openfiler:racdb.crs1-lun-0 -> ../../sdb
ip-192.168.2.195:3260-iscsi-iqn.2006-01.com.openfiler:racdb.data1-lun-0 -> ../../sddip-192.168.2.195:3260-iscsi-iqn.2006-01.com.openfiler:racdb.fra1-lun-0 -> ../../sdc
Using the output from the above listing, we can establish the following current mappings:
Current iSCSI Target Name to local SCSI Device Name Mappings
iSCSI Target Name SCSI Device Name
iqn.2006-01.com.openfiler:racdb.crs1 /dev/sdb
iqn.2006-01.com.openfiler:racdb.data1 /dev/sdd
iqn.2006-01.com.openfiler:racdb.fra1 /dev/sdc
This mapping, however, may change every time the Oracle RAC node is rebooted. For example, after a reboot it may be determined that the iSCSI
target iqn.2006-01.com.openfiler:racdb.crs1 gets mapped to the local SCSI device /dev/sdc. It is therefore impractical to rely on using
the local SCSI device name given there is no way to predict the iSCSI target mappings after a reboot.
What we need is a consistent device name we can reference (i.e. /dev/iscsi/crs1) that will always point to the appropriate iSCSI target through
reboots. This is where the Dynamic Device Management tool named udev comes in. udev provides a dynamic device directory using symbolic
links that point to the actual device using a configurable set of rules. When udev receives a device event (for example, the client logging in to an
iSCSI target), it matches its configured rules against the available device attributes provided in sysfs to identify the device. Rules that match may
provide additional device information or specify a device node name and multiple symlink names and instruct udev to run additional programs (a
SHELL script for example) as part of the device event handling process.
The first step is to create a new rules file. The file will be named /etc/udev/rules.d/55-openiscsi.rules and contain only a single line of
name=value pairs used to receive events we are interested in. It will also define a call-out SHELL script ( /etc/udev/scripts/iscsidev.sh) to
handle the event.
Create the following rules file /etc/udev/rules.d/55-openiscsi.rules on both Oracle RAC nodes:
..............................................
# /etc/udev/rules.d/55-openiscsi.rulesKERNEL=="sd*", BUS=="scsi", PROGRAM="/etc/udev/scripts/iscsidev.sh %b",SYMLINK+="iscsi/%c/part%n"
..............................................
We now need to create the UNIX SHELL script that will be called when this event is received. Let's first create a separate directory on both Oracle
RAC nodes where udev scripts can be stored:
[root@racnode1 ~]#
mkdir -p /etc/udev/scripts
Next, create the UNIX shell script /etc/udev/scripts/iscsidev.sh on both Oracle RAC nodes:
..............................................
#!/bin/sh
# FILE: /etc/udev/scripts/iscsidev.sh
BUS=${1}
HOST=${BUS%%:*}
[ -e /sys/class/iscsi_host ] || exit 1
file="/sys/class/iscsi_host/host${HOST}/device/session*/iscsi_session*/targetname"
target_name=$(cat ${file})
# This is not an open-scsi drive
if [ -z "${target_name}" ]; then exit 1
fi
# Check if QNAP drive
check_qnap_target_name=${target_name%%:*}
if [ $check_qnap_target_name = "iqn.2004-04.com.qnap" ]; then target_name=̀echo "${target_name%.*}"̀
fi

28/08/2012Build Your Own Oracle RAC 11g Cluster on Oracle Enterprise Linux and iSCSI
28/30www.oracle.com/technetwork/articles/hunter-rac11gr2-iscsi-088677.html?printOnly=1
echo "${target_name##*.}"..............................................
After creating the UNIX SHELL script, change it to executable:
[root@racnode1 ~]# chmod 755 /etc/udev/scripts/iscsidev.sh
Now that udev is configured, restart the iSCSI service on both Oracle RAC nodes:
[root@racnode1 ~]# service iscsi stop
Logging out of session [sid: 6, target: iqn.2006-01.com.openfiler:racdb.crs1, portal: 192.168.2.195,3260]
Logging out of session [sid: 7, target: iqn.2006-01.com.openfiler:racdb.fra1, portal: 192.168.2.195,3260]Logging out of session [sid: 8, target: iqn.2006-01.com.openfiler:racdb.data1, portal: 192.168.2.195,3260]
Logout of [sid: 6, target: iqn.2006-01.com.openfiler:racdb.crs1, portal: 192.168.2.195,3260]: successful
Logout of [sid: 7, target: iqn.2006-01.com.openfiler:racdb.fra1, portal: 192.168.2.195,3260]: successfulLogout of [sid: 8, target: iqn.2006-01.com.openfiler:racdb.data1, portal: 192.168.2.195,3260]: successful
Stopping iSCSI daemon: [
OK ]
[root@racnode1 ~]#
service iscsi start
iscsid dead but pid file exists
Turning off network shutdown. Starting iSCSI daemon: [
OK ]
[
OK ]
Setting up iSCSI targets: Logging in to [iface: default, target: iqn.2006-01.com.openfiler:racdb.crs1, portal: 192.168.2.195,3260]
Logging in to [iface: default, target: iqn.2006-01.com.openfiler:racdb.fra1, portal: 192.168.2.195,3260]
Logging in to [iface: default, target: iqn.2006-01.com.openfiler:racdb.data1, portal: 192.168.2.195,3260]Login to [iface: default, target: iqn.2006-01.com.openfiler:racdb.crs1, portal: 192.168.2.195,3260]: successful
Login to [iface: default, target: iqn.2006-01.com.openfiler:racdb.fra1, portal: 192.168.2.195,3260]: successful
Login to [iface: default, target: iqn.2006-01.com.openfiler:racdb.data1, portal: 192.168.2.195,3260]: successful [
OK ]
Let's see if our hard work paid off:
[root@racnode1 ~]#
ls -l /dev/iscsi/*
/dev/iscsi/crs1:
total 0
lrwxrwxrwx 1 root root 9 Nov 3 18:13 part -> ../../sdc
/dev/iscsi/data1:
total 0
lrwxrwxrwx 1 root root 9 Nov 3 18:13 part -> ../../sde
/dev/iscsi/fra1:
total 0lrwxrwxrwx 1 root root 9 Nov 3 18:13 part -> ../../sdd
The listing above shows that udev did the job it was suppose to do! We now have a consistent set of local device names that can be used to
reference the iSCSI targets. For example, we can safely assume that the device name /dev/iscsi/crs1/part will always reference the iSCSI
target iqn.2006-01.com.openfiler:racdb.crs1. We now have a consistent iSCSI target name to local device name mapping which is
described in the following table:
iSCSI Target Name to Local Device Name Mappings
iSCSI Target Name Local Device Name
iqn.2006-01.com.openfiler:racdb.crs1 /dev/iscsi/crs1/part
iqn.2006-01.com.openfiler:racdb.data1/dev/iscsi/data1/part
iqn.2006-01.com.openfiler:racdb.fra1 /dev/iscsi/fra1/part
Create Partitions on iSCSI Volumes
We now need to create a single primary partition on each of the iSCSI volumes that spans the entire size of the volume. As mentioned earlier in
this article, I will be using Automatic Storage Management (ASM) to store the shared files required for Oracle Clusterware, the physical database
files (data/index files, online redo log files, and control files), and the Fast Recovery Area (FRA) for the clustered database.
The Oracle Clusterware shared files (OCR and voting disk) will be stored in an ASM disk group named +CRS which will be configured for external
redundancy. The physical database files for the clustered database will be stored in an ASM disk group named +RACDB_DATA which will also be
configured for external redundancy. Finally, the Fast Recovery Area (RMAN backups and archived redo log files) will be stored in a third ASM disk
group named +FRA which too will be configured for external redundancy.
The following table lists the three ASM disk groups that will be created and which iSCSI volume they will contain:
Oracle Shared Drive Configuration
File Types ASM Diskgroup Name iSCSI Target (short) Name ASM Redundancy Size ASMLib Volume Name
OCR and Voting Disk +CRS crs1 External 2GBORCL:CRSVOL1
Oracle Database Files +RACDB_DATA data1 External 32GBORCL:DATAVOL1
Oracle Fast Recovery Area+FRA fra1 External 32GBORCL:FRAVOL1
As shown in the table above, we will need to create a single Linux primary partition on each of the three iSCSI volumes. The fdisk command is
used in Linux for creating (and removing) partitions. For each of the three iSCSI volumes, you can use the default values when creating the
primary partition as the default action is to use the entire disk. You can safely ignore any warnings that may indicate the device does not contain a
valid DOS partition (or Sun, SGI or OSF disklabel).
In this example, I will be running the fdisk command from racnode1 to create a single primary partition on each iSCSI target using the local
device names created by udev in the previous section:
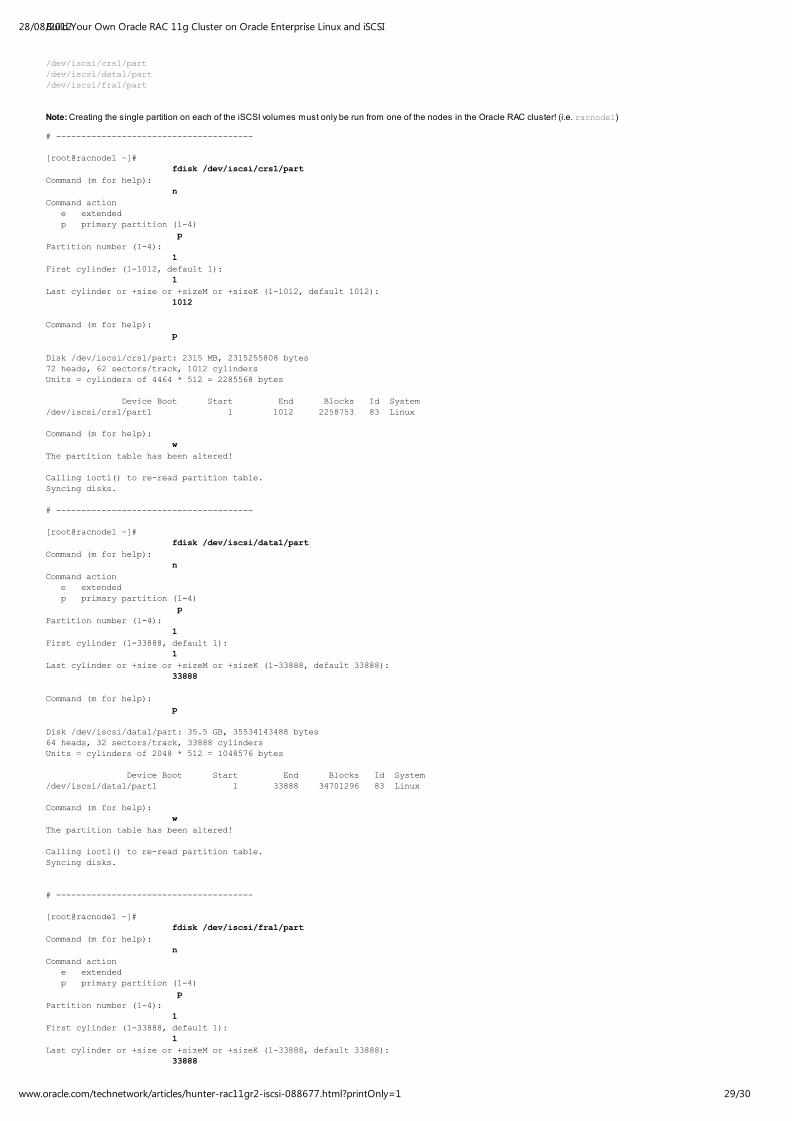
28/08/2012Build Your Own Oracle RAC 11g Cluster on Oracle Enterprise Linux and iSCSI
29/30www.oracle.com/technetwork/articles/hunter-rac11gr2-iscsi-088677.html?printOnly=1
/dev/iscsi/crs1/part/dev/iscsi/data1/part
/dev/iscsi/fra1/part
Note: Creating the single partition on each of the iSCSI volumes must only be run from one of the nodes in the Oracle RAC cluster! (i.e. racnode1)
# ---------------------------------------
[root@racnode1 ~]#
fdisk /dev/iscsi/crs1/part
Command (m for help): n
Command action
e extended p primary partition (1-4)
p
Partition number (1-4):
1
First cylinder (1-1012, default 1):
1
Last cylinder or +size or +sizeM or +sizeK (1-1012, default 1012):
1012
Command (m for help):
p
Disk /dev/iscsi/crs1/part: 2315 MB, 2315255808 bytes
72 heads, 62 sectors/track, 1012 cylinders
Units = cylinders of 4464 * 512 = 2285568 bytes
Device Boot Start End Blocks Id System
/dev/iscsi/crs1/part1 1 1012 2258753 83 Linux
Command (m for help):
w
The partition table has been altered!
Calling ioctl() to re-read partition table.
Syncing disks.
# ---------------------------------------
[root@racnode1 ~]# fdisk /dev/iscsi/data1/part
Command (m for help):
n
Command action
e extended
p primary partition (1-4) p
Partition number (1-4):
1
First cylinder (1-33888, default 1):
1
Last cylinder or +size or +sizeM or +sizeK (1-33888, default 33888): 33888
Command (m for help): p
Disk /dev/iscsi/data1/part: 35.5 GB, 35534143488 bytes64 heads, 32 sectors/track, 33888 cylinders
Units = cylinders of 2048 * 512 = 1048576 bytes
Device Boot Start End Blocks Id System/dev/iscsi/data1/part1 1 33888 34701296 83 Linux
Command (m for help): w
The partition table has been altered!
Calling ioctl() to re-read partition table.
Syncing disks.
# ---------------------------------------
[root@racnode1 ~]# fdisk /dev/iscsi/fra1/part
Command (m for help):
n
Command action
e extended
p primary partition (1-4) p
Partition number (1-4):
1
First cylinder (1-33888, default 1):
1
Last cylinder or +size or +sizeM or +sizeK (1-33888, default 33888): 33888

28/08/2012Build Your Own Oracle RAC 11g Cluster on Oracle Enterprise Linux and iSCSI
30/30www.oracle.com/technetwork/articles/hunter-rac11gr2-iscsi-088677.html?printOnly=1
Command (m for help):
p
Disk /dev/iscsi/fra1/part: 35.5 GB, 35534143488 bytes
64 heads, 32 sectors/track, 33888 cylindersUnits = cylinders of 2048 * 512 = 1048576 bytes
Device Boot Start End Blocks Id System
/dev/iscsi/fra1/part1 1 33888 34701296 83 Linux
Command (m for help):
w
The partition table has been altered!
Calling ioctl() to re-read partition table.Syncing disks.
Verify New Partitions
After creating all required partitions from racnode1, you should now inform the kernel of the partition changes using the following command as
the " root" user account from all remaining nodes in the Oracle RAC cluster ( racnode2). Note that the mapping of iSCSI target names
discovered from Openfiler and the local SCSI device name will be different on both Oracle RAC nodes. This is not a concern and will not cause
any problems since we will not be using the local SCSI device names but rather the local device names created by udev in the previous section.
From racnode2, run the following commands:
[root@racnode2 ~]# partprobe
[root@racnode2 ~]# fdisk -l
Disk /dev/sda: 160.0 GB, 160000000000 bytes255 heads, 63 sectors/track, 19452 cylinders
Units = cylinders of 16065 * 512 = 8225280 bytes
Device Boot Start End Blocks Id System/dev/sda1 * 1 13 104391 83 Linux
/dev/sda2 14 19452 156143767+ 8e Linux LVM
Disk /dev/sdb: 35.5 GB, 35534143488 bytes
64 heads, 32 sectors/track, 33888 cylinders
Units = cylinders of 2048 * 512 = 1048576 bytes
Device Boot Start End Blocks Id System
/dev/sdb1 1 33888 34701296 83 Linux
Disk /dev/sdc: 35.5 GB, 35534143488 bytes
64 heads, 32 sectors/track, 33888 cylinders
Units = cylinders of 2048 * 512 = 1048576 bytes
Device Boot Start End Blocks Id System
/dev/sdc1 1 33888 34701296 83 Linux
Disk /dev/sdd: 2315 MB, 2315255808 bytes
72 heads, 62 sectors/track, 1012 cylinders
Units = cylinders of 4464 * 512 = 2285568 bytes
Device Boot Start End Blocks Id System
/dev/sdd1 1 1012 2258753 83 Linux
As a final step you should run the following command on both Oracle RAC nodes to verify that udev created the new symbolic links for each new
partition:
[root@racnode2 ~]# (cd /dev/disk/by-path; ls -l *openfiler* | awk '{FS=" "; print $9 " " $10 " " $11}')
ip-192.168.2.195:3260-iscsi-iqn.2006-01.com.openfiler:racdb.crs1-lun-0 -> ../../sdd
ip-192.168.2.195:3260-iscsi-iqn.2006-01.com.openfiler:racdb.crs1-lun-0-part1 -> ../../sdd1ip-192.168.2.195:3260-iscsi-iqn.2006-01.com.openfiler:racdb.data1-lun-0 -> ../../sdc
ip-192.168.2.195:3260-iscsi-iqn.2006-01.com.openfiler:racdb.data1-lun-0-part1 -> ../../sdc1
ip-192.168.2.195:3260-iscsi-iqn.2006-01.com.openfiler:racdb.fra1-lun-0 -> ../../sdbip-192.168.2.195:3260-iscsi-iqn.2006-01.com.openfiler:racdb.fra1-lun-0-part1 -> ../../sdb1
The listing above shows that udev did indeed create new device names for each of the new partitions. We will be using these new device names
when configuring the volumes for ASMlib later in this guide:
/dev/iscsi/crs1/part1
/dev/iscsi/data1/part1/dev/iscsi/fra1/part1
Page 1Page 2Page 3