build rich client forms with adf swing and adf … · adf swing is a binding layer that connects...
TRANSCRIPT

Build Rich Client Forms with ADF Swing and ADF Business Components
Purpose
In this tutorial, you use Oracle JDeveloper (10.1.3.1.0) to quickly build ADF Swing forms. ADF Business Components is used to build the data model.
You can use ADF Swing to build rich client applications if your application requires immediate response to user input or for events that change the user display. This is also true for complex user interfaces that have multiple master-detail dependencies displayed on one screen. Applications that need to perform immediate item validation, which could be based on complex logic, also find better support in Swing than on the web. Another reason for using Swing clients is when, for business reasons, applications require to work offline, disconnected from the network.
Time to Complete
30 minutes
Topics
This tutorial covers the following topics:
Viewing Screenshots
Place the cursor over this icon to load and view all the screenshots for this tutorial. (Caution: This action loads all screenshots simultaneously, so response time may be slow depending on your Internet connection.)
Note: Alternatively, you can place the cursor over an individual icon in the following steps to load and view only the screenshot associated with that step. You can hide an individual screenshot by clicking it.
Overview
In this tutorial, you are going to build a Swing application with ADF Swing that leverages ADF Business Components as a business service. Though not in the focus of this exercise, ADF Swing applications can also be built on top of business services like EJB, Web Services, TopLink, POJOs etc. The steps to develop an application with ADF Swing are similar.
First in this OBE, you create an ADF Business Component model as a persistence layer that contains the business logic and the validation rules. Using ADF Swing, you build a master-detail Swing application that displays customer information along with their placed orders. ADF Swing applications that use ADF Business Components can be deployed in a 2-tier and 3-tier architecture. For this tutorial, you will run and test the application locally using the JDeveloper embedded Java Runtime Environment (JRE).
ADF Swing is a binding layer that connects standard Swing components to the Oracle Application Development Framework (ADF) binding layer. Through ADF, applications use a consistent client API to access the various business services mentioned above. ADF Swing provides a productivity advantage to all application developers that need to build scalable client-server applications for their enterprises.
Back to Topic List
OverviewPrerequisitesCreating a Database Connection Building the Business Model with ADF Business ComponentsCreating a Master Detail ADF Swing Form Creating an Edit ADF Swing Form Summary
Page 1 of 64Build Rich Client Forms with ADF Swing and ADF Business Components
08/06/2010http://www.oracle.com/technology/obe/obe1013jdev/10131/adf%20swing/master_detail_...

Prerequisites
Before starting the tutorial, you should:
1. Have access to or have installed Oracle JDeveloper (10.1.3.1.0) Production. You can download it from Oracle Technology Network.
2. Have access to or have installed Oracle Database 10g (Release 2 or Release 1). You can download it from Oracle
Technology Network (http://www.oracle.com/technology/software/products/database/oracle10g/index.html).
3. Have access to or have installed the sample schemas.
This OBE uses the HR schema included with Oracle Database 10g .
Instructions for installing the HR schema and creating a connection to it in JDeveloper are available online at:
http://www.oracle.com/technology/obe/obe1013jdev/common/OBEConnection.htm
4. Start JDeveloper. Double-click the JDeveloper executable (jdeveloper.exe) found in the root directory
(<jdev_home>) where you unzipped it.
If the Migrate User Settings dialog box opens, click NO.
Close the Tip of the Day window.
5. The JDeveloper IDE should now be displayed.
Page 2 of 64Build Rich Client Forms with ADF Swing and ADF Business Components
08/06/2010http://www.oracle.com/technology/obe/obe1013jdev/10131/adf%20swing/master_detail_...

Back to Topic List
Creating a Database Connection
Java Database Connectivity (JDBC) is a standard application programming interface (API) that is used for connecting a Java application to relational databases. JDeveloper uses a connection navigator to maintain connection information for your application. The connection navigator makes it easy to create, manage, and test database connections.
If you haven't already created a JDBC connection to the HR schema, then perform the following steps:
1. Click the Connections tab on the Applications Navigator. If the Connections tab is not showing, choose View > Connection Navigator from the JDeveloper main menu.
Page 3 of 64Build Rich Client Forms with ADF Swing and ADF Business Components
08/06/2010http://www.oracle.com/technology/obe/obe1013jdev/10131/adf%20swing/master_detail_...

2. Right-click the Database node and choose New Database Connection from the context menu.
3. In the Create Database Connection Wizard, review the information on the Welcome page and then click Next.
Page 4 of 64Build Rich Client Forms with ADF Swing and ADF Business Components
08/06/2010http://www.oracle.com/technology/obe/obe1013jdev/10131/adf%20swing/master_detail_...

4. In the Connection Name field, enter hrconn.
Click Next to continue.
5. On the Authentication page: enter hr in the Username field and hr in the Password field. Select Deploy password.
Page 5 of 64Build Rich Client Forms with ADF Swing and ADF Business Components
08/06/2010http://www.oracle.com/technology/obe/obe1013jdev/10131/adf%20swing/master_detail_...

Click Next to continue.
6. On the Connections page, the default values for the connection should be the following:
Driver: thin
Host name: localhost
JDBC Port: 1521
SID: ORCL
Leave the fields set to these default values.
Page 6 of 64Build Rich Client Forms with ADF Swing and ADF Business Components
08/06/2010http://www.oracle.com/technology/obe/obe1013jdev/10131/adf%20swing/master_detail_...

Click Next to continue.
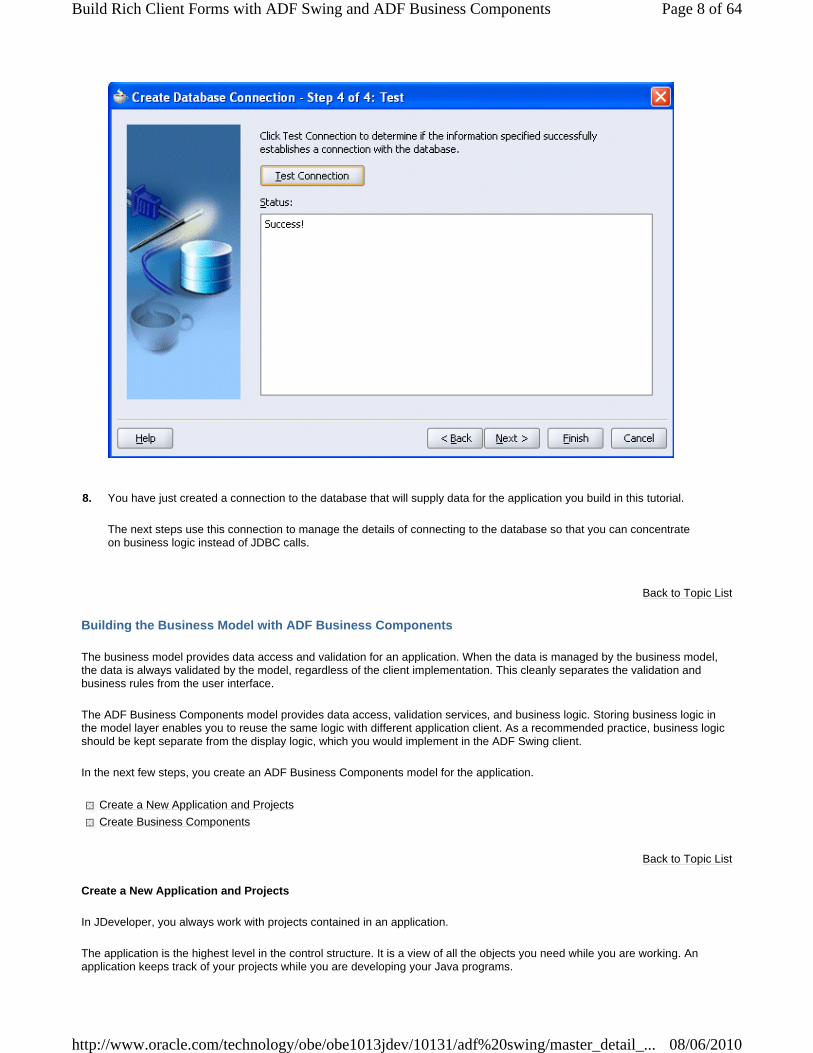
7. Click Test Connection.
If the database is available and the connection details are correct, you see the word Success! displayed in the Status window.
If an error occurs, verify the connection settings, click Back to make any necessary changes, and then retest the connection.
If the connection is successful, click Finish to complete the connection.
Page 7 of 64Build Rich Client Forms with ADF Swing and ADF Business Components
08/06/2010http://www.oracle.com/technology/obe/obe1013jdev/10131/adf%20swing/master_detail_...
Back to Topic List
Building the Business Model with ADF Business Components
The business model provides data access and validation for an application. When the data is managed by the business model, the data is always validated by the model, regardless of the client implementation. This cleanly separates the validation and business rules from the user interface.
The ADF Business Components model provides data access, validation services, and business logic. Storing business logic in the model layer enables you to reuse the same logic with different application client. As a recommended practice, business logic should be kept separate from the display logic, which you would implement in the ADF Swing client.
In the next few steps, you create an ADF Business Components model for the application.
Back to Topic List
Create a New Application and Projects
In JDeveloper, you always work with projects contained in an application.
The application is the highest level in the control structure. It is a view of all the objects you need while you are working. An application keeps track of your projects while you are developing your Java programs.
8. You have just created a connection to the database that will supply data for the application you build in this tutorial.
The next steps use this connection to manage the details of connecting to the database so that you can concentrate on business logic instead of JDBC calls.
Create a New Application and ProjectsCreate Business Components
Page 8 of 64Build Rich Client Forms with ADF Swing and ADF Business Components
08/06/2010http://www.oracle.com/technology/obe/obe1013jdev/10131/adf%20swing/master_detail_...

A JDeveloper project is an organization structure used to logically group related files. You can add multiple projects to your application to easily organize, access, modify, and reuse your source code. In the Applications Navigator, projects are displayed as the second level in the hierarchy under the application.
Note that it is considered best practices to use projects to separate the model code from the code written for the view. In this hands-on we will create one project for the ADF Business Components model, and a second one later for the ADF Swing client.
Before you create any application components, you must first create the application and project. To do this, perform the following steps:
1. Click the Applications tab to go back to the Applications Navigator.
Right-click the Applications node and select New Application from the context menu.
2. In the Create Application dialog box, enter the Application Name ADFSwing. Notice that as you enter the application
name, the directory name changes automatically.
Enter oracle as the Application Package Prefix.
Select the Java Application [Swing, ADF BC] value from the Application Template drop-down list.
Click the Manage Templates... button.
Page 9 of 64Build Rich Client Forms with ADF Swing and ADF Business Components
08/06/2010http://www.oracle.com/technology/obe/obe1013jdev/10131/adf%20swing/master_detail_...

3. In the Application Templates tree, for the Java Application [Swing, ADF BC] node, select Rich Client View and in the
Rich Client View pane, set Project Name to UserInterface.jpr and Default Package to view.
Page 10 of 64Build Rich Client Forms with ADF Swing and ADF Business Components
08/06/2010http://www.oracle.com/technology/obe/obe1013jdev/10131/adf%20swing/master_detail_...

4. In the Application Templates tree, for the Java Application [Swing, ADF BC] node, select Data Model and in the Data
Model pane, set Project Name to DataModel.jpr and Default Package to datamodel.
Page 11 of 64Build Rich Client Forms with ADF Swing and ADF Business Components
08/06/2010http://www.oracle.com/technology/obe/obe1013jdev/10131/adf%20swing/master_detail_...

Click OK. 5. Back in the Create Application click OK to create the application.
Page 12 of 64Build Rich Client Forms with ADF Swing and ADF Business Components
08/06/2010http://www.oracle.com/technology/obe/obe1013jdev/10131/adf%20swing/master_detail_...

Back to Topic
Back to Topic List
Creating Business Components from Tables
In this section, you create ADF Business Components based on tables in the database. You use the hrconn database connection, which you created earlier. You create these objects in the Model project.
6.
Click Save All on the toolbar to save your work. Alternatively, you can select File | Save All from the menu.
The Applications Navigator should look like the image below.
You are now ready to create application components for the tutorial. In the next few steps, you create a model for your application.
1. In the Applications Navigator, right-click the Model project and select New from the context menu.
Page 13 of 64Build Rich Client Forms with ADF Swing and ADF Business Components
08/06/2010http://www.oracle.com/technology/obe/obe1013jdev/10131/adf%20swing/master_detail_...

2. In the New Gallery, expand Business Tier and select ADF Business Components in the Categories list.
Select Business Components from Tables in the Items list.
Page 14 of 64Build Rich Client Forms with ADF Swing and ADF Business Components
08/06/2010http://www.oracle.com/technology/obe/obe1013jdev/10131/adf%20swing/master_detail_...

Click OK.
3. In the Business Components Project Initialization window, select the hrconn connection from the Connection list,
and then click OK.
Page 15 of 64Build Rich Client Forms with ADF Swing and ADF Business Components
08/06/2010http://www.oracle.com/technology/obe/obe1013jdev/10131/adf%20swing/master_detail_...

4. If the Welcome page of the Create Business Components wizard appears, click Next.
In step 1 of the of the Create Business Components Wizard, verify that the package name is set to oracle.datamodel.
Select HR from the Schema drop-down list and select the Tables option as the Object Type.
Click Query to populate the list of available tables.
Control-click to select both DEPARTMENTS and EMPLOYEES in the Available list.
Click the Add button to shuttle both tables to the Selected list.
Page 16 of 64Build Rich Client Forms with ADF Swing and ADF Business Components
08/06/2010http://www.oracle.com/technology/obe/obe1013jdev/10131/adf%20swing/master_detail_...

Click Next to continue.
5.
On step 2 of the Create Business Components Wizard, click the Add All button to shuttle both tables to the Selected list.
Page 17 of 64Build Rich Client Forms with ADF Swing and ADF Business Components
08/06/2010http://www.oracle.com/technology/obe/obe1013jdev/10131/adf%20swing/master_detail_...

Select each Updatable View Object in the Selected pane and change the Object Name to DepartmentsVO and EmployeesVO.
Click Next.
6.
In step 3 of the wizard, click the Query button. Select the DEPARTMENTS table and click the Add button to shuttle the selection in the Selected list.
Change the View Name field to DepartmentsLOV. Then Next.
Page 18 of 64Build Rich Client Forms with ADF Swing and ADF Business Components
08/06/2010http://www.oracle.com/technology/obe/obe1013jdev/10131/adf%20swing/master_detail_...

7. In step 4 of the wizard, name the application module HRAppModule.
Click Next.
Page 19 of 64Build Rich Client Forms with ADF Swing and ADF Business Components
08/06/2010http://www.oracle.com/technology/obe/obe1013jdev/10131/adf%20swing/master_detail_...

8. JDeveloper provides several different techniques for managing components. One is to use a diagram of the components and their relationships. In this step, you can choose to have JDeveloper create a diagram of the components that you are creating.
For our example, we skip this step. Click Next to continue.
9. The final page of the Business Components Wizard shows the objects and relationships that are created when you
click Finish.
Click Finish to complete the wizard.
Page 20 of 64Build Rich Client Forms with ADF Swing and ADF Business Components
08/06/2010http://www.oracle.com/technology/obe/obe1013jdev/10131/adf%20swing/master_detail_...

Back to Topic
Back to Topic List
10. Expanding the DataModel nodes, the Applications Navigator should now look like this:
Page 21 of 64Build Rich Client Forms with ADF Swing and ADF Business Components
08/06/2010http://www.oracle.com/technology/obe/obe1013jdev/10131/adf%20swing/master_detail_...

Creating a Master-Detail ADF Swing Form
In the next few steps, you create a Master-Detail ADF Swing Form:
Back to Topic List
Creating the Master Part
Creating the Master PartCreating the Detail PartAdding a Combo box to a Detail attribute
1. When you created the application for this tutorial, you created it with two projects: DataModel and UserInterface. The DataModel project contains the ADF Business Components that serve as the business model for your application. The UserInterface project will include the View portion of your application, which defines the User Interface components.
In the Applications Navigator, collapse the DataModel node, the Applications Navigator should appear as follows:
2. Create a new ADF Swing form by right-clicking UserInterface in the Applications Navigator and selecting New from
the context menu.
3. Expand the Client Tier node and select Empty Form from the ADF Swing Category to create a JFrame.
Page 22 of 64Build Rich Client Forms with ADF Swing and ADF Business Components
08/06/2010http://www.oracle.com/technology/obe/obe1013jdev/10131/adf%20swing/master_detail_...

Click OK.
Note: Empty Form is used to create an empty Java client frame. The frame that the wizard generates will contain ADF Swing-specific application bootstrapping code. This code initializes the ADF Swing application and binds it to the ADF binding layer that accesses the ADF Business Components. As a Swing developer, you don't need to change this code.
4. Selecting a new Empty Form opens the Create ADF Swing Empty Form Wizard. Click Next to skip the Welcome
page of the Wizard (if it appears).
Page 23 of 64Build Rich Client Forms with ADF Swing and ADF Business Components
08/06/2010http://www.oracle.com/technology/obe/obe1013jdev/10131/adf%20swing/master_detail_...

5. Name the new form MDForm. Accept the other defaults and click Next to continue.
Click Finish.
6. The Empty Form opens in the Design editor.
Page 24 of 64Build Rich Client Forms with ADF Swing and ADF Business Components
08/06/2010http://www.oracle.com/technology/obe/obe1013jdev/10131/adf%20swing/master_detail_...

7. Select the default generated navigation bar and delete it.
Note: The default navigation bar is generic and operates on any table or form that is added to a Java panel. For this application, you create two navigation bars that are specifically created for distinct datacontrols on the panel.
8. Click within the top part of the frame to select the Swing frame and open the Property Inspector to set Title of frame
to Swing Demo.
Page 25 of 64Build Rich Client Forms with ADF Swing and ADF Business Components
08/06/2010http://www.oracle.com/technology/obe/obe1013jdev/10131/adf%20swing/master_detail_...

9. Click in the middle of the frame to select the DataPanel. Set the layout property in the Property pane to
FormLayout.
Note: FormLayout places components in a grid of columns and rows, allowing specified components to span multiple columns or rows.
In the new dialog set the following properties - Number of rows 8 - Number of columns 3 - Click OK.
The new form should look like this:
Page 26 of 64Build Rich Client Forms with ADF Swing and ADF Business Components
08/06/2010http://www.oracle.com/technology/obe/obe1013jdev/10131/adf%20swing/master_detail_...
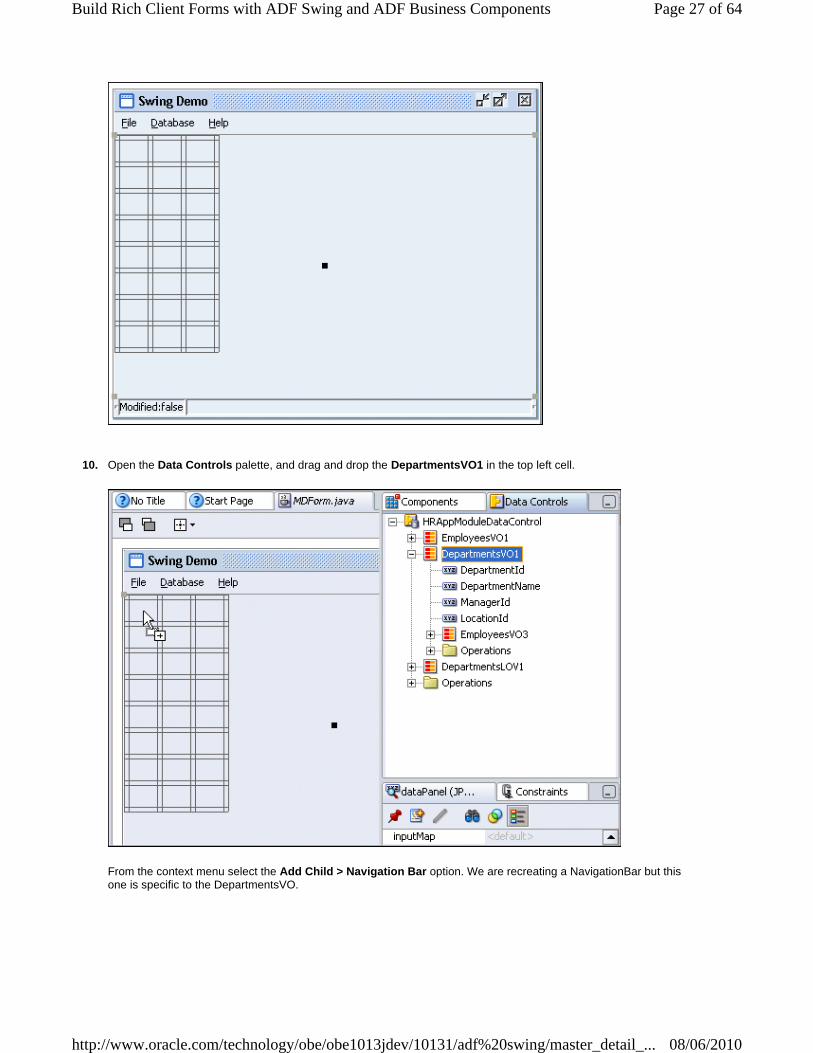
10. Open the Data Controls palette, and drag and drop the DepartmentsVO1 in the top left cell.
From the context menu select the Add Child > Navigation Bar option. We are recreating a NavigationBar but this one is specific to the DepartmentsVO.
Page 27 of 64Build Rich Client Forms with ADF Swing and ADF Business Components
08/06/2010http://www.oracle.com/technology/obe/obe1013jdev/10131/adf%20swing/master_detail_...

Select the Scrollbar and drag the right most blue marker to size the scrollbar to span columns 1 to 3.
11. Adding a selection of databound columns to the form.
In the Data Controls Palette, expand the DepartmentsVO1 node, select DepartmentId and drag and drop it in the cell on the second column first row (below the Scrollbar).
Page 28 of 64Build Rich Client Forms with ADF Swing and ADF Business Components
08/06/2010http://www.oracle.com/technology/obe/obe1013jdev/10131/adf%20swing/master_detail_...

In the context menu select Add Child > Text Field
Note: You can set an ADF attribute binding on basic UI components that you insert from the Data Control Palette. Use a TextField to display plain text in a single line.
12. Repeat the previous step for DepartmentName and LocationId. Your form should look like this:
Page 29 of 64Build Rich Client Forms with ADF Swing and ADF Business Components
08/06/2010http://www.oracle.com/technology/obe/obe1013jdev/10131/adf%20swing/master_detail_...

13. Adding the corresponding default label to each field.
Open the Component Palette in JDeveloper (Ctrl+Shift+P) and select the ADF Swing Controls library. Drag and drop a JULabel component in the first column in front of the DepartmentId text field.
14. Repeat the previous step to add a JULabel in front of the two other text fields.
Page 30 of 64Build Rich Client Forms with ADF Swing and ADF Business Components
08/06/2010http://www.oracle.com/technology/obe/obe1013jdev/10131/adf%20swing/master_detail_...
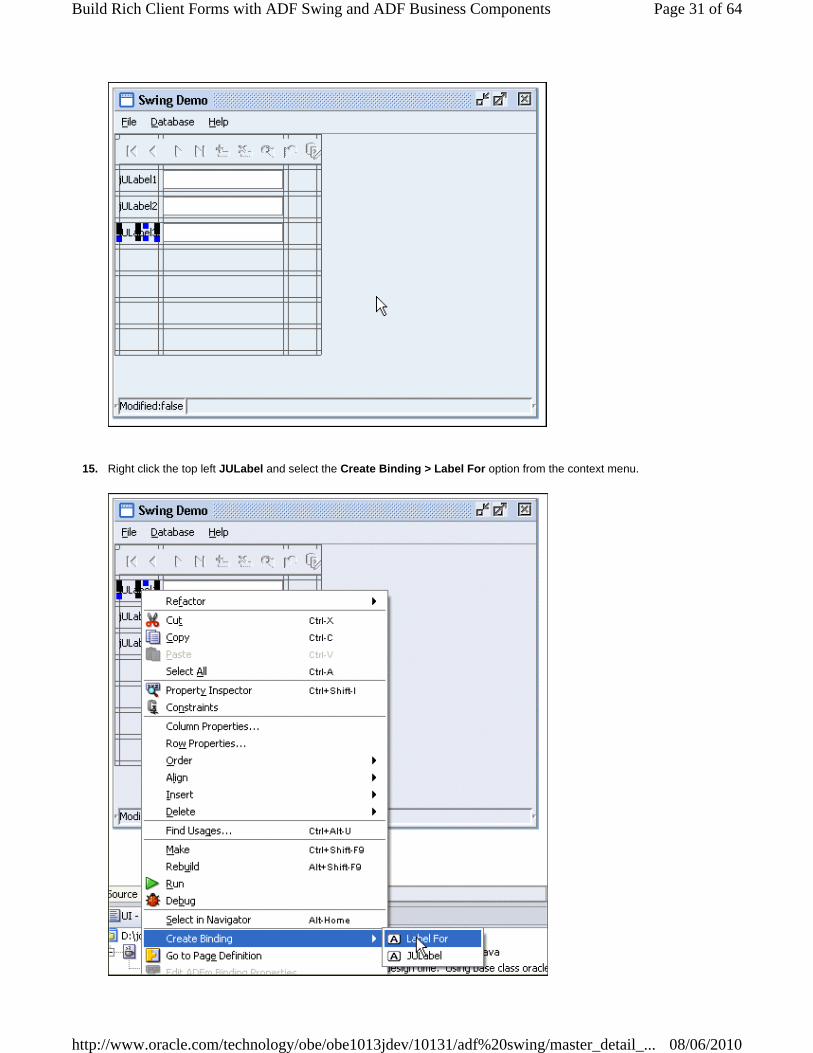
15. Right click the top left JULabel and select the Create Binding > Label For option from the context menu.
Page 31 of 64Build Rich Client Forms with ADF Swing and ADF Business Components
08/06/2010http://www.oracle.com/technology/obe/obe1013jdev/10131/adf%20swing/master_detail_...

Note: The JULabel control can be bound to the metadata defined either on the Business Component Entity Object or View Object (display attribute) or the ADF metadata (used with EJB, POJO or Web Services controls to define display attributes).
16. In the Attribute Binding Editor, expand the HRAppModuleDataControl node, select the DepartmentsVO1 and select the DepartmentId attribute.
Click OK.
17. Repeat steps 15 and 16 (Create Binding > Label For) to map JULabel2 to DepartmentName and JULabel3 to
LocationId.
Page 32 of 64Build Rich Client Forms with ADF Swing and ADF Business Components
08/06/2010http://www.oracle.com/technology/obe/obe1013jdev/10131/adf%20swing/master_detail_...

Note: You could easily right align the labels using a multi label selection (CTRL + label selection) and then click on
the Right Align icon on the toolbar.
18. From the Data Controls palette, drop DepartmentsVO1 to column 3, row 1. From the context menu, select Add
Child > Scrollbar.
Page 33 of 64Build Rich Client Forms with ADF Swing and ADF Business Components
08/06/2010http://www.oracle.com/technology/obe/obe1013jdev/10131/adf%20swing/master_detail_...

19. Drag on the blue marker to size the scrollbar to span rows 1-3
20. Right click the scroll bar component and select Column Properties from the context menu.
Page 34 of 64Build Rich Client Forms with ADF Swing and ADF Business Components
08/06/2010http://www.oracle.com/technology/obe/obe1013jdev/10131/adf%20swing/master_detail_...

Set the size to Constant Size with a value of 12 dialog unit.
Click OK
21. Right click one of the labels (first column) and select Column Properties from the context menu. Set the Resize
Page 35 of 64Build Rich Client Forms with ADF Swing and ADF Business Components
08/06/2010http://www.oracle.com/technology/obe/obe1013jdev/10131/adf%20swing/master_detail_...

Back to Topic
Back to Topic List
Creating the Detail Part
Now that you have built the Master part of the form based on departments, you add the Detail part based on employees.
The next few steps take you through the testing process.
behavior to None.
Click the Save All icon on the JDeveloper menu bar, or select File > Save All from the menu.
1. From the Swing Containers library in the Component Palette, add a JScrollPane to column 1 row 5.
Page 36 of 64Build Rich Client Forms with ADF Swing and ADF Business Components
08/06/2010http://www.oracle.com/technology/obe/obe1013jdev/10131/adf%20swing/master_detail_...

Use the blue markers to span it across rows 6-7 and columns 1-3.
Note: A JScrollPane provides a scrollable view of a component. When screen real estate is limited, use a scroll pane to display a component that is large or one whose size can change dynamically.
2. With the JscrollPane selected, press the toolbar icon for Grow Row
Page 37 of 64Build Rich Client Forms with ADF Swing and ADF Business Components
08/06/2010http://www.oracle.com/technology/obe/obe1013jdev/10131/adf%20swing/master_detail_...

3. From the DataControls Palette, drag and drop EmployeesVO3 onto the JScrollPane. In the context menu, select Add Child > Table
Page 38 of 64Build Rich Client Forms with ADF Swing and ADF Business Components
08/06/2010http://www.oracle.com/technology/obe/obe1013jdev/10131/adf%20swing/master_detail_...

The MDForm should now look like this:
4. In the Applications Navigator, select the MDFormPageDef.xml node and open the Structure pane.
5. Expand the table binding node and double click the DepartmentsVO1EmployeesVO3 to open the binding editor.
Page 39 of 64Build Rich Client Forms with ADF Swing and ADF Business Components
08/06/2010http://www.oracle.com/technology/obe/obe1013jdev/10131/adf%20swing/master_detail_...

In the Display Attributes pane, select all columns except EmployeeId- FirstName- LastName- Email-
DepartmentId and click the Remove button to shuttle the selection in the Available Attributes pane.
Page 40 of 64Build Rich Client Forms with ADF Swing and ADF Business Components
08/06/2010http://www.oracle.com/technology/obe/obe1013jdev/10131/adf%20swing/master_detail_...

Click OK.
6. Close and save the MDForm.java then re-open MDForm.java to see the changes in the visual editor. Your MDForm
should now look like this:
7. From the Data Control Pane, Drag and Drop EmployeesVO3 to row 4 in the panel. From the context menu, select
the Add Child > NavigationBar option.
Page 41 of 64Build Rich Client Forms with ADF Swing and ADF Business Components
08/06/2010http://www.oracle.com/technology/obe/obe1013jdev/10131/adf%20swing/master_detail_...

Use the blue marker to span it across all 3 columns.
8. Right-click a component from the second column of the FormLayout and choose Column Properties from the
context menu.
Page 42 of 64Build Rich Client Forms with ADF Swing and ADF Business Components
08/06/2010http://www.oracle.com/technology/obe/obe1013jdev/10131/adf%20swing/master_detail_...

In the Column Properties dialog, set the Grow property of the Resize section to 1
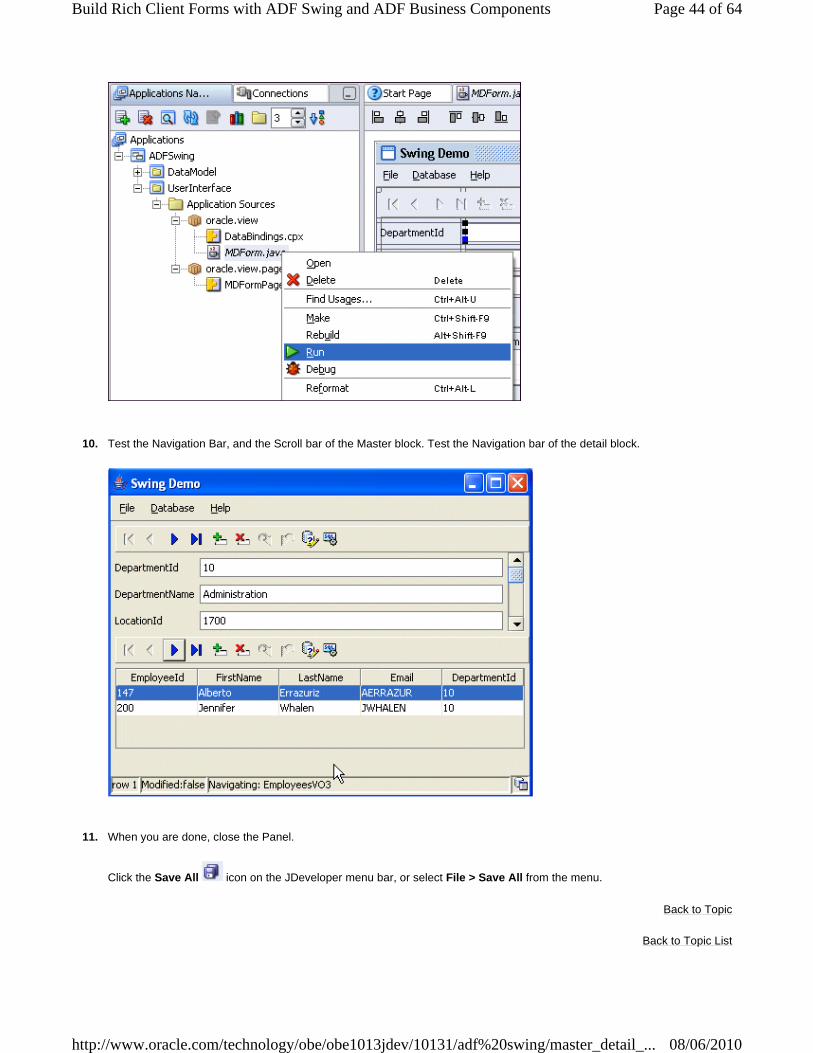
9. Right-click the MDForm.java node in the Applications Navigator and Run it.
Page 43 of 64Build Rich Client Forms with ADF Swing and ADF Business Components
08/06/2010http://www.oracle.com/technology/obe/obe1013jdev/10131/adf%20swing/master_detail_...
Back to Topic
Back to Topic List
10. Test the Navigation Bar, and the Scroll bar of the Master block. Test the Navigation bar of the detail block.
11. When you are done, close the Panel.
Click the Save All icon on the JDeveloper menu bar, or select File > Save All from the menu.
Page 44 of 64Build Rich Client Forms with ADF Swing and ADF Business Components
08/06/2010http://www.oracle.com/technology/obe/obe1013jdev/10131/adf%20swing/master_detail_...

Adding a Combo Box to a Detail attribute
Now that you have built the Master-Detail Swing form, you create a listbox for the DepartmentId of the detail form so that Department Name is now displayed in place of the DepartmentId. The listbox lets the user choose one of several choices.
To create a list for the DepartmentId, perform the following steps:
1. In the Applications Navigator select the MDFormPageDef.xml node and in the Structure pane, double click the DepartmentsVo1EmployeesVO3 to open the binding editor.
2. Select the Attributes Properties tab and set the editor property for the DepartmentId to Combo Box. Then press the
[...] Edit button to create the binding for the Combo Box.
Page 45 of 64Build Rich Client Forms with ADF Swing and ADF Business Components
08/06/2010http://www.oracle.com/technology/obe/obe1013jdev/10131/adf%20swing/master_detail_...

Click the Create button in the Editor Properties window
3. In the List Binding Editor dialog, Select HRAppModuleDataControl.EmployeesVO3 as the Base Data Source.
Press the Add button for the List Data Source and expand the HRAppModuleDataControl node to select DepartmentsLOV1
Page 46 of 64Build Rich Client Forms with ADF Swing and ADF Business Components
08/06/2010http://www.oracle.com/technology/obe/obe1013jdev/10131/adf%20swing/master_detail_...

Map the Base Data Source Attribute DepartmentId to the List Data Source Attribute DepartmentId in the attribute mapping.
Page 47 of 64Build Rich Client Forms with ADF Swing and ADF Business Components
08/06/2010http://www.oracle.com/technology/obe/obe1013jdev/10131/adf%20swing/master_detail_...

Set the DepartmentName as the display attribute. Set the No Selection Item field to Selection Required
Page 48 of 64Build Rich Client Forms with ADF Swing and ADF Business Components
08/06/2010http://www.oracle.com/technology/obe/obe1013jdev/10131/adf%20swing/master_detail_...

Close all editors by pressing OK.
4. Rerun the application and experiment with the combo box.
Page 49 of 64Build Rich Client Forms with ADF Swing and ADF Business Components
08/06/2010http://www.oracle.com/technology/obe/obe1013jdev/10131/adf%20swing/master_detail_...

Back to Topic
Back to Topic List
Creating an Edit Form
Now that you have built your new Master Detail Swing form, you're going to create an Edit form to display additional information related to the selected Detail record.
The next few steps take you through the testing process.
5. Click the DepartmentId column on one of the details to pop up the Department list of values.
Page 50 of 64Build Rich Client Forms with ADF Swing and ADF Business Components
08/06/2010http://www.oracle.com/technology/obe/obe1013jdev/10131/adf%20swing/master_detail_...
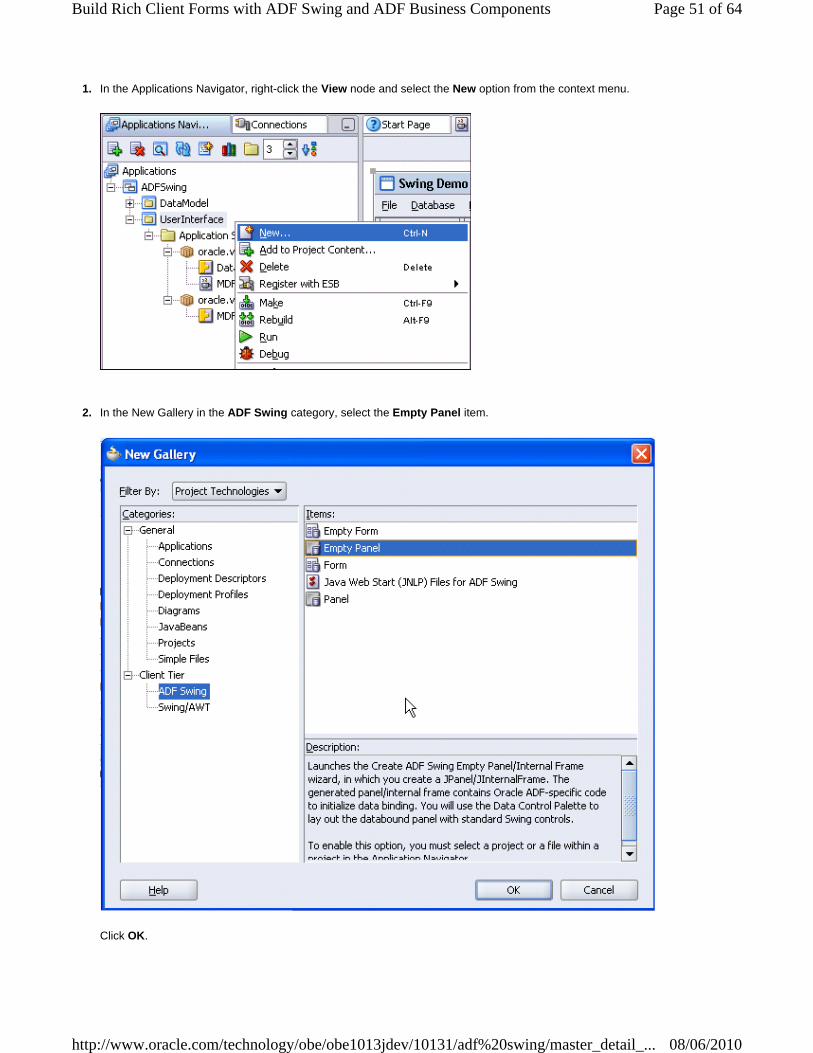
1. In the Applications Navigator, right-click the View node and select the New option from the context menu.
2. In the New Gallery in the ADF Swing category, select the Empty Panel item.
Click OK.
Page 51 of 64Build Rich Client Forms with ADF Swing and ADF Business Components
08/06/2010http://www.oracle.com/technology/obe/obe1013jdev/10131/adf%20swing/master_detail_...

3. Click Next to skip the Welcome page of the Create ADF Swing dialog, and in Step 1 enter EmployeeEdit as the panel name.
Click Next then Finish
4. The EmployeeEdit panel opens in the Design editor.
5. From the DataControls Palette, drag the EmployeesVO3 to the new panel and choose Add Edit Form option from the
context menu.
Page 52 of 64Build Rich Client Forms with ADF Swing and ADF Business Components
08/06/2010http://www.oracle.com/technology/obe/obe1013jdev/10131/adf%20swing/master_detail_...

6. In the opened dialog, set the CommissionPct attribute to be rendered as a Combo Box.
Click OK.
7. Close the EmployeeEdit Design view and reopen it to see the changes.
Page 53 of 64Build Rich Client Forms with ADF Swing and ADF Business Components
08/06/2010http://www.oracle.com/technology/obe/obe1013jdev/10131/adf%20swing/master_detail_...

8. Resize the EmployeesEdit form so that all attributes from the edit form are visible.
9. Double-click the PanelEmployeesVO3Helper.java node in the Applications Navigator and open the design view in the
editor.
Page 54 of 64Build Rich Client Forms with ADF Swing and ADF Business Components
08/06/2010http://www.oracle.com/technology/obe/obe1013jdev/10131/adf%20swing/master_detail_...

10. Select the panel and set the layout property to Vertical Flow Layout
11. Select any edit form label column and right click to select the Column Properties option.
Page 55 of 64Build Rich Client Forms with ADF Swing and ADF Business Components
08/06/2010http://www.oracle.com/technology/obe/obe1013jdev/10131/adf%20swing/master_detail_...

In the Column Properties dialog, set the Resize property to none.
Page 56 of 64Build Rich Client Forms with ADF Swing and ADF Business Components
08/06/2010http://www.oracle.com/technology/obe/obe1013jdev/10131/adf%20swing/master_detail_...

12. Select the combo box component for the CommissionPct and choose Edit ADFm Binding Properties from the context
menu.
Page 57 of 64Build Rich Client Forms with ADF Swing and ADF Business Components
08/06/2010http://www.oracle.com/technology/obe/obe1013jdev/10131/adf%20swing/master_detail_...

13. In the List Binding Editor, create a Fixed List, set the Base Data Source attribute to CommissionPct and add the following
list of values:
.10 .15 .20 .25 .30 .35 .40 .45 .50 .55 .60 .65 .70 .75
Set the No Selection Item to Include Blank Item
Page 58 of 64Build Rich Client Forms with ADF Swing and ADF Business Components
08/06/2010http://www.oracle.com/technology/obe/obe1013jdev/10131/adf%20swing/master_detail_...
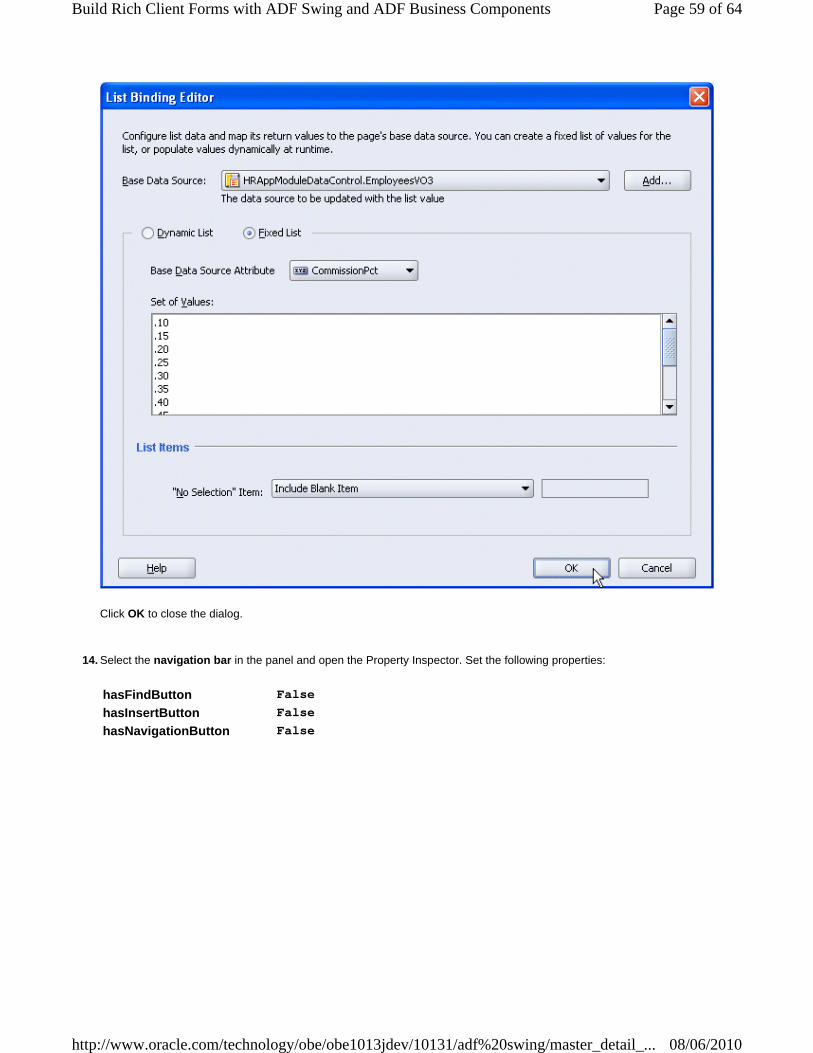
Click OK to close the dialog.
14. Select the navigation bar in the panel and open the Property Inspector. Set the following properties:
hasFindButton False
hasInsertButton False
hasNavigationButton False
Page 59 of 64Build Rich Client Forms with ADF Swing and ADF Business Components
08/06/2010http://www.oracle.com/technology/obe/obe1013jdev/10131/adf%20swing/master_detail_...

15. Open the MDForm panel in the design editor, and drag the EmployeesEdit panel from the Applications Navigator into the
last row, first column of the MDForm Panel
16. In the new dialog, choose Display Panel in JDialog and select the option Invoke JDialog from Button
Page 60 of 64Build Rich Client Forms with ADF Swing and ADF Business Components
08/06/2010http://www.oracle.com/technology/obe/obe1013jdev/10131/adf%20swing/master_detail_...
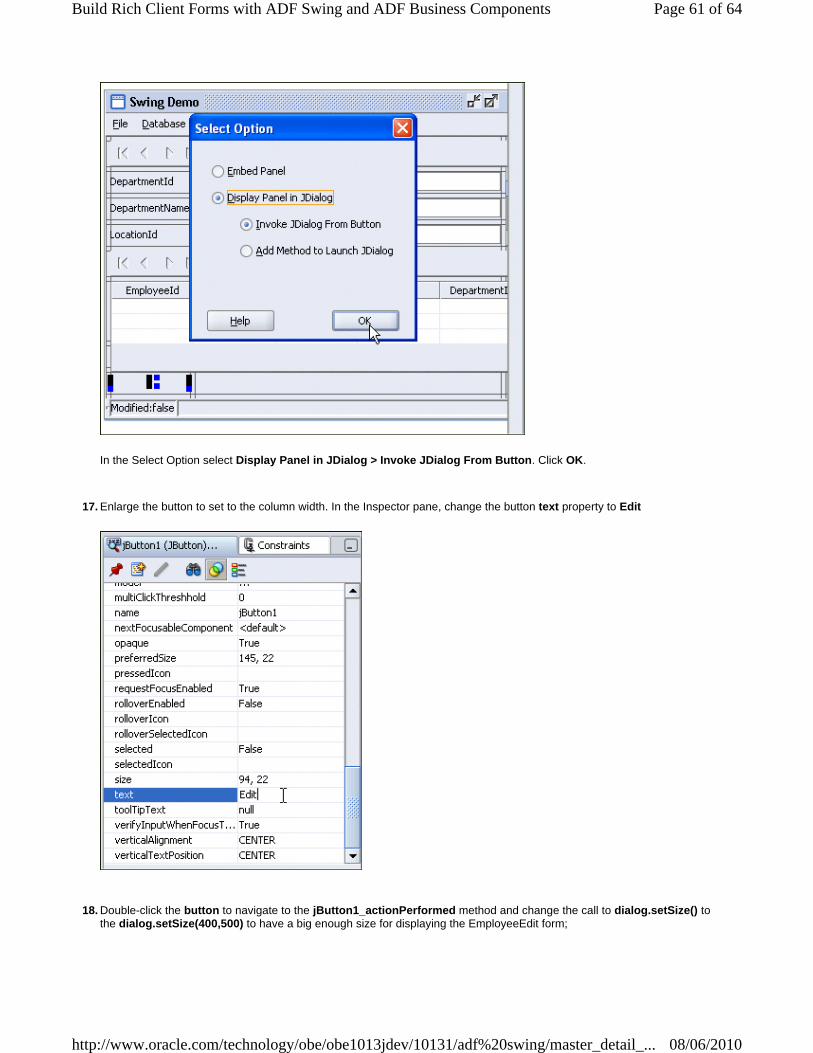
In the Select Option select Display Panel in JDialog > Invoke JDialog From Button. Click OK.
17. Enlarge the button to set to the column width. In the Inspector pane, change the button text property to Edit
18. Double-click the button to navigate to the jButton1_actionPerformed method and change the call to dialog.setSize() to
the dialog.setSize(400,500) to have a big enough size for displaying the EmployeeEdit form;
Page 61 of 64Build Rich Client Forms with ADF Swing and ADF Business Components
08/06/2010http://www.oracle.com/technology/obe/obe1013jdev/10131/adf%20swing/master_detail_...

19. Run the MDForm, navigate from the master to a detail with many records.
Press the Edit button on one of the detail row to display the EmployeeEdit form for the selected record.
Page 62 of 64Build Rich Client Forms with ADF Swing and ADF Business Components
08/06/2010http://www.oracle.com/technology/obe/obe1013jdev/10131/adf%20swing/master_detail_...

20. Test the Combo Box for CommissionPct.
Page 63 of 64Build Rich Client Forms with ADF Swing and ADF Business Components
08/06/2010http://www.oracle.com/technology/obe/obe1013jdev/10131/adf%20swing/master_detail_...

Back to Topic List
Summary
In this tutorial, you created a simple application by using Oracle JDeveloper, ADF Business Components, and ADF Swing. You learned how to:
Place the cursor over this icon to hide all screenshots.
Back to Topic List
When you are done, close the Application window.
You've successfully completed the ADF Swing tutorial.
Build the Business Model using ADF Business ComponentsCreate a Master-Detail ADF Swing formCreate an Edit ADF Swing form
Page 64 of 64Build Rich Client Forms with ADF Swing and ADF Business Components
08/06/2010http://www.oracle.com/technology/obe/obe1013jdev/10131/adf%20swing/master_detail_...