brs gm100 glucose monitoring system - bioreactor … · brs gm100 glucose monitoring system user...
TRANSCRIPT

BRS GM100 Glucose Monitoring System
User
Instruction
Manual
Ver. 3.5

2
TABLE OF CONTENTS Introduction .......................................................................................................................................................................................................................................................... 3
Intended Use ................................................................................................................................................................................................................................................................ 3
Understanding the GM100 Glucose Monitoring System........................................................................................................................................................................................ 4
Explanation of the Full Display Screen .......................................................................................................................................................................................................................... 4
GMS100 Test Strips ....................................................................................................................................................................................................................................................... 4
Changing the Battery .................................................................................................................................................................................................................................................... 5
Meter Set-up ......................................................................................................................................................................................................................................................... 6
Basic Rules .................................................................................................................................................................................................................................................................... 6
Setting the Clock (Year, Date, Time) ............................................................................................................................................................................................................................. 6
Selecting the Units of Measurement (mg/dL or mmol/L)............................................................................................................................................................................................. 7
Verifying the Meter is Properly Functioning ................................................................................................................................................................................................................. 7
Loading Meter with Test Strip Code ............................................................................................................................................................................................................................. 8
Performing a Control Standard Solution Test ........................................................................................................................................................................................................ 8
Troubleshooting Control Standard Solution Test ......................................................................................................................................................................................................... 9
Glucose Measurement .......................................................................................................................................................................................................................................... 9
Performing a Glucose Test ............................................................................................................................................................................................................................................ 9
Recalling Results - Entering Memory Mode......................................................................................................................................................................................................... 10
Maintenance ....................................................................................................................................................................................................................................................... 10
Cleaning ...................................................................................................................................................................................................................................................................... 10
Storage and Handling ................................................................................................................................................................................................................................................. 10
Display Screen and Error Messages ............................................................................................................................................................................................................................ 11
Product Information ........................................................................................................................................................................................................................................... 13
Product Specifications ................................................................................................................................................................................................................................................ 13
Warnings, Precautions, and Limitations ..................................................................................................................................................................................................................... 14
Warranty ..................................................................................................................................................................................................................................................................... 14
Contact Information ................................................................................................................................................................................................................................................... 14

3
INTRODUCTION
Intended Use The BioReactor Sciences (BRS) GM100 Glucose Monitoring System is designed to quantitatively measure the glucose concentration
in microbial and cell cultures for bioprocessing applications. The GM100
System uses the latest glucose monitoring technology to provide you a simple, rapid, relatively accurate, and
inexpensive way to measure glucose concentration in culture medium. The system requires only a 2.5µL of medium sample to
complete the testing in only 10 seconds.
The System Includes:
One (1) GM100 Glucose Meter
Fifty (50) GMTS100 Glucose Test Strips (includes Code Key)
GM100 Check Key
Carrying Case
Quick Reference Guide and User’s Operational Manual available on website: http://www.bioreactorsciences.com/gm-100-portable-glucose-meter.html

4
UNDERSTANDING THE GM100 GLUCOSE MONITORING SYSTEM
Top Bottom
Explanation of the Full Display Screen
NOTE: Meters are programmed to show results in either mg/dL or mmol/L. See Meter Set-up to select the units of measurement.
GMTS50 Test Strips
These test strips need only 2.5 µL (microliter) of medium. Apply medium to the sample application tip. The strip draws in the medium by capillary action. The medium glucose reacts with the enzyme on the test strip. This produces a current proportional to the medium glucose level. The meter detects the current and converts it into a glucose measurement.
GMTS50 Test Strips are intended for use only with the GM100. Each batch of test strips is assigned a specific 3 digit code that must be loaded into the meter.

5
Test Strip
Sample is drawn up on this tip end with arrow This electrode end to be inserted into the meter
Changing the Battery The GM100 Glucose Monitoring System comes with 2 AAA batteries (not pre-installed or not included for security regulation). NOTE:
Replacing the battery will not delete meter settings or test results stored in the meter.
To save battery power, the meter turns itself off after a period 3-5 minutes of inactivity.
Replace batteries when the low battery symbol appears. Otherwise inaccurate results may be obtained.
Discard used batteries per local guidelines. To replace batteries:
1. Turn meter off. 2. Remove the battery cover on the back of the meter, by sliding it downward. 3. Load new batteries into the battery carriage, aligning the "+" and "-" ends. 4. Reattach the battery cover.

METER SET-UP
Basic Rules
Meter set-up allows you to set the year, date, time, and units of measurement. Before using the GM100 Glucose Monitoring System for the first time, set the time and date. Do not perform a medium glucose test until you have set-up the meter.
Setting the Clock (Year, Date, Time)
1. Install batteries (if not already installed).
2. In the battery panel, press the left button to turn the meter on.
3. The first blinking number designates the year (13=2013, 14=2014, etc.). Press the front button to change/advance the year number. After the target year appears, press the back left button to change the selection to month.
4. The month number designation should start blinking. Once blinking you can now change the month. Press the front button until your desired month number is displayed. After the proper month appears, press the back left button to change the selection to day.
5. The day-number designation (top right hand corner) should now be blinking. Once blinking you can now adjust the day. Press the front button until your desired day number is displayed. After the proper day appears, press the back left button to change the selection to time-hour.
6. The hour-number designation in military time (middle) should now be blinking. Once blinking you can now adjust the hour. Press the front button until your desired hour is displayed. After the proper hour appears, press the back left button to change the selection to time-minutes.
7. The minutes-number designation (middle-right) should now be blinking. Once blinking you can now adjust the minutes. Press the front button until your desired minutes is displayed. Hold the button down to advance. After the proper minutes appear, press the back left button to power the meter off.
8. "OFF" should appear on the meter display. The clock has now been set.
Selecting the Units of Measurement (mg/dL or mmol/L)
1. In the battery panel, the switch in the lower right hand corner designates the units of measurement.
2. To use the meter with the units of measurement as mg/dL, switch the lower right hand switch
to the RIGHT. When a test strip is inserted and the meter powered on, the units "mg/dL" will appear in the lower right hand corner.
3. To use the meter with the units of measurement as mmol/L, switch the lower right hand switch to the LEFT. When a test strip is inserted and the meter powered on, the units "mmol/L" will appear in the lower right hand corner.
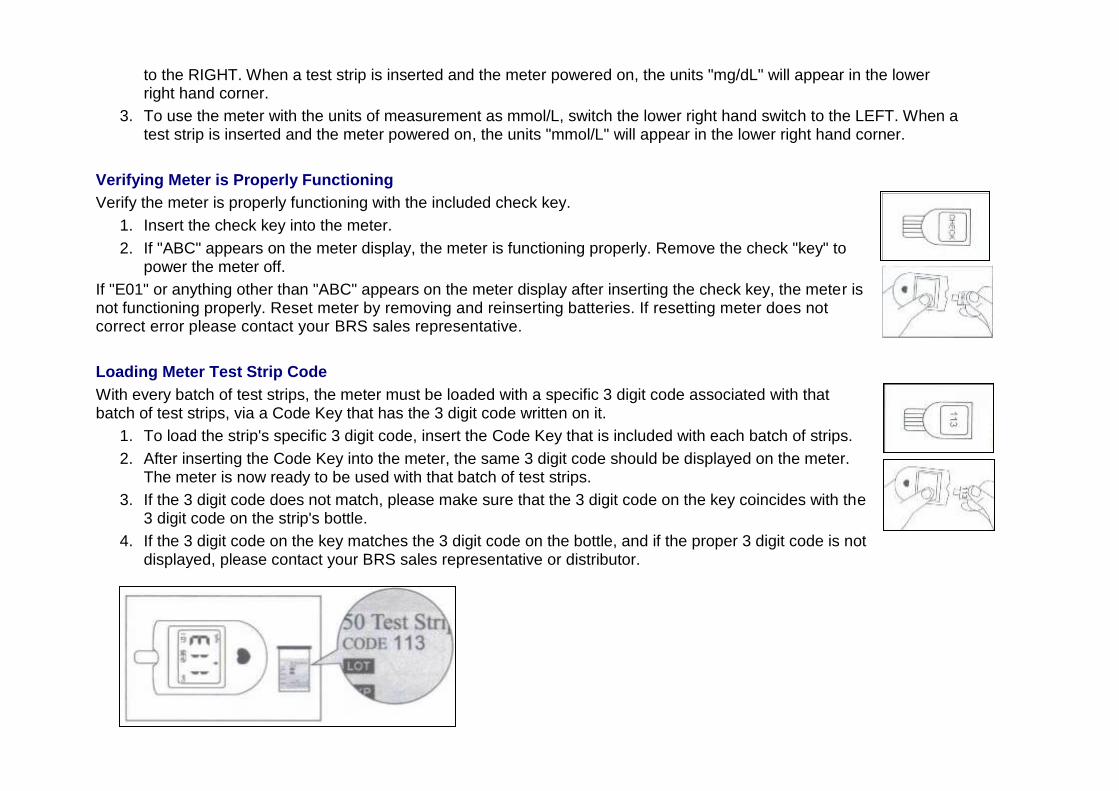
Verifying Meter is Properly Functioning
Verify the meter is properly functioning with the included check key.
1. Insert the check key into the meter.
2. If "ABC" appears on the meter display, the meter is functioning properly. Remove the check "key" to power the meter off.
If "E01" or anything other than "ABC" appears on the meter display after inserting the check key, the meter is not functioning properly. Reset meter by removing and reinserting batteries. If resetting meter does not correct error please contact your BRS sales representative.
Loading Meter Test Strip Code
With every batch of test strips, the meter must be loaded with a specific 3 digit code associated with that batch of test strips, via a Code Key that has the 3 digit code written on it.
1. To load the strip's specific 3 digit code, insert the Code Key that is included with each batch of strips.
2. After inserting the Code Key into the meter, the same 3 digit code should be displayed on the meter. The meter is now ready to be used with that batch of test strips.
3. If the 3 digit code does not match, please make sure that the 3 digit code on the key coincides with the 3 digit code on the strip's bottle.
4. If the 3 digit code on the key matches the 3 digit code on the bottle, and if the proper 3 digit code is not displayed, please contact your BRS sales representative or distributor.

PERFORMING A CONTROL STANDARD SOLUTION TEST
The control standard solution test is used to verify that the GM100 Glucose Monitoring System and Test Strips are working together as a system. This test is performed at BioReactor Sciences before shipping and is normally not required by the user. It is however and optional test that can be conducted as frequently as you wish using a standard solution prepared by yourself under the below situations.
1. When you suspect the meter or strips are not properly performing.
2. When the glucose measurement seems inaccurate.
3. If the meter is dropped.
Prepare the control standard solution as follows: Standard A: use the fresh medium of your process/of your preference with known glucose concentration Standard B ([¾] of Std A): 3 parts of Std A + 1 part of Z (glucose-free medium if available or PBS buffer solution) Standard C: ([½] of Std A): 1 part of Std A + 1 part of Z Standard D: ([¼] of Std A): 1 part of Std A + 3 parts of Z
IMPORTANT:
1. Store aseptically the control standard solution in a refrigerator
2. The enzymatic reaction rate may be affected by physical conditions such as pH and temperature, and by the contents in the media other than glucose.
To Conduct a Test Using the Control Standard Solution:
1. Open the bottle of test strips.
2. Remove a new strip from the bottle. Close the bottle's lid to preserve the strip's shelf life.
3. Insert a new strip into the meter with the electrode side first. The strip should seat FIRMLY into the meter. The meter will turn on automatically. A 3 digit code will appear on the meter's front display. Confirm that the 3 digit code is displayed, and that it coincides with the strip's 3 digit code on the bottle.
4. The droplet symbol will start flashing on the meter. You may now place the tip of the strip into the droplet of standard solution in an angle of >45 degree. The sample will be drawn in and the meter will emit a beep when a sufficient sample size has been submitted.
5. The meter will begin counting down from 10. Your glucose measurement will then be displayed
Troubleshooting Control Standard Solution Test
Measure the glucose of all four standard solutions twice for each solution using the key provided. If the measurements do not match the glucose concentration of the control solution and is not within the accepted accuracy range (+/- 10% of the standard concentration) please contact your BRS representative or distributor.
GLUCOSE MEASUREMENT
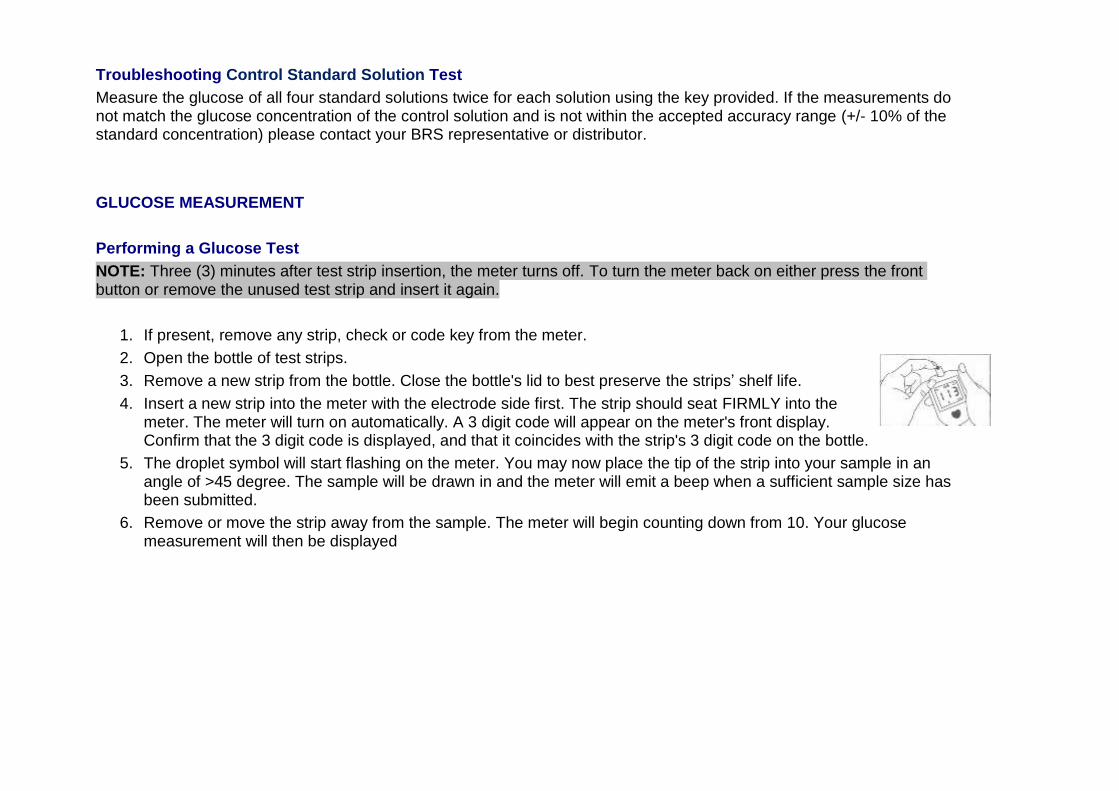
Performing a Glucose Test
NOTE: Three (3) minutes after test strip insertion, the meter turns off. To turn the meter back on either press the front button or remove the unused test strip and insert it again.
1. If present, remove any strip, check or code key from the meter.
2. Open the bottle of test strips.
3. Remove a new strip from the bottle. Close the bottle's lid to best preserve the strips’ shelf life.
4. Insert a new strip into the meter with the electrode side first. The strip should seat FIRMLY into the meter. The meter will turn on automatically. A 3 digit code will appear on the meter's front display. Confirm that the 3 digit code is displayed, and that it coincides with the strip's 3 digit code on the bottle.
5. The droplet symbol will start flashing on the meter. You may now place the tip of the strip into your sample in an angle of >45 degree. The sample will be drawn in and the meter will emit a beep when a sufficient sample size has been submitted.
6. Remove or move the strip away from the sample. The meter will begin counting down from 10. Your glucose measurement will then be displayed

RECALLING RESULTS - ENTERING MEMORY MODE
The GM100 Glucose Monitoring System can store up to 70 measurements, assigned with a specific Memory Slot Number ("01" to "70"), stamped with its sample time. When the memory has exceeded 70 measurements or slots, the oldest measurements will be replaced by the newest measurements. The newest sample will always be Slot No. "01". The meter's Memory Mode can only be accessed when the meter is off.
1. To access the Memory Mode hold down the front button. Memory Slot No. 1 designated by "01" will appear and then flash intermittently with a screen displaying the glucose measurement with a time/date stamp coinciding with when the measurement was taken.
2. To access older measurements, press the front button until your desired measurement or Slot Number appears. When the front button is pressed, sequential numbers ("02" to "70") will appear with coinciding measurements and time/date stamps. Again, the newest sample will always be Slot No. "01".
3. The meter will automatically turn off when inactive. Or hold down the front button to power the meter off.
MAINTENANCE
Cleaning
To prevent malfunction of the meter, keep the test strip port free of moisture, dirt, or dust. Use a lint-free cloth dampened with water to clean meter. Thoroughly wring out cloth before use. Do not use an abrasive cloth or antiseptic solution, as these may damage the display screen. Do not clean inside battery compartment. Do not use alcohol to clean the meter as it may damage the meter.
Storage and Handling
1. When meter is not in use, store it in its case at 32°F-122°F (0°C-50°C).
2. Avoid prolonged exposure with direct sunlight.
3. Do not leave the meter in very hot or cold places.
4. Do not leave it near a heat source (radiator) or in a car in hot or cold weather.

5. Do not store or use meter or test strips:
i. in high humidity, such as a bathroom or kitchen
ii. near a strong electromagnetic field such as a microwave oven or cell phone.
6. Do not use a meter that has been dropped into water, or if any water has entered the meter. Even if you dry it, correct test results may not be obtained, and malfunction may result.
7. Do not store meter or test strips near bleach or cleaners that contain bleach.
8. Do not drop meter. This can damage the meter. If you do drop meter, check it with a control solution test.
9. Do not take the meter apart.
10. Do not leave test strips out of their bottle.
11. Do not hold test strips with fingers for a long period of time.
12. Do not hold test strips with wet or dirty fingers. Otherwise correct test results may not be obtained.
Display Screen and Error Messages
Display Description Action
Coding Error - test strip code not correctly loaded. Code key not correctly inserted.
Remove and firmly reinsert code key.
Meter function error - meter requires resetting Reset meter by removing and reinserting batteries. If resetting meter does not correct error please contact your BRS sales representative.
Strip is not functioning properly Use a new strip.

Incorrect strip code Use proper strip for that code or reload strip's new code.
Operating Procedure Error - strip has been used Use a new strip.
Glucose measurement out of range - higher than 600 mg/dL or 33.3 mmol/L.
Review proper testing procedure and perform a quality check with the test control solution. Repeat test, if “HI” error still appears, contact your BRS sales representative.
Glucose measurement out of range - lower than 30 mg/dL or 1.66 mmol/L.
Review proper testing procedure and perform a quality check with the test control solution. Repeat test, if “LO” error still appears, contact your BRS sales representative.
Testing environment temperature is above the operating range of the system.
Measurement may not be accurate. Move to an area of temperature between 10ºC to 40ºC (50ºF - 104ºF). Do not artificially heat or cool the meter.
Testing environment temperature is below the operating range of the system.
Measurement may not be accurate. Move to an area of temperature between 10ºC to 40ºC (50ºF - 104ºF). Do not artificially heat or cool the meter.
Low batteries Batteries will need replacement soon.
No response or display when
strip is inserted into the meter.
1. Battery is dead
2. Incorrect strip may have been inserted
3. Meter is defective
1. Replace battery
2. Correctly insert the test strip
3. Contact BRS for further assistance

No response when sample is applied to the
test strip
1. Sample is not sufficient
2. Meter not properly functioning
1. Repeat test with sufficient sample size
2. Perform Meter Check with Check Key
NOTE : If the meter displays an error message not listed above, or if the meter shuts down for no apparent reason, please reset the meter by removing and reinserting the batteries. If resetting the meter does not resolve your issue, please contact your BRS sales representative or distributor.
PRODUCT INFORMATION
Product Specifications
Test Strips BRS GMTS50 Glucose Test Strips
Result Range 30 – 600 mg/dL (1.66 – 33.3 mmol/L)
Accuracy Range +/- 10%
Precision 10%
Sample Size 2.5 µL
Sample Source Microbial or cell culture medium & buffer solution
Test Time 10 seconds
Assay Method Electrochemical biosensor
Power Source 2xAAA 1.5-volt Alkaline Batteries
Battery Life Approximately 1000 tests
Memory 70 test results with time and date
Automatic Shut-off 3 minutes
Size/Dimensions 87 mm x 60 mm x 21 mm
Weight 75 g including battery
Operating Ranges 10℃~40℃(50℉~104℉), 20% - 80% Relative Humidity
Units of Measurement mg/dL or mmol/L

Warnings, Precautions, and Limitations
1. Strips can only be used once.
2. Hold the meter securely when inserting test strips.
3. Opening the meter will void manufacturer's warranty.
4. Meter is not compatible with other brand test strips.
5. Meter is not waterproof.
6. For accurate measurements and to not damage the meter, do not remove the test strips while the meter is counting down.
7. Meter must be used within a room temperature environment (5-42 degree Centigrade) with less than 85% humidity.
8. Medium samples with strong reducing agents (vitamin C or ureic acid) will impact glucose measurement accuracy. If unavoidable, contact us at [email protected]
Warranty You are a valued customer of BioReactor Sciences. It is important to us that you are completely satisfied with your GM100 Glucose Monitoring System. BioReactor Sciences warrants your GM100 Glucose Monitoring System will be free from defects in materials and workmanship for a period of two years from the date of the original purchase. If during this time the meter does not work properly because of a defect in materials or workmanship, BioReactor Sciences agrees to replace or repair, free of charge any and all parts proven to be defective and subject to warranty. This warranty is in lieu of all other warranties, expressed or implied, including any implied warranty of merchantability or fitness for any purpose, other than stated herein. This warranty does not apply to the performance of the GM100 Glucose Monitoring System that has been damaged by accident or has been altered, misused, tampered with, or abused in any way. This warranty only applies to the original purchaser of the meter and/or its agents. Other accessories and/or consumables such as the case, battery, test strips, etc. are not covered in this warranty.
CONTACT INFORMATION 1150 Home Place Drive Lawrenceville, GA 30043 Tel: 404-307-7100
Fax: 678-226-9367
E-mail: [email protected]
Website: www.BioReactorSciences.com