brocade 6.4.0 fabric os command reference manual
TRANSCRIPT

53-1001764-0213 September 2010
®
Fabric OSCommand Reference Manual
Supporting Fabric OS v6.4.0

Copyright © 2006-2010 Brocade Communications Systems, Inc. All Rights Reserved.
Brocade, the B-wing symbol, BigIron, DCX, Fabric OS, FastIron, IronPoint, IronShield, IronView, IronWare, JetCore, NetIron, SecureIron, ServerIron, StorageX, and TurboIron are registered trademarks, and DCFM, Extraordinary Networks, and SAN Health are trademarks of Brocade Communications Systems, Inc., in the United States and/or in other countries. All other brands, products, or service names are or may be trademarks or service marks of, and are used to identify, products or services of their respective owners.
Notice: This document is for informational purposes only and does not set forth any warranty, expressed or implied, concerning any equipment, equipment feature, or service offered or to be offered by Brocade. Brocade reserves the right to make changes to this document at any time, without notice, and assumes no responsibility for its use. This informational document describes features that may not be currently available. Contact a Brocade sales office for information on feature and product availability. Export of technical data contained in this document may require an export license from the United States government.
The authors and Brocade Communications Systems, Inc. shall have no liability or responsibility to any person or entity with respect to any loss, cost, liability, or damages arising from the information contained in this book or the computer programs that accompany it.
The product described by this document may contain “open source” software covered by the GNU General Public License or other open source license agreements. To find out which open source software is included in Brocade products, view the licensing terms applicable to the open source software, and obtain a copy of the programming source code, please visit http://www.brocade.com/support/oscd.

Brocade Communications Systems, Incorporated
Document History
The table below lists all versions of the Fabric OS Command Reference.
Corporate and Latin American HeadquartersBrocade Communications Systems, Inc.130 Holger WaySan Jose, CA 95134Tel: 1-408-333-8000 Fax: 1-408-333-8101 Email: [email protected]
Asia-Pacific HeadquartersBrocade Communications Systems China HK, Ltd.No. 1 Guanghua RoadChao Yang DistrictUnits 2718 and 2818Beijing 100020, ChinaTel: +8610 6588 8888Fax: +8610 6588 9999E-mail: [email protected]
European HeadquartersBrocade Communications Switzerland SàrlCentre SwissairTour B - 4ème étage29, Route de l'AéroportCase Postale 105CH-1215 Genève 15Switzerland Tel: +41 22 799 56 40Fax: +41 22 799 56 41Email: [email protected]
Asia-Pacific HeadquartersBrocade Communications Systems Co., Ltd. (Shenzhen WFOE)Citic PlazaNo. 233 Tian He Road NorthUnit 1308 – 13th FloorGuangzhou, ChinaTel: +8620 3891 2000Faz: +8620 3891 2111E-mail: [email protected]
Document Title Publication Number Summary of Changes Publication Date
Fabric OS Reference v2.0 53-0001487-03 September 1999
Fabric OS Reference v2.2 53-0001558-02 May 2000
Fabric OS Reference v2.3 53-0000067-02 December 2000
Fabric OS Reference v3.0 53-0000127-03 July 2001
Fabric OS Reference v2.6 53-0000194-02 December 2001
Fabric OS Reference v3.0 / v4.0 53-0000182-02 March 2002
Fabric OS Reference v4.0.2 53-0000182-03 September 2002
Fabric OS Reference v3.1.0 53-0000500-02 April 2003
Fabric OS Reference v4.1.0 53-0000519-02 April 2003
Fabric OS Reference v4.1.2 53-0000519-03 May 2003
Fabric OS Reference v4.1.2 53-0000519-04 July 2003
Fabric OS Reference v4.1.2 53-0000519-05 August 2003
Fabric OS Reference v4.1.2 53-0000519-06 October 2003
Fabric OS Reference v4.2.0 53-0000519-07 December 2003
Fabric OS Command Reference 53-0000519-08 March 2004
Fabric OS Command Reference 53-0000519-08 Rev. A April 2004
Fabric OS Command Reference 53-0000519-09 September 2004
Fabric OS Command Reference 53-0000519-10 April 2005
Fabric OS Command Reference 53-0000519-12 July 2005
Fabric OS Command Reference iii53-1001764-02

Fabric OS Command Reference 53-1000240-01 September 2006
Fabric OS Command Reference 53-1000436-01 June 2007
Fabric OS Command Reference 53-1000599-01 Added 13 new commands, Updated 23 commands with new options in support of v6.0. Removed 46 obsolete commands. Edit/revise ~ 150 commands. Added command syntax conventions to Preface. Updated FCS, standby CP, and RBAC tables. Added AD Type to RBAC table (Appendix A). Removed licensed command tables and SupportShow reference. Cosmetic edits throughout.
October 2007
Fabric OS Command Reference 53-1000599-02 Added 9new commands, Updated 28 commands to support new v6.1 functionality. Removed 6 operands from 6 commands. Corrected errors in ~150 commands. Updated Preface and RBAC/AD table. (Appendix A). Cosmetic edits throughout.
March 2008
Fabric OS Command Reference 53-1000599-03 Corrections and updates to 31 commands. Removed “Brocade Optional Features” from Preface. Added trademark note to Preface. Cosmetic edits throughout.
July 2008
Fabric OS Command Reference 53-1001115-01 Added 3 new commands to support Encryption. Modified 1 command. Updated Preface and RBAC/AD table.
August 2008
Fabric OS Command Reference 53-1001186-01 Added 14 new commands to support Logical Fabrics. Modified 63 commands with new command operands to support new Fabric OS v6.2.0 features. Removed 8 deprecated commands. Miscellaneous edits to ~40 commands to correct edits, update examples etc. Removed standby CP command table. Updated Preface, surrounding chapters, and command availability tables.
November 2008
Document Title Publication Number Summary of Changes Publication Date
iv Fabric OS Command Reference53-1001764-02

Fabric OS Command Reference 53-1001337-01 Added 18 new commands. Modified 27 commands with new command operands to support new Fabric OS v6.3.0 features. Removed 6 deprecated command options. Removed 6 diagnostic commands that now require root access. Miscellaneous edits to ~100 commands to correct edits, update examples etc. Updated Preface, surrounding chapters, and permission tables.
July 2009
Fabric OS Command Reference 53-1001764-02 Updated 4 help pages with new command options. Modified 16 help pages for minor updates and corrections.
January 2010
Fabric OS Command Reference 53-1001764-01 Added 8 new commands. Modified 41 commands with new operands to support Fabric OS v6.4.0 features. Removed 5 commands and 3 deprecated command options. Miscellaneous edits to ~100 additional commands to correct edits, update examples etc. Updated Preface, surrounding chapters, and permission tables.
March 2010
Fabric OS Command Reference 53-1001764-02 Miscellaneou updates to 7commands. Note that these updates are not current in the v6.4.0 manual pages on the switch.
September 2010
Document Title Publication Number Summary of Changes Publication Date
Fabric OS Command Reference v53-1001764-02

vi Fabric OS Command Reference53-1001764-02

Contents
About This Document
In this chapter . . . . . . . . . . . . . . . . . . . . . . . . . . . . . . . . . . . . . . . . . . . xxi
How this document is organized . . . . . . . . . . . . . . . . . . . . . . . . . . . . xxi
Supported hardware and software . . . . . . . . . . . . . . . . . . . . . . . . . . xxi
What is new in this document . . . . . . . . . . . . . . . . . . . . . . . . . . . . . xxiiiNew Commands. . . . . . . . . . . . . . . . . . . . . . . . . . . . . . . . . . . . . xxiiiModified Commands . . . . . . . . . . . . . . . . . . . . . . . . . . . . . . . . . xxiiiDeprecated Commands. . . . . . . . . . . . . . . . . . . . . . . . . . . . . . .xxvii
Document conventions. . . . . . . . . . . . . . . . . . . . . . . . . . . . . . . . . . xxviiiText formatting . . . . . . . . . . . . . . . . . . . . . . . . . . . . . . . . . . . . . xxviiiCommand syntax conventions . . . . . . . . . . . . . . . . . . . . . . . . . xxixNotes, cautions, and warnings . . . . . . . . . . . . . . . . . . . . . . . . . xxixKey terms . . . . . . . . . . . . . . . . . . . . . . . . . . . . . . . . . . . . . . . . . . .xxx
Notice to the reader . . . . . . . . . . . . . . . . . . . . . . . . . . . . . . . . . . . . . .xxx
Additional information. . . . . . . . . . . . . . . . . . . . . . . . . . . . . . . . . . . . .xxxBrocade resources. . . . . . . . . . . . . . . . . . . . . . . . . . . . . . . . . . . .xxxOther industry resources . . . . . . . . . . . . . . . . . . . . . . . . . . . . . . xxxi
Getting technical help . . . . . . . . . . . . . . . . . . . . . . . . . . . . . . . . . . . . xxxi
Document feedback . . . . . . . . . . . . . . . . . . . . . . . . . . . . . . . . . . . . . xxxii
Chapter 1 Using Fabric OS Commands
In this chapter . . . . . . . . . . . . . . . . . . . . . . . . . . . . . . . . . . . . . . . . . . . . 1
Understanding role-based access control . . . . . . . . . . . . . . . . . . . . . . 1
Understanding Virtual Fabric restrictions . . . . . . . . . . . . . . . . . . . . . . 2
Understanding Admin Domain restrictions . . . . . . . . . . . . . . . . . . . . . 3
Using the command line interface. . . . . . . . . . . . . . . . . . . . . . . . . . . . 3
Chapter 2 Fabric OS Commands
aaaConfig. . . . . . . . . . . . . . . . . . . . . . . . . . . . . . . . . . . . . . . . . . . . . . . . 5
ad . . . . . . . . . . . . . . . . . . . . . . . . . . . . . . . . . . . . . . . . . . . . . . . . . . . . . 10
ag . . . . . . . . . . . . . . . . . . . . . . . . . . . . . . . . . . . . . . . . . . . . . . . . . . . . .20
agAutoMapBalance. . . . . . . . . . . . . . . . . . . . . . . . . . . . . . . . . . . . . . .38
agShow . . . . . . . . . . . . . . . . . . . . . . . . . . . . . . . . . . . . . . . . . . . . . . . . 41
aliAdd . . . . . . . . . . . . . . . . . . . . . . . . . . . . . . . . . . . . . . . . . . . . . . . . . .43
aliCreate. . . . . . . . . . . . . . . . . . . . . . . . . . . . . . . . . . . . . . . . . . . . . . . .44
Fabric OS Command Reference vii53-1001764-02

aliDelete. . . . . . . . . . . . . . . . . . . . . . . . . . . . . . . . . . . . . . . . . . . . . . . .45
aliRemove . . . . . . . . . . . . . . . . . . . . . . . . . . . . . . . . . . . . . . . . . . . . . .46
aliShow. . . . . . . . . . . . . . . . . . . . . . . . . . . . . . . . . . . . . . . . . . . . . . . . . 47
aptPolicy. . . . . . . . . . . . . . . . . . . . . . . . . . . . . . . . . . . . . . . . . . . . . . . .48
auditCfg . . . . . . . . . . . . . . . . . . . . . . . . . . . . . . . . . . . . . . . . . . . . . . . . 51
auditDump. . . . . . . . . . . . . . . . . . . . . . . . . . . . . . . . . . . . . . . . . . . . . .53
authUtil . . . . . . . . . . . . . . . . . . . . . . . . . . . . . . . . . . . . . . . . . . . . . . . .54
bannerSet . . . . . . . . . . . . . . . . . . . . . . . . . . . . . . . . . . . . . . . . . . . . . .58
bannerShow. . . . . . . . . . . . . . . . . . . . . . . . . . . . . . . . . . . . . . . . . . . . .59
bcastShow . . . . . . . . . . . . . . . . . . . . . . . . . . . . . . . . . . . . . . . . . . . . . .60
bladeCfgGeMode. . . . . . . . . . . . . . . . . . . . . . . . . . . . . . . . . . . . . . . . . 61
bladeDisable . . . . . . . . . . . . . . . . . . . . . . . . . . . . . . . . . . . . . . . . . . . .63
bladeEnable. . . . . . . . . . . . . . . . . . . . . . . . . . . . . . . . . . . . . . . . . . . . .65
bladeSwap . . . . . . . . . . . . . . . . . . . . . . . . . . . . . . . . . . . . . . . . . . . . . .67
bootLunCfg . . . . . . . . . . . . . . . . . . . . . . . . . . . . . . . . . . . . . . . . . . . . .68
bottleneckMon . . . . . . . . . . . . . . . . . . . . . . . . . . . . . . . . . . . . . . . . . .69
bpPortLoopbackTest . . . . . . . . . . . . . . . . . . . . . . . . . . . . . . . . . . . . . .78
bpTurboRamTest . . . . . . . . . . . . . . . . . . . . . . . . . . . . . . . . . . . . . . . . . 81
ceePortLedTest . . . . . . . . . . . . . . . . . . . . . . . . . . . . . . . . . . . . . . . . . .83
ceePortLoopbackTest . . . . . . . . . . . . . . . . . . . . . . . . . . . . . . . . . . . . .84
ceeTurboRamTest . . . . . . . . . . . . . . . . . . . . . . . . . . . . . . . . . . . . . . . .85
cfgActvShow . . . . . . . . . . . . . . . . . . . . . . . . . . . . . . . . . . . . . . . . . . . .86
cfgAdd . . . . . . . . . . . . . . . . . . . . . . . . . . . . . . . . . . . . . . . . . . . . . . . . . 87
cfgClear . . . . . . . . . . . . . . . . . . . . . . . . . . . . . . . . . . . . . . . . . . . . . . . .88
cfgCreate . . . . . . . . . . . . . . . . . . . . . . . . . . . . . . . . . . . . . . . . . . . . . . .89
cfgDelete . . . . . . . . . . . . . . . . . . . . . . . . . . . . . . . . . . . . . . . . . . . . . . .90
cfgDisable . . . . . . . . . . . . . . . . . . . . . . . . . . . . . . . . . . . . . . . . . . . . . . 91
cfgEnable . . . . . . . . . . . . . . . . . . . . . . . . . . . . . . . . . . . . . . . . . . . . . . .92
cfgMcdtmode. . . . . . . . . . . . . . . . . . . . . . . . . . . . . . . . . . . . . . . . . . . .93
cfgRemove . . . . . . . . . . . . . . . . . . . . . . . . . . . . . . . . . . . . . . . . . . . . . .94
cfgSave . . . . . . . . . . . . . . . . . . . . . . . . . . . . . . . . . . . . . . . . . . . . . . . .95
cfgSaveActiveToDefined . . . . . . . . . . . . . . . . . . . . . . . . . . . . . . . . . . .96
cfgShow . . . . . . . . . . . . . . . . . . . . . . . . . . . . . . . . . . . . . . . . . . . . . . . . 97
cfgSize . . . . . . . . . . . . . . . . . . . . . . . . . . . . . . . . . . . . . . . . . . . . . . . . .99
cfgTransAbort . . . . . . . . . . . . . . . . . . . . . . . . . . . . . . . . . . . . . . . . . .101
cfgTransShow . . . . . . . . . . . . . . . . . . . . . . . . . . . . . . . . . . . . . . . . . .102
chassisBeacon . . . . . . . . . . . . . . . . . . . . . . . . . . . . . . . . . . . . . . . . .103
viii Fabric OS Command Reference53-1001764-02

chassisConfig . . . . . . . . . . . . . . . . . . . . . . . . . . . . . . . . . . . . . . . . . .104
chassisDisable . . . . . . . . . . . . . . . . . . . . . . . . . . . . . . . . . . . . . . . . .105
chassisDistribute. . . . . . . . . . . . . . . . . . . . . . . . . . . . . . . . . . . . . . . .106
chassisEnable . . . . . . . . . . . . . . . . . . . . . . . . . . . . . . . . . . . . . . . . . .108
chassisName. . . . . . . . . . . . . . . . . . . . . . . . . . . . . . . . . . . . . . . . . . .109
chassisShow . . . . . . . . . . . . . . . . . . . . . . . . . . . . . . . . . . . . . . . . . . .110
cliHistory . . . . . . . . . . . . . . . . . . . . . . . . . . . . . . . . . . . . . . . . . . . . . .112
cmsh. . . . . . . . . . . . . . . . . . . . . . . . . . . . . . . . . . . . . . . . . . . . . . . . . .113
configDefault . . . . . . . . . . . . . . . . . . . . . . . . . . . . . . . . . . . . . . . . . . .115
configDownload. . . . . . . . . . . . . . . . . . . . . . . . . . . . . . . . . . . . . . . . .117
configList . . . . . . . . . . . . . . . . . . . . . . . . . . . . . . . . . . . . . . . . . . . . . .122
configRemove . . . . . . . . . . . . . . . . . . . . . . . . . . . . . . . . . . . . . . . . . .123
configShow . . . . . . . . . . . . . . . . . . . . . . . . . . . . . . . . . . . . . . . . . . . .124
configUpload . . . . . . . . . . . . . . . . . . . . . . . . . . . . . . . . . . . . . . . . . . .128
configure . . . . . . . . . . . . . . . . . . . . . . . . . . . . . . . . . . . . . . . . . . . . . .132
configureChassis. . . . . . . . . . . . . . . . . . . . . . . . . . . . . . . . . . . . . . . .142
cryptoCfg . . . . . . . . . . . . . . . . . . . . . . . . . . . . . . . . . . . . . . . . . . . . . .144
dataTypeShow . . . . . . . . . . . . . . . . . . . . . . . . . . . . . . . . . . . . . . . . . .197
date . . . . . . . . . . . . . . . . . . . . . . . . . . . . . . . . . . . . . . . . . . . . . . . . . .198
dbgShow . . . . . . . . . . . . . . . . . . . . . . . . . . . . . . . . . . . . . . . . . . . . . .200
defZone . . . . . . . . . . . . . . . . . . . . . . . . . . . . . . . . . . . . . . . . . . . . . . .201
diagClearError . . . . . . . . . . . . . . . . . . . . . . . . . . . . . . . . . . . . . . . . . .203
diagDisablePost. . . . . . . . . . . . . . . . . . . . . . . . . . . . . . . . . . . . . . . . .204
diagEnablePost . . . . . . . . . . . . . . . . . . . . . . . . . . . . . . . . . . . . . . . . .205
diagHelp. . . . . . . . . . . . . . . . . . . . . . . . . . . . . . . . . . . . . . . . . . . . . . .206
diagPost . . . . . . . . . . . . . . . . . . . . . . . . . . . . . . . . . . . . . . . . . . . . . . .207
diagRetry . . . . . . . . . . . . . . . . . . . . . . . . . . . . . . . . . . . . . . . . . . . . . .208
diagShow . . . . . . . . . . . . . . . . . . . . . . . . . . . . . . . . . . . . . . . . . . . . . .209
dbgShow . . . . . . . . . . . . . . . . . . . . . . . . . . . . . . . . . . . . . . . . . . . . . .210
distribute . . . . . . . . . . . . . . . . . . . . . . . . . . . . . . . . . . . . . . . . . . . . . .211
dlsReset . . . . . . . . . . . . . . . . . . . . . . . . . . . . . . . . . . . . . . . . . . . . . . .213
dlsSet . . . . . . . . . . . . . . . . . . . . . . . . . . . . . . . . . . . . . . . . . . . . . . . . .214
dlsShow . . . . . . . . . . . . . . . . . . . . . . . . . . . . . . . . . . . . . . . . . . . . . . . 217
dnsConfig. . . . . . . . . . . . . . . . . . . . . . . . . . . . . . . . . . . . . . . . . . . . . .218
enclosureShow . . . . . . . . . . . . . . . . . . . . . . . . . . . . . . . . . . . . . . . . .219
errClear . . . . . . . . . . . . . . . . . . . . . . . . . . . . . . . . . . . . . . . . . . . . . . .220
errDelimiterSet . . . . . . . . . . . . . . . . . . . . . . . . . . . . . . . . . . . . . . . . .221
Fabric OS Command Reference ix53-1001764-02

errDump. . . . . . . . . . . . . . . . . . . . . . . . . . . . . . . . . . . . . . . . . . . . . . .222
errFilterSet . . . . . . . . . . . . . . . . . . . . . . . . . . . . . . . . . . . . . . . . . . . . .224
errModuleShow . . . . . . . . . . . . . . . . . . . . . . . . . . . . . . . . . . . . . . . . .225
errShow . . . . . . . . . . . . . . . . . . . . . . . . . . . . . . . . . . . . . . . . . . . . . . .226
exit . . . . . . . . . . . . . . . . . . . . . . . . . . . . . . . . . . . . . . . . . . . . . . . . . . .228
fabPortShow . . . . . . . . . . . . . . . . . . . . . . . . . . . . . . . . . . . . . . . . . . .229
fabRetryShow . . . . . . . . . . . . . . . . . . . . . . . . . . . . . . . . . . . . . . . . . .232
fabricLog . . . . . . . . . . . . . . . . . . . . . . . . . . . . . . . . . . . . . . . . . . . . . .233
fabricPrincipal . . . . . . . . . . . . . . . . . . . . . . . . . . . . . . . . . . . . . . . . . .235
fabricShow . . . . . . . . . . . . . . . . . . . . . . . . . . . . . . . . . . . . . . . . . . . . .237
fabStatsShow . . . . . . . . . . . . . . . . . . . . . . . . . . . . . . . . . . . . . . . . . .239
fanDisable . . . . . . . . . . . . . . . . . . . . . . . . . . . . . . . . . . . . . . . . . . . . . 241
fanEnable. . . . . . . . . . . . . . . . . . . . . . . . . . . . . . . . . . . . . . . . . . . . . .242
fanShow . . . . . . . . . . . . . . . . . . . . . . . . . . . . . . . . . . . . . . . . . . . . . . .243
fastBoot . . . . . . . . . . . . . . . . . . . . . . . . . . . . . . . . . . . . . . . . . . . . . . .244
fastWriteCfg . . . . . . . . . . . . . . . . . . . . . . . . . . . . . . . . . . . . . . . . . . . .246
fcipChipTest . . . . . . . . . . . . . . . . . . . . . . . . . . . . . . . . . . . . . . . . . . . .248
fcipHelp . . . . . . . . . . . . . . . . . . . . . . . . . . . . . . . . . . . . . . . . . . . . . . .250
fcipLedTest . . . . . . . . . . . . . . . . . . . . . . . . . . . . . . . . . . . . . . . . . . . .251
fcipPathTest . . . . . . . . . . . . . . . . . . . . . . . . . . . . . . . . . . . . . . . . . . . .252
fcLunQuery . . . . . . . . . . . . . . . . . . . . . . . . . . . . . . . . . . . . . . . . . . . .254
FCoE . . . . . . . . . . . . . . . . . . . . . . . . . . . . . . . . . . . . . . . . . . . . . . . . . .255
fcoeLoginCfg . . . . . . . . . . . . . . . . . . . . . . . . . . . . . . . . . . . . . . . . . . .259
fcoeLoginGroup . . . . . . . . . . . . . . . . . . . . . . . . . . . . . . . . . . . . . . . . .261
fcPing . . . . . . . . . . . . . . . . . . . . . . . . . . . . . . . . . . . . . . . . . . . . . . . . .263
fcpLogClear . . . . . . . . . . . . . . . . . . . . . . . . . . . . . . . . . . . . . . . . . . . .270
fcpLogDisable . . . . . . . . . . . . . . . . . . . . . . . . . . . . . . . . . . . . . . . . . . 271
fcpLogEnable. . . . . . . . . . . . . . . . . . . . . . . . . . . . . . . . . . . . . . . . . . .272
fcpLogShow . . . . . . . . . . . . . . . . . . . . . . . . . . . . . . . . . . . . . . . . . . . .273
fcpProbeShow . . . . . . . . . . . . . . . . . . . . . . . . . . . . . . . . . . . . . . . . . . 274
fcpRlsShow . . . . . . . . . . . . . . . . . . . . . . . . . . . . . . . . . . . . . . . . . . . .275
fcrBcastConfig . . . . . . . . . . . . . . . . . . . . . . . . . . . . . . . . . . . . . . . . . . 276
fcrChipTest. . . . . . . . . . . . . . . . . . . . . . . . . . . . . . . . . . . . . . . . . . . . .278
fcrConfigure . . . . . . . . . . . . . . . . . . . . . . . . . . . . . . . . . . . . . . . . . . . .280
fcrEdgeshow . . . . . . . . . . . . . . . . . . . . . . . . . . . . . . . . . . . . . . . . . . .281
fcrFabricShow . . . . . . . . . . . . . . . . . . . . . . . . . . . . . . . . . . . . . . . . . .283
fcrlSan . . . . . . . . . . . . . . . . . . . . . . . . . . . . . . . . . . . . . . . . . . . . . . . .285
x Fabric OS Command Reference53-1001764-02

fcrLsanCount . . . . . . . . . . . . . . . . . . . . . . . . . . . . . . . . . . . . . . . . . . .287
fcrLsanMatrix. . . . . . . . . . . . . . . . . . . . . . . . . . . . . . . . . . . . . . . . . . .288
fcrPathTest. . . . . . . . . . . . . . . . . . . . . . . . . . . . . . . . . . . . . . . . . . . . .293
fcrPhyDevShow . . . . . . . . . . . . . . . . . . . . . . . . . . . . . . . . . . . . . . . . .296
fcrProxyConfig . . . . . . . . . . . . . . . . . . . . . . . . . . . . . . . . . . . . . . . . . .298
fcrProxyDevShow. . . . . . . . . . . . . . . . . . . . . . . . . . . . . . . . . . . . . . . .300
fcrResourceShow . . . . . . . . . . . . . . . . . . . . . . . . . . . . . . . . . . . . . . .302
fcrRouterPortCost . . . . . . . . . . . . . . . . . . . . . . . . . . . . . . . . . . . . . . .304
fcrRouteShow . . . . . . . . . . . . . . . . . . . . . . . . . . . . . . . . . . . . . . . . . .306
fcrXlateConfig . . . . . . . . . . . . . . . . . . . . . . . . . . . . . . . . . . . . . . . . . .307
fddCfg. . . . . . . . . . . . . . . . . . . . . . . . . . . . . . . . . . . . . . . . . . . . . . . . .310
fdmiCacheShow . . . . . . . . . . . . . . . . . . . . . . . . . . . . . . . . . . . . . . . .312
fdmiShow . . . . . . . . . . . . . . . . . . . . . . . . . . . . . . . . . . . . . . . . . . . . . .313
ficonCfg . . . . . . . . . . . . . . . . . . . . . . . . . . . . . . . . . . . . . . . . . . . . . . .314
ficonClear. . . . . . . . . . . . . . . . . . . . . . . . . . . . . . . . . . . . . . . . . . . . . .315
ficonCupSet . . . . . . . . . . . . . . . . . . . . . . . . . . . . . . . . . . . . . . . . . . . .316
ficonCupShow . . . . . . . . . . . . . . . . . . . . . . . . . . . . . . . . . . . . . . . . . .318
ficonHelp . . . . . . . . . . . . . . . . . . . . . . . . . . . . . . . . . . . . . . . . . . . . . .320
ficonShow . . . . . . . . . . . . . . . . . . . . . . . . . . . . . . . . . . . . . . . . . . . . .321
fipsCfg . . . . . . . . . . . . . . . . . . . . . . . . . . . . . . . . . . . . . . . . . . . . . . . .327
firmwareCommit . . . . . . . . . . . . . . . . . . . . . . . . . . . . . . . . . . . . . . . .331
firmwareDownload . . . . . . . . . . . . . . . . . . . . . . . . . . . . . . . . . . . . . .332
firmwareDownloadStatus . . . . . . . . . . . . . . . . . . . . . . . . . . . . . . . . .337
firmwareKeyShow . . . . . . . . . . . . . . . . . . . . . . . . . . . . . . . . . . . . . . .340
firmwareKeyUpdate. . . . . . . . . . . . . . . . . . . . . . . . . . . . . . . . . . . . . .341
firmwareRestore . . . . . . . . . . . . . . . . . . . . . . . . . . . . . . . . . . . . . . . .343
firmwareShow . . . . . . . . . . . . . . . . . . . . . . . . . . . . . . . . . . . . . . . . . .344
fmConfig. . . . . . . . . . . . . . . . . . . . . . . . . . . . . . . . . . . . . . . . . . . . . . .345
fosConfig . . . . . . . . . . . . . . . . . . . . . . . . . . . . . . . . . . . . . . . . . . . . . .351
fosExec. . . . . . . . . . . . . . . . . . . . . . . . . . . . . . . . . . . . . . . . . . . . . . . .354
fruReplace . . . . . . . . . . . . . . . . . . . . . . . . . . . . . . . . . . . . . . . . . . . . .357
fspfShow . . . . . . . . . . . . . . . . . . . . . . . . . . . . . . . . . . . . . . . . . . . . . .358
fwAlarmsFilterSet . . . . . . . . . . . . . . . . . . . . . . . . . . . . . . . . . . . . . . .360
fwAlarmsFilterShow. . . . . . . . . . . . . . . . . . . . . . . . . . . . . . . . . . . . . .361
fwClassInit . . . . . . . . . . . . . . . . . . . . . . . . . . . . . . . . . . . . . . . . . . . . .362
fwConfigReload . . . . . . . . . . . . . . . . . . . . . . . . . . . . . . . . . . . . . . . . .363
fwConfigure . . . . . . . . . . . . . . . . . . . . . . . . . . . . . . . . . . . . . . . . . . . .364
Fabric OS Command Reference xi53-1001764-02

fwFruCfg . . . . . . . . . . . . . . . . . . . . . . . . . . . . . . . . . . . . . . . . . . . . . . .369
fwHelp . . . . . . . . . . . . . . . . . . . . . . . . . . . . . . . . . . . . . . . . . . . . . . . .370
fwMailCfg . . . . . . . . . . . . . . . . . . . . . . . . . . . . . . . . . . . . . . . . . . . . . . 371
fwPortDetailShow . . . . . . . . . . . . . . . . . . . . . . . . . . . . . . . . . . . . . . .373
fwSamShow . . . . . . . . . . . . . . . . . . . . . . . . . . . . . . . . . . . . . . . . . . . . 376
fwSet . . . . . . . . . . . . . . . . . . . . . . . . . . . . . . . . . . . . . . . . . . . . . . . . .378
fwSetToCustom . . . . . . . . . . . . . . . . . . . . . . . . . . . . . . . . . . . . . . . . .379
fwSetToDefault . . . . . . . . . . . . . . . . . . . . . . . . . . . . . . . . . . . . . . . . .381
h . . . . . . . . . . . . . . . . . . . . . . . . . . . . . . . . . . . . . . . . . . . . . . . . . . . . .383
haDisable. . . . . . . . . . . . . . . . . . . . . . . . . . . . . . . . . . . . . . . . . . . . . .384
haDump . . . . . . . . . . . . . . . . . . . . . . . . . . . . . . . . . . . . . . . . . . . . . . .385
haEnable . . . . . . . . . . . . . . . . . . . . . . . . . . . . . . . . . . . . . . . . . . . . . .387
haFailover . . . . . . . . . . . . . . . . . . . . . . . . . . . . . . . . . . . . . . . . . . . . .388
haShow . . . . . . . . . . . . . . . . . . . . . . . . . . . . . . . . . . . . . . . . . . . . . . .389
haSyncStart . . . . . . . . . . . . . . . . . . . . . . . . . . . . . . . . . . . . . . . . . . . .391
haSyncStop . . . . . . . . . . . . . . . . . . . . . . . . . . . . . . . . . . . . . . . . . . . .392
help . . . . . . . . . . . . . . . . . . . . . . . . . . . . . . . . . . . . . . . . . . . . . . . . . .393
historyLastShow . . . . . . . . . . . . . . . . . . . . . . . . . . . . . . . . . . . . . . . .395
historyMode. . . . . . . . . . . . . . . . . . . . . . . . . . . . . . . . . . . . . . . . . . . .396
historyShow . . . . . . . . . . . . . . . . . . . . . . . . . . . . . . . . . . . . . . . . . . . .397
i. . . . . . . . . . . . . . . . . . . . . . . . . . . . . . . . . . . . . . . . . . . . . . . . . . . . . .399
iclCfg . . . . . . . . . . . . . . . . . . . . . . . . . . . . . . . . . . . . . . . . . . . . . . . . .401
ifModeSet . . . . . . . . . . . . . . . . . . . . . . . . . . . . . . . . . . . . . . . . . . . . .403
ifModeShow. . . . . . . . . . . . . . . . . . . . . . . . . . . . . . . . . . . . . . . . . . . .405
interfaceShow . . . . . . . . . . . . . . . . . . . . . . . . . . . . . . . . . . . . . . . . . .407
interopMode . . . . . . . . . . . . . . . . . . . . . . . . . . . . . . . . . . . . . . . . . . .411
iodDelayReset . . . . . . . . . . . . . . . . . . . . . . . . . . . . . . . . . . . . . . . . . .415
iodDelayShow . . . . . . . . . . . . . . . . . . . . . . . . . . . . . . . . . . . . . . . . . .416
iodReset. . . . . . . . . . . . . . . . . . . . . . . . . . . . . . . . . . . . . . . . . . . . . . . 417
iodSet . . . . . . . . . . . . . . . . . . . . . . . . . . . . . . . . . . . . . . . . . . . . . . . . .418
iodShow . . . . . . . . . . . . . . . . . . . . . . . . . . . . . . . . . . . . . . . . . . . . . . .419
ipAddrSet . . . . . . . . . . . . . . . . . . . . . . . . . . . . . . . . . . . . . . . . . . . . . .420
ipAddrShow . . . . . . . . . . . . . . . . . . . . . . . . . . . . . . . . . . . . . . . . . . . .425
ipfilter . . . . . . . . . . . . . . . . . . . . . . . . . . . . . . . . . . . . . . . . . . . . . . . . .428
ipSecConfig . . . . . . . . . . . . . . . . . . . . . . . . . . . . . . . . . . . . . . . . . . . .433
iscsiCfg. . . . . . . . . . . . . . . . . . . . . . . . . . . . . . . . . . . . . . . . . . . . . . . .449
iscsiChipTest . . . . . . . . . . . . . . . . . . . . . . . . . . . . . . . . . . . . . . . . . . .457
xii Fabric OS Command Reference53-1001764-02

iscsiHelp. . . . . . . . . . . . . . . . . . . . . . . . . . . . . . . . . . . . . . . . . . . . . . .458
iscsiPathTest . . . . . . . . . . . . . . . . . . . . . . . . . . . . . . . . . . . . . . . . . . .459
iscsiPortCfg . . . . . . . . . . . . . . . . . . . . . . . . . . . . . . . . . . . . . . . . . . . .460
iscsiSessionCfg . . . . . . . . . . . . . . . . . . . . . . . . . . . . . . . . . . . . . . . . .463
iscsiSwCfg . . . . . . . . . . . . . . . . . . . . . . . . . . . . . . . . . . . . . . . . . . . . .465
islShow. . . . . . . . . . . . . . . . . . . . . . . . . . . . . . . . . . . . . . . . . . . . . . . .466
isnscCfg . . . . . . . . . . . . . . . . . . . . . . . . . . . . . . . . . . . . . . . . . . . . . . .467
itemList . . . . . . . . . . . . . . . . . . . . . . . . . . . . . . . . . . . . . . . . . . . . . . .469
killTelnet. . . . . . . . . . . . . . . . . . . . . . . . . . . . . . . . . . . . . . . . . . . . . . . 471
ldapCfg. . . . . . . . . . . . . . . . . . . . . . . . . . . . . . . . . . . . . . . . . . . . . . . .472
lfCfg . . . . . . . . . . . . . . . . . . . . . . . . . . . . . . . . . . . . . . . . . . . . . . . . . . 474
licenseAdd . . . . . . . . . . . . . . . . . . . . . . . . . . . . . . . . . . . . . . . . . . . . .478
licenseHelp . . . . . . . . . . . . . . . . . . . . . . . . . . . . . . . . . . . . . . . . . . . .479
licenseIdShow . . . . . . . . . . . . . . . . . . . . . . . . . . . . . . . . . . . . . . . . . .480
licensePort. . . . . . . . . . . . . . . . . . . . . . . . . . . . . . . . . . . . . . . . . . . . .481
licenseRemove . . . . . . . . . . . . . . . . . . . . . . . . . . . . . . . . . . . . . . . . .483
licenseShow. . . . . . . . . . . . . . . . . . . . . . . . . . . . . . . . . . . . . . . . . . . .485
licenseSlotCfg . . . . . . . . . . . . . . . . . . . . . . . . . . . . . . . . . . . . . . . . . .487
linkCost . . . . . . . . . . . . . . . . . . . . . . . . . . . . . . . . . . . . . . . . . . . . . . .491
login . . . . . . . . . . . . . . . . . . . . . . . . . . . . . . . . . . . . . . . . . . . . . . . . . .493
logout . . . . . . . . . . . . . . . . . . . . . . . . . . . . . . . . . . . . . . . . . . . . . . . . .494
lsanZoneShow . . . . . . . . . . . . . . . . . . . . . . . . . . . . . . . . . . . . . . . . . .495
lsCfg . . . . . . . . . . . . . . . . . . . . . . . . . . . . . . . . . . . . . . . . . . . . . . . . . .497
lsDbShow . . . . . . . . . . . . . . . . . . . . . . . . . . . . . . . . . . . . . . . . . . . . . .503
memShow . . . . . . . . . . . . . . . . . . . . . . . . . . . . . . . . . . . . . . . . . . . . .506
msCapabilityShow. . . . . . . . . . . . . . . . . . . . . . . . . . . . . . . . . . . . . . .507
msConfigure . . . . . . . . . . . . . . . . . . . . . . . . . . . . . . . . . . . . . . . . . . .508
msPlatShow. . . . . . . . . . . . . . . . . . . . . . . . . . . . . . . . . . . . . . . . . . . .510
msPlatShowDBCB . . . . . . . . . . . . . . . . . . . . . . . . . . . . . . . . . . . . . . .511
msPlClearDB . . . . . . . . . . . . . . . . . . . . . . . . . . . . . . . . . . . . . . . . . . .512
msPlMgmtActivate . . . . . . . . . . . . . . . . . . . . . . . . . . . . . . . . . . . . . .513
msPlMgmtDeactivate . . . . . . . . . . . . . . . . . . . . . . . . . . . . . . . . . . . .514
msTdDisable . . . . . . . . . . . . . . . . . . . . . . . . . . . . . . . . . . . . . . . . . . .515
msTdEnable. . . . . . . . . . . . . . . . . . . . . . . . . . . . . . . . . . . . . . . . . . . .516
msTdReadConfig . . . . . . . . . . . . . . . . . . . . . . . . . . . . . . . . . . . . . . . . 517
myId . . . . . . . . . . . . . . . . . . . . . . . . . . . . . . . . . . . . . . . . . . . . . . . . . .518
nbrStateShow . . . . . . . . . . . . . . . . . . . . . . . . . . . . . . . . . . . . . . . . . .519
Fabric OS Command Reference xiii53-1001764-02

nbrStatsClear. . . . . . . . . . . . . . . . . . . . . . . . . . . . . . . . . . . . . . . . . . .521
nodeFind . . . . . . . . . . . . . . . . . . . . . . . . . . . . . . . . . . . . . . . . . . . . . .523
nsAliasShow. . . . . . . . . . . . . . . . . . . . . . . . . . . . . . . . . . . . . . . . . . . .525
nsAllShow. . . . . . . . . . . . . . . . . . . . . . . . . . . . . . . . . . . . . . . . . . . . . .528
nsCamShow. . . . . . . . . . . . . . . . . . . . . . . . . . . . . . . . . . . . . . . . . . . .529
nsShow. . . . . . . . . . . . . . . . . . . . . . . . . . . . . . . . . . . . . . . . . . . . . . . .533
nsZoneMember . . . . . . . . . . . . . . . . . . . . . . . . . . . . . . . . . . . . . . . . .537
passwd. . . . . . . . . . . . . . . . . . . . . . . . . . . . . . . . . . . . . . . . . . . . . . . .540
passwdCfg . . . . . . . . . . . . . . . . . . . . . . . . . . . . . . . . . . . . . . . . . . . . .543
pathInfo . . . . . . . . . . . . . . . . . . . . . . . . . . . . . . . . . . . . . . . . . . . . . . .548
pdShow . . . . . . . . . . . . . . . . . . . . . . . . . . . . . . . . . . . . . . . . . . . . . . .554
perfAddEEMonitor . . . . . . . . . . . . . . . . . . . . . . . . . . . . . . . . . . . . . . .555
perfAddIPMonitor . . . . . . . . . . . . . . . . . . . . . . . . . . . . . . . . . . . . . . .559
perfAddReadMonitor. . . . . . . . . . . . . . . . . . . . . . . . . . . . . . . . . . . . .561
perfAddRWMonitor . . . . . . . . . . . . . . . . . . . . . . . . . . . . . . . . . . . . . .563
perfAddSCSIMonitor . . . . . . . . . . . . . . . . . . . . . . . . . . . . . . . . . . . . .565
perfAddUserMonitor . . . . . . . . . . . . . . . . . . . . . . . . . . . . . . . . . . . . .567
perfAddWriteMonitor. . . . . . . . . . . . . . . . . . . . . . . . . . . . . . . . . . . . .569
perfCfgClear. . . . . . . . . . . . . . . . . . . . . . . . . . . . . . . . . . . . . . . . . . . . 571
perfCfgRestore . . . . . . . . . . . . . . . . . . . . . . . . . . . . . . . . . . . . . . . . .572
perfCfgSave . . . . . . . . . . . . . . . . . . . . . . . . . . . . . . . . . . . . . . . . . . . .573
perfClearAlpaCrc . . . . . . . . . . . . . . . . . . . . . . . . . . . . . . . . . . . . . . . . 574
perfDelEEMonitor . . . . . . . . . . . . . . . . . . . . . . . . . . . . . . . . . . . . . . .575
perfDelFilterMonitor . . . . . . . . . . . . . . . . . . . . . . . . . . . . . . . . . . . . . 576
perfHelp . . . . . . . . . . . . . . . . . . . . . . . . . . . . . . . . . . . . . . . . . . . . . . .578
perfMonitorClear . . . . . . . . . . . . . . . . . . . . . . . . . . . . . . . . . . . . . . . .580
perfMonitorShow. . . . . . . . . . . . . . . . . . . . . . . . . . . . . . . . . . . . . . . .582
perfResourceShow . . . . . . . . . . . . . . . . . . . . . . . . . . . . . . . . . . . . . .586
perfSetPortEEMask. . . . . . . . . . . . . . . . . . . . . . . . . . . . . . . . . . . . . .589
perfShowAlpaCrc . . . . . . . . . . . . . . . . . . . . . . . . . . . . . . . . . . . . . . . .591
perfShowPortEEMask . . . . . . . . . . . . . . . . . . . . . . . . . . . . . . . . . . . .592
perfTTmon . . . . . . . . . . . . . . . . . . . . . . . . . . . . . . . . . . . . . . . . . . . . .594
pkiCreate . . . . . . . . . . . . . . . . . . . . . . . . . . . . . . . . . . . . . . . . . . . . . .597
pkiRemove . . . . . . . . . . . . . . . . . . . . . . . . . . . . . . . . . . . . . . . . . . . . .598
pkiShow . . . . . . . . . . . . . . . . . . . . . . . . . . . . . . . . . . . . . . . . . . . . . . .599
policy . . . . . . . . . . . . . . . . . . . . . . . . . . . . . . . . . . . . . . . . . . . . . . . . .600
portAddress . . . . . . . . . . . . . . . . . . . . . . . . . . . . . . . . . . . . . . . . . . . .603
xiv Fabric OS Command Reference53-1001764-02

portAlpaShow . . . . . . . . . . . . . . . . . . . . . . . . . . . . . . . . . . . . . . . . . .606
portBeacon . . . . . . . . . . . . . . . . . . . . . . . . . . . . . . . . . . . . . . . . . . . .607
portBufferShow . . . . . . . . . . . . . . . . . . . . . . . . . . . . . . . . . . . . . . . . .608
portCamShow . . . . . . . . . . . . . . . . . . . . . . . . . . . . . . . . . . . . . . . . . .610
portCfg . . . . . . . . . . . . . . . . . . . . . . . . . . . . . . . . . . . . . . . . . . . . . . . .612
portCfgAlpa . . . . . . . . . . . . . . . . . . . . . . . . . . . . . . . . . . . . . . . . . . . .638
portCfgAutoDisable . . . . . . . . . . . . . . . . . . . . . . . . . . . . . . . . . . . . . .639
portCfgCreditRecovery . . . . . . . . . . . . . . . . . . . . . . . . . . . . . . . . . . .641
portCfgDefault . . . . . . . . . . . . . . . . . . . . . . . . . . . . . . . . . . . . . . . . . .642
portCfgEport . . . . . . . . . . . . . . . . . . . . . . . . . . . . . . . . . . . . . . . . . . .643
portCfgEXPort . . . . . . . . . . . . . . . . . . . . . . . . . . . . . . . . . . . . . . . . . .645
portCfgFillword . . . . . . . . . . . . . . . . . . . . . . . . . . . . . . . . . . . . . . . . .648
portCfgFportBuffers . . . . . . . . . . . . . . . . . . . . . . . . . . . . . . . . . . . . .650
portCfgGeMediaType. . . . . . . . . . . . . . . . . . . . . . . . . . . . . . . . . . . . .651
portCfgGport . . . . . . . . . . . . . . . . . . . . . . . . . . . . . . . . . . . . . . . . . . .653
portCfgLossTov . . . . . . . . . . . . . . . . . . . . . . . . . . . . . . . . . . . . . . . . .654
portCfgISLMode . . . . . . . . . . . . . . . . . . . . . . . . . . . . . . . . . . . . . . . .656
portCfgLongDistance . . . . . . . . . . . . . . . . . . . . . . . . . . . . . . . . . . . .658
portCfgLport . . . . . . . . . . . . . . . . . . . . . . . . . . . . . . . . . . . . . . . . . . .661
portCfgNPIVPort . . . . . . . . . . . . . . . . . . . . . . . . . . . . . . . . . . . . . . . .663
portCfgNPort . . . . . . . . . . . . . . . . . . . . . . . . . . . . . . . . . . . . . . . . . . .666
portCfgPersistentDisable . . . . . . . . . . . . . . . . . . . . . . . . . . . . . . . . .667
portCfgPersistentEnable. . . . . . . . . . . . . . . . . . . . . . . . . . . . . . . . . .670
PortCfgQoS . . . . . . . . . . . . . . . . . . . . . . . . . . . . . . . . . . . . . . . . . . . .672
portCfgShow . . . . . . . . . . . . . . . . . . . . . . . . . . . . . . . . . . . . . . . . . . . 674
portCfgSpeed. . . . . . . . . . . . . . . . . . . . . . . . . . . . . . . . . . . . . . . . . . .685
portCfgTrunkPort . . . . . . . . . . . . . . . . . . . . . . . . . . . . . . . . . . . . . . . .687
portCfgVEXPort . . . . . . . . . . . . . . . . . . . . . . . . . . . . . . . . . . . . . . . . .688
portCmd . . . . . . . . . . . . . . . . . . . . . . . . . . . . . . . . . . . . . . . . . . . . . . .691
portDebug . . . . . . . . . . . . . . . . . . . . . . . . . . . . . . . . . . . . . . . . . . . . .699
portDisable . . . . . . . . . . . . . . . . . . . . . . . . . . . . . . . . . . . . . . . . . . . .700
portEnable . . . . . . . . . . . . . . . . . . . . . . . . . . . . . . . . . . . . . . . . . . . . .702
portErrShow. . . . . . . . . . . . . . . . . . . . . . . . . . . . . . . . . . . . . . . . . . . .704
portFencing . . . . . . . . . . . . . . . . . . . . . . . . . . . . . . . . . . . . . . . . . . . .706
portFlagsShow. . . . . . . . . . . . . . . . . . . . . . . . . . . . . . . . . . . . . . . . . .709
portLedTest . . . . . . . . . . . . . . . . . . . . . . . . . . . . . . . . . . . . . . . . . . . . 710
portLogClear . . . . . . . . . . . . . . . . . . . . . . . . . . . . . . . . . . . . . . . . . . .711
Fabric OS Command Reference xv53-1001764-02

portLogConfigShow. . . . . . . . . . . . . . . . . . . . . . . . . . . . . . . . . . . . . .712
portLogDisable . . . . . . . . . . . . . . . . . . . . . . . . . . . . . . . . . . . . . . . . .713
portLogDump. . . . . . . . . . . . . . . . . . . . . . . . . . . . . . . . . . . . . . . . . . . 714
portLogDumpPort . . . . . . . . . . . . . . . . . . . . . . . . . . . . . . . . . . . . . . .715
portLogEnable . . . . . . . . . . . . . . . . . . . . . . . . . . . . . . . . . . . . . . . . . . 716
portLogEventShow . . . . . . . . . . . . . . . . . . . . . . . . . . . . . . . . . . . . . . 717
portLoginShow. . . . . . . . . . . . . . . . . . . . . . . . . . . . . . . . . . . . . . . . . .718
portLogPdisc . . . . . . . . . . . . . . . . . . . . . . . . . . . . . . . . . . . . . . . . . . .719
portLogReset . . . . . . . . . . . . . . . . . . . . . . . . . . . . . . . . . . . . . . . . . . .720
portLogResize . . . . . . . . . . . . . . . . . . . . . . . . . . . . . . . . . . . . . . . . . .721
portLogShow . . . . . . . . . . . . . . . . . . . . . . . . . . . . . . . . . . . . . . . . . . .722
portLogShowPort. . . . . . . . . . . . . . . . . . . . . . . . . . . . . . . . . . . . . . . .727
portLogTypeDisable. . . . . . . . . . . . . . . . . . . . . . . . . . . . . . . . . . . . . .728
portLogTypeEnable . . . . . . . . . . . . . . . . . . . . . . . . . . . . . . . . . . . . . .729
portLoopbackTest . . . . . . . . . . . . . . . . . . . . . . . . . . . . . . . . . . . . . . .730
portMirror. . . . . . . . . . . . . . . . . . . . . . . . . . . . . . . . . . . . . . . . . . . . . .733
portName. . . . . . . . . . . . . . . . . . . . . . . . . . . . . . . . . . . . . . . . . . . . . .737
portPerfShow. . . . . . . . . . . . . . . . . . . . . . . . . . . . . . . . . . . . . . . . . . .739
portRouteShow . . . . . . . . . . . . . . . . . . . . . . . . . . . . . . . . . . . . . . . . . 742
portShow . . . . . . . . . . . . . . . . . . . . . . . . . . . . . . . . . . . . . . . . . . . . . .744
portStats64Show . . . . . . . . . . . . . . . . . . . . . . . . . . . . . . . . . . . . . . .783
portStatsClear . . . . . . . . . . . . . . . . . . . . . . . . . . . . . . . . . . . . . . . . . .787
portStatsShow. . . . . . . . . . . . . . . . . . . . . . . . . . . . . . . . . . . . . . . . . .789
portSwap . . . . . . . . . . . . . . . . . . . . . . . . . . . . . . . . . . . . . . . . . . . . . .795
portSwapDisable . . . . . . . . . . . . . . . . . . . . . . . . . . . . . . . . . . . . . . . .796
portSwapEnable . . . . . . . . . . . . . . . . . . . . . . . . . . . . . . . . . . . . . . . .797
portSwapShow . . . . . . . . . . . . . . . . . . . . . . . . . . . . . . . . . . . . . . . . .798
portTest . . . . . . . . . . . . . . . . . . . . . . . . . . . . . . . . . . . . . . . . . . . . . . .799
portTestShow. . . . . . . . . . . . . . . . . . . . . . . . . . . . . . . . . . . . . . . . . . .801
portThConfig . . . . . . . . . . . . . . . . . . . . . . . . . . . . . . . . . . . . . . . . . . .803
portTrunkArea . . . . . . . . . . . . . . . . . . . . . . . . . . . . . . . . . . . . . . . . . .811
portZoneShow . . . . . . . . . . . . . . . . . . . . . . . . . . . . . . . . . . . . . . . . . .816
powerOffListSet . . . . . . . . . . . . . . . . . . . . . . . . . . . . . . . . . . . . . . . . . 817
powerOffListShow . . . . . . . . . . . . . . . . . . . . . . . . . . . . . . . . . . . . . . .819
psShow. . . . . . . . . . . . . . . . . . . . . . . . . . . . . . . . . . . . . . . . . . . . . . . .820
reBoot . . . . . . . . . . . . . . . . . . . . . . . . . . . . . . . . . . . . . . . . . . . . . . . .821
routeHelp . . . . . . . . . . . . . . . . . . . . . . . . . . . . . . . . . . . . . . . . . . . . . .823
xvi Fabric OS Command Reference53-1001764-02

secActiveSize . . . . . . . . . . . . . . . . . . . . . . . . . . . . . . . . . . . . . . . . . . .824
secAuthCertificate. . . . . . . . . . . . . . . . . . . . . . . . . . . . . . . . . . . . . . .825
secAuthSecret . . . . . . . . . . . . . . . . . . . . . . . . . . . . . . . . . . . . . . . . . .827
secCertUtil . . . . . . . . . . . . . . . . . . . . . . . . . . . . . . . . . . . . . . . . . . . . .829
secDefineSize . . . . . . . . . . . . . . . . . . . . . . . . . . . . . . . . . . . . . . . . . .837
secGlobalShow . . . . . . . . . . . . . . . . . . . . . . . . . . . . . . . . . . . . . . . . .838
secHelp . . . . . . . . . . . . . . . . . . . . . . . . . . . . . . . . . . . . . . . . . . . . . . .840
secPolicyAbort . . . . . . . . . . . . . . . . . . . . . . . . . . . . . . . . . . . . . . . . . .841
secPolicyActivate . . . . . . . . . . . . . . . . . . . . . . . . . . . . . . . . . . . . . . . .842
secPolicyAdd . . . . . . . . . . . . . . . . . . . . . . . . . . . . . . . . . . . . . . . . . . .843
secPolicyCreate . . . . . . . . . . . . . . . . . . . . . . . . . . . . . . . . . . . . . . . . .845
secPolicyDelete . . . . . . . . . . . . . . . . . . . . . . . . . . . . . . . . . . . . . . . . .848
secPolicyDump . . . . . . . . . . . . . . . . . . . . . . . . . . . . . . . . . . . . . . . . .850
secPolicyFCSMove. . . . . . . . . . . . . . . . . . . . . . . . . . . . . . . . . . . . . . .853
secPolicyRemove. . . . . . . . . . . . . . . . . . . . . . . . . . . . . . . . . . . . . . . .855
secPolicySave . . . . . . . . . . . . . . . . . . . . . . . . . . . . . . . . . . . . . . . . . .857
secPolicyShow . . . . . . . . . . . . . . . . . . . . . . . . . . . . . . . . . . . . . . . . . .858
secStatsReset . . . . . . . . . . . . . . . . . . . . . . . . . . . . . . . . . . . . . . . . . .860
secStatsShow . . . . . . . . . . . . . . . . . . . . . . . . . . . . . . . . . . . . . . . . . .862
sensorShow . . . . . . . . . . . . . . . . . . . . . . . . . . . . . . . . . . . . . . . . . . . .864
setContext . . . . . . . . . . . . . . . . . . . . . . . . . . . . . . . . . . . . . . . . . . . . .865
setDbg . . . . . . . . . . . . . . . . . . . . . . . . . . . . . . . . . . . . . . . . . . . . . . . .866
setVerbose. . . . . . . . . . . . . . . . . . . . . . . . . . . . . . . . . . . . . . . . . . . . .867
sfpShow . . . . . . . . . . . . . . . . . . . . . . . . . . . . . . . . . . . . . . . . . . . . . . .868
shellFlowControlDisable . . . . . . . . . . . . . . . . . . . . . . . . . . . . . . . . . .873
shellFlowControlEnable . . . . . . . . . . . . . . . . . . . . . . . . . . . . . . . . . . 874
slotPowerOff . . . . . . . . . . . . . . . . . . . . . . . . . . . . . . . . . . . . . . . . . . .875
slotPowerOn. . . . . . . . . . . . . . . . . . . . . . . . . . . . . . . . . . . . . . . . . . . .876
slotShow . . . . . . . . . . . . . . . . . . . . . . . . . . . . . . . . . . . . . . . . . . . . . .877
snmpConfig . . . . . . . . . . . . . . . . . . . . . . . . . . . . . . . . . . . . . . . . . . . .881
snmpTraps . . . . . . . . . . . . . . . . . . . . . . . . . . . . . . . . . . . . . . . . . . . . .894
spinFab . . . . . . . . . . . . . . . . . . . . . . . . . . . . . . . . . . . . . . . . . . . . . . .896
sshUtil . . . . . . . . . . . . . . . . . . . . . . . . . . . . . . . . . . . . . . . . . . . . . . . .899
statsClear. . . . . . . . . . . . . . . . . . . . . . . . . . . . . . . . . . . . . . . . . . . . . .903
stopPortTest. . . . . . . . . . . . . . . . . . . . . . . . . . . . . . . . . . . . . . . . . . . .904
supportFfdc . . . . . . . . . . . . . . . . . . . . . . . . . . . . . . . . . . . . . . . . . . . .905
supportFtp . . . . . . . . . . . . . . . . . . . . . . . . . . . . . . . . . . . . . . . . . . . . .906
Fabric OS Command Reference xvii53-1001764-02

supportSave . . . . . . . . . . . . . . . . . . . . . . . . . . . . . . . . . . . . . . . . . . .908
supportShow . . . . . . . . . . . . . . . . . . . . . . . . . . . . . . . . . . . . . . . . . . .912
supportShowCfgDisable . . . . . . . . . . . . . . . . . . . . . . . . . . . . . . . . . .915
supportShowCfgEnable . . . . . . . . . . . . . . . . . . . . . . . . . . . . . . . . . . 917
supportShowCfgShow. . . . . . . . . . . . . . . . . . . . . . . . . . . . . . . . . . . .919
switchBeacon . . . . . . . . . . . . . . . . . . . . . . . . . . . . . . . . . . . . . . . . . .921
switchCfgPersistentDisable . . . . . . . . . . . . . . . . . . . . . . . . . . . . . . .922
switchCfgPersistentEnable . . . . . . . . . . . . . . . . . . . . . . . . . . . . . . . .923
switchCfgSpeed. . . . . . . . . . . . . . . . . . . . . . . . . . . . . . . . . . . . . . . . .924
switchCfgTrunk . . . . . . . . . . . . . . . . . . . . . . . . . . . . . . . . . . . . . . . . .925
switchDisable . . . . . . . . . . . . . . . . . . . . . . . . . . . . . . . . . . . . . . . . . .926
switchEnable . . . . . . . . . . . . . . . . . . . . . . . . . . . . . . . . . . . . . . . . . . .927
switchName. . . . . . . . . . . . . . . . . . . . . . . . . . . . . . . . . . . . . . . . . . . .928
switchShow . . . . . . . . . . . . . . . . . . . . . . . . . . . . . . . . . . . . . . . . . . . .929
switchStatusPolicySet . . . . . . . . . . . . . . . . . . . . . . . . . . . . . . . . . . . .938
switchStatusPolicyShow . . . . . . . . . . . . . . . . . . . . . . . . . . . . . . . . . .940
switchStatusShow. . . . . . . . . . . . . . . . . . . . . . . . . . . . . . . . . . . . . . .942
switchUptime. . . . . . . . . . . . . . . . . . . . . . . . . . . . . . . . . . . . . . . . . . .944
switchViolation . . . . . . . . . . . . . . . . . . . . . . . . . . . . . . . . . . . . . . . . .945
syslogdFacility . . . . . . . . . . . . . . . . . . . . . . . . . . . . . . . . . . . . . . . . . .946
syslogdIpAdd . . . . . . . . . . . . . . . . . . . . . . . . . . . . . . . . . . . . . . . . . . .947
syslogdIpRemove . . . . . . . . . . . . . . . . . . . . . . . . . . . . . . . . . . . . . . .948
syslogdIpShow. . . . . . . . . . . . . . . . . . . . . . . . . . . . . . . . . . . . . . . . . .949
sysMonitor . . . . . . . . . . . . . . . . . . . . . . . . . . . . . . . . . . . . . . . . . . . . .950
sysShutDown . . . . . . . . . . . . . . . . . . . . . . . . . . . . . . . . . . . . . . . . . . .956
tempShow . . . . . . . . . . . . . . . . . . . . . . . . . . . . . . . . . . . . . . . . . . . . .958
thConfig . . . . . . . . . . . . . . . . . . . . . . . . . . . . . . . . . . . . . . . . . . . . . . .959
timeOut . . . . . . . . . . . . . . . . . . . . . . . . . . . . . . . . . . . . . . . . . . . . . . .967
topologyShow . . . . . . . . . . . . . . . . . . . . . . . . . . . . . . . . . . . . . . . . . .968
traceDump. . . . . . . . . . . . . . . . . . . . . . . . . . . . . . . . . . . . . . . . . . . . .972
trackChangesHelp. . . . . . . . . . . . . . . . . . . . . . . . . . . . . . . . . . . . . . . 974
trackChangesSet. . . . . . . . . . . . . . . . . . . . . . . . . . . . . . . . . . . . . . . .975
trackChangesShow . . . . . . . . . . . . . . . . . . . . . . . . . . . . . . . . . . . . . . 976
trunkDebug . . . . . . . . . . . . . . . . . . . . . . . . . . . . . . . . . . . . . . . . . . . .977
trunkShow . . . . . . . . . . . . . . . . . . . . . . . . . . . . . . . . . . . . . . . . . . . . .978
tsClockServer . . . . . . . . . . . . . . . . . . . . . . . . . . . . . . . . . . . . . . . . . .981
tsTimeZone . . . . . . . . . . . . . . . . . . . . . . . . . . . . . . . . . . . . . . . . . . . .983
xviii Fabric OS Command Reference53-1001764-02

turboRamTest . . . . . . . . . . . . . . . . . . . . . . . . . . . . . . . . . . . . . . . . . .986
upTime . . . . . . . . . . . . . . . . . . . . . . . . . . . . . . . . . . . . . . . . . . . . . . . .987
uRouteConfig . . . . . . . . . . . . . . . . . . . . . . . . . . . . . . . . . . . . . . . . . . .988
uRouteRemove . . . . . . . . . . . . . . . . . . . . . . . . . . . . . . . . . . . . . . . . .989
uRouteShow . . . . . . . . . . . . . . . . . . . . . . . . . . . . . . . . . . . . . . . . . . .990
usbStorage . . . . . . . . . . . . . . . . . . . . . . . . . . . . . . . . . . . . . . . . . . . .992
userConfig . . . . . . . . . . . . . . . . . . . . . . . . . . . . . . . . . . . . . . . . . . . . .994
userRename . . . . . . . . . . . . . . . . . . . . . . . . . . . . . . . . . . . . . . . . . 1002
version . . . . . . . . . . . . . . . . . . . . . . . . . . . . . . . . . . . . . . . . . . . . . . 1003
wwn . . . . . . . . . . . . . . . . . . . . . . . . . . . . . . . . . . . . . . . . . . . . . . . . 1004
wwnAddress. . . . . . . . . . . . . . . . . . . . . . . . . . . . . . . . . . . . . . . . . . 1006
zone . . . . . . . . . . . . . . . . . . . . . . . . . . . . . . . . . . . . . . . . . . . . . . . . 1008
zoneAdd . . . . . . . . . . . . . . . . . . . . . . . . . . . . . . . . . . . . . . . . . . . . . .1017
zoneCreate. . . . . . . . . . . . . . . . . . . . . . . . . . . . . . . . . . . . . . . . . . . .1018
zoneDelete. . . . . . . . . . . . . . . . . . . . . . . . . . . . . . . . . . . . . . . . . . . 1020
zoneHelp . . . . . . . . . . . . . . . . . . . . . . . . . . . . . . . . . . . . . . . . . . . . .1021
zoneObjectCopy. . . . . . . . . . . . . . . . . . . . . . . . . . . . . . . . . . . . . . . 1022
zoneObjectExpung. . . . . . . . . . . . . . . . . . . . . . . . . . . . . . . . . . . . . 1023
zoneObjectRename. . . . . . . . . . . . . . . . . . . . . . . . . . . . . . . . . . . . .1024
zoneRemove . . . . . . . . . . . . . . . . . . . . . . . . . . . . . . . . . . . . . . . . . 1025
zoneShow. . . . . . . . . . . . . . . . . . . . . . . . . . . . . . . . . . . . . . . . . . . . 1026
Chapter 3 Primary FCS Commands
In this chapter . . . . . . . . . . . . . . . . . . . . . . . . . . . . . . . . . . . . . . . . 1029
Primary FCS commands . . . . . . . . . . . . . . . . . . . . . . . . . . . . . . . . 1029
Appendix A Command Availability
In this appendix . . . . . . . . . . . . . . . . . . . . . . . . . . . . . . . . . . . . . . . .1031
Command validation checks . . . . . . . . . . . . . . . . . . . . . . . . . . . . .1031
Encryption commands and permissions . . . . . . . . . . . . . . . . . . . 1032
General Fabric OS commands and permissions. . . . . . . . . . . . . 1035
Fabric OS Command Reference xix53-1001764-02

xx Fabric OS Command Reference53-1001764-02

About This Document
In this chapter
•How this document is organized . . . . . . . . . . . . . . . . . . . . . . . . . . . . . . . . . . xxi
•Supported hardware and software. . . . . . . . . . . . . . . . . . . . . . . . . . . . . . . . . xxi
•What is new in this document . . . . . . . . . . . . . . . . . . . . . . . . . . . . . . . . . . . xxiii
•Notice to the reader . . . . . . . . . . . . . . . . . . . . . . . . . . . . . . . . . . . . . . . . . . . . xxx
•Additional information. . . . . . . . . . . . . . . . . . . . . . . . . . . . . . . . . . . . . . . . . . . xxx
•Getting technical help . . . . . . . . . . . . . . . . . . . . . . . . . . . . . . . . . . . . . . . . . . xxxi
•Document feedback . . . . . . . . . . . . . . . . . . . . . . . . . . . . . . . . . . . . . . . . . . . xxxii
How this document is organized
This document is organized to help you find the information that you want as quickly and easily as possible.
The document contains the following components:
• Chapter 1, “Using Fabric OS Commands” explains how to use the command line interface to manage a Brocade SAN and Brocade switches.
• Chapter 2, “Fabric OS Commands” provides command information.
• Chapter 3, “Primary FCS Commands” summarizes the subset of commands available when an FCS policy is enabled.
• Appendix A, “Command Availability,” explains the Role-Based Access Control as well as Virtual Fabric and Admin Domain restriction checks used to validate commands.
Supported hardware and software
This document includes updated information specific to new functionality introduced in Fabric OS v6.4.0. The following hardware platforms are supported in this release:
• Brocade 300
• Brocade 4100
• Brocade 4900
• Brocade 5000
• Brocade 5100
• Brocade VA-40FC (new)
Fabric OS Command Reference xxi53-1001764-02

• Brocade 5300
• Brocade 5410
• Brocade 5480
• Brocade 5424
• Brocade 5450
• Brocade 5460
• Brocade 5470
• Brocade 7500
• Brocade 7500E
• Brocade 7600
• Brocade 7800 Extension Switch
• Brocade 8000 FCoE Switch
• Brocade Encryption Switch
• Brocade DCX Backbone and Brocade DCX-4S Backbone
- FA4-18 Fibre Channel application blade
- FCOE10-24 Blade
- FS8-18 Encryption Blade
- FC8-16 port blade
- FC8-32 port blade
- FC8-48 port blade
- FC8-64 port blade (new)
- FC10-6 port blade
- FR4-18i router blade
- FX8-24 Extension Blade
• Brocade 48000 director
- FA4-18 Fibre Channel application blade
- FC4-16 port blade
- FC4-16IP
- FC4-32 port blade
- FC4-48 port blade
- FC10-6 port blade
- FR4-18i router blade
Although many different software and hardware configurations are tested and supported by Brocade Communications Systems, Inc. for Fabric OS v6.4.0, documenting all possible configurations and scenarios is beyond the scope of this document.
This document is specific to Fabric OS v6.4.0. To obtain information about an OS version other than v6.4.0, refer to the documentation for that OS version.
xxii Fabric OS Command Reference53-1001764-02
What is new in this document
The Fabric OS v6.4.0 Command Reference documents updates and corrections to support the current Fabric OS release and the new Brocade FC8-64 port blade.
NEW COMMANDSThe following commands and associated man pages have been added since the publication of the Fabric OS v6.3.1 release of this manual:
• fcipLedTest - LED test for the Brocade 7800/FX8-24 platforms (Diagnostics).
• ceePortLedTest - Port LED test for the DCE platforms (Diagnostics).
• ficonCfg - Configures FICON LIRR database (FICON).
• fmConfig - Manages frame monitor configuration replacing deprecated performance monitoring commands (Advance Performance Monitoring).
• portBeacon - Configures and displays port beaconing mode (Diagnostics).
• portCfgLossTov - Enables or disables debouncing of signal loss for front end ports.
• secAuthCertificate - Configures and manages certificate database (Security).
• thConfig - Configures Fabric Watch thresholds for SFP, Fabric and Security class monitoring (Fabric Watch).
MODIFIED COMMANDSThe following commands and associated man pages have been modified to support new functionality:
Access Gateway
• ag - New device WWN mapping command options.
• portCfgShow - New display for “NPIV Max Login Limit" value.
• portCfgNPIVPort - New operand to configure the maximum number of permitted logins per NPIV port.
• configure - New option to configure "NPIV Max Login Limit" per switch. You can no longer configure this parameter per port with this command. Use portCfgNPIVPort instead.
Bottleneck Monitoring
• bottleNeckMon - New operands to support enhanced bottleneck monitoring for congestion and latency. Per switch configuration with support for exclusion of individual ports. The syntax of this command has changed! Legacy usage is mapped to new syntax wherever possible, however, results may deviate from what is expected. Use of new command syntax is therefore highly recommended.
Diagnostics
• spinFab - Removal of previous port configuration restrictions. New operand to include F_Ports connected to Brocade-branded HBAs.
• portTest - Removal of previous port configuration restrictions.
Fabric OS Command Reference xxiii53-1001764-02

• fcipPathTest - Revised, updated examples.
• turboRamtest - Revised, updated examples.
• portLedTest - Updated examples.
• portLoopBackTest - - Updated examples.
Dynamic area mode on default switch
• configure - New option to enable or disable Dynamic Area Mode.
• portAddress - Port Address binding is now supported on the default switch as well after you enable Dynamic Area Mode with the configure command.
• wwnAddress - Dynamic Area Mode and WWN-Based persistent PID must be enabled on the switch before you can assign an address with this command.
Encryption
• New command options to support replication for remote host access to data. Supported only with RSA RKM key vault.
• CryptoCfg --add - Enhanced to support replication (new -newLUN parameter).
• CryptoCfg --decommission - New command group to support device decommissioning.
• CryptoCfg --manual_rekey - Modified to support replication (-include_mirror with the -all option).
• CryptoCfg --rebalance - Support for combined disk and tape containers on a single Encryption Engine including load balancing for optimized throughput.
• CryptoCfg --refreshDEK - Rereads the mirror LUN metadata and updates the FPGA tables for the LUN.
• CryptoCfg --set -replication - Configures replication mode.
• CryptoCfg --show -container - Enhanced display includes new parameters, "New LUN" and "Replication LUN type".
• CryptoCfg --show -groupcfg/-egstatus - Enhanced display “Replication Mode” status and includes diagnostic output to detect incorrectly configured connectivity settings.
• CryptoCfg --show -localEE - Enhanced display to show rebalance status.
• CryptoCfg --sync -securitydb - Synchronizes security database across encryption group to rectify master key propagation failure.
Fabric Watch
The interactive Fabric Watch configuration interface (fwConfigure) has been replaced with a command-driven set of new Fabric Watch commands. All Fabric Watch configuration and displays can now be performed non-interactively. The legacy commands will be removed in a subsequent release.
• poprtFencing - port and area updates.
• portThConfig - Support for VE_Ports and Copper ports added.
• sysMonitor - Support for configuring Environment and Resources classes.
• thConfig (see new commands) - Configures FW thresholds for the SFP, Fabric, Security, Filter, and End-to-End Performance Monitor classes.
xxiv Fabric OS Command Reference53-1001764-02
FCIP
• portCfg - Updated for IPv6, advanced compression, and DSCP configuration support. Minimum committed rate has changed from 1,544 kbps to 10000 Kbps. Keep Alive default is now 1000 ms.
• portCfgShow - Updated for IPv6 configuration support
• portShow - Updated to display new portCfg options and values.
FCping
• fcPing - New options to support SuperPing. Not supported on FCR.
FICON
• ficonCfg - Refer to New Commands.
• ficonCupSet - New CRP operand to set the current reporting path.
• ficonCupShow - New LP operand to display logical paths on the switch.
• ficonShow - New flags to distinguish LIRR entry types (current or secondary)
Lossless DLS
Ability to configure Lossless has moved from iodSet to dlsSet. You can no longer configure lossless with the iodSet command. Refer to the section “Deprecated Commands” section (Lossless DLS) for changes made to iodSet.
• dlsShow - Enhanced to display Lossless configuration
• dlsSet - Configures Lossless.
Platform support
• switchShow - Updated for mini-FSP support.
• sfpShow - Updated for mini-FSP support.
• slotshow - Updated for new hardware.
Port configuration
• portCfgEport - New mode value 2 to lock down port as E_Port.
• portstats64show - Now displays one 64-bit number, SNMP counters.
• portSwapShow - Now displays 24-bit port Address (PID) instead of area.
• portSwap - Now displays 24-bit port Address (PID) instead of area.
The following commands have been enhanced to support port ranges and port index ranges:
Fabric OS Command Reference xxv53-1001764-02

• portEnable
• portDisable
• portLogDump
• portCfgSpeed
• portStatsClear
• portStatsShow
• portCfgShow
• portCfgEport
• portCfgPersistentDisable
• portCfgPersistentEnable
• portName
• portPerfShow
• portLogDump
• portShow
Security
• authUtil - Support for FCAP configuration.
• fipsCfg - Verbose output (interactive) for zeroize operations.
• distribute - No longer supports IPFILTER distribution. Use chassisDistribute.
• passwd - Support for non-interactive password change.
• secAuthCertificate - New command to manage certificate database.
• secCertUtil - Support for third party certificates.
• userConfig - New option to display all accounts with a given role. Support for non-interactive password configuration.
SNMP
• snmpCfg - Non-interactive commands for configuring MIBs and traps
• snmpTraps - Updated examples.
Virtual Fabrics
• lsCfg - New ge option for the Brocade 7800/FX8-24 platforms.
• lfCfg - New operand to display XISLs.
Zoning
• zoneShow - New Domain, Index (D,I) sort option.
• zone --show New Domain, Index (D,I) sort option.
xxvi Fabric OS Command Reference53-1001764-02
Fabric OS Infrastructure
supportSave - New timeout multplier.
DEPRECATED COMMANDSInformation that was removed or deprecated since this document was last released:
Advanced Performance Monitoring
The following commands are being deprecated. These commands are still operational in the Fabric OS v6.4 release and man pages have been retained, but they are incompatible with new fmConfig command. Use of the new fmConfig command is recommended.
• perfAddIPMonitor
• perfAddReadMonitor
• perfAddSCSIMonitor
• perfAddUserMonitor
• perfAddWriteMonitor
• perfCfgClear
• perfCfgSave
• perfShowFilterMonitor
• perfMonitorShow
• perfMonitorClear
Diagnostics
The following commands have been removed from the manual. These commands are for internal debugging purposes only.
• fabPortShow
• fabSwitchShow
Fabric Watch
The following commands are being deprecated. They are still operational but using the new non-interactive Fabric Watch commands is highly recommended.
• fwConfigure
• fwShow
Lossless DLS
• iodSet --enable losslessDLS, --disable losslessDLS and --show have been removed from the command and associated documentation. Use the dlsSet command instead.
Fabric OS Command Reference xxvii53-1001764-02

Document conventions
Modem support
The dial-in feature via modem is no longer supported as Fabric OS v6.4.0. Help for the following command has been removed:
• setModem
WebTools configuration
The following commands to set and display the Java plug-in for WebTools are no longer supported as Fabric OS v6.4.0.
• httpCfgSet
• httpCfgShow
NOTEAutomatic page breaks in CLI command output displays are being phased out. Use the more option to display command output with page breaks: command | more. Do not use the more option in conjunction with help pages. Executing help command | more will display a command “no manual entry for command” message.
Document conventionsThis section describes text formatting conventions and important notices formats.
Text formattingThe narrative-text formatting conventions that are used in this document are as follows:
bold text Identifies command namesIdentifies GUI elementsIdentifies keywords and operandsIdentifies text to enter at the GUI or CLI
italic text Provides emphasisIdentifies variablesIdentifies paths and Internet addressesIdentifies document titles
code text Identifies CLI outputIdentifies syntax examples
For readability, command names in the narrative portions of this guide are presented in mixed letter case, for example, switchShow. In examples, command letter case is all lowercase.
xxviii Fabric OS Command Reference53-1001764-02

Document conventions
Command syntax conventionsCommand syntax in the synopsis section follows these conventions:
command Commands are printed in bold.
--option, option Command options are printed in bold.
-argument, arg Arguments are printed in bold.
[ ] Optional element.
variable Variables are printed in italics. In the help pages, values are underlined or enclosed in angle brackets < >.
... Repeat the previous element, for example “member[;member...]”
value Fixed values following arguments are printed in plain font. For example, --show WWN
| Boolean. Elements are exclusive. Example: --show -mode egress | ingress
\ Backslash indicates a “soft” line break. If a backslash separates two lines of a command input, enter the entire command at the prompt without the back slash.
Notes, cautions, and warningsThe following notices and statements are used in this manual. They are listed below in order of increasing severity of potential hazards.
NOTEA note provides a tip, guidance, or advice, emphasizes important information, or provides a reference to related information. Regular help page notes are included under the NOTES side heading.
ATTENTIONAn Attention statement indicates potential damage to hardware or data.
CAUTION
A Caution statement alerts you to situations that can be potentially hazardous to you or cause damage to hardware, firmware, software, or data.
DANGER
A Danger statement indicates conditions or situations that can be potentially lethal or extremely hazardous to you. Safety labels are also attached directly to products to warn of these conditions or situations.
Fabric OS Command Reference xxix53-1001764-02

Document conventions
Key termsFor definitions specific to Brocade and Fibre Channel, see the technical glossaries on the Brocade Web site. See “Brocade resources” on page xxx for instructions on accessing the information.
For definitions of SAN-specific terms, visit the Storage Networking Industry Association online dictionary at:
http://www.snia.org/education/dictionary
Notice to the reader
This document may contain references to the trademarks of the following corporations. These trademarks are the properties of their respective companies and corporations.
These references are made for informational purposes only.
Additional information
This section lists additional Brocade and industry-specific documentation that you may find helpful.
Brocade resourcesTo get up-to-the-minute information, join MyBrocade at no cost to obtain a user ID and password:
http://my.brocade.com
White papers, online demonstrations, and data sheets are available through the Brocade Web site at:
http://www.brocade.com/products-solutions/products/index.page
Corporation Referenced Trademarks and Products
Commvault Commvault Galaxy Data Protection
Thales NCKA Thales nCipher Key Appliance
EMC RSA Key Manager (RKM)
HP Secure Key Manager (SKM)
IBM Tivoli Storage Manager
Legato Legato Networker
Microsoft Corporation Windows, Windows NT, Internet Explorer
NetApp Net App Lifetime Key Manager (LKM)
Oracle Corporation Oracle, Java
Symantec Veritas NetBackup 6.5 Enterprise Server
Red Hat, Inc. Linux
xxx Fabric OS Command Reference53-1001764-02
Document conventions
For additional Brocade documentation, visit the Brocade SAN Info Center and click the Resource Library location:
http://www.brocade.com
Release notes are available on the Brocade Web site and are also bundled with the Fabric OS firmware.
Other industry resourcesFor additional resource information, visit the Technical Committee T11 Web site. This Web site provides interface standards for high-performance and mass storage applications for Fibre Channel, storage management, and other applications:
http://www.t11.org
For information about the Fibre Channel industry, visit the Fibre Channel Industry Association Web site:
http://www.fibrechannel.org
Getting technical help
Contact your switch support supplier for hardware, firmware, and software support, including product repairs and part ordering. To expedite your call, have the following information available:
1. General Information
• Switch model
• Switch operating system version
• Error numbers and messages received
• supportSave command output
• Detailed description of the problem, including the switch or fabric behavior immediately following the problem, and specific questions
• Description of any troubleshooting steps already performed and the results
• Serial console and Telnet session logs
• syslog message logs
2. Switch Serial Number
The switch serial number and corresponding bar code are provided on the serial number label, as shown here::
The serial number label is located as follows:
• Brocade 300, 4100, 4900, 5100, 5300, 7500, 7500E, VA-40FC, and Brocade Encryption Switch—On the switch ID pull-out tab located inside the chassis on the port side on the left
*FT00X0054E9
FT00X0054E9
Fabric OS Command Reference xxxi53-1001764-02

Document conventions
• Brocade 7500E, 7800, and 8000—On the pull-out tab on the left side of the port side of the switch
• Brocade 5000—On the switch ID pull-out tab located on the bottom of the port side of the switch
• Brocade 7600—On the bottom of the chassis
• Brocade 48000—Inside the chassis next to the power supply bays
• Brocade DCX—On the bottom right on the port side of the chassis
• DCX-4S—On the port side of the chassis, on the lower right side and directly above the cable management comb
3. Use the licenseIdShow command to display the switch WWN.
If you cannot use the licenseIdShow command because the switch is inoperable, you can get the WWN from the same place as the serial number, except for the Brocade DCX. For the Brocade DCX, access the numbers on the WWN cards by removing the Brocade logo plate at the top of the non-port side of the chassis.
Document feedback
Quality is our first concern at Brocade, and we have made every effort to ensure the accuracy and completeness of this document. However, if you find an error or an omission, or you think that a topic needs further development, we want to hear from you. Forward your feedback to:
Provide the title and version number and as much detail as possible about your issue, including the topic heading and page number and your suggestions for improvement.
xxxii Fabric OS Command Reference53-1001764-02

Fabric OS Command Reference53-1001764-02
Chapter
1
Using Fabric OS CommandsIn this chapter•Understanding role-based access control . . . . . . . . . . . . . . . . . . . . . . . . . . . . 1
•Understanding Virtual Fabric restrictions . . . . . . . . . . . . . . . . . . . . . . . . . . . . 2
•Understanding Admin Domain restrictions . . . . . . . . . . . . . . . . . . . . . . . . . . . 3
•Using the command line interface . . . . . . . . . . . . . . . . . . . . . . . . . . . . . . . . . . 3
Understanding role-based access controlFabric OS implements Role-Based Access Control (RBAC) to control access to all Fabric OS operations.
Seven roles are supported, as defined in Table 1. Role definitions are guided by perceived common operational situations and the operations and effects a role is permitted to have on a fabric and individual fabric elements.
Appendix A, “Command Availability” explains the Role-Based Access Control checks in place to validate command execution, and provides the RBAC permissions for the commands included in this manual.
Additional command restrictions apply depending on whether Virtual Fabrics or Admin Domains are enabled in a fabric.
TABLE 1 Role definitions
Role Name Definition
User Non-administrative use, such as monitoring system activity. In Fabric OS v6.2.0 and later, the user account gains access to Fabric ID 128. This is the default Logical Fabric after a firmware upgrade.
Operator A subset of administrative tasks typically required for routine maintenance operations.
SwitchAdmin Administrative use excluding security, user management, and zoning.
ZoneAdmin Zone management only.
FabricAdmin Administrative use excluding user management and Admin Domain management.
BasicSwitchAdmin A subset of administrative tasks, typically of a more limited scope and effect.
Admin All administrative tasks, including encryption and chassis commands.
SecurityAdmin Administrative use including admin, encryption, security, user management, and zoning.
1

Understanding Virtual Fabric restrictions1
NOTEVirtual Fabrics and Admin Domains are mutually exclusive and are not supported at the same time on a switch. To use Admin Domains, you must first disable Virtual Fabrics; to use Virtual Fabrics, you must first delete all Admin Domains. Use ad --clear -f to remove all Admin Domains. Refer to the Fabric OS Administrator’s Guide for more information.
Understanding Virtual Fabric restrictionsIn Fabric OS v6.2.0 and later, all commands are subject to additional RBAC enforcement with regard to Virtual Fabric contexts and switch types. Commands can be executed in one or more of the contexts described in Table 2. Execution of chassis commands requires chassis permissions.
Switch commands are further defined by the switch type restrictions as described in Table 3. Switch type restrictions are not applicable to commands that require chassis permissions.
In a Virtual Fabric environment where contexts are enforced, the following Virtual Fabric restrictions apply to the RBAC permissions specified in Table 1. Refer to userConfig help for more information on configuring user account access permissions in a Virtual Fabric environment.
• Any given role is allowed to execute all switch commands to which the role is authorized in the account’s home context. The default home context is the default logical fabric FID 128.
• You can change an account’s home context to a specified FID and configure the account permissions to access additional logical switches specified in the user’s Fabric ID list.
• Accounts with user or admin permissions can be granted chassis permissions. A user account with the chassis role can execute chassis-level commands at the user RBAC access level. An admin account with the chassis role can execute chassis-level commands at the admin RBAC access level.
Refer to Appendix A, “Command Availability” for context and switch type information as it applies to CLI commands.
TABLE 2 Virtual Fabric contexts
Context type Definition
Switch context Command applies to the current logical switch only, or to a specified logical switch.
Chassis context Command applies to the chassis on which it is executed.
Switch and Chassis context
Command can be executed in a logical switch context or in a chassis context.
Disallowed Command is not supported in Virtual Fabric mode.
TABLE 3 Switch Types
Switch Type Definition
All Switches Command can be executed in any switch context.
Base Switch Only Command can be executed only on the base switch.
Default Switch Only Command can be executed only on the default switch.
N/A Command is a chassis command or not supported in Virtual Fabric mode.
2 Fabric OS Command Reference53-1001764-02

Understanding Admin Domain restrictions 1
Understanding Admin Domain restrictionsA subset of Fabric OS commands is subject to Admin Domain restrictions that may be in place. In order to execute an AD-restricted command on a switch or device, the switch or device must be part of a given Admin Domain, and the user must be logged in to that Admin Domain.
Six Admin Domain types are supported, as defined in Table 4.
Refer to Appendix A, “Command Availability” for a listing of Admin Domain restrictions that apply to the commands included in this manual.
Using the command line interfaceThe Fabric OS command line interface (accessed via Telnet, SSH, or serial console) provides full management capability on a Brocade switch. The Fabric OS CLI enables an administrator to monitor and manage individual switches, ports, and entire fabrics from a standard workstation. Selected commands must be issued from a secure Telnet or SSH session.
Access is controlled by a switch-level password for each access level. The commands available through the CLI are based on the user’s login role and the license keys used to unlock certain features.
The Fabric OS CLI provides the following capabilities:
• Access to the full range of Fabric OS features, given the license keys installed.
• Assistance with configuration, monitoring, dynamic provisioning, and daily management of every aspect of storage area networks (SANs).
• A deeper view of the tasks involved in managing a Brocade SAN.
• Identification, isolation, and management of SAN events across every switch in the fabric.
• Management of Brocade licenses.
The documentation for each command includes a synopsis of its syntax, a description of command use, and a set of examples. The same information can be accessed by issuing help command on a Brocade switch or director. This command displays the help page for the specified command. For example, to display the help page for ad, type:
switch:admin> help ad
TABLE 4 AD types
AD Type Definition
Allowed Allowed to execute in all ADs.
PhysFabricOnly Allowed to execute only in AD255 context (and the user should own access to AD0-AD255 and have admin RBAC privilege).
Disallowed Only allowed to execute in AD0 or AD255 context, not allowed in AD1-AD254 context.
PortMember All control operations allowed only if the port or the local switch is part of the current AD. View access allowed if the device attached to the port is part of current AD.
AD0Disallowed Allowed to execute only in AD255 and AD0 (if no ADs are configured).
AD0Only Allowed to execute only in AD0 when ADs are not configured.
Fabric OS Command Reference 353-1001764-02

Using the command line interface1
4 Fabric OS Command Reference53-1001764-02

Fabric OS Command Reference53-1001764-02
Chapter
2
Fabric OS CommandsaaaConfig
Manages RADIUS and LDAP configuration information.
Synopsis aaaconfig
aaaconfig --show
aaaconfig --add | --change server -conf radius|ldap [-p port] [-d domain][-t timeout] [-s secret] [-a chap | pap | peap-mschapv2]
aaaconfig --remove server -conf radius|ldap
aaaconfig --move server -conf radius|ldap to_position
aaaconfig --authspec aaa1[;aaa2 [-backup]
aaaconfig --help
Description Use this command to manage the RADIUS and LDAP server configuration for the authentication, authorization and accounting (AAA) services. Use this command to display, add, remove, change, enable or disable the RADIUS or LDAP configuration.
Switches running Fabric OS v5.2.0 or later use a local as well as a remote authentication mechanism for validating a login. Supported authentication protocols include Password Authentication Protocol (PAP), Challenge-Handshake Authentication Protocol (CHAP) and, for switches running Fabric OS v5.3.0 or later, Protected Extensible Authentication Protocol (PEAP). In addition, Fabric OS v6.0.0 provides support for Light-weight Directory Access Protocol (LDAP) authentication against Active Directory for user authentication and authorization.
RADIUS or LDAP servers are contacted in the order they appear in the configuration list. The first server returning authentication success or failure causes the authentication request to succeed or fail. If no response is received within the specified timeout, the next RADIUS or LDAP server in the list is contacted. An event entry logs if all RADIUS or LDAP servers fail to respond.
When the command succeeds, it triggers an event log (the Fabric OS error log) to indicate a server is added, removed, or modified. Refer to the Fabric OS Message Reference manual for specific details.
There are two modes of operation in LDAP authentication, FIPS mode and non-FIPS mode. However, there is no option to configure LDAP while the switch is in FIPS mode. The LDAP client checks if FIPS mode is set on the switch and uses FIPS-compliant TLS ciphers for LDAP. If FIPS mode is not set and the ADir server is configured for FIPS ciphers, it uses FIPS-compliant ciphers.
Fabric OS v6.1.0 and later is required to configure LDAP to use FIPS-compliant ciphers. Refer to the Fabric OS Administrator's Guide for configuration procedures.
Configuration changes are persistently saved and take effect with the next AAA request. The configuration applies to all switch instances in a platform supporting multiple switch domains.
5
aaaConfig2
Notes Customers can use centralized RADIUS servers to manage AAA services for a switch, as defined in the RFC 2865 RADIUS specification.
Fabric OS v6.1.0 and later is required to configure LDAP while in FIPS mode. Refer to the Fabric OS Administrator’s Guide for configuration procedures.
This command can be executed when logged in through the console, Telnet or SSH connection.
The execution of this command is subject to Virtual Fabric or Admin Domain restrictions that may be in place. Refer to chapter 1, “Using Fabric OS commands” and Appendix A, “Command Availability” for details.
Operands This command takes as input an action and its associated arguments. Without any specified action, the command prints out the usage.
The following operands are supported:
server Specifies an IP address or a server name in dot-decimal notation. IPv6 addresses are supported. If a name is used, a DNS entry must be correctly configured for the server. If the specified server IP address or name already exists in the current configuration, the command fails and generates an error. However, the command does not validate the server name against the IP address in the configuration. Make sure to avoid duplicate configuration of the same server, one specified by the name, the other specified by the IP address.
--show Displays the current AAA service configuration.
--add | --change server [options]
Adds or modifies a RADIUS or LDAP server. The --add option appends the specified server to the end of the current configuration list. A maximum of 5 servers are supported for each authentication type. The --change option modifies the specified server configuration to use the new arguments. The server must be one of the IP addresses or names shown in the current configuration.
The following options are supported:
-conf radius|ldap
Specifies the server configuration as either RADIUS or LDAP. This operand is required.
The following operands are optional:
-p port Specifies the RADIUS or LDAP server port number. Supported range is 1 to 65535. The default port is 1812 for RADIUS authentication. The default port is 389 for LDAP authentication. This operand is optional. If no port is specified, the default is used.
-t timeout Specifies the response timeout for the RADIUS or the LDAP server. The supported range is between 1 and 30 seconds. The default is 3 seconds. This operand is optional. If no timeout is specified, the default is used.
-d domain Specifies the Windows domain name for the LDAP server, for example, brocade.com. This option is valid only with the -conf ldap option. This operand is required.
6 Fabric OS Command Reference53-1001764-02

aaaConfig 2
-s secret Specifies a common secret between the switch and the RADIUS server. The secret must be between 8 and 40 characters long. This option is valid only with the -conf radius option, and it is optional. The default value is sharedsecret.
-a Specifies the remote authentication protocol for the RADIUS server. This operand is valid only with the -conf radius option, and it is optional. The default value for this operand is CHAP.
Valid protocols are one of the following:
pap Password Authentication Protocol
chap Challenge-Handshake Authentication Protocol
peap-mschapv2 Protected Extensible Authentication Protocol (requires Fabric OS v5.3.0 or later)
The distinction between protocols is only applicable to the packets between a system and the RADIUS server. Between the user and system, passwords are always used.
--remove server Removes the specified server from the configuration. The server must match one of the IP addresses or the names shown in the current configuration. The following operand is required:
-conf radius|ldap
Specifies the server configuration as either RADIUS or LDAP. If the server is enabled, the command does not allow the last server to be removed from the configuration list. RADIUS or LDAP must first be disabled before the last server of the specified type may be removed.
--move server option Moves the specified server from the current position in a RADIUS or LDAP configuration list to the specified position. If the specified position is the same as the current position, no change takes place. Valid options are:
-conf radius|ldap
Specifies the server configuration as either RADIUS or LDAP. This operand is required.
to_position Specifies the new position for the server. The value for to_position is an integer, and must be within the range of server positions in the current configuration. Use the --show option to determine current server positions. This operand is required.
--authspec “aaa1[;aaa2” [-backup]
Replaces the configuration with the specified AAA service. Each service can be specified only once in the list, for example, “radius; local; radius” is invalid. No edit option is provided. The --authspec option takes as an argument a semicolon-separated list of AAA services. Services must be enclosed in double quotation marks.
The following AAA services and service pairs are valid:
“local” Default setting. Authenticates the user against the local database only. If the password does not match or the user is not defined, the login fails.
Fabric OS Command Reference 753-1001764-02

aaaConfig2
“radius” When “radius” is specified, the first RADIUS server is contacted. If the RADIUS server is not reachable, the next RADIUS server is contacted. If the authentication fails, the authentication process does not check for the next server in the sequence.
“ldap” When “ldap” is specified, the first Active directory (AD) server is contacted. If the AD server is not reachable, the next AD server is contacted. If the authentication fails, the authentication process does not check for the next server in the sequence.
“radius;local” Enables the current RADIUS configuration as the primary AAA service and the switch-local database as the secondary AAA service. If “radius” and “local” are specified, and if the RADIUS servers are reachable and the user credentials are correct, the user authentication succeeds. If the user provides credentials from the switch database, the RADIUS authentication fails but login succeeds through the switch database.
“ldap;local” Enables the current LDAP configuration as the primary AAA service and the switch-local database as the secondary AAA service. If “ldap” and “local” are specified, and if the AD servers are reachable and the user credentials are correct, the user authentication succeeds. If the user provides credentials from the switch database, AD authentication fails but login would still succeed through the switch database.
-backup For use with the "radius;local" and "ldap;local" options only. The backup option states to try the secondary AAA service only if none of the primary AAA services are available.
--help Displays the command usage.
Examples To display the current RADIUS configuration:
switch:admin> aaaconfig --show RADIUS CONFIGURATIONS
===================== Position Server Port Secret Timeout(s) Auth-Protocol 1 192.168.233.48 1812 sharedsecret 3 CHAP 2 192.168.233.44 1812 sharedsecret 3 CHAP 3 radserver 1812 private 5 CHAP Primary AAA Service: Switch database Secondary AAA Service: None
LDAP CONFIGURATIONS =================== LDAP configuration does not exist.
To move the RADIUS server "radserver" from position 3 to position 1:
switch:admin> aaaconfig --move radserver -conf radius 1
To configure the RADIUS server 192.168.233.48 as an LDAP server:
switch:admin> aaaconfig --change 192.168.233.48 -conf ldap -p 3002 -s newsecret -t 1
To add an AD/LDAP server to the configuration:
switch:admin> aaaconfig --add 194.72.68.335 -conf ldap -p 3002 -d brocade.com -t 1
8 Fabric OS Command Reference53-1001764-02

aaaConfig 2
To replace the AAA service with backup option:
switch:admin> aaaconfig --authspec “ldap;local” -backup
See Also none
Fabric OS Command Reference 953-1001764-02

ad2
ad
Manages Admin Domain operations.
Synopsis ad --activate ad_id
ad --add ad_id [-d “dev_list”] [-s “switch_list”]
ad --apply
ad --clear [-f]
ad --create ad_id [-d "dev_list"] [-s "switch_list"]
ad --deactivate ad_id
ad --delete ad_id
ad --exec ad_id "command_list"
ad --remove ad_id [-d "dev_list"] [-s "switch_list"]
ad --rename ad_id new_ad_id
ad --save
ad --select ad_id
ad --show [-i | [ad_id [-m mode]]] (in AD255 context)
ad --show [-i ] (in AD0 context)
ad --show (in AD1-254 context)
ad --validate [-i | [ad_id | [-m mode]]]
ad --transabort
ad --transshow
Description Use this command to manage Admin Domain operations.
This command follows a batched-transaction model. When executed with the --activate, --add, --clear, --create, --deactivate, --delete, --remove, or--rename options, this command changes only the Defined Configuration in the transaction buffer. The --save option sends the changes made in the transaction buffer to all other switches and permanently saves the changes to the Defined configuration in persistent storage. The --apply option performs a save operation, sends a request to apply the Admin Domain configuration (as defined in the persistent storage), and then enforces the configuration locally.
The Admin Domain transaction buffer is linked to the current login shell and is lost on logout. Use the --transshow option to display the current Admin Domain transaction information.
Before creating Admin Domains, the default zone mode should be set to “No Access”. To set the default zone mode to “No Access” execute the following command sequence:
switch:admin> ad --select AD0switch:admin> defzone --noaccessswitch:admin> cfgsave
Refer to defZone help for more information.
10 Fabric OS Command Reference53-1001764-02

ad 2
All switches, switch ports and devices in the fabric that are not specified in any other Admin Domain are treated as implicit members of AD0. Members added to AD0 are called explicit members.
When a new Admin Domain is created, the members included in the new Admin Domain are automatically removed from the implicit member list of AD0. If the devices included in the new Admin Domain are already zoned in AD0, and if you want to move these devices from AD0 without any traffic disruption, do the following:
1. Add the devices to AD0’s explicit member list using ad--add and ad--apply.
2. Create new ADs with the devices and execute ad--apply.
3. Select (or login to) the new Admin Domain and create a relevant zone configuration and zones (Refer to zone --copy help for details). Enable the new zone configuration under the Admin Domain.
4. (Optionally) remove explicit members from AD0 (using ad --remove and ad --apply). Remove the member references from the AD0 zone database.
Note The execution of this command is subject to Virtual Fabric or Admin Domain restrictions that may be in place. Refer to chapter 1, "Using Fabric OS commands" and Appendix A, "Command Availability" for details.
Operands The generalized syntax for this command is “ad action arguments”. Command actions are described first. Argument details follow the description of actions.
The following actions are supported:
--activate arg Activates an Admin Domain. An Admin Domain is enforced only if it is in an activated state. AD0 is always in an activated state. By default, after the Admin Domain is enabled, the devices specified in the Admin Domain are not able to see each other until they are zoned together. The command prompts for confirmation. The activate operation remains in the transaction buffer until you issue ad --apply or ad --save.
--add arguments Adds new members to an existing Admin Domain. The add operation remains in the transaction buffer until you issue ad --apply or ad --save.
--apply Saves the current transaction buffer contents to the defined configuration and enforces the defined configuration on all switches in the fabric. ad --apply prompts for confirmation.
--clear [-f] Deletes all ADs and clears AD0’s explicit members. This command fails if AD1 through AD254’s zone databases are not empty. The command prompts for confirmation before deleting all Admin Domains. The clear operation remains in the transaction buffer until you issue ad --apply or ad --save.
When used with the -f option, this command deletes all ADs and clears all explicit members from AD0, even if the zone databases or AD1 through AD254 are not empty. Use the force option to remove Admin Domains before enabling Virtual Fabrics.
Fabric OS Command Reference 1153-1001764-02

ad2
--create arguments
Creates a new Admin Domain with optionally specified device or switch members. A newly created Admin Domain is in an activated state. It initially contains no zone database. The newly created Admin Domain remains in the transaction buffer until you issue ad --apply or ad --save. AD0 always exists. Use ad --add to add explicit members to AD0.
--deactivate arg Deactivates an Admin Domain. This operation fails if an effective zone configuration exists under the Admin Domain. This operation is not allowed on AD0. ad --deactivate does not disable any ports. Existing logins to a deactivated Admin Domain are not terminated; however, subsequent CLI execution is disallowed. A message is displayed to indicate that the current Admin Domain is not active. The command prompts for confirmation. The deactivate operation remains in the transaction buffer until you issue ad --apply or ad --save.
--delete arg Deletes an Admin Domain. This command succeeds regardless of whether the Admin Domain is in a deactivated or an activated state. AD0 always exists; using this operation on AD0 does not delete AD0, it only removes all explicit members from AD0. The AD0 zone database does not need to be empty for the delete operation to succeed. Not all existing user sessions to a deleted Admin Domain are terminated; however, subsequent CLI execution is disallowed. A message displays indicating that the current Admin Domain is not active. The command prompts for confirmation before executing the delete action. The delete operation remains in the transaction buffer until you issue ad --apply or ad --save.
--exec argumentsThis command performs the following tasks:
1. Create a new shell.
2. Executes ad --select to the specified Admin Domain.
3. Executes the specified commands.
4. Exits the shell.
--remove argumentsRemoves one or more members from an Admin Domain. Removing the last member from an Admin Domain deletes the Admin Domain. The remove operation remains in the transaction buffer until you issue ad --apply or ad --save.
--rename argumentsRenames the specified Admin Domain. If a reserved name is used for new_ad_id (AD number format), the operation fails if the reserved name does not correspond to the ad_id AD number. The rename operation remains in the transaction buffer until you issue ad --apply or ad --save.
--save Saves the outstanding Admin Domain transaction to the defined configuration on all switches in the fabric. The saved Admin Domain definition is enforced only when ad --apply is issued. Attempts to modify and save an Admin Domain that is currently enforced will fail. The command prompts for confirmation.
12 Fabric OS Command Reference53-1001764-02

ad 2
--select arg Selects an Admin Domain context. This command fails if the corresponding Admin Domain is not activated. This operation succeeds only if you have the specified Admin Domain. This command internally spawns off a new shell within the requested Admin Domain context. Type logout or exit to exit from the selected Admin Domain. The zone transaction is linked to the current shell; therefore, the zone transaction buffer is lost on logout. Use cfgTransShow to display the current zoning transaction information.
--show arguments Displays the membership information of the specified Admin Domain or all Admin Domains.
When executed in an AD255 context and an Admin Domain name is not specified, all information about all existing Admin Domains is displayed. When executed in an AD0-AD254 context, the command, by default, displays the members of the current Admin Domain’s effective configuration, and therefore you cannot specify an ad_id or mode.
When executed in an AD255 context, all Admin Domain information from the transaction buffer, defined configuration and effective configuration is displayed.
--validate arguments
Checks whether Admin Domain members are from a non-Admin Domain aware switch or the members do not exist in the fabric. The output is similar to ad --show; however, all members that are from non-Admin Domain aware switches are marked with a plus sign (+). Members that are not online are marked with an asterisk (*).
FC Router Front Phantom Domain and FC Router Translate Phantom Domain are virtual entities without any exposed management interfaces; therefore, any FC Router phantom switch WWN specified in an AD switch member list is marked as a non-Admin Domain aware member. All D,PI members in the device list corresponding to an FC Router Phantom Domain are marked as non-Admin Domain aware members. All FC Router imported devices in the AD device list are marked as AD-aware members.
--transabort Aborts the transaction buffer. The command prompts for confirmation before aborting the transaction.
--transshow Displays the ID of the current Admin Domain transaction and indicates whether or not the transaction can be aborted. The transaction cannot be aborted if it is an internal Admin Domain transaction.
The following arguments are supported with selected AD actions:
ad_id Uniquely identifies an Admin Domain. An ad_id can be a name or a number:
name An Admin Domain name can be up to 63 bytes, must begin with a letter, and can consist of letters, numbers, and underscore characters. The Admin Domain names with the format AD[0-255] are reserved for autoassigning Admin Domain names to Admin Domains created with an Admin Domain number. and can be assigned only to the corresponding Admin Domain. Using ad --rename, for example, in an attempt to assign a name of AD5 to an Admin Domain with ID not equal to 5 fails. Admin Domain names are case-sensitive.
Fabric OS Command Reference 1353-1001764-02

ad2
number An Admin Domain can be specified by a number. Valid values include 0 through 255. AD0 and AD255 are always active. AD0 cannot be specified with --activate, --deactivate or --delete actions. AD255 can be specified only with --exec, --show and --validate actions.
For all command iterations, with the exception of ad --create, the Admin Domain is specified either by a name or a number. For ad --create, both name and number can be specified: for example, ad --create test_ad/10 -d “100,5; 100,1”.
-d “dev_list” Specifies the list of devices in an Admin Domain, in quotation marks. Separate each entry in the device list with a semicolon (;). Valid formats include:
D,PI Uses existing zone D,PI member types. Benefits include:
• Grants port control and zoning on the switch port and the devices attached to that port.
• PI can be specified as a range; for example, D,[0-34]. The port index range is expanded and stored internally.
• The same D,PI members can be specified in more than one Admin Domain.
Device WWN Uses traditional zone WWN member types. Benefits include:
• Supports node or port WWNs.• End-device members, whose WWNs are used in an Admin Domain
definition, need not be online when the Admin Domain is created (similar to a zoneCreate operation).
• Provides rights to zone the devices.• Provides administrative view rights to the switch port the device is
connected to.
-s “switch_list” Specifies the list of switches in an Admin Domain. The list must be enclosed in quotation marks. Separate each entry in the switch list with a semicolon (;). Specify the switch in one of the following formats:
Switch WWN World wide name of the switch.
Domain ID Any switch member specified in Domain ID format is converted into a switch WWN-based on the current fabric information. Operations with switch list fail if the domain ID to switch WWN lookup fails.
Membership in an AD switch_list grants switch administrative operations such as switchDisable, switchEnable, reboot, ad, etc. on the switch. Ownership of a switch implicitly provides port control capability on all its ports, but no zoning control.
“command_list” Specifies one or more commands to execute in an Admin Domain context. This operand is valid only with the --exec option.
new_ad_id Specifies a new Admin Domain name or number. This operand is valid only with the --rename option. Format is the same as ad_id.
-i Displays the implicit members of AD0. This operand is valid only with the --show option.
14 Fabric OS Command Reference53-1001764-02

ad 2
-m mode Specifies the mode in which Admin Domain configuration information is displayed. This operand is valid only with --show and --validate. Valid values for mode include:
0 Displays the Admin Domain configuration in the current transaction buffer.
1 Displays the Admin Domain configuration stored in persistent memory (defined configuration).
2 Displays the currently enforced Admin Domain configuration currently enforced (effective configuration).
Examples To enable AD5:
switch:admin> ad --activate 5You are about to activate a new admin domain.Do you want to activate ‘5’ admin domain (yes, y, no, n): [no] y
To enable AD_13:
switch:admin> ad --activate AD_13
To add new device members to AD1:
switch:admin> ad --add AD1, -d “100,5; 4,1”
To apply all changes made to the Admin Domain configurations since --apply was last executed:
switch:admin> ad --applyYou are about to enforce the saved AD configuration.This action will trigger ad --apply to all switches in the fabric.Do you want to apply all admin domains (yes, y, no, n): [no] y
To clear all Admin Domain definitions:
switch:admin> ad --clearYou are about to delete all ADs definitions.This operation will fail if zone configurations exists in AD1-AD254Do you want to clear all admin domains (yes, y, no, n): [no] y
To create an Admin Domain with a mix of D,PI, WWNs, and zone alias device members (two different methods shown):
switch admin> ad --create “AD1”, -d “100,5; 1,3; 20:00:00:e0:8b:05:4d:05”switch admin> ad --create 1, -d “100,5; 1,3; 21:00:00:e0:8b:05:4d:05”
To create an Admin Domain with two switches identified by domain ID and switch WWN:
switch:admin> ad --create “AD1”, -s “100; 10:00:00:60:69:80:59:13”
To create an Admin Domain with a device list and a switch list:
switch:admin> ad --create “AD1”, -d “100,5; 1,3; 21:20:00:00:e0:8b:05:4d:05” -s “100; 10:00:00:60:69:80:59:13”
To deactivate Admin Domain 5:
switch:admin> ad --deactivate 5You are about to deactivate an AD.This operation will fail if an effective zone configuration exists in the ADDo you want to deactivate ‘5’ admin domain (yes, y, no, n): [no] y
Fabric OS Command Reference 1553-1001764-02

ad2
To delete AD13:
switch:admin> ad --delete 13You are about to delete an AD.This operation will fail if an effective zone configuration exists in the ADDo you want to delete ‘13’ admin domain (yes, y, no, n): [no] y
To execute switchShow in an AD7 context (using the current user_id):
switch:admin> ad --exec 7 “switchshow”
To rename Eng_AD to Eng_AD2:
switch:admin> ad --rename Eng_AD Eng_AD2
To rename AD 200 to Eng_AD200:
switch:admin> ad --rename 200 Eng_AD200
To rename a user-assigned Admin Domain name to a reserved Admin Domain name (this operation fails if AD_test’s AD number is not 200):
switch:admin> ad--rename AD_test AD200
To remove the devices 100,5 and 1,3 from AD1:
switch:admin> ad --remove “AD1”, -d “100,5; 1,3; 21:00:00:e0:8b:05:4d:05”
To remove the switch 100 from AD1:
switch:admin> ad --remove “AD1”, -s “100”
To save any outstanding Admin Domain definition-related transaction buffer:
switch:admin> ad --saveYou are about to save the outstanding AD membership.This action will only save the changes to Defined configuration.Any changes made will be enforced only on ad --apply.Do you want to save admin domains (yes, y, no, n): [no] y
To select a new Admin Domain context by specifying the AD number:
switch:admin> ad --select 12
To display all ADs:
switch:admin> ad --showCurrent AD: 255 : AD255
Transaction buffer configuration:---------------------------------no configuration
Defined configuration:----------------------
AD: 1 : AD1 Active
Device WWN members: 21:00:00:80:e5:12:8b:37; 21:00:00:80:e5:12:8b:55; Switch port members: 1,0; 1,1; 1,2; 1,3; 1,4; 1,5; 1,6; 1,7; 1,8; 1,9; 1,10; 1,11;
16 Fabric OS Command Reference53-1001764-02

ad 2
1,12; 1,13; 1,14; 1,15; Switch WWN members: 10:00:00:60:69:00:02:53; Effective configuration:------------------------
AD: 1 : AD1 Active
Device WWN members: 21:00:00:80:e5:12:8b:37; 21:00:00:80:e5:12:8b:55; Switch port members: 1,0; 1,1; 1,2; 1,3; 1,4; 1,5; 1,6; 1,7; 1,8; 1,9; 1,10; 1,11; 1,12; 1,13; 1,14; 1,15; Switch WWN members: 10:00:00:60:69:00:02:53;
To display the AD1 configuration information in the transaction buffer:
switch:admin> ad --show 1 -m 0Current AD: 255 : AD255
Transaction buffer configuration:---------------------------------no configuration
To display the AD10 configuration information in persistent storage:
switch:admin> ad --show 10 -m 1Current AD: 255 : AD255
Defined configuration:----------------------
AD: 1 : AD1 Active
Device WWN members: 21:00:00:80:e5:12:8b:37; 21:00:00:80:e5:12:8b:55; Switch port members: 1,0; 1,1; 1,2; 1,3; 1,4; 1,5; 1,6; 1,7; 1,8; 1,9; 1,10; 1,11; 1,12; 1,13; 1,14; 1,15; Switch WWN members: 10:00:00:60:69:00:02:53;
To display the Admin Domain effective configuration information:
switch:admin> ad --show -m 2Current AD: 255 : AD255
Effective configuration:------------------------
AD: 1 : AD1 Active
Device WWN members: 21:00:00:80:e5:12:8b:37; 21:00:00:80:e5:12:8b:55; Switch port members: 1,0; 1,1; 1,2; 1,3; 1,4; 1,5; 1,6; 1,7; 1,8; 1,9; 1,10; 1,11; 1,12; 1,13; 1,14; 1,15; Switch WWN members: 10:00:00:60:69:00:02:53;
Fabric OS Command Reference 1753-1001764-02
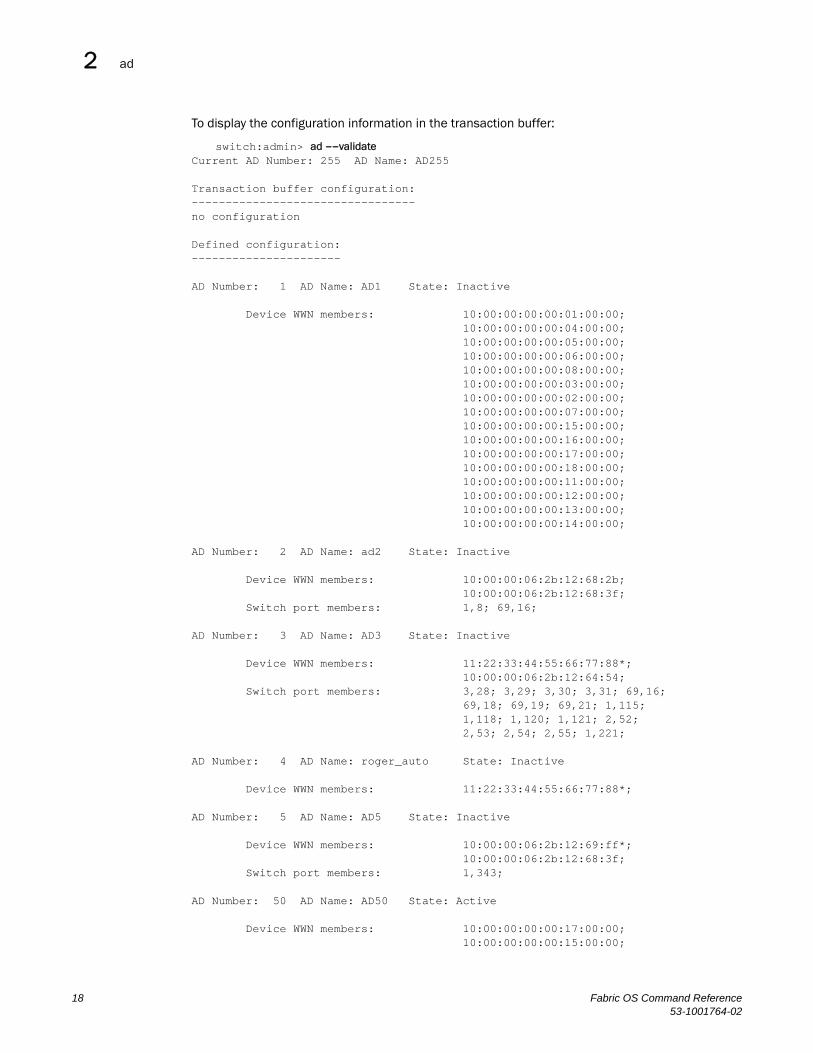
ad2
To display the configuration information in the transaction buffer:
switch:admin> ad --validateCurrent AD Number: 255 AD Name: AD255
Transaction buffer configuration:---------------------------------no configuration
Defined configuration:----------------------
AD Number: 1 AD Name: AD1 State: Inactive
Device WWN members: 10:00:00:00:00:01:00:00; 10:00:00:00:00:04:00:00; 10:00:00:00:00:05:00:00; 10:00:00:00:00:06:00:00; 10:00:00:00:00:08:00:00; 10:00:00:00:00:03:00:00; 10:00:00:00:00:02:00:00; 10:00:00:00:00:07:00:00; 10:00:00:00:00:15:00:00; 10:00:00:00:00:16:00:00; 10:00:00:00:00:17:00:00; 10:00:00:00:00:18:00:00; 10:00:00:00:00:11:00:00; 10:00:00:00:00:12:00:00; 10:00:00:00:00:13:00:00; 10:00:00:00:00:14:00:00;
AD Number: 2 AD Name: ad2 State: Inactive
Device WWN members: 10:00:00:06:2b:12:68:2b; 10:00:00:06:2b:12:68:3f; Switch port members: 1,8; 69,16;
AD Number: 3 AD Name: AD3 State: Inactive
Device WWN members: 11:22:33:44:55:66:77:88*; 10:00:00:06:2b:12:64:54; Switch port members: 3,28; 3,29; 3,30; 3,31; 69,16; 69,18; 69,19; 69,21; 1,115; 1,118; 1,120; 1,121; 2,52; 2,53; 2,54; 2,55; 1,221;
AD Number: 4 AD Name: roger_auto State: Inactive
Device WWN members: 11:22:33:44:55:66:77:88*;
AD Number: 5 AD Name: AD5 State: Inactive
Device WWN members: 10:00:00:06:2b:12:69:ff*; 10:00:00:06:2b:12:68:3f; Switch port members: 1,343;
AD Number: 50 AD Name: AD50 State: Active
Device WWN members: 10:00:00:00:00:17:00:00; 10:00:00:00:00:15:00:00;
18 Fabric OS Command Reference53-1001764-02

ad 2
Switch port members: 2,52; 2,53; 2,54; 2,55; 21,5; 3,28; 3,29; 98,72; 98,75; 69,16; 69,18; 69,21; 1,336; 1,337;
AD Number: 55 AD Name: AD55 State: Inactive
Device WWN members: 10:00:00:00:00:03:00:00; 10:00:00:00:00:04:00:00; 10:00:00:00:00:12:00:00; 10:00:00:00:00:11:00:00; 10:00:00:00:00:13:00:00; 10:00:00:00:00:14:00:00; 10:00:00:00:00:05:00:00; 10:00:00:00:00:06:00:00; 10:00:00:00:00:08:00:00; 10:00:00:00:00:01:00:00; 10:00:00:00:00:02:00:00; 10:00:00:00:00:18:00:00; 10:00:00:00:00:16:00:00; 10:00:00:00:00:17:00:00; 10:00:00:00:00:15:00:00; 10:00:00:00:00:07:00:00;
Effective configuration:------------------------
AD Number: 50 AD Name: AD50 State: Active
Device WWN members: 10:00:00:00:00:17:00:00; 10:00:00:00:00:15:00:00; Switch port members: 2,52; 2,53; 2,54; 2,55; 21,5; 3,28; 3,29; 98,72; 98,75; 69,16; 69,18; 69,21; 1,336; 1,337;
----------------------------* - Member does not exist+ - Member is AD Unaware
To abort the Admin Domain management transaction buffer:
switch:admin> ad --transabortYou are about to abort the outstanding AD transaction.Do you want to abort the AD transaction (yes, y, no, n): [no] y
To display the current Admin Domain transaction:
switch:admin> ad --transshowCurrent transaction token is 26816It is abortableswitch:admin> ad --transshowThere is no outstanding zoning transaction
See Also cfgSave, cfgTransShow, defZone, logout.
Fabric OS Command Reference 1953-1001764-02

ag2
ag
Enables Access Gateway (AG) and manages AG-specific operations.
Synopsis ag --help
ag --show
ag --modeshow | --modeenable |--modedisable
ag [--policyenable | --policydisable] policy
ag --policyshow
ag --mapshow [N_Port]
ag [--mapset | --mapadd |--mapdel] N_Port [F_Port1; F_Port2;...]
ag --pgshow [pgid]
ag --pgcreate- pgid “N_Port1 [;N_Port2;...]” [-n pgname] [-m "lb; mfnm”]
ag [--pgadd | --pgdel] pgid “N_Port1 [; N_Port2;...]”
ag --pgrename pgid newname
ag --pgremove pgid
ag [--pgmapadd | --pgmapdel] pgid “F_Port1 [; F_Port2;...]”
ag [ --pgsetmodes | pgdelmodes ] pgid "mfnm;lb"
ag ---pgfnmtov [new_tov]
ag [--failoverenable | --failoverdisable] N_Port | -pg pgid]
ag --failovershow [N_Port]
ag [--failbackenable | --failbackdisable] [ N_Port | | -pg pgid]
ag --failbackshow [N_Port]
ag [--prefset | --prefdel ] "F_Port [;F_Port2;...]" N_Port
ag --prefshow
ag [--adsset | --adsadd | --adsdel] "F_Port [;F_Port2;...]" "WWN [;WWN2;...]"
ag --adsshow
ag --persistentalpaenable 1 | 0 mode
ag --printalpamap F_Port
ag --deletepwwnfromdb PWWN
ag --clearalpamap F_Port
ag --addwwnmapping N_Port "WWN [;WWN2;...]"|--all
ag --delwwnmapping N_Port "WWN [;WWN2;...]"|--all
ag --addwwnpgmapping Port_Group "WWN [;WWN2;...]"|--all
ag --delwwnpgmapping Port_Group "WWN [;WWN2;...]"|--all
ag --addwwnfailovermapping N_Port "WWN [;WWN2;...]"|--all
20 Fabric OS Command Reference53-1001764-02

ag 2
ag --delwwnfailovermapping N_Port "WWN [;WWN2;...]"|--all
ag --wwnmappingenable "WWN [;WWN2;...]"|--all
ag --wwnmappingdisable "WWN [;WWN2;...]"|--all
Description Use this command to perform the following Access Gateway management functions:
• Enable or disable Access Gateway mode.
• Display current configuration and state of AG.
• Configure and display F_Port to N_Port mapping.
• Configure and display N_Port failover and failback policies.
• Configure and display Port Group policy.
• Create or remove a Port group.
• Enable or disable auto port configuration (APC) modes for a Port group.
• Get or set timeout value for fabric name monitoring.
• Display Port Groups and member N_Ports.
• Add or delete N_Ports in a Port group.
• Display all policies and their status.
• Enable or disable auto port configuration (APC) policy.
• Enable or disable preferred secondary N_Port policy.
• Enable, disable, and manage advanced device security (ADS) policy.
• Manage persistent ALPA mode.
• Manage device WWN to N_Port mappings.
• Manage device WWN to N_Port group mappings.
• Manage device WWN failover to N_Ports configured as preferred failover ports.
• Enable or disable device WWN mappings.
AG configuration changes are saved persistently as configuration keys. Use the portCfgNPort command to set a port as N_Port.
This command supports multiple configurations for mapping device logins to N_Ports for the purposes of load balancing and redistribution in the event of a fabric change. If multiple mappings are configured, the system considers the available mappings in a fixed order of priority to determine which of the available N_Ports should be assigned to the login request. The first eligible mapping is chosen in the order specified below.
1. Device WWN to N_Port
2. Device WWN to N_Port Group
3. Automatic device WWN load balancing.
4. F_Port to N_Port
5. F_Port to N_Port Group
Notes The execution of this command is subject to Virtual Fabric or Admin Domain restrictions that may be in place. Refer to chapter 1, "Using Fabric OS commands" and Appendix A, "Command Availability" for details.
Fabric OS Command Reference 2153-1001764-02

ag2
AG is supported only on selected Brocade hardware platforms. Refer to the Access Gateway Administrator’s Guide for Hardware support and AG configuration procedures.
In non-AG mode, the only two actions available are --modeenable and --modeshow.
Operands This command has the following operands:
--help Displays the command usage.
--show Displays the current configuration of the Access Gateway. This includes all N_Ports and F_Ports that are currently online, failover and failback settings as well as any online F_Ports that are currently mapped to N_Ports. Failover and failback policies are displayed as enabled (1) or disabled (0).
--modeshow Displays the current Access Gateway operating mode of the switch as either enabled or disabled.
--modeenable Enables Access Gateway mode on a switch. Long distance mode settings should be cleared for all ports on the NPIV edge switch to which the AG is connected. Otherwise, the NPIV switch port displays the long distance port type along with the F_Port.
--modedisable Disables Access Gateway mode on a switch. After AG mode is disabled, the switch reboots automatically and comes online with default zone access set to "No Access". In order to merge the switch to a fabric, set the default zone to "All Access" and disable/enable the E_Port.
--policyshow Displays the supported AG port policies and their status as either enabled or disabled. AG supports four types of policies:
• Port Grouping (pg) policy: This policy manages failover of an F_Port to a set of related N_Ports in a port group.
• Auto Port Configuration (auto): When this policy is enabled, the AG enabled switch automatically detects available ports and maps F_Ports to N_Ports. Auto port configuration is disabled by default.
• Advanced Device Security (ADS) policy. This policy restricts access to the fabric at the AG level to a set of authorized devices. Unauthorized access is rejected and the system logs a RASLOG message. You can configure the list of allowed devices for each F_Port by specifying their Port WWN. Refer to the ag --ads* commands for information on managing advanced device security. ADS policy is disabled by default, which means that all devices can connect to the switch.
• WWN Based Load Balancing policy: This policy routes device logins to the least loaded port in the port group to which they are mapped.
--policyenable policy Enables the specified port policy for the Access Gateway. When a new policy is enabled, all port related configuration settings are lost. Use the configUpload command to save the current port configuration. Valid policies are:
pg Enables the port grouping policy. A default port group "pg0" is created, which includes all configured N_Ports assigned to the policy. Enabling port grouping policy disables the Get Fabric Name policy.
22 Fabric OS Command Reference53-1001764-02

ag 2
auto Enables the automatic port configuration policy. When enabled, this policy applies to all ports on the switch. All F_Port to N_Port mapping and port group configurations are ignored.
ads Enables the advanced device security (ADS) policy. When enabled, this policy applies to all the ports on the switch. By default all devices have access to the fabric on all ports.
wwnloadbalance Enables the device WWN load balancing policy. When this policy is enabled, device logins are sent to the least loaded port in the port group to which they are mapped. These devices are displayed with ag --wwnmapshow as dynamic device mappings. Port Group policy must be enabled before you can enable the WWN load balancing policy.
--policydisable policy Disables the specified policy for the Access Gateway. When a policy is disabled, all port-related configuration settings are lost. Use the configUpload command to save the current port configuration. Valid policies are:
pg Disables the port grouping policy. All port group configurations are deleted. Disabling port grouping policy enables the Get Fabric Name policy.
auto Disables the automatic port configuration policy and deletes all associated configuration settings.
ads Disables the advanced device security (ADS) policy and deletes all lists of allowed device WWNs.
wwnloadbalance Disables the device WWN load balancing policy.
--mapshow [N_Port | device_WWN] Displays the F_Ports that are configured and currently mapped to a given “primary” N_Port. Optionally specify an N_Port to display the F_Ports that are mapped to the specified N_Port only, or specify a device WWN to display the N_Port to which the device WWN is mapped. Failover and failback policies are displayed as enabled (1) or disabled (0).
--mapset N_Port [F_Port1; F_Port2;...] Maps a set of F_Ports to a specified “primary” N_Port forcing all traffic from the F_Ports to be routed through this N_Port to the attached fabric. An F_Port cannot be mapped to more than one primary N_Port at any given time. F_Ports are enabled only if the N_Port is online. This command overwrites existing port mappings. Use a blank list ("") to clear current mappings.
--mapadd N_Port F_Port1 [; F_Port2;...] Adds one or more specified F_Ports to the mapping of an existing “primary” N_Port. The traffic for the configured F_Ports is routed to the fabric through the specified N_Port when the F_Ports come online. An F_Port cannot be mapped to more than one primary N_Port at the same time.
--mapdel N_Port F_Port1 [; F_Port2;...] Deletes one or more specified F_Ports from the “primary” N_Port mapping.
Fabric OS Command Reference 2353-1001764-02

ag2
--pgshow [pgid] Displays the Port Group configuration. The port grouping feature supports specifying a set of N_Ports to be included in the Port Group (PG) Policy. The factory default PG is "pg0", which includes all N_Ports. The default PG cannot be removed or renamed.
--pgcreate- pgid “N_Port1 [; N_Port2;...]” [-n pgname] [-m “lb; mfnm”] Creates a port group with the ID pgid and a specified list of N_Ports to be included in the policy. The list must be enclosed in quotation marks. Ports must be separated by semicolons. The Port Group ID must not exceed 64 characters. Optionally specify a name for the port group and a mode. Modes are by default disabled. For an explanation of mode values, refer to --pgsetmodes.
--pgadd pgid “N_Port1 [; N_Port2;...]” Adds one or more N_Ports to the specified port group. The port list must be enclosed in quotation marks. Ports must be separated by semicolons.
--pgdel pgid “N_Port1 [; N_Port2;...]” Deletes one or more N_Ports from the specified port group. Deleted ports are added to the default port group “pg0”. The port list must be enclosed in quotation marks. Ports must be separated by semicolons.
--pgrename pgid newname Replaces the name of an existing port group with the specified new name. The port group ID must not exceed 64 characters.
--pgremove pgid Deletes the specified port group. The N_Ports in the port group that was deleted are moved to the default port group, which is pgid 0.
--pgmapadd pgid "F_Port1[;F_Port2;...]" Maps the specified F_Ports to the PG identified by the pgid. Upon execution, the system identifies the least loaded N_Port in the port group and maps the F_Ports to that N_Port. The port list must be enclosed in double quotation marks. Ports must be separated by semicolons. Login balancing (LB) mode must be enabled on the port group for this command to succeed. Use ag --pgsetmodes to enable LB mode.
--pgmapdel pgid "F_Port1[;F_Port2;...]" Removes one or more F_Ports that are part of the port group identified by the pgid from their mapping to a corresponding N_Port. The port list must be enclosed in double quotation marks. Ports must be separated by semicolons. Login balancing (LB) mode must be enabled on the port group for this command to succeed. Use ag --pgsetmodes to enable LB mode.
--pgsetmodes pgid "lb;mfnm" Sets the APC modes for the specified port group. The mode list must be enclosed in double quotation marks and the modes must be separated by a semicolon. Alternately you can set the modes at the time when you create the port group with the pgcreate command. The following modes are supported:
lb Specifies the login balancing mode for the specified port group. If login balancing mode is enabled and an F_Port goes offline, logins in the port group are redistributed among the remaining F_Ports. Similarly, if an N_Port comes online, port logins in the PG are redistributed to maintain a balanced N_Port to F_Port ratio. This operation is disruptive. Login balancing mode is by default disabled in all port groups.
24 Fabric OS Command Reference53-1001764-02

ag 2
mfnm Enables the managed fabric name monitoring mode (MFNM) in the specified port group. This command changes the fabric name monitoring mode from “default” to “managed”. In both default and managed mode, the system queries the fabric name once every 120 seconds, and if it detects an inconsistency, for example, if the port group is connected to multiple fabrics, it triggers a RASLOG message. The difference between default and managed fabric name monitoring is that in managed mode, failover is disabled for all ports in the port group if the system detects an inconsistency in fabric names.
--pgdelmodes pgid "lb;mfnm" Disables the specified modes on a given port group. The mode list must be enclosed in double quotation marks and the modes must be separated by a semicolon. For a description of supported modes, refer to --pgsetmodes.
--pgfnmtov new_tov Displays the fabric name monitoring timeout value in seconds when used without specifying a new value. To change the current value, specify a new timeout value in seconds. The valid range is from 30 to 120 seconds. The default value is 120 seconds.
--failoverenable [N_Port | -pg pgid] Enables the failover policy for a given N_Port or for all N_Ports in the given port group. When failover policy is enabled for a given N_Port, F_Ports behave as follows:
• If only primary F_Port to N_Port mapping is in place, all currently mapped F_Ports fail over to another available N_Port in the event the original N_Port becomes disabled. If multiple N_Ports are available for failover, F_Ports are evenly balanced across all available N_Ports. If no other N_Port is available, failover does not occur.
• If preferred secondary F_Port to N_Port Mapping is in place, the F_Ports are routed through the preferred Secondary N_Port. If the preferred secondary N_Port is offline, the F_Ports are disabled.
--failoverdisable [N_Port | -pg pgid] Disables the failover policy for a given N_Port or for all N_Ports in the given port group.
--failovershow [N_Port] If an N_Port is specified (optional), the command displays the failover policy for this N_Port. Otherwise, the failover policy for all N_Ports is displayed. Failover is displayed as enabled (1) or disabled (0).
Fabric OS Command Reference 2553-1001764-02

ag2
--failbackenable [N_Port | -pg pgid] Enables the failback policy for a specified N_Port or for all N_Ports in the given port group. When failback policy is enabled, ports behave as follows:
• If only primary F_Port to N_Port mapping is in place, all F_Ports are automatically rerouted back to the N_Ports to which they were originally mapped as those N_Ports come back online. Only the originally mapped F_Ports fail back. In the case of multiple N_Port failures, only F_Ports that were mapped to the recovered N_Port experience failback. The remaining F_Ports are not redistributed among the online N_Ports during the failback.
• If preferred secondary F_Port to N_Port mapping is in place, and the primary N_Port comes back online, then the F_Ports are rerouted through the primary N_Port. If the secondary N_Port comes online, while the primary N_Port is still offline, F_Ports are rerouted through the secondary N_Port.
--failbackdisable [N_Port | -pg pgid] Disables the failback policy for the specified N_Port or for all N_Ports in the given port group.
--failbackshow [N_Port] If an N_Port is specified (optional), the command displays the failback policy for this N_Port. Otherwise, the failover policy for all the N_Ports is displayed. The failback policy is displayed as disabled (0) or enabled (1).
--prefset "F_Port [;F_Port2;...]" N_Port Sets the preferred secondary N_Port for one or more F_Ports. Preferred mapping is optional. Preferred F_Port to N_Port Mapping provides an alternate N_Port for F_Ports to come online for predictable failover and failback. An F_Port must have primary N_Port mapping before a secondary N_Port can be configured. The list of F_Ports to be mapped must be enclosed in double quotation marks. Port numbers must be separated by semicolons.
--prefdel "F_Port [;F_Port2;...]" N_Port Deletes the preferred Secondary N_Port for the specified F_Ports. The list of F_Ports to be deleted from the secondary mapping must be enclosed in double quotation marks. Port numbers must be separated by semicolons.
--prefshow Displays the preferred Secondary N_Port for all F_Ports.
--adsset "F_Port [;F_Port2;...]" "WWN [;WWN2;...]" Sets the list of devices that are allowed to login to a specified set of F_Ports. Devices are specified by their world wide names. Lists must be enclosed in double quotation marks. List members must be separated by semicolons. The maximum number of entries in the allowed device list is twice the per port maximum login count. Replace the WWN list with an asterisk (*) to indicate all access on the specified F_Port list. Replace the F_Port list with an asterisk (*) to add the specified WWNs to all the F_Ports' allow lists. A blank WWN list (““) indicates no access. ADS policy must be enabled for this command to succeed.
26 Fabric OS Command Reference53-1001764-02

ag 2
--adsadd "F_Port [;F_Port2;...]" "WWN [;WWN2;...]" Adds the specified WWNs to the list of devices allowed to login to the specified F_Ports. Lists must be enclosed in double quotation marks. List members must be separated by semicolons. Replace the F_Port list with an asterisk (*) to add the specified WWNs to all the F_Ports' allow lists. ADS policy must be enabled for this command to succeed.
--adsdel "F_Port [;F_Port2;...]" "WWN [;WWN2;...] Deletes the specified WWNs from the list of devices allowed to login to the specified F_Ports. Lists must be enclosed in double quotation marks. List members must be separated by semicolons. Replace the F_Port list with an asterisk (*) to remove the specified WWNs from all the F_Ports' allow lists. ADS policy must be enabled for this command to succeed.
--adsshow Displays the list of allowed device WWNs for all F_Ports.
--persistentalpaenable 1 | 0 mode Configures the persistent ALPA feature. Once enabled, the ALPA parts of all device PIDs become persistent regardless of whether they were logged in before or after the persistent ALPA feature was enabled. ALPA persistence ensures that there is no inconsistency between logged in devices. The persistent ALPA feature is by default disabled.
1 | 0 Specify 1 to enable persistent ALPA. Specify 0 to disable the feature.
mode Specifies the manner in which the ALPA is obtained in the event that the ALPA value is already taken by another host. Valid modes are:
-s Specifies a stringent ALPA request mode. In stringent mode, the login is rejected if the ALPA is not available.
-f Specifies a flexible ALPA request mode. In flexible mode, the host login is accepted either with the requested ALPA value or with a different ALPA value if the requested ALPA is not available.
--printalpamap F_Port Displays the database entry for the specified port. An F_Port must be specified. The output displays the PWWN-to-host-ALPA mapping.
--deletepwwnfromdb PWWN Removes the specified port WWN entry from the database after the host has logged out.
--clearalpamap F_Port Clears the ALPA values for the specific F_Port. This command removes the PWWN-to-ALPA-value mapping from the database.
--addwwnmapping N_Port "WWN [;WWN2;...]"|--all Maps one or more device WWNsto a preferred N_Port. All traffic form the specified devices is forced through the specified N_Port, regardless of which F_Port the device logs into. In the event the designated N_Port should become unavailable, an alternate port can serve as a preferred failover port. This command only affects devices that are connecting to the fabric after successful execution of this command; it will not affect devices already logged in. If a device is already connected to the switch when its mapping is created, that mapping goes into effect the next time the device connects. The WWN list must be enclosed in double quotation marks. WWNs must be separated by semicolons.
Fabric OS Command Reference 2753-1001764-02

ag2
The --all option indicates all device WWNs already mapped, for example, if you wish to change an existing WWN mapping. It does not affect device WWNs that are not part of an existing mapping.
--delwwnmapping N_Port "WWN [;WWN2;...]"|--all Removes the mapping of one or more device WWNs to a preferred N_Port. The --all option removes the mapping for all device WWNs currently mapped to the specified N_Port. The WWN list must be enclosed in double quotation marks. WWNs must be separated by semicolons. The mappings are removed upon execution of this command.
--addwwnpgmapping Port_Group "WWN [;WWN2;...]"|--all Maps one or more device WWNsto any of the N_Ports included in the specified port group. The port group is identified by its port group ID. The --all option maps all currently mapped device WWNs to the specified port group. The WWN list must be enclosed in double quotation marks. WWNs must be separated by semicolons. The device WWN to port group mapping takes effect the next time the device logs in.
--delwwnpgmapping Port_Group "WWN [;WWN2;...]"|--all Removes the mapping between the specified device WWNs and the specified port group. The port group is identified by its port group ID. The --all option removes the mapping of all device WWNs currently mapped to the specified port group. The WWN list must be enclosed in double quotation marks. WWNs must be separated by semicolons. The mappings are removed upon execution of this command.
--addwwnfailovermapping N_Port "WWN [;WWN2;...]"|--all Maps one or more device WWNs to a preferred failover N_Port.If the N_Port to which the WWNS are mapped is not available or goes down, the device logins fail over to the preferred failover N_Port. The --all option maps all currently mapped device WWNs to the specified failover N_Port. The WWN list must be enclosed in double quotation marks. WWNs must be separated by semicolons.
--delwwnfailovermapping N_Port "WWN [;WWN2;...]"|--all Deletes the mapping of one or more device WWNs to a preferred failover N_Port. The --all option deletes the failover mappings of all device WWNs currently mapped to the specified N_Port. The WWN list must be enclosed in double quotation marks. WWNs must be separated by semicolons.
--wwnmappingdisable "WWN [;WWN2;...]"| --all Disables one or more device WWN mappings. Use this command if you want to disable the mapping action temporarily without making permanent changes to the mappings. The mappings remain disabled until they are re-enabled or deleted. The --all option disables all currently existing device WWN mappings.
--wwnmappingenable "WWN [;WWN2;...]" | --all Re-enables one or more previously disabled device WWN mappings. The --all option re-enables all previously disabled device WWN mappings.
--wwnmapshow Displays all device WWN mappings. For each device WWN, the command displays the N_Port number to which it is mapped, the secondary (failover) N_Port, and the port group if applicable. The “Current” field shows the port the device is currently using. If the device is not logged in, the field displays
28 Fabric OS Command Reference53-1001764-02

ag 2
“none.” If the device is logged into a port other than the one it is mapped to, the field displays that port. If the device is mapped to a port group, the field displays the number of the port within that port group that the device is currently using. If the device is using a trunk, the field displays which port in that trunk the device is logged in. The “Enabled” field indicates, whether a mapping has been temporarily disabled (“no”), or whether it is in enabled state (“yes”).
Examples AG show commandsTo display the current state of the Access Gateway with Failover (FO) and Failback (FB) enabled on N_Ports 9 and 12:
switch:admin> ag --showName : switch_ST1 NodeName : 10:00:00:05:1e:35:9b:e7 Number of Ports : 16 IP Address(es) : 10.115.74.53 Firmware Version : v6.4.0 N_Ports : 4 F_Ports : 10 Policies enabled : pg; wwnloadbalance Persistent ALPA : Disabled Static WWN Map : None Port Group information : PG_ID PG_Members PG_Name PG mode -------------------------------------------- 0 1;3 pg0 - 2 0;2 SecondFabric - -------------------------------------------- Fabric Information : Attached Fabric Name N_Ports --------------------------------------------- 10:00:00:05:1e:34:01:d7 0;1;2;3 --------------------------------------------- N_Port information : Port PortID Attached PWWN FO FB IP_Addr F_Ports ----------------------------------------------------------- 0 0x6d0a00 20:0a:00:05:1e:37:11:aa 1 0 10.32.74.109 4;5;6; 1 0x6d0b00 20:0b:00:05:1e:37:11:aa 0 1 10.32.74.109 7;8;9; 2 0x6d0c00 20:0c:00:05:1e:37:11:aa 1 0 10.32.74.109 10;11; 3 0x6d0d00 20:0d:00:05:1e:37:11:aa 0 1 10.32.74.109 12;13; ----------------------------------------------------------- F_Port information : Port PortID Attached PWWN N_Port Preferred N_port Login Exceeded? -------------------------------------------------------------------------- 4 0x6d0a01 21:00:00:e0:8b:83:e3:cd 0 2 no 5 0x6d0a02 21:01:00:e0:8b:a3:e3:cd 0 2 no 6 0x6d0a03 21:00:00:e0:8b:83:3e:ce 0 2 no 7 0x6d0b01 21:01:00:e0:8b:a3:3e:ce 1 3 no 8 0x6d0b02 21:00:00:e0:8b:83:5c:cd 1 3 no 9 0x6d0b03 21:01:00:e0:8b:a3:5c:cd 1 3 no 10 0x6d0c02 10:00:00:06:2b:0a:a3:93 2 0 no 11 0x6d0c01 10:00:00:06:2b:0a:a3:92 2 0 no 12 0x6d0d02 10:00:00:06:2b:0a:a3:91 3 1 no --------------------------------------------------------------------------
To display the current Access Gateway mode:
switch:admin> ag --modeshowAccess Gateway mode is enabled.
Fabric OS Command Reference 2953-1001764-02

ag2
switch:admin> ag --modeshowAccess Gateway mode is NOT enabled.
AG group policy commandsTo show current policies:
switch:admin> ag --policyshowAG Policy Policy Name State----------------------------------------------------------Port Grouping pg EnabledAuto Port Configuration auto DisabledAdvanced Device Security ads DisabledWWN Based Load Balancing wwnloadbalance Disabled----------------------------------------------------------
To enable a port grouping policy:
switch:admin> ag --policyenable pg
To disable a port grouping policy
switch:admin> ag --policydisable pg
To enable auto port configuration policy when both policies are disabled and the switch is already disabled:
switch:admin> ag --policyenable autoAll Port related configurations will be lost.Please save the current configuration using configupload.Do you want to continue? (yes, y, no, n): [no] y
To disable auto port configuration policy when the switch is disabled:
switch:admin> ag --policydisable autoDefault factory settings will be restored. Default mappings will come into effect. Please save the current configuration using configupload. Do you want to continue? (yes, y, no, n): [no] y Access Gateway configuration has been restored to factory default
To enable the ADS policy:
switch:admin> ag --policyenable ads
To disable the ADS policy:
switch:admin> ag --policydisable ads
To enable the WWN load balancing policy:
switch:admin> ag --policyenable wwnloadbalance
To disable the WWN load balancing policy:
switch:admin> ag --policydisable wwnloadbalance
30 Fabric OS Command Reference53-1001764-02

ag 2
AG port mapping commandsTo display current port mappings and port grouping policies:
switch:admin> ag --mapshowN_Port Configured_F_Ports Current_F_Ports Failover Failback PG_ID PG_Name----------------------------------------------------------------------------- 0 4;5;6 4;5;6 1 0 2 SecondFabric 1 7;8;9 7;8;9 0 1 0 pg0 2 10;11 10;11 1 0 2 SecondFabric 3 12;13 12;13 0 1 0 pg0-----------------------------------------------------------------------------
Explanation of fields in --mapshow output:
- Current F_Ports are the F_Ports that are currently online and mapped to a given N_Port either because they are mapped to that N_Port or as a result of N_Port failover.
- Configured F_Ports are the F_Ports that are explicitly mapped to this N_Port (saved in config).
- Failover and Failback indicate whether or not N_Port policy is enabled (1) or disabled (0).
- PG_ID is the Port Group ID and PG_Name is the Port Group Name.
To clear all F_Ports mapped to the configured primary N_Port 0:
switch:admin> ag --mapset 0 ““F_Port to N_Port mapping has been updated successfully
To add F_Ports 4 and 6 to N_Port 0 (observe that Port 0 has no configured F_Ports):
switch:admin> ag --mapset 0 “4;6”F_Port to N_Port mapping has been updated successfully
To add F_Port 5 to N_Port 2 (observe that N_Port 2 already has mapped F_Ports):
switch:admin> ag --mapadd 2 "5"
To display the new mappings:
switch:admin> ag --mapshowN_Port Configured_F_Ports Current_F_Ports Failover Failback PG_ID PG_Name ---------------------------------------------------------------------------- 0 4;6 4;6 1 0 2 SecondFabric 1 7;8;9 7;8;9 0 1 0 pg0 2 5;10;11 5;10;11 1 0 2 SecondFabric 3 12;13 12;13 0 1 0 pg0 ----------------------------------------------------------------------------
To delete F_Port 5 that was mapped to N_Port 2:
switch:admin> ag --mapdel 2 "5" Preferred N_port is set for F_Port[s] Please delete it before removing primary N_Port ERROR:Unable to remove F_Port[s] from mapping, retry the command
switch:admin> ag --prefshow F_Ports Preferred N_Port ------------------------------------------------- 10;11 0 4;5;6 2 7;8;9 3 -------------------------------------------------
Fabric OS Command Reference 3153-1001764-02

ag2
switch:admin> ag --prefdel 5 2Preferred N_Port is deleted successfully for the F_Port[s]
switch:admin> ag --mapdel 2 “5”F_Port to N_Port mapping has been updated successfully
NOTE: Preferred Port commands are discussed in detail below.
AG failover policy commandsTo display failover policy settings for all N_Ports:
switch:admin> ag --failovershow N_Port failover_bit ---------------------------
0 1 1 0 2 1 3 0
To set and display failover and failback policies on a single port:
switch:admin> ag --failoverenable 1 Failover policy is enabled for port 1
switch:admin> ag --failoverdisable 0 Failover policy is disabled for port 0 switch:admin> ag --failovershow 0 Failover on N_Port 0 is not supported
switch:admin> ag --failbackdisable 2 Failback policy is disabled for port 2 admin> ag --failbackshow 2 Failback on N_Port 2 is not supported switch:admin> ag --failbackenable 2 Failback policy is enabled for port 2
To display failback policy settings for all the N_Ports:
switch:admin> ag --failbackshowN_Port failback_bit---------------------------0 01 12 03 1
To set and display failback policy settings on a single port:
switch:admin> ag --failbackenable 0Failback policy cannot be enabled since failover policy is disabled for port 0
switch:admin> ag --failbackenable 2Failback policy is enabled for port 2
switch:admin> ag --failbackenable 3Failback on N_Port 3 is not supported
32 Fabric OS Command Reference53-1001764-02

ag 2
switch:admin> ag --failbackenable 2Failback on N_Port 2 is supported
Port Group commandsTo display Port Group information:
switch:admin> ag --pgshowPG_ID PG_Name PG_Mode N_Ports F_Ports-----------------------------------------------0 pg0 lb,mfnm 1;3 10;11 2 SecondFabric - 0;2 4;5;6-----------------------------------------------
To create a port group “FirstFabric” that includes N_Ports 1 and 3 and has login balancing enabled:
switch:admin> ag --pgcreate 3 “1;3” -n FirstFabric1 -m “lb”Port Group 3 created successfully
switch:admin> ag --pgshowPG_ID PG_Name PG_Mode N_Ports F_Ports-----------------------------------------------0 pg0 lb,mfnm none none 2 SecondFabric - 0;2 4;5;63 FirstFabric lb 1;3 10;11-----------------------------------------------
To rename the port group with pgid 2 to "MyEvenFabric"
switch:admin> ag --pgrename 2 MyEvenFabricPort Group 2 has been renamed as MyEvenFabric successfully
switch:admin> ag --pgshowPG_ID PG_Name PG_Mode N_Ports F_Ports-----------------------------------------------0 pg0 lb,mfnm none none 2 MyEvenFabric - 0;2 4;5;63 FirstFabric lb 1;3 10;11-----------------------------------------------
To remove the port group with pgid 2:
switch:admin> ag --pgremove 2Port Group 2 has been removed successfully
switch:admin> ag --pgshowPG_ID PG_Name PG_Mode N_Ports F_Ports----------------------------------------------- 0 pg0 lb,mfnm 0;2 4;5;63 FirstFabric lb 1;3 10;11-----------------------------------------------
To enable managed fabric name monitoring in port group 3:
switch:admin> ag --pgsetmodes 3 "mfnm"Managed Fabric Name Monitoring mode has been enabled for Port Group 3switch:admin> ag --pgshowPG_ID PG_Name PG_Mode N_Ports F_Ports----------------------------------------------- 0 pg0 lb,mfnm 0;2 4;5;63 FirstFabric lb,mfnm 1;3 10;11-----------------------------------------------
Fabric OS Command Reference 3353-1001764-02

ag2
To disable managed fabric name monitoring in port group 3:
switch:admin> ag --pgdelmodes 3 "mfnm"Managed Fabric Name Monitoring mode has been disabled for Port Group 3
switch:admin> ag --pgshowPG_ID PG_Name PG_Mode N_Ports F_Ports----------------------------------------------- 0 pg0 lb,mfnm 0;2 4;5;63 FirstFabric lb 1;3 10;11-----------------------------------------------
To get the current fabric name monitoring timeout value:
switch:admin> ag --pgfnmtovFabric Name Monitoring TOV: 120 seconds
To set the fabric name monitoring timeout value to 30 seconds:
switch:admin> ag --pgfnmtov 30
AG Preferred port information commandsTo display preferred port settings for F_Ports:
switch:admin> ag --prefshowF_Ports Preferred N_Port ------------------------------------------10;11 0 12;13 1 4;6 2 7;8;9 3 ------------------------------------------
To delete secondary port mapping for F_Ports 7, 8 and 9:
switch:admin> ag --prefdel “7;8;9” 3Preferred N_Port is deleted successfully for the F_Port[s]
To set secondary port mapping for F_Ports 7, 8 and 9:
switch:admin> ag --prefset “7;8;9” 3Preferred N_Port is set successfully for the F_Port[s
ADS Policy commandsTo set the list of allowed devices for Ports 11 and 12 to ‘no access’:
switch:admin> ag–-adsset“11;12”“”WWN list set successfully as the Allow Lists of the F_Port[s]
To set the list of allowed devices for Ports 1, 10 and 13 to ‘all access’:
switch:admin> ag–-adsset“1;10;13”“*”WWN list set successfully as the Allow Lists of the F_Port[s]
To remove two devices from the lists of allowed devices for ports 1 and 9:
switch:admin> ag –-adsdel "3;9" "22:03:08:00:88:35:a0:12;22:00:00:e0:8b:88:01:8b"WWNs removed successfully from Allow Lists of the F_Port[s]
34 Fabric OS Command Reference53-1001764-02

ag 2
To add a two new device to the lists of allowed devices for ports 1 and 9:
switch:admin> ag –-adsadd "3;9" "20:03:08:00:88:35:a0:12;21:00:00:e0:8b:88:01:8b"WWNs added successfully to Allow Lists of the F_Port[s]
To display the lists of allowed devices on the switch:
switch:admin> ag --adsshowF_Port WWNs Allowed-------------------------------------------------------------------------1 ALL ACCESS3 20:03:08:00:88:35:a0:12 21:00:00:e0:8b:88:01:8b9 20:03:08:00:88:35:a0:12 21:00:00:e0:8b:88:01:8b10 ALL ACCESS11 NO ACCESS12 NO ACCESS13 ALL ACCESS--------------------------------------------------------------------------
Persistent ALPA configuration commands
To enable persistent ALPA in flexible mode:
switch:admin> ag --persistentalpaenable 1 -fPersistent ALPA mode is enabled
To enable persistent ALPA in stringent mode:
switch:admin> ag --persistentalpaenable 1 -sPersistent ALPA mode is enabled
To disable persistent ALPA mode:
switch:admin> ag --persistentalpaenable 0Persistent ALPA mode is enabled
To display the ALPA database entries for F_Port 5:
switch:admin> ag --printalpamap 5 Hash table for Port 5 data
PWWN ALPA============================================ 20:12:00:05:1e:85:92:88 1 20:07:00:05:1e:01:0b:4a 3
To attempt to remove a device entry from the database while the device is online and cannot be removed:
switch:admin> ag --deletepwwnfromdb 0:12:00:05:1e:85:92:88 20:08:00:05:1e:01:0b:4a Online. Cannot delete an online device
To remove a device entry from the database when the device is offline:
switch:admin> ag --deletepwwnfromdb 0:12:00:05:1e:85:92:88Device 20:13:00:05:1e:85:92:88 successfully deleted
Fabric OS Command Reference 3553-1001764-02

ag2
To remove a device entry from the database when the device is not present in the table:
switch:admin> ag --deletepwwnfromdb 0:12:00:05:1e:85:92:0020:12:00:05:1e:85:92:00 not found. Please check the device name
To remove the PWWN to ALPA value for port 5 from the database and to verify the removal:
switch:admin> ag --clearalpamap 5 ALPA Table for port 5 is cleared
switch:admin> ag --clearalpamap 5
Hash table for Port 5 data PWWN ALPA ============================================Hash Table is empty
Device WWN mapping commandsTo create a WWN to N_Port mapping for two devices.
switch:admin> ag --addwwnmapping 8 “0:12:00:05:1e:85:92:88; 0:12:00:05:1e:85:92:88”To delete one of the device WWN to N_Port mappings.
switch:admin> ag --delwwnmapping 8 “0:12:00:05:1e:85:92:88”
To create a WWN to port group mapping for all currently mapped devices (this command does not affect devices not already mapped or connecting later).
switch:admin> ag --addwwnpgmapping 4 --all
To add port 13 as a preferred failover N_Port for a device:
switch:admin> ag --addwwnfailovermapping 13 “0:12:00:05:1e:85:92:88”
To disable all WWN mappings:
switch:admin> ag --wwnmappingdisable --all
To display the WWN mappings when WWN load balancing policy is not enabled:
switch:admin> ag --wwnmapshowStatic Device Mapping Information: WWN, 1st N_Port 2nd N_Port PG_ID Current Enabled ---------------------------------------------------------------- 25:f7:00:0c:29:00:02:8b 9 None None None yes 25:f7:00:0c:29:00:03:8b 9 None None None yes 25:f7:00:0c:29:00:04:8b 9 None None None yes 25:f7:00:0c:29:00:05:8b 9 None None None yes 25:f7:00:0c:29:00:07:8b 9 None None None yes 25:f7:00:0c:29:00:08:8b 9 None None None yes 25:f7:00:0c:29:00:09:8b 9 None None None yes 25:f7:00:0c:29:00:0a:8b 9 None None None yes ---------------------------------------------------------------
Dynamic Device Mapping Information: --------------------------------------------------------------- No dynamic mappings in use ----------------------------------------------------------------
36 Fabric OS Command Reference53-1001764-02

ag 2
To display the WWN mappings when WWN load balancing policy is enabled:
switch:admin> ag --wwnmapshowStatic Device Mapping Information: WWN, 1st N_Port 2nd N_Port PG_ID Current Enabled ---------------------------------------------------------------- No static mappings are defined ---------------------------------------------------------------- Dynamic Device Mapping Information: WWN, 1st N_Port 2nd N_Port PG_ID Current Enabled ---------------------------------------------------------------- 10:00:00:06:2b:11:52:df 23 None 0 23 yes ----------------------------------------------------------------
See Also portCfgNPort, portCfgNPIVPort, agAutoMapBalance
Fabric OS Command Reference 3753-1001764-02

agAutoMapBalance2
agAutoMapBalance
Controls automatic remapping of F_Ports in AG mode.
Synopsis agautomapbalance --enable [-fport | -nport] [-pg Port_Group_Number | -all]
agautomapbalance --disable [-fport | -nport] [-pg Port_Group_Number | -all]
agautomapbalance --force
agautomapbalance --show
agautomapbalance --help
Description Use this command to control the automatic rebalancing of F_Ports for login distribution in the event that an F_Port goes offline or an N_Port comes online.
If automatic rebalancing is enabled, and an F_Port goes offline, the remaining F_Port logins are redistributed across the existing N_Ports. Similarly if a new N_Port comes online, some of the F_Port logins being routed through existing N_Ports would be failed over to the new N_Ports. Both operations are potentially disruptive. Disabling automatic rebalancing of login distribution provides a way of avoiding disruptions associated with routine F_Port/N_Port offline/online events.
The default values for agautomapbalance are as follows:
• Disable automatic login redistribution when F_Ports go offline.
• Enable automatic login redistribution when N_Ports come online.
Use the --show option to display the current configuration of the automatic rebalancing feature. The command output varies depending on current AG policy settings:
• If Port Group Policy is enabled on the switch, the command displays the following information for each configured port group:
PG_ID Port Group number
LB mode Login Balancing mode: enabled or disabled
nport Enabled or disabled
fport Enabled or disabled
• If Auto Policy is enabled on the switch, the command displays the status of the automatic rebalancing feature per port type as either disabled or enabled.
Note The execution of this command is subject to Virtual Fabric or Admin Domain restrictions that may be in place. Refer to chapter 1, "Using Fabric OS commands" and Appendix A, "Command Availability" for details.
Operands This command has the following operands:
--enable Enables automatic login redistribution upon removal or addition of a specified port type.
-fport Enables automatic login redistribution in the event that one or more F_Ports go offline. When automatic login redistribution is enabled, the remaining F_Ports are remapped such that logins are balanced among the existing Imports.
38 Fabric OS Command Reference53-1001764-02

agAutoMapBalance 2
-nport Enables automatic login redistribution in the event that one or more N_Ports come online. When automatic login redistribution is enabled, the F_Ports mapped to the current N_Ports are rebalanced among the N_Ports.
--disable Disables automatic login redistribution upon removal or addition of a specified port type.
-fport Disables automatic login redistribution in the event that one or more F_Ports go offline. When automatic login redistribution is disabled, the remaining F_Ports maintain their existing N_Port mappings.
-nport Disables automatic login redistribution in the event that one or more N_Ports come online. When auto map balancing is enabled, the F_Ports mapped to the current N_Ports are rebalanced among the N_Ports.
-pg Port_Group_Number | -all Specifies the port group number or all port groups. These operands are mutually exclusive and optional with the --enable and --disable options. When a port group is specified, command execution is targeted to the members of that specific port group. When all port groups are specified, command execution is targeted to all port groups defined in the Access Gateway. The port group options are allowed only when login balancing is enabled on the specified port groups.
--force Enforces automatic login redistribution on a one-time basis in the event that automatic login redistribution is disabled for N_Port addition, F_Port removal or both. This command forces rebalancing of the F_Port to N_Port mapping once. It does not affect the configuration settings.
--show Displays the auto login distribution configuration.
--help Displays the command usage.
Examples To display the automatic login redistribution settings for port groups 0 and 1:
switch:admin> agautomapbalance --showAG Policy: pg--------------------------------------------PG_ID LB mode nport fport--------------------------------------------0 Enabled Enabled Disabled1 Disabled - ----------------------------------------------
To display the automatic login redistribution settings for N_Ports and F_Ports.
switch:admin> agautomapbalance --show
-------------------------------------------------AG Policy: Auto-------------------------------------------------automapbalance on N_Port Online Event: Disabledautomapbalance on F_Port Offline Event: Enabled--------------------------------------------------
To disable automatic login redistribution on F_Port offline events:
switch:admin> agautomapbalance --disable -fport
Fabric OS Command Reference 3953-1001764-02

agAutoMapBalance2
To enable automatic login redistribution on F_Ports and N_Ports on port group 1 in the Access Gateway:
switch:admin> agautomapbalance --enable -fport pg 1
To disable automatic login redistribution on F_Ports and N_Ports on all port groups in the Access Gateway:
switch:admin> agautomapbalance --disable -all
See Also ag, agShow
40 Fabric OS Command Reference53-1001764-02

agShow 2
agShow
Displays the Access Gateway information registered with the fabric.
Synopsis agshow --name [ag_name] | [--local]
Description This command displays the details of the F_Ports and the configured N_Ports in the Access Gateway attached to the fabric shows the following information.
Name The name of the Access Gateway.
Ports The number of ports in the Access Gateway.
Enet IP Addr The IP address of the Access Gateway.
Firmware Current firmware running on the Access Gateway.
Local/Remote Indicates whether the Access Gateway is locally or remotely registered to this switch.
World Wide Name The world wide name (WWN) of the given Access Gateway.
N-Port ID(s) The port ids of the N_Ports configured in the given Access Gateway.
N-Ports The number of configured N_Ports that are online.
F-Ports The number of F_Ports that are online.
Attached F-Port informationDisplays the PortID and the Port WWN of each F_Port that is online on the Access Gateway.
Note NPIV capability should be enabled on the ports connected to the Access Gateway. NPIV capability is by default enabled. Use portCfgNPIVPort to enable NPIV capability a port if it was previously disabled. Note that enabling or disabling NPIV capability is no longer supported in Access Gateway mode.
Operands This command has the following optional operands:
ag_name Use this option to display the information regarding a specific Access Gateway that is registered with this fabric.
--local Use this option to display the information of all Access Gateways that are locally registered to this switch
Examples To display the Access Gateway information registered with the fabric:
switch:admin> agshow --name WT_Stealth
Name : WT_StealthWorld Wide Name : 10:00:00:05:1e:34:e4:bdN-Port ID(s) : 0x010200Number of Ports : 16IP Address(es) : 10.202.90.231Firmware Version : v1.0.0N-Ports : 1F-Ports : 2Attached F-Port information: PortID Port WWN ----------------------------------
Fabric OS Command Reference 4153-1001764-02

agShow2
0x010208 10:00:00:00:c9:3f:7c:86 0x01020a 10:00:00:00:c9:3f:7c:b9
To display the locally registered Access Gateways:
switch:admin> agshow --local
Worldwide Name Ports Enet IP Addr Firmware Local/Remote Name---------------------------------------------------------------------------------10:00:00:05:1e:04:06:ae 24 10.32.173.64 v6.0.0 local L5D2_B14_4024_1
To display all Access Gateways attached to the fabric:
switch:admin> agshow
Worldwide Name Ports Enet IP Addr Firmware Local/Remote Name---------------------------------------------------------------------------------10:00:00:05:1e:02:b7:2c 16 10.32.173.62 v6.0.0 remote L5D2_B10_4016_110:00:00:05:1e:04:06:ae 24 10.32.173.64 v6.0.0 local L5D2_B14_4024_110:00:00:05:1e:35:10:69 16 10.32.173.51 v6.0.0 remote L5D2_B13_200_AG
See Also portCfgNPIVPort
42 Fabric OS Command Reference53-1001764-02

aliAdd 2
aliAdd
Adds a member to a zone alias.
Synopsis aliadd “aliName”, “member[; member...]”
Description Use this command to add one or more members to an existing zone alias. The alias member list cannot contain another zone alias.
This command changes the defined configuration. For the change to become effective, enable the zone configuration with the cfgEnable command. For the change to be preserved across switch reboots, save the zone configuration to nonvolatile memory with cfgSave.
Notes The execution of this command is subject to Virtual Fabric or Admin Domain restrictions that may be in place. Refer to chapter 1, "Using Fabric OS Commands" and Appendix A, "Command Availability" for details.
When an FCS policy is enabled, this command can be issued only from the primary FCS switch.
Operands The following operands are required:
“aliName” Specify the name of a zone alias, enclosed in double quotation marks.
“member” Specify a member or list of members to be added to the alias, enclosed in double quotation marks. Members must be separated by semicolons. An alias member can be specified by one or more of the following methods:
• A switch domain and port index pair. Use switchShow for a list of valid port index numbers.
• A world wide name (WWN).
Examples To add members to zone aliases array1, array2, and loop1:
switch:admin> aliadd "array1", "1,2"
switch:admin> aliadd "array2", "21:00:00:20:37:0c:72:51"
See Also aliDelete, aliRemove, aliShow
Fabric OS Command Reference 4353-1001764-02

aliCreate2
aliCreate
Creates a zone alias.
Synopsis alicreate “aliName”, “member[; member...]”
Description Use this command to create a new zone alias. The zone alias member list must have at least one member (empty lists are not allowed). The alias member list cannot contain another zone alias. Refer to the zoneCreate command for more information on name and member specifications.
This command changes the defined configuration. For the change to become effective, enable the zone configuration with the cfgEnable command. For the change to be preserved across switch reboots, save the zone configuration to nonvolatile memory with the cfgSave command.
Notes The execution of this command is subject to Virtual Fabric or Admin Domain restrictions that may be in place. Refer to chapter 1, "Using Fabric OS Commands" and Appendix A, "Command Availability" for details.
When an FCS policy is enabled, this command can be issued only from the primary FCS switch.
Operands The following operands are required:
“aliName” Specify a name for the zone alias, in double quotation marks. A zone alias name must begin with a letter and can be followed by any number of letters, numbers, and underscore characters. Names are case-sensitive. For example, “Ali_1” and “ali_1” are different zone aliases. Spaces are ignored.
“member” Specify a member or list of members to be added to the alias, enclosed in double quotation marks. Members must be separated by semicolons. An alias member can be specified by one or more of the following methods:
• A switch domain and port index pair. Use switchShow for a list of valid port index numbers.
• A world wide name (WWN).
Examples To create a zone alias defined by domain and port index pairs:
switch:admin> alicreate "array1", "2,32; 2,33; 2,34"
To create a zone alias with one member defined by WWN.
switch:admin> alicreate "array2", "21:00:00:20:37:0c:66:23"
See Also aliAdd, aliDelete, aliRemove, aliShow
44 Fabric OS Command Reference53-1001764-02

aliDelete 2
aliDelete
Deletes a zone alias.
Synopsis alidelete “aliName”
Description Use this command to delete a zone alias.
This command changes the defined configuration. For the change to become effective, enable the zone configuration with the cfgEnable command. For the change to be preserved across switch reboots, save the zone configuration to nonvolatile memory with the cfgSave command.
Notes The execution of this command is subject to Virtual Fabric or Admin Domain restrictions that may be in place. Refer to chapter 1, "Using Fabric OS Commands" and Appendix A, "Command Availability" for details.
When an FCS policy is enabled, this command can be issued only from the primary FCS switch.
Operands The following operand is required:
“aliName” Specify the name of the zone alias to be deleted. This operand must be enclosed in quotation marks.
Examples To delete the zone alias “array2”:
switch:admin> alidelete "array2"
See Also aliAdd, aliCreate, aliRemove, aliShow
Fabric OS Command Reference 4553-1001764-02

aliRemove2
aliRemove
Removes a member from a zone alias.
Synopsis aliremove “aliName”, “member[; member...]”
Description Use this command to remove one or more members from an existing zone alias.
If all members are removed, the zone alias is deleted.
This command changes the defined configuration. For the change to become effective, enable the zone configuration with the cfgEnable command. For the change to be preserved across switch reboots, save the zone configuration to nonvolatile memory with the cfgSave command.
Notes The execution of this command is subject to Virtual Fabric or Admin Domain restrictions that may be in place. Refer to chapter 1, "Using Fabric OS Commands" and Appendix A, "Command Availability" for details.
When an FCS policy is enabled, this command can be issued only from the primary FCS switch.
Operands This command has the following operands:
“aliName” Specify the name of the zone alias from which members are to be removed in double quotation marks. This operand is required.
“member” Specify a member or list of members to be removed from the alias. The list must be enclosed in double quotation marks. Members must be separated by semicolons. An alias member can be specified by one or more of the following methods:
• A switch domain and port index number pair. Use switchShow for a list of valid port index numbers.
• WWN
The member list is located by an exact string match; therefore, it is important to maintain the order when removing multiple members. For example, if a zone alias contains “1,2; 1,3; 1,4”, then removing “1,3; 1,4” succeeds but removing “1,4; 1,3” fails.
Examples To remove a world wide name from “array1”:
switch:admin> aliremove "array1", "3,5"
switch:admin> aliremove "array1", "21:00:00:20:37:0c:76:8c"
switch:admin> aliremove "array1", "0xEF"
See Also aliAdd, aliCreate, aliDelete, aliShow
46 Fabric OS Command Reference53-1001764-02

aliShow 2
aliShow
Displays zone alias information.
Synopsis alishow ["pattern"][, mode]
Description Use this command to display zone configuration information.
Use the pattern operand to display only matching zone alias names in the defined configuration.
Notes The execution of this command is subject to Virtual Fabric or Admin Domain restrictions that may be in place. Refer to chapter 1, "Using Fabric OS Commands" and Appendix A, "Command Availability" for details.
When an FCS policy is enabled, this command can be issued only from the primary FCS switch.
Operands When invoked without an operand, this command displays all zone configuration information (defined and effective). Refer to cfgShow for a description of this display. The following operands are optional:
“pattern” A POSIX-style regular expression that matches zone alias names. This operand must be enclosed in quotation marks. Patterns may contain:
• Question mark (?) - matches any single character.• Asterisk (*) - matches any string of characters.• Range - matches any character within the range. Ranges must be
enclosed in brackets: for example, [0-9] or [a-f].
mode Specify 0 to display the contents of the transaction buffer (the contents of the current transaction), or specify 1 to display the contents of the nonvolatile memory. The default value is 0.
If no parameters are specified, all zone configuration information (both defined and effective) is displayed. Refer to cfgShow for a description of this display.
Examples To display all zone aliases beginning with “arr”:
switch:admin> alishow "arr*"alias: array1 21:00:00:20:37:0c:76:8c
alias: array2 21:00:00:20:37:0c:66:23
See Also aliAdd, aliCreate, aliDelete, aliRemove
Fabric OS Command Reference 4753-1001764-02

aptPolicy2
aptPolicy
Changes or displays the Advanced Performance Tuning (APT) policy.
Synopsis aptpolicy [policy]
aptpolicy -ap [ap_policy]
Description Use this command to display and change the advanced performance tuning (APT) policies on a switch. Several internal performance tuning parameters can be modified with this command. The default parameters (AP shared Link Policy) are optimized for most SAN applications; in most environments, there is no need to modify the default policy.
Distributed path selection (DPS) is supported in logical fabrics. APT policy settings affecting the DPS behavior can be configured per logical switch, and settings apply to the partition for which they are set. Note that policy settings for the base switch or any switch in the base fabric affect all traffic going through the base fabric including any logical fabric traffic that uses the base fabric.
In a logical fabric environment, Link Policy settings (aptpolicy -ap) apply only to the base switch and can be executed only on the base switch.
When invoked without arguments, this command displays the APT policies supported on this switch, as well as the current policy.
Notes You must disable the switch before using this command to change the current policy. Changes take effect immediately for all EX/VEX_Ports after the switch is re-enabled.
For details on performance tuning, refer to the Fabric OS Administrator’s Guide.
The execution of this command is subject to Virtual Fabric or Admin Domain restrictions that may be in place. Refer to chapter 1, "Using Fabric OS commands" and Appendix A, "Command Availability" for details.
Operands This command has the following operands:
policy Specifies the APT policy. The following polices are supported:
1 Port-based routing policy. With this policy, the path chosen for an ingress frame is based on both of the following items:
• The ingress port on which the frame was received.• The destination domain for the frame.
The chosen path remains the same if Dynamic Load Sharing (DLS) is not enabled. If DLS is enabled, a different path may be chosen for a fabric event. Refer to dlsSet for a definition of a fabric event.
This policy may provide better ISL utilization when there is little or no oversubscription of the ISLs.
Note that static routes are supported only with this policy.
48 Fabric OS Command Reference53-1001764-02

aptPolicy 2
3 Exchange-based routing policy (default). With this policy, the path chosen for an ingress frame is based on all of the following items:
• The ingress port on which the frame was received.• The FC address of the source fabric device (SID) for this frame.• The FC address of the destination fabric device (DID) for this frame.• The FC Originator Exchange ID (OXID) for this frame.
This policy optimizes the utilization of the available paths by allowing I/O traffic between different SID, DID, or OXID pairs to use different paths. All frames received on an ingress port with the same SID, DID, or OXID parameters take the same path unless there is a fabric event. Refer to dlsSet for the definition of a fabric event.
This policy does not support static routes. DLS is always enabled and the DLS setting cannot change with this policy.
-ap ap_policy Specifies an additional AP policy option supported under both port-based and exchange-based policies. If logical fabrics are enabled, this command is valid only on the base switch. The following policies are supported:
0 AP Shared Link Policy (default).
1 AP Dedicated Link Policy. This policy dedicates some links to the ingress traffic and some links to the egress traffic. This policy relieves internal congestion in an environment where there is a large amount of traffic going through both directions at the same time. In addition, it can reduce the impact of slow devices on the overall switch performance.
Examples To display the current APT policy:
switch:admin> aptpolicy Current Policy: 3 1(ap)
3 1 (ap): Default Policy 1: Port Based Routing Policy 3: Exchange Based Routing Policy 0: AP Shared Link Policy 1: AP Dedicated Link Policy
To change the current APT policy to the AP Shared Link Policy:
switch:admin> aptpolicy -ap 0 Switch must be disabled in order to modify this configuration parameter. To disable the switch, use the "switchDisable" command.
switch:admin> switchdisable
switch:admin> aptpolicy -ap 0Policy updated successfully.
switch:admin> switchenable
switch:admin> aptpolicyCurrent Policy: 3 0(ap)
3 0(ap): Default Policy1: Port Based Routing Policy3: Exchange Based Routing Policy
Fabric OS Command Reference 4953-1001764-02

aptPolicy2
0: AP Shared Link Policy1: AP Dedicated Link Policy
See Also dlsReset, dlsSet, dlsShow, switchDisable
50 Fabric OS Command Reference53-1001764-02

auditCfg 2
auditCfg
Modifies and displays the audit log filter configuration.
Synopsis auditcfg --class audit_class
auditcfg --enable |--disable
auditcfg --severity severity_level
auditcfg --show
Description Use this command to configure the audit logging and to display the audit log configuration. This command allows you to set filters by configuring certain classes, to add or remove any of the classes in the filter list, to set severity levels for audit messages, and to enable or disable audit filters. Based on the configuration, certain classes are logged to syslog for auditing. Syslog configuration is required for logging audit messages. Use the syslogdIpAdd command to add the syslogd server IP address.
Note The execution of this command is subject to Virtual Fabric or Admin Domain restrictions that may be in place. Refer to chapter 1, "Using Fabric OS commands" and Appendix A, "Command Availability" for details.
Operands This command has the following operands:
--class Configures filters for a specified audit class. To add or remove any of the classes in the filter list, reissue the --class option.
audit_class Specifies the filters to be configured. Valid values are: 1-ZONE, 2-SECURITY, 3-CONFIGURATION, 4-FIRMWARE and 5-FABRIC filters. This operand is required.
--severity Sets audit severity level. When severity is set, only log messages of type severity_level and higher are displayed.
severity_level Valid values are INFO, WARNING, ERROR, and CRITICAL. By default, all messages are logged. This operand is required.
--enable Enables all filters.
--disable Disables all filters.
--show Displays the current configuration. This operand is optional.
Examples To configure the audit log filter, disable audit logging, and show the configuration:
switch:admin> auditcfg --class 2,3Audit filter is configured.
switch:admin> auditcfg --disableAudit filter is disabled.
Fabric OS Command Reference 5153-1001764-02

auditCfg2
switch:admin> auditcfg --showAudit filter is disabled.1-ZONE2-SECURITY3-CONFIGURATION4-FIRMWARE5-FABRICSeverity level: INFO
See Also auditDump
52 Fabric OS Command Reference53-1001764-02

auditDump 2
auditDump
Displays or clears the audit log.
Synopsis auditdump -s | -show
auditdump -c | -clear
Description Use this command to display or clear the audit log on the switch. The audit log persistently saves the most recent 256 log entries on the switch. On modular platforms, the entries are not shared across CPs. To display or clear the logs, this command must be issued for each CP separately.
Note The execution of this command is subject to Virtual Fabric or Admin Domain restrictions that may be in place. Refer to chapter 1, "Using Fabric OS commands" and Appendix A, "Command Availability" for details.
Operands This command has the following operands:
-s | -show Displays the audit log on the switch or the CP.
-c | -clear Clears the audit log on the switch or the CP.
Examples To display the audit log:
switch:admin> auditdump -s
0 AUDIT, 2008/08/11-13:14:53 (UTC), [SULB-1003], INFO, FIRMWARE, NONE/NONE/NONE/None/CLI, None/sw48000_100/FID CHASSIS, , Firmwarecommit has started.
1 AUDIT, 2008/08/11-13:16:12 (UTC), [SULB-1003], INFO, FIRMWARE, NONE/NONE/NONE/None/CLI, None/sw48000_100/FID CHASSIS, , Firmwarecommit has started.
2 AUDIT, 2008/08/11-13:17:30 (UTC), [SULB-1003], INFO, FIRMWARE, NONE/NONE/NONE/None/CLI, None/sw48000_100/FID CHASSIS, , Firmwarecommit has started. [output truncated]
To clear the audit log:
switch:admin> auditdump -C
See Also auditCfg
Fabric OS Command Reference 5353-1001764-02

authUtil2
authUtil
Displays and sets the authentication configuration.
Synopsis authutil
authutil --show
authutil --set option value
authutil --policy -sw option | -dev option
authutil --authinit [slot/]port[, [slot/]port...] | allE
Description Use this command to display and set local switch authentication parameters.
Use --set to change authentication parameters such as protocol, Diffie-Hellman group (DH group), or hash type. When no protocol is set, the default setting of “FCAP, DH- CHAP” is used. When no group is set, the default setting of “*” (meaning “0,1,2,3,4”) is used. Configuration settings are saved persistently across reboots. Configuration changes take effect during the next authentication request.
Use --show to display the current authentication configuration. Use portShow to display the authentication type and associated parameters, if applicable, used on the port.
Authentication parameters are set on a per-switch basis. If Virtual Fabrics are enabled, all authentication parameters apply to the current logical switch context only, and must be configured separately for each logical switch. Use setContext to change the current logical switch context.
In a VF environment, authentication is performed only on physical E_Ports, not on logical interswitch links (LISLs).
Note The execution of this command is subject to Virtual Fabric or Admin Domain restrictions that may be in place. Refer to chapter 1, "Using Fabric OS commands" and Appendix A, "Command Availability" for details.
Operands When invoked without operands, this command displays the usage. The following operands are supported:
--show Displays local authentication configuration.
--set value Modifies the authentication configuration. Valid options and their values are:
-a fcap |dhchap | all Sets the authentication protocol. Specify “fcap” to set only FCAP authentication, “dhchap” to set only DH-CHAP authentication. Specify “all” to set both FCAP and DH-CHAP, which is the default setting. When authentication is set to “all”, the implicit order is FCAP followed by DH-CHAP. This means that in authentication negotiation, FCAP is given priority over DH-CHAP on the local switch.
-g 0|1|2|3|4|* Sets the Diffie-Hellman (DH) group. Valid values are 0 to 4 and “*”. The DH group 0 is called NULL DH. Each DH group implicitly specifies a key size and associated parameters. Higher group value provides stronger cryptography
54 Fabric OS Command Reference53-1001764-02

authUtil 2
and a higher level of security. When DH group is set to a specified value, only that DH group is enabled. Specifying “*” enables all DH groups 0, 1, 2, 3, and 4, in that order. This means that in authentication negotiation, the NULL DH group s given priority over all other groups.
-h sha1 | md5 | all Sets the hash type. Valid values are “sha1”, “md5” or “all”, which sets both hash types. Use this option to disable md5 authentication access by setting the hash type to sha1 only. Disabling md5 access is required when configuring the system for FIPS. Refer to the Fabric OS Administrator’s Guide for details on FIPS configuration.
--policy Sets the switch authentication policy or device authentication policy. The following options are supported:
-sw on|off|active|passive Sets the switch authentication policy. Specify one of the following modes. Operands are exclusive.
on Sets the switch authentication policy to ON mode. Strict authentication is enforced on all E_Ports. The interswitch link (ISL) goes down (port disable), if the connecting switch does not support the authentication or the authentication policy is switched off.
off Turns the authentication policy off, and the switch rejects any authentication requests.
active Sets the authentication policy to active mode. During switch initialization, authentication is initiated on all E_Ports, but the port is not disabled if the connecting switch does not support authentication or the authentication policy is turned off.
passive (default) Sets the authentication policy to passive mode. The switch does not initiate authentication but participates in authentication if the connecting switch initiates authentication.
-dev off|passive|on Sets the device authentication policy. Two modes are supported. Device authentication policy is off by default.
off Turns off the device authentication policy. Authentication is not required. The switch ignores any authentication requests and continues with the FC probing without authentication.
passive Sets the authentication policy to passive mode. Authentication is optional. If the attached device is capable of doing the authentication then the switch participates in authentication; otherwise it forms an F_Port without authentication. In this mode the device accepts authentication on all F_Ports.
on Sets the authentication policy to “on” mode. Authentication is mandatory. If the attached device is not capable of doing authentication, the corresponding port is disabled.
Fabric OS Command Reference 5553-1001764-02

authUtil2
authinit [slot/]port [, [slot]/port...| allE Reinitiates authentication on selected ports after changing the DH-CHAP group, hash type, and shared secret between a pair of switches. This command does not work on Private, Loop, NPIV and FICON devices. The command can reinitiate authentication only if the device was previously authenticated. This command may bring down the E_Ports if the DH-CHAP shared secrets are not installed correctly. Valid options include:
slot Specify the slot number, if applicable, followed by a slash (/).
port Specify the port number. On enterprise-class platforms, use the slot/port format for specifying the port number.
allE Specify all E_Ports in the switch.
Examples To display authentication configuration on the switch:
switch:admin> authutil --show AUTH TYPE HASH TYPE GROUP TYPE -------------------------------------- fcap,dhchap sha1,md5 0,1,2,3,4
Switch Authentication Policy: PASSIVE Device Authentication Policy: OFF
To set DH-CHAP as the authentication protocol:
switch:admin> authutil --set -a dhchapAuthentication is set to dhchap.
To set both protocols in order of FCAP and then DH-CHAP:
switch:admin> authutil --set -a allAuthentication is set to fcap,dhchap.
To set DH group 3:
switch:admin> authutil --set -g 3DH Group was set to 3.
To set all DH groups to be specified in the authentication negotiation in the order of 0, 1, 2, 3, and 4:
switch:admin> authutil --set -g "*"DH Group is set to 0,1,2,3,4
To set the Switch policy to active mode:
switch:admin> authutil --policy -sw activeWarning: Activating the authentication policy requireseither DH-CHAP secrets or PKI certificates dependingon the protocol selected. Otherwise, ISLs will besegmented during next E-port bring-up.ARE YOU SURE (yes, y, no, n): [no] yAuth Policy is set to ACTIVE
56 Fabric OS Command Reference53-1001764-02

authUtil 2
To set the Device policy to passive mode:
switch:admin> authutil --policy -dev passive Warning: Activating the authentication policy requiresDH-CHAP secrets on both switch and device. Otherwise,the F-port will be disabled during next F-portbring-up.ARE YOU SURE (yes, y, no, n): [no] yDevice authentication is set to PASSIVE
To set the device authentication policy to “on” mode:
switch:admin> authutil --policy -dev onWarning: Activating the authentication policy requires DH-CHAP secrets on both switch and device. Otherwise, the F-port will be disabled during next F-port bring-up. ARE YOU SURE (yes, y, no, n): [no] yDevice authenticaiton is set to ON2008/03/24-23:13:06, [AUTH-1003], 112,, INFO, Stealth_3, Device authentication type has been successfully set to ON
To start authentication on E/F_Ports 2, 3, and 4:
switch:admin> authutil --authinit 2,3,4
To disable md5 hash type for FIPS configuration:
switch:admin> authutil --showAUTH TYPE HASH TYPE GROUP TYPE--------------------------------------fcap,dhchap sha1,md5 1
Switch Authentication Policy: PASSIVEDevice Authentication Policy: OFF
switch:admin> authutil --set -h sha1Hash is set to sha1.
switch:admin> authutil --showAUTH TYPE HASH TYPE GROUP TYPE--------------------------------------fcap,dhchap sha1 1
Switch Authentication Policy: PASSIVEDevice Authentication Policy: OFF
See Also portShow, secAuthSecret
Fabric OS Command Reference 5753-1001764-02

bannerSet2
bannerSet
Sets the banner on the local switch.
Synopsis bannerset [banner]
Description Use this command to set the banner on the local switch.
The banner is a string of alphanumeric characters. It is displayed whenever you log in to a switch.
The banner can be created using the banner operand or by entering the bannerSet command without an operand, making the session interactive.
If you enter the banner text using the interactive method, the valid length is 1022 characters. If the banner text length exceeds the maximum allowed, the software truncates the input. To close the banner text string, enter a period at the beginning of a new line.
Note The execution of this command is subject to Virtual Fabric or Admin Domain restrictions that may be in place. Refer to chapter 1, "Using Fabric OS commands" and Appendix A, "Command Availability" for details.
Operands This command has the following optional operand:
banner Specify a text string to be displayed upon login. If you enter the banner text using the banner operand, the valid length is 116 characters.
Examples To set a new banner for a switch:
switch:admin> bannerset "My banner"
switch:admin> bannerSetPlease input context of security banner (press "." RETURN at thebeginning of a newline to finish input): Do not log into thisswitch if you are not an authorized administrator.
See Also bannerShow
58 Fabric OS Command Reference53-1001764-02

bannerShow 2
bannerShow
Displays the banner text.
Synopsis bannershow
Description Use this command to display the contents of the banner.
Note The execution of this command is subject to Virtual Fabric or Admin Domain restrictions that may be in place. Refer to chapter 1, "Using Fabric OS commands" and Appendix A, "Command Availability" for details.
Operands none
Examples To display the banner for a switch:
switch:admin> bannershowBanner:Do not log into this switch if you are not an authorized administrator.
See Also bannerSet
Fabric OS Command Reference 5953-1001764-02

bcastShow2
bcastShow
Displays broadcast routing information.
Synopsis bcastshow
Description Use this command to display the broadcast routing information for all ports in the switch. The broadcast routing information indicates all ports that are members of the broadcast distribution tree: ports that are able to send and receive broadcast frames.
Normally, all F_Ports and FL_Ports are members of the broadcast distribution tree. The broadcast path selection protocol selects the E_Port members of this tree in a manner designed to prevent broadcast routing loops.
The following fields are displayed:
Group The multicast group ID of the broadcast group (always 256).
Member Ports A map of all ports in the broadcast tree.
Member ISL Ports A map of all E_Ports in the broadcast tree.
The broadcast routing information for the ports is displayed as a set of hexadecimal bit maps. Each bit in a bit map represents a port, with the least significant bit in each row representing port 0, 32, 64, and so on.
Note The output from this command may vary, depending on the hardware platform.
The execution of this command is subject to Virtual Fabric or Admin Domain restrictions that may be in place. Refer to chapter 1, "Using Fabric OS commands" and Appendix A, "Command Availability" for details.
Operands none
Examples To display the broadcastshow routing information for all ports in the switch:
switch:admin> bcastShow
Group Member Ports Member ISL Ports----------------------------------------256 0x00012083 0x00002080 0x00000440 0x00000400 0x00770000 0x00700000 0x00008200 0x00000000 0x00000001 0x00000000
In this example, from a switch with 128 ports, the member ports consist of ports 7, 13, 42, 84, 85, and 86. The final Member Ports bit set represents the embedded port (frames sent to be handled by firmware) and is typically set.
See Also portRouteShow
60 Fabric OS Command Reference53-1001764-02

bladeCfgGeMode 2
bladeCfgGeMode
Configures a GbE port or a 10GbE port on the Brocade FX8-24 blade.
Synopsis bladecfggemode --set mode -slot slot
bladecfggemode --show -slot slot | -all
bladecfggemode --help
Description Use this command to configure the GbE port mode on the Brocade FX8-24 extension blade or to display the configuration. The mode configuration controls which ports are enabled.
Notes The execution of this command is subject to Virtual Fabric or Admin Domain restrictions that may be in place. Refer to chapter 1, "Using Fabric OS commands" and Appendix A, "Command Availability" for details.
This command is supported only on the Brocade FX8-24 blade in a DCX or DCX-S4 chassis.
Operands This command has the following operands:
--set mode Sets the GbE port mode for a specified slot. Valid modes are one of the following:
1g Enables the GbE ports ge0-ge9 (xge0 and xge1 are disabled).
10g Enables the GbE ports xge0 and xge1 (ge0-ge9 ports are disabled).
dual Enables the GbE ports ge0-ge9 and xge0 (xge1 is disabled).
-slot slot Specifies the slot number for the FX8-24 blade. This operand is required when setting the GbE port mode.
--show Displays the GbE port mode for the specified slots.
-slot slot Displays the GbE port mode for a single slot.
-all Displays the GbE port mode for all configured slots.
--help Displays the command usage.
Examples To configure the Brocade FX8-24 blade in slot 4 in 1G mode:
switch:admin> bladecfggemode --set 1g –slot 4switch:admin>
To display the GbE port mode for the Brocade FX8-24 blade in slot 4:
switch:admin> bladecfggemode --show –slot 4bladeCfgGeMode: Blade in slot 4 is configured in 10GigE Mode10GigE mode: only xge0 and xge1 are enabled (ge0-9 ports are disabled)switch:admin>
To display the GbE port mode for all configured slots:
switch:admin> bladecfggemode --show –all
Fabric OS Command Reference 6153-1001764-02

bladeCfgGeMode2
bladeCfgGeMode: Blade in slot 1 is configured in 1GigE Mode1GigE mode: only the ge0-9 ports are enabled (xge0 and xge1 are disabled)bladeCfgGeMode: Blade in slot 4 is configured in 10GigE Mode10GigE mode: only xge0 and xge1 are enabled (ge0-9 ports are disabled)
See Also none
62 Fabric OS Command Reference53-1001764-02

bladeDisable 2
bladeDisable
Disables all user ports on a blade.
Synopsis bladedisable slot
Description Use this command to disable all user ports on a blade. All Fibre Channel ports on the blade are taken offline. If the switch was connected to a fabric through this blade, the remaining switches reconfigure, and the switch reconfigures based on the other blade ports. As each port is disabled, the front panel LED changes to a slow flashing yellow.
After issuing bladeDisable on a slot in a chassis, switchShow displays the user ports in the disabled state. The blade is still shown as enabled in both switchShow and slotShow output.
The blade must be disabled before making configuration changes or before running many of the diagnostic tests. The blade does not need to be disabled before rebooting or powering off.
You cannot disable a blade when the blade is faulted, powered off, or running diagnostics.
This command disables the ports on a single blade. To disable the ports in an entire chassis, use the chassisDisable command.
Note The execution of this command is subject to Virtual Fabric or Admin Domain restrictions that may be in place. Refer to chapter 1, "Using Fabric OS commands" and Appendix A, "Command Availability" for details.
Operands This command has the following operand:
slot Specifies the slot number for which the ports are to be disabled.
Examples To disable a blade in slot 5:
switch:admin> bladedisable 5Blade 5 is being disabled...Done
To verify that the user ports on the blade are disabled:
switch:admin> switchshow -slot 5switchName: DCX57_9switchType: 62.1switchState: OnlineswitchMode: NativeswitchRole: SubordinateswitchDomain: 9switchId: fffc09switchWwn: 10:00:00:05:1e:40:4a:00zoning: ON (all_cfg)switchBeacon: OFFFC Router: OFFFC Router BB Fabric ID: 128
Slot Blade Type ID Model Name Status----------------------------------------------------- 5 COREBLADE 52 CORE8 ENABLED
Index Slot Port Address Media Speed State Proto===================================================384 5 0 ------ cu 8G In_Sync FC Disabled
Fabric OS Command Reference 6353-1001764-02

bladeDisable2
385 5 1 ------ cu 8G In_Sync FC Disabled386 5 2 ------ cu 8G In_Sync FC Disabled387 5 3 ------ cu 8G In_Sync FC Disabled388 5 4 ------ cu 8G In_Sync FC Disabled389 5 5 ------ cu 8G In_Sync FC Disabled390 5 6 ------ cu 8G In_Sync FC Disabled391 5 7 ------ cu 8G In_Sync FC Disabled392 5 8 ------ cu 8G In_Sync FC Disabled393 5 9 ------ cu 8G In_Sync FC Disabled394 5 10 ------ cu 8G In_Sync FC Disabled395 5 11 ------ cu 8G In_Sync FC Disabled396 5 12 ------ cu 8G In_Sync FC Disabled397 5 13 ------ cu 8G In_Sync FC Disabled398 5 14 ------ cu 8G In_Sync FC Disabled399 5 15 ------ cu 8G In_Sync FC Disabled400 5 16 ------ cu 8G In_Sync FC Disabled401 5 17 ------ cu 8G In_Sync FC Disabled402 5 18 ------ cu 8G In_Sync FC Disabled403 5 19 ------ cu 8G In_Sync FC Disabled404 5 20 ------ cu 8G In_Sync FC Disabled405 5 21 ------ cu 8G In_Sync FC Disabled406 5 22 ------ cu 8G In_Sync FC Disabled407 5 23 ------ cu 8G In_Sync FC Disabled408 5 24 ------ cu 8G In_Sync FC Disabled409 5 25 ------ cu 8G In_Sync FC Disabled410 5 26 ------ cu 8G In_Sync FC Disabled411 5 27 ------ cu 8G In_Sync FC Disabled412 5 28 ------ cu 8G In_Sync FC Disabled413 5 29 ------ cu 8G In_Sync FC Disabled414 5 30 ------ cu 8G In_Sync FC Disabled415 5 31 ------ cu 8G In_Sync FC Disabledswitch:admin>
See Also bladeEnable, chassisDisable, chassisEnable, portDisable, portEnable, slotShow, switchEnable,switchDisable, switchShow
64 Fabric OS Command Reference53-1001764-02

bladeEnable 2
bladeEnable
Enables all user ports on a blade.
Synopsis bladeenable slot
Description Use this command to enable all user ports on a blade. All ports within the blade that did not fail the power-on self-test (POST) are enabled (except for persistently disabled ports). They may come online if connected to a device, or remain offline if disconnected. Use bladeEnable to re-enable the blade after making configuration changes or running offline diagnostics.
If the switch is connected to a fabric through previously disabled ports, it rejoins the fabric. If this switch remains the principal switch at the end of the fabric countdown, it assigns itself a domain ID. If another switch assumes the principal role, the re-enabled switch becomes a subordinate switch and accepts a domain ID from the principal.
As each port is enabled, the front panel LED changes from slow flashing amber to green for online ports or to yellow for ports that do not initialize. Disconnected ports remain unlit.
Notes You cannot disable a single blade when the entire chassis is disabled, or when the blade itself is faulted, powered off, or running diagnostics. Use chassisEnable to enable the ports on an entire chassis.
Persistently disabled ports are not enabled by this command.
The execution of this command is subject to Virtual Fabric or Admin Domain restrictions that may be in place. Refer to chapter 1, "Using Fabric OS commands" and Appendix A, "Command Availability" for details.
Operands This command has the following operand:
slot Specifies the slot number to be enabled.
Examples To display the slot status, enable the user ports in slot 4, and verify the settings:
switch:admin> slotshow
Slot Blade Type ID Status--------------------------------- 1 SW BLADE 2 ENABLED 2 UNKNOWN VACANT 3 UNKNOWN VACANT 4 SW BLADE 2 ENABLED (User Ports Disabled) 5 CP BLADE 1 ENABLED 6 CP BLADE 1 ENABLED 7 SW BLADE 2 ENABLED 8 UNKNOWN VACANT 9 UNKNOWN VACANT 10 UNKNOWN VACANT
switch:admin> bladeenable 4slBlade 4 is being enabled...Done
Fabric OS Command Reference 6553-1001764-02

bladeEnable2
switch:admin> slotshow
Slot Blade Type ID Status--------------------------------- 1 SW BLADE 2 ENABLED 2 UNKNOWN VACANT 3 UNKNOWN VACANT 4 SW BLADE 2 ENABLED 5 CP BLADE 1 ENABLED 6 CP BLADE 1 ENABLED 7 SW BLADE 2 ENABLED 8 UNKNOWN VACANT 9 UNKNOWN VACANT 10 UNKNOWN VACANT
See Also bladeDisable, chassisDisable, chassisEnable, portEnable, portDisable, switchDisable,switchShow
66 Fabric OS Command Reference53-1001764-02

bladeSwap 2
bladeSwap
Swaps the area numbers for matching port pairs of two blades.
Synopsis bladeSwap -src source_slot -dest destination_slot
Description Use this command to swap the area numbers for matching port pairs of two blades. All ports must qualify for swapping for this command to succeed. It validates that the blades in the indicated slots are of the same type, have the same number of ports, and that the port pairs are in the same partition.
If all the ports qualify for swapping, this command automatically performs the following operations:
1. It enables the port swapping feature by executing the portSwapEnable command.
2. It takes all ports on both the source and destination blades offline by executing the bladeDisable command.
3. It swaps the matching port pairs on each of the specified blades.
4. It re-enables the blade by executing the bladeEnable command.
The result of this operation is persistent across reboots and power cycles.
Note The execution of this command is subject to Virtual Fabric or Admin Domain restrictions that may be in place. Refer to chapter 1, "Using Fabric OS commands" and Appendix A, "Command Availability" for details.
This command leaves both the source and destination blades in a disabled state. To enable all ports on a blade, issue the bladeEnable command. To enable individual ports, issue the portEnable command.
Operands This command has the following operands:
-src source_slot Specifies the slot number for the source blade.
-dest destination_slot Specifies the slot number for the destination blade. Use slotShow for a listing of valid slots.
Examples To swap area numbers between matching port pairs of two slots:
switch:admin> bladeswap -src 1 -dest 3bladeswap done
See Also portSwapEnable, portSwapDisable, portSwapShow, portShow, portEnable, portDisable, bladeEnable, bladeDisable, switchShow, switchEnable
Fabric OS Command Reference 6753-1001764-02

bootLunCfg2
bootLunCfg
Transparently configures the boot LUN for an HBA.
Synopsis bootluncfg --add HBA_WWN PWWN LUN_ID
bootluncfg --delete HBA_WWN [PWWN LUN_ID]
bootluncfg --show
bootluncfg --help
Description Use this command to configure the boot LUN for an HBA.
Existing fabric-based boot LUN discovery allows the host's boot LUN information to be stored in the fabric zone database by using a zone name that contains the PWWN of an HBA port. The zone members consist of storage target PWWN and LUN ID.
This command provides a simplified and transparent procedure for configuring the boot LUN. Once configured, the HBA boot code queries the zone member list for the zone name matching the HBA PWWN to determine the boot target and LUN.
Note The execution of this command is subject to Virtual Fabric or Admin Domain restrictions that may be in place. Refer to chapter 1, "Using Fabric OS commands" and Appendix A, "Command Availability" for details.
Operands This command has the following operands:
HBA_WWN Specifies the WWN of the HBA port connecting to the boot LUN. This is a hexadecimal number, for example, 10:00:00:000:05:1e:41:9a:cb.
PWWN Specifies the WWN of the remote storage target's port. For example, 50:00:00:05:1e:41:9a:ca. This operand is optional.
LUN_ID Specifies the hexadecimal LUN identification. The LUN ID is represented as an eight-byte value (four-level LUN addressing), for example, 09AABBCCDDEEFF00. This operand is optional.
--add Configures the specified HBA (HBA_WWN) to boot from the specified LUN (LUN_WWN) accessible through the Target PWWN (PWWN).
--.delete Removes the mapping for the HBA (HBA_PWWN) to boot from the LUN (LUN_ID) accessible through the Target Port (PWWN).
--.show Displays all configured HBA to Port/LUN Mappings.
--.help Displays the command usage.
Examples To configure a boot LUN:
switch:admin> bootluncfg --add 11:22:ab:44:44:ff:44:ca 1b:6c:55:55:55:3a:55:ff 9abc345fa1112410Operation Successful
To remove an HBA to Port/LUN mapping:
switch:admin> bootluncfg --delete 11:22:ab:44:44:ff:44:ca 1b:6c:55:55:55:3a:55:ff 9abc345fa1112410Operation Successful
See Also none
68 Fabric OS Command Reference53-1001764-02

bottleneckMon 2
bottleneckMon
Monitors and reports latency and congestion bottlenecks on F_Ports and E_Ports.
Synopsis bottleneckmon --enable [ -cthresh congestion_threshold] [-lthresh latency_threshold] [ -time seconds] [-qtime seconds] [-alert | -noalert]
bottleneckmon --disable
bottleneckmon --config [-cthresh congestion_threshold] [-lthresh latency_threshold] [-time seconds][-qtime seconds] [[slot]port_list] [-alert | -noalert]
bottleneckmon --configclear [slot]port_list
bottleneckmon --exclude [slot]port_list
bottleneckmon --include [slot]port_list
bottleneckmon --show [-interval seconds] [-span seconds] [-refresh] [-congestion | -latency ] [[slot/]port | *]
bottleneckmon --status
bottleneckmon --help
Description Use this command to monitor latency and congestion bottlenecks on F[L]_Ports and E_Ports. The configuration options supported by this command include the following management functions:
• Enabling or disabling bottleneck monitoring on a switch and optionally configuring thresholds and alert parameters.
• Changing alert parameters on specified ports after you have enabled the feature on the switch.
• Configuring severity thresholds for congestion and latency bottlenecks for a switch or for a specified port list.
• Clearing the configuration on specified ports only (this option cannot be performed switch-wide).
• Excluding specified ports from being monitored or including previously excluded ports.
• Generating history or status reports that show congestion bottlenecks and latency bottlenecks.
In Fabric OS v6.4.0 and later, enabling or disabling bottleneck monitoring is a switch-wide operation. If Virtual Fabrics are enabled, the configuration is applied per logical switch and affects all ports on the current logical switch. After the (logical) switch-wide bottleneck monitoring parameters have been set, you can you can fine-tune the configuration for specific ports.
A bottleneck is defined as a condition where the offered load at a given port exceeds the throughput at the port. This command supports detection of two types of bottleneck conditions: congestion and latency.
• A congestion bottleneck arises from link over-utilization. This happens when the offered load exceeds throughput and throughput is at 100%. Frames attempt to egress at a faster rate than the line rate allows. Link utilization is measured once every second at the port (or when trunked ports are monitored at the trunk master). A congestion bottleneck is assumed if the utilization during the measured second is 95% or more.
• A latency bottleneck occurs when egress throughput at a port is lower than the offered load because of latency in the return of credits from the other end of the link. This is not a permanent condition. The offered load exceeds throughput and throughput is less than 100%. In this case, the load does not exceed the physical capacity of the channel as such, but can
Fabric OS Command Reference 6953-1001764-02

bottleneckMon2
occur because of an underperforming device connected to the F_Port, or because of back pressure from other congestion or latency bottlenecks on the E_Ports. Bottleneck monitoring can help identify these devices and pinpoint the upstream bottlenecks caused by these devices inside the fabric.
When bottleneck monitoring is enabled on a switch and -alert is specified, the command triggers an SNMP and a RASlog alert when the ports on the configured switch experience latency or congestion. Another alert is sent after the condition resolves. For a given averaging time, each second is marked as affected by latency and/or congestion or not. If the number of affected seconds crosses the configured threshold, an alert is triggered for the port. You can configure a severity threshold for each type of bottleneck and the time interval over which the bottlenecks are measured.
For example, setting a latency threshold of 0.8 and a time window of 30 seconds specifies that an alert should be sent when 80% of the one-second samples over any period of 30 seconds were affected by latency bottleneck conditions. The -qtime option can be used to throttle alerts by specifying the minimum number of seconds between consecutive alerts. Thresholds are configured separately for each type of bottleneck and statistical data are collected independently for each condition. The -qtime parameter applies to both types of bottleneck monitoring; there can be one latency alert and one congestion alert in a configured quiet time.
Bottleneck monitoring works both in non-Virtual Fabric mode and in Virtual Fabric Mode. If Virtual Fabrics are enabled, bottleneck monitoring is configured per logical switch. If a port is removed from a logical switch after bottleneck detection is enabled on the logical switch, the configuration is retained in that logical switch. If the port is added again to the same logical switch, bottleneck detection is automatically re-enabled for this port using the retained configuration. This feature allows you to configure more than one logical switch to perform bottleneck detection on the same port, although only one logical switch performs the operation on the port at any given time.
The --show option displays a history of the bottleneck severity for a specified port or for all ports. Each line of output shows the percentage of one-second intervals affected by bottleneck conditions during the time window shown on that line. When issued for all ports, the union of all port statistics is displayed in addition to individual port statistics. The union value provides a good indicator for the overall bottleneck severity on the switch. You can filter the output to display only latency or congestion bottleneck statistics. When used without port operand the command displays the number of ports affected by bottleneck conditions. A “bottlenecked” port in this output is defined as any port that was affected by a bottleneck for one second or more in the corresponding interval.
The --status option displays bottleneck configuration details for the current (logical) switch. If virtual fabrics are enabled, ports not belonging to the current logical switch are not displayed. This is change from v6.3.0, where the output of --status included ports that did not belong to the current logical switch. The command output includes the following information:
Bottleneck detection Enabled or disabled
Switch-wide alerting parameters
Alerts? Yes (enabled) or No (disabled)
Congestion threshold for alert The severity threshold for triggering a congestion alert. This threshold indicates the percentage of one-second intervals affected by congestion conditions within a specified time window. The congestion threshold is expressed as a fraction between 0 and 1.
70 Fabric OS Command Reference53-1001764-02

bottleneckMon 2
Latency threshold for alert The severity threshold for triggering a latency alert. This threshold indicates the percentage of one-second intervals affected by latency conditions within a specified time window. The latency threshold is expressed as a fraction between 0 and 1.
Averaging time for alert The time window in seconds over which the percentage of seconds affected by bottleneck conditions is computed and compared with the threshold.
Quiet time for alert The minimum number of seconds between consecutive alerts. The value assigned to this parameter applies to both latency and congestion monitoring.
Per-port overrides for alert parameters Custom configuration for the above mentioned parameters. Note that everything above this line applies to all ports in the switch that don't have any custom configuration or exclusions.
Excluded ports List of ports excluded from bottleneck monitoring.
Note This command has been enhanced in Fabric OS v6.4.0 with new and modified command options. You can still execute the pre-v.6.4.0 command syntax, but the legacy commands will be mapped to the new functionality. For example, If you specify a port with the enable option, the system assumes a v6.3.0 command. The -thresh operand is mapped to -lthresh, and the configuration is applied switch-wide (with appropriate exclusions) unless you fine-tune it further after it is enabled. When using the legacy command, results may not always match expectations, and it is therefore recommended to use the new syntax.
The execution of this command is subject to Virtual Fabric or Admin Domain restrictions that may be in place. Refer to chapter 1, "Using Fabric OS commands" and Appendix A, "Command Availability" for details.
This command is supported on F_Ports, FL_Ports, E_Ports, and EX_Ports.
Operands This command has the following operands:
slot On bladed systems only, specifies the slot number of the ports to be configured, followed by a slash (/).
port_list Specifies one or more ports, relative to the slot on bladed systems. Use switchShow for a listing of valid ports. The --show option allows only a single port or all ports (*) to be specified with this command, unless it is used without port operand. A port list should be enclosed in double quotation marks and can consist of the following:
• A single port, for example, “8” or “5/8” on blades systems.• A port range where beginning and end port are separated by a dash, for
example, “8-13” or “5/8-13” on blades systems. A port range cannot span multiple slots.
• A set of ports, separated by a space, for example “3 5 7 8”or 5/3 5 7 8 on bladed systems.
Fabric OS Command Reference 7153-1001764-02

bottleneckMon2
• A wildcard ‘*’ indicates all ports. The wild card should be enclosed in single quotation marks. The wildcard (‘*) specifier is not allowed with the --config option. To make switch-wide changes, use --config without a port specifier.
--enable Enables bottleneck detection on the switch. This operation is switch-wide and affects all F[L]_Ports and F_Ports. This operation enables bottleneck monitoring on all eligible ports of a switch, no matter when they become eligible. If you have Virtual Fabrics enabled and you move ports into a bottleneck enabled logical switch from another logical switch, bottleneck monitoring is enabled upon completion of the move. You can configure optional thresholds and alerts when you enable the feature, or you can change selected parameters later with the --config command.
--config Modifies bottleneck detection parameters on specified ports or, when a port list is not specified, on the entire switch. Bottleneck detection must first be enabled before you can fine-tune the configuration with the --config command. The history of bottleneck statistics thus far will not be lost for the specified ports and can be viewed with the --show option. However, alert calculations restart on the specified ports when parameters change. This operation is allowed on excluded ports.
The following parameters can be optionally set with the --enable and --config commands; if omitted, default thresholds apply.
-alert Enables alerts when configured thresholds are exceeded on the ports that are enabled for bottleneck monitoring. The alerting mechanism is by RASlog and SNMP traps. This operand is optional; if omitted, no alert is assumed. When -alert is specified, one or more of the following operands may be specified. If -alert is not specified and you try to specify additional configuration parameters, the command fails with an appropriate message.
-cthresh congestion_threshold Specifies the severity threshold for congestion that triggers an alert. The threshold indicates the percentage of one-second intervals affected by the bottleneck condition within the specified time window. The threshold is expressed as the equivalent fraction between 0 and 1. The default value is 0.8.
-lthresh latency_threshold Specifies the severity threshold for latency that triggers an alert. The threshold indicates the percentage of one-second intervals affected by the bottleneck condition within the specified time window. The threshold is expressed as the equivalent fraction between 0 and 1. The default value is 0.1.
-time window Specifies the time window in seconds over which the percentage of seconds affected by bottleneck conditions is computed and compared with the threshold. The maximum window size is 10800 seconds (3 hours). The default is 300 seconds.
-qtime quiet_time Specifies the minimum number of seconds between consecutive alerts. The default is 300 seconds. The maximum is 31556926 seconds (approximately one year)..
72 Fabric OS Command Reference53-1001764-02

bottleneckMon 2
-noalert Disables alerts. This is the default state assumed if neither -alert nor -noalert is specified. This operand is valid only with the --config option.
--exclude [slot]port_list Excludes the specified ports from bottleneck detection. No data will be collected from these ports, and no alerts will be triggered for these ports. All statistics history for a port is erased when a port is excluded. Alerting parameters are preserved. It is not recommended to exclude ports from monitoring except under special circumstances, for example, when a long-distance port is known to be a bottleneck because of credit insufficiency. The wildcard (*) port specifier is allowed but not recommended. Use --disable to exclude all ports on the switch.
--include [slot]port_list Includes previously excluded ports for bottleneck detection. Previously configured switch-wide alerts and threshold parameters reapply when monitoring resumes. The wildcard (*) port specifier may be used as a shorthand for removing all exclusions.
--configclear [slot]port_list Removes any port-specific alert parameters from the specified ports and restores switch-wide parameters on these ports. You can still view the history of bottlenecks statistics on these ports. However, alert calculations restart on the specified ports after the parameter reset. This operation is allowed on excluded ports.
--disable Disables bottleneck detection on the entire switch. This operation erases all configuration details, including the list of excluded ports, all custom thresholds and alerting parameters for specific ports, and all historical data.
--show [[slot/]port |*]
Displays a history of the bottleneck severity for the specified ports. The output shows the percentage of one-second intervals affected by the bottleneck condition within the specified time interval. When a single port is specified, the command displays the bottleneck statistic for that port. When the wildcard (*) is specified, the same statistic is displayed for every port on the switch. Additionally, a combined “union” statistic for the switch as a whole is displayed. When used without a port specifier, the command displays the number of ports affected by bottleneck conditions. A “bottlenecked” port in this output is defined as any port that was affected by a bottleneck for one second or more in the corresponding interval. This command succeeds only on online ports.
The following operands are optional:
-interval seconds Specifies the time window in seconds over which the percentage of seconds affected by bottleneck conditions is displayed in the output. When a port is specified with the --show command, the maximum interval is 10800 seconds (3 hours). When a wildcard (*) is specified, the maximum interval is defined such that the value of -span divided by the value of the interval cannot exceed 30. The interval value must be greater than 0.The default value is 10 seconds.
Fabric OS Command Reference 7353-1001764-02

bottleneckMon2
-span seconds Specifies the total duration in seconds covered in the output. When a port is specified with the --show command, the maximum span is 10800 seconds (3 hours). When a wildcard (*) is specified, the maximum span is defined such that the value of -span divided by the value of the interval cannot exceed 30. The span value must be greater than 0. The default value is 10 seconds.
History data are maintained for a maximum of three hours per port, so the span can be 10800 seconds at most. When the show command is issued for all ports (*), the maximum duration is defined such that the value of -span divided by the value of the interval cannot exceed 30.
-refresh Refreshes the display to continuously update with fresh data at a certain rate. The refresh rate is equal to the number of seconds specified in the interval.
-congestion | -latency Restricts the display to congestion or latency data. If neither is specified, the command displays combined statistics for both types of bottlenecks
--status Displays the details of the Bottleneck Detection configuration for the current (logical) switch. Refer to the command description section for an explanation of the displays. If virtual fabrics are enabled, ports not belonging to the current logical switch are not displayed. This is change from v6.3.0, where the output of --status included ports that did not belong to the current logical switch.
--help Displays the command usage.
Examples To enable bottleneck monitoring on the switch without alerts (statistics collected with default parameters are still available for viewing):
switch:admin> bottleneckmon --enable
To enable bottleneck monitoring on the switch with alerts using default values for thresholds and time (preferred use case):
switch:admin> bottleneckmon --enable -alert
To customize congestion bottleneck monitoring on a port range after default alerts are enabled switch-wide:
switch:admin> bottleneckmon --enable -alertswitch:admin> bottleneckmon --config -alert -cthresh .5 -time 240 1-15
To disable bottleneck monitoring on a specified port:
switch:admin> bottleneckmon --exclude 2/4
To disable bottleneck monitoring on all ports of a chassis:
switch:admin> bottleneckmon --disable
74 Fabric OS Command Reference53-1001764-02

bottleneckMon 2
To display the number of ports affected by bottleneck conditions:
switch:admin> bottleneckmon --show================================================================== Fri Feb 26 22:00:00 UTC 2010==================================================================List of bottlenecked ports in most recent interval:13 16================================================================== Number ofFrom To bottlenecked ports==================================================================Feb 26 21:59:50 Feb 26 22:00:00 2Feb 26 21:59:40 Feb 26 21:59:50 0Feb 26 21:59:30 Feb 26 21:59:40 0Feb 26 21:59:20 Feb 26 21:59:30 0Feb 26 21:59:10 Feb 26 21:59:20 0Feb 26 21:59:00 Feb 26 21:59:10 0Feb 26 21:58:50 Feb 26 21:59:00 0Feb 26 21:58:40 Feb 26 21:58:50 0Feb 26 21:58:30 Feb 26 21:58:40 0Feb 26 21:58:20 Feb 26 21:58:30 2Feb 26 21:58:10 Feb 26 21:58:20 3Feb 26 21:58:00 Feb 26 21:58:10 3Feb 26 21:57:50 Feb 26 21:58:00 3Feb 26 21:57:40 Feb 26 21:57:50 3Feb 26 21:57:30 Feb 26 21:57:40 2Feb 26 21:57:20 Feb 26 21:57:30 2Feb 26 21:57:10 Feb 26 21:57:20 0Feb 26 21:57:00 Feb 26 21:57:10 0Feb 26 21:56:50 Feb 26 21:57:00 0Feb 26 21:56:40 Feb 26 21:56:50 0Feb 26 21:56:30 Feb 26 21:56:40 0Feb 26 21:56:20 Feb 26 21:56:30 0Feb 26 21:56:10 Feb 26 21:56:20 0Feb 26 21:56:00 Feb 26 21:56:10 0Feb 26 21:55:50 Feb 26 21:56:00 0Feb 26 21:55:40 Feb 26 21:55:50 0Feb 26 21:55:30 Feb 26 21:55:40 0Feb 26 21:55:20 Feb 26 21:55:30 0Feb 26 21:55:10 Feb 26 21:55:20 0Feb 26 21:55:00 Feb 26 21:55:10 0
To display bottleneck statistics for a single port:
switch:admin> bottleneckmon --show -interval 5 -span 30 2/4============================================================= Wed Jan 13 18:54:35 UTC 2010============================================================= Percentage ofFrom To affected secs=============================================================Jan 13 18:54:05 Jan 13 18:54:10 20.00%Jan 13 18:54:10 Jan 13 18:54:15 60.00%Jan 13 18:54:15 Jan 13 18:54:20 0.00%Jan 13 18:54:20 Jan 13 18:54:25 0.00%Jan 13 18:54:25 Jan 13 18:54:30 40.00%Jan 13 18:54:30 Jan 13 18:54:35 80.00%
Fabric OS Command Reference 7553-1001764-02

bottleneckMon2
To display the bottleneck statistic for every port in the switch including the union of all individual port statistics:
switch:admin> bottleneckmon --show -interval 5 -span 30 *============================================================= Wed Jan 13 18:54:35 UTC 2010================================================================================================================================From To 0 1 2 3 4 5===================================================================Jan 13 18:54:05 Jan 13 18:54:10 20.00 20.00 0.00 80.00 20.00 100.00===================================================================From To 5 6 7 8 UNION===================================================================Jan 13 18:54:05 Jan 13 18:54:10 40.00 0.00 0.00 20.00 100.00 =================================================================== From To 0 1 2 3 4 5===================================================================Jan 13 18:54:10 Jan 13 18:54:15 0.00 0.00 20.00 40.00 20.00 0.00===================================================================From To 5 6 7 8 UNION===================================================================Jan 13 18:54:10 Jul 13 18:54:15 0.00 20.00 0.00 0.00 40.00
To display only the union statistic for the switch:
switch:admin> bottleneckmon --show -interval 5 -span 30============================================================= Wed Jan 13 18:54:35 UTC 2010============================================================= Percentage ofFrom To affected secs =============================================================Jan 13 18:54:05 Jan 13 18:54:10 80.00Jan 13 18:54:10 Jan 13 18:54:15 20.00Jan 13 18:54:15 Jan 13 18:54:20 80.00Jan 13 18:54:20 Jan 13 18:54:25 0.00Jan 13 18:54:25 Jan 13 18:54:30 0.00Jan 13 18:54:30 Jan 13 18:54:35 40.00
To display bottleneck configuration details for the switch:
switch:admin> bottleneckmon --statusBottleneck detection - Enabled==============================
Switch-wide alerting parameters:============================Alerts - YesCongestion threshold for alert - 0.800Latency threshold for alert - 0.100Averaging time for alert - 300 secondsQuiet time for alert - 300 seconds
Per-port overrides for alert parameters:========================================Slot Port Alerts? LatencyThresh CongestionThresh Time(s) QTime(s)=======================================================================0 1 Y 0.990 0.900 3000 6000 2 Y 0.990 0.900 4000 600
76 Fabric OS Command Reference53-1001764-02

bottleneckMon 2
0 3 Y 0.990 0.900 4000 600
Excluded ports:===============Slot Port============0 20 30 4
See Also none
Fabric OS Command Reference 7753-1001764-02

bpPortLoopbackTest2
bpPortLoopbackTest
Sends and receives data from the same BP port to perform a functional test of the port.
Synopsis bpportloopbacktest [--slot slot][ -nframes count] -pklen count] -lb_mode mode] [-spd_mode mode ] -bpports itemlist ]
Description Use this command to verify the functional operation of the switch. The test sends frames from a specified blade processor (BP) port transmitter and loops the frames back into the same BP port’s receiver. The path exercised in this test includes the connections from the BP chip to the Control Processor (CP) chip. The test can be performed on a single port or on a range of BP ports.
Before running this diagnostic, you must disable the chassis and clear all logs using the following command sequence:
1. chassisdisable
2. slotstatsclear
3. diagclearerror -all
4. cryptocfg --disableEE (if the encryption engine is in enabled state)
By default, eight frames are transmitted and received on each port. The test method is as follows:
1. Set all ports present for the loopback mode specified.
2. Create a frame F of maximum data size (2112 bytes).
3. Transmit frame F through the specified port.
4. Pick up the frame from the same port.
5. Check if any of the following statistic error counters report nonzero values:
ENC_in, CRC_err, TruncFrm, FrmTooLong, BadEOF, Enc_out, BadOrdSet, DiscC3.
6. Check if the transmit, receive, or class 3 receiver counters are stuck at some value.
7. Check if the number of frames transmitted is not equal to the number of frames received.
8. Repeat steps two through seven for all specified ports until one of the following conditions is met:
a. The number of frames (or nframes) requested is reached.
b. All ports are marked bad.
At each pass, a different data type is used to create the frame from a palette of seven. If a pass of seven is requested, seven different frames are used in the test. If eight passes, the first seven frames are unique, and the eighth frame is the same as the first. The data palette of seven consists of the following data types:
1) CSPAT: 0x7e, 0x7e, 0x7e, 0x7e, ...2) BYTE_LFSR: 0x69, 0x01, 0x02, 0x05, ...3) CHALF_SQ: 0x4a, 0x4a, 0x4a, 0x4a, ...4) QUAD_NOT: 0x00, 0xff, 0x00, 0xff, ...5) CQTR_SQ: 0x78, 0x78, 0x78, 0x78, ...6) CRPAT: 0xbc, 0xbc, 0x23, 0x47, ...7) RANDOM: 0x25, 0x7f, 0x6e, 0x9a, ...
78 Fabric OS Command Reference53-1001764-02

bpPortLoopbackTest 2
Notes This command does not support High Availability (HA).
This command is currently supported only on the Brocade Encryption platform at a default speed of 4 Gbps and a loopback mode of 7. Use portLoopBackTest on all other platforms.
The execution of this command is subject to Virtual Fabric or Admin Domain restrictions that may be in place. Refer to chapter 1, “Using Fabric OS commands” and Appendix A, “Command Availability” for details.
Operands This command has the following operands:
--slot slot Specifies the slot number on bladed systems.
-nframes count Specifies the number of frames to send. The test progresses until the specified number of frames has been transmitted on each port. The default value is 8.
-pklen count Specifies the size of the packet to be sent. The default is 2112 bytes. The valid range is 100 to 2112 bytes.
-lb_mode mode Specifies the loopback point for the test. The Brocade Encryption Platform, only supports line loopback (lb_mode 7) and lb_mode defaults to 7 when the parameter is not specified.
Mode values are as follows:
1 Port Loopback (loopback plugs)
2 External (SERDES) loopback
7 Back-end bypass & port loopback
8 Back-end bypass & SERDES loopback
-spd_mode mode Specifies the speed mode for the test. On the Brocade Encryption platforms only a speed of 4 Gbps is supported and spd_mode defaults to 4 when the parameter is not specified.
1 Runs test at 1 Gbps.
2 Runs test at 2 Gbps.
4 Runs test at 4 Gbps (Default for Encryption platforms).
8 Runs test at 8 Gbps (Default for Condor2).
-bpports itemlist Specifies a list of blade ports to test. By default all valid blade ports in the specified blade are tested. On the Brocade Encryption platforms, ports 80-103 are the only valid ports, because these are the only blade ports with access to the Vader chip. Refer to the itemlist help page for further information on the itemlist parameter.
Examples To run the test on blade ports 80-90 with one frame:
switch:admin> bpportloopbacktest -bpports 80-90 -nframes 1Running bpportloopbacktest ..............Ram InitOb1 portloopbacktest on ports 80-90 lbMode 7 speed 4Info: Vader port 0 recovering Rx FifoInfo: Vader port 1 recovering Rx FifoInfo: Vader port 2 recovering Rx FifoInfo: Vader port 3 recovering Rx Fifo
Fabric OS Command Reference 7953-1001764-02

bpPortLoopbackTest2
Info: Vader port 4 recovering Rx FifoInfo: Vader port 5 recovering Rx FifoOb1 portloopbacktest on ports 80-90 PASSEDTest Complete: bpportloopbacktest Pass 1 of 1Duration 0 hr, 0 min & 24 sec (0:0:24:599).Cleaning up after test....... passed.
Diagnostics When it detects failures, the test may report one or more of the following error messages. If errors persist, contact Technical Support.
DATA Data received does not match the data sent.
ERRSTAT Errors were found in the ASIC statistics.
INIT Port failed to initialize.
PORTDIED A previously initialized port went to an un-initialized state.
STATS Errors were found in the ASIC statistics.
TIMEOUT Did not receive a frame in the given timeout period.
XMIT Frame transmission failure.
See Also itemList, portLoopBackTest
80 Fabric OS Command Reference53-1001764-02

bpTurboRamTest 2
bpTurboRamTest
bpTurboRamTest - MBIST test for AP Blade BP ASICs.
Synopsis bpturboramtest [--slot slot][ -passcnt count ] [ -bpports itemlist ]
Description Use this command to verify the on-chip static random access memory (SRAM) located in the Blade Processor (BP) ASICs of the Application Processor (AP) blade. The command makes use of the memory built-in self-test (MBIST) circuitry.
Before running this diagnostics, you must disable the chassis and clear all logs using the following command sequence:
1. chassisdisable
2. slotstatsclear
3. diagclearerror -all
4. cryptocfg --disableEE (if the encryption engine is in enabled state)
The test flow for each SRAM is as follows:
1. Fill RAM with alternating FFFF 0000 pattern. (Subtest 1: turboram memory fill)
2. For each incrementing address read FFFF 0000 pattern and write 0000 FFFF. (Subtest 2: turboram r-m-w inc 1)
3. For each incrementing address read 0000 FFFF pattern and write FFFF 0000. (Subtest 3: turboram r-m-w inc 2)
4. For each decrementing address read FFFF 0000 pattern and write 0000 FFFF. (Subtest 4: turboram r-m-w dec 1)
5. For each decrementing address read 0000 FFFF pattern and write FFFF 0000. (Subtest 5: turboram r-m-w dec 2)
6. Repeat steps 1-5 with AAAA 5555 pattern.
Notes This command is currently supported only on the Brocade Encryption platform. It complements the bpturboramTest, which tests the Condor2 ASIC on the switch.
The execution of this command is subject to Virtual Fabric or Admin Domain restrictions that may be in place. Refer to chapter 1, “Using Fabric OS commands” and Appendix A, “Command Availability” for details.
Operands This command has the following operands:
--slot slot Specifies the slot number on bladed systems.
-passcnt count Specifies the number of test repetitions. By default the test runs once.
-bpports itemlist Specifies a list of blade ports to test. By default all blade ports in the specified blade are tested. Note that on the Encryption platform, ports 80-103 are the blade ports connected to the BP ASICs. Refer to the itemlist help page for further information on the itemlist parameter.
Fabric OS Command Reference 8153-1001764-02

bpTurboRamTest2
Example To run the test in default mode:
switch:admin> bpturboramtest Running bpturboramtest ..............Board InitRunning Vader bist testVader bist test PASSEDRunning Ob1 bist testOb1 bist test PASSEDBIST test PASSED on all ASIC(s)Test Complete: bpturboramtest Pass 1 of 1Duration 0 hr, 1 min & 55 sec (0:1:55:884).Cleaning up after test....... passed.
See Also turboRamTest
82 Fabric OS Command Reference53-1001764-02

ceePortLedTest 2
ceePortLedTest
Refer to “portLedTest”.
Fabric OS Command Reference 8353-1001764-02

ceePortLoopbackTest2
ceePortLoopbackTest
Refer to “portLoopbackTest”.
84 Fabric OS Command Reference53-1001764-02

ceeTurboRamTest 2
ceeTurboRamTest
Refer to “turboRamTest”.
Fabric OS Command Reference 8553-1001764-02

cfgActvShow2
cfgActvShow
Displays effective zone configuration information.
Synopsis cfgactvshow
Description Use this command to display the effective zone configuration information.
The current configuration is a single zone configuration that is currently in effect. The devices that an initiator sees are based on this configuration. The effective configuration is built when a specified zone configuration is enabled.
Note The execution of this command is subject to Virtual Fabric or Admin Domain restrictions that may be in place. Refer to chapter 1, "Using Fabric OS commands" and Appendix A, "Command Availability" for details.
Operands none
Examples To display the effective zone configuration information:
switch:admin> cfgactvshowEffective configuration: cfg: c4 zone: z3 33:07:06:05:04:03:02:01 zone: z4 44:01:23:45:67:89:a0:bc 40:01:23:45:67:89:a0:bc
See Also cfgClear, cfgDelete, cfgRemove, cfgSave, cfgShow
86 Fabric OS Command Reference53-1001764-02

cfgAdd 2
cfgAdd
Adds a member to a zone configuration.
Synopsis cfgadd "cfgName", "member[ ;member...]"
Description Use this command to add one or more members to an existing zone configuration.
This command changes the Defined Configuration. For the change to take effect, enable the configuration with the cfgEnable command. For the change to be preserved across switch reboots, save the configuration to nonvolatile memory with the cfgSave command.
Notes The execution of this command is subject to Virtual Fabric or Admin Domain restrictions that may be in place. Refer to chapter 1, "Using Fabric OS commands" and Appendix A, "Command Availability" for details.
When an FCS policy is enabled, this command can be issued only from the primary FCS switch.
Operands The following operands are required:
"cfgName" Specify a name for the zone configuration, enclosed in double quotation marks.
"member" Specify a zone member or a list of zone members to be added to the configuration. The list must be enclosed in quotation marks. Members must be separated by semicolons.
Examples To add two new zones to the configuration “Test_cfg”:
switch:admin> cfgadd "Test_cfg", "greenzone; bluezone"
See Also cfgClear, cfgCreate, cfgDelete, cfgDisable, cfgEnable, cfgRemove, cfgSave, cfgShow
Fabric OS Command Reference 8753-1001764-02

cfgClear2
cfgClear
Clears all zone configurations.
Synopsis cfgclear
Description Use this command to clear all zone information in the transaction buffer. All defined zone objects in the transaction buffer are deleted. If an attempt is made to commit the empty transaction buffer while a zone configuration is enabled, you are warned to first disable the enabled zone configuration or to provide a valid configuration with the same name.
After clearing the transaction buffer using the cfgClear command, use the cfgDisable command to commit the transaction and then disable and clear the zone configuration in nonvolatile memory for all the switches in the fabric.
If no current zoning configuration exists, use the cfgSave command.
If the default zone access mode is “No Access”, then this command recreates the default zoning objects.
Notes The execution of this command is subject to Virtual Fabric or Admin Domain restrictions that may be in place. Refer to chapter 1, "Using Fabric OS commands" and Appendix A, "Command Availability" for details.
When an FCS policy is enabled, this command can be issued only from the primary FCS switch.
Operands none
Examples To clear all zones and then clear nonvolatile memory:
switch:admin> cfgclearThe Clear All action will clear all Aliases, Zones, FA Zones and configurations in the Defined configuration.cfgSave may be run to close the transaction or cfgTransAbortmay be run to cancel the transaction.Do you really want to clear all configurations? (yes, y, no, n): [no] n
switch:admin> cfgsaveYou are about to save the Defined zoning configuration. This action will only save the changes on Defined configuration. Any changes made on the Effective configuration will not take effect until it is re-enabled.Do you want to save Defined zoning configuration only? (yes, y, no, n): [no] n
See Also cfgDisable, cfgEnable, cfgSave
88 Fabric OS Command Reference53-1001764-02

cfgCreate 2
cfgCreate
Creates a zone configuration.
Synopsis cfgcreate "cfgName", "member[ ;member...]"
Description Use this command to create a new zone configuration.
This command changes the Defined Configuration (see cfgShow). For the change to become effective, enable the configuration with the cfgEnable command. For the change to be preserved across switch reboots, save the configuration to nonvolatile memory with the cfgSave command.
Refer to the zoneCreate command for more information on name and member specifications.
Notes The execution of this command is subject to Virtual Fabric or Admin Domain restrictions that may be in place. Refer to chapter 1, "Using Fabric OS commands" and Appendix A, "Command Availability" for details.
When an FCS policy is enabled, this command can be issued only from the primary FCS switch.
Operands The following operands are required:
"cfgName" Specify a name for the zone configuration in double quotation marks. A zone configuration name must begin with a letter followed by any number of letters, numbers, and underscores. Names are case-sensitive. For example, "Cfg_1" and "cfg_1" are different zone configurations. Blank spaces are ignored.
"member" Specify a zone member or list of zone members to be added to the configuration. The list must be enclosed in double quotation marks. Members must be separated by semicolons. The zone configuration member list must have at least one member. Empty member lists are not allowed.
Examples To create a configuration containing three zones:
switch:admin> cfgcreate "USA_cfg", "Purple_zone;Blue_zone;Green_zone"
See Also cfgAdd, cfgClear, cfgDelete, cfgDisable, cfgEnable, cfgRemove, cfgSave, cfgShow
Fabric OS Command Reference 8953-1001764-02

cfgDelete2
cfgDelete
Deletes a zone configuration.
Synopsis cfgdelete "cfgName"
Description Use this command to delete a zone configuration.
This command changes the Defined Configuration (see cfgShow). For the change to become effective, enable the configuration with the cfgEnable command. For the change to be preserved across switch reboots, save the configuration to nonvolatile memory with the cfgSave command.
Notes The execution of this command is subject to Virtual Fabric or Admin Domain restrictions that may be in place. Refer to chapter 1, "Using Fabric OS commands" and Appendix A, "Command Availability" for details.
When an FCS policy is enabled, this command can be issued only from the primary FCS switch.
Operands The following operand is required:
"cfgName" Specify a name for the zone configuration to be deleted, in quotation marks.
Examples To delete a zone configuration:
switch:admin> cfgdelete “USA_cfg”
See Also cfgAdd, cfgClear, cfgCreate, cfgDisable, cfgEnable, cfgRemove, cfgSave, cfgShow
90 Fabric OS Command Reference53-1001764-02

cfgDisable 2
cfgDisable
Disables a zone configuration.
Synopsis cfgdisable
Description Use this command to disable the current zone configuration. The fabric returns to non-zoning mode, in which all devices see each other.
This command ends and commits the current zoning transaction buffer to both volatile and nonvolatile memory. If a transaction is open on a different switch in the fabric when this command is run, the transaction on the other switch is automatically aborted. A message displays on the other switches to indicate that the transaction was aborted.
If the default zone access mode is “No Access”, then this command becomes cfgEnable “d_efault_Cfg”. Refer to defZone help for zone access configuration.
Notes The execution of this command is subject to Virtual Fabric or Admin Domain restrictions that may be in place. Refer to chapter 1, "Using Fabric OS commands" and Appendix A, "Command Availability" for details.
When an FCS policy is enabled, this command can be issued only from the primary FCS switch.
Operands none
Examples To disable the current zone configuration:
switch:admin> cfgdisableYou are about to disable zoning configuration. Thisaction will disable any previous zoning configuration enabled.Do you want to disable zoning configuration? (yes, y, no, n): [no] y
See Also cfgClear, cfgEnable, cfgSave
Fabric OS Command Reference 9153-1001764-02

cfgEnable2
cfgEnable
Enables a zone configuration.
Synopsis cfgenable cfgName
Description Use this command to enable a zone configuration. The command builds the specified zone configuration . It checks for undefined zone names, zone alias names, or other inconsistencies, by expanding zone aliases, removing duplicate entries, and then installing the effective configuration.
If the build fails, the previous state is preserved (zoning remains disabled, or the previous effective configuration remains in effect). If the build succeeds, the new configuration replaces the previous configuration. Refer to the cfgShow command for a description of defined and effective configurations.
Notes The execution of this command is subject to Virtual Fabric or Admin Domain restrictions that may be in place. Refer to chapter 1, "Using Fabric OS commands" and Appendix A, "Command Availability" for details.
When an FCS policy is enabled, this command can be issued only from the primary FCS switch.
Operands The following operand is required:
cfgName Specifies the name of the zone configuration.
Examples To enable the zone configuration USA_cfg:
switch:admin> cfgenable USA_cfgYou are about to enable a new zoning configuration.This action will replace the old zoning configuration with thecurrent configuration selected.Do you want to enable 'USA_cfg' configuration (yes, y, no, n): [no] y zone config "USA_cfg" is in effectUpdating flash ...
See Also cfgClear, cfgDisable, cfgSave, cfgShow
92 Fabric OS Command Reference53-1001764-02

cfgMcdtmode 2
cfgMcdtmode
Configures zoning features in McDATA Fabric mode.
Synopsis cfgMcdtMode [--enable | --disable | --help] [safezoning | defaultzoning]
Description Use this command to enable or disable either the McDATA safe zoning feature or the McDATA default zoning feature. Enabling or disabling safezoning or default zoning on one switch in the fabric enables or disables the specific feature fabric-wide, meaning that the feature is disabled or enabled on all switches in the fabric.
Notes The execution of this command is subject to Virtual Fabric or Admin Domain restrictions that may be in place. Refer to chapter 1, "Using Fabric OS commands" and Appendix A, "Command Availability" for details.
This command is effective only when the Brocade switch or director is in McDATA fabric mode.
Operands This command has the following operands:
--enable Enables McDATA zoning features.
--disable Disables McDATA zoning feature.
safezoning If safezoning is disabled, and if the zone database does not match, a zone merge occurs when the E_Port comes online. The E_Port will segment only if the zone merge fails. If safezoning is enabled, there is no zone merge as part of the E_Port coming online, and the E_Port will segment only if the zone database does not match.
defaultzoning If defaultzoning is disabled, and if there is no zone database, devices in the fabric will not be able to see each other. If there is a zone database, devices NOT part of the Zone DB will not be able to see each other. If defaultzoning is enabled, and if there is no zone database, all devices in the fabric will be able to see each other. If there is a zone database, all devices NOT part of the Zone DB will be able to see each other.
--help Displays command help.
Examples To enable fabric-wide McDATA safe zoning:
switch:admin> cfgmcdtmode --enable safezoning
To disable fabric-wide McDATA safe zoning:
switch:admin> cfgmcdtmode --disable safezoning
To enable fabric-wide McDATA default zoning:
switch:admin> cfgmcdtmode --enable defaultzoning
To disable fabric-wide McDATA default zoning:
switch:admin> cfgmcdtmode --disable defaultzoning
See Also interopMode, cfgSaveActiveToDefined
Fabric OS Command Reference 9353-1001764-02

cfgRemove2
cfgRemove
Removes a member from a zone configuration.
Synopsis cfgremove “cfgName”, “member[; member...]”
Description Use this command to remove one or more members from an existing zone configuration. If all members are removed, the zone configuration is deleted.
This command changes the Defined Configuration (see cfgShow). For the change to become effective, enable the configuration with the cfgEnable command. For the change to be preserved across switch reboots, save the configuration to nonvolatile memory with the cfgSave command.
Notes The execution of this command is subject to Virtual Fabric or Admin Domain restrictions that may be in place. Refer to chapter 1, "Using Fabric OS commands" and Appendix A, "Command Availability" for details.
When an FCS policy is enabled, this command can be issued only from the primary FCS switch.
Operands The following operands are required:
“cfgName” Specify a name for the zone configuration, enclosed in double quotation marks.
“member” Specify a zone member or a list of zone members to be removed from the configuration. The list must be enclosed in double quotation marks. Members must be separated by semicolons.
Examples To remove a zone from a configuration:
switch:admin> cfgremove "Test_cfg", "bluezone"
See Also cfgAdd, cfgClear, cfgCreate, cfgDelete, cfgDisable, cfgEnable, cfgSave, cfgShow, cfgTransAbort,cfgTransShow
94 Fabric OS Command Reference53-1001764-02

cfgSave 2
cfgSave
Saves zone configuration to nonvolatile memory.
Synopsis cfgsave
Description Use this command to save the current zone configuration. This command writes the defined configuration and the name of the effective configuration to nonvolatile memory in all switches in the fabric.
The saved configuration is automatically reloaded at power on, and, if a configuration was in effect at the time it was saved, the same configuration is reinstalled with an automatic cfgEnable command.
Because the saved configuration is reloaded at power on, only valid configurations are saved. cfgSave validates the effective configuration by performing the same tests as cfgEnable. If the tests fail, an error displays and the configuration is not saved.
This command ends and commits the current transaction. If a transaction is open on a different switch in the fabric when this command is run, the transaction on the other switch is automatically aborted. A message displays on the other switches to indicate that the transaction was aborted.
Notes The execution of this command is subject to Virtual Fabric or Admin Domain restrictions that may be in place. Refer to chapter 1, "Using Fabric OS commands" and Appendix A, "Command Availability" for details.
When an FCS policy is enabled, this command can be issued only from the primary FCS switch.
Operands none
Examples To save a zone configuration:
switch:admin> cfgsaveYou are about to save the Defined zoning configuration. This action will only save the changes on Defined configuration. Any changes made on the Effective configuration will not take effect until it is re-enabled.Do you want to save Defined zoning configuration only? (yes, y, no, n): [no] yUpdating flash ...
See Also cfgAdd, cfgClear, cfgCreate, cfgDelete, cfgDisable, cfgEnable, cfgRemove, cfgShow, cfgTransAbort,cfgTransShow
Fabric OS Command Reference 9553-1001764-02

cfgSaveActiveToDefined2
cfgSaveActiveToDefined
Saves the active (effective) zoning configuration to the defined configuration in McDATA Fabric mode.
Synopsis cfgSaveActiveToDefined
Description Use this command in McDATA Fabric mode to move the effective zoning configuration to the defined configuration database. If the Defined Database contains a configuration with the same name, it is replaced. Any nonduplicate zone sets or zones remain unchanged.
Notes The execution of this command is subject to Virtual Fabric or Admin Domain restrictions that may be in place. Refer to chapter 1, "Using Fabric OS commands" and Appendix A, "Command Availability" for details.
This command is only effective when the Brocade switch/director is in McDATA fabric mode.
Operands The cfgSaveActiveToDefined command has no operands.
Examples Execute the cfgShow command to view defined and effective zoning configurations.
switch:admin> cfgShow Default Zone: OFF Safe Zone: OFF Defined configuration: cfg: switch set switch1; sqitch2; switch3; switch4 zone: switch1 dd:dd:dd:dd:aa:aa:aa:aa; bb:bb:bb:cc:cc:cd:dd:dd zone: switch2 23:34:87:23:50:72:35:07; 12,64 [output truncated] ... Effective configuration: cfg: switch set zone: switch1 dd:dd:dd:dd:aa:aa:aa:aa bb:bb:bb:cc:cc:cd:dd:dd zone: switch2 23:34:87:23:50:72:35:07 12,64 [output truncated]
Run cfgSaveActiveToDefined to save the active (effective) zoning configuration to the defined configuration.
switch:admin> cfgsaveactivetodefined You are about to save the Defined zoning configuration. This action will save the effective configuration to the defined configuration. Do you want the Effective zoning to become the Defined zoning? (yes, y, no, n): [no] yes Attempting to save new config to the defined config... 2sw0 Updating flash ... ... [output truncated]
See Also cfgShow, cfgSave
96 Fabric OS Command Reference53-1001764-02

cfgShow 2
cfgShow
Displays zone configuration information.
Synopsis cfgshow ["pattern"] [, mode]
Description Use this command to display zone configuration information.
If no operand is specified, all zone configuration information (both defined and effective) displays. If the local switch has an outstanding transaction, this command displays the most recently edited zone configuration that has not yet been saved. If the local switch has no outstanding transaction, this command displays the committed zone configuration.
If a pattern is specified, only matching configurations are displayed.
The defined configuration is the complete set of all zone objects that have been defined in the fabric. There can be multiple zone configurations defined, but only one can be enabled at a time. There might be inconsistencies in the definitions, zones, or aliases that are referenced but not defined, or there might be duplicate members. The defined configuration is the current state of the administrator input.
The effective configuration is the single zone configuration that is currently enabled. The devices that an initiator sees in the fabric are based on this configuration. The effective configuration is built when a specific zone configuration is enabled and all error checking has been completed successfully.
When this command is executed after a zoning transaction was aborted on the local switch, it displays a warning message:
Warning: Current Zoning Transaction was aborted.Reason code = Zone Config update received.
When default zoning is enabled with “No Access” mode, “No Effective configuration: (No Access)” is displayed.
Note The execution of this command is subject to Virtual Fabric or Admin Domain restrictions that may be in place. Refer to chapter 1, "Using Fabric OS commands" and Appendix A, "Command Availability" for details.
Operands The following operands are optional:
“pattern” A POSIX-style regular expression used to match zone configuration names. The pattern must be enclosed in quotation marks and may contain the following:
• Question mark (?) - matches any single character• Asterisk (*) - matches any string of characters.• Range - matches any character within the range. Ranges must be
enclosed in brackets: for example, [0-9] or [a-f].
mode Specify 0 to display the contents of the transaction buffer (the contents of the current transaction) or specify 1 to display the contents of nonvolatile memory. The default value is 0.
Fabric OS Command Reference 9753-1001764-02

cfgShow2
Examples To display all zone configurations that start with "Test":
switch:admin> cfgshow "Test*"cfg: Test1 Blue_zonecfg: Test_cfg Red_zone; Blue_zone
To display all zone configuration information:
switch:admin> cfgshowDefined configuration: cfg: USA1 Blue_zone cfg: USA_cfg Red_zone; Blue_zone zone: Blue_zone 1,1; array1; 1,2; array2 zone: Red_zone 1,0; loop1 alias: array1 21:00:00:20:37:0c:76:8c; 21:00:00:20:37:0c:71:02 alias: array2 21:00:00:20:37:0c:76:22; 21:00:00:20:37:0c:76:28 alias: loop1 21:00:00:20:37:0c:76:85; 21:00:00:20:37:0c:71:df Effective configuration: cfg: USA_cfg zone: Blue_zone 1,1 21:00:00:20:37:0c:76:8c 21:00:00:20:37:0c:71:02 1,2 21:00:00:20:37:0c:76:22 21:00:00:20:37:0c:76:28 zone: Red_zone 1,0 21:00:00:20:37:0c:76:85 21:00:00:20:37:0c:71:df
To display only configuration names:
switch:admin> cfgshow “*”cfg: USA1 Blue_zonecfg: USA_cfg Red_zone; Blue_zone
See Also cfgAdd, cfgClear, cfgCreate, cfgDelete, cfgDisable, cfgEnable, cfgRemove, cfgSave, cfgTransAbort,cfgTransShow
98 Fabric OS Command Reference53-1001764-02

cfgSize 2
cfgSize
Displays zone and Admin Domain database size details.
Synopsis cfgsize [integer]
Description Use this command to display the size details of the zone database and the Admin Domain database.
When executed in non-AD255 context, the size details include the Zone DB maximum size, the committed size, and the transaction size. All sizes are in bytes.
When executed in AD255 context, this command displays Admin Domain and Zone DB maximum size, Admin Domain header size, and the zone database sizes for each Admin Domain:
Zone DB maximum size
Defines the upper limit for both zone and Admin Domain defined configuration, determined by the amount of nonvolatile memory available for storing the defined configuration. The Zone DB maximum size is further reduced due to a message header that is propagated with the zone configuration to all switches in the fabric.
Committed size Displays the size of the defined configuration currently stored in nonvolatile memory.
Transaction size Displays the size of the uncommitted defined configuration. This value will be nonzero if the defined configuration is being modified by Telnet, API, and so forth; otherwise it is 0.
Refer to cfgShow for a description of defined and effective zone configurations. Refer to ad for a description of defined and effective Admin Domain configurations.
Notes The execution of this command is subject to Virtual Fabric or Admin Domain restrictions that may be in place. Refer to chapter 1, "Using Fabric OS commands" and Appendix A, "Command Availability" for details.
When an FCS policy is enabled, this command can be issued only from the primary FCS switch.
Operands The following operand is optional:
integer If a nonzero integer is specified, the size of the nonvolatile memory allocated for the zone database is displayed. The zone database includes both the defined and effective configurations. This size is displayed in bytes.
Examples To display zone database information in non-AD255 context:
switch:admin> cfgsizeZone DB max size - 1045274 bytescommitted - 244transaction - 0
To display Admin Domain and zone database information in AD255 context:
switch:admin> cfgsize
Maximum AD and Zone DB size - 1045274 bytesTotal Committed AD and Zone DB size - 3390 bytes
Fabric OS Command Reference 9953-1001764-02

cfgSize2
AD and Zone DB uncommitted space available - 1041884 bytes Total AD and Zone Transaction buffer size - 0 bytes
AD Database Size:-----------------
committed - 3124 bytestransaction - 0 bytes
Number of ADs in Effective Configuration - 4
Each AD's Zone Database Size:----------------------------cfgsize Info for AD Number:0 (AD Name: AD0, State=Active):
committed - 242 bytestransaction - 0 bytes
cfgsize Info for AD Number:1 (AD Name: AD1, State=Active):committed - 16 bytestransaction - 0 bytes
cfgsize Info for AD Number:2 (AD Name: AD2, State=Active): committed - 4 bytestransaction - 0 bytes
cfgsize Info for AD Number:3 (AD Name: AD3, State=Active):committed - 4 bytestransaction - 0 bytes
See Also ad, cfgShow, zoneHelp
100 Fabric OS Command Reference53-1001764-02

cfgTransAbort 2
cfgTransAbort
Aborts the current zoning transaction.
Synopsis cfgtransabort [token]
Description Use this command to abort the current zoning transaction without committing it. All changes made since the transaction was started are removed and the zone configuration database is restored to the state before the transaction was started.
If a transaction is open on a different switch in the fabric when this command is run, the transaction on the other switch remains open and unaffected.
Notes The execution of this command is subject to Virtual Fabric or Admin Domain restrictions that may be in place. Refer to chapter 1, "Using Fabric OS commands" and Appendix A, "Command Availability" for details.
When an FCS policy is enabled, this command can be issued only from the primary FCS switch.
Operands When invoked without an operand, this command aborts the current transaction. The following operand is optional:
token Specify the token ID of the transaction to be aborted. Use the cfgTransShow command to obtain the token ID of a transaction.
Examples To abort the current transaction:
switch:admin> cfgtransabort
See Also cfgAdd, cfgClear, cfgCreate, cfgDelete, cfgDisable, cfgEnable, cfgRemove, cfgSave, cfgShow,cfgTransShow
Fabric OS Command Reference 10153-1001764-02

cfgTransShow2
cfgTransShow
Displays information about the current zoning transaction.
Synopsis cfgtransshow
Description Use this command to display the ID of the current zoning transaction. In addition, the command provides information on whether or not the transaction can be aborted. The transaction cannot be aborted if it is an internal zoning transaction.
Notes The execution of this command is subject to Virtual Fabric or Admin Domain restrictions that may be in place. Refer to chapter 1, "Using Fabric OS commands" and Appendix A, "Command Availability" for details.
When an FCS policy is enabled, this command can be issued only from the primary FCS switch.
Operands none
Examples To display the current transaction:
switch:admin> cfgtransshowThere is no outstanding zone transaction
switch:admin> cfgclearDo you really want to clear all configurations? (yes, y, no, n): [no] yClearing All zoning configurations...
switch:admin> cfgtransshowCurrent transaction token is 271010736It is abortable
See Also cfgAdd, cfgClear, cfgCreate, cfgDelete, cfgDisable, cfgEnable, cfgRemove, cfgSave, cfgShow,cfgTransAbort
102 Fabric OS Command Reference53-1001764-02

chassisBeacon 2
chassisBeacon
Sets chassis beaconing mode.
Synopsis chassisbeacon [mode]
Description Use this command to enable or disable beaconing on a chassis. Chassis beaconing can be used to locate a failing chassis in a group of chassis. Use portBeacon to locate a failing port, and use switchBeacon to locate a failing (logical) switch.
When beaconing mode is turned on, the port LEDs flash green at various rates across the chassis. The beaconing continues until you turn it off.
Beaconing mode takes over the port LEDs. The normal flashing LED pattern associated with an active, faulty, or disabled port is suppressed, and only the beaconing pattern is shown. Other commands are still executable and functional. However, if diagnostic frame-based tests such as portLoopbackTest are executed, the diagnostic LED pattern is interleaved with the beaconing pattern.
Note The execution of this command is subject to Virtual Fabric or Admin Domain restrictions that may be in place. Refer to chapter 1, "Using Fabric OS commands" and Appendix A, "Command Availability" for details.
Operands This command has the following operand:
mode Specify 1 to enable chassis beaconing mode or 0 to disable beaconing mode. This operand is optional. If no operand is specified, the current value is displayed.
Examples To turn chassis beaconing mode on:
switch:admin> chassisbeacon 1Chassis beacon success 1
To turn beaconing mode off:
switch:admin> chassisbeacon 0Chassis beacon success 0
See Also portBeacon, switchShow, switchBeacon
Fabric OS Command Reference 10353-1001764-02

chassisConfig2
chassisConfig
Displays or sets the configuration of the Brocade 48000.
Synopsis chassisconfig [-f][option]
Description This command is retained for legacy reasons only. It has nothing to do with Virtual Fabrics and chassis configuration related to the Virtual Fabric feature. The chassisConfig command is supported ONLY on the Brocade 48000 and ONLY option 5 is supported.
When no arguments are provided, this command displays the current configuration of the chassis as well as the supported configuration, which is 5. When a specific option is provided to this command, all CPs currently in the system are immediately rebooted and come up in the specified mode. This may result in some blades being faulted as incompatible, based on the new configuration option. When an option is not supported by the platform, this command is rejected without causing a reboot.
5 One 384-port switch (Blade ID 17, 18, 24, 31, 33, 36, 39 in slots 1-4, 7-10, Blade ID 16 in slots 5-6).
Certain configuration values that are not considered switch-based and are determined not to cause adverse effects are left untouched. These include SSL certificates, PKI certificates, licenses, and IP address.
When the -f (force) option is omitted, this command prompts for your consent to proceed further with the configuration change. It also prompts you to upload the configuration data to a host so it can be used as a guide to reestablishing the configuration data in the new mode. Use the -f option to proceed without the interactive step.
Notes Chassis configuration changes are disruptive and should be implemented with caution. User account data and passwords might not be saved with configUpload. User accounts created with the userConfig command are deleted and user accounts are reset to factory defaults.
The execution of this command is subject to Virtual Fabric or Admin Domain restrictions that may be in place. Refer to chapter 1, "Using Fabric OS commands" and Appendix A, "Command Availability" for details.
Operands This command has the following operands:
-f If specified, forces configuration changes without prompting for confirmation or requesting a configuration upload.
option Specify the configuration option to apply to the chassis. The only supported option is 5.
Examples To display the current configuration option on a Brocade 48000 director:
switch:admin> chassisconfigCurrent Option: 5 All Supported Options ---------------------------------------------------- Option 5: One 384-port switch Blade ID's 17, 18, 24, 31, 33, 36, 39, 37, 51, 55 in slots 1-4, 7-10 Blade ID 16 in slots 5-6
See Also configDownload, configUpload, slotShow
104 Fabric OS Command Reference53-1001764-02

chassisDisable 2
chassisDisable
Disables all user ports in a chassis.
Synopsis chassisdisable [-force]
Description Use this command to disable a Virtual Fabric-aware chassis. All Fibre Channel ports are taken offline. This command prompts for confirmation unless the -force option is used. If the chassis is partitioned into logical switches that are part of logical fabrics, the remaining switches in these fabrics reconfigure. As each port is disabled, the front panel LED changes to a slow flashing yellow.
The chassis must be disabled before making configuration changes or before running offline diagnostic tests. Commands that require the chassis to be disabled generate an error message if invoked while the chassis is enabled. It is not necessary to disable a chassis before rebooting or powering off.
To disable the ports of a single logical switch, use the switchDisable command. To disable the ports of a single blade, use the bladeDisable command.
Note The execution of this command is subject to Virtual Fabric or Admin Domain restrictions that may be in place. Refer to chapter 1, "Using Fabric OS commands" and Appendix A, "Command Availability" for details.
Operands -force Disables the chassis without confirmation. This operand is optional.
Examples To disable a chassis:
switch:admin> chassisdisableThis command can cause disruption to multiple logical switches.Are you sure you want to disable all chassis ports now? (yes, y, no, n): [no]y
See Also bladeDisable, bladeEnable, chassisEnable, switchShow, switchDisable, switchEnable,switchCfgPersistentEnable, switchCfgPersistentDisable
Fabric OS Command Reference 10553-1001764-02

chassisDistribute2
chassisDistribute
Distributes IP filter policies.
Synopsis chassisdistribute -db policy_db -fid FID | -domain domain_list [-force]
Description Use this command to manually distribute IP Filter policies. The behavior of this command depends on whether Virtual Fabrics are enabled or disabled.
• In Virtual Fabric mode, this command distributes the IP filter policy databases from a specified logical switch to all chassis that are connected through the logical switch on which the command is issued.
• If Virtual fabrics are disabled, the IP filter policy databases are distributed to a specified list of Domain IDs.
This command distributes the entire database and overwrites any existing data on the receiving switches. The chassisDistribute command does not enforce FCS policy.
The target chassis or switches must be capable of accepting the distribution. The distribution is aborted if one of the connected chassis or domains is configured to reject the distribution. Use the fddCfg command to configure the fabric-wide policies that control distribution behavior.
The command output includes the following information:
FID Indicates whether Virtual Fabrics are enabled or not on the domain that receives the distribution. If Virtual Fabrics are enabled, the FID is displayed, and all logical switches which are part of the chassis are targeted to receive the distribution.
DOMAIN Displays the Domain ID of the originating switch.
CHASSISWWN Displays the WWN of the originating chassis in Fabric OS v6.3.0 switches. Displays the originating switch WWN in switches running earlier Fabric OS versions.
CHASSISNAME Displays the name of the originating chassis..
SUPPORTED_DIST Displays yes if the distribution is supported. Displays no if the distribution is not supported.
This command distributes IP Filter policies only. To distribute other security policies, use the distribute command.
Note The execution of this command is subject to Virtual Fabric or Admin Domain restrictions that may be in place. Refer to chapter 1, "Using Fabric OS commands" and Appendix A, "Command Availability" for details.
Operands This command has the following operands:
-db policy_list Specifies the list of policy sets, also called security databases, to be distributed. Currently, only the IPFILTER policy database can be distributed with this command. The policy list must be enclosed in double quotation marks; members must be separated by semicolons. The following operands are exclusive:
106 Fabric OS Command Reference53-1001764-02

chassisDistribute 2
-fid FID Specifies the logical switch from which the distribution should originate. The logical switch is identified by its fabric ID (FID). When a FID is specified, the database is distributed to all chassis that are connected to the logical switch and are configured to accept the distribution. This operand is required and valid only when the switch is in Virtual Fabric mode.
-domain domain_list Specifies a list of switch domain IDs that should receive the database. The list must be enclosed in double quotation marks; members must be separated by a semicolon. A wildcard (*) may be specified to include all switches in the fabric that support the distribute feature. This operand is required and valid only when Virtual Fabrics are disabled.
-force Distributes the database without confirmation.
Examples To distribute the IP Filter policies to all chassis that are connected through the logical fabric 128 and support the distribute feature:
switch:admin> chassisDistribute -db “IPFILTER” -fid 128FID DOMAIN CHASSISWWN CHASSISNAME SUPPORTED_DIST---------------------------------------------------------128 3 10:00:00:05:1e:38:ac:0e DCX_93 yesNON-VF 4 10:00:00:05:1e:39:bd:0f Silkworm24000 yes128 98 10:00:00:05:1e:41:22:9f Brocade5000 nochassisDistribute will distribute the database(s)to above topology.Would you like to continue [Y/N] : yChassisDistribute operation succeeded for above topology
To distribute the IP Filter policies to all switches in the fabric that support the distribute feature (Virtual Fabrics are disabled on the evoking switch):
switch:admin> chassisDistribute -db "IPFILTER" -domain "*"FID DOMAIN CHASSISWWN CHASSISNAME SUPPORTED_DIST--------------------------------------------------------128 3 10:00:00:05:1e:38:ac:0e DCX_93 noNON-VF 4 10:00:00:05:1e:39:bd:0f Silkworm24000 yes128 98 10:00:00:05:1e:41:22:9f Brocade5000 noChassisDistribute will distribute the database(s) to above topology.Would you like to continue [Y/N] : yChassisDistribute operation succeeded for above topology
See Also distribute, fddCfg
Fabric OS Command Reference 10753-1001764-02

chassisEnable2
chassisEnable
Enables all user ports in a chassis.
Synopsis chassisenable
Description Use this command to enable a Virtual Fabric-aware chassis. All Fibre Channel ports that passed the power-on self test (POST) are enabled. They may come online if connected to a device, or remain offline if disconnected. Use chassisEnable to re-enable the chassis after making configuration changes or running offline diagnostics.
If the chassis is partitioned into multiple logical switches and physically connected to multiple logical fabrics, the logical switches rejoin their fabrics.
As each port is enabled, the front panel LED changes from slow flashing amber to green for online ports, or to yellow for ports that do not initialize. Disconnected ports remain unlit. Loopback ports are slow flashing green when online.
Note The execution of this command is subject to Virtual Fabric or Admin Domain restrictions that may be in place. Refer to chapter 1, "Using Fabric OS commands" and Appendix A, "Command Availability" for details.
Operands none
Examples To enable a chassis:
switch:admin> chassisenable
See Also bladeDisable, bladeEnable, chassisDisable, switchShow, switchDisable, switchEnable,switchCfgPersistentEnable, switchCfgPersistentDisable
108 Fabric OS Command Reference53-1001764-02

chassisName 2
chassisName
Displays or sets the chassis name.
Synopsis chassisname [name]
Description Use this command to display or change the name associated with the chassis.
Enter this command without parameters to display the current chassis name. Use this command with the name operand to assign a new chassis name.
Note The execution of this command is subject to Virtual Fabric or Admin Domain restrictions that may be in place. Refer to chapter 1, "Using Fabric OS commands" and Appendix A, "Command Availability" for details.
Operands This command has the following operand:
name Specify a new name for the chassis, optionally in double quotation marks. A chassis name can include up to 31 characters on the Brocade 300, 5100, 5300, and 5410 platforms. On all other platforms, the chassis name is limited to 15 characters. A chassis name must begin with a letter, and can consist of letters, numbers, underscore or hyphen characters. Spaces are not permitted.
This operand is optional; if omitted, the current chassis name displays.
Examples To change the chassis name to “dilbert”:
switch:admin> chassisname dilbertswitch:admin> chassisnamedilbert
See Also switchName
Fabric OS Command Reference 10953-1001764-02

chassisShow2
chassisShow
Displays all field replaceable units (FRUs).
Synopsis chassisshow
Description Use this command to inventory and display the FRU header content for each object in the chassis and chassis backplane version.
Refer to theTable 5 for more information about the lines and their meaning.
On some platforms, for certain FRU types, a few items might not be available. In these cases, the lines are suppressed. Possibly affected lines are 1, 3 through 7, 9, and 11 through 14. In addition, for lines 11 through 14, if there is no data set, these lines are suppressed.
Note The execution of this command is subject to Virtual Fabric or Admin Domain restrictions that may be in place. Refer to chapter 1, "Using Fabric OS commands" and Appendix A, "Command Availability" for details.
Operands none
TABLE 5 Command output descriptions
Line Description
1 If applicable, the first line displays the chassis backplane version number, in hexadecimal.
2 Object type: CHASSIS, FAN, POWER SUPPLY, SW BLADE (switch), CP BLADE (control processor), WWN (world wide name), or UNKNOWN.Object number: Slot nn (for blades), Unit nn (for everything else).If the FRU is part of an assembly, a brief description, in parentheses, displays.
3 FRU header version number: Header Version: x
4 Value to calculate the object's power consumption: positive for power supplies and negative for consumers. Power Consume Factor: -xxx
5 Part number (up to 14 characters): Factory Part Num: xx-xxxxxx-xx
6 Serial number (up to 12 characters): Factory Serial Num: xxxxxxxxxx
7 FRU manufacture date: Manufacture:Day: dd Month: mm Year: yyyy
8 Date of the last FRU header update: Update: Day: dd Month: mm Year: yyyy
9 Cumulative time, in days, that the FRU has been powered on: Time Alive:dddd days
10 Current time, in days, since the FRU was last powered on: Time Awake:ddd days
11 Externally supplied ID (up to 10 characters): ID: xxxxxxxxxx
12 Externally supplied part number (up to 20 characters): Part Num: xxxxxxxxxxxxxxxxxxxx
13 Externally supplied serial number (up to 20 characters): Serial Num:xxxxxxxxxxxxxxxxxxxx
14 Externally supplied revision number (up to 4 characters): Revision Num: xxxx
110 Fabric OS Command Reference53-1001764-02

chassisShow 2
Examples To display all FRUs for a switch:
switch:user> chassisshow
Chassis Backplane Revision: 1C
SW BLADE Slot: 3Header Version: 1Power Consume Factor: -180Factory Part Num: 60-0001532-03Factory Serial Num: 1013456800Manufacture: Day: 12 Month: 6 Year: 2001Update: Day: 15 Month: 7 Year: 2001Time Alive: 28 daysTime Awake: 16 daysID: 555-374757Part Num: 234-294-12345Serial Num: 2734658 Revision Num: A.00
CP BLADE Slot: 6Header Version: 1Power Consume Factor: -40Factory Part Num: 60-0001604-02Factory Serial Num: FP00X600128Manufacture: Day: 12 Month: 6 Year: 2001Update: Day: 15 Month: 7 Year: 2001Time Alive: 61 daysTime Awake: 16 daysID: 555-374757Part Num: 236-296-12350Serial Num: 2836542Revision Num: A.00. . . POWER SUPPLY Unit: 2Header Version: 1Power Consume Factor: 1000Factory Part Num: 60-0001536-02Factory Serial Num: A013450700Manufacture: Day: 14 Month: 6 Year: 2001Update: Day: 15 Month: 7 Year: 2001Time Alive: 50 daysTime Awake: 16 daysID: 555-374757Part Num: 238-298-12360Serial Num: 1234567. . .FAN Unit: 1Header Version: 1Power Consume Factor: -50Factory Part Num: 20-123456-12Factory Serial Num: B014934500Manufacture: Day: 6 Month: 7 Year: 2001Update: Day: 15 Month: 7 Year: 2001Time Alive: 88 daysTime Awake: 16 days(output truncated)
See Also slotShow
Fabric OS Command Reference 11153-1001764-02

cliHistory2
cliHistory
Name Displays switch command history.
Synopsis clihistory
Description This command saves the following information whenever a command is executed on the switch:
• Timestamp
• Username
• IP address of the Telnet session
• Options
• Arguments
This command displays the local CLI command history. The information is saved as part of supportSave as the CH file. It is also saved persistently to compact flash if the switch panics. The maximum number of saved entries for this command is 512.
The CLI history is erased, if the switch is rebooted or a CP failover has occurred on the active CP.
Note The execution of this command is subject to Virtual Fabric or Admin Domain restrictions that may be in place. Refer to chapter 1, "Using Fabric OS commands" and Appendix A, "Command Availability" for details.
This command cannot be executed on the standby CP.
Operands none
Examples To display the command history on a switch:
switch:admin> clihistory Command History: 09:14:17.6924 1 admin, 192.168.163.233, version 10:25:36.8875 1 admin, 192.168.100.19, clihistory 12:05:40.3492 1 admin, 192.168.100.19, help | more 12:05:46.2940 1 admin, 192.168.100.19, switchshow 12:06:05.4138 1 admin, 192.168.100.19, help - switchshow 12:06:17.7643 1 admin, 192.168.100.19, slotshow 12:06:27.6852 1 admin, 192.168.100.19, clihistory 12:06:56.3138 1 admin, 192.168.100.19, aaaconfig --show 12:07:17.8312 1 admin, 192.168.100.19, clihistory 12:09:28.7144 1 admin, 192.168.100.19, aaaconfig \ --add 194.72.68.335 -conf ldap 12:09:35.0275 1 admin, 192.168.100.19, clihistory 12:10:05.6848 1 admin, 192.168.100.19, aaaconfig \ --move radserver -conf radius 1
See Also none
112 Fabric OS Command Reference53-1001764-02

cmsh 2
cmsh
Opens the CEE command shell.
Description Use this command to open a shell for managing 10 GbE interfaces and L2/L3 protocol services. The CEE management shell provides a hierarchical CLI interface.
Refer to the Fabric OS Converged Enhanced Ethernet Command Reference and the Fabric OS Converged Enhanced Ethernet Administrator’s Guide for information on using the CEE commands and configuration procedures.
Note The execution of this command is subject to Virtual Fabric or Admin Domain restrictions that may be in place. Refer to chapter 1, "Using Fabric OS commands" and Appendix A, "Command Availability" for details.
Operands None
Examples To run FCoE using the minimum switch configuration:
switch:admin> cmshadmin>enadmin>#conf tEnter configuration commands, one per line. End with CNTL/Z.admin>(config)#int te 0/0admin>(config-if)#swadmin>(config-if)#no shutadmin>(config-if)#exitadmin>(config)#exitadmin>#show ip int brInterface IP-Address Status ProtocolTenGigabitEthernet 0/0 unassigned up upTenGigabitEthernet 0/1 unassigned administratively down downTenGigabitEthernet 0/2 unassigned administratively down downTenGigabitEthernet 0/3 unassigned administratively down downTenGigabitEthernet 0/4 unassigned administratively down downTenGigabitEthernet 0/5 unassigned administratively down downTenGigabitEthernet 0/6 unassigned administratively down downTenGigabitEthernet 0/7 unassigned administratively down downTenGigabitEthernet 0/8 unassigned administratively down downTenGigabitEthernet 0/9 unassigned administratively down downTenGigabitEthernet 0/10 unassigned administratively down downTenGigabitEthernet 0/11 unassigned administratively down downTenGigabitEthernet 0/12 unassigned administratively down downTenGigabitEthernet 0/13 unassigned administratively down downTenGigabitEthernet 0/14 unassigned administratively down downTenGigabitEthernet 0/15 unassigned administratively down downTenGigabitEthernet 0/16 unassigned administratively down downTenGigabitEthernet 0/17 unassigned administratively down downTenGigabitEthernet 0/18 unassigned administratively down downTenGigabitEthernet 0/19 unassigned administratively down downTenGigabitEthernet 0/20 unassigned administratively down downTenGigabitEthernet 0/21 unassigned administratively down downTenGigabitEthernet 0/22 unassigned administratively down downTenGigabitEthernet 0/23 unassigned administratively down downswitch:admin>#exit
Fabric OS Command Reference 11353-1001764-02

cmsh2
To create an FCoE VLAN:
switch:admin> cmshswitch:admin>enswitch:admin>#conf tswitch:admin>(config)#protocol lldpswitch:admin>(conf-lldp)# advertise dcbx-fcoe-app-tlvswitch:admin>(conf-lldp)# advertise dcbx-fcoe-logical-link-tlvswitch:admin>(conf-lldp)#exit
switch:admin>(config)#exit
switch:admin>(config)# vlan classifier rule 1 proto fcoe encap ethv2switch:admin>(config)# vlan classifier rule 2 proto fip encap ethv2switch:admin>(config)# vlan classifier group 1 add rule 1switch:admin>(config)# vlan classifier group 1 add rule 2
switch:admin>(config)#interface vlan 5switch:admin>(conf-if-vl-5 )#fcf forwardswitch:admin>(conf-if-vl-5 )exit
switch:admin>(config) # cee-map testswitch:admin>(conf-ceemap) # priority-group-table 1 weight 40 pfcswitch:admin>(conf-ceemap) # priority-group-table 2 weight 60switch:admin>(conf-ceemap) # priority-table 2 2 2 1 2 2 2 2switch:admin>(conf-ceemap) # exit
switch:admin>(config)#interface te 0/0switch:admin>(config-if-te-0/0)#switchportswitch:admin>(config-if-te-0/0)#switchport mode accessswitch:admin>(config-if-te-0/0)# vlan classifier activate group 1 vlan 5switch:admin>(config-if-te-0/0)# cee testswitch:admin>(config-if-te-0/0)#no shutdownswitch:admin>(config-if-te-0/0)#exitswitch:admin>(config)#exitswitch:admin>#exit
See Also FCoE, fcoeLoginGroup, fcoeLoginGroup
114 Fabric OS Command Reference53-1001764-02

configDefault 2
configDefault
Resets the nonpersistent configuration data to factory defaults.
Synopsis configdefault [-fid FID | -all]
Description Use this command to reset the nonpersistent configuration settings to their factory defaults.
Beginning with Fabric OS v6.2.0, configuration data is grouped into chassis information and switch information. Each configuration type is managed separately. The behavior of configDefault depends on the environment in which the command is executed:
• In a Virtual Fabric environment, when executed without operands, this command resets the switch configuration to defaults on the current logical switch only. An Admin with chassis permissions can use additional parameters to reset configuration data for a specified logical switch (-fid FID) or for all logical switches and the chassis (-all).
• In a non-Virtual Fabric environment, when executed without operands, this command resets the switch configuration. When executed with the -all operand, configDefault resets all of the system's configuration data, including chassis and switch configurations. The -fid option is not valid.
This command resets nonpersistent configuration parameters only. The following parameters are not affected by this command:
• Ethernet MAC address, IP address, subnet mask, and boot ROM parameters
• IP gateway address
• License keys
• OEM customization
• Product ID and Vendor ID
• SNMP configuration
• iSCSI configuration
• System name
• Chassis name
• World wide name
• Zoning configuration (includes aliases, zones, and configurations)
• Security parameters and policies
• User account passwords (includes all user configuration and all built-in accounts)
• Switch PID format
• Ethernet Link Mode
Refer to the help files for configure and configureChassis help for more information on default values for configuration parameters.
Notes This command cannot be executed on an enabled switch. You must first disable the switch using switchDisable or chassisDisable.
Some configuration parameters are cached by the system. To avoid unexpected system behavior, reboot the system after executing configDefault.
Fabric OS Command Reference 11553-1001764-02

configDefault2
Note that configDefault does not completely remove all FCIP tunnels and GbE IP address information. This may be an issue when attempting to use the same information to create new tunnels or modify the existing ones.
When issuing configDefault on the Brocade 7500 or on the FR4-18i blade, it persistently disables the ports.
The execution of this command is subject to Virtual Fabric or Admin Domain restrictions that may be in place. Refer to chapter 1, "Using Fabric OS commands" and Appendix A, "Command Availability” for details.
Operands This command has the following operands:
-fid FID Specifies the Fabric ID of the logical switch for which to reset the configuration. This operand is valid only in Virtual Fabric mode, and the executing account must have chassis permissions.
-all Restores all nonpersistent configuration parameters to factory defaults (switch and chassis parameters).
Examples To restore all system configuration parameters to default values:
switch:admin> configdefault -all
Executing configdefault...Please wait
Committing Configuration ...done.
See Also snmpConfig, configure, configureChassis, switchDisable, switchEnable
116 Fabric OS Command Reference53-1001764-02

configDownload 2
configDownload
Downloads configuration data to the system.
Synopsis configdownload
configdownload [- all ] [-p ftp | -ftp ] [”host”,”user”,”path” [,”passwd”]]
configdownload [- all ] [-p scp| -scp ] [”host”,”user”,”path”]
configdownload [- all ] [-local | -USB | -U [”file”]]
configdownload [ -fid -FID [-sfid FID ] | -chassis |-all ] [-p ftp | -ftp ] [”host”,”user”,”path” [,”passwd”]]
configdownload [ -fid -FID [-sfid FID ] | -chassis |- all ] [-p scp| -scp ] [”host”,”user”,”path”]
configdownload [ -fid -FID [-sfid FID ] | -chassis |- all ] [-local | -USB | -U [”file”]]
configdownload [ -vf] [-p ftp | -ftp ] [”host”,”user”,”path” [,”passwd”]]
configdownload [ -vf] [-p scp| -scp ] [”host”,”user”,”path”]
configdownload [ -vf] [-local | -USB | -U [”file”]]
Description This command downloads configuration parameters to the local system. Two types of configuration files can be downloaded with this command: Virtual Fabric configuration parameters and system configuration parameters. You must download both types of configuration data for the system to behave as expected. You can use FTP or SCP to download configuration files from a remote host, or you can retrieve the configuration files from a predetermined directory on the local system, or from an attached USB device.
Use the -vf option to download the Virtual Fabric configuration parameters. The Virtual Fabric configuration file includes logical switch definitions for a specific platform, the platform ID, Virtual Fabric status (enabled or disabled), and F_Port trunking ports. The file should be named switch-conf_xx.txt to distinguish it from the regular system configuration (config.txt). The xx indicates the platform ID. Virtual Fabric configuration data can only be shared between switches that belong to the same platform type and share the same platform ID. If the platform ID contained in the header of the configuration file does not match the platform ID of the system to which it is downloaded, configDownload fails. When you download a switch-conf_xx.txt file, all attributes defined in this file are downloaded to the system and take effect with the exception of LISL ports. The LISL ports on the system are not affected by this download.
The system configuration data is downloaded separately. It is grouped into chassis information and switch information. Each configuration type is managed separately and the behavior of configDownload depends on the environment in which the command is executed and which part of the system configuration you wish to download.
• In a Virtual Fabric environment, when executed without chassis permissions, this command downloads the switch configuration to the current logical switch only. An Admin user with chassis permissions can use additional parameters to perform the following selective configuration downloads:
- Download the switch configuration to a specified logical switch (-fid FID).
- Download the switch configuration from a specified logical switch source (-sfid FID) to a specified logical switch target (-fid FID).
- Download the chassis configuration only (-chassis).
Fabric OS Command Reference 11753-1001764-02

configDownload2
- Download the entire configuration including the data for all logical switches and for the chassis (-all).
The interactive version of the command (no operands) prompts for input on only the parameters the user is allowed to execute.
• In a non-Virtual Fabric environment, this command by default downloads the switch configuration. Additional options support downloading the chassis configuration (-chassis) or all of the system's configuration data, including chassis and switch configurations (-all). Chassis permissions are required. The -fid, and -sfid options are not valid.
Configuration management supports download of v6.1 or v6.2+ configuration files to a switch running v6.2 firmware, but a v6.2 configuration file is not accepted by a switch running pre-v6.2 firmware. A v6.1 configuration downloaded to a 6.2 system is applied only to the default switch or chassis. For more information on compatibility refer to the Fabric OS Administrator's Guide.
The switch must be disabled for configuration download of all parameters with the exception of SNMP and Fabric Watch.
The following rules apply to configuration download in Virtual Fabric mode:
• When downloading the chassis configuration, the number of logical switches defined in the configuration download must match the number of logical switches currently defined on the switch.
• When downloading the switch configuration, the target FID must be defined in both the configuration download and the current system.
• When downloading the switch configuration from a specified source FID to a target FID, the target FID must be defined on the switch and the source FID and associated configuration must be defined in the configuration download. In addition, downloading an SFID configuration resets the target FID ports without warning. Caution is advised when using this option.
• When downloading all configuration parameters, the number of switches defined in the downloaded configuration file must match the number of switches currently defined on the switch. In addition, the following restrictions apply:
- The switches must be disabled unless you only wish to download SNMP or Fabric Watch parameters.
- Downloading a configuration file from a system that is not Virtual Fabric-capable to a system in Virtual Fabric mode is not recommended. The configuration is applied to the default switch only, and only to the ports that are part of the default switch.
If an FCS policy is enabled, the following rules and restrictions apply:
• Both [Defined Security Policies] and [Active Security Policies] sections must exist and contain the FCS_POLICY.
• In the [Defined Security Policies] section, at least one member of the FCS_POLICY must be the same as a member in the previous FCS_POLICY.
• In the [Active Security Policies] section, the FCS_POLICY must be exactly the same as the previous FCS_POLICY. Order of members must be maintained.
• If either security policies section has an RSNMP_POLICY, then that section must have a WSNMP_POLICY.
• After the switch is enabled, if the switch is the primary FCS, then its security and zoning information is propagated to all other switches in the fabric.
• After the switch is enabled, if the switch is a non-FCS or a backup FCS, then its security and zoning information will be overwritten by the primary FCS.
118 Fabric OS Command Reference53-1001764-02

configDownload 2
Security parameters and the switch’s identity cannot be changed by configDownload. Parameters such as the switch name and IP address are ignored; they are lines in the configuration file that begin with “boot”. Security parameters and version stamp are ignored; they are the lines in the configuration file that begin with “sec”.
[License] is only accepted if the boot.mac parameter matches the license ID (WWN) of the switch performing the download; otherwise, it is ignored.
The configuration parameters R_A_TOV, E_D_TOV, WAN_TOV, and MAX_HOPS are interrelated. Assigning a specific value to one or more of these parameters might change the range of allowed values that can be assigned to the other parameters. As a result, you may not be able to set all the values within the range displayed for each parameter. This command validates the modified values of these four parameters and terminates the download operation, if the validation check fails.
This is particularly important when downloading a zoning configuration. Since the new zoning information is added to the current configuration, there might not be any conflicts. If the current zoning configuration is to be replaced, the keyword “clear:” should be inserted into the configuration file immediately before the zoning lines (starting at the line “[Zoning]”).
If the configuration file contains the keyword “enable:” followed by a zone_configuration, that zoning configuration is enabled in the fabric. If there is no “enable:” keyword in the configuration file or no zoning configuration by that name exists, or if enable fails for any reason (such as dangling aliases), then the following conditions apply:
• The effective configuration remains as it was prior to the configuration download. The “enable:” action is ignored.
• The Defined Configuration changes to reflect the new zoning configuration.
Notes The execution of this command is subject to Virtual Fabric or Admin Domain restrictions that may be in place. Refer to chapter 1, "Using Fabric OS commands" and Appendix A, "Command Availability" for details.
If the switch is in Access Gateway mode, some of the configuration parameters will take effect only after the switch has been re-enabled with the switchEnable command.
Do not manually edit a configuration file after uploading the file and before downloading the file to a switch. Manual editing bypasses sanity checks for some configuration parameters and results in unpredictable system behavior.
Operands This command has the following operands:
-p ftp | -ftp or -p scp | -scp
Specifies the data transmission protocol as either File Transfer Protocol (FTP) or Secure Copy Protocol (SCP). If no protocol is specified, the protocol defaults to FTP.
-vf Downloads the Virtual Fabric configuration (switch-conf_xx.txt) instead of the regular system configuration. The switch-con_xx.txt file contains a listing of logical switches configured on the platform specified by the platform ID (xx) and other Virtual Fabric parameters. You cannot use the -vf option with any of the system configuration upload options (-fid, -chassis, -all).
-all Downloads all configuration data, including chassis and switch configuration data.
Fabric OS Command Reference 11953-1001764-02
configDownload2
-fid FID Downloads the switch configuration to a logical switch specified by its fabric ID. This operand is valid only in a Virtual Fabric environment and requires chassis permissions. The following optional parameter is supported with the -fid operand:
-sfid FID Specifies an alternate source switch configuration to be downloaded to the target logical switch specified by -fid. When no source FID is specified, the configuration file corresponding to the logical switch -fid FID is downloaded. When a source FID is specified, the configuration corresponding to the logical switch specified by the source FID is downloaded instead. This parameter allows you to effectively swap logical switch configurations. Note that all ports in the FID are reset to the default state when downloading data from the source FID.
-chassis Downloads the chassis configuration only.
“host” Specifies the name or the IP address of the external host, from which to download the configuration. IPv4 and IPv6 addresses are supported. To be able to mention the FTP server by name, you need to set up two DNS servers with dnsConfig. Quotation marks are optional.
“user” Specifies the login name for the external host. Quotation marks are optional.
“path” Specifies the file name and path of the configuration file. Absolute path names may be specified using a forward slash (/). Relative path names search for the file in the login account’s home directory on UNIX hosts and in the directory on which the FTP server is running on Windows hosts. This operand is valid only when the file is downloaded from an external host. Quotation marks are optional.
“passwd” Specifies the login password when you use the FTP protocol. Quotation marks are optional.
-local Downloads a specified configuration file from a predetermined directory on the local chassis.
-USB | -U Downloads a specified configuration file from a predetermined directory on an attached USB device.
“file” A file name in quotation marks, for example, "config.txt". This parameter can be used only with the -local or -USB option, each of which retrieves files from a predetermined directory on the local chassis or on an attached USB device. Therefore, subdirectories and absolute path names are not permitted.
Examples To download the switch configuration file interactively to the current logical switch from a local directory (no chassis permissions):
switch:admin> configdownloadProtocol (scp, ftp, local) [ftp]:Server Name or IP Address [host]: 192.168.163.233User Name [user]: adminPath/Filename [<home dir>/config.txt]:Section (all|chassis|FID# [all]):
*** CAUTION ***
This command is used to download a backed-up configuration for a specific switch. If using a file from a different switch, this file's configuration settings will override
120 Fabric OS Command Reference53-1001764-02

configDownload 2
any current switch settings. Downloading a configuration file, which was uploaded from a different type of switch, may cause this switch to fail. A switch reboot might be required for some parameter changes to take effect.
configDownload operation may take several minutes to complete for large files. Do you want to continue [y/n]: y Password: Activating configDownload: Switch is disabledconfigDownload complete: All config parameters are downloaded
To download the switch configuration data to the current logical switch from an external FTP server (no chassis permissions):
switch:admin> configdownload -ftp 192.168.38.245,jdoe,config.txt,password
To download all system configuration data for the chassis and all logical switches (requires chassis permissions):
switch:admin> configdownload -all -ftp 192.168.38.245,jdoe,config.txt,password
To download the switch configurations to a logical switch with FID 8 from an attached USB device (requires chassis permissions):
switch:admin> configdownload -fid 8 -USB config.txt
To download the switch configurations belonging to a logical switch with FID 4 to a logical switch with FID 8 from an attached USB device (requires chassis permissions):
switch:admin> configdownload -fid 8 -sfid 4 -USB config_fid8.txt
To download the Virtual Fabric configuration file using FTP:
switch:admin> configdownload -vf -p ftp 10.32.248.119,jdoe,/temp/switch-conf_66.txt,mypassword
Diagnostics The configuration download may fail for one or more of the following reasons:
• The switch has not been disabled. Disabling the switch is not necessary for configuration files containing only certain SNMP or Fabric Watch parameters. You can run configDownload first without disabling the switch, and if there is at least one changed parameter outside of Fabric Watch or SNMP, you are prompted to disable the switch before proceeding.
• The host name is not known to the switch.
• The host IP address cannot be contacted.
• You do not have permission on the host.
• You are running a script that prints something at login.
• The file does not exist on the host.
• The file is not a switch configuration file.
• The FTP server is not running on the host.
• The configuration file contains errors.
• The configuration file’s logical switch definitions do not match the definitions on the target switch.
See Also configDefault, configList, configShow, configUpload, configure, configRemove
Fabric OS Command Reference 12153-1001764-02

configList2
configList
Lists uploaded configuration files.
Synopsis configlist -local|-USB|-U
Description This command displays a list of names, sizes, and creation dates of configuration files saved on the local chassis or on an attached USB device. These files are created when the configUpload command is executed with the -local or the -USB option.
Note The execution of this command is subject to Virtual Fabric or Admin Domain restrictions that may be in place. Refer to chapter 1, "Using Fabric OS commands" and Appendix A, "Command Availability" for details.
Operands This command has the following operands:
-local Displays the list of configuration files on the local chassis.
-USB | -U Displays the list of configuration files on the attached USB device. (The options -U and -USB are equivalent.)
Examples To display a list of configuration files stored on the local chassis:
switch:admin> configlist -local config.txt 25679 2007 Jan 02 15:16 config2.txt 25679 2007 Jan 06 15:16 next_cfg.txt 20977 2007 Jan 18 15:16
See Also configDownload, configUpload, configShow, configRemove
122 Fabric OS Command Reference53-1001764-02

configRemove 2
configRemove
Deletes a saved configuration file.
Synopsis configremove -local|-USB|-U [file]
Description This command deletes a configuration file that was previously saved to the local chassis or to an attached USB device by using the configUpload command.
Note The execution of this command is subject to Virtual Fabric or Admin Domain restrictions that may be in place. Refer to chapter 1, "Using Fabric OS commands" and Appendix A, "Command Availability" for details.
Operands This command has the following operands:
-local Removes a configuration file that was previously created by configUpload -local from the local chassis.
-USB | -U Removes a configuration file that was previously created by configUpload -USB from an attached USB device. The options -USB and -U are equivalent.
file Specifies the configuration file to be removed. If the -file option is omitted, the command prompts for a file name.
Examples To remove a configuration file from the local chassis:
switch:admin> configremove -local first_config.txt
To remove a configuration file from an attached USB device without specifying a filename:
switch:admin> configremove -USBFile Name [config.txt]: second_config.txt
See Also configDownload, configUpload, configList, configShow
Fabric OS Command Reference 12353-1001764-02

configShow2
configShow
Displays system configuration settings.
Synopsis configshow -pattern “pattern”
configshow [-all | -fid FID| -chassis] [-local|-USB|-U] [file] [-pattern "pattern"]
Description Use this command to display system configuration settings. Some but not all of these parameters are set by the configure and configureChassis commands.
Beginning with Fabric OS v6.2.0, configuration data is grouped into chassis information and switch information. Each configuration type is managed separately. The behavior of configShow depends on the environment in which the command is executed:
• In a Virtual Fabric environment, when executed without operands, this command displays the switch configuration for the current logical switch. An Admin with chassis permissions can use additional parameters to display configuration data for a specified logical switch (-fid FID), for the chassis (-chassis), or for all logical switches and the chassis (-all).
• In a non-Virtual Fabric environment, when executed without operands, this command displays the switch configuration. When executed with the -all operand, configShow displays all of the system's configuration data, including chassis and switch configuration data. The -chassis option displays the chassis configuration only. The -fid option is not valid.
Notes Not all values displayed are applicable to all system models and configurations.
The execution of this command is subject to Virtual Fabric or Admin Domain restrictions that may be in place. Refer to chapter 1, "Using Fabric OS commands" and Appendix A, "Command Availability" for details.
Operands The following operands are optional:
-pattern “pattern”
Specifies a text string, enclosed in double quotation marks, that limits the output of the command to only those entries that contain the pattern. Use of wildcards and other common regular expression operators is not supported. Some configuration settings do not display when filtered. When in doubt, use the command without the -pattern operand.
-all Displays all configuration data including chassis and switch configuration.
-fid FID Displays configuration data for a logical switch specified by its fabric ID. This option is valid only in a Virtual Fabric environment and requires chassis permissions
-chassis Displays configuration data for the chassis only. This option is valid only in a Virtual Fabric environment and requires chassis permissions
-local [file] Displays the content of a configuration file that was previously created by configUpload and stored on the chassis. The output can be optionally filtered by -pattern “pattern”. If file is omitted, the command prompts for a file name. The output format when -local is specified matches that of configUpload and contains a superset of the information provided when -local is not specified.
124 Fabric OS Command Reference53-1001764-02

configShow 2
-USB | -U [file] Displays the content of a configuration file that was previously created by configUpload and stored on an attached USB device. The output can be optionally filtered by -pattern “pattern”. If file is omitted, the command prompts for a file name. The output format when -USB is specified matches that of configUpload and contains a superset of the information provided when -USB is not specified.
Examples To display all configuration data on a Virtual Fabric-enabled system:
switch :admin> configshow -all[Configuration upload Information]Configuration Format = 2.0date = Tue Oct 7 14:54:20 2008FOS version = v6.2.0.0Number of LS = 3[Chassis Configuration Begin]
[fcRouting]fcRoute.backboneFabricId:100fcRoute.fcrState:2fcRouteParam.maxLsanCount:3000fcRoute.port.8.xportAdmin:DISABLEDfcRoute.port.8.fabricId:4fcRoute.port.8.ratov:10000fcRoute.port.8.edtov:2000fcRoute.port.8.frontConfigDid:160fcRoute.port.8.portType:400fcRoute.port.8.portMode:0fcRoute.port.8.autoElp:7fcRoute.port.9.xportAdmin:DISABLEDfcRoute.port.9.fabricId:5fcRoute.port.9.ratov:10000fcRoute.port.9.edtov:2000fcRoute.port.9.frontConfigDid:160fcRoute.port.9.portType:400fcRoute.port.9.portMode:0fcRoute.port.9.autoElp:7fcRouteParam.port.8.rportCost:0fcRouteParam.port.9.rportCost:0fcRoute.xlate.persistxdState:1fcRouteParam.lsan.tagCnt:0
[Chassis Configuration]passwdcfg.minlength:8passwdcfg.lowercase:0passwdcfg.uppercase:0passwdcfg.digits:0passwdcfg.punctuation:0passwdcfg.history:1passwdcfg.minpasswordage:0passwdcfg.maxpasswordage:0passwdcfg.warning:0passwdcfg.lockoutthreshold:0passwdcfg.lockoutduration:30passwdcfg.adminlockout:0passwdcfg.repeat:1passwdcfg.sequence:1passwdcfg.status:0fips.mode:0
Fabric OS Command Reference 12553-1001764-02

configShow2
fips.selftests:0ipfilter.0.name:default_ipv4ipfilter.0.numofrules:12ipfilter.0.rule.1:0,0x23,0,0,6,22ipfilter.0.rule.10:0,0x23,0,0,17,123ipfilter.0.rule.11:0,0x63,0,0,6,600,1023ipfilter.0.rule.12:0,0x63,0,0,17,600,1023ipfilter.0.rule.2:0,0x23,0,0,6,23ipfilter.0.rule.3:0,0x23,0,0,6,897ipfilter.0.rule.4:0,0x23,0,0,6,898ipfilter.0.rule.5:0,0x23,0,0,6,111ipfilter.0.rule.6:0,0x23,0,0,6,80ipfilter.0.rule.7:0,0x23,0,0,6,443ipfilter.0.rule.8:0,0x23,0,0,17,161ipfilter.0.rule.9:0,0x23,0,0,17,111ipfilter.0.state:3ipfilter.0.type:0ipfilter.1.name:default_ipv6ipfilter.1.numofrules:12ipfilter.1.rule.1:0,0x23,0,0,6,22ipfilter.1.rule.10:0,0x23,0,0,17,123ipfilter.1.rule.11:0,0x63,0,0,6,600,1023ipfilter.1.rule.12:0,0x63,0,0,17,600,1023ipfilter.1.rule.2:0,0x23,0,0,6,23ipfilter.1.rule.3:0,0x23,0,0,6,897ipfilter.1.rule.4:0,0x23,0,0,6,898ipfilter.1.rule.5:0,0x23,0,0,6,111ipfilter.1.rule.6:0,0x23,0,0,6,80ipfilter.1.rule.7:0,0x23,0,0,6,443ipfilter.1.rule.8:0,0x23,0,0,17,161ipfilter.1.rule.9:0,0x23,0,0,17,111ipfilter.1.state:3ipfilter.1.type:1[output truncated]
To filter the content to display only the password configuration:
switch :admin> configshow -all -pattern “passwdcfg”passwdcfg.minlength:8passwdcfg.lowercase:0passwdcfg.uppercase:0passwdcfg.digits:0passwdcfg.punctuation:0passwdcfg.history:1passwdcfg.minpasswordage:0passwdcfg.maxpasswordage:0passwdcfg.warning:0passwdcfg.lockoutthreshold:0passwdcfg.lockoutduration:30passwdcfg.adminlockout:0passwdcfg.repeat:1passwdcfg.sequence:1passwdcfg.status:0
To display switch configuration data for FID 20:
switch :admin> configshow -fid 20[Configuration upload Information]Configuration Format = 2.0date = Tue Oct 7 14:53:12 2008
126 Fabric OS Command Reference53-1001764-02

configShow 2
FOS version = v6.2.0.0Number of LS = 3[Switch Configuration Begin : 0]SwitchName = Spirit_66Fabric ID = 20
[Boot Parameters]boot.name:Spirit_66boot.ipa:10.32.228.66boot.licid:10:00:00:05:1e:41:5c:c1boot.mac:10:00:00:05:1e:41:5c:c1boot.device:eth0boot.gateway.ipa:10.32.224.1
[Configuration]acl.clear:0ag.port.nfportfailback:0x0ag.port.nfportfailover:0x0ag.port.nfporttopo.0:0x0ag.port.nfporttopo.1:0x0ag.port.nfporttopo.10:0x0ag.port.nfporttopo.11:0x0ag.port.nfporttopo.12:0x0ag.port.nfporttopo.13:0x0ag.port.nfporttopo.14:0x0ag.port.nfporttopo.15:0x0ag.port.nfporttopo.16:0x0ag.port.nfporttopo.17:0x0ag.port.nfporttopo.18:0x0ag.port.nfporttopo.19:0x0ag.port.nfporttopo.2:0x0ag.port.nfporttopo.20:0x0[output truncated]
See Also configure, configureChassis, configDownload, configUpload, configList, configRemove,diagDisablePost, diagEnablePost, ipAddrShow, licenseShow, syslogdIpShow
Fabric OS Command Reference 12753-1001764-02

configUpload2
configUpload
Uploads system configuration data to a file.
Synopsis configupload
configupload [-all] [-p ftp | -ftp] [”host”,”user”,”path”,[”passwd”]]
configupload [-all] [-p scp| -scp] [”host”,”user”,”path”]
configupload [-all] [-force] [-local | USB |-U] [“file”]
configupload [-fid FID | -chassis | -all ] [-p ftp | -ftp] [”host”,”user”,”path”,[”passwd”]]
configupload [-fid FID | -chassis | -all ] [-p scp| -scp] [”host”,”user”,”path”]
configupload [-fid FID | -chassis | -all ] [-force] [-local | USB |-U] [“file”]
configupload [-vf] [-p ftp | -ftp] [”host”,”user”,”path”,[”passwd”]]
configupload [-vf] [-p scp| -scp] [”host”,”user”,”path”]
configupload [-vf] [-force] [-local | USB |-U] [“file”]
Description This command uploads configuration data to a file. Two types of configuration files can be uploaded with this command: Virtual Fabric configuration parameters and system configuration parameters.
Use the -vf option to upload Virtual Fabric configuration parameters. The Virtual Fabric configuration includes logical switch definitions, Virtual Fabric status (enabled or disabled), and the F_Port trunking ports. The file should be named switch-conf_xx.txt to distinguish it from the regular system configuration (config.txt). The xx indicates the platform ID. The platform ID is the same as the first two digits of the "switchType" parameter displayed by switchShow. Virtual Fabric configuration data can only be shared between switches that belong to the same platform type and share the same platform ID. Refer to configDownload for more information on the Virtual Fabric configuration.
The system configuration data is uploaded separately. It is grouped into chassis information and switch information. Each configuration type is managed separately and the behavior of configUpload depends on the environment in which the command is executed and which part of the system configuration you wish to upload.
• In a Virtual Fabric environment, when executed without chassis permissions, this command uploads the current logical switch configuration only. An Admin user with chassis permissions can use additional parameters to perform the following selective configuration uploads:
- Upload the switch configuration of a specified logical switch (-fid FID).
- Upload the chassis configuration only (-chassis).
- Upload the entire system configuration including the data for all logical switches and for the chassis (-all).
The interactive version of the command (no operands) prompts for input on only the parameters the user is allowed to execute.
• In a non-Virtual Fabric environment, this command by default uploads the switch configuration only. Additional options support uploading the chassis configuration (-chassis) or all of the system's configuration data, including chassis and switch configurations (-all). Chassis permissions are required. The -fid option is not valid.
128 Fabric OS Command Reference53-1001764-02

configUpload 2
You can use FTP or SCP to upload configuration files to an external host, or you can save the configuration in a predetermined directory on the local chassis or on an attached USB device. If the specified file already exists, this command prompts you to overwrite the file. Specify -force to overwrite the file without confirmation. When the local chassis is chosen as the destination, the resulting file is written to both primary and secondary partitions, and on enterprise-class platforms, to both Active and Standby Control Processors (CPs).
Refer to the Fabric OS Administrator’s Guide for information on backward compatibility, on configuration upload and download in Admin Domains (AD), and on the content of the configuration file.
Notes The execution of this command is subject to Virtual Fabric or Admin Domain restrictions that may be in place. Refer to chapter 1, "Using Fabric OS commands" and Appendix A, "Command Availability" for details.
Do not manually edit a configuration or a switch-conf.xx file after uploading the file and before downloading the file to a switch. Manual editing bypasses sanity checks for some configuration parameters and results in unpredictable system behavior
Operands The following operands are supported:
-p ftp | -ftp or -p scp | -scp Specifies the data transmission protocol as either File Transfer Protocol (FTP) or Secure Copy Protocol (SCP). If no protocol is specified, the protocol defaults to FTP.
-vf Uploads the Virtual fabric configuration to a file. You must specify a filename when uploading this file. It is recommended to name this file switch-conf_xx.txt (where xx indicates the platform ID) to distinguish this file from the system configuration (config.txt). Use switchShow to determine the platform ID of the system. The platform ID in the header of the configuration file is the same as the first two digits of the switchType parameter in the switchShow output. You cannot use the -vf option with any of the regular configuration upload options (-fid, -chassis, -all).
-fid FID Uploads switch configuration data from a logical switch specified by its fabric ID. This parameter is valid only in a Virtual Fabric environment and requires chassis permissions.
-chassis Uploads chassis configuration only.
-all Uploads all system configuration data including chassis and switch configuration for all logical switches.
“host” Specifies the name or the IP address of the external host to which to upload the configuration. To be able to mention the FTP server by name, you need to set up one or more DNS servers with dnsConfig. Quotation marks are optional.
“user” Specifies the login name for the external host. Quotation marks are optional.
“path” Specifies the file name and path of the configuration file. Absolute path names may be specified using a forward slash (/). Relative path names upload the file to the login account’s home directory on UNIX hosts and into the directory on which the FTP server is running on Windows hosts. This operand is valid only when the file is uploaded to an external host. Quotation marks are optional.
Fabric OS Command Reference 12953-1001764-02

configUpload2
“passwd” Specifies the account password when you use the FTP protocol. Quotation marks are optional.
-local Uploads a specified configuration file to a predetermined directory on the local chassis. This option requires a file name.
-USB | -U Uploads a specified configuration file to a predetermined directory on an attached USB device. This option requires a file name.
“file” Specifies the file name. Quotation marks are optional. This parameter is valid only with the -local or -USB options, each of which stores files in a predetermined directory on the local chassis or on an attached USB device. Therefore, subdirectories and absolute path names are not permitted.
-force Overwrites an existing file without confirmation. This parameter is valid only with the -local or -USB options.
When invoked without operands or without “host” or “file” parameters, configUpload runs in interactive mode. When invoked without any of the parameters -all, -fid, or -chassis, only the switch configuration for the current logical switch is uploaded.
Examples To upload the switch configuration interactively from a switch that is not enabled for Virtual Fabrics:
switch:admin> configuploadProtocol (scp, ftp, local) [ftp]:Server Name or IP Address [host]: 192.168.38.245User Name [user]: jdoeFile Name [<home dir>/config.txt]:Password:
configUpload complete: All config parameters are uploaded
To upload the switch configuration that belongs to a logical switch with FID 100:
switch:admin> configuploadProtocol (scp, ftp, local) [ftp]:Server Name or IP Address [host]: 10.32.220.100User Name [user]: jdoeFile Name [<home dir>/config.txt]: config.fid100.txtSection (all|chassis|FID# [all]): 100Password:
configUpload complete: All config parameters are uploaded
To upload the configuration for the entire chassis to a local file from the command line forcing an overwrite:
switch:admin> configupload -chassis -local -force config.txt
configUpload complete: All config parameters are uploaded
To upload the configuration for the current logical switch to an external FTP server:
switch:admin> configupload -ftp 192.168.38.245,jdoe,config.txt,password
To upload all system configuration data to an external FTP server:
switch:admin> configupload -all -ftp 192.168.38.245,jdoe,config.txt,password
130 Fabric OS Command Reference53-1001764-02

configUpload 2
To upload the system configuration file for a logical switch with FID 8 to an attached USB device:
switch:admin> configupload -fid 8 -ftp -USB config.txt
To upload the Virtual Fabric configuration of the current platform to an external FTP server:
switch:admin> configupload -vf -p ftp 10.32.248.119,jdoe,/temp/switch-conf.66.txt,password
Diagnostics The configuration upload might fail for one or more of the following reasons:
• The host name is not known to the switch.
• The host IP address cannot be contacted.
• The user does not have permission on the host.
• The FTP server is not running on the host.
See Also configDefault, configDownload, configShow, configList, configRemove, configure, configureChassis
Fabric OS Command Reference 13153-1001764-02

configure2
configure
Changes switch configuration settings.
Synopsis configure
Description Use this command to change switch configuration settings.
Configuration data is grouped into chassis information and switch information. Each configuration type is managed separately. For information on file format and specific parameters contained in each section, refer to the configUpload help page.
The behavior of configure depends on the environment in which the command is executed:
• In a Virtual Fabric environment, the configure command sets switch configuration parameters for the current logical switch only. If a switch or chassis is configured with multiple logical switches, you must configure each logical switch separately. Use setContext to change the current logical switch context.
• In a non-Virtual Fabric environment, the configure command sets switch configuration parameters.
To configure chassis-wide parameters, use the configureChassis command.
The following switch configuration parameters can be set with the configure command:
• Switch fabric parameters
• Virtual channel parameters
• F_Port login parameters
• Zoning operation parameters
• Remote State Change Notifications (RSCN) transmission mode
• Arbitrated Loop parameters
• System Services settings
• Portlog Events enable or disable settings
• Secure Socket Layer (SSL) attributes
• Remote Procedure Call Daemon (RPCD) attributes
• Web Tools attributes
To access all parameters controlled by this command, you must disable the switch using the switchDisable command. If executed on an enabled switch, only a subset of attributes are configurable. Menu display may vary depending on the hardware platform.
Notes The maximum per port login limit is no longer configurable with this command. Use portcfgNPIVPort --setloginlimit to configure this parameter on a per port basis.
The Telnet interface is no longer configurable with this command. Use the ipFilter command to enable or disable the Telnet interface.
The SNMP attributes are no longer configurable with this command. Use snmpConfig --set seclevel to configure SNMP attributes.
The execution of this command is subject to Virtual Fabric or Admin Domain restrictions that may be in place. Refer to chapter 1, "Using Fabric OS commands" and Appendix A, "Command Availability" for details.
132 Fabric OS Command Reference53-1001764-02

configure 2
Operands none
The configure command runs in interactive mode and presents you with a series of hierarchical menus. Each top-level menu and its associated submenus consist of a text prompt, a selection of valid values, and a default value (in brackets).
The following keys control the execution of the command:
Return When entered at a prompt with no preceding input, the command accepts the default value (if applicable) and moves to the next prompt.
Interrupt (Ctrl-C) Aborts the command immediately and ignores all changes made.
End-of-file (Ctrl-D) When entered at a prompt with no preceding input, terminates the command and saves changes made.
The following parameters can be modified with the configure command:
Switch Fabric SettingsFabric settings control the overall behavior and operation of the fabric. Some of these settings, such as the domain, are assigned automatically and may differ from one switch to another in a given fabric. Other parameters, such as buffer-to-buffer credit or timeout values, can be modified to suit specific applications or operating environments but must be in agreement among all switches to allow formation of the fabric.
Table 6 lists the switch fabric settings that can be modified.
TABLE 6 Configure command fabric parameters (* = multiplication symbol)
Field Type Default Range
Domain number 1 varies
Enable a 256 Area Limit number 0 0 to 2
WWN Based persistent PID boolean no yes or no
Allow XISL Use boolean yes yes or no
R_A_TOV number 10000 E_D_TOV * 2 to 120000
E_D_TOV number 2000 1000 to R_A_TOV / 2
WAN_TOV number 0 0 to R_A_TOV / 4
MAX_HOPS number 7 7 to 19
Data Field Size number 2112 256 to 2112
Sequence Level Switching boolean 0 0 or 1
Disable Device Probing boolean 0 0 or 1
Suppress Class F Traffic boolean 0 0 or 1
Per-frame Route Priority boolean 0 0 or 1
Long Distance Fabric boolean 0 0 or 1
BB Credit number 16 1 to 27
Disable FID Check boolean no yes or no
Insistent Domain ID Mode boolean no yes or no
Fabric OS Command Reference 13353-1001764-02

configure2
Fabric setting fields are defined as follows:
Domain The domain number uniquely identifies a switch in a fabric. This value is automatically assigned by the fabric. The range of valid values varies depending on the switch model and other system parameter settings.
Enable 8-bit Dynamic Area Mode When enabled, this feature supports Dynamic Area Mode in default partitions on the Brocade DCX and DCX-4S. Dynamic Area Mode is by default disabled. When enabled, Dynamic Area Mode supports both static and dynamic area assignment. Use the portAddress command to perform a static assignment of an area to a given port. In Dynamic Area Mode, areas are dynamically assigned to the ports (up to a 255 limit). Port area assignments are persistent; however, disabling Dynamic Area Mode with configure resets the area assignments. This feature is configurable only on the default switch. Enabling Dynamic Area Mode fails under one or more of the following conditions:
• The number of ports in the default partition exceeds 255.• An AP blade with FL ports is present in the chassis (Brocade Encryption
blade, FA-418, or FCoE10-24.• The stand-by CPU is running a pre-v6.4.0 version of Fabric OS.
WWN Based persistent PID When enabled, this feature supports both dynamic and static WWN-based PID assignment. In dynamic PID binding, the first area assigned to a device when it logs in is bound to the device WWN and remains persistent through subsequent logins. Every time the device logs into the switch, it is guaranteed to get the same PID. Alternately, you can use the wwnAddress command to create a static WWN-based PIDassignment. In either case, the WWN-based persistent PID feature must be enabled through configure. The feature is by default disabled; it is dependent on Dynamic Area Mode being enabled.
Allow XISL Use An extended interswitch link (XISL) is an interswitch link (ISL) that connects the logical switch to the base switch and carries traffic for multiple logical fabrics. This feature is supported only on Virtual Fabric-aware platforms under the following conditions: Virtual Fabrics must be enabled on the switch, and the switch cannot be a base switch. In addition, on the Brocade DCX or DCX-4S the switch cannot be a default switch, include interchassis link (ICL) ports or GbE ports, or be in interop mode. This feature is enabled by default (yes=enabled). On the Brocade 5100, 5300, and VA-40FC default switch, the feature is disabled by default (no=disabled).
Fabric OS v6.3.0 and later no longer require disabling the logical switch before changing the value of this parameter. Turning off XISL use requires confirmation because all LISLs will be removed upon execution. If the logical switch is enabled and is part of an edge fabric connected to an FCR, this parameter cannot be turned on. If the logical switch is disabled or it is not yet part of an edge fabric, this parameter can be turned on. However, execution may cause edge fabric segmentation if the EX_Port connected to the edge fabric is disabled while the logical switch is enabled or connected to the edge fabric.
134 Fabric OS Command Reference53-1001764-02

configure 2
Disable FID Check If fabric ID (FID) check is disabled, the fabric ignores the Fabric Identifier conflict with the neighboring switch during fabric formation. By default, FID check is enabled. If the fabric detects a FID conflict, it disables the E_Port with a "Fabric ID conflict" message. This parameter is configurable only if the switch is Virtual Fabric-aware and Virtual Fabric is enabled on the switch.
Enable 256 Area limit The 256 area limit allows the partition to be configured for 8-bit addressing rather than the default 10-bit addressing. Each port in this partition is given a unique area represented by the middle 8 bits of the PID. Valid values are:
0 No limit is imposed on the area. This is the default value. The partition is configured for 10-bit addressing and supports up to 1800 ports
1 The unique area assignments begin at zero regardless of where the port is physically located. This allows FICON users to make use of high port count port blades with port indexes greater than 256. However, this mode is not compatible with domain-index zoning.
2 The unique area assignments are based on the port index. This mode does not allow FICON users to make use of ports with an index greater than 256 (high ports of a high port count blade), but this mode is compatible with domain-index zoning. This parameter is configurable only if the switch is Virtual Fabric-aware and Virtual Fabric is enabled on the switch.
R_A_TOV The resource allocation time out value specified in milliseconds. This variable works with the variable E_D_TOV to determine switch actions when presented with an error condition.
Allocated circuit resources with detected errors are not released until the time value has expired. If the condition is resolved prior to the time out, the internal time-out clock resets and waits for the next error condition.
E_D_TOV Error detect time out value specified in milliseconds. This timer is used to flag a potential error condition when an expected response is not received within the set time limit. If the time for an expected response exceeds the set value, then an error condition occurs.
WAN_TOV Wide area network time out value specified in milliseconds. This timer is the maximum frame time out value for a WAN, if any, interconnecting the Fibre Channel islands.
MAX_HOPS Maximum hops is an integer that denotes the upper limit on the number of hops a frame might have to traverse to reach any destination port from any source port across the fabric.
Note that the R_A_TOV, E_D_TOV, WAN_TOV, and MAX_HOPS configuration parameters are interrelated. Assigning a specific value to one or more of these parameters can change the range of allowed values that can be assigned to the other parameters. As a result, you may not be able to set all the values within the range displayed against each parameter. To reduce problems, the configuration utility validates the modified parameter values and prompts you to re-enter some values, if the validation check fails.
Fabric OS Command Reference 13553-1001764-02

configure2
Data Field Size The data field size specifies the largest possible value, in bytes, for the size of a type 1 (data) frame. The switch advertises this value to other switches in the fabric during construction of the fabric as well as to other devices when they connect to the fabric. Setting this parameter to a value smaller than 2112 might result in decreased performance.
Sequence-Level SwitchingWhen sequence-level switching is set to 1, frames of the same sequence from a particular source are transmitted as a group. When this feature is set to 0, frames are transmitted interleaved among multiple sequences.
Under normal conditions, sequence-level switching should be disabled for better performance. However, some host adapters have performance issues when receiving interleaved frames from multiple sequences. When there are such devices attached to the fabric, sequence-level switching should be enabled.
Disable Device ProbingWhen disable device probing is set to 1, devices that do not register with the Name Server will not be present in the Name Server data base. Set this mode only if the switch’s N_Port discovery process (PLOGI, PRLI, INQUIRY) causes an attached device to fail.
Suppress Class F TrafficBy default, the switch can send Class F frames. When this option is turned on, Class F traffic is converted to Class 2 traffic before being transmitted.
Per-frame Route PriorityIn addition to the eight virtual channels used in frame routing priority, support is also available for per-frame-based prioritization when this value is set. When Per-frame Route Priority is set to 1, the virtual channel ID is used in conjunction with a frame header to form the final virtual channel ID.
Long Distance FabricWhen this mode is set to 1, ISLs in a fabric can be up to 100 km long. The exact distance level is determined by the per-port configuration on the E_Ports of each ISL. Both E_Ports in an ISL must be configured to run the same long-distance level; otherwise, the fabric will be segmented.
An Extended Fabrics license is required to set this mode.
BB Credit The buffer-to-buffer (BB) credit represents the number of buffers available to attached devices for frame receipt. The range of allowed values varies depending on other system settings (see Unicast-only Operation). BB credits are not supported on 4G platforms. Refer to the Fabric OS Administrator’s Guide for more information on platform-specific BB Credit limitations.
Insistent Domain ID ModeWhen this mode is set, the switch attempts to acquire from the fabric the domain number programmed in its "Switch Fabric Settings." If the operation fails, the switch will segment from the fabric.
Virtual Channel SettingsThe switch enables fine-tuning for a specific application by configuring the parameters for eight virtual channels. The first two virtual channels are reserved for switch internal functions and are not available for modification.
136 Fabric OS Command Reference53-1001764-02

configure 2
The default virtual channel settings have already been optimized for switch performance. Changing the default values can improve switch performance but can also degrade performance. Do not change these settings without fully understanding the effects of the changes.
Table 7 lists the virtual channel settings.
VC Priority specifies the class of frame traffic given priority for a virtual channel.
F_Port Login ParametersSpecifies the F_Port login parameters.
Maximum logins per switch Sets a switch-wide limit on allowed logins. The maximum login per switch has decreased with Fabric OS v6.4.0. When upgrading from pre-v6.4.0 firmware versions, the configured maximum is carried forward and may exceed the v6.4.0 limit. It is recommended to reconfigure this parameter to be within the range permitted in Fabric OS v6.4.0.
The following three parameters are related to staged F_Port logins by FLOGI requests and virtual device logins by FDISC(SID==0) requests.
Logins per second Specifies the number of logins the switch accepts per second in staged F_Port bring up.
Login stage interval Specifies the stage interval in staged F_Port bring up.
Stage FDISC logins This parameter, if nonzero, enables staging of FDISC logins by rejecting the FDISC requests with "logical busy", when the requests are more than the number of configured "logins per second". It also specifies the number of FDISC requests that will always be accepted first without reject.
Unless there are issues with F_Port staging, do not change default values.
TABLE 7 Configure command virtual channel settings
Field Default Range
VC Priority 2 2 2 to 3
VC Priority 3 2 2 to 3
VC Priority 4 2 2 to 3
VC Priority 5 2 2 to 3
VC Priority 6 3 2 to 3
VC Priority 7 3 2 to 3
TABLE 8 F_Port login parameters (* = multiplication symbol)
Field Type Default Range
Maximum logins per switch Number 16 * the max number of ports
1 to 126 * the max number of ports
Logins per second Number 0 0 to 100
Login stage interval (milliseconds)
Number 0 0 to 10000
Stage FDISC logins Number 0 0 to 255
Fabric OS Command Reference 13753-1001764-02

configure2
Zoning Operation Parameters
Table 9 lists the configurable zoning operation parameters.
Disable NodeName Zone CheckingSpecify 1 to disable using node WWN when specifying nodes in the zone database, or specify 0 to enable using node WWN when specifying nodes in the zone data. The default value is 0. This value must be set to 1 for interpretability.
RSCN Transmission ModeTable 10 lists the RSCN transmission mode values fields.
End-device RSCN Transmission Mode values are as follows:
0 RSCN only contains single PID
1 RSCN contains multiple PIDs
2 Fabric addresses RSCN
Domain RSCN to End-device for switch IP address or name change values are as follows:
0 Disabled. No domain RSCN is sent to the end-device for the switch IP address or name change.
1 Enabled. Domain RSCN is sent to the end-device for the switch IP address or name change.
Arbitrated Loop ParametersThe Arbitrated Loop Setting fields are described in Table 11.
Descriptions of the Arbitrated Loop Parameter fields are as follows:
Send FAN frames? Specifies that fabric address notification (FAN) frames be sent to public loop devices to notify them of their node ID and address. When set to 1, frames are sent; when set to 0, frames are not sent.
TABLE 9 Zoning operation parameters
Field Type Default Range
Disable NodeName Zone Checking Boolean 0 1
TABLE 10 RSCN transmission modes
Field Type Default Range
End-device RSCN Transmission Mode number 1 0 to 2
Domain RSCN to End-device for switch IP address or name change number 0 0 to 1
TABLE 11 Configure command arbitrated loop settings
Field Default Range
Send FAN frames? 1 0 or 1
Enable CLOSE on OPEN received? 4 0 to 4
Always send RSCN? 0 0 or 1
138 Fabric OS Command Reference53-1001764-02

configure 2
Enable CLOSE on OPEN received? If this is set, a CLS is returned immediately to an OPN if no buffers are available. This is required for TachLite.
Always send RSCN? Following the completion of loop initialization, a remote state change notification (RSCN) is issued when FL_Ports detect the presence of new devices or the absence of preexisting devices. When set to 1, an RSCN is issued upon completion of loop initialization, regardless of the presence or absence of new or preexisting devices.
System Services SettingsSettings affecting System Services are described in Table 12.
Disable RLS probing Enables or disables the read link status (RLS) probing. Performed by the FCP daemon, RLS probing reads the link error block from the device. This extended link services command is defined by the FC standards. Refer to the FC standards for information. This parameter is enabled (“on”) by default; “off” disables RLS probing.
Portlog Events Enable/Disable SettingsThese settings determine whether or not various types of port events are logged.
Each event type displayed on the screen is enabled by default (“on”). When disabled, this event is not logged by the port log.
Application AttributesTable 13 lists configurable application attributes. By default, all application attributes are enabled.
Examples To enable XISL use on a logical switch with FID 20:
switch:admin> setcontext 20switch:admin>switchdisable
TABLE 12 Disable RLS probing
Field Type Default Range
Disable RLS probing Boolean off off or on
TABLE 13 Configurable application attributes
Application File Type Default Range
ssl Certificate File string not set varies
CA Certificate File string not set varies
Length of crypto key number 128 40, 56, 128
rpcd Secure RPCd Callback secret string none varies
Web Tools Basic User Enabled boolean no no/yes
Perform License Checking and Warning boolean yes yes/no
Allow Fabric Event Collection boolean yes yes/no
Login Session Timeout (in seconds) number 7200 60 to 432000
Fabric OS Command Reference 13953-1001764-02

configure2
switch:admin>configureConfigure...
Fabric parameters (yes, y, no, n): [no] y
Domain: (1..239) [1] Enable a 256 Area Limit (0 = No, 1 = Zero Based Area Assignment, 2 = Port Based Area Assignment): (0..2) [0] 1 WWN Based persistent PID (yes, y, no, n): [no]
Allow XISL Use (yes, y, no, n): [yes]yesR_A_TOV: (4000..120000) [10000]E_D_TOV: (1000.. 5000) [2000]WAN_TOV: (0..30000) [0]MAX_HOPS: (7..19) [7]Data field size: (256..2112) [2112]Sequence Level Switching: (0..1) [0]Disable Device Probing: (0..1) [0]Suppress Class F Traffic: (0..1) [0]Per-frame Route Priority: (0..1) [0]Long Distance Fabric: (0..1) [0]BB credit: (1..27) [16] Disable FID Check (yes, y, no, n): [no]
Insistent Domain ID Mode (yes, y, no, n): [no]Virtual Channel parameters (yes, y, no, n): [no]F-Port login parameters (yes, y, no, n): [no]Zoning Operation parameters (yes, y, no, n): [no]RSCN Transmission Mode (yes, y, no, n): [no]Arbitrated Loop parameters (yes, y, no, n): [no]System services (yes, y, no, n): [no]Portlog events enable (yes, y, no, n): [no] ssl attributes (yes, y, no, n): [no]rpcd attributes (yes, y, no, n): [no]webtools attributes (yes, y, no, n): [no]
switch:admin> switchenable
To enable Dynamic Area Mode on the default partition of the Brocade DCX:
switch:admin>switchdisableswitch:admin>configureConfigure...
Change fabric parameters? YDomain: (1..239) [160] Enable 8 bit Dynamic Area Mode (0 = No, 1 = Zero Based Area Assignment): (0..1) [0] 1 R_A_TOV: (4000..120000) [10000] E_D_TOV: (1000..5000) [2000] WAN_TOV: (0..30000) [0] MAX_HOPS: (7..19) [7] Data field size: (256..2112) [2112] Sequence Level Switching: (0..1) [0] Disable Device Probing: (0..1) [0] Suppress Class F Traffic: (0..1) [0] Per-frame Route Priority: (0..1) [0] Long Distance Fabric: (0..1) [0] BB credit: (1..27) [16]
140 Fabric OS Command Reference53-1001764-02

configure 2
Disable FID Check (yes, y, no, n): [no] Insistent Domain ID Mode (yes, y, no, n): [no] Virtual Channel parameters (yes, y, no, n): [no] F-Port login parameters (yes, y, no, n): [no] Zoning Operation parameters (yes, y, no, n): [no] RSCN Transmission Mode (yes, y, no, n): [no] Arbitrated Loop parameters (yes, y, no, n): [no] System services (yes, y, no, n): [no] Portlog events enable (yes, y, no, n): [no] ssl attributes (yes, y, no, n): [no] rpcd attributes (yes, y, no, n): [no] cfgload attributes (yes, y, no, n): [no] webtools attributes (yes, y, no, n): [no]
See Also configDefault, configShow, configureChassis, ipAddrSet, portCfgLongDistance, switchDisable, switchEnable, upTime
Fabric OS Command Reference 14153-1001764-02

configureChassis2
configureChassis
Changes chassis-level system configuration settings.
Synopsis configurechassis
Description Use this command to modify chassis-level system configuration settings.
Beginning with Fabric OS v6.2.0, configuration data is grouped into chassis information and switch information. Each configuration type is managed separately.
Use the configure command to modify switch configuration parameters.
Use the configureChassis command to modify the following chassis configuration parameters:
• cfgload attributes
• Custom Attributes
• System settings
When executed in a Virtual Fabric environment, this command requires chassis permissions. It is necessary to disable the chassis before configuring the chassis system parameters. In a non-Virtual Fabric environment, disable the switch before configuring chassis parameters.
Note The execution of this command is subject to Virtual Fabric or Admin Domain restrictions that may be in place. Refer to chapter 1, "Using Fabric OS commands" and Appendix A, "Command Availability" for details.
Operands none
The configureChassis command interactively presents a hierarchical menu. Each top-level heading and its associated subheadings consist of a text prompt, a selection of valid values, and a default value (in brackets).
The following keys control the execution of the command:
Return When entered at a prompt with no preceding input, the command accepts the default value (if applicable) and moves to the next prompt.
Interrupt (Ctrl-C) Aborts the command immediately and ignores all changes made.
End-of-file (Ctrl-D) When entered at a prompt with no preceding input, terminates the command and saves changes made.
The following parameters can be modified with the configureChassis command:
cfgload AttributesTable 14 lists the configuration upload and download attributes that may be modified.
TABLE 14 Configurable application attributes
Application Attribute Type Default Range
cfgload Enforce secure Config Upload/Download boolean no no/yes
Enforce signature validation for firmware boolean no no/yes
142 Fabric OS Command Reference53-1001764-02

configureChassis 2
Custom AttributesTable 15 lists custom attributes that may be modified.
config Index OEM custom configuration. This attribute is for internal use only.
System Settings
The following system-related parameters are configurable on a Virtual Fabric-aware switch.
system.blade.bladeFaultOnHwErrMsk
If this field is set to a value other than 0, then any nonfatal HW ASIC data parity error causes the problem blade to be powered off.
system.cpuLoad Sets a threshold to define internally when the CPU is busy. The default threshold is 121, which represents a CPU instantaneous load average of 1.21 in the uptime or top command. The range is 10 through 121 (representing CPU load thresholds of .10 through 1.21).
Examples To enable signature validation for downloading firmware:
switch:admin> configurechassis
Configure...
cfgload attributes (yes, y, no, n): [no] \fBy\fR
Enforce secure config Upload/Download (yes, y, no, n): [no] Enforce signature validation for firmware (yes, y, no, n): [no]
Custom attributes (yes, y, no, n): [no] \fBy\fR
Config Index (0 to ignore): (0..1000) [0]
system attributes (yes, y, no, n): [no] \fBy\fR
system.blade.bladeFaultOnHwErrMsk: (0x0..0xffff) [0x0] system.cpuLoad: (10..121) [121]
See Also configDefault, configShow, chassisEnable, chassisDisable, configure, ipAddrSet,portCfgLongDistance, switchDisable, switchEnable, upTime
TABLE 15 Configurable custom attributes
Application Attribute Type Default Range
Custom Config Index (0 to ignore): Number 0 0-10000
TABLE 16 System Settings
Field Type Default Range
system.blade.bladeFaultOnHwErrMsk Number 0x0 0x0 to 0xffff
system.cpuLoad Number 121 10 to 121
Fabric OS Command Reference 14353-1001764-02

cryptoCfg2
cryptoCfg
Name Performs encryption configuration and management functions.
Synopsis cryptocfg --help -nodecfg
cryptocfg --help -groupcfg
cryptocfg --help -hacluster
cryptocfg --help -devicecfg
cryptocfg --help -transcfg
cryptocfg --help -decommission
Description Use the cryptoCfg command to configure and manage the Brocade Encryption Switch and the FS8-18 encryption blade. These platforms support the encryption of data-at-rest for tape devices and disk array logical unit numbers (LUNs).
The cryptoCfg CLI consists of six command sets grouped around the following configuration functions:
“1. Node configuration”
“2. Encryption group configuration”
“3. High Availability (HA) cluster configuration”
“4. Storage device configuration and management”
“5. Transaction management”
“6. Device decommissioning”
Each of these command groups is documented in a separate section that includes function, synopsis, description, and operands. Examples are presented at the end of the help page.
For detailed encryption switch management and configuration procedures, refer to the Fabric OS Encryption Administrator’s Guide.
CAUTION
When configuring a LUN with multiple paths, there is a considerable risk of ending up with potentially catastrophic scenarios where different policies exist for each path of the LUN, or a situation where one path ends up being exposed through the encryption switch and other path has direct access to the device from a host outside the secured realm of the encryption platform. To protect against this risk, it is necessary to configure containers IN SEQUENCE and with the same policies and not issue a commit until the configuration for all hosts accessing the LUN is complete. Failure to follow correct configuration procedures for multi-path LUNs results in data corruption. If you are configuring multi-path LUNs as part of an HA cluster or DEK cluster or as a standalone LUN accessed by multiple hosts, follow the instructions described in the section "Configuring a multi-path Crypto LUN" in the Fabric OS Encryption Administrator's Guide.
Note The execution of this command is subject to Virtual Fabric or Admin Domain restrictions that may be in place. For details on command availability, refer to Appendix A, “Command Availability” on page 1031.
144 Fabric OS Command Reference53-1001764-02

cryptoCfg 2
Function 1. Node configuration
Synopsis cryptocfg --help -nodecfg
cryptocfg --initnode
cryptocfg --initEE [slot]
cryptocfg --regEE [slot]
cryptocfg --enableEE [slot]
cryptocfg --disableEE [slot]
cryptocfg --export -scp -dhchallenge vault_IP_address | -currentMK | -KACcert |-KACcsr| -CPcert] host_IP host_username host_file_path
cryptocfg --export -usb -dhchallenge vault_IP_address | -currentMK | -KACcert | -KACcsr |-CPcert dest_filename
cryptocfg --import -scp local_name host_IP host_username host_file_path
cryptocfg --import -usb dest_filename source_filename
cryptocfg --reg -membernode member_node_WWN member_node_certfile Member_node_IP_addr
cryptocfg --dereg -membernode member_node_WWN
cryptocfg --dhchallenge vault_IP_addr
cryptocfg --dhresponse vault_IP_addr
cryptocfg --zeroizeEE [slot]
cryptocfg --delete -file local_name
cryptocfg --reg -KAClogin primary | secondary
cryptocfg --show -file -all
cryptocfg --show -localEE
cryptocfg --rebalance [slot]
Description Use the node configuration commands to perform node initialization and configuration tasks. Node initialization and configuration must be performed on every node. A node is an encryption switch or a chassis containing one or more encryption blades. A node is identified by the switch IP address or switch WWN, which is subsequently referred to as the "node WWN." The node configuration commands include the following functions:
• Node initialization and certificate generation.
• Certificate export and import to and from a specified host or USB device.
• Enabling or disabling an encryption engine (EE).
• Encryption group member node and group leader registration.
• Group-wide policy configuration.
• Zeroization of all critical security parameters on the local encryption switch or blade.
• Certificate display and management.
• Display of the local encryption engine status.
• Rebalancing of disk and tape LUNS for optimized performance.
Fabric OS Command Reference 14553-1001764-02
cryptoCfg2
Use the --show localEE command to display encryption engine configuration parameters pertaining to the local node. The command displays the following information:
• EE Slot: Encryption engine slot number.
• SP state: Security processor state. For a complete listing of SP states, refer to the Encryption Administrator’s Guide, Appendix A.
• Current master key ID (or primary link key ID) - Key ID or zero if not configured.
• Alternate master key ID (or secondary link key- Key ID or zero if not configured.
• HA cluster name to which this EE belongs, or "No HA cluster membership".
• EE Attributes: The following attributes are displayed:
- Link IP Address: Link IP address
- Link GW IP Address: Link gateway W IP address
- Link Net Mask: Link net mask
- Link MAC Address: Link MAC address
- Link MTU: The maximum transmission unit of the link
- Link State: DOWN unless the EE is part of an HA cluster
- Route Mode: Always “shared;” this parameter is not configurable
- Media Type: TAPE, DISK, DISK/TAPE, or NOT DEFINED
- Rebalance Recommended: No, Yes, or EE Busy (unspecified, try again to determine rebalance recommendation)
- System Card Label: Displayed only if a system card is registered
- System Card CID: Displayed only if a system card is registered.
Remote EE Reachability: If the EE is part of an encryption group, the following information is displayed for the peer. Node WWN/Slot, EE IP Address, EE State, and IO Link State. On a chassis with multiple encryption blades, remote reachability information is displayed for all encryption groups.
Note The initial setup includes preparatory steps that are outside the scope of the cryptoCfg command. For preinitialization procedures, refer to the Fabric OS Encryption Administrator’s Guide.
Operands The cryptoCfg node initialization and configuration function has the following operands:
--help -nodecfg Displays the synopsis for the node initialization and configuration function. This command is valid on all nodes.
--initnode Initializes the node to prepare for the configuration of encryption options. Initialization must be performed on every node before configuration options may be set and encryption may be enabled.
This command prompts for confirmation, because the --initnode function overwrites any previously generated identification or authentication data on the node. Successful execution generates the node CP certificate, the key authentication center (KAC) certificate, the FIPS Crypto Officer, and the FIPS User key pairs.
Some of the certificates generated with this command may need to be exported so that they can be registered with external entities, such as the key vault or the group leader, for mutual authentication. Refer to the Fabric OS Encryption Administrator’s Guide for details.
146 Fabric OS Command Reference53-1001764-02

cryptoCfg 2
The --initnode function must be performed before the --initEE function may be performed.
--initEE Initializes the encryption engine (EE). This command generates critical security parameters (CSPs) and certificates in the CryptoModule’s security processor (SP). The CP and the SP perform a certificate exchange to register respective authorization data. Initialization must be performed on every encryption engine before configuration options may be set and encryption may be enabled.
This command prompts for confirmation, because it overwrites any previously generated identification or authentication data on the SP. Existing key encryption keys (KEKs) such as link keys or master keys are erased. If this is not a first-time initialization, make sure to export the master key before running this command. If the encryption engine was configured with an LKM key vault, you will have to reconfigure the key vault to regenerate the Trusted Link after initializing the encryption engine.
The --initnode function must be performed before the --initEE function may be performed.
slot Specifies the slot number of the encryption engine to be initialized. This operand is required on bladed systems.
--regEE Registers a previously initialized encryption engine with the CP or chassis. The CP and the specified encryption engine perform a certificate exchange to register respective authorization lists across the encryption engine’s FIPS boundary. The encryption blade's certificate is registered with the CP. The CP, FIPS Crypto Officer, and FIPS User certificate are registered with the specified encryption engine.
slot Specifies the slot number of the encryption engine to be registered. This operand is required on bladed systems.
--enableEE | --disableEE Enables or disables an encryption engine to perform encryption. You must create the encryption group and complete the key vault registration before you can enable an encryption engine for encryption. In addition, you must re-enable the encryption engine for encryption every time a Brocade Encryption Switch or DCX chassis goes through a power cycle event or after issuing slotPowerOff followed by slotPowerOn for an FS8-18 blade. This command is valid on all nodes.
slot Specifies the slot number to identify the encryption engine. This operand is required on bladed systems.
--export Exports a certificate from the local encryption switch or blade to a specified external host or to a mounted USB device. This command is valid on all nodes. The files are exported from the predetermined directory that was generated during the node initialization phase. The following operands are supported with the --export command:
-scp Exports a specified certificate to an external host using the secure copy (SCP) protocol.
When -scp is specified, the following operands are required:
Fabric OS Command Reference 14753-1001764-02

cryptoCfg2
host IP | host_name Specifies the IP address of the host to which the file is to be exported. To specify the host by name, it must first be configured with dnsconfig.
host_username Specifies the user name for the host. Depending on your host configuration, the command may prompt for a password.
host_file_path Specifies the fully qualified path to the file on the host to which the file is to be exported. This includes the file name. Make sure to name your certificates so you can track the file type and the originator switch, for example, name_cpcert.pem.
-usb Exports a specified certificate to a mounted USB storage device. When -usb is specified, the following operands are required:
dest_filename Specifies the name of the file on the USB device to which the file is to be exported. The file is stored in a predetermined default directory on the storage device.
Specify one of the following certificates to be exported. Certificates must be specified by file type. Referring to certificates by file name is not permitted. These file types are valid both with the -scp and with the -usb options.
-dhchallenge vault_IP_address Exports the DH Challenge file for the specified key vault.
-currentMK Exports the current master key file.
-KACcert Exports the KAC certificate.
-KACcsr Exports the certificate sign request file. Use cryptocfg –-reg –KACcert to register the certificate on the node after it has been signed and reimported. This procedure must be performed for all nodes that participate in a two-way certificate exchange-based authentication mechanism with key vaults. Two-way certificate exchange is supported only for the RKM, HP SKM, and NCKA key vaults.
-CPcert Exports the member node CP certificate.
--import Imports a certificate from a specified external host or from a mounted USB storage device to a predetermined directory on the local encryption switch or blade. This command is valid on all nodes.
Files to be imported include member node CP certificates and key vault certificates. Use the cryptocfg --show -file -all command to view all imported files. The following operands are supported with the --import command:
-scp Imports a specified certificate from an external host using the secure copy (SCP) protocol. When -scp is specified, the following operands are required:
local_name Specifies the name to be assigned to the imported certificate. This is a user-generated file name.
host_IP | host_name Specifies the IP address or name of the host from which to import the file. To specify the host by name, it must first be configured with dnsconfig.
148 Fabric OS Command Reference53-1001764-02

cryptoCfg 2
host_username Specifies the user name for the host. Depending on your host configuration, this command may prompt for a password.
host_file_path Specifies the fully qualified path of the file to be imported. The path must include the file name.
-usb Imports a file from a mounted USB storage device. This command is valid only on nodes with an attached USB device. When -usb is specified, the following operands are required:
dest_filename Specifies the name to be assigned to the imported file. This is a user-generated file name.
source_filename Specifies the name of the certificate on the USB storage device from which you are importing.
--reg -membernode Registers a member node with the group leader. This command is valid only on the group leader. The encryption group must have been created prior to performing member node registration. All member nodes and group leaders must be registered before encryption group discovery and formation can occur.
The order in which member node registration is performed defines group leader succession. At any given time, there is only one active group leader in an encryption group. The group leader succession list Specifies the order in which group leadership is assumed if the current group leader is not available.
The following operands are required when registering a member node with the group leader:
member_node_WWN Specifies the switch world wide name of the member node.
member_node_certfile Specifies the member node CP certificate. You must have exported this file earlier to external storage and then imported it to the group leader before you can register a member node. Use cryptocfg --show -file -all to view all imported certificates.
member_node_IP_addr Specifies the IP address of the member node to be registered with the group leader.
--dereg -membernode Removes the registration for the specified member node. This command is valid only on the group leader. The node is identified by the switch WWN.
member_node_WWN Specifies the member node by its switch WWN. This operand is required when removing a node registration.
Fabric OS Command Reference 14953-1001764-02

cryptoCfg2
--dhchallenge Establishes a link key agreement protocol between a node and an instance of the primary or backup NetApp Lifetime Key Management (LKM) appliance. This command generates the Diffie-Hellman challenge that is passed from the node to the specified NetApp LKM appliance. When quorum authentication is enabled and the quorum size is greater than zero, this operation requires authentication of a quorum of authentication cards. This command is valid on all nodes.
vault_IP_addr Specifies the IP address of the NetApp LKM appliance. This operand is required.
--dhresponse Accepts the LKM Diffie-Hellman response from the specified NetApp LKM appliance and generates the link key on the node on which this command is issued. The DH response occurs by an automatic trusted link establishment method. The LKM appliance must be specified by its vault_IP_addr. The DH challenge request must be approved on the Net App LKM appliance for this command to succeed. When quorum authentication is enabled (Quorum Size is > 0), this operation requires authentication of a quorum of authentication cards.
vault_IP_addr Specifies the IP address of the NetApp LKM appliance. This operand is required.
--zeroizeEE Zeroizes all critical security parameters on the local encryption switch or blade including all data encryption keys. This command is valid on all nodes. This operation causes the encryption switch to reboot. When issued on a chassis, it power-cycles the encryption blade only. This command prompts for confirmation and should be exercised with caution.
slot Specifies the slot number of the encryption engine to be zeroized on a bladed system.
--delete -file Deletes an imported file. The file must be specified by its local name. This command is valid on all nodes.
local_name Specifies the file to be deleted form the local directory where certificates are stored.
--reg -KAClogin Registers the node KAC login credentials (username and password) with the configured key vaults. This command is valid only for the Thales nCipher (NCKA) and HPSKM key vaults. This command must be run on each member node.
primary|secondary Specifies the key vault as primary or secondary.
For the NCKA, run this command on both a primary and a secondary key vault. The system generates a username based on the switch WWN. The username and group under which the username should be created on the key vault are displayed when the command is executed. Configure the password on the switch and create the same username on the key vault.
For the SKM, run this command only for the primary key vault. The login credential must match a valid username/password pair configured on the key vault. The same username/password must be configured on all the nodes of any given encryption group to prevent connectivity issues between the SKM and the switch. However, there is no enforcement from the switch to ensure
150 Fabric OS Command Reference53-1001764-02

cryptoCfg 2
the same username is configured on all nodes. Different encryption groups can use different usernames so long as all nodes in the group have the same username. Changing the username using -KAClogin renders the previously created keys inaccessible. When changing the username you must do the same on the key vault, and you must change the key owner for all keys of all LUNs through the SKM GUI. For downgrade considerations, refer to the Fabric OS Encryption Administrator’s Guide.
--show Displays node configuration information. This command requires one of the following mutually exclusive operands:
-localEE Displays encryption engine information local to the node.
-file -all Displays all imported certificates. The -all parameter is required with the --show -file command.
--rebalance [slot] Rebalances the disk and tape containers to maximize throughput. Rebalancing is recommended after containers have been added, removed, moved, failed over, and failed back. This is a disruptive operation. You may have to restart backup applications after rebalancing is complete. Optionally specify a slot number on bladed systems.
Function 2. Encryption group configuration
Synopsis cryptocfg --help -groupcfg
cryptocfg --create -encgroup encryption_group_name
cryptocfg --delete -encgroup encryption_group_name
cryptocfg --reg -keyvault cert_label certfile hostname | ip_address primary | secondary
cryptocfg --dereg -keyvault cert_label
cryptocfg --reg -KACcert signed_certfile primary | secondary
cryptocfg --set -keyvault LKM | RKM | SKM | TEMS
cryptocfg --set -failbackmode auto | manual
cryptocfg --set -hbmisses value
cryptocfg --set -hbtimeout value
cryptocfg --set -quorumsize value
cryptocfg --set -systemcard enable | disable
cryptocfg --set -replication enable | disable
cryptocfg --add -membernode node_WWN
cryptocfg --eject -membernode node_WWN
cryptocfg --leave_encryption_group
cryptocfg --genmasterkey
cryptocfg --exportmasterkey [-file]
cryptocfg --recovermasterkey currentMK | alternateMK -keyID keyID | -srcfile filename
cryptocfg --show -groupcfg
Fabric OS Command Reference 15153-1001764-02

cryptoCfg2
cryptocfg --show -groupmember -all | node_WWN
cryptocfg --show -egstatus -cfg | -stat
cryptocfg --sync -encgroup
cryptocfg --sync -securitydb
Description Use these cryptoCfg commands to create or delete an encryption group, to add or remove group member nodes, key vaults, and authentication cards, to enable or disable system cards, to enable quorum authentication and set the quorum size, to manage keys including key recovery from backup, to configure group-wide policies, and to sync the encryption group databases.
An encryption group is a collection of encryption engines that share the same key vault and are managed as a group. All EEs in a node are part of the same encryption group. Fabric OS v6.2.0 and later support up to four nodes per encryption group, and up to two encryption engines per node. The maximum number of EEs per encryption group is sixteen (four per member node).
With the exception of the --help and --show commands, all group configuration functions must be performed from the designated group leader. The encryption switch or blade on which you create the encryption group becomes the designated group leader. The group leader distributes all relevant configuration data to the member nodes in the encryption group.
The groupCfg commands include three display options that show group configuration, runtime status, and group member information. Refer to the Appendix of the Fabric OS Encryption Administrator’s Guide for a more comprehensive explanation of system states.
Use --show -groupcfg to display encryption group and member configuration parameters, including the following:
• Encryption group name: user-defined label
• Encryption group policies:
- Failback mode: Auto or Manual
- Replication mode: Enabled or Disabled
- Heartbeat misses: numeric value
- Heartbeat timeout: value in seconds
- Key Vault Type: LKM, RKM, SKM, or NCKA
- System Card: Disabled or Enabled
• For each configured key vault, primary and secondary, the command shows:
- IP address: The key vault IP address
- Certificate ID: the key vault certificate name
- State: connected, disconnected, up, authentication failure, or unknown.
- Type: LKM, RKM, SKM, or NCKA
If an SKM key vault is configured in HA mode, no connection information is displayed because the system is unable to detect the connection status of an SKM appliance in an HA configuration.
152 Fabric OS Command Reference53-1001764-02

cryptoCfg 2
• Additional diagnostic key vault information to facilitate troubleshooting of connectivity (For the TEMS and LKM key vaults, "Additional Primary Key Vault Information" and "Additional Secondary Key Vault Information" is displayed separately. For the SKM and RKM there is just one section "Additional Key Vault/Cluster Information"):
- :Key Vault/CA Certificate Validity: Yes or No
- Port for Key Vault Connection: numeric identifier
- Time of Day on Key Server: time stamp or N/A
- Server SDK Version: revision number or N/A
• Diagnostic information for the encryption node (key vault client):
- Node KAC Certificate Validity: Yes (valid) or No (invalid)
- Time of Day on the Switch: time stamp
- Client SDK Version: SDK revision number
- Client Username: node login name for key vault
- Client Usergroup: user group
- Connection Timeout: time in seconds
- Response Timeout: time in seconds
- Connection Idle Timeout: time in seconds
- Status message indicating success/readiness for key operations or, if there is a problem, displays a diagnostic message. For example, if the username on the switch has changed, but the key owner is still the old username, key operations will not be permitted.
• Quorum information includes:
- Authentication Quorum Size: 0 (disabled), 1- 5 (enabled).
- Authentication Cards: Certificate ID /label or “not configured”.
• Node list display includes:
- Total number of defined nodes: numeric value
- Group leader node name: Node WWN
- Encryption group state: CONVERGED = Encryption group formed successfully. CONVERGING = Encryption group partially formed, member nodes may still be in discovery process. DEGRADED = Nodes lost connection with the group.
• For each node in the encryption group, the following information is displayed:
- Node name: the node WWN
- IP address: the node IP address
- Role: GroupLeader or MemberNode
Use --show groupmember to display encryption group member information for one or all member nodes. Depending on the key vault configuration, the command displays master key information (RKM) or link key information (LKM).
• Node List (displayed only with the --all option)
- Total number of defined nodes: numeric value
- Group leader node name: the node WWN
- Encryption group state: CONVERGED = Encryption group formed successfully. CONVERGING = Encryption group partially formed, member nodes may still be in discovery process. DEGRADED = Nodes lost connection with the group.
Fabric OS Command Reference 15353-1001764-02

cryptoCfg2
• For each node, the display includes the following:
- Node Name: the node WWN
- State: DISCOVERED = The node is part of the encryption group. DISCOVERING = The node is in the process of discovery.
- Role: GroupLeader or MemberNode
- IP address: the node IP address
- Certificate: the node CP certificate name (user-defined)
- Current master key (or primary link key) state: Not configured, Saved, Created, Propagated, Valid, or Invalid.
- Current master key ID (or primary link key ID): Shows key ID or zero if not configured.
- Alternate master key (or secondary link key) state: Not configured, Saved, Created, Propagated, Valid, or Invalid.
- Alternate master key ID (or secondary link key ID): Shows key ID or zero if not configured.
• For each encryption engine, the command displays the following:
- EE slot number: the encryption engine slot number
- SP state: refer to the appendix in the Fabric OS Encryption Administrator’s Guide
- Current master key ID (if RKM is configured) or primary link key ID (if LKM is configured).
- Alternate master key ID (if RKM is configured) or secondary link keyID (if LKM is configured).
- HA cluster name to which this encryption engine belongs, or “No HA cluster membership”.
- Media Type: DISK, TAPE, or MEDIA NOT DEFINED.
Use --show -egstatus with the -stat or -cfg option to display configuration or status information for all nodes in the encryption group. This command displays a superset of information included in the -groupcfg, -groupmember and -hacluster show commands. Refer to these commands for a description of display details.
Note All encryption engines s in the encryption group must be interconnected through a dedicated local area network (LAN), preferably on the same subnet and on the same VLAN using the GbE ports on the encryption switch or blade. The two GbE ports of each member node (Eth0 and Eth1) should be connected to the same IP Network, the same subnet, and the same VLAN. Configure the GbE ports (I/O sync links) with an IP address for the eth0 Ethernet interface, and also configure a gateway for these I/O sync links. Refer to the ipAddrSet help page for instructions on configuring the Ethernet interface.
These I/O sync link connections must be established before you enable the EEs for encryption. If these configuration steps are not performed, you cannot create an HA cluster, perform a first-time encryption, or initiate a rekeying session.
Operands The cryptoCfg group configuration function has the following operands:
--help -groupcfg Displays the synopsis for the group configuration function. This command is valid on all nodes.
--create -encgroup Creates an encryption group. The node on which this command is invoked becomes the group leader. You must specify a name when creating an encryption group.
154 Fabric OS Command Reference53-1001764-02

cryptoCfg 2
encryption_group_name Specifies the name of the encryption group to be created. The name can be up to 15 characters long and include alphanumeric characters and underscores. White space, hyphens, and other special characters are not permitted.
--delete -encgroup Deletes an encryption group with the specified name. This command is valid only on the group leader. This command fails if the encryption group has more than one node, or if any HA cluster configurations, CryptoTarget container/LUN configurations, or tape pool configurations exist in the encryption group. Remove excess member nodes and clear all HA cluster, CryptoTarget container/LUN, or tape pool configurations before deleting an encryption group.
encryption_group_name Specifies the name of the encryption group to be deleted. This operand is required when deleting an encryption group.
--reg -keyvault Registers the specified key vault (primary or secondary) with the encryption engines of all nodes present in an encryption group. Upon successful registration, a connection to the key vault is automatically established. This command is valid only on the group leader. Registered certificates are distributed from the group leader to all member nodes in the encryption group. Each node in the encryption group distributes the certificates to their respective encryption engines.
The following operands are required when registering a key vault:
cert_label Specifies the key vault certificate label. This is a user-generated name for the specified key vault. Use cryptocfg --show -groupcfg to view the key vault label after registration is complete.
certfile Specifies the certificate file. This file must be imported prior to registering the key vault and reside in the predetermined directory where certificates are stored. In the case of the HP SKM, this operand specifies the CA file, which is the certificate of the signing authority on the SKM. Use --show -file -all for a listing of imported certificates.
hostname | ip_address Specifies the key vault by providing either a host name or IP address. If you are registering a key vault that is part of an RKM cluster, the value for ip_address is the virtual IP address for the RKM cluster and not the address of the actual key vault.
primary | secondary Specifies the key vault as either primary or secondary. The secondary key vault serves as backup.
--dereg -keyvault Removes the registration for a specified key vault. The key vault registration is identified by specifying the certificate label. Removing a key vault registration disconnects the key vault. This command is valid only on the group leader.
cert_label Specifies the key vault certificate label. This operand is required when removing the registration for a key vault.
Fabric OS Command Reference 15553-1001764-02

cryptoCfg2
--reg -KACcert Registers the signed node certificate. After being exported and signed by the external signing authority, the signed node certificate must be imported back into the node and registered for a successful two-way certificate exchange with the key vault. This command is valid only on the group leader.
Registration functions need to be invoked on all the nodes in a DEK cluster for their respective signed node certificates. The following operands are required:
signed_certfile Specifies the name of the signed node certificate to be reimported.
primary | secondary Specifies the signing key vault as primary or secondary. This operand is valid only with the NCKA key vault, which requires the CSR to be signed by the primary or secondary vault. If both primary and secondary vaults are configured, this command must be run once for the primary and once for secondary key vault from every node.
--set -keyvault Sets the key vault type. This command is valid only on the group leader.
value Specifies the key vault type. The default is set to no value. This operand is required. Valid values for -keyvault are:
LKM Specifies the NetApp LKM appliance (trusted key vault).
RKM Specifies the RSA Key Manager (RKM) (opaque key repository).
SKM Specifies the HP Secure Key Manager (SKM) (opaque key repository).
TEMS Specifies the Thales nCipher key management appliance (opaque key repository, a.k.a NCKA).
--set -failbackmode Sets the failback mode parameter. This parameter is set on the group leader. Valid values for failback mode are:
auto Enables automatic failback. In this mode, failback occurs automatically within an HA cluster when an encryption switch or blade that failed earlier has been restored or replaced. Automatic failback mode is enabled by default.
manual Enables manual failback. In this mode, failback must be initiated manually after an encryption switch or blade that failed earlier has been restored or replaced.
--set -hbmisses Sets the number of heartbeat misses allowed in a node that is part of an encryption group before the node is declared unreachable. This value is set in conjunction with the time-out value. It must be configured at the group leader node and is distributed to all member nodes in the encryption group. The following operand is required:
value Specifies the number of heartbeat misses. The default value is 3. The range is 1-15 in integer increments only.
--set -hbtimeout Sets the time-out value for the heartbeat. This parameter must be configured at the group leader node and is distributed to all member nodes in the encryption group. The following operand is required:
value Specifies the heartbeat time-out in seconds. The default value is 2 seconds. Valid values are integers in the range between 1 and 30 seconds.
156 Fabric OS Command Reference53-1001764-02

cryptoCfg 2
--set -quorumsize Sets the quorum size used to authenticate functions that require a quorum of authentication cards. The default value is zero. You can set the quorum size only if the current value is zero. Note that this value is different from the recovery set size that specifies the number of recovery shares used to perform Master Key recovery. When quorum authentication is enabled (Quorum Size is > 0), this operation requires authentication of a quorum of authentication cards.
value Specifies the quorum size. Valid values are 0 (quorum authentication is disabled) and 1-5 (quorum authentication is enabled). This operand is required.
--set -systemcard enable | disable Enables or disables the system card usage policy. When the policy is enabled, a system card is required to be inserted in an encryption engine to enable encryption after a power-cycle event. When quorum authentication is enabled (Quorum Size is > 0), this operation requires authentication of a quorum of authentication cards. The policy is by default disabled. This command must be executed on the group leader.
. --set -replication enable | disable Enables or disables replication-specific features. You must enable replication before you can use replication-specific features such as the -newLUN, -include_mirror, or the --refreshDEK command. Replication is disabled by default; it must be enabled on the group leader.
--add -membernode Adds the specified member node to the existing encryption group. The member node is specified by its node WWN. This command is valid only on the group leader. Initial setup on the node must be performed prior to adding the node to an encryption group.
This command is required only when a node that was earlier part of encryption group (online and DISCOVERED) was ejected or left the encryption group and is now added back to that encryption group. A member node that is online during registration is added automatically to the encryption group. The following operand is required:
node_WWN Specifies the WWN of the node to be added back to the encryption group.
--eject -membernode Removes a member node from the existing encryption group. The node is specified by its node WWN. This command is valid only on the group leader. The node must be online (in DISCOVERED state) for this command to succeed. To remove a node that is not online (in DISCOVERING State), use --dereg -membernode. You must remove the EEs from the HA cluster and delete any Crypto Target container/LUN configurations from this node before ejecting the node or the command fails. The following operand is required when ejecting a member node:
node_WWN Specifies the node WWN of the node to be removed from the encryption group.
Fabric OS Command Reference 15753-1001764-02

cryptoCfg2
--leave_encryption_group Clears the node's states pertaining to the node's membership in the encryption group. This command is invoked from the member node that is to be ejected from the encryption group.The node must be online (in DISCOVERED state) for this command to succeed. To remove a node that is not online (in DISCOVERING State), use --dereg -membernode.
If there are CryptoTarget container/LUN configurations on the node and the encryption engines of this node are part of any HA Cluster configuration, this command prompts you to either continue leaving the encryption group while retaining the configuration, or to abort the leave operation. It is recommended that you remove the EEs from the HA cluster and delete any CryptoTarget container and Crypto LUN configurations from this node prior to initiating a leave operation.
--genmasterkey Generates a master key. A master key is needed when an opaque key vault such as RKM is used. The master key must be exported (backed up) before it may be used. This command is valid only on the group leader. Only one master key per key vault is needed for the entire encryption group. When a master key is generated and a master key exists, the current master key becomes the alternate master Key and the newly generated master key becomes the current master key.
--exportmasterkey Exports the current master key encrypted in a key generated from a specified pass phrase. By default this command backs up the key to the attached key vaults, or optionally to a predetermined file on the switch. This command is valid only on the group leader. This command prompts for a pass phrase.
passphrase Specifies the pass phrase for the master key encryption. A pass phrase must be between 8 and 40 characters in length and can contain any character combination. Make a note of the pass phrase, because the same pass phrase is required to restore the master key from backup. This operand is required.
-file Stores the encrypted master key in a predetermined file on the switch. This operand is optional. If the -file operand is not specified, the encrypted master key is stored in the attached key vaults, and a key ID uniquely identifying the encrypted master key is displayed. Make a note of the key ID, because the same key ID is required to restore the master key from backup.
--recovermasterkey Restores the master key from backup. This command is valid only on the group leader. This command prompts for a pass phrase:
passphrase Specifies the pass phrase for recovering the master key. The pass phrase must be the samethat was used to back up the master key with the --exportmasterkey command.
currentMK | alternateMK Specifies whether the master key should be restored to the current position or the alternate position. This command replaces the specified existing master key and should be exercised with caution. A master key is typically restored to the alternate position to enable decryption of older data encryption keys (DEKs) that were encrypted in that master key.
158 Fabric OS Command Reference53-1001764-02

cryptoCfg 2
-keyID keyID Specifies the master key ID. This option restores the master key from the key vault. The master key ID was returned when it was backed up to the key vault with the --exportmasterkey command. The -keyID and the -srcfile options are mutually exclusive.
-srcfile filename Specifies the file name when restoring the master key from a file in the predetermined directory on the switch. Use this operand when the master key was backed up to a file rather than to a key vault. The -keyID and the -srcfile operands are mutually exclusive.
--show -groupcfg Displays the group-wide encryption policy configuration. This command is valid on all member nodes and on the group leader.
--show -groupmember Displays detailed information for all encryption group members or for a single member. This command is valid on all member nodes and on the group leader. The following required operands are mutually exclusive:
-all Displays information on all nodes in the existing encryption group.
node_WWN Displays information on a single specified node. The node is identified by its node WWN.
--show -egstatus Displays encryption group configuration or status information for all nodes in the encryption group. The following operands are exclusive:
-cfg Displays encryption group configuration information.
-stat Displays encryption group status information.
--sync -encgroup Manually synchronizes the encryption group database belonging to the group leader node with the databases of all member nodes that are out of sync. If this command is invoked when the encryption group databases are in sync, the command is ignored.
Note: When the encryption group is out of sync and the group leader reboots, the newly selected group leader pushes its database information to all other members. The new group leader’s database information may be different from what was set up before the group leader was rebooted.
--sync -securitydb Distributes the security database from the group leader node to all member nodes. This operation can resolve problems with master key propagation. The synchronization occurs every time this command is executed regardless of whether or not the security database was in sync across all nodes in the encryption group. This command is valid only on the group leader.
Function 3. High Availability (HA) cluster configuration
Synopsis cryptocfg --help -hacluster
cryptocfg --create -hacluster HA_cluster_name [node_WWN [slot]] [node_WWN [slot]]
cryptocfg --delete -hacluster HA_cluster_name
cryptocfg --add -haclustermember HA_cluster_name node_WWN [slot] [node_WWN [slot]]
cryptocfg --remove -haclustermember HA_cluster_name node_WWN [slot] [node_WWN [slot]]
Fabric OS Command Reference 15953-1001764-02

cryptoCfg2
cryptocfg --replace [-haclustermember HA_cluster_name] current_node_WWN [slot] new_node_WWN [slot]
cryptocfg --show -hacluster -all | HA_cluster_name
Description Use these cryptoCfg commands to configure and manage High Availability (HA) clusters.
An HA cluster consists of two encryption engines configured to host the CryptoTargets and to provide the active/standby failover and failback capabilities in a pair-wise relationship in a single fabric. The encryption engines that are part of an HA cluster must belong to the same encryption group and be part of the same fabric.
Failure to ensure that HA cluster members are part of the same encryption group dissolves the HA cluster and the encryption engines lose their failover capability.
The HA cluster configuration must be performed on the group leader. Configuration changes must be committed before they take effect. Use the cryptocfg --commit command to commit a new configuration or a configuration change. Refer to section“5. Transaction management” for more information. Any operation related to an HA cluster performed without a commit operation will not survive across switch reboots, power cycles, CP failover, or HA reboots.
The command group includes a show option, --show -hacluster. When invoked on a member node, this command displays the committed HA cluster configuration. When invoked on the group leader, both defined and committed configuration data is displayed including the following:
• Encryption group name: A user-defined name
• Number of HA clusters in the existing encryption group: numeric value
• For each HA cluster:
- HA cluster name: user-defined label
- Number of encryption engine entries: numeric value
- HA cluster Status: Committed or Defined
• For each encryption engine member in the HA cluster:
- EE WWN: the encryption group world wide name
- EE slot number: the encryption group slot number
- EE status: online or offline
Operands The cryptoCfg HA cluster configuration function has the following operands:
--help -hacluster Displays the synopsis for the HA cluster configuration function. This command is valid on all nodes.
--create -hacluster ‘ Defines an HA cluster with a specified name and optionally associates up to two encryption engines with the HA cluster. This command is valid only on the group leader. The EEs must be members of the same encryption group as the group leader on which this command is issued. This command fails if the member nodes’ IP addresses for the GbE ports (I/O sync ports) are not
configured. The encryption engines must belong to different switches or chassis. This rule is enforced by the CLI to ensure redundancy.
The following operands are supported:
160 Fabric OS Command Reference53-1001764-02

cryptoCfg 2
HA_cluster_name Specifies the name for the HA cluster. The name can be up to 31 characters long and can include alphanumeric characters, hyphens, and underscores. White space and other special characters are not permitted. This operand is required.
node_WWN Specifies the WWN of the switch or chassis to which the encryption engine belongs. This operand is optional; if omitted, only the HA cluster name is defined. You may add EEs separately with the --add -haclustermember command.
slot Specifies the encryption engine slot number on bladed systems.
--delete -hacluster Deletes the HA cluster with the specified name. This command is valid only on the group leader. The following operand is required:
HA_cluster_name Specifies the name of the HA cluster to be deleted.
--add -haclustermember Adds one or more encryption engine members to an already configured HA. A maximum of two HA cluster members is currently supported. The EEs must be part of the same encryption group as the node on which this command is issued. This command is valid only on the group leader. The encryption engines must belong to different switches or chassis. This rule is enforced by the CLI to ensure redundancy.
The following operands are required with the --add command:
node_WWN Specifies the node WWN of the switch or chassis to which the encryption engine belongs.
slot Specifies the encryption engine slot number on bladed systems.
--remove -haclustermember Removes one or both encryption engine members from an already configured HA cluster. This command is valid only on the group leader. This command only removes the failover/failback capability for the removed EEs; it does not affect the relationship between configured CryptoTarget containers and the encryption engine that is removed from the HA cluster. The containers still belong to this encryption engine and encryption operations continue.
The following operands are required with the --remove command:
node_WWN Specifies the WWN of the switch or chassis to which the encryption engine belongs.
slot Specifies the encryption engine slot number on bladed systems.
--replace -haclustermember Replaces an encryption engine, either failed or alive, with an alternate encryption engine. All target associations for the current encryption engine are transferred over to the alternate encryption engine when this command is executed. The alternate encryption engine does not have to be part of the current HA cluster. Upon successful replacement, the alternate encryption engine automatically becomes part of the configured HA cluster and disrupted peer relationships are repaired. This command is only valid on the group leader.
Fabric OS Command Reference 16153-1001764-02

cryptoCfg2
The following operands are supported with the --replace command:
HA_cluster_name Specifies the HA cluster member to be replaced. The HA cluster name must be specified when this operand is used. This operand is optional. It is not needed if the encryption engine to be replaced is not part of an HA cluster.
current_node_WWN [slot] Specifies the WWN of the encryption engine to be replaced. This operand is required. On bladed systems, include the encryption engine slot number.
new_node_WWN [slot] Specifies the WWN of the encryption engine that is to replace the current encryption engine. This operand is required. On bladed systems, include the encryption engine’s slot number.
--show -hacluster Displays the specified HA clusters in the encryption group and associated state information for all HA clusters or for a single, specified HA cluster. When invoked on a member node, only the committed HA cluster configuration is displayed. When invoked on the group leader, both defined and committed configuration data is displayed.
The following operands are mutually exclusive:
-all Displays configuration information for all HA clusters.
HA_cluster_name Displays configuration information for a specified HA cluster.
Function 4. Storage device configuration and management
Synopsis cryptocfg --help -devicecfg
cryptocfg --create -container disk | tape crypto_target_container_name EE_node_WWN [EE_slot] target_PWWN target_NWWN [-initiator initiator_PWWN initiator_NWWN [initiator_PWWN initiator_NWWN]...]
cryptocfg --delete -container crypto_target_container_name
cryptocfg --failback -EE current_node_WWN [current_slot] new_node_WWN [new_slot]
cryptocfg --move -container crypto_target_container_name new_node_WWN [new_slot]
cryptocfg --add -initiator crypto_target_container_name initiator_PWWN initiator_NWWN [[initiator_PWWN initiator_NWWN]...]
cryptocfg --remove -initiator crypto_target_container_name initiator_PWWN [initiator_PWWN...]
cryptocfg --add -LUN crypto_target_container_name LUN_Num | LUN_Num_Range [initiator_PWWN initiator NWWN [initiator_PWWN initiator NWWN]...] [-lunstate encrypted | cleartext] [-keyID keyID] [-encryption_format native | DF_compatible] [-encrypt | -cleartext] [-enable_encexistingdata | -disable_encexistingdata] [-enablerekey time_period | -disable_rekey] [-key_lifespan time_in_days | none] [-newLUN]
162 Fabric OS Command Reference53-1001764-02

cryptoCfg 2
cryptocfg --modify -LUN crypto_target_container_name LUN_Num initiator_PWWN [-encryption_format native | DF_compatible] [-encrypt | -cleartext] [-enable_encexistingdata | -disable_encexistingdata] [-enablerekey time_period | -disable_rekey]
cryptocfg --remove -LUN crypto_target_container_name LUN_Num initiator_PWWN
cryptocfg --enable -LUN crypto_target_container_name LUN_Num initiator_PWWN
cryptocfg --create -tapepool -label pool_label | -num pool_num [-encryption_format native | DF_compatible] [-encrypt | -cleartext] [-key_lifespan time_in_days | none]
cryptocfg --delete -tapepool -label pool_label | -num pool_num
cryptocfg --modify -tapepool -label pool_label | -num pool_num [-encryption_format native | DF_compatible] [-encrypt | -cleartext]
cryptocfg --manual_rekey crypto_target_container_name LUN_Num initiator_PWWN [-include_mirror]
cryptocfg --manual_rekey -all [-include_mirror]
cryptocfg --resume_rekey crypto_target_container_name LUN_Num initiator_PWWN
cryptocfg --discoverLUN crypto_target_container_name
cryptocfg --show -container -all -cfg | -stat
cryptocfg --show -container crypto_target_container_name -cfg | -stat
cryptocfg --show -tapepool -all | -label pool_label |-num pool_num -cfg | -stat
cryptocfg --show -LUN crypto_target_container_name LUN_Num initiator_PWWN -cfg | -stat
cryptocfg --show -rekey -all
cryptocfg --show -rekey crypto_target_container_name
cryptocfg --show -rekey crypto_target_container_name LUN_Num initiator_PWWN
cryptocfg --show -tape_sessions -all
cryptocfg --show -tape_sessions crypto_target_container_name
cryptocfg --clearstats -container [-all | crypto_target_container_name ]
cryptocfg --clearstats -LUN crypto_target_container_name LUN_Num initiator_PWWN
cryptocfg --refreshDEK crypto_target_container_name LUN_Num initiator_PWWN
Description Use these cryptoCfg commands to configure and manage tape or disk devices that store the encrypted and compressed data.
A CryptoTarget container (CTC) is a configuration of “virtual devices” that is created for each target port hosted on a Brocade Encryption Switch or FS8-18 blade. The container holds the configuration information for a single target, including associated hosts and LUN settings. A CryptoTarget container interfaces between the encryption engine, the external storage devices (targets), and the initiators (hosts) that can access the storage devices through the target ports.
Fabric OS Command Reference 16353-1001764-02

cryptoCfg2
Virtual devices redirect the traffic between host and target/LUN to encryption engines so they can perform cryptographic operations. To enable frame redirection, you must create a target-initiator zone prior to performing any CryptoTarget container configuration.
The CryptoTarget container (CTC) and associated Crypto LUN configuration is always configured from the group leader node, and the configuration is subsequently propagated to all members in the encryption group.
CTC configuration uses a transaction model. Configuration changes must be committed before they take effect. Use the cryptocfg --commit command to commit the transaction. Refer to section “5. Transaction management” for more information.
This command set supports the following tasks:
• Configure and manage CryptoTarget containers (CTCs). Create, move, or delete a CTC, add or remove initiators (hosts permitted to access the targets), or manually initiate a failback of an encryption engine.
• Configure and manage logical unit numbers (LUNs) for disk and tape storage devices: add a LUN to a CTC, set or modify LUN encryption policy parameters, or remove a LUN from a CTC. Perform LUN discovery.
• Configure and manage tape pools: create a tape pool, set or modify tape pool encryption policies, or delete a tape pool. Perform LUN discovery.
• Manage rekey operations for primary and mirror LUNS.
In addition, this command set includes the following display commands. Output may vary depending on your configuration. Refer to the Appendix of the Fabric OS Encryption Administrator’s Guide for a more comprehensive explanation of system states.
Use the --show -container -all -stat command for runtime status information on all CryptoTarget containers in the encryption group. The display includes the following information:
• Encryption group name: user-define label
• Number of containers numeric value
• For each container:
- Container name: user-defined label
- Type: disk or tape
- EE node: The node WWN
- EE slot: the slot number for the encryption engine
- Target: The target port WWN
- Target PID: The target PID
- VT: The virtual target port WWN
- VT PID: The virtual target PID
- Number of hosts: numeric value
- Number of tape sessions (or rekey sessions): numeric value
- Host: The port WWN
- Host PID: The host PID
- VI: The virtual initiator port WWN
- VI PID: The virtual initiator PID
- Number of LUNs: numeric value
164 Fabric OS Command Reference53-1001764-02

cryptoCfg 2
- LUN number: numeric ID
- LUN type: disk or tape drive, tape medium changer, tape attached medium changer, tape offline/unknown, or unsupported/other
- LUN serial number: The LUN serial number
- Encryption mode: encrypt or cleartext
- Encryption format: (brocade) native or DF-compatible
- Tape policy type: pool-based, LUN-based
- Encrypt existing data: disabled or enabled
- Rekey: disabled or enabled
- Key life: the key life span (in days)
- Volume/Pool label: the label for the tape volume or tape pool
- Internal EE LUN state: Encrypted, Cleartext, or Disabled (Data state is cleartext but metadata exists on the LUN, or vice versa.)
- Encryption algorithm: AES256-ECB (DF_compatible), AES256-GCM (native) or None (cleartext)
- Key ID state: Read, Write, or Key ID not applicable
- Key ID: The Key ID (if available)
- New LUN: Yes or No
- Replication LUN type: Primary or Mirror
- Tape session number: numeric value
- Number of uncompressed blocks: numeric value
Use the --show -container -all -cfg command for configuration information on all CryptoTarget containers in the encryption group, or specify a crypto_target_container_name for information on a specified CTC. The display includes the following information:
• Encryption group name: user-defined label
• Number of containers: numeric value
• For each container
- Container name: a user-defined label
- Type: tape or disk
- EE node: the node WWN
- EE slot: numeric value
- Target: target port WWN, node WWN
- VT: virtual target port WWN, node WWN
- Number of hosts: numeric value
- Configuration status: committed or defined
- For each host: the host port WWN and the node WWN
- For each VI: the virtual initiator port WWN and the node WWN
- Number of LUNs: numeric value
If a rekey session is in progress while the command is run, the following additional information is displayed:
• LUN number: numeric ID
Fabric OS Command Reference 16553-1001764-02

cryptoCfg2
• LUN type: disk, tape drive, tape medium changer, tape attached medium changer, offline/unknown, or unsupported/other
• LUN serial number (disk only): alpha-numeric ID
• Encryption mode: encrypt or cleartext
• Encryption format: native or DF compatible
• Encrypt existing data: enabled or disabled
• Rekey: enabled or disabled
• LUN state: refer to the appendix in the Fabric OS Encryption Administrator’s Guide
• Encryption algorithm: AES256 -XTS (disk), AES256-CCM (tape), or none
• Key ID state: Rekey
• Key ID: numeric identifier
• Key creation time: date and time of key creation
• Key life (in days); number of days until expiration
• Rekey status: numeric value
• Key expiration time
• Rekey session number: numeric value
• Percentage complete
• Rekey state: Read or write Phase
• Rekey role: primary, alternate
• Block size: numeric value
• Number of blocks: numeric value
• Current logical block address (LBA) being processed
Use the --show -tapepool command to display tape pool configuration parameters for all Tape pools or for a specific tape pool. For each tape pool, the display includes the following information:
• tape pool Label: user-define label
• Key Life: Life span in minutes
• Encryption mode: encrypt or cleartext
• Encryption format: native or DF compatible
• Configuration status: committed or defined
Use the --show -LUN command for a listing of Crypto LUN status or configuration information for a specific CTC.
When used with -stat the display includes the following LUN runtime status information:
• Container name: user-defined label
• Type: disk or tape
• EE node: node WWN
• EE slot: EE slot number
• Target: target port WWN and node WWN
• Target PID
• VT: virtual target port WWN and node WWN
• VT PID: virtual target PID
166 Fabric OS Command Reference53-1001764-02

cryptoCfg 2
• Number of hosts: numeric value
• Number of rekey (or tape) sessions: numeric value
• For each host:
- Host PWWN, NWWN: host port WWN and node WWN
- Host PID: host port ID
- VI PWWN, NWWN: virtual initiator port WWN and node WWN
- VI PID: virtual initiator port ID
• Number of LUNs: numeric value
• For each LUN:
- LUN number: numeric value
- LUN type: disk, tape drive, tape medium changer, tape attached medium changer, offline/unknown, or unsupported/other
- LUN serial number: alpha-numeric ID
- Encryption mode: encrypt or cleartext
- Encryption format: native or DF-compatible
- Encrypt existing data: enabled or disabled
- Rekey: enabled or disabled
- Tape policy type: pool-based or LUN-based
- Key life: key lifespan in days
- Volume/pool label
- LUN state: Refer to the Fabric OS Encryption Administrator’s Guide.
- Encryption algorithm: AES256 -XTS (disk), AES256-CCM (tape), or none
- Compression algorithm
- Key ID state: available or not available
- Key ID: numeric identifier if available
- New LUN: Yes or No
- Replication LUN type: Primary or Mirror
When used with -cfg the --show -LUN command displays LUN configuration information:
• EE node: node WWN
• EE slot: slot number
• Target: target port WWN and node NWWN
• VT: virtual target port WWN and node WWN
• Number of hosts: numeric value
• Configuration status: committed or defined
• For each host:
- Host port WWN and node WWN
- Virtual initiator port WWN and node WWN
- Virtual initiator PID
• Number of LUNs
Fabric OS Command Reference 16753-1001764-02

cryptoCfg2
• For each LUN:
- LUN number: numeric identifier
- LUN type: disk, tape drive, tape medium changer, tape attached medium changer, offline/unknown, or unsupported/other
- LUN status: numeric value
- Encryption mode: encrypt or cleartext
- Encryption format: native or DF compatible
- Tape policy type: pool-based or LUN-based
- Encrypt existing data: disabled or enabled
- Rekey: disabled or enabled
- Key ID state: Read, Write, or Key ID not applicable
- Key life (in days): numeric value
- Volume/pool label: user-defined label
- Rekey status: numeric value
If rekey- or tape sessions are in progress, the command shows:
• Number of rekey sessions in progress: numeric value
• For each rekey session the display includes:
- Rekey session number: numeric value
- Percent completion: numeric value
- Rekey state: Read or Write phase
- Tape volume/pool Label: user-defined label
- Tape state: mounted or unmounted
- Tape policy configuration details:
• Tape pool or tape
• Encryption or Cleartext
• Key life span in days
• Encryption Algorithm
• Compression Algorithm
• Number of Tape sessions in progress: numeric value
• For each Tape session the display includes:
- Tape Session Number: numeric value
- Number of uncompressed blocks: numeric value
- Number of compressed blocks: numeric value
- Number of uncompressed bytes: numeric value
- Number of compressed bytes: numeric value
Use the --show -rekey command to display all rekey sessions in progress on the current node or for a specified container. The display includes the following information:
• Number of rekey sessions in progress: numeric value
• For each rekey session, the display includes:
- Container name: user-define label
168 Fabric OS Command Reference53-1001764-02

cryptoCfg 2
- EE node: node WWN
- EE slot: Slot number
- Target: target port WWN and node WWN
- Target PID: target PID
- VT: virtual target port WWN and node WWN
- VT PID: virtual target PID
- Host (initiator) PWWN
- Host (initiator): node WWN
- Host (initiator) PID: hoist PID
- VI: virtual initiator port WWN and node WWN
- VI PID: virtual initiator PID
- LUN Number: numeric identifier
- LUN Serial Number: alpha-numeric identifier
- Percentage complete: numeric value
- Rekey state displays one of the following:
• Read Phase
• Write Phase
• HA Sync Phase
• LUN Cleanup
- Rekey role: Primary or Backup
- Block Size: in KB
- Current logical block address (LBA) being processed: block address
Use the --show -rekey crypto_target_container_name LUN_Num initiator_PWWN command to display all rekey sessions in progress for a specific Crypto LUN/initiator pair of a specific CryptoTarget container. The display includes the following information:
• LUN number: numeric ID
• LUN Serial Number (SN): alpha-numeric label
• CryptoTarget container Name: user-defined name
• Target: target port WWN and node WWN
• Target PID: target PID
• EE node name: node WWN
• EE slot: slot number
• Number of rekey sessions in progress: numeric value
• For each rekey session the display includes:
- Rekey session number: numeric value
- Percent completion: numeric value
- Rekey state. Displays one of the following:
• Rekey Setup
• LUN Prep
• Key Update
Fabric OS Command Reference 16953-1001764-02

cryptoCfg2
- Operation in progress. Displays one of the following:
• Read Phase
• Write Phase
• HA Sync Phase
• LUN Cleanup
- VI: virtual initiator port WWN and node WWN
- VI PID: virtual initiator PID
- Number of blocks: numeric value
- Block size: numeric value (in KB)
- Size of the LUN (in bytes)
- Current logical block address (LBA) being processed
- Rekey Role: Primary Or Backup
Use the --show -tape_sessions command to display all tape sessions in progress on the local node or for a specific container. The display includes the following information:
• Number of tape sessions in progress: numeric value
• Container name: user-defined label
• EE node name: node WWN
• EE Slot Number: slot number
• Target: target port WWN and node WWN
• Target PID: Target PID
• VT: virtual target port WWN and node WWN
• VT PID: virtual target PID
• Host: host port WWN and node WWN
• Host PID: host PID
• VI: virtual initiator port WWN and node WWN
• VI PID: virtual initiator PID
• LUN number: numeric identifier
• Tape session number: numeric identifier
• For each Tape session:
- Number of uncompressed blocks: numeric value
- Number of compressed blocks: numeric value
- Number of uncompressed bytes: numeric value
- Number of compressed bytes: numeric value
Notes Encryption groups and HA clusters must be configured before performing any CryptoTarget container and Crypto LUN configurations.
When adding a LUN to a CryptoTarget container, special attention should be paid to the input format. A LUN number can be entered either as a 16-bit (2 bytes) number in hex notation (for example, 0x07) or as a 64-bit (8 bytes) number in WWN format (for example, 00:07:00:00:00:00:00:00). Although the command does accept decimal input, it is not recommended. The conversion function used to parse the LUN number converts a decimal number
170 Fabric OS Command Reference53-1001764-02

cryptoCfg 2
beginning with 0 to an octal, which results in a conversion error. For example, 035 is interpreted as 29 (decimal), or 0x1D hex, or 00:1D:00:00:00:00:00:00. To ensure correct conversion to decimal notation, use the recommended Hex formats or make sure to remove preceding zeros from decimal input.
Operands The cryptoCfg storage device configuration and management function has the following operands:
--help -devicecfg Displays the synopsis for the storage device configuration and management function. This command is valid on all nodes.
--create -container Creates a CryptoTarget container (CTC) for a disk or a tape storage device. The target device port WWN must be specified and one or more initiator port WWNs (PWWNs) may optionally be specified. Additional initiator PWWNs may be added after the CryptoTarget container is created.
Upon commit of a CTC configuration, one virtual target (VT) is created, and for each initiator that has the access to the target port, one virtual initiator (VI) is created. These virtual devices are created by logging into the fabric and registering with the Name Server. Initiator and target must be zoned for NS-based frame redirection to take effect. Use nsshow to verify the creation of the virtual devices. Use cfgshow to view the redirection zone.
This command is valid only on the group leader. The following operands are supported:
disk | tape Specifies the type of the CTC as a disk array or tape storage container depending on the target device. These operands are mutually exclusive.
crypto_target_container_name Specifies the CTC name for the storage device. The CTC name can be up to 31 characters long and include any alphanumeric characters and underscores. White space and other special characters are not permitted. This operand is required.
EE_node_WWN [EE_slot] Specifies the WWN of the node to which the encryption engine belongs and on which encryption engine this particular CTC is hosted. This operand is required. On bladed systems, include the slot number.
target_PWWN Specifies the target port WWN of the device port hosted on the encryption engine. This operand is required.
target_NWWN Specifies the target node WWN. This operand is required.
-initiator Specifies one or more initiators. Specifying initiators within a CTC does not mean that these initiators have access to the Crypto LUN. The initiator PWWNs still need to be specified when the LUN is added to the CTC to which these initiators should gain access. The initiators added to the CTC are used only for discovering the LUNs of the target as exposed to these initiators.
This operand is optional. You may add initiators at the time when the CTC is created or any time thereafter with the --add -initiator command. The following operands are required when specifying an initiator:
initiator_PWWN Specifies the initiator port WWN.
Fabric OS Command Reference 17153-1001764-02

cryptoCfg2
initiator_NWWN Specifies the initiator node WWN.
--delete -container Deletes a specified CTC. This command removes the virtual target and associated LUNs from the fabric. Before issuing this command, you must stop all traffic to the target port for which the CTC is being deleted. Failure to do so results in I/O failure between the initiators and that target Port.
This command is valid only on the group leader. The following operand is required when deleting a CTC:
crypto_target_container_name Specifies the name of the CTC to be deleted. Use cryptocfg --show -container for a listing of valid CTC names.
--failback -EE Performs a manual failback of all CTCs that were failed over earlier to another encryption engine within an HA cluster to a "new" specified encryption engine. This command generates an error if the specified current encryption engine and new encryption engine are not members of the same HA cluster or if the current encryption engine or the new encryption engine are offline.
This command is valid only on the group leader. The following operands are required:
current_node_WWN [current_slot] Specifies the node WWN of the current encryption engine to which failover occurred earlier, and which is now performing all encryption tasks. On bladed systems, specify the slot number of the current encryption engine.
new_node_WWN [new_slot] Specifies the node WWN of the encryption engine to which failback of all CTCs should occur. On bladed systems, specify the slot number of the new encryption engine.
--move -container Moves the specified CTC from its currently configured encryption engine to another encryption engine. This command is valid only on the group leader. The EEs must be part of the same encryption group for this operation to succeed, but they do not need to be part of the same HA cluster. This operation permanently changes the encryption engine association of a single CTC from an existing encryption engine to another encryption engine. To move all CTCs hosted on an encryption engine permanently to another encryption engine, use cryptocfg --replace .
This command is valid only on the group leader. The following operands are required when moving a CTC:
crypto_target_container_name Specifies the name of the CTC to be moved.
new_node_WWN [new_slot] Specifies the encryption engine to which the CTC should be moved. On bladed systems, specify the encryption engine’s slot number.
--add -initiator Adds one or more initiators to an existing CTC. An initiator that is added to a CTC facilitates discovering the LUNs of the target as exposed to these initiators. You must still add the initiators when you add the LUN to the CTC to enable access for these initiators.
172 Fabric OS Command Reference53-1001764-02

cryptoCfg 2
This command is valid only on the group leader. The following operands are required when adding an initiator to a CTC:
crypto_target_container_name Specifies the name of the CTC to which the initiators should be added.
initiator_PWWN Specifies the initiator port WWN.
initiator_NWWN Specifies the initiator node WWN.
--remove -initiator Removes an initiator from the specified CTC. This command is valid only on the group leader. The following operands are required when removing an initiator:
crypto_target_container_name Specifies the name of the CTC fro which the initiator is to be removed.
initiator_PWWN Specifies the initiator port WWN.
--add -LUN Adds a LUN to a CTC and optionally sets encryption policies for the LUN. The maximum number of Tape LUNs that can be added to an Initiator in a container is 8. LUN policies may be set at this time or after the LUN is added. The maximum number of LUNs you can add in one commit operation is 25. There is a delay of five seconds for each commit operation.
This command is valid only on the group leader. The following operands are supported:
crypto_target_container_name Specifies the name of the CTC to which the LUN is added. This operand is required.
LUN_Num | LUN_Num_Range Specifies the LUN number or a range of LUN numbers. These operands are mutually exclusive. The LUN number can be either a 16-bit (2 bytes) number in hex notation (for example, 0x07) or a 64-bit (8 bytes) number in WWN format (for example, 00:07:00:00:00:00:00:00). When specifying a range, the LUN numbers must be 16-bit numbers in hex format. The Range parameter is not supported for 64-bit LUN numbers.
The LUN number must be zero when a tape LUN is specified and the tape drive is a single LUN device.
initiator_PWWN initiator NWWN Optionally specifies one or more hosts (initiators) that will be permitted to access the LUN. For each initiator added, the port WWN and the node WWN must be specified. You may add more than one initiator.
Encryption policy parameters: The following encryption policy configuration parameters can be optionally set for disk and tape devices when adding a LUN to a CTC, or they can be set at a later time with the --modify -LUN command.
The tape policies specified at the LUN level take effect if you do not create tape pools or configure policies at the tape pool level.
Fabric OS Command Reference 17353-1001764-02

cryptoCfg2
LUN policies are configured per HA or DEK cluster. For multi-path LUNs exposed through multiple target ports and thus configured on multiple CTCs on different EEs in an HA cluster or DEK cluster, the same LUN policies must be configured. Refer to the Fabric OS Encryption Administrator’s Guide for more information.
The following LUN policy parameters can be optionally set:
-lunstate encrypted | cleartext Sets the encryption state of a specified disk LUN. When set to encrypted, metadata on the LUN containing the key ID of the DEK that was used for encrypting the LUN is used to retrieve the DEK from the key vault. If the LUN state is not specified, the default state is cleartext. This operand is not valid for tape LUNs.
-keyID keyID Specifies the Key ID. Use this operand only if the LUN was encrypted but does not include the metadata containing the keyID for the LUN. This is a rare case for LUNS encrypted in Brocade native mode. However for LUNS encrypted with DataFort v2.0, a Key ID is required, because these LUNs do not contain any metadata. This operand is not valid for tape LUNs.
-encryption_format native | DF_compatible Specifies the LUN encryption format. Two encryption formats are supported:
native The LUN uses the Brocade metadata format and algorithm for the encryption and decryption of data. This is the default mode.
DF_compatible The LUN uses the NetApp DataFort metadata format and algorithm for the encryption and decryption of data. Use of this format requires a NetApp DataFort-compatible license to be present on the encryption switch or the chassis that houses the encryption blade.
-encrypt | -cleartext Enables or disables the LUN for encryption. By default, cleartext is enabled (no encryption). When the LUN policy is changed from encrypt to cleartext, the following policy parameters become disabled (default) and generate errors when executed: -enable_encexistingdata, -enable_rekey, and -key_lifespan. When a LUN is added in DF -compatible Encryption Format, -cleartext is rejected as invalid.
-enable_encexistingdata | -disable_encexistingdata Specifies whether or not existing data should be encrypted. The Encryption policy must be enabled on the LUN before the -enable_encexistingdata can be set and the LUN state must be set to -cleartext. By default, encryption of existing data is disabled. If LUN policy is set to -encrypt, the encryption of existing data must be enabled, or existing data is not preserved. This policy is not valid for tape LUNs.
-enable_rekey time_period | -disable_rekey Enables or disables the auto rekeying capability on the specified disk LUN. This operand is not valid for tape LUNs. By default, the automatic rekey feature is disabled. Enabling automatic rekeying is valid only if the LUN policy is set to encrypt. You must specify a time_period in days when enabling auto rekeying to indicate the interval at which automatic rekeying should take place.
174 Fabric OS Command Reference53-1001764-02

cryptoCfg 2
-key_lifespan time_in_days | none Specifies the lifespan of the encryption key in days. The key will expire after the specified number of days. Accepted values are integers from 1 to 2982616. The default value is none, which means, the key does not expire. This operand is valid only for tape LUNs. The key lifespan cannot be modified after it is set.
-newLUN Indicates that the LUN created does not contain any user data and will be part of a replication configuration. This operand is optional. The presence of this operand is incompatible with the with -keyID, -key_lifespan, and -enable_rekey options. An RSA RKM must be configured and replication must be enabled (cryptocfg --set replication enabled) before invoking this command. Both primary and remote mirror LUNs must be added to their container with the -newLUN option.
--modify -LUN Modifies the encryption policies of one or more LUNs in a specified CTC. This command is valid only on the group leader. The following operands are required when modifying a LUN:
crypto_target_container_name Specifies the name of the CTC to which the LUNs belong.
LUN_Num | range Specifies the LUN number either as a 16-bit (2 bytes) number in hex notation (for example, 0x07) or as a 64-bit (8 bytes) number in WWN format (for example, 0:07:00:00:00:00:00:00). The LUN number must be zero when a tape LUN is specified and the tape drive is a single LUN device. When specifying a range, the LUN numbers must be entered in the 16-bit hex format.
initiator_PWWN initiator_NWWN Specifies the initiator by its port WWN and node WWN.
You may optionally modify the following LUN policy configuration parameters. Refer to cryptocfg --add -LUN for descriptions of these parameters.
[-encryption_format native | DF_compatible]
[-encrypt | cleartext]
[-enable_encexistingdata | -disable_encexistingdata]
[-enablerekey time_period | -disable_rekey]
Make sure you understand the ramifications of modifying LUN parameters (such as changing the LUN policy from encrypt to cleartext) for devices that are online and are already being utilized. The following restrictions apply when modifying LUN policy parameters:
• When you change LUN policy from encrypt to cleartext the following policy parameters are restored to default (disabled): -enable_encexistingdata, -enable_rekey, and -key_lifespan.
• When changing the LUN policy back to encrypt, these parameters need to be reconfigured. Attempting to reconfigure these parameters while the LUN policy is set to cleartext is not permitted and generates an error.
• For tape LUNs the -enable_encexistingdata and the -enable_rekey operands are not valid and return an error when executed.
• The -key_lifespan parameter cannot be modified for tape LUNs once it has been set.
Fabric OS Command Reference 17553-1001764-02

cryptoCfg2
• Exercise caution when modifying policy parameters while tape sessions are in progress. For information on the impact of encryption policy changes while tape sessions are in progress, refer to the Fabric OS Encryption Administrator’s Guide.
--remove -LUN Removes a LUN from a specified CTC. You must stop all traffic to the LUN from all initiators accessing the LUN you are removing from the CTC. Failure to do so results in I/O failure between the initiators and the LUN. If the LUN is exposed with different LUN Numbers to different initiators, all exposed LUN Numbers must be removed. This command is valid only on the group leader. The following operands are required when removing a LUN from a CTC:
crypto_target_container_name Specifies the name of the CTC from which the LUN is to be removed.
LUN_Num Specifies the number of the LUN to be removed. Use --show -container for a list of LUN numbers associated with the specified CTC.
initiator_PWWN Specifies the initiator port WWN for the LUN to be removed.
--enable -LUN Forces the LUN to become enabled for encryption from a disabled state. This command must be executed on the local switch that is hosting the LUN. No commit is required after executing this command. This command proceeds with a warning and prompts for confirmation.
A LUN may become disabled for various reasons, such as a change in policy from encrypted to cleartext, a conflict between LUN policy and LUN, or a missing DEK in the key vault. Force-enabling a LUN while metadata exist on the LUN may result in a loss of data and should be exercised with caution. Refer to the Fabric OS Encryption Administrator’s Guide for a description of conditions under which a LUN may be disabled and recommendations for re-enabling the LUN while minimizing the risk of data loss.
The following operands are required when force-enabling a LUN:
crypto_target_container_name Specifies the name of the CTC to which this LUN belongs.
LUN_Num Specifies the number of the LUN to be enabled. Use --show -container for a list of LUN numbers associated with the specified CTC.
initiator_PWWN Specifies the initiator port WWN for the specified LUN.
--create -tapepool Creates a tape pool. A tape pool consists of a group of tape media that share the same encryption policies and data encryption keys (DEKs).
A maximum of 4096 tape pools per encryption group are supported. You may add up to a maximum of 25 tape pools per commit operation. There is a delay of five seconds delay at each commit operation.
Policy configuration at the tape pool level is optional; if left unspecified LUN-level tape policy parameters apply.
This command is valid only on the group leader. The following operands are supported:
176 Fabric OS Command Reference53-1001764-02

cryptoCfg 2
-label pool_label | -num pool_num Specifies the tape pool volume label or alternately the tape pool ID. This is a user-defined identifier, which must be unique within the encryption group and should match the tape pool label or ID that is configured on the tape backup application. The tape pool label can consist of any combination of characters. When using white space, you must enclose the tape pool label in double quotation marks. The maximum size is 64 bytes. This operand is required.
-encryption_format Optionally specifies the tape encryption format. Two encryption formats are supported for tape pools:
native Data is encrypted or decrypted using the Brocade native encryption format (metadata format and algorithm). This is the default setting.
DF_compatible Data is encrypted or decrypted using the NetApp DataFort encryption format (metadata format and algorithm). Use of this format requires a NetApp DataFort-compatible license on the encryption switch or on the chassis that houses the encryption blade.
-encrypt | -cleartext Enables encryption or cleartext (no encryption). By default, cleartext is enabled.
-key_lifespan time_in_days | none Specifies the lifespan of the encryption key in days. The key expires after the specified number of days. The default value is none, which means the key does not expire until the value is set. This parameter cannot be modified for tape pools once it is set.
--delete -tapepool Deletes the specified tape pool. This command is valid only on the group leader. The following operand is required:
-label pool_label | -num pool_num Specifies the tape pool by volume label or tape pool ID. Use --show -tapepool for a listing of configured tape pools and their respective labels or IDs.
--modify -tapepool Modifies the encryption policies of a specified tape pool. This command is valid only on the group leader. The following operand is required:
-label pool_label | -num pool_num Specifies the tape pool by volume label or tape pool ID. Use --show -tapepool for a listing of configured tape pools and their respective labels or IDs. To modify the label or pool number, you must delete and recreate the tape pool.
You may optionally modify the following tape policy parameters.
[-encryption_format native | DF_compatible]
[-encrypt | -cleartext]
Refer to cryptocfg --create -tapepool for descriptions of these parameters. Exercise caution when modifying tape pool policy parameters while tape sessions are in progress. Refer to the Fabric OS Administrator’s Guide for more information.
Fabric OS Command Reference 17753-1001764-02

cryptoCfg2
--manual_rekey Performs a manual rekeying of a specified LUN associated with a specified CTC. Manual rekeying is performed in both online and offline fashion depending on whether or not the host is online or host I/O is present. If any policy-based rekeying operation is currently in progress, this command aborts with a warning message. This command is valid only on the group leader.
The following operands are supported:
crypto_target_container_name Specifies the name of the CTC to which this LUN belongs.
LUN_Num Specifies the number of the LUN to be rekeyed. Use --show -container for a list of LUN numbers associated with the specified CTC.
initiator_PWWN Specifies the port WWN of the initiator for the specified LUN.
-include_mirror Initiates a manual rekey on an mirror LUN or on a primary LUN in read-only state. This operand is required if the specified LUN is an mirror LUN or a primary that has been restored from an out-of-sync mirror LUN.
-all Performs a manual rekey operation on all encrypted primary or nonreplicated LUNs on the node that are in read-write state. This operation may take an extended period of time.
-include_mirror Initiates a manual rekey operation on all primary LUNs and mirror LUNs in read-only state. In addition, this command also starts a manual rekey operation on all primary and and nonreplicated LUNs in read-write state.
--resume_rekey Resumes a suspended rekey session for a specified disk LUN at the termination point. A rekey session may terminate prematurely due to unrecoverable medium or hardware errors. When a rekey session terminates prematurely, the system logs CRITICAL RASlog and rekey operation failure status messages. You must take corrective action to clear all error conditions that caused the rekey failure before resuming a suspended rekey session. All DEK or HA cluster members must be online and reachable for this operation to succeed.
crypto_target_container_name Specifies the name of the CTC to which the LUN belongs.
LUN_Num Specifies the number of the LUN to be rekeyed. Use --show -container for a list of LUN numbers associated with the specified CTC.
initiator_PWWN Specifies the initiator port WWN for the specified LUN.
--discoverLUN Performs LUN discovery. This command discovers and displays all LUNs that are discoverable by the initiators of a specified CTC. This command is valid only on the node that hosts the CTC. The following operand is required:
crypto_target_container_name Specifies the name of the CTC.
--show -container Displays all CTCs in the encryption group. This command is valid on all nodes. The following operands are supported:
-all -cfg Displays the configuration for all containers in the encryption group.
-all -stat Displays the runtime status for all containers hosted on the local node only.
178 Fabric OS Command Reference53-1001764-02

cryptoCfg 2
crypto_target_container_name Displays information for the specified CryptoTarget container. If the -stat parameter is specified with this operand, the CTC must be hosted on the local node.
-cfg Displays the configuration for the specified CTC.
-stat Displays the runtime status for the specified CTC.
--show -tapepool Displays configuration information for specified tape pools when used with the -cfg option. Displays runtime status information for specified tape pools when used with the -cfg option. This command is valid on all nodes. The following operands are supported:
-all -cfg Displays configuration information for all configured tape pools in the encryption group.
-all -stat Displays runtime status information for all configured tape pools in the encryption group.
-label pool_label | -num pool_num Displays tape pool configuration or runtime status information for a single tape pool specified either by a tape pool label or a number. These operands must be used with either the -stat or the -cfg option.
-cfg | -stat Displays either configuration information or runtime status for the specified tape pools.
--show -LUN Displays Crypto LUN configuration or runtime status information for a specified CTC. This command is valid on all nodes. The following operands are supported:
crypto_target_container_name Specifies the CTC for which to display the Crypto LUN information.
LUN_Num Specifies the number of the LUN for which to display information.
initiator_PWWN Specifies the PWWN of the initiator.
-cfg | -stat Displays either the configuration or the status of the specified Crypto LUN. The configuration can be displayed on any node in the encryption group. To display LUN status, the specified LUN must be hosted on the local node.
--show -rekey Displays information about rekey sessions in progress. This command is valid on all nodes. The following operands are mutually exclusive:
-all Lists all rekey sessions in progress on the current node.
crypto_target_container_name Lists all rekey sessions in progress for a specified CryptoTarget container. You may further specify either one of the following operands:
LUN_Num Lists all rekey sessions in progress for a specific Crypto LUN of the specified CryptoTarget container.
initiator_PWWN Lists all rekey sessions in progress for a specific initiator of the specified CryptoTarget container.
--show -tape_sessions Displays runtime tape session information. This command is valid on all nodes. The following operands are mutually exclusive:
Fabric OS Command Reference 17953-1001764-02
cryptoCfg2
-all Displays runtime information for all tape sessions in progress on the local node.
crypto_target_container_name Displays runtime information for all tape sessions in progress for a specified CryptoTarget container.
--clearstats -container Clears compressed or uncompressed blocks and/or byte counters for the specified containers. Specify one of the following operands:
-all Clears blocks and/or byte counters for all CryptoTarget tape containers.
crypto_target_container_name Clears blocks and/or byte counters for all CryptoLUNs of the specified CryptoTarget tape container.
--clearstats -LUN Clears compressed or uncompressed blocks and/or byte counters for a specific CryptoLUN. The following operands are required:
crypto_target_container_name Specifies the CryptoTarget tape container for the LUN.
LUN_Num Specifies the number of the LUN to be cleared.
initiator_PWWN Specifies the initiator port WWN for the specified LUN.
--refreshDEK Rereads the mirror LUN metadata and updates the FPGA tables for the LUN if the keyID in the metadata has changed. You must issue this command on the node of the EE where the container that includes the mirror LUN is hosted. An RSA RKM must be configured for the encryption group and replication mode must be enabled for this command to succeed. This command fails if the specified LUN was not added with -newLUN option. The refresh operation may cause a brief disruption of the host I/O. The following operands are required:
crypto_target_container_name Specifies the CryptoTarget container for the LUN.
LUN_Num Specifies the number of the LUN whose metadata needs to be reread.
initiator_PWWN Specifies the initiator port WWN for the specified LUN.
Function 5. Transaction management
Synopsis cryptocfg --help transcfg
cryptocfg --commit [-force]
cryptocfg --transabort transaction_ID
cryptocfg --transshow
Description Use these cryptoCfg commands to manage the transaction mechanism for those functions that require configuration changes to be committed before they take effect. These functions include “3. High Availability (HA) cluster configuration” and “4. Storage device configuration and management”
Transaction commands must be invoked on the group leader.
180 Fabric OS Command Reference53-1001764-02

cryptoCfg 2
Operands The cryptoCfg transaction management function has the following operands:
--help transcfg Displays the synopsis for the transaction management function.
--commit Commits the transaction. This command saves the defined configuration to nonvolatile storage. Changes are persistent across reboots and power cycles. This command overwrites existing configuration parameters and therefore prompts for confirmation. This command is permitted only when the encryption group is in a converged state.
The following operand is optional:
-force Commits the transaction without confirmation.
--transabort transaction_ID Aborts a pending database transaction for any device configurations invoked earlier through the CLI or DCFM interfaces. The following operand is required:
transaction_ID Specifies the ID of the transaction to be aborted. Use --transshow to determine the currently pending transaction ID.
--transshow Displays the pending database transaction for any device configurations invoked earlier through the CLI or DCFM interfaces. The command displays the transaction status (completed or pending), the transaction ID, and the transaction owner (CLI or DCFM)
Function 6. Device decommissioning
Synopsis cryptocfg --help -decommission
cryptocfg --decommission -container container_name -initiator initiatator _PWWN -LUN LUN_num
cryptocfg --delete -decommissionedkeyids
cryptocfg --show -decommissionedkeyids
cryptocfg --show -vendorspecifickeyid key_ID
Description Use these cryptoCfg commands to decommission a disk LUN in the event that the storage device is to be reprovisioned, retired, or returned to the vendor. The decommission function renders all data on the disk media inaccessible before decommissioning the device.
Device decommissioning deletes or renders invalid all important information including keys stored in the key vault, on the chip, and from the various internal caches, and it erases the metadata on the media to ensure that the data on the decommissioned device is irrecoverable.
The following restrictions apply to device decommissioning:
• Devices not encrypted on the Brocade Encryption platform or devices in cleartext cannot be decommissioned with this command.
• All nodes in the encryption group must run Fabric OS v6.4.0 or later.
• Device decommissioning does not work across a reboot. Rebooting terminates an ongoing decommissioning process and the command must be reissued after completing the reboot.
• Device decommissioning is supported only with the LKM and RKM key vaults.
• Decommissioning of tape devices or snap drive volumes is currently no supported.
• Decommissioning does not automatically delete the keys. You must manually delete the keys from the key vault to complete the operation.
Fabric OS Command Reference 18153-1001764-02

cryptoCfg2
Operands This command has the following operands:
--help -decommission Displays the command usage help for the device decommissioning commands.
--decommission Decommissions a disk LUN hosted in a specified container as seen from the initiator. You must issue this command from the node that hosts the container. Upon successful completion of a decommissioning operation, the LUN is deleted from all the containers hosting it. All active paths to the LUN are lost; there is no need to execute a decommissioning operation separately for each path associated with the LUN. A commit operation is not required. The following operands are required:
-container container_name Specifies the name of the container that hosts the LUN.
-initiator initiatator_PWWN Specifies the initiator port WWN.
-LUN LUN_num Specifies the number of the LUN to be decommissioned.
--delete -decommissionedkeyids Purges all key IDs associated with decommissioned LUNs from the internal cache. You must delete the keys manually from the key vaults before purging the cache.
--show -decommissionedkeyids Displays the key IDs associated with decommissioned LUNs.
--show -vendorspecifickeyid key_ID Displays the UUID for the specified key. This operand is valid only on the RKM key vault.
Examples This section includes examples for the following tasks:
“A. Node configuration”
“B. Encryption group configuration”
“C. Group-wide policy configuration”
“D. High Availability (HA) cluster configuration”
“E. Storage device configuration”
“F. Device configuration display commands”
“G. Device decommissioning commands”
For additional examples and configuration procedures, refer to the Fabric OS Encryption Administrator's Guide.
A. Node configurationTo initialize a node and generate certificates (output shows what is generated and where it is stored):
SecurityAdmin:switch>cryptocfg --initnodeThis will overwrite all identification and authentication dataARE YOU SURE (yes, y, no, n): [no] y
182 Fabric OS Command Reference53-1001764-02

cryptoCfg 2
Notify SPM of Node CfgOperation succeeded.To initialize an encryption engine:
SecurityAdmin:switch>cryptocfg --initEEThis will overwrite previously generated identificationand authentication dataARE YOU SURE (yes, y, no, n): yOperation succeeded.
To register an encryption engine with the CP or chassis:
SecurityAdmin:switch>cryptocfg -regEEOperation succeeded.
To enable an encryption engine:
SecurityAdmin:switch> cryptocfg --enableEEOperation succeeded.
To disable an encryption engine:
SecurityAdmin:switch> cryptocfg --disableEEOperation succeeded.
To export a KAC certificate from the group leader to an external host:
SecurityAdmin:switch>cryptocfg --export -scp -KACcert 192.168.38.245 mylogin kac_lkm_cert.pemPassword:Operation succeeded.
To export a KAC certificate from the group leader to an attached USB device:
SecurityAdmin:switch>cryptocfg --export -usb -KACcert kac_lkm_cert.pemPassword:Operation succeeded.
To import a member CP certificate to the group leader:
SecurityAdmin:switch>cryptocfg --import -scp enc1_cpcert.pem 192.168.38.245 mylogin /temp/certs/enc_switch1_cpcert.pemPassword:
To register a member node with the group leader:
SecurityAdmin:switch>cryptocfg --reg -membernode 10:00:00:05:1e:39:14:00 enc_switch1_cert.pem 10.32.244.60Operation succeeded.
To deregister a member node:
SecurityAdmin:switch> cryptocfg --dereg -membernode 10:00:00:05:1e:53:b6:80Operation succeeded.
To generate a trusted link establishment package (TEP):
SecurityAdmin:switch>cryptocfg --dhchallenge 10.33.54.231Operation succeeded.
To issue the DH response to retrieve the TAP from the NetApp LKM appliance:
SecurityAdmin:switch>cryptocfg --dhresponse 10.33.54.231
Fabric OS Command Reference 18353-1001764-02

cryptoCfg2
Operation succeeded.
To zeroize all critical security parameters on an encryption switch:
SecurityAdmin:switch> cryptocfg --zeroizeEEThis will zeroize all critical security parametersARE YOU SURE (yes, y, no, n): [no]yOperation succeeded.
To delete a file from the local node:
SecurityAdmin:switch> cryptocfg --delete -file/etc/fabos/certs/sw0/foo.pemThis will permanently delete the selected file.ARE YOU SURE (yes, y, no, n): [no] y
To display local encryption engine information for a Brocade FS8-18 encryption blade on a DCX:
SecurityAdmin:switch> cryptocfg --show -localEEEE Slot: 1 SP state: Online Primary Link KeyID: 85:1c:ca:dd:fc:8c:31:fc:87:21:26:d1:24:a0:92:be Secondary Link KeyID: 98:4f:b4:98:c0:42:ab:6b:6d:65:ba:f2:fc:aa:b5:8a HA Cluster Membership: mace40_dcx74_1 EE Attributes: Link IP Addr : 10.32.72.75 Link GW IP Addr : 10.32.64.1 Link Net Mask : 255.255.240.0 Link MAC Addr : 00:05:1e:53:8d:cd Link MTU : 1500 Link State : UP Media Type : DISK/TAPE Rebalance Recommended: NO System Card Label : System Card CID :
Remote EE Reachability :
Node WWN/Slot EE IP Addr EE State IO Link State10:00:00:05:1e:54:22:36/0 10.32.72.62 EE_STATE_ONLINE Reachable10:00:00:05:1e:47:30:00/1 10.32.72.104 EE_STATE_ONLINE Reachable10:00:00:05:1e:47:30:00/3 10.32.72.105 EE_STATE_ONLINE Reachable10:00:00:05:1e:47:30:00/10 10.32.72.106 EE_STATE_ONLINE Reachable10:00:00:05:1e:47:30:00/12 10.32.72.107 EE_STATE_ONLINE ReachableEE Slot: 2 SP state: Online Primary Link KeyID: 85:1c:ca:dd:fc:8c:31:fc:87:21:26:d1:24:a0:92:be Secondary Link KeyID: 98:4f:b4:98:c0:42:ab:6b:6d:65:ba:f2:fc:aa:b5:8a No HA cluster membership EE Attributes: Link IP Addr : 10.32.72.76 Link GW IP Addr : 10.32.64.1 Link Net Mask : 255.255.240.0 Link MAC Addr : 00:05:1e:53:89:03 Link MTU : 1500 Link State : UP Media Type : DISK Rebalance Recommended: NO System Card Label : System Card CID :
184 Fabric OS Command Reference53-1001764-02

cryptoCfg 2
Remote EE Reachability :
Node WWN/Slot EE IP Addr EE State IO Link State10:00:00:05:1e:54:22:36/0 10.32.72.62 EE_STATE_ONLINE Reachable10:00:00:05:1e:47:30:00/1 10.32.72.104 EE_STATE_ONLINE Reachable10:00:00:05:1e:47:30:00/3 10.32.72.105 EE_STATE_ONLINE Reachable10:00:00:05:1e:47:30:00/10 10.32.72.106 EE_STATE_ONLINE Reachable10:00:00:05:1e:47:30:00/12 10.32.72.107 EE_STATE_ONLINE Reachable(output truncated)
To rebalance load between tape and disk LUNS for optimal performance on slot 1:
switch:admin> cryptocfg --rebalance 1Rebalancing the EE may cause disruption to disk I/Os.Backup applications to tapes may need to be restarted after rebalance.
ARE YOU SURE (yes, y, no, n): [no] yesOperation succeededswitch:admin>
B. Encryption group configurationTo create an encryption group “brocade”:
SecurityAdmin:switch> cryptocfg --create -encgroup brocadeEncryption group create status: Operation Succeeded.
To delete the encryption group “brocade”:
SecurityAdmin:switch> cryptocfg --delete -encgroup brocadeEncryption group create status: Operation Succeeded.
To register a NetApp LKM appliance as the primary key vault "LKM1":
SecurityAdmin:switch>cryptocfg --reg -regkeyvault LKM1 lkmcert.pem 10.33.54.231 primarydecru-lkm-1Register key vault status: Operation Succeeded.
To set the key vault type to LKM:
SecurityAdmin:switch>cryptocfg --set -keyvault LKMSet key vault status: Operation Succeeded.
To add a member node to the encryption group:
SecurityAdmin:switch> cryptocfg --add -membernode 10:00:00:05:1e:39:14:00Add node status: Operation Succeeded.
To eject a member node from the encryption group:
SecurityAdmin:switch>cryptocfg --eject -membernode 10:00:00:05:1e:53:b8:45Eject node status: Operation Succeeded.
To leave the encryption group:
SecurityAdmin:switch>cryptocfg --leave_encryption_groupLeave node status: Operation Succeeded.
To generate the master key (RKM) on the group leader:
SecurityAdmin:switch>cryptocfg --genmasterkey
Fabric OS Command Reference 18553-1001764-02

cryptoCfg2
Master key generated. The master key should beexported before further operations are performed.
To export the master key to the RKM key vault:
SecurityAdmin:switch>cryptocfg --exportmasterkey Enter the passphrase: passphraseMaster key exported.Key ID: 8f:88:45:32:8e:bf:eb:44:c4:bc:aa:2a:c1:69:94:2
To export the master key to a file:
SecurityAdmin:switch>cryptocfg --exportmasterkey -fileEnter the passphrase: passphraseMaster key file generated.
To export the master key file to an external host:
SecurityAdmin:switch>cryptocfg --export -scp -currentMK 192.168.38.245 mylogin GL_MK.mkPassword:Operation succeeded.
To recover the master key from the key vault to the current location:
SecurityAdmin:switch>cryptocfg --recovermasterkey currentMK -keyID bd:ae:2d:0b:b9:1a:ad:18:0d:eb:fe:c9:67:ed:29:b0Enter the passphrase: passphraseRecover master key status: Operation succeeded.
To display the encryption group configuration:
SecurityAdmin:switch>cryptocfg --show -groupcfgEncryption Group Name: system_test Failback mode: Auto Replication mode: Disabled Heartbeat misses: 3 Heartbeat timeout: 2 Key Vault Type: LKM System Card: Disabled
Primary Key Vault: IP address: 10.32.49.200 Certificate ID: 3D2-LKM3-B05-200 Certificate label: LKM200 State: Connected Type: LKM
Secondary Key Vault: IP address: 10.32.49.201 Certificate ID: 3D2-LKM4-B05-201 Certificate label: LKM201 State: Connected Type: LKM
Additional Primary Key Vault Information:: Key Vault/CA Certificate Validity: Yes Port for Key Vault Connection: 32579 Time of Day on Key Server: N/A Server SDK Version: N/A
186 Fabric OS Command Reference53-1001764-02

cryptoCfg 2
Additional Secondary Key Vault Information: Key Vault/CA Certificate Validity: Yes Port for Key Vault Connection: 32579 Time of Day on Key Server: N/A Server SDK Version: N/A
Encryption Node (Key Vault Client) Information: Node KAC Certificate Validity: Yes Time of Day on the Switch: Fri Jan 29 23:01:55.205779 GMT 2010 Client SDK Version: OpenKey Reference Lib 2.0.9 Client Username: N/A Client Usergroup: N/A Connection Timeout: 20 seconds Response Timeout: 20 seconds Connection Idle Timeout: N/A
Key Vault configuration and connectivity checks successful, ready for key operations.
Authentication Quorum Size: 0Authentication Cards not configured
NODE LISTTotal Number of defined nodes: 4Group Leader Node Name: 10:00:00:05:1e:54:22:36Encryption Group state: CLUSTER_STATE_CONVERGED
Node Name IP address Role10:00:00:05:1e:40:22:00 10.32.72.74 MemberNode EE Slot: 1 SP state: Online
EE Slot: 2 SP state: Online
EE Slot: 4 SP state: Online
EE Slot: 9 SP state: Online
10:00:00:05:1e:53:6b:62 10.32.72.40 MemberNode (current node) EE Slot: 0 SP state: Waiting for enableEE
10:00:00:05:1e:54:22:36 10.32.72.61 GroupLeader EE Slot: 0 SP state: Online
10:00:00:05:1e:47:30:00 10.32.72.101 MemberNode EE Slot: 1 SP state: Online
EE Slot: 3 SP state: Online
EE Slot: 10 SP state: Online
EE Slot: 12
Fabric OS Command Reference 18753-1001764-02

cryptoCfg2
SP state: Online
To display the encryption group member information:
SecurityAdmin:switch>cryptocfg --show -groupmember -allNODE LISTTotal Number of defined nodes:2Group Leader Node Name: 10:00:00:05:1e:41:9a:7eEncryption Group state: CLUSTER_STATE_CONVERGED
Node Name: 10:00:00:05:1e:41:9a:7e (current node) State: DEF_NODE_STATE_DISCOVERED Role: GroupLeader IP Address: 10.32.244.71 Certificate: GL_cpcert.pem Current Master Key State: Not configured Current Master KeyID: 00:00:00:00:00:00:00:00:00:00:00:00:00:00:00:00 Alternate Master Key State:Not configured Alternate Master KeyID: 00:00:00:00:00:00:00:00:00:00:00:00:00:00:00:00 EE Slot: 0 SP state: Operational; Need Valid KEK Current Master KeyID: 00:00:00:00:00:00:00:00:00:00:00:00:00:00:00:00 Alternate Master KeyID: 00:00:00:00:00:00:00:00:00:00:00:00:00:00:00:00 No HA cluster membership
Node Name: 10:00:00:05:1e:39:14:00 State: DEF_NODE_STATE_DISCOVERED Role: MemberNode IP Address: 10.32.244.60 Certificate: enc1_cpcert.pem Current Master Key State: Not configured Current Master KeyID: 00:00:00:00:00:00:00:00:00:00:00:00:00:00:00:00 Alternate Master Key State:Not configured Alternate Master KeyID: 00:00:00:00:00:00:00:00:00:00:00:00:00:00:00:00
EE Slot: 0 SP state: Unknown State Current Master KeyID: 00:00:00:00:00:00:00:00:00:00:00:00:00:00:00:00 Alternate Master KeyID: 00:00:00:00:00:00:00:00:00:00:00:00:00:00:00:00 No HA cluster membership No HA cluster membership
C. Group-wide policy configurationTo set the failback mode to manual failback:
SecurityAdmin:switch> cryptocfg --set -failbackmode manualSet failback policy status: Operation Succeeded.
To set the heartbeat miss value to 3:
SecurityAdmin:switch> cryptocfg --set -hbmisses 3Set heartbeat miss status: Operation Succeeded.
To set the heartbeat timeout value to 10 seconds:
SecurityAdmin:switch> cryptocfg --set -hbtimeout 10Set heartbeat timeout status: Operation Succeeded.
D. High Availability (HA) cluster configurationNOTE: HA cluster configuration commands must be committed before they take effect.
188 Fabric OS Command Reference53-1001764-02

cryptoCfg 2
To display existing HA clusters in the encryption group "brocade". The encryption group in the following example has one committed HA cluster with one encryption engine:
SecurityAdmin:switch> cryptocfg --show -hacluster -allEncryption Group Name: brocadeNumber of HA Clusters: 1
HA cluster name: HAC1 - 1 EE entryStatus: Committed WWN Slot Number Status11:22:33:44:55:66:77:00 0 Online
To create a second HA cluster with one encryption engine:
SecurityAdmin:switch> cryptocfg --create -hacluster HAC2 10:00:00:05:1e:53:4c:91EE Node WWN: 10:00:00:05:1e:53:4c:91 Slot number: 0 DetectedCreate HA cluster status: Operation succeeded.
To add another encryption engine to HA cluster HAC2:
SecurityAdmin:switch> cryptocfg --add -haclustermember HAC2 10:00:00:05:1e:53:74:87 3EE Node WWN: 10:00:00:05:1e:53:74:87 Slot number: 3 DetectedAdd HA cluster member status: Operation succeeded.
To display the changes (Note that "HAC2" is in the "defined" state until the transaction is committed):
SecurityAdmin:switch> cryptocfg --show -hacluster -allEncryption Group Name: brocade_1Number of HA Clusters: 2
HA cluster name: HAC1 - 1 EE entryStatus: Committed WWN Slot Number Status11:22:33:44:55:66:77:00 0 Online
HA cluster name: HAC2 - 2 EE entriesStatus: Defined WWN Slot Number Status10:00:00:05:1e:53:4c:91 0 Online10:00:00:05:1e:53:74:87 3 Online
To replace an encryption engine in HA cluster "HAC2":
SecurityAdmin:switch> cryptocfg --replace -haclustermember HAC210:00:00:05:1e:53:4c:91 10:00:00:05:1e:39:53:67Replace HA cluster member status: Operation Succeeded.
To remove HA cluster member 10:00:00:05:1e:53:74:87 from the HA cluster "HAC2":
SecurityAdmin:switch> cryptocfg --rem -haclustermember HAC2 10:00:00:05:1e:53:74:87Remove HA cluster member status: Operation Succeeded.
To delete a previously created (committed) HA cluster named HAC1:
SecurityAdmin:switch> cryptocfg --delete -hacluster HAC1Delete HA cluster status: Operation succeeded
To commit the changes:
SecurityAdmin:switch> cryptocfg --commit
Fabric OS Command Reference 18953-1001764-02

cryptoCfg2
Operation Succeeded
To view the changes:
SecurityAdmin:switch> cryptocfg --show -hacluster -allEncryption Group Name: brocade_1Number of HA Clusters: 1
HA cluster name: HAC2 - 1 EE entryStatus: Defined WWN Slot Number Status10:00:00:05:1e:39:53:67 0 Online
To initiate a manual failback of an encryption engine:
SecurityAdmin:switch> cryptocfg --failback -EE10:00:00:05:1e:39:53:67 0 22:00:00:04:cf:6e:57:62Operation Succeeded
E. Storage device configuration
1. Create a zone that includes initiator and target.
a. Determine the device configuration.
FabricAdmin:switch>nsshow{ Type Pid COS PortName NodeName TTL(sec) N 010600; 2,3;10:00:00:00:c9:2b:c9:3a;20:00:00:00:c9:2b:c9:3a; na NodeSymb: [35] "Emulex LP9002 FV3.82A1 DV5-4.81A4 " Fabric Port Name: 20:06:00:05:1e:41:9a:7e Permanent Port Name: 10:00:00:00:c9:2b:c9:3a Port Index: 6 Share Area: No Device Shared in Other AD: No Redirect: No
Partial: No The Local Name Server has 1 entry }
FabricAdmin:switch>nscamshownscamshow for remote switches:Switch entry for 2 state rev owner known v611 0xfffc01 Device list: count 13 Type Pid COS PortName NodeName NL 0208d3; 3;20:0c:00:06:2b:0f:72:6d;20:00:00:06:2b:0f:72:6d; FC4s: FCP PortSymb: [55] "LSI7404XP-LC BR A.1 03-01081-02D FW:01.03.06 Port 1 " Fabric Port Name: 20:08:00:05:1e:34:e0:6b Permanent Port Name: 20:0c:00:06:2b:0f:72:6d Port Index: 8 Share Area: No Device Shared in Other AD: No Redirect: No
Partial: No
b. Create and enable a zone named "itzone" that includes initiator and target.
FabricAdmin:switch> zonecreate itzone, "10:00:00:00:c9:2b:c9:3a; 20:0c:00:06:2b:0f:72:6d"
190 Fabric OS Command Reference53-1001764-02

cryptoCfg 2
FabricAdmin:switch> cfgcreate itcfg, itzone
FabricAdmin:switch> cfgenable itcfgYou are about to enable a new zoning configuration.This action will replace the old zoning configuration with thecurrent configuration selected.Do you want to enable 'itcfg' configuration (yes, y, no, n): [no] yzone config"itcfg" is in effectUpdating flash ...
2. Create a disk CryptoTarget container to be hosted on the encryption engine.
FabricAdmin:switch>cryptocfg --create -container disk my_disk_tgt1 0:00:00:05:1e:41:9a:7e20:0c:00:06:2b:0f:72:6d 20:00:00:06:2b:0f:72:6dOperation Succeeded
3. Add an initiator to the CryptoTarget container and commit the transaction.
FabricAdmin:switch>cryptocfg --add -initiator my_disk_tgt 10:00:00:00:c9:2b:c9:3a 20:00:00:00:c9:2b:c9:3aOperation SucceededFabricAdmin:switch>cryptocfg --commitOperation Succeeded
4. Display the CTC configuration.
FabricAdmin:switch>cryptocfg --show -container my_disk_tgt -cfgContainer name: my_disk_tgtType: diskEE node: 10:00:00:05:1e:41:9a:7eEE slot: 0Target: 20:0c:00:06:2b:0f:72:6d 20:00:00:06:2b:0f:72:6dVT: 20:00:00:05:1e:41:4e:1d 20:01:00:05:1e:41:4e:1dNumber of host(s): 1Configuration status: committedHost: 10:00:00:00:c9:2b:c9:3a 20:00:00:00:c9:2b:c9:3aVI: 20:02:00:05:1e:41:4e:1d 20:03:00:05:1e:41:4e:1dNumber of LUN(s): 0Operation Succeeded
5. Discover the LUNs seen by the initiators in the CryptoTarget container.
FabricAdmin:switch>cryptocfg --discoverLUN my_disk_tgtContainer name: my_disk_tgtNumber of LUN(s): 1Host: 10:00:00:00:c9:2b:c9:3aLUN number: 0x0LUN serial number: 200000062B0F726D0C000000Key ID state: Read writeKey ID: 3a:21:6a:bd:f2:37:d7:ea:6b:73:f6:19:72:89:c6:4f
6. Add a LUN to the CTC with encryption enabled.
FabricAdmin:switch>cryptocfg --add -LUN my_disk_tgt 0 10:00:00:00:c9:2b:c9:3a 20:00:00:00:c9:2b:c9:3a -lunstate cleartext -encryptOperation Succeeded
7. Commit the device configuration.
FabricAdmin:switch>cryptocfg --commit
Fabric OS Command Reference 19153-1001764-02

cryptoCfg2
Operation Succeeded
8. Display Crypto LUN runtime status.
FabricAdmin:switch>cryptocfg --show -LUN my_disk_tgt 0 10:00:00:00:c9:2b:c9:3a -statContainer name: my_disk_tgtType: diskEE node: 10:00:00:05:1e:41:9a:7eEE slot: 0E hosting container: currentTarget: 20:0c:00:06:2b:0f:72:6d 20:00:00:06:2b:0f:72:6dTarget PID: 0208d3VT: 20:00:00:05:1e:41:4e:1d 20:01:00:05:1e:41:4e:1dVT PID: 012001Number of host(s): 1Number of rekey session(s):0Host: 10:00:00:00:c9:2b:c9:3a 20:00:00:00:c9:2b:c9:3aHost PID: 010600VI: 20:02:00:05:1e:41:4e:1d 20:03:00:05:1e:41:4e:1dVI PID: 012002Number of LUN(s): 1LUN number: 0x0LUN type: diskLUN serial number: 200000062B0F726D0C000000Encryption mode: encryptEncryption format: nativeEncrypt existing data: disabledRekey: disabledInternal EE LUN state: Encryption enabledEncryption algorithm: AES256-XTSKey ID state: Read writeKey ID: 3a:21:6a:bd:f2:37:d7:ea:6b:73:f6:19:72:89:c6:4fKey creation time: Sun Jun 1 20:21:32 2008New LUN: NoReplication LUN type: PrimaryOperation Succeeded
9. Display Crypto LUN configuration.
FabricAdmin:switch>cryptocfg --show -LUN my_disk_tgt 0 10:00:00:00:c9:2b:c9:3a -cfgEE node: 10:00:00:05:1e:41:9a:7eEE slot: 0Target: 20:0c:00:06:2b:0f:72:6d 20:00:00:06:2b:0f:72:6dVT: 20:00:00:05:1e:41:4e:1d 20:01:00:05:1e:41:4e:1dNumber of host(s): 1Configuration status: committedHost: 10:00:00:00:c9:2b:c9:3a 20:00:00:00:c9:2b:c9:3aVI: 20:02:00:05:1e:41:4e:1d 20:03:00:05:1e:41:4e:1dLUN number: 0x0LUN type: diskLUN status: 0Encryption mode: encryptEncryption format: nativeEncrypt existing data: disabledRekey: disabledKey ID: not availableOperation Succeeded
10. Display the zone configuration.
192 Fabric OS Command Reference53-1001764-02

cryptoCfg 2
Note that a frame redirection zone has been created automatically to route traffic between host, VT, VI and target, VI, VT.
FabricAdmin:switch>cfgshowDefined configuration: cfg: itcfg itzone cfg: r_e_d_i_r_c__fg red_1109_brcd200c00062b0f726d200200051e414e1d; red_______base cfg: testcfg1 testzone1 zone: itzone 10:00:00:00:c9:2b:c9:3a; 20:0c:00:06:2b:0f:72:6d zone: red_1109_brcd200c00062b0f726d200200051e414e1d 10:00:00:00:c9:2b:c9:3a; 20:0c:00:06:2b:0f:72:6d; 20:02:00:05:1e:41:4e:1d; 20:00:00:05:1e:41:4e:1d zone: red_______base 00:00:00:00:00:00:00:01; 00:00:00:00:00:00:00:02; 00:00:00:00:00:00:00:03; 00:00:00:00:00:00:00:04 zone: testzone1 1,0
Effective configuration: cfg: itcfg zone: itzone 10:00:00:00:c9:2b:c9:3a 20:0c:00:06:2b:0f:72:6d
F. Device configuration display commandsTo display the tape pool configuration:
FabricAdmin:switch> cryptocfg --show -container -all -cfgEncryption group name: brocadeNumber of Container(s): 2
Container name: pc21_stk10kType: tapeEE node: 10:00:00:05:1e:53:8a:28EE slot: 0Target: 50:01:04:f0:00:b2:ea:6c 50:01:04:f0:00:b2:ea:6bVT: 20:00:00:05:1e:53:8a:24 20:01:00:05:1e:53:8a:24Number of host(s): 1Configuration status: committedHost: 10:00:00:06:2b:0f:41:0c 20:00:00:06:2b:0f:41:0cVI: 20:02:00:05:1e:53:8a:24 20:03:00:05:1e:53:8a:24Number of LUN(s): 1
Container name: pc23_hplto3Type: tapeEE node: 10:00:00:05:1e:53:8a:28EE slot: 0Target: 50:01:10:a0:00:8c:28:ba 50:01:10:a0:00:8c:28:b9VT: 20:08:00:05:1e:53:8a:24 20:09:00:05:1e:53:8a:24Number of host(s): 1Configuration status: committedHost: 10:00:00:05:1e:53:68:28 20:00:00:05:1e:53:68:28VI: 20:0a:00:05:1e:53:8a:24 20:0b:00:05:1e:53:8a:24Number of LUN(s): 1
To display all configured tape pools:
Fabric OS Command Reference 19353-1001764-02

cryptoCfg2
FabricAdmin:switch> cryptocfg --show -tapepool -all
Tape pool label: tpool.00001Key life: 0 (minute)Encryption mode: encryptEncryption format: nativeConfiguration status: committed(2)
Tape pool label: tpool.00002Key life: 0 (minute)Encryption mode: encryptEncryption format: nativeConfiguration status: committed(2)
To display CryptoTarget container runtime status information For a disk LUN with rekeying enabled:
FabricAdmin:switch> cryptocfg --show -tapepool -LUN my_disk_tgt 0x0 10:00:00:db:69:78:93:0e -stat
Container name: my_disk_tgtType: diskEE node: 10:00:00:05:1e:53:75:01EE slot: 0Target: 21:00:00:04:cf:6e:58:2c 20:00:00:04:cf:6e:58:2cTarget PID: 0107d5 VT: 20:28:00:05:1e:53:74:fd 20:29:00:05:1e:53:74:fdVT PID: 012805Number of host(s): 1Number of rekey session(s):1Host: 10:00:00:db:69:78:93:0e 20:00:00:db:69:78:93:0eHost PID: 000000VI: 20:36:00:05:1e:53:74:fd 20:37:00:05:1e:53:74:fdVI PID: 012806Number of LUN(s): 1LUN number: 0x0LUN type: diskLUN serial number: 20000004CF6E582CEncryption mode: encryptEncryption format: nativeEncrypt existing data: enabledRekey: enabledLUN state: First time re-key is in progressEncryption algorithm: AES256-XTSKey ID state: Re-keyKey ID: eb:d0:48:ce:e9:f2:40:89:da:d4:7e:10:18:72:fa:15Key creation time: Fri May 16 02:03:48 2008Key life: 3000 (minute)Rekey status: 0Key expiration time: Sun May 18 04:03:48 2008Operation Succeeded
To display CryptoTarget container configuration information For a disk LUN with rekeying enabled:
FabricAdmin:switch>cryptocfg --show -LUN my_disk_tgt 0x0 10:00:00:db:69:78:93:0e -cfgEE node: 10:00:00:05:1e:53:75:01EE slot: 0Target: 21:00:00:04:cf:6e:58:2c 20:00:00:04:cf:6e:58:2cVT: 20:28:00:05:1e:53:74:fd 20:29:00:05:1e:53:74:fdNumber of host(s): 1Configuration status: committedHost: 10:00:00:db:69:78:93:0e 20:00:00:db:69:78:93:0e
194 Fabric OS Command Reference53-1001764-02

cryptoCfg 2
VI: 20:36:00:05:1e:53:74:fd 20:37:00:05:1e:53:74:fdLUN number: 0x0LUN type: diskLUN status: 0Encryption mode: encryptEncryption format: nativeEncrypt existing data: enabledRekey: enabledKey ID: not availableKey life: 3000 (minute)Rekey status: 0Operation Succeeded
To display all tape sessions in progress on the local node:
FabricAdmin:switch>cryptocfg --show -tape_sessions -allNumber of tape session(s): 2
Container name: apps92EE node: 10:00:00:05:1e:43:ee:00EE slot: 2Target: 50:03:08:c0:9c:e5:a0:01 50:03:08:c0:9c:e5:a0:00Target PID: 8e0100VT: 20:00:00:05:1e:53:77:e8 20:01:00:05:1e:53:77:e8VT PID: 019001Host: 10:00:00:00:c9:52:00:ba 20:00:00:00:c9:52:00:baHost PID: 8e0200VI: 20:02:00:05:1e:53:77:e8 20:03:00:05:1e:53:77:e8VI PID: 019002LUN number: 0x0Tape session number: 0Number of uncompressed blocks: 37466Number of compressed blocks: 36587Number of uncompressed bytes: 2455059456Number of compressed bytes: 1138031028LUN number: 0x1Tape session number: 1Number of uncompressed blocks: 0Number of compressed blocks: 0Number of uncompressed bytes: 0Number of compressed bytes: 0Operation succeeded.
G. Device decommissioning commandsThe following steps must be performed to decommission a disk LUN:
1. Execute the decommission operation on a LUN
switch:admin> cryptocfg --decommission -container disk_ct0 -initiator 21:01:00:1b:32:29:5d:1c -LUN 0Operation succeeded.
2. Display the key IDs to be deleted manually from the keyvault
switch:admin> cryptocfg --show -decommissionedkeyids
Please Delete these keyed from the vault:76:a0:01:f2:34:6e:44:cc:35:e9:be:71:64:ca:5e:90
switch:admin> cryptocfg --show vendorspecifickeyid aa:8b:91:b0:35:6f:da:92:8a:72:b3:97:92:1b:ca:b4
Fabric OS Command Reference 19553-1001764-02

cryptoCfg2
uuid = b7e07a6a-db64-40c2-883a-0bc6c4e923e6
3. Manually delete the keys from the vault
This step requires accessing the Key Vault GUI and deleting the keys manually.
4. Delete the key IDs from the internal cache.
switch:admin> cryptocfg --delete -decommissionedkeyidsoperation succeeded.
See Also none
196 Fabric OS Command Reference53-1001764-02

dataTypeShow 2
dataTypeShow
Displays sample data stream types used in some diagnostic commands.
Synopsis datatypeshow [-seed value]
Description Use this command to display sample data stream types used in diagnostic commands. There are 20 different sample data types. The command displays an example of each data stream.
Note The execution of this command is subject to Virtual Fabric or Admin Domain restrictions that may be in place. Refer to chapter 1, "Using Fabric OS commands" and Appendix A, "Command Availability" for details.
Operands This command has the following operand:
-seed value Specify the data pattern seed value. If no seed is specified, then a seed value of 0 is used.
Examples To display sample data streams you can use with diagnostics:
switch:admin> datatypeshow
Pattern type example
BYTE_FILL 1 00 00 00 00 00 00 00 00 00 00 00 00 00 00 00 00WORD_FILL 2 0000 0000 0000 0000 0000 0000 0000 0000QUAD_FILL 3 00000000 00000000 00000000 00000000BYTE_NOT 4 00 ff 00 ff 00 ff 00 ff 00 ff 00 ff 00 ff 00 ffWORD_NOT 5 0000 ffff 0000 ffff 0000 ffff 0000 ffffQUAD_NOT 6 00000000 ffffffff 00000000 ffffffffBYTE_RAMP 7 00 01 02 03 04 05 06 07 08 09 0a 0b 0c 0d 0e 0fWORD_RAMP 8 0000 0001 0002 0003 0004 0005 0006 0007QUAD_RAMP 9 00000000 00000001 00000002 00000003BYTE_LFSR 10 69 01 02 05 0b 17 2f 5e bd 7b f6 ec d8 b0 60 c0RANDOM 11 55 16 fc d7 17 65 a9 87 5f 44 be 5a d0 de bc a5CRPAT 12 bc bc 23 47 6b 8f b3 d7 fb 14 36 59 bc bc 23 47CSPAT 13 7e 7e 7e 7e 7e 7e 7e 7e 7e 7e 7e 7e 7e 7e 7e 7eCHALF_SQ 14 4a 4a 4a 4a 4a 4a 4a 4a 4a 4a 4a 4a 4a 4a 4a 4aCQTR_SQ 15 78 78 78 78 78 78 78 78 78 78 78 78 78 78 78 78RDRAM_PAT 16 00 ff 00 ff 00 ff 00 ff 00 ff 00 ff 00 ff 00 ffjCRPAT 17 be d7 23 47 6b 8f b3 14 5e fb 35 59 be d7 23 47jCJTPAT 18 7e 7e 7e 7e 7e 7e 7e 7e 7e 7e 7e 7e 7e 7e 7e 7ejCSPAT 19 7f 7f 7f 7f 7f 7f 7f 7f 7f 7f 7f 7f 7f 7f 7f 7fPRED_RAND 20 00000000 11111111 22222222 33333333
See Also none
Fabric OS Command Reference 19753-1001764-02

date2
date
Displays or sets the switch date and time.
Synopsis date [“newdate”]
Description Use this command to display or set the date and time. All switches maintain current date and time in flash memory. Date and time are used for logging events. Normal switch operation does not depend on the date and time; a switch with incorrect date values continues to function properly.
This command sets a common date and time for the entire fabric. A change in date or time to one switch is forwarded to the principal switch and distributed to the fabric. It may take up to 64 seconds for the switches in the fabric to be synchronized. However, if an FCS policy is enabled, this command can be executed only on the Primary FCS switch, and only the primary FCS switch can distribute the time stamp to all other switches in the fabric.
If Virtual Fabrics are enabled, the date is set for the entire chassis, including all logical switches. A date update issued from a nonprincipal, pre-v6.2.0 switch will be dropped by a v6.2.0 principal switch.
The date specified is always the local switch time, taking into account daylight saving time and the time zone setup of the switch. Each switch takes care of converting the GMT time distributed fabric-wide to its local time. Refer to tsTimeZone for more information on time zone support.
If the switch is operating in FICON Management Server mode (fmsmode), setting the date is subject to the director clock alert mode (DCAM). If DCAM is 1, the operator issues a warning that the switch date is about to change. The operator then prompts to confirm the change with a yes or no response.
Notes This command becomes read-only if external NTP synchronization is enabled. For more information, refer to tsClockServer.
The execution of this command is subject to Virtual Fabric or Admin Domain restrictions that may be in place. Refer to chapter 1, "Using Fabric OS commands" and Appendix A, "Command Availability" for details.
Operands When invoked without operand, this command displays the current date and time. The following operand is optional:
"newdate" Specify the new date and time, in quotation marks. Date and time are specified as a string in the format: "mmddhhmmyy" where:
mm is the month, valid values are 01-12.
dd is the date, valid values are 01-31.
hh is the hour, valid values are 00-23.
mm is minutes, valid values are 00-59.
yy is the year, valid values are 00-37 and 70-99.
Year values from 70-99 are interpreted as 1970- 1999, year values from 00-37 are interpreted as 2000-2037.
198 Fabric OS Command Reference53-1001764-02

date 2
Examples To display the current date and time and then modify it:
switch:admin> dateFri Jan 29 17:01:48 UTC 2007
switch:admin> date "0227123007"Thu Feb 27 12:30:00 UTC 2007
See Also errShow, ficonCupSet, ficonCupShow, portLogShow, tsClockServer, tsTimeZone, upTime
Fabric OS Command Reference 19953-1001764-02

dbgShow2
dbgShow
Displays current values of debug and verbosity levels of the specified module.
Synopsis dbgshow [module_name]
Description Use this command to display the current values of debug and verbosity levels of the specified module. If no module name is specified, displays debug and verbosity levels of all modules.
Note The execution of this command is subject to Virtual Fabric or Admin Domain restrictions that may be in place. Refer to chapter 1, "Using Fabric OS commands" and Appendix A, "Command Availability" for details.
Operands This command has the following operand:
module_name Specify the name of the module for which you want to view the debug and verbosity levels. Module names are case-sensitive. This operand is optional.
Examples To display information about a specific module named NS:
switch:admin> dbgshow NSModule NS, debug level = 1, verbose level = 1
See Also setDbg
200 Fabric OS Command Reference53-1001764-02

defZone 2
defZone
Sets or displays the default zone access mode.
Synopsis defzone [--noaccess | --allaccess | --show]
Description Use this command to display or set the Default Zone access mode. Setting the Default Zone mode initializes a zoning transaction (if one is not already in progress), and create reserved zoning objects.
A default zone controls device access when zoning is not enabled. When a user-specified zoning configuration is not enabled, Default Zone is in effect, allowing access to all devices. When a user-specified zone configuration is enabled, it overrides the Default Zone access mode.
Notes This command must be run from the primary FCS switch.
The execution of this command is subject to Virtual Fabric or Admin Domain restrictions that may be in place. Refer to chapter 1, "Using Fabric OS commands" and Appendix A, "Command Availability" for details.
Zone object names beginning with the d_efault_ prefix are reserved for default zoning use. Editing of these objects is not permitted. Therefore, cfgShow does not display the names of these objects.
If d_efault_Cfg is the effective zone configuration, both cfgShow and cfgActvShow do not display d_efault_Cfg as the effective zone configuration.
Operands This command has the following operands:
--noaccess Sets the default zone access mode to No Access, initializes a zoning transaction (if one is not already in progress), and creates the reserved zoning objects equivalent to the following zoning commands:
cfgCreate “d_efault_Cfg”, “d_efault_Zone”
zoneCreate “d_efault_Zone”, “00:00:00:00:00:00:00:01”
A cfgSave, cfgEnable, or cfgDisable command must be issued after issuing this command to commit the changes and distribute them to the fabric; for example:
primaryfcs:admin> defzone --noaccessprimaryfcs:admin> cfgsave
An audit log record is generated for each execution of this command.
When No Access default zone is activated, the following conditions apply:
• If the current effective zone configuration is disabled with the cfgDisable command, the local switch converts this command to the equivalent of cfgEnable d_efault_Cfg.
• If zoning receives a cfgDisable command from a remote switch that does not support default zoning, zoning rejects the cfgDisable command in the second phase of RCS because the remote switch does not convert the cfgDisable command to cfgEnable d_efault_Cfg.
Fabric OS Command Reference 20153-1001764-02

defZone2
--allaccess Sets the default zone access mode to All Access, initiates a zoning transaction (if one is not already in progress), and deletes the reserved zoning objects by performing the equivalent to the following zoning commands:
cfgDelete “d_efault_Cfg”
zoneDelete “d_efault_Zone”
A cfgSave, cfgEnable, or cfgDisable command must be performed subsequent to the use of this command to commit the changes and distribute them to the fabric. If a cfgSave is performed and the fabric is already in the No Access default zone state, a cfgDisable is sent to the fabric. For example:
primaryfcs:admin> defzone --allaccessprimaryfcs:admin> cfgsave
An audit log record is generated for each use of this command.
--show Displays the current state of the default zone access mode.
Examples To create a default zone configuration:
primaryfcs:admin> cfgactvshow Effective configuration: No Effective configuration
primaryfcs:admin> defzone --noaccess
primaryfcs:admin> cfgsave
primaryfcs:admin> defzone --showDefault Zone Access Modecommitted - No Accesstransaction - No Transaction
primaryfcs:admin> cfgactvshow Effective configuration: No Effective configuration: (No Access)
See Also none
202 Fabric OS Command Reference53-1001764-02

diagClearError 2
diagClearError
Clears the diagnostics failure status.
Synopsis diagclearerror [[--slot] slot] -all
Description Use this command to clear the diagnostics failure status.
Note The execution of this command is subject to Virtual Fabric or Admin Domain restrictions that may be in place. Refer to chapter 1, "Using Fabric OS commands" and Appendix A, "Command Availability" for details.
Operands This command has the following operand:
--slot slot Specify the slot on which to clear the diagnostics failure status. The default is set to 0 and designed to operate on fixed-port-count products.
-all If specified, all blades clear.
If no operand is specified, the default is to clear all bad port flags.
Examples To clear the diag software flag:
switch:admin> diagclearerror 8ERROR: DIAG CLEARERRDiagnostics Errors Cleared, port: 8/31Err# 0120041 081F
See Also none
Fabric OS Command Reference 20353-1001764-02

diagDisablePost2
diagDisablePost
Disables the power-on self-test (POST).
Synopsis diagdisablepost
Description Use this command to disable POST. A reboot is not required for this command to take effect. Use the diagPost command to display the current POST status, and use diagEnablePost to enable POST.
Note The execution of this command is subject to Virtual Fabric or Admin Domain restrictions that may be in place. Refer to chapter 1, "Using Fabric OS commands" and Appendix A, "Command Availability" for details.
Operands none
Examples To disable the POST:
switch:admin> diagdisablepostConfig update SucceededDiagnostic POST is now disabled.
See Also diagEnablePost, diagPost
204 Fabric OS Command Reference53-1001764-02

diagEnablePost 2
diagEnablePost
Enables the power-on self-test (POST).
Synopsis diagenablepost
Description Use this command to enable POST. A reboot is not required for this command to take effect. POST includes two phases: POST Phase I mainly tests hardware and POST Phase II tests system functionality.
Use the diagPost command to display the current POST status, and use diagDisablePost to disable POST.
Note The execution of this command is subject to Virtual Fabric or Admin Domain restrictions that may be in place. Refer to chapter 1, "Using Fabric OS commands" and Appendix A, "Command Availability" for details.
Operands none
Examples To enable POST:
switch:admin> diagenablepostConfig update SucceededDiagnostic POST is now enabled.
See Also diagDisablePost, diagPost
Fabric OS Command Reference 20553-1001764-02

diagHelp2
diagHelp
Displays diagnostic command information.
Synopsis diaghelp
Description Use this command to display a short description of diagnostic commands.
Use default operands when running diagnostics commands. Non-default settings require detailed knowledge of the underlying hardware and are intended for support personnel only. Contact support if you want to use these operands.
Note The diagHelp command displays diagnostic commands that may not be available. Execute help command to verify availability.
The execution of this command is subject to Virtual Fabric or Admin Domain restrictions that may be in place. Refer to chapter 1, "Using Fabric OS commands" and Appendix A, "Command Availability" for details.
Operands none
Examples To display diagnostic command information:
switch:admin> diaghelpbpportloopbacktest Functional test of port via blade processor path.bpturboramtest MBIST test for AP blade BP ASICsceeportloopbacktest Functional test of port N->N path.ceeturboramtest MBIST test for ASICs(output truncated)
See Also none
206 Fabric OS Command Reference53-1001764-02

diagPost 2
diagPost
Sets or displays diagnostic POST configuration.
Synopsis diagpost
Description Use this command to display the current POST configuration. Use diagEnablePost or diagDisablePost to modify the POST configuration.
Note The execution of this command is subject to Virtual Fabric or Admin Domain restrictions that may be in place. Refer to chapter 1, "Using Fabric OS commands" and Appendix A, "Command Availability" for details.
Operands none
Examples To display the current POST configuration:
switch:admin> diagpost Diagnostic POST is currently disabled.
See Also none
Fabric OS Command Reference 20753-1001764-02

diagRetry2
diagRetry
Sets or displays diagnostic retry mode.
Synopsis diagretry [mode | -show]
Description Use this command to enable retry mode if the mode value is nonzero and to disable the retry mode if the mode value is 0. The mode is saved in flash memory (and stays in that mode) until the next execution of diagRetry. The mode becomes active as soon as this command is executed; it does not require a reboot to take effect.
Retry mode modifies the behavior of the diagnostic test methods, power-on self-test (POST), and burn-in scripts. The exact behavior depends on the tests and scripts that are run.
Note The execution of this command is subject to Virtual Fabric or Admin Domain restrictions that may be in place. Refer to chapter 1, "Using Fabric OS commands" and Appendix A, "Command Availability" for details.
Operands This command has the following optional operands:
mode Specify 1 to enable, 0 to disable retry mode.
-show Displays the current mode setting.
If no operand is specified, the current value is displayed.
Examples To view and modify the current retry mode value:
switch:admin> diagretry -showDiagnostic Retry Mode is currently enabled.
switch:admin> diagretry 0Config update SucceededDiagnostic Retry Mode is now disabled.
switch:admin> diagretry 1Config update SucceededDiagnostic Retry Mode is now enabled.
See Also none
208 Fabric OS Command Reference53-1001764-02

diagShow 2
diagShow
Displays diagnostics status.
Synopsis diagshow [--slot number][-uports itemlist][-bports itemlist][-use_bports value]
Description Use this command to display the diagnostics status for the specified list of blade or user ports.
Note The execution of this command is subject to Virtual Fabric or Admin Domain restrictions that may be in place. Refer to chapter 1, "Using Fabric OS commands" and Appendix A, "Command Availability" for details.
Operands This command has the following optional operands:
--slot number Specify which slot to operate on. If this option is not specified, the default slot 0 is used. The default slot is designed to operate on fixed-port-count products. By default, this command displays all user ports in the system.
-uports itemlist Specify a list of user ports to display.
-bports itemlist Specify a list of blade ports to display.
-use_bports value If this value is not 0 the diagnostics status for the blade ports specified in -use_bports displays; otherwise, the user ports specified in -uports displays. The default value is 0.
Examples To display diagnostic status on a switch blade:
switch:admin> diagshowDiagnostics Status: Fri Feb 08 15:25:24 2002Slot: 1 UPORTSPort BPort Diag Active Speed ...... 0 15 OK UP 2G Auto ...... 1 14 OK UP 2G Auto ...... 2 13 OK UP 2G Auto ...... 3 12 OK UP 2G Auto ...... 4 31 OK UP 2G Auto ...... 5 30 OK UP 2G Auto ...... 6 29 OK UP 2G Auto ...... 7 28 OK UP 2G Auto ...... 8 47 OK UP 2G Auto ......(output truncated)
See Also itemList
Fabric OS Command Reference 20953-1001764-02

dbgShow2
dbgShow
Displays current values of debug and verbosity levels of the specified module.
Synopsis dbgshow module_name
Description Use this command to display the current values of debug and verbosity levels of the specified module. If no module name is specified, displays debug and verbosity levels of all modules.
Note The execution of this command is subject to Virtual Fabric or Admin Domain restrictions that may be in place. Refer to chapter 1, "Using Fabric OS commands" and Appendix A, "Command Availability" for details.
Operands This command has the following operands:
module_name Specify the name of the module for which you want to view the debug and verbosity levels. Module names are case-sensitive. This operand is optional.
Examples To display information about a specific module named NS:
switch:admin> dbgshow NSModule NS, debug level = 1, verbose level = 1
See Also setDbg
210 Fabric OS Command Reference53-1001764-02

distribute 2
distribute
Distributes data to switches in a fabric.
Synopsis distribute -p policy_list -d switch_list
Description Use this command to distribute data to a specified list of switches in the fabric. The distributed data must be from the list of currently supported policy sets:
SCC Switch Connection Control Policy
DCC Device Connection Control Policy
PWD Password Database and Password Configuration Policy
AUTH E_Port and F_Port Authentication Policy
FCS Fabric Configuration Server Policy
Each supported database has a switch-local configuration parameter that controls whether the database can be distributed and accepts distributions. Use the fddCfg command to view and modify these parameters.
Notes IP Filter policies cannot be distributed with the distribute command. Use the chassisDistribute command.
Password database received from a switch running pre-v6.3.0 firmware will be rejected by a Virtual Fabric-enabled v6.3.0 chassis if it has more than one logical switch.
The execution of this command is subject to Virtual Fabric or Admin Domain restrictions that may be in place. Refer to chapter 1, "Using Fabric OS commands" and Appendix A, "Command Availability" for details.
Operands This command has the following operands:
-p policy_list Specify the list of policy sets, also called security databases, to be distributed. policy_list is a semicolon-separated list. Valid values include SCC, DCC, PWD, AUTH, and FCS.
-d switch_list Specify the list of switches that should receive the data distribution. The switch_list is a semicolon-separated list of one of the following:
• switch domain IDs• switch names • switch WWNs
A wildcard (*) may be specified to include all switches in the fabric that support the distribute feature.
Examples To distribute the Switch Connection Control Policy and Device Connection Control Policy to domains 3 and 5 in the fabric:
switch:admin> distribute -p “SCC;DCC” -d “3;5”To distribute the Switch Connection Control Policy, FCS Policy, and Password database to all domains in the fabric that support the distribute feature:
switch:admin> distribute -p “SCC;FCS;PWD” -d “*”Wildcard domains are:1 3 5
Fabric OS Command Reference 21153-1001764-02

distribute2
To distribute the FCS policy, and the Password database to all domains in the fabric that support the distribute feature:
switch:admin> distribute -p “FCS;PWD” -d "*"
To distribute the AUTH and FCS policies to all switches in the fabric that run Fabric OS v5.3.0 or later:
switch:admin> distribute -p "AUTH;FCS" -d "*"
To distribute the AUTH and SCC policies to domains 1 and 3 in the fabric:
switch:admin> distribute -p "AUTH;SCC" -d "1;3"
See Also fddCfg
212 Fabric OS Command Reference53-1001764-02

dlsReset 2
dlsReset
Disables Dynamic Load Sharing (DLS) .
Synopsis dlsreset
Description Use this command to disable Dynamic Load Sharing.
If DLS is turned off, load sharing calculations are used only to place new routes. Once placed, existing routes are never moved from one output E_Port to another, unless the original output E_Port is no longer a recognized path to the remote domain. Optimal balance is rarely achieved with this setting. Refer to the dlsSet help page for a full description of load sharing options including the Lossless feature.
The behavior of this command depends on the routing policies configured on the switch:
• If a port-based routing policy is in place, DLS is by default disabled, and dlsReset returns the DLS setting to default. If Lossless was enabled, this command removes the Lossless option along with the DLS feature and returns a message stating that “DLS is not set”.
• If an exchange-based routing policy is in place, DLS is always enabled. It cannot be disabled and the dlsReset command fails. The command generates a message stating that “DLS cannot be changed with current routing policy”. If Lossless is enabled, the feature remains enabled until you disable it with the dlsSet --disable -lossless command.
• If DLS is already disabled, the command output confirms the disabled status:“DLS is not set (unchanged)”
Refer to aptPolicy for information on routing policies.
Notes The Lossless feature is supported only on the Brocade DCX and DCX-4S chassis with 8G blades (FC ports only), and on the Brocade 300, 5100, 5300 and 7800 switches. On the Brocade 7800 and FX8-24, the Lossless feature is supported only on FC ports. On unsupported platforms, this command exits with an appropriate message.
The execution of this command is subject to Virtual Fabric or Admin Domain restrictions that may be in place. Refer to chapter 1, "Using Fabric OS commands" and Appendix A, "Command Availability" for details.
Operands none
Examples To disable the dynamic load sharing option on a switch with a port-based routing policy and DLS enabled:
switch:admin> dlsresetDLS is not set
To execute dlsReset on a switch with an exchange-based routing policy and DLS enabled:
switch:admin> dlsresetDLS cannot be changed with current routing policy
See Also aptPolicy, dlsSet, dlsShow
Fabric OS Command Reference 21353-1001764-02

dlsSet2
dlsSet
Enables Dynamic Load Sharing (DLS) without frame loss.
Synopsis dlsset
dlsset --enable -lossless
dlsset --disable -lossless
dlsset --help
Description Use this command to enable or disable Dynamic Load Sharing (DLS) in the event of a fabric change, to configure DLS without frame loss, and to display the DLS configuration.
Dynamic load sharing optimizes the utilization of the interswitch links (ISLs) by rebalancing the paths going over the ISLs whenever there is a fabric event that may result in a sub-optimal utilization of the ISL. Dynamic rebalancing can be triggered by any one of the following events:
• A change in the fabric occurs.
• A local E_Port (including trunk ports) goes up or down.
• A local Fx_Port goes down.
When used without operands, this command enables Dynamic Load Sharing on a switch (legacy DLS behavior). Frames may be lost during reroute operations. If the switch has an exchanged-based routing policy, DLS is by default enabled and this command fails with the following message: “DLS can not be changed with current routing policy.”
During the load sharing recomputation, existing routes may be moved to maintain optimal load balance. Frame loss is unavoidable when a port goes down. To prevent frames from being lost during this operation, you can enable DLS without frame loss by issuing this command with the --enable -lossless option.
Dynamic load sharing without frame loss is supported in logical fabrics and is configured per logical switch. However, there is a potential impact on other logical switches due to the fact that they share the same hardware. Chassis permissions are required to configure DLS in a logical fabric environment.
For example, assume a chassis is partitioned as follows: logical switch LS1 consists of ports 1/0-1/5, and logical switch LS2 consists of ports 1/6-1/10. Lossless is enabled on logical switch LS1. Since the ports 1/0-1/10 share the same chip, traffic in LS2 is affected whenever traffic for LS1 on ports 1/0-5 is rebalanced. The impact on LS2 depends on the configuration on LS2:
• If the Lossless feature is enabled on LS1, traffic pauses and resumes without frame loss on both switches at the same time.
• If the Lossless feature is disabled on LS1, traffic on LS 2 is not affected.
Notes You cannot enable Lossless when XISL use is enabled, and you cannot enable XISL use while Lossless is enabled. In either case, the operation terminates with an appropriate error message. Use the configure command to disable XISL use.
Fabric OS v6.4.0 and later supports Lossless with both exchange-based and port-based routing policies. Behavior depends on the kind of policy configured and concurrent IOD settings. Refer to the Fabric OS Administrator's Guide for information on how to optimize your configuration. Refer to the aptPolicy help page for more information on routing policies.
214 Fabric OS Command Reference53-1001764-02

dlsSet 2
The Lossless feature is supported only on the Brocade DCX and DCX-4S chassis with 8G blades (FC ports only), and on the Brocade 300, 5100, 5300 and 7800 switches. On the Brocade 7800 and FX8-24, the Lossless feature is supported only on FC ports. On unsupported platforms, this command exits with an appropriate message.
The execution of this command is subject to Virtual Fabric or Admin Domain restrictions that may be in place. Refer to chapter 1, "Using Fabric OS commands" and Appendix A, "Command Availability" for details.
Operands --enable -lossless Enables the Lossless feature. Frame loss is reduced while the path is rerouted. If DLS is set on the switch, this command adds the Lossless feature to the existing DLS legacy mode. If DLS is not set on the switch, this command enables both DLS and the Lossless feature. The Lossless feature is by default disabled.
--disable -lossless Disables the previously enabled Lossless feature. Execution of this command is equivalent to the legacy dlsSet command. Dynamic load balancing is enforced but not without frame loss. DLS (legacy mode) continues to be enabled after Lossless is disabled. Use dlsReset to disable DLS completely.
--help Displays the command usage.
Examples DLS configuration commands on a switch with an exchange-based policy:
switch:admin> aptpolicyCurrent Policy: 3 0(ap)
3 0(ap) : Default Policy 1: Port Based Routing Policy 3: Exchange Based Routing Policy 0: AP Shared Link Policy 1: AP Dedicated Link Policy
switch:admin> dlsshow
DLS is set by default with current routing policy
DLS is set with Lossless enabled
switch:admin> dlsreset
DLS can not be changed with current routing policy
switch:admin> dlsset
DLS can not be changed with current routing policy
switch:admin> dlsset --enable -lossless
Lossless is set
switch:admin> dlsset --disable -lossless
Lossless is not set
Fabric OS Command Reference 21553-1001764-02

dlsSet2
switch:admin> dlssshow
DLS is set by default with current routing policy
DLS configuration commands on a switch with a port-based policy:
switch:admin> dlsshow
DLS is set by default with current routing policy
DLS is set with Lossless enabled
switch:admin> dlsreset
DLS is not set
switch:admin> dlsshow
DLS is not set
switch:admin> dlsset --enable -lossless
DLS and Lossless are set
switch:admin> dlsshow
DLS is set with Lossless enabled
switch:admin> dlsset
Lossless is set (unchanged)
switch:admin> dlsset --disable -lossless
Lossless is not set
switch:admin> dlssshow
DLS is not set
To attempt to enable Lossless while XISL use is enabled:
switch:admin> dlsset --enable -lossless
Lossless option cannot be enabled when XISL use is allowed.Please disable the switch with 'switchdisable' and run 'configure' to disallow XISL use before enabling Lossless.
See Also aptPolicy, dlsReset, dlsShow, iodReset, iodSet, iodShow, uRouteShow, topologyShow
216 Fabric OS Command Reference53-1001764-02

dlsShow 2
dlsShow
Displays the setting of the dynamic load sharing (DLS) option.
Synopsis dlsshow
Description Use this command to display information about Dynamic Load Sharing configuration settings on the switch. Depending on the configuration, the command output displays one of the following messages:
DLS is set. DLS is enabled without the lossless feature. Load sharing is reconfigured with every change in the fabric, and existing routes can be moved to maintain optimal balance. No attempt is made to prevent frames from being lost while load sharing is recomputed.
DLS is not set DLS is disabled. Existing routes are never moved to maintain optimal balance. If the lossless option was enabled before you disabled DLS, it is now disabled as well. This means, frame loss is not prevented during a load sharing recomputation.
DLS is set with Lossless enabled. DLS is enabled with the lossless feature. Load sharing is recomputed with every change in the fabric, and existing routes can be moved to maintain optimal balance. In Lossless mode, no framers are lost during this operation.
DLS is set by default with current routing policy. DLS is set with Lossless enabled Indicates that the current routing policy (Exchange-based) requires DLS to be enabled by default. In addition, the lossless option is enabled. Frame loss is prevented during a load sharing recomputation.
Refer to dlsSet for a description of load sharing.
Notes The Lossless feature is supported only on the Brocade DCX and DCX-4S chassis with 8G blades (FC ports only), and on the Brocade 300, 5100, 5300 and 7800 switches. On the Brocade 7800 and FX8-24, the Lossless feature is supported only on FC ports. On unsupported platforms, this command exits with an appropriate message.
The execution of this command is subject to Virtual Fabric or Admin Domain restrictions that may be in place. Refer to chapter 1, "Using Fabric OS commands" and Appendix A, "Command Availability" for details.
Operands none
Examples To display the current DLS option setting:
switch:admin> dlsshowDLS is set with Lossless enabled.
See Also dlsSet, dlsReset
Fabric OS Command Reference 21753-1001764-02

dnsConfig2
dnsConfig
Sets, displays, or removes domain name service (DNS) parameters.
Synopsis dnsconfig
Description Use this command to display, set, or remove the domain name service parameters.
The domain name service parameters are the domain name and the name server IP address for primary and secondary name servers. The dnsconfig command displays IPv4 and IPv6 addresses.
Note The execution of this command is subject to Virtual Fabric or Admin Domain restrictions that may be in place. Refer to chapter 1, "Using Fabric OS commands" and Appendix A, "Command Availability" for details.
Operands none
Examples To set the DNS parameters for the system:
switch:admin> dnsconfig
Enter option1 Display Domain Name Service (DNS) configuration2 Set DNS configuration3 Remove DNS configuration4 QuitSelect an item: (1..4) [4] 2
Enter Domain Name: [] domain.comEnter Name Server IP address in dot notation: [] 123.123.123.123Enter Name Server IP address in dot notation: [] 123.123.123.124DNS parameters saved successfully
Enter option1 Display Domain Name Service (DNS) configuration2 Set DNS configuration3 Remove DNS configuration4 QuitSelect an item: (1..4) [4] 4
See Also configDownload, configUpload, firmwareDownload, ipAddrSet, ipAddrShow
218 Fabric OS Command Reference53-1001764-02

enclosureShow 2
enclosureShow
Displays attributes of the switch enclosure.
Synopsis enclosureshow attribute
Description Use this command to display attributes of the switch enclosure, including the vendor-specific enclosure identifier and the identifier of the enclosure interface to which the switch is attached.
This command applies to products that are embedded in a blade server or storage chassis. Most options are platform-specific. Options that do not apply to a platform are identified with a “Not supported on this platform” message.
Note The execution of this command is subject to Virtual Fabric or Admin Domain restrictions that may be in place. Refer to chapter 1, "Using Fabric OS commands" and Appendix A, "Command Availability" for details.
Operands This command has the following operand:
attribute Specifies the enclosure attribute. Valid attributes include the following:
id The vendor-specific enclosure identifier.
modelname The vendor-specific enclosure model name.
slotid The identifier of the enclosure interface to which the switch is attached.
rackname The name assigned by the enclosure manager to the rack.
rackid The serial number assigned by the enclosure manager to the rack.
enclosurename
The name assigned by the enclosure manager to the enclosure.
enclosureid The serial number assigned by the enclosure manager to the enclosure.
connname The product name used by the enclosure manager for the switch model.
connaddr The connector address used by the enclosure manager for this switch (indicates the physical position of the switch in the enclosure).
connid The serial number of the switch used by the enclosure manager (not to be confused with the Factory Serial Number).
conntype The connector type used by the enclosure manager for this model of switch.
connloc The switch location within the enclosure.
connpres Information about the switch’s presence that is used by the enclosure manager.
connfuse Information about whether or not the switch has a fuse.
Examples To display the identifier of the enclosure interface to which the switch is attached:
switch:admin> enclosureShow slotidBay 4
See Also chassisShow
Fabric OS Command Reference 21953-1001764-02

errClear2
errClear
Clears all error log messages for all switch instances on this control processor (CP).
Synopsis errclear
Description Use this command to clear all internal and external error log messages for all switch instances on the CP where the command is executed. For products with a single processor, all error log messages are cleared. For products that contain multiple processors, this command can be executed on either control processor. It clears the error log only on the CP where the command is executed, for example, to clear the error log on the standby CP, issue errclear on the standby CP.
Note The execution of this command is subject to Virtual Fabric or Admin Domain restrictions that may be in place. Refer to chapter 1, "Using Fabric OS commands" and Appendix A, "Command Availability" for details.
Operands none
Examples To clear the error log messages:
switch:admin> errclear
See Also errDump, errShow
220 Fabric OS Command Reference53-1001764-02

errDelimiterSet 2
errDelimiterSet
Sets the error log start and end delimiters for messages sent to the console and syslog.
Synopsis errdelimiterset [-s "start delimiter string"][-e "end delimiter string"]
Description Use this command to set the error log start and end delimiters for log messages sent to the console and syslog. An empty string clears the start and the end delimiters (including the colon) so that they are not displayed.
If no arguments are supplied to the command, it instead displays the existing errDelimiterSet configuration. These delimiters are stored persistently.
Note The execution of this command is subject to Virtual Fabric or Admin Domain restrictions that may be in place. Refer to chapter 1, "Using Fabric OS commands" and Appendix A, "Command Availability" for details.
Operands This command has the following operands:
-s "start delimiter string"Specify the alphanumeric string for the start delimiter; up to 10 characters are allowed. This operand is optional.
-e "end delimiter string"Specify the alphanumeric string for the end delimiter; up to 10 characters are allowed. This operand is optional.
Examples To display the start and end delimiters:
switch:admin> errdelimiterset
delimiter start string: <none>
delimiter end string: <none>
To change the start and end delimiters (with sample output):
switch:admin> errdelimiterset -s "Start" -e "End"
Start2003/03/10-09:54:03, [NS-1002], 1035,, ERROR, SWITCH43, Name Server received an invalid request from device 10:02:32:A3:78:23:23:End
See Also errDump, errFilterSet, errShow
Fabric OS Command Reference 22153-1001764-02

errDump2
errDump
Displays the error log without pagination.
Synopsis errdump [-a |-r ]
Description Use this command to dump external error log messages without any page breaks. When executed without operands, this command prints all error messages for the logical switch context in which the command is executed. When used with the -a option, the command prints the error messages for the entire chassis. The messages are dumped to the console without page breaks. The -r operand displays the messages in reversed order.
The output of this command is unique for each Control Processor (CP). On dual-CP processors this command must be executed on each CP to obtain a complete record.
The following information displays in each message:
Start delimiter Delimiter string for the start of a message.
Timestamp Timestamp for the message.
Message ID Message identifier.
External sequence numberSequence number for the message.
Security audit flag Security audit message displayed as AUDIT.
Severity Severity of the message. Valid values include INFO, WARNING, ERROR, and CRITICAL.
Switch name Switch name for the generator of this message, or “chassis”.
Message Message body.
End delimiter Delimiter string for the end of a message.
Note The execution of this command is subject to Virtual Fabric or Admin Domain restrictions that may be in place. Refer to chapter 1, "Using Fabric OS commands" and Appendix A, "Command Availability" for details.
Operands This command has the following operands:
-a Displays messages for the entire chassis for a user with admin and chassis permissions. This operand is optional; if omitted, the messages for the current logical switch context are displayed.
-r Displays messages in reversed order. This operand is optional; if omitted, the messages display in chronological order.
Examples To display the error log for the chassis:
switch:admin> errdump -aFabric OS: v6.2.0
2008/08/25-10:10:41, [SEC-1203], 9036, CHASSIS, INFO, Spir_67, Login information : Login successful via TELNET/SSH/RSH. IP Addr: 10.106.7.62
222 Fabric OS Command Reference53-1001764-02

errDump 2
2008/08/25-10:13:41, [ZONE-1022], 9037, CHASSIS, INFO, Spir_67, The effective configuration has changed to meh.
2008/08/25-11:35:04, [FABR-1001], 9041, CHASSIS, WARNING, Spir_67, port 0, incompatible Long distance mode.
2008/08/25-11:39:35, [LOG-1000], 9043, CHASSIS, INFO, Spir_67, Previous message repeated 1 time(s)[output truncated]
See Also errDelimiterSet, errFilterSet, errShow
Fabric OS Command Reference 22353-1001764-02

errFilterSet2
errFilterSet
Sets a filter for an error log destination.
Synopsis errfilterset [-d “destination"][-v severity]
Description Use this command to set a filter for an error log destination. A filter is set based on the severity level of the messages.
If no parameters are specified, this command displays the filters that are currently in use.
Note The execution of this command is subject to Virtual Fabric or Admin Domain restrictions that may be in place. Refer to chapter 1, "Using Fabric OS commands" and Appendix A, "Command Availability" for details.
Operands This command has the following operands:
-d destination Specifies the destination for the filter. The string console is the only valid value at this time.
-v severity Specifies the minimum severity level of the message to pass through the filter. Valid values are INFO, WARNING, ERROR, or CRITICAL. Input values are not case-sensitive.
Examples To display the current filter settings:
switch:admin> errfilterset
console: filter severity = WARNING
To set the filter severity level for the console:
switch:admin> errfilterset -d console -v warning
See Also errDump, errShow
224 Fabric OS Command Reference53-1001764-02

errModuleShow 2
errModuleShow
Displays all the defined error log modules.
Synopsis errmoduleshow
Description Use this command to display a list of all defined error log modules.
Note The execution of this command is subject to Virtual Fabric or Admin Domain restrictions that may be in place. Refer to chapter 1, "Using Fabric OS commands" and Appendix A, "Command Availability" for details.
Operands none
Examples To display a list of all defined error log modules:
switch:user> errmoduleshowModule IDs:
1 KT 2 UT 3 TRCE 4 KTRC 5 LOG 6 CDR 7 BLPU 8 PISP 9 PIXE 10 EGR 11 BL 12 PIC 13 PS 14 RTE 15 AS 16 AUTH 17 BLDE 18 BLM 19 BPRT 20 CER 21 CFLD 22 CFMN 23 CHPS 24 CONF(output truncated)
See Also errDump, errShow
Fabric OS Command Reference 22553-1001764-02

errShow2
errShow
Displays the error log messages with pagination.
Synopsis errshow [-a |-r ]
Description Use this command to display external error log messages one at a time. When executed without operands, this command prints the error messages for the logical switch context in which the command is executed. When used with the -a option, the command prints the error messages for the entire chassis. The messages are displayed with page breaks. The -r operand displays the messages in reversed order.
The output of this command is unique for each Control Processor (CP). On dual-CP processors this command must be executed on each CP to obtain a complete record.
The following information displays in each message:
Start delimiter Delimiter string for the start of a message.
Timestamp Timestamp for the message.
Message ID Message identifier.
External sequence numberSequence number for the message
Security audit flag Security audit message displayed as AUDIT.
Severity Severity of the message. Valid values include INFO, WARNING, ERROR, and CRITICAL.
Switch name Switch name for the generator of this message, or “chassis”.
Message Message body.
End delimiter Delimiter string for the end of a message.
Note The execution of this command is subject to Virtual Fabric or Admin Domain restrictions that may be in place. Refer to chapter 1, "Using Fabric OS commands" and Appendix A, "Command Availability" for details.
Operands This command has the following operands:
-a Displays messages for the entire chassis for a user with admin and chassis permissions. This operand is optional; if omitted, the messages for the current logical switch context are displayed.
-r Displays messages in reversed order. This operand is optional; if omitted, the messages display in the chronological order.
Examples To display the error log for the chassis:
switch:admin> errdump -aFabric OS: v6.2.0
2008/08/25-10:10:41, [SEC-1203], 9036, CHASSIS, INFO, Spir_67, Login information : Login successful via TELNET/SSH/RSH. IP Addr: 10.106.7.62
[Type <CR> to continue, Q<CR> to stop:
226 Fabric OS Command Reference53-1001764-02

errShow 2
2008/08/25-10:13:41, [ZONE-1022], 9037, CHASSIS, INFO, Spir_67, The effective configuration has changed to meh.[Type <CR> to continue, Q<CR> to stop:
2008/08/25-11:35:04, [FABR-1001], 9041, CHASSIS, WARNING, Spir_67, port 0, incompatible Long distance mode.
[Type <CR> to continue, Q<CR> to stop:
2008/08/25-11:39:35, [LOG-1000], 9043, CHASSIS, INFO, Spir_67, Previous message repeated 1 time(s)
[Type <CR> to continue, Q<CR> to stop:q
See Also errDelimiterSet, errDump, errFilterSet
Fabric OS Command Reference 22753-1001764-02

exit2
exit
Logs out from a shell session.
Synopsis exit
Description Use this command to log out from a Telnet, SSH, rlogin or serial port session. Telnet and rlogin connections are closed; the serial port returns to the login: prompt.
The exit command is an accepted synonym for logout, as is typing Ctrl-D at the beginning of a line.
Operands none
Examples To exit from a shell session:
switch:admin> exitConnection to host lost.
See Also logout
228 Fabric OS Command Reference53-1001764-02

fabPortShow 2
fabPortShow
Displays fabric port information.
Synopsis fabportshow [slot/]port
Description Use this command to display the state of a port relative to the fabric and a list of pending commands. The following information is displayed:
Port The port number.
State The state of the port:
P0 Port Offline
P1 Port Online
P2 ELP ACC Received
P3 Link Reset Done
I0 Trunk Initiator: EMT Sent
I1 Trunk Initiator: ETP ACC Received
I2 Trunk Initiator: ETP Sent
I3 Trunk Initiator: Link Reset
T0 Trunk Target: EMT Received
T1 Trunk Target: ETP Received
T2 Trunk Target: Link Reset
LD Dynamic long distance: ECP sent or received
T3 Trunk Target: Link reset done on slave
I4 Trunk Initiator: Link reset done on slave
List The IU list pointer for this port.
Flags Port flags:
0x00000001 Slave connection
0x00000002 Loopback connection
0x00000004 Incompatible connection
0x00000008 Overlapping domains
0x00000010 Overlapping zones
0x00000020 Done PTIO ioctl
0x00000040 Sent an RJT to ELP
0x00000080 BF received from the port
0x00000100 Port truly connected to E_Port
0x00000200 Segmented by routing code
0x00000400 FSPF has completed routing
Fabric OS Command Reference 22953-1001764-02

fabPortShow2
0x00000800 Zoning has completed
0x00001000 Segmented by Platform Management
0x00002000 Segmented due to no license
0x00004000 Segmented due to E_Port disabling
0x00008000 DIA already sent for that port
0x00010000 RDI already sent
0x00020000 Port is true T port
0x00040000 Port received an ELP
0x00080000 Port received an ELP RJT
0x00100000 LR pending due to ELP RJT rcv
0x00200000 Received a DIA on this port
0x00400000 Port is the EMT Initiator
0x00800000 Security violation
0x01000000 Security incompatibility
0x02000000 Rcv a DIA ACC
0x040000000 Port is security authenticating
0x080000000 ECP RJT or retires exceeded
0x100000000 Segmented due to duplicated WWN
0x200000000 Segmented due to E_Port isolation
0x40000000 ELP complete on loopback port
0x80000000 Logical E_Port corresponding to physical EX_PPort
nbrWWN Neighboring switch WWN
nbrPort Neighboring switch port
lr_tid Link reset timer identifier and current state
flow_control The flow control mode of the link.
nghbr_escF Lists info exchanged by the neighbor switch in ESC (link level protocol). Values for etiz_state can be as follows:
-1 Unknown ETIZ state
2 ETIZ capable but not configured
3 ETIZ capable and configured
red_ports All E_Ports that are connected to the same neighboring switch
Note The execution of this command is subject to Virtual Fabric or Admin Domain restrictions that may be in place. Refer to chapter 1, "Using Fabric OS commands" and Appendix A, "Command Availability" for details.
230 Fabric OS Command Reference53-1001764-02

fabPortShow 2
Operands This command has the following operands:
slot For bladed systems only, specifies the slot number of the port to display, followed by a slash (/).
port Specifies the port number to display, relative to its slot for bladed systems. Use switchShow to list valid ports.
Examples To display fabric port information:
switch:admin> fabportshow 4/14Fabric Port Information:========================
Port: 62State: P3List: 0x10068418List Count: 0Flags: 0x280120nbrWWN: 10:00:00:60:69:80:06:cfnbrPort: 5lr_tid: 0x1005dbd8, IDLE STATEflow_control:1nghbr_esc: etiz_state: -1 (Unknown ETIZ state)
red_ports:10 11 62 63
Open commands pending:======================No commands pending
See Also portShow
Fabric OS Command Reference 23153-1001764-02

fabRetryShow2
fabRetryShow
Displays the retry count of the fabric commands.
Synopsis fabretryshow
Description Use this command to display the retry count of the fabric commands. The SW_ISL (ISL ports) information displays the retry count for the following fabric commands:
ELP Exchange Link Parameters
EFP Exchange Fabric Parameters
HA_EFP Exchange Fabric Parameters used during warm recovery
DIA Domain Identifier Assigned
RDI Request Domain Identifier
BF Build Fabric
FWD Fabric Controller Forward
EMT Fabric Controller Mark Timestamp
ETP Fabric Controller Trunk Parameters
RAID Return Address Identifier
GAID Get Address Identifier
ELP_TMR Used internally for fabric application (not a SW_ISL)
GRE Get Route Entry
ECP Exchange Credit Parameters
Note The execution of this command is subject to Virtual Fabric or Admin Domain restrictions that may be in place. Refer to chapter 1, "Using Fabric OS commands" and Appendix A, "Command Availability" for details.
Operands none
Examples To display the retry count of Fabric OS commands:
switch:user> fabretryshow SW_ILSE_Port ELP EFP HA_EFP DIA RDI BF FWD EMT ETP RAID GAID ELP_TMR GRE ECP
16 0 0 0 0 0 0 0 0 0 0 0 0 0 0 17 0 0 0 0 0 0 0 0 0 0 0 0 0 0
See Also fabricLog
232 Fabric OS Command Reference53-1001764-02

fabricLog 2
fabricLog
Displays (all users) or manipulates (admin) the fabric log.
Synopsis fabriclog -s | --show
fabriclog -c | --clear
fabriclog -d | --disable
fabriclog -e | --enable
fabriclog -r size | --resize size
fabriclog -h | --help
Description Use this command to display, clear, disable, enable, or resize the fabric log.
Note The execution of this command is subject to Virtual Fabric or Admin Domain restrictions that may be in place. Refer to chapter 1, “Using Fabric OS commands” and Appendix A, “Command Availability” for details.
Operands This command has the following operands:
-s | --show Displays the fabric log.
-c | --clear Clears the fabric log.
-d | --disable Disables the fabric log. By default, the fabric log is enabled.
-e | --enable Enables the fabric log.
-r size | --resize size
Changes the maximum number of log entries. The specified size has to be at least 2 and a power of 2; otherwise, the command fails.
-h | --help Displays the command usage.
Examples To display the fabric log:
switch:admin> fabriclog -sTime Stamp Input and *Action S, P Sn,Pn Port Xid =============================================================================Wed Apr 6 01:08:52 200501:08:52.977 SCN Switch Offline A2,NA F2,NA NA NA01:08:52.977 *Snd SW state: F2 F2,NA F2,NA NA NA01:08:52.977 *Removing all nodes F2,NA F2,NA NA NA01:08:52.977 *Cancel F_S_TOV Timer F2,NA F2,NA NA NA01:08:52.977 *Cancel 2 * F_S_TOV Timer F2,NA F2,NA NA NA01:08:52.977 *Cancel RDI Receive Timer F2,NA F2,NA NA NA01:08:52.977 *Cancel RDI Send Timer F2,NA F2,NA NA NA01:08:52.977 *Cancel 24 * F_S_TOV Timer F2,NA F2,NA NA NA01:08:52.977 *Cancel EFP Flood Timer F2,NA F2,NA NA NA01:08:52.977 *Cancel NTP Timer F2,NA F2,NA NA NA01:08:52.977 *Cancel FAB_SIZE Timer F2,NA F2,NA NA NA01:08:52.983 1) fabInqData F2,NA F2,NA NA NA01:08:53.059 2) fabInqData F2,NA F2,NA NA NA01:08:53.063 *Snd inquiry (1) F2,NA F2,NA NA NA01:08:53.063 SCN Port Offline;g=0x3e F2,P3 F2,P0 0 NA01:08:53.063 *Snd port state: P0 F2,P0 F2,P0 0 NA
Fabric OS Command Reference 23353-1001764-02

fabricLog2
01:08:53.066 *Removing all nodes from port F2,P0 F2,P0 0 NA01:08:53.066 SCN Port Offline;g=0x40 F2,T3 F2,P0 1 NA01:08:53.068 *Removing all nodes from port F2,P0 F2,P0 1 NA01:08:53.068 *Snd slv port (1) (-1) (2) F2,NA F2,NA NA NA01:08:53.068 SCN Port Offline;g=0x42 F2,I4 F2,P0 8 NA01:08:53.072 *Removing all nodes from port F2,P0 F2,P0 8 NA01:08:53.072 *Snd slv port (8) (-1) (2) F2,NA F2,NA NA NANumber of entries: 23Max number of entries: 8192
To change the size of the fabric log:
switch:admin> fabriclog -r 64Warning: This command will clear the logs.Are your sure you want to do the resize [y/n]? y
To display the cleared fabric log after the size was changed:
switch:admin> fabriclog -sTime Stamp Input and *Action S, P Sn,Pn Port Xid ===========================================================================
See Also fabPortShow, fabStatsShow
234 Fabric OS Command Reference53-1001764-02
fabricPrincipal 2
fabricPrincipal
Sets the principal switch selection mode.
Synopsis fabricprincipal --help|-h
fabricprincipal [--show|-q]
fabricprincipal --enable [-priority|-p priority] [-force|-f]
fabricprincipal --disable
fabricprincipal [-f] mode
Description Use this command to set principal switch selection mode for a switch and to set priorities for principal switch selection.
The implementation of the fabricPrincipal command is based solely on mechanisms specified in the Fibre Channel standards. These mechanisms provide a preference for a switch requesting to be the principal switch in a fabric, but they do not provide an absolute guarantee that a switch requesting to be the principal switch is granted this status.
When dealing with large fabrics, the selection of the principal switch is less deterministic. In these cases, to help ensure that the desired switch is selected as the principal switch, a small cluster of switches should be interconnected first, followed by additional switches to enlarge the fabric.
Note The execution of this command is subject to Virtual Fabric or Admin Domain restrictions that may be in place. Refer to chapter 1, "Using Fabric OS commands" and Appendix A, "Command Availability" for details.
Operands This command has the following operands:
--help|-h Displays the command usage.
--show Displays the current mode setting and principal switch selection priority. This operand is optional; if not specified, fabricPrincipal displays the same data as with the --show option.
-q Displays principal mode only (enabled or disabled). This is a legacy command option that does not display the priority settings.
Disables principal switch selection. This command resets the priority to the default value 0xfE.
--enable Enables principal switch selection. The following operands are optional. If you do not provide a priority value, the system assigns the default of 0x01 or generates a value based on the switch state.
-priority|-p priority Sets the principal selection priority of the switch. The specified priority value is used in the principal switch selection protocol when the fabric rebuilds. Not all of these values can be assigned.
0x00 Reserved. This value cannot be assigned.
0x01 Highest priority. This is a user-defined value.
Fabric OS Command Reference 23553-1001764-02

fabricPrincipal2
0x02 Switch was principal prior to sending or receiving a build fabric (BF) request. This value is generated by the switch to initiate a fabric reconfiguration. This value cannot be assigned.
0x3 - 0xFE Priority value range. Choose a value in this range to indicate priority. Higher numbers mean lower priority.
0xFF Switch is not capable of acting as a principal switch. This is a user-defined value. Use --enable with a new priority to revert to this condition.
-force|-f Forces a fabric rebuild. This option is required when enabling principal switch mode. This option is not valid with the --disable command.
--disable Disables principal switch selection. This command resets the priority to the default value 0xFE.
[-f ] mode Sets the principal switch mode. Specify 1 to enable principal switch mode. Specify 0 to disable principal switch mode. Optionally use the -f operand to force a fabric rebuild. Mode changes take effect when the fabric rebuilds. This operand is optional.
Examples To enable a high fabric principle priority setting:
switch:admin> fabricprincipal --enable -p 0xff -fPrincipal Selection Mode enabled (Activate in next fabric rebuild)
To disable the principal mode selection:
switch:admin> fabricprincipal --disablePrincipal Selection Mode disabled
To display the current mode setting:
switch:admin> fabricprincipal -qPrincipal Selection Mode: Enable
To disable the mode setting:
switch:admin> fabricprincipal 0Principal Selection Mode disabled
To enable the mode setting:
switch:admin> fabricprincipal 1Principal Selection Mode enabled
To enable the mode setting and force fabric rebuild:
switch:admin> fabricprincipal -f 1Principal Selection Mode enabled (Forcing fabric rebuild)
To display the principal switch selection priority:
switch:admin> fabricprincipal --showPrincipal Selection Mode: EnablePrincipal Switch Selection Priority: 0x10
See Also fabricShow
236 Fabric OS Command Reference53-1001764-02

fabricShow 2
fabricShow
Displays fabric membership information.
Synopsis fabricshow [-membership | -chassis ]
fabricshow -help
Description Use this command to display information about switches in the fabric.
If the switch is initializing or is disabled, the message “no fabric” is displayed. In a mixed fabric, fabricshow must be executed on a switch that runs Fabric OS v5.3.0 or later; otherwise, IPv6 information is lost, since switches running earlier versions do not recognize an IPv6-configured switch.
Running this command on an FCR or edge switch does not provide any router information; running this command on an edge switch with the -m option does provide router information.
If the fabric is reconfiguring, some or all switches may not be displayed; otherwise, the following fields are displayed depending on the command option used:
Switch ID The switch Domain_ID and embedded port D_ID.
World Wide Name The switch WWN.
Enet IP Addr The switch Ethernet IP address for IPv4 and IPv6 configured switches. For IPv6 switches, only the static IP address displays.
FC IP Addr The switch FC IP address.
Name The switch symbolic name. An arrow (>) indicates the principal switch.
FC Router IP Addr The IP address of the FC router. This field is empty if the switch is not an FC Router or it the FC Router does not support it.
FC Router Name The FC Router symbolic name. This field is empty if the switch is not an FC Router or it the FC Router does not support it.
Chassis WWN The world wide name of the chassis.
Chassis Name The name of the chassis.
Note The execution of this command is subject to Virtual Fabric or Admin Domain restrictions that may be in place. Refer to chapter 1, "Using Fabric OS commands" and Appendix A, "Command Availability" for details.
Operands This command has the following operands:
-membership Displays fabric membership information with additional details of the FC Router, if present in the fabric.
-chassis Displays information about the chassis including chassis WWN and chassis name.
-help Displays the command usage.
Examples The following example illustrates a fabric of four switches. "sw180" is the Principal switch. Three of the switches are configured to run IP over Fibre Channel.
switch:admin> fabricshowSwitch ID Worldwide Name Enet IP Addr FC IP Addr Name
Fabric OS Command Reference 23753-1001764-02

fabricShow2
-------------------------------------------------------------------------64: fffc40 10:00:00:60:69:00:06:56 192.168.64.59 192.168.65.59 "sw5"65: fffc41 10:00:00:60:69:00:02:0b 192.168.64.180 192.168.65.180 >"sw180"66: fffc42 10:00:00:60:69:00:05:91 192.168.64.60 192.168.65.60 "sw60"67: fffc43 10:00:00:60:69:10:60:1f 192.168.64.187 0.0.0.0 "sw187"
The Fabric has 4 switches
To show a mixed fabric with IPv4 and IPv6-configured switches:
sw5:admin> fabricShowSwitch ID Worldwide Name Enet IP Addr FC IP Addr Name---------------------------------------------------------------------------------1: fffc41 10:00:00:60:69:00:02:0b 192.168.64.180 192.168.65.180 >"sw180"
1080::8:800:200C:1234/64 2: fffc42 10:00:00:60:69:00:05:91 192.168.64.60 192.168.65.60 "sw60"
The Fabric has 2 switches.
To show additional details of the FC Router, if present:
switch:admin> fabricshow -membershipSwitch ID Name ENET IP Addr FC Router FC Router IP Addr Name------------------------------------------------------------------------- 1: fffc01 fcr_sprint_01 10.33.59.224160: fffca0 fcr_fd_160 0.0.0.0 10.33.59.25 fcr_meteor2190: fffcbe fcr_mojo_6 10.33.59.32
The Fabric has 3 switches
To show additional details about the chassis:
switch:admin> fabricshow -chassisSwitch ID Name ENET IP Addr Chassis WWN Chassis Name-------------------------------------------------------------------------4: fffc04 sw5100_126_128 10.38.17.126 10:00:00:05:1e:0e:eb:58 Brocade51005: fffc05 sw1500_127_128 10.38.17.127 10:00:00:05:1e:0e:eb:98 Brocade5100
The Fabric has 2 switches
See Also switchShow
238 Fabric OS Command Reference53-1001764-02

fabStatsShow 2
fabStatsShow
Displays fabric statistics.
Synopsis fabstatsshow
Description Use this command to display statistics for the fabric. The following information is displayed:
Description Description of the incident tracked including the following:
• Number of times a switch domain ID has been forcibly changed• Number of E_Port offline transitions• Number of fabric reconfigurations• Number of fabric segmentations resulting from any of the following
causes:•Loopback•Incompatibility•Overlap•Zoning•E_Port segment•Licensing•Disabled E_Port•Platform DB•Security incompatibility•Security violation•ECP error•Duplicate WWN•E_Port isolated•Admin Domain header conflict•DomainID offset conflict•McData SafeZone conflict•Virtual Fabric Admin Domain conflict•MSFR/RD H&T WWN conflict (internal only)•Enhanced/Overlapping TI zones (ETIZ) Incompatibility •Exchange Switch Capabilities (ESC) detected conflict
For each recorded incident, the command provides the following additional information:
count The total number of times the specific event occurred on various ports on the switch.
port The number of the port where the latest incident occurred. An “<“ next to the port number denotes the type of event that occurred last.
timestamp The time when the latest incident occurred.
Note The execution of this command is subject to Virtual Fabric or Admin Domain restrictions that may be in place. Refer to chapter 1, "Using Fabric OS commands" and Appendix A, "Command Availability" for details.
Operands none
Fabric OS Command Reference 23953-1001764-02

fabStatsShow2
Examples To display the fabric statistics:
switch:admin> fabstatsshowDescription Count Port Timestamp--------------------------- ------ ------ ----------------Domain ID forcibly changed: 0E_Port offline transitions: 104 17 Sat Jan 23 23:29:56 2010Reconfigurations: 113 17 Sat Jan 23 23:29:56 2010Segmentations due to: Loopback: 0 Incompatibility: 0 Overlap: 0 Zoning: 17 < 52 Thu Jan 21 22:29:49 2010 E_Port Segment: 0 Licensing: 0 Disabled E_Port: 0 Platform DB: 0 Sec Incompatibility: 0 Sec Violation: 0 ECP Error: 0 Duplicate WWN: 0 Eport Isolated: 0 AD header conflict: 0 DomainID offset conflict: 0 McData SafeZone conflict: 0 VF AD conflict: 0 MSFR/RD H&T WWN conflict: 0 ETIZ Incompatibility: 0 ESC detected conflict: 0
See Also fabRetryShow
240 Fabric OS Command Reference53-1001764-02

fanDisable 2
fanDisable
Disables a fan unit.
Synopsis fandisable unit
Description Use this command to disable a nonfaulty fan unit by setting the RPM speed to 0.
Notes This command is not available on nonbladed systems except for the Brocade 4100, 4900, and 5300.
The execution of this command is subject to Virtual Fabric or Admin Domain restrictions that may be in place. Refer to chapter 1, "Using Fabric OS commands" and Appendix A, "Command Availability" for details.
Operands This command has the following operand:
unit Specifies the number of the fan unit to disable.
Examples To disable a fan unit:
switch:admin> fandisable 1
Fan unit 1 has been disabled
See Also fanEnable, fanShow
Fabric OS Command Reference 24153-1001764-02

fanEnable2
fanEnable
Enables a fan unit.
Synopsis fanenable unit
Description Use this command to set a previously disabled fan unit back to the default RPM speed.
Notes This command is not available on nonbladed systems except for the Brocade 4100, 4900, and 5300.
The execution of this command is subject to Virtual Fabric or Admin Domain restrictions that may be in place. Refer to chapter 1, "Using Fabric OS commands" and Appendix A, "Command Availability" for details.
Operands This command has the following operand:
unit Specify the fan unit number to enable.
Examples To enable a fan unit:
switch:admin> fanenable 1
Fan unit 1 has been enabled
See Also fanDisable, fanShow
242 Fabric OS Command Reference53-1001764-02

fanShow 2
fanShow
Displays fan status and speed.
Synopsis fanshow
Description Use this command to display the current status and speed of each fan in the system.
Fan status is displayed as:
OK Fan is functioning correctly.
absent Fan is not present.
below minimum Fan is present but rotating too slowly or stopped.
above minimum Fan is rotating too quickly.
unknown Unknown fan unit installed.
faulty Fan has exceeded hardware tolerance and has stopped. In this case, the last known fan speed is displayed.
The output from this command varies depending on switch type and number of fans present.
Note The execution of this command is subject to Virtual Fabric or Admin Domain restrictions that may be in place. Refer to chapter 1, "Using Fabric OS commands" and Appendix A, "Command Availability" for details.
Operands none
Examples To display information on the fans in the system:
switch:admin> fanshowFan #1 is OK, speed is 2721 RPMFan #2 is OK, speed is 2657 RPMFan #3 is OK, speed is 2700 RPM
See Also chassisShow, fanDisable, fanEnable, psShow
Fabric OS Command Reference 24353-1001764-02

fastBoot2
fastBoot
Reboots the Control Processor (CP), bypassing the Power-On Self-Tests (POST).
Synopsis fastboot
Description Use this command to perform a “cold reboot” (power off/restart) of the control processor bypassing POST when the system comes back up. Bypassing POST can reduce boot time significantly. If POST was previously disabled using the diagDisablePost command, then fastBoot is the same as reBoot.
The fastBoot operation is disruptive, and the command prompts for confirmation before executing. When you reboot a switch connected to a fabric, all traffic to and from that switch stops. All Fibre Channel ports on that switch including E_Ports become inactive until the switch comes back online.
The behavior of this command varies according to platform type:
• When issued on a standalone (single-processor) switch, this command performs a cold reboot of the switch.
• When issued on an enterprise-class platform (Brocade DCX, DCX-4S, or 48000) with two CPs (active and standby), the following rules apply:
- When the Standby CP reboots, it goes down and there is no failover because there is no traffic on that switch. When the Standby CP comes up again, it is temporarily no longer in sync with the Active CP.
- When the Active CP reboots, it fails over to the Standby CP. The Standby CP becomes the new Active CP and traffic is disrupted.
- When HA is disabled and fastBoot is issued on the Active CP, both the Active and Standby CPs reboot with the original mastership retained. The original Active CP remains the Active CP after the reboot, and the original Standby CP remains the Standby CP. After the reboot, HA is enabled.
- When HA is disabled and fastBoot is issued on the Standby CP, the Standby CP reboots without prompting. It boots up with the default switch only, even if the Active CP has multiple logical switches configured. After the Standby CP boots up, HA is still disabled.
Notes. The execution of this command is subject to Virtual Fabric or Admin Domain restrictions that may be in place. Refer to chapter 1, "Using Fabric OS commands" and Appendix A, "Command Availability" for details.
Operands none
Examples To reboot a standalone (single-processor) switch without executing POST on startup:
switch:admin> fastboot
Warning: This command would cause the switch to rebootand result in traffic disruption.Are you sure you want to reboot the switch [y/n]? y
Broadcast message from root (pts/0) Sun Feb 28 19:49:45 2010...
The system is going down for reboot NOW !!
244 Fabric OS Command Reference53-1001764-02

fastBoot 2
To reboot a DCX without executing POST on startup (in the following example HA is enabled):
switch:admin> fastbootWarning: This command is being run on a control processor (CP)based system and will cause the active CP to reboot.Are you sure you want to reboot the active CP [y/n]? y
Broadcast message from root (pts/0) Sun Feb 28 19:49:45 2010...
The system is going down for reboot NOW !!
To reboot a DCX without executing POST on startup (in the following example HA is disabled):
switch:admin> fastbootThis command is being run on a control processor (CP) based system. Because HA is disabled, it will cause both active CP and the standby CP to reboot. After reboot, the HA will be enabled.
Do you want to continue [y/n] y Broadcast message from root (pts/0) Sun Feb 28 19:49:45 2010...
The system is going down for reboot NOW !!
See Also diagDisablePost, diagEnablePost, reBoot, haDisable, haEnable, haFailover
Fabric OS Command Reference 24553-1001764-02

fastWriteCfg2
fastWriteCfg
Enables or disables the FC Fastwrite feature.
Synopsis fastwritecfg --enable | --disable [slot]
fastwritecfg --show
Description Use this command to configure FC FastWrite on a blade in a given slot. FastWrite minimizes storage latency and improves the number of write transactions per second over long distances. A blade can be configured either to support FC FastWrite or FCIP (default supported when FC FastWrite is disabled). When the blade is configured to support a particular feature, the blade must be rebooted. After the blade has been rebooted, use portcfg --fastwritecfg to enable or disable FC FastWrite on the individual ports.
Notes This command requires a High-Performance Extension over FCIP/FC license
This command is supported only on the Brocade 7500 and on modular platforms with one or more Brocade FC-IP/FC Router blades (FR4-18i).
When FC FastWrite is enabled, GbE ports are not allowed to be enabled on the blade. The blade comes up with GbE ports internally disabled.
A maximum of four user ports per port group (0-7 or 8-15) may be configured as FC FastWrite. This amounts to a maximum of eight FC FastWrite ports per blade.
The execution of this command is subject to Virtual Fabric or Admin Domain restrictions that may be in place. Refer to chapter 1, "Using Fabric OS commands" and Appendix A, "Command Availability" for details.
Operands This command has the following operands:
--enable Enables a blade for FC FastWrite on a specified slot.
--disable Disables a blade for FC FastWrite on a specified slot. The blade reverts to FCIP (default).
--show Displays the FC FastWrite configuration including the FC FastWrite-enabled ports. The slot number is an optional parameter. If the slot number is not specified, the command displays the FC FastWrite-enabled ports on the entire system.
slot Specifies the slot number. This operand is required with the --disable and --enable options on FR4-18i platforms. It is optional on the Brocade 7500. On the 7500, slot 0 is a valid slot.
Examples To enable FC FastWrite for a given slot:
switch:admin> fastwritecfg --enable 7
!!!! WARNING !!!!
Enabling this feature requires power-cycling of the affected blade to take effect and may take up to 5 minutes to complete. Non-bladed switches will be rebooted. In all cases, data traffic on all the ports (FC and GbE) of the blade will be disrupted.
Continue (Y,y,N,n): [ n]
246 Fabric OS Command Reference53-1001764-02

fastWriteCfg 2
To disable FC FastWrite:
switch:admin> fastwritecfg --disable 7
!!!! WARNING !!!!Disabling this feature requires power-cycling of the affected blade to take effect and may take up to 5 minutes to complete. Non-bladed switches will be rebooted. In all cases, data traffic on all the ports (FC and GbE) of the blade will be disrupted.
Continue (Y,y,N,n): [ n]
See Also portCfg
Fabric OS Command Reference 24753-1001764-02

fcipChipTest2
fcipChipTest
Tests functionality of components in the FCIP complex.
Synopsis fcipchiptest [--slot slot][-testtype type][-unit number]
Description Use this command to verify the internal registers and memory of the network processor, FCIP FPGA, compression processor, and GigPHY.
Notes The execution of this command is subject to Virtual Fabric or Admin Domain restrictions that may be in place. Refer to chapter 1, "Using Fabric OS commands" and Appendix A, "Command Availability" for details.
This command is supported only on Brocade FR4-18i blades and Brocade 7500 platforms.
Operands This command has the following operands:
--slot slot Specifies the slot number on which the diagnostic operates. The default is 0 and operates on fixed-port-count products.
-testtype type Specifies the test type to run. By default, the command runs all tests. Valid tests include:
0 All tests
1 Network processor SRAM test
2 FCIP FPGA internal register test
3 FCIP FPGA interrupt test
4 FCIP FPGA checksum test
5 Compression engine MBIST and LBIST
-unit number Specifies the GbE port to test. By default, all GbE ports in the specified slot are used. Valid number values include:
0 GbE port 0
1 GbE port 1
2 All GbE ports
Examples To run all tests on slot 7 and GbE port 1:
switch:admin> fcipchiptest --slot 7 -unit 1 -testtype 0Running fcipchiptest ..............Test Complete: fcipchiptest Pass 1 of 1Duration 0 hr, 1 min & 15 sec (0:1:15:351). passed.
248 Fabric OS Command Reference53-1001764-02

fcipChipTest 2
Diagnostics When a failure is detected, the test might report one or more of the following error messages:
CHIP_TEST_ERR
CHIP_TEST_CHIP_INIT_ERR
CHIP_TEST_IMAGE_VER_ERR
CHIP_TEST_TIMEOUT_ERR
CHIP_TEST_HEARBEAT_ERR
CHIP_TEST_INVALID_RESULT
See Also fcipPathTest
Fabric OS Command Reference 24953-1001764-02

fcipHelp2
fcipHelp
Displays FCIP command information.
Synopsis fciphelp
Description Use this command to display a listing of Fibre Channel over IP (FCIP) commands with short descriptions for each command. FCIP commands require an FCIP license.
Note The execution of this command is subject to Virtual Fabric or Admin Domain restrictions that may be in place. Refer to chapter 1, "Using Fabric OS commands" and Appendix A, "Command Availability" for details.
Operands none
Examples To display FCIP command help information:
switch:admin> fciphelp
fastwritecfg Configure FC fastwrite featureportcfg Create/Delete a new ip interface/route/arp entry or fcip tunnel on the GigE portportcmd Execute commands (ping etc) on the GigE portportshow Show configured ip interfaces/routes/arp entries or fcip tunnels on the GigE Port
See Also fastWriteCfg, portCfg, portCmd, portShow
250 Fabric OS Command Reference53-1001764-02

fcipLedTest 2
fcipLedTest
Exercises the GbE port LEDS on the Brocade 7800 and FX8-24.
Synopsis fcipledtest [slot | all]
Description Use this command to exercise the GbE port LEDs on the Brocade 7800 and FX8-24. This test cycles through the port LEDs by lighting GREEN and then flashing GREEN on all ports for 3 seconds. As the test continues the ports turn AMBER and then flashing AMBER for 3 seconds. The LEDs turn off when the test has finished.
You must disable the switch before running this command.
Note The execution of this command is subject to Virtual Fabric or Admin Domain restrictions that may be in place. Refer to chapter 1, "Using Fabric OS commands" and Appendix A, "Command Availability" for details.
Operands This command has the following operands:
slot Tests all GbE ports in the specified slot. This operand is optional; if omitted, all GbE ports are tested.This operand is valid only on chassis-based platforms.
all Tests all ports on the switch.
Examples To test the LEDs on slot 4 of Brocade DCX with an FX8-24 blade.
switch:admin> fcipledtest 4
PASSED.
See Also ceeportLedTest, portLedTest, switchDisable, switchEnable
Fabric OS Command Reference 25153-1001764-02

fcipPathTest2
fcipPathTest
Tests the data path of the FCIP complex.
Synopsis fcippathtest [--slot slot][-lb_mode mode][-nframes count]
fcippathtest [--slot slot][-unit number][-path mode][-nframes count][-length data_length][-compress mode]
Description Use this command to verify the data paths in the FCIP complex. All data path modes run tests by comparing Fibre Channel frames or data packets transmitted from and received by the network processor due to the designated loopback.
This command is supported only on the Brocade 7500/FR4-18i and 7800/FX8-24 platforms. The command syntax is platform-specific and not all options are valid on both platforms. To specify the loopback mode on the Brocade 7500/FR4-18i, use the -path option. To specify the loopback mode on the Brocade 7800/FX8-24, use the -lb_mode option. Both options are mutually exclusive.
When issued on the Brocade 7800 or FX8-24, this command causes the switch or blade to reboot.
Notes The execution of this command is subject to Virtual Fabric or Admin Domain restrictions that may be in place. Refer to chapter 1, "Using Fabric OS commands" and Appendix A, "Command Availability" for details.
Operands This command has the following operands:
--slot slot Specifies the slot number on which the diagnostic operates. The default is 0 and operates on fixed-port-count products (Brocade 7500/FR4-18i and Brocade 7800/FX8-24).
-unit number Specifies the GbE port to test (Brocade 7500/FR4-18i only). By default, all GbE ports in the specified slot are tested. Valid number values include:
0 GbE port 0
1 GbE port 1
2 All GbE ports
-lb_mode mode Specifies the loopback mode for the test on the Brocade 7800/FX8-24 only. By default, this test uses the External (SERDES) loopback (2). Valid values are as follows:
1 Port loopback (loopback plugs)
2 External (SERDES) loopback
7 Backend bypass and port loopback
-path mode Specifies the loopback mode for the test on the Brocade 7500/FR4-18i only. By default, fcipPathTest uses the PHY and central ASIC loopback modes. You can specify one of the following alternate loopback modes:
1 SFP loopback
2 PHY loopback
3 FCIP FPGA GMAC loopback
4 FCIP FPGA FC loopback
252 Fabric OS Command Reference53-1001764-02

fcipPathTest 2
5 Central ASIC FC loopback
7 SFP and central ASIC FC loopback
8 PHY and central ASIC FC loopback
9 FCIP FPGA GMAC and central ASIC FC loopback
-nframes count Specifies the number of frames to send. The test progresses until the specified number of frames are transmitted on each port. The default value is 100 (Brocade 7500/FR4-18i and Brocade 7800/FX8-24).
-length data_length Specifies the data length of the frames used in the test (Brocade 7500/FR4-18i only). The default is 1,024; the maximum is 2,112 FC frames and 8,196 data packets.
-compress mode Specifies the compression device for which to select or to bypass data compression for the test (Brocade 7500/FR4-18i only). By default, data compression is used. This setting is applicable only to path mode 1 and 2.
Examples To run the test on slot 2 with PHY loopback sending 10 frames:
switch:admin> fcippathtest --slot 2 -path 2 -nframes 10Running fcippathtest ..............Test Complete: fcippathtest Pass 10 of 10Duration 0 hr, 1 min & 50 sec (0:1:50:942). passed.
Diagnostics When it detects failures, the test may report one or more of the following error messages:
PATH_TEST_ERR
PATH_TEST_CHIP_INIT_ERR
PATH_TEST_IMAGE_ERR
PATH_TEST_TIMEOUT_ERR
PATH_TEST_HEARTBEAT_ERR
PATH_TEST_INVALID_RESULT
PATH_TEST_GE_PORT_ENABLE_ERR
PATH_TEST_GE_PORT_DISABLE_ERR
See Also fcipChipTest
Fabric OS Command Reference 25353-1001764-02

fcLunQuery2
fcLunQuery
Displays a list of LUN IDs and LUNs for all accessible targets.
Synopsis fclunquery [-w wwn | -s]
Description Use this command to display a list of LUN IDs and LUNs for all accessible targets.
Notes The execution of this command is subject to Virtual Fabric or Admin Domain restrictions that may be in place. Refer to chapter 1, "Using Fabric OS commands" and Appendix A, "Command Availability" for details.
Operands This command has the following operands:
-w wwn Specifies a port or node WWN from which to display LUN information; otherwise, LUN information from all FC devices specified in the name sever is displayed. Use commas to separate a list of WWNs.
-s Displays the port and node WWNs which is used for any LUN query from this switch.
Examples To display the LUN information:
switch:user> fclunquery
Target Index: 1 Target Node WWN: 50:05:07:65:05:03:f9:39 Target Port WWN: 50:05:07:65:05:83:f9:39 Target Pid: 144e8 Number of LUNs returned by query: 1 LUN ID: 0x00
To display the LUN information of a list of port WWNs:
switch:admin> fclunquery -w 20:00:00:04:cf:5d:cf:0e Target Index: 1 Target Node WWN: 20:00:00:04:cf:5d:cf:0e Target Port WWN: 21:00:00:04:cf:5d:cf:0e Target Pid: 207ef Number of LUNs returned by query: 1 LUN ID: 0x00
To display what port and node WWNs which is used for any LUN query from this switch:
switch:admin> fclunquery -s The following WWNs will be used for any lun query from this switch: Node WWN: 10:00:00:60:69:e2:09:c8 Port WWN: 21:fd:00:60:69:e2:09:c8
See Also fosConfig, iscsiCfg, iscsiPortCfg
254 Fabric OS Command Reference53-1001764-02

FCoE 2
FCoE
Manages and displays FCoE configuration.
Synopsis fcoe --cfgshow [[slot]port]
fcoe --disable [slot]port
fcoe --enable [slot]port
fcoe --loginshow [[slot]port]
fcoe --fcmapset -vlan vid fcmapid
fcoe --fcmapunset -vlan vid
fcoe --fipcfg -advintvl intvl
fcoe --fipcfgshow
fcoe --resetlogin [-teport slot/port | -device wwn ]
fcoe --help
Description Use this command to configure and display the status of FCoE ports, FCoE Initialization Protocol (FIP), and FCMAP settings.
Unlike regular FC ports, FCoE ports are embedded interfaces that are not directly associated with an external physical port on the switch. Although show commands such as switchShow display FCoE ports as “ports,” configuration of these ports through the regular FC CLI is disabled. Only the FCoE CLI commands can be used.
Note The execution of this command is subject to Virtual Fabric or Admin Domain restrictions that may be in place. Refer to chapter 1, "Using Fabric OS commands" and Appendix A, "Command Availability" for details.
Operands This command has the following operands.
slot Specifies the slot number on bladed systems, followed by a slash (/).
port Specifies the port number. There are 24 configurable embedded FCoE ports on the Brocade 8000 switch, and the valid range for port is 8 to 31. On the Brocade FCoE 10-24 blade, there are 24 configurable FCoE ports numbered 0-23. Use switchShow for a list of valid FCoE ports.
--help Displays the command usage.
--cfgshow Displays the configuration of a specified embedded FCoE port. If a port is not specified, the command displays all port configurations.
--disable Disables the specified FCoE port.
--enable Enables the specified FCoE port.
--loginshow Displays information about the devices logged into the specified FCoE port.
--fcmapset Configures the FCMAP values for Fabric Provided MAC Addresses (FPMA) for the specified VLANs.
-vlan vid Specifies the VLAN for which to set the FCMAP.
fcmapid Specifies the FCMAP to be set.
Fabric OS Command Reference 25553-1001764-02

FCoE2
--fcmapunset Unsets the FCMAP for a specified VLAN. Devices previously logged in are disconnected.
-vlan vid Specifies the VLAN ID for which the FCMAP is unset.
--fipcfg Configures FIP multicast advertisement intervals.
-advintvl intvl Specifies the interval in seconds. The minimum interval value is 0 and the maximum value is 90. A value of 0 cancels the previous advertisement interval value. A value of 1 to 90 is valid for changing the interval.
--fipcfgshow Displays FIP configurations.
--resetlogin Clears the logins that occurred through a front end port or from a device specified by the Enode's VN_Port WWN.
-teport slot/port Specifies the slot or port number.
-device wwn Specifies the device WWN.
Examples To Display the FCoE ports on the Brocade 8000:
switch:admin> switchshowswitchName: elara133switchType: 76.6switchState: OnlineswitchMode: NativeswitchRole: SubordinateswitchDomain: 133switchId: fffc85switchWwn: 10:00:00:05:1e:76:60:80zoning: ON (cfg_fcoe)switchBeacon: OFFFC Router: OFFFC Router BB Fabric ID: 1
Index Port Address Media Speed State Proto==============================================0 0 850000 id N8 Online FC E-Port 10:00:00:05:1e:92:de:00 "pluto145" (upstream)(Trunk master) 1 1 850100 id N8 Online FC E-Port(Trunk port, master is Port 0 ) 2 2 850200 id N8 Online FC E-Port(Trunk port, master is Port 0 ) 3 3 850300 id N8 Online FC E-Port(Trunk port, master is Port 0 ) 4 4 850400 id N8 Online FC E-Port(Trunk port, master is Port 0 ) 5 5 850500 id N8 Online FC E-Port(Trunk port, master is Port 0 ) 6 6 850600 id N8 Online FC E-Port(Trunk port, master is Port 0 ) 7 7 850700 id N8 Online FC E-Port(Trunk port, master is Port 0 ) 8 8 850800 -- 10G Online FCoE VF-Port 0 VN-Port(s) 9 9 850900 -- 10G Online FCoE VF-Port 0 VN-Port(s) 10 10 850a00 -- 10G Online FCoE VF-Port 0 VN-Port(s) 11 11 850b00 -- 10G Online FCoE VF-Port 0 VN-Port(s) 12 12 850c00 -- 10G Online FCoE VF-Port 0 VN-Port(s) 13 13 850d00 -- 10G Online FCoE VF-Port 0 VN-Port(s) 14 14 850e00 -- 10G Online FCoE VF-Port 0 VN-Port(s) 15 15 850f00 -- 10G Online FCoE VF-Port 0 VN-Port(s) 16 16 851000 -- 10G Online FCoE VF-Port 0 VN-Port(s) 17 17 851100 -- 10G Online FCoE VF-Port 0 VN-Port(s) 18 18 851200 -- 10G Online FCoE VF-Port 0 VN-Port(s) 19 19 851300 -- 10G Online FCoE VF-Port 0 VN-Port(s) 20 20 851400 -- 10G Online FCoE VF-Port 0 VN-Port(s) 21 21 851500 -- 10G Online FCoE VF-Port 0 VN-Port(s)
256 Fabric OS Command Reference53-1001764-02

FCoE 2
22 22 851600 -- 10G Online FCoE VF-Port 1 VN-Port(s) 23 23 851700 -- 10G Online FCoE VF-Port 1 VN-Port(s) 24 24 851800 -- 10G Online FCoE VF-Port 1 VN-Port(s) 25 25 851900 -- 10G Online FCoE VF-Port 1 VN-Port(s) 26 26 851a00 -- 10G Online FCoE VF-Port 1 VN-Port(s) 27 27 851b00 -- 10G Online FCoE VF-Port 1 VN-Port(s) 28 28 851c00 -- 10G Online FCoE VF-Port 1 VN-Port(s) 29 29 851d00 -- 10G Online FCoE VF-Port 1 VN-Port(s) 30 30 851e00 -- 10G Online FCoE VF-Port 1 VN-Port(s) 31 31 851f00 -- 10G Online FCoE VF-Port 1 VN-Port(s)
To display information about devices logged into a specific FCoE port on the Brocade 8000:
switch:admin> fcoe --loginshow 31Number of connected devices: 1================================================================================= Peer Type Connect Info Device WWN Device MAC =================================================================================FCOE_DEVICE Direct 10:00:00:00:c9:76:d7:29 00:00:c9:76:d7:29 ==============================================Session MAC FCoE Port MAC Te port==============================================0e:fc:00:85:1f:01 00:05:1e:76:60:97 Te 0/23
To display embedded FCoE port configurations on the Brocade 8000:
switch:admin> fcoe --cfgshow UserPort Status Port WWN DeviceCount Port Type MAC VF_ID=================================================================================8 ENABLED 20:08:00:05:1e:76:60:80 0 FCoE VF-Port 00:05:1e:76:60:80 1289 ENABLED 20:09:00:05:1e:76:60:80 0 FCoE VF-Port 00:05:1e:76:60:81 12810 ENABLED 20:0a:00:05:1e:76:60:80 0 FCoE VF-Port 00:05:1e:76:60:82 12811 ENABLED 20:0b:00:05:1e:76:60:80 0 FCoE VF-Port 00:05:1e:76:60:83 12812 ENABLED 20:0c:00:05:1e:76:60:80 0 FCoE VF-Port 00:05:1e:76:60:84 12813 ENABLED 20:0d:00:05:1e:76:60:80 0 FCoE VF-Port 00:05:1e:76:60:85 12814 ENABLED 20:0e:00:05:1e:76:60:80 0 FCoE VF-Port 00:05:1e:76:60:86 12815 ENABLED 20:0f:00:05:1e:76:60:80 0 FCoE VF-Port 00:05:1e:76:60:87 12816 ENABLED 20:10:00:05:1e:76:60:80 0 FCoE VF-Port 00:05:1e:76:60:88 12817 ENABLED 20:11:00:05:1e:76:60:80 0 FCoE VF-Port 00:05:1e:76:60:89 12818 ENABLED 20:12:00:05:1e:76:60:80 0 FCoE VF-Port 00:05:1e:76:60:8a 12819 ENABLED 20:13:00:05:1e:76:60:80 0 FCoE VF-Port 00:05:1e:76:60:8b 12820 ENABLED 20:14:00:05:1e:76:60:80 0 FCoE VF-Port 00:05:1e:76:60:8c 12821 ENABLED 20:15:00:05:1e:76:60:80 0 FCoE VF-Port 00:05:1e:76:60:8d 12822 ENABLED 20:16:00:05:1e:76:60:80 1 FCoE VF-Port 00:05:1e:76:60:8e 12823 ENABLED 20:17:00:05:1e:76:60:80 1 FCoE VF-Port 00:05:1e:76:60:8f 12824 ENABLED 20:18:00:05:1e:76:60:80 1 FCoE VF-Port 00:05:1e:76:60:90 12825 ENABLED 20:19:00:05:1e:76:60:80 1 FCoE VF-Port 00:05:1e:76:60:91 12826 ENABLED 20:1a:00:05:1e:76:60:80 1 FCoE VF-Port 00:05:1e:76:60:92 12827 ENABLED 20:1b:00:05:1e:76:60:80 1 FCoE VF-Port 00:05:1e:76:60:93 12828 ENABLED 20:1c:00:05:1e:76:60:80 1 FCoE VF-Port 00:05:1e:76:60:94 12829 ENABLED 20:1d:00:05:1e:76:60:80 1 FCoE VF-Port 00:05:1e:76:60:95 12830 ENABLED 20:1e:00:05:1e:76:60:80 1 FCoE VF-Port 00:05:1e:76:60:96 12831 ENABLED 20:1f:00:05:1e:76:60:80 1 FCoE VF-Port 00:05:1e:76:60:97 128
Fabric OS Command Reference 25753-1001764-02

FCoE2
To display FIP and FCMAP configurations on the Brocade 8000:
switch:admin> fcoe --fipcfgshowFIP Unsolicited Advertisement Interval = 0========================================VLAN fcmap======================================== 5 0xefc00 [Default fcmap]========================================
To display devices logged into FCoE port 2/0on the Brocade FCoE10-24:
switch:admin> fcoe --loginshow 2/0Number of connected devices: 1================================================================Peer Type Connect Info Device WWN Device MAC ================================================================FCOE_DEVICE Direct 10:00:00:05:1e:8f:fb:12 00:05:1e:8f:fb:12
========================================================== Session MAC FCoE Port MAC Te port==========================================================0e:fc:00:91:40:01 00:05:1e:7b:34:e0 Te 2/0
To display the configuration for FCoE port 2/0 on the Brocade FCoE10-24:
switch:admin> fcoe --cfgshow 2/0Slot: 2, Port: 0, Status: Enabled, Port WWN: 20:40:00:05:1e:92:de:00, DeviceCount: 1, Type: VF-Port, MAC: 00:05:1e:7b:34:e0VF_ID: 128, Fabric Name: 10:00:00:05:1e:35:bb:32
See Also fcoeLoginGroup, fcoeLoginCfg
258 Fabric OS Command Reference53-1001764-02
fcoeLoginCfg 2
fcoeLoginCfg
Manages or displays the FCoE login configuration.
Synopsis fcoelogincfg --show [-switch swwn | -logingroup lgname] [-saved]] | [-mergestatus]
fcoelogincfg --save
fcoelogincfg --transshow
fcoelogincfg --transabort
fcoelogincfg --purge -conflicting [-nonexisting]
fcoelogincfg --purge -nonexisting [-conflicting]
fcoelogincfg --enable
fcoelogincfg --disable
Description Use this command to save, abort, or display the current FCoE login configuration, including ongoing transactions and the effective (saved) configuration.
Note The execution of this command is subject to Virtual Fabric or Admin Domain restrictions that may be in place. Refer to chapter 1, "Using Fabric OS commands" and Appendix A, "Command Availability" for details.
The FCoE Login management feature is disabled in AGmode.
Operands This command has the following operands.
--help Displays the command usage.
--show Displays the state of the FCoE login configuration including current transactions and effective (saved) configuration.
-switch swwn Displays the login groups for the specified switch.
-logingroup lgnameDisplays the login group configuration for the specified login group.
-saved Displays only the effective configuration.
-mergestatus Displays the status of the last configuration merge during the last fabric merge. This operand also displays conflicting login groups and login groups for nonexisting switches.
--save Saves and applies FCoE login configuration changes as the effective configuration fabric-wide.
--transshow Displays the current configuration transaction in progress fabric-wide..
--transabort Aborts the FCoE login configuration transaction currently in progress.
--purge Purges the specified entries from the effective configuration. Specify one or both of the following operands:
-conflicting Purges all conflicting login groups and conflicting VN_Port mappings from the effective configuration.
-nonexisting Purges all login groups for nonexisting switches from the effective configuration.
Fabric OS Command Reference 25953-1001764-02

fcoeLoginCfg2
--enable Enables the FCoE login configuration management on the switch. This allows only configured Enode VN_Ports to log in. Use the fcoeLoginGroup command to configure allowed Enode VN_Ports.
--disable Disables the FCoE login configuration management on the switch. This allows unrestricted login on Enode V_Ports.
Examples To configure a login group and save the configuration:
switch:admin> fcoelogingroup --create login_def_allowall -self -allowallswitch:admin> fcoelogincfg --save
To display the saved configuration:
switch:admin> fcoelogincfg --show
No ongoing transaction
Effective Configuration*********************** Login Configuration Switch WWN Login group10:00:00:05:1e:76:5c:80 login_def_allowall(active)
To display the current FCoE login configuration for the switch only:
switch:admin> fcoelogincfg --show -switch 10:00:00:05:1e:76:5c:80
No ongoing transaction
Effective Configuration***********************
Logingroup name : login_def_allowall(active)Switch wwn : 10:00:00:05:1e:76:5c:80All devices are allowed
To perform a clean-up of the effective configuration:
switch:admin> fcoelogincfg --purge -conflicting -nonexistingswitch:admin>
To disable the FCoE login configuration management on the switch:
switch:admin> fcoelogincfg --disable
switch:admin> fcoelogincfg --showLogin management is disabled.
Effective Configuration***********************Login management is disabled.
See Also fcoe, fcoeLoginGroup
260 Fabric OS Command Reference53-1001764-02

fcoeLoginGroup 2
fcoeLoginGroup
Creates and manages FCoE login group configuration.
Synopsis fcoelogingroup --create lgname -self |-switch swwn [-allowall | member[;member] ...
fcoelogingroup --delete lgname
fcoelogingroup --add lgname member[;member] ...
fcoelogingroup --remove lgname wwn
fcoelogingroup --rename lgname newlgname
fcoelogingroup --help
Description Use this command to create or modify the FCoE login management configuration fabric-wide. You can create or delete a login group, add Virtual N_Port (VN_Port) WWNs to a login group, or removeor VN_Port WWNs from a login group.
Notes The configuration changes effected by this command are kept in a transaction buffer until you save the new configuration with the fabric-wide fcoelogincfg--save command.
The execution of this command is subject to Virtual Fabric or Admin Domain restrictions that may be in place. Refer to chapter 1, "Using Fabric OS commands" and Appendix A, "Command Availability" for details.
Operands This command has the following operands.
--help Displays the command usage.
--create Creates a login group with the specified name and associates it with a specified switch.
lgname Specifies the name of the login group for this switch. The maximum length is a 64-byte string.
-self Specifies the WWN of the current switch. When this operand is specified, the login group is associated with the current switch.
-switch swwn Specifies the WWN of the switch for which to create the login group.
-allowall Allows all VN_Port devices to log in to the switch.
member Identifies the WWN of the VN_Port. The WWN must be specified in hex format as xx.xx.xx.xx.xx.xx.xx.xx. If more than one member is specified, members must be separated by a semicolon. Only specified members are allowed to log into the switch.
--delete Deletes a login group.
lgname Specifies the name of the login group.
--add Adds VN_Port devices to the login group.
lgname Specifies the name of the login group to which VN_Port devices are to be added.
Fabric OS Command Reference 26153-1001764-02

fcoeLoginGroup2
member Identifies the WWN of the VN_Port. The WWN must be specified in hex as xx.xx.xx.xx.xx.xx.xx.xx. If more than one member is specified, members must be separated by a semicolon. Only specified members are allowed to log into the switch.
--remove Removes VN_Port devices from the login group.
lgname Specifies the name of the login group from which VN_Port devices are to be removed.
wwn Identifies the WWN of the VN_Port. The WWN must be specified in hex format as xx.xx.xx.xx.xx.xx.xx.x. Only specified members are allowed to log into the switch.
--rename Renames the specified login group.
Examples To create a login group:
switch:admin>fcoelogingroup --create mylg -self “12:23:34:45:56:67:78:89"
To add a VN_Port device to the login group:
switch:admin> fcoelogingroup --add mylg "12:00:00:00:00:00:1e:34"
To remove a VN_Port device from the login group:
switch:admin> fcoelogingroup --remove mylg "12:00:00:00:00:00:1e:34"
To delete a login group:
switch:admin>fcoelogingroup --delete mylg
See Also fcoe, fcoeLoginCfg
262 Fabric OS Command Reference53-1001764-02

fcPing 2
fcPing
Sends a Fibre Channel Extended Link Service (ELS) Echo request to a pair of ports or to a single destination, or executes a SuperPing.
Synopsis fcping [--number frames][--length size][--interval wait][--pattern pattern] [--bypasszone] [--quiet] [source] destination
fcping --allpaths] [-printisl] [-maxTries M][-covcount N][-delay N] destination
fcping --help
Description Use this command to send a Fibre Channel ELS Echo request to a pair of ports (a source and a destination), to a single device, or to execute a SuperPing that exercises all interswitch links (ISLs) and internal links in different paths that route to the destination device.
• When you use fcPing with a source and a destination, the command performs a zoning check between the two ports. In addition, two Fibre Channel ELS requests are generated. The first ELS request is from the domain controller to the source port identifier. The second ELS request is from the domain controller to the destination port identifier. The ELS Echo request elicits an ELS Echo response from a port identifier in the fabric and is useful for validating link connectivity.
The source and destination port identifiers can be specified as a 24-bit Fibre Channel port identifier (PISD), a port World Wide Name, or a node World Wide Name. The two port identifiers are then used to determine if the identifiers are zoned together.
• When you use fcPing to probe a single destination, an ELS Echo is sent to the specified destination and a response obtained. The destination can be a switch WWN, a domain ID, or a switch domain controller ID. No zoning check is performed when a single device is probed.
• When you use fcPing with the --allpaths option, the command exercises a “SuperPing.” Superping exercises all ISLs and the internal links included in the paths that route to the destination. The SuperPing command collects statistical data of all the covered paths and their port and provides optional parameters to selectively display the data. SuperPing takes only one argument, that is, the destination port identifier. To execute SuperPing for two destination, you must issue the command separately for each destination.
Superping facilitates troubleshooting of links that experience problems. When an echo frame is dropped, all the ISLs and internal links potentially traversed by this frame are marked as failure. If a fabric topology is considered fully redundant, that is, at each hop there are multiple paths to reach a destination, a high percentage of errors are recorded on the link that experiences errors.
Logical Fabrics: When executed in a Logical Fabric from a switch to a destination device connected through the base fabric, SuperPing exercises all paths in the base fabric along with the ISLs in the logical fabric. The path output indicates the LISLs and the base switch. Refer to the example section for an illustration.
Notes The ELS Echo may not be supported on all devices. In such cases, the response could be either an ELS reject or a request timeout.
By default, fcPing sends five ELS Echo requests to each port. When a device does not respond to the ELS Echo request, further debugging may be needed to determine, whether the device does not support ELS Echo, or whether the request is rejected for some other reason. Do not assume that the device is not connected.
Fabric OS Command Reference 26353-1001764-02

fcPing2
The execution of SuperPing requires that all switches in the fabric run Fabric OS v6.4.0 or later. For switches running earlier versions of Fabric OS, the collected data is incomplete.
If a fabric reconfiguration occurs while SuperPing is in progress, the command reports an error message. Exit the command and rerun the test after the fabric becomes stable again.
The execution of this command is subject to Virtual Fabric or Admin Domain restrictions that may be in place. Refer to chapter 1, "Using Fabric OS commands" and Appendix A, "Command Availability" for details.
Operands This command has the following operands:
destination Specifies the destination as follows.
• When using fcPing between a source and a destination, specify the destination as port WWN or a node WWN.
• When using fcPing to ping a single device, specify the destination as a PID, a switch WWN, a domain ID, or a switch domain controller ID.
• When using fcPing with the --allpaths option, specify the destination as a PID, a switch WWN, or a domain ID.
source Specifies the source port ID, port WWN, or node WWN. This operand is optional; it is not valid with the SuperPing command (--allpaths).
The following operands are valid only when fcPing is executed without the --allpaths option (legacy mode):
--number frames Specifies the number of ELS Echo requests to send. The default value is 5.
--length size Specifies the frame size of the requests in bytes. The default value is 0. Without data, the Fibre Channel Echo request frame size is 12 bytes. The total byte count includes four bytes from the Echo request header and eight bytes from the timestamp. The maximum allowed value is 2,036 bytes. The length must be word-aligned.
--interval wait Specifies the interval, in seconds, between successive ELS Echo requests. The default value is 0 seconds.
--pattern pattern Specifies up to 16 "pad" bytes, which are used to fill out the request frame payload sent. This is useful for diagnosing data-dependent problems in the fabric link. The pattern bytes are specified as hexadecimal characters. For example, --pattern ff fills the request frame with instances of the number 1. If a non-byte-aligned pattern is specified, the upper nibble of the last pattern byte is filled with zeros. For example, --pattern 123 fills the payload with a pattern of 0x1203.
--bypasszone Bypasses the zone check.
--quiet Suppresses the diagnostic output. Only zoning information, if applicable, and the summary line are displayed.
The following operands are valid only when fcPing is executed to perform a SuperPing:
--allpaths destination Executes a SuperPing that covers all available paths to the specified destination. The number of actual paths covered depends on two other parameters that you can optionally specify. When you issue fcPing --allpaths
264 Fabric OS Command Reference53-1001764-02

fcPing 2
for a destination without any other options, SuperPing covers all ISLs in the routes between source to destination but does exercise all possible combinations of end-to-end paths. This operand is required when executing fcPing as SuperPing.
The following operands are optional and valid only with the --allpaths option:
-printisl Displays statistical data for each ISL and internal port along the paths traversed by SuperPing. This information displays in addition to the path display.
-covcount N Specifies the minimum number of times each ISL is exercised by the SuperPing command. The command sends N frames and checks if each ISL is exercised at least N times. When the condition is met, superping exits and prints the statistics. The default value is 5.
-maxTries M Specifies the maximum number of frames to be sent before SuperPing exits. If both -maxTries and -covcount are specified, SuperPing checks the ISL coverage and keeps resending framers until the minimum coverage condition to is met or until the maximum number of echo frames specified in maxTries have been sent. For example, assuming a coverage count of 100 and a MaxTRies value of 300, SuperPing will send 100 frames at a time and checks if each ISL is covered at least 100 times. If not, SuperPing will keep sending 100 frames at a time to check for coverage up to 3 times for a maximum of 3*100 = 300 frames on each egress port. If this value is set too low in relation to the specified coverage count, not all ISLs may be covered. The default value is 100.
-delay D Includes a delay of D milliseconds between each echo frame sent.
--help Displays the command usage.
Examples To display one device that accepts the request and another device that rejects the request:
switch:admin> fcping 10:00:00:00:c9:29:0e:c4 21:00:00:20:37:25:ad:05Source: 10:00:00:00:c9:29:0e:c4Destination: 21:00:00:20:37:25:ad:05Zone Check: Not Zoned
Pinging 10:00:00:00:c9:29:0e:c4 [0x20800] with 12 bytes of data:received reply from 10:00:00:00:c9:29:0e:c4: 12 bytes time:1162 usecreceived reply from 10:00:00:00:c9:29:0e:c4: 12 bytes time:1013 usecreceived reply from 10:00:00:00:c9:29:0e:c4: 12 bytes time:1442 usecreceived reply from 10:00:00:00:c9:29:0e:c4: 12 bytes time:1052 usecreceived reply from 10:00:00:00:c9:29:0e:c4: 12 bytes time:1012 usec5 frames sent, 5 frames received, 0 frames rejected, 0 frames timeoutRound-trip min/avg/max = 1012/1136/1442 usec
Pinging 21:00:00:20:37:25:ad:05 [0x211e8] with 12 bytes of data:Request rejectedRequest rejectedRequest rejectedRequest rejectedRequest rejected5 frames sent, 0 frames received, 5 frames rejected, 0 frames timeoutRound-trip min/avg/max = 0/0/0 usec
Fabric OS Command Reference 26553-1001764-02

fcPing2
To display one device that accepts the request and another device that does not respond to the request:
switch:admin> fcping 0x020800 22:00:00:04:cf:75:63:85Source: 0x20800Destination: 22:00:00:04:cf:75:63:85Zone Check: Zoned
Pinging 0x20800 with 12 bytes of data:received reply from 0x20800: 12 bytes time:1159 usecreceived reply from 0x20800: 12 bytes time:1006 usecreceived reply from 0x20800: 12 bytes time:1008 usecreceived reply from 0x20800: 12 bytes time:1038 usecreceived reply from 0x20800: 12 bytes time:1010 usec5 frames sent, 5 frames received, 0 frames rejected, 0 frames timeoutRound-trip min/avg/max = 1006/1044/1159 usec
Pinging 22:00:00:04:cf:75:63:85 [0x217d9] with 12 bytes of data:Request timed outRequest timed outRequest timed outRequest timed outRequest timed out5 frames sent, 0 frames received, 0 frames rejected, 5 frames timeoutRound-trip min/avg/max = 0/0/0 usec
To use fcPing with a single destination (in this example, the destination is a switch WWN):
switch:admin> fabricshowSwitch ID Worldwide Name Enet IP Addr FC IP Addr Name------------------------------------------------------------------------- 6: fffc06 10:00:00:05:1e:34:2b:66 10.202.90.201 0.0.0.0 "mps_daz_1" 55: fffc37 10:00:00:05:1e:34:01:f5 10.202.90.226 0.0.0.0 "pulsar055"
switch:admin> fcping 10:00:00:05:1e:34:2b:66Destination: 10:00:00:05:1e:34:2b:66
Pinging10:00:00:05:1e:34:2b:66 [fffc06] with 12 bytes of data:received reply from 10:00:00:05:1e:34:2b:66 : 12 bytes time:1162 usecreceived reply from 10:00:00:05:1e:34:2b:66 : 12 bytes time:1013 usecreceived reply from 10:00:00:05:1e:34:2b:66 : 12 bytes time:1442 usecreceived reply from 10:00:00:05:1e:34:2b:66 : 12 bytes time:1052 usecreceived reply from 10:00:00:05:1e:34:2b:66 : 12 bytes time:1012 usec5 frames sent, 5 frames received, 0 frames rejected, 0 frames timeoutRound-trip min/avg/max = 1012/1136/1442 usec
To use fcPing with a single destination (in this example, the destination is a device node WWN):
switch:admin> nsshow{ Type Pid COS PortName NodeName TTL(sec) N 370500; 3;20:07:00:05:1e:35:10:7f;10:00:00:05:1e:35:10:7f; na Fabric Port Name: 20:05:00:05:1e:34:01:f5 Permanent Port Name: 20:07:00:05:1e:35:10:7f Port Index: 5 Share Area: No Device Shared in Other AD: No Redirect: No Partial: NO
266 Fabric OS Command Reference53-1001764-02

fcPing 2
N 370501; 3;10:00:00:00:c9:3f:7c:b8;20:00:00:00:c9:3f:7c:b8; na FC4s: FCP NodeSymb: [44] "Emulex LP1050 FV1.81A1 DV5-5.20A9 DELL1750-3" Fabric Port Name: 20:05:00:05:1e:34:01:f5 Permanent Port Name: 20:07:00:05:1e:35:10:7f Port Index: 5 Share Area: No Device Shared in Other AD: No Redirect: No Partial: NOThe Local Name Server has 2 entries }
switch:admin> fcping 20:00:00:00:c9:3f:7c:b8Destination: 20:00:00:00:c9:3f:7c:b8
Pinging 20:00:00:00:c9:3f:7c:b8 [0x370501] with 12 bytes of data:received reply from 20:00:00:00:c9:3f:7c:b8: 12 bytes time:825 usecreceived reply from 20:00:00:00:c9:3f:7c:b8: 12 bytes time:713 usecreceived reply from 20:00:00:00:c9:3f:7c:b8: 12 bytes time:714 usecreceived reply from 20:00:00:00:c9:3f:7c:b8: 12 bytes time:741 usecreceived reply from 20:00:00:00:c9:3f:7c:b8: 12 bytes time:880 usec5 frames sent, 5 frames received, 0 frames rejected, 0 frames timeoutRound-trip min/avg/max = 713/774/880 usec
To execute a SuperPing testing all ISLs to a specified destination domain:
In the following example, two paths are tested. Each hop is displayed in Domain/Index format.
switch:admin> fcping --allpaths 165
Pinging(size:12 bytes) destination domain 165 through all paths
PATH SWITCH1--> SWITCH2--> SWITCH3--> \-------------------------------------------------------------1.(3/EMB,3/205)[128] (207/25,207/42)[128] (101/3,101/16)[128] \
2.(3/EMB,3/204)[128] (207/27,207/42)[128] (101/3,101/16)[128] \
SWITCH4 STATUS----------------------------(165/99,165/0)[128] SUCCESS
2(165/99,165/0)[128] SUCCESS
To execute a SuperPing in a logical fabric:
In the following example, domains 10 and 40 in FID 1 are connected through the base fabric (FID 2).
switch:admin: fcping --allpaths 40Pinging(size:12 bytes) destination domain 30 through all paths
PATH SWITCH1--> SWITCH2--> \--------------------------------------------------------1.(10/EMB,10/4)[128] (20/5,20/EMB )[128] (1/EMB, 1/6)[2] \Successfully completed superping for all paths
SWITCH3--> SWITCH4 STATUS---------------------------------------------------------(2/7,2/EMB)[2] (30/EMB,30/8)[128] (40/9, 40/EMB)[128] SUCCESSSuccessfully completed superping for all paths
Fabric OS Command Reference 26753-1001764-02

fcPing2
To execute a SuperPing and print statistical coverage of each ISL and internal port along the potential paths:
In the following example a few errors are recorded on the ISLs 3/205->2/25, 3/204->2/27, 2/42->101/3 and 2/1->101/8. But the internal port analyis shows that errors are recorded on the internal port 0/284 in domain 2, which is the potential faulty link.
switch:admin> fcping --allpaths -printisl 101Pinging(size:12 bytes) destination domain 101 through all paths
PATH SWITCH1--> SWITCH2--> SWITCH3 STATUS------------------------------------------------------------------1. ( 3/EMB, 3/123)[128] (165/96 ,165/99 )[128] (101/16 ,101/EMB)[128] SUCCESS2. ( 3/EMB, 3/205)[128] ( 2/25 , 2/1 )[128] (101/8 ,101/EMB)[128] FAILED3. ( 3/EMB, 3/205)[128] ( 2/25 , 2/42 )[128] (101/3 ,101/EMB)[128] FAILED4. ( 3/EMB, 3/204)[128] ( 2/27 , 2/42 )[128] (101/3 ,101/EMB)[128] FAILED5. ( 3/EMB, 3/204)[128] ( 2/27 , 2/1 )[128] (101/8 ,101/EMB)[128] FAILEDCompleted superping for all paths. Error found in few paths
ISL COVERAGE-------------SNO ISL STATUS--------------------------------------------------- 1 ( 3/123-->165/96 [128]) SUCCESS(5/5) 2 ( 3/205--> 2/25 [128]) FAILURE(7/50) 3 ( 3/204--> 2/27 [128]) FAILURE(11/50) 4 (165/99 -->101/16 [128]) SUCCESS(5/5) 6 ( 2/42 -->101/3 [128]) FAILURE(10/67) 7 ( 2/1 -->101/8 [128]) FAILURE(8/33)INTERNAL PORT COVERAGE-----------------------
SNO DOMAIN INTRNL_PORT STATUS------------------------------------------- 1 2 0/272 SUCCESS(40/40) 2 2 0/276 SUCCESS(44/44) 3 2 0/280 SUCCESS(30/30) 4 2 0/284 FAILURE(20/20)
To execute a superping with a coverage count of 1000 and a maxTry value of 5000 (In the following example, the ISL (3/204->204/27), could not be covered 1000 times):
switch:admin>fcping --allpaths -covcount 1000 -maxTries 5000 -printisl 165
Pinging(size:12 bytes) destination domain 165 through all paths|PATH SWITCH1--> SWITCH2--> SWITCH3--> \-------------------------------------------------------------1.(3/EMB,3/205)[128] (207/25,207/42)[128] (101/3,101/16)[128] \
2.(3/EMB,3/204)[128] (207/27,207/42)[128] (101/3,101/16)[128] \
SWITCH4 STATUS---------------------------(165/99,165/0)[128] SUCCESS
(165/99,165/0)[128] SUCCESS
Successfully completed superping for all paths
268 Fabric OS Command Reference53-1001764-02

fcPing 2
ISL COVERAGE-------------SNO ISL STATUS---------------------------------------------------- 1 ( 3/205-->207/25 ) SUCCESS(4025/4025) 2 ( 3/204-->207/27 ) SUCCESS(5/5) 3 (207/42 -->101/3 ) SUCCESS(4030/4030) 4 (101/16 -->165/99 ) SUCCESS(4030/4030)
INTERNAL PORT COVERAGE-----------------------
SNO DOMAIN INTRNL_PORT STATUS-----------------------------------------
See Also ping
Fabric OS Command Reference 26953-1001764-02

fcpLogClear2
fcpLogClear
Clears the FCPD debug information log.
Synopsis fcplogclear
Description Use this command to clear the debug information logged by the Fibre Channel Protocol daemon (FCPD).
Note The execution of this command is subject to Virtual Fabric or Admin Domain restrictions that may be in place. Refer to chapter 1, "Using Fabric OS commands" and Appendix A, "Command Availability" for details.
Operands none
Examples To clear the FCPD debug information log:
switch:admin> fcplogclear
See Also fcpLogDisable, fcpLogEnable, fcpLogShow
270 Fabric OS Command Reference53-1001764-02

fcpLogDisable 2
fcpLogDisable
Disables the FCPD debug information log (debug command).
Synopsis fcplogdisable
Description Use this command to disable the logging of debug information by the Fibre Channel Protocol daemon (FCPD).
Note The execution of this command is subject to Virtual Fabric or Admin Domain restrictions that may be in place. Refer to chapter 1, "Using Fabric OS commands" and Appendix A, "Command Availability" for details.
Operands none
Examples To disable the FCPD debug information log:
switch:admin> fcplogdisable
See Also fcpLogClear, fcpLogEnable, fcpLogShow
Fabric OS Command Reference 27153-1001764-02

fcpLogEnable2
fcpLogEnable
Enables the FCPD debug information log (debug command).
Synopsis fcplogenable
Description Use this command to enable Fibre Channel Protocol daemon (FCPD) logging. Debug information logging is enabled by default.
Note The execution of this command is subject to Virtual Fabric or Admin Domain restrictions that may be in place. Refer to chapter 1, "Using Fabric OS commands" and Appendix A, "Command Availability" for details.
Operands none
Examples To enable the FCPD debug information log:
switch:admin> fcplogenable
See Also fcpLogClear, fcpLogDisable, fcpLogShow
272 Fabric OS Command Reference53-1001764-02

fcpLogShow 2
fcpLogShow
Displays the FCPD debug information log (debug command).
Synopsis fcplogshow
Description Use this command to display the debug information logged at various stages during the Fibre Channel Protocol daemon (FCPD) device probing.
Note The execution of this command is subject to Virtual Fabric or Admin Domain restrictions that may be in place. Refer to chapter 1, "Using Fabric OS commands" and Appendix A, "Command Availability" for details.
Operands none
Examples To display the FCPD debug information log:
switch:admin> fcplogshow
Time Stamp Event Port file&lineno arg0 arg1 arg2 arg3 arg4===============================================================================08:20:12.274 FlshOrProbe 0 1 536 2 :0 :0 :0 :008:20:12.275 ProbeFlsh 0 1 3031 0 :0 :0 :0 :008:20:12.275 FlshOrProbe 1 1 536 2 :0 :0 :0 :008:20:12.275 ProbeFlsh 1 1 3031 0 :0 :0 :0 :008:20:12.275 FlshOrProbe 2 1 536 2 :0 :0 :0 :008:20:12.275 ProbeFlsh 2 1 3031 0 :0 :0 :0 :008:20:12.275 FlshOrProbe 3 1 536 2 :0 :0 :0 :008:20:12.275 ProbeFlsh 3 1 3031 0 :0 :0 :0 :008:20:12.275 FlshOrProbe 4 1 536 2 :0 :0 :0 :0[output truncated]
See Also fcpLogClear, fcpLogDisable, fcpLogEnable
Fabric OS Command Reference 27353-1001764-02

fcpProbeShow2
fcpProbeShow
Displays the Fibre Channel Protocol (FCP) probe information.
Synopsis fcpprobeshow [slot/]port
Description Use this command to display the Fibre Channel Protocol daemon (FCPD) device probing information for the devices attached to the specified F_Port or FL_Port. This information includes the number of successful logins and SCSI INQUIRY commands sent over this port and a list of the attached devices.
Note The execution of this command is subject to Virtual Fabric or Admin Domain restrictions that may be in place. Refer to chapter 1, "Using Fabric OS commands" and Appendix A, "Command Availability" for details.
Operands This command has the following operands:
slot For bladed systems only, specify the slot number of the port to display, followed by a slash (/).
port Specify the port number to display, relative to its slot for bladed systems. Use switchShow to list valid ports. This operand is required.
Examples To display the FCP probe information:
switch:admin> fcpprobeshow 4/4
port 52 is L-Port and it is online.nodes probed: 2successful PLOGIs: 2successful PRLIs: 2successful INQUIRies: 2successful LOGOs: 2outstanding IUs: 0probing state: 3 probing TOV: 0 probing count: 0 probing next: 0 pmap: 0x00000000, 0x00000000, 0x00000000, 0x00000010update map: 0x00000000, 0x00000000, 0x00000000, 0x00000010
list of devices(may include old devices on the loop):0x2b4e2: IBM DDYF-T09170R F60N0x2b4e4: IBM DDYF-T09170R F60N
See Also portLoginShow, portLogShow
274 Fabric OS Command Reference53-1001764-02

fcpRlsShow 2
fcpRlsShow
Displays the Fibre Channel Protocol (FCP) Read Link Status (RLS) information.
Synopsis fcprlsshow [slot/]port
Description Use this command to display the FCP RLS information for an F_Port or FL_Port. This information describes the number of loss-of-signal, loss-of-sync, CRC errors, and other failure events detected on the specified port.
For this command to gather and display F_Port error statistics, you must enable the following two configuration parameters:
• Disable Device Probing = Enabled 1
• Disable RLS Probing = Enabled 1
Device probing and RLS probing are disabled by default. Use the configure command to enable these parameters.
Note The execution of this command is subject to Virtual Fabric or Admin Domain restrictions that may be in place. Refer to chapter 1, "Using Fabric OS commands" and Appendix A, "Command Availability" for details.
Operands This command has the following operands:
slot For bladed systems only, specifies the slot number of the port to display, followed by a slash (/).
port Specifies the port number to display, relative to its slot for bladed systems. Use switchShow for a listing of valid ports. This operand is required.
Examples To display the FCP RLS information:
switch:admin> fcprlsshow 2/5
link fail loss sync loss sig prtc err bad word crc err0xda 0 5 0 0 525 00xdc 0 3 0 0 330 0
See Also portLoginShow, portLogShow
Fabric OS Command Reference 27553-1001764-02

fcrBcastConfig2
fcrBcastConfig
Displays or sets the broadcast frame forwarding option.
Synopsis fcrbcastconfig --show
fcrbcastconfig --enable -f fabric id
fcrbcastconfig --disable -f fabric id
fcrbcastconfig --help
Description Use this command to enable or disable the broadcast frame option or to display the current configuration. If no operands are specified, this command displays the usage. By default, frame forward option is disabled. Use the --show option to display the current settings on the switch.
Note The execution of this command is subject to Virtual Fabric or Admin Domain restrictions that may be in place. Refer to chapter 1, "Using Fabric OS commands" and Appendix A, "Command Availability" for details.
Operands This command takes the following operands:
--show Shows the current broadcast configuration as enabled or disabled. If broadcast frame forwarding is disabled for selected FIDs, only the enabled FIDs in the current configuration are displayed.
--enable Enables the frame forwarding option for a specified fabric ID.
--disable Disables the frame forwarding option for a specified fabric ID
-f fabric id Specifies the fabric ID to be disabled or enabled. Valid values are 1-128. This operand is required with the --enable and --disable options.
--help Displays the command usage.
Examples To display the current configuration:
fcr:admin> fcrbcastconfig --showBroadcast configuration is disabled for all FID
To enable broadcast frame forwarding for FID 33, 28, and 2:
fcr:admin> fcrbcastconfig --enable -f 33fcr:admin> fcrbcastconfig --enable -f 28fcr:admin> fcrbcastconfig --enable -f 2
To display the new configuration:
fcr:admin> fcrbcastconfig --show Broadcast configuration is enabled for FID:2 33 128
To disable broadcast frame forwarding for FID 33:
fcr:admin> fcrbcastconfig --disable -f 33
276 Fabric OS Command Reference53-1001764-02

fcrBcastConfig 2
To display the new configuration:
switch:admin> fcrbcastconfig --showBroadcast configuration is enabled for FID:2 128
See Also bcastshow, portRouteShow
Fabric OS Command Reference 27753-1001764-02

fcrChipTest2
fcrChipTest
Tests the functionality of FC Router FPGA.
Synopsis fcrchiptest [--slot slot] [-unit number] [-testtype type]
Description Use this command to test the FC Router Field-programmable gate array (FPGA). This test verifies that all SRAM and register data bits in each ASIC can be independently written and read successfully.
The method used is to write a walking 1 pattern to each location. This is accomplished by writing a pattern of 0x00000001 to register N, performing a direct memory access (DMA) read, and ensuring that the same pattern previously written is read back. Shift the pattern to the left by 1 bit (to 0x00000002), repeat the write, read, and compare the cycle. Shift again and repeat until the last writable bit in register N is reached (0x80000000 for a 32-bit register).
For example, a 6-bit register is effectively tested with the following patterns:
0x0001 0x0002 0x0004 0x0008
0x0010 0x0020 0x0040 0x0080
0x0100 0x0200 0x0400 0x0800
0x1000 0x2000 0x4000 0x8000
Repeat the steps until all FPGA registers are tested.
The built-in self test (BIST) runs to verify the static random access memory (SRAM) of the FPGAs.
Notes The execution of this command is subject to Virtual Fabric or Admin Domain restrictions that may be in place. Refer to chapter 1, "Using Fabric OS commands" and Appendix A, "Command Availability" for details.
This command is supported only on Brocade FR4-18i blades and Brocade 7500 platforms.
Operands This command has the following operands:
--slot slot Specifies the slot number on which the diagnostic operates. The default is 0 and operates on fixed-port-count products.
-testtype type Specifies the test type to run. By default, the command runs all tests. Valid tests include:
0 All tests
1 DMA test
2 SRAM BIST test
-unit number Specifies the FC Router FPGA to test. By default, all FC Router FPGA in the specified slot are used. Valid number values include:
0 FC Router FPGA 0
1 FC Router FPGA 1
2 All FC Router FPGAs
278 Fabric OS Command Reference53-1001764-02

fcrChipTest 2
Examples To run all tests on slot 7 and FC Router FPGA 1:
switch:admin> fcrchiptest --slot 7 -unit 1 -testtype 0Running fcrchiptest ..............Test Complete: fcrchiptest Pass 1 of 1Duration 0 hr, 0 min & 4 sec (0:0:4:351). passed.
Diagnostics When a failure is detected, the test might report one or more of the following:
DMA_ALLOC_FAIL
DMA_READ_ABORT
DMA_READ_TIMEOUT
CHIP_INIT_TIMEOUT
BIST_TIMEOUT
BIST_FAIL
See Also fcrPathTest, portLoopbackTest
Fabric OS Command Reference 27953-1001764-02

fcrConfigure2
fcrConfigure
Sets FC Router configuration parameters.
Synopsis fcrconfigure
Description Use this command to configure the FC Router parameters for this platform. This is an interactive command.
This command cannot execute on a system with the FC Router feature enabled. First disable FC routing by using fosConfig or disable the switch with switchDisable.
Note The execution of this command is subject to Virtual Fabric or Admin Domain restrictions that may be in place. Refer to chapter 1, "Using Fabric OS commands" and Appendix A, "Command Availability" for details.
Operands This command interactively prompts for the following parameter:
Backbone Fabric ID A fabric ID uniquely identifies a fabric in FC Router configurations. The backbone fabric is the fabric attached to the U_Ports—for example, E/F_Ports—of this switch. The backbone fabric ID must be unique across all FC Router-connected fabrics. The current Backbone Fabric ID can be displayed using the switchShow command.
Examples To configure FC Router parameters:
fcr:admin> fcrconfigureFC Router parameter set. <cr> to skip a parameterPlease make sure new Backbone Fabric ID does not conflict with any configured EX-Port's Fabric IDBackbone fabric ID: (1-128)[128]
See Also fosConfig, switchDisable, switchEnable, switchShow
280 Fabric OS Command Reference53-1001764-02

fcrEdgeshow 2
fcrEdgeshow
Displays the FIDs of all configured EX_Ports.
Synopsis fcredgeshow
fcredgeshow [-fid FabricID]
fcredgeshow --help
Description Use this command without operand to display information about all Fabric IDs (FIDs) that have been created on the chassis and are assigned to EX_Ports.
When a FID is specified, fcredgeshow displays information for all EX_Ports configured with the specified FID.
For each FID, the command output includes the following:
FID Fabric ID of the EX_Port.
EX-port EX_Port number of the switch.
E_Port Port number for the remote E_Port.
PWWN Neighbor switch port WWN.
SWWN Neighbor switch WWN.
The command output depends on the EX_Port configuration:
• If the EX_Port is Online, the command displays the FID, the EX_Port to which it is assigned, the E_Port, the port WWN and the switch WWN.
• If the EX_Port is offline, the command displays the FID, the EX_Port to which it is assigned, and an "OFFLINE" message.
• IF no EX_Ports are configured in the switch, the command displays "No EX-port Configured".
• If no EX_Ports are configured with the specified FID, the command displays the following message: "No EX-ports with FID FabricID"
Operands This command has the following operands:
-fid FabricID Specifies the FID for which to display the configured EX_Ports.
--help Displays the command usage.
Examples To display the EX_Ports configured in the switch:
switch:admin> fcredgeshowFID EX-port E-port Neighbor Switch (PWWN, SWWN )-------------------------------------------------------------------------25 11 244 20:f4:00:05:1e:38:a4:cb 10:00:00:05:1e:38:a4:cb35 10 299 2e:2b:00:05:1e:40:44:02 10:00:00:05:1e:40:44:02
To display the EX_Ports configured with a specified FID:
switch:admin> fcredgeshow -fid 25FID EX-port E-port Neighbor Switch (PWWN, SWWN )-------------------------------------------------------------------------25 11 244 20:f4:00:05:1e:38:a4:cb 10:00:00:05:1e:38:a4:cb
Fabric OS Command Reference 28153-1001764-02

fcrEdgeshow2
To display a FID for which no EX_Ports are configured:
switch:admin> fcredgeshow -fid 29No EX-ports with FID 29
See Also fcrPhyDevShow, fcrProxyDevShow, fcrRouteShow, lsanZoneShow, switchShow, fcrfabricshow
282 Fabric OS Command Reference53-1001764-02

fcrFabricShow 2
fcrFabricShow
Displays the FC Routers on a backbone fabric.
Synopsis fcrfabricshow
Description Use this command to display information about FC Routers that exist in an FC Router backbone fabric. The existing syntax is maintained for IPv6 support. When IPv6 addresses are not configured, the output of fcrFabricShow displays the IPv4 format.
The message "No active FC Routers found" is displayed if no active FC Routers are present on the backbone fabric.
The following information is displayed for each FC Router found on the backbone fabric:
WWN The world wide name of the FC Router.
Domain ID The domain ID of the FC Router. This domain ID is relevant only on the backbone fabric.
Info The Ethernet IP address and switch name of the FC Router. When IPv6 addresses are configured, only the static IP address displays for each FC router found on the backbone fabric.
EX_Ports A listing of active EX_Ports for the FC Router and information about these EX_Ports. This information includes:
EX_Port The port number for the EX_Port. An asterisk (*) at the end of the line indicates that the EX_Port is a Remote Router Port.
FID The fabric ID of the EX_Port.
Neighbor Switch Info (WWN, enet IP, name) The WWN, Ethernet IP address, and switch name of the switch attached to the EX_Port.
Note The execution of this command is subject to Virtual Fabric or Admin Domain restrictions that may be in place. Refer to chapter 1, "Using Fabric OS commands" and Appendix A, "Command Availability" for details.
Operands none
Examples To display the FC Routers in the backbone fabric:
switch:admin> fcrfabricshow
FC Router WWN: 10:00:00:05:1e:41:59:81, Dom ID: 2, Info: 10.33.36.8, "swd77" EX_Port FID Neighbor Switch Info (enet IP, WWN, name) ------------------------------------------------------------------------ 12 5 10.33.35.81 10:00:00:05:1e:34:01:d0 "B10_4"
FC Router WWN: 10:00:00:05:1e:41:1c:73, Dom ID: 4, Info: 10.33.36.12, "ttv12" EX_Port FID Neighbor Switch Info (enet IP, WWN, name) ------------------------------------------------------------------------ 9 2 10.33.35.80 10:00:00:05:1e:38:01:e7 "B10_3" 10 2 10.33.35.80 10:00:00:05:1e:38:01:e7 "B10_3"
Fabric OS Command Reference 28353-1001764-02

fcrFabricShow2
FC Router WWN: 10:00:00:05:1e:39:51:67, Dom ID: 5, Info: 10.33.36.96, "Scimitar" EX_Port FID Neighbor Switch Info (enet IP, WWN, name) ------------------------------------------------------------------------ 151 2 10.33.35.80 10:00:00:05:1e:38:01:e7 "B10_3"*
FC Router WWN: 10:00:00:05:1e:39:a6:7e, Dom ID: 1,Info: 10.32.66.210, 210::10:32:66:210 "Neptune210" EX_Port FID Neighbor Switch Info (enet IP, WWN, name) ------------------------------------------------------------------------ 17 76 10.20.30.176 10:00:00:05:1e:35:bf:1d "b240e_7x_1" 16 79 10.32.66.189 10:00:00:05:1e:35:a4:53 "b4100_7x_2"
189::10:32:69:189 18 79 10.32.66.179 10:00:00:05:1e:37:12:f8 "Sprint_179"
FC Router WWN: 10:00:00:05:1e:40:22:00, Dom ID: 2,Info: 10.32.66.220, 220::10:32:66:220 "sw220n" EX_Port FID Neighbor Switch Info (enet IP, WWN, name) ------------------------------------------------------------------------ 16 80 10.32.66.180 10:00:00:05:1e:34:e8:46 "b4100_7x_1"
180::10:32:66:180 27 80 10.32.69.180 10:00:00:05:1e:37:12:e0 "Sprint_180"
See Also fcrPhyDevShow, fcrProxyDevShow, fcrRouteShow, lsanZoneShow, switchShow
284 Fabric OS Command Reference53-1001764-02

fcrlSan 2
fcrlSan
Configures and displays LSAN policies.
Synopsis fcrlsan
fcrlsan --add -enforce tag | -speed tag
fcrlsan --remove -enforce tag | -speed tag
fcrlsan --show -enforce | -speed | all
fcrlsan --help
Description Use this command to add or remove LSAN tags, or to display existing tags in the configuration. LSAN tagging optimizes an FC router's behavior based on a specified subset of LSANS. This feature improves scalability and performance related to LSAN zone size and the speed with which they are imported or exported.
This command supports two types of LSAN tags: enforced tags and speed tags.
• Enforced LSAN tags filter zones accepted by the FC router from the edge fabric by matching the zones to the configured tags. Only matching zones are accepted into the local database for export and import. For example, if you configure an enforced LSAN tag "BRCD" on a router, only zones with names starting with "lsan_BRCD" are accepted. If multiple tags are configured, any matching zones are accepted. A maximum of eight LSAN enforce tags are configurable per FC router switch.
• A speed tag is a flag to indicate to the FCR that the targets in the LSANs matching the tag need to be imported permanently when host and target are zoned together, even if the host is not present. This mechanism facilitates a speedy discovery process by reducing instances of failure related to timeouts.
Once the devices that belong to the target edge fabric are defined as speed LSANS, the import or export can occur with a minimum amount of delay when hosts reboot or are added to the zone database.
The following restrictions apply when configuring LSAN tags:
• The FCR must run Fabric OS v6.2.0 or later.
• The switch must be disabled when you configure enforce tags. Speed tags can be configured while the switch is online.
• You must change the LSAN name in the edge fabric or the backbone fabric and propagate the LSAN to the FCR. Note that enforce tags are not supported in the backbone fabric.
• The speed tags must be set in all related FC routers in order for import and export to proceed correctly. However, only LSANs on the target edge fabric must append the tag.
When executed without operands, fcrlSan displays the command usage.
Note The execution of this command is subject to Virtual Fabric or Admin Domain restrictions that may be in place. Refer to chapter 1, "Using Fabric OS Commands" and Appendix A, "Command Availability" for details.
Operands This command has the following operands:
--add Adds the specified tag to the LSAN tag configuration.
--remove Removes the specified tag from the LSAN tag configuration.
Fabric OS Command Reference 28553-1001764-02

fcrlSan2
--show Displays the specified tag from the LSAN tag configuration.
--help Displays the command usage.
-enforce tag Accepts only the LSANs from the edge fabric that matches the specified tag string into the local FCR database. A valid tag is a string of a maximum of eight characters. The maximum configurable enforced tags is eight.
-speed tag Allows the FCR to always import these target devices to the hosts specified in the LSANs that match the speed tag. Only one speed tag is allowed per FCR.
-all When used with the --show option, displays all LSAN tags in the FCR LSAN tag database.
Examples To add an LSAN enforcement tag named "brocade":
switch:admin> switchdisable
switch:admin> fcrlsan --add -enforce brocade LSAN tag set successfully
To add a speed tag named "mcdt":
switch:admin> fcrlsan --add -speed mcdtLSAN tag set successfully
To remove the LSAN enforcement tag "brocade":
switch:admin> fcrlsan --remove -enforce brocadeLSAN tag removed successfully
To remove the speed tag "mcdt":
switch:admin> fcrlsan --remove -speed mcdtLSAN tag removed successfully
To display the information from the cache:
switch:admin> fcrlsan --show -enforceTotal LSAN tags : 2ENFORCE : brocadeENFORCE : cisco
switch:admin> fcrlsan --show -speedTotal LSAN tags : 1SPEED: mcdt
switch:admin> fcrlsan --show -allTotal LSAN tags : 3ENFORCE : brocadeENFORCE : ciscoSPEED: mcdt
See Also fcrFabricShow, lsanZoneShow, fcrPhyDevShow, fcrProxyDevShow, fcrRouteShow, switchShow
286 Fabric OS Command Reference53-1001764-02

fcrLsanCount 2
fcrLsanCount
Displays or sets the maximum LSAN count.
Synopsis fcrlsancount [max-lsan-count]
Description Use this command to set or display the maximum number of LSAN zones that can be configured on the edge fabric. By default, the maximum LSAN count is set to 3000, which is also the minimum. This command lets you create more LSANs on your edge fabric, up to 5000, if needed to support additional devices. The maximum number of supported LSAN devices is 10,000.
When executed without operand, this command displays the current LSAN zone limit.
This command assumes that all FCRs in the same LSAN fabric matrix or backbone have the same maximum LSAN count defined in order to protect the FCRs from running into indefinite state. Asymmetric LSAN configurations due to different maximum LSAN counts may lead to different devices being imported on different FCRs.
Since the maximum number of LSANs is configured per switch, if there is a different maximum LSAN count on the switches throughout the meta-SAN, the device import or export will not be identical on the FCRs. You should therefore enter the same maximum LSAN count for all the FCR switches in the same backbone that support this feature. Verify the configured maximum limit against the LSANs configured using the fcrResourceShow command.
Notes The default LSAN count maximum of 3000 is the Fabric OS v5.2 default. It allows v5.2 to run on the standby CP if the active CP runs firmware v5.3 or later. In this case, you cannot increase the LSAN Zone count to 5000, and if the v5.2 standby CP is coming online in a system where the LSAN count is set to 5000, the HA sync will not be established. In addition, downgrading to a firmware version lower than v5.3 is blocked if the LSAN count is set to 5000.
The execution of this command is subject to Virtual Fabric or Admin Domain restrictions that may be in place. Refer to chapter 1, "Using Fabric OS commands" and Appendix A, "Command Availability" for details.
Operands This command has the following operands:
max-lsan-count Specifies the maximum LSAN count.
Examples To display the current LSAN limit:
switch:admin> fcrlsancount LSAN Zone Limit: 3000
To increase the LSAN zone limit:
switch:admin> fcrlsancount 5000 LSAN Zone Limit: 5000
See Also fcrResourceShow
Fabric OS Command Reference 28753-1001764-02

fcrLsanMatrix2
fcrLsanMatrix
Creates, edits and displays LSAN fabric or FCR matrix information, which binds the LSAN Zone and device database information to specified edge fabric IDs or FCRs.
Synopsis fcrlsanmatrix
fcrlsanmatrix --add -lsan FID FID | -fcr wwn wwn
fcrlsanmatrix --remove -lsan FID FID | -fcr wwn wwn
fcrlsanmatrix --apply -lsan | -fcr | -all
fcrlsanmatrix --cancel -lsan | -fcr | -all
fcrlsanmatrix --display -lsan | -fcr | -all
fcrlsanmatrix --fabricview -lsan | -fcr
fcrlsanmatrix --verify -lsan | -fcr
fcrlsanmatrix --quickmode -lsan | -fcr
fcrlsanmatrix --help
Description Use this command to specify pairs of edge fabrics IDs (FIDs) that can access each other. Every pair implies two-way communications. The pairs of edge fabrics have access only to the edge fabrics associated with them by this command. The edge fabrics that are not specified have access to the remaining unspecified edge fabrics. Using this information, the FCR switch maintains the remote LSAN Zone and the device state database only if it is associated to its local edge fabrics.
For example, if edge fabric FIDs 1, 2, 3, 4, 5 are online, the default is that all edge fabrics have two-way communication. In the case where 1 and 2 are specified with the --add option to have access to each other, then:
• 1 can access only 2.
• 2 can access only 1.
• 3, 4, 5 can access each other, but cannot access 1 or 2.
The FIDs entered are not required to be online when you set up the LSAN fabric matrix. The FIDs entered are not required to be online when you set up the LSAN fabric matrix. In Fabric OS v6.1 and later, the LSAN fabric matrix information is automatically distributed to all switches in the fabric. On pre-Fabric OS v6.1 switches, the information is saved only locally. For FC Routers running Fabric OS versions prior to 6.1.0, the best practice is, therefore, to enter the same information for all the FCR switches in the backbone that support this command.
This command is also used to specify FC Router pairs that can talk to each other. All edge fabrics connected to a defined pair of FCRs are allowed to import devices each other. Once, a fabric is removed from an FCR, the communication with other fabrics of the two FCRs is also removed. The world wide name (WWN) is used to specify an FCR member. If the FCR is online, the domain ID of the switch can be used in place of the WWN.
Using the command options, you can do the following:
• Update the cached information (nonpersistent location) by editing pairs of FIDs.
• Update the cached information by removing pairs of FIDs.
• Apply the changes to the persistent memory and distribute the changes to all FCRs in the backbone fabric.
288 Fabric OS Command Reference53-1001764-02

fcrLsanMatrix 2
• Display the information saved in the cache.
• Clear the information from the cache and revert to the saved value.
• Display the information that is saved in the persistent memory (CLI command with no option).
• Display the static and default/dynamic binding of the backbone to show which edge fabricsor FCRs can access each other.
• Verify that the information in the cache is valid and does not disrupt existing import/export devices.
• Run a quickmode to derive the LSAN Zone matrix from the current import/ export database.
Note The execution of this command is subject to Virtual Fabric or Admin Domain restrictions that may be in place. Refer to chapter 1, "Using Fabric OS commands" and Appendix A, "Command Availability" for details.
Operands If no operands are specified, this command displays the persistent LSAN Zone matrix information. The following operands are optional:
--add -lsan FID FID | -fcr wwn wwn
Adds the pair of edge fabrics or FCR members that can access each other. If you specify --add with zero (0) value for FID or 00:00:00:00:00:00:00:00 for wwn, the command returns the cache to default mode.
--remove -lsan FID FID | -fcr wwn wwn
Removes the entry of the pair of FIDS. If no longer specified, the edge fabric assumes the default behavior.
--apply -lsan | -fcr | -all
Applies the information from the cache to the persistent memory only if thereis no effect on the existing import/export devices. Otherwise, an error message is displayed.
--cancel -lsan | -fcr
Cancels the data that was not applied; reverts to the persistent information.
--display -lsan | -fcr | -all
Displays the information saved in the cache.
--fabricview -lsan | -fcr
Views all the static and default/dynamic fabric binding in the backbone.
--verify -lsan | -fcr
Verifies if the LSAN Zone information previously entered and stored in the cache can be successfully applied. The data is okay if the apply operation does not cause disruption to the traffic.
--quickmode Derives the LSAN Zone matrix from the import/export setup.
Fabric OS Command Reference 28953-1001764-02

fcrLsanMatrix2
Examples For the following example, assume that the backbone has the following online edge fabrics (FIDs): 1, 2, 4, 5, 7, 8, 10 (currently, 14, 19 are not available). To add the LSAN Zone Matrix data:
switch:admin > fcrlsanmatrix --add 4 5switch:admin > fcrlsanmatrix --add 4 7switch:admin > fcrlsanmatrix --add 10 14switch:admin > fcrlsanmatrix --add 10 19
To remove an entry:
switch:admin > fcrlsanmatrix --remove 10 14
To display the information from the cache:
switch:admin > fcrlsanmatrix --display
Fabric ID 1 Fabric ID 2 ------------------------------------ 4 5 4 710 19
To apply the changes persistently:
switch:admin > fcrlsanmatrix --apply -lsan
To view the persistent changes:
switch:admin > fcrlsanmatrix -lsanLSAN MATRIX is activatedFabric ID 1 Fabric ID 2 -------------------------------------- 4 5 4 710 19
To view the LSAN Zone static and default/dynamic binding in the backbone where online fabrics are: 1, 2, 4, 5, 7, 8, 10:
switch:admin > fcrlsanmatrix --fabricview -lsanLSAN MATRIX is activated
Fabric ID 1 Fabric ID 2--------------------------------------4 5 4 7 10 19 Default LSAN Matrix:1 2 8
To display all proxy devices for all FC Routers in the same backbone fabric whether or not they are relevant to this FC Router:
switch:admin > fcrproxydevshow -a
Proxy WWN Proxy Device Physical State Created PID Exists PIDin Fabric in Fabric
52 10:00:00:06:2b:0e:4d:e5 01f001 78 4e0000 Imported
290 Fabric OS Command Reference53-1001764-02

fcrLsanMatrix 2
52 10:32:16:90:28:dd:d0:03 0bf001 82 2a0900 Imported 52 10:32:16:91:24:dd:d0:07 0bf002 82 520c00 Imported 52 10:32:16:91:25:dd:d0:06 01f002 78 4e3000 Imported 78 10:00:00:06:2b:0d:29:31 09f002 52 482200 Imported 78 10:32:16:90:29:dd:d0:07 08f002 82 2a0a00 Imported 78 10:32:16:91:24:dd:d0:05 09f001 52 48a100 Imported 78 10:32:16:91:25:dd:d0:03 08f001 82 520f00 Imported 82 10:00:00:06:2b:0d:29:30 01f002 78 4e1400 Imported 82 10:00:00:06:2b:0d:2f:ed 03f002 52 480200 Imported 82 10:00:00:06:2b:0d:33:4d 01f001 78 4e1800 Imported 82 10:00:00:06:2b:0e:4d:c9 03f001 52 482000 ImportedTotal devices displayed: 12
To display the information from the cache:
switch:admin > fcrlsanmatrix --display -lsan
Fabric ID 1 Fabric ID 2--------------------------------------52 7852 8278 82
To apply the changes persistently:
switch:admin > fcrlsanmatrix --apply -lsan
To view all the static and the default/dynamic fabric binding in the backbone:
switch:admin > fcrlsanmatrix --fabricview -lsanLSAN MATRIX is activated
Fabric ID 1 Fabric ID 2--------------------------------------52 7852 8278 82
Default LSAN Matrix:57 91
Diagnostics Error message (1):
"LSAN Matrix in the cache conflicts with existing import/export devices and may disrupt traffic."
"Please refer to the man page for the corrective action."
Corrective actions:
• Any new router added to backbone fabric automatically triggers a matrix merge. If a router does not support the matrix merge feature, the router can not join the backbone fabric. Make sure that all legacy FCR switches in the backbone support the matrix merge feature, otherwise the feature is not supported.
• Use fcrlsanmatrix --fabricview -lsan | -fcr to confirm that all the switches in the backbone have the same LSAN and FCR binding matrix. If not, there are two solutions. The first solution is to modify one FCR or both to make them the same and then activate the FCRs. The second solution is to zero out the database of one FCR to signal that this FCR accepts the database from the other FCR once the change is activated.
Fabric OS Command Reference 29153-1001764-02
fcrLsanMatrix2
To zero out database execute the following commands:
fcrlsanmatrix --add -lsan 0 0
fcrlsanmatrix --add -fcr 00:00:00:00:00:00:00:00 00:00:00:00:00:00:00:00
fcrlsanmatrix --apply -all
• In a dual backbone configuration, execute fcrlsanmatrix --fabricview on the FCR switches to confirm that the shared edge fabric FIDs have the same access in both backbones.
• Execute fcrlsanmatrix --display -lsan | -fcr and fcrproxydevshow -a Check that the LSAN binding matrix in the cache is not in conflict with the existing import/export devices that are displayed on the FCR switch. If there is a conflict, do one of the following:
- Update the LSAN/FCR binding matrix in the cache to allow access for the FIDs that have imported devices.
- Remove the conflicting import/export devices by updating the LSAN zone in the edge fabrics.
- Disable the conflicting devices.
Error message (2):
"There may be other FCR switches in the backbone that do not support the LSAN Binding feature or do not have the same fcrlsanmatrix settings."
"Please refer to the man page for the corrective action."
Corrective actions:
• Check that all FCR switches in the backbone support the LSAN Binding feature, otherwise the feature is not supported.
• Execute fcrlsanmatrix --fabricview to confirm that all the switches in the backbone have the same LSAN binding matrix. If not, clear the LSAN binding feature on all the switches and reapply the same LSAN binding matrix on all the FCR switches in the backbone.
• In a dual backbone configuration, use fcrlsanmatrix --fabricview on the FCR switches to confirm that the shared edge fabric FIDs have the same access in both backbones.
Refer to the Fabric OS Message Reference manual for further diagnostic information.
See Also fcrFabricShow, lsanZoneShow, fcrPhyDevShow, fcrProxyDevShow,fcrRouteShow, switchShow
292 Fabric OS Command Reference53-1001764-02
fcrPathTest 2
fcrPathTest
Tests the data path connection between the FC Router FPGA and the central ASIC.
Synopsis fcrpathtest [--slot slot][-unit number][-path mode][-nframes count]
Description Use this command to verify the data path connecting the FC Router field-programmable gate array (FPGA) and the central ASIC by sending frames from the FC Router FPGA port N transmitter, and looping the frames back into the same port’s receiver. The loopback is accomplished at the parallel loopback path. The path exercised in this test does not include the media nor the fiber cable.
Only one frame is transmitted and received at any one time. An external cable is not required to run this test. The port LEDs flicker green rapidly while the test is running.
The test method is as follows:
1. Set all ports present for parallel loopback.
2. Create a frame F of maximum data size (2,112 bytes).
3. Transmit frame F by way of the FC Router FPGA port N.
4. Pick up the frame from the same port N.
5. Check if any of the eight statistic error counters are nonzero:
- ENC_in
- CRC_err
- TruncFrm
- FrmTooLong
- BadEOF
- Enc_out
- BadOrdSet
- DropRxUnavail
6. Check if the transmit, receive, or Class 3 receiver counters are stuck at some value.
7. Check if the number of frames transmitted is not equal to the number of frames received.
8. Repeat steps 2 through 7 for all ports present until one of the following conditions is met:
a. The number of frames (or passCount) requested is reached.
b. All ports are marked bad.
At each pass, a different data type is used to create the frame from a palette of seven; if a pass of seven is requested, seven different frames are used in the test. If eight passes, the first seven frames are unique and the eighth is the same as the first pass.
The data palette of seven includes:
CSPAT 0x7e, 0x7e, 0x7e, 0x7e, ...BYTE_LFSR0x69, 0x01, 0x02, 0x05, ...CHALF_SQ0x4a, 0x4a, 0x4a, 0x4a, ...QUAD_NOT0x00, 0xff, 0x00, 0xff, ...CQTR_SQ0x78, 0x78, 0x78, 0x78, ...CRPAT 0xbc, 0xbc, 0x23, 0x47, ...RANDOM0x25, 0x7f, 0x6e, 0x9a, ...
Fabric OS Command Reference 29353-1001764-02

fcrPathTest2
Notes The execution of this command is subject to Virtual Fabric or Admin Domain restrictions that may be in place. Refer to chapter 1, "Using Fabric OS commands" and Appendix A, "Command Availability" for details.
This command is supported only on Brocade FR4-18i blades and Brocade 7500 platforms.
The switch must be offline for this test to run.
Operands This command has the following operands:
--slot slot Specifies the slot number on which the diagnostic operates. The default is 0 and operates on fixed-port-count products.
-unit number Specifies the FC Router FPGA to test. By default, all FC Router FPGAs in thespecified slot are tested. Valid number values include:
0 FC Router FPGA 0
1 FC Router FPGA 1
2 All FC Router FPGAs
-path mode Specifies the loopback point for the test. By default, fcrPathTest uses the Central ASIC loopback. Valid mode values include:
1 Central ASIC loopback
2 FC Router FPGA Serdes loopback
3 FC Router FPGA internal loopback
-nframes count Specifies the number of frames to send. The test progresses until thespecified number of frames are transmitted on each port. The default value is10.
Examples To test slot 2 with FC Router FPGA Serdes loopback sending 10 frames:
switch:admin> fcrpathtest --slot 2 -path 2 -nframes 10Running fcrpathtest ..............Test Complete: fcrpathtest Pass 10 of 10Duration 0 hr, 0 min & 18 sec (0:0:18:942). passed.
Diagnostics When a failure is detected, the test may report one or more of the following:
DIAG-DATA The payload received by the specified port did not match the transmitted payload. A cable, media, or ASIC failure is the probable cause. Check for a faulty SFP. Replace the SFP if necessary.
DIAG-ERRSTAT One of the ASIC internal counters detected a frame statistics error in the received frame. A cable, media, or ASIC failure is the probable cause. Check for a faulty SFP. Replace the SFP if necessary.
DIAG-INIT The port failed to synchronize in the loopback mode requested. A cable, media, or ASIC failure is the probable cause. Check for a faulty SFP. Replace the SFP if necessary.
DIAG-PORTDIED The specified port was in loopback mode and then lost sync. A cable, media, or ASIC failure is the probable cause. Check for a faulty SFP. Replace the SFP if necessary.
294 Fabric OS Command Reference53-1001764-02

fcrPathTest 2
DIAG-STATS The ASIC internal error counters detected an error in the received frame. This error is similar to ERRSTATS, but includes verifying the Tx/Rx frame count statistics. The DIAG-STATS error can be caused by a faulty SFP or indicate deeper problems in the main board or ASIC. Check for a faulty SFP. Replace the cable or SFP if necessary.
DIAG-TIMEOUT The port failed to receive back a frame that was sent out. This can be caused by a faulty SFP or indicate deeper problems in the main board or ASIC. Check for a faulty SFP. Replace the SFP if necessary.
DIAG-XMIT The specified port failed to transmit frames. This usually indicates an ASIC failure. Replace the blade or the switch.
See Also fcrChipTest, portLoopbackTest
Fabric OS Command Reference 29553-1001764-02

fcrPhyDevShow2
fcrPhyDevShow
Displays the FC Router physical device information.
Synopsis fcrphydevshow [-a][-f FID][-w wwn][-c][-d]
Description Use this command to display the physical (real) devices that are configured to be exported to other fabrics. A device is considered to be configured to be exported to another fabric if it is a member of an LSAN zone. The device is displayed only if it is discovered in the EX_Port-attached fabric and backbone fabric’s name server (for instance, the device is online).
Physical device information is available only for physical devices that exist in fabrics attached to EX_Ports of FC Routers on the same backbone fabric as this FC Router.
The default output displays only physical device information relevant to this FC Router. Relevant physical devices include physical devices that are configured to be exported from fabrics attached to this FC Router’s EX_Ports.
The physical devices are listed by fabric.
The -f and -w operands allow searching for physical devices based on fabric ID or port world wide name.
“No device found” is displayed if there is no physical device information available at this FC Router.
Each line of the output displays:
Device Exists in FabricThe fabric in which the physical device exists.
WWN The world wide name of the device port.
Physical PID The port ID of the physical device. This port ID is only relevant on the fabric specified by the “Device Exists in Fabric” column.
Note The execution of this command is subject to Virtual Fabric or Admin Domain restrictions that may be in place. Refer to chapter 1, "Using Fabric OS commands" and Appendix A, "Command Availability" for details.
Operands This command has the following operands:
-a Displays all physical devices for all FC Routers in the same backbone fabric whether or not they are relevant to this FC Router.
-a -f FID Displays the physical devices in the specified fabric for all FC Routers in the same backbone fabric whether or not they are relevant to this FC Router.
-w wwn Displays the physical devices with the specified port WWN.
-c Clears login-related counters.
-d Displays login-related counters in login try (local failure, remote failure) format. Login try counter represents the number of times the device has attempted to log in. Local failure counter represents the number of times the device login failed due to missing LSAN zones within the device's fabric. Remote failure counter represents the number of times the device login failed due to missing LSAN zones within the remote fabric. Counters are cleared upon reboot or failover.
296 Fabric OS Command Reference53-1001764-02
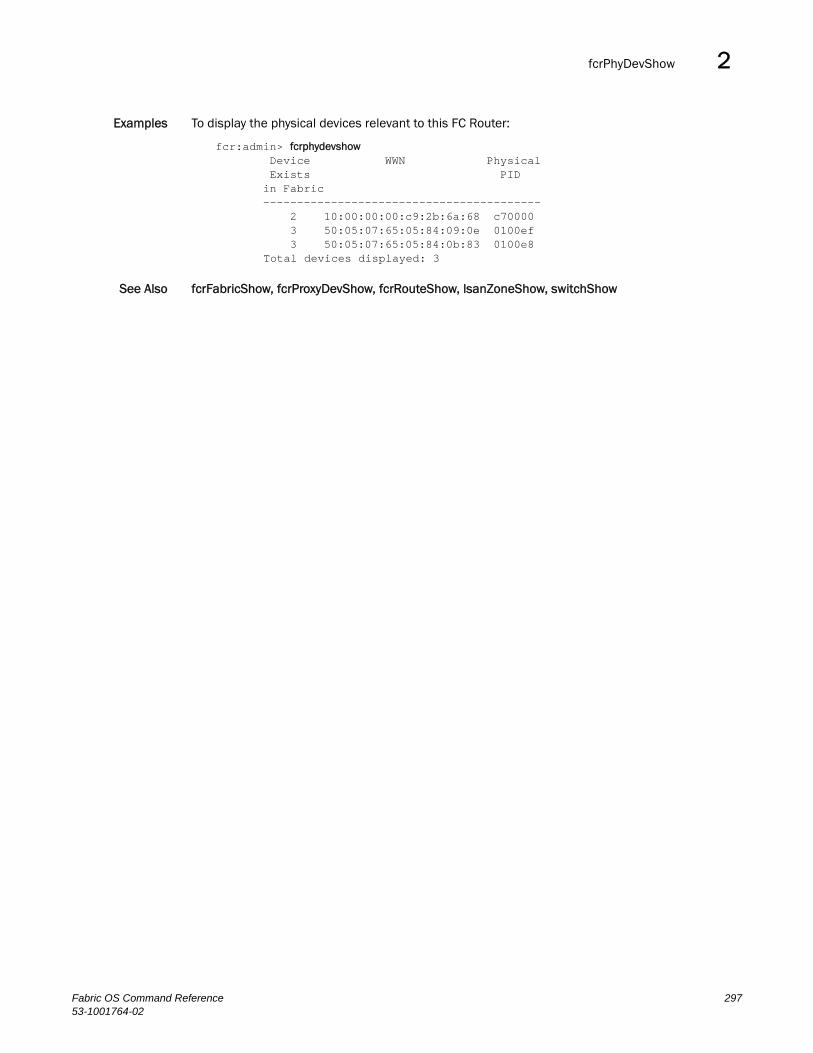
fcrPhyDevShow 2
Examples To display the physical devices relevant to this FC Router:
fcr:admin> fcrphydevshow Device WWN Physical Exists PID in Fabric ----------------------------------------- 2 10:00:00:00:c9:2b:6a:68 c70000 3 50:05:07:65:05:84:09:0e 0100ef 3 50:05:07:65:05:84:0b:83 0100e8 Total devices displayed: 3
See Also fcrFabricShow, fcrProxyDevShow, fcrRouteShow, lsanZoneShow, switchShow
Fabric OS Command Reference 29753-1001764-02

fcrProxyConfig2
fcrProxyConfig
Displays or configures proxy devices presented by an FC Router.
Synopsis fcrproxyconfig [-s importedFID devWWN slot][-r importedFID devWWN]
Description Use this command to display or set the persistent configuration of proxy devices presented by the local FC Router.
If no optional operand is provided, the command displays the persistent proxy device configuration; otherwise, it sets the specified attributes to its new value.
The proxy device must be inactive prior to setting or clearing persistent attributes. Disabling EX_Ports (using the portDisable command) attached to the relevant edge fabric, removing the device from the appropriate LSAN zones, or disabling the physical device are valid methods of ensuring a proxy device is inactive.
Persistent proxy device configuration attributes apply to the local FC Router. Multiple FC Routers attached to the same edge fabric coordinate to present the same proxy devices. As a result, persistent proxy device configurations must be consistent across all FC Routers attached to the same edge fabric or unpredictable results may occur. If the proxy device configuration is not altered, no action is required. If the configuration is altered, then care must be taken to ensure consistency across all FC Routers attached to the same edge fabric.
If no operand is specified, the command displays the following information:
importedFID The imported fabric ID of the proxy device.
devWWN The port world wide name of the device.
Slot The slot used for the device WWN. The device WWN-to-slot association is persistently stored. The slot format is XXYYH, where XX specifies the translate domain area_ID (valid values include F0H through FFH) and YY specifies the PortID value or the low 8-bits of the proxy device address (valid values include 01H through 7FH). The address of the proxy device is derived from the PID format (for example, native, core, or extended edge) and the proxy device slot.
“All slots empty” is displayed if no proxy device WWN is stored in any slot for all edge fabrics.
Note The execution of this command is subject to Virtual Fabric or Admin Domain restrictions that may be in place. Refer to chapter 1, “Using Fabric OS commands” and Appendix A, “Command Availability” for details.
Operands This command has the following operands:
-s importedFID devWWN slotAdds the specified devWWN (format: xx:xx:xx:xx:xx:xx:xx:xx) to the specified slot (format XXYYH, where XX is the translate domain area_ID [F0H through FFH] and YY is the port_ID [01H through 7FH]) for the edge fabric specified (1 through 128).
298 Fabric OS Command Reference53-1001764-02

fcrProxyConfig 2
“WWN does not exist in any proxy device slot” is displayed if the WWN does not exist in any slot for the specified edge fabric.
“Too many proxy slots configured. Remove some unused proxy device WWNs from their slots using the -r operand and try again.” is displayed if all slots are used for the specified edge fabric.
“The specified slot already contains a WWN, overwrite? [y]” is displayed if the specified slot already contains an entry. You are then prompted for overwrite confirmation.
-r importedFID devWWNRemoves the specified devWWN (format: XX:XX:XX:XX:XX:XX:XX:XX) from its slot for the edge fabric specified by importedFID (1 through 128).
“WWN does not exist in any proxy device slot.” is displayed if the WWN does not exist in any slot for the specified edge fabric.
Examples To display the persistent proxy device configuration:
switch:admin> fcrproxyconfig Imported FID Device WWN Slot 002 50:05:07:65:05:84:08:d7 f001 002 50:05:07:65:05:84:0a:7b f002 002 22:00:00:20:37:c3:11:71 f001 002 22:00:00:20:37:c3:1a:8a f002 003 10:00:00:00:c9:2b:6a:2c f001
To persistently configure device WWN 00:11:22:33:44:55:66:77 to use slot f101h in fabric 5:
switch:admin> fcrproxyconfig -s 5 00:11:22:33:44:55:66:77 f101
To remove device WWN 00:11:22:33:44:55:66:77 from its persistent slot in fabric 5:
switch:admin> fcrproxyconfig -r 5 00:11:22:33:44:55:66:77WWN deleted from proxy device slot
See Also fcrPhyDevShow, fcrProxyDevShow, fcrXlateConfig, lsanZoneShow, switchShow
Fabric OS Command Reference 29953-1001764-02

fcrProxyDevShow2
fcrProxyDevShow
Displays FC Router proxy device information.
Synopsis fcrproxydevshow [-a][-f fabricid][-w wwn]
Description Use this command to display the proxy devices presented by FC Router EX_Ports and information about the proxy devices. A proxy device is a virtual device presented in to a fabric by an FC Router. A proxy device represents a real device on another fabric. When a proxy device is created in a fabric, the real Fibre Channel device is considered to be imported in to this fabric. The presence of a proxy device is required for inter-fabric device communication. The proxy device appears to the fabric as a real Fibre Channel device. It has a name server entry and is assigned a valid port ID.
Proxy device information is available only for proxy devices that are presented by FC Routers on the same backbone fabric as this FC Router.
The default output displays only proxy device information relevant to this FC Router. Relevant proxy devices include proxy devices created by this FC Router (devices imported by this FC Router).
The proxy devices are listed by fabric. Search parameters -f and -w allow searching for proxy devices based on fabric ID or port WWN.
“No proxy device found” is displayed if there is no proxy device information available on this FC Router.
This command displays the following information:
Proxy Created in FabricThe fabric in which the proxy device has been created.
WWN The WWN of the device port.
Proxy PID The port ID of the proxy device. The port ID is only relevant on the fabric specified by the “Proxy Created in Fabric” column.
Device Exists in FabricThe fabric in which the physical device represented by this proxy device exists.
Physical PID The port ID of the physical device. The port ID is relevant only on the fabric specified by the “Device Exists in Fabric” column.
State State includes:
Imported Proxy device has been imported into the fabric.
Initializing The proxy device is being initialized and will soon be imported into the fabric.
Note The execution of this command is subject to Virtual Fabric or Admin Domain restrictions that may be in place. Refer to chapter 1, "Using Fabric OS commands" and Appendix A, "Command Availability" for details.
Operands This command has the following operands:
-a Display all proxy devices for all FC Routers in the same backbone fabric whether or not they are relevant to this FC Router.
-a -f fabricid Display the proxy devices in the specified fabric for all FC Routers in the same backbone fabric whether or not they are relevant to this FC Router.
300 Fabric OS Command Reference53-1001764-02
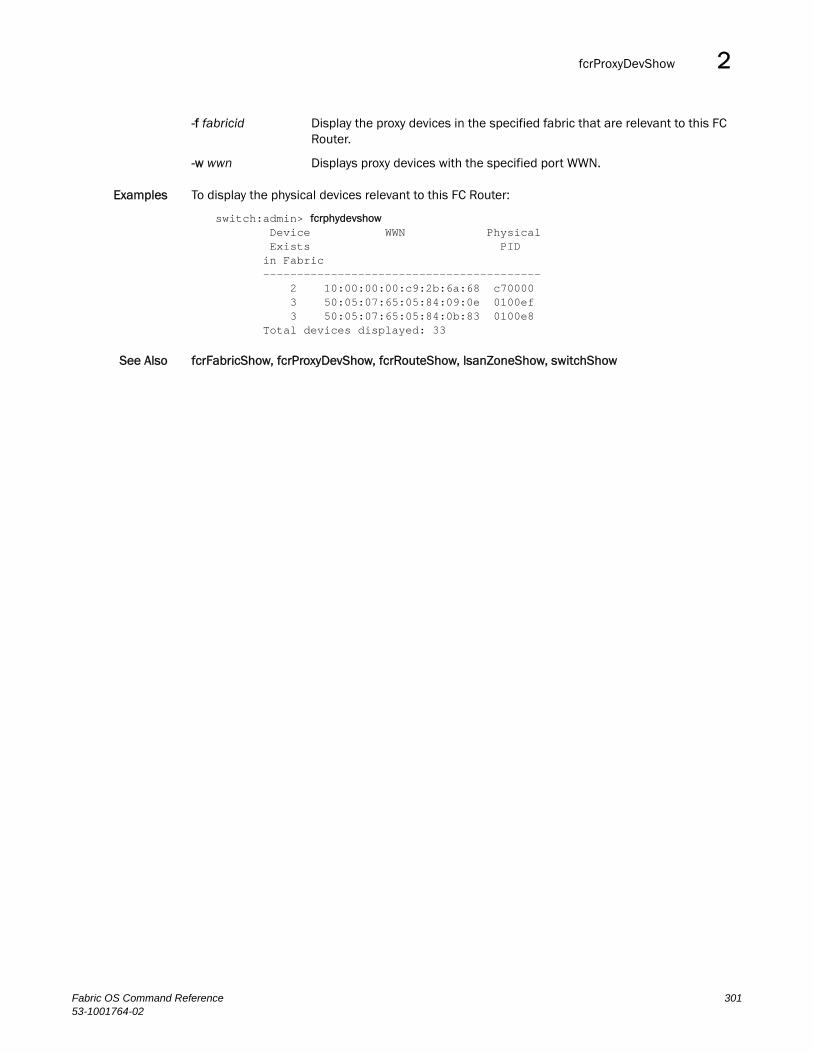
fcrProxyDevShow 2
-f fabricid Display the proxy devices in the specified fabric that are relevant to this FC Router.
-w wwn Displays proxy devices with the specified port WWN.
Examples To display the physical devices relevant to this FC Router:
switch:admin> fcrphydevshow Device WWN Physical Exists PID in Fabric ----------------------------------------- 2 10:00:00:00:c9:2b:6a:68 c70000 3 50:05:07:65:05:84:09:0e 0100ef 3 50:05:07:65:05:84:0b:83 0100e8 Total devices displayed: 33
See Also fcrFabricShow, fcrProxyDevShow, fcrRouteShow, lsanZoneShow, switchShow
Fabric OS Command Reference 30153-1001764-02

fcrResourceShow2
fcrResourceShow
Displays FC Router physical resource usage.
Synopsis fcrresourceshow
Description Use this command to display the FC Router-available resources. The maximum number allowed versus the currently used is displayed for various resources. The command output includes:
LSAN Zones The maximum versus the currently used LSAN zones.
LSAN Devices The maximum versus the currently used LSAN device database entries. Each proxy or physical device constitutes an entry.
Proxy Device Slots The maximum versus the currently used proxy device slots. A proxy device is presented to an edge fabric as being connected to a translate domain slot. A slot is the port number and AL_PA combination. The slot-to-device WWN association is persistently stored.
Phantom Node WWNsThe maximum versus the currently allocated phantom switch node WWNs. The phantom switch requires node WWNs for fabric-shortest-path-first (FSPF) and manageability purposes. Phantom node names are allocated from the pool sequentially and are not reused until the pool is exhausted and rolls over. The last allocated phantom node WWN is persistently stored. If the switch is disabled, the phantom node WWNs are not returned to the pool until the system reboots, because the phantom switch could still be accessible through other switches. Across a switch reboot, the allocation starts from the next usable WWN from the pool and not from the beginning.
Phantom Port WWNsThe maximum versus the currently used phantom domain port WWNs. Phantom domain ports require port WWNs for manageability purposes. Phantom domain ports include ports connecting front and translate domains (virtual ISLs), translate domain ports for proxy devices, and EX_Ports. Phantom port names are allocated from the pool sequentially and are not resumed until the pool is exhausted and rolls over. The last allocated phantom port WWN is persistently stored. If the switch is disabled, phantom port WWNs are not returned to the pool until the system reboots, because the phantom switch might still be accessible through other switches. Across the switch reboot, the allocation starts from the next usable WWN base from the pool and not from the beginning.
Port Limits Displays resources for each physical port (EX_Port), which include the following:
Max Proxy Devices
The maximum versus the currently used proxy device.
Max NR_Ports The maximum versus the currently used NR_Port entries. Destination NR_Port entries are stored at every physical port for routing decision purposes.
302 Fabric OS Command Reference53-1001764-02

fcrResourceShow 2
Notes Only configured EX/VEX_Ports are displayed
The execution of this command is subject to Virtual Fabric or Admin Domain restrictions that may be in place. Refer to chapter 1, "Using Fabric OS commands" and Appendix A, "Command Availability" for details.
Operands none
Examples To display the resource usage for the local FC Router:
switch:admin> fcrresourceshow
Daemon Limits: Max Allowed Currently Used ----------------------------------LSAN Zones: 1000 22LSAN Devices: 10000 1208Proxy Device Slots: 10000 2
WWN Pool Size Allocated ----------------------------------Phantom Node WWN: 8192 3790Phantom Port WWN: 32768 6446
Port Limits:Max proxy devices: 2000Max NR_Ports: 1000
Currently Used(column 1: proxy, column 2: NR_Ports): 48 | 0 0 49 | 0 0 50 | 0 0 52 | 0 0 53 | 0 0 54 | 0 0 60 | 0 0 63 | 1 4176 | 1 4177 | 1 4183 | 1 4190 | 0 0
See Also fcrFabricShow, fcrProxyDevShow, fcrRouteShow, lsanZoneShow, switchShow
Fabric OS Command Reference 30353-1001764-02

fcrRouterPortCost2
fcrRouterPortCost
Displays or sets an FC Router port cost.
Synopsis fcrrouterportcost [[slot/]port] [cost]
Description Use this command to set or display the cost of the FC router ports. You can set the cost of the link to one of two fixed values: 1000 or 10000. The option 0 sets the cost of the link to the default value based on link type (EX/VEX). The router module chooses the router port path based on the minimum cost per fabric ID (FID) connection. If multiple paths exist with the same minimum cost, the load is shared over these paths.
Every inter-fabric link (IFL) has a default cost. For an EX_Port IFL, the default cost is 1000. For a VEX_Port, the default cost is 10000. If the cost is set to 0, the link cost defaults to 1000 for an EX_Port and to 10000 for a VEX_Port.
If no operands are specified, this command displays the current link costs for all ports on the switch.
Notes Before setting the cost, ensure that admin is enabled for the EX_Port/VEX_Port with portCfgEXPort or portCfgVEXPort. The cost can be set only on a disabled port.
The bandwidth of an inter-fabric link (IFL) is unrelated to its default cost. In other words, 1 Gbps, 2 Gbps, 4 Gbps, and 8 Gbps EX_Port IFLs have the same cost value of 1000 as their FC Router port.
The execution of this command is subject to Virtual Fabric or Admin Domain restrictions that may be in place. Refer to chapter 1, “Using Fabric OS commands” and Appendix A, “Command Availability” for details.
Operands This command has the following operands:
slot For bladed systems only, specifies the slot number of the port whose cost is to be displayed or changed, followed by a slash (/).
port Specifies the number of the port whose cost is to be displayed or changed. This value is relative to the slot for bladed systems. Use switchShow for a list of valid ports. If a port is not specified, this command displays the costs of all ports.
cost Specifies the new cost of the link connected to the specified port. This operand is optional; if omitted, this command displays the cost of the specified port. The cost of the link can be changed only when the specified port is disabled. Valid values for cost are 0, 1000 or 10000.
Examples To display the cost of all EX_Ports:
switch:admin> fcrrouterportcost Port Cost ------------------------ 7/3 1000 7/4 1000 7/9 1000 7/10 1000 7/16 10000 10/0 10000
304 Fabric OS Command Reference53-1001764-02

fcrRouterPortCost 2
To display the cost on an EX_Port:
switch:admin> fcrrouterportcost 7/10 0
switch:admin> fcrrouterportcost 7/10Port Cost------------------------7/10 1000
To set the cost of an EX_Port and display the result:
switch:admin> fcrrouterportcost 7/10 10000
switch:admin> fcrrouterportcost 7/10Port Cost------------------------7/10 10000
To set the default cost on the EX_Port:
switch:admin> fcrrouterportcost 7/10 0
switch:admin> fcrrouterportcost 7/10Port Cost------------------------7/10 1000
See Also switchShow, fcrRouteShow, portCfgEXPort
Fabric OS Command Reference 30553-1001764-02

fcrRouteShow2
fcrRouteShow
Displays FC Router route information.
Synopsis fcrrouteshow
Description Use this command to display routes through the FC Router backbone fabric to accessible destination fabrics. An FC Router backbone fabric is the fabric that contains the E_Ports of this platform and routes inter-fabric traffic between imported fabrics, creating a meta-SAN.
There are FC Router ports that reside on the backbone fabric. These ports are known as NR_Ports. NR_Ports send and receive inter-fabric traffic. For the AP7420, there is a one-to-one relationship between an NR_Port on a backbone fabric and an EX_Port. NR_Port technology enables EX_Ports to exchange traffic across an intermediate fabric. NR_Ports are addressable entities on the backbone fabric and have port IDs relevant to the backbone fabric.
Because cascaded backbone/intermediate fabrics are currently not supported, an NR_Port provides a path to a single fabric with a single FC Router protocol cost. Multiple NR_Ports can provide paths to the same destination fabric.
“No routes found” is displayed if there is no route information available at this FC Router. There is no route information available if no EX_Ports are configured at this FC Router.
The output includes:
Destination Fabric ID
The destination fabric.
NR_Port PID The port ID of the NR_Port. The port ID is relevant only on the backbone fabric. This NR_Port has a route to the destination fabric identified by the “Destination Fabric ID” column.
FCRP Cost The FC Router protocol cost (for routing decisions) for this NR_Port. The FCRP cost is the same (1000) for all NR_Ports.
WWN of the Principal Switch in the Dest. FabricThe world wide name of the principal switch in the destination fabric.
Note The execution of this command is subject to Virtual Fabric or Admin Domain restrictions that may be in place. Refer to chapter 1, "Using Fabric OS commands" and Appendix A, "Command Availability" for details.
Operands none
Examples To display the route information:
switch:admin> fcrrouteshow Destination NR_Port FCRP Cost WWN of Principal Fabric Id PID Switch in the Dest. Fabric --------------------------------------------------------- 4 640000 1000 10:00:00:60:69:c0:05:d1 4 640100 1000 10:00:00:60:69:c0:05:d1 5 640200 1000 10:00:00:60:69:c0:20:ed 5 640300 1000 10:00:00:60:69:c0:20:ed
See Also fcrFabricShow, fcrPhyDevShow, fcrProxyDevShow, lsanZoneShow, switchShow
306 Fabric OS Command Reference53-1001764-02

fcrXlateConfig 2
fcrXlateConfig
Configures a translate (xlate) domain's domain ID and state of persistence for both the EX_Port-attached fabric and the backbone fabric.
Synopsis fcrxlateconfig
fcrxlateconfig importedFID exportedFID preferredDomainID
fcrxlateconfig --remove | -r importedFID exportedFID
fcrxlateconfig --enable persistxd
fcrxlateconfig --disable persistxd
fcrxlateconfig --help
Description Use this command to display a translate (xlate) domain ID or change the preferred domain ID and its state of persistence.
A translate domain is a phantom domain created by an FC Router. FC Routers emulate proxy devices representing real devices in remote fabrics. These proxy devices are emulated to be connected to translate domains. Translate domains are presented to a fabric as residing topologically behind front phantom domains (domains created by an EX_Port). In the case of backbone fabrics, translate domains are topologically behind an E_Port. In every EX_Port-attached edge fabric and backbone fabric, there can be a translate domain for every FC Router-accessible remote fabric.
During a fabric build, the translate domain requests a domain ID from the principal switch in the EX_Port-attached edge fabric. The domain ID requested is the preferred domain ID. You can set the preferred domain ID when the translate domain is not active and is persistently saved. The principal switch attempts to provide the translate domain with the requested domain ID, but it may not provide it if there are domain ID conflicts with other domains in the fabric. If the requested domain ID (such as the preferred domain ID) is unavailable, the domain ID assignment is completely at the discretion of the principal switch. The assignment domain ID is persistently stored and is used as the preferred domain ID in the future.
By default, FCR creates the translate domain for a remote fabric if a valid persistent translate domain ID is configured in the local fabric, even if no devices are imported or exported across the edge fabrics. Fabric OS v6.2.0 and later provides the option of not creating the translate domain, even if a valid persistent translate domain ID is configured if no devices are imported or exported across the edge fabrics. Disabling the persistxd parameter prevents the translate domain from being created. Enabling the persistxd parameter from a disabled state re-enables the FCR default behavior.
When executed without operands, fcrxlateconfig displays for each translate domain the imported FID, the exported FID, the domain ID and the xlate WWN.
Notes The execution of this command is subject to Virtual Fabric or Admin Domain restrictions that may be in place. Refer to chapter 1, “Using Fabric OS commands” and Appendix A, “Command Availability” for details.
Information displayed is not related to the entire backbone. The FC Router displays only connections to an edge fabric for which there are translate domain IDs. Any changes you intend to make using this command should be issued on the switches to which the edge fabrics are directly attached. In a Virtual Fabric environment, this is the base switch.
Fabric OS Command Reference 30753-1001764-02

fcrXlateConfig2
Operands This command has the following operands:
fcrxlateconfig Sets the preferred domain ID (1-239) to preferredDomainID for the translate phantom domain and saves the configuration persistently. The translate domain must be inactive to set the preferred domain ID. The following operands are required:
importedFID Specifies the fabric ID (1 through 128) of the fabric that contains the translate domain.
exportedFID Specifies the fabric ID (1 through 128) of the remote fabric represented by this translate domain.
preferredDomainID Specifies the preferred domain ID (1 through 239) of the translate phantom domain.
--remove | -r Removes the preferred domain ID of the translate phantom domain. The translate domain must be inactive to remove the preferred domain ID. The following operands are required:
importedFID Specifies the fabric ID (1 through 128) of the fabric that contains the translate domain.
exportedFID Specifies the fabric ID (1 through 128) of the remote fabric represented by this translate domain.
preferredDomainID
Specifies the preferred domain ID (1 through 239) of the translate phantom.
--enable persistxd Enables translate domain persistence. When persistxd is enabled, the translate domain is created based on the persistent translate domain ID configuration. If a valid persistent translate domain ID is configured for a given importedFID and exportedFID pair, a translate domain for the exportedFID is created, even if no devices need to be imported or exported across the edge fabrics represented by importedFID and exportedFID. By default, persistxd is enabled.
--disable persistxd Disables translate domain persistence. When persistxd is disabled, the translate domain is not created, even if a valid persistent translate domain ID is configured for the importedFID and exportedFID pair, so long as no devices are imported or exported across the edge fabrics represented by importedFID and exportedFID. Once devices need to be imported or exported across the edge fabrics, the translate domain is created.
Examples To display the translate domain configuration and the state of the persistxd parameter:
switch:admin> fcrxlateconfig
ImportedFid ExportedFid Domain OwnerDid XlateWWN 001 002 004 000001 N/A 001 005 003 N/A 50:00:51:e1:30:30:0f:05
Persist XD state: Enabled
308 Fabric OS Command Reference53-1001764-02

fcrXlateConfig 2
To set the preferred domain ID of the translate domain created in fabric 2, which represents the remote fabric 3, to a value of 8:
switch:admin> fcrxlateconfig 2 3 8xlate domain already configured, overwrite?(n) y
To clear the preferred domain ID of the translate domain created in fabric 2, which represents remote fabric 3:
switch:admin> fcrxlateconfig -r 2 3xlate domain deleted
To enable translate domain persistence:
fcr:admin> fcrxlateconfig --enable persistxd Persist XD is enabled
To disable translate domain persistence:
fcr:admin> fcrxlateconfig --disable persistxd Persist XD is disabled
See Also portCfgEXPort, portCfgVEXPort, portDisable, portEnable, portShow
Fabric OS Command Reference 30953-1001764-02

fddCfg2
fddCfg
Manages the fabric data distribution configuration parameters.
Synopsis fddcfg --showall
fddcfg --localaccept policy_list
fddcfg --localreject policy_list
fddcfg --fabwideset policy_list
Description Use this command to manage the fabric data distribution configuration parameters. These parameters control the fabric-wide consistency policy.
Switches can be locally configured to allow or reject a security policy. Supported policies are Switch Connection Control (SCC), Device Connection Control (DCC), Password (PWD), Fabric Configuration Server (FCS), Fabric Element Authentication (AUTH), and IP Filter (IPFILTER) policies.
Automatic distribution of a fabric-wide consistency policy is limited to SCC, DCC, and FCS policies. To enforce these policies fabric-wide in tolerant or strict mode, use the --fabwideset parameter. The following rules apply:
• The SCC and DCC policies can be distributed to any switch and do not require all switches to run Fabric OS v6.0 for automatic distribution.
• In tolerant mode, fabric-wide enforcement of FCS consistency policy is blocked in "mixed fabrics" that include switches running firmware versions earlier than v6.0. If a v5.3/5.2 switch joins a fabric that has a fabric-wide FCS policy enforcement in tolerant mode, a corresponding message is displayed.
• In strict mode, fabric-wide enforcement of FCS consistency policy is possible in mixed fabrics. However, switches that do not support the policies ignore them.
Note The execution of this command is subject to Virtual Fabric or Admin Domain restrictions that may be in place. Refer to chapter 1, “Using Fabric OS commands” and Appendix A, “Command Availability” for details.
Operands This command has the following operands:
--showall Displays the accept/reject configuration of all policy sets and the fabric-wide consistency policy on the switch.
--localaccept policy_list Configures the switch to accept distributions of the specified policies. The policies in policy_list must be separated by semicolons and enclosed in quotation marks; for example, “SCC;DCC;FCS”.
--localreject policy_list Configures the switch to reject distributions of the specified policies in policy_list. However, a database cannot be rejected if it is specified in the Fabric-Wide Consistency Policy. The policies in policy_list must be separated by semicolons and enclosed in quotation marks; for example, “SCC;DCC”.
--fabwideset policy_list Sets the Fabric-Wide Consistency Policy. A database that is set to reject distributions cannot be specified in the Fabric-wide Consistency Policy. To set the Fabric-Wide Consistency Policy as strict, use the strictness indicator "S".
310 Fabric OS Command Reference53-1001764-02

fddCfg 2
To set the Fabric-Wide Consistency Policy as tolerant, omit the "S". A valid policy set should be of the form "SCC:S;DCC;FCS". To set the fabric-wide policy to NULL (default) or no fabric-wide consistency, use the policy Set "". Supported policies are Switch Connection Control (SCC), Device Connection Control (DCC), and Fabric Configuration Server (FCS). All members specified in a given policy set are automatically distributed to all participating switches in the fabric that support the policy. Refer to the DESCRIPTION section for specific exceptions. In the presence of a fabric-wide FCS consistency policy, this command can only be run from the primary FCS switch.
Examples To display the Fabric-Wide Consistency Policy and the accept/reject configuration for all databases:
switch:admin> fddcfg --showallLocal Switch Configuration for all Databases:-DATABASE - Accept/Reject---------------------------------------
SCC - acceptDCC - acceptPWD - accept
FCS - acceptAUTH - accept
IPFILTER - accept
Fabric-Wide Consistency Policy:- “SCC:S;DCC;FCS”
To configure the switch to accept distribution of the SCC policy set and PWD database:
switch:admin> fddcfg --localaccept “SCC;PWD”Local Switch Configured to accept policies.
To configure this switch to reject distribution of SCC and DCC policy sets:
switch:admin> fddcfg --localreject “SCC;DCC”Local Switch Configured to reject policies.
To set the Fabric-Wide Consistency Policy to “strict” for SCC and “tolerant” for DCC and FCS:
switch:admin> fddcfg --fabwideset “SCC:S;DCC;FCS”
See Also distribute
Fabric OS Command Reference 31153-1001764-02

fdmiCacheShow2
fdmiCacheShow
Displays abbreviated remote FDMI device information, according to remote domain ID.
Synopsis fdmicacheshow
Description Use this command to display FDMI cache information for remote domains only.
The state of each remote domain, identified by its domain ID, is shown to be unknown, known, unsupported, or error.
The revision of the switch also displays, followed by the world wide name of the switch.
For HBAs, only the HBA identifiers and registered port lists are displayed. No detailed HBA attributes are displayed. For registered ports, only port identifier and corresponding HBA are shown; no detailed port attributes are displayed.
Note The execution of this command is subject to Virtual Fabric or Admin Domain restrictions that may be in place. Refer to chapter 1, “Using Fabric OS commands” and Appendix A, “Command Availability” for details.
Operands none
Examples To display the FDMI cache:
switch:admin> fdmicacheshowSwitch entry for domain 3 state: known version: v310 wwn: 10:00:00:60:69:90:03:c7
HBAs: 10:00:00:00:c9:25:9b:96
Ports: 1 10:00:00:00:c9:25:9b:96 Total count of devices on the switch is 1
See Also fdmiShow
312 Fabric OS Command Reference53-1001764-02

fdmiShow 2
fdmiShow
Displays detailed FDMI device information.
Synopsis fdmishow
Description Use this command to display FDMI information for all HBAs and ports.
Detailed FDMI information is displayed for local HBAs and ports. This information includes the HBA with its corresponding ports, along with their respective attributes.
Only abbreviated FDMI information is shown for HBA and ports on remote switches.
Note The execution of this command is subject to Virtual Fabric or Admin Domain restrictions that may be in place. Refer to chapter 1, “Using Fabric OS commands” and Appendix A, “Command Availability” for details.
Operands none
Examples To display FDMI information on a local switch:
switch:admin> fdmishowLocal HBA database contains: 10:00:00:00:c9:25:9b:96 Ports: 1 10:00:00:00:c9:25:9b:96 Port attributes: FC4 Types: 0x0001000001000000000000000000000000000000000000000000000000000000 Supported Speed: 0x00000001 Port Speed: 0x00000001 Frame Size: 0x00000800 HBA attributes: Node Name: 20:00:00:00:c9:25:9b:96 Manufacturer: Emulex Network Systems Serial Number: 0000c9259b96 Model: LP9000 Model Description: Emulex LightPulse LP9000 1 Gigabit PCI Fibre Channel Adapter Hardware Version: 00000001 Driver Version: SLI-2 SW_DATE:May 3 2002, v5-2.11a2 **CT_TEST 1** Firmware Version: 03814101 OS Name and Version: Window 2000 Max CT Payload Length: 0x00061300
Local Port database contains: 10:00:00:00:c9:25:9b:96
Remote HBA database contains no entry.
Remote Port database contains no entry.
See Also fdmiCacheShow
Fabric OS Command Reference 31353-1001764-02

ficonCfg2
ficonCfg
Configures the specified FICON database.
Synopsis ficoncfg --set database port_index
ficoncfg --reset database
ficoncfg --help
Description Use this command to configure a FICON database on a specified port. Refer to ficonShow for a description of the database content.
Note The execution of this command is subject to Virtual Fabric or Admin Domain restrictions that may be in place. Refer to chapter 1, “Using Fabric OS commands” and Appendix A, “Command Availability” for details.
Operands This command has the following operands:.
port_index Specifies the port to be configured by its port index. Use switchShow for a listing of valid port index numbers.
--set Sets the configuration entry.
--reset Resets the configuration entry to its default value.
database Specifies the name of the FICON database. The only database currently supported is the follwoing:
LIRR Devices registered to receive link incident reports.
Examples To set the LIRR database on port 5:
switch:user> ficoncfg --set LIRR 5
To reset the LIRR
switch:user> ficoncfg --reset LIRR
See Also ficonHelp, ficonShow
314 Fabric OS Command Reference53-1001764-02

ficonClear 2
ficonClear
Clears the records from the specified FICON database.
Synopsis ficonclear database
Description Use this command to remove records from the local FICON database. The command effect depends on the specified database.
Note The execution of this command is subject to Virtual Fabric or Admin Domain restrictions that may be in place. Refer to chapter 1, “Using Fabric OS commands” and Appendix A, “Command Availability” for details.
Operands This command has the following operand:
database Specifies the name of the FICON database. The databases are:
RLIR Remove all entries from the link incidents database including implicit link incidents (ILIR).
RNID Remove all the “not current” entries from the device node identification database. The entries are for devices that were previously connected but are no longer online. Note that “current” entries are not removed from the RNID database.
Examples To clear the RLIR database:
switch:user> ficonclear RLIRsuccessfully clear local RLIR Database.
To clear the RNID database:
switch:user> ficonclear RNIDsuccessfully clear not current entries from local RNID Database.
See Also ficonHelp, ficonShow
Fabric OS Command Reference 31553-1001764-02

ficonCupSet2
ficonCupSet
Sets FICON-CUP parameters for a switch.
Synopsis ficoncupset fmsmode enable | disable
ficoncupset modereg bitname 0 | 1
ficoncupset MIHPTO seconds
ficoncupset CRP PID CHID
Description Use this command to set FICON-CUP (Control Unit Port) parameters for a switch. All parameters can be set while the switch is online. Changes made by this command take effect immediately. A reboot is not required.
Use ficonCupShow to display current settings.
Notes FICON Management Server (FMS) mode cannot be enabled if port ID (PID) Format 2 is used. Refer to the Fabric OS Administrator’s Guide for information on PID formats.
The execution of this command is subject to Virtual Fabric or Admin Domain restrictions that may be in place. Refer to chapter 1, "Using Fabric OS commands" and Appendix A, "Command Availability" for details.
Operands This command has the following operands:
fmsmode Enables or disables the FICON Management Server (FMS) mode for the switch.
modereg Set a bit in the FICON-CUP mode register. The following operands are required:
bitname 0|1 Specifies a given bit value to be (1) set or not set (0). Valid values for bitname are
POSC Programmed offline state control
UAM User alert mode
ASM Active=saved mode
DCAM Director clock alert mode
ACP Alternate control prohibited
HCP Host control prohibited
MIHPTO Sets the missing interrupt handler primary timeout (MIHPTO) value for the CUP. The following operand is required:
seconds Specifies the timeout value in seconds. Provide a decimal value in the range between 15 and 600 seconds. The default timeout value is 180 seconds. If a value greater than 63 seconds is specified, the timeout value is rounded down to the closest value divisible by 10. For example, an MIHPTO timeout value of 86 defaults to 80.
316 Fabric OS Command Reference53-1001764-02

ficonCupSet 2
CRP PID CHID Sets the current reporting path (CRP). The reporting path is a CUP mechanism for sending FRU-failure reports to a FICON logical path via FICON protocol. The logical path between the PID and the CHID must exist and be in operational state for this command to succeed. Use ficonCupShow with the LP option to display the logical paths on the switch. The following operands are required:
PID Specifies the Port identifier.
CHID Specifies the Channel ID (CHID). The CHID is the Logical Partition (LPAR) identifier supplied as part of the FICON protocol header. The format of the CHID is a numerical identifier followed by a letter, for example, 1B.
Examples To enable FMS mode for the switch:
switch:admin> ficoncupset fmsmode enablefmsmode for the switch is now Enabled
To set the ASM bit in the mode register for the switch:
switch:admin> ficoncupset modereg ASM 1Active=Saved Mode bit is set to 1
To set the MIHPTO value to 60 seconds:
switch:admin> ficoncupset MIHPTO 60 MIHPTO has been changed to 60 seconds
To set the current reporting path:
switch:admin> ficoncupset CRP 082300 1A
To display the current reporting path:
switch:admin> ficoncupshow LPFICON CUP Logical Paths for CUP 0x08FE00
LP ReportingPID CHID State Path------ ---- ---- ------082300 1A Oper*** Curr082300 1B Oper082300 1C Oper082400 1A Reset082400 1B Reset612400 1E Reset Prim612400 1F Reset
See Also ficonCupShow
Fabric OS Command Reference 31753-1001764-02

ficonCupShow2
ficonCupShow
Displays FICON-CUP parameters for a switch.
Synopsis ficoncupshow fmsmode
ficoncupshow modereg [bitname]
ficoncupshow MIHPTO
ficoncupshow LP
Description Use this command to display FICON-CUP (Control Unit Port) parameters for a switch.
Note The execution of this command is subject to Virtual Fabric or Admin Domain restrictions that may be in place. Refer to chapter 1, "Using Fabric OS commands" and Appendix A, "Command Availability" for details
Operands This command has the following operands:
fmsmode Display the FICON Management Server (FMS) mode for the switch.
modereg Display the FICON-CUP mode register. If no operand is specified, all mode register bit settings are displayed. If a mode register bit name is specified, then only the value of that bit is displayed. A value of 1 indicates that a given mode register bit is set, and 0 indicates that it is not set.
The following operand is optional:
bitname Displays the specified mode register bit as either set (1) or not set (0). Valid values for bitname are:
POSC Programmed offline state control
UAM User alert mode
ASM Active=saved mode
DCAM Director clock alert mode
ACP Alternate control prohibited
HCP Host control prohibited
MIHPTO Displays the FICON-CUP missing interrupt handler primary timeout (MIHPTO) value in seconds.
LP Displays the logical paths on the switch. For each entry, the command displays the port identifier (PID), the LPAR identifier (CHID), reporting state (operational or reset (=nonoperational)), and path (current or primary).
Examples To display the FMS mode for the switch:
switch:user> ficoncupshow fmsmodefmsmode for the switch: Enabled
318 Fabric OS Command Reference53-1001764-02

ficonCupShow 2
To display the mode register for the switch:
switch:user> ficoncupshow modereg POSC UAM ASM DCAM ACP HCP ------------------------------ 1 0 1 1 1 0
To display the ASM bit in the mode register for the switch:
switch:user> ficoncupshow modereg ASM ASM --- 1
To display the MIHPTO value for the CUP:
switch:user> ficoncupshow MIHPTO MIHPTO for the CUP: 60 seconds
To display the logical paths for the switch:
switch:user> ficoncupshow LP FICON CUP Logical Paths for CUP 0x08FE00
LP Reporting PID CHID State Path ------ ---- ---- ------ 082300 1A Oper*** Curr 082300 1B Oper 082300 1C Oper 082400 1A Reset 082400 1B Reset 612400 1E Reset Prim 612400 1F Reset
See Also ficonCupSet, ficonHelp
Fabric OS Command Reference 31953-1001764-02

ficonHelp2
ficonHelp
Displays a list of FICON support commands.
Synopsis ficonhelp
Description Use this command to display a list of FICON support commands with descriptions.
Note The execution of this command is subject to Virtual Fabric or Admin Domain restrictions that may be in place. Refer to chapter 1, "Using Fabric OS commands" and Appendix A, "Command Availability" for details.
Operands none
Examples To display a list of FICON commands:
switch:admin> ficonhelpficoncfg Manage FICON configurationficonclear Clears contents of the specified FICON management databaseficoncupset Sets FICON-CUP parameters for a switchficoncupshow Displays FICON-CUP parameters for a switchficonhelp Displays FICON commandsficonshow Displays contents of the specified FICON management
See Also none
320 Fabric OS Command Reference53-1001764-02

ficonShow 2
ficonShow
Displays the contents of the specified FICON database.
Synopsis ficonshow database [fabric]
Description Use this command to display the contents of a FICON database. The ficonShow database operand is the name of the database to display. If the fabric operand is absent, the command displays the members of the named database that are local to the switch on which the command was issued. If the fabric operand is present, it must be entered exactly as shown, and this specifies that all members are displayed, both local and remote.
The following information might be displayed, depending on which database you enter and which operands you use with the command:
Domain Displays the domain ID.
Fabric WWN Displays the fabric WWN.
Flag Indicates if the node is valid, not valid, or not current. Flag values are as follows:
0x00 Indicates the node ID of the storage port is valid.
0x10 Indicates the node ID of the channel port is valid.
0x20 Indicates the node ID of the storage port is not current.
0x30 Indicates the node ID of the channel port is not current.
0x40 Indicates the node ID of the storage port for the RNID switch for RLIR is not valid.
0x50 Indicates the node ID of the channel port is not valid.
Fmt Displays the record-registration format.
FRU Failure DescriptionIndicates the FRU failure type as one of the following:
WWN card [unit number]
The WWN card.
Power Supply [unit number]
The Power Supply card.
Hardware Slot [unit number]
The Hardware Slot.
Blower [unit number]
The Blower.
FRU Part Number Displays the FRU part number.
FRU Serial Number Displays the FRU serial number.
Incident Count Displays the incident count. This number increases by 1 for each incident within the individual switch.
Fabric OS Command Reference 32153-1001764-02

ficonShow2
Link Incident DescriptionSame as Link Incident Type.
Link Incident Type Indicates the link incident type as one of the following:
• Bit-error-rate threshold exceeded• Loss of signal or synchronization• NOS recognized• Primitive sequence timeout• Invalid primitive sequence for port state
Listener PID Same as PID.
Listener Port Type Same as Port Type.
Listener Port WWN Displays the channel HBA port world wide name.
Listener Type Indicates the listener type as follows:
Conditiona This port receives a link incident record if no other recipients from the established registration list have been chosen.
Unconditional This port is always chosen as a recipient of a link incident record.
Manufacturer Displays the manufacturer name or code.
Model Number Displays the model number.
Node Parameters Same as Parameters.
Parameters Displays the node type for the switch in three bytes, 0xAABBCC:
Byte AA 0x20 FC-SB-2 and updates.
Byte BB 0x0a Switch.
Byte CC 0x00 Port number. It is dynamically assigned whenever a link incident occurs.
Parm Displays the incident node parameters type in three bytes, 0xAABBCC:
Byte AA 0x00 Reserved.
0x20 FC-SB-2 and updates.
0x40 Other FC-4s including FCP and updates.
0x60 FC-SB-2 and updates and other FC-4s including FCP and updates.
0x80 FC-4 support not specified.
0xa0 Reserved.
0xc0 Reserved.
0xe0 Vendor-specific.
Byte BB 0x00 Unspecified class.
0x01 Direct access storage device, if it is a storage port; otherwise, not channel-to-channel capable.
0x02 Magnetic tape, if it is a storage port; otherwise, a reserved field for a channel port.
0x03 Input unit record, if it is a storage port; otherwise, a reserved field for a channel port.
322 Fabric OS Command Reference53-1001764-02
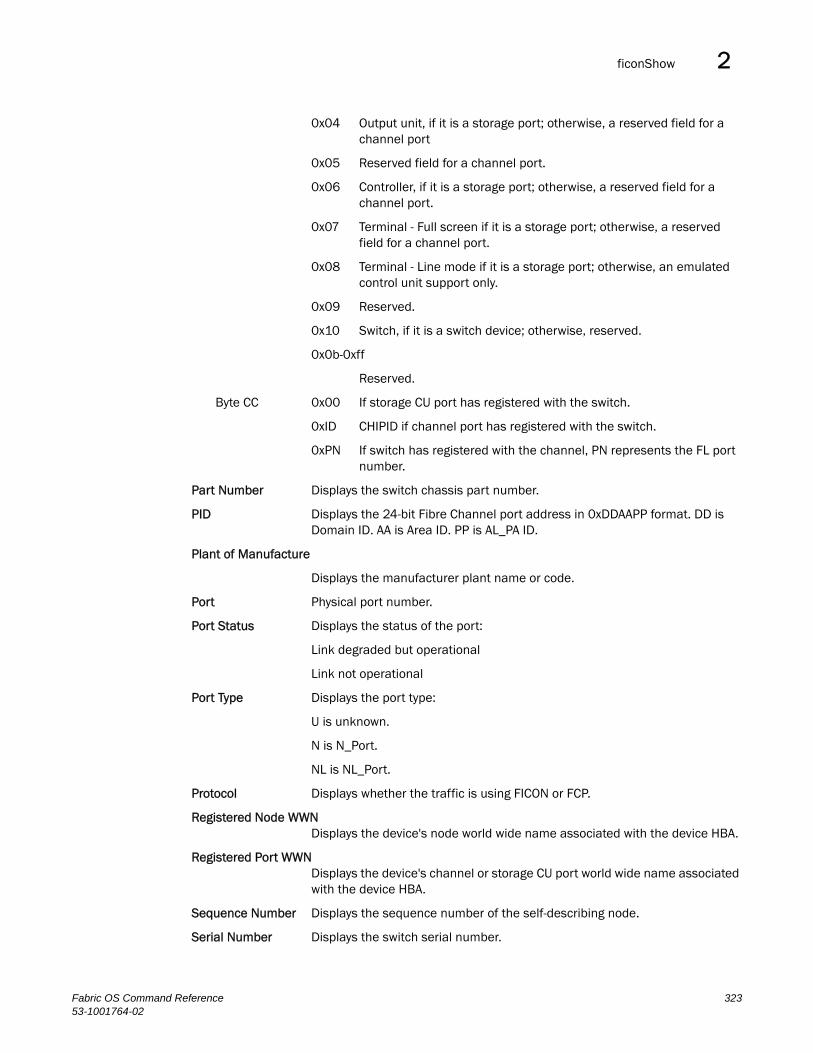
ficonShow 2
0x04 Output unit, if it is a storage port; otherwise, a reserved field for a channel port
0x05 Reserved field for a channel port.
0x06 Controller, if it is a storage port; otherwise, a reserved field for a channel port.
0x07 Terminal - Full screen if it is a storage port; otherwise, a reserved field for a channel port.
0x08 Terminal - Line mode if it is a storage port; otherwise, an emulated control unit support only.
0x09 Reserved.
0x10 Switch, if it is a switch device; otherwise, reserved.
0x0b-0xff
Reserved.
Byte CC 0x00 If storage CU port has registered with the switch.
0xID CHIPID if channel port has registered with the switch.
0xPN If switch has registered with the channel, PN represents the FL port number.
Part Number Displays the switch chassis part number.
PID Displays the 24-bit Fibre Channel port address in 0xDDAAPP format. DD is Domain ID. AA is Area ID. PP is AL_PA ID.
Plant of Manufacture
Displays the manufacturer plant name or code.
Port Physical port number.
Port Status Displays the status of the port:
Link degraded but operational
Link not operational
Port Type Displays the port type:
U is unknown.
N is N_Port.
NL is NL_Port.
Protocol Displays whether the traffic is using FICON or FCP.
Registered Node WWNDisplays the device's node world wide name associated with the device HBA.
Registered Port WWNDisplays the device's channel or storage CU port world wide name associated with the device HBA.
Sequence Number Displays the sequence number of the self-describing node.
Serial Number Displays the switch serial number.
Fabric OS Command Reference 32353-1001764-02

ficonShow2
Switch node WWN Displays the switch node world wide name.
Switch Port WWN Displays the switch port world wide name.
Switch WWN Displays the switch WWN.
Tag Displays the physical identifier for the self-describing node interface.
TS Format Displays the Time Server format.
Time Stamp Displays the timestamp, expressed in date format.
Type Same as Port Type.
Type Number Displays the type number of the self-describing node. It also describes the machine type.
Note The execution of this command is subject to Virtual Fabric or Admin Domain restrictions that may be in place. Refer to chapter 1, "Using Fabric OS commands" and Appendix A, "Command Availability" for details.
Operands This command has the following operands:
database Specify the database to display. This operand is required. Valid values are:
RNID Device node identification.
LIRR Devices registered to receive link incident reports. Entries can have the following flags:
-C* A user-configured LIRR entry defined as current (set with the ficonCfg command).
-C A LIRR entry defined by the management server demon as current based on order.
-S A LIRR entry defined by the management server demon as secondary.
SwitchRNID Switch node identification.
RLIR Link incident reports.
ILIR Implicit link incident reports.
fabric Displays FICON database information for the entire fabric. This operand is optional; if omitted, only local members of the named database are displayed.
Examples To display the local RNID database:
switch:admin> ficonshow RNID{ {Fmt Type PID Registered Port WWN Registered Node WWN flag Parm 0x18 N 502b00 50:05:07:64:01:00:15:8d 50:05:07:64:00:c1:69:ca 0x10 0x200110 Type number: 002064 Model number: 101 Manufacturer: IBM Plant of Manufacture: 02 Sequence Number: 0000000169CA tag: 102b } {Fmt Type PID Registered Port WWN Registered Node WWN flag Parm
324 Fabric OS Command Reference53-1001764-02

ficonShow 2
0x18 N 502e00 50:05:07:64:01:40:0f:ca 50:05:07:64:00:c1:69:ca 0x10 0x200105 Type number: 002064 Model number: 101 Manufacturer: IBM Plant of Manufacture: 02 Sequence Number: 0000000169CA tag: 052e }}
To display the local and remote LIRR database:
switch:admin> ficonshow LIRR fabric{Fmt Type PID Listener Port WWN Switch Port WWN Listener Type 0x18 N 502d00 50:05:07:64:01:40:11:79 20:2d:00:60:69:80:1e:4e Conditional-C 0x18 N 510d00 50:05:07:64:01:00:15:8c 20:0d:00:60:69:80:1e:4f Conditional-S 0x18 N 510f00 50:05:07:64:01:00:14:62 20:0f:00:60:69:80:1e:4f Conditional}The LIRR database has 3 entries.
Current LIRR device port number: Not configured
To display the local Switch RNID database:
switch:admin> ficonshow switchrnid{ {Switch WWN flag Parm 10:00:00:60:69:80:1e:4e 0x00 0x200a00 Type number: SLKWRM Model number: 48K Manufacturer: BRD Plant of Manufacture: CA Sequence Number: 0RB030000082 tag: 00ff }}The Local switch RNID database has 1 entries.
To display the local RLIR database:
switch:user> ficonshow RLIR
{ {Fmt Type PID Port Incident Count TS Format Time Stamp 0x18 N 502e00 46 1 Time server Mon Jan 13 04:29:33 2003 Port Status: Link not operational Link Failure Type: Loss of signal or synchronization
Registered Port WWN Registered Node WWN Flag Node Parameters 50:05:07:64:01:40:0f:ca 50:05:07:64:00:c1:69:ca 0x50 0x200105 Type Number: 002064 Model Number: 101 Manufacturer: IBM Plant of Manufacture: 02 Sequence Number: 0000000169CA tag: 2e00
Switch Port WWN Switch Node WWN Flag Node Parameters
Fabric OS Command Reference 32553-1001764-02

ficonShow2
20:2e:00:60:69:80:1e:4e 10:00:00:60:69:80:1e:4e 0x00 0x200a2e Switch Part Number: 060-0001501-05 Switch Serial Number: 0FT02X801E4E Domain: 20480 }}The local RLIR database has 1 entry.
To display the local ILIR database:
switch:user> ficonshow ILIR{ {FRU Failure [2]: Power Supply[2] failure occurred on Mon Jan 13 12:11:38 2003
Fmt Protocol Domain Fabric WWN Switch WWN 0x18 FICON 80 10:00:00:60:69:33:33:33 10:00:00:60:69:80:1e:4e
FRU part number: 23000000602 FRU serial number: FL2L0001071
{Listener Port Type Listener PID Listener Port WWN N 0x502b00 50:05:07:64:01:00:15:8d } } {FRU Failure [3]: Power Supply[4] failure occurred on Mon Jan 13 12:11:38 2003
Fmt Protocol Domain Fabric WWN Switch WWN 0x18 FICON 80 10:00:00:60:69:33:33:33 10:00:00:60:69:80:1e:4e
FRU part number: 23000000602 FRU serial number: FL2L0001060
{Listener Port Type Listener PID Listener Port WWN N 0x502b00 50:05:07:64:01:00:15:8d } }}The Local ILIR database has 2 entries.
See Also ficonClear
326 Fabric OS Command Reference53-1001764-02

fipsCfg 2
fipsCfg
Configures FIPS (Federal Information Processing Standards) mode.
Synopsis fipscfg --enable [fips | selftests | bootprom]
fipscfg --disable [fips | selftests | bootprom]
fipscfg --zeroize
fipscfg --show | --showall
fipscfg --force fips
fipscfg --verify fips
Description Use this command to configure FIPS mode on the switch. In this mode, only FIPS-compliant algorithms are allowed. As part of FIPS 140-2 level-2 compliance, passwords, shared secrets and the private keys used in SSL/TLS, system login, etc., need to be zeroized. Power-up self tests are executed when the switch is powered on to check for the consistency of the algorithms implemented on the switch.
This command prompts for confirmation before FIPS configuration changes take effect. Specifying no cancels the operation.
Notes Certain services and functions, such as FTP, HTTP, remote procedure calls (RPC), root account, boot prom access, etc., must be blocked before the system can enter FIPS mode.
LDAP should not be configured while FIPS is enabled.
The system must be rebooted for FIPS mode changes to take effect.
Refer to the Fabric OS Administrator's Guide for information on configuring your system for FIPS 140-2 level-2 compliance.
FIPS mode cannot be modified through configDownload.
FIPS is not supported on all platforms. For FIPS-compliant hardware, refer to the Fabric OS Administrator's Guide.
In a Virtual Fabric environment, FIPS is treated as chassis-wide configuration and applies to all logical switches in the chassis. Chassis permissions are required to configure FIPS.
The execution of this command is subject to Virtual Fabric or Admin Domain restrictions that may be in place. Refer to chapter 1, "Using Fabric OS commands" and Appendix A, "Command Availability" for details.
Operands This command has the following operands:
--disable [fips | selftests]
Disables FIPS or selftests mode. Selftests cannot be disabled when FIPS mode is enabled.
--enable [fips | selftests]
Enables FIPS or selftests mode. Selftests must be enabled before FIPS mode is enabled.
--zeroize Erases all passwords, shared secrets, private keys, etc. in the system.
Fabric OS Command Reference 32753-1001764-02

fipsCfg2
--show |--showall Displays the current FIPS configuration.
--force fips This option enables FIPS mode even if prerequisites are not met, except under the following two conditions:
1. In a dual-CP system if HA is not in sync between the two CPs.
2. If selftests is in a disabled state.
--verify fips Scans the prerequisites for enabling FIPS and print the failure/success cases.
--disable | --enable bootprom
Disables or enables the Boot Programmable Read-Only Memory (Boot PROM) on the switch. Boot PROM access is blocked in FIPS mode. Disabling Boot PROM requires root permission. Enabling Boot PROM does not require root permission.
--help Prints command usage.
Examples To display the current FIPS configuration:
switch:admin> fipscfg --showFIPS mode is : DisabledFIPS Selftests mode/status is : Disabled/None
To enable selftests:
switch admin> fipscfg --enable selftestsYou are enabling selftests.
Do you want to continue? (yes, y, no, n) [no] : yesFIPS Selftests mode/status has been set to : Enabled/None
To verify FIPS prerequisites:
switch:admin>fipscfg --verify fipsStandby firmware supports FIPSSELF tests check has passedRoot account is enabled.Radius check has passedAuthentication check has passedSNMP is in read only mode.Bootprom access is disabled.Firmwaredownload signature verification is enabled.cfgload.secure parameter value is 1.
To attempt enabling FIPS when prerequisites are not met:
switch:admin> fipscfg --enable fipsSelfTests mode is not enabled.Root account is enabled.Authentication uses MD5 hash algorithm.Authentication uses DH group 0.Telnet port number <23> for the policy <default_ipv4> is in permit state.HTTP port number <80> for the policy <default_ipv4> is in permit state.RPC port number <898> for the policy <default_ipv4> is in permit state.Telnet port number <23> for the policy <default_ipv6> is in permit state.HTTP port number <80> for the policy <default_ipv6> is in permit state.RPC port number <898> for the policy <default_ipv6> is in permit state.SNMP is not in read only mode.
328 Fabric OS Command Reference53-1001764-02

fipsCfg 2
Bootprom access is enabled.
FIPS mode cannot be configured at this time
To enable FIPS after prerequisites have been met:
switch:admin> fipscfg --enable fipsYou are enabling FIPS.Do you want to continue? (yes, y, no, n) [no] : yesFIPS mode has been set to : EnabledPlease reboot the system
switch:admin> fipscfg --showFIPS mode is : Enabled
To back out of a zeroizing operation:
switch:admin> fipscfg --zeroizeYou are Zeroizing FIPS configuration.Do you want to continue? (yes, y, no, n) [no]: noOperation cancelled.
switch:admin> fipscfg --zeroizeYou are Zeroizing FIPS configuration.Do you want to continue? (yes, y, no, n) [no]: yes
Executing 'secauthsecret --remove --all':
This command deletes database of DH-CHAP secret keys. If a fabric requires authentication, deleting this database may cause switchto segment from the fabric.
Do want to remove secret key database? (yes, y, no, n): [no] Operation cancelled...Executing 'pkiremove':
WARNING!!!
Removing pki objects will impair the security functionality
of this fibre channel switch. If you want secure mode enabled,you will need to get the switch certificate again.
About to remove Pki objects.ARE YOU SURE (yes, y, no, n): [no] Operation cancelled.Executing 'passwddefault':Password policies are already set to default.All account passwords have been successfully set to factory default.Executing 'seccertutil delkey':
Deleting the key pair will automatically do the following:
1. Delete all existing CSRs.2. Delete all existing certificates.3. Reset the certificate filename to none.4. Disable secure protocols.
Continue (yes, y, no, n): [no] Operation cancelled.
Fabric OS Command Reference 32953-1001764-02

fipsCfg2
Zeroizing Radius configuration:RADIUS configuration does not exist.LDAP configuration does not exist.Zeroizing IPSec static SA configuration.Zeroizing SSH key.Permission denied to perform this operation.Failed to zeroize SSH public key.switch:admin>
To disable bootprom:
switch:root> fipscfg --disable bootprom You are disabling bootprom.Do you want to continue? (yes, y, no, n) [no] : noOperation cancelled.
See Also none
330 Fabric OS Command Reference53-1001764-02

firmwareCommit 2
firmwareCommit
Commits switch firmware.
Synopsis firmwarecommit
Description Use this command to commit a firmware download to a CP. This command copies an updated firmware image to the secondary partition and commits both partitions of the CP to an updated version of the firmware. This must be done after each firmware download and after the switch has been rebooted and a sanity check is performed to make sure the new image is fine.
For switches that have nonvolatile memory set into two equal partitions, the primary partition is the where the system boots from; the secondary partition is where a copy of the firmware is stored, in case the primary partition is damaged.
To maintain the integrity of the firmware image in the nonvolatile memory, the firmwareDownload command updates the secondary partition only. When firmwareDownload completes successfully and the CP is rebooted, the system switches the primary partition (with the old firmware) to the secondary, and the secondary partition (with the new firmware) to the primary.
The default behavior of the firmwareDownload command is to automatically run the firmwareCommit command after the reboot. If you decide to disable the autocommit option when running firmwareDownload, you must execute one of the following two commands after the CP is rebooted:
• firmwareCommit copies the primary partition (with new firmware) to the secondary and commits the new firmware to both partitions of the CP.
• firmwareRestore copies the secondary partition (with the old firmware) to the primary and backs out of the new firmware download. The firmwareRestore command can be run only if autocommit was disabled during the firmware download. Autocommit can be disabled only when you run firmwareDownload in single mode.
Note The execution of this command is subject to Virtual Fabric or Admin Domain restrictions that may be in place. Refer to chapter 1, "Using Fabric OS commands" and Appendix A, "Command Availability" for details.
Operands none
Examples To commit a new version of the firmware:
switch:admin> firmwarecommitValidating primary partition... Doing firmwarecommit now.Please wait ...Replicating kernel image...............FirmwareCommit completes successfully.
See Also firmwareDownload, firmwareRestore
Fabric OS Command Reference 33153-1001764-02

firmwareDownload2
firmwareDownload
Downloads firmware from a remote host, a local directory, or a USB device.
Synopsis To invoke the command in interactive mode:
firmwaredownload
To download FOS firmware over a network:
firmwaredownload [ -s [ -b | -n ] ] [ -p ftp | scp ] [ -c ] [ -o ] host, user, pfile, passwd
To download SAS/SA firmware over a network:
firmwaredownload -a sas | dmm | application [ -t slotnumber(s) ] [ -p ftp | scp ] [ -c ] [ -o ] host, user, pfile, passwd
To download SAS firmware over a network and remove the existing SA firmware at the same time:
firmwaredownload -a sas [ -t slotnumber(s) ] [ -p ftp | scp ] [ -c ] [ -o ] [ -e ] host, user, pfile, passwd
To download FOS firmware from a USB device:
firmwaredownload [ -s [ -b | -n ] ] [ -U ] [-c] [ -o ] pfile
To download SAS/SA firmware from a USB device:
firmwaredownload -a sas | dmm | application [ -t slotnumber(s) ] [ -U ] [-c] [ -o ] pfile
To download SAS firmware from a USB device and remove the existing SA firmware at the same time:
firmwaredownload -a sas [ -t slotnumber(s) ] [ -U ] [-c] [ -o ] [ -e ] pfile
Description Use this command to download switch firmware from an FTP or SSH server or local NFS directory to nonvolatile storage. Switch firmware can also be downloaded from an external USB device on platforms that support USB.
The new firmware is downloaded in the form of RPM packages. Package names are defined in pfile along with other firmware information (time stamp, platform code, version, etc.). These packages are made available periodically to add features or to remedy defects. Contact customer support to obtain information about available firmware versions.
On enterprise-class platforms, this command, by default, downloads the firmware image to both CPs in rollover mode to prevent disruption to application services. This operation depends on High Availability (HA) support. If HA is not available, use the -s option to upgrade the CPs one at a time.
All systems supported by this firmware have two partitions of nonvolatile storage (primary and secondary) to store two firmware images. This command always downloads the new image to the secondary partition and then swaps partitions so the secondary partition becomes the primary.
By default, firmwaredownload then reboots the system and activates the new image. Finally, it performs a firmwareCommit automatically to copy the new image to the other partition. In systems with blade processors (BPs), after the new CP firmware is downloaded to the system and activated, the BP firmware is downloaded to the BP processors if there is a mismatch between the BP and CP firmware.
By default, firmwareDownload performs a full install, autoreboot, and autocommit. These modes are selectable only in single CP (-s) mode, in which case autoreboot is OFF by default.
332 Fabric OS Command Reference53-1001764-02

firmwareDownload 2
For each standalone switch in your fabric, complete all firmware download changes before issuing the firmwareDownload command on the next switch to ensure a nondisruptive download.
If firmwareDownload is interrupted due to an unexpected reboot as a result of a software error or power failure, the command automatically recovers the corrupted secondary partition. Wait for the recovery to complete before starting another firmwareDownload.
Notes Firmware download and subsequent POST failure may occur on certain platforms (the Brocade AP blades FR4-18i, FA4-18, FC4-16IP, and the Brocade 7500 and 7600 switches) when the firmwareCommit operation coincides with the execution of POST. The recommended work around is to disable POST (diagDisablePost) before you initiate a firmware download and re-enable POST (diagEnablePost) after the firmwareCommit is complete.
On certain occasions, you may see messages in the console output of firmwareDownload .These are internal messages generated by the Linux utilities. You can safely ignore these messages. For relevant Brocade-generated firmware download messages, refer to the Fabric OS Message Reference (SULB module).
Firmware download procedures may vary depending on which Fabric OS version you are migrating from. See the Fabric OS Administrator's Guide "Firmware Download" chapter for restrictions on changing Fabric OS versions.
To correlate Brocade blade names with blade IDs, use the slotShow command.
The execution of this command is subject to Virtual Fabric or Admin Domain restrictions that may be in place. Refer to chapter 1, "Using Fabric OS commands" and Appendix A, "Command Availability" for details.
Operands The following operands are optional. When invoked without operands, the command goes into interactive mode.
-U Downloads the firmware from an attached USB device. This option is valid only on platforms that support a USB port. Refer to your specific Hardware Reference Guide for details. The USB device must be enabled prior to firmware download with the usbStorage command. Firmware must be stored under the /firmware directory in the USB file system. On a dual-CP chassis, the USB device must be attached to the active CP. When downloading firmware from a USB device, the -p option is ignored.
-s Enables single-CP mode. This mode supports selectively enabling or disabling a full install, autoreboot, and autocommit on bladed and nonbladed systems. On enterprise-class platforms, this mode supports upgrading a single CP. When downloading the main Fabric OS firmware, this option disables autoreboot, unless overridden by the -b option.
-b Enables autoreboot mode. When single CP mode is enabled and this operand is not specified, reboot must be run manually to activate the downloaded image. If autoreboot mode is enabled, the switch reboots automatically after the firmware has been downloaded.
-n Disables autocommit mode. When autocommit mode is disabled, the firmwareCommit command must be executed manually to propagate the downloaded image to both partitions of the storage device.
Fabric OS Command Reference 33353-1001764-02

firmwareDownload2
host Specify a valid FTP or SSH server name or IP address. IPV4 and IPv6 addresses are supported. The firmware is downloaded from the specified host. If a host is not specified, the firmware is considered accessible on a local directory. To mention an FTP server by name, a DNS server must first be set up with the dnsConfig command. If DNS is enabled and a server name is specified, firmwareDownload automatically determines whether IPv4 or IPv6 should be used.
user Specify a user name for FTP or SSH server access. This operand can be omitted, if the firmware is accessible on a local directory, a USB device, or by anonymous FTP server access. A user name other than “anonymous” is required for SSH server access.
pfile Specify a fully qualified path for the firmware pfile. Absolute path names may be specified using forward slashes (/).
passwd Specify a password. This operand can be omitted, if the firmware is accessible through a local directory or an attached USB device, or if no password is required by the FTP server. This operand is required when accessing an SSH server.
-p scp|ftp Specify the file transfer protocol. Valid values are ftp and scp. The values are not case-sensitive. If -p is not specified, firmwareCommit determines the protocol automatically by checking the config.security parameter. When using the USB option, these parameters, if specified, are ignored.
-a fos |sas| any application
Specify the type of firmware to be downloaded. Accepted values are fos, sas, or any valid application name. Values are not case-sensitive.
-t slot(s) Specify the target slots for the firmware download. Valid values are a list of slot numbers separated by comma.
-c Disables version compatibility checking. By default, firmwareDownload checks if the firmware being downloaded is compatible with other running firmware images in the system. If the firmware version is not compatible, firmwareDownload fails. If this option is specified, version compatibility checking is disabled.
-e Removes all of the installed SA images in the system during SAS firmware download. By default, downloading a SAS image does not remove the installed SA images. If this option is specified, the installed SA images are removed. This option is only valid with the -a sas option.
-o Bypasses the checking of Coordinated HotCode Load (HCL). On single CP systems in InterOp fabrics, the HCL protocol is used to ensure data traffic is not disrupted during firmware upgrades. This option allows firmwareDownload to continue even if HCL is not supported in the fabric or the protocol fails. Using this option may cause traffic disruption for some switches in the fabric.
Examples To download the firmware to an HA switch over a network:
switch:admin> firmwaredownload 192.168.166.30,johndoe,/pub/dist/release.plist,12345The following BP blades are installed in the system.
Slot Name Versions Scope of Impact
334 Fabric OS Command Reference53-1001764-02

firmwareDownload 2
----------------------------------------------------------------- 2 FR4-18i v5.3.0 GigE/FC Fast-write 7 FR4-18i v5.3.0 GigE/FC Fast-write 9 FA4-18 v5.3.0 Virtualization
This command will upgrade both CPs and all BP blade above. Ifyou want to upgrade a single CP only, use the -s option.
You can run firmwaredownloadstatus to get the status of thiscommand.
This command will cause the active CP to reset and will requirethat existing telnet, secure telnet or SSH sessions be restarted.
Do you want to continue [Y]: y
The firmware is being downloaded to the Standby CP. It may take up to 10 minutes.
To download the firmware to both CPs on a dual-CP chassis with an attached USB device (You would execute the same command on a single-CP switch with USB support. Output may vary depending on platform.):
switch:admin> firmwaredownload -U v6.2.0
Checking system settings for firmwaredownload...Protocol selected: USBTrying address-->AF_INET IP: 127.1.1.8, flags : 2System settings check passed.
Checking version compatibility...Version compatibility check passed.
This command will upgrade the firmware on both CP blades. If you wantto upgrade firmware on a single CP only, please use -s option.
You may run firmwaredownloadstatus to get the status of this command.
This command will cause a warm/non-disruptive boot on the active CP,but will require that existing telnet, secure telnet or SSH sessionssessions be restarted.
To download SAS firmware interactively:
switch:admin> firmwaredownloadType of Firmware (FOS, SAS, or any application) [FOS]:SASTarget Slots (all, or slot numbers) [all]:Server Name or IP Address: 192.168.32.10Network Protocol (1-auto-select, 2-FTP, 3-SCP) [1]:User Name: userfooFile Name: /home/userfoo/dist/release.plistPassword:
To download SAS firmware without version compatibility checking:
Note that in interactive mode, the options -a, -p, and -t are invalid and defaults are used. When specified, these options are overridden.
switch:admin> firmwaredownload -cType of Firmware (FOS, SAS, or any application name) [FOS]: SAS
Fabric OS Command Reference 33553-1001764-02
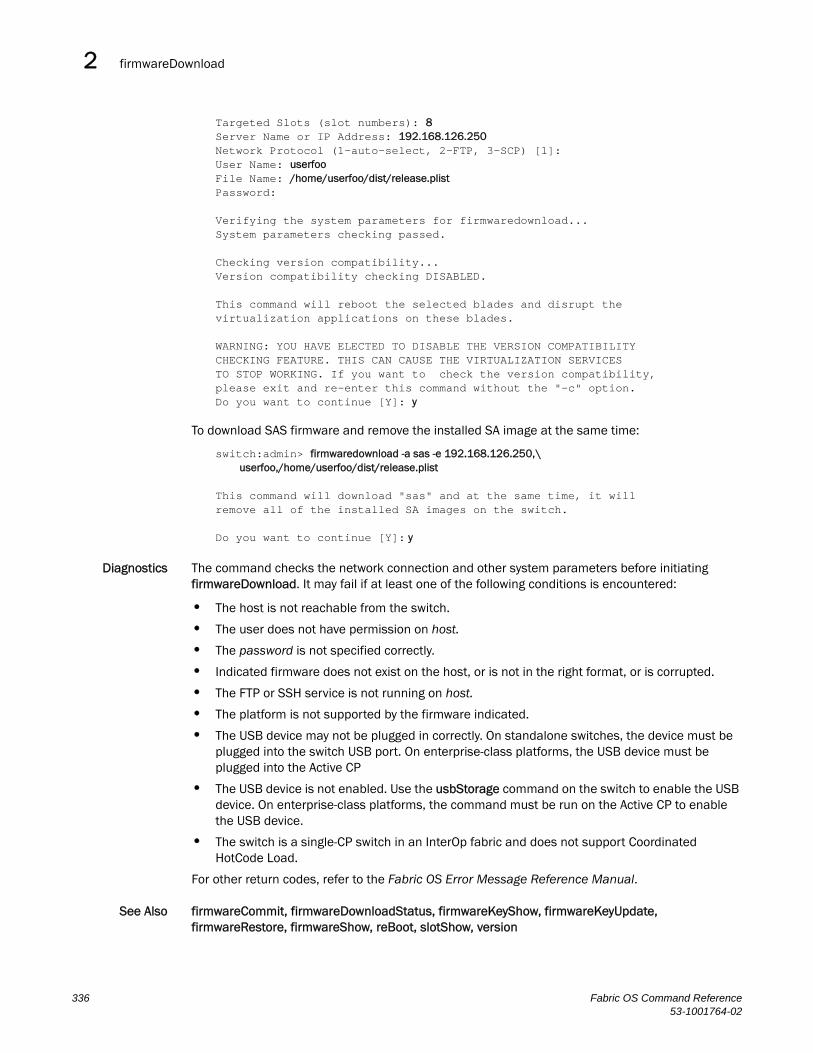
firmwareDownload2
Targeted Slots (slot numbers): 8Server Name or IP Address: 192.168.126.250Network Protocol (1-auto-select, 2-FTP, 3-SCP) [1]:User Name: userfooFile Name: /home/userfoo/dist/release.plistPassword:
Verifying the system parameters for firmwaredownload...System parameters checking passed.
Checking version compatibility...Version compatibility checking DISABLED.
This command will reboot the selected blades and disrupt thevirtualization applications on these blades.
WARNING: YOU HAVE ELECTED TO DISABLE THE VERSION COMPATIBILITYCHECKING FEATURE. THIS CAN CAUSE THE VIRTUALIZATION SERVICESTO STOP WORKING. If you want to check the version compatibility,please exit and re-enter this command without the "-c" option.Do you want to continue [Y]: y
To download SAS firmware and remove the installed SA image at the same time:
switch:admin> firmwaredownload -a sas -e 192.168.126.250,\userfoo,/home/userfoo/dist/release.plist
This command will download "sas" and at the same time, it willremove all of the installed SA images on the switch.
Do you want to continue [Y]: y
Diagnostics The command checks the network connection and other system parameters before initiating firmwareDownload. It may fail if at least one of the following conditions is encountered:
• The host is not reachable from the switch.
• The user does not have permission on host.
• The password is not specified correctly.
• Indicated firmware does not exist on the host, or is not in the right format, or is corrupted.
• The FTP or SSH service is not running on host.
• The platform is not supported by the firmware indicated.
• The USB device may not be plugged in correctly. On standalone switches, the device must be plugged into the switch USB port. On enterprise-class platforms, the USB device must be plugged into the Active CP
• The USB device is not enabled. Use the usbStorage command on the switch to enable the USB device. On enterprise-class platforms, the command must be run on the Active CP to enable the USB device.
• The switch is a single-CP switch in an InterOp fabric and does not support Coordinated HotCode Load.
For other return codes, refer to the Fabric OS Error Message Reference Manual.
See Also firmwareCommit, firmwareDownloadStatus, firmwareKeyShow, firmwareKeyUpdate,firmwareRestore, firmwareShow, reBoot, slotShow, version
336 Fabric OS Command Reference53-1001764-02

firmwareDownloadStatus 2
firmwareDownloadStatus
Displays the status of a firmware download.
Synopsis firmwaredownloadstatus
Description Use this command to display an event log that records the progress and status of events during FOS, SAS, and SA firmwaredownload. The event log is created by the current firmwaredownload command and is kept until another firmwaredownload command is issued. There is a timestamp associated with each event.
When downloading SAS or SA in systems with two control processor (CP) cards, you can only run this command on the active CP. When downloading FOS, the event logs in the two CPs are synchronized. This command can be run from either CP.
Note The execution of this command is subject to Virtual Fabric or Admin Domain restrictions that may be in place. Refer to chapter 1, "Using Fabric OS commands" and Appendix A, "Command Availability" for details.
Operands none
Examples The following example shows the status of the firmwaredownload for an SAS image to the blades in slot 2 and 7.
switch:admin> firmwaredownloadstatus[1]: Thu Jul 28 00:30:49 2007Slot 2 (SAS): Firmware is being downloaded to the blade. It may take up to 30 minutes.
[2]: Thu Jul 28 00:30:49 2007Slot 7 (SAS): Firmware is being downloaded to the blade. It may take up to 30 minutes.
[3]: Thu Jul 28 00:37:42 2007Slot 2 (SAS): Firmware has been downloaded successfully to the blade.
[4]: Thu Jul 28 00:37:42 2007Slot 7 (SAS): Firmware has been downloaded successfully to the blade.
[5]: Thu Jul 28 00:37:50 2007Slot 2 (SAS): Blade is rebooting.
[6]: Thu Jul 28 00:37:50 2007Slot 7 (SAS): Blade is rebooting.
[7]: Thu Jul 28 00:37:50 2007Slot 2 (SAS): Firmware commit is started.
[8]: Thu Jul 28 00:37:50 2007Slot 7 (SAS): Firmware commit is started.
[9]: Thu Jul 28 00:37:50 2007Slot 2 (SAS): Firmware commit has completed.
[10]: Thu Jul 28 00:37:50 2007Slot 7 (SAS): Firmware commit has completed.
Fabric OS Command Reference 33753-1001764-02

firmwareDownloadStatus2
To display the status of a firmware download on a switch:
switch:admin> firmwaredownloadstatus[1]: Fri Feb 15 22:17:03 2007Firmware is being downloaded to the switch. This step may take up to 30 minutes.
[2]: Fri Feb 15 22:20:54 2007Firmware has been downloaded to the secondary partition of the switch.
[3]: Fri Feb 15 22:22:19 2007The firmware commit operation has started. This may take up to 10 minutes.
[4]: Fri Feb 15 22:22:51 2007Switch is relocating an internal firmware image.
[5]: Fri Feb 15 22:25:15 2007The commit operation has completed successfully.
[6]: Fri Feb 15 22:25:46 2007The internal firmware image is relocated successfully.
[7]: Fri Feb 15 22:25:46 2007Firmwaredownload command has completed successfully. Use firmwareshow to verify the firmware versions.
To display the status of a firmware download on a chassis:
switch:admin> firmwaredownloadstatus[1]: Mon Dec 19 18:40:19 2007Slot 6 (CP1, active): Firmware is being downloaded to standby CP. This step may take up to 30 minutes.
[2]: Mon Dec 19 18:46:18 2007Slot 6 (CP1, active): Firmware has been downloaded successfully to Standby CP.
[3]: Mon Dec 19 18:46:25 2007Slot 6 (CP1, active): Standby CP is going to reboot with new firmware.
[4]: Mon Dec 19 18:47:45 2007Slot 6 (CP1, active): Standby CP booted successfully with new firmware.
[5]: Mon Dec 19 18:47:56 2007Slot 8 (FR4-18i): Firmware is being downloaded to the blade. This step may take up to 10 minutes.
[6]: Mon Dec 19 18:48:50 2007Slot 5 (CP0, active): Forced failover succeeded. New Active CP is running new firmware
[7]: Mon Dec 19 18:48:57 2007Slot 5 (CP0, active): Firmware is being download to standby CP. This step may take up to 30 minutes.
[8]: Mon Dec 19 18:49:28 2007Slot 8 (FR4-18i): Firmware has been downloaded successfully. Blade is rebooting with the new firmware.
[9]: Mon Dec 19 18:50:12 2007
338 Fabric OS Command Reference53-1001764-02

firmwareDownloadStatus 2
Slot 8 (FR4-18i): Firmware commit has started on the blade. This may take up to 10 minutes.
[10]: Mon Dec 19 18:50:51 2007Slot 8 (FR4-18i): The commit operation has completed successfully.
[11]: Mon Dec 19 18:55:39 2007Slot 5 (CP0, active): Firmware has been downloaded successfully on Standby CP.
[12]: Mon Dec 19 18:55:46 2007Slot 5 (CP0, active): Standby CP reboots.
[13]: Mon Dec 19 18:57:06 2007Slot 5 (CP0, active): Standby CP booted successfully with new firmware.
[14]: Mon Dec 19 18:57:10 2007Slot 5 (CP0, active): Firmware commit operation has started on both active and standby CPs.
[15]: Mon Dec 19 19:01:38 2007Slot 5 (CP0, active): Firmware commit operation has completed successfully on active CP.
[16]: Mon Dec 19 19:01:39 2007Slot 5 (CP0, active): Firmwaredownload command has completed successfully. Use firmwareshow to verify the firmware versions.
See Also firmwareCommit, firmwareDownload, firmwareRestore, firmwareShow
Fabric OS Command Reference 33953-1001764-02

firmwareKeyShow2
firmwareKeyShow
Displays the public key used for signed firmware validation.
Synopsis firmwarekeyshow
Description This command displays the contents of the public key used for validating the integrity of firmware images when signed firmware validation is enabled.
Notes A firmware key should be installed on every switch as a part of the Fabric OS installation. The presence of a firmware key does not imply that the firmware signature is checked during firmwareDownload. Signed Firmware Download must be enabled before the public key can be used for signature validation.
Use the configure command to enable Signed Firmware Download.
If Signed Firmware Download is enabled, and if the validation succeeds, firmware download proceeds normally. If the firmware is not signed or if the signature validation fails, signed firmware download fails.
Refer to the Fabric OS Administrator's Guide for complete details on upgrading or downgrading firmware.
The execution of this command is subject to Virtual Fabric or Admin Domain restrictions that may be in place. Refer to chapter 1, “Using Fabric OS commands” and Appendix A, “Command Availability” for details.
Operands none
Examples To display the public key used for signed firmware validation:
switch:admin> firmwarekeyshow-----BEGIN PUBLIC KEY-----MIGfMA0GCSqGSIb3DQEBAQUAA4GNADCBiQKBgQDjuQpMk4FrceFvVZ12iAakFNv9k4ZGhFDMPGIHIems1Ywqdl55U7LTDIVwoViTLevtIDn012r1XlNQ+DORAzvJfkwDXegkeTn/8wDgHBwotPz4WTd9UGJ9M0Vs52ro1TiukIpsh084LXKgxt+IgdseRCzY8p8rQZWLpyputx6rgwIDAQAB-----END PUBLIC KEY-----
See Also firmwareDownload, firmwareKeyUpdate, configure
340 Fabric OS Command Reference53-1001764-02

firmwareKeyUpdate 2
firmwareKeyUpdate
Updates the public key used for signed firmware validation.
Synopsis firmwarekeyupdate
firmwarekeyupdate [-p ftp|scp] host,user,keyfile,passwd
firmwarekeyupdate -U keyfile
Description Use this command to update the public key used for firmware signature validation.
The firmware key can be updated over the network, or, if the switch supports this option, from an attached USB device.
A default firmware key is released as part of the firmware image and is downloaded to the switch during the firmware download process. The default key is used to download new firmware. However, the firmware key may be change for future releases, and the default key may not be the right key for validating the signature of the new firmware. In this case, switch administrators can use the firmwareKeyUpdate command to update the firmware key first. After the new firmware is downloaded, the firmware key that is part of the new firmware becomes the default firmware key.
Notes A firmware key should be installed on every switch as a part of the Fabric OS installation. The presence of a firmware key does not imply that the firmware signature is checked during firmwareDownload. Signed Firmware Download must be enabled before the public key can be used for signature
Use the configure command to enable Signed Firmware Download.
If Signed Firmware Download is enabled, and if the validation succeeds, firmware download proceeds normally. If the firmware is not signed or if the signature validation fails, signed firmware download fails.
Refer to the Fabric OS Administrator's Guide for complete details on upgrading or downgrading firmware.
The execution of this command is subject to Virtual Fabric or Admin Domain restrictions that may be in place. Refer to chapter 1, "Using Fabric OS commands" and Appendix A, "Command Availability" for details.
Operands The following operands are supported. When invoked without operands, the command goes into interactive mode, prompting you for input.
-p scp|ftp Specify the file transfer protocol. Valid values are ftp and scp. Values are not case-sensitive. If -p is not specified, firmwareKeyUpdate determines the protocol automatically.
-U Specify this operand to update the firmware key from a USB device. This option requires the keyfile operand.
host Specify a valid FTP or SSH server name or IP address. IPV4 and IPv6 addresses are supported. The firmware key is updated from the specified host. If a host is not specified, the firmware key is considered accessible on a local directory. To mention an FTP server by name, a DNS server must first be set up with the dnsConfig command.
Fabric OS Command Reference 34153-1001764-02

firmwareKeyUpdate2
user Specify a user name for FTP or SSH server access. This operand can be omitted, if the firmware key is accessible on a local directory or by anonymous FTP server access. A user name other than “anonymous” is required for SSH server access.
keyfile Specify a fully qualified path for the firmware keyfile. Absolute path names may be specified using forward slashes (/). When updating from a USB device, the keyfile must reside in the /firmwarekey directory on the USB device.
passwd Specify a password. This operand can be omitted, if firmware is accessible through a local directory or an attached USB device, or if no password is required by the FTP server. This operand is required when accessing an SSH server.
Examples To update the public key from a server, using an automatically determined transfer protocol:
switch:admin> firmwarekeyupdate 192.168.21.34,johndoe,/pub/dist/pubkey.pem,12345 Updating the public key, please wait... Public key successfully updated.
To update the public key using the interactive method:
switch:admin> firmwarekeyupdate Server Name or IP Address: 192.168.21.34 User Name: johndoe File Name: /pub/dist/pubkey.pem Network Protocol(1-auto-select, 2-FTP, 3-SCP) [1]: Password: Updating the public key, please wait... Public key successfully updated.
To update the public key from an external USB device:
switch:admin>firmwarekeyupdate -U /usb/usbstorage/brocade/firmwarekey/pubkey.pem Updating the public key, please wait...
Public key successfully updated.
See Also firmwareDownload, firmwareKeyShow, configure
342 Fabric OS Command Reference53-1001764-02

firmwareRestore 2
firmwareRestore
Restores the former active firmware image.
Synopsis firmwarerestore
Description Use this command to restore the former active Fabric OS firmware image. This command can only be run if autocommit was disabled during the firmwaredownload. This command cannot be used to restore SAS and SA images.
After a firmwaredownload and a reboot (with autocommit disabled), the downloaded firmware becomes active. If you then do not want to commit the firmware and want to restore the former firmware, run firmwarerestore. After running firmwarerestore, you can run firmwaredownload again.
This command reboots the system and makes the former firmware active. After reboot, both primary and secondary partitions restore to the former firmware.
This command only takes action if the system is booted after a firmwareDownload; otherwise, it returns with an error code.
Note The execution of this command is subject to Virtual Fabric or Admin Domain restrictions that may be in place. Refer to chapter 1, "Using Fabric OS commands" and Appendix A, "Command Availability" for details.
Operands none
Examples To restore the former active firmware image:
switch:admin> firmwarerestoreRestore old image to be active ...Restore both primary and secondary image after reboot.The system is going down for reboot NOW !!Broadcast message from root (ttyS0) Fri Oct 26 23:48:54 2001...
Doing firmwarecommit now.Please wait ...
See Also firmwareCommit, firmwareDownload
Fabric OS Command Reference 34353-1001764-02

firmwareShow2
firmwareShow
Displays the Fabric OS versions on all firmware partitions in the system.
Synopsis firmwareshow
Description Use this command to display the FOS, SAS, and SA firmware versions. The command shows the firmware versions on both the primary and secondary partitions of the storage device. When this command is issued while a firmware download is in process, an appropriate warning message is displayed,
Note The execution of this command is subject to Virtual Fabric or Admin Domain restrictions that may be in place. Refer to chapter 1, “Using Fabric OS commands” and Appendix A, “Command Availability” for details.
Operands none
Examples To display the firmware versions on a Brocade DCX while a firmware download is in progress:
switch:admin> firmwareshow
Slot Name Appl Primary/Secondary Versions Status-----------------------------------------------------------
4 FR4-18i FOS v6.4.0 v6.4.0 6 CP0 FOS v6.4.0 STANDBY v6.4.0 7 CP1 FOS v6.4.0 ACTIVE * v6.4.0 10 FA4-18 FOS v6.4.0 v6.4.0 SAS v3.4.0 v3.4.0
WARNING: Firmwaredownload is in progress.
To display the firmware version on a Brocade 4100:
switch:admin> firmwareshowAppl Primary/Secondary Versions ------------------------------------------FOS v6.4.0 v6.4.0
See Also firmwareDownload, firmwareDownloadStatus
344 Fabric OS Command Reference53-1001764-02

fmConfig 2
fmConfig
Manages frame monitor configuration.
Synopsis fmConfig --create frame_type -pat bit_pattern [-port port_list] [-nosave] [-highth value][-timebase time_base][-action actions] [-force]
fmconfig --change frame_type [-pat bit_pattern][-highth value] [-timebase time_base] [-action actions]
fmconfig --show [frame_type] [-port port_list | -all][-force]
fmconfig --addmonitor frame_type -port port_list [-nosave][-force]
fmconfig --delmonitor frame_type -port port_list [-nosave][-force]
fmconfig --delete frame_type [-force]
fmconfig --clear frame_type -port port_list
fmconfig --save frame_type
fmconfig --help
Description Use this command to configure, install, and display frame monitors across port ranges on a switch. This command supports predefined and user-defined names for frame types defined by their offset, bit mask, and frame values. For each frame type you can configure a threshold and specify one or more alert mechanisms, such as RAS log, SNMP trap and email.
Frame monitors count the number of frames transmitted through a port that match specific values in the first 64 bytes of the frame. Since the entire Fibre Channel frame header and many upper protocol (e.g. SCSI) headers fall within the first 64 bytes of a frame, frame monitors can detect different types of traffic transmitted through a port. Each frame monitor keeps a timestamp of its last refresh. It also keeps a generation count, which is incremented each time the monitor is cleared.
Frame monitors generate alerts whenever the frame count for a certain frame type crosses the threshold configured for that frame type. You can configure high thresholds for every frame type, specify actions to be taken when the threshold is exceeded, and configure how often the data are sampled. When you create a new frame type without specifying the events, a generic filter monitor configuration for generating events is applied.
The fmConfig command supports basic Fabric Watch configurations for frame monitors. Use thConfig with the FILTER class for more advanced configurations.
This command enhances and replaces the following legacy commands:
• perfAddIPMonitor
• perfAddRWMonitor
• perfAddReadMonitor
• perfAddSCSIMonitor
• perfAddUserMonitor
• perfAddWriteMonitor
• PerfDelFiltermonitor
Fabric OS Command Reference 34553-1001764-02

fmConfig2
For the perfMonitorShow and perfMonitorClear commands, the management of Filter Monitors (FLT class) is provided through the new fmConfig interface.
While the legacy commands are still operational in the Fabric OS 6.4.0 release, their use is incompatible with the new fmConfig command. Once you use the new interface to configure and manage frame monitors, you can no longer use the old commands. When you execute fmConfig for the first time with --create, --addmonitor, --delmonitor, or --show, the command prompts for confirmation, because it implicitly enables the Frame Monitor feature and disables the legacy commands. Use the -force option to enable the new feature without confirmation. The legacy commands will be removed in a future release.
Notes The execution of this command is subject to Virtual Fabric or Admin Domain restrictions that may be in place. Refer to chapter 1, “Using Fabric OS commands” and Appendix A, “Command Availability” for details.
The number of monitors supported per port is platform-specific. Refer to the Fabric OS Administrator’s Guide for more information.
This command requires an Advanced Performance Monitoring license. A Fabric Watch license is optional. Without a Fabric Watch license, you cannot use the alert mechanism, but you can still configure frame monitors and observe the counters.
This command is not supported on virtual FC ports (VE/VEX_Port), EX_Port, mirror ports, GbE ports, and FCoE ports.
Operands --create Creates a user-defined frame type to be monitored. A frame type is defined by a unique name and bit pattern.
--change Modifies an existing frame type configuration.
frame_type Specifies a name for the frame type. The name is a user-defined string of up to 10 characters. Strings exceeding the character limit are truncated. The string must be included in double quotation marks. Spaces are not permitted. This operand is required with all configuration and display options.
Use the --change option to modify an existing frame type that you created earlier by changing, for example, the bit pattern, the ports where the frames should be monitored, or the alert mechanism. You can also use the --change option to modify one of the predefined frame types supported with this command. You can modify the ports where the frames should be monitored or change the default threshold and alert mechanism. You cannot change the bit pattern of a predefined frame type.
Predefined frame types include the following:
ABTS Specifies a frame of type ABTS (Abort Sequence Basic Link Service command) with a bit pattern of “4,0xff,0x81;12,0xff,0x00;20,0xff,0x00;”
BA_ACC Specifies a frame of type BA_ACC (Abort Accept) with a bit pattern of “4,0xff,0x84;12,0xff,0x00;”
IP Specifies a frame of type IP with a bit pattern of “12,0xFF,0x05;”.
SCSI Specifies a frame of type SCSI with a bit pattern of “12,0xFF,0x08;”.
SCSI_READ Specifies a frame of type SCSI Read with a bit pattern of “12,0xFF,0x08;4,0xFF,0x06;40,0xFF,0x08,0x28;”.
346 Fabric OS Command Reference53-1001764-02

fmConfig 2
SCSI_WRITE Specifies a frame of type SCSI Write with a bit pattern of “12,0xFF,0x08;4,0xFF,0x06;40,0xFF,0x08,0x0A,0x2A;”.
SCSI_RW Specifies a frame of type SCSI Write with a bit pattern of “12,0xFF,0x08;4,0xFF,0x06;40,0xFF,0x08,0x28,0x0A,0x2A;”.
SCSI2_RESERVE Specifies a frame of type SCSI-2 Reserve with a bit pattern of “12,0xFF,0x08;4,0xFF,0x06;40,0xFF,0x16,0x56;”.
SCSI3_RESERVE Specifies a frame of type SCSI-3 Reserve with a bit pattern of “12,0xFF,0x08;4,0xFF,0x06;40,0xFF,0x5F;41,0xFF,0x01;”.
-pat bit_pattern Specifies a unique combination of values in the first 64 bytes of a frame. The syntax for the bit patterns is as follows: “offset, bitmask,value;[offset, bitmask,value;] ...;” for example, "12,0xFF,0x08;4,0xFF, 0x06;40,0xFF,0x08,0x28;". This example monitors for SCSI read command traffic transmitted from a port by filtering on offset 12 with a value of 0x08 (SCSI-FCP), on offset 4 with value 0x06 (unsolicited command), and on offset 40 with values of 0x08 or 0x28 (read command). Each pattern must end with a semicolon (;) and the combined pattern must be enclosed in double quotation marks. This operand is required with the --create option. It is optional with the --change option.
The pattern components are as follows:
Offset Specifies the offset within the frame. Offset 0 is the first byte of the start-of-frame (SOF) delimiter, and offset 4 is the first byte of the frame header. The offset must be in decimal format. Valid values for offset are 0, 4-63. Offset 0 is a special case that can be used to monitor the first four bytes SOFx frames. The end-of--frame (EOF) delimiter cannot be monitored. A maximum of six offsets can be specified for each filter, and each offset can match up to four values. The count is incremented by one, if a frame has a matching value in all the offsets specified by the filter.
bitmask Specifies the mask value to be applied to frame contents.
value Specifies the values that need to be captured from the frame contents.
In SOFx frames the offset is specified as 0x0; value is specified as one of the following. For example, the value of 0x6 matches frames of type SOFi3:
0 SOFf
1 SOFc1
2 SOFi1
3 SOFn1
4 SOFi2
5 SOFn2
6 SOFi3
7 SOFn3
Fabric OS Command Reference 34753-1001764-02

fmConfig2
-port port_list Specifies one or more ports on which to install the monitor for the specified frame type. This operand is optional; if omitted, the monitor is installed on all eligible ports. A port list can consist of the following:
• One or more single ports, preceded by a slot number followed by a slash (/) on bladed systems. Multiple ports must be separated by a comma, for example, 8 or 5/8 or 3,5,8.
• One or more port ranges where the beginning and end port are separated by a dash, for example, 8-13 or 5/8-13, or 3/4-9. A port range cannot span multiple slots.
-nosave Overrides the default behavior of fmConfig --create, which automatically saves the configuration and collected data persistently. When -nosave is specified, the configuration is nonpersistent and will be erased upon reboot. -nosave resembles the behavior of the legacy filter monitor commands. This operand is optional and valid only with the --create, --addmonitor and --delmonitor options. It is not valid with the --change option.
-highth value Sets the high threshold value for the specified frame monitor. This operand is optional. High threshold values and defaults are platform-specific. Refer to the Fabric Watch Administrator’s Guide for more information.
-timebase time_base Specifies the time interval between two samples to be compared. Valid intervals are:
day Samples are compared once a day.
hour Samples are compared once every hour.
minute Samples are compared once every minute.
second Samples are compared once every second.
-action value Specifies the action triggered if the frame count for the specified frame type exceeds the configured high threshold. Valid actions include snmp, raslog, portlog, email or none. This operand is optional; if omitted, defaults are used (snmp, raslog). Note that fmConfig only supports specification of high thresholds and the actions taken when the frame count exceeds the configured high threshold. Use the thConfig command with the filter class operand to configure and display other Fabric Watch thresholds, and the actions to be taken when the counters fall below or in-between configured Fabric Watch thresholds.
-force Enables the Frame Monitor feature without confirmation. This operand is used only once with options that implicitly enable the new feature and disable the legacy commands. These options include --create, --addmonitor, --delmonitor, and --show. When executed without -force, these commands prompt for confirmation.
--save frame_type Saves the set of ports on which the specified frame type is monitored to the persistent configuration. If a frame type is not specified, this command saves the port configurations of all existing frame types. This operation removes the configuration for ports not monitored.
348 Fabric OS Command Reference53-1001764-02

fmConfig 2
--addmonitor frame_type -port port_list [-nosave] [-force] Installs an existing frame monitor on the specified ports. Specify -nosave to save the configuration is nonpersistently. Use -force for first-time execution without confirmation.
--delmonitor frame_type -port port_list [-nosave] [-force] Removes an existing frame monitor from the specified ports. Specify -nosave to save the configuration is nonpersistently. Use -force for first-time execution without confirmation.
--delete frame_type Deletes an existing frame type. This command removes the entire configuration, including configured threshold and associated actions. It also removes any frame monitors of the specified type from all ports. This operand is not valid with predefined frame types.
--clear frame_type -port port_list Clears the ports on which the specified frame type is monitored from the persistent configuration.
--show Displays the specified frame type configuration. When used without operand, the --show command displays the configured frame types along with their bit patterns. The following operands are optional:
frame_type Displays the following information for the specified frame type: Port number, Frame type, frame count, configured high threshold, configured alerts. time base and configuration status (saved or N/A).
. This operand is optional; if omitted, this command lists all configured frame types on the switch along with their bit patterns. The following operands are exclusive.
-force Executes display without confirmation (First-time use only).
-port port_list Specifies the ports for which to display the frame type configurations. Refer to the description above for valid values.
all Displays information for all ports and frame types.
--help Displays the command usage.
Examples To create a custom frame type using default thresholds and report actions (This custom frame monitor checks all incoming frames at offset 17, applies a mask of 0x0FF to the byte, and looks for a matching value of 0x07. It also monitors the incoming frames at offset 7, applies a mask of 0x0FF to the byte, and looks for matching values of 0x4F or 0x01. The counter is incremented when the monitor detects a frame where byte 17 is 0x07, and byte 7 is 0x4F or 0x01. The thresholds, alerting mechanism , action and threshold level for this custom frame type will be imported from a generic filter monitor configuration.):
switch:admin>fmConfig --create MyFrameMonitor -pat “17,0x0FF,0x07;7,0x0FF,0x4F,0x01”
To add E-mail alerts to the previously created frame type:
switch:admin> fmconfig --change MyFrameMonitor -action email
To install a SCSI frame monitor on ports 3-12: switch:admin> fmconfig --addmonitor SCSI -port 3-12
To save the port configuration persistently:
switch:admin> fmconfig --save SCSI
Fabric OS Command Reference 34953-1001764-02

fmConfig2
To delete the custom frame monitor “MyFrameMonitor” from all ports:
switch:admin> fmconfig --delmonitor MyFrameMonitor
To delete the entire frame type configuration:
switch:admin> fmconfig --delete MyFrameMonitor
To clear the counters for the SCSI2_READ monitor from ports 7-10:
switch:admin> fmconfig --clear SCSI2_READ -port 7-10
To display the existing frame types and associated bit patterns on the switch:
switch:admin> fmconfig --show FRAME_TYPE BIT PATTERN---------------------------------------- scsi 12,0xFF,0x08; scsiread 12,0xFF,0x08;4,0xFF,0x06;40,0xFF,0x08,0x28; scsiwrite 12,0xFF,0x08;4,0xFF,0x06;40,0xFF,0x08,0x28,0x0A,0x2A; scsirw 12,0xFF,0x08;4,0xFF,0x06;40,0xFF,0x08,0x28,0x0A,0x2A; scsi2reserve 12,0xFF,0x08;4,0xFF,0x06;40,0xFF,0x16,0x56; scsi3reserve 12,0xFF,0x08;4,0xFF,0x06;40,0xFF,0x5F;41,0xFF,0x01 ip 12,0xFF,0x05; abts 4,0xFF,0x81;40,0xFF,0x81;12,0xFF,0x0;17,0xFF,0x0; baacc 4,0xff,0x84;12,0xff,0x00;17,0xff,00;
To display configuration details for the predefine SCSI frame monitor (Use thConfig filter class to set and display other Fabric Watch thresholds for frame monitors):
switch:admin> fmconfig --show
Port| Frame Type|Count|HIGHThres|Actions |TIMEBASE|CFG--------------------------------------------------------000002|scsi|0000000000000123|10 |Raslog |None |saved000003|scsi|0000000000000124|10 |Raslog |None |saved000004|scsi||0000000000000143|10 |Raslog |None |saved
To display all configured frame types for all ports:
switch:admin> fmconfig --show Port|Frame Type |Count |HIGH Thres|Actions |TIMEBASE |CFG-----------------------------------------------------------------------------000062|scsi |0000000000000123 |10 |Raslog,SNMP |None |saved -|scsiread |N/A |0 |None |None |N/A -|scsiwrite |N/A |0 |None |None |N/A -|scsirw |N/A |10 |Raslog,SNMP |None |N/A -|scsi2reserve|N/A |0 |None |None |N/A -|scsi3reserve|N/A |0 |None |None |N/A -|ip |N/A |0 |None |None |N/A -|abts |N/A |0 |None |None |N/A -|baacc |N/A |0 |None |None |N/A000002|myFrameMon |0000000000000145 |10 |Email |None |saved
See Also portThConfig, thConfig
350 Fabric OS Command Reference53-1001764-02

fosConfig 2
fosConfig
Displays or modifies Fabric OS features.
Synopsis fosconfig --enable feature
fosconfig --disable feature
fosconfig --show
Description Use this command to enable or disable a feature, or to display the current operating status of features on a switch. This command can be run while the switch is online.
The following features are supported (refer to the Notes for limitations):
• FC Routing service (see fcrConfigure)
• iSCSI service (see iscsiCfg)
• iSNS client service (see isnscCfg)
• Virtual Fabrics (see lfCfg)
• Ethernet switching service
Notes The features described may not be supported on all platforms. If you attempt to enable a feature that is not supported on your platform, an error message stating "Command not supported on this platform" is displayed.
The execution of this command is subject to Virtual Fabric or Admin Domain restrictions that may be in place. Refer to chapter 1, "Using Fabric OS commands" and Appendix A, "Command Availability" for details.
Operands This command has the following operands:
--enable feature
Enables a feature on the switch. Valid values for feature are:
fcr Enables the FC Routing service on the switch. The FC Routing service is disabled by default. Use fosConfig --show to determine if FCR is enabled or disabled,
When enabling FCR, you may encounter one of the following system messages:
"FC Routing service is in the process of being disabled, please try again after a few minutes." This means that a command to disable the FC Routing service is still in progress. Wait a few minutes and try again.
"FC Routing service is already enabled." This means that the FC Routing service is already enabled.
iSCSI Enables the iSCSI service on the switch. By default, iSCSI is disabled.
iSNSC Enables the iSNSC service on the switch. By default, iSNSC is disabled.
Fabric OS Command Reference 35153-1001764-02

fosConfig2
vf Enables Virtual Fabrics. By default, Virtual Fabrics are disabled. Before enabling the Virtual Fabrics, ensure that there are no Administrative Domains (ADs) in effect. Administrative Domains must be disabled before enabling Virtual Fabrics. This command prompts for confirmation, because the chassis reboots after this command is executed.
ethsw Enables the Ethernet switch service on the switch. The Ethernet switch service is disabled by default. Enabling the Ethernet switch service does not disrupt the FC traffic.
--disable feature
Disables a feature on the switch. Valid values for feature are:
fcr Disables the FC Routing service on the switch. All enabled EX_Ports and VEX_Ports on the switch must be offline for this command to succeed.
. To use this command to disable the FC Routing service only instead of disabling the switch, issue this command, then change the BB fabric ID using fcrConfigure.
When disabling the FCR service, you may encounter the following system messages:
"Please disable all EX/VEX_Ports first before running this command." This means that there were EX_Ports or VEX_Ports online when this command was issued. Take these ports offline and try the command again.
"FC Routing service is already disabled" -This means that the FC Routing service is already disabled.
iSCSI Disables the iSCSI service on the switch.
iSNSC Disables the iSNSC service on the switch.
vf Disables Virtual Fabrics on the switch. This command prompts for confirmation, because the chassis reboots after this command is executed.
ethsw Disables the Ethernet switch service. Ethernet switching is disabled by default. This operation reboots the switch and is therefore disruptive. You must disable the service before downgrading from Fabric OS v6.3.0 to v6.2.0.
--show Displays the current operating status of features on the switch.
Examples To display the operating status of the services:
switch:admin> fosconfig --showFC Routing service: enablediSCSI service: enablediSNS Client service: disabledVirtual Fabric: enabledEthernet Switch Service: disabled
To disable the FC Routing service:
switch:admin> fosconfig --disable fcr FC Routing service is disabled
To enable the FC Routing service:
switch:admin> fosconfig --enable fcr FC Routing service is enabled
352 Fabric OS Command Reference53-1001764-02

fosConfig 2
To enable the iSCSI service:
switch:admin> fosconfig --enable iscsi iSCSI service is enabled
To disable the iSCSI service:
switch:admin> fosconfig --disable iscsi iSCSI service is disabled
To enable Virtual Fabrics:
switch:admin> fosconfig --enable vfWARNING: This is a disruptive operation that requires a reboot to take effect.All EX ports will be disabled upon reboot.Would you like to continue [Y/N]y
To disable Virtual Fabrics:
switch:admin> fosconfig --disable vfWARNING: This is a disruptive operation that requires a reboot to take effect.Would you like to continue [Y/N]y
To enable the Ethernet Switching service:
switch:admin> fosconfig --enable ethswWARNING: This operation will enable the Ethernet Switch Service on this switch.Would you like to continue [Y/N]: yEnabling the Ethernet Switch Service. Please wait ...Create Ethernet switch instance 0All service instances in sync.The Ethernet Switch Service has been enabled.Please enable all of the Blades with ID 74 now.
To disable the Ethernet Switching service:
switch:admin> fosconfig --disable ethswWARNING: This is a disruptive operation that requires a reboot to take effect.Would you like to continue [Y/N]: yThe Ethernet Switch Service has been disabled. Your system is being rebooted now.The system is coming up, please wait...
See Also fcrConfigure, iscsiCfg, iscsiPortCfg, isnscCfg, switchShow
Fabric OS Command Reference 35353-1001764-02

fosExec2
fosExec
Executes a command in a specified logical switch context.
Synopsis fosexec --fid FID -cmd “cmd [args]”
fosexec --fid all [-force] -cmd “cmd [args]”
Description Use this command to execute any Fabric OS command on a specified logical switch context or on all logical switches. The target logical switch is identified by its fabric ID (FID). When used with the --fid all option, the specified command is executed in all logical switches.
The FIDs must be part of the FID permission list associated with the user account. If you execute fosexec --fid all and you do not have permission to one or more of the logical switches (FIDs), the command prompts for confirmation to continue with the execution of the command in the FIDs for which you do have permission. You can override the prompt for confirmation with the -force option. Refer to userConfig help for more information on logical switch access permissions.
Executing chassis-level commands through fosexec --fid all results in redundant output.
Note The execution of this command is subject to Virtual Fabric or Admin Domain restrictions that may be in place. Refer to chapter 1, "Using Fabric OS Commands" and Appendix A, "Command Availability" for details.
Operands This command has the following operands:
--fid FID Specifies the Fabric ID of the logical switch for which the command is executed.
--fid all Executes the specified command in all logical switch contexts configured on the physical switch.
-force Executes the specified command on all logical switches in your permission list without prompting for confirmation.
-cmd “cmd [args]” Specifies the command to be executed including command options if applicable. The entire command string must be enclosed in double quotation marks.
Examples To display switch information for a logical switch with FID 10:
switch:admin> fosexec --fid 10 -cmd "switchshow"-------------------------------------“switchshow” on FID 10
switchName: switch_10switchType: 66.1switchState: Online switchMode: NativeswitchRole: SubordinateswitchDomain: 1switchId: fffc01switchWwn: 10:00:00:05:1e:41:5f:c2zoning: ON (lsan_cfg)switchBeacon: OFFFC Router: OFFAllow XISL Use: ONLS Attributes: [FID: 10, Base Switch: No, Default Switch: No, Address Mode 0]
354 Fabric OS Command Reference53-1001764-02

fosExec 2
Index Slot Port Address Media Speed State Proto=================================================== 0 1 0 640000 -- N8 No_Module FC 1 1 1 640100 -- N8 No_Module FC 2 1 2 640200 -- N8 No_Module FC
To enable port 5/0 on all logical switches:
switch:admin> fosexec --fid all -cmd “portenable 5/0”
---------------------------------------------------
"portenable" on FID 128:
---------------------------------------------------
"portenable" on FID 10:
A port or ports is/are not part of this switch.
---------------------------------------------------
"portenable" on FID 20:
A port or ports is/are not part of this switch.switch:admin>
To display the firmware version for all logical switches:
switch:user> fosexec --fid all -cmd “firmwareshow -v”LF permission does not exist for one or more logical switches.Would you like to continue [Y/N] : y
------------------------------------------
"firmwareshow" on FID 10:Appl Primary/Secondary Versions
------------------------------------------
FOS v6.3.0_main_bld15 v6.3.0_main_bld15
------------------------------------------
"firmwareshow" on FID 20:Appl Primary/Secondary Versions
------------------------------------------
FOS v6.3.0_main_bld15 v6.3.0_main_bld15switch:user>
Fabric OS Command Reference 35553-1001764-02

fosExec2
To display the switch name for all logical switches without confirmation:
switch:user> fosexec --fid all -force -cmd "switchname"
------------------------------------
"switchname" on FID 10:
switch_10
-----------------------------------
"switchname" on FID 20:
switch_20switch:user>
See Also setContext, userConfig
356 Fabric OS Command Reference53-1001764-02

fruReplace 2
fruReplace
Provides an interactive interface to help replace a field replaceable unit (FRU).
Synopsis frureplace fru
Description Use this command to replace a FRU. The command automatically performs the necessary backup and restore operations to accommodate the replacement.
Note The execution of this command is subject to Virtual Fabric or Admin Domain restrictions that may be in place. Refer to chapter 1, "Using Fabric OS commands" and Appendix A, "Command Availability" for details.
Operands The following operand is required:
fru Specify the type of hardware component being replaced. WWN is the only supported value, specifying the replacement of the WWN card.
Examples To replace the world wide name card:
switch:admin> frureplace wwnThis is the WWN card hot swap interface.Continuing from this point will require the whole process to be completed.If this process is not complete due to a power cycle, or CP failover, please followthe recovery procedure in Core Switch WWN Card Removal andReplacement document.Do you wish to continue [y/n]? y
Backing up WWN card data, pleasewait about 25 seconds for furtherinstruction.
Please install the new FRU now.
If this session lost for any reason,please re-enter the frureplace command andfollow the instructions to complete theoperation.
Please enter the word `continue' after thenew WWN card has been installed: continueRestoring the information to thereplacement FRU now, please wait about20 seconds to completeVerifying the replacement FRU now...WWN card hot swap is now complete.FRU replacement completed successfully!
See Also none
Fabric OS Command Reference 35753-1001764-02
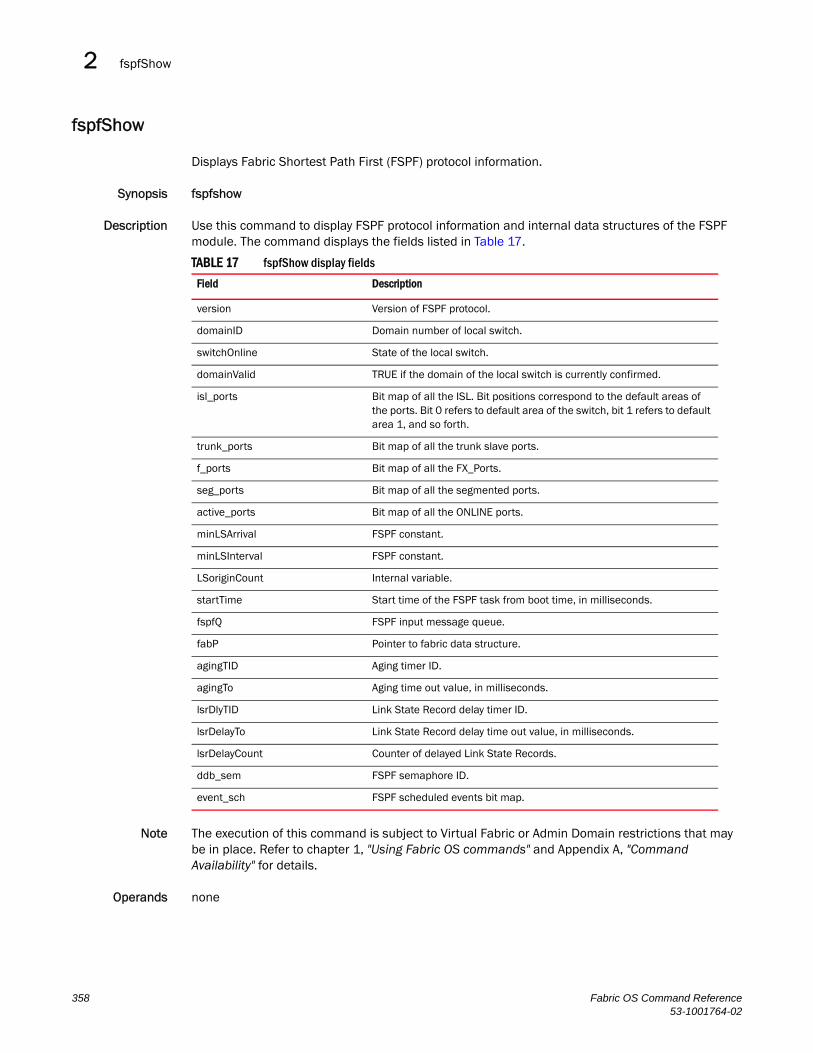
fspfShow2
fspfShow
Displays Fabric Shortest Path First (FSPF) protocol information.
Synopsis fspfshow
Description Use this command to display FSPF protocol information and internal data structures of the FSPF module. The command displays the fields listed in Table 17.
Note The execution of this command is subject to Virtual Fabric or Admin Domain restrictions that may be in place. Refer to chapter 1, "Using Fabric OS commands" and Appendix A, "Command Availability" for details.
Operands none
TABLE 17 fspfShow display fields
Field Description
version Version of FSPF protocol.
domainID Domain number of local switch.
switchOnline State of the local switch.
domainValid TRUE if the domain of the local switch is currently confirmed.
isl_ports Bit map of all the ISL. Bit positions correspond to the default areas of the ports. Bit 0 refers to default area of the switch, bit 1 refers to default area 1, and so forth.
trunk_ports Bit map of all the trunk slave ports.
f_ports Bit map of all the FX_Ports.
seg_ports Bit map of all the segmented ports.
active_ports Bit map of all the ONLINE ports.
minLSArrival FSPF constant.
minLSInterval FSPF constant.
LSoriginCount Internal variable.
startTime Start time of the FSPF task from boot time, in milliseconds.
fspfQ FSPF input message queue.
fabP Pointer to fabric data structure.
agingTID Aging timer ID.
agingTo Aging time out value, in milliseconds.
lsrDlyTID Link State Record delay timer ID.
lsrDelayTo Link State Record delay time out value, in milliseconds.
lsrDelayCount Counter of delayed Link State Records.
ddb_sem FSPF semaphore ID.
event_sch FSPF scheduled events bit map.
358 Fabric OS Command Reference53-1001764-02

fspfShow 2
Examples To display FSPF protocol information:
switch:admin> fspfshow
version = 2domainID = 131switchOnline = TRUEdomainValid = TRUEisl_ports[0] = 0x00000000isl_ports[1] = 0x74000000trunk_ports[0] = 0x00000000trunk_ports[1] = 0x02000000f_ports[0] = 0x00400000f_ports[1] = 0x00000000seg_ports[0] = 0x00000000seg_ports[1] = 0x00000000active_ports[0] = 0x00400000active_ports[1] = 0x76000000minLSArrival = 3minLSInterval = 5LSoriginCount = 3startTime = 50222fspfQ = 0x1003e640fabP = 0x1003e630agingTID = 0x1004ca28agingTo = 10000lsrDlyTID = 0x100507a8lsrDelayTo = 5000lsrDelayCount = 1ddb_sem = 0x1003e6e8
fabP:event_sch = 0x0
See Also bcastShow, topologyShow, uRouteShow
Fabric OS Command Reference 35953-1001764-02

fwAlarmsFilterSet2
fwAlarmsFilterSet
Enables or disables alarms for Fabric Watch.
Synopsis fwalarmsfilterset [mode]
Description Use this command to configure alarm filtering for Fabric Watch. By turning off the alarms, all nonenvironment class alarms are suppressed. By turning on the alarms, all class alarms are generated.
Notes This command requires a Fabric Watch license.
The execution of this command is subject to Virtual Fabric or Admin Domain restrictions that may be in place. Refer to chapter 1, "Using Fabric OS commands" and Appendix A, "Command Availability" for details.
Operands This command has the following operand:
mode Specify 1 to enable the alarms, 0 to disable the alarms. If no operand is specified, the default value is 0 (alarms deactivated). This operand is optional.
Examples To enable alarms in Fabric Watch:
switch:admin> fwalarmsfiltersetFW: Alarms are already disabled
switch:admin> fwalarmsfilterset 1FW: Alarms are already enabled
See Also fwAlarmsFilterShow
360 Fabric OS Command Reference53-1001764-02

fwAlarmsFilterShow 2
fwAlarmsFilterShow
Displays alarm filtering for Fabric Watch.
Synopsis fwalarmsfiltershow
Description Use this command to display whether alarm filtering is enabled or disabled.
Notes This command requires a Fabric Watch license.
The execution of this command is subject to Virtual Fabric or Admin Domain restrictions that may be in place. Refer to chapter 1, "Using Fabric OS commands" and Appendix A, "Command Availability" for details.
Operands none
Examples To display the status of alarm filtering in Fabric Watch:
switch:user> fwalarmsfiltershowFW: Alarms are enabled
switch:user> fwalarmsfiltershowFW: Alarms are disabled
See Also fwAlarmsFilterSet
Fabric OS Command Reference 36153-1001764-02

fwClassInit2
fwClassInit
Initializes all classes under Fabric Watch.
Synopsis fwclassinit
Description Use this command to initialize all classes under Fabric Watch. The command should only be used after installing a Fabric Watch license to start licensed Fabric Watch classes. Refer to the Fabric Watch Administrator’s Guide for a list of supported Fabric Watch classes.
Notes This command requires a Fabric Watch license.
The execution of this command is subject to Virtual Fabric or Admin Domain restrictions that may be in place. Refer to chapter 1, "Using Fabric OS commands" and Appendix A, "Command Availability" for details.
Operands none
Examples To initialize all classes under Fabric Watch:
switch:admin> fwclassinitfwClassInit: Fabric Watch is updating...fwClassInit: Fabric Watch has been updated.
See Also fwConfigReload, fwHelp, portFencing, portThConfig, thConfig, sysMonitor
362 Fabric OS Command Reference53-1001764-02

fwConfigReload 2
fwConfigReload
Reloads the Fabric Watch configuration.
Synopsis fwconfigreload
Description Use this command to reload the Fabric Watch configuration. This command should only be used after downloading a new Fabric Watch configuration file from a host.
Notes This command requires a Fabric Watch license.
The execution of this command is subject to Virtual Fabric or Admin Domain restrictions that may be in place. Refer to chapter 1, "Using Fabric OS commands" and Appendix A, "Command Availability" for details.
Operands none
Examples To reload the saved Fabric Watch configuration:
switch:admin> fwconfigreloadfwConfigReload: Fabric Watch configuration reloaded
See Also configDownload, configUpload, fwClassInit, fwHelp
Fabric OS Command Reference 36353-1001764-02

fwConfigure2
fwConfigure
Displays and modifies the Fabric Watch configuration.
Synopsis fwconfigure
fwconfigure --enable --port port
fwconfigure --disable --port port
Description This command is being deprecated in Fabric OS v6.4.0; it will be removed in a subsequent release. Functional equivalents for configuring Fabric Watch thresholds are provided by the portThConfig, thConfig, and sysMonitor commands.
Use this command to display and modify threshold information for the Fabric Watch configuration. Switch elements monitored by Fabric Watch are divided into classes, which are further divided into areas. Each area can include multiple thresholds. In addition, the command can be used to disable or enable all thresholds associated with a given port. When executed without operands, this command runs interactively.
On switches running Fabric OS v6.1.0 or later, use this command to enable Port Fencing. This feature allows the OS to disable a port that is operating outside the bounds of normal operation. When an erratically behaving port is fenced, the port is placed into the disabled state and is kept offline, thereby preventing the port to transmit or receive frames. Refer to the Fabric Watch Administrator’s Guide for information on how to enable Port Fencing.
The Fabric Watch classes and areas are provided in Table 18. The following restrictions apply:
1. The Port class does not support VE _Ports and VEX_Ports, except for State Changes.
2. The E_Port class has the same port limitations as the port class except under the following condition: On a Brocade 48000 with a FR4-18i blade, or on the Brocade 7500, the E_Port class monitors the following additional ports and creates monitors for each of the logical ports:
- FCR (includes EX_Ports)
- FCIP (includes VE_Ports, VEX_Ports)
3. SFP Class: SFPs connected to GbE ports are not monitored. For more Information, refer to the Fabric Watch Administrator’s Guide.
TABLE 18 fwConfigure Fabric Watch classes and areas
Class Area
Environment TemperatureFan*Power Supply*
SFP TemperatureRXPTXPCurrentVoltage
364 Fabric OS Command Reference53-1001764-02

fwConfigure 2
Port Link lossSync lossSignal lossProtocol errorInvalid wordsInvalid CRCSRX PerformanceTX PerformanceState Changes
Fabric E_Port downsFabric reconfigureDomain ID changesSegmentation changesZone changesFabric<->QLFabric loginsSFP state changes
E_Port Link loss (E_Port)Sync loss (E_Port)Signal loss (E_Port)Protocol error (E_Port)Invalid words (E_Port)Invalid CRCS E_Port)RX Performance (E_Port)TX Performance (E_Port)State Changes (E/VE_Port)Utilization (VE_Port)Packet Loss (VE_Port)
F/FL_Port (Optical) Same as Port class
AL_PA Performance Monitor Invalid CRCS
EE Performance Monitor Invalid CRCSRX PerformanceTX Performance
Filter Performance Monitor Customer Defined
TABLE 18 fwConfigure Fabric Watch classes and areas
Class Area
Fabric OS Command Reference 36553-1001764-02

fwConfigure2
In Access Gateway mode, only the following classes are supported. F/FL_Port (Copper) class is supported only on Embedded platforms..
Security Telnet ViolationsHTTP ViolationsAPI ViolationsRSNMP ViolationsWSNMP ViolationsSES ViolationsMS ViolationsSerial ViolationsFront Panel ViolationsSCC ViolationsDCC ViolationsLogin ViolationsInvalid TimestampsInvalid SignaturesInvalid CertificatesSLAP FailuresSLAP Bad PacketsTS Out of SyncNo-FCSIncompatible Security DBIllegal Command
Resource Flash
TABLE 19 Access Gateway mode
Class Area
Environmental TemperatureFan*Power Supply*
SFP TemperatureRXPTXPCurrentVoltage
Port Link failureSync lossSignal lossProtocol errorInvalid wordsInvalid CRCsRX PerformanceTX PerformanceState Changes
TABLE 18 fwConfigure Fabric Watch classes and areas
Class Area
366 Fabric OS Command Reference53-1001764-02

fwConfigure 2
Notes This command requires a Fabric Watch license.
The execution of this command is subject to Virtual Fabric or Admin Domain restrictions that may be in place. Refer to chapter 1, "Using Fabric OS commands" and Appendix A, "Command Availability" for details.
Not all platforms support fans or power supplies. If you attempt to configure values for these items the following displays: "ERROR: No threshold available.
Operands This command has the following optional operands:
--enable --port portEnables all thresholds associated with a certain port.
--disable --port portDisables all thresholds associated with a certain port.
Examples To configure thresholds in Fabric OS mode:
switch:admin> fwconfigure 1 : Environment class 2 : SFP class 3 : Port class 4 : Fabric class 5 : E-Port class 6 : F/FL Port (Optical) class 7 : Alpa performance Monitor class 8 : EE performance Monitor class 9 : Filter performance Monitor class 10 : Security class 11 : Resource class 12 : Quit Select a class => : (1..12) [1] 1
1 : Temperature 2 : Fan
Fabric E_Port downsFabric reconfigureDomain ID changesSegmentation changesZone changesFabric<->QLFabric loginsSFP state changes
FFL_Port (Optical Same as Port class
FFL_Port (Copper) Same as Port class
Resource class Flash area
EE Performance Monitor Invalid CRCSRX PerformanceTX Performance
Filter Performance Monitor Customer Defined
Resource Flash
TABLE 19 Access Gateway mode
Class Area
Fabric OS Command Reference 36753-1001764-02
fwConfigure2
3 : Power Supply 4 : return to previous page Select an area => : (1..4) [4] 1
Index ThresholdName Status CurVal LastEvent LastEventTime LastVal LastState===========================================================================
1 envTemp001 enabled 33 C started 10:28:59 on 02/01/2000 0 C Informative2 envTemp002 enabled 34 C started 10:28:59 on 02/01/2000 0 C Informative3 envTemp003 enabled 36 C started 10:28:59 on 02/01/2000 0 C Informative4 envTemp004 enabled 35 C started 10:28:59 on 02/01/2000 0 C Informative5 envTemp005 enabled 36 C started 10:28:59 on 02/01/2000 0 C Informative 1 : refresh 2 : disable a threshold 3 : enable a threshold 4 : advanced configuration 5 : return to previous page Select choice => : (1..5) [5]
To disable all thresholds associated with port 1:
switch:admin> fwConfigure --disable --port 1
To configure thresholds in Access Gateway mode:
switch:admin> fwconfigure
1 : Environment class2 : SFP class3 : Port class4 : F/FL Port (Optical) class5 : Resource class6 : quitSelect a class => : (1..6) [6] 1
1 : Temperature2 : Fan3 : Power Supply4 : return to previous pageSelect an area => : (1..4) [4] 1
Index ThresholdName Status CurVal LastEvent LasteventTime LastVal LastState================================================================================
1 envTemp001 enabled 23 C inBetween Sat Oct7 10:01:53 2006 21 C In_Range2 envTemp002 enabled 24 C inBetween Sat Oct 7 10:01:53 2006 21 C In_Range
1 : refresh2 : disable a threshold3 : enable a threshold4 : advanced configuration5 : return to previous pageSelect choice => : (1..5) [5] 5
See Also fwClassInit, fwConfigReload, fwShow
368 Fabric OS Command Reference53-1001764-02

fwFruCfg 2
fwFruCfg
Displays or modifies FRU state alert configuration.
Synopsis fwfrucfg [--show]
Description Use this command to configure field-replaceable unit (FRU) states and actions. Based on these configuration settings, Fabric Watch generates actions when a FRU state changes. When used without operand, this command interactively prompts for user input. To configure email alerts, use fwMailCfg. This command is not applicable to platforms that do not support FRUs.
Notes This command requires a Fabric Watch license.
The execution of this command is subject to Virtual Fabric or Admin Domain restrictions that may be in place. Refer to chapter 1, "Using Fabric OS commands" and Appendix A, "Command Availability" for details.
Operands This command has the following operand:
--show Displays the current FRU configuration setting. This operand is optional; if omitted, the configuration prompt displays.
Examples To change the FRU state alert configuration:
switch:admin> fwfrucfg
The current FRU configuration: Alarm State Alarm Action ----------------------------------------------- Slot 0 1 Power Supply 0 0 Fan 0 0 WWN 0 0
Note that the value 0 for a parameter means that it is NOT used in the calculation
Configurable Alarm States are: Absent-1, Inserted-2, On-4, Off-8, Faulty-16
Configurable Alarm Actions are: Errlog-1, E-mail-16 Slot Alarm State: (0..31) [0] 3 Slot Alarm Action: (0..17) [1] Power Supply Alarm State: (0..31) [0] Power Supply Alarm Action: (0..17) [0] Fan Alarm State: (0..31) [0] Fan Alarm Action: (0..17) [0] WWN Alarm State: (0..31) [0] WWN Alarm Action: (0..17) [0]
Fru configuration successfully changed
See Also fwHelp, fwMailCfg
Fabric OS Command Reference 36953-1001764-02

fwHelp2
fwHelp
Displays Fabric Watch command information.
Synopsis fwhelp
Description Use this command to display the commands that configure Fabric Watch.
Note The execution of this command is subject to Virtual Fabric or Admin Domain restrictions that may be in place. Refer to chapter 1, "Using Fabric OS commands" and Appendix A, "Command Availability" for details.
Operands none
Examples To display a summary of Fabric Watch commands:
switch:user> fwhelp
fanshow Print fan status fmconfig Configure Frame Monitors fwalarmsfilterset Configure alarms filtering for Fabric Watch fwalarmsfiltershow Show alarms filtering for Fabric Watch fwclassinit Initialize all Fabric Watch classes fwconfigreload Reload Fabric Watch configuration fwfrucfg Configure FRU state and notification fwhelp Print Fabric Watch help info fwmailcfg Configure Fabric Watch Email Alert fwportdetailshow Create a report with detailed port information fwsamshow Show availability monitor information fwset Set port persistence time fwsettocustom Set boundary & alarm level to custom fwsettodefault Set boundary & alarm level to default portfencing Configure Fabric Watch port fencing feature portthconfig Configure Fabric Watch port threshold monitor sensorshow Display sensor readings switchstatuspolicyset Set policy parameters for overall switch status switchstatuspolicyshow Print policy parameters for overall switch status switchstatusshow Print overall switch status sysmonitor Configure system memory usage monitor tempshow Print temperature readings thconfig Configure Fabric Watch thresholds
See Also none
370 Fabric OS Command Reference53-1001764-02

fwMailCfg 2
fwMailCfg
Displays and configures Fabric Watch email alerts.
Synopsis fwmailcfg
Description Use this command to display or modify the configuration and status of the Fabric Watch email alert on the switch.
Switch elements monitored by Fabric Watch are divided into classes, and email alerts are based on the classes. Each class can configure one email address as the alert message's receiver.
For an email alert to function correctly, add the CP0 and CP1 IP addresses and hostnames to DNS and also set the domain name and name server. The ipAddrShow and dnsConfig commands can be used to set and verify this information.
Notes This command requires a Fabric Watch license.
The execution of this command is subject to Virtual Fabric or Admin Domain restrictions that may be in place. Refer to chapter 1, "Using Fabric OS commands" and Appendix A, "Command Availability" for details.
Operands none
Examples To configure email settings:
switch:admin> fwmailcfg1 : Show Mail Configuration Information2 : Disable Email Alert3 : Enable Email Alert4 : Send Test Mail5 : Set Recipient Mail Address for Email Alert6 : Relay Host IP Configuration7 : QuitSelect an item => : (1..7) [7]1
Config Show Menu -------------------------------------- 1 : Environment class 2 : SFP class 3 : Port class 4 : Fabric class 5 : E-Port class 6 : F/FL Port (Optical) class 7 : Alpa Performance Monitor class 8 : End-to-End Performance Monitor class 9 : Filter Performance Monitor class 10 : Security class 11 : Resource class 12 : FRU Class 13 : Quit Select an item => : (0..13) [11] 1mail configuration information -------------------------------------------- Email Alert = disable Mail Recipients = NONE --------------------------------------------
Fabric OS Command Reference 37153-1001764-02

fwMailCfg2
1 : Show Mail Configuration Information 2 : Disable Email Alert 3 : Enable Email Alert 4 : Send Test Mail 5 : Set Recipient Mail Address for Email Alert 6 : Relay Host IP Configuration 7 : Quit Select an item => : (1..7) [7]5
Mail Config Menu -------------------------------------- 1 : Environment class 2 : SFP class 3 : Port class 4 : Fabric class 5 : E-Port class 6 : F/FL Port (Optical) class 7 : Alpa Performance Monitor class 8 : End-to-End Performance Monitor class 9 : Filter Performance Monitor class 10 : Security class 12 : FRU Class 13 : Quit Select an item => : (0..13) [11] 1 Mail To: [NONE] [email protected] Email Alert configuration succeeded!
See Also dnsConfig, fwHelp, ipAddrSet, ipAddrShow
372 Fabric OS Command Reference53-1001764-02

fwPortDetailShow 2
fwPortDetailShow
Displays the port information for specified user ports.
Synopsis fwportdetailshow [--p port] | [--s portState]
Description Use this command to print the overall status of a specified port. The output of this command is different for IPv4 and IPv6 addresses. The overall status is calculated based on the following contributors:
Port Errors:
LFA Number of link loss occurrences exceeded limit for time period
LSY Number of sync loss occurrences exceeded limit for time period
LSI Number of signal loss occurrences exceeded limit for time period
PER Number of protocol errors exceeded limit for time period
INW Number of invalid words exceeded limit for time period
CRC Number of invalid CRC errors exceeded limit for time period
PSC Port hardware state changed too often
BLP Buffer limited port
SFP Errors:
STM SFP temperature is out of specification
SRX SFP receive power is out of specification
STX SFP transmit power is out of specification
SCU SFP current is out of specification
SVO SFP voltage is out of specification
The overall status may be in one of the following:
Healthy Every contributor is healthy
Marginal One or more contributors are in this status
Faulty Faulty hardware
Offline Port has no connectivity or is disabled
If the overall status is not healthy, the contributing factors also are listed.
Notes This command requires a Fabric Watch license.
Port errors are not supported for virtual ports and SFP errors are not applicable for virtual ports.
The execution of this command is subject to Virtual Fabric or Admin Domain restrictions that may be in place. Refer to chapter 1, "Using Fabric OS commands" and Appendix A, "Command Availability" for details.
Operands This command has the following operands:
--p port Yields a port detail report for a specific user port.
Fabric OS Command Reference 37353-1001764-02

fwPortDetailShow2
--s portState Yields a port detail report for the specified portState. Valid portState entries are:
h Report based on all healthy ports
m Report based on all marginal ports
f Report based on all faulty ports
o Report based on all offline ports
If no option is specified, all ports are displayed.
Examples To retrieve a port detailed report for a switch configured with an IPv6 address:
switch:user> fwportdetailshowPort Detail Report Report time: 09/11/2006 05:51:15 PMSwitch Name: switchIP address: 1080::8:800:200C:417APort Exception report [by All]
--------Port-Errors------------ -----SFP-Errors----Port# Type State Dur(H:M) LFA LSY LSI PER INW CRC PSC BLP STM SRX STX SCU SVO--------------------------------------------------------------------------------000 U OFFLINE 080:24 - - - - - - - - - - - - -001 E HEALTHY 073:22 - - - - - - - - - - - - -002 L HEALTHY 080:24 - - - - - - - - - - - - -003 U OFFLINE 080:24 - - - - - - - - - - - - -004 U OFFLINE 002:53 - - - - - - - - - - - - -005 U OFFLINE 080:24 - - - - - - - - - - - - -006 U OFFLINE 080:24 - - - - - - - - - - - - -007 U OFFLINE 080:24 - - - - - - - - - - - - -
To retrieve a port detailed report for a switch configured with an IPv4 address:
switch:user> fwportdetailshowPort Detail Report Report time: 09/11/2006 05:51:15 PMSwitch Name: switchIP address: 10.202.78.24Port Exception report [by All]
--------Port-Errors------------ -----SFP-Errors----Port# Type State Dur(H:M) LFA LSY LSI PER INW CRC PSC BLP STM SRX STX SCU SVO--------------------------------------------------------------------------------000 U OFFLINE 080:24 - - - - - - - - - - - - -001 E HEALTHY 073:22 - - - - - - - - - - - - -002 L HEALTHY 080:24 - - - - - - - - - - - - -003 U OFFLINE 080:24 - - - - - - - - - - - - -004 U OFFLINE 002:53 - - - - - - - - - - - - -005 U OFFLINE 080:24 - - - - - - - - - - - - -006 U OFFLINE 080:24 - - - - - - - - - - - - -007 U OFFLINE 080:24 - - - - - - - - - - - - -
374 Fabric OS Command Reference53-1001764-02

fwPortDetailShow 2
To retrieve a port detailed report:
switch:user> fwportdetailshow --s hPort Detail Report Report time: 05/21/2007 11:22:58 PMSwitch Name: switchIP address: 192.168.163.237Port Exception report [by Healthy]
--------Port-Errors------------ -----SFP-Errors----Port# Type State Dur(H:M) LFA LSY LSI PER INW CRC PSC BLP STM SRX STX SCU SVO-----------------------------------------------------------------------------001 F HEALTHY 409:09 - - - - - - - - - - - - -014 F HEALTHY 409:09 - - - - - - - - - - - - -015 E HEALTHY 409:09 - - - - - - - - - - - - -
See Also switchStatusShow
Fabric OS Command Reference 37553-1001764-02

fwSamShow2
fwSamShow
Generates switch availability monitor (SAM) report.
Synopsis fwsamshow
Description Use this command to display a switch availability monitor (SAM) report. This report displays uptime and downtime for each port and enables you to check if a particular port is failing more often than the others. The information displayed includes total uptime, total downtime, number of faulty occurrences, and total percent of downtime for each port.
Notes The execution of this command is subject to Virtual Fabric or Admin Domain restrictions that may be in place. Refer to chapter 1, "Using Fabric OS commands" and Appendix A, "Command Availability" for details.
This command requires a Fabric Watch license.
Operands none
Examples To generate a SAM report on an eighty-port switch:
switch:user> fwsamshow
Total Total Down Total Port Type Up Time Down Time Occurrence Offline Time (Percent) (Percent) (Times) (Percent) =========================================================== 0 U 0 0 0 100 1 U 0 0 0 100 2 U 0 0 0 100 3 U 0 0 0 100 4 U 0 0 0 100 5 U 0 0 0 100 6 F 100 0 0 0 7 U 0 0 0 100 8 U 0 0 0 100 9 U 0 0 0 100 10 U 0 0 0 100 11 U 0 0 0 100 12 U 0 0 0 100 13 U 0 0 0 100 14 U 0 0 0 100 15 U 0 0 0 100 16 F 100 0 0 0 17 F 100 0 0 0 18 F 100 0 0 0 19 F 100 0 0 0 20 U 00 0 100 100 21 U 0 0 0 100 22 U 0 0 0 100 23 U 0 0 0 100 24 U 0 0 0 100 25 U 0 0 0 100 26 U 0 0 0 100 27 U 0 0 0 100 28 U 0 0 0 100 29 U 0 0 0 100
376 Fabric OS Command Reference53-1001764-02

fwSamShow 2
30 U 0 0 0 100 31 U 0 0 0 100 32 U 0 0 0 100 33 U 0 0 0 100 34 U 0 0 0 100 35 U 0 0 0 100 36 U 0 0 0 100 37 U 0 0 0 100 38 U 0 0 0 100 39 U 0 0 0 100 40 T 99 0 0 0 41 T 99 0 0 0 42 T 100 0 0 0 43 T 99 0 0 0 44 U 0 0 0 100 45 U 0 0 0 100 46 U 0 0 0 100 47 U 0 0 0 100 48 U 0 0 0 100 49 U 0 0 0 100 50 U 0 0 0 100 51 U 0 0 0 100 52 U 0 0 0 100 53 U 0 0 0 100 54 F 99 0 0 0 55 U 0 0 0 100 56 U 0 0 0 100 57 U 0 0 0 100 58 U 0 0 0 100 59 U 0 0 0 100 60 U 0 0 0 100 61 U 0 0 0 100 62 U 0 0 0 100 63 U 0 0 0 100 64 U 0 0 0 100 65 U 0 0 0 100 66 U 0 0 0 100 67 U 0 0 0 100 68 U 0 0 0 100 69 U 0 0 0 100 70 U 0 0 0 100 71 U 0 0 0 100 72 U 0 0 0 100 73 U 0 0 0 100 74 U 0 0 0 100 75 U 0 0 0 100 76 U 0 0 0 100 77 U 0 0 0 100 78 U 0 0 0 100 79 U 0 0 0 100
See Also portShow, switchShow
Fabric OS Command Reference 37753-1001764-02

fwSet2
fwSet
Sets port persistence time.
Synopsis fwset --port --persistence seconds
Description Use this command to set port persistence time, a parameters controlled by Fabric Watch. Port persistence time specifies the time in seconds during which a port must persistently be in a marginal state before being labeled as such. port persistence is a switch-wide parameter. Use portThconfig to display port persistence time.
Notes This command requires a Fabric Watch license.
The execution of this command is subject to Virtual Fabric or Admin Domain restrictions that may be in place. Refer to chapter 1, "Using Fabric OS commands" and Appendix A, "Command Availability" for details.
Operands The following operands are required:
--port --persistence secondsSpecifies the time, in seconds, during which a port must be persistently in a marginal state before being recognized as such.
Examples To set the port persistence time to 18 seconds:
switch:user> fwset --port --persistence 18
See Also fwHelp, portThconfig
378 Fabric OS Command Reference53-1001764-02

fwSetToCustom 2
fwSetToCustom
Sets Fabric Watch thresholds and alarm levels to custom values.
Synopsis fwsettocustom
Description Use this command to set threshold and alarm levels to custom values for all Fabric Watch classes and areas.
Fabric Watch uses two types of settings: factory default settings and user-defined custom settings.
• Factory default settings are automatically enabled. These settings vary depending on hardware platform, and cannot be modified.
• For some Fabric Watch parameters, you can create custom configurations to suit your unique environment.
The fwSetToCustom command allows you to switch from default to custom settings. The command assumes that a set of user-defined thresholds have been configured prior to executing the fwSetToCustom command. If no user-defined settings exist, this command reapplies the default values.
Use the advanced configuration option provided with the portThconfig, thConfig, and sysMontitor commands to view and modify custom and default values for specified classes and areas in Fabric Watch. For specific configuration procedures, refer to the Fabric Watch Administrator’s Guide.
Notes This command requires a Fabric Watch license.
The execution of this command is subject to Virtual Fabric or Admin Domain restrictions that may be in place. Refer to chapter 1, "Using Fabric OS commands" and Appendix A, "Command Availability" for details.
Operands none
Examples To apply configured custom settings to all Fabric Watch classes and areas:
switch:admin> fwsettocustomCommitting configuration...done.
To view the current Fabric Watch configuration for the environment class:
switch:admin> sysmonitor --show envClass: ENV Area : TEMP ThLevel : Cust ActLevel: Cust High : Custom: TimeBase: None Value : 90 Trigger : Above Action: Raslog,SNMP Trigger : Below Action: None Default: TimeBase: None Value : 65 Trigger : Above Action: Raslog,SNMP Trigger : Below Action: Raslog,SNMP Low: Custom:
Fabric OS Command Reference 37953-1001764-02

fwSetToCustom2
TimeBase: None Value :32 Trigger : Above Action: None Trigger : Below Action: Raslog,SNMP Default: TimeBase: None Value : 0 Trigger : Above Action: None Trigger : Below Action: Raslog,SNMP Buffer: Custom: Value : 20 Default: Value : 10
Class: RESOURCE Area : FLASH ThLevel : Cust ActLevel: Def High : Custom: TimeBase: None Value : 110 Trigger : Above Action: Raslog,SNMP Trigger : Below Action: Raslog Default: TimeBase: None Value : 90 Trigger : Above Action: Raslog,SNMP Trigger : Below Action: Raslog Low: Custom: TimeBase: None Value : 15 Trigger : Above Action: None Trigger : Below Action: Raslog,SNMP Default: TimeBase: None Value : 0 Trigger : Above Action: None Trigger : Below Action: Raslog,SNMP Buffer: Custom: Value : 20 Default: Value : 0
See Also fwSetToDefault, fwHelp, portThconfig, thConfig, sysMontitor
380 Fabric OS Command Reference53-1001764-02

fwSetToDefault 2
fwSetToDefault
Returns Fabric Watch thresholds and alarm levels to default values.
Synopsis fwsettodefault
Description Use this command to return Fabric Watch thresholds and alarm levels to defaults for all classes and areas in Fabric Watch.
Fabric Watch uses two types of settings: factory default settings and user-defined custom settings.
• Factory default settings are automatically enabled. These settings vary depending on hardware platform and cannot be modified.
• For some settings, you can create custom threshold configurations to suit your unique environment.
The fwSetToDefault command reapplies the Fabric Watch default configuration for all classes and areas. Use the advanced configuration option provided with the portThconfig, thConfig, and sysMontitor commands to view and modify custom and default values for specified classes and areas in Fabric Watch. For specific configuration procedures, refer to the Fabric Watch Administrator’s Guide.
Notes This command requires a Fabric Watch license.
The execution of this command is subject to Virtual Fabric or Admin Domain restrictions that may be in place. Refer to chapter 1, "Using Fabric OS commands" and Appendix A, "Command Availability" for details.
Operands none
Examples To return alarm levels to default values:
switch:admin> fwsettodefaultCommitting configuration...done.
To view the current Fabric Watch configuration for the environment class:
switch:admin> sysmonitor --show envClass: ENV Area : TEMP ThLevel : Def ActLevel: Def High : Custom: TimeBase: None Value : 90 Trigger : Above Action: Raslog,SNMP Trigger : Below Action: None Default: TimeBase: None Value : 65 Trigger : Above Action: Raslog,SNMP Trigger : Below Action: Raslog,SNMP Low: Custom: TimeBase: None Value :32 Trigger : Above Action: None
Fabric OS Command Reference 38153-1001764-02

fwSetToDefault2
Trigger : Below Action: Raslog,SNMP Default: TimeBase: None Value : 0 Trigger : Above Action: None Trigger : Below Action: Raslog,SNMP Buffer: Custom: Value : 20 Default: Value : 10
Class: RESOURCE Area : FLASH ThLevel : Def ActLevel: Def High : Custom: TimeBase: None Value : 110 Trigger : Above Action: Raslog,SNMP Trigger : Below Action: Raslog Default: TimeBase: None Value : 90 Trigger : Above Action: Raslog,SNMP Trigger : Below Action: Raslog Low: Custom: TimeBase: None Value : 15 Trigger : Above Action: None Trigger : Below Action: Raslog,SNMP Default: TimeBase: None Value : 0 Trigger : Above Action: None Trigger : Below Action: Raslog,SNMP Buffer: Custom: Value : 20 Default: Value : 0
See Also fwSetToCustom, fwHelp, portThconfig, thConfig, sysMontitor
382 Fabric OS Command Reference53-1001764-02

h 2
h
Displays shell history.
Synopsis h
history
Description Use this command to view the shell history. The shell history mechanism is similar to the UNIX shell history facility. The h command displays the 20 most recent commands typed into the shell; the oldest commands are replaced as new ones are entered.
Operands none
Examples To display previous shell commands:
switch:admin> h1 version2 switchshow3 portdisable 24 portenable 25 switchshow
See Also none
Fabric OS Command Reference 38353-1001764-02

haDisable2
haDisable
Disables the High Availability feature.
Synopsis hadisable
Description Use this command to disable the High Availability (HA) feature on a switch. If the HA feature is already disabled, this command does nothing.
Note The execution of this command is subject to Virtual Fabric or Admin Domain restrictions that may be in place. Refer to chapter 1, “Using Fabric OS commands” and Appendix A, “Command Availability” for details.
Operands none
Examples To disable the High Availability feature:
switch:admin> hadisableHA is disabled
See Also haEnable
384 Fabric OS Command Reference53-1001764-02

haDump 2
haDump
Displays High Availability status information.
Synopsis hadump
Description Use this command to display information about the status of the High Availability (HA) feature on a switch. This command displays the following information:
• Local CP state (slot number and CP ID)
• Remote CP state (slot number and CP ID)
• Type of recovery (warm or cold)
• High Availability (enabled or disabled)
• Heartbeat (up or down)
• Health of standby CP defined as follows:
Healthy The standby CP is running and the background health diagnostic has not detected any errors.
Failed The standby CP is running, but the background health diagnostic has discovered a problem with the blade. Check the logs to determine an appropriate course of action. Failover is disabled until the standby CP is repaired. Information about the failing device in the standby CP is displayed.
Unknown The standby CP health state is unknown because the standby CP does not exist, heartbeat is down, or Health Monitor detects a configuration file error.
• HA synchronization status:
HA State synchronized
The system is currently fully synchronized. If a failover becomes necessary, it is nondisruptive.
HA State not in sync
The system is unable to synchronize the two CPs because the standby CP is faulty, an haSyncStop command was issued, or a system error occurred. If a failover becomes necessary at this time, active CP reboots and the failover is disruptive.
• IP and Fibre Channel addresses configured for the switch.
• Additional internal HA state information, subject to change.
Note The execution of this command is subject to Virtual Fabric or Admin Domain restrictions that may be in place. Refer to chapter 1, “Using Fabric OS commands” and Appendix A, “Command Availability” for details.
Operands none
Examples To view information about the High Availability feature status:
switch:admin> hadumpLocal CP (Slot 6, CP1): Active, Cold RecoveredRemote CP (Slot 5, CP0): Standby, HealthyHA enabled, Heartbeat Up, HA State synchronized
Fabric OS Command Reference 38553-1001764-02

haDump2
SWITCHEthernet IP Address: 10.32.227.64Ethernet Subnetmask: 255.255.240.0Fibre Channel IP Address: 220.220.220.64Fibre Channel Subnetmask: 255.255.240.0
CP0Ethernet IP Address: 10.32.227.66Ethernet Subnetmask: 255.255.240.0Host Name: cp0Gateway IP Address: 10.32.224.1
CP1Ethernet IP Address: 10.32.227.67Ethernet Subnetmask: 255.255.240.0Host Name: cp1Gateway IP Address: 10.32.224.1
Slot 10eth0: 10.32.227.69/20Gateway: 10.32.224.1
Backplane IP address of CP0 : 10.0.0.5Backplane IP address of CP1 : 10.0.0.6IPv6 Autoconfiguration Enabled: NoLocal IPv6 Addresses:sw 0 static fec0:60:69bc:64:260:69ff:fee4:3a/64cp 0 static fec0:60:69bc:64:205:1eff:fe25:9c1/64cp 1 static fec0:60:69bc:64:205:1eff:fe02:a197/64FSSME registered: TRUE
[output truncated]
See Also haFailover, haShow
386 Fabric OS Command Reference53-1001764-02

haEnable 2
haEnable
Enables the High Availability feature.
Synopsis haenable
Description Use this command to enable the High Availability (HA) feature on a switch. If the HA feature is already enabled, this command has no effect.
If the HA is disabled, this command enables it. The standby CP reboots as part of the process. The command displays a warning message and prompts for confirmation before rebooting the CP.
Note The execution of this command is subject to Virtual Fabric or Admin Domain Restrictions that may be in place. Refer to chapter 1, “Using Fabric OS commands” and Appendix A, “Command Availability” for details.
Operands none
Examples To enable the High Availability feature:
switch:admin> haenableWarning: This command will enable the HA. It will reboot the standby CP and require all telnet, secure telnet, and SSH sessions to the standby CP to be restarted
Do you want to continue [y/n]? y
To verify that High Availability is enabled:
switch:admin> hashowLocal CP (Slot 6, CP0): Active, Warm RecoveredRemote CP (Slot 7, CP1): Standby, HealthyHA enabled, Heartbeat Up, HA State synchronized
See Also haDisable
Fabric OS Command Reference 38753-1001764-02

haFailover2
haFailover
Forces the failover mechanism so that the standby control processor (CP) becomes the active CP.
Synopsis hafailover
Description Use this command to force the failover mechanism to occur so that the standby CP becomes the active CP. In case the active and standby CPs are not synchronized or the system is not in redundant mode, the command aborts.
Notes When High Availability (HA) synchronization is enabled and the CPs are in sync, the port traffic light does not flash during the failover, even while traffic is continuing to flow.
This command is supported only on dual-CP systems.
The execution of this command is subject to Virtual Fabric or Admin Domain restrictions that may be in place. Refer to chapter 1, "Using Fabric OS commands" and Appendix A, "Command Availability" for details.
Operands none
Examples To force the failover of the active CP to the standby CP in the switch:
switch:admin> hafailoverLocal CP (Slot 7, CP1): Active, Warm RecoveredRemote CP (Slot 6, CP0): Standby, HealthyHA enabled, Heartbeat Up, HA State synchronizedWarning: This command is being run on a redundant control processor(CP)system, and this operation will cause the active CP to reset.Therefore all existing telnet sessions are required to be restarted.
Are you sure you want to fail over to the standby CP [y/n]?
See Also haDisable, haEnable, haShow
388 Fabric OS Command Reference53-1001764-02

haShow 2
haShow
Displays control processor (CP) status.
Synopsis hashow
Description Use this command to display control processor status. The display includes:
• Local CP state (slot number and CP ID), warm or cold, recovering or recovered.
• Remote CP state (slot number and CP ID).
• High Availability (enabled or disabled).
• Heartbeat (up or down).
• The Health of the standby CP is defined as follows:
Healthy The standby CP is running and the background health diagnostic has not detected any errors.
Failed The standby CP is running, but the background health diagnostic has discovered a problem with the blade. Check the logs to determine the appropriate action. Failover is disabled until the standby CP is repaired. Information about the failing device in the standby CP is displayed.
Unknown The standby CP health state is unknown because of one of the following reasons: the standby CP does not exist, Heartbeat is down, or the Health Monitor has detected a configuration file error.
• HA synchronization status:
“HA State synchronized”The system is currently fully synchronized. If a failover becomes necessary, it is nondisruptive.
“HA State not in sync”The system is unable to synchronize the two CPs. This may be caused by one or more of the following conditions:
• An Failover was issued. In this case the “HA State not in sync” state is transitory.
• The standby CP is faulty.• An HSyncStop command was issued.• A system error occurred.
If a failover becomes necessary while the CPs are not in sync, the standby CP reboots, and the failover is disruptive.
Notes This command may not be supported on nonbladed systems.
Slot numbers for CP1 and CP0 vary depending on the hardware platform. On the Brocade 48000, CP0 is in slot 5 and CP1 is in slot 6. On the Brocade DCX, CP0 is in slot 6 and CP1 is in slot 7. On the Brocade DCX-4S, CP0 is in slot 4 and CP1 is in slot 5.
The execution of this command is subject to Virtual Fabric or Admin Domain restrictions that may be in place. Refer to chapter 1, “Using Fabric OS commands” and Appendix A, “Command Availability” for details.
Fabric OS Command Reference 38953-1001764-02

haShow2
Operands none
Examples To display CP status on a Brocade 48000, first on a healthy standby CP and then on a faulty standby CP:
switch:admin> hashowLocal CP (Slot 6, CP1): Active, Cold RecoveredRemote CP (Slot 5, CP0): Non-Redundant
switch:admin> hashowLocal CP (Slot 6, CP1): Active, Warm RecoveredRemote CP (Slot 5, CP0): Standby, Failed Backplane PCI fail, severity: CRITICALHA enabled, Heartbeat Up, HA State not in sync
To display CP status on a Brocade DCX with a healthy standby CP:
switch:admin> hashowLocal CP (Slot 7, CP1) : Active, Cold RecoveredRemote CP (Slot 6, CP0) : Standby, HealthyHA Enabled, Heartbeat Up, HA State Synchronized
See Also haDisable, haEnable, haFailover
390 Fabric OS Command Reference53-1001764-02

haSyncStart 2
haSyncStart
Enables High Availability state synchronization.
Synopsis hasyncstart
Description Use this command to enable the High Availability (HA) state synchronization.
After issuing hasyncStop, the switch does not go back to sync start unless you reboot the active CP, or reboot the standby CP, or issue hasyncStart. The time it takes for the HA sync to complete depends on the system configuration. The HA sync timeout is set to 10 minutes.
Note The execution of this command is subject to Virtual Fabric or Admin Domain restrictions that may be in place. Refer to chapter 1, “Using Fabric OS commands” and Appendix A, “Command Availability” for details.
Examples To enable the HA state synchronization:
switch:admin> hasyncstart
See Also haFailover, haShow, haSyncStop
Fabric OS Command Reference 39153-1001764-02

haSyncStop2
haSyncStop
Disables High Availability state synchronization.
Synopsis hasyncstop
Description Use this command to temporarily disable High Availability (HA) synchronization.
After issuing hasyncStop, the switch does not go back to sync start unless you reboot the active CP, or reboot the standby CP, or issue hasyncStart. The time it takes for the HA sync to complete depends on the system configuration. The HA sync timeout is set to 10 minutes.
Notes Disabling HA synchronization may cause failover to be disruptive.
The execution of this command is subject to Virtual Fabric or Admin Domain restrictions that may be in place. Refer to chapter 1, “Using Fabric OS commands” and Appendix A, “Command Availability” for details.
Operands none
Examples To disable the HA state synchronizing process:
switch:admin> hasyncstop
See Also haFailover, haShow, haSyncStart
392 Fabric OS Command Reference53-1001764-02

help 2
help
Displays command help information.
Synopsis help [command]
help [-p | -page]
help --help
Description Use this command without an operand to display an alphabetical listing of commands for which help is available. When used without an operand, the command listing displays without page break.
Pipe the output through “grep” to filter the output.
Use the -page operand to display the commands for which help is available one page at a time. Press Enter to go to the next page. When using help with the -page option, you can search for specific strings by entering a forward slash, followed by a text string, for example /zone.
The help listing includes only commands that are available to the current user; command availability may vary depending on:
• Login user role
• License key
• Hardware platform
To access help information for a specific command, enter the command name as an operand.
Commands ending in "Help" display grouped commands for a particular subsystem; for example, diagHelp displays a list of diagnostic commands.
Operands This command has the following operands:
command Specifies the name of the command for which to display help information. This operand is optional.
p | -page Displays help output with page breaks.
--help Displays the command usage.
Examples To display a listing of commands for which help is available (with page breaks):
switch:admin> help -paaaconfig Configure RADIUS for AAA servicesad Specifies all administration domain (AD)-level operationsag Configure the Access Gateway featureagshow Displays the Access Gateway information registered with the fabricagtcfgdefault Reset SNMP agent to factory defaultaliadd Add a member to a zone aliasalicreate Create a zone aliasalidelete Delete a zone aliasaliremove Remove a member from a zone aliasalishow Print zone alias informationaptpolicy Get and set Advanced Performance Tuning policyauditcfg Modifies and displays audit log filter configuration.
Fabric OS Command Reference 39353-1001764-02

help2
auditdump Display audit logauthutil Get and set authentication configurationbannerset Set security bannerbannershow Display security bannerbcastshow Display broadcast routing informationbladedisable Disables all user ports on a blade.bladeenable Enables all User Ports on a blade.Type <CR> to continue, Q<CR> to stop:
To search for a string while paging is enabled:
switch:admin> help -paaaconfig Configure RADIUS for AAA servicesad Specifies all administration domain (AD)-level operationsag Configure the Access Gateway featureagshow Displays the Access Gateway information registered with the fabricagtcfgdefault Reset SNMP agent to factory defaultaliadd Add a member to a zone aliasalicreate Create a zone aliasalidelete Delete a zone aliasaliremove Remove a member from a zone aliasalishow Print zone alias informationaptpolicy Get and set Advanced Performance Tuning policyauditcfg Modifies and displays audit log filter configuration.auditdump Display audit logauthutil Get and set authentication configurationbackplanetest Backplane connection test for multi-blade systems.backport Test for back-end ASIC pair to ASIC pair links.bannerset Set security bannerbannershow Display security bannerbcastshow Display broadcast routing information
aliadd Add a member to a zone aliasalicreate Create a zone aliasalidelete Delete a zone aliasaliremove Remove a member from a zone aliasalishow Print zone alias informationaptpolicy Get and set Advanced Performance Tuning policyauditcfg Modifies and displays audit log filter configuration.[output truncated]
To filter the output with "grep":
switch:admin> help | grep errshowerrshow Print error logporterrshow Print port error summaryswitch:admin>
See Also diagHelp, fwHelp, licenseHelp, perfHelp, routeHelp, zoneHelp
394 Fabric OS Command Reference53-1001764-02

historyLastShow 2
historyLastShow
Displays the latest entry in the field replaceable unit (FRU) history log.
Synopsis historylastshow
Description Use this command to display the latest entry of the history log, which records insertion and removal events for field-replaceable units (FRUs), such as blades, power supplies, fans, and world wide name (WWN) cards. The type of FRU supported depends on the hardware platform.
Each history record contains three lines of information. The first line of each record contains the following:
Object type On standalone platforms: FAN, POWER SUPPLY, WWN (WWN card), or UNKNOWN.
On enterprise-class platforms: CHASSIS, FAN, POWER SUPPLY, SW BLADE (port blade), CP BLADE (control processor), WWN (WWN card), or UNKNOWN.
Object number Slot number for blades. Unit number for all other object types.
Event type Inserted, Removed, or Invalid
Time of the event Format: Day Month dd hh:mm:ss yyyy
The second and third lines of a record contain the factory part number and factory serial number, if applicable:
Factory Part Number xx-yyyyyyy-zz or Not available
Factory Serial Numberxxxxxxxxxxxx or Not available
The size of the history log depends on the HW platform. The Brocade 48000 director supports 100 history log entries. The Brocade DCX supports a maximum log size of 50 entries. Since the WWNs are completely separate FRUs in the DCX, they have redundant data in these units. All other platforms that contain FRUs support 28 history log entries.
Note The execution of this command is subject to Virtual Fabric or Admin Domain restrictions that may be in place. Refer to chapter 1, “Using Fabric OS commands” and Appendix A, “Command Availability” for details.
Operands none
Examples To display the late FRU insertion or removal event:
switch:admin> historylastshow
POWER SUPPLY Unit 2 Inserted at Tue Aug 14 15:52:10 2001Factory Part Number: 60-0001536-02Factory Serial Number: 1013456800
Records: 11
See Also historyShow
Fabric OS Command Reference 39553-1001764-02

historyMode2
historyMode
Displays the mode of the field replaceable unit (FRU) history log.
Synopsis historymode
Description Use this command to display the mode of the history buffer, which records the insertion and removal of FRUs on a switch or chassis.
This command supports two modes of handling new log entries once the history buffer has reached its maximum size:
Rotating mode Any new entry exceeding the maximum buffer size overwrites the oldest entry in the log. This is the default mode.
First-in mode Any new entry exceeding the maximum buffer size is discarded. The original entries in the buffer is preserved.
The history mode is a factory setting that cannot be changed by the end user. The size of the history buffer depends on the HW platform: The Brocade 48000 Director supports 100 history log entries. The Brocade DCX backbone supports a maximum log size of 50 entries. Since the WWNs are completely separate FRUs in the DCX, they have redundant data in these units. All other platforms containing FRUs support 28 history log entries.
Note The execution of this command is subject to Virtual Fabric or Admin Domain restrictions that may be in place. Refer to chapter 1, “Using Fabric OS commands” and Appendix A, “Command Availability” for details.
Operands none
Examples To display the mode of the history log:
switch:admin> historymode
History Mode is: Rotating.
See Also historyLastShow, historyShow
396 Fabric OS Command Reference53-1001764-02

historyShow 2
historyShow
Displays the entire field replaceable unit (FRU) history log.
Synopsis historyshow
Description Use this command to display the entire history log, which records insertion and removal events for field-replaceable units (FRUs), such as blades, power supplies, fans, and world wide name (WWN) cards. The type of FRU supported depends on the hardware platform.
Each history record contains three lines of information. The first line of each record contains the following:
Object type On standalone platforms: FAN, POWER SUPPLY, WWN (WWN card), or UNKNOWN.
On enterprise-class platforms: CHASSIS, FAN, POWER SUPPLY, SW BLADE (port blade), CP BLADE (control processor), WWN (WWN card), or UNKNOWN.
Object number Slot number for blades. Unit number for all other object types.
Event type Inserted, Removed, or Invalid
Time of the event Format: Day Month dd hh:mm:ss yyyy
The second and third lines of a record contain the factory part number and factory serial number, if applicable:
Factory Part Number xx-yyyyyyy-zz or Not available
Factory Serial Numberxxxxxxxxxxxx or Not available
The size of the history buffer depends on the HW platform. The Brocade 48000 director supports 100 history log entries. The Brocade DCX supports a maximum log size of 50 entries. Since the WWNs are completely separate FRUs in the DCX, they have redundant data in these units. All other platforms that contain FRUs support 28 history log entries.
Note The execution of this command is subject to Virtual Fabric or Admin Domain restrictions that may be in place. Refer to chapter 1, “Using Fabric OS commands” and Appendix A, “Command Availability” for details.
Operands none
Examples To display the history log of FRUs and removal events on a standalone switch:
switch:admin> historyshow
FAN Unit 3 Removed at Tue Aug 14 10:05:37 1970Factory Part Number: 20-123456-12Factory Serial Number: 1013456800
POWER SUPPLY Unit 1 Inserted at Tue Aug 14 10:52:10 1970Factory Part Number: 60-0001536-02Factory Serial Number: Not Available
FAN Unit 3 Inserted at Tue Aug 14 10:23:45 2001Factory Part Number: 20-123456-12Factory Serial Number: 1013456800
Fabric OS Command Reference 39753-1001764-02

historyShow2
WWN Unit 1 Inserted at Tue Aug 14 11:03:45 2001Factory Part Number: 40-0000031-03Factory Serial Number: 1013456800
SW BLADE Slot 3 Removed at Tue Aug 14 12:10:09 2001Factory Part Number: 60-0001532-03Factory Serial Number: 1013456800
CP BLADE Slot 6 Removed at Tue Aug 14 13:45:07 2001Factory Part Number: 60-0001604-02Factory Serial Number: FP00X600128
SW BLADE Slot 3 Inserted at Tue Aug 14 13:53:40 2001Factory Part Number: 60-0001532-03Factory Serial Number: 1013456800
CP BLADE Slot 6 Inserted at Tue Aug 14 13:59:50 2001Factory Part Number: 60-0001604-02Factory Serial Number: FP00X600128
POWER SUPPLY Unit 2 Inserted at Tue Aug 14 15:52:10 2001Factory Part Number: 60-0001536-02Factory Serial Number: 1013456800
Records: 11
See Also historyLastShow
398 Fabric OS Command Reference53-1001764-02

i 2
i
Displays a process summary.
Synopsis i [processID]
Description Use this command to display information about a specified process or about all processes running on the local switch. One line is displayed per process. Fields displayed with this command include those shown in Table 20.
Note The execution of this command is subject to Virtual Fabric or Admin Domain restrictions that may be in place. Refer to chapter 1, "Using Fabric OS commands" and Appendix A, "Command Availability" for details.
TABLE 20 Command field description
Field Description
F Process flags:ALIGNWARN 001 print alignment warning messagesSTARTING 002 being createdEXITING 004 getting shut downPTRACED 010 set if ptrace (0) has been calledTRACESYS 020 tracing system callsFORKNOEXEC 040 forked but did not execSUPERPRIV 100 used super-user privilegesDUMPCORE 200 dumped coreSIGNALED 400 killed by a signal
S Process state codes:D uninterruptible sleep (usually IO)R runable (on run queue)S sleepingT traced or stoppedZ a defunct ("zombie") process
UID The effective user ID number of the process
PID The process ID of the process
PPID The process ID of the parent process
C Processor utilization for scheduling
PRI Priority number of the process; higher numbers mean lower priority
NI Nice value used in priority computation
ADDR Memory address of the process
SZ The total size of the process in virtual memory, in pages
WCHAN The address of an event for which a process is sleeping (if blank, process is running)
TTY The controlling terminal of the process (? displayed for no controlling terminal)
TIME The cumulative execution time for the process
CMD The command name of the process
Fabric OS Command Reference 39953-1001764-02

i2
Operands This command has the following operand:
processID Specifies the process name or process ID for the process to display.
Examples To display information about process ID 433:
switch:admin> i 433F S UID PID PPID C PRI NI ADDR SZ WCHAN TTY TIME CMD000 S 0 433 1 0 69 0 - 1283 5c64 ? 00:00:02 fabricd
See Also diagHelp, routeHelp
400 Fabric OS Command Reference53-1001764-02

iclCfg 2
iclCfg
Enables or disables Inter-chassis links (ICL).
Synopsis iclcfg --enable slot/icl_group
iclcfg --disable slot/icl_group
iclcfg --persistentenable slot/icl_group
iclcfg --persistentdisable slot/icl_group
iclcfg --help
Description Use this command to enable or disable an inter-chassis link (ICL) or to enable or disable an ICL persistently. The command enables or disables the ICL by enabling or disabling the ports associated with the link. Persistently disabled ports remain disabled across reboots and power cycles. This command is supported only on the Brocade DCX and the Brocade DCX-S4.
Notes The execution of this command is subject to Virtual Fabric or Admin Domain restrictions that may be in place. Refer to chapter 1, "Using Fabric OS commands" and Appendix A, "Command Availability" for details.
This command must be executed on the active CP.
Operands The following operands are required:
slot Specifies the slot number of the ICL group to be enabled or disabled, followed by a slash (/). The slot on the DCX can be either 5 or 8. On the DCX-4S, valid slots are 3 and 6.
icl_group Specifies the ICL port group to be disabled or enabled. An ICL group represents a range of ports. Specify 0 to enable or disable ports 0-15. Specify 1 to enable or disable ports 16-31.
--enable Enables the ICL for the specified port group.
--disable Disables the ICL for the specified port group.
--persistentenable Persistently enables the ICL for the specified port group.
--persistentdisable Persistently disables the ICL for the specified port group.
--help Displays the command usage.
Examples To disable the ICL for ports 16-31:
switch:user> iclcfg --disable 8/1
To enable the ICL for ports 16-31:
switch:user> iclcfg --enable 8/1
To disable the ICL for ports 16-31 persistently:
switch:user> iclcfg --persistentdisable 8/1
Fabric OS Command Reference 40153-1001764-02

iclCfg2
To enable the ICL for ports 16-31 persistently:
switch:user> iclcfg --persistentdnable 8/1
See also none
402 Fabric OS Command Reference53-1001764-02

ifModeSet 2
ifModeSet
Sets the link operating mode for a network interface.
Synopsis ifmodeset [“interface”]
Description Use this command to set the link operating mode for a network interface.
An operating mode is confirmed with a y or yes at the prompt. If the operating mode selected differs from the current mode, the change is saved and the command exits.
Changing the link mode is not supported for all network interfaces or for all Ethernet network interfaces. On the CP of a Brocade DCX or DCX-S4, this command supports eth0 and eth3 as interface parameters. On all other platforms, only eth0 is supported.
When selecting autonegotiation, you can choose the specific link operating modes that are advertised to the link partner. At least one common link operating mode must be advertised by both sides of the link.
When forcing the link operating mode, both sides of the link must be forced to the same mode. The link does not work reliably if one side is set to autonegotiate and the other side is set to forced mode.
Exercise care when using this command. Forcing the link to an operating mode not supported by the network equipment to which it is attached might result in an inability to communicate with the system through its Ethernet interface. It is recommended that this command be used only from the serial console port. When used through an interface other than the serial console port, the command displays a warning message and prompts for verification before continuing. This warning is not displayed and you are not prompted when the command is used through the serial console port.
For dual-CP systems, the ifModeSet command affects only the CP you are currently logged in to. To set the link operating mode on the active CP, you must issue this command on the active CP; to set the link operating mode on the standby CP, you must issue this command on the standby CP. During failover, the link operating mode is retained separately for each CP, because the physical links might be set to operate in different modes.
Note The execution of this command is subject to Virtual Fabric or Admin Domain restrictions that may be in place. Refer to chapter 1, "Using Fabric OS commands" and Appendix A, "Command Availability" for details.
Operands This command has the following operand:
“interface” Specify the name of the interface, optionally enclosed in double quotation marks. When issued on a Brocade DCX or a DCX-S4 CP, valid interfaces are eth0 and eth3. On all other platforms, only eth0 is supported.
Examples To advertise all modes of operation, when not entering this command through the serial console port, follow this scenario for the ifModeSet command:
switch:admin> ifmodeset eth0Exercise care when using this command. Forcing the link toan operating mode not supported by the network equipment towhich it is attached may result in an inability tocommunicate with the system through its ethernet interface.
It is recommended that you only use this command from the
Fabric OS Command Reference 40353-1001764-02
ifModeSet2
serial console port.Are you sure you really want to do this? (yes, y, no, n): [no] yProceed with caution.Auto-negotiate (yes, y, no, n): [no] yAdvertise 100 Mbps / Full Duplex (yes, y, no, n): [yes] yAdvertise 100 Mbps / Half Duplex (yes, y, no, n): [yes] yAdvertise 10 Mbps / Full Duplex (yes, y, no, n): [yes] yAdvertise 10 Mbps / Half Duplex (yes, y, no, n): [yes] yCommitting configuration...done.
To force the link for the eth0 interface from autonegotiation to 10 Mbps half-duplex operation, when entering this command through the serial console port:
switch:admin> ifmodeset eth0Auto-negotiate (yes, y, no, n): [yes] nForce 100 Mbps / Full Duplex (yes, y, no, n): [no] nForce 100 Mbps / Half Duplex (yes, y, no, n): [no] nForce 10 Mbps / Full Duplex (yes, y, no, n): [no] nForce 10 Mbps / Half Duplex (yes, y, no, n): [no] yCommitting configuration...done.
See Also ifModeShow
404 Fabric OS Command Reference53-1001764-02

ifModeShow 2
ifModeShow
Displays the link operating mode and MAC address for a network interface.
Synopsis ifmodeshow interface
Description Use this command to display the link operating mode and MAC address for a network interface.
On the CP of a Brocade DCX or DCX-S4, this command supports eth0 and eth3 as interface parameters. On all other platforms, only eth0 is supported.
The CP on a Brocade DCX or DCX-S4 has two external physical Ethernet management ports, eth1 and eth3. Both interfaces are bonded together to form a single logical interface, bond0.
The management port IP addresses are assigned to the logical interface, bond0. Link layer Ethernet operations are applied to the physical interfaces, eth0 and eth3.
Ethernet bonding provides link layer redundancy using the active-standby failover model. The two Ethernet ports must be part of the same subnet. By default, all traffic is transmitted over the active Ethernet port, eth0. The second Ethernet port, eth3, acts as a standby interface and no traffic is transmitted over it. When the active Ethernet port is disconnected, the alternate Ethernet port becomes active. When the system reboots, the Ethernet port eth0 is always made active if it is connected.
When executed with the bond0 operand, ifModeShow displays the active Ethernet port
Note The execution of this command is subject to Virtual Fabric or Admin Domain restrictions that may be in place. Refer to chapter 1, “Using Fabric OS commands” and Appendix A, “Command Availability” for details.
Operands This command has the following operand:
interface Specifies the name of the interface, optionally enclosed in double quotation marks. Valid interfaces are:
eth0 |eth3 Displays the link operating mode of the specified interface. The value eth3 is valid only on the CP of a Brocade DCX or DCX-4S.
bond0 Displays the active Ethernet port. This operand is valid only on the CP of a DCX or a DCX-S4.
Examples To display the link operating mode for the eth0 Ethernet interface:
switch:admin> ifmodeshow eth0Link mode: negotiated 100baseTx-HD, link okMAC Address: 00:60:69:D0:24:40
To display the link operating mode for the eth3 Ethernet interface (in this example, the management port is disconnected):
switch:admin> ifmodeshow eth3Link mode: no linkMAC Address: 00:05:1E:40:62:30
Fabric OS Command Reference 40553-1001764-02

ifModeShow2
To display the active interface:
ras010:root> ifmodeshow bond0Currently Active Slave: eth0
See Also ifModeSet
406 Fabric OS Command Reference53-1001764-02

interfaceShow 2
interfaceShow
Displays FSPF interface information.
Synopsis interfaceshow [slot/][port]
Description Use this command to display the two data structures associated with FSPF interfaces (E_Ports) on the switch:
• The permanently allocated interface descriptor block (IDB).
• The neighbor data structure. This data structure is allocated when a switch port becomes an E_Port. The neighbor data structure contains all the information relating to the switch that is connected to an adjacent switch.
This command displays the content of both data structures, if they have been allocated.
The following fields are displayed:
idbP Pointer to IDB.
nghbP Pointer to neighbor data structure.
ifNo Interface number.
masterPort Port number of the trunk master port, if present, of the trunk group of which this port is a part.
defaultCost Default cost of sending a frame over the interswitch link (ISL) connection to this interface.
cost Cost of sending a frame over the ISL connected to this interface. A value of 1000 indicates a 1-Gbps link. A value of 500 indicates a 2-Gbps link. For links with a bandwidth greater than 2 Gbps, the cost is 500. For links with less than 1 Gbps, the cost is 2000. Refer to linkCost for more information.
delay Conventional delay incurred by a frame transmitted on this ISL. A fixed value required by the FSPF protocol.
lastScn Type of the last State Change Notification received on this interface.
lastScnTime Time the last State Change Notification was received on this interface.
upCount Number of times this interface came up, with respect to FSPF.
lastUpTime Last time this interface came up.
downCount Number of times this interface went down.
lastDownTime Last time this interface went down.
downReason Type of last State Change Notification that caused this interface to go down.
iState Current state of this interface. The state can be UP or DOWN. An interface in DOWN state does not have an allocated neighbor data structure and cannot be used to route traffic to other switches.
state Current state of this interface. This E_Port is used to route traffic to other switches only if the state is NB_ST_FULL.
lastTransition Time the last state changed on this interface.
nghbCap Neighbor capabilities. Should be 0.
Fabric OS Command Reference 40753-1001764-02

interfaceShow2
nghbId Domain ID of the neighbor (adjacent) switch.
idbNo IDB number. Should be equal to port.
remPort Port number on the remote switch connected to this port.
nflags Internal FSPF flags.
initCount Number of times this neighbor was initialized without the interface going down.
lastInit Time of the last initializing state, NB_ST_INIT, on this interface.
firstHlo Time of the first hello sent on this interface.
nbstFull Time of the last finishing state, NB_ST_FULL, on this interface.
&dbRetransList
Pointer to the database retransmission list.
&lsrRetransList
Pointer to the link state records (LSR) retransmission list.
&lsrAckList Pointer to the link state acknowledgements (LSA) retransmission list.
inactTID Inactivity timer ID.
helloTID Hello timer ID.
dbRtxTID Database retransmission timer ID.
lsrRtxTID LSR retransmission timer ID.
inactTo Inactivity timeout value, in milliseconds. When this timeout expires, the adjacency with the neighbor switch is broken and new paths are computed to all possible destination switches in the fabric.
helloTo Hello timeout value, in milliseconds. When this timeout expires, a Hello frame is sent to the neighbor switch through this port.
rXmitTo Retransmission timeout value, in milliseconds. It is used to transmit topology information to the neighbor switch. If no acknowledgement is received within this value, the frame is retransmitted.
nCmdAcc Total number of commands accepted from the neighbor switch. Number includes Hellos, Link State Updates (LSUs), and LSAs.
nInvCmd Number of invalid commands received from the neighbor switch. Usually commands with an FSPF version number higher than the one running on the local switch.
nHloIn Number of Hello frames received from the neighbor switch.
nInvHlo Number of invalid Hello frames (Hello frames with invalid parameters) received from the neighbor switch.
nLsuIn Number of LSUs received from the neighbor switch.
nLsaIn Number of LSAs received from the neighbor switch.
attHloOut Number of attempted transmissions of Hello frames to the neighbor switch.
nHloOut Number of Hello frames transmitted to the neighbor switch.
408 Fabric OS Command Reference53-1001764-02

interfaceShow 2
attLsuOut Number of attempted transmissions of LSUs to the neighbor switch.
nLsuOut Number of LSUs transmitted to the neighbor switch.
attLsaOut Number of attempted transmissions of LSAs to the neighbor switch.
nLsaOut Number of LSAs transmitted to the neighbor switch.
Note The execution of this command is subject to Virtual Fabric or Admin Domain restrictions that may be in place. Refer to chapter 1, “Using Fabric OS commands” and Appendix A, “Command Availability” for details.
Operands This command has the following operands:
slot For bladed systems only, specify the slot number of the port to be displayed, followed by a slash (/).
port Specify the number of the port to be displayed, relative to its slot for bladed systems. Use switchShow for a list of valid ports. This operand is optional; if omitted, the interface information for all ports is displayed.
When invoked without operands, this command displays the interface information for all ports on the switch (including non-E_Ports).
Examples To display FSPF interface information:
switch:user> interfaceshow 1/4
idbP = 0x1008b3d0
Interface 4 data structure:
nghbP = 0x1008c668ifNo = 4masterPort = 4 (self)defaultCost = 500cost = 500delay = 1lastScn = 16lastScnTime = Apr 02 20:01:44.458upCount = 2lastUpTime = Apr 02 20:01:44.458downCount = 1lastDownTime = Apr 02 20:01:09.050downReason = 2iState = UP
Neighbor 4 data structure:
state = NB_ST_FULLlastTransition = Apr 02 20:01:44.512nghbCap = 0x0nghbId = 100idbNo = 4remPort = 52nflags = 0xfinitCount = 1lastInit = Apr 02 20:01:44.460firstHlo = Apr 02 20:01:44.473nbstFull = Apr 02 20:01:44.512
Fabric OS Command Reference 40953-1001764-02

interfaceShow2
delay = 1lastScn = 16&dbRetransList = 0x1008c6a0&lsrRetransList = 0x1008c6c4&lsrAckList = 0x1008c6e8inactTID = 0x1008c768helloTID = 0x1008c7a0dbRtxTID = 0x1008c7d8lsrRtxTID = 0x1008c848inactTo = 80000helloTo = 2000rXmitTo = 5000nCmdAcc = 7nInvCmd = 0nHloIn = 2nInvHlo = 0nLsuIn = 2nLsaIn = 3attHloOut = 2nHloOut = 2attLsuOut = 3nLsuOut = 3attLsaOut = 2nLsaOut = 2
See Also nbrStateShow, portShow, switchShow
410 Fabric OS Command Reference53-1001764-02

interopMode 2
interopMode
Manages Brocade switch interoperability with McDATA switches.
Synopsis interopmode --show
interopmode --help
interopmode --disable
interopmode --enable [-mcdata | -IM2 | -im2] [-defaultzone | -safezone] [-domainoffset domain_offset ]
interopmode --enable [-openmcdata | -IM3 | -im3] [-domainoffset domain_offset ]
interopmode [mode [-z McDataDefaultZone | -s McDataSafeZone]]
Description Use this command to enable or disable Brocade switch interoperability with McDATA Enterprise OS (M-EOS) switches within a Brocade fabric, to configure the domain ID offset, and to enable safe zoning or default zoning.
The following interop modes can be configured with this command:
• Brocade Native Mode (IM0) - Interoperability with McDATA switches is not supported.
• McDATA Fabric Mode (IM2) - Brocade switches in IM2 are interoperable with McDATA switches in IM2, which is the McDATA legacy mode.
• McDATA Open Fabric Mode (IM3) - Brocade switches in IM3 are interoperable with McDATA switches in IM3. IM3 is supported on all platforms that support McDATA Fabric Mode (IM2). Open Fabric Mode is intended specifically for adding Fabric OS-based products into M-EOS fabrics that are already using McDATA Open Fabric Mode. Fabrics comprised of only Fabric OS switches in McDATA Open Fabric Mode are not supported and cannot be zoned. All zoning of a mixed M-EOS and Fabric OS fabric operating in McDATA Open Fabric Mode is performed through the M-EOS switches.
Domain ID offset mode - Fabric OS v6.3.0 provides support for domain ID offset configuration in IM2 and IM3. This feature expands the range of domain IDs that Brocade switches running Fabric OS v6.3.0 or later can support in IM2 and IM3 fabrics. It allows you to integrate Brocade switches into an existing McDATA fabric that is configured with a domain ID offset mode other than the McDATA legacy mode.
You can set the domain ID Offset to any one of the following values: 0x00, 0x20, 0x40, 0x60, 0x80, 0xA0, 0xC0 or 0xFF. With the use of offsets, the domain ID is calculated as the domain ID plus the configured domain offset. This provides the following domain ID ranges in IM2 and IM3 fabrics: With domain ID offset configured as 0x00, 0x20, 0x40, 0x80, 0xA0, or 0xC0, the supported domain ID ranges are 1-31 [0x01, 0x1F], 33-63 [0x21, 0x3F], 65-95 [0x41, 0x5F], 129-159 [0x81, 0x9F], 161-191 [0xA1, 0xBF], and 193-223 [0xC1, 0xDF] respectively. There are two exceptions: the domain ID default mode (offset 0x60) and the 239 domain ID mode (offset 0xFF).
• Domain ID offset default mode (McDATA Legacy domain ID mode) - The default mode of 0x60 (96) is used when you enable IM2 or IM3 without specifying a domain ID offset. In this mode, the supported domain ID ranges are 1-31 for IM2 fabrics, and 97–127 [0x61 – 0x7F] for IM3 fabrics.
• 239 Domain ID offset mode - In this mode, the full range of domain IDs, 1-239, is available. This mode is supported only in IM3. The Mi10K is the only M-Series switch that supports the 239 Domain ID mode. To enable 239 domain ID mode, specify a domain ID offset of 0xFF.
Refer to the Fabric OS Administrator’s Guide for domain ID configuration procedures and examples.
Fabric OS Command Reference 41153-1001764-02

interopMode2
Notes The interopMode command must be executed on all Brocade switches in the fabric. Certain restrictions apply when changing Fabric Modes. Refer to the Fabric OS Administrator’s Guide for more information.
The execution of this command is subject to Virtual Fabric or Admin Domain restrictions that may be in place. Refer to chapter 1, "Using Fabric OS commands" and Appendix A, "Command Availability" for details.
Operands This command has the following operands:
--show Displays the current interop mode settings.
--help Displays the command usage.
--disable Disables interop mode. This command effectively returns the switch to Brocade Native mode (IM0).
--enable Enables and configures the specified interop mode settings. The following operands are supported with this option:
-mcdata | -IM2 | -im2 Enables McDATA Fabric mode (IM2). All three operands are functionally equivalent.
-defaultzone |-safezone Enables default zoning or safe zoning. These operands are exclusive and are valid only in McDATA Fabric mode (IM2). McDATA Default Zone and McDATA Safe Zone are fabric-wide features. If one of these features is enabled on one switch, it must be enabled on all other switches. Otherwise the E_Port is segmented. Use the cfgmcdtMode command to enable or disable the zoning features fabric wide.
-openmcdata | -IM3 | -im3 Enables McDATA Open Fabric mode (IM3). All three operands are functionally equivalent.
-domainoffset domain_offset Specifies the domain offset. The following domain offset values are supported in both McDATA Fabric mode (IM2) and McDATA Open Fabric mode (IM3): 0x00, 0x20, 0x40, 0x60, 0x80, 0xA0 and 0xC0. If a domain offset is not specified, the default of 0x60 is used. To enable the 239 domain mode, specify a domain offset value of 0xFF. This mode is valid only in McDATA Open Fabric Mode (IM 3).
The following command options are retained for legacy reasons only. They cannot be combined with any of the options described above.
mode Specify 0 to disable interoperability mode.
Specify 2 to enable McDATA Fabric mode.
Specify 3 to enable McDATA Open Fabric mode
Available only in IM2:
-z Default Zone
Specify 1 to enable the McDATA default zone feature.
Specify 0 to disable the McDATA default zone feature.
412 Fabric OS Command Reference53-1001764-02

interopMode 2
-s Safe Zone Specify 1 to enable the McDATA Safe Zone feature.
Specify 0 to disable the McDATA Safe Zone feature.
Examples To display the current interop mode and command usage:
switch:admin> interopmode --showInteropMode: McDATA Fabric ( IM2 ) Default Zone: Off Safe Zone: Off Domain Id offset: 0x20
To turn Safe Zone on while in IM2:
switch:admin> interopmode --enable -safezoneMCDT default/safe zone will be changed.
Do you want to continue? (yes, y, no, n): [no] yInteropMode: McDATA Fabric ( IM2 ) Default Zone: Off Safe Zone: On Domain Id offset: 0x20
To disable interoperability mode and to verify the result:
switch:admin> interopmode --disableThe switch effective and defined configurationwill be lost if interop Mode is changed.
Interop Mode or Domain Offset Will Be Changedand switch will be Enabled
Do you want to continue? (yes, y, no, n): [no] yInteropMode: Off
To enable McDATA Open Fabric mode (IM3) and to set the domain offset to 0x80.
switch:admin> interopmode --enable -im3 -domainoffset 0x80The switch effective and defined configurationwill be lost if interop Mode is changed.
Interop Mode or Domain Offset Will Be Changedand switch will be Enabled
Do you want to continue? (yes, y, no, n): [no] yInteropMode: McDATA Open Fabric ( IM3 ) Domain Id offset: 0x80
To enable 239 Domain ID mode in IM3:
switch:admin> interopmode --enable -domainoffset 0xFFThe switch effective and defined configurationwill be lost if interop Mode is changed.
Interop Mode or Domain Offset Will Be Changedand switch will be Enabled
Do you want to continue? (yes, y, no, n): [no] yInteropMode: McDATA Open Fabric ( IM3 ) Domain Id offset: 0xff
Fabric OS Command Reference 41353-1001764-02

interopMode2
To try to switch from 239 Domain ID mode in IM3 to IM 2 (this command fails unless you change the domain offset as well to a value supported in IM2):
switch:admin> interopmode --enable -mcdataThe switch effective and defined configurationwill be lost if interop Mode is changed.
Interop Mode or Domain Offset Will Be Changedand switch will be Enabled
Do you want to continue? (yes, y, no, n): [no] yInteropMode Offset: Failed to set offset 239 does not exist for IM2rc 0, err 0, msg VÜÉ
See Also cfgMcdtMode, cfgSaveActiveToDefined
414 Fabric OS Command Reference53-1001764-02

iodDelayReset 2
iodDelayReset
Resets the user-defined IOD delay settings to default values.
Synopsis ioddelayreset domain_id
Description Use this command to reset the user-defined IOD delay settings to default values (-1). This command resets IOD delay values for a specified domain ID that was previously configured with the iodDelaySet command.
The switch must be disabled before IOD delay can be reset.
Notes The iodDelaySet command is deprecated in Fabric OS v6.2.0. The iodDelayReset command is retained for legacy reasons only. If you have configured IOD delay settings previously, you must reset the IOD settings to defaults before upgrading to v6.2.0. Use iodDelayShow to determine current settings.
The execution of this command is subject to Virtual Fabric or Admin Domain restrictions that may be in place. Refer to chapter 1, "Understanding Admin Domain Restrictions" and Appendix A, "Command Availability" for details.
Operands none
Examples To reset IOD delay to default values for domain 10:
switch:admin> ioddelayreset 10
See Also iodDelayShow
Fabric OS Command Reference 41553-1001764-02

iodDelayShow2
iodDelayShow
Displays the user-defined IOD delay settings for specified domains.
Synopsis ioddelayshow [ domain_id ]
Description Use this command to display the user-defined IOD delay settings for all domains in the fabric or for a specified domain ID. This command only displays delay values for domain IDs, for which the IOD delay parameter has been previously set with the iodDelaySet command. The command does not display defaults values.
Note The iodDelaySet command is deprecated in Fabric OS v6.2.0. The iodDelayReset command is retained for legacy reasons only. If you have configured IOD delay settings previously, you must reset the IOD settings to defaults before upgrading to v6.2.0. Use iodDelayShow to determine current settings.
The execution of this command is subject to Virtual Fabric or Admin Domain restrictions that may be in place. Refer to chapter 1, "Understanding Admin Domain Restrictions" and Appendix A, "Command Availability" for details.
Operands The following operand is optional:
domain_id Specifies the domain ID for which to display the IOD delay setting. If this operand is omitted, the command displays the IOD delay settings for all domains in the fabric.
Examples To Display the IOD delay setting for domain 5:
switch:user> ioddelayshow 5Domain - Iod Delay 5 - 20
To display IOD settings for all domains in the fabric:
switch:user> ioddelayshow 5Domain - Iod Delay (ms) 1 - 2 5 - 20 10 - 20 20 - 30 21 - 23
See Also iodDelaySet
416 Fabric OS Command Reference53-1001764-02

iodReset 2
iodReset
Disables in-order delivery (IOD) on a switch.
Synopsis iodreset
Description Use this command to disable in-order delivery enforcement on the local switch. IOD is disabled by default, and can only be disabled after it has been enabled with the iodSet command. This command disables the legacy IOD enforcement only.
Disabling IOD allows faster rerouting after a fabric topology change, but it may cause out-of-order delivery of frames during fabric topology changes.
Note The execution of this command is subject to Virtual Fabric or Admin Domain restrictions that may be in place. Refer to chapter 1, "Using Fabric OS commands" and Appendix A, "Command Availability" for details.
Operands none
Examples To disable IOD enforcement:
switch:admin> iodreset
IOD is not set
See Also iodSet, iodShow
Fabric OS Command Reference 41753-1001764-02

iodSet2
iodSet
Enables in-order delivery (IOD).
Synopsis iodset
iodset --help
Description Use this command to enforce in-order delivery of frames during a fabric topology change.
In a stable fabric, frames are always delivered in order, even when the traffic between switches is shared among multiple paths. However, when topology changes occur in the fabric (for instance, a link goes down), traffic is rerouted around the failure and some frames might be delivered out of order. This command ensures that frames are not delivered out-of-order, even during fabric topology changes. It enforces a sufficient delay between the event that causes an existing path to be removed and the establishment of a new path, so that frames are delivered in order. However, this also means that frames are dropped during the delay, causing I/O failures.
When used without operands, iodSet enables in-order-delivery of frames on a switch (legacy IOD behavior). Frame loss is unavoidable when a port goes down.
IOD is disabled by default. Use iodShow to display current settings. Use iodReSet to restore the default setting.
Notes You can no longer use this command to manage lossless DLS. Use dlsSet instead. The following command options are deprecated in Fabric OS v6.4.0 and later:
• iodset --enable -lossLessDls
• iodset --disable -lossLessDls
• iodset --show
The execution of this command is subject to Virtual Fabric or Admin Domain restrictions that may be in place. Refer to chapter 1, "Using Fabric OS commands" and Appendix A, "Command Availability" for details.
Operands This command has the following operands:
--help Displays the command usage.
Examples To display the default legacy IOD setting:
switch:admin>iodshow
IOD is not set
To enable IOD:
switch:admin> iodset
IOD is set
See Also iodShow, iodReset
418 Fabric OS Command Reference53-1001764-02

iodShow 2
iodShow
Displays the in-order delivery (IOD) setting.
Synopsis iodshow
Description Use this command to display the IOD setting on the switch. By default, IOD is disabled.
Note The execution of this command is subject to Virtual Fabric or Admin Domain restrictions that may be in place. Refer to chapter 1, "Using Fabric OS commands" and Appendix A, "Command Availability" for details.
Operands none
Examples To display the current setting of the IOD setting:
switch:admin> iodshow
IOD is not set
See Also iodReset, iodSet
Fabric OS Command Reference 41953-1001764-02

ipAddrSet2
ipAddrSet
Sets the Ethernet and FC IP addresses.
Synopsis ipaddrset [-ipv6 ] [--add x:x:x:x:x:x:x/n | --delete]
ipaddrset [-cp cp_number | -chassis ] [-ipv6 ] [--add x:x:x:x:x:x:x/n | --delete]
ipaddrset [-slot slot] [-eth0 | -eth1] [--add x.x.x.x/n | --delete]
ipaddrset [-slot slot] -gate [--add x.x.x.x | --delete]
ipaddrset -ls FID --add IPv4_address/prefix
ipaddrset -ls FID --delete
ipaddrset -ipv6 [-auto | -noauto]
ipaddrset [-cp cp_number | -chassis]
Description Use this command to configure the IP addresses on a switch, a control processor (CP), a blade processor (BP), or a standalone application processor (AP). On platforms that support Logical Fabrics, this command configures the IPv4 Fibre Channel addresses for the logical fabric IPFC network interface. The IPFC (IP over Fibre Channel) protocol allows switches to send IP traffic over Fibre Channel rather than through Ethernet connections.
This command supports an interactive legacy mode and a command line interface. Use the command line interface to configure IPv6 addresses, to enable or disable stateless IPv6 autoconfiguration, to assign a Fibre Channel IPv4 address and prefix to a logical switch IPFC network interface, and to configure a service port on the CP blade of a Brocade DCX. When run interactively in legacy mode, this command sets the Ethernet IPv4 address, subnet mask, and Gateway on a switch or a chassis.
Command usage depends on the type of IP address and on the platform on which the command is run. Some of the platform- and IP address-specific features of the command are outlined below. For complete details, refer to the Fabric OS Administrator Guide.
Configuring IP Addresses using the command line interface• The command accepts the -ipv6 command line syntax with the --add or--delete option on all
platforms that support IPv6 addresses. The --add option configures a single static IPv6 address and prefix for the specified managed entity (chassis, CP, or AP). The --delete option deletes a static IPv6 address and prefix for the specified managed entity. On modular platforms, the command can be executed only on the active CP.
- When using the command line syntax to add or delete IPv6 addresses, the managed entity is identified only on modular platforms. To set the CP IPv6 address, use the -cp option; to set the IP address for the entire chassis, use the -chassis option.
- When using the command line syntax to add or delete IPv6 addresses on standalone platforms, the implied entity is the single managed entity supported by the platform and must be left unspecified.
- Additionally, the -eth0, -eth1, and -gate command line options are available with the --add or --delete option on platforms with blade processors to set the BP Ethernet or Gateway addresses. On a chassis with a blade processor the values for the blade in slot slot can be set from the command line using the -slot option. The -slot option is not accepted in standalone application processors with a hidden blade, such as the AP7600.
• Use the -auto and -noauto options to enable or disable stateless IPv6 autoconfiguration.
420 Fabric OS Command Reference53-1001764-02

ipAddrSet 2
• Use the -ls option with appropriate arguments to set or delete the IPv4 Fibre Channel address and prefix for the IPFC interface of a logical switch. In a Virtual Fabric environment, each logical fabric is represented by a separate IPFC network interface. Each of these network interfaces can be assigned a unique IPv4 FC address and prefix. The logical switches that make up a logical fabric are identified by the fabric ID (FID) that is assigned to each of the logical switch instances.
When setting the IPFC interface of a switch that is not in Virtual Fabric mode, use the -ls option with FID 128. FID 128 identifies the switch when Virtual Fabrics are disabled.
Setting IP addresses interactively (IPv4 Ethernet address only):• To set the CP Ethernet IPv4 address, use the -cp option; to set the Ethernet IP address for the
entire chassis, use the -chassis option. When setting the chassis IP address, the command prompts for the Ethernet IP address and Ethernet subnet mask. When setting the CP Ethernet IP address, the command prompts for the host name, Ethernet IP address, Ethernet subnet mask, and Gateway IP address. Valid switch and CP numbers depend on the platform on which the command is run. The command must be executed on the active CP.
• On most standalone platforms (with the exception of the AP7600), ipAddrSet runs interactively if invoked without operands. The command prompts for the Ethernet IP address, Ethernet subnet mask, and Gateway IP address. In addition, the command prompts for a specification of whether the Dynamic Host Control Protocol (DHCP) should be used to acquire the Ethernet IP address, Ethernet subnet mask and Gateway IP address. Valid entries are "On" to enable DHCP and "Off" to disable it. When DHCP is enabled, any user-configured Ethernet IP address, Ethernet subnet mask or Gateway IP address is ignored.
Notes The execution of this command is subject to Virtual Fabric or Admin Domain restrictions that may be in place. Refer to chapter 1, "Using Fabric OS commands" and Appendix A, "Command Availability" for details.
The option to set the Fibre FC IP address and FC subnet mask interactively is no longer supported as of Fabric OS v6.2.0.
Operands When used in command line mode, the following operands are supported:
-Ipv6 Specifies IP address type as static IPv6 including prefix as needed.
--add x:x:x:x:x:x:x/n Sets the specified IPv6 address.
--delete [ x:x:x:x:x:x:x/n] Deletes the specified IPv6 address. If no address is specified, any existing IPv6 addresses and prefixes are deleted from the specified or implied entity.
-cp cp_number Specifies the CP on a chassis. Valid values are 0 or 1.
-chassis Specifies the IPv6 address and prefix of a chassis.
On platforms with blade processors, the following additional command line options are supported with the --add or --delete options:
-eth0 |-eth1 Specifies the local IPv4 address of the blade processor. A prefix is required.
-gate Specifies the IPv4 address of the blade processor (BP) Gateway (no prefix).
-slot number On a chassis with a blade processor (BP), specifies the slot number. On standalone platforms with a hidden BP, such as the AP76500, this parameter is not accepted.
Fabric OS Command Reference 42153-1001764-02

ipAddrSet2
-ipv6 [-auto | -noauto] Enables or disables stateless IPv6 autoconfiguration on a switch or chassis. When autoconfiguration is enabled, the host automatically performs configuration of IPv6 addresses and periodic nondisruptive reconfiguration. By default, autoconfiguration is disabled.
-ls FID Specifies the logical fabric ID for which to configure an IPFC network interface. The FID is a decimal number. A switch that is not in Virtual Fabric mode uses the -ls parameter with FID 128 (the effective, single Logical Fabric number on such switches) to set the IPv4 FC address. Note that setting the IP address for the logical switch is only for the IPFC interface, not for the Ethernet interface.
--add Assigns a specified IPv4 FC address and prefix to the logical switch instance represented by the specified FID. This command replaces any existing FC IPv4 address.
IPv4_address/prefix Specifies the IPv4 address and prefix for the IPFC network interface. The IP Address is represented by a dotted decimal number, followed by a slash and a prefix. This operand is required with the --add option.
--delete Deletes the IPv4 FC address and prefix from a logical switch.
-ls IFID Specifies the fabric ID that identifies the logical switch for which to delete the FC IPv4 address and prefix. This operand is required when deleting an FC IPv4 address from a logical switch. On a switch that is not in Virtual Fabric mode, use the -ls parameter with FID 128 (the effective, single Logical Fabric number on such switches) to delete the IPv4 FC address.
When used interactively to configure IPv4 addresses on a modular platform, ipAddrSet prompts for the following parameters:
-cp cp_number Specifies the managed entity as a CP. Valid values are:
0 Sets the Ethernet IP address, Ethernet subnet mask, gateway IP address, and host name of CP0.
1 Sets the Ethernet IP address, Ethernet subnet mask, gateway IP address, and host name of CP1.
-chassis Specifies the managed entity as the chassis.
Examples Command line examples
To configure an IPv6 address and prefix on a standalone platform:
switch:admin> ipaddrset -ipv6 --add fec0:60:69bc:60:260:69ff:fed0:107/64
To configure an IPv6 address and prefix on a single CP of a chassis:
switch:admin> ipaddrset -cp 0 -ipv6 --add 1080::8:800:200C:417A/64
To delete any existing IPv6 address and prefix on CP0 on an enterprise-class platform:
switch:admin> ipaddrset cp 0 -ipv6 --delete To configure a local IPv4 Ethernet address on a Brocade FC4-16E in a chassis (prefix required):
switch:admin> ipaddrset -slot 1 -eth0 --add 10.12.34.123/24
To configure a local IPv4 Ethernet address on an AP7600 with a hidden BP:
422 Fabric OS Command Reference53-1001764-02

ipAddrSet 2
switch:admin>ipaddrset -eth0 --add 10.12.34.123/24
To configure an IPv4 FC address for the IPFC interface associated with a logical switch with fabric ID 123:
switch:admin>ipaddrset -ls 123 --add 11.1.2.4/24IP address is being changed...Done.
To verify the IPv4 FC address for the logical switch:
switch:admin> ipaddrshow
CHASSISEthernet IP Address: 10.32.220.10Ethernet Subnetmask: 255.255.240.0
CP0Ethernet IP Address: 10.32.220.11Ethernet Subnetmask: 255.255.240.0Host Name: cp0Gateway IP Address: 10.32.208.1
CP1Ethernet IP Address: 10.32.220.12Ethernet Subnetmask: 255.255.240.0Host Name: cp1Gateway IP Address: 10.32.208.1IPFC address for logical fabric ID 128: 1.2.3.4/24
Backplane IP address of CP0 : 10.0.0.5Backplane IP address of CP1 : 10.0.0.6
To delete the IPv4 address for the IPFC interface associated with a logical switch with Virtual Fabric ID 67:
switch:admin> ipaddrset -ls 67 --deleteIP address is being changed...Done.
To configure an IPv4 FC address for the IPFC interface associated with a switch that is not in Virtual Fabric mode:
switch:admin>ipaddrset -ls 128 --add 10.32.72.70/24IP address is being changed...Done.
To verify the changes:
switch:admin>ipaddrshowSWITCHEthernet IP Address: 10.32.72.9Ethernet Subnetmask: 255.255.240.0Gateway IP Address: 10.32.64.1DHCP: OffIPFC address for virtual fabric ID 128: 10.32.72.70/24
Interactive command usage examples
To set the IPv4 address details for a switch chassis in interactive mode:
switch:admin> ipaddrset -chassisEthernet IP Address [192.168.166.148]:
Fabric OS Command Reference 42353-1001764-02

ipAddrSet2
Ethernet Subnetmask [255.255.255.0]:Committing configuration...Done.
To enable DHCP on a standalone, non-AP platform:
switch:admin> ipaddrsetEthernet IP Address [192.168.74.102]:Ethernet Subnetmask [255.255.255.0]:Gateway IP Address [192.168.74.1]:DHCP [Off]: on
See Also ipAddrShow
424 Fabric OS Command Reference53-1001764-02

ipAddrShow 2
ipAddrShow
Displays IP address information for a switch or control processor (CP).
Synopsis ipaddrshow
ipaddrshow [-cp cp_number] | -chassis
ipaddrshow -slot slot_numb [-eth0 | -eth1 | -gate]
Description Use this command to display the IP addresses configured in the system.
The -cp option displays the IP address for a specified CP on modular platforms, or use the command without arguments to display the IP address on a standalone switch, or the IP addresses for both CPs on a chassis.
On a standalone switch, the command displays the following information:
• Ethernet IP Address
• Ethernet Subnet mask
• The Gateway IP Address
• Dynamic Host Control Protocol (DHCP): on or Off
• Pv6 Autoconfiguration Enabled: Yes or No
• Local IPv6 Addresses
On modular platforms, the command displays the following information:
For the chassis:
• Ethernet IP Address
• Ethernet Subnet mask
For each CP:
• Ethernet IP Address
• Ethernet Subnet mask
• Host Name
• Gateway IP Address
If the IPFC network interface is configured for logical switches:
• IPFC address for Virtual Fabric ID
For each CP:
- Backplane IP address
- IPv6 Autoconfiguration Enabled: Yes or No
If enabled, the command displays:
• All local IPv6 Addresses
• Gateway IP addresses for both CPs
Local IPv6 addresses display the following identifiers:
IP Address type:
• static - A statically configured IPv6 address.
Fabric OS Command Reference 42553-1001764-02

ipAddrShow2
• stateless - Acquired through stateless autoconfiguration.
IP Address state:
• tentative
• preferred
• deprecated
Refer to the RFC 2462 specification for more information.
On modular platforms with intelligent blades, the addresses configured for each slot can be shown with the -slot option. On standalone platforms, all command options are ignored.
Note The execution of this command is subject to Virtual Fabric or Admin Domain restrictions that may be in place. Refer to chapter 1, "Using Fabric OS commands" and Appendix A, "Command Availability" for details.
Operands This command has the following operands:
-cp cp_number On dual-CP systems, specifies the CP card number to be displayed (0 or 1).
-chassis On dual-CP systems, displays the IP addresses for the chassis.
-slot slot Specifies the slot for a blade.
-eth0 |-eth1 |-gate For a specified slot, shows only the selected Ethernet interface or the gateway. This operand is optional with the -slot option.
Examples To display the IP addresses on a standalone switch:
switch:admin> ipaddrshow
SWITCHEthernet IP Address: 192.168.163.238Ethernet Subnetmask: 255.255.255.0Gateway IP Address: 192.168.163.1DHCP: OffIPv6 Autoconfiguration Enabled: NoLocal IPv6 Addresses:static 1080::8:800:200c:417a/64
To display all IP addresses on a Brocade DCX backbone:
switch:admin> ipaddrshow
ChassisEthernet IP Address: 10.33.60.85Ethernet Subnetmask: 255.255.240.0
CP0Ethernet IP Address: 10.33.60.86Ethernet Subnetmask: 255.255.240.0Host Name: cp0Gateway IP Address: 10.33.48.1
CP1Ethernet IP Address: 10.33.60.87Ethernet Subnetmask: 255.255.240.0Host Name: cp1Gateway IP Address: 10.33.48.1
426 Fabric OS Command Reference53-1001764-02

ipAddrShow 2
Backplane IP address of CP0 : 10.0.0.5Backplane IP address of CP1 : 10.0.0.6IPv6 Autoconfiguration Enabled: YesLocal IPv6 Addresses:chassis 0 stateless fd00:60:69bc:63:205:1eff:fe39:e45a/64 preferredchassis 0 stateless fec0:60:69bc:63:205:1eff:fe39:e45a/64 preferredcp 0 stateless fd00:60:69bc:63:205:1eff:fe40:6230/64 preferredcp 0 stateless fec0:60:69bc:63:205:1eff:fe40:6230/64 preferredcp 1 stateless fd00:60:69bc:63:205:1eff:fe39:ff2a/64 preferredcp 1 stateless fec0:60:69bc:63:205:1eff:fe39:ff2a/64 preferredIPv6 Gateways:cp 0 fe80:60:69bc:63::3cp 0 fe80:60:69bc:63::1cp 0 fe80:60:69bc:63::2cp 1 fe80:60:69bc:63::1cp 1 fe80:60:69bc:63::2cp 1 fe80:60:69bc:63::3
To display the IP addresses for a chassis:
switch:admin> ipaddrshow -chassisCHASSISEthernet IP Address: 10.32.220.10Ethernet Subnetmask: 255.255.240.0IPv6 Autoconfiguration Enabled: YesLocal IPv6 Addresses:chassis 0 stateless fd00:60:69bc:63:205:1eff:fe39:e45a/64 preferredchassis 0 stateless fec0:60:69bc:63:205:1eff:fe39:e45a/64 preferredIPv6 Gateways:
To display only the IP addresses for CP 1:
switch:admin> ipaddrshow
CP1Ethernet IP Address: 10.33.60.87Ethernet Subnetmask: 255.255.240.0Host Name: cp1Gateway IP Address: 10.33.48.1
See Also ipAddrSet
Fabric OS Command Reference 42753-1001764-02

ipfilter2
ipfilter
Manages the IP filter policies.
Synopsis ipfilter --create policyname -type ipv4 | ipv6
ipfilter --clone policyname -from src_policyname
ipfilter --show [policyname]
ipfilter --save [policyname]
ipfilter --activate policyname
ipfilter --delete policyname
ipfilter --addrule policyname -rule rule_number -sip source IP -dp dest port -proto protocol -act permit | deny
ipfilter --delrule policyname -rule rule number
ipfilter --transabort
Description Use this command to manage IP filter policies. The ipfilter command and command options are noninteractive, except when prompting for a confirmation.
The IP filter policy sets up a packet filtering firewall to provide access control on the management IP interface. The IPv4 and IPv6 policies are either in the defined configuration or in the active configuration.
Excluding the default policies, there can be a maximum of six policies in the defined configuration and one policy per IPv4 and IPv6 type in the active configuration.
The active policy must be the default policy or one of the policies in the defined configuration. Only the active policies are enforced. All of the ipfilter options except --show and --transabort, create a transaction owned by the management session initiating the commands.
An open transaction prevents other transactions from being created on different management sessions. The --create, --clone, --delete, --addrule, and --delrule operands modify policies in memory buffer, while operands, --save and --activate commit policies to the persistent configuration. The operands, --save and --activate, implicitly end the transaction if all policy changes are committed. The operand --transabort explicitly ends an open transaction and aborts policy changes in memory buffer. Closing the management session that owns the transaction also aborts policy changes and closes the transaction.
Notes The execution of this command is subject to Virtual Fabric or Admin Domain restrictions that may be in place. Refer to chapter 1, "Using Fabric OS commands" and Appendix A, "Command Availability" for details.
In a Virtual Fabric environment, IP Filter policies are treated as chassis-wide configurations and apply to all logical switches in the chassis. Chassis permissions are required to manage IP Filter policies.
Operands This command has the following operands:
policyname Specifies an IP filter policy name. The policy name is a unique string composed of a maximum of 20 alphanumeric or underscore characters. The default_ipv4 and default_ipv6 names are reserved for default IP filter policies. The policy name is case-insensitive and is always stored as lower
428 Fabric OS Command Reference53-1001764-02

ipfilter 2
case. The policy type identifies the policy as an IPv4 or IPv6 filter. You can create a maximum of eight IP filter policies.
--create policyname -type ipv4 | ipv6 Creates an IP filter policy with the specified name and type. The policy created is stored in a temporary buffer and is lost if the policy is not saved to the persistent configuration.
--clone policyname -from src_policynameCreates a replica of an existing IP filter policy. The cloned policy is stored in a temporary buffer and has the same rules as the original policy.
--show [policyname]Displays the IP filter policy content for the specified policy name or all IP filter policies if policyname is not specified. For each IP filter policy, the policy name, type, persistent state, and policy rules are displayed. The policy rules are listed by the rule number in ascending order.
Command output displays without pagination. Use command | more to display the output with page breaks. If a temporary buffer exists for an IP filter policy, the --show operand displays the content in the temporary buffer, with the persistent state set to modified defined or modified active.
--save [policyname]
Saves one or all IP filter policies persistently as the defined configuration. This operand is optional. If a policy name is specified, only the specified IP filter policy in the temporary buffer is saved; otherwise, all IP filter policies in the temporary buffer is saved. Only the CLI session that owns the updated temporary buffer can run this command. Modification to an active policy cannot be saved without being applied. Therefore, --save is blocked for the active policies; instead use --activate.
--activate policynameActivates the specified IP filter policy. IP filter policies are not enforced until they are activated. Only one IP filter policy per IPv4 and IPv6 type can be active. If there is a temporary buffer for the policy, the policy is saved to the defined configuration and activated at the same time. If there is no temporary buffer for the policy, the policy existing in the defined configuration becomes active. The policy to be activated replaces the existing active policy of the same type. Activating the default IP filter policies returns the IP management interface to its default state. An IP filter policy without any rule cannot be activated. This operand prompts for confirmation before proceeding.
--delete policyname
Deletes the specified IP filter policy. Deleting an IP filter policy removes it from the temporary buffer. To permanently delete the policy from the persistent database, issue ipfilter --save. An active IP filter policy cannot be deleted.
--addrule policyname
Adds a new rule to the specified IP filter policy. The change made to the specified IP filter policy is not saved to the persistent configuration until saved or activated.
Fabric OS Command Reference 42953-1001764-02

ipfilter2
The following arguments are supported with the --addrule option:
-sip Specifies the source IP address. For filters of type IPv4, the address must be a 32-bit address in dot notation, or a CIDR-style IPv4 prefix. For filters of type IPv6, the address must be a 12- bit IPv6 address in any format specified by RFC, or a CIDR-style IPv6 prefix.
-dp Specifies the destination port number, a range of port numbers, or a service name.
-proto Specifies the protocol type, for example tcp or udp.
-act Specifies the permit or deny action associated with this rule.
rule rule_number
Adds a new rule at the specified rule index number. The rule number must be between 1 and the current maximum rule number plus one.
--delrule policyname -rule rule_number
Deletes a rule from the specified IP filter policy. Deleting a rule in the specified IP filter policy causes the rules following the deleted rule to shift up in rule order. The change to the specified IP filter policy is not saved to the persistent configuration until it is saved or activated.
--transabort A transaction is associated with a CLI or manageability session. It is opened implicitly when running the --create, --addrule and --delrule subcommands. --transabort explicitly ends the transaction owned by the current CLI or manageability session. If a transaction is not ended, other CLI or manageability sessions are blocked on the subcommands that would open a new transaction.
Examples To create an IP filter for a policy with an IPv6 address:
switch:admin> ipfilter --create ex1 -type ipv6
To add a new rule to the policy and specify the source IP address, destination port, and protocol, and to permit the rule:
switch:admin> ipfilter --addrule ex1 -sip fec0:60:69bc:60:260:69ff:fe80:d4a -dp 23 \-proto tcp -act permit
To display all existing IP filter policies:
switch:admin> ipfilter --show
Name: default_ipv4, Type: ipv4, State: activeRule Source IP Protocol Dest Port Action1 any tcp 22 permit2 any tcp 23 permit3 any tcp 897 permit4 any tcp 898 permit5 any tcp 111 permit6 any tcp 80 permit7 any tcp 443 permit8 any udp 161 permit9 any udp 111 permit10 any udp 123 permit11 any tcp 600 - 1023 permit12 any udp 600 - 1023 permit
430 Fabric OS Command Reference53-1001764-02

ipfilter 2
Name: default_ipv6, Type: ipv6, State: activeRule Source IP Protocol Dest Port Action1 any tcp 22 permit2 any tcp 23 permit3 any tcp 897 permit4 any tcp 898 permit5 any tcp 111 permit6 any tcp 80 permit7 any tcp 443 permit8 any udp 161 permit9 any udp 111 permit10 any udp 123 permit11 any tcp 600 - 1023 permit12 any udp 600 - 1023 permit
Name: ex1, Type: ipv6, State: defined (modified)Rule Source IP Protocol Dest Port Action1 fec0:60:69bc:60:260:69ff:fe80:d4a tcp 23 permit
To activate the IP Filter policy “ex1”:
switch:admin> ipfilter --activate ex1
To display all IP Filter policies, including the activated policy:
switch:admin> ipfilter --show
Name: default_ipv4, Type: ipv4, State: activeRule Source IP Protocol Dest Port Action1 any tcp 22 permit2 any tcp 23 permit3 any tcp 897 permit4 any tcp 898 permit5 any tcp 111 permit6 any tcp 80 permit7 any tcp 443 permit8 any udp 161 permit9 any udp 111 permit10 any udp 123 permit11 any tcp 600 - 1023 permit12 any udp 600 - 1023 permit
Name: default_ipv6, Type: ipv6, State: definedRule Source IP Protocol Dest Port Action1 any tcp 22 permit2 any tcp 23 permit3 any tcp 897 permit4 any tcp 898 permit5 any tcp 111 permit6 any tcp 80 permit7 any tcp 443 permit8 any udp 161 permit9 any udp 111 permit10 any udp 123 permit11 any tcp 600 - 1023 permit12 any udp 600 - 1023 permit
Name: ex1, Type: ipv6, State: activeRule Source IP Protocol Dest Port Action1 fec0:60:69bc:60:260:69ff:fe80:d4a tcp 23 permit
Fabric OS Command Reference 43153-1001764-02

ipfilter2
To create an IPv4-type IP filter policy:
switch:admin> ipfilter --create ex2 -type ipv4
To add a rule to the created policy “ex2”:
switch:admin> ipfilter --addrule ex2 -sip 10.32.69.99 -dp 23 -proto tcp -act permit
To display the IP filter policies, including the new policy:
switch:admin> ipfilter --show
Name: default_ipv4, Type: ipv4, State: activeRule Source IP Protocol Dest Port Action1 any tcp 22 permit2 any tcp 23 permit3 any tcp 897 permit4 any tcp 898 permit5 any tcp 111 permit6 any tcp 80 permit7 any tcp 443 permit8 any udp 161 permit9 any udp 111 permit10 any udp 123 permit11 any tcp 600 - 1023 permit12 any udp 600 - 1023 permit
Name: ex2, Type: ipv4, State: defined (modified)Rule Source IP Protocol Dest Port Action1 10.32.69.99 tcp 23 permit
To save the IP Filter policy “ex2” (the status of the policy changes from modified to defined after the policy is saved):
switch:admin> ipfilter --save ex2switch:admin> ipfilter --showName: default_ipv4, Type: ipv4, State: activeRule Source IP Protocol Dest Port Action1 any tcp 22 permit2 any tcp 23 permit3 any tcp 897 permit4 any tcp 898 permit5 any tcp 111 permit6 any tcp 80 permit7 any tcp 443 permit8 any udp 161 permit9 any udp 111 permit10 any udp 123 permit11 any tcp 600 - 1023 permit12 any udp 600 - 1023 permit
Name: ex2, Type: ipv4, State: definedRule Source IP Protocol Dest Port Action1 10.32.69.99 tcp 23 permit
See Also policy, distribute
432 Fabric OS Command Reference53-1001764-02

ipSecConfig 2
ipSecConfig
Configures Internet Protocol security (IPSec) policies for Ethernet management interfaces.
Synopsis ipsecconfig --enable [default] --disable
ipsecconfig --add | --modify type [subtype] [arguments]
ipsecconfig --delete [type] arguments
ipsecconfig --flush manual-sa
ipsecconfig --show type [subtype] arguments
ipsecconfig --help [command type subtype]
Description Use this command to configure the Internet Protocol Security (IPSec) feature for traffic flows on switch Ethernet management interfaces, or to display the current configuration.
Internet Protocol security (IPSec) is a framework of open standards that provides private, secure communication over Internet Protocol (IP) networks through the use of cryptographic security services.
IPSec uses different protocols to ensure the authentication, integrity, and confidentiality of the communication.
• Encapsulating Security Payload (ESP) provides confidentiality, data integrity and data source authentication of IP packets, and protection against replay attacks.
• Authentication Header (AH) provides data integrity, data source authentication, and protection against replay attacks, but unlike ESP, AH does not provide confidentiality.
IPSec can protect either the entire IP datagram or only the upper-layer protocols. The appropriate modes are called tunnel mode and transport mode.
• In tunnel mode the IP datagram is fully encapsulated by a new IP datagram using the IPSec protocol.
• In transport mode only the payload of the IP datagram is handled by the IPSec protocol; it inserts the IPSec header between the IP header and the upper-layer protocol header.
The IPSec key management supports Internet Key Exchange (IKE) or Manual key/SA entry.
• In IKE the IPSec protocol negotiates shared security parameters and keys. Security Associations (SAs) used in IKE use automatically generated keys for authentication negotiation between peers.
• Manual key/SA entry requires the keys to be generated and managed manually, and it is therefore suited for small static environments. For the selected authentication or encryption algorithms, the correct keys must be generated. The key length is determined by the algorithm selected. Refer to the Fabric OS Administrator’s Guide for more information.
The following IPSec configuration tasks can be performed with this command:
• Enable or disable the IPSec policies.
• Configure IP address for both IPv4 and IPv6 format.
• Configure three types of policies and their respective components:
- IPSec policy including selector, transform, SA-proposal, and SA.
- IKE policy (automatic key management).
- Manual SA (manual SA management).
Fabric OS Command Reference 43353-1001764-02

ipSecConfig2
• Modify existing IPSec and IKE policies.
• Delete existing policies and SAs from the configuration database.
• Flush existing SAs from the kernel SA database (SADB).
• Display policy parameters.
Representation of IP addressesWhen configuring IPSec policies, IP addresses and ports must be specified in the following format:
IP address IPv4 addresses are expressed in dotted decimal notation consisting of numeric characters (0-9) and periods (.), for example, 203.178.141.194.
IPv6 address consist of hexadecimal digits (09afAF), colons (:) and a percent sign (%) if necessary, for example, 2001:200:0:8002:203:47ff:fea5:3085
network prefix A network prefix is represented by a number followed by a slash (/), for example: ::1/0.
Notes IPSec configuration changes take effect upon execution and are persistent across reboot.
The execution of this command is subject to Virtual Fabric or Admin Domain restrictions that may be in place. Refer to chapter 1, “Using Fabric OS commands” and Appendix A, “Command Availability” for details.
This command does not provide IPSec protection for traffic flows on external management interfaces of intelligent blades in a chassis, nor does it support protection of traffic flows on FCIP interfaces.
This command does not support manipulating preshared keys corresponding to the identity of the IKE peer or group of peers. Use secCertUtil to import, delete, or display the preshared keys in the local switch database.
The MD5 hash algorithm is blocked when FIPS mode is enabled.
Refer to the example section for specific use cases and associated command sequences. Refer to the Fabric OS Administrator’s Guide for configuration procedures.
This command accepts abbreviated operands. The abbreviated string must contain the minimum number of characters necessary to uniquely identify the operand within the set of available operands.
Operands This command has the following operands:
--enable Enables IPSec on the switch. Existing IPSec configurations are enabled by this command. IPSec is by default disabled. It must be enabled before you can configure the policies and parameters. The following operand is optional:
default Clears the existing policies (automatic key management and manual keyed entries) and resets the configuration databases to default values.
--disable Disables IPSec on the switch. All active TCP sessions are terminated when you disable iPsec.
--add |--modify Adds or modifies an IPSec or IKE policy in an existing enabled configuration. Not all parameters can be modified. Parameters that cannot be modified are indicated below. When modifying a policy the names and identifiers need to refer to valid existing entities. The syntax is as follows:
--add | --modify type [subtype] [arguments]
434 Fabric OS Command Reference53-1001764-02

ipSecConfig 2
type Specifies the policy to be created. Supported policies include:
policy ips Creates or modifies an IPSec policy. This policy determines the security services afforded to a packet and the treatment of a packet in the network. An IPSec policy allows classifying IP packets into different traffic flows and specifies the actions or transformations performed on IP packets on each of the traffic flows. The main components of an IPSec policy are: IP packet filter/selector (IP address, protocol, and port information) and transform set.
subtype A subtype is required when configuring an IPSec policy. The subtype specifies the components to be configured. The following are required subtypes for the IPSec policy:
selector Creates a selector that is applied to the IP data traffic. A selector consists of a set of parameters that identify the IP traffic that needs IPSec protection. To configure the selector, the following parameters must be specified:
-tag name Specifies a name for the selector. This is a user-generated name. The name must be between 1 and 32 characters in length, and may include alphanumeric characters, dashes (-), and underscores (_).
-direction in|out Specifies traffic flow direction as inbound or outbound.
-local IP_address[/prefixlength] Specifies the source IPv4 or IPv6 address.
-remote IP_address[/prefixlength] Specifies the peer IPv4 or IPv6 address.
-transform name Specifies the transform to be included in the selector. You must create the transform before you can use in the selector. Use ipsecConfig --show policy ips transform to display existing transforms.
-protocol protocol_name Specifies the upper layer protocols to be selected for IPSec protection. Valid protocols include tcp, udp, icmp or any. When any is specified all existing protocols are selected for protection. This operand is optional.
transform Creates the IPSec transform set. The transform set is a combination of IPSec protocols and cryptographic algorithms that are applied on the packet after it is matched to a selector. The transform set specifies the IPSec protocol, the IPSec mode, and the action to be performed on the IP packet. It also specifies the key management policy that is needed for the IPSec connection and the encryption and authentication algorithms to be used in security associations when IKE is used as key management protocol. The following operands are required:
-tag name Specifies a name for the transform. This is a user-generated name. The name must be between 1 and 32 characters in length, and may include alphanumeric characters, dashes (-), and underscores (_).
Fabric OS Command Reference 43553-1001764-02

ipSecConfig2
-mode tunnel|transport Specifies the IPSec transform mode. In tunnel mode, the IP datagram is fully encapsulated by a new IP datagram using the IPSec protocol. In transport mode, only the payload of the IP datagram is handled by the IPSec protocol inserting the IPSec header between the IP header and the upper-layer protocol header.
-sa-proposal name Specifies the SA proposal to be included in the transform. You must create the SA proposal first before you can include it in the transform. Use ipsecConfig --show policy ips sa-proposal -a for a listing of existing SA proposals.
-action discard|bypass|protect Specifies the protective action the transform should take regarding the traffic flows.
-ike name Specifies the IKE policy to be included in the transform. This operand is optional. Use ipsecConfig --show policy ike -a for a listing of existing IKE policies.
-local IP_address[/prefixlength] Specifies the source IPv4 or IPv6 address. This operand is optional. If a local source IP address is defined, a remote peer IP address must also be defined.
-remote IP_address[/prefixlength] Specifies the peer IPv4 or IPv6 address. This operand is optional. If a remote peer IP address is defined, a local source IP address must also be defined.
sa-proposal Defines the security associations (SA) proposal, including name, SAs to be included and lifetime of the proposal. The following operands are supported:
-tag name Specifies a name for the SA proposal. This is a user-generated name. The name must be between 1 and 32 characters in length, and may include alphanumeric characters, dashes (-), and underscores (_).
-sa name[,name] Specifies the SAs to include in the SA proposal. The bundle consists of one or two SA names, separated by commas. For SA bundles, [AH, ESP] is the supported combination. The SAs must be created prior to being included in the SA proposal. This operand is required.
-lttime number Specifies the SA proposal’s lifetime in seconds. This operand is optional. If a lifetime is not specified, the SA does not expire. If lifetime is specified both in seconds and in bytes, the SA expires when the first expiration criterion is met.
436 Fabric OS Command Reference53-1001764-02

ipSecConfig 2
-ltbyte number Specifies the SA proposal’s lifetime in bytes. The SA expiries after the specified number of bytes have been transmitted. This operand is optional.
sa Defines the Security Association. An SA specifies the IPSec protocol (AH or ESP), the algorithms used for encryption and authentication, and the expiration definitions used in security associations of the traffic. IKE uses these values in negotiations to create IPSec SAs.
You cannot modify an SA once it is created. Use ipsecConfig --flush manual-sa to remove all SA entries from the kernel SA database (SADB) and start over.
-tag name Specifies a name for the SA. This is a user-generated name. The name must be between 1 and 32 characters in length, and may include alphanumeric characters, dashes (-), and underscores (_). This operand is required.
-protocol ah|esp Specifies the IPSec protocol. Encapsulating Security Payload (ESP) provides confidentiality, data integrity and data source authentication of IP packets, and protection against replay attacks. Authentication Header (AH) provides data integrity, data source authentication, and protection against replay attacks but, unlike ESP, does not provide confidentiality. This operand is required.
-auth algorithm Specifies the authentication algorithm. This operand is required. Valid algorithms include:
• hmac_md5 - MD5 authentication algorithm• hmac_sha1 - SHA1 authentication algorithm
-enc algorithm Specifies the encryption algorithm. This operand is required. Valid algorithms include:
• 3des_cbc - 3DES encryption algorithm • blowfish_cbc - Blowfish encryption algorithm • null_enc - Null encryption algorithm • aes256_cbc - AES-256 algorithm
-spi number Specifies the security parameter index (SPI) for the SA. This is a user-defined index. Valid SPI numbers consist of numeric characters (0-9). This operand is optional.
Fabric OS Command Reference 43753-1001764-02

ipSecConfig2
policy ike Creates or modifies an IKE policy configuration. No subtype is required with this command. The command defines the following IKE policy parameters: IKE version, IP address of the remote entity, IP address of the local entity, encryption algorithm, hash algorithm, PRF algorithm, DH group, authentication method, path and filename of the preshared key. The syntax is as follows: ipsecConfig --add | --modify ike arguments.
arguments Valid arguments for policy ike include:
-tag name Specifies a name for the IKE policy. This is a user-generated name. The name must be between 1 and 32 characters in length, and may include alphanumeric characters, dashes (-), and underscores (_). This operand is required.
remote IP_address[/prefixlength] Specifies the peer IPv4 or IPv6 address and prefix.
-id identifier Specifies the local identifier. The switch is identified by its IPv4 or IPv6 address.
-remoteid identifier Specifies the peer identifier. The remote peer is identified by its IPv4 or IPv6 address.
-enc algorithm Specifies the encryption algorithm. Valid encryption algorithms include the following:
• 3des_cbc - 3DES algorithm • blowfish_cbc - Blowfish algorithm• aes128_cbc - AES 128-bit algorithm • aes256_cbc - AES 256-bit algorithm • null_enc - Null encryption algorithm (cleartext)
-hash algorithm Specifies the hash algorithm. Valid hash algorithms include the following:
• hmac_md5 - MD5 algorithm• hmac_sha1 - SH1 algorithm
-prf algorithm Specifies the PFR algorithm. Valid PRF algorithms include the following:
• hmac_md5 - MD5 algorithm• hmac_sha1 - SH1 algorithm
-auth psk|dss|rsasig Specifies the authentication method as one of the following:
psk Authenticate using preshared keys.
dss Authenticate using digital signature standard.
rsasig Authenticate using an RSA signature.
-dh number Specifies the DH group number as one of the following:
1 Specifies DH group modp768.
2 Specifies DH group modp1024.
14 Specifies DH group modp2048.
438 Fabric OS Command Reference53-1001764-02

ipSecConfig 2
The following operands are optional (use secCertUtil import to import the key files to the local and remote systems):
-psk file Specifies the preshared key filename.
-pubkey file Specifies the public key filename (in X.509 PEM format).
-privkey file Specifies the private key filename (in X.509 PEM format).
-peerpubkey file Specifies the peer public key filename (in X.509 PEM format).
-lttime number Specifies the key lifetime in seconds. If a lifetime is not specified, the keys do not expire. If a lifetime is specified both in seconds and in bytes, the keys expire when the first expiration criterion is met.
-ltbyte number Specifies the key lifetime in bytes. The keys expire after the specified number of bytes have been transmitted.
-pfs on|off Enables or disables Perfect Forward Secrecy (PFS). PFS is disabled by default. When PFS is disabled, IKE uses the initial master key it generates in Phase1 to generate the keys for SA connections in Phase2. When PFS is enabled, a new key is generated for keying the SAs. Enabling PFS may provide enhanced protection against keys compromise.
-version 1|2 Specifies the IKE version. This operand is optional. If not specified, IKEv2 is used (2). If 1 is specified, IKEv1 is selected. Use -v 2 to revert to version 2 after version 1 was set.
manual-sa Creates manually keyed SADB entries. When using this option, you must generate the keys manually, The lifetime of an SA entry created using this command is infinite. You cannot modify manually keyed SA entries. Use ipsecConfig --flush, or ipsecConfig --delete and recreate the entries. The syntax for creating an SADB entry is as follows:
ipsecconfig --add manual-sa arguments.
arguments Valid arguments for manual-sa include:
-spi number Specifies the security parameter index (SPI) for the SA. This is a user-defined index. Valid SPI numbers consist of numeric characters (0-9).
-local ipaddress Specifies the local IPv4 or IPv6 address.
-remote ipaddress Specifies the remote IPv4 or IPv6 address.
-protocol protocol_name Specifies the upper layer protocols to be selected for protection. Valid protocols include tcp, udp, icmp or any. When any is specified all existing protocols are selected for protection.
Fabric OS Command Reference 43953-1001764-02

ipSecConfig2
-ipsec ah|esp Specifies the IPSec protocol. Encapsulating Security Payload (ESP) provides confidentiality, data integrity and data source authentication of IP packets, and protection against replay attacks. Authentication Header (AH) provides data integrity, data source authentication, and protection against replay attacks but, unlike ESP, does not provide confidentiality.
-action discard|bypass|protect Specifies the IPSec protection type regarding the traffic flows.
-direction in|out Specifies traffic flow direction as inbound or outbound.
-mode tunnel|transport Specifies the IPSec mode. In tunnel mode, the IP datagram is fully encapsulated by a new IP datagram using the IPSec protocol. In transport mode, only the payload of the IP datagram is handled by the IPSec protocol; it inserts the IPSec header between the IP header and the upper-layer protocol header.
-enc algorithm Specifies the encryption algorithm. Valid encryption algorithms include the following:
• 3des_cbc - 3DES algorithm • null_enc - Null encryption algorithm(cleartext)
-auth algorithm Specifies the authentication algorithm. Valid authentication algorithms include the following:
• hmac_md5 - MD5 algorithm• hmac_sha1 - SH1 algorithm
-enc-key number Specifies the encryption key. This is a user-generated key based on the length of the key. Use the LINUX random key generator or any other comparable third party utility to generate the manual SA keys. Refer to the Fabric OS Administrator’s Guide for details.
• A 192-bit value for the 3des_cbc encryption algorithm, for example, 0x96358c90783bbfa3d7b196ceabe0536b
• A zero-bit value for the null_enc encryption algorithm.
-auth-key number Specifies the authentication key. This is a user-generated key based on the length of the key.
• A 128-bit value for the hmac_md5 authentication algorithm.• A 160-bit value for the hmac_sha1 authentication algorithm.
The following operands are optional:
tunnel-local ipaddress Specifies the local tunnel IPv4 or IPv6 address.
tunnel-remote ipaddress Specifies the peer tunnel IPv4 or IPv6 address.
440 Fabric OS Command Reference53-1001764-02

ipSecConfig 2
--delete Deletes a specified policy or all policies of a certain type from the configuration database. You can delete IPSec policies, IKE policies, and SADB entries. When deleting IPSec policies, you have the option to delete specific components only, such as the transform or the selector, and recreate these components without having to recreate the entire policy. The syntax for deleting a policy is as follows:
ipsecconfig --delete type [subtype] arguments
type Specifies the policy to be deleted. Valid policy types include:
policy ips Deletes a specified IPSec policy or all IPSec policies.
subtype Optionally specify a component (subtype) to delete the component only:
selector Deletes the selector for a specified IPSec policy, or all selectors of all configured IPSec policies.
transform Deletes the transform for a specified IPSec policy, or all transforms of all configured IPSec policies.
sa-proposal Deletes the SA proposal for a specified IPSec policy, or all SA proposals of all configured IPSec policies.
sa Deletes the SAs for a specified IPSec policy, or all SAs of all configured IPSec policies.
policy ike Deletes a specified IKE policy or all configured IKE policies.
sa Deletes a specified SADB entry or all manual SADB entries.
manual-sa Deletes the SA policy entries used in manually keyed SA entries from the configuration database.
arguments Specifies the selection as one of the following:
-a Deletes all configuration information for the specified type and subtype.
-tag name Deletes all configuration information for the specified policy type.
--flush manual-sa Flushes all SA entries (including manually keyed and automatically keyed SAs) from the kernel SADB. All active TCP sessions that are using IPSec protection are terminated when this command is executed. This command, unlike delete, does not remove the policies from the configuration database. Flushing any other policy parameters is not supported.
--show Displays current IPSec or IKE configuration. The syntax for the display option is as follows:
--show type [subtype] arguments]
type Specifies the policy to be displayed. Valid values for type include the following:
policy ips Displays the IPSec policy configuration. A policy subtype must be specified when displaying the IPSec policy configuration. Valid subtypes include the following:
Fabric OS Command Reference 44153-1001764-02

ipSecConfig2
selector Displays IPSec selector parameters including IPSec policy name, IP address of the local entity, IP address of the remote entity, direction of traffic flow (inbound or outbound), upper layer protocol used, and IPSec transform index.
transform Displays IPSec transform parameters including IPSec policy name, key management protocol (version) or manual SA, processing option for selected IP traffic, IPSec mode (tunnel or transport), IP address of the local entity, IP address of the remote entity, and SA proposal.
sa-proposal Displays the parameters of the SA proposal, including proposal name, lifetime (in seconds and in byte units, or infinite), and associated SA definitions.
sa Displays security association (SA) parameters for the specified IPSec policies including policy names, IPSec protocol used (AH or ESP), encryption and authentication algorithms.
policy ike Displays the IKE policy configuration. No subtype is required with this command. The command displays the following IKE policy parameters: IKE version, IP address of the remote entity, IP address of the local entity, encryption algorithm, hash algorithm, PRF algorithm, DH group, authentication method, path and filename of the preshared key.
manual-sa Displays the Security Associations in the local SADB. No subtype is required with this command.
arguments Specifies the display selection as one of the following:
-a Displays all configuration information for the specified type and subtype.
-tag name Displays configuration information for the specified IPSec policy only.
--help Displays the command usage. Optionally use --help with a specified command, type, and subtype to display the syntax for specific commands. Do not include a double dash when specifying the command.
Examples 1. “Example 1” - Configure an IPSec policy using AH protection with MD5 and configure IKE with preshared keys.
2. “Example 2” - Configure an IPSec policy using ESP protection with 3DES_CBC encryption and SHA1 authentication, and configure IKE with RSA signed certificates.
3. “Example 3” - Configure an IPSec policy using AH with SHA1 and ESP protection with 3DES and configure IKE with preshared keys.
4. “Example 4” - Secure traffic between two systems using protection with MD5 and Manually keyed SAs.
5. “IPSec display commands” - Verify your IPSec configurations.
6. “Using the help command” - Use the help command with arguments to get syntax information on specific parameters.
442 Fabric OS Command Reference53-1001764-02

ipSecConfig 2
Example 1Secure traffic between two systems using AH protection with MD5 and configure IKE with preshared keys. The two systems are a switch, BROCADE300 (IPv4 address 10.33.74.13), and an external UNIX server (10.33.69.132).
1. On the system console, log into the switch as Admin and enable IPSec.
switch:admin> ipsecconfig --enable
2. Create an IPSec SA policy named AH01, which uses AH protection with MD5.
switch:admin> ipsecconfig --add policy ips sa -t AH01 -p ah -auth hmac_md5
3. Create an IPSec proposal IPSEC-AH to use AH01 as SA.
switch:admin> ipsecconfig --add policy ips sa-proposal -t IPSEC-AH -sa AH01
4. Configure the SA proposal’s lifetime in time units.
switch:admin> ipsecconfig --add policy ips sa-proposal -t IPSEC-AH -lttime 280000 -sa AH01
5. Import the preshared key file (e.g., ipseckey.psk) using the seCcertUtil import command.
6. Configure an IKE policy for the remote peer.
switch:admin> ipsecconfig --add policy ike -t IKE01 -remote 10.33.69.132 -id 10.33.74.13 \-remoteid 10.33.69.132 -enc 3des_cbc -hash hmac_md5 -prf hmac_md5 -auth psk \-dh modp1024 -psk ipseckey.psk
7. Create an IPSec transform named TRANSFORM01 to use transport mode to protect traffic identified for IPSec protection and use IKE01 as the key management policy.
switch:admin> ipsecconfig --add policy ips transform -t TRANSFORM01 -mode transport \-sa-proposal IPSEC-AH -action protect -ike IKE01
8. Create traffic selectors to select the outbound and inbound traffic that needs to be protected.
switch:admin> ipsecconfig --add policy ips selector -t SELECTOR-OUT \-d out -l 10.33.74.13 -r 10.33.69.132 -transform TRANSFORM01
switch:admin> ipsecconfig --add policy ips selector -t SELECTOR-IN \-d in -l 10.33.69.132 -r 10.33.74.13 -transform TRANSFORM01
9. Verify the IPSec SAs created using IKE for above traffic flow using ipsecConfig --show manual-sa -a. Refer to the “IPSec display commands” section for an example.
10. Perform the equivalent steps on the remote peer to complete the IPSec configuration. Refer to your server administration guide for instructions.
Example 2Secure traffic between two systems using ESP protection with 3DES_CBC encryption and SHA1 authentication, and configure IKE with RSA Certificates signed by the certification authority (CA). The two systems are A SWITCH, BROCADE300 (IPv6 address fe80::220:1aff:fe34:2e82), and an external UNIX host (IPv6 address fe80::205:1fff:fe51:f09e).
1. On the system console, log into the switch as Admin and enable IPSec.
switch:admin> ipsecconfig --enable
2. Create an IPSec SA policy named ESP01, which uses ESP protection with 3DES and SHA1.
switch:admin> ipsecconfig --add policy ips sa -t ESP01 -p esp -enc 3des_cbc -auth hmac_sha1
3. Create an IPSec proposal IPSEC-ESP to use ESP01 as the SA.
switch:admin> ipsecconfig --add policy ips sa-proposal -t IPSEC-ESP -sa ESP01
Fabric OS Command Reference 44353-1001764-02

ipSecConfig2
4. Configure the SA proposal lifetime in seconds.
switch:admin> ipsecconfig --add policy ips sa-proposal -t IPSEC-ESP -lttime 280000 -sa ESP01
5. Import the public key for the BROCADE300 (Brocade300.pem), the private key for BROCADE300 (Brocade300-key.pem), and the public key of the external host (remote-peer.pem) in X.509 PEM format from the remote certificate server (10.6.103.139).
switch:admin> seccertutil import -ipaddr 10.103.6.139 -remotedir /root/certs -certname \ Brocade300.pem
switch:admin> seccertutil import -ipaddr 10.103.6.139 -remotedir /root/certs -certname \ Brocade300-key.pem
switch:admin> seccertutil import -ipaddr 10.103.6.139 -remotedir /root/certs -certname \ remote-peer.pem
6. Import the CA certificate that was used to sign the public certificates of BROCADE300 and the remote peer as IPSECCA.pem.
switch:admin> seccertutil import -ipaddr 10.103.6.139 -remotedir /root/certs \ -certname IPSECCA.pem
7. Configure an IKE policy for the remote peer UNIX host.
switch:admin> ipsecconfig --add policy ike -t IKE01 -remote fe80::205:1fff:fe51:f09e \-id fe80::220:1aff:fe34:2e82 -remoteid fe80::205:1fff:fe51:f09e \-enc 3des_cbc -hash hmac_md5 -prf hmac_md5 -auth rsasig -dh modp1024 \-pubkey "Brocade300.pem" -privkey "Brocade300-key.pem" -peerpubkey "remote-peer.pem"
8. Create an IPSec transform TRANSFORM01 to use transport mode to protect traffic identified for IPSec protection and use IKE01 as the key management policy.
switch:admin> ipsecconfig --add policy ips transform -t TRANSFORM01 \-mode transport -sa-proposal IPSEC-ESP -action protect -ike IKE01
9. Create traffic selectors to select outbound and inbound TCP traffic that needs to be protected.
switch:admin> ipsecconfig --add policy ips selector -t SELECTOR-OUT \-d out -l fe80::220:1aff:fe34:2e82 -r fe80::205:1fff:fe51:f09e \-protocol "tcp" -transform TRANSFORM01
switch:admin> ipsecconfig --add policy ips selector -t SELECTOR-IN \-d in -l fe80::205:1fff:fe51:f09e -r fe80::220:1aff:fe34:2e82 \-protocol "tcp" -t transform TRANSFORM01
10. Verify the IPSec SAs using ipSecConfig --show manual-sa -a. Refer to the ““IPSec display commands” section for an example.
11. Perform the equivalent steps on the remote peer to complete the IPSec configuration. Refer to your server administration guide for instructions.
Example 3Secure traffic between two systems using AH with SHA1 and ESP protection with 3DES and configure IKE with preshared keys. The two systems are a switch, BROCADE300 (IP address 10.33.74.13), and an external UNIX host (IPv4 address 10.33.69.132).
1. On the system console, log into the switch as Admin and enable IPSec.
switch:admin> ipsecconfig --enable
2. Create an IPSec SA policy named AH01, which uses AH protection with SHA1.
switch:admin> ipsecconfig --add policy ips sa -t AH01 -p ah -auth hmac_sha1
444 Fabric OS Command Reference53-1001764-02

ipSecConfig 2
3. Create an IPSec SA policy named ESP01, which uses ESP protection with 3DES.
switch:admin> ipsecconfig --add policy ips sa -t ESP01 -p esp -enc 3des_cbc
4. Create an IPSec proposal IPSEC-AHESP to use an AH01 and ESP01 bundle.
switch:admin> ipsecconfig --add policy ips sa-proposal -t IPSEC-AHESP -sa AH01,ESP01
5. Import the preshared key file (e.g., ipseckey.psk) using the secCertUtil import command.
6. Create an IKE policy for the remote peer.
switch:admin> ipsecconfig --add policy ike -t IKE01 -remote 10.33.69.132 -id 10.33.74.13 \-remoteid 10.33.69.132 -enc 3des_cbc -hash hmac_md5 -prf hmac_md5 \-auth psk -dh modp1024 -psk ipseckey.psk
7. Create an IPSec transform TRANSFORM01 configured with transport mode to protect traffic identified for IPSec protection and use IKE01 as a key management policy.
switch:admin> ipsecconfig --add policy ips transform -t TRANSFORM01 -mode transport \-sa-proposal IPSEC-AHESP -action protect -ike IKE01
8. Create traffic selectors to protect outbound and inbound traffic.
switch:admin> ipsecconfig --add policy ips selector -t SELECTOR-OUT \-d out -l 10.33.74.13 -r 10.33.69.132 -transform TRANSFORM01switch:admin> ipsecconfig --add policy ips selector -t SELECTOR-IN \-d in -l 10.33.69.132 -r 10.33.74.13 -transform TRANSFORM01
9. Verify the IPSec SAs using ipSecConfig --show manual-sa -a. Refer to the “IPSec display commands” section for an example.
10. Perform the equivalent steps on the remote peer to complete the IPSec configuration. Refer to your server administration guide for instructions.
Example 4Secure traffic between two systems using protection with MD5 and Manually keyed SAs. The two systems are a switch, the BROCADE300 (IPv4 address 10.33.74.13), and an external UNIX host (IPv4 address 10.33.69.132).
1. On the system console, log into the switch as Admin and enable IPSec.
switch:admin> ipsecconfig --enable
2. Create an IPSec Manual SA that uses AH protection with MD5 for outbound traffic:
switch:admin> ipsecconfig --add manual-sa -spi 0x300 -l 10.33.74.13 -r 10.33.69.132 \-p any -d out -m transport -ipsec ah -ac protect -auth hmac_md5 -auth-key "TAHITEST89ABCDEF"
3. Create an SA for inbound traffic.
switch:admin> ipsecconfig --add manual-sa -spi 0x200 -l 10.33.69.132 -r 10.33.74.13 \-p any -d in -m transport -ipsec ah -ac protect -auth hmac_md5 -auth-key "TAHITEST89ABCDEF"
4. Verify the SAs using ipsecConfig --show manual-sa -a. Refer to the “IPSec display commands” section for an example.
5. Perform the equivalent steps on the remote peer to complete the IPSec configuration. Refer to your server administration guide for instructions.
Fabric OS Command Reference 44553-1001764-02

ipSecConfig2
IPSec display commandsTo display the IPSec IKE Policy:
switch:admin> ipsecconfig --show policy ike -aIKE-01 version:ikev2 remote:10.33.69.132 local-id:10.33.74.13 remote-id:10.33.69.132 encryption algorithm: 3des_cbc hash algorithm: hmac_md5 prf algorithm: hmac_md5 dh group: 2 1 auth method:rsasig public-key:"/etc/fabos/certs/sw0/thawkcert.pem" private-key:"/etc/fabos/certs/sw0/thawkkey.pem" peer-public-key:"/etc/fabos/certs/sw0/spiritcert.pem
To display the outbound and inbound SAs in the kernel SA database:
switch:admin> ipsecconfig --show manual-sa -a10.33.69.132[0] 10.33.74.13[0] ah mode=transport spi=34560190(0x020f58be) reqid=0(0x00000000) A: hmac-md5 7e5aeb47 e0433649 c1373625 34a64ece seq=0x00000000 replay=32 flags=0x00000000 state=mature created: Oct 15 23:34:55 2008 current: Oct 15 23:35:06 2008 diff: 11(s) hard: 2621440(s) soft: 2100388(s) last: Oct 15 23:34:56 2008 hard: 0(s) soft: 0(s) current: 256(bytes) hard: 0(bytes) soft: 0(bytes) allocated: 4 hard: 0 soft: 0 sadb_seq=1 pid=10954 refcnt=010.33.74.13[0] 10.33.69.132[0] ah mode=transport spi=48095089(0x02dddf71) reqid=0(0x00000000) A: hmac-md5 c84d27e5 960d116c bf7c0e4a b232c49e seq=0x00000000 replay=32 flags=0x00000000 state=mature created: Oct 15 23:34:55 2008 current: Oct 15 23:35:06 2008 diff: 11(s) hard: 2621440(s) soft: 2137448(s) last: Oct 15 23:34:55 2008 hard: 0(s) soft: 0(s) current: 540(bytes) hard: 0(bytes) soft: 0(bytes) allocated: 5 hard: 0 soft: 0 sadb_seq=0 pid=10954 refcnt=0
To display a specified IPSec SA:
switch:admin> ipsecconfig --show policy ips sa -t sa-esp-1sa-esp-1 ipsec-protocol:esp encryption algorithm: aes128_cbc 3des_cbc authentication algorithm: hmac_sha1 hmac_md5
To display all IPSec SA proposals:
switch:admin> ipsecconfig --show policy ips sa-proposal -aipsec-esp-a-b SA(s) used:sa-esp-1 sa-ah-1 lifetime in seconds:infinite lifetime in bytes:infinite
ipsec-esp-def SA(s) used:sa-esp-1 lifetime in seconds:infinite lifetime in bytes:infinite
446 Fabric OS Command Reference53-1001764-02

ipSecConfig 2
To display all IPSec transforms:
switch:admin> ipsecconfig --show policy ips transform -apolicy-A-B action:auto_ipsec mode:transport local:10.33.69.132 remote:10.33.74.13 sa-proposal:ipsec-esp-a-b ike-policy:remote-B
To display all IPSec traffic selectors:
switch:admin> ipsecconfig --show policy ips selector -a slt-A-B-any local:10.33.69.132 remote:10.33.74.13 direction:outbound upper-layer-protocol:any transform-used:policy-A-B
slt-B-A-any local:10.33.74.13 remote:10.33.69.132 direction:inbound upper-layer-protocol:any transform-used:policy-A-B
Using the help commandTo use the --help command with arguments to display the syntax of specific types and subtypes:
switch:admin>ipsecconfig --help add policy ips selectorUsage: ipsecConfig --add policy ips selector ARGUMENTS
ARGUMENTS -tag <name> selector name -direction <in|out> traffic flow direction -local <addr> source IPv4 or IPv6 address -remote <addr> peers IPv4 or IPv6 address -transform <name> transform name [-protocol <name>] protocol nam
switch:admin> ipsecconfig --help modify policy ike Usage: ipsecConfig --modify policy ike ARGUMENTS
ARGUMENTS -tag <name> ike policy name -remote <addr> peers ipaddress -id <identifier> local identifier -remoteid <identifier> peers identifier -enc <ALGORITHM> encryption algorithm -hash <ALGORITHM> hash algorithm -prf <ALGORITHM> prf algorithm -dh <number> dh group number
ENCRYPTION ALGORITHM 3des_cbc, aes128_cbc, aes256_cbc, null_enc
HASH ALGORITHM hmac_md5, hmac_sha1, aes_xcbc
PRF ALGORITHM hmac_md5, hmac_sha1, aes_xcbc
DH-GROUP modp768(1), modp1024(2), modp2048(14), modp8192(18)
Fabric OS Command Reference 44753-1001764-02

ipSecConfig2
References [DISR] "DOD IPv6 Standards Profiles for IPv6 Capable Products", v2.0 (6/15/2007).
[NIST] "A Profile for IPv6 in the U.S. Government", v1.0 (1/31/2007).
[4301] Kent, S. and K. Seo, "Security Architecture for the Internet Protocol", RFC 4301 (Dec 2005).
[4302] Kent, S., "IP Authentication Header", RFC4302 (Dec 2005).
[4303] Kent, S., "IP Encapsulating Security Payload (ESP)", RFC4303 (Dec 2005).
[4306] Kaufman, C., Ed., "The Internet Key Exchange (IKEv2) Protocol", RFC 4306 (Dec 2005).
See Also none
448 Fabric OS Command Reference53-1001764-02

iscsiCfg 2
iscsiCfg
Configures or displays iSCSI entities.
Synopsis iscsicfg create auth -u username -s CHAP_secret [-h]
iscsicfg --modify auth -u username -s CHAP_secret [-h]
iscsicfg --delete auth -u username [-h]
iscsicfg --clear auth [-h]
iscsicfg --show auth [-u username] [-h]
iscsicfg --easycreate tgt [-w port_wwn] [-h]
iscsicfg --easycreate tgt -s
iscsicfg --create tgt -t target_name [-h]
iscsicfg --delete tgt -t target_name [-h]
iscsicfg --modify tgt -t target_name -a auth_method [-h]
iscsicfg --addusername tgt -t target_name -u user_list [-h]
iscsicfg --deleteusername tgt -t target_name -u user_list [-h]
iscsicfg --clear tgt [-h]
iscsicfg --show tgt [-t target_name] [-v] [-h]
iscsicfg --add lun -t target_name -w fc_wwn -l lun_map [-h]
iscsicfg --delete lun -t target_name -w fc_wwn -l lvirtual_un_list [-h]
iscsicfg --show lun [-t target_name] [-h]
iscsicfg --create dd -d dd_name -m member_list [-h]
iscsicfg --delete dd -d dd_name [-m member_list] [-h]
iscsicfg --clear dd [-h]
iscsicfg --show dd [-d dd_name] [-h]
iscsicfg --add dd -d dd_name -m member_list [-h]
iscsicfg --create ddset -n ddset_name -d dd_list [-h]
iscsicfg --add ddset -n ddset_name -d dd_list [-h]
iscsicfg --delete ddset -n ddset_name [-d dd_list] [-h]
iscsicfg --enable ddset -n ddset_name [-h]
iscsicfg --disable ddset [-n ddset_name] [-h]
iscsicfg --show ddset [-n ddset_name] [-v] [-h]
iscsicfg --show fabric [-h]
iscsicfg --clear initiator [-h]
iscsicfg --show initiator [-i initiator_name] [-h]
iscsicfg --abort transaction -x transaction_id [-h]
Fabric OS Command Reference 44953-1001764-02

iscsiCfg2
iscsicfg --show transaction [-h]
iscsicfg --clear all [-h]
iscsicfg --commit all [-f] [-h]
Description Use this command to configure all iSCSI entities (such as authentication (CHAP), discovery domains (DD), discovery domain sets (DDSet), iSCSI virtual targets (VT), and LUN maps). Common actions include --add, --delete, --modify, --show, --enable and --disable; however, not all actions are valid for all operands.
Use --commit all to save all entity changes to nonvolatile memory. This triggers the propagation of changes to all iSCSI-enabled switches and blades in the fabric.
Changes do not take effect until a --commit all command is issued.
Make all necessary configuration changes before issuing --commit all.
Note The execution of this command is subject to Virtual Fabric or Admin Domain restrictions that may be in place. Refer to chapter 1, "Using Fabric OS commands" and Appendix A, "Command Availability" for details.
Operands This command has the following operands:
auth CHAP parameters. Actions on auth include:
--create auth -u username -s CHAP_secret [-h]Creates a CHAP entry with a CHAP secret of CHAP_secret for username.
--modify auth -u username -s CHAP_secret [-h]Modifies the secret associated with an existing user.
--delete auth -u username [-h]Deletes the CHAP entry associated with the specified username.
--clear auth [-h]
Deletes the entire authentication database.
--show auth [-u username] [-h]Displays the username and status for the specified user. If username is not specified, all users in the database are displayed.
tgt iSCSI virtual target parameters. Actions on tgt are:
--easycreate tgt [-w port_wwn] [-h]Creates iSCSI targets with all available FC targets in one step. If port_wwn is specified, all LUNs of that target are imported into one virtual target. If no port_wwn is specified, all FC targets are imported into virtual targets. The names for the iSCSI targets are the target prefix followed by the port WWN.
--easycreate tgt -s [-h]Shows the Node and Port WWNs which is used for any easycreate operation from this switch.
--create tgt -t target_name [-h]Creates a target entry with the specified target_name. The target_name needs to be in IQN format.
--delete tgt -t target_name [-h]Deletes a target entry with the specified target_name.
450 Fabric OS Command Reference53-1001764-02

iscsiCfg 2
--modify tgt -t target_name -a auth_method [-h]Associates the authentication method auth_method with the target. Valid values for auth_method are CHAP and none. If CHAP is specified, then either one-way or mutual CHAP is enforced, based on the login frame from the host.
--addusername tgt -t target_name -u user_list [-h]Binds user names defined in AUTH database to the specific target.
--deleteusername tgt -t target_name -u user_list [-h]Unbinds user names defined in AUTH database from the specific target
--clear tgt [-h]Clears the iSCSI target database from the fabric.
--show tgt [-t target_name] [-v] [-h]Displays the iSCSI target database entries for target_name.
lun iSCSI LUN map parameters. Actions on lun include:
--add lun -t target_name -w fc_wwn -l lun_map [-h]Adds the LUN map to target_name. port_wwn specifies the port WWN of the physical FC target whose LUNs are to be mapped to the iSCSI target. lun_map specifies the LUN map. A LUN map is required that maps the specified physical LUNs to specified virtual LUNs. lun_map is specified as a pair: "virtual LUN list:physical LUN list". Either single or multiple list mapping can be specified.
--delete lun -t target_name -w fc_wwn -l virtual_lun_list[-h] Deletes the LUN map from target_name. If target_name is specified only, all LUN maps associated with target_name are deleted. If target_name and port_wwn are specified, all LUN maps associated with target_name and port_wwn are deleted. If target_name and virtual_lun_list are specified, the specified LUN map is deleted.
--show lun [-t target_name] [-h]Displays the LUN database; target_name is optional.
dd Discovery Domain (DD) parameters. Valid DD actions include:
--create dd -d dd_name -m member_list [-h]Creates a DD entry with the specified dd_name and member_list (iSCSI initiators and targets).
--delete dd -d dd_name [-m member_list ] [-h]Deletes the member or members specified in member_list from an existing iSCSI Discovery Domain (DD). If a DD does not exist or the members specified are not a part of the specified domain, an error is returned. If, after deletion, there are no members remaining in the domain, the domain is deleted. If no members are specified, the DD is deleted. If a DD to be deleted is part of a DD set, the set is modified to reflect the missing DD. member_list has to be iSCSI entity names in a valid format. Currently, only IQN format is supported. Multiple entities may be specified as a comma-separated list. The IQN may be a maximum of 64 characters.
--add dd -d dd_name -m member_list [-h]Adds a new member to an existing DD. DD member lists also are acceptable.
--clear dd [-h]Deletes the DD and DDset databases.
Fabric OS Command Reference 45153-1001764-02

iscsiCfg2
--show dd [-d dd_name] [-h]Displays the DD database; dd_name is optional.
ddset Discovery Domain Set parameters. Actions on ddset are:
--create ddset -n ddset_name -d dd_list [-h]Creates a DD set entry with the specified ddset_name and dd_list. The DDs in dd_list must already exist.
--add ddset -n ddset_name -d dd_list [-h]Adds a new DD to an existing DD set.
--delete ddset -n ddset_name [-d dd_list] [-h]Deletes the DD set with ddset_name. If dd_list is specified, only those DDs are deleted; otherwise, the entire DD set is deleted.
--enable ddset -n ddset_name [-h]Activates the DD set specified.
--disable ddset [-n ddset_name] [-h]Disables an active DD set.
--show ddset [-n ddset_name] [-v] [-h]Displays the DD set database. ddset_name is optional.
fabric iSCSI-enabled switches and their operational states. The action is --show.
--show fabric[-h]Displays the database iSNS client status of all iSCSI switches in the fabric. An asterisk (*) next to the switch ID denotes the local switch.
initiator iSCSI Initiator database. Actions on initiator are:
--clear initiator [-h]Clears the iSCSI initiator database.
--show initiator [-i initiator_name][-h]Displays all iSCSI initiators that the switch is aware of. If an initiator has attempted discovery or logon to a target, it is displayed here. If initiator_name is specified, this command returns a list of all online iSCSI targets accessible by initiator_name.
transaction Transaction database. Actions on transaction include:
--abort transaction -x transaction_id [-h]Aborts the database transaction in progress with ID transaction_id.
--show transaction [-h]Displays information about a transaction or the entire transaction database.
all Applies to all databases. Actions include:
--clear all [-h] Deletes auth, ddset, dd and target databases. The modifications made to the databases are not saved to nonvolatile memory until a --commit all is issued.
452 Fabric OS Command Reference53-1001764-02

iscsiCfg 2
--commit all [-f] [-h] Commits the iSCSI configuration database to nonvolatile memory. Any modifications made to the database are not saved until an explicit --commit all is issued. If multiple switches in the fabric have uncommitted changes, this operation is rejected. The -f option needs to be used in this case to force the commit operation, in which case uncommitted changes on other switches are erased.
-h Use -h on any command to display the help text for the action and operand combination.
Examples To create a CHAP entry:
switch:admin> iscsicfg --create auth -u user1 -s abcdefg123 The operation completed successfully.
To modify a CHAP entry associated with an existing user:
switch:admin> iscsicfg --modify auth -u user1 -s newsecret The operation completed successfully.
To display the authentication database
switch:admin> iscsicfg --show auth Number of records found: 1 Name Status user1 Defined
To delete a CHAP entry:
switch:admin> iscsicfg --delete auth -u user1 The operation completed successfully.
To create a target entry:
switch:admin> iscsicfg --create tgt -t iqn.2005-10.com.brocade.tgt1 The operation completed successfully.
To modify the authentication method for a target:
switch:admin> iscsicfg --modify tgt -t iqn.2005-10.com.brocade.tgt1 -a CHAP The operation completed successfully.
To display the target database:
switch:admin> iscsicfg --show tgt Number of records found: 2
Name: iqn.2005-10.com.brocade.tgt1 State/Status: Offline/Defined
Name: iqn.2222-23.com.brocade:21:00:00:20:37:df:83:fc State/Status: Online/Committed
To delete a target entry:
switch:admin> iscsicfg --delete tgt -t iqn.2005-10.com.brocade.tgt1 The operation completed successfully.
Fabric OS Command Reference 45353-1001764-02

iscsiCfg2
To bind user CHAP to a target:
switch:admin> iscsicfg --addusername tgt-t iqn.2005-10.com.brocade.tgt1 -u user1 The operation completed successfully.
To unbind user CHAP from a target:
switch:admin> iscsicfg --deleteusername tgt -t iqn.2005-10.com.brocade.tgt1 -u user1 The operation completed successfully.
To clear the target database:
switch:admin> iscsicfg --clear tgt The operation completed successfully.
To create iSCSI targets with all available FC targets:
switch:admin> iscsicfg --easycreate tgt This will create iSCSI targets for ALL FC targets. This could be a long-running operation. Continue [N]: Y Index FC WWN iSCSI Name Status
[Output truncated]
To add a LUN map:
switch:admin> iscsicfg --add lun -t iqn.2005-10.com.brocade.tgt1 -w 22:00:00:04:cf:20:5d:33 -l 0:0 The operation completed successfully.
switch:admin> iscsicfg --add lun -t iqn.2005-12.com.brocade.tgt2 -w 22:00:00:04:cf:75:5b:9a -l 2-5:5-8 The operation completed successfully.
To display LUN maps:
switch:admin> iscsicfg --show lun Number of records found: 2
Target: iqn.2005-10.com.brocade.tgt1 Number of LUN Maps: 1 FC WWN Virtual LUN(s) Physical LUN(s) 22:00:00:04:cf:20:5d:33 0 0
Target: iqn.2222-23.com.brocade:50:06:0e:80:00:43:80:a2 Number of LUN Maps: 5 FC WWN Virtual LUN(s) Physical LUN(s) 50:06:0e:80:00:43:80:a2 0 0x0000000000000000 50:06:0e:80:00:43:80:a2 1 0x0001000000000000 50:06:0e:80:00:43:80:a2 2 0x0002000000000000 50:06:0e:80:00:43:80:a2 3 0x0009000000000000 50:06:0e:80:00:43:80:a2 4 0x003e000000000000
To create a DD entry with a specified name and members:
switch:admin> iscsicfg --create dd -d mynewdd -m iqn.2222 23.mytest1,iqn.234358.newtest1 The operation completed successfully.
To add a new member to an existing DD:
switch:admin> iscsicfg --add dd -d mynewdd -m iqn.2222-23.mytest3 The operation completed successfully.
454 Fabric OS Command Reference53-1001764-02

iscsiCfg 2
To display the DD database:
switch:admin> iscsicfg --show dd Number of records found: 1
Name: mynewdd Status: Defined Num. Members: 3 iqn.2222-23.mytest1 iqn.2343-58.newtest1 iqn.2222-23.mytest3
To create a DD set entry:
switch:admin> iscsicfg --create ddset -n myddset -d mynewdd The operation completed successfully.
To add a new member to an existing DD set (the new DD, iscsidd3, must exist already)
switch:admin> iscsicfg --add ddset -n myddset -d iscsidd3 The operation completed successfully.
To enable a DD set:
switch:admin> iscsicfg --enable ddset -n myddset This will enable the DDSet specified. Continue [N]: y [Output truncated]
To disable a DD set:
switch:admin> iscsicfg --disable ddset The operation completed successfully.
To display the DD set database in verbose mode:
switch:admin> iscsicfg --show ddset -v Number of records found: 1 Name: myddset State/Status: Disabled/Defined Num. members: 1 mynewdd iqn.2222-23.mytest1 iqn.2343-58.newtest1 iqn.2222-23.mytest3
To delete a DD set:
switch:admin> iscsicfg --delete ddset -n myddset -d mynewdd The operation completed successfully.
To display the iSCSI-aware switches and their operational states (Displays switches that are capable of propagating iSCSI data base):
switch:admin> iscsicfg --show fabric
Switch ID Switch WWN Switch State iSNSC * 1 10:00:00:60:69:e4:20:1e -- Disabled Aggregated iSCSI database state for fabric: In Sync
Fabric OS Command Reference 45553-1001764-02

iscsiCfg2
To display the iSCSI initiators that attempted to log in:
switch:admin> iscsicfg --show initiator
Number of records found: 1 Name IP Address iqn.1991-05.com.brocade:initiator1 172.16.14.101
switch:admin> iscsicfg --show initiator -i iqn.1991-05.com.brocade:initiator1 Initiator details are: Name IP Address iqn.1991-05.com.brocade:isi154116.englab.brocade.com 172.16.14.101 No. of targets currently accessible to the specified initiator are: 4 iqn.2222-12.com.brocade:tgt1 iqn.2222-12.com.brocade:tgt2 iqn.2002-12.com.brocade:50:06:0e:80:00:43:80:a2 iqn.2222-23.com.brocade:21:00:00:20:37:df:83:fc
To display all targets that are accessible by a specified initiator:
switch:admin> iscsicfg --show initiator -i iqn.1991-05.com.brocade:initiator1 The operation completed successfully. Index iSCSI Name IP Address Type 1. iqn.1991-05.com.brocade:initiator1 192.168.250.107 Physical Initiator. Accessible Targets 1 iqn.2000-12.brocade.com.246:tgt-1
To clear the iSCSI initiator database:
switch:admin> iscsicfg---clear initiator This will delete the iSCSI initiator database. Continue [N]: y The operation completed successfully.
To display in-progress database transactions:
switch:admin> iscsicfg --show transaction Active transaction ID is: 19359 and the owner is: CLI. The following groups have been modified: 1. Target/LUN group. 2. DD/DDSet group.
To abort a database transaction:
switch:admin> iscsicfg --abort transaction -x 19359 The operation completed successfully.
To commit the changes to persistent memory:
switch:admin> iscsicfg --commit all The operation completed successfully.
See Also fosConfig, iscsiPortCfg, iscsiSessionCfg
456 Fabric OS Command Reference53-1001764-02

iscsiChipTest 2
iscsiChipTest
Performs functional test of components in iSCSI complex.
Synopsis iscsichiptest --slot slot -testtype type -unit GigEports
Description Use this command to verify the memory of the network processor and iFlipper FPGA.
Notes This command is supported only on the Brocade FR4-16IP blade. On all other platforms, this command displays the message: “Command not applicable to this platform. SKIPPED!”
The execution of this command is subject to Virtual Fabric or Admin Domain restrictions that may be in place. Refer to chapter 1, "Using Fabric OS commands" and Appendix A, "Command Availability" for details.
Operands This command has the following operands:
--slot slot Specifies the slot number for which to run the diagnostics. The default is set to 0 and designed to operate on fixed-port-count products.
-testtype type Selects the test type to run. By default, the command runs all tests. Valid values are:
0 All of the following tests.
1 BCM 1125H SRAM test.
2 iFlipper internal register test.
-unit GigEports Specifies the GbE port to test. By default, all GbE ports in the specified slot are tested. Specify a value in the range of 0 - 7 or specify 8 for all ports.
Examples To run iscsichiptest:
switch:admin> iscsichiptest --slot 7 -unit 1 -testtype 0Running iscsichiptest ..............Test Complete: iscsichiptest Pass 1 of 1Duration 0 hr, 3 min & 12 sec (0:3:12:511).passed.
See Also iscsiPathTest
Fabric OS Command Reference 45753-1001764-02
iscsiHelp2
iscsiHelp
Displays a list of iSCSI support commands.
Synopsis iscsihelp
Description Use this command to display a list of iSCSI support commands with descriptions.
Note The execution of this command is subject to Virtual Fabric or Admin Domain restrictions that may be in place. Refer to chapter 1, "Using Fabric OS commands" and Appendix A, "Command Availability" for details.
Operands none
Examples To display the list of iSCSI support commands:
switch:admin> iscsihelpfclunquery Display a list of LUNs of FC target(s).fosconfig Enable/disable FabOS servicesiscsicfg Manage/display all iscsi configuration including authentication/virtual targets/discovery domains.iscsiportcfg Manage/display iscsi protocol related port configuration including negotiated parameters/port statistics/current sessions.iscsisessioncfg Manage/display iscsi session information.iscsiswcfg Manage/display iscsi switch configuration parameters.portcfg Create/Delete a new ip interface/route/arp entry on the GigE portportshow Show configured ip interfaces/routes/arp entries on the GigE Portswitchshow Display the number of sessions on each iSCSI port
See Also switchShow
458 Fabric OS Command Reference53-1001764-02

iscsiPathTest 2
iscsiPathTest
Performs functional test of components in iSCSI complex.
Synopsis iscsipathtest --slot slot -unit number -path mode -nframes count
Description Use this command to verify the functions of the network processor and the iSCSI complex. Multiple frames or data packets are transmitted from the Network processor to designated loopback points and sent back. The command checks statistics, frame counts, data path, and hardware connections in the iSCSI complex. You can set the data path mode with the -path option.
Notes This command is supported only on the Brocade FR4-16IP blade. On all other platforms, this command displays the message: “Command not applicable to this platform. SKIPPED!”
The execution of this command is subject to Virtual Fabric or Admin Domain restrictions that may be in place. Refer to chapter 1, "Using Fabric OS commands" and Appendix A, "Command Availability" for details.
Operands This command has the following operands:
--slot slot Specifies the slot number on which to run the diagnostics. The default is set to 0 and designed to operate on fixed-port-count products.
-unit number Specifies the GbE port to test. By default all the GbE ports in the specified slot are tested. . Specify an integer between 0 and 7 or 8 to specify all ports.
-path mode Selects the loopback point for the test. By default, iscsiPathTest uses PHY and Central ASIC loopback. Valid values are:
1 Data packets from network processor to GbE RJ-45 loopback.
2 Data packets from network processor to GbE PHY loopback.
3 Data packets from network processor to GbE GMAC loopback.
4 FC frames from network processor to Central ASIC FC Serdes loopback.
5 FC frames from network processor to serial loopback at iFlipper FC serdes.
6 FC frames from network processor to parallel loopback at iFlipper FC serdes.
9 Data packets from network processor to loopback at network processor 8-bit FIFO.
-nframes count Specifies the number of frames to send. The test progresses until the specified number of frames has been transmitted on each port. The default value is 100.
Examples To run iscsipathtest:
switch:admin> iscsipathtest --slot 2 -path 2 -nframes 10 Running iscsipathtest ..............Test Complete: iscsipathtest Pass 10 of 10Duration 0 hr, 3 min & 1 sec (0:3:0:630).passed.
See Also iscsiChipTest
Fabric OS Command Reference 45953-1001764-02

iscsiPortCfg2
iscsiPortCfg
Displays or modifies iSCSI port parameters.
Synopsis iscsiportcfg --clearstats slot/geport
iscsiportcfg --default slot/geport
iscsiportcfg --show slot/geport [-v]
iscsiportcfg --modify slot/geport options
Description Use this command to display or modify the iSCSI port parameters.
The default iSCSI port settings are as follows:
TABLE 21 Default iSCSI port settings
Note The execution of this command is subject to Virtual Fabric or Admin Domain restrictions that may be in place. Refer to chapter 1, "Using Fabric OS commands" and Appendix A, "Command Availability" for details.
Operands This command has the following operands:
--modify Modifies the port parameters on the specified port. Valid options are:
-e value Specifies the error recovery level; values are 0, 1, or 2.
-c value Specifies the TCP of connections; values are 1 or 2.
-d value Enables or disables data digest support; specify 0 to disable or 1 to enable.
-a value Enables or disables header digest support; specify 0 to disable or 1 to enable.
-i value Enables or disables immediate data support; specify 0 to disable or 1 to enable.
-f value Specifies the first burst length value; values include 512, 1024, 2048, 4096, 8192, 16384, and 32768.
--clearstats Clears port-level iSCSI statistics on the specified port.
--default Resets the port to the default values. See the "Description" section for the listof default values.
Setting Default
Error recovery level 0
Connections per session 1
Connections per session Disabled
Header digest support Disabled
Immediate data support No
First burst length value 512
460 Fabric OS Command Reference53-1001764-02

iscsiPortCfg 2
--show Displays port-level protocol parameters, statistics, and session information on the specified port. Options include:
-v Specifies verbose mode, which displays the initiator IP, TSID, and the number of connections in addition to the other port-level information.
slot Specifies the slot number. This parameter only supports FC4-16IP blades in Brocade 48000 directors.
geport Specifies the port number of a GbE port to be configured in the specified slot.
-h Use -h on any option to display the help text for it.
Examples To modify the port parameters:
switch:admin> iscsiportcfg --modify 7/ge2 -e 2 -c 2 -f 32768 The operation completed successfully.
To display the port information in verbose mode:
switch:admin> iscsiportcfg --show 7/ge0 The configured port parameters for slot 7 and port ge0 are: Header Digest: Off Data Digest: Off First Burst Length: 512 Error Recovery Level: 0 Immediate Data: Off Connections per session: 1 Num. of active sessions on port: 1 Port Statistics: iSCSI in PDU: 211 iSCSI in Octet: 32592 iSCSI out PDU: 307 iSCSI out Octet: 77484 FCP in PDU: 205 FCP in Octet: 76356 FCP out PDU: 114 FCP out Octet: 29944 iSCSI Command: 104 iSCSI R2T: 11 iSCSI Data In: 11 iSCSI Data Out: 96 iSCSI Response: 104 FCP Command: 103 FC Data In: 91 FC Data Out: 11 FC XFer Ready: 11 FC Response: 103 iSCSI Error PDU: 0 FC Error PDU: 0 iSCSI Snack: 0 iSCSI NOP Out: 0 iSCSI Text: 1 iSCSI Logout: 1 iSCSI Task Mgmt.: 0 iSCSI TM Response: 0 iSCSI Abort Task: 0
Fabric OS Command Reference 46153-1001764-02

iscsiPortCfg2
iSCSI Abort Task Set: 0 iSCSI Clear ACA: 0 iSCSI Clear Task Set: 0 iSCSI LUN Reset: 0 iSCSI Target Reset: 0 iSCSI Task Reassign: 0 Non FCP in PDU: 17 Non FCP in Octet: 2576 Non FCP out PDU: 17 Non FCP out Octet: 1352 Session details: Session Number: 1 iSCSI Session Type: Normal Initiator Name: iqn.1991-05.com.microsoft:win-iscsi.lab Target Name: iqn.2002-12.com.tgt:21:00:00:04:cf:5d:cf:0e ISID: 0x400001370000
See Also fosConfig, iscsiCfg, iscsiSessionCfg
462 Fabric OS Command Reference53-1001764-02

iscsiSessionCfg 2
iscsiSessionCfg
Displays iSCSI session/connection details, clears the associated counters, or deletes an iSCSI session/connection.
Synopsis iscsisessioncfg --clearstats [-i initiator_iqn] [-t target_iqn]
iscsisessioncfg --delete [-i initiator_iqn] [-t target_iqn]
iscsisessioncfg --show [-i initiator_iqn] [-t target_iqn]
Description Use this command to display iSCSI session/connection details, clear the associated counters, or delete an iSCSI session/connection.
Note The execution of this command is subject to Virtual Fabric or Admin Domain restrictions that may be in place. Refer to chapter 1, "Using Fabric OS commands" and Appendix A, "Command Availability" for details.
Operands This command has the following operands:
--clearstats Clears the counters associated with a session.
--delete Deletes one or more iSCSI sessions.
--show Displays the iSCSI session details. Options include:
-v Specifies verbose mode, which displays information for all sessions, including statistics.
-i initiator_iqn Selects only sessions that match the given initiator IQN.
-t target_iqn Selects only sessions that match the given target IQN.
Examples To display the iSCSI session status:
switch:admin> iscsisessioncfg --show
Number of sessions found: 1 Session 1 Details: Initiator Name: iqn.1991-05.com.init:6a3-iscsi-053.englab.brocade.com Target Name: iqn.2002-12.com.brocade:2f:df:00:06:2b:0d:10:b9 Session type Init. Session ID Tgt. Session ID Initiator IP Num. Conns . Normal 0x400001370000 1025 30.50.1.115 1 TCP Connection Details Index TCP Port Leading Connection Switch Port 1 2743 Yes 8/ge4 Security Details CHAP Username: none FC Details Number of FC targets: 1 FC Target Information Index FC WWN 1 2f:df:00:06:2b:0d:10:b9 iSCSI Operating Login Parameters: Session Level Parameter Name Self Value Peer Value
Fabric OS Command Reference 46353-1001764-02

iscsiSessionCfg2
Max. Burst Length 256KB 256KB First Burst Length 512B 64KB Max outstanding R2T 1 16 Default time to retain 20s 60s Default time to wait 2s 0s Error recovery level 0 2 Initial R2T Off Off iSCSI Operating Login Parameters: Connection Level Connection Index: 1 Parameter Name Self Value Peer Value Max. Recv. Data Segment Length 56KB 64KB Header Digest Off On Data Digest Off On Immediate Data Off On iSCSI Connection Statistics iSCSI in PDU: 23100 iSCSI in Octet: 855685264 iSCSI out PDU: 851487 iSCSI out Octet: 882055140 FCP in PDU: 431295 FCP in Octet: 878756240 FCP out PDU: 425006 FCP out Octet: 855888688 iSCSI Command: 6787 iSCSI R2T: 3375 iSCSI Data In: 16313 iSCSI Data Out: 420747 iSCSI Response: 6659 FCP Command: 7350 FC Data In: 420686 FC Data Out: 417656 FC XFer Ready: 3375 FC Response: 7234 iSCSI Error PDU: 0 FC Error PDU: 0 iSCSI Snack: 0 iSCSI NOP Out: 0 iSCSI Text: 0 iSCSI Logout: 0 iSCSI Task Mgmt.: 0 iSCSI TM Response: 0 iSCSI Abort Task: 0 iSCSI Abort Task Set: 0 iSCSI Clear ACA: 0 iSCSI Clear Task Set: 0 iSCSI LUN Reset: 0 iSCSI Target Reset: 0 iSCSI Task Reassign: 0 Non FCP in PDU: 0 Non FCP in Octet: 0 Non FCP out PDU: 0 Non FCP out Octet: 0
See Also fosConfig, iscsiCfg, iscsiPortCfg
464 Fabric OS Command Reference53-1001764-02

iscsiSwCfg 2
iscsiSwCfg
Displays or configures the iSCSI switch level configuration.
Synopsis iscsiswcfg --enableconn -s slot number | all
iscsiswcfg --disableconn -s slot number | all
iscsiswcfg --showconn -s slot number | all
iscsiswcfg --modifygw -t target name
iscsiswcfg --showgw
Description Use this command to display the iSCSI switch level configuration and to configure the iSCSI connection redirection and target name prefix.
Note The execution of this command is subject to Virtual Fabric or Admin Domain restrictions that may be in place. Refer to chapter 1, "Using Fabric OS commands" and Appendix A, "Command Availability" for details.
Operands This command has the following operands:
--enableconn Enables the connection redirection on a specific slot or all slots.
--disableconn Disables the connection redirection on a specific slot or all slots.
--showconn Displays the configuration of the connection redirection.
--modifygw Specifies the IQN prefix of the target name.
--showgw Displays the target name prefix.
Examples To enable the connection redirection on slot 3:
switch:admin> iscsiswcfg --enableconn -s 3The operation completed successfully.
To disable the connection redirection on slot 3:
switch:admin> iscsiswcfg --disableconn -s 3 The operation completed successfully.
To display the connection redirection for iSCSI blades on the switch:
switch:admin> iscsiswcfg --showconn -s allNumber of records found: 1Slot ICR Status3 Disabled
To display a target name prefix:
switch:admin> iscsiswcfg --showgw Target name is: iqn.2002-12.com.brocade
To change a target name prefix:
switch:admin> iscsiswcfg --modifygw -t iqn.2002-10.com.brocadeThe operation completed successfully.
See Also fosConfig, iscsiCfg, iscsiPortCfg
Fabric OS Command Reference 46553-1001764-02

islShow2
islShow
Displays interswitch link (ISL) information.
Synopsis islshow
Description Use this command to display the current connections and status of the interswitch link (ISL) for each port on a switch. The command output includes the following information:
• Node world wide name (WWN)
• Domain ID
• Switch name
• ISL connection speed, if applicable
• Bandwidth
• Trunking enabled, if applicable
• QoS enabled, if applicable
When issued on a switch that is part of a logical fabric configuration, the islShow command displays logical interswitch links (LISLs) along with regular ISLs. However, speed (sp) displays N/A for logical ports. The bandwidth (bw) displayed is the sum of the bandwidth of all extended ISLs (XISLs) that form the LISL. A shared ISL (XISL) connects the base switches and is shared by different logical fabrics. It allows devices to communicate with each other within the logical fabric.
Connection speed is not applicable to LE_Ports or VE_Ports. For these port types, speed displays as “sp:-------”.
Note The execution of this command is subject to Virtual Fabric or Admin Domain restrictions that may be in place. Refer to chapter 1, “Using Fabric OS commands” and Appendix A, “Command Availability” for details.
Operands none
Examples When you issue islshow in a base fabric, the output displays as follows:
switch:user> islshow1: 2->300 10:00:00:05:1e:43:00:00 100 DCX sp: 8.000G bw: 32.000G TRUNK QOS2: 8-> 3 10:00:00:05:1e:41:8a:d5 30 B5300 sp: 4.000G bw: 16.000G TRUNK QOS3: 19-> 10 10:00:00:05:1e:41:43:ac 50 B300 sp: 8.000G bw: 64.000G TRUNK
When you issue islshow in a logical fabric, the output displays as follows:
switch:user> islshow1: 33-> 29 10:00:00:60:69:80:4f:84 3 B3200 sp: 2.000G bw: 4.000G TRUNK2: 39-> 7 10:00:00:60:69:45:68:04 4 B3850 sp: 2.000G bw: 8.000G TRUNK3: 41-> (incompatible)4: 47-> (incompatible)5: 95-> 0 10:00:00:05:1e:01:0b:4a 15 B200E sp: 2.000G bw: 2.000G TRUNK6:162->160 10:00:00:60:69:e2:09:fa 5 B24000 sp:-------- bw: 0.001G7:384-> 16 10:00:00:05:1e:37:02:73 39 DCX sp:-------- bw: 10.000G8:385-> 16 10:00:00:05:1e:37:02:73 43 B5300 sp:-------- bw: 11.000G
See Also switchShow, trunkShow
466 Fabric OS Command Reference53-1001764-02

isnscCfg 2
isnscCfg
Displays or modifies the configuration state of the iSNS client operation.
Synopsis isnsccfg --set slot | geport -s server_ip
isnsccfg --set -m -s server_ip
isnsccfg --reregister
isnsccfg --show
isnsccfg --clear
Description Use this command to display and update the configuration state of the iSNS client daemon.
Note The execution of this command is subject to Virtual Fabric or Admin Domain restrictions that may be in place. Refer to chapter 1, "Using Fabric OS commands" and Appendix A, "Command Availability" for details.
Operands This command has the following operands:
--set Sets the external iSNS server IP address to perform peering to populate the FC SCSI targets and iSCSI portal.
--show Displays the current iSNS client configuration.
--reregister Reregisters the iSNS objects.
--clear Clears the configured iSNS server.
-m Specifies the management port for communication with the iSNS server.
slot Specifies the slot number of an iSCSI blade in a chassis.
geport Specifies the port number of a GbE port in an iSCSI blade. This parameter only supports Brocade FC4-16IP blades in Brocade 48000 directors.
-s server_ip Specifies the IP address in dotted-decimal form.
Examples To set the IP address of an external iSNS server with an attached GbE port:
switch:admin> isnsccfg --set 7/ge0 -s 192.168.131.124iSNS client configuration updated:peering with iSNS server 192.168.131.124on slot 7, port ge0
To set an external iSNS server with an attached management port:
switch:admin> isnsccfg --set -m -s 192.168.131.124iSNS client configuration updated:peering with iSNS server 192.168.131.124on the management port
To display the current configuration of the iSNS client daemon
switch:admin> isnsccfg --showiSNS client is peering with iSNS server 192.168.250.109 onslot 7, port ge0Operational Status: Connected to iSNS server.
Fabric OS Command Reference 46753-1001764-02

isnscCfg2
To register the iSNS objects:
switch:admin> isnsccfg --reregisterInitiated re-register of iSNS objects with iSNS server
To clear the IP address of iSNS server:
switch:admin> isnsccfg --clearCleared iSNS server configuration.
See Also none
468 Fabric OS Command Reference53-1001764-02
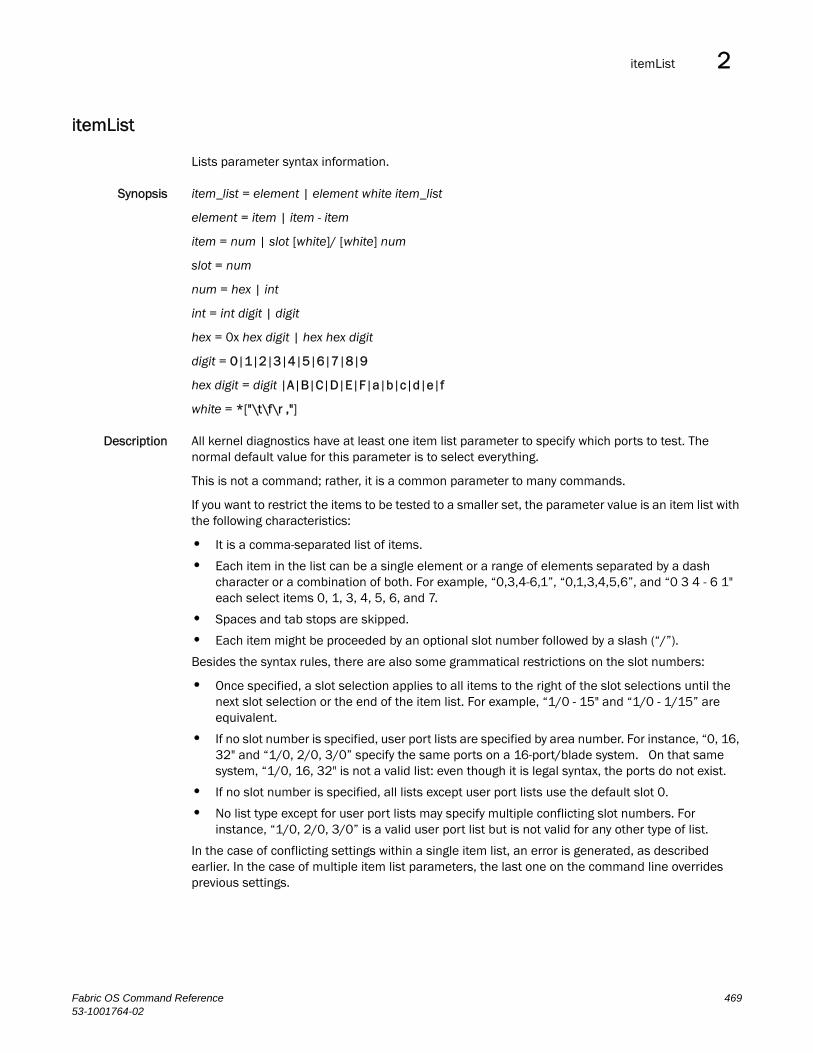
itemList 2
itemList
Lists parameter syntax information.
Synopsis item_list = element | element white item_list
element = item | item - item
item = num | slot [white]/ [white] num
slot = num
num = hex | int
int = int digit | digit
hex = 0x hex digit | hex hex digit
digit = 0|1|2|3|4|5|6|7|8|9
hex digit = digit |A|B|C|D|E|F|a|b|c|d|e|f
white = *["\t\f\r ,"]
Description All kernel diagnostics have at least one item list parameter to specify which ports to test. The normal default value for this parameter is to select everything.
This is not a command; rather, it is a common parameter to many commands.
If you want to restrict the items to be tested to a smaller set, the parameter value is an item list with the following characteristics:
• It is a comma-separated list of items.
• Each item in the list can be a single element or a range of elements separated by a dash character or a combination of both. For example, “0,3,4-6,1”, “0,1,3,4,5,6”, and “0 3 4 - 6 1" each select items 0, 1, 3, 4, 5, 6, and 7.
• Spaces and tab stops are skipped.
• Each item might be proceeded by an optional slot number followed by a slash (“/”).
Besides the syntax rules, there are also some grammatical restrictions on the slot numbers:
• Once specified, a slot selection applies to all items to the right of the slot selections until the next slot selection or the end of the item list. For example, “1/0 - 15" and “1/0 - 1/15” are equivalent.
• If no slot number is specified, user port lists are specified by area number. For instance, “0, 16, 32" and “1/0, 2/0, 3/0” specify the same ports on a 16-port/blade system. On that same system, “1/0, 16, 32" is not a valid list: even though it is legal syntax, the ports do not exist.
• If no slot number is specified, all lists except user port lists use the default slot 0.
• No list type except for user port lists may specify multiple conflicting slot numbers. For instance, “1/0, 2/0, 3/0” is a valid user port list but is not valid for any other type of list.
In the case of conflicting settings within a single item list, an error is generated, as described earlier. In the case of multiple item list parameters, the last one on the command line overrides previous settings.
Fabric OS Command Reference 46953-1001764-02

itemList2
The exact type of list varies, depending on the test and the parameter; however, the most common are blade ports and user ports. A list of blade ports is most commonly used by ASIC-level tests such as turboRamTest and represents which ports on the current blade (specified with --slot number) are tested. A list of user ports is used by higher-level tests to specify which user-accessible external ports within the current switch (selected during Telnet login) are tested. When specified in an item list, user ports might be specified by either the area portion of the ports Fibre Channel address or with slot/port notation. For nonblade systems, the port number on the silkscreen is the area number, so the two notations are identical.
For item list parameters, the parameter type is PT_LIST and the list type is one of those shown in Table 22.
Note The execution of this command is subject to Virtual Fabric or Admin Domain restrictions that may be in place. Refer to chapter 1, “Using Fabric OS commands” and Appendix A, “Command Availability” for details.
Operands none
Examples none
See Also portLoopbackTest, bpPortLoopbackTest
TABLE 22 Object descriptions
Type Grouping Description
BPORTS Blade Blade ports, internal and external ports
UPORTS Switch User ports, ports with external connections
QUADS Blade Quadrants, group of (normally four) ports
CHIPS Blade Chips, ASICs within a blade
MINIS Blade Mini-switches
SLOTS Chassis Slots
INDEX N/A Anything
470 Fabric OS Command Reference53-1001764-02

killTelnet 2
killTelnet
Terminates an open Telnet session.
Synopsis killtelnet
Description Use this command to terminate an open Telnet session. The command lists all current Telnet and serial port login sessions and information such as session number, login name, idle time, IP address of the connection, and timestamp of when the login session was opened. The command prompts you to specify the number of the session you want to terminate. The list of open sessions displayed with killTelnet includes your current session; be sure not kill your own Telnet session.
Notes The execution of this command is subject to Virtual Fabric or Admin Domain restrictions that may be in place. Refer to chapter 1, "Using Fabric OS commands" and Appendix A, "Command Availability" for details.
Examples To terminate an open Telnet connection:
switch:admin> killtelnetCollecting login information....Done List of telnet sessions (3 found)_____________________________________________________________________________Session No USER TTY IDLE FROM LOGIN@~~~~~~~~~~~~~~~~~~~~~~~~~~~~~~~~~~~~~~~~~~~~~~~~~~~~~~~~~~~~~~~~~~~~~~~~~~~~~~ 0 root0 ttyS0 1:17m - 5:13pm 1 admin0 pts/0 16.00s 192.168.130.29 6:29pm 2 admin0 pts/1 3.00s 192.168.130.29 6:31pm~~~~~~~~~~~~~~~~~~~~~~~~~~~~~~~~~~~~~~~~~~~~~~~~~~~~~~~~~~~~~~~~~~~~~~~~~~~~~Enter Session Number to terminate (q to quit) 1Collecting process information... Done. You have opted to terminate the telnet session:- logged in as "admin0 ", from "192.168.130.29 " since " 6:29pm" and has been inactive for "16.00s ", the current command executed being: "-rbash ". The device entry is: "pts/0 ". This action will effectively kill these process(es):- USER PID ACCESS COMMAND/dev/pts/0 root 12868 f.... login root 12869 f.... login root 12877 f.... rbashPlease Ensure (Y/[N]): ykilling session.... Done!Collecting login information....Done
List of telnet sessions (2 found)______________________________________________________________________________Session No USER TTY IDLE FROM LOGIN@~~~~~~~~~~~~~~~~~~~~~~~~~~~~~~~~~~~~~~~~~~~~~~~~~~~~~~~~~~~~~~~~~~~~~~~~~~~~~~ 0 root0 ttyS0 1:17m - 5:13pm 1 admin0 pts/1 3.00s 192.168.130.29 6:31pm~~~~~~~~~~~~~~~~~~~~~~~~~~~~~~~~~~~~~~~~~~~~~~~~~~~~~~~~~~~~~~~~~~~~~~~~~~~~~Enter Session Number to terminate (q to quit) q
See Also none
Fabric OS Command Reference 47153-1001764-02

ldapCfg2
ldapCfg
Maps LDAP AD server roles to default switch roles.
ldapcfg --maprole ldaprole switchrole
ldapcfg --unmaprole ldaprole
ldapcfg --show
ldapcfg --help
Description Use this command to map a Lightweight Directory Access Protocol (LDAP) Active Directory (AD) server role to one of the default roles available on a switch. This command also provides an option to remove an existing mapping.
This command creates an alias for a customer-defined group which allows a user belonging to that group to login to the switch with the permissions associated with the mapped switch role.
This command supports one-to-one role mapping only. For example, you might map the "SAN administrator" role on the AD server to the "admin" role on the switch, or the "SAN maintenance" role to the switch "operator" role. But the command fails if you attempt to map an already mapped AD server role.
Note The execution of this command is subject to Virtual Fabric or Admin Domain restrictions that may be in place. Refer to chapter 1, "Using Fabric OS commands" and Appendix A, "Command Availability" for details.
Operands This command takes as input an action and its associated arguments. When no operand is specified, the command prints the usage.
This command has the following operands:
--maprole Maps an LDAP role to a specified switch role. The following operands are required:
ldaprole Specifies the LDAP role to be mapped to a switch role. The role must be a valid AD server role.
switchrole Specifies the switch role to which the LDAP role is mapped. Valid switch roles include the following:
• admin• user• switchadmin• zoneadmin• fabricadmin• basicswitchadmin• operator• securityadmin
--unmaprole Removes the mapping between an LDAP role and a switch role. Use the --show option for a listing of existing mappings. The following operand is required:
ldaprole Specifies the LDAP AD sever role to be removed from the mapping.
472 Fabric OS Command Reference53-1001764-02

ldapCfg 2
--show Displays a table of existing mappings between LDAP roles and their corresponding switch role.
--help Displays the command usage.
Examples To display current LDAP and switch role map:
switch:admin> ldapcfg --showLDAP Role | Switch Role------------------------------------------------ldapadmin | adminldapuser | userSANfabadmin | fabricadminSANzoneadmin | zoneadminSANoperator | operatorLDAPSANsecadm | securityadminSANuser | userSAN01secadmin | securityadminLD_02zoneadmin | zoneadmin------------------------------------------------
To map an LDAP AD server role to the switch role of "operator":
switch:admin> ldapcfg --maprole SANoperator operatorLDAP role SANoperator has been successfully mapped.
switch:admin> ldapcfg --unmaprole SANoperatorLDAP role SANoperator has been successfully unmapped.
See Also aaaConfig, userConfig
Fabric OS Command Reference 47353-1001764-02

lfCfg2
lfCfg
Configures and displays logical fabrics.
Synopsis lfcfg [--show | --showall] -cfg
lfcfg [--show | --showall] -lisl [-v]
lfcfg [--show -xisl [slot]port |--showall -xisl
lfcfg --lislenable
lfcfg --help
Description Use this command to display logical fabric configuration information, to determine the status of logical interswitch links (LISLs), to enable LISLs between logical switches, and to display information about the XISLs and LISLs associated with each XISL.
A logical switch is a partition created on a physical switch that shares the physical resources of the base fabric while functioning as an independent entity in a "virtual" logical fabric. The logical fabric sits on top of a base physical fabric and ties otherwise disconnected logical switches together to share the same connectivity and physical resources. At the same time, the logical fabric provides protocol and management isolation, and each logical fabric is independently scalable.
The display options provided with this command show the logical fabric configuration for a given logical switch context or for a chassis context. Each logical switch displays only the user ports that are configured to be part of that switch instance. The switch context is defined by the fabric ID. The default context is the base logical switch that you are placed in upon login. The default logical switch context is defined by the fabric ID 128. To change the context, use the setContext command.
When issued with the -cfg option, this command displays the following information:
Chassis Numeric identifier for the chassis.
Chassis WWN Chassis world wide name.
Base switch Domain The domain ID of the base switch.
For each logical switch, the following information is displayed:
Logical Switch Numeric identifier for the logical switch within the chassis.
Base switch Yes or No. This field indicates whether or not this logical switch is the base switch.
Fabric Id The logical switch fabric ID (FID).
State The state of the logical switch: Online or Offline.
Switch WWN The logical switch world wide name.
When issued with the -lisl option, the command displays the following information:
FID Fabric ID of the logical switch.
Port Number of the logical LISL port.
remote-domain Domain ID of the base switch in the remote chassis.
Name Switch name.
State Port state: Online or Offline.
474 Fabric OS Command Reference53-1001764-02

lfCfg 2
Associated physical ports Physical ports associated with the LISL ports.
When lfCfg is issued within a logical switch context, only the configuration regarding that switch and the fabrics reachable from that switch is displayed. When the command is issued in a chassis context the information for all chassis in the base fabric reachable from the current chassis is displayed. Executing chassis-level commands requires chassis permissions. Refer to the userConfig command for information on setting chassis user permissions.
Notes The execution of this command is subject to Virtual Fabric or Admin Domain restrictions that may be in place. Refer to chapter 1, "Using Fabric OS Commands" and Appendix A, "Command Availability" for details.
This command is supported only on hardware platforms that are Virtual Fabric-aware and run Fabric OS v6.2.0 or later. Refer to the Fabric OS Administrator’s Guide for specific hardware support.
You cannot use the portEnable command on logical ports. Use lfcfg with the --lislenable option to re-enable disabled LISL ports on a logical switch.
Operands This command has the following operands:
--show -cfg Displays information for the fabric ID set by the context in all chassis reachable from the base fabric.
--showall -cfg Displays information for all fabrics in all chassis reachable from the chassis context in which the command is executed. This option requires chassis permissions.
--show -lisl Displays status information about the LISLs in the logical switch set by the context.
--showall -lisl Displays status information of all LISLs in the chassis. This option requires chassis permissions.
-v Displays, in addition to the LISLs, the physical ports on the base switch that are associated with the LISL ports. This operand is optional with the -lisl option.
--show -xisl [slot]port Displays the XISL and the LISLs associated with it for the specified XISL port. For each LISL port, the output displays the FID, LISL State (online/offline) and the local and remote logical switch WWNs. This command must be executed from the base switch.
--showall -lisl Displays the XISL connections between two base switches for all XISL ports. This command must be executed from the base switch.
--lislenable Re-enables all LISLs in the fabric that were disabled because of some conflict or error condition in the fabric. This command provides the option of manually reestablishing the LISLs after the error condition has been resolved.
--help Displays the command usage.
Fabric OS Command Reference 47553-1001764-02

lfCfg2
Examples To display logical fabric information for FID 2 in all chassis reachable from the base fabric.
switch:admin> lfcfg --show -cfg
------------------------------ Chassis: 1 ------------------------------Chassis WWN: 10:00:00:05:1e:39:82:64Number of Partitions: 2Base switch domain: 1
Logical switch: 2 Base switch: YES Fabric Id: 2 State: Online(1) Switch WWN: 10:00:00:05:1e:39:81:67
------------------------------ Chassis: 2 ------------------------------Chassis WWN: 10:00:00:05:1e:0b:a4:5eNumber of Partitions: 2Base switch domain: 2
Logical switch: 2 Base switch: YES Fabric Id: 2 State: Online(1) Switch WWN: 10:00:00:05:1e:0b:a4:41
To display information for all fabrics in all chassis reachable from the base fabric:
switch:admin> lfcfg --showall -cfg
------------------------------ Chassis: 1 ------------------------------Chassis WWN: 10:00:00:05:1e:39:82:64Number of Partitions: 2Base switch domain: 1
Logical switch: 2 Base switch: YES Fabric Id: 2 State: Online(1) Switch WWN: 10:00:00:05:1e:39:81:67
Logical Switch: 1 Base switch: NO Fabric Id: 1 State: Online(1) Switch WWN: 10:00:00:05:1e:39:81:66
------------------------------ Chassis: 2 ------------------------------Chassis WWN: 10:00:00:05:1e:0b:a4:5eNumber of Partitions: 2Base switch domain: 2
Logical switch: 2 Base switch: YES Fabric Id: 2 State: Online(1) Switch WWN: 10:00:00:05:1e:0b:a4:41
Logical Switch: 1 Base switch: NO Fabric Id: 1 State: Online(1) Switch WWN: 10:00:00:05:1e:0b:a4:40
To display the LISLs in the logical switch:
switch:admin> lfcfg --show -lislFID Port# remote-domainName State
2 384 24 sw0 PT Online
Displays status information about the LISLs in the logical switch set by the context:
switch:admin> lfcfg --show -lisl -v
ID Port# remote-domain Name State Associated Physical Ports2 384 24 sw0 PT Online 1/29, 2/41, 3/33, 4/24
476 Fabric OS Command Reference53-1001764-02

lfCfg 2
To display information about all LISLs in the chassis:
switch:admin> lfcfg --showall -lisl
FID Port# remote-domain Name State2 384 24 sw0 PT Online3 385 24 sw0 PT Online
To display all XISLs and the LISLs associated with each XISL:
switch:admin> lfcfg --showall -xisl
XISL Port No. : 12/30 LISL Pt. FID LISL State Local LS WWN Remote LS WWN450 10 PortOnline 10:00:00:05:1e:48:f8:02 10:00:00:05:1e:58:b2:5a451 20 PortOnline 10:00:00:05:1e:48:f8:03 10:00:00:05:1e:58:b2:5b452 30 PortOnline 10:00:00:05:1e:48:f8:04 10:00:00:05:1e:5b:69:d5453 10 PortOnline 10:00:00:05:1e:48:f8:02 10:00:00:05:1e:5b:69:d4454 30 PortOnline 10:00:00:05:1e:48:f8:04 10:00:00:05:1e:58:bd:6b455 10 PortOnline 10:00:00:05:1e:48:f8:02 10:00:00:05:1e:58:bd:6a
XISL Port No. : 12/31 LISL Pt. FID LISL State Local LS WWN Remote LS WWN448 10 PortOnline 10:00:00:05:1e:48:f8:02 10:00:00:05:1e:0b:87:dd449 20 PortOnline 10:00:00:05:1e:48:f8:03 10:00:00:05:1e:0b:87:de
To display a specific XISL and the LISLs associated with it
switch:admin> lfcfg --show -xisl 12/31
XISL Port No. : 12/31 LISL Pt. FID LISL State Local LS WWN Remote LS WWN448 10 PortOnline 10:00:00:05:1e:48:f8:02 10:00:00:05:1e:0b:87:dd449 20 PortOnline 10:00:00:05:1e:48:f8:03 10:00:00:05:1e:0b:87:de
See Also none
Fabric OS Command Reference 47753-1001764-02

licenseAdd2
licenseAdd
Adds a license key to a switch.
Synopsis licenseadd license
Description Use this command to add a license key to a switch.
Some features of the switch and the fabric to which it is connected are optional, licensed products. Without a valid license installed for such products, their services are not available.
A license key is a string of any length consisting of upper- and lowercase letters and numbers. License keys are case-sensitive. The license must be entered exactly as issued. The system may accept an incorrectly entered license, but the licensed products will not function. After entering the license, use the licenseShow command to validate the product associated with the license. If no licensed products are shown, the license is invalid.
After you enter a license, the licensed product is generally available immediately without requiring a system reboot. The following exceptions apply:
• When adding a fabric license to a switch that lacks a fabric license, you must reboot the switch to activate the license.
• When adding a trunking license is added to the switch, you must refresh the trunk ports to activate the trunking license. Depending on your system, use portDisable/portEnable, switchDisable/switchEnable or chassisDisable/chassisEnable to refresh the trunk ports.
Note The execution of this command is subject to Virtual Fabric or Admin Domain restrictions that may be in place. Refer to chapter 1, "Using Fabric OS Commands" and Appendix A, "Command Availability" for details.
Operands This command has the following operand:
license Specifies the license key to be installed. This operand is required.
Examples To add a license key to the switch:
switch:admin> licenseadd DXXtN3LmRSMWCSW3XmfSBPfrWKLZ3HMTN73rP9GANJMAadding license-key [DXXtN3LmRSMWCSW3XmfSBPfrWKLZ3HMTN73rP9GANJMA]
See Also licesnseHelp, licenseRemove, licenseShow
478 Fabric OS Command Reference53-1001764-02

licenseHelp 2
licenseHelp
Displays commands used to administer license keys.
Synopsis licensehelp
Description Use this command to display a list of the commands used to administer license keys.
Notes The execution of this command is subject to Virtual Fabric or Admin Domain restrictions that may be in place. Refer to chapter 1, "Using Fabric OS Commands" and Appendix A, "Command Availability" for details.
Operands none
Examples To display license commands:
switch:admin> licensehelplicenseadd Adds license keys to switchlicensehelp Prints license help infolicenseidshow Displays the system license IDlicenseremove Removes a license key from this systemlicenseshow Displays current license keyslicenseslotcfg Configures licenses on a slot basis
See Also licenseAdd, licenseIdShow, licensePort, licenseRemove, licenseSlotCfg, licenseShow
Fabric OS Command Reference 47953-1001764-02

licenseIdShow2
licenseIdShow
Displays the system license ID.
Synopsis licenseidshow
Description Use this command to display the license ID of the system.
Some features of the switch and the fabric are optional, licensed products. Without a license installed for such products, the services provided by these features are not available.
This command displays the system license ID used for generating and validating licenses on the system. The license ID format consists of eight pairs of hexadecimal values, separated by colons. Each hexadecimal value is between 00 (0) and FF (255).
Notes While the format of this identifier might be similar or even identical to other identifiers in the system, no inferences should be made about the relationships between them as they are subject to change independently of one another.
The execution of this command is subject to Virtual Fabric or Admin Domain restrictions that may be in place. Refer to chapter 1, "Using Fabric OS Commands" and Appendix A, "Command Availability" for details.
Operands none
Examples To display the license ID:
switch:admin> licenseidshowa4:f8:69:33:22:00:ea:18
See Also licenseAdd, licenseHelp, licensePort, licenseRemove, licenseShow, licenseSlotCfg
480 Fabric OS Command Reference53-1001764-02

licensePort 2
licensePort
Manages Dynamic Ports On Demand (DPOD) licenses.
Synopsis licenseport --release port
licenseport --reserve port
licenseport --show
lcenseport --method dynamic | static
Description Use this command to manage and display Dynamic Ports on Demand (DPOD) license assignments.
Dynamic Ports On Demand (DPOD) is an optional feature available on all embedded platforms. DPOD takes the expansion capability of static Ports On Demand (POD) and adds the flexibility of activating any available port as long as a valid license is available. In Static mode, POD allows only specific fixed ports to be activated or licensed. With DPOD, any physical port can be made active as long as the total number of licenses is not exceeded.
The Dynamic POD feature assigns ports to the POD license in the order in which they come online until they equal the number of online licensed ports. This command provides the mechanism to make adjustments to the dynamic assignments by reserving assignments for specific ports in the event that there are more online ports than the purchased POD licenses can support.
Note The execution of this command is subject to Virtual Fabric or Admin Domain restrictions that may be in place. Refer to chapter 1, "Using Fabric OS commands" and Appendix A, "Command Availability" for details.
This command is valid only on embedded platforms. On unsupported platforms, this command returns a "not supported" message.
Operands This command has the following operands:
port Specifies the number of the port to which to assign or from which to remove a POD license. A port must be specified when releasing or reserving a port.
--release Releases a license assignment from the specified port when the switch is using the Dynamic POD method. The port must be offline for this command to succeed.
--reserve Reserves a license assignment for the specified port when the switch is using the Dynamic POD method. The port must be offline for this command to succeed.
--show Displays the POD license assignments.
--method Selects the POD method as one of the following:
dynamic Selects the dynamic POD method.
static Selects the static POD method.
Examples To activate Dynamic Ports On Demand:
switch:admin> licenseport --method dynamicThe POD method has been changed to dynamic.Please reboot the switch now for this change to take effect.
Fabric OS Command Reference 48153-1001764-02
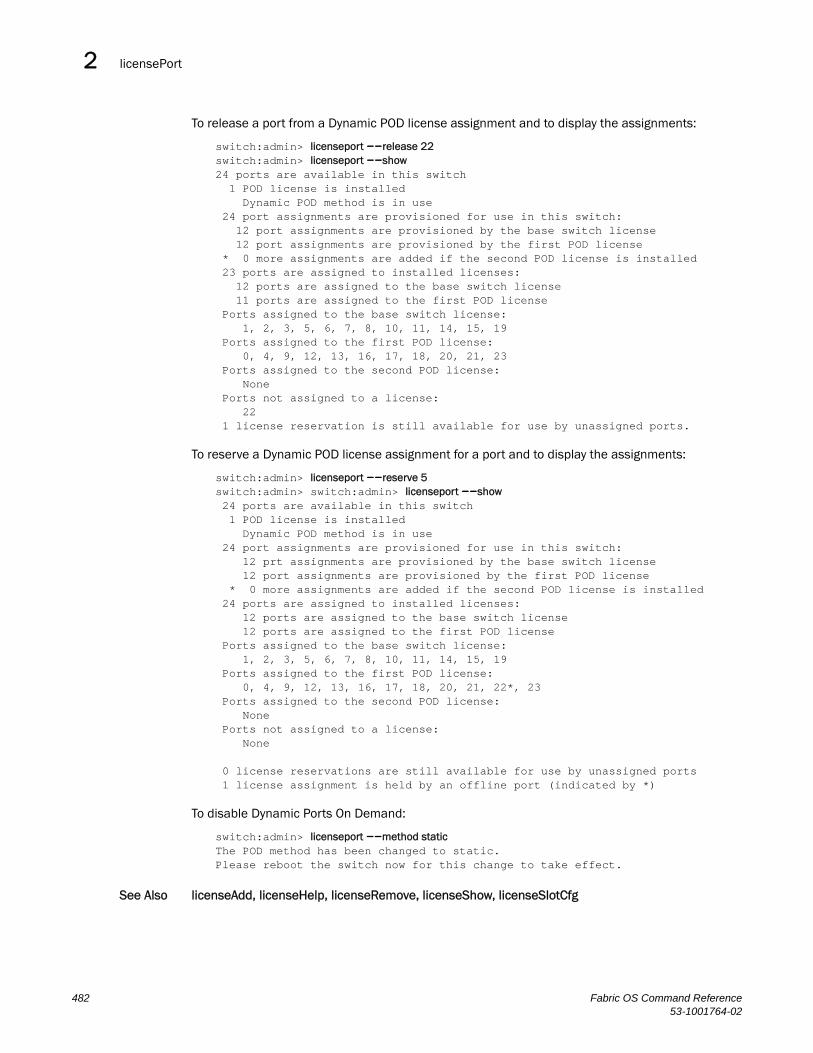
licensePort2
To release a port from a Dynamic POD license assignment and to display the assignments:
switch:admin> licenseport --release 22switch:admin> licenseport --show24 ports are available in this switch 1 POD license is installed Dynamic POD method is in use 24 port assignments are provisioned for use in this switch: 12 port assignments are provisioned by the base switch license 12 port assignments are provisioned by the first POD license * 0 more assignments are added if the second POD license is installed 23 ports are assigned to installed licenses: 12 ports are assigned to the base switch license 11 ports are assigned to the first POD license Ports assigned to the base switch license: 1, 2, 3, 5, 6, 7, 8, 10, 11, 14, 15, 19 Ports assigned to the first POD license: 0, 4, 9, 12, 13, 16, 17, 18, 20, 21, 23 Ports assigned to the second POD license: None Ports not assigned to a license: 22 1 license reservation is still available for use by unassigned ports.
To reserve a Dynamic POD license assignment for a port and to display the assignments:
switch:admin> licenseport --reserve 5switch:admin> switch:admin> licenseport --show 24 ports are available in this switch 1 POD license is installed Dynamic POD method is in use 24 port assignments are provisioned for use in this switch: 12 prt assignments are provisioned by the base switch license 12 port assignments are provisioned by the first POD license * 0 more assignments are added if the second POD license is installed 24 ports are assigned to installed licenses: 12 ports are assigned to the base switch license 12 ports are assigned to the first POD license Ports assigned to the base switch license: 1, 2, 3, 5, 6, 7, 8, 10, 11, 14, 15, 19 Ports assigned to the first POD license: 0, 4, 9, 12, 13, 16, 17, 18, 20, 21, 22*, 23 Ports assigned to the second POD license: None Ports not assigned to a license: None
0 license reservations are still available for use by unassigned ports 1 license assignment is held by an offline port (indicated by *)
To disable Dynamic Ports On Demand:
switch:admin> licenseport --method staticThe POD method has been changed to static.Please reboot the switch now for this change to take effect.
See Also licenseAdd, licenseHelp, licenseRemove, licenseShow, licenseSlotCfg
482 Fabric OS Command Reference53-1001764-02

licenseRemove 2
licenseRemove
Removes or deactivates a license key.
Synopsis licenseremove license
Description Use this command to remove an existing license key from a switch or to deactivate the license key. The existing license key must be entered exactly as shown by licenseShow, including case.
When the key has been removed, use the licenseShow command to verify that the key and the associated product have been uninstalled. You must reboot the switch after removing a license. For a switch that has no licenses installed, licenseShow displays “No licenses.”
Upgradable licenses, such as slot-based licenses or Universal Time-based licenses cannot be permanently removed; they remain in the database but are not displayed in the licenseShow output.
Note The execution of this command is subject to Virtual Fabric or Admin Domain restrictions that may be in place. Refer to chapter 1, "Using Fabric OS commands" and Appendix A, "Command Availability" for details.
Operands The following operand is required:
license Specifies the license key to be removed or deactivated. This operand is required.
Examples To remove a license key from the switch:
switch:admin> licenseremove bQebzbRdScRfc0iKremoving license key [bQebzbRdScRfc0iK]
To deactivate a slot-based license:
switch:admin> licenseremove DXXtN3LmRSMWCSW3XmfSBPfrWKLZ3HMTN73rP9GANJMAremoving license-key [DXXtN3LmRSMWCSW3XmfSBPfrWKLZ3HMTN73rP9GANJMA]
switch:admin> licenseshowSSezcSec9RXTf0dj:Performance Monitor licenseKgrfCBHgRtfBrGKH4D7f9S3FBX7K3MtTtBHKrYHA4CMB:10 Gigabit Ethernet (FTR_10G) licenseCapacity 8Consumed 4Configured Blade Slots 1,3,5,12A7N9rATZLYgFa7JBfmGEJKETgCMHFGQMY4gfLmGAa4GA:Advanced FICON Acceleration (FTR_AFA) licenseCapacity 6Consumed 2Configured Blade Slots 3,4DXXtN3LmRSMWCSW3XmfSBPfrWKLZ3HMTN73rP9GANJMA:Advanced Extension (FTR_AE) license - Inactive.G4H3AZmW4gPTMHN9FfZJFGX4fSaTSY9TtaDCB43EBNHKYANSZA: 10 Gigabit Ethernet (FTR_10G) license - Inactive.SBZNQ344YCLK4QaYXJ9SfPDR9FrSaXAT4WHNGmADFRFrgAYWTC:8 Gig FC license - Inactive.KSYFYAtAfPGHDRJfCYQrC4Q9T9CYYmXDBJgLB:Enhanced Group Management licenseXFJXYHmPtCWC93CLgBD9BZD9AmTFgDStFDJGMaLKC9FgWAfgSE:
Fabric OS Command Reference 48353-1001764-02

licenseRemove2
8 Gig FC licenseExpiry Date 03/06/2009License is expiredHf7MBEEGCFNmTAWXXF99RtHXQN4RRtM3mLGtrWZLAMaTaAY9EB:Storage Application Services licenseExpiry Date 03/07/2009
See Also licenseAdd, licenseHelp, licenseIdShow, licenseShow
484 Fabric OS Command Reference53-1001764-02

licenseShow 2
licenseShow
Displays current license keys.
Synopsis licenseshow
Description Use this command to display current license keys, along with a list of licensed products enabled by these keys. Depending on the type of license, this command displays the following information:
Permanent licenses
- License key
- Associated product
Temporary and universal time-based licenses
- License key
- Associated product
- Expiration date or expiration notice if the license has expired
Slot-based licenses
- License key
- Associated product
- Capacity (number of slots purchased)
- Consumed (number of slots configured to use the license)
- Configured Blade Slot Positions (slot numbers of the configured blade slots)
When no licenses are installed, the message "No license installed on this switch" is displayed.
Note The execution of this command is subject to Virtual Fabric or Admin Domain restrictions that may be in place. Refer to chapter 1, "Using Fabric OS Commands" and Appendix A, "Command Availability" for details.
Operands none
Examples To display the license keys on a switch with permanent licenses installed:
switch:admin> licenseshow S9bddb9SQbTAceeC:
Fabric license eezeRRySff0fSe: Remote Switch license bzbzRcbcSc0c0SY: Remote Fabric license dSeR9RcSeeTfSAq: Extended Fabric license RyeSzRScycTzfT09: Entry Fabric license RyeSzRScycUzfT0A: Fabric Watch license RyeSzRScycazfT0G: Trunking license RyeSzRScycS0fT09: 4 Domain Fabric license
Fabric OS Command Reference 48553-1001764-02

licenseShow2
To display the license keys on a switch with temporary (expired) licenses installed:
switch:admin> licenseShow 7QmYFYJrmDgE9tTS4AYXB9trYSGtMtrQZSTK4ZSC7FC9ZAYAgE:
Integrated Routing license Expiry Date 01/16/2008 License is expired 33YBfZfKZ3tQKrRJJRtgmS3JDtCL99P4fYrJYQP7GffS4ASmNE: Enterprise Bundle license Expiry Date 01/16/2008 License is expired
To display the license keys on a switch with universal time-based and slot-based licenses installed (the first two examples show time-based, the third one shows a slot-based license):
switch:admin> licenseshowDAmHTPgQ7KDtKrEYQC7X7STF9HJDL7TmTWRmZPmSTSE49AEfaE: Trunking license Expiry Date 11/11/2008 License is expiredH47CFSa93aKgKJM9NWMYEMaLrATQWDHCgHfZftWGGgNCYAJaBA: High-Performance Extension over FCIP/FC license Expiry Date 12/20/2008KBrttggRJ4TEBBAt4CrXWRgSCgCJrKZNRFYS9A74ZG: 10 Gigabit Ethernet (FTR_10G) license Capacity 4 Consumed 2 Configured Blade Slots 1,3.
See Also licenseAdd, licenseHelp, licenseIdShow, licenseRemove
486 Fabric OS Command Reference53-1001764-02

licenseSlotCfg 2
licenseSlotCfg
Configures and displays slot-based licensed features.
Synopsis licenseslotcfg –-add feature slot
licenseslotcfg –-remove feature slot
licenseslotcfg –-show
licenseslotcfg –-help
Description Use this command to configure and manage licenses for the Brocade FX8-24 extension blade on the slot where the blade is installed.
Slot-based licenses allow you to select the slots the license will enable up to the purchased capacity and thereby increase existing capacity without disrupting the slots for which licensed features are already enabled.
There is a separate slot-based license key for each licensed feature supported on the blade. For example, the Brocade FX8-24 supports slot-based license keys for each of the following features:
• 10 GbE license - Enables the two 10GbE ports on the Brocade FX8-24.
• Advanced Extension license - Enables FCIP Trunking and Adaptive Rate Limiting.
• Advanced FICON Acceleration license - Accelerates FICON tape read and write and IBM Global Mirror data replication operations over distance.
A license key with the specified capacity must be installed with the licenseAdd command before you can enable the feature on a specified slot with the licenseSlotCfg command. Refer to the Fabric OS Administrator’s Guide for more information.
Note The execution of this command is subject to Virtual Fabric or Admin Domain restrictions that may be in place. Refer to chapter 1, "Using Fabric OS Commands" and Appendix A, "Command Availability" for details.
In Fabric OS v6.3.0, slot-based licensing is available only on the Brocade FX8-24 extension blade. All other blades continue to use the chassis-based licensing model as before.
Operands feature Specifies the licensed feature to be added at the specified slot. The feature is specified as a tag from the following set of licenses:
FTR_AE Advanced Extension license
FTR_AFA Advanced FICON Acceleration license
FTR_10G 10 Gigabit Ethernet license
slot Specifies the slot number for the Brocade FX8-24 extension blade. This number corresponds to the physical blade slot number on the chassis (1-4, 9-12 on the Brocade DCX; 1-2, 7-8 on the Brocade DCX-4S).
–-add Adds a slot-based license to the specified slot.
–-remove Removes a slot-based license from the specified slot. This operation frees up the license to be assigned to another slot. You must disable the applications that use the license on this slot before you can deactivate the license.
–-show Displays all slot-based licenses in the chassis.
Fabric OS Command Reference 48753-1001764-02

licenseSlotCfg2
–-help Displays the command usage.
Examples To add a license key for the slot-based Advance Extension feature for eight slots:
switch:admin> licenseadd DXXtN3LmRSMWCSW3XmfSBPfrWKLZ3HMTN73rP9GANJMAadding license-key [DXXtN3LmRSMWCSW3XmfSBPfrWKLZ3HMTN73rP9GANJMA]
To display the installed license (new license in bold):
switch:admin> licenseshowSSezcSec9RXTf0dj:Performance Monitor licenseKgrfCBHgRtfBrGKH4D7f9S3FBX7K3MtTtBHKrYHA4CMB:10 Gigabit Ethernet (FTR_10G) licenseCapacity 8Consumed 4Configured Blade Slots 1,3,5,12A7N9rATZLYgFa7JBfmGEJKETgCMHFGQMY4gfLmGAa4GA:Advanced FICON Acceleration (FTR_AFA) licenseCapacity 6Consumed 2Configured Blade Slots 3,4DXXtN3LmRSMWCSW3XmfSBPfrWKLZ3HMTN73rP9GANJMA:Advanced Extension (FTR_AE) licenseCapacity 8Consumed 0
To configure the blade slots 3, 4, 11, and 12 to enable the license on these slots:
switch:admin> licenseslotcfg --add FTR_AE 3Blade slot-3 added to FTR_AE slot-based license configurationRemaining capacity for FTR_AE slot-based license = 7
switch:admin licenseslotcfg --add FTR_AE 4Blade slot-4 added to FTR_AE slot-based license configurationRemaining capacity for FTR_AE slot-based license = 6
switch:admin> licenseslotcfg --add FTR_AE 11Blade slot-11 added to FTR_AE slot-based license configurationRemaining capacity for FTR_AE slot-based license = 5
switch:admin> licenseslotcfg --add FTR_AE 12Blade slot-12 added to FTR_AE slot-based license configurationRemaining capacity for FTR_AE slot-based license = 4
To display the enabled licenses:
switch:admin> licenseshowSSezcSec9RXTf0dj:Performance Monitor licenseKgrfCBHgRtfBrGKH4D7f9S3FBX7K3MtTtBHKrYHA4CMB:10 Gigabit Ethernet (FTR_10G) licenseCapacity 8Consumed 4Configured Blade Slots 1,3,5,12A7N9rATZLYgFa7JBfmGEJKETgCMHFGQMY4gfLmGAa4GA:Advanced FICON Acceleration (FTR_AFA) licenseCapacity 6Consumed 2Configured Blade Slots 3,4DXXtN3LmRSMWCSW3XmfSBPfrWKLZ3HMTN73rP9GANJMA:
488 Fabric OS Command Reference53-1001764-02

licenseSlotCfg 2
Advanced Extension (FTR_AE) licenseCapacity 8Consumed 4Configured Blade Slots 3,4,11,12
switch:admin> licenseslotcfg --showFTR_10G license - blade slots configured = 1,3,5,12FTR_AE license - blade slots configured = 3,4,11,12FTR_AFA license - blade slots configured = 3,4
To deactivate the Advanced Extension license on slots 3 and 12, and to display the: results:
switch:admin> licenseslotcfg --remove FTR_AE 3Blade slot-3 removed from FTR_AE slot-based license configuration
switch:admin> licenseslotcfg --showFTR_10G license - blade slots configured = 1,3,5,12FTR_AE license - blade slots configured = 12FTR_AFA license - blade slots configured = 3,4
switch:admin> licenseslotcfg --remove FTR_AE 12Blade slot-12 removed from FTR_AE slot-based license configuration
switch:admin> licenseslotcfg --showFTR_10G license - blade slots configured = 1,3,5,12FTR_AFA license - blade slots configured = 3,4
switch:admin> licenseshowSSezcSec9RXTf0dj:Performance Monitor licenseKgrfCBHgRtfBrGKH4D7f9S3FBX7K3MtTtBHKrYHA4CMB:10 Gigabit Ethernet (FTR_10G) licenseCapacity 8Consumed 4Configured Blade Slots 1,3,5,12A7N9rATZLYgFa7JBfmGEJKETgCMHFGQMY4gfLmGAa4GA:Advanced FICON Acceleration (FTR_AFA) licenseCapacity 6Consumed 2Configured Blade Slots 3,4DXXtN3LmRSMWCSW3XmfSBPfrWKLZ3HMTN73rP9GANJMA:Advanced Extension (FTR_AE) licenseCapacity 8Consumed 0G4H3AZmW4gPTMHN9FfZJFGX4fSaTSY9TtaDCB43EBNHKYANSZA:10 Gigabit Ethernet (FTR_10G) license - Inactive.SBZNQ344YCLK4QaYXJ9SfPDR9FrSaXAT4WHNGmADFRFrgAYWTC:8 Gig FC license - Inactive.KSYFYAtAfPGHDRJfCYQrC4Q9T9CYYmXDBJgLB:Enhanced Group Management licenseXFJXYHmPtCWC93CLgBD9BZD9AmTFgDStFDJGMaLKC9FgWAfgSE:8 Gig FC licenseExpiry Date 03/06/2009License is expiredHf7MBEEGCFNmTAWXXF99RtHXQN4RRtM3mLGtrWZLAMaTaAY9EB:Storage Application Services licenseExpiry Date 03/07/2009
Fabric OS Command Reference 48953-1001764-02

licenseSlotCfg2
To remove the Advanced Extension license completely (marked inactive):
switch:admin> licenseremove DXXtN3LmRSMWCSW3XmfSBPfrWKLZ3HMTN73rP9GANJMAremoving license-key [DXXtN3LmRSMWCSW3XmfSBPfrWKLZ3HMTN73rP9GANJMA]
switch:admin> licenseshowSSezcSec9RXTf0dj:Performance Monitor licenseKgrfCBHgRtfBrGKH4D7f9S3FBX7K3MtTtBHKrYHA4CMB:10 Gigabit Ethernet (FTR_10G) licenseCapacity 8Consumed 4Configured Blade Slots 1,3,5,12A7N9rATZLYgFa7JBfmGEJKETgCMHFGQMY4gfLmGAa4GA:Advanced FICON Acceleration (FTR_AFA) licenseCapacity 6Consumed 2Configured Blade Slots 3,4DXXtN3LmRSMWCSW3XmfSBPfrWKLZ3HMTN73rP9GANJMA:Advanced Extension (FTR_AE) license - InactiveG4H3AZmW4gPTMHN9FfZJFGX4fSaTSY9TtaDCB43EBNHKYANSZA:10 Gigabit Ethernet (FTR_10G) license - Inactive.SBZNQ344YCLK4QaYXJ9SfPDR9FrSaXAT4WHNGmADFRFrgAYWTC:8 Gig FC license - Inactive.KSYFYAtAfPGHDRJfCYQrC4Q9T9CYYmXDBJgLB:Enhanced Group Management licenseXFJXYHmPtCWC93CLgBD9BZD9AmTFgDStFDJGMaLKC9FgWAfgSE:8 Gig FC licenseExpiry Date 03/06/2009License is expiredHf7MBEEGCFNmTAWXXF99RtHXQN4RRtM3mLGtrWZLAMaTaAY9EB:Storage Application Services licenseExpiry Date 03/07/2009
See Also licenseAdd, licenseHelp, licenseIdShow, licenseRemove
490 Fabric OS Command Reference53-1001764-02

linkCost 2
linkCost
Sets or displays the Fabric Shortest Path First (FSPF) cost of a link.
Synopsis linkcost [[slot/]port [cost]]
Description Use this command to set or display the cost of an interswitch link (ISL). The cost of a link is a dimensionless positive number. The FSPF protocol compares the cost of various paths between a source switch and a destination switch by adding the costs of all the ISLs along each path. FSPF chooses the path with minimum cost. If multiple paths exist with the same minimum cost, FSPF distributes the load among these paths.
Every ISL has a default cost that is inversely proportional to its bandwidth. For a 1 Gbps ISL, the default cost is 1000. For a 2 Gbps ISL, the default cost is 500. This simple algorithm is not effective when dealing with trunking ISLs greater than 2 Gbps and less than 1 Gbps bandwidths. Link cost default values are shown in Table 23.
When executed without operands, the command displays the current cost of each port on the switch, including non-ISLs. An E_PORT suffix is appended to the interface number of active ISLs. If a static cost is assigned to a port, a STATIC suffix is appended to the link cost. In this case, only the current link cost displays. Use interfaceShow to display both the default and current link costs.
Notes This command sets a non-default, “static” cost for any port except EX/VEX ports. Use fcrRouterPortCost to configure EX/VEX ports.
The execution of this command is subject to Virtual Fabric or Admin Domain restrictions that may be in place. Refer to chapter 1, "Using Fabric OS commands" and Appendix A, "Command Availability" for details.
This command cannot be executed on a logical ISL (LISL).
Operands When invoked without operands, this command displays the cost for all ports. The following operands are optional:
slot For bladed systems only, specifies the slot number for which to set or display the cost, followed by a slash (/).
port Specifies the port number for which to set or display the cost, relative to its slot for bladed systems. Use switchShow to list of valid ports.
TABLE 23 Link cost defaults
Link type Link cost (ISL bandwidth in Mbps)
< 1 Gbps ISL 2000
1 Gbps ISL 1000
2-Gbps ISL 500
> 2 Gbps trunks 500
4 Gbps ISL 500
8 Gbps ISL 500
10 Gbps ISL 500
Fabric OS Command Reference 49153-1001764-02

linkCost2
cost Specifies the static cost of the link connected to the specified port. Valid values are 0 to 65,535. Assigning a value outside this range will fail and generate an error. A value of 0 removes the static cost and the port reverts to its default link cost. If cost is not specified, the command displays the current cost of the specified port.
Examples To display the link costs for all ports on a switch:
switch:admin> linkcostSlot Interface Cost-------------------------------------- 2 0 500 (STATIC) 2 1 1000 2 2 500 (STATIC) 2 3 200 (STATIC) 2 4 1000 2 5 1000 2 6 1000 2 7 1000 2 8 1000 2 9 1000 2 10 1000 2 11 (E_PORT) 2000 (STATIC) 2 12 1000 2 13 1000 2 14 1000 2 15 1000
Type <CR> to continue, Q<CR> to stop:
To set the ISL cost on a port:
switch:admin> linkcost 2/4 500
To display the new cost value on the same port:
switch:admin> linkcost 2/4
Interface2/4 Cost 500 (STATIC)
To delete the cost value and reset to default:
switch:admin> linkcost 2/4 0
To display the change:
switch:admin> linkcost 2/4
Interface2/4 Cost 1000
See Also interfaceShow, lsDbShow, topologyShow, uRouteShow, fcrRouterPortCost
492 Fabric OS Command Reference53-1001764-02

login 2
login
Logs in as new user.
Synopsis login
Description Use this command to log in to the switch with another user name and password, without first logging out from the original session. If you originally connected through a Telnet or rlogin session, that session is left open.
This command allows you to access commands that you cannot access at your current user level.
Note The execution of this command is subject to Virtual Fabric or Admin Domain restrictions that may be in place. Refer to chapter 1, "Using Fabric OS Commands" and Appendix A, "Command Availability" for details.
Operands none
Examples To log in as admin from the login user:
switch:user> loginlogin: adminPassword:xxxxxx
See Also logout
Fabric OS Command Reference 49353-1001764-02

logout2
logout
Logs out from a shell session.
Synopsis logout
Description Use this command to log out from a shell session. Remote login connections are closed and the local serial connections return to the login prompt.
The exit command is accepted as a synonym for logout, as is Ctrl-D at the beginning of a line.
Operands none
Examples To log out from an rlogin session:
switch:admin> logout
See Also login
494 Fabric OS Command Reference53-1001764-02

lsanZoneShow 2
lsanZoneShow
Displays logical SAN zone information.
Synopsis lsanzoneshow [-s] [-f fabricid] [-w wwn] [-z zonename]
Description Use this command to display the inter-fabric zones or LSAN zones. These zones are normal WWN zones created in FC Router EX_Port-connected fabrics and backbone fabrics. The LSAN zones are identified by the text string “lsan_” in the zone name. Note that the string is case insensitive so “LSAN_” also is valid. The FC Router uses these zones to establish the inter-fabric device import and export policy. The LSAN zones are established by zoning administration in each EX_Port-attached fabric and backbone fabric. Inter-fabric device sharing is allowed between two devices if the LSAN zones defined in their respective fabrics both allow the two devices to communicate; for example, the intersection of LSAN zones in two fabrics define the device sharing policy.
The LSAN zones are listed by fabric. Zone membership information (information about the devices in the zone) is provided for each LSAN zone. The default output displays only WWNs of the zone members.
Search parameters -f, -w, and -z allow searching for LSAN zones based on fabric ID, WWN of an LSAN zone member, or LSAN zone name.
"No LSAN zone found" is displayed if there is no LSAN zone information available at this FC Router.
Each LSAN zone entry displays the following:
Fabric ID The ID of the fabric in which the LSAN zone was created.
Zone Name The zone name.
Zone Members The zone members or devices. The default output displays the WWN of the zone members.
Note The execution of this command is subject to Virtual Fabric or Admin Domain restrictions that may be in place. Refer to chapter 1, "Using Fabric OS Commands" and Appendix A, "Command Availability" for details.
Operands This command has the following operands:
-s Displays state information for the device. Valid states include:
Configured Device is configured to be in an LSAN, but the device is neither imported nor exists in this fabric.
Initializing Device is in an intermediate state. It is not yet imported into the fabric.
EXIST Device exists in this fabric (the fabric of the zone entry).
Imported Device has been imported (proxy created) into this fabric.
-f fabricid Displays LSAN zones in the specified fabric.
-w wwn Displays LSAN zones containing the specified port WWN. The WWN format is xx:xx:xx:xx:xx:xx:xx:xx.
-z zonename Displays LSAN zones with the specified zone name. The database for zones is displayed per switch, which can differ from the database stored on the other FCR switches.
Fabric OS Command Reference 49553-1001764-02

lsanZoneShow2
Examples To display the LSAN zones:
switch:admin> lsanzoneshow Fabric ID: 4 Zone Name: lsan_fcr10_0 50:05:07:65:05:84:0b:83 50:05:07:65:05:84:09:0e 10:00:00:00:c9:2b:6a:68 21:00:00:20:37:18:22:55 Fabric ID: 5 Zone Name: lsan_fcr11_0 10:00:00:00:c9:2b:6a:68 21:00:00:20:37:18:22:55 50:05:07:65:05:84:0b:83 50:05:07:65:05:84:09:0e switch#
See Also fcrFabricShow, fcrPhyDevShow, fcrProxyDevShow, fcrRouteShow, switchShow
496 Fabric OS Command Reference53-1001764-02

lsCfg 2
lsCfg
Configures and manages a logical switch
Synopsis lscfg --create FID [-b | -base] [-f | -force]
lscfg --delete FID
lscfg --config FID -slot slot1[-slot2] [-port [ port1[-port2]] [-f |-force]
lscfg --restore_to_default FID
lscfg --restore_slot_to_default slot
lscfg --change FID [[-newfid FID] | [-base]] [-force]
lscfg --show [-ge] [-provision]
lscfg --help
Description Use this command to create a logical switch and to modify logical switch configurations.
The logical switch feature provides the ability to partition a single physical switch into multiple switch instances. Each of these switch partitions is referred to as a logical switch (LS). The logical switch feature allows you to configure multiple logical fabrics on top of a base (physical) fabric. Each logical fabric is made up of logical switches that share the physical resources of the base fabric, for example, interswitch link (ISL) connectivity. At the same time, protocol and management isolation of each logical fabric is maintained, and each logical fabric can scale independently.
The Default Logical Switch is created by the system and cannot be deleted. All switch ports not explicitly assigned to a logical switch are part of the default logical switch.
The logical switch feature is supported only on hardware platforms that are Virtual Fabric-aware and run Fabric OS v6.2.0 or later. Refer to the Fabric OS Administrator's Guide for specific hardware support.
The Virtual Fabric (VF) feature must be enabled on the switch before you can configure a logical switch. Use the fosconfig --enable vf command to enable the feature. Use the fosconfig --show command to determine whether the VF feature is enabled or disabled on the switch.
Notes The execution of this command is subject to Virtual Fabric or Admin Domain restrictions that may be in place. Refer to chapter 1, "Using Fabric OS Commands" and Appendix A, "Command Availability" for details.
Not all commands that support the -force option will prompt for user input when used without the -force option.
Operands This command has the following operands:
--create Creates a logical switch instance. The following operands are supported.
FID Specifies the Fabric ID. Each logical switch in a chassis is assigned a unique fabric identifier. The FID address space is shared between logical switches and EX_Ports. Valid FID values are integers between 1 and 128. The default logical switch is assigned FID 128 by default. This operand is required.
Fabric OS Command Reference 49753-1001764-02
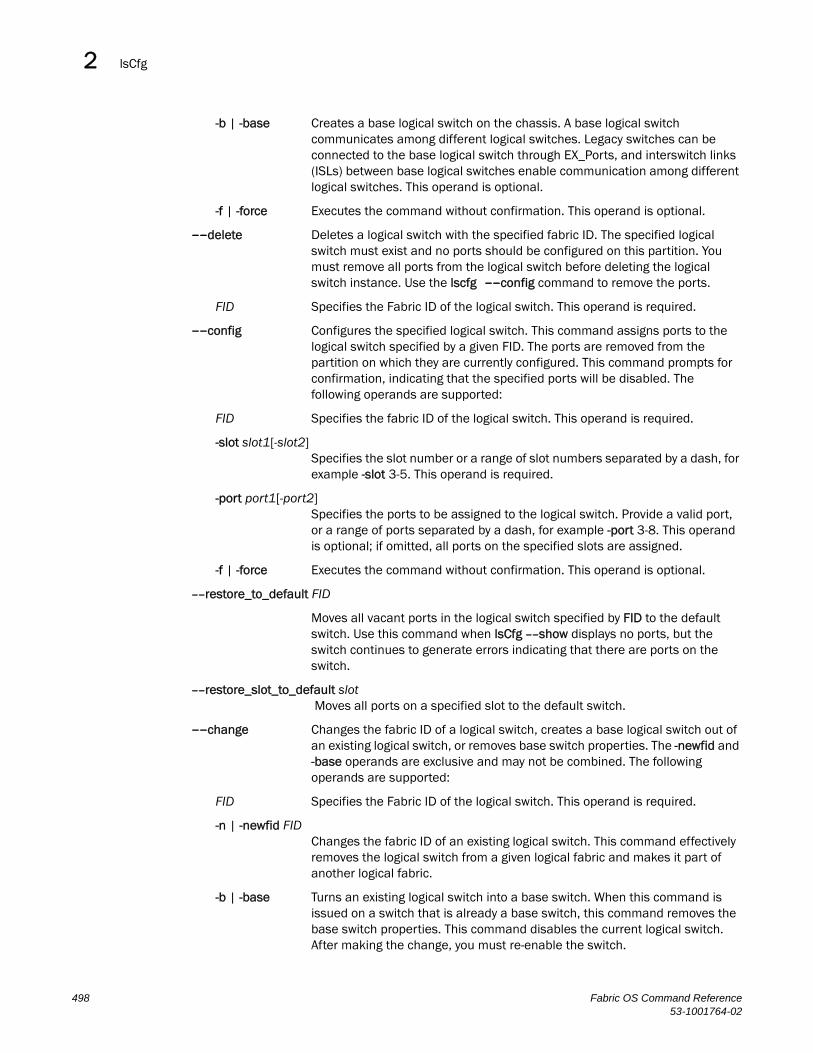
lsCfg2
-b | -base Creates a base logical switch on the chassis. A base logical switch communicates among different logical switches. Legacy switches can be connected to the base logical switch through EX_Ports, and interswitch links (ISLs) between base logical switches enable communication among different logical switches. This operand is optional.
-f | -force Executes the command without confirmation. This operand is optional.
--delete Deletes a logical switch with the specified fabric ID. The specified logical switch must exist and no ports should be configured on this partition. You must remove all ports from the logical switch before deleting the logical switch instance. Use the lscfg --config command to remove the ports.
FID Specifies the Fabric ID of the logical switch. This operand is required.
--config Configures the specified logical switch. This command assigns ports to the logical switch specified by a given FID. The ports are removed from the partition on which they are currently configured. This command prompts for confirmation, indicating that the specified ports will be disabled. The following operands are supported:
FID Specifies the fabric ID of the logical switch. This operand is required.
-slot slot1[-slot2] Specifies the slot number or a range of slot numbers separated by a dash, for example -slot 3-5. This operand is required.
-port port1[-port2] Specifies the ports to be assigned to the logical switch. Provide a valid port, or a range of ports separated by a dash, for example -port 3-8. This operand is optional; if omitted, all ports on the specified slots are assigned.
-f | -force Executes the command without confirmation. This operand is optional.
--restore_to_default FID
Moves all vacant ports in the logical switch specified by FID to the default switch. Use this command when lsCfg --show displays no ports, but the switch continues to generate errors indicating that there are ports on the switch.
--restore_slot_to_default slot Moves all ports on a specified slot to the default switch.
--change Changes the fabric ID of a logical switch, creates a base logical switch out of an existing logical switch, or removes base switch properties. The -newfid and -base operands are exclusive and may not be combined. The following operands are supported:
FID Specifies the Fabric ID of the logical switch. This operand is required.
-n | -newfid FID Changes the fabric ID of an existing logical switch. This command effectively removes the logical switch from a given logical fabric and makes it part of another logical fabric.
-b | -base Turns an existing logical switch into a base switch. When this command is issued on a switch that is already a base switch, this command removes the base switch properties. This command disables the current logical switch. After making the change, you must re-enable the switch.
498 Fabric OS Command Reference53-1001764-02

lsCfg 2
-f | -force Executes the command without confirmation. This operand is optional.
--show Displays the partition configuration on a switch or chassis. Without any operands, the command displays all logical switches and the FC ports assigned to them. For each switch, the FID and switch role are displayed: base switch (BS) or default switch (DS). The following operands are optional with the --show option.
-ge Displays partition configuration information for GbE ports. This operand is valid only on the Brocade 7800/FX8-24 and the Brocade 7500/7500E/FR4-18i platforms.
-provision Displays the partition configuration for all slots, regardless of the slot's status. This operand is valid only on a chassis and can be used with or without the -ge option.
--help Displays the command usage.
Examples To create a base switch:
switch:admin> lscfg --create 1 -baseCreation of a base switch requires that the proposed new base switch on this system be disabled.Would you like to continue [y/n]?: yAbout to create switch with fid=1. Please wait...Switch successfully created.
Logical Switch has been created with default configurations.Please configure the Logical Switch with appropriate switchand protocol settings before activating the Logical Switch.
To create a logical switch identified by fabric ID 2:
switch:admin> lscfg --create 2About to create switch with fid=2. Please wait...Switch successfully created.
Logical Switch has been created with default configurations.Please configure the Logical Switch with appropriate switchand protocol settings before activating the Logical Switch.
To create a base switch with FID 2 without confirmation:
switch:admin> lscfg --create 2 -base -forceAbout to create switch with fid=2. Please wait...Switch successfully created.
Logical Switch has been created with default configurations.Please configure the Logical Switch with appropriate switchand protocol settings before activating the Logical Switch.
To delete a logical switch:
switch:admin> lscfg --delete 2All active login sessions for FID 2 have been terminated.Switch successfully deleted.
Fabric OS Command Reference 49953-1001764-02

lsCfg2
To assign ports to a logical switch:
switch:admin> lscfg --config 2 -port 10-12This operation requires that the affected ports be disabled.Would you like to continue [y/n]?: yMaking this configuration change. Please wait...Configuration change successful.Please enable your ports/switch when you are ready to continue.
To assign ports to a logical switch without confirmation:
switch:admin> lscfg --config 2 -port 0-4 -forceConfiguration change successful.Making this configuration change. Please wait...Please enable your ports/switch when you are ready to continue.
To display the logical switch configuration for :FC ports only:
switch:admin> lscfg --show
Created switches: 128(ds) 1(bs) 2 Port 0 1 2 3 4 5 6 7 8 9 -------------------------------------------------------------------FID 1 | 1 | 1 | 1 | 1 | 1 | 1 | 1 | 2 | 2 |
Port 10 11 12 13 14 15 16 17 18 19 -------------------------------------------------------------------FID 128 | 128 | 128 | 128 | 128 | 128 | 128 | 128 | 128 | 128 |
Port 20 21 22 23 24 25 26 27 28 29 -------------------------------------------------------------------FID 128 | 128 | 128 | 128 | 128 | 128 | 128 | 128 | 128 | 128 |
Port 30 31 32 33 34 35 36 37 38 39 -------------------------------------------------------------------FID 128 | 128 | 128 | 2 | 2 | 2 | 128 | 128 | 128 | 128 |
To display the logical switch configuration for GbE ports only (in the following example, all GbE ports are in logical switch 2):
switch:admin> lscfg --show -ge
Created switches: (ds) 2(bs) 1
Slot 1 2 3 4 5 6 7 8-------------------------------------------------------Port 0 | | 2 | | | | | | | 1 | | 2 | | | | | | | 2 | | 2 | | | | | | | 3 | | 2 | | | | | | | 4 | | 2 | | | | | | | 5 | | 2 | | | | | | | 6 | | 2 | | | | | | | 7 | | 2 | | | | | | | 8 | | 2 | | | | | | | 9 | | 2 | | | | | | |10 | | 2 | | | | | | |11 | | 2 | | | | | | |
500 Fabric OS Command Reference53-1001764-02

lsCfg 2
To display the partition configuration for all slots with the -ge option:
switch:admin> lscfg --show -provision -ge Created switches: 128(ds) 2(bs) 1Slot 1 2 3 4 5 6 7 8-------------------------------------------------------Port 0 | 128 | 2 | | | | | 128 | 128 | 1 | 128 | 2 | | | | | 128 | 128 | 2 | 128 | 2 | | | | | 128 | 128 | 3 | 128 | 2 | | | | | 128 | 128 | 4 | 128 | 2 | | | | | 128 | 128 | 5 | 128 | 2 | | | | | 128 | 128 | 6 | 128 | 2 | | | | | 128 | 128 | 7 | 128 | 2 | | | | | 128 | 128 | 8 | 128 | 2 | | | | | 128 | 128 | 9 | 128 | 2 | | | | | 128 | 128 |10 | 128 | 2 | | | | | 128 | 128 |11 | 128 | 2 | | | | | 128 | 128 |
To change the fabric ID for a logical switch:
switch:admin> lscfg --change 1 -newfid 2Changing of a switch fid requires that the switch be disabled.Would you like to continue [y/n]?: yDisabling switch...All active login sessions for FID 2 have been terminated.Checking and logging message: fid = 2.Please enable your switch.
To display the change:
switch:admin> lscfg --show
Created switches: 128(ds) 1 2(bs)
Port 0 1 2 3 4 5 6 7 8 9-------------------------------------------------------------------FID 1 | 1 | 1 | 1 | 1 | 128 | 128 | 128 | 128 | 128 |
Port 10 11 12 13 14 15 16 17 18 19-------------------------------------------------------------------FID 128 | 128 | 128 | 128 | 128 | 128 | 128 | 128 | 128 | 128 |
Port 20 21 22 23 24 25 26 27 28 29-------------------------------------------------------------------FID 128 | 128 | 128 | 128 | 128 | 128 | 128 | 128 | 128 | 128 |
Port 30 31 32 33 34 35 36 37 38 39-------------------------------------------------------------------FID 128 | 128 | 128 | 128 | 128 | 128 | 128 | 128 | 128 | 128 |
To make logical switch FID 1 the base switch without confirmation:
switch:admin> lscfg --change 1 -base -forceDisabling the current base switch...Disabling switch fid 1Disabling the proposed new base switch...Disabling switch fid 1Please enable your switches when ready.
Fabric OS Command Reference 50153-1001764-02

lsCfg2
To make logical switch FID 1 the base switch with confirmation:
switch:admin> lscfg --change 1 -baseCreation of a base switch requires that the proposed new base switch on this system be disabled.Would you like to continue [y/n]?: yDisabling the proposed new base switch...Disabling switch fid 1Please enable your switches when ready.
See Also lfCfg, setContext
502 Fabric OS Command Reference53-1001764-02

lsDbShow 2
lsDbShow
Displays the Fabric Shortest Path First (FSPF) link state database.
Synopsis lsdbshow [domain]
Description Use this command to display an FSPF link state database record for switches in the fabric or for a specified domain.
There are two types of database entries:
• The link state database entry, which is permanently allocated.
• The link state record (LSR), which is allocated when a switch is connected to the fabric.
The LSR describes the links between connected domains in a fabric. For a link to be reported in the LSR, the neighbor for that link must be in NB_ST_FULL state.
This command displays the content of both types of database entries, if both are present, as shown in Table 24.
TABLE 24 lsDbShow display fields
Field Description
Domain Domain ID described by this LSR. A (self) keyword after the domain ID indicates that LSR describes the local switch.
lsrP Pointer to LSR.
earlyAccLSRs Number of LSRs accepted, even though they were not sufficiently spaced apart.
ignoredLSRs Number of LSRs not accepted because they were not sufficiently spaced apart.
lastIgnored Last time an LSR was ignored.
installTime Time this LSR was installed in the database, in seconds since boot.
lseFlags Internal variable.
uOutIfs Internal variable.
uPathCost Internal variable.
uOldHopCount Internal variable.
uHopsFromRoot Internal variable.
mOutIfs Internal variable.
parent Internal variable.
mPathCost Internal variable.
mHopsFromRoot Internal variable.
lsAge Age, in seconds, of this LSR. An LSR is removed from the database when its age exceeds 3,600 seconds.
reserved Reserved for future use.
type Type of the LSR. Always 1.
options Always 0.
lsId ID of this LSR. It is identical to the domain ID.
Fabric OS Command Reference 50353-1001764-02

lsDbShow2
Note The execution of this command is subject to Virtual Fabric or Admin Domain restrictions that may be in place. Refer to chapter 1, "Using Fabric OS Commands" and Appendix A, "Command Availability" for details.
Operands This command has the following operand:
domain Specifies the domain ID of the LSR to be displayed. This operand is optional; if omitted, the entire link state database is displayed.
Examples To display the link state record for a switch:
switch:admin> lsdbshow 1
Domain = 1 (self), Link State Database Entry pointer = 0x1096da60lsrP = 0x109784b0earlyAccLSRs = 0ignoredLSRs = 0lastIgnored = NeverinstallTime = Aug 26 18:20:41.451lseFlags = 0xauOutIfsP[0] = 0x00000000uOutIfsP[1] = 0x00000000uOutIfsP[2] = 0x00000000uOutIfsP[3] = 0x00000000uOutIfsP[4] = 0x00000000uOutIfsP[5] = 0x00000000uOutIfsP[6] = 0x00000000uPathCost = 0uOldHopCount = 0uHopsFromRoot = 0mOutIfsP[0] = 0x10000000mOutIfsP[1] = 0x00000000mOutIfsP[2] = 0x00000000mOutIfsP[3] = 0x00000000
advertiser Domain ID of the switch that originated this LSR.
incarn Incarnation number of this LSR.
length Total length, in bytes, of this LSR. Includes header and link state information for all links.
chksum Checksum of total LSR, with exception of lsAge field.
linkCnt Number of links in this LSR. Each link represents a neighbor in NB_ST_FULL state.
flags Always 0.
LinkId ID of this link. It is the domain ID of the switch on the other side of the link.
out port Port number on the local switch.
rem port Port number of the port on the other side of the link.
cost Cost of this link. The default cost for a 1 Gbps link is 1,000.
costCnt Always 0.
type Always 1.
TABLE 24 lsDbShow display fields (Continued)
Field Description
504 Fabric OS Command Reference53-1001764-02

lsDbShow 2
mOutIfsP[4] = 0x00000000mOutIfsP[5] = 0x00000000mOutIfsP[6] = 0x00000000parent = 0xf0mPathCost = 0mHopsFromRoot = 0
Link State Record:Link State Record pointer = 0x109784b0lsAge = 321reserved = 0type = 1options = 0x0lsId = 1advertiser = 1incarn = 0x80000185length = 60chksum = 0x168alinkCnt = 2, flags = 0x0LinkId = 91, out port = 28, rem port = 28, cost = 500, costCnt = 0, type = 1LinkId = 91, out port = 29, rem port = 29, cost = 500, costCnt = 0, type = 1
See Also interfaceShow, nbrStateShow
Fabric OS Command Reference 50553-1001764-02

memShow2
memShow
Displays the amounts of free and used memory in a switch.
Synopsis memshow [-b | -k | -m]
Description Use this command to display free and used memory in the switch, as well as the shared memory and buffers used by the kernel.
Note The execution of this command is subject to Virtual Fabric or Admin Domain restrictions that may be in place. Refer to chapter 1, "Using Fabric OS Commands" and Appendix A, "Command Availability" for details.
Operands This command has the following operands:
-b Specify to display memory usage in bytes.
-k Specify to display memory usage in kilobytes.
-m Specify to display memory usage in megabytes. By default, memory usage is displayed in bytes.
Examples To view the memory usage:
switch:admin> memshow total used free shared buffers cachedMem: 129740800 112562176 17178624 0 139264 30396416Swap: 0 0 0switch:admin> memshow -m total used free shared buffers cachedMem: 123 107 16 0 0 28Swap: 0 0 0
See Also supportSave
506 Fabric OS Command Reference53-1001764-02

msCapabilityShow 2
msCapabilityShow
Displays the Management Server (MS) capabilities.
Synopsis mscapabilityshow
Description Use this command to display the supported capabilities of the Management Server for each switch in the fabric. An asterisk displays next to the name of the local switch.
Notes Reliable commit service (RCS) is a fabric-wide capability and is supported only if all the switches in the fabric support the service.
The execution of this command is subject to Virtual Fabric or Admin Domain restrictions that may be in place. Refer to chapter 1, "Using Fabric OS commands" and Appendix A, "Command Availability" for details.
Operands none
Examples To display the supported MS capabilities for each switch in the fabric:
switch:admin> mscapabilityshow Switch WWN Capability Switch Name======================== ========== =======10:00:00:60:69:20:15:71 0x0000008f "switch1"*10:00:00:60:69:00:30:05 0x0000008f "switch2"
Capability Bit Definitions: Bit 0: Basic Config Service Supported. Bit 1: Platform Management Service Supported. Bit 2: Topology Discovery Service Supported. Bit 3: Unzoned Name Service Supported. Bit 4: Fabric Zone Service Supported. Bit 5: Fabric Lock Service Supported. Bit 6: Time Service Supported. Bit 7: RSCN Small Payload Supported. Bit 8: Reliable Commit Service(RCS) Supported. Bit 9: Access Gateway Registration/Discovery Supported. Bit 10: Administrative Domains(AD) Supported. Others: Reserved.
See Also msConfigure, msPlMgmtActivate, msPlMgmtDeactivate, msTdDisable, msTdEnable,msTdReadConfig
Fabric OS Command Reference 50753-1001764-02

msConfigure2
msConfigure
Configures the Management Server (MS) access control list (ACL).
Synopsis msconfigure
Description Use this command to configure the MS Access Control List (ACL). The MS allows a Storage Area Network (SAN) management application to retrieve and administer the fabric and Interconnect Elements, such as switches. This application is located at the Fibre Channel well-known address, 0xFFFFFA.
If the MS ACL is empty (default), The MS is available to all systems connected to the fabric. By populating the MS ACL with one or more world wide names (WWNs), you can restrict access to MS to the specified WWNs.
This command is interactive and provides the following choices:
0 Done
1 Display the access list
2 Add member based on its port/node WWN
3 Delete member based on its port/node WWN
When changing the MS ACL by adding or deleting WWNs, you are prompted to save the new configuration to nonvolatile storage. The saved MS ACL becomes effective upon reboot.
The MS ACL is implemented on a per-switch basis and should be configured on the switch to which the management application is directly connected.
Notes When an FCS policy is enabled, the MS ACL is not used. In such a case, access to MS is controlled by security by way of the MS_POLICY configuration.
The execution of this command is subject to Virtual Fabric or Admin Domain restrictions that may be in place. Refer to chapter 1, "Using Fabric OS commands" and Appendix A, "Command Availability" for details.
This command is supported only in AD0 and AD255 contexts.
Operands none
Examples To display the MS ACL:
switch:admin> msconfigure
0 Done1 Display the access list2 Add member based on its Port/Node WWN3 Delete member based on its Port/Node WWNselect : (0..3) [1] 1
MS Access List consists of (5): {20:01:00:60:69:00:60:1020:02:00:60:69:00:60:1020:03:00:60:69:00:60:1020:02:00:60:69:00:60:0320:02:00:60:69:00:60:15
508 Fabric OS Command Reference53-1001764-02

msConfigure 2
0 Done1 Display the access list2 Add member based on its Port/Node WWN3 Delete member based on its Port/Node WWNselect : (0..3) [1] 0
done ...
See Also msCapabilityShow, msPlatShow, msPlClearDB, msPlMgmtActivate, msPlMgmtDeactivate,msTdDisable, msTdEnable, msTdReadConfig, secPolicyShow
Fabric OS Command Reference 50953-1001764-02

msPlatShow2
msPlatShow
Displays the Management Server (MS) platform database.
Synopsis msplatshow
Description Use this command to display information from the MS platform database. This command displays the name of each platform object with the platform type (GATEWAY, HOST_BUS_ADAPTER, and so forth), associated management addresses, and associated node names.
Note The execution of this command is subject to Virtual Fabric or Admin Domain restrictions that may be in place. Refer to chapter 1, "Using Fabric OS Commands" and Appendix A, "Command Availability" for details.
Operands none
Examples To display the MS platform database for a fabric:
switch:admin> msplatshow-----------------------------------------------------------Platform Name: [9] "first obj"Platform Type: 5 : GATEWAYNumber of Associated M.A.: 1Associated Management Addresses:[35] "http://java.sun.com/products/plugin"Number of Associated Node Names: 1Associated Node Names:10:00:00:60:69:20:15:71-------------------------------------------------------------Platform Name: [10] "second obj"Platform Type: 7 : HOST_BUS_ADAPTERNumber of Associated M.A.: 1Associated Management Addresses:[30] "http://java.sun.com/products/1"Number of Associated Node Names: 2Associated Node Names:10:00:00:60:69:20:15:7910:00:00:60:69:20:15:75
See Also msCapabilityShow, msConfigure, msPlatShowDBCB, msPlClearDB, msPlMgmtActivate,msPlMgmtDeactivate
510 Fabric OS Command Reference53-1001764-02

msPlatShowDBCB 2
msPlatShowDBCB
Displays the Management Server (MS) platform service database control block.
Synopsis msplatshowdbcb
Description Use this command to display the control block fields associated with the platform database.
Note The execution of this command is subject to Virtual Fabric or Admin Domain restrictions that may be in place. Refer to chapter 1, "Using Fabric OS Commands" and Appendix A, "Command Availability" for details.
Operands none
Examples To display the MS platform service database control block:
switch:admin> msplatshowdbcbDomain Worldwide Name Retry Count Exchange Status--------------------------------------------------------- 3: 10:00:00:60:69:51:10:e6 0 0x2---------------------------------------------------------msPlDBCB.peerWwn == 00:00:00:00:00:00:00:00.msPlDBCB.psPeerWwn == 00:00:00:00:00:00:00:00.msPlDBCB.replicate == 0.msPlDBCB.fabMaySeg == 255.msPlDBCB.enabled == 1.
See Also msCapabilityShow, msConfigure, msPlatShow, msPlClearDB, msPlMgmtActivate,msPlMgmtDeactivate
Fabric OS Command Reference 51153-1001764-02

msPlClearDB2
msPlClearDB
Clears the Management Server (MS) platform database on all switches in the fabric.
Synopsis msplcleardb
Description Use this command to clear the MS platform database in the entire fabric. Because this operation cannot be undone, it should not be performed unless it is intended to resolve a database conflict between two joining fabrics or to establish an entirely new fabric with an empty database.
Notes When an FCS policy is enabled, this command can be issued only from the primary FCS switch.
The execution of this command is subject to Virtual Fabric or Admin Domain restrictions that may be in place. Refer to chapter 1, "Using Fabric OS commands" and Appendix A, "Command Availability" for details.
This command is supported only in AD0 and AD255 contexts.
Operands none
Examples To clear the MS platform database:
switch:admin> msplcleardb
MS Platform Service is currently enabled.This will erase MS Platform Service Database in the entire fabric.
Would you like to continue this operation? (yes, y, no, n): [no] y
Request to MS Platform DB Clear operation in progress.....
*Completed clearing MS Platform Service Database!!
See Also msCapabilityShow, msConfigure, msPlatShow, msPlatShowDBCB, msPlMgmtActivate,msPlMgmtDeactivate
512 Fabric OS Command Reference53-1001764-02

msPlMgmtActivate 2
msPlMgmtActivate
Activates the Management Server (MS) platform service.
Synopsis msplmgmtactivate
Description Use this command to activate the MS platform service throughout the fabric. This command attempts to activate the MS platform service for each switch in the fabric. The change takes effect immediately and is committed to the configuration database of each affected switch. MS activation is persistent across power cycles and reboots.
Notes By default, the MS platform service is disabled.
Before issuing this command, run msCapabilityShow to verify that all switches in the fabric support the MS platform service; if one switch does not support the service, the command fails.
When an FCS policy is enabled, this command can be issued only from the primary FCS switch.
The execution of this command is subject to Virtual Fabric or Admin Domain restrictions that may be in place. Refer to chapter 1, "Using Fabric OS commands" and Appendix A, "Command Availability" for details.
This command is supported only in AD0 and AD255 contexts.
Operands none
Examples To activate the MS platform service:
switch:admin> msplmgmtactivate
Request to activate MS Platform Service in progress......
*Completed activating MS Platform Service in the fabric!
See Also msCapabilityShow, msPlatShow, msPlClearDB, msPlMgmtDeactivate
Fabric OS Command Reference 51353-1001764-02

msPlMgmtDeactivate2
msPlMgmtDeactivate
Deactivates the Management Server (MS) platform service.
Synopsis msplmgmtdeactivate
Description Use this command to deactivate the MS platform service throughout the fabric. This command deactivates the MS platform service for each switch in the fabric and commits the change to nonvolatile storage.
Notes When an FCS policy is enabled, this command can be issued only from the primary FCS switch.
The execution of this command is subject to Virtual Fabric or Admin Domain restrictions that may be in place. Refer to chapter 1, "Using Fabric OS commands" and Appendix A, "Command Availability" for details.
This command is supported only in AD0 and AD255 contexts.
Operands none
Examples To deactivate the MS platform service on all switches in the fabric:
switch:admin> msplmgmtdeactivate
MS Platform Service is currently enabled.
This will erase MS Platform Service configurationinformation as well as database in the entire fabric.
Would you like to continue this operation? (yes, y, no, n): [no] y
Request to deactivate MS Platform Service in progress......
*Completed deactivating MS Platform Service in the fabric!
See Also msCapabilityShow, msConfigure, msPlatShow, msPlatShowDBCB, msPlClearDB,msPlMgmtActivate
514 Fabric OS Command Reference53-1001764-02

msTdDisable 2
msTdDisable
Disables the Management Server (MS) topology discovery service.
Synopsis mstddisable ["ALL"]
Description Use this command to disable the management server topology discovery service on a local switch or an entire fabric. This change takes effect immediately and commits to the configuration database for all affected switches. The change is persistent across power cycles and reboots.
Notes Topology Discovery Management requires the attached devices (including attached switches) to support request node identification data (RNID) extended link service (ELS).
When an FCS policy is enabled, and this command is issued with the "ALL" operand, it can be issued only from the primary FCS.
The execution of this command is subject to Virtual Fabric or Admin Domain restrictions that may be in place. Refer to chapter 1, "Using Fabric OS commands" and Appendix A, "Command Availability" for details.
This command is supported only in AD0 and AD255 contexts.
Operands The following operand is optional:
"ALL” Disables the MS topology discovery service throughout the entire fabric. This operand must be enclosed in double quotation marks.
Examples To disable the MS topology discovery service on the local switch only:
switch:admin> mstddisableThis may erase all NID entries. Are you sure? (yes, y, no, n): [no] y
Request to disable MS Topology Discovery Service in progress....done.*MS Topology Discovery disabled locally.
To disable MS topology discovery on all the switches in the fabric:
primaryfcs:admin> mstddisable "ALL"This may erase all NID entries. Are you sure? (yes, y, no, n): [no] y
Request to disable MS Topology Discovery Service in progress....done.*MS Topology Discovery disabled locally.*MS Topology Discovery Disable Operation Complete!!
See Also msTdEnable, msTdReadConfig
Fabric OS Command Reference 51553-1001764-02

msTdEnable2
msTdEnable
Enables the Management Server (MS) topology discovery service.
Synopsis mstdenable ["ALL"]
Description Use this command to enable the MS topology discovery service on the local switch or throughout the fabric. The change takes effect immediately and commits to the configuration database for all affected switches. The change is persistent across power cycles and reboots.
Notes Topology Discovery Management requires the attached devices (including attached switches) to support request node identification data (RNID) extended link service (ELS).
When an FCS policy is enabled, and this command is issued with the "ALL" operand, it can be issued only from the primary FCS.
The execution of this command is subject to Virtual Fabric or Admin Domain restrictions that may be in place. Refer to chapter 1, "Using Fabric OS commands" and Appendix A, "Command Availability" for details.
This command is supported only in AD0 and AD255 contexts.
Operands The following operand is optional:
"ALL" Enables the MS topology discovery service throughout the fabric. This operand must be enclosed in double quotation marks.
Examples To enable the MS topology discovery service on the local switch:
switch:admin> mstdenable
Request to enable MS Topology Discovery Service in progress....done.*MS Topology Discovery enabled locally.
To enable MS topology discovery on all switches in the fabric:
switch:admin> mstdenable "ALL"
Request to enable MS Topology Discovery Service in progress....done.*MS Topology Discovery enabled locally.*MS Topology Discovery Enable Operation Complete!!
See Also msTdDisable, msTdReadConfig
516 Fabric OS Command Reference53-1001764-02

msTdReadConfig 2
msTdReadConfig
Displays the status of The Management Server (MS) topology discovery service.
Synopsis mstdreadconfig
Description Use this command to check whether or not the management server topology discovery service is enabled.
Note The execution of this command is subject to Virtual Fabric or Admin Domain restrictions that may be in place. Refer to chapter 1, "Using Fabric OS Commands" and Appendix A, "Command Availability" for details.
Operands none
Examples To display the status of the topology discovery service:
switch:admin> mstdreadconfig
*MS Topology Discovery is enabled.
See Also msCapabilityShow, msConfigure, msPlMgmtActivate, msPlMgmtDeactivate, msTdDisable,msTdEnable
Fabric OS Command Reference 51753-1001764-02

myId2
myId
Displays the current login session details.
Synopsis myid
Description Use this command to display the status of the system and the login session details. This includes IPv4 or IPv6 addresses associated with the login session.
The login session gives details of the following:
• CP/switch (or console/serial port) used to log in.
• The IP address of the current login session for Telnet or the name of the current console port or the serial port (if modem login used).
• The current CP mode (Active, Standby, or Unknown).
• The current system status (Redundant, Nonredundant, or Unknown).
Note The execution of this command is subject to Virtual Fabric or Admin Domain restrictions that may be in place. Refer to chapter 1, "Using Fabric OS Commands" and Appendix A, "Command Availability" for details.
Operands none
Examples To display current login information:
switch:admin> myid Current Switch: switch Session Detail: switch (123.123.123.123) Active Redundant
See Also version
518 Fabric OS Command Reference53-1001764-02

nbrStateShow 2
nbrStateShow
Displays the state of FSPF neighbors.
Synopsis nbrstateshow [slot/][port]
Description Use this command to display information about fabric shortest path first (FSPF) neighbors to the local switch or information about a neighbor to a specified port. FSPF defines a neighbor as a remote E_Port interface that is directly attached to the local switch. However, if ports are trunked, the command displays data only about the trunk master.
This command displays the following fields:
Local Domain ID Domain ID of the local switch.
Local Port E_Port interface on the local switch. This value is typically equal to the Index field reported in the switchShow command.
Domain Domain ID of the remote switch.
Remote Port E_Port interface on the remote switch.
State State of the neighbor. The neighbor can be in one of the following five states:
0 NB_ST_DOWN - The neighbor is down.
1 NB_ST_INIT - The neighbor is initializing.
2 NB_ST_DB_EX - The neighbor and the switch are exchanging data from their Link State Records (LSR) databases.
3 NB_ST_DB_ACK_WT - The neighbor is waiting for the switch to acknowledge the LSR database.
4 NB_ST_DB_WT - The LSR Database is in waiting state; synchronization is in process.
5 NB_ST_FULL - The neighbor is in the last, finishing state. The E_Port can route frames only if the neighbor is in full state.
Note The execution of this command is subject to Virtual Fabric or Admin Domain restrictions that may be in place. Refer to chapter 1, "Using Fabric OS Commands" and Appendix A, "Command Availability" for details.
Operands This command has the following operands:
slot For bladed systems only, specify the slot number of the port to display, followed by a slash (/).
port Specify the port number to display, relative to its slot for bladed systems. Use switchShow to list valid ports. This operand is optional; if omitted, all neighbor states are displayed.
Fabric OS Command Reference 51953-1001764-02

nbrStateShow2
Examples To display information about a neighbor directly connected to the local switch:
switch:user> nbrstateshow 2/0Local Domain ID: 1
Local Port Domain Remote Port State------------------------------------------------------- 16 2 48 NB_ST_FULL
See Also interfaceShow
520 Fabric OS Command Reference53-1001764-02

nbrStatsClear 2
nbrStatsClear
Resets FSPF interface counters.
Synopsis nbrstatsclear [slot/][port]
Description Use this command to reset the counters of fabric shortest path first (FSPF) frames transmitted and received on all interswitch links (ISLs) or on a specified ISL Use this command without operands to reset counters on all interfaces. Use interfaceShow to view the FSPF counters.
Note The execution of this command is subject to Virtual Fabric or Admin Domain restrictions that may be in place. Refer to chapter 1, "Using Fabric OS commands" and Appendix A, "Command Availability" for details.
Operands This command has the following operands:
slot For bladed systems only, specify the slot number of the port to display, followed by a slash (/).
port Specify the port number to display, relative to its slot for bladed systems. Use switchShow to list valid ports. This operand is optional; if omitted, FSPF statistics are reset.
Examples To display the counters on a port:
switch:admin> interfaceshow 1/0
idbP = 0x10050a38
Interface 0 data structure:
nghbP = 0x1004ce68ifNo = 0masterPort = 0 (self)defaultCost = 500cost = 500delay = 1
(output truncated)
nCmdAcc = 37nInvCmd = 0nHloIn = 10nInvHlo = 0nLsuIn = 17nLsaIn = 10attHloOut = 11nHloOut = 11attLsuOut = 12nLsuOut = 12attLsaOut = 17nLsaOut = 17
Fabric OS Command Reference 52153-1001764-02

nbrStatsClear2
To reset the counters on a port:
switch:admin> nbrstatsclear 1/0
To verify the changes:
switch:admin> interfaceshow 1/0
idbP = 0x10050a38
Interface 0 data structure:
nghbP = 0x1004ce68ifNo = 0masterPort = 0 (self)defaultCost = 500cost = 500
(output truncated)
See Also interfaceShow, portShow, switchShow
522 Fabric OS Command Reference53-1001764-02

nodeFind 2
nodeFind
Displays all device Name Server (NS) entries matching a given WWN, device PID, or alias.
Synopsis nodefind WWN | PID | ALIAS
Description Use this command to display the NS information for all devices in the fabric that have either a port world wide name (WWN) or a node WWN matching the given WWN; or have a device PID matching the given PID; or have a defined configuration alias to which the device belongs matching the given alias.
If there is no device matching the given WWN, PID, or alias, the message "No device found" is displayed.
Note The execution of this command is subject to Virtual Fabric or Admin Domain restrictions that may be in place. Refer to chapter 1, "Using Fabric OS Commands" and Appendix A, "Command Availability" for details.
Operands This command has the following operand:
WWN | PID | ALIAS
Specify the WWN, device PID, or alias that can be used to match the real device's data. WWN must have eight colon-separated fields, each consisting of one or two hexadecimal numbers between 0 and ff, with no spaces. PID must begin with 0x or 0X; otherwise, it is interpreted as an alias.
Examples To display all the device information matching the alias “a320”:
switch:user> nodefind a320Local: Type Pid COS PortName NodeName SCR NL 0314d9; 3;22:00:00:04:cf:5d:dc:2d;20:00:00:04:cf:5d:dc:2d; 0 FC4s: FCP [SEAGATE ST318452FC 0001] Fabric Port Name: 20:14:00:60:69:80:04:79 Permanent Port Name: 22:00:00:04:cf:5d:dc:2d Device type: Physical Target Port Index: 20 Share Area: No Device Shared in Other AD: No Aliases: a320 NL 0314d6; 3;22:00:00:04:cf:9f:78:7b;20:00:00:04:cf:9f:78:7b; 0 FC4s: FCP [SEAGATE ST336605FC 0003] Fabric Port Name: 20:14:00:60:69:80:04:79 Permanent Port Name: 22:00:00:04:cf:9f:78:7b Device type: Physical Target Port Index: 20 Share Area: No Device Shared in Other AD: No Aliases: a320 NL 0314d5; 3;22:00:00:04:cf:9f:7d:e0;20:00:00:04:cf:9f:7d:e0; 0 FC4s: FCP [SEAGATE ST336605FC 0003] Fabric Port Name: 20:14:00:60:69:80:04:79 Permanent Port Name: 22:00:00:04:cf:9f:7d:e0 Device type: Physical Target Port Index: 20 Share Area: No
Fabric OS Command Reference 52353-1001764-02

nodeFind2
Device Shared in Other AD: No Aliases: a320 NL 0314d4; 3;22:00:00:04:cf:9f:26:7e;20:00:00:04:cf:9f:26:7e; 0 FC4s: FCP [SEAGATE ST336605FC 0003] Fabric Port Name: 20:14:00:60:69:80:04:79 Permanent Port Name: 22:00:00:04:cf:9f:26:7e Device type: Physical Target Port Index: 20 Share Area: No Device Shared in Other AD: No Aliases: a320
To display all the device information matching the WWN "20:00:00:e0:8b:01:ce:d3":
switch:user> nodefind 20:00:00:e0:8b:01:ce:d3Remote: Type Pid COS PortName NodeName NL 020eef; 3;20:00:00:e0:8b:01:ce:d3;20:00:00:e0:8b:01:ce:d3; Fabric Port Name: 20:0e:00:60:69:51:0b:ba Permanent Port Name: 20:00:00:e0:8b:01:ce:d3Device type: Physical TargetPort Index: 14Share Area: NoDevice Shared in Other AD: No Aliases:
To display all the device information matching the PID "0x020eef":
switch:user> nodefind 0x020eefRemote: Type Pid COS PortName NodeName NL 020eef; 3;20:00:00:e0:8b:01:ce:d3;20:00:00:e0:8b:01:ce:d3; Fabric Port Name: 20:0e:00:60:69:51:0b:ba Permanent Port Name: 20:00:00:e0:8b:01:ce:d3Device type: Physical TargetPort Index: 14Share Area: NoDevice Shared in Other AD: No Aliases:
No match:
To display device information for a string for which there is no match:
switch:user> nodefind abcdNo device found.
See Also aliShow, nsAllShow, nscamShow, nsShow
524 Fabric OS Command Reference53-1001764-02

nsAliasShow 2
nsAliasShow
Displays local Name Server (NS) information, with aliases.
Synopsis nsaliasshow [-r ][-t]
Description Use this command to display local name server information with the added feature of displaying the defined configuration aliases to which the device belongs. If there are no defined configuration aliases for that device, no alias is displayed. If there is no information in this switch, the following message is displayed: "There is no entry in the Local Name Server."
The information displayed for each device is the same that is displayed by the nsShow command with the exception of the additional display of the alias to which the device belongs. Refer to the nsShow help page for a description of these displays. Use nsCamShow to display information from all switches.
Note The execution of this command is subject to Virtual Fabric or Admin Domain restrictions that may be in place. Refer to chapter 1, "Using Fabric OS Commands" and Appendix A, "Command Availability" for details.
Operands This command has the following optional operands:
-r Replaces the time-to-live (TTL) attribute output with state change registration (SCR) information. This value indicates what type of RSCN a device registers to receive. Values include:
SCR=0 Reserved.
SCR=1 Fabric detected registration. Register to receive all RSCN requests issued by the fabric controller for events detected by the fabric.
SCR=2 NX_Port detected registration. Register to receive all RSCN requests issued for events detected by the affected NX_Port.
SCR=3 Register to receive all RSCN requests issued. The RSCN request returns all effected N_Port_ID pages.
-t Displays the device type. The device type is defined in terms of two attributes. The first attribute indicates the origination of the device as one of the following:
• Physical- The device is connected to the NX_Port, using FLOGI to log into the switch.
• Virtual - The device is contrived by the switch.• NPV - The device is connected to the NX_Port, using FDISC to log in to the
switch.• iSCSI Device is connected to the iSCSI port.
The second attribute indicates the role of the device. Valid role attributes include the following:
• Unknown (initiator/target) - Device role is not detected• Initiator - An iSCSI initiator.• Target - An iSCSI target.• Initiator+Target - Both an iSCSI initiator and an iSCSI target.
Fabric OS Command Reference 52553-1001764-02

nsAliasShow2
Examples To display local NS information with aliases:
switch:user> nsaliasshow{ Type Pid COS PortName NodeName TTL(sec) N 010600; 3;20:06:00:05:1e:38:81:71;10:00:00:05:1e:38:81:71; na Fabric Port Name: 20:06:00:05:1e:7a:7a:00 Permanent Port Name: 20:06:00:05:1e:38:81:71 Port Index: 6 Share Area: No Device Shared in Other AD: No Redirect: No Partial: No Aliases: MyAlias1 MyAlias2 N 010601; 3;23:0d:00:05:1e:38:81:71;50:00:51:e3:88:17:10:0d; na FC4s: FCP PortSymb: [44] "Brocade Ioblaster Port Entity #00,pid#10601." Fabric Port Name: 20:06:00:05:1e:7a:7a:00 Permanent Port Name: 20:06:00:05:1e:38:81:71 Port Index: 6 Share Area: No Device Shared in Other AD: No Redirect: No Partial: No Aliases: N 010602; 3;10:00:00:00:00:00:00:01;10:00:00:00:00:00:00:01; na FC4s: FCP PortSymb: [41] "Brocade Ioblaster Initiator#00,pid#10602." Fabric Port Name: 20:06:00:05:1e:7a:7a:00 Permanent Port Name: 20:06:00:05:1e:38:81:71 Port Index: 6 Share Area: No Device Shared in Other AD: No Redirect: No Partial: No Aliases: DeviceAliasThe Local Name Server has 3 entries }
To display local NS information with aliases with the -r option:
switch:user> nsaliasshow -r{ Type Pid COS PortName NodeName SCR N 010600; 3;20:06:00:05:1e:38:81:71;10:00:00:05:1e:38:81:71; 0 Fabric Port Name: 20:06:00:05:1e:7a:7a:00 Permanent Port Name: 20:06:00:05:1e:38:81:71 Port Index: 6 Share Area: No Device Shared in Other AD: No Redirect: No Partial: No Aliases: MyAlias1 MyAlias2 N 010601; 3;23:0d:00:05:1e:38:81:71;50:00:51:e3:88:17:10:0d; 3 FC4s: FCP PortSymb: [44] "Brocade Ioblaster Port Entity #00,pid#10601." Fabric Port Name: 20:06:00:05:1e:7a:7a:00 Permanent Port Name: 20:06:00:05:1e:38:81:71 Port Index: 6 Share Area: No Device Shared in Other AD: No
526 Fabric OS Command Reference53-1001764-02

nsAliasShow 2
Redirect: No Partial: No Aliases: N 010602; 3;10:00:00:00:00:00:00:01;10:00:00:00:00:00:00:01; 3 FC4s: FCP PortSymb: [41] "Brocade Ioblaster Initiator#00,pid#10602." Fabric Port Name: 20:06:00:05:1e:7a:7a:00 Permanent Port Name: 20:06:00:05:1e:38:81:71 Port Index: 6 Share Area: No Device Shared in Other AD: No Redirect: No Partial: No Aliases: DeviceAliasThe Local Name Server has 3 entries }
To display local NS information with aliases with the -r and -t options:
switch:admin> nsaliasshow -r -t{ Type Pid COS PortName NodeName SCR N 010600; 3;20:06:00:05:1e:38:81:71;10:00:00:05:1e:38:81:71; 0 Fabric Port Name: 20:06:00:05:1e:7a:7a:00 Permanent Port Name: 20:06:00:05:1e:38:81:71 Device type: Physical Unknown(initiator/target) Port Index: 6 Share Area: No Device Shared in Other AD: No Redirect: No Partial: No Aliases: MyAlias1 MyAlias2 N 010601; 3;23:0d:00:05:1e:38:81:71;50:00:51:e3:88:17:10:0d; 3 FC4s: FCP PortSymb: [44] "Brocade Ioblaster Port Entity #00,pid#10601." Fabric Port Name: 20:06:00:05:1e:7a:7a:00 Permanent Port Name: 20:06:00:05:1e:38:81:71 Device type: NPIV Unknown(initiator/target) Port Index: 6 Share Area: No Device Shared in Other AD: No Redirect: No Partial: No Aliases: N 010602; 3;10:00:00:00:00:00:00:01;10:00:00:00:00:00:00:01; 3 FC4s: FCP PortSymb: [41] "Brocade Ioblaster Initiator#00,pid#10602." Fabric Port Name: 20:06:00:05:1e:7a:7a:00 Permanent Port Name: 20:06:00:05:1e:38:81:71 Device type: NPIV Initiator Port Index: 6 Share Area: No Device Shared in Other AD: No Redirect: No Partial: No Aliases: DeviceAliasThe Local Name Server has 3entries }
See Also nsAllShow, nsShow, switchShow
Fabric OS Command Reference 52753-1001764-02
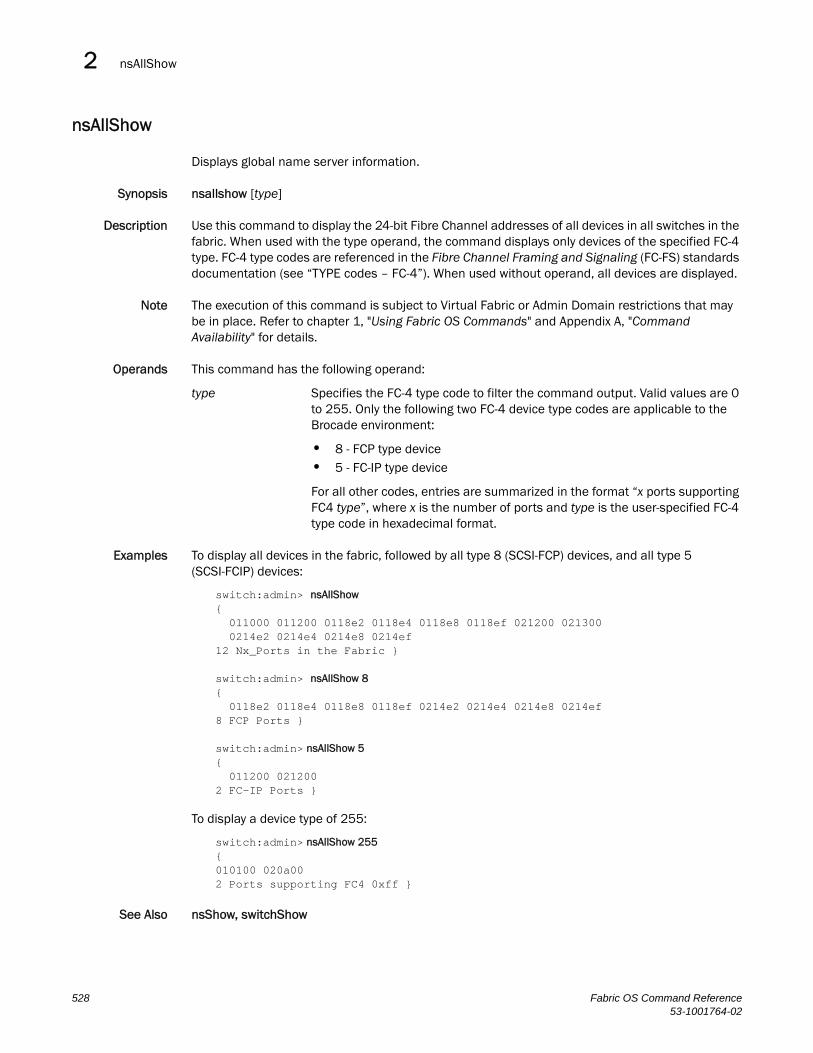
nsAllShow2
nsAllShow
Displays global name server information.
Synopsis nsallshow [type]
Description Use this command to display the 24-bit Fibre Channel addresses of all devices in all switches in the fabric. When used with the type operand, the command displays only devices of the specified FC-4 type. FC-4 type codes are referenced in the Fibre Channel Framing and Signaling (FC-FS) standards documentation (see “TYPE codes – FC-4”). When used without operand, all devices are displayed.
Note The execution of this command is subject to Virtual Fabric or Admin Domain restrictions that may be in place. Refer to chapter 1, "Using Fabric OS Commands" and Appendix A, "Command Availability" for details.
Operands This command has the following operand:
type Specifies the FC-4 type code to filter the command output. Valid values are 0 to 255. Only the following two FC-4 device type codes are applicable to the Brocade environment:
• 8 - FCP type device• 5 - FC-IP type device
For all other codes, entries are summarized in the format “x ports supporting FC4 type”, where x is the number of ports and type is the user-specified FC-4 type code in hexadecimal format.
Examples To display all devices in the fabric, followed by all type 8 (SCSI-FCP) devices, and all type 5 (SCSI-FCIP) devices:
switch:admin> nsAllShow{ 011000 011200 0118e2 0118e4 0118e8 0118ef 021200 021300 0214e2 0214e4 0214e8 0214ef12 Nx_Ports in the Fabric }
switch:admin> nsAllShow 8{ 0118e2 0118e4 0118e8 0118ef 0214e2 0214e4 0214e8 0214ef8 FCP Ports }
switch:admin> nsAllShow 5{ 011200 0212002 FC-IP Ports }
To display a device type of 255:
switch:admin> nsAllShow 255{010100 020a002 Ports supporting FC4 0xff }
See Also nsShow, switchShow
528 Fabric OS Command Reference53-1001764-02

nsCamShow 2
nsCamShow
Displays information about remote devices in the Name Server (NS) cache.
Synopsis nscamshow [-t]
Description Use this command to display the local NS cache information about the devices discovered in the fabric by the NS cache manager.
If the NS cache manager does not discover new switches or new devices in the fabric, the command displays the message “No Entry is found!”
For each discovered remote switch, this command displays the following information:
Switch entry for N Displays the remote domain ID for the switch.
state Displays one of the following values:
• known - The local domain is aware of all the devices from this remote domain.
• unknown - The local domain is unaware of devices from this remote domain.
• ERROR - The information for this remote domain is unreliable.
rev Fabric OS firmware version of the remote switch. For switches running firmware other than Fabric OS, the “????” string is displayed.
owner Displays the owner of the NSCAM database entry. The value displayed is a domain ID (domain address). For example, 0xfffc02 indicates domain 2 and is the domain on which the command has been executed. This is the local domain and the information is stored locally by this switch.
cap_available Each switch in the fabric exchanges information regarding its capabilities (for example, firmware level, feature support, etc.). When the cap_available value is 1, it indicates that the local domain has received the capabilities of the remote domain that is being displayed. When the value is 0 capability information has not been received.
The remaining information displayed for each device is the same that is displayed by the nsShow command. Refer to the nsShow help page for a description of these displays.
Note The execution of this command is subject to Virtual Fabric or Admin Domain restrictions that may be in place. Refer to chapter 1, "Using Fabric OS Commands" and Appendix A, "Command Availability" for details.
Operands The following operand is optional:
-t Displays the device type. The device type is defined in terms of two attributes. The first attribute indicates the origination of the device as one of the following:
• Physical- The device is connected to the NX_Port, using FLOGI to log into the switch.
• Virtual - The device is contrived by the switch.• NPV - The device is connected to the NX_Port, using FDISC to log in to the
switch.
Fabric OS Command Reference 52953-1001764-02

nsCamShow2
• iSCSI Device is connected to the iSCSI port.
The second attribute indicates the role of the device. Valid role attributes include the following:
• Unknown (initiator/target) - Device role is not detected• Initiator - An iSCSI initiator.• Target - An iSCSI target.• Initiator+Target - Both an iSCSI initiator and an iSCSI target.
Examples To display all switch and device entries discovered by the Name Server in the fabric:
switch:user> nscamshownscam show for remote switches:Switch entry for 92 state rev owner cap_available known v640 0xfffc23 1 Device list: count 8 Type Pid COS PortName NodeName N 5c1000; 3;23:06:00:05:1e:53:e3:8a;50:00:51:e5:3e:38:a0:06; FC4s: FCP PortSymb: [45] "Brocade VDPC Entity-Slot#00,DPC#00,Entity#03." Fabric Port Name: 20:10:00:05:1e:53:e3:8a Permanent Port Name: 23:06:00:05:1e:53:e3:8a Port Index: 16 Share Area: No Device Shared in Other AD: No Redirect: No Partial: No N 5c1200; 3;23:04:00:05:1e:53:e3:8a;50:00:51:e5:3e:38:a0:04; FC4s: FCP PortSymb: [45] "Brocade VDPC Entity-Slot#00,DPC#00,Entity#02." Fabric Port Name: 20:12:00:05:1e:53:e3:8a Permanent Port Name: 23:04:00:05:1e:53:e3:8a Port Index: 18 Share Area: No Device Shared in Other AD: No Redirect: No Partial: No N 5c1300; 3;23:02:00:05:1e:53:e3:8a;50:00:51:e5:3e:38:a0:02; FC4s: FCP PortSymb: [45] "Brocade VDPC Entity-Slot#00,DPC#00,Entity#01." Fabric Port Name: 20:13:00:05:1e:53:e3:8a Permanent Port Name: 23:02:00:05:1e:53:e3:8a Port Index: 19 Share Area: No Device Shared in Other AD: No Redirect: No Partial: No N 5c1700; 3;23:00:00:05:1e:53:e3:8a;50:00:51:e5:3e:38:a0:00; FC4s: FCP PortSymb: [34] "Brocade DPC Entity-Slot#00,DPC#00." Fabric Port Name: 20:17:00:05:1e:53:e3:8a Permanent Port Name: 23:00:00:05:1e:53:e3:8a Port Index: 23 Share Area: No Device Shared in Other AD: No
530 Fabric OS Command Reference53-1001764-02

nsCamShow 2
Redirect: No Partial: No N 5c1800; 3;23:05:00:05:1e:53:e3:8a;50:00:51:e5:3e:38:a0:05; FC4s: FCP PortSymb: [45] "Brocade VDPC Entity-Slot#00,DPC#01,Entity#02." Fabric Port Name: 20:18:00:05:1e:53:e3:8a Permanent Port Name: 23:05:00:05:1e:53:e3:8a Port Index: 24 Share Area: No Device Shared in Other AD: No Redirect: No Partial: No N 5c1900; 3;23:03:00:05:1e:53:e3:8a;50:00:51:e5:3e:38:a0:03; FC4s: FCP PortSymb: [45] "Brocade VDPC Entity-Slot#00,DPC#01,Entity#01." Fabric Port Name: 20:19:00:05:1e:53:e3:8a Permanent Port Name: 23:03:00:05:1e:53:e3:8a Port Index: 25 Share Area: No Device Shared in Other AD: No Redirect: No Partial: No N 5c1a00; 3;23:01:00:05:1e:53:e3:8a;50:00:51:e5:3e:38:a0:01; FC4s: FCP PortSymb: [34] "Brocade DPC Entity-Slot#00,DPC#01." Fabric Port Name: 20:1a:00:05:1e:53:e3:8a Permanent Port Name: 23:01:00:05:1e:53:e3:8a Port Index: 26 Share Area: No Device Shared in Other AD: No Redirect: No Partial: No N 5c1c00; 3;23:07:00:05:1e:53:e3:8a;50:00:51:e5:3e:38:a0:07; FC4s: FCP PortSymb: [45] "Brocade VDPC Entity-Slot#00,DPC#01,Entity#03." Fabric Port Name: 20:1c:00:05:1e:53:e3:8a Permanent Port Name: 23:07:00:05:1e:53:e3:8a Port Index: 28 Share Area: No Device Shared in Other AD: No Redirect: No Partial: No
To display the output with the -t option:
switch:user> nscamshow -tSwitch entry for 92 state rev owner cap_available known v640 0xfffc23 1 Device list: count 8 Type Pid COS PortName NodeName N 5c1000; 3;23:06:00:05:1e:53:e3:8a;50:00:51:e5:3e:38:a0:06; FC4s: FCP PortSymb: [45] "Brocade VDPC Entity-Slot#00,DPC#00,Entity#03." Fabric Port Name: 20:10:00:05:1e:53:e3:8a Permanent Port Name: 23:06:00:05:1e:53:e3:8a Device type: Virtual Unknown(initiator/target) Port Index: 16 Share Area: No Device Shared in Other AD: No
Fabric OS Command Reference 53153-1001764-02

nsCamShow2
Redirect: No Partial: No N 5c1200; 3;23:04:00:05:1e:53:e3:8a;50:00:51:e5:3e:38:a0:04; FC4s: FCP PortSymb: [45] "Brocade VDPC Entity-Slot#00,DPC#00,Entity#02." Fabric Port Name: 20:12:00:05:1e:53:e3:8a Permanent Port Name: 23:04:00:05:1e:53:e3:8a Device type: Virtual Unknown(initiator/target) Port Index: 18 Share Area: No Device Shared in Other AD: No Redirect: No Partial: No(output truncated)
See Also nsAllShow, nsAliasShow, nsShow, switchShow
532 Fabric OS Command Reference53-1001764-02

nsShow 2
nsShow
Displays local Name Server (NS) information.
Synopsis nsshow [-r][-t]
Description Use this command to display local NS information about devices connected to a switch. If no information is available for the switch, the command displays the message: “There is no entry in the Local Name Server.”
Use nsAllShow to display NS information for all switches in the fabric.
Each line of output displays the following information:
Type Displays U for unknown, N for N_Port, NL for NL_Port.
PID Displays the 24-bit Fibre Channel address of the device.
COS Displays the Class of Service levels supported by the device. This can be class 1, class 2, or class 3. The command displays only the numeric values, 1, 2, and/or 3. A device can support multiple CoS levels.
PortName Displays the device port world wide name (WWN).
NodeName Displays the device node WWN.
TTL Displays the time-to-live, in seconds, for cached entries or NA (not applicable) if the entry is local.
SCR Displays the state change registration of the device. This field displays only with the -r option.
Device type Displays the device type if -t is specified.
Fabric Port Name Displays the F_Port WWN to which the N_Port connects.
Permanent Port Name
Displays the physical N_Port or NL_Port WWN.
Port Index Displays the index number of the physical N_Port to which the device connects.
Share Area Displays “Yes” if the port shares an area; otherwise displays “No”.
Device Shared in Other AD Displays “Yes” if the device is shared in another Admin Domain; otherwise displays “No.”
Redirect Displays “Yes” if the device is involved in frame redirection; otherwise displays “No”. The device involved in frame redirection is specified as either “virtual” , “host”, or “target”.
Partial Displays “Yes” if t the device entry is incomplete; otherwise displays “No.” Devices that are incomplete are displayed by the nsShow and nsCamShow commands, and have routing established, but are not considered during device discovery (for example, during FC-GS Name Server Queries).
Fabric OS Command Reference 53353-1001764-02

nsShow2
The following information is displayed only if the device has registered the information (for example, the switch automatically registers SCSI inquiry data for FCP target devices):
• FC4s supported
• IP address
• Port and node symbolic names
• Fabric Port Name. This is the WWN of the port on the switch to which the device is physically connected.
• Port address or port IP address
Note The execution of this command is subject to Virtual Fabric or Admin Domain restrictions that may be in place. Refer to chapter 1, "Using Fabric OS Commands" and Appendix A, "Command Availability" for details.
Operands This command has the following optional operands:
-r Replaces the time-to-live (TTL) attribute output with state change registration (SCR) information. This value indicates what type of RSCN a device registers to receive. Values include:
SCR=0 Reserved.
SCR=1 Fabric detected registration. Register to receive all RSCN requests issued by the fabric controller for events detected by the fabric.
SCR=2 NX_Port detected registration. Register to receive all RSCN requests issued for events detected by the affected NX_Port.
SCR=3 Register to receive all RSCN requests issued. The RSCN request returns all effected N_Port_ID pages.
-t Displays the device type. The device type is defined in terms of two attributes. The first attribute indicates the origination of the device as one of the following:
• Physical- The device is connected to the NX_Port, using FLOGI to log into the switch.
• Virtual - The device is contrived by the switch.• NPV - The device is connected to the NX_Port, using FDISC to log in to the
switch.• iSCSI Device is connected to the iSCSI port.
The second attribute indicates the role of the device. Valid role attributes include the following:
• Unknown (initiator/target) - Device role is not detected• Initiator - An iSCSI initiator.• Target - An iSCSI target.• Initiator+Target - Both an iSCSI initiator and an iSCSI target.
534 Fabric OS Command Reference53-1001764-02

nsShow 2
Examples To display local NS information:
switch:user> nsshow{ Type Pid COS PortName NodeName TTL(sec) N 010100; 3;21:00:00:e0:8b:13:08:10;20:00:00:e0:8b:13:08:10; na FC4s: FCP NodeSymb: [41] "QLA2340 FW:v3.03.06 DVR:v9.0.0.2 (w32 IP)" Fabric Port Name: 20:01:00:05:1e:34:00:70 Permanent Port Name: 21:00:00:e0:8b:13:08:10 Port Index: 1 Share Area: No Device Shared in Other AD: No Redirect: No Partial: No N 010e00; 3;21:00:00:e0:8b:12:8a:be;20:00:00:e0:8b:12:8a:be; na FC4s: FCP NodeSymb: [41] "QLA2340 FW:v3.03.06 DVR:v9.0.0.2 (w32 IP)" Fabric Port Name: 20:0e:00:05:1e:34:00:70 Permanent Port Name: 21:00:00:e0:8b:12:8a:be Port Index: 14 Share Area: No Device Shared in Other AD: No Redirect: No Partial: NoThe Local Name Server has 2 entries }
To display local name server information with the -r option.
switch:user> nsshow -r{
Type Pid COS PortName NodeName SCR N 010100; 3;21:00:00:e0:8b:13:08:10;20:00:00:e0:8b:13:08:10; 1
FC4s: FCPNodeSymb: [41] "QLA2340 FW:v3.03.06 DVR:v9.0.0.2 (w32 IP)"Fabric Port Name: 20:01:00:05:1e:34:00:70Permanent Port Name: 21:00:00:e0:8b:13:08:10Port Index: 1Share Area: NoDevice Shared in Other AD: NoRedirect: No
Partial: No N 010e00; 3;21:00:00:e0:8b:12:8a:be;20:00:00:e0:8b:12:8a:be; 1
FC4s: FCPNodeSymb: [41] "QLA2340 FW:v3.03.06 DVR:v9.0.0.2 (w32 IP)"Fabric Port Name: 20:0e:00:05:1e:34:00:70Permanent Port Name: 21:00:00:e0:8b:12:8a:bePort Index: 14Share Area: NoDevice Shared in Other AD: NoRedirect: No
Partial: NoThe Local Name Server has 2 entries }
T
Fabric OS Command Reference 53553-1001764-02

nsShow2
o display local name server information with -r and -t options.
switch:user> nsshow -r -t{ Type Pid COS PortName NodeName SCR N 010100; 3;21:00:00:e0:8b:13:08:10;20:00:00:e0:8b:13:08:10; 1
FC4s: FCPNodeSymb: [41] "QLA2340 FW:v3.03.06 DVR:v9.0.0.2 (w32 IP)"Fabric Port Name: 20:01:00:05:1e:34:00:70Permanent Port Name: 21:00:00:e0:8b:13:08:10Device type: Physical InitiatorPort Index: 1Share Area: NoDevice Shared in Other AD: NoRedirect: No
Partial: No N 010e00; 3;21:00:00:e0:8b:12:8a:be;20:00:00:e0:8b:12:8a:be; 1
FC4s: FCPNodeSymb: [41] "QLA2340 FW:v3.03.06 DVR:v9.0.0.2 (w32 IP)"Fabric Port Name: 20:0e:00:05:1e:34:00:70Permanent Port Name: 21:00:00:e0:8b:12:8a:beDevice type: Physical InitiatorPort Index: 14Share Area: NoDevice Shared in Other AD: NoRedirect: No
Partial: No
The Local Name Server has 2 entries }
See Also nsAllShow, nsAliasShow, nsCamShow, switchShow
536 Fabric OS Command Reference53-1001764-02

nsZoneMember 2
nsZoneMember
Displays the information on online devices zoned with a specified device.
Synopsis nszonemember pid | wwn
nszonemember -a | -u
Description Use this command to display information on all online devices zoned with the specified device. The device can be specified by WWN or Port ID (PID). Use this command with the -u option to display all unzoned devices in the entire fabric. Use the -a option to display online zoned device data for each local device.
The command output displays the following information:
Type U - known, N - N_Port, NL - NL_Port.
Pid The 24-bit Fibre Channel address.
COS A list of classes of service supported by the device.
PortName The device's port world wide name (WWN).
NodeName The device's node WWN.
Permanent Port Name
The physical N_Port or NL_Port WWN.
DeviceType The device type.
Port Index The index of the port to which the device is attached.
Shared Area Whether or not the device shares an area with other devices.
Device Shared in Other AD
Whether or not the device is shared in other Admin Domains.
Additional lines may display if the device has registered any of the following information (the switch automatically registers SCSI inquiry data for FCP target devices):
• FC4 supported
• IP address (node)
• IPA
• port and node symbolic name (local device only)
• fabric port name
• hard address or port IP address
Note The execution of this command is subject to Virtual Fabric or Admin Domain restrictions that may be in place. Refer to chapter 1, "Using Fabric OS commands" and Appendix A, "Command Availability" for details.
Operands This command has the following operands:
PID | WWN Specifies the port ID or WWN of the device for which to display zoned devices.
-a Displays each local device’s online zoned device data, including the device PID and zone alias.
Fabric OS Command Reference 53753-1001764-02

nsZoneMember2
-u Displays all unzoned devices in the entire fabric. The device data includes the device PID and zone alias.
Examples To display information about all the online devices zoned with the given device:
switch:admin> nszonemember 0x0416e23 local zoned members:
Type Pid COS PortName NodeName SCR NL 041901; 2,3;10:00:00:00:c9:26:0e:ae;20:00:00:00:c9:26:0e:ae; 3 Fabric Port Name: 20:09:00:60:69:50:06:78 Permanent Port Name: 10:00:00:00:c9:26:0e:ae Device type: Physical Initiator NL 0416e2; 3;22:00:00:20:37:d9:6b:b3;20:00:00:20:37:d9:6b:b3; 0 FC4s: FCP [SEAGATE ST318304FC 0005] Fabric Port Name: 20:06:00:60:69:50:06:78 Permanent Port Name: 22:00:00:20:37:d9:6b:b3 Device type: Physical Target NL 0416e4; 3;22:00:00:20:37:d9:61:ac;20:00:00:20:37:d9:61:ac; 0 FC4s: FCP [SEAGATE ST318304FC 0005] Fabric Port Name: 20:06:00:60:69:50:06:78 Permanent Port Name: 22:00:00:20:37:d9:61:ac Device type: Physical Target
No remote zoned members
To display information about all the online devices zoned with the given WWN:
switch:admin> nszonemember 10:00:00:00:c8:23:0b:ad3 local zoned members:
Type Pid COS PortName NodeName SCR NL 041901; 2,3;10:00:00:00:c9:26:0e:ae;20:00:00:00:c9:26:0e:ae; 3 Fabric Port Name: 20:09:00:60:69:50:06:78 Permanent Port Name: 10:00:00:00:c9:26:0e:ae Device type: Physical Initiator NL 0416e2; 3;22:00:00:20:37:d9:6b:b3;20:00:00:20:37:d9:6b:b3; 0 FC4s: FCP [SEAGATE ST318304FC 0005] Fabric Port Name: 20:06:00:60:69:50:06:78 Permanent Port Name: 22:00:00:20:37:d9:6b:b3 Device type: Physical Target NL 0416e4; 3;22:00:00:20:37:d9:61:ac;20:00:00:20:37:d9:61:ac; 0 FC4s: FCP [SEAGATE ST318304FC 0005] Permanent Port Name: 22:00:00:20:37:d9:61:ac Device type: Physical Target
No remote zoned members
To display each local device’s online zoned device data:
switch:admin> nszonemember -a Port: 4 Pid: 0xb00400 Aliases: ix360_131_201_6a Zoned Members: 2 devices Pid: 0xb00400 Aliases: ix360_131_201_6a Pid: 0xba1ee8 Aliases: trimm101b_3
Port: 12 Pid: 0xb00c01 Aliases: dl360_130159a Zoned Members: 2 devices Pid: 0xb00c01 Aliases: dl360_130159a Pid: 0xbd1bef Aliases: nstor4b_8
538 Fabric OS Command Reference53-1001764-02

nsZoneMember 2
Port: 13 Pid: 0xb00d00 Aliases: ix360_131_196p5 Zoned Members: 2 devices Pid: 0xb00d00 Aliases: ix360_131_196p5 Pid: 0xe07d00 Aliases: hds9200_6p4 hds9200_6p4
Port: 14 Pid: 0xb00e00 Aliases: dl360_130251a dl360_130251a Zoned Members: 2 devices Pid: 0xb00e00 Aliases: dl360_130251a dl360_130251a Pid: 0xba1ae4 Aliases: trimm100a_2
To display all the unzoned devices in the fabric:
switch:admin> nszonemember -u Pid: 0xb01ea9; Aliases: trimm32b_1 Pid: 0xb01eaa; Aliases: trimm32b_2 Pid: 0xb01eab; Aliases: trimm32b_3 Pid: 0xb01eac; Aliases: trimm32b_4 Pid: 0xb01fad; Aliases: trimm32a_5 Pid: 0xb01fae; Aliases: trimm32a_6 Pid: 0xb01fb1; Aliases: trimm32a_7 Pid: 0xb01fb2; Aliases: trimm32a_8 Pid: 0xdc2800; Aliases: Totally 9 unzoned devices in the fabric.
See Also cfgShow, nscamShow, nsShow
Fabric OS Command Reference 53953-1001764-02

passwd2
passwd
Changes the password for a specified user.
Synopsis passwd [user_account] [-old old_password] [-new new_password]
Description Use this command to change a user account password.
Passwords can be changed locally on any switch. For the password database to be distributed to other switches in the fabric, the switches must be configured to accept the password database with the fddCfg command. The password database is distributed manually with the distribute command.
If RADIUS authentication is enabled, password change is blocked for users changing their own password. Administrators with the privilege to change passwords for other accounts may do so regardless of whether RADIUS authentication is enabled; all such password changes operate on the local password database.
The passwd command cannot be run on the Standby CP. When an admin account or a SecurityAdmin account changes the password for other accounts, it does not prompt for the current password, unless the target account is a factory or root account.
Any chosen password must satisfy the following password strength rules:
• Password contains the minimum required number of lowercase characters.
• Password contains the minimum required number of uppercase characters.
• Password contains the minimum required number of numeric characters.
• Password contains the minimum required number of punctuation characters.
• Password must be between minlength and 40 characters long. The minlength parameter is set with the passwdCfg command.
• Password may not contain the colon (:) character.
• Password must satisfy repeated and sequential character constraints.
The password history policy is enforced across all user accounts when the user is setting his own password. The password history policy is not enforced when an administrator sets a password for another user, but the user’s password history is preserved and the password set by the administrator is recorded in the user’s password history.
The passwd command behaves as follows:• If you are changing your own password, you are prompted to enter the old password and, if your
entry is valid, you are prompted to enter the new password. Alternately, you may specify the old and new password on the command line.
• If a you are changing another user’s password with greater privileges than your current login level, you are prompted to enter that user level’s old password and, if your entry is valid, you are prompted for a new password.
• If you are changing another user’s password, the target account's AD member list must be a subset of your account's AD member list.
• If you are logged in as the root user when changing another user’s password, you are not prompted to enter the old password. If you are a factory account, an admin, or SecurityAdmin account, you are not prompted to enter the current password unless the target account is root.
540 Fabric OS Command Reference53-1001764-02

passwd 2
• Changing the password of any user level causes the login session of that account (if logged in) to terminate.
Operands When this command is invoked without an operand, the password is changed for the current user account. The following operand is optional:
user_account Specifies the user account for which the password is to be changed. The user account must be an existing account, either default or user-created. Only users with accounts of type "root", "factory", "SecurityAdmin", or "admin" can execute this operand and have permission to change passwords for accounts other than their own.
-old old_password Specifies the old password. This operand is optional; if omitted, the command interactively prompts for the old password.
-new new_password Specifies the new password. This operand is optional; if omitted and only the old password is specified on the command line, the command interactively prompts for the new password.
Note The execution of this command is subject to Virtual Fabric or Admin Domain restrictions that may be in place. Refer to chapter 1, "Using Fabric OS Commands" and Appendix A, "Command Availability" for details.
Examples To change the password for the admin account while logged in as admin:
switch:admin> passwd Changing password for adminEnter new password:Re-type new password:Password changed.Saving password to stable storage.Password saved to stable storage successfully.
To change the password for user "admin" from an admin account noninteractively:
switch:admin> passwd -old password -new adminpassPassword changed.Saving password to stable storage.Password saved to stable storage successfully.
To change the password for user "brocadeUser" from an admin account noninteractively:
switch:admin> passwd -old brocadeUser -old brcdPasswd -new mynewPasswdPassword changed.Saving password to stable storage.Password saved to stable storage successfully.
Diagnostics The system may generate one or more of the following error messages. Refer to the Fabric OS Message Reference for more diagnostic information.
RADIUS enabled error
Password change disallowed, RADIUS authentication is enabled.
Password error
Password length, strength, or history policy not met.
"user" is not a valid user name
Fabric OS Command Reference 54153-1001764-02

passwd2
You have not specified a valid recognized user name on the system.
Permission denied
You do not have permission to change the password for the specified user.
Incorrect password
You have not entered the correct password when prompted for the old password.
Password unchanged
You have entered the carriage return special input case, choosing not to change the password.
Passwords do not match
You have not correctly verified the new password.
Invalid length of password
You have entered a password length that is not between minlength and 40.
Insufficient number of lower case letters
The password you entered contains less than the minimum required number of lowercase characters.
Insufficient number of upper case letters
The password you entered contains less than the minimum required number of uppercase characters.
Insufficient number of digits in password
The password you entered contains less than the minimum required number of numeric characters.
Insufficient number of punctuation characters
You have entered a password that contains less then the minimum required number of punctuation characters.
Password matches one of the previous passwords
The password you entered matches one of the previous passwords.
You must wait longer to change your password.
You cannot change the password before the minimum aging period expires.
Password contains invalid characters.
The password you entered contains invalid characters.
See Also login, logout, passwdCfg
542 Fabric OS Command Reference53-1001764-02

passwdCfg 2
passwdCfg
Manages the password policies.
Synopsis passwdcfg --set options value
passwdcfg --disableadminlockout
passwdcfg --enableadminlockout
passwdcfg --setdefault
passwdcfg --showall
passwdcfg --help
Description Use this command to manage password policies.
Use --set to configure the following password policies:
• Password strength policy
• Password history policy
• Password expiration policy
• Account lockout policy
Password Strength PolicyThe password strength policy enforces a set of rules that new passwords must satisfy. Configurable rules include lowercase and uppercase characters, numbers, punctuation occurrences and minimum length values. It is enforced only when a new password is defined. The password strength policy is enforced across all user accounts. When a password fails more than one of the strength attributes, an error is reported for only one of the attributes at a time.
Password History PolicyThe password history policy prevents reuse of a recently used password. The password history policy is enforced across all user accounts when users are setting their own password. It is not enforced when an administrator sets a password for another user, but the user’s password history is preserved and the password set by the administrator is recorded in the user’s password history.
Password Expiration PolicyThe password expiration policy forces expiration of a password after a specified period of time. When a user’s password expires, the user must change the password to complete the authentication process. A warning that password expiration is approaching is displayed when the user logs in. The number of days prior to password expiration during which warnings commence is a configurable parameter. Password expiration does not disable or lock out the account. The password expiration policy is enforced across all user accounts except the root and factory accounts.
Account Lockout PolicyThe account lockout policy disables a user account when the user exceeds a configurable number of failed login attempts. The mechanism can be configured to keep the account locked until explicit administrative action is taken to unlock the account or locked accounts can be automatically unlocked after a specified period. An administrator can unlock a locked account at any time. Note that the account locked state is distinct from the account disabled state. The account lockout
Fabric OS Command Reference 54353-1001764-02

passwdCfg2
policy is enforced across all user accounts except the root, factory, and SecurityAdmin role accounts. A separate configuration option, available to the SecurityAdmin and Admin role accounts, may be used to enable and disable applications of the account lockout policy to Admin role accounts.
A failed login attempt counter is maintained for each user on each switch instance. The counters for all user accounts are reset to zero when the account lockout policy is enabled. The counter for an individual account is reset to zero when the account is unlocked after the lock-out duration period expires.
Note The execution of this command is subject to Virtual Fabric or Admin Domain restrictions that may be in place. Refer to chapter 1, "Using Fabric OS commands" and Appendix A, "Command Availability" for details.
Operands This command takes as input an operand and its associated arguments. When invoked without operands, the command prints the usage.
--showall Displays all the password configuration parameters.
--set Configures a specified password policy. The following arguments are supported:
-lowercase valueSpecifies the minimum number of lowercase alphabetic characters that must occur in the password. The default value is 0. The maximum value must be less than or equal to the -minlength value.
-uppercase valueSpecifies the minimum number of uppercase alphabetic characters that must occur in the password. The default value is 0. The maximum value must be less than or equal to the -minlength value.
-digits value Specifies the minimum number of numeric digits that must occur in the password. The default value is 0. The maximum value must be less than or equal to the -minlength value.
-punctuation valueSpecifies the minimum number of punctuation characters that must occur in the password. All displayable, non-alphanumeric punctuation characters, except the colon (:), are allowed. The default value is 0. The maximum value must be less than or equal to the -minlength value.
-minlength valueSpecifies the minimum length of the password. The minimum can be set anywhere between 8 and 40 characters. The default value is 8. The total of -lowercase, -uppercase, -digits, -punctuation must be less than or equal to -minlength value.
-history value Specifies the number of past password values that are disallowed when setting a new password. A value of 1 to 24 can be specified. The default value is 1.
544 Fabric OS Command Reference53-1001764-02

passwdCfg 2
-minpasswordage valueSpecifies the minimum number of days that must elapse before a password can be changed. -minpasswordage can be set at 0 to 999. The default value is 0. Setting this parameter to a nonzero value discourages a user from rapidly changing a password in order to defeat the password history setting to reuse a recently used password. The minpasswordage policy is not enforced when an administrator changes the password for another user..
-maxpasswordage valueSpecifies the maximum number of days that can elapse before a password must be changed. This is the password expiration period. -maxpasswordage can be set at 0 to 999. Setting this parameter to 0 disables password expiration. The default value is 0. When -maxpasswordage is set to a nonzero value, -minpasswordage must be set to a value less than or equal to -maxpasswordage.
-warning valueSpecifies the number of days prior to password expiration that a warning of password expiration is displayed. The valid range for -warning is 0 to 999. The default value to 0.
-lockoutthreshold valueSpecifies the number of times a user can specify an incorrect password during login before the account is locked. The number of failed login attempts is counted from the last successful login. Values for -lockoutthreshold range from 0 to 999. Setting this parameter to 0 disables the lockout mechanism. The default value is 0.
-lockoutduration valueSpecifies the time, in minutes, after which a previously locked account automatically unlocks. lockoutduration values range from 0 to 99999. The default value is 30. Setting this parameter to 0 disables lockout duration, requiring an administrative action to unlock the account. The lockout duration begins with the first login attempt after the lockout threshold has been reached. Subsequent failed login attempts do not extend the lockout period.
--enableadminlockout
Enables the admin lockout policy and sets the config parameter "passwdcfg.adminlockout" to 1. If the parameter "passwdcfg.lockoutthreshold" is set to greater than 0 and Admin Lockout policy is enabled, then, if the number of failed login attempts from the last successful login equals the "passwdcfg.lockoutthreshold", the account gets locked for the "passwdcfg.lockoutduration" duration. The particular account is unlocked manually using userconfig --change account name-u (requires root/factory/security admin/admin privileges) or it is automatically unlocked after "passwdcfg.lockoutduration" duration.
-repeat value Specifies the length of repeated character sequences that will be disallowed. For example, if the "repeat" value is set to 3, a password "passAAAword" is disallowed because it contains the repeated sequence "AAA". A password of "passAAword" would be allowed because no repeated character sequence exceeds two characters. The range of allowed values is 1-40.
Fabric OS Command Reference 54553-1001764-02

passwdCfg2
-sequence value
Specifies the length of sequential character sequences that will be disallowed. A sequential character sequence is defined as a character sequence in which the ASCII value of each contiguous character differs by one. The ASCII value for the characters in the sequence must all be increasing or all decreasing. For example, if the "sequence" value is set to 3, a password "passABCword" is disallowed because it contains the sequence "ABC". A password of "passABword" would be allowed because no repeated character sequence exceeds two characters. The range of allowed values is 1-40. The default value is 1.
--disableadminlockout
Disables the admin lockout policy if already enabled and sets the config parameter "passwdcfg.adminlockout" to 0. By default, admin lockout policy is disabled.
--setdefault Resets all password policies to their default values.
--help Displays the command usage.
Examples To display the current password configuration parameters:
switch:admin> passwdcfg --showallpasswdcfg.minlength: 8passwdcfg.lowercase: 0passwdcfg.uppercase: 0passwdcfg.digits: 0passwdcfg.punctuation: 0passwdcfg.history: 1passwdcfg.minpasswordage: 0passwdcfg.maxpasswordage: 0passwdcfg.warning: 0passwdcfg.lockoutthreshold: 0passwdcfg.lockoutduration: 30passwdcfg.status: 0
To set passwd configuration parameters, specifying that a password must contain at least two uppercase characters, and that passwords expire in 90 days from the date they are defined:
switch:admin> passwdcfg --set -uppercase 2 -maxpasswordage 90
Diagnostics The passwdCfg command may fail for any of the following reasons:
Permission failure
You not permitted to execute the command.
Invalid command line option
An unrecognized command line option was specified.
minlength value out of range
The -minlength value must be between 8 and 40.
546 Fabric OS Command Reference53-1001764-02

passwdCfg 2
lowercase value out of range
The -lowercase value specified must be greater than or equal to 0 and less than or equal to -minlength value.
uppercase value out of range
The -uppercase value specified must be greater than or equal to 0 and less than or equal to -minlength value.
digits value out of range
The -digits value specified must be greater than or equal to 0 and less than or equal to -minlength value.
punctuation value out of range
The -punctuation value specified must be greater than or equal to 0 and less than or equal to -minlength value.
total strength specification out of range
The total of -lowercase value, -uppercase value, -digits value, and -punctuation value must be less than or equal to -minlength value.
history value out of range
The -history value must be between 1 and 24.
minpasswordage value out of range
The -minpasswordage value must be between 0 and 999.
maxpasswordage value out of range
The -maxpasswordage value must be between 0 and 999.
warning value out of range
The -warning value must be between 0 and 999.
invalid password expiration specification
The -minpasswordage value or -warning value must be less than or equal to -maxpasswordage value when -maxpasswordage value is nonzero.
lockoutthreshold value out of range
The -lockoutthreshold value must be between 0 and 999.
lockoutduration value out of range
The -lockoutduration value must be between 0 and 99999.
repeat value out of range
The -repeat value must be between 1 and 40.
sequence value out of range
The -sequence value must be between 1 and 40.
See Also passwd, userConfig
Fabric OS Command Reference 54753-1001764-02

pathInfo2
pathInfo
Displays routing information and statistics along a path covering multiple switches.
Synopsis pathinfo
pathinfo -f FID destination_switch [destination_port] [-r] [-t]
pathinfo destination_switch [source_port[destination_port]] [-r] [-t]
Description Use this command to display routing information from a source port on the local switch to a destination port on another switch. The command output describes the exact data path between these ports, including all intermediate switches.
When using pathInfo across fabrics connected through an FC router, the command represents backbone information as a single hop. The command captures details about the FC router to which ingress and egress EX_Ports are connected, but it hides the details about the path the frame traverses between the ingress EX_Ports to the egress EX_Ports in the backbone.
To use pathInfo across remote fabrics, you must specify both the fabric ID (FID) and the domain ID of the remote switch. You cannot use the command to obtain source port information across remote FCR fabrics. When obtaining path info across remote fabrics, the destination switch must be identified by its Domain ID. Identifying the switch by name or WWN is not accepted.
The command does not retry if there is a timeout or failure. It may fail if a switch along the path is busy or does not support this feature.
If the advanced performance tuning (APT) policy in effect on the intermediate switches is not a port-based policy, subsequent data streams may not take the same path as displayed in the pathInfo output. Refer to aptPolicy for more information on advanced performance tuning policies.
If you specify an inactive port or a path through a switch that does not have active routing tables to the destination, this command describes the path that would be taken if the ports were active. If you specify a destination port that is not active, this command uses the embedded port as the destination.
The ingress and egress points above 256 are specified as port index. Use switchShow for a listing of valid port index numbers.
In addition, pathInfo can provide statistics on every traversed interswitch link (ISL) that is part of the path. This feature is available only in the interactive command mode.
The routing and statistics information are provided by every switch along the path, based on the current routing table information and statistics calculated continuously in real-time. Each switch represents one hop of the total path.
In a Virtual Fabric environment, pathInfo displays port numbers beyond physical port numbers while displaying information for a hop that corresponds to a path in the base fabric. The cost for this hop is the cost of the corresponding path in the base fabric plus a small offset. Refer to the example section for an illustration.
Other command options allow the collection of information on the reverse path, or on a user-selected path (source route).
For each hop, this command displays the following fields:
Hop The hop number. The local switch is hop 0.
548 Fabric OS Command Reference53-1001764-02

pathInfo 2
In Port The port on which the switch receives frames. For hop 0, this is source_port. identified by the port index.
Domain ID The domain ID of the switch.
Name The name of the switch.
Out Port The output port that the frames take to reach the next hop. For the last hop, this is destination_port identified by the port index.
BW The bandwidth of the output interswitch link (ISL), in Gbps. This parameter does not apply to the embedded port. If the bandwidth is zero, it is displayed as 1 Gbps. For logical interswitch links (LISL) ports, the bandwidth displays as 8 Gbps, the maximum bandwidth on hardware platforms on which LISLs can be formed. In cases where the LISL bandwidth is zero, pathInfo displays a bandwidth of 4 Gbps.
Cost The cost of the output link used by the fabric shortest path first (FSPF) routing protocol. This parameter applies only if the output link is recognized by FSPF.
You can request more detailed statistics for each hop in addition to the routing information. These statistics are presented for the input and output ports for both receive and transmit modes. You can select basic or extended statistics or both when running pathInfo in interactive mode. Statistics are not reported for the embedded port. Some throughput values are reported in multiple time intervals, to describe both current path utilization and the average throughput over a larger period of time.
To collect these statistics, this command uses a special pathInfo frame that is sent hop-by-hop from the source switch to the destination switch. To prevent such a frame to loop forever if an error occurs, a maximum number of hops for the frame to traverse is enforced. The hop count includes all hops in the direct path from source to destination, and also all the hops in the reverse path, if the tracing of the reverse path is requested. The default value for the maximum hop count is 25.
Basic statistics Basic statistics report parameters that may indicate ISL congestion along the path. They include the following:
B/s Bytes per second received or transmitted. This value is reported for multiple time periods displayed in parentheses.
Txcrdz The length of time, in milliseconds, that the port was unable to transmit frames because the transmit BB credit was zero. The purpose of this statistic is to detect congestion or a device affected by latency. This parameter is sampled at 1 millisecond intervals, and the counter is incremented if the condition is true. Each sample represents 1 ms of time with zero Tx BB Credit. An increment of this counter means that the frames could not be sent to the attached device for 1 ms, indicating degraded performance. This value reports for multiple time periods, displayed in parentheses. Note that other commands, such as portStatsShow, may express this value in units other than milliseconds.
Extended statistics
Extended statistics report variables of general interest. They include the following:
F/s The number of frames received or transmitted per second. This value is reported for multiple time periods, displayed in parentheses.
Words The total number of 4-byte Fibre Channel words.
Fabric OS Command Reference 54953-1001764-02

pathInfo2
Frames The total number of frames.
Errors The total number of errors that may have caused a frame not to be received correctly. This includes cyclic redundancy check (CRC) errors, bad end-of-frame (EOF) errors, frame truncated errors, frame-too-short errors, and encoding errors inside a frame.
Reverse path The path from port A on switch X to port B on switch Y may be different from the path from port B to port depending on the links traversed between a given sequence of switches, or the reverse path may involve different switches. The -r option displays routing and statistics information for the reverse path in addition to those for the direct path.
Source route The source route option allows you to specify a sequence of switches or ports, which the pathInfo frame has to traverse to reach the destination. Therefore, the path specified may be different from the one used by actual traffic.
The source route is expressed as a sequence of switches, a sequence of output ports, or a combination of both. The next hop in the source route is described by either the output port to be used to reach the next hop, or the domain ID of the next hop.
The source route can specify a full route from source to destination or a partial route. In a partial route the remaining hops are chosen as the path from the input port on the first hop not listed in the source route to the destination. The maximum hop count is enforced in both cases.
If the source route does not specify all the switches along a section of the path, you can specify a strict or a loose path. A strict source route requires that only the specified switches are reported in the path description. If two switches are specified back-to-back in the source route descriptor but are not directly connected, the switches in-between are ignored. In a loose source route, the switches in-between are reported. The concepts of strict and loose route apply only to the portions of the path described by domains, not to the part described by output ports.
Note The execution of this command is subject to Virtual Fabric or Admin Domain restrictions that may be in place. Refer to chapter 1, "Using Fabric OS commands" and Appendix A, "Command Availability" for details.
Operands This command has the following operands:
destination_switch Specifies the destination switch. To obtain path info in a Layer 2 fabric, the destination switch can be identified by its Domain ID, by the switch WWN, or by the switch name. To obtain path info across remote fabrics connected through an FC router, the destination switch must be identified by its Domain ID. Identifying the switch by name or WWN is not accepted. This operand is optional; if omitted, the command prompts for input interactively.
source_port Specifies the port whose path to the destination domain is traced, specified as the port index. The embedded port (-1) is the default. The embedded port can be selected manually by entering the value of MAX_PORT. MAX_PORT stands for the maximum number of ports supported by the local switch.
550 Fabric OS Command Reference53-1001764-02

pathInfo 2
destination_port Specifies the port on the destination switch for the path being traced. This operand returns the state of this port. The embedded port (-1) is used by default, or if you specify a destination port that is not active. The destination is specified as the port index.
"-r" Displays the reverse path in addition to the forward path. This operand is optional.
-t Displays the command output in traceroute format. When this operand is used, only routing information is displayed. The output includes the time it takes, in microseconds, to reach each hop. Basic and extended statistics are not available in the traceroute format.
When executed without operands, pathInfo runs interactively. Specifying a destination switch is required; the values for the source and destination ports can be -1 to indicate the embedded port. Reverse-path tracing is optional. In addition, this command prompts for the following parameters:
max hops The maximum number of hops that the pathInfo frame is allowed to traverse; the default is 25.
Fabric Id Specifies the Fabric ID. If unspecified, the value defaults to -1 (Default switch FID 128)
basic stats Whether basic statistics are generated on every link; the default is no.
extended stats Whether basic statistics are generated on every link; the default is no.
source route Specifies a sequence of switches or ports that the pathInfo frame should traverse; the default is no. If an output port to the next hop is specified, you are not prompted for the domain of the next switch. The domain is determined by the port.
strict source rte Specifies a strict source route, skipping intermediate switches. When using this option, the source route hops must be specified using the domain rather than the output port.
Timeout The maximum time allowed waiting for the response in milliseconds. The default is 10000 milliseconds.
Examples To display basic path information to a specific domain in command line mode:
switch:admin> pathinfo 91Target port is EmbeddedHop In Port Domain ID (Name) Out Port BW Cost---------------------------------------------------------0 E 9 (web226) 2 1G 10001 3 10 (web229) 8 1G 10002 8 8 (web228) 9 1G 10003 6 91 (web225) E - -
To display basic path information in traceroute format:
switch:admin> pathinfo 91 -ttraceroute to domain 91(web225) , 25 hopsHop Domain ID (Name) time taken for the hop-----------------------------------------------1 10 (web229) 0.0331 us
Fabric OS Command Reference 55153-1001764-02

pathInfo2
To display basic path information in traceroute format with reverse path option:
switch:admin> pathinfo 4 -r -t
Target port is Embedded
Hop Domain ID (Name) Time/hop----------------------------------------------------1 11 (mps_daz_1) 32882 usec2 4 (METEOR) 32882 usec3 11 (mps_daz_1) 32882 usec4 97 (pulsar055) 32882 usec
To display path information when source port and destination port are provided along with the traceroute option:
switch:admin> pathinfo 6 12 13 -t
Target port is F_Port
Hop Domain ID (Name) Time/hop-----------------------------------------------6 (Stealth_I) 108186 usec
To display basic path information to a specific domain in a Virtual Fabric environment (the cost for this hop is the cost of the corresponding path in the base fabric):
switch:admin> pathinfo 13 4
Target port is Embedded
Hop In Port Domain ID (Name) Out Port BW Cost---------------------------------------------------------0 4 9 2009* - 1500 1 2015* 10 8 1G 10002 6 13 E - -
To display basic and extended statistics in interactive mode:
switch:admin> pathinfoMax hops: (1..127) [25]Fabric Id: (1..128) [-1]Domain|Wwn|Name: [] 8Source port: (0..15) [-1]Destination port: (0..255) [-1]Basic stats (yes, y, no, n): [no] yExtended stats (yes, y, no, n): [no] yTrace reverse path (yes, y, no, n): [no]Source route (yes, y, no, n): [no]Timeout: (1..30) [5]Target port is Embedded
Hop In Port Domain ID (Name) Out Port BW Cost---------------------------------------------------------0 E 9 (web226) 2 1G 1000
Port E 2 Tx Rx Tx Rx ----------------------------------------------- B/s (1s) - - 0 0
552 Fabric OS Command Reference53-1001764-02

pathInfo 2
B/s (64s) - - 1 1 Txcrdz (1s) - - 0 - Txcrdz (64s) - - 0 - F/s (1s) - - 0 0 F/s (64s) - - 2743 0 Words - - 2752748 2822763 Frames - - 219849 50881 Errors - - - 0Hop In Port Domain ID (Name) Out Port BW Cost---------------------------------------------------------1 3 10 (web229) 12 1G 1000Port 3 12 Tx Rx Tx Rx ----------------------------------------------- B/s (1s) 36 76 0 0 B/s (64s) 5 5 5 5 Txcrdz (1s) 0 - 0 - Txcrdz (64s) 0 - 0 - F/s (1s) 1 1 0 0 F/s (64s) 0 0 0 0 Words 240434036 2294316 2119951 2121767 Frames 20025929 54999 162338 56710 Errors - 4 - 0
Hop In Port Domain ID (Name) Out Port BW Cost---------------------------------------------------------2 14 8 (web228) E - -(output truncated)
See Also portStatsShow, switchShow
Fabric OS Command Reference 55353-1001764-02

pdShow2
pdShow
Displays data from a panic dump file.
Synopsis pdshow [panic_dump_file]
Description Use this command to display data from a panic dump file. The panic dump file contains information that might be useful to determine the cause of the system panic.
When executed without any arguments, this command displays output from the latest panic dump file available on the switch.
If a panic dump file is specified as an argument, the contents of that specific file are displayed.
Note The execution of this command is subject to Virtual Fabric or Admin Domain restrictions that may be in place. Refer to chapter 1, "Using Fabric OS commands" and Appendix A, "Command Availability" for details.
Operands This command has the following optional operand:
panic_dump_file Specify the full path name of a panic dump file.
Examples To examine a panic dump file by the name panic_dump located under the directory /tmp:
switch:admin> pdshow /tmp/panic_dump
*** CAUTION *** * Host PLATFORM (current) is: 'Unknown' * PLATFORM got from pd file is: 'SW12000' * Some results shown may be incorrect and/or missing * It is best if this command is run on same PLATFORM as that of pdfile **************
_______________________********________________________* File :/core_files/panic/core.pd1038932352 ** SECTION:PD_MISC *-----------------------********------------------------WatchDogRegister=0x0Section=Startup time: Tue Dec 3 16:06:11 UTC 2002Kernel= 2.4.19Fabric OS= v4.1.0_j_dist_1103Made on= Tue Dec 3 19:07:13 2002Flash= Tue Dec 3 13:19:06 2002BootProm= 3.2.0Section=HA show Output
(output truncated)
See Also portLogDump, supportSave
554 Fabric OS Command Reference53-1001764-02

perfAddEEMonitor 2
perfAddEEMonitor
Adds an end-to-end monitor to a port.
Synopsis perfaddeemonitor [slot/]port SourceID DestID
Description Use this command to add an end-to-end performance monitor to a port. The performance monitor counts the number of words received, number of words transmitted, and number of CRC errors detected using either of the following two conditions:
1. For frames received at the port, the frame SID is the same as and frame DID is the same as DestID; both RX_COUNT and CRC_COUNT are updated accordingly.
2. For frames transmitted from the port, the frame DID is the same as SourceID and frame SID is the same as DestID; both TX_COUNT and CRC_COUNT are updated accordingly.
To monitor traffic from host A to device B, add a monitor on port 2, specifying 0x050200 as the SID and 0x010100 as the DID. The RX count equals the number of words from host A to device B, whereas the TX count equals the number of words from device B to host A. The CRC count equals the total number of CRC errors for both directions. Adding a monitor on port 1, specifying 0x010100 as SID and 0X050200 as the DID has a similar effect, except the RX and TX counts are interchanged.
To monitor traffic between one Initiator host and one target storage device connected to an Encryption Switch, you must add two monitors because of the manner in which the real initiators or targets transfer data to VIs and VTs. The first monitor would be added between the initiator SID and the virtual initiator DID, and the second monitor would be set up between virtual target SID and the target DID. Refer to the example section for details.
If ISL monitoring is enabled, end-to-end monitors cannot be added to E_Ports. Existing end-to-end monitors on E_Ports are deleted.
Identical monitors cannot be added to the same port. Two monitors are considered identical if they have the same SID and DID values after applying the end-to-end mask.
Execution of this command displays a monitor number, which can be used to manipulate performance monitors.
Notes This command requires an Advanced Performance Monitoring license.
This command is not supported on virtual FC ports (VE/VEX_Port), EX_Port, M (Mirror) ports and GbE ports.
The execution of this command is subject to Virtual Fabric or Admin Domain restrictions that may be in place. Refer to chapter 1, "Using Fabric OS commands" and Appendix A, "Command Availability" for details.
Operands This command has the following operands:
slot For bladed systems only, specifies the slot number of the port on which the monitor is to be added, followed by a slash (/).
port Specifies the number of the port on which the monitor is to be added, relative to its slot for bladed systems. Use switchShow for a list of valid ports.
Fabric OS Command Reference 55553-1001764-02

perfAddEEMonitor2
SourceID Specifies the 3-byte SID (Source ID) of the originator device. It should be in "0xDDAAPP" format, where DD is domain ID, AA is area ID and PP is AL_PA ID. For example, 0x050200 has a domain ID of 5, an area ID of 2, and an AL_PA ID of 0. SourceID and DestID both cannot be 0x000000.
DestID Specifies the 3-byte DID (destination ID) of the destination device. It should be in "0xDDAAPP" format, where DD is domain ID, AA is area ID and PP is AL_PA ID. For example, 0x050200 has a domain ID of 5, an area ID of 2, and an AL_PA ID of 0. SourceID and DestID both cannot be 0x000000.
Examples To add an end-to-end monitor to blade 1 port 2:
switch:admin> perfaddeemonitor 1/2 "0x050200" "0x1182ef"End-to-End monitor number 0 added.
To add an end-to-end monitor to an Encryption switch:
In this scenario, one target disk storage device connects to the Encryption switch, and an initiator device connects to a DCX backbone. The DCX is directly connected to the Encryption Switch. Two EE monitors are added on port 1 of the Encryption Switch, which is an F_Port that attaches to the target device.
1. Get the CryptoTarget container configuration. This command shows the PIDs for the target, the virtual target, the initiator, and the virtual initiator:
EncryptionSwitch:SecurityAdmin>cryptocfg --show -container -all -stat
Encryption group name: brcd
Number of Container(s): 1 Container name: st_target Type: disk EE node: 10:00:00:05:1e:53:b8:45 EE slot: 0 Target: 2f:ff:00:06:2b:0e:b3:3c 2f:ff:00:06:2b:0e:b3:3c Target PID: 0a0100 VT: 20:00:00:05:1e:53:b8:41 20:00:00:05:1e:53:b8:41 VT PID: 0a2001 Number of host(s): 1 Number of rekey session(s): 0 Host: 10:00:00:00:c9:52:00:7d 20:00:00:00:c9:52:00:7d Host PID: 01a000 VI: 20:01:00:05:1e:53:b8:41 20:02:00:05:1e:53:b8:41 VI PID: 0a2002 Number of LUN(s): 1 LUN number: 0x0 LUN type: disk LUN serial number: 600062B0000EB33C00000000000000000000000000000000 Encryption mode: encrypt Encryption format: native Encrypt existing data: disabled Rekey: disabled LUN state: Encryption enabled Encryption algorithm: AES256-XTS Key ID state: Read write Key ID: ba:26:50:3a:22:72:01:04:c9:57:ff:27:77:e3:8d:6d Key creation time: Tue May 20 08:32:25 2008 Operation Succeeded
556 Fabric OS Command Reference53-1001764-02

perfAddEEMonitor 2
2. Get name server information. Name server info shows four devices (two of which are virtual) connected to the Encryption Switch along with their PIDs:
EncryptionSwitch:SecurityAdmin>nsshow { Type Pid COS PortName NodeName TTL(sec) N 0a0100; 3;2f:ff:00:06:2b:0e:b3:3c;2f:ff:00:06:2b:0e:b3:3c; na FC4s: FCP PortSymb: [18] "SANBlaze V3.0 Port" Fabric Port Name: 20:01:00:05:1e:53:b8:45 Permanent Port Name: 2f:ff:00:06:2b:0e:b3:3c Port Index: 1 Share Area: No Device Shared in Other AD: No Redirect: Yes target Partial: NO
N 0a0900; 3;10:00:00:06:2b:12:66:33;20:00:00:06:2b:12:66:33; na FC4s: IPFC FCP PortSymb: [52] "LSI7404EP-LC A.1 L3-01071-01G FW:01.03.14 Port 1" Fabric Port Name: 20:09:00:05:1e:53:b8:45 Permanent Port Name: 10:00:00:06:2b:12:66:33 Port Index: 9 Share Area: No Device Shared in Other AD: No Redirect: No Partial: NO N 0a2001; 3;20:00:00:05:1e:53:b8:41;20:00:00:05:1e:53:b8:41; na FC4s: FCP PortSymb: [21] "Crypto Virtual Target" NodeSymb: [58] "Cntr Name:st_target Tgt Port wwn:2F:FF:00:06:2B:0E:B3:3C" Fabric Port Name: 20:20:00:05:1e:53:b8:45 Permanent Port Name: 20:00:00:05:1e:53:b8:41 Port Index: 32 Share Area: No Device Shared in Other AD: No Redirect: Yes virtual N 0a2002; 3;20:01:00:05:1e:53:b8:41;20:02:00:05:1e:53:b8:41; na FC4s: FCP PortSymb: [24] "Crypto Virtual Initiator" NodeSymb: [37] "Ini Port wwn: 10:00:00:00:C9:52:00:7D" Fabric Port Name: 20:20:00:05:1e:53:b8:45 Permanent Port Name: 20:01:00:05:1e:53:b8:41 Port Index: 32 Share Area: No Device Shared in Other AD: No Redirect: Yes virtual The Local Name Server has 4 entries }
The configuration is as follows:
Initiator ---> VT VI ---> Target
0x01a000 0x0a2001 0x0a2002 0x0a0100
3. Add an EE monitor on port 1 between the Initiator SID and the virtual initiator DID:
EncryptionSwitch:SecurityAdmin> perfaddeemonitor 1 0x0a0100 0x0a2002 End-to-End monitor number 0 added.
Fabric OS Command Reference 55753-1001764-02

perfAddEEMonitor2
4. Add another EE monitor on port 1 between the Virtual Target SID and the Target DID:
EncryptionSwitch:SecurityAdmin> perfaddeemonitor 1 0x0a2001 0x01a000 End-to-End monitor number 1 added.
5. Display the EE monitors on the Encryption Switch:
EncryptionSwitch:SecurityAdmin> perfmonitorshow --class EE 1 There are 2 end-to-end monitor(s) defined on port 1.
KEY SID DID OWNER_APP TX_COUNT RX_COUNT OWNER_IP_ADDR ---------------------------------------------------------------------- 0 0x0a0100 0x0a2002 TELNET 0x000000001d914e1c 0x000000002183f0da N/A 1 0x0a2001 0x01a000 TELNET 0x0000000002b5c076 0x0000000006c4fb04 N/A
See Also perfAddIPMonitor, perfAddReadMonitor, perfAddRWMonitor, perfAddSCSIMonitor,perfAddUserMonitor, perfAddWriteMonitor, perfDelEEMonitor, perfMonitorClear, perfMonitorShow
558 Fabric OS Command Reference53-1001764-02

perfAddIPMonitor 2
perfAddIPMonitor
Adds a filter-based performance monitor for IP frame count.
Synopsis perfaddipmonitor [slot/]port [alias]
Description Use this command to create a filter-based monitor that will count the number of IP traffic frames. Only frames transmitted are counted.
Execution of this command displays a numeric key that uniquely identifies the monitor. Use the perfMonitorShow command for a listing of valid keys and user-defined aliases.
Notes This command is being deprecated along with the commands listed below. Use the new fmConfig command instead.
• perfAddReadMonitor
• perfAddRWMonitor
• perfAddSCSIMonitor
• perfAddUserMonitor
• perfAddWriteMonitor
• perfDelFilterMonitor
• perfShowFilterMonitor
For the perfMonitorShow and perfMonitorClear commands, only the management of Filter Monitors is being deprecated (FLT class); these commands continue to be supported for managing classes other than Filter monitors. Management of filter-based monitors is provided through the new fmConfig interface.
While the legacy commands are still operational in the Fabric OS 6.4.0 release, their use is incompatible with the new fmConfig command. Once you use the new command to configure and manage filter-based monitors, you can no longer use the old commands. The legacy commands and options will be removed in Fabric OS v6.5.0.
This command requires an Advanced Performance Monitoring license.
This command is not supported on virtual FC ports (VE/VEX_Port), EX_Port, M (Mirror) ports and GbE ports.
The execution of this command is subject to Virtual Fabric or Admin Domain restrictions that may be in place. Refer to chapter 1, "Using Fabric OS commands" and Appendix A, "Command Availability" for details.
Operands This command has the following operands:
slot For bladed systems only, this operand specifies the slot number of the port on which the monitor is to be added, followed by a slash (/).
port Specifies the number of the port on which the monitor is to be added, relative to its slot for bladed systems. Use switchShow for a list of valid ports.
alias Specifies a name for this monitor. Names exceeding 10 characters are truncated. To include spaces, the string must be surrounded by double quotation marks. Spaces count toward the character limit but are removed. This operand is optional. The default alias is “IP Frame”.
Fabric OS Command Reference 55953-1001764-02

perfAddIPMonitor2
Examples To add an IP monitor to a port:
switch:admin> perfaddipmonitor 1/4 IP_MONITORIP traffic frame monitor #0 added
See Also perfAddEEMonitor, perfAddReadMonitor, perfAddRWMonitor, perfAddSCSIMonitor,perfAddUserMonitor, perfAddWriteMonitor
560 Fabric OS Command Reference53-1001764-02

perfAddReadMonitor 2
perfAddReadMonitor
Adds a filter-based performance monitor for the SCSI Read command.
Synopsis perfaddreadmonitor [slot/]port [alias]
Description Use this command to create a filter-based monitor that counts the number of SCSI FCP Read commands in Fibre Channel frames. Only frames transmitted are counted.
Execution of this command displays a numeric key that uniquely identifies the monitor. Use the perfMonitorShow command for a listing of valid keys and user-defined aliases.
Notes This command is being deprecated along with the commands listed below. Use the new fmConfig command instead.
• perfAddIPMonitor
• perfAddRWMonitor
• perfAddSCSIMonitor
• perfAddUserMonitor
• perfAddWriteMonitor
• perfDelFilterMonitor
• perfShowFilterMonitor
For the perfMonitorShow and perfMonitorClear commands, only the management of Filter Monitors is being deprecated (FLT class); these commands continue to be supported for managing classes other than Filter monitors. Management of filter-based monitors is provided through the new fmConfig interface.
While the legacy commands are still operational in the Fabric OS 6.4.0 release, their use is incompatible with the new fmConfig command. Once you use the new command to configure and manage filter-based monitors, you can no longer use the old commands. The legacy commands and options will be removed in Fabric OS v6.5.0.
This command requires an Advanced Performance Monitoring license.
This command is not supported on virtual FC ports (VE/VEX_Port), EX_Port, M (Mirror) ports and GbE ports.
The execution of this command is subject to Virtual Fabric or Admin Domain restrictions that may be in place. Refer to chapter 1, "Using Fabric OS commands" and Appendix A, "Command Availability" for details.
Operands This command has the following operands:
slot For bladed systems only, this operand specifies the slot number of the port on which the monitor is to be added, followed by a slash (/).
port Specifies the number of the port on which the monitor is to be added, relative to its slot for bladed systems. Use switchShow for a list of valid ports.
alias Specifies a name for this monitor. Strings exceeding 10 characters are truncated. To accommodate spaces, the string must be surrounded by quotation marks. Spaces count toward the character limit but are removed. This operand is optional. The default alias is “SCSI Read”.
Fabric OS Command Reference 56153-1001764-02

perfAddReadMonitor2
Examples To add an SCSI read monitor to a port:
switch:admin> perfaddreadmonitor 2/4 SCSI_RSCSI Read filter monitor #2 added
See Also perfAddEEMonitor, perfAddIPMonitor, perfAddRWMonitor, perfAddSCSIMonitor,perfAddUserMonitor, perfAddWriteMonitor
562 Fabric OS Command Reference53-1001764-02

perfAddRWMonitor 2
perfAddRWMonitor
Adds a filter-based performance monitor for the SCSI read and write commands.
Synopsis perfaddrwmonitor [slot/]port [alias]
Description Use this command to create a filter-based monitor that counts the number of SCSI FCP Read and Write commands in Fibre Channel frames. Only frames transmitted are counted.
Execution of this command displays a numeric key that uniquely identifies the monitor. Use the perfMonitorShow command for a listing of valid keys and user-defined aliases.
Notes This command is being deprecated along with the commands listed below. Use the new fmConfig command instead.
• perfAddIPMonitor
• perfAddReadMonitor
• perfAddSCSIMonitor
• perfAddUserMonitor
• perfAddWriteMonitor
• perfDelFilterMonitor
• perfShowFilterMonitor
For the perfMonitorShow and perfMonitorClear commands, only the management of Filter Monitors is being deprecated (FLT class); these commands continue to be supported for managing classes other than Filter monitors. Management of filter-based monitors is provided through the new fmConfig interface.
While the legacy commands are still operational in the Fabric OS 6.4.0 release, their use is incompatible with the new fmConfig command. Once you use the new command to configure and manage filter-based monitors, you can no longer use the old commands. The legacy commands and options will be removed in Fabric OS v6.5.0.
This command requires an Advanced Performance Monitoring license.
This command is not supported on virtual FC ports (VE/VEX_Port), EX_Port, M (Mirror) ports and GbE ports.
The execution of this command is subject to Virtual Fabric or Admin Domain restrictions that may be in place. Refer to chapter 1, "Using Fabric OS commands" and Appendix A, "Command Availability" for details.
Operands This command has the following operands:
slot For bladed systems only, specifies the slot number of the port on which the monitor is to be added, followed by a slash (/).
port Specifies the number of the port on which the monitor is to be added, relative to its slot for bladed systems. Use switchShow for a list of valid ports.
alias Specifies a name for this monitor. Strings exceeding 10 characters are truncated. To accommodate spaces, the string must be surrounded by quotation marks. Spaces count toward the character limit but are removed. This operand is optional. The default alias is “SCSI R/W”.
Fabric OS Command Reference 56353-1001764-02

perfAddRWMonitor2
Examples To add an SCSI read and write monitor to a port:
switch:admin> perfaddrwmonitor 2/4 SCSI_RWSCSI Read/Write filter monitor #4 added
See Also perfAddEEMonitor, perfAddIPMonitor, perfAddReadMonitor, perfAddSCSIMonitor,perfAddUserMonitor, perfAddWriteMonitor
564 Fabric OS Command Reference53-1001764-02

perfAddSCSIMonitor 2
perfAddSCSIMonitor
Adds a filter-based performance monitor for SCSI frame count.
Synopsis perfaddscsimonitor [slot/]port [alias]
Description Use this command to create a filter-based monitor that counts the number of SCSI traffic frames. Only frames transmitted are counted.
Execution of this command displays a numeric key that uniquely identifies the monitor. Use the perfMonitorShow command for a listing of valid keys and user-defined aliases.
Notes This command is being deprecated along with the commands listed below. Use the new fmConfig command instead.
• perfAddIPMonitor
• perfAddReadMonitor
• perfAddRWMonitor
• perfAddUserMonitor
• perfAddWriteMonitor
• perfDelFilterMonitor
• perfShowFilterMonitor
For the perfMonitorShow and perfMonitorClear commands, only the management of Filter Monitors is being deprecated (FLT class); these commands continue to be supported for managing classes other than Filter monitors. Management of filter-based monitors is provided through the new fmConfig interface.
While the legacy commands are still operational in the Fabric OS 6.4.0 release, their use is incompatible with the new fmConfig command. Once you use the new command to configure and manage filter-based monitors, you can no longer use the old commands. The legacy commands and options will be removed in Fabric OS v6.5.0.
This command requires an Advanced Performance Monitoring license.
This command is not supported on virtual FC ports (VE/VEX_Port), EX_Port, M (Mirror) ports and GbE ports.
The execution of this command is subject to Virtual Fabric or Admin Domain restrictions that may be in place. Refer to chapter 1, "Using Fabric OS commands" and Appendix A, "Command Availability" for details.
Operands This command has the following operands:
slot For bladed systems only, specifies the slot number of the port on which the monitor is to be added, followed by a slash (/).
port Specifies the number of the port on which the monitor is to be added, relative to its slot for bladed systems. Use switchShow for a list of valid ports.
alias Specifies a name for this monitor. Strings exceeding 10 characters are truncated. To accommodate spaces, the string must be surrounded by quotation marks. Spaces count toward the character limit but are removed. This operand is optional. The default alias is “SCSI Frame”.
Fabric OS Command Reference 56553-1001764-02

perfAddSCSIMonitor2
Examples To add a SCSI traffic frame monitor to a port:
switch:admin> perfaddscsimonitor 2/4 “SCSI FR”SCSI traffic frame monitor #0 added
See Also perfAddEEMonitor, perfAddIPMonitor, perfAddReadMonitor, perfAddRWMonitor,perfAddUserMonitor, perfAddWriteMonitor
566 Fabric OS Command Reference53-1001764-02

perfAddUserMonitor 2
perfAddUserMonitor
Adds a user-defined filter-based performance monitor.
Synopsis perfaddusermonitor [slot/]port "grouplist" [alias]
Description Use this command to define a custom filter for frame offsets and values.
For every offset, each group of comparison values is evaluated using the Boolean OR operator to determine a match. If there are multiple offsets, each resulting OR function is evaluated using the AND operator to determine if the entire statement is true, thereby incrementing the counter.
Execution of this command displays a numeric key that uniquely identifies the monitor. Use the perfMonitorShow command for a listing of valid keys and user-defined aliases.
Notes This command is being deprecated along with the commands listed below. Use the new fmConfig command instead.
• perfAddIPMonitor
• perfAddReadMonitor
• perfAddRWMonitor
• perfAddSCSIMonitor
• perfAddWriteMonitor
• perfDelFilterMonitor
• perfShowFilterMonitor
For the perfMonitorShow and perfMonitorClear commands, only the management of Filter Monitors is being deprecated (FLT class); these commands continue to be supported for managing classes other than Filter monitors. Management of filter-based monitors is provided through the new fmConfig interface.
While the legacy commands are still operational in the Fabric OS 6.4.0 release, their use is incompatible with the new fmConfig command. Once you use the new command to configure and manage filter-based monitors, you can no longer use the old commands. The legacy commands and options will be removed in Fabric OS v6.5.0
This command requires an Advanced Performance Monitoring license.
This command is not supported on virtual FC ports (VE/VEX_Port), EX_Port, M (Mirror) ports and GbE ports.
The execution of this command is subject to Virtual Fabric or Admin Domain restrictions that may be in place. Refer to chapter 1, "Using Fabric OS commands" and Appendix A, "Command Availability" for details.
Operands This command has the following operands:
slot For bladed systems only, this operand specifies the slot number of the port on which the monitor is to be added, followed by a slash (/).
port Specifies the number of the port on which the monitor is to be added, relative to its slot for bladed systems. Use switchShow for a list of valid ports.
Fabric OS Command Reference 56753-1001764-02

perfAddUserMonitor2
"grouplist" Specifies up to six sets of offset, mask, and ValueList, separated by semicolons (;). The entire grouplist operand must be enclosed in quotation marks. For example: "4, 0xff, 0x22; 12, 0xff, 0x01"
The grouplist component values are as follows:
Offset Specifies the offset within the frame. Offset 0 is the first byte of the SOF, and offset 4 is the first byte of the frame header. The offset must be in decimal format. Valid values for offset are 0, [4-63]. Offset 0 is a special case that can be used to monitor the first four bytes SOFx frames. EOF cannot be monitored.
Mask Specifies the mask value to be applied (with the AND operator) to frame contents.
ValueList Specifies up to four values that need to be captured from frame contents. The ValueList can be either hexadecimal or decimal format.
SOFx frames are considered a special case. The Offset is specified as 0x0; valueList values are specified with:
0 SOFf
1 SOFc1
2 SOFi1
3 SOFn1
4 SOFi2
5 SOFn2
6 SOFi3
7 SOFn3
alias Specifies a name for the monitor. Strings exceeding 10 characters are truncated. To accommodate spaces, the string must be surrounded by quotation marks. Spaces count toward the character limit but are removed. This operand is optional. By default, the alias is an empty string.
Examples To add a filter-based monitor for all Extended Link Service requests (R_CTL=0x22 and TYPE=0x01) to a port:
switch:admin> perfaddusermonitor 1/4 "4, 0xff, 0x22; 12, 0xff, 0x01"User monitor #0 added
As a special case, to add a filter-based monitor for SOFi3 to a port:
switch:admin> perfaddusermonitor 1/4 "0, 0xff, 6"User monitor #1 added
See Also perfAddEEMonitor, perfAddIPMonitor, perfAddReadMonitor, perfAddRWMonitor,perfAddSCSIMonitor, perfAddWriteMonitor
568 Fabric OS Command Reference53-1001764-02

perfAddWriteMonitor 2
perfAddWriteMonitor
Adds a filter-based performance monitor for the SCSI write command.
Synopsis perfaddwritemonitor [slot/]port [alias]
Description Use this command to create a filter-based monitor that counts the number of SCSI FCP write commands in Fibre Channel frames. Only frames transmitted are counted.
Execution of this command displays a numeric key that uniquely identifies the monitor. Use the perfMonitorShow command for a listing of valid keys and user-defined aliases.
Notes This command is being deprecated along with the commands listed below. Use the new fmConfig command instead.
• perfAddIPMonitor
• perfAddReadMonitor
• perfAddRWMonitor
• perfAddSCSIMonitor
• perfAddUserMonitor
• perfDelFilterMonitor
• perfShowFilterMonitor
For the perfMonitorShow and perfMonitorClear commands, only the management of Filter Monitors is being deprecated (FLT class); these commands continue to be supported for managing classes other than Filter monitors. Management of filter-based monitors is provided through the new fmConfig interface.
While the legacy commands are still operational in the Fabric OS 6.4.0 release, their use is incompatible with the new fmConfig command. Once you use the new command to configure and manage filter-based monitors, you can no longer use the old commands. The legacy commands and options will be removed in Fabric OS v6.5.0.
This command requires an Advanced Performance Monitoring license.
This command is not supported on virtual FC ports (VE/VEX_Port), EX_Port, M (Mirror) ports and GbE ports.
The execution of this command is subject to Virtual Fabric or Admin Domain restrictions that may be in place. Refer to chapter 1, "Using Fabric OS commands" and Appendix A, "Command Availability" for details.
Operands This command has the following operands:
slot For bladed systems only, specifies the slot number of the port on which the monitor is to be added, followed by a slash (/).
port Specifies the number of the port on which the monitor is to be added, relative to its slot for bladed systems. Use switchShow for a list of valid ports.
alias Specifies a name for this monitor. Strings exceeding 10 characters are truncated. To accommodate spaces, the string must be surrounded by quotation marks. Spaces count toward the character limit but are removed. This operand is optional. The default alias is “SCSI_Write”.
Fabric OS Command Reference 56953-1001764-02

perfAddWriteMonitor2
Examples To add an SCSI Write command monitor to a port:
switch:admin> perfaddwritemonitor 2/4 SCSI_WSCSI Write filter monitor #0 added
See Also perfAddEEMonitor, perfAddIPMonitor, perfAddReadMonitor, perfAddRWMonitor,perfAddSCSIMonitor, perfAddUserMonitor
570 Fabric OS Command Reference53-1001764-02

perfCfgClear 2
perfCfgClear
Clears the previously saved performance monitoring configuration settings from nonvolatile memory.
Synopsis perfcfgclear
Description Use this command to clear the previously saved end-to-end and filter configuration settings of performance monitoring from nonvolatile memory.
Notes This command requires an Advanced Performance Monitoring license.
This command is not supported on virtual FC ports (VE/VEX_Port), EX_Port, M (Mirror) ports and GbE ports.
The execution of this command is subject to Virtual Fabric or Admin Domain restrictions that may be in place. Refer to chapter 1, "Using Fabric OS commands" and Appendix A, "Command Availability" for details.
Operands none
Examples To clear the performance monitoring information from nonvolatile memory:
switch:admin> perfcfgclearThis will clear Performance Monitoring settings in FLASH.The RAM settings won't change. Do you want to continue? (yes, y, no, n): [no] yPlease wait ...Performance Monitoring configuration cleared from FLASH.
See Also perfCfgRestore, perfCfgSave
Fabric OS Command Reference 57153-1001764-02

perfCfgRestore2
perfCfgRestore
Restores performance monitoring configuration settings from nonvolatile memory.
Synopsis perfcfgrestore
Description Use this command to restore the performance monitoring configuration information from nonvolatile memory. This does not restore the information cleared by the perfCfgClear command; rather, it restores the configuration from nonvolatile memory. The perfCfgRestore command overwrites any configuration changes that were not saved.
Notes This command requires an Advanced Performance Monitoring license.
This command is not supported on virtual FC ports (VE/VEX_Port), EX_Port, M (Mirror) ports and GbE ports.
The execution of this command is subject to Virtual Fabric or Admin Domain restrictions that may be in place. Refer to chapter 1, "Using Fabric OS commands" and Appendix A, "Command Availability" for details.
Operands none
Examples To restore the performance monitoring configuration information from nonvolatile memory:
switch:admin> perfcfgrestoreThis will overwrite current Performance Monitoring settingsin RAM. Do you want to continue? (yes, y, no, n): [no] yPlease wait ...Performance monitoring configuration restored from FLASH.
See Also perfCfgClear, perfCfgSave
572 Fabric OS Command Reference53-1001764-02

perfCfgSave 2
perfCfgSave
Saves performance monitoring configuration settings to nonvolatile memory.
Synopsis perfcfgsave
Description Use this command to save the current Performance Monitor configuration for end-to-end (EE) and filter configuration settings of performance monitoring into nonvolatile memory. Configurations are saved persistently across power cycles.
The number of monitors that can be saved to flash memory is limited as follows:
• 16 EE monitors
• 16 filter monitors
• A total number of 512 monitors per switch
When there are more than 512 monitors in the system, monitors are saved to the flash in the following order:
1. For each port (from 0 to MAX_PORT), the EE monitors in each port are saved to the flash first.
2. Filter monitors for each port are saved next.
When the total monitors per port or switch exceeds the limit, the following message is displayed: “Performance monitor count has exceeded limit. some monitors have been discarded.”
Notes This command requires an Advanced Performance Monitoring license.
This command is not supported on virtual FC ports (VE/VEX_Port), EX_Port, M (Mirror) ports and GbE ports.
Monitors created by Web Tools are not saved in persistent memory.
The execution of this command is subject to Virtual Fabric or Admin Domain restrictions that may be in place. Refer to chapter 1, "Using Fabric OS commands" and Appendix A, "Command Availability" for details.
Operands none
Examples To save the current performance monitoring configuration to firmware:
switch:admin> perfcfgsaveThis will overwrite previously saved Performance Monitoringsettings in FLASH. Do you want to continue? (yes, y, no, n): [no] yPlease wait ...Performance monitoring configuration saved in FLASH.
See Also perfCfgClear, perfCfgRestore
Fabric OS Command Reference 57353-1001764-02

perfClearAlpaCrc2
perfClearAlpaCrc
Clears the CRC error count associated with a port and arbitrated loop physical address (AL_PA).
Synopsis perfclearalpacrc [slot/]port [ALPA]
Description Use this command to clear a specific cyclic redundancy check (CRC) error counter associated with a specific port and AL_PA, or all such counters on a port.
Notes This command requires an Advanced Performance Monitoring license.
This command is not supported on virtual FC ports (VE/VEX_Port), EX_Port, M (Mirror) ports and GbE ports.
The execution of this command is subject to Virtual Fabric or Admin Domain restrictions that may be in place. Refer to chapter 1, "Using Fabric OS commands" and Appendix A, "Command Availability" for details.
This command is not supported on all platforms. Refer to the Fabric OS Administrator's Guide for specific hardware support.
Operands This command has the following operands:
slot For bladed systems only, specifies the slot number of the port on which the monitor is to be added, followed by a slash (/).
port Specifies the number of the port on which the monitor is to be added, relative to its slot for bladed systems. Use switchShow for a list of valid ports.
ALPA Specifies the AL_PA address to clear the CRC error counter for a particular device. This operand is optional; if ALPA is not specified, this command clears the counters for all devices attached to the specified port.
Examples To clear the CRC count on a particular AL_PA on a port and then clear the CRC count for all AL_PAs on a port:
switch:admin> perfclearalpacrc 2/15 0x59CRC error count at ALPA 0x59 on port 31 is cleared.
switch:admin> perfclearalpacrc 2/15This will clear all ALPA CRC Counts on port 31Do you want to continue? (yes, y, no, n) yPlease wait ...All alpa CRC counts are cleared on port 31.
See Also perfShowAlpaCrc
574 Fabric OS Command Reference53-1001764-02

perfDelEEMonitor 2
perfDelEEMonitor
Deletes one or all end-to-end performance monitors from a port.
Synopsis perfdeleemonitor [slot/]port [monitorId]
Description Use this command to delete an end-to-end performance monitor from a port, or all such monitors associated with a port.
Notes This command requires an Advanced Performance Monitoring license.
This command is not supported on virtual FC ports (VE/VEX_Port), EX_Port, M (Mirror) ports and GbE ports.
The execution of this command is subject to Virtual Fabric or Admin Domain restrictions that may be in place. Refer to chapter 1, "Using Fabric OS commands" and Appendix A, "Command Availability" for details.
Operands This command has the following operands:
slot For bladed systems only, specifies the slot number of the port on which to delete the monitor, followed by a slash (/).
port Specifies the number of the port on which the monitor is to be deleted, relative to its slot for bladed systems. Use switchShow for a list of valid ports.
monitorId Specifies the numeric key of the monitor to be deleted. The key is defined when a monitor is created. Use perfMonitorShow to determine the monitor key. This operand is optional. If no operand is specified, this command deletes all end-to-end monitors associated with the port.
Examples To delete an end-to-end monitor on a port, or all such monitors:
switch:admin> perfdeleemonitor 7/2 5End-to-End monitor number 5 deleted
switch:admin> perfdeleemonitor 7/2This will remove ALL EE monitors on port 2, continue? (yes, y, no, n): [no] y
See Also perfAddEEMonitor, perfMonitorShow
Fabric OS Command Reference 57553-1001764-02
perfDelFilterMonitor2
perfDelFilterMonitor
Deletes one or all filter-based performance monitors from a port.
Synopsis perfdelfiltermonitor [slot/]port [monitorid]
Description Use this command to delete a filter-based performance monitor from a port, or all such monitors associated with a port.
Notes This command is being deprecated along with the commands listed below. Use the new fmConfig command instead.
• perfAddIPMonitor
• perfAddReadMonitor
• perfAddRWMonitor
• perfAddSCSIMonitor
• perfAddUserMonitor
• perfAddWriteMonitor
• perfShowFilterMonitor
For the perfMonitorShow and perfMonitorClear commands, only the management of Filter Monitors is being deprecated (FLT class); these commands continue to be supported for managing classes other than Filter monitors. Management of filter-based monitors is provided through the new fmConfig interface.
While the legacy commands are still operational in the Fabric OS 6.4.0 release, their use is incompatible with the new fmConfig command. Once you use the new command to configure and manage filter-based monitors, you can no longer use the old commands. The legacy commands and options will be removed in Fabric OS v6.5.0.
This command requires an Advanced Performance Monitoring license.
This command is not supported on virtual FC ports (VE/VEX_Port), EX_Port, M (Mirror) ports and GbE ports.
The execution of this command is subject to Virtual Fabric or Admin Domain restrictions that may be in place. Refer to chapter 1, "Using Fabric OS commands" and Appendix A, "Command Availability" for details.
Operands This command has the following operands:
slot For bladed systems only, specifies the slot number of the port on which the monitor is to be deleted, followed by a slash (/).
port Specifies the number of the port on which the monitor is to be deleted, relative to its slot for bladed systems. Use switchShow for a list of valid ports.
monitorid Specifies the numeric key of the monitor to be deleted. The key is defined when a monitor is created and can be displayed with the perfMonitorShow command. This operand is optional. If omitted, this command deletes all filter-based performance monitors associated with the port.
576 Fabric OS Command Reference53-1001764-02

perfDelFilterMonitor 2
Examples To delete filter monitor 4 from a port, and then all filter monitors from the port:
switch:admin> perfdelfiltermonitor 2/3 4The specified filter-based monitor is deleted.switch:admin> perfdelfiltermonitor 2/3This will remove ALL monitors on port 19, continue? (yes, y, no, n): [no] y
See Also perfAddUserMonitor, perfMonitorShow
Fabric OS Command Reference 57753-1001764-02

perfHelp2
perfHelp
Displays performance monitoring help information.
Synopsis perfhelp
Description Use this command to display the help commands available for performance monitoring.
Note The execution of this command is subject to Virtual Fabric or Admin Domain restrictions that may be in place. Refer to chapter 1, "Using Fabric OS commands" and Appendix A, "Command Availability" for details.
Operands none
Examples To display commands related to performance monitoring:
switch:admin> perfhelpfmConfig Manage frame monitor configurationperfAddEEMonitor Add end-to-end monitorperfAddIPMonitor Add monitor for IP traffic frame count (Will be deprecated in Fabric OS v6.5.0; use fmConfig)perfAddReadMonitor Add filter-based monitor - SCSI Read (Will be deprecated in Fabric OS v6.5.0; use fmConfig)perfAddRWMonitor Add monitor - SCSI Read and Write (Will be deprecated in Fabric OS v6.5.0; use fmConfig)perfAddSCSIMonitor Add monitor for SCSI frame count (Will be deprecated in Fabric OS v6.5.0; use fmConfig)perfAddUserMonitor Add filter-based monitor (Will be deprecated in Fabric OS v6.5.0; use fmConfig)perfAddWriteMonitor Add filter-based monitor - SCSI Write (Will be deprecated in Fabric OS v6.5.0; use fmConfig)perfCfgClear Clear Performance settings from FLASHperfCfgRestore Restore Performance configuration from
FLASHperfCfgSave Save Performance configuration to FLASHperfDelEEMonitor Delete an end-to-end monitorperfDelFilterMonitor Delete filter-based monitor (Will be deprecated in Fabric OS v6.5.0; use fmConfig)perfMonitorClear Clear end-to-end/filter-based/ISL monitors (Management of the filter-based class will be deprecated in Fabric OS v6.5.0; use fmConfig)perfMonitorShow Show end-to-end/filter-based/ISL monitors (Management of filter-based class will be deprecated in Fabric OS v6.5.0; use fmConfig)perfSetPortEEMask Set overall mask for end-to-end monitorsperfShowAlpaCrc Get ALPA CRC count by port and ALPA
578 Fabric OS Command Reference53-1001764-02

perfHelp 2
perfShowPortEEMask Show the current end-to-end maskperfTTmon Install Top Talker monitorperfResourceShow Display performance monitor resources for a logical switch.
See Also none
Fabric OS Command Reference 57953-1001764-02

perfMonitorClear2
perfMonitorClear
Clears counters of end-to-end, filter-based, and ISL performance monitors on a port.
Synopsis perfmonitorclear --class monitor_class [slot/]port [monitorId]
Description Use this command to clear counters for performance monitors on a port, specified by class. Monitor classes include end-to-end monitors (EE), filter-based monitors (FLT), and interswitch link monitors (ISL).
Issuing the portStatsClear command on a port clears all end-to-end and filter-based monitors (but not ISL monitors) for all the ports in the same quad.
Notes The management of Filter Monitors (--class FLT) with this command is being deprecated along with all other filter-based performance monitoring commands. Management of filter-based monitors is provided through the new Frame Monitor management interface (fmConfig). While the legacy commands are still operational in the Fabric OS 6.4.0 release, their use is incompatible with the new interface. Once you use fmConfig to configure and manage filter-based monitors, you can no longer use the old commands. The legacy commands and options will be removed in Fabric OS v6.5.0.
This command requires an Advanced Performance Monitoring license.
This command is not supported on virtual FC ports (VE/VEX_Port), EX_Port, M (Mirror) ports and GbE ports.
The execution of this command is subject to Virtual Fabric or Admin Domain restrictions that may be in place. Refer to chapter 1, "Using Fabric OS commands" and Appendix A, "Command Availability" for details.
Operands This operands are as follows:
--class monitor_class
Specifies the monitor class as one of the following: EE (end-to-end), FLT (filter-based=deprecated), or ISL (interswitch link). These values are case-sensitive. This operand is required.
slot For bladed systems only, specifies the slot number of the port on which the monitor counter is to be cleared, followed by a slash (/).
port Specifies the number of the port on which the monitor counter is to be cleared, relative to its slot for bladed systems. Use switchShow for a list of valid ports.
monitorId Specifies the numeric key of the monitor to be deleted. The key is defined when a monitor is created and can be displayed with the perfMonitorShow command. This operand is optional. If no operand is specified, this command clears all monitor counters of the specified monitor_class on the port. This operand does not apply to ISL monitors.
Examples To clear statistics counters for an end-to-end monitor:
switch:admin> perfmonitorclear --class EE 1/2 5End-to-End monitor number 5 counters are cleared
580 Fabric OS Command Reference53-1001764-02
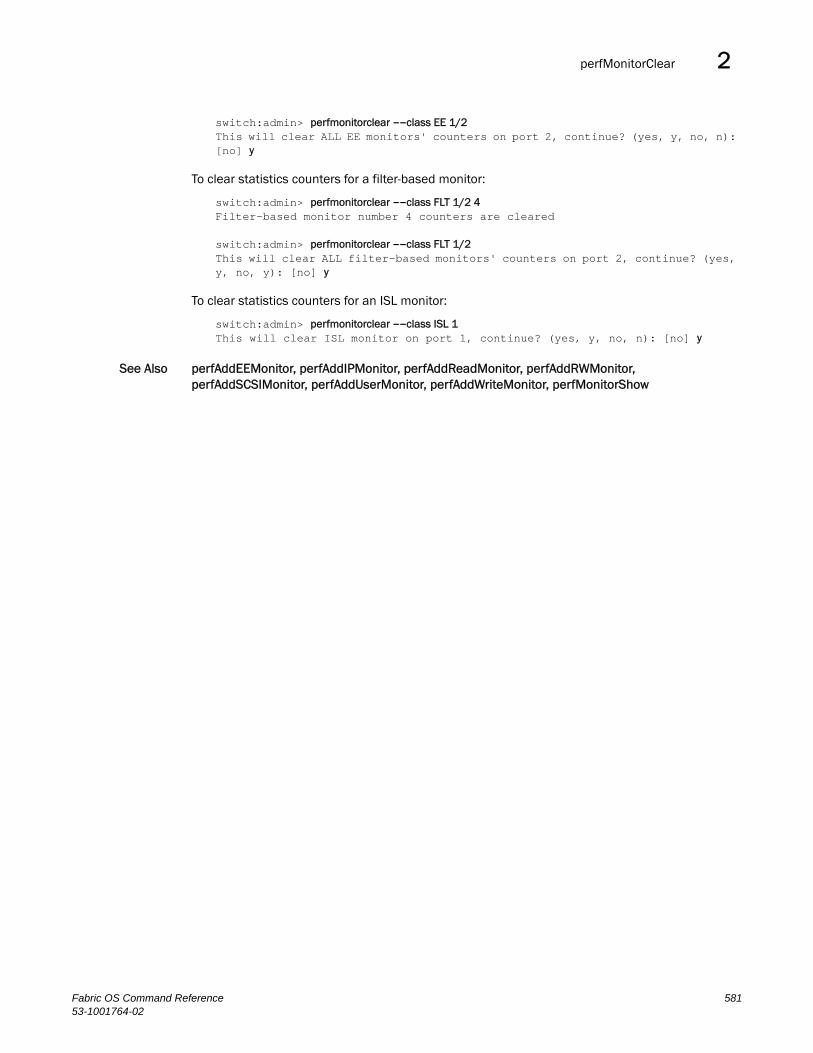
perfMonitorClear 2
switch:admin> perfmonitorclear --class EE 1/2This will clear ALL EE monitors' counters on port 2, continue? (yes, y, no, n): [no] y
To clear statistics counters for a filter-based monitor:
switch:admin> perfmonitorclear --class FLT 1/2 4Filter-based monitor number 4 counters are cleared
switch:admin> perfmonitorclear --class FLT 1/2This will clear ALL filter-based monitors' counters on port 2, continue? (yes, y, no, y): [no] y
To clear statistics counters for an ISL monitor:
switch:admin> perfmonitorclear --class ISL 1This will clear ISL monitor on port 1, continue? (yes, y, no, n): [no] y
See Also perfAddEEMonitor, perfAddIPMonitor, perfAddReadMonitor, perfAddRWMonitor,perfAddSCSIMonitor, perfAddUserMonitor, perfAddWriteMonitor, perfMonitorShow
Fabric OS Command Reference 58153-1001764-02
perfMonitorShow2
perfMonitorShow
Displays end-to-end, filter-based, and interswitch Link performance monitors on a port.
Synopsis perfmonitorshow --class monitor_class [slot/]port [interval]
Description Use this command to display performance monitors on a port. Monitor classes include end-to-end monitors (EE), filter-based monitors (FLT), and interswitch link monitors (ISL).
ISL monitors are automatically activated on E_Ports (not including trunk slaves). End-to-end monitors are created using perfAddEEMonitor. Filter-based monitors are created using perfAddIPMonitor, perfAddReadMonitor, perfAddRWMonitor, perfAddSCSIMonitor, perfAddUserMonitor, or perfAddWriteMonitor.
This command displays the following information:
• IF interval is specified, the command displays a snapshot of the traffic at the specified interval.
• For end-to-end monitors, the command displays the following (if no interval operand is specified):
Key The monitor number.
SID The source Port ID.
DID The destination Port ID.
Owner_app The owner application: TELNET, WEB_TOOLS, or API.
Tx_count The number of FC words transmitted.
Rx_count The number of FC words received.
Owner_ip_addr The IP address of the originator that created the EE monitor. Displays the IPv6 address if applications pass the IP address while adding the monitor. If the monitor is added using performance monitor commands, this field displays N/A.
• For filter-based monitors (if no interval is specified), this command displays the following:
Key The monitor number.
Alias The monitor alias name.
Owner_app The owner application: TELNET, WEB_TOOLS, or API.
Frame_count The cumulative 64-bit frame count.
Owner_ip_addr The IP address of the originator that created the filter monitor. Displays the IPv6 address if applications pass the IP address while adding the monitor. If the monitor is added using performance monitor commands, this field displays N/A.
• For ISL monitors (if no interval is specified), this command displays the following:
Tx_count The 64-bit cumulative ISL transmit count for the whole ISL.
Num_ports The number of ports in this ISL (one for a standalone ISL, more for trunks).
Num_domains The total number of domains being monitored.
Domain_count The 64-bit cumulative transmit counter for each individual domain.
582 Fabric OS Command Reference53-1001764-02

perfMonitorShow 2
Notes The management of Filter Monitors (--class FLT) with this command is being deprecated along with all other filter-based performance monitoring commands. Management of filter-based monitors is provided through the new Frame Monitor management interface (fmConfig). While the legacy commands are still operational in the Fabric OS 6.4.0 release, their use is incompatible with the new interface. Once you use fmConfig to configure and manage filter-based monitors, you can no longer use the old commands. The legacy commands and options will be removed in Fabric OS v6.5.0.
This command requires an Advanced Performance Monitoring license.
This command is not supported on virtual FC ports (VE/VEX_Port), EX_Port, M (Mirror) ports and GbE ports.
The execution of this command is subject to Virtual Fabric or Admin Domain restrictions that may be in place. Refer to chapter 1, "Using Fabric OS commands" and Appendix A, "Command Availability" for details.
Operands This command has the following operands:
--class monitor_class
Specifies the monitor class as one of the following: EE (end-to-end), FLT (filter-based=deprecated), or ISL (interswitch link). These values are case-sensitive.
slot For bladed systems only, specifies the slot number of the port on which to display the monitor, followed by a slash (/).
port Specifies the number of the port on which to display the monitor, relative to its slot for bladed systems. Use switchShow for a listing of valid ports.
interval The interval value must be greater than or equal to 5, and it must be a multiple of 5. In the case of end-to-end monitor, Tx and Rx counts are displayed in the unit of byte when this operand is specified. This operand is optional; if the operand is not specified, this command displays cumulative counts.
Examples To display filter monitors on port 8:
switch:admin> perfmonitorshow --class FLT 8There are 2 filter-based monitors defined on port 8.
KEY ALIAS OWNER_APP FRAME_COUNT OWNER_IP_ADDR -------------------------------------------------------- 0 IPFrame TELNET 0x0000000000000000 N/A 1 SCSIRead TELNET 0x0000000000000000 N/A
To display EE monitors on port 8
switch:admin> perfmonitorshow --class EE 2/8There are 8 end-to-end monitor(s) defined on port 8.
KEY SID DID OWNER_APP TX_COUNT RX_COUNT OWNER_IP_ADDR ----------------------------------------------------------------------- 0 0xfffff1 0x000001 TELNET 0x0000000000000000 0x0000000000000000 N/A 1 0xfffff2 0x000002 TELNET 0x0000000000000000 0x0000000000000000 N/A 2 0xfffff3 0x000003 TELNET 0x0000000000000000 0x0000000000000000 N/A 3 0xfffff4 0x000004 TELNET 0x0000000000000000 0x0000000000000000 N/A 4 0xfffff5 0x000005 TELNET 0x0000000000000000 0x0000000000000000 N/A 5 0xfffff6 0x000006 TELNET 0x0000000000000000 0x0000000000000000 N/A
Fabric OS Command Reference 58353-1001764-02

perfMonitorShow2
6 0xfffff7 0x000007 TELNET 0x0000000000000000 0x0000000000000000 N/A 7 0xfffff8 0x000008 TELNET 0x0000000000000000 0x0000000000000000 N/A 0 0x000000 0x1182ef TELNET 0x0000000000000000 0x0000000000000000 N/A
To display end-to-end monitors on a port at an interval of every 5 seconds:
switch:admin> perfmonitorshow --class EE 8 5
Showing EE monitors 8, 5: Tx/Rx are # of bytes
0 1 2 3 4 5 6 7 ----- ----- ----- ----- ----- ----- ----- ----- Tx Rx Tx Rx Tx Rx Tx Rx Tx Rx Tx Rx Tx Rx Tx Rx ===== ===== ===== ===== ===== ===== ===== ===== 0 0 0 0 0 0 0 0 0 0 0 0 0 0 0 0 0 0 0 0 0 0 0 0 0 0 0 0 0 0 0 0
To display cumulative filter monitor information on a port:
switch:admin> perfmonitorshow --class FLT 8
There are 2 filter-based monitors defined on port 8.
KEY ALIAS OWNER_APP FRAME_COUNT OWNER_IP_ADDR --------------------------------------------------------- 0 IPFrame TELNET 0x0000000000000000 N/A 1 SCSIRead TELNET 0x0000000000000000 N/A
To display filter-based monitors on a port at an interval of every 6 seconds:
switch:admin> perfmonitorshow --class FLT 2/5 6Showing filter monitors 2/5, 6 0 1 2 3 4 5 6 #Frames #Frames #Frames #Frames #Frames #Frames #Frames --------------------------------------------------------------- 0 0 0 0 0 0 0 26k 187 681 682 682 494 187 26k 177 711 710 710 534 176 26k 184 734 734 734 550 184 26k 182 649 649 649 467 182 26k 188 754 755 755 567 184 26k 183 716 716 717 534 183 26k 167 657 656 655 488 167 26k 179 749 749 749 570 179 26k 164 752 752 752 588 164 26k 190 700 700 700 510 190 26k 181 701 701 701 520 181 26k 200 750 750 751 550 201 26k 180 692 692 691 512 179 26k 179 696 696 696 517 179 26k 187 720 720 720 533 187 26k 200 722 722 722 522 200 26k 204 717 717 717 513 204
584 Fabric OS Command Reference53-1001764-02

perfMonitorShow 2
To display ISL monitor information on a port:
switch:admin> perfmonitorshow --class ISL 1/1 Total transmit count for this ISL: 1462326 Number of destination domains monitored: 3 Number of ports in this ISL: 2 Domain 97: 110379 Domain 98: 13965 Domain 99: 1337982
See Also perfMonitorClear, perfAddEEMonitor, perfAddIPMonitor, perfAddRWMonitor,perfAddReadMonitor, perfAddSCSIMonitor, perfAddUserMonitor,perfAddWriteMonitor
Fabric OS Command Reference 58553-1001764-02

perfResourceShow2
perfResourceShow
Displays performance monitor resources for a logical switch.
Synopsis perfresourceshow --fportRes [[slot]/port]
perfResourceShow --eeRes [[slot]/port]
perfResourceShow --fabmodeRes
perfResourceShow --installed [[slot]/port]
perfResourceShow --help
Description Use this command to determine the physical resources available to support the installation of performance monitors on a logical switch port.
In a Virtual Fabric environment, performance monitors installed on a logical switch share the physical resources of the switches that make up the base fabric. To make efficient usage of existing system resources, such as link table size for all supported monitors, the resources reserved for a given logical switch are allocated when the first monitor is installed on a port belonging to that logical switch. The resources are de-allocated when the last monitor installed on a given partition is removed.
This command displays the resource availability for the current logical switch context. The display includes the maximum of supported monitors, the number of monitors currently installed, and the remaining available resources.
In a non-Virtual Fabric environment, this command displays the resources for the switch.
Note The execution of this command is subject to Virtual Fabric or Admin Domain restrictions that may be in place. Refer to chapter 1, "Using Fabric OS commands" and Appendix A, "Command Availability" for details.
Operands This command has the following optional operands:
slot For bladed systems only, specifies the slot number of the port for which to display the resources, followed by a slash (/).
port Specifies the number of the port for which to display the resources, relative to its slot for bladed systems. Use switchShow for a listing of valid ports.
--fportRes Displays the number of F_Port monitors that can be installed on a specified port. If no port is specified, this command displays the resources for all ports on the current logical switch.
--eeRes Displays the number of EE monitors that can be supported on the specified port. If no port is specified, this command displays the resources for all ports on the current logical switch.
--fabmodeRes Displays whether fabric mode Top Talkers are running on the current logical switch. A port is not required with this operand.
--installed Displays the monitor types installed on a specified port.
--help Displays the command usage.
586 Fabric OS Command Reference53-1001764-02

perfResourceShow 2
Examples To display the number of F_Port monitors that can be installed on the current logical switch:
switch:admin> perfresourceshow --fportRes ====================================================== Max Installed Available Slot/PortRange ====================================================== 4 0 3 2/13 4 2 2 3/5,3/7,3/12 Port list information --------------------- Slot 1 2 3 4 5 6 7 8 9 10 11 12 ----------------------------------------------------- Port 0 | | - | - | | - | | | | | | - | | 1 | | - | - | | - | | | | | | - | | 2 | | - | - | | - | | | | | | - | | 3 | | - | - | | - | | | | | | - | | 4 | | - | - | | - | | | | | | - | | 5 | | - | 1 | | - | | | | | | - | | 6 | | - | - | | - | | | | | | - | | 7 | | - | 1 | | - | | | | | | - | | 8 | | - | - | | - | | | | | | - | | 9 | | - | - | | - | | | | | | - | | 10 | | - | - | | - | | | | | | - | | 11 | | - | - | | - | | | | | | - | | 12 | | - | 0 | | - | | | | | | - | | 13 | | 0 | - | | - | | | | | | - | | 14 | | - | - | | - | | | | | | - | | 15 | | - | - | | - | | | | | | - | | 16 | | - | | | - | | | | | | | | 17 | | - | | | - | | | | | | | | 18 | | - | | | - | | | | | | | |(output truncated)
To display the number of F_Port monitors that can be installed on port 2/37:
switch:admin> perfresourceshow --fportRes 2/37 Slot/Port Max Installed Available ===========================================2/37 4 0 4
To display the number of EE monitors that can be installed on the current logical switch:
switch:admin> perfresourceshow --eeRes ==================================================== Max Installed Available Slot/PortRange ==================================================== 256 1 255 2/13 256 0 129 3/5,3/7,3/12 Port list information --------------------- Slot 1 2 3 4 5 6 7 8 9 10 11 12 ----------------------------------------------------- Port 0 | | - | - | | - | | | | | | - | | 1 | | - | - | | - | | | | | | - | | 2 | | - | - | | - | | | | | | - | | 3 | | - | - | | - | | | | | | - | | 4 | | - | - | | - | | | | | | - | |
Fabric OS Command Reference 58753-1001764-02

perfResourceShow2
5 | | - | 0 | | - | | | | | | - | | 6 | | - | - | | - | | | | | | - | | 7 | | - | 0 | | - | | | | | | - | | 8 | | - | - | | - | | | | | | | - | 9 | | - | - | | - | | | | | | - | | 10 | | - | - | | - | | | | | | - | | 11 | | - | - | | - | | | | | | - | | 12 | | - | 0 | | - | | | | | | - | | 13 | | 1 | - | | - | | | | | | - | | 14 | | - | - | | - | | | | | | - | | 15 | | - | - | | - | | | | | | - | | 16 | | - | | | - | | | | | | | | 17 | | - | | | - | | | | | | | | 18 | | - | | | - | | | | | | | | 19 | | - | | | - | | | | | | | |(output truncated)
To display the number of EE monitors that can be installed on port 10:
switch:admin> perfresourceshow --eeRes 2/10
slot/Port Available Installed========================================2/0 30 3
To display the status of TT fabric mode on the current logical switch:
switch:admin> perfresourceshow --fabRes================================Maximum Installed Available ===============================1 1 0
To display the types of monitors installed on port 2/10:
switch:admin> perfresourceshow --installed 2/0Top Talker Fabric mode: Not InstalledTop Talker F-Port mode: Not InstalledEE monitor: Not InstalledFilter monitor: InstalledISL monitor: Not Install
See Also none
588 Fabric OS Command Reference53-1001764-02

perfSetPortEEMask 2
perfSetPortEEMask
Sets the overall mask for end-to-end (EE) performance monitors.
Synopsis perfsetporteemask [slot/]port "TxSIDMsk " "TxDIDMsk " "RxSIDMsk" "RxDIDMsk"
Description Use this command to set the mask for an end-to-end (EE) performance monitor. This command allows selecting the Fibre Channel frames for which to collect performance statistics. When setting the EE mask on a port, all existing EE monitors on that port are deleted.
This command controls all three address fields (Domain ID, Area ID, and AL_PA ID) of both the source ID and destination ID, which can be used to trigger the monitor.
The address mask is of the form "dd:aa:pp", where "dd" is the Domain ID mask, "aa" is the Area ID mask, and "pp" is AL_PA ID mask.
Specify the following values to turn a specific field on or off:
00 Specifies that the field does not trigger EE monitors.
ff Specifies that the field does trigger EE monitors.
The default EE mask value is 0xffffff.
When a mask is set (0xff), the corresponding field triggers the monitor. If the mask is unset (0x00), the corresponding field is ignored.
For example, "00:ff:00" uses only the Area ID to trigger the EE monitor.
There is only one EE mask per port. The mask is applied to all eight EE monitors available on a port. The default EE mask value upon power-on is already set. When ISL monitoring is enabled, the EE mask on E_Ports is controlled automatically and existing mask values for E_Ports are over-written.
Notes This command requires an Advanced Performance Monitoring license.
This command is not supported on virtual FC ports (VE/VEX_Port), EX_Port, M (Mirror) ports and GbE ports.
On the Brocade FC4-48, the Area ID address field and the AL_PA ID address field must be masked together. On this blade, one bit of the AL_PA ID address field is used with the Area ID address field to identify the upper 32 ports. For example, ports 128 and 256 may be addressed on Domain ID "dd" with Area ID "aa" as "dd:aa:00" and "dd:aa:80" respectively. If the Area ID and AL_PA ID address fields are masked separately, the switch cannot track frames sent to the upper 32 ports deterministically, and this command returns the message that "Area and AL_PA fields need to be masked together."
The execution of this command is subject to Virtual Fabric or Admin Domain restrictions that may be in place. Refer to chapter 1, "Using Fabric OS commands" and Appendix A, "Command Availability" for details.
Operands This command has the following operands:
slot For bladed systems only, this operand specifies the slot number of the port on which the monitor is to be updated, followed by a slash (/).
port Specifies the number of the port on which the EE mask is to be updated, relative to its slot for bladed systems. Use switchShow for a list of valid ports.
Fabric OS Command Reference 58953-1001764-02

perfSetPortEEMask2
TxSIDMsk Specify the transmitting source ID mask in dd:aa:pp format, with quotation marks, where dd is the domain ID mask, aa is the Area ID mask, and pp is AL_PA ID mask. For example, "00:ff:00" uses only the Area ID to trigger the EE monitor.
Specify the following values to turn a specific field on or off:
00 Specifies that the field does not trigger EE monitors.
ff Specifies that the field does triggers EE monitors.
TxDIDMsk Specify the transmitting Destination ID mask, in quotation marks, in dd:aa:pp format.
RxSIDMsk Specify the receiving Source ID mask, in quotation marks, in dd:aa:pp format.
RxDIDMsk Specify the destination ID mask, in quotation marks, in dd:aa:pp format.
Examples To set the overall mask for end-to-end monitors on a port:
switch:admin> perfsetporteemask 1/6 "00:00:00" "ff:ff:ff" "00:ff:ff" "ff:00:00" Changing EE mask for this port will cause ALL EE monitors on this port to be deleted. continue? (yes, y, no, n): [no] y The EE mask on port 6 is set and EE Monitors on this port are deleted
See Also perfAddEEMonitor, perfShowPortEEMask
590 Fabric OS Command Reference53-1001764-02

perfShowAlpaCrc 2
perfShowAlpaCrc
Displays the CRC error count by port or by arbitrated loop physical address (AL_PA).
Synopsis perfshowalpacrc [slot/]port [ALPA]
Description Use this command to display the cyclic redundancy check (CRC) error count of one or all devices attached to a port. If the AL_PA operand is specified, only the CRC count for that AL_PA device is displayed. If the AL_PA operand is not specified, the CRC count for all the AL_PA devices on a specified port are displayed.
CRC count is a 64-bit counter. The CRC count value is displayed in hexadecimal.
Notes This command requires an Advanced Performance Monitoring license.
This command is not supported on virtual FC ports (VE/VEX_Port), EX_Port, M (Mirror) ports and GbE ports.
The execution of this command is subject to Virtual Fabric or Admin Domain restrictions that may be in place. Refer to chapter 1, "Using Fabric OS commands" and Appendix A, "Command Availability" for details.
This command is not supported on all platforms. Refer to the Fabric OS Administrator's Guide for specific hardware support.
Operands This command has the following operands:
slot For bladed systems only, specifies the slot number of the port to be displayed, followed by a slash (/).
port Specifies the number of the port to be displayed, relative to its slot for bladed systems. Use switchShow for a list of valid ports.
ALPA Specify the AL_PA address to get the CRC errors for a specific device. This operand is optional; if the operand is omitted, this command displays CRC error counts for all devices attached to the specified port.
Examples To display the CRC error count for all AL_PA devices on a port:
switch:admin> perfshowalpacrc 2/4ALPA CRC_ERROR_COUNT----------------------------------0x01 00x03 0
See Also perfClearAlpaCrc
Fabric OS Command Reference 59153-1001764-02

perfShowPortEEMask2
perfShowPortEEMask
Displays the current address mask for end-to-end performance monitors on a port.
Synopsis perfshowporteemask [slot/]port
Description Use this command to display the current mask shared across all end-to-end (EE) performance monitors of a port. There are only two commands that can modify the value of the EE mask: perfSetPortEEMask and perfCfgRestore.
The end-to-end mask has 12 fields:
TxSID Domain: onTxSID Area: onTxSID ALPA: onTxDID Domain: onTxDID Area: onTxDID ALPA: onRxSID Domain: onRxSID Area: onRxSID ALPA: onRxDID Domain: onRxDID Area: onRxDID ALPA: on
The fields that are marked “on” are used to trigger end-to-end monitors. The default value of the EE mask is all fields set to “on.”
Notes This command requires an Advanced Performance Monitoring license.
This command is not supported on virtual FC ports (VE/VEX_Port), EX_Port, M (Mirror) ports and GbE ports.
The execution of this command is subject to Virtual Fabric or Admin Domain restrictions that may be in place. Refer to chapter 1, "Using Fabric OS commands" and Appendix A, "Command Availability" for details.
Operands This command has the following operand:
slot For bladed systems only, this operand specifies the slot number of the port on which the monitor is to be displayed, followed by a slash (/).
port Specifies the number of the port on which the monitor is to be displayed, relative to its slot for bladed systems. Use switchShow for a list of valid ports.
Examples To display the end-to-end mask on a port:
switch:admin> perfshowporteemask 2/4The EE mask on port 20 is set by application NONE
TxSID Domain: onTxSID Area: onTxSID ALPA: onTxDID Domain: onTxDID Area: onTxDID ALPA: onRxSID Domain: onRxSID Area: on
592 Fabric OS Command Reference53-1001764-02

perfShowPortEEMask 2
RxSID ALPA: onRxDID Domain: onRxDID Area: onRxDID ALPA: on
See Also perfAddEEMonitor, perfDelEEMonitor, perfSetPortEEMask
Fabric OS Command Reference 59353-1001764-02

perfTTmon2
perfTTmon
Installs the Top Talker monitor in the specified mode.
Synopsis perfttmon
Port Mode (F_Port):
perfttmon --add egress | ingress [slot/]port
perfttmon --show [slot/]port [number_of_flows] [wwn| pid]
perfttmon --delete [slot/]port
Fabric Mode:
perfttmon --add fabricmode
perfttmon --show dom domain id [number_of_flows] [wwn| pid]
perfttmon --delete fabricmode
Description Use this command to install the Top Talker monitor. The TopTalker feature provides real-time information about the top 'n' bandwidth consuming flows from a set of a large number of flows passing through a specific point in the network (after initial stabilization).
Top Talkers can display between 1 and 32 flows depending on hardware platform. The maximum flows displayed are as follows:
32 For the Brocade 300, 5100, 5300, 8000 (FC Ports only) and FC8-xx port blades.
16 For the Brocade 4100, 4900, 5000, 7600, and FC4-xx port blades.
4 For the Brocade 7500.
Top Talker supports two modes, Port Mode and Fabric Mode:
• In Port Mode, Top Talker is installed on an F_Port to measure the traffic originating from the F_Port and flowing to different destinations. The output displays the data in a sorted order based on the data rate of each flow.
• In Fabric Mode, Top Talker measures the top "n" bandwidth using flows on a given switch. Top Talker installs only on E_Ports and measures the data rate of all the possible flows in the fabric. Flow is a pair of communicating FC addresses (SID and DID). Top Talkers in Fabric Mode and EE monitors are mutually exclusive. EE monitors must be removed from all switches before enabling fabric mode.
Notes This command requires an Advanced Performance Monitor license.
Top Talkers are incompatible with Frame Redirection, and therefore this feature is not supported on the Brocade Encryption switch for encrypted data traffic.
Top Talkers are not supported on embedded platforms.
Top Talkers are not supported on VE_Ports, EX_Ports, VEX_Ports, FCoE ports or ports configured as mirror ports.
The execution of this command is subject to Virtual Fabric or Admin Domain restrictions that may be in place. Refer to chapter 1, "Using Fabric OS commands" and Appendix A, "Command Availability" for details.
594 Fabric OS Command Reference53-1001764-02

perfTTmon 2
Operands This command has the following operands:
slot For bladed systems only, specifies the slot number of the port on which to install Top Talkers, followed by a slash (/).
port Specifies the number of the port on which the Top Talker is to be installed, relative to its slot for bladed systems. Use switchShow for a list of valid ports.
F_Port Top Talker commands:
--add Installs the Top Talker monitor on a specified F_Port.
egress | ingress
Used with the --add option to specify the direction in which the traffic is monitored as incoming or outgoing. This operand is required.
--show Displays the top talking flows on a specified port.
number of top talking flows
Specifies "n" top talking flows. Valid values are between 1 and 32. If a value greater than 32 is entered, Top Talker displays counters for only 32 flows and a warning message. This operand is optional; if omitted, the command displays the top 8 flows.
wwn | pid Specifies the output display as either WWN or PID format. This operand is optional. If omitted, the command displays in WWN format.
--delete Deletes an existing Top Talker monitor on a specified F_Port.
Fabric Mode Top Talker commands:
--add fabricmode Installs the Top Talker monitor on all switches in the fabric. When a new switch joins the fabric, this command must be run again on the switch. The TT configuration information is not propagated automatically to the new switch.
--show Displays the Top Talking flows on the switch for a given domain ID.
dom dom_id Specifies the domain ID for the flow display.
number of top talking flows
Specifies "n" Top Talking flows. Valid values are between 1 and 32. If a value greater than 32 is entered, Top Talker displays counters for only 32 flows and a warning message. This operand is optional; if omitted, the command displays the top 8 flows.
wwn | pid Specifies display as either WWN or PID format. This operand is optional; if omitted, the command displays in WWN format.
--delete fabricmode
Deletes the Fabric Mode Top Talker.
Examples To add an F_Port Top Talker to blade 1 port 2 (which should be an F_Port):
Switch:admin> perfttmon --add ingress 1/2
To delete the F_Port Top Talker:
switch:admin> perfttmon --del 1/2
Fabric OS Command Reference 59553-1001764-02
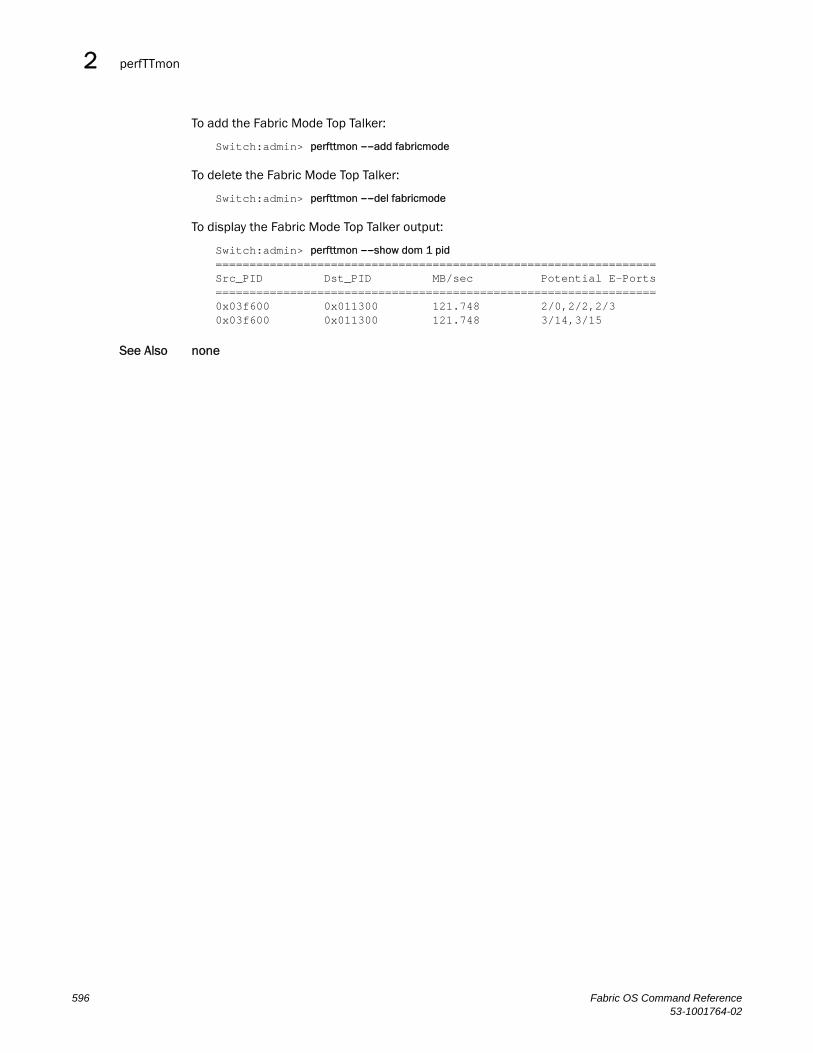
perfTTmon2
To add the Fabric Mode Top Talker:
Switch:admin> perfttmon --add fabricmode
To delete the Fabric Mode Top Talker:
Switch:admin> perfttmon --del fabricmode
To display the Fabric Mode Top Talker output:
Switch:admin> perfttmon --show dom 1 pid=================================================================Src_PID Dst_PID MB/sec Potential E-Ports=================================================================0x03f600 0x011300 121.748 2/0,2/2,2/30x03f600 0x011300 121.748 3/14,3/15
See Also none
596 Fabric OS Command Reference53-1001764-02

pkiCreate 2
pkiCreate
Creates public key infrastructure (PKI) objects.
Synopsis pkicreate
Description Use this command to create PKI objects such as a pass-phrase switch private key and CSR and to install a root certificate. This command does not create the switch certificate. Switch certificate should be obtained offline from the Certificate Authority.
Note The execution of this command is subject to Virtual Fabric or Admin Domain restrictions that may be in place. Refer to chapter 1, "Using Fabric OS commands" and Appendix A, "Command Availability" for details.
Operands none
Examples To create PKI objects:
switch:admin> pkicreateInstalling Private Key and Csr...Switch key pair and CSR generated...Installing Root Certificate...
If PKI objects already exist, the following message is displayed:
switch:admin> pkicreatePki objects already exist.
If you want to regenerate new objects, remove currentobjects by running pkiRemove command with securitydisabled.
WARNING: Recertification is required with new pki objectsbefore security can be enabled
See Also pkiRemove, pkiShow
Fabric OS Command Reference 59753-1001764-02

pkiRemove2
pkiRemove
Removes existing public key infrastructure (PKI) objects.
Synopsis pkiremove
Description Use this command to remove PKI objects including the switch private key, private key pass-phrase, CSR, root certificate, and switch certificate.
Note The execution of this command is subject to Virtual Fabric or Admin Domain restrictions that may be in place. Refer to chapter 1, "Using Fabric OS commands" and Appendix A, "Command Availability" for details.
Operands none
Examples To remove PKI objects:
switch:admin> pkiremove
WARNING!!!
Removing Pki objects will impair the security functionalityof this fibre channel switch. If you want secure mode enabled,you will need to get the switch certificate again.
About to remove Pki objects.ARE YOU SURE (yes, y, no, n): [no] yAll PKI objects removed.
See Also pkiCreate, pkiShow
598 Fabric OS Command Reference53-1001764-02

pkiShow 2
pkiShow
Displays existing public key infrastructure (PKI) objects.
Synopsis pkishow
Description Use this command to display PKI objects, such as switch private key, private key pass-phrase, CSR, root certificate, and switch certificate.
Note The execution of this command is subject to Virtual Fabric or Admin Domain restrictions that may be in place. Refer to chapter 1, "Using Fabric OS Commands" and Appendix A, "Command Availability" for details.
Operands none
Examples To view PKI objects:
switch:admin> pkishowPassphrase : ExistPrivate Key : ExistCSR : ExistCertificate : EmptyRoot Certificate: Exist
See Also pkiCreate, pkiRemove
Fabric OS Command Reference 59953-1001764-02

policy2
policy
Displays or modifies the encryption and authentication algorithms for security policies.
Synopsis policy option type number [-enc method] [-auth algorithm] [-pfs value] [-dh group] [-seclife seconds]
Description Use this command to display or modify the encryption and authentication algorithms for security policies. You can configure a maximum of 32 Internet key exchange (IKE) and 32 Internet protocol security (IPSec) policies.
Each FCIP tunnel is configured separately and may have the same or different IKE and IPSec policies.
Policies cannot be altered. To change the parameters associated with a current IKE or IPSec policy, that policy must be deleted and re-created with new parameters.
A policy cannot be deleted while an active FCIP tunnel is using it.
Note The execution of this command is subject to Virtual Fabric or Admin Domain restrictions that may be in place. Refer to chapter 1, "Using Fabric OS commands" and Appendix A, "Command Availability" for details.
Operands The following operands are required:
option Specifies the action to take. Actions include:
--create Creates the policy.
--delete Deletes the policy.
--show Displays the policy.
type Specifies the policy type. Types include:
ike Internet key exchange.
ipsec Internet protocol security.
number Specifies the numeric ID of the policy. Valid values are 1 to 32, and ALL with the --show option.
OptionalOperands
-enc method Specifies the encryption algorithm. The default is AES-128. Methods include:
3DES Triple data encryption standard, 168-bit key.
AES-128 Advanced encryption standard, 128-bit key.
AES-256 Advanced encryption standard, 256-bit key.
-auth algorithm Specifies the authentication algorithm. The default is SHA-1. Algorithms include:
SHA-1 Secure hash algorithm.
MD5 Message digest 5.
AES-XCBC Advanced encryption standard. Valid only with IPSec.
-pfs value Specifies the perfect forward secrecy. This operand is valid only with IKE policies. Values are on (default) or off.
600 Fabric OS Command Reference53-1001764-02

policy 2
-dh group Specifies the Diffie-Hellman group used in PFS negotiation. This operand is valid only with IKE policies. The default is 1. Values include:
1 Fastest as it uses 768 bit values, but least secure.
14 Slowest as it uses 2048 bit values, but most secure.
-seclife seconds Security association lifetime in seconds. A new key is renegotiated before the specified length of time expires. The valid range for seconds is 28800 to 250000000 or 0. The default is 28800.
Examples To create a new policy:
switch:admin> policy --create ike 10 -enc 3des -auth md5 The following policy has been set:
IKE policy 10 ----------------------------------------- Authentication Algorithm: MD5 Encryption: 3DES Perfect Forward Secrecy: 0 Diffie-Hellman Group: 1 SA Life (seconds): 28800
To display a policy setting:
switch:admin> policy --show ipsec 1 IPSec policy 1 ----------------------------------------- Authentication Algorithm: SHA-1 Encryption: 3DES SA Life (seconds): 28800
To display all IKE policy settings:
switch:admin> policy --show ike allIKE Policy 1-----------------------------------------Authentication Algorithm: SHA-1Encryption: AES-128Perfect Forward Secrecy: onDiffie-Hellman Group: 1SA Life (seconds): 28800
IKE Policy 29-----------------------------------------Authentication Algorithm: SHA-1Encryption: AES-128Perfect Forward Secrecy: onDiffie-Hellman Group: 1SA Life (seconds): 28800
Operation Succeeded
Fabric OS Command Reference 60153-1001764-02

policy2
To display all IPSec policy settings:
switch:admin> policy --show ipsec allIPSec Policy 2-----------------------------------------Authentication Algorithm: SHA-1Encryption: AES-128SA Life (seconds): 28800
IPSec Policy 29-----------------------------------------Authentication Algorithm: SHA-1Encryption: AES-128SA Life (seconds): 28800
Operation Succeeded
To change (delete and re-create) a policy:
switch:admin> policy ike --delete 10 This policy has been successfully deleted.
switch:admin> policy ike --create 10 -enc aes-128 -auth sha-1 The following policy has been set:
IKE policy 10 ----------------------------------------- Authentication Algorithm: SHA-1 Encryption: AES-128 Perfect Forward Secrecy: 0 Diffie-Hellman Group: 1 SA Life (seconds): 28800
To delete a policy:
switch:admin> policy ike --delete 10 The policy has been successfully deleted.
See Also portCfg, portCfgShow, portShow
602 Fabric OS Command Reference53-1001764-02

portAddress 2
portAddress
Assigns the lower 16 bits of the Fibre Channel Port ID.
Synopsis portaddress --bind [slot/]por [16-bit_address] [--auto]
portaddress --unbind [slot/]port
portaddress --show [[slot/]port]
portaddress --findPID 24-bit_Port_ID
portaddress --help
Description Use this command to bind the 16-bit address to the lower two bytes of a port 24-bit Fibre Channel address, or to unbind the currently bound address for the specified port. Changes effected by this command are persistent across reboots and power cycles.
The port must be offline to bind an address and not currently bound to another address. If the port is currently bound to another address, use this command with the --unbind option to unbind the port.
This command returns an error if the chosen address is in use or is bound to another port. If the address is currently assigned to another port, use this command with the --findPID option to identify the port that is bound to that address, and then unbind the port.
The command provides a --show option that displays the currently bound address for a specified port or for all ports. Alternately, you can use the --findPID option to display the port currently bound to a specified port ID (PID).
Notes Dynamic Area Mode and WWN-Based persistent PID must be enabled on the switch before you can assign an address with this command. Refer to configure for more information.
In Fabric OS v6.4.0 and later, this command is supported on the Brocade DCX and DCX-4S,on all logical switches including the Default Switch. Virtual Fabrics must be enabled. It is also supported on the Brocade 5300, 5100, 300, 7800, and VA-40FC, regardless of Virtual Fabrics status.
In Fabric OS v6.3.0, this command is supported on the Brocade DCX and DCX-4S on all logical switches except the Default Switch. Virtual Fabrics must be enabled. It is also supported on the Brocade 5300, 5100, and 300 (the Brocade 7800 is not supported).
This command is not supported on any embedded platforms.
If a any blade port is qualified to be in a user-created logical switch on a Brocade DCX or DCX-4S, this feature is supported on those ports. In the Default Switch, AP blades such as the Brocade FA4-18, FCOE10-24, AND FS8-18 are not supported, when dynamic area mode is enabled. This is enforced by the software.
The execution of this command is subject to Virtual Fabric or Admin Domain restrictions that may be in place. Refer to chapter 1, "Using Fabric OS Commands" and Appendix A, "Command Availability" for details.
Operands This command has the following operands:
--bind Assigns the lower two bytes of the Fibre Channel address to the specified port.
slot Specifies the slot number on bladed systems, followed by a slash (/).
Fabric OS Command Reference 60353-1001764-02

portAddress2
port Specifies the port number, relative to its slot on bladed systems.
16-bit_address Specifies the 16-bit address to be bound to the FC address. Note that only the upper 10 bits of the PID can be used for a unique route. Therefore, not all addresses in the 16-bit range are available.
--auto Enables autobinding on the specified port. If the auto feature is enabled, the entire area field of the PID is bound to a single port. With 10-bit routing, up to 4 ports can share the same 8-bit area field of the PID. This address assignment mode dedicates all four unique routes to a single port. By default, auto is off. This operand is optional; if unspecified, the default is used.
--unbind Removes both the address and any automode override configuration from the specified port.
--show Displays the currently bound address attributes for the specified port. This command shows the lowest two bytes of the Fibre Channel address as well as the current setting for automode. If a port is not specified, the display shows the Partition Address Mode value (0, 1, or 2) and all ports on the current partition. A -1 is displayed for ports that have not been assigned an area. Areas are dynamically assigned an address as they are added to a partition. The Partition Address Mode value is set by the configure command (Enable a 256 Area Limit).
--findPID Displays the port (slot and port offset) of the port that is currently assigned the provided address. This command applies the 10-bit area mask to the provided PID and returns the port that has been assigned the specified address. Therefore not all 24 bits are required to match exactly.
24-bit_Port_ID Specifies the 24-bit Fibre Channel port address. This operand is required with the --findPID option. This command applies the 10-bit area mask to the provided PID and returns the port hat has been assigned the specified address. Therefore not all 24 bits are required to match.
--help Displays the command usage.
Examples To bind a 16-bit address to the low two bytes of a port 24-bit Fibre Channel address:
switch:admin>portaddress --bind 5/18 0x1a00
To unbind a given address from a port:
switch:admin>portaddress --unbind 5/18 0x1a00
To display all port address bindings on the current partition:
switch:admin>portaddress --showPartition Address Mode :0Index Slot Port Area Mode===============================384 5 0 0x0800 8 bit385 5 1 0x0900 8 bit386 5 2 0x0a00 8 bit387 5 3 0x0b00 8 bit388 5 4 0x0c00 8 bit389 5 5 0x0d00 8 bit
604 Fabric OS Command Reference53-1001764-02

portAddress 2
390 5 6 0x0e00 8 bit391 5 7 0x0f00 8 bit392 5 8 0x0000 8 bit393 5 9 0x0100 8 bit394 5 10 0x0200 8 bit395 5 11 0x0300 8 bit396 5 12 0x0400 8 bit397 5 13 0x0500 8 bit398 5 14 0x0600 8 bit399 5 15 0x0700 8 bit400 5 16 0x1800 8 bit401 5 17 0x1900 8 bit402 5 18 0x1a00 8 bit403 5 19 0x1b00 8 bit404 5 20 0x1c00 8 bit405 5 21 0x1d00 8 bit406 5 22 0x1e00 8 bit407 5 23 0x1f00 8 bit408 5 24 0x1000 8 bit409 5 25 0x1100 8 bit410 5 26 0x1200 8 bit411 5 27 0x1300 8 bit412 5 28 0x1400 8 bit413 5 29 0x1500 8 bit414 5 30 0x1600 8 bit415 5 31 0x1700 8 bit
To display the port address binding for port 28:
switch:admin>portaddress --show 5/18
Index Slot Port Area Mode===============================412 5 28 0x1400 8 bit
To display the port bound to a specified address.
switch:admin>portaddress --findPID 0x2400
Index Port Port ID===================36 36 0x 2400
See Also none
Fabric OS Command Reference 60553-1001764-02

portAlpaShow2
portAlpaShow
Displays the Arbitrated Loop Physical Addresses (AL_PAs) of devices attached to a port.
Synopsis portalpashow [slot/]port
Description Use this command to display the AL_PAs of devices connected to a port, and whether these devices are public or private. If the specified port is not an active FL_Port or if no AL_PAs are present, this command prints an error.
Note The execution of this command is subject to Virtual Fabric or Admin Domain restrictions that may be in place. Refer to chapter 1, "Using Fabric OS commands" and Appendix A, "Command Availability" for details.
Operands This command has the following operands:
slot For bladed systems only, specify the slot number of the port to display, followed by a slash (/).
port Specify the port number to display, relative to its slot for bladed systems. Use switchShow to list valid ports.
Examples To display the AL_PAs of a port:
switch:user> portalpashow 4/14AL_PA type AL_PA type AL_PA type0xe2 public 0xe4 public
See Also switchShow
606 Fabric OS Command Reference53-1001764-02

portBeacon 2
portBeacon
Sets port beaconing mode.
Synopsis portbeacon --enable [slot]port
portbeacon --disable [slot]port
portbeacon --show [slot]port
portbeacon --help
Description Use this command to enable or disable beaconing mode on a specified port.
When beaconing mode is enabled on a port, the port LED flashes amber and green for 2.5 seconds each in an alternating pattern. The beaconing mode continues until you turn it off. Beaconing mode is useful if you are trying to locate a specific port.
Beaconing mode takes over the port LEDs. The normal flashing LED pattern associated with an active, faulty, or disabled port is suppressed, and only the beaconing pattern is shown. Other commands are still executable and functional. However, if diagnostic frame-based tests such as portLoopbackTest are executed, the diagnostic LED pattern is interleaved with the beaconing pattern. Running switch beaconing or HBA- side (E2E) beaconing also overwrites the pattern.
Note The execution of this command is subject to Virtual Fabric or Admin Domain restrictions that may be in place. Refer to chapter 1, "Using Fabric OS commands" and Appendix A, "Command Availability" for details.
Operands This command has the following operands:
slot For bladed systems only, specifies the slot number of the port group to display, followed by a slash (/).
port Specifies the number of the port to be configured, relative to its slot for bladed systems. Use switchShow for a listing of valid ports.
--enable Enables beaconing mode on the specified port.
--disable Disables beaconing mode on the specified port.
--show Displays the port beaconing mode on the specified port as ON or OFF.
--help Displays the command usage.
Examples To enable beaconing mode on a port:
switch:admin> portbeacon --enable 1/0
To disable beaconing mode on a port:
switch:admin> chassisbeacon --disable 2/1
To display beaconing mode on a port:
switch:admin> chassisbeacon --show 2/1PortBeacon status of : slot 2, port 1 is ON
See Also chassisBeacon, switchBeacon
Fabric OS Command Reference 60753-1001764-02

portBufferShow2
portBufferShow
Displays the buffer usage information for a port group or for all port groups in the switch.
Synopsis portbuffershow [[slot/]port]
Description Use this command to display the current long distance buffer information for the ports in a port group. The port group can be specified by giving any port number in that group. If no port is specified, then the long distance buffer information for all of the port groups of the switch is displayed.
The following long distance information is displayed:
User Port Index number of the port.
Port Type E (E_Port), F (F_Port), G (G_Port), L (L_Port), or U (U_Port).
Lx Mode Long distance mode. L0 Link is not in long distance mode.LE Link is up to 10 km.LD Distance is determined dynamically.LS Distance is determined statically by user input.
Max/Resv Buffers The maximum or reserved number of buffers that are allocated to the port based on the estimated distance (as defined by the desired_distance operand of the portCfgLongDistance command). If the port is not configured in long distance mode, certain systems might reserve buffers for the port. This field then displays the number of buffers reserved for the port.
Buffer Usage The actual number of buffers allocated to the port. In LD mode, the number is determined by the actual distance and the user-specified desired distance (as defined by the desired_distance operand of the portCfgLongDistance command).
Needed Buffers The number of buffers needed to utilize the port at full bandwidth (depending on the port configuration). If the number of Buffer Usage is less than the number of Needed Buffers, the port is operating in the buffer limited mode.
Link Distance For L0 (not in long distance mode), the command displays the fixed distance based on port speed, for instance: 10 km (1 Gbps), 5 km (2 Gbps), 2 km (4 Gbps), or 1 km (8 Gbps). For static long distance mode (LE), the fixed distance of 10 km displays. For LD mode, the distance in kilometers displays as measured by timing the return trip of a MARK primitive that is sent and then echoed back to the switch. LD mode supports distances up to 500 km. Distance measurement on a link longer than 500 km might not be accurate. If the connecting port does not support LD mode, is shows “N/A”.
Remaining Buffers The remaining (unallocated and reserved) buffers in a port group.
A hyphen in one of the display fields indicates that no relevant information is available; there may be no connection to a port, or the port is disabled, or the port is not an E_Port.
Note The execution of this command is subject to Virtual Fabric or Admin Domain restrictions that may be in place. Refer to chapter 1, "Using Fabric OS commands" and Appendix A, "Command Availability" for details.
608 Fabric OS Command Reference53-1001764-02

portBufferShow 2
Operands When invoked without operands, this command displays the long distance buffer information for all the port groups of the switch.
The following operands are optional:
slot For bladed systems only, specifies the slot number of the port group to display, followed by a slash (/).
port Specifies the number of a port associated with the port group, relative to its slot for bladed systems. Use switchShow for a list of valid ports.
Examples To display the port buffer information for a port:
switch:admin> portbuffershow 17User Port Lx Max/Resv Buffer Needed Link RemainingPort Type Mode Buffers Usage Buffers Distance Buffers---- ---- ---- ------- ------ ------- ---------- --------- 16 - - 0 - - 17 E L1 - 54 54 50km 18 - - 0 - - 19 - - 0 - - 54
See Also portCfgLongDistance
Fabric OS Command Reference 60953-1001764-02

portCamShow2
portCamShow
Displays port-based filter CAM utilization.
Synopsis portcamshow [slot/]port
Description Use this command to display the current filter Content-Addressable Memory (CAM) utilization of a specified port.
The command displays the following information:
SID used Total number of CAM entries used by this port. Note that each CAM entry, either source ID (SID) or destination ID (DID) CAM, can be shared among a certain number of ports, depending on the ASIC.
DID used Total number of CAM entries used by this port. Note that each CAM entry (either SID or DID CAM) can be shared among a certain number of ports, depending on the ASIC.
SID entries All existing source ID entries within the CAM for this port. Note that each CAM entry (either SID or DID CAM) can be shared among a certain number of ports, depending on the ASIC.
DID entries All existing destination ID entries within the CAM for this port. Note that each CAM entry (either SID or DID CAM) can be among a certain number of ports, depending on the ASIC.
SID free The total number of free SID CAM entries available for use by this port.
DID free The total number of free DID CAM entries available for use by this port.
Notes This command cannot be executed on a logical port.
Ports that support shared areas are divided into two ports: primary and secondary ports. Primary and secondary ports share the same area. Port CAM entries displayed on the primary ports also consist of all the secondary port SIDs and DIDs as well, when both the ports are F_Ports. This is because the primary port acts as a proxy for the CAM entries of the secondary port, in this case using redirect filters.
The execution of this command is subject to Virtual Fabric or Admin Domain restrictions that may be in place. Refer to chapter 1, "Using Fabric OS Commands" and Appendix A, "Command Availability" for details.
This command is not supported on FCoE ports.
This command cannot be executed on a logical port.
Operands This command has the following operands:
slot For bladed systems only, specifies the slot number of the port to display, followed by a slash (/).
port Specifies the port number to display, relative to its slot for bladed systems. Use switchShow to list valid ports. This operand is required.
610 Fabric OS Command Reference53-1001764-02

portCamShow 2
Examples To display the filter CAM utilization for a single port on a switch:
switch:user> portcamshow 3/2
--------------------------------------------------Area SID used DID used SID entries DID entries 34 3 1 350400 2b2200 2b1200 220400--------------------------------------------------SID Free, DID Free: (61, 511)
To display port CAM entries on shared ports (In the following example, port 7/31 and 7/39 are shared ports and 7/31 is the primary port):
switch:user> portcamshow 7/39--------------------------------------------------Area SID used DID used SID entries DID entries207 3 1 03b380 03cf80
03410003cf00
--------------------------------------------------SID free, DID free: (2044, 1020)
switch:admin> portcamshow 7/31--------------------------------------------------Area SID used DID used SID entries DID entries207 4 2 03b380 03cf80 034100 03cf00 03cf00 03cf80--------------------------------------------------SID free, DID free: (2044, 1020)
The SID entry 03cf00 and DID entry 03cf80 on port 7/31 belong to port 7/39.
See Also switchShow
Fabric OS Command Reference 61153-1001764-02

portCfg2
portCfg
Manages port configuration parameters for FC ports, VE_ports, and GbE/10GbE ports.
Synopsis portcfg action [slot/] port arguments
portcfg action [slot/] ge_port arguments
portcfg action [slot/]ve_port options arguments
portcfg action [slot/][ge_port options arguments
Description Use this command to manage port configuration parameters on FC ports as well as on Gigabit Ethernet (GbE) ports on the Brocade 7800/FX8-24 and on the Brocade 7500/7500E/FR4-18i.
This command has been modified to support the configuration of FCIP tunnels on the Brocade 7800/FX8-24 platforms. As a result, the behavior of this command in Fabric OS v6.3.0 and later has changed.
You must use this command in a manner that honors the platform-specific differences in command syntax and behavior. Some command options are not available on all platforms. Others behave differently depending on the platform on which they are executed.
Platform specific commands are documented in separate sections that include function, synopsis, description, operands and examples. Use the following section headings to navigate this page.
• “Commands supported on all platforms”
- portcfg mirrorport - Configure a mirror port on the local FC port.
- portcfg rscnsupr - Manage registered state change notification (RSCN) suppression on the local port.
• “Commands supported on the Brocade 7800/FX8-24 and the Brocade 7500/7500E/FR4-18i platforms”
- portcfg ipif - Configure the local IP interfaces
- portcfg iproute - Configure a static route on the IP interface.
- portcfg vlantag - Manage the IP interface VLAN configuration for FCIP.
• “Commands supported only on the Brocade 7800 and the Brocade FX8-24 platforms”
- portcfg fciptunnel - Create, modify, and delete Fibre Channel over IP (FCIP) tunnels (although this command is technically valid on the Brocade 7500/7500E/FR4-18i platforms as well, the behavior is very different, and the command is therefore described separately for each platform).
- portcfg fcipcircuit - Create, modify, and delete FCIP circuits.
• “Commands supported only on the Brocade 7500/7500E and the Brocade FR4-18i platforms”
- portcfg arp - Add and delete address resolution protocol (ARP) entries. Flush ARP table.
- portcfg fciptunnel - Create, modify, and delete Fibre Channel over IP (FCIP) tunnels (FCIP) tunnels (although this command is technically valid on the Brocade 7800/FX8-24 platforms as well, the behavior is very different, and the command is therefore described separately for each platform).
- portcfg fastwrite - Configure the FC port for FC FastWrite.
- portcfg ficon - Manage FICON emulation in an FCIP tunnel.
612 Fabric OS Command Reference53-1001764-02

portCfg 2
• “Commands supported only on the Brocade 7500/7500E switches”
- portcfg inbandmgmt - Configures IP addresses and routes for the CP or GbE port inband management interfaces.
To display the command usage on the switch, execute portcfg action without any further arguments.
Notes Beginning with the Fabric OS v6.4.0 release, IPv6 addresses are supported on the Brocade 7800 and FX8-24 platforms. On the Brocade 7500/7500E and FR4-18i, IPv6 addresses are supported on switches running Fabric OS v.6.0 or later.
The execution of this command is subject to Virtual Fabric or Admin Domain restrictions that may be in place. Refer to chapter 1, "Using Fabric OS commands" and Appendix A, "Command Availability" for details.
Some of the features supported by this command may require a license.
The Fabric OS port configuration commands are not supported on FCoE ports.
Function Commands supported on all platforms
Synopsis portcfg action [slot/]port arguments
Description Use this command to configure the following parameters on a local FC port.
• portcfg mirrorport - Configure a mirror port on the local port.
• portcfg rscnsupr - Manage registered state change notification (RSCN) suppression on the local port.
Operands This command has the following operands:
slot For bladed systems only, specifies the slot number of the port to be configured, followed by a slash (/).
port[-port] Specifies a single port or a range of ports, for example, 3-22 or 1/3-8. port ranges are supported only with the rscnsupr option.
rscnsupr Manages Registered State Change Notification (RSCN) suppression on the local port. RSCN suppression is configurable only on FC ports. The syntax for portCfg rscnsupr is as follows:
portcfg rscnsupr [slot/]port[-port] mode
The following modes are supported with the rscnsupr option:
--disable Disables the configuration. When disabled, device changes on the port generate an RSCN to all other end devices that are zoned with this one. By default, RSCN suppression is disabled on all ports.
--enable Enables the configuration. When enabled, any device changes on the port will not generate an RSCN to any other end device.
mirrorport Configures a mirror port on the local port. The port mirroring feature reroutes data frames between two devices to the mirror port. Port mirroring can aid in troubleshooting common FC end-to-end communication problems. The command prompts for confirmation that the specified port be enabled as a mirror port. Once a port is configured as a mirror port, the port can only be used as part of a mirror connection.
Fabric OS Command Reference 61353-1001764-02

portCfg2
The syntax for portCfg mirrorport is as follows:
portcfg mirrorport [slot/]port mode
Valid modes for mirrorport are:
--disable Disables the configuration. When disabled, a port cannot be a mirror port.
--enable Enables the configuration. When the mirror port feature is enabled to a port, a mirror connection can use this port to mirror traffic.
Examples To enable a mirror port configuration:
switch:admin> portcfg mirrorport 2/4 --enablePlease confirm enable of Mirror Port (Y,y,N,n): [n] y
To configure a range of ports as RSCN-suppressed:
switch:admin> portcfg rscnsupr 2/4-7 --enable
Function Commands supported on the Brocade 7800/FX8-24 and the Brocade 7500/7500E/FR4-18i platforms
Synopsis portcfg action [slot/] ge_port arguments
Description Use this command to configure the local IP interfaces and static routes on the Brocade 7800/FX8-24 and on the Brocade 7500/7500E/FR4-18i platforms. You must configure the local IP interfaces before you can create and configure FCIP tunnels. In Fabric OS v6.3.1 and later, you can also create a VLAN configuration at the IP interface on the Brocade 7800/FX8-24. The configuration procedures described in this section are essentially the same.
• portcfg ipif - Configure the local IP interfaces.
• portcfg iproute - Configure a static route on the IP interface.
• portcfg vlantag - Manage the IP interface VLAN configuration for FCIP.
Operands This command has the following operands:
slot For bladed systems only, specifies the slot number of the port to be configured, followed by a slash (/).
ge_port Specifies the number of the GbE port to be configured. The GbE ports are numbered ge0 - ge9 on the Brocade FX8-24 blade and ge0 - ge5 on the Brocade 7800 switch. The two 10GbE ports on the Brocade FX8-24 blade are numbered xge0 and xge1. The two GbE ports on the Brocade 7500/7500E, and FR4-18i are numbered ge0 and ge1. Use the switchShow command for a list of valid ports.
ipif Defines the IP interface for both ports of a tunnel.
On the Brocade 7800 and FX8-24, up to eight IP interfaces per GbE port are supported, but only 4 FCIP circuits can be configured on a single GbE port. Up to 10 IP interfaces and 10 FCIP circuits are supported on the 10GbE port.
On the Brocade 7500/7500E/FR4-18i, up to eight IP interfaces per GbE port are supported.
The IP network connection is configured by defining IP interfaces for origin and destination virtual ports, and then defining one or more IP routes to connect them. The syntax for portCfg ipif is as follows:
614 Fabric OS Command Reference53-1001764-02

portCfg 2
portcfg ipif [slot/]ge_port option arguments
Valid options and arguments for ipif are:
create src_ipaddr [netmask] mtu_size
Creates IP interfaces. Specify the following:
src_ipaddr Specifies source IP address in either IPv6 or IPv4 format:
src_IPv6_addr/prefix_len Specifies the source IPv6 address of the virtual port if IPv6 is used. The address must be an IPv6 global, unicast address, followed by a prefix. This is used for IPv6 addresses instead of a netmask. The prefix_len operator is required. Refer to the Fibre Channel over IP Administrator’s Guide for more information on IPv6 rules and restrictions.
src_IPv4_addr netmask Specifies the source IPv4 address of the virtual port, if IPv4 is used. If an IPv4 address is used, the subnet mask must be specified as well (in a.b.c.d. format.)
mtu_size Specifies the maximum transmission unit size. The permitted range is 1260 Bytes to 1500 Bytes for the Brocade 7800/FX8-24 platforms and 1260 Bytes to 2348 Bytes for the Brocade 7500/7500E/FR4-18i. This operand is required.
delete ipaddr Deletes IP interfaces. Specify the IPv6 or IPv4 address of the virtual port.
iproute Defines static IP routes on a GbE port or on a 10GbE port. After defining the IP interface on the remote switch, you can define destination routes for an interface. A maximum of 32 user-configurable routes per GbE/10GbE port are supported. You cannot use this command to configure routes for inband management; use portCfg inbandmgmt instead.
The syntax for portcfg iproute is as follows:
portcfg iproute [slot/]ge_port option arguments
Valid options and arguments for iproute are:
create dest_ipaddr [netmask] [gateway_router] metric Creates an IP route. Specify the following:
dest_ipaddr Specifies the destination IP address in either IPv6 or IPv4 format:
dest_IPv6_addr/prefix_len Specifies the destination IPv6 address of the virtual port, if IPv6 is used. The address must be an IPv6 global, unicast address, followed by a prefix. This is used for IPv6 addresses instead of a netmask. The prefix_len operand is required.
dest_IPv4_addr netmask Specifies the destination IPv4 address of the virtual port, if IPv4 is used. If an IPv4 address is used, the subnet mask must be specified as well. Use a.b.c.d. format.
Fabric OS Command Reference 61553-1001764-02

portCfg2
gateway_router Specifies the IP address of an IP router that can route packets to the destination virtual port IP address. The gateway address must be on the same IP subnet as one of the port IP addresses. This operand is optional with IPv6 addresses. If not specified, the gateway_router learned from the Neighbor Discovery protocol is used.
metric Specifies the link metric associated with the route. Valid values are 0-255. The default value is 0. A low value encourages the use of the route, and a high value discourages the use of the route. This operand is valid only on the Brocade 7500/7500E/FR4-18i platforms. This operand is not valid on the Brocade 7800 and FX8-24.
delete ipaddr Deletes IP routes for a specified IPv4 or IPv6 address.
ipaddr Specifies IP address in either IPv6 or IPv4 format:
IPv6_addr/prefix_len Specifies the IPv6 address of the virtual port, if IPv6 is used. The address must be an IPv6 global, unicast address, followed by a prefix. The prefix_len operand is required.
dest_IPv4_addr netmask Specifies the destination IPv4 address of the virtual port, if IPv4 is used. If an IPv4 address is used, the subnet mask must be specified as well. Use a.b.c.d. format.
vlantag Use this command to maintain the VLAN tag table associated with a particular network interface. This table is mainly used during ingress processing to filter VLAN tagged frames. You can configure multiple VLAN IDs per IP interface; however, if you provide a destination address, there cannot be two entries to the same destination, including 0.0.0.0. Egress frames already marked as VLAN tagged (FCIP circuit-level tagging) take precedence over entries in this table.
NOTE: This command supports --add and --delete options only. To modify a table entry, it must first be deleted, then added with different configuration parameters.The syntax for portcfg vlantag is as follows:
portcfg vlantag [slot/]ge_port mode arguments
Valid modes for vlantag are:
add ipif_addr vlan_id l2cos [dst_ipaddr] Adds an entry to the VLAN tag table.
delete ipif_addr vlan_id [dst_ipaddr] Deletes an entry from the VLAN tag table.
Valid arguments for add and delete are:
ipif_addr Specifies the locally defined interface address in IPv6 or IPv4 format.
vlan_id Specifies the VLAN ID used for this tag. The range is 1 to 4094.
l2cos Specifies Layer 2 Class of Service/Priority, as defined in the IEEE 802.1p specification. The range is 0 to 7. Valid only with the add option.
616 Fabric OS Command Reference53-1001764-02

portCfg 2
dst_ipaddr Specifies an optional destination IP address (IPv4 or IPv6). All packets destined for this IP address are tagged accordingly. If a destination IP address is not specified, all packets not already tagged will be tagged. The default is 0.0.0.0.
Examples To create an IP interface using IPv4:
switch:admin> portcfg ipif ge0 create 192.168.0.20 255.0.0.0 1500Operation Succeeded
To create an IP interface using IPv6 with a prefix:
switch:admin> portcfg ipif ge0 create 2000::22/64 1500Operation Succeeded
switch:admin> portshow ipif ge0 Port: ge0Interface IPv4 Address NetMask Effective MTU Flags---------------------------------------------------------- 0 192.168.0.20 255.255.255.0 1500 U R M 1 192.168.0.21 255.255.255.0 1500 U R M
Interface IPv6 Address Len Effective MTU Flags--------------------------------------------------------------- 2 fe80::205:1eff:fec3:e6b2 64 1500 U R M 3 2000::20 64 1500 U R M 4 2000::21 64 1500 U R M 5 2000::22 64 1500 U R M
Flags: U=Up B=Broadcast D=Debug L=Loopback P=Point2Point R=Running N=NoArp PR=Promisc M=Multicast S=StaticArp LU=LinkUp
To delete an IP interface:
switch:admin> portcfg ipif ge0 delete 192.168.0.20Operation Succeeded
To create a static IP route using an IPv4 destination address, a net mask, and a gateway address:
switch:admin> portcfg iproute ge0 create 192.42.0.0 255.255.255.0 192.168.0.250Operation Succeeded
To create a static IP route using IPv6:
switch:admin> portcfg iproute ge0 create 2000::/64 2000::1:250Operation Succeeded
switch:admin> portshow iproute ge0
Port: ge0IP Address Mask Gateway Metric Flags-------------------------------------------------------------192.42.0.0 255.255.255.0 192.168.0.250 0 U G192.168.0.0 255.255.255.0 * 0 U C192.168.0.10 255.255.255.255 * 0 U H L192.168.0.11 255.255.255.255 * 0 U H L192.168.0.21 255.255.255.255 * 0 U C192.168.0.250 255.255.255.255 * 0 U H L
Fabric OS Command Reference 61753-1001764-02

portCfg2
IPv6 Address Len Gateway Metric Flags----------------------------------------------------------------2000:: 64 * 0 U C2000::10 128 * 0 U H L2000::11 128 * 0 U H L2000::1:250 128 * 0 U H L2001:: 64 2000::1:250 0 U Gfe80:: 64 * 0 U Cff01:: 32 * 0 U Cff02:: 32 * 0 U C Flags: U=Usable G=Gateway H=Host C=Created(Interface) S=Static L=LinkLayer(Arp)
To delete a static IP route using an IPv4 address:
switch:admin> portcfg iproute ge0 delete 172.16.0.0 255.255.0.0Operation Succeeded
To create a network-wide permanent VLAN tag entry with a VLAN ID of 200 and an L2 CoS value of 5 (no destination address):
switch:admin> portcfg vlantag ge2 add 192.168.2.10 200 5Operation Succeeded
To display the VLAN tag configuration (for an explanation of the flags, refer to portShow):
switch:admin> portshow vlantag ge2
Port: ge2Interface Address VlanId L2CoS Flags Destination Address-------------------------------------------------------------192.168.2.10 200 5 Perm Net 0.0.0.0192.168.0.20 100 0 Perm 192.168.0.10192.168.0.21 200 0 Perm 192.168.0.112000::20 300 0 Perm 2000::102000::21 400 0 Perm 2000::11switch:admin>
To delete a VLAN tag entry:
switch:admin> portcfg vlantag ge2 delete 192.168.2.10 200Operation Succeeded
Function Commands supported only on the Brocade 7800 and the Brocade FX8-24 platforms
Synopsis portcfg action [slot/]ve_port options arguments
Description Use this command to configure FCIP tunnels and FCIP circuits on the GbE/10GbE ports on the Brocade 7800 and FX8-24 platforms only. The FCIP tunnels on the local and remote GbE ports act as Virtual E_Ports (VE_Ports) connecting the local and remote fabrics. The following operations can be performed with this command:
618 Fabric OS Command Reference53-1001764-02

portCfg 2
• portcfg fciptunnel - Create, modify, and delete Fibre Channel over IP (FCIP) tunnels.
- Configure a tunnel with the FCIP FastWrite feature.
- Enable or disable Tape Pipelining.
- Configure the compression options.
- Configure an IPSec-enabled tunnel (Brocade 7800 only).
- Configure VLAN tagging on the default FCIP circuit.
- Configure Differentiated Services Code Point (DSCP) markings.
- Set the committed rate or minimum and maximum rates for the default circuit.
- Configure a tunnel for FICON emulation.
• portcfg fcipcircuit - Create, modify, and delete additional FCIP circuits.
- Set or modify the committed rate or minimum and maximum rates for the circuit.
- Configure or change VLAN tagging on the default circuit.
- Set or modify additional circuit parameters.
Note In the Fabric OS v6.3.0 and later, you can configure up to 20 FCIP tunnels on the Brocade FX8-24 and up to 8 tunnels on the Brocade 7800.
Operands This command has the following operands:
slot For bladed systems only, specifies the slot number of the port to be configured, followed by a slash (/).
ve_port Specifies the number of the VE_Port associated with the tunnel configured on one of the GbE/10GbE ports to be configured. The VE_Ports are numbered 16-23 on the Brocade 7800 and 12-31 on the Brocade FX8-24 blade.
fciptunnel Creates, modifies, or deletes a Fibre Channel over IP (FCIP) tunnel.
Note the following port mapping restriction on the Brocade FX8-24: The Brocade FX8-24 has two FCIP chips and each one controls specific GbE ports and VE ports. The first FCIP chip controls VE_Ports 12-21, and the GbE ports ge0-ge9 and xge1. The second FCIP chip controls VE_Ports 22-31 and xge0. You can only use IP addresses on ge0-ge9 and xge1 for any FCIP circuits that use VE_Ports 12-21. And likewise, you can only use IP addresses on xge0 for any FCIP circuits that use VE_Ports 22-31.
The syntax for portcfg fciptunnel is as follows:
portcfg fciptunnel [slot/]ve_port options [tunnel_arguments] [circuit_arguments]
The following options are supported with fciptunnel:
create [tunnel_arguments] [circuit_arguments] Creates an FCIP tunnel and, optionally a single default circuit. If no circuit arguments are specified, no FCIP circuit will be created. While it is possible to create a tunnel without a default circuit, it is an unlikely scenario (for example, for configuration staging purposes). In most cases, you will create a tunnel with at least one configured FCIP circuit. In this case, you must specify a remote and local IP address for the circuit as well as a committed rate (or alternately, a minimum and maximum committed rate) to configure the
Fabric OS Command Reference 61953-1001764-02

portCfg2
default circuit. The default circuit created with the tunnel is automatically assigned the circuit ID 0. You can modify the default circuit with the fciptunnel modify command. To add additional circuits to an existing tunnel, use the fcipcircuit create command.
modify [tunnel_arguments] [circuit_arguments] Modifies the properties of an existing FCIP tunnel. To modify a tunnel, you must specify at least one of the tunnel or circuit parameters for the command to be effective. Any circuit attribute you change with the fciptunnel modify command affects only the FCIP circuit 0. All other circuits remain unchanged. To modify a circuit other than circuit 0, you must use the fcipcircuit modify command.
In order to create a default circuit 0 with the tunnel, you must at least specify the following circuit arguments with fciptunnel create:
remote_ip_address Specifies the IP address for the remote end of the FCIP circuit.
local_ip_address Specifies the IP address for the local end of the FCIP circuit.
The following two operands are exclusive; you can either specify a committed rate or a minimum and maximum rate for circuit 0. You can modify these parameters later with fciptunnel modify.
comm_rate Specifies the committed traffic rate on the FCIP tunnel in Kbps. The valid range is 10000 Kbps to 1000000 Kbps. There is no default. Both sides of the circuit must have matching configurations.
-b |--min-comm-rate value, -B |--max-comm-rate value Alternately you may set a minimum and a maximum for the committed rate to configure the tunnel for Adaptive Rate Limiting (ARL), which allows for a more effective sharing of bandwidth between applications. The valid range is 10000 Kbps to 1000000 Kbps. The maximum committed rate can be no larger than five times the minimum committed rate, and both sides of the circuit must have matching configurations.
Optional tunnel_arguments for fciptunnel create and modify include the following. Tunnel parameters are by default disabled. To change the default (for example, enabling FastWrite) with fciptunnel create, specify the parameter only. To modify any of these parameters with fciptunnel modify, specify the parameter and one of the values in square brackets.
-f |--fastwrite [0|1] Disables (0) or enables (1) FCIP FastWrite on the specified FCIP tunnel.
-t |--tape-pipelining [0-2] Configures Open Systems Tape Pipelining on the specified FCIP tunnel. By default, OSTP is disabled (0).
When using this operand with fciptunnel create, specify one or more of the following:
-t |--tape-pipelining Enables write-read Tape Pipelining (FCIP FastWrite must also be enabled.)
620 Fabric OS Command Reference53-1001764-02

portCfg 2
-N, --no-read-pipelining Disables tape read-pipelining. This operand is valid only with fciptunnel create and -t must be specified enabling the feature. The combination of -t and -N effectively enables tape write-pipeling.
When using this operand with fciptunnel modify specify one or more of the following:
-t |--tape-pipelining mode Modifies the Open System Tape Pipelining configuration. Specify one of the following modes:
0 Disables Tape Pipelining
1 Enables write-read Tape Pipelining (FCIP FastWrite must also be enabled).
2 Enables write-only Tape Pipelining (FCIP FastWrite must also be enabled).
-c |--compression compression_level Configures compression on the specified FCIP tunnel. By default, compression is disabled (0). Specify one of the following values:
0 Compression disabled
1 Standard compression
2 Moderate compression
, 3 Aggressive
On the Brocade FX-24, options 2 and 3 requires Fabric OS v6.4.0 or later.
-T |--tperf [0|1] Disables (0) or enables (1) TPerf test mode. Refer to portCmd help for more information regarding TPerf monitoring.
-n |--remote-wwn remote-wwn Specifies the WWN of the remote FC entity.
-d |--description string Specifies a description for the specified tunnel.
-i |--ipsec [0|1] Enables (1) or disables (0) Internet Protocol Security (IPSec) on the specified tunnel. Circuits that fall underneath a tunnel inherit the IPSec tunnel attributes. IPSec uses a predefined policy with IKEv2 for key negotiation, ESP transport mode for IPSec, and AES with 256-bit keys for Encryption (AES-GCM-ESP). You must specify a key with this option. IPSec is currently supported on the Brocade 7800 only and only with Fabric OS v6.3.1 or later.
-K |---key preshared_key Specifies the preshared key to be used for authentication. Specify a string of alphanumeric characters 32 bytes in length. This argument must be used together with --ipsec.
Fabric OS Command Reference 62153-1001764-02

portCfg2
-F |--ficon [0|1] Enables (1) or disables (0) FICON emulation on the specified FCIP tunnel. Optional FICON arguments for fciptunnel create allow you to control specific features. Use the [0|1] value only with fciptunnel modify.
--ficon-xrc [0|1] Enables (1) or disables (0) FICON XRC emulation. FICON XRC Emulation allows XRC (IBM eXtendedRemote Copy, also known as IBM z/OS Global Mirroring) to operate effectively at extended distances.
--ficon-tape-write [0|1] Enables (1) or disables (0) FICON Tape Write Pipelining. This feature improves the performance of certain applications when writing to tape over extended distances.
--ficon-tape-read [0|1] Enables (1) or disables (0) FICON Tape Read Pipelining. This feature improves performance for certain applications when reading from FICON tape over extended distances.
--ficon-tin-tir [0|1] Enables (1) or disables (0) FICON TIN/TIR emulation. This feature enhances recovery when a TIN/TIR exchange occurs as part of a channel recovery operation during tape emulation.
--ficon-dvcack [0|1] Enables (1) or disables (0) FICON Device Level Acknowledgement emulation. This feature is applicable to both FICON Disk and Tape configurations. The feature removes one network round trip for exchanges that end with a Device Level Acknowledgement frame from the device.
--ficon-read-blk [0|1] Enables (1) or disables (0) FICON read Tape Read Block ID emulation. This feature permits FICON write channel programs containing embedded read block ID commands (CCWs) with a byte count of exactly four bytes to be processed as emulated commands during write emulation processes.
--max-read-pipe value Defines the maximum number of tape read channel commands (CCWs) that can enter the read pipeline for a single device whether all the CCWs are bundled in a single channel program or in multiple channel programs. The setting has significance only for host (channel) initiated operations at this side and will not affect tape write operations initiated by hosts (channels) attached at the opposite side. Too small of a value will result in poor performance. The value should be chosen based upon the typical tape channel program that requires optimum performance. The default value is 32. The range is 1 to 100.
--max-write-pipe value Defines the maximum number of tape write channel commands (CCWs) that can enter the write pipeline for a single device whether all the CCWs are bundled in a single channel program or in multiple channel programs. The setting has significance only for host (channel) initiated operations at this side and will not affect tape write operations initiated
622 Fabric OS Command Reference53-1001764-02

portCfg 2
by hosts (channels) attached at the opposite side. Too small of a value will result in poor performance. The value should be chosen based upon the typical tape channel program that requires optimum performance. The default value is 32. The range is 1 to 100.
--max-read-devs value Defines the maximum number of concurrent emulated tape read operations. As concurrency increases, the value of emulation decreases. Excessive concurrency has the potential to oversubscribe packet data memory. The setting has significance only for host (channel) initiated operations at this side and will not affect tape read operations initiated by hosts (channels) attached at the opposite side. The default value is 16. The range is 1 to 32.
--max-write-devs value Defines the maximum number of concurrent emulated tape write operations. As concurrency increases, the value of emulation decreases. Excessive concurrency has the potential to oversubscribe packet data memory. The setting has significance only for host (channel) initiated operations at this side and will not affect tape write operations initiated by hosts (channels) attached The default value is 16. The range is 1 to 32.
--write-timer value Defines a time limit for pipelined write chains. This value is specified in milliseconds (ms). If a pipelined write chain takes longer than this value to complete, the ending status for the next write chain will be withheld from the channel. This limits processing to what the network and device can support. Too small a value limits pipelining performance. Too large a value results in too much data being accepted for one device on a path. The default value is 300 milliseconds (ms). The range is 100 to 1500.
--write-chain value Defines the maximum amount of data that can be contained in a single CCW chain. If this value is exceeded, emulation is suspended. The default value is 3 MB (3000000 bytes) The range is 1 MB to 5 MB.
--oxid-base value Defines the base value of an entry pool of 256 OXIDs supplied to emulation-generated exchanges. It should fall outside the range used by FICON channels and devices to avoid conflicts. The default value is 0x8000. The range is 0x0000 to 0xF000. Note that the default value has changed, and you no longer need to change the default value for any configuration.
--ficon-debug value Defines optional debug flags. The default value is 0xF7C80000. This parameter is primarily for use by technical support personnel.
Optional FCIP circuit arguments for fciptunnel create and modify include the following.
-a |--admin-status [0|1] Enables (1) or disables (0) the circuit. Admin status is by default disabled. Use -a |--admin-status to enable the feature when creating a circuit. Use -a |--admin-status 0|1 when modifying a circuit.
Fabric OS Command Reference 62353-1001764-02

portCfg2
-s |--sack 0|1 Disables or enables selective acknowledgement code (SACK) on the FCIP circuit. Note that SACK is by default enabled. Use -s | --sack to disable the feature when creating a circuit. Use -s | --sack 0 to disable and -s | --sack 1 to enable SACK when modifying a circuit.
-k |--keepalive-timeout timeout Specifies the keep alive timeout in milliseconds. The valid range is 500 ms to 720000 ms. If the tunnel does not already have FICON Emulation enabled, circuits created on the tunnel default to 10000 ms (10 seconds) for the FCIP Trunking keep alive timeout. If FICON emulation is enabled on the FCIP Tunnel when a circuit is created, the keep alive timeout defaults to 1000 ms (1 seconds.)
-x |--metric metric Specifies the metric for the configured circuit. The valid range is 0 to 1. The default value is 0. A lower metric assigns a higher priority to the circuit. As data is flowing through the FCIP tunnel, it automatically traverses the lowest metric cost circuits. For example, if a tunnel has four circuits, three of which are set to a metric of 0 and one is set to a metric of 1, all data will flow over the metric 0 circuits. If all of the metric 0 circuits go down, traffic will run over the metric 1 circuits. This parameter is meaningful only, if you configure more than one circuit.
-m |--min-retrans-time time Specifies the minimum time interval in milliseconds between retransmits. The valid range is 20 ms to 5000 ms. The default value is 100 ms.
-r |--max-retransmits retransmissions Specifies the maximum number of retransmissions. The valid range is 1 to 16. The default value is 8.
-v |--vlan-tagging vlan_id Creates an FCIP tunnel with VLAN Tagging and Class of Service (CoS). Specify a vlan_id in the range between 1 and 4094. If any other VLAN option is specified, the VLAN ID must also be specified. Refer to the IEEE 802.1p specification for more information.
You can configure VLAN tags when you create a circuit or after the fact by modifying a circuit. Note that adding or modifying the VLAN configuration after a circuit has been created is a disruptive operation.
You may also specify VLAN tagging per IP interface with the portCfg vlantag command.The VLAN configuration at the IP interface level is for non-data path traffic only. If the data path traffic is to be tagged, it must be done through the VLAN tagging option with the fcipcircuit create or modify command. Note that the circuit VLAN configuration takes priority over the IP interface VLAN configuration.
The following operands are optional with VLAN tagging:
--l2cos-f-class l2cos Specifies the Layer 2 Class of Service (L2CoS) value for F-Class Traffic. This priority setting controls connections between switches. The range is 0 to 7. The default is 0.
624 Fabric OS Command Reference53-1001764-02

portCfg 2
--l2cos-high l2cos Specifies the L2CoS value for High Priority Traffic. The range is 0 to 7. The default is 0.
--l2cos-medium l2cos Specifies the L2CoS value for Medium Priority Traffic. The range is 0 to 7. The default is 0.
--l2cos-low l2cos Specifies the L2CoS value for Low Priority Traffic. The range is 0 to7. The default is 0.
--dscp-f-class dscp Specifies the DSCP value for F-Class Traffic. The range is 0 to 63. The default value is 0. DSCP is supported only in Fabric OS v6.4.0 and later.
--dscp-high dscp Specifies the DSCP value for High Priority. The range is 0 to 63. The default value is 0. DSCP is supported only in Fabric OS v6.4.0 and later.
--dscp-medium dscp Specifies the DSCP value for Medium Priority. The range is 0 to 63. The default value is 0. DSCP is supported only in Fabric OS v6.4.0 and later.
--dscp-low dscp Specifies he DSCP value for Low Priority. The range is 0 to 63. The default value is 0. DSCP is supported only in Fabric OS v6.4.0 and later.
delete tunnel_ID Deletes the specified FCIP tunnel. This command deletes all associated circuits created with the fciptunnel or fcipcircuit commands. Use the portShow command to display all FCIP tunnels and their associated circuits.
fcipcircuit Creates an FCIP circuit on an existing tunnel. Use this command to configure additional circuits. The circuit-specific parameters are optional. The syntax for portcfg fcipcircuit is as follows:
portcfg fcipcircuit [slot/]ve_port option circuit_ID options [arguments] [optional_arguments]
The following options and arguments are supported with fcipcircuit:
create circuit_ID remote_ip_addr local_ip_addr comm_rate [circuit_arguments]
Creates an FCIP circuit. You must specify the following parameters when creating an additional circuit:
circuit_ID Specifies a numeric identifier for the circuit. The circuit ID is an integer value between 0-9 for both the Brocade FX8-24 and the Brocade 7800.
remote_ip_addr Specifies the IP address for the remote end of the FCIP circuit.
local_ip_addr Specifies the IP address for the local end of the FCIP circuit.
The following two operands are mutually exclusive:
Fabric OS Command Reference 62553-1001764-02

portCfg2
comm_rate Specifies the committed traffic rate on the FCIP tunnel in Kbps. The valid range is 10000 Kbps to 1000000 Kbps. There is no default. Both sides of the tunnel must have matching configurations.
-b |--min-comm-rate value, -B |--max-comm-rate value Alternately you can set a minimum and a maximum for the committed rate to configure the tunnel for Adaptive Rate Limiting (ARL), which allows for a more effective sharing of bandwidth between applications. The valid range is 10000 Kbps to 1000000 Kbps. The maximum committed rate can be no larger than five times the minimum committed rate, and both sides of the circuit must have matching configurations.
modify [circuit_ID] [circuit_arguments] Modifies the properties of an existing FCIP circuit. To modify a circuit, you must specify at least one of the optional circuit parameters for the command to be effective. Any circuit attribute you change with the fcipcircuit modify command affects only the specified FCIP circuit. All other circuits remain unchanged.
Refer to fciptunnel create and modify for a listing of optional circuit arguments and their descriptions.
delete circuit_ID Deletes the specified FCIP circuit.
Examples To create an FCIP tunnel (and default circuit 0) with a committed rate of 10000 Kbps on a Brocade FX8-24:
switch:admin>portcfg fciptunnel 1/12 create 20.10.12.34 20.09.14.57 10000Operation succeeded
To create another FCIP circuit (circuit 1) on the same switch:
switch:admin>portcfg fcipcircuit 1/12 create 1 20.10.12.35 20.09.14.60 10000Operation succeededswitch:admin> portshow fcipcircuit 1/12 1-------------------------------------------Circuit ID: 1/12.1 Circuit Num: 1 Admin Status: Enabled Oper Status: In Progress Remote IP: 20.10.12.35 Local IP: 20.09.14.60 Metric: 0 Min Comm Rt: 10000 Max Comm Rt: 10000 SACK: On Min Retrans Time: 100 Max Retransmits: 8 Keepalive Timeout: 5000 Path MTU Disc: 0 VLAN ID: (Not Configured) L2CoS: (VLAN Not Configured) DSCP: F: 0 H: 0 M: 0 L: 0 Flags: 0x00000000
626 Fabric OS Command Reference53-1001764-02

portCfg 2
To set the compression rate to ‘moderate’ on the tunnel:
switch:admin> portcfg fciptunnel 1/12 modify -c 2Operation succeeded
To enable and configure FICON emulation on the tunnel:
switch:admin>portcfg fciptunnel 1/12 modify -F 1 --ficon -xrc 1Operation succeeded
To configure FCIP FastWrite and Tape Pipelining on the tunnel:
switch:admin>portcfg fciptunnel 1/12 modify -f 1 -t 1Operation succeeded
To delete circuit 1:
switch:admin>portcfg fcipcircuit 1/12 delete 1Operation succeeded
To configure VLAN tagging on a tunnel:
1. Create a tunnel with VLAN tagging set.
switch:admin> portcfg fciptunnel 16 create 192.168.2.20 192.168.2.10 100000 -v 100Operation Succeeded
2. Create a circuit with VLAN tagging set.
switch:admin> portcfg fcipcircuit 16 create 1 192.168.2.21 192.168.2.11 100000 -v 200Operation Succeeded
3. Modify an existing circuit to change the VLAN tag and L2 CoS levels.
switch:admin> portcfg fcipcircuit 16 modify 0 -v 300 --l2cos-f 7 --l2cos-h 5 --l2cos-m 3 --l2cos-l 1!!!! WARNING !!!!Modify operation can disrupt the traffic on the fcipcircuit specified for a brief period of time. This operation will bring the existing circuit down (if circuit is up) before applying new configuration.
Continue with Modification (Y,y,N,n): [ n] yOperation Succeeded
4. Modify existing circuit to change DSCP marking values
switch:admin> portcfg fcipcircuit 16 modify 0 --dscp-f 32 --dscp-h 16 --dscp-m 8 --dscp-l 4Operation Succeeded
5. Display the tunnel configuration and circuit values.
switch:admin> portshow fciptunnel 16 -c-------------------------------------------Tunnel ID: 16 Tunnel Description: Admin Status: Enabled Oper Status: In Progress Compression: Off Fastwrite: Off Tape Acceleration: Off TPerf Option: Off IPSec: Disabled Remote WWN: Not Configured Local WWN: 10:00:00:05:1e:c3:f0:16
Fabric OS Command Reference 62753-1001764-02

portCfg2
Peer WWN: 00:00:00:00:00:00:00:00 Circuit Count: 2 Flags: 0x00000000 FICON: Off ------------------------------------------- Circuit ID: 16.0 Circuit Num: 0 Admin Status: Enabled Oper Status: In Progress Remote IP: 192.168.2.20 Local IP: 192.168.2.10 Metric: 0 Min Comm Rt: 100000 Max Comm Rt: 100000 SACK: On Min Retrans Time: 100 Max Retransmits: 8 Keepalive Timeout: 10000 Path MTU Disc: 0 VLAN ID: 300 L2CoS: F: 7 H: 5 M: 3 L: 1 DSCP: F: 32 H: 16 M: 8 L: 4 Flags: 0x00000000------------------------------------------- Circuit ID: 16.1 Circuit Num: 1 Admin Status: Enabled Oper Status: In Progress Remote IP: 192.168.2.21 Local IP: 192.168.2.11 Metric: 0 Min Comm Rt: 100000 Max Comm Rt: 100000 SACK: On Min Retrans Time: 100 Max Retransmits: 8 Keepalive Timeout: 10000 Path MTU Disc: 0 VLAN ID: 200 L2CoS: F: 0 H: 0 M: 0 L: 0 DSCP: F: 0 H: 0 M: 0 L: 0 Flags: 0x00000000switch:admin>
Function Commands supported only on the Brocade 7500/7500E and the Brocade FR4-18i platforms
Synopsis portcfg action [slot/] ge_port arguments
Description Use this command to manage configuration parameters for ports and Gigabit Ethernet (GbE) ports on the Brocade 7500 and 7500E FC switches and on the FR4-18i FC blade. The following commands are exclusive to these platforms.
• portcfg arp - Add and delete address resolution protocol (ARP) entries. Flush ARP table.
• portcfg fciptunnel - Create, modify, and delete Fibre Channel over IP (FCIP) tunnels.
- Delete, reset, and modify QoS mappings on an existing tunnel.
- Create or modify a tunnel with VLAN tagging and Class of Service (CoS).
- Create or modify a tunnel with Tape read/write Pipelining enabled or disabled.
628 Fabric OS Command Reference53-1001764-02

portCfg 2
- Create or modify a tunnel with Byte Streaming enabled or disabled.
• portcfg fastwrite - Configure the FC port for FC FastWrite.
• portcfg ficon - Manage FICON emulation in an FCIP tunnel.
Operands This command supports the following operands:
slot For bladed systems only, specifies the slot number of the port to be configured, followed by a slash (/).
ge_port Specifies the number of the port to be configured, relative to its slot for bladed systems. The GbE ports on the Brocade 7500/7500E, and FR4-18i are numbered ge0 - ge1. Use the switchShow command for a list of valid ports.
arp Optionally adds entries to the address resolution protocol (ARP) table or deletes entries from ARP table. Can also be used to flush the entire table. The syntax for portcfg arp is as follows:
portcfg arp [slot/][ge]port options arguments
Valid options and arguments for arp include:
add ipaddr macaddr
Adds a static ARP entry to the ARP table. Specify an IP address and a MAC address for each entry. Use portShow arp with the -lmac option to get the MAC address.
delete ipaddr Deletes a static ARP entry from the ARP table. Only the IP address must be specified to delete the entry.
flush Flushes the ARP table. Only dynamic entries can be flushed, static entries cannot be cleared.
fciptunnel Creates, modifies, or deletes a Fibre Channel over IP (FCIP) tunnel. You can configure up to a maximum of eight FCIP tunnels per GbE port. The syntax for portCfg fciptunnel is as follows:
portcfg fciptunnel [slot/][ge]port options arguments [optional_arguments]
The following options and arguments are supported with fciptunnel:
create tunnel_id dest_ipaddr src_ipaddr comm_rate Creates an FCIP tunnel. You must specify a tunnel ID, destination and source IP address, and committed rate when creating an FCIP tunnel. Other configuration parameters are optional, and can be added later.
tunnel_id Specifies the FCIP tunnel on the GbE port. Valid values are 0-7.
dest_ipaddr Specifies the IP address for the remote end of the FCIP tunnel.
src_ipaddr Specifies the IP address for the local end of the FCIP tunnel.
comm_rate Specifies the committed traffic rate on the FCIP tunnel in Kbps. Valid range is 1,544 to 1,000,000. Specify 0 for an uncommitted tunnel. Uncommitted tunnels compete for bandwidth. Changing comm_rate is potentially disruptive.
Fabric OS Command Reference 62953-1001764-02
portCfg2
modify tunnel_id [arguments] Modifies the properties of an existing FCIP tunnel. This operation disrupts the traffic on the specified FCIP tunnel for a brief period of time. If IPSec is enabled on the FCIP tunnel, the tunnel cannot be modified. To modify the tunnel attributes, you must delete and re-create the tunnel.
delete tunnel_id Deletes the specified FCIP tunnel.
Optional arguments for fciptunnel create and modify include the following. Tunnel parameters are by default disabled. To change the default (for example, enabling FastWrite) with fciptunnel create, specify the parameter only. To modify any of these parameters with fciptunnel modify, specify the parameter and one of the values in square brackets.
-n remote_wwn Specifies the remote-side FC entity WWN.
-d description Specifies a descriptor for the FCIP tunnel, for example, "Tunnel 0 to San Jose Office".
-c [0|1] Disables (0) or enables (1) compression on the specified tunnel. By default, compression is disabled.
-f [0|1] Disables (0) or enables (1) FCIP FastWrite on the specified tunnel. By default, FCIP FastWrite is disabled.
-t [0|1] Disables (0) or enables (1) read/write Tape Pipelining on the existing tunnel (requires FCIP FastWrite to be enabled).
-k timeout Specifies the keep alive timeout, in seconds. Timeout values are 8 to 7,200. The default is 10. If Tape Piplelining is enabled, the minimum supported value is 80.
-M [0|1] Disables (0) or enables (1) default VC QoS mapping on the specified tunnel. By default VC QoS mapping is disabled. There are two ways of prioritizing network traffic over FCIP tunnels: Differentiated Services Code Point (DSCP) and Layer 2 Class of Service (L2CoS). If the -M option is set, the VC on the FCIP outbound frame is mapped to both a DSCP and L2CoS value. These default values can be modified on a per-FCIP tunnel basis with the fciptunnel qosmap option. The -M option can be turned on or off any time. QoS map settings are unaffected by the -M option.
-q control-dscp Specifies the DSCP (DiffServ Code Point) marking used for the TCP connection of the FCIP tunnel. This operand is optional. The range is 0 to 63. The default value is 0.
-Q data-dscp Specifies the DSCP (DiffServ Code Point) marking used for the data TCP connection of the FCIP tunnel. This operand is optional. The range is 0 to 63. The default value is 0.
-m time Specifies the minimum retransmit time, in milliseconds. The range is 20ms to 5000ms; the default value is 100ms.
-r retransmission Specifies the maximum retransmissions. Values are 1 to 16. The default value is 8. If Tape Piplelining is enabled, the default value is calculated based on the minimum retransmit time to ensure that the TCP connection does not time out before the host times out. The specified value must be greater than the calculated value.
630 Fabric OS Command Reference53-1001764-02

portCfg 2
-s [0|1] Disables or enables selective acknowledgement code (SACK) on the specified FCIP tunnel. Note that SACK is by default enabled. Use -s to disable the feature when creating a tunnel. Use -s 0 to disable and -s 1 to enable SACK when modifying a tunnel.
-t [0|1] Disables (0) or enables (1) read/write Tape Piplelining on the specified tunnel (requires FCIP FastWrite to be enabled).
-v vlan_id Creates an FCIP tunnel with VLAN Tagging and Class of Service (CoS). Specify a vlan_id in the range between 1 and 4094. There is no default. If any other VLAN option is specified, the VLAN ID must also be specified.
The following operands are optional with VLAN tagging:
-p Control l2cos Specifies the L2 Class of Service/Priority for the FCIP control connection as defined in the IEEE 802.1p specification. The range is 0 to 7. The default is 0.
-P l2cos Specifies the L2 Class of Service/Priority for the FCIP data connection as defined in the IEEE 802.1p specification. The range is 0 to 7. The default is 0.
-bstr [0|1] Enables (1) or disables (0) Byte Streaming on the specified tunnel. Byte streaming allows the Brocade switch to communicate with third party WAN optimization hardware. The WAN optimization hardware connects to the GbE ports configured for FCIP.
-ipsec policy _ID Specifies the Internet Protocol security (IPSec) policy number to be used on the specified tunnel. This option must be used together with -ike and -key.
-ike policy_ID Specifies the Internet Key Exchange (IKE) policy number to be used on the specified tunnel. This option must be used together with -ipsec and -key.
-key preshared_key Specifies the preshared key to be used during IKE authentication. Specify a double-quoted string of alphanumeric characters between 12 and 32 bytes in length. This argument must be used together with -ike and -ipsec.
NOTE: Only a single IPSec-enabled tunnel can be configured on a port. No other tunnels (IPSec or otherwise) can be configured on the same port. Jumbo frames (packets > 1500 bytes) are not supported on secure tunnels. Only a single route is supported on an interface with a secure tunnel.
-b comm_rate Modifies the committed traffic rate on the FCIP tunnel in Kbps. Valid range is 1,544 to 1,000,000. Specify 0 for an uncommitted tunnel. Uncommitted tunnels compete for bandwidth. Changing the comm_rate is potentially disruptive. This operand is valid only with the fciptunnel modify command.
Fabric OS Command Reference 63153-1001764-02

portCfg2
qosmap Modifies (or resets to default), the VC to QoS mapping for a particular FCIP tunnel. This table can be modified at any time without bringing down the tunnel. The FCIP tunnel must be configured with the fciptunnel create/modify -M option before the actual mapping occurs.
The following operands are supported with the fciptunnel qosmap option:
tunnel_id Specifies the tunnel ID. The valid range is 0 to 7.
-default Resets or sets the VC QoS map to default values.
-delete Deletes the associated QoS map configuration file. You must delete QoS mappings before downgrading to pre-v6.0.0 firmware versions that do not support QoS mapping. This command removes the file from the configuration flash memory only. The file is automatically reset to defaults if later used or modified.
vc_num When modifying the VC QoS map, specifies the virtual channel ID for which the QoS map is modified. Valid values are 0 - 15.
When specifying vc_num, either the -Q or the -P option or both must be specified.
-Q dscp Specifies the Differentiated Services Code Point (DSCP) value to be modified. Use the portShow fciptunnel geport all -qosmap command to display current values. Supported range is 0 to 63.
-P l2cos Specifies the L2 Class Of Service (COS) Tagging value. Use the portShow fciptunnel geport all -qosmap command to display current values. Supported range is 0 to 7.
fastwrite Configures the FC port for FC FastWrite. Enables or disables FC FastWrite between two Brocade 7500 switches or two Brocade chassis with FR4-18i blades connected by Fibre Channel ISLs. FC FastWrite mitigateslatency effects on SCSI writes, and improves throughputover a high-latency link. The switch or blade must first be enabled for FC FastWrite using fastWriteCfg. You can also use this command to list all ports configured for FC FastWrite. The syntax for portcfg fastwrite is as follows:
portcfg fastwrite [slot/]port mode
Valid modes for fastwrite are:
--enable Enables FC FastWrite on the specified port.
--disable Disables FC FastWrite on the specified port.
ficon Use this command to enable or disable FICON emulation in an FCIP tunnel and modify associated parameters onan FCIP tunnel on a VE_Port. A feature key is required to enable any of the FICON emulation processing. The tunnel must be down or disabled to issue and process the FICON commands. The results of this command are persistent. The syntax for portCfg ficon is as follows:
portCfg ficon [slot/]Ge_Port tunnel_Id config |delete [FeatArgs] [ParamArgs]
632 Fabric OS Command Reference53-1001764-02

portCfg 2
This command has the following operands:
tunnel_Id Specifies the tunnel ID for the configuration change. The valid range is 0 to 7.
config Creates or modifies a FICON configuration.
delete Deletes an existing FICON configuration.
The following optional feature arguments are supported with the config and delete options. These configurations are persistent.
-x 1|0 Enables (1) or disables (0) XRC emulation. FICON XRC Emulation allows XRC (IBM eXtendedRemote Copy, also known as IBM z/OS Global Mirroring) to operate effectively at extended distances.
-w 1|0 Enables (1) or disables (0) Tape Write Pipelining. This feature improves the performance of certain applications when writing to tape over extended distances.
-r 1|0 Enables (1) or disables (2) Tape read pipelining. This feature improves performance for certain applications when reading from FICON tape over extended distances.
-t 1|0 Enables or disables TIN/TIR emulation. This feature enhances recovery when a TIN/TIR exchange occurs as part of a channel recovery operation during tape emulation.
-l 1|0 Enables (1) or disables (0) Device Level Acknowledgement emulation. This feature is applicable to both FICON Disk and Tape configurations. The feature removes one network round trip for exchanges that end with a Device Level Acknowledgement frame from the device.
-i 1|0 Enables (1) or disables (0) FICON tape read block ID. This feature permits FICON write channel programs containing embedded read block ID commands (Cadres) with a byte count of exactly four bytes to be processed as emulated commands during write emulation processes.
The following optional parameter-specific arguments are supported with the config and delete options.
-a |--wrtMaxPipe value Defines the maximum number of tape write channel commands (CCWs) that can enter the write pipeline for a single device whether all the CCWs are bundled in a single channel program or in multiple channel programs. The setting has significance only for host (channel) initiated operations at this side and does not affect tape write operations initiated by hosts (channels) attached at the opposite side. Too small of a value results in poor performance. The value should be chosen based upon the typical tape channel program that requires optimum performance. The default value is 32. The range is 1 to 100.
-b |--rdMaxPipe value Defines the maximum number of tape read channel commands (CCWs) that can enter the read pipeline for a single device whether all the CCWs are bundled in a single channel program or in multiple channel programs. The setting has significance only for host (channel) initiated operations at this side and does not affect tape write operations initiated
Fabric OS Command Reference 63353-1001764-02

portCfg2
by hosts (channels) attached at the opposite side. Too small of a value results in poor performance. The value should be chosen based upon the typical tape channel program that requires optimum performance. The default value is 32. The range is 1 to 100.
-c |--wrtMaxDevs value Defines the maximum number of concurrent emulated tape write operations. As concurrency increases, the value of emulation decreases. Excessive concurrency has the potential to oversubscribe packet data memory. The setting has significance only for host (channel) initiated operations at this side and does not affect tape write operations initiated by hosts (channels) attached. The default value is 16. The range is 1 to 32.
-g |--rdMaxDevs value Defines the maximum number of concurrent emulated tape read operations. As concurrency increases, the value of emulation decreases. Excessive concurrency has the potential to oversubscribe packet data memory. The setting has significance only for host (channel) initiated operations at this side and does not affect tape read operations initiated by hosts (channels) attached at the opposite side. The default value is 16. The range is 1 to 32.
-e |--wrtTimer value Defines a time limit for pipeline write chains. This value is specified in milliseconds (ms). If a pipeline write chain takes longer than this value to complete, the ending status for the next write chain is withheld from the channel. This limits processing to what the network and device can support. Too small a value limits pipelining performance. Too large a value results in too much data being accepted for one device on a path. The default value is 300 milliseconds (ms). The range is 100 to 1500.
-n |--wrtMaxChains value Defines the maximum amount of data that can be contained in a single CCW chain. If this value is exceeded, emulation is suspended. The default value is 3 MB (3000000 bytes) The range is 1 MB to 5 MB.
-o |--oxidBase value Defines the base value of an entry pool of 256 OXIDs supplied to emulation-generated exchanges. It should fall outside the range used by FICO channels and devices to avoid conflicts. The default value is 0x1000. The range is 0x0000 to 0xF000.
-f |--dbgFlags value Defines optional debug flags. The default is 0xF7C80000. This parameter is primarily for use by technical support personnel.
Examples To add an ARP entry for an IP address (the second parameter is the MAC address):
switch:admin> portcfg arp ge0 add 192.168.255.25 00:01:02:03:04:60Operation Succeeded
To create an FCIP tunnel using an IPV4 address:
switch:admin> portcfg fciptunnel ge0 create 2 192.168.255.2 192.168.255.20 100000Operation Succeeded
634 Fabric OS Command Reference53-1001764-02

portCfg 2
To create an FCIP tunnel using IPV6:
switch:admin> portcfg fciptunnel 8/ge0 create 0 4000::1234 2000::800:3333:1234 0Operation Succeeded
To modify the committed rate and turn on compression on an existing FCIP tunnel:
switch:admin> portcfg fciptunnel 3/ge0 modify 6 -b 100000 -c 1Operation Succeeded
To create an FCIP tunnel with VC QoS mapping (default) turned on:
switch:admin> portcfg fciptunnel ge1 create 1 192.168.200.109 192.168.200.108 0 -M
To modify the default VC QoS map settings for VC 1:
switch:admin> portcfg fciptunnel ge1 qosmap 1 3 -Q 29
switch:admin> portcfg fciptunnel ge1 qosmap 1 3 -Q 28 -P 7
switch:admin> portcfg fciptunnel ge1 qosmap 1 3 -P 2
To return the VC QoS map settings to default values:
switch:admin> portcfg fciptunnel ge1 qosmap 1 -default
To create an FCIP tunnel with a minimum retransmission time of 20 ms, a VLAN ID of 100, and an L2 CoS priority setting of 7:
switch:admin> portcfg fciptunnel 8/ge0 create 1 192.168.10.1 192.168.20.1 0 -m 20 -v 100 -p 3 -P 7Operation Succeeded
To create an FCIP tunnel with FastWrite and read/write Tape Pipelining enabled:
switch:admin> portcfg fciptunnel 3/ge0 create 6 10.1.1.44 192.168.131.124 155000 -f -t
To enable FCIP FastWrite and read/write Tape Pipelining on an existing tunnel:
switch:admin> portcfg fciptunnel ge1 modify 0 -f 1
To create an FCIP tunnel with Byte Streaming enabled:
switch:admin> porrtcfg fciptunnel geo create 1 172.68.100.88 192.168.200.108 0 -f1 -bstr
To disable Byte Streaming on an existing tunnel:
switch:admin> portcfg fciptunnel ge0 modify 1-bstr 0
To configure an FCIP Tunnel 1 with FICON XRC and FICON write Tape Pipelining emulation features enabled using all default parameter arguments:
switch:admin> portcfg ficon ge0 1 -x 1 -w 1
Function Commands supported only on the Brocade 7500/7500E switches
Synopsis portcfg inbandmgmt ge_port option arguments
Description Use this command to configure IP addresses and routes for the CP or GbE port inband management interfaces on the Brocade 7500. Inband management allows a management station to communicate with the CP through GbE ports.
Fabric OS Command Reference 63553-1001764-02

portCfg2
Operands This command has the following operands:
inbandmgmt Configures IP addresses and routes for the CP or GbE port inband management interfaces. Inband management allows a management station to communicate with the CP through GbE ports.
Valid options and arguments for inbandmgmt are:
ipaddrset cp | ge ip_address netmask Configures the IP address and netmask for a CP or a GbE inband management interface. This command requires specifying the type of interface (cp or ge), an IPv4 address, and the subnet mask. For each management interface, configure two IP addresses, one for the CP and one for the GbE port.
ipaddrdel cp | ge ip_address Deletes the IP address for a CP or GE inband management interface. Specify the type of interface (cp or ge) and the IPv4 address to be deleted.
cp | ge Specifies the interface type as either CP or port processor. This operand is required when configuring or deleting an IP address.
ip_address Specifies the IP address for the inband management interface. The IP address must be in IPv4 format, followed by the subnet mask. IPv6 addresses are not supported. This operand is required with the ipaddrset and ipaddrdel options.
netmask Specifies the subnet mask for the IP address in a.b.c.d format. This operand is required only with the ipaddrset option.
routeadd destination netmask [gateway] Adds a route to the management station for an existing CP or GbE port (CP or GbE designation is made automatically). You must specify the destination IP address and the subnet mask when adding a management route. You must create the IP addresses for the CP and the GbE port interfaces before you can add a route to the routing table. Use portshow iproute to display existing routes. Use portshow inbandmgmt to display the management interface status and IP addresses.
routedel destination netmask Deletes a management route from an internal CP or a GbE port interface. You must specify the destination and the subnet mask when deleting a management route.
destination Specifies the destination for the route. This is the IP address of the management station. This operand is required when adding or deleting a route.
netmask Specifies the subnet mask. This operand is required when adding or deleting a route.
gateway Specifies the gateway IP address. This operand is optional if the destination is in the same subnet as one of the IP interface addresses. If the destination is not part of the same subnet, you must specify a gateway IP address.
636 Fabric OS Command Reference53-1001764-02

portCfg 2
Examples To configure the internal addresses for the CP and GbE port inband management interfaces:
switch:admin> portcfg inbandmgmt ge0 ipaddrset cp 192.168.255.1 255.255.255.0
switch:admin> portcfg inbandmgmt ge0 ipaddrset ge 192.168.255.2 255.255.255.0
To add a route to a management station that is on the same subnet as the management interface IP addresses in the previous example:
switch:admin> portcfg inbandmgmt ge0 routeadd 192.168.3.0 255.255.255.0To configure a route for a management station that is on a different subnet (note the added gateway IP address):
switch:admin> portcfg inbandmgmt ge0 routeadd 192.168.3.0 255.255.255.0 192.168.1.250
See Also portCfgShow, portCmd, portShow, switchShow, configure, fastWriteCfg
Fabric OS Command Reference 63753-1001764-02

portCfgAlpa2
portCfgAlpa
Configures the AL_PA offset on a specified port or range of ports.
Synopsis portcfgalpa [slot/]port, mode
Description Use this command to set the Arbitrated Loop Physical Address (AL_PA) offset on a port or a range of ports to either 0x0 (default) or 0x13.
Changes made by this command are persistent across switch reboots and power cycles.
Note The execution of this command is subject to Virtual Fabric or Admin Domain restrictions that may be in place. Refer to chapter 1, "Using Fabric OS commands" and Appendix A, "Command Availability" for details.
The Fabric OS port configuration commands are not supported on FCoE ports.
Operands When invoked without operands, this command displays the usage. The following operands are supported:
slot For bladed systems only, specify the slot number of the port to be configured, followed by a slash (/).
port Specify the number of the port to be configured, relative to its slot for bladed systems. Use the switchShow command for a list of valid ports.
mode Specify a value of 1 to set the AL_PA to 0x13. A value of 0 sets the default AL_PA to 0x0. This operand is required.
Examples To configure a port with AL_PA 0x0 (default):
switch:admin> portcfgalpa 1/3 0
To configure a port with AL_PA 0x13:
switch:admin> portcfgalpa 1/3 1
See Also portCfgShow
638 Fabric OS Command Reference53-1001764-02

portCfgAutoDisable 2
portCfgAutoDisable
Name Enables or disables the port autodisable flag.
Synopsis portcfgautodisable --enable [slot/]port[-port]
portcfgautodisable --disable [slot/]port[-port]
Description Use this command to enable or disable the autodisable feature for a specified port or a range of ports. If the ports are already in the requested configuration, no action is taken. If a range of ports is specified, some of which are already in the requested configuration, a notification is generated, and no action is taken for those ports only. All other ports in the specified range are updated. Execution of this command is nondisruptive.
The default behavior of the autodisable feature is to be disabled for all ports unless you specifically enable the feature.
When executed without operands, this command displays the usage. Use the portCfgShow command to determine if the port autodisable flag is on or off.
The port autodisable feature minimizes traffic disruption introduced in some instances when automatic port recovery is performed. When the autodisable flag is set, the specified ports disable automatically under any conditions that would cause the port to reinitialize. Such conditions include loss of sync, loss of signal, OLS, or NOS. Note that a link reset does not cause a port autodisable. When a port is in FICON Management Server (FMS) mode, an autodisabled port remains persistently disabled across HA failover. In all cases, the automatically disabled port may be brought back into service using the portEnable command.
Note The execution of this command is subject to Virtual Fabric or Admin Domain restrictions that may be in place. Refer to chapter 1, "Using Fabric OS commands" and Appendix A, "Command Availability" for details.
The Fabric OS port configuration commands are not supported on FCoE ports.
Operands This command has the following operands:
--enable Enables the autodisable feature on the specified ports.
--disable Disables the autodisable feature on the specified ports.
slot Specifies the slot number on bladed systems, followed by a slash (/).
port[-port] Specifies a port or a port range, relative to the slot number on bladed systems, for example, 5/17-29.
Examples To enable the autodisable feature on a single port:
switch:admin> portcfgautodisable --enable 1
To enable the autodisable feature on a port, on which this feature is already enabled:
switch:admin> portcfgautodisable --enable 8 Same configuration for port 8
To enable the autodisable feature on a port range.
switch:admin> portcfgautodisable --enable 0-8
Fabric OS Command Reference 63953-1001764-02

portCfgAutoDisable2
To enable the auto-disable feature on a range of ports, some of which were previously enabled (The following example enables port 4):
switch:admin> portcfgautodisable --enable 2-4Same configuration for port 2Same configuration for port 3
To disable the auto-disable feature on a port range.
switch:admin> portcfgautodisable --disable 0-8
See Also portCfgShow, portEnable
640 Fabric OS Command Reference53-1001764-02

portCfgCreditRecovery 2
portCfgCreditRecovery
Enables or disables credit recovery on a port.
Synopsis portcfgcreditrecovery --disable | --enable [slot/]port
Description Use this command to enable or disable credit recovery on a port.
The credit recovery feature enables credits or frames to be recovered. Only ports configured as long distance ports can utilize the credit recovery feature. The default credit recovery configuration is enabled.
Note The execution of this command is subject to Virtual Fabric or Admin Domain restrictions that may be in place. Refer to chapter 1, "Using Fabric OS commands" and Appendix A, "Command Availability" for details.
The Fabric OS port configuration commands are not supported on FCoE ports.
Operands This command has the following operands:
--disable Disables credit recovery configuration on the specified port.
--enable Enables credit recovery configuration on the specified port.
--help Displays the command usage.
Examples To enable credit recovery on a port:
switch:admin> portcfgcreditrecovery --enable 3/15
To disable credit recovery on a port:
portcfgcreditrecovery --disable 3/15
See Also portCfgShow
Fabric OS Command Reference 64153-1001764-02

portCfgDefault2
portCfgDefault
Resets the port configuration to factory default values.
Synopsis portcfgdefault [slot/][ge]port
Description Use this command to reset all configuration values on a specified port to their factory defaults. This command persistently disables ports capable of routing, which is the factory default value. Use the portCfgShow command to display the port configuration.
This command does not change the state of a port. To change the state of an E_Port, use either switchDisable/switchEnable or portDisable/portEnable.
When issued on a Brocade 8000 in Access Gateway mode, this command resets the buffer limited mode on all N_Ports. It also returns the maximum NPIV per port login limit to the default value of 126 on all ports, including FCoE ports.
Note The execution of this command is subject to Virtual Fabric or Admin Domain restrictions that may be in place. Refer to chapter 1, "Using Fabric OS commands" and Appendix A, "Command Availability" for details.
Operands This command has the following operands:
slot For bladed systems only, specifies the slot number of the port to be reset, followed by a slash (/).
port Specifies the number of the port to be reset, relative to its slot for bladed systems. Use switchShow to list of valid ports.
Examples To reset a port to factory defaults:
switch:admin> portcfgdefault 1/3
To reset a GbE port to factory defaults:
switch:admin> portcfgdefault 8/ge1
To reset a an FCoE port on a Brocade 8000 in Access Gateway mode:
switch:admin> portcfgdefault 13
switch:admin> portcfgshowArea Number: 13Speed Level: AUTO(HW)Fill Word: 0(Idle-Idle)Trunk Port ONLocked N_Port OFFPersistent Disable OFFLOS TOV enable OFFNPIV capability ONQOS Port AEPort Auto Disable: OFFRate Limit OFFF_Port Buffers OFFNPIV PP Limit: 126
See Also portCfgEport, portCfgGport, portCfgLongDistance, portCfgLport, portCfgPersistentDisable,portCfgPersistentEnable, portCfgShow, portCfgSpeed, portCfgTrunkPort
642 Fabric OS Command Reference53-1001764-02

portCfgEport 2
portCfgEport
Enables or disables E_Port capability on a port or locks down a port as an E_Port.
Synopsis portcfgeport [slot/]port mode
portcfgeport -i [index1[-index2] [...] [-f] mode]
portcfgeport -slot [slot1[-slot2] [...]
portcfgeport -h
Description Use this command to enable or disable E_Port capability on a port or to lock down a port as an E_Port. E_Port capability is enabled by default. When an interswitch link (ISL) is connected to a port and the port's E_Port capability is disabled, the ISL is segmented, and all traffic between the switches stops. Fabric management data, such as zoning information, can no longer be exchanged through this port.
You can identify a single port to be configured by its port number or by its port index number. Port ranges are supported with index numbers or by specifying a slot or a slot range. Use switchShow for a listing of valid ports, slots, and port index numbers. When used without operands, this command displays all persistently disabled ports on the switch.
Specifying multiple ports with the index (-i) or slot (-s) option is supported only if PortSwap is disabled. They are not supported on GbE ports and configured F_Port trunks. Use the -i option without a port index argument to display the portSwap status or alternately use portSwapShow.
Changes made by this command are persistent across switch reboots or power cycles.
Notes The execution of this command is subject to Virtual Fabric or Admin Domain restrictions that may be in place. Refer to chapter 1, "Using Fabric OS commands" and Appendix A, "Command Availability" for details.
Regardless of how many E_Ports are connected between two switches, the maximum routing paths are limited to 16 E_Ports.
The Fabric OS port configuration commands are not supported on FCoE ports.
Operands This command has the following operands:
slot For bladed systems only, specifies the slot number of the port to be configured, followed by a slash (/).
port Specifies the number of the port to be configured, relative to its slot for bladed systems. Use switchShow to display a listing of valid ports.
-i index1[-index2] Specifies a range of ports identified by port index numbers. You may specify multiple index ranges separated by a space, for example, -i 33-38 40-60.
-f Ignores nonexisting ports. This operand is valid only with the -i option.
-slot [slot1[-slot2] Specifies all ports on a slot or on a range of slots, for example, -s 3-5. You may specify multiple slot ranges separated by a space, for example, -s 3-5 8-10.
mode 0 Disables E_Port capability for the specified ports.
1 Enables the ports as E_Ports. This is the default port state.
2 Locks down the ports as E_Ports. This command effectively disables the port’s F_Port capability.
Fabric OS Command Reference 64353-1001764-02

portCfgEport2
-h Displays the command usage.
Examples To disable E_Port capability on a port:
switch:admin> portcfgeport 1/3 0
To enable E_Port capability on a port:
switch:admin> portcfgeport 1/3 1
To lock down the port as an E_Port.
switch:admin> portcfgeport 1/3 2
To disable E_Port capability on a range of ports specified by their index number:
switch:admin> portcfgeport -i 12-18 0
To enable E_Port capability on all ports of slot 3-5:
switch:admin> portcfgeport -s 3-5 1
See Also portShow, portSwapDisable. portSwapShow, switchShow
644 Fabric OS Command Reference53-1001764-02

portCfgEXPort 2
portCfgEXPort
Sets a port to be an EX_Port, and sets and displays EX_Port configuration parameters.
Synopsis portcfgexport [slot/]port
portcfgexport [-a admin]
portcfgexport [-f fabricid]
portcfgexport [-r ratov]
portcfgexport [-e edtov]
portcfgexport [-d domainid]
portcfgexport [-p pidformat]
portcfgexport [-t fabric_parameter]
portcfgexport [-m port mode]
portcfgexport [-i mode]
Description Use this command to allow a port to be configured as an EX_Port, to display the port's EX_Port configuration, or to change the configuration. If no optional parameter is specified, the command displays the currently configured values; otherwise, it sets the specified attribute to its new value. The port must be disabled prior to setting EX_Port attributes. The port must be enabled before the port can become active following EX_Port parameter changes. Use portDisable and portEnable to disable or enable the port.
IPFC over FCR allows the routing of IPFC traffic between different EX_Ports where EX_Ports are connected to an edge fabric that has IPFC-capable devices. IPFC traffic is routed between EX and VEX Ports. IPFC traffic can be related to the same edge fabric or to different edge fabrics.
When the port is not active, the preferred domain ID is configurable. The preferred domain ID is used by the EX_Port's front phantom domain to request a domain ID from the principal switch. The domain ID received becomes the subsequent preferred domain ID, which is persistent and is displayed.
Fabric OS v6.2.0 FCR supports FCR connections to McDATA Open Fabric Mode fabrics operating in 239 domain ID mode. The 239 DID mode is only supported on the Brocade Mi10k director. The portCfgExport command displays the Domain ID mode of the McDATA edge fabric. Refer to the example section for an illustration of this feature.
Notes The fabric ID must be the same for every router port connected to the same edge fabric, and different for every edge fabric. If two ports are connected to the same fabric but have been assigned different fabric IDs, one of them will be disabled due to a fabric ID oversubscription. If two fabrics have been assigned the same fabric ID, one of them will be disabled due to a fabric ID conflict.
When a port is changed from FL_Port to EX_Port, the topology is implicitly changed to point-to-point.
The front domain WWN field displays the WWN of the front domain. If the port is enabled and the state is “OK”, the edge fabric principal switch’s domain ID and WWN also are displayed.
Fabric OS Command Reference 64553-1001764-02

portCfgEXPort2
If the Fabric Parameter value is “Auto Negotiate”, the port ID format, R_A_TOV, and E_D_TOV values display the negotiated values indicated by “(N)” next to them. The negotiated values are what the edge switch specifies in the ELP request. If the state is “Not OK”, the R_A_TOV and E_D_TOV display “Not Applicable”. By default, all EX_Ports are auto-ELP enabled.
If the Fabric Parameter attribute value is “User configured”, the port ID format R_A_TOV and E_D_TOV values display the configured values.
A configuration change that would result in an invalid domain ID for McDATA Open Fabric mode or McDATA Fabric mode causes the preferred domain ID to be set to the minimum valid McDATA mode domain ID of 1. The exception to this is if the configuration change includes setting the preferred domain ID, in which case the configuration change does not take place and a corresponding error message is displayed.
The execution of this command is subject to Virtual Fabric or Admin Domain restrictions that may be in place. Refer to chapter 1, "Using Fabric OS commands" and Appendix A, "Command Availability" for details.
Operands When invoked without operands, this command displays the usage. The following operands are supported:
slot On bladed systems only, specifies the slot number followed by a slash (/).
port Specifies the por number. Use switchShow for a list of valid ports. When executed with [slot]port only, the command displays the current port configuration.
-a admin Enables or disables the specified port as an EX_Port. Valid values are 1 (enable as EX_Port), 2 (disable as EX_Port and enable as non-EX_Port). portCfgDefault may also be used to disable EX_Ports.
-f fabricid Specifies the fabric ID. Valid values are 1-128.
-r ratov Specifies the R_A_TOV used for port negotiation. Valid values are 2000 - 120000. This operand is only applicable if the "Fabric Parameter" attribute value is not "Auto Negotiate".
-e edtov Specifies the E_D_TOV used for port negotiation. Valid values are 1000 - 60000. This operand is only applicable if the "Fabric Parameter" attribute value is not "Auto Negotiate".
-d domainid Specifies the preferred domain ID. For Brocade native mode (-m 0) or McDATA Open Fabric mode (-m 1), valid values are 1-239. Use 239 for connectivity with the Mi10k director. For McDATA Fabric mode (-m 2), valid values are 1-31.
-p pidformat Specifies the Port ID format. Valid values are 0-native, 1-core, 2-extended edge. This operand is applicable only when port mode is set to 0 (native mode). If port mode is not "Brocade Native", the Port ID format displays as "Not applicable".
-t fabric_parameter Enables or disables negotiation of the fabric parameters. Valid values are 1 for enable and 2 for disable.
-m port mode Specifies the port mode. The -m option enforces the same port mode for all the ports connected to the same edge fabric. If this option is selected, the port mode is compared against the online ports. If the modes are different,
646 Fabric OS Command Reference53-1001764-02

portCfgEXPort 2
an error message is posted, and the command fails. Valid values are as follows:
0 Brocade Native mode.
1 McDATA Open Fabric mode.
2 McDATA Fabric mode.
3 MCDATA fabric legacy mode.
Note that this mapping between mode values and modes is NOT the same as the mapping used when setting interoperability modes with the interopMode, command.
-i mode Enables or disables Insistent Domain Id (IDID) for the specified EX_Port. Specify 1 to enable IDID, specify 2 to disable IDID. This command must be issued from a McDATA edge switch attached to a single or dual FCR configuration.
Examples To set the fabric ID of port 2/1 to 5 and the port ID format to core:
switch:admin> portcfgexport 2/1 -f 5 -p 1
To configure port 2/0 to be an EX_Port and set the fabric ID to 4:
switch:admin> portcfgexport 2/0 -a 1 -f 4
To disable fabric parameter negotiation on port 2/0 of an EX_Port:
switch:admin> portcfgexport 2/0 -t 2
To enable IDID on port 2:
switch:admin>portcfgexport 2 –i 1
To display EX_Port settings configured for Mi10K connectivity:
switch:admin> portcfgexport 10 Port 10 info Admin: enabled State: OK Pid format: Not Applicable Operate mode: Open Domain Id mode: 239 Mode Insistent Domain ID Mode: enabled Front WWN: 50:00:51:e3:76:0e:4e:46 Fabric Parameters: Auto Negotiate R_A_TOV: Not Applicable E_D_TOV: Not Applicable Authentication Type: None DH Group: N/A Hash Algorithm: N/A Edge fabric's primary wwn: N/A Edge fabric's version stamp: N/A
See Also portCfgVEXPort, portDisable, portEnable, portShow, portCfgDefault, fcrbCastConfig
Fabric OS Command Reference 64753-1001764-02
portCfgFillword2
portCfgFillword
Configures the fill word for a single 8G FC port.
Synopsis portcfgfillword [slot/]port, mode
portcfgfillword --help
Description Use this command to configure the fill word of an 8G FC port. This command is not applicable to non-8G FC ports. This command disables and re-enables the port and the port comes online with the new fill word setting. The configuration is stored in nonvolatile memory and is persistent across switch reboots or power cycles.
Notes This configuration cannot be set on VE_Ports or VEX_Ports.
Use the portCfgShow command to display user-configured fill word settings.
The execution of this command is subject to Admin Domain or Virtual Fabric restrictions that may be in place. Refer to chapter 1, "Using Fabric OS commands" and Appendix A, "Command Availability" for details.
Operands This command has the following operands:
slot For bladed systems only, specifies the slot number of the port to be configured, followed by a slash (/).
port Specifies the number of the port to be configured, relative to its slot for bladed systems. Use switchShow for a listing of valid ports.
mode Specifies the fill word for the port number. This operand is required. Valid values are one of the following:
0 | -idle-idle Sets IDLE mode in the Link Init and IDLE as the fill word (default).
1 | -arbff-arbff Sets ARB(ff) in the Link Init and ARB(ff) as the fill word.
2 | -idlef-arbff Sets IDLE mode in the Link Init and ARB(ff) as the fill word.
3 | -aa-then-ia Attempts hardware arbff-arbff (mode 1) first. If the attempt fails to go into active state, this command executes software idle-arb (mode 2). Mode 3 is the preferable to modes 1 and 2 as it captures more cases..
Examples To set the fill word of a port to ARBFF-ARBFF using the numeric mode notation:
switch:admin> portcfgfillword 2/3, 1
To set the fill word of a port to ARBFF-ARBFF using the -arbff-arbff option:
switch:admin> portcfgfillword 2/3, -arbff-arbff
To set the fill word of a port to IDLE-ARBFF using the -idle-arbff option:
switch:admin> portcfgfillword 2/3, -idle-arbff
To set the fill word of a port to the preferred mode 3 (If hardware arb-arbff fails, try software idle-arbff):
switch:admin> portcfgfillword 27 -aa-then-iaswitch:admin> portcfgfillword 28 -aa-then-ia
648 Fabric OS Command Reference53-1001764-02

portCfgFillword 2
switch:admin> portcfgshow 27Area Number: 27Speed Level: AUTO(HW)Fill Word: 2(SW Idle-Arbff)(output truncated)
switch:admin> portcfgshow 28Area Number: 28Speed Level: AUTO(HW)Fill Word: 3(A-A then SW I-A)(output truncated)
switch:admin> portcfgshow Ports of Slot 0 16 17 18 19 20 21 22 23 24 25 26 27 28 29 30 31 -----------------+---+---+---+---+-----+---+---+---+-----+---+---+Speed AN AN AN AN AN AN AN AN AN AN AN AN AN AN AN AN Fill Word 0 0 0 0 0 0 0 0 0 0 0 2 3 0 0 0 (output truncated)
See Also portCfgShow
Fabric OS Command Reference 64953-1001764-02

portCfgFportBuffers2
portCfgFportBuffers
Configures F_Port buffer allocation.
Synopsis portcfgfportbuffers --enable [slot/]port buffers
portcfgfportbuffers --disable [slot/]port
Description Use this command to change the default buffer allocation for an F_Port and to allocate a specified number of buffers to the port. When port buffer allocation is enabled, the number of buffers specified override the default F_Port buffer allocation. When the configuration is disabled, the default buffer allocation is restored. Only an F_Port can utilize the buffers allocated by this command, and the allocated buffers are reserved only for this port.
The F_Port buffer configuration is persistent across system reboots.
Use the portBufferShow command to determine current port buffer allocations.
.Notes The execution of this command is subject to Virtual Fabric or Admin Domain restrictions that may be in place. Refer to chapter 1, "Using Fabric OS Commands" and Appendix A, "Command Availability" for details.
The F_Port buffer feature does not support ports configured as EX_Ports, Mirror Ports, Long Distance Ports, L_Ports, QoS Ports, Fast Write, and Trunk Areas.
The Fabric OS port configuration commands are not supported on FCoE ports.
Operands This command has the following operands:
--enable Enables the F_Port buffer configuration on a specified port. A port and buffer allocation must be specified with this option.
.--disable Disables the F_Port buffer configuration on a specified port.
slot Specifies the slot number on bladed systems, followed by a slash (/).
buffers Specifies the number of buffers to be allocated to the specified port. The specified buffer allocation takes effect when the F_Port comes online. This operand is required with the --enable option. The minimum buffer allocation is the default number of buffers plus 1. The maximum is determined by the remaining buffer allocations in the port's port group. Use BportBufferShow to determine the number of remaining free buffers.
Examples To allocate 12 buffers to an F_Port:
switch:admin> portcfgfportbuffers --enable 2/44 12
To disable the port buffer configuration and return to the default buffer allocation:
switch:admin> portcfgfportbuffers --disable 2/44 12
See Also portBufferShow
650 Fabric OS Command Reference53-1001764-02

portCfgGeMediaType 2
portCfgGeMediaType
Sets the active ge0 and ge1 ports on the Brocade 7800.
Synopsis portcfggemediatype ge_port [optical | copper]
portcfggemediatype --help
Description Use this command to set the active ge0 and ge1 ports on the Brocade 7800.
Each of the ge0 and ge1 ports on the Brocade 7800 can be configured as a copper port (RJ45) or an optical port (SFP). The copper ports (RJ45) can only accept copper connections. The optical ports can accept any Brocade-branded SFP, optical or copper. The copper (RJ45) ports and the optical (SFP) ports operate independently. Each of the ge0 and ge1 ports can be configured either as a copper port or an optical port, but not both.
The following configurations are possible:
Default ge0 (RJ45) - active and ge0 (SFP) - inactive ge1 (RJ45) - active and ge1 (SFP) - inactive
One copper and one optical port active ge0 (RJ45) - active and ge0 (SFP) - inactive ge1 (RJ45) - inactive and ge1 (SFP) - active Or: ge1 (RJ45) - active and ge1 (SFP) - inactive ge0 (RJ45) - inactive and ge0 (SFP) - active
Both copper ports inactive. Both optical SPP ports active Ge0 (RJ45) - inactive and Ge0 (SFP) - active Ge1 (RJ45) - inactive and Ge1 (SFP) - active
The copper-only GbE ports are active by default. To activate the port that can accept both copper and optical connections, specify the optical operand. Specify copper to reactivate the default copper port.
When used with the ge_port operand only, this command displays the currently active GbE port and connection type.
Notes The execution of this command is subject to Virtual Fabric or Admin Domain restrictions that may be in place. Refer to chapter 1, “Using Fabric OS commands” and Appendix A, “Command Availability” for details.
This command is supported only on the Brocade 7800 and only on ge1 and ge0 ports. On all other platforms or ports, this command returns a “not supported message.”
Operands This command has the following operands:
ge_Port Specifies the GbE port to be activated. Valid ports are ge0 and ge1. This operand is required.
optical | copper Specifies which port to activate. Specifying optical activates the GbE port that can accept both optical and copper connections. Specifying copper activates the copper-only GbE port. The copper-only GbE ports are active by default. These operands are exclusive and optional; if omitted, the current port configuration is displayed for the specified GbE port.
--help Displays the command usage.
Fabric OS Command Reference 65153-1001764-02

portCfgGeMediaType2
Examples To activate a GbE port that can accept both copper and optical connections:
switch:admin> portcfggemediatype ge0 optical
To display the current configuration:
switch:admin> portcfggemediatype ge0Port ge1 is configured in optical mode
See Also portCfgShow
652 Fabric OS Command Reference53-1001764-02

portCfgGport 2
portCfgGport
Designates a port as a G_Port; removes G_Port designation.
Synopsis portcfggport [slot/]port,mode
Description Use this command to designate a port as a G_Port. After successful execution of this command, the switch attempts to initialize the specified port as an F_Port only, and does not attempt loop initialization (FL_Port) on the port. A port designated as a G_Port can become an E_Port. This configuration can be cleared but not set on VE/VEX_Ports. Changes made by this command are persistent across switch reboots or power cycles.
Note The execution of this command is subject to Virtual Fabric or Admin Domain restrictions that may be in place. Refer to chapter 1, "Using Fabric OS commands" and Appendix A, "Command Availability" for details.
Operands This command has the following operands:
slot For bladed systems only, specify the slot number of the port to be configured, followed by a slash (/).
port Specify the port to be configured, relative to its slot for bladed systems. Use switchShow to display a list of valid ports.
mode Specify a value of 1 to designate the port as a G_Port or specify a value of 0 to remove the G_Port designation from the port. A value of 0 is the default port state. Mode must be preceded by a comma. This operand is required.
Examples To configure port as a locked G_Port:
switch:admin> portcfggport 1/3, 1
See Also configure, portCfgLport, portShow, switchShow
Fabric OS Command Reference 65353-1001764-02

portCfgLossTov2
portCfgLossTov
Enables or disables de-bouncing of signal loss for front end ports.
Synopsis portcfglosstov [slot]/port mode
Description Use this command to enable or disable the de-bouncing of loss of signal for 100 ms for front end ports. Use portCfgShow to display the current setting.
If executed without operands, the command prints the usage.
Notes The execution of this command is subject to Virtual Fabric or Admin Domain restrictions that may be in place. Refer to chapter 1, "Using Fabric OS commands" and Appendix A, "Command Availability" for details.
On a chassis, this command must be executed on the active CP.
Operands This command has the following operands:
slot For bladed systems only, specifies the slot number of the port to be configured, followed by a slash (/).
port Specifies the port to be configured, relative to its slot for bladed systems. Use switchShow to list valid ports.
mode Specify 1 to enable the configuration. Specify 0 to disable the configuration.
Examples To enable the configuration on port 1/5 and to display the configuration:
switch:admin> portcfglosstov 1/5 1
switch:admin> portcfgshow 1/5Area Number: 5Speed Level: AUTO(HW)Fill Word: 0(Idle-Idle)AL_PA Offset 13: OFFTrunk Port ONLong Distance OFFVC Link Init OFFLocked L_Port OFFLocked G_Port OFFDisabled E_Port OFFLocked E_Port OFFISL R_RDY Mode OFFRSCN Suppressed OFFPersistent Disable OFFLOS TOV enable ONNPIV capability ONQOS E_Port AEPort Auto Disable: OFFRate Limit OFFEX Port OFFCredit Recovery ONF_Port Buffers OFFNPIV PP Limit: 126CSCTL mode: OFF
654 Fabric OS Command Reference53-1001764-02

portCfgLossTov 2
To disable the configuration on port 1/5:
switch:admin> portcfglosstov 1/5 0
See Also portCfgShow
Fabric OS Command Reference 65553-1001764-02

portCfgISLMode2
portCfgISLMode
Enables or disables ISL R_RDY mode on a port.
Synopsis portcfgislmode [slot/]port,mode
Description Use this command to enable or disable interswitch link read-ready (ISL R_RDY) mode on a port. Use the portCfgShow command to determine whether ISL R_RDY mode is enabled on a port.
In ISL R_RDY mode, the port sends a primitive signal that the port is ready to receive frames. The port sends an exchange link parameter (ELP) with flow control mode 02. If a port is ISL R_RDY enabled, it can only receive an ELP with flow control mode 02. A received ELP with flow control mode 01 will segment the fabric.
This mode cannot detect any inconsistencies in fabric operating mode parameters, such as the PID format of connected ports. Before enabling ISL R_RDY mode, ensure that all fabric-wide parameters are consistent for every switch in the fabric.
Use configShow fabric.ops to view a complete listing of fabric operating mode parameters on the switch.
The following E_Port configurations are not applicable to a port configured for ISL R_RDY mode. If configured, these port configuration parameters are ignored during E_Port initialization:
• Trunk port
• VC link init
The portCfgISLMode and portCfgLongDistance levels LE, LD, or LS only can be enabled at the same time. Such an ISL uses R_RDY mode of flow control over the long distance link. This feature is not backward compatible with firmware versions that do not support it.
Notes The long distance modes L0.5, L1, and L2 are no longer supported in v5.3.0 or later.
Changes made by portCfgISLMode are persistent across switch reboots and power cycles.
This configuration can be cleared but not set on VE/VEX_Ports.
The execution of this command is subject to Virtual Fabric or Admin Domain restrictions that may be in place. Refer to chapter 1, "Using Fabric OS commands" and Appendix A, "Command Availability" for details.
The Fabric OS port configuration commands are not supported on FCoE ports.
Operands This command has the following operands:
slot For bladed systems only, specify the slot number of the port to display, followed by a slash (/).
port Specify the port to display, relative to its slot for bladed systems. Use switchShow to list valid ports.
mode Specify 1 to enable ISL R_RDY mode. Specify 0 to disable ISL R_RDY mode.
Examples To enable ISL R_RDY mode on a port:
switch:admin> portcfgislmode 1/3, 1ISL R_RDY Mode is enabled for port 3. Please make sure the PIDformats are consistent across the entire fabric.
656 Fabric OS Command Reference53-1001764-02

portCfgISLMode 2
To disable ISL R_RDY mode on a port:
switch:admin> portcfgislmode 1/3, 0
See Also configure, portCfgLongDistance, portCfgShow
Fabric OS Command Reference 65753-1001764-02

portCfgLongDistance2
portCfgLongDistance
Configures a port to support long distance links.
Synopsis portcfglongdistance [slot/]port [distance_level] [vc_translation_link_init] [desired_distance]
Description Use this command to allocate sufficient numbers of full size frame buffers on a particular port or to support a specified long distance link. The port can only be used as an E_Port. Changes made by this command are persistent across switch reboots and power cycles. This configuration can be cleared but not set on VE/VEX_Ports.
Long distance configuration allows native FC ports to run WAN/LAN connections. It ensures that the full bandwidth of a link or trunk can be utilized for a particular long distance configuration. The receiving port must have sufficient buffers available, so that the transmitting port can stuff the link with enough frames to fill the entire length of the link. As the distance between switches and the link speed increases, additional buffer-to-buffer credits are required to maintain maximum performance. If a port is configured as a long distance port, the remaining ports of that port group could be disabled, fail to initialize, or move to “buffer limited” mode due to a lack of frame buffer credits.
The number of credits reserved for a port depends on the switch model and on the extended fabric mode for which it is configured. Not all distance modes are supported by all platforms. For example, the FC10-6 only supports LO and LS up to 120 km at 10 Gbps, and the maximum supported distance can vary greatly depending on switch platform and available buffers. Refer to the Fabric OS Administrator’s Guide for details on platform-specific buffer credit models, long distance mode support, and maximum distance supported for specific hardware configurations.
Notes This command requires an Extended Fabrics license.
The execution of this command is subject to Virtual Fabric or Admin Domain restrictions that may be in place. Refer to chapter 1, “Using Fabric OS commands” and Appendix A, “Command Availability” for details.
The long distance modes L0.5, L1, and L2 are no longer supported in v5.3.0 and later.
A long-distance link can also be configured to be part of a trunk group. Refer to portCfgTrunkPort help for details.
When a port is configured as a long-distance port, the output of portShow and switchShow displays the long-distance level. Refer to portShow help and switchShow help for details.
The portCfgISLMode and portCfgLongDistance LE, LD, or LS levels y can be enabled at the same time. Such an ISL uses the R_RDY mode of flow control over the long distance link. While using R_RDY mode flow control, an E_Port cannot form trunk groups of long-distance links even if the trunking is enabled. This feature is not backward compatible with firmware versions that do not support it.
Ctrl-D cancels the configuration update.
The Fabric OS port configuration commands are not supported on FCoE ports.
658 Fabric OS Command Reference53-1001764-02

portCfgLongDistance 2
Operands This command has the following operands:
slot Specify the slot number (for bladed systems only), followed by a slash (/).
port Specify the number of the port to be configured relative to its slot for bladed systems. Use switchShow to display a list of valid ports. This operand is required.
distance_level Specify the long distance level as one of the following (the numerical value representing each distance_level is shown in parentheses):
L0 (0) Specify L0 to configure the port as a regular port. A total of 20 full-size frame buffers are reserved for data traffic, regardless of the port’s operating speed; therefore, the maximum supported link distance is up to 10 km at 1 Gbps, up to 5 km at 2 Gbps, up to 2 km at 4 Gbps and up to 1 km at 8 Gbps.
LE (3) Specify LE mode to configure an E_Ports distance greater than 5 km and up to 10 km. A total of 5, 10, 20, or 40 full-size frame buffers are reserved for data traffic at port speeds of 1 Gbps, 2 Gbps, 4 Gbps, or 8 Gbps. LE does not require an Extended Fabrics license.
LD (5) Specify LD for automatic long-distance configuration. The buffer credits for the given E_Port are automatically configured based on the actual link distance. Up to a total of 1452 full-size frame buffers are reserved depending on the distance measured during E_Port initialization. Fabric OS v6.1.0 or later supports up to 3000 km at 1 Gbps, up to 1500 km at 2 Gbps, and up to 750 km at 4 Gbps and 8 Gbps on certain platforms. If a value for desired_distance is specified, it is used as the upper limit to the measured distance.
LS (6) Specify LS mode to configure a static long distance link with a fixed buffer allocation greater than 10 km. Up to a total of 1452 full-size frame buffers are reserved for data traffic, depending on the specified desired_distance value.
vc_translation_link_initOn switches running Fabric OS v6.2.0 or later, this parameter specifies the fill words used on long distance links. When set to 1, the link uses ARB fill words (default). When set to 0, the link uses IDLE fill words. The IDLE fill word option is not compatible with QoS configured links and Credit Recovery enabled links. You must disable these features before configuring long distance IDLE fill words.
On switches running firmware versions earlier than Fabric OS v6.2.0, this parameter controls the long distance link initialization sequence. Specify 1 to activate the long distance link initialization sequence. Specify 0 to deactivate this mode. This operand is optional. When the command is run without specifying a value, 1 is assigned automatically for a long distance link in VC_RDY flow control. Otherwise, 0 is assigned. For a long-distance link not configured for ISL R_RDY mode, this parameter must be set to 1; otherwise, it must be reset to 0.
desired_distance This parameter is required when a port is configured as an LD or an LS mode link. In LD mode, the value of desired_distance is the upper limit of the link distance and is used to calculate buffer availability for other ports in the same port group. When the measured distance exceeds the value of
Fabric OS Command Reference 65953-1001764-02

portCfgLongDistance2
desired_distance, this value is used to allocate the buffers. In this case, the port operates in degraded mode instead of being disabled due to insufficient buffers. In LS mode, the actual link distance is not measured, instead the desired_distance is used to allocate the buffers required for the port.
Examples To configure a switch port 63 to support a 100 km link and be initialized using the long distance link initialization protocol:
switch:admin> portcfglongdistance 4/15 LS 1 100switch:admin> portshow 4/15portCFlags: 0x1portFlags: 0x20001 PRESENT LEDportType: 1.1portState: 2 OfflineportPhys: 4 No_LightportScn: 0portId: 013f00portWwn: 20:3f:00:60:69:00:02:48Distance: super long <= 100kmportSpeed: 2Gbps
Interrupts: 9 Link_failure: 0 Frjt: 0Unknown: 0 Loss_of_sync: 0 Fbsy: 0Lli: 9 Loss_of_sig: 9Proc_rqrd: 0 Protocol_err: 0Timed_out: 0 Invalid_word: 0Rx_flushed: 0 Invalid_crc: 0Tx_unavail: 0 Delim_err: 0Free_buffer: 0 Address_err: 0Overrun: 0 Lr_in: 0Suspended: 0 Lr_out: 0Parity_err: 0 Ols_in: 02_parity_err: 0 Ols_out: 0CMI_bus_err: 0
See Also configure, portCfgISLMode, portCfgTrunkPort, portCfgShow, portShow, switchShow
660 Fabric OS Command Reference53-1001764-02

portCfgLport 2
portCfgLport
Configures a port as an L_Port.
Synopsis portcfglport [[slot/]port] locked_mode [private_mode] [duplex_mode]]
Description Use this command to designate a port as an L_Port, and to configure its behavior. When a port is designated as an L_Port, the switch attempts to initialize that port as a fabric L_Port (FL_Port). The switch will never attempt a point-to-point (F_Port) initialization on the port. By default the L_Port will be a public L_Port. It can be configured as a private L_Port, in which case it will reject fabric login (FLOGI).
Notes This configuration can be cleared but not set on VE/VEX_Ports.
VE_Ports on the Brocade 7800 and FX8-24 platforms do not support Arbitrated Loops. If one of the virtual FC ports (16-31) is preconfigured as an L_Port, and a Brocade FX8-24 Extension blade is inserted into the slot, the configuration is not honored. The system logs a RASLOG error and the port defaults back to a G_Port. Attempts to configure a VE_Port as an L_Port are rejected with a corresponding system message.
The Fabric OS port configuration commands are not supported on FCoE ports.
The execution of this command is subject to Virtual Fabric or Admin Domain restrictions that may be in place. Refer to chapter 1, “Using Fabric OS commands” and Appendix A, “Command Availability” for details.
Operands When invoked without operands, this command reports the L_Port conditions for all ports present. The following operands are supported:
slot For bladed systems only, specify the slot number of the port to be configured, followed by a slash (/).
port Specify a port number to be configured, relative to its slot for bladed systems. Use switchShow to display a list of valid ports. This operand is optional; if omitted, this command displays the L_Port conditions for all ports.
locked_mode Specify 1 to configure the specified port as a locked L_Port. Specify 0 to remove the locked L_Port configuration from the port (default). This operand is required, if a port is specified.
private_mode Specify 1 to configure the L_Port as a private L_Port. Specify 0 to configure the L_Port as a public L_Port. This operand is optional; if omitted; the default value of 0 is used. On unsupported platforms, this command is blocked and returns an appropriate message.
duplex_mode Specify 2 to configure the specified port as a full-duplex L_Port with fairness. Specify 0 to configure the L_Port as a full-duplex L_Port. This operand is optional; if omitted, the default value of 0 is used.
Fabric OS Command Reference 66153-1001764-02

portCfgLport2
Examples To configure ports 8, 14, and 15 as locked L_Ports:
switch:admin> portcfglport 4/8 4/14-15, 1
switch:admin> portcfgshow 15Area Number: 48Speed Level: AUTO(HW)Fill Word: 0(Idle-Idle)AL_PA Offset 13: OFFTrunk Port ONLong Distance OFFVC Link Init OFFLocked L_Port OFFLocked G_Port OFFDisabled E_Port OFFLocked E_Port OFFISL R_RDY Mode OFFRSCN Suppressed OFFPersistent Disable OFFLOS TOV enable OFFNPIV capability ONQOS E_Port AEPort Auto Disable: OFFRate Limit OFFEX Port OFFMirror Port OFFCredit Recovery ONF_Port Buffers OFFNPIV PP Limit: 255CSCTL mode: OFF
To display the L_Port conditions:
switch:admin> portcfglport[...]Ports of Slot 4 0 1 2 3 4 5 6 7 8 9 10 11 12 13 14 15-----------------+--+--+--+--+----+--+--+--+----+--+--+--+----+--+--+--Locked L_Port .. .. .. .. .. .. .. .. .. .. .. .. .. .. ON ONPrivate L_Port .. .. .. .. .. .. .. .. ON.. .. .. .. .. .. ..Locked Loop HD .. .. .. .. .. .. .. .. .. .. .. .. .. .. .. .. Loop Fairness .. .. .. .. .. .. .. .. .. .. .. .. .. .. .. .. (output truncated)
See Also configure, portCfgShow, portShow, switchShow
662 Fabric OS Command Reference53-1001764-02

portCfgNPIVPort 2
portCfgNPIVPort
Enables or disables N_Port ID virtualization (NPIV) functionality on a port and sets the per-port login limit.
Synopsis portcfgnpivport --enable [slot/]port
portcfgnpivport --disable [slot/]port
portcfgnpivport --setloginlimit [slot/]port login_limit
portcfgnpivport --help
portcfgnpivport [slot/]port mode
Description Use this command to enable or disable NPIV functionality on a port and to configure the maximum number of logins for this port. Changes made by this command are persistent across switch reboots and power cycles.
N_Port ID Virtualization (NPIV) enables a single Fibre Channel protocol port to appear as multiple, distinct ports, providing separate port identification within the fabric for each operating system image behind the port as if each operating system image had its own unique physical port. NPIV assigns a different virtual port ID to each Fibre Channel protocol device without impacting your existing hardware implementation. The virtual port has the same properties as an N_Port and is therefore capable of registering with all fabric services.
The following conditions must be met for a switch port to respond to NPIV requests from an NPIV device:
NPIV capable: NPIV capability is a switch blade or port attribute that is required for NPIV functionality. Some blades within a switch, or some ports within a switch or blade, may not have NPIV capability. NPIV functionality cannot be enabled on such ports and they do not respond to NPIV requests.
NPIV enabled: NPIV functionality must be enabled on a port for it to respond to NPIV requests. NPIV is enabled by default. It can be selectively disabled or re-enabled on specified switch ports using this command.
NPIV HA: To enable NPIV functionality on dual-CP systems, NPIV-enabled firmware must be running on both the active and the standby CPs. This requirement does not apply to single-CP systems.
Use the --setloginlimit option to configure the number of permitted logins per NPIV port. Up to 255 virtual port IDs are allocated per NPIV port, which means each NPIV port can support up to 255 logins. The number of logins you can configure per port is between 0 to 255. The default is 126 per port. The sum of all configured per-port login maximum values cannot exceed the total number of logins set for the switch with the configure command.
As of Fabric OS v.6.4.0 you can no longer use the configure command to set the NPIV port login limit on a per-switch basis. However, the maximum number of logins per switch is still set and enforced by the configure command. Use configure to display the current setting.
Note The execution of this command is subject to Virtual Fabric or Admin Domain restrictions that may be in place. Refer to chapter 1, “Using Fabric OS commands” and Appendix A, “Command Availability” for details.
Fabric OS Command Reference 66353-1001764-02

portCfgNPIVPort2
Use the portCfgShow command to determine whether NPIV is enabled on a port and to display the maximum logins configured for that port. Use the portCfgDefault command to reset all port configurations, including the NPIV configuration of a port.
Operands This command has the following operands:
slot For bladed systems only, specifies the slot number of the port to be configured, followed by a slash (/).
port Specifies the number of the port to be configured, relative to its slot for bladed systems. Use switchShow for a listing of valid ports.
--enable Enables NPIV on the specified port. This command can be executed only in switch mode.
--disable Disables NPIV on the specified port. This command can be executed only in switch mode.
--setloginlimit login_limit Sets the maximum number of allowed logins for the specified port. This command can be executed both in switch mode and Access Gateway mode. Valid values for login_limitrange from 0 to 255. The default value is 126.
--help Displays the command usage.
mode Enables or disables NPIV on the specified port. Specify 1 to enable or 0 to disable the feature. The mode operand is a legacy command; it will be deprecated in a future Fabric OS release.
Examples To display the current NPIV port configuration:
switch:admin> portcfgshowPorts of Slot 0 0 1 2 3 4 5 6 7 8 9 10 11 12 13 14 15-------------------+--+--+--+--+----+--+--+--+----+--+--+--+----+--+Speed AN AN AN AN AN AN AN AN AN AN AN AN AN AN AN ANFill Word 0 1 0 0 0 0 0 0 0 0 0 0 0 0 0 0AL_PA Offset 13 .. .. .. .. .. .. .. .. .. .. .. .. .. .. .. ..Trunk Port ON ON ON ON ON ON ON ON ON ON ON ON ON ON ON ONLong Distance .. .. .. .. .. .. .. .. .. .. .. .. .. .. .. ..VC Link Init .. .. .. .. .. .. .. .. .. .. .. .. .. .. .. ..Locked L_Port .. .. .. .. .. .. .. .. .. .. .. .. .. .. .. ..Locked G_Port .. .. .. .. .. .. .. .. .. .. .. .. .. .. .. ..Disabled E_Port .. .. .. .. .. .. .. .. .. .. .. .. .. .. .. ..Locked E_Port .. .. .. .. .. .. .. .. .. .. .. .. .. .. .. ..ISL R_RDY Mode .. .. .. .. .. .. .. .. .. .. .. .. .. .. .. ..RSCN Suppressed .. .. .. .. .. .. .. .. .. .. .. .. .. .. .. ..Persistent Disable.. .. ON ON .. .. .. .. .. .. .. .. .. .. .. ..LOS TOV enable .. .. .. .. .. .. .. .. .. .. .. .. .. .. .. ..NPIV capability ON ON ON ON ON ON ON ON ON ON ON ON ON ON ON ONNPIV PP Limit 80 80 80 80 80 80 80 80 95 95 95 95 95 95 95 95QOS E_Port .. .. AE AE AE AE AE AE AE AE AE AE AE AE AE AEEX Port .. .. .. .. .. .. .. .. .. .. .. .. .. .. .. ..Mirror Port .. .. .. .. .. .. .. .. .. .. .. .. .. .. .. ..Rate Limit .. .. .. .. .. .. .. .. .. .. .. .. .. .. .. ..Credit Recovery ON ON ON ON ON ON ON ON ON ON ON ON ON ON ON ONFport Buffers .. .. .. ON .. .. .. .. .. .. ON .. .. .. .. ..Port Auto Disable .. .. .. .. .. .. .. .. .. .. .. .. .. .. .. ..CSCTL mode .. .. .. .. .. .. .. .. .. .. .. .. .. .. .. ..(output truncated)
664 Fabric OS Command Reference53-1001764-02

portCfgNPIVPort 2
To disable NPIV functionality on port 7 and to display the change:
switch:admin> portcfgnpivport --disable 7switch:admin> portcfgshow 0/7Area Number: 7Speed Level: AUTO(HW)Fill Word: 0(Idle-Idle)AL_PA Offset 13: OFFTrunk Port ONLong Distance OFFVC Link Init OFFLocked L_Port OFFLocked G_Port OFFDisabled E_Port OFFLocked E_Port OFFISL R_RDY Mode OFFRSCN Suppressed OFFPersistent Disable OFFLOS TOV enable OFFNPIV capability OFFQOS E_Port AEPort Auto Disable: OFFRate Limit OFFEX Port OFFMirror Port OFFCredit Recovery ONF_Port Buffers OFFNPIV PP Limit: 126CSCTL mode: OFF
To increase the maximum logins on port 1 to 255 and to display the change:
switch:admin> portcfgnpivport --setloginlimit 1 255
switch:admin> portcfgshow 1Area Number: 7Speed Level: AUTO(HW)Fill Word: 0(Idle-Idle)AL_PA Offset 13: OFFTrunk Port ONLong Distance OFFVC Link Init OFFLocked L_Port OFFLocked G_Port OFFDisabled E_Port OFFLocked E_Port OFFISL R_RDY Mode OFFRSCN Suppressed OFFPersistent Disable OFFLOS TOV enable OFFNPIV capability OFFQOS E_Port OFFPort Auto Disable: OFFEX Port OFFMirror Port OFFF_Port Buffers OFFNPIV Max Login Limit: 255CSCTL mode: OFF
See Also configure, portCfgDefault, portCfgShow
Fabric OS Command Reference 66553-1001764-02

portCfgNPort2
portCfgNPort
Enables or disables N_Port functionality for an Access Gateway port.
Synopsis portcfgnport [slot]port1[-port2] [mode]
Description Use this command to enable or disable N_Port functionality for an Access Gateway port or for a range of ports. The enabled N_Ports automatically come online if they are connected to an enterprise fabric switch that supports NPIV. When used without operands, this command displays the port configuration.
Notes NPIV capability must be enabled on the ports connected to the Access Gateway. By default, NPIV is enabled. Use portcfgnpivport --enable to enable NPIV capability on a port, if it was previously disabled. Note that enabling or disabling NPIV capability is no supported in Access Gateway mode.
The execution of this command is subject to Virtual Fabric or Admin Domain restrictions that may be in place. Refer to chapter 1, "Using Fabric OS commands" and Appendix A, "Command Availability" for details.
Operands This command has the following optional operands:
slot Specifies the slot number, followed by a slash (/) on bladed systems.
port1[-port2] Specifies a single port or a range of ports to be configured as N_Ports, for example, 3-9, or 2/10-15.
mode Enables (1) or disables (0) N_Port functionality on the specified ports. The default mode is 0 (disabled).
Examples To enable N_Port functionality for a port:
switch:admin> portcfgnport 2 1
To enable N_Port functionality for a set of ports in a specific range:
switch:admin> portcfgnport 2-3 1
To display the N_Port configuration for all ports:
switch:admin> portcfgnportPorts 0 1 2 3 4 5 6 7 8 9 10 11 12 13 14 15--------------------+--+--+--+--+--+--+--+--+--+--+--+--+--+--+--+--+Locked N_Port ON ON ON ON .. .. .. .. ON ON ON ON .. .. .. .
switch:admin> portcfgshowPorts of Slot 0 0 1 2 3 4 5 6 7 8 9 10 11 12 13 14 15----------------+--+--+--+--+----+--+--+--+----+--+--+--+----+--+--+---Speed AN AN AN AN AN AN AN AN AN AN AN AN AN AN AN ANFill Word 0 0 0 0 0 0 0 0 0 0 0 0 0 0 0 0Trunk Port ON ON ON ON ON ON ON ON ON ON ON ON ON ON ON ONLocked N_Port .. .. .. .. .. .. .. .. .. .. .. .. .. .. .. ..Persistent Disable.. .. .. .. .. .. .. .. .. .. .. .. .. .. .. ..NPIV capability ON ON ON ON ON ON O ON ON ON ON ON ON ON ON ONNPIV PP Limit 90 90 90 90 90 90 90 90 90 90 90 90 90 90 90 90(output truncated)
See Also portCfgShow, ag
666 Fabric OS Command Reference53-1001764-02

portCfgPersistentDisable 2
portCfgPersistentDisable
Persistently disables a port or a range of ports.
Synopsis portcfgpersistentdisable
portcfgpersistentdisable [slot/]port1[-port2] [...]
portcfgpersistentdisable -i [index1[-index2] [...] [-f]]
portcfgpersistentdisable -slot [slot1[-slot2] [...]
portcfgpersistentdisable -h
Description Use this command to persistently disable a port or a range of ports. Persistently disabled ports remain disabled across power cycles, switch reboots, and switch enables. By default, a port is enabled persistently, unless the port is capable of routing. The change in configuration is effective immediately.
You can identify a single port to be configured by its port number or by its port index number. Port ranges are supported with index numbers or by specifying a slot or a slot range. Use switchShow for a listing of valid ports, slots, and port index numbers. When used without operands, this command displays all persistently disabled ports on the switch.
Specifying multiple ports with the index (-i) or slot (-s) option is supported only if PortSwap is disabled. They are not supported on GbE ports and configured F_Port trunks. Use the -i option without a port index argument to display the portSwap status, or alternately use portSwapShow.
The persistent disable configuration overrides existing port configurations, but it does not change these configurations. Use the portCfgPersistentEnable command to enable a port persistently and to restore all previously set port configurations for that port. The switch still runs power-on diagnostics and initializes a persistently disabled port. The portEnable, switchEnable, and bladeEnable commands do not enable a specific port or ports alone, but these commands succeed on a switch with one or more persistently disabled ports. The portEnable command fails when issued on persistently disabled ports.
The persistent switch disable or enable configuration does not alter the persistent disable or enable configurations of the ports within the switch.
Because ports are by default persistently enabled, the persistently disabled state of a port is cleared by the portCfgDefault command.
Notes This command is blocked if the switch is operating in the FICON Management Server mode (fmsmode); instead, use portDisable with Active=Saved mode enabled.
The execution of this command is subject to Virtual Fabric or Admin Domain restrictions that may be in place. Refer to chapter 1, "Using Fabric OS commands" and Appendix A, "Command Availability" for details.
This command is not supported on FCoE ports. To disable an FCoE port, use fcoe --disable.
Fabric OS Command Reference 66753-1001764-02

portCfgPersistentDisable2
Operands This command has the following operands:
slot On bladed systems only, specifies the slot number of the ports to be disabled persistently, followed by a slash (/).
port1[-port2] Persistently disables a single port or a range of ports identified by port numbers. The port range cannot span slots, but you can specify multiple port ranges pairs separated by a space, for example 3/1-4 4/7-9.
-i index1[-index2] Persistently disables a port or a range of ports identified by port index numbers. You may specify multiple index ranges separated by a space, for example, -i 33-38 40-60.
-f Ignores nonexisting ports. This operand is valid only with the -i option.
-slot [slot1[-slot2] Persistently disables all ports on a slot or on a range of slots, for example, -s 3-5. You may specify multiple slot ranges separated by a space, for example, -s 3-5 8-10.
-h Displays the command usage.
Examples To disable a single port persistently:
switch:admin> portcfgpersistentdisable 2/4
To disable a range of ports persistently:
switch:admin> portcfgpersistentdisable 2/4-8
To disable multiple port ranges persistently:
switch:admin> portcfgpersistentdisable 2/12 -15 3/10-12 4/3-4
To display the portSwap status:
switch:admin> portcfgpersistentdisable -iportcfgpersistentdisable: portSwap feature enabled.'-i' option not supported.
To disable a port persistently by specifying its index number:
switch:admin> portcfgpersistentdisable -i 176
To disable a range of ports persistently by specifying the corresponding port index range:
switch:admin> portcfgpersistentdisable -i 17-18
To disable multiple ports persistently by specifying multiple port index ranges:
switch:admin> portcfgpersistentdisable -i 17-18 30-39
To disable all ports on slots 3-5 persistently:
switch:admin> portcfgpersistentdisable -s 3-5
To disable all ports on slots 3-5 and 8-10 persistently:
switch:admin> portcfgpersistentdisable -s 3-5 8-10
668 Fabric OS Command Reference53-1001764-02

portCfgPersistentDisable 2
To display the persistently disabled ports on the switch:
switch:admin> portcfgpersistentdisableSlot 0 0 1 2 3 4 5 6 7 8 9 10 11 12 13 14 15---------+---+---+---+---+---+---+---+---+---+---+---+---+---+---+---+---Disabled - - - - - - - - - - - - - - - -
Slot 0 16 17 18 19 20 21 22 23 24 25 26 27 28 29 30 31---------+---+---+---+---+---+---+---+---+---+---+---+---+---+---+---+---Disabled - YES YES - - - - - - - - - - - YES YES
Slot 0 32 33 34 35 36 37 38 39---------+---+---+---+---+---+---+---+---Disabled YES YES YES YES YES YES YES YES
See Also ficonCupSet, ficonCupShow, portCfgDefault, portDisable, portEnable, portCfgPersistentEnable,portShow, portSwapDisable, portSwapshow, switchShow
Fabric OS Command Reference 66953-1001764-02

portCfgPersistentEnable2
portCfgPersistentEnable
Persistently enables a port or a range of ports.
Synopsis portcfgpersistentenable
portcfgpersistentenable [slot/]port1[-port2] [...]
portcfgpersistentenable -i [index1[-index2] [...] [-f]]
portcfgpersistentenable -s[lot] [slot1[-slot2]
portcfgpersistentenable -h
Description Use this command to persistently enable a port or a range of ports. If the port is connected to another switch when this command is issued, the fabric may reconfigure. After the port is persistently enabled, devices connected to the port can again communicate with the fabric.
You can identify a single port to be configured by its port number or by its port index number. Port ranges are supported with index numbers or by specifying a slot or a slot range. Use switchShow for a listing of valid ports, slots, and port index numbers. When used without operands, this command displays all persistently enabled ports on the switch.
Specifying multiple ports with the index (-i) or slot (-s) option is supported only if PortSwap is disabled. They are not supported on GbE ports and configured F_Port trunks. Use the -i option without a port index argument to display the portSwap status, or alternately use portSwapShow.
For ports that come online after being persistently enabled, the following indications may be sent to indicate a state transition: RSCN, SNMP trap, Web pop-up window.
Persistently enabled ports remain enabled across power cycles, switch reboots, and switch enables. By default, a port is enabled persistently, unless the port is capable of routing. The change in configuration is effective immediately.
This command re-enables all previously set port configurations of a specified port. You can temporarily disable a persistently enabled port with the portDisable or switchDisable commands. The persistent switch disable or enable configuration does not alter the persistent disable or enable configurations of the ports within the switch. The configuration commands configDefault and portCfgDefault do not modify the persistent enable attribute of a port.
Notes This command is blocked if the switch is operating in the FICON Management Server mode (fmsmode). Instead use portEnable with Active=Saved Mode enabled.
The execution of this command is subject to Virtual Fabric or Admin Domain restrictions that may be in place. Refer to chapter 1, "Using Fabric OS commands" and Appendix A, "Command Availability" for details.
This command is not supported on FCoE ports. To enable an FCoE port, use fcoe --enable.
Operands This command has the following operands:
slot On bladed systems only, specifies the slot number of the ports to be enabled persistently, followed by a slash (/).
port1[-port2] Persistently enables a single port or a range of ports identified by port numbers. The port range cannot span slots, but you can specify multiple port ranges pairs separated by a space, for example 3/1-4 4/7-9.
670 Fabric OS Command Reference53-1001764-02

portCfgPersistentEnable 2
-i index1[-index2] Persistently enables a port or a range of ports identified by port index numbers. You may specify multiple index ranges separated by a space, for example, 33-38 40-60.
-f Ignores nonexisting ports. This operand is valid only with the -i option.
-s[lot] [slot1[-slot2] Persistently enables all ports on a slot or on a range of slots, for example, -s 3-5. Multiple slot ranges are not supported with this command.
-h Displays the command usage.
Examples To enable a single port persistently:
switch:admin> portcfgpersistentenable 2/4
To enable a range of ports persistently:
switch:admin> portcfgpersistentenable 2/4-8
To enable multiple port ranges persistently:
switch:admin> portcfgpersistentenable 2/24-26 3/10-12 4/3-4
To enable a port persistently by specifying its index number:
switch:admin> portcfgpersistentenable -i 176
To enable a range of ports persistently by specifying the corresponding port index range:
switch:admin> portcfgpersistentenable -i 17-18
To enable multiple ports persistently by specifying multiple port index ranges:
switch:admin> portcfgpersistentenable -i 17-18 30-39
To enable all ports on slots 3-5 persistently:
switch:admin> portcfgpersistentenable -s 3-5
To display the persistently enabled ports on the switch:
switch:admin> portcfgpersistentenable
Slot 9 0 1 2 3 4 5 6 7 8 9 10 11 12 13 14 15---------+---+---+---+---+---+---+---+---+---+---+---+---+---+---+---+---Enabled YES YES YES YES YES YES YES YES YES YES YES YES YES YES YES YES(output truncated)
See Also ficonCupSet, ficonCupShow, portDisable, portEnable, portCfgPersistentDisable, portCfgShow,portShow, portSwapDisable, portSwapshow, switchShow
Fabric OS Command Reference 67153-1001764-02

PortCfgQoS2
PortCfgQoS
Enables or disables QoS, sets the default configuration, and sets and resets the ingress rate limit.
Synopsis portcfgqos --disable | --enable | --default [slot/]port
portcfgqos --setratelimit [slot/]port ratelimit
portcfgqos --resetratelimit [slot/]port
portcfgqos --help
Description Use this command to enable or disable Adaptive Networking/Quality of Service (AN/QoS) on a port, to set or reset the ingress rate limit for the specified port, and to set the default behavior.
The Adaptive Networking with QoS feature allows latency-sensitive applications to share storage resources alongside throughput-intensive applications. Ingress Rate Limiting delays the return of BB credits to the external device. By limiting the throughput on the ingress side of a port, existing congestion can be removed or avoided.
Notes The execution of this command is subject to Virtual Fabric or Admin Domain restrictions that may be in place. Refer to chapter 1, "Using Fabric OS commands" and Appendix A, "Command Availability" for details.
An Adaptive Networking license is required for using this command.
This command is not supported on all platforms. Refer to the Fabric OS Administrator's Guide for more information.
The configuration changes effected by this command are persistent across system reboots.
The Fabric OS port configuration commands are not supported on FCoE ports.
Operands This command has the following operands:
slot For bladed systems only, specifies the slot number of the port to configure, followed by a slash (/).
port Specifies the port to be configured, relative to its slot for bladed systems. Use switchShow for a listing of valid ports.
--default Applies the default QoS configuration to the specified ports. This command attempts to enable QoS; success depends on availability of buffers.
--disable Disables the QoS configuration on the specified port. Qos is by default enabled.
--enable Enables the QoS configuration on the specified port.
--resetratelimit Turns off the ingress rate limiting feature on the specified port.
--setratelimit ratelimit Sets an ingress rate limit to reduce traffic from the specified port. This configuration is applicable only to F/FL_Ports. For E/EX_Ports, this configuration would not be effective. The ingress rate limit is enforced only when a given port can run at a speed higher than the speed specified in the
672 Fabric OS Command Reference53-1001764-02

PortCfgQoS 2
configuration. For example if the rate limit is set at 4 Gbps and the port comes online only at 2 Gbps, no enforcement is needed. Specify an ingress rate in Mbps. Supported values for ratelimit are: 200, 400, 600, 800, 1000, 1500, 2000, 2500, 3000, 3500, 4000, 5000, 6000, 7000, and 8000.
--help Displays the command usage.
Examples To enable QoS on a port.
switch:admin> portcfgqos --enable 3/15
To disable QoS on a port.
switch:admin> portcfgqos --disable 3/15
To set the ingress rate limit on a port to 2 Gbps:
switch:admin> portcfgqos --setratelimit 3/15 2000
To set the default QoS configuration on a port:
switch:admin> portcfgqos --default 3/15
See Also portCfg, portCmd, portShow, switchShow, configure
:
Fabric OS Command Reference 67353-1001764-02

portCfgShow2
portCfgShow
Displays port configuration settings.
Synopsis portcfgshow
portcfgshow [slot/]port
portcfgshow -i [index1[-index2] [...] [-f]]
portcfgshow -slot slot1[-slot2] [...]
portcfgshow option [slot/][ge_port] [arguments] [optional_arguments]
Description Use this command to display the current configuration of a port. The behavior of this command is platform-specific; output varies depending on port type and platform, and not all options are supported on all platforms.
“Non-GbE port displays”
When used without operands, this command displays port configuration settings for all ports on a switch, except Gigabit Ethernet (GbE) ports.
“Displays supported only on the Brocade 7800 /FX8-24 and on the Brocade 7500/7500E/FR4-18i platforms”
Use this command with optional arguments to display the following parameters configured for a GbE port on the Brocade 7800/FX8-24 and on the Brocade 7500/7500E/FR4-18i platforms.
• IP interfaces on the GbE port
• Static routes on the IP interfaces
• Address resolution protocol (ARP) entries
• VLAN tag configuration
• Fibre Channel over IP (FCIP) tunnel configuration settings
- IPSec configuration
- QoS mappings (Brocade 7500/7500E/FR4-18i only)
“Displays supported only on the Brocade 7500/7500E/FR4-18i platforms”
• Port mode information
• Inband Management IP addresses and routes (Brocade 7500 only)
Non-GbE port displaysThe following information is displayed when the command is issued for all ports, for a single port, or for one or more port ranges specified by their port index numbers or slot numbers:
Area Number Displays the port area number. This field is displayed only when portCfgShow is executed for a single port.
Speed Displays Auto for auto speed negotiation mode, or a specific speed of 1, 2, 4, or 8 Gbps. This value is set by the portCfgSpeed command.
Fill Word Displays one of the following numeric values: 0(Idle-Idle), 1(arbff-arbff), 2(Idle-arbff), or 3(A-A then SW I-A).This parameter is set by the portcfgFillword command.
674 Fabric OS Command Reference53-1001764-02

portCfgShow 2
AL_PA Offset 13 Displays (..) or OFF when the arbitrated loop physical address (AL_PA) on the port is configured to use a 0x0 AL_PA address (default). Displays ON when the address configuration is 0x13 AL_PA. This value is set by the portCfgAlpa command.
Trunk Port Displays ON when port is set for trunking. Displays (..) or OFF when trunking is disabled on the port. This value is set by the portCfgTrunkPort command.
Long Distance Displays (..) or OFF when long distance mode is off; otherwise, displays long distance levels as follows:
LE The link is up to 10 km.
LM The link is up to 25 km.
L1 The link is up to 50 km.
L2 The link is up to 100 km.
LD The distance is determined dynamically.
LS The distance is determined statically by user input.
This value is set by the portCfgLongDistance command.
VC Link Init Displays (..) or OFF when the long distance link initialization option is turned off. Displays ON when it is turned on for long distance mode. This value is set by the portCfgLongDistance command.
Locked L_Port Displays ON when the port is locked to L_Port only. Displays (..) or OFF when L_Port lock mode is disabled and the port behaves as a U_Port). This value is set by the portCfgLport command.
Locked G_Port Displays ON when the port is locked to G_Port only. Displays (..) or OFF when G_Port lock mode is disabled and the port behaves as a U_Port. This value is set by the portCfgGport command.
Disabled E_Port Displays ON when the port is not allowed to be an E_Port. Displays (..) or OFF when the port is allowed to function as an E_Port. This value is set by the portCfgEport command.
ISL R_RDY Mode Displays ON when ISL R_RDY mode is enabled on the port. Displays (..) or OFF when ISL R_RDY mode is disabled. This value is set by the portCfgISLMode command.
RSCN Suppressed Displays ON when RSCN suppression is enabled on the port. Displays (..) or OFF when RSCN suppression is disabled. This value is set by the portCfg rscnsupr command.
Persistent Disable Displays ON when the port is persistently disabled; otherwise displays (..) or OFF. This value is set by the portCfgPersistentDisable command.
LOS TOV enable Displays ON when LOS TOV is enabled on the port; otherwise displays (..) or OFF. This value is set by the portCfgLossTov command.
NPIV capability Displays ON when N_Port ID Virtualization (NPIV) is enabled on the port (default). Displays (..) or OFF when NPIV capability is disabled. This value is set by the portCfgNPIVPort command.
Fabric OS Command Reference 67553-1001764-02

portCfgShow2
QOS E_Port Displays ON when Quality of Service (QoS) is enabled on the E_Port (or EX_Port) when QoS is enabled in an FCR deployment scenario. Displays (..) or OFF when QoS is disabled. By default, QoS is enabled if sufficient buffers are available. Displays AE when QoS is configured as Auto Enabled. In the AE state, QoS is enabled based on the availability of buffers.
Use islShow to determine the current status of QoS (on or off) in the AE state. This value is set by the portCfgQos command.
EX_port. Displays ON when the port is configured as an EX_Port. Otherwise displays (..) or OFF. This value is set by the portCfgExPort command.
Mirror Port Displays ON when Mirror Port is enabled on the port. Displays (..) or OFF when Mirror Port is disabled. This value is set by the portCfg mirrorport command.
FC Fastwrite Displays ON when FC FastWrite is enabled on the port or (..) or OFF when disabled. FastWrite is disabled by default. This value is set by the portCfg fastwrite command.
Rate Limit Displays ON when ingress rate limit is set on the port or (..) or OFF when the ingress rate limiting feature is disabled. This value is set by the portCfgQos --setratelimit command. The default value is OFF.
Credit Recovery Displays ON when Credit Recovery is enabled on the port. Displays (..) or OFF when the feature is disabled. This value is set by the portCfgCreditRecovery command. The credit recovery feature is enabled by default, but only ports configured as long distance ports can utilize this feature.
Port Auto Disable Displays On when the Auto Disable feature is enabled on a port. Displays (..) or OFF when the feature is disabled. This feature causes ports to become disabled when they encounter an event that would cause them to reinitialize. This feature is enabled by the portCfgAutoDisable command. The feature is disabled by default.
F_Port Buffers Displays the number of configured F_Port buffers. Displays (..) or OFF if no buffers are configured. The buffer value is set by the portCfgfPortbuffers command.
NPIV PP Limit Displays the maximum number of allowed logins for the port. Displays the default of 126 or the configured maximum. This parameter is set with the portCfgNPIVPort --setloginlimit command.
CSCTL mode Currently not supported.
You can identify a single port to be displayed by its port number or by its port index number. Port ranges are supported with index numbers or by specifying a slot or a slot range. Use switchShow for a listing of valid ports, slots, and port index numbers. When used without operands, this command displays all persistently disabled ports on the switch.
Specifying multiple ports with the index (-i) or slot (-s) option is supported only if PortSwap is disabled. They are not supported on GbE ports and configured F_Port trunks. Use the -i option without a port index argument to display the portSwap status, or alternately use portSwapShow.
Notes The execution of this command is subject to Virtual Fabric or Admin Domain restrictions that may be in place. Refer to chapter 1, "Using Fabric OS commands" and Appendix A, "Command Availability" for details.
The Fabric OS port configuration commands are not supported on FCoE ports.
676 Fabric OS Command Reference53-1001764-02

portCfgShow 2
Operands This command supports the following operands:
slot For bladed systems only, specifies the slot number of the port to be configured, followed by a slash (/).
port Specifies the number of the port to be displayed, relative to its slot for bladed systems. Use switchShow for a listing of valid port numbers.
-i index1[-index2] Specifies a port or a range of ports identified by port index numbers. You can specify multiple index ranges separated by a space, for example, -i 33-38 40-60.
-f Ignores nonexisting ports. This operand is valid only with the -i option.
-slot slot1[-slot2] Specifies a slot or a range of slots. You can specify multiple slot ranges separated by a space, for example, -s 1-3 5-7.
ge_port Specifies the number of the GbE Port to be displayed. The GbE ports are numbered ge0 - ge9 on the Brocade FX8-24 blade and ge0 - ge5 on the Brocade 7800 switch. The 10GbE ports on the Brocade FX8-24 blade are numbered xge0 and xge1. The GbE ports on the Brocade 7500/7500E, and FR4-18i are numbered ge0 and ge1. Use the switchShow command for a list of valid ports.
Use portCfgshow with a GbE port or with one of the following optional arguments to display specific FCIP-related parameters.
Displays supported only on the Brocade 7800 /FX8-24 and on the Brocade 7500/7500E/FR4-18i platforms The following operands are optional; if omitted, all of the configuration settings are displayed on the 7500/7500E/FR4-18i platforms, along with the FCIP tunnels. When issued on the Brocade 7800/FX8-24, tunnels and parameters not applicable to these platforms are not displayed. Use the portShow command to display FCIP tunnel and circuit parameters on the Brocade 7800/FX8-24.
ipif Displays the IP interface for both ports of the tunnel. IPv6 addresses are supported on the Brocade 7500/7500E/FR4-18i platforms, and on the Brocade 7800/FX8-24 platforms with Fabric OS v6.4.0.
iproute Displays the IP route on the specified GbE port. IPv6 addresses are supported. IPv6 addresses are supported on the Brocade 7500/7500E/FR4-18i platforms, and on the Brocade 7800/FX8-24 platforms with Fabric OS v6.4.0.
arp Displays the address resolution protocol (ARP) table.
vlantag Displays the VLAN tagging configuration. For each entry, the output displays the IP interface address, the destination IP address, the VLAN ID, and the L2 CoS priority. This display includes permanent entries only. Permanent entries are configured at the IP interface level with the portCfg vlantag command. To view VLAN tagged tunnels and circuits along with permanent entries, use the portShow vlantag command.
fciptunnel Displays FCIP tunnels and related parameters. Valid arguments for fciptunnel include:
all Displays information for all FCIP tunnels.
Fabric OS Command Reference 67753-1001764-02

portCfgShow2
ve_port Displays information for the specified FCIP tunnel on the Brocade 7800/FX8-24 (only). To display the tunnel, specify the VE_Port number associated with the tunnel configured on one of the GbE ports. VE_Ports are numbered 16-23 on the Brocade 7800 and 12-31 on the Brocade FX8-24 blade.
tunnel_id Displays information for the specified FCIP tunnel on the Brocade 7500/7500E/FR4-18i only. valid tunnel IDs are 0 to 7.
-ipsec On the 7500/7500E/FR4-18i, this option displays IKE and IPSec policy information on IPSec-enabled tunnels. On the Brocade 7800/FX8-24, this option displays whether IPSec is enabled or disabled. If enabled, the key is displayed. This operand is optional.
-qosmap Displays the VC to QoS mapping. This operand is optional and valid only on the 7500/7500E/FR4-18i.
Displays supported only on the Brocade 7500/7500E/FR4-18i platformsWhen executed on the Brocade 7800/FX8-24, the following commands are not blocked, but return no relevant information.
mode Displays the mode of the specified GbE port as FCIP or not configured.
inbandmgmt Displays any inband management interfaces configured on the Brocade 7500 for a specified GbE port. This command is not supported on the FR4-18i blade.
Examples To display the port configuration settings for a single port on a Brocade DCX-4S:
switch:admin> portcfgshow 1/3Area Number: 3Speed Level: AUTO(HW)Fill Word: 0(Idle-Idle)AL_PA Offset 13: OFFTrunk Port ONLong Distance OFFVC Link Init OFFLocked L_Port OFFLocked G_Port OFFDisabled E_Port OFFLocked E_Port OFFISL R_RDY Mode OFFRSCN Suppressed OFFPersistent Disable OFFLOS TOV enable OFFNPIV capability ONQOS E_Port AEPort Auto Disable: OFFRate Limit OFFEX Port OFFMirror Port OFFCredit Recovery ONF_Port Buffers OFFNPIV Max Login Limit: 126CSCTL mode: OFF
678 Fabric OS Command Reference53-1001764-02

portCfgShow 2
To display the port configuration settings on a Brocade 7800 for a range of ports specified by their index numbers:
switch:admin> portcfgshow -i 3-5portcfgshow -i 3-5Index: 3 4 5---------------- +---+---+---Speed AN AN ANFill Word 0 0 0AL_PA Offset 13 .. .. ..Trunk Port ON ON ONLong Distance .. .. ..VC Link Init .. .. ..Locked L_Port .. .. ..Locked G_Port .. .. ..Disabled E_Port .. .. ..Locked E_Port .. .. ..ISL R_RDY Mode .. .. ..RSCN Suppressed .. .. ..Persistent Disable .. .. ..LOS TOV enablle .. .. ..NPIV capability ON ON ONNPIV PP Limit 255 255 255QOS E_Port AE AE AEEX Port .. .. ..Mirror Port .. .. ..Rate Limit .. .. ..Credit Recovery ON ON ONFport Buffers .. .. ..Port Auto Disable .. .. ..CSCTL mode .. .. ..
where AE:QoSAutoEnable, AN:AutoNegotiate, ..:OFF, NA:NotApplicable, ??:INVALID,
To display the port configuration settings for all ports on slot 1 on a Brocade DCX-4S:
switch:admin> portcfgshow -slot 1Index: 0 1 2 3 4 5 6 7 8 9 10 11 12 13 14 15---------------- +--+--+--+--+---+--+--+--+---+--+--+--+--+--+--+----Speed AN AN AN AN AN AN AN AN AN AN AN AN AN AN AN ANFill Word 0 0 0 0 0 0 0 0 0 0 0 0 0 0 0 0AL_PA Offset 13 .. .. .. .. .. .. .. .. .. .. .. .. .. .. .. ..Trunk Port ON ON ON ON ON ON ON ON ON ON ON ON ON ON ON ONLong Distance .. .. .. .. .. .. .. .. .. .. .. .. .. .. .. ..VC Link Init .. .. .. .. .. .. .. .. .. .. .. .. .. .. .. ..Locked L_Port .. .. .. .. .. .. .. .. .. .. .. .. .. .. .. ..Locked G_Port .. .. .. .. .. .. .. .. .. .. .. .. .. .. .. ..Disabled E_Port .. .. .. .. .. .. .. .. .. .. .. .. .. .. .. ..Locked E_Port .. .. .. .. .. .. .. .. .. .. .. .. .. .. .. ..ISL R_RDY Mode .. .. .. .. .. .. .. .. .. .. .. .. .. .. .. ..RSCN Suppressed .. .. .. .. .. .. .. .. .. .. .. .. .. .. .. ..Persistent Disable .. .. .. .. .. .. .. .. .. .. .. .. .. .. .. ..LOS TOV enablle .. .. .. .. .. .. .. .. .. .. .. .. .. .. .. ..NPIV capability ON ON ON ON ON ON ON ON ON ON ON ON ON ON ON ONNPIV PP Limit 90 90 90 90 90 90 90 90 90 90 90 90 90 90 90 90QOS E_Port AE AE AE AE AE AE AE AE AE AE AE AE .. .. .. ..EX Port .. .. .. .. .. .. .. .. .. .. .. .. .. .. .. ..Mirror Port .. .. .. .. .. .. .. .. .. .. .. .. .. .. .. ..Rate Limit .. .. .. .. .. .. .. .. .. .. .. .. .. .. .. ..
Fabric OS Command Reference 67953-1001764-02

portCfgShow2
Credit Recovery ON ON ON ON ON ON ON ON ON ON ON ON ON ON ON ONFport Buffers .. .. .. .. .. .. .. .. .. .. .. .. .. .. .. ..Port Auto Disable .. .. .. .. .. .. .. .. .. .. .. .. .. .. .. ..CSCTL mode .. .. .. .. .. .. .. .. .. .. .. .. .. .. .. ..
Index: 16 17 18 19 20 21 22 23 24 25 26 27 28 29 30 31---------------- +--+--+--+--+---+--+--+--+---+--+--+--+---+--+--+--+Speed AN AN AN AN AN AN AN AN AN AN AN AN AN AN AN ANFill Word 0 0 0 0 0 0 0 0 0 0 0 0 0 0 0 0AL_PA Offset 13 .. .. .. .. .. .. .. .. .. .. .. .. .. .. .. ..Trunk Port ON ON ON ON ON ON ON ON ON ON ON ON ON ON ON ONLong Distance .. .. .. .. .. .. .. .. .. .. .. .. .. .. .. ..VC Link Init .. .. .. .. .. .. .. .. .. .. .. .. .. .. .. ..Locked L_Port .. .. .. .. .. .. .. .. .. .. .. .. .. .. .. ..Locked G_Port .. .. .. .. .. .. .. .. .. .. .. .. .. .. .. ..Disabled E_Port .. .. .. .. .. .. .. .. .. .. .. .. .. .. .. ..Locked E_Port .. .. .. .. .. .. .. .. .. .. .. .. .. .. .. ..ISL R_RDY Mode .. .. .. .. .. .. .. .. .. .. .. .. .. .. .. ..RSCN Suppressed .. .. .. .. .. .. .. .. .. .. .. .. .. .. .. ..Persistent Disable .. .. .. .. .. .. .. .. .. .. .. .. .. .. .. ..LOS TOV enablle .. .. .. .. .. .. .. .. .. .. .. .. .. .. .. ..NPIV capability ON ON ON ON ON ON ON ON ON ON ON ON ON ON ON ONNPIV PP Limit 90 90 90 90 90 90 90 90 90 90 90 90 90 90 90 90QOS E_Port AE AE AE AE AE AE AE AE AE AE AE AE .. .. .. ..EX Port .. .. .. .. .. .. .. .. .. .. .. .. .. .. .. ..Mirror Port .. .. .. .. .. .. .. .. .. .. .. .. .. .. .. ..Rate Limit .. .. .. .. .. .. .. .. .. .. .. .. .. .. .. ..Credit Recovery ON ON ON ON ON ON ON ON ON ON ON ON ON ON ON ONFport Buffers .. .. .. .. .. .. .. .. .. .. .. .. .. .. .. ..Port Auto Disable .. .. .. .. .. .. .. .. .. .. .. .. .. .. .. ..CSCTL mode .. .. .. .. .. .. .. .. .. .. .. .. .. .. .. ..
where AE:QoSAutoEnable, AN:AutoNegotiate, ..:OFF, NA:NotApplicable, ??:INVALID,
To display the configuration settings for a single port on a switch with Access Gateway enabled:
switch:admin> portcfgshow 8Area Number: 8Speed Level: AUTO(HW)Fill Word: 0(Idle-Idle)Trunk Port ONLocked N_Port OFFPersistent Disable OFFNPIV capability ONQOS Port AEPort Auto Disable: OFFLOS TOV enable OFFRate Limit OFFF_Port Buffers OFFNPIV PP Limit: 10
To display the QoS configuration for an EX_Port (QoS over FCR deployment):
switch:admin> switchshow | grep EX-Port 16 16 id N4 Online FC EX-Port 10:00:00:05:1e:41:4a:45 "Tom_100" (fabric id = 25 )(Trunk master)
680 Fabric OS Command Reference53-1001764-02

portCfgShow 2
switch:admin> portcfgshow 16Area Number: 11Speed Level: AUTO(HW)Fill Word: 0(Idle-Idle)AL_PA Offset 13: OFFTrunk Port ONLong Distance OFFVC Link Init OFFLocked L_Port OFFLocked G_Port OFFDisabled E_Port OFFISL R_RDY Mode OFFRSCN Suppressed OFFPersistent Disable OFFLOS TOV enable OFFNPIV capability ONQOS E_Port AEPort Auto Disable: OFFRate Limit OFFEX Port ONMirror Port OFFCredit Recovery ONF_Port Buffers OFFNPIV PP Limit: 126CSCTL mode: OFF
To display FCIP tunnels configured on a Brocade FR4-18i FC (refer to the portCfg help page for an explanation of the displayed parameters):
switch:admin> portcfgshow 12/ge0Mode: FCIP
Persistent Disable: OFFIpif configuration:Interface IP Address NetMask MTU---------------------------------------------------------- 0 192.168.100.50 255.255.255.0 1500 1 192.168.100.51 255.255.255.0 1500 2 192.168.100.52 255.255.255.0 1500 3 192.168.100.53 255.255.255.0 1500 4 192.168.100.54 255.255.255.0 1500 5 192.168.100.55 255.255.255.0 1500 6 192.168.100.56 255.255.255.0 1500 7 192.168.100.57 255.255.255.0 1500
Inband management configuration:Inband management: DisabledCP Interface IP Address NetMask MTU----------------------------------------------------------GE Interface IP Address NetMask MTU----------------------------------------------------------Arp configuration:IP Address Mac Address------------------------------Iproute Configuration:IP Address Mask Gateway Metric------------------------------------------------------IPv6 Address Len Gateway
Metric
Fabric OS Command Reference 68153-1001764-02

portCfgShow2
-------------------------------------------------------
Fciptunnel configuration:IPV4 FCIP TUNNEL(S)------------------------------------------- Tunnel ID 0 Remote IP Addr 192.168.100.40 Local IP Addr 192.168.100.50 Remote WWN Not Configured Local WWN 10:00:00:05:1e:40:68:78 Compression off Fastwrite off Tape Pipelining off Committed Rate 100000 Kbps (0.100000 Gbps) SACK on Min Retransmit Time 100 Keepalive Timeout 10 Max Retransmissions 8 VC QoS Mapping off DSCP (Control): 0, DSCP (Data): 0 VLAN Tagging Not Configured VC QoS Map: (default) VC DSCP L2CoS VC DSCP L2CoS VC DSCP L2CoS VC DSCP L2CoS 0 46 7 1 07 0 2 11 3 3 15 3 4 19 3 5 23 3 6 27 0 7 31 0 8 35 0 9 39 0 10 43 4 11 47 4 12 51 4 13 55 4 14 59 4 15 63 0
------------------------------------------- Tunnel ID 1 Remote IP Addr 192.168.100.41 Local IP Addr 192.168.100.51 Remote WWN Not Configured Local WWN 10:00:00:05:1e:40:68:78 Compression off Fastwrite off Tape Pipelining off Committed Rate 100000 Kbps (0.100000 Gbps) SACK on Min Retransmit Time 100 Keepalive Timeout 10 Max Retransmissions 8 VC QoS Mapping off DSCP (Control): 0, DSCP (Data): 0 VLAN Tagging Not Configured VC QoS Map: (default) VC DSCP L2CoS VC DSCP L2CoS VC DSCP L2CoS VC DSCP L2CoS 0 46 7 1 07 0 2 11 3 3 15 3 4 19 3 5 23 3 6 27 0 7 31 0 8 35 0 9 39 0 10 43 4 11 47 4 12 51 4 13 55 4 14 59 4 15 63 0(output truncated)
682 Fabric OS Command Reference53-1001764-02

portCfgShow 2
To display FCIP parameters on the Brocade 7800 (with IPv6 support):
switch:admin> portcfgshow ge2Mode: FCIP
Persistent Disable: OFF
Ipif configuration:Interface IP Address NetMask MTU---------------------------------------------------- 0 192.168.2.10 255.255.255.0 1500 1 192.168.2.12 255.255.255.0 1500 2 192.168.2.13 255.255.255.0 1500 3 192.168.2.11 255.255.255.0 1500 4 192.168.2.110 255.255.255.0 1500 Interface IPv6 Address Len MTU-------------------------------------------------------- 0 20::2:10 64 1500
Iproute Configuration:IP Address Mask Gateway Metric------------------------------------------------------192.168.42.0 255.255.255.0 192.168.2.250 0
IPv6ddress Len Gateway Metric-------------------------------------------------------20:42:: 64 20::2:250 0
Vlantag configuration:-------------------------Interface Address VlanId L2CoS Destination Address------------------------------------------------------192.168.2.10 200 5 0.0.0.0192.168.2.10 300 5 192.168.2.21
To display the VLAN tagging configuration only:
switch:admin> portcfgshow vlantag ge2Port: ge2
Vlantag configuration:-------------------------Interface Address VlanId L2CoS Destination Address---------------------------------------------------192.168.2.20 200 5 0.0.0.0192.168.2.21 300 5 192.168.2.10
Fabric OS Command Reference 68353-1001764-02

portCfgShow2
To display an FCIP Tunnel on a Brocade FX8-24 with and without IPSec information:
switch:admin> portcfgshow fciptunnel 7/12 -ipsec-------------------------------------------Tunnel ID: 7/12 Tunnel Description: Compression: Off Fastwrite: Off Tape Acceleration: Off TPerf Option: Off IPSec: Enabled IPSec Key: '01234567890123456789012345678901' Remote WWN: Not Configured Local WWN: 10:00:00:05:1e:7a:7a:00 Flags: 0x00000000 FICON: Off
switch:admin> portcfgshow fciptunnel 7/12 -------------------------------------------Tunnel ID: 7/12 Tunnel Description: Compression: Off Fastwrite: Off Tape Acceleration: Off TPerf Option: Off Remote WWN: Not Configured Local WWN: 10:00:00:05:1e:7a:7a:00 Flags: 0x00000000 FICON: Off
To display inband management interfaces configured on the Brocade 7500:
switch:admin> portcfgshow inbandmgmt ge1Inband management: Enabled
Port: ge1CP Interface IP Address NetMask MTU---------------------------------------------------------- 0 192.168.255.1 255.255.255.252 1500
Port: ge1GE Interface IP Address NetMask MTU---------------------------------------------------------- 0 192.168.255.2 255.255.255.252 1500
See Also portCfg, portCfgCreditRecovery, portCfgEport, portCfgGport, portCfgLongDistance, portCfgLPort, portCfgNPIVPort, portCfgSpeed, portCfgTrunkPort, portSwapDisable, portSwapShow, switchShow
684 Fabric OS Command Reference53-1001764-02

portCfgSpeed 2
portCfgSpeed
Configures the speed for a port or a range of ports.
Synopsis portcfgspeed [slot/]port speed
portcfgspeed -i [index1[-index2] [-f] speed]
portcfgspeed -slot [slot1[-slot2] [...] speed
portcfgspeed -h
Description Use this command to set the speed on a specified port or port range. This command disables and then re-enables the ports, and the ports come online with the new speed setting. The configuration is saved in nonvolatile memory and is persistent across switch reboots or power cycles. Use the portShow command to display supported port speed levels. Use the portCfgShow command to display configured speed settings.
You can identify a single port to be configured by its port number or by its port index number. Port ranges are supported with index numbers or by specifying a slot or a slot range. Use switchShow for a listing of valid ports, slots, and port index numbers.
Specifying multiple ports with the index (-i) or slot (-s) option is supported only if PortSwap is disabled. They are not supported on GbE ports and configured F_Port trunks. Use the -i option without a port index argument to display the portSwap status, or alternately use portSwapShow.
Notes This configuration cannot be set on VE/VEX_Ports. For a virtual FC port, the speed is always 10 GbE and port speed autonegotiation is not possible.
Speed configuration is not applicable to FCoE ports.
The execution of this command is subject to Virtual Fabric or Admin Domain restrictions that may be in place. Refer to chapter 1, "Using Fabric OS commands" and Appendix A, "Command Availability" for details.
Operands This command has the following operands:
slot For bladed systems only, specifies the slot number of the ports to be configured, followed by a slash (/).
port Configures a single port identified by the port number relative its the slot on bladed systems.
-i index1[-index2] Configures a port or a range of ports identified by port index numbers. Multiple port ranges are not supported with this command.
-f Ignores nonexisting ports. This operand is valid only with the -i option.
-slot [slot1[-slot2] Configures all ports on a slot or on a range of slots, for example, -s 3-5. You may specify multiple slot ranges separated by a space, for example, -s 3-5 8-10.
speed Sets speed for the specified ports. This operand is required. Valid values are one of the following.
0 Autosensing mode (hardware). The port automatically configures for maximum speed.
Fabric OS Command Reference 68553-1001764-02

portCfgSpeed2
ax Autosensing mode (hardware). The port automatically configures for maximum speed with enhanced retries.
s Auto-sensing mode (software). The port automatically configures for maximum speed with enhanced retries.
1 The port is set at a fixed speed of 1 Gbps.
2 The port is set at a fixed speed of 2 Gbps.
4 The port is set at a fixed speed of 4 Gbps.
8 The port is set at a fixed speed of 8 Gbps.
-h Displays the command usage.
Examples To set the speed of a port to 4 Gbps:
switch:admin> portcfgspeed 2/3 4
To set the speed of a port using the port index:
switch:admin> portcfgspeed -i 78 8
To set the speed of a port range using the port index:
switch:admin> portcfgspeed -i 24-38 8
To set all ports on slots 2 and 3 to 8 Gbps:
switch:admin> portcfgspeed -s 2-3
To set all ports on slots 2-3 and 9-12 to 8 Gbps:
switch:admin> portcfgspeed -s 2-3 9-12
See Also portCfgShow, portShow, switchCfgSpeed, portSwapDisable, portSwapShow, switchShow
686 Fabric OS Command Reference53-1001764-02

portCfgTrunkPort 2
portCfgTrunkPort
Enables or disables trunking on a port.
Synopsis portcfgtrunkport [slot/]port[,] mode
Description Use this command to enable or disable trunking on a port. Use switchCfgTrunk to enable or disable trunking on all ports of a switch.
When the command is executed to update the trunking configuration, the port to which the configuration applies is disabled and subsequently re-enabled with the new trunking configuration. Traffic through the ports may be temporarily disrupted.
Disabling trunking fails if a Trunk Area (TA) is enabled on the port. Use the portTrunkArea command to remove the TA before disabling trunking.
Notes Enabling trunking requires an ISL Trunking license. You may disable trunking without a license.
The execution of this command is subject to Virtual Fabric or Admin Domain restrictions that may be in place. Refer to chapter 1, "Using Fabric OS commands" and Appendix A, "Command Availability" for details.
The Fabric OS port configuration commands are not supported on FCoE ports.
Virtual FC Ports do not support frame-based trunking . If trunking is enabled for one of these ports in a slot, and a Brocade FX-24 Extension blade is inserted into the slot, the configuration is not honored and the system logs a RASLOG error. An attempt to enable trunking for a Virtual FC port in a slot that contains a Brocade FX-24 is rejected.
Operands This command has the following operands:
slot For bladed systems only, specifies the slot number of the port to be configured, followed by a slash (/).
port Specifies the port to be configured, relative to its slot for bladed systems. Use switchShow to display a listing of valid ports.
mode Specify 1 to enable trunking on the specified port. Specify 0 to disable trunking on the port. This operand is required. Trunking is enabled by default, when a trunking license is present on the switch.
Examples To enable a port for trunking:
switch:admin> portcfgtrunkport 1/3, 1
See Also portCfgShow, portShow, switchCfgTrunk, portTrunkArea, switchShow
Fabric OS Command Reference 68753-1001764-02

portCfgVEXPort2
portCfgVEXPort
Configures a port as a VEX_Port connected to an FC-IP and sets and displays VEX_Port configuration parameters.
Synopsis portcfgvexport [slot/]port
portcfgvexport [-a admin]
portcfgvexport [-f fabricid]
portcfgvexport [-r ratov]
portcfgvexport [-e edtov]
portcfgvexport [-d domainid]
portcfgvexport [-p pidformat]
portcfgvexport [-t fabric_parameter]
portcfgvexport [-m portmode]
Description Use this command to configure a port as a VEX_Port, to display the port's VEX_Port configuration, or to change the configuration. If no optional parameter is specified, the command displays the currently configured values; otherwise, it sets the specified attribute to its new value. The port must be disabled prior to setting VEX_Port attributes. The port must be enabled before the port can become active following VEX_Port parameter changes. Use portDisable and portEnable to disable or enable the port.
When the port is not active, the preferred domain ID is configurable. The preferred domain ID is used by the VEX_Port's front phantom domain to request a domain ID from the principal switch. The domain ID received becomes the subsequent preferred domain ID, which is persistent and is displayed.
Notes The fabric ID must be the same for every router port connected to the same edge fabric, and different for every edge fabric. If two ports are connected to the same fabric but have been assigned different fabric IDs, one of them will be disabled due to a fabric ID oversubscription. If two fabrics have been assigned the same fabric ID, one of them will be disabled due to a fabric ID conflict.
The front domain WWN field displays the WWN of the front domain. If the port is enabled and the state is “OK”, the edge fabric principal switch’s domain ID and WWN also are displayed.
If the Fabric Parameter value is “Auto Negotiate”, the port ID format, R_A_TOV, and E_D_TOV values display the negotiated values indicated by “(N)” next to them. The negotiated values are what the edge switch specifies in the ELP request. If the state is “Not OK”, R_A_TOV and E_D_TOV display “Not Applicable”. By default, all VEX_Ports are auto-ELP enabled.
If the Fabric Parameter attribute value is “User configured”, port ID format, R_A_TOV, and E_D_TOV display the configured values.
A configuration change that would result in an invalid domain ID for McDATA Open Fabric mode or McDATA Fabric mode causes the preferred domain ID to be set to the minimum valid McDATA mode domain ID of 1. The exception to this is if the configuration change includes setting the preferred domain ID, in which case the configuration change does not take place and a corresponding error message is displayed.
688 Fabric OS Command Reference53-1001764-02

portCfgVEXPort 2
The execution of this command is subject to Virtual Fabric or Admin Domain restrictions that may be in place. Refer to chapter 1, "Using Fabric OS commands" and Appendix A, "Command Availability" for details.
Operands This command has the following operands:
-a admin Enables or disables the specified port as a VEX_Port. Valid values are 1 (enable as VEX_Port), 2 (disable as VEX_Port and enable as non-VEX_Port). portCfgDefault may also be used to disable VEX_Ports.
-f fabricid Specifies the fabric ID. Valid values are 1-128.
-r ratov Specifies the R_A_TOV used for port negotiation. Valid values are 2000 - 120000. This operand is only applicable if the "Fabric Parameter" attribute value is not "Auto Negotiate".
-e edtov Specifies the E_D_TOV used for port negotiation. Valid values are 1000 - 60000. This operand is only applicable if the "Fabric Parameter" attribute value is not "Auto Negotiate".
-d domainid Specify the preferred domain ID. For Brocade native mode (-m 0) or McDATA Open Fabric mode (-m 1), valid values are 1-239. For McDATA Fabric mode (-m 2), valid values are 1-31.
-p pidformat Specifies the Port ID format. Valid values are 0-native, 1-core, 2-extended edge. This operand is applicable only when port mode is set to 0 (native mode). If port mode is not "Brocade Native", the Port ID format displays as "Not applicable".
-t fabric_parameter Enables or disables negotiation of the fabric parameters. Valid values are: 1-enable, 2-disable.
-m port mode Specifies the Port mode. The -m option enforces the same port mode for all the ports connected to the same edge fabric. If the -m option is selected, the port mode is compared to the online ports. If the modes are different, an error message is displayed, and the command fails. Valid values are as follows:
0 Brocade Native mode.
1 McDATA Open Fabric mode.
2 McDATA Fabric mode.
3 MCDATA fabric legacy mode.
Note that this mapping between mode values and modes is NOT the same as the mapping used when setting interoperability modes with the interopMode command.
Fabric OS Command Reference 68953-1001764-02

portCfgVEXPort2
Examples To display the VEX_Port configuration of port 2/16:
switch:admin> portcfgvexport 2/16
Port 2/16 infoAdmin: enabledState: OKPid format: core(N)Edge Fabric ID: 16Front Domain ID: 160Front WWN: 50:06:06:9e:20:9f:ce:10Principal Switch: 7principal WWN: 10:00:00:60:69:c0:05:8aFabric Parameters: Auto NegotiateR_A_TOV: 9000(N)E_D_TOV: 2000(N)Edge fabric's primary wwn: N/AEdge fabric's version stamp: N/A
To set the fabric ID of port 2/21 to 5 and the port ID format to core:
switch:admin> portcfgvexport 2/21 -f 5 -p 1
To configure port 2/20 as a VEX_Port and set the fabric ID to 4:
switch:admin> portcfgvexport 2/20 -a 1 -f 4
To disable fabric parameter negotiation on port 2/20 of a VEX_Port:
switch:admin> portcfgvexport 2/20 -t 2
See Also portCfgEXPort, portDisable, portEnable, portShow
690 Fabric OS Command Reference53-1001764-02

portCmd 2
portCmd
Diagnoses intelligent ports.
Synopsis portcmd --ipperf [slot/]geport -s src_ip -d dst_ip -S | -R [-i interval][-p port][-q diffserv] [-r committed_rate][-t running_time][-z size] [-v vlan_id [-c L2 Class-of-Service]]
portcmd --ping [slot/][slot/]geport -s src_ip -d dst_ip [-n num_requests][-q service_type] [-t ttl][-w wait_time][-z size][-v vlan_id [-c L2 Class-of-Service]]
portcmd --traceroute [slot/][slot/]geport -s src_ip -d dst_ip [-h max_hops][-f first_ttl] [-q type_of_service][-w timeout] [-z size] [-v vlan_id [-c L2 Class-of-Service]]
portcmd --tperf [slot/]veport -sink | -source [-high | -medium | -low][-time duration] [-unidirectional] [-loop] [-random] [-crc] [-pattern pattern] [-size pdu_size] [-interval interval]
Description Use this command to invoke the end-to-end IP path performance (ipperf) characterization feature, to ping or trace a route to a destination IP host from an intelligent GbE port, or to determine the path characteristics between a local data source and a remote data sink.
When issued with the --tperf option, this command determines the path characteristics to a remote host or tunnel destination. TPerf generates statistics every 30 seconds by default unless you specify a different value for -interval. The output displays the following information:
Tunnel ID Numeric identifier for the TPerf tunnel.
Traffic Priority High, Medium, or Low.
bytes tx Number of bytes transmitted.
bytes rx Number of bytes received.
PDUs tx Number of protocol data units transmitted.
PDUs rx Number of protocol data units received.
bad CRC headers rx Number of bad CRC headers received.
bad CRC payloads rx Number of bad CRC payloads received.
out of seq PDUs rx Number of out-of-sequence PDUs received.
flow control count Flow control count.
last rtt Last Round trip in milliseconds (RT traffic only).
When issued with the ipperf option, this command determines characteristics of the path to the remote host. The output of --ipperf -S includes the following information:
Sampling frequency(s) The interval specified with the -i option or the default (30 seconds).
Total Time(s) The time in seconds the command has been running since it was last issued.
BW The bandwidth measured in the last interval. Bandwidth is defined as the total number of transmitted packets in bytes. BW represents what the FCIP tunnel and the FC application register as throughput rather than the Ethernet on-the-wire bytes.
WBW The current bandwidth weighted with a gain of 50%.
Fabric OS Command Reference 69153-1001764-02

portCmd2
Loss(%) The number of TCP retransmits. This number averages the TCP retransmit rate over the last display interval.
Delay(ms) The smoothed TCP round-trip time and variance estimate in milliseconds.
PMTU The path maximum transmission unit (MTU) represents the largest IP layer datagram that can be transmitted over the end-to-end path without fragmentation. This value is measured in bytes and includes the IP header and payload. There is limited support for black hole PMTU detection. PTMUs of decreasing size are sent: Jumbo PMTU (greater than 1500 bytes), 1500 bytes, and 1260 bytes, the minimum PMTU supported for FCIP tunnels. If the 1260 PMTU transmission fails, --ipperf terminates. There is no support for aging. During black hole PMTU detection the BW, WBW, Loss and PMTU values printed may not be accurate.
VLAN tagging ensures that test traffic traverses the same path as real FCIP traffic. A VLAN tag entry must exist prior to issuing the --ping or --traceroute commands; this includes both the local and remote sides. A VLAN Tag table entry is dynamically maintained by the ipperf application.
The following portcmd features are platform-specific:
Tperf Brocade FX-24 and 7800 only.
VLAN tagging Brocade FX-24/7800 and FR4-18i/7500.
IPv6 Brocade FX-24/7800 and FR4-18i/7500.
ipperf Brocade FR4-18i and 7500 only.
Notes End-to-end path characterization is not supported if there exists an IPSec-enabled tunnel using the same source/local IP address.
Make sure to use --ping and --ipperf with a double-dash (--). If the dashes are omitted, a message displays indicating that the command is deprecated.
The execution of this command is subject to Virtual Fabric or Admin Domain restrictions that may be in place. Refer to chapter 1, "Using Fabric OS commands" and Appendix A, "Command Availability" for details.
Operands This command has the following operands:
slot For bladed systems only, specifies the slot number of the port to be configured, followed by a slash (/).
geport Specifies the port number of the GbE port on the blade.
--ipperf Determines the path characteristics to the remote host. Valid arguments and their values include the following:
-s src_ip Specifies the local IP address to use for sourcing the probe packets. ipperf will not start if there exists an IPSec-enabled tunnel using the same source IP address. IPv6 addresses are supported.
-d dst_ip Specifies the destination IP address to which to probe the IP router path. IPv6 addresses are supported.
-S Instructs the source mode to initiate the TCP connection. The source end-point generates a traffic stream and reports the end-to-end IP path characteristics from this end-point to the receiver end-point sink.
692 Fabric OS Command Reference53-1001764-02

portCmd 2
-R Instructs the sink mode to accept the new connection. The end-to-end path characteristics are not reported.
-i interval Specifies the intervals between polling and displaying statistics, in seconds. If the duration is greater than -t running_time, the statistics displays only once, at the conclusion of the test. This operand is optional.
-p port Specifies the TCP port number for the listener end-point. This operand is optional.
-q diffserv Specifies the DSCP (DiffServ Code Point) marking used for the TCP connection. This operand accepts values between 0 and 63. The default value is 0. This operand is optional.
-r committed_rateSpecifies a committed rate for the data stream, in Kbps. If specified, the traffic generator is limited by a traffic shaper. This characterizes the end-to-end IP path performance based on the data rate configured for a tunnel between the same end-points. If a rate is not specified, the traffic generator competes for uncommitted bandwidth. This operand is optional.
-t running_time Specifies total time to run the test traffic stream, in seconds. If not specified, the test runs continuously until aborted with Ctrl+c. This operand is optional.
-z size Specifies the size, in bytes, of the trace route packet to use. The default is 64 bytes. In an IPv4 environment, the ICMP/IP header occupies 28 bytes. In an IPv6 environment, it occupies 48 bytes. The total size, including ICMP/IP headers (28 or 48 bytes without IP options) cannot be greater than the IP MTU configured on the interface. This operand is optional.
-v vlan_id Specifies the VLAN ID. Values must be in the range of 1 and 4094. There is no default value. Note that a VLAN tag entry must exist on the local and remote sides prior to issuing the -v option. A VLAN Tag table entry is dynamically maintained by the ipperf application. See the portCfg help page for details on creating a VLAN tag table.
-c L2 Class-of-Service
Specifies Class of Service/Priority, as defined by IEEE 802.1p. Valid values are 0 to 7. The default is 0. This operand is optional with the -v option
--ping Pings a destination IP address from one of the source IP interfaces on the GbE port. Valid arguments and their values include:
-s src_ip Specifies the source IP address that originates the ping request. IPv6 addresses are supported.
-d dst_ip Specifies the destination IP address to which to target the ping request. IPv6 addresses are supported.
-n num_requests
Specifies the number of ping requests. Valid values are 1 to 255. The default is 4. This operand is optional.
-q service_type Specifies the type of service in the ping request. The default is 0 and service_type must be an integer from 0 to 255. This operand is optional.
Fabric OS Command Reference 69353-1001764-02

portCmd2
-t ttl Specifies the time to live. Valid values are 1 to 255. The default is 100. This operand is optional.
-w wait_time Specifies the time to wait for the response of each ping request in milliseconds. The default is 5000 ms and the maximum wait time is 9000 ms (9 seconds). This operand is optional.
-z size Specifies the default packet size to a fixed size in bytes. The default is 64 bytes. In an IPv4 environment, the ICMP/IP header occupies 28 bytes. In an IPv6 environment it occupies 48 bytes. The total size, including ICMP/IP headers (28 or 48 bytes without IP options) cannot be greater than the IP MTU configured on the interface. This operand is optional.
-v vlan_id Specifies the VLAN ID. Values must be in the range of 1 to 4094. There is no default value. Note that a VLAN tag entry must exist on the local and remote sides prior to issuing the -v option. A VLAN Tag table entry is dynamically maintained by the ipperf application. See the portCfg help page for details on creating a VLAN tag table.
-c L2 Class-of-Service Specifies Class of Service/Priority, as defined by IEEE 802.1p. Values must be in the range between 0 and 7. The default is 0. This operand is optional with the -v option.
--traceroute Traces the IP router hops used to reach the host dst_ip from one of the source IP interfaces on the GbE port. Valid arguments include:
-s src_ip Specifies the local IP address to use for sourcing the probe packets. IPv6 addresses are supported.
-d dst_ip Specifies the destination IP address to which to probe the IP router path. IPv6 addresses are supported.
-h max_hops Specifies the maximum hop limit used in the outgoing probe packets. The default value is 30 hops. This operand is optional.
-f first_ttl Specifies the starting point for the “time to live” parameter. The default is 1. The command skips processing for those intermediate gateways that are less than the first_ttl hops. This operand is optional.
-q service_type Specifies the type of service in the traceroute request. The default is 0 and service_type must be an integer from 0 to 255. This operand is optional.
-w wait_time Sets the time, in milliseconds, to wait for a response to a probe. The default is 5000 milliseconds. The maximum wait time is 9000 milliseconds (9 seconds). This operand is optional.
-z size Specifies the size, in bytes, of the trace route packet to use. The default is 64 bytes. In an IPv4 environment, the ICMP/IP header occupies 28 bytes. In an IPv6 environment, it occupies 48 bytes. The total size, including ICMP/IP headers (28 or 48 bytes without IP options), cannot be greater than the IP MTU configured on the interface. This operand is optional.
-v vlan_id Specifies the VLAN ID. Values must be in the range of 1 and 4094. There is no default value. Note that a VLAN tag entry must exist on the local and remote sides prior to issuing the -v option. A VLAN Tag table entry is dynamically maintained by the ipperf application. See the portCfg help page for details on creating a VLAN tag table.
694 Fabric OS Command Reference53-1001764-02

portCmd 2
-c L2 Class-of-Service Specifies Class of Service/Priority, as defined by the IEEE 802.1p specification. Values must be in the range of 0 to 7. The default value is 0. This operand is optional with the -v option.
--tperf Determines the path characteristics to a remote host or tunnel destination The -tperf option requires two separate Brocade FX-24 blades to function. One blade plays the role of a data sink and the other blade plays the role of the data source. TPerf also requires that you define a tunnel as a TPerf tunnel. Refer to portCfg fciptunnel for more information.
-sink | -source Designates the switch to function either as a data sink or a data source. This operand is required.
When -sink is specified, TPerf begins to respond to traffic sent by the switch acting as the data source. The process continues to run until it is either terminated by user intervention (Ctrl +C) or, if a value for duration is specified with the -t option, until the process completes the set time frame.
The following optional arguments are ignored on the data sink, because it services all requests from the data source: -high, --medium, --low, -unidirectional, -random, -pattern, and -size.
When -source is specified, TPerf generates traffic until it is interrupted by user intervention (Ctrl + c) or, if a value for duration is specified with the -t option, until the process completes the set time frame. The TPerf module on the remote host will immediately begin generating traffic; it is therefore imperative that the data sink has been started on the opposing switch before the data source is started on the local switch.
The following arguments are optional:
-high Generates high priority traffic.
-medium Generates medium priority traffic.
-low Generates low priority traffic.
If no traffic priority is specified, high, medium, and low priority traffic is generated.
-time duration Specifies the duration of the TPerf traffic flow in seconds. If a value for duration is not specified, the process continues to run until it is terminated with Ctrl + C.
-unidirectional Generates traffic in one direction only. The default is round-trip.
-loop Reissues a send request as fast as possible after completion of the previous send request.
-random Specifies a random protocol data unit (PDU) size between 1 and the size of the send request. Refer to -size below.
-crc Specifies cyclic redundancy check (CRC) to be performed on the payload.
Fabric OS Command Reference 69553-1001764-02

portCmd2
-pattern pattern Specifies the test data pattern for the payload as one of the following values:
0 No pattern is specified. TPerf applies whatever is already set or in memory. This is the default value.
1 All zeros
2 All ones
3 Incrementing byte
4 Random
5 Jitter
-size pdu_size Specifies the PDU size to use (not including headers). The valid range is between 1k and 16k. The default is equivalent to the maximum segment size (MSS). This is the maximum size if the -random option is specified.
-interval interval Specifies the interval at which the statistics display is refreshed, in seconds. The default is 30 seconds.
Examples To verify if packets can be sent to the destination IP address with maximum wait_time specified:
switch:admin> portcmd --ping 12/ge0 -s 2007:7:30:32:227:138:10:120 -d \ 2007:7:30:32:227:77:0:60 -w 29000Pinging 2007:7:30:32:227:77:0:60 from ip interface 2007:7:30:32:227:138:10:120 on 12/ge0 with 64
bytes of dataReply from 2007:7:30:32:227:77:0:60: bytes=64 rtt=0ms ttl=255Reply from 2007:7:30:32:227:77:0:60: bytes=64 rtt=1ms ttl=255Reply from 2007:7:30:32:227:77:0:60: bytes=64 rtt=0ms ttl=255Reply from 2007:7:30:32:227:77:0:60: bytes=64 rtt=0ms ttl=255
Ping Statistics for 2007:7:30:32:227:77:0:60: Packets: Sent = 4, Received = 4, Loss = 0 ( 0 percent loss) Min RTT = 0ms, Max RTT = 1ms Average = 0ms
To trace the IP router hops used to reach the remote (with packet size specified):
switch:admin> portcmd --traceroute 12/ge0 -s 2007:7:30:32:227:138:10:120 -d \ 2007:7:30:32:227:77:0:60 -z 1452Traceroute to 2007:7:30:32:227:77:0:60 from IP interface 2007:7:30:32:227:138:10:120 on 12/0, 30
hops max1 1 ms 0 ms 0 msTraceroute complete.
To verify if packets can be sent to the destination IP address using VLAN tagging with the -c option.
switch:admin> portcmd --ping 8/ge0 –s 192.168.10.1 –d 192.168.20.1 –v 10 –c 3
To trace the IP router hops used to reach the remote host using VLAN tagging with the -c option.
switch:admin> portcmd --traceroute 8/ge0 –s 192.168.10.1 –d 192.168.20.1 –v 10
696 Fabric OS Command Reference53-1001764-02

portCmd 2
To set the path characteristic to source mode on the remote host using VLAN tagging with the -c option.
switch:admin> portcmd --ipperf 8/ge0 –s 192.168.10.1 –d 192.168.20.1 –S –v 10 –c 3
To create a TPerf data sink on VE_Port 16:
switch:admin> portcmd --tperf 16 -sink
TPerf has been configured successfully for 16TPerf is servicing requests on 16 priority: highTPerf is servicing requests on 16 priority: mediumTPerf is servicing requests on 16 priority: lowTperf data source can now be started
To configure a TPerf data source a Brocade FX-24 blade (this example generates round-trip high, medium, and low priority traffic with a fixed PDU size of 400 bytes. The payload pattern is a jitter pattern and the checksum is checked by the sink):
switch:admin> portcmd --tperf 16 -source -size 400 -crc -pattern 5
TPerf has been configured successfully for 16TPerf is generating traffic on 16 priority: highTPerf is generating traffic on 16 priority: mediumTPerf is generating traffic on 16 priority: low**********************************************************************Tunnel ID: 16 High Priority Medium Priority Low Prioritybytes tx 5491960 5280520 5071880bytes rx 408280 407240 460960PDUs tx 10209 10183 11527PDUs rx 10208 10182 11526bad CRC headers rx 0 0 0bad CRC payloads rx 0 0 0out of seq PDUs rx 0 0 0flow control count 0 0 0last rtt 5 5 5**********************************************************************
To configure a TPerf source so it generates round-trip high and low priority traffic with a random PDU size from 0 to 10112 bytes (1 MSS) and with a payload pattern determined by previous settings saved in memory:
switch: admin> portcmd --tperf 16 -source -high -low -randomTPerf has been configured successfully for 16TPerf is generating traffic on 16 priority: highTPerf is generating traffic on 16 priority: low**********************************************************************Tunnel ID: 16 High Priority Medium Priority Low Prioritybytes tx 19800708 0 19168848bytes rx 187200 0 183640PDUs tx 4686 0 4598PDUs rx 4685 0 4597bad CRC headers rx 0 0 0bad CRC payloads rx 0 0 0out of seq PDUs rx 0 0 0flow control count 0 0 0last rtt 5 0 5**********************************************************************
Fabric OS Command Reference 69753-1001764-02

portCmd2
To configure a TPerf source to generate one-way low priority traffic with a random PDU size from 0 to 400 bytes and a payload pattern of ones.
switch:admin> portcmd --tperf 16 -source -low -size 400 -random -unidirectional -pattern 2
TPerf has been configured successfully for 16TPerf is generating traffic on 16 priority: low**********************************************************************Tunnel ID: 16 High Priority Medium Priority Low Prioritybytes tx 0 0 19800708bytes rx 0 0 0PDUs tx 0 0 1434686PDUs rx 0 0 0bad CRC headers rx 0 0 0bad CRC payloads rx 0 0 0out of seq PDUs rx 0 0 0flow control count 0 0 0last rtt N/A N/A N/A**********************************************************************
See Also portCfg, portShow
698 Fabric OS Command Reference53-1001764-02

portDebug 2
portDebug
Sets debug level and verbose level of port modules.
Synopsis portdebug dbg_lvl, vbs_lvl
Description Use this command to set the debug level and verbose level of port modules.
Note The execution of this command is subject to Virtual Fabric or Admin Domain restrictions that may be in place. Refer to chapter 1, "Using Fabric OS commands" and Appendix A, "Command Availability" for details.
Operands This command has the following operands:
dbg_lvl Specify the debug level to be set for port modules; valid values are 1 to 5.
vbs_lvl Specify the verbose level to be set for port modules; valid values are 1 to 5.
Examples To set debug level and verbose level of port modules:
switch:admin> portdebug 3 4
See Also dbgShow
Fabric OS Command Reference 69953-1001764-02

portDisable2
portDisable
Disables a port or a range of ports.
Synopsis portdisable [slot/]port1[-port2] [...]
portdisable -i [index1[-index2] [...] [-f]]
portdisable -slot [slot1[-slot2] [...]
portdisable -h
Description Use this command to disable a port or a range of ports. If the port is connected to another switch when disabled, the fabric may reconfigure. Devices connected to this port can no longer communicate with the fabric.
You can identify a single port to be disabled by its port number or by its port index number. Port ranges are supported with index numbers or by specifying a slot or a slot range. Use switchShow for a listing of valid ports, slots, and port index numbers.
Specifying multiple ports with the index (-i) or slot (-s) option is supported only if PortSwap is disabled. They are not supported on GbE ports and configured F_Port trunks. Use the -i option without a port index argument to display the portSwap status, or alternately use portSwapShow.
The front panel LED of a disabled port flashes yellow with a two-second cycle. If the port was online before being disabled, a state transition will be indicated in one of the following ways: RSCN, SNMP trap, or Web pop-up window.
Notes The execution of this command is subject to Virtual Fabric or Admin Domain restrictions that may be in place. Refer to chapter 1, "Using Fabric OS commands" and Appendix A, "Command Availability" for details.
This command is not supported on FCoE ports. To disable an FCoE port, use fcoe --disable.
Operands This command has the following operands:
slot On bladed systems only, specifies the slot number of the ports to be disabled, followed by a slash (/).
port1[-port2] Disables a single port or a range of ports identified by port numbers. The port range cannot span slots, but you can specify multiple port ranges pairs separated by a space, for example 3/1-4 4/7-9.
-i index1[-index2] Disables a port or a range of ports identified by port index numbers. You may specify multiple index ranges separated by a space, for example, -i 33-38 40-60.
-f Ignores nonexisting ports. This operand is valid only with the -i option.
-slot [slot1[-slot2] Disables all ports on a slot or on a range of slots, for example, -s 3-5. You may specify multiple slot ranges separated by a space, for example, -s 3-5 8-10.
-h Displays the command usage.
700 Fabric OS Command Reference53-1001764-02

portDisable 2
Examples To disable a single port.
switch:admin> portdisable 2/4
To disable a range of ports:
switch:admin> portdisable 2/4-8To disable multiple port ranges:
switch:admin> portdisable 2/24-26 3/10-12 4/3-4
To disable a port by specifying its index number:
switch:admin> portdisable -i 176
To disable a range of ports by specifying the corresponding port index range:
switch:admin> portdisable -i 170-176
To disable multiple ports by specifying multiple port index ranges:
switch:admin> portdisable -i 30-36 170-176
To disable all ports on slots 3-5:
switch:admin> portdisable -s 3-5
To disable all ports on slots 3-5 and 9-12:
switch:admin> portdisable -s 3-5 9-12
See Also portCfgPersistentDisable, portCfgPersistentEnable, portEnable, portShow, portSwapDisable, portSwapShow, switchShow
Fabric OS Command Reference 70153-1001764-02

portEnable2
portEnable
Enables a port or a range of ports.
Synopsis portenable [slot/]port1[-port2] [...]
portenable -i [index1[-index2] [...]] [-f]
portenable -s[lot] [slot1[-slot2]
portenable -h
Description Use this command to enable a port or a range of ports. If a port is connected to another switch when this command is issued, the fabric may reconfigure. After the port is enabled, devices connected to the port can again communicate with the fabric. The front panel LED of a port that is enabled and online is green.
You can identify a single port to be enabled by its port number or by its port index number. Port ranges are supported with index numbers or by specifying a slot or a slot range. Use switchShow for a listing of valid ports, slots, and port index numbers.
Specifying multiple ports with the index (-i) or slot (-s) option is supported only if PortSwap is disabled. They are not supported on GbE ports and configured F_Port trunks. Use the -i option without a port index argument to display the portSwap status, or alternately use portSwapShow.
For ports that come online after being enabled, the following indications might be sent to indicate a state transition: RSCN, SNMP trap, Web pop-up window.
This command fails if the switch is disabled, the port’s blade is not fully enabled (faulted, powered off, or disabled), or if the port is persistently disabled.
Notes The execution of this command is subject to Virtual Fabric or Admin Domain restrictions that may be in place. Refer to chapter 1, "Using Fabric OS commands" and Appendix A, "Command Availability" for details.
This command is not supported on FCoE ports. To enable an FCoE port, use fcoe --enable.
Operands This command has the following operands:
slot On bladed systems only, specifies the slot number of the ports to be enabled, followed by a slash (/).
port1[-port2] Enables a single port or a range of ports identified by port numbers. The port range cannot span slots, but you can specify multiple port ranges separated by a space, for example 3/1-4 4/7-9.
-i index1[-index2] Enables a port or a range of ports identified by port index numbers. You may specify multiple index ranges separated by a space, for example, 33-38 40-60.
-f Ignores nonexisting ports. This operand is valid only with the -i option.
-s[lot] [slot1[-slot2] Enables all ports on a slot or on a range of slots, for example, -s 3-5. Multiple slot ranges are not supported with this command.
-h Displays the command usage.
702 Fabric OS Command Reference53-1001764-02

portEnable 2
Examples To enable a single port:
switch:admin> portenable 2/4
To enable a range of ports:
switch:admin> portenable 2/4-8
To enable multiple port ranges:
switch:admin> portenable 2/24-26 3/10-12 4/3-4
To enable a port by specifying its index number:
switch:admin> portenable -i 176portenable: portSwap feature enabled.
To enable a range of ports by specifying the corresponding port index range:
switch:admin> portenable -i 170-176portenable: portSwap feature enabled.
To enable multiple ports by specifying multiple port index ranges:
switch:admin> portenable -i 30-36 170-176portenable: portSwap feature enabled.
To enable all ports on slot 3-5.
switch:admin> portenable -s 3-5
See Also portCfgPersistentDisable, portCfgPersistentEnable, portDisable, portShow, portSwapDisable, portSwapShow, switchShow
Fabric OS Command Reference 70353-1001764-02

portErrShow2
portErrShow
Displays a port error summary.
Synopsis porterrshow
Description Use this command to display an error summary for all ports. Counts are reported on frames transmitted by the port (Tx) or on frames received by the port (Rx). The display contains one output line per port. Numeric values exceeding 999 are displayed in units of thousands (k), or millions (m) if indicated.
Values for the following parameters are displayed:
frames tx Number of frames transmitted (Tx).
frames rx Number of frames received (Rx).
enc in Number of encoding errors inside frames received (Rx).
crc err Number of frames with CRC errors received (Rx).
crc g_eof Number of frames with CRC errors with good EOF received (Rx).
too shrt Number of frames shorter than minimum received (Rx).
too long Number of frames longer than maximum received (Rx).
bad eof Number of frames with bad end-of-frame delimiters received (Rx).
enc out Number of encoding error outside of frames received (Rx).
disc c3 Number of Class 3 frames discarded (Rx). This counter includes the sum of the following class 3 discard counters reported by the portStatsShow command: er_rx_c3_timeout, er_tx_c2_timeout, er_c2_dest_unreach, and er_other_disc. Refer to portStatsShow help for a description of these counters.
link fail Number of link failures (LF1 or LF2 states) received (Rx).
loss sync Number of times synchronization was lost (Rx).
loss sig Number of times a loss of signal was received (increments whenever an SFP is removed) (Rx).
frjt Number of transmitted frames rejected with F_RJT (Tx).
fbsy Number of transmitted frames busied with F_BSY (Tx).
Note The execution of this command is subject to Virtual Fabric or Admin Domain restrictions that may be in place. Refer to chapter 1, "Using Fabric OS Commands" and Appendix A, "Command Availability" for details.
This command is not supported on FCoE ports.
Operands none
704 Fabric OS Command Reference53-1001764-02

portErrShow 2
Examples To display error counters for ports on a switch:
switch:admin> porterrshowframes enc crc crc too too bad enc disc link loss loss frjt fbsy
tx rx in err g_eof shrt long eof out c3 fail sync sig ============================================================================ 0: 0 0 0 0 0 0 0 0 0 0 0 0 0 0 0 1: 0 0 0 0 0 0 0 0 0 0 0 0 0 0 0 2: 0 0 0 0 0 0 0 0 0 0 0 0 4 0 0 3: 0 0 0 0 0 0 0 0 0 0 0 0 4 0 0 4: 0 0 0 0 0 0 0 0 0 0 0 0 4 0 0 5: 0 0 0 0 0 0 0 0 0 0 0 0 4 0 0 6: 0 0 0 0 0 0 0 0 0 0 0 0 4 0 0 7: 1.6k 24 0 0 0 0 0 0 11 0 0 4 8 0 0 8: 527k 44k 0 0 0 0 0 0 32 0 7 6 9 0 0 9: 38m 37k 0 0 0 0 0 0 29 0 7 6 10 0 0 10: 34 38 0 0 0 0 0 0 12 0 0 4 8 0 0 11: 0 0 0 0 0 0 0 0 39k 0 39k 6.6k 13k 0 0 12: 777 37 0 0 0 0 0 0 13 0 0 5 10 0 0 13: 2.2k 38 0 0 0 0 0 0 12 0 0 5 10 0 0 14: 0 0 0 0 0 0 0 0 0 0 0 0 4 0 0 15: 0 0 0 0 0 0 0 0 0 0 0 0 4 0 0 16: 0 0 0 0 0 0 0 0 0 0 0 0 4 0 0 17: 0 0 0 0 0 0 0 0 0 0 0 0 4 0 0 18: 0 0 0 0 0 0 0 0 0 0 0 0 4 0 0 19: 0 0 0 0 0 0 0 0 0 0 0 0 4 0 0
(output truncated)
See Also portShow, portStatsShow
Fabric OS Command Reference 70553-1001764-02

portFencing2
portFencing
Configures the Fabric Watch port fencing feature.
Synopsis portfencing --show
portfencing --enable port_type | all -area area_type | -area all
portfencing --disable port_type | all -area area_type | -area all
portfencing --help
Description Use this command to enable or disable the Fabric Watch port fencing feature for specified port types and Fabric Watch areas. Supported port types include E_Ports, optical F_Ports, copper F_Ports, physical ports, and Virtual E_Ports (Ve_Ports). You can configure a specified port type or a list of port types to enable port fencing for one or more areas. Use the all option to indicate all port types or all areas.
Use the --disable option to disable port fencing for the specified areas on all ports of the specified port types. Use the --show option to display the configuration. The display includes the configured port types, error types, and port fencing status (disabled or enabled). Port fencing is by default disabled.
Port fencing monitors ports for erratic behavior and disables a port if specified error conditions are met. The portFencing command enables and configures the port fencing feature; it does not set the thresholds for port fencing. You must configure port thresholds with the portThconfig command before you can enable port fencing.
Note The execution of this command is subject to Virtual Fabric or Admin Domain restrictions that may be in place. Refer to chapter 1, "Using Fabric OS Commands" and Appendix A, "Command Availability" for details.
Execution of this command requires a Fabric Watch license.
Operands This command has the following operands:
--show Displays the port fencing status of all configured port types and area types.
--enable Enables port fencing for one or more specified port types and areas. Specifying at least one port type and area is required. This command fails if thresholds are not set. Refer to portThConfig help for more information.
--disable Disables port fencing for a specified area on all ports in a port type list. Upon successful execution Fabric Watch ceases monitoring the ports for errors in the disabled area. You must specify at least one port type and area when disabling port fencing.
The following operands are required with the --enable and --disable options.
port_type| all Specifies one or more port types for which to enable or disable port fencing. When specifying multiple port types, the list members must be separated by a comma. Alternately, use the all option to specify all of the following port types:
e-port Enables or disables port fencing for all E_Ports.
706 Fabric OS Command Reference53-1001764-02

portFencing 2
fop-port Enables or disables port fencing for all optical F_Ports.
fcu-port Enables or disables port fencing for all copper F_Ports. This operand is supported only on embedded platforms and only on copper ports.
port Enables or disables port fencing for all physical ports.
-area area | -area all Specifies one or more Fabric Watch areas to be monitored by the port fencing feature. Areas are not case sensitive. Alternately, use the all option to specify all of the following areas:
CRC Cyclic redundancy check error
ITW Invalid word transmission
PE Protocol error
ST State Change
LR Link reset
C3TX_TO Class 3 frame discard due to timeout.
--help Displays the command usage.
Examples To enable port fencing for the CRC area on all E_Ports:
switch:admin> portFencing --enable e-port -area crc
To enable port fencing for all areas on all E_Ports:
switch:admin> portFencing --enable e-port -area all
To enable port fencing for all areas on all E_Ports:
switch:admin> portFencing --enable e-port -area all
To enable port fencing for the CRC, ITW, and PE areas on all E_Ports:
switch:admin> portFencing --enable e-port -area CRC,ITW,PE
To enable port fencing for the ST area on all E_Ports and optical F_Ports:
switch:admin> portFencing --enable e-port,fopport -area ST
To enable port fencing for the ST area on all port types:
switch:admin> portFencing --enable all -area ST
To display the current port fencing configuration:
switch:admin> portFencing --show Port Type|Area |PF Status ---------|----------------|------------E-port |CRC |disabled |ITW |enabled |LR |enabled |PE |enabled |ST |enabled FOP-port |CRC |enabled |ITW |enabled |LR |enabled |C3TX_TO |enabled
Fabric OS Command Reference 70753-1001764-02

portFencing2
|PE |enabled |ST |enabled Port |CRC |enabled |ITW |disabled |LR |disabled |C3TX_TO |disabled |PE |disabled |ST |disabled
See Also fwHelp, portThConfig
708 Fabric OS Command Reference53-1001764-02

portFlagsShow 2
portFlagsShow
Displays the port status bitmaps for all ports in a switch.
Synopsis portflagsshow
Description Use this command to display the following status for a port:
SNMPDisplays whether the port is online or offline.
PhysicalDisplays the port physical status. Valid values are In_Sync and No_Light.
FlagsDisplays whether there is an SFP inserted in the port, whether the port is active, and the port type.
Note The execution of this command is subject to Virtual Fabric or Admin Domain restrictions that may be in place. Refer to chapter 1, "Using Fabric OS Commands" and Appendix A, "Command Availability" for details.
Operands none
Examples To display the port status for all ports in the switch:
switch:user> portflagsshow Slot Port SNMP Physical Flags----------------------------------------------------- 1 0 Online In_Sync PRESENT ACTIVE E_PORT G_PORT LOGIN LED ACCEPT 1 1 Online In_Sync PRESENT ACTIVE E_PORT G_PORT LOGIN LED ACCEPT 1 2 Online In_Sync PRESENT ACTIVE E_PORT G_PORT LOGIN LED ACCEPT 1 3 Online In_Sync PRESENT ACTIVE E_PORT G_PORT LOGIN LED ACCEPT 1 4 Online In_Sync PRESENT ACTIVE E_PORT G_PORT LOGIN LED ACCEPT 1 5 Online In_Sync PRESENT ACTIVE E_PORT G_PORT LOGIN LED ACCEPT 1 6 Online In_Sync PRESENT ACTIVE E_PORT G_PORT LOGIN LED ACCEPT 1 7 Online In_Sync PRESENT ACTIVE E_PORT G_PORT LOGIN LED ACCEPT 1 8 Offline No_Light PRESENT LED 1 9 Offline No_Light PRESENT LED 1 10 Offline No_Light PRESENT LED 1 11 Offline No_Light PRESENT LED 1 12 Online In_Sync PRESENT ACTIVE E_PORT G_PORT LOGIN LED ACCEPT 1 13 Online In_Sync PRESENT ACTIVE E_PORT G_PORT LOGIN LED ACCEPT 1 14 Online In_Sync PRESENT ACTIVE E_PORT G_PORT LOGIN LED ACCEPT 1 15 Online In_Sync PRESENT ACTIVE E_PORT G_PORT LOGIN LED ACCEPT 4 0 Online In_Sync PRESENT ACTIVE E_PORT G_PORT LOGIN LED ACCEPT 4 1 Online In_Sync PRESENT ACTIVE E_PORT G_PORT LOGIN LED ACCEPT 4 2 Online In_Sync PRESENT ACTIVE E_PORT G_PORT LOGIN LED ACCEPT 4 3 Online In_Sync PRESENT ACTIVE E_PORT G_PORT LOGIN LED ACCEPT 4 4 Offline No_Light PRESENT LED 4 5 Offline No_Light PRESENT LED(output truncated)
See Also portShow, switchShow
Fabric OS Command Reference 70953-1001764-02

portLedTest2
portLedTest
Cycles user port LEDs.
Synopsis portledtest [-npass count][-ports itemlist][-action value]
ceeportledtest [-npass count][-ports itemlist][-action value]
Description Use this command to exercise the user port LEDs in the current switch. For each port, the command cycles through the ON and OFF state by setting the ATTN LEDs to green for the ON condition and unlighted for the OFF condition. The SPEED LEDs are initially set to black before the test starts. The SPEED LEDs turn green while the test is running.
portLedTest and ceePortLedTest are platform-specific versions of the same test. Use ceePortLedTest on FCoE platforms only. Use fcipLedTest for GbE port testing on the Brocade 7800 and FX8-24.On all other platforms, use portLedTest.
You must disable the current switch (using the switchDisable command) before running this command. After the command completes, the ATTN LEDs flash amber, indicating that the command has finished and exited. Enable the current switch (using the switchEnable command) to set the ATTN LEDs back to black.
Notes The execution of this command is subject to Virtual Fabric or Admin Domain restrictions that may be in place. Refer to chapter 1, "Using Fabric OS commands" and Appendix A, "Command Availability" for details.
Operands This command has the following operands:
-npass count Specify the number of times to perform this test. The default value is 10.
-ports itemlist Specify a list of user ports on which to run the test. If omitted, all the active ports in the switch are assumed. For more information, refer to the itemList command.
-action action Specifies the LED color. Valid values are:
0 Cycle all Port LEDs.
1 Turn Port status LED off.
2 Turn Port status LED amber.
3 Turn Port status LED green.
16 Turn Port speed LED green.
17 Turn Port speed LED amber.
Examples To test port LEDs:
switch:admin> portledtest -ports 1/1-1/5PASSED.
To test port LEDs on a Brocade 8000 using default values:
switch:admin> ceeportledtestPASSED.
See Also fcipLedTest, itemList, switchDisable, switchEnable
710 Fabric OS Command Reference53-1001764-02

portLogClear 2
portLogClear
Clears the port log.
Synopsis portlogclear
Description Use this command to clear the port log. It is recommended that you clear the port log before triggering an activity so that the log displays only the log events related to that activity.
If the port log is disabled, portLogClear enables it. The port log is disabled automatically when certain errors occur to allow the collection of all the information needed to understand the cause of the error. When the port log is disabled, the events already present in the log are preserved, but new events are not collected.
The following errors disable the port log:
FCPH, EXCHBADFCPH, EXCHFREENBFSM, DUPEPORTSCNUCAST, RELICPDB
Refer to the Fabric OS Message Reference for more information on these errors.
Note The execution of this command is subject to Virtual Fabric or Admin Domain restrictions that may be in place. Refer to chapter 1, "Using Fabric OS commands" and Appendix A, "Command Availability" for details.
Operands None
Examples To clear the port log:
switch:admin> portlogclearswitch:admin> portlogshowport log is empty
See Also portLogDump, portLogShow
Fabric OS Command Reference 71153-1001764-02

portLogConfigShow2
portLogConfigShow
Displays the current port log configuration.
Synopsis portlogconfigshow
Description Use this command to display the current port log configuration.
Note The execution of this command is subject to Virtual Fabric or Admin Domain restrictions that may be in place. Refer to chapter 1, "Using Fabric OS commands" and Appendix A, "Command Availability" for details.
Operands none
Examples To display the current port log configuration:
switch:admin> portlogconfigshowmax portlog entries = 16384
See Also portLogResize
712 Fabric OS Command Reference53-1001764-02

portLogDisable 2
portLogDisable
Disables the port log facility.
Synopsis portlogdisable
Description Use this command to disable the port log facility.
Note The execution of this command is subject to Virtual Fabric or Admin Domain restrictions that may be in place. Refer to chapter 1, "Using Fabric OS commands" and Appendix A, "Command Availability" for details.
Operands none
Examples To display the port log facility:
switch:admin> portlogdisable
See Also portLogEnable
Fabric OS Command Reference 71353-1001764-02

portLogDump2
portLogDump
Displays the port log without page breaks.
Synopsis portlogdump [count[, saved]]
Description Use this command to display the port log, listing all entries in the log without page breaks. This command displays the same information as portLogShow, but portLogShow prompts you to press Enter between each page.
For an explanation of the information displayed by this command, refer to the portLogShow command.
If the port log is disabled while this command is executed, a warning message is displayed. Refer to the portLogClear command for more information.
Notes The execution of this command is subject to Virtual Fabric or Admin Domain restrictions that may be in place. Refer to chapter 1, "Using Fabric OS Commands" and Appendix A, "Command Availability" for details.
Operands This command has the following operands:
count Specifies the maximum number of lines to be displayed. Only the most recent count entries are displayed. This operand is optional.
saved Specify a nonzero value to display the saved port log from the last switch fault. Refer to upTime for conditions that cause a fault. The operand count is ignored when displaying the saved log. This operand is optional.
Examples To display 10lines of the portlog on a Brocade DCX:
switch:user> portlogdump 10time task event port cmd args-------------------------------------------------Mon Nov 16 21:52:15 200921:52:15.214 FCPH seq 106 7f0 ed210000,00000000,000073ee,10010082,0000800021:52:15.214 PORT Tx3 106 2032 02fffffd,00fffffd,0701ffff,1301000021:52:15.216 FCPH read 106 2032 03fffffd,00fffffd,00000000,00008000,0701000021:52:15.216 FCPH seq 106 7f0 ed980000,07010000,00004143,0004001c,0000800021:52:15.216 FCPH write 106 2032 00fffffd,00fffffd,00000000,00008000,0000000021:52:15.216 FCPH seq 106 7f0 ed210000,00000000,000073ee,10010082,0000800021:52:15.216 PORT Tx3 106 2032 02fffffd,00fffffd,06feffff,1301000021:52:15.218 FCPH read 106 2032 03fffffd,00fffffd,00000000,00008000,06fe000021:52:15.218 FCPH seq 106 7f0 ed980000,06fe0000,00004143,0004001c,0000800021:52:15.220 FCPH seq 106 7f0 ed980000,06fc0000,00004143,0004001c,00008000switch:admin>
See Also portLogClear, portLogShow, upTime
714 Fabric OS Command Reference53-1001764-02

portLogDumpPort 2
portLogDumpPort
Displays the port log of a specified port without page breaks.
Synopsis portlogdumpport port_index
Description Use this command to display the port log for for a single port specified by its port index number. The command displays all entries in the log without any page breaks. This command is identical to portLogShowPort, except that portLogShowPort prompts you to press Enter to display the next page.
Port logs are circular log files in the switch firmware, which can save up to 65,536 entries depending on the hardware platform. Use portLogConfigShow to display the current size of the port log. Once the log has reached its maximum size, new entries displace the oldest ones. Port logs capture switch-to-device, device-to-switch, switch-to-switch, some device-to-device1, and control information
If the port log is disabled while this command is executed, a warning message is displayed. Refer to portLogClear command for more information.
Note The execution of this command is subject to Virtual Fabric or Admin Domain restrictions that may be in place. Refer to chapter 1, "Using Fabric OS commands" and Appendix A, "Command Availability" for details.
Operands This command has the following operand:
port_index Displays the port log for the a single port specified by its port index number. Use switchShow for a listing of valid port index numbers.
Examples To display the port log dump for a port:
switch:user> portlogdumpport 14time task event port cmd args------------------------------------------------------08:35:27.899 tShell pstate 14 OL108:35:27.899 tReceive pstate 14 LR208:35:27.916 tReceive pstate 14 AC08:35:28.416 interrupt scn 14 108:35:28.433 tFabric ioctl 14 90 101d9910,008:35:28.433 tFabric Tx 14 164 02fffffd,00fffffd,0005ffff,1000000008:35:28.433 tReceive Rx 14 0 c0fffffd,00fffffd,0005000608:35:28.433 tReceive Rx 14 164 03fffffd,00fffffd,00050006,0200000008:35:28.433 tTransmit Tx 14 0 c0fffffd,00fffffd,0005000608:35:28.433 tFabric ioctl 14 91 103646d8,008:35:28.466 tFabric ioctl 14 a7 3c,108:35:28.466 tFabric pstate 14 LR108:35:28.466 tReceive pstate 14 LR308:35:28.466 tReceive pstate 14 AC08:35:28.483 tFabric Tx 14 96 02fffffd,00fffffd,0006ffff,1110006008:35:28.483 tReceive Rx 14 0 c0fffffd,00fffffd,0006000708:35:28.483 tReceive Rx 14 96 03fffffd,00fffffd,00060007,0210006008:35:28.483 tTransmit Tx 14 0 c0fffffd,00fffffd,0006000708:35:28.483 tFabric ioctl 14 a1 0,008:35:28.483 tFabric scn 14 5
See Also portLogDump, portLogClear, portLogShow, upTime
Fabric OS Command Reference 71553-1001764-02

portLogEnable2
portLogEnable
Enables the port log facility.
Synopsis portLogEnable
Description Use this command to enable the port log facility.
Note The execution of this command is subject to Virtual Fabric or Admin Domain restrictions that may be in place. Refer to chapter 1, "Using Fabric OS commands" and Appendix A, "Command Availability" for details.
Operands none
Examples To enable the port log facility:
switch:admin> portlogenable
See Also portLogDisable
716 Fabric OS Command Reference53-1001764-02

portLogEventShow 2
portLogEventShow
Displays information about port log events.
Synopsis portlogeventshow
Description Use this command to display information about the ID associated with the various port log events. The Disabled field indicates whether the port log for that event ID is disabled (1) or enabled (0).
Note The execution of this command is subject to Virtual Fabric or Admin Domain restrictions that may be in place. Refer to chapter 1, "Using Fabric OS Commands" and Appendix A, "Command Availability" for details.
Operands none
Examples To display information about port log events:
switch:admin> portlogeventshowID Event-Name Disabled---------------------------------1 start 02 disable 03 enable 04 ioctl 05 Tx 06 Tx1 07 Tx2 08 Tx3 09 Rx 010 Rx1 011 Rx2 012 Rx3 013 stats 014 scn 015 pstate 016 reject 017 busy 018 ctin 019 ctout 020 errlog 021 loopscn 022 create 023 debug 124 nbrfsm 025 timer 026 sn 027 fcin 028 fcout 029 read 030 write 048 cmd 049 event 0(output truncated)
See Also portLogTypeDisable, portLogTypeEnable
Fabric OS Command Reference 71753-1001764-02

portLoginShow2
portLoginShow
Displays port login status of devices attached to the specified port.
Synopsis portloginshow [slot/]port
Description Use this command to display port login status received from devices attached to the specified port. For each login, this command displays the following fields:
Type Type of login can display one of the following:
fd FDISC, Discover F_Port Service Parameters or Virtual N_Port login.
fe FLOGI, Fabric Login to Fabric F_Port.
ff PLOGI, Port Login to specific N_Ports or well-known addresses like Name Server.
PID The 24-bit Port ID of the attached device.
WorldWideName The port's world wide name.
credit The credit for this login as appropriate. This is BB (buffer-to-buffer) credit for Flogs and EE (end-to-end) credit for PLOGIs.
df_sz The default frame size for this login.
cos Class of Services supported. This can be a combination of the following bits:
4 Class 2 is supported.
8 Class 3 is supported.
Further information about each login is displayed after these columns, including the Port ID of the well-known address or N_Port that was the target of the PLOGI, if applicable.
Note The execution of this command is subject to Virtual Fabric or Admin Domain restrictions that may be in place. Refer to chapter 1, "Using Fabric OS commands" and Appendix A, "Command Availability" for details.
This command is not applicable to embedded FCoE ports. Use fcoeLoginShow.
Operands This command has the following operands:
slot For bladed systems only, specify the slot number of the port to be displayed, followed by a slash (/).
port Specify the port for which to display login status information, relative to its slot for bladed systems. Use switchShow for a list of valid ports.
Examples To display the logins received by Port 23 (revealing one FLOGI (type fe) and two PLOGIs):
switch:admin> portloginshow 23Type PID World Wide Name credit df_sz cos=====================================================fe 201700 21:00:00:e0:8b:05:a3:c9 3 2048 8 scr=1ff 201700 21:00:00:e0:8b:05:a3:c9 0 0 8 d_id=FFFC20ff 201700 21:00:00:e0:8b:05:a3:c9 0 0 8 d_id=FFFFFC
See Also fcpProbeShow, portShow
718 Fabric OS Command Reference53-1001764-02

portLogPdisc 2
portLogPdisc
Sets or clears the debug_pdisc_flag.
Synopsis portlogpdisc 0 | 1
Description Use this command to set or clear the debug_pdisc_flag. This command is part of the environmental monitor. A setting of 1 enables logging of Port Discovery parameters. The PDISC log is disabled by default.
Note The execution of this command is subject to Virtual Fabric or Admin Domain restrictions that may be in place. Refer to chapter 1, "Using Fabric OS commands" and Appendix A, "Command Availability" for details.
Operands This command has the following operand:
0|1 Specify 0 to clear or 1 to set the debug_pdisc_flag. The default is 0.
Examples To set the debug_pdisc_flag:
switch:admin> portlogpdisc 1PDISC log setting = 1
See Also none
Fabric OS Command Reference 71953-1001764-02

portLogReset2
portLogReset
Enables the port log facility.
Synopsis portlogreset
Description Use this command to enable the port log facility.
Notes Refer to portLogClear for events that may disable the port log facility.
The execution of this command is subject to Virtual Fabric or Admin Domain restrictions that may be in place. Refer to chapter 1, "Using Fabric OS commands" and Appendix A, "Command Availability" for details.
Operands none
Examples To enable the port log:
switch:admin> portlogreset
See Also none
720 Fabric OS Command Reference53-1001764-02

portLogResize 2
portLogResize
Resizes the port log to include a specified number of entries.
Synopsis portlogresize num_entries
Description Use this command to resize the port log to include a specified number of entries. If the specified number of entries is less than the already configured port log size, there is no change.
Note The execution of this command is subject to Virtual Fabric or Admin Domain restrictions that may be in place. Refer to chapter 1, "Using Fabric OS commands" and Appendix A, "Command Availability" for details.
Operands This command has the following operand:
num_entries Specifies the number of port log entries. The valid range of values is 32,768 to 13,1072 for the Brocade 7500, 7600, Encryption Switch, DCX, and DCX-4S. For all other platforms, the range is 16,384 to 32,768.
Examples To resize the portlog:
switch:admin> portlogresize 17288
See Also portLogConfigShow
Fabric OS Command Reference 72153-1001764-02

portLogShow2
portLogShow
Displays the port log with page breaks.
Synopsis portlogshow [count[, saved]]
Description Use this command to display the port log with page breaks. This command displays the same information as portLogDump, but one page at a time.
The port log is a circular log file in the switch firmware which can save up to 65,536 entries depending on the hardware platform. Use portLogConfigShow to display the current port log size. Once the log has reached the maximum size, new entries replace the oldest ones. The port log captures switch-to-device, device-to-switch, switch-to-switch, some device-to-device, and control information.
If the command is executed while the port log is disabled, a warning message is displayed. Refer to the portLogClear command for more information.
For each log entry, the following information is displayed:
Time Displays the event date and time in milliseconds. The clock resolution is 16 milliseconds.
Task Displays the name of the task that logged the event or “interrupt” if the event was logged in interrupt context, or “unknown” if the task no longer exists.
Event Displays the task event that generated the log entry. Possible events include:
start A switch start or restart event.
disable A port is disabled.
enable A port is enabled.
ioctl A port I/O control is executed.
Tx A frame is transmitted (class is indicated).
Rx A frame is received (class is indicated).
scn A state change notification is posted.
pstate A port changes physical state.
reject A received frame is rejected.
busy A received frame is busy.
ctin A CT based request is received.
ctout A CT based response is transmitted.
errlog A message is added to the error log.
loopscn A loop state change notification is posted.
create A task is created.
debug Indicates a debug message.
nbrfsm Indicates a neighbor state transition.
sn Indicates a speed negotiation state.
722 Fabric OS Command Reference53-1001764-02

portLogShow 2
fcin Indicates an incoming Fibre Channel information unit.
fcout Indicates an outgoing Fibre Channel information unit.
read Indicates an information unit header log from a read operation.
write Indicates an information unit header log from a write operation.
err Indicates an information unit header log of an FC error frame.
frame Indicates a Fibre Channel frame payload.
nsRemQ Indicates an interswitch name server query.
rscn Indicates a Registered State Change Notification.
xalloc Allocates an exchange.
xfree Frees an exchange.
xerr Indicates an exchange error.
xstate Indicates an exchange state.
payload Indicates a frame payload.
Port Displays the port number that logged the event.
Cmd Defined by the event. Displays a value defined by the event as follows:
ioctl I/O control command code.
Tx & Rx Frame payload size.
scn New state (see state codes below).
pstate New physical state (see pstate codes below).
ctin The CT-subtype:
fc Simple Name Server.
f8 Alias Server.
ctout The same as ctin.
errlog Error level (refer to errShow).
loopscn The current loop state during loop initialization. Possible values are:
OLP Offline (disconnected or nonparticipating).
LIP FL_Port entered INITIALIZING or OPEN_INIT state.
LIM LISM completed, FL_Port became the loop master.
BMP Loop init completed, FL_Port in MONITORING state.
OLD Port transitioned to the OLD_PORT state.
TMO Loop init times out.
Args Displays additional information about the event as follows:
start Start type: 0 = enable ports, 100 = disable ports.
disable State (refer to state codes).
enable Mode: 0 normal; nonzero loopback.
Fabric OS Command Reference 72353-1001764-02

portLogShow2
Tx & Rx Header words 0,1,4 (R_CTL,D_ID,S_ID,OX_ID,RX_ID) and the first payload word.
reject FC-PH reject reason.
busy FC-PH busy reason.
ctin Argument 0 is divided into two 16-bit fields:
[A] a bit map indicating whether subsequent arguments are valid (0001 means argument 1 is valid, 0003 means arguments 1 and 2 are valid).
[B] the CT-based service command code.
Argument 1 is the first word of the CT payload, if applicable (as specified in [A]).
Argument 2 is the second word of the CT payload, if applicable (as specified in [A]).
ctout Argument 0 is also divided into two 16-bit fields:
[A] a bit map indicating whether subsequent arguments are valid (0001 means argument 1 is valid, 0003 means arguments 1 and 2 are valid).
[B] the CT command code indicating whether an accept (8002) or a reject (8001).
If [B] is an accept, argument 1 and 2 represents the first and second words of the CT payload, if applicable (as specified in [A]).
If [B] is a reject, argument 1 contains the CT reject reason and explanation code.
errlog Error type (refer to errShow).
loopscn The meaning further depends on each loop state:
OLP Offline reason code, usually zero.
LIP Reason code for LIPs initiated by FL_Port, if the code value is 800x (x = [1,0xc], see below), or the lower two bytes of the LIP received, if the code value is other than 800x.
LIM Usually zero.
BMP Memory address for the loop bitmap.
OLD Usually zero.
TMO Encoded value of the state when loop initialization timed out This value is usually equal to the first word of a loop init frame payload. Other possible values include:
2 LIP (req. INITIALIZING) timeout.
94 F0F0ARB(F0) timeout.
40 CLS timeout.
Codes used in various fields are as follows:
state
1 Online
724 Fabric OS Command Reference53-1001764-02

portLogShow 2
2 Offline
3 Testing
4 Faulty
5 E_Port
6 F_Port
7 Segmented
pstate
AC Active State
LR1 Link Reset: LR Transmit State
LR2 Link Reset: LR Receive State
LR3 Link Reset: LRR Receive State
LF1 Link Failure: NOS Transmit State
LF2 Link Failure: NOS Receive State
OL1 Offline: OLS Transmit State
OL2 Offline: OLS Receive State
OL3 Offline: Wait for OLS State
LIP reason
8001 Retry loop init.
8002 Start loop after gaining sync.
8003 Restart loop after port reset.
8004 LIP when a loop hangs.
8005 Restart loop if LIP received when sending out ARB(F0).
8006 LIP when an OPN returns.
8007 Restart loop when LIPs received in OLD_PORT AC state.
8008 Restart loop if loop not empty but E_Port loopback.
8009 LIP as requested by the LINIT ELS received.
800a LIP as requested by the LPC ELS received.
Speed Negotiation States
INIT Start negotiation.
NM Negotiate master.
WS Wait for signal.
NF Negotiation follows.
NC Negotiation complete.
Fabric OS Command Reference 72553-1001764-02

portLogShow2
Note The execution of this command is subject to Virtual Fabric or Admin Domain restrictions that may be in place. Refer to chapter 1, "Using Fabric OS Commands" and Appendix A, "Command Availability" for details.
Operands This command has the following operands:
count Specifies the maximum number of lines to display. Only the most recent count entries are displayed. This operand is optional.
saved Specifies a nonzero value to display the saved port log from the last switch fault. Refer to upTime for a list of conditions that cause a fault. The count is ignored when the saved log is displayed. This operand is optional.
Examples To view the port log for a port:
switch:user> portlogshow 24time task event port cmd args-------------------------------------------------17:05:30.384 PORT Rx 0 40 02fffffd,00fffffd,08fbffff,1400000017:05:30.384 PORT Tx 0 0 c0fffffd,00fffffd,08fb0e0217:05:30.384 PORT debug 0 00c0ffee,00fd0118,00000000,0000000117:05:30.389 PORT Rx 1 40 02fffffd,00fffffd,08fdffff,1400000017:05:30.389 PORT Tx 1 0 c0fffffd,00fffffd,08fd0e0317:05:30.389 PORT debug 1 00c0ffee,00fd013c,00000000,0000000117:05:30.504 PORT Rx 2 40 02fffffd,00fffffd,08feffff,1400000017:05:30.504 PORT Tx 2 0 c0fffffd,00fffffd,08fe0e0417:05:30.504 PORT debug 2 00c0ffee,00fd0182,00000000,0000000117:05:30.507 PORT Rx 3 40 02fffffd,00fffffd,08ffffff,1400000017:05:30.507 PORT Tx 3 0 c0fffffd,00fffffd,08ff0e0517:05:30.508 PORT debug 3 00c0ffee,00fd0148,00000000,0000000117:05:31.081 PORT Tx 0 40 02fffffd,00fffffd,0e06ffff,1400000017:05:31.082 PORT debug 0 00c0ffee,00fd0188,14000000,0000000117:05:31.084 PORT Rx 0 0 c0fffffd,00fffffd,0e06090217:05:31.772 PORT Tx 1 40 02fffffd,00fffffd,0e07ffff,1400000017:05:31.772 PORT debug 1 00c0ffee,00fd014a,14000000,0000000117:05:31.774 PORT Rx 1 0 c0fffffd,00fffffd,0e07090617:05:31.775 PORT Tx 2 40 02fffffd,00fffffd,0e08ffff,1400000017:05:31.775 PORT debug 2 00c0ffee,00fd015c,14000000,0000000117:05:31.777 PORT Rx 2 0 c0fffffd,00fffffd,0e08090717:05:31.778 PORT Tx 3 40 02fffffd,00fffffd,0e09ffff,1400000017:05:31.779 PORT debug 3 00c0ffee,00fd015e,14000000,0000000117:05:31.782 PORT Rx 3 0 c0fffffd,00fffffd,0e090908
See Also portLogClear, portLogDump, upTime
726 Fabric OS Command Reference53-1001764-02

portLogShowPort 2
portLogShowPort
Displays the port log of a specified port with page breaks.
Synopsis portlogshowport port_index
Description Use this command to display the port log of a specified port with page breaks. This command displays the same information as portLogDumpPort, except that portLogDumpPort does not prompt you to press Enter to display the next page.
If the command is executed while the port log is disabled, a warning message is displayed. Refer to the portLogClear command for more information.
Notes Refer to the portLogShow command for a description of the data returned by this command.
The execution of this command is subject to Virtual Fabric or Admin Domain restrictions that may be in place. Refer to chapter 1, "Using Fabric OS commands" and Appendix A, "Command Availability" for details.
Operands This command has the following operands:
port_index Displays the port log for a single port specified by its port index number. Use switchShow for a listing of valid port index numbers.
Examples To display the port log for port 14:
switch:user> portlogshowport 14time task event port cmd args------------------------------------------------------08:35:28.483 tFabric scn 14 008:35:27.899 tShell pstate 14 OL108:35:27.899 tReceive pstate 14 LR208:35:27.916 tReceive pstate 14 AC08:35:28.416 interrupt scn 14 108:35:28.433 tFabric ioctl 14 90 101d9910,008:35:28.433 tFabric Tx 14 164 02fffffd,00fffffd,0005ffff,1000000008:35:28.433 tReceive Rx 14 0 c0fffffd,00fffffd,0005000608:35:28.433 tReceive Rx 14 164 03fffffd,00fffffd,00050006,0200000008:35:28.433 tTransmit Tx 14 0 c0fffffd,00fffffd,0005000608:35:28.433 tFabric ioctl 14 91 103646d8,008:35:28.433 tFabric ioctl 14 92 103646d8,008:35:28.466 tFabric ioctl 14 a7 3c,108:35:28.466 tFabric pstate 14 LR108:35:28.466 tReceive pstate 14 LR308:35:28.466 tReceive pstate 14 AC08:35:28.483 tFabric Tx 14 96 02fffffd,00fffffd,0006ffff,1110006008:35:28.483 tReceive Rx 14 0 c0fffffd,00fffffd,0006000708:35:28.483 tReceive Rx 14 96 03fffffd,00fffffd,00060007,0210006008:35:28.483 tTransmit Tx 14 0 c0fffffd,00fffffd,0006000708:35:28.483 tFabric ioctl 14 a1 0,008:35:28.483 tFabric scn 14 5(output truncated)
See Also portLogClear, portLogDumpPort, portLogShow, upTime
Fabric OS Command Reference 72753-1001764-02

portLogTypeDisable2
portLogTypeDisable
Disables the port log of a specified type.
Synopsis portlogtypedisable id
Description Use this command to disable the port log for a specified port log type.
Note The execution of this command is subject to Virtual Fabric or Admin Domain restrictions that may be in place. Refer to chapter 1, "Using Fabric OS commands" and Appendix A, "Command Availability" for details.
Operands This command has the following operand:
id Specifies a nonzero value that corresponds to the port log type to be disabled. Use portLogEventShow for a listing of values corresponding to supported log types.
Examples To disable logging of type 2 port log events:
switch:admin> portlogtyedisable 2
See Also portLogDisable, portLogEventShow, portLogTypeEnable
728 Fabric OS Command Reference53-1001764-02

portLogTypeEnable 2
portLogTypeEnable
Enables the port log of a specified port log type.
Synopsis portlogtypeenable id
Description Use this command to enable the port log for a specified port log type.
Note The execution of this command is subject to Virtual Fabric or Admin Domain restrictions that may be in place. Refer to chapter 1, "Using Fabric OS commands" and Appendix A, "Command Availability" for details.
Operands This command has the following operand:
id Specifies a nonzero value that corresponds to the port log type to be enabled. Use portLogEventShow for a listing of values corresponding to supported log types.
Examples To enable logging of type 2 port log events:
switch:admin> portlogtypeenable 2
See Also portLogEventShow, portLogTypeDisable
Fabric OS Command Reference 72953-1001764-02

portLoopbackTest2
portLoopbackTest
Performs a functional test of port N->N path.
Synopsis portloopbacktest [--slot slot][-nframes count][-lb_mode mode] [-spd_mode mode][-ports itemlist]
ceeportloopbacktest [--slot slot][-nframes count][-lb_mode mode][-spd_mode mode][-ports itemlist]
Description Use this command to verify the functional operation of the switch.
The portLoopbackTest and ceePortLoopbackTest commands are platform-specific versions of the same test. The portLoopbackTest command is supported on all Goldeneye/Goldeneye2 and Condor/Condor2 platforms. Use ceePortLoopbackTest on FCoE platforms only. On all other platforms, use portLoopbackTest. Refer to the Fabric OS Troubleshooting and Diagnostics Guide, Appendix A, for a table that correlates ASIC type with switch models.
This test sends frames from a given port’s transmitter and loops them back into the same port’s receiver. The loopback is done at the parallel loopback path. The path traversed in this test does not include the media or the fiber cable. Only one frame is transmitted and received at any given time. An external cable is not required to run this test. The port LEDs flicker green rapidly while the test is running.
The test performs the following operations:
1. Sets all ports for parallel loopback.
2. Creates a frame F of maximum data size (2,112 bytes).
3. Transmits the frame F through port N.
4. Picks up the frame from the same port N.
5. Checks if any of the following eight statistic error counters report nonzero values:
ENC_in, CRC_err, TruncFrm, FrmTooLong, BadEOF, Enc_out, BadOrdSet, DiscC3
6. Checks whether the transmit, receive, or class 3 receiver counters are stuck at some value.
7. Checks whether the number of frames transmitted is not equal to the number of frames received.
8. Repeats Steps two through seven for all ports until one of the following conditions is met:
a. The number of frames (or pass count) requested is reached.
b. All ports are marked bad.
At each pass, the frame is created from a different data type of a palette of seven. If seven passes are requested, seven different data types are used in the test. If eight passes are requested, the first seven frames use unique data types, and the eighth is the same as the first. The seven data types are:
CSPAT: 0x7e, 0x7e, 0x7e, 0x7e, ...BYTE_LFSR: 0x69, 0x01, 0x02, 0x05, ...CHALF_SQ: 0x4a, 0x4a, 0x4a, 0x4a, ...QUAD_NOT: 0x00, 0xff, 0x00, 0xff, ...CQTR_SQ: 0x78, 0x78, 0x78, 0x78, ...CRPAT: 0xbc, 0xbc, 0x23, 0x47, ...RANDOM: 0x25, 0x7f, 0x6e, 0x9a, ....
730 Fabric OS Command Reference53-1001764-02

portLoopbackTest 2
Notes Do not abort this test prematurely, using CTRL-C or q to quit. Doing so may cause the test to report unexpected errors.
This command does not support High Availability (HA).
The Brocade DCX series cannot negotiate speeds of 1 Gbps.
The switch must be disabled before you can run this diagnostics.
The execution of this command is subject to Virtual Fabric or Admin Domain restrictions that may be in place. Refer to chapter 1, "Using Fabric OS commands" and Appendix A, "Command Availability" for details.
Operands This command has the following operands:
--slot slot Specifies the number of the slot on which to run the diagnostics. All eligible ports relative to the slot number are tested. The default is 0 and designed to operate on fixed-port-count products.
-nframes count Specifies the number of frames to send. The test progresses until the specified number of frames has been transmitted on each port. The default value is 10.
-lb_mode mode Specifies the loopback mode for the test. By default, this test uses the internal loopback. Valid values depend on the platform on which the command is executed. Unsupported values are rejected with an appropriate message.
1 Port Loopback (loopback plugs)
2 External (SERDES) loopback
5 Internal (parallel) loopback
7 Backend bypass & port loopback
8 Backend bypass & SERDES loopback (supported only on a chassis)
-spd_mode mode Specifies the speed mode for the test. This parameter controls the speed at which each port is operated.
0 Runs test at 1 Gbps, 2 Gbps, and 4 Gbps.
1 Runs test at 1 Gbps.
2 Runs test at 2 Gbps.
4 Runs test at 4 Gbps (Default for 4 G platforms).
8 Runs test at 8 Gbps (Default for 8 G platforms).
-ports itemlist Specifies a list of blade ports to test. By default, all of the blade ports in the specified slot (--slot) are used. See itemList for more information on the itemlist parameter.
Examples To run a functional test in default mode:
switch:admin> portloopbacktest
Running portloopbacktest ..............
PASSED.
Fabric OS Command Reference 73153-1001764-02

portLoopbackTest2
To run a functional test on a Brocade 8000:
switch:admin> pceeportloopbacktest
Running portloopbacktest ..............
PASSED.
Diagnostics When it detects failures, the test may report one or more of the following error messages. If errors persist, contact Technical Support.
DATA Data received does not match the data sent.
ERRSTAT Errors were found in the ASIC statistics.
INIT Port failed to initialize.
PORTDIED A previously initialized port went to an uninitialized state.
STATS Errors were found in the ASIC statistics.
TIMEOUT Did not receive a frame in the given timeout period.
XMIT Frame transmission failure.
See Also itemList
732 Fabric OS Command Reference53-1001764-02

portMirror 2
portMirror
Adds, deletes, or displays port mirror connections.
Synopsis portmirror
portmirror --show
portmirror --add [slot/]port SID DID
portmirror --delete SID DID
Description Use this command to add, delete, or display a mirror connection between two ports, a source and a destination port. When used without operand, this command displays the usage.
Port mirroring allows you to configure any switch port in such a way that it will mirror the traffic passing in both directions between a specified source port (SID) and a destination port (DID) back to the configured mirror port. You can use this feature to troubleshoot Fiber Channel end-to-end link communications.
The port mirroring feature mirrors only those frames to the mirror port that contain the specified SID/DID. It does not mirror all frames transmitted or received for a given port. This restriction allows a single mirror port to mirror multiple mirror connections.
The SID must be located in the same domain where the mirror port is configured. The following configurations are supported:
• SID, DID and mirror port reside in the same blade.
• SID, DID and mirror port reside in the same switch (standalone platform).
• SID, DID and mirror port reside in different blades in the same chassis.
• SID, DID and mirror port reside in two different chassis or standalone switches connected through interchassis or interswitch links.
The DID can be either on the local switch or on a different switch. Any given SID can participate in either one or a maximum of three mirror connections, depending on the switch configuration and switch model associated with the SID.
Port mirroring makes use of ASIC resources, and the behavior of this command is therefore dependent on the hardware platform on which the feature is configured. Refer to the Fabric OS Troubleshooting and Diagnostics Guide for information on:
• Platforms that support the port mirroring feature
• Supported mirror connection maximums for each platform
• Platform-specific feature restrictions
• Special configuration considerations and configuration scenarios
A mirror connection may be rejected because of an invalid configuration, an unavailability of resources, duplicate entries, a mirror port that is not configured, or an offline connection port.
When issued with the --show option, this command displays the following information:
Mirror_Port The port number of the mirror port that mirrors the traffic between a SID and a DID.
SID Source Port ID.
DID Destination Port ID.
Fabric OS Command Reference 73353-1001764-02

portMirror2
State The state of the mirror connection. The state can either be "Defined" or "Enabled." In both cases, the port mirroring connection is persistently stored. A connection that is "Defined" has not been hardware-configured because at least one port is not online. A connection that is "Enabled" has been configured in the hardware.
You must enable port mirroring on the port before you can configure mirror connections for that port. Use portcfg mirrorport --enable to enable a port for port mirroring. Use the portCfgShow command to display all mirror ports on a switch. The switchShow command displays the configured port as "Mirror Port".
Use the portPerfShow command to display the total number of transmitted and received bytes for each port. In the case of a mirror port, this command shows twice the amount of traffic, because the mirror port transmits and receives the frames.
Notes The execution of this command is subject to Virtual Fabric or Admin Domain restrictions that may be in place. Refer to chapter 1, “Using Fabric OS commands” and Appendix A, “Command Availability” for details.
The port mirroring feature is supported in Virtual Fabric mode so long as the FC Routing service is not enabled on the logical switch. Use the fosConfig command to disable the FC Routing service.
When in-order deliver (IOD) is enabled, deleting a mirror connection can cause frame loss between the SID and DID. If IOD is disabled, deleting a mirror connection may introduce an "order of delivery" error between the SID and DID.
Operands This command has the following operands:
--show Displays all configured mirror connections.
--add Adds a mirror connection between a source port and a destination port.
slot For bladed systems only, specifies the slot number of the port to be configured, followed by a slash (/).
port Specifies the number of the port to be configured, relative to its slot for bladed systems. This port is the mirror port, in which the mirror traffic is shown. Use switchShow for a listing of valid ports.
SID Specifies the 3-byte source ID of the originator device in "0xDDAAPP" format, where DD is the Domain ID, AA is the Area ID and PP is the AL_PA ID. For example, 0x050200 has a domain ID of 5, an area ID of 2, and an AL_PA ID of 0. The values for the SID and the DID cannot both be 0x000000.
DID Specifies the 3-byte DID destination ID of the destination device, in "0xDDAAPP" format, where DD is Domain ID, AA is Area ID and PP is AL_PA ID. For example, 0x050200 has a domain ID of 5, an area ID of 2 and an AL_PA ID of 0. The values for the SID and the DID cannot both be 0x000000.
--delete Deletes a mirror connection between a source and a destination. You must specify a SID and a DID when deleting a mirror connection.
Examples To configure a port as a mirror port:
switch:admin> portcfg mirrorport 18--enable Please confirm enable of Mirror Port: 17 (Y,y,N,n): [n] y
734 Fabric OS Command Reference53-1001764-02

portMirror 2
To verify that port mirroring is enabled on port 18:
switch:admin> portcfgshow 18Area Number: 18Speed Level: AUTO(HW)Fill Word: 0(Idle-Idle)AL_PA Offset 13: OFFTrunk Port ONLong Distance OFFVC Link Init OFFLocked L_Port OFFLocked G_Port OFFDisabled E_Port OFFLocked E_Port OFFISL R_RDY Mode OFFRSCN Suppressed OFFPersistent Disable OFFLOS TOV enable OFFNPIV capability ONQOS E_Port AEPort Auto Disable: OFFRate Limit OFFEX Port OFFMirror Port ONCredit Recovery ONF_Port Buffers OFFNPIV PP Limit: 126CSCTL mode: OFFswitch:admin>
switch:admin> switchshow | grep OnlineswitchState: Online 1 1 640100 id N2 Online FC G-Port 2 2 640200 id N2 Online FC E-Port 10:00:00:05:1e:36:01:26 "sw0" (downstream) 7 7 640700 id N4 Online FC F-Port 20:14:00:05:1e:a2:f9:b1 8 8 640800 id N2 Online FC F-Port 1 N Port + 2 NPIV public10 10 640a00 id N2 Online FC Mirror Port11 11 640b00 id N2 Online FC F-Port 21:00:00:e0:8b:10:1d:9d12 12 640c00 id N4 Online FC F-Port 20:15:00:05:1e:a2:f9:b117 17 641100 id N2 Online FC E-Port 10:00:00:05:1e:a2:ec:9c "sw0" (downstream)18 18 641200 id N2 Online FC Mirror Port
To add three mirror connection between three local device port pairs to mirror port 18:
switch:admin> portmirror --add 18 0x640c00 0x640800switch:admin> portmirror --add 18 0x640700 0x640b00switch:admin> portmirror --add 18 0x640700 0x640c00
To display the mirror connections:
switch:admin> portmirror --show
Number of mirror connection(s) configured: 3
Mirror_Port SID DID State ----------------------------------------18 0x640c00 0x640800 Enabled18 0x640700 0x640b00 Enabled18 0x640700 0x640c00 Enabled
Fabric OS Command Reference 73553-1001764-02

portMirror2
To delete a port mirror connection between two local switch ports:
switch:admin> portmirror --delete 0x640700 0x640c00
To add a port mirror connection between a local switch port and a remote switch port:
switch:admin> portmirror --add 2/1 0x011400 0x240400
To delete a port mirror connection between a local switch port and a remote switch port:
switch:admin> portmirror --delete 0x011400 0x240400
See Also portCfgShow, switchShow
736 Fabric OS Command Reference53-1001764-02

portName 2
portName
Assigns or displays port names.
Synopsis portname
portname [slot/]port [ -n name]
portname -i [index1[-index2][...][-f] [-n name]]
portname -slot slot1[-slot2] [...][-n name]
portname -h
Description Use this command to assign a port name to a specified port or to a range of ports. The port name is included in the portShow output; it should not be confused with the world wide port name.
You can identify a single port to be configured by its port number or by its port index number. Port ranges are supported with index numbers or by specifying a slot or a slot range. Use switchShow for a listing of valid ports, slots, and port index numbers. When issued without the name operand, this command displays the names of the specified ports or of all ports, if no port is specified.
Specifying multiple ports with the index (-i) or slot (-s) option is supported only if PortSwap is disabled. They are not supported on GbE ports and configured F_Port trunks. Use the -i option without a port index argument to display the portSwap status, or alternately use portSwapShow.
Like all other configurable port attributes, port names persists across reboots and power cycles. They are not affected by the configDefault command, but they are cleared by portCfgDefault.
Note The execution of this command is subject to Virtual Fabric or Admin Domain restrictions that may be in place. Refer to chapter 1, "Using Fabric OS commands" and Appendix A, "Command Availability" for details.
Operands This command has the following operands:
slot For bladed systems only, specifies the slot number of the ports to be configured, followed by a slash (/).
port Assigns a name to a single port identified by its port number.
-i index1[-index2] Assigns a name to a single port or to a range of ports identified by port index numbers, for example, -i 1/3-8 -n backup. You may specify multiple index ranges separated by a space, for example, -i 35-45 61-68 -n backup.
-f Ignores nonexisting ports. This operand is valid only with the -i option.
-slot [slot1[-slot2] Assigns a name to all ports on a slot or on a range of slots, for example, -s 3-5 -n backup. Multiple slot ranges are not supported with this command.
-n name Specifies the name to be assigned to the ports. The port name is a character string up to 32 characters, including spaces and characters, and excluding commas (,), semicolons (;), backlashes (\), and the at sign (@). To erase a port name, specify this operand as an empty string in double-quotation marks. If the name includes spaces it must be included in double quotation marks. This operand is optional; if omitted, the current port name is displayed.
Fabric OS Command Reference 73753-1001764-02

portName2
Some characters require a qualifier or double quotation marks when used with a bash shell; for example, enter a single quotation mark as \’, enter an exclamation mark as \!, or enter a pipe (|) as “|”.
-h Displays the command usage.
Examples To name a port tape drive 8:
switch:admin> portname 1/3, "-n Tape drive 8"switch:admin> portname 1/3Tape drive 8
To assign a name to a range of ports specified by port index numbers:
switch:admin> portname -i 22-26 -n backupswitch:admin> portname -i 22-26ort 22: backupport 23: backupport 24: backupport 25: backupport 26: backup
To assign a name to all ports on slot 1 and 2:
switch:admin> portname -s 1-2 -n backupswitch:admin> portname -s 1-2port 416: backupport 417: backupport 418: backupport 419: backupport 420: backupport 421: backup(output truncated)
See Also configDefault, portCfgDefault, portShow, portSwapDisable, portSwapShow, switchShow
738 Fabric OS Command Reference53-1001764-02

portPerfShow 2
portPerfShow
Displays port throughput performance.
Synopsis portperfshow
portperfshow [[slot/]port1[-[slot/]port2]] [-tx -rx | -tx | -rx] [-t interval]]
portperfshow --help
Description Use this command to display throughput information for all ports on a switch or chassis or to display the information for a specified port or port range. Output includes the number of bytes received and transmitted per interval. Throughput values are displayed as either bytes, kilobytes (k), megabytes (m), or gigabytes (g). Values are rounded down.
The data is displayed one column per port plus one column that displays the total for these ports. Results display every second or over a specified interval. Press Enter, Ctrl-c, or Ctrl-d to terminate the command.
When executed with the command line arguments -tx, -rx, or -tx -rx, this command displays the transmitter throughput, the receiver throughput, or both. For ports with status of "No_Module" or "No_Light" throughput is displayed as 0.
Notes The execution of this command is subject to Virtual Fabric or Admin Domain restrictions that may be in place. Refer to chapter 1, "Using Fabric OS Commands" and Appendix A, "Command Availability" for details.
When FastWrite or Tape Pipelining is enabled, the portPerfShow VE link output is different. The acceleration entity (FastWrite or Tape Piplelining) responds by sending XFER_RDY and status well ahead of the actual device's response to the host. The host sends data which is stored near the device and is delivered to the device only when the device is ready. Consequently, the data may be stored near the target for some brief period of time. In this case, the portPerfShow output on the VE link may not match the output on the device port.
Operands This command has the following optional operands:
[slot\]port1[-[slot\]port2] Displays throughput information for a single port or for a range of ports, relative to the slot number on bladed systems. Port numbers in a range must be separated by a dash (-), for example, 3-5, or 2/0-2/15. Port ranges cannot span slots. Use switchShow to display a listing of valid ports. Port operands are optional; if omitted, information for all ports is displayed.
-t time_interval Specifies the interval, in seconds, between each sample. The default interval is one second. If no interval is specified, the default is used.
-tx Displays the transmitter throughput.
-rx Displays the receiver throughput.
-tx -rx Displays the transmitter and receiver throughput.
Fabric OS Command Reference 73953-1001764-02

portPerfShow2
Examples To display performance information for all ports at a one second (default) interval:
switch:user> portperfshow 0 1 2 3 4 5 6 7 8 9 10 11 12 13 14 15 ================================================================================630.4m 0 0 0 0 0 0 0 0 0 630.4m 0 0 0 0 0
16 17 18 19 20 21 22 23 24 25 26 27 28 29 30 31 ================================================================================ 0 210.1m 840.5m 210.1m 0 0 0 0 0 0 0 0 0 0 0 0
32 33 34 35 36 37 38 39 Total============================================== 0 0 0 0 0 0 0 0 2.5g
0 1 2 3 4 5 6 7 8 9 10 11 12 13 14 15 ===============================================================================630.4m 0 0 0 0 0 0 0 0 0 630.4m 0 0 0 0 0
16 17 18 19 20 21 22 23 24 25 26 27 28 29 30 31 ===============================================================================0 210.1m 840.6m 210.1m 0 0 0 0 0 0 0 0 0 0 0 0
32 33 34 35 36 37 38 39 Total=============================================== 0 0 0 0 0 0 0 0 2.5g
0 1 2 3 4 5 6 7 8 9 10 11 12 13 14 15==============================================================================630.4m 0 0 0 0 0 0 0 0 0 630.4m 0 0 0 0 0
16 17 18 19 20 21 22 23 24 25 26 27 28 29 30 31 ==============================================================================0 210.1m 840.5m 210.1m 0 0 0 0 0 0 0 0 0 0 0 0
32 33 34 35 36 37 38 39 Total=============================================== 0 0 0 0 0 0 0 0 2.5g(output stopped)
To display port performance for all ports with an interval of 5 seconds:
switch:user> portperfshow -t 5 0 1 2 3 4 5 6 7 8 9 10 11 12 13 14 15 =================================================================================630.4m 0 0 0 0 0 0 0 0 112 630.4m 0 0 0 0 0
16 17 18 19 20 21 22 23 24 25 26 27 28 29 30 31 ================================================================================= 0 210.1m 840.6m 210.1m 0 112 0 0 0 0 0 0 0 0 0 0
32 33 34 35 36 37 38 39 Total============================================== 0 0 0 0 0 0 0 0 2.5g
0 1 2 3 4 5 6 7 8 9 10 11 12 13 14 15===============================================================================630.4m 0 0 0 0 0 0 0 0 0 630.4m 0 0 0 0 0
740 Fabric OS Command Reference53-1001764-02

portPerfShow 2
16 17 18 19 20 21 22 23 24 25 26 27 28 29 30 31===============================================================================0 210.1m 840.5m 210.1m 0 0 0 0 0 0 0 0 0 0 0 0
32 33 34 35 36 37 38 39 Total============================================== 0 0 0 0 0 0 0 0 2.5g
(output stopped)
To display performance on a single port with at a 5 second interval:
switch:user> portperfshow 0 -t 5 0 Total================= 630.4m 630.4m
0 Total================= 630.3m 630.3m(output stopped)
To display transmitter throughput for a single port at a 5 second interval:
switch:user> portperfshow 0 -tx -t 5 0 ======== 210.1m 0 ======== 210.1m(output stopped)
To display receiver throughput for a single port at a 5 second interval:
switch:user> portperfshow 0 -rx -t 5 0 ======== 420.3m 0 ======== 420.2m(output stopped)
To display port performance on a chassis for range of ports at an interval of 5 seconds:
switch:user> portperfshow 12/0-12/6 -t 5 0 1 2 3 4 5 6 Total===============================================================slot 12: 840.6m 0 0 0 0 0 630.4m 1.4g
0 1 2 3 4 5 6 Total===============================================================slot 12: 840.6m 0 0 0 0 0 630.4m 1.4g
0 1 2 3 4 5 6 Total===============================================================slot 12: 840.6m 0 0 0 0 0 630.4m 1.4g(output stopped)
See Also portStatsShow
Fabric OS Command Reference 74153-1001764-02

portRouteShow2
portRouteShow
Displays routing tables for the specified port.
Synopsis portrouteshow [slot/]port
Description Use this command to display the port address ID for a specified port and the contents of the following port routing tables:
External unicast routing table
Displays how the specified port forwards unicast frames to remote domains in the following format:
domain_number: ports_bitmap
domain_number
The remote domain ID to which frames are ultimately routed.
ports_bitmap The port number on the ASIC pair to which frames for the domain ID forward in bitmap hex format; for example, 0x0100 indicates port 8 on the ASIC pair. The arrangement of ports on an ASIC pair is specific to the system type. For any active port, this table contains at least one entry, which routes unicast frames destined to the embedded port (value 0x10000) of the local domain.
Internal unicast routing table
Displays how the specified port forwards unicast frames to a locally attached NX_Port in the following format:
area_number: ports_bitmap
area_number The area number of a device (or set of looped devices) attached to the local switch.
ports_bitmap The format of ports_bitmap is the same as the one used in the external unicast routing table.
Broadcast routing table
Displays how the specified port forwards broadcast frames. There is one bit map entry in this table, similar to the bit maps in the other tables; however, this table typically has only Bit 16 set (value 0x10000), indicating this port always routes broadcast frames to the embedded port, for handling by the firmware.
Note The execution of this command is subject to Virtual Fabric or Admin Domain restrictions that may be in place. Refer to chapter 1, "Using Fabric OS commands" and Appendix A, "Command Availability" for details.
Operands This command has the following operands:
slot For bladed systems only, specifies the slot number of the port to display, followed by a slash (/).
port Specifies the number of the port to display, relative to its slot for bladed systems. Use switchShow to display a list of valid ports.
742 Fabric OS Command Reference53-1001764-02

portRouteShow 2
Examples To display the routing tables for a port:
switch:user> portrouteshow 4/15port address ID: 0x02bf00external unicast routing table: 1: 0x4 (vc=3) 2: 0x10000 (vc=0)internal unicast routing table: 60: 0x8000 (vc=2) 63: 0x1000 (vc=5)broadcast routing table: 0x10000
See Also bcastShow, fabricShow, switchShow, topologyShow, uRouteShow
Fabric OS Command Reference 74353-1001764-02

portShow2
portShow
Displays status and configuration parameters for ports and GbE ports.
Synopsis portshow [slot/][ge]port
portshow -i [index1[-index2] [...]] [-f]
portshow option [slot/]ge_port [optional_args]
portshow option [ all |ve_port] arguments [optional_arguments]
portshow option [ all |ge_port] arguments [optional_arguments]
Description Use this command to display general port status and specific configuration parameters for a specified port, GbE port, or VE_Port.
If this command is executed for a specified port with no additional options, it displays general status and configuration for that port. If executed with optional arguments for a Gigabit Ethernet (GbE) port or VE_Port, the command displays FCIP-related port configuration parameters specific to the Brocade 7800/FX8-24 and the Brocade 7500/7500E/FR-18i platforms.
This command has been modified to support the display of FCIP tunnels on the Brocade 7800 and FX8-24 platforms. As a result, the behavior of this command in Fabric OS v6.3.0 and later has changed.
You must use this command in a manner that honors the platform-specific differences in command syntax and behavior. Some command options are not available on all platforms. Others behave differently depending on the platform on which they are executed.
Platform-specific commands are documented in separate sections that include function, synopsis, description, operands, and examples. Use the following section headings to navigate this page.
• “General port status display commands supported on all platforms”
• “Port display commands supported only on the Brocade 7800/FX8-24 and on the Brocade 7500/7500E/FR4-18i platforms”
- portshow ipif - Displays the local IP interfaces.
- portshow arp - Displays the content of the address resolution protocol (ARP) table.
- portshow iproute - Displays static routes on the IP interface.
- portshow vlantag - Displays the IP interface VLAN configuration.
• “Commands supported only on the Brocade 7800 and the Brocade FX8-24”
- portshow fciptunnel - Displays Fibre Channel over IP (FCIP) tunnels.
- portshow fcipcircuit - Displays FCIP circuits.
• “Commands supported only on the Brocade 7500/7500E and FR4-18i”
- portshow fciptunnel - Displays Fibre Channel over IP (FCIP) tunnels.
- portshow iscsi - Displays ISCSI configuration.
- portshow mode - Displays GbE port mode.
- portcfg ficon - Displays FICON emulation parameters.
- portshow inbandmgmt - Displays IP addresses and routes for the CP or GbE port inband management interfaces (Brocade 7500/7500E only).
To display command usage on the switch, use portShow [action].
744 Fabric OS Command Reference53-1001764-02

portShow 2
Notes The execution of this command is subject to Virtual Fabric or Admin Domain restrictions that may be in place. Refer to chapter 1, "Using Fabric OS commands" and Appendix A, "Command Availability" for details.
Some of the features supported by this command may require a license.
In an AD context, if one of the L_Ports or NPIV ports is a part of the current AD, the complete device information attached to the port is shown in the output.
Function General port status display commands supported on all platforms
Synopsis portshow [slot/][ge]port
portshow -i [index1[-index2] [...]] [-f]
Description Use this command to display general port status and configuration parameters for the specified port. This command is valid on all platforms, but the output is platform-specific and not all fields are displayed on all platforms.
The following general information is displayed when the command is issued for a non-GbE port without additional arguments:
portIndex Index number assigned to the port.
portName Name assigned to the port by the portName command.
portHealth Current health of the port (requires a Fabric Watch license).
Authentication Authentication type and associated parameters (ifapplicable) used on the port at port online.
None No authentication was performed.
FCAP FCAP authentication was performed.
DHCHAP DHCHAP authentication was performed. Also displays DH group and hash type used for authentication.
portDisableReason
Provides an explanation for the port's disabled status, if it has not been disabled by portDisable or portCfgPersistentDisable.
portCFlags Port control flags.
portFlags A bit map of port status flags, including information on the type of port, whether it is fully online, and whether logins have been accepted.
portType The port's type and revision numbers.
POD Port Port on Demand License status.
portState The port's SNMP state:
Online Up and running.
Offline Not online, see portPhys for more detail.
Testing Running diagnostics.
Faulty Failed diagnostics.
Persistently Disabled Persistently disabled.
Fabric OS Command Reference 74553-1001764-02

portShow2
Protocol Protocol used by the port: FC or FCoE.
portPhys The port's physical state:
No_Card No interface card present.
No_Module No module (GBIC or other) present.
No_Light Module is not receiving light.
Mod_Inv Incompatible vendor or module speed mismatch.
No_Sync Receiving light but out of sync.
In_Sync Receiving light and in sync.
Laser_Flt Module is signaling a laser fault.
Port_Flt Port marked faulty.
Diag_Flt Port failed diagnostics.
Lock_Ref Locking to the reference signal.
portScn The port’s last State Change Notification.
port generation numberThe port’s generation number for the last offline state change.
portId The port’s 24-bit port ID.
portIfId The user port’s interface ID.
portWwn The port’s world wide name.
portWwn of devices(s) connectedThe World Wide Port Names of connected devices.
Distance The port's long-distance level. In the case of LD mode, the user configured distance and actual distance also are displayed. See portCfgLongDistance for information on long distance levels.
Port part of other AD Yes or No.
portSpeed The port's fixed speed (1, 2, 4, or 8 Gbps) or negotiated speed (N1 Gbps, N2 Gbps, N4 Gbps, N8 Gbps or AN).
LE domain The LE domain ID.
FC FastWrite The status of FC FastWrite (ON or OFF).
If the port is configured as an EX_Port, the following additional port information is displayed:
EX_Port Mode The port is configured as an EX_Port.
Fabric ID The fabric ID assigned to this EX_Port; this is the fabric ID of the edge fabric attached to this EX_Port.
Front Phantom Information on the front phantom domain presented by this EX_Port. Includes the preferred (if not active) or actual (if active) domain ID for the front domain and the WWN of the front domain.
Pr Switch Info Information on the principal switch of the edge fabric attached to this EX_Port. Includes the domain ID and WWN of the principal switch.
746 Fabric OS Command Reference53-1001764-02

portShow 2
BB XLate Information on the xlate (translate) phantom domain presented at this port. Includes the preferred (if not active) or actual (if active) domain ID for the xlate phantom domain and the WWN of the xlate phantom domain. The xlate phantom domain connected at this port is in the same fabric as the router and represents the edge fabric connected to the EX_Port.
Authentication Type
Displays NONE or DH-CHAP. DH-CHAP is the only authentication type supported on EX_Ports.
DH Group Displays DH group [0-4] if DH-CHAP authentication is used. Otherwise displays N/A.
Hash Algorithm Displays hash type (MD5 or SHA-1) if DH-CHAP authentication is used. Otherwise, displays N/A.
Edge fabric’s primary WWNIf the EX_Port is connected to an edge switch with FCS policy enforcement, the WWN of the primary FCS is displayed when the edge fabric is secure and the primary FCS is online. Otherwise, displays “No Primary”.
Edge fabric’s version stampIf the EX_PORT is connected to an edge switch with FCS policy enforcement, the version of the security database is displayed. Otherwise displays N/A.
The portShow command displays FCoE ports with "Protocol: FCoE" and "portSpeed: 10Gbps". Only a subset of information is displayed. Refer to the example section for an illustration. Use fcoe --cfgshow and fcoe --loginshow to display FCoE-specific configuration details.
Following the general information, the command displays three columns of counters. The first column shows interrupt statistics:
Interrupts Total number of interrupts.
Unknown Interrupts that are not counted elsewhere.
Lli Low-level interface (physical state, primitive sequences).
Proc_rqrd Frames delivered for embedded N_Port processing.
Timed_out Frames that have timed out.
Rx_flushed Frames requiring translation.
Tx_unavail Frames returned from an unavailable transmitter.
Free_buffer Free buffer available interrupts.
Overrun Buffer overrun interrupts.
Suspended Transmission suspended interrupts.
Parity_err Central memory parity errors.
2_parity_err Secondary transmission parity errors.
CMI_bus_err Control message interface errors.
The second column displays link error status block counters.
The third column shows the number of F_RJTs and F_BSYs generated. For L_Ports, the third column also displays the number of loop initialization protocols (LIPs) received, number of LIPs transmitted, and the last LIP received.
Fabric OS Command Reference 74753-1001764-02
portShow2
Operands This command has the following port operands:
slot For bladed systems only, specifies the slot number of the port to be displayed, followed by a slash (/).
port Specifies the number of the port to be displayed, relative to its slot for bladed systems. Use switchShow for a listing of valid port numbers.
-i index1[-index2] Specifies a port or a range of ports identified by port index numbers. You can specify multiple index ranges separated by a space, for example, 33-38 40-60. Port indexes are supported only if PortSwap is disabled. They are not supported on GbE ports and configured F_Port trunks. Use the -i option without a port index argument to display the portSwap status, or alternately use portSwapShow.
Examples To display the current state of a port:
switch:admin> portshow 43portIndex: 43portName:portHealth: HEALTHY
Authentication: NoneportDisableReason: NoneportCFlags: 0x1portFlags: 0x1000490b PRESENT ACTIVE E_PORT T_PORT T_MASTER G_PORT U_PORT LOGICAL_ONLINE LOGIN LEDportType: 18.0POD Port: Port is licensedportState: 1 OnlineProtocol: FCportPhys: 6 In_Sync portScn: 16 E_Port Trunk master portport generation number: 0state transition count: 1
portId: 230100portIfId: 43020009portWwn: 20:2b:00:05:1e:07:c7:26portWwn of device(s) connected:
Distance: normalportSpeed: N4Gbps
LE domain: 0FC Fastwrite: OFFInterrupts: 0 Link_failure: 0 Frjt: 0Unknown: 0 Loss_of_sync: 1 Fbsy: 0Lli: 11 Loss_of_sig: 2Proc_rqrd: 9877 Protocol_err: 0Timed_out: 0 Invalid_word: 14Rx_flushed: 0 Invalid_crc: 0Tx_unavail: 0 Delim_err: 0Free_buffer: 0 Address_err: 0Overrun: 0 Lr_in: 2Suspended: 0 Lr_out: 0Parity_err: 0 Ols_in: 02_parity_err: 0 Ols_out: 1CMI_bus_err: 0switch:admin>
748 Fabric OS Command Reference53-1001764-02

portShow 2
To display the state of a VE_Port on a chassis with an FX8-24 blade:
switch:admin> portshow 7/12portIndex: 140portName:portHealth: No Fabric Watch License
Authentication: NoneportDisableReason: NoneportCFlags: 0x1portFlags: 0x490b PRESENT ACTIVE VIRTUAL E_PORT G_PORT U_PORT LOGICAL_ONLINE LOGIN LEDportType: 12.0portState: 1 OnlineProtocol: FCportPhys: 255 N/A portScn: 16 E_Portport generation number: 1048state transition count: 26
portId: 018c00portIfId: 43720806portWwn: 20:8c:00:05:1e:7a:7a:00portWwn of device(s) connected:
Distance: normalswitch:admin>
To display port status for a GbE port on a Brocade 7800:
switch:admin> portshow ge2Eth Mac Address: 00.05.1e.54.b1.17Port State: 1 OnlinePort Phys: 6 In_SyncPort Flags: 0x4003 PRESENT ACTIVE LEDPort Speed: 1G
To view xlate domains, you must issue the command on a Brocade 7500/7500E or a chassis with an FR4-18i blade. Note that the Front Domain ID is what is shown:
switch:admin> portshow 8/4 portName: portHealth: No Fabric Watch License
Authentication: None
EX_Port Mode: Enabled Fabric ID: 20 Front Phantom: State: OK Cur Dom ID: 160 WWN: 50:00:51:e3:60:ee:0e:14 Pr Switch Info: Dom ID: 5 WWN: 10:00:00:05:1e:34:02:04 Fabric params: R_A_TOV: 10000 E_D_TOV: 2000 PID fmt: core
Authentication Type: None Hash Algorithm: N/A DH Group: N/A Edge fabric's primary wwn: N/A Edge fabric's version stamp: N/A
portDisableReason: None
Fabric OS Command Reference 74953-1001764-02

portShow2
portCFlags: 0x1 portFlags: 0x903 PRESENT ACTIVE G_PORT U_PORT EX_PORT LOGICAL_ONLINE LOGIN portType: 10.0 portState: 1 Online portPhys: 6 In_Sync
portScn: 1 Online Trunk master port port generation number: 160 portId: 965400 portIfId: 43820005 portWwn: 20:54:00:05:1e:36:0e:e0 portWwn of device(s) connected:
Distance: normal portSpeed: N2Gbps
LE domain: 0 Interrupts: 49 Link_failure: 0 Frjt: 0 Unknown: 0 Loss_of_sync: 2 Fbsy: 0 Lli: 27 Loss_of_sig: 4 Proc_rqrd: 143 Protocol_err: 0 Timed_out: 0 Invalid_word: 0 Rx_flushed: 0 Invalid_crc: 0 Tx_unavail: 0 Delim_err: 0 Free_buffer: 0 Address_err: 1 Overrun: 0 Lr_in: 2 Suspended: 0 Lr_out: 2 Parity_err: 0 Ols_in: 0 2_parity_err: 0 Ols_out: 2 CMI_bus_err: 0
Port part of other ADs: No
To display an FCoE port:
switch:admin> portshow 8portIndex: 8portName:portHealth: HEALTHY
Authentication: NoneportDisableReason: NoneportCFlags: 0x1portFlags: 0x2cb03 PRESENT ACTIVE F_PORT G_PORT U_PORT LOGICAL_ONLINE LOGIN NOELP LED NSREG ACCEPT FLOGIportType: 17.0POD Port: Port is licensedportState: 1 OnlineProtocol: FCoEportPhys: 6 In_Sync portScn: 32 F_Portport generation number: 0state transition count: 1
portId: 850800portIfId: 43020028portWwn: 20:08:00:05:1e:76:60:80portWwn of device(s) connected:
Distance: normalportSpeed: 10Gbps
750 Fabric OS Command Reference53-1001764-02

portShow 2
Function Port display commands supported only on the Brocade 7800/FX8-24 and on the Brocade 7500/7500E/FR4-18i platforms
Synopsis portshow option [slot/]ge_port [optional_args]
Description Use this command to display FCIP-related configuration parameters on the Brocade 7800/FX8-24 and on the Brocade 7500/7500E/FR4-18i platforms. The parameters displayed by this command are set with the portCfg command. The following displays are supported with this command:
• portshow ipif - Displays the local IP interfaces.
• portshow iproute - Displays static routes on the IP interface.
• portshow arp - Displays the content of the address resolution protocol (ARP) table.
• portshow vlantag - Displays the IP interface VLAN configuration.
Note Beginning with the Fabric OS v6.4.0 release, IPv6 addresses are supported on the Brocade 7800 and FX8-24 platforms. On the Brocade 7500/7500E and FR4-18i, IPv6 addresses are supported on switches running Fabric OS v.6.0 or later.
Operands This command has the following operands:
slot For bladed systems only, specifies the slot number of the port to be displayed, followed by a slash (/).
ge_port Specifies the number of the GbE port to be displayed relative to the slot number. The GbE ports are numbered ge0 - ge9 on the Brocade FX8-24 blade and ge0 - ge5 on the Brocade 7800 switch. The 10GbE ports on the Brocade FX8-24 blade are numbered xge0 and xge1. The GbE ports on the Brocade 7500/7500E and FR4-18i are numbered ge0 and ge1. Use the switchShow command for a listing of valid ports.
ipif Displays the IP interface ID, IP address, netmask, and MTU for IPv4 addresses. Displays the prefix instead of the netmask for IPv6 addresses. Flags are explained in the command output (refer to the example below).
iproute Displays the IP address, netmask, gateway, metrics, and flags. Displays the prefix instead of the netmask for IPv6 addresses. A status flag for the IP routes indicates if a route is used for the management interfaces. A route definition that uses one of the internal interfaces has the words “Interface Management” printed at the end of the line.
arp Displays the address resolution protocol (ARP) table. On the 7800/FX8-24 platform you can display the content of the ARP table, but you cannot modify its contents. On the 7500/7500E/FR4-18i you can add static ARP entries using the portcfg arp command.
-lmac Displays the local MAC address. This operand is optional.
vlantag Displays the VLAN Tagging configuration. For each entry, the output displays the IP interface address, the destination IP address, the VLAN ID, the L2 CoS priority, and a flag. This display includes tunnel- and IPIF-level configurations. The following flags indicate the type of configuration:
Perm Permanent entry. Permanent entries are configured at the IP interface level with the portCfg vlantag command.
Fabric OS Command Reference 75153-1001764-02
portShow2
Perm Net Network-wide permanent entry. The same as the permanent entry except that no destination address was defined (defaults to 0.0.0.0), so traffic to all destinations is tagged.
App Application layer VLAN configuration defined at the circuit level.
Examples To display the IP interface and static route configured on Brocade 7800:
switch:admin> portshow ipif ge0
Port: ge0Interface IPv4 Address NetMask Effective MTU Flags---------------------------------------------------------- 0 192.168.0.20 255.255.255.0 1500 U R M 1 192.168.0.21 255.255.255.0 1500 U R M
Interface IPv6 Address Len Effective MTU Flags--------------------------------------------------------------- 2 fe80::205:1eff:fec3:e6b2 64 1500 U R M 3 2000::20 64 1500 U R M 4 2000::21 64 1500 U R M 5 2000::22 64 1500 U R M
Flags: U=Up B=Broadcast D=Debug L=Loopback P=Point2Point R=Running N=NoArp PR=Promisc M=Multicast S=StaticArp LU=LinkUp
switch:admin> portshow iproute ge0
Port: ge0IP Address Mask Gateway Metric Flags-------------------------------------------------------------192.42.0.0 255.255.255.0 192.168.0.250 0 U G192.168.0.0 255.255.255.0 * 0 U C192.168.0.10 255.255.255.255 * 0 U H L192.168.0.11 255.255.255.255 * 0 U H L192.168.0.21 255.255.255.255 * 0 U C192.168.0.250 255.255.255.255 * 0 U H L
IPv6 Address Len Gateway Metric Flags----------------------------------------------------------------2000:: 64 * 0 U C2000::10 128 * 0 U H L2000::11 128 * 0 U H L2000::1:250 128 * 0 U H L2001:: 64 2000::1:250 0 U Gfe80:: 64 * 0 U Cff01:: 32 * 0 U Cff02:: 32 * 0 U C Flags: U=Usable G=Gateway H=Host C=Created(Interface) S=Static L=LinkLayer(Arp)
752 Fabric OS Command Reference53-1001764-02

portShow 2
To display the ARP tables on the Brocade 7800:
switch:admin> portshow arp ge0
Port: ge0IP Address Mac Address Flags------------------------------------------------------192.168.0.10 00:05:1e:c3:f0:1a Resolved192.168.0.11 00:05:1e:c3:f0:1a Resolved192.168.0.250 00:00:00:00:00:002000::10 00:05:1e:c3:f0:1a Resolved2000::11 00:05:1e:c3:f0:1a Resolved2000::1:250 00:00:00:00:00:00
switch:admin> portshow arp ge5No Arp Entries found
To show the ARP entries with local MAC address for a GbE port on the Brocade 7500:
switch:admin> portshow arp 12/ge0 -lmac
Port: ge0 Local MAC Address: 00:05:1e:35:1e:e5 IP Address Mac Address Flags ------------------------------------------------------ 192.168.15.20 00:05:1e:37:0f:a5 Permanent Resolved
To display the VLAN tagging configurations on a Brocade 7800:
switch:admin> portshow vlantag ge0
Port: ge0Interface Address VlanId L2CoS Flags Destination Address-------------------------------------------------------------192.168.2.10 200 5 Perm Net 0.0.0.0192.168.0.20 100 0 Perm 192.168.0.10192.168.0.21 200 0 Perm 192.168.0.112000::20 300 0 Perm 2000::102000::21 400 0 Perm 2000::11
Function Commands supported only on the Brocade 7800 and the Brocade FX8-24
Synopsis portshow option [ all |[slot]ve_port]] arguments [optional_arguments]
Description Use this command to display configuration parameters and status information for FCIP tunnels and FCIP circuits on the GbE/10GbE ports on the Brocade 7800 and FX8-24 platforms. The FCIP tunnels on the local and remote GbE ports act as Virtual E_Ports (VE_Ports) connecting the local and remote fabrics. The following display options are supported on these platforms:
• portShow fciptunnel - Displays Fibre Channel over IP (FCIP) tunnels including the following:
- Additional performance information
Fabric OS Command Reference 75353-1001764-02

portShow2
- FICON configuration parameters
- IPSec status and key
- Circuits with the tunnel
- QoS statistics including performance for each priority
- FCIP Tunnel hierarchy listing circuit IDs and TCP connection information for the tunnel
• portShow fcipcircuit - Displays status and configuration for FCIP circuits:
- TCP statistics for the circuit
- Circuit-level VLAN tagging configuration
- Circuit-level Differentiated Services (DSCP) markings
• portShow xtun - Displays FICON and FCP emulation statistics and current runtime conditions.
Operands This command has the following operands:
slot For bladed systems only, specifies the slot number of the VE_Port to be displayed, followed by a slash (/).
ve_port Displays information for a single specified FCIP tunnel. On the Brocade 7800/FX8-24, specify the VE_Port number associated with the tunnel configured on one of the GbE ports. VE_Ports are numbered 16-23 on the Brocade 7800 and 12-31 on the Brocade FX8-24 blade.
all Displays information for all configured FCIP tunnels.
fciptunnel Displays configuration and status per FCIP tunnel. The following operands are supported with fciptunnel and fcipcircuit.
-c | --circuit Displays the FCIP circuits within the tunnel. This operand can be used with any other operand to include circuit displays.
-t | --tcp Displays the TCP statistics for the circuit. The -c option must be specified with this option.
-p | --perf Displays additional performance information for the specified FCIP tunnels.
-q | --qos Displays the QoS statistics including performance for each priority. This operand is optional with the --perf option.
-i | --ipsec Displays IPSec status (enabled or disabled) and key if enabled. This option is valid for portShow fciptunnel only.
-h | --hier Displays the FCIP tunnel hierarchy listing basic circuit IDs and TCP connection information for the tunnel.
fcipcircuit Displays FCIP circuit configuration and status. The following operands are supported with portShow fcipcircuit:
circuit_ID Specifies a single circuit within the FCIP tunnel. The circuit ID is an integer value between 1 and 19 on the Brocade FX8-24 and 1 and 7 on the Brocade 7800. This operand is required.
-t | --tcp Displays the TCP statistics for the specified circuit.
-p | --perf Displays additional performance information for the specified FCIP circuit.
-q | --qos Displays the QoS statistics including performance for each priority. This operand is optional with the --perf option.
754 Fabric OS Command Reference53-1001764-02

portShow 2
xtun Displays FICON and FCP emulation statistics and current runtime conditions for a specified set of parameters. The following arguments are supported:
-fcp Displays the SCSI FastWrite/Tape Pipelining command sub-menu when issued with a VE_Port number. The syntax for -fcp is as follows:
portshow xtun [slot/]\ve_port -fcp [level] [command] [param] [options]
The following optional operands are supported with -fcp to display FCP emulation statistics and status information:
-help Displays the command usage. You must specify a VE_Port number to display the help functions, for example: portshow xtun 7/12 -fcp -help.
level Specifies the level for which information is displayed. You can specify one or more of the following levels. With each additional level, this command generates progressively more information.
-port Displays data at the port level.
-it Displays data at the Initiator Target (SID/DID) FCP level.
-itn Displays data at the Initiator Target nexus (SID/DID) level.
-itl Displays data at the Initiator Target LUN (SID/DID/LUN) level.
-twb Displays data at the Exchange (SID/DID/LUN/Exchange) level.
command Specifies the type of information to be displayed. This operand is optional; if omitted, the default (-stats) is used. You can specify more than one command option. Valid commands include:
-stats Displays FCP emulation statistics. This is the default display.
-info Displays general FCP emulation information.
-cfg Displays the FCP emulation configuration.
-dump Displays a raw data dump including data for all information types.
param Limits output to one or more of the following parameters, given the commands and levels specified with this command. This operand is optional; if omitted, output for all parameters is displayed. There is no default parameter.
-sid SID Displays output for the specified SID only.
-did DID Displays output for the specified DID only.
-lun LUN Displays output for the specified LUN only.
-timer Displays timer information only.
options Affects all levels and commands globally. Only one option is supported.
-zero Displays zero-valued statistics. Note that some commands may show zero-valued information regardless of whether or not this option is specified.
-ficon Displays sub-menu for FICON emulation display commands when issued with a VE_Port number. The syntax for -ficon is as follows:
portshow xtun [slot/]ve_port -ficon [command] [options]
Fabric OS Command Reference 75553-1001764-02

portShow2
The following optional commands are supported with -ficon; if omitted, the usage for all parameters is displayed.
-help Displays the command usage. You must specify a VE_Port number to display the help functions, for example: portshow xtun 7/12 -ficon -help
-stats Displays FICON statistics.
-fdpb adrs Displays FICON ports or a specific FICON Device Path Block.
-fchb adrs Displays FICON logical partitions (LPARs) or a specific FICON Channel Control Block.
-fcub adrs Displays FICON images (the same output as with -images) or a specific FICON Control Unit Block.
-images Displays FICON images.
-fdcb adrs Displays FICON devices or specific FICON Device Control Block.
-tapeperf Displays the emulated tape performance. When issued with -clear, this command starts the emulated XRC performance monitor.
-xrcperf Displays the emulated XRC Performance. When issued with -clear, this command starts the emulated XRC performance monitor.
-structs Displays FICON control block sizes.
-emul Displays the current FICON emulation statistics.
-act Displays the current Active Exchange information.
options The following additional option is supported.
-clear Resets the specified statistics. This operand is optional; it requires a preceding command.
-mem adrs length Specifies the SE memory length in words to display. The valid range for length is 0-1024.
-dram2 Display the current usage of the dynamic memory allocator.
-pools Display the current free pool allocation (FPA) buffer usage.
-tcb Displays tunnel statistics.
-drshow Displays the current Descriptor Ring status
-smem Displays the current Shadow Memory data.
-rte Displays the current Routing Info SE memory.
Examples To display FCIP tunnel configuration parameters on the Brocade 7800:
switch:admin> portshow fciptunnel 16-------------------------------------------Tunnel ID: 16 Tunnel Description: Admin Status: Enabled Oper Status: Up Compression: On (Standard) Fastwrite: Off Tape Acceleration: Off
756 Fabric OS Command Reference53-1001764-02

portShow 2
TPerf Option: Off IPSec: Disabled Remote WWN: Not Configured Local WWN: 10:00:00:05:1e:54:b0:ba Peer WWN: 10:00:00:05:1e:54:b1:12 Circuit Count: 4 Flags: 0x00000000 FICON: On FICON XRC: Off FICON Tape Write: On FICON Tape Read: On FICON TinTir Emul: On FICON Dvc Acking: On FICON Read BLK-ID: Off Tape Write Pipe: 32 Tape Read Pipe: 32 Tape Write Devs: 16 Tape Read Devs: 16 Tape Write Timer: 300 Tape Max Chain: 3000000 FICON OXID Base: 0x8000 FICON Debug Flags: 0xf7c80000
To display an FCIP tunnel with FICON disabled:
switch:admin> portshow fciptunnel 16-------------------------------------------Tunnel ID: 16 Tunnel Description: Admin Status: Enabled Oper Status: Up Compression: On (Moderate) Fastwrite: Off Tape Acceleration: Off TPerf Option: Off IPSec: Disabled Remote WWN: Not Configured Local WWN: 10:00:00:05:1e:55:59:e9 Peer WWN: 10:00:00:05:1e:55:68:05 Circuit Count: 4 Flags: 0x00000000 FICON: Off
To display an FCIP tunnel with additional circuit information:
switch:admin> portshow fciptunnel 17 -c-------------------------------------------Tunnel ID: 17 Tunnel Description: Admin Status: Enabled Oper Status: Up Compression: On (Moderate) Fastwrite: Off Tape Acceleration: Off TPerf Option: Off IPSec: Disabled Remote WWN: Not Configured Local WWN: 10:00:00:05:1e:55:59:e9 Peer WWN: 10:00:00:05:1e:55:68:05 Circuit Count: 4
Fabric OS Command Reference 75753-1001764-02

portShow2
Flags: 0x00000000 FICON: Off ------------------------------------------- Circuit ID: 17.0 Circuit Num: 0 Admin Status: Enabled Oper Status: Up Remote IP: 100.83.0.100 Local IP: 100.80.0.100 Metric: 0 Min Comm Rt: 1000000 Max Comm Rt: 1000000 SACK: On Min Retrans Time: 100 Max Retransmits: 8 Keepalive Timeout: 10000 Path MTU Disc: 0 VLAN ID: 300 L2CoS: F: 7 H: 5 M: 3 L: 1 DSCP: F: 32 H: 16 M: 8 L: 4 Flags: 0x00000000 ------------------------------------------- Circuit ID: 17.1 Circuit Num: 1 Admin Status: Enabled Oper Status: Up Remote IP: 100.83.0.101 Local IP: 100.80.0.101 Metric: 0 Min Comm Rt: 1000000 Max Comm Rt: 1000000 SACK: On Min Retrans Time: 100 Max Retransmits: 8 Keepalive Timeout: 10000 Path MTU Disc: 0 VLAN ID: (Not Configured) L2CoS: (VLAN not Configured) DSCP: F: 0 H: 0 M: 0 L: 0 Flags: 0x00000000 ------------------------------------------- Circuit ID: 17.2 Circuit Num: 2 Admin Status: Enabled Oper Status: Up Remote IP: 100.83.0.102 Local IP: 100.80.0.102 Metric: 0 Min Comm Rt: 1000000 Max Comm Rt: 1000000 SACK: On Min Retrans Time: 100 Max Retransmits: 8 Keepalive Timeout: 10000 Path MTU Disc: 0 VLAN ID: (Not Configured) L2CoS: (VLAN not Configured) DSCP: F: 0 H: 0 M: 0 L: 0 Flags: 0x00000000 -------------------------------------------
758 Fabric OS Command Reference53-1001764-02

portShow 2
Circuit ID: 17.3 Circuit Num: 3 Admin Status: Enabled Oper Status: Up Remote IP: 100.83.0.103 Local IP: 100.80.0.103 Metric: 0 Min Comm Rt: 1000000 Max Comm Rt: 1000000 SACK: On Min Retrans Time: 100 Max Retransmits: 8 Keepalive Timeout: 10000 Path MTU Disc: 0 VLAN ID: (Not Configured) L2CoS: (VLAN not Configured) DSCP: F: 0 H: 0 M: 0 L: 0 Flags: 0x00000000
To display additional performance parameters on tunnel 17 (add -c to display all circuits):
switch:admin> portshow fciptunnel 17 --perf-------------------------------------------Tunnel ID: 17 Tunnel Description: Admin Status: Enabled Oper Status: Up Compression: On (Moderate) Fastwrite: Off Tape Acceleration: Off TPerf Option: Off IPSec: Disabled Remote WWN: Not Configured Local WWN: 10:00:00:05:1e:55:59:e9 Peer WWN: 10:00:00:05:1e:55:68:05 Circuit Count: 4 Flags: 0x00000000 FICON: Off Oper Status: Up Flow Ctrl State: On Connected Count: 2 Tunnel Duration: 6 hours, 52 minutes, 18 seconds Compression Statistics: 10588 Uncompressed Bytes 7400 Compressed Bytes 1.43 : 1 Compression Ratio Performance Statistics: Overall Throughput 285016 Output Bytes 14 Bps 30s Avg, 11 Bps Lifetime Avg 2642 Output Packets 0 pkt/s 30s Avg, 0 pkt/s Lifetime Avg 534396 Input Bytes 14 Bps 30s Avg, 21 Bps Lifetime Avg 2754 Input Packets 0 pkt/s 30s Avg, 0 pkt/s Lifetime Avg
TCP Stats: 34379252 Output Bytes 501434 Output Packets 14791556 Input Bytes 490602 Input Packets
Fabric OS Command Reference 75953-1001764-02

portShow2
Retransmits: 0 Round Trip Time: 100 ms Out Of Order: 0 Slow Starts: 0
To display TCP connections for the circuits on the tunnel:
switch:admin>portshow fciptunnel 2/12 -c --tcp -------------------------------------------Tunnel ID: 2/12 Tunnel Description: Admin Status: Enabled Oper Status: Up Compression: On (Aggressive) Fastwrite: Off Tape Acceleration: Off TPerf Option: Off IPSec: Disabled Remote WWN: Not Configured Local WWN: 10:00:00:05:1e:7a:7a:00 Peer WWN: 10:00:00:05:1e:b3:00:9e Circuit Count: 1 Flags: 0x00000000 FICON: Off ------------------------------------------- Circuit ID: 2/12.0 Circuit Num: 0 Admin Status: Enabled Oper Status: Up Remote IP: 192.169.10.2 Local IP: 192.169.10.1 Metric: 0 Min Comm Rt: 1000000 Max Comm Rt: 1000000 SACK: On Min Retrans Time: 100 Max Retransmits: 8 Keepalive Timeout: 10000 Path MTU Disc: 0 VLAN ID: (Not Configured) L2CoS: (VLAN Not Configured) DSCP: F: 0 H: 0 M: 0 L: 0 Flags: 0x00000000 ------------------------------------------- TCP Connection 2/12.0:15486613 Priority: F-Class Flags: 0x00000000 Duration: 23 hours, 58 minutes, 16 seconds Local Port: 3225 Remote Port: 54478 Max Seg Size: 1420 Adaptive Rate Limiting Statistics: None (F-Class) Sender Statistics: Bytes Sent: 15875636 Packets Sent: 213447 Round Trip Time 102 ms, HWM 102 ms, Variance 0, HWM 750 Send Window: 20971520 bytes, scale: 9 Slow Starts: 0 Slow Start Threshold: 16777216
760 Fabric OS Command Reference53-1001764-02

portShow 2
Congestion Window: 16778636 TCP Op State: unknown Next Seq: 0xde919bf7, Min: 0xde919bf7, Max: 0xde919bf7 Unacked data: 0 Retransmit Timeout: 230 ms, Duplicate ACKs 0 Retransmits: 0, max: 0 Fast ReTx: 0, HWM 0, Slow ReTx: 0 Receiver Statistics: Bytes Received: 8037732 Packets Received: 203258 Receive Window: 20968624 Bytes, max: 20971520 Negotiated Window Scale: 9 RecvQ Bytes: 0 RecvQ Next: 0xc2b189ac Min: 0xc2b189ac Max: 0xc3f17e5c Out Of Sequence Pkts: 0, HWM 0, Total 0 Keepalive: Keepalive Timeout: 60 s Keepalive Interval: 15 s Inactivity: 120 s ------------------------------------------- TCP Connection 2/12.0:15486865 Priority: Low Flags: 0x00000000 Duration: 23 hours, 58 minutes, 16 seconds Local Port: 3225 Remote Port: 54432 Max Seg Size: 1420 Adaptive Rate Limiting Statistics: Min Rate: 200000 kbps Max Rate: 1000000 kbps Cur Rate: 200000 kbps Soft Limit: 200000 kbps Sender Statistics: Bytes Sent: 11392812 Packets Sent: 172610 Round Trip Time 0 ms, HWM 14 ms, Variance 6, HWM 750 Send Window: 20971520 bytes, scale: 9 Slow Starts: 0 Slow Start Threshold: 16777216 Congestion Window: 16778636 TCP Op State: unknown Next Seq: 0xc119a767, Min: 0xc119a767, Max: 0xc119a767 Unacked data: 0 Retransmit Timeout: 150 ms, Duplicate ACKs 0 Retransmits: 0, max: 0 Fast ReTx: 0, HWM 0, Slow ReTx: 0 Receiver Statistics: Bytes Received: 4488344 Packets Received: 172609 Receive Window: 20971520 Bytes, max: 20971520 Negotiated Window Scale: 9 RecvQ Bytes: 0 RecvQ Next: 0xc2383293 Min: 0xc2383293 Max: 0xc378325f Out Of Sequence Pkts: 0, HWM 0, Total 0 Keepalive: Keepalive Timeout: 60 s Keepalive Interval: 15 s Inactivity: 120 s -------------------------------------------(output truncated)
Fabric OS Command Reference 76153-1001764-02
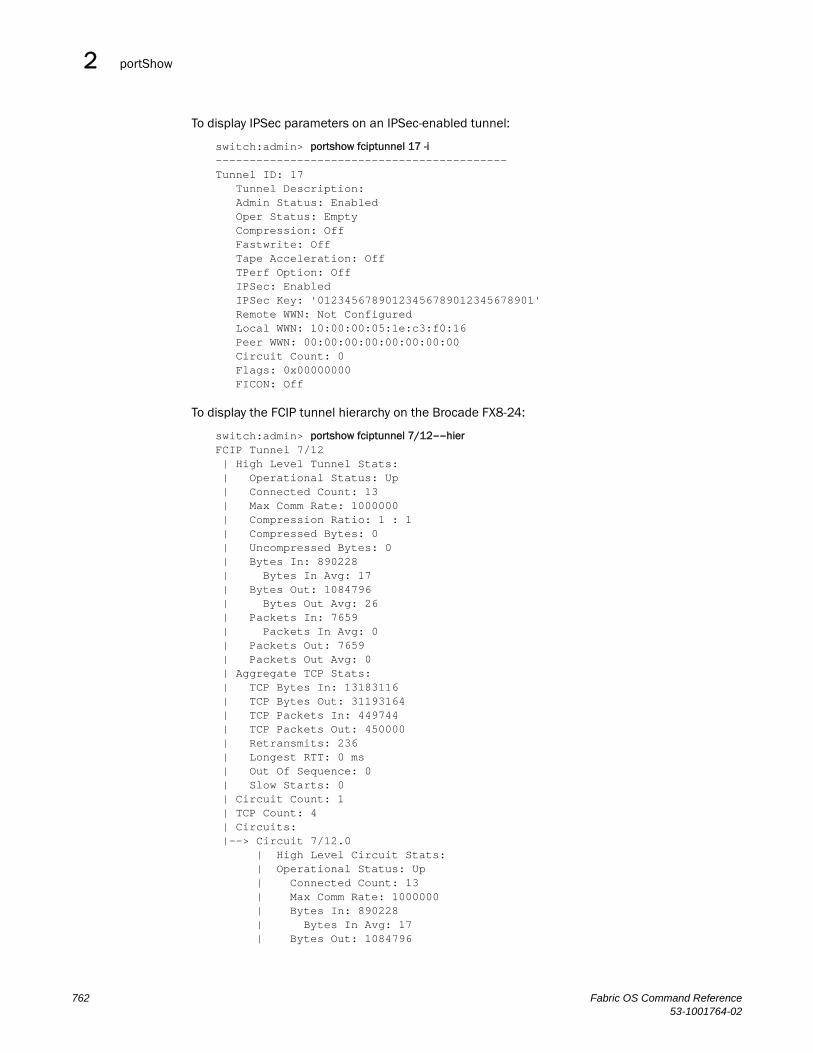
portShow2
To display IPSec parameters on an IPSec-enabled tunnel:
switch:admin> portshow fciptunnel 17 -i-------------------------------------------Tunnel ID: 17 Tunnel Description: Admin Status: Enabled Oper Status: Empty Compression: Off Fastwrite: Off Tape Acceleration: Off TPerf Option: Off IPSec: Enabled IPSec Key: '01234567890123456789012345678901' Remote WWN: Not Configured Local WWN: 10:00:00:05:1e:c3:f0:16 Peer WWN: 00:00:00:00:00:00:00:00 Circuit Count: 0 Flags: 0x00000000 FICON: Off
To display the FCIP tunnel hierarchy on the Brocade FX8-24:
switch:admin> portshow fciptunnel 7/12--hierFCIP Tunnel 7/12 | High Level Tunnel Stats: | Operational Status: Up | Connected Count: 13 | Max Comm Rate: 1000000 | Compression Ratio: 1 : 1 | Compressed Bytes: 0 | Uncompressed Bytes: 0 | Bytes In: 890228 | Bytes In Avg: 17 | Bytes Out: 1084796 | Bytes Out Avg: 26 | Packets In: 7659 | Packets In Avg: 0 | Packets Out: 7659 | Packets Out Avg: 0 | Aggregate TCP Stats: | TCP Bytes In: 13183116 | TCP Bytes Out: 31193164 | TCP Packets In: 449744 | TCP Packets Out: 450000 | Retransmits: 236 | Longest RTT: 0 ms | Out Of Sequence: 0 | Slow Starts: 0 | Circuit Count: 1 | TCP Count: 4 | Circuits: |--> Circuit 7/12.0 | High Level Circuit Stats: | Operational Status: Up | Connected Count: 13 | Max Comm Rate: 1000000 | Bytes In: 890228 | Bytes In Avg: 17 | Bytes Out: 1084796
762 Fabric OS Command Reference53-1001764-02

portShow 2
| Bytes Out Avg: 26 | Packets In: 7659 | Packets In Avg: 0 | Packets Out: 7659 | Packets Out Avg: 0 | Aggregate TCP Stats: | TCP Bytes In: 16667040 | TCP Bytes Out: 38472100 | TCP Packets In: 544536 | TCP Packets Out: 545523 | Retransmits: 236 | Longest RTT: 0 ms | Out Of Sequence: 0 | Slow Starts: 0 | TCP Count: 4 | TCP Connections: |---> TCP Conn 7/12.0:15486613 |---> TCP Conn 7/12.0:15486865 |---> TCP Conn 7/12.0:15486781 |---> TCP Conn 7/12.0:15486697
To display all FCIP circuits on the Brocade FX8-24:
switch:admin> portshow fcipcircuit all----------------------------------------------------------------------------- Tunnel Circuit OpStatus Flags Uptime TxMBps RxMBps ConnCnt CommRt Met----------------------------------------------------------------------------- 1/12 0 1/ge0 Up ----s 1d12m 0.00 0.00 8 1000/1000 0 1/13 0 1/ge1 Up ----s 1d12m 0.00 0.00 6 1000/1000 0 1/14 0 1/ge2 Up ----s 1d12m 0.00 0.00 6 1000/1000 0 1/15 0 1/ge3 Up ----s 1d12m 0.00 0.00 6 1000/1000 0 1/16 0 1/ge4 Up ----s 1d12m 0.00 0.00 6 1000/1000 0 1/17 0 1/ge5 Up ----s 1d12m 0.00 0.00 6 1000/1000 0 2/12 0 2/ge0 Up ----s 1d12m 0.00 0.00 6 1000/1000 0 2/13 0 2/ge1 Up ----s 1d12m 0.00 0.00 6 1000/1000 0 2/14 0 2/ge2 Up ----s 1d12m 0.00 0.00 6 1000/1000 0 2/15 0 2/ge3 Up ----s 1d12m 0.00 0.00 6 1000/1000 0 2/16 0 2/ge4 Up ----s 1d12m 0.00 0.00 6 1000/1000 0 2/17 0 2/ge5 Up ----s 1d12m 0.00 0.00 6 1000/1000 0 7/12 0 7/xge1 Up ----s 21h47m 0.00 0.00 13 1000/1000 0----------------------------------------------------------------------------- Flags: circuit: s=sack
To display a tunnel with circuit information:
switch:admin> portshow fciptunnel 16 -c-------------------------------------------Tunnel ID: 16 Tunnel Description: Admin Status: Enabled Oper Status: In Progress Compression: Off Fastwrite: Off Tape Acceleration: Off TPerf Option: Off IPSec: Disabled Remote WWN: Not Configured Local WWN: 10:00:00:05:1e:c3:f0:16 Peer WWN: 00:00:00:00:00:00:00:00 Circuit Count: 2
Fabric OS Command Reference 76353-1001764-02

portShow2
Flags: 0x00000000 FICON: Off ------------------------------------------- Circuit ID: 16.0 Circuit Num: 0 Admin Status: Enabled Oper Status: In Progress Remote IP: 192.168.2.20 Local IP: 192.168.2.10 Metric: 0 Min Comm Rt: 100000 Max Comm Rt: 100000 SACK: On Min Retrans Time: 100 Max Retransmits: 8 Keepalive Timeout: 10000 Path MTU Disc: 0 VLAN ID: 300 L2CoS: F: 7 H: 5 M: 3 L: 1 DSCP: F: 0 H: 0 M: 0 L: 0 Flags: 0x00000000 ------------------------------------------- Circuit ID: 16.1 Circuit Num: 1 Admin Status: Enabled Oper Status: In Progress Remote IP: 192.168.2.21 Local IP: 192.168.2.11 Metric: 0 Min Comm Rt: 100000 Max Comm Rt: 100000 SACK: On Min Retrans Time: 100 Max Retransmits: 8 Keepalive Timeout: 10000 Path MTU Disc: 0 VLAN ID: 200 L2CoS: F: 7 H: 5 M: 3 L: 1 DSCP: F: 32 H: 16 M: 8 L: 4 Flags: 0x00000000
To display a single circuit (circuit 0 on tunnel 16) with VLAN tagging configuration:
switch:admin> portshow fcipcircuit 16 0 ------------------------------------------- Circuit ID: 16.0 Circuit Num: 0 Admin Status: Enabled Oper Status: In Progress Remote IP: 192.168.2.20 Local IP: 192.168.2.10 Metric: 0 Min Comm Rt: 100000 Max Comm Rt: 100000 SACK: On Min Retrans Time: 100 Max Retransmits: 8 Keepalive Timeout: 10000 Path MTU Disc: 0 VLAN ID: 300
764 Fabric OS Command Reference53-1001764-02

portShow 2
L2CoS: F: 7 H: 5 M: 3 L: 1 DSCP: F: 0 H: 0 M: 0 L: 0 Flags: 0x00000000
To display additional performance parameters for a circuit:
switch:admin> portshow fcipcircuit 2/12 0--perf ------------------------------------------- Circuit ID: 2/12.0 Circuit Num: 0 Admin Status: Enabled Oper Status: Up Remote IP: 192.169.10.2 Local IP: 192.169.10.1 Metric: 0 Min Comm Rt: 1000000 Max Comm Rt: 1000000 SACK: On Min Retrans Time: 100 Max Retransmits: 8 Keepalive Timeout: 10000 Path MTU Disc: 0 VLAN ID: (Not Configured) L2CoS: (VLAN Not Configured) DSCP: F: 0 H: 0 M: 0 L: 0 Flags: 0x00000000 Flow Ctrl State: Off Connected Count: 6 Circuit Duration: 1 day, 2 hours, 40 minutes, 30 seconds Performance Statistics: Overall Throughput 1300544 Output Bytes 7 Bps 30s Avg, 13 Bps Lifetime Avg 10741 Output Packets 0 pkt/s 30s Avg, 0 pkt/s Lifetime Avg 1697876 Input Bytes 10 Bps 30s Avg, 17 Bps Lifetime Avg 14456 Input Packets 0 pkt/s 30s Avg, 0 pkt/s Lifetime Avg TCP Stats: 387921563652 Output Bytes 1671508568 Output Packets 189019870456 Input Bytes 1472851458 Input Packets Retransmits: 0 Round Trip Time: 102 ms Out Of Order: 0 Slow Starts: 0
To display QoS prioritization for the default circuit:
switch:admin> portshow fcipcircuit 2/12 0--perf --qos------------------------ Circuit ID: 2/12.0 Circuit Num: 0 Admin Status: Enabled Oper Status: Up Remote IP: 192.169.10.2 Local IP: 192.169.10.1 Metric: 0 Min Comm Rt: 1000000
Fabric OS Command Reference 76553-1001764-02

portShow2
Max Comm Rt: 1000000 SACK: On Min Retrans Time: 100 Max Retransmits: 8 Keepalive Timeout: 10000 Path MTU Disc: 0 VLAN ID: (Not Configured) L2CoS: (VLAN Not Configured) DSCP: F: 0 H: 0 M: 0 L: 0 Flags: 0x00000000 Flow Ctrl State: Off Connected Count: 6 Circuit Duration: 1 day, 2 hours, 47 minutes, 28 seconds Performance Statistics - Priority: F-Class Oper Status: Up Flow Ctrl State: Off Connected Count: 0 Duration: 1 day, 2 hours, 47 minutes, 28 seconds 1305668 Output Bytes 7 Bps 30s Avg, 13 Bps Lifetime Avg 10783 Output Packets 0 pkt/s 30s Avg, 0 pkt/s Lifetime Avg 1704464 Input Bytes 10 Bps 30s Avg, 17 Bps Lifetime Avg 14516 Input Packets 0 pkt/s 30s Avg, 0 pkt/s Lifetime Avg TCP Stats: 132528756 Output Bytes 1764002 Output Packets 66978832 Input Bytes 1717751 Input Packets Retransmits: 0 Round Trip Time: 102 ms Out Of Order: 0 Slow Starts: 0 Performance Statistics - Priority: High Oper Status: Up Flow Ctrl State: Off Connected Count: 0 Duration: 1 day, 2 hours, 47 minutes, 28 seconds 0 Output Bytes 0 Bps 30s Avg, 0 Bps Lifetime Avg 0 Output Packets 0 pkt/s 30s Avg, 0 pkt/s Lifetime Avg 0 Input Bytes 0 Bps 30s Avg, 0 Bps Lifetime Avg 0 Input Packets 0 pkt/s 30s Avg, 0 pkt/s Lifetime Avg TCP Stats: 94101740 Output Bytes 1425731 Output Packets 37071884 Input Bytes 1425720 Input Packets Retransmits: 0 Round Trip Time: 0 ms Out Of Order: 0 Slow Starts: 0 Performance Statistics - Priority: Medium Oper Status: Up Flow Ctrl State: Off
766 Fabric OS Command Reference53-1001764-02

portShow 2
Connected Count: 0 Duration: 1 day, 2 hours, 47 minutes, 28 seconds 468 Output Bytes 0 Bps 30s Avg, 0 Bps Lifetime Avg 4 Output Packets 0 pkt/s 30s Avg, 0 pkt/s Lifetime Avg 212 Input Bytes 0 Bps 30s Avg, 0 Bps Lifetime Avg 1 Input Packets 0 pkt/s 30s Avg, 0 pkt/s Lifetime Avg TCP Stats: 387601068268 Output Bytes 1666896581 Output Packets 188878848584 Input Bytes 1468285669 Input Packets Retransmits: 0 Round Trip Time: 0 ms Out Of Order: 0 Slow Starts: 0 Performance Statistics - Priority: Low Oper Status: Up Flow Ctrl State: Off Connected Count: 0 Duration: 1 day, 2 hours, 47 minutes, 28 seconds 0 Output Bytes 0 Bps 30s Avg, 0 Bps Lifetime Avg 0 Output Packets 0 pkt/s 30s Avg, 0 pkt/s Lifetime Avg 0 Input Bytes 0 Bps 30s Avg, 0 Bps Lifetime Avg 0 Input Packets 0 pkt/s 30s Avg, 0 pkt/s Lifetime Avg TCP Stats: 94107504 Output Bytes 1425817 Output Packets 37074500 Input Bytes 1425814 Input Packets Retransmits: 0 Round Trip Time: 0 ms Out Of Order: 0 Slow Starts: 0
To display FCP emulation statistics using the command with two levels and a single command:
switch:admin> portshow xtun 1/13 -fcp -itl -itn -stats
To display FCP emulation statistics, information, and configuration information using the command with a single level and three commands:
switch:admin> portshow xtun 1/13 -fcp -itl -stats -info -cfg
To display FICON statistics on the Brocade 7800:
switch:admin> portshow xtun 16 -ficon -stats
FICON FCIP Tunnel Statistics:STATISTICS (decimalEmulation Common Statistical Counts (decimal)=============================================TotalIngressFrames = 12280588298
Fabric OS Command Reference 76753-1001764-02

portShow2
TotalEgressFrames = 6131098914TotalFCEgressFrames = 1119802559TotalCmds = 994174108TotalEmulDvcLvlAcks = 5382TotalEmulatedOps = 393653297MaxRetryQueueDepth = 1201 MaxEgressQueueDepth = 3249TotalCUBusyResponses = 0 TotalCUEndResponses = 0TotalEmulatedCUBusys = 0 TotalEmulCUEnd = 0TotalSelectiveResets = 0 TotalChLinkBusy = 0TotalCancels = 0 TotalAborts = 0TotalEmulErrors = 0 TotalCuLinkBusy = 0TotalPurgePaths = 0 Xport LRC CheckErrors= 0Generated Link Busys = 70 Failed Generate Frame= 0
WIRE Buffer Percentages LocalFree= 95 LocalLow= 93 PeerFree= 95 PeerLow=93XBAR Buffer Percentages LocalFree= 98 LocalLow= 97 PeerFree= 98 PeerLow=97
FICON Configuration Status:---------------------------------------------------------------------- FICON Host side Paths = 0 Device Side Paths= 1 FICON LPARS Connected = 2 Curr LCUs = 5 Total Devices= 65 Current Egress Q Count= 0 RetryQCnt = 0 Current Free Headers = 32712 HdrsInUse = 0 Active Emulation Count= 4
No Emulated XRC Operations--------------------------
Tape Write Emulation Statistical Counts (decimal)----------------------------------------------------------- Current Bytes in write pipe = 0 Maximum Bytes in write pipe = 0 Largest write chain processed = 4128769 Total number of emulated Write Bytes= 9005990808925 Number of emulated Write Chains = 113180437 Total number of emulated Write CCWs = 272902411 Average Emulated Writes Blocksize = 33000 Average Writes in Emulated Chains = 2 Write emulation slowdowns = 0 Slowdowns at Start of Chain = 0 Slowdowns at End of chain = 0 Single Chain Emulation Counter = 0 Write Paced Count = 0 Current Host side Write FDCB Count = 0 Max Concurrent Write FDCB Count = 0 Current Write Limited FDCB Count = 0
Tape Read Emulation Statistical Counts (decimal)-------------------------------------------------- Total number of emulated Read Bytes = 9724178015167 Total number of emulated Read Chains= 280472860 Total number of emulated Read CCWs = 291325165 Average Emulated Bytes per chain = 34670 Average Emulated Read Blocksize = 33379 Average CCWs in Emulated Chains = 1 Read Block Paced Count = 0 Read Channel Program Paced Count = 0 Read Not Ready Situations Count = 1 Current Read FDCBs Count = 0 Max Concurrent Read FDCB Count = 0
768 Fabric OS Command Reference53-1001764-02

portShow 2
Current Read Limited FDCB Count = 0
To display the FICON Device Path Blocks:
switch:admin> portshow xtun 16 -ficon -fdpb
FDPB (FICON Device Path Block - one per path) Count = 1---------------------------------------------------------------(0x) Side Path: FastP Emul Type Tag=========== ==== ================== ===== ==== ==== ===========0410558000 D 0x1063016401****** No Yes Tape 0x14000034CONTROL======= draining = N drained = N fcrPresent = N emulatingTunnel = Y vtnValid = Y onAllocatedFdpbQ = Y esconDevice = N valid = YCounts======= curFdcbOxidCnt = 0x00000000 curFcubOxidCnt = 0x00000000 curFchbOxidCnt = 0x00000000 curEmulFdcbCnt = 0x00000000 ingAbortCount = 0x00000000 egrAbortCount = 0x00000000 curFchbCnt = 0x00000002 oxidCount = 0x0000 oxidOffset = 0x8100
To display the FICON Channel Blocks (all blocks and a specified block):
switch:admin> portshow xtun 16 -ficon -fchb
FCHB (FICON CHannel Block - one per LPAR) Count = 2---------------------------------------------------------------(0x) Side Path: CU Count Emul ChTIN CuTIN=========== ==== ================== ======== ========== ======041055D680 D 0x106301640100**** 0x0001 0x0000 0x0000041055B680 D 0x106301640106**** 0x0004 0x0000 0x0000
switch:admin> portshow xtun 16 -ficon -fchb 041055B680
FCHB (FICON CHannel Block - one per LPAR) Count = 1---------------------------------------------------------------(0x) Side Path: CU Count Emul ChTIN CuTIN=========== ==== ================== ======== ========== ======041055B680 D 0x106301640106**** 0x0004 0x0000 0x0000
FCHB Flags: tinInProgress=N emuTinAckPending=N emuTirInProgress=NemuTirAckPending=N emuTinLackPending=N emuTirPending=N emuTirReceived=N emuTinFinalAckPend=N emuTirPending=NemuTinSuccessful=N emuTinReceived=N emuTirSent=N fcrPresent=N fchbValid=Y
FCHB Control variables: tinOrigOxid=0xFFFF tirOrigOxid=0xFFFF tinAckRxid=0xFFFF tinAckOxid=0xFFFF allocChOxid=0xFFFF allocChOIdx=0x0000 tinTirOxid=0xFFFF
To reset the Device Path Block statistics:
switch:admin> portshow xtun 16 -ficon -fdpb -clear
Fabric OS Command Reference 76953-1001764-02

portShow2
Function Commands supported only on the Brocade 7500/7500E and FR4-18i
Synopsis portshow option [slot/]ge_port [all| tunnel_id ] [arguments]
Description Use this command to display configuration parameters and status information for FCIP tunnels on the Brocade 7500/7500E switch and on the FR4-18i blade. The following display options are supported only on these platforms:
• portShow fciptunnel - Displays Fibre Channel over IP (FCIP) tunnel configuration settings including the following:
- Additional performance parameters
- FC data path credit data
- Connection parameter information
- IKE and IPSec policy information on IPSec-enabled tunnels
- VC to FCIP QoS mapping table
- FCIP TCP Byte Stream statistics on Byte Stream-enabled tunnels
- History of TCP connections
- SnapShow capture of TCP statistics between two points in time
• portShow iscsi - Displays iSCSI configuration information.
• portShow mode- Displays Port Mode information.
• portShow ficon - Displays FICON parameters on FICON-configured tunnels.
• portShow inbandmgmt - Displays inband management configuration (Brocade 7500 only).
In Fabric OS v6.2.0 and later, each GbE port is associated with a TCP history, which tracks the state of statistics at the moment of a TCP connection failure. An entry is logged for the TCP connection when it encounters any of the following failures:
• Maximum number of retransmits is exceeded (MAX RTX)
• Maximum keep alive timeout is exceeded (KEEPALV TO)
• RST packet is received (RESET RCVD)
You can display the TCP history with the fciptunnel -hist command. This command displays a maximum of 16 entries. Once the maximum history length is reached, the oldest entry is removed from the end, and the newest entry is added to the front of the TCP history as future connection failures occur. The following data items are captured when a TCP connection encounters a failure:
Reason The reason for the TCP connection failure
RTT Round trip time
RTT H Round trip time high water mark
Var Variance
Var H Variance high water mark
OOO Counter of out-of-order segments
OOO H Out-of-order segments high water mark
Sendw Cwnd Size of sender congestion window (bytes)
Rx win Size of receive window (bytes)
Fast Rtx Fast retransmits
770 Fabric OS Command Reference53-1001764-02

portShow 2
F Rtx H Fast retransmits high water mark
Slow Rtx Slow retransmits
InFlt H Packets in-flight high water mark
SlowStarts Counter of slow starts
Rtx TO Retransmit timeouts
Rtx Rtx TO Counter of retransmit packets due to timeout
Dup ACK Counter of duplicate ACKs
Rtx Dup ACK Counter of retransmit packets due to duplicate ACK
LPort Local port
RPort Remote port
Along with history, the system keeps track of the following TCIP statistics, which you can display with the fciptunnel -snapshow option. The statistic is collected from system startup onwards until it is reset with the fciptunnel -snapstart option. Subsequent calls to -snapshow display statistics collected since the system was last reset. The TCIP statistics include the following information:
Tunnel Num The tunnel number associated with this TCP connection
Connection The type of TCP connection (CONTROL or DATA)
LPort Local port
RPort Remote port
OOO Counter of out-of-order segments
OOO H Out-of-order segments high water mark
Dup ACK Counter of duplicate ACKs
Rtx Dup ACK Counter of retransmit packets due to duplicate ACK
Fast Rtx Fast retransmits
F Rtx H Fast retransmits high water mark
Slow Rtx Slow retransmits
InFlt H Packets in-flight high water mark
SlowStarts Counter of slow starts
Rtx TO Retransmit timeouts
Rtx Rtx TO Counter of retransmit packets due to timeout
Use portCfg fciptunnel with the -bstr parameter to display parameters related to the Byte Streaming feature. Byte streaming allows the Brocade switch to communicate with third party WAN optimization hardware. Refer to portCfg for more information on this feature. The following parameters are displayed:
Head index The index into the TCP segment queue pointing to the oldest segment.
Tail index The index into the TCP segment queue pointing to the newest segment.
Current count The current number of pending segments to be processed.
Fabric OS Command Reference 77153-1001764-02
portShow2
Pending Frames High A high count of the number of frames waiting to be processed from TCP.
Segment Count High A high count of the number of segments that were used to create a single FCIP frame.
Data Mover Restarts The number of times the Data Mover was hung and needed to be restarted.
Frame Too Large Count The number of times more data was received than was intended for the single FCIP frame
Max Reference Count The maximum number of FCIP frames that referenced a single TCP segment.
Max Frame Size The maximum size of an FCIP frame received.
Max Segments The number of times the maximum allowable number of segments was pulled from TCP.
Reached Max Pending Count of the number of times the pending frames queue was full.
FCIP Smoothed RTT The WAN RTT perceived in FCIP smoothed over the last 8 samples.
FCIP RTT Variance Variance in RTT perceived in FCIP.
Operands This command supports the following operands:
slot For bladed systems only, specify the slot number of the port to be configured, followed by a slash (/).
[ge]port Specifies the GbE port number to be displayed relative to its slot for bladed systems. GbE ports on the Brocade 7500/7500E and FX-18i are numbered ge0 and ge1. See switchShow for a listing of valid ports.
all | tunnel_id For FCIP-related command options only, specify all to display all FCIP tunnels or a Tunnel ID between 0 and 7 to display a single FCIP tunnel.
fciptunnel Displays FCIP tunnel IDs, remote and local IP addresses, remote and local WWNs, compression status, FCIP FastWrite status, Tape Pipelining status, bandwidth rate, SACK status, Minimum Retransmit time, Keepalive Timeout, Maximum Retransmissions, DSCP Marking, tunnel status, tunnel uptime. Refer to portCfg help for an explanation of these parameters.
Additional optional arguments for fciptunnel include:
-perf Displays additional performance information.
-params Displays connection parameter information. In Fabric OS 6.2.0 or later, the display includes the following High Water Marks:
• Packets in flight• Round trip time• Round trip time variance• Fast retransmits• Out of order packets received
772 Fabric OS Command Reference53-1001764-02

portShow 2
-credits Displays FC data path credit data.
-ipsec Displays IKE and IPSec policy information on IPSec-enabled tunnels. Security policies are configured with the portCfg command.
-qosmap Displays the mapping table for VC to FCIP QoS.
-bstr Displays FCIP TCP Byte Stream statistics on Byte Stream-enabled tunnels.
-hist Displays the history of TCP connections.
-snapstart Resets TCP statistics. The collection of the statistics restarts when this command is executed. It ends when the -snapshow option is executed.
-snapshow Displays the TCP statistics that were collected since startup or since the statistics were reset with the -snapshow command.
iscsi Displays GbE port WWN and ISCSI Sessions.
mode Displays mode of GbE port as either “FCIP” or “not configured”.
ficon Displays FICON emulation configuration parameters.
The syntax for tportshow ficon is as follows:
portshow ficon [Slot/] ge_port all | tunnel_Id [arg] [parm] [-clear]
The following arguments are supported with ficon:
-globals Displays general FICON controls and statistics.
-images Displays discovered Images (FCUB).
-emul Displays emulated FDCBs.
-active Displays active FDCBs.
-epcb Displays Emulation Control Block (port specific).
-fhpb Displays FICON Host Path Block.
-fdpb adrs Displays FICON Device Path Block.
-fchb Displays FICON Channel Control Block.
-fcub Displays FICON Control Unit Control Block.
-fdcb adrs Displays FICON Device Control Block.
-mem adrs Displays memory in 256-byte increments: ! for next.
-pools Displays current data buffer pool counts.
-pmmr Displays PMMR pointers.
-fastw Displays the FastWrite queue.
-clear Clears post-display statistics; requires a preceding argument.
inbandmgmt Displays the status of the inband management configuration and IP addresses configured to enable inband management on the Brocade 7500 through GbE port interfaces. This command requires a port to be specified and displays the IP addresses for that port. In addition the output shows whether inband management is enabled or disabled. To display the routing table, use the portshow iproute command.
Fabric OS Command Reference 77353-1001764-02

portShow2
Examples To display iSCSI Port WWN and sessions:
switch:admin> portshow iscsi 2/ge0 GE Port 2/ge0 Port WWN Sessions ----------------------------------- 50:06:06:9e:40:09:a2:00 0
To display the connection parameter information for all FCIP tunnels on the switch and to show the current DiffServ markings being used for data connection as well as control connection (The following example displays high-water marks in bold for the data and control TCP connections of Tunnel 0):
switch:admin> portshow fciptunnel -all -paramsPort: ge0------------------------------------------- Tunnel ID 0 Tunnel Description "This is a test Description of this tunnel" Remote IP Addr 192.168.10.2 Local IP Addr 192.168.44.9 Remote WWN Not Configured Local WWN 10:00:00:05:1e:38:84:65 Compression off Fastwrite off Tape Pipelining off Committed Rate 900000 Kbps (0.900000 Gbps) SACK on Min Retransmit Time 100 Keepalive Timeout 10 Max Retransmissions 8 VC QoS Mapping off DSCP Marking (Control): 0, DSCP Marking (Data): 0 VLAN Tagging Not Configured
TCP Byte Streaming on Status : Inactive Connected Count: 0
Port: ge1------------------------------------------- Tunnel ID 0 Tunnel Description "This is a test Description of this tunnel" Remote IP Addr 192.168.10.10 Local IP Addr 192.168.10.2 Remote WWN Not Configured Local WWN 10:00:00:05:1e:39:37:5f Compression off Fastwrite off Tape Pipelining off Committed Rate 900000 Kbps (0.900000 Gbps) SACK on Min Retransmit Time 100 Keepalive Timeout 10 Max Retransmissions 8 VC QoS Mapping off DSCP Marking (Control): 0, DSCP Marking (Data): 0 VLAN Tagging Not Configured
TCP Byte Streaming on Status : Active Connected Count: 3 Uptime 23 minutes, 53 seconds
774 Fabric OS Command Reference53-1001764-02

portShow 2
FC control traffic TCP connection: Local 192.168.10.2:4149, Remote 192.168.10.10:3225 Runtime parameters: Send MSS 1460 Bytes Sender stats: smoothed roundtrip 1 ms (HWM 1 ms), variance 1 (HWM 562) peer advertised window 13498368 Bytes negotiated window scale (shift count) 9 congestion window 25920 Bytes slow start threshold 20480 Bytes operational mode: congestion avoidance 0 packets queued: TCP sequence# NXT(2454152682) 0 packets in-flight (HWM 4) Send.Unacknowledged(TCP sequence# 2454152682) recovery: retransmit timeout 500 ms, duplicate ACKs 0 retransmits 0 (max retransmits 8) loss recovery: fast retransmits 0 (HWM 0),retransmit timeouts 1 Receiver stats: advertised window 13498368 Bytes (max 13498368) negotiated window scale (shift count) 9 0 packets queued: TCP sequence# NXT(646865406) 0 out-of-order packets queued (HWM 0) (0 lifetime total) Keepalive: time since last activity detected 1 s idle connection probe interval 1 s timeout 10 s Data transfer TCP connection: Local 192.168.10.2:4150, Remote 192.168.10.10:3226 Runtime parameters: Send MSS 1460 Bytes Sender stats: smoothed roundtrip 0 ms (HWM 1 ms), variance 0 (HWM 562) peer advertised window 20443136 Bytes negotiated window scale (shift count) 9 congestion window 169464 Bytes slow start threshold 112500 Bytes operational mode: congestion avoidance 0 packets queued: TCP sequence# NXT(3715211236) 0 packets in-flight (HWM 3) Send.Unacknowledged(TCP sequence# 3715211236) recovery: retransmit timeout 500 ms, duplicate ACKs 0 retransmits 0 (max retransmits 8) loss recovery: fast retransmits 0 (HWM 0),retransmit timeouts 1 Receiver stats: advertised window 53997568 Bytes (max 53997568) negotiated window scale (shift count) 9 0 packets queued: TCP sequence# NXT(1502034779) 0 out-of-order packets queued (HWM 0) (0 lifetime total) Keepalive: time since last activity detected 0 s idle connection probe interval 1 s timeout 10 s
To display the performance information on an FCIP tunnel:
switch:admin> portshow fciptunnel 9/ge0 0 -perfSlot: 9 Port: ge0------------------------------------------- Tunnel ID 0
Tunnel Description "This is a test Description of this tunnel"
Fabric OS Command Reference 77553-1001764-02

portShow2
Remote IP Addr 10.62.0.100 Local IP Addr 10.10.9.100 Remote WWN Not Configured Local WWN 10:00:00:05:1e:39:d4:5a Compression on Fastwrite on Tape Pipelining on Uncommitted bandwidth, minimum of 1000 Kbps (0.001000 Gbps) SACK on Min Retransmit Time 100 Keepalive Timeout 90 Max Retransmissions 9 VC QoS Mapping off DSCP Marking (Control): 10, DSCP Marking (Data): 62 VLAN Tagging Id 1062, L2CoS (Control): 1, L2CoS (data): 0
TCP Byte Streaming on Status : Active Connected Count: 1 Uptime 2 hours, 12 minutes, 5 seconds QoS shaper performance stats: 48152162 Bytes 2961 Bps 30s avg, 6075 Bps lifetime avg 29286242 compressed Bytes 2065 Bps 30s avg, 3695 Bps lifetime avg 1.64 compression ratio FC control traffic TCP connection: Local 10.10.9.100:4099, Remote 10.62.0.100:3225 Performance stats: 44862 output packets 2 pkt/s 30s avg, 5 pkt/s lifetime avg 34118172 output Bytes 1655 Bps 30s avg, 4305 Bps lifetime avg 951 packets lost (retransmits) 12.25% loss rate 30s avg 38563 input packets
2 pkt/s 30s avg, 4 pkt/s lifetime avg 8208640 input Bytes 699 Bps 30s avg, 1035 Bps lifetime avg Data transfer TCP connection: Local 10.10.9.100:4100, Remote 10.62.0.100:3226 Performance stats: 41255 output packets 5 pkt/s 30s avg, 5 pkt/s lifetime avg 2149844 output Bytes 252 Bps 30s avg, 271 Bps lifetime avg 1 packets lost (retransmits) 0.00% loss rate 30s avg 33521 input packets 4 pkt/s 30s avg, 4 pkt/s lifetime avg 4006508 input Bytes 464 Bps 30s avg, 505 Bps lifetime avg IKE Policy 1 IPSec Policy 1
Pre-Shared Key testingFIPSandIPSec
776 Fabric OS Command Reference53-1001764-02

portShow 2
To display the connection IPSec information on an FCIP tunnel on a GbE port:
switch:admin> portshow fciptunnel 9/ge0 0 -ipsec Slot: 9 Port: ge0 ------------------------------------------- Tunnel ID 0
Tunnel Description "This is a test Description of this tunnel" Remote IP Addr 10.62.0.100 Local IP Addr 10.10.9.100 Remote WWN Not Configured Local WWN 10:00:00:05:1e:39:d4:5a Compression on Fastwrite on Tape Pipelining on Uncommitted bandwidth, minimum of 1000 Kbps (0.001000 Gbps) SACK on Min Retransmit Time 100 Keepalive Timeout 90 Max Retransmissions 9 VC QoS Mapping off DSCP Marking (Control): 10, DSCP Marking (Data): 62 VLAN Tagging Id 1062, L2CoS (Control): 1, L2CoS (data): 0
TCP Byte Streaming on Status : Active Connected Count: 1 Uptime 2 hours, 13 minutes, 58 seconds
IKE Policy 1 ----------------------------------------- Authentication Algorithm: SHA-1 Encryption: AES-128 Perfect Forward Secrecy: on
Diffie-Hellman Group: 14 SA Life (seconds): 28800
IPSec Policy 1 ----------------------------------------- Authentication Algorithm: SHA-1 Encryption: AES-128 SA Life (seconds): 28800 Pre-Shared Key testingFIPSandIPSec
To display the TCIP connection history after the connection was severed:
Switch:admin> portshow fciptunnel ge1 0 -histPort: ge1------------------------------------------- Tunnel ID 0 Tunnel Description "This is a test Description of this tunnel" Remote IP Addr 192.168.114.2 Local IP Addr 192.168.114.1 Remote WWN Not Configured Local WWN 10:00:00:05:1e:38:84:65 Compression off Fastwrite off Tape Pipelining off Committed Rate 900000 Kbps (0.900000 Gbps) SACK on Min Retransmit Time 100 Keepalive Timeout 10
Fabric OS Command Reference 77753-1001764-02

portShow2
Max Retransmissions 8 VC QoS Mapping off DSCP Marking (Control): 0, DSCP Marking (Data): 0 VLAN Tagging Not Configured
TCP Byte Streaming on Status : Active Connected Count: 2 Uptime 6 minutes, 39 seconds
TCP Connection History: ge1 +----------+-----+-----+-----+-----+----------+----------+----------+----------+| Reason | RTT |RTT H| Var |Var H| OOO | OOO H |Sendw Cwnd| Rx win | +----------+-----------+-----------+----------+----------+----------+----------+| Fast Rtx | F Rtx H | Slow Rtx | InFlt H |SlowStarts| Rtx TO |Rtx Rtx TO|+----------+-----------+-----+-----+----------+----------+----------+----------+| Dup ACK |Rtx Dup ACK|LPort|RPort| Event Timestamp |+----------+-----------+-----+-----+-------------------------------------------+|KEEPALV TO 0 0 750 0 0 0 2309 53997568|| 0 0 0 0 1 0 0|| 0 0 4098 3226 Thu May 29 17:03:10 2008|+- - - - - - - - - - - - - - - - - - - - - - - - - - - - - - - - - - - - - - - +|KEEPALV TO 0 0 8 562 0 0 5093 13498368|| 0 0 0 0 17 0 0|| 0 0 4097 3225 Thu May 29 17:03:10 2008|+------------------------------------------------------------------------------+
To display a snapshot of the TCP statistics:
Switch:admin> portshow fciptunnel ge1 0 -snapshow
Port: ge1------------------------------------------- Tunnel ID 0 Tunnel Description "This is a test Description of this tunnel" Remote IP Addr 192.168.114.2 Local IP Addr 192.168.114.1 Remote WWN Not Configured Local WWN 10:00:00:05:1e:38:84:65 Compression off Fastwrite off Tape Pipelining off Committed Rate 900000 Kbps (0.900000 Gbps) SACK on Min Retransmit Time 100 Keepalive Timeout 10 Max Retransmissions 8 VC QoS Mapping off DSCP Marking (Control): 0, DSCP Marking (Data): 0 VLAN Tagging Not Configured
TCP Byte Streaming on Status : Active Connected Count: 1 Uptime 3 minutes, 35 seconds
TCP Statistics Snapshot Duration: 3 minutes, 35 seconds
778 Fabric OS Command Reference53-1001764-02

portShow 2
+----------+-----------+-----+-----+----------+----------+----------+----------+|Tunnel Num| Connection|LPort|RPort| OOO | OOO H | DupACK |Rtx DupACK|+----------+-----------+-----------+----------+----------+----------+----------+| Fast Rtx | F Rtx H | Slow Rtx | InFlt H |SlowStarts| Rtx TO |Rtx Rtx TO|+----------+-----------+-----------+----------+----------+----------+----------+| 0 CONTROL 4097 3225 0 0 0 0|| 0 0 0 2 0 0 0|+- - - - - - - - - - - - - - - - - - - - - - - - - - - - - - - - - - - - - - - +| 0 DATA 4098 3226 0 0 0 0|| 0 0 0 1 0 0 0| +-------------------------------------------------------------------------------+
To reset the TCIP statistics:
Switch:admin> portshow fciptunnel ge1 0 -snapstart
Port: ge1------------------------------------------- Tunnel ID 0 Tunnel Description "This is a test Description of this tunnel" Remote IP Addr 192.168.114.2 Local IP Addr 192.168.114.1 Remote WWN Not Configured Local WWN 10:00:00:05:1e:38:84:65 Compression off Fastwrite off Tape Pipelining off Committed Rate 900000 Kbps (0.900000 Gbps) SACK on Min Retransmit Time 100 Keepalive Timeout 10 Max Retransmissions 8 VC QoS Mapping off DSCP Marking (Control): 0, DSCP Marking (Data): 0 VLAN Tagging Not Configured
TCP Byte Streaming on Status : Active Connected Count: 1 Uptime 5 minutes, 26 seconds
TCP data and control statistics snapshots have been reset for tunnel 0
To display the FC data path credit data:
switch:admin> portshow fciptunnel 9/ge0 0 -credits
Slot: 9 Port: ge0 ------------------------------------------- Tunnel ID 0
Tunnel Description "This is a test Description of this tunnel" Remote IP Addr 10.62.0.100 Local IP Addr 10.10.9.100 Remote WWN Not Configured Local WWN 10:00:00:05:1e:39:d4:5a Compression on Fastwrite on Tape Pipelining on Uncommitted bandwidth, minimum of 1000 Kbps (0.001000 Gbps) SACK on
Fabric OS Command Reference 77953-1001764-02

portShow2
Min Retransmit Time 100 Keepalive Timeout 90 Max Retransmissions 9 VC QoS Mapping off DSCP Marking (Control): 10, DSCP Marking (Data): 62 VLAN Tagging Id 1062, L2CoS (Control): 1, L2CoS (data): 0
TCP Byte Streaming on Status : Active Connected Count: 1 Uptime 2 hours, 14 minutes, 34 seconds QoS Runtime Credit Controls: =============================================
iac_credits_total: 26366 iac_credits_posted: 32 iac_credits_queued: 0
iac_max_credits_queued: 1 iac_credits_pipesize: 20250000 iac_credits_queued_bytes: 0 iac_credits_timer_updates:0 overcommitted_count: 0 iac_credits_timestamp: 0x0000030DF1E6C770 iac_credits_time_savg: 907614 microseconds iac_credits_time_max: 1000221 microseconds iac_e2e_latency_savg: 81800 microseconds iac_e2e_latency_max: 90074 microseconds iac_credits_timer_abort: 0 iac_credits_timer_nobuff: 0 iac_hold_head = 0x00000000 iac_hold_tail = 0x00000000 Internal Knobs for tuning Credit processing: ============================================ ip_api_data_credit_target = 32 ip_api_data_credit_ratio = 80 ip_api_credit_time = 15 ip_api_cwnd_overcommit = 29760 FC control traffic TCP connection: Local 10.10.9.100:4099, Remote 10.62.0.100:3225 Data transfer TCP connection: Local 10.10.9.100:4100, Remote 10.62.0.100:3226 IKE Policy 1 IPSec Policy 1 Pre-Shared Key testingFIPSandIPSec
To display QoS Mappings:
switch:admin> portshow fciptunnel 9/ge0 0 -qosmap
Slot: 9 Port: ge0 ------------------------------------------- Tunnel ID 0
Tunnel Description "This is a test Description of this tunnel" Remote IP Addr 10.62.0.100 Local IP Addr 10.10.9.100 Remote WWN Not Configured Local WWN 10:00:00:05:1e:39:d4:5a Compression on Fastwrite on Tape Pipelining on Uncommitted bandwidth, minimum of 1000 Kbps (0.001000 Gbps) SACK on
780 Fabric OS Command Reference53-1001764-02

portShow 2
Min Retransmit Time 100 Keepalive Timeout 90 Max Retransmissions 9 VC QoS Mapping off DSCP Marking (Control): 10, DSCP Marking (Data): 62 VLAN Tagging Id 1062, L2CoS (Control): 1, L2CoS (data): 0
Connected Count: 1 Uptime 2 hours, 14 minutes, 47 seconds IKE Policy 1 IPSec Policy 1 Pre-Shared Key testingFIPSandIPSec VC QoS Map: VC DSCP L2CoS VC DSCP L2CoS VC DSCP L2CoS VC DSCP L2CoS 0 46 7 1 07 0 2 11 3 3 15 3 4 19 3 5 23 3 6 27 0 7 31 0 8 35 0 9 39 0 10 43 4 11 47 4 12 51 4 13 55 4 14 59 4 15 63 0
To display Byte Streaming parameters:
switch:admin> portshow fciptunnel ge1 0 -bstr
Port: ge1------------------------------------------- Tunnel ID 0 Remote IP Addr 192.168.32.2 Local IP Addr 192.168.32.1 Remote WWN Not Configured Local WWN 10:00:00:05:1e:41:2f:2e Compression off Fastwrite on Tape Pipelining off Committed Rate 400000 Kbps (0.400000 Gbps) SACK on Min Retransmit Time 100 Keepalive Timeout 10 Max Retransmissions 8 VC QoS Mapping off DSCP Marking (Control): 0, DSCP Marking (Data): 0 VLAN Tagging Not Configured TCP Byte Streaming on Status : Active Connected Count: 9 Uptime 23 hours, 19 minutes, 45 seconds ============================================ Streaming TCP vars: ============================================ head index = 24 tail index = 24 Current Count = 0 Pending Frames High = 16 Segment Count High = 3 Data Mover Restarts = 0 Data Mover Desc Full = 0 Frame Too Large Count = 0 Max Reference Count = 15 Max Frame Size = 2116 Max Segments Pulled = 0 Reached Max Pending Frames = 0 FCIP Smoothed RTT = 202 ms
Fabric OS Command Reference 78153-1001764-02

portShow2
FCIP RTT Variance = 1 ms FC control traffic TCP connection: Local 192.168.32.1:4129, Remote 192.168.32.2:3225 Data transfer TCP connection: Local 192.168.32.1:4130, Remote 192.168.32.2:3226
To display FICON EPCB for a GbE port 0 tunnel ID 1 with post display clearing of relevant statistics:
switch:admin> portshow ficon ge0 1 -epcb -clear
To display a list of discovered devices and selected path and status information on each. Get the adrs from this display for the next command:
switch:admin> portshow ficon ge0 all -fdcb
To display details on the FDCB specified in the adrs argument, which was derived from the previous example:
switch:admin> portshow ficon ge0 all -fdcb 10008000To display the same information as the previous example but with post display clearing of relevant statistics:
switch:admin> portshow ficon ge0 all -fdcb 10008000 -clear
To display the inband management interfaces configured on the Brocade 7500:
switch:admin> portshow inbandmgmt ge1
Port: ge1Inband Management: EnabledCP Interface IP Address NetMask MTU---------------------------------------------- 0 192.168.255.1 255.255.255.252 1500GE Interface IP Address NetMask MTU---------------------------------------------- 0 192.168.255.2 255.255.255.252 1500
To display the routes that use internal management interfaces.
switch:admin> portshow iproute ge1
Port: ge1IP Address Mask Gateway Metric-----------------------------------------------------192.168.112.0 255.255.255.0 192.168.112.61 0 Interface 192.168.255.0 255.255.255.0 192.168.255.2 0 Interface Management 10.1.1.61 255.255.255.255 192.168.255.1 0 Management 192.168.102.0 255.255.255.0 192.168.112.1 0192.168.106.0 255.255.255.0 192.168.112.1 0192.168.255.0 255.255.255.0 192.168.255.1 0 Interface Management192.168.112.60 255.255.255.255 192.168.255.2 0 ManagementIPv6 Address Len Gateway Metric----------------------------------------------------------------------------
See Also authUtil, portCfg, portLoginShow, portCfgLongDistance, portName, switchShow
782 Fabric OS Command Reference53-1001764-02

portStats64Show 2
portStats64Show
Displays the 64-bit hardware statistics for a port.
Synopsis portstats64show [slot/]port [-long]
Description Use this command to display 64-bit hardware statistics for a specified port. When used without the -longoption, two integers are reported for most values, the lower and upper 32-bits are reported as two separate numbers. In this case, the top word is the most significant. When issued with the -long option, the command displays the counters as one single 64-bit number.
stat64_wtx Number of 4-byte words transmitted.
stat64_wrx Number of 4-byte words received.
stat64_ftx Number of frames transmitted.
stat64_frx Number of frames received.
stat64_c2_frx Number of class 2 frames received.
stat64_c3_frx Number of class 3 frames received.
stat64_lc_rx Number of link control frames received.
stat64_mc_rx Number of multicast frames received.
stat64_mc_to Number of multicast timeouts.
stat64_mc_tx Number of multicast frames transmitted.
tim64_rdy_pri Number of times R_RDY was high priority.
tim64_txcrd_z Number of times that the TX BB_credit was at zero.
er64_enc_in Number of encoding errors inside of frames.
er64_crc Number of frames with CRC errors.
er64_trunc Number of frames shorter than minimum.
er64_toolong Number of frames longer than maximum.
er_bad_eof Number of frames with bad end-of-frame.
er64_enc_out Number of encoding error outside of frames.
er64_disc_c3 Number of class 3 frames discarded.
stat64_rateTxFrameTx frame rate (frames/second).
stat64_rateRxFrameRx frame rate (frames/second).
stat64_rateTxPeakFrameTx peak frame rate (frames/second).
stat64_rateRxPeakFrameRx peak frame rate (frames/seconds).
stat64_rateTxByte Tx Byte rate (Bps).
stat64_rateRxByte Rx Byte rate (Bps).
Fabric OS Command Reference 78353-1001764-02

portStats64Show2
stat64_rateTxPeakByteTx peak Byte rate (Bps).
stat64_rateRxPeakByteRx peak Byte rate (Bps).
stat64_PRJTFrames Number of P_RJT frames transmitted.
stat64_PBSYFrames Number of P_BSY transmitted.
stat64_inputBuffersFullNumber of occasions on which input buffers are full.
stat64_rxClass1FramesNumber of class 1 frames received.
The following counters provided by SNMP are displayed with portStats64Show -long on switches running Fabric OS v6.4.0 or later:
swConnUnitZeroTenancy, zero_tenancy Number of times a zero tenancy occurred.
swConnUnitFLNumOfTenancy , fl_tenancy Number of times the FL_Port had a loop tenancy.
swConnUnitNLNumOfTenancy , nl_tenancy Number of times any NL_Port had a loop tenancy.
swConnUnitStopTenancyStarvation, Starve_stop Number of loop tenancies stopped due to starvation.
swConnUnitOpend, opened Number of times the FL_Port entered OPENED state.
swConnUnitTransferConnection, transfer Number of times the FL_Port entered TRANSFER state.
swConnUnitOpen , open Number of times the FL_Port entered OPEN state.
swConnUnitInvalidARB, er_inv_arb Number of invalid arbitrated loops (ARBs).
The following counters are platform-specific and applicable only to Condor2 and Goldeneye2 ASICs only. Refer to the Fabric OS Troubleshooting and Diagnostics Guide, Appendix A, for a table that correlates ASIC type with switch models.
swConnUnitFTB1Miss , er_type1_miss Number of frames with FTB type 1 miss.
swConnUnitFTB2Miss , er_type2_miss Number of frames with FTB type 2 miss.
swConnUnitFTB6Miss, er_type6_miss Number of frames with FTB type 2 miss.
swConnUnitZoneMiss, er_zone_miss
Number of frames with hard zoning miss
swConnUnitLunZoneMiss, er_lun_zone_miss
Number of frames with logical unit number (LUN) zoning miss.
784 Fabric OS Command Reference53-1001764-02

portStats64Show 2
swConnUnittStatRxMulticastToObjects, stat_mc_to
The number of multicast timeouts.
Note The execution of this command is subject to Virtual Fabric or Admin Domain restrictions that may be in place. Refer to chapter 1, "Using Fabric OS commands" and Appendix A, "Command Availability" for details.
This command is not supported on FCoE ports.
Operands This command has the following operands:
slot For bladed systems only, specify the slot number of the port to be displayed, followed by a slash (/).
port Specify a port number to be displayed, relative to its slot for bladed systems. Use switchShow to display a list of valid ports.
-long Displays the counters as one single 64-bit number. This operand is optional; if omitted, the lower and upper 32-bits are reported as two separate numbers.
Examples To display the 64-bit hardware statistics for a port:
switch:user> portstats64show 4/15stat64_wtx 0 top_int : 4-byte words transmitted 316 bottom_int : 4-byte words transmittedstat64_wrx 0 top_int : 4-byte words received 1486 bottom_int : 4-byte words receivestat64_ftx 0 top_int : Frames transmitted 69 bottom_int : Frames transmittedstat64_frx 0 top_int : Frames received 73 bottom_int : Frames receivedstat64_c2_frx 0 top_int : Class 2 frames received 0 bottom_int : Class 2 frames receivedstat64_c3_frx 0 top_int : Class 3 frames received 37 bottom_int : Class 3 frames receivedstat64_lc_rx 0 top_int : Link control frames received 8 bottom_int : Link control frames receivedstat64_mc_rx 0 top_int : Multicast frames received 0 bottom_int : Multicast frames receivedstat64_mc_to 0 top_int : Multicast timeouts 0 bottom_int : Multicast timeoutsstat64_mc_tx 0 top_int : Multicast frames transmitted 0 bottom_int : Multicast frames transmittedtim64_rdy_pri 0 top_int : Time R_RDY high priority 60438254 bottom_int : Time R_RDY high prioritytim64_txcrd_z 0 top_int : Time BB_credit zero 2 bottom_int : Time BB_credit zeroer64_enc_in 0 top_int : Encoding errors inside of frames 0 bottom_int : Encoding errors inside of frameser64_crc 0 top_int : Frames with CRC errors 0 bottom_int : Frames with CRC errorser64_trunc 0 top_int : Frames shorter than minimum 0 bottom_int : Frames shorter than minimumer64_toolong 0 top_int : Frames longer than maximum 0 bottom_int : Frames longer than maximum er_bad_eof 0 top_int : Frames with bad end-of-frame
Fabric OS Command Reference 78553-1001764-02

portStats64Show2
0 bottom_int : Frames with bad end-of-frameer64_enc_out 0 top_int : Encoding error outside of frames 9131157 bottom_int : Encoding error outside of frameser64_disc_c3 0 top_int : Class 3 frames discarded 0 bottom_int : Class 3 frames discardedstat64_rateTxFrame 17 Tx frame rate (fr/sec)stat64_rateRxFrame 17 Rx frame rate (fr/sec)stat64_rateTxPeakFrame 17 Tx peak frame rate (fr/sec)stat64_rateRxPeakFrame 17 Rx peak frame rate (fr/sec)stat64_rateTxByte 79 Tx Byte rate (bytes/sec)stat64_rateRxByte 371 Rx Byte rate (Bytes/sec)stat64_rateTxPeakByte 79 Tx peak Byte rate (Bytes/sec)stat64_rateRxPeakByte 371 Rx peak Byte rate (Bytes/sec)stat64_PRJTFrames 0 top_int : 4-byte words transmitted 0 bottom_int : 4-byte words transmittedstat64_PBSYFrames 0 top_int : 4-byte words transmitted 0 bottom_int : 4-byte words transmittedstat64_inputBuffersFull 0 top_int : 4-byte words transmitted 0 bottom_int : 4-byte words transmittedstat64_rxClass1Frames 0 top_int : 4-byte words transmitted 0 bottom_int : 4-byte words transmitted
To display the counters as one single 64-bit number:
switch:admin> portstats64show 12 -longzero64_tenancy 0 zero_tenancyfl64_tenancy 0 number of times FL has the tenancynl64_tenancy 0 number of times NL has the tenancystarve64_stop 0 tenancies stopped due to starvationopened64 0 FL_Port openedtransfer64 0 loop_transferopen64 0 loop_opener64_inv_arb 0 Invalid ARBer64_type1_miss 0 frames with FTB type 1 misser64_type2_miss 0 frames with FTB type 2 misser64_type6_miss 0 frames with FTB type 6 misser64_zone_miss 0 frames with hard zoning misser64_lun_zone_miss 0 frames with LUN zoning misslli64 0 Low level interrupts
See Also portStatsClear, portStatsShow
786 Fabric OS Command Reference53-1001764-02

portStatsClear 2
portStatsClear
Clears port hardware statistics.
Synopsis portstatsclear [slot/]port
portstatsclear -i [index1[-index2] [...] [-f]]
portstatsclear -slot [slot1[-slot2][...]
portstatsclear -h
Description Use this command to clear the hardware statistics for the specified ports. Including ALPA-based CRC monitor, End-to-End monitor, and Filter-based performance monitor statistics.
You can identify a single port to be cleared by its port number or by its port index number. Port ranges are supported with index numbers or by specifying a slot or a slot range. Use switchShow for a listing of valid ports, slots, and port index numbers.
Specifying multiple ports with the index (-i) or slot (-s) option is supported only if PortSwap is disabled. They are not supported on GbE ports and configured F_Port trunks. Use the -i option without a port index argument to display the portSwap status, or alternately use portSwapShow.
Note The execution of this command is subject to Virtual Fabric or Admin Domain restrictions that may be in place. Refer to chapter 1, "Using Fabric OS commands" and Appendix A, "Command Availability" for details.
This command is not supported on FCoE ports.
Operands This command has the following operands:
slot For bladed systems only, specify the slot number of the port to be cleared, followed by a slash (/).
port Clears a single port identified by the port number, relative to its slot on bladed systems. Port ranges are not supported with this command. Use switchShow for a listing of valid ports.
-i index1[-index2] Clears a single port or a range of ports identified by port index numbers. You may specify multiple index ranges separated by a space, for example, -i 33-47 65-73.
-f Ignores nonexisting ports. This operand is valid only with the -i option.
-slot [slot1[-slot2] Clears all ports on a slot or on a range of slots, for example, -s 3-5. You may specify multiple slot ranges separated by a space, for example, -s 3-5 8-10.
-h Displays the command usage.
Examples To clear hardware statistics for a single port specified by its port number:
switch:admin> portstatsclear 4/15
To clear hardware statistics for a single port specified by its index number:
switch:admin> portstatsclear -i 25
To clear hardware statistics for a range of ports specified by their index numbers:
switch:admin> portstatsclear -i 32-40
Fabric OS Command Reference 78753-1001764-02

portStatsClear2
To clear hardware statistics for multiple port ranges specified by their index numbers:
switch:admin> portstatsclear -i 32-40 50-56
To clear hardware statistics for all ports on slots 3-5:
switch:admin> portstatsclear -s 3-5
To clear hardware statistics for all ports on slots 3-5 and 7-10:
switch:admin> portstatsclear -s 3-5 7-10
See Also portStats64Show, portStatsShow, portSwapDisable, portSwapShow, switchShow
788 Fabric OS Command Reference53-1001764-02

portStatsShow 2
portStatsShow
Displays port hardware statistics.
Synopsis portstatsshow [slot/]port
portstatsshow -i [index1[-index2][...] [-f]]
portstatsshow -slot [slot1[-slot2][...]
portstatsshow ge [slot/]geport
portstatsshow ip [slot/]geport [ip_address]
portstatsshow fcip [slot/]geport [tunnel_number]
portstatsshow -h
Description Use this command to display port hardware statistics counters. Some counters are platform- or port-specific and display only on those platforms and ports. All statistics have a maximum 32-bit value of 4,294,967,295.
You can display statistics for a single port identified by its port number or by its port index. Port ranges are supported with index numbers and by specifying a slot or a slot range. Use switchShow for a listing of valid ports, slots, and port index numbers.
Specifying multiple ports with the index (-i) or slot (-s) option is supported only if PortSwap is disabled. They are not supported on GbE ports and configured F_Port trunks. Use the -i option without a port index to display the portSwap status, or alternately use portSwapShow.
The command output may include the following fields (Tx indicates frames transmitted by the port; Rx indicates frames received by the port).
stat_wtx The number of 4-byte words transmitted.
stat_wrx The number of 4-byte words received.
stat_ftx The number of frames transmitted.
stat_frx The number of frames received.
stat_c2_frx The number of class 2 frames received.
stat_c3_frx The number of class 3 frames received.
stat_lc_rx The number of link control frames received.
stat_mc_rx The number of multicast frames received.
stat_mc_to The number of multicast timeouts.
stat_mc_tx The number of multicast frames transmitted.
tim_rdy_pri The number of times that sending R_RDY or VC_RDY primitive signals was a higher priority than sending frames, due to diminishing credit reserves in the transmitter at the other end of the fiber. This parameter is sampled at intervals of 1.8 µs (microseconds), and the counter is incremented by 1 if the condition is true.
Fabric OS Command Reference 78953-1001764-02

portStatsShow2
tim_txcrd_z The number of times that the port was unable to transmit frames because the transmit BB credit was zero. The purpose of this statistic is to detect congestion or a device affected by latency. This parameter is sampled at intervals of 2.5 µs (microseconds), and the counter is incremented if the condition is true. Each sample represents 2.5 µs of time with zero Tx BB Credit. An increment of this counter means that the frames could not be sent to the attached device for 2.5 µs, indicating degraded performance.
tim_txcrd_z_vc The number of times that the port was unable to transmit frames because the transmit BB credit was zero for each of the port's 16 Virtual Channels (VC 0-15). The purpose of this statistic is to detect congestion or a device affected by latency. This parameter is sampled at intervals of 2.5 µs (microseconds), and the counter is incremented if the condition is true. Each sample represents 2.5 µs of time with zero Tx BB Credit. An increment of this counter means that the frames could not be send to the attached device for 2.5 µs, indicating degraded performance (platform- and port-specific).
er_enc_in The number of encoding errors inside frames.
er_crc The number of frames with cyclic redundancy check (CRC) errors.
er_trunc The number of frames shorter than the minimum frame length.
er_toolong The number of frames longer than the maximum frame length.
er_bad_eof The number of frames with bad end-of-frame.
er_enc_out The number of encoding error outside frames.
er_bad_os The number of invalid ordered sets (platform- and port-specific).
er_rx_c3_timeout The number of receive class 3 frames received at this port and discarded at the transmission port due to timeout (platform-and port-specific).
er_tx_c3_timeout The number of transmit class 3 frames discarded at the transmission port due to timeout (platform- and port-specific).
er_c3_dest_unreach The number of class 3 frames discarded because the transmit port, although it is determined, cannot send the frame at the moment when the error occurs.
er_other_discard The number of other discarded due to route lookup failures or other reasons.
er_zone_discard The number of class 3 frames discarded due to zone mismatch.
er_type1_miss The number of frames with FTB type 1 miss.
er_type2_miss The number of frames with FTB type 2 miss.
er_type6_miss The number of frames with FTB type 6 miss.
er_zone_miss , er_lun_zone_miss The number of frames discarded due to hard zoning miss or LUN zoning miss. If Rx port hard zoning is enabled, frames will be discarded at the Rx port. If TX port hard zoning is enabled, frames will be discarded at the TX port. If both RX and TX port hard zoning is enabled, frames will be discarded at the RX port. (LUN zoning is currently not supported.)
er_crc_good_eof The number of CRC errors with good end-of-frame (EOF) (platform- and port-specific).
er_inv_arb The number of invalid arbitrated loops (ARBs).
790 Fabric OS Command Reference53-1001764-02

portStatsShow 2
open The number of times the FL_Port entered OPEN state.
transfer The number of times the FL_Port entered TRANSFER state.
opened The number of times the FL_Port entered OPENED state.
starve_stop The number of loop tenancies stopped due to starvation.
fl_tenancy The number of times the FL_Port had a loop tenancy.
nl_tenancy The number of times the NL_Port had a loop tenancy.
zero_tenancy The number of times a zero tenancy occurred.
ge_stat_tx_frms The number of frames transmitted on the GbE port.
ge_stat_tx_octets The number of octets transmitted on the GbE port.
ge_stat_tx_ucast_frms The number of unicast frames transmitted on the GbE port.
ge_stat_tx_mcast_frms The number of multicast frames transmitted on the GbE port.
ge_stat_tx_bcast_frms The number of broadcast frames transmitted on the GbE port.
ge_stat_tx_vlan_frms The number of VLAN frames transmitted on the GbE port.
ge_stat_tx_pause_frms The number of pause frames transmitted on the GbE port.
ge_stat_rx_frms The number of frames received on the GbE port.
ge_stat_rx_octets The number of octets received on the GbE port.
ge_stat_rx_ucast_frms The number of unicast frames received on the GbE port.
ge_stat_rx_mcast_frms The number of multicast frames received on the GbE port.
ge_stat_rx_bcast_frms The number of broadcast frames received on the GbE port.
ge_stat_rx_vlan_frms The number of VLAN frames received on the GbE port.
ge_stat_rx_pause_frms The number of pause frames received on the GbE port.
ge_err_carrier The number of times the GbE port lost carrier sense.
ge_err_length The number of times an invalid length error was observed on the GbE port.
ge_err_crc The number of CRC Errors received on the GbE port.
ge_err_abort The number of frames aborted on the GbE port.
ge_err_overrun The number of overruns observed on the GbE port.
ge_err_fifo_ovf The number of times an overflow of the first in first out (FIFO) queue was observed on the GbE port.
ip_err_hdr_cksum The number of checksum errors observed on the GbE port.
Fabric OS Command Reference 79153-1001764-02

portStatsShow2
ip_err_tcp_data_chksum The number of IP TCP data checksum errors observed on the GbE port.
Note The execution of this command is subject to Virtual Fabric or Admin Domain restrictions that may be in place. Refer to chapter 1, "Using Fabric OS commands" and Appendix A, "Command Availability" for details.
This command is not supported on FCoE ports.
Operands This command has the following operands:
slot For bladed systems only, specifies the slot number of the port to be displayed, followed by a slash (/).
[ge]port Displays statistics for a single port identified by the port number, relative to its slot on bladed systems. Specify the optional ge option to display the GbE port hardware statistics. Port ranges are not supported with this command. Use switchShow for a listing of valid ports.
-i index1[-index2] Displays statistics for a single port or for a range of ports identified by port index numbers. You may specify multiple index ranges separated by a space, for example, -i 33-47 65-73.
-f Ignores nonexisting ports. This operand is valid only with the -i option.
-slot] [slot1[-slot2] Displays statistics for all ports on a slot or on a range of slots, for example, -s 3-5. You may specify multiple slot ranges separated by a space, for example, -s 3-5 8-10.
ge Displays the GbE port statistics.
ip Displays all GbE port statistics related to IP addresses that are not zero. This operand is not supported on the Brocade 7800 and FX8-24 platforms.
ip_address Specifies an IP address to display statistics only for the specified IP address. This operand is optional and valid only with the ip option.
fcip Displays the GbE statistics on all FCIP tunnels. This operand is not supported on the Brocade 7800 and FX8-24 platforms.
tunnel_number Specifies a tunnel ID to display statistics only for the specified FCIP tunnel. This operand is optional and valid only with the fcip option.
-h Displays the command usage.
Examples To display the basic set of statistics for port 1/13 on a DCX backbone:
switch:admin> portstatsshow 13stat_wtx 0 4-byte words transmittedstat_wrx 0 4-byte words receivedstat_ftx 0 Frames transmittedstat_frx 0 Frames receivedstat_c2_frx 0 Class 2 frames receivedstat_c3_frx 0 Class 3 frames receivedstat_lc_rx 0 Link control frames receivedstat_mc_rx 0 Multicast frames receivedstat_mc_to 0 Multicast timeoutsstat_mc_tx 0 Multicast frames transmittedtim_rdy_pri 0 Time R_RDY high prioritytim_txcrd_z 0 Time TX Credit Zero (2.5Us ticks)
792 Fabric OS Command Reference53-1001764-02

portStatsShow 2
tim_txcrd_z_vc 0- 3: 0 0 0 0tim_txcrd_z_vc 4- 7: 0 0 0 0tim_txcrd_z_vc 8-11: 0 0 0 0tim_txcrd_z_vc 12-15: 0 0 0 0er_enc_in 0 Encoding errors inside of frameser_crc 0 Frames with CRC errorser_trunc 0 Frames shorter than minimumer_toolong 0 Frames longer than maximumer_bad_eof 0 Frames with bad end-of-frameer_enc_out 0 Encoding error outside of frameser_bad_os 0 Invalid ordered seter_rx_c3_timeout 0 Class 3 receive frames discarded due to timeouter_tx_c3_timeout 0 Class 3 transmit frames discarded due to timeouter_c3_dest_unreach 0 Class 3 frames discarded due to destination unreachableer_other_discard 0 Other discardser_type1_miss 0 frames with FTB type 1 misser_type2_miss 0 frames with FTB type 2 misser_type6_miss 0 frames with FTB type 6 misser_zone_miss 0 frames with hard zoning misser_lun_zone_miss 0 frames with LUN zoning misser_crc_good_eof 0 Crc error with good eofer_inv_arb 0 Invalid ARBopen 0 loop_opentransfer 0 loop_transferopened 0 FL_Port openedstarve_stop 0 tenancies stopped due to starvationfl_tenancy 0 number of times FL has the tenancynl_tenancy 0 number of times NL has the tenancyzero_tenancy 0 zero tenancy
To display the basic set of statistics using port index numbers:
switch:admin> portstatsshow -i 13switch:admin> portstatsshow -i 13-23switch:admin> portstatsshow -i 4-6 22-30
To display the basic set of stattistics using slot numbers:
switch:admin> portstatsshow -s 3-5switch:admin> portstatsshow -s 3-5 10-13
To display GbE port statistics for GbE1 on the Brocade 7800:
switch:admin> portstatsshow ge 8/ge1ge_stat_tx_frms 1523916 GE transmitted framesge_stat_tx_octets 152411630 GE transmitted octetsge_stat_tx_ucast_frms 1523907 GE transmitted unicast framesge_stat_tx_mcast_frms 0 GE transmitted multicast framesge_stat_tx_bcast_frms 9 GE transmitted broadcast framesge_stat_tx_vlan_frms 0 GE transmitted vlan framesge_stat_tx_pause_frms 0 GE transmitted pause framesge_stat_rx_frms 1512154 GE received framesge_stat_rx_octets 149255230 GE received octetsge_stat_rx_ucast_frms 1512154 GE received unicast framesge_stat_rx_mcast_frms 0 GE received multicast framesge_stat_rx_bcast_frms 0 GE received broadcast framesge_stat_rx_vlan_frms 0 GE received vlan framesge_stat_rx_pause_frms 0 GE received pause frames
Fabric OS Command Reference 79353-1001764-02

portStatsShow2
ge_err_carrier 0 GE lost carrier sensege_err_length 0 GE invalid lengthge_err_crc 0 GE CRC Errorsge_err_abort 0 GE abort framesge_err_overrun 0 GE overrunsge_err_fifo_ovf 0 GE Fifo overflow
To display statistics for FCIP tunnel 2, slot 8, and GbE1 on the Brocade FR4-18i.:
switch:admin> portstatsshow fcip 8/ge1 2tunnel_id 2 Tunnel IDfcip_ip2fc_bytes 0 uncompressed bytesfcip_ip2fc_pkts 0 pkt rvd by fcip entity from ipfcip_ip2fc_wantov_drop 0 pkt dropped due to wantovfcip_fc2ip_pkts 0 ve to fcip_entity pktsfcip_fc2ip_bytes 0 ve to fcip_entity bytes
To display port statistics for all IP addresses, slot 8, and GbE1 on the Brocade FR4-18i:
switch:admin> portstatsshow ip 8/ge1ip_err_crc 0 IP CRC Errorsip_err_hdr_cksum 0 IP Checksum Errorsip_err_tcp_data_chksum 0 IP TCP Data Checksum Errors
To display port statistics for IP address 192.168.255.10, slot 8, and GbE1 GbE1 on the Brocade FR4-18i:
switch:admin> portstatsshow ip 8/ge1 192.168.255.10ipaddr 192.168.255.10 IP addressip_out_octets 159896 IP transmitted comp bytesip_out_octets 159896 IP transmitted uncomp bytesip_out_pkts 3476 IP transmitted packetsip_out_ucast_pkts 3476 IP transmitted unicast packetsip_out_bcast_pkts 0 IP transmitted broadcast packetsip_out_mcast_pkts 0 IP transmitted multicast packetsip_in_octets 0 IP received comp bytesip_in_octets 0 IP received uncompbytesip_in_pkts 0 IP received packetsip_in_ucast_pkts 0 IP received unicast packetsip_in_bcast_pkts 0 IP received broadcast packetsip_in_mcast_pkts 0 IP received multicast packets
ip_err_crc 0 IP CRC Errorsip_err_hdr_cksum 0 IP Checksum Errorsip_err_tcp_data_chksum 0 IP TCP Data Checksum Errors
See Also portErrShow, portShow, portSwapDisable, portSwapShow
794 Fabric OS Command Reference53-1001764-02

portSwap 2
portSwap
Swaps the port Address of two ports.
Synopsis portswap [slot1/]port1 [slott2/]port2
Description Use this command to swap the 24-bit port address (PID) for a pair of ports. Both ports must be disabled prior to executing this command and the port-swapping feature must be enabled using portSwapEnable.
The result of this operation is persistent across reboots and power cycles. Use portSwapShow to display the swapped ports along with their new port address
Port swap information is kept in its own database; it cannot be manipulated by editing the configuration database displayed by configShow and configUpload. To undo a previous port swap, execute portSwap again on the same two ports.
Note The execution of this command is subject to Virtual Fabric or Admin Domain restrictions that may be in place. Refer to chapter 1, "Using Fabric OS commands" and Appendix A, "Command Availability" for details.
You cannot swap E_ports that are configured as part of a TI zone. The TI zone information is lost when you swap the E_ports. To work around this issue, reconfigure your TI zones rather than swapping the ports.
Operands This command has the following operands:
slot1 For bladed systems only, specifies the slot number of the first port whose area number is to be swapped, followed by a slash (/).
port1 Specifies the number of the first port whose address is to be swapped, relative to its slot for bladed systems. Use switchShow to display a listing of valid ports.
slot2 For bladed systems only, specifies the slot number of the second port whose area number is to be swapped, followed by a slash (/).
port2 Specifies the number of the second port whose port address is to be swapped, relative to its slot for bladed systems.
Examples To swap area numbers between a pair of ports:
switch:admin> portswap 8/1 8/2portswap done
switch:admin> portswapshowPortSwap is enabledSlot Slotport Swport Address============================================8 1 193 0x01c2008 2 194 0x01c100
See Also portDisable, portEnable, portShow, portSwapDisable, portSwapEnable, portSwapShow,switchShow
Fabric OS Command Reference 79553-1001764-02

portSwapDisable2
portSwapDisable
Disables the PortSwap feature.
Synopsis portswapdisable
Description Use this command to disable the PortSwap feature. The portSwap command cannot be used after this feature is disabled.
The disabled state of the PortSwap feature is persistent across reboots and power cycles.
Enabling or disabling the PortSwap feature does not affect previously performed PortSwap operations.
Note The execution of this command is subject to Virtual Fabric or Admin Domain restrictions that may be in place. Refer to chapter 1, "Using Fabric OS commands" and Appendix A, "Command Availability" for details.
Operands none
Examples To disable the PortSwap feature:
switch:admin> portswapdisable
See Also portSwap, portDisable, portEnable, portShow, portSwapEnable, portSwapShow, switchShow
796 Fabric OS Command Reference53-1001764-02

portSwapEnable 2
portSwapEnable
Enables the PortSwap feature.
Synopsis portswapenable
Description Use this command to enable the PortSwap feature. The portSwap command cannot be used unless the feature is first enabled with this command.
The enabled state of the PortSwap feature is persistent across reboots and power cycles.
Enabling or disabling the PortSwap feature does not affect previously performed PortSwap operations.
Note The execution of this command is subject to Virtual Fabric or Admin Domain restrictions that may be in place. Refer to chapter 1, "Using Fabric OS commands" and Appendix A, "Command Availability" for details.
Operands none
Examples To enable the PortSwap feature:
switch:admin> portswapenable
See Also portSwap, portDisable, portEnable, portShow, portSwapDisable, portSwapShow, switchShow
Fabric OS Command Reference 79753-1001764-02

portSwapShow2
portSwapShow
Displays the state of the PortSwap feature.
Synopsis portswapshow
Description Use this command to display the state of the PortSwap feature and information about swapped ports. If portSwap is enabled and ports have been swapped, the command displays the enabled status as well as the swapped ports and the new port address (the 24-bit PID) for these ports. If portSwap is disabled, the command shows the disabled status and indicates whether or not swapped ports exist on the switch.
Note The execution of this command is subject to Virtual Fabric or Admin Domain restrictions that may be in place. Refer to chapter 1, "Using Fabric OS Commands" and Appendix A, "Command Availability" for details.
Operands none
Examples To display a switch with PortSwap enabled and information for swapped ports:
Console message:
2009/10/09-21:22:45, [PSWP-1001], 482, SLOT 6 | FID 51, INFO,DCX_105_51, PID for port 12/0 and port 12/63 are swapped.New PID for port 12/0 is 0x697000 and port 12/63 is 0x69e3c0.
switch:admin> portswapshowPortSwap is enabledSlot Slotport Swport Address============================================12 0 112 0x69700012 63 895 0x69e3c0
To display the portSwap status on a switch when the feature is disabled and no ports are swapped:
switch:admin> portswapshowPortSwap is disabled.Existing Portswap condition is still effective.Only future Portswap operations are not allowed.
No ports have been swapped
See Also portSwap, portDisable, portEnable, portShow, portSwap, portSwapDisable, portSwapEnable,switchShow
798 Fabric OS Command Reference53-1001764-02

portTest 2
portTest
Performs a functional test of a switch in a live fabric.
Synopsis porttest [-ports itemlist][-iteration count][-userdelay time][-timeout time][-pattern pattern][-patsize size][-seed seed][-listtype porttype]
Description Use this command to isolate problems in a single replaceable element and to trace problems to near-end terminal equipment, far-end terminal equipment, or the transmission line. You can perform this test on a daily basis or as needed to verify the persistence of failures detected earlier.
This command verifies the functional operation of the switch by sending frames from a port’s transmitter, and looping the frames back through an external fiber cable into the port’s receiver. The test exercises all switch components from the main board, to the fibre cable, to the media (of the devices and the switch), and back to the main board.
The cables and media connected should be of the same type: a short-wavelength media (switch) port should be connected to another short-wavelength media (device) port using a short-wavelength cable; a long-wavelength port should be connected to a long-wavelength port, and a copper port should be connected to a copper port.
Only one frame is transmitted and received at any given time. The port LEDs flicker green while the test is running.
This command supports E_Ports, F_Ports (must support ELS Echo), L_Port, and N->N loopback ports. In addition, on switches running Fabric OS v6.4.0 and later, you can now use portTest on port configurations that previously caused nonspecific test results or were skipped by portTest. The following ports are now support the portTest diagnostics.
• Ports with index numbers greater than 255.
• Ports with swapped areas.
• Ports in shared area regions.
• Ports in logical switches.
• Ports in Base Switches.
• Long Distance ports.
This command is currently not supported on the following ports or switch configurations:
• Interchassis links (ICL) ports
• F_Ports connected to an Access Gateway
• EX_Ports
• E_Ports connected to EX_Ports
• The portTest diagnostics is not supported in Access Gateway mode.
This command performs the following operations:
1. Initiates tests on certain ports (portTest command).
2. Stops active tests on certain ports (stopPortTest command).
3. Takes a snapshot of the test result (portTestShow command).
Use the stopPortTest command to stop the test. Refer to the stopPortTest help page for more information.
Fabric OS Command Reference 79953-1001764-02

portTest2
Use the portTestShow command to view the current status of portTest. Refer to the portTestShow help page for more information.
If there is a port type change during portTest execution, the test continues on a given port as long as it can be supported and it is asked to do so. If a request was made to test all ports on a given switch, portTest starts a new test appropriate for the new port type.
Notes The execution of this command is subject to Virtual Fabric or Admin Domain restrictions that may be in place. Refer to chapter 1, "Using Fabric OS commands" and Appendix A, "Command Availability" for details.
Operands This command has the following operands:
-ports itemlist Specifies the list of user ports to test. By default, all user ports in the switch are tested. Refer to the itemList help page for more information.
-iteration count Specifies the number of times (or number of frames per port) to execute this test. Specify 0 to run the test in timeout mode, or specify -1 to run the test indefinitely. The default value is 20.
-userdelay time Specifies the delay between frames sent by portTest, in milliseconds. The default value is 10 milliseconds.
-timeout time Specifies the number of seconds to run the test. Setting the iteration to 0 puts the portTest process into timeout mode. The default value is 0.
-pattern pattern Specifies the pattern of the test packet payload. The pattern is selected from a set of twenty predefined pattern types. Use the dataTypeShow command to view the patterns supported with portTest. For each pattern, the dataTypeShow command displays the name, the pattern type number, and an example. Specify the pattern by its type number. If pattern is not specified, it defaults to RANDOM (type=11)
-patsize size Specifies the size of the pattern. The default pattern size is 1024 bytes. The range is 4 to 2112 bytes.
-seed seed Specifies the seed value to be used with the pattern. The default seed value is 0xaa.
-listtype porttype Specifies the type of ports on which to run portTest. Valid values for porttype include:
-1 All ports (default).
-2 All L_Ports.
-3 All F_Ports.
-4 All E_Ports.
-5 All N->N loopback ports.
Examples To run a functional test on an active switch:
switch:admin> porttest -ports 1/1-1/3
See Also portLoopbackTest, portTestShow, spinFab, stopPortTest
800 Fabric OS Command Reference53-1001764-02

portTestShow 2
portTestShow
Displays information from portTest.
Synopsis porttestshow [-ports itemlist]
Description Use this command to display a snapshot of information from portTest. The command output displays statistical data about past test runs and values for parameters that were set when the test was run. Refer to the portTest help page for more information on the displayed parameters. The output includes the following information:
Port number Displays test status for the port. Values are PASS or FAIL.
PortType Type of port tested.
PortState Current State of portTest. Values are NO TEST, TESTING, or TEST DONE.
PortTypeToTest Groups of ports tested: Values are ALL_PORTS, ALL_E_PORTS, ALL_L_PORTS, ALL_F_PORTS, ALL_LB_PORTS, or SINGLE_PORT.
Pattern The pattern of the test packets payload.
Seed The seed value used with the selected pattern. The default seed value is 0xaa.
UserDelay The delay between frames sent by portTest in milliseconds. The default value is 10 milliseconds.
TotalIteration Total number of test iterations.
CurrentIteration Current test iteration.
TotalFail Total number of failed tests.
ConsecutiveFail Number of consecutive failed tests.
StartTime portTest start time.
StopTime portTest end time.
Timeout Number of timed out tests.
ErrorCode Error code, if any.
Note The execution of this command is subject to Virtual Fabric or Admin Domain restrictions that may be in place. Refer to chapter 1, "Using Fabric OS commands" and Appendix A, "Command Availability" for details.
Operands This command has the following operand:
-ports itemlist Displays test results for the specified ports. This operand is optional; if omitted, data for all ports are displayed. Refer to the itemList help page for further details.
Fabric OS Command Reference 80153-1001764-02

portTestShow2
Examples To display information from portTest:
switch:admin> porttestshow 1 Port 1 : PASS PortType: OTHER PortState: NO TEST PortInternalState: INIT PortTypeToTest: NO_TEST Pattern: 0x0 Seed: 0x0 UserDelay: 0 TotalIteration: 0 CurrentIteration: 0 TotalFail: 0 ConsecutiveFail: 0 StartTime: NONE StopTime: NONE Timeout: 0 ErrorCode: 0
See Also portLoopbackTest, portTest, spinFab, stopPortTest
802 Fabric OS Command Reference53-1001764-02

portThConfig 2
portThConfig
Configures Fabric Watch event thresholds per port type.
Synopsis porthconfig --set port_type -area area [-timebase time_base] [-highthreshold -value value -trigger above | below -action actions] [-lowthreshold -value value -trigger above | below -action actions] [-buffer value][-nosave]
portthconfig --apply port_type -area area [-thresh_level def | cust] [-alarm_level def| cust]
portthconfig --cancel port_type -area area [-thresh_level def | cust] [-alarm_level def| cust]
portthconfig --show [port_type] [-area area] [ [-current_status] | [[-thresh_level cust | def] | [-action_level cust | def]]
portthconfig --help
Description Use this command to configure thresholds for Fabric Watch event monitoring for all ports of a specified type and to display the configuration and current port status in real time. In addition to the areas traditionally monitored by Fabric Watch, this command supports monitoring Class 3 discard frames on all ports of a specified type. If frame discard errors or any other configured areas exceed the currently effective threshold settings, the Fabric Watch daemon can take one or more of the following actions:
• Send an SNMP message.
• Log a RASlog message.
• Send an E-mail alert.
• Log a port log message.
• Fence the port if port fencing is enabled (not applicable to E_Ports). Refer to portFencing help for more information.
Class 3 frames may be discarded on a port because of timeout, destination unreachable, or other reasons. This command only monitors Class 3 frames that are discarded because of timeout, and is applicable only to Brocade 8 G platforms.
The portThConfig follows a transaction model. When you configure thresholds and actions with the --set option, the changes are saved persistently to nonvolatile storage, but the changes do not become effective until you execute portThconfig --apply. The --apply option allows you to toggle between default settings and your own saved custom configuration and to apply actions and thresholds separately. You may choose to use default thresholds together with a customized subset of available actions, or you may modify some of the thresholds and use the default actions. Use the -nosave option to save the configuration nonpersistently, and use --cancel to remove a nonpersistent configuration.
This command configures thresholds per port type and the configuration is applied to all ports of the specified type. Configurable ports include E_Ports, optical F_Ports, copper F_Ports, physical ports, and Virtual E_Ports (VE_Ports).
Note The execution of this command is subject to Virtual Fabric or Admin Domain restrictions that may be in place. Refer to chapter 1, "Using Fabric OS Commands" and Appendix A, "Command Availability" for details.
Fabric OS Command Reference 80353-1001764-02

portThConfig2
For more information on port threshold configuration procedures, including default values for specific area high/low thresholds, refer to the Fabric Watch Administrator’s Guide.
Execution of this command requires a Fabric Watch License.
Operands This command has the following operands:
port_type Specifies the port type for which to configure or display Fabric Watch settings. This operand is optional with the --show option. With all configuration options it is required. Valid port types include one of the following:
e-port Configures or displays all E_Ports (not supported in Access Gateway mode).
fop-port Configures or displays all optical F_Ports.
fcu-port Configures or displays all copper F_Ports. This operand is supported only on embedded platforms and only on copper ports.
port Configures or displays all physical ports.
ve-port Configures or displays all VE_Ports. Only a subset of areas can be configured for this port type (not supported in Access Gateway mode).
-area area Specifies the area monitored by the Fabric Watch daemon. This operand is optional with the --show option. With all configuration options it is required
The following areas are valid when configuring or displaying configuration settings on E_Ports, optical F_Ports, copper F_Ports, and physical ports. Area values are not case-sensitive.
CRC Cyclic redundancy check error
ITW Invalid transmission word
C3TX_TO Class 3 transmit frames discarded due to timeout.
LOS Loss of synchronization
LF Link failure
RX Receive error
TX Transmit error
PE Protocol error
LR Link reset
ST State change
TU Trunk Utilization
Only the following areas are valid for VE_Ports.
UTIL Port utilization
PKTLOSS Packet loss
ST State change
804 Fabric OS Command Reference53-1001764-02

portThConfig 2
--set Configures the Fabric Watch thresholds for monitoring a specified area for all ports of a specified port type. When configuring a threshold, you must specify a port type and area. The following operands are optional and valid only with the --set option. Defaults are used unless you configure custom settings. Defaults parameters vary depending on the area and platform. Refer to the Fabric Watch Administrator’s Guide for specific details.
-timebase time_base Specifies the time interval between two samples to be compared. Valid intervals are:
day Samples are compared once a day.
hour Samples are compared once every hour.
minute Samples are compared once every minute.
second Samples are compared once every second.
-highthreshold -value value Specifies the high threshold value for triggering a specified alert action. To change the default value, provide an integer value.
-lowthreshold -value value Specifies the low threshold for triggering a specified alert action. To change the default value, provide an integer value.
-trigger above | below Specifies the actions for in range port behavior. In range is defined as the space above the low threshold and below the high threshold.
-action actions Specifies the actions triggered by a configured event condition. Valid values include one or more of the following actions. If more than one action is specified, the actions must be separated by commas.
raslog Event triggers a RASlog message.
snmp Event triggers an SNMP trap.
email Event triggers an e-mail.
poortlog Event triggers a port log entry
none Event triggers no action.
-buffer value Specifies the buffer value for in range behavior. A buffer defines a zone within which event criteria are met, rather than a single threshold value. This operand is valid only with the -trigger options.
-nosave Prevents the configuration changes from being saved persistently. This option allows you to make and view changes without overwriting the saved configuration. When you use --set with the -nosave option and the switch reboots your changes will be lost.
--apply Applies the custom or default configuration for thresholds, actions, or both. This command allows you to toggle between custom and default settings. The specified configuration takes effect upon execution of this command. When you select custom, the saved configuration becomes effective. You must specify a port type and area when applying a configuration.
Fabric OS Command Reference 80553-1001764-02

portThConfig2
--cancel Cancels a nonpersistent custom configuration. This command effectively undoes the -nosave operation without reboot. You must specify a port type and area type with this command. Thresholds and alarm levels are optional with this command; if omitted, all nonpersistent configurations for the specified port type and area type are canceled.
--show Displays the threshold configuration or run-time status for all configured port types and areas. You can optionally specify a port type to display the threshold for ports of that type only. The display includes the port persistence time value in seconds, which is set by the fwSet command. Specify an area to display the area-specific configuration only. When issued without operands, this command displays Fabric Watch thresholds for all classes and areas.
-current_status Displays current values for a specified port type and area, as registered by Fabric Watch, or for all port types and areas. The output includes PortType, Area, Port number, Circuit ID (for the Brocade 7800 and FS8-24 only), Value, and State. The State field reports whether the current value is above, in range, or below (info) the configured threshold.
The following operands are optional with the --apply, --cancel, and --show options; if omitted, the default thresholds are used.
-thresh_level def | cust Configures or displays default or custom threshold configuration settings.
-action_level def | cust Configures or displays default or custom configuration settings.
--help Displays the command usage.
Examples To set custom thresholds for the port class and CRC area with E-mail alerts:
switch:admin> portthconfig --set port -area crc -highthreshold -value 2 -trigger above -action email
switch:admin> portthconfig --set port -area crc -highthreshold -value 2 -trigger below -action email
switch:admin> portthconfig --set port -area crc -lowthreshold -value 1 -trigger above -action email
switch:admin> portthconfig --set port -area crc -lowthreshold -value 1 -trigger below -action email
To apply the new custom settings so they become effective:
switch:admin> portthconfig --apply port -area crc -action cust -thresh_level cust
To set custom thresholds for the VE_Port class and UTIL area with SNMP alerts and save the thresholds nonpersistently:
switch:admin> portthconfig --set ve-port -area util -highthreshold -value 2 -trigger above \ -action snmp -nosave
switch:admin> portthconfig --set ve-port -area util -highthreshold -value 2 -trigger below \ -action snmp -nosave
switch:admin> portthconfig --set ve-port -area util -lowthreshold -value 1 -trigger above \ -action snmp -nosave
switch:admin> portthconfig --set ve-port -area util -lowthreshold -value 1 -trigger below \ -action snmp -nosave
806 Fabric OS Command Reference53-1001764-02

portThConfig 2
To cancel the custom settings that have previously been saved nonpersistently:
switch:admin> portthconfig --cancel ve-port -area util -action_level cust -thresh_level cust
To display the port threshold configuration for all port types and areas:
switch:admin> portthconfig --showPortType: E-port Area : CRC ThLevel : Def ActLevel: Def High : Custom: TimeBase: Minute Value : 1000 Trigger : Above Action: None Trigger : Below Action: None Default: TimeBase: Minute Value : 1000 Trigger : Above Action: None Trigger : Below Action: None Low: Custom: TimeBase: Minute Value : 0 Trigger : Above Action: None Trigger : Below Action: None Default: TimeBase: Minute Value : 0 Trigger : Above Action: None Trigger : Below Action: None Buffer: Custom: Value : 100 Default: Value : 100
Port persistence time = 18s
Area : ITW ThLevel : Def ActLevel: Def High : Custom: TimeBase: Minute Value : 1000 Trigger : Above Action: None Trigger : Below Action: None Default: TimeBase: Minute Value : 1000 Trigger : Above Action: None Trigger : Below Action: None Low: Custom: TimeBase: Minute
Fabric OS Command Reference 80753-1001764-02

portThConfig2
Value : 0 Trigger : Above Action: None Trigger : Below Action: None Default: TimeBase: Minute Value : 0 Trigger : Above Action: None Trigger : Below Action: None Buffer: Custom: Value : 100 Default: Value : 100
Port persistence time = 18s
Area : LR ThLevel : Def ActLevel: Def High : Custom: TimeBase: Minute Value : 500 Trigger : Above Action: None Trigger : Below Action: None Default: TimeBase: Minute Value : 500 Trigger : Above Action: None Trigger : Below Action: None Low: Custom: TimeBase: Minute Value : 0 Trigger : Above Action: None Trigger : Below Action: None Default: TimeBase: Minute Value : 0 Trigger : Above Action: None Trigger : Below Action: None(output truncated)
To display threshold configuration and current status for E_Port CRC errors:
Switch:admin> portthconfig --show e-port -area crcPortType: E-port Area : CRC ThLevel : Def ActLevel: Def High : Custom: TimeBase: Minute Value : 1000 Trigger : Above Action: None Trigger : Below Action: None Default: TimeBase: Minute Value : 1000 Trigger : Above Action: None
808 Fabric OS Command Reference53-1001764-02

portThConfig 2
Trigger : Below Action: None Low: Custom: TimeBase: Minute Value : 0 Trigger : Above Action: None Trigger : Below Action: None Default: TimeBase: Minute Value : 0 Trigger : Above Action: None Trigger : Below Action: None Buffer: Custom: Value : 100 Default: Value : 100
Port persistence time = 18s
To display current values for all port types and areas:
Switch:admin> portthConfig --show -current PortType|Area |PortNo|C# |Value |State --------|-------|------|----|---------|-------E-port |CRC |000005|n/a |0 |Info E-port |CRC |000007|n/a |0 |Info E-port |CRC |000032|n/a |0 |Info E-port |CRC |000038|n/a |0 |Info E-port |ITW |000005|n/a |0 |Info E-port |ITW |000007|n/a |0 |Info E-port |ITW |000032|n/a |0 |Info E-port |ITW |000038|n/a |0 |Info E-port |LR |000005|n/a |0 |Info E-port |LR |000007|n/a |0 |Info E-port |LR |000032|n/a |0 |Info E-port |LR |000038|n/a |0 |Info E-port |C3TX_TO|000005|n/a |0 |InRangeE-port |C3TX_TO|000007|n/a |0 |InRangeE-port |C3TX_TO|000032|n/a |0 |InRangeE-port |C3TX_TO|000038|n/a |0 |InRangeE-port |PE |000005|n/a |0 |InRangeE-port |PE |000007|n/a |0 |InRangeE-port |PE |000032|n/a |0 |InRangeE-port |PE |000038|n/a |0 |InRangeE-port |LF |000005|n/a |0 |Info E-port |LF |000007|n/a |0 |Info E-port |LF |000032|n/a |0 |Info E-port |LF |000038|n/a |0 |Info E-port |RX |000005|n/a |0 |Info E-port |RX |000007|n/a |0 |Info E-port |RX |000032|n/a |0 |Info E-port |RX |000038|n/a |0 |Info E-port |TX |000005|n/a |0 |Info E-port |TX |000007|n/a |0 |Info E-port |TX |000032|n/a |0 |Info E-port |TX |000038|n/a |0 |Info E-port |LOS |000005|n/a |0 |Info E-port |LOS |000007|n/a |0 |Info E-port |LOS |000032|n/a |0 |Info E-port |LOS |000038|n/a |0 |Info
Fabric OS Command Reference 80953-1001764-02

portThConfig2
E-port |ST |000005|n/a |0 |InRangeE-port |ST |000007|n/a |0 |InRangeE-port |ST |000032|n/a |0 |InRangeE-port |ST |000038|n/a |0 |InRangeFOP-port|CRC |000019|n/a |0
To display current values for CRC errors for all port types and areas:
Switch:admin> portthConfig --show -area CRC -currentPortType|Area |PortNo|C# |Value |State --------|-------|------|----|---------|-------E-port |CRC |000005|n/a |0 |Info E-port |CRC |000007|n/a |0 |Info E-port |CRC |000032|n/a |0 |Info E-port |CRC |000038|n/a |0 |Info FOP-port|CRC |000019|n/a |0 |Info Port |CRC |000000|n/a |0 |Info Port |CRC |000001|n/a |0 |Info Port |CRC |000002|n/a |0 |Info Port |CRC |000003|n/a |0 |Info Port |CRC |000004|n/a |0 |Info Port |CRC |000005|n/a |0 |Info Port |CRC |000006|n/a |0 |Info Port |CRC |000007|n/a |0 |Info Port |CRC |000008|n/a |0 |Info Port |CRC |000009|n/a |0 |Info Port |CRC |000010|n/a |0 |Info Port |CRC |000011|n/a |0 |Info Port |CRC |000012|n/a |0 |Info Port |CRC |000013|n/a |0 |Info Port |CRC |000014|n/a |0 |Info Port |CRC |000015|n/a |0 |Info Port |CRC |000016|n/a |0 |Info Port |CRC |000017|n/a |0 |Info Port |CRC |000018|n/a |0 |Info Port |CRC |000019|n/a |0 |Info Port |CRC |000020|n/a |0 |Info Port |CRC |000021|n/a |0 |Info Port |CRC |000022|n/a |0 |Info
To display current values for CRC errors on all optical F_Ports:
switch:admin> portthconfig --show fop-port -area CRC -currentPortType|Area |PortNo|C# |Value |State --------|-------|------|----|---------|-------FOP-port|CRC |000019|n/a |0 |Info
See Also fwHelp, portFencing, sysMonitor, thConfig
810 Fabric OS Command Reference53-1001764-02

portTrunkArea 2
portTrunkArea
Assigns or removes a trunk area (TA) from a port or port trunk group; displays masterless F_Port trunking configuration.
Synopsis porttrunkarea --enable [slot/]port1[-port2] -index port_index
porttrunkarea --disable [slot/]port1[-port2]
porttrunkarea --disable all
porttrunkarea --show disabled | enabled | trunk | all
porttrunkarea --show slot/port1[-port2]
Description Use this command to assign a static trunk area (TA) on a port or port trunk group, to remove a TA from a port or group of ports in a trunk, and to display masterless F_Port trunking information. In Fabric OS v6.3.0 and later, the TA is identified by the port index number displayed in the output of the switchShow command.
Masterless F_Port trunking interoperates between the Access Gateway (AG) and Condor-based platforms. It is designed to (1) prevent reassignments of virtual addresses when F_Ports come back online after going offline and (2) to increase N_Port bandwidth.
Assigning a TA to a port or trunk group enables F_Port masterless trunking on that port or trunk group. When a TA is assigned to a port or trunk group, the ports immediately acquires the TA as the area of their process IDs (PID). Likewise, when a TA is removed from a port or trunk group, the ports reverts to the default area as their PID.
Use the --show option to obtain configuration details including the following information.
Slot On enterprise-class platforms, displays the slotnumber.
Port Displays the port number.
Type Displays online masterless trunked F_Port or EX_Port if applicable. Otherwise displays --.
State Displays Trunk Master, Slave, or --.
Master Displays the master port of the trunk group.
TA On standalone switches, displays the user assigned TA number.
DA On standalone switches, displays the default port area. The default area can be a port swapped area.
TI On enterprise-class platforms, displays the user-assigned TA port index.
DI On enterprise-class platforms, displays the default port index. The default port index can be a port swapped area.
The --show trunk option displays the following information:
Trunk Index Displays the trunk index.
ptA->ptB ptA indicates the local user port; ptB indicates the remote user port.
sp Port speed in Gbps.
Fabric OS Command Reference 81153-1001764-02

portTrunkArea2
Bandwidth The bandwidth (Rx, Tx, and the combined total for Tx+Rx) of the trunk group. Values are displayed as either bits per second (Bps), kilobits per second (Kbps), megabits per second (Mbps), or gigabits per second (Gbps), rounded down to the next integer.
Throughput Displays the throughput (Rx, Tx, and the combined total for Tx+Rx) of the trunk group. Results are displayed for the previous second. Values are displayed as either bits per second (Bps), kilobits per second (kbps), megabits per second (Mbps), or gigabits per second (Gbps), rounded down to the next integer.
% Displays the percentage of link utilization (Rx, Tx, and the combined total for Tx+Rx) . Even when the link utilization is 100% , the throughput value will be lesser than the bandwidth value, due to the 8b/10b encoding and the control words transmitted. For example, the throughput for an 8Gbps link at 100% utilization would be approximately 6.8Gbps.
deskew The time difference for traffic to travel over each F_Port trunk as compared to the F_Port trunk with the shortest travel time in the group. The value is expressed in nanoseconds divided by 10. The firmware automatically sets the minimum deskew value of the shortest F_Port trunk travel time to 15.
Master Identifies the master port of the trunk group.
Execution of this command is subject to the following restrictions:
1. Only F_Port trunk ports are allowed to be part of a TA. E/F/L/EX_Port will be persistently disabled. Private L_Ports remain online but will not run traffic.
2. Only one trunk master per TA is permitted. The second trunk master is persistently disabled.
3. The entire TA trunk group shares the same port WWN.
4. The port must be disabled before a TA can be assigned to a port or removed from a trunk group.
5. There is one port whose Default Area is the same as its Trunk Area. You cannot remove that port from the trunk group unless The TA is removed from all ports in the trunk group.
6. You must enable trunking on all ports to be included in a TA before you can create a TA. Use portCfgTrunkPort or switchCfgTrunk to enable Trunking on a port or on all ports of a switch.
7. N_Port ID Virtualization (NPIV) support is provided for up to 255 devices per TA. Note that this decreases the number of devices available per port, since all participating ports share the same area.
8. F_Port trunking is only supported in CORE PID formats.
9. Certain port configuration features are not supported within a TA and the command fails if one of these features is enabled on a port within the trunk group. These features include FastWrite, Port Swapping, Port Mirroring, Long Distance, Inter-chassis links (ICL), and FICON.
10. Ports from different Admin Domains are not allowed to join the same Trunk Area group.
11. On the Brocade FC4-48C, F_Port masterless trunk ports are not supported on ports 16 - 47.
12. Ports included in a TA share the same port index. The original port index may be removed in the process. This means that D, I zones referring to these indices are no longer part of the switch. For details and workarounds, refer to the Fabric OS Administrator's Guide.
812 Fabric OS Command Reference53-1001764-02

portTrunkArea 2
13. Device Connection Control (DCC) Policy must be removed from ports prior to creating a TA. You can re-enable DCC policy after creating the TA.
14. You cannot assign a TA while AG mode is enabled.
Notes The execution of this command is subject to Virtual Fabric or Admin Domain restrictions that may be in place. Refer to chapter 1, "Using Fabric OS commands" and Appendix A, "Command Availability" for details.
Masterless F_Port trunking requires an ISL Trunking license.
Operands This command supports the following operands:
slot On enterprise-class platforms, specifies the slot number, followed by a slash (/).
port1[-port2] Specifies a single port or a port range, relative to its slot on bladed systems. For example, 9/8-15 on an enterprise-class platform indicates slot 9, ports 8 - 15. Port ranges on Condor, Condor2 and Golden-Eye2 platforms should fall in the octet (8 port) trunk range starting from port 0 on a switch or blade. On Golden-Eye platforms, the port range should fall in the quad (4 port) trunk range. Trunking must be enabled on all ports.
--enable Creates a TA assigned to the specified ports. Use this option with one of the following operands:
-area area_number
On single processor switches, specifies the port area number for the static TA to be created. The TA must fall within the 8 port trunk group starting from port 0 on a switch or blade. The TA must be a default area of an existing port in a given port group. However, you may add ports to the trunk group even when a trunk group has already been assigned by using the same area of the octet trunk group. Use switchShow for a list of valid port area or index numbers.
-index port_index
On enterprise-class platforms, specifies the port index for the static TA to be created. The port index must fall within the 8 port trunk group starting from port 0 on a switch or blade. The TA must be a default index of an existing port in a given port group. However, you may add ports to the trunk group even when a trunk group has already been assigned by using the same index of the octet trunk group. Use switchShow for a list of valid port indexes.
--disable Removes specified ports from a TA. If a port with the same default area as the TA assigned for the trunk group is removed, all ports in the trunk group must be explicitly specified for removal.
all Optionally removes all TA assigned ports on the switch. This option disables masterless F_Port trunking on all ports. All TA assigned ports must be disabled for this option to succeed.
--show Displays masterless F_Port trunking information. When using this option, specify one of the following operands:
[slot]/port1[-port2]
Displays configuration for a specified port or port range.
Fabric OS Command Reference 81353-1001764-02

portTrunkArea2
trunk Displays configuration details for the port trunk group, including user port, neighboring user port, and master port properties.
enabled Displays configuration details for all ports included in a user assigned TA (all ports on which masterless F_Port trunking is enabled).
disabled Displays configuration details for all ports not included in a user assigned TA (all portson which masterless F_Port trunking is notenabled).
all Displays configuration details for all ports on a switch.
Examples To enable masterless F_Port trunking on a standalone switch:
1. Disable ports 10-11 by executing portdisable port for each port to be included in the TA.
2. Enable Trunk Area for ports 10-11 with area number 37:
switch:admin> porttrunkarea --enable 10-11 -index 112009/05/15-12:43:10, [SWCH-1012], 60, FID 128, INFO, sw0, Trunk Area (11) has been enabled for one or more portsTrunk area 11 enabled for ports 10 and 11.
3. Re-enable ports 10-11 by executing portenable port for each port in the TA.
4. Show switch/port information:
switch:admin> switchshow[...]Index Port Address Media Speed State Proto==============================================[...]11 10 030b00 id N4 No_Light FC 11 11 030b00 id N4 No_Light FC [...]
5. Display TA-enabled port configuration:
switch:admin> porttrunkarea --show enabled
Port Type State Master TA DA------------------------------------- 10 -- -- -- 11 10 11 -- -- -- 11 11
To disable masterless F_Port trunking on ports 10-11:
switch:admin> porttrunkarea --disable 10-11ERROR: port 11 has to be disabled
Disable each port prior to removing ports from the TA. Then reissue the command:
switch:admin> porttrunkarea --disable 10-11Trunk area 11 disabled for ports 10 and 11.
814 Fabric OS Command Reference53-1001764-02

portTrunkArea 2
To display trunk details for a user assigned TA 25 that includes ports 24-25:
switch:admin> porttrunkarea --show trunkTrunk Index 25: 25->0 sp: 8.000G bw: 16.000G deskew 15 MASTER Tx: Bandwidth 16.00Gbps, Throughput 1.63Gbps (11.84%) Rx: Bandwidth 16.00Gbps, Throughput 1.62Gbps (11.76%) Tx+Rx: Bandwidth 32.00Gbps, Throughput 3.24Gbps (11.80%) 24->1 sp: 8.000G bw: 8.000G deskew 15 Tx: Bandwidth 16.00Gbps, Throughput 1.63Gbps (11.84%) Rx: Bandwidth 16.00Gbps, Throughput 1.62Gbps (11.76%) Tx+Rx: Bandwidth 32.00Gbps, Throughput 3.24Gbps (11.80%)
To configure a TA on an enterprise-class platform including ports 13 and 14 on slot 10 with port index of 125:
1. Disable the ports to be included in the TA.
2. Enable TA for ports 13 and 14 on slot 10 with port index of 125:
switch:admin> porttrunkarea --enable 10/13-14 -index 125Trunk index 125 enabled for ports 10/13 and 10/14.
3. Show the TA port configuration (ports still disabled):
switch:admin> porttrunkarea --show enabledSlot Port Type State Master TI DI-------------------------------------------10 13 -- -- -- 125 12510 14 -- -- -- 125 126-------------------------------------------
4. Enable ports 13 and 14:
switch:admin> portenable 10/13switch:admin> portenable 10/14
5. Show the TA port configuration after enabling the ports:
switch:admin> porttrunkarea --show enabledSlot Port Type State Master TI DI-------------------------------------------10 13 F-port Master 10/13 125 12510 14 F-port Slave 10/13 125 126
See Also portCfgTrunkPort, portCfgShow, portShow, switchCfgTrunk, switchShow
Fabric OS Command Reference 81553-1001764-02

portZoneShow2
portZoneShow
Displays the enforced zone type of the F_Ports and FL_Ports of a switch.
Synopsis portzoneshow
Description Use this command to display the enforced zone type of the F_Ports and FL_Ports of a switch.
Output shows virtual port number (decimal), physical port number (decimal), online status, and if online, port type. If the current zone configuration has been disabled by cfgDisable, the fabric is in non-zoning mode, in which all devices see each other. When default zoning is enabled with "No Access" mode, "No Effective configuration: (No Access)" is displayed.
Note The execution of this command is subject to Virtual Fabric or Admin Domain restrictions that may be in place. Refer to chapter 1, "Using Fabric OS Commands" and Appendix A, "Command Availability" for details.
Operands none
Examples To display the zone membership information of ports:
switch:user> portzoneshow[OUTPUT TRUNCATED]PORT: 160 (160) OfflinePORT: 161 (161) OfflinePORT: 162 (162) OfflinePORT: 163 (163) OfflinePORT: 164 (164) OfflinePORT: 165 (165) OfflinePORT: 166 (166) OfflinePORT: 167 (167) OfflinePORT: 168 (168) FL-Port Enforcement: HARD WWN defaultHard: 0 IFID: 0x4332000aPORT: 169 (169) OfflinePORT: 170 (170) OfflinePORT: 171 (171) OfflinePORT: 172 (172) OfflinePORT: 173 (173) OfflinePORT: 174 (174) OfflinePORT: 175 (175) OfflinePORT: 176 (176) F-Port Enforcement: HARD WWN defaultHard: 0 IFID: 0x4342002aPORT: 177 (177) OfflinePORT: 178 (178) OfflinePORT: 179 (179) OfflinePORT: 180 (180) Offline[OUTPUT TRUNCATED]
See Also cfgShow, switchShow
816 Fabric OS Command Reference53-1001764-02

powerOffListSet 2
powerOffListSet
Sets the order in which slots are powered off.
Synopsis powerofflistset
Description Use this command to Modify the order in which slots are powered off. This command displays the current order, and then prompts you interactively to confirm or modify the power-off position for each slot.
Whenever a power supply goes out of service or a field-replaceable unit (FRU) RU is inserted, the system's available power is compared to the system's required power to determine if there is enough power to operate. If less than the required power is available, the power-off list is processed, until there is sufficient power for the system to operate.
If the system's power supply drops abruptly to insufficient levels, the power-off list cannot be processed. The sudden lack of power causes the CP board processors to cease executing the firmware.
For example, if only one power supply is available to power a fully loaded system and the power supply is removed from the chassis, all system operations terminate immediately, and the power-off list cannot be processed. However, if the system is running on two power supplies (this is not recommended) and one goes into a predicted fail state (in which the power supply is still supplying power), the power-off list is processed as described.
The power-off list does not affect the order, in which slots are powered on. On power-on or when an additional power supply is added, slots are processed sequentially, starting at slot 1.
Notes CP blade slots are not included in the power-off list.
Command output may vary depending on the hardware platform.
.Some FRUs may use significant power, but cannot be powered off by the software. For example a missing blower FRU may change the power computation enough to affect how many slot blades can be powered up.
The execution of this command is subject to Virtual Fabric or Admin Domain restrictions that may be in place. Refer to chapter 1, "Using Fabric OS commands" and Appendix A, "Command Availability" for details.
Operands none
Examples To modify the power-off list order:
switch:admin> powerofflistset
Slot Current POL------------------- 10 1st 9 2nd 8 3rd 7 4th 4 5th 3 6th 2 7th 1 8th
1st slot to be powered off: (1..10) [10] 1
Fabric OS Command Reference 81753-1001764-02

powerOffListSet2
2nd slot to be powered off: (2..10) [9] 23rd slot to be powered off: (3..10) [8] 34th slot to be powered off: (4..10) [7] 45th slot to be powered off: (7..10) [7] 106th slot to be powered off: (7..9) [8] 97th slot to be powered off: (7..8) [8] 88th slot to be powered off: (7..7) [7] 7
Old POL New POL Power Off Order------------------------------------- 10 1 1st 9 2 2nd 8 3 3rd 7 4 4th 4 10 5th 3 9 6th 2 8 7th 1 7 8th
Proceed to change the POL order? (yes, y, no, n): [no] y
See Also chassisShow, powerOffListShow, psShow, slotPowerOff, slotPowerOn, slotShow
818 Fabric OS Command Reference53-1001764-02

powerOffListShow 2
powerOffListShow
Displays the order in which slots are powered off.
Synopsis powerofflistshow
Description Use this command to display the order in which the physical slots are powered off.
Whenever a power supply goes out of service or a field-replaceable unit (FRU) is inserted, the system's available power is compared to the system's required power to determine if there is enough power to operate. If less than the required power is available, the power-off list is processed, until there is sufficient power for the system to operate.
If the system's power supply drops abruptly to insufficient levels, the power-off list cannot be processed. The sudden lack of power causes the CP board processors to cease executing the firmware.
For example, if only one power supply is available to power a fully loaded system and the power supply is removed from the chassis, all system operations terminate immediately, and the power-off list cannot be processed. However, if the system is running on two power supplies (this is not recommended) and one goes into a predicted fail state (in which the power supply is still supplying power), the power-off list is processed as described.
Notes Command output may vary depending on the hardware platform.
Control processor (CP) blades are not included in the power-off list.
The execution of this command is subject to Virtual Fabric or Admin Domain restrictions that may be in place. Refer to chapter 1, "Using Fabric OS commands" and Appendix A, "Command Availability" for details.
Operands none
Examples To display the slot power off list order:
switch:admin> powerofflistshow
Slot 10 will be powered off 1stSlot 9 will be powered off 2ndSlot 8 will be powered off 3rdSlot 7 will be powered off 4thSlot 6 will be powered off 5thSlot 5 will be powered off 6thSlot 4 will be powered off 7thSlot 3 will be powered off 8thSlot 2 will be powered off 9thSlot 1 will be powered off 10th
See Also chassisShow, powerOffListSet, psShow, slotPowerOff, slotPowerOn, slotShow
Fabric OS Command Reference 81953-1001764-02

psShow2
psShow
Displays power supply status.
Synopsis psshow
Description Use this command to display the current status of the switch power supplies.
The status of each supply is displayed as:
OK Power supply functioning correctly.
absent Power supply not present.
unknown Unknown power supply unit installed.
predicting failure Power supply is present but predicting failure.
faulty Power supply present but faulty (no power cable, power switch turned off, fuse blown, or other internal error).
For certain switch models, the OEM serial ID data displays after each power supply status line.
Note The execution of this command is subject to Virtual Fabric or Admin Domain restrictions that may be in place. Refer to chapter 1, "Using Fabric OS Commands" and Appendix A, "Command Availability" for details.
Operands none
Examples To view the status of the power supplies:
switch:admin> psshow
Power Supply #1 is OK DELTA DPS-1001AB-1E 23000000601 S1 IXD0111000088Power Supply #2 is faulty DELTA DPS-1001AB-1E 23000000601 S1 IXD0111000162Power Supply #3 is OK DELTA DPS-1001AB-1E 23000000601 S1 IXD0111000120Power Supply #4 is absent
See Also chassisShow, fanShow
820 Fabric OS Command Reference53-1001764-02

reBoot 2
reBoot
Reboots the control processor (CP).
Synopsis reboot [-f]
Description Use this command to perform a “cold reboot” (power off/restart) of the control processor. This operation may be disruptive, and the command prompts for confirmation before executing. When you reboot a switch connected to a fabric, all traffic to and from that switch stops. All Fibre Channel ports on that switch including E_Ports become inactive until the switch comes back online.
The behavior of this command depends on the platform:
• When issued on a standalone (single-processor) switch, this command performs a cold reboot of the switch.
• When issued on an enterprise-class platform (Brocade DCX, DCX-4S, or 48000) with two CPs (active and standby), the following rules apply:
- When the Standby CP reboots, it goes down and there is no failover because there is no traffic on that switch. When the Standby CP comes up again, it is temporarily no longer in sync with the Active CP.
- When the Active CP reboots, it fails over to the Standby CP. The Standby CP becomes the new Active CP and traffic is disrupted.
- When HA is in sync, and reboot -f is issued on the Active CP of a director, the Standby CP takes over as the active CP without traffic disruption. If HA is not in sync, and reboot -f is issued on the Active CP, the Standby CP takes over as the Active CP and traffic is disrupted.
- When HA is disabled and reboot or reboot -f is issued on the Active CP, both the Active and Standby CPs reboot with the original mastership retained. The original Active CP remains the Active CP after the reboot, and the original Standby CP remains the Standby CP. After the reboot, HA is enabled.
- When HA is disabled and reboot or reboot -f is issued on the Standby CP, the Standby CP reboots without prompting. It boots up with the default switch only, even if the Active CP has multiple logical switches configured. After the Standby CP boots up, HA is still disabled.
Notes. The execution of this command is subject to Virtual Fabric or Admin Domain restrictions that may be in place. Refer to chapter 1, "Using Fabric OS commands" and Appendix A, "Command Availability" for details.
Operands -f Causes the CP to fail over to the Standby CP without affecting any of the Fibre Channel Ports. Note that the recommended way to force a failover without affecting any Fibre Channel ports is to issue the haFailover command.
Examples To reboot a standalone switch with a single CP:
switch:admin> rebootWarning: This command would cause the switch to rebootand result in traffic disruption.Are you sure you want to reboot the switch [y/n]? y
Broadcast message from root (pts/0) Sun Feb 28 19:49:45 2010...The system is going down for reboot NOW !!
Fabric OS Command Reference 82153-1001764-02

reBoot2
To reboot a CP on a DCX when HA is enabled:
switch:admin> rebootWarning: This command is being run on a control processor (CP)based system and will cause the active CP to reboot.Are you sure you want to reboot the active CP [y/n]? y
Broadcast message from root (pts/0) Sun Feb 28 19:49:45 2010...
The system is going down for reboot NOW !!
To reboot a CP on a DCX when haFailover is disabled:
switch:admin> reboot
This command is being run on a control processor (CP) based system. Because HA is disabled, it will cause both active CP and the standby CP to reboot. After reboot, the HA will be enabled.
Do you want to continue [y/n] y Broadcast message from root (pts/0) Sun Feb 28 19:49:45 2010...
The system is going down for reboot NOW !!
See Also fastboot, hafailover
822 Fabric OS Command Reference53-1001764-02

routeHelp 2
routeHelp
Displays a list of FSPF-related commands.
Synopsis routehelp
Description Use this command to display a list of fabric-shortest-path-first (FSPF)-related commands.
Note The execution of this command is subject to Virtual Fabric or Admin Domain restrictions that may be in place. Refer to chapter 1, "Using Fabric OS commands" and Appendix A, "Command Availability" for details.
Operands none
Examples To display a list of routing-related commands:
switch:admin> routehelp
aptpolicy Get and set Advanced Performance Tuning policybcastshow Display broadcast routing informationdlsreset Turn off the dynamic load sharing (DLS) optiondlsset Turn on the dynamic load sharing (DLS) optiondlsshow Display the state of the dynamic load sharing optionfspfshow Print FSPF global informationinterfaceshow Display the FSPF (TM) interface informationiodreset Turn off the in-order delivery (IOD) optionioddelayreset Configure in-order-delivery (IOD) delay parameterioddelayshow Display in-order-delivery (IOD) delay parameteriodset Turn on the in-order delivery (IOD) optioniodshow Display the state of the in-order delivery optionlinkcost Set or print the FSPF cost of a linklsdbshow Displays the FSPF link state databasenbrstateshow Display FSPF (TM) neighbors' statesnbrstatsclear Reset the FSPF (TM) interface counterstopologyshow Display the unicast fabric topologyurouteconfig Configure a static routeurouteremove Remove a static routeurouteshow Display unicast routing information
See Also bcastShow, interfaceShow, uRouteShow
Fabric OS Command Reference 82353-1001764-02

secActiveSize2
secActiveSize
Displays the size of the active security database.
Synopsis secactivesize
Description Use this command to display the size of the active security database. The command also displays the maximum database size.
For switches running Fabric OS v6.2.0 and later, the maximum security database size is 1 megabyte per logical switch. With up to eight partitions, the total database size on a chassis can be up to 8 megabytes. On switches that are not Virtual Fabric-capable, the security database is limited to 1 megabyte. For switches running earlier versions of Fabric OS (up to v5.3.0), the maximum size is 256 Kilobytes.
Notes The effective security DB size is the lowest supported by the fabric. The presence of a Standby CP that runs an earlier version of the operating system will drop the effective security DB size on an Active CP that runs Fabric OS v6.2.0.
The Brocade 200E is unable to handle the maximum DB size supported in v6.2.0 and issues a compact flash warning when the active security database is close to the 1 MB limit.
The execution of this command is subject to Virtual Fabric or Admin Domain restrictions that may be in place. Refer to chapter 1, "Using Fabric OS commands" and Appendix A, "Command Availability" for details.
Operands none
Examples To display the size of the active security database:
switch:admin> secactivesize Size of security active data: 35 bytes (Max 1048576 bytes)
See Also secDefineSize, secGlobalShow
824 Fabric OS Command Reference53-1001764-02

secAuthCertificate 2
secAuthCertificate
Configures FCAP certificate for authentication with peer switches
Synopsis secauthcertificate --show
secauthcertificate --set [-wwn wwn | -did domain_id |-all] [ -usecert brcd | thirdparty]
secauthcertificate --remove [-wwn wwn | -did domain_id |-all]
secauthcertificate --help
Description Use this command to manage certificates for FCAP authentication on a switch.
FCAP requires the exchange of certificates between two or more switches to authenticate each other before they are allowed to join fabric. FCAP certificates can be issued by Brocade or any third party CA.
Use this command to add, remove, or display the switches in the certificate database. When adding switches, you can specify the type of certificate to be used in the authentication. Brocade and third Party certificates are supported.
Fabric OS supports two authentication protocols, DHCHAP and FCAP. By default, FCAP is the default switch authentication protocol. Use the authUtil command to configure the authentication protocol.
Note The execution of this command is subject to Virtual Fabric or Admin Domain restrictions that may be in place. Refer to chapter 1, "Using Fabric OS commands" and Appendix A, "Command Availability" for details.
Operands This command has the following operands:
--show Displays the switches in the certificate database. No operand is required with this command.
--set Adds the specified switch entries to the certificate database.
--remove Removes the specified switch entries from the certificate database.
--help Displays the command usage.
One or more switches must be specified with the --set and --remove options. The switches can be specified in one of the following ways; each of these operands is inclusive:
-wwn wwn Specifies the World Wide Name of the peer switches. You may specify multiple WWNs separated by a comma..
-did domain_id Specifies the Domain ID of the peer switches. You may specify multiple DIDs separated by a comma.
-all Specifies all switches in the fabric.
-usecert brcd | thirdparty Specifies the FCAP certificate to be used for authentication with the specified switches. Specify thirdparty to use a third party certificate. Specify brcd to use a Brocade certificates (default). This operand is optional with the --set option; if omitted, the default is used.
Fabric OS Command Reference 82553-1001764-02

secAuthCertificate2
Examples To add a peer switch to the database and specify that third party certificates be used:
switch:admin> secauthcertificate --set -wwn 10:00:00:05:1e:41:4b:35 -usecert brcdPeer switch with WWN 10:00:00:05:1e:41:4b:35 added.
To display the certificate database entry:
switch:admin> secauthcertificate --showWWN Certificate-----------------------------------------------10:00:00:05:1e:41:4b:35 Brocade
To remove the switch from the certificate database:
switch:admin> secauthcertificate --remove -wwn 10:00:00:05:1e:41:4b:35Specified wwn entry has been removed from the database.
To remove all entries from the certificate database:
switch:admin> secauthcertificate --remove -allAll entries from the database has been removed.
See Also authUtil, secCertUtil
826 Fabric OS Command Reference53-1001764-02

secAuthSecret 2
secAuthSecret
Manages the DH-CHAP shared secret key information.
Synopsis secauthsecret --show
secauthsecret --set
secauthsecret --remove value | --all
Description Use this command to manage the DH-CHAP shared secret key database used for authentication. This command displays, sets, and removes shared secret key information from the database or deletes the entire database. If you are performing set or remove operations, when the command is completed new data is saved persistently. New data is effective with the next authentication request. The configuration applies to a switch instance only.
Note The execution of this command is subject to Virtual Fabric or Admin Domain restrictions that may be in place. Refer to chapter 1, "Using Fabric OS commands" and Appendix A, "Command Availability" for details.
Operands This command has the following operands:
--show Lists the WWNs for which a shared secret is configured.
--set Sets shared secrets with a WWN. This command is interactive. When setting secrets for an entry of an EX_Port, the WWN of the entry must be specified.
--remove [wwn | domain | swname]Removes the specified WWN entry from the database. If a domain name is specified, it is converted to a WWN and then the entry is removed. When removing an entry of an EX_Port type, the WWN of the entry must be specified. If no option is specified, the command is interactive.
--remove --all Deletes the entire secret key database.
Examples To list the shared secret WWN:
switch:admin> secauthsecret --show
WWN DId Name-----------------------------------------------10:00:00:60:69:80:5b:e8 1 switch
To set the shared secret:
switch:admin> secAuthSecret --set
This command sets up secret keys for the DH-CHAP authentication. The minimum length of a secret key is 8 characters and maximum 40 characters. Setting up secret keys does not initiate DH-CHAP authentication. If switch is configured to do DH-CHAP, it is performed whenever a port or a switch is enabled.
Warning: Please use a secure channel for setting secrets. Using an insecure channel is not safe and may compromise secrets.
Following inputs should be specified for each entry.
Fabric OS Command Reference 82753-1001764-02

secAuthSecret2
1. WWN for which secret is being set up. 2. Peer secret: The secret of the peer that authenticates to peer. 3. Local secret: The local secret that authenticates peer.
Press Enter to start setting up shared secrets >
Enter WWN, Domain, or switch name (Leave blank when done): 10:00:00:60:69:80:05:14 Enter peer secret: Re-enter peer secret: Enter local secret: Re-enter local secret:
Enter WWN, Domain, or switch name (Leave blank when done): Are you done? (yes, y, no, n): [no] y Saving data to key store... Done.
To delete the entire secret key database:
switch:admin> secAuthSecret --remove --all
This command deletes database of DH-CHAP secret keys. If a fabric requires authentication, deleting this database may cause switch to segment from the fabric.
Do want to remove secret key database? (yes, y, no, n): [no] y Deleting secret key database... Done.
switch:admin>
See Also none
828 Fabric OS Command Reference53-1001764-02

secCertUtil 2
secCertUtil
Manages certificates on a switch.
Synopsis seccertutil
seccertutil genkey [-nowarn] [-keysize 1024 | 2048]
seccertutil delkey [-nowarn][-all]
seccertutil gencsr [-country country code] [-state state] [-locality locality] [ -org organization] [-orgunit organization unit] [-cn common name]
seccertutil delcsr [-nowarn]
seccertutil showcsr
seccertutil generate [-fcapall] [-keysize 1024 | 2048]
seccertutil delete [-ldapcacert file name ]| [-fcapcacert] | [-fcapswcert] | [-fcapall] [-nowarn]
seccertutil export [-ldapcacert [-certname certificate name]] | [-fcapswcert] | [-fcapswcsr] | [-fcapcacert][-protocol ftp | scp] [-ipaddr IP address] [-remotedir remote directory ] [-login login name] [-password password]
seccertutil import [-ldapcacert] | [-fcapswcert] | [-fcapcacert] | [-config cacert] | [-config swcert [-nowarn] [-enable https]] [-protocol ftp | scp] [-ipaddr IP address] [-remotedir remote directory ] [-certname certificate name] [-login login name] [-password password]
seccertutil show [-ldapcacert] | [-fcapall]
Description Use this command to manage third-party certificates on a switch, including Public Key Infrastructure (PKI) based certificates, Lightweight Directory Access Protocol (LDAP) certificates, and FCAP certificates. This command also imports or exports Certificate Signing Requests (CSRs) from or to a remote host. This command supports IPV4 and IPV6 addresses.
Use this command to do the following:
• Generate a public/private key pair.
• Delete a public/private key pair.
• Generate a CSR.
• Delete a CSR.
• List existing certificates on a switch.
• Display the contents of a certificate or CSR.
• Delete a specified certificate.
• Import or export a certificate.
• Configure a SSL certificate file name.
• Enable secure protocols.
This command takes an action and associated arguments. If only an action is specified, this command prompts interactively for input values of the associated arguments. The command runs noninteractively when the arguments associated with a given action are specified on the command line. When invoked without operands, this command displays the usage.
Fabric OS Command Reference 82953-1001764-02

secCertUtil2
Note The execution of this command is subject to Virtual Fabric or Admin Domain restrictions that may be in place. Refer to chapter 1, "Using Fabric OS commands" and Appendix A, "Command Availability" for details.
Operands This command has the following operands:
genkey Generates a public/private key pair. This is the first step in setting up a third-party certificate. The following operands are optional; when omitted, the command prompts interactively for input values to these operands.
-keysize 1024 | 2048 Specifies the size of the key. Valid values are 1024 or 2048. bits. The greater the value, the more secure is the connection; however, performance degrades with size. The keys are generated only after all existing CSRs and certificates have been deleted.
-nowarn Specifies that no warning is given when overwriting or deleting data. If this operand is omitted, the command prompts for confirmation before existing CSRs and certificates are deleted.
delkey Deletes all public/private key pairs with the exception of Encryption-related certificates and key pairs. This command prompts for confirmation unless -nowarn is specified.
-nowarn Executes the delete operation without confirmation.
-all Deletes all public/private key pairs including Encryption-related certificates and keypairs.
gencsr Generates a new CSR for the switch. This is the second step in setting up a third-party certificate. The following operands are optional; if omitted, the command prompts for answers to a series of questions. If only one or a few operands are specified. the command prompts for input to the remaining questions. When all questions are answered, a CSR is generated and placed in a file named ip_address.csr, where ip_address is the IP address of the switch.
-country country code Specifies the country. Provide a two-letter country code. For example, US.
-state state Specifies the state. Provide the full name, for example, California. If the state consists of multiple words, it must be enclosed in double quotes.
-locality locality Specifies the city. Provide the full name, for example, "San Jose". If the locality consists of multiple words, it must be enclosed in double quotes.
-org organization Specifies the organization. Provide the full name, for example, Brocade. If the organization consists of multiple words, it must be enclosed in double quotes.
-orgunit organization unit Specifies the organizational unit, for example, your department name. If the organizational unit consists of multiple words, it must be enclosed in double quotes.
-cn common name Specifies the common name. Provide a fully qualified Domain Name, or IP address.
830 Fabric OS Command Reference53-1001764-02

secCertUtil 2
showcsr Displays the content of the CSR on the switch without page breaks. Use the pipe operator followed by the “more” option to display the content one page at a time.
delcsr [-nowarn] Deletes CSR. This command prompts for confirmation before deleting the CSR unless -nowarn is specified.
generate -fcapall Generates FCAP switch CSR, passphrase, and key.
-keysize 1024 | 2048 Specifies the size of the key. Valid values are 1024 or 2048. bits. The greater the value, the more secure is the connection; however, performance degrades with size.
delete Deletes the specified certificate. Specify one of the following operands:
-ldapcacert Deletes all LDAP CA certificates. You must specify a file name when deleting the LDAP CA certificates. All LDAP certificates are concatenated in a single file. Use show -ldapcacert to list that file name on the switch. You cannot delete an individual certificate.
-fcapcacert Deletes the FCAP CA certificate.
-fcapswcert Deletes the FCAP SW certificate.
-fcapall Deletes all FCAP objects including the switch CSR, keys, pass phrase, Root CA certificate, and switch certificate.
-nowarn Deletes the specified file without confirmation. This operand is optional.
export Exports a CSR to a host. This command is typically used to submit a CSR to the Certification Authority (CA) that issues the certificate. The following operands are optional; if omitted, the command prompts interactively for your input.
-ldapcacert -certname certificate name Exports an LDAP CA certificate from the switch to a remote host. You must specifiy the name of the LDAP CA certificate to be exported. Use the show option for a list of existing certificates.
-fcapswcert Exports the FCAP switch certificate from the switch to the remote host. The certificate is exported with the same filename it had when it was imported.
-fcapswcsr Exports the FCAP switch CSR certificate from the switch to the remote host. The FCAP switch CSR is exported as switchIPfcapSw.csr.
-fcapcacert Exports the FCAP CA certificate from the switch to the remote host. The FCAP CA certificate is exported as switchIPfcapRootCA.pem.
-protocol ftp | scp Specifies the protocol as either FTP or SCP.
-ipaddr IP address Specifies the IP address of the remote host.
-remotedir remote directory Specifies the remote directory. Provide a fully qualified path name.
Fabric OS Command Reference 83153-1001764-02

secCertUtil2
-login login name Specifies the login name for the server.
-password password Specifies the password for the user account. When using SCP, for security reasons, do not enter a password on the command line. Use the interactive version instead.
import Imports a certificate. Use this command to import a certificate from the server or to download a certificate issued by a CA after sending the CSR to the CA. Specify one of the following certificates:
-ldapcacert Imports an LDAP CA certificate.
-fcapswcert Imports an FCAP switch certificate.
-fcapcacert Imports an FCAP CA certificate.
-config cacert Imports a CA certificate.
-config swcert [-nowarn] Imports an SSL certificate. If -nowarn is specified, the SSL certificate import is blocked without warning if the certificate is invalid. If -nowarn is omitted, you are prompted for confirmation before importing an invalid switch certificate. However, you will be able to import the invalid certificate. The -nowarn option effectively prevents you from importing an invalid swcert certificate.
-enable https Enables secure https. Optionally use this operand with -config swcert only.
The following operands are optional with import; if omitted, the command prompts interactively for your input.
-protocol ftp | scp Specifies the protocol as either FTP or SCP.
-ipaddr IP address Specifies the IP address of the remote host.
-remotedir remote directory Specifies the remote directory. Provide a fully qualified path name.
-certname certificate name Specifies the certificate name.
-login login name Specifies the login name for the server.
-password password Specifies the password for the user account. When using SCP, for security reasons, do not enter a password on the command line. Use the interactive version instead.
show Lists all existing PKI-based certificates on the switch. The following operands are optional and exclusive.
-ldapcacert Lists LDAP certificates.
-fcapall Indicates whether FCAP related files exist or are empty.
832 Fabric OS Command Reference53-1001764-02

secCertUtil 2
Examples To generate a public/private key pair in interactive mode:
switch:admin> seccertutil genkey
Generating a new key pair will automatically do the following: 1. Delete all existing CSRs. 2. Delete all existing certificates. 3. Reset the certificate filename to none. 4. Disable secure protocols.
Continue (yes, y, no, n): [no] y Select key size [1024 or 2048]: 1024 Generating new rsa public/private key pair Done.
To generate a public/private key pair in noninteractive mode:
switch:admin> seccertutil genkey -nowarn -keysize 1024Generating new rsa public/private key pairDone.
To generate a CSR in interactive mode:
switch:admin> seccertutil gencsr Country Name (2 letter code, eg, US):US State or Province Name (full name, eg, California):California Locality Name (eg, city name):San Jose Organization Name (eg, company name):Brocade Organizational Unit Name (eg, department or section name): IT Common Name (Fully qualified Domain Name, or IP address):192.168.38.206 generating CSR, file name is: 192.168.38.206.csr Done
To generate a CSR in noninteractive mode:
switch:admin> seccertutil gencsr -country US -state California -locality "San Jose" \-org Brocade -orgunit software -cn 192.168.38.206generating CSR, file name is: 192.168.38.206.csrDone
To delete the CSR in interactive mode:
switch:admin> seccertutil delcsr WARNING!!!
About to delete CSR: 192.168.163.238.csr ARE YOU SURE (yes, y, no, n): [no] y
To delete a CSR in noninteractive mode:
switch:admin> seccertutil delcsr -nowarn
To import an LDAP certificate from a remote host to the local switch in interactive mode:
switch:admin> seccertutil import -ldapcacert Select protocol [ftp or scp]: ftp Enter IP address: 195.168.38.206 Enter remote directory: /users/home/remote_certs Enter certificate name (must have ".crt", ".cer" or ".pem" suffix): ldap.cer
Fabric OS Command Reference 83353-1001764-02

secCertUtil2
Enter Login Name: mylogin Enter Password: password Success: imported certificate [ldap.cert].
To import an LDAP certificate from a remote host to the local switch in noninteractive mode:
switch:admin> seccertutil import -ldapcacert -protocol ftp -ipaddr 195.168.38.206 \-remotedir /users/home/remote_certs -certname ldap.cer -login abcd -passwd passwdSuccess: imported certificate [ldap.cert].
To import an FCAP switch certificate in interactive mode:
switch:admin> seccertutil import -fcapswcert Select protocol [ftp or scp]: scp Enter IP address: 10.32.2.25 Enter remote directory: /users/myname/OPENSSL Enter certificate name (must have ".crt" or ".cer" ".pem" or ".psk" suffix):01.pem Enter Login Name: myname [email protected]'s password: Success: imported certificate [01.pem].
To import an FCAP CA certificate in interactive mode:
switch:admin> seccertutil import -fcapcacert Select protocol [ftp or scp]: scp Enter IP address: 10.32.2.25 Enter remote directory: /users/myname/OPENSSL Enter certificate name (must have ".crt" or ".cer" ".pem" or ".psk" suffix):CACert.pem Enter Login Name: myname [email protected]'s password: Success: imported certificate [CACert.pem].
To import a PKI-based certificate with configure and enable option in interactive mode:
switch:admin> seccertutil import -config swcert -enable https Select protocol [ftp or scp]: ftp Enter IP address: 192.168.38.206 Enter remote directory: /users/home/mycerts Enter certificate name (must have ".crt", ".cer" or ".pem" suffix): filename Enter Login Name: username Enter Password: password Success: imported certificate [filename]. Certificate file in configuration has been updated. Secure http has been enabled.
To import a PKI-based certificate with configure and enable option in noninteractive mode:
switch:admin> seccertutil import -config swcert -enable https -protocol ftp \-ipaddr 195.168.38.206 -remotedir /users/home/remote_certs -certname file.crt \-login abcd -password passwdSuccess: imported certificate [file.crt]. Certificate file in configuration has been updated. Secure http has been enabled.
834 Fabric OS Command Reference53-1001764-02

secCertUtil 2
To export an LDAP CA certificate from the local switch to a remote host in interactive mode:
switch:admin> seccertutil export -ldapcacertSelect protocol [ftp or scp]: scpEnter IP address: 192.168.38.206Enter remote directory: /users/home/remote/mycertsEnter Login Name: usernameEnter LDAP certificate name (must have ".pem" \ suffix):filename.cerPassword:passwordSuccess: exported LDAP certificate
To export an LDAP CA certificate from the local switch to a remote host in noninteractive mode:
switch:admin> seccertutil export -ldapcacert -protocol ftp -ipaddr 192.168.38.206 \-remotedir /users/home/remote_certs -login abcd -passwd passwd -certname ldap.cerSuccess: exported LDAP certificate
To export an FCAP switch certificate in interactive mode:
switch:admin> seccertutil export -fcapswcert Select protocol [ftp or scp]: scp Enter IP address: 10.32.2.25 Enter remote directory: /users/myname/OPENSSL Enter Login Name: myname [email protected]'s password: Success: exported FCAP switch certificate
To export an FCAP switch CSR in interactive mode:
swithc:admin> seccertutil export -fcapswcsrSelect protocol [ftp or scp]: scpEnter IP address: 10.32.2.25Enter remote directory: /users/myname/OPENSSLEnter Login Name: [email protected]'s password:Success: exported FCAP switch CSR
To delete an LDAP CA certificate in interactive mode:
switch:admin> seccertutil delete -ldapcacert filename.pemWARNING!!!About to delete certificate: filename.cerARE YOU SURE (yes, y, no, n): [no] yDeleted LDAP certificate successfully
To delete an LDAP CA certificate in noninteractive mode:
switch:admin> seccertutil delete -ldapcacert filename.pemDeleted LDAP certificate successfully
To delete all FCAP PKI objects:
switch:admin> seccertutil delete -fcapall WARNING!!!
About to delete FCAP-Files: ARE YOU SURE (yes, y, no, n): [no] y
Fabric OS Command Reference 83553-1001764-02

secCertUtil2
To generate FCAP PKI objects:
switch:admin> seccertutil generate -fcapall -keysize 1024Generating a new key pair will automatically do the following: 1. Delete all existing CSRs. 2. Delete existing switch certificate. 3. Reset the certificate filename to none.
Continue (yes, y, no, n): [no] y Installing Private Key and Csr... Switch key pair and CSR generated...
To display the FCAP PKI objects:
switch:admin> seccertutil show -fcapall List of fcap files: Passphrase : Exist Private Key : Exist CSR : Exist Certificate : Empty Root Certificate: Exist
To list all LDAP certificates on a switch:
switch:admin> seccertutil show -ldapcacertList of ldap ca certificate files:Sample.cer
To display the content of the CSR one page at a time:
switch:admin> seccertutil showcsr | more
To display the content of a certificate:
switch:admin> seccertutil show certificate_name
See Also secAuthCertificate
836 Fabric OS Command Reference53-1001764-02

secDefineSize 2
secDefineSize
Displays the size of the defined security database.
Synopsis secdefinesize
Description Use this command to display the size of the defined security database. The command also displays the maximum database size.
For switches running Fabric OS v6.2.0 and later, the maximum security database size is 1 Megabyte per logical switch. With up to eight partitions, the total database size on a chassis can be up to 8 Megabytes. On switches that are not Virtual Fabric-capable, the security database is limited to 1 Megabyte. For switches running earlier versions of Fabric OS (up to v5.3.0), the maximum size is 256 Kilobytes.
The effective security DB size is the lowest supported by the fabric. The presence of a Standby CP that runs an earlier version of the operating system drops the effective security DB size on an Active CP that runs Fabric OS v6.2.0 or later.
Notes The execution of this command is subject to Virtual Fabric or Admin Domain restrictions that may be in place. Refer to chapter 1, "Using Fabric OS commands" and Appendix A, "Command Availability" for details.
Operands none
Examples To display the size of the defined security database
switch:admin> secdefinesize Size of security defined data: 35 bytes (Max 1048576 bytes)
See Also secActiveSize, secGlobalShow
Fabric OS Command Reference 83753-1001764-02

secGlobalShow2
secGlobalShow
Displays the current internal security state information.
Synopsis secglobalshow
Description Use this command to display security server-specific information as a snapshot of its current state. The output may include information about the following:
• General security parameters
• The latest zone transaction
• The current status of the RCS transaction
• The state of the Domain
• wwnDL state
This command is intended primarily for debugging purposes by technical support staff. The information displayed may not be supported between releases and is subject to change without notice.
Note The execution of this command is subject to Virtual Fabric or Admin Domain restrictions that may be in place. Refer to chapter 1, "Using Fabric OS commands" and Appendix A, "Command Availability" for details.
Operands none
Examples To view the current security state:
switch:admin> secglobalshow
----General Security Information----flag 1, saveflag 0transId 0Queue Size 0final Rca 0reliablemsg 0reliablePhase 0Primary pub key: EmptyPrimary Version 0Primary WWN 10:00:00:05:1e:01:23:e0 (local switch)Stamp 0----The latest zone transaction--last retVal from zone: not usedlast zone size when calling zone: not used----The latest RCS STATUS----RCS was enabledsec_aca: freeRCS latest Phase: CompletionRCS Message ==> RCS transaction completes.----DataBase STATUS----Retry Role 0Retry Qeury0Security Active DataSize 35 bytes
-----Domain State-----
Active Sum 215b
838 Fabric OS Command Reference53-1001764-02

secGlobalShow 2
Security Defined DataSize 35 bytesDefine Sum 215bZone Size (include enabled configuration) 312 bytesZone sum e04b215bsec_db: freeprimaryDLPhase 0----wwnDL State-----pid tid key sec usec
--------- LOG CACHE ---------14:08:50 813905136 secipadm_ipchange receives notification14:08:50 850588912 secProcessIPChange starts processing14:08:50 850588912 secProcessIPChange acks completion
[Output truncated]
See Also secActiveSize, secDefineSize
Fabric OS Command Reference 83953-1001764-02

secHelp2
secHelp
Displays information about security commands.
Synopsis sechelp
Description Use this command to display a list of security commands with a brief description of the commands.
Note The execution of this command is subject to Virtual Fabric or Admin Domain restrictions that may be in place. Refer to chapter 1, "Using Fabric OS commands" and Appendix A, "Command Availability" for details.
Operands none
Examples To display a list of security commands:
switch:admin> sechelp
fipscfg Configure FIPS mode operation pkicreate Creates public key infrastructure (PKI) objects pkiremove Removes existing public key infrastructure (PKI) objects pkishow Displays existing public key infrastructure (PKI)
objects secactivesize Displays size of the active (security) database secauthsecret Creates/Manages DHCHAP secret key details seccertutil Creates/Manages/Displays third party PKI certificates secdefinesize Displays size of the defined (security) database secglobalshow Displays current internal security state information secpolicyabort Aborts changes to defined policy secpolicyactivate Activates all policy sets secpolicyadd Adds members to an existing policy secpolicycreate Creates a new policy secpolicydelete Deletes an existing policy secpolicydump Displays all members of existing policies secpolicyfcsmove Moves a member in the FCS policy secpolicyremove Removes members from an existing policy secpolicysave Saves defined policy set and sends to all switches secpolicyshow Shows members of one or more policies secstatsreset Resets security statistics secstatsshow Displays security statistics
See Also none
840 Fabric OS Command Reference53-1001764-02

secPolicyAbort 2
secPolicyAbort
Aborts all unsaved changes to the defined database.
Synopsis secpolicyabort
Description Use this command to abort all changes to the defined security database that have not been saved to flash memory and to abort changes to policy creation and modification operations from all the switches if a fabric-wide consistency policy is not set for the particular policy.
Notes When an FCS policy is enabled, this command can be issued only from the Primary FCS switch.
Only the user who made the changes to the defined database may use this command to abort them.
The execution of this command is subject to Virtual Fabric or Admin Domain restrictions that may be in place. Refer to chapter 1, "Using Fabric OS commands" and Appendix A, "Command Availability" for details.
Operands none
Examples To abort all changes that have not been saved to nonvolatile memory:
primaryfcs:admin> secpolicyabortUnsaved data has been aborted.primaryfcs:admin> secpolicyabortNo new data to abort.
See Also secPolicyActivate, secPolicyAdd, secPolicyDelete, secPolicyDump,secPolicyRemove, secPolicySave, secStatsShow
Fabric OS Command Reference 84153-1001764-02

secPolicyActivate2
secPolicyActivate
Saves and activates the Defined Security Policy Set.
Synopsis secpolicyactivate
Description Use this command to activate the current defined security policy to all switches in the fabric. This activates the policy set on the local switch or all switches in the fabric depending on the fabric-wide consistency policy.
If there are changes to the SCC, DCC, or FCS policies in the current CLI or API transaction that have not been saved to the Defined Security Policy Set, then this command saves the changes to the Defined Security Policy Set first, and then activates it. If there are no changes, but the Defined Security Policy Set differs from the Active Security Policy Set, then the Defined Security Policy Set is activated. If there are no changes and the Defined Security Policy Set is the same as the Active Security Policy Set, then nothing is done.
After activation the defined policy set becomes the Active Policy Set.
Use secPolicyShow to display the members of an existing policy in the Active or Defined Security Policy Sets.
Notes The behavior of this command is the same for tolerant and strict fabric-wide consistency.
When an FCS policy is enabled, this command can be issued only from the Primary FCS switch.
Any modifications to the SCC, DCC, and FCC DB are saved and activated. When secPolicyActivate is issued after the secPolicySave command, it might fail.
The execution of this command is subject to Virtual Fabric or Admin Domain restrictions that may be in place. Refer to chapter 1, "Using Fabric OS commands" and Appendix A, "Command Availability" for details.
Operands none
Examples To activate the defined security policy set on all switches in the fabric:
switch:admin> secpolicyactivateAbout to overwrite the current Active data.ARE YOU SURE (yes, y, no, n): [no] ysecpolicyactivate command was completed successfully.
See Also fddCfg, secPolicyAbort, secPolicyAdd, secPolicyDelete, secPolicyDump,secPolicyRemove, secPolicySave, secPolicyShow
842 Fabric OS Command Reference53-1001764-02

secPolicyAdd 2
secPolicyAdd
Adds members to an existing security policy.
Synopsis secpolicyadd “name”, “member[;member...]”
Description Use this command to add one or more members to an existing access policy.
Each policy corresponds to a management method. The list of members of a policy acts as an access control list for that management method. Before a policy is created, there is no enforcement for that management method; all access is granted. After a policy has been created and a member has been added to the policy, that policy becomes closed to all access except from included members. If all members are then deleted from the policy, all access is denied for that management method (the DCC_POLICY is an exception).
Attempting to add a member to a policy that already is a member causes this command to fail.
In a Virtual Fabric Environment, when you create a DCC lockdown policy on a logical switch, the DCC policy is created for each port in the chassis, even though the ports are not currently present in the local logical switch. This is done to provision the DCC policy for the ports that may be moved later. If a policy seems stale at any point, use secPolicyDelete to remove all stale DCC policies.
Fabric-wide consistency policies can be configured on per logical switch basis, which applies the FCS policy to the corresponding fabric connecting to the logical switch. Automatic policy distribution for DCC, SCC and FCS remains unchanged in Fabric OS v6.2.0 and can be configured on a per logical switch basis.
Notes When an FCS policy is enabled, this command can be issued only from the Primary FCS switch. The secpolicyadd command can be issued on all switches for SCC and DCC policies as long as fabric-wide consistency policy is not set for the particular policy.
Do not add the WWNs of front or translate (xlate) domains to the FCS policy if the edge fabric is connected to an FC Router.
Backup FCS switches typically cannot modify the policy. However, if the Primary FCS switch in the policy list is not reachable, then a backup FCS switch is allowed to modify the policy. If all the reachable backup FCS switches are running pre-v5.3.0 versions of Fabric OS, a non-FCS v5.3.0 switch is allowed to modify the policy so that a new switch can be added to the policy.
The execution of this command is subject to Virtual Fabric or Admin Domain restrictions that may be in place. Refer to chapter 1, "Using Fabric OS commands" and Appendix A, "Command Availability" for details.
Operands This command has the following operands:
“name” Specify the name of an existing policy to which you want to add members. Valid values for this operand are:
• DCC_POLICY_nnn• FCS_POLICY• SCC_POLICY
The specified policy name must be capitalized.
The DCC_POLICY_nnn name has the common prefix DCC_POLICY_ followed by a string of user-defined characters. These characters do not have to be capitalized like regular policy names, but they are case-sensitive.
Fabric OS Command Reference 84353-1001764-02

secPolicyAdd2
“member” Specify a list of one or more member switches to be included in the security policy. The list must be enclosed in quotation marks; members must be separated by semicolons. Depending on the policy type, members are specified as follows.
FCS_POLICY or SCC_POLICY Members
This policy type requires member IDs to be specified as WWN strings, Domains, or switch names. If Domain IDs or switch names are used, the switches associated must be present in the fabric or the command fails.
DCC_POLICY Members
The DCC_POLICY_nnn is a list of device port names associated with a specific switch and port index combination. An empty DCC_POLICY does not stop access to the switch. The device port name is specified by its port WWN string. The switch and port index combination must be in the switch port format, where switch can be specified as a WWN, a domain, or a switch name, and port is specified by port numbers separated by commas and enclosed in either brackets or parentheses; for example, (2, 4, 6). Ports enclosed in brackets include the devices currently attached to those ports.
The following examples illustrate several ways to specify the port values:
(1-6) Selects ports 1 through 6.
(*) Selects all ports on the switch.
[3, 9] Selects ports 3 and 9 and all devices attached to those ports.
[1-3, 5] Selects ports 1 through 3 and 5 and all devices attached to those ports.
[*] Selects all ports on the switch and devices currently attached to those ports.
Examples To add a member to the SCC_POLICY using the device WWN:
primaryfcs:admin> secpolicyadd "SCC_POLICY", "12:24:45:10:0a:67:00:40"Member(s) have been added to SCC_POLICY.
To add two devices to attach to domain 3, ports 1 and 3, in an existing empty DCC policy; the port WWN of the first device is 11:22:33:44:55:66:77:aa and port WWN of the second device is 11:22:33:44:55:66:77:bb:
primaryfcs:admin> secpolicyadd "DCC_POLICY_abc", "11:22:33:44:55:66:77:aa;11:22:33:44:55:66:77:bb;3(1,3)" Member(s) have been added to DCC_POLICY_abc.
See Also distribute, fddCfg, secPolicyAbort, secPolicyActivate, secPolicyDelete,secPolicyDump, secPolicyRemove, secPolicySave
844 Fabric OS Command Reference53-1001764-02

secPolicyCreate 2
secPolicyCreate
Creates a new security policy.
Synopsis secpolicycreate "name" [, "member[;member...]"]
Description Use this command to create a new policy and to edit Switch Connection Control (SCC), Device Connection Control (DCC), and Fabric Configuration Server (FCS) policies on the local switch. All policies can be created only once, except for the DCC_POLICY_nnn. Each DCC_POLICY_nnn must have a unique name. This command can be issued on all switches in the current fabric for SCC and DCC policies if they are not intended to be fabric-wide.
Adding members while creating a policy is optional. You can add members to a policy later, using the secPolicyAdd command.
Each policy corresponds to a management method. The list of members of a policy acts as an access control list for that management method. Before a policy is created, there is no enforcement for that management method, which is all access is granted. After a policy is created and a member is added to the policy, that policy is closed to all access except to included members. If all members are then deleted from the policy, all access is denied for that management access method.
All newly created policies are saved on the local switch only, unless the switch has a fabric-wide consistency policy for that policy.
In a Virtual Fabric environment, when you create a DCC lockdown policy on a logical switch, the DCC policy is created for each port in the chassis, even though the ports are not currently present in the local logical switch. This is done to provision the DCC policy for the ports that may be moved later. If a policy seems stale at any point, use secPolicyDelete to remove all stale DCC policies.
Fabric wide consistency policies can be configured on a logical switch basis, which applies the FCS policy to the corresponding fabric connecting to the logical switch. Automatic policy distribution behavior for DCC, SCC and FCS remains unchanged in Fabric OS v6.2.0 and can be configured on a logical switch basis.
Notes When an FCS policy is enabled, this command can be issued only from the Primary FCS switch.
The execution of this command is subject to Virtual Fabric or Admin Domain restrictions that may be in place. Refer to chapter 1, "Using Fabric OS commands" and Appendix A, "Command Availability" for details.
Operands This command has the following operands:
"name" Specify the name of the policy you want to create. Valid values for this operand are:
• DCC_POLICY_nnn• SCC_POLICY• FCS_POLICY
The specified policy name must be capitalized.
Fabric OS Command Reference 84553-1001764-02

secPolicyCreate2
The DCC_POLICY_nnn name has the common prefix DCC_POLICY_ followed by a string of user-defined characters. These characters do not have to be capitalized like regular policy names. Valid values for DCC_POLICY_nnn are user-defined alphanumeric or underscore characters. The maximum length is 30 characters, including the prefix DCC_POLICY_.
secpolicycreate DCC_POLICY "*" may be used to indicate DCC lockdown. This command creates a unique policy for each port in the fabric locking it down to the device connected or creating an empty policy to disallow any device to be connected to it. This can be done only when there are no other DCC policies defined on the switch.
"member" Specify one or more members to be included in the security policy. The member list must be enclosed in double quotation marks and members separated by semicolons. The member list must be separated from the name field by a comma and a space. Depending on the policy type, members are specified as follows:
DCC_POLICY Members
The DCC_Policy_nnn is a list of devices associated with a specific switch and port index combination. An empty DCC_POLICY does not stop access to the switch. The device is specified by its port WWN. The switch and port combination must be in the switch port format
switch can be specified using a WWN, domain, or switch name.
port can be specified by port numbers separated by commas and enclosed in either brackets or parentheses: for example, (2, 4, 6). Ports enclosed in brackets include the devices currently attached to those ports.
The following examples illustrate several ways to specify the port values:
(1-6) Selects ports 1 through 6.
(*) Selects all ports on the switch.
[3, 9] Selects ports 3 and 9 and all devices attached to those ports.
[1-3, 5] Selects ports 1 through 3 and 5 and all devices attached to those ports.
[*] Selects all ports on the switch and devices currently attached to those ports.
SCC_POLICY and FCC_POLICY Members
This policy type requires member IDs to be specified as WWN strings, domains, or switch names. If domain or switch names are used, the switches associated must be present in the fabric or the command fails.
To add all switches in the current fabric as members of the policy, enter an asterisk enclosed in quotation marks (*) as the member value. This feature cannot be used by the other security commands.
846 Fabric OS Command Reference53-1001764-02

secPolicyCreate 2
Examples To create an FCS policy:
primaryfcs:admin> secpolicycreate "FCS_POLICY", "3; 4"FCS_POLICY has been created.
While creating the FCS policy, the local switch WWN is automatically included in the list. Switches included in the FCS list are FCS switches and the remaining switches in the fabric are non-FCS switches. Out of the FCS list, the switch that is in the first position becomes the Primary FCS switch and the remaining switches become backup FCS switches. If the first switch in the FCS list is not reachable, the next switch becomes the Primary.
To create a device policy to allow two devices to attach to domain 3 ports 1 and 3 (the WWN of first device is 11:22:33:44:55:66:77:aa and the WWN of second device is 11:22:33:44:55:66:77:bb):
primaryfcs:admin> secpolicycreate "DCC_POLICY_aB_7", "11:22:33:44:55:66:77:aa;11:22:33:44:55:66:77:bb;3[1,3]"DCC_POLICY_abc has been created.
To create a SCC policy in a Fabric with three switches:
1. Check if a policy exists.
switch:admin> secpolicyshow____________________________________________________ ACTIVE POLICY SET____________________________________________________ DEFINED POLICY SET
2. Identify switches in the fabric.
switch:admin> fabricshow Switch ID Worldwide Name Enet IP Addr FC IP Addr Name ------------------------------------------------------------------------- 2: fffc02 10:00:00:05:1e:39:5f:67 10.32.69.53 10.20.30.53 "NeptuneSec" fec0:60:69bc:60:260:69ff:fe80:d4a 4: fffc04 10:00:00:05:1e:04:ef:0e 10.32.69.49 10.20.30.49 >"SW4900_Sec" fec0:60:69bc:54:205:1eff:fe04:ef0e 200: fffcc8 10:00:00:05:1e:35:cd:ef 10.32.69.117 10.20.30.117 "nSW4100_98"
3. Create a SCC policy that includes switches with domain IDs 2 and 4.
switch:admin> secpolicycreate "SCC_POLICY","2;4" SCC_POLICY has been created.
4. Activate the policy.
switch:admin> secpolicyactivate About to overwrite the current Active Policy Set. ARE YOU SURE (yes, y, no, n): [no] y secpolicyactivate command was completed successfully.
To create an SCC policy that includes all switches in the fabric:
switch:admin> secpolicycreate "SCC_POLICY",* SCC_POLICY has been created.
See Also fddCfg, distribute, secPolicyAbort, secPolicyActivate, secPolicyAdd, secPolicyDelete,secPolicyDump, secPolicyRemove, secPolicySave, secStatsShow
Fabric OS Command Reference 84753-1001764-02

secPolicyDelete2
secPolicyDelete
Deletes an existing security policy.
Synopsis secpolicydelete name
Description Use this command to delete an existing security policy from the defined security database. Run secPolicyActivate to delete the policies from the active security policy list. Deleting a security policy does not cause any traffic disruption.
Each policy corresponds to a management method. The list of members of a policy acts as an access control list for that management method. Before a policy is created, there is no enforcement for that management method; all access is granted. After a policy has been created and a member has been added to the policy, that policy becomes closed to all access except from included members. If the policy is deleted all access is granted.
Notes When an FCS policy is enabled, this command can be issued only from the Primary FCS switch.
The execution of this command is subject to Virtual Fabric or Admin Domain restrictions that may be in place. Refer to chapter 1, "Using Fabric OS commands" and Appendix A, "Command Availability" for details.
Operands The following operand is required:
“name” Specify the name of a security policy to delete. The policy name must be capitalized. Quotation marks are optional. Once a security policy is deleted, fabric-wide switch access through that method is unrestricted. Valid security policy names are:
DCC_POLICY_nnn Deletes the specified Device Connection Control (DCC) policy. The DCC_POLICY_nnn name has the common prefix DCC_POLICY_ followed by a string of user-defined characters. These characters do not have to be capitalized.
ALL_DCC_POLICY Deletes all DCC policies from the defined policy list.
ALL_STALE_DCC_POLICY Deletes all stale DCC policies from the defined policy list. DCC policies become stale when the ports are removed from a logical switch.
SCC_POLICY Deletes the Switch Connection Control policy from the defined policy list.
FCS_POLICY Deletes the Fabric Configuration Server policy from the defined policy list.
Examples To delete an existing security policy:
switch:admin> secpolicydelete "DCC_POLICY_ab1”About to delete policy DCC_POLICY_ab1.Are you sure (yes, y, no, n):[no] yDCC_POLICY has been deleted.
To delete all existing DCC policies in the fabric:
primaryfcs:admin> secpolicydelete ALL_DCC_POLICY About to clear all the DCC policies ARE YOU SURE (yes, y, no, n): [no] y
848 Fabric OS Command Reference53-1001764-02

secPolicyDelete 2
To delete all stale DCC policies in the fabric:
primaryfcs:admin> secpolicydelete ALL_STALE_DCC_POLICYAbout to clear all STALE DCC policiesARE YOU SURE (yes, y, no, n): [no] y
See Also secPolicyAbort, secPolicyActivate, secPolicyAdd, secPolicyCreate, secPolicyDump, secPolicyRemove, secPolicySave, secPolicyShow
Fabric OS Command Reference 84953-1001764-02

secPolicyDump2
secPolicyDump
Displays the members of one or all existing security policies.
Synopsis secpolicydump [“listtype”][, “name”]
Description Use this command to display, without page breaks, the members of an existing policy in the active and defined (saved) databases. When issued without operands, this command displays the members of all security policies.
Notes The execution of this command is subject to Virtual Fabric or Admin Domain restrictions that may be in place. Refer to chapter 1, "Using Fabric OS commands" and Appendix A, "Command Availability" for details.
This command can be issued from all FCS switches in the fabric.
Operands This command has the following optional operands:
“listtype” Specifies the database to display, enclosed in double quotation marks. The name for an active database is "Active"; the name for a saved, defined database is "Defined". If listtype is not specified, all databases are displayed.
“name” Specifies the security policy for which to display the members. Valid values for this operand are:
• DCC_POLICY_nnn• FCS_POLICY• SCC_POLICY
The specified policy name must be capitalized and enclosed in double quotation marks.
The DCC_POLICY_nnn name has the common prefix DCC_POLICY_ followed by a string of user-defined characters. These characters do not have to be capitalize. If name is not specified, all existing policies are displayed.
Examples To display all security policy information from all databases without page breaks:
switch:admin> secpolicydump______________________________________________________ DEFINED POLICY SETFCS_POLICY Pos Primary WWN DId swName______________________________________________________ 1 Yes 10:00:00:60:69:30:15:5c 1 primaryfcs 2 No 10:00:00:60:69:30:1e:62 4 switch_______________________________________________________
_____________________________________________________ ACTIVE POLICY SET FCS_POLICY Pos Primary WWN DId swName________________________________________________________ 1 Yes 10:00:00:60:69:30:15:5c 1 primaryfcs 2 No 10:00:00:60:69:30:1e:62 4 switch_______________________________________________________
850 Fabric OS Command Reference53-1001764-02

secPolicyDump 2
To display all security policies in the active database:
switch:admin> secpolicydump "active"
____________________________________________________ ACTIVE POLICY SETFCS_POLICY Pos Primary WWN DId swName -------------------------------------------------- 1 Yes 10:00:00:05:1e:39:5f:67 3 NeptuneSec 2 No 10:00:00:05:1e:90:09:4a - Unknown
SCC_POLICY WWN DId swName -------------------------------------------------- 10:00:00:05:1e:39:5f:67 3 NeptuneSec 10:00:00:05:1e:90:09:4a - Unknown
DCC_POLICY_h1 Type WWN DId swName -------------------------------------------------- Switch 10:00:00:05:1e:39:5f:67 3 NeptuneSec. =Index=> 34. Device 21:00:00:e0:8b:13:5e:8d Device 21:00:00:e0:8b:13:5e:8e
To display all security policies in the defined database:
switch:admin> secpolicydump "Defined"
____________________________________________________ DEFINED POLICY SETFCS_POLICY Pos Primary WWN DId swName -------------------------------------------------- 1 Yes 10:00:00:05:1e:39:5f:67 3 NeptuneSec 2 No 10:00:00:05:1e:90:09:4a - Unknown
SCC_POLICY WWN DId swName -------------------------------------------------- 10:00:00:05:1e:39:5f:67 3 NeptuneSec 10:00:00:05:1e:90:09:4a - Unknown
DCC_POLICY_h1 Type WWN DId swName -------------------------------------------------- Switch 10:00:00:05:1e:39:5f:67 3 NeptuneSec. =Index=> 34. Device 21:00:00:e0:8b:13:5e:8d Device 21:00:00:e0:8b:13:5e:8e
Fabric OS Command Reference 85153-1001764-02

secPolicyDump2
To display the FCS policies in the defined database:
switch:admin> secpolicydump "Defined","FCS_POLICY"
____________________________________________________ DEFINED POLICY SETFCS_POLICY Pos Primary WWN DId swName -------------------------------------------------- 1 Yes 10:00:00:05:1e:39:5f:67 3 NeptuneSec 2 No 10:00:00:05:1e:90:09:4a - Unknown
To display the SCC policies in the defined database:
switch:admin> secpolicydump "Defined","SCC_POLICY"
____________________________________________________ DEFINED POLICY SETSCC_POLICY WWN DId swName -------------------------------------------------- 10:00:00:05:1e:39:5f:67 3 NeptuneSec 10:00:00:05:1e:90:09:4a - Unknown
To display the SCC policies in the active database:
switch:admin> secpolicydump "Active","SCC_POLICY"
____________________________________________________ ACTIVE POLICY SETSCC_POLICY WWN DId swName -------------------------------------------------- 10:00:00:05:1e:39:5f:67 3 NeptuneSec 10:00:00:05:1e:90:09:4a - Unknown
See Also secPolicyAbort, secPolicyActivate, secPolicyAdd, secPolicyCreate, secPolicyDelete,secPolicyRemove, secPolicySave, secPolicyShow
852 Fabric OS Command Reference53-1001764-02

secPolicyFCSMove 2
secPolicyFCSMove
Moves a member in the FCS policy.
Synopsis secpolicyfcsmove [from, to]
Description Use this command to move an FCS member from one position to another position in the FCS list. Only one FCS can be moved at a time. The first FCS switch in the list that is also present in the fabric is the Primary FCS.
Notes If a backup FCS is moved to the first position, it becomes the primary FCS after activation.
An FCS policy most be enabled to execute this command, and the command must be issued from the primary FCS switch.
The execution of this command is subject to Virtual Fabric or Admin Domain restrictions that may be in place. Refer to chapter 1, "Using Fabric OS commands" and Appendix A, "Command Availability" for details.
Operands This command has the following operands:
from Specify the position of the FCS switch you want to move.
to Specify the position to which you want to move the FCS switch.
Examples To move the backup FCS switch from position 2 to position 3 in the FCS list (interactively):
switch:admin> secpolicyfcsmovePos Primary WWN DId swName.================================================= 1 Yes 10:00:00:60:69:10:02:18 1 switch5. 2 No 10:00:00:60:69:00:00:5a 2 switch60. 3 No 10:00:00:60:69:00:00:13 3 switch73.
Please enter position you'd like to move from : (1..3) [1] 2
Please enter position you'd like to move to : (1..3) [1] 3
____________________________________________________ DEFINED POLICY SET
FCS_POLICY Pos Primary WWN DId swName __________________________________________________ 1 Yes 10:00:00:60:69:10:02:18 1 switch5. 2 No 10:00:00:60:69:00:00:13 3 switch73. 3 No 10:00:00:60:69:00:00:5a 2 switch60.
____________________________________________________
To move Backup FCS switch from position 3 to position 1 in the FCS list (non-interactively):
switch:admin> secpolicyshow____________________________________________________
ACTIVE POLICY SET1 Yes 10:00:00:05:1e:39:5f:67 2 switch12 No 10:00:00:05:1e:04:ef:0e 4 switch23 No 10:00:00:05:1e:35:cd:ef 200 switch3
Fabric OS Command Reference 85353-1001764-02

secPolicyFCSMove2
switch:admin> secpolicyfcsmove 3,1____________________________________________________
DEFINED POLICY SETFCS_POLICYPos Primary WWN DId swName--------------------------------------------------1 No 10:00:00:05:1e:35:cd:ef 200 switch32 Yes 10:00:00:05:1e:39:5f:67 2 switch13 No 10:00:00:05:1e:04:ef:0e 4 switch2
switch:admin> secpolicyactivateAbout to overwrite the current Active Policy Set.ARE YOU SURE (yes, y, no, n): [no] ysecpolicyactivate command was completed successfully.
switch:admin> secpolicyshow____________________________________________________ ACTIVE POLICY SETFCS_POLICYPos Primary WWN DId swName--------------------------------------------------1 Yes 10:00:00:05:1e:35:cd:ef 200 switch32 No 10:00:00:05:1e:39:5f:67 2 switch13 No 10:00:00:05:1e:04:ef:0e 4 switch2
See Also secPolicyAbort, secPolicyActivate, secPolicyAdd, secPolicyCreate, secPolicyDelete,secPolicyDump, secPolicyRemove, secPolicySave, secPolicyShow
854 Fabric OS Command Reference53-1001764-02

secPolicyRemove 2
secPolicyRemove
Removes members from an existing security policy.
Synopsis secpolicyremove “name” , “member[;member...]”
Description Use this command to remove one or more members from an existing security policy. It is not possible to remove all members from the FCS_POLICY; the local switch WWN cannot be deleted from the FCS policy. In the case of SCC policy, if it is empty after removing all members, all access to the switch itself would be disallowed.
Notes If an FCS policy is enabled, this command must be issued from the primary FCS switch.
The execution of this command is subject to Virtual Fabric or Admin Domain restrictions that may be in place. Refer to chapter 1, "Using Fabric OS commands" and Appendix A, "Command Availability" for details.
Operands This command has the following operands:
“name” Specify the name of an existing policy you want to remove members from. Valid values for this operand are:
• DCC_POLICY_nnn• FCS_POLICY• SCC_POLICY
The specified policy name must be capitalized.
The DCC_POLICY policy name has the common prefix DCC_POLICY_ followed by a string of user-defined characters. These characters do not have to be capitalized like regular policy names, but are case-sensitive.
This operand is required.
“member” Specify a member or list of members to delete from the policy. The list must be enclosed in quotation marks; members must be separated by semicolons. This operand is required. Depending on the policy type, members can be specified using IP address, WWN, domain, or switch name.
WWN Member Policy Types
The following policy types require members be specified by WWN address:
• FCS_POLICY• SCC_POLICY
These policy types require member IDs be specified as WWN strings, domains, or switch names. If domain or switch names are used, the switches associated must be present in the fabric or the command fails.
DCC_POLICY Members
The DCC_Policy_nnn is a list of devices associated with a specific switch and port combination. The device is specified with a WWN string. The switch and port combination must be specified in the switch port format where switch can be specified by switch WWN, domain, or switch name. The port
Fabric OS Command Reference 85553-1001764-02

secPolicyRemove2
parameter can be specified by port number separated by commas, and enclosed in either brackets or parentheses: for example, (2, 4, 6). Ports enclosed in brackets include the devices currently attached to those ports. The following examples illustrate several ways to specify the port values:
(1-6) Selects ports 1 through 6.
(*) Selects all ports on the switch.
[3, 9] Selects ports 3 and 9 and all devices attached to those ports.
[1-3, 5] Selects ports 1 through 3 and 5 and all devices attached to those ports.
[*] Selects all ports on the switch and devices currently attached to those ports.
Examples To remove a member that has a WWN of 12:24:45:10:0a:67:00:40 from SCC policy:
switch:admin> secpolicyremove "SCC_POLICY", "12:24:45:10:0a:67:00:40"Member(s) have been removed from SCC_POLICY.
See Also secPolicyAbort, secPolicyActivate, secPolicyAdd, secPolicyCreate, secPolicyDelete, secPolicyDump,secPolicySave, secStatsShow
856 Fabric OS Command Reference53-1001764-02

secPolicySave 2
secPolicySave
Saves a defined security policy to persistent memory.
Synopsis secpolicysave
Description Use this command to save a defined security policy to persistent memory. Secpolicysave saves the modified SCC, DCC, and FCS policies to the Defined Security Policy Set on the local switch.
Notes This command is always a local switch operation. A fabric-wide consistency configuration does not affect the behavior of this command.
The execution of this command is subject to Virtual Fabric or Admin Domain restrictions that may be in place. Refer to chapter 1, "Using Fabric OS commands" and Appendix A, "Command Availability" for details.
Operands none
Example To save a defined policy set to persistent memory:
switch:admin> secpolicysavesecpolicysave command was completed successfully.
See Also fddCfg, secPolicyAbort, secPolicyActivate, secPolicyAdd, secPolicyCreate, secPolicyDelete,secPolicyDump, secPolicyRemove, secStatsShow
Fabric OS Command Reference 85753-1001764-02

secPolicyShow2
secPolicyShow
Displays an existing security policy including the FCS policy.
Synopsis secpolicyshow [“policy_set”[“, name”]]
Description Use this command to display the members of an existing policy in the Active or Defined security policy set. The command can be issued from all FCS switches.
This command displays the policy database one page at a time. Use secPolicyDump to display the policy database without page breaks.
Note The execution of this command is subject to Virtual Fabric or Admin Domain restrictions that may be in place. Refer to chapter 1, "Using Fabric OS commands" and Appendix A, "Command Availability" for details.
Operands This command has the following operands:
“policy_type” Specify which policy to display, in quotation marks. Valid values are "Active", "Defined", or and asterisk (*) for both Active and Defined. This operand is optional. If not specified, all databases are displayed.
“name” Specify the name of the security policy you want to view, in quotation marks. This operand is optional. Valid values for this operand are:
DCC_POLICY_nnn
FCS_POLICY
SCC_POLICY
The specified policy name must be capitalized.
The DCC_POLICY_nnn name has the common prefix DCC_POLICY_ followed by a string of user-defined characters. These characters do not have to be capitalized like regular policy names, but they are case-sensitive.
Examples To display all security policies from active databases:
switch:admin> secpolicyshow "active"____________________________________________________ ACTIVE POLICY SET FCS_POLICY Pos Primary WWN DId swName__________________________________________________ 1 Yes 10:00:00:60:69:30:15:5c 1 primaryfcs 2 No 10:00:00:60:69:30:1e:62 4 switch____________________________________________________
858 Fabric OS Command Reference53-1001764-02

secPolicyShow 2
To display all security policies from defined databases:
switch:admin> secpolicyshow "defined"____________________________________________________ DEFINED POLICY SET FCS_POLICY Pos Primary WWN DId swName_____________________________________________________ 1 Yes 10:00:00:60:69:30:15:5c 1 primaryfcs 2 No 10:00:00:60:69:30:1e:62 4 switch_________________________________________________________
See Also fddCfg, secPolicyAbort, secPolicyActivate, secPolicyAdd, secPolicyCreate, secPolicyDelete,secPolicyDump, secPolicyRemove, secPolicySave
Fabric OS Command Reference 85953-1001764-02

secStatsReset2
secStatsReset
Resets one or all security statistics to 0.
Synopsis secstatsreset [name][,” domain[;domain]”]
Description Use this command to reset one or all security statistics to 0. This command can be issued on any switch to reset the security statistics on the local switch or chassis. If an FCS policy is enabled and secStatsReset is issued on the primary FCS switch, this command can reset security statistics for any or all switches in the fabric.
Note The execution of this command is subject to Virtual Fabric or Admin Domain restrictions that may be in place. Refer to chapter 1, "Using Fabric OS commands" and Appendix A, "Command Availability" for details.
Operands When invoked without operands, this command displays the security statistics on the local switch or chassis. The following operands are optional:
name Specify the name of a security statistic you would like to reset. The specified policy name must be capitalized. If executed on the primary FCS, specify an asterisk (*) to reset all security policies. Valid values for this operand are:
TELNET_POLICY
HTTP_POLICY
API_POLICY
RSNMP_POLICY
WSNMP_POLICY
SES_POLICY
MS_POLICY
SERIAL_POLICY
FRONTPANEL_POLICY
SCC_POLICY
DCC_POLICY
LOGIN
INVALID_TS
INVALID_SIGN
INVALID_CERT
AUTH FAIL
SLAP_BAD_PKT
TS_OUT_SYNC
NO_FCS
INCOMP_DB
ILLEGAL_CMD
860 Fabric OS Command Reference53-1001764-02

secStatsReset 2
To access DCC policies, enter DCC_POLICY. Violations are not tracked for individual DCC policies. The statistics for all DCC_POLICY violations are grouped together.
domain(s) Specify a list of domain IDs on which to reset the security statistics. Specify an asterisk (*) to represent all switches in the fabric or specify a list of domains, separated by semicolons and enclosed in quotation marks. This option can only be executed when an FCS policy is enabled and when the command is issued from the primary FCS switch. When domain is specified, the name operand is required.
Examples To reset all statistics on the local switch:
switch:admin> secstatsresetAbout to reset all security counters.ARE YOU SURE (yes, y, no, n):[no] ySecurity statistics reset to zero.
To reset DCC_POLICY statistics on domains 1 and 69:
primaryfcs:admin> secstatsreset DCC_POLICY, "1;69"Reset DCC_POLICY statistic.
See Also secStatsShow
Fabric OS Command Reference 86153-1001764-02

secStatsShow2
secStatsShow
Displays one or all security statistics.
Synopsis secstatsshow [name[, “domain[;domain]”]]
Description Use this command to display one or all security statistics. This command can be issued on any switch to display local security statistics. If an FCS policy is enabled and secStatsShow is issued on the primary FCS switch, this command can retrieve and display the security statistics for any or all switches in the fabric.
Note The execution of this command is subject to Virtual Fabric or Admin Domain restrictions that may be in place. Refer to chapter 1, "Using Fabric OS Commands" and Appendix A, "Command Availability" for details.
Operands When invoked without operands, this command displays the security statistics on the local switch or chassis. The following operands are optional:
name Specify the name of the security statistic you want to view. The specified policy name must be capitalized. If executed on the primary FCS, specify an asterisk (*) to represent all security policies in the fabric. Valid values for this operand are:
TELNET_POLICY
HTTP_POLICY
API_POLICY
RSNMP_POLICY
WSNMP_POLICY
SES_POLICY
MS_POLICY
SERIAL_POLICY
FRONTPANEL_POLICY
SCC_POLICY
DCC_POLICY
LOGIN
INVALID_TS
INVALID_SIGN
INVALID_CERT
AUTH FAIL
SLAP_BAD_PKT
TS_OUT_SYNC
NO_FCS
INCOMP_DB
862 Fabric OS Command Reference53-1001764-02
secStatsShow 2
ILLEGAL_CMD
To access DCC policies, enter DCC_POLICY. Violations are not tracked for individual DCC policies. The statistics for all DCC_POLICY violations are grouped together.
domain Specify one or more domains for which to display the security statistics. Specify an asterisk (*) in quotation marks to represent all switches in the fabric or specify a list of domains separated by semicolons. This option can only be executed when an FCS policy is enabled and the command is issued from the primary FCS switch. When domain is specified, the name operand is required.
Examples To display the MS_POLICY statistics on the local switch or chassis:
switch:admin> secstatsshow MS_POLICYName Value====================MS 20
To display statistic information for TELNET_POLICY for all switches in the fabric from the primary FCS switch.
primaryfsc:admin> secstatsshow TELNET_POLICY, “*”
Fabric Statistics:
Domain 1:Name Value=========================================
TELNET_POLICY 0
Domain 69:Name Value=========================================
TELNET_POLICY 0
Domain 70:Name Value=========================================
TELNET_POLICY 0
See Also secStatsReset
Fabric OS Command Reference 86353-1001764-02

sensorShow2
sensorShow
Displays sensor readings.
Synopsis sensorshow
Description Use this command to display the current temperature, fan, and power supply status and readings from sensors located on the switch. The actual location of the sensors varies, depending on the switch type.
Note The execution of this command is subject to Virtual Fabric or Admin Domain restrictions that may be in place. Refer to chapter 1, "Using Fabric OS Commands" and Appendix A, "Command Availability" for details.
Operands none
Examples To view all sensor values:
switch:admin> sensorshowsensor 1: (Temperature) is Ok, value is 39 Csensor 2: (Temperature) is Absentsensor 3: (Temperature) is Absentsensor 4: (Temperature) is Absentsensor 5: (Temperature) is Ok, value is 26 Csensor 6: (Temperature) is Ok, value is 27 Csensor 7: (Fan ) is Ok, speed is 2537 RPMsensor 8: (Fan ) is Ok, speed is 2537 RPMsensor 9: (Fan ) is Ok, speed is 2556 RPMsensor 10: (Power Supply ) is Oksensor 11: (Power Supply ) is Absentsensor 12: (Power Supply ) is Oksensor 13: (Power Supply ) is Absent
See Also fanShow, tempShow
864 Fabric OS Command Reference53-1001764-02

setContext 2
setContext
Sets the logical switch context to a specified FID.
Synopsis setcontext FID
Description Use this command to set the logical switch context to a specified fabric ID (FID). The FID uniquely defines a partition as a logical switch. Use lscfg --show -cfg to display currently configured partitions and their FIDs.
A logical switch context defines the boundaries within which a user can execute commands in a Virtual Fabric-aware environment. In a Virtual Fabric-aware environment, all commands are context-specific. When a user executes a switch-wide command, the command applies to the current logical switch context.
On legacy platforms, or if a logical switch context is not set explicitly, switch commands apply to the default logical switch context (FID 128). When the context is changed, switch-wide commands apply to the new logical switch context.
You must have chassis permissions to access all logical switches in the chassis and to use the setContext command to change the current context to any partition configured on the chassis. A user without chassis permissions can change contexts only within the list of FIDs specified in the user's access permissions. Refer to userConfig for more information.
Notes The execution of this command is subject to Virtual Fabric or Admin Domain restrictions that may be in place. Refer to chapter 1, "Using Fabric OS Commands" and Appendix A, "Command Availability" for details.
If a logical switch FID is deleted, users logged into that switch are logged out.
Operands This command has the following operand:
FID Specifies the fabric ID of the logical switch instance for which the context is set.
Examples To change the logical switch context to FID 20:
switch:admin> setcontext 20
See Also lsCfg, userConfig
Fabric OS Command Reference 86553-1001764-02

setDbg2
setDbg
Sets the debug level of the specified module.
Synopsis setdbg [module_name][level]
Description Use this command to set the debug level of a specified module. Debug levels filter the display of debug messages to the serial console. By default, no debug messages are displayed.
High debug level values can generate a large volume of messages, degrading the system response time.
The set of supported modules and their current debug levels are displayed by the command dbgShow.
Note The execution of this command is subject to Virtual Fabric or Admin Domain restrictions that may be in place. Refer to chapter 1, "Using Fabric OS commands" and Appendix A, "Command Availability" for details.
Operands This command has the following operands:
module_name Specify the name of the module for which you want to view the debug and verbosity levels. Module names are case-sensitive. This operand is optional; if omitted, this command displays the debug and verbose level for all modules.
level Specify the debug level for the specified module (0 to 9). A zero (0) value (default) specifies that no messages are to display. Higher values cause more messages from that module to display. This operand is optional; if omitted, this command displays the current debug and verbose level of the specified module.
Examples To set the debug level for a module named NS to value 3:
switch:admin> setdbg NS 3switch:admin> dbgshow NSModule NS, debug level = 3, verbose level = 0
See Also dbgShow
866 Fabric OS Command Reference53-1001764-02

setVerbose 2
setVerbose
Specifies module verbose level.
Synopsis setverbose [module_name][level]
Description Use this command to set the verbose level of the specified module. These levels filter the display of the debug message to the serial console. By default, no debug messages are displayed.
Note The execution of this command is subject to Virtual Fabric or Admin Domain restrictions that may be in place. Refer to chapter 1, "Using Fabric OS commands" and Appendix A, "Command Availability" for details.
Operands This command has the following operands:
module_name Specify the name of the module for which the verbose level is to be set; module names are case-sensitive.
level Specify the verbose level (0 to 9).
Examples To set the verbose level of a module named NS to value 3:
switch:admin> setverbose NS 3switch:admin> dbgshow NSModule NS, debug level = 0, verbose level = 3
See Also dbgShow, setDbg
Fabric OS Command Reference 86753-1001764-02

sfpShow2
sfpShow
Displays Small Form-factor Pluggable SFP information.
Synopsis sfpshow
sfpshow [slot/]geport [ -f]
sfpshow -all
Description Use this command to display information about Serial Identification SFPs (also known as module definition "4" SFPs). These SFPs provide extended information that describes the SFP’s capabilities, interfaces, manufacturer, and other information.
Use this command without operands to display a summary of all SFPs in the switch. The summary displays the SFP type and, for serial ID SFP, the vendor name and SFP serial number. Refer to switchShow for an explanation of the two-letter codes.
Use this command with a port number to display detailed information about the serial ID SFP in the specified port. In this mode, this command displays values described in the “Gigabit Interface Converter” spec by Sun Microsystems, et al. Use the -f option to refresh the SFP information. This option is valid only when a spfShow is issued for a specific port.
Use the -all operand to display detailed information for all available SFPs.
For "smart" SFPs including mini-SFPs, this command displays additional fields, including module temperature, voltage, received optical power, transmitted optical power (long wave only), laser diode drive current, optional status/control register, alarm and warning flags, as well as high and low thresholds programmed on the SFPs.
A “Can not read Serial Data!” message indicates that an SFP ID could not be detected on that location (it could be a fixed port type, or an unsupported SFP type, or an interchassis link without a cable).
Notes The sfpShow command does not reflect changes in the sfpShow output if any SFPs are replaced or removed while a port or a switch is disabled.
The execution of this command is subject to Virtual Fabric or Admin Domain restrictions that may be in place. Refer to chapter 1, "Using Fabric OS commands" and Appendix A, "Command Availability" for details.
Operands This command has the following operands:
slot For bladed systems only, specifies the slot number of the port to display, followed by a slash (/)
port Specifies the number of the port for which to display the SFP information, relative to its slot for bladed systems. Use switchShow for a list of valid ports. This operand is optional; if omitted, this command displays a summary of all SFPs on the switch.
-f Refreshes the SFP information. This option is valid only when sfpShow is issued for a specific port.
-all Displays detailed data for all available SFPs on the switch. This operand is not compatible with slot/port operands.
868 Fabric OS Command Reference53-1001764-02

sfpShow 2
Examples To display SFP summary information:
switch:admin> sfpshowSlot 1/Port 0: --Slot 1/Port 1: --Slot 1/Port 2: --Slot 1/Port 3: --Slot 1/Port 4: id (sw) Vendor: IBM Serial No: 21P70530013BP Speed: 100,200_MB/sSlot 1/Port 5: id (sw) Vendor: IBM Serial No: 53P14760099VM Speed: 100,200_MB/sSlot 1/Port 6: --Slot 1/Port 7: --Slot 1/Port 8: id (sw) Vendor: BROCADE Serial No: UAJ10733CVGZYJN Speed: 200,400,800_MB/sSlot 1/Port 9: --Slot 1/Port 10: id (sw) Vendor: BROCADE Serial No: UAJ10732CVGZZGB Speed: 200,400,800_MB/sSlot 1/Port 11: --Slot 1/Port 12: id (sw) Vendor: BROCADE Serial No: UAF108100000F32 Speed: 200,400,800_MB/s
To display detailed SFP information for a smart SFP:
switch:user> sfpshow 12/0Identifier: 3 SFPConnector: 7 LCTransceiver: 540c402000000000 200,400,800_MB/s M5,M6 sw Inter_distEncoding: 1 8B10BBaud Rate: 85 (units 100 megabaud)Length 9u: 0 (units km)Length 9u: 0 (units 100 meters)Length 50u: 5 (units 10 meters)Length 62.5u:3 (units 10 meters)Length Cu: 0 (units 1 meter)Vendor Name: BROCADEVendor OUI: 00:05:1eVendor PN: 57-1000012-01Vendor Rev: AWavelength: 850 (units nm)Options: 001a Loss_of_Sig,Tx_Fault,Tx_DisableBR Max: 0BR Min: 0Serial No: UAA307360005530Date Code: 071007DD Type: 0x68Enh Options: 0xf0Status/Ctrl: 0x82Alarm flags[0,1] = 0x0, 0x0Warn Flags[0,1] = 0x0, 0x40 Alarm Warn low high low highTemperature:48 Centigrade -15 90 -10 85Current: 6.568 mAmps 2.000 8.500 2.000 8.500Voltage: 3318.4 mVolts 2800.0 3800.0 2970.0 3630.0RX Power: -32.2 dBm (0.6 uW) 0.0 uW 6550.0 uW 49.0 uW 1100.0 uWTX Power: -2.5 dBm (566.4 uW) 50.0 uW 800.0 uW 100.0 uW 700.0 uW
Fabric OS Command Reference 86953-1001764-02

sfpShow2
To display mini-SFPs on a DCX-4S with a FC8-64 blade:
switch:user> setcontext 52switch:user> sfpshow
Slot 8/Port 60: id (sw) Vendor: BROCADE Serial No: UYA109291003972 Speed: 200,400,800_MB/s
Slot 8/Port 61: id (sw) Vendor: BROCADE Serial No: UYA109301011012 Speed: 200,400,800_MB/s
Slot 8/Port 62: id (sw) Vendor: BROCADE Serial No: UYA109291004082 Speed: 200,400,800_MB/s
To display mini-SFP details on a DCX with an FC8-64 blade:
switch:user> sfpshow 12/8Identifier: 3 SFPConnector: 7 LCTransceiver: 540c402000000000 200,400,800_MB/s M5,M6 sw Inter_distEncoding: 1 8B10BBaud Rate: 85 (units 100 megabaud)Length 9u: 0 (units km)Length 9u: 0 (units 100 meters)Length 50u: 5 (units 10 meters)Length 62.5u:3 (units 10 meters)Length Cu: 0 (units 1 meter)Vendor Name: BROCADE Vendor OUI: 00:05:21Vendor PN: 57-1000046-01 Vendor Rev: A Wavelength: 850 (units nm)Options: 001a Loss_of_Sig,Tx_Fault,Tx_DisableBR Max: 0 BR Min: 0 Serial No: UYA109301009212 Date Code: 090723 DD Type: 0x68Enh Options: 0xf0Status/Ctrl: 0x80Alarm flags[0,1] = 0x0, 0x0Warn Flags[0,1] = 0x0, 0x0
Alarm Warn low high low highTemperature:30 Centigrade -15 90 -10 85Current: 5.648 mAmps 2.000 8.500 2.000 8.500 Voltage: 3300.0 mVolts 2800.0 3800.0 2970.0 3630.0 RX Power: -2.5 dBm (565.9 uW) 0.0 uW 6550.0 uW 49.0 uW 1100.0 uWTX Power: -2.6 dBm (551.6 uW) 50.0 uW 800.0 uW 100.0 uW 700.0 uWswitch:admin>
To display detailed information for GbE port 0 on a Brocade 7800 extension switch:
switch:admin> sfpshow ge0dentifier: 3 SFPConnector: 0Transceiver: 0000000008000000 idEncoding: 1 8B10BBaud Rate: 13 (units 100 megabaud)Length 9u: 0 (units km)
870 Fabric OS Command Reference53-1001764-02

sfpShow 2
Length 9u: 0 (units 100 meters)Length 50u: 0 (units 10 meters)Length 62.5u:0 (units 10 meters)Length Cu: 100 (units 1 meter)Vendor Name: BROCADEVendor OUI: 00:05:1eVendor PN: 57-1000042-01Vendor Rev: AWavelength: 0 (units nm)Options: 0010 Tx_DisableBR Max: 0BR Min: 0Serial No: CZA109302000053Date Code: 090504DD Type: 0x0Enh Options: 0x0
To display detailed information for GbE port 0 on an FR4-18i blade:
CS48000:admin> sfpshow 10/ge0Identifier: 3 SFPConnector: 7 LCTransceiver: 050c402000000000 100,200_MB/s M5,M6 sw Inter_distEncoding: 1 8B10BBaud Rate: 21 (units 100 megabaud)Length 9u: 0 (units km)Length 9u: 0 (units 100 meters)Length 50u: 30 (units 10 meters)Length 62.5u:15 (units 10 meters)Length Cu: 0 (units 1 meter)Vendor Name: AGILENTVendor OUI: 00:30:d3Vendor PN: HFBR-5720LVendor Rev:Wavelength: 0 (units nm)Options: 001a Loss_of_Sig,Tx_Fault,Tx_DisableBR Max: 0BR Min: 0Serial No: A00143427Date Code: 020511DD Type: 0x0Enh Options: 0x0
To display all SFP information:
switch:user> sfpshow -all
=============Port 0:=============Identifier: 3 SFPConnector: 7 LCTransceiver: 050c402000000000 100,200_MB/s M5,M6 sw Inter_distEncoding: 1 8B10BBaud Rate: 21 (units 100 megabaud)Length 9u: 0 (units km)Length 9u: 0 (units 100 meters)Length 50u: 30 (units 10 meters)Length 62.5u:15 (units 10 meters)
Fabric OS Command Reference 87153-1001764-02

sfpShow2
Length Cu: 0 (units 1 meter)Vendor Name: IBMVendor OUI: 08:00:5aVendor PN: IBM42P21SNYVendor Rev: AA10Wavelength: 0 (units nm)Options: 001a Loss_of_Sig,Tx_Fault,Tx_DisableBR Max: 5BR Min: 5Serial No: 21P7053164529Date Code: 01060501DD Type: 0x0Enh Options: 0x0
=============Port 1:=============Identifier: 3 SFPConnector: 7 LCTransceiver: 050c402000000000 100,200_MB/s M5,M6 sw Inter_distEncoding: 1 8B10BBaud Rate: 21 (units 100 megabaud)Length 9u: 0 (units km)Length 9u: 0 (units 100 meters)Length 50u: 30 (units 10 meters)Length 62.5u:15 (units 10 meters)Length Cu: 0 (units 1 meter)Vendor Name: IBMVendor OUI: 08:00:5aVendor PN: IBM42P21SNYVendor Rev: AA10Wavelength: 0 (units nm)Options: 001a Loss_of_Sig,Tx_Fault,Tx_DisableBR Max: 5BR Min: 5Serial No: 21P70530005BWDate Code: 01062301DD Type: 0x0Enh Options: 0x0
(output truncated)
See Also switchShow
872 Fabric OS Command Reference53-1001764-02

shellFlowControlDisable 2
shellFlowControlDisable
Disables XON/XOFF flow control on the console serial port.
Synopsis shellflowcontroldisable
Description Use this command to disable XON/XOFF flow control on the console serial port. Flow control is disabled by default.
Because this command changes the flow control on the console serial port, it must be executed from a session that is logged in from the console serial port. This command cannot run from a Telnet session.
This setting is saved in the configuration database; therefore, it is persistent across reboots and power cycles.
Notes On dual-CP systems, a reboot on the standby CP is required for this command to take effect. No action is required on the active CP.
The execution of this command is subject to Virtual Fabric or Admin Domain restrictions that may be in place. Refer to chapter 1, "Using Fabric OS commands" and Appendix A, "Command Availability" for details.
Operands none
Examples To disable flow control:
switch:admin> shellflowcontroldisableDisabling flowcontrolflow control is now disabled
See Also shellFlowControlEnable
Fabric OS Command Reference 87353-1001764-02

shellFlowControlEnable2
shellFlowControlEnable
Enables XON/XOFF flow control on the console serial port.
Synopsis shellflowcontrolenable
Description Use this command to enable XON/XOFF flow control to the shell task. Flow control is disabled by default.
Because this command changes the flow control on the console serial port, it must be executed from a session that is logged in from the console serial port. This command cannot run from a Telnet session.
This setting is saved in the configuration database; therefore, it is persistent across reboots and power cycles.
Notes On dual-CP systems, a reboot on the standby CP is required for this command to take effect. No action is required on the active CP.
If flow control is enabled and if the console output is suspended for an extended period of time, the switch might reboot. It is recommended to disable the flow control, using shellFlowControlDisable.
The execution of this command is subject to Virtual Fabric or Admin Domain restrictions that may be in place. Refer to chapter 1, "Using Fabric OS commands" and Appendix A, "Command Availability" for details.
Operands none
Examples To enable flow control:
switch:admin> shellflowcontrolenableEnabling flowcontrolflow control is now enabled
See Also shellFlowControlDisable
874 Fabric OS Command Reference53-1001764-02

slotPowerOff 2
slotPowerOff
Removes power from a slot.
Synopsis slotpoweroff slot
Description Use this command to turn off the power to a blade unit. The slot must have a valid blade unit present and the blade unit must be of a type that can be powered off.
Note The execution of this command is subject to Virtual Fabric or Admin Domain restrictions that may be in place. Refer to chapter 1, "Using Fabric OS commands" and Appendix A, "Command Availability" for details.
Operands This command has the following operand:
slot Specify the slot number of the blade to be powered down. This operand is required.
Examples To power off blade unit 3:
switch:admin> slotpoweroff 3Slot 3 is being powered off
See Also powerOffListSet, powerOffListShow, slotPowerOn, slotShow
Fabric OS Command Reference 87553-1001764-02

slotPowerOn2
slotPowerOn
Restores power to a slot.
Synopsis slotpoweron slot
Description Use this command to turn on the power to a blade unit. The slot must have a valid blade unit present and the blade unit must be currently powered off. The slotShow command reports such slots as being in the state of INSERTED, NOT POWERED ON.
Note The execution of this command is subject to Virtual Fabric or Admin Domain restrictions that may be in place. Refer to chapter 1, "Using Fabric OS commands" and Appendix A, "Command Availability" for details.
Operands This command has the following operand:
slot Specify the slot number of the blade to be powered on. This operand is required.
Examples To power on blade unit 3:
switch:admin> slotpoweron 3Powering on slot 3.
See Also slotPowerOff, slotShow
876 Fabric OS Command Reference53-1001764-02

slotShow 2
slotShow
Displays the status of all slots in the system.
Synopsis slotshow [-m] [-p]
Description Use this command to display the current status of each slot in the system. Depending on the option used, the command retrieves information on blade type, blade ID, status, Brocade model name, and power usage for each slot in the switch or chassis.
When no operand is specified, slotShow displays the blade type, blade ID, and status for each slot. In this view, the fields and their possible values are as follows:
Slot Displays the physical slot number.
Blade Type Displays the blade type as one of the following:.
SW BLADE The blade is a switch.
CP BLADE The blade is a control processor.
CORE BLADE The blade is a core switch blade.
AP BLADE The blade is an application processor.
UNKNOWN The blade not present or its type is not recognized.
ID Displays the blade type ID as one of the following:
16 CP256 control processor blade
17 FC4-16 port blade
18 FC4-32 port blade
24 FR4-18i port blade
31 FC4-16IP port blade
33 FA4 -18 port blade
36 FC4-48 port blade
39 FC10-6 port blade
43 FS8-18 encryption blade
46 CR4S-8 core blade
50 CP8 control processor blade
52 Core8 switch blade
37 FC8-16 port blade
55 FC8-32 port blade
51 FC8-48 port blade
55 FC8-32 port blade
74 FCoE10-24 port blade
75 FX8-24 port blade
77 FC8-64 port blade
Fabric OS Command Reference 87753-1001764-02

slotShow2
Status Displays the status of the blade as one of the following:
VACANT The slot is empty.
INSERTED, NOT POWERED ON
The blade is present in the slot but is turned off.
POWERING UP The blade is present and powering on.
LOADING The blade is present, powered on, and loading the initial configuration.
DIAG RUNNING POST1
The blade is present, powered on, and running the POST (power-on self-test).
DIAG RUNNING POST2
The blade is present, powered on, and running the preboot power on self tests.
INITIALIZING The blade is present, powered on, and initializing hardware components.
ENABLED The blade is on and fully enabled.
ENABLED (SAS Virtualization Disabled)
The blade is on, but due to an incompatibility between the FOS image and the SAS or Application image, the SAS Virtualization services are disabled. Only applies to the FA4-18 blade.
DISABLED The blade is powered on but disabled.
FAULTY The blade is faulty because an error was detected.
UNKNOWN The blade is inserted but its state cannot be determined.
Note The execution of this command is subject to Virtual Fabric or Admin Domain restrictions that may be in place. Refer to chapter 1, "Using Fabric OS Commands" and Appendix A, "Command Availability" for details.
Operands This command supports the following operands:
-p In addition to the basic slot status view, displays the following information about power consumption:
• Total direct current (DC) power consumption for the chassis and individual values for each blade (in Watts). Note that usage for other components is included but not listed.
• Total alternating current (AC) power consumption in Watts.• AC efficiency, as a percentage of total and BTU.• Power efficiency in Watts/port and Watts/Gb.
-m In addition to the basic slot status view, displays the Brocade model name for each blade.
878 Fabric OS Command Reference53-1001764-02

slotShow 2
Examples To display a basic view of all slots and their status:
switch:user> slotshowSlot Blade Type ID Status-----------------------------------1 SW BLADE 51 FAULTY (21)2 SW BLADE 51 DISABLED3 SW BLADE 55 ENABLED4 SW BLADE 51 DIAG RUNNING POST25 CORE BLADE 52 ENABLED6 CP BLADE 50 ENABLED7 CP BLADE 50 ENABLED8 CORE BLADE 52 ENABLED9 UNKNOWN VACANT10 AP BLADE 33 LOADING11 SW BLADE 55 DIAG RUNNING POST112 SW BLADE 51 INSERTED, NOT POWERED ON 1
To display power consumption information:
switch:user> slotshow -pSlot Blade Type ID DC Power Status Consumption------------------------------------------------- 1 SW BLADE 77 130 ENABLED 2 SW BLADE 51 115 ENABLED 3 CORE BLADE 46 60 ENABLED 4 CP BLADE 50 40 ENABLED 5 CP BLADE 50 40 ENABLED 6 CORE BLADE 46 60 ENABLED 7 AP BLADE 74 250 ENABLED 8 AP BLADE 74 250 FAULTY (21)Total DC Power Consumption: 1199 wattsTotal AC Power Consumption: 1332 watts AC @ 90% efficiency (4546 BTU)Power Efficiency: 1.04 watts per port, 0.26 watts per Gb
To display Brocade model names for each blade in a Brocade DCX:
switch:user> slotshow -m Slot Blade Type ID Model Name Status-------------------------------------------------- 1 AP BLADE 33 FA4-18 ENABLED 2 SW BLADE 55 FC8-32 ENABLED 3 SW BLADE 37 FC8-16 ENABLED 4 SW BLADE 39 FC10-6 ENABLED 5 CORE BLADE 52 CORE8 ENABLED 6 CP BLADE 50 CP8 ENABLED 7 CP BLADE 50 CP8 ENABLED 8 CORE BLADE 52 CORE8 ENABLED 9 SW BLADE 37 FC8-16 ENABLED 10 SW BLADE 51 FC8-48 ENABLED 11 UNKNOWN VACANT 12 SW BLADE 51 FC8-48 ENABLED
Fabric OS Command Reference 87953-1001764-02

slotShow2
To display Brocade model names for each blade in a Brocade DCX-4S:
switch:user> slotshow -m Slot Blade Type ID Model Name Status-------------------------------------------------- 1 AP BLADE 43 FS8-18 ENABLED 2 SW BLADE 51 FC8-48 ENABLED 3 CORE BLADE 46 CR4S-8 ENABLED 4 CP BLADE 50 CP8 ENABLED 5 CP BLADE 50 CP8 ENABLED 6 CORE BLADE 46 CR4S-8 ENABLED 7 SW BLADE 37 FC8-16 ENABLED 8 SW BLADE 77 FC8-64 ENABLED
To display Brocade model names for each blade in a Brocade DCX-4S:
switch:user> slotshow -m Slot Blade Type ID Model Name Status-------------------------------------------------- 1 SW BLADE 36 FC4-48 ENABLED 2 SW BLADE 36 FC4-48 ENABLED 3 SW BLADE 18 FC4-32 ENABLED 4 UNKNOWN VACANT 5 CP BLADE 16 CP256 ENABLED 6 CP BLADE 16 CP256 ENABLED 7 SW BLADE 18 FC4-32 ENABLED 8 AP BLADE 31 FC4-16IP ENABLED 9 SW BLADE 18 FC4-32 ENABLED 10 SW BLADE 39 FC10-6 ENABLED
See Also bladeDisable, bladeEnable, chassisShow, slotPowerOff, slotPowerOn
880 Fabric OS Command Reference53-1001764-02

snmpConfig 2
snmpConfig
Manages the SNMP agent configuration.
Synopsis snmpConfig --show | --set | --default [snmpv1 | snmpv3 | accessControl | mibCapability | systemGroup | seclevel]
snmpConfig --set mibCapability [-mib_name mib_name [ -bitmask bit_mask]]
snmpConfig --enable |--disable mibCapability --mib_name mib_name [-trap_name trap_name]
snmpConfig --help
Description Use this command to manage the configuration of the SNMP agent in the switch. The configuration includes SNMPv1 and SNMPv3 configuration, access control list (ACL), MIB capability, system group, and security level settings. The command supports set, reset to default, and display operations.
The SNMP Agent configuration interface is interactive for all parameters except mibCapability, which can be configured both interactively and with command-line options on platforms running Fabric OS v6.4.0 and later. The enhanced command-line interface supports enabling or disabling a single MIB or all MIBs, configuring a single trap only, and managing traps in excess of 32.
In Fabric OS v6.3.0 and later, the SNMPv3 configuration supports sending inform requests as an alternative to trap requests. Traps are unreliable because the receiver does not send any acknowledgment when it receives a trap. The sender cannot determine if the trap was received. However, an SNMP manager that receives an inform request acknowledges the message with an SNMP response protocol data unit (PDU). If the manager does not receive an inform request, it does not send a response. If the sender never receives a response, the inform request can be sent again. Thus, informs are more likely to reach their intended destination.
All values successfully changed by this command take effect immediately and are persistent across power cycles and reboots.
Note The execution of this command is subject to Virtual Fabric or Admin Domain restrictions that may be in place. Refer to chapter 1, "Using Fabric OS commands" and Appendix A, "Command Availability" for details.
Informs are currently not supported for IPv6 addresses.
Operands This command supports the following operands:
--help Displays the command usage.
--show Displays the SNMP agent configuration data of the specified category.
--set Sets the SNMP agent configuration data of the specified category. This operand displays the current settings and then prompts you to change the values for each parameter.
--default Sets the SNMP agent configuration data for a specified item to the default values. Generally, these default values may be available in the configuration database. The command sets to factory defaults if the SNMP agent configuration parameters are not available in the configuration database.
Fabric OS Command Reference 88153-1001764-02

snmpConfig2
--show, --set, and --default support the following arguments:
snmpv1 Selects SNMPv1-related configuration parameters. These parameters include the community string, trap recipient IP address, and trap severity level associated with each trap recipient IP address. When "0" is configured as a trap port, traps can be received at the default port 162.
snmpv3 Selects SNMPv3-related configuration parameters. These parameters include the user name, authentication protocol and password, the privacy protocol and password, the SNMPv3 trap recipient’s IP address, its associated user index and trap severity level. When "0" is configured as a trap port, traps can be received at the default port 162.
In Fabric OS 6.3.0 and later, the --set snmpv3 command supports an interactive option to enable or disable informs by setting the parameter “SNMP Informs Enabled” to true or false. If informs are enabled, all trap destinations receive inform requests. If informs are disabled, all trap destinations receive trap requests. When informs are enabled, the engine ID must be set to correspond to the management engine IP address (see example). Informs are by default disabled. IPv6 Informs are currently not supported.
accessControl Selects access-control-related parameters. These parameters include the access host subnet area and access permission (read-write).
mibCapability Selects configuration parameters related to the SNMP agent’s MIBs and trap capability parameters. These parameters include MIBs and traps supported by the SNMP agent.
systemGroup Selects configuration parameters related to the system group. These parameters include sysDescr, sysLocation, sysContact, and authentication failure trap.
secLevel Sets the SNMP security level.
SNMPv1 Configuration ParametersThe agent supports six communities and their associated trap recipients and trap recipient severity levels. The first three communities are for read-write (rw) access and the last three are for read-only (ro) access. The default value for the trap recipient of each community is 0.0.0.0. The length of the community string should be in the range of 2 to 16 characters. The default values for the community strings are:
Community 1: Secret Code
Community 2: OrigEquipMfr
Community 3: private
Community 4: public
Community 5: common
Community 6: FibreChannel
When an FCS policy s enabled, community strings can be changed on the primary FCS switch only, and only the primary FCS switch propagates changes across the fabric.
882 Fabric OS Command Reference53-1001764-02

snmpConfig 2
For an SNMP management station to receive a trap generated by the agent, the administrator must configure a trap recipient to correspond to the IP address of the management station. In addition, the trap recipient must be able to pass the access control list (ACL) check as described in the Access Control category.
Trap Recipient Severity LevelWhen an event occurs and its severity level is at or below the set value, the Event Trap traps (swEventTrap, connUnitEventTrap and swFabricWatchTrap), are sent to configured trap recipients. By default, this value is set at 0, implying that no Event Trap is sent. Possible values are
0 None
1 Critical
2 Error
3 Warning
4 Informational
5 Debug
SNMPv3 Configuration ParametersTwo user roles, snmpadmin and snmpuser are supported. The snmpadmin role provides read-write access and the snmpuser role provides read-only access. Entries are added to the USM table corresponding to each role. A total of three entries for snmpadmin and snmpuser respectively are supported. Separate default passwords are provided for creation of authKey and privKey for each entry. The default set of passwords is published and the default algorithm (MD5/SHA) is used to create the initial set of authentication keys. You can change these passwords using this option. You can select the authentication protocol MD5/SHA or no authentication for each entry.
The following combinations of protocols are supported:
NoAuth/NoPriv
Auth/NoPriv
Auth/Priv
The user name must be between 2 and 32 characters long. The default user names are defined with the noAuth and noPriv protocol. The factory default SNMPv3 user names are:
User 1: snmpadmin1
User 2: snmpadmin2
User 3: snmpadmin3
User 4: snmpuser1
User 5: snmpuser2
User 6: snmpuser3
The --default option sets the user name and password to default.
If an FCS policy is enabled, the configuration has to be updated on the primary switch and the nonprimary switches; unlike community strings, user names and passwords are not distributed for other switches in the fabric.
Fabric OS Command Reference 88353-1001764-02

snmpConfig2
When new passwords are entered for any user entry, a new authKey and privKey are generated. The new passwords must be updated on the client (e.g., MIB browser) as well. AuthKey and privKey can also be updated with the delta key mechanism provided by the SNMPv3 protocol.
The system prompts for password confirmation if a protocol other than NoAuth/NoPriv is selected. Protocol passwords must be between 1 and 20 characters.
In order for an SNMP management station to receive SNMPv3 traps generated by the agent, the administrator must configure a trap recipient value to correspond to the IP address of the management station. In addition, the trap recipient must pass the ACL check as described in the Access Control section. The trap recipient must be associated with one of the six users of SNMPv3 and trap severity level. The factory default value for the SNMPv3 trap recipient of each user is 0.0.0.0.
Access Control Configuration ParametersThe ACL check is as follows: there are six ACLs to restrict SNMP get, set, and trap operations to hosts under an host-subnet-area. The host-subnet-area is defined by comparing nonzero IP octets. For example, an ACL of 192.168.64.0 enables access by any hosts that start with the specified octets. The connecting host is enabled to set each host-subnet-area to be read-write or read-only. The closest match out of six entries is given access. The ACL check is turned off when all six entries contain 0.0.0.0. The default values of all six entries are 0.0.0.0. For IPv6 subnets, the format is specified by an IPv6 address followed by the number of fixed bits in the address.
MIB Capability Configuration ParametersThe mibCapability option turns certain MIBS and associated SNMP traps on or off. If a specific MIB is disabled, the corresponding traps also are disabled. If any trap group is disabled, the corresponding individual traps are also disabled. Use the --show mibCapability option to display the traps configurable under each MIB. For more information, refer to the Fabric OS MIB Reference.
The following MIB configuration options are supported:
--set mibCapability Configures MIBs interactively. When used without a MIB name, this command displays a menu with supported MIBs and associated traps, and for each MIB or trap, you are prompted to confirm or change the default by specifying yes or no. Specifying yes means you can access the MIB variables with an SNMP manager.
For two traps under the SW-TRAP category, the swEventTrap and the swFabricWatchTrap, this command provides the option to specify a severity levels to control the number of generated alerts. When a severity level is configured, traps below the specified severity level specified are not sent. Refer to the example section for an illustration. Specify one of the following values:
0 None (default)
1 Critical
2 Error
3 Warning
4 Informational
884 Fabric OS Command Reference53-1001764-02

snmpConfig 2
-mib_name mib_name Specifies the name of the MIB to be configured. This operand is required if you want to configure MIB traps noninteractively. Valid MIB names include the following.
• FE-MIB• SW-MIB • FA-MIB• FICON-MIB• HA-MIB• FCIP-MIB• ISCSI-MIB• IF-MIB• BD-MIB
-bitmask bit_mask Specifies the bit mask for the MIB. In Fabric OS v6.4.0 and later, SNMP Traps are identified by their bit mask and can be read directly from the switch configuration. The MIB and trap status (enabled or disabled) status is recorded in a 64- bit counter. The last bit (bit 0) is reserved for the MIB and the remaining bits are reserved for the traps of that MIB. The trap's position is allocated based on the last ID of the trap OID. For example, the last ID of the swEventTrap is 5 so its position will be 5th from the right. Refer to Table 25 for a listing of valid bit masks.
TABLE 25 SNMP Trap bit mask values
MIB Trap Name Bit mask Default
FE-MIB (Fibre Channel FE evants) 0x1 Enabled
SW-MIB (switch events) 0x1 Enabled
swFault 0x2 Enabled
swSensorScn 0x4 Enabled
swFCPortScn 0x8 Enabled
swEventTrap 0x10 Enabled
swFabricWatchTrap 0x20 Enabled
swTrackChangeTraps 0x40 Enabled
swIPv6ChangeTrap 0x80 Enabled
swPmgrEventTrap 0x100 Enabled
swFabricSegmentTrap 0x200 Disabled
swFabricReconfigTrap 0x400 Disabled
swExtTrap 0x800 Disabled
FA-MIB (fabric events) 0x1 Enabled
connUnitStatusChange(1) 0x2 Enabled
connUnitAddedTrap (2) N/A Enabled
connUnitDeletedTrap (3) 0x8 Enabled
connUnitEventTrap (4) 0x10 Enabled
Fabric OS Command Reference 88553-1001764-02

snmpConfig2
--enable mibCapability -mib_name mib_name Enables the specified MIB noninteractively.
--disable mibCapability -mib_name mib_name Disables the specified MIB noninteractively. When used with the trap name operand, only the specified trap is disabled.
-trap_name trap_name Specifies the name of the trap to be enabled or disable. This operand is optional. Use snmpConfig --show mibCapability for a listing of valid traps.
System Group Configuration Parameters
sysDescr The system description. The default value is Fibre Channel switch.
sysLocation The location of the system (switch). The default value is End User Premise. The string must be at least 4 characters in length; the maximum length is 255 characters.
connUnitSensorStatusChange (5) 0x20 Enabled
connUnitPortStatusChange (6) 0x40 Enabled
FICON-MIB (FICON events) 0x1 Enabled
linkRNIDDeviceRegistration (1) 0x2 Enabled
linkRNIDDevicedeRegistration (2) 0x4 Enabled
linkLIRRListenerAdded (3) 0x8 Enabled
linkLIRRListenerRemoved (4) 0x10 Enabled
linkRLIRFailureIncident (5) 0x20 Enabled
HA-MIB (High-Availability events) 0x1 Enabled
fruStatusChanged (1) 0x2 Enabled
cpStatusChanged (2) 0x4 Enabled
fruHistoryTrap (3) 0x8 Enabled
FCIP-MIB (FCIP events) 0x1 Enabled
ISCSI-MIB (ISCSI events) 0x1 Enabled
iscsiTgtLoginFailure (1) 0x2 Enabled
iscsiTgtLoginFailure (2) 0x4 Enabled
iscsiTgtLoginFailure (3) 0x8 Enabled
IF-MIB (link status events) Enabled
linkUpTrap (3) 0x8 Enabled
linkdownTrap (4) 0x10 Enabled
BD-MIB (bottleneck detection events) Enabled
bdTrap (1) 0x2 Enabled
bdClearTrap (2) 0x4 Enabled
TABLE 25 SNMP Trap bit mask values
MIB Trap Name Bit mask Default
886 Fabric OS Command Reference53-1001764-02

snmpConfig 2
sysContact The contact information for this system (switch). The default value is Field Support. Refer to the definition of sysDescr, sysLocation and sysContact in the system group of MIB-II. The string must be at least 4 characters in length; the maximum length is 255 characters.
authTraps When enabled, the authentication trap (authenticationFailure) is transmitted to a configured trap recipient in the event that the agent receives a protocol message that is not properly authenticated. In the context of SNMPv1 and SNMPv2c, this means that a request contains a community string that is not known to the agent. The default value for this parameter is 0 (disabled).
Security Level ParametersThe --show option displays the current SNMP GET security and SNMP SET security levels. Use --set secLevel to modify existing settings:
SNMP GET security level Specifies security level for all SNMP GET requests.
SNMP SET security level Specifies security level for SNMP SET requests only.
Values are: 0 No security.
1 Authentication only.
2 Authentication and Privacy.
3 OFF
Examples To display the SNMPv1 configuration:
switch:admin> snmpConfig --show snmpv1SNMPv1 community and trap recipient configuration: Community 1: Secret C0de (rw) Trap recipient: 10.32.147.113 Trap recipient Severity Level: 0 Community 2: OrigEquipMfr (rw) Trap recipient: 1080::8:800:200C:1234 Trap recipient Severity Level: 0 Community 3: private (rw) No trap recipient configured yet Community 4: public (ro) No trap recipient configured yet Community 5: common (ro) No trap recipient configured yet Community 6: FibreChannel (ro) No trap recipient configured yet
To set the SNMPv1 configuration of a switch:
switch:admin> snmpConfig --set snmpv1SNMP community and trap recipient configuration:Community (rw): [Secret C0de]Trap Recipient's IP address: [0.0.0.0] 1080::8:800:200C:1234Community (rw): [OrigEquipMfr] string size must be between 2 and 16 - please re-enterCommunity (rw): [OrigEquipMfr]Trap Recipient's IP address: [1080::8:800:200C:1230] 10.32.147.113Community (rw): [private]Trap Recipient's IP address: [0.0.0.0]
Fabric OS Command Reference 88753-1001764-02

snmpConfig2
Community (ro): [public]Trap Recipient's IP address: [0.0.0.0]Community (ro): [common]Trap Recipient's IP address: [0.0.0.0]Community (ro): [FibreChannel]Trap Recipient's IP address: [0.0.0.0]
To set the access control configuration:
switch:admin> snmpconfig --set accessControl SNMP access list configuration: Access host subnet area in dot notation: [0.0.0.0] 192.168.0.0 Read/Write? (true, t, false, f): [true] Access host subnet area in dot notation: [0.0.0.0] 10.32.148.0 Read/Write? (true, t, false, f): [true] f Access host subnet area in dot notation: [0.0.0.0] Read/Write? (true, t, false, f): [true] Access host subnet area in dot notation: [0.0.0.0] 10.33.0.0 Read/Write? (true, t, false, f): [true] f Access host subnet area in dot notation: [0.0.0.0] Read/Write? (true, t, false, f): [true] Access host subnet area in dot notation: [0.0.0.0] Read/Write? (true, t, false, f): [true] Committing configuration...done.
To set the severity level for switch events and Fabric Watch alerts:
switch:admin> snmpconfig --set mibCapabilityThe SNMP Mib/Trap Capability has been set to supportSW-TRAP (yes, y, no, n): [yes] swFCPortScn (yes, y, no, n): [yes] swEventTrap (yes, y, no, n): [yes] Desired Serverity Level (1- critical 2- error 3 -warning 4- informational 0 -None): 4 swFabricWatchTrap (yes, y, no, n): [yes] Desired Serverity Level (1- critical 2- error 3 -warning 4- informational 0 -None): 2[...]
To enable the swFabricWatchTrap noninteractively:
switch:admin> snmpconfig --enable mibCapability -mib_name SW-MIB -trap_name swFabricWatchTrapOperation succeeded
To enable the swEventTrap of the SW-MIB category only (this operation disables all other SNMP traps in this MIB category):
switch:admin> snmpconfig --set mibCapability -mib_name SW-MIB -bitmask 0x10Operation succeeded
switch:admin> snmpconfig --show mibCapability [...]SW-TRAP: NO swFault: NO swSensorScn: NO swFCPortScn: NO swEventTrap: YES DesiredSeverity:4 swFabricWatchTrap: NO DesiredSeverity:2 swTrackChangesTrap: NO
888 Fabric OS Command Reference53-1001764-02

snmpConfig 2
swIPv6ChangeTrap: NO swPmgrEventTrap: NO swFabricReconfigTrap: NO swFabricSegmentTrap: NO swExtTrap: NO[...]
To enable the SW-MIB MIB only without changing the current trap configuration:
switch:admin> snmpconfig --enable mibCapability -mib_name SW-MIB Operation succeeded
switch:admin> snmpconfig --show mibCapability[...]SW-TRAP: YESswFault: NO swSensorScn: NO swFCPortScn: NO swEventTrap: YES DesiredSeverity:4 swFabricWatchTrap: NO DesiredSeverity:2 swTrackChangesTrap: NO swIPv6ChangeTrap: NO swPmgrEventTrap: NO swFabricReconfigTrap: NO swFabricSegmentTrap: NO swExtTrap: NO[...]
To re-enable all traps under the SW-MIB category:
switch:admin> snmpconfig --set mibCapability -mib_name SW-MIB -bitmask 0xFFFOperation succeeded
switch:admin> snmpconfig --show mibCapability [...]SW-TRAP: YES swFault: YES swSensorScn: YES swFCPortScn: YES swEventTrap: YES DesiredSeverity:None swFabricWatchTrap: YES DesiredSeverity:None swTrackChangesTrap: YES swIPv6ChangeTrap: YES swPmgrEventTrap: YES swFabricReconfigTrap: Yes swFabricSegmentTrap: Yes swExtTrap: Yes
[...]
Fabric OS Command Reference 88953-1001764-02

snmpConfig2
To display the configuration for all MIBs and associated traps:
switch:admin> snmpconfig --show mibCapabilityFE-MIB: YESSW-MIB: YESFA-MIB: YESFICON-MIB: YESHA-MIB: YESFCIP-MIB: YESISCSI-MIB: YESIF-MIB: YESBD-MIB: YESSW-TRAP: NO swFault: NO swSensorScn: NO swFCPortScn: NO swEventTrap: NO DesiredSeverity:None swFabricWatchTrap: NO DesiredSeverity:None swTrackChangesTrap: NO swIPv6ChangeTrap: NO swPmgrEventTrap: NO swFabricReconfigTrap: NO swFabricSegmentTrap: NO swExtTrap: NOFA-TRAP: NO connUnitStatusChange: NO connUnitDeletedTrap: NO connUnitEventTrap: NO connUnitSensorStatusChange: NO connUnitPortStatusChange: NOFICON-TRAP: NO linkRNIDDeviceRegistration: NO linkRNIDDeviceDeRegistration: NO linkLIRRListenerAdded: NO linkLIRRListenerRemoved: NO linkRLIRFailureIncident: NOHA-TRAP: NO fruStatusChanged: NO cpStatusChanged: NO fruHistoryTrap: NOISCSI-TRAP: NO iscsiTgtLoginFailure: NO iscsiIntrLoginFailure: NO iscsiInstSessionFailure: NOIF-TRAP: NO linkDown: NO linkUp: NOBD-TRAP: NO bdTrap: NO bdClearTrap: NOswicth:admin>
890 Fabric OS Command Reference53-1001764-02

snmpConfig 2
To restore the systemGroup configuration to default values:
switch:admin> snmpconfig --default systemGroup ***** This command will reset the agent's system group configuration back to factory default ***** sysDescr = Fibre Channel Switch sysLocation = End User Premise sysContact = Field Support authTraps = 0 (OFF)
***** Are you sure? (yes, y, no, n): [no] y
To set the security level:
switch:admin> snmpconfig --set seclevel Select SNMP Security Level (0 = No security, 1 = Authentication only, 2 = Authentication and Privacy, 3 = No Access): (0..3) [0] 1
Select SNMP SET Security Level (0 = No security, 1 = Authentication only, 2 = Authentication and Privacy, 3 = No Access): (1..3) [1]
To display the SNMP3 configuration with informs disabled (In this example, the Engine ID in the user1 entry corresponds to the engine ID of the trap manager in Trap Entry 2: 10.103.5.105):
switch:admin> snmpconfig --show snmpv3
SNMP Informs = 1 (ON)
SNMPv3 USM configuration:User 1 (rw): snmpadmin1 Auth Protocol: noAuth Priv Protocol: noPriv Engine ID: 00:00:00:00:00:00:00:00:00User 2 (rw): snmpadmin2 Auth Protocol: noAuth Priv Protocol: noPriv Engine ID: 80:00:05:23:01:0a:23:34:22User 3 (rw): snmpadmin3 Auth Protocol: noAuth Priv Protocol: noPriv Engine ID: 00:00:00:00:00:00:00:00:00User 4 (ro): snmpuser1 Auth Protocol: noAuth Priv Protocol: noPriv Engine ID: 00:00:00:00:00:00:00:00:00User 5 (ro): snmpuser2 Auth Protocol: noAuth Priv Protocol: noPriv Engine ID: 00:00:00:00:00:00:00:00:00User 6 (ro): snmpuser3 Auth Protocol: noAuth Priv Protocol: noPriv Engine ID: 00:00:00:00:00:00:00:00:00
SNMPv3 Trap configuration:
Fabric OS Command Reference 89153-1001764-02

snmpConfig2
Trap Entry 1: No trap recipient configured yetTrap Entry 2: 10.35.52.34 Trap Port: 162 Trap User: snmpadmin2 Trap recipient Severity level: 5Trap Entry 3: No trap recipient configured yetTrap Entry 4: No trap recipient configured yetTrap Entry 5: No trap recipient configured yetTrap Entry 6: No trap recipient configured yet
To enable inform requests to be sent instead of trap requests:
switch:admin>snmpconfig --set snmpv3
SNMP Informs Enabled (true, t, false, f): [false] t
SNMPv3 user configuration(snmp user not configured in FOS user database will have physical AD and admin role as the default):User (rw): [snmpadmin1] Auth Protocol [MD5(1)/SHA(2)/noAuth(3)]: (1..3) [3] Priv Protocol [DES(1)/noPriv(2)/3DES(3)/AES128(4)/AES192(5)/AES256(6)]): (2..2) [2] Engine ID: [0:0:0:0:0:0:0:0:0] User (rw): [snmpadmin2] Auth Protocol [MD5(1)/SHA(2)/noAuth(3)]: (1..3) [3] Priv Protocol [DES(1)/noPriv(2)/3DES(3)/AES128(4)/AES192(5)/AES256(6)]): (2..2) [2] Engine ID: [0:0:0:0:0:0:0:0:0] User (rw): [snmpadmin3] Auth Protocol [MD5(1)/SHA(2)/noAuth(3)]: (1..3) [3] Priv Protocol [DES(1)/noPriv(2)/3DES(3)/AES128(4)/AES192(5)/AES256(6)]): (2..2) [2] Engine ID: [0:0:0:0:0:0:0:0:0] User (ro): [snmpuser1] Auth Protocol [MD5(1)/SHA(2)/noAuth(3)]: (1..3) [3] Priv Protocol [DES(1)/noPriv(2)/3DES(3)/AES128(4)/AES192(5)/AES256(6)]): (2..2) [2] Engine ID: [0:0:0:0:0:0:0:0:0] User (ro): [snmpuser2] Auth Protocol [MD5(1)/SHA(2)/noAuth(3)]: (1..3) [3] Priv Protocol [DES(1)/noPriv(2)/3DES(3)/AES128(4)/AES192(5)/AES256(6)]): (2..2) [2] Engine ID: [0:0:0:0:0:0:0:0:0] User (ro): [snmpuser3] Auth Protocol [MD5(1)/SHA(2)/noAuth(3)]: (1..3) [3] Priv Protocol [DES(1)/noPriv(2)/3DES(3)/AES128(4)/AES192(5)/AES256(6)]): (2..2) [2] Engine ID: [0:0:0:0:0:0:0:0:0]
SNMPv3 trap recipient configuration:Trap Recipient's IP address : [0.0.0.0] Trap Recipient's IP address : [10.32.147.6] UserIndex: (1..6) [2] Trap recipient Severity level : (0..5) [5] Trap recipient Port : (0..65535) [162] Trap Recipient's IP address : [0.0.0.0] Trap Recipient's IP address : [0.0.0.0] Trap Recipient's IP address : [0.0.0.0] Trap Recipient's IP address : [0.0.0.0]
892 Fabric OS Command Reference53-1001764-02

snmpConfig 2
See Also none
References Refer to the following publications for further information on SNMP:
Fabric OS MIB Reference
SW_v5_x.mib, “Switch Management Information & Switch Enterprise Specific Trap”
RFC1157, “A Simple Network Management Protocol (SNMPv1)”
RFC1213, “Management information Base for Network Management of TCP/IP-based internets: MIB-II”
RFC2574, “User-based Security Model (USM) for version 3 of the Simple Network Management Protocol (SNMPv3)”
Fabric OS Command Reference 89353-1001764-02

snmpTraps2
snmpTraps
Sends or displays SNMP traps.
Synopsis snmptraps --send [-trap_name trap_name] [-ip_address ip_address]
snmptraps --show
snmptraps --help
Description Use this command to generate specific Simple Network Management Protocol (SNMP) traps, to test the trap recipient, and to validate Management Information Base (MIB) objects and associated traps that are supported in Fabric OS.
Use the --send option to send a specific SNMP trap to a recipient indicated by its IP address. Or use the --send option without operands to send all supported traps to all configured SNMP trap recipients. When the command is issued to send all traps, the message returned indicates only the total number of traps sent and not the individual trap names. Use snmpTraps --show or snmpConfig --show mibcapability to verify which traps were disabled and not sent. The recipients must be configured for this command to succeed.
Refer to the snmpConfig command for more information.
Use the --show option to display all MIB objects and associated traps that are supported in Fabric OS.
Note The execution of this command is subject to Virtual Fabric or Admin Domain restrictions that may be in place. Refer to chapter 1, "Using Fabric OS commands" and Appendix A, "Command Availability" for details.
Operands This command has the following operands:
--send Sends one or all SNMP traps to all configured recipients or to a specified recipient. The following operands are optional:
-trap_name trap_name Specifies the trap by name. Use snmptraps --show for a listing of valid traps.
-ip_address ip_address Specifies the recipient by its IP address in IPv4 or IPv6 format. IPv6 addresses require Fabric OS v6.4.0 or later.
--show Displays all configured SNMP traps and MIBs supported in Fabric OS v6.4.0 and later.
--help Displays the command usage.
Examples To send all traps to the configured recipients:
switch:admin> snmpTraps --sendNumber of traps sent : 27
To send a bottleneck detection trap to recipient 172.16.0.12
switch:admin> snmptraps --send -trap_name bd-trap-ip_address 172.16.0.12.Number of traps sent : 1
894 Fabric OS Command Reference53-1001764-02

snmpTraps 2
To display the traps and MIBs supported in Fabric OS:
switch:admin> snmpTraps --show# |Mib Name |Supported Traps---|----------------|--------------------------------001|SW-MIB |sw-track-changes-trap | |sw-fabric-watch-trap | |sw-fc-port-scn | |ip-v6-change-trap | |sw-pmgr-event-trap | |sw-event-trap | |sw-fabric-reconfig-trap | |sw-fabric-segment-trap002|FICON-MIB |link-rnid-device-registration | |link-rnid-device-deregistration | |link-lirr-listerner-added | |link-lirr-listerner-removed | |link-rlir-failure-incident003|FA-MIB |conn-unit-status-change | |conn-unit-sensor-status-change | |conn-unit-port-status-change | |conn-unit-event-trap004|RFC1157 |cold-restart-trap | |warm-restart-trap | |if-link-up-trap | |if-link-down-trap | |snmp-authetication-trap005|HA-MIB |fru-status-change-trap | |fru-history-trap | |cp-status-change-trap006|BD-MIB |bd-trap | |bd-clear-trap
See Also snmpConfig
Fabric OS Command Reference 89553-1001764-02

spinFab2
spinFab
Runs functional test of interswitch link (ISL) cabling and trunk group operation.
Synopsis spinfab [-nmegs count][-ports itemlist][-setfail mode][-fports flag]
Description Use this command to verify the intended functional operation of interswitch links (ISLs) at the maximum speed by setting up the routing hardware so that test frames received by each E_Port are retransmitted on the same E_Port. Several frames are subsequently sent to the neighbor port attached to each active E_Port specified. Because the default action for such frames is to route them back to the sender, which never occurs during normal traffic, the frames circulate until the test terminates.
The frames are continuously transmitted and received in all ports in parallel. The port LEDs flicker green rapidly while the test is running.
M->N/M->M loopback ports are tested as well, using the same algorithm, if loopback cables or loopback plugs are present in the switch.
While the frames are circulating, the RX frame count and port CRC and encoder error statistics are monitored. If a port stops or a low-level error occurs, the test generates an error message. Every one million frames, the circulating frames are captured to verify that they are still circulating and in the appropriate order. In this manner, the test can verify the entire path to the remote switch as well as the proper in-order delivery operation of any trunk groups present.
The switch remains in normal operation while this test is running. However, some performance degradation may occur due to the ISLs being saturated with test frames. For this reason, use caution when running this test on live fabrics. Consider testing only one trunk group or ISL at a time, and do not run the tests for extended periods of time.
Combine this test with portLoopBackTest for ISL link failure isolation. If spinFab fails, replace the cable with a loopback plug and run portLoopBackTest to verify the local switch and media. If these pass, the fault lies in the cable, the remote switch, or media.
The frame size depends on the amount of buffer credit available on the port. There are eight possible frames that can be sent. Especially with trunking groups, all eight possible frames are used unless there is extensive traffic running on the link. The payload sizes of those eight frames are 1024, 12, 8, 1024, 512, 1024, 12, and 1024.
Notes On switches running Fabric OS v6.4.0 and later, you can now use spinFab to test ports that previously caused nonspecific test results or were skipped by spinFab. The following port types now support the spinFab diagnostics.
• Loopback ports
• E_Ports
• Trunk master ports
• Ports with index numbers greater than 255.
• Ports with swapped areas.
• Ports in logical switches.
• Ports in Base Switches.
• Trunk Slave ports.
• Long Distance ports.
896 Fabric OS Command Reference53-1001764-02

spinFab 2
• F_Ports connected to an HBA.
The following ports do not support the spinFab test:
• Interchassis links (ICL) ports
• F_Ports connected to an Access Gateway
• EX_Ports
• E_Ports connected to EX_Ports
• If Access Gateway mode is enabled, spinFab tests only the F_Ports connected to Brocade-branded HBAs and skips all other ports (F_Ports connected to non-Brocade branded HBAs and N_Ports).
When trunk groups are present, the entire trunk group must be included in the range of ports to test or false failure notifications may occur. If multiple ISL links are present between two switches that support trunking, then it is likely that trunk groups are present and all ports between the two switches should be tested at the same time.
The execution of this command is subject to Virtual Fabric or Admin Domain restrictions that may be in place. Refer to chapter 1, "Using Fabric OS commands" and Appendix A, "Command Availability" for details.
Operands This command has the following operands:
-nmegs count Specifies the number of frames to send in millions. The test progresses until the specified number of frames has been transmitted on each port. The default value is 10 million frames. This command only approximately counts the frames and the actual number of frames sent will be slightly larger, particularly at link speeds of 4 Gbps or higher.
-ports itemlist Specifies a list of user ports to test. By default, all of the ISL ports in the current switch are tested. Refer to itemList for further details.
-setfail mode Instructs spinFab how to mark failed ports. Valid values are:
0 Does not mark failing ports as FAILED (default). This option minimizes the impact on live fabrics.
1 Marks the failing ports as FAILED. In test or qualification environments without live traffic, this may be useful with large values of -nmegs count. This mode is disabled by default.
-fports flag Instructs spinFab to include or exclude F_Ports in the testing. This feature is disabled by default. If enabled, spinFab tests the F_Ports connected to Brocade-branded HBAs along with other valid ports (E-ports & Loopback ports) . The HBA must be running firmware v2.1.1or higher. Valid flag values are:
0 Does not include F_Ports in the port list for testing (default).
1 Includes F_Ports in the port list for testing.
Fabric OS Command Reference 89753-1001764-02

spinFab2
Examples To test cascading ISLs:
switch:admin> spinfab -ports 1/0 - 1/2spinfab running...spinfab: Completed 11 megs, status: passed. port 0 test status: 0x00000000 -- passed. port 1 test status: 0x00000000 -- passed. port 2 test status: 0x00000000 -- passed.Test Complete: "spinfab" Pass 10 of 10Duration 0 hr, 0 min & 41 sec (0:0:41:877).passed.
Diagnostics When it detects failures, the test may report one or more of the following error messages. If errors persist, contact Technical Support.
DATAERR_STATERR_STATSERR_STATS_2LONGERR_STATS_BADEOFERR_STATS_BADOSERR_STATS_C3DISCERR_STATS_CRCERR_STATS_ENCINERR_STATS_ENCOUTERR_STATS_TRUNCERR_STAT_2LONGERR_STAT_BADEOFERR_STAT_BADOSERR_STAT_C3DISCERR_STAT_CRCERR_STAT_ENCINERR_STAT_ENCOUTERR_STAT_TRUNCFINISH_MSG_ERRINITMBUF_STATE_ERRNO_SEGMENTPORT_ABSENTPORT_DIEDPORT_ENABLEPORT_M2MPORT_STOPPEDPORT_WRONGRXQ_RAM_PERRSTATSSTATS_C3FRXSTATS_FRXSTATS_FTXTIMEOUTXMIT
See Also itemList, portLoopbackTest
898 Fabric OS Command Reference53-1001764-02

sshUtil 2
sshUtil
Manages public key authentication.
Synopsis sshutil allowuser user name
sshutil showuser
sshutil importpubkey
sshutil showpubkeys
sshutil delpubkeys
sshutil genkey
sshutil exportpubkey
sshutil delprivkey
sshutil help
Description Use this command to enable and manage SSH public key authentication on a switch. SSH public key authentication provides a mechanism for authenticating an authorized user without a password. SSH public key authentication is more secure than password authentication and can be used to securely access services that require automatic login.
SSH public key authentication works as follows:
An authorized user generates a pair of encryption keys (public and private) on a local machine (a switch or a server). Messages encrypted with the private key can only be decrypted by the public key, and vice versa. The private key remains on the local machine; the public key is exported to a remote host. The remote host responds to login requests by sending a brief message encrypted with the public key. The private key on the local host decrypts the message, and the login succeeds.
Use the sshutil command to do the following:
• Configure a user to perform public key authentication and to manage keys on a switch.
• Generate a private/public key pair on the local switch.
• Import a public key from a remote host to the local switch.
• Export the public key from the local switch to a remote host.
• Delete the public keys associated with the configured user on the local switch.
• Delete the private key on the local switch.
Notes The execution of this command is subject to Virtual Fabric or Admin Domain restrictions that may be in place. Refer to chapter 1, "Using Fabric OS commands" and Appendix A, "Command Availability" for details.
Outgoing public key authentication from the switch to a remote host is restricted to Fabric OS commands which use secure copy (SCP), such as configDownload/configUpload.
This command supports generation of a public/private key pair on the switch to enable outgoing connections between a switch and a remote host. To set up incoming connections, you must first generate the public/private key pair on a remote host and then import the public key to the switch. Use the SSH utility ssh-keygen -t dsa to generate the keys on the remote host. Refer to your UNIX system documentation for details on this command.
Fabric OS Command Reference 89953-1001764-02
sshUtil2
Operands This command supports the following operands:
allowuser user name
Configures the specified user to perform public key authentication and all related management operations. This operation can only be performed by the default admin. The default admin is, by default, a configured user. Only one user can be configured at any given time. When the default Admin configures a user, successful execution of this command deletes the previously configured user and all public keys associated with this user.
The following operand is required:
user name Specifies login name for the configured user. The user must be in the switch user database and must have admin privileges on the switch.
showuser Displays the currently configured user. This operation can only be performed by the default admin.
importpubkey Imports a public key from a remote host to the local switch. This operation supports authentication for incoming connections. For this operation to succeed, a public/private key pair must be generated on the remote host prior to the import by issuing ssh-genkey -t dsa (a UNIX command). importpubkey can only be performed by a configured user. Once the public key is imported successfully, the configured user can perform public key authentication with the switch from the remote host, on which the private key resides.
importpubkey prompts for the following input parameters:
IP Address Enter the IP address for the remote host. IPv4 and IPv6 addresses are supported.
remote directory
Enter the path to store the public key. The default directory where SSH stores public keys is ~username/.ssh.
login name Enter the user name for the configured user.
password Enter the password for the configured user.
showpubkeys Displays all imported public keys associated with the configured user. Public keys generated on the switch are not shown. This option can only be performed by the configured user.
delpubkeys Deletes all imported public keys associated with the configured user on the switch. This option can only be performed by the configured user. Deletion of a configured user's public keys effectively blocks incoming connections from this user that rely on public key authentication with the switch.
genkey Generates a private/public key pair on the local switch. Keys are generated with Digital Signature Algorithm (DSA) encryption. This option can be performed only by a configured user. This option enables authentication for outgoing connections from the switch to a remote host. You must export the public key to a remote host to complete the setup. For incoming connections, the private/public key must first be generated on the remote host by issuing ssh-genkey -t dsa (a UNIX command), and then importing the public key from the remote host to the switch using the sshutil import command.
900 Fabric OS Command Reference53-1001764-02

sshUtil 2
genkey prompts for user input on the following parameters:
passphrase
Accepts a string of arbitrary length. This operand is optional, but creating a pass-phrase is strongly recommended. Good pass phrases are 10-30 characters long, are not simple sentences or otherwise easily guessable and contain a mix of upper and lowercase letters, numbers, and nonalphanumeric characters. There is no way to recover a lost pass phrase. If the pass phrase is lost or forgotten, a new key must be generated and copied to the corresponding public key to other machines.
exportpubkey Exports the public key from the switch to a specified remote host to support outgoing connections from the switch to a remote host. This option can only be performed by a configured user. The successfully exported public key must be appended to the authorized_keys file on the remote host. Use the cat ~/.ssh/outgoing.pub >> ~/.ssh/authorized_keys command to append the file.
exportpubkey prompts for IP Address, remote directory, login name and password. Refer to importpubkey for a description of these parameters.
delprivkey Deletes the private key for outgoing connection from the switch. This option can only be performed by a configured user. Deletion of a configured user's private keys effectively blocks outgoing connections initiated by this user that rely on public key authentication with a remote host.
help Displays the command usage.
Examples To configure a user for public key authentication:
switch:admin> sshutil allowuser username
Allowed user has been successfully changed to username.
To display the configured user:
switch:username> sshutil showuserusername
To set up SSH public key authentication on a switch for incoming connections:
1. Generate a private/public key pair on a remote host (accept default directory and file name):
username@remotehost> ssh-keygen -t dsaGenerating public/private dsa key pair.Enter file in which to save the key (/users/home/username/.ssh/id_dsa):Enter passphrase (empty for no passphrase):passphraseEnter same passphrase again: passphraseYour identification has been saved in /users/home/username/.ssh/id_dsa.Your public key has been saved in /users/home/username/.ssh/id_dsa.pub.The key fingerprint is:3 0:9f:ae:b6:7f:7e:55:e4:b2:7a:51:f0:95:44:5c:d1 username@host
2. Import the public key from the remote host to the local switch:
switch:username> sshutil importpubkeyEnter IP address:Remote host IP AddressEnter remote directory: ~username/.sshEnter public key name(must have .pub suffix):id_dsa.pubEnter login name:username
Fabric OS Command Reference 90153-1001764-02
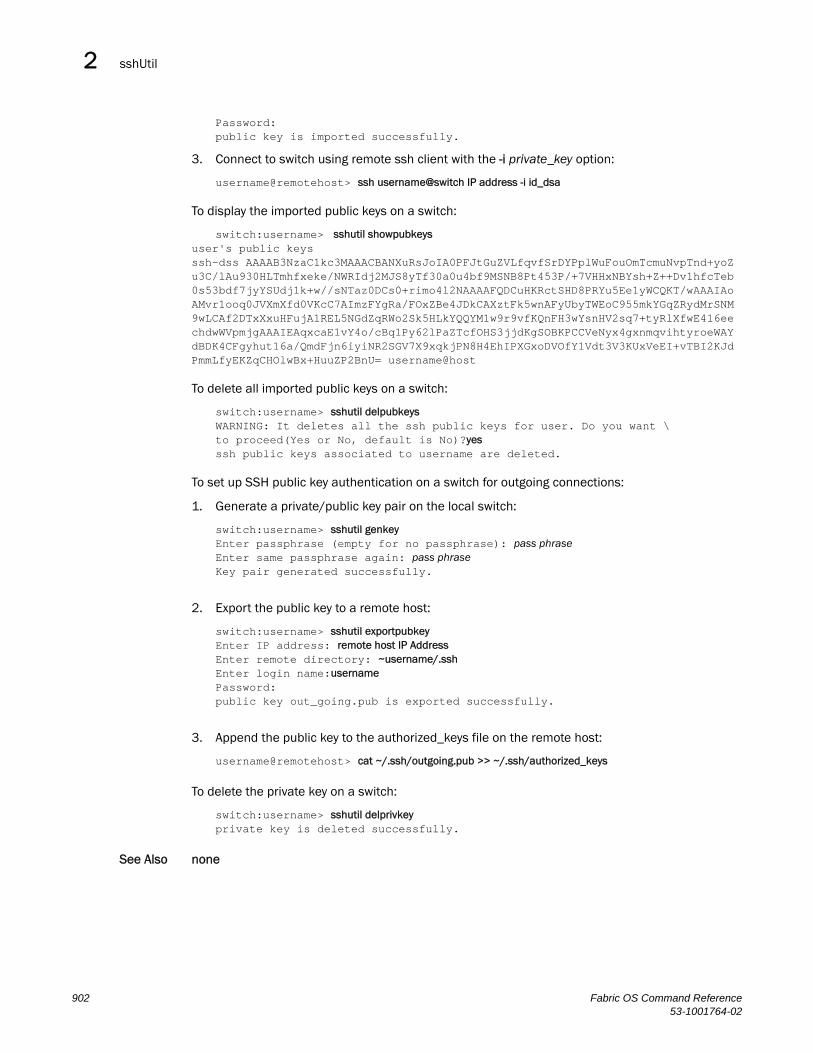
sshUtil2
Password:public key is imported successfully.
3. Connect to switch using remote ssh client with the -i private_key option:
username@remotehost> ssh username@switch IP address -i id_dsa
To display the imported public keys on a switch:
switch:username> sshutil showpubkeysuser's public keysssh-dss AAAAB3NzaC1kc3MAAACBANXuRsJoIA0PFJtGuZVLfqvfSrDYPplWuFouOmTcmuNvpTnd+yoZu3C/lAu930HLTmhfxeke/NWRIdj2MJS8yTf30a0u4bf9MSNB8Pt453P/+7VHHxNBYsh+Z++Dv1hfcTeb0s53bdf7jyYSUdj1k+w//sNTaz0DCs0+rimo4l2NAAAAFQDCuHKRctSHD8PRYu5Ee1yWCQKT/wAAAIAoAMvr1ooq0JVXmXfd0VKcC7AImzFYgRa/FOxZBe4JDkCAXztFk5wnAFyUbyTWEoC955mkYGqZRydMrSNM9wLCAf2DTxXxuHFujA1REL5NGdZqRWo2Sk5HLkYQQYM1w9r9vfKQnFH3wYsnHV2sq7+tyRlXfwE416eechdwWVpmjgAAAIEAqxcaE1vY4o/cBq1Py62lPaZTcfOHS3jjdKgSOBKPCCVeNyx4gxnmqvihtyroeWAYdBDK4CFgyhut16a/QmdFjn6iyiNR2SGV7X9xqkjPN8H4EhIPXGxoDVOfY1Vdt3V3KUxVeEI+vTBI2KJdPmmLfyEKZqCHOlwBx+HuuZP2BnU= username@host
To delete all imported public keys on a switch:
switch:username> sshutil delpubkeysWARNING: It deletes all the ssh public keys for user. Do you want \to proceed(Yes or No, default is No)?yesssh public keys associated to username are deleted.
To set up SSH public key authentication on a switch for outgoing connections:
1. Generate a private/public key pair on the local switch:
switch:username> sshutil genkeyEnter passphrase (empty for no passphrase): pass phraseEnter same passphrase again: pass phraseKey pair generated successfully.
2. Export the public key to a remote host:
switch:username> sshutil exportpubkeyEnter IP address: remote host IP AddressEnter remote directory: ~username/.sshEnter login name:usernamePassword:public key out_going.pub is exported successfully.
3. Append the public key to the authorized_keys file on the remote host:
username@remotehost> cat ~/.ssh/outgoing.pub >> ~/.ssh/authorized_keys
To delete the private key on a switch:
switch:username> sshutil delprivkeyprivate key is deleted successfully.
See Also none
902 Fabric OS Command Reference53-1001764-02

statsClear 2
statsClear
Clears port and diagnostic statistics.
Synopsis statsclear [--slot slot][-uports itemlist][-bports itemlist][-use_bports value]
Description Use this command to clear the port and diagnostics statistics for the specified list of blade or user ports.
You can issue this command on the FR4-18i blade in a Brocade chassis; however, the command is not supported by the Brocade platform and does not affect any other feature operations. This availability is offered to maintain consistency across a mixed-blade environment.
Note The execution of this command is subject to Virtual Fabric or Admin Domain restrictions that may be in place. Refer to chapter 1, "Using Fabric OS commands" and Appendix A, "Command Availability" for details.
Operands The following are optional:
--slot slot Specifies the slot on which to operate. If this option is not specified, the default slot is assumed. The default slot is 0 and designed to operate on fixed-port-count products, if -use_bports sets with nonzero value.
-uports itemlist Specifies the list of user ports for which statistics are to be cleared.
-bports itemlist Specifies the list of blade ports for which statistics are to be cleared.
-use_bports value Specify a nonzero value to clear the diagnostics statistics for the blade ports specified in -bports clears. A value of zero (0) clears the user ports specified in -uports. The default value is 0.
Examples To clear port and diagnostic statistics:
switch:admin> statsclear -bports 1/10-1/62 -use_bports 1
See Also itemList
Fabric OS Command Reference 90353-1001764-02

stopPortTest2
stopPortTest
Terminates the running portTest.
Synopsis stopporttest [-ports itemlist]
Description Use this command to terminate the portTest command. Refer to the portTest help page for more information.
Note The execution of this command is subject to Virtual Fabric or Admin Domain restrictions that may be in place. Refer to chapter 1, "Using Fabric OS commands" and Appendix A, "Command Availability" for details.
Operands This command has the following operand:
-ports itemlist Terminates the test on the specified ports; this operand is optional; if omitted, the test is terminated on all ports. Refer to itemList help pages for further details.
Examples To stop the portTest command:
switch:admin> stopporttest
See Also portLoopbackTest, portTest, portTestShow, spinFab
904 Fabric OS Command Reference53-1001764-02

supportFfdc 2
supportFfdc
Modifies or displays the first-fault data capture (FFDC) daemon.
Synopsis supportffdc [--disable | --enable | --show]
Description Use this command to disable or enable the FFDC events, or to display the current configuration. If disabled, the daemon does not capture any data even when a message with FFDC attributes is logged. FFDC is enabled by default.
Note The execution of this command is subject to Virtual Fabric or Admin Domain restrictions that may be in place. Refer to chapter 1, "Using Fabric OS commands" and Appendix A, "Command Availability" for details.
Operands This command has the following operands:
--disable Disables the FFDC.
--enable Enables the FFDC.
--show Displays the FFDC configuration parameters.
When executed without operands, the command prints the usage.
Examples To display the FFDC configuration:
switch:admin> supportffdc --showFirst Failure Data Capture (FFDC) is disabled.
To enable the FFDC events:
switch:admin> supportffdc --enableFirst Failure Data Capture (FFDC) is enabled.
See Also none
Fabric OS Command Reference 90553-1001764-02

supportFtp2
supportFtp
Sets, clears, or displays support FTP parameters and enables or disables auto file transfer.
Synopsis supportftp [-S]
supportftp -s [-h host][-u username][-p password][-d remotedirectory]
supportftp -t hours
supportftp -R
supportftp -e
supportftp -d
Description Use this command to set, clear, or display support FTP parameters. The parameters set by this command are used by the supportSave and traceDump commands.
Note The execution of this command is subject to Virtual Fabric or Admin Domain restrictions that may be in place. Refer to chapter 1, "Using Fabric OS commands" and Appendix A, "Command Availability" for details.
Operands This command has the following mutually exclusive operands:
-S Displays the current FTP parameters.
-s Sets the FTP parameters. The following operands can be optionally specified on the command line. If the -s option is specified without further operands, the command interactively prompts for these parameters.
-h host Specifies the FTP host. Provide an IP address or a server name. IPv4 and IPv6 addresses are supported. To specify the host by name, a DNS entry must exist for the server.
-u username Specifies the FTP account user name. The user name must be less than 48 characters long.
-p password Specifies the FTP account password. The password must be less than 48 characters long. When using anonymous FTP, a password is not required.
-d remotedirectory
Specifies the remote directory where the trace dump files are stored. The directory name must be less than 48 characters long. Specifying the root directory as the remote directory (/) is not allowed.
-t hours Specifies the time interval, in units of hours, at which the FTP server connectivity is checked.
-R Clears all FTP parameters.
-e Enables auto file transfer. Trace dump files are automatically transferred to a designated FTP server. The server parameters must be set before you can enable auto file transfer.
-d Disables auto file transfer.
906 Fabric OS Command Reference53-1001764-02

supportFtp 2
Examples To set the FTP parameters:
switch:admin> supportftp -s -h 1080::8:800:200C:417A -u njoe -p password -d supportsupportftp: ftp parameters changed.
To display the FTP parameters:
switch:admin> supportftpHost IP Addr: 1080::8:800:200C:417AUser name: njoeRemote Dir: supportFTP Auto check: Off
To set FTP parameters interactively:
switch:admin> supportftp -sHost IP Addr[1080::8:800:200C:417A]:192.168.67.126User Name[njoe]:adminPassword[********]:passwordRemote Dir[support]:tempAuto file transfer parameters changed
To set the time interval at which the FTP server connectivity is checked:
switch:admin> supportftp -t 24supportftp: ftp check period changed.
To enable auto file transfer:
switch:admin> supportftp -esupport auto file transfer enabled.
To disable auto file transfer:
switch:admin> supportftp -dsupport auto file transfer disabled.
See Also supportSave, supportShow, traceDump
Fabric OS Command Reference 90753-1001764-02

supportSave2
supportSave
Saves RASLOG, TRACE, supportShow, core file, FFDC data, and other support information
Synopsis supportsave
supportsave [-n] [-c] [-k] [-u user_name -p password -h host_ip -d remote_dir -l protocol]
supportsave [-R]
supportsave [-U -d remote_dir]
supportsave [-t timeout_multiplier]
Description Use this command to collect RASLOG, TRACE, supportShow, core file, FFDC data and other support information to a remote FTP location. On platforms that support USB, the information can also be stored on an attached USB device. On a dual-CP system, information is saved for the local and the remote CP. SupportShow information is available on Active and Standby CPs. To reduce the chance of missing the correct trace dump, supportSave retrieves old (the dump created prior to the current one) and new (the dump triggered by the command) trace dumps.
The files generated by this command are compressed before being sent off the switch. The core files and panic dumps remain on the switch after the command is run. The FFDC data are removed after the command has finished.
If there are blade processor (BP) blades installed on the switch, a support file (a.tar.gz file) is generated from each slot.
This command accepts IPv4 and IPv6 addresses. If the configured IP address is in IPv6 format, the RAS auto file transfer and event notification to syslog will not work in the case where the Fabric OS version is downgraded. It is required to reconfigure auto file transfer and syslog with IPv4 IP addresses.
In a Virtual Fabric environment, supportSave saves all chassis-based information and iterates through the defined switch-based information for all logical switches. Chassis permissions are required to execute this command.
System-wide supportSave is supported on platforms running Fabric OS v6.2.0 or later. The command collects support data from the Active CP (and its Co-CPU), the standby CP (and its Co-CPU), and all AP blades.
Note The execution of this command is subject to Virtual Fabric or Admin Domain restrictions that may be in place. Refer to chapter 1, "Using Fabric OS commands" and Appendix A, "Command Availability" for details.
Operands When invoked without operands, this command goes into interactive mode. The following operands are optional:
-n Does not prompt for confirmation. This operand is optional; if omitted, you are prompted for confirmation.
-c Uses the FTP or SCP parameters saved by the supportFtp command. This operand is optional; if omitted, specify the FTP or SCP parameters through command line options or interactively. To display the current FTP parameters, run supportFtp (on a dual-CP system, run supportFtp on the active CP).
The -c option is mutually exclusive with -u, -p, -h, and -d.
908 Fabric OS Command Reference53-1001764-02

supportSave 2
-k Specifies that the supportFtp auto file transfer configuration transfer only core and FFDC files in noninteractive mode.
-u user_name Specifies the user name for the FTP or SCP server. This operand is optional; if omitted, anonymous FTP is used.
-p password Specifies the password for the FTP or SCP server. This operand is optional with FTP; if omitted, anonymous FTP is used.
-h host_ip Specifies the IPv4 or IPv6 address for the remote server.
-d remote_dir Specifies the remote directory to which the file is to be transferred. When saving to a USB device, the predefined /support directory must be used.
-R Removes all core files on the CP and BP. This option cannot be used with any other options.
-l protocol Specifies the transfer protocol. Valid values are FTP or SCP.
If you plan to use secure copy (SCP) to transfer files, it is important to test the supportSave command prior to its use with various SCP-mode services. Because the supportSave command makes several access requests to copy files, it is important that the SCP-mode service be configured so that passwords are not required for each attempted transfer by the supportSave command. Failure to configure the service correctly may result in significant delays in obtaining transferred output from the supportSave command.
When using secure copy (SCP), supportSave may create a directory specified by the -d option if it does not already exist and the parent directory has the appropriate permissions. Use of FTP requires the directory to exist on the remote server.
-U Saves support data to an attached USB device. When using this option, a target directory must be specified with the -d option.
-t timeout_multiplier Extends predefined SupportSave timeout values by the value of the timeout multiplier. Use this option to repeat the supportSave operation when supportSave completion indicates that one or more modules timed out during the process. For example, -t 2 doubles the timeout values for each of the SupportSave modules. Valid multiplier values are 2-5. The default is 1.
Examples To save RASLOG, TRACE, supportShow, and other support information to an FTP server in interactive mode:
switch:admin> supportsaveThis command will collect RASLOG, TRACE, supportShow, core file, FFDC dataand other support information and then transfer them to a FTP/SCP serveror a USB device. This operation can take several minutes.NOTE: supportSave will transfer existing trace dump file first, thenautomatically generate and transfer latest one. There will be two trace dumpfiles transfered after this command.OK to proceed? (yes, y, no, n): [no] y
Host IP or Host Name: 192.168.126.115User Name: adminPassword:Protocol (ftp or scp): ftpRemote Directory: /temp/support
Fabric OS Command Reference 90953-1001764-02

supportSave2
Saving support information for chassis:HL_5100_66, module:RAS...Saving support information for chassis:HL_5100_66, module:TRACE_OLD...Saving support information for chassis:HL_5100_66, module:TRACE_NEW...Saving support information for chassis:HL_5100_66, module:FABRIC...Saving support information for chassis:HL_5100_66, module:CORE_FFDC...Saving support information for chassis:HL_5100_66, module:DIAG...Saving support information for chassis:HL_5100_66, module:RTE...Saving support information for chassis:HL_5100_66, module:ISCSID_DBG...Saving support information for chassis:HL_5100_66, module:AGDUMP...Saving support information for chassis:HL_5100_66, module:SSHOW_PLOG...Saving support information for chassis:HL_5100_66, module:SSHOW_OS...Saving support information for chassis:HL_5100_66, module:SSHOW_EX...Saving support information for chassis:HL_5100_66, module:SSHOW_FABRIC...Saving support information for chassis:HL_5100_66, module:SSHOW_SERVICE...Saving support information for chassis:HL_5100_66, module:SSHOW_SEC...Saving support information for chassis:HL_5100_66, module:SSHOW_NET.........(output truncated)
To collect support information on a Brocade 5100 and save it to an attached USB device timeout values are doubled):
switch:admin> supportsave -U -d -t 2 mysupportsaveThis command will collect RASLOG, TRACE, supportShow, core file, FFDC dataand other support information and then transfer them to a FTP/SCP serveror a USB device. This operation can take several minutes.NOTE: supportSave will transfer existing trace dump file first, thenautomatically generate and transfer latest one. There will be two trace dumpfiles transferred after this command.OK to proceed? (yes, y, no, n): [no] y
Saving support information for chassis:ras095_chassis, module:RAS...Saving support information for chassis:ras095_chassis, module:TRACE_OLD...Saving support information for chassis:ras095_chassis, module:TRACE_NEW...Saving support information for chassis:ras095_chassis, module:FABRIC...Saving support information for chassis:ras095_chassis, module:CORE_FFDC...No core or FFDC data files found!Saving support information for chassis:ras095_chassis, module:DIAG..Saving support information for chassis:ras095_chassis, module:RTE...Saving support information for chassis:ras095_chassis, module:ISCSID_DBG...Saving support information for chassis:ras095_chassis, module:AGDUMP...Saving support information for chassis:ras095_chassis, module:SSHOW_PLOG...(output truncated)
To run supportSave without confirmation on a Brocade DCX with AP blades included using supportFTP parameters (only Active CP output is shown):
switch:admin> supportsave -n -cSaving support information for chassis:ras020_chassis, module:RAS............Saving support information for chassis:ras020_chassis, module:TRACE_OLD...Saving support information for chassis:ras020_chassis, module:TRACE_NEW...Saving support information for chassis:ras020_chassis, module:FABRIC.......Saving support information for chassis:ras020_chassis, module:CORE_FFDC...Saving support information for chassis:ras020_chassis, slot:4...slot 4 support file transfer done.Saving support information for chassis:ras020_chassis, slot:12...slot 12 support file transfer done.Saving support information for chassis:ras020_chassis, module:DIAG.....Saving support information for chassis:ras020_chassis, module:RTE...Saving support information for chassis:ras020_chassis, module:ISCSID_DBG...Saving support information for chassis:ras020_chassis, module:AGDUMP...
910 Fabric OS Command Reference53-1001764-02

supportSave 2
Saving support information for chassis:ras020_chassis, module:SSHOW_PLOG.....Saving support information for chassis:ras020_chassis, module:SSHOW_OS..................................Saving support information for chassis:ras020_chassis, module:SSHOW_EX.....Saving support information for chassis:ras020_chassis, module:SSHOW_FABRIC........(output truncated)
See Also supportShow, supportFTP
Fabric OS Command Reference 91153-1001764-02

supportShow2
supportShow
Displays switch information for debugging purposes.
Synopsis supportshow [[slot/]port1[-port2]] [lines]
Description Use this command to display support information from groups of preselected Fabric OS and Linux commands and other support and debugging information. You can specify a port or a range of ports for which to display this information. These commands are organized by groups, but note that the order of the groups listed below is not the same as executed by the command.
The FCIP commands are supported only on the Brocade 7800/FX8-24 and 7500/7500E/FR4-18i platforms. On unsupported platforms, the command displays a "not applicable to this platform" message next to the FCIP command group.
SupportShow executes commands in the following command groups. Use supportShowCfgenable or supportShowCfgDisable to modify the settings for each group.
os OS group commands, enabled by default.
exception Exception group commands, enabled by default.
port Port group commands, enabled by default.
fabric Fabric group commands, enabled by default.
services Service group commands, enabled by default.
security Security group commands, enabled by default.
network Network group commands, enabled by default.
portlog Portlog group commands, enabled by default.
system System group commands, enabled by default.
extend Extend group commands, disabled by default.
filter Filter group commands, disabled by default.
perfmon Performance Monitor group commands, disabled by default.
ficon FICON group commands, disabled by default.
iswitch FC Router group commands, disabled by default.
asic_db ASIC DB group commands, disabled by default.
iscsi iSCSI group commands, disabled by default.
fcip FCIP group commands, disabled by default.
ag Access Gateway group commands, disabled by default.
dce_hsl DCE group commands, enabled by default.
crypto Encryption group commands, disabled by default.
Notes The execution of this command is subject to Virtual Fabric or Admin Domain restrictions that may be in place. Refer to chapter 1, "Using Fabric OS commands" and Appendix A, "Command Availability" for details.
This is a diagnostic command and should only be run for diagnostic support.
912 Fabric OS Command Reference53-1001764-02

supportShow 2
Output generated by this command may vary by switch configuration and platform. Output may change without notice.
Operands This command has the following operands:
slot On bladed systems only, specifies a slot number, followed by a slash (/).
port1[-por2]Specifies a port or a range of ports for which to display supportShow information. this operand is optional; if omitted, the command displays information for all ports.
lines Specifies the number of lines for the portLogDump output. This parameter is valid only with the slot/port parameters.
Examples To display debugging information for a single port on a Brocade 5300:
switch:admin> supportshow 43VF======================Date:Sun Dec 6 05:10:13 PST 2009
Time Zone:America/Los_Angeles
Version:Kernel: 2.6.14.2Fabric OS: v6.4.0_main_bld09Made on: Tue Dec 1 20:04:36 2009Flash: Wed Dec 2 11:54:49 2009BootProm: 1.0.15
supportshow groups enabled: os enabled exception enabled port enabled fabric enabled services enabled security enabled network enabled portlog enabled system enabled extend disabled filter disabled perfmon disabled ficon disabled iswitch enabled asic_db enabled iscsi enabled fcip disabled (not applicable to this platform) ag enabled dce_hsl enabled
**** Begin start_port_log_cmd group ****Sun Dec 6 05:10:14 PST 2009portlogdump:CURRENT CONTEXT -- 0 , 128portlogdump :time task event port cmd args
Fabric OS Command Reference 91353-1001764-02

supportShow2
-------------------------------------------------Sat Dec 5 23:54:37 200923:54:37.560 FCPH read 56 16 02fffc23,00fffc19,bb000000,00000000,043401bb23:54:37.560 FCPH seq 56 10 20290000,043401bb,00000722,0000001c,0000000023:54:37.560 msd0 ctin 56 fa 0001f007,0000000023:54:37.561 msd0 ctout 56 fa 00018001,0009f300(output truncated)
See Also supportFtp, supportSave, supportShowCfgDisable, supportShowCfgEnable, supportShowCfgShow,traceDump
914 Fabric OS Command Reference53-1001764-02

supportShowCfgDisable 2
supportShowCfgDisable
Disables a group of commands under the supportShow command.
Synopsis supportshowcfgdisable os | exception | port | fabric | services | security | network | portlog | systemextend | filter | perfmon | ficon | iswitch | asic_db |iscsi | ficon | ag | dce_hsl | crypto | fcip
Description Use this command to disable a group of commands under the supportShow command. Use the supportShowCfgEnable command to enable groups of commands.
The FCIP commands are supported only on the Brocade 7800/FX8-24 and 7500/7500E/FR4-18i platforms and cannot be configured to collect data on unsupported platforms.
Note The execution of this command is subject to Virtual Fabric or Admin Domain restrictions that may be in place. Refer to chapter 1, "Using Fabric OS commands" and Appendix A, "Command Availability" for details.
Operands This command has the following operands:
os Disables the OS group commands.
exception Disables the exception group commands.
port Disables the port group commands.
fabric Disables the fabric group commands.
services Disables the service group commands.
security Disables the security group commands.
network Disables the network group commands.
portlog Disables the portlog group commands.
system Disables the system group commands.
extend Disables the extend group commands.
filter Disables the filter group commands.
perfmon Disables the Performance Monitor group commands
ficon Disables the FICON group commands.
iswitch Disables the FC Router group commands.
asic_db Disables the ASIC DB group commands.
iscsi Disables the iSCSI group commands.
ag Disables the Access Gateway group commands.
dce_hsl Disables the DCE group commands.
crypto Disables the encryption group commands
fcip Disables the FCIP group commands. Supported only on the Brocade 7800/FX8-24 and 500/7500E/FR4-18i.
Fabric OS Command Reference 91553-1001764-02

supportShowCfgDisable2
Examples To disable the OS group of commands under the supportShow command:
switch:admin> supportshowcfgdisable osConfig update Succeeded
See Also supportShow, supportShowCfgEnable, supportShowCfgShow
916 Fabric OS Command Reference53-1001764-02

supportShowCfgEnable 2
supportShowCfgEnable
Enables a group of commands to be displayed under the supportShow command.
Synopsis supportshowcfgenable os | exception | port | fabric | services | security | network | portlog | system | extend | filter | perfmon | ficon | iswitch | asic_db |ag | dce_hsl |crypto | fcip
Description Use this command to enable a group of commands to be displayed under the supportShow command. Use the supportShowCfgDisable command to disable groups of commands.
The FCIP commands are supported only on the Brocade 7800/FX8-24 and 7500/7500E/FR4-18i platforms and cannot be configured to collect data on unsupported platforms.
Note The execution of this command is subject to Virtual Fabric or Admin Domain restrictions that may be in place. Refer to chapter 1, "Using Fabric OS commands" and Appendix A, "Command Availability" for details.
Operands This command has the following operands:
os Enables the OS group commands.
exception Enables the exception group commands.
port Enables the port group commands.
fabric Enables the fabric group commands.
services Enables the service group commands.
security Enables the security group commands.
network Enables the network group commands.
portlog Enables the portlog group commands.
system Enables the system group commands.
extend Enables the extend group commands.
filter Enables the filter group commands.
perfmon Enables the Performance Monitor group commands.
ficon Enables the FICON group commands.
iswitch Enables the FC Router group commands.
asic_db Enables the ASIC DB group commands.
iscsi Enables the iSCSI group commands.
ag Enables the Access Gateway group commands.
dce_hsl Disables the DCE group commands
crypto Enables the encryption group commands.
fcip Enables the FCIP group commands. Supported only on the Brocade 7800/FX8-24 and 500/7500E/FR4-18i.
Fabric OS Command Reference 91753-1001764-02

supportShowCfgEnable2
Examples To enable a group of commands under the supportShow command:
switch:admin> supportshowcfgenable osConfig update Succeeded
See Also supportShow, supportShowCfgDisable, supportShowCfgShow
918 Fabric OS Command Reference53-1001764-02

supportShowCfgShow 2
supportShowCfgShow
Displays the groups of commands enabled for display by the supportShow command.
Synopsis supportshowcfgshow
Description Use this command to display the groups of commands enabled for display by the supportShow command. Use the supportShowCfgEnable and the supportShowCfgDisable commands to modify which groups are displayed.
The FCIP commands are supported only on the Brocade 7800/FX8-24 and 7500/7500E/FR4-18i platforms and cannot be configured to collect or display data on unsupported platforms.
Note The execution of this command is subject to Virtual Fabric or Admin Domain restrictions that may be in place. Refer to chapter 1, "Using Fabric OS commands" and Appendix A, "Command Availability" for details.
Operands none
Examples To display command groups configured for data collection on the Brocade 5100:
switch:admin> supportshowcfgshow os enabled exception enabled port enabled fabric enabled services enabled security enabled network enabled portlog enabled system enabled extend disabled filter disabled perfmon disabled ficon disabled iswitch disabled asic_db enabled iscsi disabled ag disabled
To display command groups configured for data collection on the Brocade 7800
switch:admin> supportshowcfgshow os enabled exception enabled port enabled fabric enabled services enabled security enabled network enabled portlog enabled system enabled extend disabled filter disabled perfmon disabled ficon disabled iswitch enabled
Fabric OS Command Reference 91953-1001764-02

supportShowCfgShow2
asic_db enabled iscsi enabled fcip enabled ag enabled dce_hsl enabled
See Also supportShow, supportShowCfgDisable, supportShowCfgEnable
920 Fabric OS Command Reference53-1001764-02

switchBeacon 2
switchBeacon
Sets switch beaconing mode on or off.
Synopsis switchbeacon [mode]
Description Use this command to enable or disable switch beaconing mode. Switch beaconing can be used to locate a failing unit.
When beaconing mode is turned on, the port LEDs flash amber, left to right and right to left, from port 0 to the highest port number and back to port 0. The beaconing mode continues until you turn it off.
The beaconing LED pattern continues until you turn it off. Beaconing mode takes over the port LEDs. Other commands are still executable and functional. The normal flashing LED pattern (associated with an active, faulty or disabled port for example) is suppressed and only the beaconing pattern is shown. However, if diagnostic frame-based tests (such as portLoopbackTest) are executed, two patterns are interleaved. The diagnostic test flickers the LEDs green and the beaconing mode runs the LEDs amber at the same time.
Use the switchShow command to display the status of beaconing.
Note The execution of this command is subject to Virtual Fabric or Admin Domain restrictions that may be in place. Refer to chapter 1, "Using Fabric OS commands" and Appendix A, "Command Availability" for details.
Operands This command has the following operand:
mode Specify 1 to enable beaconing mode or 0 to disable beaconing mode. This operand is optional.
If no operand is specified, the current value is displayed.
Examples To turn beaconing mode on:
switch:admin> switchbeacon 1
To turn beaconing mode off:
switch:admin> switchbeacon 0
See Also switchShow
Fabric OS Command Reference 92153-1001764-02

switchCfgPersistentDisable2
switchCfgPersistentDisable
Disables a switch persistently.
Synopsis switchcfgpersistentdisable
Description Use this command to persistently disable the switch. All Fibre Channel ports are taken offline. If the switch was part of a fabric, the remaining switches reconfigure. The switch remains disabled even after a reboot.
The disable process can be observed and verified by watching the front panel LEDs change to slow flashing yellow as each port is disabled.
A persistently disabled switch can be temporarily enabled using the switchEnable command. A temporarily enabled switch remains disabled after a reboot.
Notes Performance Monitoring cannot be added to any port on a persistently disabled switch.
The execution of this command is subject to Virtual Fabric or Admin Domain restrictions that may be in place. Refer to chapter 1, "Using Fabric OS commands" and Appendix A, "Command Availability" for details.
Operands none
Examples To disable a switch persistently:
switch:admin> switchcfgpersistentdisable
See Also switchDisable, switchEnable, switchCfgPersistentEnable, switchShow
922 Fabric OS Command Reference53-1001764-02

switchCfgPersistentEnable 2
switchCfgPersistentEnable
Enables a switch persistently.
Synopsis switchcfgpersistentenable
Description Use this command to persistently enable a persistently disabled switch. All Fibre Channel ports that passed the power-on self-test (POST) are enabled and come online if connected to a device, or remain offline if disconnected. The switch may need to be enabled if it was previously disabled to make configuration changes or to run diagnostics.
If the switch is connected to a fabric, it rejoins the fabric. If this switch remains the principal switch, it assigns itself a domain ID. If another switch assumes the principal role, then this switch becomes a subordinate switch, and accepts a domain ID from the principal. Refer to the FC-SW specification for a complete description of this process.
The enable process can be observed and verified by watching the front panel LEDs change from slow flashing yellow as each port is enabled. The LEDs change to green for online ports, or can remain black for disconnected ports. Yellow indicates ports that do not initialize.
Note The execution of this command is subject to Virtual Fabric or Admin Domain restrictions that may be in place. Refer to chapter 1, "Using Fabric OS commands" and Appendix A, "Command Availability" for details.
Operands none
Examples To persistently enable a previously persistently disabled switch:
switch:admin> switchcfgpersistentenable 10 9 8 7 6 5 4 3 2 1 fabric: Principal switch fabric: Domain 1
See Also switchDisable, switchEnable, switchCfgPersistentDisable, switchShow
Fabric OS Command Reference 92353-1001764-02

switchCfgSpeed2
switchCfgSpeed
Configures the speed for all ports on a switch.
Synopsis switchcfgspeed speed
Description Use this command to configure the port speed on a switch. This command sets the speed for all user ports. If any port on the switch is not capable of the specified speed setting, an error message is displayed for that port. The configuration is saved in nonvolatile memory and persists across switch reboots or power cycles.
Use the portShow command to display actual port speed settings. Use the portCfgShow command to display user-configured speed settings.
Notes This configuration cannot be set on VE_Ports or VEX_Ports.
Speed configuration is not applicable to FCoE ports.
The execution of this command is subject to Virtual Fabric or Admin Domain restrictions that may be in place. Refer to chapter 1, "Using Fabric OS commands" and Appendix A, "Command Availability" for details.
Operands This command has the following operand:
speed Specifies the speed for all ports on a switch. This operand is required. Valid values are as follows:
0 Autosensing mode. The port automatically configures for the highest speed.
1 The port is set at a fixed speed of 1 Gbps.
2 The port is set at a fixed speed of 2 Gbps.
4 The port is set at a fixed speed of 4 Gbps.
8 The port is set at a fixed speed of 8 Gbps.
Examples To set the autosensing mode for all ports on a switch:
switch:admin> switchcfgspeed 0Committing configuration...done.
See Also portCfgSpeed, portShow
924 Fabric OS Command Reference53-1001764-02

switchCfgTrunk 2
switchCfgTrunk
Enables or disables trunking on all the ports of a switch.
Synopsis switchcfgtrunk mode
Description Use this command to enable or disable trunking on all the ports of a switch. Use portCfgTrunkPort to enable or disable trunking on a single port.
When the command is executed to update the trunking configuration, the ports to which the configuration applies are disabled and subsequently re-enabled with the new trunking configuration. Traffic through these ports may be temporarily disrupted. The command issues a message that lists the VE/VEX_Ports to which the configuration does not apply.
Trunking on Inter-Chassis Link (ICL) ports is always enabled and cannot be turned off by this command.
Disabling trunking fails if a Trunk Area (TA) is enabled on the port. Use the portTrunkArea command to disable the TA on all ports before disabling trunking.
Notes Enabling trunking requires an ISL Trunking license. You may disable trunking without a license.
The execution of this command is subject to Virtual Fabric or Admin Domain restrictions that may be in place. Refer to chapter 1, "Using Fabric OS commands" and Appendix A, "Command Availability" for details.
Operands The following operand is required:
mode Specify 1 to enable trunking on all ports. Specify 0 to disable trunking on all ports.
Examples To enable trunking on all ports of a switch:
switch:admin> switchcfgtrunk 1Configuration applied to all ports except the following \VE/VEX_Ports (ports 176 - 191).
To disable trunking on all ports of a switch:
switch:admin> switchcfgtrunk 0Committing configuration...done.
See Also portCfgShow, portCfgTrunkPort, portShow, portTrunkArea, switchShow
Fabric OS Command Reference 92553-1001764-02

switchDisable2
switchDisable
Disables all user ports on a switch.
Synopsis switchdisable
Description Use this command to disable all user ports on a switch. All Fibre Channel ports are taken offline. If the switch was part of a fabric, the remaining switches reconfigure. As each port is disabled, the front panel LED changes to a slow flashing yellow.
The switch must be disabled before making configuration changes or before running offline diagnostic tests. Commands that require the switch to be disabled generate an error message if invoked while the switch is enabled. It is not necessary to disable the switch before rebooting or powering off.
When this command is executed on a logical switch, only the ports allocated to the logical are disabled. To disable the entire chassis, use the chassisDisable command.
Note The execution of this command is subject to Virtual Fabric or Admin Domain restrictions that may be in place. Refer to chapter 1, "Using Fabric OS commands" and Appendix A, "Command Availability" for details
Operands none
Examples To disable the switch:
switch:admin> switchdisable
See Also bladeEnable, bladeDisable, chassisEnable, chassisDisable, switchCfgPersistentDisable,switchCfgPersistentEnable, switchEnable, switchShow
926 Fabric OS Command Reference53-1001764-02

switchEnable 2
switchEnable
Enables all user ports on a switch.
Synopsis switchenable
Description Use this command to enable all user ports on a switch. All Fibre Channel ports that passed the power-on self test (POST) are enabled. They can come online if connected to a device, or remain offline if disconnected. Use switchEnable to re-enable the switch after making configuration changes or running offline diagnostics.
If the switch is connected to a fabric, it rejoins the fabric. If the switch remains the principal switch, it assigns itself a domain ID. If another switch assumes the principal role, then the re-enabled switch becomes a subordinate switch and accepts a domain ID from the principal.
As each port is enabled, the front panel LED changes to green for online ports, or to yellow for uninitialized ports. Disconnected ports remain unlit.
When this command is executed on a logical switch, only the ports allocated to the logical switch are enabled. To enable the entire chassis, use the chassisEnable command.
Note The execution of this command is subject to Virtual Fabric or Admin Domain restrictions that may be in place. Refer to chapter 1, "Using Fabric OS commands" and Appendix A, "Command Availability" for details.
Operands none
Examples To enable a switch:
switch:admin> switchenable
See Also bladeEnable, bladeDisable, chassisDisable, chassisEnable, CfgPersistentDisable,switchCfgPersistentEnable, switchDisable, switchShow
Fabric OS Command Reference 92753-1001764-02

switchName2
switchName
Displays or sets the switch name.
Synopsis switchname [name]
Description Use this command to display or set the switch name. All switches have a symbolic name that is primarily used for switch management. This name is shown in the Fabric OS CLI prompt, under each switch icon in Web Tools, and in the output of various Fabric OS commands, such as fabricShow.
Use this command with the name operand to assign a new switch name. Enter this command without an operand to display the current switch name.
Changing the switch name causes a domain address format registered state change notification (RSCN) to be issued. Refer to the FC-FLA specification for a description of RSCNs).
Note The execution of this command is subject to Virtual Fabric or Admin Domain restrictions that may be in place. Refer to chapter 1, "Using Fabric OS commands" and Appendix A, "Command Availability" for details.
Operands This command has the following operand:
name Specify a new name for the switch. A switch name can include up to 30 characters on all platforms running Fabric OS v.6.2.0 or later. On the Brocade 300, 5100, 5300, and 5410 platforms running earlier firmware versions, the switch name can be up to 31 characters long. On all other pre-Fabric OS v6.2.0 platforms, the name is limited to 15 characters. The name must begin with a letter, can consist of letters, numbers, hyphens, and underscore characters. Spaces are not allowed. This operand is optional; if omitted, this command displays the current switch name.
Examples To change a switch name to dilbert (note the change in the prompt text):
switch:admin> switchname brocade_demo_1298765_AY4TYI60brocade_demo_1298765_AY4TYI60:admin> switchnamebrocade_demo_1298765_AY4TYI60
See Also chassisShow, switchShow
928 Fabric OS Command Reference53-1001764-02

switchShow 2
switchShow
Displays switch and port status.
Synopsis switchshow
switchshow [-slot slot] -portname
switchshow [-portcount |-iscsi]
Description Use this command to display switch, blade, and port status information. Output may vary depending on the switch model.
When used without operands, switchShow displays the following information:
switchName Switch name.
switchType Switch model and revision numbers.
switchState Switch state: Online, Offline, Testing, or Faulty. If switchcfgPersistentDisable is issued and thereafter followed by switchEnable, then the switch state changes to, “Online (Temporary)”. The switch remains in this state until switchcfgPersistentEnable is issued.
switchMode Switch operation mode: Native, Interop, or Access Gateway.
switchRole Switch role: Principal, Subordinate, or Disabled.
DomainIDOffset Domain ID Offset, displays only on switches in interop mode 2 and 3. Valid values for this field are: 0x00, 0x20, 0x40, 0x60, 0x80, 0xA0, 0xC0, and 0xFF. The 0xFF value indicates 239 domain offset mode and is applicable only to interop mode 3. Refer to interopMode for more information.
switchDomain Switch domain ID: 0-31 or 1-239.
switchId Switch embedded port D_ID.
switchWwn Switch world wide name (WWN).
switchBeacon Switch beaconing state: On or Off.
zoning The name of the active zone is displayed in parentheses. Active only when Access Gateway mode is disabled.
FC Router FC Router state: On or Off.
FC Router BB Fabric IDThe backbone fabric ID for FC routing.
Allow XISL Use Allows the switch to use interswitch links (XILS) in the base fabric to carry traffic to this logical switch. Values are ON or OFF.
LS Attributes On a switch in Virtual Fabric mode, this field displays logical switch attributes, including the fabric ID associated with the logical switch, the switch role (default switch or base switch), and the fabric Address Mode (0, 2 or 3). If Virtual Fabrics are disabled, only the Address Mode is displayed. The fabric Address Mode value is set by the configure command (Enable a 256 Area Limit).
The switch summary is followed by one-line description for non-EX_Ports and one or two lines for EX_Ports:
Fabric OS Command Reference 92953-1001764-02

switchShow2
Index Port index is a number between 0 and the maximum number of supported ports on the platform. The port index identifies the port number relative to the switch.
Slot Slot number; 1-12
Port Port number; 0-15, 0-31, or 0-47.
Address The 24-bit Address Identifier.
Media Media types include:
-- No module present. Applicable to all port types.
cu Displays when the copper (default) GbE port ge0 or ge1 is active (refer to portCfgGeMediaType for more information). If the optical GbE port is active and an SFP is installed (copper or optical), “id” is displayed. If nothing is installed on the optical port, the Media field shows “--”. The “cu” field also displays for interchassis links (ICLs).
id Serial ID. Indicates that an SFP is installed. Use sfpShow to get more information about the SFP, including the serial number.
Speed The speed of the port:
1/8G 125 Mbps
1/4G 250 Mbps
1/2G 500 Mbps
1G 1 Gbps fixed transfer speed
N1 1 Gbps negotiated transfer speed
2G 2 Gbps fixed transfer speed
N2 2 Gbps negotiated transfer speed
4G 4 Gbps fixed transfer speed
N4 4 Gbps negotiated transfer speed
8G 8 Gbps fixed transfer speed
N8 8 Gbps negotiated transfer speed
10G 10 Gbps fixed transfer speed
N10 10 Gbps negotiated transfer speed
AN Autonegotiating
UN Unknown
State Port state information:
No_Card No interface card present.
No_Module No module (GBIC or other) present.
Mod_Val Module validation in process.
Mod_Inv Module speed mismatch or incompatible SFP.
No_Light The module is not receiving light.
930 Fabric OS Command Reference53-1001764-02

switchShow 2
No_Sync The module is receiving light but is out of sync.
In_Sync The module is receiving light and in sync.
Laser_Flt The module is signaling a laser fault.
Port_Flt The port is marked faulty.
Diag_Flt The port failed diagnostics.
Lock_Ref The port is locking to the reference signal.
Testing The port is running diagnostics.
Offline A port connection is not established (for virtual ports only).
Online The port is up and running.
Proto Protocol support by GbE port.
ISCSI The ports supports ISCSI.
FCIP The port supports FCIP.
FCoE The port supports Fibre Channel over Ethernet.
comment Optionally displays one of the following:
Copper or Optical Displays which GbE port is currently active: Copper indicates that the RJ45 GbE port is currently active. Only copper connections are accepted (default). Optical indicates that the currently active GbE port accepts both copper and optical connections (SFPs). This parameter is set by the portCfgGeMediaType command, and applies only to the ge0 and ge1 ports on the Brocade 7800.
Disabled The port is disabled.
Bypassed The port is bypassed (loop only).
Loopback The port is in loopback mode.
E_Port Fabric port; displays the world wide name (WWN) and name of the attached switch. If the port is configured as an EX_Port, the WWN of the attached switch is the same as the router.
F_Port Point-to-point port; displays the WWN of the attached N_Port. If that specific F_Port receives 1 FDISK frame, switchShow displays the total number of NPIV Public ports as 1, for example: F_Port 1 NPort + 1 NPIV devices.
G_Port Point-to-point port, but not yet E_Port or F_Port.
L_Port Loop port; displays the number of NL_Ports.
EX_Port Router port; displays the WWN of the attached edge switch.
VF_Port FCoE Virtual F_Port. For these ports, the number of NPIV or external device logins is displayed ("n VN-Port(s)"), instead of the WWN of the internal port.
Mirror Port The port is a mirror port.
(Trunk master) The port is the master port in a group of trunking ports.
(Trunk port, master is port #x)The port is configured as a trunking port; the master port is port #x.
(upstream) The E_Port is an upstream path toward the principal switch of the fabric.
Fabric OS Command Reference 93153-1001764-02

switchShow2
(downstream) The E_Port is a downstream path away from the principal switch of the fabric.
Persistently DisabledThis port has been disabled with the portCfgPersistentDisable command.
FICON Persistent DIDThis port has been disabled, because the switch could not obtain its configuration domain ID during the fabric reconfiguration when fmsmode was enabled. See the ficonCupSet help page for more information.
Fabric ID conflict
Two different fabrics have been assigned the same fabric ID. Applicable only to EX_Ports and Logical Fabric environments.
Fabric ID oversubscribed
One fabric has been assigned two different fabric IDs (EX_Ports only).
AoQ Application-oriented QoS; indicates that an F_Port or N_Port has negotiated a link that is capable of quality of service (QoS). Both sides of the link have QoS capability and agreed on the protocol. The link could be between an HBA and an Access Gateway, between an Access Gateway and an edge switch, or between an HBA and an edge switch.
If the Access Gateway cannot negotiate QoS capabilities with the edge switch, an HBA connected to the Access Gateway will not be able to negotiate a QoS link with the Access Gateway.
A Server Application Optimization (SAO) license is required to enable QoS at the HBA. An Adaptive Networking license is required both at the Access Gateway and the edge switch to enable QoS.
(logical) Indicates a logical port. The switchShow output shows all logical ports currently present in the logical switch. The command displays -1 for the slot for logical ports and the user port number for slot port. The logical port numbers are not persistent and may change when the logical interswitch links (LISLs) are deleted and recreated. A logical port is shown to be in one of the following states: E_Port (if the port is online), offline, or disabled. When the port is disabled, a reason is provided.
When used with the -slot option, the command displays the following blade-specific information:
slot Slot number.
Blade Type Type of blade, for example, Core blade or AP blade. Refer to the slotShow command for a listing of supported blade types.
ID A numeric blade ID that specifies the blade type. Refer to the slotShow command for a listing of supported blade IDs.
Status Enabled or disabled.
Notes The execution of this command is subject to Virtual Fabric or Admin Domain restrictions that may be in place. Refer to chapter 1, "Using Fabric OS commands" and Appendix A, "Command Availability" for details.
932 Fabric OS Command Reference53-1001764-02

switchShow 2
On the Brocade 8000, the Proto column identifies the FCoE ports of the switch. For all FCoE ports, the speed is 10 Gbps. The default configuration of an FCoE port is an F_Port configuration. After a successful reboot switchShow displays all FCoE ports as online. For each FCoE port, the FCoE controller WWN is shown. FCoE ports are not configurable with the Fabric OS port commands. Use the fcoe commands instead.
If a port is configured as a long distance port, the long distance level is displayed in the format of Lx, where x represents the long distance level number. See portCfgLongDistance for the level description.
The port state for disabled E_Ports displays as In_Sync when the port is the interswitch link (ISL) between a Brocade 48000 and a Brocade 24000. If the ISL is between a Brocade 48000 and a Brocade 4100 or 200E, the disabled E_Port displays as No_Sync.
On a Brocade 7600 switch, if the SAS image is not consistent with the FOS image, the message "SAS Virtualization Disabled" is displayed.
When a port is configured as an N_Port and is online, switchShow displays its type as an N_Port. Also, switchShow displays the WWN of the border switch attached to this N_Port as a 24-bit Port Identifier assigned to this port by the enterprise fabric.
In an AD context, if one of the L_Ports or NPIV Ports is a part of the current AD, the complete device information attached to the port is displayed.
Operands This command has the following operands:
-slot slot Displays blade information. You can specify this operand with -portname, but not with any other operand.
-portname Displays the name for each port on the switch. The port name is set by the portName command. You can specify this operand with -slot, but not with any other operand.
-portcount Displays the number of ports on the switch. This operand is exclusive.
-iscsi Displays the number of ports on the iSCSI sessions associated with GbE ports in a switch. This operand is exclusive.
Examples To display the port count:
switch:admin> switchshow -portcountFC ports = 198, GE ports = 12
To display GbE ports with iSCSI sessions:
switch:admin> switchshow -iscsiPorts of Slot 1 ge0 ge1 ge2 ge3 ge4 ge5 ge6 ge7-----------------+---+---+---+---+-----+---+---+---Sessions 0 0 0 0 0 0 0 0
To display a QoS-capable Core Access Gateway with online AoQ F_Ports and N_Ports:
switch:admin> switchshowswitchName: Spirit_125switchType: 66.1switchState: Online switchMode: Access Gateway ModeswitchWwn: 10:00:00:05:1e:85:95:d0switchBeacon: OFFFC Router: OFF
Fabric OS Command Reference 93353-1001764-02

switchShow2
FC Router BB Fabric ID: 1
Area Port Media Speed State Proto===================================== 0 0 -- N8 No_Module FC 1 1 -- N8 No_Module FC 2 2 -- N8 No_Module FC 3 3 -- N8 No_Module FC 4 4 -- N8 No_Module FC 5 5 -- N8 No_Module FC 6 6 -- N8 No_Module FC 7 7 -- N8 No_Module FC 8 8 -- N8 No_Module FC 9 9 id N8 Online FC F-Port 10:00:00:05:1e:53:2c:54 0x690105 (AoQ) 10 10 id N8 Online FC F-Port 10:00:00:05:1e:56:5f:a9 0x690107 (AoQ) 11 11 id N4 Online FC F-Port 10:00:00:05:1e:56:5f:a8 0x690106 (AoQ) 12 12 -- N8 No_Module FC 13 13 -- N8 No_Module FC 14 14 -- N8 No_Module FC 15 15 -- N8 No_Module FC 16 16 id N8 No_Light FC 17 17 id N8 Online FC F-Port 1 N Port + 3 NPIV public (AoQ) 18 18 -- N8 No_Module FC 19 19 -- N8 No_Module FC 20 20 -- N8 No_Module FC 21 21 -- N8 No_Module FC 22 22 -- N8 No_Module FC 23 23 -- N8 No_Module FC 24 24 -- N8 No_Module FC 25 25 -- N8 No_Module FC 26 26 -- N8 No_Module FC 27 27 -- N8 No_Module FC 28 28 -- N8 No_Module FC 29 29 -- N8 No_Module FC 30 30 -- N8 No_Module FC 31 31 -- N8 No_Module FC 32 32 id N8 Online FC N-Port 10:00:00:05:1e:43:e8:02 0x690100 (Trunk master) (AoQ) 33 33 -- N8 No_Module FC 34 34 id N8 Online FC N-Port 10:00:00:05:1e:43:e8:02 0x690100 (Trunk port, master is Port 32 )(AoQ) 35 35 -- N8 No_Module FC 36 36 -- N8 No_Module FC 37 37 -- N8 No_Module FC 38 38 -- N8 No_Module FC 39 39 -- N8 No_Module FC
To display switch information on a Virtual Fabrics-enabled switch:
switch:admin> switchshowswitchName: brocade218switchType: 62.1switchState: Online switchMode: NativeswitchRole: PrincipalswitchDomain: 1switchId: fffc01
934 Fabric OS Command Reference53-1001764-02

switchShow 2
switchWwn: 10:00:00:60:69:80:04:92zoning: ON (testcfg1)switchBeacon: OFFFC Router: OFFAllow XISL use: ON LS Attributes: [FID: 10, Base Switch: No, Default Switch: No, Address Mode 0]
Index Slot Port Address Media Speed State Proto===================================================377 12 41 32f180 -- N8 No_Module 378 12 42 32f280 -- N8 No_Module 379 12 43 32f380 -- N8 No_Module 380 12 44 32f480 -- N8 No_Module 381 12 45 32f580 -- N8 No_Module 382 12 46 32f680 -- N8 No_Module 383 12 47 32f780 -- N8 No_Module769 -1 769 -- -- -- OnlineE-Port 10:00:00:05:1e:40:f0:79 "Switch 1" (logical)770 -1 770 -- -- -- Offline(logical)785 -1 785 -- -- -- Offline Disabled (logical, reason why port was disabled)
To display switch configuration information on the Brocade 8000:
switch:admin> switchshowswitchName: elara133switchType: 76.6switchState: OnlineswitchMode: NativeswitchRole: SubordinateswitchDomain: 133switchId: fffc85switchWwn: 10:00:00:05:1e:76:60:80zoning: ON (cfg_fcoe)switchBeacon: OFF
Index Port Address Media Speed State Proto============================================== 0 0 850000 id N8 Online FC E-Port 10:00:00:05:1e:92:de:00 "pluto145" (upstream)(Trunk master) 1 1 850100 id N8 Online FC E-Port (Trunk port, master is Port 0 ) 2 2 850200 id N8 Online FC E-Port (Trunk port, master is Port 0 ) 3 3 850300 id N8 Online FC E-Port (Trunk port, master is Port 0 ) 4 4 850400 id N8 Online FC E-Port (Trunk port, master is Port 0 ) 5 5 850500 id N8 Online FC E-Port (Trunk port, master is Port 0 ) 6 6 850600 id N8 Online FC E-Port (Trunk port, master is Port 0 ) 7 7 850700 id N8 Online FC E-Port (Trunk port, master is Port 0 ) 8 8 850800 -- 10G Online FCoE FCoE VF-Port 1 VN-Port(s)\par 9 9 850900 -- 10G Online FCoE VF-Port 1 VN-Port(s)\par 10 10 850a00 -- 10G Online FCoE VF-Port 0 VN-Port(s)\par 11 11 850b00 -- 10G Online FCoE VF-Port 1 VN-Port(s)\par 12 12 850c00 -- 10G Online FCoE VF-Port 1 VN-Port(s)\par 13 13 850d00 -- 10G Online FCoE VF-Port 0 VN-Port(s)\par 14 14 850e00 -- 10G Online FCoE VF-Port 4 VN-Port(s)\par 15 15 850f00 -- 10G Online FCoE VF-Port 0 VN-Port(s)\par 16 16 851000 -- 10G Online FCoE VF-Port 1 VN-Port(s)\par(output truncated)
Fabric OS Command Reference 93553-1001764-02

switchShow2
To display blade information and port names:
switch:admin> switchshow -slot 5 -portname
FC Router: OFFAllow XISL Use: OFFLS Attributes:[FID: 128, Base Switch: No, Default Switch: Yes, Address Mode 0] Slot Blade Type ID Status -------------------------------------------------5 COREBLADE 52 ENABLED Index Slot Port Name ===================================================384 5 0 MyName_portname0 385 5 1 ------ 386 5 2 ------
To display the domain ID offset on a switch in interop mode 2:
switch:admin> switchshowswitchName: WT_Pulsar_77switchType: 32.0switchState: OnlineswitchMode: McDATA FabricswitchRole: PrincipalDomainIDOffset: 0x20switchDomain: 2switchId: fffc25switchWwn: 10:00:00:05:1e:35:71:8bzoning: OFFswitchBeacon: OFFFC Router: OFFFC Router BB Fabric ID: 1
[output truncated]
To display media type information (relevant output excerpts only):
• The following example shows switchshow output for the ge0 and ge1 ports on a Brocade 7800. The ge0 port is a copper port (default). The ge1 has an SFP installed (copper or optical):
[...]ge0 cu 1G No_Sync FCIP Copperge1 id 1G No_Light FCIPge2 -- 1G No_Module FCIPge3 -- 1G No_Module FCIPge4 id 1G Online FCIPge5 -- 1G No_Module FCIP[...]
• This example shows switchshow output for a Brocade 5100. Port 31 has an SFP installed. Nothing is installed on Port 30.
[...]31 31 421f00 id N4 In_Sync FC Disabled32 32 422000 -- N8 No_Module FC Disabled[...]
936 Fabric OS Command Reference53-1001764-02

switchShow 2
• The sfpshow output for the same switch displays the serial number for the SFP.
[...]Port 31: id (sw) Vendor: BROCADE Serial No: UAF1081800000MK Speed: 200,400,800_MB/sPort 32: --[...]
See Also portCfgLongDistance, switchDisable, switchEnable, switchName
Fabric OS Command Reference 93753-1001764-02

switchStatusPolicySet2
switchStatusPolicySet
Sets the policy parameters that determine overall switch status.
Synopsis switchstatuspolicyset
Description Use this command to set policy parameters for calculating the overall status of the switch enclosure. The policy parameter values determine how many failed or faulty units of each contributor are allowed before triggering a status change in the switch from HEALTHY to MARGINAL or DOWN. The status of the switch can be found by issuing the switchStatusShow command. The existence of policies such as Fans, PowerSupplies, WWN, CP, and Blade might differ from platform to platform.
The command displays the current parameters in a three-column table format similar to what is shown inTable 26 The command then prompts you to change the values for each policy parameter.
Any single contributor can force the overall status of the switch to MARGINAL or DOWN. For example, assuming that the switch contributor values are set to the default values, if there is one faulty port in a switch, then this contributor would set the overall switch status to MARGINAL. If two ports were faulty, then this contributor would set the overall switch status to DOWN.
Note The execution of this command is subject to Virtual Fabric or Admin Domain restrictions that may be in place. Refer to chapter 1, "Using Fabric OS commands" and Appendix A, "Command Availability" for details.
Operands none
Examples To change the switch policies:
switch:admin> switchstatuspolicyset
To change the overall switch status policy parameters
The current overall switch status policy parameters: Down Marginal ---------------------------------- PowerSupplies 2 1
TABLE 26 Example of contributor, values, and status
Contributor DOWN MARGINAL
PowerSupplies 2 1
Temperatures 2 1
Fans 2 1
WWN 0 1
CP 0 1
Blade 0 1
Flash 0 1
MarginalPorts 2 1
FaultyPorts 2 1
MissingSFPs 0 0
938 Fabric OS Command Reference53-1001764-02

switchStatusPolicySet 2
Temperatures 2 1 Fans 2 1 WWN 0 1 CP 0 1 Blade 0 1 CoreBlade 1 1 Flash 0 1 MarginalPorts 2 1 FaultyPorts 2 1 MissingSFPs 0 0
Note that the value, 0, for a parameter, means that it isNOT used in the calculation.** In addition, if the range of settable values in the prompt is (0..0),** the policy parameter is NOT applicable to the switch.** Simply hit the Return key.
The minimum number of Bad PowerSupplies contributing to DOWN status: (0..4) [3] 2 Bad PowerSupplies contributing to MARGINAL status: (0..4) [0] 1 Bad Temperatures contributing to DOWN status: (0..28) [2] Bad Temperatures contributing to MARGINAL status: (0..28) [1] Bad Fans contributing to DOWN status: (0..3) [2] Bad Fans contributing to MARGINAL status: (0..3) [1] Down WWN contributing to DOWN status: (0..2) [0] Down WWN contributing to MARGINAL status: (0..2) [1] Down CP contributing to DOWN status: (0..2) [0] Down CP contributing to MARGINAL status: (0..2) [1] Down Blade contributing to DOWN status: (0..8) [0] Down Blade contributing to MARGINAL status: (0..8) [1] Down CoreBlade contributing to DOWN status: (0..2) [0] 1 Down CoreBlade contributing to MARGINAL status: (0..2) [1] Out of range Flash contributing to DOWN status: (0..1) [0] Out of range Flash contributing to MARGINAL status: (0..1) [1] MarginalPorts contributing to DOWN status: (0..448) [2] MarginalPorts contributing to MARGINAL status: (0..448) [1] FaultyPorts contributing to DOWN status: (0..448) [2] FaultyPorts contributing to MARGINAL status: (0..448) [1] MissingSFPs contributing to DOWN status: (0..448) [0] MissingSFPs contributing to MARGINAL status: (0..448) [0]
Policy parameter set has been changed
See Also switchStatusPolicyShow, switchStatusShow
Fabric OS Command Reference 93953-1001764-02

switchStatusPolicyShow2
switchStatusPolicyShow
Displays the policy parameters that determine overall switch status.
Synopsis switchstatuspolicyshow
Description Use this command to view the current policy parameters set for the switch. These policy parameters determine the number of failed or nonoperational units allowed for each contributor before triggering a status change in the switch.
The command displays the current parameters in a three-column format similar to what is shown in Table 27. The first column indicates the contributor, the second column indicates the minimum number that contributes to the DOWN status, and the third column indicates the minimum number that contributes to the MARGINAL status. The parameters can be set by the switchStatusPolicySet command. The existence of policies such as Fans, PowerSupplies, CP, WWN, and Blade may differ from platform to platform.
The policy parameters determine the number of failed or nonoperational units for each contributor that trigger a status change in the switch. For example, if the FaultyPorts DOWN parameter is set to 3, and three ports fail in the switch, then the status of the switch changes to DOWN.
Note The execution of this command is subject to Virtual Fabric or Admin Domain restrictions that may be in place. Refer to chapter 1, "Using Fabric OS commands" and Appendix A, "Command Availability" for details.
Operands none
Examples switch:admin> switchstatuspolicyshow The current overall switch status policy parameters: Down Marginal ---------------------------------- PowerSupplies 2 1 Temperatures 2 1 Fans 2 1 WWN 0 1 CP 0 1 Blade 0 1
TABLE 27 Example of contributor, values, and status
Contributor DOWN MARGINAL
PowerSupplies 2 1
Temperatures 2 1
Fans 2 1
WWN 0 1
CP 0 1
Blade 0 1
Flash 0 1
MarginalPorts 2 1
FaultyPorts 2 1
MissingSFPs 0 0
940 Fabric OS Command Reference53-1001764-02

switchStatusPolicyShow 2
Flash 0 1 MarginalPorts 2 1 FaultyPorts 2 1 MissingSFPs 0 0
See Also switchStatusPolicySet, switchStatusShow
Fabric OS Command Reference 94153-1001764-02

switchStatusShow2
switchStatusShow
Displays overall switch status.
Synopsis switchstatusshow
Description Use this command to display the overall status for a switch that is configured with IPv4 and IPv6 addresses. In addition, users with a Fabric Watch license are able to view the list of unhealthy ports.
This command displays the overall switch status, and the status of the following contributors:
• Power supplies
• Temperatures
• Fans
• WWN servers (dual-CP systems only)
• Standby CP (dual-CP systems only with HA enabled)
• Blades (bladed systems only)
• Flash
• Marginal ports
• Faulty ports
• Missing SFPs
Status values are HEALTHY, MARGINAL, or DOWN, depending on whether thresholds established by switchStatusPolicySet have been exceeded. The overall status is based on the most severe status of all contributors.
Refer to switchStatusPolicyShow for details on the calculation of contributors and overall switch status.
Note The execution of this command is subject to Virtual Fabric or Admin Domain restrictions that may be in place. Refer to chapter 1, "Using Fabric OS commands" and Appendix A, "Command Availability" for details.
Operands none
Examples To display a switch health report:
To retrieve a switch health report for a switch that is configuredwith an IPv6 address:
switch:user> switchstatusshow Switch Health Report Report time: 09/11/2006 05:39:28 PM Switch Name: switch IP address: 1080::8:800:200C:417A SwitchState: MARGINAL Duration: 80:12 Power supplies monitor HEALTHY Temperatures monitor HEALTHY Fans monitor HEALTHY Flash monitor MARGINAL Marginal ports monitor HEALTHY Faulty ports monitor HEALTHY
942 Fabric OS Command Reference53-1001764-02

switchStatusShow 2
Missing SFPs monitor HEALTHY All ports are healthy
To retrieve a switch health report for a switch that is configured with an IPv4 address:
switch:user> switchstatusshow Switch Health Report Report time: 09/11/2006 05:39:28 PM Switch Name: switch IP address: 10.32.89.26 SwitchState: MARGINAL Duration: 80:12
Power supplies monitor HEALTHY Temperatures monitor HEALTHY Fans monitor HEALTHY Flash monitor MARGINAL Marginal ports monitor HEALTHY Faulty ports monitor HEALTHY Missing SFPs monitor HEALTHY
All ports are healthy
See Also switchStatusPolicySet, switchStatusPolicyShow
Fabric OS Command Reference 94353-1001764-02
switchUptime2
switchUptime
Displays the amount of time the switch has been operating.
Synopsis switchuptime
Description Use this command to display the current time and the amount of time that the switch has been operational.
Note The execution of this command is subject to Virtual Fabric or Admin Domain restrictions that may be in place. Refer to chapter 1, "Using Fabric OS Commands" and Appendix A, "Command Availability" for details.
Operands none
Examples To view the uptime for the switch:
switch:user> switchuptime9:50pm up for 20 mins
See Also none
944 Fabric OS Command Reference53-1001764-02

switchViolation 2
switchViolation
Dumps the DCC violations for a switch.
Synopsis switchViolation --dump -dcc
Description Use this command to display all Device Connection Control (DCC) violations that have occurred on a switch. Internally the command searches "errdumpall" for the DCC violations. For each DCC violation, the command displays the device WWN and the port where the violation occurred.
Notes The execution of this command is subject to Virtual Fabric or Admin Domain restrictions that may be in place. Refer to chapter 1, "Using Fabric OS Commands" and Appendix A, "Command Availability" for details.
This command can be executed on both active and standby CPs. This command does not support High Availability (HA).
Operands This command has the following operands. If executed without operands, the command prints the usage.
--dump Displays specified policy violation.
-dcc Specifies the violation type as DCC.
Examples To display DCC violations for a switch:
switch:admin> switchviolation --dump -dccDevice WWN Port-----------------------------------22:00:00:04:cf:75:59:87 10
See Also none
Fabric OS Command Reference 94553-1001764-02

syslogdFacility2
syslogdFacility
Sets or displays the syslog facility.
Synopsis syslogdFacility [-l level]
Description Use this command to set the syslog facility to a specified log file, or use this command without operands to display the current syslog facility. The syslog daemon (syslogd) reads and forwards system messages to the log file specified by this command. You must configure the servers to receive system messages by adding them with the syslogdIpAdd command.
Note The execution of this command is subject to Virtual Fabric or Admin Domain restrictions that may be in place. Refer to chapter 1, "Using Fabric OS commands" and Appendix A, "Command Availability" for details.
Operands This command has the following operands:
-l level Specifies the syslog facility. Valid levels are 0 through 7. The default is 7. This operand is optional; if omitted, the current facility is displayed.
0 - LOG_LOCAL0
1 - LOG_LOCAL1
2 - LOG_LOCAL2
3 - LOG_LOCAL3
4 - LOG_LOCAL4
5 - LOG_LOCAL5
6 - LOG_LOCAL6
7 - LOG_LOCAL7 (default)
Examples To set the syslog facility to LOG_LOCAL1:
switch:admin> syslogdfacility -l 1Syslog facility changed to LOG_LOCAL1
To display the current setting:
switch:admin> syslogdfacilityLOG_LOCAL1
See Also syslogdIpAdd, syslogdIpRemove, syslogdIpShow
946 Fabric OS Command Reference53-1001764-02

syslogdIpAdd 2
syslogdIpAdd
Configures a switch to forward system messages to specified servers.
Synopsis syslogdipadd ip_address
Description Use this command to configure a switch to forward all error log entries to the syslog daemon (syslogd) of one or more specified servers. The syslog daemon is a process available on most UNIX systems that reads and forwards system messages to the appropriate log files or users, depending on the system configuration. Up to six servers are supported.
Only one syslogd server can be specified at any given time. To configure more than one server, the command must be executed for each server.
Note The execution of this command is subject to Virtual Fabric or Admin Domain restrictions that may be in place. Refer to chapter 1, "Using Fabric OS commands" and Appendix A, "Command Availability" for details.
Operands This command has the following operands:
ip_address Specifies the IP address of the server running syslogd in IPv4 or IPv6 format.
Examples To add an IP address to the list of machines to which system messages are sent:
switch:admin> syslogdipadd 1080::8:800:200C:417A
switch:admin> syslogdipshowsyslog.1 1080::8:800:200C:417A
To add a second IP address to the existing syslogd server configuration:
switch:admin> syslogdipadd 192.168.163.234
switch:admin> syslogdipshowsyslog.1 1080::8:800:200C:417Asyslog.2 192.168.163.234
See Also errShow, syslogdFacility, syslogdIpRemove, syslogdIpShow
Fabric OS Command Reference 94753-1001764-02

syslogdIpRemove2
syslogdIpRemove
Removes a server that is running the syslog daemon.
Synopsis syslogdipremove ip_address
Description Use this command to remove a server that is running the syslogd process and to which system messages are sent from the syslog server configuration on the switch. IPv6 and IPv4 syslogd addresses are supported. Use syslogdIPShow to view the current syslog server configuration.
Note The execution of this command is subject to Virtual Fabric or Admin Domain restrictions that may be in place. Refer to chapter 1, "Using Fabric OS commands" and Appendix A, "Command Availability" for details.
Operands This command has the following operand:
ip_address Specifies the IP address of the server running syslogd.
Examples To remove the IP address 1080::8:800:200C:417A from the list of machines to which system messages are sent:
switch:admin> syslogdipshow syslog.1 1080::8:800:200C:417A
switch:admin> syslogdipremove 1080::8:800:200C:417A
See Also errShow, syslogdFacility, syslogdIpAdd, syslogdIpShow
948 Fabric OS Command Reference53-1001764-02

syslogdIpShow 2
syslogdIpShow
Displays all syslog daemon IP addresses.
Synopsis syslogdipshow
Description Displays the list of servers that are running the syslogd daemon and to which system messages are sent. Servers are specified in the configuration database by IP address. IPv4 and IPv6 addresses are supported.
Note The execution of this command is subject to Virtual Fabric or Admin Domain restrictions that may be in place. Refer to chapter 1, "Using Fabric OS Commands" and Appendix A, "Command Availability" for details.
Operands none
Examples To display all syslog daemon IP addresses configured on a switch:
switch:admin> syslogdipshowsyslog.1 1080::8:800:200C:417A
See Also errShow, syslogdFacility, syslogdIpAdd, syslogdIpRemove
Fabric OS Command Reference 94953-1001764-02

sysMonitor2
sysMonitor
Configures Fabric Watch thresholds for the SFP, fabric, filter, security, and EE monitor classes and monitors memory and system resources..
Synopsis sysmonitor --config class -area area [-highthreshold -value value] [-trigger above | below -action actions] [-lowthreshold -value value][-trigger above | below -action actions] [-buffer value] [-nosave]
sysmonitor --apply class -area area [-action_level def | cust] [-thresh_level def | cust]
sysmonitor --cancel class -area area [-action_level def | cust] [-thresh_level def | cust]
sysmonitor --show [-class classs][-area area] [[-current_status]| [[-action_level def | cust] [-thresh_level def | cust]]]
sysmonitor --config mem | cpu [-poll polling_interval] [-retry number_of_retries] [-limit high_usage_limit][-action action] [-high_limit high_limit] [-low_limit low_limit]]
sysmonitor --show mem | cpu
sysmonitor --help
Description Use this command to configure thresholds for Fabric Watch event monitoring for temperature and system resources on the switch. The following operations are supported by this command:
• Configure thresholds for Fabric Watch event monitoring and reporting for the environment and resource classes. Environment thresholds enable temperature monitoring, and resource thresholds enable monitoring of flash memory. This command follows a transaction model. Configuration changes are saved persistently to nonvolatile storage, but the changes do not take effect until you execute --apply. The --apply option allows you to toggle between default settings and your own saved custom configuration and to apply actions and thresholds separately. You may choose to use default thresholds together with a customized subset of available actions, or you may modify some of the thresholds and use the default actions. Use the -nosave option to save the configuration nonpersistently, and use --cancel to remove a nonpersistent configuration.
• Configure memory or CPU usage parameters on the switch or display memory or CPU usage. Configuration options include setting usage thresholds which, if exceeded, trigger a set of specified Fabric Watch alerts. You can set up the system monitor to poll at certain intervals and specify the number of retries required before Fabric Watch takes action. Configuring thresholds for CPU and memory does not follow the transaction model of the typical Fabric Watch command. The --apply and --cancel option are not valid in this context.
If any configured area exceeds the currently effective threshold settings, the Fabric Watch daemon can take one or more of the following actions:
• Send an SNMP message.
• Log a RAS log message.
• Send an E-mail alert (valid only for the environment and resource class).
• Log a port log message (valid only for the environment and resource class).
950 Fabric OS Command Reference53-1001764-02

sysMonitor 2
Fabric Watch thresholds vary depending on the class and platform. Refer to the Fabric Watch Administrator’s Guide for defaults and configuration guidelines.
Note Execution of this command requires a Fabric Watch License.
The execution of this command is subject to Virtual Fabric or Admin Domain restrictions that may be in place. Refer to chapter 1, "Using Fabric OS Commands" and Appendix A, "Command Availability" for details.
Operands This command has the following operands:
class Specifies a Fabric Watch class to be monitored. This operand is optional with the --show option; it is required with all configuration options. Valid classes include the following:
env Monitors the environment class.
resource Monitors the resource class.
-area area Specifies the area that can be configured for this class. This operand is optional with the --show option; it is required with all configuration options. Valid areas include the following:
temp Specifies the temperature area for the environment class. This area is valid only with the environment class.
flash Specifies the flash memory area for the resource class. This area is valid only with the resource class.
--config class -area area Configures Fabric Watch thresholds for monitoring a specified class and area. When configuring Fabric Watch thresholds, you must specify a class and an area.
The following operands are optional; if omitted, Fabric Watch uses default thresholds
-highthreshold -value value Specifies the high threshold for triggering a specified alert action. To change the default value, provide an integer value.
-lowthreshold -value value Specifies the low threshold for triggering a specified alert action. To change the default value, provide an integer value.
-trigger above | below Specifies the actions for in-range behavior. In range is defined as the space above the low threshold and below the high threshold for a given class and area.
-action actions Specifies the actions triggered by a configured event condition. Valid values include one or more of the following actions. If more than one action is specified, the actions must be separated by commas.
snmp Event triggers an SNMP trap.
raslog Event triggers a RASlog message.
email Event triggers an e-mail.
portlog Event triggers a port log entry.
Fabric OS Command Reference 95153-1001764-02

sysMonitor2
none Event triggers no action.
-buffer value Specifies the buffer value for in-range behavior. A buffer defines a zone within which event criteria are met, rather than a single threshold value. This operand is optional with the -trigger options and valid only with these options.
-nosave Prevents the configuration changes from being saved persistently. This option allows you to make and view changes without overwriting the saved configuration. When you use --config with the -nosave option and the switch reboots your changes will be lost.
--apply Applies the custom or default configuration for thresholds, actions, or both. This command allows you to choose between custom and default settings. The specified configuration takes effect upon execution of this command. When you select custom, the saved configuration becomes effective.
--cancel Cancels a nonpersistent configurations. This command effectively undoes the -nosave operation without reboot.
You must always specify a class and area when you apply or cancel a configuration. Thresholds and alarm levels are optional; if omitted, all nonpersistent configurations for the specified class and area are used.
--show Displays the Fabric Watch configuration for the specified class. When used without operands, this command displays the current Fabric Watch configuration for all classes and areas. When used with optional arguments, the output displays partial views or status information.
-current_status Displays current values for a specified class or area. This operand is optional and valid only with the --show option. The output includes the class, area, port number, circuit ID (for the Brocade 7800 and FS8-24 only), Value, and State. The State field reports whether the current value is above, in range, or below (info) the configured threshold. If no class or area is specified, this command displays current values for all Fabric Watch classes and areas (not only those configured with this command).
The following operands are optional with the --apply, --cancel, and --show options; if omitted, default thresholds are used.
-action_level def | cust Configures or displays default or custom action settings.
-thresh_level def | cust Configures or displays default or custom thresholds.
--config mem | cpu Configures the parameters for monitoring system CPU or memory usage. The following parameters are configurable with this command.
-poll Specifies the polling interval in seconds. Valid values are between 10 and 3600 seconds. The default value is 120 seconds. This operand is optional.
-retry Specifies the number of retries before Fabric Watch takes action. The default value is 3.
-limit Specifies a usage limit as percentage of available resources.
952 Fabric OS Command Reference53-1001764-02

sysMonitor 2
When used to configure CPU monitoring, specify a value in the 1-100 range. When CPU usage exceeds the limit a Fabric Watch alert is triggered. The default CPU limit is 50% for the Brocade 48000 and 75% for all other platforms.
When used to configure memory monitoring the limit value must be greater than the low limit and smaller than the high limit. When the limit is exceeded, Fabric Watch sends out a RASlog WARNING message. When usage returns below the limit, Fabric Watch sends a RASlog INFO message. Valid values are in the range between the low limit and 90%. The default is 70% on the Brocade 48000 and 60% on all other platforms.
The following operands are valid only with --config mem. They provide two additional limits above and below the middle usage limit.
-high_limit high_limit Specifies an upper usage limit for memory as percentage of available memory. This value must be greater than the value set by the -limit parameter. The maximum is 90%. When memory usage exceeds this limit, Fabric Watch generates a CRITICAL RASlog message. The default is 90% for the Brocade 48000 and 80% for all other platforms.
-low_limit low_limit Specifies a lower usage limit for memory as percentage of available memory. This value must be smaller than the value set by the -limit parameter. When memory usage exceeds or falls below this limit, Fabric Watch generates an INFO RASlog message. The default for all platforms is 50%.
-action actions Specifies the actions to be taken if system resources exceed the specified high threshold or fall outside the boundaries defined by the high and low thresholds. Valid values are snmp, raslog, both, or none. The default is none. If more than one action is specified, actions must be separated by commas.
--show cpu | mem Displays system memory or CPU usage.
--help Displays the command usage.
Examples To configure Fabric Watch custom thresholds for temperature:
switch:admin>sysmonitor --config env -area temp -highthreshold -value 99 -trigger above -action raslog
To apply the custom thresholds for temperature:
switch:admin>sysMonitor --apply env -area temp -action_level cust -thresh_level cust
To configure Fabric Watch custom thresholds for temperature using high and low thresholds and save the configuration nonpersistently:
switch:admin>sysmonitor --config env -area temp -highthreshold -value 99 -trigger above -action email -lowthreshold -value 32 -trigger below -action email
To apply the custom thresholds for temperature:
switch:admin>sysmonitor --apply env -area temp -action_level cust -thresh_level cust
To cancel the previously configured thresholds for temperature:
switch:admin>sysmonitor --cancel env -area temp -action_level cust -thresh_level cust
Fabric OS Command Reference 95353-1001764-02

sysMonitor2
To display the Fabric Watch configuration for temperature:
switch:admin>sysmonitor --show env -area tempClass: ENV Area : TEMP ThLevel : Def ActLevel: Def High : Custom: TimeBase: None Value : 65 Trigger : Above Action: Raslog,SNMP Trigger : Below Action: Raslog,SNMP Default: TimeBase: None Value : 65 Trigger : Above Action: Raslog,SNMP Trigger : Below Action: Raslog,SNMP Low: Custom: TimeBase: None Value : 0 Trigger : Above Action: None Trigger : Below Action: Raslog,SNMP Default: TimeBase: None Value : 0 Trigger : Above Action: None Trigger : Below Action: Raslog,SNMP Buffer: Custom: Value : 10 Default: Value : 10
To display current temperature values:
switch:admin>sysmonitor --show env -area temp -cClass |Area |PortNo|C# |Value |State---------|-------|------|----|---------|-------ENV |TEMP |000001|n/a |39 |InRangeENV |TEMP |000002|n/a |35 |InRangeENV |TEMP |000003|n/a |42 |InRangeENV |TEMP |000004|n/a |44 |InRange
To configure Fabric Watch custom thresholds for flash memory:
switch:admin>sysmonitor --config env -area resource -highthreshold -value 100
To apply the custom thresholds for flash memory:
switch:admin>sysmonitor --apply env -area temp -thresh_level cust
To display the Fabric Watch configuration for flash memory:
switch:admin>sysmonitor --show resourceClass: RESOURCE Area : FLASH ThLevel : Cust ActLevel: Cust High :
954 Fabric OS Command Reference53-1001764-02

sysMonitor 2
Custom: TimeBase: None Value : 100 Trigger : Above Action: Raslog,SNMP Trigger : Below Action: Raslog Default: TimeBase: None Value : 90 Trigger : Above Action: Raslog,SNMP Trigger : Below Action: Raslog Low: Custom: TimeBase: None Value : 0 Trigger : Above Action: None Trigger : Below Action: Raslog,SNMP Default: TimeBase: None Value : 0 Trigger : Above Action: None Trigger : Below Action: Raslog,SNMP Buffer: Custom: Value : 0 Default: Value : 0
To configure the thresholds for memory usage monitoring:
switch:admin>sysmonitor --config mem -poll 10 -retry 3 -limit 60 -action snmp,raslog \\-high_limit 70 -low_limit -40
To display the current memory usage and configuration:
switch:admin>sysmonitor --show memShowing Memory Usage: Used Memory : 192020k 25% Total Memory : 768080k Free Memory : 576060k Used Memory Limit : 60% Low Used Memory Limit : 40% High Used Memory Limit: 70% Polling Interval : 60 seconds No Of Retries : 3 Actions : none
To configure the threshold for monitoring system CPU usage:
switch:admin>sysmonitor --config cpu -poll 20 -retry 4 -limit 70 -action snmp
To display the current memory usage threshold:
switch:admin>sysmonitor --show cpuShowing Cpu Usage: Cpu Usage : 21.9% Cpu Usage limit : 75% Number of Retries : 4 Polling Interval : 120 seconds Actions : none
See Also fwHelp, portFencing, portThConfig, thConfig
Fabric OS Command Reference 95553-1001764-02

sysShutDown2
sysShutDown
Provides a graceful shutdown to protect the switch file systems.
Synopsis sysshutdown
Description On standalone platforms, use this command to shut down the switch operating system.
On enterprise-class platforms, when sysShutDown is called on the active control processor (CP), the command shuts down the active CP, standby CP, and any AP blades.
Some platforms will only shut down the operating systems; others will shut down the operating system as well as shut off the power, that is, the LEDs will turn black.
After executing this command, manually power off the system. To reboot the system, manually turn the power switch on.
Notes This command is not supported on the standby CP.
The execution of this command is subject to Virtual Fabric or Admin Domain restrictions that may be in place. Refer to chapter 1, "Using Fabric OS commands" and Appendix A, "Command Availability" for details.
Operands none
Examples To perform a system shutdown on a standalone platform:
switch:admin> sysshutdownThis command will shutdown the operating systems on your switch.You are required to power-cycle the switch in order to restore operation.Are you sure you want to shutdown the switch [y/n]? yBroadcast message from root (ttyS0) Mon Sep 12 17:52:12 2005...
The system is going down for system halt NOW !! INIT: Switching to runlevel: INIT: Sending processes the TERM signaless095:root> Unmounting all filesystems. The system is haltedflushing ide devices: hda Power down.
To perform a system shutdown on a Brocade DCX-4S:
switch:admin> sysshutdownThis command will shutdown the operating systems on your switch.You are required to power-cycle the switch in order to restore operation.Are you sure you want to shutdown the switch [y/n]?yHA is disabledShutting down blade in slot:1, IP addr:127.1.14.2Shutting down blade in slot:8, IP addr:127.1.14.9Shutting down OCP at:0.0.0.0
Broadcast message from root (pts/0) Wed Nov 5 19:03:06 2008...
The system is going down for system halt NOW !!
956 Fabric OS Command Reference53-1001764-02

sysShutDown 2
To attempt a system shutdown from the standby CP (not supported):
switch:admin> sysshutdownShut down the whole system is not support from the standby CPFor shut down the whole systemplease run the sysshutdown from the active CP
See Also haDisable
Fabric OS Command Reference 95753-1001764-02

tempShow2
tempShow
Displays temperature readings.
Synopsis tempshow
Description Use this command to display the current temperature readings of all temperature sensors in a switch. For each sensor, this command displays the slot number (if applicable), the sensor state, and the temperature. The temperature readings are given in both Centigrade and Fahrenheit.
Notes The execution of this command is subject to Virtual Fabric or Admin Domain restrictions that may be in place. Refer to chapter 1, "Using Fabric OS Commands" and Appendix A, "Command Availability" for details.
Refer to the hardware reference manual for your switch to determine the normal temperature range.
Operands none
Examples To display temperature and status sensors:
switch:user> tempshow
Index Slot State Centigrade Fahrenheit ===================================================== 1 1 Ok 41 105 2 2 Ok 39 102 3 3 Absent 4 4 Absent 5 5 Ok 26 78 6 6 Ok 27 80
See Also fanShow, psShow, sensorShow, slotShow
958 Fabric OS Command Reference53-1001764-02

thConfig 2
thConfig
Configures Fabric Watch thresholds for the SFP, fabric, filter, security and EE monitor classes.
Synopsis thconfig --set class-area area [-timebase time_base] [-highthreshold -value value -trigger above | below -action actions] [-lowthreshold -value value -trigger above | below -action actions] [-buffer value][-nosave]
thconfig --apply class-area area [-thresh_level def | cust] [-alarm_level def| cust]
thconfig --cancel class-area area [-thresh_level def | cust] [-alarm_level def| cust]
thconfig --show [class] [-area area] [[-current_status] | [[-thresh_level def | cust] [-action_level def | cust]]
thconfig --show [class] [-only_area]
thconfig --help
Description Use this command to configure thresholds for Fabric Watch event monitoring for the SFP, fabric, filter, end-to-end performance monitor, and security classes or to display the configuration. If configured areas exceed the currently effective threshold settings, the Fabric Watch daemon can take one or more of the following actions:
• Send an SNMP message.
• Log a RASlog message.
• Send an E-mail alert.
• Log a port log message.
The thConfig command follows a transaction model. When you configure thresholds and actions with the --set option, the changes are saved persistently to nonvolatile storage, but the changes do not become effective until you apply the configuration. The --apply option allows you to toggle between default settings and your own saved custom configuration and to apply actions and thresholds separately. You may choose to use default thresholds together with a customized subset of available actions, or you may modify some of the thresholds and use the default actions. Use the -nosave option to save the configuration nonpersistently, and use --cancel to remove a nonpersistent configuration.
For more information on Fabric Watch threshold configuration procedures, including default values for specific area high/low thresholds, refer to the Fabric Watch Administrator’s Guide.
Note The execution of this command is subject to Virtual Fabric or Admin Domain restrictions that may be in place. Refer to chapter 1, "Using Fabric OS Commands" and Appendix A, "Command Availability" for details.
The Fabric and Security classes are not supported in Access Gateway mode.
Execution of this command requires a Fabric Watch License.
Operands This command has the following operands:
class Specifies a Fabric Watch class to be monitored. This operand is optional with the --show option and required with all configuration options.
Fabric OS Command Reference 95953-1001764-02

thConfig2
-area area Specifies the area that can be configured for a specified class. This operand is optional with the --show option and required with all configuration options. Areas are specific to each class. The following classes and associated areas are configurable with the thConfig command. Classes and areas are not case sensitive.
SFP Monitors the SFP class. Valid areas for the SFP class include the following:
TEMP Monitors the physical temperature of the SFP in degrees Celsius.
RXP Measures Receive Power for the SPF in Watts.
TXP Measures Transmit Power for the SPF in Watts.
CURRENT Measures the amount of current supplied to the SFP transceiver.
VOLTAGE Measures the amount of voltage supplied to the SFP.
FABRIC Monitors the Fabric class. Valid areas for the Fabric class include the following:
ED Tracks the number of times an E_Port or VE_Port goes down.
FC Tracks the number of times the fabric reconfigures.
DC Tracks the number of Domain ID changes.
SC Tracks the number of segmentation changes.
ZC Tracks the number of zoning conflicts.
FL Tracks the number of fabric logins.
SECURITY Monitors the Security class. Valid areas for the security class include the following:
TV Tracks the number of Telnet violations.
HV Tracks the number of HTTP violations.
SV Tracks the number of switch connection control (SCC) policy violations.
DV Tracks the number device connection control (DCC) policy violations.
LV Tracks the number of login violations.
IC Tracks the number of invalid certificates.
TS Tracks the number of times the time server is out of sync.
FF Tracks the number of Fibre Channel link access protocol (FLAP) violations.
NF Tracks the number of times the switch has lost contact with the primary FCS.
ISB Tracks the number of times the switch encounters an incompatible security database
IV Tracks the number times a command permitted only on the primary Fibre Channel Switch (FCS) are executed on another switch.
960 Fabric OS Command Reference53-1001764-02

thConfig 2
FILTER Monitors the Filter Performance Monitor class. Valid areas for the filter class include the following:
customer-defined Customer defined performance areas. You can specify any filter monitor to be tracked by Fabric Watch. Refer to the fmConfig command for more information.
EE Monitors the End-to-End Performance Monitor class. Valid areas for the EE class include the following:
RXP Monitors receive performance as the percentage of word frames traveling from the configured SID to the DID.
TXP Monitors transmit performance as the percentage of word frames traveling from the configured DID to the SID.
--set class -area area Configures Fabric Watch thresholds for monitoring a specified class and area. When configuring Fabric Watch thresholds, you must specify a class and an area.
The following operands are optional and valid only with the --set option; if omitted, the default Fabric Watch configuration is used. Defaults parameters vary depending on the area and platform. Refer to the Fabric Watch Administrator’s Guide for specific details.
-timebase time_base Specifies the time interval between two samples to be compared. Valid intervals are:
day Samples are compared once a day.
hour Samples are compared once every hour.
minute Samples are compared once every minute.
second Samples are compared once every second.
none Samples are compared against threshold boundary limit.
-highthreshold -value value Specifies the high threshold value for triggering a specified alert action. To change the default value, provide an integer value.
-lowthreshold -value value Specifies the low threshold for triggering a specified alert action. To change the default value, provide an integer value.
-trigger above | below Specifies the actions for in range behavior. In range is defined as the space above the low threshold and below the high threshold.
-action actions Specifies the actions triggered by a configured event condition. Valid values include one or more of the following actions. If more than one action is specified, the actions must be separated by commas.
raslog Event triggers a RASlog message.
snmp Event triggers an SNMP trap.
Fabric OS Command Reference 96153-1001764-02
thConfig2
email Event triggers an e-mail.
poortlog Event triggers a port log entry
none Event triggers no action.
-buffer value Specifies the buffer value for in range behavior. A buffer defines a zone within which event criteria are met, rather than a single threshold value. This operand is valid only with the -trigger options.
-nosave Prevents the configuration changes from being saved persistently. This option allows you to make and view changes without overwriting the saved configuration. When you use --set with the -nosave option and the switch reboots your changes will be lost.
--apply Applies the custom or default configuration for thresholds, actions, or both. This command allows you to toggle between custom and default settings. The specified configuration takes effect upon execution of this command. When you select custom, the saved configuration becomes effective. You must specify a class and an area when applying a configuration.
--cancel Cancels a nonpersistent custom configuration. This command effectively undoes the -nosave operation without reboot. You must specify a class and an area with this command. Thresholds and alarm levels are optional; if omitted, all nonpersistent configurations for the specified class and area are canceled.
--show Displays the threshold configuration or run-time status for all configured classes and areas. You can optionally specify a class to display the threshold for all areas in that class. Or you can specify an a class and an area to display the area-specific configuration only. When issued without operands, this command displays all configured thresholds for all Fabric Watch classes.
The following operand a are optional and valid only with the --show option.
-current_status Displays current values for a specified class and area, as registered by Fabric Watch, or for all port types and areas. The output includes the class, area, port number, circuit number if applicable, current value, and Fabric Watch State. he State field reports whether the current value is above, in range, or below (info) the configured threshold.
-only_area Displays a comprehensive listing of all valid Fabric Watch classes and associated areas. If a class is provided, this command displays the areas of the specified class.
The following operands are optional with the --apply, --cancel, and --show options; if omitted, defaults are used.
-thresh_level def | cust Configures or displays default or custom threshold configuration settings.
-action_level def | cust Configures or displays default or custom configuration settings.
--help Displays the command usage.
962 Fabric OS Command Reference53-1001764-02

thConfig 2
Examples To set custom thresholds for the SFP class and temperature area:
switch:admin> thconfig --set sfp -area temp -highthreshold -value 32 -trigger above -action email
switch:admin> tthconfig --set sfp -area temp -highthreshold -trigger below -action raslog
switch:admin> thconfig --set sfp -area temp -lowthreshold -value 0 -trigger above -action raslogswitch:admin> thconfig --set sfp -area temp -lowthreshold -value 0 -trigger below -action email
To apply the new custom settings so they become effective:
switch:admin> tthconfig --apply sfp -area temp -action cust -thresh_level cust
To set high thresholds for the security class and login violation area with SNMP alerts and save the thresholds nonpersistently:
switch:admin> thconfig --set security -area lv -highthreshold -value 0 -trigger above \ -action snmp -nosave
switch:admin>thconfig --set security -area lv -highthreshold -value 0 -trigger below \ -action none -nosave
To cancel the custom settings that have previously been saved nonpersistently.
switch:admin> thconfig --cancel security -area lv -action cust -thresh_level cust
To display the Fabric Watch configuration for the SFP class:
switch:admin> thconfig --show sfpClass: SFP Area : TEMP ThLevel : Def ActLevel: Def High : Custom: TimeBase: None Value : 85 Trigger : Above Action: Raslog Trigger : Below Action: Raslog Default: TimeBase: None Value : 85 Trigger : Above Action: Raslog Trigger : Below Action: Raslog Low: Custom: TimeBase: None Value : -10 Trigger : Above Action: None Trigger : Below Action: Raslog Default: TimeBase: None Value : -10 Trigger : Above Action: None Trigger : Below Action: Raslog Buffer: Custom: Value : 3 Default: Value : 3
Fabric OS Command Reference 96353-1001764-02
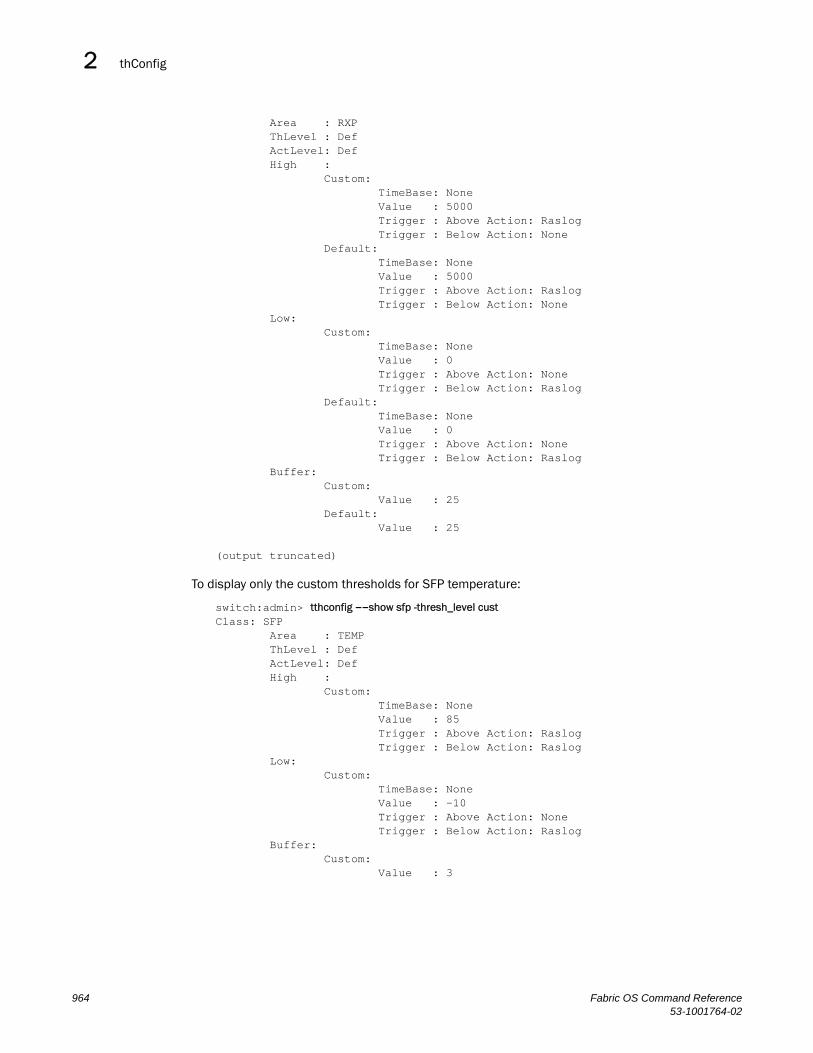
thConfig2
Area : RXP ThLevel : Def ActLevel: Def High : Custom: TimeBase: None Value : 5000 Trigger : Above Action: Raslog Trigger : Below Action: None Default: TimeBase: None Value : 5000 Trigger : Above Action: Raslog Trigger : Below Action: None Low: Custom: TimeBase: None Value : 0 Trigger : Above Action: None Trigger : Below Action: Raslog Default: TimeBase: None Value : 0 Trigger : Above Action: None Trigger : Below Action: Raslog Buffer: Custom: Value : 25 Default: Value : 25
(output truncated)
To display only the custom thresholds for SFP temperature:
switch:admin> tthconfig --show sfp -thresh_level cust Class: SFP Area : TEMP ThLevel : Def ActLevel: Def High : Custom: TimeBase: None Value : 85 Trigger : Above Action: Raslog Trigger : Below Action: Raslog Low: Custom: TimeBase: None Value : -10 Trigger : Above Action: None Trigger : Below Action: Raslog Buffer: Custom: Value : 3
964 Fabric OS Command Reference53-1001764-02

thConfig 2
To display the current status for the SFP class:
switch:admin> thconfig --show sfp -cClass |Area |PortNo|C# |Value |State---------|-------|------|----|---------|-------SFP |TEMP |000000|n/a |50 |InRangeSFP |TEMP |000001|n/a |51 |InRangeSFP |TEMP |000002|n/a |51 |InRangeSFP |TEMP |000003|n/a |44 |InRangeSFP |TEMP |000009|n/a |51 |InRangeSFP |TEMP |000010|n/a |51 |InRangeSFP |TEMP |000011|n/a |51 |InRangeSFP |TEMP |000016|n/a |49 |InRangeSFP |TEMP |000017|n/a |49 |InRangeSFP |TEMP |000018|n/a |49 |InRangeSFP |TEMP |000019|n/a |47 |InRangeSFP |RXP |000000|n/a |458 |InRangeSFP |RXP |000001|n/a |368 |InRangeSFP |RXP |000002|n/a |0 |InfoSFP |RXP |000003|n/a |0 |InfoSFP |RXP |000009|n/a |0 |InfoSFP |RXP |000010|n/a |0 |InfoSFP |RXP |000011|n/a |0 |InfoSFP |RXP |000016|n/a |0 |InfoSFP |RXP |000017|n/a |0 |InfoSFP |RXP |000018|n/a |0 |InfoSFP |RXP |000019|n/a |0 |InfoSFP |TXP |000000|n/a |344 |InRangeSFP |TXP |000001|n/a |376 |InRangeSFP |TXP |000002|n/a |372 |InRangeSFP |TXP |000003|n/a |263 |InRangeSFP |TXP |000009|n/a |357 |InRangeSFP |TXP |000010|n/a |378 |InRangeSFP |TXP |000011|n/a |384 |InRangeSFP |TXP |000016|n/a |337 |InRangeSFP |TXP |000017|n/a |332 |InRangeSFP |TXP |000018|n/a |377 |InRangeSFP |TXP |000019|n/a |355 |InRangeSFP |CURRENT|000000|n/a |8 |InRangeSFP |CURRENT|000001|n/a |8 |InRangeSFP |CURRENT|000002|n/a |8 |InRangeSFP |CURRENT|000003|n/a |5 |InRangeSFP |CURRENT|000009|n/a |7 |InRangeSFP |CURRENT|000010|n/a |9 |InRangeSFP |CURRENT|000011|n/a |8 |InRangeSFP |CURRENT|000016|n/a |7 |InRangeSFP |CURRENT|000017|n/a |8 |InRangeSFP |CURRENT|000018|n/a |8 |InRangeSFP |CURRENT|000019|n/a |7 |InRangeSFP |VOLTAGE|000000|n/a |3255 |InRangeSFP |VOLTAGE|000001|n/a |3262 |InRangeSFP |VOLTAGE|000002|n/a |3268 |InRangeSFP |VOLTAGE|000003|n/a |3303 |InRangeSFP |VOLTAGE|000009|n/a |3266 |InRangeSFP |VOLTAGE|000010|n/a |3260 |InRangeSFP |VOLTAGE|000011|n/a |3272 |InRangeSFP |VOLTAGE|000016|n/a |3270 |InRangeSFP |VOLTAGE|000017|n/a |3268 |InRangeSFP |VOLTAGE|000018|n/a |3267 |InRangeSFP |VOLTAGE|000019|n/a |3273 |InRange
Fabric OS Command Reference 96553-1001764-02

thConfig2
To display valid areas for all classes:
switch:admin> thconfig --show -only_areaClassName|Area ---------|---------------Fabric |ED |FC |DC |SC |ZC |FL SFP |TXP |RXP |Current |Voltage |ST |Tempsecurity |TV |HV |SV |DV |LV | IC |TS |FF |NF |ISB |IV] filter |CUSDEF ee |RXP |TXP
To display valid areas for the Fabric class:
switch:admin> thconfig --show fabric -only_areaClassName|Area ---------|---------------Fabric |ED |FC |DC |SC |ZC |FL
See Also portFencing, portThConfig, sysmonitor
966 Fabric OS Command Reference53-1001764-02

timeOut 2
timeOut
Sets or displays the idle timeout value for a login session.
Synopsis timeout [timeval]
Description Use this command without an operand to display the current timeout value (in minutes) after which idle logins are automatically terminated.
Use this command with the timeval operand to set the login timeout value to the specified interval. A value of 0 disables timeout of login sessions.
The new timeout value takes effect with the next logins.
Note The execution of this command is subject to Virtual Fabric or Admin Domain restrictions that may be in place. Refer to chapter 1, "Using Fabric OS commands" and Appendix A, "Command Availability" for details.
Operands This command has the following operand:
timeval Specify the number of minutes for the Telnet timeout value. Valid values are 1 to 99,999, or 0 to disable login timeouts. This operand is optional; if omitted, the command displays the current timeout value.
Examples To set the idle timeout to 10 minutes:
switch:admin> timeout 10IDLE Timeout Changed to 10 minutesThe modified IDLE Timeout will be in effect after NEXT login
See Also none
Fabric OS Command Reference 96753-1001764-02

topologyShow2
topologyShow
Displays the unicast fabric topology.
Synopsis topologyshow [domain]
Description Use this command to display the fabric topology as it appears to the local switch. The display varies depending on the hardware configuration. The following rules apply:
1. On all switches, the command displays the number of domains in the fabric and the local Domain IDs. If translate domains are configured, existing translate domains and associated ports are displayed.
2. On an edge fabric, the command displays the following additional details for all domains in the fabric (including local translate domains):
- All possible paths from the local switch to each of the remote domains.
- For each path, the cost, the associated output port on the local switch, the path cost, and the number of hops from the local switch to the destination switch.
- A summary of all ports that are routed through that path.
3. On a backbone fabric, the command displays details for remote domains only. Details for local translate domains are not displayed.
4. If there are two switches in the Backbone and the edge fabric is directly connected to both of those switches, topologyshow does not display the description of the translate domain associated with that edge fabric. In this case the translate domain is considered local to both of the switches in the backbone.
5. If there is only one switch in the backbone, no domain details are displayed (all domains are local).
Depending on the fabric, the display may contains the following fields:
Local Domain ID The domain number of local switch.
Local Translate Domain x owned by portThe port number associated with the local translate domain x.
Domain The domain number of destination switch.
Metric The cost of reaching destination domain.
Name The name of the destination switch.
Path Count The number of currently active paths to the destination domain.
Hops The maximum number of hops to reach destination domain.
Out Port The port to which incoming frames are forwarded to reach the destination domain.
In Ports The input ports that use the corresponding out port to reach the destination domain. This is the same information provided by portRouteShow and uRouteShow but in a different format.
968 Fabric OS Command Reference53-1001764-02
topologyShow 2
Total Bandwidth The maximum bandwidth of the out port. A bandwidth that is less than 0.512 Gbps is adjusted to the nearest power of 2 value. A bandwidth in the range of 0.512 Gbps Included) to 1 Gbps (not included) is adjusted to the 0.512 Gbps value. No adjustment takes place if the bandwidth is greater or equal to 1 Gbps.
Bandwidth Demand
The maximum bandwidth demand by the in ports.
Flags Always D, indicating a dynamic path. A dynamic path is discovered automatically by the FSPF path selection protocol.
Note The execution of this command is subject to Virtual Fabric or Admin Domain restrictions that may be in place. Refer to chapter 1, "Using Fabric OS Commands" and Appendix A, "Command Availability" for details.
Operands The following operand is optional:
domain Specify the destination domain for which to display the topology information.
Examples To display the topology on a single switch: domain is local, details are not displayed.
switch:user> topologyshow
1 domains in the fabric; Local Domain ID: 97
When executed from an edge fabric, topologyshow displays details for all domains, including local domains and local translate domains:
switch:user> topologyshow
6 domains in the fabric; Local Domain ID: 7
Domain: 1Metric: 10500Name: fcr_xd_1_1Path Count: 1
Hops: 2 Out Port: 11 In Ports: 0 1 2 3 4 5 6 7 8 9 15 Total Bandwidth: 8.000 Gbps Bandwidth Demand: 1275 % Flags: D
Domain: 2Metric: 1000Name: fcr_fd_2Path Count: 1
Hops: 2 Out Port: 15 In Ports: 0 1 2 3 4 5 6 7 8 9 11 Total Bandwidth: 2.000 Gbps Bandwidth Demand: 4000 % Flags: D
Fabric OS Command Reference 96953-1001764-02

topologyShow2
Domain: 3Metric: 10500Name: fcr_xd_3_5Path Count: 1 Hops: 2 Out Port: 11 In Ports: 0 1 2 3 4 5 6 7 8 9 15 Total Bandwidth: 8.000 Gbps Bandwidth Demand: 1275 % Flags: D
Domain: 111Metric: 500Name: peng3900101Path Count: 1
Hops: 1 Out Port: 15 In Ports: 0 1 2 3 4 5 6 7 8 9 11 Total Bandwidth: 2.000 Gbps Bandwidth Demand: 4000 % Flags: D
Domain: 160Metric: 500Name: fcr_fd_160Path Count: 1
Hops: 1 Out Port: 11 In Ports: 0 1 2 3 4 5 6 7 8 9 15 Total Bandwidth: 8.000 Gbps Bandwidth Demand: 1275 % Flags: D
The command is executed from the backbone in a fabric with five switches. The fabric has five domains, but details are only shown for the three remote domains, not for the two local translate domains.
switch:user> topologyshow
5 domains in the fabric; Local Domain ID: 2Local Translate Domain 4 owned by port: 24Local Translate Domain 5 owned by port: 23 33
Domain: 1Metric: 500Name: pengsaturn104Path Count: 1
Hops: 1 Out Port: 0 In Ports: 23 24 33 38 39 Total Bandwidth: 8.000 Gbps Bandwidth Demand: 350 % Flags: D
Domain: 3Metric: 10500Name: fcr_xd_3_6
970 Fabric OS Command Reference53-1001764-02

topologyShow 2
Path Count: 1
Hops: 2 Out Port: 0 In Ports: 23 24 33 38 39 Total Bandwidth: 8.000 Gbps Bandwidth Demand: 350 % Flags: D
See Also fcrXlateConfig, portRouteShow, uRouteShow
Fabric OS Command Reference 97153-1001764-02

traceDump2
traceDump
Initiates, or removes a trace dump or displays the trace dump status.
Synopsis tracedump [-S ]
tracedump -n [-s slot]
tracedump -r [-s slot] | -R
tracedump -c [-s slot]
Description Use this command to initiate a background trace dump, to remove the content of a trace dump, or to display the dump status on the switch.
When executed without operands, this command defaults to traceDump -S.
Execution of traceDump –n generates a local trace dump locally. Use supportSave to transfer the local trace dump to a remote host. When supportSave is used, the default remote file name format for the trace dump file is as follows:
chassisname-S#-YYYYMMDDHHMMSS.<new | old>.tracedump.dmp.gz
S# Indicates the slot number (0 on standalone platforms)
YYYYMMDDHHMMSS Indicates the trace dump time stamp (year-month-day-hour-minute-second).
new | old Indicates a new or an old trace dump file.
dmp.gz The compressed trace dump archive file extension.
Note The execution of this command is subject to Virtual Fabric or Admin Domain restrictions that may be in place. Refer to chapter 1, "Using Fabric OS Commands" and Appendix A, "Command Availability" for details.
Operands This command has the following mutually exclusive operands:
-S Displays the trace dump status This operand is optional. If omitted, the same status information is displayed.
-n Initiates a background trace dump.
-r Clears the status of a particular trace dump on a specified slot.
-R Clears the status of a particular trace dump on all slots.
-c Clears all trace dump buffers. This operation resets the trace buffer contents.
This command has the following optional operand:
-s slot Specifies the slot number from which a trace dump is generated. If a slot is not supplied, the trace dump is generated from the local slot. This operand is optional.
Examples To initiate a background trace dump from slot 5:
switch:admin> tracedump -n -s 5
972 Fabric OS Command Reference53-1001764-02

traceDump 2
To clear the status of a trace dump:
switch:admin> tracedump -Rtrace dump removed
To clear the content of the trace dump buffer:
switch:admin> tracedump -cCleared Trace Buffer contents
See Also supportFtp, supportSave, supportShow
Fabric OS Command Reference 97353-1001764-02

trackChangesHelp2
trackChangesHelp
Displays information on the track-changes commands.
Synopsis trackchangeshelp
Description Use this command to display information about the track-changes commands.
Note The execution of this command is subject to Virtual Fabric or Admin Domain restrictions that may be in place. Refer to chapter 1, "Using Fabric OS commands" and Appendix A, "Command Availability" for details.
Examples To display information on the track-changes commands:
switch:admin> trackchangeshelptrackChangesSet Configure alert for login/logout/config updatetrackChangesShow Displays status of track changes
See Also trackChangesSet, trackChangesShow
974 Fabric OS Command Reference53-1001764-02

trackChangesSet 2
trackChangesSet
Enables or disables the track-changes feature.
Synopsis trackchangesset [mode][, snmptrapmode]
Description This command enables or disables the track-changes feature. An SNMP-TRAP mode can also be enabled. Changes that can be tracked with this command include the following:
• Successful login
• Unsuccessful login
• Logout
• Config file change from task
• Track-changes on
• Track-changes off
The output from the track-changes feature is dumped to the error log for the switch. Use errDump or errShow to view the error log.
Note The execution of this command is subject to Virtual Fabric or Admin Domain restrictions that may be in place. Refer to chapter 1, "Using Fabric OS commands" and Appendix A, "Command Availability" for details.
Operands This command has the following operands:
mode Specify 1 to enable the track-changes feature or 0 to disable the feature. The default (if no operand is specified) is to disable the track-changes feature. This operand is optional.
snmptrapmode Specify 1 to enable errors to be sent to the SNMP-TRAP in addition to the errlog or specify 0 to disable the SNMP-TRAP messages. The default (if no operand is specified) is to disable SNMP-TRAP messages. This operand is optional.
Examples To enable the track-changes feature:
switch:admin> trackchangesset 1, 1Committing configuration...done.switch:admin> trackchangesshowTrack changes status: ONTrack changes generate SNMP-TRAP: YES
See Also snmpConfig, trackChangesHelp, trackChangesShow
Fabric OS Command Reference 97553-1001764-02

trackChangesShow2
trackChangesShow
Displays status of the track-changes feature.
Synopsis trackchangesshow
Description Use this command to display status of the track-changes feature. It shows whether the feature is enabled or disabled and if SNMP traps are generated.
The output from the track-changes feature is dumped to the error log for the switch. Use the errDump command or errShow command to view the error log.
Note The execution of this command is subject to Virtual Fabric or Admin Domain restrictions that may be in place. Refer to chapter 1, "Using Fabric OS Commands" and Appendix A, "Command Availability" for details.
Operands none
Examples To display the status of the track-changes feature:
switch:admin> trackchangesshowTrack changes status: ONTrack changes generate SNMP-TRAP: YES
See Also trackChangesHelp, trackChangesSet
976 Fabric OS Command Reference53-1001764-02

trunkDebug 2
trunkDebug
Debugs a trunk link failure.
Synopsis trunkdebug port1 port2
Description Use this command to debug a trunk link failure. This command reports one of the following messages, based on the trunking properties of the two specified ports:
• Switch does not support trunking
• Trunking license required
• Trunking not supported in switch interop mode
• port port_id is not E_Port
• port port_id trunking disabled
• port port_id speed is not 2G, 4G or 8G
• port port_id and port port_id are not in same port group
• port port_id and port port_id connect to different switches
• port port_id and port port_id connect to the switch WWN
• port port_id is not a trunking port due to: E_Port being disabled, or trunking might be disabled at remote port
• port port_id and port port_id cannot trunk, please check link length to make sure difference is less than 400 m
Note The execution of this command is subject to Virtual Fabric or Admin Domain restrictions that may be in place. Refer to chapter 1, "Using Fabric OS commands" and Appendix A, "Command Availability" for details.
Operands This command has the following operands:
port1 Specify the port index number of port 1. Use the switchShow command to view the index numbers for a port. This operand is required.
port2 Specify the port index number of port 2. Use the switchShow command to view the index numbers for a port. This operand is required.
Examples To debug a trunk connection:
switch:admin> trunkdebug 43 44Switch does not support trunking
switch:admin> trunkdebug 62 63port 62 and 63 are trunked together
See Also portCfgTrunkPort, switchCfgTrunk, trunkShow
Fabric OS Command Reference 97753-1001764-02

trunkShow2
trunkShow
Displays trunking information.
Synopsis trunkshow [-perf]
Description Use this command to display trunking information of both E_Ports and EX_Ports. The command displays the following fields:
Trunking Group NumberDisplays each trunking group on a switch. All ports that are part of this trunking group are displayed.
Port to port connectionsDisplays the port-to-port trunking connections.
WWN Displays the world wide name of the connected port.
Domain Displays the domain IDs of the switches directly connected to the physical ports. In case of an FC Router backbone fabric interlinking several edge fabrics, the domain ID displayed for an E_Port trunk refers to a domain of a switch within the backbone fabric, whereas the domain ID displayed for an EX_Port trunk refers to the domain ID of a switch in the edge fabric. Because they are independent fabrics, it is possible that both the backbone and the edge fabric may have the same domain ID assigned to switches. If this is the case, run switchShow to obtain information on the port types of the local switch and the WWNs of the remote switches. Refer to the Example section for an illustration.
deskew The difference between the time it takes for traffic to travel over each ISL compared to the time it takes through the shortest ISL in the group. The value is expressed in nanoseconds divided by 10. The firmware automatically sets the minimum deskew value for the shortest ISL, which is 15.
Master Displays whether this trunking port connection is the master port connection for the trunking group.
When used with the -perf option, the command output displays the following additional information:
bandwidth The bandwidth (Rx, Tx, and the combined total for Tx+Rx) of the trunk group. Values are displayed as either bits per second (Bps), kilobits per second (Kbps), megabits per second (Mbps), or gigabits per second (Gbps), rounded down to the next integer.
throughputDisplays the throughput (Rx, Tx, and the combined total for Tx+Rx) of the trunk group. Results are displayed for the previous second. Values are displayed as either bits per second (Bps), kilobits per second (Kbps), megabits per second (Mbps), or gigabits per second (Gbps), rounded down to the next integer.
% Displays the percentage of link utilization (Rx, Tx, and the combined total for Tx+Rx) . Even when the link utilization is 100% , the throughput value will be lesser than the bandwidth value, due to the 8b/10b encoding and the control words transmitted. For example, the throughput for an 8Gbps link at 100% utilization would be approximately 6.8Gbps.
978 Fabric OS Command Reference53-1001764-02

trunkShow 2
Note The execution of this command is subject to Virtual Fabric or Admin Domain restrictions that may be in place. Refer to chapter 1, "Using Fabric OS Commands" and Appendix A, "Command Availability" for details.
Operands This command has the following operand:
-perf Displays the total bandwidth, throughput, and percentage of link utilization information for the trunk group (Rx, Tx, and combined total for Tx+Rx) . This operand is optional.
Examples To display trunking information for a switch:
switch:admin> trunkshow1: 43-> 0 10:00:00:05:1e:53:e3:8a 92 deskew 15 MASTER
2: 58-> 66 10:00:00:05:1e:4f:eb:00 65 deskew 16 MASTER 61-> 69 10:00:00:05:1e:4f:eb:00 65 deskew 16 57-> 65 10:00:00:05:1e:4f:eb:00 65 deskew 16 60-> 68 10:00:00:05:1e:4f:eb:00 65 deskew 15 56-> 64 10:00:00:05:1e:4f:eb:00 65 deskew 16 63-> 71 10:00:00:05:1e:4f:eb:00 65 deskew 16 62-> 70 10:00:00:05:1e:4f:eb:00 65 deskew 16
3: 59-> 67 10:00:00:05:1e:4f:eb:00 65 deskew 15 MASTER
To display trunking information for a switch that is part of an FC Router backbone fabric interlinking several edge fabrics (see the EX_Port with WWN "10:00:00:05:1e:35:b3:03" and the E_Port with WWN "10:00:00:05:1e:37:12:13" in the output below):
switch:admin> trunkshow 4: 49-> 0 10:00:00:05:1e:35:b3:03 4 deskew 16 MASTER 54-> 2 10:00:00:05:1e:35:b3:03 4 deskew 16 53-> 5 10:00:00:05:1e:35:b3:03 4 deskew 16 50-> 6 10:00:00:05:1e:35:b3:03 4 deskew 15 51-> 4 10:00:00:05:1e:35:b3:03 4 deskew 16 52-> 7 10:00:00:05:1e:35:b3:03 4 deskew 67 55-> 3 10:00:00:05:1e:35:b3:03 4 deskew 16 48-> 1 10:00:00:05:1e:35:b3:03 4 deskew 15
5: 71-> 22 10:00:00:05:1e:37:12:13 4 deskew 17 MASTER 67-> 17 10:00:00:05:1e:37:12:13 4 deskew 16 70-> 20 10:00:00:05:1e:37:12:13 4 deskew 16 69-> 21 10:00:00:05:1e:37:12:13 4 deskew 16 66-> 18 10:00:00:05:1e:37:12:13 4 deskew 17 68-> 23 10:00:00:05:1e:37:12:13 4 deskew 17 64-> 16 10:00:00:05:1e:37:12:13 4 deskew 15 65-> 19 10:00:00:05:1e:37:12:13 4 deskew 16
switch:admin> switchshow 48 4 0 013000 id N4 Online EX-Port (Trunk port, master is Slot 4 Port 1 ) 49 4 1 013100 id N4 Online EX-Port 10:00:00:05:1e:35:b3:03 "SW4100_33" (fabric id = 100 )(Trunk master) E-Port 50:00:51:e3:70:bb:af:c1 "fcr_xd_9_100" 50 4 2 013200 id N4 Online EX-Port (Trunk port, master is Slot 4 Port 1 ) 51 4 3 013300 id N4 Online EX-Port (Trunk port, master is Slot 4 Port 1 ) 52 4 4 013400 id N4 Online EX-Port (Trunk port, master is Slot 4 Port 1 ) 53 4 5 013500 id N4 Online EX-Port (Trunk port, master is Slot 4 Port 1 ) 54 4 6 013600 id N4 Online EX-Port (Trunk port, master is Slot 4 Port 1 ) 55 4 7 013700 id N4 Online EX-Port (Trunk port, master is Slot 4 Port 1 )
Fabric OS Command Reference 97953-1001764-02

trunkShow2
64 7 0 014000 id N4 Online E-Port (Trunk port, master is Slot 7 Port 7 ) 65 7 1 014100 id N4 Online E-Port (Trunk port, master is Slot 7 Port 7 ) 66 7 2 014200 id N4 Online E-Port (Trunk port, master is Slot 7 Port 7 ) 67 7 3 014300 id N4 Online E-Port (Trunk port, master is Slot 7 Port 7 ) 68 7 4 014400 id N4 Online E-Port (Trunk port, master is Slot 7 Port 7 ) 69 7 5 014500 id N4 Online E-Port (Trunk port, master is Slot 7 Port 7 ) 70 7 6 014600 id N4 Online E-Port (Trunk port, master is Slot 7 Port 7 ) 71 7 7 014700 id N4 Online E-Port 10:00:00:05:1e:37:12:13 "SW4900_43" (downstream)(Trunk master)
To display trunking information along with bandwidth throughput information:
switch:admin> trunkshow -perf1: 43-> 0 10:00:00:05:1e:53:e3:8a 92 deskew 15 MASTER Tx: Bandwidth 4.00Gbps, Throughput 288.00bps (0.00%) Rx: Bandwidth 4.00Gbps, Throughput 320.00bps (0.00%) Tx+Rx: Bandwidth 8.00Gbps, Throughput 608.00bps (0.00%)
2: 58-> 66 10:00:00:05:1e:4f:eb:00 65 deskew 16 MASTER 61-> 69 10:00:00:05:1e:4f:eb:00 65 deskew 16 57-> 65 10:00:00:05:1e:4f:eb:00 65 deskew 16 60-> 68 10:00:00:05:1e:4f:eb:00 65 deskew 15 56-> 64 10:00:00:05:1e:4f:eb:00 65 deskew 16 63-> 71 10:00:00:05:1e:4f:eb:00 65 deskew 16 62-> 70 10:00:00:05:1e:4f:eb:00 65 deskew 16 Tx: Bandwidth 28.00Gbps, Throughput 320.00bps (0.00%) Rx: Bandwidth 28.00Gbps, Throughput 1.73Kbps (0.00%) Tx+Rx: Bandwidth 56.00Gbps, Throughput 2.05Kbps (0.00%)
3: 59-> 67 10:00:00:05:1e:4f:eb:00 65 deskew 15 MASTER Tx: Bandwidth 8.00Gbps, Throughput 0.00bps (0.00%) Rx: Bandwidth 8.00Gbps, Throughput 0.00bps (0.00%) Tx+Rx: Bandwidth 16.00Gbps, Throughput 0.00bps (0.00%)
See Also portCfgTrunkPort, switchCfgTrunk
980 Fabric OS Command Reference53-1001764-02

tsClockServer 2
tsClockServer
Displays or sets the Network Time Protocol (NTP) Server addresses.
Synopsis tsclockserver [ipaddr [; ipaddr ...]]
Description Use this command to synchronize the local time of the Principal or Primary FCS switch to one or more external NTP servers.
This command accepts a list of NTP server addresses. The NTP server addresses can be passed in either IPV4 or IPV6 address format or as a DNS server name. When multiple NTP server addresses are specified, tsClockServer sets the first reachable address for the active NTP server. The remaining addresses are stored as backup servers, which can take over if the active NTP server fails.
The time server daemon synchronizes fabric time by sending updates of the Principal or Primary FCS local switch time periodically to every switch in the fabric. The time server daemon runs on all switches in the fabric, but only the Principal switch (when an FCS policy is not enabled) or the Primary FCS switch (when an FCS policy is enabled) connect to the NTP server (if specified) and broadcasts time service updates.
All switches in the fabric maintain the current clock server IP address in nonvolatile memory. By default, this value is LOCL., that is, the local clock of the Principal or the Primary FCS switch is the default clock server. Changes to the clock server IP addresses on the Principal or Primary FCS switch are propagated to all switches in the fabric.
Use this command without parameters to display the active NTP server and the configured NTP server list. Specify the ipaddr operands to set the clock server IP addresses and enable fabric-wide clock synchronization with the specified clock server. A value of LOCL may be specified as operand to set the clock server back to default.
Each ipaddr specified should be the IP address of an NTP server and should be accessible from the switch. The NTP server must support a full NTP client. When a clock server IP address other than LOCL is specified but is not used by the fabric, a warning is displayed and logged. When a clock server IP address other than LOCL is specified, the date command is restricted to display only. Refer to the date command help for details.
Notes When an FCS policy is enabled, this command can be run on all switches to view the clock server value. However, you can only modify the clock server value from the Primary FCS switch.
The execution of this command is subject to Virtual Fabric or Admin Domain restrictions that may be in place. Refer to chapter 1, "Using Fabric OS commands" and Appendix A, "Command Availability" for details.
Operands This command has the following operand:
ipaddr Specify the IP address of the NTP server or LOCL to use the local clock of the Principal or Primary FCS switch as the clock server. If more than one IP address is specified, separate the IP addresses by semicolons and enclose the list in double quotation marks. This operand is optional; if omitted, the current NTP server configuration is displayed. The default NTP server is LOCL.
Fabric OS Command Reference 98153-1001764-02

tsClockServer2
Examples To display the default clock server:
switch:admin> tsclockserverLOCL
To set the NTP server to a specified IP address:
switch:admin> tsclockserver 123.123.123.123Updating Clock Server configuration...done.
switch:admin> tsclockserver123.123.123.123
To configure multiple NTP servers:
switch:admin> tsclockserver "12.134.125.24; 12.234.87.01"Updating Clock Server configuration...done.
See Also date
982 Fabric OS Command Reference53-1001764-02

tsTimeZone 2
tsTimeZone
Displays or sets the system time zone.
Synopsis tstimezone --interactive
tstimezone timezonename
tstimezone --old hourOffset [, minuteOffset]
Description Use this command to display or set the system time zone.
All switches maintain the current time zone setup in nonvolatile memory. Changing the time zone on a switch updates the local time zone setup and is reflected in local time calculations.
All switches are by default in the 0,0 time zone:, which is, GMT. If all switches in a fabric are located in the same time zone, you may leave the default time zone setup.
Time zone is used in computing local time for error reporting and logging. An incorrect time zone setup does not affect the switch operation in any way.
System services started during the switch boot reflect a time zone change only at the next reboot.
The time zone can be specified in two ways, by name or in an hours and minutes offset format:
1. The offset format is specified with the --old option, followed by an hour offset value and optionally a minute offset value.
2. The time zone name format uses the timezone database, which automatically adjusts for Daylight Saving Time.
By default, the switch is in offset mode (--old), with zero offsets, that is, time is displayed in GMT. Use tsTimeZone timezonename to change the offset format to the timezone name format.
When executed without parameters, this command displays the current time zone configuration in the format in which it was set.
• Negative hour offset values mean that the local time is behind GMT; for example, -8,0 is GMT-08:00.
• Positive hour offset values mean the that local time is ahead of GMT; for example, 3,0 is GMT+03:00.
When Virtual Fabrics are enabled, the hardware clock is updated by the default switch in the chassis, and the time zone set on any logical switch applies to all logical switches on the chassis. The tsTimeZone command requires chassis permissions.
Since there is only one clock on the chassis, for the time server to function correctly, ensure that all logical switches in the fabric have the same NTP Clock Server configured. This includes any Pre-v6.2.0 switches in the fabric.
Note The execution of this command is subject to Virtual Fabric or Admin Domain restrictions that may be in place. Refer to chapter 1, "Using Fabric OS commands" and Appendix A, "Command Availability" for details.
Fabric OS Command Reference 98353-1001764-02

tsTimeZone2
Operands This command has the following operands:
--old Specifies the time zone in the offset format.
hourOffset Specifies the number of hours relative to GMT. This operand must be specified as an integer. Valid values are -12 through 12. This operand is required with the --old option.
minuteOffset Specifies the number of minutes relative to hour offset. This operand must be specified as an integer and is valid only with the --old option. Valid values are -30, 0, or 30. This operand is optional; if not specified, the value defaults to 0.
timezonename Specifies the name of a time zone from the time zone database. Use tstimezone --interactive for a listing of valid time zone name.
--interactive Interactively sets the timezone in name format.
Examples To display the current time zone setup and then change it to GMT-3:30:
switch:admin> tstimezoneTime Zone Hour Offset: 0Time Zone Minute Offset: 0
switch:admin> tstimezone -3, -30Updating Time Zone configuration...done.System Time Zone change will take effect at next reboot.
switch:admin> tstimezoneTime Zone Hour Offset: -3Time Zone Minute Offset: -30
To set the current timezone to the zone to Pacific Time using the interactive command mode:
switch:admin> tsTimeZone --interactive Please identify a location so that time zone rules can be set correctly. Please select a continent or ocean. 1) Africa 2) Americas 3) Antarctica 4) Arctic Ocean 5) Asia 6) Atlantic Ocean 7) Australia 8) Europe 9) Indian Ocean 10) Pacific Ocean 11) none - I want to specify the time zone using the Posix TZ format. Enter number or control-D to quit ?2 Please select a country. 1) Anguilla 18) Ecuador 35) Paraguay 2) Antigua & Barbuda 19) El Salvador 36) Peru 3) Argentina 20) French Guiana 37) Puerto Rico 4) Aruba 21) Greenland 38) St Kitts & Nevis 5) Bahamas 22) Grenada 39) St Lucia 6) Barbados 23) Guadeloupe 40) St Pierre 7) Belize 24) Guatemala 41) St Vincent 8) Bolivia 25) Guyana 42) Suriname 9) Brazil 26) Haiti 43) Trinidad & Tobago 10) Canada 27) Honduras 44) Turks & Caicos Is 11) Cayman Islands 28) Jamaica 45) United States
984 Fabric OS Command Reference53-1001764-02

tsTimeZone 2
12) Chile 29) Martinique 46) Uruguay 13) Colombia 30) Mexico 47) Venezuela 14) Costa Rica 31) Montserrat 48) Virgin Islands (UK) 15) Cuba 32) Netherlands Antilles 49) Virgin Islands (US) 16) Dominica 33) Nicaragua 17) Dominican Republic 34) Panama Enter number or control-D to quit ?45
Please select one of the following time zone regions. 1) Eastern Time 2) Eastern Time - Michigan - most locations 3) Eastern Time - Kentucky - Louisville area 4) Eastern Time - Kentucky - Wayne County 5) Eastern Time - Indiana - most locations 6) Eastern Time - Indiana - Crawford County 7) Eastern Time - Indiana - Starke County 8) Eastern Time - Indiana - Switzerland County 9) Central Time 10) Central Time - Indiana - Daviess, Dubois, Knox, Martin, Perry, Pulaski 11) Central Time - Indiana - Pike County 12) Central Time - Michigan - Dickinson, Gogebic, Iron & Menominee 13) Central Time - North Dakota - Oliver County 14) Mountain Time 15) Mountain Time - south Idaho & east Oregon 16) Mountain Time - Navajo 17) Mountain Standard Time - Arizona 18) Pacific Time 19) Alaska Time 20) Alaska Time - Alaska panhandle 21) Alaska Time - Alaska panhandle neck 22) Alaska Time - west Alaska 23) Aleutian Islands 24) Hawaii Enter number or control-D to quit ?18 The following information has been given: United States Pacific Time Therefore TZ='America/Los_Angeles' will be used. Local time is now: Tue Feb 26 15:15:22 PST 2008. Universal Time is now: Tue Feb 26 23:15:22 UTC 2008. Is the above information OK? 1) Yes 2) No Enter number or control-D to quit ?1 System Time Zone change will take effect at next reboot
To revert back to the offset format and verify the configuration:
switch admin> tstimezone --old 2
switch admin> tsttimezoneTime Zone Hour Offset: 2Time Zone Minute Offset: 0
See Also date
Fabric OS Command Reference 98553-1001764-02
turboRamTest2
turboRamTest
Performs a turbo SRAM test of ASIC chips.
Synopsis turboramtest [--slot slot][-passcnt count]
ceeturboramtest [--slot slot][-passcnt count]
Description Use this command to verify the chip SRAM located in the ASIC using the turbo-RAM BIST circuitry. The BIST controller is able to perform the SRAM write and read operation at a much faster rate than the PCI operation.
The turboRamTest and ceeTurboRamTest commands are platform-specific versions of the same test. The turboRamTest command is supported on all Goldeneye/Goldeneye2 and Condor/Condor2 platforms. Use ceeTurboRamTest on FCoE platforms only. On all other supported platforms, use turboramtest. Refer to the Fabric OS Troubleshooting and Diagnostics Guide, Appendix A, for a table that correlates ASIC type with switch models.
Note The execution of this command is subject to Virtual Fabric or Admin Domain restrictions that may be in place. Refer to chapter 1, "Using Fabric OS commands" and Appendix A, "Command Availability" for details.
The switch must be disabled before you can run this diagnostics.
Operands This command has the following optional operands:
--slot slot Specifies the slot number on which the diagnostic operates. All eligible blade ports in the specified slot are tested. This operand is optional. The default value is 0 and operates on fixed port count products.
-passcnt count Specifies the number of times to perform this test. This operand is optional. The default value is 1.
Examples To run the SRAM test with two passes:
switch:admin> turboramtest -passcnt 2
Running turboramtest ..............
PASSED.
To run the SRAM test on a Brocade 8000 in default mode:
switch:admin> turboramtest
Running turboramtest ..............
PASSED.
See Also none
986 Fabric OS Command Reference53-1001764-02

upTime 2
upTime
Displays length of time the system has been operational.
Synopsis uptime
Description This command displays the current time, how long the system has been running, how many users are currently logged on, and the system load averages for the past 1, 5, and 15 minutes.
If the uptime is less than 60 seconds, the time is displayed in seconds. For times greater than or equal to 60 seconds, the time is displayed in minutes. The output format adjusts accordingly.
Note The execution of this command is subject to Virtual Fabric or Admin Domain restrictions that may be in place. Refer to chapter 1, "Using Fabric OS Commands" and Appendix A, "Command Availability" for details.
Operands none
Examples To display the length of time the system has been operational:
switch:admin> uptime12:03am up 4:56, 3 users, load average: 1.17, 1.08, 1.08
See Also date, fastboot, reboot
Fabric OS Command Reference 98753-1001764-02

uRouteConfig2
uRouteConfig
Configures a static route.
Synopsis urouteconfig in_area domain out_area
Description Use this command to configure static routes. A static route is assigned to a specific path (defined by port number out_area) and does not change when a topology change occurs unless the path used by the route becomes unavailable.
After this command is issued, if out_area port is associated with a valid minimum-cost path, all frames coming in from the in_area port addressed to domain are forwarded through the out_area port. If the out_area port is not associated with such a path, the routing assignment is not immediately affected by this command. However, the static route is remembered so that it can be enforced if this port becomes part of a valid path in the future.
If a static route requires hardware resources that are already used, a platform conflict warning message is displayed and the configuration does not take effect.
When using static routes, load sharing may be affected. The switch attempts to optimize load sharing, but if too many routes are statically configured to use the same output port, a fair load sharing may not be achievable.
To prevent routing loops, static route requests involving non-minimum-cost paths are not enforced.
Notes Static route configuration is not supported on the Brocade 300, 4900, 5100, 5300, 7500, 7600, and DCX platforms. On the Brocade 48000, Static route configuration is not supported on Brocade directors set to chassis configuration option 5 by chassisConfig.
The execution of this command is subject to Virtual Fabric or Admin Domain restrictions that may be in place. Refer to chapter 1, "Using Fabric OS commands" and Appendix A, "Command Availability" for details.
Operands This command has the following operands:
in_area Specifies the input port to be statically routed. The in_area parameter can refer to either an F_Port or an E_Port.
domain Specifies the destination domain.
out_area Specifies the output port to which traffic is forwarded.
Examples To configure a static route for all traffic coming in from port 1 and addressed to domain 2 to go through port 5:
switch:admin> urouteconfig 1 2 5done.
switch:admin> urouteshow 1/1 2Local Domain ID: 1
In Port Domain Out Port Metric Hops Flags Next (Dom, Port)---------------------------------------------------------------------------- 1 2 5 500 1 S 2,5
See Also configShow, interfaceShow, uRouteRemove, uRouteShow
988 Fabric OS Command Reference53-1001764-02

uRouteRemove 2
uRouteRemove
Removes a static route.
Synopsis urouteremove in_area domain
Description Use this command to remove a previously configured static route.
After this command is issued, the route to domain for in_area might change to use a different output port, but only if dynamic load sharing (DLS) is set. If DLS is not set, the route remains as is, with its route attribute changed from static to dynamic.
Note The execution of this command is subject to Virtual Fabric or Admin Domain restrictions that may be in place. Refer to chapter 1, "Using Fabric OS commands" and Appendix A, "Command Availability" for details.
Operands This command has the following operands:
in_area Specify the input port of the static route to remove. in_area can be either an F_Port or an E_Port.
domain Specify the destination domain of the static route to remove.
Examples To remove a static route for all traffic coming in from port 1 and addressed to domain 2:
switch:admin> urouteremove 1 2done.
See Also configShow, dlsShow, uRouteConfig, uRouteShow
Fabric OS Command Reference 98953-1001764-02

uRouteShow2
uRouteShow
Displays unicast routing information.
Synopsis urouteshow [slot/][port] [domain]
Description Use this command to display the unicast routing information for a port, as it is known by the FSPF path selection and routing task. The routing information describes how a frame that is received from a port on the local switch is to be routed to reach a destination switch.
The following information displays:
Local Domain ID Domain number of local switch.
In Port Port from which a frame is received. Except for the cases in which you perform a port swap or enable extended-edge PID (PID Format 2) on a switch, the value is equal to the port index field displayed by the switchShow command. Refer to Fabric OS Administrator’s Guide for more information regarding the extended edge PID format.
Domain Destination domain of incoming frame.
Out Port Port to which the incoming frame is to be forwarded. Except for the cases in which you perform a port swap or enable extended edge PID (PID Format 2) on a switch, the value is equal to the port index field displayed by the switchShow command. For port swap operations, the value is equal to the switch port field displayed by the portSwapShow command. Refer to Fabric OS Administrator’s Guide for more information regarding the extended-edge PID format.
Metric Cost of reaching the destination domain.
Hops Maximum number of hops required to reach the destination domain. If the number of hops are different for some multiple equal cost paths (to reach the same domain), then it displays the maximum number.
Flags Indicates rout type as either dynamic (D) or static (S). A dynamic route is discovered automatically by the FSPF path selection protocol. A static route is assigned using the command uRouteConfig.
Next (Dom, Port) Domain and port number of the next hop. These are the domain number and the port number of the switch to which Out Port is connected.
The information provided by this command should match what is provided by portRouteShow and topologyShow.
Note The execution of this command is subject to Virtual Fabric or Admin Domain restrictions that may be in place. Refer to chapter 1, "Using Fabric OS Commands" and Appendix A, "Command Availability" for details.
Operands This command has the following operands:
slot For bladed systems only, specify the slot number of the input port whose routes are displayed, followed by a slash (/).
990 Fabric OS Command Reference53-1001764-02

uRouteShow 2
port Specify the number of the input port whose routes are to be displayed, relative to its slot for bladed systems. Use switchShow to display a list of valid ports. This operand is optional; if omitted, the command displays routing information for all input ports in the switch.
domain Specify a remote domain in the fabric for which routing information is to be displayed. This operand is optional; if omitted, the routing information for all domains in the fabric is displayed.
Examples To display the routing information of all the active ports:
switch:admin> urouteshowLocal Domain ID: 3In Port Domain Out Port Metric Hops Flags Next (Dom, Port)--------------------------------------------------------------------------- 0 1 11 1000 1 D 1,011 2 0 1500 2 D 4,0 4 0 500 1 D 4,016 1 27 1000 1 D 1,127 2 16 1500 2 D 4,16
To display the routing information of port 11 to domain 4 only:
switch:admin> urouteshow 1/11, 4 Local Domain ID: 3In Port Domain Out Port Metric Hops Flags Next (Dom, Port)----------------------------------------------------------------------------11 4 16 500 1 D 4,16
See Also portRouteShow, topologyShow, uRouteConfig, uRouteRemove
Fabric OS Command Reference 99153-1001764-02

usbStorage2
usbStorage
Manages data files on an attached USB storage device.
Synopsis usbstorage [-e | --enable]
usbstorage [-d | --disable]
usbstorage [-l | --list]
usbstorage [-r | --remove area target]
usbstorage [-h | --help]
Description Use this command to control a USB device attached to the Active CP. When the USB device is enabled, other applications, such as supportSave, firmwareDownload, firmwareKeyupdate, or configDownload/cfgUpload can conveniently store and retrieve data from the attached storage device. Refer to the help pages for these commands for specific information on how the USB device is accessed by each application.
Notes The execution of this command is subject to Virtual Fabric or Admin Domain restrictions that may be in place. Refer to chapter 1, "Using Fabric OS Commands" and Appendix A, "Command Availability" for details.
This command is available only on the Active CP.
Operands This command has the following operands:
-e | --enable Enables the USB device. The USB device must be enabled before the list and remove functions are available.
-d |--disable Disables an enabled USB device. This command prevents access to the device until it is enabled again.
-r |--remove area target Removes a target in a specified application storage area. Valid areas are: firmware, support, config, or firmwarekey. A specified area must be followed by a target. Any existing file in a given application directory can be specified as a target. This command removes all data associated with the specified target.
-l |--list Lists the content of the USB device up to two levels down from the root directory.
-h |--help Displays the command usage.
Examples To enable an attached USB device:
switch:admin> usbstorage -eUSB storage enabled
To list the contents of the attached USB device:
switch:admin> usbstorage -lfirmwarekey\ 0B 2007 Aug 15 15:13support\ 106MB 2007 Aug 24 05:36 support1034\ 105MB 2007 Aug 23 06:11config\ 0B 2007 Aug 15 15:13firmware\ 380MB 2007 Aug 15 15:13
992 Fabric OS Command Reference53-1001764-02

usbStorage 2
FW_v6.0.0\ 380MB 2007 Aug 15 15:13Available space on usbstorage 74%
To remove a firmware target from the firmware application area:
switch:admin> usbstorage -r firmware FW_v6.0.0
To disable an attached USB device:
switch:admin> usbstorage -dUSB storage disabled
See also supportSave, firmwareDownload, configUpload, configDownload, firmwareKeyupdate
Fabric OS Command Reference 99353-1001764-02

userConfig2
userConfig
Manages user accounts.
Synopsis userconfig
userconfig --show [username | -a | -r rolename]
userconfig --show ad -a AD_ID
userconfig --showlf -l LF_ID | -c
userconfig --add username -r role [-h AD_ID] [-a AD_ID_list] [-d description] [-p password] [-x]
userconfig --add username -r role -l LF_ID_list [-h LF_ID ] [-c chassis_role] [-d description] [-p password] [-x]
userconfig --change username [-r role] [[-h AD_ID ] [-a AD_ID_list]] [-d description] [-x] [-e yes | no] [-u]
userconfig --change username [-r role] [-h LF_ID] [-l LF_ID_list] [-c chassis_role] [-d description] [-x] [-e yes | no] [-u]
userconfig --addad username [-h AD_ID][-a AD_ID_list]
userconfig --deletead username [-h AD_ID] -a AD_ID_list
userconfig --addlf username [-h LF_ID] [-r role -l LF_ID_list] [-c chassis_role]
userconfig --deletelf username [-h LF_ID] [-l LF_ID_list] [-c]
userconfig --delete username
userconfig --help
Description Use this command to manage user accounts on a switch. The command options and behavior depend on your environment.
• In an Admin Domain-enabled environment, you can configure the account's username, its role, and the Admin Domains that the account may access. An account is assigned a single role. An account can access multiple Admin Domains, but only one Admin Domain at a time. New accounts created take on the role specified during account creation.
• In a Virtual Fabric-enabled environment, you can configure the account's username, its role, and the logical fabrics that the account may access. An account can have different roles for different Logical Fabrics. An account can access multiple Logical Fabrics, but only one Logical Fabric at a time.
When executed without operands, this command displays the usage. The logical fabric command options are displayed only if Logical Fabrics are enabled on the switch.
You can execute the userConfig command on any switch. When the command completes, account information is saved persistently. On platforms supporting multiple switch domains, account information is saved only to the switch domain, in which the command was executed.
Use the distribute command to distribute the account database manually to other switches in the fabric. Target switches must be configured to accept the database. Accounts that are not consistent with the distributed database are overwritten. Account recovery from backup or access to backup data is no longer supported as of Fabric OS v6.0.
994 Fabric OS Command Reference53-1001764-02

userConfig 2
This command supports the following roles. These roles define access permissions for Fabric OS commands. In a Logical Fabric environment, you can additionally define access to chassis-level commands. An account can have one role in the Logical Fabric, and another role regarding chassis commands.
User Nonadministrative use, such as monitoring system activity.
Operator A subset of administrative tasks for routine switch maintenance.
SwitchAdmin Administrative use excluding security, user management, and zoning.
ZoneAdmin Zone management.
FabricAdmin Administrative use excluding user management and AD management.
BasicSwitchAdmin Administrative use with a subset of admin-level commands, mostly for monitoring with limited switch (local) access.
Admin All administrative commands.
SecurityAdmin All switch security and user management functions.
Notes The userConfig command operates on the switch-local user database only, regardless of whether the switch is configured to use RADIUS authentication or not.
The account database supports a maximum of 256 customer created accounts.
The backup account database is no longer supported on switches running Fabric OS v6.0 or later. As a consequence, account recovery from backup as well as backup display option (former --show -b option) are no longer supported in Fabric OS v6.0 or later.
The execution of this command is subject to Virtual Fabric or Admin Domain and Virtual Fabric restrictions that may be in place. Refer to chapter 1, "Using Fabric OS commands" and Appendix A, "Command Availability" for details.
Operands This command has the following operands:
--show Displays user account information. Only accounts with SecurityAdmin and Admin roles can show information about accounts other than the current login account. The following operands are optional:
username Specifies the account login name. When no operand is specified, the command displays the current account information.
-a Displays information about all accounts.
-r rolename Displays information about all accounts with the specified role.
--showad Displays Admin Domain permissions in an AD-enabled environment. The following operand is required:
-a AD_ID_list For each AD in AD_ID_list, displays a list of users that include that AD in their AD permissions. Specify a range (1-5) or a list of AD_IDs separated by a comma (1,2,3), or a combination of both (1-5,7). Only users with SecurityAdmin or Admin role may execute this command.
--showlf Displays Logical Fabric permissions in an LF-enabled environment. Only users with SecurityAdmin or Admin role may execute this command. An operand is required with this command. The following operands are mutually exclusive:
Fabric OS Command Reference 99553-1001764-02

userConfig2
-l LF_ID For each LF in LF_ID_list, displays a list of users that include that LF in their LFF permissions. Specify a range (1-5), or a list of LF_IDs separated by a comma (1,2,3), or a combination of both (1-5,7). Only users with SecurityAdmin or Admin role may execute this command.
-c Displays a list of users who have permission to execute chassis commands.
--add |--change Creates a new user account or modifies an existing user account. The following restrictions apply when you create or modify a user account:
• You cannot change the role, the AD or LF permissions, the home AD or the home LF of any default account.
• You cannot change the role, the AD or LF permissions, or the description of accounts at the same or a higher authorization level.
• You cannot change the role, the AD or LF permissions, or the home AD or home Logical Fabric of your own account.
• No account can disable itself.• AD or LF permissions must be a subset of the respective AD or LF
permissions of the account that creates or modifies a user account.• In an LF-enabled environment, you can change the role associated with
existing LFs but you cannot add new LFs or delete any existing LFs.
The following operands are supported with the --add and --change options:
username Specifies the login name of the account to be created or modified. Enter a valid login name to modify an existing account. For new accounts, the name must be unique, between 8 and 40 characters long, and must begin with an alphabetic character. User names are case-sensitive and can contain alphanumeric characters, periods (.), and underscore (_) characters. The account name cannot be the same as a role name.
-r role In an AD-enabled environment, this operand specifies the role for the account. In an LF-enabled environment, this operand specifies the account's role for all LFs provided with the LF list. When you create a user account in an LF-enabled environment, you can specify only one role for the user. This role is associated with each of the LF IDs in the specified LF_ID_list. Once the account is created, you can use the --addlf option to create another list of LF IDs with its own set of associated roles.
Valid roles are: User, SwitchAdmin, ZoneAdmin, FabricAdmin, BasicSwitchAdmin, Operator, or Admin. This operand is required with the --add option; it is optional with the --change option.
-h AD_ID | LF_ID Specifies the home Administrative Domain or the home Logical Fabric depending on the environment. This operand is optional. If no AD or LF is specified with the --add option, the system assigns the lowest numbered AD or LF the user is authorized to access.
996 Fabric OS Command Reference53-1001764-02

userConfig 2
-a AD_ID_list Specifies the Administrative Domains the user is authorized to access. The ADs in AD_ID_list and the existing AD permissions for username must be a subset of the AD permissions of the account that executes this command. This operand is optional. If no AD list is specified with the --add option, AD0 is assigned by default. Use comma-separated lists, ranges, or both, for example -a 0,9,10-15,244.
-l LF_ID_list Specifies the Virtual Fabrics the user is authorized to access. The LFs in LF_ID_list and the existing LF permissions for username must be a subset of the LF permissions of the account that executes this command. This operand is required with the --add option. It is optional with the --change option.
-c chassis_role Specifies the account’s access permissions at the chassis level. The chassis role allows the user to execute chassis-related commands in an LF-enabled environment. To assign the chassis role to an account, the executing account must have chassis-level permissions. Valid chassis roles are: User, SwitchAdmin, ZoneAdmin, FabricAdmin, BasicSwitchAdmin, Operator, or Admin.
-d description Provides a description for the new account. This operand is optional. The maximum length is 40 printable ASCII characters. Some characters that are interpreted by the shell (", ', ! etc.) require a preceding escape character (\). To include spaces, place the description in double quotation marks. Colons are not permitted
-x Optionally specifies an expired password that must be changed the first time the user logs into a new or modified account. This command also prompts for the existing password.
The following optional operand is available only with the --add option:
-p password Specifies a password for the account. This operand is optional; if omitted, the command prompts for an initial password for the account. The password must satisfy all currently enforced password rules. By default the password is created with the configured expiration period.
The following optional operands are available only with the --change option:
-e yes|no Enables or disables an account. Specify "yes" to enable or "no" to disable an account. Once an account is disabled, the CLI sessions associated with the account are terminated.
-u Unlocks the specified user account. User accounts can get locked after several attempts to log in with an invalid password. Refer to the passwdCfg help page for more information.
--addad | --deletead
Adds one or more ADs to a user account or deletes ADs from a user account. The following operands are supported:
username Specifies the account login name.
Fabric OS Command Reference 99753-1001764-02

userConfig2
-h AD_ID Specifies the account’s home AD. This operand is optional.
• If home AD is specified with the --addad option, it must be one of the ADs in AD_ID_list. If a home AD is not specified and username did not previously have a home AD, the home AD is set to the lowest numbered AD in the user's AD permissions.
• If a home AD is specified with the --deletead option, it must be one of the ADs in the AD permissions remaining after the ADs specified in AD_ID_list have been removed. If a home AD is not specified, the current home AD remains unchanged, if it is still in the user's s AD permissions. If a home AD is not specified and the user’s current home AD is deleted, the new home AD is set to the lowest numbered AD in the user's AD permissions.
The existing AD permission for username, and the AD_ID_list must be a subset of the AD permissions of the account executing this command.
-a AD_ID_list Specifies the AD IDs to be added or deleted. Specify a range (1-5) or a list of AD_IDs separated by comma (1,2,3), or a combination of both (1-5,7).
--addlf | --deletelf
Adds Logical Fabric or chassis permissions to a user account or deletes LF or chassis permission from a user account. The following operands are supported:
username Specifies the account login name.
-h LF_ID Specifies the account’s home LF. This operand is optional.
• If a home LF is specified with the --addlf option, the home LF must be one of the LFs in LF_ID_list. If a home LF is not specified and the account did not previously have a home LF, the home LF is set to the lowest numbered LF in the user's LF permissions.
• If a home LF is specified with the --deletelf option, the home LF must be one of the LFs in the LF permissions remaining after the LFs specified in LF_ID_list have been removed. If a home LF is not specified, the current home LF remains unchanged, if it is still in the user's LF permissions. If a home LF is not specified and the current home LF is deleted, the new home LF is set to the lowest numbered LF in the user's LF permissions.
The account’s existing LF permission and the LF_ID_list must be a subset of the LF permissions of the account executing this command.
-l LF_ID_list Specifies the logical fabric IDs to be added or deleted. Specify a range (1-5) or a list of AD_IDs separated by comma (1,2,3), or a combination of both (1-5,7).
-r role Specifies the role associated with the LFID list given in this command. This operand is required when you specify an LF_ID_list.
-c [chassis_role] Specifies the account's access permissions regarding chassis-level commands. To remove an account’s chassis permissions, specify -c only. To add chassis permissions, specify a chassis role with the -c option.
998 Fabric OS Command Reference53-1001764-02

userConfig 2
--delete username Deletes the specified account from the switch. This command prompts for confirmation. Once an account is deleted, the CLI sessions associated with the account are terminated.
The following restrictions apply when you delete an account:
• You cannot delete a default account.• You cannot delete your own account.
AD_ID_list or LF_ID list and associated AD or LF permissions for username must be a subset of the AD or LF permissions of the account that executes the userConfig --delete command.
--help Displays the command usage. In an LF-enabled environment, LF-specific options are displayed. In an AD-enabled environment, AD-specific options are displayed.
Examples A. The following examples illustrate how to create and manage user accounts in an AD-enabled environment.
To add a new account:
switch:admin> userconfig --add joe -r admin -d "Joe Smith"Setting initial password for joeEnter new password:Re-type new password:Account joe has been successfully added.
To add a new account noninteractively:
switch:admin> userconfig --add joe -r admin -d "Joe Smith" -p welCome2brcdAccount joe has been successfully added.
To display current account information:
switch:admin> userconfig --show joeAccount name: joeRole: adminDescription: Joe SmithEnabled: YesPassword Last Change Date: UnknownPassword Expiration Date: Not ApplicableLocked: NoAD membership: 0Home AD: 0
To disable the account “joe”:
switch:admin> userconfig --change joe -e noBroadcast message from root Sat Apr 2 03:03:32 2005...Security Policy, Password or Account Attribute Change: joe will be logged outAttribute for account joe has been successfully changed.
To add an account named bob with role ZoneAdmin and AD member list 1,4,10,11,12,13,14 and Home AD 4:
switch:admin> userConfig --add bob -r ZoneAdmin -a 1,4,10-14 -h 4
Fabric OS Command Reference 99953-1001764-02

userConfig2
To change account bob's AD member list to 128 and 129, Home AD to 128:
switch:admin> userConfig --change bob -a 128,129
To add AD 0 and 255 to bob’s AD member list. Home AD is unchanged:
switch:admin> userConfig --addad bob -a 0,AD255To delete AD 128 from bob’s AD member list. New home AD is set to 0:
switch:admin> userConfig --deletead bob -a 128 -h 0
B. The following examples illustrate how to create and manage user accounts in an LF-enabled environment.
To create a new account named "test" with admin role and admin chassis permissions in the LF member list 1-10:
switch:admin> userconfig --add test -l 1-10 -r admin -c adminSetting initial password for testEnter new password:Re-type new password: Account test has been successfully added.
To display current account information:
switch:admin> userconfig --show testAccount name: testRole: adminDescription:Enabled: YesPassword Last Change Date: Sat Jun 14 2008Password Expiration Date: Not ApplicableLocked: NoRoleLFMaps: admin: 1-10 chassisChassis Role: adminHome Context: 1
To grant user access permissions to the test account for the Virtual Fabrics 11-15:
switch:admin> userconfig --addlf test -r user -l 11-15New LFs/Chassis role for account test has been successfully added.
To change the test account's access permissions for the Logical l Fabrics 5 and 6 to ZoneAdmin and the chassis permission to user:
switch:admin> userconfig --change test -r zoneadmin -l 1-5 -c user -h 4Broadcast message from root (ttyS0) Sat Jun 14 01:05:28 2008...Security Policy, Password or Account Attribute Change: test will be logged out
To display the test account information:
switch:admin> userconfig --show test Account name: test Role: zoneadmin Description: Enabled: Yes Password Last Change Date: Sat Jun 14 2008 Password Expiration Date: Not Applicable Locked: No RoleLFMaps: zoneadmin: 1-5 admin: 6-10 user: 11-15 chassis Chassis Role: user Home Context: 4
1000 Fabric OS Command Reference53-1001764-02

userConfig 2
To remove chassis permissions from the test account for the LFs 1-3.
switch:admin> userconfig --deletelf test -l 1-3 -c
Broadcast message from root (ttyS0) Sat Jun 14 01:10:02 2008...
Security Policy, Password or Account Attribute Change: test will be logged outLFs/chassis role for account test has been successfully deleted.
To display information for all accounts with admin privileges:
switch:admin> userconfig --show -r admin
Account name: adminDescription: AdministratorEnabled: YesPassword Last Change Date: UnknownPassword Expiration Date: Not ApplicableLocked: NoHome LF Role: adminRole-LF List: admin: 1-128Chassis Role: adminHome LF: 128
Account name: testls1Description: Enabled: YesPassword Last Change Date: Sun Oct 5 2025Password Expiration Date: Not ApplicableLocked: NoHome LF Role: adminRole-LF List: admin: 1No chassis permissionHome LF: 1
See Also none
Fabric OS Command Reference 100153-1001764-02

userRename2
userRename
Renames the user login name.
Synopsis userrename old_username new_username
Description Use this command to change an existing account login name to a new login name. The following rules apply:
• The new username must begin with a letter and contain only alphanumeric characters or underscores. Note that usernames are case sensitive.
• The new username must be between 1 and 40 characters long.
• The new username must be different from any other existing account login name. For example, if you are changing the default login name ("USERID"), you must choose a name other than the default login name.
• Renaming a user account login does not change the role associated with the account. For example, if you are converting an existing user name to the default login name ("USERID"), the new default login may not have all the access permissions associated with the original default login.
Notes This command is supported only on the Brocade 3016 and 4020 embedded platforms.
The execution of this command is subject to Virtual Fabric or Admin Domain restrictions that may be in place. Refer to chapter 1, "Using Fabric OS commands" and Appendix A, "Command Availability" for details.
Operands The following operands are required.
old_username Specifies the current user login name.
new_username Specifies the new user login name.
Examples To rename the admin-level login name from “USERID” to “admin”:
switch:admin> userrename USERID admin
See Also none
1002 Fabric OS Command Reference53-1001764-02

version 2
version
Displays firmware version information.
Synopsis version
Description Use this command to display firmware version information and build dates.
The command output includes the following:
Kernel The version of switch kernel operating system.
Fabric OS The version of switch Fabric OS.
Made on The build date of firmware running in switch.
Flash The build date of firmware stored in flash proms.
BootProm The version of the firmware stored in the boot PROM
Usually the Made on and Flash dates are the same, because the switch starts running flash firmware at power-on. However, in the time period between firmwareDownload and the next reboot, the dates can differ.
Operands none
Examples To display the firmware version information in a switch:
switch:admin> versionKernel: 2.6.14.2Fabric OS: v6.1.0Made on: Wed Feb 13 06:59:17 2008Flash: Thu Feb 14 18:38:31 2008BootProm: 4.6.6
See Also firmwareDownload, reboot
Fabric OS Command Reference 100353-1001764-02

wwn2
wwn
Displays the world wide name (WWN) and factory serial number of the switch or chassis.
Synopsis wwn [-sn ]
Description Use this command to display the WWN associated with a switch or chassis and to display the factory serial number. The WWN is a 64-bit number that has eight colon-separated fields each consisting of one or two hexadecimal digits between 0 and ff. The WWN is a factory-set parameter that cannot be changed by the end user. The WWN is used as the license ID in many cases, but the only official string to be used for requesting licenses is the licenseidShow output. Alternately, use switchShow to display the WWN.
In addition to the WWN, all switches have a unique 24-bit Fibre Channel address that is used for communicating with the switch. Use fabricShow to display the FC address in addition to the WWN.
Note The execution of this command is subject to Virtual Fabric or Admin Domain restrictions that may be in place. Refer to chapter 1, "Using Fabric OS commands" and Appendix A, "Command Availability" for details.
Operands This command has the following operands:
-sn On enterprise-class platforms, this operand displays the chassis factory serial number following the WWN. On standalone platforms, it displays the factory serial number. This operand is optional; if omitted, this command displays only the WWN for the switch or chassis.
Examples To display the WWN on a Brocade DCX-4S:
switch:admin> wwn10:00:00:05:1e:7a:7a:00
To display the WWN and chassis factory serial number:
switch:admin> wwn -sn
WWN: 10:00:00:05:1e:7a:7a:00SN: ANP0645D05B
switch:admin> chassisshow | grep ANP0645D05BChassis Factory Serial Num: ANP0645D05Bswitch:admin>
To display the license ID:
switch:admin>licenseidshow10:00:00:05:1e:7a:7a:00
To display the WWN and the Fibre Channel address:
switch:admin> fabricshowSwitch ID Worldwide Name Enet IP Addr FC IP Addr Name------------------------------------------------------------------------- 1: fffc01 10:00:00:05:1e:7a:7a:00 10.32.39.25 0.0.0.0 "pluto3925" 2: fffc02 10:00:00:05:1e:b3:00:9e 10.32.39.34 0.0.0.0 "spike3934" 3: fffc03 10:00:00:05:1e:93:c4:00 10.32.39.20 0.0.0.0 "pluto3920" 4: fffc04 10:00:00:05:1e:55:5c:69 10.32.39.59 0.0.0.0 >"spike3959"
1004 Fabric OS Command Reference53-1001764-02

wwn 2
To display the WWN on a Brocade 5100:
switch:admin> wwn10:00:00:05:1e:7a:7a:00
To display the WWN and factory serial number:
switch:admin> wwn -sn
WWN: 10:00:00:05:1e:82:3c:2aSN: ALM0602E003
switch:admin> chassisshow | grep ALM0602E003Factory Serial Num: ALM0602E003
See Also chassisShow, fabricShow, licenseidShow, switchShow,
Fabric OS Command Reference 100553-1001764-02

wwnAddress2
wwnAddress
Binds an FC Port ID to a device WWN.
Synopsis wwnaddress --bind [WWN] [PID]
wwnaddress --unbind [WWN]
wwnaddress --show
wwnaddress --findPID [WWN]
wwnaddress --help
Description Use this command to manage address assignments for a given device world wide name. The allocation of a PID to a specified device WWN supports the persistence of the PID based on the WWN of the device to which the PID is bound. If the PID is not bound to a device WWN, the device can get the same or a different PID irrespective of which port it logs in to a given switch partition.
This command fails under any of the following conditions:
• The PID is currently bound to another port through port address binding. Use portaddress --unbind to free up the PID.
• The WWN is already bound with a different PID, or the PID is bound to another WWN. Use wwnaddress --unbind to remove the PID-WWN binding.
• There is no space left in the WWN-PID table for an additional entry. Use wwnaddress --unbind to free up space in the table.
The command provides a --show option that displays the currently bound address for all WWNs. Alternately, you can use the --findPID option to display the PID currently bound to a specified WWN.
Notes Dynamic Area Mode and WWN-Based persistent PID must be enabled on the switch before you can assign an address with this command. Refer to configure for more information.
This command is supported only on the Brocade DCX and on the DCX-4S.
The execution of this command is subject to Virtual Fabric or Admin Domain restrictions that may be in place. Refer to chapter 1, "Using Fabric OS commands" and Appendix A, "Command Availability" for details.
Operands This command has the following operands:
--bind Assigns the lower two bytes of the Fibre Channel address to the specified WWN.
WWN Specifies the WWN for the device to which the PID should be assigned.
PID Specifies the PID (the lower 16 bits of the address excluding the domain part) in hexadecimal format to be bound to the device WWN. Note that only the upper 10 bits of the PID can be used for a unique route. Therefore, not all addresses in the 16-bit range are available.
--unbind Removes the WWN-PID binding corresponding to the specified device WWN.
WWN Specifies the WWN for the device from which to remove the PID binding.
--show Displays all WWN-PID entries currently present in the partition.
1006 Fabric OS Command Reference53-1001764-02

wwnAddress 2
--findPID Displays the PID currently bound to the specified device WWN.
WWN Specifies the device WWN.
--help Displays the command usage.
Examples To bind a 16-bit address to a device WWN:
switch:admin> wwnaddress --bind 10:00:00:06:2b:0f:76:5f 0x9000
To unbind a given address from a WWN:
switch:admin> wwnaddress --unbind 10:00:00:06:2b:0f:76:5f
To display all WWN address bindings on the current partition:
switch:admin> wwnaddress --show# WWN Area Age Flag===========================================1) 10:00:00:06:2b:0f:71:0c 0x405 53 0x122) 10:00:00:05:1e:5e:2c:11 0x9900 101 0x213) 10:00:00:06:2b:0f:71:0d 0x503 37 0x124) 10:00:00:06:2b:0f:71:0e 0x304 43 0x125) 10:00:00:06:2b:0f:71:0f 0x303 38 0x126) 10:00:00:06:2b:0f:70:14 0x401 29 0x127) 10:00:00:06:2b:0f:70:15 0x505 46 0x128) 10:00:00:06:2b:0f:70:16 0x402 33 0x129) 10:00:00:06:2b:0f:70:17 0x406 47 0x1210) 10:00:00:06:2b:0f:72:20 0x403 30 0x1211) 10:00:00:06:2b:0f:72:21 0x501 36 0x1212) 10:00:00:06:2b:0f:72:23 0x502 34 0x1213) 10:00:00:06:2b:0f:6e:30 0x301 35 0x1214) 10:00:00:06:2b:0f:6e:31 0x102 42 0x1215) 10:00:00:06:2b:0f:6e:32 0x302 39 0x1216) 10:00:00:06:2b:0f:6e:33 0x504 45 0x1217) 10:00:00:06:2b:0f:76:5e 0x404 101 0x1218) 10:00:00:06:2b:0f:76:5f 0x101 41 0x1219) 20:20:00:05:1e:0b:61:cc 0x400 28 0x2220) 20:21:00:05:1e:0b:61:cc 0x500 31 0x2221) 20:22:00:05:1e:0b:61:cc 0x300 32 0x2222) 20:23:00:05:1e:0b:61:cc 0x100 40 0x2223) 10:00:00:06:2b:0f:6d:ee 0x305 50 0x1224) 10:00:00:06:2b:0f:6d:ef 0x103 49 0x12
To display the WWW address binding for device 20:22:00:05:1e:0b:61:cc:
switch:admin> wwnaddress --findPid 20:22:00:05:1e:0b:61:ccWWN PID============================= 20:22:00:05:1e:0b:61:cc 0x300.
Fabric OS Command Reference 100753-1001764-02

zone2
zone
Performs specific zone operations, manages Traffic Isolation (TI) Zones, and Frame Redirect (RD) Zones.
Synopsis zone --help
To perform specific zone operations:
zone --copy [source_AD.] source_zone_object [dest_zone_object][-f]
zone --expunge “zone_object”
zone --validate [[-f |] [-m mode] [“zone_object”]]]
To create and manage traffic Isolation zones:
zone --create -t objecttype [-o optlist] name -p portlist
zone --add [-o optlist] name -p portlist
zone --remove name -p portlist
zone --delete name
zone --activate name
zone --deactivate name
zone --show [name][ -ascending]
zone --rdcreate [host_wwn] [target_wwn] [vi_wwn] [vt_wwn] [policy] [FCR | noFCR]
zone --rddelete name
Description The zone command supports three types of operations: specific zone operations, creation/management of Traffic Isolation Zones, and creation and management of Frame Redirect (RD) Zones.
1. Use the --copy, --expunge, and --validate options to perform specific zoning operations. These commands follow a batched-transaction model.
2. Use the --create, --add,--remove, --delete, --activate, --deactivate, and --show options to manage Traffic Isolation (TI) Zones.
TI zones control the flow of interswitch traffic by provisioning certain E_Ports to carry only traffic flowing from a specific set of source ports. The provision (a.k.a TI Zone) is part of the defined zone configuration and does not appear in the effective zone configuration. A Maximum of 255 TI Zones can be created in one fabric.
TI zones over FCR provide the ability to lock down a request and corresponding response to the same VE_Port tunnel for a given pair of devices in two separate fabrics. TI over FCR has two working parts:
- TI within edge fabric routes traffic between a real device and a Proxy device to a specified EX_Port.
- TI within backbone fabric locks down the route within the backbone fabric based on EX_Ports and devices involved.
TI zones over FCR is supported only on switches running Fabric OS v6.1.0 or later. Participating devices must be LSAN-zoned to enforce TI.
1008 Fabric OS Command Reference53-1001764-02

zone 2
Using TI zones in logical fabrics has several restrictions. For more information, refer to the Fabric OS Administrator’s Guide.
3. Use the --rdcreate and --rddelete options to manage Frame Redirect (RD) Zones.
RD zones allow frames to be redirected to devices that can perform additional processing on these frames (for example, encryption). The feature uses a combination of RD zones and Name Server changes to map real device world wide names (WWNs) to virtual port IDs (PIDs.) This allows redirecting a flow between a host and target to a device that can perform its functionality without reconfiguring the host and target.
The RD Zone is part of the defined zone configuration and does not appear in the effective zone configuration. Use cfgSave to save the RD zone changes to the defined configuration. Use cfgShow to display the RD zones.
When you create the first RD zone, two additional zone objects are created automatically: A base zone "red_______base" and a zone configuration "r_e_d_i_r_c__fg". These additional zone objects are required by the implementation. These zone objects must remain on the switch as long as other redirect zones are defined. Do not remove these objects, unless redirection is no longer required and no other redirect zones exist.
Use zone --rddelete to remove the base RD zone, "red_______base". When the base zone is removed, the RD zone configuration "r_e_d_i_r_c__fg” is removed as well.
Notes Device ports are allowed to be part of several TI zones to support enhanced TI zone deployment in FICON environments. This feature is supported only on 8G platforms running Fabric OS v.6.4.0 or later.
You cannot swap E_ports that are configured as part of a TI zone. The TI zone information is lost when you use portSwap to swap the E_ports. To work around this issue, reconfigure your TI zones rather than swapping the E_ports.
The current zone commands, zoneCreate, aliCreate, cfgCreate, etc., cannot be used to manage special zones, such as TI zones or RD zones.
The execution of this command is subject to Virtual Fabric or Admin Domain restrictions that may be in place. Refer to chapter 1, "Using Fabric OS Commands" and Appendix A, "Command Availability" for details.
Operands This command takes as an operand an action and its associated arguments. When executed without operands, the command displays the usage.
--help Displays the command usage.
1. Commands for performing specific zone operations:
--copy Copies a specified zone object or all zone objects from the source_AD into the current AD. The current AD transaction buffer is used for this operation. The following operands are optional:
source_AD.Specifies the source Admin Domain of the zone objects. If unspecified, objects are copied within the current AD.
source_zone_object Specifies the zone object under the source_AD. The zone object can be a zone configuration, a zone alias, or several zones. If a source zone object is not specified, all zone configurations are copied over to the current Admin Domain.
Fabric OS Command Reference 100953-1001764-02

zone2
dest_zone_object Identifies the destination zone object within the current Admin Domain. If dest_zone_object is not specified, source_zone_object is copied over with the same name. If the destination zone object is not already present in the Admin Domain, one is created (with type as source_zone_object).
-f Overwrites existing zone object without confirmation.
--expunge Removes all references to the specified zone object and then deletes the zone object. The command displays the list of zone objects to be deleted and prompts for confirmation before deleting the zone objects. The removal of zone object references can trigger the removal of zones not specified in the command. For example, removing the last zone member from a zone deletes the zone, and may trigger a recursive deletion of other zones. The following operand is required:
“zone_object” Specifies a zone object. A zone object can be a zone member, zone alias, or a zone. The zone object must be enclosed in double quotation marks.
--validate Lists all zone members that are not part of the current zone enforcement table.
If a zone member is specified by Domain and Port (D,P) in the Admin Domain membership list, all zone elements specified with WWNs associated with that D,P are considered for zone enforcement. If a device WWN is specified in the Admin Domain member list, the corresponding D,P (the device the specified WWN is associated with) is not considered for zone enforcement.
The following operands are optional:
-f Specifies that zone members that are not enforceable should be expunged in the transaction buffer. This pruning operation affects both the transaction buffer and the defined buffer. You cannot specify a mode or a zone object together with the -f option.
mode Specifies the zone database location. Supported mode flag values are:
0 Uses the zone database from the current transaction buffer.
1 Uses the zone database stored in persistent storage.
2 Uses the currently enforced zone database.
If no mode option is specified, the validated output of all the three buffers is displayed.
“zone_object” Specifies a zone object. A zone object can be a zone member, a zone alias, or a zone.
2. Creating and managing TI Zones
Use these commands to create and manage TI Zones.
--create Creates a TI Zone with specified options and port list.
--add Adds port list members and the failover option to existing TI zones.
--remove Removes port list members from existing zones. Removal of the last member from an active TI zone generates a warning. If the last member of a TI zone is removed, the TI zone name is removed from the defined TI zone list.
1010 Fabric OS Command Reference53-1001764-02

zone 2
The following operands are supported:
-t objecttype Specifies the zone object type. This operand is supported only with the --create option. To create a TI zone, the value is ti.
-o optlist Specifies list of options to control activation, deactivation, and failover mode. If this option is not specified the zone is created, by default, with failover enabled, and the zone will be activated. This operand is supported only with the --create and --add options.
Valid values for optlist are:
a Activates the specified zone.
d Deactivates the specified zone.
n Disables failover mode. In non-failover mode, when the last interswitch link (ISL) of a TI Zone goes offline and there is an alternative ISL, the alternative ISL is not used and the switch generates a state change notification (SCN) or a registered state change notification (RSCN) to indicate that no ISL is available. When the ISL of the TI Zone comes online again, the route is set up again and the switch generates another SCN or RSCN. TI zones with no-failover option are not supported in logical fabrics. TI zones defined in the Base Fabric for logical fabric traffic need to allow failover.
f Enables failover mode. In failover mode, when the last ISL of a TI Zone goes offline and there is an alternative ISL, the alternative ISL is used and the switch does not generate any SCN or RSCN messages. If the ISL of that TI Zone comes online again, traffic is rerouted immediately to the original ISL.
name Specifies the name of the zone to be created, added or deleted.
-p portlist Specifies the lists of ports to be included, added or removed from a TI zone. The syntax for portlist is "D,I" (Domain, Index). The port list must be enclosed in double quotation marks. List members must be separated by semicolons, followed by a space. When you create TI zones over FCR, for a TI within an Edge fabric use "-1"in "I" (of "D,I") in to denote Front and Translate phantom in the E_Port list. When creating a TI zone within the Backbone fabric specify "Port WWN" in portlist to indicate devices talking across fabrics.
--activate name
--deactivate name Activates or deactivates the specified TI zones. If more than one zone is specified, the list of zone names must be enclosed in double quotation marks; zone names must be separated by semicolons.
--delete name Deletes TI zones from the defined TI zone lists. This command prompts for confirmation.
--show [name] Displays zone name, port lists, failover option, configured status and, the active status for the specified zones. The configured status reflects the latest change that may or may not have been activated. The active status reflects the state that is activated by cfgEnable. Without any specified name, this command displays all TI zones in the defined configuration. The following operand is optional:
Fabric OS Command Reference 101153-1001764-02