brett shaver's guide - x-ways software technology ag
TRANSCRIPT

1 | P a g e Brett Shavers
Brett’s X‐Ways Forensics (v15.4) QuickStart Guide
This is a quick guide to getting up and running using X‐Ways Forensics (XWF). There are many features documented in the manual, plus more that may not seem to be documented, but are there in more detail. I suggest signing up for the XWF Support Forum where you will have access for more help and be able to ask questions directly to the XWF community. I do not profess to be an XWF expert and hope that this guide does some justice to what XWF can do. If you truly only had one forensic tool to choose, X‐Ways Forensics would be that one tool.
XWF is constantly updated. Each update is typically something that you will find to be a valuable new feature, not just bug fixes. I have not yet seen any forensic program so constantly updated, maintained, and supported directly by a developer that is quickly and personally responsive. There are few forensic software companies that will read your wishlist or request, consider it, and either tell you ‘no thank you’ or ‘implement it’ almost immediately.
Some of the features that I find to be ‘neat’….XWF can run from an external device, such as a flashdrive or external drive. It requires the dongle to be plugged into the machine, but the dongle is recognized only as a HID (human interface device), so minimal walking over the system. Because XWF can run from an external device, it does not need to be installed to run. This makes it easy to take an image in an XWF folder that can be run on another machine without having to install XWF on every machine you may move your image for examinations. Simply, on an external drive, your image and complete XWF operating program files can be on the same drive and run on any of your forensic machines without installing XWF everywhere. This also makes it possible to work on a live machine, if need be. If there is cause to work on the live machine, using an external drive, with a XWF programs folder, you have full access to XWF on your live suspect machine and do to it as your wish (image it, examine it, export files, etc…).
This QuickStart Guide does not do XWF justice in using the features or capability. However, this will show you how to start up XWF, acquire an image, and run the initial processes so you can begin your examination. It’s not quite ‘push button forensics’, but after a while, you will always find yourself going back to XWF and wondered why you did without it for so long. And yes, you can do an entire exam in XWF and validate findings with another tool.
Some of the topics this QuickStart doesn’t go into are that of looking at the MFT, hex views of files, and some other intensive analysis that would not be adequately covered in a QuickStart Guide. XWF is much much more than a “hex editor” and has come a long way since when it was just that.
For topics that I do brush upon, a search of that topic in the XWF manual will give more information. Sometimes all you need to know is that a feature exists, then you can figure it out or look it up. Not knowing will cause you to not use XWF for what it can do, because you just may not know. The XWF Manual, is in‐depth, detailed, and can be overwhelming if you skim it. But, it does cover every function you’ll come across.
I would highly suggest, that the XWF user acquaint him/herself with the terminology as used by XWF to be better prepared to answer terms such as an “Existing File” as compared to a “Previously Existing File” in the manner that it is meant with XWF, among other terms.
As side note to how well XWF works…I was at FLETC sitting between a FTK (v1.x) user and longtime Encase (v5) user. Data carving the same image, XWF (v13) came up with literally hundreds of additional images (photos) than did either FTK or Encase. I don’t know why that happened; only that no one else could explain how XWF could do what neither FTK nor Encase could, at least with those versions.

2 | P a g e Brett Shavers
The initial, no case, nothing started, XWF. From here, let’s see how one workflow option can work.
Set up your Options‐General so XWF behaves like you want it to behave.

3 | P a g e Brett Shavers
Something I also do is to create folders for files I export for specific reasons. A folder for “Docs” or “User Files” and XWF can be directed to put your files in the folder of your choice. Not unlike any other program. XWF will by default export files to its respective case folder.

4 | P a g e Brett Shavers
When dealing with lots of various time zones, UTC/GMT can save you some headaches of figuring out what happened when and on which machine. Those are the basic settings, now for a real (test) case…
Create a case (File‐Create New Case). This will automatically store in the folder you previously created above. In this example, it will be under my XWF Quick Start folder, Case sub‐folder.

5 | P a g e Brett Shavers
Most of these options are self‐explanatory. The logging includes screen captures of your dialog boxes, which is a nice feature to see exactly what your dialog box was set to, just when you hit ‘enter’.

6 | P a g e Brett Shavers
You can modify your report settings now, or you can do it later when you are ready to create a report. Simply, choose the fields you want displayed on the report and how you want it to look (3 files per line, more or less?, etc…).

7 | P a g e Brett Shavers
To add media or an image (or file), choose File – Add _ _ _.
I’m going to add a small flashdrive and choose the Physical Media. Pretend this is a write blocked drive…

8 | P a g e Brett Shavers
Now we are getting into XWF. This is where some might get scared away to go back to the easy (and maybe not so detailed) other tools.
The legend is very important to look at, especially if you don’t know what a particular color or symbol means.

9 | P a g e Brett Shavers
To create an image, XWF is as easy as any other forensic application, but it seems to run a bit faster than others. XWF is a very reliable forensic imager.
Easy enough: File – Create Disk Image
Same settings as you see on most forensic tools, choose your format type, compression, hash, encryption, etc…The default location for the image is the sub‐folder you created in the beginning. This keeps it nice and neat to have everything in one place. Don’t forget, you can even have your XWF Program Folder in the same place and run XWF from that folder on an external drive.

10 | P a g e Brett Shavers
XWF spins away…
Hashes…
And is done…
Now for the processing.

11 | P a g e Brett Shavers
The key factor in XWF is the Snapshot! This button is about the most powerful button in the entire program. If nothing else, remember the Refine Volume Snapshot.

12 | P a g e Brett Shavers
Indexing can be configured to what your needs are, which is different from other indexing engines where you may not have that much control. Some configurations will make indexing go faster, or take longer (such as choosing word lengths of 2 and 24).
Ok, we let the Snapshot run….

13 | P a g e Brett Shavers
Most is done at this point, but if you choose indexing, it will continue some more as seen below.

14 | P a g e Brett Shavers

15 | P a g e Brett Shavers

16 | P a g e Brett Shavers
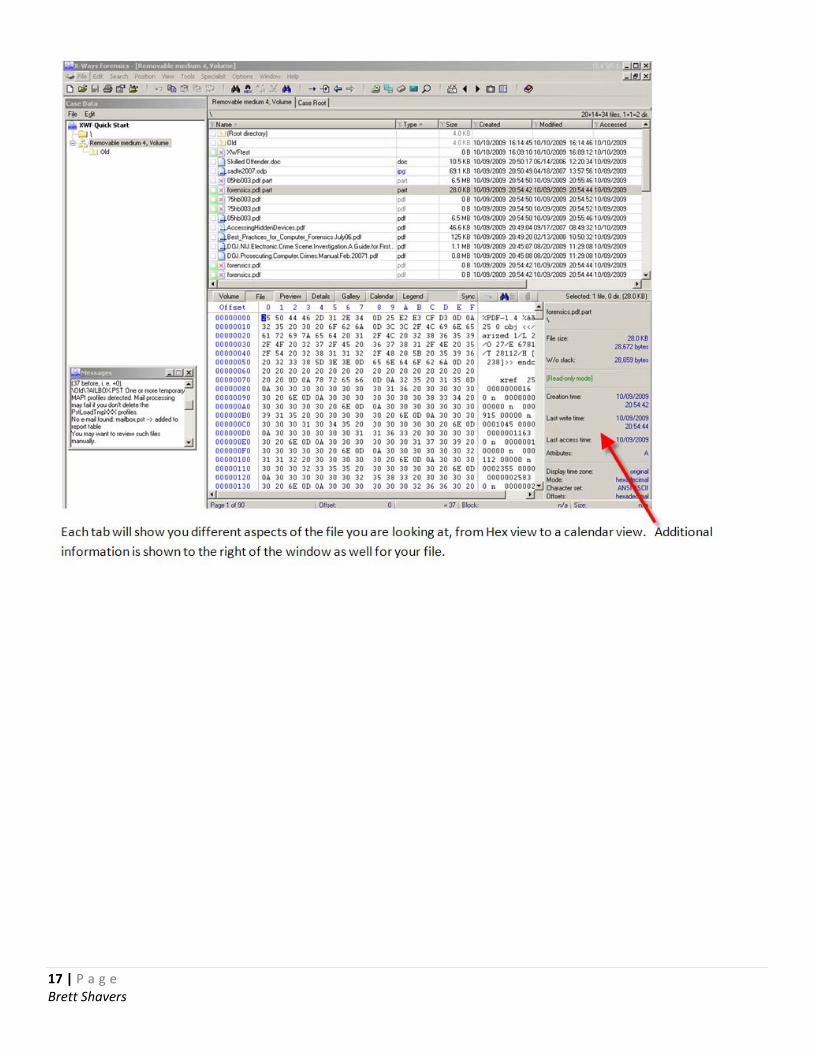
17 | P a g e Brett Shavers

18 | P a g e Brett Shavers
The Directory Browser (Options‐Directory Browser or F5) is another need to know feature of XWF. With this feature, you can control what you see as you examine your files. Some may be important in a case, but not in another, therefore, you can control how much and what you see. As you work in the case, you will be tagging files (responsive/evidence) or hiding others (irrelevant files). In this dialog box, you can choose whether to keep seeing files you tagged or you can choose that tagged files be hidden, at least for the time of the examination, but included in the report later.

19 | P a g e Brett Shavers
Oh yes, XWF will pull out eml files from your PST files. You can view the emails individually, but will need Outlook installed on your forensic machine.

20 | P a g e Brett Shavers
Ok, maybe the Snapshot and Directory Browser weren’t the only great features…XWF allows you to filter by most of the header columns. In this screenshot, choosing to filter by Type allows you to pick those files types of importance in your case. If you are only looking for Email, you can hide everything and XWF will only show you email files. If you want more specificity, you can even choose the individual file types listing under each Type Folder. This is very fast and very neat. As an example, when used in conjunction with the Directory Browser, you could choose to only look at MS Word documents that are previously existing and nothing else. That list can be quickly exported to a spreadsheet.
If you are looking at a live machine, with XWF running on your external drive, you can quickly and easier filter files by file type and export them directly to a folder on your external along with an exported spreadsheet of your selected files and a log file of your actions. In a civil ediscovery case, where you may only need to grab user files on a machine that can’t be shutdown (or isn’t a need to be shut down or allowed to be imaged), you can use the filter feature, select those files of agreed upon relevance (docs, pdfs, email, etc…) and have them exported in mere minutes, logged, metadata intact. Who needs a super duper, fancy pancy, file copying utility when you already have the best thing in your kit?
21 | P a g e Brett Shavers
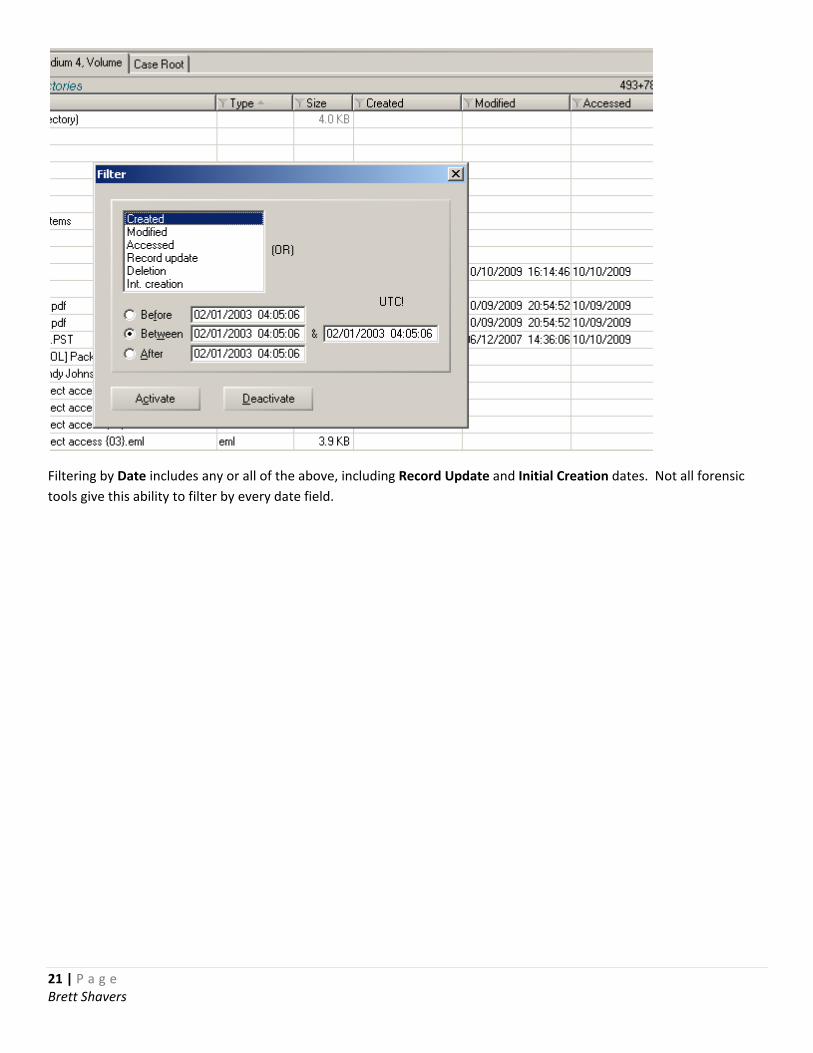
Filtering by Date includes any or all of the above, including Record Update and Initial Creation dates. Not all forensic tools give this ability to filter by every date field.

22 | P a g e Brett Shavers
Files can be tagged one at a time or in mass selections by using the Shift of Ctrl keys.

23 | P a g e Brett Shavers
“Edit Comment” adds your comment to a file or files of interest. This is very helpful as reminders to either reexamine a file or make notes of your thoughts for later reporting. The comments feature is also a header, so you can create specific comments in which you can sort your data later.

24 | P a g e Brett Shavers

25 | P a g e Brett Shavers
As you go through and find files that need to go to your report, just add them using the Report Table Association (right click on the file).

26 | P a g e Brett Shavers
Another nice feature about the “right clicking” in XWF is that you can hide files you do not want to see again. Just right click, “Hide” and done. This doesn’t remove the files from the image, just hides them from your view until you want to see them again.
If there are files of interest and you want to create a hash set of these files…just “right click” again and Create Hash Set. Using files of interest in one image, a hash set can be created and run against a different image.

27 | P a g e Brett Shavers
With the “Right Click” of a mouse, you can export selected files to your location and in the manner you need.
When exporting files, select your target folder (if using XWF default case settings, the location will be in the case folder you created). You can choose to recover the file(s) using any of the options seen. Copy logical or slack, or both, with directory structure or not. Extremely simple and quick.

28 | P a g e Brett Shavers
The Tools‐Hash Database function allows you to import other hash sets into XWF. This can be NSRL hash sets, or sets created with XWF or other tools (such as a FTK Imager exported hash set). After importing your hash set, such as a set of known files you are looking for, run the Snapshot again to check your files against your new hash set.

29 | P a g e Brett Shavers
Searching in XWF is straightforward. The options are simple and multiple terms can be entered for searching at the same time.

30 | P a g e Brett Shavers
The results are output in a dialog box.
And the file hits are highlighted as surrounded by their context. Any of these can be “tagged” as previously mentioned, or viewed or exported.

31 | P a g e Brett Shavers
In this test case, I indexed the image, and therefore, I can search the index, which is much faster than searching the image without indexing. But of course, you have to choose to index first if you know you will be keyword searching, or you index later. Either way, your investigative plan will determine if you need to find specific data fast and first, to keyword search later, or if you can afford to have the image index while you wait.
After the index is complete, you can also export your word list that was created.

32 | P a g e Brett Shavers
XWF can reconstruct RAIDS. I’ve had nearly 100% success with reconstructing RAIDs with XWF.
Under the Options – Security, you have several choices to make. For one example, a Strict drive letter protection will not let you save case data outside of where you chose to store initially (at least not on another drive). If you want to be able to save data outside the defaults, uncheck the Strict drive letter protection box.

33 | P a g e Brett Shavers
So your case is done (well, they are never really ever done, but at some point, you need a report). From File‐Create Report, here you go. By this point, you should have been tagging and marking your evidence files to the report, or else, you need to go back and do that now or you won’t have anything in your report.
Choose the metadata you want included, whether your want your logo, case log, and other details. Once you hit “Ok”, you’ll get an editable html report (basic).

34 | P a g e Brett Shavers
Here is a report, with 3 files showing on each line. The metadata selected is below each file. Also, a link to the file exists to where the file can be opened if clicked. If the file was a graphic, the graphic would be seen. This entire report can be easily edited to your liking for ease of review.

35 | P a g e Brett Shavers

36 | P a g e Brett Shavers
The activity log, which you can choose to have included or not in your report, contains not only the date and time entries of your work, but also screen shots of every dialog box in which you clicked, “OK”. This is really nice to see just what your settings were when you submitted an action with XWF. In this screen shot above, you can see that I choose the Physical Media of RM4 and pushed “OK”.
XWF can really dig into your data. From basic file recovery, data runs, MFT records, and flying from offset to offset, XWF can be used by beginners and the most advanced examiners. With RAM analysis being able to be examined, there really isn’t much that XWF can’t do. And when I thought XWF was at the limit of what was possible, when you throw a tool like F‐Response to work with XWF, you have so much more because you can then touch drives remotely for analysis with two tools to leave you wondering again, “why have I have gone so long without XWF…?” For any tip of the iceberg I touched upon, there are substantial details in the XWF Manual. Stefan does an excellent job at keeping the manual updated and XWF updated to the types of media and operating systems available.
Two other fantastic features of XWF are the Registry Viewer and X‐Ways Trace. The Registry Viewer, along with its report, has been greatly enhanced over the past years as well as X‐Ways Trace. However, both of those would also be well fitted with their own “QuickStart Guides”…..
And to Stefan, thanks for your forensic tool and also for giving the first U.S. class in Seattle ;)