bravo & bravo os v11 - melco university · open, and your bravo must be on. a hoop with the...
TRANSCRIPT

BRAVO & BRAVO OS V11
ww
w.
me
lc
ou
ni
ve
rs
it
y.
co
m
ww
w.
me
lc
ou
ni
ve
rs
it
y.
co
m
ww
w.
me
lc
ou
ni
ve
rs
it
y.
co
m
BRAVO OS V11 Classroom Notes & Quick Reference Guide BRAVO OS V11 Classroom Notes & Quick Reference Guide
BRAVO_OS_v11_BRAVO_Handout.pub 2 Rev: 102014
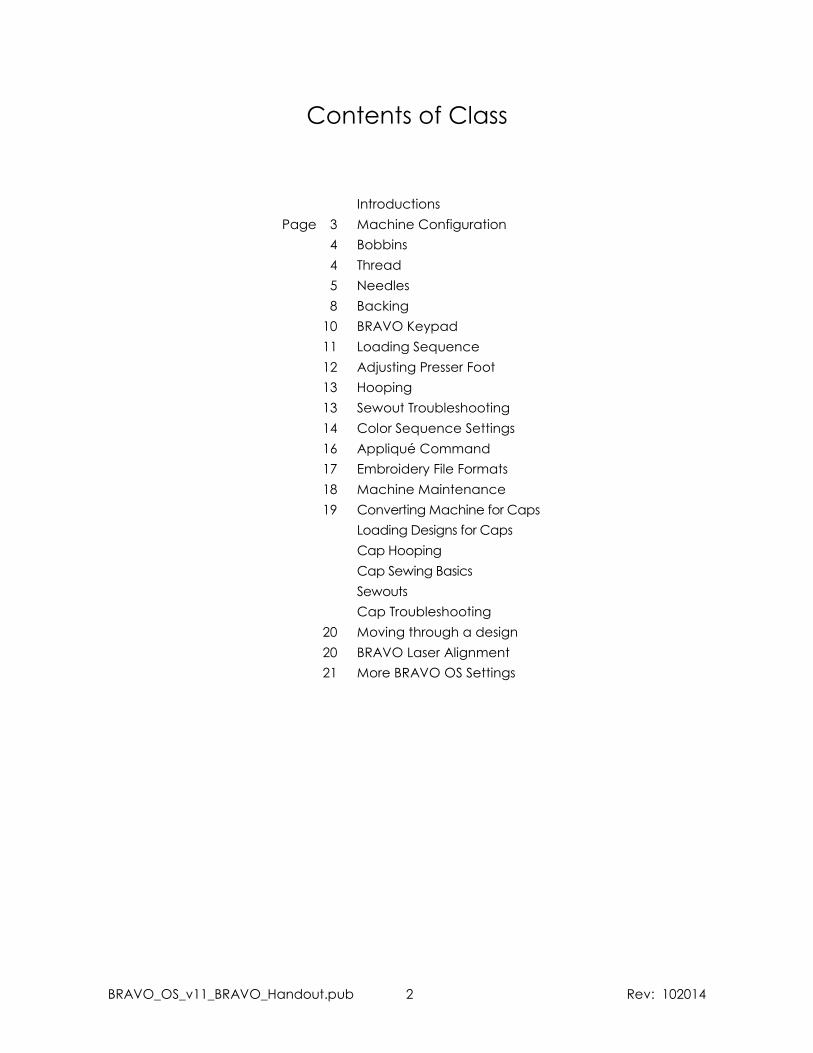
Contents of Class
Introductions
Machine Configuration
Bobbins
Thread
Needles
Backing
BRAVO Keypad
Loading Sequence
Adjusting Presser Foot
Hooping
Sewout Troubleshooting
Color Sequence Settings
Appliqué Command
Embroidery File Formats
Machine Maintenance
Converting Machine for Caps
Loading Designs for Caps
Cap Hooping
Cap Sewing Basics
Sewouts
Cap Troubleshooting
Moving through a design
BRAVO Laser Alignment
More BRAVO OS Settings
Page 3
4
4
5
8
10
11
12
13
13
14
16
17
18
19
20
20
21
BRAVO_OS_v11_BRAVO_Handout.pub 3 Rev: 102014
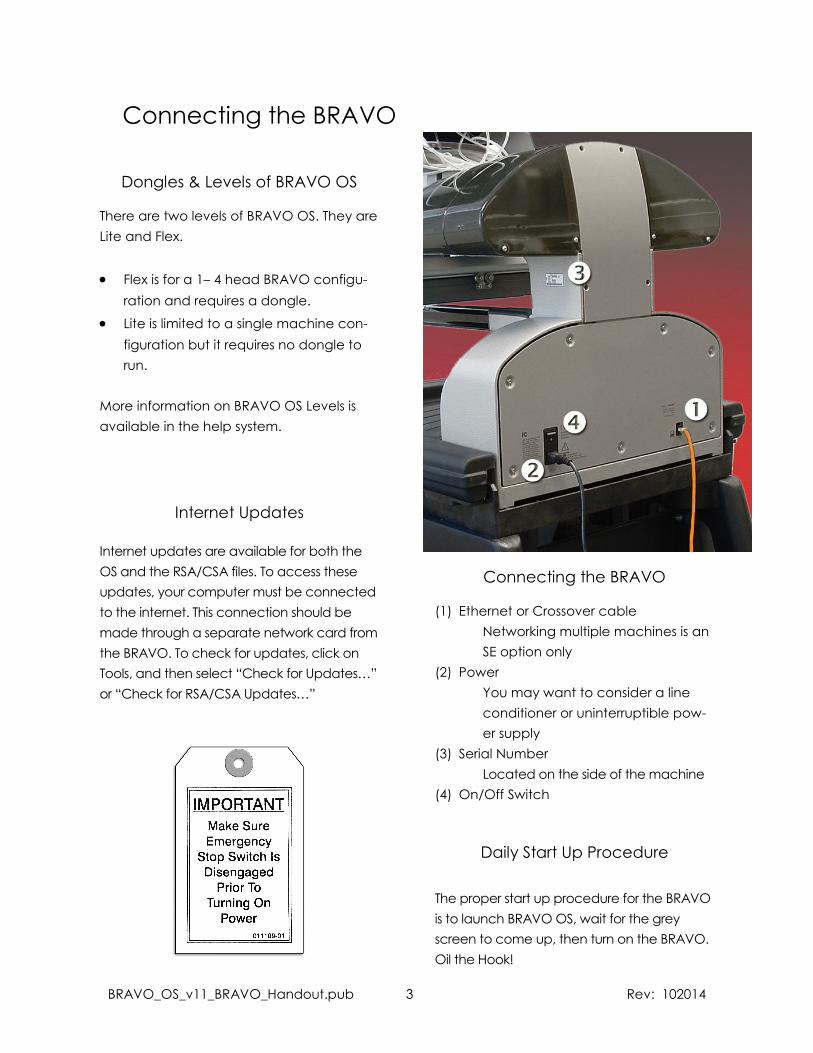
Connecting the BRAVO
(1) Ethernet or Crossover cable
Networking multiple machines is an
SE option only
(2) Power
You may want to consider a line
conditioner or uninterruptible pow-
er supply
(3) Serial Number
Located on the side of the machine
(4) On/Off Switch
Connecting the BRAVO
Dongles & Levels of BRAVO OS
Internet Updates
Daily Start Up Procedure
There are two levels of BRAVO OS. They are
Lite and Flex.
Flex is for a 1– 4 head BRAVO configu-
ration and requires a dongle.
Lite is limited to a single machine con-
figuration but it requires no dongle to
run.
More information on BRAVO OS Levels is
available in the help system.
Internet updates are available for both the
OS and the RSA/CSA files. To access these
updates, your computer must be connected
to the internet. This connection should be
made through a separate network card from
the BRAVO. To check for updates, click on
Tools, and then select “Check for Updates…”
or “Check for RSA/CSA Updates…”
The proper start up procedure for the BRAVO
is to launch BRAVO OS, wait for the grey
screen to come up, then turn on the BRAVO.
Oil the Hook!
BRAVO_OS_v11_BRAVO_Handout.pub 4 Rev: 102014
Bobbin
We recommend continuous filament polyester bobbin thread.
Cleaning the bobbin case
Types of bobbins
Threading up the bobbin case
Testing the bobbin tension
Adjusting the bobbin tension
Reinserting the bobbin case
Bobbin tail
Thread
Threading the BRAVO Types of Thread

BRAVO_OS_v11_BRAVO_Handout.pub 5 Rev: 102014
Needles
FR
ON
T
SID
E
BA
CK
Needle Orientation
Needle Sizes
65/9 70/10 75/11 80/12
Smaller Larger
Needle Points
Sharp Ball
Needle Coatings
Standard Titanium
Thread Guide
Scarf
BRAVO_OS_v11_BRAVO_Handout.pub 6 Rev: 102014
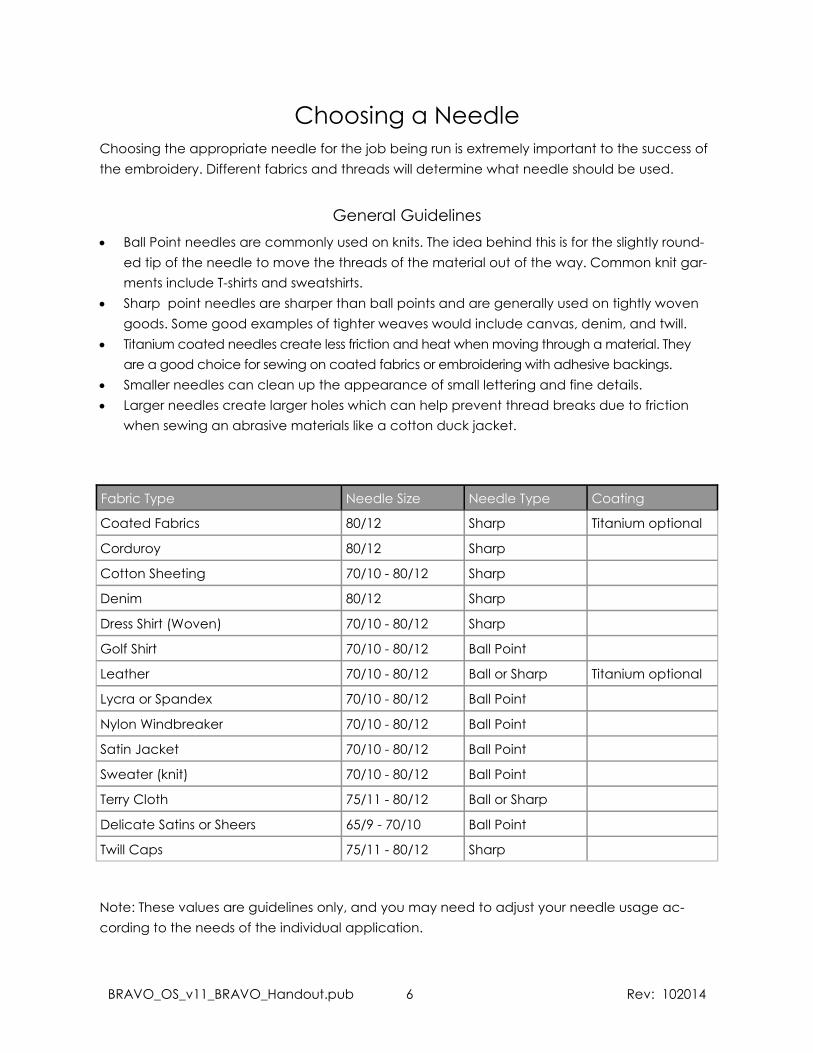
Choosing a Needle
General Guidelines
Choosing the appropriate needle for the job being run is extremely important to the success of
the embroidery. Different fabrics and threads will determine what needle should be used.
Ball Point needles are commonly used on knits. The idea behind this is for the slightly round-
ed tip of the needle to move the threads of the material out of the way. Common knit gar-
ments include T-shirts and sweatshirts.
Sharp point needles are sharper than ball points and are generally used on tightly woven
goods. Some good examples of tighter weaves would include canvas, denim, and twill.
Titanium coated needles create less friction and heat when moving through a material. They
are a good choice for sewing on coated fabrics or embroidering with adhesive backings.
Smaller needles can clean up the appearance of small lettering and fine details.
Larger needles create larger holes which can help prevent thread breaks due to friction
when sewing an abrasive materials like a cotton duck jacket.
Fabric Type Needle Size Needle Type Coating
Coated Fabrics 80/12 Sharp Titanium optional
Corduroy 80/12 Sharp
Cotton Sheeting 70/10 - 80/12 Sharp
Denim 80/12 Sharp
Dress Shirt (Woven) 70/10 - 80/12 Sharp
Golf Shirt 70/10 - 80/12 Ball Point
Leather 70/10 - 80/12 Ball or Sharp Titanium optional
Lycra or Spandex 70/10 - 80/12 Ball Point
Nylon Windbreaker 70/10 - 80/12 Ball Point
Satin Jacket 70/10 - 80/12 Ball Point
Sweater (knit) 70/10 - 80/12 Ball Point
Terry Cloth 75/11 - 80/12 Ball or Sharp
Delicate Satins or Sheers 65/9 - 70/10 Ball Point
Twill Caps 75/11 - 80/12 Sharp
Note: These values are guidelines only, and you may need to adjust your needle usage ac-
cording to the needs of the individual application.
BRAVO_OS_v11_BRAVO_Handout.pub 7 Rev: 102014
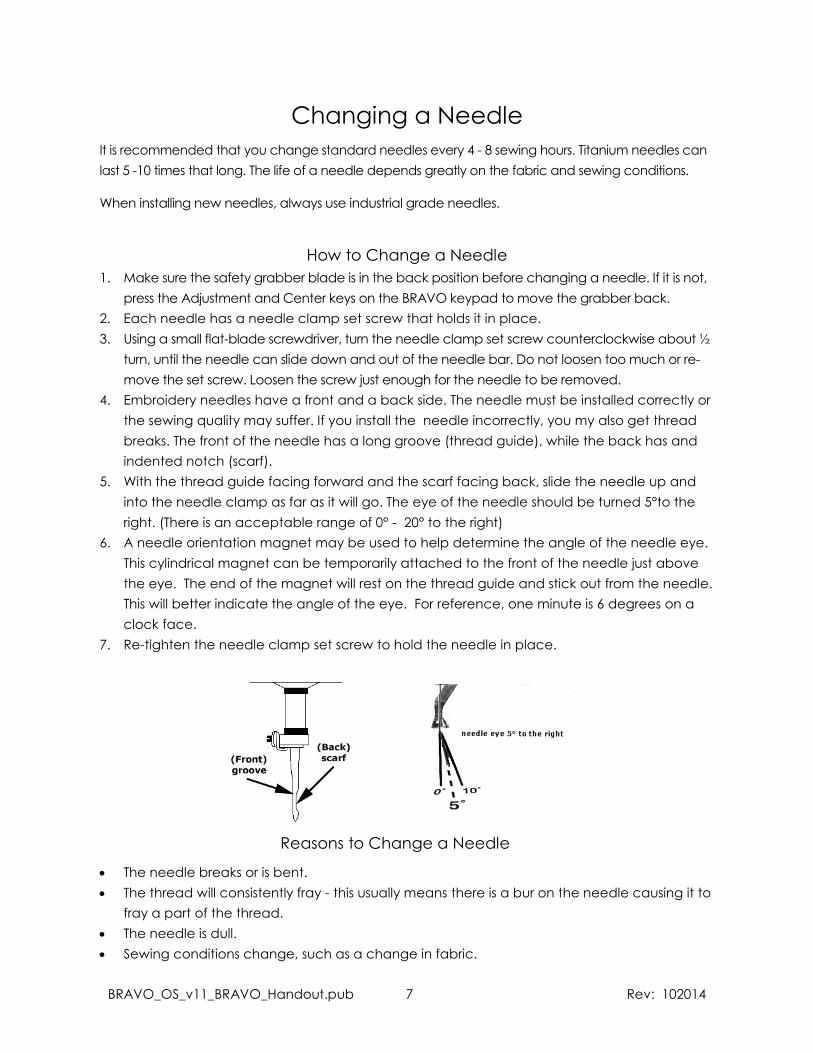
Changing a Needle
When installing new needles, always use industrial grade needles.
How to Change a Needle
1. Make sure the safety grabber blade is in the back position before changing a needle. If it is not,
press the Adjustment and Center keys on the BRAVO keypad to move the grabber back.
2. Each needle has a needle clamp set screw that holds it in place.
3. Using a small flat-blade screwdriver, turn the needle clamp set screw counterclockwise about ½
turn, until the needle can slide down and out of the needle bar. Do not loosen too much or re-
move the set screw. Loosen the screw just enough for the needle to be removed.
4. Embroidery needles have a front and a back side. The needle must be installed correctly or
the sewing quality may suffer. If you install the needle incorrectly, you my also get thread
breaks. The front of the needle has a long groove (thread guide), while the back has and
indented notch (scarf).
5. With the thread guide facing forward and the scarf facing back, slide the needle up and
into the needle clamp as far as it will go. The eye of the needle should be turned 5°to the
right. (There is an acceptable range of 0° - 20° to the right)
6. A needle orientation magnet may be used to help determine the angle of the needle eye.
This cylindrical magnet can be temporarily attached to the front of the needle just above
the eye. The end of the magnet will rest on the thread guide and stick out from the needle.
This will better indicate the angle of the eye. For reference, one minute is 6 degrees on a
clock face.
7. Re-tighten the needle clamp set screw to hold the needle in place.
The needle breaks or is bent.
The thread will consistently fray - this usually means there is a bur on the needle causing it to
fray a part of the thread.
The needle is dull.
Sewing conditions change, such as a change in fabric.
Reasons to Change a Needle
BRAVO_OS_v11_BRAVO_Handout.pub 8 Rev: 102014
Backings and Toppings
Standard Backings
Cut Away Tear Away
Specialty Backings
Water Soluble Toppings and Backings
Other Toppings and Backings
BRAVO_OS_v11_BRAVO_Handout.pub 9 Rev: 102014
More Backing and Topping Information
Appropriate backing is essential for embroidering most fabrics. Without backing, fabrics can slip
even when they are hooped tightly. Using the proper backing is directly linked to the produc-
tion of consistently high quality embroidery. It is important to understand that many different
embroiderers with identical criteria may choose completely different backing and topping for-
mulas and still achieve successful embroidery results. Experimentation and experience are es-
sential in creating consistently high quality embroidery. New products are constantly being de-
veloped and introduced. Find the combinations that work best for you.
Tear away backing is a non-woven material that tears easily in any direction and can be easily
removed after embroidery. Tear away is extremely simple and fast to use, but the uses are lim-
ited because it offers little support to unstable fabrics. Some examples of fabrics suitable for
tear away are cotton sheeting, woven dress shirts, denim, terry cloth, hats, and some satins. Be
aware that tear away can be a bit scratchy, and use on fabrics that will be worn against skin
may want to be avoided.
Tear Away Backing
Cut Away backing is a woven or non-woven material that must be cut form the fabric after the
embroidery is complete. This type of backing is used to support the embroidery on the fabric
during and after the embroidery process. It also prevents the fabric from stretching during em-
broidery. Cut Away backings are generally used for unstable goods like knits. Examples of a knit
would be a t-shirt, golf shirt, sweater, or a sweatshirt.
Cut Away Backing
Specialty backings such as poly mesh and nylon mesh are also options. While they may not be
as stable as traditional cut aways, they are much less visible through lighter weight garments.
They also tend to be softer than other backings.
Water soluble backing is also available for jobs that require that no backing be left after the comple-
tion of the embroidery. Be aware that this would require a fairly stable garment as the backing will
be dissolved completely and offer no support once the garment has been laundered.
Specialty Backings
Toppings are used to keep your stitches from falling into the nap of a lofty material like terry
cloth or polar fleece. It can also be used to clean up small lettering and the overall appear-
ance of your embroidery. Most toppings are water-soluble and can be easily removed after
the embroidery is complete.
Toppings
BRAVO_OS_v11_BRAVO_Handout.pub 10 Rev: 102014
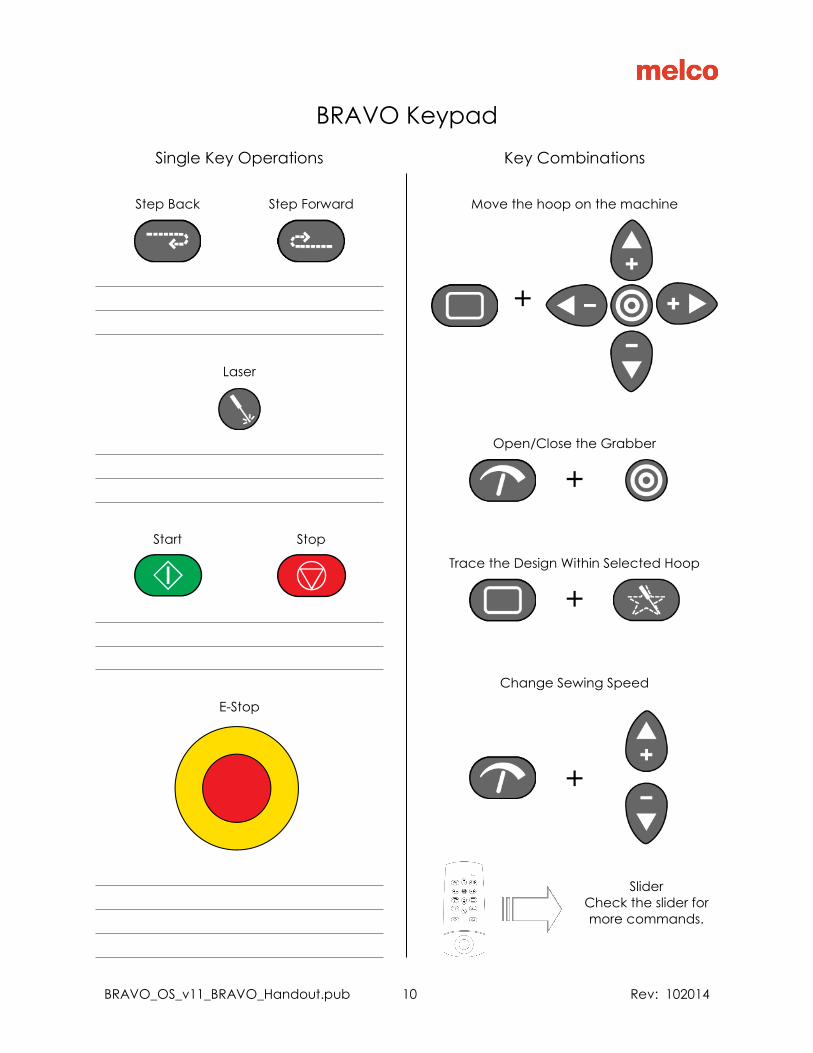
BRAVO Keypad
Single Key Operations
Step Back Step Forward
Laser
Start Stop
E-Stop
Key Combinations
Move the hoop on the machine
+
+
Open/Close the Grabber
Slider
Check the slider for
more commands.
+
Trace the Design Within Selected Hoop
Change Sewing Speed
+
BRAVO_OS_v11_BRAVO_Handout.pub 11 Rev: 102014
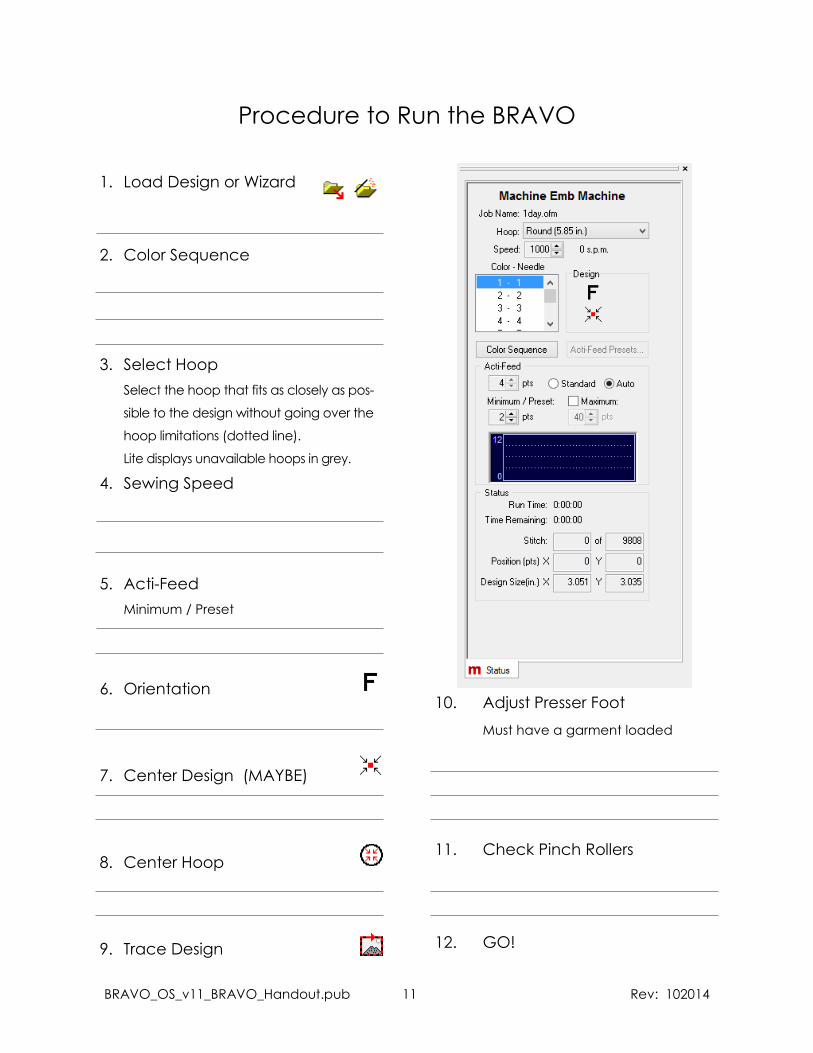
Procedure to Run the BRAVO
1. Load Design or Wizard
2. Color Sequence
3. Select Hoop
4. Sewing Speed
5. Acti-Feed
Minimum / Preset
6. Orientation
7. Center Design (MAYBE)
8. Center Hoop
9. Trace Design
10. Adjust Presser Foot
Must have a garment loaded
11. Check Pinch Rollers
12. GO!
BRAVO_OS_v11_BRAVO_Handout.pub 12 Rev: 102014
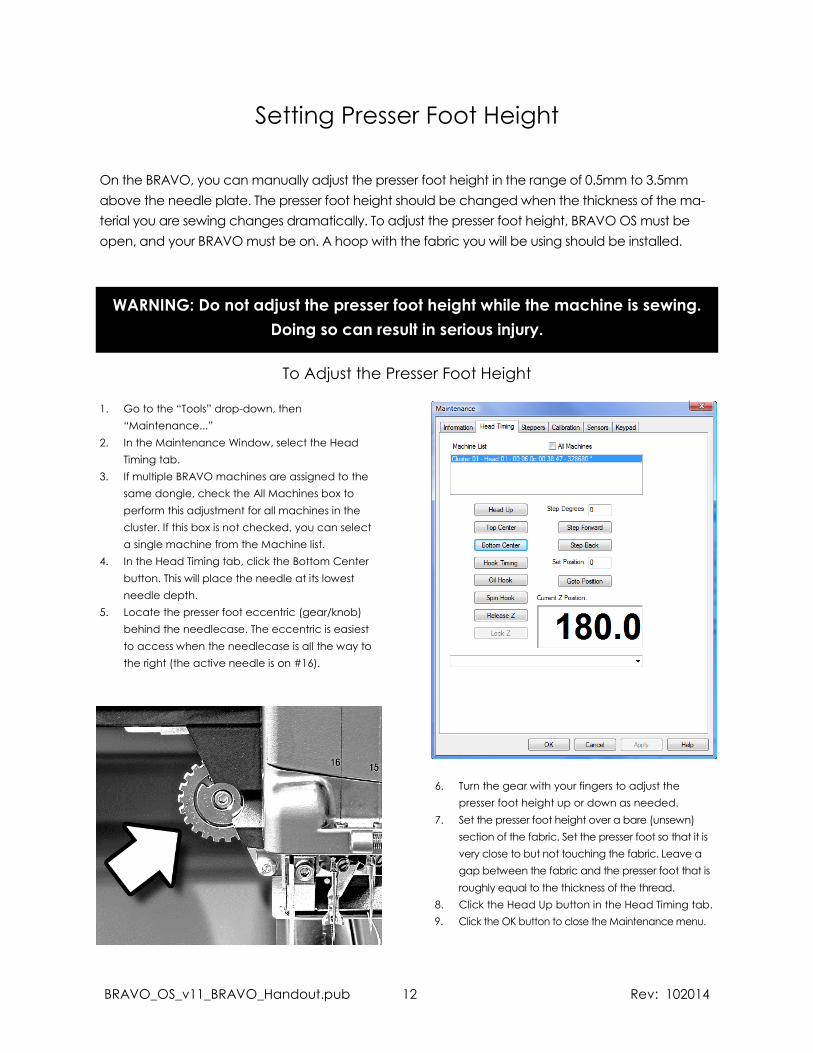
1.
Setting Presser Foot Height
On the BRAVO, you can manually adjust the presser foot height in the range of 0.5mm to 3.5mm
above the needle plate. The presser foot height should be changed when the thickness of the ma-
terial you are sewing changes dramatically. To adjust the presser foot height, BRAVO OS must be
open, and your BRAVO must be on. A hoop with the fabric you will be using should be installed.
WARNING: Do not adjust the presser foot height while the machine is sewing.
Doing so can result in serious injury.
1. Go to the “Tools” drop-down, then
“Maintenance...”
2. In the Maintenance Window, select the Head
Timing tab.
3. If multiple BRAVO machines are assigned to the
same dongle, check the All Machines box to
perform this adjustment for all machines in the
cluster. If this box is not checked, you can select
a single machine from the Machine list.
4. In the Head Timing tab, click the Bottom Center
button. This will place the needle at its lowest
needle depth.
5. Locate the presser foot eccentric (gear/knob)
behind the needlecase. The eccentric is easiest
to access when the needlecase is all the way to
the right (the active needle is on #16).
6. Turn the gear with your fingers to adjust the
presser foot height up or down as needed.
7. Set the presser foot height over a bare (unsewn)
section of the fabric. Set the presser foot so that it is
very close to but not touching the fabric. Leave a
gap between the fabric and the presser foot that is
roughly equal to the thickness of the thread.
8. Click the Head Up button in the Head Timing tab.
To Adjust the Presser Foot Height
BRAVO_OS_v11_BRAVO_Handout.pub 13 Rev: 102014
Hooping
Round hoops give the most even tension of all the hoop shapes.
Wooden hoops will have registration marks on them. These help main-
tain the shape and hold of the hoop.
Many wooden hoops are double-high, meaning their sides are twice
as tall as normal hoops. They help grip slick or bulky goods because of
the larger surface area and slight tooth the wood provides.
Choose the smallest hoop that the design will fit in without going over
the hoop limitations (the dotted line in BRAVO OS).
Adjust the hoop tension before hooping the final garment. If you ad-
just the tension of the hoop while the garment is in it, you will increase
your chances of “hoop burn” and create ripples in the garment.
Sewout Troubleshooting
After you complete your first sew out of a design, it is a good idea to examine the quality of the
piece and how well it sewed. Reassess the hooping, backing, and machine settings. A few ad-
justments now can save you from frustrations later on.
Symptom Possible Solutions
Thread breaks Slow down the BRAVO. Make sure the piece is hooped properly. Adjust
presser foot. Check bobbin tension. Check needle orientation. Oil the
rotary hook.
Bobbin pulled to top Check bobbin tension. Slow down the BRAVO. Adjust presser foot.
Registration loss Check hooping tension. Slow down the BRAVO.
Fabric is puckering Avoid stretching or pulling the fabric too much when hooping it.
BRAVO_OS_v11_BRAVO_Handout.pub 14 Rev: 102014
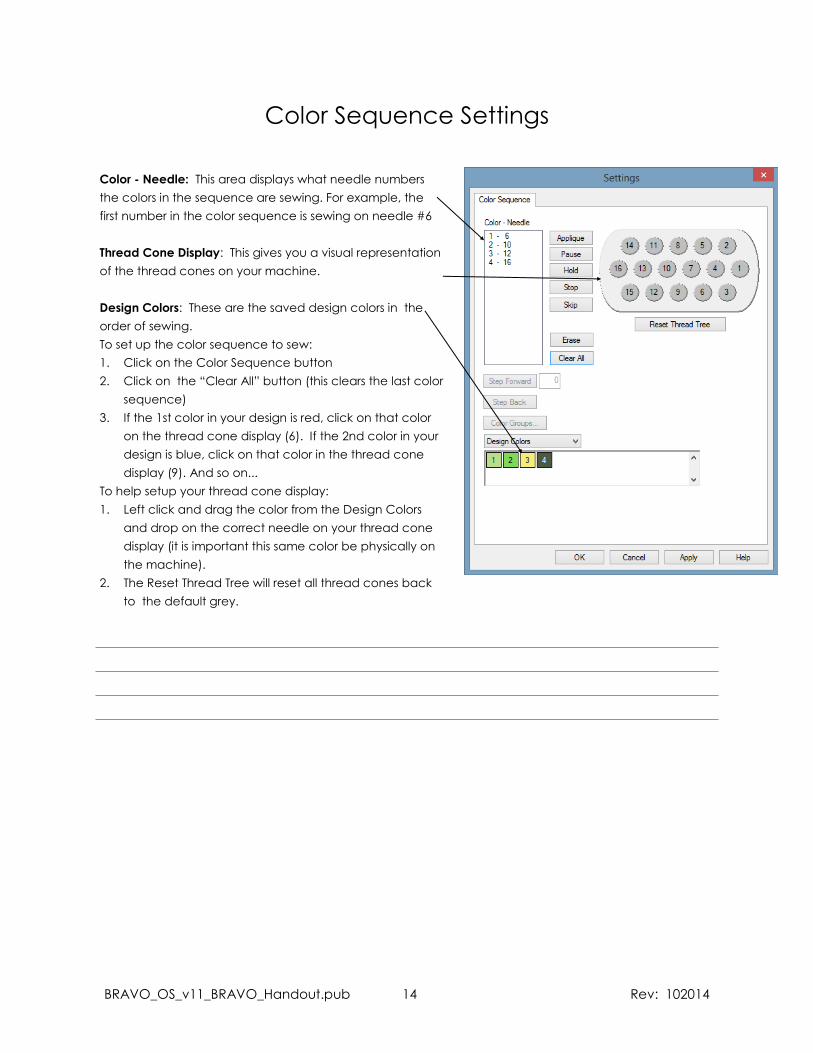
Color Sequence Settings
Color - Needle: This area displays what needle numbers
the colors in the sequence are sewing. For example, the
first number in the color sequence is sewing on needle #6
Thread Cone Display: This gives you a visual representation
of the thread cones on your machine.
Design Colors: These are the saved design colors in the
order of sewing.
To set up the color sequence to sew:
1. Click on the Color Sequence button
2. Click on the “Clear All” button (this clears the last color
sequence)
3. If the 1st color in your design is red, click on that color
on the thread cone display (6). If the 2nd color in your
design is blue, click on that color in the thread cone
display (9). And so on...
To help setup your thread cone display:
1. Left click and drag the color from the Design Colors
and drop on the correct needle on your thread cone
display (it is important this same color be physically on
the machine).
2. The Reset Thread Tree will reset all thread cones back
to the default grey.
BRAVO_OS_v11_BRAVO_Handout.pub 15 Rev: 102014
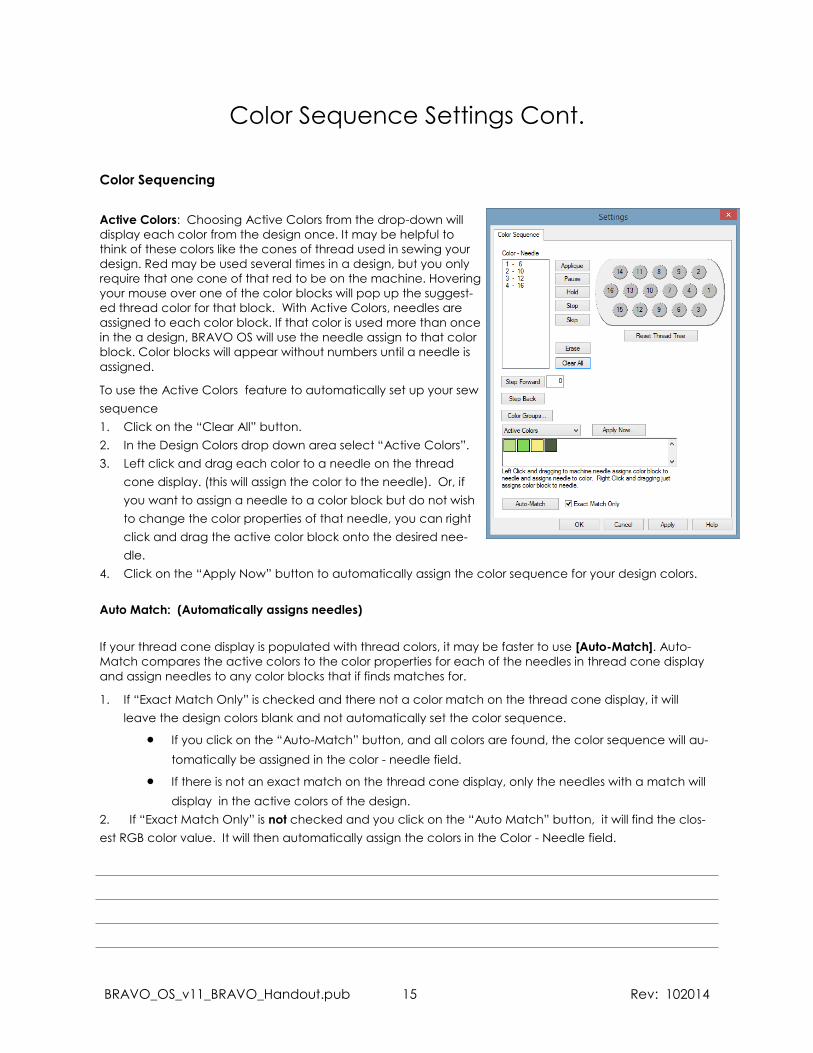
Color Sequencing
Active Colors: Choosing Active Colors from the drop-down will
display each color from the design once. It may be helpful to
think of these colors like the cones of thread used in sewing your
design. Red may be used several times in a design, but you only
require that one cone of that red to be on the machine. Hovering
your mouse over one of the color blocks will pop up the suggest-
ed thread color for that block. With Active Colors, needles are
assigned to each color block. If that color is used more than once
in the a design, BRAVO OS will use the needle assign to that color
block. Color blocks will appear without numbers until a needle is
assigned.
To use the Active Colors feature to automatically set up your sew
sequence
1. Click on the “Clear All” button.
2. In the Design Colors drop down area select “Active Colors”.
3. Left click and drag each color to a needle on the thread
cone display. (this will assign the color to the needle). Or, if
you want to assign a needle to a color block but do not wish
to change the color properties of that needle, you can right
click and drag the active color block onto the desired nee-
dle.
4. Click on the “Apply Now” button to automatically assign the color sequence for your design colors.
Auto Match: (Automatically assigns needles)
If your thread cone display is populated with thread colors, it may be faster to use [Auto-Match]. Auto-
Match compares the active colors to the color properties for each of the needles in thread cone display
and assign needles to any color blocks that if finds matches for.
1. If “Exact Match Only” is checked and there not a color match on the thread cone display, it will
leave the design colors blank and not automatically set the color sequence.
If you click on the “Auto-Match” button, and all colors are found, the color sequence will au-
tomatically be assigned in the color - needle field.
If there is not an exact match on the thread cone display, only the needles with a match will
display in the active colors of the design.
2. If “Exact Match Only” is not checked and you click on the “Auto Match” button, it will find the clos-
est RGB color value. It will then automatically assign the colors in the Color - Needle field.
Color Sequence Settings Cont.
BRAVO_OS_v11_BRAVO_Handout.pub 16 Rev: 102014
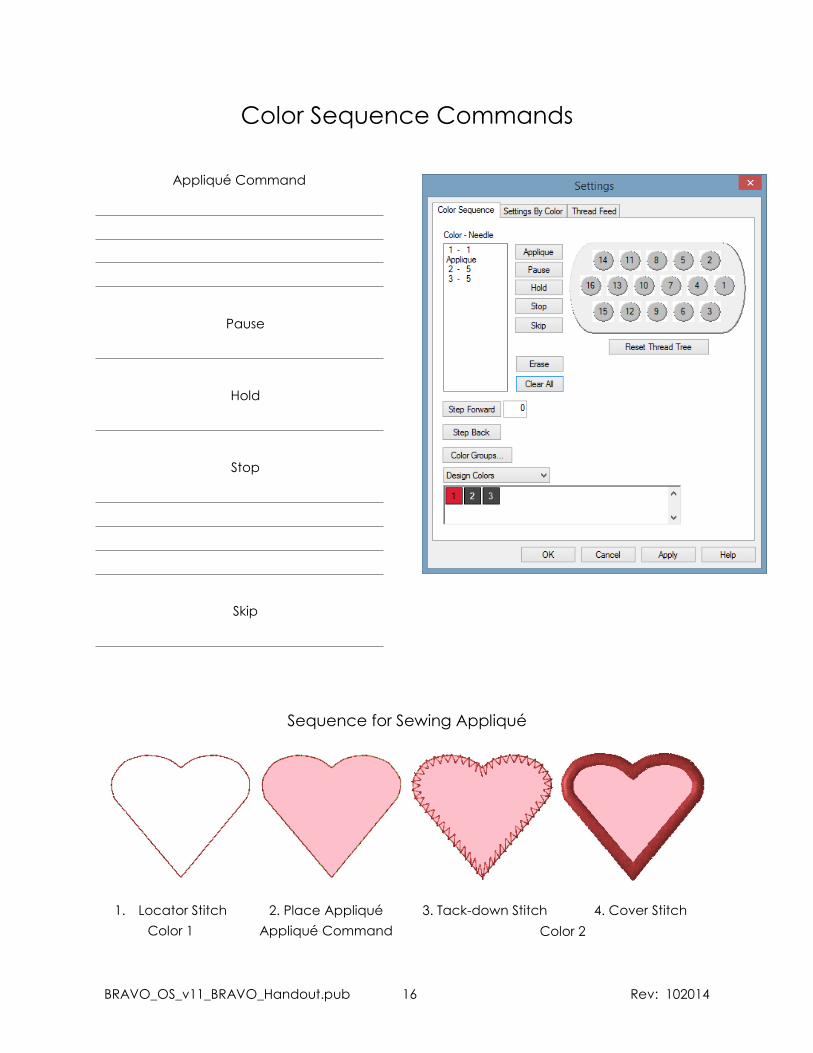
Color Sequence Commands
Appliqué Command
Sequence for Sewing Appliqué
1. Locator Stitch
Color 1
2. Place Appliqué
Appliqué Command
3. Tack-down Stitch 4. Cover Stitch
Color 2
Stop
Pause
Hold
Skip
BRAVO_OS_v11_BRAVO_Handout.pub 17 Rev: 102014
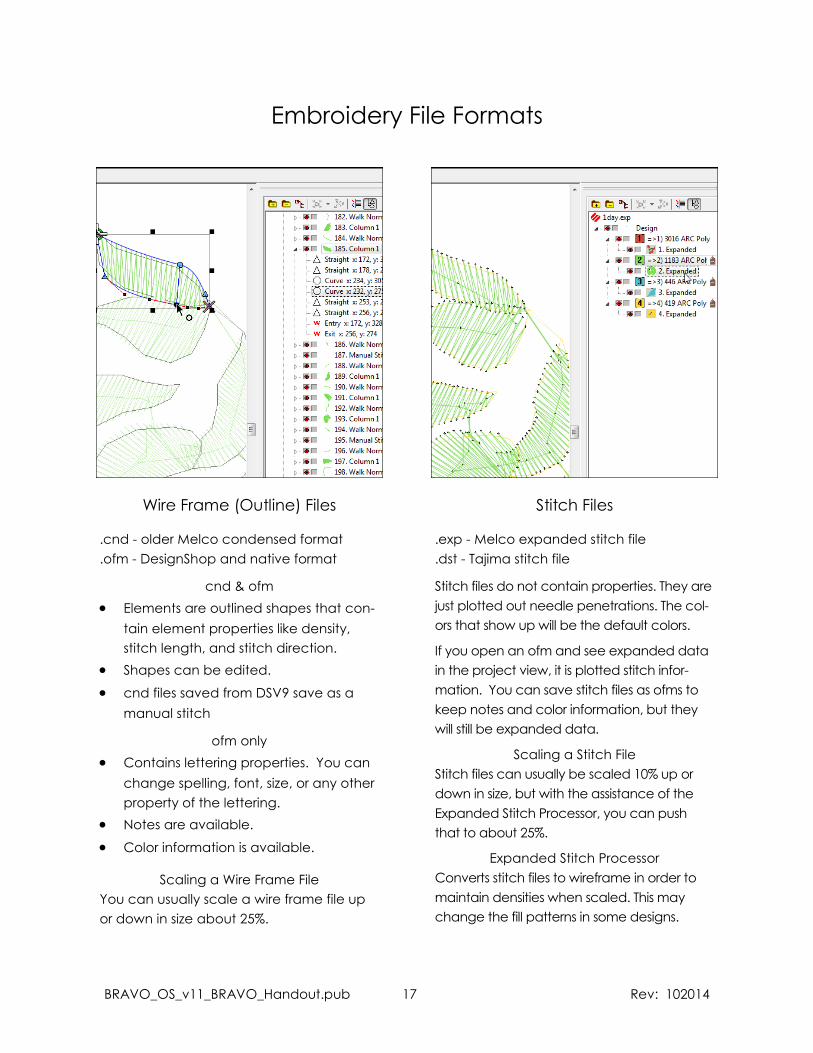
Embroidery File Formats
Wire Frame (Outline) Files
.cnd - older Melco condensed format
.ofm - DesignShop and native format
cnd & ofm
Elements are outlined shapes that con-
tain element properties like density,
stitch length, and stitch direction.
Shapes can be edited.
cnd files saved from DSV9 save as a
manual stitch
ofm only
Contains lettering properties. You can
change spelling, font, size, or any other
property of the lettering.
Notes are available.
Color information is available.
Scaling a Wire Frame File
You can usually scale a wire frame file up
or down in size about 25%.
Stitch Files
.exp - Melco expanded stitch file
.dst - Tajima stitch file
Stitch files do not contain properties. They are
just plotted out needle penetrations. The col-
ors that show up will be the default colors.
If you open an ofm and see expanded data
in the project view, it is plotted stitch infor-
mation. You can save stitch files as ofms to
keep notes and color information, but they
will still be expanded data.
Scaling a Stitch File
Stitch files can usually be scaled 10% up or
down in size, but with the assistance of the
Expanded Stitch Processor, you can push
that to about 25%.
Expanded Stitch Processor
Converts stitch files to wireframe in order to
maintain densities when scaled. This may
change the fill patterns in some designs.
BRAVO_OS_v11_BRAVO_Handout.pub 18 Rev: 102014
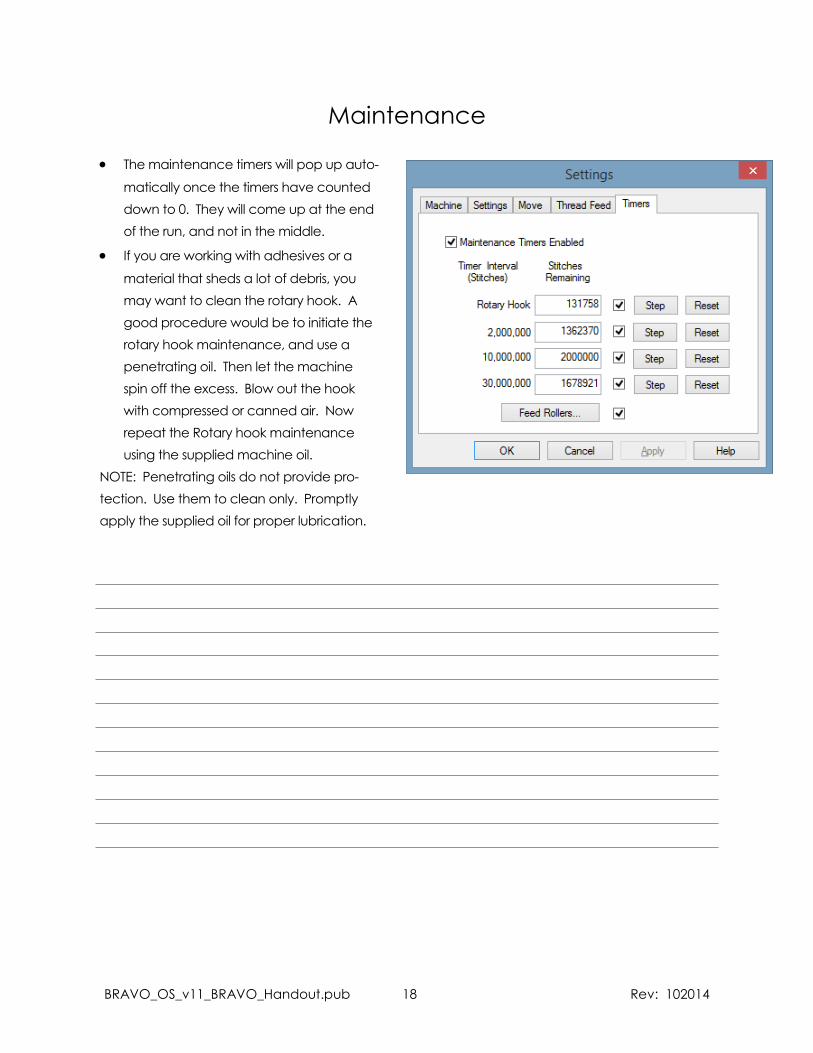
Maintenance
The maintenance timers will pop up auto-
matically once the timers have counted
down to 0. They will come up at the end
of the run, and not in the middle.
If you are working with adhesives or a
material that sheds a lot of debris, you
may want to clean the rotary hook. A
good procedure would be to initiate the
rotary hook maintenance, and use a
penetrating oil. Then let the machine
spin off the excess. Blow out the hook
with compressed or canned air. Now
repeat the Rotary hook maintenance
using the supplied machine oil.
NOTE: Penetrating oils do not provide pro-
tection. Use them to clean only. Promptly
apply the supplied oil for proper lubrication.
BRAVO_OS_v11_BRAVO_Handout.pub 19 Rev: 102014
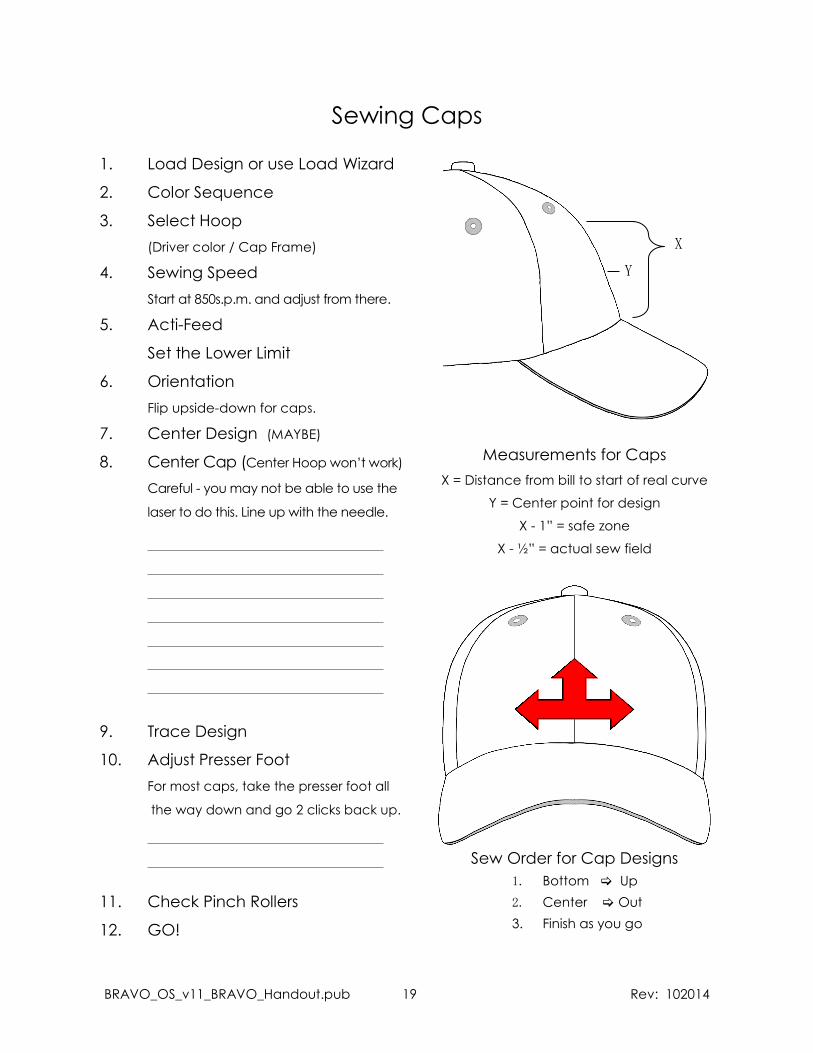
Sewing Caps
1. Load Design or use Load Wizard
2. Color Sequence
3. Select Hoop
(Driver color / Cap Frame)
4. Sewing Speed
Start at 850s.p.m. and adjust from there.
5. Acti-Feed
Set the Lower Limit
6. Orientation
Flip upside-down for caps.
7. Center Design (MAYBE)
8. Center Cap (Center Hoop won’t work)
Careful - you may not be able to use the
laser to do this. Line up with the needle.
9. Trace Design
10. Adjust Presser Foot
11. Check Pinch Rollers
12. GO!
Measurements for Caps
X = Distance from bill to start of real curve
Y = Center point for design
X - 1” = safe zone
X - ½” = actual sew field
Sew Order for Cap Designs
1. Bottom Up
2. Center Out
3. Finish as you go
X
Y
BRAVO_OS_v11_BRAVO_Handout.pub 20 Rev: 102014
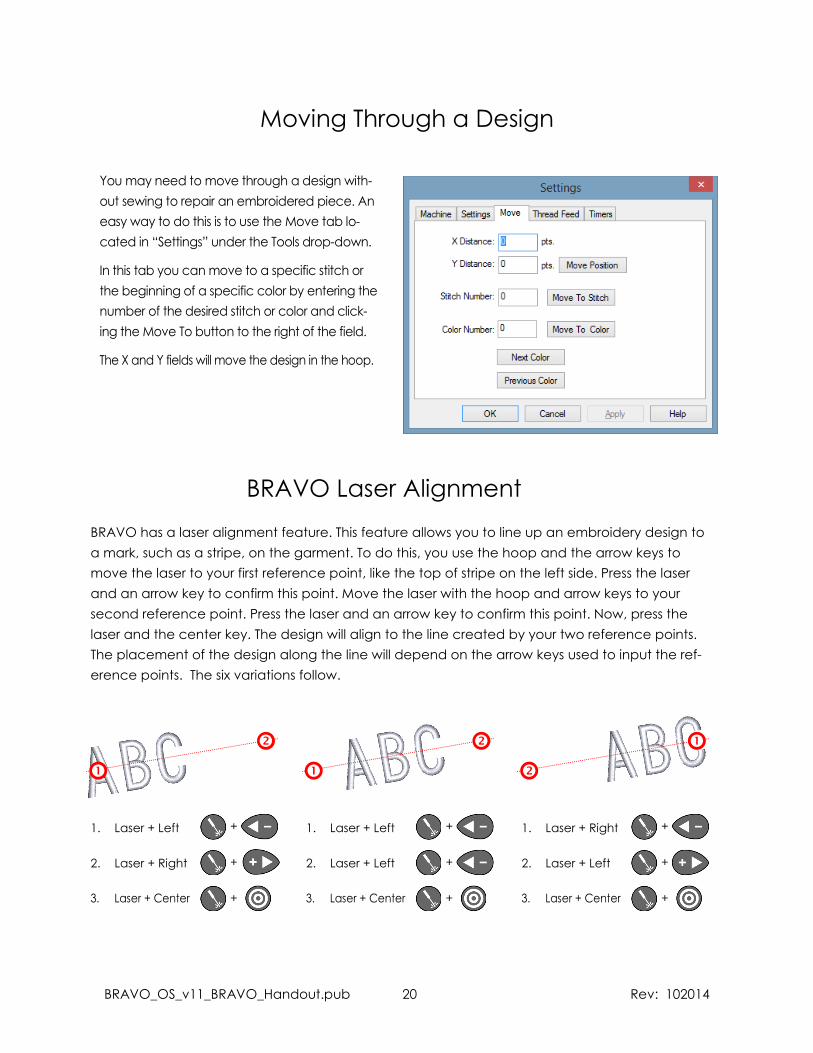
BRAVO has a laser alignment feature. This feature allows you to line up an embroidery design to
a mark, such as a stripe, on the garment. To do this, you use the hoop and the arrow keys to
move the laser to your first reference point, like the top of stripe on the left side. Press the laser
and an arrow key to confirm this point. Move the laser with the hoop and arrow keys to your
second reference point. Press the laser and an arrow key to confirm this point. Now, press the
laser and the center key. The design will align to the line created by your two reference points.
The placement of the design along the line will depend on the arrow keys used to input the ref-
erence points. The six variations follow.
1. Laser + Left
2. Laser + Right
1. Laser + Left
2. Laser + Left
1. Laser + Right
2. Laser + Left
+
+
+
+
+
+
+
+
+
Moving Through a Design
BRAVO Laser Alignment
BRAVO_OS_v11_BRAVO_Handout.pub 21 Rev: 102014
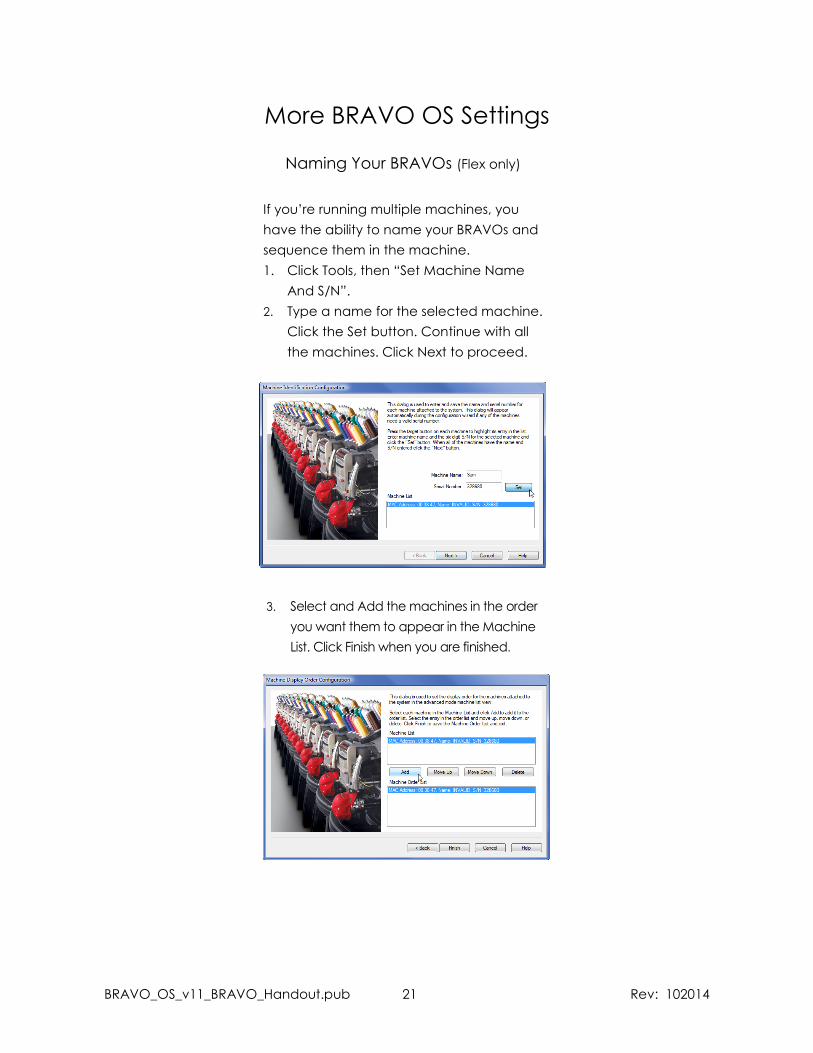
More BRAVO OS Settings
Naming Your BRAVOs (Flex only)
If you’re running multiple machines, you
have the ability to name your BRAVOs and
sequence them in the machine.
1. Click Tools, then “Set Machine Name
And S/N”.
2. Type a name for the selected machine.
Click the Set button. Continue with all
the machines. Click Next to proceed.