boral timber floor laying instructions - paradise timbers
TRANSCRIPT

Product installation guide • Boral 19mm Solid Strip Flooring• Boral 13mm Solid Strip Flooring• Boral Block Parquetry• Boral Decking
AFS/01-31-38Promoting sustainable
forest management

Contents1. IntroductIon 1
2. Product descrIPtIon 1
2.1 Timber Flooring 1
2.2 Decking 2
3. Product handlIng on sIte 3
4. tImber FloorIng 3
4.1 Properties of Timber 3
4.2 Prior to Installation 3
4.3 Installation 7
4.3.1 19mm solid strip flooring installation 8
4.3.2 13mm solid strip overlay flooring installation 12
4.3.3 Block Parquetry installation 15
4.5 Important points to remember 17
4.6 Accessories available from Boral Timber Flooring 17
4.7 Post installation care and maintenance 18
5. deckIng 19
5.1 Introduction 19
5.2 Prior to Installation 19
5.3 Installing Boral Decking 19
5.4 Decking Care and Maintenance 20
6. saFe workIng PractIces 21
7. dIsPosal oF oFFcuts and waste 21

1. Introduction
2. Product description
Welcome to the Boral Timber Flooring Product and Installation Guide for timber flooring and decking. The final result of installing a Boral timber floor or deck in an Australian species is dependant on the use of the following guidelines.
The following should only be used as a guide and the installer should apply all Australian Standards, BCA requirements, and best practices when installing. This must include the relevant safety protocols required. This guide should not be used as the sole means of direction.
Boral Timber Flooring recommends that an experienced professional timber flooring contractor installs, sands and finishes a Boral hardwood timber floor. It is recommended that a qualified person such as a licensed builder or carpenter installs Boral hardwood timber decking products.
It is the installer’s responsibility to check all material for faults or defects prior to installation. Material which is deemed faulty by a Boral Timber representative will be replaced free of charge. Costs associated with the replacement of any faulty boards after they have been installed will not be accepted by Boral Timber Flooring.
Timber flooring boards need to be mixed on the floor according to colour and feature. This is at the discretion of the installer and the end user. Boral Timber Flooring does not accept any responsibility for the way the boards are laid in relation to colour and feature.
If there are any problems before or during the laying of a Boral Timber product, stop and do not continue laying. Contact Boral Timber Flooring immediately on 1800 818 317 or email [email protected] for further advice.
2.1 timber FlooringBoral Timber Flooring is ideal for indoor domestic and commercial applications but is not recommended for wet areas such as laundries or bathrooms. For installation over heated subfloors please contact Boral Timber Flooring on 1800 818 317 for additional instructions.
This installation guide does not apply to speciality flooring applications such as sports floors and some commercial applications. For installation of commercial and industrial floors please refer to the document from the National Association of Forest Industries (NAFI): Timber Floors - Commercial and Industrial dated 2005. This document can be sourced by visiting the NAFI website at www.nafi.com.au
Australian Beech 19mm solid strip flooring
1
ThIS INSTAllATIoN GuIDe CoverS The
INSTAllATIoN oF The FolloWING BorAl
TIMBer FloorING ProDuCTS.

Boral 19mm Solid Strip Flooring
Boral 19mm (and thicker) solid strip flooring is structurally designed to be laid directly onto joists, battens or underply over concrete, or nailed to existing timber flooring. The BTF2 profile is precision-milled to a variety of cover widths and is designed for a tight board-to-board fit. Tongue and groove joints on both sides and ends of the board ensure a continuous and stable surface. end matching removes the need for ends to fall directly over a joist or batten. This results in less cutting and less waste. Boards up to 130mm can be secret nailed or top nailed. For secret nailing boards wider than 85mm please read the Secret Fixing procedure on page 11.
Suitable subfloorsBoral 19mm solid strip flooring is designed for any subfloor that is structurally sound, level, flat, clean and dry such as:
• Bearers and joists
• Concrete slab
• Sheet flooring such as Boral plywood or particleboard
• existing strip timber floors
Boral 13mm Solid Strip Overlay Flooring
Boral 13mm (overlay) solid strip flooring is solid hardwood non-structural tongue and groove strip flooring designed to be installed over a solid subfloor. It is precision-milled to 80mm and 85mm wide. Tongue and groove joints ensure a continuous and stable surface.
Suitable subfloors Boral 13mm solid strip flooring is designed for any subfloor that is structurally sound, level, flat, clean and dry such as:
• Concrete slab
• Sheet flooring such as Boral plywood or particleboard
• existing strip timber floors
Boral Block Parquetry flooring
Boral Block Parquetry flooring is a solid hardwood timber product that is designed to be laid directly over a flat and level concrete slab, Boral plywood or particleboard flooring. It is supplied in blocks 260mm long x 65mm wide x 18mm thick. Boral Parquetry flooring can be laid in many patterns using contrasting timber species to create depth in design. Centre “dots” measuring 65mm x 65mm can be individually laid to create various patterns.
Suitable subfloors Boral Parquetry flooring is designed for any subfloor that is structurally sound, level, flat, clean and dry such as:
• A concrete slab
• Sheet flooring such as Boral plywood
2.2 decking
Boral Decking
Boral Decking is a solid hardwood timber product that is designed to be laid outdoors directly onto structural bearers and joists or can be used for fencing, gates or seating. It is precision milled with round edges to a variety of widths in a smooth finish on both sides of the board.
Suitable subfloors Boral Decking is designed for bearers and joists that are structurally sound as per the Australian Standard AS1720 and the Building Code of Australia:
• Decking should be nailed or screwed directly to hardwood bearers and joists
• When used for fencing it can be screwed into timber or steel posts
2
Spotted Gum decking

3
3. Product handling on siteThe packaging around Boral Timber products is designed to protect it during transport only. upon delivery the timber flooring and decking products should be stored indoors where they can be protected from the elements. Do not store outside using a protective covering such as a tarpaulin as condensation can occur underneath, defeating the purpose of the covering.
Boral 13mm solid strip flooring is delivered in strapped bundles. It is recommended that the bundles are kept strapped until just before laying.
4.1 Properties of timberTimber is hygroscopic - meaning it is capable of easily absorbing and expelling moisture in response to local conditions. As timber absorbs moisture it expands and as it expels moisture it contracts. As such, factors such as relative humidity (atmospheric moisture), moisture ingress (subfloor or other), direct sunlight, air conditioning and lack of adequate ventilation can cause timber to expand or contract. Therefore, care must be taken to correctly assess the suitability of the site prior to the installation of timber flooring, as well as to maintain a suitable environment where the timber floor has been installed.
Solid timber floors may need to be acclimatised to their new local environment before installation. It is important to allow time for the timber to adapt to the above conditions.
4.2 Prior to InstallationBefore installing a timber floor, ensure the site conditions are suitable. A timber floor should only be installed in a weatherproof building. The project should reach near completion before installation
begins to avoid damaging the newly fitted timber floor from heavy trade traffic. The roof should be complete, all external doors and windows installed, the exterior cladding finished and wet trades complete before a timber floor is installed. The storm water system must be complete or effectively directed away from the subfloor.
Acclimatisation
Timber is a natural product that expands and contracts with seasonal changes and is affected by the moisture content of the air. The moisture content of timber is the percentage weight of water present in the timber compared to the weight of the timber with all water removed. Moisture content varies with changes in humidity and temperature in the surrounding air.
It is important to remember that small seasonal changes in timber flooring are considered normal and small gaps that open up during dry periods are not considered a defect, as gaps will close again during wetter periods.
To minimise the movement of a hardwood floor caused by swelling on moisture uptake and
4. Timber Flooring
Sydney Blue Gum

shrinking on moisture loss, it is important to lay and fix a timber floor that is close to the average moisture content of the environment in which it is to be laid.
This guide outlines the procedures required to assess the site and acclimatise solid hardwood timber flooring for the best results.
Site climate assessmentevery site requires climate assessment prior to the installation of a timber floor. It is important to know the long term relative humidity (rh) for the area where the floor is to be installed. relative humidity is the major influence determining whether solid timber flooring will absorb moisture from the air and swell, or whether it will lose moisture and shrink.
If the moisture content of the timber floor is close to the average long term relative humidity for the area then subsequent seasonal changes will be minimal. however, if the long term relative humidity for the area is significantly different to that of the timber flooring, seasonal changes in the moisture content of the floor can create problems.
Solid hardwood timber flooring is kiln dried to approximately 9 to 14% moisture content as per Australian Standard AS2796. See Figure 1.0
onsite relative humidity is measured with a hygrometer. It is recommended that relative humidity (rh) and temperature levels are recorded prior to and during installation.
The local site climate can be assessed using data from the Australian Bureau of Meteorology website at www.bom.gov.au/climate/averages
Approximate average equilibrium moisture content (eMC) is provided for each climate in Australia. eMC is the moisture content that timber will reach under set conditions of relative humidity and temperature.
Where seasonal variations are greater, seasonal movement (shrinkage and swelling) can be expected to be greater. Areas that experience high levels of seasonal variation require greater allowance for floor expansion at the time of installation.
The site should also be assessed for adequate subfloor ventilation that is an important factor in reducing expansion and cupping of hardwood timber flooring. Where humidity remains high beneath a floor, the boards will absorb the moisture and expand.
Important issues about subfloors1. Air vents should always remain unobstructed
2. Number of air vents and size should meet or exceed BCA requirements
3. Ground level below flooring should be well drained
4. The subfloor ground should be flat, level and clear of any debris.
It is also recommended that the ground below the subfloor be sealed with an impervious membrane, such as 200 micron plastic or vapour barrier. The plastic should be taped continuously with a 200mm overlap. As subfloor conditions can change, this alone can greatly improve the performance of a timber floor in the future.
Internal micro climatesThe internal environment should also be assessed before installation. Within a dwelling, a number of
Flooring normally supplied at an average moisture content of 10% to 12.5%
moIst In-serVIce enVIronment
• expected average mc 12.5% to 15%
Allow for future expansion• additional expansion allowance• acclimatisation
normal In-serVIce enVIronment
• expected average mc 10% to 12.5%No special consideration
drY In-serVIce enVIronment
• expected average mc 8% to 10%Allow for future shrinkage• acclimatisation
lay Flooring
laid in a
laid in a
laid in a
Figure 1.0 - A simple guide to whether acclimatisation is necessary
4 Some of the information regarding acclimatisation has been sourced from the FWPrDC document ‘Timber Flooring’ version one December 2005

5
climates may develop, causing areas of flooring to respond differently within the same dwelling.
These include large expanses of glass, fireplaces, fridges, air conditioners, any appliances that vent warm air, the aspect of the house and two-storey construction. All of these can have an effect on the dimensional movement of the boards. When floors are exposed to direct sun through large glassed areas, protection should be considered before, during and after construction. evaporative coolers add moisture to the air and raise the relative humidity, resulting in moisture contents in the flooring that are higher than under ambient conditions.
The likely movement of a floor after installation should also be a consideration when assessing the site. Small differences in moisture content between boards at the time of manufacture (5% is allowed by Australian Standards) together with variable conditions within the house (such as a west-facing room compared to a south-facing) will cause further variation in board width. For this reason, it can be expected that small gaps will occur at the edges of most boards, particularly during drier months. These gap sizes may differ across the floor.
In cases where shrinkage may occur after installation, wider boards such as 130mm will result in larger gaps at board edges when compared with narrower board widths (e.g. 85mm). Air conditioning that does not have a humidity control system, which is installed after a floor has been laid, may increase the size of shrinkage gaps, as it changes the relatively humidity in the area.
Some movement occurs after laying timber floors as the timber adjusts to the climate. Although some floor finishes may reduce moisture content changes, they will not prevent this kind of movement. In cases where greater movement is expected after installation, such as from seasonal changes, the use of wider boards or from air conditioning installed after installation, particular care should be taken to ensure that the flooring finish does not act as an adhesive by bonding a number of boards together. With subsequent
shrinking, wide gaps between groups of four or five boards may occur, or boards may split.
Installation moisture content and acclimatisationSolid hardwood timber flooring is kiln dried to 9 to 14% moisture content as per Australian Standard AS2796.
Where the average supplied moisture content of the flooring is near the expected average in-service moisture content, acclimatisation of the hardwood boards is not necessary. Where conditions are drier, such as inland areas or air conditioned buildings, or where conditions are humid, such as in coastal areas or elevated regions, flooring may need to be acclimatised on site.
Acclimatisation is the process of allowing partial equalisation of the moisture content of the hardwood timber flooring when supplied, to the moisture content of the surrounding environment in which the timber is to be installed. Note that the rate of moisture uptake varies from species to species and must be monitored on site for each individual site installation.
Acclimatisation relies on each individual board being exposed to the in-service atmosphere so packs must be opened and restacked in a way that allows air to flow freely between each board.
Acclimatisation can only be effective in dry locations during dry periods or in an air conditioned building if the air conditioning is operating at the time.
Acclimatisation is only complete when the moisture content of the timber flooring is equal to the relative humidity (rh) in the environment. This usually takes about 14 days for 19mm flooring, but the time may vary depending on the species used and the weather conditions. To check that the timber flooring has reached this point it should be moisture tested with an appropriate timber moisture meter. This reading can then be compared to the relative humidity (rh) using Table 1.1 over the page.

Boral 13mm solid strip (overlay) flooring and Parquetry product acclimatisation13mm solid strip flooring and parquetry should be acclimatised after the installation process has been completed. The flooring is left unsanded until its moisture content is equal to the relative humidity (rh) in the environment around it. This may take 7 - 14 days.
In a dry in-service environment this type of acclimatisation may lead to gapping between the boards. If required, these gaps can be “trowel filled” using an appropriate timber flooring putty.
In a moist in-service environment this acclimatisation method should be used with caution and extra expansion gaps will be required to take up the expanding boards.
Inspection of the site, the subfloor surface and preparation1. Conduct a visual inspection for signs of
moisture possibly resulting from pipe leaks, window seal leaks, bathroom/laundry overflow problems, ceilings leaks or rising damp. Any signs of moisture ingress must be remedied prior to installation.
2. The subfloor must be dry and free of contaminants including but not limited to oil, paint, grease, dust, metal shavings, saw dust.
3. The subfloor is to be fully scraped with a wide blade scraper to remove all cement render spoil, plasterboard setting residues and mortar excess at the base of walls.
4. Make sure the concrete slab is flat with no more than +/-3mm deviation in a 3 metre radius as per Australian Standard AS3600 - 2001: Concrete structures. Deviations to the surface greater than 3mm over 3m are
to be filled with a self levelling compound following manufacturers’ recommendations, or ground down to conform to the aforementioned specification for flatness. Note: When installing timber flooring over battens, unevenness in the subfloor can be remedied through the use of packers or by planing down the battens.
5. A concrete subfloor should be moisture tested in accordance with AS1884 - 1985 to ensure the concrete subfloor has a moisture content (MC) of less than 5.5%. If the MC is greater than 5.5%, a moisture/vapour barrier must be applied as per the manufacturer’s recommendations. It is also good practice to provide a 200 micron plastic membrane (builders plastic) as a moisture/vapour barrier prior to installation of your battens or plywood substrate. This can help minimise the risk of moisture uptake into the timber flooring from the concrete slab after installation. The plastic barrier should continue 75mm up the walls and all joins should overlap by 200mm. Joins should then be sealed with duct tape. The moisture/vapour barrier should be installed according to manufacturers instructions. ensure a compatible adhesive is used with the moisture/vapour barrier.
6. Timber substrates such as particleboard, plywood or existing timber floors should be sanded to create a clean flat surface. For further information on installing a plywood subfloor request a Boral Plywood handbook at your stockist or visit www.boralplywood.com.au
7. If installing timber flooring over bearers and joists or a platform floor it is particularly important to maintain adequate sub-floor ventilation. If the area underneath the timber
6
tem
per
atu
re (
˚c)
10 4.0 5.5 6.3 7.1 7.9 8.7 9.5 10.4 11.3 12.4 13.5 14.9 15.5 18.5
16 4.6 5.4 6.2 7.0 7.8 8.6 9.4 10.2 11.1 12.1 13.3 14.6 16.2 18.221 4.5 5.4 6.2 6.9 7.7 8.5 9.2 10.1 11.0 12.0 13.1 14.4 16.0 17.927 4.4 5.3 6.1 6.8 7.6 8.3 9.1 9.9 10.8 11.7 12.9 14.2 15.7 17.732 4.3 5.1 5.9 6.7 7.4 8.1 8.9 9.7 10.5 11.5 12.6 13.9 15.4 17.338 4.2 5.0 5.8 6.5 7.2 7.9 8.7 9.5 10.3 11.2 12.3 13.6 15.1 17.0
20 25 30 35 40 45 50 55 60 65 70 75 80 85relative humidity (percent)
Table 1.1 - Moisture content of wood at various temperatures and relative humidity readings
Chart taken from Wood handbook: Wood as an engineering material, (Agriculture handbook 72), Forest products laboratory, uS Department of Agriculture

7
flooring is consistently damp (high humidity) this can adversely affect the timber flooring and lead to increased expansion and/or cupping. Subfloor ventilation should at a minimum conform to the Building Code of Australia, although in areas of high humidity or where increased exposure to moisture is apparent it is good practice to increase the surface area of the vents and/or install fans to increase air circulation under the floor. Subfloor vents should always allow for cross ventilation of the subfloor and must not be placed on only one side of a dwelling.
4.3 InstallationIt is the installer’s responsibility to check all material for faults or defects prior to installation. Material which is deemed faulty by a Boral representative will be replaced free of charge. Costs associated with the replacement of any faulty boards after they have been installed will not be accepted by Boral Timber Flooring.
Boards need to be mixed on the floor according to colour and feature. This is at the discretion of the installer and Boral Timber Flooring does not accept any responsibility for the way the boards are laid in relation to colour and feature.
Expansion gaps (control joints)
expansion gaps and perimeter fixings should be planned before commencing the job. expansion
gaps are a requirement of timber flooring. Due to the hygroscopic nature of timber the flooring will expand and contract with changes in moisture content. The allowance of expansion gaps at the perimeter walls and around obstructions will allow the floor to move as required. Insufficient expansion gaps can result in buckling and deformation of the flooring. Boral Timber Flooring recommends a minimum expansion gap at all perimeter walls and obstructions of 12mm.
For domestic applications floor widths over 6m will require an intermediate expansion joint as per Australian Standard AS1684. Where extra allowance for expansion is required (e.g. moist locations), cramping pressure needs to be considered. Alternatively, a series of smaller expansion gaps every 800mm to 1000mm can be used to provide equivalent spacing. If cork expansion joints are used, the cork should be approximately 2mm above the floor surface when installed. This will be removed during the sanding process. however, cork to the perimeter should be installed level with the timber surface. expansion gaps can be readily increased by under cutting plasterboard walls or through the use of thicker skirtings or beading. overall, the greater the expansion allowed while installing, the better.
expansion joints are best placed at doorways or in line with internal walls. expansion joints help to break large floors into smaller sections thereby maximising total expansion gaps (refer Diagram 1.0).
Tongue
>450mm12mm expansion gap
leave at least two rows between end-joints in similar locations
‘rack’ of boards
Diagram 1.0

8
Specialty ApplicationsFor specialty applications, such as sports floors and some commercial applications, additional expansion gaps may be required and should be assessed on a site by site basis. For installation of commercial and industrial floors please refer to the document from the National Association of Forest Industries (NAFI): Timber Floors – Commercial and Industrial dated 2005. visit the NAFI website at www.nafi.com.au for a copy of this document.
Acoustic systems
There are a variety of acoustic systems available on the market today. Boral Timber Flooring recommends Boral rv4 acoustic underlay.
Boral rv-4 is well suited to reducing the noise of foot traffic in multi-level apartments and exceeds the BCA requirement of lnw+C of 62 for acoustic underlays for solid timber flooring. The product system is deemed to comply in accordance with ISo 140.6 and 140.8 as defined in AS ISo 717.2 - 2004.
For further details see the Boral Timber Flooring underlay brochure or visit www.boraltimberflooring.com.au
4.3.1 - 19mm solid strip flooring Installation
Subfloor preparation
ensure subfloor preparation recommendations are followed as per page 8 in this guide.
Battens or plywoodBattens may be used to compensate for minor fluctuations in concrete level. For secret nailing, use 19mm battens and for top nailing use battens that are at least 35mm thick. lay battens 450mm apart on the plastic membrane at right angles to the direction of the new floor. Adjust levels with plywood or masonite packing and use masonry anchors to attach battens to the slab.
For the best result, Boral Timber Flooring recommends the use of kiln dried hardwood battens to give the highest possible nail hold.
An alternative method is to fix Boral underply plywood sheeting (recommended minimum thickness of 15mm or greater) to the concrete slab after first laying a polyethylene membrane (minimum 200 micron). For this application top nailing is not suitable. For further details refer to the Boral Plywood handbook or visit www.boralplywood.com.au
Bearers and joistsexisting joists should be inspected for structural soundness prior to installation of new timber flooring. ensure there is sufficient subfloor ventilation and clearance between the ground and flooring. The subfloor ventilation and clearance should meet or exceed BCA requirements. Air should circulate below the new floor from all four sides of the house. The level of the floor frame must be suitable for the installation of the strip flooring, ascertaining the suitability is the responsibility of the builder or floor contractor. A number of alternative methods exist to assess the floor frame. The method most commonly used is to place a straight edge of a minimum of 3 metres on top of the joists and assess the various high and low members. The joists can be planed down if too high or packed if too low. Care must be taken to ensure that the joists are not reduced in sectional size below that required under AS1684. This same structural requirement prevails in cases where the joists are “crippled” ie cut through over a support to reduce the bow in the timber.
Existing timber flooringWhen laying a Boral 19mm solid strip floor over existing timber floors make sure the existing boards are sound and not warped or cupped. Sand for an even surface if necessary. If the existing boards are very uneven, remove the entire floor and lay the new boards directly over the joists. The new Boral 19mm solid strip floorboards may be glued using a polyurethane flooring adhesive and nailed at 90˚ to the existing boards. To run the new timber floor boards in the same direction as the current timber floor boards, a plywood layer is required between the new and existing floor boards.

9
Laying the boards
Sort the timber into two stacks: one of similar-length boards and one of varying lengths. Start by laying the varying lengths, longest first, in a triangle or “rack” from one corner. lay the first board with its groove towards the wall and leave a 12mm expansion gap all round the room between the floor and the wall (not the skirting, if any). This gap will be covered by the skirting. retain the existing skirting if the new board can slide under it. If not, remove the skirting. Continue each row by laying the similar-length boards in each row, adding and cutting short lengths to finish the row (still leaving a 12mm gap). There must be at least 450mm distance between butt joints in adjacent rows. refer Diagram 1.0 on the previous page.
Distribute end-joints evenlyPlain end boards must be joined on a joist. This is not necessary with end matched boards. Make sure all joints are distributed evenly and do not cluster in any one section of the floor. Push end matched boards together before using a tapping block to avoid damage to the tongues.
Nailing the boards
When the boards have acclimatised correctly, secret-nail them permanently to the joists or battens with a secret-nailing gun, or cramp them and top-nail with a traditional hammer or standard nail-gun. A secret-nailing gun will “kick” the boards together at the same time as it drives the nail in at 45˚. When installing over an existing floor or on a plywood base also use a polyurethane flooring adhesive as per manufacturer’s instructions. If nailing into plywood, nailing should be on every joist or at 450mm centres and alternate to the bead of polyurethane flooring adhesive, as per manufacturers instructions, between nail centres. If top-nailing the floor directly onto joists, attach floor-cramps to a few joists to lever the strips together evenly across the room. Floor-cramps may be hired from a reputable tool hire firm. Cramp nine or ten boards at one time - do not cramp two or three strips together as this may set up excessive strains in the floor causing over-cramping.
Recommended nailsAs a minimum requirement for secret-nailing use 45mm-long Powernail cleats - or equivalent size nail/staple as specified in AS1684. For machine driven top-nailing use 2.2 to 2.5mm finish-heads, 45mm long (2.5 times the timber thickness), 2 per joist. Scribe and cut the last board to the profile of the wall and tighten up by hand, or lever with a chisel.
Sanding and finishing
There are many different types of finishes available ranging from oils through to water based polyurethanes. Choose the best finish to suit the functional and aesthetic requirements of the job. At all times it is important that the manufacturer’s instructions are followed carefully.
Do not use a product that will bond several boards together. This can create unsightly gaps as the boards expand and contract in groups, creating large gaps every four to six boards. Always check with the finishing product manufacturer to ensure that this is not a problem. Allow a curing period as per manufacturer’s instructions after completing the fixing of the floor before sanding, to allow the glue time to set. Boral Timber Flooring recommends the use of a professional sander and finisher to complete the sanding and finish stage of the job. refer to AS4786 for sanding and finishing of timber floors.
note: Curing periods can vary between adhesive products so ensure manufacturer’s instructions are followed.
Framing the floor
The finishing touches Don’t forget the finishing touches on your new timber floor. You will need to cover the 12mm expansion gap left between the wall and the floorboards. This can be covered with an appropriate skirting which should be nailed to the wall and not fixed to the floor. If you install your timber flooring with existing skirtings in place use a fillet mould or bead to cover the gap, fixed to the skirting and not the floor.

10
Secret fixing 19mm wide boards
OutlineThe following procedure is for secret fixing 108mm and 130mm Boral 19mm solid strip flooring by using a combination of flooring cleats and full trowel adhesive to attach the hardwood flooring to a solid sheet subfloor.
This procedure should be used as a guideline for wide board secret fixing. Secret fixing wide board flooring requires skilled tradespeople, who understand the potential hazards of incorrect installation, and should not be undertaken by novice flooring installers.
AcclimatisationCorrect acclimatisation is critical for a successful installation. Knowledge of site conditions, both currently and in the future, are important for secret fixing wide flooring satisfactorily.
For the best results secret fixing of wide boards should be undertaken where the seasonal moisture content change is limited to a 4% point swing, for example 9% - 13%. onsite testing and research into the anticipated moisture swings should be undertaken to confirm that the site is suitable.
refer to page 5 of this installation guide for further details on how to acclimatise timber flooring correctly.
SubfloorThe following subfloors are suitable for secret fixing wide board flooring:
• 15mm (or greater) plywood - Boral F14DD
• 19mm (or greater) particleboard flooring
The plywood or particleboard subfloor must have a moisture content that is within 2% of the acclimatised timber flooring being installed.
note that secret fixing wide board flooring directly to floor joists is not recommended.
Subfloor requirementsPlywood/particleboard on bearers and joist systemAs per normal installation it is important to ensure adequate cross-flow ventilation in the
area below the flooring. observe the following recommendations:
1. Air vents should always remain unobstructed.
2. The number of air vents and size should exceed BCA requirements.
3. The ground level below the flooring should be flat, well drained and clear of any debris.
4. The subfloor ground must be dry at the time of installation and should remain dry.
It is also recommended that the ground below the subfloor be covered with an impervious membrane, such as 200 micron plastic. The plastic should be taped with a 200mm overlap. As subfloor conditions can change, this alone can greatly improve the performance of a timber floor in the future.
Plywood fixed to concreteensure the concrete slab is flat with no more than +/- 3mm deviation in 3 metres as per Australian Standard AS3600 - 2001: Concrete structures. A self-levelling compound can be used to level any variations. The moisture content of the slab must be 5.5% or below.
If the moisture content of a new slab is too high, installation of the floor will need to wait until moisture content decreases to 5.5% or less.
lay a 200 micron plastic membrane over the whole area and continue up the walls 75mm (to be trimmed later). overlap joins by 200mm and seal the entire join with duct tape.
Plywood is then fixed on top of the plastic membrane as outlined in the Boral Plywood handbook or www.boralplywood.com.au
Installation procedureLaying the boardsSort the timber into two stacks: one of similar-length boards and one of varying lengths. Start by laying the varying lengths, longest first, in a triangle or “rack” from one corner. lay the first board with its groove towards the wall and leave a 12mm expansion gap all round the room between the floor and the wall (not the skirting, if any). This gap will be covered by the skirting.

11
retain existing skirting if the new board can slide under it. If not, remove the skirting. Continue each row by laying the similar-length boards in each row, adding and cutting short lengths to finish the row (still leaving a 12mm gap). There must be at least 450mm distance between butt joints in adjacent rows.
1. using a 5mm v notched trowel, fully trowel out a workable area (approximately 3-5m2) of polyurethane flooring adhesive, as per manufacturers instructions, onto the subfloor. A workable area is governed by the conditions that you are working in. The adhesive should not dry or “skin over” before adhesion occurs.
2. Place boards onto the adhesive with minimal disturbance to the glue.
3. Secret nail floor boards permanently to the subfloor with a Powernail secret-nailing gun (Powernail 445, 45r).
4. use 38mm Powercleats when fixing to 15mm plywood and 44mm Powercleats for 19mm particleboard or plywood.The secret-nailing gun will “kick” the boards together at the same time as it drives the nail in at 45 degrees.
5. Secret nail at 250mm to 300mm centres into the subfloor and no further away than 50mm from an end joint.
0.0% 1.0% 2.0% 3.0% 4.0% 5.0%
Visual appearance No movementvery small amounts of movement
Small amounts of movement
Noticeable gapping / Slight cupping
Medium gaps and/or cupping
large (approx. 2mm) gapping and/or cupping
Install method - structural integrity
Suitability
top nail 450mm centres into joists Suitable Suitable Suitable Suitable Suitable Suitable
secret nail at 300mm centres on 15mm ply - full trowel adhesive
Suitable Suitable Suitable Suitable Not Suitable Not Suitable
secret nail at 300mm centres on 19mm plywood/particle board - full trowel adhesive
Suitable Suitable Suitable Suitable Suitable Not Suitable
Table 2.0 - expected moisture content uptake or loss following installation
Spotted Gum - Top Nail 450mm CSpotted Gum - 19mm PlySpotted Gum - 19mm Partical FloorSpotted Gum - 15mm Ply
10.7% 13.5% 14.3% 14.5%
130.3 130.8 131.1 131.6130.1 130.4 130.6 130.7130.1 130.5 130.6 130.7130.0 130.4 130.6 130.6
Spotted GumAverage Board Width - Increasing Moisture Content
Various Fixing Methods
132.0
131.5
131.0
130.5
130.0
129.5
129.0
Ave
rage
Wid
th
Source - Boral Timber Independent test report March 2007
Blackbutt - Top Nail 450mm CBlackbutt - 19mm PlyBlackbutt - 15mm Ply
10.1% 14.5% 15% 15.5%
130.2 131.3 131.4 131.6130.1 130.8 131.1 131.3130.1 131.0 131.4 131.6
BlackbuttAverage Board Width - Increasing Moisture Content
Various Fixing Methods
132.0
131.5
131.0
130.5
130.0
129.5
129.0
Ave
rage
Wid
th
Source - Boral Timber Independent test report March 2007
Independent testing
Boral Timber has undertaken independent testing on various different installation methods and has found the recommended method to be the most stable.Testing has shown that the recommended fixing method offers equal to / or greater restraint than the current recommendation of two top nails every 450mm.As for all fixing methods, secret nailing wide board will not suit all installation situations, particularly sites where large moisture fluctuations are expected.

12
Limitationsexcessive swings in humidity and subsequently higher movement in moisture content will result in larger gaps or cupping in the floor - see Table 2.0 over the page for what can be expected as the variation becomes larger.
Key points for successful secret fixing installation of wide boards• Secret fixing of wide board flooring should
only be undertaken by a competent timber flooring installer with an understanding of the relationship between timber and its surrounding environment.
• understand, test and record the moisture content of the subfloor, timber flooring and the area to be installed and assess the suitability of the site.
• All moisture readings and test results pertaining to the site must be recorded and permanently retained for future reference.
• Do not install a wide board floor using secret fixing if the moisture swing is expected to exceed four percentage points from the moisture content of the timber at the time of installation.
• Fully trowel polyurethane flooring adhesive, as per manufacturers instructions, using a 5mm v-notched trowel.
• ensure that nail centres are 250 - 300mm apart and no more than 50mm from an end.
• It is normal to expect that timber floor gapping may occur though seasonal change.
Sanding and finishingSee page 11 for sanding and finishing information.
4.3.2 - 13mm solid strip overlay flooring installation
Boral 13mm solid strip flooring is delivered in strapped bundles. It is recommended that the bundles are kept strapped until just before laying.
Subfloor preparationPlease ensure subfloor preparation recommendations are followed as per page 8 in this guide.
Glue Down ApplicationIn all cases, the subfloor must be structurally sound, level, flat, dry and clean.
Plywood Boral plywood or particleboard is a good subfloor for Boral 13mm solid strip flooring when free from wax and dirt. The subfloor must be level sanded prior to Boral 13mm solid strip flooring installation. This will remove any other surface irregularities, such as edge swelling at joints.
Boral plywood sheeting should be a minimum of five ply 12mm thick. For further information request a Boral Plywood handbook at your stockist or visit www.boralplywood.com.au
Existing timber floor Timber flooring must be rough-sanded to remove any cupping or rough material. Sand to eliminate any unevenness and to remove wax or other surface finishes. It is recommended that the Boral 13mm solid strip floor boards be laid at a 90 degree angle to the line of the subfloor boards to avoid possible subfloor movement that could affect the finished Boral 13mm solid strip floor. If the above preparation is not practical then Boral Plywood underply sheeting should be laid over the existing floor boards to act as a subfloor. To run the new timber floor boards in the same direction as current timber floor boards, plywood is required between the new and existing floor boards. For further information on installing a plywood subfloor request a Boral Plywood handbook at your stockist or visit www.boralplywood.com.au
Concrete slab • The concrete must be sound and have a steel
trowelled finish and be free of floating ridges. These may be removed by rubbing the floor with an emery stone or house brick.
• The concrete should be clean, dry and free of contaminants including, but not limited to, dust, wax, coatings, adhesives, curing compounds, oil or grease.
• The slab must be flat with no more than +/- 3mm deviation in a 3m radius as per Australian Standard AS3600 - 2001: Concrete structures. If
deviations are greater than acceptable then the laying surface can be brought to level by using a self-levelling compound available from Boral Timber Flooring.
• An alternative method is to fix Boral Plywood underPly sheeting to the concrete slab after first laying a polyethylene membrane (minimum 200 micron). For further details see the Boral Plywood handbook.
• Boral 13mm solid strip flooring must not be laid on any section of a concrete floor which has moisture content of more than 5.5%. The best way to test for moisture content is to use an appropriate moisture meter.
• Concrete floors that are not suspended should have a polyethylene waterproof membrane underneath to prevent rising damp. If this is not present or there are concerns with varying moisture in the slab, you should use a moisture/vapour barrier as per the manufacturer’s instructions. ensure a compatible adhesive is used with the moisture/vapour barrier.
Installation • lay the boards parallel to the longest wall in
the room.
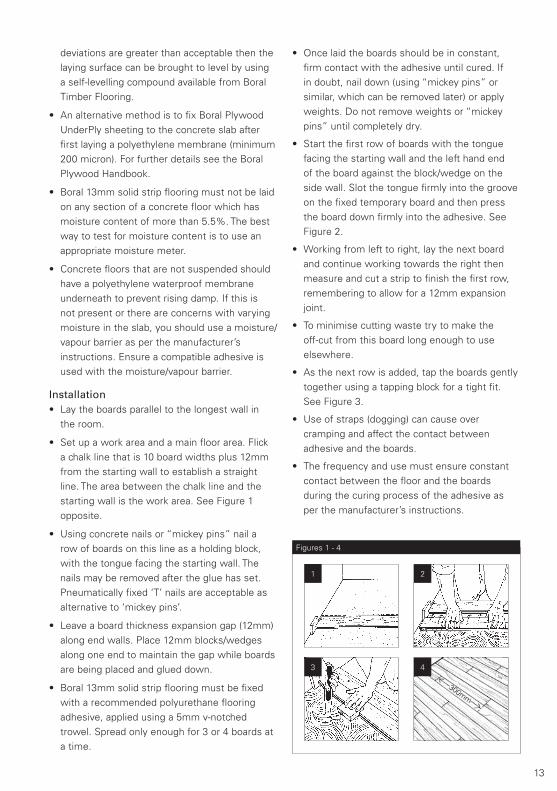
• Set up a work area and a main floor area. Flick a chalk line that is 10 board widths plus 12mm from the starting wall to establish a straight line. The area between the chalk line and the starting wall is the work area. See Figure 1 opposite.
• using concrete nails or “mickey pins” nail a row of boards on this line as a holding block, with the tongue facing the starting wall. The nails may be removed after the glue has set. Pneumatically fixed ‘T’ nails are acceptable as alternative to ‘mickey pins’.
• leave a board thickness expansion gap (12mm) along end walls. Place 12mm blocks/wedges along one end to maintain the gap while boards are being placed and glued down.
• Boral 13mm solid strip flooring must be fixed with a recommended polyurethane flooring adhesive, applied using a 5mm v-notched trowel. Spread only enough for 3 or 4 boards at a time.
• once laid the boards should be in constant, firm contact with the adhesive until cured. If in doubt, nail down (using “mickey pins” or similar, which can be removed later) or apply weights. Do not remove weights or “mickey pins” until completely dry.
• Start the first row of boards with the tongue facing the starting wall and the left hand end of the board against the block/wedge on the side wall. Slot the tongue firmly into the groove on the fixed temporary board and then press the board down firmly into the adhesive. See Figure 2.
• Working from left to right, lay the next board and continue working towards the right then measure and cut a strip to finish the first row, remembering to allow for a 12mm expansion joint.
• To minimise cutting waste try to make the off-cut from this board long enough to use elsewhere.
• As the next row is added, tap the boards gently together using a tapping block for a tight fit. See Figure 3.
• use of straps (dogging) can cause over cramping and affect the contact between adhesive and the boards.
• The frequency and use must ensure constant contact between the floor and the boards during the curing process of the adhesive as per the manufacturer’s instructions.
13
1 2
3 4
Figures 1 - 4

14
• use a pull tool to fit the last board closest to the wall.
• Start all new rows with a board at least 300mm shorter or longer than the strip used in the previous row. This will prevent end joints from clustering or aligning throughout the floor. See Figure 4.
• Scribe the last board to fit allowing for the 12mm expansion joint along its whole length.
• once the main floor area has been laid, remove the temporary block and lay Boral 13mm solid strip flooring in the work area, following the procedure above.
• Clean up excess adhesive as per manufacturer’s instructions.
• Following installation, vacuum thoroughly and clean the floor.
Sanding and finishingrefer to page 11 for sanding and finishing information.
Nail/staple down applicationIn all cases, the subfloor must be structurally sound, level, dry and clean.
PlywoodPlywood or particleboard is a good subfloor for Boral 13mm solid strip flooring when free from wax and dirt. The subfloor must be level sanded prior to Boral 13mm solid strip flooring installation. This will remove any other surface irregularities, such as edge swelling at joints. Plywood sheeting should be a minimum of five ply 12mm thick. For further information on installing a plywood subfloor request a Boral Plywood handbook at your stockist or visit www.boralplywood.com.au. A plastic moisture barrier (minimum thickness of 200 micron) needs to be installed under the plywood. Any joins should be overlapped by 200mm and taped to ensure that no moisture ingress (entry) is possible through the barrier.
Existing Timber floor existing timber flooring must be rough-sanded to remove any cupping or rough material. Sand to eliminate any unevenness and to remove wax or other surface finishes. It is recommended that the
Boral 13mm solid strip floor boards be laid at a 90 degree angle to the line of the existing subfloor boards to avoid possible subfloor movement that could affect the finished floor. If the above preparation is not practical then Boral Plywood underply sheeting should be laid over the existing floor boards to act as a subfloor.
Installation • lay the boards parallel to the longest wall in
the room.
• leave a board thickness expansion gap (12mm) along side and end walls. Place 12mm blocks/wedges along sides and on one end to maintain these gaps while boards are being placed and nailed or stapled. See Figure A (next page).
• recommended for areas of high humidity: Boral 13mm solid strip flooring must be fixed with a polyurethane flooring adhesive as per manufacturers instructions. Spread only enough for 3 or 4 boards at a time.
• Starting from the wall and working from left to right, lay the boards and nail as per Figure B with the groove to the wall.
• Continue working towards the right then start the next row, remembering to allow for a 12mm expansion joint. To minimise cutting waste try to make the off-cut from this board long enough to use elsewhere.
• All rows except those immediately adjacent to a wall should be nailed using a Powernailer model 50C, 50P or 50M. Due to the obstruction created by the wall the boards adjacent to the wall will need to be hand/top nailed and counter sunk.
• Apply a 5mm bead of recommended polyurethane flooring adhesive every 150 - 200mm, alternating between nails. Nail every 150 - 200mm and at least 50mm from each end joint.
• As the next rows are added, tap the boards gently together for a tight fit. See Figure C.
• use a pull tool to fit the last board, closest to the wall.
• Start all new rows with a board at least 300mm shorter or longer than the strip used in the

15
previous row. This will stop end joints from clustering throughout the floor. See Figure D.
• It is recommended that a chalk line is flicked every metre (or as required), parallel to the starting wall to ensure that the Boral 13mm solid strip floor remains square.
• Scribe the last board to fit, allowing for a 12mm expansion joint along the whole length.
• Clean up any excess adhesive as per manufacturer’s instructions.
• Following installation, vacuum thoroughly and clean the floor.
Sanding and finishingrefer to page 11 for sanding and finishing information.
4.3.3 - block Parquetry Installation
Subfloor preparation
Please ensure subfloor preparation recommendations are followed as per page 8 in this guide and the instructions for acclimatisation as per page 5.
Concrete slab • The concrete must be sound and have a steel
trowelled finish and be free of floating ridges. These may be removed by rubbing the floor with an emery stone or house brick.
• The concrete should be clean, dry and free
of but not limited to dust, wax, coatings, adhesives, curing compounds, oil or grease.
• The slab must be flat with no more than +/- 3mm deviation in a 3 metre radius as per Australian Standard AS3600 – 2001: Concrete structures. If the deviations are greater than acceptable then the laying surface can be brought to level by using a self-levelling compound available from Boral Timber Flooring.
• An alternative method is to fix Boral Plywood underPly sheeting to the concrete slab after first laying a polyethylene membrane (minimum 200 micron). For further information request a Boral Plywood handbook at your stockist or visit www.boralplywood.com.au
• Parquetry must not be laid on any section of a concrete floor which has moisture content of more than 5.5%. The best way to test for moisture content is to use an appropriate moisture meter.
• Concrete floors that are not suspended should have a polyethylene waterproof membrane underneath to prevent rising damp. If this is not present or you have concerns with varying moisture in the slab, you should use a moisture/vapour barrier as per the manufacturer’s instructions. ensure a compatible adhesive is used with the moisture/vapour barrier.
Plywood The subfloor must be level sanded prior to Boral parquetry installation. This will remove any other surface irregularities, such as edge swelling at joints. For further details request a Boral Plywood handbook at your stockist or visit www.boralplywood.com.au
A B
C D
Figures A-D
Blackbutt with Sydney Blue Gum centres: Block Parquetry in Basketweave pattern

16
Setting out Find the centre of the room and strike chalk lines parallel to the walls. See Diagram 2.0. ensure that the lines intersect at right angles. If the room is not square, find the centre point of the room by snapping a chalk line at the centre of a and b as well as c and d (see Diagram 2.1). Measure right angle triangle 3 (900mm) and 4 (1200mm) and 5 (1500mm). Check the length of 5. If 5 is not the correct length adjust line c and d until correct. This is very important for correct placement of the pattern.
• lay off the parquetry to the perimeter and leave even cutting on all sides.
• leave a 12mm expansion gap at the perimeter.
• If a border is to be laid, snap chalk lines the width of the border plus 12mm from the perimeter. Do not glue past this line when laying the body of the floor. Where the parquetry blocks extend past the glue area place the whole block (without extra glue) and trim later as described below.
• 24 hours after laying re-mark the border lines and setting the saw depth to the thickness of the block, cut out the border. lay the border leaving a 12mm expansion gap.
Laying the product
Pour a quantity of recommended parquetry flooring adhesive onto the floor at the centre of the room and using a parquetry spreader vigorously comb onto the floor leaving ridges of adhesive the full depth of the spreader teeth (Figure 1). Sufficient adhesive for one square metre should be spread at a time. Select a number of parquetry blocks from various boxes (to ensure blocks are mixed) and lay into the spread adhesive. ensure the block has made good contact with the adhesive by sliding it into place. Keep the edge of the panel exactly to the chalk lines and continue laying blocks in the sequence shown keeping them tightly together (Figure 2). regularly tap the parquetry in the adhesive bed with a rubber mallet or timber block (Figure 3). Continue until the whole room is covered. Cut the last blocks with a handsaw or small circular saw leaving 12mm clearance from the walls. This expansion space can be covered later by skirting boards, beading or quarter round. At doorways the parquetry can be cut neatly to door jambs and architraves. Where parquetry meets adjoining solid floors such as stone or concrete, the expansion gap should be filled with a strip of cork or covered by a fillet moulding.
Sanding and finishingrefer to page 11 for sanding and finishing information.
Figures 1 - 3
1 2
3
Diagram 2.1
45 46 47 48 49 50 51 52 54 55 5653
43 20 19 18 17 16 11 12 14 15 5813
44 30 27 28 27 26 21 22 24 25 5723
42 10
Chalkline
Chalkline
9mm gap
9 8 7 6 1 2 4 5 59 3
41 40 39 38 37 36 31 32 34 35 6033
72 71 70 69 68 67 66 65 63 62 6164
Diagram 2.0

17
4.4 Important points to remember • Boral Timber Flooring recommends a
professional installer to install Boral products.
• read all instructions before starting and take the time to plan the job properly.
• remember that Boral’s timber flooring must not be laid over a concrete slab which has a moisture content greater than 5.5%.
• ensure that the subfloor is flat (+/- 3mm over a 3m radius as per Australian Standard AS3600 – 2001: Concrete structures.), clean and dry.
• If possible, lay boards before fixing skirting.
• Boral’s timber flooring is not recommended for wet areas such as laundries or bathrooms
• If there are any problems before or during the laying of a Boral timber floor, SToP and do not continue laying. Contact Boral Timber Flooring immediately for further advice on 1800 818 317 or [email protected].
• laying hardwood timber flooring requires skills in carpentry and specialist knowledge. only those who are competent in this area should attempt to undertake a floor installation. For the best result, Boral Timber Flooring recommends that a professional flooring contractor be engaged to undertake the project.
With the abundance of various different primers, levelling compounds, sealers and adhesives on the market, the following points should be considered and applied.
• Always follow the manufacturer’s guidelines.
• Always use compatible products. Manufacturers often have recommended “systems” that guarantee compatibility.
4.5 accessories available from boral timber FlooringBoral Timber stocks a range of accessories to assist with timber flooring installation. Please contact your local Boral Timber office for stock availability and recommendations on products to suit your installation requirements.
nsw and act - 02 9735 5555
Qld - 07 3215 2200
sa and nt - 08 8243 1122
VIc and tas - 09 9790 1790
wa - 08 9446 6450
Some of the products stocked by Boral Timber state offices include:
1. Abrasives
2. Adhesives
3. Coatings
4. Fixing Tools
5. Flooring putty and wood fillers
6. levellers and sealers
7. Moisture Barriers
8. Nails guns and cleats - A range of nail guns and cleats such as Powernail 445, 45r, 50MA
9. Plywood - Boral Plywood underply
10. Scotias and Trims - Prefinished, species-matched hardwood scotias and aluminium trims available in silver, bronze and champagne
11. underlay - Boral rv-4 acoustically rated
polyurethane underlay
Stringybark Boral 13mm solid strip flooring

18
4.6 Post installation care and maintenance• The surface of the floor should be kept as free
as possible of grit and other abrasive material. It is recommended that dirt-trapping mats be used at all external doorways as they can significantly reduce the amount of stones, grit and sand entering the area.
• Sweep or vacuum your floor regularly to remove dirt and grit. Sweep using an electrostatic mop.
• Floors should be damp mopped, with a well wrung out mop, to remove dust. Never wet mop or steam mop a timber floor. Adding a ph neutral floor cleaner can help remove more stubborn dirt or grease.
• Felt protectors should always be fixed under furniture to prevent scratching.
• Monitor the climatic conditions. In cases of extreme climatic conditions it may be
necessary to increase humidity using a humidifier, or decrease humidity using an air conditioner. This is especially relevant during periods of non-habitation when there is little or no air circulation within a property. This can lead to magnified levels of relative humidity and or temperature, causing the floor boards to expand and in some cases distort. If the residence is expected to be uninhabited for extended periods, care should be taken to control the climate with the use of air conditioning and/or humidity controls.
• Timber floors must be protected from direct sunlight with appropriate window treatments. Failure to do so may result in localised cupping and or checking of the timber.
• For further information on care and maintenance of a timber floor request a Boral Timber Flooring Care and Maintenance brochure or visit www.boraltimberflooring.com.au

19
5. Decking5.1 IntroductionThis guide outlines the installation of timber decking onto bearers and joists. To ensure regulations are met for post sizes, stress grades, bearers and joists spans and other structural elements pertaining to building a deck refer to Australian Standards AS1684: residential Timber-Framed Construction and AS1720: Timber Structures - Design Methods.
All building codes and Australian Standards need to be adhered to when building a deck. Check with a licensed builder, architect or engineer before building a deck.
Building a deck in bush-fire prone areas may require adherence to Australian Standard AS3959: Construction of Buildings in Bush Fire Prone Areas.
Check with the local council about relevant regulations. Detailed plans, as well as development and building approvals may be required depending on the scope of the deck.
Boral Decking is seasoned to the moisture requirements of Australian Standard AS2796 (i.e. hardwood 10% to 15%).
Traditional indoor tongue and groove flooring must not be used for weather exposed decks.
5.2 Prior to InstallationPreparation for building a deck is important. Determine the dimensions of the deck and note the position of features such as stairs, drains, and gas pipes – these will need to be marked up before any work begins.
ensure the ground is clear and weed control is undertaken prior to installing the deck. land preparation is required by laying drainage to avoid build up of water underneath the deck. unobstructed air flow is required below the deck. Add vents at various locations for decks with limited ventilation.
ensure the bearers and joists are built to the relevant Australian Standards and all council and Building Codes Australia requirements are met prior to installation.
Joist span recommendations
• residential Installation - a 407mm centre to centre joist span
• Commercial installation - a 305mm centre to centre joist span
• 45˚ angles installation - 305mm centre to centre joist span
5.3 Installing boral deckingDecking may be left to weather or coated and sealed. When applying coatings or sealants ensure manufacturers instructions are followed.
To compensate for expansion, decking boards must be properly spaced during installation. For decking boards up to 86mm use a spacer approximately 3mm thick to ensure that the decking boards are spaced with 3mm gaps. Allow a minimum 5mm gap between boards for decking boards over 86mm.
When fixing joints stagger the joints so they do not sit on adjoining joists to avoid joists splitting. Make sure that all joins in the decking boards sit over a joist (Diagram 3.0). To obtain a tight fit on the joints a slight undercut will assist with the boards sitting flush (Diagram 4.0 over the page).
Pre-drill nail holes (80% of nail diameter) into
Diagram 3.0
Joints staggered

20
the decking board to avoid splitting. Nails must be kept 12mm from edges and ends of boards (Diagram 4.0). Nails must be driven flush with surface (not punched).
each decking board should be nailed to each joist with two nails as required by Australian Standard AS 1684 for required fixings for domestic decking. Alternatively, proprietary fixings may be used in accordance with manufacturer’s instructions. only hot dipped galvanised or stainless steel (not plain steel or zinc plated) nails should be used to fix decking to joists. Stainless steel or silicon bronze fixings are recommended for decks built within 1m of water such as pools, ponds etc.
At intermediate fixings, nails should either be offset or driven at slightly opposing angles (Diagram 5.0).
5.4 decking care and maintenanceIn order to keep a hardwood timber deck looking its best, it must be kept clean and well maintained. It is a good idea to inspect a hardwood timber deck at least annually to ensure that it is in good condition.
The deck must be regularly maintained as it may become discoloured or affected by moisture and weather. Inspect the deck to replace loose boards and protruding nails or screws. Any loose or damaged boards should be resecured or replaced, loose nails hammered back in or screws refixed.
To clean the deck, sweep off any loose dirt or garden residue and then clean the deck with a specialised deck cleaning product. It is important to not only remove dirt, but any algae or moss that may be growing on the deck. After the cleaning has been completed, lightly sand the deck in the direction of the timber. This will remove any splinters and damage to the timber.
once cleaned, reseal the deck with a stain, oil, paint or varnish, depending on aesthetic preference. Before the decking finish is applied, ensure that drop cloths are used on areas around the deck that need protection such as plants and furniture. Drying times are dependent on the type of finish that is used so check manufacturer’s recommendations before walking on the newly finished deck. More than one coat may need to be applied. Apply and re-apply decking finish as per manufacturer’s recommendations. Manufacturers may recommend that the decking finish needs to be re-applied more than once a year.
After a new timber deck has been built, or an existing deck repaired, it must be thoroughly swept and cleaned to remove metal filings from drilling, nailing or other construction that may cause black spots on the hardwood deck when exposed to the elements.
If the deck has turned grey from natural weathering or is discoloured due to metal filings or other construction materials, a solution of oxalic acid crystals mixed with water, a light sanding and a new coat of decking finish may help bring it back to its natural beauty. use with care and follow the manufacturer’s instructions carefully.
Diagram 5.0
Nails offset Nails at oppsing angles
Diagram 4.0
Nails to be 12mm from ends
ends undercut for a tight fit.

21
All standards set by Work Safety Australia must be followed when installing a timber floor or deck. The following work practices should be used when working with timber:
• Work areas must be clean. Sawing, sanding and routing equipment should be fitted with dust extractors. Dust levels should be below standards set by Work Safety Australia for wood dust.
• When machining timber respiratory protection, gloves, clothing, hearing and eye protection should be worn.
• After handling timber, wash skin thoroughly with mild soap and regularly wash clothing.
• Before handling, storing, or using kiln dried timber, it is essential that you read the Boral Timber brochure “What you Should know about Boral Kiln Dried Flooring” visit www.boraltimberflooring.com.au to download this brochure.
• When using adhesives, coatings and other voC’s ensure that manufacturer’s recommendations are followed.
When machining timber respiratory protection, gloves, clothing, hearing
and eye protection should be worn.
6. Safe work practices
7. Disposal of offcuts and wasteFor any treated timber, do not burn offcuts or sawdust. Preservative treated offcuts and sawdust should be disposed of by approved local authority methods.
Blackbutt Boral Decking

The information provided herein is for guidance purposes only. Any installation should be undertaken by an appropriately qualified and experienced tradesperson. Boral Timber retains the right to change specification without notice in accordance with its policy of continued product development. Boral Timber will not accept any liability arising from use of the installation procedure that is not in accordance with Boral Timber’s recommended instructions and guidelines.
AFS/01-31-38Promoting sustainable
forest management
Pure2786/MAr10
www.boraltimberflooring.com.auemail [email protected]
National free call 1800 818 317
Blackbutt 19mm solid strip flooring secret nailed wide boards