booklet #4: intern policies & procedures
DESCRIPTION
ÂTRANSCRIPT

TEACHER’S MANUAL
Section 4 Intern Policies & Procedures
• What It Means to Be an Arts For Life Intern • Goals for the Internship • Art Studio Lesson Plan Template + Example • Craft Studio Lesson Plan Template + Example • Goal Worksheet • Lesson Writing Ideas + Inspiration
o Chapter Specific Internship Contracts + Documents

What it means to be an Arts For Life Intern Interns help us increase our reach to serve more patients and families, but they also help us engage in the bigger picture issues and behind the scenes tasks that come with running a non-profit organization. As an intern, you are an essential part of a community comprised of staff, teachers, children and families, and supporters all dedicated to making this very important work possible. Your role is vital; your contribution, priceless.
While the majority of your time during your internship will be spent gaining hands-on experience working directly with kids and families, you will also have the opportunity to engage in activities and events promoting program support, hospital relations, and community building,
In return for your positive engagement and dedication, we offer compassionate guidance, continuous support, and a commitment to helping you grow as a teacher, as a leader, and as a person.
As an Arts For Life Teaching Intern, you WILL get the opportunity to:
• Work with children and families in one-on-one and group settings every week.
• Develop relationships over time with kids and their families.
• Teach a variety of visual art projects that are successful, innovative, and educational.
• Create a “project tool belt” containing simple projects using basic materials that you can use anytime, anywhere.
• Learn about some of the physical, mental, and emotional challenges our kids and families face everyday.
• Navigate successfully within the hospital environment.
• Be challenged and inspired by your fellow AFL teachers and by the kids we teach!
• Discover your own interests and passions within your work.
• Contribute to a professional team.
• Support the work of our programs through community outreach and awareness events.
• Share your strengths with an organization that appreciates and develops them.

Goals for the Internship Program
• To give interested students and young professionals the experience of teaching art to kids facing serious illness and their families in a hospital setting.
• To help interns become familiar with the mission and programs of Arts For Life.
• To give interns a better understanding of the role of education-based art instruction within the hospital environment.
• To help interns gain valuable experience in a professional work environment.
• To help interns build applicable professional skills including appropriate dress, communication, commitment, punctuality, and personal organization.
• To provide interns the opportunity to explore their own interests and motivations in the field through goal-setting, discussion, and supervision.
• To provide interns the opportunity to process and evaluate their internship experiences in order to get the most out of them.
• To build interns’ confidence through compassionate, objective, constructive evaluation in both teaching and professional skills sets.
• To create an internship experience that is mutually beneficial for the intern and Arts For Life as an organization.
• To expose interns to a variety of dynamic, adaptable, unique, educational projects developed by teachers with experience in the setting.
• To give interns the opportunity to observe and learn from other Arts For Life Teachers, who have combined decades of teaching experience.
• To help prepare interns for the next step in their lives, whether it is a career change, graduate school, or first job.

ART Studio Lesson: Lesson Title
© Arts For Life / artsforlifenc.org
Lesson Inspired by: list site/source (if applicable)
Title and Artist Name under artwork (9 pt) Time Frame: in minutes Skill Level: Minimum Age+ Terms Include if relevant to project. Note source or website. Wikipedia NOT an acceptable source. History info about an artist, genre of artwork, etc. Goals List 2 – 4 goals (Use the Goals Worksheet to help write a dynamic goal) • • Materials • List materials • In the order • You will use them • In the project Teacher Prep (describe any prep work the teacher must do. i.e. – cut the paper into 4”x4” squares, etc.)
1. 2. 3.
Directions
1. 2. 3.
Tweak It! • A section to add any ways you can tweak this project (ie. How can it be altered, added
to, etc). • You will always need to alter projects to fit the student’s needs. Brainstorm in this
section for ways to do that. • Be creative. Header Font: Century Schoolbook, 12 pt Bold Body and Footer Font: Century Schoolbook, 11 pt Regular Caption Font: Century Schoolbook, 9 pt Italic How to name the file: “TitleOfLesson_ArtStudioAVL_MonthYEAR.doc” (no spaces) Use BULLETS or NUMBERS (no dashes); use colons only when continuing across the page
Photo

ART Studio Lesson: Matisse Inspired Batik Portrait
© Arts For Life / artsforlifenc.org
Sad Lady by Annie Rogers Portrait of L.N. Delekorskaya by Henri Matisse, 1947 Age Level: 4+ years Time Frame: 60 minutes + drying time Terms Batik: a technique of hand-dyeing fabrics by using wax as a dye repellent to cover parts of a design, dyeing the uncovered fabric with a color or colors, and dissolving the wax in boiling water. From Dictionary.com History Matisse's career can be divided into several periods that changed stylistically, but his underlying aim always remained the same: to discover "the essential character of things" and to produce an art "of balance, purity, and serenity," as he himself put it.
In these first years of struggle Matisse set his revolutionary artistic agenda. He disregarded perspective, abolished shadows, repudiating the academic distinction between line and color. He was attempting to overturn a way of seeing evolved and accepted by the Western world for centuries by substituting a conscious subjectivity in the place of the traditional illusion of objectivity.
Matisse hit his stride in the avant-garde art world in the first years of the new decade. By 1905, Matisse was considered spearhead the Fauve movement in France, characterized by its spontaneity and roughness of execution as well as use of raw color straight from the palette to the canvas. Matisse combined pointillist color and Cézanne’s way of structuring pictorial space stroke by stroke to develop Fauvism - a way less of seeing the world than of feeling it with one’s eyes. More info at http://www.henri-matisse.net/

ART Studio Lesson: Matisse Inspired Batik Portrait
© Arts For Life / artsforlifenc.org
Goals • To emulate a famous artist’s style in an original work of art while learning about Art
History. • To recognize themes and style characteristics of Matisse’s portraitures, specifically his
use of line and color. • Learn basic batik methods while exploring the principles of design. Materials • White cardstock • Pencil • Colored Chalk • Tempera Paint – variety of bright colors • Paintbrush • Water cups • Eraser • Scrap paper • Black India Ink • Blowdryer optional – to speed drying time Directions
1. Look at Henri Matisse’s Portrait of L.N. Delekorskaya. Notice his use of a simple black outline for her head, face, and hair. Also notice his use of unconventional colors in a colorblocking style.
2. Using a pencil, draw a portrait on your white cardstock. You can draw a self-portrait, or you may choose a different subject for your portrait. Concentrate only on the head and shoulders, and be sure that your portrait takes up most of your paper. Keep the features fairly simple, as Matisse does in his portrait.
3. Draw a line down the center of the face. Do the same with the hair, dividing it into at least two parts. Draw a design on the shirt if desired.
4. Trace over your pencil lines with the colored chalk, making nice thick lines. 5. With the tempera paints and a paintbrush, fill in the space between the chalk lines.
Paint right up to the chalk lines, but try not to go over them. Wash your brush between colors, and use a variety of sizes of brushes to get into those small areas. Paint both inside and outside (background) of your portrait.
6. Allow your paint to dry completely. Use a hairdryer to speed the process if desired. 7. Use an eraser to rub away all the chalk on your lines. 8. Place your cardstock on top of a scrap sheet of paper (so that you can feel free to
paint the ink all the way up to and over the edges of your paper.) Using a large paintbrush, cover your entire paper with ink.
9. Place your paper under the running faucet and rub gently with your fingers to remove some of the ink. Don’t do this for too long, or the paint will start to rub away as well. It’s okay to lose a little of the paint. The ink will stay in the lines where your chalk was.
10. Allow your paper to dry completely, either on a drying wrack or hanging on a line. You can use a hairdryer to speed the process.
Tweak It! • You could get the same effect using black paper and oil pastels. Draw first in pencil; go
over lines with black oil pastel, then fill the spaces with brightly-colored oil pastel.
Craft Studio Lesson Lesson Title
© Arts For Life / artsforlifenc.org
Example photo
Goals
• Use bullets to separate goals. • Have at least two.
Vocabulary Relevant Words in bold: with definitions from a reputable source.
Teaching Aid: Indicate only if there is a relevant teaching aid, otherwise leave off In the Bin: What prepped materials will teachers find for this lesson? Teacher Prep: What do you need teachers do before teaching the lesson? Directions
1. Number the steps. 2. Be as clear and concise as possible 3. etc 4. etc
One Step Further
• Share a couple of ways this lesson can be adapted for an older and/or more experienced student.
• Can you add a step, material, or learning topic? • Use bullets
Simplify:
• Share a couple of ways this lesson can be adapted for a younger and/or less experienced student.
• Can you take another step to prepare the lesson before teaching it? Tweak Can you change anything about a lesson to adapt it to a new theme or idea? Header Font: Century Schoolbook, 12 pt Bold Body and Footer Font: Century Schoolbook, 11 pt Regular Caption Font: Century Schoolbook, 9 pt Italic How to name the file: “TitleOfLesson_ArtStudioAVL_MonthYEAR.doc” (no spaces) Use BULLETS or NUMBERS (no dashes); use colons only when continuing across the page
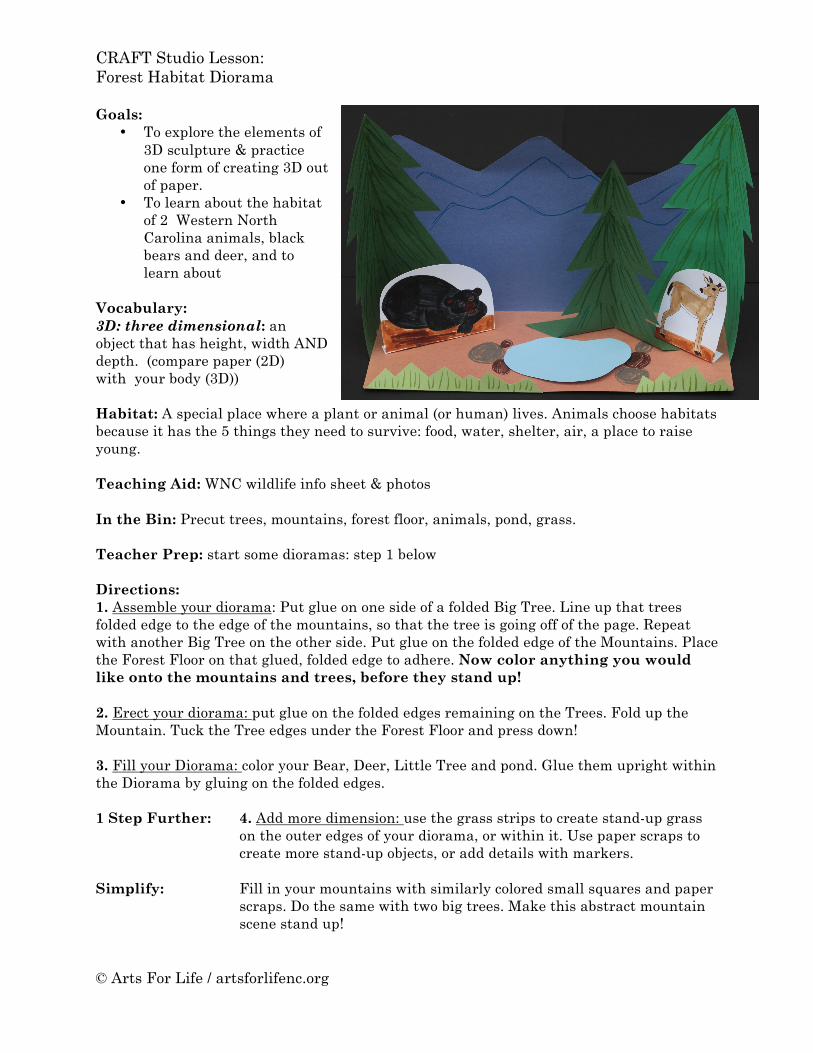
CRAFT Studio Lesson: Forest Habitat Diorama
© Arts For Life / artsforlifenc.org
Goals: • To explore the elements of
3D sculpture & practice one form of creating 3D out of paper.
• To learn about the habitat of 2 Western North Carolina animals, black bears and deer, and to learn about
Vocabulary: 3D: three dimensional: an object that has height, width AND depth. (compare paper (2D) with your body (3D)) Habitat: A special place where a plant or animal (or human) lives. Animals choose habitats because it has the 5 things they need to survive: food, water, shelter, air, a place to raise young.
Teaching Aid: WNC wildlife info sheet & photos In the Bin: Precut trees, mountains, forest floor, animals, pond, grass. Teacher Prep: start some dioramas: step 1 below Directions: 1. Assemble your diorama: Put glue on one side of a folded Big Tree. Line up that trees folded edge to the edge of the mountains, so that the tree is going off of the page. Repeat with another Big Tree on the other side. Put glue on the folded edge of the Mountains. Place the Forest Floor on that glued, folded edge to adhere. Now color anything you would like onto the mountains and trees, before they stand up! 2. Erect your diorama: put glue on the folded edges remaining on the Trees. Fold up the Mountain. Tuck the Tree edges under the Forest Floor and press down! 3. Fill your Diorama: color your Bear, Deer, Little Tree and pond. Glue them upright within the Diorama by gluing on the folded edges. 1 Step Further: 4. Add more dimension: use the grass strips to create stand-up grass
on the outer edges of your diorama, or within it. Use paper scraps to create more stand-up objects, or add details with markers.
Simplify: Fill in your mountains with similarly colored small squares and paper
scraps. Do the same with two big trees. Make this abstract mountain scene stand up!

Goals Worksheet
Choose 1-2 words from each column to write a dynamic Goal for your lesson and fit them into a similar sentence structure below: A. __(1)_____ _____(2)______ through ___(3a)____ and ____(3b)____. Example A: Encourage self-discovery through drawing and portraiture. B. ___(1)____ ____(3c)____ to ___(3a) while ___(1)___ ___(2)___. Example B: Apply Abstract Concepts to sculpture while developing fine motor skills. (1) Power Verbs
Achieve Act Adopt Analyze Apply Bridge Communicate Connect Clarify Create Decide Define Describe Design Develop Discover Encourage Evaluate Explore Identify Implement Improve Increase Innovate Inspire Learn Master Measure Prepare Promote Raise Relate Solve Support Transform Understand Uplift Use
(2) Outcomes
Art History Communication Creative Thinking Critical Thinking Culture Competency Diversity Elements of Design Fine Motor Skills Gross Motor Skills Knowledge Peer Interaction Positive Thinking Principles of Design Problem Solving Self-discovery Self-enrichment Self-expression Spacial Skills Tactile Skills
(3) Actions / Skills
(3a) Media * Charcoal Clay Crayons
Paint Photography Textiles Sculpture
(3b) Techniques/Processes * Beading
Collage Cutting
Drawing Designing Felting Gluing Jewelry making Printmaking Sculpting Writing (3c) Concepts *
3-D Abstract Asymmetrical Cityscape
Landscape Portraiture
Surrealism Symmetrical (3d)Subject Matter* (3e)Symbols* (3f)Ideas* *These categories contain too many items to be listed
Lesson Writing Ideas and Inspiration
David Lynch: Where Do Ideas Come From?
“An idea comes – and you see it, and you hear it, and you know it… We don’t do anything without an idea. So they’re beautiful gifts. And I always say, you desiring an idea is like a bait on a hook – you can pull them in. And if you catch an idea that you love, that’s a beautiful, beautiful day. And you write that idea down so you won’t forget it. And that idea you caught might just be a fragment of the whole – whatever it is you’re working on – but now you have even more bait. Thinking about that small fragment – that little fish – will bring in more, and they’ll come in and they’ll hook on. And more and more come in, and pretty soon you might have a script, or a chair, or a painting, or an idea for a painting. [Ideas] come, more often than not, in small fragments. I like to think of it as, in the other room, the puzzle is all together. But they keep flipping in one piece at a time.”
Project Based Learning Tips:
• Do not to choose project topics that you don't find interesting. How can you facilitate a group of students for months on end if you think the topic is boring?
• Do not pick something that you do already know everything about! You may feel more confident, but confidence is boring. Better to pick something you always wished you had time to learn about, because that will motivate you to develop great projects for the kids.
A big part of facilitating students rather than "teaching" them is that you are helping them find the answers to their questions – not answering their questions for them. So, really, your knowledge is beside the point and can actually work against you.
Project learning is meaningful learning – sustained time, sustained focus, no limits, no road map, simply connecting one concept to the next, until you have achieved real understanding and authentic knowledge. Instead of a learning moment, we can have a learning life.
Some Easy Ways of Expanding a Project:
Add a piece of history (cultural or artistic history)

Add definition of words
Change the colors or materials you are using, and do it again!
Add a research element to it
Ask an open-ended question, that the student must figure out or think about
Add a cultural element to it…where was it from, why was it done?
If you are looking at a particular artist, talk to the students about what inspired the artist…why was he or she choosing to do what they were doing?
Add a display element and collect many of the same project for the kids to explore.
Bring an example or an object that can be used in the project as…use your surroundings for inspiration.