bonita bpm 7.0 getting started tutorial · bonita bpm 7.0 getting started table of contents...
TRANSCRIPT

BONITA BPM 7.0
GETTING STARTED TUTORIAL
BONITA BPM 7.0 GETTING STARTED
Table of contents
INTRODUCTION ............................................................................................................................................................... 3
DESIGN APPLICATION PAGES .......................................................................................................................................... 3
Create travel tool home page ...................................................................................................................................... 4
Add dummy data ........................................................................................................................................................ 5
Review and improve the page .................................................................................................................................... 6
CREATE THE DATA MODEL.............................................................................................................................................. 6
CREATE THE PROCESS DEFINITION ................................................................................................................................. 8
Create the diagram .................................................................................................................................................... 8
Define business variables ........................................................................................................................................... 9
Create contracts ......................................................................................................................................................... 9
Define business object initial values ......................................................................................................................... 10
Update business object with review data .................................................................................................................. 11
Specify actors .......................................................................................................................................................... 11
Run process with temporary forms ........................................................................................................................... 12
CREATE FORMS ............................................................................................................................................................ 13
Run process ............................................................................................................................................................. 15
BUILD THE APPLICATION ............................................................................................................................................... 15
Update the application page ..................................................................................................................................... 15
Link button to process .............................................................................................................................................. 16
Build application....................................................................................................................................................... 16

3 | www.bonitasoft.com
Introduction
This tutorial explains how to create an
Bonita BPM Community edition, and uses features that are available in all editions. The example application is
a business travel tool, and is similar to the simple travel request pro
tutorial for earlier versions of Bonita BPM:
An employee opens the Travel Tool application to view their pending and approved travel requests. They create a
new travel request. Then the request is sent to the emplo
approves or refuses it. In a real travel management application, there would be several process steps after
approval: estimating costs, possibly getting a second level of approval if the cost passes a cert
submitting an expenses claim after the travel, reviewing the expenses claim, escalating anything out of policy,
and authorizing payment. However, for this tutorial you will consider only the first part of the process, where
a travel request is submitted and then reviewed.
This tutorial assumes that you are a developer using Bonita BPM for the first time. It gives instructions
for using Bonita BPM Studio, the UI designer, and Bonita BPM Portal. It assumes you are familiar with
JavaScript, JSON and REST APIs. If you are already a Bonita BPM user, look for the star highlighting new and
changed features, including features now in the Community edition that were previously only available in
Subscription editions.
Use Bonita BPM Studio to define yo
Then use Bonita BPM Portal to build the application.
This is the recommended sequence for creating an application:
• Design the application page
• Define the data model
• Create the process definition
o Create the diagram
o Define variables
o Create contracts
o Define business object initial values
o Update business object with review data
o Specify actors
o Run process with temporary forms
• Define the process forms
• Build the application
Design application pages
The first step in creating an application is
dummy data, creating a prototype application as seen by users. This ena
with the stakeholders and get validation of the application design before proceeding to more
The Bonita BPM Studio UI designer is an environment for creating application pages and forms. To start the
UI designer, click the UI designer icon in the Bonita BPM Studio coolbar (at the top of the screen). The UI
designer opens in a browser.
BONITA BPM 7.0 GETTI
This tutorial explains how to create an application that includes a process. The application is created using the
Bonita BPM Community edition, and uses features that are available in all editions. The example application is
a business travel tool, and is similar to the simple travel request process that was used in the getting started
tutorial for earlier versions of Bonita BPM:
An employee opens the Travel Tool application to view their pending and approved travel requests. They create a
new travel request. Then the request is sent to the employee's manager. The manager reviews the request and
In a real travel management application, there would be several process steps after
approval: estimating costs, possibly getting a second level of approval if the cost passes a cert
submitting an expenses claim after the travel, reviewing the expenses claim, escalating anything out of policy,
and authorizing payment. However, for this tutorial you will consider only the first part of the process, where
is submitted and then reviewed.
This tutorial assumes that you are a developer using Bonita BPM for the first time. It gives instructions
for using Bonita BPM Studio, the UI designer, and Bonita BPM Portal. It assumes you are familiar with
N and REST APIs. If you are already a Bonita BPM user, look for the star highlighting new and
changed features, including features now in the Community edition that were previously only available in
Use Bonita BPM Studio to define your process, including using the UI designer to create pages and forms.
Then use Bonita BPM Portal to build the application.
This is the recommended sequence for creating an application:
Design the application pages
Create the process definition
Create the diagram
Define business object initial values
Update business object with review data
Run process with temporary forms
Design application pages
The first step in creating an application is to design the application pages in the UI designer using
dummy data, creating a prototype application as seen by users. This enables you to review the application
with the stakeholders and get validation of the application design before proceeding to more
The Bonita BPM Studio UI designer is an environment for creating application pages and forms. To start the
UI designer, click the UI designer icon in the Bonita BPM Studio coolbar (at the top of the screen). The UI
© 2015 Bonitasoft
BONITA BPM 7.0 GETTING STARTED
application that includes a process. The application is created using the
Bonita BPM Community edition, and uses features that are available in all editions. The example application is
cess that was used in the getting started
An employee opens the Travel Tool application to view their pending and approved travel requests. They create a
yee's manager. The manager reviews the request and
In a real travel management application, there would be several process steps after
approval: estimating costs, possibly getting a second level of approval if the cost passes a certain threshold,
submitting an expenses claim after the travel, reviewing the expenses claim, escalating anything out of policy,
and authorizing payment. However, for this tutorial you will consider only the first part of the process, where
This tutorial assumes that you are a developer using Bonita BPM for the first time. It gives instructions
for using Bonita BPM Studio, the UI designer, and Bonita BPM Portal. It assumes you are familiar with
N and REST APIs. If you are already a Bonita BPM user, look for the star highlighting new and
changed features, including features now in the Community edition that were previously only available in
ur process, including using the UI designer to create pages and forms.
to design the application pages in the UI designer using
les you to review the application
with the stakeholders and get validation of the application design before proceeding to more complex tasks.
The Bonita BPM Studio UI designer is an environment for creating application pages and forms. To start the
UI designer, click the UI designer icon in the Bonita BPM Studio coolbar (at the top of the screen). The UI

© 2015 Bonitasoft
BONITA BPM 7.0 GETTING STARTED
The travel tool has a home page that displays a list of pending and approved travel requests to the current
user. It contains a button for starting a new travel request.
There are also some pages that are forms associated with the travel management proc
• Create a travel request
• Review a travel request and approve or refuse it
The easiest way to create these forms is from the process definition, so that is what you will do later in the
tutorial.
The following sections explain how to create the applicat
any stage, you can click Preview and see a preview the layout the page as it will appear to users. Remember
to click Save to save your work frequently.
Create travel tool home page
In Bonita BPM Studio, start the UI designer by clicking the icon in the coolbar. This opens the UI designer
in your browser, at the home page.
In the New page field, type the page name,
characters. This name is used in Bonita BPM to identify the page. It is not displayed to the application user.
Then click the + icon or press Return
Create the page structure by dragging widgets from the palette on the left and dropping them on the
whiteboard (the central panel). Specify the characteristics of a widget by selecting it and updating the
properties in the panel on the right. Add the following widgets:
• A TEXT widget, with the Text
• A TITLE widget, with the Text
• A TEXT widget, with text introducing the application:
travel requests.
• A CONTAINER for the user pending requests, with the following widgets:
o A TITLE widget with a lower title level than the page title (for example, "Level 3"), with the
text My pending requests
o A TABLE widget for listing pending travel requests, with the fo
� Headers
� Columns key
o A LINK widget with text
• A CONTAINER for the user approved requests, with the following widgets:
o A TITLE widget with a lower title level than the page title, with the text
o A TABLE widget for listing approved travel requests, with the foll
� Headers
Reason.
� Columns key
reason.
When you have added the widgets, click
the widgets in the whiteboard using drag and drop and using the
result.
www.bonitasoft.com
NG STARTED
The travel tool has a home page that displays a list of pending and approved travel requests to the current
user. It contains a button for starting a new travel request.
There are also some pages that are forms associated with the travel management process:
Review a travel request and approve or refuse it
The easiest way to create these forms is from the process definition, so that is what you will do later in the
The following sections explain how to create the application page and then populate it with dummy data. At
and see a preview the layout the page as it will appear to users. Remember
to save your work frequently.
Create travel tool home page
art the UI designer by clicking the icon in the coolbar. This opens the UI designer
in your browser, at the home page.
field, type the page name, TravelTool. The name must not contain spaces or special
characters. This name is used in Bonita BPM to identify the page. It is not displayed to the application user.
Return. This opens the new page in the Page editor.
structure by dragging widgets from the palette on the left and dropping them on the
whiteboard (the central panel). Specify the characteristics of a widget by selecting it and updating the
properties in the panel on the right. Add the following widgets:
Text property set to username.
Text property set to Travel tool.
A TEXT widget, with text introducing the application: This page lists your pending
A CONTAINER for the user pending requests, with the following widgets:
A TITLE widget with a lower title level than the page title (for example, "Level 3"), with the
requests.
A TABLE widget for listing pending travel requests, with the following properties:
set to Departure date, Number of nights, Hotel needed,
Columns key set to departureDate, numberOfNights, hotelNeeded,
A LINK widget with text Create new travel request and the Style property set to primary.
A CONTAINER for the user approved requests, with the following widgets:
A TITLE widget with a lower title level than the page title, with the text
A TABLE widget for listing approved travel requests, with the following properties:
set to Departure date, Number of nights, Hotel needed,
Columns key set to departureDate, numberOfNights, hotelNeeded,
When you have added the widgets, click Preview to see how the page displays. Change the arrangement of
the widgets in the whiteboard using drag and drop and using the Width property, until you are happy with the
www.bonitasoft.com | 4
The travel tool has a home page that displays a list of pending and approved travel requests to the current
ess:
The easiest way to create these forms is from the process definition, so that is what you will do later in the
ion page and then populate it with dummy data. At
and see a preview the layout the page as it will appear to users. Remember
art the UI designer by clicking the icon in the coolbar. This opens the UI designer
. The name must not contain spaces or special
characters. This name is used in Bonita BPM to identify the page. It is not displayed to the application user.
structure by dragging widgets from the palette on the left and dropping them on the
whiteboard (the central panel). Specify the characteristics of a widget by selecting it and updating the
pending and approved
A TITLE widget with a lower title level than the page title (for example, "Level 3"), with the
llowing properties:
needed, Destination, Reason
hotelNeeded, destination, reason
rty set to primary.
A TITLE widget with a lower title level than the page title, with the text My approved requests.
owing properties:
needed, Destination,
hotelNeeded, destination,
splays. Change the arrangement of
property, until you are happy with the

5 | www.bonitasoft.com
Add dummy data
Now use some dummy data to see how the tables will look when there is data. First create a variable
containing the data, and then bind the variable to the widget
will be business data retrieved by a REST AP
need two JSON variables, myPendingRequests_dummy
myPendingRequests_dummy:
1. In the Variables panel (at the bottom of the page), click
2. Enter the variable name, myPendingRequests_dummy
3. Select the JSON type.
4. Enter this value:
[{
"userId": "3",
"destination":"Grenoble",
"departureDate": "18/6/2015",
"numberOfNights":"1",
"hotelNeeded":"true",
"reason":"Bonita BPM 7.0 launch",
"status":"pending",
"refusalReason":""
},
{
"userId": "3",
"departureDate": "10/09/2015",
"numberOfNights":"3",
"hotelNeeded":"false",
"destination":"Paris",
"reason":"Open source conference",
"status":"pending",
"refusalReason":""
},
{
"userId": "3",
"departureDate": "07/07/2015",
"numberOfNights":"4",
"hotelNeeded":"false",
"destination":"San Francis
"reason":"BPAD training",
"status":"pending",
"refusalReason":""
}]
5. Click Save.
6. Select the table widget for the pending requests.
7. In the Content property, click the link icon at the right, then click in the box and choose
myPendingRequests_dummy from the list of variables (start typing the variable name to get auto
completion).
8. Click Preview to see the page with data for pending requests.
Now follow the same steps to create
BONITA BPM 7.0 GETTI
Now use some dummy data to see how the tables will look when there is data. First create a variable
containing the data, and then bind the variable to the widget Value property. In the application, the real data
will be business data retrieved by a REST API call. The dummy data for the travel requests is in JSON. You
myPendingRequests_dummy and myApprovedRequests_dummy. To create
panel (at the bottom of the page), click Create a new variable.
myPendingRequests_dummy.
"destination":"Grenoble",
"departureDate": "18/6/2015",
"reason":"Bonita BPM 7.0 launch",
"departureDate": "10/09/2015",
"reason":"Open source conference",
"departureDate": "07/07/2015",
"destination":"San Francisco",
"reason":"BPAD training",
Select the table widget for the pending requests.
property, click the link icon at the right, then click in the box and choose
from the list of variables (start typing the variable name to get auto
to see the page with data for pending requests.
Now follow the same steps to create myApprovedRequests_dummy with the following content:
© 2015 Bonitasoft
BONITA BPM 7.0 GETTING STARTED
Now use some dummy data to see how the tables will look when there is data. First create a variable
property. In the application, the real data
I call. The dummy data for the travel requests is in JSON. You
. To create
property, click the link icon at the right, then click in the box and choose
from the list of variables (start typing the variable name to get auto-
with the following content:

© 2015 Bonitasoft
BONITA BPM 7.0 GETTING STARTED
[{
"userId": "3",
"destination":"Tokyo",
"departureDate": "10/10/2015",
"numberOfNights":"5",
"hotelNeeded":"yes",
"reason":"BPM for HR conference",
"status":"approved",
"refusalReason":""
},
{
"userId": "3",
"departureDate": "12/11/2015",
"numberOfNights":"3",
"hotelNeeded":"no",
"destination":"San Franciso",
"reason":"Meetigns with team",
"status":"approved",
"refusalReason":""
}]
When you have defined this variable, select the table widget for the approved requests and set the value of
the Content property to myApprovedRequests_dummy
Review and improve the page
You now have a prototype of the TravelT
arrangement of the widgets until you are happy with the appearance of the page. You can drag and drop
widgets to reorder them, and you can change properties including
improve this page, you could make the following changes:
• Select the username widget, and change the
• Select the "Travel Tool" title and drag it beside the username. The size of the username widget will
automatically adjust, so that both widgets are in the same row. Delete the empty row by selecting it
and clicking the delete control in the row handle. Empty rows are ignored when the page is
displayed, but it is a good idea to delete them to save space in the whiteboard.
• Select the link widget and change the
Create the data model
Business data is new for 7.0 in the Community edition.
There are two stages to defining variables: first you define the business data model, and then you specify
how the process handles objects of the model. The model is defined as a set of Java objects, and the process
uses instances of these objects. If you are not familiar with the terminology, all you need to remember is that
the model is the global definition, with a collecti
subset that is relevant.
First, we will create the business data model, which will then be available for all processes. We will use a
model with one object:
• TravelRequest contains the details of
www.bonitasoft.com
NG STARTED
"reason":"BPM for HR conference",
When you have defined this variable, select the table widget for the approved requests and set the value of
myApprovedRequests_dummy.
Review and improve the page
TravelTool page with dummy data. View the prototype, and adjust the
arrangement of the widgets until you are happy with the appearance of the page. You can drag and drop
widgets to reorder them, and you can change properties including Width and Alignment
improve this page, you could make the following changes:
Select the username widget, and change the Alignment to right.
Select the "Travel Tool" title and drag it beside the username. The size of the username widget will
hat both widgets are in the same row. Delete the empty row by selecting it
and clicking the delete control in the row handle. Empty rows are ignored when the page is
displayed, but it is a good idea to delete them to save space in the whiteboard.
e link widget and change the Alignment to center.
Create the data model
Business data is new for 7.0 in the Community edition.
There are two stages to defining variables: first you define the business data model, and then you specify
handles objects of the model. The model is defined as a set of Java objects, and the process
uses instances of these objects. If you are not familiar with the terminology, all you need to remember is that
the model is the global definition, with a collection of structured variables. For your process, you select the
First, we will create the business data model, which will then be available for all processes. We will use a
contains the details of the travel that is being requested and its approval status.
www.bonitasoft.com | 6
When you have defined this variable, select the table widget for the approved requests and set the value of
page with dummy data. View the prototype, and adjust the
arrangement of the widgets until you are happy with the appearance of the page. You can drag and drop
Alignment. For example, to
Select the "Travel Tool" title and drag it beside the username. The size of the username widget will
hat both widgets are in the same row. Delete the empty row by selecting it
and clicking the delete control in the row handle. Empty rows are ignored when the page is
There are two stages to defining variables: first you define the business data model, and then you specify
handles objects of the model. The model is defined as a set of Java objects, and the process
uses instances of these objects. If you are not familiar with the terminology, all you need to remember is that
on of structured variables. For your process, you select the
First, we will create the business data model, which will then be available for all processes. We will use a
the travel that is being requested and its approval status.

7 | www.bonitasoft.com © 2015 Bonitasoft
BONITA BPM 7.0 GETTING STARTED
To define the business data model:
1. Go to the Development menu, choose Business Data Model, and then choose Manage.... This opens the
dialog to manage the business data model.
2. Beside the list of business object types, click Add. A temporary type name, such as BusinessObject1 is
added to the list.
3. Click on the temporary name, and change it to TravelRequest.
4. Select the TravelRequest business object type, and add its attributes. This table shows the attributes and
their types:
Variable Data type Mandatory
userId String yes
departureDate Date yes
numberOfNights Integer yes
hotelNeeded Boolean no
destination String yes
reason String yes
status String yes
refusalReason String no
To add each attribute:
a. In the Attributes tab, click Add. A temporary attribute name is added to the Name column.
b. Change the temporary name to the attribute name.
c. Select the type from the drop-down list. To display the list, click at the right end of the Type
column.
d. There are no Multiple attributes in this object, so you can ignore this column.
e. In the Mandatory column, check the box for the attributes that are mandatory.
5. Add a custom query that you will use to search for data using both the userId and the status:
a. In the Queries tab, select Custom.
b. Click Add. A temporary query name is added to the Name column.
c. Change the temporary name to findByUserIdAndStatus.
d. Click in the query column, and then click the edit icon at the right. This opens a popup with a
proposed custom query that uses all the attributes.
e. In the JPQL Query field, remove these lines:
AND t.departureDate = :departureDate
AND t.numberOfNights = :numberOfNights
AND t.hotelNeeded = :hotelNeeded
AND t.destination = :destination
AND t.reason = :reason
AND t.refusalReason = :refusalReason
f. In the Parameters list, delete all the attributes except userId and status.
g. Click OK to save the query.
© 2015 Bonitasoft
BONITA BPM 7.0 GETTING STARTED
6. Click Finish to save the business data model.
Create the process definition
Create the diagram
The first stage is to create the new diagram, which you do using Bonita
a diagram, save your work from time to time
or by typing Ctrl-S. Create the diagram as follows:
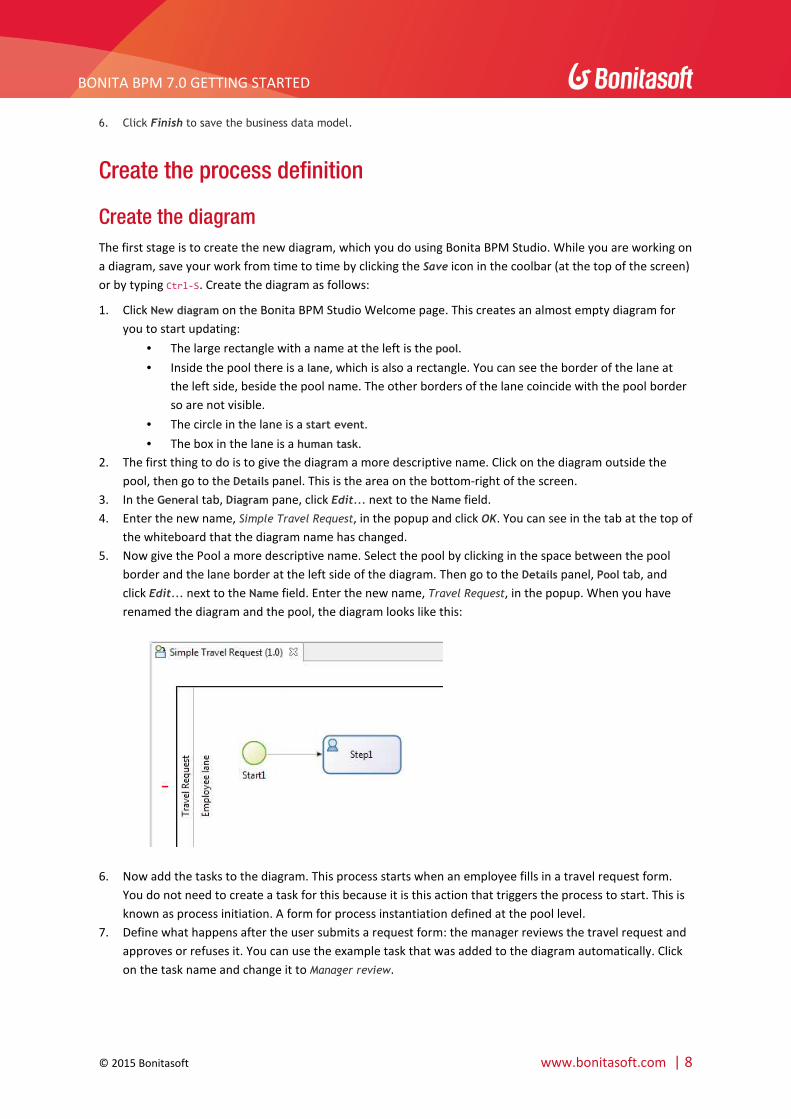
1. Click New diagram on the Bonita BPM Studio Welcome page. This creates an almost empty diagram for
you to start updating:
• The large rectangle with a name at the left is the
• Inside the pool there is a
the left side, beside the pool name. The other borders of the lane coincide with the pool border
so are not visible.
• The circle in the lane is a
• The box in the lane is a
2. The first thing to do is to give the diagram a more descr
pool, then go to the Details panel. This is the area on the bottom
3. In the General tab, Diagram pane, click
4. Enter the new name, Simple Travel Request
the whiteboard that the diagram name has changed.
5. Now give the Pool a more descriptive name. Select the pool by clicking in the space between the pool
border and the lane border at the left s
click Edit... next to the Name field. Enter the new name,
renamed the diagram and the pool, the diagram looks like this:
6. Now add the tasks to the diagram. This process starts when an employee fills in a travel request form.
You do not need to create a task for this because it is this action that triggers the process to start. This is
known as process initiation. A
7. Define what happens after the user submits a request form: the manager reviews the travel request and
approves or refuses it. You can use the example task that was added to the diagram automatically. Click
on the task name and change it to
www.bonitasoft.com
NG STARTED
to save the business data model.
Create the process definition
The first stage is to create the new diagram, which you do using Bonita BPM Studio. While you are working on
ave your work from time to time by clicking the Save icon in the coolbar (at the top of the screen)
. Create the diagram as follows:
on the Bonita BPM Studio Welcome page. This creates an almost empty diagram for
The large rectangle with a name at the left is the pool.
Inside the pool there is a lane, which is also a rectangle. You can see the border of the lane
the left side, beside the pool name. The other borders of the lane coincide with the pool border
The circle in the lane is a start event.
The box in the lane is a human task.
The first thing to do is to give the diagram a more descriptive name. Click on the diagram outside the
panel. This is the area on the bottom-right of the screen.
pane, click Edit... next to the Name field.
Simple Travel Request, in the popup and click OK. You can see in the tab at the top of
the whiteboard that the diagram name has changed.
Now give the Pool a more descriptive name. Select the pool by clicking in the space between the pool
border and the lane border at the left side of the diagram. Then go to the Details panel,
field. Enter the new name, Travel Request, in the popup. When you have
renamed the diagram and the pool, the diagram looks like this:
Now add the tasks to the diagram. This process starts when an employee fills in a travel request form.
You do not need to create a task for this because it is this action that triggers the process to start. This is
known as process initiation. A form for process instantiation defined at the pool level.
Define what happens after the user submits a request form: the manager reviews the travel request and
approves or refuses it. You can use the example task that was added to the diagram automatically. Click
the task name and change it to Manager review.
www.bonitasoft.com | 8
BPM Studio. While you are working on
icon in the coolbar (at the top of the screen)
on the Bonita BPM Studio Welcome page. This creates an almost empty diagram for
, which is also a rectangle. You can see the border of the lane at
the left side, beside the pool name. The other borders of the lane coincide with the pool border
iptive name. Click on the diagram outside the
right of the screen.
. You can see in the tab at the top of
Now give the Pool a more descriptive name. Select the pool by clicking in the space between the pool
panel, Pool tab, and
, in the popup. When you have
Now add the tasks to the diagram. This process starts when an employee fills in a travel request form.
You do not need to create a task for this because it is this action that triggers the process to start. This is
defined at the pool level.
Define what happens after the user submits a request form: the manager reviews the travel request and
approves or refuses it. You can use the example task that was added to the diagram automatically. Click

9 | www.bonitasoft.com
8. In a future evolution of this process, the next task would be to send the travel request details to the
admin team so they can handle the booking. For now, though we are just interested in getting the first
part of the process working, so add an end after the review task. You can do this by dragging the end icon
from the palette to the whiteboard, and then connecting to the
When you have finished, your diagram should lo
Define business variables
You have already defined the data model, but now you need to specify how the model is applied to this
process. Define a travelRequest business variable, which is an instance of the
Follow these steps:
1. Select the pool.
2. Go to the Details panel, Data pane and click
3. In the Name field, type travelRequest
4. Add a description if you want to.
5. From the Business Object list, choose
6. Do not configure the default value. The default value uses information that is in the contract, so you will
define it later.
7. Click Finish to save the definition.
The attributes of travelRequest are the information that is used in the process. There are no other v
define.
Create contracts
A contract is the specification of what a form must return to the process instance. Define a contract for
process instantiation, and for each human task.
The contract does not need to include information that is sent
included in the context, which is the set of information passed to the form. You cannot configure the context.
The information that you specify in the contract is a subset of the information used in the proces
the process instantiation contract, select the pool and follow these steps:
1. Go to the Details panel, Execution
2. in the Inputs tab, click Add from data...
data variables that are defined for the process.
3. Select travelRequest and click Next
BONITA BPM 7.0 GETTI
In a future evolution of this process, the next task would be to send the travel request details to the
admin team so they can handle the booking. For now, though we are just interested in getting the first
art of the process working, so add an end after the review task. You can do this by dragging the end icon
from the palette to the whiteboard, and then connecting to the Manager review task with a flow element.
When you have finished, your diagram should look like this:
Define business variables
You have already defined the data model, but now you need to specify how the model is applied to this
business variable, which is an instance of the TravelRequest
pane and click Add... beside the Business variables box.
travelRequest.
Add a description if you want to.
From the Business Object list, choose TravelRequest.
configure the default value. The default value uses information that is in the contract, so you will
to save the definition.
are the information that is used in the process. There are no other v
A contract is the specification of what a form must return to the process instance. Define a contract for
process instantiation, and for each human task.
The contract does not need to include information that is sent from the process instance to the form. This is
included in the context, which is the set of information passed to the form. You cannot configure the context.
The information that you specify in the contract is a subset of the information used in the proces
the process instantiation contract, select the pool and follow these steps:
Execution tab, Contract pane.
Add from data.... This opens a popup for creating the contract using the business
variables that are defined for the process.
Next.
© 2015 Bonitasoft
BONITA BPM 7.0 GETTING STARTED
In a future evolution of this process, the next task would be to send the travel request details to the
admin team so they can handle the booking. For now, though we are just interested in getting the first
art of the process working, so add an end after the review task. You can do this by dragging the end icon
task with a flow element.
You have already defined the data model, but now you need to specify how the model is applied to this
TravelRequest object type.
beside the Business variables box.
configure the default value. The default value uses information that is in the contract, so you will
are the information that is used in the process. There are no other variables to
A contract is the specification of what a form must return to the process instance. Define a contract for
from the process instance to the form. This is
included in the context, which is the set of information passed to the form. You cannot configure the context.
The information that you specify in the contract is a subset of the information used in the process. To specify
. This opens a popup for creating the contract using the business

© 2015 Bonitasoft
BONITA BPM 7.0 GETTING STARTED
4. Specify the attributes to include. By default, all the attributes are checked, so uncheck those that are not
relevant: userId, status and refusalReason
5. Click Finish.
In the Details panel, click travelRequestTravelRequest
a Description. The description is displayed in the form, so include information that will help the user complete
the form correctly, as follows:
Attribute Description
departureDate Select the date that the travel starts.
numberOfNights Enter the number of nights.
hotelNeeded Check this box if you need a hotel reservation.
destination Enter the destination city.
reason Explain the reason for
The process instantiation contract is now complete.
The contract for the Manager review
directly instead of from data. It also has a constraint: a
the request. To define this contract:
1. Select the Manager review
2. Go to the Details panel, Execution
3. In the Inputs tab, for each input, click
4. Go to the Constraints tab and click
5. Click on the placeholder name and change it to
6. Click in the Expression field, then click on the icon that appears at the right of the field. This opens a
popup where you can enter the constraint expression.
7. Define the constraint on approval
status=="Approved" || (status
8. In the Error message column, add this text:
Define business object initial values
Now that the contract is defined, you can configure the initial value of
1. Select the pool and go to the
2. Double-click travelRequest
3. Click the pencil icon beside the
4. Set the expression type to
www.bonitasoft.com
NG STARTED
Specify the attributes to include. By default, all the attributes are checked, so uncheck those that are not
refusalReason.
travelRequestTravelRequest to open up the list of attributes. For each attribute, add
. The description is displayed in the form, so include information that will help the user complete
Select the date that the travel starts.
Enter the number of nights.
Check this box if you need a hotel reservation.
Enter the destination city.
Explain the reason for this travel. Give the business justification.
The process instantiation contract is now complete.
Manager review task only has two inputs, status and refusalReason, so you can create it
directly instead of from data. It also has a constraint: a refusalReason must be specified if the manager refuses
the request. To define this contract:
task.
Execution tab, Contract pane.
tab, for each input, click Add and specify the name, type, and description, like this:
tab and click Add. This adds a placeholder constraint.
Click on the placeholder name and change it to reasonRequired.
field, then click on the icon that appears at the right of the field. This opens a
popup where you can enter the constraint expression.
approval and refusalReason with this script:
status=="Refused" && refusalReason != null && !refusalReason.
column, add this text: If you refuse the travel request, you
Define business object initial values
Now that the contract is defined, you can configure the initial value of travelRequest
Select the pool and go to the Details panel, Data tab.
travelRequest to edit it.
Click the pencil icon beside the Default value field. This opens the expression editor.
Set the expression type to Script, and enter a name for the script, newRequestInitialValue
www.bonitasoft.com | 10
Specify the attributes to include. By default, all the attributes are checked, so uncheck those that are not
to open up the list of attributes. For each attribute, add
. The description is displayed in the form, so include information that will help the user complete
, so you can create it
must be specified if the manager refuses
and specify the name, type, and description, like this:
field, then click on the icon that appears at the right of the field. This opens a
refusalReason.isEmpty())
you must enter a reason.
travelRequest, as follows:
ns the expression editor.
newRequestInitialValue.
11 | www.bonitasoft.com
5. Enter this script:
import com.company.model.TravelRequest
TravelRequest newTravelRequest
newTravelRequest.setUserId
processInstanceId).getId()))
newTravelRequest.setDepartureDate
newTravelRequest.setNumberOfNights
newTravelRequest.setHotelNeeded
newTravelRequest.setDestination
newTravelRequest.setReason
newTravelRequest.setStatus
return newTravelRequest;
6. Set the Return type to com.company.model.TravelRequest
from the popup.
7. Click OK to save the expression.
8. Click OK again to save the updated object definition.
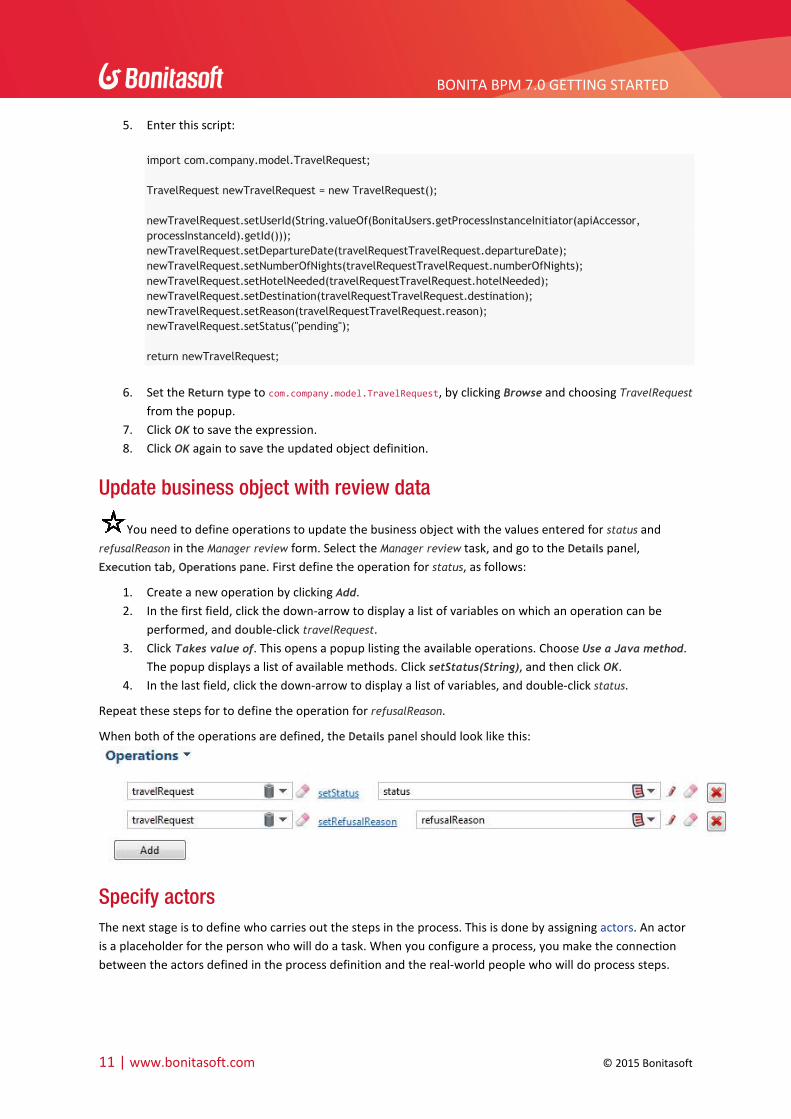
Update business object
You need to define operations to update the business object with the values entered for
refusalReason in the Manager review
Execution tab, Operations pane. Firs
1. Create a new operation by clicking
2. In the first field, click the down
performed, and double-click
3. Click Takes value of. This opens a popup listing the available operations. Choose
The popup displays a list of available methods. Click
4. In the last field, click the down
Repeat these steps for to define the operation for
When both of the operations are defined, the
Specify actors
The next stage is to define who carries out the steps in the process. This is done by assigning
is a placeholder for the person who will do a task. When you configure a process, yo
between the actors defined in the process definition and the real
BONITA BPM 7.0 GETTI
com.company.model.TravelRequest;
TravelRequest newTravelRequest = new TravelRequest();
setUserId(String.valueOf(BonitaUsers.getProcessInstanceInitiator
()));
setDepartureDate(travelRequestTravelRequest.departureDate);
setNumberOfNights(travelRequestTravelRequest.numberOfNights
setHotelNeeded(travelRequestTravelRequest.hotelNeeded);
setDestination(travelRequestTravelRequest.destination);
setReason(travelRequestTravelRequest.reason);
setStatus("pending");
com.company.model.TravelRequest, by clicking Browse and choosing
to save the expression.
again to save the updated object definition.
Update business object with review data
You need to define operations to update the business object with the values entered for
Manager review form. Select the Manager review task, and go to the Details
pane. First define the operation for status, as follows:
Create a new operation by clicking Add.
In the first field, click the down-arrow to display a list of variables on which an operation can be
click travelRequest.
s opens a popup listing the available operations. Choose
The popup displays a list of available methods. Click setStatus(String), and then click
In the last field, click the down-arrow to display a list of variables, and double-click
Repeat these steps for to define the operation for refusalReason.
When both of the operations are defined, the Details panel should look like this:
The next stage is to define who carries out the steps in the process. This is done by assigning
is a placeholder for the person who will do a task. When you configure a process, you make the connection
between the actors defined in the process definition and the real-world people who will do process steps.
© 2015 Bonitasoft
BONITA BPM 7.0 GETTING STARTED
getProcessInstanceInitiator(apiAccessor,
ights);
and choosing TravelRequest
You need to define operations to update the business object with the values entered for status and
Details panel,
arrow to display a list of variables on which an operation can be
s opens a popup listing the available operations. Choose Use a Java method.
, and then click OK.
click status.
The next stage is to define who carries out the steps in the process. This is done by assigning actors. An actor
u make the connection
world people who will do process steps.
© 2015 Bonitasoft
BONITA BPM 7.0 GETTING STARTED
Bonita BPM Studio comes with a test organization, called ACME, which you can use for testing. In this
example, we have two people, the employee who initiates the process, and the employee's manager. The
managers are also employees, so you can use the same actor for process instantiation and for the review
task, but use a filter to specify who does the approval step. This is how it
1. In the diagram, select the pool. This is where you define all the actors for the process. By default,
there is already an Employee actor, which is defined for testing. You can change the organization
and the actors later, but for initial testing,
employee in the organization can start a case of the travel request process. You do not need to
change anything.
2. Next, select the review step and define who can do this. This step will be done by the
person who initiated the request. All the managers are also employees, and the employee actor is
defined for the lane, so check the button for
3. To make sure that the review task is sent to the right manager,
a. Click the actor filter
b. Open up the list of process actor filters.
c. Select Initiator manager
the person who submitted the request that initiated the proces
d. Specify a name for the actor filter definition,
The process is now defined. The next section shows you how to configure and run it to verify that the process
definition is correct before you define forms a
Run process with temporary forms
You can run a process that is in development before you create forms, by using temporary forms that
are created automatically. This section explains how to configure the process and run it from
Studio.
Before you can run the process, you need to configure it. Use the default setting for almost everything for the
first tests. There are just two things to configure for this example process, the actor mapping and the name of
the test user.
1. Open the Configuration dialog, by clicking
2. Click Actor mapping in the menu on the left of the popup. The actor mapping box lists the actors and
shows the default mapping: The Employee actor is mapped to a group called acme, whic
all the employees of the example organization called ACME. You do not need to change this.
3. Now specify the name of the test user. For this example, we can specify the user Helen Kelly, in the
ACME test organization. Her manager is William Jobs.
specify Helen's username,
4. The configuration is now complete, so click
Now you can run the process and see the temporary forms, to check that the process definition is correc
1. Click Run in the coolbar. This opens a browser window, logs you in to Bonita BPM Portal as Helen,
and displays the travel request form.
2. Fill out the form. Make sure that you use the right format for each field in the temporary forms. The
date must be specified in the form yyyy
submits the form and starts the process instance.
www.bonitasoft.com
NG STARTED
Bonita BPM Studio comes with a test organization, called ACME, which you can use for testing. In this
e, the employee who initiates the process, and the employee's manager. The
managers are also employees, so you can use the same actor for process instantiation and for the review
task, but use a filter to specify who does the approval step. This is how it works:
In the diagram, select the pool. This is where you define all the actors for the process. By default,
there is already an Employee actor, which is defined for testing. You can change the organization
and the actors later, but for initial testing, this will work fine. The default settings mean that any
employee in the organization can start a case of the travel request process. You do not need to
Next, select the review step and define who can do this. This step will be done by the
person who initiated the request. All the managers are also employees, and the employee actor is
defined for the lane, so check the button for Use the actor defined in the lane.
To make sure that the review task is sent to the right manager, use an actor filter:
Click the actor filter Set... button.
Open up the list of process actor filters.
Initiator manager. This means that the review task is to be done by the manager of
the person who submitted the request that initiated the process. Click
Specify a name for the actor filter definition, requestersManager, and click
The process is now defined. The next section shows you how to configure and run it to verify that the process
definition is correct before you define forms and create the application.
Run process with temporary forms
You can run a process that is in development before you create forms, by using temporary forms that
are created automatically. This section explains how to configure the process and run it from
Before you can run the process, you need to configure it. Use the default setting for almost everything for the
first tests. There are just two things to configure for this example process, the actor mapping and the name of
Open the Configuration dialog, by clicking Configure in the coolbar.
in the menu on the left of the popup. The actor mapping box lists the actors and
shows the default mapping: The Employee actor is mapped to a group called acme, whic
all the employees of the example organization called ACME. You do not need to change this.
Now specify the name of the test user. For this example, we can specify the user Helen Kelly, in the
ACME test organization. Her manager is William Jobs. Click Authentication in the left menu, and
specify Helen's username, helen.kelly, and password, bpm.
The configuration is now complete, so click Finish.
Now you can run the process and see the temporary forms, to check that the process definition is correc
in the coolbar. This opens a browser window, logs you in to Bonita BPM Portal as Helen,
and displays the travel request form.
Fill out the form. Make sure that you use the right format for each field in the temporary forms. The
ecified in the form yyyy-mm-dd. When you have filled out the form, click
submits the form and starts the process instance.
www.bonitasoft.com | 12
Bonita BPM Studio comes with a test organization, called ACME, which you can use for testing. In this
e, the employee who initiates the process, and the employee's manager. The
managers are also employees, so you can use the same actor for process instantiation and for the review
In the diagram, select the pool. This is where you define all the actors for the process. By default,
there is already an Employee actor, which is defined for testing. You can change the organization
this will work fine. The default settings mean that any
employee in the organization can start a case of the travel request process. You do not need to
Next, select the review step and define who can do this. This step will be done by the manager of the
person who initiated the request. All the managers are also employees, and the employee actor is
use an actor filter:
. This means that the review task is to be done by the manager of
s. Click Next
, and click Finish.
The process is now defined. The next section shows you how to configure and run it to verify that the process
You can run a process that is in development before you create forms, by using temporary forms that
are created automatically. This section explains how to configure the process and run it from Bonita BPM
Before you can run the process, you need to configure it. Use the default setting for almost everything for the
first tests. There are just two things to configure for this example process, the actor mapping and the name of
in the menu on the left of the popup. The actor mapping box lists the actors and
shows the default mapping: The Employee actor is mapped to a group called acme, which contains
all the employees of the example organization called ACME. You do not need to change this.
Now specify the name of the test user. For this example, we can specify the user Helen Kelly, in the
in the left menu, and
Now you can run the process and see the temporary forms, to check that the process definition is correct.
in the coolbar. This opens a browser window, logs you in to Bonita BPM Portal as Helen,
Fill out the form. Make sure that you use the right format for each field in the temporary forms. The
dd. When you have filled out the form, click Start. This

13 | www.bonitasoft.com
3. At the top-right of the Portal window, click the arrow beside Helen's name and choose
4. Log in as Helen's manager,
view is displayed, where there is a task called
5. Select the Manager review
displayed. It contains fields
information that Helen entered in the request. When you create your own forms, you will add this
information, so that the manger can see the details of the request before approving or refusin
For now, you can see the form, so you have verified that the process definition is correct.
Create forms
The easiest way to create a process form is to generate it automatically from the contract. This
automatically creates a mapping between the
update the form manually to add or remove field, and to change the layout.
While using the UI designer, click Save
To create the process instantiation form:
1. In Bonita BPM Studio, select the pool and go to the
2. At the top-right of the Details
browser window, with the automatically generated form.
3. Change the form name. All forms that are generated automatically are called
rename them to avoid confusion. To do this, double
specify a new form name,
The form is now created. A form is a
widgets, and each field is defined by a widget. Widgets are arranged in rows. Each widget has a set of
properties, on the right side of the window. To change the appearance and behavi
the widgets. At any time, you can click
update the page, you can hide the
Here are some suggestions for how
1. Select the title, which is the top widget, and change the
request.
2. Make the Departure date widget narrower. To do this, select it and change the value of the
property to 4 columns.
3. Move the Destination widget up to the top of the form. To do this, position your mouse over the bar
at the left side of the widget. A row control is displayed. Click the up arrow to move the row up. For
each click, the row move up one space, so
(below the title).
4. Move the Number of nights and Hotel needed widgets to the same row as the Departure date, and
reduce the widths. (Note: when you add a widget to a row, it automatically takes all the
columns, so set the width after you move the widgets.)
5. Remove the empty rows left when you moved the widgets, using the row control.
When you have finished, the preview of the form looks like this:
BONITA BPM 7.0 GETTI
right of the Portal window, click the arrow beside Helen's name and choose
Log in as Helen's manager, William Jobs, with username william.jobs and password
view is displayed, where there is a task called Manager review.
task and click Do it. The temporary form for the manager review is
displayed. It contains fields for the items defined in the contract for this step, but not the
information that Helen entered in the request. When you create your own forms, you will add this
information, so that the manger can see the details of the request before approving or refusin
For now, you can see the form, so you have verified that the process definition is correct.
The easiest way to create a process form is to generate it automatically from the contract. This
automatically creates a mapping between the process and the form and defines form data. You can then
update the form manually to add or remove field, and to change the layout.
Save frequently to save your work.
To create the process instantiation form:
M Studio, select the pool and go to the Details panel, Execution tab,
Details panel, click the UI designer icon. This opens the UI designer in a
browser window, with the automatically generated form.
ame. All forms that are generated automatically are called newForm
rename them to avoid confusion. To do this, double-click on the name in the top bar, and then
specify a new form name, submitTravelRequest.
The form is now created. A form is a UI designer page that is mapped to a process. A page is a collection of
widgets, and each field is defined by a widget. Widgets are arranged in rows. Each widget has a set of
properties, on the right side of the window. To change the appearance and behavior of a page, you update
the widgets. At any time, you can click Preview to see how the page will look to a user. To have more space to
update the page, you can hide the Data and Assets tabs, by clicking on the down-arrow.
Here are some suggestions for how to improve the instantiation form layout:
Select the title, which is the top widget, and change the Text property to Submit
Make the Departure date widget narrower. To do this, select it and change the value of the
Move the Destination widget up to the top of the form. To do this, position your mouse over the bar
at the left side of the widget. A row control is displayed. Click the up arrow to move the row up. For
each click, the row move up one space, so you need to click several times to move it to the top
Move the Number of nights and Hotel needed widgets to the same row as the Departure date, and
reduce the widths. (Note: when you add a widget to a row, it automatically takes all the
columns, so set the width after you move the widgets.)
Remove the empty rows left when you moved the widgets, using the row control.
When you have finished, the preview of the form looks like this:
© 2015 Bonitasoft
BONITA BPM 7.0 GETTING STARTED
right of the Portal window, click the arrow beside Helen's name and choose Logout.
and password bpm. The Tasks
. The temporary form for the manager review is
for the items defined in the contract for this step, but not the
information that Helen entered in the request. When you create your own forms, you will add this
information, so that the manger can see the details of the request before approving or refusing it.
For now, you can see the form, so you have verified that the process definition is correct.
The easiest way to create a process form is to generate it automatically from the contract. This
process and the form and defines form data. You can then
tab, Contract pane.
panel, click the UI designer icon. This opens the UI designer in a
newForm, so you must
click on the name in the top bar, and then
UI designer page that is mapped to a process. A page is a collection of
widgets, and each field is defined by a widget. Widgets are arranged in rows. Each widget has a set of
or of a page, you update
to see how the page will look to a user. To have more space to
Submit a new travel
Make the Departure date widget narrower. To do this, select it and change the value of the Width
Move the Destination widget up to the top of the form. To do this, position your mouse over the bar
at the left side of the widget. A row control is displayed. Click the up arrow to move the row up. For
you need to click several times to move it to the top
Move the Number of nights and Hotel needed widgets to the same row as the Departure date, and
reduce the widths. (Note: when you add a widget to a row, it automatically takes all the remaining
Remove the empty rows left when you moved the widgets, using the row control.

© 2015 Bonitasoft
BONITA BPM 7.0 GETTING STARTED
Now define the form for the Manager review
context, then add widgets to display the request details for the manager to review. Follow these steps:
1. In Bonita BPM Studio, select the
Contract pane.
2. At the top-right of the Details
the UI designer.
3. Change the form name to
4. Add a title widget. To do this, drag the TITLE widget from the palette
top of the form. Change the text property to the form title,
property to Level 4, so it is the same size as the title of the form for creating a request.
5. Add a variable to get the infor
a. In the Variables tab, click
b. Specify the name,
c. Set the Type to External API
d. Set the value to /bonita/{{context.travelRequest_ref.link}}
e. Click Save.
6. Add widgets to display the details of the travel request, using the following information:
Destination
Departure date
Number of nights
Hotel needed
Reason for travel
7. Specify that these widgets are read
8. Add a Radio buttons widget labeled
value bound to formInput.status
9. Add a Text widget beside the radio buttons, with the text
this travel request:.
10. Remove the Status widget that was added automatically.
11. Preview the form and rearrange the widgets until you are happy with the form.
www.bonitasoft.com
NG STARTED
Manager review task. Start by automatically generating the form from the
context, then add widgets to display the request details for the manager to review. Follow these steps:
In Bonita BPM Studio, select the Manager review task and go to the Details panel,
Details panel, click the UI designer icon. This generates a form and opens it in
Change the form name to reviewTravelRequest.
Add a title widget. To do this, drag the TITLE widget from the palette (on the left) and drop it at the
top of the form. Change the text property to the form title, Review travel request
property to Level 4, so it is the same size as the title of the form for creating a request.
Add a variable to get the information that the user entered in the request form. To do this:
tab, click Create a new variable.
Specify the name, travelRequest.
External API.
/bonita/{{context.travelRequest_ref.link}}.
Add widgets to display the details of the travel request, using the following information:
Widget type Value binding
Input travelRequest.destination
Input travelRequest.departureDate | date
Input travelRequest.numberOfNights
Checkbox travelRequest.hotelNeeded
Text area travelRequest.reason
Specify that these widgets are read-only by setting the property.
Add a Radio buttons widget labeled Status with Available values set to Approved,Refused
formInput.status.
Add a Text widget beside the radio buttons, with the text Check a button to give
Remove the Status widget that was added automatically.
review the form and rearrange the widgets until you are happy with the form.
www.bonitasoft.com | 14
task. Start by automatically generating the form from the
context, then add widgets to display the request details for the manager to review. Follow these steps:
panel, Execution tab,
panel, click the UI designer icon. This generates a form and opens it in
(on the left) and drop it at the
request. Set the Level
property to Level 4, so it is the same size as the title of the form for creating a request.
mation that the user entered in the request form. To do this:
Add widgets to display the details of the travel request, using the following information:
travelRequest.departureDate | date
travelRequest.numberOfNights
Approved,Refused and Selected
give your decision about
review the form and rearrange the widgets until you are happy with the form.
15 | www.bonitasoft.com
Run process
You can now run the process using the forms that you created. Make sure that you have saved everything in
the UI designer. Then click Run in the Studio coolbar.
Now when you see the request form there is a date picker to specify the date. Fill out the request form as
Helen, then log in as William and do the review task. Now when the review form is displayed, it contains the
information that Helen entered in the reques
You process is now complete, so you can include it in an application.
Build the application
This section explains how to build the application from the pages and process that you have already created.
There are the following steps:
1. In the UI designer, update the application page to use business data instead of the dummy JSON
data and to specify the connection between the page and the process.
2. In Bonita BPM Portal, create the application.
Update the application
There are two stages to updating the page: first create some variables, and then change the widget data
mappings.
Create the following variables:
• An External API variable called
• An External API variable called
Request.
• A JavaScript expression variable called
• An External API variable called
../API/bdm/businessData/com.company.model.TravelRequest?q=findByUserIdAndStatus&p=0&c=10&f=userId={
{myUserId}}&f=status=pending
• An External API variable valled
../API/bdm/businessData/com.company.model.TravelRequest?q=findByUs
{myUserId}}&f=status=Approved
Now update the widgets to use the new variables:
1. Select the username widget at the top of the page, and update the
session.user_name (click on the "link" icon).
2. Update the pending requests table widget to change the
3. Update the approved requests table widget to change the
4. For both pending and approved requests, set the
hotelNeeded, destination, reason
BONITA BPM 7.0 GETTI
You can now run the process using the forms that you created. Make sure that you have saved everything in
in the Studio coolbar.
when you see the request form there is a date picker to specify the date. Fill out the request form as
Helen, then log in as William and do the review task. Now when the review form is displayed, it contains the
information that Helen entered in the request form. You can approve or refuse the request.
You process is now complete, so you can include it in an application.
Build the application
This section explains how to build the application from the pages and process that you have already created.
In the UI designer, update the application page to use business data instead of the dummy JSON
data and to specify the connection between the page and the process.
In Bonita BPM Portal, create the application.
Update the application page
There are two stages to updating the page: first create some variables, and then change the widget data
An External API variable called session with the value ../API/system/session/unusedid
ariable called processDef with the value ../API/bpm/process?p=0&c=1&f=name=Travel
A JavaScript expression variable called myUserId with the value return $data.session.user_id;
An External API variable called myPendingRequests with the value
I/bdm/businessData/com.company.model.TravelRequest?q=findByUserIdAndStatus&p=0&c=10&f=userId={
{myUserId}}&f=status=pending.
An External API variable valled myApprovedRequests with the value
../API/bdm/businessData/com.company.model.TravelRequest?q=findByUserIdAndStatus&p=0&c=10&f=userId={
{myUserId}}&f=status=Approved.
Now update the widgets to use the new variables:
Select the username widget at the top of the page, and update the Text property to bind it to
(click on the "link" icon).
ate the pending requests table widget to change the Content binding to myPendingRequests
Update the approved requests table widget to change the Content binding to myApprovedRequests
For both pending and approved requests, set the Column keys to departureDate | date,
reason, to set the date format.
© 2015 Bonitasoft
BONITA BPM 7.0 GETTING STARTED
You can now run the process using the forms that you created. Make sure that you have saved everything in
when you see the request form there is a date picker to specify the date. Fill out the request form as
Helen, then log in as William and do the review task. Now when the review form is displayed, it contains the
t form. You can approve or refuse the request.
This section explains how to build the application from the pages and process that you have already created.
In the UI designer, update the application page to use business data instead of the dummy JSON
There are two stages to updating the page: first create some variables, and then change the widget data
../API/system/session/unusedid.
../API/bpm/process?p=0&c=1&f=name=Travel
$data.session.user_id;.
I/bdm/businessData/com.company.model.TravelRequest?q=findByUserIdAndStatus&p=0&c=10&f=userId={
erIdAndStatus&p=0&c=10&f=userId={
property to bind it to
myPendingRequests.
myApprovedRequests.
date, numberOfNights,

© 2015 Bonitasoft
BONITA BPM 7.0 GETTING STARTED
Link button to process
When the user clicks the button on the Travel Tool page for creating a travel request, the application
displays the form for creating a request. This is the instantiation form for the Travel Request process. To
configure this, select the button and set the
http://localhost:8080/bonita/portal/resource/process/Travel%20Request/1.0/content/?id={{processDef[0].id}}
After the user submits the form, the Tasks view of Bonita BPM Portal is displayed.
Build application
Warning: If you are using a Portal that was started from Bonita BPM Studio, by default when you close
the Studio your processes, pages and applications
application definition, edit the Studio
To build the Travel Tool application, you need to export the page from the UI designer, deploy the process,
and then create the application in Bonita BPM Portal.
To export the page, click the Export
zip file in your default browser download location.
To deploy the process, you can simply run it from Studio. If you have no changed the process since you last
ran it, it is already deployed.
To create your application in Bonita BPM Portal:
1. Log in to Bonita BPM Portal with the Administrator profile.
2. From the menu bar, choose Resources
exported from the UI designer.
3. Go to Applications and click New
4. Enter a display name and URL for the application, and click
5. In the list of applications, click the edit icon to configure your new application.
6. In the Pages section, click Add and add the page you imported. Make this page the appl
page, and delete the default home page.
7. Check that the application is correctly defined, by clicking the URL. The travel requests summary page is
displayed, with a link to the form to create a new request. When you click the link, the form for
submitting a new travel requests is displayed.
You can now share the application URL with Bonita BPM users to give them access to the application.
www.bonitasoft.com
NG STARTED
When the user clicks the button on the Travel Tool page for creating a travel request, the application
displays the form for creating a request. This is the instantiation form for the Travel Request process. To
configure this, select the button and set the target URL property to
http://localhost:8080/bonita/portal/resource/process/Travel%20Request/1.0/content/?id={{processDef[0].id}}
After the user submits the form, the Tasks view of Bonita BPM Portal is displayed.
Warning: If you are using a Portal that was started from Bonita BPM Studio, by default when you close
the Studio your processes, pages and applications in the Portal are not saved. If you want to save your
application definition, edit the Studio Database Preferences and uncheck all the options.
To build the Travel Tool application, you need to export the page from the UI designer, deploy the process,
and then create the application in Bonita BPM Portal.
Export icon in the Page editor or on the home page. The page is exported as a
zip file in your default browser download location.
To deploy the process, you can simply run it from Studio. If you have no changed the process since you last
on in Bonita BPM Portal:
Log in to Bonita BPM Portal with the Administrator profile.
Resources, and then click Add and import the TravelTool page that you
exported from the UI designer.
New.
splay name and URL for the application, and click Create. The application is created.
In the list of applications, click the edit icon to configure your new application.
and add the page you imported. Make this page the appl
page, and delete the default home page.
Check that the application is correctly defined, by clicking the URL. The travel requests summary page is
displayed, with a link to the form to create a new request. When you click the link, the form for
submitting a new travel requests is displayed.
You can now share the application URL with Bonita BPM users to give them access to the application.
www.bonitasoft.com | 16
When the user clicks the button on the Travel Tool page for creating a travel request, the application
displays the form for creating a request. This is the instantiation form for the Travel Request process. To
http://localhost:8080/bonita/portal/resource/process/Travel%20Request/1.0/content/?id={{processDef[0].id}}.
Warning: If you are using a Portal that was started from Bonita BPM Studio, by default when you close
are not saved. If you want to save your
uncheck all the options.
To build the Travel Tool application, you need to export the page from the UI designer, deploy the process,
he home page. The page is exported as a
To deploy the process, you can simply run it from Studio. If you have no changed the process since you last
and import the TravelTool page that you
. The application is created.
and add the page you imported. Make this page the application home
Check that the application is correctly defined, by clicking the URL. The travel requests summary page is
displayed, with a link to the form to create a new request. When you click the link, the form for
You can now share the application URL with Bonita BPM users to give them access to the application.

HEADQUARTERS PARIS, FRANCE
73-77, rue de Sèvres
92100 Boulogne-Billancourt
GRENOBLE, FRANCE
327, rue Gustave Eiffel
38000 Grenoble
SAN FRANCISCO, USA
51 Federal St. Suite 305
San Francisco, CA 94107
NEW YORK, USA
419 Lafayette Street
New York, NY 10003