bob’s 17 tips for beginners get a good start at the lathec.ymcdn.com/sites/ · get a good start...
TRANSCRIPT

Get a Good Start at the Lathe
Bob’s 17 Tips for Beginners
People just getting started in turning usually have as many questions as a new runner
hoping to finish a 5k race:• What’s the best chuck on themarket? • What kind of tools should I buy?• What grit is best for sharpening?• Should I buy a sharpening jig?• What’s the best way to sand?If you teach or demonstrate fre-quently, you’ve heard all these ques-tions many times over.
Sharpening
1What grit do yourecommend for
sharpening tools? Alan Lacer wrote an excellent article on sharpening, which appeared in the Fall 2003 issue of American Woodturner.Woodturner.Woodturner
Pitch the gray wheels that accom-pany most grinders and sharpen with a 60- or 80-grit aluminum oxide wheel. Although Alan and others advocate honing, I find it unneces-sary for most woods and projects Iturn. I go directly from the sharpen-ing wheel to the lathe.
Over the years, I’ve discoveredthat a Oneway diamond-tip wheel dresser tears up the wheel less than a star wheel dresser. If used proper-ly, the diamond-tip dresser prepares a true wheel and your lathe tool will not bounce (a problem with hand-held dressers).
2What speed grinder do you recommend?
Instead of the better-known 3,500-rpm grinder for general woodwork-rpm grinder for general woodwork-rpm grinder for general woodworking, I prefer to sharpen lathe toolswith a 1,725-rpm grinder, sometimes
referred to as a slow-speed grinder. The slow-speed grinder removes metal at a slower rate and allows me to work with the edge of the tool a bit (it’s also more forgiving oferrors). When I first started turning,I shortened the life of many tools byattempting to sharpen at 3,500 rpm. Don’t make the same mistake.
3Should I buy asharpening jig or
should I learn freehandsharpening? I often repeat Bonnie Klein’s answer:“If you turn a lot, you probably don’tneed a grinding jig. But if you onlyturn a couple of days a week, it’swell worth it.”
I’ll go one step further: Eventhough I learned freehand sharp-ening first (jigs weren’t commonlyavailable then), I now use a sharpen-ing jig all the time.
If you use a jig for sharpening,keep in mind that it will not sharpen the tool for you and you still need to know what you want the grind to look like.
4I just want to turn. Why is sharpening so
important? John Jordan has popularized this saying: “If you can’t sharpen, youcan’t turn.” I think that John is
By Bob Rosand
1Regular use of a wheel dresser will true your wheel and expose fresh grinding surfaces.
3If you don’t turn frequently, a sharpening jig may become your best friend.

absolutely right. You’ll never becomea proficient turner without first learning to sharpen your tools. And it’s not only about speed and profi-ciency: A dull tool is far more dangerous than a sharp tool.
Before you get too excited aboutturning, I suggest investing a fewhours of time (and money, if neces-sary) standing shoulder to shoulder with an expert sharpener.
Buying tools
5What set of toolsshould I buy?
My answer is don’t buy a set. Everyset I’ve seen seems to include oneor two tools that you don’t need. It’sbetter to buy individual tools andlearn how to use them. When you shop for tools, make
sure you buy high-speed steel(HSS) tools. They hold an edgebetter than the carbon-steel toolsthat used to be popular. If youstumble across some garage-salebargains or inherit a set from a rel-ative’s estate, chances are those arecarbon steel. (Some deceptive mar-keters actually pass off new carbonsteel as HSS. If the price seems toogood to be true, be careful.)
There is nothing wrong with carbon steel, but if you are juststarting out and have difficulties sharpening, you will probably blue
the steel, removing the temper. The great thing about HSS is that youcan blue the edge and the tool willstill stay sharp. (The blued edgedulls instantly.)
I’ve also had people tell me thatthey purchased yard-sale tools (old, worn-out carbon-steel tools) topractice on until they got better atturning. The problem with this isthat as a novice turner, you’re com-pounding your problems: Now youhave some inferior tools that you’renot sure how to use.
Buy the best tools you can afford,even if you buy only one tool at a time.
Another reason I dislike toolsets is the uniformity of handles. A matched set of tools looks great hanging on your wall, but whenyou are turning and the chips cover the bed of your lathe, it’s difficult toidentify each tool. Virtually all of my tools have different handles, and Ican identify each one amid the chips when I am hard at work.
6What tools shouldI start with?
I’d suggest a 33⁄3⁄33⁄3⁄⁄4⁄4⁄⁄4⁄⁄4⁄4⁄4⁄ " spindle roughing gouge, a 33⁄3⁄33⁄3⁄⁄8⁄8⁄8⁄8⁄ " spindle gouge, a 11⁄1⁄11⁄1⁄⁄⁄2⁄2⁄2⁄2⁄ " skew, and a diamond parting tool. If youwant to turn bowls, select a 33⁄3⁄33⁄3⁄⁄8⁄8⁄8⁄8⁄ " or 11⁄1⁄11⁄1⁄⁄⁄2⁄2⁄2⁄2⁄ " bowl gouge, althoughmy personalfavorite is a 33⁄3⁄33⁄3⁄⁄8⁄8⁄8⁄8⁄ " bowl gouge. The nexttools I would add are a 11⁄1⁄11⁄1⁄⁄⁄2⁄2⁄2⁄2⁄ " roundnose and 11⁄1⁄11⁄1⁄⁄⁄2⁄2⁄2⁄2⁄ " squarenose scraper.
Setting up a turning area
7What’s the best lathe height?
Your lathe may be set to the properheight, but I doubt it. Measure thedistance from the floor to your elbow. That should be the same asthe distance from the floor to the centerline of the headstock. If youhave to raise your lathe, I recom-mend reading the Del Stubbs article,“Tuning Up Your Lathe” (Spring1995 issue of American Woodturner). American Woodturner). American WoodturnerDel discusses how to fabricate asolid base for your lathe so that itdoesn’t walk around the shop whenyou are turning. If your lathe is toohigh, build a stable platform thatyou can stand on and not trip over.
8How much lightdo I need?
I‘ve done countless demonstrationsin shops with pitiful lighting. I don’trecommend traditional fluorescent lighting because of the strobe effectit causes. (This is less noticeable withnewer ballasts.) I prefer incandescentlight. At my small lathe, I have three100-watt bulbs overhead and oneswing-arm lamp that I can focus onmy work.
5With distinctive handles, you’ll quickly locate the next tool for your turning task.
6From left: 1⁄⁄2" bowl gouge, 33⁄⁄8" bowl gouge, diamond parting tool, 33⁄⁄8" spindle gouge, 1⁄⁄2" skew, 33⁄⁄4" spindle roughing gouge, 1⁄⁄2" squarenose scraper, 1⁄⁄2" round-nose scraper.
9What’s the big dealabout a face shield?
Always wear a face shield! When I first started turning, I did not wear a face shield or safety glasses of any kind. What a fool. After scratching my cornea numerous times and stopping to flush chips out of my eyes on many occasions, I won’t even turn on the lathe today without a face shield.
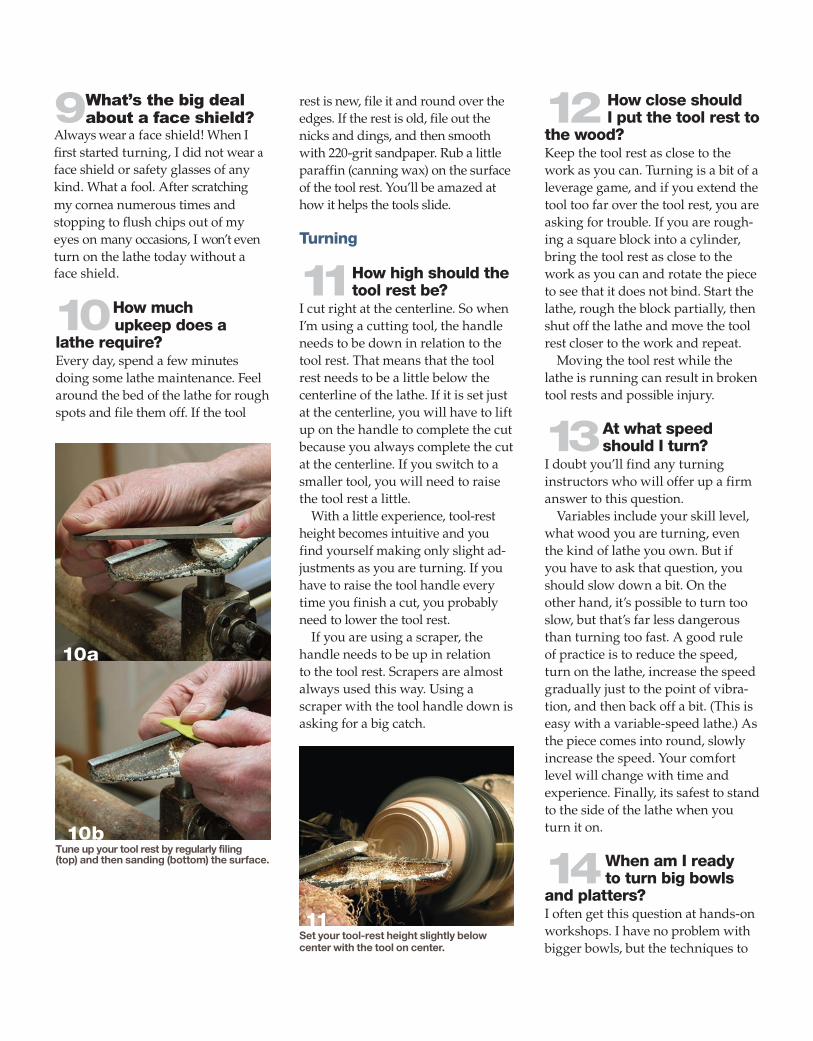
10How muchupkeep does a
lathe require?Every day, spend a few minutes doing some lathe maintenance. Feel around the bed of the lathe for rough spots and file them off. If the tool
rest is new, file it and round over the edges. If the rest is old, file out the nicks and dings, and then smooth with 220-grit sandpaper. Rub a little paraffin (canning wax) on the surface of the tool rest. You’ll be amazed at how it helps the tools slide.
Turning
11How high should thetool rest be?
I cut right at the centerline. So when I’m using a cutting tool, the handle needs to be down in relation to the tool rest. That means that the tool rest needs to be a little below the centerline of the lathe. If it is set just at the centerline, you will have to lift up on the handle to complete the cut because you always complete the cut at the centerline. If you switch to a smaller tool, you will need to raise the tool rest a little.
With a little experience, tool-rest height becomes intuitive and you find yourself making only slight ad-justments as you are turning. If you have to raise the tool handle every time you finish a cut, you probably need to lower the tool rest.
If you are using a scraper, the handle needs to be up in relationto the tool rest. Scrapers are almost always used this way. Using a scraper with the tool handle down is asking for a big catch.
12How close shouldI put the tool rest to
the wood?Keep the tool rest as close to the work as you can. Turning is a bit of a leverage game, and if you extend the tool too far over the tool rest, you are asking for trouble. If you are rough-ing a square block into a cylinder, bring the tool rest as close to the work as you can and rotate the piece to see that it does not bind. Start the lathe, rough the block partially, then shut off the lathe and move the tool rest closer to the work and repeat.
Moving the tool rest while the lathe is running can result in broken tool rests and possible injury.
13At what speedshould I turn?
I doubt you’ll find any turning instructors who will offer up a firm answer to this question.
Variables include your skill level, what wood you are turning, even the kind of lathe you own. But if you have to ask that question, you should slow down a bit. On the other hand, it’s possible to turn too slow, but that’s far less dangerous than turning too fast. A good rule of practice is to reduce the speed, turn on the lathe, increase the speed gradually just to the point of vibra-tion, and then back off a bit. (This is easy with a variable-speed lathe.) As the piece comes into round, slowly increase the speed. Your comfort level will change with time and experience. Finally, its safest to stand to the side of the lathe when you turn it on.
14When am I readyto turn big bowls
and platters? I often get this question at hands-on workshops. I have no problem with bigger bowls, but the techniques to
10b Tune up your tool rest by regularly filing (top) and then sanding (bottom) the surface.
11Set your tool-rest height slightly below center with the tool on center.
10a

turn a 6" bowl are the same as the techniques to turn a 24" bowl. If you are just learning and blow up a small bowl with an oops, you have far less time, energy, and money invested in the small bowl than you would in the large bowl. Plus, it’s a lot safer turning smaller pieces
Start small and work your way up. Some people have made a career of turning small items.
15What is the bestchuck?
Pull back on those reins; there will be plenty of chances to plunk down money on a 4-jaw scroll chuck after you get your chops. After you’ve turned for a bit, you’ll know exactly what kind of chuck you need.
Don’t buy any chuck until you know what kind of turning you like to do. If you want to turn small items (up to 10"), a chuck such as the Oneway Talon or Penn State Barracu-da 2N is ideal. But until you settle on what you like to turn, use a faceplate. It’s a lot less expensive and you can do almost everything with a face-plate that you can do with a chuck.
For example, if you want to turn a weed pot, you can use a small chuck with #2 jaws, turn a shoulder on your turning stock, and grasp the weed-pot stock with the jaws.
You can turn the same project with a faceplate. After attaching a wasteblock to the faceplate with screws, use cyanoacrylate (CA) glue to adhere the turning stock to the wasteblock.
Sanding and finishing
16What grit sand- paper is that?
I wish I had a dollar for each time I’ve been asked this question during a demonstration. How I sand depends upon what I am turning.
If I’m turning a weed pot or a ring holder, I might start with 120- or 150- grit sandpaper and work up to 600 grit. On a good day, I might start with 180 or 220 grit. However, when I first started turning I generally started with 80 grit or even 60 grit. But now that my skills are better, I can cut better and I have less tear-out, so I can start turning with a higher grit. I do like to use a good quality sandpaper. I’m particularly fond of the gold sand-paper from Klingspor (800-645-5555; klingspor.com), but I also use a blue zirconia paper from Red Hill Corp. (800-822-4003; Supergrit.com). Norton and 3M also make outstanding sand-papers for efficient removal.
If I am sanding something like a bowl or a platter, I sand a little differently. I generally start by hand-sanding with 120 or 150 grit with the lathe running (slowly) to about 220 or 320 grit. I then shut off the lathe, drop down to 180 or 220 grit, and use 3" sanding discs in a drill to finish the piece at least to 600 grit.
As a general rule, I like to slow the lathe down a bit when I am sanding, because it generates less heat. For protection, I often use a foam pad between the sandpaper and my fingers. I sand at the highest grit possible, but won’t hesitate to drop down to a lower grit if neces-sary. The problem with sanding with lower grits is that you can easily sand away those fine details in your turning.
Finally, don’t be stingy by trying to reuse sandpaper. If it’s still cut-ting okay, fine, but if it’s loaded up or clogged, throw it away and use fresh sandpaper.
17What’s the bestfinish to apply?
New woodturners shouldn’t worry about a finished project! I know that sounds odd, but when you’re just
Start EasyWhen I lead hands-on workshops, I limit students to small projects and usually bring suf�cient material to complete three of the same projects (three birdhouses, three ornaments). I always tell the students not to worry about �nishing the �rst project, but to go through the process, learn from their mistakes, and improve the next project. Most people are determined to complete their �rst project, but those who learn from their mistakes and get on to the next project are usually happiest with their results.
Finally, don’t use valuable wood for practice sessions. Go out to the �re-wood pile and turn that wood until you are competent with the tools. Years ago, at one of the early symposiums, another turner and I purchased some beautiful redwood burl slabs. When we saw David Ellsworth, we asked him what we should do with it. His response was, “Put it away until you know the answer to that question.”
starting, your job is to have fun at woodturning. You need to get used to the tools, how they work, and what they will do. When you have mastered the tools, then you can start looking at finished projects.
I like the feel and look of an oil finish such as Waterlox. If I am in a rush, I may resort to a spray lacquer, let the piece dry, and then buff it. For things like my Christmas orna-ments, I hang them in a row and spray them with a Deft satin lacquer.
Bob Rosand Bloomsburg, PA