bmw f650gs owners manual - fuelarc.com · bmw motorrad rider'smanual f650gs the ultimate...
TRANSCRIPT
BMW Motorrad
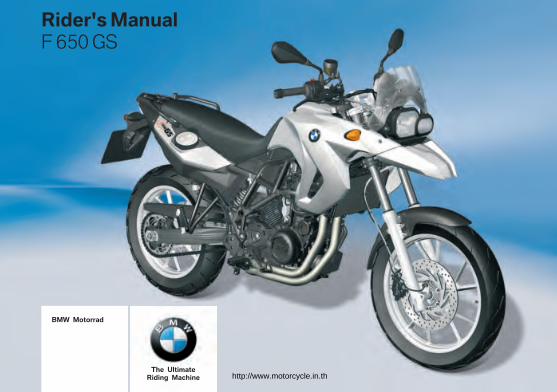
Rider's ManualF 650 GS
The UltimateRiding Machine http://www.motorcycle.in.th
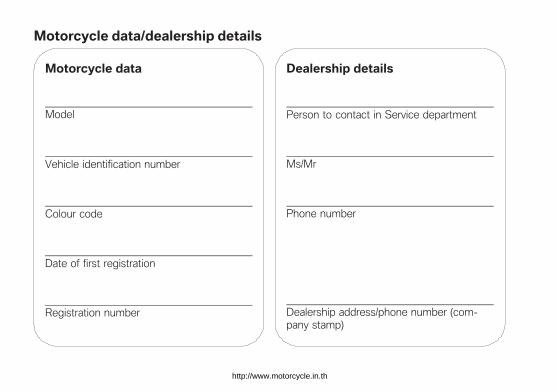
Motorcycle data/dealership details
Motorcycle data
Model
Vehicle identification number
Colour code
Date of first registration
Registration number
Dealership details
Person to contact in Service department
Ms/Mr
Phone number
Dealership address/phone number (com-pany stamp)
http://www.motorcycle.in.th
Welcome to BMW
We congratulate you on yourchoice of a motorcycle fromBMW and welcome you to thecommunity of BMW riders.Familiarise yourself with your newmotorcycle so that you can ride itsafely and confidently in all trafficsituations.Please read this Rider's Manualcarefully before starting to useyour new BMW motorcycle. Itcontains important information onhow to operate the controls andhow to make the best possibleuse of all your BMW's technicalfeatures.In addition, it contains informationon maintenance and care to helpyou maintain your motorcycle'sreliability and safety, as well as itsvalue.If you have questions concerningyour motorcycle, your authorised
BMW Motorrad dealer will gladlyprovide advice and assistance.
We hope that you will enjoy rid-ing your BMW and that all yourjourneys will be pleasant andsafe.
BMW Motorrad.
http://www.motorcycle.in.th
Table of Contents
You can also consult the index atthe end of this Rider's Manual ifyou want to find a particular topicor item of information.
1 General instructions . . . . 5Overview . . . . . . . . . . . . . . . . . . . . . 6Abbreviations andsymbols . . . . . . . . . . . . . . . . . . . . . . 6Equipment . . . . . . . . . . . . . . . . . . . 7Technical data . . . . . . . . . . . . . . . 7Currency . . . . . . . . . . . . . . . . . . . . . 7
2 General views . . . . . . . . . . . . 9General view, left side . . . . . . . 11General view, right side . . . . . 13Underneath the seat . . . . . . . . 14Underneath the trimpanel . . . . . . . . . . . . . . . . . . . . . . . . 15Multifunction switch, left . . . . 16Multifunction switch,right . . . . . . . . . . . . . . . . . . . . . . . . . 17Instrument panel . . . . . . . . . . . . 18
3 Status indicators . . . . . . . 21Multifunction display . . . . . . . . 22Meaning of symbols . . . . . . . . . 23Warning and telltalelights . . . . . . . . . . . . . . . . . . . . . . . . 24Service-due indicator . . . . . . . . 25Kilometres travelled after fueldown to reserve . . . . . . . . . . . . . 25Ambient temperature. . . . . . . . 26Tyre pressures . . . . . . . . . . . . . . 26Warnings . . . . . . . . . . . . . . . . . . . . 26
4 Operation. . . . . . . . . . . . . . . . 37Ignition switch/steeringlock . . . . . . . . . . . . . . . . . . . . . . . . . 38Electronic immobiliserEWS . . . . . . . . . . . . . . . . . . . . . . . . 39Clock . . . . . . . . . . . . . . . . . . . . . . . . 39Reading . . . . . . . . . . . . . . . . . . . . . 40Stopwatch. . . . . . . . . . . . . . . . . . . 41Lights . . . . . . . . . . . . . . . . . . . . . . . 43Turn indicators . . . . . . . . . . . . . . 44Hazard warning flashers . . . . . 44Emergency off switch (killswitch) . . . . . . . . . . . . . . . . . . . . . . 45
Grip heating . . . . . . . . . . . . . . . . . 45BMW Motorrad ABS . . . . . . . . 46Clutch . . . . . . . . . . . . . . . . . . . . . . . 47Brakes . . . . . . . . . . . . . . . . . . . . . . 47Mirrors . . . . . . . . . . . . . . . . . . . . . . 48Spring preload . . . . . . . . . . . . . . 49Damping . . . . . . . . . . . . . . . . . . . . 50Tyres . . . . . . . . . . . . . . . . . . . . . . . . 50Headlight . . . . . . . . . . . . . . . . . . . . 51Seat . . . . . . . . . . . . . . . . . . . . . . . . . 52Helmet holder . . . . . . . . . . . . . . . 53
5 Riding . . . . . . . . . . . . . . . . . . . . 55Safety instructions . . . . . . . . . . 56Checklist . . . . . . . . . . . . . . . . . . . . 58Starting. . . . . . . . . . . . . . . . . . . . . . 59Running in . . . . . . . . . . . . . . . . . . 61speed . . . . . . . . . . . . . . . . . . . . . . . 61Off-roading . . . . . . . . . . . . . . . . . . 62Brakes . . . . . . . . . . . . . . . . . . . . . . 63Parking your motorcycle . . . . 64Refuelling . . . . . . . . . . . . . . . . . . . 65Securing motorcycle fortransportation . . . . . . . . . . . . . . . 66
http://www.motorcycle.in.th

6 Engineering details. . . . . 69Brake system with BMWMotorrad ABS . . . . . . . . . . . . . . . 70Tyre pressure monitoringRDC. . . . . . . . . . . . . . . . . . . . . . . . . 72
7 Accessories . . . . . . . . . . . . . 75General instructions . . . . . . . . . 76Power sockets . . . . . . . . . . . . . . 76Luggage . . . . . . . . . . . . . . . . . . . . 77Cases . . . . . . . . . . . . . . . . . . . . . . . 77Topcase. . . . . . . . . . . . . . . . . . . . . 80
8 Maintenance . . . . . . . . . . . . 85General instructions . . . . . . . . . 86Toolkit . . . . . . . . . . . . . . . . . . . . . . . 86Engine oil . . . . . . . . . . . . . . . . . . . 87Brake system . . . . . . . . . . . . . . . 88Coolant . . . . . . . . . . . . . . . . . . . . . . 92Clutch . . . . . . . . . . . . . . . . . . . . . . . 93Rims and tyres . . . . . . . . . . . . . . 94Chain . . . . . . . . . . . . . . . . . . . . . . . . 95Wheels . . . . . . . . . . . . . . . . . . . . . . 97Front-wheel stand . . . . . . . . . 103Bulbs . . . . . . . . . . . . . . . . . . . . . . 104Body panels . . . . . . . . . . . . . . . 109Air filter . . . . . . . . . . . . . . . . . . . . 111
Jump starting . . . . . . . . . . . . . 111Battery . . . . . . . . . . . . . . . . . . . . 113
9 Care . . . . . . . . . . . . . . . . . . . . 117Care products . . . . . . . . . . . . . 118Washing motorcycle. . . . . . . 118Cleaning easily damagedcomponents . . . . . . . . . . . . . . . 118Paint care . . . . . . . . . . . . . . . . . 119Protective wax coating . . . . 120Laying up motorcycle . . . . . 120Restoring motorcycle touse . . . . . . . . . . . . . . . . . . . . . . . . 120
10 Technical data . . . . . . 121troubleshooting chart . . . . . . 122Threaded fasteners . . . . . . . 123Engine . . . . . . . . . . . . . . . . . . . . 125Fuel . . . . . . . . . . . . . . . . . . . . . . . 126Engine oil . . . . . . . . . . . . . . . . . 126Clutch . . . . . . . . . . . . . . . . . . . . . 127Transmission . . . . . . . . . . . . . . 127Rear-wheel drive . . . . . . . . . . 128Running gear . . . . . . . . . . . . . . 128Brakes . . . . . . . . . . . . . . . . . . . . 129Wheels and tyres. . . . . . . . . . 129Electrics . . . . . . . . . . . . . . . . . . . 131
Frame . . . . . . . . . . . . . . . . . . . . . 132Dimensions . . . . . . . . . . . . . . . 133Weights . . . . . . . . . . . . . . . . . . . 134Riding specifications . . . . . . 134
11 Service . . . . . . . . . . . . . . . 135BMW Motorrad Service . . . 136BMW Motorrad Mobilityservices . . . . . . . . . . . . . . . . . . . 136Maintenance work . . . . . . . . . 136Confirmation of mainten-ance work . . . . . . . . . . . . . . . . . 138Confirmation of service . . . . 143
12 Index . . . . . . . . . . . . . . . . . 145
http://www.motorcycle.in.th


General instructions
General instructions
Overview . . . . . . . . . . . . . . . . . . . . . . . . . . . . 6
Abbreviations and symbols . . . . . . . . . . 6
Equipment . . . . . . . . . . . . . . . . . . . . . . . . . . . 7
Technical data . . . . . . . . . . . . . . . . . . . . . . . 7
Currency . . . . . . . . . . . . . . . . . . . . . . . . . . . . . 7
15
z Ge
ne
ral i
nst
ruc
tio
ns
http://www.motorcycle.in.th
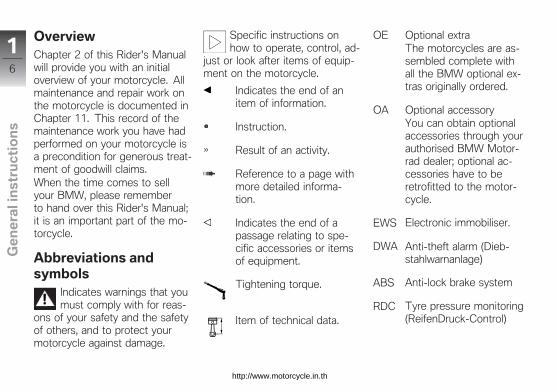
OverviewChapter 2 of this Rider's Manualwill provide you with an initialoverview of your motorcycle. Allmaintenance and repair work onthe motorcycle is documented inChapter 11. This record of themaintenance work you have hadperformed on your motorcycle isa precondition for generous treat-ment of goodwill claims.When the time comes to sellyour BMW, please rememberto hand over this Rider's Manual;it is an important part of the mo-torcycle.
Abbreviations andsymbols
Indicates warnings that youmust comply with for reas-
ons of your safety and the safetyof others, and to protect yourmotorcycle against damage.
Specific instructions onhow to operate, control, ad-
just or look after items of equip-ment on the motorcycle.
Indicates the end of anitem of information.
Instruction.
Result of an activity.
Reference to a page withmore detailed informa-tion.
Indicates the end of apassage relating to spe-cific accessories or itemsof equipment.
Tightening torque.
Item of technical data.
OE Optional extraThe motorcycles are as-sembled complete withall the BMW optional ex-tras originally ordered.
OA Optional accessoryYou can obtain optionalaccessories through yourauthorised BMW Motor-rad dealer; optional ac-cessories have to beretrofitted to the motor-cycle.
EWS Electronic immobiliser.
DWA Anti-theft alarm (Dieb-stahlwarnanlage)
ABS Anti-lock brake system
RDC Tyre pressure monitoring(ReifenDruck-Control)
16
z Ge
ne
ral i
nst
ruc
tio
ns
http://www.motorcycle.in.th
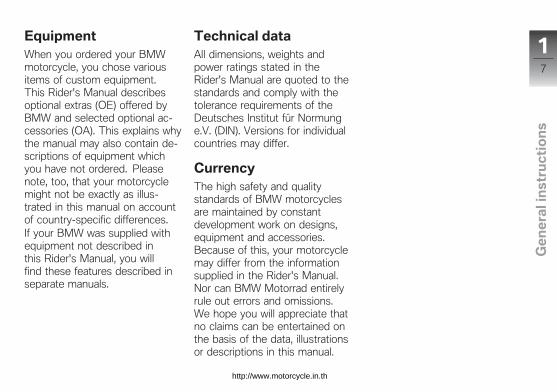
EquipmentWhen you ordered your BMWmotorcycle, you chose variousitems of custom equipment.This Rider's Manual describesoptional extras (OE) offered byBMW and selected optional ac-cessories (OA). This explains whythe manual may also contain de-scriptions of equipment whichyou have not ordered. Pleasenote, too, that your motorcyclemight not be exactly as illus-trated in this manual on accountof country-specific differences.If your BMW was supplied withequipment not described inthis Rider's Manual, you willfind these features described inseparate manuals.
Technical dataAll dimensions, weights andpower ratings stated in theRider's Manual are quoted to thestandards and comply with thetolerance requirements of theDeutsches Institut für Normunge.V. (DIN). Versions for individualcountries may differ.
CurrencyThe high safety and qualitystandards of BMW motorcyclesare maintained by constantdevelopment work on designs,equipment and accessories.Because of this, your motorcyclemay differ from the informationsupplied in the Rider's Manual.Nor can BMW Motorrad entirelyrule out errors and omissions.We hope you will appreciate thatno claims can be entertained onthe basis of the data, illustrationsor descriptions in this manual.
17
z Ge
ne
ral i
nst
ruc
tio
ns
http://www.motorcycle.in.th

General views
General views
General view, left side . . . . . . . . . . . . . . . 11
General view, right side . . . . . . . . . . . . . 13
Underneath the seat . . . . . . . . . . . . . . . . 14
Underneath the trim panel . . . . . . . . . . 15
Multifunction switch, left . . . . . . . . . . . . 16
Multifunction switch, right . . . . . . . . . . . 17
Instrument panel . . . . . . . . . . . . . . . . . . . . 18
29
z Ge
ne
ral v
iew
s
http://www.motorcycle.in.th
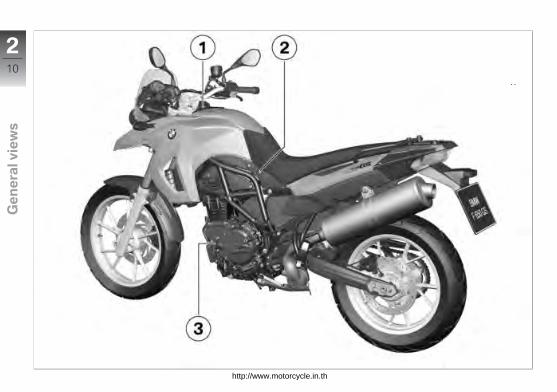
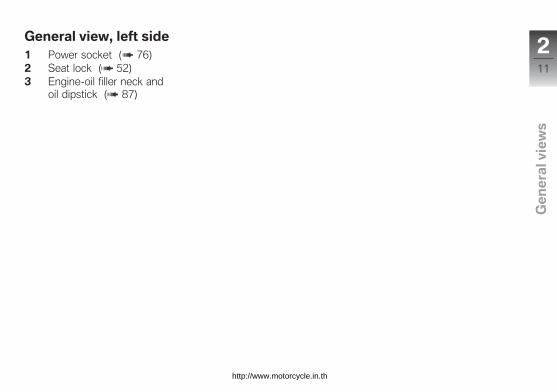
General view, left side1 Power socket ( 76)2 Seat lock ( 52)3 Engine-oil filler neck and
oil dipstick ( 87)
211
z Ge
ne
ral v
iew
s
http://www.motorcycle.in.th

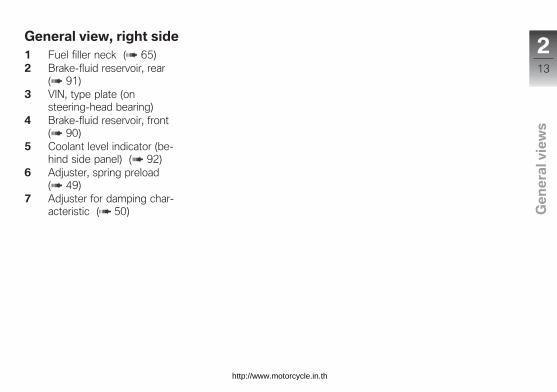
General view, right side1 Fuel filler neck ( 65)2 Brake-fluid reservoir, rear
( 91)3 VIN, type plate (on
steering-head bearing)4 Brake-fluid reservoir, front
( 90)5 Coolant level indicator (be-
hind side panel) ( 92)6 Adjuster, spring preload
( 49)7 Adjuster for damping char-
acteristic ( 50)
213
z Ge
ne
ral v
iew
s
http://www.motorcycle.in.th

Underneath the seat1 Stowage
with first-aid kit OA
Location of the first-aid kit2 Standard toolkit ( 86)3 Payload table4 Table of tyre pressures5 Helmet holder ( 53)6 Rider's Manual7 Tool for adjusting spring
preload ( 49)
214
z Ge
ne
ral v
iew
s
http://www.motorcycle.in.th

Underneath the trimpanel1 Battery ( 113)2 Air-filter housing ( 111)
215
z Ge
ne
ral v
iew
s
http://www.motorcycle.in.th
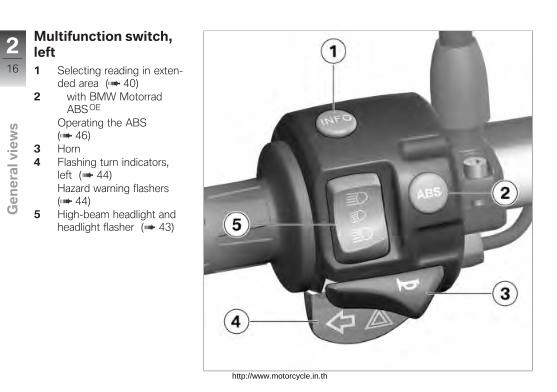
Multifunction switch,left1 Selecting reading in exten-
ded area ( 40)2 with BMW Motorrad
ABS OE
Operating the ABS( 46)
3 Horn4 Flashing turn indicators,
left ( 44)Hazard warning flashers( 44)
5 High-beam headlight andheadlight flasher ( 43)
216
z Ge
ne
ral v
iew
s
http://www.motorcycle.in.th
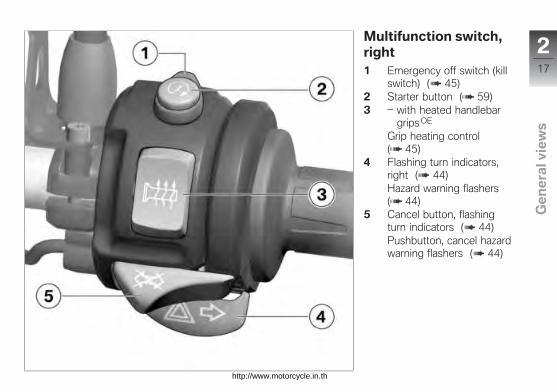
Multifunction switch,right1 Emergency off switch (kill
switch) ( 45)2 Starter button ( 59)3 with heated handlebar
grips OE
Grip heating control( 45)
4 Flashing turn indicators,right ( 44)Hazard warning flashers( 44)
5 Cancel button, flashingturn indicators ( 44)Pushbutton, cancel hazardwarning flashers ( 44)
217
z Ge
ne
ral v
iew
s
http://www.motorcycle.in.th

Instrument panel1 Warning and telltale lights
( 24)2 Speedometer3 Setting clock ( 39).
with on-board com-puter OE
Operation of the stopwatch( 41)
4 Multifunction display( 22)
5 Select the readings( 40).Reset the tripmeter( 41).
218
z Ge
ne
ral v
iew
s
http://www.motorcycle.in.th
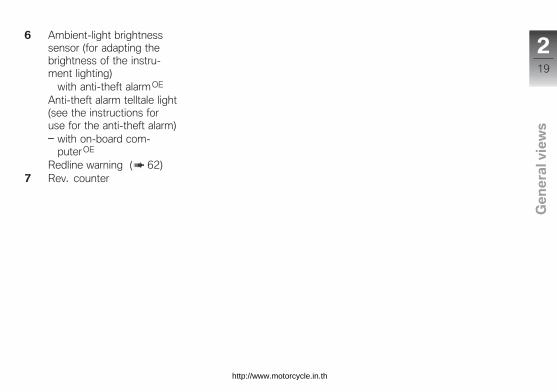
6 Ambient-light brightnesssensor (for adapting thebrightness of the instru-ment lighting)
with anti-theft alarm OE
Anti-theft alarm telltale light(see the instructions foruse for the anti-theft alarm)
with on-board com-puter OE
Redline warning ( 62)7 Rev. counter
219
z Ge
ne
ral v
iew
s
http://www.motorcycle.in.th

Status indicators
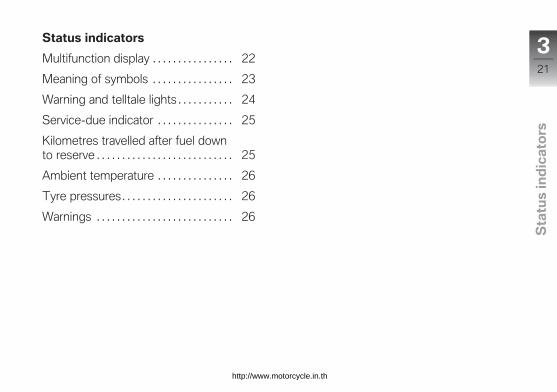
Status indicators
Multifunction display . . . . . . . . . . . . . . . . 22
Meaning of symbols . . . . . . . . . . . . . . . . 23
Warning and telltale lights . . . . . . . . . . . 24
Service-due indicator . . . . . . . . . . . . . . . 25
Kilometres travelled after fuel downto reserve . . . . . . . . . . . . . . . . . . . . . . . . . . . 25
Ambient temperature . . . . . . . . . . . . . . . 26
Tyre pressures. . . . . . . . . . . . . . . . . . . . . . 26
Warnings . . . . . . . . . . . . . . . . . . . . . . . . . . . 26
321
z Sta
tus
ind
ica
tors
http://www.motorcycle.in.th
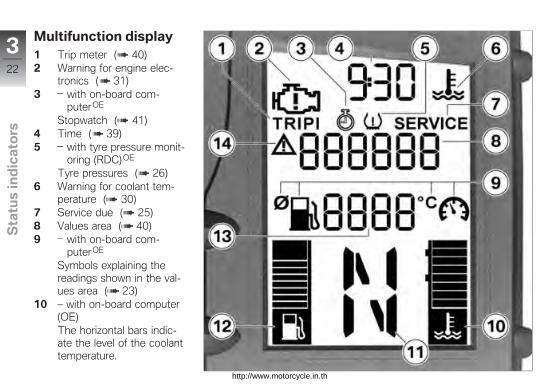
Multifunction display1 Trip meter ( 40)2 Warning for engine elec-
tronics ( 31)3 with on-board com-
puter OE
Stopwatch ( 41)4 Time ( 39)5 with tyre pressure monit-
oring (RDC)OE
Tyre pressures ( 26)6 Warning for coolant tem-
perature ( 30)7 Service due ( 25)8 Values area ( 40)9 with on-board com-
puter OE
Symbols explaining thereadings shown in the val-ues area ( 23)
10 – with on-board computer(OE)The horizontal bars indic-ate the level of the coolanttemperature.
322
z Sta
tus
ind
ica
tors
http://www.motorcycle.in.th
11 – with on-board computer(OE)Gear indicator; "N" indic-ates neutral
12 – with on-board computer(OE)Fuel levelThe horizontal bars abovethe fuel-pump symbolindicate the remainingquantity of fuel. The topbar is larger than the oth-ers and the quantity of fuelit represents is significantlylarger.
13 – with on-board computer(OE)Values area ( 40)
14 a warning is shown in thevalues area ( 26)
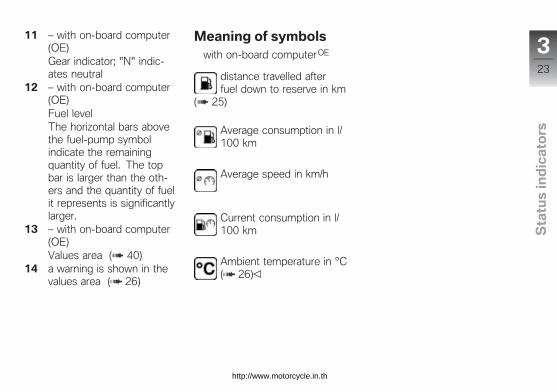
Meaning of symbolswith on-board computerOE
distance travelled afterfuel down to reserve in km
( 25)
Average consumption in l/100 km
Average speed in km/h
Current consumption in l/100 km
Ambient temperature in °C( 26)
323
z Sta
tus
ind
ica
tors
http://www.motorcycle.in.th
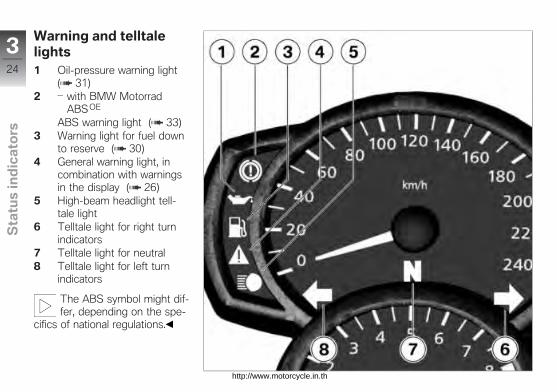
Warning and telltalelights1 Oil-pressure warning light
( 31)2 with BMW Motorrad
ABS OE
ABS warning light ( 33)3 Warning light for fuel down
to reserve ( 30)4 General warning light, in
combination with warningsin the display ( 26)
5 High-beam headlight tell-tale light
6 Telltale light for right turnindicators
7 Telltale light for neutral8 Telltale light for left turn
indicators
The ABS symbol might dif-fer, depending on the spe-
cifics of national regulations.
324
z Sta
tus
ind
ica
tors
http://www.motorcycle.in.th
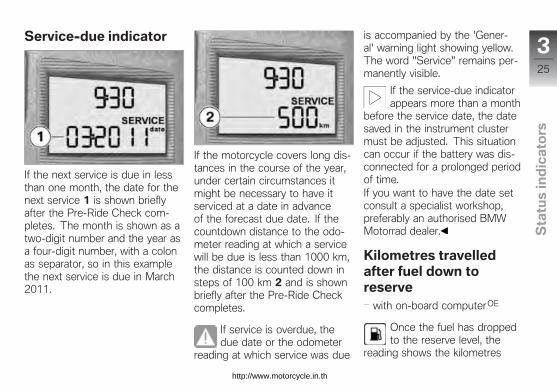
Service-due indicator
If the next service is due in lessthan one month, the date for thenext service 1 is shown brieflyafter the Pre-Ride Check com-pletes. The month is shown as atwo-digit number and the year asa four-digit number, with a colonas separator, so in this examplethe next service is due in March2011.
If the motorcycle covers long dis-tances in the course of the year,under certain circumstances itmight be necessary to have itserviced at a date in advanceof the forecast due date. If thecountdown distance to the odo-meter reading at which a servicewill be due is less than 1000 km,the distance is counted down insteps of 100 km 2 and is shownbriefly after the Pre-Ride Checkcompletes.
If service is overdue, thedue date or the odometer
reading at which service was due
is accompanied by the 'Gener-al' warning light showing yellow.The word "Service" remains per-manently visible.
If the service-due indicatorappears more than a month
before the service date, the datesaved in the instrument clustermust be adjusted. This situationcan occur if the battery was dis-connected for a prolonged periodof time.If you want to have the date setconsult a specialist workshop,preferably an authorised BMWMotorrad dealer.
Kilometres travelledafter fuel down toreserve
with on-board computerOE
Once the fuel has droppedto the reserve level, the
reading shows the kilometres
325
z Sta
tus
ind
ica
tors
http://www.motorcycle.in.th
travelled since then. This counteris reset as soon as refuellingbrings the total quantity of fuelon board back above the reservelevel.
Ambient temperaturewith on-board computerOE
When the motorcycle is ata standstill the heat of the
engine can falsify the ambient-temperature reading. If the effectof the engine's heat becomes ex-cessive, -- temporarily appearson the display.If ambient temperature drops be-low 3 °C the temperature dis-play flashes to draw your atten-tion to the risk of black ice form-ing. The display automaticallyswitches from any other modeto the temperature reading whenthe temperature drops below thisthreshold for the first time.
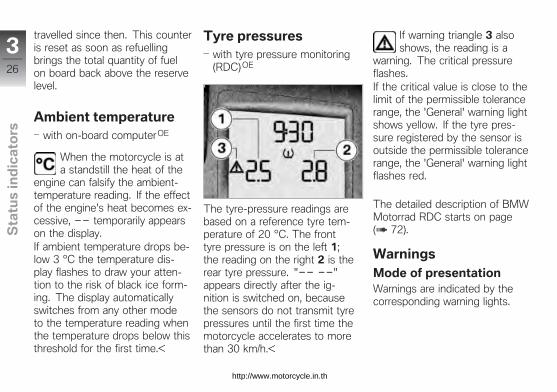
Tyre pressureswith tyre pressure monitoring(RDC)OE
The tyre-pressure readings arebased on a reference tyre tem-perature of 20 °C. The fronttyre pressure is on the left 1;the reading on the right 2 is therear tyre pressure. "-- --"appears directly after the ig-nition is switched on, becausethe sensors do not transmit tyrepressures until the first time themotorcycle accelerates to morethan 30 km/h.
If warning triangle 3 alsoshows, the reading is a
warning. The critical pressureflashes.If the critical value is close to thelimit of the permissible tolerancerange, the 'General' warning lightshows yellow. If the tyre pres-sure registered by the sensor isoutside the permissible tolerancerange, the 'General' warning lightflashes red.
The detailed description of BMWMotorrad RDC starts on page( 72).
WarningsMode of presentationWarnings are indicated by thecorresponding warning lights.
326
z Sta
tus
ind
ica
tors
http://www.motorcycle.in.th

Warnings that do not have warn-ing lights of their own are indic-ated by 'General' warning light 1showing in combination with atext warning or a warning symbolin the multifunction display. The'General' warning light shows redor yellow, depending on the ur-gency of the warning.
A reading in values area 2that constitutes a warningis accompanied by warningtriangle 3. These warnings canalternate with the odometerreadings ( 40).
The status of the 'General' warn-ing light matches the most ur-gent warning.
The possible warnings are listedon the next page.
327
z Sta
tus
ind
ica
tors
http://www.motorcycle.in.th
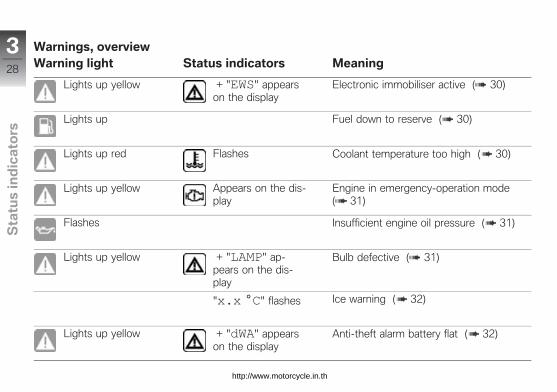
Warnings, overviewWarning light Status indicators Meaning
Lights up yellow + "EWS" appearson the display
Electronic immobiliser active ( 30)
Lights up Fuel down to reserve ( 30)
Lights up red Flashes Coolant temperature too high ( 30)
Lights up yellow Appears on the dis-play
Engine in emergency-operation mode( 31)
Flashes Insufficient engine oil pressure ( 31)
Lights up yellow + "LAMP" ap-pears on the dis-play
Bulb defective ( 31)
"x.x °C" flashes Ice warning ( 32)
Lights up yellow + "dWA" appearson the display
Anti-theft alarm battery flat ( 32)
328
z Sta
tus
ind
ica
tors
http://www.motorcycle.in.th

Warning light Status indicators Meaning
Flashes ABS self-diagnosis not completed( 33)
Lights up ABS deactivated ( 33)
Lights up ABS fault ( 33)
Lights up yellow + "x.x" flashes Tyre pressure close to limit of permittedtolerance ( 33)
Flashes red + "x.x" flashes Tyre pressure outside permitted toler-ance ( 34)
+ "--" or "----" appears onthe display.
Signal transmission disrupted ( 34)
Lights up yellow + "--" or "----" appears onthe display.
Sensor defective or system error( 35)
Lights up yellow + "RdC" appearson the display.
Battery of tyre-pressure sensor weak( 35)
329
z Sta
tus
ind
ica
tors
http://www.motorcycle.in.th

Electronic immobiliseractive
General warning light showsyellow.
+ "EWS" appears on thedisplay.
Possible cause:The key being used is not au-thorised for starting, or commu-nication between key and engineelectronics is disrupted.
Remove all other vehicle keysfrom the same ring as the igni-tion key.Use the reserve key.Have the defective key re-placed, preferably by an au-thorised BMW Motorrad dealer.
Fuel down to reserveWarning light for fuel downto reserve shows.
Lack of fuel can result inthe engine misfiring and
cutting out unexpectedly. Mis-firing can damage the catalyticconverter; a hazardous situationcan result if the engine cuts outunexpectedly.Do not run the fuel tank dry.
Possible cause:The fuel tank contains no morethan the reserve quantity of fuel.
Reserve fuel
approx. 4 l
Refuelling ( 65).
Coolant temperature toohigh
General warning light showsred.
The temperature symbolflashes.
Continuing to ride when theengine is overheated could
result in engine damage.Compliance with the informationset out below is essential.
Possible cause:If the coolant level is too low.
Check the coolant level ( 92).If the coolant level is too low:
Topping up coolant ( 93).
Possible cause:The coolant temperature is toohigh.
If possible, ride in the part-loadrange to cool down the engine.In traffic jams, switch off theengine, but leave the ignitionswitched on so that the radi-ator fan continues to operate.If the coolant temperature isfrequently too high, have thefault rectified as soon as pos-sible by a specialist workshop,
330
z Sta
tus
ind
ica
tors
http://www.motorcycle.in.th
preferably an authorised BMWMotorrad dealer.
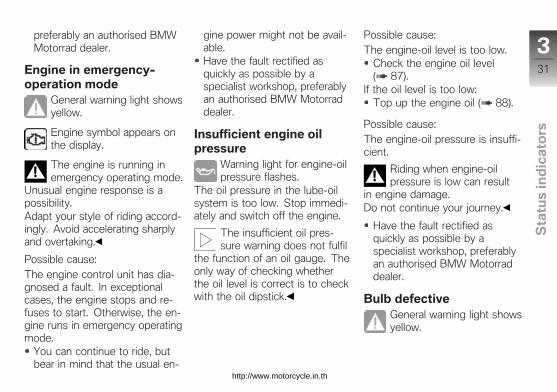
Engine in emergency-operation mode
General warning light showsyellow.
Engine symbol appears onthe display.
The engine is running inemergency operating mode.
Unusual engine response is apossibility.Adapt your style of riding accord-ingly. Avoid accelerating sharplyand overtaking.
Possible cause:The engine control unit has dia-gnosed a fault. In exceptionalcases, the engine stops and re-fuses to start. Otherwise, the en-gine runs in emergency operatingmode.
You can continue to ride, butbear in mind that the usual en-
gine power might not be avail-able.Have the fault rectified asquickly as possible by aspecialist workshop, preferablyan authorised BMW Motorraddealer.
Insufficient engine oilpressure
Warning light for engine-oilpressure flashes.
The oil pressure in the lube-oilsystem is too low. Stop immedi-ately and switch off the engine.
The insufficient oil pres-sure warning does not fulfil
the function of an oil gauge. Theonly way of checking whetherthe oil level is correct is to checkwith the oil dipstick.
Possible cause:The engine-oil level is too low.
Check the engine oil level( 87).
If the oil level is too low:Top up the engine oil ( 88).
Possible cause:The engine-oil pressure is insuffi-cient.
Riding when engine-oilpressure is low can result
in engine damage.Do not continue your journey.
Have the fault rectified asquickly as possible by aspecialist workshop, preferablyan authorised BMW Motorraddealer.
Bulb defectiveGeneral warning light showsyellow.
331
z Sta
tus
ind
ica
tors
http://www.motorcycle.in.th

+ "LAMP" appears on thedisplay.
A defective bulb placesyour safety at risk because
it is easier for other users tooversee the motorcycle.Replace defective bulbs assoon as possible; always carry acomplete set of spare bulbs ifpossible.
Possible cause:Bulb defective.
Visually inspect to ascertainwhich bulb is defective.Replacing low-beam and high-beam headlight bulb ( 104).Replacing parking-light bulb( 105).Replacing brake light and rearlight bulb ( 107).Replacing turn indicator bulbs,front and rear ( 107).
Ice warningwith on-board computerOE
"x.x °C" (ambient tempera-ture) flashes.Possible cause:The air temperature measuredat the motorcycle is lower than3 °C.
The ice warning does notmean that there is no risk
of black ice forming at measuredtemperatures above 3 °C.Always take extra care whentemperatures are low; rememberthat the danger of black ice form-ing is particularly high on bridgesand where the road is in shade.
Ride carefully and think wellahead.
Anti-theft alarm batteryflat
with anti-theft alarm OE
General warning light showsyellow.
+ "dWA" appears on thedisplay.
This error message appearsonly briefly after the pre-
ride check completes.
Possible cause:The integral battery in the anti-theft alarm has lost its entire ori-ginal capacity. There is no assur-ance that the anti-theft alarm willbe operational if the motorcycle'sbattery is disconnected.
Seek the advice of a specialistworkshop, preferably an author-ised BMW Motorrad dealer.
332
z Sta
tus
ind
ica
tors
http://www.motorcycle.in.th
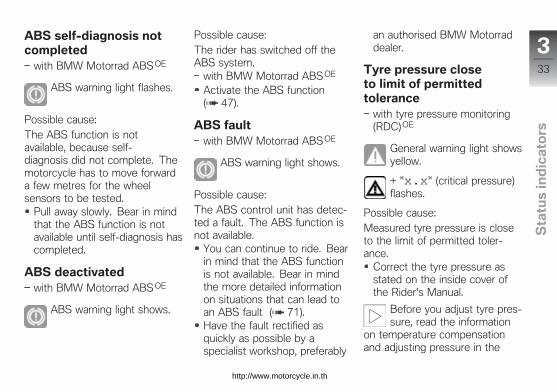
ABS self-diagnosis notcompleted
with BMW Motorrad ABS OE
ABS warning light flashes.
Possible cause:The ABS function is notavailable, because self-diagnosis did not complete. Themotorcycle has to move forwarda few metres for the wheelsensors to be tested.
Pull away slowly. Bear in mindthat the ABS function is notavailable until self-diagnosis hascompleted.
ABS deactivatedwith BMW Motorrad ABS OE
ABS warning light shows.
Possible cause:The rider has switched off theABS system.
with BMW Motorrad ABS OE
Activate the ABS function( 47).
ABS faultwith BMW Motorrad ABS OE
ABS warning light shows.
Possible cause:The ABS control unit has detec-ted a fault. The ABS function isnot available.
You can continue to ride. Bearin mind that the ABS functionis not available. Bear in mindthe more detailed informationon situations that can lead toan ABS fault ( 71).Have the fault rectified asquickly as possible by aspecialist workshop, preferably
an authorised BMW Motorraddealer.
Tyre pressure closeto limit of permittedtolerance
with tyre pressure monitoring(RDC)OE
General warning light showsyellow.
+ "x.x" (critical pressure)flashes.
Possible cause:Measured tyre pressure is closeto the limit of permitted toler-ance.
Correct the tyre pressure asstated on the inside cover ofthe Rider's Manual.
Before you adjust tyre pres-sure, read the information
on temperature compensationand adjusting pressure in the
333
z Sta
tus
ind
ica
tors
http://www.motorcycle.in.th
section entitled "Engineeringdetails".
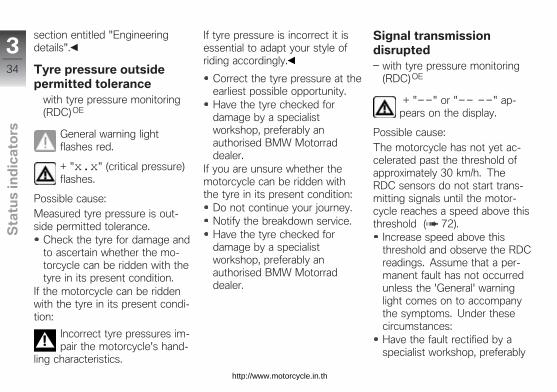
Tyre pressure outsidepermitted tolerance
with tyre pressure monitoring(RDC)OE
General warning lightflashes red.
+ "x.x" (critical pressure)flashes.
Possible cause:Measured tyre pressure is out-side permitted tolerance.
Check the tyre for damage andto ascertain whether the mo-torcycle can be ridden with thetyre in its present condition.
If the motorcycle can be riddenwith the tyre in its present condi-tion:
Incorrect tyre pressures im-pair the motorcycle's hand-
ling characteristics.
If tyre pressure is incorrect it isessential to adapt your style ofriding accordingly.
Correct the tyre pressure at theearliest possible opportunity.Have the tyre checked fordamage by a specialistworkshop, preferably anauthorised BMW Motorraddealer.
If you are unsure whether themotorcycle can be ridden withthe tyre in its present condition:
Do not continue your journey.Notify the breakdown service.Have the tyre checked fordamage by a specialistworkshop, preferably anauthorised BMW Motorraddealer.
Signal transmissiondisrupted
with tyre pressure monitoring(RDC)OE
+ "--" or "-- --" ap-pears on the display.
Possible cause:The motorcycle has not yet ac-celerated past the threshold ofapproximately 30 km/h. TheRDC sensors do not start trans-mitting signals until the motor-cycle reaches a speed above thisthreshold ( 72).
Increase speed above thisthreshold and observe the RDCreadings. Assume that a per-manent fault has not occurredunless the 'General' warninglight comes on to accompanythe symptoms. Under thesecircumstances:Have the fault rectified by aspecialist workshop, preferably
334
z Sta
tus
ind
ica
tors
http://www.motorcycle.in.th
an authorised BMW Motorraddealer.
Possible cause:Wireless communication with theRDC sensors has been disrupted.Possible causes include radio-communication systems operat-ing in the vicinity and interferingwith the link between the RDCcontrol unit and the sensors.
Move to another location andobserve the RDC readings. As-sume that a permanent faulthas not occurred unless the'General' warning light comeson to accompany the symp-toms. Under these circum-stances:Have the fault rectified by aspecialist workshop, preferablyan authorised BMW Motorraddealer.
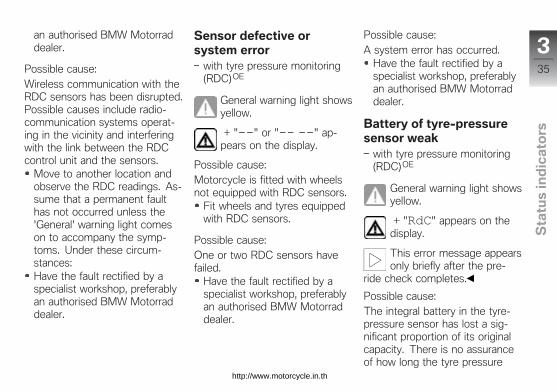
Sensor defective orsystem error
with tyre pressure monitoring(RDC)OE
General warning light showsyellow.
+ "--" or "-- --" ap-pears on the display.
Possible cause:Motorcycle is fitted with wheelsnot equipped with RDC sensors.
Fit wheels and tyres equippedwith RDC sensors.
Possible cause:One or two RDC sensors havefailed.
Have the fault rectified by aspecialist workshop, preferablyan authorised BMW Motorraddealer.
Possible cause:A system error has occurred.
Have the fault rectified by aspecialist workshop, preferablyan authorised BMW Motorraddealer.
Battery of tyre-pressuresensor weak
with tyre pressure monitoring(RDC)OE
General warning light showsyellow.
+ "RdC" appears on thedisplay.
This error message appearsonly briefly after the pre-
ride check completes.
Possible cause:The integral battery in the tyre-pressure sensor has lost a sig-nificant proportion of its originalcapacity. There is no assuranceof how long the tyre pressure
335
z Sta
tus
ind
ica
tors
http://www.motorcycle.in.th
control system can remain opera-tional.
Seek the advice of a specialistworkshop, preferably an author-ised BMW Motorrad dealer.
336
z Sta
tus
ind
ica
tors
http://www.motorcycle.in.th
Operation
Operation
Ignition switch/steering lock . . . . . . . . . 38
Electronic immobiliser EWS. . . . . . . . . 39
Clock . . . . . . . . . . . . . . . . . . . . . . . . . . . . . . . 39
Reading. . . . . . . . . . . . . . . . . . . . . . . . . . . . . 40
Stopwatch . . . . . . . . . . . . . . . . . . . . . . . . . . 41
Lights . . . . . . . . . . . . . . . . . . . . . . . . . . . . . . . 43
Turn indicators . . . . . . . . . . . . . . . . . . . . . . 44
Hazard warning flashers . . . . . . . . . . . . . 44
Emergency off switch (killswitch) . . . . . . . . . . . . . . . . . . . . . . . . . . . . . . 45
Grip heating. . . . . . . . . . . . . . . . . . . . . . . . . 45
BMW Motorrad ABS . . . . . . . . . . . . . . . . 46
Clutch . . . . . . . . . . . . . . . . . . . . . . . . . . . . . . 47
Brakes . . . . . . . . . . . . . . . . . . . . . . . . . . . . . . 47
Mirrors . . . . . . . . . . . . . . . . . . . . . . . . . . . . . . 48
Spring preload . . . . . . . . . . . . . . . . . . . . . . 49
Damping . . . . . . . . . . . . . . . . . . . . . . . . . . . . 50
Tyres . . . . . . . . . . . . . . . . . . . . . . . . . . . . . . . 50
Headlight . . . . . . . . . . . . . . . . . . . . . . . . . . . 51
Seat . . . . . . . . . . . . . . . . . . . . . . . . . . . . . . . . 52
Helmet holder . . . . . . . . . . . . . . . . . . . . . . 53
437
z Op
era
tio
n
http://www.motorcycle.in.th
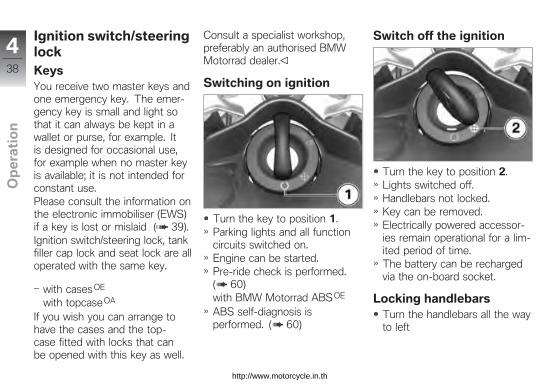
Ignition switch/steeringlockKeysYou receive two master keys andone emergency key. The emer-gency key is small and light sothat it can always be kept in awallet or purse, for example. Itis designed for occasional use,for example when no master keyis available; it is not intended forconstant use.Please consult the information onthe electronic immobiliser (EWS)if a key is lost or mislaid ( 39).Ignition switch/steering lock, tankfiller cap lock and seat lock are alloperated with the same key.
with casesOE
with topcaseOA
If you wish you can arrange tohave the cases and the top-case fitted with locks that canbe opened with this key as well.
Consult a specialist workshop,preferably an authorised BMWMotorrad dealer.
Switching on ignition
Turn the key to position 1.Parking lights and all functioncircuits switched on.Engine can be started.Pre-ride check is performed.( 60)with BMW Motorrad ABS OE
ABS self-diagnosis isperformed. ( 60)
Switch off the ignition
Turn the key to position 2.Lights switched off.Handlebars not locked.Key can be removed.Electrically powered accessor-ies remain operational for a lim-ited period of time.The battery can be rechargedvia the on-board socket.
Locking handlebarsTurn the handlebars all the wayto left
438
z Op
era
tio
n
http://www.motorcycle.in.th
Turn the key to position 3,while moving the handlebarsslightly.Ignition, lights and all functioncircuits switched off.Handlebars locked.Key can be removed.
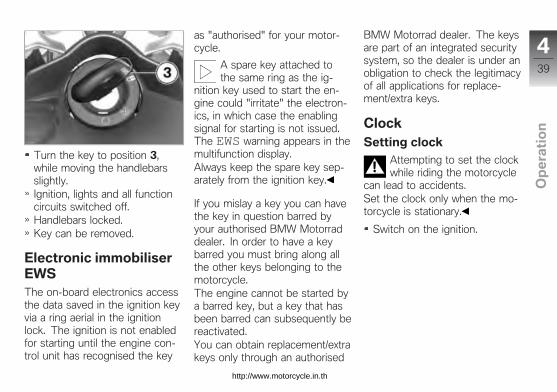
Electronic immobiliserEWSThe on-board electronics accessthe data saved in the ignition keyvia a ring aerial in the ignitionlock. The ignition is not enabledfor starting until the engine con-trol unit has recognised the key
as "authorised" for your motor-cycle.
A spare key attached tothe same ring as the ig-
nition key used to start the en-gine could "irritate" the electron-ics, in which case the enablingsignal for starting is not issued.The EWS warning appears in themultifunction display.Always keep the spare key sep-arately from the ignition key.
If you mislay a key you can havethe key in question barred byyour authorised BMW Motorraddealer. In order to have a keybarred you must bring along allthe other keys belonging to themotorcycle.The engine cannot be started bya barred key, but a key that hasbeen barred can subsequently bereactivated.You can obtain replacement/extrakeys only through an authorised
BMW Motorrad dealer. The keysare part of an integrated securitysystem, so the dealer is under anobligation to check the legitimacyof all applications for replace-ment/extra keys.
ClockSetting clock
Attempting to set the clockwhile riding the motorcycle
can lead to accidents.Set the clock only when the mo-torcycle is stationary.
Switch on the ignition.
439
z Op
era
tio
n
http://www.motorcycle.in.th
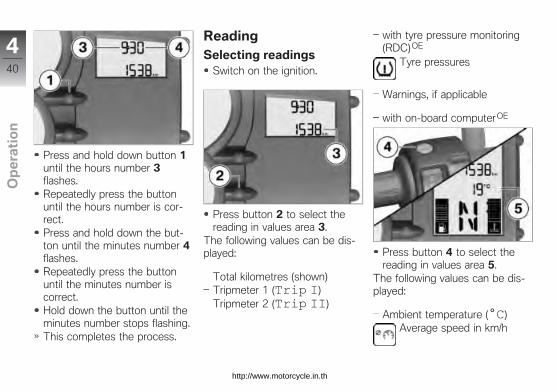
Press and hold down button 1until the hours number 3flashes.Repeatedly press the buttonuntil the hours number is cor-rect.Press and hold down the but-ton until the minutes number 4flashes.Repeatedly press the buttonuntil the minutes number iscorrect.Hold down the button until theminutes number stops flashing.This completes the process.
ReadingSelecting readings
Switch on the ignition.
Press button 2 to select thereading in values area 3.
The following values can be dis-played:
Total kilometres (shown)Tripmeter 1 (Trip I)Tripmeter 2 (Trip II)
with tyre pressure monitoring(RDC)OE
Tyre pressures
Warnings, if applicable
with on-board computerOE
Press button 4 to select thereading in values area 5.
The following values can be dis-played:
Ambient temperature (°C)Average speed in km/h
440
z Op
era
tio
n
http://www.motorcycle.in.th
Average consumption in l/100 km
Current consumption in l/100 km
distance travelled after fueldown to reserve in km
Resetting tripmeterSwitch on the ignition.Select the desired tripmeter.
Press and hold down button 2until the tripmeter reading isreset.
Resetting average valueswith on-board computerOE
Switch on the ignition.Select average consumption oraverage speed.
Press and hold down button 1until the value shown is reset.
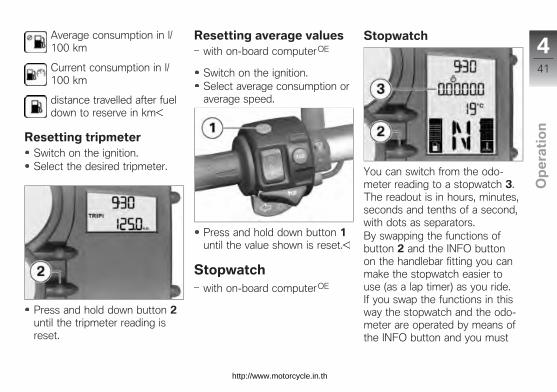
Stopwatchwith on-board computerOE
Stopwatch
You can switch from the odo-meter reading to a stopwatch 3.The readout is in hours, minutes,seconds and tenths of a second,with dots as separators.By swapping the functions ofbutton 2 and the INFO buttonon the handlebar fitting you canmake the stopwatch easier touse (as a lap timer) as you ride.If you swap the functions in thisway the stopwatch and the odo-meter are operated by means ofthe INFO button and you must
441
z Op
era
tio
n
http://www.motorcycle.in.th
use button 2 to operate the on-board computer.The stopwatch continues to timein the background if you switchback temporarily to the odometerreading. Similarly, the stopwatchcontinues timing if you temporar-ily switch off the ignition.
Operating stopwatch
If necessary, use button 1 toswitch from the odometer tothe stopwatch.
When the stopwatch isstopped, press button 2 tostart timing with the stopwatch.When the stopwatch is running,press button 2 to stop timingwith the stopwatch.Press and hold down button 2to reset the stopwatch.
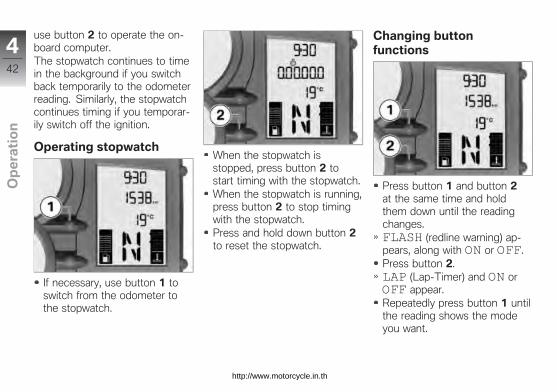
Changing buttonfunctions
Press button 1 and button 2at the same time and holdthem down until the readingchanges.FLASH (redline warning) ap-pears, along with ON or OFF.Press button 2.LAP (Lap-Timer) and ON orOFF appear.Repeatedly press button 1 untilthe reading shows the modeyou want.
442
z Op
era
tio
n
http://www.motorcycle.in.th

ON: Stopwatch operated bymeans of the INFO button onthe handlebar fitting.OFF: Stopwatch operated bymeans of button 2 in the in-strument panel.To save the setting, pressbutton 1 and button 2 atthe same time and holdthem down until the readingchanges.
LightsSide lightThe side lights switch on auto-matically when the ignition isswitched on.
The side lights placea strain on the battery.
Do not switch the ignitionon for longer than absolutelynecessary.
Low-beam headlightThe low-beam headlight switcheson automatically when you startthe engine.
When the engine is notrunning you can switch on
the lights by switching on the ig-nition and either switching on thehigh-beam headlight or operatingthe headlight flasher.
High-beam headlight andheadlight flasher
Press top section of switch 1to switch on the high-beamheadlight.
Centre switch 1 to switch offthe high-beam headlight.Press bottom section ofswitch 1 to operate theheadlight flasher.
Parking lightSwitch off the ignition.
Immediately after switching offthe ignition, push button 1 andhold it in this position until theparking lights come on.Switch the ignition on and offagain to switch off the parkinglights.
443
z Op
era
tio
n
http://www.motorcycle.in.th
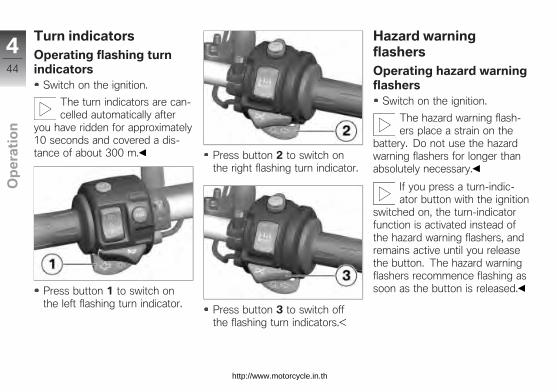
Turn indicatorsOperating flashing turnindicators
Switch on the ignition.
The turn indicators are can-celled automatically after
you have ridden for approximately10 seconds and covered a dis-tance of about 300 m.
Press button 1 to switch onthe left flashing turn indicator.
Press button 2 to switch onthe right flashing turn indicator.
Press button 3 to switch offthe flashing turn indicators.
Hazard warningflashersOperating hazard warningflashers
Switch on the ignition.
The hazard warning flash-ers place a strain on the
battery. Do not use the hazardwarning flashers for longer thanabsolutely necessary.
If you press a turn-indic-ator button with the ignition
switched on, the turn-indicatorfunction is activated instead ofthe hazard warning flashers, andremains active until you releasethe button. The hazard warningflashers recommence flashing assoon as the button is released.
444
z Op
era
tio
n
http://www.motorcycle.in.th
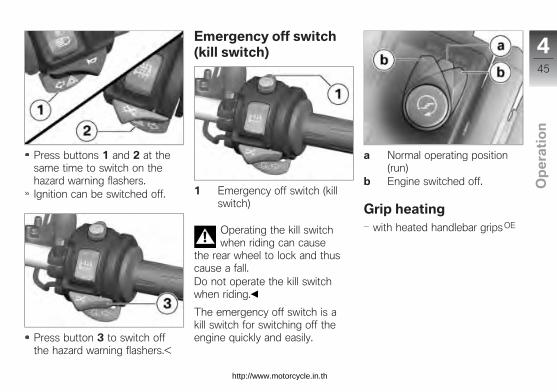
Press buttons 1 and 2 at thesame time to switch on thehazard warning flashers.Ignition can be switched off.
Press button 3 to switch offthe hazard warning flashers.
Emergency off switch(kill switch)
1 Emergency off switch (killswitch)
Operating the kill switchwhen riding can cause
the rear wheel to lock and thuscause a fall.Do not operate the kill switchwhen riding.
The emergency off switch is akill switch for switching off theengine quickly and easily.
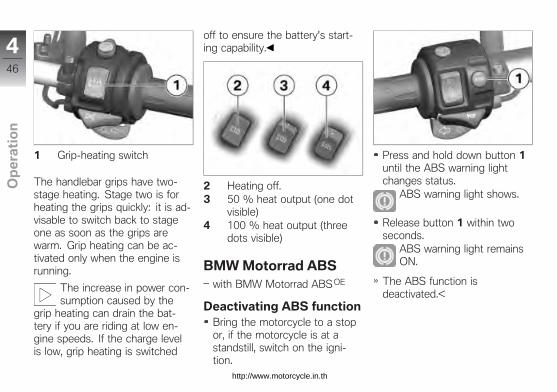
a Normal operating position(run)
b Engine switched off.
Grip heatingwith heated handlebar grips OE
445
z Op
era
tio
n
http://www.motorcycle.in.th
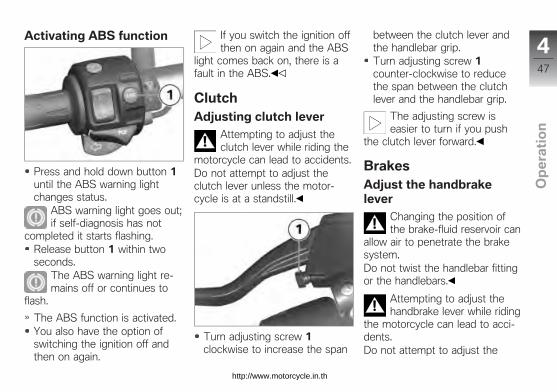
1 Grip-heating switch
The handlebar grips have two-stage heating. Stage two is forheating the grips quickly: it is ad-visable to switch back to stageone as soon as the grips arewarm. Grip heating can be ac-tivated only when the engine isrunning.
The increase in power con-sumption caused by the
grip heating can drain the bat-tery if you are riding at low en-gine speeds. If the charge levelis low, grip heating is switched
off to ensure the battery's start-ing capability.
2 Heating off.3 50 % heat output (one dot
visible)4 100 % heat output (three
dots visible)
BMW Motorrad ABSwith BMW Motorrad ABS OE
Deactivating ABS functionBring the motorcycle to a stopor, if the motorcycle is at astandstill, switch on the igni-tion.
Press and hold down button 1until the ABS warning lightchanges status.
ABS warning light shows.
Release button 1 within twoseconds.
ABS warning light remainsON.
The ABS function isdeactivated.
446
z Op
era
tio
n
http://www.motorcycle.in.th
Activating ABS function
Press and hold down button 1until the ABS warning lightchanges status.
ABS warning light goes out;if self-diagnosis has not
completed it starts flashing.Release button 1 within twoseconds.
The ABS warning light re-mains off or continues to
flash.
The ABS function is activated.You also have the option ofswitching the ignition off andthen on again.
If you switch the ignition offthen on again and the ABS
light comes back on, there is afault in the ABS.
ClutchAdjusting clutch lever
Attempting to adjust theclutch lever while riding the
motorcycle can lead to accidents.Do not attempt to adjust theclutch lever unless the motor-cycle is at a standstill.
Turn adjusting screw 1clockwise to increase the span
between the clutch lever andthe handlebar grip.Turn adjusting screw 1counter-clockwise to reducethe span between the clutchlever and the handlebar grip.
The adjusting screw iseasier to turn if you push
the clutch lever forward.
BrakesAdjust the handbrakelever
Changing the position ofthe brake-fluid reservoir can
allow air to penetrate the brakesystem.Do not twist the handlebar fittingor the handlebars.
Attempting to adjust thehandbrake lever while riding
the motorcycle can lead to acci-dents.Do not attempt to adjust the
447
z Op
era
tio
n
http://www.motorcycle.in.th
handbrake lever unless the mo-torcycle is at a standstill.
Turn adjusting screw 1clockwise to increase the spanbetween the brake lever andthe handlebar grip.Turn adjusting screw 1counter-clockwise to reducethe span between the brakelever and the handlebar grip.
The adjusting screw iseasier to turn if you push
the handbrake lever forward.
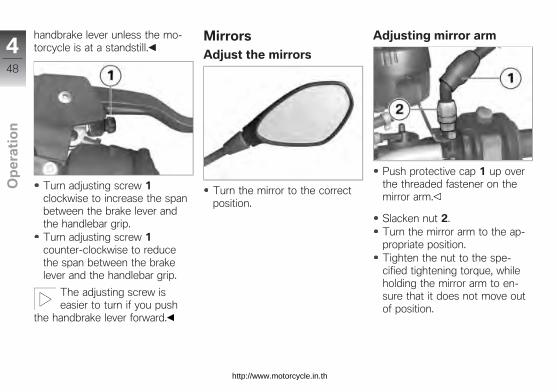
MirrorsAdjust the mirrors
Turn the mirror to the correctposition.
Adjusting mirror arm
Push protective cap 1 up overthe threaded fastener on themirror arm.
Slacken nut 2.Turn the mirror arm to the ap-propriate position.Tighten the nut to the spe-cified tightening torque, whileholding the mirror arm to en-sure that it does not move outof position.
448
z Op
era
tio
n
http://www.motorcycle.in.th
Locknut (mirror) toclamping piece
20 Nm
Push the protective cap overthe threaded fastener.
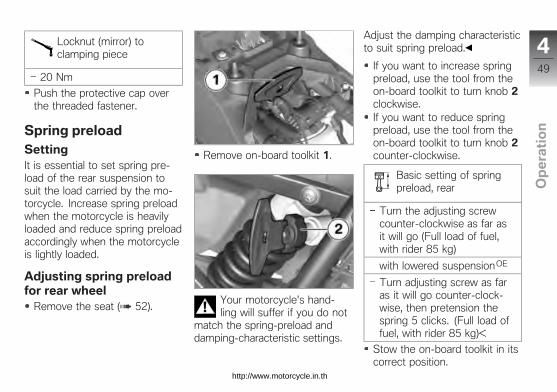
Spring preloadSettingIt is essential to set spring pre-load of the rear suspension tosuit the load carried by the mo-torcycle. Increase spring preloadwhen the motorcycle is heavilyloaded and reduce spring preloadaccordingly when the motorcycleis lightly loaded.
Adjusting spring preloadfor rear wheel
Remove the seat ( 52).
Remove on-board toolkit 1.
Your motorcycle's hand-ling will suffer if you do not
match the spring-preload anddamping-characteristic settings.
Adjust the damping characteristicto suit spring preload.
If you want to increase springpreload, use the tool from theon-board toolkit to turn knob 2clockwise.If you want to reduce springpreload, use the tool from theon-board toolkit to turn knob 2counter-clockwise.
Basic setting of springpreload, rear
Turn the adjusting screwcounter-clockwise as far asit will go (Full load of fuel,with rider 85 kg)
with lowered suspensionOE
Turn adjusting screw as faras it will go counter-clock-wise, then pretension thespring 5 clicks. (Full load offuel, with rider 85 kg)
Stow the on-board toolkit in itscorrect position.
449
z Op
era
tio
n
http://www.motorcycle.in.th

Install the seat ( 53).
DampingSettingDamping must be adapted to suitthe surface on which the motor-cycle is ridden and to suit springpreload.
An uneven surface requiressofter damping than a smoothsurface.An increase in spring preloadrequires firmer damping, a re-duction in spring preload re-quires softer damping.
Adjusting damping forrear wheel
Make sure the ground is leveland firm and place the motor-cycle on its stand.
You adjust the damping char-acteristic by turning adjustingscrew 1.
If you want a harder dampingcharacteristic, use a screw-driver to turn adjusting screw 1
in the direction indicated by theH arrow.If you want a softer dampingcharacteristic, use a screw-driver to turn adjusting screw 1in the direction indicated by theS arrow.
Basic setting of rear-sus-pension damping charac-
teristic
Turn adjusting screw as faras it will go clockwise, thenback it off 2 turns. (Full loadof fuel, with rider 85 kg)
TyresChecking tyre pressure
Incorrect tyre pressures im-pair the motorcycle's hand-
ling characteristics and increasethe rate of tyre wear.Always check that the tyre pres-sures are correct.
450
z Op
era
tio
n
http://www.motorcycle.in.th
At high road speeds, tyrevalves installed perpen-
dicular to the wheel rim have atendency to open as a result ofcentrifugal force.In order to avoid sudden defla-tion, fit valves installed perpen-dicular to the rim with valve capscomplete with rubber seals andmake sure the valve caps arescrewed firmly on to the valves.
Make sure the ground is leveland firm and place the motor-cycle on its stand.Check tyre pressures againstthe data below.
Tyre pressure, front
2.2 bar (one-up, at tyre tem-perature 20 °C)
2.4 bar (two-up and/or withluggage, at tyre temperature20 °C)
Tyre pressure, rear
2.4 bar (one-up, at tyre tem-perature 20 °C)
2.8 bar (two-up and/or withluggage, at tyre temperature20 °C)
If tyre pressure is too low:Correct tyre pressure.
HeadlightAdjusting headlight fordriving on left/driving onrightIf the motorcycle is ridden in acountry where the opposite ruleof the road applies, its asymmet-ric low-beam headlight will tendto dazzle oncoming traffic.Have the headlight set accord-ingly by a specialist workshop,preferably an authorised BMWMotorrad dealer.
Headlight beam throw andspring preloadHeadlight beam throw is gener-ally kept constant when springpreload is adjusted to suit load.Spring preload adjustment mightnot suffice only if the motorcycleis very heavily loaded. Underthese circumstances, headlightbeam throw has to be adjustedto suit the weight carried by themotorcycle.
Consult a specialist work-shop, preferably an au-
thorised BMW Motorrad dealer,if you are unsure whether theheadlight beam-throw setting iscorrect.
451
z Op
era
tio
n
http://www.motorcycle.in.th
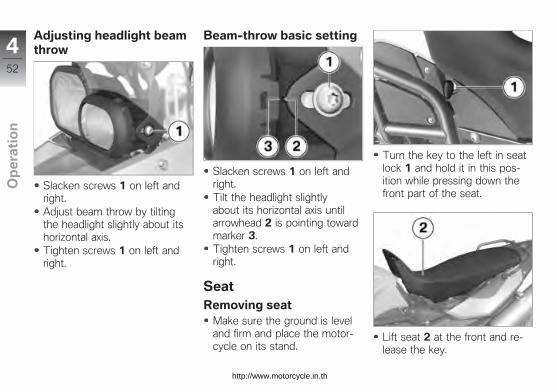
Adjusting headlight beamthrow
Slacken screws 1 on left andright.Adjust beam throw by tiltingthe headlight slightly about itshorizontal axis.Tighten screws 1 on left andright.
Beam-throw basic setting
Slacken screws 1 on left andright.Tilt the headlight slightlyabout its horizontal axis untilarrowhead 2 is pointing towardmarker 3.Tighten screws 1 on left andright.
SeatRemoving seat
Make sure the ground is leveland firm and place the motor-cycle on its stand.
Turn the key to the left in seatlock 1 and hold it in this pos-ition while pressing down thefront part of the seat.
Lift seat 2 at the front and re-lease the key.
452
z Op
era
tio
n
http://www.motorcycle.in.th
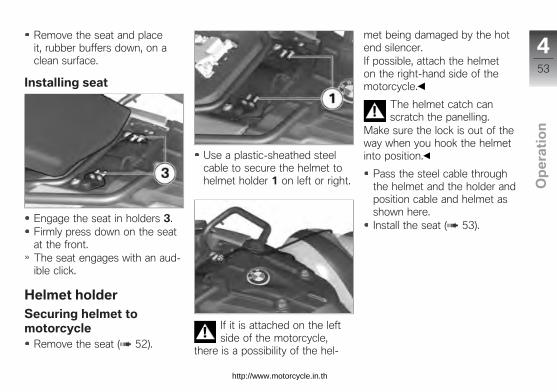
Remove the seat and placeit, rubber buffers down, on aclean surface.
Installing seat
Engage the seat in holders 3.Firmly press down on the seatat the front.The seat engages with an aud-ible click.
Helmet holderSecuring helmet tomotorcycle
Remove the seat ( 52).
Use a plastic-sheathed steelcable to secure the helmet tohelmet holder 1 on left or right.
If it is attached on the leftside of the motorcycle,
there is a possibility of the hel-
met being damaged by the hotend silencer.If possible, attach the helmeton the right-hand side of themotorcycle.
The helmet catch canscratch the panelling.
Make sure the lock is out of theway when you hook the helmetinto position.
Pass the steel cable throughthe helmet and the holder andposition cable and helmet asshown here.Install the seat ( 53).
453
z Op
era
tio
n
http://www.motorcycle.in.th
Riding
Riding
Safety instructions . . . . . . . . . . . . . . . . . . 56
Checklist . . . . . . . . . . . . . . . . . . . . . . . . . . . . 58
Starting . . . . . . . . . . . . . . . . . . . . . . . . . . . . . 59
Running in . . . . . . . . . . . . . . . . . . . . . . . . . . 61
speed . . . . . . . . . . . . . . . . . . . . . . . . . . . . . . . 61
Off-roading . . . . . . . . . . . . . . . . . . . . . . . . . 62
Brakes . . . . . . . . . . . . . . . . . . . . . . . . . . . . . . 63
Parking your motorcycle . . . . . . . . . . . . 64
Refuelling . . . . . . . . . . . . . . . . . . . . . . . . . . . 65
Securing motorcycle for transporta-tion . . . . . . . . . . . . . . . . . . . . . . . . . . . . . . . . . 66
555
z Rid
ing
http://www.motorcycle.in.th

Safety instructionsRider's equipmentDo not ride without the correctclothing. Always wear:
HelmetMotorcycling jacket andtrousersGlovesBoots
This applies even to short jour-neys, and to every season ofthe year. Your authorised BMWMotorrad dealer will be glad toadvise you on the correct cloth-ing for every purpose.
Restricted angle of heelwith lowered suspensionOE
A motorcycle with loweredsuspension has less groundclearance and cannot cornerat angles of heel as extremeas those achievable by acounterpart motorcycle with
standard-height suspension (seethe section entitled "Technicaldata").
Risk of accident by unex-pectedly early contact with
the ground.Bear in mind that loweredsuspension limits themotorcycle's angle of heel andground clearance.
Test your motorcycle's angleof heel in situations that do notinvolve risk. When riding overkerbs and similar obstacles, bearin mind that your motorcycle'sground clearance is limited.
Lowering the motorcycle's sus-pension shortens suspensiontravel. Ride comfort might berestricted as a result. Be sure toadjust spring preload accordingly,particularly for riding two-up.
Correct loading
Overloading and imbal-anced loads can adversely
affect the motorcycle's handling.Do not exceed the permissiblegross weight and be sure tocomply with the instructions onloading.
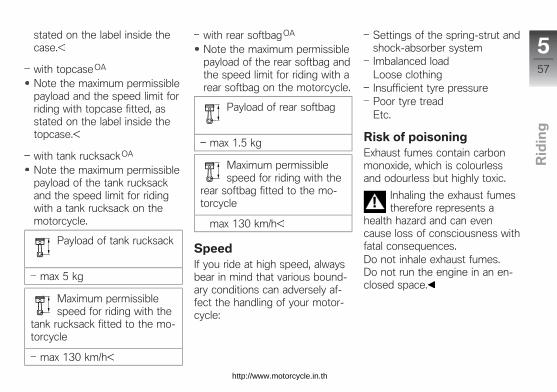
Set spring preload, dampingcharacteristic and tyre pres-sures to suit total weight.with casesOE
Ensure that the case volumeson the left and right are equal.Make sure that the weight isuniformly distributed betweenright and left.Pack heavy items at the bot-tom of the cases and towardthe inboard side.Note the maximum permissiblepayload and the speed limitfor riding with cases fitted, as
556
z Rid
ing
http://www.motorcycle.in.th
stated on the label inside thecase.
with topcaseOA
Note the maximum permissiblepayload and the speed limit forriding with topcase fitted, asstated on the label inside thetopcase.
with tank rucksackOA
Note the maximum permissiblepayload of the tank rucksackand the speed limit for ridingwith a tank rucksack on themotorcycle.
Payload of tank rucksack
max 5 kg
Maximum permissiblespeed for riding with the
tank rucksack fitted to the mo-torcycle
max 130 km/h
with rear softbagOA
Note the maximum permissiblepayload of the rear softbag andthe speed limit for riding with arear softbag on the motorcycle.
Payload of rear softbag
max 1.5 kg
Maximum permissiblespeed for riding with the
rear softbag fitted to the mo-torcycle
max 130 km/h
SpeedIf you ride at high speed, alwaysbear in mind that various bound-ary conditions can adversely af-fect the handling of your motor-cycle:
Settings of the spring-strut andshock-absorber systemImbalanced loadLoose clothingInsufficient tyre pressurePoor tyre treadEtc.
Risk of poisoningExhaust fumes contain carbonmonoxide, which is colourlessand odourless but highly toxic.
Inhaling the exhaust fumestherefore represents a
health hazard and can evencause loss of consciousness withfatal consequences.Do not inhale exhaust fumes.Do not run the engine in an en-closed space.
557
z Rid
ing
http://www.motorcycle.in.th
Risk of burn injury
Engine and exhaust systembecome very hot when the
motorcycle is in use. There is arisk of burn injuries by contactwith hot surfaces, particularly atthe silencer.When you park the motorcyclemake sure that no-one comesinto contact with the engine andexhaust system.
Catalytic converterIf misfiring causes unburned fuelto enter the catalytic converter,there is a danger of overheatingand damage.For this reason, observe the fol-lowing points:
Do not run the fuel tank dry.Do not attempt to start or runthe engine with a spark-plugcap disconnected.Stop the engine immediately ifit misfires.
Use only unleaded fuel.Comply with all specified main-tenance intervals.
Unburned fuel will destroythe catalytic converter.
Note the points listed for protec-tion of the catalytic converter.
Risk of overheating
Cooling would beinadequate if the engine
were allowed to idle for a lengthyperiod with the motorcycle ata standstill: overheating wouldresult. In extreme cases, themotorcycle could catch fire.Do not allow the engine to idleunnecessarily. Ride away imme-diately after starting the engine.
Tampering
Tampering with motor-cycle settings (e.g. elec-
tronic engine management unit,throttle valves, clutch) can cause
damages to the components inquestion and lead to failure ofsafety-relevant functions. Dam-age caused in this way is notcovered by the warranty.Do not tamper with the motor-cycle in any way that could resultin tuned performance.
ChecklistUse the following checklist tocheck important functions, set-tings and wear limits before youride off.
BrakesBrake-fluid levels, front and rearClutchDamping-characteristic settingand spring preloadTyre-tread depth and tyrepressuresCases correctly installed andluggage secured
At regular intervals:
558
z Rid
ing
http://www.motorcycle.in.th
Engine oil level (every refuellingstop)Brake-pad wear (every thirdrefuelling stop)Tension and lubrication of thedrive chain
StartingStarting engine
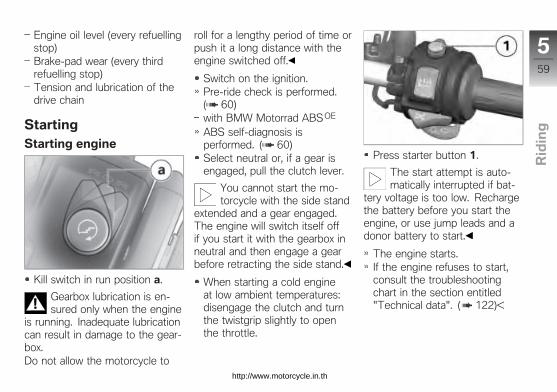
Kill switch in run position a.
Gearbox lubrication is en-sured only when the engine
is running. Inadequate lubricationcan result in damage to the gear-box.Do not allow the motorcycle to
roll for a lengthy period of time orpush it a long distance with theengine switched off.
Switch on the ignition.Pre-ride check is performed.( 60)with BMW Motorrad ABS OE
ABS self-diagnosis isperformed. ( 60)Select neutral or, if a gear isengaged, pull the clutch lever.
You cannot start the mo-torcycle with the side stand
extended and a gear engaged.The engine will switch itself offif you start it with the gearbox inneutral and then engage a gearbefore retracting the side stand.
When starting a cold engineat low ambient temperatures:disengage the clutch and turnthe twistgrip slightly to openthe throttle.
Press starter button 1.
The start attempt is auto-matically interrupted if bat-
tery voltage is too low. Rechargethe battery before you start theengine, or use jump leads and adonor battery to start.
The engine starts.If the engine refuses to start,consult the troubleshootingchart in the section entitled"Technical data". ( 122)
559
z Rid
ing
http://www.motorcycle.in.th
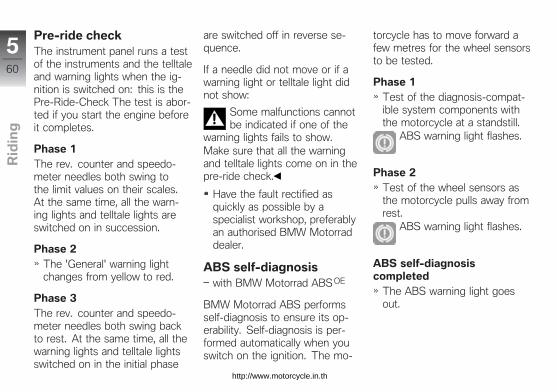
Pre-ride checkThe instrument panel runs a testof the instruments and the telltaleand warning lights when the ig-nition is switched on: this is thePre-Ride-Check The test is abor-ted if you start the engine beforeit completes.
Phase 1The rev. counter and speedo-meter needles both swing tothe limit values on their scales.At the same time, all the warn-ing lights and telltale lights areswitched on in succession.
Phase 2The 'General' warning lightchanges from yellow to red.
Phase 3The rev. counter and speedo-meter needles both swing backto rest. At the same time, all thewarning lights and telltale lightsswitched on in the initial phase
are switched off in reverse se-quence.
If a needle did not move or if awarning light or telltale light didnot show:
Some malfunctions cannotbe indicated if one of the
warning lights fails to show.Make sure that all the warningand telltale lights come on in thepre-ride check.
Have the fault rectified asquickly as possible by aspecialist workshop, preferablyan authorised BMW Motorraddealer.
ABS self-diagnosiswith BMW Motorrad ABS OE
BMW Motorrad ABS performsself-diagnosis to ensure its op-erability. Self-diagnosis is per-formed automatically when youswitch on the ignition. The mo-
torcycle has to move forward afew metres for the wheel sensorsto be tested.
Phase 1Test of the diagnosis-compat-ible system components withthe motorcycle at a standstill.
ABS warning light flashes.
Phase 2Test of the wheel sensors asthe motorcycle pulls away fromrest.
ABS warning light flashes.
ABS self-diagnosiscompleted
The ABS warning light goesout.
560
z Rid
ing
http://www.motorcycle.in.th
If an indicator showing an ABSfault appears when ABS self-dia-gnosis completes:
You can continue to ride. Bearin mind that the ABS functionis not available.Have the fault rectified asquickly as possible by aspecialist workshop, preferablyan authorised BMW Motorraddealer.
Running inThe first 1000 km
While running in the motor-cycle, vary the throttle openingand engine-speed range fre-quently; avoid riding at constantengine rpm for prolonged peri-ods.Try to do most of your rid-ing during this initial period ontwisting, fairly hilly roads, avoid-ing high-speed main roads andhighways if possible.
Comply with the rpm limits forrunning in.
Running-in speed
<5000 min-1
Do not omit the first inspectionafter 500 - 1200 km.
Brake padsNew brake pads have to beddown before they can achievetheir optimum friction levels. Youcan compensate for this initial re-duction in braking efficiency byexerting greater pressure on thelevers.
New brake pads can extendstopping distance by a sig-
nificant margin.Apply the brakes in good time.
TyresNew tyres have a smooth sur-face. This must be roughened byriding in a restrained manner atvarious heel angles until the tyresare run in. This running in pro-cedure is essential if the tyres areto achieve maximum grip.
Tyres do not have their fullgrip when new and there
is a risk of accidents at extremeangles of heel.Avoid extreme angles of heel.
speedwith on-board computerOE
561
z Rid
ing
http://www.motorcycle.in.th
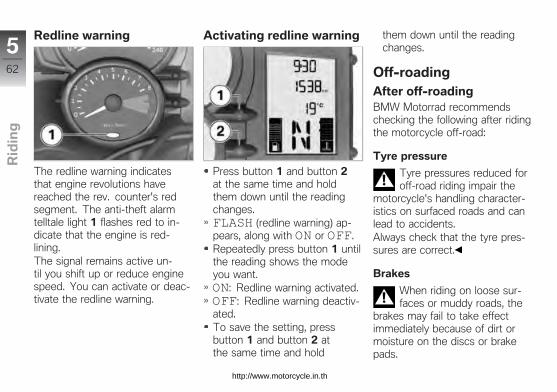
Redline warning
The redline warning indicatesthat engine revolutions havereached the rev. counter's redsegment. The anti-theft alarmtelltale light 1 flashes red to in-dicate that the engine is red-lining.The signal remains active un-til you shift up or reduce enginespeed. You can activate or deac-tivate the redline warning.
Activating redline warning
Press button 1 and button 2at the same time and holdthem down until the readingchanges.FLASH (redline warning) ap-pears, along with ON or OFF.Repeatedly press button 1 untilthe reading shows the modeyou want.ON: Redline warning activated.OFF: Redline warning deactiv-ated.To save the setting, pressbutton 1 and button 2 atthe same time and hold
them down until the readingchanges.
Off-roadingAfter off-roadingBMW Motorrad recommendschecking the following after ridingthe motorcycle off-road:
Tyre pressure
Tyre pressures reduced foroff-road riding impair the
motorcycle's handling character-istics on surfaced roads and canlead to accidents.Always check that the tyre pres-sures are correct.
Brakes
When riding on loose sur-faces or muddy roads, the
brakes may fail to take effectimmediately because of dirt ormoisture on the discs or brakepads.
562
z Rid
ing
http://www.motorcycle.in.th
Apply the brakes in good timeuntil the brakes have beencleaned.
The brake pads will wearmore rapidly if you ride fre-
quently on unsurfaced tracks orpoor roads.Check the thickness of the brakepads more frequently and replacethe brake pads in good time.
Spring preload and shock-absorber settings
The off-road settings forspring preload and shock
absorber damping characteristicwill impair the motorcycle's hand-ling characteristics on surfacedroads.If you have been off-roading, re-member to correct spring preloadand shock-absorber dampingcharacteristics before you returnto surfaced roads.
RimsBMW Motorrad recommendschecking the rims for damageafter off-roading.
Air filter element
Engine damage due toclogged air filter element.
If you ride in dusty terrain checkthe air filter element for cloggingat shorter intervals; clan or re-place as necessary.
Operation in very dusty condi-tions (desert, steppes, or the like)necessitates the use of air filterelements specially designed forconditions of this nature.
BrakesHow can stoppingdistance be minimised?Each time the brakes are applied,a load distribution shift takesplace with the load shifting for-ward from the rear to the frontwheel. The sharper the motor-cycle decelerates, the more loadis shifted to the front wheel. Thehigher the wheel load, the morebraking force can be transmittedwithout the wheel locking.To optimise stopping distance,apply the front brakes rapidly andkeep on increasing the force youapply to the brake lever. Thismakes the best possible use ofthe dynamic increase in load atthe front wheel. Remember topull the clutch at the same time.In the "panic braking situations"that are trained so frequentlybraking force is applied as rap-idly as possible and with the
563
z Rid
ing
http://www.motorcycle.in.th
rider's full force exerted on thebrake levers; under these circum-stances the dynamic shift in loaddistribution cannot keep pacewith the increase in decelerationand the tyres cannot transmit thefull braking force to the surfaceof the road. Under these circum-stances the front wheel can lockup.
with BMW Motorrad ABS OE
BMW Motorrad ABS preventsthe front wheel from locking up.
Descending mountainpasses
There is a danger of thebrakes fading if you use
only the rear brakes when des-cending mountain passes. Underextreme conditions, the brakescould overheat and suffer severedamage.Use both front and rear brakes,
and make use of the engine'sbraking effect as well.
Wet and dirty brakesWetness and dirt on the brakediscs and the brake pads dimin-ish braking efficiency.Delayed braking action or poorbraking efficiency must bereckoned with in the followingsituations:
Riding in the rain or throughpuddles of water.After the motorcycle has beenwashed.Riding on salted or grittedroads.After work has been carried onthe brakes, due to traces of oilor grease.Riding on dirt-covered surfacesor off-road.
Wetness and dirt result inpoor braking efficiency.
Apply the brakes lightly while
riding to remove wetness anddirt, or dismount and clean thebrakes.Think ahead and brake in goodtime until full braking efficiency isrestored.
Parking yourmotorcycleSide stand
Switch off the engine.
If the ground is soft or un-even, there is no guaran-
tee that the motorcycle will restfirmly on the stand.Always check that the groundunder the stand is level andfirm.
Extend the side stand andprop the motorcycle on thestand.
The side stand is designedto support only the weight
of the motorcycle.
564
z Rid
ing
http://www.motorcycle.in.th
Do not lean or sit on themotorcycle with the side standextended.
If the camber of the roadwaypermits, turn the handlebars allthe way to the left.On a gradient, the motorcycle
should always face uphill; se-lect 1st gear.
Centre standwith centre stand OE
Switch off the engine.
If the ground is soft or un-even, there is no guaran-
tee that the motorcycle will restfirmly on the stand.Always check that the groundunder the stand is level andfirm.
Excessive movementscould cause the centre
stand to retract, and the
motorcycle would topple inconsequence.Do not lean or sit on the mo-torcycle with the centre standextended.
Extend the centre stand andlift the motorcycle onto thestand.
RefuellingFuel is highly flammable. Anaked flame close to the
fuel tank can cause a fire or ex-plosion.Do not smoke. Never bring anaked flame near the fuel tank.
Fuel expands when hot.Fuel escaping from an
overfilled tank could make its wayonto the road surface. This couldcause a fall.Do not overfill the fuel tank.
Fuel attacks plastics, whichbecome dull or unsightly.
Wipe off plastic parts immediatelyif they come into contact withfuel.
Leaded fuel will destroy thecatalytic converter.
Use only unleaded fuel.
Make sure the ground is leveland firm and place the motor-cycle on its side stand.
The volume of the tank canbe utilised to the full only
when the motorcycle is proppedon its side stand.
Open the protective cap.
565
z Rid
ing
http://www.motorcycle.in.th
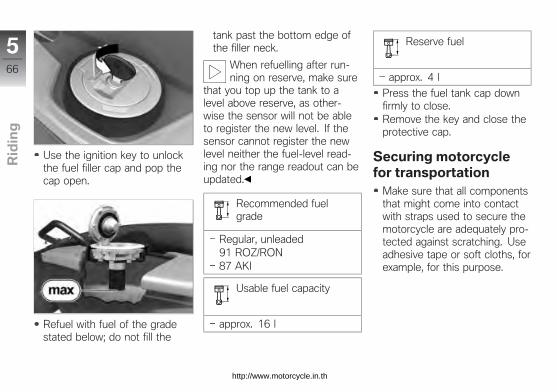
Use the ignition key to unlockthe fuel filler cap and pop thecap open.
Refuel with fuel of the gradestated below; do not fill the
tank past the bottom edge ofthe filler neck.
When refuelling after run-ning on reserve, make sure
that you top up the tank to alevel above reserve, as other-wise the sensor will not be ableto register the new level. If thesensor cannot register the newlevel neither the fuel-level read-ing nor the range readout can beupdated.
Recommended fuelgrade
Regular, unleaded91 ROZ/RON87 AKI
Usable fuel capacity
approx. 16 l
Reserve fuel
approx. 4 l
Press the fuel tank cap downfirmly to close.Remove the key and close theprotective cap.
Securing motorcyclefor transportation
Make sure that all componentsthat might come into contactwith straps used to secure themotorcycle are adequately pro-tected against scratching. Useadhesive tape or soft cloths, forexample, for this purpose.
566
z Rid
ing
http://www.motorcycle.in.th
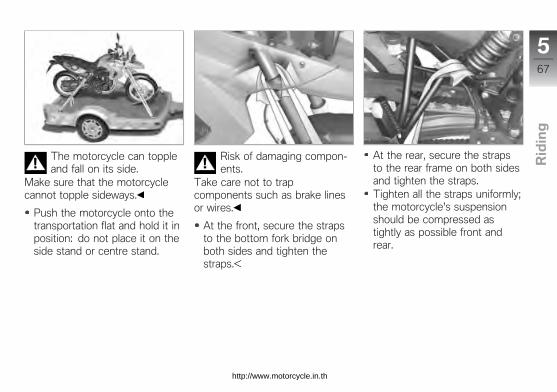
The motorcycle can toppleand fall on its side.
Make sure that the motorcyclecannot topple sideways.
Push the motorcycle onto thetransportation flat and hold it inposition: do not place it on theside stand or centre stand.
Risk of damaging compon-ents.
Take care not to trapcomponents such as brake linesor wires.
At the front, secure the strapsto the bottom fork bridge onboth sides and tighten thestraps.
At the rear, secure the strapsto the rear frame on both sidesand tighten the straps.Tighten all the straps uniformly;the motorcycle's suspensionshould be compressed astightly as possible front andrear.
567
z Rid
ing
http://www.motorcycle.in.th

Engineering details
Engineering details
Brake system with BMW MotorradABS . . . . . . . . . . . . . . . . . . . . . . . . . . . . . . . . 70
Tyre pressure monitoring RDC . . . . . 72
669
z En
gin
ee
rin
g d
eta
ils
http://www.motorcycle.in.th
Brake system withBMW Motorrad ABS
with BMW Motorrad ABS OE
How does ABS work?The amount of braking force thatcan be transferred to the roaddepends on factors hat includethe coefficient of friction of theroad surface. Loose stones, iceand snow or a wet road all havemuch lower coefficients of frictionthan a clean, dry asphalt surface.The lower the coefficient of fric-tion, the longer the braking dis-tance.If the rider increases brakingpressure to the extent that brak-ing force exceeds the maximumtransferrable limit, the wheelsstart to lock and the motorcycleloses its directional stability; a fallis imminent. Before this situationcan occur, ABS intervenes andadapts braking pressure to themaximum transferrable braking
force, so the wheels continueto turn and directional stabilityis maintained irrespective of thecondition of the road surface.
What are the effects ofsurface irregularities?Humps and surface irregularit-ies can cause the wheels to losecontact temporarily with the roadsurface; if this happens the brak-ing force that can be transmit-ted to the road can drop to zero.If the brakes are applied underthese circumstances the ABShas to reduce braking force toensure that directional stabilityis maintained when the wheelsregain contact with the road sur-face. At this instant the BMWMotorrad ABS must assume anextremely low coefficient of fric-tion, so that the wheels will con-tinue to rotate under all imagin-able circumstances, because thisis the precondition for ensuring
directional stability. As soon asis registers the actual circum-stances, the system reacts in-stantly and adjusts braking forceaccordingly to achieve optimumbraking.
Rear wheel liftUnder very severe and suddendeceleration, however, undercertain circumstances it is pos-sible that the BMW MotorradABS will be unable to preventthe rear wheel from lifting clearof the ground. If this happensthe outcome can be a highsidingsituation in which the motorcyclecan flip over.
Severe braking can causethe rear wheel to lift off the
ground.When you brake, bear in mindthat ABS control cannot be reliedon in all circumstances to preventthe rear wheel from lifting clear ofthe ground.
670
z En
gin
ee
rin
g d
eta
ils
http://www.motorcycle.in.th
What is the designbaseline for BMWMotorrad ABS?Within the limits imposed byphysics, BMW Motorrad ABS en-sures directional stability on anysurface. The system is not op-timised for special requirementsthat apply under extreme com-petitive situations off-road or onthe track.
Special situationsThe speeds of the front and rearwheels are compared as onemeans of detecting a wheel'sincipient tendency to lock. Ifthe system registers implaus-ible values for a lengthy periodthe ABS function is deactivatedfor safety reasons and an ABSfault message is issued. Self-dia-gnosis has to complete beforefault messages can be issued.In addition to problems with theBMW Motorrad ABS, exceptional
riding conditions can lead to afault message being issued.Exceptional ridingconditions:
Riding for a lengthy period withthe front wheel lifted off theground (wheelie).Rear wheel rotating with themotorcycle held stationary byapplying the front brake (burn-out).Heating up with the motorcycleon the centre stand or an auxil-iary stand, engine idling or witha gear engaged.Rear wheel locked for a lengthyperiod, for example while des-cending off-road.
If a fault message is issued onaccount of exceptional ridingconditions as outlined above, youcan reactivate the ABS functionby switching the ignition off andon again.
What significancedevolves on regularmaintenance?
Invariably, a technical sys-tem cannot perform beyond
the abilities dictated by its levelof maintenance.In order to ensure that the BMWMotorrad ABS is always main-tained in optimum condition, itis essential for you to complystrictly with the specified inspec-tion intervals.
Reserves for safetyThe potentially shorter brakingdistances which BMW MotorradABS permits must not be usedas an excuse for careless riding.ABS is primarily a means of en-suring a safety margin in genuineemergencies.Take care when cornering. Whenyou apply the brakes on a corner,the motorcycle's weight and
671
z En
gin
ee
rin
g d
eta
ils
http://www.motorcycle.in.th

momentum take over and evenBMW Motorrad ABS is unable tocounteract their effects.
Tyre pressuremonitoring RDC
with tyre pressure monitoring(RDC)OE
FunctionA sensor integrated into eachtyre measures the air tempera-ture and the air pressure insidethe tyre and transmits this in-formation to the control unit.
Each sensor has a centrifugal-force tripswitch that does notenable transmission of the meas-ured values until the motorcyclehas accelerated to about 30 km/h. The display shows -- foreach tyre until the tyre-pressuresignal is received for the firsttime. The sensors continue totransmit the measured-value sig-
nals for approximately 15 minutesafter the motorcycle comes to astop.
The control unit can adminis-trate four sensors, so two dif-ferent sets of wheels with RDCsensors can be alternated onthe motorcycle. An error mes-sage is issued if wheels withoutsensors are fitted to a motorcycleequipped with an RDC controlunit.
TemperaturecompensationTyre pressure is a temperature-sensitive variable: pressure in-creases as tyre temperature risesand decreases as tyre temper-ature drops. Tyre temperaturedepends on ambient tempera-ture, on the style of riding andthe duration of the ride.
The tyre-pressure readingsshown by the multifunctiondisplay are temperature-compensated; the reference tyretemperature for these readingsis always 20 °C. The air linesavailable to the public in petrolstations and motorway serviceareas have gauges that do notcompensate for temperature; thereading shown by a gauge ofthis nature is the temperature-dependent tyre pressure. Inmost instances, therefore, thesegauge readings will not tally withthe pressures shown by themultifunction display.
Tyre-pressure rangesThe RDC control unit differenti-ates between three tyre-pressureranges, all of which are paramet-erised for the motorcycle:
672
z En
gin
ee
rin
g d
eta
ils
http://www.motorcycle.in.th
Tyre pressure within permittedtolerance.Tyre pressure close to limit ofpermitted tolerance.Tyre pressure outside permit-ted tolerance.
Pressure adaptationCompare the RDC readingson the multifunction displaywith the value in the table onthe inside cover of the Rider'sManual. Then use the air line tocompensate for the differencebetween the RDC reading andthe value in the table.
Example: According to theRider's Manual, tyre pressureshould be 2.5 bar, but thereading in the multifunctiondisplay is 2.3 bar. The gauge onthe air line shows 2.4 bar. Youmust now increase tyre pressureby the 0.2 bar differencebetween the value in the table
and the RDC reading; when theair-line gauge shows 2.6 bar,the tyre is inflated to the correctpressure.
673
z En
gin
ee
rin
g d
eta
ils
http://www.motorcycle.in.th

Accessories
Accessories
General instructions . . . . . . . . . . . . . . . . . 76
Power sockets . . . . . . . . . . . . . . . . . . . . . . 76
Luggage . . . . . . . . . . . . . . . . . . . . . . . . . . . . 77
Cases . . . . . . . . . . . . . . . . . . . . . . . . . . . . . . . 77
Topcase . . . . . . . . . . . . . . . . . . . . . . . . . . . . 80
775
z Ac
ce
sso
rie
s
http://www.motorcycle.in.th
General instructionsBMW Motorrad recommendsthe use of parts and accessoriesfor your motorcycle that are ap-proved by BMW for this purpose.Genuine BMW parts and ac-cessories and other productswhich BMW has approved canbe obtained from your authorisedBMW Motorrad dealer, togetherwith expert advice on their install-ation and use.These parts and products havebeen tested by BMW for safety,function and suitability. BMWaccepts product liability for them.Conversely, BMW is unable toaccept any liability whatsoeverfor parts and accessories which ithas not approved.Also bear in mind the informa-tion on the effect of wheel sizeon suspension-control systems( 97).
BMW Motorrad cannotexamine or test each
product of outside origin toensure that it can be used onor in connection with BMWmotorcycles without constitutinga safety hazard. Country-specificofficial authorisation does notsuffice as assurance. Testsconducted by these instancescannot make provision for alloperating conditions experiencedby BMW motorcycles and,consequently, they are notsufficient in some circumstances.Use only parts and accessor-ies approved by BMW for yourmotorcycle.
Whenever you are planningmodifications, comply with all thelegal requirements. Make surethat the motorcycle does notinfringe the national road-vehicleconstruction and use regulationsapplicable in your country.
Power socketsNotes on use of power sockets:
automatic shutdownPower sockets are shut downautomatically under the followingcircumstances:
If battery charge state is toolow to maintain the motor-cycle's start capabilityIf maximum load capability asstated in the technical data isexceededWhen the engine is beingcranked on the starter
Operating electricalaccessoriesYou can start using electricalaccessories connected to themotorcycle's sockets only whenthe ignition is switched on. Theaccessory remains operationalif the ignition is subsequentlyswitched off. The power socketsare switched off approximately
776
z Ac
ce
sso
rie
s
http://www.motorcycle.in.th
15 minutes after the ignition isswitched off, in order to preventoverloading of the on-board elec-trics.
Cable routingThe cables from the power sock-ets to the auxiliary devices mustbe routed in such a way thatthey:
Do not impede the riderDo not restrict the steeringangle or obstruct handlingCannot be trapped
LuggageLashing luggage
Loop the luggage straps overthe bar between the motor-cycle and stops 1.
Position luggage strap 2 asshown here with a stuffbag asexample.Check that the luggage is se-cure.
Caseswith cases OE
777
z Ac
ce
sso
rie
s
http://www.motorcycle.in.th
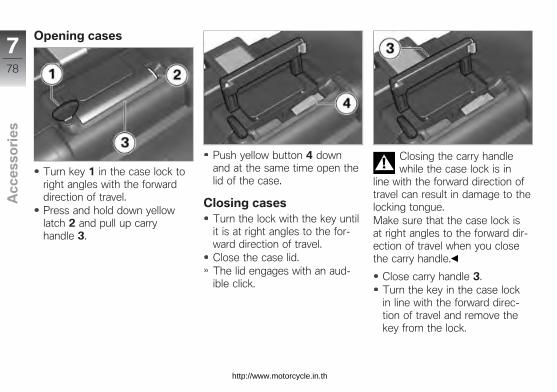
Opening cases
Turn key 1 in the case lock toright angles with the forwarddirection of travel.Press and hold down yellowlatch 2 and pull up carryhandle 3.
Push yellow button 4 downand at the same time open thelid of the case.
Closing casesTurn the lock with the key untilit is at right angles to the for-ward direction of travel.Close the case lid.The lid engages with an aud-ible click.
Closing the carry handlewhile the case lock is in
line with the forward direction oftravel can result in damage to thelocking tongue.Make sure that the case lock isat right angles to the forward dir-ection of travel when you closethe carry handle.
Close carry handle 3.Turn the key in the case lockin line with the forward direc-tion of travel and remove thekey from the lock.
778
z Ac
ce
sso
rie
s
http://www.motorcycle.in.th
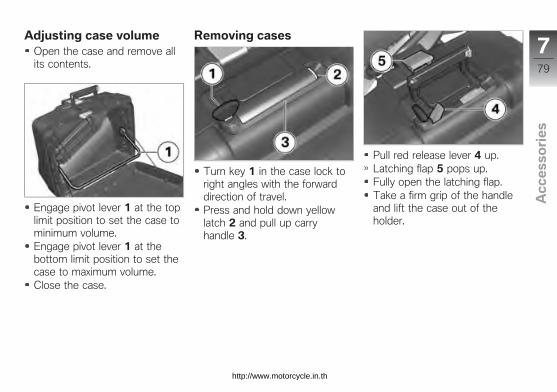
Adjusting case volumeOpen the case and remove allits contents.
Engage pivot lever 1 at the toplimit position to set the case tominimum volume.Engage pivot lever 1 at thebottom limit position to set thecase to maximum volume.Close the case.
Removing cases
Turn key 1 in the case lock toright angles with the forwarddirection of travel.Press and hold down yellowlatch 2 and pull up carryhandle 3.
Pull red release lever 4 up.Latching flap 5 pops up.Fully open the latching flap.Take a firm grip of the handleand lift the case out of theholder.
779
z Ac
ce
sso
rie
s
http://www.motorcycle.in.th
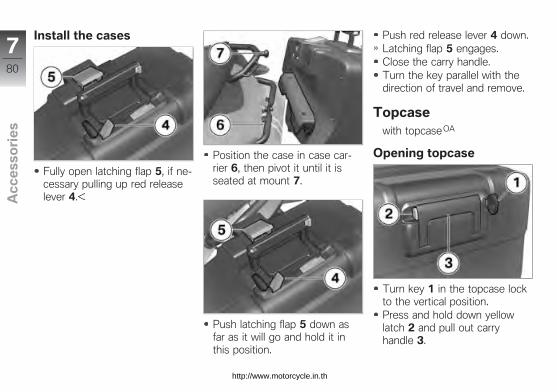
Install the cases
Fully open latching flap 5, if ne-cessary pulling up red releaselever 4.
Position the case in case car-rier 6, then pivot it until it isseated at mount 7.
Push latching flap 5 down asfar as it will go and hold it inthis position.
Push red release lever 4 down.Latching flap 5 engages.Close the carry handle.Turn the key parallel with thedirection of travel and remove.
Topcasewith topcaseOA
Opening topcase
Turn key 1 in the topcase lockto the vertical position.Press and hold down yellowlatch 2 and pull out carryhandle 3.
780
z Ac
ce
sso
rie
s
http://www.motorcycle.in.th

Push yellow button 4 forwardand at the same time push thetopcase lid up.
Close the topcase
Press down firmly on the top-case lid to close.
Closing the carry handlewhile the topcase lock is
horizontal can result in damageto the locking tongue.Make sure that the topcase lockis vertical when you close thecarry handle.
Close carry handle 3.The handle engages with anaudible click.Turn the key in the topcaselock to the horizontal positionand remove the key from thelock.
Adjusting topcase volumeOpen the topcase and removeall its contents.
Engage pivot lever 1 at thefront limit position to set thecase to maximum volume.Engage pivot lever 1 at therear limit position to set thecase to minimum volume.Close the topcase.
781
z Ac
ce
sso
rie
s
http://www.motorcycle.in.th
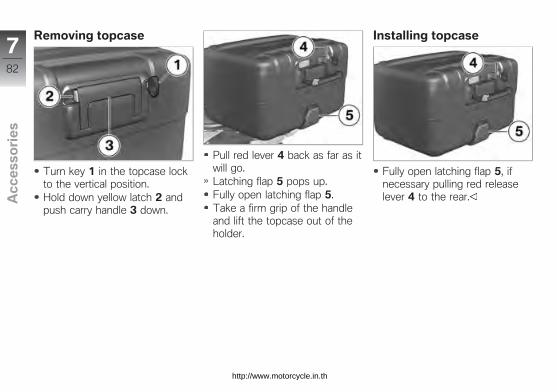
Removing topcase
Turn key 1 in the topcase lockto the vertical position.Hold down yellow latch 2 andpush carry handle 3 down.
Pull red lever 4 back as far as itwill go.Latching flap 5 pops up.Fully open latching flap 5.Take a firm grip of the handleand lift the topcase out of theholder.
Installing topcase
Fully open latching flap 5, ifnecessary pulling red releaselever 4 to the rear.
782
z Ac
ce
sso
rie
s
http://www.motorcycle.in.th
Engage the topcase in frontholders 6 of the topcase carrierplate.Press the topcase onto thetopcase carrier plate at therear.
Push latching flap 5 fullyclosed and hold it in thisposition.Push red release lever 4 for-ward.The latching flap engages.Close the carry handle.Turn the key to the horizontalposition and remove.
783
z Ac
ce
sso
rie
s
http://www.motorcycle.in.th

Maintenance
Maintenance
General instructions . . . . . . . . . . . . . . . . . 86
Toolkit . . . . . . . . . . . . . . . . . . . . . . . . . . . . . . 86
Engine oil . . . . . . . . . . . . . . . . . . . . . . . . . . . 87
Brake system . . . . . . . . . . . . . . . . . . . . . . . 88
Coolant . . . . . . . . . . . . . . . . . . . . . . . . . . . . . 92
Clutch . . . . . . . . . . . . . . . . . . . . . . . . . . . . . . 93
Rims and tyres . . . . . . . . . . . . . . . . . . . . . . 94
Chain . . . . . . . . . . . . . . . . . . . . . . . . . . . . . . . 95
Wheels . . . . . . . . . . . . . . . . . . . . . . . . . . . . . 97
Front-wheel stand . . . . . . . . . . . . . . . . . 103
Bulbs . . . . . . . . . . . . . . . . . . . . . . . . . . . . . . 104
Body panels . . . . . . . . . . . . . . . . . . . . . . . 109
Air filter . . . . . . . . . . . . . . . . . . . . . . . . . . . . 111
Jump starting . . . . . . . . . . . . . . . . . . . . . . 111
Battery . . . . . . . . . . . . . . . . . . . . . . . . . . . . . 113
885
z Ma
inte
na
nc
e
http://www.motorcycle.in.th

General instructionsThe "Maintenance" chapter de-scribes straightforward proced-ures for checking and replacingcertain wear parts.Special tightening torques are lis-ted as applicable. The tighteningtorques for the threaded fasten-ers on your motorcycle are listedin the section entitled "Technicaldata".You will find information on moreextensive maintenance and repairwork in the Repair Manual onDVD for your motorcycle, whichis available from your authorisedBMW Motorrad dealer.
Some of the work calls for spe-cial tools and a thorough know-ledge of motorcycle technology.If you are in doubt consult aspecialist workshop, preferablyyour authorised BMW Motorraddealer.
ToolkitStandard toolkit
1 Screwdriver handle2 Reversible screwdriver
bladeWith star-head and plain-tip ends
Replacing turn indic-ator bulbs, front and rear( 107).Replacing number-platelight bulbs ( 108).Removing battery( 114).
3 Open-ended spannerWidth across flats 17
Adjust the mirror arm( 48).
4 Torx wrench, T40Adjusting headlight beamthrow ( 52).
5 Reversible screwdriverbladeWith star-head and TorxT25
Remove the centre trimpanel ( 109).
Tools service setwith service toolkitOA
886
z Ma
inte
na
nc
e
http://www.motorcycle.in.th
BMW Motorrad has assembleda tools service set that is idealfor carrying out extended servicework (e.g. removing and installingwheels) on this motorcycle. Youcan obtain the tools set fromyour authorised BMW Motorraddealer.
Engine oilChecking engine oil level
The oil level varies withthe temperature of the
oil. The higher the temperature,the higher the level of oil in thesump. Checking the oil level with
the engine cold or after no morethan a short ride will lead to mis-interpretation; this in turn, meansthat the engine will be operatedwith the incorrect quantity of oil.In order to ensure that the en-gine oil level is read correctly,check the oil level only after alengthy trip.
Wipe the area around the oilfiller neck clean.Allow the engine to idle untilthe fan starts up, then allow itto idle one minute longer.Switch off the engine.Make sure the engine is at op-erating temperature and holdthe motorcycle upright.with centre stand OE
Check that the engine is at op-erating temperature, make surethe ground is level and firmand place the motorcycle on itscentre stand.
Remove oil dipstick 1.
Use a dry cloth to wipe gaugelength 2 cleanSeat the oil dipstick on the oilfiller neck, but do not engagethe threads.
887
z Ma
inte
na
nc
e
http://www.motorcycle.in.th
Remove the oil dipstick andcheck the oil level.
Engine oil, specified level
Between MIN and MAXmarks
If the oil level is below the MINmark:
Top up the engine oil ( 88).
If the oil level is above the MAXmark:
Have the oil level correctedby a specialist workshop,
preferably an authorised BMWMotorrad dealer.
Install the oil dipstick.
Top up the engine oilMake sure the ground is leveland firm and place the motor-cycle on its stand.Wipe the area around the fillerneck clean.
Remove oil dipstick 1.
Damage to the enginecan result if it is operated
without enough oil, but the same
also applies if the oil level is toohigh.Always make sure that the oillevel is correct.
Top up the engine oil to thespecified level.Check the engine oil level( 87).Install the oil dipstick.
Brake systemCheck operation of thebrakes
Pull the handbrake lever.The pressure point must beclearly perceptible.Press the footbrake lever.The pressure point must beclearly perceptible.
If pressure points are not clearlyperceptible:
Incorrect working practicesendanger the reliability of
the brakes.
888
z Ma
inte
na
nc
e
http://www.motorcycle.in.th
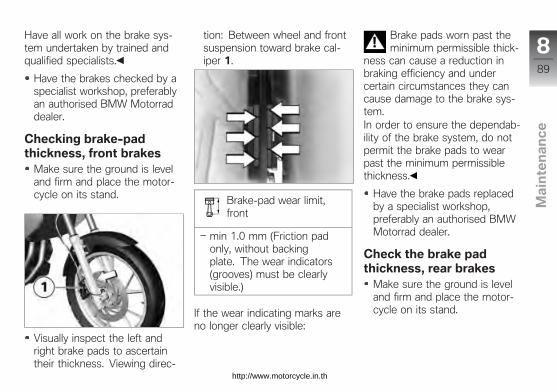
Have all work on the brake sys-tem undertaken by trained andqualified specialists.
Have the brakes checked by aspecialist workshop, preferablyan authorised BMW Motorraddealer.
Checking brake-padthickness, front brakes
Make sure the ground is leveland firm and place the motor-cycle on its stand.
Visually inspect the left andright brake pads to ascertaintheir thickness. Viewing direc-
tion: Between wheel and frontsuspension toward brake cal-iper 1.
Brake-pad wear limit,front
min 1.0 mm (Friction padonly, without backingplate. The wear indicators(grooves) must be clearlyvisible.)
If the wear indicating marks areno longer clearly visible:
Brake pads worn past theminimum permissible thick-
ness can cause a reduction inbraking efficiency and undercertain circumstances they cancause damage to the brake sys-tem.In order to ensure the dependab-ility of the brake system, do notpermit the brake pads to wearpast the minimum permissiblethickness.
Have the brake pads replacedby a specialist workshop,preferably an authorised BMWMotorrad dealer.
Check the brake padthickness, rear brakes
Make sure the ground is leveland firm and place the motor-cycle on its stand.
889
z Ma
inte
na
nc
e
http://www.motorcycle.in.th
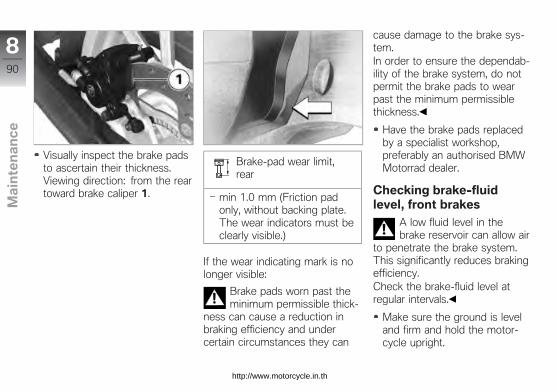
Visually inspect the brake padsto ascertain their thickness.Viewing direction: from the reartoward brake caliper 1.
Brake-pad wear limit,rear
min 1.0 mm (Friction padonly, without backing plate.The wear indicators must beclearly visible.)
If the wear indicating mark is nolonger visible:
Brake pads worn past theminimum permissible thick-
ness can cause a reduction inbraking efficiency and undercertain circumstances they can
cause damage to the brake sys-tem.In order to ensure the dependab-ility of the brake system, do notpermit the brake pads to wearpast the minimum permissiblethickness.
Have the brake pads replacedby a specialist workshop,preferably an authorised BMWMotorrad dealer.
Checking brake-fluidlevel, front brakes
A low fluid level in thebrake reservoir can allow air
to penetrate the brake system.This significantly reduces brakingefficiency.Check the brake-fluid level atregular intervals.
Make sure the ground is leveland firm and hold the motor-cycle upright.
890
z Ma
inte
na
nc
e
http://www.motorcycle.in.th
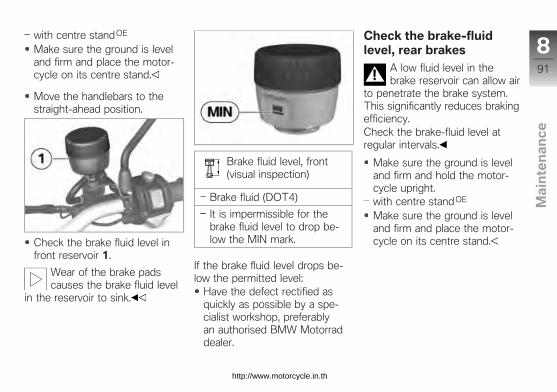
with centre stand OE
Make sure the ground is leveland firm and place the motor-cycle on its centre stand.
Move the handlebars to thestraight-ahead position.
Check the brake fluid level infront reservoir 1.
Wear of the brake padscauses the brake fluid level
in the reservoir to sink.
Brake fluid level, front(visual inspection)
Brake fluid (DOT4)
It is impermissible for thebrake fluid level to drop be-low the MIN mark.
If the brake fluid level drops be-low the permitted level:
Have the defect rectified asquickly as possible by a spe-cialist workshop, preferablyan authorised BMW Motorraddealer.
Check the brake-fluidlevel, rear brakes
A low fluid level in thebrake reservoir can allow air
to penetrate the brake system.This significantly reduces brakingefficiency.Check the brake-fluid level atregular intervals.
Make sure the ground is leveland firm and hold the motor-cycle upright.with centre stand OE
Make sure the ground is leveland firm and place the motor-cycle on its centre stand.
891
z Ma
inte
na
nc
e
http://www.motorcycle.in.th

Check the brake fluid level inrear reservoir 1.
Wear of the brake padscauses the brake fluid level
in the reservoir to sink.
Brake fluid level, rear(visual inspection)
Brake fluid (DOT4)
It is impermissible for thebrake fluid level to drop be-low the MIN mark.
If the brake fluid level drops be-low the permitted level:
Have the defect rectified asquickly as possible by a spe-cialist workshop, preferablyan authorised BMW Motorraddealer.
CoolantCheck the coolant level
Make sure the ground is leveland firm and place the motor-cycle on its stand.
Check the coolant level inexpansion tank 1. Viewingdirection: From in front,between windscreen and rightside panel.
892
z Ma
inte
na
nc
e
http://www.motorcycle.in.th

Coolant, specified level
Antifreeze
between MIN and MAXmarks on the expansion tank
If the coolant drops below thepermitted level:
Top up the coolant.
Topping up coolant
Open cap 1 of the expansiontank.Using a suitable funnel, top upwith coolant until the level iscorrect.Close the cap of the expansiontank.
ClutchChecking clutch operation
Pull the clutch lever.The pressure point must beclearly perceptible.
If the pressure point is not clearlyperceptible:
Have the clutch checked by aspecialist workshop, preferablyan authorised BMW Motorraddealer.
Check the clutch playTurn the handlebars all the wayto left
Pull clutch cable 1 as far aspossible away from the clutchlever.
893
z Ma
inte
na
nc
e
http://www.motorcycle.in.th
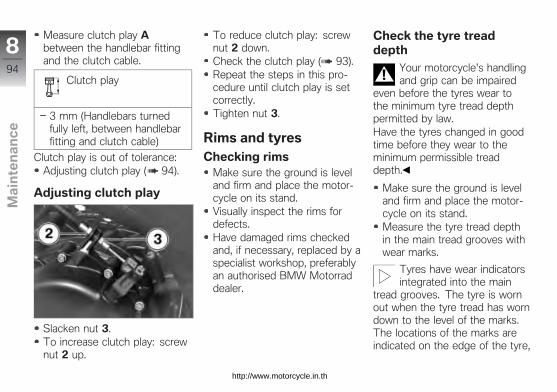
Measure clutch play Abetween the handlebar fittingand the clutch cable.
Clutch play
3 mm (Handlebars turnedfully left, between handlebarfitting and clutch cable)
Clutch play is out of tolerance:Adjusting clutch play ( 94).
Adjusting clutch play
Slacken nut 3.To increase clutch play: screwnut 2 up.
To reduce clutch play: screwnut 2 down.Check the clutch play ( 93).Repeat the steps in this pro-cedure until clutch play is setcorrectly.Tighten nut 3.
Rims and tyresChecking rims
Make sure the ground is leveland firm and place the motor-cycle on its stand.Visually inspect the rims fordefects.Have damaged rims checkedand, if necessary, replaced by aspecialist workshop, preferablyan authorised BMW Motorraddealer.
Check the tyre treaddepth
Your motorcycle's handlingand grip can be impaired
even before the tyres wear tothe minimum tyre tread depthpermitted by law.Have the tyres changed in goodtime before they wear to theminimum permissible treaddepth.
Make sure the ground is leveland firm and place the motor-cycle on its stand.Measure the tyre tread depthin the main tread grooves withwear marks.
Tyres have wear indicatorsintegrated into the main
tread grooves. The tyre is wornout when the tyre tread has worndown to the level of the marks.The locations of the marks areindicated on the edge of the tyre,
894
z Ma
inte
na
nc
e
http://www.motorcycle.in.th
e.g. by the letters TI, TWI or byan arrow.
If the tyre tread is worn to min-imum:
Replace tyre or tyres, as applic-able.
ChainLubricating chain
Dirt, dust and inadequatelubrication will result in ac-
celerated wear and significantlyshorten the drive chain's usefullife.Clean and lubricate the drivechain at regular intervals.
Lubricate the drive chain every1000 km at the latest. Lubric-ate the chain more frequently ifthe motorcycle is ridden in wet,dusty or dirty conditions.
Switch the ignition off and se-lect neutral.
Clean the drive chain with asuitable cleaning product, dry itand apply chain lubricant.Wipe off excess lubricant.
Checking chain sagMake sure the ground is leveland firm and place the motor-cycle on its stand.Turn the rear wheel until itreaches the position with thelowest amount of chain sag.
Use a screwdriver to push thechain up and down and meas-ure difference A.
Chain deflection
30...40 mm (Motorcycle withno weight applied, supportedon its side stand)
with lowered suspensionOE
20...30 mm (Motorcycle withno weight applied, supportedon its side stand)
If measured value is outside per-mitted tolerance:
Adjust the chain sag ( 95).
Adjusting chain sagMake sure the ground is leveland firm and place the motor-cycle on its stand.
895
z Ma
inte
na
nc
e
http://www.motorcycle.in.th
Slacken quick-release axlenut 1.Slacken locknuts 2 on left andright.Use adjusting screws 3 on leftand right to adjust chain sag.Checking chain sag ( 95).Make sure that scale read-ings 4 are the same on left andright.Tighten locknuts 2 on left andright to the specified tighteningtorque.
Locknut of the final-drivechain tensioning screw
19 Nm
Tighten quick-release axlenut 1 to the specified tight-ening torque.
Rear quick-release axlein swinging arm
100 Nm
Checking chain wearMake sure the ground is leveland firm and place the motor-cycle on its stand.Engage 1st gear.Turn the rear wheel in the nor-mal direction of travel until thechain is tensioned.Measure the length of thechain over 9 rivets below therear wheel swinging arm.
permissible chain length
max 144.30 mm (measuredover 9 rivets, chain pulledtaut)
If the chain has stretched to themaximum permissible length:
Seek the advice of a specialistworkshop, preferably an author-ised BMW Motorrad dealer.
896
z Ma
inte
na
nc
e
http://www.motorcycle.in.th

WheelsTyre recommendationFor each size of tyre BMWMotorrad tests certain makes,and approves those that itcertifies as roadworthy. If BMWMotorrad has not approved thewheels and tyres, it cannotassess their suitability or provideany guarantee of road safety.Use only wheels and tyres ap-proved by BMW Motorrad foryour type of motorcycle.You can obtain detailed informa-tion from your authorised BMWMotorrad dealer or on the Inter-net at www.bmw-motorrad.com.
Effect of wheel size onABSWheel size is very important as aparameter for the ABS. In partic-ular, the diameter and the widthof a motorcycle's wheels are pro-grammed into the control unit
and are fundamental to all cal-culations. Any change in theseinfluencing variables, caused forexample by a switch to wheelsother than those installed ex-works, can have serious effectson the performance of the con-trol systems.The sensor rings are essentialfor correct road-speed calcula-tion, and they too must matchthe motorcycle's control sys-tems and consequently cannotbe changed.If you decide that you would liketo fit non-standard wheels toyour motorcycle, it is very im-portant to consult a specialistworkshop beforehand, prefer-ably an authorised BMW Motor-rad dealer. In some cases, thedata programmed into the controlunits can be changed to suit thenew wheel sizes.
RDC labelwith tyre pressure monitoring(RDC)OE
Incorrect tyre fitting candamage the RDC sensors.
Be sure to explain to the au-thorised BMW Motorrad dealeror the specialist workshop thatthe wheel is fitted with an RDCsensor.
If the motorcycle is equippedwith RDC, each wheel rim bearsan adhesive label indicating theposition of the RDC sensor.When changing the tyre, take
897
z Ma
inte
na
nc
e
http://www.motorcycle.in.th
care not to damage the RDCsensor. Be sure to draw theattention of the authorised BMWMotorrad dealer or specialistworkshop to the fact that thewheel is fitted with an RDCsensor.
Removing front wheelMake sure the ground is leveland firm and place the motor-cycle on its stand.with BMW Motorrad ABS OE
Remove screw 1 and removethe speed sensor from itsbore.
Place the motorcycle on a suit-able auxiliary stand.with centre stand OE
Make sure the ground is leveland firm and place the motor-cycle on its centre stand.
Raise front of motorcycle untilthe front wheel can turn freely.BMW Motorrad recommendsthe BMW Motorrad front-wheelstand for lifting the motorcycle.Install the front-wheel stand( 103).
Release axle clamping screw 2.
Remove axle 3, while support-ing the wheel.Do not remove the grease fromthe axle.
Once the calipers havebeen removed, there is
a risk of the brake pads beingpressed together to the extentthat they cannot be slipped backover the brake disc on reas-sembly.Do not operate the handbrakelever when the brake calipershave been removed.
Roll the front wheel forward toremove.
898
z Ma
inte
na
nc
e
http://www.motorcycle.in.th
Remove spacing bushing 4from the left-hand side of thewheel hub.
Installing front wheel
Threaded fasteners nottightened to the specified
torque can work loose or theirthreads can suffer damage.Always have the security of thefasteners checked by a specialistworkshop, preferably an author-ised BMW Motorrad dealer.
Slip spacing bushing 4 intothe left-hand side of the wheelhub.
The front wheel must beinstalled right way round to
rotate in the correct direction.Note the direction-of-rotation ar-rows on the tyre or the wheelrim.
Roll the front wheel into posi-tion between the forks, makingsure that the brake disc passesbetween the brake pads.
Raise the front wheel, insertaxle 3 and tighten to specifiedtorque.
Quick-release axle, front,in axle holder
30 Nm
Remove the front-wheel stand.
without centre standOE
Remove the auxiliary stand.
Firmly compress the front forksseveral times.
899
z Ma
inte
na
nc
e
http://www.motorcycle.in.th
Tighten axle clamping screw 2to the specified torque.
Clamp of quick-releaseaxle
19 Nm
with BMW Motorrad ABS OE
Insert the ABS sensor into itsbore and install screw 1.
The cable of the wheel-speed sensor could chafe
through if it comes into contactwith the brake disc.Make sure that the sensorcable is routed correctly.
Make sure that the ABS sensorcable is routed as shownhere.
Remove the rear wheelMake sure the ground is leveland firm and place the motor-cycle on its stand.
Remove screw 1 and removethe speed sensor from its bore.Make sure the ground is leveland firm and place the mo-torcycle on a suitable auxiliarystand.
with centre stand OE
Make sure the ground is leveland firm and place the motor-cycle on its centre stand.
8100
z Ma
inte
na
nc
e
http://www.motorcycle.in.th
Remove axle nut 2.Slacken locknuts 3 on left andright by turning them counter-clockwise.Back off adjusting screws 4 onleft and right by turning themcounter-clockwise.Remove adjusting plate 5 andpush the axle in as far as it willgo.
Remove quick-release axle 6and remove adjusting plate 7.
Roll the rear wheel as farforward as possible anddisengage chain 8 from thesprocket.
Roll the rear wheel back until itis clear of the swinging arm.
The sprocket and thespacer sleeves on left
and right are loose fits in thewheel. Make sure that theseparts are not damaged or lost onremoval.
Install the rear wheel
Possible malfunctions whenthe ABS system intervenes
if non-standard wheels are in-stalled.See the information on the effectof wheel size on the ABS systemat the start of this chapter.
Threaded fasteners nottightened to the specified
torque can work loose or theirthreads can suffer damage.Always have the security of thefasteners checked by a specialistworkshop, preferably an author-ised BMW Motorrad dealer.
8101
z Ma
inte
na
nc
e
http://www.motorcycle.in.th
Roll the rear wheel into theswinging arm, making sure thatthe brake disc passes betweenthe brake pads.
Roll the rear wheel as farforward as possible and loopchain 8 over the sprocket.
Seat left adjusting plate 7 inthe swinging arm and installquick-release axle 6 in thebrake caliper and the rearwheel.Make sure that the axle fitsinto the recess of the adjust-ing plate.
Install right adjusting plate 5.
Install nut 2, but do not tightenit at this point.
without centre standOE
Remove the auxiliary stand.
8102
z Ma
inte
na
nc
e
http://www.motorcycle.in.th
Insert the speed sensor intothe bore and install screw 1.
Adjust the chain sag ( 95).
Front-wheel standInstall the front-wheelstand
The BMW Motorrad frontwheel stand is not designed
to support the motorcyclewithout the assistance of anauxiliary stand. A motorcycleresting only on the front wheelstand and the rear wheel cantopple.
Place the motorcycle on an aux-iliary stand before lifting the frontwheel with the BMW Motorradfront-wheel stand.
Place the motorcycle on a suit-able auxiliary stand.with centre stand OE
Place the motorcycle on itscentre stand.
Use basic stand (83 30 0 402241) with front-wheel adapter(83 30 0 402 242).Slacken adjusting screws 1.Push the two adapters 2 apartuntil the front forks fit between
them. Adjust the adapter studsto suit the front suspension.Use locating pins 3 to set thefront-wheel stand to the de-sired height.Centre the front-wheel standrelative to the front wheel andpush it against the front axle.
Align the two adapters 2 sothat the front forks are securelyseated.Tighten adjusting screws 1.
8103
z Ma
inte
na
nc
e
http://www.motorcycle.in.th
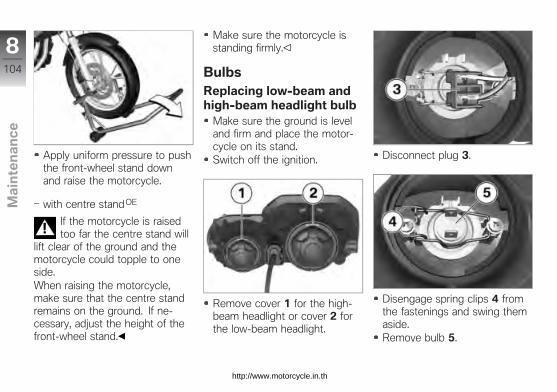
Apply uniform pressure to pushthe front-wheel stand downand raise the motorcycle.
with centre stand OE
If the motorcycle is raisedtoo far the centre stand will
lift clear of the ground and themotorcycle could topple to oneside.When raising the motorcycle,make sure that the centre standremains on the ground. If ne-cessary, adjust the height of thefront-wheel stand.
Make sure the motorcycle isstanding firmly.
BulbsReplacing low-beam andhigh-beam headlight bulb
Make sure the ground is leveland firm and place the motor-cycle on its stand.Switch off the ignition.
Remove cover 1 for the high-beam headlight or cover 2 forthe low-beam headlight.
Disconnect plug 3.
Disengage spring clips 4 fromthe fastenings and swing themaside.Remove bulb 5.
8104
z Ma
inte
na
nc
e
http://www.motorcycle.in.th
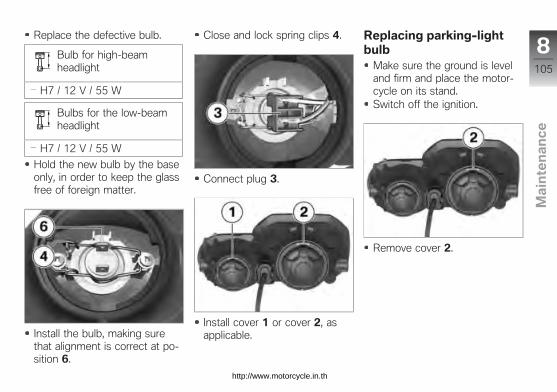
Replace the defective bulb.
Bulb for high-beamheadlight
H7 / 12 V / 55 W
Bulbs for the low-beamheadlight
H7 / 12 V / 55 W
Hold the new bulb by the baseonly, in order to keep the glassfree of foreign matter.
Install the bulb, making surethat alignment is correct at po-sition 6.
Close and lock spring clips 4.
Connect plug 3.
Install cover 1 or cover 2, asapplicable.
Replacing parking-lightbulb
Make sure the ground is leveland firm and place the motor-cycle on its stand.Switch off the ignition.
Remove cover 2.
8105
z Ma
inte
na
nc
e
http://www.motorcycle.in.th

Pull parking-light bulb 3 out ofthe headlight housing.
Remove the bulb from the bulbholder.
Replace the defective bulb.
Bulb for parking light
W5W / 12 V / 5 W
Use a clean, dry cloth to holdthe new bulb in order to keepthe glass free of foreign matter.
Push the bulb into the bulbsocket.
Insert parking-light bulb 3 intothe headlight housing.
Install cover 2.
8106
z Ma
inte
na
nc
e
http://www.motorcycle.in.th
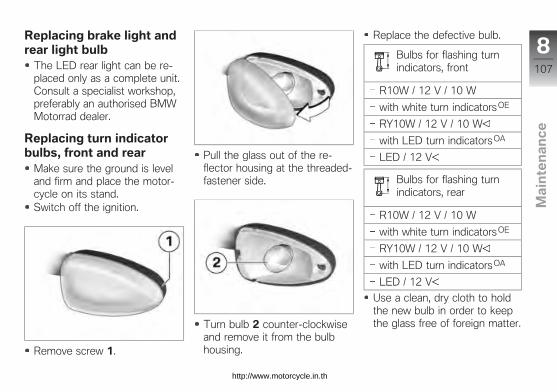
Replacing brake light andrear light bulb
The LED rear light can be re-placed only as a complete unit.Consult a specialist workshop,preferably an authorised BMWMotorrad dealer.
Replacing turn indicatorbulbs, front and rear
Make sure the ground is leveland firm and place the motor-cycle on its stand.Switch off the ignition.
Remove screw 1.
Pull the glass out of the re-flector housing at the threaded-fastener side.
Turn bulb 2 counter-clockwiseand remove it from the bulbhousing.
Replace the defective bulb.
Bulbs for flashing turnindicators, front
R10W / 12 V / 10 W
with white turn indicatorsOE
RY10W / 12 V / 10 W
with LED turn indicatorsOA
LED / 12 V
Bulbs for flashing turnindicators, rear
R10W / 12 V / 10 W
with white turn indicatorsOE
RY10W / 12 V / 10 W
with LED turn indicatorsOA
LED / 12 V
Use a clean, dry cloth to holdthe new bulb in order to keepthe glass free of foreign matter.
8107
z Ma
inte
na
nc
e
http://www.motorcycle.in.th

Turn bulb 2 clockwise to installit in the bulb housing.
Working from the inboard side,insert the glass into the bulbhousing and close the housing.
Install screw 1.
Replacing number-platelight bulbs
Make sure the ground is leveland firm and place the motor-cycle on its stand.Switch off the ignition.
Remove screw 1 from themudguard cover and removethe cover.
Pull bulb holder 2 out of thelight carrier.
8108
z Ma
inte
na
nc
e
http://www.motorcycle.in.th
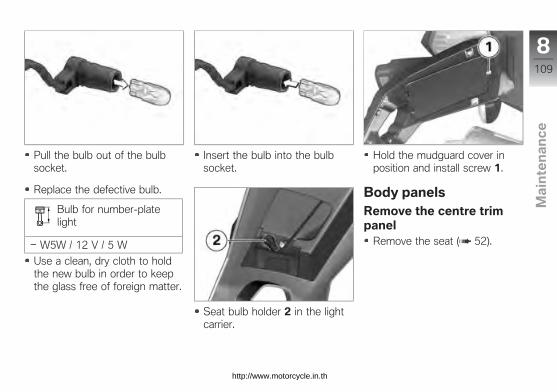
Pull the bulb out of the bulbsocket.
Replace the defective bulb.
Bulb for number-platelight
W5W / 12 V / 5 W
Use a clean, dry cloth to holdthe new bulb in order to keepthe glass free of foreign matter.
Insert the bulb into the bulbsocket.
Seat bulb holder 2 in the lightcarrier.
Hold the mudguard cover inposition and install screw 1.
Body panelsRemove the centre trimpanel
Remove the seat ( 52).
8109
z Ma
inte
na
nc
e
http://www.motorcycle.in.th
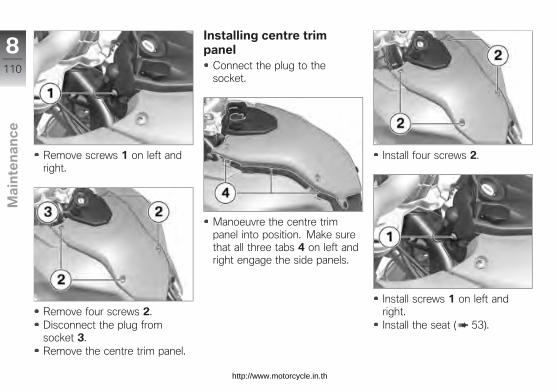
Remove screws 1 on left andright.
Remove four screws 2.Disconnect the plug fromsocket 3.Remove the centre trim panel.
Installing centre trimpanel
Connect the plug to thesocket.
Manoeuvre the centre trimpanel into position. Make surethat all three tabs 4 on left andright engage the side panels.
Install four screws 2.
Install screws 1 on left andright.Install the seat ( 53).
8110
z Ma
inte
na
nc
e
http://www.motorcycle.in.th
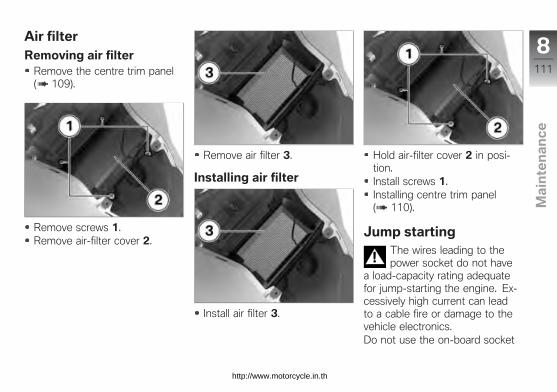
Air filterRemoving air filter
Remove the centre trim panel( 109).
Remove screws 1.Remove air-filter cover 2.
Remove air filter 3.
Installing air filter
Install air filter 3.
Hold air-filter cover 2 in posi-tion.Install screws 1.Installing centre trim panel( 110).
Jump startingThe wires leading to thepower socket do not have
a load-capacity rating adequatefor jump-starting the engine. Ex-cessively high current can leadto a cable fire or damage to thevehicle electronics.Do not use the on-board socket
8111
z Ma
inte
na
nc
e
http://www.motorcycle.in.th
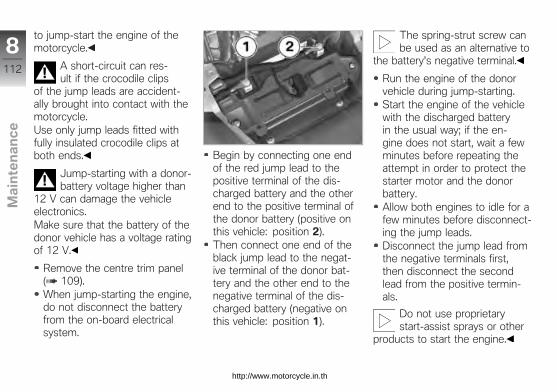
to jump-start the engine of themotorcycle.
A short-circuit can res-ult if the crocodile clips
of the jump leads are accident-ally brought into contact with themotorcycle.Use only jump leads fitted withfully insulated crocodile clips atboth ends.
Jump-starting with a donor-battery voltage higher than
12 V can damage the vehicleelectronics.Make sure that the battery of thedonor vehicle has a voltage ratingof 12 V.
Remove the centre trim panel( 109).When jump-starting the engine,do not disconnect the batteryfrom the on-board electricalsystem.
Begin by connecting one endof the red jump lead to thepositive terminal of the dis-charged battery and the otherend to the positive terminal ofthe donor battery (positive onthis vehicle: position 2).Then connect one end of theblack jump lead to the negat-ive terminal of the donor bat-tery and the other end to thenegative terminal of the dis-charged battery (negative onthis vehicle: position 1).
The spring-strut screw canbe used as an alternative to
the battery's negative terminal.
Run the engine of the donorvehicle during jump-starting.Start the engine of the vehiclewith the discharged batteryin the usual way; if the en-gine does not start, wait a fewminutes before repeating theattempt in order to protect thestarter motor and the donorbattery.Allow both engines to idle for afew minutes before disconnect-ing the jump leads.Disconnect the jump lead fromthe negative terminals first,then disconnect the secondlead from the positive termin-als.
Do not use proprietarystart-assist sprays or other
products to start the engine.
8112
z Ma
inte
na
nc
e
http://www.motorcycle.in.th

Installing centre trim panel( 110).
BatteryMaintenance instructionsCorrect upkeep, recharging andstorage will prolong the life ofthe battery and are essential ifwarranty claims are to be con-sidered.Compliance with the points be-low is important in order to max-imise battery life:
Keep the surface of the batteryclean and dryDo not open the batteryDo not top up with waterBe sure to read and complywith the instructions for char-ging the battery on the follow-ing pagesDo not turn the battery upsidedown
If the battery is not discon-nected, the on-board elec-
tronics (e.g. clock, etc.) graduallydrain the battery. This can causethe battery to run flat. If this hap-pens, warranty claims will not beaccepted.Connect a float charger to thebattery if the motorcycle is toremain out of use for more thanfour weeks.
BMW Motorrad has de-veloped a float charger spe-
cially designed for compatibilitywith the electronics of your mo-torcycle. Using this charger, youcan keep the battery chargedduring long periods of disuse,without having to disconnect thebattery from the motorcycle'son-board systems. You can ob-tain additional information fromyour authorised BMW Motorraddealer.
Charging battery whenconnected
Disconnect devices pluggedinto the sockets.
Charging the connectedbattery directly at the bat-
tery terminals can damage thevehicle electronics.Always disconnect the batteryfrom the on-board circuits be-fore recharging it with a chargerconnected directly to the batteryposts.
Only chargers suitable forthis mode of charging can
be used to recharge the batteryvia the on-board socket. Unsuit-able chargers could cause dam-age to the motorcycle's on-boardelectrics.Use BMW chargers with thepart numbers 71 60 7 688 864(220 V) or, as applicable,71 60 7 688 865 (110 V). Ifyou are in doubt, disconnect
8113
z Ma
inte
na
nc
e
http://www.motorcycle.in.th

the battery from the on-boardsystems and connect the chargerdirectly to the battery.
If you switch on the igni-tion and the multifunction
display and telltale lights fail tolight up, the battery is completelyflat (battery voltage is less than 9V). Attempting to charge a com-pletely flat battery via the on-board socket can cause damageto the motorcycle's electronics.If a battery has discharged to theextent that it is completely flat, ithas to be disconnected from theon-board circuits and chargedwith the charger connected dir-ectly to the battery posts.
Charge via the power socket,with the battery connectedto the motorcycle's on-boardelectrical system.
The motorcycle's on-boardelectronics know when the
battery is fully charged. The
on-board socket is switched offwhen this happens.
Comply with the operating in-structions of the charger.
If you are unable to chargethe battery through the on-
board socket, you may be usinga charger that is not compatiblewith your motorcycle's electron-ics. If this happens, disconnectthe battery from the on-boardsystems and connect the chargerdirectly to the battery.
Charging battery whendisconnected
Charge the battery using asuitable charger.Comply with the operating in-structions of the charger.Once the battery is fullycharged, disconnect thecharger's terminal clips fromthe battery terminals.
The battery has to be re-charged at regular intervals
in the course of a lengthy periodof disuse. See the instructionsfor caring for your battery. Al-ways fully recharge the batterybefore restoring it to use
Removing batteryMake sure the ground is leveland firm and place the motor-cycle on its stand.with anti-theft alarm OE
If applicable, switch off the anti-theft alarm.
Switch off the ignition.Remove the centre trim panel( 109).
8114
z Ma
inte
na
nc
e
http://www.motorcycle.in.th
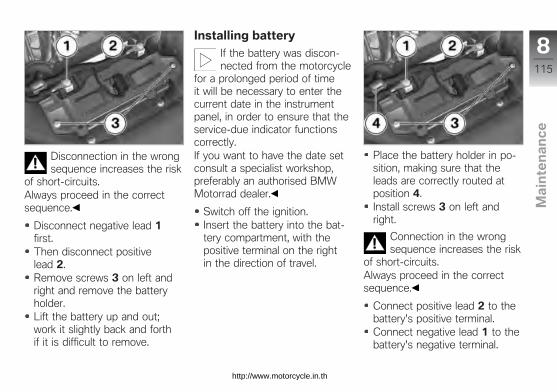
Disconnection in the wrongsequence increases the risk
of short-circuits.Always proceed in the correctsequence.
Disconnect negative lead 1first.Then disconnect positivelead 2.Remove screws 3 on left andright and remove the batteryholder.Lift the battery up and out;work it slightly back and forthif it is difficult to remove.
Installing battery
If the battery was discon-nected from the motorcycle
for a prolonged period of timeit will be necessary to enter thecurrent date in the instrumentpanel, in order to ensure that theservice-due indicator functionscorrectly.If you want to have the date setconsult a specialist workshop,preferably an authorised BMWMotorrad dealer.
Switch off the ignition.Insert the battery into the bat-tery compartment, with thepositive terminal on the rightin the direction of travel.
Place the battery holder in po-sition, making sure that theleads are correctly routed atposition 4.Install screws 3 on left andright.
Connection in the wrongsequence increases the risk
of short-circuits.Always proceed in the correctsequence.
Connect positive lead 2 to thebattery's positive terminal.Connect negative lead 1 to thebattery's negative terminal.
8115
z Ma
inte
na
nc
e
http://www.motorcycle.in.th
Installing centre trim panel( 110).Setting clock ( 39).
8116
z Ma
inte
na
nc
e
http://www.motorcycle.in.th
Care
Care
Care products . . . . . . . . . . . . . . . . . . . . . 118
Washing motorcycle . . . . . . . . . . . . . . . 118
Cleaning easily damaged compon-ents . . . . . . . . . . . . . . . . . . . . . . . . . . . . . . . . 118
Paint care . . . . . . . . . . . . . . . . . . . . . . . . . . 119
Protective wax coating . . . . . . . . . . . . . 120
Laying up motorcycle . . . . . . . . . . . . . . 120
Restoring motorcycle to use . . . . . . . 120
9117
z Ca
re
http://www.motorcycle.in.th

Care productsBMW Motorrad recommendsthat you use the cleaning andcare products you can obtainfrom your authorised BMWMotorrad dealer. The substancesin BMW Care Products havebeen tested in laboratories and inpractice; they provide optimisedcare and protection for thematerials used in your vehicle.
The use of unsuitablecleaning and care products
can damage vehicle components.Do not use solvents such as cel-lulose thinners, cold cleaners,fuel or the like, and do not usecleaning products that containalcohol.
Washing motorcycleBMW Motorrad recommendsthat you use BMW insect re-mover to soften and wash offinsects and stubborn dirt on
painted parts prior to washingthe motorcycle.To prevent stains, do not washthe motorcycle immediately afterit has been exposed to strongsunlight and do not wash it in thesun.Make sure that the motorcycleis washed frequently, especiallyduring the winter months.To remove road salt, clean themotorcycle with cold water im-mediately after every trip.
After the motorcycle hasbeen washed, ridden
through water or ridden inthe rain, the brake discs andpads might be wet and thebrakes might not take effectimmediately.Apply the brakes in good timeuntil the brake discs and brakepads have dried out.
Warm water intensifies theeffect of salt.
Use only cold water to wash offroad salt.
The high pressure of high-pressure cleaners (steam
cleaners) can damage seals, thehydraulic brake system, the elec-trical system, and the seat.Do not use a steam jet or high-pressure cleaning equipment.
Cleaning easilydamaged componentsPlastics
If plastic parts are cleanedusing unsuitable cleaning
agents, the surfaces can be dam-aged.Do not use cleaning agents thatcontain alcohol, solvents or ab-rasives to clean plastic parts.Even fly-remover pads or clean-ing pads with hard surfaces canproduce scratches.
9118
z Ca
re
http://www.motorcycle.in.th
Body panelsClean the trim panels with waterand BMW plastic care emulsion.
Windscreens and headlightlenses made of plasticClean off dirt and insects with asoft sponge and plenty of water.
Soften stubborn dirt andinsects by covering the af-
fected areas with a wet cloth.
ChromeUse plenty of water and BMWshampoo to clean chrome, par-ticularly if it has been exposed toroad salt. Use chrome polish foradditional treatment.
RadiatorClean the radiator regularly toprevent overheating of the en-gine due to inadequate cooling.For example, use a garden hosewith low water pressure.
Cooling fins can be benteasily.
Take care not to bend the finswhen cleaning the radiator.
RubberTreat rubber components withwater or BMW rubber-careproducts.
Using silicone sprays forthe care of rubber seals can
cause damage.Do not use silicone sprays orother care products that containsilicon.
Paint careWashing the motorcycle regularlywill help counteract the long-termeffects of substances that dam-age the paint, especially if yourmotorcycle is ridden in areaswith high air pollution or naturalsources of dirt, for example treeresin or pollen.
Remove particularly aggressivesubstances immediately, how-ever, as otherwise the paint canbe affected or become discol-oured. Substances of this natureinclude spilt fuel, oil, grease,brake fluid and bird droppings.We recommend BMW vehiclepolish or BMW paint cleaner forthis purpose.Marks on the paintwork are par-ticularly easy to see after themotorcycle has been washed.Remove stains of this kind im-mediately, using cleaning-gradebenzene or petroleum spirit on aclean cloth or ball of cotton wool.BMW Motorrad recommendsBMW tar remover for removingspecks of tar. Remember to waxthe parts treated in this way.
9119
z Ca
re
http://www.motorcycle.in.th
Protective wax coatingBMW Motorrad recommendsapplying only BMW car wax orproducts containing carnaubawax or synthetic wax.It is time to rewax the paint-work when water "puddles" onthe surface, instead of formingbeads.
Laying up motorcycleClean the motorcycle.Removing battery ( 114).Spray the brake and clutchlever pivots, the side standpivots and the centre standpivots (if the motorcycle is fit-ted with a centre stand) with asuitable lubricant.Coat bright metal and chrome-plated parts with an acid-freegrease (e.g. Vaseline).Stand the motorcycle in a dryroom in such a way that thereis no load on either wheel.
Restoring motorcycleto use
Remove the protective waxcoating.Clean the motorcycle.Install a charged battery.Before starting: work throughthe checklist.
9120
z Ca
re
http://www.motorcycle.in.th
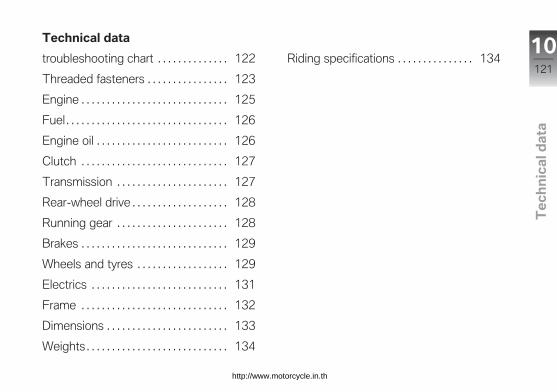
Technical data
Technical data
troubleshooting chart . . . . . . . . . . . . . . 122
Threaded fasteners . . . . . . . . . . . . . . . . 123
Engine . . . . . . . . . . . . . . . . . . . . . . . . . . . . . 125
Fuel . . . . . . . . . . . . . . . . . . . . . . . . . . . . . . . . 126
Engine oil . . . . . . . . . . . . . . . . . . . . . . . . . . 126
Clutch . . . . . . . . . . . . . . . . . . . . . . . . . . . . . 127
Transmission . . . . . . . . . . . . . . . . . . . . . . 127
Rear-wheel drive . . . . . . . . . . . . . . . . . . . 128
Running gear . . . . . . . . . . . . . . . . . . . . . . 128
Brakes . . . . . . . . . . . . . . . . . . . . . . . . . . . . . 129
Wheels and tyres . . . . . . . . . . . . . . . . . . 129
Electrics . . . . . . . . . . . . . . . . . . . . . . . . . . . 131
Frame . . . . . . . . . . . . . . . . . . . . . . . . . . . . . 132
Dimensions . . . . . . . . . . . . . . . . . . . . . . . . 133
Weights . . . . . . . . . . . . . . . . . . . . . . . . . . . . 134
Riding specifications . . . . . . . . . . . . . . . 13410121
z Te
ch
nic
al d
ata
http://www.motorcycle.in.th
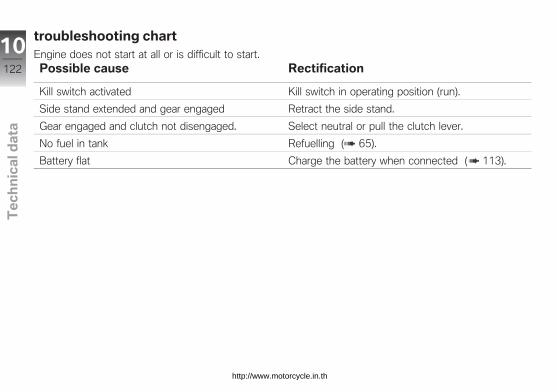
troubleshooting chartEngine does not start at all or is difficult to start.Possible cause Rectification
Kill switch activated Kill switch in operating position (run).
Side stand extended and gear engaged Retract the side stand.
Gear engaged and clutch not disengaged. Select neutral or pull the clutch lever.
No fuel in tank Refuelling ( 65).
Battery flat Charge the battery when connected ( 113).
10122
z Te
ch
nic
al d
ata
http://www.motorcycle.in.th

Threaded fastenersFront wheel FR Valid
Brake caliper to fork leg
M10 x 40 38 Nm
Clamp of quick-release axle
M8 x 25 19 Nm
Quick-release axle, front, in axleholder
M16 x 1.5 30 Nm
Rear wheel FR Valid
Locknut of the final-drive chaintensioning screw
M8 19 Nm
Rear quick-release axle inswinging arm
M16 x 1.5 100 Nm
10123
z Te
ch
nic
al d
ata
http://www.motorcycle.in.th
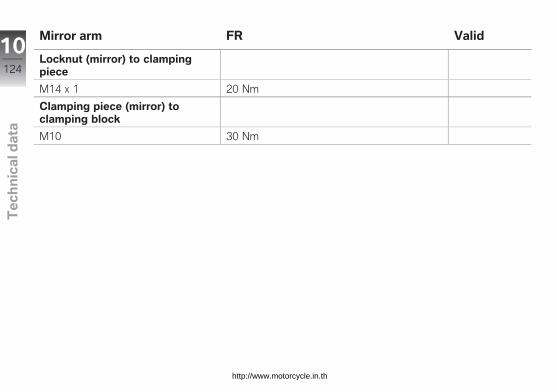
Mirror arm FR Valid
Locknut (mirror) to clampingpiece
M14 x 1 20 Nm
Clamping piece (mirror) toclamping block
M10 30 Nm
10124
z Te
ch
nic
al d
ata
http://www.motorcycle.in.th
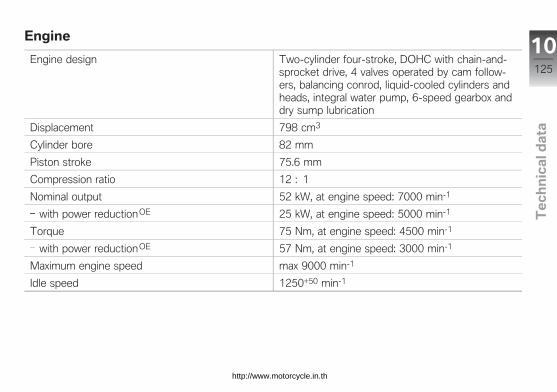
Engine
Engine design Two-cylinder four-stroke, DOHC with chain-and-sprocket drive, 4 valves operated by cam follow-ers, balancing conrod, liquid-cooled cylinders andheads, integral water pump, 6-speed gearbox anddry sump lubrication
Displacement 798 cm3
Cylinder bore 82 mm
Piston stroke 75.6 mm
Compression ratio 12 : 1
Nominal output 52 kW, at engine speed: 7000 min-1
with power reductionOE 25 kW, at engine speed: 5000 min-1
Torque 75 Nm, at engine speed: 4500 min-1
with power reductionOE 57 Nm, at engine speed: 3000 min-1
Maximum engine speed max 9000 min-1
Idle speed 1250+50 min-1
10125
z Te
ch
nic
al d
ata
http://www.motorcycle.in.th
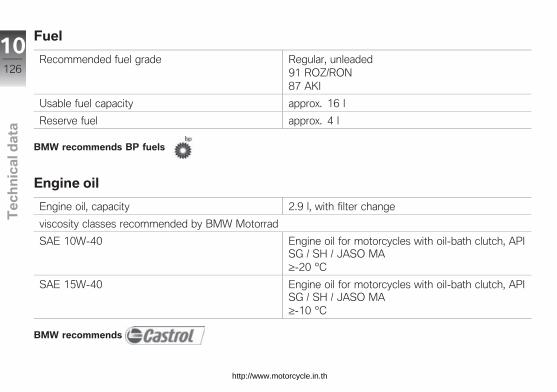
Fuel
Recommended fuel grade Regular, unleaded91 ROZ/RON87 AKI
Usable fuel capacity approx. 16 l
Reserve fuel approx. 4 l
BMW recommends BP fuels
Engine oil
Engine oil, capacity 2.9 l, with filter change
viscosity classes recommended by BMW Motorrad
SAE 10W-40 Engine oil for motorcycles with oil-bath clutch, APISG / SH / JASO MA≥-20 °C
SAE 15W-40 Engine oil for motorcycles with oil-bath clutch, APISG / SH / JASO MA≥-10 °C
BMW recommends
10126
z Te
ch
nic
al d
ata
http://www.motorcycle.in.th
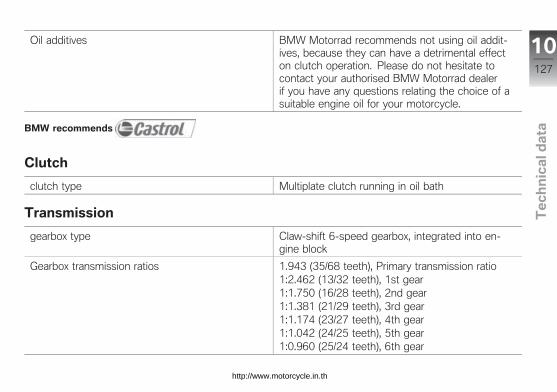
Oil additives BMW Motorrad recommends not using oil addit-ives, because they can have a detrimental effecton clutch operation. Please do not hesitate tocontact your authorised BMW Motorrad dealerif you have any questions relating the choice of asuitable engine oil for your motorcycle.
BMW recommends
Clutch
clutch type Multiplate clutch running in oil bath
Transmission
gearbox type Claw-shift 6-speed gearbox, integrated into en-gine block
Gearbox transmission ratios 1.943 (35/68 teeth), Primary transmission ratio1:2.462 (13/32 teeth), 1st gear1:1.750 (16/28 teeth), 2nd gear1:1.381 (21/29 teeth), 3rd gear1:1.174 (23/27 teeth), 4th gear1:1.042 (24/25 teeth), 5th gear1:0.960 (25/24 teeth), 6th gear
10127
z Te
ch
nic
al d
ata
http://www.motorcycle.in.th
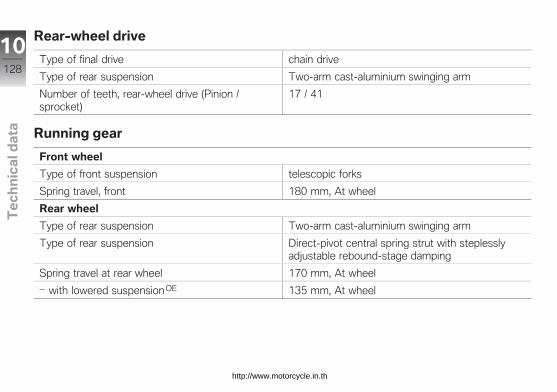
Rear-wheel drive
Type of final drive chain drive
Type of rear suspension Two-arm cast-aluminium swinging arm
Number of teeth, rear-wheel drive (Pinion /sprocket)
17 / 41
Running gear
Front wheel
Type of front suspension telescopic forks
Spring travel, front 180 mm, At wheel
Rear wheel
Type of rear suspension Two-arm cast-aluminium swinging arm
Type of rear suspension Direct-pivot central spring strut with steplesslyadjustable rebound-stage damping
Spring travel at rear wheel 170 mm, At wheel
with lowered suspensionOE 135 mm, At wheel
10128
z Te
ch
nic
al d
ata
http://www.motorcycle.in.th
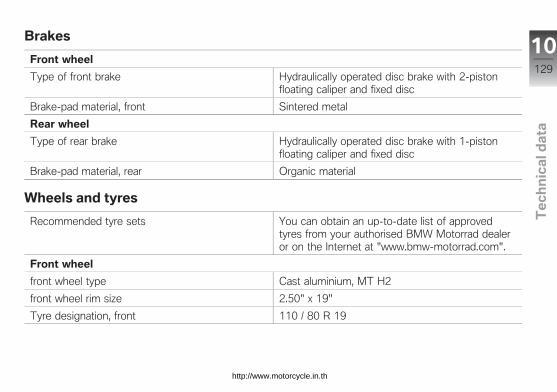
Brakes
Front wheel
Type of front brake Hydraulically operated disc brake with 2-pistonfloating caliper and fixed disc
Brake-pad material, front Sintered metal
Rear wheel
Type of rear brake Hydraulically operated disc brake with 1-pistonfloating caliper and fixed disc
Brake-pad material, rear Organic material
Wheels and tyres
Recommended tyre sets You can obtain an up-to-date list of approvedtyres from your authorised BMW Motorrad dealeror on the Internet at "www.bmw-motorrad.com".
Front wheel
front wheel type Cast aluminium, MT H2
front wheel rim size 2.50" x 19"
Tyre designation, front 110 / 80 R 19
10129
z Te
ch
nic
al d
ata
http://www.motorcycle.in.th
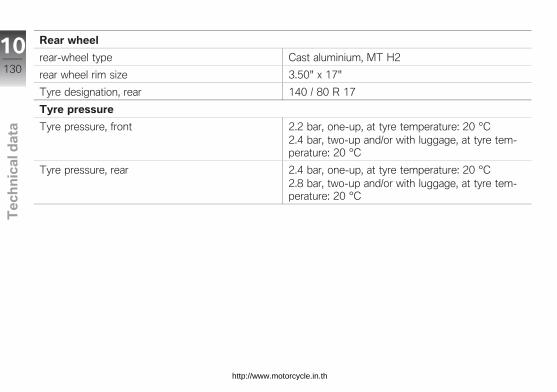
Rear wheel
rear-wheel type Cast aluminium, MT H2
rear wheel rim size 3.50" x 17"
Tyre designation, rear 140 / 80 R 17
Tyre pressure
Tyre pressure, front 2.2 bar, one-up, at tyre temperature: 20 °C2.4 bar, two-up and/or with luggage, at tyre tem-perature: 20 °C
Tyre pressure, rear 2.4 bar, one-up, at tyre temperature: 20 °C2.8 bar, two-up and/or with luggage, at tyre tem-perature: 20 °C
10130
z Te
ch
nic
al d
ata
http://www.motorcycle.in.th
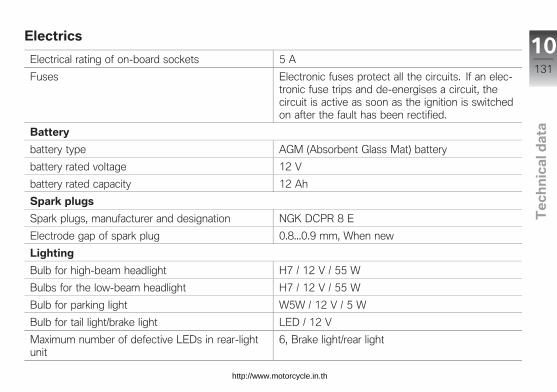
Electrics
Electrical rating of on-board sockets 5 A
Fuses Electronic fuses protect all the circuits. If an elec-tronic fuse trips and de-energises a circuit, thecircuit is active as soon as the ignition is switchedon after the fault has been rectified.
Battery
battery type AGM (Absorbent Glass Mat) battery
battery rated voltage 12 V
battery rated capacity 12 Ah
Spark plugs
Spark plugs, manufacturer and designation NGK DCPR 8 E
Electrode gap of spark plug 0.8...0.9 mm, When new
Lighting
Bulb for high-beam headlight H7 / 12 V / 55 W
Bulbs for the low-beam headlight H7 / 12 V / 55 W
Bulb for parking light W5W / 12 V / 5 W
Bulb for tail light/brake light LED / 12 V
Maximum number of defective LEDs in rear-lightunit
6, Brake light/rear light
10131
z Te
ch
nic
al d
ata
http://www.motorcycle.in.th
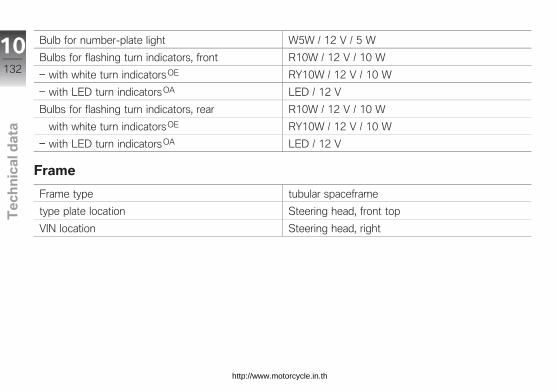
Bulb for number-plate light W5W / 12 V / 5 W
Bulbs for flashing turn indicators, front R10W / 12 V / 10 W
with white turn indicatorsOE RY10W / 12 V / 10 W
with LED turn indicatorsOA LED / 12 V
Bulbs for flashing turn indicators, rear R10W / 12 V / 10 W
with white turn indicatorsOE RY10W / 12 V / 10 W
with LED turn indicatorsOA LED / 12 V
Frame
Frame type tubular spaceframe
type plate location Steering head, front top
VIN location Steering head, right
10132
z Te
ch
nic
al d
ata
http://www.motorcycle.in.th
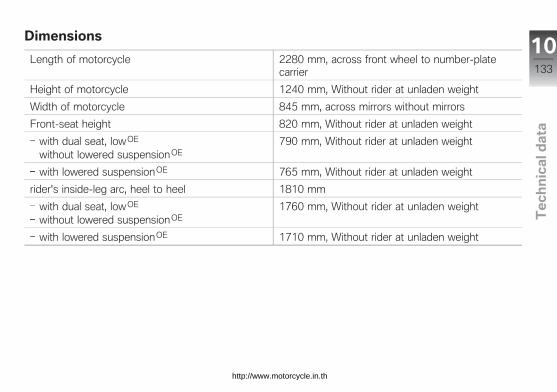
Dimensions
Length of motorcycle 2280 mm, across front wheel to number-platecarrier
Height of motorcycle 1240 mm, Without rider at unladen weight
Width of motorcycle 845 mm, across mirrors without mirrors
Front-seat height 820 mm, Without rider at unladen weight
with dual seat, low OE
without lowered suspensionOE790 mm, Without rider at unladen weight
with lowered suspensionOE 765 mm, Without rider at unladen weight
rider's inside-leg arc, heel to heel 1810 mm
with dual seat, low OE
without lowered suspensionOE1760 mm, Without rider at unladen weight
with lowered suspensionOE 1710 mm, Without rider at unladen weight
10133
z Te
ch
nic
al d
ata
http://www.motorcycle.in.th
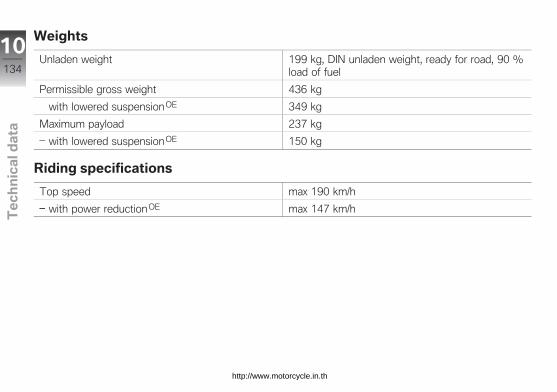
Weights
Unladen weight 199 kg, DIN unladen weight, ready for road, 90 %load of fuel
Permissible gross weight 436 kg
with lowered suspensionOE 349 kg
Maximum payload 237 kg
with lowered suspensionOE 150 kg
Riding specifications
Top speed max 190 km/h
with power reductionOE max 147 km/h
10134
z Te
ch
nic
al d
ata
http://www.motorcycle.in.th
Service
Service
BMW Motorrad Service . . . . . . . . . . . . 136
BMW Motorrad Mobilityservices . . . . . . . . . . . . . . . . . . . . . . . . . . . . 136
Maintenance work . . . . . . . . . . . . . . . . . 136
Confirmation of maintenancework . . . . . . . . . . . . . . . . . . . . . . . . . . . . . . . 138
Confirmation of service . . . . . . . . . . . . 143
11135
z Se
rvic
e
http://www.motorcycle.in.th

BMW Motorrad ServiceBMW Motorrad has an extens-ive after-sales service networkin place to look after you andyour motorcycle in more than100 countries. Authorised BMWMotorrad dealerships have thetechnical information and thetechnical know-how to carry outreliably all maintenance and repairwork on your BMW.Visit our website www.bmw-motorrad.com to find out wherethe nearest authorised BMWMotorrad dealership is located.
If maintenance and re-pair work is performed in-
expertly, it could result in con-sequential damage and thus con-stitute a safety risk.BMW Motorrad recommends youto have all the associated workon your motorcycle carried outby a specialist workshop, prefer-
ably an authorised BMW Motor-rad dealer.
In order to help ensure that yourBMW is always in optimumcondition, BMW Motorradrecommends compliance withthe maintenance intervalsspecified for your motorcycle.Have all maintenance and repairwork carried out confirmed in the"Service" chapter in this manual.For generous treatment of claimssubmitted after the warrantyperiod has expired, evidence ofregular maintenance is essential.
Your authorised BMW Motorraddealer can provide information onBMW services and the work un-dertaken as part of each service.
BMW Motorrad MobilityservicesAs owner of a new BMW mo-torcycle, in circumstances inwhich assistance is required youcan benefit from the protectionafforded by the various BMWMotorrad mobility services (e.g.Mobile Service, breakdown ser-vice, vehicle recovery service).Your authorised BMW Motorraddealer will be happy provide in-formation about the mobility ser-vices available to you.
Maintenance workBMW Pre-delivery CheckYour authorised BMW Motorraddealer conducts the BMW pre-delivery check before handingover the motorcycle to you.
11136
z Se
rvic
e
http://www.motorcycle.in.th
BMW Running-in CheckThe BMW running-in check hasto be performed when the mo-torcycle has covered between500 km and 1200 km
BMW ServiceThe BMW Service is carried outonce a year; the extent of servi-cing can vary, depending on theage of the motorcycle and thedistance it has covered. Your au-thorised BMW Motorrad dealerconfirms that the service workhas been carried out and entersthe date when the next servicewill be due.Riders who cover long distancesin a year might have to bring intheir motorcycles for service be-fore the next scheduled date. Itis to allow for these cases thata maximum odometer reading isentered as well in the confirma-tion of service. Servicing has tobe brought forward if this odo-
meter reading is reached beforethe next scheduled date for theservice.
The service-due indicator in themultifunction display reminds youabout one month or 1000 km inadvance when the time for a ser-vice is approaching, on the basisof the programmed values.
11137
z Se
rvic
e
http://www.motorcycle.in.th
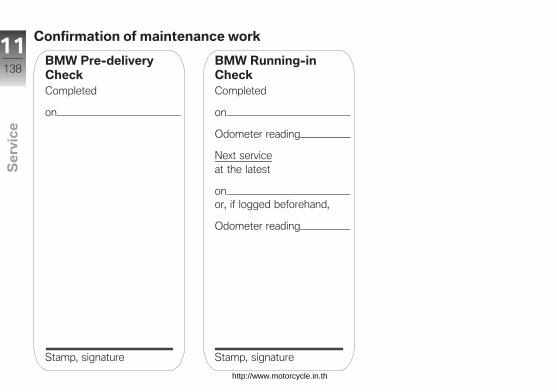
Confirmation of maintenance work
BMW Pre-deliveryCheckCompleted
on
Stamp, signature
BMW Running-inCheckCompleted
on
Odometer reading
Next serviceat the latest
onor, if logged beforehand,
Odometer reading
Stamp, signature
11138
z Se
rvic
e
http://www.motorcycle.in.th

BMW ServiceCompleted
on
Odometer reading
Next serviceat the latest
onor, if logged beforehand,
Odometer reading
Stamp, signature
BMW ServiceCompleted
on
Odometer reading
Next serviceat the latest
onor, if logged beforehand,
Odometer reading
Stamp, signature
BMW ServiceCompleted
on
Odometer reading
Next serviceat the latest
onor, if logged beforehand,
Odometer reading
Stamp, signature
11139
z Se
rvic
e
http://www.motorcycle.in.th
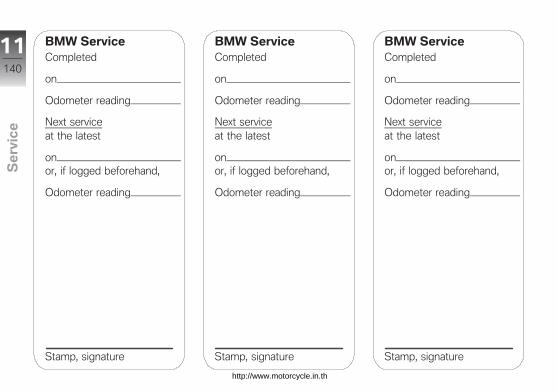
BMW ServiceCompleted
on
Odometer reading
Next serviceat the latest
onor, if logged beforehand,
Odometer reading
Stamp, signature
BMW ServiceCompleted
on
Odometer reading
Next serviceat the latest
onor, if logged beforehand,
Odometer reading
Stamp, signature
BMW ServiceCompleted
on
Odometer reading
Next serviceat the latest
onor, if logged beforehand,
Odometer reading
Stamp, signature
11140
z Se
rvic
e
http://www.motorcycle.in.th
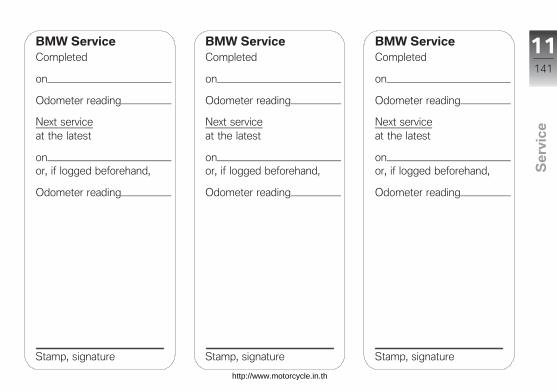
BMW ServiceCompleted
on
Odometer reading
Next serviceat the latest
onor, if logged beforehand,
Odometer reading
Stamp, signature
BMW ServiceCompleted
on
Odometer reading
Next serviceat the latest
onor, if logged beforehand,
Odometer reading
Stamp, signature
BMW ServiceCompleted
on
Odometer reading
Next serviceat the latest
onor, if logged beforehand,
Odometer reading
Stamp, signature
11141
z Se
rvic
e
http://www.motorcycle.in.th

BMW ServiceCompleted
on
Odometer reading
Next serviceat the latest
onor, if logged beforehand,
Odometer reading
Stamp, signature
BMW ServiceCompleted
on
Odometer reading
Next serviceat the latest
onor, if logged beforehand,
Odometer reading
Stamp, signature
BMW ServiceCompleted
on
Odometer reading
Next serviceat the latest
onor, if logged beforehand,
Odometer reading
Stamp, signature
11142
z Se
rvic
e
http://www.motorcycle.in.th

Confirmation of serviceThe table is intended as a record of maintenance and repair work, the installation of optional accessoriesand, if appropriate, special campaign (recall) work.
Item Odometerreading
Date
11143
z Se
rvic
e
http://www.motorcycle.in.th
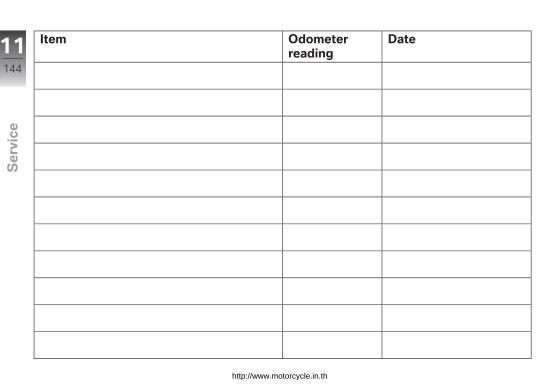
AAbbreviations and symbols, 6ABS
Control, 16Engineering details, 70Operation, 46Self-diagnosis, 60Warnings, 33
AccessoriesGeneral instructions, 76
Air filterInstallation, 111Position on the motorcycle, 15Removal, 111
Ambient temperatureIce warning, 32Reading, 26
Anti-theft alarmTelltale light, 18Warnings, 32
Average valuesResetting, 41
BBattery
Charging battery whenconnected, 113Charging battery whendisconnected, 114Installation, 115Maintenance instructions, 113Position on the motorcycle, 15Removal, 114Technical data, 131
Brake fluidChecking fluid level, front, 90Checking fluid level, rear, 91Reservoir, front, 13Reservoir, rear, 13
Brake padsChecking front, 89Checking rear, 89Running in, 61
BrakesAdjusting handlebar lever, 47Checking operation, 88Safety instructions, 63Technical data, 129
BulbsReplacing high-beam headlightbulb, 104Replacing low-beam headlightbulb, 104Replacing number-plate lightbulbs, 108Replacing side-light bulb, 105Replacing the brake light andrear light bulbs, 107Replacing turn indicatorbulbs, 107Technical data, 131Warning for bulb failure, 31
CCase
Operation, 77Chain
Adjusting sag, 95Checking sag, 95Checking wear, 96Lubricating, 95
Checklist, 58
12145
z Ind
ex
http://www.motorcycle.in.th
ClockAdjusting, 39Control, 18
ClutchAdjusting handlebar lever, 47Adjusting play, 94Checking operation, 93Checking play, 93Technical data, 127
Confirmation of maintenancework, 138
CoolantChecking fill level, 92Fill-level indicator, 13Topping up, 93Warning for overtemperat-ure, 30
Currency, 7
DDamping
Adjuster, 13Adjusting, 50
DimensionsTechnical data, 133
EElectrics
Technical data, 131Emergency off switch (kill
switch), 17Operation, 45
EngineStarting, 59Technical data, 125Warning for engineelectronics, 31
Engine oilChecking fill level, 87Filler neck, 11Oil dipstick, 11Technical data, 126Topping up, 88Warning for engine oilpressure, 31
Equipment, 7
FFirst-aid kit
Stowage, 14Frame
Technical data, 132
Front-wheel standInstalling, 103
FuelFiller neck, 13Refuelling, 65Technical data, 126
Fuel reserveDistance covered, 25Warning, 30
FusesTechnical data, 131
GGeneral views
Instrument panel, 18Left handlebar fitting, 16Left side of motorcycle, 11Multifunction display, 22Right handlebar fitting, 17Right side of motorcycle, 13Underneath the seat, 14Underneath the trim panel, 15Warning and telltale lights, 24
Grip heatingControl, 17Operation, 45
12146
z Ind
ex
http://www.motorcycle.in.th
HHazard warning flashers
Control, 16, 17Operation, 44
HeadlightAdjusting headlight beamthrow, 52Beam throw, 51Driving on right/driving onleft, 51
Helmet holderHelmet, securing, 53Position on the motorcycle, 14
Horn, 16
IIgnition
Switching off, 38Switching on, 38
ImmobiliserReserve key, 39Warning, 30
Instrument panelAmbient-light brightnesssensor, 18Overview, 18
JJump starting, 111
KKeys, 38
LLights
Control, 16Headlight flasher, operating, 43High-beam headlight,operating, 43Low-beam headlight, 43Parking lights, operating, 43Side light, 43
Lowered suspensionRestrictions, 56
LuggageInstructions for loading, 56lashing, 77
MMaintenance
General instructions, 86Maintenance intervals, 136
MirrorsAdjusting, 48
Mobility services, 136Motorcycle
care, 117Cleaning, 117Lashing, 66Laying up, 120Parking, 64Restoring to use, 120
Multifunction display, 18Control, 16Meaning of symbols, 23Overview, 22Selecting readings, 40
multifunction switchGeneral view, left side, 16General view, right side, 17
OOdometer and tripmeters
Control, 18Resetting, 41
Off-roading, 62
12147
z Ind
ex
http://www.motorcycle.in.th
PParking, 64Power socket
Notes on use, 76Position on the motorcycle, 11
Pre-ride check, 60
RRear-wheel drive
Technical data, 128Redline warning
Switching on, 61, 62Warning light, 18
Refuelling, 65Rev. counter, 18Rider's Manual
Position on the motorcycle, 14Running gear
Technical data, 128Running in, 61
SSafety instructions
for brake, 63for riding, 56
SeatInstallation, 52Lock, 11Removal, 52
Service, 136Service-due indicator, 25Spark plugs
Technical data, 131Speedometer, 18Spring preload
Adjuster, 13Adjusting, 49Tools, 14
Starting, 59Control, 17
Steering lockLocking, 38
StopwatchOperation, 41
SymbolsMeaning, 23
TTechnical data
Battery, 131Brakes, 129Bulbs, 131Clutch, 127Dimensions, 133Electrics, 131Engine, 125Engine oil, 126Frame, 132Fuel, 126Rear-wheel drive, 128Running gear, 128Spark plugs, 131Standards, 7Transmission, 127Weights, 134Wheels and tyres, 129
Telltale lightsOverview, 24
ToolkitContents, 86Position on the motorcycle, 14
12148
z Ind
ex
http://www.motorcycle.in.th

topcaseOperation, 80
Torques, 123Transmission
Technical data, 127Trim panels
Installing centre trim panel, 110Removing centre trimpanel, 109
troubleshooting chart, 122Turn indicators
Control, left, 16Control, right, 17Operation, 44
Type platePosition on the motorcycle, 13
Tyre pressure monitoring RDCAdhesive label for rim, 97Engineering details, 72Reading, 26Warnings, 33
TyresChecking inflation pressure, 50Checking tread depth, 94Pressures, 130
Recommendation, 97Running in, 61Table of tyre pressures, 14Technical data, 129
VVehicle identification number
Position on the motorcycle, 13
WWarning lights
Overview, 24Warnings
ABS, 33Anti-theft alarm, 32Bulb defect, 31Coolant temperature, 30Engine electronics, 31Engine oil pressure, 31Fuel reserve, 30Ice warning, 32Immobiliser, 30Mode of presentation, 26RDC, 33
Warnings, overview, 28
WeightsPayload table, 14Technical data, 134
WheelsChange of size, 97Checking rims, 94Install the rear wheel, 101Installing front wheel, 99Remove the rear wheel, 100Removing front wheel, 98Technical data, 129
12149
z Ind
ex
http://www.motorcycle.in.th
Details described or illustratedin this booklet may differ fromthe motorcycle's actual specifica-tion as purchased, the accessor-ies fitted or the national-marketspecification. No claims will beentertained as a result of suchdiscrepancies.Dimensions, weights, fuel con-sumption and performance dataare quoted to the customary tol-erances.The right to modify designs,equipment and accessories isreserved.Errors and omissions excepted.
© 2011 BMW MotorradNot to be reproduced eitherwholly or in part without writtenpermission from BMW Motorrad,After Sales.Printed in Germany.
http://www.motorcycle.in.th
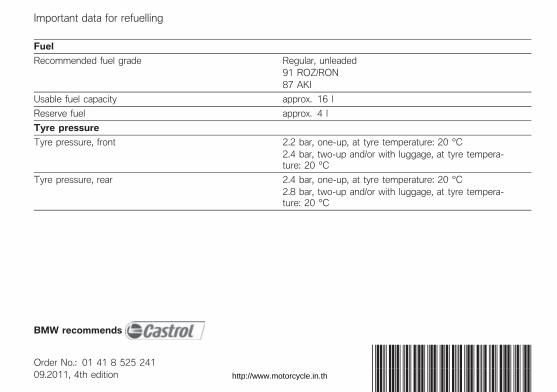
Important data for refuelling
Fuel
Recommended fuel grade Regular, unleaded91 ROZ/RON87 AKI
Usable fuel capacity approx. 16 l
Reserve fuel approx. 4 l
Tyre pressure
Tyre pressure, front 2.2 bar, one-up, at tyre temperature: 20 °C2.4 bar, two-up and/or with luggage, at tyre tempera-ture: 20 °C
Tyre pressure, rear 2.4 bar, one-up, at tyre temperature: 20 °C2.8 bar, two-up and/or with luggage, at tyre tempera-ture: 20 °C
BMW recommends
Order No.: 01 41 8 525 24109.2011, 4th edition
*01418525241**01418525241**01418525241*
http://www.motorcycle.in.th