bmw e46 line #23 replacement - top hydraulics · background: line #23 runs from the valve block on...
TRANSCRIPT
Use as a guideline only – apply common sense, be careful, and wear protective gear! Top Hydraulics, Inc. is not responsible or liable for personal injury or material damage.
BMW E46 Line #23 Replacment Guide, page 1 of 23
© Top Hydraulics, Inc. Rev. 1.0 05/2013
BMW E46 Convertible Hydraulic Line #23 Replacement Guide
Created by taylor192 of E46Fanatics.com
Use as a guideline only – apply common sense, be careful, and wear protective gear! Top Hydraulics, Inc. is not responsible or liable for personal injury or material damage.
BMW E46 Line #23 Replacment Guide, page 2 of 23
© Top Hydraulics, Inc. Rev. 1.0 05/2013
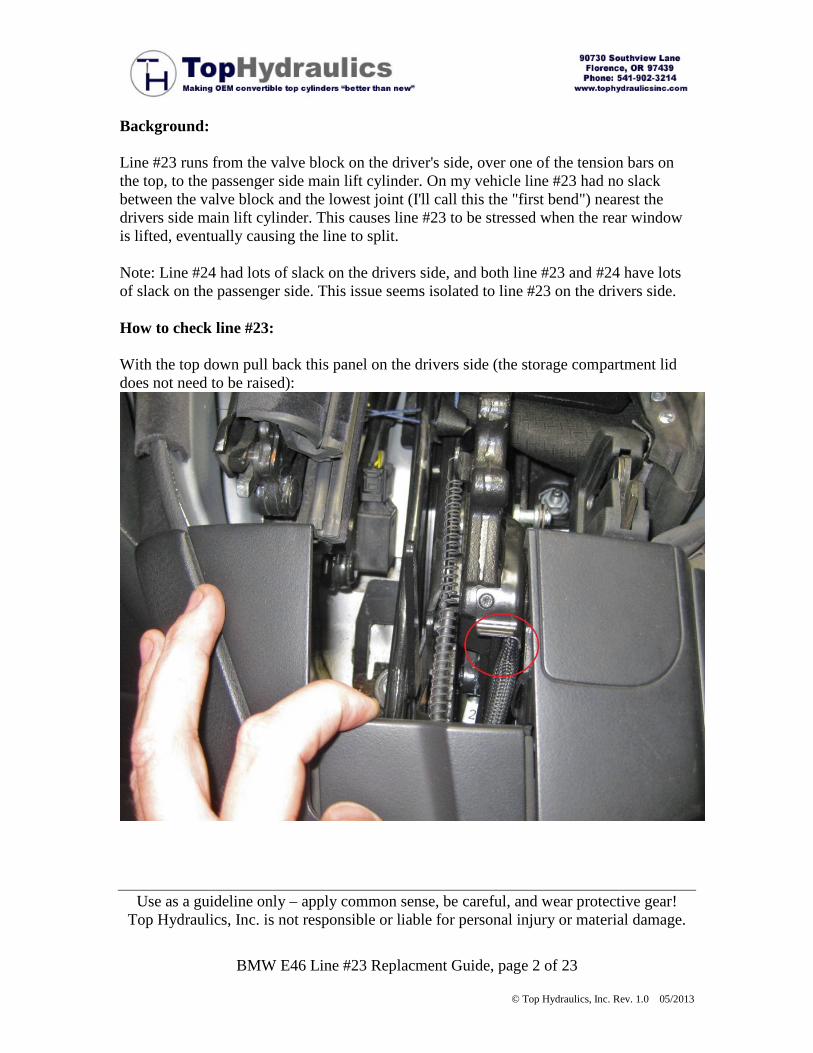
Background: Line #23 runs from the valve block on the driver's side, over one of the tension bars on the top, to the passenger side main lift cylinder. On my vehicle line #23 had no slack between the valve block and the lowest joint (I'll call this the "first bend") nearest the drivers side main lift cylinder. This causes line #23 to be stressed when the rear window is lifted, eventually causing the line to split. Note: Line #24 had lots of slack on the drivers side, and both line #23 and #24 have lots of slack on the passenger side. This issue seems isolated to line #23 on the drivers side. How to check line #23: With the top down pull back this panel on the drivers side (the storage compartment lid does not need to be raised):
Use as a guideline only – apply common sense, be careful, and wear protective gear! Top Hydraulics, Inc. is not responsible or liable for personal injury or material damage.
BMW E46 Line #23 Replacment Guide, page 3 of 23
© Top Hydraulics, Inc. Rev. 1.0 05/2013
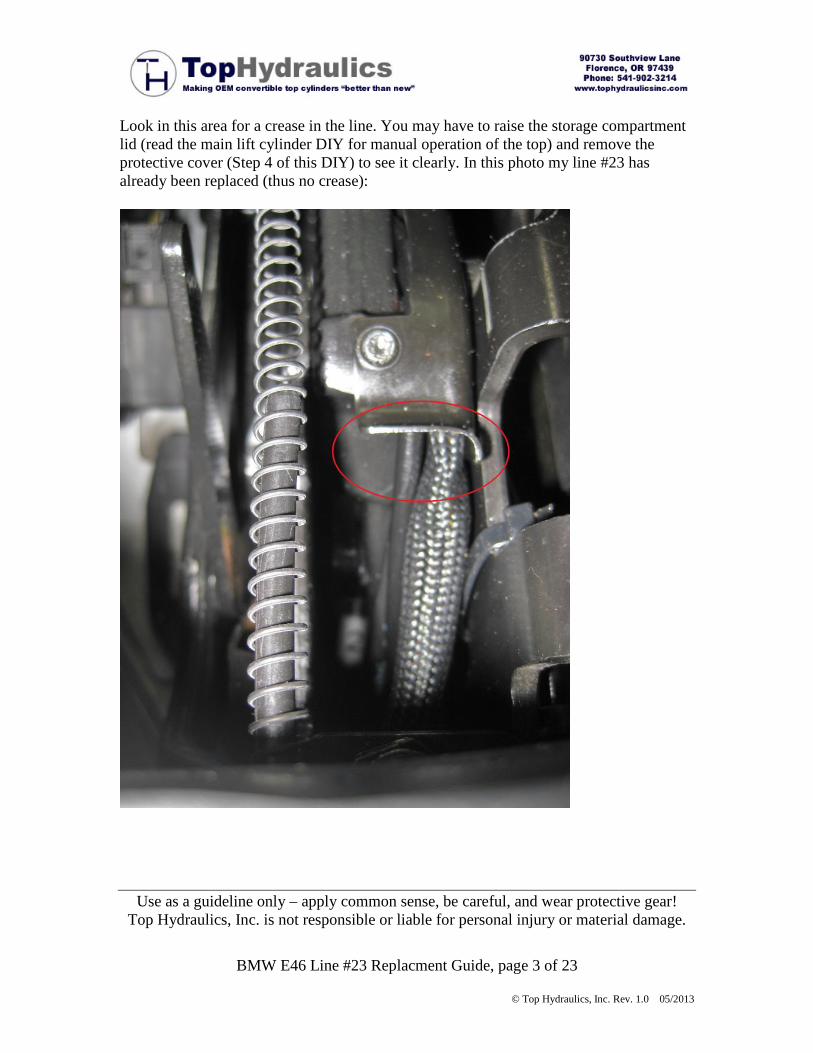
Look in this area for a crease in the line. You may have to raise the storage compartment lid (read the main lift cylinder DIY for manual operation of the top) and remove the protective cover (Step 4 of this DIY) to see it clearly. In this photo my line #23 has already been replaced (thus no crease):
Use as a guideline only – apply common sense, be careful, and wear protective gear! Top Hydraulics, Inc. is not responsible or liable for personal injury or material damage.
BMW E46 Line #23 Replacment Guide, page 4 of 23
© Top Hydraulics, Inc. Rev. 1.0 05/2013
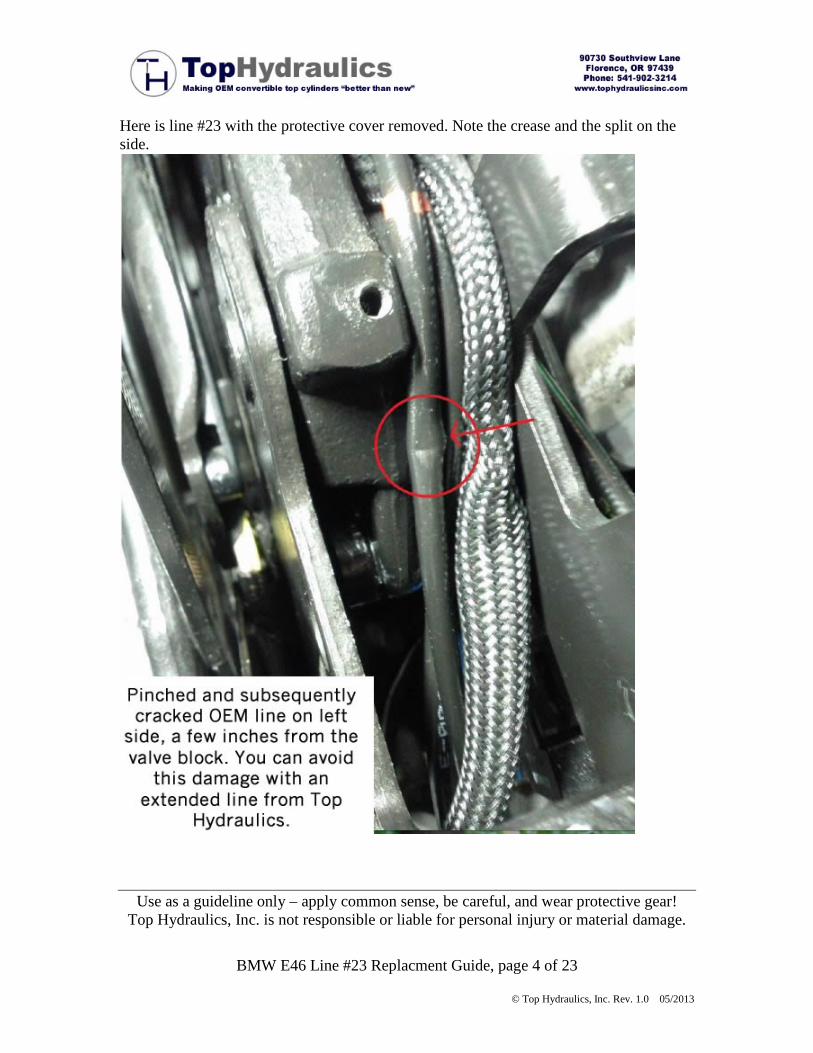
Here is line #23 with the protective cover removed. Note the crease and the split on the side.
Use as a guideline only – apply common sense, be careful, and wear protective gear! Top Hydraulics, Inc. is not responsible or liable for personal injury or material damage.
BMW E46 Line #23 Replacment Guide, page 5 of 23
© Top Hydraulics, Inc. Rev. 1.0 05/2013
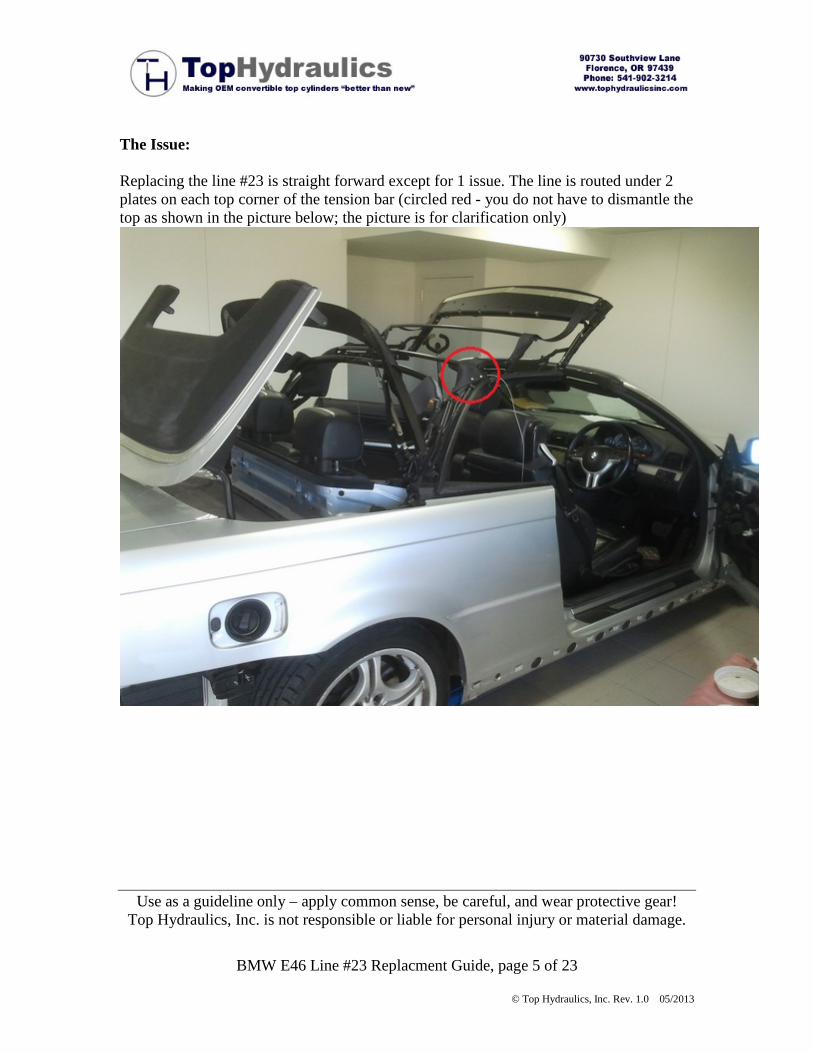
The Issue: Replacing the line #23 is straight forward except for 1 issue. The line is routed under 2 plates on each top corner of the tension bar (circled red - you do not have to dismantle the top as shown in the picture below; the picture is for clarification only)
Use as a guideline only – apply common sense, be careful, and wear protective gear! Top Hydraulics, Inc. is not responsible or liable for personal injury or material damage.
BMW E46 Line #23 Replacment Guide, page 6 of 23
© Top Hydraulics, Inc. Rev. 1.0 05/2013
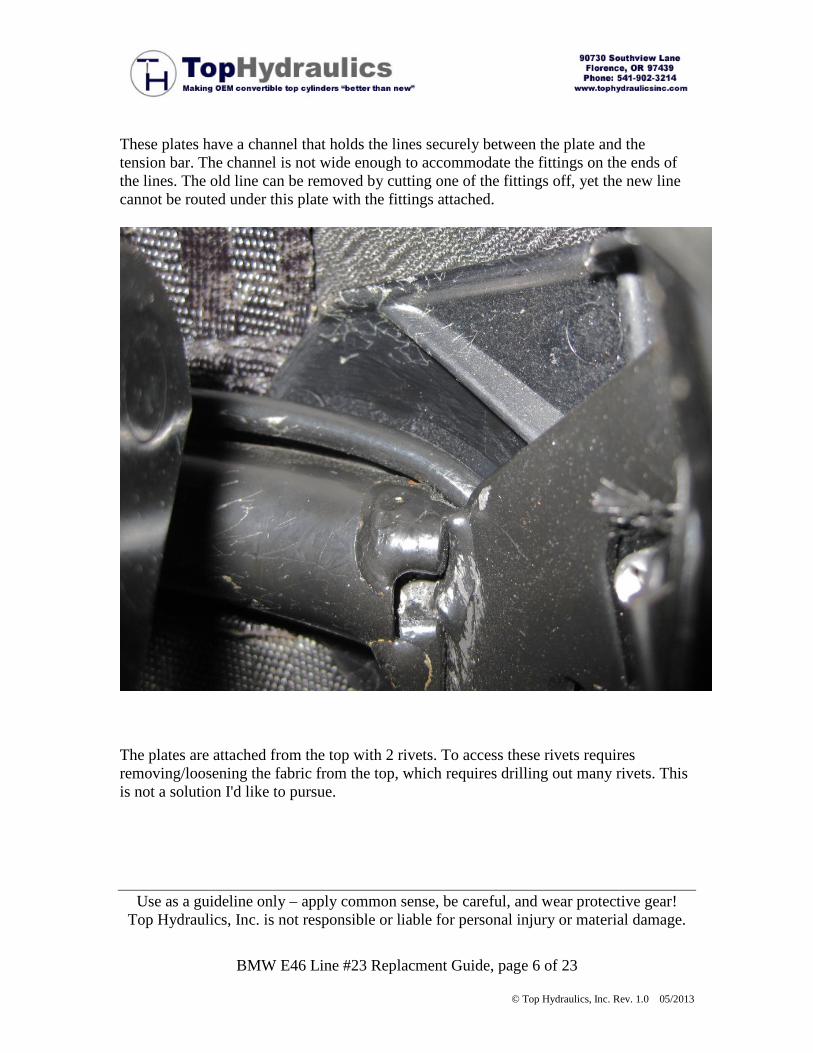
These plates have a channel that holds the lines securely between the plate and the tension bar. The channel is not wide enough to accommodate the fittings on the ends of the lines. The old line can be removed by cutting one of the fittings off, yet the new line cannot be routed under this plate with the fittings attached.
The plates are attached from the top with 2 rivets. To access these rivets requires removing/loosening the fabric from the top, which requires drilling out many rivets. This is not a solution I'd like to pursue.

Use as a guideline only – apply common sense, be careful, and wear protective gear! Top Hydraulics, Inc. is not responsible or liable for personal injury or material damage.
BMW E46 Line #23 Replacment Guide, page 7 of 23
© Top Hydraulics, Inc. Rev. 1.0 05/2013
My proposed solution is to reroute line #23 around these plates. This requires a longer line to reroute, as well to provide extra slack at the "first bend". Thankfully Top Hydraulics is able to manufacture a custom extended line #23!

Use as a guideline only – apply common sense, be careful, and wear protective gear! Top Hydraulics, Inc. is not responsible or liable for personal injury or material damage.
BMW E46 Line #23 Replacment Guide, page 8 of 23
© Top Hydraulics, Inc. Rev. 1.0 05/2013
Line #23 replacement A shop would easily charge 10+ hrs as the proper way to perform this repair involves removing the top from the car and the outer fabric from the top. This took me about 2 hrs and did not have to remove the top from the car, nor the outer fabric from the top, nor the headliner. Some of the steps work in tight spaces, so plan for 3-4 hrs. Disclaimer: Attempt these steps at your own risk. I have done a lot of research on how to reroute line #23 to ensure it does not get pinched and leak. Your results may vary. Tools required: - stubby #20 torx screw driver (or small ratchet with bit) - long bent nose pliers (http://www.canadiantire.ca/AST/brows....jsp?locale=en) - long flat head screw driver - cutters - rags and tape - small and medium tiewraps - fabric tape - a very bright light - a friend Step 1: Order an extended line #23 Contact Top Hydraulics to order an extended line #23. It can be ordered here: http://www.tophydraulicsinc.com/en/bmw-e46/225-extended-hydraulic-line-number-23.html The longer line is needed to reroute the line around the tension bar and provide some slack where the line was crushed and split. The price of the line is $200 (contact Top Hydraulics for current pricing). Line #23 is part number 54347025598. New from BMW It comes with Line #24 and runs ~$275 (plus taxes and surcharges where applicable) Win, win, win. Saving $75, not having an extra useless line (#24), and the extended line solves the issue. Note: The line is 5 cm longer. 1 cm to provide extra slack at the "first bend" and 2x 2 cm to allow the line to be rerouted at the corners of the tension bar.
Use as a guideline only – apply common sense, be careful, and wear protective gear! Top Hydraulics, Inc. is not responsible or liable for personal injury or material damage.
BMW E46 Line #23 Replacment Guide, page 9 of 23
© Top Hydraulics, Inc. Rev. 1.0 05/2013
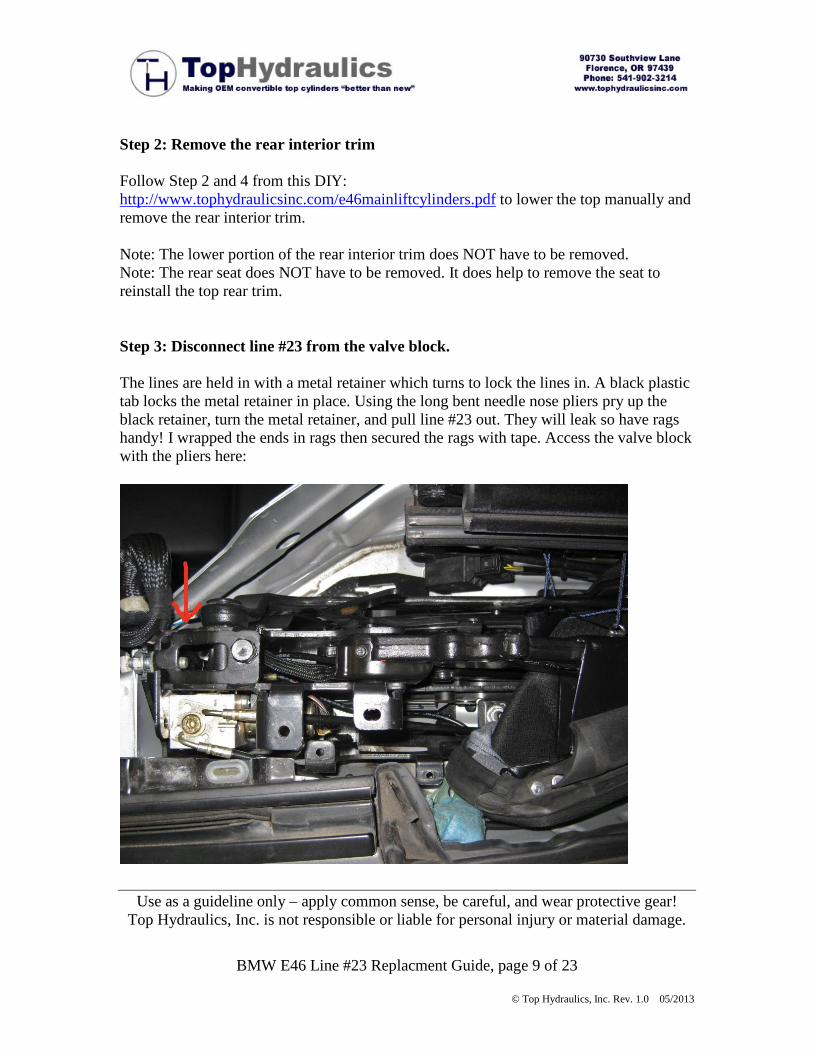
Step 2: Remove the rear interior trim Follow Step 2 and 4 from this DIY: http://www.tophydraulicsinc.com/e46mainliftcylinders.pdf to lower the top manually and remove the rear interior trim. Note: The lower portion of the rear interior trim does NOT have to be removed. Note: The rear seat does NOT have to be removed. It does help to remove the seat to reinstall the top rear trim. Step 3: Disconnect line #23 from the valve block. The lines are held in with a metal retainer which turns to lock the lines in. A black plastic tab locks the metal retainer in place. Using the long bent needle nose pliers pry up the black retainer, turn the metal retainer, and pull line #23 out. They will leak so have rags handy! I wrapped the ends in rags then secured the rags with tape. Access the valve block with the pliers here:
Use as a guideline only – apply common sense, be careful, and wear protective gear! Top Hydraulics, Inc. is not responsible or liable for personal injury or material damage.
BMW E46 Line #23 Replacment Guide, page 10 of 23
© Top Hydraulics, Inc. Rev. 1.0 05/2013
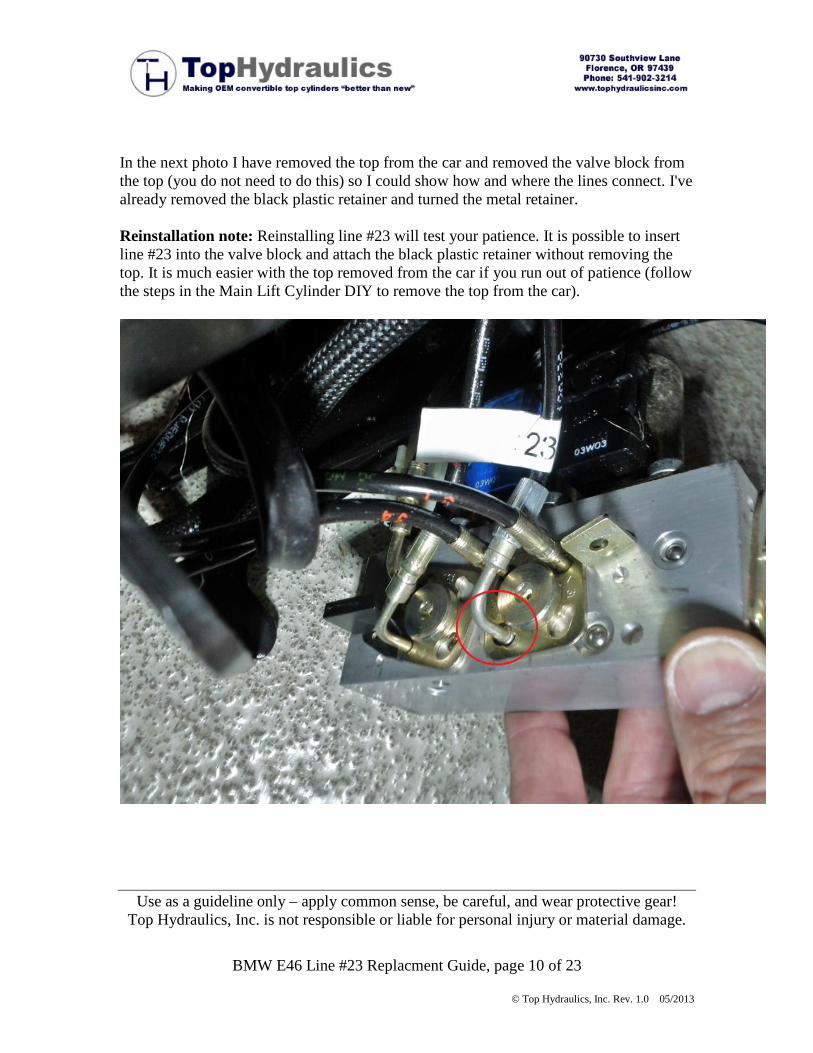
In the next photo I have removed the top from the car and removed the valve block from the top (you do not need to do this) so I could show how and where the lines connect. I've already removed the black plastic retainer and turned the metal retainer. Reinstallation note: Reinstalling line #23 will test your patience. It is possible to insert line #23 into the valve block and attach the black plastic retainer without removing the top. It is much easier with the top removed from the car if you run out of patience (follow the steps in the Main Lift Cylinder DIY to remove the top from the car).
Use as a guideline only – apply common sense, be careful, and wear protective gear! Top Hydraulics, Inc. is not responsible or liable for personal injury or material damage.
BMW E46 Line #23 Replacment Guide, page 11 of 23
© Top Hydraulics, Inc. Rev. 1.0 05/2013
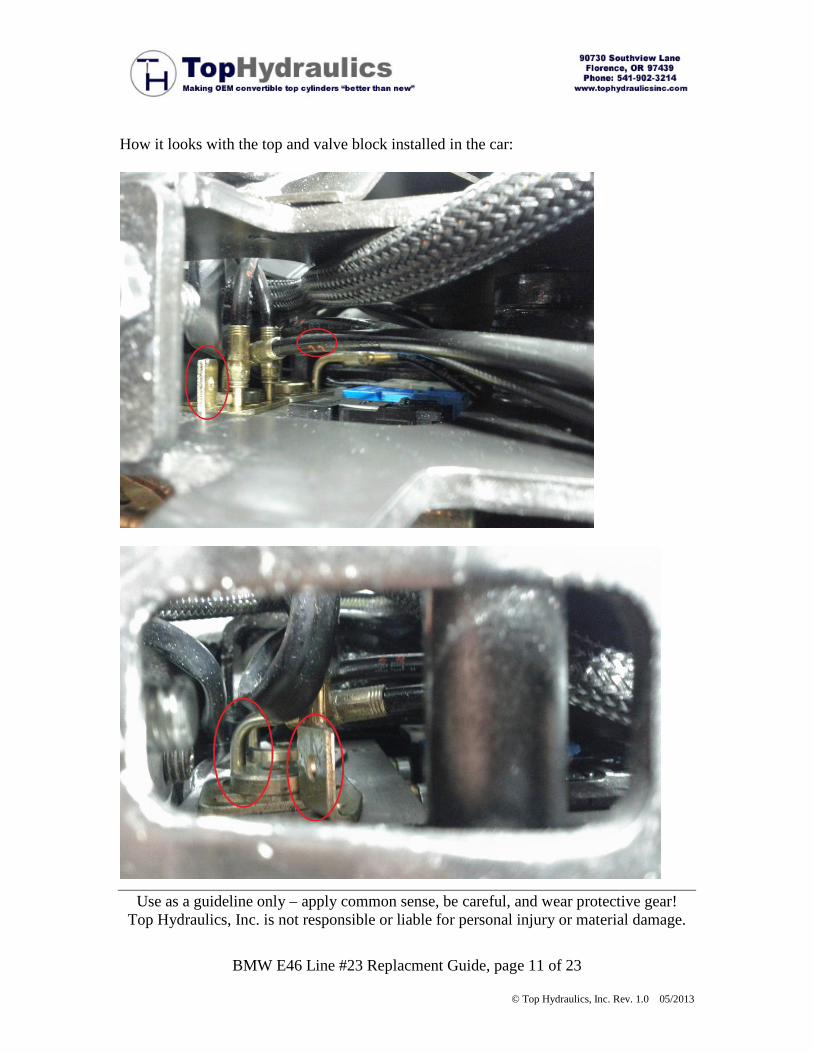
How it looks with the top and valve block installed in the car:
Use as a guideline only – apply common sense, be careful, and wear protective gear! Top Hydraulics, Inc. is not responsible or liable for personal injury or material damage.
BMW E46 Line #23 Replacment Guide, page 12 of 23
© Top Hydraulics, Inc. Rev. 1.0 05/2013
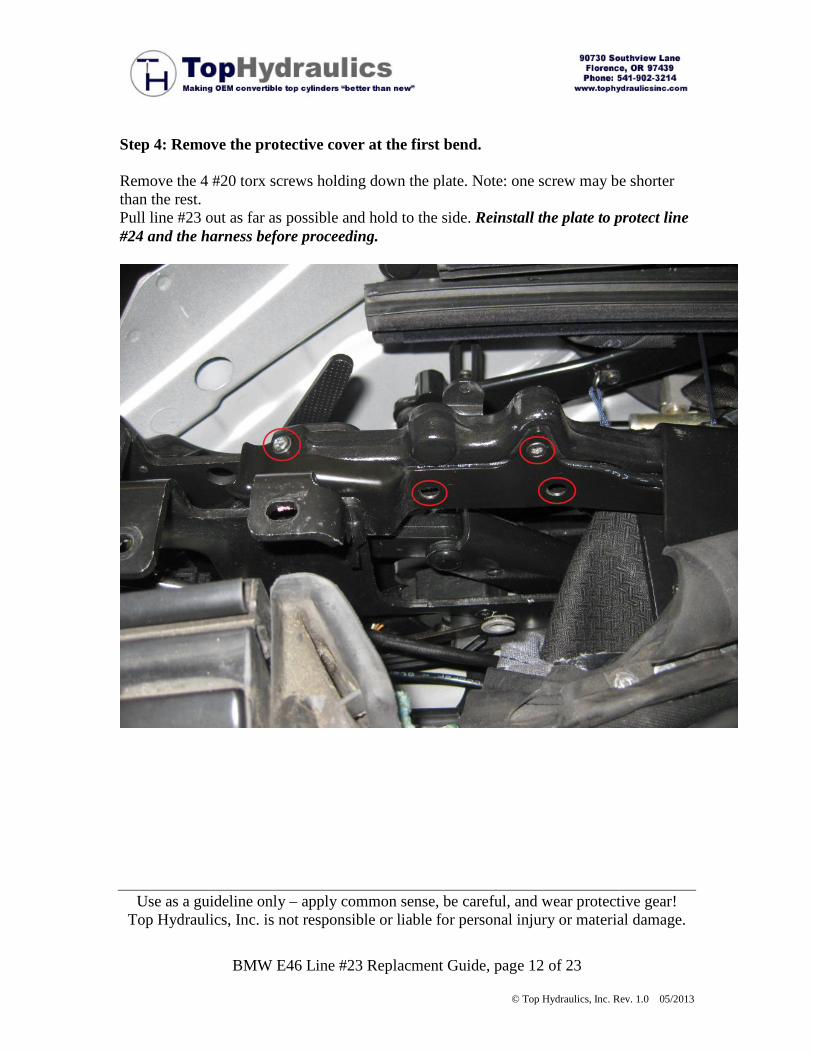
Step 4: Remove the protective cover at the first bend. Remove the 4 #20 torx screws holding down the plate. Note: one screw may be shorter than the rest. Pull line #23 out as far as possible and hold to the side. Reinstall the plate to protect line #24 and the harness before proceeding.
Use as a guideline only – apply common sense, be careful, and wear protective gear! Top Hydraulics, Inc. is not responsible or liable for personal injury or material damage.
BMW E46 Line #23 Replacment Guide, page 13 of 23
© Top Hydraulics, Inc. Rev. 1.0 05/2013
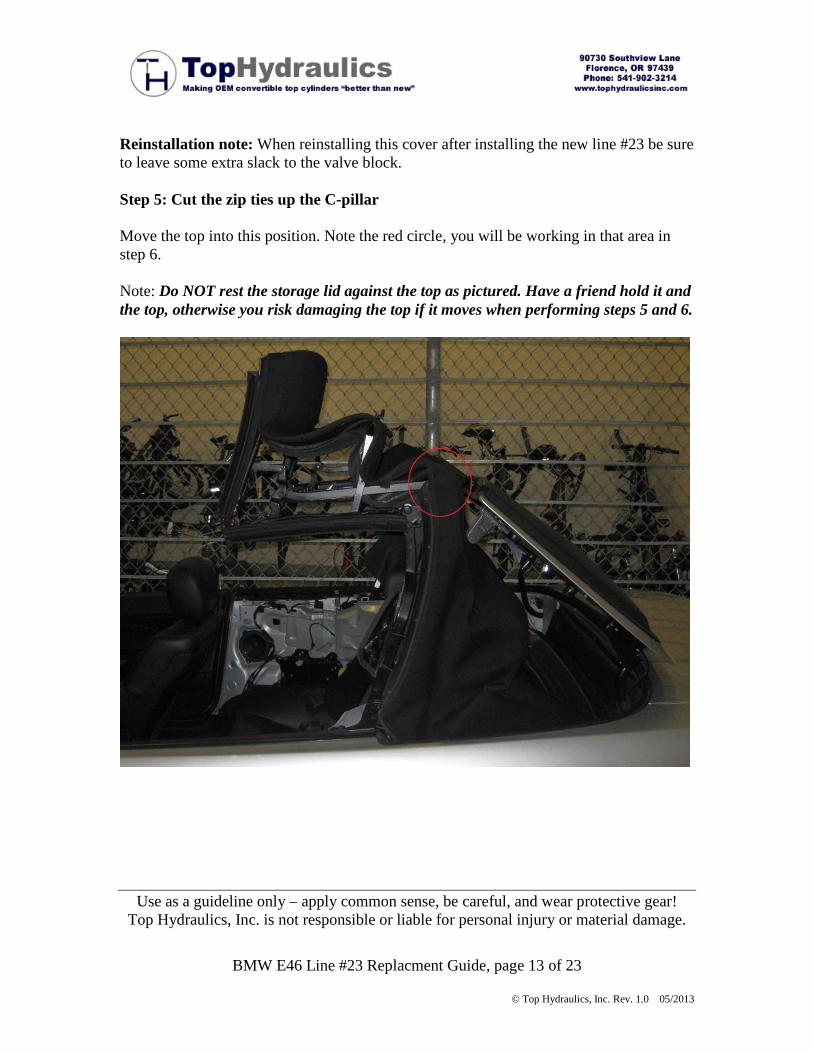
Reinstallation note: When reinstalling this cover after installing the new line #23 be sure to leave some extra slack to the valve block. Step 5: Cut the zip ties up the C-pillar Move the top into this position. Note the red circle, you will be working in that area in step 6. Note: Do NOT rest the storage lid against the top as pictured. Have a friend hold it and the top, otherwise you risk damaging the top if it moves when performing steps 5 and 6.
Use as a guideline only – apply common sense, be careful, and wear protective gear! Top Hydraulics, Inc. is not responsible or liable for personal injury or material damage.
BMW E46 Line #23 Replacment Guide, page 14 of 23
© Top Hydraulics, Inc. Rev. 1.0 05/2013
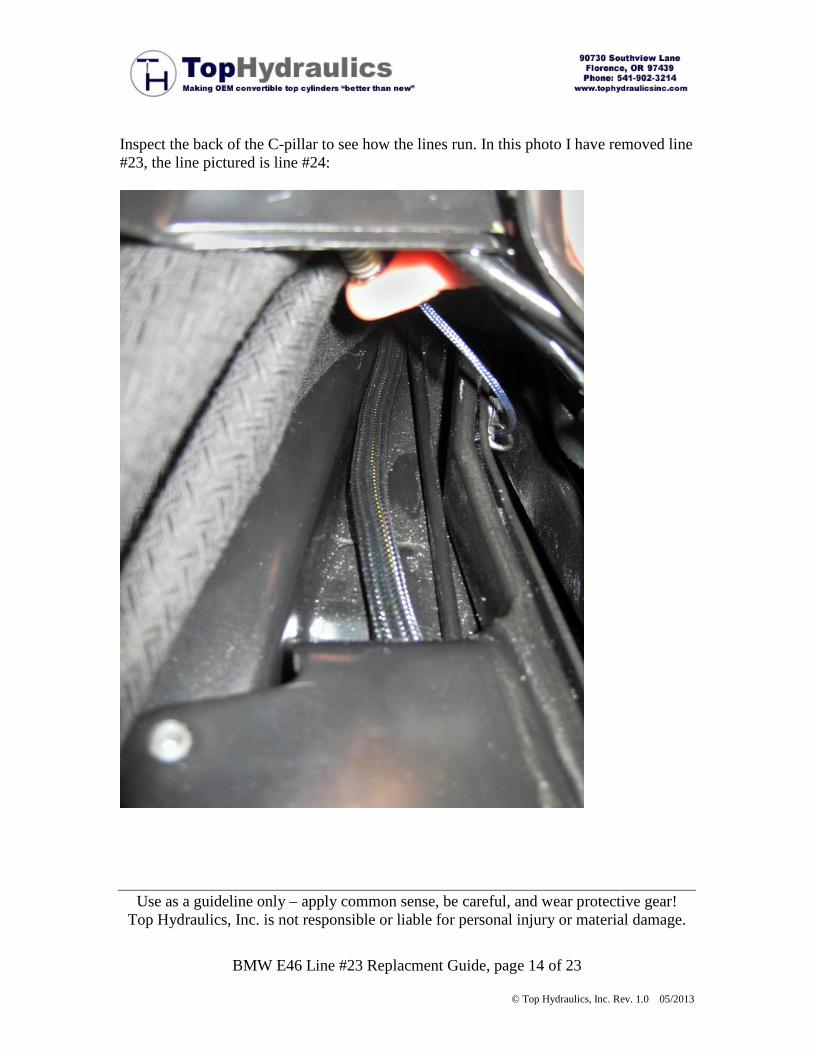
Inspect the back of the C-pillar to see how the lines run. In this photo I have removed line #23, the line pictured is line #24:
Use as a guideline only – apply common sense, be careful, and wear protective gear! Top Hydraulics, Inc. is not responsible or liable for personal injury or material damage.
BMW E46 Line #23 Replacment Guide, page 15 of 23
© Top Hydraulics, Inc. Rev. 1.0 05/2013
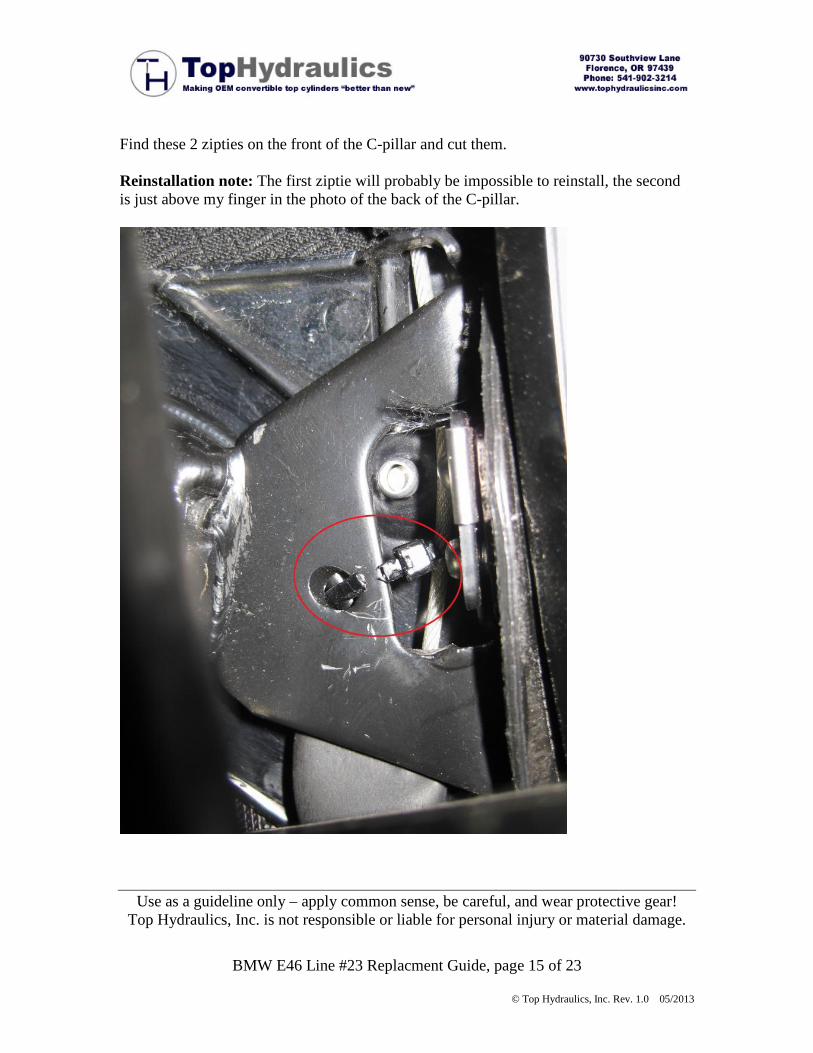
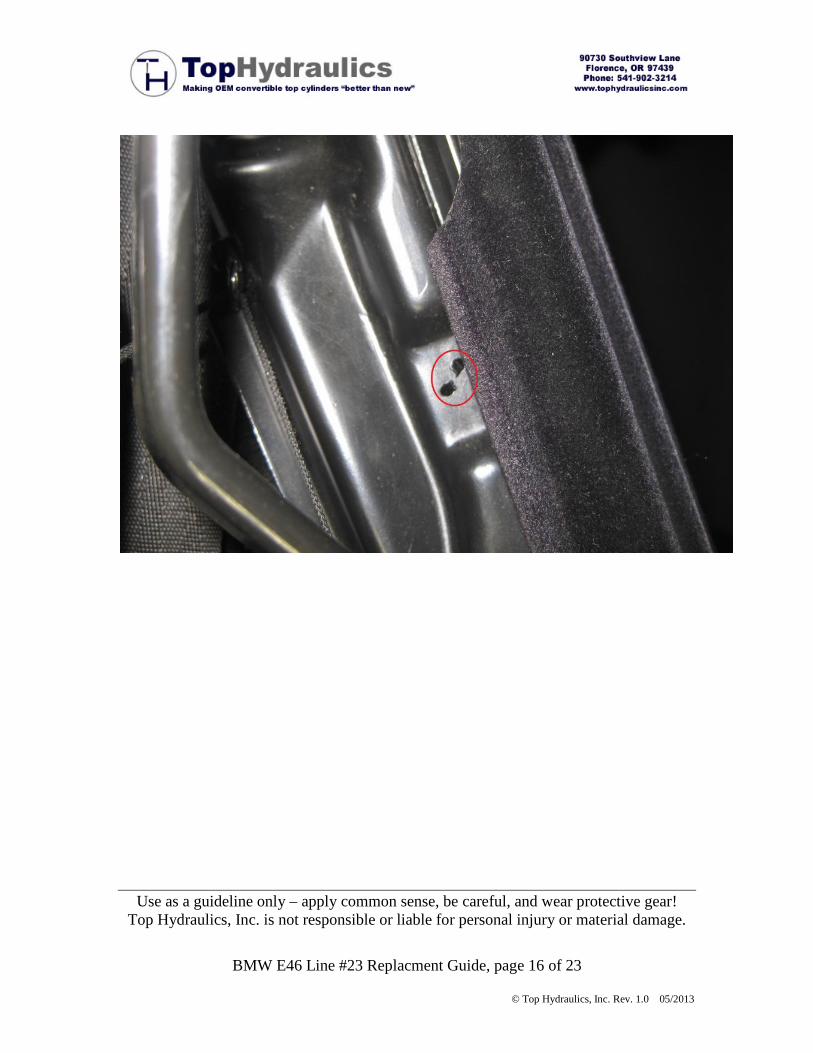
Find these 2 zipties on the front of the C-pillar and cut them. Reinstallation note: The first ziptie will probably be impossible to reinstall, the second is just above my finger in the photo of the back of the C-pillar.
Use as a guideline only – apply common sense, be careful, and wear protective gear! Top Hydraulics, Inc. is not responsible or liable for personal injury or material damage.
BMW E46 Line #23 Replacment Guide, page 16 of 23
© Top Hydraulics, Inc. Rev. 1.0 05/2013
Use as a guideline only – apply common sense, be careful, and wear protective gear! Top Hydraulics, Inc. is not responsible or liable for personal injury or material damage.
BMW E46 Line #23 Replacment Guide, page 17 of 23
© Top Hydraulics, Inc. Rev. 1.0 05/2013
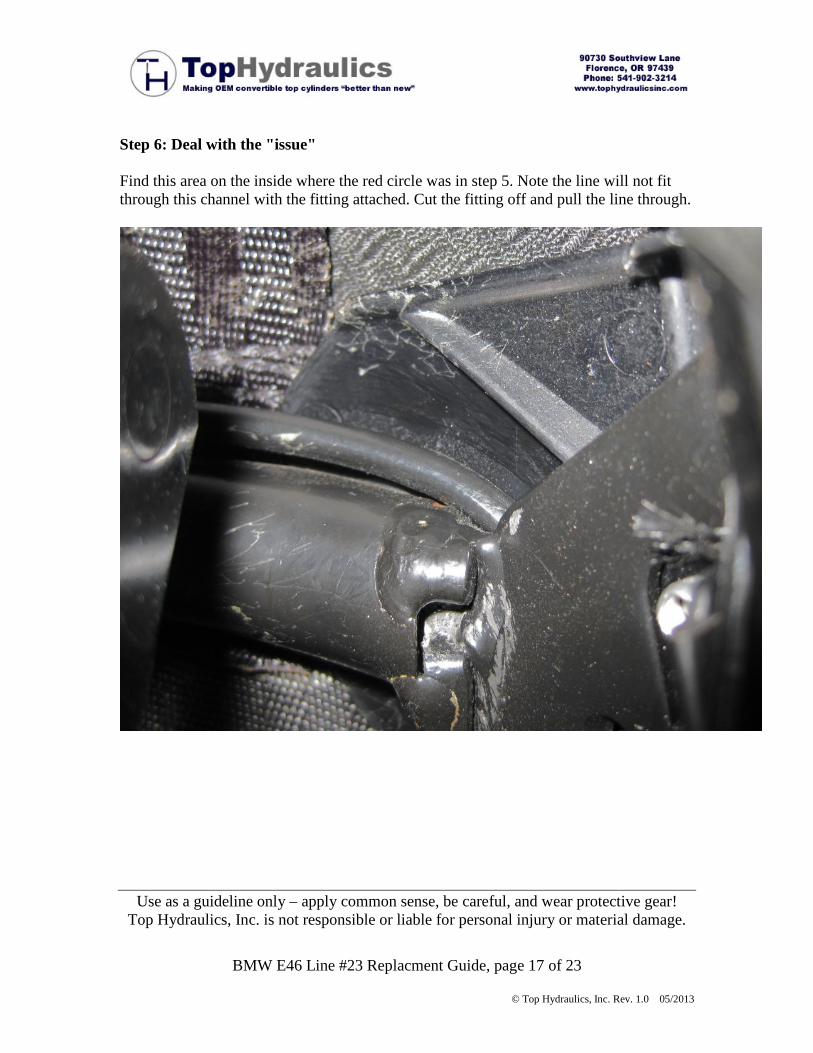
Step 6: Deal with the "issue" Find this area on the inside where the red circle was in step 5. Note the line will not fit through this channel with the fitting attached. Cut the fitting off and pull the line through.
Use as a guideline only – apply common sense, be careful, and wear protective gear! Top Hydraulics, Inc. is not responsible or liable for personal injury or material damage.
BMW E46 Line #23 Replacment Guide, page 18 of 23
© Top Hydraulics, Inc. Rev. 1.0 05/2013
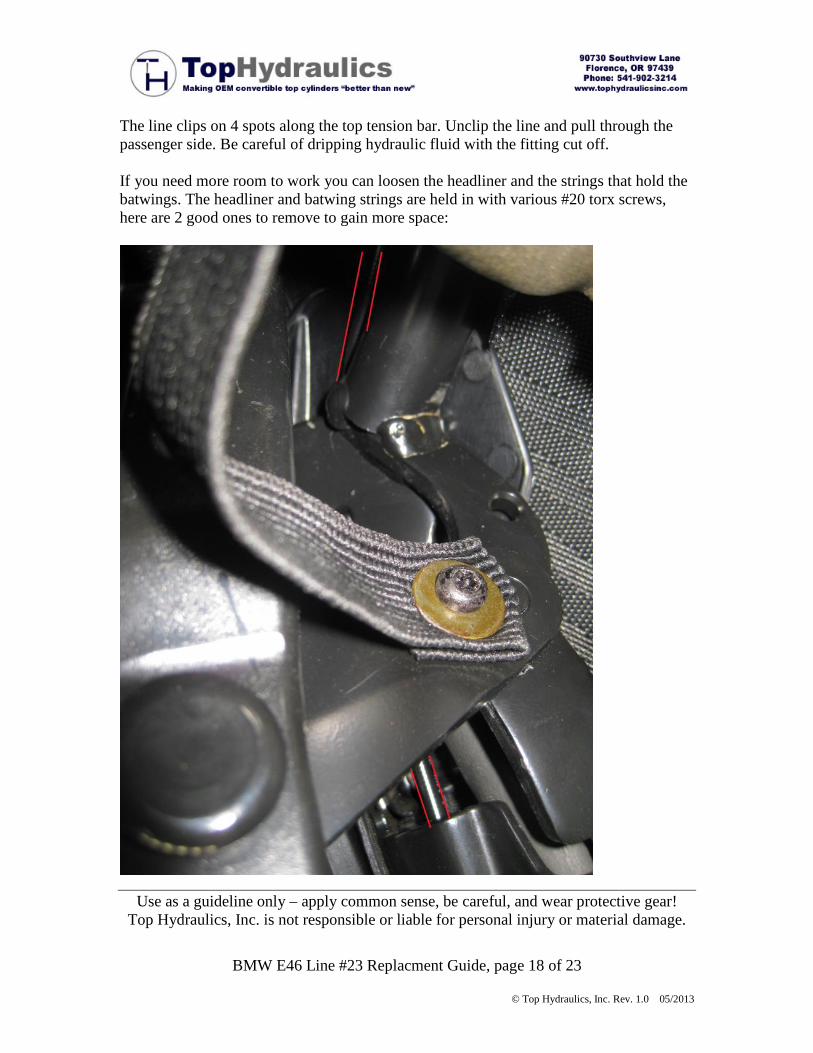
The line clips on 4 spots along the top tension bar. Unclip the line and pull through the passenger side. Be careful of dripping hydraulic fluid with the fitting cut off. If you need more room to work you can loosen the headliner and the strings that hold the batwings. The headliner and batwing strings are held in with various #20 torx screws, here are 2 good ones to remove to gain more space:
Use as a guideline only – apply common sense, be careful, and wear protective gear! Top Hydraulics, Inc. is not responsible or liable for personal injury or material damage.
BMW E46 Line #23 Replacment Guide, page 19 of 23
© Top Hydraulics, Inc. Rev. 1.0 05/2013
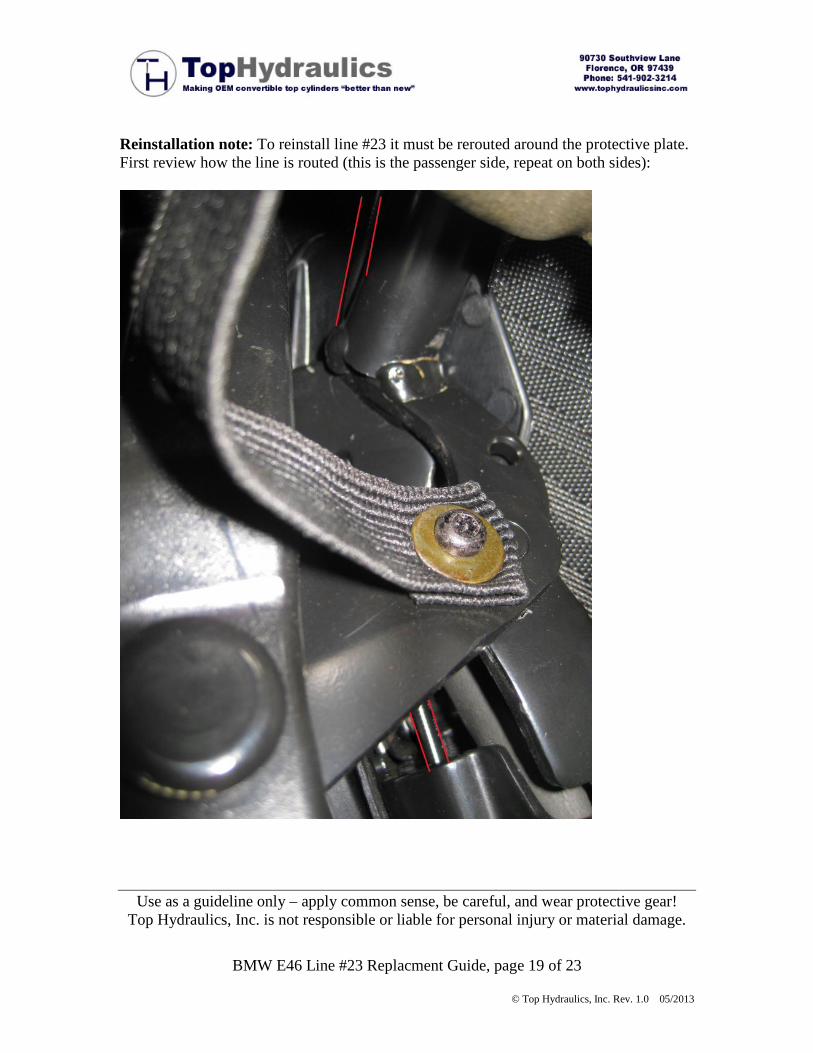
Reinstallation note: To reinstall line #23 it must be rerouted around the protective plate. First review how the line is routed (this is the passenger side, repeat on both sides):
Use as a guideline only – apply common sense, be careful, and wear protective gear! Top Hydraulics, Inc. is not responsible or liable for personal injury or material damage.
BMW E46 Line #23 Replacment Guide, page 20 of 23
© Top Hydraulics, Inc. Rev. 1.0 05/2013
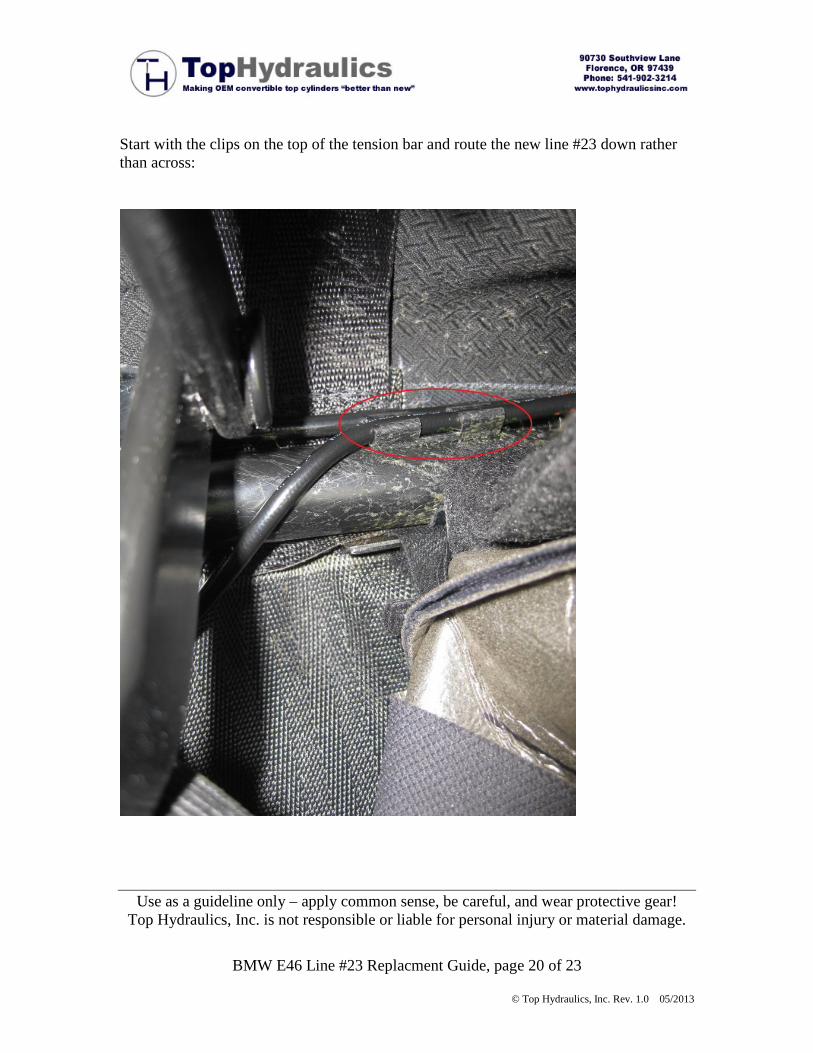
Start with the clips on the top of the tension bar and route the new line #23 down rather than across:
Use as a guideline only – apply common sense, be careful, and wear protective gear! Top Hydraulics, Inc. is not responsible or liable for personal injury or material damage.
BMW E46 Line #23 Replacment Guide, page 21 of 23
© Top Hydraulics, Inc. Rev. 1.0 05/2013
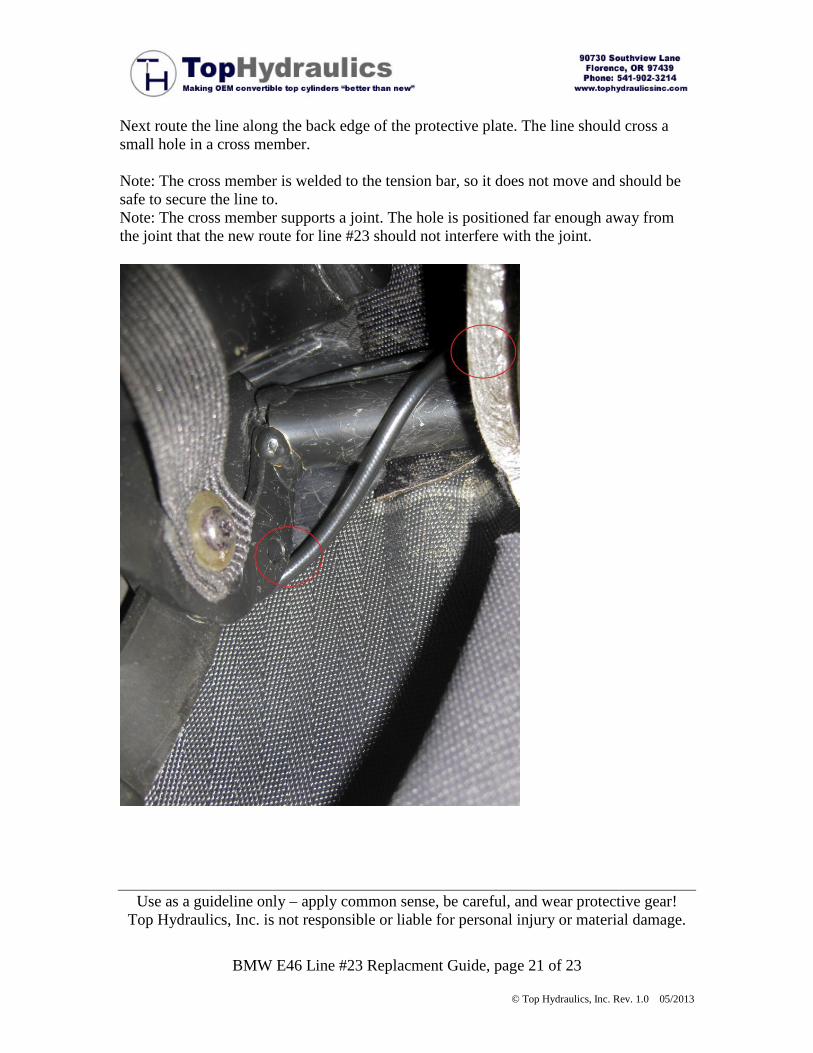
Next route the line along the back edge of the protective plate. The line should cross a small hole in a cross member. Note: The cross member is welded to the tension bar, so it does not move and should be safe to secure the line to. Note: The cross member supports a joint. The hole is positioned far enough away from the joint that the new route for line #23 should not interfere with the joint.
Use as a guideline only – apply common sense, be careful, and wear protective gear! Top Hydraulics, Inc. is not responsible or liable for personal injury or material damage.
BMW E46 Line #23 Replacment Guide, page 22 of 23
© Top Hydraulics, Inc. Rev. 1.0 05/2013
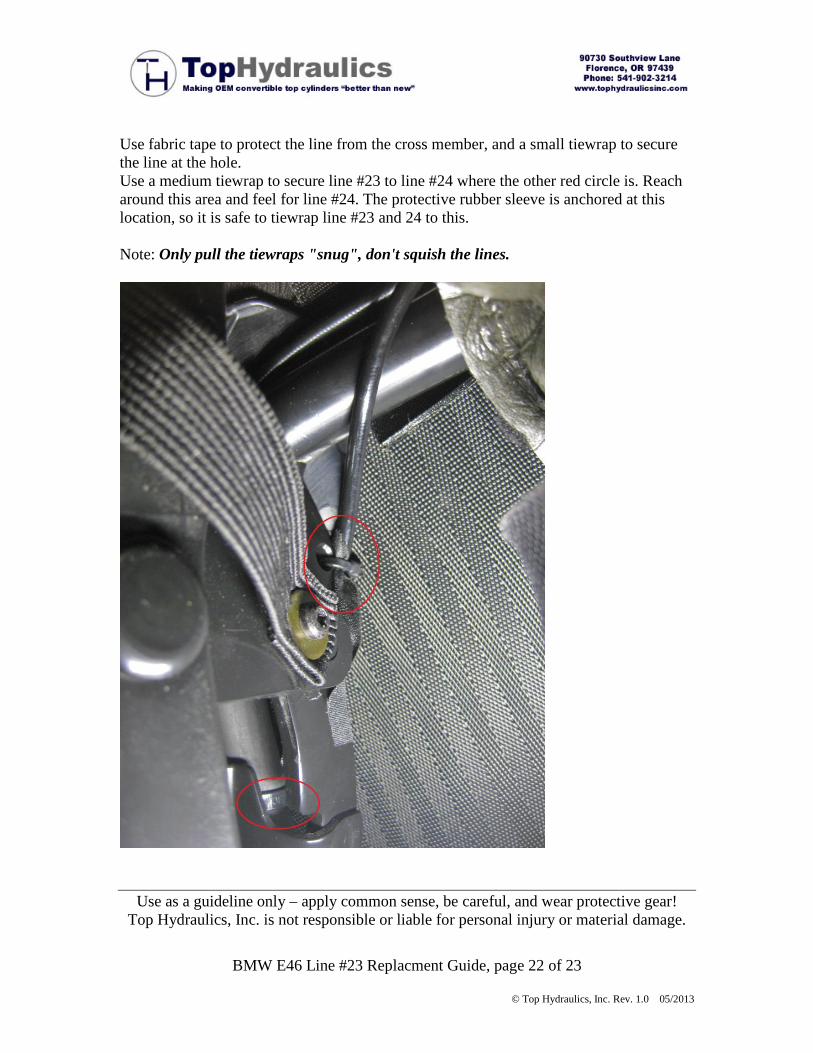
Use fabric tape to protect the line from the cross member, and a small tiewrap to secure the line at the hole. Use a medium tiewrap to secure line #23 to line #24 where the other red circle is. Reach around this area and feel for line #24. The protective rubber sleeve is anchored at this location, so it is safe to tiewrap line #23 and 24 to this. Note: Only pull the tiewraps "snug", don't squish the lines.
Use as a guideline only – apply common sense, be careful, and wear protective gear! Top Hydraulics, Inc. is not responsible or liable for personal injury or material damage.
BMW E46 Line #23 Replacment Guide, page 23 of 23
© Top Hydraulics, Inc. Rev. 1.0 05/2013
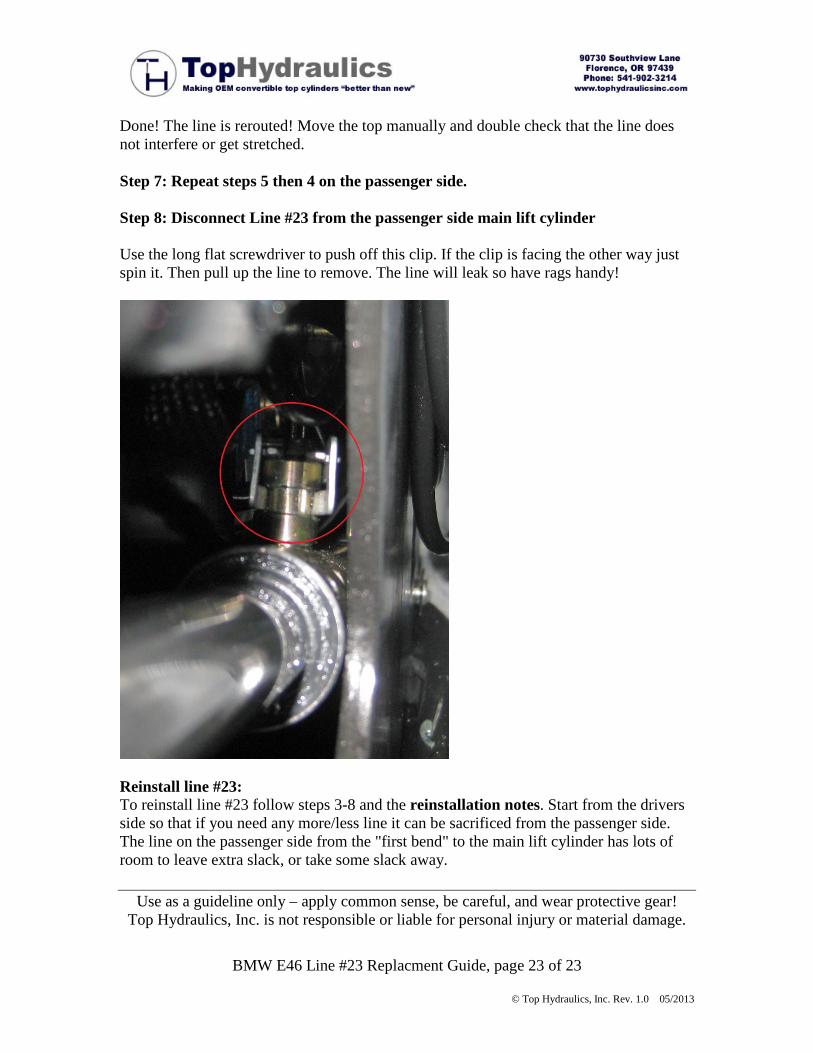
Done! The line is rerouted! Move the top manually and double check that the line does not interfere or get stretched. Step 7: Repeat steps 5 then 4 on the passenger side. Step 8: Disconnect Line #23 from the passenger side main lift cylinder Use the long flat screwdriver to push off this clip. If the clip is facing the other way just spin it. Then pull up the line to remove. The line will leak so have rags handy!
Reinstall line #23: To reinstall line #23 follow steps 3-8 and the reinstallation notes. Start from the drivers side so that if you need any more/less line it can be sacrificed from the passenger side. The line on the passenger side from the "first bend" to the main lift cylinder has lots of room to leave extra slack, or take some slack away.