bluetooth® blood pressure monitor user manual€¦ · instruction manual. any other use is deemed...
TRANSCRIPT

Bluetooth® Blood Pressure MonitorUser
Manual
ID: #05007
myhansecontrol.c
om
MA
NUA
L
DEVELOPED IN GERMA
NY
User-friendlyManual
Bluetooth® Blood Pressure Monitor
Bluetooth® Blood Pressure Monitor
Dok.
/rev
.-n
r. 9
2785
_201
4120
2
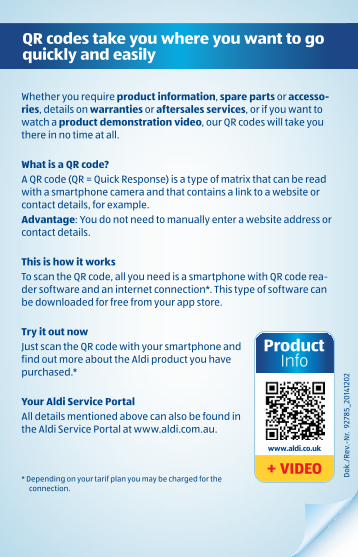
Qr codes take you where you want to go quickly and easily
whether you require product information, spare parts or accesso-ries, details on warranties or aftersales services, or if you want to watch a product demonstration video, our Qr codes will take you there in no time at all.
What is a Qr code?A Qr code (Qr = Quick response) is a type of matrix that can be read with a smartphone camera and that contains a link to a website or contact details, for example.advantage: you do not need to manually enter a website address or contact details.
this is how it worksto scan the Qr code, all you need is a smartphone with Qr code rea-der software and an internet connection*. this type of software can be downloaded for free from your app store.
try it out nowJust scan the Qr code with your smartphone and find out more about the Aldi product you have purchased.*
your aldi service PortalAll details mentioned above can also be found in the Aldi Service Portal at www.aldi.com.au.
* Depending on your tarif plan you may be charged for the connection.

Contents
Overview .................................4Use ............................................5scope of delivery/ device parts .............................6 General information ............... 7
reading and storing the instruction manual ...............7explanation of symbols ...... 8
safety ..................................... 10Proper use ............................10Safety notes ......................... 12
Checking the product contents 16Crane Connect app .................17
Compatibility .......................18Description of the device ...... 18
Control elements ................19Display ................................. 20LeD indicator ....................... 22Device modes ..................... 22
start-up ................................. 25Inserting batteries ............. 25Setting the measurement computer ............................. 26Installing the app ............... 27Creating a user account .... 27Configuring users .............. 28
Handling ................................30Performing a measurement .....................30Preparing a measurement ..................... 33Manual data transfer ......... 37
Viewing the measurements on the measurement computer .............................38erasing measurements .... 39
evaluating the measurements ......................40
Cardiac arrhythmia ...........40wHo classifications .............41
Cleaning and maintenance ..44Changing the batteries.....45Storage ................................45
troubleshooting ...................46technical data ....................... 51
Full display reference ........54Manufacturer information ...55Declaration of conformity ....56Disposal .................................56
Disposing of the packaging 56Disposing of old devices ... 57
electromagnetic compatibility .........................58
electromagnetic emissions .............................58electromagnetic immunity .............................59recommended separation distances ............................. 62
trademark protection notices ...................................64Warranty ................................65

a
B
2
3
5
13
14
15
17
1920
16
18
21
22
23
12
1
47 6
8
9
1011
overview 4 AUS

C
D F
e
5use AUS

6 Scope of delivery/device parts
scope of delivery/device parts
AUS
1 Measurement computer
2 Cuff
3 Cuff hose
4 batteries (AAA), 4x
5 bag
6 Display
7 Set button
8 user 2 touch button
9 on/oFF switch for user 1 and user 2 touch button
10 user 1 touch button
11 Connector jack for the cuff hose
12 Date indicator
13 time indicator
14 Indicator for systolic pressure
15 Indicator for diastolic pressure
16 Air release indicator
17 Memory slot indicator
18 Pulse indicator
19 Indicator for mea-surement classifica-tion according to the wHo
20 bluetooth® indicator
21 battery indicator
22 Arrhythmia indica-tor/pulse indicator
23 user indicator

7General information AUSGeneral information
General information
Reading and storing the instruction manual
This instruction manual accompanies this Bluetooth® blood pressure monitor. It con-tains important information on how to set up and handle the device.For improved readability, the Bluetooth® blood pressure monitor will be referred to merely as the “blood pressure monitor” below.Before using the blood pressure monitor, read the instruction manual carefully. This particularly applies for the safety notes. Non-observance of this instruction manual may cause damage to the blood pressure monitor. The instruction manual is based on the standards and rules in force in the European Union. When abroad, you must also observe country-specific guidelines and laws.Store the instruction manual for future use. Make sure to include this instruction manual when passing the blood pressure monitor on to third parties.

8 General informationAUS
Explanation of symbolsThe following symbols and signal words are used in this instruction manual, on the packaging or on the blood pressure monitor.
WARNING! This signal word designates a hazard with a moderate degree of risk which may lead to death or severe injury if not avoided.
CAUTION! This signal word designates a hazard with low risk that, if not avoided, may result in minor or moderate injury.
NOTICE! This signal word warns against pos-sible damage to property or provides you with useful additional information on use.
Declaration of conformity (see chapter “Dec-laration of conformity”): Products marked with this symbol fulfil the requirements of the CE directive for medical products.
This symbol indicates that the warranty for the blood pressure monitor amounts to 36 months (3 years).

9General information AUS
This symbol identifies devices classified as type BF.
This symbol indicates that the device must be protected against wetness.
This symbol indicates that you should read the instruction manual and hold onto it.
This symbol identifies information from the manufacturer (see chapter “Manufacturer information”).
This symbol identifies information from the manufacturer's representative in the Eu-ropean Union (see chapter “Manufacturer information”).
This symbol identifies devices that emit non-ionising electromagnetic radiation (see chapter “Electromagnetic compatibility”).
This symbol signalises disposal instructions for packaging material (see chapter “Dis-posal instructions”).
This symbol identifies devices that are oper-ated with direct current (see chapter “Tech-nical data”).

10 SafetyAUS
This symbol signalises legal regulations for the disposal of electrical devices (see chap-ter “Disposal instructions”).
This symbol signalises legal regulations for the disposal of rechargeable batter-ies and batteries (see chapter “Disposal instructions”).
This symbol identifies the serial number of the device.
Operation
RH 15% - 93%
+40°C
+5°C
This graphic identifies permissible oper-ating conditions (see chapter “Technical data”).
Storage
RH < 93%
+70°C
-25°C
This graphic identifies the permissible storage conditions (see chapter “Technical data”).
Safety
Proper useThe blood pressure monitor is designed for non-invasive measuring and monitoring of arterial blood pressure levels of adults (patients). Your pulse rate is also shown on the display of the blood pressure monitor.The blood pressure monitor issues a warning in the

11Safety AUS
event of cardiac arrhythmia. The levels measured are classified and rendered in accordance with the guide-lines of the WHO (World Health Organisation).The patient is also intended to be the user. The blood pressure monitor is exclusively intended for private use and is not suitable for commercial or clinical use. The blood pressure monitor is not a children's toy.Only use the blood pressure monitor as described in this instruction manual. Any other use is deemed improper and may result in injury to persons or damage to the blood pressure monitor.The manufacturer or vendor accepts no liability for dam-age caused by improper or incorrect use.

12 SafetyAUS
Safety notes
WARNING! Danger for children and per-sons with impaired physical, sensory or mental capacities (e.g. partially disabled per-sons, older persons with re-duced physical and mental capacities) or lack of expe-rience and knowledge (e.g. children).
− The blood pressure monitor may not be used by children under the age of 8. Keep the blood pressure monitor and its accessories away from children under the age of 8.
− The blood pressure monitor may be used by children ages eight and over as well as persons with impaired physical, sensory or mental capacities or those lacking experience and/or knowledge if they are supervised or have been in-structed in how to safely use the blood pressure monitor and have understood

13Safety AUS
the risks associated with operating it. − Do not allow children to play with the
packaging wrapper. They may get caught in it and suffocate.
WARNING! Risks associated with improper handling of the batteries!The blood pressure monitor is bat-tery-operated. Improper handling of the batteries may result in injury and damage to property.
− Store the batteries in an area that is not accessible for children. If you suspect that a child has swallowed a battery, immediately contact a physician.
− Never expose the batteries to exces-sive heat such as direct sunlight, open flames or similar.
− Do not charge the batteries and do not reactivate them with other means.
− Do not short circuit the batteries. − Do not open the batteries.

14 SafetyAUS
− To prevent the batteries from leaking, only insert batteries of the same type in the blood pressure monitor.
− If necessary, clean the battery and de-vice contacts before inserting the bat-teries.
− Make sure that the polarity is correct when inserting the batteries.
− Promptly remove empty batteries from the blood pressure monitor.
− If a battery in the blood pressure moni-tor has leaked, put on protective gloves and use a dry cloth to clean the battery compartment.
− Do not allow battery acid to come into contact with skin, eyes or mucus mem-branes. In the event of contact with bat-tery acid, immediately flush the applica-ble areas with plenty of clean water and consult a physician immediately.
− If you do not use the blood pressure monitor for a prolonged period, remove the batteries from the battery compart-ment.

15Safety AUS
NOTICE! Risk of damage!Improper use of the blood pres-sure monitor may result in inaccu-rate measurements and damage to the blood pressure monitor.
− Do not expose the blood pressure moni-tor to strong magnetic fields (e.g. trans-formers). Otherwise this could cause errors in data transmission or damage to the blood pressure monitor.
− Only use the blood pressure monitor at an ambient temperature of + 5 °C to + 40 °C and a humidity of 15 % to 93 %.
− Do not open the blood pressure monitor. − Protect the device against dirt, direct sun-
light, severe temperature fluctuations, chemicals and mechanical shocks.
− Do not let the device fall down. − Only use enclosed or original replace-
ment cuffs to ensure that the measure-ments are correct.
− Do not start the measurement process until the cuff has been fitted.
− Do not immerse the blood pressure

16 Checking the product contentsAUS
monitor in water and do not rinse it off under running water.
− Protect the cuff and cuff hose from sharp and pointy objects.
− Do not kink the cuff hose. − Do not place any heavy objects on the
blood pressure monitor, the cuff or cuff hose.
Checking the product contentsNOTICE! Risk of damage!If you are not cautious when open-ing the packaging with a sharp knife or other pointy object, you could damage the blood pressure monitor.
− You should therefore be very careful when opening it.
1. Take the blood pressure monitor out of the packaging and remove the packaging material.
2. Take the protective plastic foil off of the display of the measurement computer.

17Crane Connect app AUS
3. Check to make sure that the delivery is complete (see fig. A).
4. Check whether the blood pressure monitor or the individual parts exhibit damages. If this is the case, do not use the blood pressure monitor. Contact the manufacturer at the service address specified on the warranty card.
Crane Connect appThe blood pressure monitor is designed to measure blood pressure and pulse. The data measured are transmitted to a smartphone or tablet via Bluetooth®. With the free Crane Connect app (hereinafter referred to as “app”) you can save and analyse this data on your smartphone or tablet.If the Internet connection on your smartphone or tablet is active, the Crane Connect app will automatically up-load the measurements to the website www.cranesportsconnect.com and permanently save them in your user account.The blood pressure monitor can record, save and trans-fer data from two different users.You can also use the blood pressure monitor without being connected to the app. The blood pressure monitor has 60 memory slots for each user. Once all 60 memory slots are occupied, the next measurement will overwrite the oldest entry.

18 Description of the deviceAUS
The data saved is transferred to the app the next time you connect the blood pressure monitor with the app.
CompatibilityThe following smartphones and tablets with Bluetooth® Smart Ready (Bluetooth® 4.0) are compati-ble with the blood pressure monitor and app: • Apple® iPhone® 4s and more recent versions• Apple® iPad® 3rd generation and more recent ver-
sions • Apple® iPad mini™ 1st generation and more recent
versions• Apple® iPad Air™ and more recent versions • Smartphones and tablets with Android™ 4.3 and
more recent versionsYou can find a detailed list of compatible devices on the following website:www.cranesportsconnect.com/compatibility.
Description of the deviceThe blood pressure monitor consists of a measurement computer, a cuff that inflates automatically and a cuff hose that connects the cuff with the measurement computer.A display, multiple LEDs and function buttons are locat-ed on the measurement computer. They are described below.

19Description of the device AUS
Control elementsThe control elements can be used to make various set-tings on the measurement computer (see Fig. A).
Control element FunctionsUser 1 touch button 10 and user 2 touch
button 8
− Start/stop the measure-ments
− Access the measurements − In Setting mode: Decrease
and/or increase the value − Changing the mode
SET button 7 − Save the data and time settings
− Stop the measurements − Manually connect to the
app − Change of mode when an
error is displayed
ON/OFF switch 9 − Activate and/or deactivate the user 1 and user 2 touch buttons

20 Description of the deviceAUS
DisplayDifferent data will be shown on the display (see fig. B).
Display Description
Date indicator 12 The date is shown here. It will be saved with the meas-urements. It therefore makes sense to set the right data on the measurement computer.
Time indicator 13 The time is shown here. It is saved with the measurements. It therefore makes sense to set the correct time on the meas-urement computer.
Indicator for systolic pressure 14
The systolic pressure is shown in mmHg here (millimetres of mercury).
Indicator for diastolic pressure 15
The diastolic pressure is shown in mmHg here (millimetres of mercury).
Air release indicator 16
This symbol is shown when the blood pressure monitor releas-es air from the cuff.
Memory slot indicator 17
Here, the memory slot being used for the current measure-ment is shown. 60 memory slots are available per user.

21Description of the device AUS
Display Description
Pulse indicator 18
Here, the pulse recorded during blood pressure meas-urement is shown in beats per minute (bpm).
Display of the meas-urement classifica-tion according to the WHO 19
The LEDs indicate the classifi-cation of the blood pressure levels measured according to the WHO scale. You can find details in the chapter “Evaluat-ing measurements”.
Bluetooth® indicator 20
This symbol indicates whether data transmission via Blue-tooth® is active.
Battery indicator 21 The battery indicator lights up when the batteries are empty and have to be replaced.
Arrhythmia indica-tor/pulse indicator 22
This symbol blinks during the measurement to show that a pulse is being measured.Once the measurement is complete, the indicator will report any potential cardiac ar-rhythmia detected during the measurement. You can find details in the chapter “Evaluat-ing measurements”.

22 Description of the deviceAUS
Display Description
User indicator 23 The user currently performing a measurement or retrieving measurements is shown here.
LED indicatorThe 6 LEDs on the left side of the display indicate the classification of the measurements according to the WHO scale. The indicator is colour-coded. For details on the WHO classification, see the chapter “Evaluating measurements”.
Colour MeaningGreen Optimal
Green Normal
Green Elevated normal
Yellow Slight hypertension
Orange Moderate hypertension
Red Severe hypertension
Device modesThe blood pressure monitor has five different modes, which are explained below.In all modes, the display light turns off after 30 seconds of user inactivity.

23Description of the device AUS
After 1 minute of user inactivity, the measurement com-puter will switch to sleep mode.
Sleep modeAfter all settings have been made and the device is acti-vated, the blood pressure monitor automatically switch-es to sleep mode. The display light and WHO-LEDs are deactivated in this mode.You can also manually transfer data to the app on your smartphone or tablet from sleep mode (see chapter “Manual data transfer”).From sleep mode, you can switch to the other modes as follows:
Mode Switching modesSetting mode for date and time
Push the “SET” button to access the setting mode for date and time and to activate or deacti-vate Bluetooth®.
Measurement mode
Tap the user 1 touch button once to access the measurement mode for user 1.Tap the user 2 touch button to access the measurement mode for user 2.

24 Description of the deviceAUS
Mode Switching modesTransmission mode
Hold the SET button for approx. three seconds to access the transmission mode for manual data transmission.
Memory mode Press and hold the user 1 touch button for approx. three seconds to access the save mode for user 1.Press and hold the user 2 touch button for approx. three seconds to access the memory mode for user 2.
Setting modeIn setting mode, you can set the time format, date, time and automatic data transmission after a measurement (see chapter “Setting the measurement computer”).
Measurement modeIn measurement mode, you can measure blood pres-sure and automatically transfer the data to the app on your smartphone or tablet (see chapter “Performing a measurement”).
Transmission modeIn transmission mode, data from the blood pressure monitor is transferred to the app on your smartphone

25Start-up AUS
or tablet. With automatic data transmission, the blood pressure monitor will directly switch to transmission mode once the measurement has been performed (see chapter “Performing a measurement”).For manual data transmission, you must switch the blood pressure monitor to transmission mode yourself (see chapter “Manual data transfer”).
Memory modeIn memory mode, you can have the measurements shown on the display of the measurement computer (see chapter “Viewing the measurements on the meas-urement computer”) and erase the measurements for a user (see chapter “Erasing measurements”).
Start-up
Inserting batteriesNOTICE! Do not use your blood pressure monitor with rechargeable batteries.
1. Open the battery compartment on the bottom of the device.
2. Insert the four batteries contained in the product contents in the battery compartment. In the process, observe the marking for the correct polarity.

26 Start-upAUS
3. Close the battery compartment. All indicator segments will briefly appear on the display 6 (see fig. A and B). Then the display will switch on and the “24 h” time format will blink on the display.
The measurement computer is now ready for the basic settings.
Setting the measurement computerThe results from each successful measurement are saved together with the time and date. For this, first the time format, date and time must be entered on the measurement computer properly. Proceed as follows:
1. If “24 h” blinks on the display, tap the touch buttons for user 1 10 or user 2 8 to switch between the “12 h” and “24 h” time formats (see fig. A).
2. Push the SET button 7 to save the time format set-ting. The year indicator will now blink.
3. Tap the touch buttons for user 1 or user 2 to set the current year.
4. Confirm your setting with the “SET” button.5. You can set the month, day, hours and minutes in
the same manner. Then “On” or “OF” will blink on the display.
6. Tap the touch buttons for user 1 or user 2 to activate or deactivate Bluetooth® on the measurement com-puter. Bluetooth® is activated by factory default.In general, you should only switch Bluetooth® off

27Start-up AUS
if you don't want to transfer measurements to your smartphone or tablet.
7. Confirm the Bluetooth® setting with the “SET” but-ton. The display will switch off.
The measurement computer is now ready for use.
Installing the app1. Download the free Crane Connect app from the App
Store or from the Google Play Store. You can also download the app by scanning one of the following QR codes:For iOS: For Android™:
You can also download the app under the following URL: www.cranesportsconnect.com/downloads.
2. Install the app on your smartphone or tablet. For this, follow the on-screen instructions.
Creating a user accountThe blood pressure monitor has 2 user memory slots for storing your individual measurements and those of family members for example. For this purpose, an own user account must be set up in the app for each of these users.

28 Start-upAUS
To create a user account with the app, follow the steps below:1. Start the app.
You will be directed to the “Home” menu.2. Select the app icon “All Settings”. 3. To create a new user or log on with an existing user,
select the app icon “User Settings”.4. Follow the step-by-step instructions provided in the
app.5. Once the user settings are complete, return to the “All
Settings” menu. You can also create your user data on the following website: www.cranesportsconnect.com.
Configuring usersIn order for the blood pressure monitor to send the cor-rect data to your smartphone or tablet, you must now assign user 1 or 2 from the blood pressure monitor to your user account.
1. Start the app on your smartphone or tablet if you have not already done so.
2. Select the app icon “All Settings”. 3. Select the icon “Blood Pressure Monitor”. You will
access the other settings for the blood pressure monitor.
4. Set user 1 or user 2 in the “Settings” menu. With the user set here, you must perform the measurements

29Start-up AUS
on the blood pressure monitor later on so that the app properly recognises your data.
5. After you have selected the user, return to the “Home” menu. From there, you can access all anal-yses of the measurements via the app icon “Blood Pressure Monitor”.
The app is now ready to receive measurements from the blood pressure monitor.
30 HandlingAUS
Handling
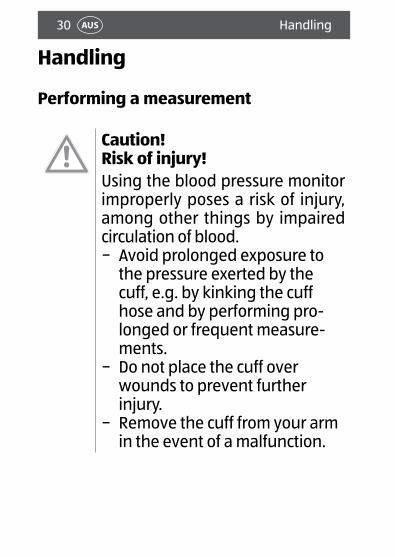
Performing a measurement
Caution! Risk of injury!Using the blood pressure monitor improperly poses a risk of injury, among other things by impaired circulation of blood.
− Avoid prolonged exposure to the pressure exerted by the cuff, e.g. by kinking the cuff hose and by performing pro-longed or frequent measure-ments.
− Do not place the cuff over wounds to prevent further injury.
− Remove the cuff from your arm in the event of a malfunction.

31Handling AUS
NOTICE!For ideal measurement results, follow the basic rules below when measuring your blood pressure.
− If possible, always measure your blood pressure at the same time of day for comparable results.
− At least 30 minutes before you perform a measure-ment, do not smoke, eat or drink and avoid physical exertion.
− Give your circulatory system about five minutes to calm down each time before you perform a meas-urement.
− If the measurements are not plausible, repeat the measurement.
− Wait at least five minutes before taking another measurement for the same person.
− The results of your blood pressure measurements are for your information and are no substitute for a medical examination. Do not make any medical decisions based on your own measurements (e.g. with respect to taking medication or their dosage). Consult your physician if you have questions about the measurements.
− Do not use this blood pressure monitor to perform any measurements on preeclampsia patients or newborn babies.
32 HandlingAUS
− Consult your physician before you use the blood pressure monitor on pregnant persons.
− Do not use the blood pressure monitor together with high-frequency surgical devices.
− Only use the device for persons with an upper arm circumference between 22 and 35 cm.
− The function of the affected body part may be im-paired when inflating the cuff.
− The cuff hose may not be kinked, compressed or otherwise restricted.
− Always measure your blood pressure on the same arm – ideally, the left arm.
− Do not use the cuff on limbs whose arteries or veins are undergoing medical treatment e.g. in the form of intravascular access, intravascular therapy or arterio-venous (A-V) shunt.
− Do not fit the cuff on persons, who have undergone a mastectomy.
− Please keep in mind that the restriction of circulation through the inflation of the cuff may temporarily cause other measurement devices connected to the same body part to temporarily malfunction.
− Avoid performing frequent measurements and pro-longed pressure in the cuff to prevent injury.
− The blood pressure monitor is battery-operated. Data transmission and data storage are only possi-ble if the power supply is intact. The blood pressure monitor will lose the date and time if the batteries

33Handling AUS
are empty or have been changed. However, meas-urements that have been saved will remain intact.
− To save battery power, automatic switch-off will automatically switch the blood pressure monitor to sleep mode after more than 1 minute of key inactivity on the measurement computer.
The following illnesses or symptoms may result in incor-rect measurements or affect the measurement accuracy of the blood pressure monitor:• Diseases of the cardiovascular system,• very low blood pressure,• diabetes,• circulatory disorder and cardiac arrhythmia,• shivering,• shaking.
Preparing a measurementEstablishing a Bluetooth® connectionIf you would like to perform the measurement without direct data transmission, the data will be saved on the measurement computer. You can transfer them to the app later (see chapter “Manual data transfer”).If you would like to automatically transfer the measure-ments to the app once measurement is complete, pro-ceed as follows:
1. Make sure that the Bluetooth® function of your smartphone or tablet is switched on.

34 HandlingAUS
2. Start the app if you have not already done so. 3. Activate the user touch buttons with the
ON/OFF switch 9 (see fig. A).4. Make sure that Bluetooth® on your measurement
computer is also on (see chapter “Setting the meas-urement computer”).
Fitting the cuff1. Expose the arm where you would like to measure the
blood pressure. Use your left arm if possible.2. Wrap the cuff 2 around the exposed upper arm
(see fig. C).The bottom edge of the cuff must be 2–3 cm above the elbow and over the artery. The cuff hose 3 must point towards the middle of your palm.
3. Now place the free end of the cuff around your arm.The cuff must be fitted tightly enough so that two fingers fit under the cuff.
4. Once the cuff has been properly fitted, close the Vel-cro strap.
5. Now connect the cuff hose with the connector jack 11 on the measurement computer 1 (see fig. A and D).
Assuming the correct postureYou can perform the measurement while sitting or lying down (see fig. E and F). Be absolutely sure to observe the following instructions:

35Handling AUS
1. The cuff must be roughly at the height of your heart, but no higher.
2. Rest your arms in a relaxed position.A chair with armrests or a table are required for measurements performed while sitting.
3. Do not move and do not speak while performing a measurement.
If you would like to measure your blood pressure while sitting, you must also observe these instructions:
4. Sit in a relaxed position when measuring your blood pressure and lean back.
5. Place your feet flat on the ground.6. Do not cross your legs.
Starting a blood pressure measurement
NOTICE!You can cancel blood pressure measure-ments that are in progress by pushing the SET button or the user 1 or user 2 touch button.
Proceed as follows to start the blood pressure monitor:1. On the measurement computer 1 , tap the user
1 touch button 10 or the user 2 touch button 8 depending on which user you have configured for yourself in the app (see fig. A and B).All display elements will be shown briefly. The last

36 HandlingAUS
measurement will then appear on the display 6 for one second. If no measurement has been per-formed yet, the device will not show any values.
2. The cuff will now inflate 2 and you will feel it tight-en (see fig. A).If no measurements have been saved, the blood pressure monitor will inflate the cuff up to a pressure of 190 mmHg. Otherwise, the device will calculate the average systolic pressure of all previous meas-urements, add 40 mmHg and inflate the cuff to that value.
3. As soon as the blood pressure monitor detects your pulse, the pulse indicator will blink on the display 22 . If this is not the case, the device will inflate
again (see fig. B).4. Once the measurement is complete, the entire air
will be released from the cuff. The measurements for systolic pressure 14 , diastolic pressure 15 and pulse 18 will appear on the display and be saved. The WHO-LED corresponding to the measured values will light up (see fig. B).
5. If you do not want to perform automatic data trans-mission, use the user 1 touch button 10 or the user 2 touch button 8 to switch the blood pressure moni-tor to sleep mode (see fig. B).If you have prepared the blood pressure monitor and your smartphone or tablet accordingly, automatic data transfer to the app will begin following the measurement:

37Handling AUS
6. The Bluetooth® symbol 20 will blink on the display 6 . The blood pressure monitor will now attempt to
connect to the app for approx. 30 seconds (see fig. A and B).
7. As soon as a connection has been established, the Bluetooth® symbol will stop blinking and all measurements will be automatically transferred to the app. Following successful transmission, the Bluetooth® symbol on the display will go out and the device will switch to sleep mode. If a trans-mission fails, the display will show the Bluetooth® symbol and the error code “E7” (see chapter “Troubleshooting”).
Manual data transfer
NOTICE!All function buttons on the blood pres-sure monitor are inactive during the data transfer.
If it is not possible to automatically transfer the measure-ments to your smartphone or tablet after the measure-ment, you can perform a manual transfer as follows:
1. Activate Bluetooth® on your smartphone or tablet.2. Open the app.3. Press and hold the SET button 7 for three seconds.
The Bluetooth® symbol 20 will blink on the display

38 HandlingAUS
of the blood pressure monitor and a connect to the app will be established (see fig. A and B).
4. As soon as a connection has been established, the Bluetooth® symbol will stop blinking and all meas-urements will automatically be transferred to the app.
5. Once the transfer is successful, the Bluetooth® sym-bol on the display will go out. The device will switch to sleep mode. If it is not possible to perform a trans-fer, the display will show the Bluetooth® symbol and the error code “E7” (see chapter “Troubleshooting”).
Viewing the measurements on the measurement computerYou can also view the measurements you saved directly on the measurement computer without a smartphone or tablet. Proceed as follows to do so:
1. Activate the user touch buttons on the measurement computer with the ON/OFF switch 9 (see fig. A).
2. Switch to memory mode by touching user 1 touch button 10 or user 2 touch button 8 for approx. three seconds until the WHO-LED lights up with the average value for all measurements (see fig. A).
3. You can now browse through the measurements of the respective user with the user 1 touch button 10 or user 2 touch button 8 (see fig. A). Tap the re-spective button once to browse further.

39Handling AUS
The data will be displayed in this order:• Average values for all measurements• Average values for the last seven measure-
ments from 05:00 a.m. to 09:00 a.m.• Average values for the last seven measure-
ments from 06:00 p.m. to 08:00 p.m.• 60th measurement (last) up to the 1st meas-
urement (oldest)4. To view the values of the other user, touch the re-
spective user button.5. After viewing all measurements, the measurement
computer will automatically switch to sleep mode. If you would like to leave memory mode before this time, touch the user 1 or user 2 touch button for three seconds.
Erasing measurementsYou can completely erase the measurements of a user. Proceed as follows to do so:
1. Activate the user buttons on the measurement com-puter with the ON/OFF switch 9 (see Fig. A).
2. Switch to memory mode by touching the user 1 button 10 or user 2 button 8 for three seconds until the WHO-LED lights up with the average for all measurements.
3. Touch the user button of the user whose values you would like to erase.

40 Evaluating the measurementsAUS
4. Touch both the user 1 button 10 and the user 2 button 8 at the same time for 3 seconds. “CL --” and then “CL 00” will appear on the display 6 (see fig. A).All measurements of the respective user are erased.
5. You can now switch the measurement computer to sleep mode by touching the user 1 or user 2 touch button for three seconds.
Evaluating the measurements
Cardiac arrhythmiaNOTICE!If the arrhythmia indicator 22 appears fre-quently after a measurement, you should advise your physician and get an in-depth examination. Follow your doctor's orders. Do not endanger yourself through self-di-agnosis or taking your own therapeutic measures.
Arrhythmia detection of the blood pressure monitor may be able to detect potential cardiac arrhythmia. If the de-vice detects an irregular pulse, this will be indicated with the arrhythmia indicator 22 after the measurement (see fig. B). Arrhythmia detection may provide an indi-cation of an illness, but does not offer a sure diagnosis. Arrhythmia is an illness involving a malfunction of the

41Evaluating the measurements AUS
bioelectric control mechanism for the heart beat that results in an abnormal cardiac rhythm. Compared to a normal cardiac rhythm, symptoms include missed or premature heart beats or an overall slower or acceler-ated pulse. The possible causes include, among other things:• physical disposition,• advanced age,• cardiac illness,• excessive consumption of alcohol or nicotine,• stress,• lack of sleep.If the arrhythmia indicator 22 appears, repeat the measurement.At the same time, make sure you comply with the basic rules for correct measurement of blood pressure (see chapter “Performing a measurement”).
WHO classificationsThe World Health Organisation (WHO) has defined six categories for the classification of blood pressure levels. This classification is provided in the following table.

42 Evaluating the measurementsAUS
Range of blood pres-sure levels
Systoles(in mmHG)
Diasto-les(in mmHG)
Measure
Optimal < 120 < 80 Check your blood pressure on your own regularly.
Normal 120 – 129
80 – 84 Check your blood pressure on your own regularly.
Elevated normal
130 – 139
85 – 89 Have your blood pressure checked regular-ly by a physician.
Level 1: Slight hypertension
140 – 159
90 – 99 Have your blood pressure checked regular-ly by a physician.
Level 2: Moderate hypertension
160 – 179
100 – 109
Have your phy-sician examine you promptly.
Level 3: Severe hypertension
≥ 180 ≥ 110 Have your phy-sician examine you promptly.

43Evaluating the measurements AUS
The LEDs on the blood pressure monitor and the arrow icons on the display indicate the range for the measured blood pressure.If the values for systoles and diastoles are within two different WHO ranges, the device will display the higher of the two ranges.Example: The systolic pressure is within the “Normal” range.The diastolic pressure is within the “Elevated normal” range.The measurement computer shows “Elevated normal”.However, the WHO only offers a general guideline. Variances in the individual blood pressure of different persons are not unusual. Ask your physician for blood pressure levels that are normal for you and for levels that are considered dangerous.

44 Cleaning and maintenanceAUS
Cleaning and maintenance
NOTICE! Risk of damage!If you do not clean the blood pres-sure monitor properly, you can damage the blood pressure mon-itor.
− Do not use any cleaners or solvents.
− Do not use any brushes with metal or nylon bristles, sharp or metallic cleaning utensils such as knives, hard scrapers or similar.
• Clean the measurement computer, the cuff hose and the cuff carefully with a damp cloth.
• After cleaning, use a soft cloth to clean the blood pressure monitor.

45Cleaning and maintenance AUS
Changing the batteries
NOTICE!After you have changed the batteries, you must reconfigure the data format, date and time. The saved measurements will, howev-er, remain intact.
If the display is blank after you switch on the measure-ment computer or the battery indicator or error code “E6” appears, the batteries are no longer supplying enough energy.To change the batteries, follow the steps described in the chapter “Inserting batteries”.
StorageIf you do not use the blood pressure monitor for a pro-longed period of time, please observe the following notes:• Take the batteries out of the battery compartment.• Store the blood pressure monitor in the enclosed
bag to protect it from dust.• Do not store the blood pressure monitor near heat
sources.• Observe the information concerning the storage
environment (see chapter “Technical data”).• Do not place any heavy objects on the measurement
computer, the cuff or the cuff hose.

46 TroubleshootingAUS
TroubleshootingIf a malfunction occurs, first check the points below before you send the blood pressure monitor in to be repaired.If error codes are shown on the display, proceed as follows:
1. Switch the measurement computer to sleep mode by pushing the SET button, the user 1 button 10 or the user 2 button 8 (see fig. A).
2. Observe the solutions provided in the following table.
Problem Causes and solutionsThe error code “E1” and the pulse in-dicator appear on the display.
The pulse is not being measured correctly.
− Fit the cuff correctly on your arm.
− Repeat the measurement.
The error code “E2” appears on the display.
You spoke or moved during the measurement.
− Repeat the measurement without speaking or moving.

47Troubleshooting AUS
Problem Causes and solutionsThe error code “E3” appears on the display.
The cuff is not on your upper arm.
− Fit the cuff correctly on your arm.
− Repeat the measurement.
The error code “E4” appears on the display.
A measurement error has occurred.
− Repeat the measurement.
The error code “E5” appears on the display.
A problem has occurred when inflating the cuff (inflation pres-sure > 300 mmHg).
− Make sure that the cuff hose is not kinked or clamped.
− Fit the cuff correctly on your arm.
− Repeat the measurement.
The display is blank.orThe battery in-dicator and the error code “E6” appear on the display.
The batteries were not inserted correctly.
− Remove the batteries and put them back in with the correct polarity.
Batteries are empty. − Replace the empty batteries
with new ones.

48 TroubleshootingAUS
Problem Causes and solutionsThe error code “E7” and the Bluetooth® in-dicator appear on the display.
Bluetooth® transfer is not possible.Once you have prepared everything for automat-ic transmission, repeat the measurement or transfer the measurements manually.
Bluetooth® transfer is not possible.The Bluetooth® function of your smartphone or tablet is switched off.
− Switch the Bluetooth® function of your smartphone or tablet on.
The Bluetooth® transmitter of the blood pressure monitor is not working properly.
− Take the batteries out of the battery compartment.
− Put the batteries back in. − Switch the Bluetooth® func-
tion of your smartphone or tablet off and back on.

49Troubleshooting AUS
Problem Causes and solutionsThe error code “E7” and the Bluetooth® in-dicator appear on the display.
Your smartphone or tablet is not working properly.
− Switch off your smartphone or tablet off completely and then back on.
The app was not successfully installed on your smartphone or tablet.
− Reinstall the app and log in with your user data.
Your smartphone or tablet does not support Bluetooth® Smart.
− Exchange your smartphone or tablet with a model that supports Bluetooth® Smart.

50 TroubleshootingAUS
Problem Causes and solutionsNot all measure-ments saved are transmitted.
You performed more than 60 measurements without connect-ing to the app.The blood pressure monitor can save a total of 60 measurements per user. Afterwards, the first measurement will be overwritten by the last one.
− Connect the blood pressure monitor with the app on a regular basis to prevent losing measurements.
Use the FAQs (frequently asked questions) on the fol-lowing website as an additional help for your blood pressure monitor: www.cranesportsconnect.com/faq.If the measures described above have not resolved the problem, please contact our service team. Use the infor-mation provided below and also consider the chapter “Warranty”.

51Technical data AUS
Technical dataType: MD 4000Model: AA5-CDBP-1Article number: 92126EAN: 20021023Power supply: Batteries, 4 x 1.5 V DC,
type LR03/AAA Classification Type BF application partType of operation Continuous operationProtection class Internal power supply

52 Technical dataAUS
IP code IPX 0Anaesthesia safety The device is not approved in
accordance with category AP or APG.
Measurement method Oscillometric, non-invasive measurement of blood pres-sure on the upper arm
Measurement accuracy Maximum permissible standard deviation according to clinical examination: systolic 8 mmHg/diastolic 8 mmHg
Measurement rangeCuff pressure: 30 – 250 mmHgSystolic pressure: 50 – 250 mmHgDiastolic pressure: 30 – 200 mmHgPulse: 40 – 180 bpm
Display accuracy: Pressure: +/- 3 mmHgPulse: +/- 5 % of the measurement
Measurement resolution:
Pressure: 1 mmHgPulse: 1 bpm
Cuff: Circumference of upper arm 22 – 35 cm
Bluetooth® version: 4.0 (Bluetooth® Smart), ~ 2.4 GHz

53Technical data AUS
Operating environment: Temperature: + 5 °C to + 40 °CHumidity: 15 % to 93 %
Storage environment:Temperature: - 25 °C to + 70 °CHumidity: up to 93 %
We reserve the right to make changes to technical data without prior notice for updating reasons.This device complies with the European standard EN 60601-1-2 and is subject to special precautionary meas-ures with respect to electromagnetic compatibility. Port-able or mobile high-frequency communication devices could interfere with this device. You can request more detailed information at the specified service address.This blood pressure monitor corresponds to the following guidelines, laws and standards:• EU Directive for Medical Products 93/42/EEC,• Medical Product Law (MPG) of the Federal Republic of
Germany,• Standard EN1060-1 (Non-Invasive Blood Pressure Mon-
itoring Devices Part 1: General requirements),• Standard EN1060-3 (Non-invasive Blood Pressure
Monitoring Devices Part 3: Supplementary require-ments for electromagnetic blood pressure monitoring systems),
• Standard IEC80601-2-30 (Medical electrical devices part 2-30: Special stipulations for safety including the

54 Technical dataAUS
essential features of automated non-invasive blood pressure monitoring devices).
Full display referenceThe following figure shows the display with all indicator segments. You can use this figure to determine whether the display is properly rendering the measurements.
AMPM
55Manufacturer information AUS
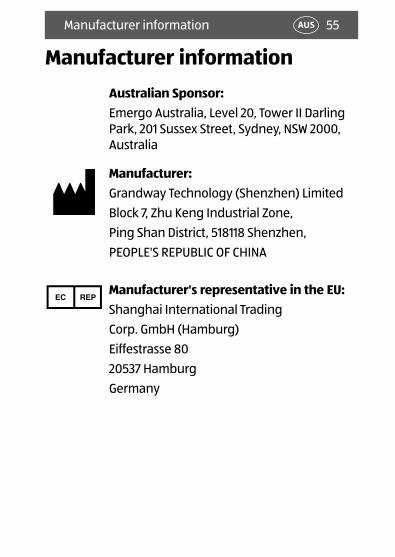
Manufacturer informationAustralian Sponsor:Emergo Australia, Level 20, Tower II Darling Park, 201 Sussex Street, Sydney, NSW 2000, Australia
Manufacturer:Grandway Technology (Shenzhen) LimitedBlock 7, Zhu Keng Industrial Zone,Ping Shan District, 518118 Shenzhen,PEOPLE'S REPUBLIC OF CHINA
Manufacturer's representative in the EU:Shanghai International TradingCorp. GmbH (Hamburg)Eiffestrasse 8020537 HamburgGermany

56 Declaration of conformityAUS
Declaration of conformityR&TTE 1999/5/CE directive, RoHS 2011/65/EU directive, 93/42/EEC medical products directive:
Short text of the declaration of conformity: Krippl-Watch-es hereby declares that the Bluetooth® blood pressure monitor (model no. AA5-CDBP-1) complies with the fun-damental requirements and other applicable provisions of the R&TTE 1999/5/EC, RoHS 2011/65/EU and 93/42/EEC medical products directive.You can access the complete text for the declaration of conformity on our website:http://www.produktservice.infoFor this, enter the following EAN (European Article Num-ber): 20021023.
Disposal
Disposing of the packagingDispose of the packaging separated into single type ma-terials. Dispose of cardboard and carton as waste paper and foils via the recyclable material collection service.

57Disposal AUS
Disposing of old devices(Applicable in the European Union and other European states with systems for the separate collection of reusa-ble waste materials)Old devices do not belong in the household waste! If the blood pressure monitor can no longer be used, every user is required by law to dispose of old devices separately from their household waste, e.g. at a col-lection point in his community/borough. This ensures that old devices are recycled in a professional manner and also rules out negative consequences for the envi-ronment. For this reason, electrical equipment is marked with the symbol shown here.Batteries and rechargeable batteries may not be dis-posed of with household waste! As the end user you are required by law to bring all bat-teries and storage batteries, regardless whether they contain harmful substances* or not, to a collection point run by the communal authority or borough or to a retail-er, so that they can be disposed of in an environmentally friendly manner. Turn in the batteries and rechargeable batteries at your collection point in a discharged state only!* labelled with: Cd = cadmium, Hg = mercury, Pb = lead

58 Electromagnetic compatibilityAUS
Elec
trom
agne
tic c
ompa
tibili
ty
Elec
trom
agne
tic e
mis
sion
s
Guid
ance
and
man
ufac
ture
r’s d
ecla
ratio
n –
elec
trom
agne
tic e
mis
sion
s fo
r al
l EQU
IPM
ENT
and
SYST
EMS
The
Sphy
gmom
anom
eter
(MD4
000)
is in
tend
ed fo
r use
in th
e el
ectr
omag
netic
env
ironm
ent s
peci
fied
belo
w. T
he
cust
omer
of t
he u
ser o
f the
Sph
ygm
oman
omet
er (M
D400
0) sh
ould
ass
ure
that
it is
use
d in
such
and
env
ironm
ent.
Emis
sion
test
Com
plia
nce
Elec
trom
agne
tic e
nviro
nmen
t – g
uida
nce
RF e
mis
sion
s
CISP
R 11
Grou
p 1
The
Sphy
gmom
anom
eter
(MD4
000)
use
s RF
ener
gy o
nly
for i
ts in
tern
al fu
nctio
n.
Ther
efor
e, it
s RF
emis
sion
s are
ver
y lo
w a
nd a
re n
ot li
kely
to ca
use
any
inte
rfer
ence
in
nea
rby
elec
tron
ic e
quip
men
t.
RF e
mis
sion
CISP
R 11
Clas
s BTh
e Sp
hygm
oman
omet
er (M
D400
0) is
suita
ble
for u
se in
all
esta
blis
hmen
ts, i
nclu
-di
ng d
omes
tic e
stab
lishm
ents
and
thos
e di
rect
ly co
nnec
ted
to th
e pu
blic
low
-vol
ta-
ge p
ower
supp
ly n
etw
ork
that
supp
lies b
uild
ings
use
d fo
r dom
estic
pur
pose
s.

59Electromagnetic compatibility AUS
Elec
trom
agne
tic im
mun
ity
Guid
ance
and
man
ufac
ture
r’s d
ecla
ratio
n –
elec
trom
agne
tic im
mun
ity –
fo
r all
EQUI
PMEN
T an
d SY
STEM
STh
e Sp
hygm
oman
omet
er (M
D400
0) is
inte
nded
for u
se in
the
elec
trom
agne
tic e
nviro
nmen
t spe
cifie
d be
low
. The
cust
omer
of t
he u
ser o
f the
Sph
ygm
oman
omet
er (M
D400
0) sh
ould
ass
ure
that
it is
use
d in
such
and
env
ironm
ent.
Imm
unity
test
IEC
6060
1 tes
t lev
elCo
mpl
ianc
e le
vel
Elec
trom
agne
tic e
nviro
nmen
t
- gui
danc
e
Elec
tros
tatic
di
scha
rge
(ESD
)
IEC
6100
0-4-
2
±6 k
V co
ntac
t
±8 k
V ai
r
±6 k
V co
ntac
t
±8 k
V ai
r
Floo
rs sh
ould
be
woo
d, co
ncre
te o
r cer
amic
tile
. If
floor
are
cove
red
with
synt
hetic
mat
eria
l, th
e re
lativ
e hu
mid
ity sh
ould
be
at le
ast 3
0%.
Pow
er fr
eque
ncy
(50H
z) m
agne
tic fi
eld
IEC
6100
0-4-
8
3A/m
3A/m
Pow
er fr
eque
ncy
mag
netic
fiel
ds sh
ould
be
at le
vels
ch
arac
teris
tic o
f a ty
pica
l loc
atio
n in
a ty
pica
l com
-m
erci
al o
r hos
pita
l env
ironm
ent.

60 Electromagnetic compatibilityAUS
Guid
ance
and
man
ufac
ture
r’s d
ecla
ratio
n –
elec
trom
agne
tic im
mun
ity fo
r EQ
UIPM
ENT
and
SYST
EMS
that
are
not
LIF
E-SU
PPOR
TING
The
Sphy
gmom
anom
eter
(MD4
000)
is in
tend
ed fo
r use
in th
e el
ectr
omag
netic
env
ironm
ent s
peci
fied
belo
w. T
he cu
stom
er
or th
e us
er o
f Sph
ygm
oman
omet
er (M
D400
0) sh
ould
ass
ure
that
it is
use
d in
such
an
envi
ronm
ent.
Imm
unity
test
IEC
6060
1 tes
t lev
elCo
mpl
ianc
e le
vel
Elec
trom
agne
tic e
nviro
nmen
t - g
uida
nce
Port
able
and
mob
ile R
F co
mm
unic
atio
ns e
quip
men
t sh
ould
be
used
no
clos
er to
any
par
t of t
he S
phyg
-m
oman
omet
er (M
D400
0), i
nclu
ding
cabl
es, t
han
the
reco
mm
ende
d se
para
tion
dist
ance
calc
ulat
ed fr
om th
e eq
uatio
n ap
plic
able
to th
e fre
quen
cy o
f the
tran
smitt
er.
Reco
mm
ende
d se
para
tion
dist
ance
.
Cond
ucte
d RF
IEC
6100
0-4-
6
3 V rm
s
150
kHz t
o 80
MH
z
3 V rm
s
Radi
ated
RF
IEC
6100
0-4-
3
3 V/
m
80 M
Hz t
o 2.
5 GH
z
3 V/
m
80
MH
z to
800
MH
z
800
MH
z to
2.5
GHz

61Electromagnetic compatibility AUS
Imm
unity
test
IEC
6060
1 tes
t lev
elCo
mpl
ianc
e le
vel
Elec
trom
agne
tic e
nviro
nmen
t - g
uida
nce
Whe
re P
is th
e m
axim
um o
utpu
t pow
er ra
ting
of th
e tr
ansm
itter
in w
atts
(W) a
ccor
ding
to th
e tr
ansm
itter
m
anuf
actu
rer a
nd d
is th
e re
com
men
ded
sepa
ratio
n di
s-ta
nce
in m
etre
s (m
).
Fiel
d st
reng
ths f
rom
fixe
d RF
tran
smitt
ers,
as d
eter
min
ed
by a
n el
ectr
omag
netic
site
surv
eya sh
ould
be
less
than
th
e co
mpl
ianc
e le
vel i
n ea
ch fr
eque
ncy
rang
eb .
Inte
rfer
ence
may
occ
ur in
the
vici
nity
of e
quip
men
t mar
-ke
d w
ith th
e fo
llow
ing
sym
bol:
NOTE
1 At
80
MH
z and
800
MH
z, th
e hi
gher
freq
uenc
y ra
nge
appl
ies.
NOTE
2 T
hese
gui
delin
es m
ay n
ot a
pply
in a
ll si
tuat
ions
. Ele
ctro
mag
netic
pro
paga
tion
is a
ffect
ed b
y ab
sorp
tion
and
refle
ctio
n fro
m st
ruct
ures
, ob
ject
s and
peo
ple.
a Fie
ld st
reng
ths f
rom
fixe
d tr
ansm
itter
s, su
ch a
s bas
e st
atio
ns fo
r rad
io (c
ellu
lar/
cord
less
) tel
epho
nes a
nd la
nd m
obile
radi
os, a
mat
eur r
adio
, AM
and
FM
radi
o br
oadc
ast a
nd T
V br
oadc
ast c
anno
t be
pred
icte
d th
eore
tical
ly w
ith a
ccur
acy.
To a
sses
s the
ele
ctro
mag
netic
env
ironm
ent d
ue to
fixe
d RF
tran
smitt
ers,
an
elec
trom
agne
tic si
te su
rvey
shou
ld b
e co
nsid
ered
. If t
he m
easu
-re
d fie
ld st
reng
th in
the
loca
tion
in w
hich
the
Sphy
gmom
anom
eter
(MD4
000)
is u
sed
exce
eds t
he a
pplic
able
RF
com
plia
nce
leve
l abo
ve, t
he
Sphy
gmom
anom
eter
(MD4
000)
shou
ld b
e ob
serv
ed to
ver
ify n
orm
al o
pera
tion.
If a
bnor
mal
per
form
ance
is o
bser
ved,
add
ition
al m
easu
res
may
be
nece
ssar
y, su
ch a
s reo
rient
ing
or re
loca
ting
the
Sphy
gmom
anom
eter
(MD4
000)
.b O
ver t
he fr
eque
ncy
rang
e 15
0 kH
z to
80 M
Hz,
fiel
d st
reng
ths s
houl
d be
less
than
3 V
/m.

62 Electromagnetic compatibilityAUS
Reco
mm
ende
d se
para
tion
dist
ance
sRe
com
men
ded
sepa
ratio
n di
stan
ces
betw
een
port
able
and
mob
ile R
F co
mm
unic
atio
ns
equi
pmen
t and
the
EQUI
PMEN
T or
SYS
TEM
– fo
r EQU
IPM
ENT
or S
YSTE
M th
at a
re n
ot L
IFE-
SUPP
ORTI
NGRe
com
men
ded
sepa
ratio
n di
stan
ces b
etw
een
port
able
and
mob
ile R
F co
mm
unic
atio
ns e
quip
men
t and
the
Sphy
gmom
ano-
met
er (M
D400
0)
The
Sphy
gmom
anom
eter
(MD4
000)
is in
tend
ed fo
r use
in a
n el
ectr
omag
netic
env
ironm
ent i
n w
hich
radi
ated
RF
dist
urba
n-ce
s are
cont
rolle
d. T
he cu
stom
er o
r the
use
r of t
he S
phyg
mom
anom
eter
(MD4
000)
can
help
pre
vent
ele
ctro
mag
netic
inte
rfe-
renc
e by
mai
ntai
ning
a m
inim
um d
ista
nce
betw
een
port
able
and
mob
ile R
F co
mm
unic
atio
ns e
quip
men
t (tr
ansm
itter
s) a
nd
the
Sphy
gmom
anom
eter
(MD4
000)
as r
ecom
men
ded
belo
w, a
ccor
ding
to th
e m
axim
um o
utpu
t pow
er o
f the
com
mun
ica-
tions
equ
ipm
ent.
Rate
d m
axim
um o
utpu
t
pow
er o
f tra
nsm
itter
(W)
Sepa
ratio
n di
stan
ce a
ccor
ding
to fr
eque
ncy
of tr
ansm
itter
(m)
80 M
Hz t
o 80
0 M
Hz
800
MH
z to
2.5
GHz
0,01
0.11
670.
2334
0,1
0.36
890.
7378
11.1
667
2.33
34
103.
6893
7.378
6
100
11.6
667
23.3
334

63Electromagnetic compatibility AUS
For t
rans
mitt
ers r
ated
at a
max
imum
out
put p
ower
not
list
ed a
bove
, the
reco
mm
ende
d se
para
tion
dist
ance
d in
met
res (
m)
can
be e
stim
ated
usi
ng th
e eq
uatio
n ap
plic
able
to th
e fre
quen
cy o
f the
tran
smitt
er, w
here
P is
the
max
imum
out
put p
ower
ra
ting
of th
e tr
ansm
itter
in w
atts
(W) a
ccor
ding
to th
e tr
ansm
itter
man
ufac
ture
r.
NOTE
1 At
80
MH
z and
800
MH
z, th
e se
para
tion
dist
ance
for t
he h
ighe
r fre
quen
cy ra
nge
appl
ies.
NOTE
2 T
hese
gui
delin
es m
ay n
ot a
pply
in a
ll si
tuat
ions
. Ele
ctro
mag
netic
pro
paga
tion
is a
ffect
ed b
y ab
sorp
tion
and
refle
ctio
n fro
m st
ruct
ures
, obj
ects
and
peo
ple.

64 Trademark protection notices AUS
Trademark protection notices Google Play™ and Android™ are trademarks of Google, Inc. Apple, the Apple logo, iPad, and iPhone are trademarks of Apple Inc., registered in the U.S. and other countries. App Store is a service mark of Apple, Inc. The Bluetooth® word mark and logos are registered trademarks of Bluetooth® SIG, Inc. and any use of such marks by Krippl-Watches is under license. Other trade-marks and trade names are those of their respective owners.

AFTER SALES SUPPORT AUS 1800 131579 (toll-free service hotline)
MODEL: AA5-CDBP-1 PRODUCT CODE: 92126
03/2015
65
KRIPPL-WATCHES Reply Paid 85139, Level 29, Chifley Tower, 2 Chifley Square, Sydney NSW 2000 AUSTRALIA
Warranty Certificate
We recommend that you attach a photocopy of your receipt, showing the date of purchase, to this Warranty certificate and keep for your reference. Please do not send to the address below. In the event of a product fault, please call the Customer Service hotline. Plea-se ensure that you have the product details ( as shown on this card) at hand so that we are able to respond as quickly and efficiently as possible.
Bluetooth® Blood Pressure Monitor
Crane
Product number : 92126 Model number: AA5-CDBP-1
Name
Address
Email Daytime tel. no.
Date of purchase
Serial number
YEARSWARRANTY
3

AFTER SALES SUPPORT AUS 1800 131579 (toll-free service hotline)
MODEL: AA5-CDBP-1 PRODUCT CODE: 92126 03/2015
66
Unfortunately, from time to time, faulty products are manufactured which need to be returned to the Supplier for repair.
Please be aware that if your product is capable of retaining user-generated data (such as files stored on a computer hard drive, telephone numbers stored on a mobile telephone, songs stored on a portable media player, games saved on a games console or files stored on a USB memory stick) during the process of re-pair, some or all of your stored data may be lost.
We recommend you save this data elsewhere prior to sending the product for repair.You should also be aware that rather than repairing goods, we may replace them with refurbished goods of the same type of use refurbished parts in the repair process.
Please be assured though, refurbished parts or replacements are only used where they meet ALDI's stringent quality specifications.If at any time you feel your repair is being handled unsatisfactorily, you may es-calate your complaint. Please telephone us on 1800 131579 or write to us at:
KRIPPL-WATCHESReply Paid 85139, Level 29, Chifley Tower, 2 Chifley Square, Sydney NSW 2000
Bluetooth® Blood Pressure Monitor
Repair and Refurbished Goods or Parts Notice
YEARSWARRANTY
3

AFTER SALES SUPPORT AUS 1800 131579 (toll-free service hotline)
MODEL: AA5-CDBP-1 PRODUCT CODE: 92126
03/2015
67
Congratulations! You have made an excellent choice of this quality product. Our commitment to quality also includes our service. Should you, contrary to expec-tations, experience defects due to manufacturing faults, ALDI will provide you with a warranty against defects as follows:
WarrantyThe product is guaranteed to be free from defects in workmanship and parts for a period of 36 months from the date of purchase. Defects that occur within this warranty period, under normal use and care, will be repaired, replaced or refun-ded at our discretion. The benefits conferred by this warranty are in addition to all rights and remedies in respect of the product that the consumer has under the Competition and Consumer Act 2010 and similar state and territory laws.
Our goods come with guarantees that cannot be excluded under the Australian Consumer Law. You are entitled to a replacement or refund for a major failure and for compensation for any other reasonably foreseeable loss or damage. You are also entitled to have the goods repaired or replaced if the goods fail to be of acceptable quality and the failure does not amount to a major failure.
Proof of PurchaseThis warranty is valid for the original purchase and is not transferable. Please keep your purchase docket, tax invoice or receipt as the best proof of purchase, and as proof of date on which the purchase was made.
Extent of WarrantyThis warranty is limited to defects in workmanship or parts. All defective products or parts will be repaired or replaced. This warranty does not cover batteries or any other consumable items.
Normal Wear and TearThis warranty does not cover normal wear and tear to the products or parts.
Warranty Certificate

ALDI guarantees that our exclusive brand products are developed to our stringent quality specifications. If you are not entirely satisfied with this product, please return it to the nearest ALDI store within 60 days from the date of purchase, for a full refund or replacement, or take advantage of our after sales support by calling the supplier s Customer Service Hotline.
Made in ChinaCrane is a registered trademark of ALDI StoresDIStrIbuteD by:ALDI StoreS1 SArgentS roADMInCHInbury nSw 2770
www.aldi.com.au
yearsWarranty
[email protected] 1800 131579
AUS
aFter saLes sUPPOrt
Model: aa5-CDBP-1 Product code: 92126 03/2015