blueprint oms v0 -...
TRANSCRIPT

Blueprint OMS v0.9
User’s Guide
DRAFT

Copyright (C) 2010 Blueprint Solutions LLC. 7625 Golden Triangle Drive, Suite G, Eden Prairie, MN 55344, USA. Allrights reserved.
DOCUMENTATION IS PROVIDED AS IS AND ALL EXPRESS OR IMPLIED CONDITIONS, REPRESENTATIONS ANDWARRANTIES, INCLUDING ANY IMPLIED WARRANTY OF MERCHANTABILITY, FITNESS FOR A PARTICULARPURPOSE OR NON-INFRINGEMENT, ARE DISCLAIMED, EXCEPT TO THE EXTENT THAT SUCH DISCLAIMERSARE HELD TO BE LEGALLY INVALID.

Contents
1 Patients 7
1.1 Patient Browser . . . . . . . . . . . . . . . . . . . . . . . . . . . . . . . . . . . . . . . . . . . . 7
1.2 Entering a new patient . . . . . . . . . . . . . . . . . . . . . . . . . . . . . . . . . . . . . . . . 7
1.2.1 Specifying the patient’s family physician . . . . . . . . . . . . . . . . . . . . . . . . . . 8
1.2.2 Specifying the patient’s preferred practitioner . . . . . . . . . . . . . . . . . . . . . . . 8
1.2.3 Saving the new patient information . . . . . . . . . . . . . . . . . . . . . . . . . . . . . 9
1.2.4 Patient hearing assessments . . . . . . . . . . . . . . . . . . . . . . . . . . . . . . . . . 9
1.2.5 Specifying patient insurer(s) . . . . . . . . . . . . . . . . . . . . . . . . . . . . . . . . . 10
1.3 Searching for a patient . . . . . . . . . . . . . . . . . . . . . . . . . . . . . . . . . . . . . . . . 11
1.4 Adding a patient’s existing hearing aid(s) . . . . . . . . . . . . . . . . . . . . . . . . . . . . . 12
1.5 Recalls . . . . . . . . . . . . . . . . . . . . . . . . . . . . . . . . . . . . . . . . . . . . . . . . . 13
1.5.1 Time-sensitive recalls . . . . . . . . . . . . . . . . . . . . . . . . . . . . . . . . . . . . 14
1.5.2 Cancelling or postponing recalls . . . . . . . . . . . . . . . . . . . . . . . . . . . . . . 14
2 Appointment scheduling 15
2.1 Overview . . . . . . . . . . . . . . . . . . . . . . . . . . . . . . . . . . . . . . . . . . . . . . . 15
2.1.1 Key features . . . . . . . . . . . . . . . . . . . . . . . . . . . . . . . . . . . . . . . . . 15
2.1.2 Integration with other areas of Blueprint OMS . . . . . . . . . . . . . . . . . . . . . . 16
2.2 Browsing appointments . . . . . . . . . . . . . . . . . . . . . . . . . . . . . . . . . . . . . . . 16
2.2.1 Selecting the clinic . . . . . . . . . . . . . . . . . . . . . . . . . . . . . . . . . . . . . . 16
2.2.2 Switching between day/week/month views . . . . . . . . . . . . . . . . . . . . . . . . . 17
2.2.3 Moving forward and backward in time . . . . . . . . . . . . . . . . . . . . . . . . . . . 17
2.2.4 Jumping back to today’s appointments . . . . . . . . . . . . . . . . . . . . . . . . . . . 17
2.2.5 Selecting a date using the annual calendar . . . . . . . . . . . . . . . . . . . . . . . . . 17
2.2.6 Refreshing the displayed appointments . . . . . . . . . . . . . . . . . . . . . . . . . . . 18
2.2.7 Previewing appointment details . . . . . . . . . . . . . . . . . . . . . . . . . . . . . . . 18
2.2.8 Filtering appointments . . . . . . . . . . . . . . . . . . . . . . . . . . . . . . . . . . . . 18
2.2.8.1 Filtering by practitioner . . . . . . . . . . . . . . . . . . . . . . . . . . . . . . 18
2.2.8.2 Filtering by resource . . . . . . . . . . . . . . . . . . . . . . . . . . . . . . . . 19
3

CONTENTS 4
2.2.8.3 Filtering by appointment status . . . . . . . . . . . . . . . . . . . . . . . . . 19
2.2.9 Navigating from an appointment to the patient’s file . . . . . . . . . . . . . . . . . . . 19
2.3 Creating an appointment . . . . . . . . . . . . . . . . . . . . . . . . . . . . . . . . . . . . . . 19
2.3.1 By right-clicking on the calendar . . . . . . . . . . . . . . . . . . . . . . . . . . . . . . 19
2.3.2 Using the “Appointment” toolbar button . . . . . . . . . . . . . . . . . . . . . . . . . . 19
2.3.3 From the “Aid orders” screen . . . . . . . . . . . . . . . . . . . . . . . . . . . . . . . . 20
2.3.4 From the “Recalls” screen . . . . . . . . . . . . . . . . . . . . . . . . . . . . . . . . . . 20
2.3.5 Using the “New appointment” toolbar button . . . . . . . . . . . . . . . . . . . . . . . 20
2.3.6 Selecting the patient . . . . . . . . . . . . . . . . . . . . . . . . . . . . . . . . . . . . . 20
2.3.7 Entering appointment details . . . . . . . . . . . . . . . . . . . . . . . . . . . . . . . . 21
2.3.7.1 Selecting the location . . . . . . . . . . . . . . . . . . . . . . . . . . . . . . . 21
2.3.7.2 Selecting the calendar . . . . . . . . . . . . . . . . . . . . . . . . . . . . . . . 21
2.3.7.3 Appointment description . . . . . . . . . . . . . . . . . . . . . . . . . . . . . 22
2.3.7.4 Selecting the event type . . . . . . . . . . . . . . . . . . . . . . . . . . . . . . 22
2.3.7.5 Appointment notes . . . . . . . . . . . . . . . . . . . . . . . . . . . . . . . . 22
2.3.7.6 Setting the date and time . . . . . . . . . . . . . . . . . . . . . . . . . . . . . 22
2.3.7.7 Appointment duration . . . . . . . . . . . . . . . . . . . . . . . . . . . . . . . 22
2.3.7.8 Creating a repeating appointment . . . . . . . . . . . . . . . . . . . . . . . . 22
2.3.7.9 Resources . . . . . . . . . . . . . . . . . . . . . . . . . . . . . . . . . . . . . . 23
2.3.7.10 Appointment status . . . . . . . . . . . . . . . . . . . . . . . . . . . . . . . . 23
2.3.7.11 Appointment visibility . . . . . . . . . . . . . . . . . . . . . . . . . . . . . . . 23
2.3.7.12 Saving the appointment . . . . . . . . . . . . . . . . . . . . . . . . . . . . . . 23
2.4 Deleting an appointment . . . . . . . . . . . . . . . . . . . . . . . . . . . . . . . . . . . . . . . 24
2.5 Editing an existing appointment . . . . . . . . . . . . . . . . . . . . . . . . . . . . . . . . . . 24
2.5.1 Changing the status of an appointment . . . . . . . . . . . . . . . . . . . . . . . . . . 24
2.5.2 By dragging and dropping the appointment . . . . . . . . . . . . . . . . . . . . . . . . 25
2.5.3 By resizing the appointment . . . . . . . . . . . . . . . . . . . . . . . . . . . . . . . . 25
2.5.4 By double-clicking on the appointment . . . . . . . . . . . . . . . . . . . . . . . . . . . 25
2.5.5 By right-clicking on the appointment . . . . . . . . . . . . . . . . . . . . . . . . . . . . 25
2.5.6 Changing a repeating appointment . . . . . . . . . . . . . . . . . . . . . . . . . . . . . 26
2.6 Searching for appointments . . . . . . . . . . . . . . . . . . . . . . . . . . . . . . . . . . . . . 26
2.6.1 Finding appointments for a particular patient . . . . . . . . . . . . . . . . . . . . . . . 26
2.6.2 Finding appointment details from the “Aid orders” screen . . . . . . . . . . . . . . . . 26
2.6.3 Searching based on the appointment description . . . . . . . . . . . . . . . . . . . . . 27

CONTENTS 5
3 Sales and Orders 28
3.1 Selling batteries, accessories and services . . . . . . . . . . . . . . . . . . . . . . . . . . . . . . 28
3.1.1 Selecting the items for sale . . . . . . . . . . . . . . . . . . . . . . . . . . . . . . . . . 28
3.1.2 Removing an item from the sale . . . . . . . . . . . . . . . . . . . . . . . . . . . . . . 29
3.1.3 Selecting the insurer (optional) . . . . . . . . . . . . . . . . . . . . . . . . . . . . . . . 29
3.1.4 Avoiding billing errors . . . . . . . . . . . . . . . . . . . . . . . . . . . . . . . . . . . . 29
3.1.5 Adjusting item quantities . . . . . . . . . . . . . . . . . . . . . . . . . . . . . . . . . . 30
3.1.6 Allocating costs between the patient and insurer(s) . . . . . . . . . . . . . . . . . . . . 30
3.1.7 Entering the authorization or claim number . . . . . . . . . . . . . . . . . . . . . . . . 31
3.1.8 Changing the transaction date . . . . . . . . . . . . . . . . . . . . . . . . . . . . . . . 31
3.1.9 Discounting or increasing item prices . . . . . . . . . . . . . . . . . . . . . . . . . . . . 31
3.1.10 Selecting the QuickBooks template . . . . . . . . . . . . . . . . . . . . . . . . . . . . . 32
3.1.11 Batch printing of invoices . . . . . . . . . . . . . . . . . . . . . . . . . . . . . . . . . . 32
3.1.12 Creating quotes (estimates) . . . . . . . . . . . . . . . . . . . . . . . . . . . . . . . . . 32
3.1.13 Completing the sale . . . . . . . . . . . . . . . . . . . . . . . . . . . . . . . . . . . . . 33
3.1.14 Entering payment details for a sales receipt . . . . . . . . . . . . . . . . . . . . . . . . 34
3.1.15 Entering payment details for an invoice . . . . . . . . . . . . . . . . . . . . . . . . . . 34
3.1.16 Editing payment details . . . . . . . . . . . . . . . . . . . . . . . . . . . . . . . . . . . 34
3.2 Selling hearing aids . . . . . . . . . . . . . . . . . . . . . . . . . . . . . . . . . . . . . . . . . . 35
3.2.1 Lifecycle of a new hearing aid . . . . . . . . . . . . . . . . . . . . . . . . . . . . . . . . 35
3.2.2 Receiving a patient deposit for a hearing aid purchase . . . . . . . . . . . . . . . . . . 36
3.2.3 Ordering hearing aids . . . . . . . . . . . . . . . . . . . . . . . . . . . . . . . . . . . . 36
3.2.4 Selecting the insurer (optional) . . . . . . . . . . . . . . . . . . . . . . . . . . . . . . . 37
3.2.5 Selecting hearing aids and options . . . . . . . . . . . . . . . . . . . . . . . . . . . . . 37
3.2.6 Adding other products and services to the order . . . . . . . . . . . . . . . . . . . . . 38
3.2.7 Allocating costs between the patient and insurer(s) . . . . . . . . . . . . . . . . . . . . 38
3.2.8 Accounting for a patient deposit . . . . . . . . . . . . . . . . . . . . . . . . . . . . . . 39
3.2.9 Saving an order . . . . . . . . . . . . . . . . . . . . . . . . . . . . . . . . . . . . . . . . 39
3.2.10 Editing an order . . . . . . . . . . . . . . . . . . . . . . . . . . . . . . . . . . . . . . . 39
3.2.11 Cancelling an order . . . . . . . . . . . . . . . . . . . . . . . . . . . . . . . . . . . . . 39
3.2.12 Receiving hearing aids . . . . . . . . . . . . . . . . . . . . . . . . . . . . . . . . . . . . 40
3.2.13 Checking hearing aids . . . . . . . . . . . . . . . . . . . . . . . . . . . . . . . . . . . . 40
3.2.14 Delivering hearing aids and generating invoices . . . . . . . . . . . . . . . . . . . . . . 40
3.2.15 Showing credits for exchanged hearing aids . . . . . . . . . . . . . . . . . . . . . . . . 41
3.3 Working with invoices . . . . . . . . . . . . . . . . . . . . . . . . . . . . . . . . . . . . . . . . 41
3.3.1 Displaying or printing invoices . . . . . . . . . . . . . . . . . . . . . . . . . . . . . . . 41
3.3.2 Viewing payment status on invoices . . . . . . . . . . . . . . . . . . . . . . . . . . . . 42
3.3.3 Correcting invoices . . . . . . . . . . . . . . . . . . . . . . . . . . . . . . . . . . . . . . 42
3.3.3.1 Regenerating invoice(s) . . . . . . . . . . . . . . . . . . . . . . . . . . . . . . 42
3.3.3.2 Voiding or deleting the incorrect invoices . . . . . . . . . . . . . . . . . . . . 43

CONTENTS 6
4 Repairs 44
4.1 Sending a hearing aid for repair . . . . . . . . . . . . . . . . . . . . . . . . . . . . . . . . . . . 44
4.1.1 Lifecycle of a repaired hearing aid . . . . . . . . . . . . . . . . . . . . . . . . . . . . . 44
4.1.2 Creating the repair order . . . . . . . . . . . . . . . . . . . . . . . . . . . . . . . . . . 44
4.1.3 Selecting the insurer (optional) . . . . . . . . . . . . . . . . . . . . . . . . . . . . . . . 45
4.1.4 Entering the repair details . . . . . . . . . . . . . . . . . . . . . . . . . . . . . . . . . . 45
4.1.5 Adding other products and services to the order . . . . . . . . . . . . . . . . . . . . . 45
4.1.6 Allocating costs between the patient and insurer(s) . . . . . . . . . . . . . . . . . . . . 46
4.1.7 Saving the order . . . . . . . . . . . . . . . . . . . . . . . . . . . . . . . . . . . . . . . 46
4.1.8 Editing a repair order . . . . . . . . . . . . . . . . . . . . . . . . . . . . . . . . . . . . 46
4.1.9 Receiving, checking, and delivering repaired aids . . . . . . . . . . . . . . . . . . . . . 46
5 Returns 47
5.1 Returning batteries, accessories, and services . . . . . . . . . . . . . . . . . . . . . . . . . . . 47
5.2 Returning hearing aids . . . . . . . . . . . . . . . . . . . . . . . . . . . . . . . . . . . . . . . . 48
5.3 Editing and reversing returns . . . . . . . . . . . . . . . . . . . . . . . . . . . . . . . . . . . . 49
5.3.1 Editing return details . . . . . . . . . . . . . . . . . . . . . . . . . . . . . . . . . . . . 50
5.3.2 Reversing returns . . . . . . . . . . . . . . . . . . . . . . . . . . . . . . . . . . . . . . . 50
6 Making bank deposits 51
6.1 Entering deposits . . . . . . . . . . . . . . . . . . . . . . . . . . . . . . . . . . . . . . . . . . 51
6.2 Saved deposits . . . . . . . . . . . . . . . . . . . . . . . . . . . . . . . . . . . . . . . . . . . . 52
7 Third party payments 53
8 Using the accounting link 54
8.1 Receiving payment from a patient . . . . . . . . . . . . . . . . . . . . . . . . . . . . . . . . . 54
8.2 Displaying and printing QuickBooks transactions . . . . . . . . . . . . . . . . . . . . . . . . . 55
9 Marketing 56
9.1 Marketing campaigns . . . . . . . . . . . . . . . . . . . . . . . . . . . . . . . . . . . . . . . . . 56
9.1.1 Viewing marketing campaigns . . . . . . . . . . . . . . . . . . . . . . . . . . . . . . . . 56
9.1.2 Creating new campaigns . . . . . . . . . . . . . . . . . . . . . . . . . . . . . . . . . . . 57
9.1.3 Building conditions . . . . . . . . . . . . . . . . . . . . . . . . . . . . . . . . . . . . . . 57
9.1.3.1 Description . . . . . . . . . . . . . . . . . . . . . . . . . . . . . . . . . . . . . 57
9.1.3.2 Operators . . . . . . . . . . . . . . . . . . . . . . . . . . . . . . . . . . . . . . 57
9.1.3.3 Values . . . . . . . . . . . . . . . . . . . . . . . . . . . . . . . . . . . . . . . . 58
9.1.4 Editing marketing campaigns . . . . . . . . . . . . . . . . . . . . . . . . . . . . . . . . 59
9.1.5 Deleting marketing campaigns . . . . . . . . . . . . . . . . . . . . . . . . . . . . . . . 61
9.2 Patient groups . . . . . . . . . . . . . . . . . . . . . . . . . . . . . . . . . . . . . . . . . . . . 61
9.2.1 Adding or removing patients to/from a group . . . . . . . . . . . . . . . . . . . . . . . 61
10 Setting up insurers in Blueprint OMS 63

Chapter 1
Patients
1.1 Patient Browser
When you log into Blueprint OMS, you are presented with the patient browser (figure 1.1), which displaysa list of patients by name at the current clinic location (figure ). To view patients at other clinics, you canselect the corresponding clinic from the Location selection box at the top-right of the Patient browser. TheLocation selection box will only contain the clinics that you have access to, not all clinics.
Figure 1.1: Patient browser
You can also display inactive/deceased patients in the Patient browser view by checking the ’Show all’checkbox.
1.2 Entering a new patient
In order to sell any products or services to a patient, or to enter journal notes, the patient must first beentered into the system.
7

CHAPTER 1. PATIENTS 8
NOTE: Do not enter or update patient information directly in QuickBooks, as these changes will not bereflected in Blueprint OMS.
To enter a new patient into the system, click the Create patient button on the Patient browser tab. TheCreate patient tab will appear (figure 1.2).
Figure 1.2: Creating a new patient
Some of the fields on the form are mandatory, indicated by an asterisk (*). Other fields must conform to aspecific format (e.g. birthdate, telephone numbers and postal codes). Areas of the form which are missingmandatory information, or which contain information in an incorrect format are highlighted in purple.
1.2.1 Specifying the patient’s family physician
If desired, you may specify this information using the Family Physician drop-down selection box. If thepatient’s physician is not in the list, you may add a new family physician by clicking the Add button, orusing the Setup function from the main toolbar.
1.2.2 Specifying the patient’s preferred practitioner
The Practitioner drop-down selection box allows you to specify the patient’s preferred practitioner, whichmay be helpful if there are multiple practitioners at your clinic.

CHAPTER 1. PATIENTS 9
1.2.3 Saving the new patient information
Once all of the required information has been correctly entered, the Create patient button will be enabled.Clicking this button will save the patient in Blueprint OMS, and will also create a new customer entry inQuickBooks. The Create patient tab will be closed, and the patient’s file will open in a new tab.
To cancel the process and close the Create patient tab, click the Cancel button.
1.2.4 Patient hearing assessments
Results from patient hearing assessments can be stored within patient files in Blueprint OMS, under theAudiology tab (figure 1.3).
Figure 1.3: Audiology tab storing patient hearing assessments
To enter a new hearing assessment, click the Create New button, where you will be prompted to enter theassessment for each ear, including hearing loss type and any diagnostic codes that may apply (figure 1.4).
To enter a diagnostic code, double-click in the Diagnostic codes section at the bottom, where you will beprompted to select applicable codes. Multiple codes can be selected by clicking while holding down the Ctrlkey (figure 1.5).
Once the assessment details have been entered, select Save and the assessment will be saved as an entryin the History list on the left. You can also view and edit any historical assessment entries by navigatingthrough the list on the left (figure 1.3).

CHAPTER 1. PATIENTS 10
Figure 1.4: Entering new hearing assessment results
Figure 1.5: Selecting diagnostic codes
1.2.5 Specifying patient insurer(s)
Within a specific patient file, Blueprint OMS is able to keep track of insurer(s) for that patient. Navigate tothe Patient Insurer tab on the right of the patient file in order to view the existing insurer(s) or add newinsurer(s) for a patient from the list of insurers stored in the Blueprint OMS system (figure 1.6).
In the Patient insurers tab, information regarding the insured should be entered as they would appear onthe HCFA form. Several fields in this tab contain special formatting constraints:

CHAPTER 1. PATIENTS 11
Figure 1.6: Patient insurer information
• Insurer: The insurer drop-down contains a list of insurers that are currently set up in the system. Forinstructions on setting up the list of insurers inside Blueprint OMS, please refer to Chapter 10.
• Name: The name format should be either ’Lastname, Firstname’ or ’Lastname, Firstname, MiddleInitial’
• Street: This field must only contain spaces and alphanumeric characters. Special characters, such asperiods (.), commas (,), and pound signs (#) are not allowed
• Zip: The zip code format should only be in one of the two formats, 00000 or 00000-0000
Once all the information has been entered for the primary and/or secondary insurers, the Update buttonwill be available for updating the newly entered information.
1.3 Searching for a patient
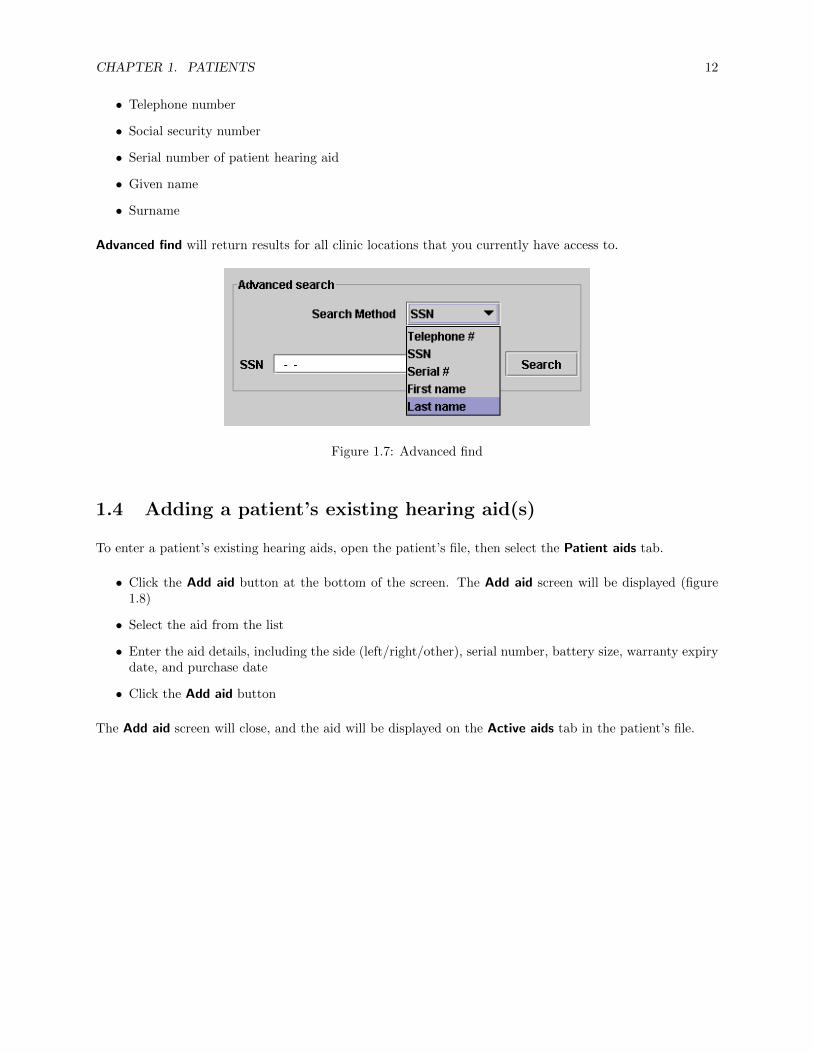
There are two ways to search for a patient. First is by entering the surname of the patient in the Quick findbox, which will result in the Patient browser navigating to the closest match. Secondly, you can enter searchterms in the Advanced find box on the right (see figure 1.7) and specify a search based on the followingcriteria:
CHAPTER 1. PATIENTS 12
• Telephone number
• Social security number
• Serial number of patient hearing aid
• Given name
• Surname
Advanced find will return results for all clinic locations that you currently have access to.
Figure 1.7: Advanced find
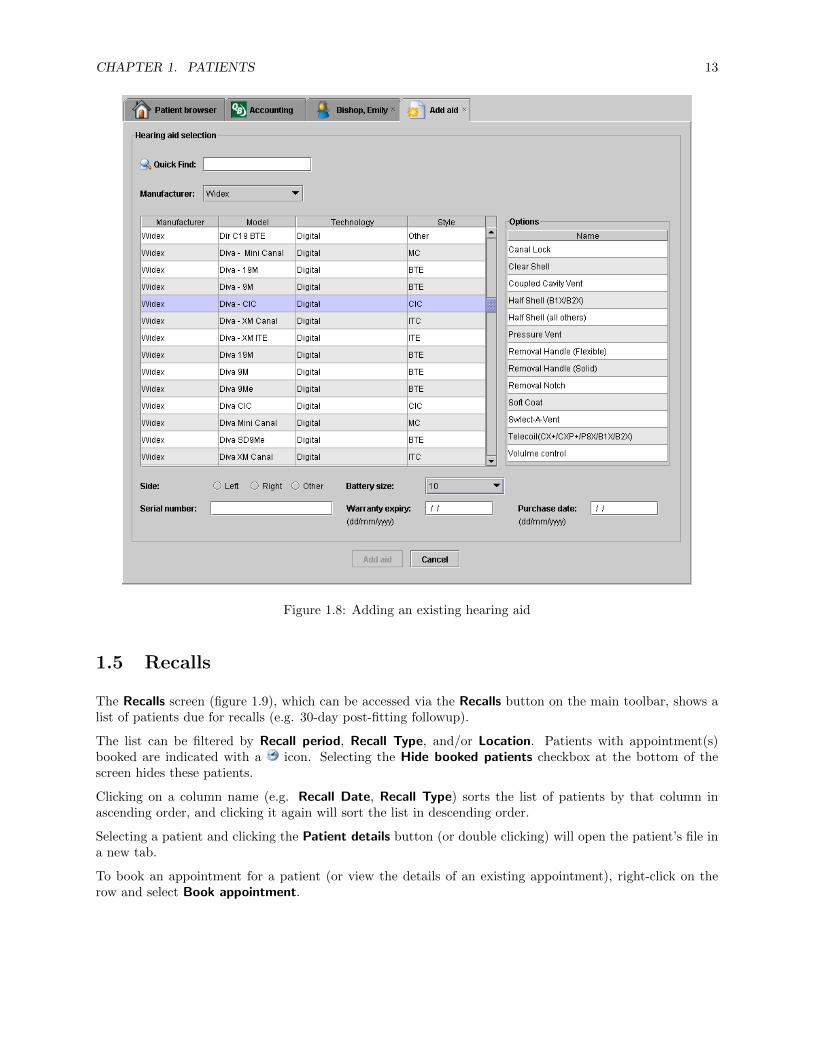
1.4 Adding a patient’s existing hearing aid(s)
To enter a patient’s existing hearing aids, open the patient’s file, then select the Patient aids tab.
• Click the Add aid button at the bottom of the screen. The Add aid screen will be displayed (figure1.8)
• Select the aid from the list
• Enter the aid details, including the side (left/right/other), serial number, battery size, warranty expirydate, and purchase date
• Click the Add aid button
The Add aid screen will close, and the aid will be displayed on the Active aids tab in the patient’s file.
CHAPTER 1. PATIENTS 13
Figure 1.8: Adding an existing hearing aid
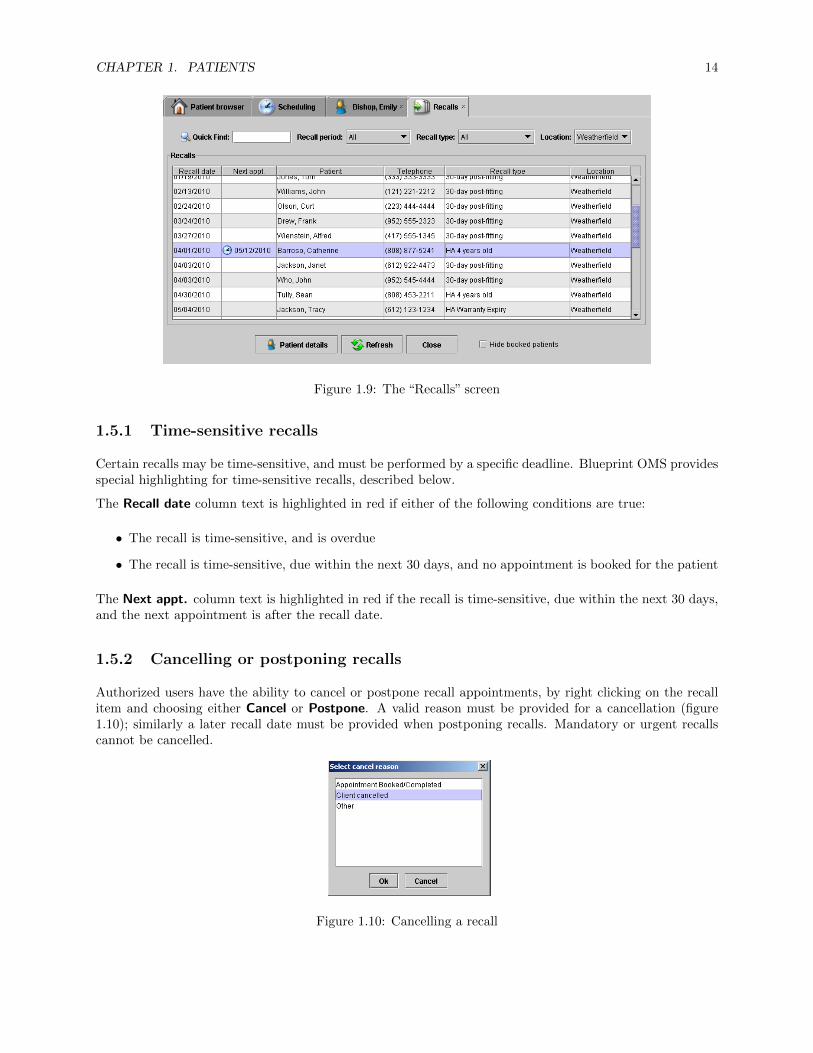
1.5 Recalls
The Recalls screen (figure 1.9), which can be accessed via the Recalls button on the main toolbar, shows alist of patients due for recalls (e.g. 30-day post-fitting followup).
The list can be filtered by Recall period, Recall Type, and/or Location. Patients with appointment(s)booked are indicated with a icon. Selecting the Hide booked patients checkbox at the bottom of thescreen hides these patients.
Clicking on a column name (e.g. Recall Date, Recall Type) sorts the list of patients by that column inascending order, and clicking it again will sort the list in descending order.
Selecting a patient and clicking the Patient details button (or double clicking) will open the patient’s file ina new tab.
To book an appointment for a patient (or view the details of an existing appointment), right-click on therow and select Book appointment.
CHAPTER 1. PATIENTS 14
Figure 1.9: The “Recalls” screen
1.5.1 Time-sensitive recalls
Certain recalls may be time-sensitive, and must be performed by a specific deadline. Blueprint OMS providesspecial highlighting for time-sensitive recalls, described below.
The Recall date column text is highlighted in red if either of the following conditions are true:
• The recall is time-sensitive, and is overdue
• The recall is time-sensitive, due within the next 30 days, and no appointment is booked for the patient
The Next appt. column text is highlighted in red if the recall is time-sensitive, due within the next 30 days,and the next appointment is after the recall date.
1.5.2 Cancelling or postponing recalls
Authorized users have the ability to cancel or postpone recall appointments, by right clicking on the recallitem and choosing either Cancel or Postpone. A valid reason must be provided for a cancellation (figure1.10); similarly a later recall date must be provided when postponing recalls. Mandatory or urgent recallscannot be cancelled.
Figure 1.10: Cancelling a recall
Chapter 2
Appointment scheduling
2.1 Overview
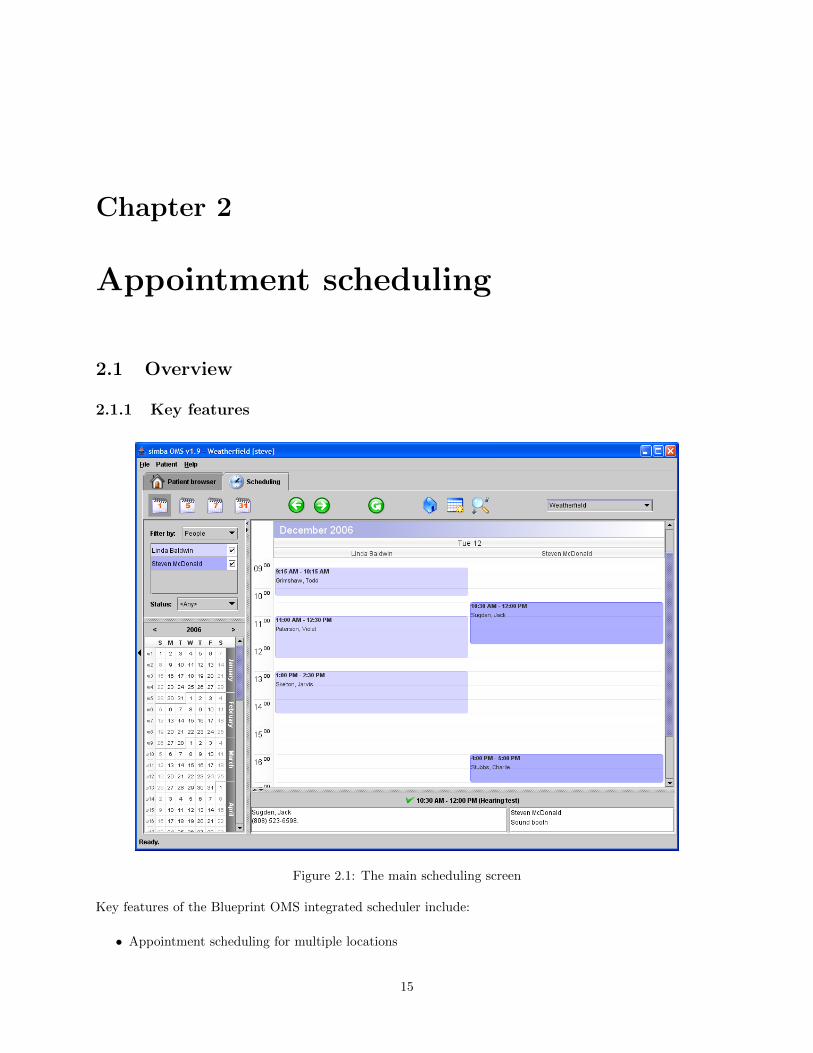
2.1.1 Key features
Figure 2.1: The main scheduling screen
Key features of the Blueprint OMS integrated scheduler include:
• Appointment scheduling for multiple locations
15

CHAPTER 2. APPOINTMENT SCHEDULING 16
• Scheduling for multiple practitioners and resources at each location
• Support for an arbitrary number of different appointment types, each having its own default duration
• Filtering by appointment status, practitioner, or resource
• 1-day, 5-day, 7-day, and 31-day views
2.1.2 Integration with other areas of Blueprint OMS
Patients who have an upcoming appointment within the next 31 days are highlighted with a icon onthe Patient browser and Aid orders screens, as shown in the figures below. Users can also create newappointments from these screens (section 2.3) and display appointment details (section 2.6.1).
Figure 2.2: Patient with upcoming appointment on “Patient browser” screen
Figure 2.3: Orders with fitting booked on “Aid orders” screen
Past and future appointments are also visible from the Patient journal tab (figure 2.4).
2.2 Browsing appointments
2.2.1 Selecting the clinic
If your organization has multiple clinics, you can select which clinic schedule to view using the drop-downselection box in the top-right corner of the scheduling screen (figure 2.5). Selecting <All> will displayappointments for all clinics.

CHAPTER 2. APPOINTMENT SCHEDULING 17
Figure 2.4: Patient journals showing past and future appointments
Figure 2.5: Selecting the clinic
2.2.2 Switching between day/week/month views
Use the , , , and toolbar buttons to display 1-day, 5-day, 7-day, and 31-day views respectively.
While in the 31-day view, clicking on a day will switch to the 1-day view, and jump to the selected date.Similarly, while in the 5 or 7-day views, clicking on the day/date in the header will have the same effect.
2.2.3 Moving forward and backward in time
Use the and toolbar buttons to navigate backward and forward in time. The interval used will dependon the current view. For example, in the 1-day view, the button will jump to the next day, but in the5-day view it would jump to the next week, and in the 31-day view it would jump to the next month.
2.2.4 Jumping back to today’s appointments
Clicking the toolbar button will switch to the 1-day view, and jump to the current date.
2.2.5 Selecting a date using the annual calendar
The annual calendar is displayed in the lower left corner of the scheduling screen, and displays a calendarfor the current year. The < and > buttons can be used to move to previous or future years. The currentdate is always highlighted with white text on a black background.
To display scheduling information for a particular date range, move the mouse over the date range in theannual calendar, then click the left mouse button. While moving the mouse, the date range to be selectedwill be highlighted using a grey background, and after it has been selected, it will be highlighted with ayellow background.

CHAPTER 2. APPOINTMENT SCHEDULING 18
2.2.6 Refreshing the displayed appointments
The most up-to-date scheduling information is retrieved each time you perform one of the following actions:
• Change the displayed date range
• Select a different clinic
• Create, edit, or delete an appointment
While updated scheduling information is being retrieved, the icon is displayed in the top right cornerof the scheduling screen (beside the clinic selection drop-down box), and it disappears when the refresh iscomplete.
However, if multiple users are using Blueprint OMS, scheduling information may have changed since the lasttime your scheduling view was refreshed. In this case, you may manually refresh the view by clicking the
toolbar button.
2.2.7 Previewing appointment details
The appointment preview panel (figure 2.6) is shown at the bottom of the scheduling screen. It displays de-tailed information about appointments. To view the details of a particular appointment in the preview panel,simply “hover” over the appointment in the scheduling screen using the mouse. The selected appointmentwill be highlighted with a thin black border.
Figure 2.6: The appointment preview panel
The appointment preview panel displays the following information:
• Area A: Appointment status, appointment time, appointment type
• Area B: Appointment description, appointment notes
• Area C: Practitioner, other resources (if any)
2.2.8 Filtering appointments
The appointments in the scheduling system can be filtered to display a specific subset. As described insection 2.2.1, selecting a clinic will display only the appointments for that clinic. Other filtering options aredescribed below.
2.2.8.1 Filtering by practitioner
The filtering panel (figure 2.7) is located in the upper left area of the scheduling screen. To display appoint-ments for specific practitioners only, follow these steps:
1. Choose to filter by People using the Filter by drop-down selection box
2. Check the checkboxes beside the practitioners whose appointments you would like to see, and uncheckthe others
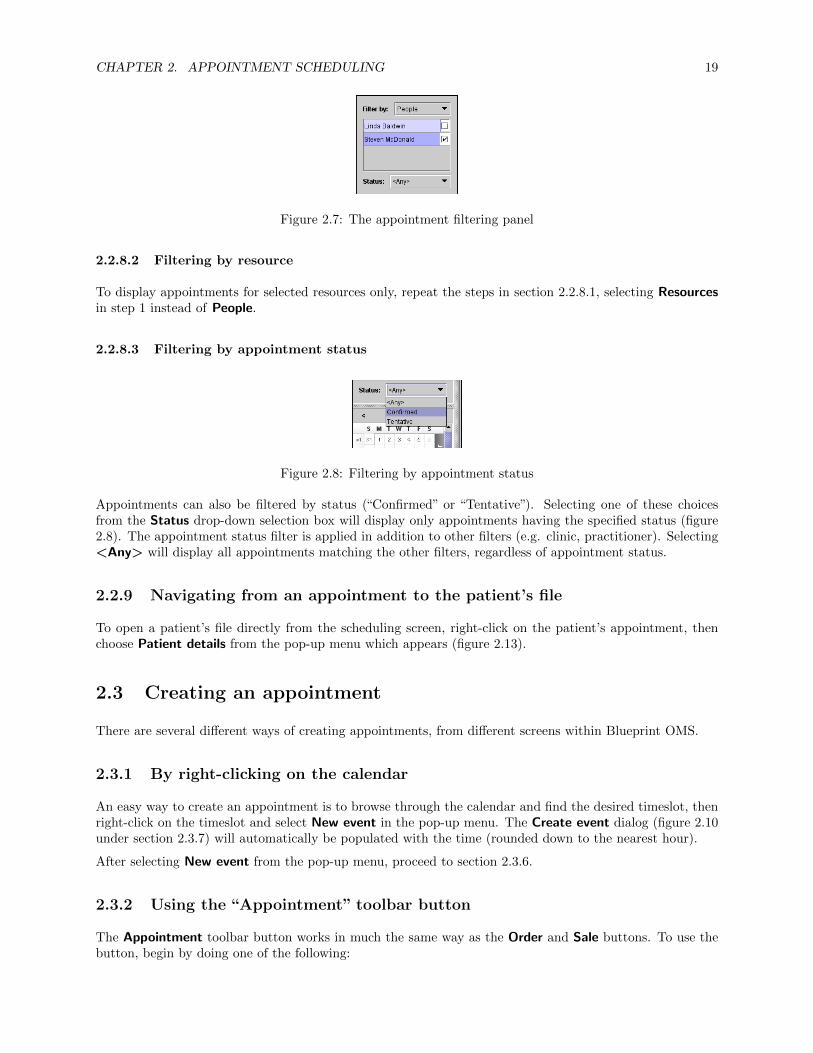
CHAPTER 2. APPOINTMENT SCHEDULING 19
Figure 2.7: The appointment filtering panel
2.2.8.2 Filtering by resource
To display appointments for selected resources only, repeat the steps in section 2.2.8.1, selecting Resourcesin step 1 instead of People.
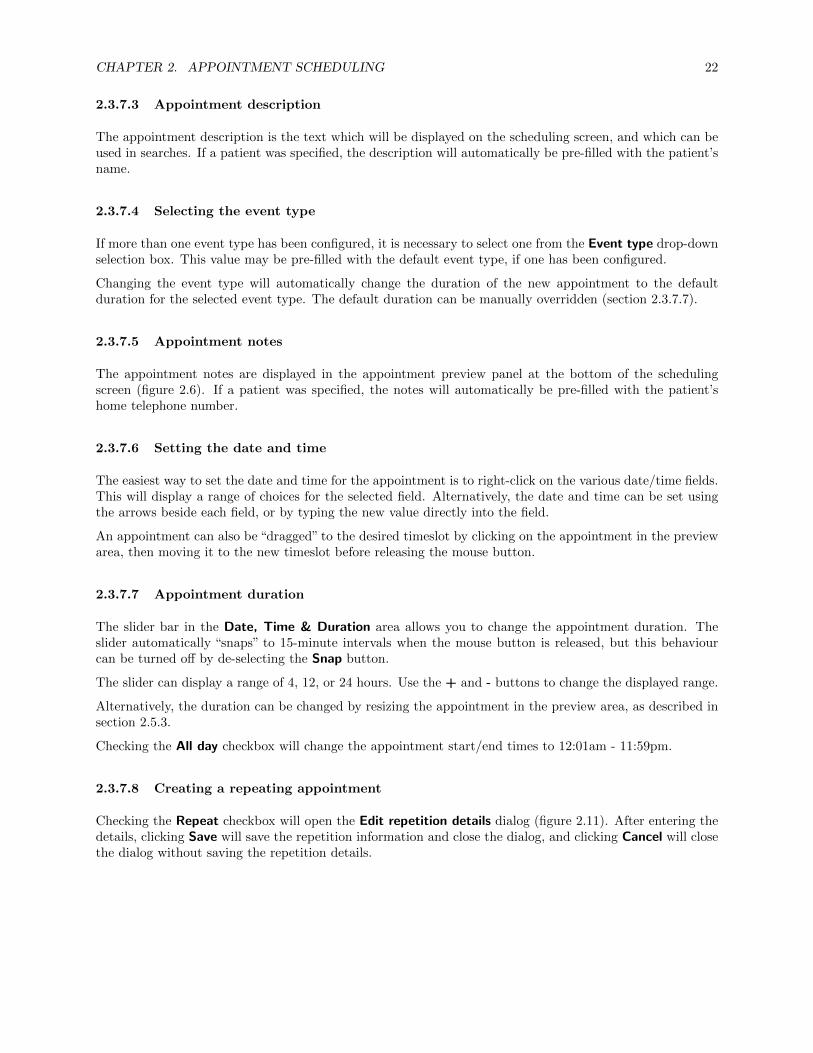
2.2.8.3 Filtering by appointment status
Figure 2.8: Filtering by appointment status
Appointments can also be filtered by status (“Confirmed” or “Tentative”). Selecting one of these choicesfrom the Status drop-down selection box will display only appointments having the specified status (figure2.8). The appointment status filter is applied in addition to other filters (e.g. clinic, practitioner). Selecting<Any> will display all appointments matching the other filters, regardless of appointment status.
2.2.9 Navigating from an appointment to the patient’s file
To open a patient’s file directly from the scheduling screen, right-click on the patient’s appointment, thenchoose Patient details from the pop-up menu which appears (figure 2.13).
2.3 Creating an appointment
There are several different ways of creating appointments, from different screens within Blueprint OMS.
2.3.1 By right-clicking on the calendar
An easy way to create an appointment is to browse through the calendar and find the desired timeslot, thenright-click on the timeslot and select New event in the pop-up menu. The Create event dialog (figure 2.10under section 2.3.7) will automatically be populated with the time (rounded down to the nearest hour).
After selecting New event from the pop-up menu, proceed to section 2.3.6.
2.3.2 Using the “Appointment” toolbar button
The Appointment toolbar button works in much the same way as the Order and Sale buttons. To use thebutton, begin by doing one of the following:

CHAPTER 2. APPOINTMENT SCHEDULING 20
• Select the desired patient from the list on the Patient browser tab
• Select the patient’s file from the set of open tabs
Clicking the Appointment button will display the Create event dialog, automatically populated with theselected patient’s details (figure 2.10 under section 2.3.7). The appointment date and time are set to thecurrent date and time (rounded down to the nearest hour) by default.
After clicking the Appointment button, proceed to section 2.3.7.
2.3.3 From the “Aid orders” screen
To book an appointment from the Aid orders screen, right-click on the order, then select Book appointmentfrom the pop-up menu. The Create event dialog (figure 2.10), will automatically be populated with theselected patient’s details, and the appointment date and time will be set to the default as described in section2.3.2.
After selecting Book appointment, proceed to section 2.3.7.
2.3.4 From the “Recalls” screen
To book an appointment from the Recalls screen, right-click on the recall, then select Book appointmentfrom the pop-up menu (figure 1.9 under section 1.5).
2.3.5 Using the “New appointment” toolbar button
The button on the toolbar of the scheduling screen can be used to create a new appointment. Theappointment date and time will be set to the default as described in section 2.3.2.
After clicking the button, proceed to section 2.3.6.
2.3.6 Selecting the patient
Figure 2.9: Selecting the patient
If necessary, select the desired patient from the Select patient dialog, then click Next. To quickly find apatient, type one or more letters of the patient surname in rapid succession.
If the event does not involve a patient, select None.
After selecting the patient (or “None”), proceed to section 2.3.7.

CHAPTER 2. APPOINTMENT SCHEDULING 21
2.3.7 Entering appointment details
The Create event dialog (figure 2.10) allows a user to specify all of the details for the new appointment. Italso displays a preview of the selected practitioner’s schedule for the selected date, with the new appointmenthighlighted in yellow. If any resources have been selected for the new appointment, the preview area will alsodisplay other appointments requiring the selected resources. Since double-booking (of either practitioners orresources) is not allowed, the preview panel will assist the user in ensuring that the new appointment doesnot conflict with existing appointments.
Figure 2.10: Entering appointment details
2.3.7.1 Selecting the location
If there is more than one scheduling location (clinic), it is necessary to select one of them. The location maybe pre-filled with one of the following (in order of precedence):
• The location specified in the patient’s file (if a patient was specified)
• The location currently being viewed (if it is not “<All>”)
2.3.7.2 Selecting the calendar
If there is more than one calendar (practitioner) at the selected location, it is necessary to select one of them.The calendar may be pre-filled with one of the following (in order of precedence):
• The patient’s preferred practitioner (if a patient was specified, and a practitioner has been specified inthe patient’s file)
• The default practitioner for the selected location (if one has been configured)
CHAPTER 2. APPOINTMENT SCHEDULING 22
2.3.7.3 Appointment description
The appointment description is the text which will be displayed on the scheduling screen, and which can beused in searches. If a patient was specified, the description will automatically be pre-filled with the patient’sname.
2.3.7.4 Selecting the event type
If more than one event type has been configured, it is necessary to select one from the Event type drop-downselection box. This value may be pre-filled with the default event type, if one has been configured.
Changing the event type will automatically change the duration of the new appointment to the defaultduration for the selected event type. The default duration can be manually overridden (section 2.3.7.7).
2.3.7.5 Appointment notes
The appointment notes are displayed in the appointment preview panel at the bottom of the schedulingscreen (figure 2.6). If a patient was specified, the notes will automatically be pre-filled with the patient’shome telephone number.
2.3.7.6 Setting the date and time
The easiest way to set the date and time for the appointment is to right-click on the various date/time fields.This will display a range of choices for the selected field. Alternatively, the date and time can be set usingthe arrows beside each field, or by typing the new value directly into the field.
An appointment can also be “dragged” to the desired timeslot by clicking on the appointment in the previewarea, then moving it to the new timeslot before releasing the mouse button.
2.3.7.7 Appointment duration
The slider bar in the Date, Time & Duration area allows you to change the appointment duration. Theslider automatically “snaps” to 15-minute intervals when the mouse button is released, but this behaviourcan be turned off by de-selecting the Snap button.
The slider can display a range of 4, 12, or 24 hours. Use the + and - buttons to change the displayed range.
Alternatively, the duration can be changed by resizing the appointment in the preview area, as described insection 2.5.3.
Checking the All day checkbox will change the appointment start/end times to 12:01am - 11:59pm.
2.3.7.8 Creating a repeating appointment
Checking the Repeat checkbox will open the Edit repetition details dialog (figure 2.11). After entering thedetails, clicking Save will save the repetition information and close the dialog, and clicking Cancel will closethe dialog without saving the repetition details.

CHAPTER 2. APPOINTMENT SCHEDULING 23
Figure 2.11: Edit repetition details
If the repetition details were saved, the Change repeat details label will appear on the Edit event detailsdialog. Clicking the label will allow you to make changes to the repetition details. Un-checking the Repeatcheckbox will erase the repetition details and make the appointment non-repeating.
NOTE: A maximum of 60 event instances will be created (even if the specified repetition details would resultin more than 60 events)
2.3.7.9 Resources
If any resources are required for the appointment, these can be selected in the Resources list. Selecting aresource will update the preview area to show any other appointments requiring the resource on the selecteddate.
2.3.7.10 Appointment status
The default status for new appointments is Confirmed. However, the appointment status can be changed toTentative using the Status drop-down selection box.
2.3.7.11 Appointment visibility
It is possible to create an appointment in your schedule whose details are hidden from other users (i.e. thetime block is visible to other users, but not the appointment description or notes). This can be done bysetting the appointment visibility to Date/Time only.
The default visibility for new appointments is Public, which means that full appointment details are visibleto other users.
2.3.7.12 Saving the appointment
Click the Create event button to save the new appointment. The button will not be enabled until thefollowing conditions are met:

CHAPTER 2. APPOINTMENT SCHEDULING 24
• A location has been selected
• A practitioner calendar has been selected
• A non-blank description has been entered
• An event type has been selected
Figure 2.12: Double-booking error message
If the new appointment conflicts with an existing appointment, an error message will be displayed (figure2.12), and the Create event dialog will remain open to allow the user to edit the appointment.
2.4 Deleting an appointment
Figure 2.13: Deleting an appointment
To delete an appointment, right-click on the appointment, then select Delete event from the pop-up menuwhich appears (figure 2.13). A confirmation dialog will appear, asking you to confirm that you would like todelete the appointment. Selecting Yes will delete the event, and selecting No will leave the appointment asis.
NOTE: When deleting a repeating appointment, the confirmation dialog will ask you which appointmentsto delete, from the following four options: This instance only, All instances, This and prior instances, Thisand future instances. Selecting an option and clicking Ok will delete the appointment(s) accordingly, andselecting Cancel will leave the appointments as they are.
2.5 Editing an existing appointment
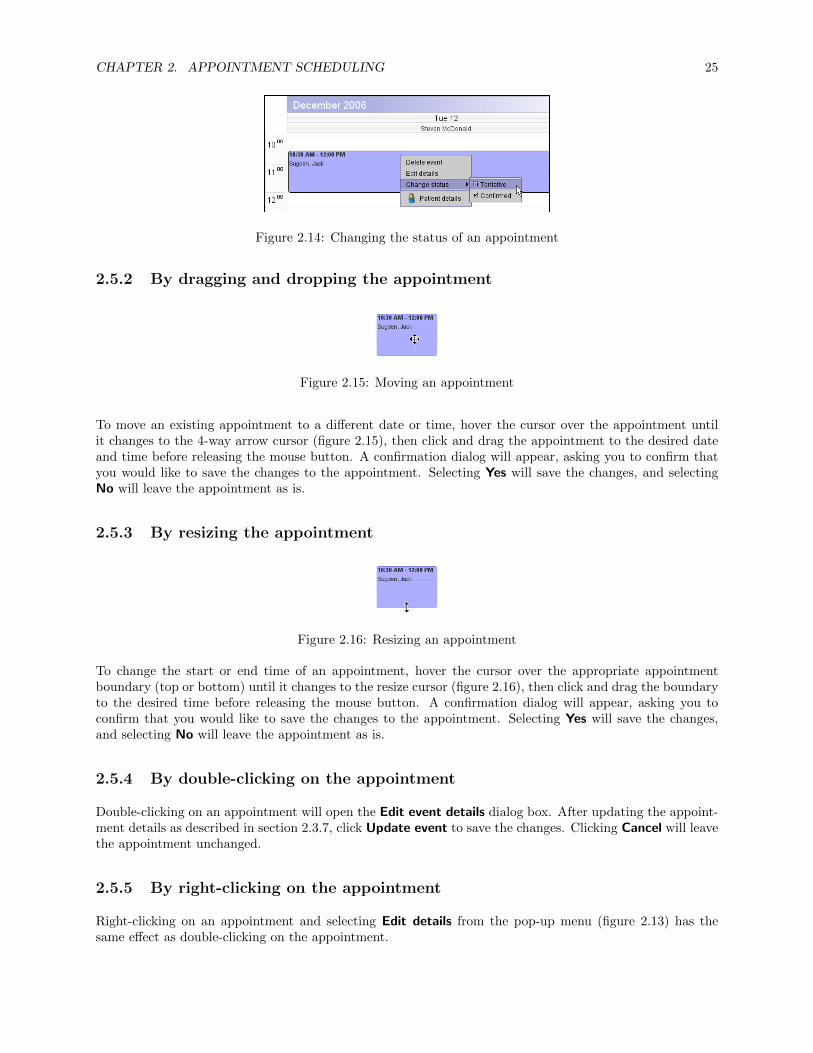
2.5.1 Changing the status of an appointment
To change the status of an existing appointment, right-click on the appointment, then select the desiredstatus from the Change status sub-menu of the pop-up menu which appears (figure 2.14)
CHAPTER 2. APPOINTMENT SCHEDULING 25
Figure 2.14: Changing the status of an appointment
2.5.2 By dragging and dropping the appointment
Figure 2.15: Moving an appointment
To move an existing appointment to a different date or time, hover the cursor over the appointment untilit changes to the 4-way arrow cursor (figure 2.15), then click and drag the appointment to the desired dateand time before releasing the mouse button. A confirmation dialog will appear, asking you to confirm thatyou would like to save the changes to the appointment. Selecting Yes will save the changes, and selectingNo will leave the appointment as is.
2.5.3 By resizing the appointment
Figure 2.16: Resizing an appointment
To change the start or end time of an appointment, hover the cursor over the appropriate appointmentboundary (top or bottom) until it changes to the resize cursor (figure 2.16), then click and drag the boundaryto the desired time before releasing the mouse button. A confirmation dialog will appear, asking you toconfirm that you would like to save the changes to the appointment. Selecting Yes will save the changes,and selecting No will leave the appointment as is.
2.5.4 By double-clicking on the appointment
Double-clicking on an appointment will open the Edit event details dialog box. After updating the appoint-ment details as described in section 2.3.7, click Update event to save the changes. Clicking Cancel will leavethe appointment unchanged.
2.5.5 By right-clicking on the appointment
Right-clicking on an appointment and selecting Edit details from the pop-up menu (figure 2.13) has thesame effect as double-clicking on the appointment.

CHAPTER 2. APPOINTMENT SCHEDULING 26
2.5.6 Changing a repeating appointment
To change a repeating appointment, double click, or right click and select Edit details (as described in section2.5.4and 2.5.5) on any instance of the series of repeating appointment. After updating the appointmentdetails as described in section 2.3.7, click Update event. A confirmation dialog will appear, asking whetheryou wish to update only the instance being edited (This instance only) or all instances of the event (Allinstances). Selecting an option and clicking Ok will update the appointment(s) accordingly, and clickingCancel will leave the appointment as is.
NOTE: When updating All instances of a repeating event, the entire series of appointments will be deleted,and then re-created again, using the start date of the instance being edited. For example, if you update arepeating appointment using the third instance of a series that has five instances, the first two instances willbe deleted, and the third instance becomes the first instance with four instances following it. If you want tomaintain a series of repeating events with their original dates, you should either edit the first instance of theseries, or edit any other instance and change the start date to the desired date (e.g. the date when the firstinstance occurs).
This applies only when a change is made to the following event details: location, calendar, date, time, orrepeat details. Changing other appointment details (e.g. description, duration, or summary) would notcause the series to be re-created.
2.6 Searching for appointments
2.6.1 Finding appointments for a particular patient
To display the details of a patient’s upcoming appointment(s), select the patient on the Patient browserscreen, then select Find appointments from the Patient menu. The Find events dialog will appear, listingall appointments for the patient within the next 31 days (figure 2.17). Selecting an appointment from the listand clicking Show (or double-clicking on the appointment) will switch to the scheduling screen, and jumpto the date of the selected appointment.
Figure 2.17: Searching for appointments
2.6.2 Finding appointment details from the “Aid orders” screen
Appointment details can also be displayed from the Aid orders screen, by right-clicking on an order, thenselecting Appointment details from the pop-up menu (figure 2.18).
CHAPTER 2. APPOINTMENT SCHEDULING 27
Figure 2.18: Displaying appointment details from the “Aid orders” screen
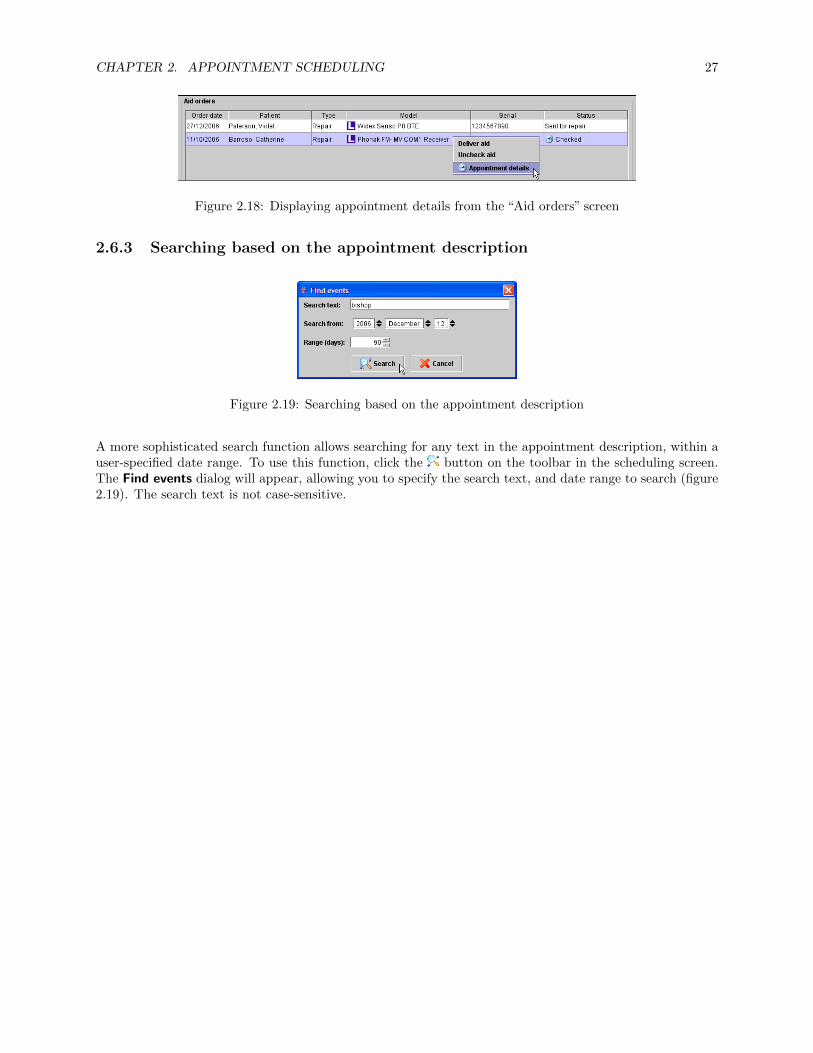
2.6.3 Searching based on the appointment description
Figure 2.19: Searching based on the appointment description
A more sophisticated search function allows searching for any text in the appointment description, within auser-specified date range. To use this function, click the button on the toolbar in the scheduling screen.The Find events dialog will appear, allowing you to specify the search text, and date range to search (figure2.19). The search text is not case-sensitive.
Chapter 3
Sales and Orders
3.1 Selling batteries, accessories and services
To sell items to a patient, you must first do one of the following:
• Select the patient from the list on the Patient browser tab
• Select the patient’s file from the set of open tabs
Click the Sale button on the main toolbar to begin the sale process. The New sale tab will appear.
3.1.1 Selecting the items for sale
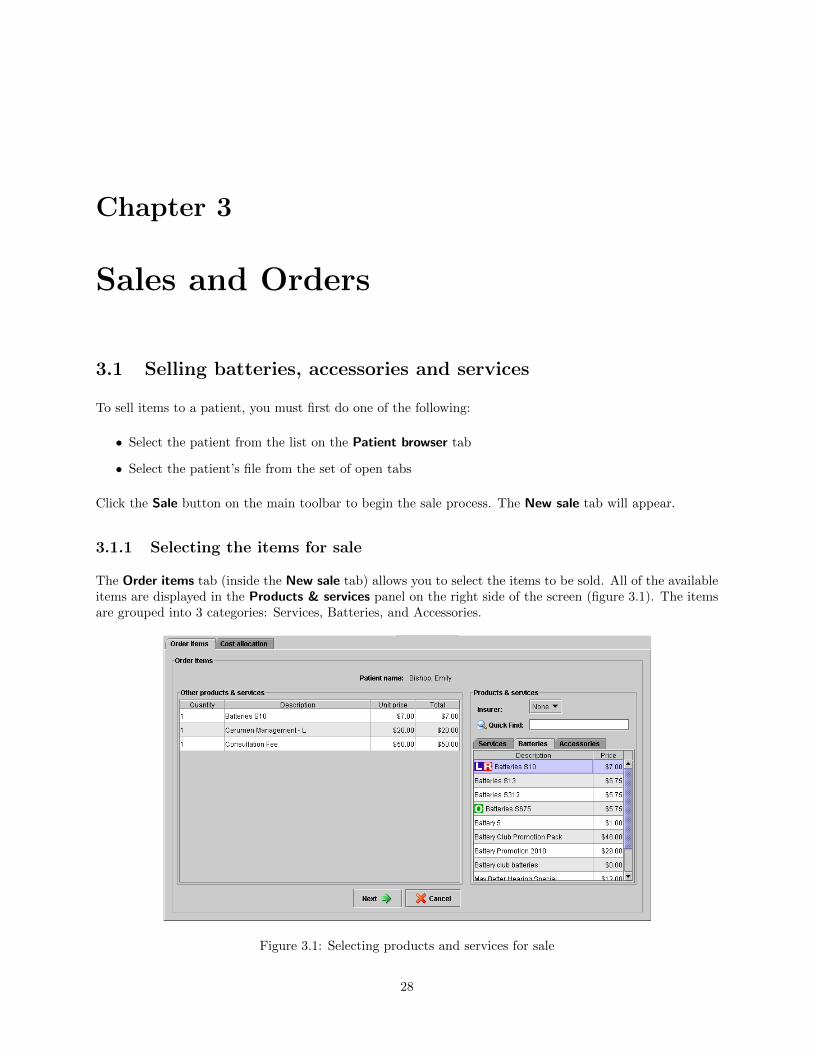
The Order items tab (inside the New sale tab) allows you to select the items to be sold. All of the availableitems are displayed in the Products & services panel on the right side of the screen (figure 3.1). The itemsare grouped into 3 categories: Services, Batteries, and Accessories.
Figure 3.1: Selecting products and services for sale
28

CHAPTER 3. SALES AND ORDERS 29
You can find an item by selecting the appropriate category, and scrolling through the list, or by typing thefirst few letters of the item description in the Quick Find field. To help you choose the correct batteriesfor the patient, batteries which match the patient’s hearing aids are highlighted with and/or icons,signifying the left or right aid respectively.
To add the item to the sale, double-click on it in the list. The item will then appear in the Other products& services panel on the left side of the screen.
3.1.2 Removing an item from the sale
To remove an item from the sale, select it from the Other products & services list, then press the Deletekey on your keyboard.
Items can also be removed from the Cost allocation tab (figure 3.4 under section 3.1.6).
3.1.3 Selecting the insurer (optional)
If this purchase will be paid for by an insurer for which special pricing applies, you must select the insurerfrom the Insurer drop-down selection box. This will ensure that the correct prices are used, and shown onthe screen. If the insurer does not appear in the list, you will need to enter the policy information on theInsurers tab in the patient’s file, before proceeding with the sale.
If an item has a benefit code and/or special pricing defined for the selected insurer, it will be highlightedwith a in the list.
In addition, some services (Insurer-specific services) are only available when the patient is covered by aparticular insurer. These services will not be visible unless the correct insurer has been selected, and theywill be highlighted with a in the list (figure 3.2).
Figure 3.2: Items with insurer-specific codes/prices
If the patient is covered by an insurer which normally pays the full amount of all purchases, the insurer willbe selected by default.
3.1.4 Avoiding billing errors
Despite the features described in section 3.1.3, it is still possible for billing errors to occur. For example:
CHAPTER 3. SALES AND ORDERS 30
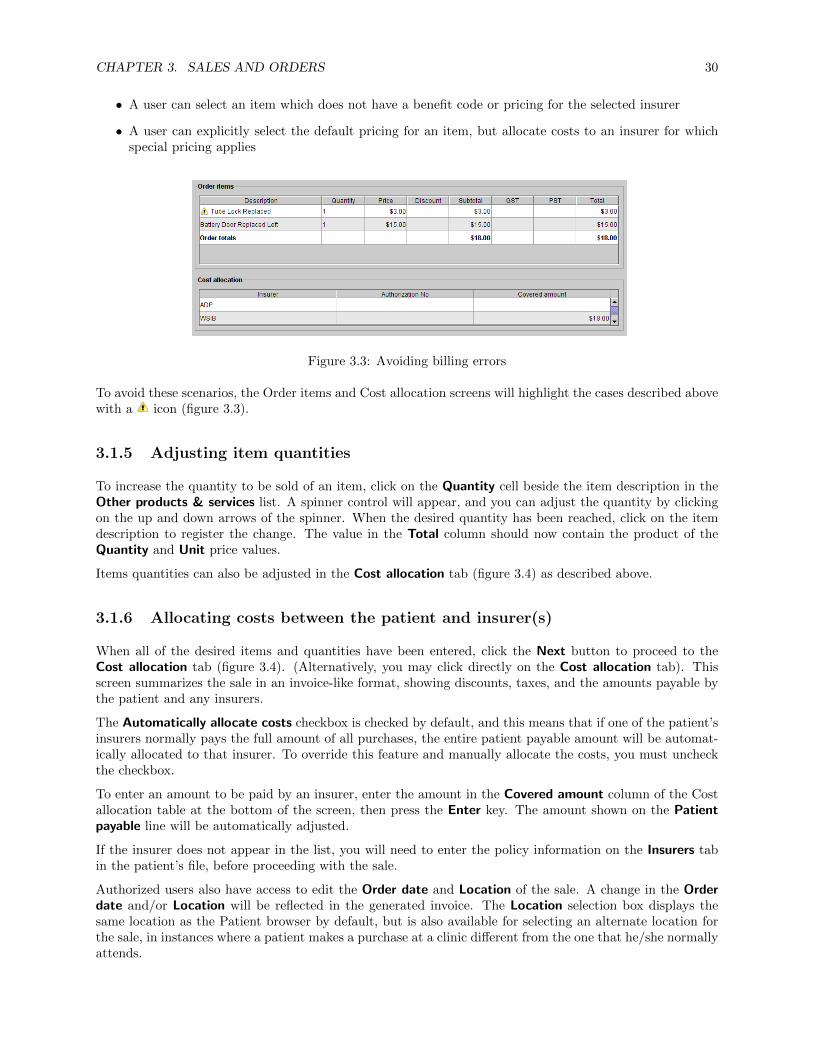
• A user can select an item which does not have a benefit code or pricing for the selected insurer
• A user can explicitly select the default pricing for an item, but allocate costs to an insurer for whichspecial pricing applies
Figure 3.3: Avoiding billing errors
To avoid these scenarios, the Order items and Cost allocation screens will highlight the cases described abovewith a icon (figure 3.3).
3.1.5 Adjusting item quantities
To increase the quantity to be sold of an item, click on the Quantity cell beside the item description in theOther products & services list. A spinner control will appear, and you can adjust the quantity by clickingon the up and down arrows of the spinner. When the desired quantity has been reached, click on the itemdescription to register the change. The value in the Total column should now contain the product of theQuantity and Unit price values.
Items quantities can also be adjusted in the Cost allocation tab (figure 3.4) as described above.
3.1.6 Allocating costs between the patient and insurer(s)
When all of the desired items and quantities have been entered, click the Next button to proceed to theCost allocation tab (figure 3.4). (Alternatively, you may click directly on the Cost allocation tab). Thisscreen summarizes the sale in an invoice-like format, showing discounts, taxes, and the amounts payable bythe patient and any insurers.
The Automatically allocate costs checkbox is checked by default, and this means that if one of the patient’sinsurers normally pays the full amount of all purchases, the entire patient payable amount will be automat-ically allocated to that insurer. To override this feature and manually allocate the costs, you must uncheckthe checkbox.
To enter an amount to be paid by an insurer, enter the amount in the Covered amount column of the Costallocation table at the bottom of the screen, then press the Enter key. The amount shown on the Patientpayable line will be automatically adjusted.
If the insurer does not appear in the list, you will need to enter the policy information on the Insurers tabin the patient’s file, before proceeding with the sale.
Authorized users also have access to edit the Order date and Location of the sale. A change in the Orderdate and/or Location will be reflected in the generated invoice. The Location selection box displays thesame location as the Patient browser by default, but is also available for selecting an alternate location forthe sale, in instances where a patient makes a purchase at a clinic different from the one that he/she normallyattends.

CHAPTER 3. SALES AND ORDERS 31
Figure 3.4: Allocating costs to insurers
3.1.7 Entering the authorization or claim number
In cases where an authorization number is required by the insurer, you may enter the number in the Autho-rization No column. This number will be shown on the body of the insurer invoice, and is also stored in theinvoice “FOB” field.
The field can also be used to store the claim number, if a separate claim form must be filed. This can behelpful when reconciling insurer payments, as the claim numbers can be made visible on QuickBooks reportsby enabling display of the “FOB” field.
The amount payable by the insurer must be entered before entering the authorization number.
3.1.8 Changing the transaction date
The date of the transaction is displayed in the Order date field, and defaults to the current date. This is thedate which will appear on any invoices, and on the patient’s Sales History tab. However, it may sometimesbe necessary to enter a transaction which occurred in the past. This can be accomplished by entering thecorrect date in the field.
Future dates are not considered valid input, and if a future date is entered, the Complete sale and Createquotes buttons will be disabled.
3.1.9 Discounting or increasing item prices
To increase the price of an item, simply click on the price, enter the desired price, and press the Enter key.
CHAPTER 3. SALES AND ORDERS 32
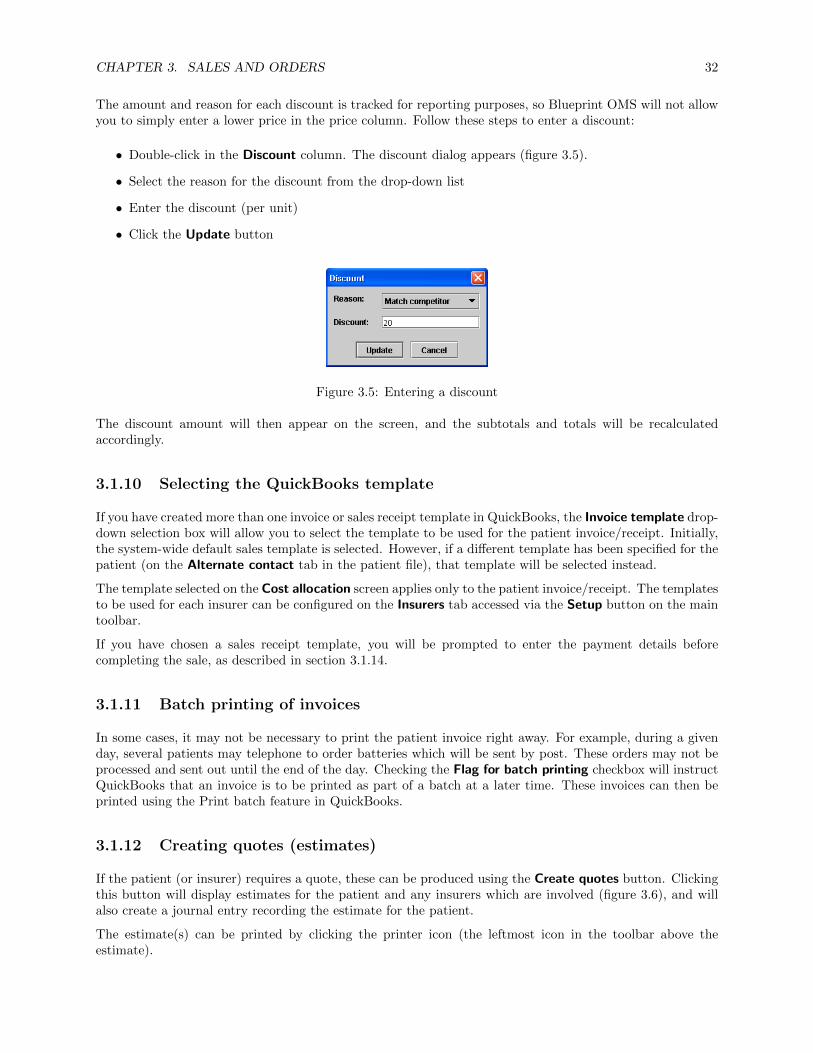
The amount and reason for each discount is tracked for reporting purposes, so Blueprint OMS will not allowyou to simply enter a lower price in the price column. Follow these steps to enter a discount:
• Double-click in the Discount column. The discount dialog appears (figure 3.5).
• Select the reason for the discount from the drop-down list
• Enter the discount (per unit)
• Click the Update button
Figure 3.5: Entering a discount
The discount amount will then appear on the screen, and the subtotals and totals will be recalculatedaccordingly.
3.1.10 Selecting the QuickBooks template
If you have created more than one invoice or sales receipt template in QuickBooks, the Invoice template drop-down selection box will allow you to select the template to be used for the patient invoice/receipt. Initially,the system-wide default sales template is selected. However, if a different template has been specified for thepatient (on the Alternate contact tab in the patient file), that template will be selected instead.
The template selected on the Cost allocation screen applies only to the patient invoice/receipt. The templatesto be used for each insurer can be configured on the Insurers tab accessed via the Setup button on the maintoolbar.
If you have chosen a sales receipt template, you will be prompted to enter the payment details beforecompleting the sale, as described in section 3.1.14.
3.1.11 Batch printing of invoices
In some cases, it may not be necessary to print the patient invoice right away. For example, during a givenday, several patients may telephone to order batteries which will be sent by post. These orders may not beprocessed and sent out until the end of the day. Checking the Flag for batch printing checkbox will instructQuickBooks that an invoice is to be printed as part of a batch at a later time. These invoices can then beprinted using the Print batch feature in QuickBooks.
3.1.12 Creating quotes (estimates)
If the patient (or insurer) requires a quote, these can be produced using the Create quotes button. Clickingthis button will display estimates for the patient and any insurers which are involved (figure 3.6), and willalso create a journal entry recording the estimate for the patient.
The estimate(s) can be printed by clicking the printer icon (the leftmost icon in the toolbar above theestimate).

CHAPTER 3. SALES AND ORDERS 33
Figure 3.6: Creating estimates
3.1.13 Completing the sale
To complete the sale, click the Complete sale button. If you selected an invoice template on the Costallocation screen, clicking the Complete sale button will have the following results:
• The New sale tab will be closed.
• Invoices for the patient and any insurers involved will be created in QuickBooks (figure 3.7)
• Invoices for the patient and any insurers involved will be displayed for printing
• A new journal entry recording the sale will be created for the patient
• The transaction will appear on the patient’s Sales History tab.
Figure 3.7: Printing invoices

CHAPTER 3. SALES AND ORDERS 34
3.1.14 Entering payment details for a sales receipt
If you selected a sales receipt template on the Cost allocation screen, the Create sales receipt dialog willbe displayed when you complete the sale (figure 3.8).
Figure 3.8: Entering payment details
The“Amount received”field is pre-filled with the patient payable amount, and cannot be edited. To completethe sale, select the appropriate payment method, enter the cheque number (if necessary), then click theComplete sale button.
Clicking the Complete sale button has the same results described in section 3.1.13, but a sales receipt willbe created for the patient, rather than an invoice. Any payment entered will be stored in Blueprint OMS.
Clicking the Cancel button closes the Create sales receipt dialog, and will allow you to continue editing thesale on the New sale tab.
3.1.15 Entering payment details for an invoice
To receive payment for a displayed invoice, use the Receive payment button on the Create invoices tab todisplay the Receive payment dialog (figure 3.9).
Figure 3.9: Recording payment for an invoice
The “Amount received” field is pre-filled with the patient payable amount, but can be edited. To recordthe payment, select the appropriate payment method, enter the cheque number (if necessary), then click theSave button. The payment will be recorded in QuickBooks and in Blueprint OMS, and the displayed invoicewill be updated to reflect the amount paid (figure 3.10).
3.1.16 Editing payment details
Authorized users can edit payment details for past payments by navigating to Sales history for a patient, rightclicking on a transaction, selecting Show payment history. The Payment history screen will be displayedwith a list of payments for that transaction. (figure 3.11)

CHAPTER 3. SALES AND ORDERS 35
Figure 3.10: Invoice showing patient payment
Figure 3.11: Payment history for a sale
By selecting a specific payment, authorized users have the option of deleting the payment, or editing thepayment details, which will bring up the Receive payment dialog.
3.2 Selling hearing aids
3.2.1 Lifecycle of a new hearing aid
Every hearing aid in the Blueprint OMS system has what is called a “state”, which the system tracks anddisplays to users. The 4 states that a new hearing aid typically goes through are:
Ordered→ Received→ Checked→ Active
Invoices are generated when the hearing aid(s) are delivered to the patient.
CHAPTER 3. SALES AND ORDERS 36
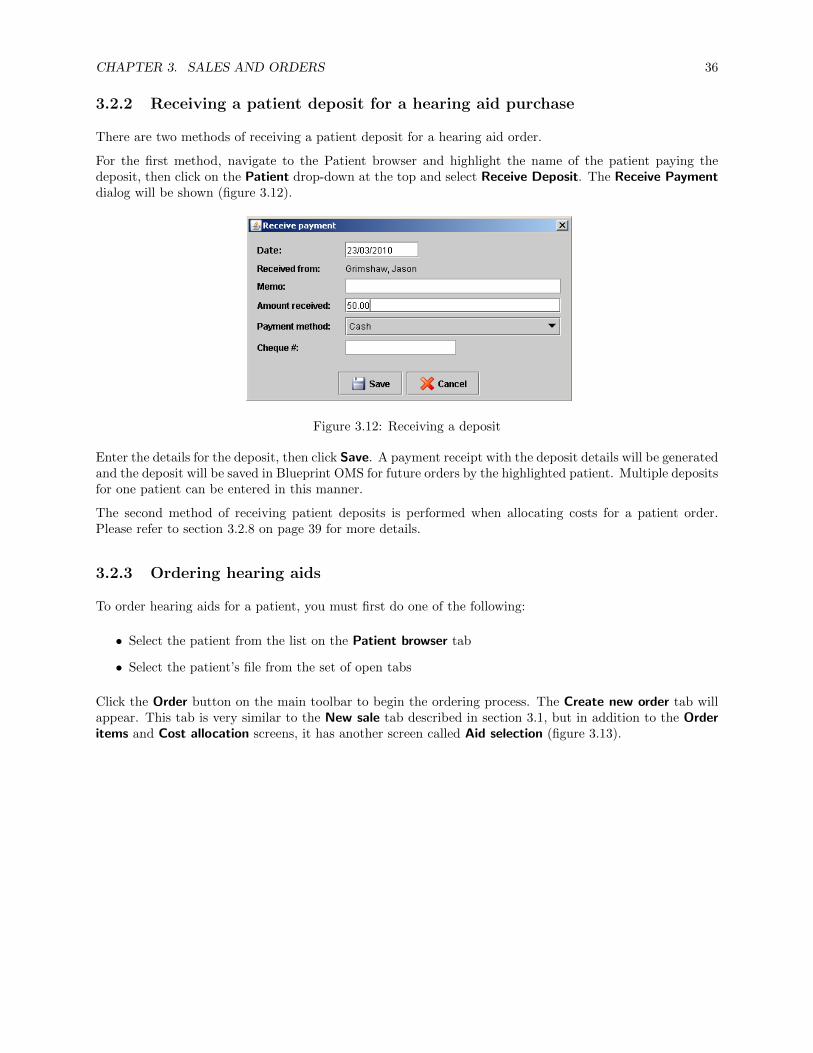
3.2.2 Receiving a patient deposit for a hearing aid purchase
There are two methods of receiving a patient deposit for a hearing aid order.
For the first method, navigate to the Patient browser and highlight the name of the patient paying thedeposit, then click on the Patient drop-down at the top and select Receive Deposit. The Receive Paymentdialog will be shown (figure 3.12).
Figure 3.12: Receiving a deposit
Enter the details for the deposit, then click Save. A payment receipt with the deposit details will be generatedand the deposit will be saved in Blueprint OMS for future orders by the highlighted patient. Multiple depositsfor one patient can be entered in this manner.
The second method of receiving patient deposits is performed when allocating costs for a patient order.Please refer to section 3.2.8 on page 39 for more details.
3.2.3 Ordering hearing aids
To order hearing aids for a patient, you must first do one of the following:
• Select the patient from the list on the Patient browser tab
• Select the patient’s file from the set of open tabs
Click the Order button on the main toolbar to begin the ordering process. The Create new order tab willappear. This tab is very similar to the New sale tab described in section 3.1, but in addition to the Orderitems and Cost allocation screens, it has another screen called Aid selection (figure 3.13).
CHAPTER 3. SALES AND ORDERS 37
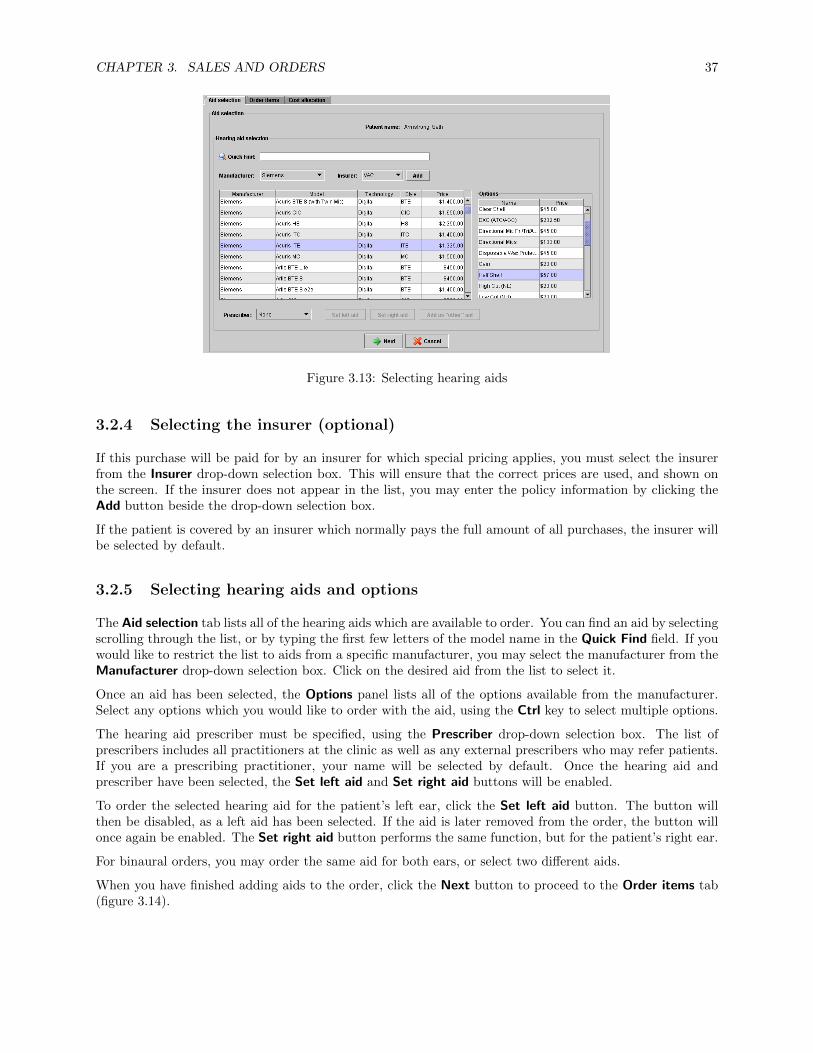
Figure 3.13: Selecting hearing aids
3.2.4 Selecting the insurer (optional)
If this purchase will be paid for by an insurer for which special pricing applies, you must select the insurerfrom the Insurer drop-down selection box. This will ensure that the correct prices are used, and shown onthe screen. If the insurer does not appear in the list, you may enter the policy information by clicking theAdd button beside the drop-down selection box.
If the patient is covered by an insurer which normally pays the full amount of all purchases, the insurer willbe selected by default.
3.2.5 Selecting hearing aids and options
The Aid selection tab lists all of the hearing aids which are available to order. You can find an aid by selectingscrolling through the list, or by typing the first few letters of the model name in the Quick Find field. If youwould like to restrict the list to aids from a specific manufacturer, you may select the manufacturer from theManufacturer drop-down selection box. Click on the desired aid from the list to select it.
Once an aid has been selected, the Options panel lists all of the options available from the manufacturer.Select any options which you would like to order with the aid, using the Ctrl key to select multiple options.
The hearing aid prescriber must be specified, using the Prescriber drop-down selection box. The list ofprescribers includes all practitioners at the clinic as well as any external prescribers who may refer patients.If you are a prescribing practitioner, your name will be selected by default. Once the hearing aid andprescriber have been selected, the Set left aid and Set right aid buttons will be enabled.
To order the selected hearing aid for the patient’s left ear, click the Set left aid button. The button willthen be disabled, as a left aid has been selected. If the aid is later removed from the order, the button willonce again be enabled. The Set right aid button performs the same function, but for the patient’s right ear.
For binaural orders, you may order the same aid for both ears, or select two different aids.
When you have finished adding aids to the order, click the Next button to proceed to the Order items tab(figure 3.14).

CHAPTER 3. SALES AND ORDERS 38
Figure 3.14: Adding other products and services to the order
3.2.6 Adding other products and services to the order
Refer to section 3.1.1 for instructions on how to add other products and services to the order.
Just as with other products and services, you may remove hearing aids or options from the order by selectingthem, then pressing the Delete key.
NOTE: Hearing aids and options cannot be deleted from an order once they have been received from themanufacturer. The “Return aid” function should be used instead.
When you have finished adding products and services to the order, click the Next button to proceed to theCost allocation tab.
3.2.7 Allocating costs between the patient and insurer(s)
Refer to section 3.1.6 for instruction on allocating costs between the patient and insurers. Other activitieswhich may be performed using the Cost allocation tab include:
• Entering the authorization or claim number
• Changing the transaction date
• Changing the transaction location
• Discounting or increasing item prices
• Creating quotes (estimates)
These activities are described in sections 3.1.6 through 3.1.12.
CHAPTER 3. SALES AND ORDERS 39
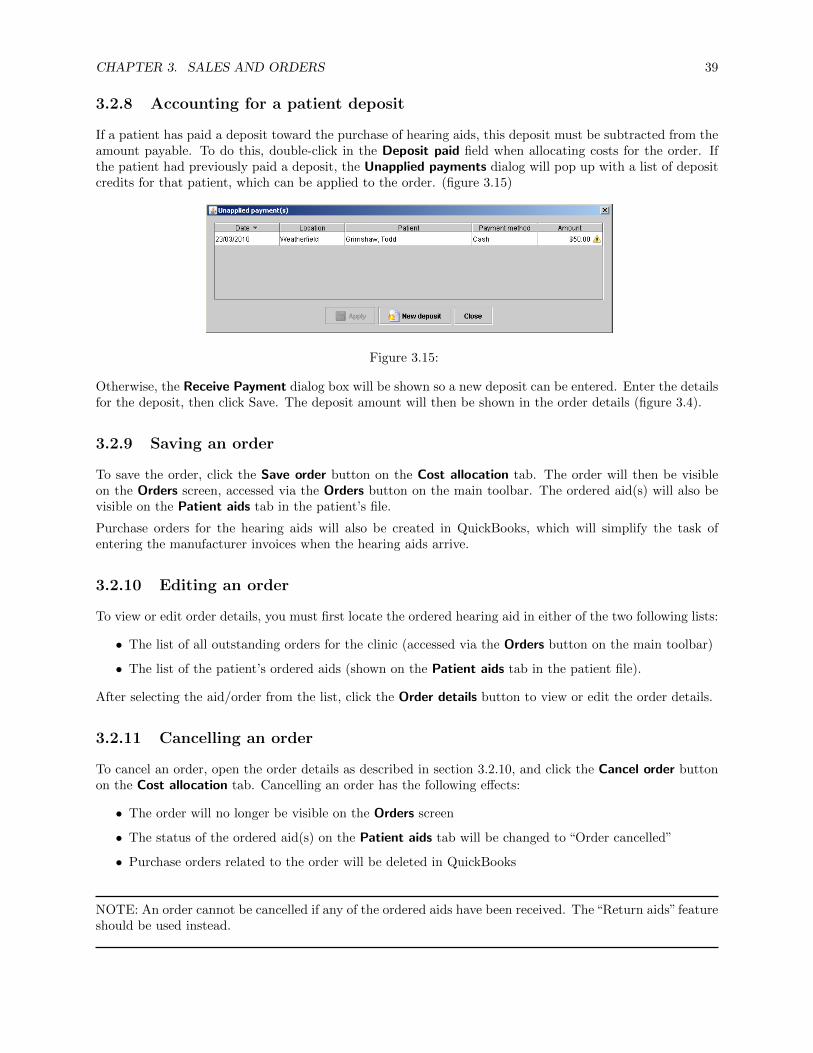
3.2.8 Accounting for a patient deposit
If a patient has paid a deposit toward the purchase of hearing aids, this deposit must be subtracted from theamount payable. To do this, double-click in the Deposit paid field when allocating costs for the order. Ifthe patient had previously paid a deposit, the Unapplied payments dialog will pop up with a list of depositcredits for that patient, which can be applied to the order. (figure 3.15)
Figure 3.15:
Otherwise, the Receive Payment dialog box will be shown so a new deposit can be entered. Enter the detailsfor the deposit, then click Save. The deposit amount will then be shown in the order details (figure 3.4).
3.2.9 Saving an order
To save the order, click the Save order button on the Cost allocation tab. The order will then be visibleon the Orders screen, accessed via the Orders button on the main toolbar. The ordered aid(s) will also bevisible on the Patient aids tab in the patient’s file.
Purchase orders for the hearing aids will also be created in QuickBooks, which will simplify the task ofentering the manufacturer invoices when the hearing aids arrive.
3.2.10 Editing an order
To view or edit order details, you must first locate the ordered hearing aid in either of the two following lists:
• The list of all outstanding orders for the clinic (accessed via the Orders button on the main toolbar)
• The list of the patient’s ordered aids (shown on the Patient aids tab in the patient file).
After selecting the aid/order from the list, click the Order details button to view or edit the order details.
3.2.11 Cancelling an order
To cancel an order, open the order details as described in section 3.2.10, and click the Cancel order buttonon the Cost allocation tab. Cancelling an order has the following effects:
• The order will no longer be visible on the Orders screen
• The status of the ordered aid(s) on the Patient aids tab will be changed to “Order cancelled”
• Purchase orders related to the order will be deleted in QuickBooks
NOTE: An order cannot be cancelled if any of the ordered aids have been received. The“Return aids” featureshould be used instead.
CHAPTER 3. SALES AND ORDERS 40
3.2.12 Receiving hearing aids
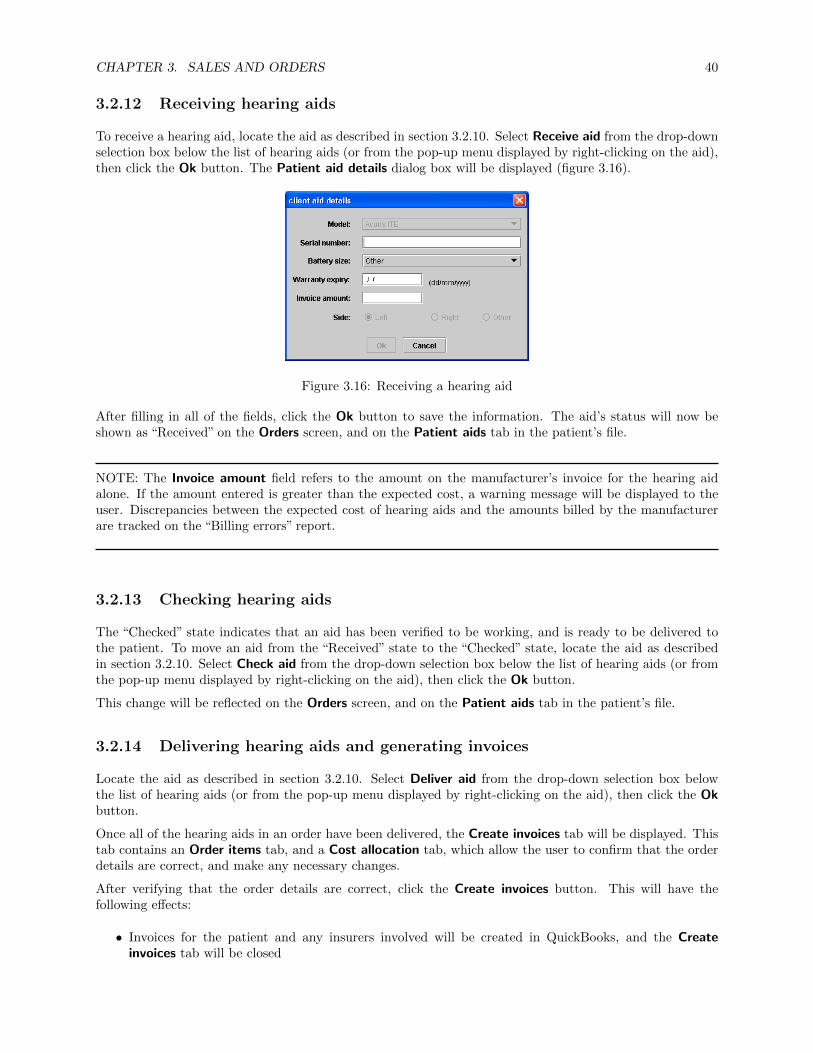
To receive a hearing aid, locate the aid as described in section 3.2.10. Select Receive aid from the drop-downselection box below the list of hearing aids (or from the pop-up menu displayed by right-clicking on the aid),then click the Ok button. The Patient aid details dialog box will be displayed (figure 3.16).
Figure 3.16: Receiving a hearing aid
After filling in all of the fields, click the Ok button to save the information. The aid’s status will now beshown as “Received” on the Orders screen, and on the Patient aids tab in the patient’s file.
NOTE: The Invoice amount field refers to the amount on the manufacturer’s invoice for the hearing aidalone. If the amount entered is greater than the expected cost, a warning message will be displayed to theuser. Discrepancies between the expected cost of hearing aids and the amounts billed by the manufacturerare tracked on the “Billing errors” report.
3.2.13 Checking hearing aids
The “Checked” state indicates that an aid has been verified to be working, and is ready to be delivered tothe patient. To move an aid from the “Received” state to the “Checked” state, locate the aid as describedin section 3.2.10. Select Check aid from the drop-down selection box below the list of hearing aids (or fromthe pop-up menu displayed by right-clicking on the aid), then click the Ok button.
This change will be reflected on the Orders screen, and on the Patient aids tab in the patient’s file.
3.2.14 Delivering hearing aids and generating invoices
Locate the aid as described in section 3.2.10. Select Deliver aid from the drop-down selection box belowthe list of hearing aids (or from the pop-up menu displayed by right-clicking on the aid), then click the Okbutton.
Once all of the hearing aids in an order have been delivered, the Create invoices tab will be displayed. Thistab contains an Order items tab, and a Cost allocation tab, which allow the user to confirm that the orderdetails are correct, and make any necessary changes.
After verifying that the order details are correct, click the Create invoices button. This will have thefollowing effects:
• Invoices for the patient and any insurers involved will be created in QuickBooks, and the Createinvoices tab will be closed
CHAPTER 3. SALES AND ORDERS 41
• Journal entries recording the hearing aid deliveries will be created for the patient, and the transactionwill also appear on the patient’s Sales History tab
• Hearing aids which have been delivered will no longer be shown on the Orders screen, and their statuswill be shown as “Active” on the Patient aids tab in the patient’s file
• Invoices for the patient and any insurers involved will be displayed for printing (figure 3.7)
3.2.15 Showing credits for exchanged hearing aids
Figure 3.17: Entering exchange credits
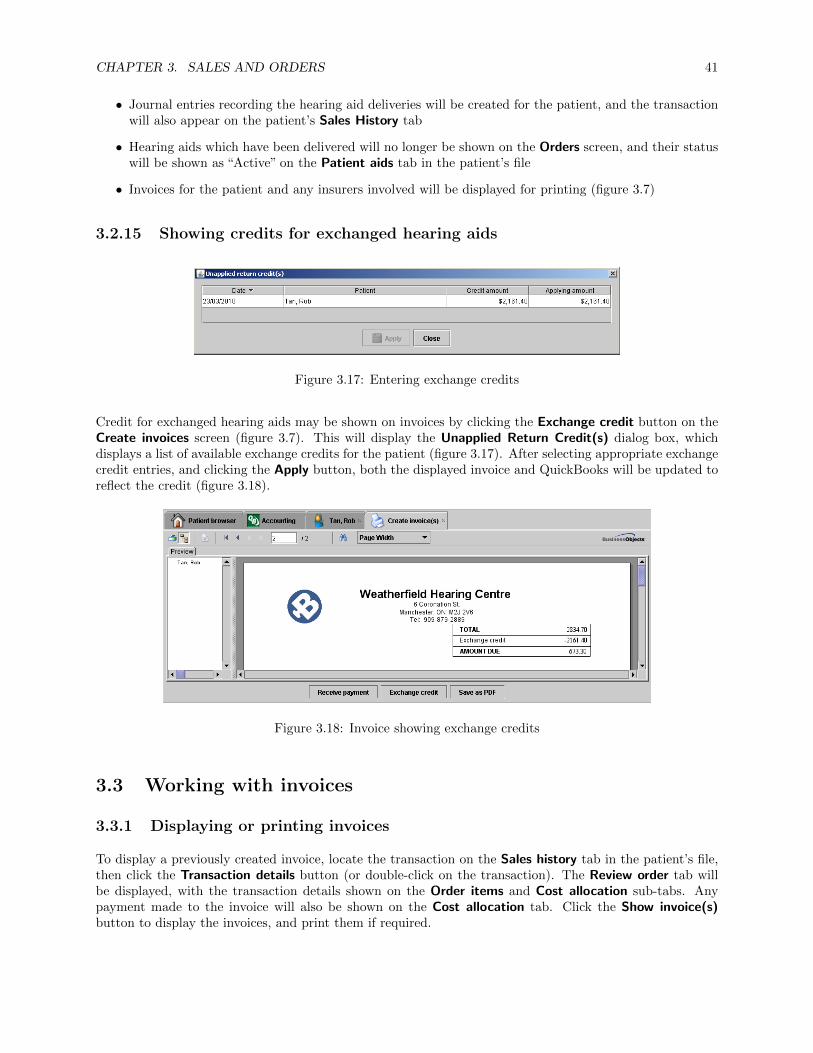
Credit for exchanged hearing aids may be shown on invoices by clicking the Exchange credit button on theCreate invoices screen (figure 3.7). This will display the Unapplied Return Credit(s) dialog box, whichdisplays a list of available exchange credits for the patient (figure 3.17). After selecting appropriate exchangecredit entries, and clicking the Apply button, both the displayed invoice and QuickBooks will be updated toreflect the credit (figure 3.18).
Figure 3.18: Invoice showing exchange credits
3.3 Working with invoices
3.3.1 Displaying or printing invoices
To display a previously created invoice, locate the transaction on the Sales history tab in the patient’s file,then click the Transaction details button (or double-click on the transaction). The Review order tab willbe displayed, with the transaction details shown on the Order items and Cost allocation sub-tabs. Anypayment made to the invoice will also be shown on the Cost allocation tab. Click the Show invoice(s)button to display the invoices, and print them if required.
CHAPTER 3. SALES AND ORDERS 42
3.3.2 Viewing payment status on invoices
Blueprint OMS keeps track of all invoices and their respective payments. To view the payment status of aninvoice, navigate to the Sales history tab under a patient file, where a list of invoices will appear for thepatient. The Patient total column displays the balance owing by the patient, while the 3p total columndisplays the balance owing by the third party insurer. To modify payment information as an authorizeduser, please refer to the instructions under section 3.1.16.
3.3.3 Correcting invoices
There are a variety of reasons why one might want to change an invoice after it has been created. Perhaps anincorrect price was used, or costs were not correctly allocated to insurers. In any case, the process consistsof two steps:
1. Regenerating corrected invoices
2. Voiding or deleting the incorrect invoices
NOTE: It is not recommended to simply modify an existing invoice in QuickBooks, because this would causea mismatch between the data in Blueprint OMS and that in QuickBooks.
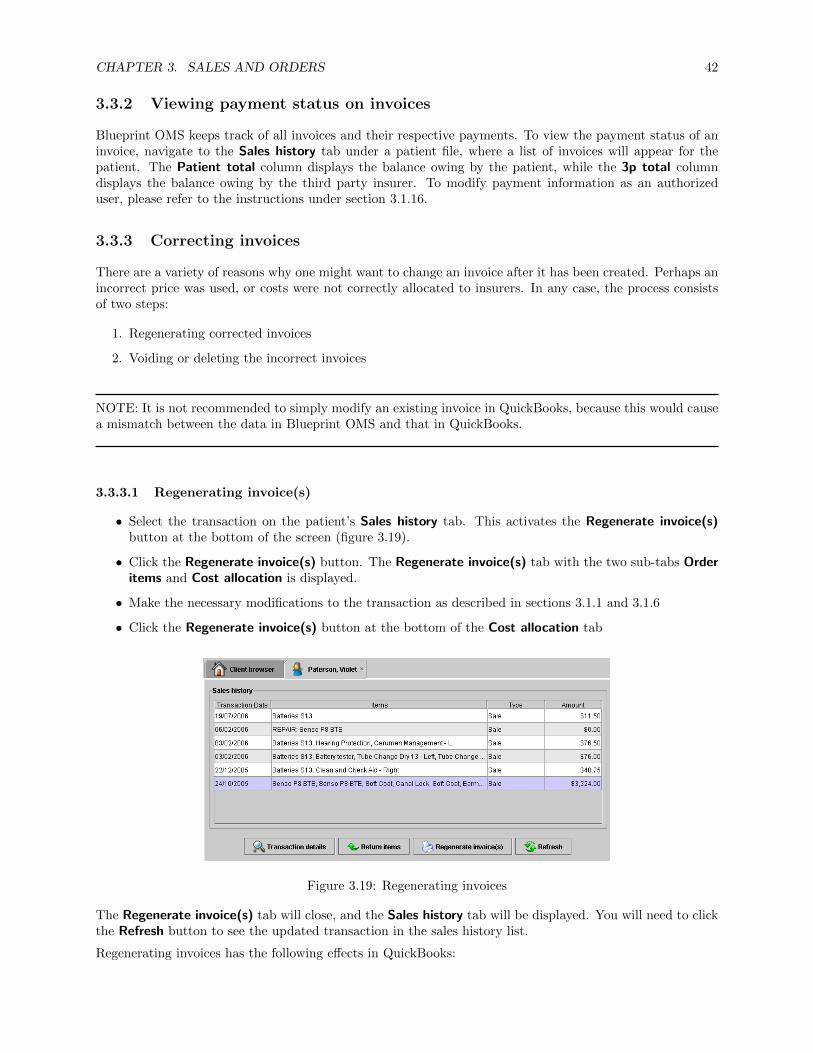
3.3.3.1 Regenerating invoice(s)
• Select the transaction on the patient’s Sales history tab. This activates the Regenerate invoice(s)button at the bottom of the screen (figure 3.19).
• Click the Regenerate invoice(s) button. The Regenerate invoice(s) tab with the two sub-tabs Orderitems and Cost allocation is displayed.
• Make the necessary modifications to the transaction as described in sections 3.1.1 and 3.1.6
• Click the Regenerate invoice(s) button at the bottom of the Cost allocation tab
Figure 3.19: Regenerating invoices
The Regenerate invoice(s) tab will close, and the Sales history tab will be displayed. You will need to clickthe Refresh button to see the updated transaction in the sales history list.
Regenerating invoices has the following effects in QuickBooks:

CHAPTER 3. SALES AND ORDERS 43
• A new invoice will be created for the patient
• New invoices will be created for any insurers to whom costs were allocated on the Cost allocationscreen
• The old invoice for the order will be voided automatically according to default settings in BlueprintOMS
NOTE: The user must have the “Regenerate invoices” privilege in order to perform this function. Also, theregeneration of invoices is only supported if none of the items in the original transaction have been returnedusing the procedures described in sections 5.1 and 5.2.
3.3.3.2 Voiding or deleting the incorrect invoices
By default, Blueprint OMS automatically voids an old invoice in QuickBooks when it has been regenerated.However it is also possible to configure Blueprint OMS so that old invoices must be voided manually inQuickBooks. To manually void or delete invoices, please refer to your QuickBooks documentation for detailedinstructions.
Chapter 4
Repairs
4.1 Sending a hearing aid for repair
4.1.1 Lifecycle of a repaired hearing aid
Every hearing aid in the Blueprint OMS system has what is called a “state”, which the system tracks anddisplays to users. The four states that a repaired hearing aid typically goes through are:
SentForRepair → Received→ Checked→ Active
Invoices are generated when the hearing aid is delivered to the patient.
Before a hearing aid can be sent for repair, it must be an active aid listed on the patient’s Patient aids tab.If the aid is not listed, you may add it as described in section 1.4.
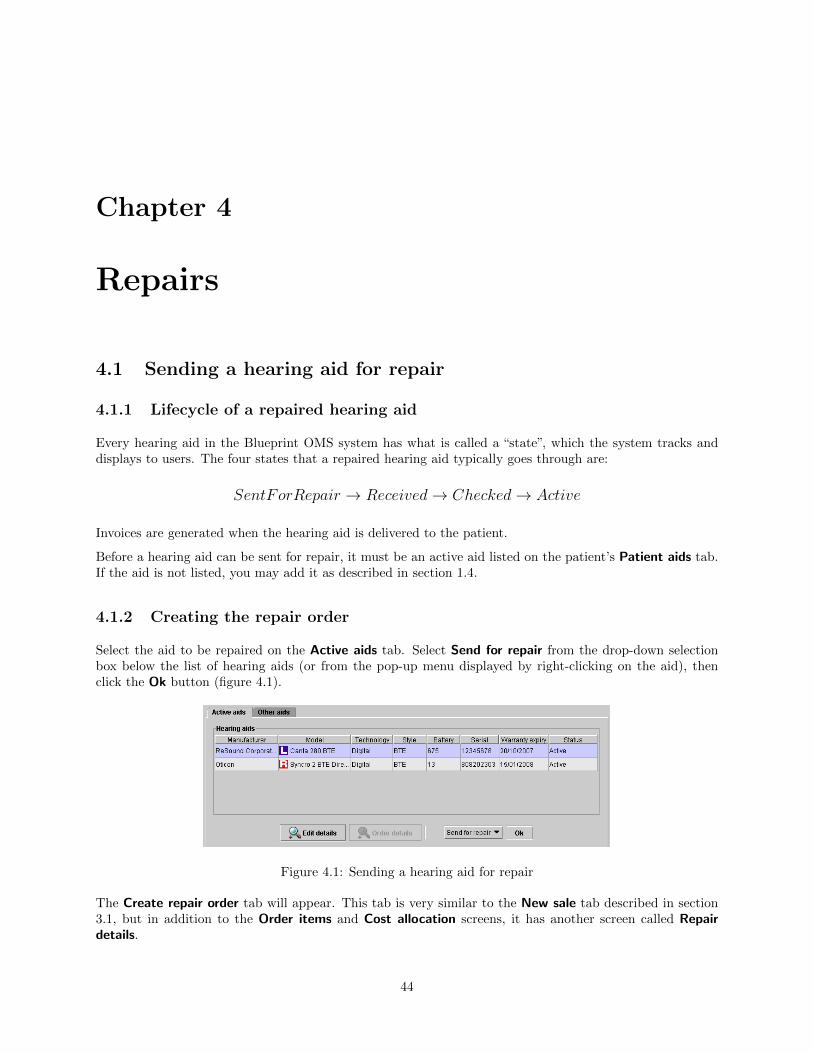
4.1.2 Creating the repair order
Select the aid to be repaired on the Active aids tab. Select Send for repair from the drop-down selectionbox below the list of hearing aids (or from the pop-up menu displayed by right-clicking on the aid), thenclick the Ok button (figure 4.1).
Figure 4.1: Sending a hearing aid for repair
The Create repair order tab will appear. This tab is very similar to the New sale tab described in section3.1, but in addition to the Order items and Cost allocation screens, it has another screen called Repairdetails.
44

CHAPTER 4. REPAIRS 45
4.1.3 Selecting the insurer (optional)
If the patient is covered by any insurers for which special pricing may apply, a dialog box will be displayedlisting these insurers (figure 4.2). If the cost of the repair will be covered by one of the listed insurers, selectthe insurer from the list, otherwise select “None”. Click Ok to close the dialog box.
Figure 4.2: Selecting the insurer
4.1.4 Entering the repair details
Use the Repair details tab to enter the following information (figure 4.3):
Figure 4.3: Entering repair details
• The manufacturer which will perform the repair. (This is usually pre-selected, based on the aidmanufacturer, but you may change it if another manufacturer will carry out the repair).
• The reason for the repair.
• Any additional documentation to be sent to the manufacturer (This will be printed on the repair orderform)
Click Next to proceed to the next step.
4.1.5 Adding other products and services to the order
The Order items tab displays the repair charge, based on the manufacturer, the technology of the aid, andthe insurer (if any). If the aid is under warranty, a zero dollar amount is shown.

CHAPTER 4. REPAIRS 46
Refer to section 3.1 for instructions on how to add other products and services to the order.
When you have finished adding products and services, Click Next to advance to the Cost allocation tab.
4.1.6 Allocating costs between the patient and insurer(s)
Refer to section 3.1.6 for instruction on allocating costs between the patient and insurers. Other activitieswhich may be performed using the Cost allocation tab include:
• Entering the authorization or claim number
• Changing the transaction date
• Discounting or increasing item prices
• Creating quotes (estimates)
These activities are described in sections 3.1.6 through 3.1.12.
4.1.7 Saving the order
To save the order, click the Save order button on the Cost allocation tab. The order will then be visible onthe Orders screen, accessed via the Orders button on the main toolbar. The status of the hearing aid willalso be shown as “Sent for repair” on the Patient aids tab in the patient’s file.
A purchase order for the repair will also be created in QuickBooks, which will simplify the task of enteringthe manufacturer invoice when the repaired aid arrives.
4.1.8 Editing a repair order
Refer to section 3.2.10 for instructions on how to edit a saved repair order.
4.1.9 Receiving, checking, and delivering repaired aids
The steps for receiving, checking, and delivering a repaired aid are described in sections 3.2.12 throughsection 3.2.14.
Chapter 5
Returns
5.1 Returning batteries, accessories, and services
This section explains how to reverse charges for batteries, accessories, and services. For instructions on howto return a hearing aid, refer to section 5.2.
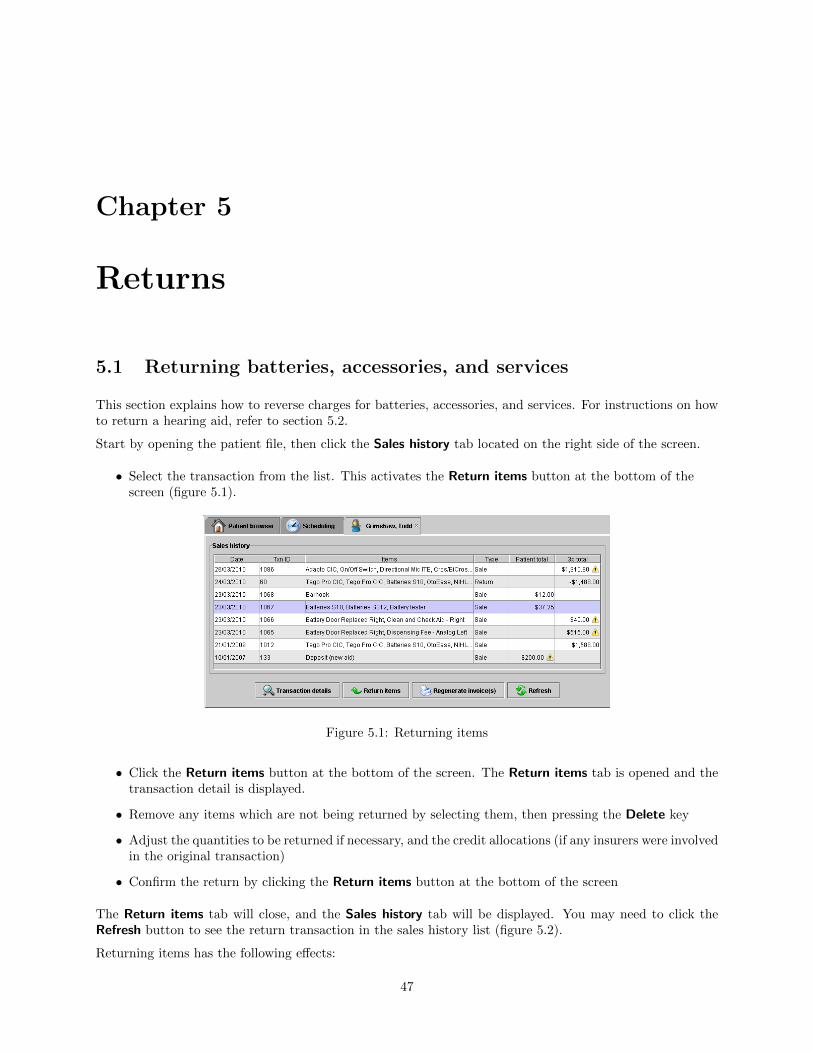
Start by opening the patient file, then click the Sales history tab located on the right side of the screen.
• Select the transaction from the list. This activates the Return items button at the bottom of thescreen (figure 5.1).
Figure 5.1: Returning items
• Click the Return items button at the bottom of the screen. The Return items tab is opened and thetransaction detail is displayed.
• Remove any items which are not being returned by selecting them, then pressing the Delete key
• Adjust the quantities to be returned if necessary, and the credit allocations (if any insurers were involvedin the original transaction)
• Confirm the return by clicking the Return items button at the bottom of the screen
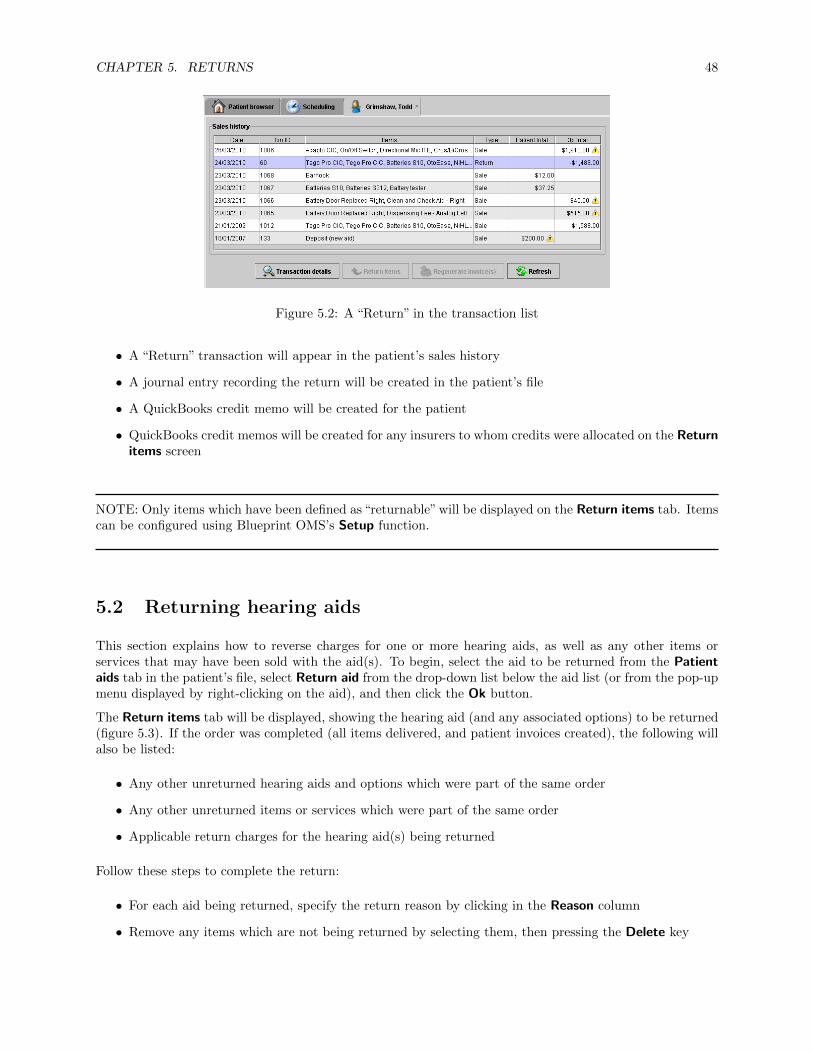
The Return items tab will close, and the Sales history tab will be displayed. You may need to click theRefresh button to see the return transaction in the sales history list (figure 5.2).
Returning items has the following effects:
47
CHAPTER 5. RETURNS 48
Figure 5.2: A “Return” in the transaction list
• A “Return” transaction will appear in the patient’s sales history
• A journal entry recording the return will be created in the patient’s file
• A QuickBooks credit memo will be created for the patient
• QuickBooks credit memos will be created for any insurers to whom credits were allocated on the Returnitems screen
NOTE: Only items which have been defined as “returnable” will be displayed on the Return items tab. Itemscan be configured using Blueprint OMS’s Setup function.
5.2 Returning hearing aids
This section explains how to reverse charges for one or more hearing aids, as well as any other items orservices that may have been sold with the aid(s). To begin, select the aid to be returned from the Patientaids tab in the patient’s file, select Return aid from the drop-down list below the aid list (or from the pop-upmenu displayed by right-clicking on the aid), and then click the Ok button.
The Return items tab will be displayed, showing the hearing aid (and any associated options) to be returned(figure 5.3). If the order was completed (all items delivered, and patient invoices created), the following willalso be listed:
• Any other unreturned hearing aids and options which were part of the same order
• Any other unreturned items or services which were part of the same order
• Applicable return charges for the hearing aid(s) being returned
Follow these steps to complete the return:
• For each aid being returned, specify the return reason by clicking in the Reason column
• Remove any items which are not being returned by selecting them, then pressing the Delete key
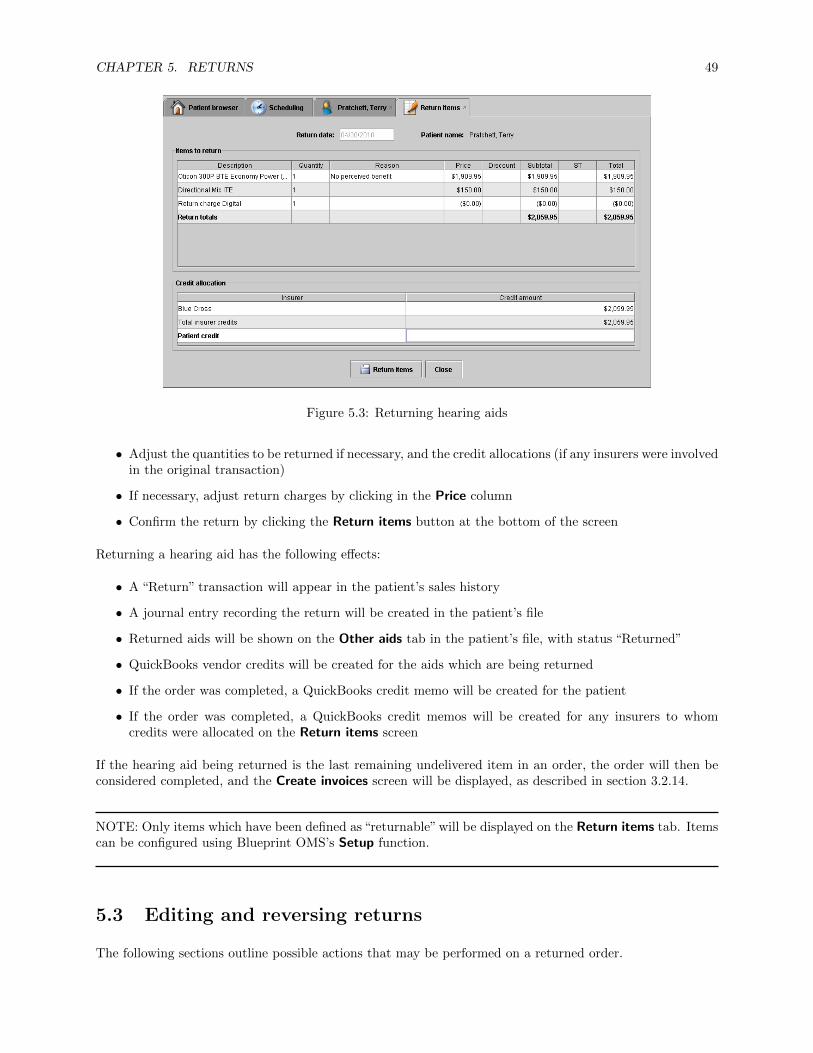
CHAPTER 5. RETURNS 49
Figure 5.3: Returning hearing aids
• Adjust the quantities to be returned if necessary, and the credit allocations (if any insurers were involvedin the original transaction)
• If necessary, adjust return charges by clicking in the Price column
• Confirm the return by clicking the Return items button at the bottom of the screen
Returning a hearing aid has the following effects:
• A “Return” transaction will appear in the patient’s sales history
• A journal entry recording the return will be created in the patient’s file
• Returned aids will be shown on the Other aids tab in the patient’s file, with status “Returned”
• QuickBooks vendor credits will be created for the aids which are being returned
• If the order was completed, a QuickBooks credit memo will be created for the patient
• If the order was completed, a QuickBooks credit memos will be created for any insurers to whomcredits were allocated on the Return items screen
If the hearing aid being returned is the last remaining undelivered item in an order, the order will then beconsidered completed, and the Create invoices screen will be displayed, as described in section 3.2.14.
NOTE: Only items which have been defined as “returnable” will be displayed on the Return items tab. Itemscan be configured using Blueprint OMS’s Setup function.
5.3 Editing and reversing returns
The following sections outline possible actions that may be performed on a returned order.

CHAPTER 5. RETURNS 50
5.3.1 Editing return details
After returning an order, an authorized user can edit return details such as the returned date or returncharge, by navigating to the Sales history tab for a patient file, right clicking on the returned order, andselecting Edit return details. When editing is completed, click on Update return to save the updated details.
5.3.2 Reversing returns
There are situations in which you may need to reverse a return of items, such as when the return is inputby mistake or when it is requested by a patient. To reverse a return on an item, select the item with typeReturn to be reversed from the Sales history tab in the patient file. Then right click on the item and selectDelete return (figure 5.4).
A confirmation dialog box will pop up and ask for confirmation of the return reversal; click on Yes to confirmthe return cancellation in both Blueprint OMS and Quickbooks. If the reversed items includes a hearing aid,the state of the hearing aid under the Patient aids tab of the Patient browser will revert from Returnedback to its previous state.
Figure 5.4: Reversing a return

Chapter 6
Making bank deposits
Blueprint OMS is able to track all undeposited patient payments and deposit them into specific accounts,while synchronizing these transactions with QuickBooks.
6.1 Entering deposits
To view a list of all undeposited payments, click on the Accounting drop-down at the top, then select Enterbank deposit. The list will be shown for the current clinic, and lists for different clinics can be displayedusing the clinic selection box (figure 6.1).
Figure 6.1: List of deposits to be made
In order to make a bank deposit consisting of one or more payments, select all payments you wish to deposit(multiple payments can be select by holding the ctrl key and clicking on the payment), then click the Savedeposit button. The Enter deposit details dialog will pop up; press Save once the deposit and cashbackdetails have been entered. The selected payments will then be moved under the Saved deposits tab.
If the accounting link is broken when a payment is received, a warning icon will show up beside theundeposited payment indicating that there is a discrepancy between Blueprint OMS and QuickBooks. Inthat case you may want to clear the undeposited payment by selecting it and pressing Clear payment, thencontact Technical Support to resubmit the payment.
51

CHAPTER 6. MAKING BANK DEPOSITS 52
6.2 Saved deposits
The Saved deposits tab contains a list of all deposited payments (figure 6.2). The following actions may beperformed by selecting a saved deposit payment:
• The deposit details can be printed by clicking Print deposit
• The deposit can be cleared from the list to reduce clutter by pressing Clear deposit
Figure 6.2: List of all deposited payments

Chapter 7
Third party payments
Blueprint OMS is able to track remittances against multiple insurer claims when they are received from thirdparty insurers, and create/update entries accordingly in QuickBooks. Click on the Accounting drop-downat the top, then select Enter 3rd party payment to show the third party payment screen. Here, you canretrieve a list of appropriate claims for each clinic and insurer, using the Insurer and Location filter selectionboxes (figure 7.1).
Figure 7.1: Allocating third party payments
Once the list of claims is displayed, check off the claims which are covered by the remittance, then enterdetails for the remittance such as Payment date, Payment amount, Payment method, and the remittanceID. Finally, press Save so that Blueprint OMS will record the appropriate payments and update QuickBooks.The Unapplied balance tag in the lower right of the screen will inform you of any unapplied amounts in theremittance.
53

Chapter 8
Using the accounting link
The accounting link feature should be enabled on one workstation (the link workstation), which then actsas the conduit for transactions to flow from Blueprint OMS into QuickBooks. Because the accounting linkscreen provides quick access to QuickBooks transactions from within the Blueprint OMS application, it ismost useful to enable this feature on a workstation where payments are received from patients, and receiptsand invoices are printed.
Instructions for enabling the accounting link can be found in section 2.4.1 of the Blueprint OMS v1.9 Instal-lation Guide.
8.1 Receiving payment from a patient
To enter a payment from a patient, select the Accounting tab (figure 8.1), then select the desired invoice onthe Transactions tab, and click the Receive payment button. This will display the Receive payment dialog(figure 3.9), with the “Memo” and “Amount” fields pre-filled appropriately.
Figure 8.1: Receiving payment from a patient
Select the appropriate payment method, enter the cheque number (if necessary), then click the Save buttonto record the payment in QuickBooks as well as in Blueprint OMS.
Payments from patients (and insurers) can also be entered directly in QuickBooks, without using BlueprintOMS. Refer to the QuickBooks documentation for instructions on entering payments.
54
CHAPTER 8. USING THE ACCOUNTING LINK 55
8.2 Displaying and printing QuickBooks transactions
A transaction listed on the Transactions tab may be displayed by selecting it, then clicking the Edit trans-action button. This will have the following effects:
• Focus will switch from Blueprint OMS to QuickBooks
• The transaction will be displayed in QuickBooks
• The payment will be displayed in QuickBooks for editing
To resume working in Blueprint OMS, you will need to switch the application focus from QuickBooks backto Blueprint OMS.

Chapter 9
Marketing
You can use Blueprint OMS to produce and keep track of mailing labels and letters that target patients basedon various criteria, such as birthdays or warranty expirations. For access to all marketing functionality, clickon the Marketing button on the left toolbar. Please note that this is different from the marketing tabunder the patient file. The following sections outline the marketing campaign listing and patient groupingfunctions.
9.1 Marketing campaigns
This section explores the viewing, adding, editing, and removal of marketing campaigns.
9.1.1 Viewing marketing campaigns
All existing marketing campaigns are listed under the marketing campaign tab, with the campaign De-scription field, the Members field showing the number of patients targeted in this campaign, and the Sentfield indicating whether or not it was sent. To view more information about a campaign, either select thecampaign and click the Edit details button, or double-click on the campaign (see figure 9.1).
Figure 9.1: Viewing marketing campaigns
If a campaign has been created but has not been sent out, you can choose to send the campaign by selectingit and pressing the Send mailing button. This creates a journal entry in the Marketing section of the patient
56

CHAPTER 9. MARKETING 57
file, to be used for reporting and tracking purposes. For procedures on printing the actual envelopes or lettersto be mailed, please refer to section 9.1.4.
Other functionality under the marketing campaign tab include the ability to delete a campaign by selectingit and pressing the Delete button, and the ability to Refresh the view for the most up-to-date list.
9.1.2 Creating new campaigns
Press the Create new button under the marketing campaigns tab. You will be prompted to enter a campaignname, so input a descriptive title and select Create, then Yes to confirm the operation (figure 9.2).
Figure 9.2: Create a new campaign
The marketing campaign list will be refreshed with the new campaign that you have created.
9.1.3 Building conditions
A campaign is defined primarily by filters used to target specific patients. A filter consists of variousconditions, while each condition consists of the following three parts,
Description − Operator − V alue
Where the Description is the field you want to filter based on, the Operator is how you would like to filter,and the Value is used to make the comparison.
9.1.3.1 Description
The description specifies the field(s) that Blueprint OMS will use to make the filtering comparison. Theseinclude information associated with patients such as age, first/last name, insurer information, as well asother information, such as hearing aid manufacturer, patient grouping, and last returned date. For moreinformation on how patient groups are defined, please see section 9.2.
9.1.3.2 Operators
When a condition is specified in a filter, an operator must be selected so that Blueprint OMS understandshow the filtering is executed. The following points discuss how various operators are used:
• Equal to (=): The equal to operator will only include search results where the value is equal to thedescription. For example, if the condition Age = 50 is specified under patient attributes, the filterwill only include patients who are currently 50 years of age.
• Not equal to (!=): The not equal to operator will exclude all search results where the value is equalto the description. For example, if the condition Surname ! = Smith is specified under patientattributes, the filter will exclude all patients who have a surname of Smith.
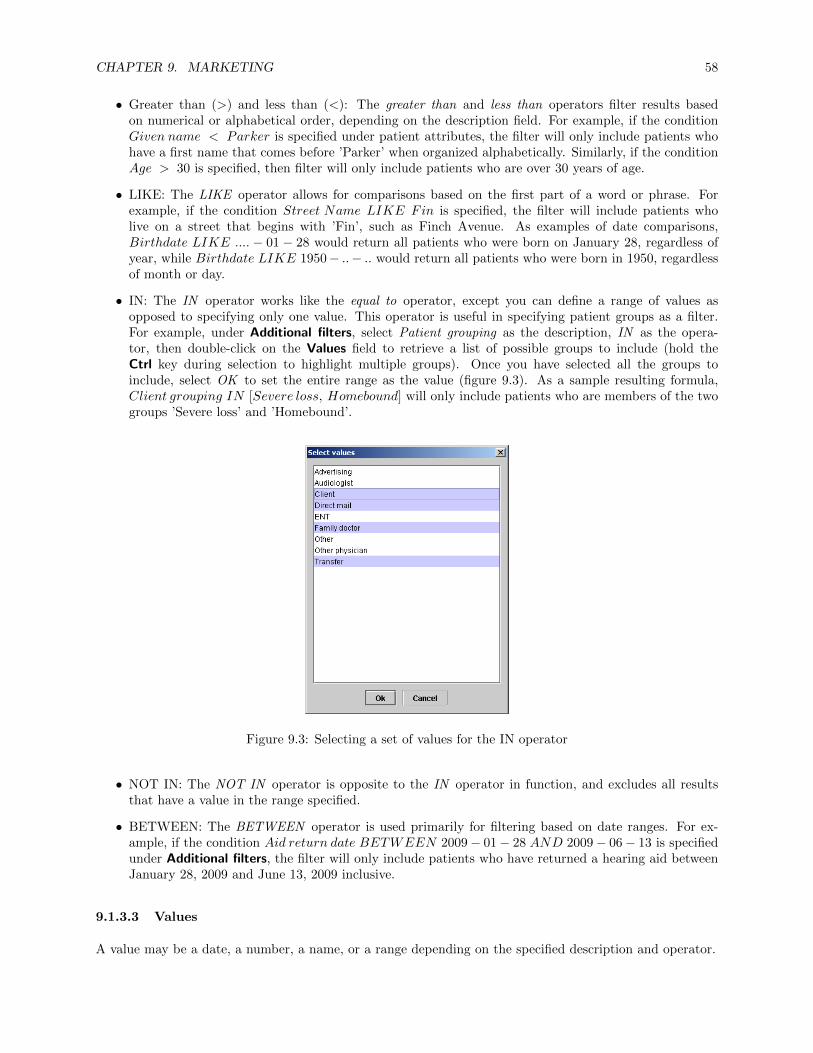
CHAPTER 9. MARKETING 58
• Greater than (>) and less than (<): The greater than and less than operators filter results basedon numerical or alphabetical order, depending on the description field. For example, if the conditionGiven name < Parker is specified under patient attributes, the filter will only include patients whohave a first name that comes before ’Parker’ when organized alphabetically. Similarly, if the conditionAge > 30 is specified, then filter will only include patients who are over 30 years of age.
• LIKE: The LIKE operator allows for comparisons based on the first part of a word or phrase. Forexample, if the condition Street Name LIKE Fin is specified, the filter will include patients wholive on a street that begins with ’Fin’, such as Finch Avenue. As examples of date comparisons,Birthdate LIKE .... − 01 − 28 would return all patients who were born on January 28, regardless ofyear, while Birthdate LIKE 1950− ..− .. would return all patients who were born in 1950, regardlessof month or day.
• IN: The IN operator works like the equal to operator, except you can define a range of values asopposed to specifying only one value. This operator is useful in specifying patient groups as a filter.For example, under Additional filters, select Patient grouping as the description, IN as the opera-tor, then double-click on the Values field to retrieve a list of possible groups to include (hold theCtrl key during selection to highlight multiple groups). Once you have selected all the groups toinclude, select OK to set the entire range as the value (figure 9.3). As a sample resulting formula,Client grouping IN [Severe loss, Homebound] will only include patients who are members of the twogroups ’Severe loss’ and ’Homebound’.
Figure 9.3: Selecting a set of values for the IN operator
• NOT IN: The NOT IN operator is opposite to the IN operator in function, and excludes all resultsthat have a value in the range specified.
• BETWEEN: The BETWEEN operator is used primarily for filtering based on date ranges. For ex-ample, if the condition Aid return date BETWEEN 2009− 01− 28 AND 2009− 06− 13 is specifiedunder Additional filters, the filter will only include patients who have returned a hearing aid betweenJanuary 28, 2009 and June 13, 2009 inclusive.
9.1.3.3 Values
A value may be a date, a number, a name, or a range depending on the specified description and operator.

CHAPTER 9. MARKETING 59
When making value comparisons using operators, all values are case-sensitive, which means that Surname ! =Smith will not return the same results as Surname ! = smith, as the former condition has the word ’Smith’capitalized.
When making date comparisons, the date that you input must be in YYYY-MM-DD format.
9.1.4 Editing marketing campaigns
By double-clicking on a campaign in the marketing campaign tab or pressing the Edit details button withthe campaign selected, the campaign details will appear, allowing you to specify the criteria used to targetpatients in a particular campaign. The first subtab under the campaign details, titled Selected patients,displays a list of patients that are part of the campaign (figure 9.4). You can add and remove patientsmanually from the campaign by selecting Add/remove manually, similar to the procedures outlined insection 9.2.1.
Figure 9.4: List of patients included in a campaign
To automatically include or exclude patients in the campaign based on criteria that you specify, navigateto the Selection criteria subtab. The primary and additional filters can be created here according to yourneeds (figure 9.5).
• Primary filters: These filters are the ones most often used by clinics that send out mail campaigns.Each of these has a set of default conditions for which the values must be specified. For example, if theLast insured aid purchase filter is selected, the Fit date and Patient insurer conditions appear underFilter parameters and must be completed.
• Patient attributes: Patient attributes are filters for information associated directly with the patient,such as information displayed in the Patient details tab of a patient in the Patient browser.
• Additional filters: These are filters for additional information, such as hearing aid model, patientinsurer, date of last appointment, etc.
Procedures on building conditions for filters are outlined in the previous section, 9.1.3. Once all filters havebeen specified, select Execute and Blueprint OMS will run a search on the patient listing based on the filtersin place. You will be notified of the number of patients who meet the filtering requirements, and the patientswill be included in the Selected patients subtab (figure 9.6).
At this point, you can either add/remove patients from the campaign manually (as described previously inthis section), or choose to print patient details to the desired form of correspondence. To print, press thePrint button, which will display the Set correspondence details screen, in which you can select the followingprinting details (figure 9.7):
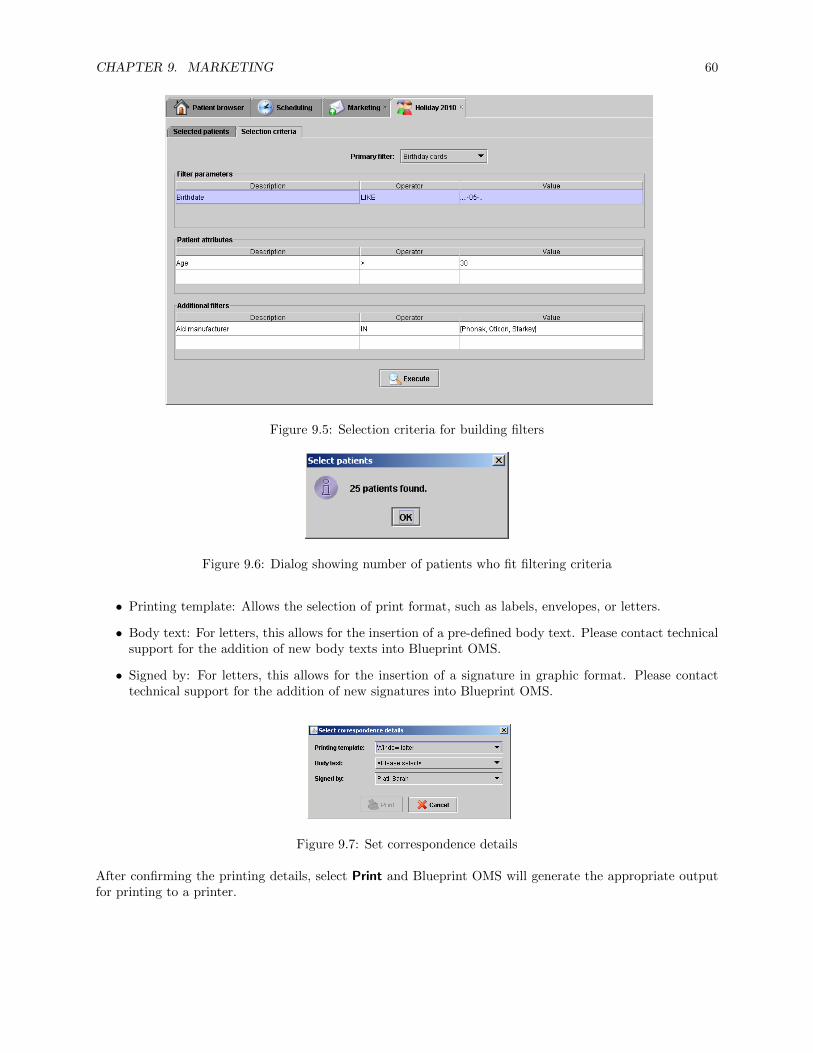
CHAPTER 9. MARKETING 60
Figure 9.5: Selection criteria for building filters
Figure 9.6: Dialog showing number of patients who fit filtering criteria
• Printing template: Allows the selection of print format, such as labels, envelopes, or letters.
• Body text: For letters, this allows for the insertion of a pre-defined body text. Please contact technicalsupport for the addition of new body texts into Blueprint OMS.
• Signed by: For letters, this allows for the insertion of a signature in graphic format. Please contacttechnical support for the addition of new signatures into Blueprint OMS.
Figure 9.7: Set correspondence details
After confirming the printing details, select Print and Blueprint OMS will generate the appropriate outputfor printing to a printer.

CHAPTER 9. MARKETING 61
9.1.5 Deleting marketing campaigns
To delete an existing marketing campaign, select the appropriate campaign under the marketing campaigntab, then press Delete. You will be asked to confirm the operation prior to deletion.
9.2 Patient groups
Patient groups can be created and used to include specific patients in marketing campaigns. To show allexisting patient groups, select the Patient groups tab under the main marketing tab, which will display thelist of patient groups by description and number of patients who are members of the group (figure 9.8). Toview more information about a group, either select the group and click the Edit details button, or double-clickon the group, which will bring up a new tab for the group.
Figure 9.8: Patient groups
9.2.1 Adding or removing patients to/from a group
In the patient group details screen, a list of patients who belong to this group is displayed. Patients can bemanually added to or removed from a group by selecting Add/remove manually, which will bring up a listof patients to be added (figure 9.9).
By selecting patients from the Available patients list on the right (multiple patients can be selected byholding the Ctrl key during selection), then clicking on the green arrow pointing left, the selection will beadded to the Selected patients list on the left, which shows all patients in the current group. Similarly toremove a patient from the group, simply highlight the patient under the Selected patients list on the left,then click on the green arrow pointing to the right.
Please note that the Available patients list only shows patients that can be accessed in the current location.If you have access to multiple locations and want to add patients from different locations, please navigateback to the Patient browser and select All or your desired location in the location selection box. Individualpatients can also be added to existing groups by selecting a patient in the Patient browser, navigating tothe marketing tab, then choosing Add to bring up a list of existing groups (figure 9.10).

CHAPTER 9. MARKETING 62
Figure 9.9: Adding/removing patients to and from groups
Figure 9.10: Adding individual patients to groups

Chapter 10
Setting up insurers in Blueprint OMS
This section outlines the process of setting up a list of insurers to be stored within Blueprint OMS, whichis necessary when updating insurers in client files, or when setting up insurer-specific benefit codes for salesitems and services.
To view the list of insurers currently stored in the system, click on Setup in the left sidebar, then navigateto the insurers tab (figure10.1).
Figure 10.1: List of insurers
To add a new insurer, select Create new and this will bring up a dialog box with information about theinsurer that must be filled in (figure 10.2):
• Mandatory address fields: These include the fields name, street #, street, city, country, state, and zipcode
• Active: This checkbox indicates whether the insurer is active within the system
• Pays full amount: When checked, new sales and orders for clients under this insurer will allocate theentire cost of the order to the insurer by default
63

CHAPTER 10. SETTING UP INSURERS IN BLUEPRINT OMS 64
Figure 10.2: Adding a new insurer
• Invoice template: This field specifies the template to be used when an invoice to this insurer is generated
A similar dialog box will show up when editing details for an existing insurer in the system.