blue goose, our first “annual maintenance” - … annual maint.pdf · bottom of the rudder post,...
TRANSCRIPT

Blue Goose, our first “annual maintenance”
A little background info to start off—Blue Goose was built in 1928, and had a major rebuild in the early
1990’s after she was purchased by the previous owner. That work was done by Pease Bro.s, now in Chatham,
on Cape Cod. We purchased Blue Goose on Jan. 27, 2014, after a haul out and survey in Beaufort, NC. The
surveyor said, “I don’t see any deal-breakers, just items for regular annual maintenance,” so home she came to
New Bern. We sailed her thru June, and hauled her for regular annual maintenance about July 1.
She had lived in the water at Beaufort since 1997, with annual haul outs for paint, repairs, etc. The previous
owner, Capt. Tom, had paid her close attention for those 20+ years, and she appeared to be in fine shape –
until we got a good look at her when we finally got about 5 layers of bottom paint removed. This is an
account of what must be expected when buying or owning an old wooden boat; it will have ongoing
deterioration no matter how closely it may be cared for and attended to. The following major areas were
found in need of close attention and repairs:
1. Wormshoe aft end at rudder post
2. Bottom paint removal
3. Keel deadwood
4. Transom
5. Mast
6. “house/coach” sides and general paint work
7. Below the waterline planking
1. Wormshoe, rudder pintle – even before the paint stripping got going, I found some “voids” at the bottom
support for the rudder shaft. At the survey it wasn’t obvious without probing. It turned out to be more than a
little void, it was a tunnel, or many tunnels made by worms which had gotten up into the deadwood and had
their dinners heading forward with the grain. The largest tube was about 3/8” in dia. And the longest went in
about 24 inches.
bottom of the rudder post, the paint covers the worst of the worms’ work

holes viewable after first cut
I undertook this job, and used a 4” x 5” piece Sapele for the wood.
2. There were approximately 5 coats of paint buildup on the bottom; this was pointed out as needing removal
when she was surveyed. We let the hull dry out for about 2 weeks before trying to grind off the paint. It was
still so saturated that it just clogged up any grinding or sanding efforts. A week later the results were the
same. Media blasting was recommended, and I agreed, but only with close supervision. An expert outfit was
brought in, they first tried walnut shells, but I put an end to that quickly, it was too aggressive and if not
watched very closely would easily get into the wood. Finally, glass beads were used; they did not cut quickly,
and took a long time, but did not damage the hull. Still, there was paint remaining in many areas, it was
finally ground off after it had dried for another week or 2.
We are into August now, and it's hard to find someone who can work on wooden boats, much less willing to
do so. I kind of know what needs to be done, but haven't got the experience to do it all correctly. After
contacting several who might have been able to do the work, I finally got together with Mike, who started in
mid-month, after recovering from knee surgery. He knows what to do, has the tools, works quickly, does a
good job, and is reasonable. He likes to work alone, so I don’t bother him (much). We communicate by
email a lot, as neither of us has much luck with cellfones.

3. Here’s a note from Mike – “whomever replaced the shaft log section with the salt treated lumber, rather
than use the existing iron rods to tie in the new pieces, they decided rather to just cut them off at the old level.
In other words, all the existing old rodding that I exposed from removing the rotted lumber had no tie in at all
with the newer replaced shaft log sections, therefore I will be cutting them off flush with the old wood left
intact. To tie in the new pieces I install with the existing old sections, I will have to make up a couple of
stainless steel straps out of 1/8 inch material, which will be installed on either side of the keel running approx.
24 inches in length perpendicular to the waterline, and through bolted at three intervals with stainless steel
threaded rod, tying together the upper salt treated section to the new mahogany section I will install, and as
well to the lower original keel section. This will ensure a rigid and failsafe support for the rudder skeg. The
straps will be of dimensions of approx. 1/8 x 2 1/2 x 24 inches.”
After doing the first section we discovered another large area rotten all the way through, just below the first.
It was repaired in similar fashion.
Initial repair
the second area, just below the first

Mike, the master Boatwright at work
4. Transom -- Pat and I were away for the first 2 wks in Sept. Here’s a note and pix we got while bareboating
on a canal in France –
“The paint on the transom peeled off in strips. Also on the transom, there are two rotten spots. On the port
side, on the half round trim, there is also a rotten spot and an area that needs to be reattached. On the white on
the port side there is an area that was rotten but just had hardener injected into it but was not repaired. That
came loose so I took it out. There are several planks that are opened fairly wide. Hope you are having a good
vacation.” (We had been)
We decided to replace the whole transom as there was more than first seen. Mike used Sapele, and did a
beautiful job. We all decided it would be a crime to paint it, so 5 coats of varnish were applied.

black and white can’t do a good job of showing this
5. Mast - Another note from Mike – “I decided to stop digging out the rotted section of the mast as I did not
want it to fall on my truck. We both were deceived yesterday morning when I was picking at it, as the lower
section had been wrapped with fiberglass cloth and epoxy resin. Whom ever did this pretty much set in place
the best environment there could possibly be to start a rotting process.”
Mast at the deck level
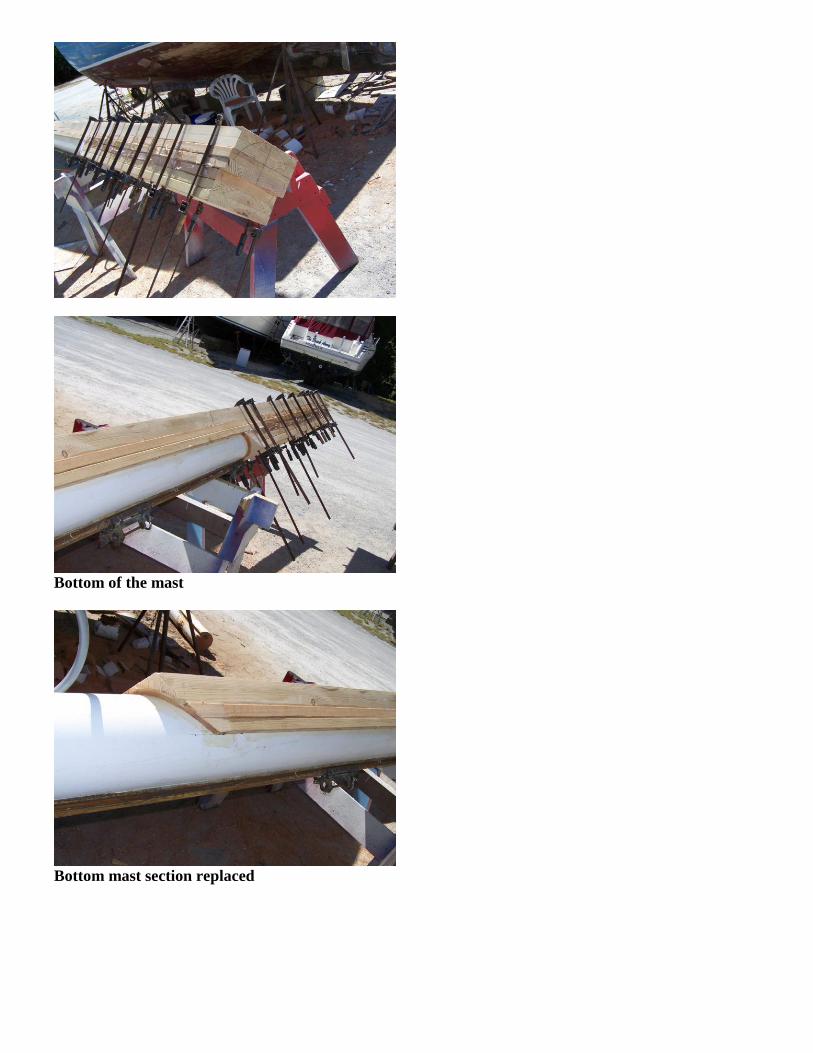
Bottom of the mast
Bottom mast section replaced

Rot at the top of the mast
Top of the mast
2 x 12 lengths of Douglas Fir were used in the bottom section of the mast, laminated with West System epoxy
as adhesive, and 2 x 4’s for the top.
6. Coach/house repair -- I had replaced a rotten section under a port light on the stbd side in the spring, Mike
did this one in about ¼ the time, and a lot prettier.

Another area, slightly bigger, was found on the other side, along with 2 or 3 smaller areas of rot. All these
areas corresponded to areas of water intrusion through the coach roof, into the cabin. Capt. Tom had tried to
locate points of invasion, with the aid of a friend and hose, but couldn’t find specific spots. Apparently water
would get through and travel along the sides and drip wherever it cared to. Some of these areas had been
patched with “plastic”, and rot had continued to spread behind it.
Also Mike made and replaced a section of moulding under the coach roof overhang.
7. bottom planking – there were 5 or 6 soft areas in the bottom planking, some of which, if pushed with a
prod, would find the prod in the bilge. Five coats of bottom paint will keep a boat together if it doesn’t span
too much. All of these areas were cut out and replaced, using juniper.

Finally, January 23, 2015, after almost 7 months on the hard, and 4 days short of a year after her purchase,
Blue Goose splashes.
At first, the 1100gph bilge pump was cycling on about every minute, for 10 seconds. The next day it was
about every 2 minutes, and after 4 days only once every 8 minutes. I had kept water in the bilge until about a
month earlier, that and Mike’s good work on patches kept things pretty tight. The thick, heavy oak barndoor
rudder’s joints had opened up about 3/8”; everyone who had seen it that way wondered why it had been built
“with those gaps”. After 4 weeks it was closed up under the waterline, and nearly closed above.
Some final thoughts --
Rot is inevitable in a wooden boat; it is the result of living organisms and continues if it is not removed from
an area completely. It’s a cancer of the wood. Covering it up with fiberglass does not stop the process, it can
actually speed it up by allowing moisture to be trapped behind it, never drying out. I know I’m no expert on
the subject, but I’ve had my memory refreshed after the 50+ years since I owned wooden boats. I remember
back then, fiberglass cloth and resin was new, and if a boat was in pretty rough shape, the saying was,
“fiberglass it,” but in our hearts we knew it was not the way to properly preserve a wooden boat. That’s still
true.
Midway in this endeavor, I read “Catboat Summers” by John E. Conway. In 1993 he bought a catboat
nearly 100 yrs old, and recounted his experiences of the following 10 years. After several years of upgrades,
repairs, revisions, etc., he set up a recurring 10 year maintenance program. Such a forward looking program
is necessary for custodians of such aging wooden boats. I hope I will be able to carry on our custodianship of
the Blue Goose as well as he has the Buckrammer’s
