blocking malware and prohibited files - · pdf filechapter 37-1 firesight system user guide 37...
TRANSCRIPT
C H A P T E R 37
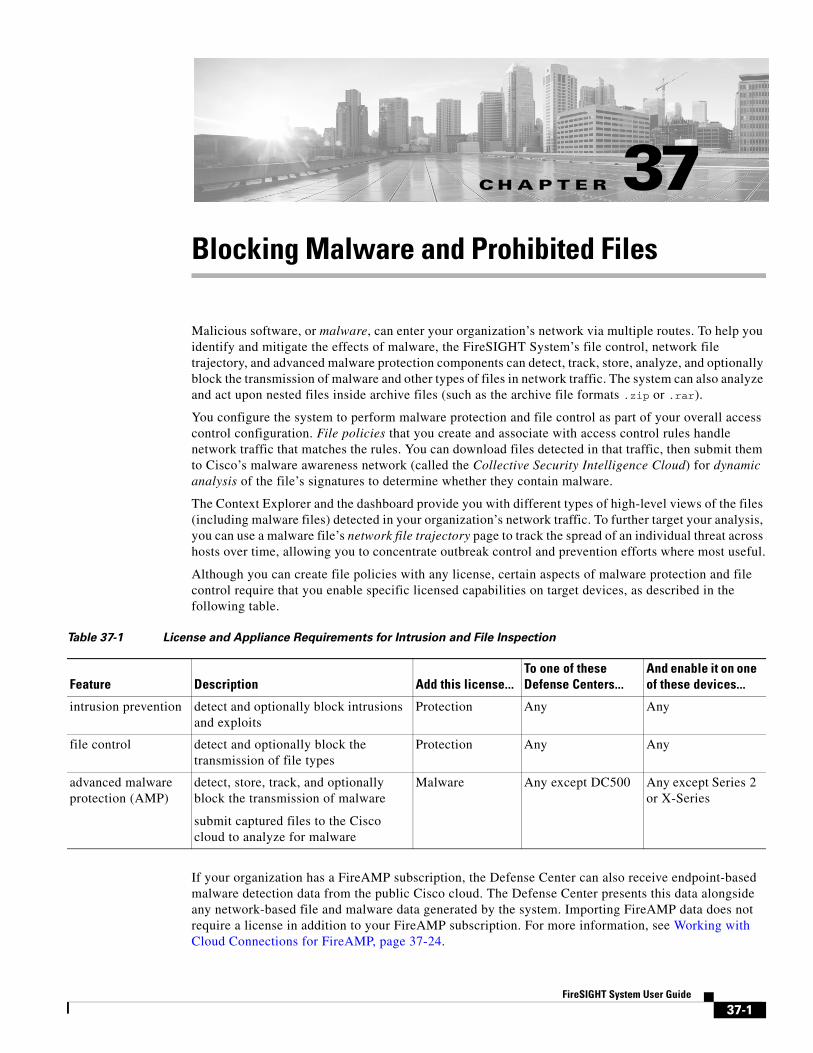
Blocking Malware and Prohibited FilesMalicious software, or malware, can enter your organization’s network via multiple routes. To help you identify and mitigate the effects of malware, the FireSIGHT System’s file control, network file trajectory, and advanced malware protection components can detect, track, store, analyze, and optionally block the transmission of malware and other types of files in network traffic. The system can also analyze and act upon nested files inside archive files (such as the archive file formats .zip or .rar).
You configure the system to perform malware protection and file control as part of your overall access control configuration. File policies that you create and associate with access control rules handle network traffic that matches the rules. You can download files detected in that traffic, then submit them to Cisco’s malware awareness network (called the Collective Security Intelligence Cloud) for dynamic analysis of the file’s signatures to determine whether they contain malware.
The Context Explorer and the dashboard provide you with different types of high-level views of the files (including malware files) detected in your organization’s network traffic. To further target your analysis, you can use a malware file’s network file trajectory page to track the spread of an individual threat across hosts over time, allowing you to concentrate outbreak control and prevention efforts where most useful.
Although you can create file policies with any license, certain aspects of malware protection and file control require that you enable specific licensed capabilities on target devices, as described in the following table.
If your organization has a FireAMP subscription, the Defense Center can also receive endpoint-based malware detection data from the public Cisco cloud. The Defense Center presents this data alongside any network-based file and malware data generated by the system. Importing FireAMP data does not require a license in addition to your FireAMP subscription. For more information, see Working with Cloud Connections for FireAMP, page 37-24.
Table 37-1 License and Appliance Requirements for Intrusion and File Inspection
Feature Description Add this license...To one of these Defense Centers...
And enable it on one of these devices...
intrusion prevention detect and optionally block intrusions and exploits
Protection Any Any
file control detect and optionally block the transmission of file types
Protection Any Any
advanced malware protection (AMP)
detect, store, track, and optionally block the transmission of malware
submit captured files to the Cisco cloud to analyze for malware
Malware Any except DC500 Any except Series 2 or X-Series
37-1FireSIGHT System User Guide

Chapter 37 Blocking Malware and Prohibited Files Understanding Malware Protection and File Control
For file and malware cloud-based features, you can use a FireAMP Private Cloud instead of the standard cloud connection if your organization requires additional security or wants to limit outside connections. All file and malware cloud lookups, as well as collection and relaying of event data from FireAMP endpoints, are handled through the private cloud; when the private cloud contacts the public Cisco cloud, it does so through an anonymized proxy connection that does not transmit your endpoint event data.
For more information, see:
• Understanding Malware Protection and File Control, page 37-2
• Understanding and Creating File Policies, page 37-9
• Working with Cloud Connections for FireAMP, page 37-24
For more information on evaluating event data related to malware protection and file control, see Analyzing Malware and File Activity, page 40-1.
Understanding Malware Protection and File ControlLicense: Protection, Malware, or Any
Supported Devices: feature dependent
Supported Defense Centers: feature dependent
Using the advanced malware protection feature, you can configure the FireSIGHT System to detect, store, track, analyze, and optionally block malware files being transmitted on your network, as shown in the following diagram.
The system can detect and optionally block malware in many types of files, including PDFs, Microsoft Office documents, and others. Managed devices monitor specific application protocol-based network traffic for transmissions of those file types. When a device detects an eligible file, it can send the file’s SHA-256 hash value to the Defense Center, which then performs a malware cloud lookup using that information. Based on these results, the Cisco cloud returns a file disposition to the Defense Center.
37-2FireSIGHT System User Guide

Chapter 37 Blocking Malware and Prohibited Files Understanding Malware Protection and File Control
When the system detects a file in network traffic, the file storage feature allows a device to store an eligible file to the hard drive or malware storage pack. For executable files with an Unknown disposition, the device can submit the file for dynamic analysis, regardless of whether the device stores the file. The cloud returns to the Defense Center:
• a threat score that describes the likelihood a file contains malware, and
• a dynamic analysis summary report that details why the cloud assigned the threat score.
If the file is an eligible executable file, the device can also perform a Spero analysis of the file structure and submit the resulting Spero signature to the cloud. Using this signature to supplement dynamic analysis, the cloud determines whether the file is malware.
If a file has a disposition in the cloud that you know to be incorrect, you can add the file’s SHA-256 value to a file list:
• To treat a file as if the cloud assigned a clean disposition, add the file to the clean list.
• To treat a file as if the cloud assigned a malware disposition, add the file to the custom detection list.
If the system detects a file’s SHA-256 value on a file list, it takes the appropriate action without performing a malware lookup or checking the file disposition. Note that you must configure a rule in the file policy with either a Malware Cloud Lookup or Block Malware action and a matching file type to calculate a file’s SHA value. You can enable use of the clean list or custom detection list on a per-file-policy basis. For more information on managing file lists, see Working with File Lists, page 3-34.
The system can inspect and block nested files inside archive files (such as .zip or .rar archive files) in much the same way as it analyzes and acts upon regular, uncompressed files. Note, however, that if your system blocks any nested file, it blocks the entire archive file that contains it. The system can inspect up to 3 levels of nested files beneath the outermost archive file (which is level 0). You can configure your file policy to block archive files that exceed a specified level of nesting (up to a maximum of 3 levels).
You can also configure your file policy to block archive files whose contents are encrypted or otherwise unable to be inspected. For more information on archive file inspection, see Configuring Archive File Inspection Options, page 37-20.
To inspect or block files, you must enable a Protection license on the managed devices where you apply policies. To store files, perform malware cloud lookups on and optionally block malware files, submit files to the cloud for dynamic analysis, or add files to a file list, you must also enable a Malware license for those devices.
Understanding File Dispositions
The system determines file dispositions based on the disposition returned by the Cisco cloud. A file can have one of the following file dispositions returned by the Cisco cloud, as a result of addition to a file list, or due to threat score:
• Malware indicates that the cloud categorized the file as malware, or that the file’s threat score exceeded the malware threshold defined in the file policy.
• Clean indicates that the cloud categorized the file as clean, or that a user added the file to the clean list.
• Unknown indicates that a malware cloud lookup occurred before the cloud assigned a disposition. The cloud has not categorized the file.
• Custom Detection indicates that a user added the file to the custom detection list.
• Unavailable indicates that the Defense Center could not perform a malware cloud lookup. You may see a small percentage of events with this disposition; this is expected behavior.
37-3FireSIGHT System User Guide

Chapter 37 Blocking Malware and Prohibited Files Understanding Malware Protection and File Control
Tip If you see several Unavailable malware events in quick succession, check your cloud connection and port configuration. For more information, see Security, Internet Access, and Communication Ports, page E-1.
Archive files have dispositions based on the dispositions assigned to the files inside the archive. The Archive File Disposition by Contents below lists the dispositions that archive files receive for different possible combinations of files that the archive contains. All archives that contain identified malware files receive a disposition of Malware. Archives without identified malware files receive a disposition of Unknown if they contain any unknown files, and a disposition of Clean if they contain only clean files. For more information on archive file inspection, see Configuring Archive File Inspection Options, page 37-20. Archive files, like other files, may have dispositions of Custom Detection or Unavailable if the conditions for those dispositions apply.
Based on the file disposition, the Defense Center instructs the managed device either to block the file or to allow its upload or download. Note that if any nested file inside an archive file is blocked, the system blocks the entire archive file. To improve performance, if the system already knows the disposition for a file based on its SHA-256 value, the Defense Center uses the cached disposition rather than querying the Cisco cloud.
Note that file dispositions can change. For example, the cloud can determine that a file that was previously thought to be clean is now identified as malware, or the reverse—that a malware-identified file is actually clean. When the disposition changes for a file for which you performed a malware lookup in the last week, the cloud notifies the Defense Center so the system can take appropriate action the next time it detects that file being transmitted. A changed file disposition is called a retrospective disposition.
File dispositions returned from a malware cloud lookup, and any associated threat scores, have a time-to-live (TTL) value. After a file disposition has been held for the duration specified in the TTL value without update, the system purges the cached information. Dispositions and associated threat scores have the following TTL values:
• Clean — 4 hours
• Unknown — 1 hour
• Malware — 1 hour
If a malware cloud lookup against the cache identifies a cached disposition that timed out, the system performs a fresh lookup to determine a file disposition.
Understanding File Control
If your organization wants to block not only the transmission of malware files, but all files of a specific type (regardless of whether the files contain malware), the file control feature allows you to cast a wider net. As with malware protection, managed devices monitor network traffic for transmissions of specific file types, then either block or allow the file.
Table 37-2 Archive File Disposition by Contents
Archive File DispositionNumber of Unknown Files Number of Clean Files
Number of Malware Files
Unknown 1 or more Any 0
Clean 0 1 or more 0
Malware Any Any 1 or more
37-4FireSIGHT System User Guide

Chapter 37 Blocking Malware and Prohibited Files Understanding Malware Protection and File Control
File control is supported for all file types where the system can detect malware, plus many additional file types. These file types are grouped into basic categories, including multimedia (swf, mp3), executables (exe, torrent), and PDFs. Note that file control, unlike malware protection, does not require queries of the Cisco cloud.
Using Captured Files, File Events, and Malware Events for Analysis
The system generates malware and file events when files are transferred or blocked. It also collects information on any files captured by a managed device. You can view these events and information using the Defense Center‘s web interface. Additionally, the Context Explorer and the dashboard provide you with different types of high-level views of the files (including malware files) detected by your organization.
To further target your analysis, the network file trajectory feature allows you to track individual files’ paths of transmission. A file’s trajectory page displays summary information about the file, a graphical map of the file’s transmission from host to host (including blocked transmissions), and a list of the malware or file events associated with the detection or blocking of those files.
Note that because you cannot use a Malware license with a DC500, nor enable a Malware license on a Series 2 device or Cisco NGIPS for Blue Coat X-Series, you cannot use those appliances to capture or block individual files, submit files for dynamic analysis, or view file trajectories for files for which you conduct a malware cloud lookup.
For more information, see the following sections:
• Configuring Malware Protection and File Control, page 37-5
• Logging Events Based on Malware Protection and File Control, page 37-6
• Integrating FireAMP with the FireSIGHT System, page 37-7
• Network-Based AMP vs Endpoint-Based FireAMP, page 37-7
• Working with Network File Trajectory, page 40-34
Configuring Malware Protection and File ControlLicense: Protection or Malware
Supported Devices: feature dependent
Supported Defense Centers: feature dependent
You configure malware protection and file control as part of your overall access control configuration by associating file policies with access control rules. This association ensures that before the system passes a file in traffic that matches an access control rule’s conditions, it first inspects the file.
A file policy, like its parent access control policy, contains rules that determine how the system handles files that match the conditions of each rule. You can configure separate file rules to take different actions for different file types, application protocols, or directions of transfer.
When a file matches a rule, the rule can:
• allow or block files based on simple file type matching
• block files based on malware file disposition
• capture files and store them to the device
• submit captured files for dynamic analysis
In addition, the file policy can:
37-5FireSIGHT System User Guide

Chapter 37 Blocking Malware and Prohibited Files Understanding Malware Protection and File Control
• automatically treat a file as if it is clean or malware based on entries in the clean list or custom detection list
• treat a file as if it is malware if the file’s threat score exceeds a configurable threshold
• inspect the contents of archive files (such as .zip or .rar)
• block archive files whose contents are encrypted, nested beyond a specified maximum archive depth, or otherwise not inspectable
As a simple example, you could implement a file policy that blocks your users from downloading executable files. As another example, you could examine downloaded PDFs for malware and block any instances you find. For detailed information on file policies and associating them with access control rules, see Understanding and Creating File Policies, page 37-9 and Tuning Intrusion Prevention Performance, page 18-8.
Because you cannot use a Malware license with a DC500, you cannot use that appliance to apply file policies that perform network-based malware protection or inspect the contents of archive files. Similarly, because you cannot enable a Malware license on a Series 2 device or Cisco NGIPS for Blue Coat X-Series, you cannot apply a file policy to those appliances that performs network-based malware protection or inspects the contents of archive files.
Logging Events Based on Malware Protection and File ControlLicense: Protection or Malware
Supported Devices: feature dependent
Supported Defense Centers: feature dependent
The Defense Center logs records of the system’s file inspection and handling as captured files, file events, and malware events:
• Captured files represent files that the system captured.
• File events represent files that the system detected, and optionally blocked, in network traffic.
• Malware events represent malware files detected, and optionally blocked, in network traffic by the system.
• Retrospective malware events represent files whose malware file dispositions have changed.
When the system generates a malware event based on detection or blocking of malware in network traffic, it also generates a file event, because to detect malware in a file the system must first detect the file itself. Note that endpoint-based malware events generated by FireAMP Connectors (see Integrating FireAMP with the FireSIGHT System, page 37-7) do not have corresponding file events. Similarly, when the system captures a file in network traffic, it also generates a file event because the system first detected the file.
You can use the Defense Center to view, manipulate, and analyze captured files, file events, and malware events, then communicate your analysis to others. The Context Explorer, dashboards, event viewer, network file trajectory map, and reporting features can give you a deeper understanding of the files and malware detected, captured, and blocked. You can also use events to trigger correlation policy violations, or alert you via email, SMTP, or syslog. For detailed information on file and malware events, see Working with File Events, page 40-7 and Working with Malware Events, page 40-16.
Because you cannot use a Malware license with a DC500, nor can you enable a Malware license on a Series 2 device or Cisco NGIPS for Blue Coat X-Series, you cannot use those appliances to generate or analyze captured files, file events, and malware events associated with malware cloud lookups or with the contents of archive files.
37-6FireSIGHT System User Guide

Chapter 37 Blocking Malware and Prohibited Files Understanding Malware Protection and File Control
Integrating FireAMP with the FireSIGHT SystemLicense: Any
FireAMP is Cisco’s enterprise-class advanced malware analysis and protection solution that discovers, understands, and blocks advanced malware outbreaks, advanced persistent threats, and targeted attacks.
If your organization has a FireAMP subscription, individual users install FireAMP Connectors on endpoints: computers and mobile devices. A FireAMP Connector is a lightweight agent that, among other capabilities, can inspect files upon upload, download, execution, open, copy, move, and so on. These connectors communicate with the Cisco cloud to determine if inspected files contain malware.
When a file is positively identified as malware, the cloud sends the threat identification to the Defense Center. The cloud can also send other kinds of information to the Defense Center, including data on scans, quarantines, blocked executions, and cloud recalls. The Defense Center logs this information as malware events.
With a FireAMP deployment, you can not only configure Defense Center-initiated remediations and alerts based on malware events, but you can also use the FireAMP portal (http://amp.sourcefire.com/) to help you mitigate the effect of malware. The portal provides a robust, flexible web interface where you control all aspects of your FireAMP deployment and manage all phases of an outbreak. You can:
• configure custom malware detection policies and profiles for your entire organization, as well as perform flash and full scans on all your users’ files
• perform malware analysis, including view heat maps, detailed file information, network file trajectory, and threat root causes
• configure multiple aspects of outbreak control, including automatic quarantines, application blocking to stop non-quarantined executables from running, and exclusion lists
• create custom protections, block execution of certain applications based on group policy, and create custom whitelists
For more information, see the following sections:
• Network-Based AMP vs Endpoint-Based FireAMP, page 37-7 compares the malware protection strategies available in the Cisco family of products.
• Working with Cloud Connections for FireAMP, page 37-24 explains how to establish communications between the Defense Center and the Cisco cloud, either directly or via a FireAMP Private Cloud connection.
Tip For detailed information on FireAMP, refer to the online help on the FireAMP portal.
Network-Based AMP vs Endpoint-Based FireAMPLicense: Malware or Any
Supported Devices: feature dependent
Supported Defense Centers: feature dependent
The following diagram shows how you can use the Defense Center to work with data from both a network-based advanced malware protection strategy and an endpoint-based FireAMP strategy.
37-7FireSIGHT System User Guide

Chapter 37 Blocking Malware and Prohibited Files Understanding Malware Protection and File Control
Note that because FireAMP malware detection is performed at the endpoint at download or execution time, while managed devices detect malware in network traffic, the information in the two types of malware events is different. For example, endpoint-based malware events contain information on file path, invoking client application, and so on, while malware detections in network traffic contain port, application protocol, and originating IP address information about the connection used to transmit the file.
As another example, for network-based malware events, user information represents the user most recently logged into the host where the malware was destined, as determined by network discovery. On the other hand, FireAMP-reported users represent the user currently logged into the endpoint where the malware was detected, as determined by the local connector.
Note The IP addresses reported in endpoint-based malware events may not be in your network map—and may not even be in your monitored network. Depending on your deployment, network architecture, level of compliance, and other factors, the endpoints where connectors are installed may not be the same hosts as those monitored by your managed devices.
Note that because you cannot use a Malware license with a DC500, nor enable a Malware license on a Series 2 device or Cisco NGIPS for Blue Coat X-Series, you cannot use those appliances to capture or block individual files, submit files for dynamic analysis, inspect the contents of archive files, or view trajectories of files for which you conduct a malware cloud lookup.
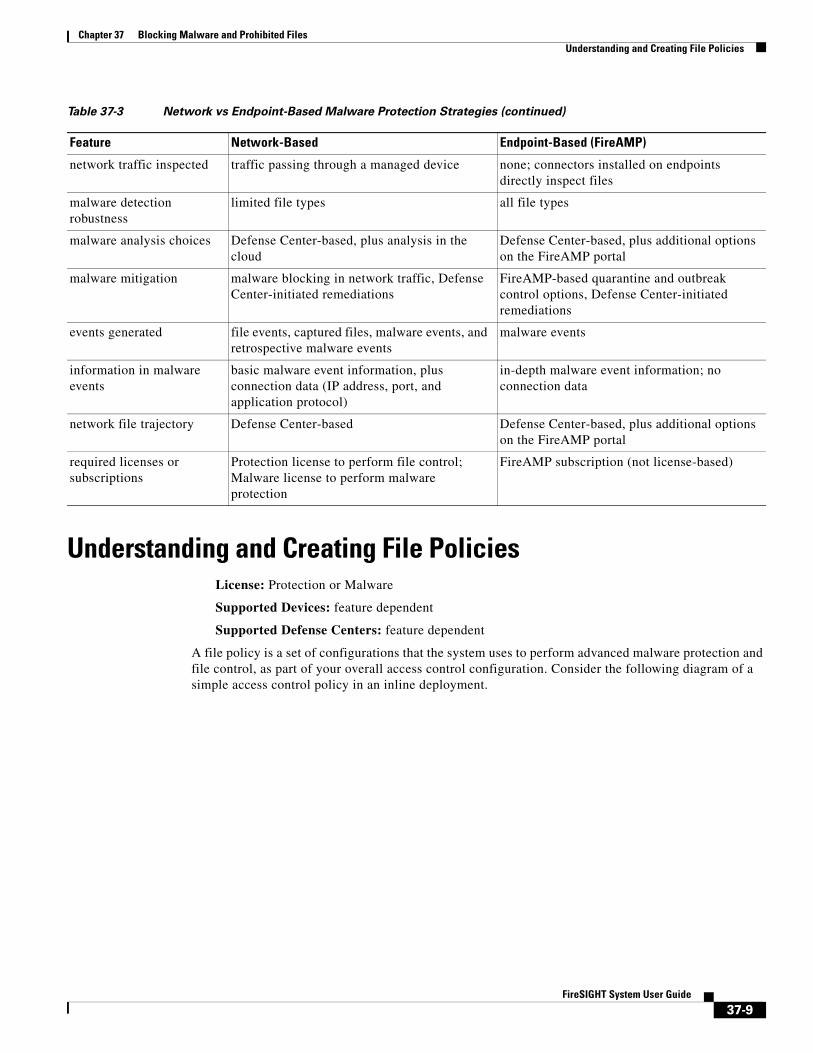
The following table summarizes the differences between the two strategies.
Table 37-3 Network vs Endpoint-Based Malware Protection Strategies
Feature Network-Based Endpoint-Based (FireAMP)
file type detection and blocking method (file control)
in network traffic, using access control and file policies
not supported
malware detection and blocking method
in network traffic, using access control and file policies
on individual endpoints, using an installed connector that communicates with the Cisco cloud
37-8FireSIGHT System User Guide
Chapter 37 Blocking Malware and Prohibited Files Understanding and Creating File Policies
Understanding and Creating File PoliciesLicense: Protection or Malware
Supported Devices: feature dependent
Supported Defense Centers: feature dependent
A file policy is a set of configurations that the system uses to perform advanced malware protection and file control, as part of your overall access control configuration. Consider the following diagram of a simple access control policy in an inline deployment.
network traffic inspected traffic passing through a managed device none; connectors installed on endpoints directly inspect files
malware detection robustness
limited file types all file types
malware analysis choices Defense Center-based, plus analysis in the cloud
Defense Center-based, plus additional options on the FireAMP portal
malware mitigation malware blocking in network traffic, Defense Center-initiated remediations
FireAMP-based quarantine and outbreak control options, Defense Center-initiated remediations
events generated file events, captured files, malware events, and retrospective malware events
malware events
information in malware events
basic malware event information, plus connection data (IP address, port, and application protocol)
in-depth malware event information; no connection data
network file trajectory Defense Center-based Defense Center-based, plus additional options on the FireAMP portal
required licenses or subscriptions
Protection license to perform file control; Malware license to perform malware protection
FireAMP subscription (not license-based)
Table 37-3 Network vs Endpoint-Based Malware Protection Strategies (continued)
Feature Network-Based Endpoint-Based (FireAMP)
37-9FireSIGHT System User Guide

Chapter 37 Blocking Malware and Prohibited Files Understanding and Creating File Policies
The policy has two access control rules, both of which use the Allow action and are associated with file policies. The policy’s default action is also to allow traffic, but without file policy inspection. In this scenario, traffic is handled as follows:
• Traffic that matches Rule 1 is inspected by File Policy A.
• Traffic that does not match Rule 1 is evaluated against Rule 2. Traffic that matches Rule 2 is inspected by File Policy B.
• Traffic that does not match either rule is allowed; you cannot associate a file policy with the default action.
A file policy, like its parent access control policy, contains rules that determine how the system handles files that match the conditions of each rule. You can configure separate file rules to take different actions for different file types, application protocols, or directions of transfer.
Once a file matches a rule, the rule can:
• allow or block files based on simple file type matching
• block files based on Malware file disposition
• store captured files to the device
• submit captured files for dynamic analysis
In addition, the file policy can:
• automatically treat a file as if it is clean or malware based on entries in the clean list or custom detection list
• treat a file as if it is malware if the file’s threat score exceeds a configurable threshold
• inspect the contents of archive files (such as .zip or .rar)
• block archive files whose contents are encrypted, nested beyond a specified maximum archive depth, or otherwise not inspectable
You can associate a single file policy with an access control rule whose action is Allow, Interactive Block, or Interactive Block with reset. The system then uses that file policy to inspect network traffic that meets the conditions of the access control rule. By associating different file policies with different access control rules, you have granular control over how you identify and block files transmitted on your
37-10FireSIGHT System User Guide

Chapter 37 Blocking Malware and Prohibited Files Understanding and Creating File Policies
network. Note, however, that you cannot use a file policy to inspect traffic handled by the access control default action. For detailed information, see Inspecting Allowed Traffic For Intrusions and Malware, page 18-2.
File Rules
You populate a file policy with file rules. The following table describes the components of a file rule.
File Rule Actions and Evaluation Order
Each file rule has an associated action that determines how the system handles traffic that matches the conditions of the rule. You can set separate rules within a file policy to take different actions for different file types, application protocols, or directions of transfer. The rule actions are as follows, in rule-action order:
Table 37-4 File Rule Components
File Rule Component Description
application protocol The system can detect and inspect files transmitted via FTP, HTTP, SMTP, IMAP, POP3, and NetBIOS-ssn (SMB). To improve performance, you can restrict file detection to only one of those application protocols on a per-file rule basis.
direction of transfer You can inspect incoming FTP, HTTP, IMAP, POP3, and NetBIOS-ssn (SMB) traffic for downloaded files; you can inspect outgoing FTP, HTTP, SMTP, and NetBIOS-ssn (SMB) traffic for uploaded files.
file categories and types The system can detect various types of files. These file types are grouped into basic categories, including multimedia (swf, mp3), executables (exe, torrent), and PDFs. You can configure file rules that detect individual file types, or on entire categories of file types.
For example, you could block all multimedia files, or just ShockWave Flash (swf) files. Or, you could configure the system to alert you when a user downloads a BitTorrent (torrent) file.
Caution Adding or removing a file type or file category restarts the Snort process when you apply your changes, temporarily interrupting traffic. Whether traffic drops during this interruption or passes without further inspection depends on the model of the managed device and how it handles traffic. See How Snort Restarts Affect Traffic, page 1-9 for more information.
Caution Frequently triggered file rules can affect system performance. For example, detecting multimedia files in HTTP traffic (YouTube, for example, transmits significant Flash content) could generate an overwhelming number of events.
file rule action A file rule’s action determines how the system handles traffic that matches the conditions of the rule.
Note File rules are evaluated in rule-action, not numerical, order. For more information, see the next section, File Rule Actions and Evaluation Order.
37-11FireSIGHT System User Guide

Chapter 37 Blocking Malware and Prohibited Files Understanding and Creating File Policies
• Block Files rules allow you to block specific file types.
• Block Malware rules allow you to calculate the SHA-256 hash value of specific file types, then use a cloud lookup process to first determine if files traversing your network contain malware, then block files that represent threats.
• Malware Cloud Lookup rules allow you to log the malware disposition of files traversing your network based on a cloud lookup, while still allowing their transmission.
• Detect Files rules allow you to log the detection of specific file types to the database, while still allowing their transmission.
Caution Changing a file rule action to or from Detect Files or Block Malware, or enabling or disabling Store FIles, restarts the Snort process when you apply your access control policy, temporarily interrupting traffic inspection. Whether traffic drops during this interruption or passes without further inspection depends on the model of the managed device and how it handles traffic. See How Snort Restarts Affect Traffic, page 1-9.
For each file rule action, you can configure options to reset the connection when a file transfer is blocked, store captured files to the managed device, and submit captured files to the cloud for dynamic and Spero analysis. The following table details the options available to each file action.
File and Malware Detection, Capture, and Blocking Notes and Limitations
Note the following details and limitations on file and malware detection, capture, and blocking behavior:
• If an end-of-file marker is not detected for a file, regardless of transfer protocol, the file will not be blocked by a Block Malware rule or the custom detection list. The system waits to block the file until the entire file has been received, as indicated by the end-of-file marker, and blocks the file after the marker is detected.
• If the end-of-file marker for an FTP file transfer is transmitted separately from the final data segment, the marker will be blocked and the FTP client will indicate that the file transfer failed, but the file will actually completely transfer to disk.
• FTP transfers commands and data over different channels. In a passive or inline tap mode deployment, the traffic from an FTP data session and its control session may not be load-balanced to the same Snort.
Table 37-5 File Rule Actions
Action Resets Connection? Stores Files? Dynamic Analysis? Spero Analysis for MSEXE?
Block Files yes (recommended) yes, you can store all matching file types
no no
Block Malware yes (recommended) yes, you can store file types matching the file dispositions you select
yes, you can submit executable files with unknown file dispositions
yes, you can submit executable files
Detect Files no yes, you can store all matching file types
no no
Malware Cloud Lookup
no yes, you can store file types matching the file dispositions you select
yes, you can submit executable files with unknown file dispositions
yes, you can submit executable files
37-12FireSIGHT System User Guide

Chapter 37 Blocking Malware and Prohibited Files Understanding and Creating File Policies
• If a file matches a rule with an application protocol condition, file event generation occurs after the system successfully identifies a file’s application protocol. Unidentified files do not generate file events.
• For an access control policy using a file policy with Block Malware rules for FTP, if you set the default action to an intrusion policy with Drop when Inline disabled, the system generates events for detected files or malware matching the rules, but does not drop the files. To block FTP fire transfers and use an intrusion policy as the default action for the access control policy where you select the file policy, you must select an intrusion policy with Drop when Inline enabled.
• File rules with Block Files and Block Malware actions block automatic resumption of file download via HTTP by blocking new sessions with the same file, URL, server, and client application detected for 24 hours after the initial file transfer attempt occurs.
• In rare cases, if traffic from an HTTP upload session is out of order, the system cannot reassemble the traffic correctly and therefore will not block it or generate a file event.
• If you transfer a file over NetBIOS-ssn (such as an SMB file transfer) that is blocked with a Block Files rule, you may see a file on the destination host. However, the file is unusable because it is blocked after the download starts, resulting in an incomplete file transfer.
• If you create file rules to detect or block files transferred over NetBIOS-ssn (such as an SMB file transfer), the system does not inspect files transferred in an established TCP or SMB session started before you apply an access control policy invoking the file policy so those files will not be detected or blocked.
• A rule configured to block files in a passive deployment does not block matching files. Because the connection continues to transmit the file, if you configure the rule to log the beginning of the connection, you may see multiple events logged for this connection.
• If the total number of bytes for all file names for files in a POP3, POP, SMTP, or IMAP session exceeds 1024, file events from the session may not reflect the correct file names for files that were detected after the file name buffer filled.
• When transmitting text-based files over SMTP, some mail clients convert newlines to the CRLF newline character standard. Since Mac-based hosts use the carriage return (CR) character and Unix/Linux-based hosts use the line feed (LF) character, newline conversion by the mail client can modify the size of the file. Note that some mail clients default to newline conversion when processing an unrecognizable file type.
• Cisco recommends that you enable Reset Connection for the Block Files and Block Malware actions to prevent blocked application sessions from remaining open until the TCP connection resets. If you do not reset connections, the client session will remain open until the TCP connection resets itself.
• If a file rule is configured with a Malware Cloud Lookup or Block Malware action and the Defense Center cannot establish connectivity with the cloud, the system cannot perform any configured rule action options until cloud connectivity is restored.
• If you are monitoring high volumes of traffic, do not store all captured files, or submit all captured files for dynamic analysis. Doing so can negatively impact system performance.
Note Until a file is detected and blocked in a session, packets from the session may be subject to intrusion inspection.
37-13FireSIGHT System User Guide

Chapter 37 Blocking Malware and Prohibited Files Understanding and Creating File Policies
File Rule Evaluation Example
Unlike in access control policies, where rules are evaluated in numerical order, file policies handle files in File Rule Actions and Evaluation Order, page 37-11. That is, simple blocking takes precedence over malware inspection and blocking, which takes precedence over simple detection and logging. As an example, consider four rules that handle PDF files in a single file policy. Regardless of the order in which they appear in the web interface, these rules are evaluated in the following order:
The Defense Center uses warning icons ( ) to designate conflicting file rules. For details, hover your pointer over a warning icon.
Note that you cannot perform malware analysis on all file types detected by the system. After you select values from the Application Protocol, Direction of Transfer, and Action drop-down lists, the system constrains the list of file types.
Note that because you cannot use a Malware license with a DC500, you cannot create file rules that use the Block Malware or Malware Cloud Lookup action or use that appliance to apply file policies that contain rules with those actions. Similarly, because you cannot enable a Malware license on a Series 2 device or Cisco NGIPS for Blue Coat X-Series, you cannot apply a file policy containing rules with those actions to those appliances.
Logging Captured Files, File Events, Malware Events and Alerts
When you associate a file policy with an access control rule, the system automatically enables file and malware event logging for matching traffic. If the file policy is configured to capture and store files, the system also automatically enables captured file logging when a file is captured. When the system inspects a file, it can generate the following types of events:
• file events, which represent detected or blocked files, and detected malware files
• malware events, which represent detected malware files
• retrospective malware events, which are generated when the Malware file disposition for a previously detected file changes
When a file policy generates a file or malware event, or captures a file, the system automatically logs the end of the associated connection to the Defense Center database, regardless of the logging configuration of the invoking access control rule.
Table 37-6 File Rule Evaluation Order Example
App. Protocol Direction Action Action Options Result
SMTP Upload Block Files Reset Connection Blocks users from emailing PDF files and resets the connection.
FTP Download Block Malware Store Files with Unknown Disposition, Reset Connection
Blocks the download of malware PDF files via file transfer, stores files with an Unknown file disposition to the device, and resets the connection.
POP3
IMAP
Download Malware Cloud Lookup Store Files with Unknown Disposition, Dynamic Analysis
Inspects PDF files received via email for malware, and stores files with an Unknown file disposition to the device. Submits the files to the Cisco cloud for dynamic analysis.
Any Any Detect Files none Detects and logs, but allows the traffic, when users view PDF files on the web (that is, via HTTP).
37-14FireSIGHT System User Guide

Chapter 37 Blocking Malware and Prohibited Files Understanding and Creating File Policies
Note File events generated by inspecting NetBIOS-ssn (SMB) traffic do not immediately generate connection events because the client and server establish a persistent connection. The system generates connection events after the client or server ends the session.
For each of these connection events:
• The Files field contains an icon ( ) that indicates the number of files (including malware files) detected in the connection; click the icon to see a list of those files and, for malware files, their file dispositions.
• The Reason field indicates the reason the connection event was logged, which depends on the file rule action:
• File Monitor for Detect Files and Malware Cloud Lookup file rules and for files on the clean list
• File Block for Block Files or Block Malware file rules
• File Custom Detection if the system encountered a file on the custom detection list
• File Resume Allow where file transmission was originally blocked by a Block Files or Block Malware file rule. After a new access control policy was applied that allowed the file, the HTTP session automatically resumed.
• File Resume Block where file transmission was originally allowed by a Detect Files or Malware Cloud Lookup file rule. After a new access control policy was applied that blocked the file, the HTTP session automatically stopped.
• For connections where a file or malware was blocked, the Action is Block.
As with any kind of event generated by the FireSIGHT System, you can view, manipulate, and analyze file and malware events using the Defense Center’s web interface. You can also use malware events to trigger correlation policy violations, or alert you via email, SMTP, or syslog.
Note The Defense Center can also receive malware events using your organization’s FireAMP subscription. Because these malware events are generated on endpoints at download or execution time, their information is different from that in network-based malware events.
For more information on connection, file, and malware events, as well as additional details on how they are logged, see:
• Logging Connections in Network Traffic, page 38-1
• Working with File Events, page 40-7
• Working with Malware Events, page 40-16
• Understanding Connection and Security Intelligence Data, page 39-2
Internet Access and High Availability
The system uses port 443 to perform malware cloud lookups for network-based AMP. You must open that port outbound on the Defense Center.
Although they share file policies and related configurations, Defense Centers in a high availability pair share neither cloud connections nor captured files, file events, and malware events. To ensure continuity of operations, and to ensure that detected files’ malware dispositions are the same on both Defense Centers, both primary and secondary Defense Centers must have access to the cloud.
To submit files to the cloud for dynamic analysis, you must also open port 443 outbound on the device.
37-15FireSIGHT System User Guide

Chapter 37 Blocking Malware and Prohibited Files Understanding and Creating File Policies
Note Note that the FireAMP Private Cloud requires the same open ports and has the same high availability limitations as the public Cisco cloud connection.
Managing File Policies
You create, edit, delete, and compare file policies on the File Policies page (Policies > Files), which displays a list of existing file policies along with their last-modified dates.
Clicking the apply icon ( ) for a file policy displays a dialog box that tells you which access control policies use the file policy, then redirects you to the Access Control Policy page. This is because you cannot apply a file policy independently, as a file policy is considered part of its parent access control policies. To use a new file policy, or to apply changes made to an existing file policy, you must apply or reapply the parent access control policies.
Note the following:
• The system checks the cloud for updates to the list of file types eligible for dynamic analysis (no more than once a day). If the list of eligible file types changes, this constitutes a change in the file policy; any access control policy using the file policy is marked out-of-date if applied to any devices. You must reapply the parent access control policy to apply the updated file policy to the device.
• You cannot delete a file policy used in a saved or applied access control policy.
For more information on managing file policies, see the following sections:
• Creating a File Policy, page 37-16
• Working with File Rules, page 37-17
• Comparing Two File Policies, page 37-23
Creating a File PolicyLicense: Protection or Malware
Supported Devices: feature dependent
Supported Defense Centers: feature dependent
After you create a file policy and populate it with rules, you can use it in an access control policy.
Note that because you cannot use a Malware license with a DC500, you cannot create file rules that use the Block Malware or Malware Cloud Lookup action or use that appliance to apply file policies that contain rules with those actions. Similarly, because you cannot enable a Malware license on a Series 2 device or Cisco NGIPS for Blue Coat X-Series, you cannot apply a file policy containing rules with those actions to those appliances.
Tip To make a copy of an existing file policy, click the copy icon ( ), then type a unique name for the new policy in the dialog box that appears. You can then modify the copy.
To create a file policy:
Access: Admin/Access Admin
Step 1 Select Policies > Files.
The File Policies page appears.
37-16FireSIGHT System User Guide

Chapter 37 Blocking Malware and Prohibited Files Understanding and Creating File Policies
Step 2 Click New File Policy.
The New File Policy dialog box appears.
For a new policy, the web interface indicates that the policy is not in use. If you are editing an in-use file policy, the web interface tells you how many access control policies use the file policy. In either case, you can click the text to jump to the Access Control Policies page; see Getting Started with Access Control Policies, page 12-1.
Step 3 Enter a Name and optional Description for your new policy, then click Save.
The File Policy Rules tab appears.
Step 4 Add one or more rules to the file policy.
File rules give you granular control over which file types you want to log, block, or scan for malware. For information on adding file rules, see Working with File Rules, page 37-17.
Because you cannot use a Malware license with a DC500, you cannot create file rules that use the Block Malware or Malware Cloud Lookup action or use that appliance to apply file policies that contain rules with those actions. Similarly, because you cannot enable a Malware license on a Series 2 device or Cisco NGIPS for Blue Coat X-Series, you cannot apply a file policy containing rules with those actions to those appliances.
Step 5 Configure the advanced options. See Configuring Advanced File Policy General Options, page 37-19 and Configuring Archive File Inspection Options, page 37-20 for more information.
Step 6 Click Save.
To use your new policy, you must add the file policy to an access control rule, then apply the access control policy. If you are editing an existing file policy, you must reapply any access control policies that use the file policy.
Working with File RulesLicense: Protection or Malware
Supported Devices: feature dependent
Supported Defense Centers: feature dependent
To be effective, a file policy must contain one or more rules. You create, edit, and delete rules on the File Policy Rules page, which appears when you create a new file policy or edit an existing policy. The page lists all the rules in the policy, along with each rule’s basic characteristics.
The page also notifies you of how many access control policies use this file policy. You can click the notification to display a list of the parent policies and, optionally, continue to the Access Control Policies page.
Caution Adding or removing a file type or file category, changing a file rule action to or from Detect Files or Block Malware, or enabling or disabling Store FIles, restarts the Snort process when you apply your access control policy, temporarily interrupting traffic inspection. Whether traffic drops during this interruption or passes without further inspection depends on the model of the managed device and how it handles traffic. See How Snort Restarts Affect Traffic, page 1-9 for more information.
To create a file rule:
Access: Admin/Access Admin
37-17FireSIGHT System User Guide

Chapter 37 Blocking Malware and Prohibited Files Understanding and Creating File Policies
Step 1 Select Policies > Files.
The File Policies page appears.
Step 2 You have the following options:
• To add rules to a new policy, click New File Policy to create a new policy; see Creating a File Policy, page 37-16.
• To add rules to an existing policy, click the edit icon ( ) next to the policy.
Step 3 On the File Policy Rules page that appears, click Add File Rule.
The Add File Rule dialog box appears.
Step 4 Select an Application Protocol.
Any, the default, detects files in HTTP, SMTP, IMAP, POP3, FTP, and NetBIOS-ssn (SMB) traffic.
Step 5 Select a Direction of Transfer.
You can inspect the following types of incoming traffic for downloaded files:
• HTTP
• IMAP
• POP3
• FTP
• NetBIOS-ssn (SMB)
You can inspect the following types of outgoing traffic for uploaded files:
• HTTP
• FTP
• SMTP
• NetBIOS-ssn (SMB)
Use Any to detect files over multiple application protocols, regardless of whether users are sending or receiving.
Step 6 Select a file rule Action. See the File Rule Actions table for more information.
When you select either Block Files or Block Malware, Reset Connection is enabled by default. To not reset the connection where a blocked file transfer occurs, clear the option.
Note Cisco recommends that you leave Reset Connection enabled to prevent blocked application sessions from remaining open until the TCP connection resets.
For detailed information on file rule actions, see File Rule Actions and Evaluation Order, page 37-11.
Note that because you cannot use a Malware license with a DC500, you cannot create file rules that use the Block Malware or Malware Cloud Lookup action or use that appliance to apply file policies that contain rules with those actions. Similarly, because you cannot enable a Malware license on a Series 2 device or Cisco NGIPS for Blue Coat X-Series, you cannot apply a file policy containing rules with those actions to those appliances.
Step 7 Select one or more File Types. Use the Shift and Ctrl keys to select multiple file types. You can filter the list of file types in the following ways:
• Select one or more File Type Categories.
37-18FireSIGHT System User Guide

Chapter 37 Blocking Malware and Prohibited Files Understanding and Creating File Policies
• Search for a file type by its name or description. For example, type Windows in the Search name and description field to display a list of Microsoft Windows-specific files.
Tip Hover your pointer over a file type to view its description.
The file types that you can use in a file rule vary depending on your selections for Application Protocol, Direction of Transfer, and Action.
For example, selecting Download as the Direction of Transfer removes GIF, PNG, JPEG, TIFF, and ICO from the Graphics category to prevent an excess of file events.
Step 8 Add the selected file types to the Selected Files Categories and Types list:
• Click Add to add selected file types to the rule.
• Drag and drop one or more file types into the Selected Files Categories and Types list.
• With a category selected, click All types in selected Categories, then either click Add or drag and drop that selection to the Selected Files Categories and Types list.
Step 9 Click Save.
The file rule is added to the policy. If you are editing an existing file policy, you must reapply any access control policies that use the file policy for your changes to take effect.
Configuring Advanced File Policy General OptionsLicense: Malware
Supported Devices: feature dependent
Supported Defense Centers: feature dependent
In a file policy, you can set the following advanced options in the General section. For information on advanced Archive File Inspection options, see Configuring Archive File Inspection Options, page 37-20.
Note that because you cannot use a Malware license with a DC500, you cannot use or modify these settings. Similarly, because you cannot enable a Malware license on a Series 2 device or Cisco NGIPS for Blue Coat X-Series, you cannot apply a file policy with these settings enabled.
Table 37-7 Advanced File Policy General Options
Field Description Default Value
Enable Custom Detection List Select this to block files on the custom detection list when detected. enabled
Enable Clean List Select this to allow files on the clean list when detected. enabled
Mark files as malware based on dynamic analysis threat score
Select a threshold value to automatically treat files with that threat score or higher as if they are malware. Select Disabled to disable this.
Note that as you select lower threshold values, you increase the number of files treated as malware. Depending on the action selected in your file policy, this can result in an increase of blocked files.
Very High(76 and above)
37-19FireSIGHT System User Guide

Chapter 37 Blocking Malware and Prohibited Files Understanding and Creating File Policies
To configure advanced file policy general options:
Access: Admin/Access Admin
Step 1 Select Policies > Files.
The File Policies page appears.
Step 2 Click the edit icon ( ) next to the policy you want to edit.
The File Policy Rule page appears.
Step 3 Select the Advanced tab.
The Advanced tab appears.
Step 4 In the General section, modify the options as described in the Advanced File Policy General Options table.
Step 5 Click Save.
You must reapply any access control policies that use the file policy you edited.
Configuring Archive File Inspection OptionsLicense: Malware
Supported Devices: Any except Series 2 or X-Series
Supported Defense Centers: Any except DC500
Archive files (such as .zip or .rar) often appear in monitored traffic. Some are just a convenient way to compress and transfer legitimate information; others may try to conceal malware or other undesirable files. You can configure your file policy to inspect the contents of archive files, allowing you to analyze and, optionally, block archive files according to your organization’s needs. All features applicable to uncompressed files (such as dynamic analysis and file storage) are available for nested files inside archive files. You can view the contents of an archive file from the event viewer or file trajectory viewer using the context menu; for more information, see the following section, Viewing the Contents of Archived Files, page 37-22.
Note If traffic that contains an archive file is blacklisted or whitelisted by Security Intelligence, or if the top-level archive file’s SHA-256 value is on the custom detection list, the system does not inspect the contents of the archive file. If a nested file is blacklisted, the entire archive is blocked; however, if a nested file is whitelisted, the archive is not automatically passed (depending on any other nested files and characteristics). For more information, see Working with the Global Whitelist and Blacklist, page 3-7.
Some archive files contain additional archive files (and so on). The level at which a file is nested is its archive file depth. Note that the top-level archive file is not considered in the depth count; depth begins at 1 with the first nested file. Although the system can only inspect up to 3 levels of nested archive files, you can configure your file policy to block archive files that exceed that depth (or a lower maximum depth that you specify). If you want to restrict nested archives further, you have the option to configure a lower maximum file depth of 2 or 1. If you choose not to block files that exceed the maximum archive file depth of 3, when archive files that contain some extractable contents and some contents nested at a depth of 3 or greater appear in monitored traffic, the system examines and reports data only for the files it was able to inspect.
37-20FireSIGHT System User Guide

Chapter 37 Blocking Malware and Prohibited Files Understanding and Creating File Policies
Archive files receive file dispositions based on the dispositions of the files they contain. All archives that contain identified malware files receive a disposition of Malware. Archives without identified malware files receive a disposition of Unknown if they contain any unknown files, and a disposition of Clean if they contain only clean files. For more information about file dispositions, see Understanding File Dispositions, page 37-3.
The following table lists the archive file inspection options you can configure in your file policy.
To configure archive file inspection options:
Access: Admin/Access Admin
Step 1 Select Policies > Files.
The File Policies page appears.
Step 2 Click the edit icon ( ) next to the policy you want to edit.
The File Policy Rule page appears.
Step 3 Select the Advanced tab.
The Advanced tab appears.
Step 4 In the Archive File Inspection section, modify the options as described in the Archive File Inspection Options.
Step 5 Click Save.
You must reapply any access control policies that use the file policy you edited.
Table 37-8 Archive File Inspection Options
Field Description Default Value
Inspect Archives Select this to inspect the contents of archive files. If this option is unselected, the options below are grayed out and unavailable.
Caution Enabling or disabling archive file inspection restarts the Snort process when you apply your changes, temporarily interrupting traffic inspection. Whether traffic drops during this interruption or passes without further inspection depends on the model of the managed device and how it handles traffic. See How Snort Restarts Affect Traffic, page 1-9 for more information.
Disabled
Block Encrypted Archives Select this to block archive files that have encrypted contents. Disabled
Block Uninspectable Archives Select this to block archive files with contents that the system is unable to inspect for reasons other than encryption (this usually applies to files corrupted in some way, or those that exceed your specified maximum archive depth).
Enabled
Max Archive Depth Specify the maximum depth of nested archive files. Archive files that exceed this depth are blocked. The value must be 1, 2, or 3. The top-level archive file is not considered in this count; depth begins at 1 with the first nested file.
2
37-21FireSIGHT System User Guide

Chapter 37 Blocking Malware and Prohibited Files Understanding and Creating File Policies
Viewing the Contents of Archived Files
License: Malware
Supported Devices: Any except Series 2 or X-Series
Supported Defense Centers: Any except DC500
If your file policy is configured to inspect archive file contents, you can use the event viewer context menu and the network file trajectory viewer to view information about the files inside an archive when the archive file appears in a file event, malware event, or as a captured file.
For more information, see:
• Using the Context Menu, page 2-5
• Viewing File Events, page 40-8
• Viewing Malware Events, page 40-18
• Viewing Captured Files, page 40-29
• Reviewing Network File Trajectory, page 40-35
You view the Archive Contents window in two ways: from the event viewer, by right-clicking on an eligible archive file and selecting View Archive Contents from the context menu, or from the file trajectory view of an archive file, by clicking the view icon ( ) under Archive Contents. In each case, the window that appears is the same. The following graphic is an example of an Archive Contents window.
All file contents of the archive are listed in table form, with a short summary of their relevant information: name, SHA-256 hash value, type, category, and archive depth. A network file trajectory icon appears by each file, which you can click to view further information about that specific file with the Network Trajectory feature.
To view the contents of an archived file from the event viewer:
Access: Admin/Access Admin
Step 1 Navigate to your chosen event viewer. You have three options:
37-22FireSIGHT System User Guide

Chapter 37 Blocking Malware and Prohibited Files Understanding and Creating File Policies
• For malware events, select Analysis > Files > Malware Events.
• For file events, select Analysis > Files> File Events.
• For captured files, select Analysis > Files > Captured Files.
The first page of your default events workflow appears.
Step 2 Right-click the table row in which the archive file you want to examine appears.
The context menu appears.
Step 3 From the context menu, click View Archive Contents.
The Archive Contents window appears.
To view the contents of an archived file from the file trajectory viewer:
Access: Admin/Access Admin
Step 1 Select Analysis > Files > Network File Trajectory.
The Network File Trajectory List page appears.
Step 2 Click the file trajectory icon ( ) for the archive file you want to examine.
The file trajectory page for that file appears.
Step 3 Under Archive Contents, click the view icon ( ).
The Archive Contents window appears.
Comparing Two File PoliciesLicense: Protection
To review policy changes for compliance with your organization’s standards or to optimize system performance, you can examine the differences between any two file policies, or two revisions of the same policy.
The file policy comparison view displays two file policies or revisions in a side-by-side format, with the time of last modification and the last user to modify displayed next to each policy name. Differences between the two policies are highlighted:
• Blue indicates that the highlighted setting is different in the two policies, and the difference is noted in red text.
• Green indicates that the highlighted setting appears in one policy but not the other.
You can navigate through the differences by clicking Previous and Next. The double-arrow icon ( ) centered between the left and right sides moves, and the Difference number adjusts to identify which difference you are viewing. Optionally, you can generate a file policy comparison report, which is a PDF version of the comparison view.
To compare two file policies:
Access: Admin/Access Admin
Step 1 Select Policies > Files.
The File Policies page appears.
37-23FireSIGHT System User Guide

Chapter 37 Blocking Malware and Prohibited Files Working with Cloud Connections for FireAMP
Step 2 Click Compare Policies.
The Select Comparison dialog box appears.
Step 3 From the Compare Against drop-down list, select the type of comparison you want to make:
• To compare two different policies, select either Running Configuration or Other Policy. The practical difference between the two options is that if you select Running Configuration, the system limits one of your comparison choices to the set of currently applied file policies.
• To compare revisions of the same policy, select Other Revision.
The dialog box refreshes, displaying your comparison options.
Step 4 Depending on the comparison type you selected, you have the following choices:
• If you are comparing two different policies, select the policies you want to compare: Policy A or Target/Running Configuration A, and Policy B.
• If you are comparing revisions of the same policy, select the Policy you want to use, then select the two revisions: Revision A and Revision B. Revisions are listed by date and user name.
Step 5 Click OK.
The comparison view appears.
Step 6 Optionally, click Comparison Report to generate the access control policy comparison report.
The comparison report appears. Depending on your browser settings, the report may appear in a pop-up window, or you may be prompted to save the report to your computer.
Working with Cloud Connections for FireAMPLicense: Any
FireAMP is Cisco’s enterprise-class advanced malware analysis and protection solution. If your organization has a FireAMP subscription, individual users install FireAMP Connectors on their computers and mobile devices. These lightweight agents communicate with the Cisco cloud, which in turn communicates with the Defense Center. After you configure the Defense Center to connect to the cloud, you can receive records of scans, malware detections, and quarantines. The records are stored in the Defense Center database as malware events. For more information, see Understanding Malware Protection and File Control, page 37-2.
If your organization’s security policy does not allow for the use of a traditional cloud server connection, you can acquire and configure Cisco’s private, on-premises cloud solution, the FireAMP Private Cloud, which is a virtual machine that acts as a compressed, local version of the public Cisco cloud. In this case, data and actions that usually involve a cloud connection (such as events from FireAMP connectors, file disposition lookups, retrospective events, and so on) are instead handled by a local connection to your private cloud. When connections to the external cloud are necessary (such as for file disposition lookups), the private cloud acts as an anonymized proxy between your Defense Center and the public Cisco cloud. With a private cloud, no endpoint event data is shared over an external connection. For more information on configuring a private cloud, see Working with the FireAMP Private Cloud, page 37-27.
Note The private cloud does not support dynamic analysis.
37-24FireSIGHT System User Guide

Chapter 37 Blocking Malware and Prohibited Files Working with Cloud Connections for FireAMP
Hosts where FireAMP Connectors are installed can also generate indications of compromise (IOC) tags when endpoint-based malware detection activity detected on that host suggests that the host’s security may be compromised. To view endpoint IOC information for a host from a Defense Center, that host must appear in the Defense Center’s network map. Cisco occasionally develops new IOC types for endpoint-based malware events, which your system automatically downloads from the Cisco cloud. For more information on indications of compromise, see Understanding Indications of Compromise, page 45-19 and Endpoint-Based Malware Event IOC Types, page 45-20.
Each Defense Center in your deployment can connect to the Cisco cloud. By default, the cloud sends malware events for all groups within your organization, but you can restrict by group when you configure the connection.
Internet Access and High Availability
The system uses port 443/HTTPS to connect to the Cisco cloud (public or private) to receive endpoint-based malware events. You must open that port, both inbound and outbound, on the Defense Center. Additionally, the Defense Center must have direct access to the Internet. The default health policy includes the FireAMP Status Monitor, which warns you if the Defense Center cannot connect to the cloud after an initial successful connection, or if the connection is deregistered using the FireAMP portal.
Cloud connections to receive endpoint-based malware events are not shared between members of a high availability pair. To ensure continuity of operations, connect both the primary and secondary Defense Centers to the cloud.
Managing Cloud Connections
Use the Defense Center’s AMP Management page (AMP > AMP Management) to view and create connections to the Cisco cloud or a private cloud, as well as disable and delete those connections.
A spinning state icon indicates that the connection is pending, for example, if you configured the connection on the Defense Center, but now must authorize the connection using the FireAMP portal. A failed or denied icon ( ) indicates that the cloud denied the connection or the connection failed for another reason.
Tip Click any cloud name to open the FireAMP portal in a new browser window.
For more information, see:
• Creating a Cisco Cloud Connection, page 37-25
• Deleting or Disabling a Cloud Connection, page 37-26
• Working with the FireAMP Private Cloud, page 37-27
Creating a Cisco Cloud ConnectionLicense: Any
Creating a connection between the Defense Center and the Cisco cloud is a two-step process. First, configure the Defense Center to connect to the cloud. Then, log into the FireAMP portal to authorize the connection. If you do not have a FireAMP subscription, you cannot complete the registration process.
By default, there is a connection to the public US Cloud that is enabled for network-based AMP. This connection is used for file lookups in file policies.
37-25FireSIGHT System User Guide

Chapter 37 Blocking Malware and Prohibited Files Working with Cloud Connections for FireAMP
To re-register a Defense Center that was restored to factory defaults or reverted while registered to the cloud, you must connect to FireAMP and remove the Defense Center before re-registering it.
To create a Cisco cloud connection for FireAMP:
Access: Admin
Step 1 Select AMP > AMP Management.
The AMP Management page appears.
Step 2 Click Create FireAMP Connection.
The Create FireAMP Connection dialog box appears.
Step 3 From the Cloud Name drop-down box, select the cloud you want to use:
• For the European Union cloud, select EU Cloud.
• For the United States of America cloud, select US Cloud.
• For a private cloud, select Private Cloud, then follow the additional steps under Working with the FireAMP Private Cloud, page 37-27.
Step 4 Click Register.
Step 5 Confirm that you want to continue to the FireAMP portal, then log into the portal.
The Applications page on the portal appears. Use this page to authorize the Cisco cloud to send malware events to the Defense Center.
Step 6 Optionally, select specific groups within your organization for which you want to receive malware events.
Select groups only if you want to restrict the events you receive. By default, the Defense Center receives malware events for all groups.
Tip To manage groups, select Management > Groups on the FireAMP portal. For detailed information, refer to the online help on the portal.
Step 7 Click Allow.
You are returned to the FireAMP Management page on the Defense Center. Your connection is enabled and the Defense Center begins receiving malware events from the cloud.
Clicking Deny also returns you to the Defense Center, where the cloud connection is marked as denied. Similarly, if you navigate away from the Applications page on the FireAMP portal, and neither deny nor allow the connection, the connection is marked as pending on the Defense Center’s web interface. The health monitor does not alert in either of these situations. If you want to connect to the cloud later, you must delete the failed or pending connection, then recreate it.
Incomplete registration of an endpoint-based FireAMP connection does not disable the network-based AMP connection.
Deleting or Disabling a Cloud ConnectionLicense: Any
37-26FireSIGHT System User Guide

Chapter 37 Blocking Malware and Prohibited Files Working with Cloud Connections for FireAMP
Delete a Cisco cloud connection or private cloud connection if you no longer want to receive malware events from the cloud. You cannot delete the cloud connection that is enabled for network-based AMP.
To temporarily stop malware events from being sent for a particular connection, you can disable the connection rather than deleting it. In this situation, the cloud stores the events until you re-enable the connection; the cloud then sends the stored events.
Caution In rare cases — for example, with a very high event rate or a long-term disabled connection — the cloud may not be able to store all events generated while the connection is disabled.
Note that deregistering a connection using the FireAMP portal (instead of the Defense Center’s web interface) stops events from being sent, but does not remove the connection from the Defense Center. Deregistered connections show a failed state on the FireAMP Management page and you must delete them.
To enable or disable a cloud connection using the Defense Center:
Access: Admin
Step 1 On the AMP Management page, next to the connection you want to delete, click the slider, then confirm that you want to either enable or disable the connection.
When you enable a connection, the cloud begins sending events to the Defense Center, including any events that occurred while the connection was disabled. The cloud does not send events for disabled connections.
To delete a cloud connection using the Defense Center:
Access: Admin
Step 1 On the AMP Management page, next to the connection you want to delete, click the delete icon ( ), then confirm you want to remove the connection.
The connection is removed and the cloud stops sending events to the Defense Center.
Working with the FireAMP Private CloudLicense: Any
Your organization may have privacy or security concerns that make frequent connections between your monitored network and an external cloud server difficult or impossible. In this case, you can acquire and configure the FireAMP Private Cloud, which is a proprietary Cisco virtual machine that acts as a secure mediator between your network and the Cisco FireAMP cloud. Instead of identifiable connections from many appliances, all necessary connections to the public, external Cisco cloud are funneled through the private cloud, which acts as an anonymized proxy to ensure the security and privacy of your monitored network. Each private cloud can support as many as 10,000 separate connectors. You can configure multiple private clouds on your network to meet your organization’s needs.
The FireAMP Private Cloud handles the cloud-based actions of file disposition lookup, endpoint-based FireAMP event retrieval, and retrospective malware event generation. The private cloud, acting in place of the public cloud, collects malware events from FireAMP Connector endpoints and transmits them to
37-27FireSIGHT System User Guide
Chapter 37 Blocking Malware and Prohibited Files Working with Cloud Connections for FireAMP
the Defense Center. Only queries to the public Cisco cloud (to determine file dispositions, SHA-256 values, and so on) leave your network, through the anonymized, proxied private cloud connection. Endpoint event data never leaves your network.
For more information on cloud-based file and malware features, see:
• Understanding Malware Protection and File Control, page 37-2
• Integrating FireAMP with the FireSIGHT System, page 37-7
• Working with Dynamic Analysis, page 40-4
• Endpoint-Based (FireAMP) Malware Events, page 40-16
• Retrospective Malware Events, page 40-17
In this and other documentation related to the private cloud’s supported features, all references to the “cloud” or the “Cisco cloud” apply to connections through a private cloud as well, unless otherwise noted. The private cloud requires the same open ports and has the same high availability limitations as a standard cloud connection.
Note The FireAMP Private Cloud supports only malware- and file-related cloud-based features. It does not support other FireSIGHT System features that use cloud connections, such as URL filtering or Security Intelligence. The private cloud also does not support the dynamic analysis feature, although you can use the private cloud to retrieve threat scores for files that Cisco has already dynamically analyzed.
To create a connection between a Defense Center and a FireAMP Private Cloud, you must first configure your FireAMP Private Cloud according to the procedures in the FireAMP Private Cloud Administration Portal User Guide, available on the Support Site. During this configuration, make sure to note the private cloud host name that appears in the FireAMP Console field; you must have this host name to connect the private cloud to your Defense Center. Note that successfully configuring a private cloud automatically disables any public cloud connections you may have configured.
To create a connection between your Defense Center and a FireAMP Private Cloud:
Access: Admin
Step 1 Select AMP > AMP Management.
The AMP Management page appears.
Step 2 Click Create FireAMP Connection.
The Create FireAMP Connection dialog box appears.
Step 3 From the Cloud Name drop-down list, select Private Cloud.
Additional fields appear in the dialog box.
Step 4 In the Name field, type a name for your private cloud connection. This name appears in the FireAMP Cloud event field when you view malware events.
Step 5 In the Host field, type the host name of your private cloud, as displayed in the FireAMP Console field when you configured your FireAMP Private Cloud virtual machine.
Step 6 In the Certificate Upload Path field, browse to the location of a valid TLS or SSL encryption certificate information for your private cloud. For more information, see the FireAMP Private Cloud Administration Portal User Guide.
37-28FireSIGHT System User Guide

Chapter 37 Blocking Malware and Prohibited Files Working with Cloud Connections for FireAMP
Step 7 If you have more than one private cloud configured for your monitored network and want to determine which private cloud handles network-based malware lookups, select or clear the Use For NetworkAMP check box. When only one private cloud is configured, the box is checked by default and cannot be cleared.
Step 8 If you have a proxy connection configured on your Defense Center and want to use that proxy connection for the private cloud, select the Use Proxy for Connection check box. If this option is not selected, the private cloud does not use your configured proxy for its communications.
Step 9 Click Register.
A dialog box appears to remind you that creating a private cloud configuration disables all public cloud connections you may have configured.
Step 10 Click Yes.
Confirm that you want to continue to the FireAMP portal, then log into the portal.
Step 11 The system processes your private cloud information and redirects you to the FireAMP site to complete configuration. For further instructions, please refer to the FireAMP Private Cloud Administration Portal User Guide.
37-29FireSIGHT System User Guide

Chapter 37 Blocking Malware and Prohibited Files Working with Cloud Connections for FireAMP
37-30FireSIGHT System User Guide