blackboard 9.1 manual for students - ottawa...
TRANSCRIPT

Blackboard 9.1 Manual for Students 1 Last updated: May 22, 2017 For technical assistance, contact OU Help ([email protected] or 855-268-4357). For feedback regarding this document, contact [email protected].
Instructional Design & Academic Technology
BLACKBOARD 9.1 MANUAL FOR STUDENTS
THE BLACKBOARD SYSTEM Blackboard is the virtual classroom system used for courses at Ottawa University. Blackboard facilitates
student-to-student and instructor-to-student interactions in a web-based environment. Students can
submit assignments, access course materials, take quizzes and exams, and check grades and instructor
feedback online. This guide provides a brief tutorial on how to use the basic functionality of the
Blackboard e-learning system.
PLEASE NOTE: The screen captures, policies, and information provided in this manual are specific to fully
online classes. If you are taking a face-to-face course which uses Blackboard but isn’t fully online, you
will notice some differences between your actual course and what is shown here. Please consult with
your instructor for clarification regarding your course.
LOGGING IN TO BLACKBOARD 1. The Blackboard login is accessed from our MyOttawa portal at https://myottawa.ottawa.edu.
2. Click the link for Blackboard on the left-hand side under QuickLinks as shown below.
Image 1: The Blackboard link highlighted on myottawa.ottawa.edu.

Blackboard 9.1 Manual for Students 2 Last updated: May 22, 2017 For technical assistance, contact OU Help ([email protected] or 855-268-4357). For feedback regarding this document, contact [email protected].
Instructional Design & Academic Technology
3. This brings you to the Blackboard login page. This page contains important updates,
announcements, and information about our Blackboard system. Please be sure to check this
page for new information each time you access Blackboard.
On the login screen, enter your username and password. Your username is your MyOttawa
portal username (for most students, this is the same as your OU student ID number), and your
password is the same as the one you use for your Ottawa student email account. If you forgot
your password, click the link labeled Forget Your Password?
Image 2: The Blackboard login screen.

Blackboard 9.1 Manual for Students 3 Last updated: May 22, 2017 For technical assistance, contact OU Help ([email protected] or 855-268-4357). For feedback regarding this document, contact [email protected].
Instructional Design & Academic Technology
4. Click Login or press <Enter> on your keyboard. This is what the main page looks like:
Image 3: The Blackboard main page.

Blackboard 9.1 Manual for Students 4 Last updated: May 22, 2017 For technical assistance, contact OU Help ([email protected] or 855-268-4357). For feedback regarding this document, contact [email protected].
Instructional Design & Academic Technology
ACCESSING YOUR COURSE(S) All courses in which you are currently enrolled are listed in the My Courses module. Courses become
available a few days prior to the term start (at 8am the Saturday before the first day of the term). Click
on the course name to enter that course in the Blackboard system.
Image 4: The main Blackboard page with the My Courses portlet highlighted.

Blackboard 9.1 Manual for Students 5 Last updated: May 22, 2017 For technical assistance, contact OU Help ([email protected] or 855-268-4357). For feedback regarding this document, contact [email protected].
Instructional Design & Academic Technology
UNDERSTANDING THE COURSE MENU The course menu is broken down into three sections:
1. Course Info
2. Course Materials
3. Resources
Your course content is located within these three sections. This content,
along with your required textbook, contains all the information you need to
be successful in your course. Each of these sections is explored in more
detail below.
Image 5: The course menu.
COURSE INFO: GETTING STARTED The Getting Started link under Course Info is the first place you go when you enter your course for the
first time. This area provides you with the first steps you need to take in your online course.
Image 6: The Getting Started page.
Blackboard 9.1 Manual for Students 6 Last updated: May 22, 2017 For technical assistance, contact OU Help ([email protected] or 855-268-4357). For feedback regarding this document, contact [email protected].
Instructional Design & Academic Technology
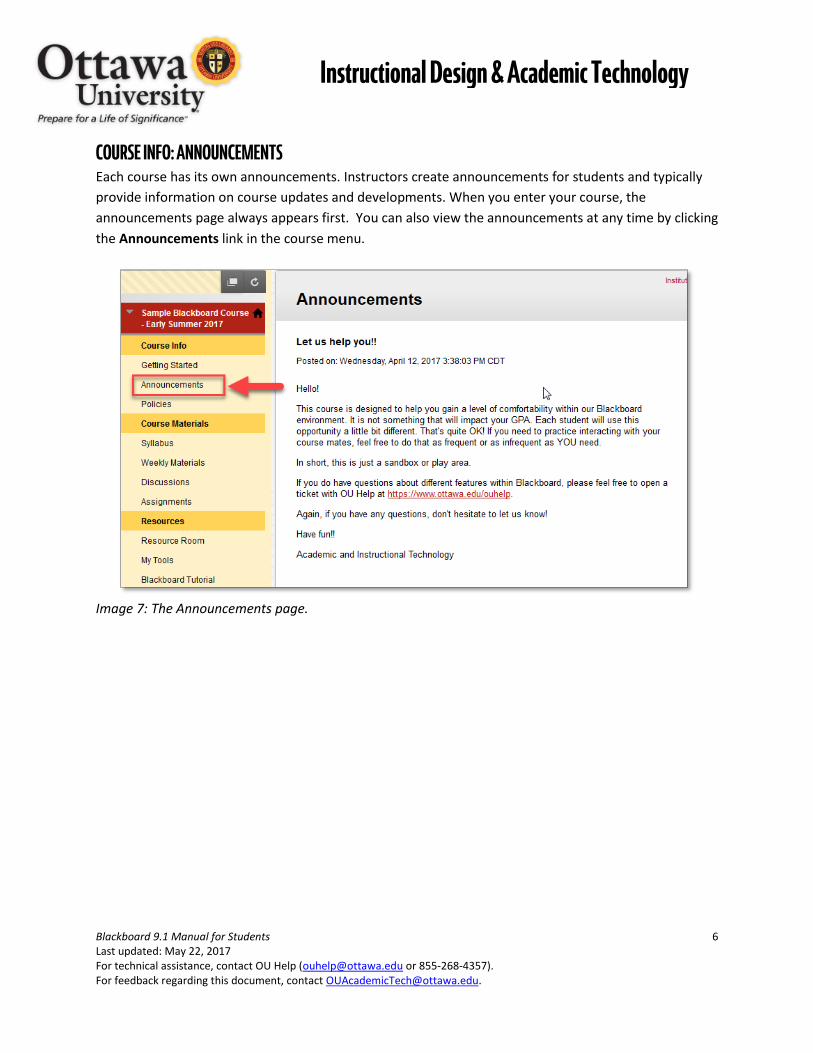
COURSE INFO: ANNOUNCEMENTS Each course has its own announcements. Instructors create announcements for students and typically
provide information on course updates and developments. When you enter your course, the
announcements page always appears first. You can also view the announcements at any time by clicking
the Announcements link in the course menu.
Image 7: The Announcements page.

Blackboard 9.1 Manual for Students 7 Last updated: May 22, 2017 For technical assistance, contact OU Help ([email protected] or 855-268-4357). For feedback regarding this document, contact [email protected].
Instructional Design & Academic Technology
COURSE INFO: POLICIES The Policies link under Course Info brings you to the University-wide policies and the course-specific
policies. You are responsible for reading and understanding these. Contact your instructor if you have
any questions. Refer to your student handbook to view all University student policies.
Image 8: The Policies page. The policies listed on this page are the same for every online course.
Blackboard 9.1 Manual for Students 8 Last updated: May 22, 2017 For technical assistance, contact OU Help ([email protected] or 855-268-4357). For feedback regarding this document, contact [email protected].
Instructional Design & Academic Technology
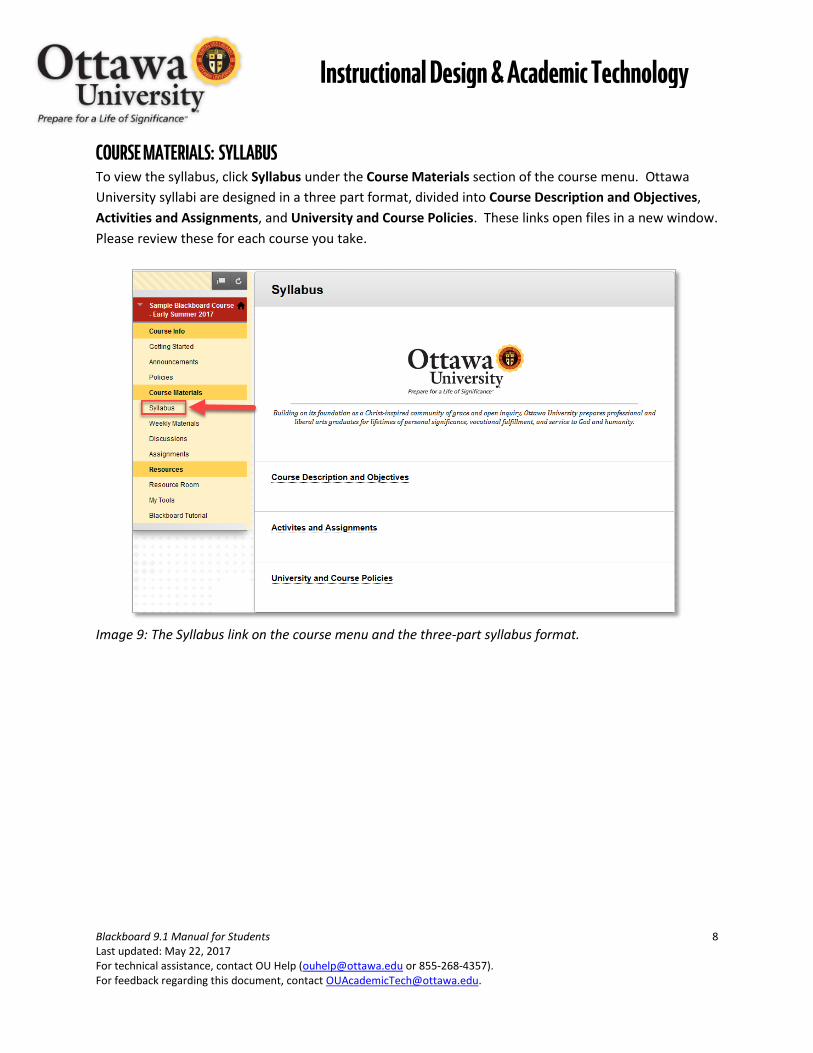
COURSE MATERIALS: SYLLABUS To view the syllabus, click Syllabus under the Course Materials section of the course menu. Ottawa
University syllabi are designed in a three part format, divided into Course Description and Objectives,
Activities and Assignments, and University and Course Policies. These links open files in a new window.
Please review these for each course you take.
Image 9: The Syllabus link on the course menu and the three-part syllabus format.
Blackboard 9.1 Manual for Students 9 Last updated: May 22, 2017 For technical assistance, contact OU Help ([email protected] or 855-268-4357). For feedback regarding this document, contact [email protected].
Instructional Design & Academic Technology
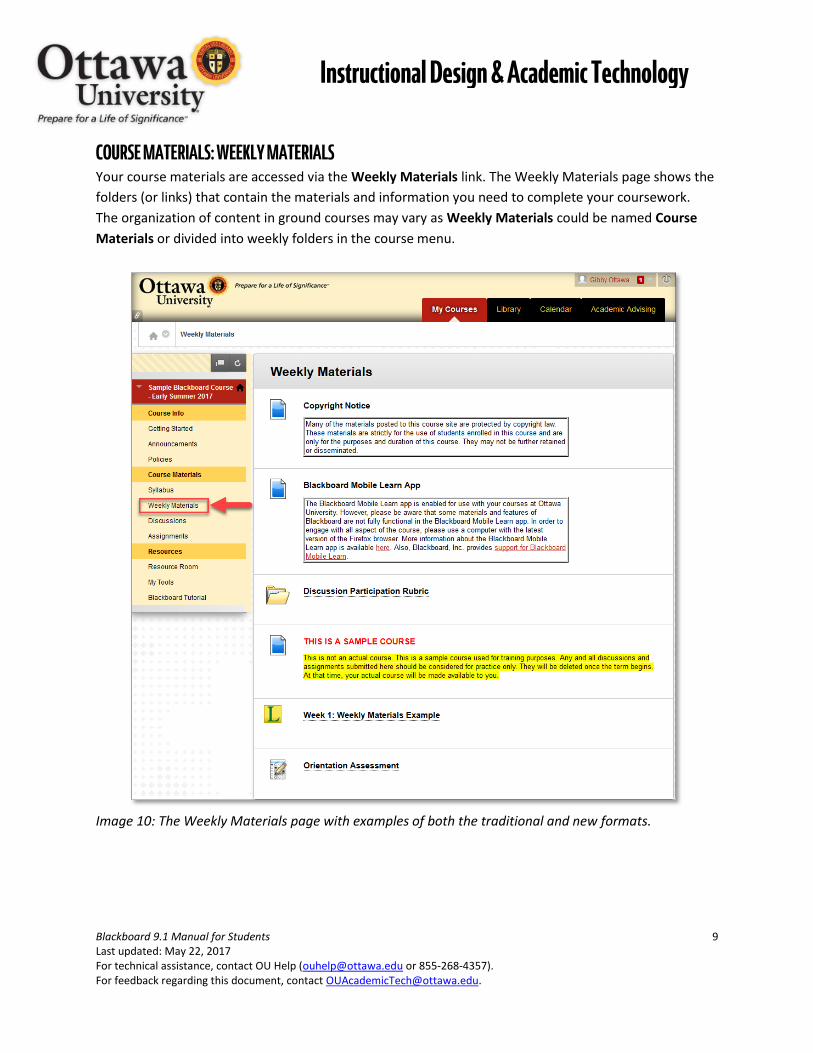
COURSE MATERIALS: WEEKLY MATERIALS Your course materials are accessed via the Weekly Materials link. The Weekly Materials page shows the
folders (or links) that contain the materials and information you need to complete your coursework.
The organization of content in ground courses may vary as Weekly Materials could be named Course
Materials or divided into weekly folders in the course menu.
Image 10: The Weekly Materials page with examples of both the traditional and new formats.

Blackboard 9.1 Manual for Students 10 Last updated: May 22, 2017 For technical assistance, contact OU Help ([email protected] or 855-268-4357). For feedback regarding this document, contact [email protected].
Instructional Design & Academic Technology
COURSE MATERIALS: DISCUSSIONS The discussion forums are located under the link titled Discussions, under Course Materials in the
course menu. To work in a specific forum, click the title of the forum to open it.
Image 11: An example of the Discussions screen and forums.
Once inside the discussion forum, you can view all the posts already made by other students. Discussion
Forums have two view options: List View and Tree View. List View appears by default, as shown below:
Image 12: The Introductions forum shown in List View.

Blackboard 9.1 Manual for Students 11 Last updated: May 22, 2017 For technical assistance, contact OU Help ([email protected] or 855-268-4357). For feedback regarding this document, contact [email protected].
Instructional Design & Academic Technology
Both views provide a list of threads in the forum. However, Tree View provides the ability to expand
and collapse folders by using the plus/minus icon next to each message, and most students find this
view more user-friendly. Switch to Tree View by clicking on Tree View in the upper right-hand corner of
the screen.
In most forums, you reply to an existing thread. However, in the Introductions forum, you need to
create a thread to introduce yourself. In fully online classes, this forum and the Course Café forum are
the only forums that allow you to create a new thread. To do this, click Create Thread.
Image 13: The threads within a discussion forum displayed in Tree View.
All discussion posts require a subject. Type your subject in the Subject box. Your introduction text is
typed in the Message area of the text editor.
Image 14: The Create Thread input screen.

Blackboard 9.1 Manual for Students 12 Last updated: May 22, 2017 For technical assistance, contact OU Help ([email protected] or 855-268-4357). For feedback regarding this document, contact [email protected].
Instructional Design & Academic Technology
Most discussion forums are not configured to allow students to attach files. For conversational
discussions, do not attach your post as a separate file. Putting your ideas in a separate, attached file
makes it hard for your classmates to follow the conversation thread. Some special forums, such as the
Introductions forum or a forum in which students are sharing their work, allow for attachments. This is
done identically as submitting assignment documents. If you need to review those steps, please see the
section below on uploading assignment files.
At the bottom right you have three options: Cancel, Save Draft, and Submit. When you save a
submission as a draft, you can come back and edit it later. To enter your thread in the discussion, select
Submit.
Image 15: The Create Thread screen with the Submit button highlighted in the bottom-right corner of the
window.

Blackboard 9.1 Manual for Students 13 Last updated: May 22, 2017 For technical assistance, contact OU Help ([email protected] or 855-268-4357). For feedback regarding this document, contact [email protected].
Instructional Design & Academic Technology
Once you have submitted your discussion post, a green bar confirms the success of your submission. You
can also view your post in the forum.
Image 16: The green confirmation bar appears at the top of the screen and the new thread is visible.
To reply to the instructor’s opening prompt/question or to another student’s post: Simply click on the
title of the discussion post to open it.
Image 17: The title of a discussion post highlighted.

Blackboard 9.1 Manual for Students 14 Last updated: May 22, 2017 For technical assistance, contact OU Help ([email protected] or 855-268-4357). For feedback regarding this document, contact [email protected].
Instructional Design & Academic Technology
The post you are replying to is completely visible. To reply, click on the Reply button shown in the image
below:
Image 18: The location of the Reply button.
The process of writing a reply is like creating a new thread. One difference is that the subject is already
filled in for you. As with your initial post, you must click Submit to post to the forum.
Image 19: An example of a reply to a student’s introduction. Note the location of the Submit button.

Blackboard 9.1 Manual for Students 15 Last updated: May 22, 2017 For technical assistance, contact OU Help ([email protected] or 855-268-4357). For feedback regarding this document, contact [email protected].
Instructional Design & Academic Technology
Once you submit your reply, a confirmation appears at the top of the thread detail screen.
Image 20: The green confirmation bar appears at the top of the screen.
Click the OK button in the bottom-right corner to return to the forum’s main page.
Image 21: Note the location of the OK button.
Blackboard 9.1 Manual for Students 16 Last updated: May 22, 2017 For technical assistance, contact OU Help ([email protected] or 855-268-4357). For feedback regarding this document, contact [email protected].
Instructional Design & Academic Technology
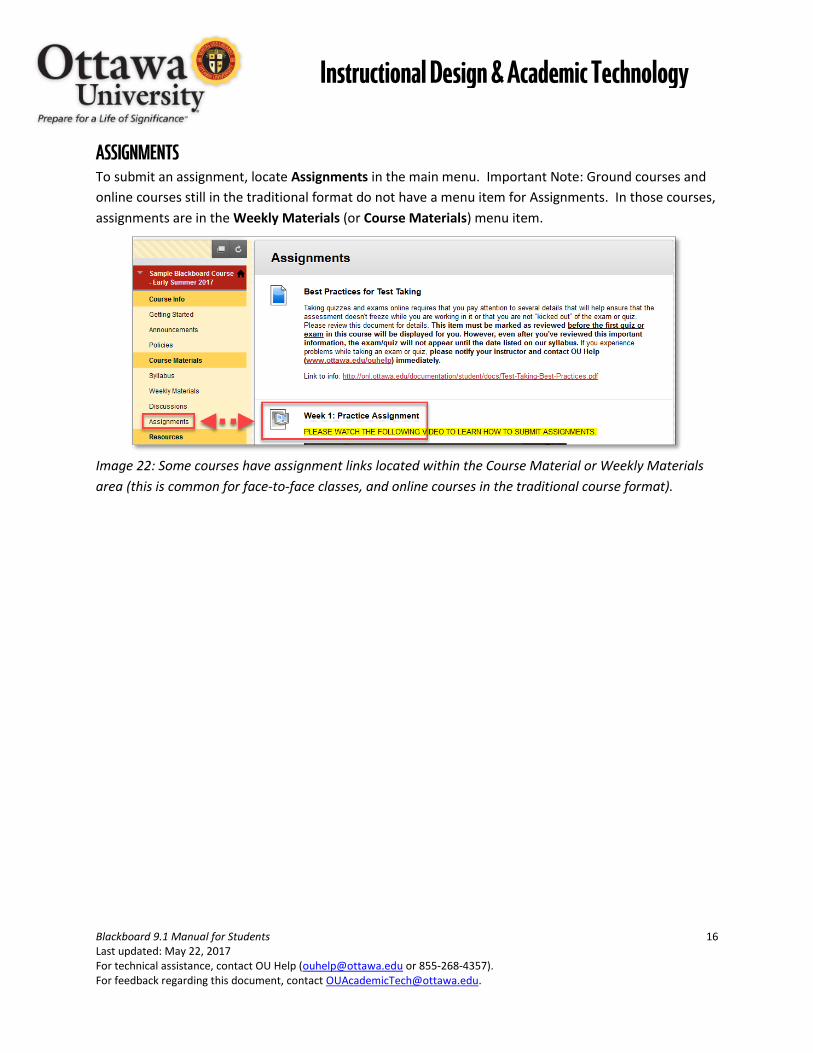
ASSIGNMENTS To submit an assignment, locate Assignments in the main menu. Important Note: Ground courses and
online courses still in the traditional format do not have a menu item for Assignments. In those courses,
assignments are in the Weekly Materials (or Course Materials) menu item.
Image 22: Some courses have assignment links located within the Course Material or Weekly Materials
area (this is common for face-to-face classes, and online courses in the traditional course format).

Blackboard 9.1 Manual for Students 17 Last updated: May 22, 2017 For technical assistance, contact OU Help ([email protected] or 855-268-4357). For feedback regarding this document, contact [email protected].
Instructional Design & Academic Technology
1. Click on the title of the assignment to open it. All the assignment information including the title
of the assignment, the instructions, and the points possible appear in the Assignment
Information section. Below that is the Assignment Submission section. There you have a choice
of either typing your submission or attaching a file. Most often you will not type your
assignment. In many instances, you will be asked to prepare your assignment in an application
such as a word processing program, and upload the file as explained below.
2. To upload an assignment file, scroll down to the Attach File option and click on Browse My
Computer.
Image 23: The Browse My Computer button is located to the right of the Attach File option. The Submit
button is at the bottom right corner of the screen.

Blackboard 9.1 Manual for Students 18 Last updated: May 22, 2017 For technical assistance, contact OU Help ([email protected] or 855-268-4357). For feedback regarding this document, contact [email protected].
Instructional Design & Academic Technology
3. A separate window launches that allows you to look on your computer for the file you want to
attach. Click on the document and select Open (this does not actually open your file).
Image 24: Files are attached by clicking on the document and then clicking the Open button.
4. The selected file appears in the Attached files area. Important Note: Do not use special
characters in your file name (such as &, %, or #) or a file error may occur.
Image 25: The selected file appears in the Attached files section when properly attached. The instructor
can view this file after the assignment is submitted.
Blackboard 9.1 Manual for Students 19 Last updated: May 22, 2017 For technical assistance, contact OU Help ([email protected] or 855-268-4357). For feedback regarding this document, contact [email protected].
Instructional Design & Academic Technology
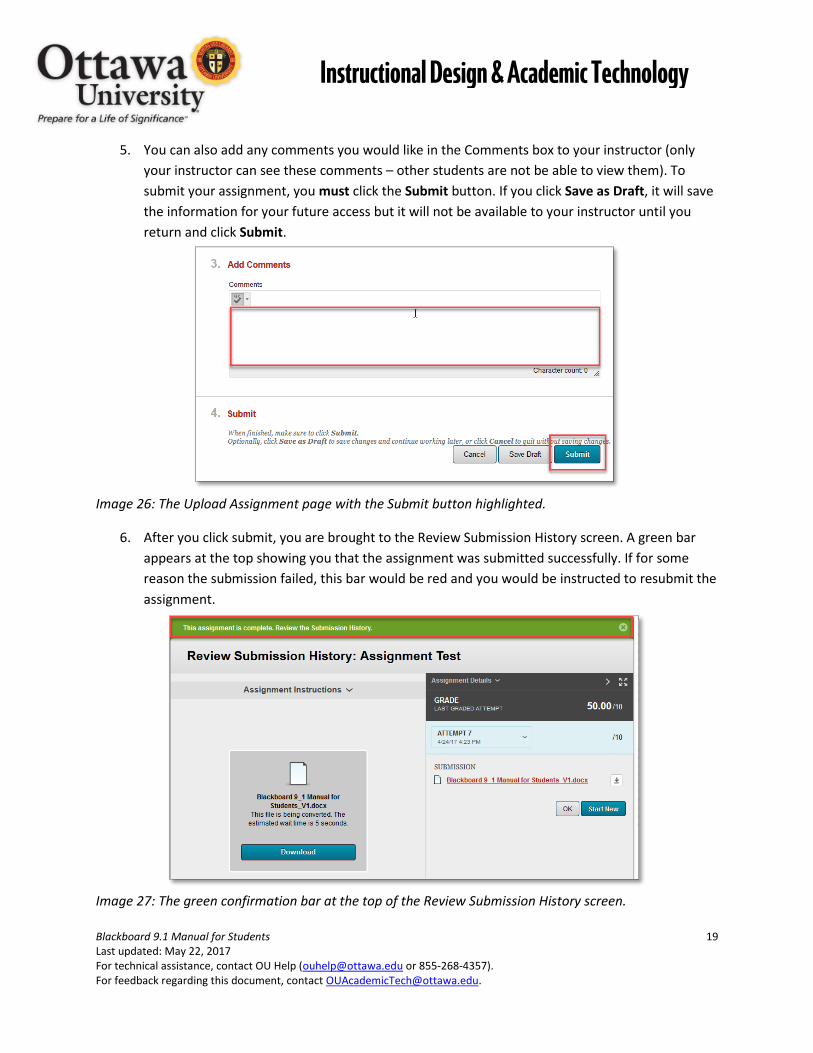
5. You can also add any comments you would like in the Comments box to your instructor (only
your instructor can see these comments – other students are not be able to view them). To
submit your assignment, you must click the Submit button. If you click Save as Draft, it will save
the information for your future access but it will not be available to your instructor until you
return and click Submit.
Image 26: The Upload Assignment page with the Submit button highlighted.
6. After you click submit, you are brought to the Review Submission History screen. A green bar
appears at the top showing you that the assignment was submitted successfully. If for some
reason the submission failed, this bar would be red and you would be instructed to resubmit the
assignment.
Image 27: The green confirmation bar at the top of the Review Submission History screen.

Blackboard 9.1 Manual for Students 20 Last updated: May 22, 2017 For technical assistance, contact OU Help ([email protected] or 855-268-4357). For feedback regarding this document, contact [email protected].
Instructional Design & Academic Technology
7. Furthermore, the Review Submission History screen shows the date and time the assignment
was submitted as well as the student’s comments and any files that have been attached.
Image 28: The Review Submission History screen.
RESOURCES
RESOURCE ROOM The Resource Room contains academic resources, technical help, bookstore access, and other support
services. To access it, click Resource Room on the menu.
Image 29: The link to the Resource Room is located toward the bottom of the course menu.

Blackboard 9.1 Manual for Students 21 Last updated: May 22, 2017 For technical assistance, contact OU Help ([email protected] or 855-268-4357). For feedback regarding this document, contact [email protected].
Instructional Design & Academic Technology
The Resource Room opens in a new window.
Image 30: The Resource Room web page.

Blackboard 9.1 Manual for Students 22 Last updated: May 22, 2017 For technical assistance, contact OU Help ([email protected] or 855-268-4357). For feedback regarding this document, contact [email protected].
Instructional Design & Academic Technology
MY TOOLS The My Tools area is where you can find the class roster, send email, and where you can go to check
grades and view instructor feedback.
Image 31: The My Tools Page
TO SEND AN EMAIL 1. Click Send Email in the My Tools area.
Image 32: The location of the Send Email link.

Blackboard 9.1 Manual for Students 23 Last updated: May 22, 2017 For technical assistance, contact OU Help ([email protected] or 855-268-4357). For feedback regarding this document, contact [email protected].
Instructional Design & Academic Technology
2. Choose the set of users whom you would like to email. It is suggested that you choose Select
Users and choose the specific people whom you want to email from a list. That option is
demonstrated in this manual.
Image 33: The Select Users option is located toward the bottom of the Send Email screen.
3. Select the names of the people you want to email and use the arrow to add them to the
Selected list.
Image 34: The Select Users page.
If you accidently move the wrong names over, you can deselect them by clicking on their name and
using the left arrow button to move them back to the Available to Select list.

Blackboard 9.1 Manual for Students 24 Last updated: May 22, 2017 For technical assistance, contact OU Help ([email protected] or 855-268-4357). For feedback regarding this document, contact [email protected].
Instructional Design & Academic Technology
4. Type in your Subject and message. You can add an attachment to the message if desired. This is
done the same way as submitting an assignment document file. If you need to review those
steps, please see the section on uploading an assignment file. Once you are satisfied with your
message, click Submit.
Image 35: The Subject and Message areas of the Select Users page.
After you submit, the main Send Email page appears along with a green confirmation bar at the top
showing that the email was successfully sent. You also receive a copy of this email in your OU student
email account Inbox (not in your Sent folder) for your records.
Image 36: The green confirmation bar appears at the top of the screen.

Blackboard 9.1 Manual for Students 25 Last updated: May 22, 2017 For technical assistance, contact OU Help ([email protected] or 855-268-4357). For feedback regarding this document, contact [email protected].
Instructional Design & Academic Technology
MY GRADES To access view your grades for a course in Blackboard, go to My Tools > View Grades.
Image 37: The View Grades button is located on the bottom-right side of the Tools menu.
A screen showing all the grade book items appears showing your total grade so far, items that have
already been graded, items waiting to be graded, and future assignments. Click on the title of a graded
assignment to view details such as your instructor’s feedback.
Image 38: An example of a student’s grade book.
Blackboard 9.1 Manual for Students 26 Last updated: May 22, 2017 For technical assistance, contact OU Help ([email protected] or 855-268-4357). For feedback regarding this document, contact [email protected].
Instructional Design & Academic Technology
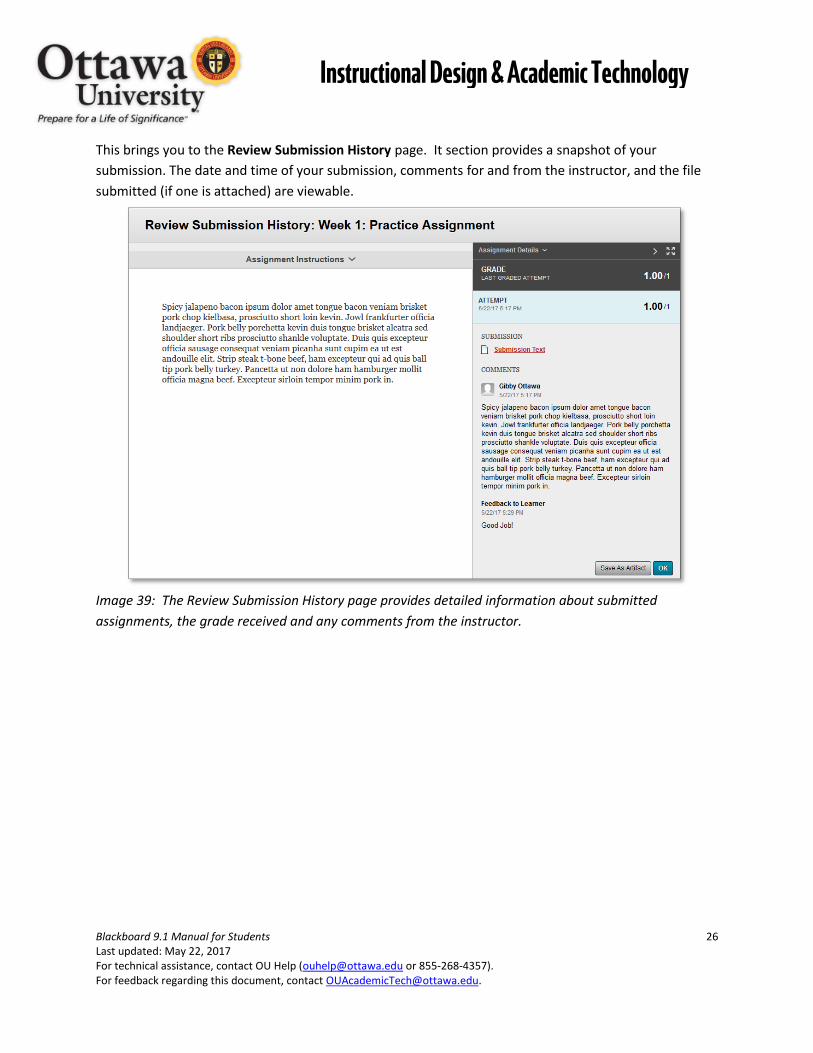
This brings you to the Review Submission History page. It section provides a snapshot of your
submission. The date and time of your submission, comments for and from the instructor, and the file
submitted (if one is attached) are viewable.
Image 39: The Review Submission History page provides detailed information about submitted
assignments, the grade received and any comments from the instructor.