blackbaud direct marketing administration guide
TRANSCRIPT

Administration Guide

11/10/2014 Blackbaud Direct Marketing 4.0 Administration UK
©2014 Blackbaud, Inc. This publication, or any part thereof, may not be reproduced or transmitted in any form or by anymeans, electronic, or mechanical, including photocopying, recording, storage in an information retrieval system, or oth-erwise, without the prior written permission of Blackbaud, Inc.
The information in this manual has been carefully checked and is believed to be accurate. Blackbaud, Inc., assumes noresponsibility for any inaccuracies, errors, or omissions in this manual. In no event will Blackbaud, Inc., be liable for direct,indirect, special, incidental, or consequential damages resulting from any defect or omission in this manual, even if advisedof the possibility of damages.
In the interest of continuing product development, Blackbaud, Inc., reserves the right to make improvements in this manualand the products it describes at any time, without notice or obligation.
All Blackbaud product names appearing herein are trademarks or registered trademarks of Blackbaud, Inc.
All other products and company names mentioned herein are trademarks of their respective holder.
BBDMAdmin-2014

ContentsQUICK LINKS 1
CONFIGURATION TASKS 3Enable or Disable Default Blank Query Criteria 3Enable or Disable Phone Formatting 3Organisation Information 4Report Model Record Access Security 4Self-service Password Reset 4Time Zones 5
Update Daylight Savings Rules 6
APPLICATION FEATURES 9Catalog Browser 9
Catalog Browser Tab 9Optional Features Tab 10Catalog Browser Tasks 10
Load All Catalog Items 10Load All Reports 11Refresh Shell Navigation 12
Application Features 12Record Types 13Features 13New Features 15
ATTRIBUTE CATEGORIES 17Manage Attribute Categories 17
Add Attribute Categories 17Data Types 19
Create Code Tables 19Manage Attribute Form Extensions 20
Add Attribute Form Extensions 20Disable or Enable Attribute Form Extensions 21Delete Attribute Form Extensions 22
Update Attribute Query Relationship 22Notifications 22
Add Notifications to a Group of Records 22Update Notification Query Relationships 23

CONFIGURATION DATA 25Configuration Export 25
Add Configuration Export Processes 25Add Export Instances 26Run a Configuration Export Process 27Assign Permissions for a Configuration Export Process 27
Configuration Export Process Status Page 28Configuration Import 29Configuration Import Process Status Page 29Import or Export Accounting Configuration Data 29
APPLICATION USAGE REPORT 31
EMAIL MANAGEMENT 33Email Services 33
Configure Email Service Settings 33Edit the External Server Settings 33
Manage Email Services 34Email Processes 34
Disable an Email Process 35Enable an Email Process 35Run an Email Process 35Reset the Last Run On Date for an Email Process 35Email Process History 35
Email Jobs 36Email Process Job Details 36Search Email Jobs 36Delete a Submitted General Purpose Email Process Job 37Email Job Statuses 37
Blacklisted Email Addresses 37Change the Blacklisted Status of an Email Address 38Add a Blacklisted Address 38
Email Services Reports 38Transactional Email Job Status Report 38General Purpose Email Job Status Report 39Transactional Email Jobs Processed Report 40General Purpose Email Jobs Processed Report 41
Email Alerts 42Manage Email Alerts 42
Edit Email Alert Settings 42Standard Email Alert Types 43

Custom Email Alert Types 43Add Custom Email Alert Types 44
Email Alert Record 44Manage Alert Definition 45
Edit Content of an Email Alert 45Assign an Email Alert to Application Users 46Disable an Email Alert for an Application User 47Add Instances of a Custom Email Alert 47
Process Details 47Delete an Instance of the Send Process 48Add a Job Schedule for the Send Process 48
Start the Send Process for an Email Alert 48Generate a Windows Scripting File for the Send Process 49
Custom Email Alert Instance Record 49Assign Users to a Custom Email Alert Instance 49Unassign Users from a Custom Email Alert Instance 49
Subscribe to Email Alerts 50Configure Batch Email Alerts 50Configure Marketing Plan Item Task Email Alerts 50
Configure Email Preferences for Users 51Edit Alert Settings for an Application User 51Enable or Disable Email Alerts for an Application User 52Manage Custom Email Alerts for an Application User 52
SEARCH LIST CONFIGURATION 53Configure Search List Fields 53Manage Search List Replacements 54
CODE TABLES 57Access Code Tables 57Manage Code Table Entries 57
Add New Table Entries 58Show Lookup Screen 58Edit the Sort Method of Code Table Entries 59Establish User Permissions for Code Tables 60
GLOBAL CHANGE 63Add a Global Change Instance 63Assign Global Change Permissions 64Process Global Changes 64Global Change Process Record 65

View a Global Change Process Record 65Recent Status 65History 65
Delete Archived Global Change Process Record 65Job Schedule 66
Reset Last Run Date 66Global Change Definitions 66
Delete Audit Tables 66Enable or Disable Audit Tables 67Delete Batch Control and Exception Reports 67Delete Business Process Outputs 68Manage Purpose or Designation Information 69Set Auto-Calculate Realised Amount 70
SMART FIELDS 71Smart Field Workflow 71Add a Smart Field 72
Add Value Groups to a Smart Field 74Manage Smart Fields 75
Process a Smart Field 76Smart Field Process Record 77
Recent Status 77History 77Job Schedules 77Add a Job Schedule 78
Clear the Results from the Last Run of a Smart Field 78Update Smart Field Query Relationships 78
Smart Field Definitions 79Marketing Smart Fields 79
Calculation for Loyalty 79Calculation for Single Gift Consecutive Year Donors 80
Data Warehouse Smart Fields 80
RECORD SOURCES 83Add/Remove Record Sources 83Manage Record Sources 84
Person Field Mappings 85Person Field Mappings 87
Gift Field Mappings 88Gift Field Mappings 90
Appeal Field Mappings 90Appeal Field Mappings 91

Define Duplicate Criteria for a Record Source 92Select Source Analysis Rule Fields for a Record Source 92
Source Analysis Rules Smart Fields 94Define a Record Source List Code 95


Quick LinksThe Administration page includes many tools and features to help you configure the program andmanage processes. Several administration tools are addressed in this guide while others are explainedelsewhere. Use these links to find the information you need.
Application Application Features
Attribute categories Attribute Categories
Audit tables Security Guide
Batch Batch and Import Guide
Business processes Queue Guide
Change password Blackbaud Direct Marketing Introduction Guide
Code tables Code Tables
Configuration Data Configuration Data
Countries and states Countries and states
Data warehouse DataWarehouse and OLAP Guide
Default search lists Blackbaud Direct Marketing Introduction Guide
Email alerts Email alerts
Email services Email services
Enable/disable default blank query criteria Enable/disable default blank query criteria
Enable/disable phone formatting Enable/disable phone formatting
Export definitions Query and Export Guide
Export Query and Export Guide
Generate application usage report file Generate application usage report file
Global changes Global changes
Import Batch and Import Guide
Notifications Notifications
Organisation currency setup Organisation currency setup
Organisation information Organisation Information

Organisational units Security Guide
Queue Queue Guide
Record sources Record sources
Report model record access security Report model record access security
Search list configuration Search list configuration
Security Security Guide
Self-service password reset Self-service password reset
Smart fields Smart fields
Time zones Time zones

Configuration TasksEnable or Disable Default Blank Query Criteria 3
Enable or Disable Phone Formatting 3
Organisation Information 4
Report Model Record Access Security 4
Self-service Password Reset 4
Time Zones 5
There are several tasks you can perform from Administration, under Configuration.
Note: Some configuration tasks are only available to users with certain security rights.
Enable or Disable Default Blank Query CriteriaThe Include blanks checkbox appears on query criteria screens for these criteria operators: Not Equal To, NotOne Of, Less Than, Less Than or Equal To, Not Between, Not Like, and Does Not Contain. When the Includeblanks checkbox is selected, the program includes blanks in the query results by adding the “or is blank” filter tothe query condition. When the checkbox is cleared, the program excludes blanks from the query results byadding the “and is not blank” filter to the query condition.
Note: Query treats nulls as blanks. When you include or exclude blank values, this also includes or excludes nullvalues.
The program is set to select Include blanks by default. Using Enable/Disable Default Blank Query Criteria, youcan change this setting. It is important to remember that the enable/disable setting simply determines thedefault behaviour for the Include blanks checkbox. You can always select or clear Include blanks on theindividual criteria screen. This allows you to evaluate and handle queries on a case by case basis. If you laterchange the Enable/Disable Default Blank Query Criteria setting, it will not affect any queries created prior to thechange.
Enable or Disable Phone FormattingIf phone formatting is enabled, the program automatically applies the format you selected for the correspondingcountry on the Countries and Counties page. For information about how to assign a default phone format to acountry, see Add Countries on page 1.
chapter 2

When you disable phone formatting, you must manually enter phone numbers exactly as you want them toappear in the program. You must also enter phone numbers as you want them to appear for countries assigned“<Unformatted>” as the default phone format.For information about how to add phone numbers on a constituent record, see the Constituents Guide.
} Enable or disable phone formatting
1. From the Administration page, click Enable/disable phone formatting under Configuration. Averification message appears.
2. Click Yes to enable or disable phone formatting, depending on the current configuration setting. Forexample, if phone formatting is enabled, click Yes to disable formatting.
Organisation InformationOne of the initial system configuration tasks you should complete is to enter your organisation name andcontact information, which includes your address, phone number, and website. After this information is entered,it is displayed in various reports and documents generated by the system. To complete this task, you edit thegeneric organisation information provided with the system.
Warning: If you do not enter the specific name and contact information for your organisation, the genericinformation that is provided with the system will be used in applicable reports and documents.
} Edit organisation information
1. From Administration, click organisation information under Configuration. TheManage organisationInformation page appears.
2. Click Edit. The Edit organisation information screen appears.
3. Enter your organisation name as it should appear on reports and documents. Also enter yourorganisation’s address, phone number, and website.
4. Click Save. You return to theManage organisation Information page and the updated information isdisplayed in the grid. If your organisation name or contact information should change, you should editthis information as needed.
Report Model Record Access SecurityYou can configure security for the Report Model Generator to use the same user access rights that exist in theprogram for records. To use record access security for the Report Model Generator, go to Administration, thenclick Configure Report Model Record Access Security under Configuration. Select Use record access securityand click Save.
Self-service Password ResetWhen you host your own Blackbaud application and turn on forms authentication in the web.config file, the Self-service password reset task appears under Configuration. You can configure this task to provide a way for usersto change passwords.
Note: Forms authentication includes other login enhancements such as invalid login messages to help clarify
4 CHAPTER 2

how to successfully log in to the application. When you host your Blackbaud applicaton, you can edit theweb.config file to turn this on. For more information, see the Infinity Platform Installer and Upgrade Guide. IfBlackbaud hosts your application and you want to turn on forms authentication, create a case on Case Central.
When you click Self-service password reset, the Edit self-service password reset options screen appears. SelectEnable self-service password reset so users can change passwords. If you have your own website for users tochange passwords, enter the URL for that site in the Custom password reset URL field. Otherwise, leave thisblank.
When you select Enable self-service password reset, an Update your email address screen appears the next timea user logs in to your application.
When a user clicks Forgot your user name or password on the login screen, an email sends to the email addressthat includes the user name and a link to reset the password. When the user clicks the link, a screen appears toenter a new password and confirm it. By default, the link expires after the user clicks it or after 24 hours.To adjust this time, edit the SelfServicePasswordResetUrlValidHours key in the web.config file.
Tip: To change the email address for the user, select the user name at the top of the page. From themenu thatappears, click Update email address. You cannot associate an email address with more than one user.
Time ZonesTo ensure time is formatted and displayed correctly for time zone-aware areas of the system, select yourorganisation’s default time zone. From the Time Zones page in Administration, you can view a list of supportedtimes zones and designate one as the default. You can also make time zones inactive or active.
CONFIGURATION TASKS 5

The default time zone setting is especially necessary for organisations with a hosted Blackbaud solution. Forexample, if your organisation is located in the Pacific time zone but our servers hosting the solution are located inthe Eastern time zone, you must set the default time zone to “(GMT- 8:00) Pacific Time” so that time zone-awareareas of the application use the correct local time.The default time zone setting affects the following time-zone aware areas of the program:• Programme event dates and times displayed through advance sales, daily sales, group sales, and online• On sale date for tickets• Availability time for discounts and combinations• Times displayed on sales receipts• Order information, including the order date and print date• Times displayed on the Average Hourly Sales Report
Note: TheUpdate time zone daylight savings rules task is used to refresh and apply daylight savings rulesstored in the database. This task is needed only if the government changes the rules for when daylight savingstime begins and ends in a particular region. For example, if the date and time that daylight savings begins forthe “(GMT-05:00) Eastern Time” region changes, then rules stored in the database will be updated to match thechanges. To apply the new rules, you must access Administration and click Update time zone daylight savingsrules. For more information see, Update Daylight Savings Rules on page 6.
} Select a default time zone for your organisation
1. From Administration, click Time zones under Configuration. The Time Zones page appears.
2. In the grid, select the default time zone for your organisation and clickMark as default. The selectedtime zone is now the system default and is displayed with a green checkmark.
Note: When a time zone is marked the default, the daylight savings rules for that time zone are automaticallyupdated to match the latest rules stored in the database.
} Mark time zones inactive or active
1. From Administration, click Time zones under Configuration. The Time Zones page appears.
2. In the grid, select a time zone to make inactive and clickMark inactive. The time zone is removed fromthe grid. By default, inactive time zones are not displayed on the Time Zones page. To view inactive timeszones, select Include inactive and click Apply.
3. If needed, you can make the time zone active again. To do so, select Include inactive and click Apply todisplay the inactive zone. All inactive zones are now displayed. Select the one to activate and click Markactive.
Note: When a time zone is marked active, the daylight savings rules for that time zone are automaticallyupdated to match the latest rules stored in the database.
Update Daylight Savings RulesTheUpdate time zone daylight savings rules task is used to manually refresh and apply daylight savings rulesstored in the database to all active time zones. This task is needed only if the government changes the rules forwhen daylight savings time begins and ends in a particular region. For example, if the date and time that daylightsavings begins for the “(GMT-05:00) Eastern Time” region changes, this task will update the rules stored in thedatabase to match the changes.
6 CHAPTER 2

} Update daylight savings rules
1. From Administration, click Time zones under Configuration. The Time Zones page appears.
2. Under Tasks, click Update time zone daylight savings rules. The rules stored in the database are appliedand updated to all active time zones.
CONFIGURATION TASKS 7

8 CHAPTER 2

Application FeaturesCatalog Browser 9
Application Features 12
On the Application page, you can high-level administrative tasks to manage the program. For example, you canuse the catalog browser to load reports to a new report server. To access the Application page, go toAdministration and click Application. The Application page appears.
Catalog BrowserSystem administrators use the catalog browser to manage the installation of custom catalog items and reports.For example, they can load reports to a new report server, if needed. To access the catalog browser, go toAdministration and click Application. On the Application page, click Catalog browser. The Catalog Browser pageappears.
Note: A catalog item is a single specification, while an optional, custom featuremay includemultiplespecifications.
Catalog Browser TabOn the Catalog Browser page, the Catalog Browser tab displays catalog items along with information such asdescriptions and whether the items are loaded. By default, all new features are loaded through revisions duringan installation or upgrade.To access the Catalog Browser, go to Administration and click Application. On the Application page, click Catalogbrowser. The Catalog Browser page appears.On the Catalog Browser tab, use the filter tool to select the catalog items to display. You can filter the catalogitems by type, source, and author. To only display items that are not loaded, select Exclude loaded items.
Load item
To load a catalog item, select it in the grid and click Load item. To load multiple items, click Load all catalog itemsunder Tasks. For more information about how to load multiple catalog items, see Load All Catalog Items on page10.
View xml
To view the specification for a catalog item in XML format, select it and click View xml. The XML appears in a sep-arate window.
chapter 3

Optional Features TabOn the Catalog Browser page, the Optional Features tab displays new features by release and indicates whetherthey are loaded. With the tree view on the tab, you can view the features that are available for different areas ofthe program.When you select a folder in the tree view, its features appear in the grid. To only display items that are notloaded, select Exclude loaded items.
Load feature
To load an optional feature to the program, select it in the grid and click Load feature.
View xml
To view the specification for a feature in XML format, select it and click View xml. The XML appears in a separatewindow.
Catalog Browser TasksFrom the Catalog Browser page, you can access these tasks load catalog items, load reports, and refresh shellnavigation.
Load All Catalog ItemsTo load multiple catalog items, click Load all catalog items under Tasks.
} Load all catalog items
1. From Administration, click Application, and on the Application page, click Catalog browser. The CatalogBrowser page appears.
2. Under Tasks, click Load all catalog items. The Load All Catalog Items screen appears.
10 CHAPTER 3
3. By default all items aremarked for loading.
• To load only items that are not already loaded, select Only load items that have never beenloaded.
• To exclude certain catalog items, clear the checkboxes for those items.
4. Click Start. The Status box displays the processing status for each catalog item. Processing may take afewminutes.
5. When processing finishes, click Close to return to the Catalog Browser page. To update the grid, clickRefresh List.
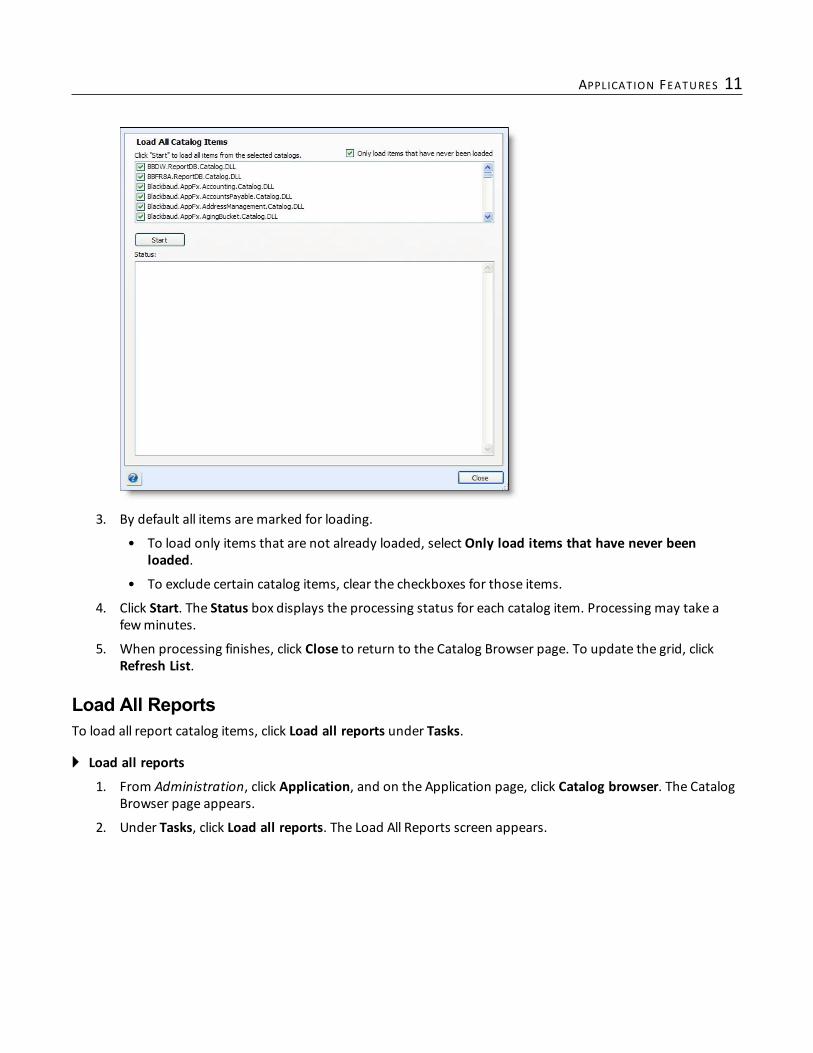
Load All ReportsTo load all report catalog items, click Load all reports under Tasks.
} Load all reports
1. From Administration, click Application, and on the Application page, click Catalog browser. The CatalogBrowser page appears.
2. Under Tasks, click Load all reports. The Load All Reports screen appears.
APPLICATION FEATURES 11

3. By default all report items aremarked for loading.
• To only load reports that are not already loaded, select Only load reports that have never beenloaded.
• To exclude certain reports, clear the checkboxes for those items.
4. Click Start. The Status box displays the processing status for each report catalog item. Processing maytake a fewminutes.
5. When processing finishes, click Close to return to Catalog Browser page. To update the grid, click RefreshList.
Refresh Shell NavigationAfter you load catalog items or optional features, click Refresh shell navigation under Tasks to make the loadeditems available in the program.
Application FeaturesOn the Features page, you can search the program for features such as data forms, query views, and KPIs in thesameway that you search for constituents, interactions, and other first-class records elsewhere in the program.You can then access the features to view details and access security permissions. This information can be usefulfor developers who need information about features and where they are used, as well as for administrators whowant an in-depth view of features. UnderNew Features, you can also search for features according to when theywere added to the program.To access the Features page, go to Administration and click Application. On the Application page, click Features.The Features page appears.
12 CHAPTER 3

Record TypesUnder Record Types, you can access record types to view their scale and scope in the program. You can searchfor record types, view a list of record types, and filter a list of record types according to the time framewhen theywere added to the program.To view a list of record types, click Record types.
On the Record types page, you can access record type definitions to view details such as the features in theprogram that require or return records for a record type. For example, you can select the Constituent recordtype to view the features in the program that require or return records of type “Constituent.”
FeaturesUnder Features, you can search for features such as data forms, query views, and KPIs in the sameway that yousearch for constituents, interactions, and other first-class records elsewhere in the program. To search for an
APPLICATION FEATURES 13

item, click a search task and enter your search criteria. When you select a feature, the program displays detailssuch as ID, record type, implementation information, and whether the feature is installed. You can also viewoutput fields and filters, as well as the pages and dashboards that use the feature.
Note: You can also create ad-hoc queries to view details about many of these features. For example, to identifythe data lists that include themost output fields, you can create a Data List query, add Field ID to the outputfields, apply the COUNT summary, and organise the results in descending order.
For example, to search for a data list, click Data list search. On the search screen, enter your search criteria andselect a data list. The Data List page appears. On this page, you can view the ID for the list, the record type,implementation information, and whether the data list is installed. You can also view the output fields and filters,as well as the pages and dashboards that use the data list.
On the details page for a feature, the API tab includes a reference for developers about how to use the featurefrom a variety of APIs. To set a reference to a BBMetalWeb assembly when you write .NET client-side code, usethis tab to see which assembly contains the wrapper for a feature. The tab also includes the BizOp SOAP URL touse to get the data that a feature returns.
14 CHAPTER 3

New FeaturesUnderNew Features, you can use the filter fields to search for features such as data forms, query views, and KPIsaccording to when they were added to the program. When you select a feature, the program displays detailsabout the feature.For example, to view new record operations, click New record operations. The Record operations page appears.In the Show field, select a time frame to filter the record operations and click Apply.
APPLICATION FEATURES 15

16 CHAPTER 3

Attribute CategoriesManage Attribute Categories 17
Manage Attribute Form Extensions 20
Update Attribute Query Relationship 22
Notifications 22
Attributes provide flexibility to your record keeping. With attributes, you can define and store special informationabout a wide variety of record types. You can identify a category for the attribute and then store an entry specificto that category.From Administration, you create the attribute categories available to users in the program. Users can assign anynecessary values to these categories. For example, if a constituent is a gourmet cook and a cyclist, a user canenter each activity in the constituent’s record with an attribute category of Hobbies. This helps keep attributesneatly organised and helps with reports and queries.To enable users to enter attributes when they add or edit information throughout the program, you can useform extensions. With form extensions, you can add a tab or section for users to enter attribute information onapplicable forms and pages that otherwise do not include fields for attributes.To view and manage the attributes available to users, go to Administration and click Attribute categories. TheAttribute Categories page appears.
Manage Attribute CategoriesOn the Attribute categories tab, you can view the categories available to users. For each category, you can viewits name, record type, and data type.From the grid, you can add and manage categories as needed.
Add Attribute CategoriesTo help better manage the attributes your organisation uses, you can add attribute categories. You can usethese categories to store information. For example, to track seating preferences for an event, you can create aSeating Preference attribute category so users knowwhere to find this information on constituent records.You can assign attributes to a category and then assign the category to a group. For example, you can create aHobbies attribute category and assign the category to constituent records. The next time you open a constituentrecord and want to record the fact that this constituent’s favourite hobby is golf, “Hobbies” appears as an optionin the Category field of the constituent attribute screen accessed from the Attributes tab. Under Code tables inAdministration, you can also create an attribute group called Outside Interests. In this group, you might havecategories for hobbies and for arts.
chapter 4

} Add an attribute category
1. From Administration, click Attribute categories. The Attribute Categories page appears. Any existingattribute categories appear on this page.
2. On the Attribute categories tab, click Add. The Add attribute category screen appears.
3. Enter a unique name to help identify the category. The name appears in the Category field drop-downmenu when you add or edit attribute information on a record. If no attribute categories exist for a recordtype, the Attributes tab does not appear.
4. In the Record type field, select a record type for the attribute. For example, to use the attribute to trackthe interests of constituents, select “Constituent.” This attribute appears as an option for constituentrecords only.
5. To assign the attribute to a group, select the attribute group code table in the Attribute group field. Forexample, you can create an attribute group called Outside Interests that includes attribute categories ofAthletics and Arts. You add and manage attribute groups as code tables in Administration.
6. In theData type field, select the type of data for users to provide in the attribute category. For example,to allow users to enter text to describe constituent interests, select “Text.” For a detailed explanation ofthe available data types, see Data Types on page 19.
• If you select “Code table,” users select attribute values from a defined list. In the Code table field,select the code table for users to select from. To create a code table, see Create Code Tables onpage 19.
• If you select “Constituent record,” users can search for and select constituents as the attributevalues. In the Search list field, select a search screen for users to find constituents. For example, toallow users to select individual constituents only, select “Individual Search.” Once you add theattribute category, you can change which search list is used.
7. To limit the category to one per record, select Allow only one per record.
8. To make the category available as a list column, selectMake available in lists. After the programexecutes a nightly business process which adds the categories and attribute values to lists, the categoryappears as an option when you click Columns from list pages.
Note: For Friends Asking Friends lists and reports that refresh data from the Data Warehouse, the program alsoexecutes a business process to refresh the data after the process to add the categories is complete.
Tip: We recommend you only select categories you need for lists. If you include a large number, the categorieswill slow list performance.
9. Click Save. You return to the Attribute Categories page.
18 CHAPTER 4

Note: If you add a query view after you create an attribute category, the program does not automatically addthe attribute category to the new query view. For information about how to add an attribute category to aquery view, see Update Attribute Query Relationship on page 22.
Data TypesData types determine the values that users can enter when they add attributes. When users add attributes, theyselect attribute categories in the Category field. The data types you select for the attribute categories determinethe type of data that the users can enter in the Value field. For example, if you create an attribute category forconstituent records and select “Currency” as the data type, users who add attributes and select this attributecategory can enter only monetary values.
Data Type AllowsText Letters, numerals, and nonalphanumeric characters such as “!,” “@,” and “#.”Number Numerals. If users enter anything else, including decimals, an error message appears.Date Complete dates in the correct format. Users can select dates from a calendar.
Currency Numerals and decimals. Automatically formats themonetary values to includes symbols such asdollar signs or pound signs.
Yes/No “Yes” or “No.”
Code table Code table entries. You select a code table with this data type, and users select from the codetable’s entries when they add attributes.
Constituentrecord
Constituent names. You select a search screen with this data type to allow users to search forconstituents. The search screen restricts the types of constituents that users can select. Once youadd the attribute category, you can change which search list is used.
Fuzzy datePartial dates such as a year or a month and year. Partial dates must use an abbreviated version ofthe date format. For example, if the date format is “mm/dd/yyyy,” users must enter a fuzzy datesuch as January 2011 as “1/2011,” not “January 2011.” Users also can select dates from a calendar.
Time Time entries, such as 2:00 p.m. or 1:15 a.m.
Memo Letters, numerals, and nonalphanumeric characters such as “!,” “@,” and “#.” The field expandsfor this data type.
Create Code TablesWhen you create an attribute category and select “Code table” as the data type, you must select a code table touse as the source of the attribute. If a code table with the desired attributes does not exist in the program, youcan create a code table from the Add attribute category screen.
} Create a code table
1. On the Add attribute category screen, select “Code table” in theData type field. The program enables theCode table field.
2. In the Code table field, click New. The Add a code table screen appears.
3. In theName field, enter a name for the code table in the program. This is the name that appears on theCode Tables page in Administration.
4. In theDB table name field, enter a name for the code table in the database schema. This is the name youuse to reference the code table in SQL.
Note: The database table name can be up to 30 characters. It can start with a capital letter from “A” to “Z,”followed by one or more uppercase letters or numerals and ending with “CODE.” To designate the table as a
ATTRIBUTE CATEGORIES 19

code table, it must end with “CODE.” For example, the database table name for the Alias Type code table in theprogram is ALIASTYPECODE.
5. In the Category field, select a category for the code table. The Code Tables page in Administrationorganises code tables by category for easier viewing. If the category does not exist, click Add a codetable category and you can create the new category.
6. In the Sort type field, select how to organise the entries in the code table.
7. In theDescription field, enter a description of the code table.
8. Click Save. You return to the Add attribute category screen.
Manage Attribute Form ExtensionsTo create tabs or sections for users to enter attributes, you can add form extensions throughout the program.Form extensions add tabs or sections to forms and pages that do not otherwise include attribute fields. On theAttribute form extensions tab, you can create and manage the form extensions for your organisation.
Add Attribute Form ExtensionsAfter you create attribute categories, you can use form extensions to create tabs or sections in related areas ofthe program. This allows users to enter attribute information on forms and pages that otherwise do not includeattribute fields. For example, you can create attribute categories for constituent records and add a formextension to the Individual, Spouse, Business Add Form. When users add constituents, they can then enterattributes on the tab or section you create with the form extension.When you create a form extension, you select the form or page to modify; select whether to create a tab orsection; enter a label for the tab or section; and select the attribute categories to include.
Note: To include an attribute category on a tab or section that you create with a form extension, the attributecategory must limit attributes to one per record. When you create an attribute category, you must select Allowonly one per record. For information about how to create attribute categories, see Add Attribute Categorieson page 17.
} Add an attribute form extension
1. From Administration, click Attribute categories. The Attribute Categories page appears.
2. On the Attribute form extensions tab, click Add. The Add attribute form extension screen appears.
20 CHAPTER 4

3. In theData form field, click the binoculars to search for a form or page to modify. A search screenappears. You can search name, record type, and whether the form is in Add, Edit, or Viewmode.
4. In the Render style field, select whether to create a tab or section.
• If you select “Tab,” the program adds a tab to the right of any existing tabs. In the Tab caption field,enter a label for the new tab.
• If you select “After parent,” the program adds a section below the existing content. If the form orpage includes tabs, the section appears on the first tab. In theGroup caption field, enter a label forthe new section.
5. UnderName, select the attribute categories to include on the form extension and click the right arrow.Attribute categories only appear underNamewhen their record typematches the record type of theform or page you select in theData form field.
Note: Form extensions require attribute categories to limit attributes to one per record. If an attribute categoryallows multiple attributes per record, it does not appear underName. When you create attribute categories,you must select Allow only one per record.
6. To require users to enter an attribute, select the Required checkbox for the attribute category.
7. If you includemultiple attribute categories, use the up and down arrows to arrange the order.
8. Click Save. You return to the Attribute Categories page. The program creates the tab or section thatallows users to enter attribute information on the form or page you select.
Note: To disable a form extension, select it and click Disable. For more information, see Disable or EnableAttribute Form Extensions on page 21.
Disable or Enable Attribute Form ExtensionsAfter you add an attribute form extension, you can enable or disable it as necessary. For example, you maydisable a form extension if your organisation temporarily stops its use. On the Attribute form extensions tab ofthe Attribute Categories page, the Enabled column displays whether a form extension is enabled.
ATTRIBUTE CATEGORIES 21

When you disable a form extension, the program removes the tab from the form or page but retains itsconfiguration for later use. To disable a form extension, select it on the Attribute form extensions tab and clickDisable.To resume use of an attribute form extension, you can enable it when necessary. When you enable a formextension, the program adds the tab to the applicable form or page so users can add attribute information asnecessary. To enable a form extension, select it on the Attribute form extensions tab and click Enable.
Delete Attribute Form ExtensionsAfter you add an attribute form extension, you can delete it as necessary. When you delete a form extension, theprogram removes the tab or section from its form or page and deletes the configuration from the database.
Tip: Rather than delete an attribute form extension, you can disable it. When you disable a form extension, theprogram removes the tab or section from the form or page but retains the configuration for later use. Forinformation about how to disable a form extension, see Disable or Enable Attribute Form Extensions on page21.
Update Attribute Query RelationshipIf you add a query view after you create an attribute category, the program does not automatically add theattribute category to the query view. To add the attribute category to the query view, go to the AttributeCategories page and click Update attribute query relationship under Tasks.
Notifications
Notifications allow you to share important information about a record or a group of records with users. You candetermine whether all users should receive a notification or only a targeted group of users. For example, youmay want all users to receive a notification when they open the record of a board member.Notifications appear on the information bar of a record.You can also set notifications to appear on a separate screen when a record is accessed. The notification screenappears the first time a record is accessed during a session. If you leave the record and return within 60minutes,the notification screen does not appear again. However, if you return after more than 60minutes, thenotification screen appears again.You can create notifications for groups of records in Administration. You can also create notifications for aspecific record from the Documentation tab of the record.
AddNotifications to a Group of RecordsYou can create notifications for groups of records in Administration. You determine whether all users shouldreceive the notification or only a targeted group of users.
} Add a notification to a group of records
1. From Administration, clickManage notifications under Configuration. The Notifications page appears.
2. Click Add. The Add notification screen appears.
22 CHAPTER 4

3. In theMessage field, enter the name of the notification (such as “Board Member Alert”) as well themessage or text to display in the actual notification.
4. If this notification will expire or is temporary, in the End date field, select a date after which thenotification expires.
5. To display the notification in a separate window in addition to the information bar, select Display innotification window.
6. UnderNotification records, select the record type and a selection of records to use. The notificationdisplays for records included in the selection.
7. UnderNotification users, select whether this notification displays for all users or only selected users. Ifyou select “Selected users,” choose the selection of users to receive the notification.
8. Click Save. You return to the Notifications page. The notification is available for the users you selectedwhen they access the records you selected.
Update Notification Query RelationshipsIf through a customisation process, you add a new query view after a notification is created, the new query viewdoes not automatically add the notification. To add the notification to the new query view, click Updatenotification query relationship.
ATTRIBUTE CATEGORIES 23

24 CHAPTER 4

Configuration DataConfiguration Export 25
Configuration Export Process Status Page 28
Configuration Import 29
Configuration Import Process Status Page 29
Import or Export Accounting Configuration Data 29
We recommend you safely configure your system settings in a test environment before you apply them to yourlive environment. From Administration, you can work with configuration data to export and import yourconfiguration settings, such as batch designs and workflows, code tables, and queries, between a testenvironment and your live database.
Configuration ExportOn the Configuration Export page, you can create and manage processes to export configuration data from yourlive database. To access the Configuration Export page from Administration, click Configuration data and thenConfiguration export.Under Configuration exports, the names and descriptions of your configuration export processes appear. Fromthe grid, you can manage your configuration export processes.
AddConfiguration Export ProcessesTo export configuration data, you must first create an export process for the data. When you create an exportprocess for configuration data, you enter a name and description to help identify the process and select thetypes of data to export.
} Add a process to export configuration data
1. From Administration, click Configuration data and then Configuration export. The Configuration Exportpage appears.
2. Under Configuration exports, click Add. The Add configuration export screen appears.
chapter 5

3. Enter a unique name and description to help identify the export process.
4. Under Export instances, add the types of configuration data to export.
To select a type of configuration data, in the box on the left, select a type of data to export and click Add.Under Selected types, the export instance for the selected data type appears.
For some configuration data such as smart fields and queries, enter the parameters required for theexport instance. For information about how to add an export instance, see Add Export Instances onpage 26.
5. After you add all configuration data types to export, arrange the order in which to export the instances.The process exports the instances in the order in which they appear under Selected types. To adjust theorder in which an instance exports, select it under Selected types and click the up or down arrow tochange its position in the process.
For some configuration data such as smart fields and queries, you can edit its parameters as necessary.To edit the parameters of an export instance, select it under Selected types and click Edit.
To remove an instance from the export process, select it under Selected types and click Delete.
6. Click Save. You return to the Configuration Exports page. Under Configuration exports, the new exportprocess appears.
Add Export InstancesWhen you add or edit a configuration export process, you select the types of configuration data to export. Someinstances of configuration data, such as smart fields and queries, require parameters to determine the data toexport.
26 CHAPTER 5

When you add an instance that requires additional parameters to a configuration export process, the Add exportinstance screen appears. On this screen, select the parameters necessary for the selected instance. For example,to include smart fields in a configuration export process, select whether to export all smart fields or only selectedsmart fields. To export a query, select the selection of queries to export.
Run aConfiguration Export ProcessTo export configuration data, you must first run its export process. When you run the process, the programretrieves the selected configuration data types to create an export data file. After the process completes, you candownload the data file from the status page of the export process.To run an export process, select it under Configuration exports on the Configuration Export page and clickExport data. The program runs the process and displays the status page of the process so you can track thestatus of the process and download the data file upon completion.For information about the items on the status page, see Configuration Export Process Status Page on page 28.
Note: You can also run a configuration export process from its status page. Select Tasks, Start process from themenu bar, or click Start process under Tasks.
Assign Permissions for a Configuration Export ProcessAfter you add an export process, you can assign permissions to the roles who can use the process. When youassign permissions for the process, you can select to allow all roles to use the process or only select roles.
} Assign permissions for a configuration export process
1. From Administration, click Configuration data and then Configuration export. The Configuration Exportpage appears.
2. Under Configuration exports, select the process to assign permissions for.
3. Click Assign permissions. The Assign permissions screen appears.
CONFIGURATION DATA 27

4. Select whether all roles or only selected roles may access the export process.
If you select Selected roles, select the permissions for the roles in the System roles box.
• To grant a role access, select it in the box and click Grant.
• To deny a role access, select it in the box and click Deny.
• To remove an existing permission assignment from a role, select it in the box and click Clear.
5. Click Save. You return to the Configuration Exports page.
Configuration Export Process Status PageWhen you add a configuration export process, the program automatically generates a status page of theprocess. On the status page, you can view the name and description of the process. To access a configurationexport process status page, select the process in the Configuration exports grid on the Configuration Exportspage and click Go to process.The status page also displays the current status and historical information about the process. To help younavigate through this information, each process status page contains multiple tabs.Depending on your system role, you can perform tasks to manage a process from its status page. To perform atask, select it from the Tasksmenu, or click it under Tasks.
28 CHAPTER 5

Configuration ImportYou can import an extensible markup language (*.xml) data file of configuration data into your live database,such as after you configure system settings in a test environment.
} Import configuration data into the database
1. From Administration, click Configuration data and then Configuration import. The Import configurationdata screen appears.
Note: To import configuration data from the status page of the import process, click Start process under Tasks.
2. Browse to and select the *.xml data file to import.
3. Click Save. The program imports the selected data file and displays the status page of the configurationimport process so you can track its status.
For information about the items on the status page, see Configuration Import Process Status Page onpage 29
Configuration Import Process Status PageWhen you import a configuration data file, the program automatically displays a status page of the configurationimport process. On the status page, you can view the file name of the imported data file.The status page also displays the current status and historical information about the process. To help younavigate through this information, each process status page contains multiple tabs.Depending on your system role, you can perform tasks to manage a process from its status page. To perform atask, select it from the Tasksmenu, or click it under Tasks.
Import or Export Accounting Configuration DataWhen you run a process to import or export Accounting configuration data (located under the Accountingfolder), you can import or export each item separately or together in one file. However, you must import orexport the data in the following order:• Account Systems (if multiple account systems are used)• Composite Segment Definition (if composite segments are used)• Account Structure• Segment Values
CONFIGURATION DATA 29

• Accounts• Account CodeMapping• Segment Mapping• Composite Segment Mapping (if composite segments are used)When you import or export Accounting data, also consider the following:• You can import Account CodeMapping, Segment Mapping, and Composite Segment Mapping in any order,but you must import them after Accounts.
• We recommend you import Segment Values before you import Accounts. If you import Accounts beforeSegment Values, the program does not import themappings for Accounts.
• You can import Fiscal Years at any time.
30 CHAPTER 5

Application Usage ReportWith the application usage report, you can monitor overall system usage and tallies. The report includes countsfor howmany records of different types are in the system, along with information about howmany system rolesand users there are. The report also includes information about any custom catalog components that have beenadded.To view the report, in Administration, click Generate application usage report file under Tools. Then click Startprocess under Tasks. Select a date and the report is processed. You can click View report.
chapter 6

32 CHAPTER 6

Email ManagementEmail Services 33
Email Services Reports 38
Email Alerts 42
From Administration, your organisation can configure and manage the delivery of email messages to itsconstituents and application users.
Email ServicesFrom Administration, you can manage the processes used to send email through the program such as forcommunications and notifications. From the Email Services page, you can configure the connection to theShared Services server, hosted by Blackbaud, used to send email messages through the program. You can alsoprioritise the order in which the program submits general purpose email jobs for messages such as email blastsand newsletters to the server. You can use key performance indicators (KPIs) to determine the health andduration of your email processes.
Configure Email Service SettingsTo send email messages through the program, you must first configure the connection to the Shared Servicesserver hosted by Blackbaud. You can also prioritise the order in which the program sends each type of generalpurpose email job to the server. From the Email Services Configuration page, you can configure these settings.To access this page from the Email Services page, click Email service settings under Configuration.To send email messages through the program, you must configure the connection to the Shared Services serverhosted by Blackbaud. Under Connection health, you can viewwhether the program can connect to this server.Under Email services external server settings, you can view the network address and credentials used toconnect to the server. For information about how to edit this information, see Edit the External Server Settingson page 33.When you run a general purpose email process, the program submits jobs for email messages such asnewsletters, blasts, and notifications to the Shared Services server. Under Email category processing order, youcan view the order in which the program submits each type of email message. You can prioritise each category asnecessary. For example, to submit email blasts before newsletters, you can give email blasts a higher priority. Toadjust the priority of an email category, select it in the grid and click the up or down arrow.
Edit the External Server SettingsTo send email messages through the program, you must first configure the connection to the Shared Servicesserver hosted by Blackbaud.
chapter 7

Warning: If you do not configure the connection to the Shared Services server, or if you enter the incorrectcredentials for the server, the program automatically disables all email job processes.
} Configure the email services server
1. From Administration, click Email services under Configuration. The Email Services page appears.
2. Under Configuration, click Email service settings. The Email Services Configuration page appears.
3. Under Email services external server settings, click Edit. The settings screen appears.
4. In theHost URL field, enter the network address for the Shared Services server.
5. In theUser name field, enter the user name your organisation uses to connect to the server.
6. In the Password and Confirm Password fields, enter the password used to connect to the server.
7. To use Secure Sockets Layer (SSL) to connect to the server, select Use SSL.
8. Click Save. The program verifies and saves the connection information. You return to the Email ServicesConfiguration page.
Manage Email ServicesOn the Email Services page, you can manage the processes used to generate and send email messages, thestatus of email processes and their jobs, and any invalid email addresses encountered by the processes. Toaccess the Email Services page, from Administration, click Email services under Configuration.To help you navigate through this information, the Email Services page contains multiple tabs.
Email ProcessesOn the Email Processes tab of the Email Services page, you can view and manage the processes used to generateand send email messages through the program. You can managemultiple email processes.• The email status process updates the status of an email job or invalid email addresses list based oninformation received from the Shared Services server.
• The general purpose process generates email messages for general communications such as newsletters,blasts, and notifications.
34 CHAPTER 7

• The transactional process generates email messages for communications based on revenue transactions suchas revenue acknowledgements and receipts.
Under Scheduled email processing, you can viewwhether a schedule is enabled for the email processes.Under Email processing jobs, the processes used for email messages appear. For each process, you can view thedate and status of its most recent instance, the dates the process most recently started and stopped, and anymessage about its status. You can enable or disable an email process as necessary.To view additional information about a process, click its row under Email processing jobs. Beneath the row,information about themost recent instance of the process appears.When an email process runs, the program generates a record of the instance of the process. To view the JobHistory page of a process, click its name under Email processing jobs. For information about the Job Historypage, see Email Process History on page 35.From the Email Processes tab, you can manage the email processes as necessary.
Disable an Email ProcessFrom the Email Services page, you can quickly disable an email process, such as to help troubleshoot problemswith email jobs. On the Email Processes tab, select the email process under Email processing jobs and clickDisable. When the confirmation message appears, click Yes.
Enable an Email ProcessFrom the Email Services page, you can quickly enable an email process, such as if you previously disabled it. Onthe Email Processes tab, select the email process under Email processing jobs and click Enable. When theconfirmation message appears, click Yes.
Warning: If you enable either the transactional or general purpose email job process, we strongly recommendyou also enable the email status job process to help track its status.
Run an Email ProcessTo generate email messages, you can run an email processing job to submit themessages to the Shared Servicesserver hosted by Blackbaud. You can run separate job processes for general purpose email messages such asnewsletters and transactional email messages such as revenue acknowledgements. You can also run a process toupdate the status of general purpose and transactional email jobs and any invalid email recipients. On the EmailServices page, select the process to run on the Email Processes tab and click Run email process.
Reset the Last Run On Date for an Email ProcessTo undo themost recent instance of an email process, you can reset its last run on date. When you reset the lastrun on date, the program resets the sent status of any email messages generated by the process during themostrecent instance. On the Email Services page, select the process to reset on the Email Processes tab and click Resetlast run on date. When the confirmation message appears, click Yes.
Email Process HistoryWhen an email process runs, the program generates a record of the instance of the process. On the Job Historypage of a process, you can view the records of the process instances.To access the Job History page of a process, click the name of the process on the Email Processes tab of the EmailServices page.Under Scheduled Job History, select the status of the instances to view, such as Completed or Did not finish, andclick Apply. The previously run instances of the process with the selected status appear. For each instance, you
EMAIL MANAGEMENT 35

can view its status, run date and time details, and the number of records included in the process. To remove thefilter and view all instances regardless of status, click Reset.You can delete the record of an instance if necessary. To delete a record of an instance, select the instance underScheduled Job History and click Delete.
Email JobsTo view and manage previously run email processes, select the Email Jobs tab on the Email Services page.Under Email status processing, you can view the date and time of themost recent instance of the Email statusprocess, such as to verify the process is up-to-date. To run the Email Status Poll process, click Get latest status.Under Email jobs, you can view the general purpose email processes and transactional email processes. For eachprocess, you can view its status, the number of retries, the number ofmessages requested and sent, and its dateand time.To view additional information about a process, select its row under Email jobs. Beneath the row, informationabout the process, such as the subject of the email, its sent from email address and display name, and fieldname, appear.To view detail information about an email process on its own page, click its name under Email jobs. The EmailJob Details page appears.To help reduce the number of processes in the grid, filter the grid by process type or status. Select the criteria ofthe process to view, and click Apply. To remove the filters and display all processes, click Reset.To use additional criteria to search for an email job, such as by description and email subject, click Search jobs tosearch for the email job and view its Email Job Details page.From the grid, you can delete a general purpose email process job that has been submitted to the SharedServices server but has not yet been processed. For example, if you submit a process to generate newsletters fora future date and then need to revise the content, you can delete the job from the server.
Email Process Job DetailsOn the Email Jobs tab of the Email Services page, you can view information about general purpose email processand transactional email process jobs. To view additional detail about a process job, access its Email Job Detailspage. On this page, you can view the subject of the email, its sent from email address and display name, and fieldname information.To access this page from the Email Jobs tab on the Email Services page, search for the email job, or click the nameof the job under Email jobs.For a general purpose email process, you can delete a job that has been submitted to the Shared Services serverbut has not yet been processed. For example, if you submit a process to generate newsletters for a future dateand then need to revise the newsletter content, you can delete the process from the server. For informationabout how to delete an email process, see Delete a Submitted General Purpose Email Process Job on page 37.To return to the Email Services page, click Go back to Email Services under Email Services.
Search Email JobsOn the Email Jobs tab of the Email Services page, you can view information about your general purpose emailprocesses and transactional email processes, such as status, the number of retries, the number ofmessagesrequested and sent, and its date and time. To view additional information about a specific email job, you cansearch for the job to access its Email Job Details page. When you search for an email job, you can use criteriasuch as description, email subject, status, and job type.
36 CHAPTER 7

On the Email Jobs tab, click Search jobs under Email jobs. On the Email Services Email Job Search screen, enterthe criteria of the email job to view and click Search. Under Results, the email jobs that meet the criteria appear.To view the Email Job Details of a job, click its name under Results . For information about the Email Job Detailspage, see Email Process Job Details on page 36.
Delete a Submitted General Purpose Email Process JobFrom the Email Services page or an Email Job Details page, you can delete a general purpose email process thathas been submitted to the Shared Services server but has not yet been processed. For example, if you submit aprocess to generate newsletters for a future date and then need to revise the newsletter content, you can deletethe process from the server.• On the Email Services page, under Email jobs on the Email Jobs tab, select the process to delete and clickDelete.
• On the Email Job Details page, click Delete.When the confirmation message appears, click Yes.
Email Job StatusesAs the Email Services process an email job, activity through the program or on the Shared Services server hostedby Blackbaud determine the current status of the job. The table below explains the statuses of an email job.
Status DescriptionCancelled The email job was cancelled or manually stopped on the Shared Services server.
Completed The Shared Services server finished processing the email job and messages have beensent.
Deleted A user deleted the email job from the queue.Exception occurred The Shared Services server encountered an exception while processing the email job.
Local chunking The program is sending the data required for the Shared Services server to process theemail job, but not all data has yet been sent.
Maximum numberof retries exceeded
The email job has been removed from the queue because the program exceeded themaximum number of attempts allowed to send it to the Shared Services server.
Processing A complete email job has been submitted to the Shared Services server, which is activelyprocessing the job.
Queued The email job is scheduled to be sent to the Shared Services server, but no data has yetbeen sent.
Server chunking The Shared Services server is adding the email job to a group of email jobs to beprocessed.
Server chunkingpaused
The Shared Services server paused while adding the email job to a group of email jobs tobe processed.
Status unknown The Shared Services server reports an unknown job status.
Blacklisted Email AddressesOn the Blacklisted Email Addresses tab of the Email Services page, you can manage the list of email addressesthat have been blacklisted to prevent the program from sending email to them.When you run the email status process, the program records any email addresses that return hard bounces andadds them to the blacklist. A hard bounce indicates a permanent delivery failure such as when the InternetService Provider reports that an address is cancelled or nonexistent. The program does not blacklist soft bouncesthat indicate temporary delivery failures such as network issues or full mailboxes.
EMAIL MANAGEMENT 37

You can also manually add email addresses to the blacklist to prevent the program from sending email. Forexample, you can blacklist email addresses that you associate with malicious or fraudulent activity.You cannot remove email addresses from the Blacklisted Email Addresses tab, but you can update the status ofemail addresses to allow the program to resume sending email.The Blacklisted email addresses grid the blacklist status of email addresses, the number of failed deliveryattempts, and themost recent notification message. To filter the grid by blacklist status, click Filter, select astatus, and click Apply. To remove the filter and view all addresses, click Reset.To search for a blacklisted address, click Search addresses On the Email Services Invalid Account Search screen,enter your criteria and click Search. Under Results, the email addresses that meet the criteria appear. For eachaddress, you can view information such as its blacklist status and number of failed attempts. To return to theBlacklisted Email Addresses tab, select the address to view.
Change the Blacklisted Status of an Email AddressYou cannot remove blacklisted email addresses from the Blacklisted Email Addresses tab. To resume sendingemail to a blacklisted email address, you can toggle its status. For example, if the Internet Service Providerincorrectly reports an email address as invalid and you want to change its status to "Not blacklisted," select theaddress under Blacklisted email addresses and click Toggle blacklisted status. On the confirmation message,click Yes. You return to the Blacklisted Email Addresses tab.
Add a Blacklisted AddressFrom the Email Services page, you can manually add an email address to the blacklist. For example, you canblacklist email addresses that you associate with malicious or fraudulent activity.
} Add an email address to the blacklist
1. From Administration, click Email services under Configuration. The Email Services page appears.
2. Select the Blacklisted Email Addresses tab.
3. Under Blacklisted email addresses, click Add blacklisted address. The Add an email address to theblacklist screen appears.
4. Enter the email address to add to the blacklist.
5. In the Reasonfield, enter an explanation for the blacklisted status.
6. Click Save. You return to the Blacklisted Email Addresses tab. The program no longer sends email to thisaddress.
Email Services ReportsFrom Administration, you can generatemultiple reports to analyse activity with your general purpose andtransactional email job processes.
Transactional Email Job Status ReportWith the Transactional Email Job Status report, you can view the status of your transactional email jobs for aspecific date or period of time. For example, you can run the report to verify all email job processes completedsuccessfully. When you generate the report, you can select to include only email that meets specific criteria, suchas status, recipient, or subject.
38 CHAPTER 7

For each status, the report displays each job that meets the selected criteria with that status during the selectedtime period. For each job, you can view information such as its description, subject, and the dates added andchanged. Under Summary, you can view a breakdown, by grid and pie chart, of the total emails that meet theselected criteria for each status.
} View the Transactional Email Job Status report
1. From Administration, click Email services. The Email Services page appears.
2. Under Reports, click Transactional Email Job Status. The Transactional Email Job Status report pageappears.
3. In theDate range field, select the time period of the transactional email jobs to analyse.
4. By default, the report includes all transactional email from the selected time period. To include onlyspecific email, specify the criteria of the email to include, such as by status, recipient, or subject.
5. Click View report. The report generates. From the report menu bar, you can print or export the report asnecessary.
General Purpose Email Job Status ReportWith the General Purpose Email Job Status report, you can view the status of your general purpose email jobs fora specific date or period of time. For example, you can run the report to verify all email job processes completedsuccessfully. When you generate the report, you can select to include only email that meets specific criteria, suchas status or subject.For each status, the report displays each job that meets the selected criteria with that status during the selectedtime period. For each job, you can view information such as its description, subject, and the dates added andchanged. Under Summary, you can view a breakdown of the total emails that meet the selected criteria for eachstatus.
EMAIL MANAGEMENT 39

} View the General Purpose Email Job Status report
1. From Administration, click Email services. The Email Services page appears.
2. Under Reports, click General Purpose Email Job Status. The General Purpose Email Job Status reportpage appears.
3. In theDate range field, select the time period of the general purpose email jobs to analyse.
4. By default, the report includes all general purpose email from the selected time period. To include onlyspecific email, specify the criteria of the email to include, such as by status or subject.
5. Click View report. The report generates. From the report menu bar, you can print or export the report asnecessary.
Transactional Email Jobs Processed ReportWith the Transactional Email Jobs Processed report, you can view information about the transactional email jobsprocessed during a specific date or period of time. For example, you can run the report to view howmany emailjobs processed for the time period. When you generate the report, you select whether to group the results byevery two hours or on a daily or monthly interval. You can also select to include only email that meets specificcriteria, such as recipient or subject.
40 CHAPTER 7

For each interval, the report displays each transactional email job that meets the selected criteria processedduring the selected time period. For each job, you can view information such as its description, subject, and thedates added and changed. You can also view a bar chart of the total emails that meet the selected criteriaprocessed for each interval.
} View the Transactional Email Jobs Processed report
1. From Administration, click Email services. The Email Services page appears.
2. Under Reports, click Transactional Email Jobs Processed. The Transactional Email Jobs Processed reportpage appears.
3. In theDate range field, select the time period of the transactional email jobs to analyse.
4. In theGrouping field, select whether to group the results by every two hours or on a daily or monthlyinterval.
5. By default, the report includes all transactional email from the selected time period. To include onlyspecific email, specify the criteria of the email to include, such as by recipient or subject.
6. Click View report. The report generates. From the report menu bar, you can print or export the report asnecessary.
General Purpose Email Jobs Processed ReportWith the General Purpose Email Jobs Processed report, you can view information about the general purposeemail jobs processed during a specific date or period of time. For example, you can run the report to view howmany email jobs processed for the time period. When you generate the report, you select whether to group theresults by every two hours or on a daily or monthly interval. You can also select to include only email that meetsspecific criteria, such as subject.For each interval, the report displays each general purpose email job that meets the selected criteria processedduring the selected time period. For each job, you can view information such as its description, subject, and thedates added and changed. You can also view a bar chart of the total emails that meet the selected criteriaprocessed for each interval.
} View the General Purpose Email Jobs Processed report
1. From Administration, click Email services. The Email Services page appears.
2. Under Reports, click General Purpose Email Jobs Processed. The General Purpose Email Jobs Processedreport page appears.
3. In theDate range field, select the time period of the general purpose email jobs to analyse.
4. In theGrouping field, select whether to group the results by every two hours or on a daily or monthlyinterval.
5. By default, the report includes all general purpose email from the selected time period. To include onlyspecific email, specify the criteria of the email to include, such as by subject.
6. Click View report. The report generates. From the report menu bar, you can print or export the report asnecessary.
EMAIL MANAGEMENT 41

Email AlertsWith email alerts, you can configure the program to automatically notify application users by email whenchanges in the database impact them. For example, you can set up alerts to inform users in Batch entry whenownership of batches transfer to them as the result of a batch status update.
Note: To generate system alerts, the program requires that you first set up a profile of DatabaseMail in yoursupported installation ofMicrosoft SQL Server. For information about how to configure DatabaseMail in SQLServer, visit theMicrosoft Developer Network (MSDN) at http://msdn.microsoft.com/en-us/library/ms175951.aspx.
To generate email alerts, you must configure information about the databasemail settings in Administration.You can then generate standard email alerts to inform users of changes in batch ownership or prospectmanagement or custom email alerts to meet the specific needs of your organisation.
Manage Email AlertsYou can use email alerts to automatically notify application users by email when changes in the database impactthem. For example, users can receive email alerts when the ownership of a batch transfers to them. To view thesettings for email alerts at your organisation and information about the types of email alerts your organisationuses, from Administration, click Email alerts. The Email alerts page appears.The program provides standard email alerts, such as to inform users in Batch entry when the ownership of abatch transfers to them. Your organisation can also create custom email alerts to meet its specific needs. Fromthe Email Alerts page, you can manage the standard and custom email alerts your organisation uses.
Edit Email Alert SettingsYou can use email alerts to automatically notify application users by email when changes in the database affectthem. To enable email alerts, you must enter information about your profile of DatabaseMail set up in SQLServer. If Blackbaud does not host your organisation’s database, you must also enter information about thedatabase to use email alerts.
Note: When you enable email alerts for your organisation, the Email preferences tab appears on applicationuser records. From this tab, users can select whether to receive specific types of email alerts and enter the emailaddress at which to receive the alerts. For information about the Email preferences tab, see Configure EmailPreferences for Users on page 51.
} Enable email alerts and configure database mail settings for alerts
To generate email alerts, the program requires that you first set up a profile of DatabaseMail in your supportedinstallation ofMicrosoft SQL Server. For information about how to configure DatabaseMail in SQL Server, visittheMicrosoft Developer Network (MSDN) at http://msdn.microsoft.com/en-us/library/ms175951.aspx.
1. From Administration, click Email alerts. The Email alerts page appears.
2. Under Tasks, click Edit alert settings. The Edit alert settings screen appears.
42 CHAPTER 7

3. To enable email alerts for your organisation, select Enabled.
4. Under Database Mail settings, enter the name of your DatabaseMail profile set up in Microsoft SQLServer.
5. If Blackbaud does not host your organisation’s database, the Application URL parts frame appears. Toinclude links to pages in the program in email alerts, enter the root URL to the program and the name ofthe database to use with the alerts. This is the virtual directory for the web application. Generally, theformat is “http://[Server name]/[Virtual directory name].”
6. If Blackbaud does not host your database, the Selected database field appears. Enter the name of thedatabase to use with the email alerts.
7. Click Save. You return to the Email alerts page.
Standard Email Alert TypesOn the Email alert types tab, you can view the types of standard email alerts your organisation uses. To updatethe information in the grid, click Refresh List.To view additional information about an email alert, such as the users who receive the alert and the emailmessage they receive, click its name under Email alert types. The record of the email alert type appears. Forinformation about the items on this record, see Email Alert Record on page 44.
Custom Email Alert TypesTo meet the needs of your organisation, you can create custom email alerts, such as to inform users when aspecific constituent makes a large donation. To manage the custom email alerts for your organisation, select theCustom email alert types tab.Under Custom email alert types, you can view the types of custom email alerts your organisation uses. Toupdate the information in the grid, click Refresh List.To view additional information about an email alert, such as the users who receive the alert and the email
EMAIL MANAGEMENT 43

message they receive, click its name under Custom email alert types. The record of the email alert type appears.For information about the items on this record, see Email Alert Record on page 44.From the grid, you can add and manage the custom email alert types for your organisation.
Add Custom Email Alert TypesTo meet the needs of your organisation, you can create custom email alerts based on the activity of a data list.For example, you can create an email alert to inform users when a specific constituent makes a large donation.After you add a custom email alert type, you can configure its content and manage instances of the alert. You canalso edit and delete custom email alert types as necessary.
} Add custom email alert types
1. From Administration, click Email alerts. The Email alerts page appears.
2. Select the Custom email alert types tab.
3. Under Custom email alert types, click Add. The Add a custom email alert type screen appears.
4. Enter a unique name to help identify the alert type.
5. In theData list field, search for and select the data list on which to base the email alert.
6. Click Save. You return to the Email alerts page. Under Custom email alert types, the new alert typeappears.
7. To configure the email content and design of the email alert, click its name under Custom email alerttypes. The record of the alert appears.
Email Alert RecordThe program automatically creates a record of each type of email alert your organisation uses.To view the record of an email alert from the Email alerts page, click its name on the Email alert types or Customemail alert types tab.For a custom email alert or a task reminder email alert, you can view and manage the instances of the alert, theemail message sent with the alert, and the process that sends the alert to its users. To help you navigate throughthis information, the record contains theManage alert definition tab and Process Details tab.For a standard email alert other than a task reminder alert, you can view and manage the application users whoreceive the alert and the email message they receive from the record.Under Email content, the subject and body of the email message that application users receive with the alertappears. To edit the email message users receive, click Edit. For information about how to edit the email messageof an alert, see Edit Content of an Email Alert on page 45.
Note: The program automatically includes a link to the area of the application related to the email alert. Forexample, an email alert that notifies the user of a batch assignment automatically includes a link to the batch inBatch entry.
Under Users, the names of the application users who receive the email alert appear. To update the information inthe grid, click Refresh List. From the grid, you can also assign the alert to users or disable the alert for a selecteduser.From the record of a custom email alert or task reminder email alert, you can manage the process to send theemail alert to remind users to complete their tasks.
44 CHAPTER 7

Manage Alert DefinitionFor a custom email alert or a task reminder email alert, theManage alert definition tab appears. From this tab,you can configure the email content sent with the alert and view and manage the instances of the alert.Under Email content, the subject and body of the email message that application users receive with the alertappears. To edit the email message users receive, click Edit. For information about how to edit the email messageof an alert, see Edit Content of an Email Alert on page 45.For a task reminder email alert, under Users, the names of the application users who receive the email alertappear. To update the information in the grid, click Refresh List. From the grid, you can also assign the alert tousers or disable the alert for a selected user.For a custom email alert, under Instances, you can view information about the alert, such as whether it has acontext record or parameters and howmany users to which it is assigned. The Enabled column indicates whetherthe alert is enabled. To update the information in the grid, click Refresh List.To view or manage the users assigned to an instance of a custom email alert, click its name under Instances . Therecord of the alert instance appears. For information about the items on this record, see Custom Email AlertInstance Record on page 49.Under Instances, you can also add and manage instances of the alert.
Edit Content of an Email AlertWhen application users receive an email alert, they receive an email message to notify them of changes in thedatabase that affect them. You can edit the subject or body of the email message to better fit the needs of yourorganisation.
Note: The program automatically includes a link to the area of the application related to the email alert. Forexample, an email alert that notifies the user of a batch assignment automatically includes a link to the batch inBatch entry.
} Edit email content
1. From Administration, click Email alerts. The Email alerts page appears.
2. On the Email alerts page, select the alert with the email content to edit and click Go to alert type. Therecord of the email alert appears.
3. For a custom email alert or a task reminder email alert, select theManage alert definition tab.
4. Under Email content, click Edit. The Edit email content screen appears.
EMAIL MANAGEMENT 45

5. In the Email subject field, edit the subject line of the email message as necessary.
6. Under Email body, compose the email message users receive with the alert.
Under Available merge fields, a list ofmerge fields available for the type of email alert appears. Topersonalize themessage, usemerge fields to include information specific to the recipient or the changethat causes the email alert. To add a merge field in the body, select it under Available merge fields andclick the right arrow. For example, for an email alert about a change in the ownership of a batch, usemerge fields to include information about the number, type, and status of the batch.
7. Click Save. You return to the email alert record.
Assign an Email Alert to Application UsersWhen you assign an email alert to application users, they receive an email message to notify them of changes inthe database that affect them. You can assign email alerts to specific users or a selection of users.
} Assign an email alert to application users
1. From Administration, click Email alerts. The Email alerts page appears.
2. Select the Email alert types tab.
3. Under Email alert types, click the name of the alert to assign to users. The record of the alert appears.
4. For a task reminder email alert, select theManage alert definition tab.
5. Under Users, click Assign to users. The Assign to users screen appears.
6. In the Assign to field, select whether to assign the email alert to selected users or a specific user.
46 CHAPTER 7

7. If you select Selected users, in the Selection field, search for and select the selection of application usersto receive the email alert.
If you select Specific user, in theUser field, search for and select the application user to receive the emailalert.
8. Click Save. You return to the email alert record.
Disable an Email Alert for an Application UserAfter you assign an email alert to an application user, you can disable the alert for the user, such as if the userrequests to no longer receive the alert. To disable an email alert for an application user from the record of thealert, select the user under Users and click Disable alert. The program disables the email alert for the user andremoves the user from theUsers grid.
Add Instances of a Custom Email AlertAfter you add a custom email alert type, you can add instances of the alert. When you add an instance of analert, you configure the parameters of when the program sends the alert to user. The parameters depend on thedata list on which you base the alert. For example, if you create an alert to notify users when a constituent makesa large donation, you can configure the constituent and minimum donation amount for each instance of thealert.
} Add instances of an email alert
1. On the record of the email alert, select theManage alert definitions tab.
2. Under Instances, click Add. The Add a custom email alert instance screen appears.
3. Enter a unique name to help identify the alert instance.
4. Enter the parameters of when to send the alert. For example, to send an alert to notify users when aconstituent makes a large donation, select the constituent and enter theminimum donation amount forwhich to send an alert.
5. Click Save. You return to the email alert record.
After you add an instance of an alert, you can then assign users to the instance so they can receive alertswhen you run the send process. For information about how to assign users to the instance, see AssignUsers to a Custom Email Alert Instance on page 49.
Process DetailsTo send alerts for a custom email alert type or a task reminder email alert, you must run a send process. Whenyou run the send process, the program determines whether changes to the selected data list match theparameters of the alert type. If the changes match the parameters, the program then automatically send alertsto the assigned users to inform them of the change. From the record of the email alert, you can start the sendprocess. For information about how to start the send process, see Start the Send Process for an Email Alert onpage 48.To view the status of themost recent instance of the send process or information about previous instances ofthe process, select the Process Details tab. From this tab, you can also add and manage job schedules to run theprocess automatically.Under Recent status, you can view the current status of the process to determine whether it completedsuccessfully. You can also view the status message generated for themost recent run; the user who ran theprocess and on which server; the dates and times the process started and ended and its duration; and the total
EMAIL MANAGEMENT 47

number of records processed, howmany of those records processed successfully, and howmany exceptions itgenerated.Under History, you can view records of the previous instances the process was run. For each instance, you canview its status, the status message generated for it, the user who ran it, its start and end dates, its duration, thetotal number of records processed, and which server handled the process. To view all process instances of aspecific status, click Filter to display the Status field and Apply and Reset buttons. In the Status field, select thestatus of the processes to display such as Did not finish, and click Apply.From theHistory grid, you can also delete records of previous instances of the process. For information abouthow to delete an instance of the process, see Delete an Instance of the Send Process on page 48.Under Job schedules, you can view the job schedules set for the job. For each job schedule, you can view its jobname, whether it is enabled, its frequency, its start date and time, its end date and time, and the dates theschedule was added and changed in the database. From the grid, you can manage the job schedules set for theprocess.
Tip: You can also generate aWindows scripting file (*.wsf) to run the send process with an automated launchprogram such as Task Scheduler. For information about how to create a *.wsf file for the process, see GenerateaWindows Scripting File for the Send Process on page 49.
Delete an Instance of the Send ProcessWhen you run the send process, the program automatically saves a status record of the instance. On the ProcessDetails tab of the email alert record, the History grid displays the previous instances of the process. You candelete the status record of an instance of the process as necessary.
} Delete a status record for the Send process
1. On the record of the email alert type from which to delete the instance, select the Process Details tab.
2. Under History, select the status record to delete.
3. On the action bar, click Delete. Amessage appears to ask whether to delete the status record.
4. Click Yes. You return to the Process Details tab. Under History, the status record no longer appears.
Add a Job Schedule for the Send ProcessTo automate the send process, you can create job schedule for the process. When you create a job schedule,you define when the job runs, such as weekly or nightly.
Start the Send Process for an Email AlertTo send alerts for a custom email alert type or a task reminder alert, you must run a send process.• When you run the send process for a custom email alert, the program determines whether changes to theselected data list match the parameters of the alert type. If the changes match the parameters, the programthen automatically sends alerts to the assigned users to inform them of the change.
• When you run the send process for a task reminder alert, the program determines whether users assigned tothe alert have active tasks with a a due date set for the current date or a future date. If assigned users haveactive tasks, the program then automatically sends alerts to the users who have not already received areminder for the task.
To start the send process from the record of the email alert, click Start send process under Tasks. The status ofthe process appears on the Process Details tab of the email alert record.For information about the Process Details tab, see Process Details on page 47.
48 CHAPTER 7

Generate a Windows Scripting File for the Send ProcessYou can generate aWindows scripting file (*.wsf) to use to run the send process with an automated launchprogram such as Task Scheduler.
Custom Email Alert Instance RecordAfter you add an instance of a custom email alert, you can assign users to the instance so they can receive alertswhen you run the send process. To view and manage the users assigned to the instance of an alert, access therecord of the instance. To access the record of an instance from the record of its email alert type, click its nameunder Instances.Under Assigned users, you can view the application users assigned to receive alerts for the instance. You canview the display and user names and the email address at which each user receives the alert. To view additionalinformation about a user, click the user's name. The record of the user appears.From the grid, you can manage the assignment of users as necessary.
Assign Users to a Custom Email Alert InstanceWhen you assign application users to an instance of a custom email alert, they receive an email message to notifythem of changes in the database that match the parameters of the alert instance. You can assign a single user ora selection of users to an email alert instance.
} Assign a single user to an email alert instance
1. On the record of the custom email alert type with the instance to which to assign the user, select theManage alert definition tab.
2. Under Instances, click the name of the instance to assign the user. The record of the instance appears.
3. Under Assigned users, click Assign and select User. The Add user to custom email alert instance screenappears.
4. In the Application user field, search for and select the user to assign to the instance.
5. Click Save. You return to the record of the instance.
} Assign a selection of users to an email alert instance
1. On the record of the custom email alert type with the instance to which to assign the users, select theManage alert definition tab.
2. Under Instances, click the name of the instance to assign the user. The record of the instance appears.
3. Under Assigned users, click Assign and select Bulk. The Assign users to a custom email alert instancescreen appears.
4. In the Assign users from selection field, search for and select the selection of application users to assignto the instance.
5. Click Save. You return to the record of the instance.
Unassign Users from a Custom Email Alert InstanceYou can unassign users from an instance of a custom email alert instance, such as if they request to no longerreceive the alert. You can unassign a single user or multiple users from an email alert instance.
EMAIL MANAGEMENT 49

} Unassign a single user from an email alert instance
1. On the record of the custom email alert type with the instance from which to unassign the user, selecttheManage alert definition tab.
2. Under Instances, click the name of the instance to remove from the user. The record of the instanceappears.
3. Under Assigned users, select the user to remove from the instance.
4. On the action bar, click Unassign and select User. A confirmation message appears.
5. Click Yes. You return to the record of the alert instance.
} Unassign multiple users from an email alert instance
1. On the record of the custom email alert type with the instance from which to unassign the users, selecttheManage alert definition tab.
2. Under Instances, click the name of the instance to remove from the users. The record of the instanceappears.
3. Under Assigned users, click Unassign and select Bulk. The Unassign users from a custom email alertscreen appears.
4. Select whether to unassign all currently subscribed users or only a selection of users.
If you select Unassign selected users, search for and select the selection of application users to removefrom the alert instance.
5. Click Yes. You return to the record of the instance.
Subscribe to Email AlertsThroughout the program, you can select to receive email alerts as notification for various changes to thedatabase. When you subscribe to an email alert, you can enter the email address at which you receive the alert.
Configure Batch Email AlertsIn Batch entry, you can select to receive email alerts as notification when the ownership of batches transfer toyou as the result of a batch status update, the addition of a new batch, or an edit of a batch’s properties.
} Configure settings for email alerts for batches
To generate email alerts in Batch entry, the system administrator must first configure your databasemailsettings. For information about how to configure these settings, see Manage Email Alerts on page 42.
1. On the Batch Entry page, click Email alerts under Tasks. The Configure batch email alerts screen appears.
2. Select whether to receive email alerts when the ownership of a batch transfers to you in Batch entry.
3. If you select to receive an alert, in the Send email alerts to field, enter the email address to receive alerts.
4. Click Save. You return to the Batch Entry page.
Configure Marketing Plan Item Task Email AlertsFromMarketing and Communications, you can select to receive email alerts as notification when the ownershipof tasks for items on marketing items transfer to you, such as the result of a the addition of a new task or an edit
50 CHAPTER 7

of an item task.
} Configure settings for email alerts for marketing plan item tasks
To generate email alerts inMarketing and Communications, the system administrator must first configure yourdatabasemail settings. For information about how to configure these settings, see Manage Email Alerts on page42.
1. Open the record of themarketing plan for which to receive email alerts.
2. Under Tasks, click Email alerts. The Configure plan item task email alerts screen appears.
3. Select whether to receive email alerts when the ownership of an item task for themarketing plantransfers to you.
4. If you select to receive an alert, in the Send email alerts to field, enter the email address to receive alerts.
5. Click Save. You return to themarketing plan record.
Configure Email Preferences for UsersThe Email preferences tab appears on application user records. On this tab, you can view and manage the emailalerts that the application user receives and the email address at which the user receives alerts.
Note: The Email preferences tab appears on application user records only if you have enabled email alerts. Formore information, see Edit Email Alert Settings on page 42.
Under Email alert settings, the email address at which the application user receives email alerts appears. Forinformation about how to edit the email address, see Edit Alert Settings for an Application User on page 51.Under Email alerts, the types of email alerts the application user can receive appears. To update the informationin the grid, click Refresh List. For each alert, you can viewwhether the alert is enabled for the user. Forinformation about how to select the alerts the user receives, see Enable or Disable Email Alerts for an ApplicationUser on page 52.Under Custom email alerts, the types of custom email alerts the application user can receive appears. To updatethe information in the grid, click Refresh List. For each alert, you can view its type and name. When the user isassigned to the alert from the alert record rather than the application user record, a checkmark appears in the Issystem-defined column. From the grid, you can add and manage the custom email alerts assigned to anapplication user. For information about how to manage the custom email alerts assigned to a user, see ManageCustom Email Alerts for an Application User on page 52.
Edit Alert Settings for an Application UserFor an application user to receive email alerts, you must enter the email address at which the user prefers toreceive the alerts. You can edit this email address as necessary, such as if the user changes the preferred address.
} Edit alert settings
1. On the record of the application user with the alert settings to edit, select the Email preferences tab.
2. Under Alert settings, click Edit. The Edit alert settings screen appears.
3. Enter the email address where the user requests to receive email alerts.
4. Click Save. You return to the application user record.
EMAIL MANAGEMENT 51

Enable or Disable Email Alerts for an Application UserWith email alerts, the program can automatically notify application users by email when changes in the databaseimpact them. From the record of an application user, you can manage the email alerts the user receives.
Note: When you enable an alert, the user receives the selected alert type at the email address that appearsunder Alert settings on the Email preferences tab. If the user does not have an email address entered when youattempt to enable an alert, the Edit alert settings screen appears so you can enter an address for the user. Forinformation about the Edit alert settings screen, see Edit Alert Settings for an Application User on page 51.
} Enable an email alert for an application user
1. On the record of the application user for whom to enable the email alert, select the Email preferencestab.
2. Under Email alerts, select the alert to enable.
3. On the action bar, click Enable. The program enables the email alert for the user. You return to the Emailpreferences tab. Under Email alerts, a checkmark appears in the Enabled column for the selected alert.
} Disable an email alert for an application user
1. On the record of the application user for whom to disable the email alert, select the Email preferencestab.
2. Under Email alerts, select the alert to disable.
3. On the action bar, click Disable. The program disables the email alert for the user. You return to the Emailpreferences tab.
Manage Custom Email Alerts for an Application UserYour organisation can create custom email alerts to inform users of activity in the database. For example, youcan create an alert to inform a user when specific constituents make a large donation. From the record of anapplication user, you can manage the custom email alerts the user receives.
Note: When you assign a custom alert to a user, the user receives the selected alert type at the email addressthat appears under Alert settings on the Email preferences tab. If the user does not have an email addressentered when you attempt to assign an alert, the Edit alert settings screen appears so you can enter an addressfor the user. For information about the Edit alert settings screen, see Edit Alert Settings for an Application Useron page 51.
} Add a custom email alert to an application user
1. On the record of the application user for whom to enable the email alert, select the Email preferencestab.
2. Under Custom email alerts, click Add. The Alert type search screen appears so you can select the customemail alert type to add to the user.
3. After you select the alert type, the parameters screen for the selected alert type appears. Configure theparameters for when the user receives the alert. For example, to inform the user when a constituentmakes a large donation, select the constituent and enter theminimum revenue amount for which tosend an alert.
4. Click OK. You return to the Email preferences tab.
52 CHAPTER 7

Search List ConfigurationConfigure Search List Fields 53
Manage Search List Replacements 54
The program provides multiple search lists to search for and select records. To better meet the needs of yourorganisation, the default search lists support optional output columns and filters. You can configure the fieldsincluded in the filters and output of search results. You can also replace a default search list with another searchlist, such as one configured for your organisation.
Configure Search List FieldsTo better meet the needs of your organisation, the default search lists provided by the program support optionaloutput columns and filters. For example, while the default constituent search list does not allow you to filtersearches based on email address information, the ability to filter on this information may be useful forcommunication with constituents. To view the constituent search lists available for configuration fromAdministration, click Search list configuration. On the Search list configuration page, click Configure search listfields. The Search List Fields page appears.
Under Search list fields, the search lists that support optional columns and filters appear. You can configurethese search lists as necessary to allow users to filter on or provide output for additional fields.
} Edit the search list field settings
1. From Administration, click Search list configuration. The Search list configuration page appears.
2. Click Configure search list fields. The Search List Fields page appears.
chapter 8

3. Under Search list fields, select a search list and click Edit settings. The Edit settings screen appears.
4. Under Available output fields, select the additional information to appear under Results on the searchscreen. To include all output fields, click Include all. To remove all fields from the search screen, clickClear all.
5. Under Available filter fields, select the additional search criteria fields to appear on the search screen.To include all filter fields, click Include all. To remove all fields from the search screen, click Clear all.
6. Click Save. You return to the Search List Fields page. The next time you access the search screen, theselected output and filter fields appear.
Manage Search List ReplacementsTo better meet the needs of your organisation, you can replace a default search list with another search list. Forexample, you can replace the default constituent search list to one that uses only the lookup ID to select aconstituent. To add and manage replacement search lists from Administration, click Search list configuration.On the Search list configuration page, clickManage search list replacements. The Search List Replacements pageappears.
Under Search list replacements, you can view the replacement search lists configured for your organisation. Foreach search list replacement, you can view the original default search list and its replacement search list. You can
54 CHAPTER 8

also view the record type associated with each search list replacement. To view only search list replacements of aspecific record type, click Filter, select the record type to view, and click Apply. Only replacements of the selectedrecord type appear in the grid. To remove the filter, click Reset.
Note: You can use an existing search list to replace a default search list in the program. To meet the needs ofyour organisation, Blackbaud Services or your system administrator may also add a custom search list to use asa replacement for a default search list.
From the grid, you can add and manage search list replacements as necessary.
Note: If you add a constituent attribute category and select “Constituent record” as your data type, you canselect a search list for users to select constituents as the attribute values for this category. If you change thedefault search list or create a custom search list to use, you must also change the search list for the attributecategory.
} Add search list replacements
1. From Administration, click Search list configuration. The Search list configuration page appears.
2. ClickManage search list replacements. The Search List Replacements page appears.
3. Under Search list replacements, click Add. The Add a search list replacement screen appears.
4. In the Search list field, select the search list to replace with a new search list.
5. In the Replace with field, select the search list to use instead of the selected search list.
6. Click Save. You return to the Search List Replacements page.
SEARCH LIST CONFIGURATION 55

56 CHAPTER 8

Code TablesAccess Code Tables 57
Manage Code Table Entries 57
Show Lookup Screen 58
Edit the Sort Method of Code Table Entries 59
Establish User Permissions for Code Tables 60
Code tables increase data entry speed and accuracy throughout the program. When users enter information intoa field with a code table, they can quickly access a list of possible entries for that field to select an entry ratherthan type it manually.Code tables also help maintain consistency in your data entry. For example, when users add a new constituentphone number, onemay enter “Cell Phone” as a phone type, another may enter “Mobile,” and yet another mayenter “Cell.” All three designate the same phone type. To prevent inconsistency and ease the interpretation andretrieval of information from your database in queries and reports, you can enter your organisation’s acceptedphone types in Code Tables and limit the rights of your users to add and edit table entries.
Access Code TablesTo view and manage your organisation’s code tables, from Administration, click Code tables. The Code Tablespage appears.
Warning: To ensure the validity of your database and consistency of your data entry, we recommend you limitrights to manage code table entries to only a few key users. This also increases the accuracy of your records andreports. For information about how to limit rights, see Establish User Permissions for Code Tables on page 60.
In the program, users access code table entries (along with value list fields and simple data list fields) from thedrop-down arrow at the end of a field. Depending on permission settings, users can enter text directly in the field.If the program does not recognise the text as an existing code table entry, it asks whether to add the text as anew entry. To access a screen to view code table entries, users can also press F7 on their keyboard when thecursor is in the table field. Depending on permission settings, users can also add and manage entries from thisscreen.
Manage Code Table EntriesFrom the Code Tables page, you can add and manage code table entries. To view the entries for a code table, inthe Category field, select the type of code table to view. To open a code table, click the name of a code table Inthe list. The Table Entries page for the code table appears.From the grid, you can add and manage the entries for the code table.
chapter 9

AddNew Table EntriesYou can add entries for code tables. When you add a code table entry, you enter its description to appear as aselection for the table throughout the program.
Warning: To ensure the validity of your database and consistency of your data entry, we recommend you limitrights to add code table entries to only a few key users. This also increases the accuracy of your records andreports. For information about how to limit rights, see Establish User Permissions for Code Tables on page 60.
} Add a new table entry
1. From Administration, click Code tables. The Code Tables page appears.
2. Under Code tables, in the Category field, select the type of code table. In the list, click the name of thecode table to open. The Table Entries page appears.
Note: You can also add entries from the lookup screen for the code table. For information about the lookupscreen, see Show Lookup Screen on page 58.
3. Click Add. The New Table Entry screen appears.
4. Enter a description to help identify the new table entry.
5. Under Filtering, select whether to make the entry available to all sites at your organisation or onlyselected sites. If you select "Selected sites," choose which sites can use the entry.
6. Click Save. You return to the Table Entries page. The next time a user accesses the code table through afield, the new entry appears as an option.
Show Lookup ScreenTo view all available entries for a code table, select the table on the Code Tables page and click Show lookup. Thelookup screen for the code table appears and displays all entries for the code table.
58 CHAPTER 9

From the lookup screen, you can view and manage the entries for the code table. For a code table with a user-defined sort method, you can also arrange the order of the entries as necessary.
Note: For information about sort methods, see Edit the Sort Method of Code Table Entries on page 59.
• To add an entry to the code table, click Add. The New Table Entry screen appears so you can enter thedescription of the entry.If you use the alphabetical sort method, the new entry appears in alphabetical order. If you use the user-defined sort method, select whether to add the new entry to the bottom of the list or above the selectedentry.
• To edit an entry, select it and click Edit. The Edit Table Entry screen appears so you can edit the entry asnecessary.
• To permanently remove an entry from your database, select it and click Delete. When a message appears toask whether to delete the entry, click Yes.
• To arrange the order of the entries for a table with a user-defined sort method, select the entry to move andclick the up or down arrow as necessary.
Edit the Sort Method of Code Table EntriesYou can select whether to display code table entries alphabetically or in a user-defined method. For example, youmay select to sort entries so more commonly selected entries appear first in the code table. In the program, theentries appear for code table fields in the same order as you arrange in Administration.
} Edit sort method of entries for a code table
1. From Administration, click Code tables. The Code Tables page appears.
2. Under Code tables, select a table and click Edit sort method. The Edit code table entry list sort methodscreen appears.
CODE TABLES 59

3. Select whether to sort the entries of the table alphabetically or in a user-defined method.
4. Click Save. You return to the Code Tables page.
Establish User Permissions for Code TablesYou can grant or deny your users permission to add, edit, and delete code table entries. Code tables provideentry options in various fields in the program. If you grant rights to change a code table, users can press F7 onthe keyboard when the cursor is in its table field to manage its entry list from its lookup screen. To limit yourtable entries to a reasonable number and protect the consistency of your database, we recommend you limitcode table permissions.
Note: Any user can click F7 to access the code table lookup screen, regardless of the permission settings.Permissions control only a user’s ability to add, edit, and delete entries.
} Establish user permissions to add, edit, and delete code table entries
1. From Administration, click Code tables. The Code Tables page appears.
2. Under Code tables, select the table for which to establish permissions.
3. Click Assign permissions. The Edit Code Table Permissions screen appears.
60 CHAPTER 9

4. In the System Role column, locate the system role for which to establish permission settings.
5. Assign the selected system role permissions:
• To establish an Add permission to determine whether users can add new entries to the code table,in the Add column, select whether to grant or deny the system role permission. If you grantpermission, users who log in under the system role can press F7while in the table field to add anentry.
Note: If you do not grant or deny a role permission, but leave the setting blank, the following occurs: If a userbelongs to no other roles, the user is not granted rights; if the user belongs to another role to whichpermissions are granted, the user has the rights assigned that role. In addition, Deny trumps Grant, and Granttrumps no entry.
• To establish an Edit permission to determine whether users can edit the entries of a code table, inthe Edit column, select whether to grant or deny the system role permission. If you grantpermission, users who log in under the system role can press F7while in the table field to edit anentry.
• To establish a Delete permission to determine whether user can delete entries from the code table,in theDelete column, select whether to grant or deny the system role permission. If you grantpermission, users who log in under the system role can press F7while in the table field to delete anentry.
• To grant all system roles permission to manage the code table, click Grant All.
• To deny all system roles permission to manage the code table, click Deny All.
CODE TABLES 61

• To clear all boxes in the grid and start over, click Clear All.
6. Click Save. Your return to the Code Tables page.
62 CHAPTER 9

Global ChangeAdd a Global Change Instance 63
Assign Global Change Permissions 64
Process Global Changes 64
Global Change Process Record 65
Reset Last Run Date 66
Global Change Definitions 66
TheGlobal changes functionality allows you to make select changes to a specific group of records in yoursystem. For example, trustees for your organisation are rotated annually, so every year you have to remove the“Trustee” constituency from all previous year trustees. Using a selection of your previous year trustees, you canuse the “Delete user-defined constituency” definition included in Global changes and remove the “Trustee”constituency from all expired trustees’ records.To access Global changes, from Administration, click Global changes under Data.
Add a Global Change InstanceA global change instance defines what you want changed where. Once you create an instance, it is saved in theGlobal changes grid on the Global Changes page. You can process and reprocess the instance at anytime andeven open the existing instance and make any necessary changes.
} Add a global change instance
1. From the Global Changes page, click Add. The Select a global change definition screen appears.
2. Select the global change definition that meets your needs. For example, if you want to delete aconstituency from selected records, select “Delete user-defined constituency”; if you want to add aconstituent attribute to selected records, select “Add constituent attributes”.
3. Click OK. The Add global change screen appears. The fields and options included on this screen vary,based on the global change definition you selected in step 2.
4. Complete the Add global change screen. In this section all definitions are explained and information isincluded about the fields and options included on the specific definition add screen.
5. Click Save. The new global change instance appears in theGlobal Changes grid.
chapter 10

Assign Global Change PermissionsYou can control system role permissions granted to each individual global change instance. Using the AssignPermissions functionality, you can control who has access to change, execute, and delete you global changeinstance.When a user assigned the specific role opens the program, only instances for which they are granted permissionappear.
} Set user permissions for global change instances
1. From the Administration page, click Global changes. The Global Changes page appears displaying anyexisting global change instances.
2. Select a global change instance and click Assign Permissions. The Assign Permissions screen appears.
3. To grant permission to all roles in your system, select All roles.
To select the individual roles to which you want to “Grant” or “Deny” permission, select Selected roles.
a. The System Roles box is activated, and you can select a role.
b. To grant the selected role access, click Grant; to deny the selected role access, click Deny; to clear anassignments, click Clear.
4. Click Save to save your assignments and close the Assign Permissions screen.
Process Global ChangesOnce you create or edit a global change instance, defining specifically what you want changed and where, youmust process the instance. This executes the change, updating all selected records.
} Process a global change instance
1. From the Global Changes page, select the instance you want to process.
2. Click Process global change. The selected records are changed, and the process screen appears.
64 CHAPTER 10

Global Change Process RecordThe global change process record displays status and history information about the selected global changeinstance. You can also schedule a global change processing job.
Note: For information about executing a global change, see Process Global Changes on page 64.
View aGlobal Change Process RecordWhenever you process a global change, the selected global change process record automatically opens after theprocess generates. When not processing changes, you can open process records from the Global Changes page.
} Open an existing global change process record
1. From the Global Changes page, click the name of tne global change process you want to view. Theselected process record appears.
2. Also from this screen, the following Tasks are available:
• Start process: Processes the global change.
• Edit global change: Accesses the Edit global change screen.
• Create job schedule: Accesses the Create Job screen.
• Delete global change: Removes the global change instance from the system.
Recent StatusThe Recent status tab displays information about themost recent global change process. For example, if theprocess “Completed”, the tab displays dates and times of the last change, the number of records processed, thenumber of exceptions, and much more.
HistoryThe History tab lists all global changes executed for the selected global change instance. It includes informationabout dates, status, duration, and more. You can also delete archived processing records from this tab.
Delete Archived Global Change Process RecordYou can permanently delete any archived global change process record stored on the History tab.
} Delete a global change process record from the History tab
1. From the global change process record, select the History tab.
2. Select the archived record you want to delete.
3. Click Delete. A confirmation message appears.
4. Click Yes. The record is deleted, and you return to the History tab.
GLOBAL CHANGE 65

Job ScheduleYou can arrange to process global changes automatically, even during off-hours, from the Job Schedule tabavailable in the global change process record.Using SQL Server Agent jobs, the program automatically processes global changes, and it executes the changeson a recurring basis, following the instructions you set. Scheduling jobs involves defining the condition orconditions that cause the job to begin running.
Reset Last Run DateWhenever you execute a selected global change, the program process the change based on any new dataentered in the database since the Last run on date. This date displays in theGlobal Changes grid on the GlobalChanges page.If for some reason, you want the program to process the change for all selected records, regardless of if therecords were included in the last execution of the global change, you can reset the Last run on date by selectingthe instance in theGlobal Changes grid and clicking Reset last run on date. A confirmation screen appears. ClickYes to reset the Last run on date.
Global Change DefinitionsDepending upon the global change that you process, there are parameters specific to that change. This sectioncontains definitions and procedures for each global change.
Delete Audit TablesOver time your database can accumulate numerous audit tables you no longer need. Use theDelete Audit Tabledefinition to permanently remove audit data from these tables. After you create the definition, you can executethe global change process to remove the data.For more information about processing a global change, see Process Global Changes on page 64.
} Delete audit tables globally
1. From the Administration page, click Global changes. The Global Changes page appears.
2. Click Add. The Select a global change definition screen appears.
3. Under Audit Tables, select Delete audit data.
4. Click OK. The Add global change screen appears.
5. In theName field, enter a name to identify your global change process.
6. To delete all audit tables, select All audit tables.
7. To delete a specific group of audit tables from Query, select Selected audit tables. Click the binoculars atthe end of the field to access a search screen and locate the selection to use.
8. Under Delete audit information older than, filter the audit tables to delete by entering a time frame. Forexample, to delete audit tables older than three years, enter “3” in the first field and select “Year(s)” inthe second field.
66 CHAPTER 10

Tip: Themaximum number you can enter in the first field is 100. In the second field, you can select to delete bydays, weeks, months, or years.
9. Click Save. The global change process appears on the Global Changes page.
10. When you are ready to execute the global change, select it and click Process global change.
Enable or Disable Audit TablesOver time your database can accumulate numerous audit tables you no longer need. You can disable an audittable rather than permanently delete it. If you decide later to use it again, you can enable it.
} Enable or disable audit tables
1. From the Administration page, click Global changes. The Global Changes page appears.
2. Click Add. The Select a global change definition screen appears.
3. Under Audit Tables, select Enable or disable audit tables.
4. Click OK. The Add global change screen appears.
5. In theName field, enter a name to identify your global change process.
6. To disable all audit tables, select All audit tables.
7. To disable a specific group of audit tables, select Selected audit tables. Click the binoculars at the end ofthe field to access a search screen and locate the selection to use.
8. If you want to enable, rather than disable, audit tables, select Enable.
9. Click Save. The global change process appears on the Global Changes page.
10. When you are ready to execute the global change, select it and click Process global change.
Delete Batch Control and Exception ReportsOver time your database can accumulate numerous batch control and exception reports you no longer need. Toremove these from the database, create a batch control and exception report global change definition. After youcreate the definition, you can execute the global change process to remove the batch reports.For more information about processing a global change, see Process Global Changes on page 64.
} Delete batch control and exception reports globally
1. From the Administration page, click Global changes. The Global Changes page appears.
2. Click Add. The Select a global change definition screen appears.
3. Under Batch Reports, select Batch control and exception report delete.
4. Click OK. The Add global change screen appears.
5. In theName field, enter a name to identify your global change process.
6. To delete all batch control and exception reports for committed batches, select All committed batches.
7. To delete a specific group of batch control and exception reports from Query, select Selected batches.Click the binoculars at the end of the field to access a search screen and locate the selection to use.
GLOBAL CHANGE 67

8. Under Delete batch control and exception reports older than, filter the reports to delete by entering atime frame. For example, to delete batch control and exception reports older than three years, enter “3”in the first field and select “Year(s)” in the second field.
Tip: Themaximum number you can enter in the first field is 100. In the second field, you can select to delete bydays, weeks, months, or years.
9. Click Save. The global change process appears on the Global Changes page.
10. When you are ready to execute the global change, select it and click Process global change.
Delete Business Process OutputsOver time your database can accumulate business process output files you no longer need. For example, inExport, the export generates output files in SQL tables that are available to download to a .csv file. To removeunneeded output files from the database, use the Delete business process outputs global change process. Thisprocess completely removes the SQL table(s) that hold output for the selected business processes.
Note: Not all business processes generate output files, but of those that do, only a few are addressed by thisglobal change. This definition deletes outputs for these types of business processes: list segment imports,finder file imports, segmented house file imports, correspondence exports, marketing effort exports, andexports run using the Export feature in Administration.
For more information about processing a global change, see Process Global Changes on page 64.
} Delete business process outputs globally
1. From the Administration page, click Global changes. The Global Changes page appears.
2. Click Add. The Select a global change definition screen appears.
3. Under Business Process, select Business process output delete.
4. Click OK. The Add global change screen appears.
5. In theName field, enter a name to identify your global change process.
6. To delete all process outputs, select All business processes.
Note: Not all business processes generate output files, but of those that do, only a few are addressed by thisglobal change. This definition deletes outputs for these types of business processes: finder file imports,segmented house file imports, correspondence exports, marketing effort exports, and exports run using theExport feature in Administration.
7. To delete a specific group of process outputs, select Selected business processes and choose a selectionof processes. To specify which types of output processes to include in the selection, on the Select filterand output fields tab of the query screen, set theName field to equal the type(s) of output processes toinclude. For example, Name equals Finder File Import Process ANDMarketing Effort Export Process willinclude only finder files and marketing efforts export files.
8. Under Delete output tables generated by business processes older than, enter a time frame. Forexample, to delete outputs older than three years, enter “3” in the first field and select “Year(s)” in thesecond field.
Tip: Themaximum number you can enter in the first field is 100. In the second field, you can select to delete bydays, weeks, months, or years.
9. Click Save. The global change process appears on the Global Changes page.
68 CHAPTER 10

10. When you are ready to execute the global change, select it and click Process global change.
Manage Purpose or Designation InformationYou use designations and fundraising purposes to track the reasons your organisation raises money and howyour donors’ gifts should be used. At times, you may need to add, edit, or delete fields associated withdesignations and fundraising purposes. To do this, you can change all values at once with Global Change and aselection of the affected records.
} Manage fundraising purpose or designation information globally
1. From the Administration page, click Global Changes. The Global Changes page appears.
2. Click Add. The Select a global change definition screen appears.
3. Under Fundraising Efforts - Purposes and Designations, select Manage purpose or designationinformation.
4. Click OK.
5. In the Name field, enter a name to identify this global change process. The name displays in the Globalchanges grid on the Global Changes page.
6. You can restrict the use of the process for a specific site in your organisation. When you select a site, onlyusers associated with the site can access the process. To allow users of all sites to access the process,select “All sites.”
7. In the Record type field, select the type of records you want to change. You can select “Designation” or“Fundraising Purpose.”
8. If you want to globally change attributes for a specific group of records included in a selection created inQuery, select Selection. Click the binoculars at the end of the field to access a search screen and locatethe specific selection you want to use. If you do not select a selection, all records are changed.
Note: A selection is a named set of IDs of the same record type. It has a name and description and isoften used as input into a process, such as the terminate sponsorship process, as a means to specifywhich set of records should be acted on by that process. Because selections consist only of IDs (ratherthan output fields), they are optimised for peak processing speed. You create selections in Query,accessed through Analysis.
9. In the Available field options grid, select any fields you want to edit during the global change process.Click the right arrow to move the fields to the Selected fields grid.
10. Fields that remain in the Available field options grid are not included in the global change process.
11. For any fields you include in the Selected fields grid, select an action and a new value. The followingactions are available:
12. Add value if it does not exist - Adds the new value to the specific field you select.
13. Add value if it does not exist and overwrite existing values - Adds the new value to the specific field youselect. If a value currently exists for the specific field, the existing value is overwritten with the new valueyou select. All records in the selection will have this new field value.
14. Delete value if it exists - Deletes the existing value from the field you select.
15. To add new entries to the NewValue field, enter your new entry and click tab on your keyboard.
16. Click Save.
GLOBAL CHANGE 69

17. When you are ready to execute the additions, click Process global change.
} Map marketing plan task owners to staff members globally
1. From Administration, click Global changes. The Global Changes page appears.
2. Click Add. The Select a global change definition screen appears.
3. UnderMarketing, selectMap marketing plan task owners to staff members.
4. Click OK.
5. In the Name field, enter a name to identify this global change process. The name displays in theGlobalchanges grid on the Global Changes page.
6. In the Parameters grid, enter the task owners and staff members that you want to map.
7. Click Save.
8. When you are ready to execute the changes, click Process global change.
Set Auto-Calculate Realised AmountWhen you add a planned gift, you select its applicable vehicle such as charitable gift annuity or bequest. On thePlanned Giving tab, you can view and manage the options for your planned gift vehicles.For each vehicle type, you can select whether to automatically calculate the realised amount as your organisationreceives revenue toward a planned gift. However, if you select to automatically calculate the realised amount fora planned gift vehicle, users can disable the automatically calculated amount for a planned gift if necessary.With the Set auto-calculate realised amount global change, you can set a selection of planned gifts to have therealised amount auto-calculated, rather than manually changing it on each planned gift.
} Globally set auto-calculate realised amounts for planned gifts
1. From the Administration page, click Global changes. The Global Changes page appears.
2. Click Add. The Select a global change definition screen appears.
3. Under Major Giving - Planned Gifts, select Set auto-calculate realised amount.
4. Click OK.
5. In the Name field, enter a name to identify this global change process. The name displays in theGlobalchanges grid on the Global Changes page.
6. You can restrict the use of the process to a specific site in your organisation. When you select a site, onlyusers associated with the site can access the process. To allow users of all sites to access the process,select “All sites.”
7. In the Selection field, select the group of planned gifts and mark Auto-calculate realised amount.
8. Click Save.
9. When you are ready to execute the changes, click Process global change.
70 CHAPTER 10

Smart FieldsSmart Field Workflow 71
Add a Smart Field 72
Manage Smart Fields 75
Smart Field Definitions 79
Smart fields provide quick access to specific information that otherwisemight take hours or days to compile. Forexample, you create a query of all donors in your database who gave £10,000, along with their first gift date. Youroutinely run this query, which takes a considerable amount of time to execute due to the size of your databaseand the complexity of the query—the server must calculate the total for every record in your database. As thenumber of records in your database increases, the time necessary to run the query also increases. When youreplace the summary fields in the query with smart fields, you improve the time it takes to run the queryconsiderably. The program automatically generates and caches the smart field values at intervals set by yoursystem administrator. In addition, smart field updates consider only records added to the database since the lastrun date and do not reconsider records already included in the value.You can use smart fields in a variety of ways throughout the program:
l To build queries and selections.
l To filter reports. With the Report Model Generator, you can use a smart field as the source view for acustom report.
l To calculate the entry amount for ask ladders on marketing effort reply devices.
Smart Field WorkflowThe smart field workflow typically involves multiple people, including a smart field author, an administrator, andconsumers who use the data generated by the smart field. Here are the primary roles involved in the smart fieldprocess and explanations of each:• Smart Field author: The ability to author smart field definitions is available as a customisation. If you needdefinitions beyond those included in the program, contact your in-house developer or implementationconsultant.
• Smart Field administrator: The administrator creates smart fields based on management’s requests. Forexample, at the beginning of each quarter, a user in your organisation generates a query to track constituentswho gave £1,000 or more in the previous quarter. Management makes its request to the administrator anddetails what the smart field values should represent. The administrator creates and processes the smart fieldsto make them available to users for queries, reports, and related records. To satisfy this user, the smart fieldadministrator creates two smart fields: one with constituent revenue amounts and another with constituentrevenue dates.
chapter 11

• Smart Field data consumer: The consumer is the individual who views and uses the data generated by thesmart field. Continuing with the smart field administrator example, the query user includes the “Value” field ofthe revenue amount smart field, assigning it a value Greater than or equal to £1,000, and the “Value” field ofthe revenue dates smart field, assigning it a value Equal to last quarter.
Add a Smart FieldWhen you add a smart field, you define parameters for the information the smart field returns. Theseparameters vary based on the type of smart field type.This section provides scenarios that demonstrate how to build a few commonly used smart fields. For moreinformation about how to create other smart field definitions, see Smart Field Definitions on page 79
Note: If you need smart field definitions beyond those included in the program, contact your in-housedeveloper or implementation consultant.
} Add a gift amounts smart field
The exact procedure to create a specific smart field varies based on the Smart Field definition you select. Thisprocedure is based on the following scenario.
Scenario: A prospector in your organisation begins each quarter by querying constituent records for donorswho gave a total of £1,000 or more the previous quarter. He has requested that the system administrator cre-ate smart fields to quickly calculate total giving for constituents. The gift smart field should also group con-stituents based on this his rating information: Fair = £1,000; Good = £3,000; and Excellent = £5,000. Finally, heasked that all gift types be included but not soft credits. The administrator will create two smart fields: one todetermine gift amounts and another for gift dates. This procedure shows you how to create the gift amountssmart field.
1. From Administration, click Smart fields. The Smart Fields page appears.
2. Click Add. The Select a smart field definition screen appears. Definitions specify how to calculate a smartfield.
For this scenario, under RE7, select "Gift Amounts.”
3. Click OK. The Add gift amounts smart field screen appears.
4. On the General tab, enter a name for your smart field. For this scenario, enter “Gift Amounts.”
5. In theDescription field, enter a description for the field, such as how it should be used.
6. Under Value groups, select Use value groups. In this scenario, the prospector wants three value groups:“Fair” for £1,000 donors; “Good” for £3,000 donors; and “Excellent” for £5,000 donors. For informationabout how to add value groups, see Add Value Groups to a Smart Field on page 74.
72 CHAPTER 11

7. Select the Parameters tab.
8. In the Aggregate typefield, select the calculation type for the smart field. For this scenario, select "Totalgift amount" because the prospector wants each constituent’s total gift for the previous quarter.
9. In theGift selection field, select the selection that contains all gifts from the last quarter.
10. Because you do not want to include soft credits, in the Include field, select "Gifts only."
SMART F IELDS 73

11. Click Save. The smart field is added to the system, and you return to the Smart Fields page. You nowmust process the smart field. This makes the smart field value available for queries, reports, and inrelated records. For more information about how to process a smart field, see Process a Smart Field onpage 76.
Add ValueGroups to a Smart FieldA smart field uses value groups to consolidate records into groups based on ranges of values. For example, usingthe scenario provided for the Gift amounts smart field, we can create groups of constituents based on ratinginformation: Fair = £1,000; Good = £3,000; and Excellent = £5,000.When you use a smart field to create a query, you can choose to filter and output based on value groups. Forexample, you can build a marketing segment for each value group produced by the total giving smart field (Fair =£1,000; Good = £3,000; and Excellent = £5,000.). You can use value groups rather than defining the criteria forvalue ranges on the query itself.
} Add value groups to a smart field
1. On the Add smart field or Edit smart field screen, select the General tab.
2. Select Use value groups.
3. Click Add. The Add value group screen appears.
74 CHAPTER 11

4. In the Values greater than or equal to column, enter theminimum value of the range included in thegroup. For example, enter
5. In the Value group name column, enter a unique name to help describe values included in the group.
Note: For smart fields that generate a date value, such as Constituent largest revenue date, in the Time periodfield. you can select themeasure of time from the current date (days, weeks, years, etc.) to use for thecalculation.
6. Click Save. You return to the previous screen.
Manage Smart FieldsYou can create and manage your organisation’s smart fields on the Smart Fields page. To access this page, fromAdministration, under Data, click Smart fields.
In the Smart Fields list, you can view information about the smart fields your organisation uses, such as when thefield was last processed and who ran it. You can choose which columns of information appear in the list.You can also complete tasks for a smart field from the Smart Fields page. To access task buttons, click the doublearrows next to a smart field to expand the row.
l To generate values for a smart field, click Process smart field. For more information, see Process a SmartField on page 76.
l To reset the last run date so the calculation includes information entered during all dates that satisfy thedate range entered for the smart field and not just information entered since the previous update, clickClear results. For more information, see Clear the Results from the Last Run of a Smart Field on page 78.
l To open the process record for a smart field and view information about recent updates, process history,
SMART F IELDS 75

and job schedules, click the smart field's name. For information about the items on the record, see SmartField Process Record on page 77.
Process a Smart FieldAfter you add or edit a smart field, you must process it to calculate values. Processed smart fields areautomatically available for use in queries, reports, and records in the program. For example, processedconstituent smart fields appear under Constituent nodes in queries and on the Smart Fields tab of constituentrecords.
Tip: You can schedule the process to automatically update the values of a smart field to run at set intervals. Forinformation about how to schedule a smart field process, see Add a Job Schedule on page 78.
} Process values for a smart field
1. On the Administration page, click Smart fields. The Smart Fields page appears.
2. Click the double arrows next to the smart field to expand the row. Then click Process smart field. Theprogram generates the values for the smart field. When the process is complete, the process recordappears.
Note: You can also process a smart field from its process record. Under Tasks, click Start process.
76 CHAPTER 11

Smart Field Process RecordWhen you process a smart field, the program automatically generates a process record. From the processrecord, you can use the tabs to view information about recent updates, process history, and job schedules. Toaccess the process record, click the smart field’s name.
Recent StatusTo view information about themost recent update of the smart field, select the Recent status tab. On this tab,you can view the current status of the process to determine whether it completed successfully. You can also viewthe status message generated for themost recent run; the user who ran the process and on which server; thedates and times the process started and ended and its duration; and the total number of records processed,howmany of those records processed successfully, and howmany exceptions it generated.
HistoryTo view information about the previous updates of the smart field, select the History tab. On this tab, you canview records of the previous instances the process was run. For each instance, you can view its status, the statusmessage generated for it, the user who ran it, it start and end dates, its duration, the total number of recordsprocessed, and which server handled the process.
To filter the process instances that appear in the list, click Filters. To download an output file that contains allrecords from the last process run, clickMore and select the file type.
Job SchedulesTo view the job schedules set for the update process, select the Job schedules tab. For each job schedule, youcan view its job name, whether it is enabled, its frequency, its start date and time, its end date and time, and thedates the schedule was added and changed in the database.
SMART F IELDS 77

From the Job schedules grid, you can manage the job schedules set for the business process.
Add a Job ScheduleYou can create a job schedule to automatically run the smart field update business process. When you create aschedule for a process, the program exports and runs the process at the scheduled instance or interval. Forexample, you can schedule a process to run at a time convenient for your organisation, such as overnight. Duringperiods of increased gift entry, you may want to schedule the process to run even more frequently. To create ajob schedule, click Add on the Job schedules tab of the process status page. The Create job screen appears.
Note: To create a job schedule from any tab of the process status page, click Create job schedule under Tasks.
To automate a process, you can create a job schedule for the process. When you create a job schedule, youdefine when the job begins to run. After you add the schedule, you can use SQL Server Agent jobs toautomatically process smart field values and run the task on a recurring basis. To schedule the job, you mustdefine the conditions that cause the job to begin.
Clear the Results from the Last Run of a Smart FieldWhen you process a smart field, the program updates its values based on the information added to the databasesince the last time it was processed. To include information from all dates in the specified date range rather thanjust information entered since the previous update, you can reset the last run date for the smart field. On theSmart Fields page, the last run date appears in the Last run on column.From the Smart Fields page, click the double arrows next to the smart field to expand the row. Then click Clearresults. The date in the Last run on column is removed to reflect the change.
} Reset the last run date for a smart field
1. On the Administration page, click Smart fields. The Smart Fields page appears.
2. Select the smart field and click Clear results. A confirmation message appears.
3. Click Yes. You return to the Smart Fields page.
Update Smart Field Query RelationshipsIf you add a new queryview, such as through a customisation process, after you create a smart field, the newqueryview does not automatically add the smart field. To add the smart field to the new queryview, you mustupdate the relationships between your smart fields and queries.From the Smart Fields page in Administration, click Update smart field query relationships under Tasks.
78 CHAPTER 11

Smart Field DefinitionsThis section describes the values returned by smart field definitions.
Note: Smart fields do not exclude inactive records.
Marketing Smart FieldsThese are descriptions of each smart field definition you can create for marketing data. These fields are providedby default in the program. You can use them to create a Source Analysis Rule for a record source. For moreinformation, see Select Source Analysis Rule Fields for a Record Source on page 92.
Smart Field Type Description
Constituent Ask Ladder
Provides the smallest, last, largest, or average gift value. Usethis value to calculate entry amounts for ask ladders based onthe constituent's previous giving.Default value - For theDefault value field, enter the entryamount to return when a value can not be calculated.
Constituent Lifetime gifts on file Provides the number of gifts on file for each member of a groupof constituents.
Constituent Lifetime giving Provides the sum total of all gifts for each constituent.
Constituent Loyalty
Determines a loyalty category based on gifts given on an annualbasis.Assigns these categories to constituents based on thecalculation for loyalty:- New- Multi- Lapsed- Reactivated- Non DonorFor more information, see Calculation for Loyalty on page 79.
Constituent Single gift consecutiveyear donors
Determines a category for donors who gave a single gift in thelast 5 consecutive years.This is a variant on loyalty.Applies a calculation to categorise single gifts. For moreinformation, see Calculation for Single Gift Consecutive YearDonors on page 80.
Constituent Years on file Provides the years since first donation for each member of agroup of constituents.
Calculation for LoyaltyCategory CriteriaNew Gift within 1 year of As Of DateMulti (10 +years) Gift each year within the past 10+ years, based on As Of Date
Multi (9 years) Gift each year within the past 9 years, based on As Of Date
SMART F IELDS 79

Category CriteriaMulti (8 years) Gift each year within the past 8 years, based on As Of DateMulti (7 years) Gift each year within the past 7 years, based on As Of DateMulti (6 years) Gift each year within the past 6 years, based on As Of DateMulti (5 years) Gift each year within the past 5 years, based on As Of DateMulti (4 years) Gift each year within the past 4 years, based on As Of DateMulti (3 years) Gift each year within the past 3 years, based on As Of DateMulti (2 years) Gift each year within the past 2 years, based on As Of Date
Reactivated Gift in the current year, No gift in the previous year, and a gift in some prior year, basedon As Of Date
Lapsed (1yr-New)
No gift in the current year, a gift in the previous year, and no gifts in some prior year,based on As Of Date
Lapsed (1yr) No gift in the current year, a gift in the previous year, and gifts in some prior year, basedon As Of Date
Lapsed (2yr) No gifts in the past 2 years, based on As Of DateLapsed (3yr) No gifts in the past 3 years, based on As Of DateLapsed (4yr) No gifts in the past 4 years, based on As Of DateLapsed (5yr) No gifts in the past 5 years, based on As Of DateLapsed (6yr) No gifts in the past 6 years, based on As Of DateLapsed (7yr) No gifts in the past 7 years, based on As Of DateLapsed (8yr) No gifts in the past 8 years, based on As Of DateLapsed (9+yr) No gifts in the past 9 years, based on As Of DateNon-donor No gift in the past 10+ years, based on As Of Date
Calculation for Single Gift Consecutive Year DonorsCategory CriteriaNo Gifts No gift in the past 10+ years, based on As Of Date
2 years A single gift each year in the past 2 years and any or no gifts in the following years, based onAs Of Date
3 years A single gift each year in the past 3 years and any or no gifts in the following years, based onAs Of Date
4 years A single gift each year in the past 4 years and any or no gifts in the following years, based onAs Of Date
5 years A single gift each year in the past 5 years and any or no gifts in the following years, based onAs Of Date
Other Any other combination of gifts over past 10+ years, based on the As Of Date
DataWarehouse Smart FieldsData warehouse smart fields provide constituent gift information from The Raiser's Edge to use in BlackbaudDirect Marketing for marketing and reporting purposes.
Warning: Changes to the settings for the ETL process can cause the data warehouse smart fields to be out ofdate. For example, if you change the cutoff date for gifts, the ETL process will update the data warehouse with
80 CHAPTER 11

the new cutoff date, but the smart fields will still reflect the previous cutoff date. To update your smart fieldsvalues to reflect the new ETL configuration settings, we recommend that you reset and refresh the smart fieldsafter any changes to the ETL configuration.
SmartField Type Description
GiftAmounts
Provides these gift amount values:Average Gift Amount = Split Gift Amount/Distinct Count of gift IDsAverage Split Gift AmountFirst Gift Amount = Ranks gifts in ascending order based on gift ID (earliest being ‘1’)Last Gift Amount = Ranks gifts in descending order based on gift ID (latest being ‘1’)Largest Gift AmountLargest Split Gift AmountSmallest Gift AmountSmallest Split Gift AmountFor example, a gift for £100 is split so that £25 goes to the Annual fund and £75 goes to theMembership fund. The Smallest Split Gift Amount smart field would return £25 for the splitgift amount rather than £100 for the actual gift amount.Total Gift Amount = Total of all gifts associated with the constituentNote: If the calculation includes split gifts, soft credits are considered splits.
GiftCounts
Provides these gift counts:Total Gifts Given, Total Gift Splits Given, Giving Years, Distinct Giving Years, or ConsecutiveYears GivenDistinct giving years = Count of individual years of givingConsecutive Years Given = Count of themost recent consecutive yearsNote: If the calculation includes split gifts, soft credits are considered splits.
Gift Dates Provides the first or last gift date.Note: Date calculations for soft credits use the gift date from the associated gift.
Gift Split
Provides the largest, smallest, first, or latest gift amounts, as well as the largest or smallestsplit gift amounts.Use this smart field when you need information about gifts associated with a constituentor household rather than the calculated amounts. For example, you can set theparameters to return all first gift records. “First gifts Smart Field” then appears as a querynode under Smart Fields in all constituent queries. Use this query node to drill-down andselect field information associated with the first gift record, such as the appeal name orpackage ID.Note: If the calculation includes split gifts, soft credits are considered splits.
SMART F IELDS 81

82 CHAPTER 11

Record SourcesAdd/Remove Record Sources 83
Manage Record Sources 84
When the standard data warehouse for The Raiser’s Edge is deployed, it is configured to work as the recordsource that provides data for constituent, gift, and appeal query views used to createmarketing efforts inBlackbaud Direct Marketing. While most organisation's use the data warehouse as their only data source, theprogram can usemultiple record sources. For example, if your organisation wants to use data from anotherprogram's database, you can add it as a record source.
Add/Remove Record SourcesIf you havemultiple record sources configured, you can use the Add/remove record source task to remove arecord source you no longer use or to add it back for usage. You cannot remove record sources that are currentlyused by a segment, list, marketing effort, or export.
} Add or remove a record source
1. From the Record Sources page in Administration, click the Add/remove record sources task. The Editrecord sources screen appears.
chapter 12

The grid lists all available sources established during installation of the program.
2. Select the checkboxes for record sources you want available for marketing efforts.
3. Clear the checkboxes for record sources you no longer want available for marketing efforts. If the recordsource is currently used by a segment, list, mailing, or export, it cannot be removed.
4. Click Save. You return to the Record Sources page.
Manage Record SourcesThe Record Source profile page contains summary information about the record source including the number ofselections, segment, lists, efforts, and exports that use data from the record source. You can also view and editthe list code, duplicate criteria, and source analysis rule defined for the record source.Record source fields aremapped to their equivalent fields in Blackbaud Direct Marketing when the standarddata warehouse is deployed. On the tabs, you can view themappings for each type of source.
84 CHAPTER 12

Person Field MappingsThe Person Field Mappings tab displays how person fields in the record sourcemap to their equivalent inBlackbaud Direct Marketing.
Note: Because The Raiser's Edge does not designate a primary phone number or email address, the datawarehouse uses the entries from the preferred address information. You can create queries of the datawarehouse records based on other phone types and email addresses, but for exporting and field mappings, theprogram uses the Telephone phone type and the Email address phone type in The Raiser's Edge.
Note: For the U.K. version of the standard data warehouse, the State field on the data warehouse recordsource is mapped to the County field from The Raiser’s Edge. This mapping allows you to import counties forrecords that were added to The Raiser’s Edge through Batch. It also allows you to include counties in certainreports. However, when you create queries in Selections, the County field still contains county information andthe State abbreviation and State name fields still contain state information.
Program Field Record Source FieldFull name Full nameFirst name First nameMiddle name Middle nameSurname Surname
RECORD SOURCES 85

Program Field Record Source FieldOrg name Organisation nameLookup ID Lookup IDTitle Title (Dr., Mrs., etc.)Suffix Suffix (Jr., Esq., etc.)Household ID Unique numeric value assigned to each constituent/spouse relationship
Head of household Determines whether the constituent is head of household (1=Head of Household,0=Not Head of Household)
Is household Constituent is a household (Yes/No)First gift date Date constituent gave first giftDate last changed Date constituent record was last changedCountry CountryAddress line 1 Address line 1Address line 2 Address line 2Address line 3 Address line 3Address line 4 Address line 4Address line 5 Address line 5City CityCounty CountyPost code Post codeAddressee AddresseeSalutation SalutationPhone number Phone numberEmail address Email addressCART Carrier RouteDPC Delivery Point CodeLOT Line of Travel
} Map person fields for a record source
1. From the Person Field Mappings tab of a record source, click Edit person field mappings under Tasks.The Edit field mappings screen appears with the personal and contact information fields.
86 CHAPTER 12

2. Under Personal information field mappings, select the name, title, or suffix fields in the record source tomap to the corresponding fields in the program.
To enable householding, you must map the following fields:
a. In theHousehold ID field, select the field to map to this record source, for example, “Household ID.”
b. In theHead of household field, select the field to map to this record source, for example, “Head ofhousehold.”
Note: When you enable householding, you can select to send one piece ofmail only to an entire household,rather than sending a separate piece ofmail to each person in the household.
3. Under Donor metrics field mappings, select themetrics field in the record source to map to thecorresponding field in the program.
4. Under Contact information field mappings, select the address, phone, or email fields in the recordsource to map to the corresponding fields in the program.
For more information about how to map person fields, see Person Field Mappings on page 87.
5. Click Save. You return to the Record Source page.
Person Field MappingsThe table below explains how person fields in the record sourcemap to their equivalent in Blackbaud DirectMarketing.
RECORD SOURCES 87

Program Field Record Source FieldFull name Full nameFirst name First nameMiddle name Middle nameSurname SurnameOrg name Organisation nameLookup ID Lookup IDTitle Title (Dr., Mrs., etc.)Suffix Suffix (Jr., Esq., etc.)Household ID Unique numeric value assigned to each constituent/spouse relationship
Head of household Determines whether the constituent is head of household (1=Head of Household,0=Not Head of Household)
Is household Constituent is a household (Yes/No)First gift date Date constituent gave first giftDate last changed Date constituent record was last changedCountry CountryAddress line 1 Address line 1Address line 2 Address line 2Address line 3 Address line 3Address line 4 Address line 4Address line 5 Address line 5City CityCounty CountyPost code Post codeAddressee AddresseeSalutation SalutationPhone number Phone numberEmail address Email addressCART Carrier RouteDPC Delivery Point CodeLOT Line of Travel
Gift Field MappingsActivated marketing efforts use the gift record source to locate all the gifts associated with an effort and calculateperformancemeasures based on the gift amounts.The Gift Field Mappings tab displays how gift fields in the record sourcemap to their equivalent in BlackbaudDirect Marketing.
Program Field Record Source FieldGift amount Gift amountGift date Date constituent gave gift
88 CHAPTER 12

Program Field Record Source FieldDonor ID System record ID (found by selecting File, Properties from constituent record)Date added Date the revenue was added to the system
Date changed Date the revenue was changed in the system. IfDate changed is not mapped, theprogram uses theDate added. IfDate added is not mapped, you receive an error.
Do notacknowledge
Whether or not the selected revenue should be included in the acknowledgementprocess (0=Will be processed, 1=Will not be processed)If integrated with The Raiser’s Edge, reads Do not acknowledge flag on gift; alsoexcludes already acknowledged gifts
Do notreceipt
Whether or not the selected revenue should be included in the receipt process (0=Willbe processed, 1=Will not be processed)If integrated with Blackbaud Direct Marketing, reads Do not receipt flag on revenuerecordIf integrated with The Raiser’s Edge, reads Do not receipt flag on gift; also excludesalready receipted gifts
Lookup ID Lookup IDAppealsystem ID
System record ID for the appeal (found by selecting File, Properties from an appealrecord)
Appeal ID Appeal ID (from the General tab of the appeal record — must be unique)Appealdescription Appeal description
Effort ID Marketing Effort IDSource code Source codeFindernumber Finder number
} Map gift fields for a record source
1. From the Gift Field Mappings tab of a record source, click Edit gift field mappings under Tasks. The Editgift record source screen appears.
2. Under Gift record source, select the gift record source. This is required to activate a mailing.
RECORD SOURCES 89

3. Under Field mappings, select the fields in the record source to map to the corresponding fields in theprogram. All the fields are required. For more information about how to map gift fields, see Gift FieldMappings on page 90.
4. Click Save. You return to the Record Source page.
Gift Field MappingsThe table below explains how gift fields in the record sourcemap to their equivalent in Blackbaud DirectMarketing.
Program Field Record Source FieldGift amount Gift amountGift date Date constituent gave giftDonor ID System record ID (found by selecting File, Properties from constituent record)Date added Date the revenue was added to the system
Date changed Date the revenue was changed in the system. IfDate changed is not mapped, theprogram uses theDate added. IfDate added is not mapped, you receive an error.
Do notacknowledge
Whether or not the selected revenue should be included in the acknowledgementprocess (0=Will be processed, 1=Will not be processed)If integrated with The Raiser’s Edge, reads Do not acknowledge flag on gift; alsoexcludes already acknowledged gifts
Do notreceipt
Whether or not the selected revenue should be included in the receipt process (0=Willbe processed, 1=Will not be processed)If integrated with Blackbaud Direct Marketing, reads Do not receipt flag on revenuerecordIf integrated with The Raiser’s Edge, reads Do not receipt flag on gift; also excludesalready receipted gifts
Lookup ID Lookup IDAppealsystem ID
System record ID for the appeal (found by selecting File, Properties from an appealrecord)
Appeal ID Appeal ID (from the General tab of the appeal record — must be unique)Appealdescription Appeal description
Effort ID Marketing Effort IDSource code Source codeFindernumber Finder number
Appeal Field MappingsThe Appeal Field Mappings tab displays how appeal fields in the record sourcemap to their equivalent inBlackbaud Direct Marketing.
Program Field Record Source FieldAppeal ID field Appeal ID (from the General tab of the appeal record — must be unique)Description field Appeal descriptionInactive field Determines whether an appeal is inactive (Yes = Inactive, No = Active)
90 CHAPTER 12

Program Field Record Source FieldStart date field Appeal start dateEnd date field Appeal end date
} Map appeal fields for a record source
1. From the Appeal Field Mappings tab of a record source, click Edit appeal field mappings under Tasks.The Edit appeal record source screen appears.
2. Under Appeal record source, select the appeal record source. This is not required, but if you do notspecify it, your users will not be able to search for any existing appeals when they activate a mailing.Instead, they will need to enter the appeal name.
3. Under Field mappings, select the fields in the record source to map to the corresponding fields in theprogram. The Appeal ID and Appeal Description fields are required. The Inactive, Start Date, and EndDate fields provide extra information to search for an appeal. For more information about how to mapappeal fields, see Appeal Field Mappings on page 91.
4. Click Save to save your mappings and return to the Record Source page.
Appeal Field MappingsThe table below explains how appeal fields in the record sourcemap to their equivalent in Blackbaud DirectMarketing.
Program Field Record Source FieldAppeal ID field Appeal ID (from the General tab of the appeal record — must be unique)Description field Appeal descriptionInactive field Determines whether an appeal is inactive (Yes = Inactive, No = Active)Start date field Appeal start dateEnd date field Appeal end date
RECORD SOURCES 91

Define Duplicate Criteria for a Record SourceWhen you import a list, the program uses duplicate criteria to determine which records in the list already exist inthe record source. For example, you can specify that for individual constituents, the program compares the first20 characters in the First name, Surname, and Preferred Address/Address Block fields of constituent records inthe source to records in the list to determine if any are duplicates.
} Define duplicate criteria for list imports
1. From the Duplicate Criteria tab of a record source, click Edit duplicate criteria under Tasks. The Editduplicate criteria screen appears.
2. To check for duplicates when you import lists into the program, select Apply duplicate criteria duringlist import. If you clear the checkbox, duplicate processing is removed from the list import process andthe Process duplicates task is not available on the Acquisition Lists page. In most cases, you will probablywant to use duplicate checking, but you may want to turn it off if you use a duplicate criteria checkingmechanism other than the default one included with the program.
3. In the grid, select a field in the Field Name column and enter a corresponding character count in theField Length column. Under Field Name, the down arrow displays all possible field entries.
4. Add as many rows as necessary to define your duplicate criteria.
5. Click Save. You return to the Record Source page.
Select Source Analysis Rule Fields for a Record SourceA source analysis rule is a way to store the state of selected attributes for constituents in a record source whenyou send a marketing effort. You can think of a source analysis rule as a snapshot of a donor’s attributes at aspecific time. For example, in one source analysis rule, you want to captureMembership Status and Giving Levelinformation for your donors. When you capture this information, you can record over time how your marketing
92 CHAPTER 12

efforts impact the constituents included in the selected membership or giving level. Source analysis rules do notapply to donors included as part of an acquisition list.To create a source analysis rule, you select the captured data fields from smart fields, selections, and fieldsassociated with the Constituent query view. When you activate a marketing effort, the program automaticallystores the current value for each field of a source analysis rule, and links this information to themarketing effortand segment.You can generate a Source Analysis Response Report to view the source analysis values for a specific recordsource. For more information about the Source Analysis Response Report, see the Reports chapter of theMarketing Efforts Guide.
} Select source analysis rule fields
1. From the Source Analysis Rule tab of an active record source, click Edit source analysis rule fields underTasks. The Edit source analysis rule screen appears.
Note: You can define only one source analysis rule per record source.
2. Under Available fields, the list on the left displays the query views available for the record source. Whenyou select a query view, the list on the right displays all fields included in that view. To include a field inthe source analysis rule, drag and drop the field or select the field and click the + button. The fieldappears in the Fields in use grid at the bottom.
3. The Capture data option is selected by default for all fields you add to the grid. If you deselect Capturedata for a field, the program no longer captures its data for reports and queries. However, data fromearlier captures is still available.
RECORD SOURCES 93

To remove a captured data field permanently from all reports and queries, select the field and clickDelete.
4. The Field to capture from column displays the captured field's name. In the SAR field name column,enter a name to identify the captured data in reports and queries. For example, "SAR–ConstituentLifetime Giving."
5. To explain why you included a specific field in the source analysis rule, enter a description for the field inthe Purpose column.
6. TheQueryable option is selected by default for all fields so they will appear in ad-hoc queries. If you use alarge number of SAR fields, you can deselect Queryable for any fields that you do not need available inqueries. If you deselect Capture Data, you may leaveQueryable selected so you can still query historicaldata.
7. Add as many fields as you need to create a source analysis rule.
8. Click Save. You return to the Record Source page.
Source Analysis Rules Smart FieldsThe table below explains the smart fields for source analysis rules. These fields are provided as defaults in theprogram. For more information about smart fields, see Smart Fields on page 71.
Warning: Before you activate any marketing efforts for the selected record source, you must first process anysmart fields for the source analysis rule. Because the program processes the smart fields separately from thesource analysis rule, if you activate a mailing without processing the smart fields, the information the fieldsdisplay may be out of date.
Smart Field Description
Ask LadderThis smart field displays entry amounts for ask ladders in the date and amount rangesyou select. The entry amount is the value from a constituent’s giving history that you useto calculate the ask amounts.
Lifetimegifts on file This smart field displays the total number of gifts to your organisation from a constituent.
Lifetimegiving This smart field displays the total amount given to your organisation by a constituent.
Loyalty This smart field defines member status in terms of NewDonor, Multi Year donor, LapsedDonor, and Reactivated Donors.
Single giftconsecutiveyear donors
This smart field displays all donors who gave a single direct mail gift consecutively for thepast five years.
Years onfile This smart field displays the number of years since the constituent’s first donation.
GiftAmounts
This smart field is associated with the standard data warehouse. It is used to calculateaggregate values such as first, last, largest, smallest, average, and total gift amounts.These fields can also be found in the Lifetime Giving node of the Constituent view query.The difference is that the Lifetime Giving fields are calculated during the ETL process for allgifts, whereas the smart field allows you to calculate these values for a subset of giftsdefined by any gift selection.
Gift Counts This smart field is associated with the standard data warehouse. It displays various sumsfor gifts in the record source.
Gift Dates This smart field is associated with the standard data warehouse. It displays the date of thefirst or last gift in a gift selection for the record source.
94 CHAPTER 12

Define a Record Source List CodeYou can define a code to identify members of this record source in source codes. The list code helps youdistinguish members of this source from members of other sources or lists.
} Define a list code for a record source
1. From a record source, click Edit list code under Tasks. The Edit record source list code screen appears.
2. Enter the code to identify members of this record source.
The code you enter must meet the formatting requirements of at least one source code layout thatincludes a list code. The valid formats for list codes for all layouts that include one appear beside the field.A valid code is indicated by a green check mark. For more information about source codes and sourcecode layouts, see theMarketing Efforts Guide.
3. Click Save. You return to the Record Source page.
RECORD SOURCES 95

96 CHAPTER 12

To determine the default currency, the program uses theMicrosoftWindows Regional and Language Optionssettings on the server where you install the database. To view the organisation currency, from Administration,click Organisation currency setup. UnderOrganisation currency, the currency settings for your organisationappear.If your organisation processes a single currency type, and you move your database from its configuredenvironment to a different environment, themovemay affect your currency settings. From Administration, asystem administrator can change the default currency for your organisation.
Warning: Configure your organisation’s currency settings only once after you install or upgrade the program. Ifyou edit the currency settings after you enter records in your new or updated database, you may invalidateyour data.
} Configure your organisation currency
1. From Administration, click Organisation currency setup. The Organisation Currency Setup page appears.
2. Under click Organisation currency, click Edit on the action bar. The Edit organisation currency screenappears.
3. In the Currency field, select your default currency type. For example, if your organisation is located in theUnited Kingdom, select UK Pound Sterling (GBP).
4. In the Locale field, the location that corresponds to the selected currency type appears.
Note: The Locale field displays a selection of predefined locales in MicrosoftWindows. It does not include theentire list of locales.
5. Click Save. You return to the Organisation Currency Setup page.
Note: Once you change your organisation currency, you must verify that your Internet Explorer languagesetting matches the locale you selected on the Edit organisation currency screen.
chapter 13

98 CHAPTER 13