bizhub c754 series/c554 series/c364 series fax job … · of the c652/c552 and subsequent...
TRANSCRIPT

bizhub C754 Series/ C554 Series/C364 Series FULL COLOR PRINTER/COPIER/SCANNER/FAX
FAX JOB SHOPS

table of contents
Methods of Faxing . . . . . . . . . . . . . . . . . . . . . . . . . . . . . . . . . . . . . . . . . . . . . . . . . . .1
Line Parameter Settings . . . . . . . . . . . . . . . . . . . . . . . . . . . . . . . . . . . . . . . . . . . . . . .4
Fax TX/RX Settings . . . . . . . . . . . . . . . . . . . . . . . . . . . . . . . . . . . . . . . . . . . . . . . . . . .6
Registering a Fax Destination in the Address Book . . . . . . . . . . . . . . . . . . . . . . . . . . .8
Registering a Fax Program Key . . . . . . . . . . . . . . . . . . . . . . . . . . . . . . . . . . . . . . . . .10
Sending a Fax by Recalling a Fax Program Key . . . . . . . . . . . . . . . . . . . . . . . . . . . .12
Confirm Address Register . . . . . . . . . . . . . . . . . . . . . . . . . . . . . . . . . . . . . . . . . . . . .13
Activating Check Destination and Send Function . . . . . . . . . . . . . . . . . . . . . . . . . . .14
Check Recipient’s Machine and Send the Fax (Check Destination and Send) . . . . .15
Set Sender Fax Number for Line 2 . . . . . . . . . . . . . . . . . . . . . . . . . . . . . . . . . . . . . .17
Set Line 2 for TX Only . . . . . . . . . . . . . . . . . . . . . . . . . . . . . . . . . . . . . . . . . . . . . . . .18
Set Separate Fax Forwarding Destinations for Line 1 & Line 2 . . . . . . . . . . . . . . . . .19
Set Fax Forwarding Destination for Line 1 & Print Faxes for Line 2 . . . . . . . . . . . . . .22
TSI Routing (Transmission Subscriber Identification) . . . . . . . . . . . . . . . . . . . . . . . . .25
Specifying PC-Fax Reception Settings on the Machine . . . . . . . . . . . . . . . . . . . . . .27
Applying Stamps to a Fax . . . . . . . . . . . . . . . . . . . . . . . . . . . . . . . . . . . . . . . . . . . . .29
Fax Print Quality Settings . . . . . . . . . . . . . . . . . . . . . . . . . . . . . . . . . . . . . . . . . . . . .31
Fax TX Active Screen Display . . . . . . . . . . . . . . . . . . . . . . . . . . . . . . . . . . . . . . . . . .32
Setting Paper Tray for Fax Receptions (RX Print) . . . . . . . . . . . . . . . . . . . . . . . . . . . .33
Designating Output Tray for Fax Receptions . . . . . . . . . . . . . . . . . . . . . . . . . . . . . . .34
Designating Page Print or Batch Print for Fax RX . . . . . . . . . . . . . . . . . . . . . . . . . . .35
Enabling TX Result Report Check . . . . . . . . . . . . . . . . . . . . . . . . . . . . . . . . . . . . . . .36
Printing the Fax Setting List . . . . . . . . . . . . . . . . . . . . . . . . . . . . . . . . . . . . . . . . . . . .37
Overview of PC Fax Utility GUI . . . . . . . . . . . . . . . . . . . . . . . . . . . . . . . . . . . . . . . . .38
PC-Fax Utility — Faxing from the Desktop using the Fax Driver . . . . . . . . . . . . . . . .41
Create a Fax Cover Sheet in the Fax Driver . . . . . . . . . . . . . . . . . . . . . . . . . . . . . . . .45
Selecting an Address from the MFP Address Book . . . . . . . . . . . . . . . . . . . . . . . . .49
Import Addresses (from MS Outlook) to Address Book . . . . . . . . . . . . . . . . . . . . . .50
Configuring the Print Driver Settings Tab . . . . . . . . . . . . . . . . . . . . . . . . . . . . . . . . . .53
Internet Faxing (T .37) . . . . . . . . . . . . . . . . . . . . . . . . . . . . . . . . . . . . . . . . . . . . . . . . .58
IP Address Faxing to a Color MFP . . . . . . . . . . . . . . . . . . . . . . . . . . . . . . . . . . . . . .62
IP Address Faxing to a Monochrome MFP . . . . . . . . . . . . . . . . . . . . . . . . . . . . . . . .69

1
bizhub C754 series/C554 series/C364 series fax job shops
Methods of FaxingHere Are 4 Different Methods Of Faxing:
G3 FAXING
Hardcopy original sent over traditional phone line and received as hard copy
output . Super G3 is a protocol that allows communication at a speed of 33 .6Kbps .
The protocol also speeds up the re-train time (transmit time) between pages
of a communication to provide you with an overall shorter transmit time
and reduces phone costs . Another component of the V .34 protocol is JBIG
data compression (standard on Konica Minolta Super G3 devices) . This
superior compression method contributes greatly to shorter transmit time .
Not all competitive products offer standard JBIG data compression . Some
manufacturers make it available as an option .
PC FAX FUNCTION Electronic original sent from desktop . PC Fax Software/Utility required .
The PC-Fax Function allows you to fax documents from your desktop . You can
use any of several applications on your PC to create a document, then fax it
directly from your PC (PC must be connected to the network) . Because there’s
no need to print the document before faxing it, there’s less paper waste and
lower costs . This paperless process also makes it easier to manage the data you
send and ensures that the sent documents are clear and easy to read, free of
smudges, faded sections and other potential degradation .
The PC Fax Utility is available as a separate utility, but it works exactly like
a print driver . The advantage of a separate utility enables users to save the PC
Fax driver as a default so that it can be selected at any time for immediate faxing
from the desktop . It eliminates the need of having to select the fax function within
the print driver .
Using the PC-Fax RX function, you can store the received fax in a Box
without printing it . Or you can print out the document at the same time
as saving it in a Box .

2
bizhub C754 series/C554 series/C364 series fax job shops
INTERNET FAXING
Hard copy original sent to an Email address – Requires Email server and T .37
protocol on sending and receiving unit . Please note that with the introduction
of the C652/C552 and subsequent C652DS/C552DS, C452, C360 Series,
652 Series, 423 Series and with the newly introduced C754 Series, C554
Series and C364 Series it is possible to send a Color Internet Fax . These
devices support the protocol necessary to send color files via Internet Faxing .
Internet Faxing enables the transmission of a hard copy document over
the Internet in the form of hard copy output . In essence it is the same
as a fax transmission .
It is sent as a hard copy document and received as a hard copy document;
however, it is transmitted over the Internet instead of a traditional phone line .
Since the transmission occurs over the Internet, there is no additional cost
incurred . Your only cost is your monthly fee for Internet service .
Transmissions can be sent over the Internet from one T .37 Internet Fax
device to another . Since T .37 Internet Fax machines are assigned Email
addresses, it is possible to send a fax transmission over the Internet instead
of over the traditional phone lines . The Email address of the receiving T .37 fax
device is stored in the address book or can be manually dialed just like a fax
number or a regular Email address . In this case, the Email address is assigned
to the device .
The Internet Engineering Task Force (IETF) established the T .37 Internet
protocol . This is a “store-and-forward” protocol . Messages are sent and stored
in a gateway until it can be forwarded to the intended recipient . The messages
are not sent in “real-time .” Unlike a fax transmission that can be sent and
received in “real-time,” transmissions over the Internet using the T .37 protocol
cannot accomplish this “real time” sending .
The T .38 Internet Protocol can accomplish this capability, however, T .38
Internet Faxing requires communication within a managed network (within
a corporation or organization) . Due to this limitation, T .37 remains the more
popular and prevalent protocol for Internet Faxing .

3
bizhub C754 series/C554 series/C364 series fax job shops
IP ADDRESS FAX
Hard copy original sent over Network – Hardcopy via Intranet (enterprise
network) . IP Address Faxing is the ability to transmit data over an office
Intranet using the IP Address of a compatible device instead of a phone line .
Taking advantage of an established LAN/WAN infrastructure, IP Address Fax
eliminates costly connection and transmission fees . IP Address Fax does not
require a dedicated server or use the office mail server . You simply send from
one fax to another in your office by using IP Address of the device (instead
of dialing the fax number of the device) .

4
bizhub C754 series/C554 series/C364 series fax job shops
Line Parameter SettingsPre-requiSiteS
•FK-511FaxKitmustbeinstalled.
APPLiCAtion
Customerwantstoadjustoneormore
ofthefollowingfaxlineparameters:
•DialingMethod
•ReceiveMode
•NumberofRXRings
•NumberofRedials
•RedialIntervals
•LineMonitorSound
•LineMonitorSoundVolume
1. Touchutility.
2. TouchAdministrator Settings.
3. EnterPassword(Defaultis1234567812345678).
4. TouchoK.
5. TouchFax Settings.
6. TouchLine Parameter Settings.
7. TouchDialing MethodTouchPB or10pps.
8. Touchreceive Mode.TouchAuto rX orManual rX.
9. Touchnumber of rX rings.Enternumberbetween0–15xusingthe–and+signunderJob Setting.
10.Touchnumber of redials.Enternumberbetween 0–7xusingthe–and+signunderJob Setting.
If not on the home screen, touch the Menu key on the Control Panel .

5
bizhub C754 series/C554 series/C364 series fax job shops
11. Touch Redial Intervals.
Enter the number of minutes (1- 15 minutes) to elapse between redial
attempts using the – and + sign under Job Setting.
12. Touch down arrow ! to advance to screen 2/2.
13. Touch Line Monitor Sound.
Touch ON or OFF under Job Setting.
14. Touch Line Monitor Sound Volume (Send). Enter volume (0-31) by using Lower and Higher keys to adjust
to desired volume.
15. Touch OK.
16. Touch Line Monitor Sound Volume (Receive). Enter volume (0-31) by using Lower and Higher keys to adjust
to desired volume.
17. Touch OK.
18. Touch OK.
19. Touch Close 3x to return to Main Menu.

6
bizhub C754 series/C554 series/C364 series fax job shops
Fax tX/rX SettingsPre-requiSiteS
•FK-511FaxKitmustbeinstalled.
APPLiCAtion
Customerwantstoadjustoneormoreofthefollowing
faxtransmissionand/orreceptionsettings:
•DuplexPrint(RX)–setfaxreceptionoutputtoduplex
•Letter/LedgeroverA4/A3–setA4/A3receptionstooutputonLetter/Ledger
•PrintPaperSelection–setpaperselectionmethod(Auto,FixedSize,
Priority Size)
•PrintPaperSize–setfaxreceptionpapersize(8.5"x11",8.5"x14",11"x17")
• IncorrectUserBoxNo.Entry–setoperationtooccuriffaxreceptionissent
to incorrectUserBox
•TraySelectionforRXPrint–setpapertrayyouwishtouseforfaxreceptions
•Min.ReductionforRXPrint–setreductionratiotouseforallincoming
fax receptions
•PrintSeparateFaxPages–setoperationtooccurifthelengthofthefax
receptionislongerthanthestandardsizeandprintsizeisnotreduced
•FileAfterPollingTX-allowsyoutosettheoperationtooccur—DeleteorSave
—afterafileissentinresponsetoapollingrequest
• IfthePollingTXfunctionisusedtoregisterfilesforpolling
•No.ofSets–setthenumberofsetsyouwouldliketoprintoutforevery
fax reception
•RXDocumentPrintSettings–setfaxoutputtoallowcolororstrictlyblackonly
1. Touchutility.
2. TouchAdministrator Settings.
3. EnterPassword(Defaultis1234567812345678).
4. TouchoK.
5. TouchFax Settings.
6. TouchtX/rX Settings.
7. TouchDuplex Print (rX).TouchonoroFF.
If not on the home screen, touch the Menu key on the Control Panel .

7
bizhub C754 series/C554 series/C364 series fax job shops
8. TouchLetter/Ledger over A4/A3.TouchonoroFF.
9. TouchPrintPaper Selection.TouchAuto Select, Fixed SizeorPriority Size.
10.TouchPrint Paper Size.Touch8.5" x 11", 8.5" x 14"or11" x 17".
11.Touchincorrect user Box no. entry.TouchPrint,Show error MessageorAuto Create user Box.
12.Touchdownarrow!toadvancetoscreen2/3.
13.Touchtray Selection for rXPrint.TouchnPrev.or!nexttocyclethroughtheavailablepapertraysor touchAuto.
14.TouchMin. reduction for rXPrint.Use–and+signstosetreductionratiobetween87-96%ortouchFullSize.
15.TouchPrintSeparate Fax Pages.TouchonoroFF.
16.TouchFile After Polling tX.TouchDeleteorSave.
17. Touchdownarrow!toadvancetoscreen3/3.
18.Touchno. of Sets (rX).Use–and+signstoenternumberofsetsbetween1-20.
19.TouchrX Document Print Settings.TouchAllow Color And Black for Black only.
20.TouchoK.
21.TouchClose3xtoreturntoMain Screen.
If Min. Reduction for RX Print is set to Full Size, the Print Separate Fax Pages is automatically switched to oFF and the area that does not fit on a standard size sheet is not printed at all.
If Duplex Print (RX) is on, you cannot use the Print Separate Fax Pages function.

8
bizhub C754 series/C554 series/C364 series fax job shops
Registering a Fax Destination in the Address BookPRE-REqUISITES
•FK-511 Fax Kit must be installed .
APPLICATION
Customer wants to store frequently accessed fax
destinations in the MFP’s Address Book to increase
productivity and reduce the possibility of entering
the wrong fax number . Typically, the Administrator will enter the information to ensure
accuracy and so that they can control which destinations are stored in the MFP .
The Administrator can also program the MFP to prohibit or allow a user to register
or change the destinations . The default is to ALLOW the user to change or register
destinations .
Customer also wants user to confirm that they have selected the correct fax number
for transmission so they want to enable the Check Destination and Send function
so the user must manually confirm that the right destination has been selected
and the transmission can proceed .
For this particular one-touch registration, the Administrator also wants to store
it in Favorites because it’s among the most frequently dialed numbers . By placing
it on the Favorites screen it is immediately accessible to the end user . They don’t
need to press the corresponding Index key to get to the one-touch key .
1 . Touch Utility .
2 . Touch Administrator Settings .
3 . Enter Password (Default is 1234567812345678) .
4 . Touch OK .
5 . Touch One-Touch/User Box Registration .
6 . Touch Create One-Touch Destination .
7 . Touch Address Book (Public) .
8 . Touch Fax .
9 . Touch New .
10 . Touch Name and enter fax destination name: Ramsey Marketing .
If not on the home screen, touch the Menu key on the Control Panel .
You can register up to 2000 destinations in the Address Book.

9
bizhub C754 series/C554 series/C364 series fax job shops
11 . Touch OK .
12 . Touch Fax and enter fax number: 2015551234 .
13 . Touch Line Setting and select applicable line settings (if necessary) .
a . Overseas TX
b . ECM OFF
c . V34 OFF
14 . From Check Destination and Send menu, touch Yes .
15 . Touch OK .
16 . Touch Down Arrow ! to advance to screen 2/2 .
17 . Touch Index and touch Favorites .
18 . Touch OK .
19 . Touch OK .
20 . Touch Close 6x .

10
bizhub C754 series/C554 series/C364 series fax job shops
Registering a Fax Program KeyPRE-REqUISITES
•FK-511 Fax Kit must be installed .
APPLICATION
Customer uses the same combination of settings
each week to send out reports . They want to store
the frequently-used settings in a program key
to reduce keystrokes in order to improve productivity
and minimize fax transmission errors .
1 . Touch Scan/Fax .
2 . Configure the desired
fax settings by selecting
the necessary
parameters:
a . Simplex/Duplex
b . Resolution
c . Color
d . File Type
e . Scan Size
f . Application Menu
3 . Tap Program when all
the fax settings have
been made .
4 . Select a “Not
Registered” key
(an unregistered
program key) store
your settings .
You can register up to 400 Fax/Scan Programs.
If not on the home screen, touch the Menu key on the Control Panel .

11
bizhub C754 series/C554 series/C364 series fax job shops
5 . Touch New .
6 . Enter the Program Name .
7 . Specify the destination
in Address .
8 . Enter URL Notification
information if you wish
to send an Email
message that contains
the save location of the
data (enter the Email
address of the person
that you wish to receive
this notification) .
9 . Touch OK .
10 . Touch Close .The URL Notification can be sent for fax receptions that are SMB, FTP or WebDAV Transmissions or saved to a User Box.

12
bizhub C754 series/C554 series/C364 series fax job shops
Sending a Fax by Recalling a Fax Program KeyPRE-REqUISITES
•FK-511 Fax Kit must be installed .
APPLICATION
Customer uses the same combination of settings
each week to send out reports . They want to store
the frequently-used settings in a program key to
reduce keystrokes in order to improve productivity
and minimize fax transmission errors . This job shop
provides the instructions on how to recall the Fax Program Key that was registered
in the previous Job Shops (Registering a Fax Program Key)
1 . Load the Original .
2 . Touch Scan/Fax .
3 . Tap the Program key .
4 . Select the Program key
(the registered settings
of the program are
automatically enabled) .
5 . Specify the Destination
(if it was not included
in the registered
Program key) .
6 . Press Start .
You can register up to 400 Fax/Scan Programs.
If not on the home screen, touch the Menu key on the Control Panel .

13
bizhub C754 series/C554 series/C364 series fax job shops
Confirm Address RegisterPRE-REqUISITES
•FK-511 Fax Kit must be installed and one-touch
fax destinations should be programmed .
APPLICATION
The system administrator of a major corporation wants
to ensure that all the fax numbers registered in the MFP are correct since the unit
will be placed in the Executive Wing of a major corporation . They want the MFP set
up so that when a fax
number is registered
it is entered twice to
ensure the accuracy
of the fax destination .
1 . Touch Utility .
2 . Touch Administrator Settings .
3 . Enter Password (Default is 1234567812345678) .
4 . Touch OK .
5 . Touch Fax Settings .
6 . Touch Function Settings .
7 . Touch Function ON/OFF Settings .
8 . Touch Down Arrow ! to advance to screen 2/2 .
9 . Touch Confirm Address (Register) .
10 . Touch ON .
11 . Touch OK .
12 . Touch Close 4x to return to Main Menu .
If not on the home screen, touch the Menu key on the Control Panel .
Enabling the Confirm Address Register function will force the end user to enter the fax number twice before it is registered in the address book. This function helps prevent the registration of a non-existent fax number or the wrong fax number.

14
bizhub C754 series/C554 series/C364 series fax job shops
Activating Check Destination and Send FunctionPRE-REqUISITES
FK-511 Fax Kit must be installed and one-touch fax
destinations should be programmed .
APPLICATION
Customer wants to program the MFP so that the device
prompts the user after each destination is selected for transmission so the user can
confirm that they are sending to the correct address . The MFP is located in a Human
Resources Department
and they transmit highly
confidential documents .
They want to enable
this function to prevent
transmitting sensitive documents to the wrong recipient .
1 . Touch Utility .
2 . Touch Administrator Settings .
3 . Enter Password (Default is 1234567812345678) .
4 . Touch OK .
5 . Touch Fax Settings .
6 . Touch Function Settings .
7 . Touch Function ON/OFF Settings .
8 . Touch Destination Check Display Function .
9 . Touch ON .
10 . Touch OK .
11 . Touch Close 4x to return to Main Menu .
If not on the home screen, touch the Menu key on the Control Panel .
Enabling the Destination Check Display function will show a list of the specified destinations before sending a fax. This function helps prevent transmitting documents to an incorrect destination or sending transmissions to a non-existent fax number.

15
bizhub C754 series/C554 series/C364 series fax job shops
Check Recipient’s Machine and Send the Fax (Check Destination and Send)PRE-REqUISITES
FK-511 Fax Kit must be installed and one-touch fax
destinations should be programmed .
APPLICATION
Customer wants to program the MFP so that the device prompts the user after each
destination is selected for transmission so the user can confirm that they are sending
to the correct address . The MFP is located in a Human Resources Department
and they transmit highly
confidential documents .
They are going to use
this function to prevent
transmitting sensitive
documents to the
wrong recipient .
1 . Load Original .
2 . Touch Scan/Fax .
3 . Touch Application .
4 . Enter Fax Settings or scroll to Fax Settings .
5 . Touch Line Settings .
6 . Touch Check Dest. and Send to Check It .
7 . Touch OK to return to Fax Setting Screen .
8 . Touch Close to return to Scan/Fax Screen .
9 . Select other file settings (if required):
a . Simplex/Duplex
b . Resolution
c . Color
d . File Type
10 . Touch Destination .
If not on the home screen, touch the Menu key on the Control Panel .
Enabling the Destination Check Display function will show a list of the specified destinations before sending a fax. This function helps prevent transmitting documents to an incorrect destination or sending transmissions to a non-existent fax number.

16
bizhub C754 series/C554 series/C364 series fax job shops
11 . Press Start key .
12 . The scanned document is stored in the queue as scheduled job and
transmission is started . The document will only be sent if the specified
fax number and the number registered in the recipient’s machine match .
13 . When prompted, review the selected destination and scan settings .
If it is correct, press Send . If it is incorrect, touch Cancel and repeat
steps to correct the necessary selections .

17
bizhub C754 series/C554 series/C364 series fax job shops
Set Sender Fax Number for Line 2This setting restricts line 2 from receiving faxes . By selecting “TX Only”, this line
is strictly used to send faxes, not receive them .
PRE-REqUISITES
•TWO FK-511 Fax Kits must be installed and one-touch fax destinations
should be programmed .
APPLICATION
This office is shared by two doctors .
Each doctor has been designated their
own fax number . In order for recipients
to clearly understand the originator of
the fax, each fax line has its own fax
number — the number that will be stamped on the fax reception . In this case,
we are specifically programming the fax number for Line 2 .
1 . Touch Utility .
2 . Touch Administrator Settings .
3 . Enter Password (Default is 1234567812345678) .
4 . Touch OK .
5 . Touch Fax Settings .
6 . Touch Multi Line Settings .
7 . Touch Sender Fax No .
8 . Touch Enter Fax Number .
9 . Touch OK .
10 . Press Close 4x to get to the Main Screen .
If not on the home screen, touch the Menu key on the Control Panel .
Setting Sender Fax Number for Line 2 identifies the “sender” of the transmission. In this case, since there are two fax lines on one machine, each line has its own fax number programmed in the device.

18
bizhub C754 series/C554 series/C364 series fax job shops
Set Line 2 for TX OnlyPRE-REqUISITES
•TWO FK-511 Fax Kits must be installed and one-touch fax destinations
should be programmed .
APPLICATION
This office sends and receives a large volume of documents via fax . They do not
want their employees waiting for an incoming fax before their transmission can be
sent because everything is very time sensitive . To handle the high volume of fax traffic,
the customer has equipped the MFP with Dual Lines . In order to ensure that the users
have immediate access to fax functions, they want one of the lines restricted for sending
transmissions only . When Line 2 is set for TX Only, it cannot receive incoming faxes so it
will be dedicated strictly for transmission operations .
1 . Touch Utility .
2 . Touch Administrator Settings .
3 . Enter Password (Default is 1234567812345678) .
4 . Touch OK .
5 . Touch Fax Settings .
6 . Touch Multi Line Settings .
7 . Touch Multi Line Settings .
8 . From the Line 2 Setting menu, select TX Only .a . Select TX and RX setting if the second fax line should be used for sending
and receiving .
b . Select RX Only setting if the second fax line should be used for receiving
only (this is for environments that have a high volume of incoming faxes
and not a high volume of faxes being sent) .
9 . Touch OK .
10 . Press Close 4x to get to the main screen .
If not on the home screen, touch the Menu key on the Control Panel .

19
bizhub C754 series/C554 series/C364 series fax job shops
You will not be able to access the necessary menus if the Pre-requisites have not been met.
Line 2
2
1
If not on the home screen, touch the Menu key on the Control Panel .
Set Separate Fax Forwarding Destinations for Line 1 & Line 2PRE-REqUISITES
•TWO FK-511 Fax Kits must be installed
•Forwarding destinations have been registered in a One-Touch key
(program an Email Address and SMB Folder destination)
APPLICATION
This medical office is shared
by two prominent doctors,
each of which has a different
method of handling their
incoming fax transmission .
They have equipped their
bizhub MFP with two fax
lines, one line dedicated to
each doctor . They have also programmed
their machine with separate forwarding
commands for each line in order to meet
the doctor’s requirements—one doctor wants all incoming faxes forwarded
to the administrator’s Email address and the other doctor wants all incoming
faxes forwarded to an SMB folder .
1 . Touch Utility .
2 . Touch Administrator Settings .
3 . Enter Password (Default is 1234567812345678) .
4 . Touch OK .
5 . Touch Fax Settings .
6 . Touch TX/RX Settings .
7 . Access screen 3/3 by pressing the down arrow ! .
8 . Touch Individual Receiving Line Set Up .
9 . Select ON from Job Setting Menu .

20
bizhub C754 series/C554 series/C364 series fax job shops
10 . Touch Individual Sender Line Set Up .
11 . Select ON from Job Setting Menu .
12 . Touch OK .
13 . Touch Function Settings .
14 . Touch Forward TX Setting .
15 . Touch Fax Line 1 .
16 . Touch Yes to enable the Fax Forwarding feature .
17 . Select Forward & Print (If TX Fails) as the Output Method .
18 . Touch Select Line .
19 . Touch Line 1 as the forwarding line .
20 . Touch Forward Dest. and then touch Select From Address Book and select
the Email address destination (destination must be pre-registered) .
21 . Touch OK 2x .
22 . Touch Fax Line 2 .
The selected destination will appear in the Forward Dest. Field for Line 1.
23 . Touch Yes to enable the Fax Forwarding feature .
24 . Select Forward & Print as the Output Method .
25 . Touch Select Line .
Forward & Print (If TX Fails) will forward the incoming fax to the selected destination and ONLY print the reception should the forwarding operation fail (i.e. forwarding destination is an Email address and the network is down.Forward & Print will forward the incoming fax to the selected destination and print it. This is for users that need and electronic copy as well as a hard copy of every fax that is received.

21
bizhub C754 series/C554 series/C364 series fax job shops
26 . Touch Line 2 as the forwarding line .
27 . Touch Forward Dest. and then touch Select From Address Book and select
the SMB Folder destination (destination must be pre-registered) .
28 . Touch OK 2x .
29 . The selected destination will appear in the Forward Dest . Field for Line 2 .
30 . Touch Close 5x .
These settings will forward all incoming faxes received on Line 1 to an Email
Address and only print the transmission if the forwarding fails and all incoming
faxes received on Line 2 will be forwarded to the SMB Folder and printed .
Please make sure your destinations are already registered in a One-Touch key otherwise you will not be able to access the destinations when you touch Select from Address Book.

22
bizhub C754 series/C554 series/C364 series fax job shops
Set Fax Forwarding Destination for Line 1 & Print Faxes for Line 2PRE-REqUISITES
•TWO FK-511 Fax Kits must be installed
•Forwarding destinations have been registered in a One-Touch key
(program an Email Address, SMB Folder, FTP or User Box destination)
APPLICATION
This law office is shared by
several lawyers . They have
equipped their bizhub MFP
with two fax lines in order
to accommodate the fax
transmissions received . For
those business associates
that send faxes that have to
be archived electronically, they have been given the fax number for Line 1 . For those
business associates that require hard copy output of each fax received, they have been
given the fax number for Line 2 .
Though all faxes are being sent to the same bizhub MFP, the line that receives the
incoming fax will handle the reception accordingly--Line 1 receptions are forwarded
to an FTP site for electronic archival and
Line 2 receptions are printed for hard
copy reference .
1 . Touch Utility .
2 . Touch Administrator Settings .
3 . Enter Password (Default is 1234567812345678) .
4 . Touch OK .
5 . Touch Fax Settings .
6 . Touch TX/RX Settings .
7 . Access screen 3/3 by pressing the down arrow ! .
8 . Touch Individual Receiving Line Set Up .
You will not be able to access the necessary menus if the Pre-requisites have not been met.
Line 2
2
1
If not on the home screen, touch the Menu key on the Control Panel .

23
bizhub C754 series/C554 series/C364 series fax job shops
9 . Select ON from Job Setting Menu .
10 . Touch Individual Sender Line Set Up .
11 . Select ON from Job Setting Menu .
12 . Touch OK .
13 . Touch Function Settings .
14 . Touch Forward TX Setting .
15 . Touch Fax Line 1 .
16 . Touch Yes to enable the Fax Forwarding feature .
17 . Select Forward & Print (If TX Fails) as the Output Method .
18 . Touch Select Line .
19 . Touch Line 1 as the forwarding line .
20 . Touch Forward Dest. and then touch Select From Address Book and select
the FTP address destination (destination must be pre-registered) .
21 . Touch OK 2x .
22 . Touch Close 2x .
23 . The selected destination will appear in the Forward Dest . Field for Line 1 .
24 . Touch Multi-Line Settings .
25 . Touch Multi-Line Settings .
Forward & Print (If TX Fails) will forward the incoming fax to the selected destination and ONLY print the reception should the forwarding operation fail (i.e. forwarding destination is an Email address and the network is down.Forward & Print will forward the incoming fax to the selected destination and print it. This is for users that need and electronic copy as well as a hard copy of every fax that is received.

24
bizhub C754 series/C554 series/C364 series fax job shops
26 . Select line settings for Line 2 .
27 . Touch Select Line .
28 . Touch TX & RX to enable sending and receiving to this line .
29 . Touch OK .
30 . Touch Close 4x .
These settings will forward all incoming faxes received on Line 1 to an FTP
Address and only print the transmission if the forwarding fails and all incoming
faxes received on Line 2 will be printed . In this configuration, users will be able
to transmit faxes using Line or Line 2 .
You can reverse the settings and instruct the MFP to print incoming faxes received on Line 1 and forward incoming faxes to the selected destination on Line 2.

25
bizhub C754 series/C554 series/C364 series fax job shops
TSI Routing (Transmission Subscriber Identification)When this mode is enabled, incoming faxes will be directed to and stored in a User
Box (on machine HDD) according to the sender’s TSI . The Header on the top edge
of the incoming fax is commonly referred to as the TSI . The sender’s fax number
in the TSI will be used as the identifying criteria . The documents are then routed
to a predetermined destination via Email address, FTP address, or SMB folder .
This function is enabled using the “Utility Mode” in the Administrator Settings
Let’s set up the TSI User Box
1 . Touch Utility .
2 . Touch Administrator Settings .
3 . Enter Password (Default is 1234567812345678) .
4 . Touch OK .
5 . Touch Fax Settings .
6 . Touch Function Settings .
7 . Touch TSI User Box Setting .
8 . Touch Yes to set the TSI User Box Setting . When a document is received that
does not have registered TSI information, you need to indicate the operation
that you would like to occur .
a . Do you want the reception to Automatically Print?
b . Do you want the reception to be stored in the Memory RX User Box?
c . Do you want the reception to be stored in a Specified User Box?
9 . Touch Automatically Print .
10 . For Print, touch Yes so that all documents routed to User Box will also be
printed (if user does not want the reception to print, they can select NO
and the document will only be routed to the applicable User Box .
Sender
Original
Server
FTP
Server
SMB
Folder
Hard Disk
FTP
SMB
If not on the home screen, touch the Menu key on the Control Panel .

26
bizhub C754 series/C554 series/C364 series fax job shops
11 . Touch TSI User Box Registration .
12 . The list of registered numbers is displayed .
13 . Touch the number to be registered (up to 128 numbers can be registered) .
14 . Touch Edit .
15 . Enter Sender (TSI) (this is the fax number of the sending fax) .
a . Use the keypad, “+”, Space, “%”, “,”, Delete (deletes one character
at a time) to enter Sender (TSI) .
b . To delete all entered characters, press C key on the control panel .
16 . Specify the forwarding destination (this designates where you want this fax
reception to be forwarded when the registered sender transmits a fax) .
a . To select from registered destinations , touch Select Address Book ,
touch the desired One-Touch key , Touch OK .
b . To specify the box number, touch Search by User Box Number ,
enter box number with keypad , touch OK .
17 . Touch OK 3x and TSI Routing is now set .
18 . Touch Close until you are back at the Scan/Fax or Main Menu Screen .
Note: The number registered in the Sender (TSI ) field represents the fax number of the sending fax.
123-456-7890
012-345-6789
123-456-7890
012-345-6789

27
bizhub C754 series/C554 series/C364 series fax job shops
If not on the home screen, touch the Menu key on the Control Panel .
Sender
Document
Hard Disk
Specifying PC-Fax Reception Settings on the MachinePC-FAX reception saves the document file received by the fax in the HHD (Hard Disk
Drive) . The saved file can be downloaded to a network computer .
PRE-REqUISITES
FK-511 Fax Kit must
be installed and one-touch
fax destinations should
be programmed .
APPLICATION
The customer wants to program the MFP to store all incoming fax receptions into
a user box instead of printing them out . They prefer this method so they can maintain
confidentiality and they decide which faxes they will archive, forward or delete .
By following these procedures they are also able to save money on consumable
(paper, toner, etc .) costs .
1 . Touch Utility .
2 . Touch Administrator Settings .
3 . Enter Password (Default is 1234567812345678) .
4 . Touch OK .
5 . Touch Fax Settings .
6 . Touch Function Settings .
7 . Touch PC-Fax RX Setting .
8 . Touch Allow .

28
bizhub C754 series/C554 series/C364 series fax job shops
9 . Select the box that will receive the PC-Fax Document .
a . Memory Receive User Box selection will store the reception in the Memory
Receive Box .
b . Specified User Box will store incoming faxes based on F-Codes .
The F-Code function and F-Code Mailboxes must be set up in order
to receive F-Code enabled transmissions .
10 . If you wish to have the document printed as well as forwarded to the Memory
Receive Box or Specified F-Code Box, then touch ON for Print .
11 . Touch Memory Receive User Box as the “Receiving User Box Destination”
selection .
12 . Touch ON as the “Print” selection .
13 . Touch OK . The settings are enabled .
14 . Touch Close until the Scan/Fax or Main Menu screen appears .

29
bizhub C754 series/C554 series/C364 series fax job shops
Applying Stamps to a FaxPRE-REqUISITES
•FK-511 Fax Kit must be installed .
APPLICATION
Customer wants to draw attention to the fax transmission .
In this case, it’s an URGENT message and the sender
wants to make sure that the recipient recognizes the importance of the incoming fax .
1 . Touch Scan/Fax .
2 . Touch Application .
3 . Enter D to access Stamp/Composition or scroll to Stamp/Composition .
4 . Touch Stamp .
5 . To specify a stamp,
touch ON .
6 . Touch Urgent .
7 . The default should
be All Pages; if not,
touch All Pages .
8 . Touching Text Details displays a screen for
specifying the color (please note that you cannot fax over a telephone line
in color, this is for your reference only) and text size (Minimal or Standard
– the default is standard) . This function can be used to apply a colored stamp
when scanning and it allows you to denote the size of the text.
9 . Touch OK .
10 . Touching Print Position displays a screen for specify the print position
of the Stamp .
11 . Touch Center .
12 . Touch Adjust Position .
If not on the home screen, touch the Menu key on the Control Panel .
You can make fine adjustments by touching Adjust Position.

30
bizhub C754 series/C554 series/C364 series fax job shops
13 . The position can be adjusted between 1/16th and 1-15/16th in the left/right
direction and the top/bottom direction . Simply touch the key (Left/Right
or Top/Bottom to make the desired adjustment .
14 . Touch OK 3x .
15 . Touch Close .
16 . Set the other Fax/Scan function if required (Simplex/Duplex, Resolution,
Color, File Type, etc .) .
17 . Select the desired destination using one of the following methods:
a . Start entering number using the keypad .
b . Touch Address Book , use alphabetical index tabs to look for number .
c . Touch Direct Input , Touch Fax ,enter number , touch OK .
d . Touch Job History , select one of the 5 previous communications .
e . Touch Addr. Search , Touch Search , Touch Name , Touch Search ,
Enter Marketing (must be a registered address) , Press Search .
18 . Press the Start key and the scanned document is stored in the memory
as a scheduled job and transmission starts .
If the fax cannot be sent because the fax line is busy, the recipient’s number is redialed.

31
bizhub C754 series/C554 series/C364 series fax job shops
Fax Print quality SettingsPRE-REqUISITES
•FK-511 Fax Kit must be installed .
APPLICATION
Customer wants to modify the fax print quality settings
to best meet their needs . This bizhub MFP is in an
Accounting Department that receives a great of faxes with numbers and fine print
so they want the image quality optimized over the print speed .
1 . Touch Utility .
2 . Touch Administrator Settings .
3 . Enter Password (Default is 1234567812345678) .
4 . Touch OK .
5 . Touch Fax Settings .
6 . Touch Forward Arrow 33 to advance
to screen 2/2 .
7 . Touch Fax Print quality Settings .
8 . Touch Low Resolution .
a . Touch Prioritize quality in Job Setting Menu .
b . Touch Prioritize Speed in the Job Setting Menu if you want the speed
to take priority of the quality .
9 . Touch High Resolution .
a . Touch Prioritize quality in Job Setting Menu .
b . Touch Prioritize Speed in the Job Setting Menu if you want the speed
to take priority of the quality .
10 . Touch OK .
11 . Touch Close 3x to return to Main Menu .
You can specify if you want the priority to be the image quality or the printing speed based on the resolution of the received fax.
If not on the home screen, touch the Menu key on the Control Panel .

32
bizhub C754 series/C554 series/C364 series fax job shops
Fax TX Active Screen DisplayPRE-REqUISITES
•FK-511 Fax Kit must be installed .
APPLICATION
Customer wants to modify the Fax TX active screen
setting to display that a fax is being sent . User will be
able to check destination and document information on this screen . Customer
also wants to adjust the Fax RX active screen setting to indicate that a fax is being
received . When this screen
is displayed, the user can
check sender and fax
reception information .
1 . Touch Utility .
2 . Touch User Settings .
3 . Touch Custom Display Settings .
4 . Touch Fax Active Screen .
5 . Touch TX Display .
6 . Touch Yes under Job Setting Menus .
7 . Touch RX Display .
8 . Touch Yes under Job Setting Menus .
9 . Touch OK .
10 . Touch Close 3x to return to Main Menu .
If not on the home screen, touch the Menu key on the Control Panel .
Fax TX Display and Fax RX Display default is “NO”. Information regarding the fax transmission and fax reception is not displayed unless this settings for both fax modes is changes to YES.

33
bizhub C754 series/C554 series/C364 series fax job shops
Setting Paper Tray for Fax Receptions (RX Print)PRE-REqUISITES
•FK-511 Fax Kit must be installed .
APPLICATION
Customer wants the fax receptions to output on a specific
tray . Often customers want to use color paper so that the
fax receptions easily stand out from the print and copy output (even if they have multiple
output trays to physically separate the fax, print and copy output) .
1 . Touch Utility .
2 . Touch Administrator Settings .
3 . Enter Password (Default is 1234567812345678) .
4 . Touch OK .
5 . Touch Fax Settings .
6 . Touch TX/RX Settings .
7 . Touch Down Arrow ! to access screen 2/3 .
8 . Touch Tray Selection for RX Print .
9 . Select the paper tray you wish to use for fax receptions (use nPrev. and !Next to scroll through the tray selections or touch Auto for automatic
tray selection) .
10 . Touch OK .
11 . Touch Close 3x .
If not on the home screen, touch the Menu key on the Control Panel .

34
bizhub C754 series/C554 series/C364 series fax job shops
Designating Output Tray for Fax ReceptionsPRE-REqUISITES
•FK-511 Fax Kit must be installed .
APPLICATION
Users want fax receptions to print out on a particular
output tray so that they can easily identify fax documents .
1 . Touch Utility .
2 . Touch Administrator Settings .
3 . Enter Password (Default is 1234567812345678) .
4 . Touch OK .
5 . Touch System Settings .
6 . Touch Output Settings .
7 . Touch Output Tray Settings .
8 . From the FAX section, select the desired Tray for fax receptions .
9 . Touch OK .
10 . Touch Close 4x to return to Main Menu .
If not on the home screen, touch the Menu key on the Control Panel .
The Output Tray selections available will vary based on the machine configuration.

Designating Page Print or Batch Print for Fax RXAllows you to designate when to start printing
the fax reception .
PRE-REqUISITES
•FK-511 Fax Kit must be installed .
APPLICATION
Users want fax receptions to begin printing as soon as the first page is received
(as opposed to waiting for the entire fax to be received before the fax is printed) .
1 . Touch Utility .
2 . Touch Administrator Settings .
3 . Enter Password (Default is 1234567812345678) .
4 . Touch OK .
5 . Touch System Settings .
6 . Touch Output Settings .
7 . Touch Print/Fax Output Settings .
8 . For the Fax setting, select Page Print .a . Page Print selection will print out the first page of the fax as soon
as it is received .
b . Batch Print selection will print out the fax reception After all the pages
have been received .
9 . Touch OK .
10 . Touch Close 4x to return to Main Menu .
35
bizhub C754 series/C554 series/C364 series fax job shops
If not on the home screen, touch the Menu key on the Control Panel .
Batch Print is the default setting for fax receptions.

36
bizhub C754 series/C554 series/C364 series fax job shops
Enabling TX Result Report CheckPRE-REqUISITES
•FK-511 Fax Kit must be installed .
APPLICATION
Customer wants the machine to prompt the user for a TX
Result Report . They don’t want this report to print for every
transmission because they don’t need it and they don’t want to incur unnecessary
supply costs . However, there are instances when the end-user needs a TX Result
Report for their records . By enabling the automatic prompt, the user won’t forget
to request it when it is required .
1 . Touch Utility .
2 . Touch Administrator Settings .
3 . Enter Password (Default is 1234567812345678) .
4 . Touch OK .
5 . Touch Fax Settings .
6 . Touch Report Settings .
7 . Access Screen 3/3 by press the down arrow ! .
8 . Touch TX Result Report Check .
9 . Touch ON .
10 . Touch OK .
11 . Touch Close 3x .
If not on the home screen, touch the Menu key on the Control Panel .

37
bizhub C754 series/C554 series/C364 series fax job shops
Printing the Fax Setting ListPRE-REqUISITES
•FK-511 Fax Kit must be installed .
APPLICATION
Customer needs a record of the Fax Setting List for future
reference . They want a proof source should someone
change settings or should an additional engine be placed within the organization and
the customer wants to ensure that the subsequent MFP has the same fax settings .
1 . Touch Utility .
2 . Touch Administrator Settings .
3 . Enter Password (Default is 1234567812345678) .
4 . Touch OK .
5 . Touch Fax Settings .
6 . Touch Job Setting List .
7 . Select the Paper Tray from which you wish to pull the paper to output
the Fax Setting List .
8 . Select Simplex or Duplex based on your needs (we recommend duplex
output to promote environmental friendliness .
9 . Press Start .
Fax Setting List contains Initial Panel Settings, Header/Footer Information, Line Parameter Settings, TX/RX Settings, Report Settings, PBX Connection Settings, Function ON/OFF Settings, Forward TXC Setting, Dial-In Settings, Remote RX Settings, Memory RX Setting, Closed Network RX Setting, PC-Fax FX Setting, Incomplete TX Hold Setting, TSI User Box Setting, PC-Fax Permission Setting, Multi-Line Settings (only if a 2nd fax board is installed) and Fax Print Quality Settings.
If not on the home screen, touch the Menu key on the Control Panel .

38
bizhub C754 series/C554 series/C364 series fax job shops
Overview of PC Fax Utility GUIThe MFP PC Fax Utility is provided as a separate utility . It is not bundled with the Printer
Driver . This was done to minimize the number of keystrokes required to access the fax
driver and allow users to have a Fax driver default . It is installed separately from the
MFP Print Drivers .
PRE-REqUISITES
•FK-511 Fax Kit must be installed on the bizhub MFP
•bizhub MFP Fax driver must be installed on PC
1 . Select File Print from an application such as MS Word .
2 . Select the MFP Fax Driver .
3 . Select Properties .
4 . The Fax tab will display .
From this tab, you can
select the Resolution,
Print Recipient File and
Timer Send (Delayed
Sending) and enter SUB
Address (for F-Codes),
Sender ID and Cover
Sheet. You can also
register Phone Book
entries.

39
bizhub C754 series/C554 series/C364 series fax job shops
5 . Select the Basic tab .
The Basic tab allows
you to designate
the Page Orientation,
Original Size and Zoom
Ratio as well as enable
User Authentication/
Account Track.
6 . Select the Layout tab .
From the Layout tab,
you can select
Combination/2-in-1.

40
bizhub C754 series/C554 series/C364 series fax job shops
7 . Select the Stamp/Composition tab .
This tab allows you
to apply a Watermark
to the Fax.
8 . Select the quality tab .
9 . Select Font Setting .
This tab allows you
to download fonts
10 . Select About tab .
The About tab provides
you with information
on the version number
of the fax driver.

41
bizhub C754 series/C554 series/C364 series fax job shops
PC-Fax Utility — Faxing from the Desktop using the Fax DriverOVERVIEW
For the Info-Palette bizhub MFP, the FK-511 Fax Kit must be installed on the machine
and the Fax Driver software must be loaded on your PC.
Normally you send a fax by loading an original into the fax machine and sending it .
With computer faxing (PC-Fax) you can send a fax directly from your computer without
using any paper .
This product now has a separate fax print driver that receives the transmission
commands sent from the application .
The data is transmitted to the MFP’s print controller via USB, for a stand-alone printer
or Ethernet interface, when used as a network printer . In the print controller, the data
is then rasterized to form the bitmap image data . Finally, the data is stored in memory
of the MFP and transmitted like a conventional fax job .
Before we attempt to send a fax, let’s make sure the Fax Driver is configured properly
and it recognizes all of the installed options .
1 . Click the Start button, and then click Printers and Faxes (steps may vary based
on Windows OS) .
2 . Right click the MFP Fax icon .
3 . Click Properties .
4 . Click the Configure tab .

42
bizhub C754 series/C554 series/C364 series fax job shops
Now let’s use the bidirectional feature of this fax driver and let it search for the installed options on the machine and automatically configure the Fax Driver.
5 . Click on the Obtain Settings button .
6 . Confirm Auto is checked
for Automatic Retrieval
Settings .
7 . Click on Specify IP Address or Printer Name and enter the IP address .
8 . Click OK, the installed
options will now be listed The Fax Driver is now properly configured .
Now let’s send a fax.
1 . Create the data you want to send using any application . Let’s use Word
and create a test document to fax, then . . .
2 . From the File menu, select Print .
3 . From the Printer Name select Konica Minolta MFP Fax .
4 . Click the Properties button to change the fax driver settings using the tabs for
such functions as: resolution, timer send, cover sheet, authentication/account
track, or watermark .
NOTE: V.34 Mode specifies the Super G3 fax mode, for normal fax operation
leave this box checked. Uncheck only if recipient cannot receive G3 fax mode
5 . Click OK twice .
6 . The Fax Transmission Popup window opens .
7 . Enter recipient’s name in Name box .
8 . Enter recipient’s number in Fax Number box .
9 . Click the Add Recipient button .
10 . Click OK button, to initiate fax transmission from the desktop .
Name appears in the Recipient List window.For multiple recipients repeat steps 7-9.
43
bizhub C754 series/C554 series/C364 series fax job shops
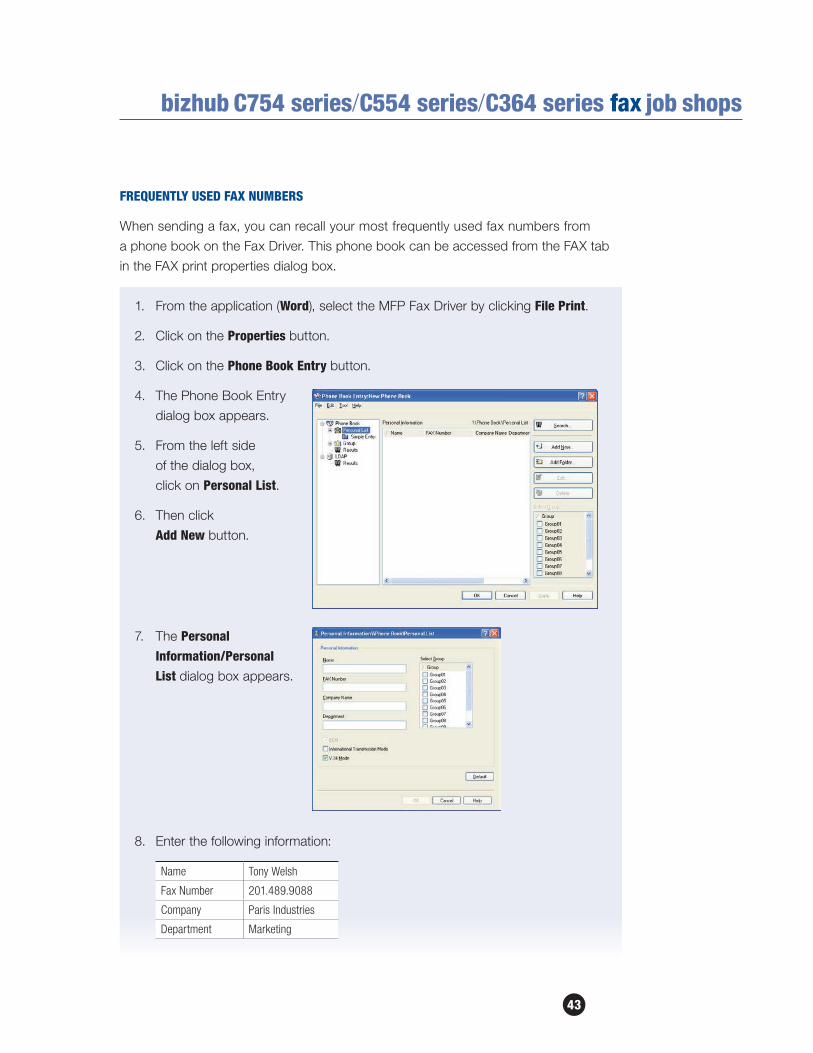
FREqUENTLY USED FAX NUMBERS
When sending a fax, you can recall your most frequently used fax numbers from
a phone book on the Fax Driver . This phone book can be accessed from the FAX tab
in the FAX print properties dialog box .
1 . From the application (Word), select the MFP Fax Driver by clicking File Print .
2 . Click on the Properties button .
3 . Click on the Phone Book Entry button .
4 . The Phone Book Entry
dialog box appears .
5 . From the left side
of the dialog box,
click on Personal List .
6 . Then click
Add New button .
7 . The Personal Information/Personal List dialog box appears .
8 . Enter the following information:
Name Tony Welsh
Fax Number 201.489.9088
Company Paris Industries
Department Marketing
44
bizhub C754 series/C554 series/C364 series fax job shops
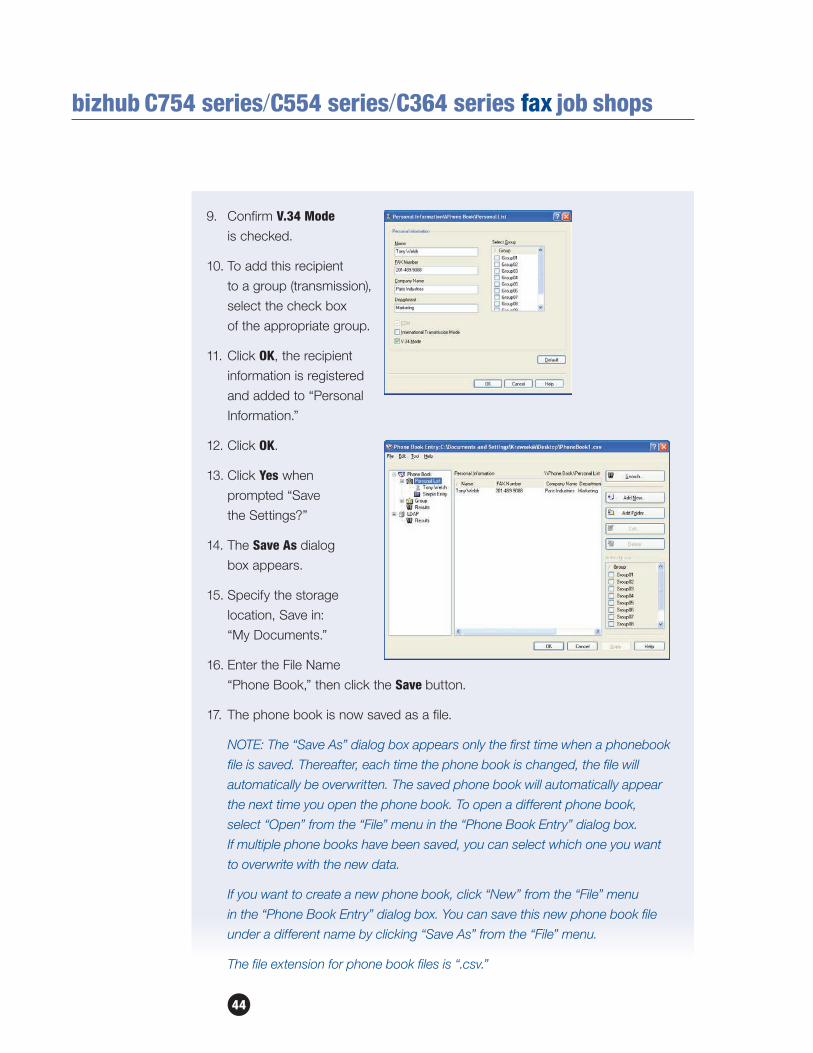
9 . Confirm V.34 Mode
is checked .
10 . To add this recipient
to a group (transmission),
select the check box
of the appropriate group .
11 . Click OK, the recipient
information is registered
and added to “Personal
Information .”
12 . Click OK .
13 . Click Yes when
prompted “Save
the Settings?”
14 . The Save As dialog
box appears .
15 . Specify the storage
location, Save in:
“My Documents .”
16 . Enter the File Name
“Phone Book,” then click the Save button .
17 . The phone book is now saved as a file .
NOTE: The “Save As” dialog box appears only the first time when a phonebook
file is saved. Thereafter, each time the phone book is changed, the file will
automatically be overwritten. The saved phone book will automatically appear
the next time you open the phone book. To open a different phone book,
select “Open” from the “File” menu in the “Phone Book Entry” dialog box.
If multiple phone books have been saved, you can select which one you want
to overwrite with the new data.
If you want to create a new phone book, click “New” from the “File” menu
in the “Phone Book Entry” dialog box. You can save this new phone book file
under a different name by clicking “Save As” from the “File” menu.
The file extension for phone book files is “.csv.”

45
bizhub C754 series/C554 series/C364 series fax job shops
Create a Fax Cover Sheet in the Fax DriverOVERVIEW
In order to use the installed fax function on the MFP, a separate fax driver must be
installed . The fax driver is a program that controls the processing of data for output .
Install the fax driver on the computer from the CD-ROM .
PRE-REqUISITES — SYSTEM REqUIREMENTS
•A fax kit must be installed on the MFP .
•The MFP Fax Driver must be loaded on your PC .
•Register several addresses in the Address Book of the MFP (so you can access
them from the Fax Driver)
APPLICATION
J . Mack, a sales rep from Acme Manufacturing needs to send a fax from his PC to two
of his best customers, Don Ward and Jeff Heinz . He needs to create a cover sheet for
the fax where he would like to make some comments regarding the fax .
JOB REqUIREMENTS
•Have a Word document ready that you would like to fax .
•Fax Driver must be setup:
qRecipient information must be entered into the driver .
qSender information must be entered into the driver .
qHave a logo ready to paste into the cover sheet .
•Sending the fax after all the data has been entered .
SETUP
1 . Open the Word document that you will use to which you want to attach
a fax cover sheet .
2 . From the File menu, select Print .
3 . From the Printer Name select MFP Fax .
4 . Click on Print .

46
bizhub C754 series/C554 series/C364 series fax job shops
5 . Enter Recipient Information .
a . Manually Enter Information .
b . Add from MFP Address Book .
c . Add from Fax Driver Phone Book .
6. Click Fax Cover Sheet .
7. Click Settings .
8 . The Fax Cover Sheet Settings Dialog Box
appears .
9 . Select Match Output Size from the Cover Size dropdown menu .
10 . On the Basic tab, select
the Style of the cover
sheet from the
drop-down menu .
11 . Select Style 01 .
12 . Check the Subject box and type in the subject of the document you are faxing .
13 . Type in “MFP Launch .”
14 . Check the Date box and
specify the date format
“mm/dd/yyyy” from the
dropdown menu .
NOTE: If you want to
enter your own format
click on the “Input
Arbitrarily” radio button
and enter up to 20
characters in the text box.
15 . Check the Pages box and specify the number of pages to be sent In the
Comment box, type in your message .
16 . In the comment field, type “Please review and add your comments .”

47
bizhub C754 series/C554 series/C364 series fax job shops
17 . Click the Recipient tab and specify the recipient information .
18 . Click Standard (specifies standard text) .
19 . From the drop-down menu select All Customers .
NOTES:
Details: Specifies the details described under “Recipient Setting Details”
Load with Joint Name: Lists the recipient with joint names. The items listed
are the items shown under “Recipient List” on the FAX Transmission Popup
dialog box.
Change Each Recipient: Changes the description for each recipient.
The items listed are the items shown under “Recipient List” on the FAX
Transmission Popup dialog box.
Load set information: Lists the information that was entered in the “Company,”
“Department,” Name, and Fax Number text boxes.
Read: Reads the information of the first recipient to the information box.
Up to 40 separate cover sheets can be created if “Change Each Recipient”
is selected.
Even is “Change Each Recipient” is selected, the first recipient is displayed
as a sample in “Preview.”
If “Load with Joint Name” and “Change Each Recipient” are selected,
the names that were added are entered, but titles cannot be added.
If you do not specify a recipient on the FAX Transmission Popup dialog box,
you will not be able to select
“Load Set Information” on the FAX Printing Preferences dialog box.
20 . Click on the Sender tab and enter the sender information .
21 . Click on each check box to add the following information:
Company Acme Manufacturing
Department Sales
Name J. Mack
Phone 215.675.1200
Fax Number 267.347.1192
Email [email protected]

48
bizhub C754 series/C554 series/C364 series fax job shops
22 . You can add a graphic (i .e . logo) or image (i .e . map) to the cover sheet
by clicking the “Image” tab .
23 . Now let’s preview the cover sheet you created .
24 . Click the Check button
and an enlarged image
appears .
25 . Press Close to exit
Preview screen .
26 . Now click the Add button to save the
Cover Sheet Settings .
27 . Enter a name into the Name box to name your settings .
NOTE: These settings can now be recalled from the “Cover Sheet Settings”
dropdown list (with the name you entered) the next time a cover sheet is used.
28 . Click the OK button 3 times .
29 . The fax data is sent via this device .
HOW TO SELL FEEDBACK
•Fax cover sheet can be customized and saved for future use .
•Various layouts can be selected .
•When used after importing address book from MS Outlook Express it becomes
very convenient to use .
NOTE: “ECM”: Error Correction Mode is always selected. If “V.34 Mode”
is selected “ECM” check box cannot be cleared.
“International Transmission Mode”: Slows the speed when sending faxes
overseas. Check this box if errors occur when sending faxes overseas.
“V.34 Mode”: Specifies the Super G3 fax mode. For normal fax operations,
leave this check box selected. Clear only if it is not possible to transmit
in the recipient’s mode.
Fax numbers that are registered in the phone book can be specified
by clicking the “Add From Phone Book” button.

49
bizhub C754 series/C554 series/C364 series fax job shops
Selecting an Address from the MFP Address BookPRE-REqUISITES
•FK-511 Fax Kit must be installed .
•MFP IP Address must be set up in the Fax Driver Configuration tab
(via Printer Properties) .
1 . Press File Print .
2 . Press Print .
3 . Click Add from Address Book .
4 . Click Get Addr. Info .
5 . Message appears: “Device information will be updated. OK to Continue? .” Click Yes .
6 . Select a recipient from the Address Book List .
7 . Click Add Recipients .
8 . Repeat steps 7 & 8 for every address you wish to retrieve from the MFP .
9 . Click OK 2x .

50
bizhub C754 series/C554 series/C364 series fax job shops
Import Addresses (from MS Outlook) to Address BookOVERVIEW
Just like when you get a new mobile phone, you want to have your address book
available in the new device so you can begin to use it with all the information loaded .
This device comes with a separate fax driver allowing you to set it up with current
contact information from your MS Outlook Express address book . Data will then be
accessible from your MFP when you want to send a fax .
PRE-REqUISITES — SYSTEM REqUIREMENTS
•The workstation you are using must have MS Word, Excel and Outlook
Express installed .
•The fax driver must be loaded on the workstation you are using .
APPLICATION
Sylvia, your new customer just purchased an MFP based on your recommendation
that can save her money and make her more productive . She had an old discontinued
Panasonic that was costing her twice as much for the service contract alone than the
Smart Lease of the MFP she just purchased . She is an avid Outlook Express user with a
large address book, so you sold her on the fact that she can fax from her desktop and
have all her Outlook Express contact information at her fingertips when she wants to
send out a document . You saved her money by cutting her payment in half but you also
promised that she would be more productive . So to make good on the second half of
your promise, you are going to show her how to use her large Outlook Express address
book in conjunction with her new fax feature .
JOB REqUIREMENTS
•A Word document ready to use .
•Outlook Express must contain a few contacts .
A DEVICE SETUP
1 . Open a document in Word .
2 . Select File Print .
3 . Select the MFP Fax Driver .
4 . Touch Properties .

51
bizhub C754 series/C554 series/C364 series fax job shops
5 . The driver opens on the Fax tab .
6 . From the Fax tab, touch Phone Book Entry…
7 . Create one new entry by selecting Add New…
8 . Enter Name, Fax Number, Company and Department .
9 . Click OK .
10 . Press File Save and enter file name Phonebook 2 .
11 . Save as Type: defaults to Konica Minolta Phonebook (csv style) .
12 . Open Outlook Express .
13 . Click File and select Export Address Book…
14 . Select Text File Comma Separated Values . Select Export .
15 . Save in the same directory as the Phonebook file . By entering a file name
and choosing [Browse] .
16 . Once you have chosen a filename Phonebook1 and location touch Next .
17 . In this window check only the following:
•Name
•Business Fax
•Company
•Job Title
18 . Be sure to uncheck all other files and scroll from top to bottom to see
all options . Only the above fields will be used by the fax driver software .
19 . Once done click Finished .
20 . When the export file Phonebook1.csv has been created click OK on the success window .
21 . Close Outlook Express .
22 . Open the Phonebook1.csv file you just saved in Excel .
23 . Select rows with contact data, do not select heading tiles .
24 . With the cells highlighted choose Edit , Copy .

52
bizhub C754 series/C554 series/C364 series fax job shops
25 . With the cells copied to the clip board choose Edit , Open and open the file
created from the fax driver Phonebook2.csv . Do not close Phonebook1.csv .
26 . With the Phonebook2.csv file open click in the first open cell under the last
listed entry .
27 . Choose Edit , Paste to insert the data .
28 . Check your data to make sure it as all lined up the correct space, if not
go back to the previous steps and re-copy the data . If you cannot read
all of your data or see alpha-numeric values in the Fax Number field,
highlight the fields and choose Format , Column , Autofit Selection .
29 . Choose Save to save the edited file as your new address book .
30 . You will see a compatibility warning while saving, simply click Yes .
31 . Make sure to close out of Excel completely after saving .
32 . Access your fax drivers just as before and choose Edit , Open .
33 . Choose the file Phonebook2.csv and click Open .
HOW TO SELL FEEDBACK
•Keep a duplicate copy handy of all your contact information in your fax
driver which will make it convenient to access when sending faxes from
the workstation using your MFP .
•Simplify cover sheet setup with current contact information residing
on the fax driver .
•Simplifies workstation setup so everyone has the same contact information .

53
bizhub C754 series/C554 series/C364 series fax job shops
Configuring the Print Driver Settings TabOVERVIEW SUMMARY APPLICATION
Configuring the Settings Tab allows the sender of documentation to register a number
of parameters that will reduce the redundancy of the most utilized fax functions . This
allows the sender to customize those functions, on-the-fly changes, and the reduction
of time spent reentering data for every fax transmitted . The following procedures
describe how to specify the necessary settings in the print driver to output documents
using the Configuring the Settings Tab function .
APPLICATION
A food processing company wants to fax several documents to a number of vendors
that supply them with goods and services . They want to configure the fax tab settings
so there will be consistency in the “sender information” that is being transmitted to
the vendor recipients . They also want to have a record printed out of the transmission
for archiving and retrieval . Lastly, they want a generic cover sheet they can use for
every transmission they generate . You’ve suggested configuring the settings, and your
customer has asked you to show them how .
PRE-REqUISITES
•FAX Driver for the C754 Series, C554 Series and C364 Series must be loaded . See the Driver CD-ROM bizhub C754 Series, C554 Series or C364 Series.
•Ensure that the bizhub MFP is logged onto the Network .
1 . Go to Start .
2 . Go to Settings .
3 . Go to Printers and Faxes .
4 . Right click on the MFP Series Fax and select Properties .
5 . Click on the Settings tab .
You will not necessarily need all the setting parameters reviewed in this job shop. This job shop provides you with the possible settings you can make. You only need to enable those that apply to the customer.
NOTE: Press the “Reset” key before beginning this job shop.

54
bizhub C754 series/C554 series/C364 series fax job shops
6 . Click on the Display Constraint Message box
and click Apply .
7 . Click on the Display Paper Set in Print Server Properties box
and click OK .
Select this check box to display a warning message when functions, which are enabled for the print driver, cannot be configured simultaneously. A change in a FAX driver setting may cause a conflict with another setting. The conflicting setting changes the original setting automatically. However, with this check box selected, a message will appear requesting confirmation to change the setting causing the conflict.
Select this check box to use forms added in the Server Properties dialog box of the Printers folder. The paper is registered in the Print Server Properties dialog box (available from the Printers and Faxes folder) and can be used with the FAX driver. The paper that can be used from the Print Server Properties dialog box are displayed for viewing.

55
bizhub C754 series/C554 series/C364 series fax job shops
8 . Click Reconfirm Fax
number entered directly
9 . Click Authentication
Settings .
10 . Click on the Verify Authentication Settings Before Printing box
and click OK .
Select this check box if you enter the Fax Number directly in the Fax Transmission Popup screen and if you wish to confirm the fax number in the screen when you click Add Recipients. Enabling this feature to prevent a fax from being sent to an incorrect destination.
Select this check box to verify authentication settings for this machine before printing and display the message if the verification is not satisfied. When the Verify button in the User Authentication/Account Track.Settings dialog box is available and the settings have been specified on the printer, the user and account information registered on the printer must be entered in the User Authentication/Account Track Setting dialog box. If the information is not entered correctly, the printer will clear the print job.

56
bizhub C754 series/C554 series/C364 series fax job shops
11 . Click on the Popup Authentication Dialog When Printing box
and click OK .
12 . Click on the Do not allow changes to [User Name] box and click OK .
Select this check box to display the User Authentication/Account Track dialog box when specifying printing, a prompt will ask for the user and account name. This occurs before the print job is sent to the printer. The print job will be sent to the printer once a password is entered in the dialog box. You can specify this setting to check the password whenever printing from an application and when user authentication or account track settings have been specified on the printer.
This option restricts the changing the name of the User Name of the Recipient in the User Authentication/Account Track dialog box in the Basics Tab.
57
bizhub C754 series/C554 series/C364 series fax job shops
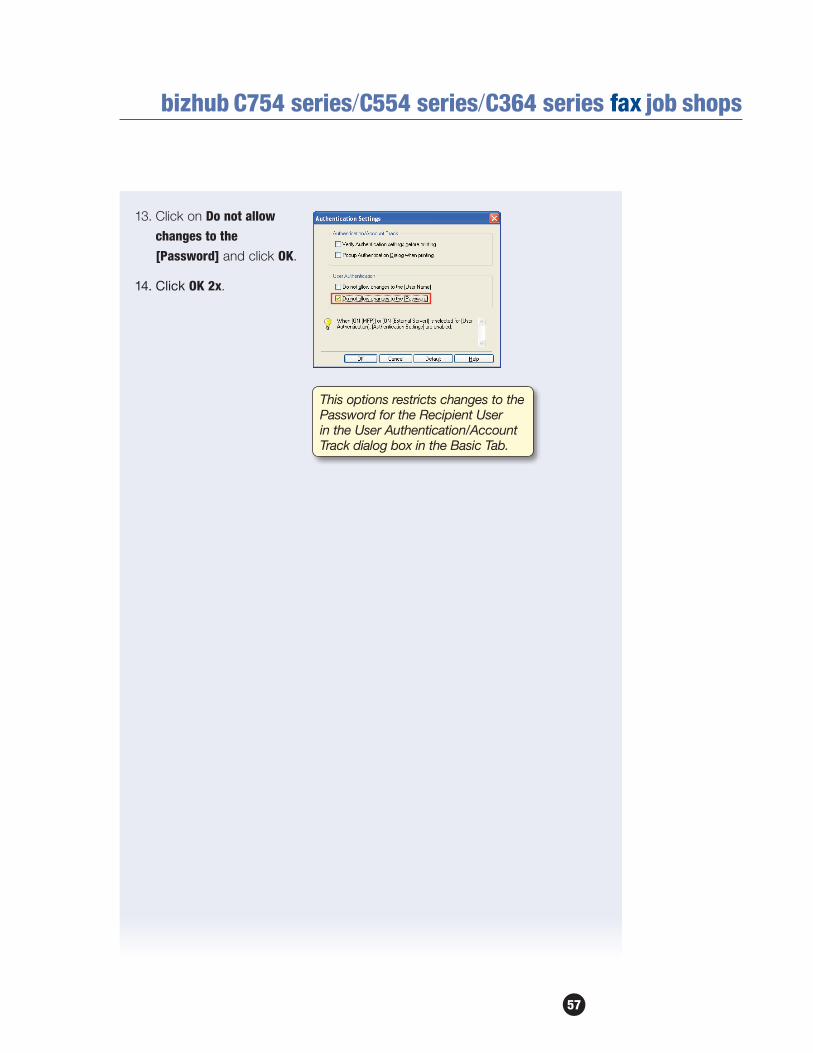
13 . Click on Do not allow changes to the [Password] and click OK .
14. Click OK 2x .
This options restricts changes to the Password for the Recipient User in the User Authentication/Account Track dialog box in the Basic Tab.

58
bizhub C754 series/C554 series/C364 series fax job shops
Internet Faxing (T.37)Internet Faxing allows you to transmit a hard copy document from the sending device
to the receiving device via the Internet instead of using a traditional phone line . The
receiving fax will print out the fax sent over the Internet just as it would had it been sent
over a phone line .
The benefit of sending a fax transmission over the Internet is that there are no additional
phone charges incurred . You simply pay the same monthly internet service provider fee,
regardless of the number of faxes that are sent using the Internet .
SYSTEM REqUIREMENTS
•Email Server is required .
• Internet Fax function must be activated via Service Mode by an authorized
Konica Minolta service technician .
•Please check with your Network Administrator to ensure that all the network
settings have been made . For assistance, please contact your local authorized
Konica Minolta technical representative .
Administrative/ Machine Settings
Input MFP (Device) Address Input MFP Email Address
Network Settings TCP/IP Settings Email TX (SMTP Settings) Email RX (POP)
Fax Settings Header Sender Information
Report Settings Network Fax Receive Error Report MDN Message SN Message Print Email Message Body
Network Fax Settings Network Fax Self RX Ability Internet Fax Advanced Setting
•The device must be connected to a network and enabled to send
and receive Emails .
•The Administrator Settings must be specified .
Internet
Receiving
Intranet
/
Internet
POP
Server
SMTP
Server
Receiving
Email +
Attached File
(TIFF Format)
Original

59
bizhub C754 series/C554 series/C364 series fax job shops
SPECIFYING INTERNET FAX SETTINGS IN ADMINISTRATOR MODE
PRE-REqUISITE
• Internet Fax Function must be enabled in Service Mode by authorized
Konica Minolta Service Technician .
1 . Press the Utility key .
2 . Touch Administrator Settings .
3 . Enter Password (Default is 12345678123455678) .
4 . Touch OK .
5 . Touch Network Settings .
6 . Touch Forward Arrow 33 to advance to the second screen (2/3) .
7 . Touch Network Fax Settings .
8 . Touch Network Fax Function Settings .
9 . Touch Internet Fax Function .
10 . Touch ON .
11 . Touch OK .
12 . Touch Close 3x to return to Main Menu screen .
If not on the home screen, touch the Menu key on the Control Panel .

60
bizhub C754 series/C554 series/C364 series fax job shops
REGISTERING AN INTERNET FAX DESTINATION
PRE-REqUISITE
Internet Fax Function must be enabled in Service Mode by authorized Konica Minolta
Service Technician and then via Administrator Settings Mode by the Key Operator .
Registering the Internet Fax destination is the same as registering an Email address .
The only difference is that this Email Address is one that is assigned to a device —
another T .37 Internet Fax capable device .
1 . Press Utility .
2 . Touch Administrator Settings .
3 . Enter Password (Default is 1234567812345678) .
4 . Touch OK .
5 . Touch One-Touch/User Box Registration .
6 . Touch Create One-Touch Destination .
7 . Touch Address Book (Public) .
8 . Touch Internet Fax .
9 . Touch New .
10 . Touch Name and enter destination name .
11 . Touch OK .
12 . Touch Index to classify name .
13 . Touch OK .
14 . Press Down Arrow ! to access screen (2/2) .
15 . Touch Email Address and type the Email address .
16 . Touch OK twice .
a . Touch RX Ability (Destination)b . Select Compression Type
i . JPEG
ii . JPEG (Grayscale)
iii . MMR
iv . MR
v . MH
If not on the home screen, touch the Menu key on the Control Panel .

61
bizhub C754 series/C554 series/C364 series fax job shops
c . Select Paper Sized . Select Resolution
i . UltraFine
ii . SuperFine
iii . Fine
iv . Normal
17 . Touch OK 2x .
18 . Touch Close 6x to return to Main Screen .
SENDING AN INTERNET FAX
Sending an Internet Fax is just like sending a regular fax . You load your document,
select your destination and press start! It’s that simple .
PRE-REqUISITE
•Two-sided original consisting of one or more sheets .
1 . Load the documents/originals
in the landscape direction .
2 . Press Scan/Fax key to display
the Fax/Scan screen .
3 . Select Internet Fax Destination(s) registered
in previous job shop
from the address book .
4 . Select Document Settings .
5 . Touch Simple/Duplex
and select 2-Sided .
6 . Touch Close .
7 . Touch Resolution .
8 . Select Ultra Fine .
9 . Touch OK .
10 . Touch Start .
If not on the home screen, touch the Menu key on the Control Panel .
You cannot select Line Setting, URL Notification Setting or Communication Method Setting when an Internet Fax is set.

62
bizhub C754 series/C554 series/C364 series fax job shops
IP Address Faxing to a Color MFPOVERVIEW
Let’s first define Internet Fax and IP Address Fax .
INTERNET FAX
The Internet Fax function sends and receives scanned originals as an attached file
(TIFF Format) via the Intranet (enterprise network) or internet . The communication via
intranet or internet reduces the communication cost as compared to a general G3 fax
message . You specify the destination Email address and send the Email message .
NOTE: With the introduction of the C652/C552 and subsequent C652DS/C552DS,
C452, C360 Series, 652 Series, 423 Series and with the newly introduced C754 Series,
C554 Series and C364 Series, Color Internet Faxing is supported. Please note that
the 423 and 652 Series can send color internet fax but cannot receive them since
they are monochrome devices (but offer color scanning).
IP ADDRESS FAX
This function allows the user to send fax transmissions over an IP network .
Specify the destination host name or IP address to send the fax .
IP Address Fax is different from Internet Fax and G3 fax as follows:
•SMTP protocol is used for sending and receiving .
•Available only within an Intranet (enterprise network) .
•No Email server is required .
•The fax is sent after entering the IP Address or Host Name .
Internet
Receiving
Intranet
/
Internet
POP
Server
SMTP
Server
Email +
Attached File
(TIFF Format)
Original
Intranet
SMTP

63
bizhub C754 series/C554 series/C364 series fax job shops
SYSTEM REqUIREMENTS
•A fax kit must be installed on the MFP . Please note that extension lines cannot
be used with this function .
•Can only be used within an Intranet .
• IP Address Fax function must be activated via Service Mode by an authorized
Konica Minolta service technician .
•Please check with your Network Administrator to ensure that all the network
settings have been made . For assistance, please contact your local authorized
Konica Minolta technical representative .
Network Settings TCP/IP Settings
IP Address Fax is set to ONNetwork Fax Settings SMTP TX Settings (Port No., Connection Timeout)
SMPT Settings (SMTP RX ON/OFF, Port No. Connection Timeout)
Fax Settings Header Information
Report Settings
IP
Address
Fax
IP
Address
Fax
P
S
T
N
Internet
Fax
G3 Fax
bizhub
Intranet
Intranet
I
n
t
r
a
n
e
t
B&W Fax Color Fax

64
bizhub C754 series/C554 series/C364 series fax job shops
APPLICATION
Joan is a colleague of yours at an investment bank . You communicate with her several
times daily . You would like the KMBS rep to show you how to quickly fax Joan a hard
copy of the documents that you both work on . Since the new MFP was just installed
and it was purchased because it can fax without using the phone lines thus saving
the bank money, you would like to see how to set that up .
PRE-REqUISITES
•Have (1) 8 .5" x 11" document ready to load into the document feeder .
•Create a one-touch destination button labeled “Joan .”
•Send an IP Address fax using the “Joan” one-touch button .
•Send an IP Address fax using Direct Input .
DEVICE SETUP
NOTE: Before we can enable IP Address Fax in the Administrator Mode, confirm that
it is turned on in the service mode.
Now let’s confirm that the IP Address Fax settings are turned on in the Administrator
Mode .
1 . Touch Utility .
2 . Touch Administrator Settings .
3 . Enter Password (Default is 1234567812345678) .
4 . Touch OK .
5 . Touch Network Settings .
6 . Touch Forward , page 2/3 .
7 . Touch Network Fax Settings .
8 . Touch Network Fax Function Settings .
9 . Touch IP Address Fax Function .
10 . Touch ON .
11 . Touch OK .
12 . Touch Close 4x the main screen .
NOTE: The factory default for IP Address Fax is OFF
If not on the home screen, touch the Menu key on the Control Panel .

65
bizhub C754 series/C554 series/C364 series fax job shops
Let’s continue with Device Setup . Next we need to enter the destination to where you
want to send the fax .
REGISTERING AN IP ADDRESS FAX DESTINATION
1 . Touch Utility .
2 . Touch Administrator Settings .
3 . Enter Password (Default is 1234567812345678) .
4 . Touch One-Touch/User Box Registration .
5 . Touch Create One-Touch Destination .
6 . Touch Address Book (Public) .
7 . Touch IP Address Fax .
8 . Touch New .
9 . Touch Name (enter name of the destination) .
10 . Enter “Joan .”
11 . Touch OK .
12 . Press down arrow ! to advance to the second screen (2/2) .
13 . Touch Destination .
14 . Touch IPv4 Address Input and enter the IP Address .
15 . Touch OK .
16 . Press C (clear key) and enter the Port Number 25 .
17 . Touch down arrow ! to advance to the second screen (2/2) .
18 . Touch Index .
19 . Touch Favorites tab to register the destination to Favorites (Favorites is for frequently used destinations) .
20 . Touch OK .
21 . Select Color or Monochrome for Destination Machine Type .
You can select to use Input Host Name, IPv4 Address Input or IPv6 Address Input.
NOTE: You must designate whether you are sending to a color or monochrome device.
If not on the home screen, touch the Menu key on the Control Panel .

66
bizhub C754 series/C554 series/C364 series fax job shops
22 . Select Color .
23 . Touch OK .
24 . Touch Close 6x .
TO SEND AN IP ADDRESS FAX
Now let’s send a document .
1 . Press Scan/Fax key to display the Fax/Scan screen .
2 . Load an 8 .5" x 11" document into the document feeder in the short edge
direction (document can be fed in either direction) .
3 . Find and select the IP Address Fax one-touch (Joan) you just created
(under the Favorites) .
4 . Tab or the Alphabetical tab – JKL .
5 . Touch Simplex/Duplex .
6 . Touch 2-Sided .
7 . Touch Close .
8 . Touch Resolution .
9 . Touch Superfine .
10 . Touch OK .
11 . Touch Start .
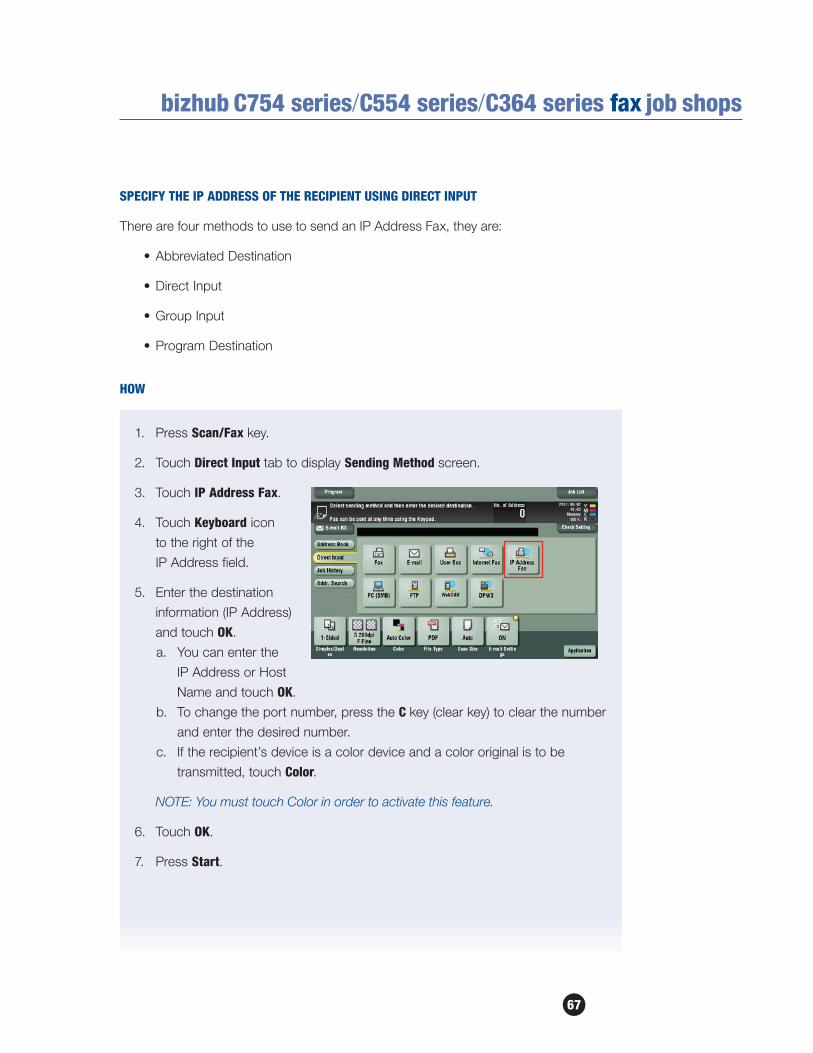
67
bizhub C754 series/C554 series/C364 series fax job shops
SPECIFY THE IP ADDRESS OF THE RECIPIENT USING DIRECT INPUT
There are four methods to use to send an IP Address Fax, they are:
•Abbreviated Destination
•Direct Input
•Group Input
•Program Destination
HOW
1 . Press Scan/Fax key .
2 . Touch Direct Input tab to display Sending Method screen .
3 . Touch IP Address Fax .
4 . Touch Keyboard icon
to the right of the
IP Address field .
5 . Enter the destination
information (IP Address)
and touch OK .
a . You can enter the
IP Address or Host
Name and touch OK .
b . To change the port number, press the C key (clear key) to clear the number
and enter the desired number .
c . If the recipient’s device is a color device and a color original is to be
transmitted, touch Color .
NOTE: You must touch Color in order to activate this feature.
6 . Touch OK .
7 . Press Start .

68
bizhub C754 series/C554 series/C364 series fax job shops
HOW TO SELL FEEDBACK
• International Communication: WAN, Overseas, Hardcopy to Hardcopy .
•Move Color Documents: Floor to Floor or Building to Building within
a company or college campus enter IP Address received at device closest
to intended recipient .
•Branch to Branch communication on the same network .
•Single network, multiple devices .
•By-pass Email server, reduce Email server traffic .
•Perform color faxing .
• In a hospital, fax to pharmacy (for free) break hospital of their G3 faxing habit .
• In a medical environment it creates a HIPAA custodial issue for the recipient
due to hard copy handling, set up a Program Dial (running in the background)
and send a simultaneous copy or the transmission to an FTP share drive where
admin will pull all documents off on a monthly basis, now you will have a record
of your activity .
•The above scenario is also applicable in a brokerage environment where
strict SEC Guidelines must be followed . . . (i .e . insider trading issues) .
•You now have a record of activity .
. . . or TSA concerns in the transportation industry, bills of lading .

69
bizhub C754 series/C554 series/C364 series fax job shops
IP Address Faxing to a Monochrome MFPOVERVIEW
Let’s first define IP Address Fax .
INTERNET FAX
The Internet Fax function sends and receives scanned originals as an attached file
(TIFF Format) via the Intranet (enterprise network) or internet . The communication via
intranet or internet reduces the communication cost as compared to a general G3 fax
message . You specify the destination Email address and send the Email message .
NOTE: With the introduction of the C652/C552 Series and subsequent C652DS/
C552DS, C452, C360 Series, 652 Series, 423 Series and with the newly introduced
C754 Series, C554 Series and C364 Series, Color Internet Faxing is supported.
Please note that the 423 and 652 Series can send color internet fax but cannot
receive them since they are monochrome devices (but offer color scanning).
IP ADDRESS FAX
This function allows the user to send fax transmissions over an IP network .
Specify the destination host name or IP address to send the fax .
IP Address Fax is different from Internet Fax and G3 fax as follows:
•SMTP protocol is used for sending and receiving .
•Available only within an Intranet (enterprise network) .
•No Email server is required .
•The fax is sent after entering the IP Address or Host Name .
Internet
Receiving
Intranet
/
Internet
POP
Server
SMTP
Server
Email +
Attached File
(TIFF Format)
Original
Intranet
SMTP

70
bizhub C754 series/C554 series/C364 series fax job shops
PRE-REqUISITES/SYSTEM REqUIREMENTS
•A fax kit must be installed on the MFP . Please note that extension lines cannot be
used with this function .
•Can only be used within an Intranet .
• IP Address Fax function must be activated via Service Mode by an authorized
Konica Minolta service technician .
•Please check with your Network Administrator to ensure that all the network
settings have been made . For assistance, please contact your local authorized
Konica Minolta technical representative .
Network Settings TCP/IP Settings
IP Address Fax is set to ON
Network Fax Settings SMTP TX Settings (Port No., Connection Timeout)
SMPT Settings (SMTP RX ON/OFF, Port No. Connection Timeout)
Fax Settings Header Information
Report Settings
IP
Address
Fax
IP
Address
Fax
P
S
T
N
Internet
Fax
G3 Fax
bizhub
Intranet
Intranet
I
n
t
r
a
n
e
t
B&W Fax Color Fax

71
bizhub C754 series/C554 series/C364 series fax job shops
APPLICATION
Joan is a colleague of yours at an investment bank . You communicate with her several
times daily . You would like the KMBS rep to show you how to quickly fax Joan a hard
copy of the documents that you both work on . Since the new MFP was just installed
and it was purchased because it can fax without using the phone lines thus saving the
bank money, you would like to see how to set that up .
PRE-REqUISITES
•Have (1) 8 .5" x 11" document ready to load into the document feeder .
•Create a one-touch destination button labeled “Joan .”
•Send an IP Address fax using the “Joan” one-touch button .
•Send an IP Address fax using Direct Input .
DEVICE SETUP
NOTE: Before we can enable IP Address Fax in the Administrator Mode, confirm
that it is turned on in the service mode.
Now let’s confirm that the IP Address Fax settings are turned on in the Administrator
Mode .
1 . Touch Utility .
2 . Touch Administrator Settings .
3 . Enter Password (Default is 1234567812345678) .
4 . Touch OK .
5 . Touch Network Settings .
6 . Touch Forward , page 2/2 .
7 . Touch Network Fax Settings .
8 . Touch Network Fax Function Settings .
9 . Touch IP Address Fax Function .
10 . Touch ON .
11 . Touch OK .
12 . Touch Close 4x .
NOTE: The factory default for IP Address Fax is OFF
If not on the home screen, touch the Menu key on the Control Panel .

72
bizhub C754 series/C554 series/C364 series fax job shops
Let’s continue with Device Setup . Next we need to enter the destination to where you
want to send the fax .
REGISTERING AN IP ADDRESS FAX DESTINATION
1 . Touch Utility .
2 . Touch Administrator Settings .
3 . Enter Password (Default is 1234567812345678) .
4 . Touch One-Touch/User Box Registration .
5 . Touch Create One-Touch Destination .
6 . Touch Address Book (Public) .
7 . Touch IP Address Fax .
8 . Touch New .
9 . Touch Name (enter name of the destination) .
10 . Enter “Joan .”
11 . Touch OK .
12 . Touch Destination .
13 . Touch IPV4 Address Input and enter the IP Address .
14 . Touch OK .
15 . Press C (clear key) and enter the Port Number 25 .
16 . Touch down arrow ! to advance to the second screen (2/3) .
17 . Touch Index .
18 . Touch Favorites tab to register the destination to Favorites (Favorites is for frequently used destinations) .
19 . Touch OK .
20 . Select Color or Monochrome for Destination Machine Type .
21 . Select Color .
You can select to use Input Host Name, IPv4 Address Input or IPv6 Address Input.
If not on the home screen, touch the Menu key on the Control Panel .
NOTE: You must designate whether you are sending to a color or monochrome device.

73
bizhub C754 series/C554 series/C364 series fax job shops
22 . Touch OK .
23 . Touch Close 6x to return to Main Menu .
TO SEND AN IP ADDRESS FAX
Now let’s send a document .
1 . Press Scan/Fax key to display the Fax/Scan screen .
2 . Load an 8 .5" x 11" document into the document feeder in the short edge
direction (document can be fed in either direction) .
3 . Find and select the IP Address Fax one-touch (Joan) you just created
(under the Favorites .
4 . Tab or the Alphabetical tab – JKL) .
5 . Touch Simplex/Duplex .
6 . Touch 2-Sided .
7 . Touch Close .
8 . Touch Resolution .
9 . Touch Superfine .
10 . Touch OK .
11 . Touch Start .

74
bizhub C754 series/C554 series/C364 series fax job shops
SPECIFY THE IP ADDRESS OF THE RECIPIENT USING DIRECT INPUT
There are four methods to use to send an IP Address Fax, they are:
•Abbreviated Destination
•Direct Input
•Group Input
•Program Destination
HOW
1 . Press Scan/Fax key .
2 . Touch Direct Input tab to display the Sending Method screen .
3 . Touch IP Address Fax .
4 . Touch Keyboard icon
to right of the
IP Address field .
5 . Enter the destination
information (IP Address)
and touch OK .
6 . You can enter the IP
Address or Host Name and touch OK .
7 . To change the port number, press the C key (clear key) to clear the number and
enter the desired number .
8 . If the recipient’s device is a color device and a color original is to be
transmitted, touch Color .
9 . Touch OK .
10 . Press Start .
NOTE: You must touch Color in order to activate this feature.
75
bizhub C754 series/C554 series/C364 series fax job shops
HOW TO SELL FEEDBACK — IP ADDRESS FAX TO COLOR MFP
• International Communication: WAN, Overseas, Hardcopy to Hardcopy .
•Move Color Documents: Floor to Floor or Building to Building within
a company or college campus enter IP Address received at device closest
to intended recipient .
•Branch to Branch communication on the same network .
•Single network, multiple devices .
•By-pass Email server, reduce Email server traffic .
•Perform color faxing .
• In a hospital, fax to pharmacy (for free) break hospital of their G3 faxing habit .
• In a medical environment it creates a HIPAA custodial issue for the recipient
due to hard copy handling, set up a Program Dial (running in the background)
and send a simultaneous copy or the transmission to an FTP share drive where
admin will pull all documents off on a monthly basis, now you will have a record
of your activity .
•The above scenario is also applicable in a brokerage environment where
strict SEC Guidelines must be followed . . . (i .e . insider trading issues) .
•You now have a record of activity .
. . . or TSA concerns in the transportation industry, bills of lading .

notes


New South Wales4 Drake Avenue Macquarie Park NSW 2113 (02) 8026 2222
Victoria21-29 Moray Street Southbank VIC 3006 (03) 8699 0777
Queensland64 Brookes Street Bowen Hills QLD 4006 (07) 3872 9100
ACT
55 Wentworht Avenue
(02) 6206 6500
South Australia255 Gilbert Street Adelaide SA 5000 (08) 8231 2911
Western AustraliaGF/ 140 Hay St., Subfiaco, WA, 6008 (08) 9479 6600
Konica Minolta Business Solutions Australia Pty Ltd
Free Call 1800 789 389konicaminolta.com.au
The Konica Minolta logo and the symbol mark, are registered trademarks or trademarks ofKonica Minolta Holdings, Inc. bizhub, PageScope, Simitri and the Emperon logo are registeredtrademarks or trademarks of KONICA MINOLTA BUSINESS TECHNOLOGIES, INC.Windows is registered trademark of Miscrosoft Corporation in the United States and other countries.Adobe and PostScript are registered trademarks or trademarks of Adobe Systems Incorporated.All other brand and product names are registered trademarks or trademarks of their respective owners.
Kingston, ACT 2604
Unit 1, Ground Floor