bitc1311 introduction to biotechnology 1414 spring 2011... · web viewintroduction to biotechnology...
TRANSCRIPT

BIOL1414 Lab Manual Austin Community College 10th Edition, Spring 2011
BIOL 1414 Introduction to Biotechnology
Course Equivalent to BITC 1311
Laboratory ManualTenth EditionSpring 2011
Linnea Fletcher, Evelyn Goss, Patricia Phelps, and Angela Wheeler
ISBN: BIOL141410
1

BIOL1414 Lab Manual Austin Community College 10th Edition, Spring 2011
Table of Contents
Introduction 3
Safety in the ACC Laboratory 7
Math Skills for the Laboratory 13
Documentation and the Lab Notebook 21
Basic Tools in the Biotechnology Laboratory 24
Using a Micropipetter 29Calibrating Lab Instruments 33
Molar Solutions and Dilutions 38
RNA Isolation 45
Transformation of E. coli 52
Plasmid Isolation 56
Restriction Enzyme Mapping of DNA 59
Green Fluorescent Protein Purification 66
Protein Electrophoresis of GFP Samples 70
DNA Fingerprinting by VNTR PCR 76
Bioremediation: Environmental Clean-Up 80
DNA Fingerprinting by Southern Blot 84
ELISA for HIV 90
Bioinformatics 95
Appendix A: ACC Lab Safety Procedures 116Appendix B: Hints for Solving Numerical Problems 122Appendix C: Summary of Chemical Hazards, MSDS, Chemical Labels and Solution Prep Forms 124Appendix D: Graphing Data 130Appendix E: Summary of Good Laboratory Practices 133Appendix F: Agarose Gel Electrophoresis with Ethidium Bromide 136
2

BIOL1414 Lab Manual Austin Community College 10th Edition, Spring 2011
Introduction
Welcome to your first course in biotechnology! This course will emphasize its laboratory component to reflect the importance of your training in biotechnology skills. Keep in mind as you work your way through this manual the specific purposes in each exercise. They will prepare you for your first job in a biotechnology laboratory, so keep a careful record of your experience. If you carefully document and archive your work, this information will be easy for you to access later and your experiences will be more valuable in your later work.
To help you to develop an archiving system for your records, it is recommended that you purchase two 3-ring binders or one 3-ring binder and a bound notebook for this course.
Other materials required for this course include
1. Personal protective equipment (PPE): goggles and a lab coat (recommended)2. Personal equipment: fine-point Sharpie markers
Before you can begin working in an ACC teaching laboratory, you must first
1. View the ACC Science Safety video.2. Tour the laboratory with your laboratory instructor to locate emergency equipment and procedures.3. Sign a safety contract, by which you agree to comply with safety regulations.
We hope that you enjoy your experience in this introductory course. Following is a discussion of biotechnology, and a description of some of the activities that you will be doing in this course.
What is biotechnology?
Strictly speaking, biotechnology is the use of a living organism for one’s own benefit. By this definition, biotechnology would date back to the very beginnings of civilization, when humankind first learned to cultivate crops and domesticate animals in a system of agriculture. When one thinks of modern biotechnology, however, gene splicing and recombinant organisms take center stage. Biotechnology was revolutionized when scientists first learned how to isolate and clone genes, allowing for genetic engineering.
Today, the biotechnology industry has grown and expanded to affect us on a day-to-day basis. Some statistics about biotechnology reflect the expansion of this industry: (found at www.bio-link.org in the year 2004)
More than 325 million people worldwide have been helped by the more than 130 biotechnology drugs and vaccines approved by the US Food and Drug Administration (FDA). Of the biotech medicines on the market, 70 percent were approved in the last six years.
There are more than 350 biotech drug products and vaccines currently in clinical trials targeting more than 200 diseases, including various cancers, Alzheimer's disease, heart disease, diabetes, multiple sclerosis, AIDS and arthritis.
Biotechnology is responsible for hundreds of medical diagnostic tests that keep the blood supply safe from the AIDS virus and detect other conditions early enough to be successfully treated. Home pregnancy tests are also biotechnology diagnostic products.
Consumers already are enjoying biotechnology foods such as papaya, soybeans and corn. Hundreds of biopesticides and other agricultural products also are being used to improve our food supply and to reduce our dependence on conventional chemical pesticides.
Environmental biotechnology products make it possible to clean up hazardous waste more efficiently by harnessing pollution-eating microbes without the use of caustic chemicals.
Industrial biotechnology applications have led to cleaner processes that produce less waste and use less energy and water in such industrial sectors as chemicals, pulp and paper, textiles, food, energy, and metals and minerals. For example, most laundry detergents produced in the United States contain biotechnology-based enzymes.
DNA fingerprinting, a biotech process, has dramatically improved criminal investigation and forensic medicine, as well as afforded significant advances in anthropology and wildlife management.
3

BIOL1414 Lab Manual Austin Community College 10th Edition, Spring 2011
There are 1,457 biotechnology companies in the United States, of which 342 are publicly held. Market capitalization, the total value of publicly traded biotech companies at market prices, was $224 billion
as of early May 2002. The biotechnology industry has more than tripled in size since 1992, with revenues increasing from $8 billion
in 1992 to $27.6 billion in 2001. The U.S. biotechnology industry currently employs 179,000 people; that's more than all the people employed
by the toy and sporting goods industries. Biotechnology is one of the most research-intensive industries in the world. The U.S. biotech industry spent
$15.6 billion on research and development in 2001. The top five biotech companies spent an average of $89,400 per employee on R&D in 2000.
The biotechnology industry has also been steadily growing in the Austin area. Today, Austin’s bioscience community encompasses approximately 85 companies that produce products and services such as pharmaceuticals, preventive medicines, medical devices, laboratory tools and analysis, and gene based cancer therapies. Austin is also a major contributor to academic research in the biological sciences, both at the University of Texas and the University of Texas/M.D. Anderson Cancer Center in nearby Bastrop.
Biotechnology Techniques and Skills Included in This Course
The ACC Biotechnology Program has been designed to match the needs of the biotechnology job market in our immediate area. We have invited industrial partners from our community to contribute to the competency goals for each course, including this introductory course, to assure that our students are adequately prepared for positions in their companies. The following list describes the areas of expertise that you will be introduced to in this course, and may provide you with an organizational plan for the archiving of your records in your notebooks for this course. As you progress through the ACC Biotechnology Program, you can add to these archives as you build on the basics learned in this introductory course.
1. Basic operations in the laboratory Purpose: There are special approaches and precautions that must be taken in any biological laboratory. This includes procedures for safe handling and storage of hazardous chemicals and biologicals. Also, the special methods for setting up and following detailed protocols are emphasized, as well as methods for recording and archiving results properly.Includes:
Safety in the LaboratoryMath Skills for the Laboratory Documentation and the Lab Notebook Molar Solutions and Dilutions Appendix A: ACC Lab Safety ProceduresAppendix B: Hints for Solving Numerical ProblemsAppendix C: Summary of Chemical Hazards, MSDS etcAppendix D: ACC Hazardous Waste Program etcAppendix E: Graphing DataAppendix F: Summary of Good Laboratory PracticesAppendix G: Agarose Gel Electrophoresis with Ethidium Bromide
4

BIOL1414 Lab Manual Austin Community College 10th Edition, Spring 2011
2. Instruments and EquipmentPurpose: An important part of working in any laboratory is the proper use and calibration of instruments and equipment. You will become familiar with general information about the use of lab equipment, as well as more detailed information about the step-by-step procedures for the specific instruments that you use.
Includes:Basic Tools in the Biotechnology Laboratory ACC Biotech Program Equipment locatorUsing a Micropipetter micropipettersCalibrating Lab Instruments balances and pH metersRestriction Enzyme Mapping of DNA agarose gel electrophoresisGFP Chromatography denaturing polyacrylamide gel electrophoresisDNA Fingerprinting: Alu PCR thermal cycler, agarose gel electrophoresis
3. Working with DNA and proteinsPurpose:It is important to be familiar with the basic techniques for purifying and analyzing biomolecules. You will learn to isolate, digest, and analyze DNA, as well as transform E. coli with a recombinant plasmid. You will also learn some basic methods to purify and analyze proteins.
Includes:Transformation of E. coli in vivo amplification of plasmid DNAPlasmid Isolation isolation of DNARestriction Enzyme Mapping of DNA analysis of a restriction digestDNA Fingerprinting: Alu PCR isolation of genomic DNA, in vitro amplification
of DNA by polymerase chain reactionGFP Chromatography hydrophobic interaction chromatography,
polyacrylamide gel electrophoresis
4. ImmunochemistryPurpose:You will be introduced to basic techniques used to detect biomolecules using antibodies.Includes:
ELISA for HIV Enzyme-linked immunosorbent assay
5. Environmental microbiologyPurpose:You will use microbes to remove environmental pollutants.Includes:
Bioremediation: Environmental Clean-Up
6. Regulatory AffairsPurpose:You will work on writing skills and how to follow Standard Operating Procedures (SOPs) in the laboratory. The regulations governing biological laboratories dictate the safety procedures and protocols for disposal of hazardous chemicals and biologicals.Includes:
Documentation and the Lab Notebook Appendix A: ACC Lab Safety ProceduresAppendix C: Summary of Chemical Hazards, MSDS
7. BioinformaticsPurpose:Using computers to document and compile information is becoming the norm in biological laboratories. Computers are also used to access databases with genomic or statistical information. Your instructor will decide on the appropriate tutorials.
5

BIOL1414 Lab Manual Austin Community College 10th Edition, Spring 2011
References
The authors would like to acknowledge the contributions of the following sources in the development of this lab manual:
Shoestring Biotechnology, by Kathy Frame (ed.). National Association of Biology Teachers (2002)
Basic Laboratory Methods for Biotechnology, by Lisa A. Seidman & Cynthia J. Moore. Prentice Hall (1999)
Dolan DNA Learning Center: www.dnalc.org
Molecular Biology Problem Solver edited by Alan S. Gerstein ISBN 0-471-37972-7
Geospiza web site (www.geospiza.com)
Bio-link web site (www.bio-link.org)
6

BIOL1414 Lab Manual Austin Community College 10th Edition, Spring 2011
Safety in the LaboratoryObjectives
Your performance will be satisfactory when you are able to Discuss safety rules for the laboratory Recognize the correct procedure for storing and handling hazardous materials Find information on the classifications of chemical hazards, what types of health hazards a chemical may pose,
what levels of medical attention are required following exposure to a hazardous chemical, and what personal protective equipment is required for handling a hazardous chemical
Locate the lab safety equipment Locate online Material Safety Data Sheet (MSDS) databases Locate the supplies for your lab exercises
Biotechnology laboratories are equipped with supplies and equipment that may pose a hazard if used carelessly and it is important that you learn how to handle them properly. It is often the responsibility of a biotechnician to make sure that safety rules are followed, and anyone working in a laboratory must pay attention to what they are doing and use common sense to avoid hazardous situations.
While the ACC science safety rules are designed to provide protection to you while working in ACC laboratories, you must become self-sufficient in protecting yourself in your future jobs in the biotechnology industry. In addition, lab technicians are frequently entrusted with ensuring compliance with safety precautions in the biotechnology workplace. For this purpose, this lab exercise will introduce you to key components to lab safety precautions and procedures that apply in a biotechnology setting.
1. Proper handling and storage of chemicals and reagents
There is no single simple formula for working safely in the laboratory, since each lab facility and each experiment presents unique challenges. We will be addressing safety issues with each experiment that we do in this course and give you some specific guidelines for safety throughout the semester.
A. MSDS (Material Safety Data Sheets)While each chemical that you use will have its own unique properties, there are some common practices that will aid you in treating them all with the level of respect that they are due. For example, labeling each chemical is required under the law and should be thorough enough so that even a person who does not work in the lab can identify any chemical. Also, every chemical in the laboratory should have a Material Safety Data Sheet (MSDS) on file and readily available. The MSDS is a legally required technical document, provided by chemical suppliers, that describes the specific properties of a chemical. Besides the MSDS on file in the lab, several web sites offer MSDS databases. They are all broken down to the same 8 sections:
1. Chemical identity. The manufacturer’s contact information is here, along with contacts for emergency situations.
2. Hazard ingredients/identity. Some reagents have multiple components, and many single-component chemicals have alternative names. These are all listed here. Concentration limits for airborne exposure to a chemical are listed here. Although these indices of toxicity are mainly of concern for production workers in factories, they are also useful for evaluation of short-term exposures. The TLV (threshold limit value) is the maximum airborne concentration of a substance to which workers can be repeatedly exposed without adverse effects. The units used are usually parts per million (ppm) or mg/m3.
3. Physical chemical characteristics. This list of physical properties tells you whether the chemical is solid or liquid and how volatile it is.
4. Fire and explosion hazard data. This is of particular interest in cases where fire-fighting methods must be selected.
5. Reactivity data. This information is essential in determining the proper handling and storage of chemicals.
7

BIOL1414 Lab Manual Austin Community College 10th Edition, Spring 2011
By knowing the reactivity patterns of a chemical, you know what substances or conditions from which you must isolate the chemical. For example, acids and bases react with each other rapidly, giving off large amounts of heat, so should not be stored next to each other. Others react with water and should be stored in sealed containers with desiccants.
6. Health hazards. The best source of specific toxicology data is given here, such as symptoms of acute damage from exposure and some recommended emergency procedures. If a chemical has been tested for its carcinogenicity, or cancer-causing potential, that information is listed here. In addition, levels at which a chemical has been found to be lethal (called the LD50 for lethal dose for 50% of test animals) is listed here. Since the LD50 is dependent on which type of animal it was tested on, as well as how the animal was exposed to the chemical, this information always requires these specifics. For example, the lethal dose for chemicals is much lower if injected than it is if ingested. The most common index reported is the LD50 for a rat in mg of chemical per kg of animal, administered orally (ingestion). For volatile chemicals, the toxicity of breathing it is measured as the LC50 (lethal concentration in air for half of the test animals), measured in ppm; in all cases, the lower the number for the LD50, the more toxic the chemical.
7. Precautions for safe handling and use. This describes how to deal with spills.8. Control measures. Specific recommendations for personal protective equipment (PPE) are given here.
B. NFPA Ratings (National Fire Protection Association)Another quick assessment of a chemical’s health hazards that is usually available on its container is a rating by the National Fire Protection Association (NFPA). A color-coded diamond shape lists numbers rating a hazard as:
Blue for health hazard Red for flammability Yellow for reactivity0 – normal material 0 – will not burn 0 – stable1 – slightly hazardous 1 – flash point > 200o F 1 – unstable if heated2 – hazardous 2 – flash point > 100o F 2 – violent chemical change3 – extreme danger 3 – flash point < 100o F 3 – shock and heat may detonate4 – deadly 4 – flash point < 73o F 4 – may detonate
The uncolored station of the NFPA diamond is for specific hazards:
OX – oxidizer compoundACID – acidic compoundALK – basic compoundCORR – corrosive compoundW – use NO WATER
B) General Safety Precautions in Handling Hazardous Chemicals in the Lab
There are generally four routes to exposure to hazardous chemicals that you should keep in mind while handling them: Inhalation – avoid by the use of fume hoods and masks Skin & eye contact – avoid by the use of lab coats, gloves, and gogglesIngestion – avoid eating or drinking in the lab or leaving the lab without removing gloves
and washing handsInjection – dispose of broken glass and needles properly
Because chemicals pose so many different kinds of hazards, there are no simple rules of thumb for safe handling of them all except for some common sense measures:
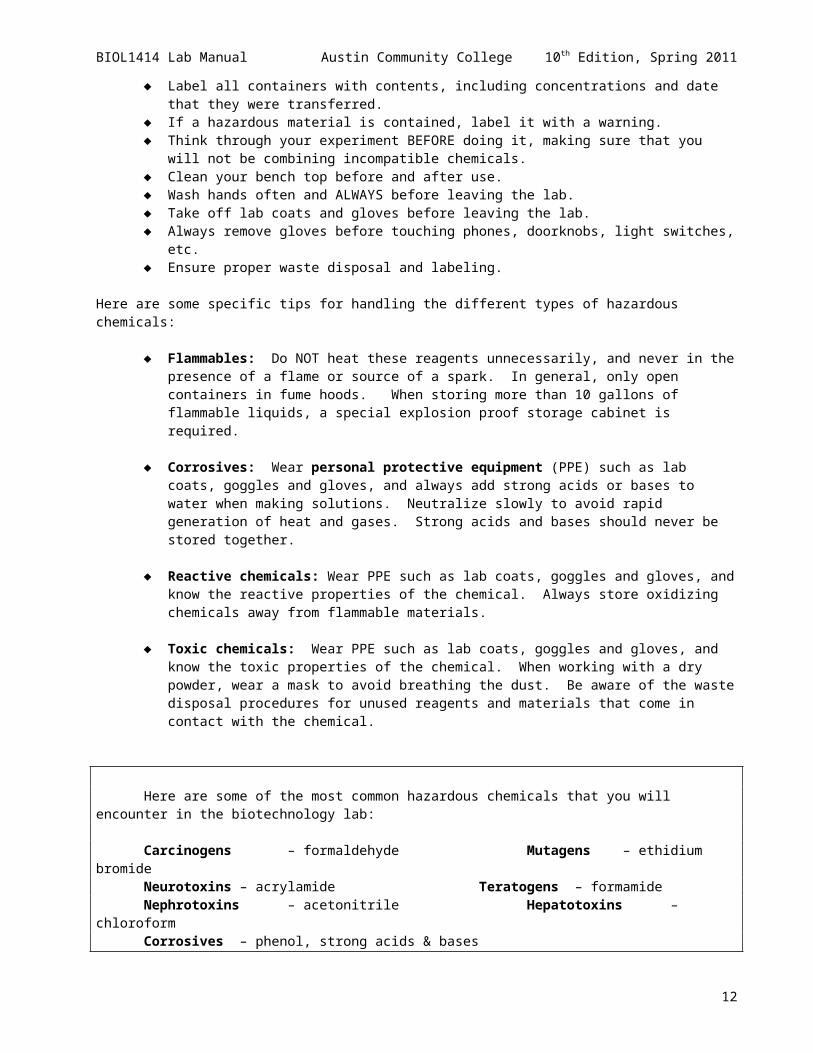
Treat all chemicals as if they were hazardous until you learn otherwise. Label all containers with contents, including concentrations and date that they were transferred. If a hazardous material is contained, label it with a warning. Think through your experiment BEFORE doing it, making sure that you will not be combining
incompatible chemicals. Clean your bench top before and after use. Wash hands often and ALWAYS before leaving the lab. Take off lab coats and gloves before leaving the lab.
8

BIOL1414 Lab Manual Austin Community College 10th Edition, Spring 2011
Always remove gloves before touching phones, doorknobs, light switches, etc. Ensure proper waste disposal and labeling.
Here are some specific tips for handling the different types of hazardous chemicals:
Flammables: Do NOT heat these reagents unnecessarily, and never in the presence of a flame or source of a spark. In general, only open containers in fume hoods. When storing more than 10 gallons of flammable liquids, a special explosion proof storage cabinet is required.
Corrosives: Wear personal protective equipment (PPE) such as lab coats, goggles and gloves, and always add strong acids or bases to water when making solutions. Neutralize slowly to avoid rapid generation of heat and gases. Strong acids and bases should never be stored together.
Reactive chemicals: Wear PPE such as lab coats, goggles and gloves, and know the reactive properties of the chemical. Always store oxidizing chemicals away from flammable materials.
Toxic chemicals: Wear PPE such as lab coats, goggles and gloves, and know the toxic properties of the chemical. When working with a dry powder, wear a mask to avoid breathing the dust. Be aware of the waste disposal procedures for unused reagents and materials that come in contact with the chemical.
Here are some of the most common hazardous chemicals that you will encounter in the biotechnology lab:
Carcinogens – formaldehyde Mutagens – ethidium bromideNeurotoxins – acrylamide Teratogens – formamideNephrotoxins – acetonitrile Hepatotoxins – chloroformCorrosives – phenol, strong acids & bases
Often vendors such as Fisher Scientific have safety information in their catalog about chemicals that they sell, in which case you can easily assess chemical hazards before you order a chemical. Spectrum Chemical also has a very large collection of MSDS on their website.
2. Biological Safety: Containment
You will be working with live organisms in many biotechnology labs, so it is important to be able to assess any biological hazards that they may pose and to treat them accordingly. In general, a live organism is considered a biological hazard if its release into the environment could have an effect on the health of the environment in general or humans in particular. This includes known pathogens to humans, plants, or animals, as well as benign organisms containing recombinant DNA that could render the recombinant host dangerous. In fact, the recombinant DNA itself should be treated as a biosafety hazard, since it is usually inserted into a vector that could transform organisms in the environment if released. Similarly, tissue cultures of human or animal cells should be treated as a biohazard: while they would not survive if released into the environment, they contain recombinant DNA.
The routes of exposure to infectious agents are the same as those of hazardous chemicals: inhalation, contact with eyes and skin, ingestion, and injection. The same general precautions should be taken in handling biological hazards as the guidelines above for handling chemical hazards, especially toxic ones. Here are some general practices to maximize biological safety:
Limit access to the lab at the discretion of the lab director, and adequately train all lab personnel. Use personal protective equipment (PPE) at all times, and keep all PPE inside the lab. Wash hands after handling viable materials and animals, after removing gloves and before leaving the lab. Always remove gloves before touching phones, doorknobs, light switches, etc. Avoid touching your face with your hands or gloves. Keep personal items such as coats and book bags out of the lab or in a designated work area. No mouth pipetting; use mechanical pipetting devices.
9

BIOL1414 Lab Manual Austin Community College 10th Edition, Spring 2011
Minimize splashes and aerosol production. Disinfect work surfaces to decontaminate after a spill and after each work session. Disinfect or decontaminate glassware before washing. Decontaminate all regulated waste before disposal by an approved method, usually by autoclaving. Have an insect and rodent control program in effect. Use a laminar flow biological safety cabinet when available.
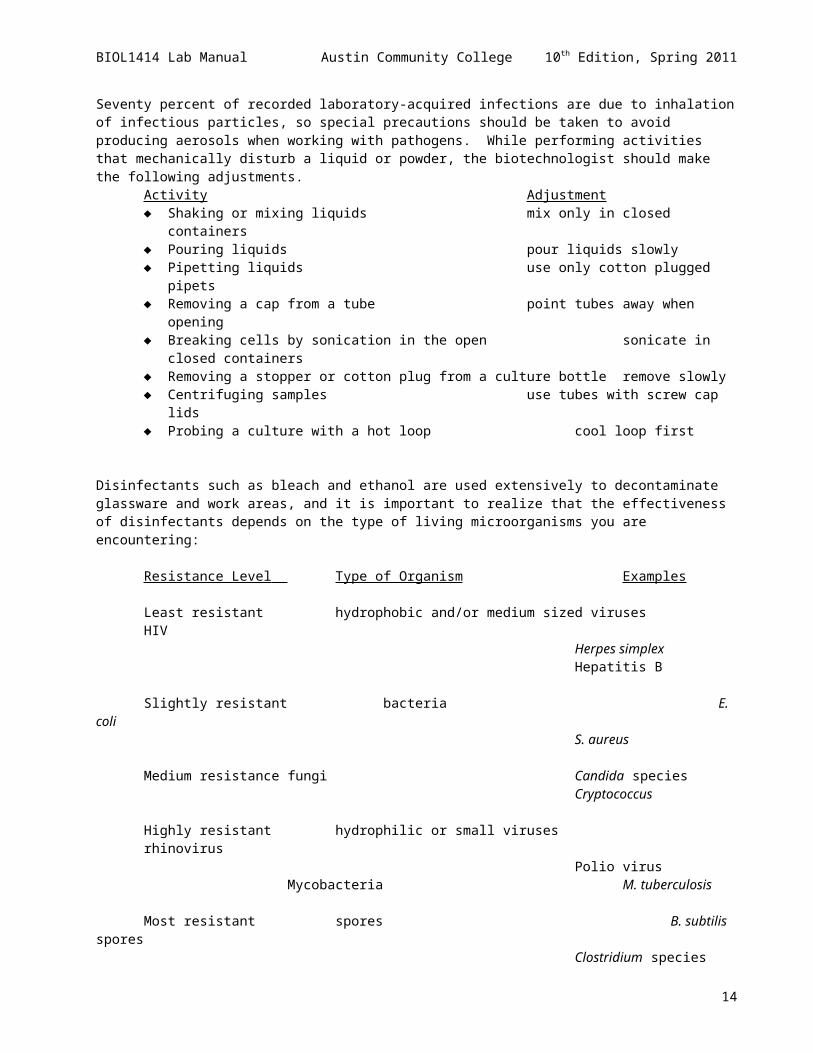
Seventy percent of recorded laboratory-acquired infections are due to inhalation of infectious particles, so special precautions should be taken to avoid producing aerosols when working with pathogens. While performing activities that mechanically disturb a liquid or powder, the biotechnologist should make the following adjustments.
Activity Adjustment Shaking or mixing liquids mix only in closed containers Pouring liquids pour liquids slowly Pipetting liquids use only cotton plugged pipets Removing a cap from a tube point tubes away when opening Breaking cells by sonication in the open sonicate in closed containers Removing a stopper or cotton plug from a culture bottle remove slowly Centrifuging samples use tubes with screw cap lids Probing a culture with a hot loop cool loop first
Disinfectants such as bleach and ethanol are used extensively to decontaminate glassware and work areas, and it is important to realize that the effectiveness of disinfectants depends on the type of living microorganisms you are encountering:
Resistance Level Type of Organism Examples
Least resistant hydrophobic and/or medium sized viruses HIVHerpes simplexHepatitis B
Slightly resistant bacteria E. coliS. aureus
Medium resistance fungi Candida speciesCryptococcus
Highly resistant hydrophilic or small viruses rhinovirusPolio virus
Mycobacteria M. tuberculosis
Most resistant spores B. subtilis sporesClostridium species
3. Disposal of Hazardous Chemicals and Biological Materials
The disposal of hazardous chemicals is subject to state and federal regulations, and is ultimately overseen by the Environmental Protection Agency. Extremely toxic chemicals are regulated at low levels, and less toxic chemicals can be disposed of through city sewer systems at higher levels. Biological hazards should be contained in autoclave bags made of a high melting point plastic that are sealed and autoclaved at high temperatures and pressures to completely kill any live organisms.
10

BIOL1414 Lab Manual Austin Community College 10th Edition, Spring 2011
First Day Lab Assignments
1. ACC Safety Policies
You must do the following to comply with college wide safety policy:a. Watch the ACC Biology Safety video b. Read the ACC Biology Safety Policy in your lab manualc. Fill out the Biology Safety Rules and Information sheet for this laboratory classroomd. Sign the safety contract
Until you complete all of the above activities, you are not allowed to attend laboratory classes at ACC.
2. Mentally Mapping the Laboratory
Mark the location of:eyewash stations sinkslab benches fume hoodsfire extinguisher windowsexits fire blanketemergency evacuation rally point (outside) and route to it
You will also be responsible for gathering materials you need for each lab exercise during the semester. You will need to know the location of the following, and if you don’t know what the item is or can’t find it, use the equipment locator document located in a folder on the side of the fume hood. (In another exercise you will be required to become more familiar with the location of equipment)
glassware broken glass disposalgloves freezer (-20˚C)hotplate/stirrers refrigerator (4˚C)micropipetters 37 ˚C incubatorsmicropipetter tips microcentrifuge tubesmicrofuges microscopesring stands and clamps test tube racksEppendorf tube racks marking tape
You will also occasionally need to locate chemicals and reagents for your lab exercises. flammables oxidizerscorrosives reactivestoxins gas cylindersbuffers enzymes
3. Finding MSDS and Safety Information on the Internet
Use the Internet to search for chemical company websites, university departments, or other databases containing MSDS information. Locate information for the following 3 chemicals:
a. Nicotine, an addictive substance found in tobacco.b. Ethidium bromide, a stain commonly used for marking DNA.c. Sodium chloride, table salt.
For each, find the LD50 (oral, rat, mg/kg) and whether it is a mutagen or carcinogen.
11
BIOL1414 Lab Manual Austin Community College 10th Edition, Spring 2011
4. Special Safety Precautions for Individual Lab Exercises.
ASSIGMENT 3: Find a partner to work with, and select a laboratory exercise together from this lab manual that has a list of chemicals and materials that will be used. Using information from MSDS, find the following information:
chemical name (trade name) Physical data (appearance, etc.) NFPA rating any health hazards/first aid measures LD50 (mg/kg, oral, rat) or LC50 (ppm) Toxicity data (carcinogen, mutagen, teratogen, neurotoxin, nephrotoxin, or hepatotoxin) waste disposal method/spill procedures any PPE needed
Enter the information in the form provided in Appendix D. Your group will be required post the table in the lab room during that particular exercise, and explain to the class what special precautions should be taken for that experiment. The simplified categories of hazardous materials found in the appendix of this manual will help you to prepare your class presentation.
12

BIOL1414 Lab Manual Austin Community College 10th Edition, Spring 2011
Math Skills for the Laboratory
Objectives
Your performance will be satisfactory when you are able to Identify metric prefixes by their exponential equivalent. Convert metric units. Convert numbers to or from scientific notation. Multiply and divide numbers written in scientific notation. Distinguish significant figures. Set up and calculate simple dimensional analysis problems.
1. Exponential Numbers
The numbers that we deal with in the laboratory are often very large or very small. Consequently, these numbers are expressed in scientific notation, using exponential numbers. These rules apply to the use of exponents:
When n is a positive integer, the expression 10n means “multiply 10 by itself n times”. Thus,
101 = 10 102 = 10 X 10 = 100 103 = 10 X 10 X 10 = 1,000 etc.
When n is a negative integer, the expression 10 n means “multiply 1/10 by itself n times”. Thus,
10-1 = 0.1 10-2 = 0.1 X 0.1 = 0.01 10-3 = 0.1 X 0.1 X 0.1 = 0.001 etc.
Examples: 2 x 101 = 2 X 10 = 20
2.62 x 102 = 2.62 X 100 = 262
5.30 x 10-1 = 5.30 X 0.1 = 0.530
8.1 x 10-2 = 8.1 X 0.01 = 0.081
In scientific notation, all numbers are expressed as the product of a number (between 1 and 10) and a whole number power of 10. This is also called exponential notation. To express a number in scientific notation, do the following:1. First express the numerical quantity between 1 and 10.2. Count the places that the decimal point was moved to obtain this number. If the decimal point has to be moved
to the left, n is a positive integer; if the decimal point has to be moved to the right, n is a negative integer.
Examples: 8162 requires the decimal to be moved 3 places to the left= 8.162 x 10³
0.054 requires the decimal to be moved 2 places to the right= 5.4 x 10⁻²
13
BIOL1414 Lab Manual Austin Community College 10th Edition, Spring 2011
Practice:
Express the following numbers in scientific notation.
20,205 = 0.000192 =
5,800000,000 = ______________ 0.0000034 = __________________
40,230,000 = 543.6 =
34.5 x 103 = 0.004 x 10-3 =
0.72 x 10-6 = 0.029 x 102 =
2. Addition and Subtraction of Exponential Numbers
Before numbers in scientific notation can be added or subtracted, the exponents must be equal.
Example: (5.4 x 10³) + (6.0 x 10²) =
(5.4 x 10³) + (0.60 x 10³) =
(5.4 + 0.60) x 103 = 6.0 x 10³
Practice:
(5.4 x 10⁻⁸) + (6.6 x 10⁻⁹) = (4.4 x 10⁵) - (6.0 x 10⁶) =
(3.24 x 10⁴) + (1.1 x 10²) = (0.434 x 10⁻³) - (6.0 x 10⁻⁶) =
3. Multiplying and Dividing Exponential Numbers
A major advantage of scientific notation is that it simplifies the process of multiplication and division. When numbers are multiplied, exponents are added; when numbers are divided, exponents are subtracted.
Examples: (3 x 10⁴)(2 x 10²) = (3 X 2)(104+2) = 6 x 10⁶
(3 x 10⁴) (2 x 10²) = (3 2)(104-2)= 1.5 x 10²
OR (3 x 10 4 ) = (3/2)(104-2) = 1.5 x 10²
(2 x 10²)
14

BIOL1414 Lab Manual Austin Community College 10th Edition, Spring 2011
Practice:All answers should be left in scientific notation.
(3.4 x 10³)(2.0 x 10⁷) = ___________ (5.4 x 10²) (2.7 x 10⁴) =_______________
(4.6 x 101)(6.7 x 10⁴) = ___________ (8.4 x 10⁻³) (4.0 x 10⁵) = ______________
(3.4 x 10⁻³)(2.5 x 10⁻⁵) = 8.8 x 10 6 = 3.2 x 10⁻²
(0.10 x 10⁵)(4.9 x 10⁻²) = 5.2 x 10 -3 = 1.3 x 10²
Combine everything you have learned and perform the following calculation. Write your answer in scientific notation.
(3.24 x 10⁸)(14,000)/(3.5 x 10-3) = _________________
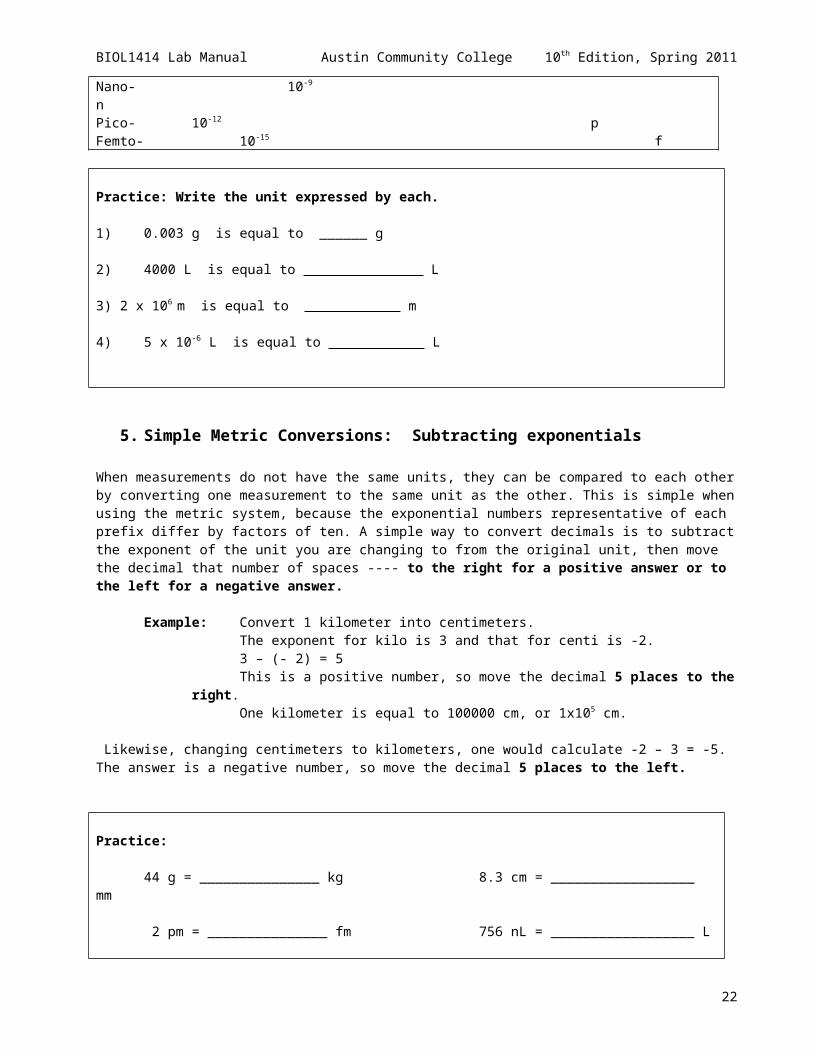
4. Metric Units
The metric system is used in the sciences to measure volumes, weights, and lengths. In the bioscience laboratory, amounts are often extremely small so it is necessary to express the values in scientific notation. You will be expected to identify the exponential number associated with each prefix. Fill in the rest of the numbers in the table below.
Prefix Exponential Meaning SymbolMega 106 MKilo- 103 kHecto- 102 100.0 hDeca- 101 10.0 daPrimary unit 100 1.0 N/ADeci- 10-1 0.01 dCenti- 10-2 0.001 cMilli- 10-3 mMicro- 10-6 µNano- 10-9 nPico- 10-12 p Femto- 10-15 f
Practice: Write the unit expressed by each.
1) 0.003 g is equal to ______ g
2) 4000 L is equal to L
3) 2 x 10⁶ m is equal to m
4) 5 x 10⁻⁶ L is equal to L
15

BIOL1414 Lab Manual Austin Community College 10th Edition, Spring 2011
5. Simple Metric Conversions: Subtracting exponentials
When measurements do not have the same units, they can be compared to each other by converting one measurement to the same unit as the other. This is simple when using the metric system, because the exponential numbers representative of each prefix differ by factors of ten. A simple way to convert decimals is to subtract the exponent of the unit you are changing to from the original unit, then move the decimal that number of spaces ---- to the right for a positive answer or to the left for a negative answer.
Example: Convert 1 kilometer into centimeters.The exponent for kilo is 3 and that for centi is -2. 3 – (- 2) = 5This is a positive number, so move the decimal 5 places to the right.One kilometer is equal to 100000 cm, or 1x105 cm.
Likewise, changing centimeters to kilometers, one would calculate -2 – 3 = -5. The answer is a negative number, so move the decimal 5 places to the left.
Practice:
44 g = _______________ kg 8.3 cm = __________________ mm
2 pm = _______________ fm 756 nL = __________________ L
6. Conversion Factors and Dimensional Analysis
The use of a conversion factor is often useful in doing more complex conversions. A conversion factor is simply the ratio between the two units of measurement.
Examples: Give conversion factors for the following pairs of units.
Kilograms and grams 1000g = 1 kg so 1000g/kg or 1 kg/1000g
Liters and milliliters 1 L = 1000 mL so 1 L/1000mL or 0.001 L/mL
meters and centimeters 1 m = 100 cm so 100 cm/m or 0.01 m/cm
Practice the following: Write two conversion factors for each pair of units:
Microliters and milliliters
Grams and milligrams
Days and weeks
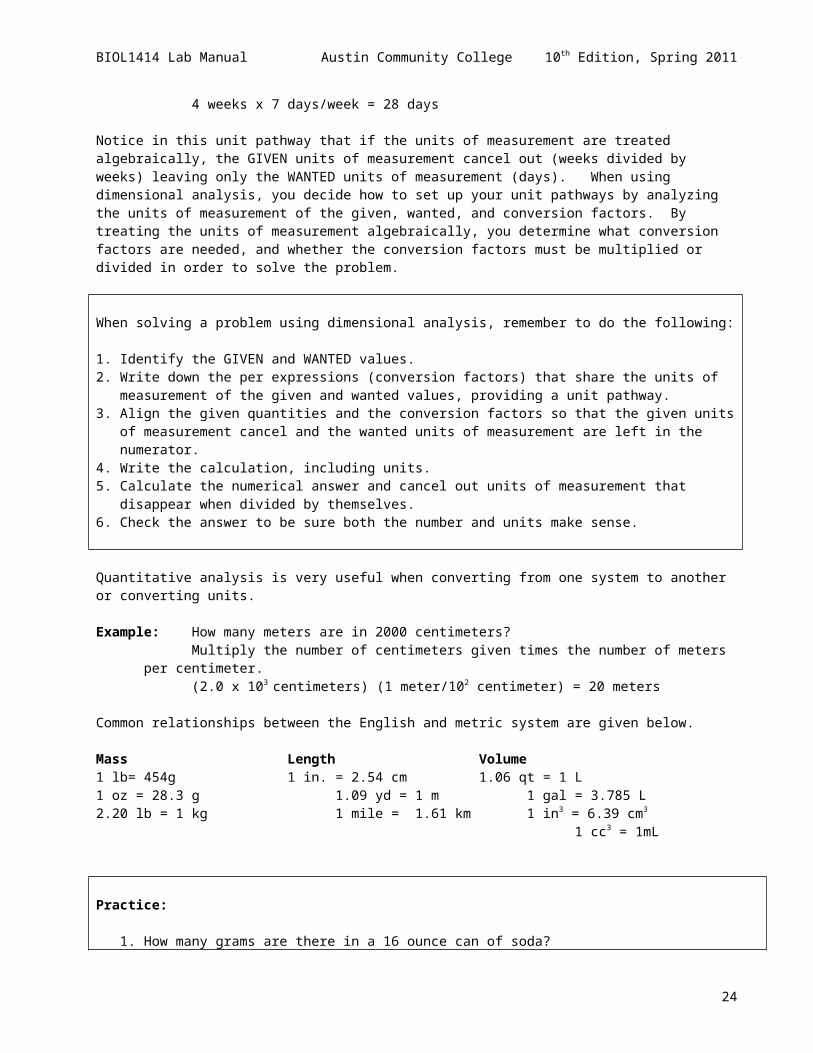
How many days are there in 4 weeks? 28 days. How would you figure this out? You know that there are 7 days in a week, so there are 4 weeks x 7 days per week = 28 days. This problem was solved using dimensional analysis and
16

BIOL1414 Lab Manual Austin Community College 10th Edition, Spring 2011
involves a per expression as a conversion factor. The per expression in this problem is 7 days/week, and you can also write it as 1 week/ 7 days, or as an equality where 7 days = 1 week. The only mathematical requirement for a PER expression or conversion factor is that the two quantities are directly proportional.
A conversion factor is used to change a quantity of either unit in the conversion factor to an equivalent amount of the other unit. The conversion follows a unit path from the given quantities (GIVEN) to the wanted quantities (WANTED). In the previous example, the one-step unit path is weeks to days, which can be written weeks days. Mathematically, you multiply the given quantity of 4 weeks by the conversion factor, 7 days /week, to get the number of days that has the same value as 4 weeks. The calculation setup is
4 weeks x 7 days/week = 28 days
Notice in this unit pathway that if the units of measurement are treated algebraically, the GIVEN units of measurement cancel out (weeks divided by weeks) leaving only the WANTED units of measurement (days). When using dimensional analysis, you decide how to set up your unit pathways by analyzing the units of measurement of the given, wanted, and conversion factors. By treating the units of measurement algebraically, you determine what conversion factors are needed, and whether the conversion factors must be multiplied or divided in order to solve the problem.
When solving a problem using dimensional analysis, remember to do the following:
1. Identify the GIVEN and WANTED values.2. Write down the per expressions (conversion factors) that share the units of measurement of the given and wanted
values, providing a unit pathway.3. Align the given quantities and the conversion factors so that the given units of measurement cancel and the wanted
units of measurement are left in the numerator.4. Write the calculation, including units.5. Calculate the numerical answer and cancel out units of measurement that disappear when divided by themselves.6. Check the answer to be sure both the number and units make sense.
Quantitative analysis is very useful when converting from one system to another or converting units.
Example: How many meters are in 2000 centimeters?Multiply the number of centimeters given times the number of meters per centimeter.(2.0 x 10³ centimeters) (1 meter/102 centimeter) = 20 meters
Common relationships between the English and metric system are given below.
Mass Length Volume1 lb= 454g 1 in. = 2.54 cm 1.06 qt = 1 L1 oz = 28.3 g 1.09 yd = 1 m 1 gal = 3.785 L2.20 lb = 1 kg 1 mile = 1.61 km 1 in3 = 6.39 cm3
1 cc3 = 1mL
Practice:
1. How many grams are there in a 16 ounce can of soda?
2. Convert 555,000 meters to miles.
3. Convert 1 square yard to square centimeters.
17

BIOL1414 Lab Manual Austin Community College 10th Edition, Spring 2011
7. Determining Significant Figures
It is important to make accurate measurements and to record them correctly so that the accuracy of the measurement is reflected in the number recorded. No physical measurement is exact; every measurement has some uncertainty. The recorded measurement should reflect that uncertainty. One way to do that is to attach an uncertainty to the recorded number. For example, if a bathroom scale weighs correctly to within one pound, and a person weighs 145 lbs, then the recorded weight should be 145 + 1 lbs. The last digit, 5, is the uncertain digit, and is named the doubtful digit.
Another way to indicate uncertainty is the use of significant figures. The number of significant figures in a quantity is the number of digits that are known accurately plus the doubtful digit. The doubtful digit is always the last digit in the number. Significant figures in a measurement
apply to measurements or calculations from measurements and do not apply to exact numbers. are independent of the location of the decimal point are determined by the measurement process and not the units
For example, a balance can weigh to + 0.01 g. A sample weighs 54.69 g. The doubtful digit is 9.
When an answer given has more numbers than significant, then the last number must be rounded off. If the first digit to be dropped is <5, leave the doubtful digit before it unchanged. If the first digit to be dropped is >5, then you round upward by adding a unit to the doubtful digit left behind. For example, a student using the balance above measures 4.688 g. The correct number will be 4.69 g.
If there is only one digit beyond the doubtful digit in your number, and that digit is exactly 5, the rule is to round it down half the time and to round it up half the time so that you don’t add a systematic error to your data. To keep track when to round up and when to round down, the rule of thumb is to always round to an even number in the remaining doubtful digit. For example, if a measurement on a balance with a + 0.01 g accuracy is used to measure 4.895 g, you should record 4.90 g. If it reads 4.885 g, you should record 4.88 g as your data.
Practice:The uncertainty of a balance measurement is + 0.01 g. Write the numbers that should be record as data with the correct number of significant figures for the following. Some answers may already be correct.
445.81 g _______________ 6.731 g _______________
5872.30 g ______________ 5.556 g _______________
5.555 g 5.565 g
It is sometimes confusing to determine whether a zero in a number is a significant figure or not. Generally, a zero is a significant figure if:
it lies between two nonzero digits in a number it lies to the right of a number with a decimal point it does not lie to the right of a number without a decimal point it does not lie to the left of a number
Examples: For 12.40 g, the zero is significant.For 110 g, the zero is not significant.For 1.004 g, the zeroes are significantFor 0.004 g, the zeroes are not significant
18

BIOL1414 Lab Manual Austin Community College 10th Edition, Spring 2011
Practice:Determine the correct number of significant figures in the following numbers.
10.01 g 140 g
0.0010 g 140.0 g
1.100 g 1100 g
8. Calculations Using Significant Figures
In adding or subtracting numbers, the answer should contain only as many decimal places as the measurement having the least number of decimal places. In other words, you answer should reflect the accuracy of the measurement by correctly placing the doubtful digit. This is best done by lining up the numbers to be added or subtracted, performing the addition or subtraction, and discarding any digits to the right of the doubtful digit from the answer.
Example: For a balance that measures to + 0.01 g, the sum of the following measurements yields:
34.60 + 24.555 g = 34.60 + 24.555
59.155 g = 59.16 g
Practice:Solve the following and report your answer with the correct number of significant figures and units.
16.0 g + 3.106 g + 0.8 g (from a balance that weight to + 0.1 g)
9.002 m - 3.10 m (from a meter stick that measures to the nearest cm)
When multiplying or dividing, the answer may have only as many significant figures as the measurement with the least number of significant figures. This is especially important to remember when using a calculator, since your calculator may give you an answer with 11 digits!
Examples: (1.13 m)(5.1261 m) = 5.79251786 m2 = 5.79 m2
Significant figures: 3 5 = 3
4.96001 g 4.740 cm3 = 1.0464135 g/cm3 = 1.046 g/cm3
Significant figures: 6 4 = 4
19

BIOL1414 Lab Manual Austin Community College 10th Edition, Spring 2011
Practice the following:Solve the following and report your answer with correct number of significant figures and units.
(4.01 x 10⁻¹ cm) (2.1 x 10⁻³ cm) (4.97 x 10⁻² cm) =
10.96 g 12.1 cm3 =
You may need to refer to the math review provided in Appendix B (such as order of operations and the manipulation of exponents when adding, subtracting, and multiplying, or dividing numbers) to solve the following.
1.059 g - 0.2 g =0.98 mL - 0.02 mL
(1.15 x 10 3 g) - (2.4 x 10 -1 g) =(1.555 x 10³ mL) - (6.2 x 10² mL)
20

BIOL1414 Lab Manual Austin Community College 10th Edition, Spring 2011
Documentation and the Lab NotebookDocumentation in a lab notebook is an essential skill for any biotechnician. The Food and Drug Administration's (FDA) handbook states, "if it isn't written down, it wasn't done." Documentation details vary from lab to lab but it is always done for one or all of the following reasons:
to record what an individual has done and observed to establish ownership for patent purposes and other legal uses to establish criteria used to evaluate a finished product or the process to make it to trace the manufacture of a product to create a contract between a company and consumers and/or between a company and regulatory agencies to prove that a procedure was done correctly to adhere to, evaluate, and develop standard operating procedures (SOP)
Even good lab work is worthless without documentation, and careful documentation can turn an erroneous result or a failed procedure into a valuable learning experience by providing essential details needed for trouble-shooting. Furthermore, in industry, laboratory notebooks are legal documents. They are used to determine patent rights, product quality, liability, and verify the accuracy of information. Notebooks are treated as if they might be used in a court of law at any time, and you can, in fact, be called upon for questioning about your notebook in court.
An important part of this documentation process is to record what equipment and materials were used, and to show that the equipment and materials were validated and used in the correct manner. Companies must be able to produce documentation for audits by government regulatory agencies to prove that Good Manufacturing Practices (GMPs) were followed. If the material in the notebooks was not entered legibly, or information is missing, companies may be fined or the company may be held liable for damages in a product lawsuit. In research and development labs, the same careful documentation is necessary to establish rights to valuable patents. The value of a well-kept notebook cannot be overstated.
1. Your lab notebook
In this course, and throughout the Biotechnology program, you will practice good documentation by keeping a lab notebook. Ideally, this is a bound book that does not leave the lab under any circumstances; at some companies, notebooks are even kept under lock and key. However, the logistics of a teaching lab do not allow for such safekeeping. Bring your lab notebook to every lab session in this course. After you complete the course, save your notebook, since it will be part of the portfolio you bring to future job interviews to show prospective employers the quality and scope of your work at ACC.
General rules for writing good lab notebooks are:
Write all parts of your lab in ink. Writing with pencil is forbidden in the lab. It's too easy for unscrupulous people to erase data or errors that they don't like, at which point important details about their work are lost. If you make an error, draw a single line through it and enter your correction in clear and legible writing. If you discard data for any reason, you must justify your decision to do so immediately and in writing.
Write legibly. Remember, supervisors, and possibly lawyers, will be reading your notebook, and if they cannot read your writing, your work is essentially nonexistent. If they cannot easily make out what you have written, they can easily misinterpret an important detail about your work. For example, there is a big difference between "fresh" and "frozen" even though the squiggle for each may look the same.
Never cover information in your notebook with anything else or store information on a sheet of paper separate from your notebook. Never fold a page into your notebook. It can easily be lost.
If you tape materials such as a graph, a manufacturer’s specification sheet, or instrument readout into your notebook, tape all four sides. Then write "NWUI" ("No writing under insert") on the tape, your initials, and the date.
Keep your records factual, concise, clear and complete in all aspects. Write down important details that have a bearing on your results so that you can answer any questions that might be asked of you about how you did your work.
21
BIOL1414 Lab Manual Austin Community College 10th Edition, Spring 2011
For this class, your lab notebook should include:
A title page with the name of the course, semester and your name. A table of contents with page numbers Lab reports with notes and any appropriate results or other documentation (such as pictures of gel or
manufacturers documentation about standards used) -- more information on this below Analysis questions for lab (at the end of each lab report)
Each lab report should include three parts:
1. the pre-lab write-up which is done before you begin the experiment (see below), 2. the lab notes which includes the standard operating procedure (SOP) used, the data and detailed observations
you make while doing the lab, and any other comments you may want to remember or convey to others3. the analysis, which is involves any calculations, conclusions drawn, and questions answered after the lab is
completed. Most lab exercises come with a set of analysis questions to be answered.
2. Prelab write-up
This must be completed before coming to lab and should include the following: Heading – name of lab, date of lab, name of student A short description of the purpose of the lab Safety information from MSDS (NFPA rating, health hazards and required PPE, spill procedures) Materials and equipment required Detailed list of steps, leaving at least one space between each numbered step
Use your own language, leaving out explanations for each step. Step numbers do not have to correspond to those on the handout but they should be in the same general order. The prelab can either be written into your lab notebook, using good penmanship, or typed, printed, and taped into the lab notebook as described on the previous page. Your instructor may provide you with an electronic copy of the laboratory exercise. In this case, you are required to rewrite the introduction and instructions in YOUR OWN WORDS. This action is required so that the instructor knows that you have acquainted yourself sufficiently with the lab before coming to class (i.e. so you are NOT figuring out what to do while you are trying to do the lab and therefore most likely wasting time and resources). Write only on the left half of the page, and use the right side of the page to record notes and results during lab. Use a ruler to draw a vertical line between the numbered steps and the space for notes and observations. If your prelab is typed, format the document to have two columns, type only in the left column, and cut or fold the page to fit into the left half of the notebook page
The lab handouts include a lot of background material and other information in the procedural steps for your instruction in these techniques. An SOP, however should not include this type of information, and should be limited only to the actual steps taken in a procedure without explanation. You should read the instructions in your manual and extract only the action required of you during lab. This usually reduces a short paragraph to one line or less. Thus, you will create a document that is easier to follow during the lab session, and you will become adept at writing SOPs, a valuable skill in the biotechnology industry.
Composition of SOPs is an art that you must master. It is sometimes difficult to gauge the amount of detail that an SOP needs. An SOP that is too long and detailed is too cumbersome to use routinely, while an SOP lacking sufficient detail will not be lead to uniformity when different people perform the procedures. In this course, we will guide you through these decisions by providing you with a lab protocol to follow. In general, an SOP that needs the most detailed information
is used by a large number of people is used infrequently so that the users will not remember exactly how it is done involves especially sensitive or critical steps of a process
For more information on keeping a notebook and writing SOPs, you can find a guide titled “Laboratory Notebooks”, at the Bio-Link website (google Bio-Link). A description on writing an SOP is available in the August 2001 issue of BioPharm, titled “Writing Procedures That Contribute to Performance”, on pp. 22-26. Other examples of SOPs and how to write them successfully can be found through googling “SOP.”
22

BIOL1414 Lab Manual Austin Community College 10th Edition, Spring 2011
3. During Lab
At the beginning of the lab itself the instructor will check off your pre-lab, much as your supervisor will check off your work in industry. During lab you will take notes in pen as described above. WRITE EVERYTHING DOWN. Yes, we mean everything. How much did you actually weigh out? What are the supplier and the lot number of the reagent? What balance number did you use? What color was your solution? When did it start boiling? How long did each sample take to come off the column? And so on. Be sure to include any changes you made to the procedure in the lab handout, even if they were at the instructor’s direction; always show calculations. In some labs, even the room temperature and humidity is recorded since that can affect the experiment. Writing down everything improves your observational skills, helps you understand the importance of each step, and provides a record of how an experiment might have gone wrong. Each individual should record his or her own notes, even when working in teams.
4. Post-lab
For the post-lab, answer the assigned questions from the lab handout in your lab notebook in complete, grammatically correct sentences. Give as much information as possible to demonstrate your understanding of the concepts. Labs are due the week after the lab is complete. Unless you have an excuse approved by the instructor, late labs will NOT be accepted. Students are allowed to miss only one of the labs during the semester. Make-up labs sessions are provided at the discretion of the instructor and the lab assistant. If there is no make-up lab session available, the student must complete the pre-lab and as much of the post-lab as possible, and will receive a passing grade (70%) on the submitted lab.
5. Lab Competency
Your competency in all the techniques in these lab exercises is the most important outcome of this class. Your ability to perform tasks successfully and use good lab technique will affect your grade. Your instructor will indicate on your graded report whether you have shown competency in these areas. Note that competency is not limited to lab skills, but also includes attendance, punctuality, teamwork, and tidiness.
6. Labeling
Labeling is very important in any lab. It is critical that you label every tube, bottle, flask, cuvette or other container you use in the lab, whatever its contents. This is especially important for any hazardous chemicals or pathogens, but be just as thorough with something as harmless as salt water.
You must label all containers with: the identity of the contents and its concentration your initials the date (and time, if applicable) your class (for example, BITC1311) OR, a number or letter corresponding to a detailed description containing the above information in your
lab notebook
If the container is destined to be kept on hand for more than a day, never use a number or letter abbreviation; this will inevitably be found by someone else to whom your symbols mean nothing. Only use the abbreviated labels if you will be disposing of the contents the same day. For example, if you are doing column chromatography, you need only label the collection tubes with numbers in the order that they come off the column. However, if your instructor wants to keep one of your fractions as a control for the next semester’s class, it is imperative that you label the tube with all the information above.
It is not necessary to write the lot number, manufacturer, or other details about the substance on the label, as long as you have recorded that information in your lab notebook. Only the details listed above are necessary for identification.
23
BIOL1414 Lab Manual Austin Community College 10th Edition, Spring 2011
Instrument and Reagent Competency ChecklistBasic Tools in the Biotechnology Laboratory
Objectives
Your performance will be satisfactory when you are able to Identify common lab equipment pieces and describe their functionDistinguish between glassware pieces in regard to measuring accuracyUnderstand the role of the reagents you use in the laboratory
During your training in the ACC Biotechnology program, you will learn to use, calibrate and troubleshoot many pieces of equipment used in biotechnology labs, and you will be making a variety of reagents. You are required to keep a list of the equipment that you learn to use and a brief description of the purpose of the machine. For example, a PCR machine is used to amplify a specific section of DNA.
You are also required to keep an Excel list of the reagents you make in the program and what is the purpose of each component in the reagent. For example, the buffer TAE or Tris Acetate EDTA is used in DNA electrophoresis; Tris is the buffering component, acetate is also a buffering component and EDTA binds divalent cations, which are required by nucleases.
Concerning the equipment, to use it you need to know its location in the laboratory. Please locate the following items in the lab.
1. Measurement of Volume
1) Erlenmeyer flasks are used primarily to prepare solutions prior to an accurate volume adjustment. Although there are volumetric markings on these flasks, they are not calibrated and should not be relied upon for exact volume measurements.
2) Beakers are also used for preparing solutions, especially when a pH adjustment requires access to the solution by a pH probe. The volumetric markings on beakers are also not reliable.
3) Graduated cylinders are calibrated with sufficient accuracy for most volume measurements when preparing solutions. For example, the calibration of most 100 mL graduated cylinder can be relied upon to accurately measure to within +/- 0.6 mL.
4) A buret is a calibrated tube with a flow control device (stopcock) at one end. Burets are used to slowly or rapidly dispense volumes to a high accuracy, especially in titrations (a type of volumetric assay).
5) Volumetric flasks are used to measure a specific volume with the highest degree of accuracy, and are used to make standard solutions for analytical assays. For example, the calibration of a 100 mL volumetric flask can have an accuracy of +/- 0.1 mL.
6) Pipettes are glass or plastic devices that are routinely used to measure and transfer liquids by drawing the liquid into the tube with a bulb or mechanical pump.
A) Pasteur pipettes are small glass tubes used with a bulb to transfer volumes as small as a single drop and as large as a few milliliters. They are not graduated and are not used to measure volumes.
B) Beral pipettes are plastic pipettes with a bulb at one end used for transfer of liquids. Sometimes they have calibration marks, which have a low level of accuracy. They are often disposable, sterile and individually wrapped.
C) Serological, or “blowout,” pipettes are graduated glass tubes used to measure anywhere from 0.1 to 50 mL. When the liquid has drained from this pipette, the final drop in the tip is transferred with a puff of air.
24
BIOL1414 Lab Manual Austin Community College 10th Edition, Spring 2011
D) Mohr, or “to deliver,” pipettes are similar to blowout pipettes, but do not require a puff of air to accurately deliver the desired volume. They can be identified by the label “TD” on the top.
E) Volumetric pipettes are not graduated, but are carefully calibrated to deliver a single, highly accurate volume, and are used for the transfer of exact volumes.
F) Automatic micropipetters are mechanical pumps calibrated to deliver highly accurate volumes generally less than 1.0 mL, and as little as 0.1 microliter. They are often adjustable for measuring different volumes and they always use dispensable plastic tips to actually transfer the liquids. Multichannel micropipetters can deliver the same volume from as many as 12 tips simultaneously. All automatic micropipetters need regular maintenance, calibration, and validation.
G) Hamilton syringes are used to measure microliter amounts very accurately. They are generally used for sample injection in enzyme assays or for chromatography and spectrophotometry.
2. Measurement of Weight
Instruments for weighing materials are called balances, and most laboratories have more than one type of balance, depending on the amount of material being measured and the degree of accuracy required.
1) Mechanical balances weigh an object on a pan hanging from a beam that has a counterbalanced weight. A) The simplest of these is a double pan balance, which has two pans: you can measure a specified mass in one
pan by counterbalancing it with that calibrated weight placed in the other pan. When the two pans are evenly balanced, you have measured the correct amount.
B) In a single pan balance, you can measure a specified mass in one pan against calibrated weight that slides along a calibrated scale on the beam. This works like the balances used in most doctors’ offices; since there is an adjustable scale, it is much more convenient to use than a double pan balance.
C) Analytical mechanical balances are similar to single pan balances, but are calibrated to measure extremely small weights with a high degree of accuracy, often as small as 0.1 milligrams.
2) Electronic balances have replaced most mechanical balances due to their greater accuracy and ease of operation. They are easier to use because they usually have a digital readout, and weighing dishes can be tared to read zero mass before using. Most balances used for preparation of solutions have a sensitivity of +/- 0.01 g, but electronic analytical balances can be sensitive to +/- 0.1 mg or less. Electronic balances require routine maintenance and recalibration.
3. Measurement of pH
Most solutions prepared in the biological laboratory must have a carefully controlled pH. Buffers are prepared by adjustment to a specific pH with strong acid and base solutions, using a meter to monitor the pH. A pH meter is a volt meter that measures the electrical potential between two electrodes. One electrode is in contact with your solution, and the other is in contact with a reference solution. Usually both of these electrodes are combined in a single pH probe that you place in your solution. These meters can read to the nearest 0.1 pH unit, but require frequent calibration with reference buffers of known pH.
4. Measurement of light
Solutions are often analyzed in the biotechnology lab by measuring how the solutes interact with light.
1) A spectrophotometer measures the amount of light that is absorbed by a solution at a specific wavelength or over a range of wavelengths. If you know a wavelength at which a specific substance absorbs light, you can calculate the amount of that substance in a solution from the measured absorbance of that solution at that wavelength.
25

BIOL1414 Lab Manual Austin Community College 10th Edition, Spring 2011
A) A visible (VIS) spectrophotometer measures absorbance of light in the visible region of the spectrum (wavelength of about 400-700 nm). A small vessel called a cuvette, which is generally plastic or glass and which usually has an internal diameter of 1.0 cm, is filled with the solution and placed in the spectrophotometer for measurements.
B) An ultraviolet/visible (UV/VIS) spectrophotometer can also measure absorbance of light in the ultraviolet region of the spectrum (about 100-400nm). These spectrophotemeters require a halogen light bulb that emits ultraviolet light and require special cuvettes that don’t absorb UV light.
C) A scanning spectrophotometer can measure the absorbance of a solution over a range of wavelengths, creating an absorbance spectrum that can be used to identify substances in a solution.
2) A polarimeter measures the angle by which plane-polarized light is rotated as it passes through a solution with an optically active compound such as a sugar. The solution is placed in a polarimeter tube that is at least 10 cm long.
5. Solution Preparation
Solution preparation involves mixing liquids and dissolving solids in liquids. There are many specialized devices in addition to balances, volume measuring devices, and pH meters involved in these processes.
1) Magnetic stirrers come in the form of a box with a magnet inside attached to a motor that spins the magnet. When a vessel containing a magnetic stir bar is on top of the magnetic stirrer, the stir bar spins and stirs the contents of the vessel.
2) A vortex mixer rotates the bottom of a tube rapidly; setting up a vortex in the liquid that rapidly mixes the contents.
3) A rotovaporization system can be used to rapidly reduce the volume (and thereby increase the concentration) of a solution by evaporation of solvent. To do this a round bottom flask containing the solution is spun to coat the glass with solution, creating a large surface area for the solvent to evaporate more rapidly. To increase the evaporation rates, a vacuum is pulled on the spinning flask and the flask can be spun in a heated water bath. To prevent the vacuum pump from being damaged by evaporating solvent, a condenser coil is placed between the flask and the pump to condense the solvent from the air.
6. Microbiological techniques
Specialized equipment is required to isolate, transfer, and grow up cultures of microbes and tissues in the laboratory.
1) Autoclaves are machines that achieve a high internal temperature and pressure and are used to sterilize solutions and glassware. The kitchen pressure cooker achieves the same results and can be used instead of an autoclave.
2) A biological safety or cell culture hood filters small particles out of the air in order to avoid contamination of cultures or sterile media. The filters are similar to those used to decontaminate air for operating rooms in hospitals or clean rooms used in the semiconductor industry.
3) Fermentors are used to grow up a large quantity of cells with automatically controlled pH and levels of oxygen and other nutrients.
4) Since most cells are generally too small to be seen with the naked eye, microscopes are used to magnify their images. Light or Brightfield microscopes and inverted microscopes are the most common types found in biotechnology laboratories.
7. Preparation of biological samples for analysis
There are many pieces of equipment that are used to prepare biological samples for analysis.
26

BIOL1414 Lab Manual Austin Community College 10th Edition, Spring 2011
1) A Sorvall-type centrifuge, or preparative centrifuge, has a balanced rotor that holds vessels and spins them at high speed, up to 20,000 rpm. This will cause most insoluble particles such as cells and many subcellular components to rapidly form a pellet at the bottom of the vessel. Rotors are available that hold vessels as small as a few milliliters to as large as a liter. These centrifuges are often refrigerated so that heat-sensitive compounds are not damaged during centrifugation.
2) A tabletop, or clinical, centrifuge is generally not refrigerated and spins at a much slower speed than a preparative centrifuge. Rotors for clinical centrifuges generally hold tubes with a capacity of 15 mL or less.
3) A microcentrifuge holds Eppendorf, or microcentrifuge, tubes that can hold about 1.5 mL of liquid. These microcentrifuges can also spin at high speeds and are sometimes refrigerated.
4) A sonicator emits ultrasonic waves that can be used to disrupt cells, allowing their contents to be released into the surrounding buffer in “grind and find” strategies.
8. Separation of macromolecules
Since there are thousands of different macromolecules in each cell, purification of a specific one from all the others requires powerful separation techniques, such as chromatography and electrophoresis. Both of these approaches take advantage of physical and chemical properties that differ between the individual macromolecules.
1) In gel electrophoresis, the macromolecules are placed in a solid matrix, called a gel, which is under a liquid buffer. An electric field is applied to this system, and since biological macromolecules carry ionic charges, they will be attracted towards one pole of the electric field and repelled by the opposite. Thus, macromolecules characteristically migrate in either direction in the field. The migration speed is determined by the charge-to-mass ratio of the macromolecule.
A) In a flat gel, also called a horizontal or submarine gel, electrophoresis system, an agarose gel lies horizontally below the electrophoresis buffer. This technique is mainly used to separate large nucleic acids (DNA and RNA).
B) A vertical electrophoresis system holds a polyacrylamide gel in the vertical position, and is mainly used to separate proteins or small-sized nucleic acids.
2) Chromatography is a family of methods used to separate macromolecules through their relative affinity to a stationary phase (generally, solid chromatography beads) and a mobile phase (generally, an aqueous buffer). The chromatography beads are loaded into a tube, called a chromatography column, and buffer is dripped, or pumped, through the column to carry the macromolecules along. The macromolecules with the least affinity to the chromatography beads travel through the column the quickest, while the macromolecules with the most affinity to the chromatography beads are the last to leave the column. Some chromatography beads separate by charge (ion exchange chromatography), by hydrophobicity (hydrophobic interaction chromatography), or by a specific property of that protein (affinity chromatography). Macromolecules can also be separated by size otherwise known as size exclusion or gel filtration chromatography. Generally, macromolecules separate from each other more cleanly when the chromatography beads are very small, but smaller size creates a backpressure and slows the rate at which the mobile phase can drip through the column. To overcome this limitation, high performance (or high pressure) chromatography (HPLC) uses high-pressure pumps and metal-jacketed columns to operate at high pressures and speed up the process.
3) A fraction collector collects the released mobile phase (eluent) of a chromatography column. It automatically measures a programmed volume (sometimes by the number of drops of liquid) into a line of test tubes or microcentrifuge tubes.
9. Manipulation of Nucleic Acids
You will be learning many techniques to isolate, transfer, and analyze DNA in your biotechnology training. Some of the specialized pieces of equipment used for these procedures will include:
27

BIOL1414 Lab Manual Austin Community College 10th Edition, Spring 2011
1) A thermal cycler is a machine that is used for amplification of a specific section of DNA by PCR (polymerase chain reaction). The machine cycles through several temperatures, which allows an enzyme called DNA polymerase to use chemicals in solution to build DNA molecules identical to a template provided.
2) An electroporator is used to discharge a high-voltage, high-amperage pulse of electricity of very short duration through a cuvette containing suspended cells to disrupt their plasma membranes, allowing DNA to be introduced.
3) A real-time PCR machine amplifies and measures the production of amplicons in one step. It is a thermal cycler and fluorescent analyzer in one instrument and is usually computer-controlled. You do not have to load your product onto a gel to determine if it was made; the machine measures its production photometrically.
28

BIOL1414 Lab Manual Austin Community College 10th Edition, Spring 2011
Using a Micropipetter
Now that you have practiced calculations and conversions, you are ready to become familiar with some of the essential tools of the biotechnician. In the next few labs, you will learn to use the micropipetter, the balance and the centrifuge. These three tools are used daily in many bioscience labs around the world.
Objectives
Your performance will be satisfactory when you are able to follow these Good Laboratory Practices (GLPs) and make them a habit for every lab:
Keep your work area clear of unnecessary items Keep everything you need within reach Gather all materials before you begin working Set up disposal areas before you begin working Label each container BEFORE you fill it Change gloves often to avoid contamination Never wear your gloves out of the lab Never do protocols from memory; always read every step every time you perform a procedure, and then check it
off as it is completed Always cap bottles of stock solutions and chemicals when finished Never hold a solution in a micropipetter; always eject immediately
Materials (per group)
20-50 mL sugar solution (dyed any color)20-50 mL each of distilled water and water dyed bluesmall beakers (4)1.5 mL microcentrifuge tubes (12 per group member)microcentrifuge tube rackset of 3 micropipettersbox of 20-200 µL tipsbox of 100 – 1000 µL tipswash bottle with 70% ethanolpicofuge
Procedure
A. Organizing Your Work Space
When your work requires aseptic (sterile) conditions, you should wash the benchtop with 70% ethanol. Although this procedure does not need to be sterile, wash the table with ethanol to get into the habit. Collect everything (including paper towels) you will need for the lab, except things like the stock solution bottle that will be shared by the whole class. Each person in your group will do each of the measurements, so make sure you have enough containers. In order to work efficiently, you should arrange everything at your workstation so that you can reach it easily. The center of the workstation should be clear of items you are not immediately using. Always have a waste beaker for used tips when you are micropipetting; do not use the sink for disposal of tips!
B. Micropipetting Practice
GLP Tip: Never lay a micropipetter down with a filled tip or hold it upside down or sideways. The liquid will not leak out if you hold it upright but it may enter the instrument if you hold it upside down, and contamination will result.
29
BIOL1414 Lab Manual Austin Community College 10th Edition, Spring 2011
1. Practice setting the volume on the micropipetters; each person in your group should set at least one and have it checked by other group members and/or your instructor. Look at the top of the micropipetter to identify its measuring range. Remember that the highest value listed on the top is the largest volume you can measure on that pipet. On a 100 to 1000 µL micropipetter, the largest measurable volume is 1000 µL; on a 20-200 micropipetter, it is 200 µL. Likewise, the smaller value in the range is the smallest measurable volume; on a 2-20 µL micropipetter, the smallest measurable volume is 2 µL. Set a 100-1000 µL pipetter to 0.45 mL, a 20-200 µL pipetter to 0.15 mL, and a 2-20 µL to 0.015 mL. What are these values in µL? You should practice doing that kind of conversion in your head; it will be useful when working in a lab.
2. Have a graduated 1.5 mL microcentrifuge tube in a rack ready to hold the liquid you measure in the next steps. Microcentrifuge tubes are often called Eppendorf tubes. Eppendorf is a popular brand of labware.
3. You will be pipetting 600µL of colored sugar solution. The color helps you see how much you are measuring. Choose the correct size micropipetter and set it to 600 µL. While you are waiting to use the micropipetter practice opening and closing microcentrifuge tubes with one hand or setting the other micropipetters with one hand.
4. Place a tip on the end of the pipetter. Do not touch the tip with your hands. Leave it in the box and push the end of the micropipetter firmly into the tip. The smaller tips fit both the 2-20 and the 20-200 µL micropipetters. They are often yellow or clear. The larger tips are for the 200-1000 µL micropipetter and are sometimes blue.
5. Using one hand, hold the micropipetter and press down on the plunger with your thumb or index finger (whichever feels more comfortable). Note that there are 2 places the plunger stops. The first stop is for filling and the second stop is for delivering. Practice a few times until you can easily feel the difference between the two stops. If you are waiting to use the correct micropipetter you can practice with the other micropipettes.
6. Press down to the first stop. Submerge the end of the tip just under the surface of the liquid. You may rest the tip against the side of the container just under the water line to steady it. If you submerge more than just the end of the tip, liquid will collect on the sides of the tip and drip into the collection tube when you deliver it. This will result in a larger volume of liquid than was desired.
7. Slowly release the plunger. If you release the plunger too quickly, the liquid may splash up into the micropipetter and contaminate it. If you are pipetting viscous (thick) liquids, such as the sugar solution you are using, and you release too quickly, the liquid won’t enter the tip fast enough and your measurement will be inaccurate. Sometimes this happens with thin liquids as well, so you should always pipette slowly. Be careful not to remove the tip from the liquid before it is filled with the desired volume or you will get an air bubble in the tip and less liquid than was desired. If you released the plunger slowly and kept the tip in the liquid but you still got a bubble, you probably pushed the plunger down to the second stop instead of the first. Practice the stops again.
8. Without removing the tip from the beaker, dispense the liquid by pushing the plunger slowly down to the first stop. Try not to make any bubbles. Repeat step 6. Drawing up the liquid twice (in labs it is called “pipetting up and down”) can improve the accuracy of the measurement.
9. Dispense the liquid into 1.5 mL microcentrifuge tube and be sure it is near the 0.6 mL mark (600 µL = 0.6 mL). This is just a check to make sure you used the correct micropipetter and set it correctly. Show the instructor your tube.
10. Discard the tip in a waste beaker by pressing the eject button. You may want to practice this technique a few times, as it is a very important skill to master.
C. Mixtures and Microcentrifuge Tube Labeling
1. You are going to measure different colors and amounts of water into 10 microcentrifuge tubes. Wearing gloves, choose 10 microcentrifuge tubes, close them, and label the lids 1 – 10. Always label on the top so that it can be read without removing the tube from the rack, and orient the tubes in the same direction so that you won’t confuse letters like “H” and “I” and numbers like “6” and “9”. Also, only use a permanent marker, such as a Sharpie, that will not erase or bleed if it gets wet. If your tubes are to be stored or mixed in a microcentrifuge etc., label your tubes with a group name, or your name, and the date of the experiment.
30

BIOL1414 Lab Manual Austin Community College 10th Edition, Spring 2011
2. Open all of the lids of the microcentrifuge tubes so they are ready to receive the solutions. Before you begin measuring, think of what will be the most efficient way of dispensing the amount. If several of the tubes contain the same liquid, you can measure them all out before you change tips, as long as you do not touch the tip to the inside of a tube containing some other solution. Even water can be a contaminant if it changes the concentration of a given solution. You may also want to first fill all of the tubes that have the same measure of liquid so you don’t have to change the setting too often. Sometimes it matters which ingredient is added first, as is the case when diluting acids and bases.
3. Measure the following amounts into the indicated tubes. Mix the contents by pipetting up and down several times. DO NOT pipet so vigorously that you make bubbles. This can degrade some sensitive solutions such as enzymes, and can also contaminate the micropipetter. You may want to close the tubes as they are filled or move them back one row to avoid accidentally filling the same tube twice.
Tube # Contents Tube # Contents
1 5 µL blue 7 100 µL clear20 µL blue2 10 µL blue
3 100 µL blue 8 500 µL clear20 µL blue4 1000 µL blue
55 µL clear20 µL blue 9
1000 µL clear20 µL blue
6 20 µL clear20 µL blue 10 500 µL clear
500 µL blue
4. Check the accuracy of your measurements by setting a micropipetter to the total volume in the tube and slowly withdrawing all of the solution from several tubes. Your pipetting was accurate if you leave no solution behind and have no air bubble in your tip. The amounts in tubes 1 and 2 are so small that if any is clinging to the side you won’t be able to draw it up. If this is the case, put the tubes in a picofuge for about 10 seconds to “spin down” the liquid so it is all in the bottom of the tube. Have your instructor check your tubes before discarding them, as he or she may wish to watch you draw up the amount to check accuracy.
31

BIOL1414 Lab Manual Austin Community College 10th Edition, Spring 2011
Using a Micropipetter Name _________________________
Analysis
Part A:
Make a sketch to show how you organized your lab space.
Part B:
If a 20 - 200 µl micropipetter is set to 0 how many µl is it set to measure? _________ How many mL is this? ____________ 4
3
Why should you avoid touching the micropipetter tips?
Why should you avoid submerging the micropipetter tip too deep in the liquid?
What happens if you push the plunger to the second stop before drawing up the liquid?
What does the phrase “pipetting up and down” mean and how is this technique used?
Part C:
On what part of a microcentrifuge tube should you write a label?
Describe the order in which you filled the tubes in step 4 (eg. same color first, same volume first). Did this order
result in maximum efficiency? If not, what order would be most efficient?
32

BIOL1414 Lab Manual Austin Community College 10th Edition, Spring 2011
Calibrating Lab InstrumentsObjectives
Your performance will be satisfactory when you are able to Calibrate a pH meter using standard pH buffers and an SOP Use a pH meter to correctly determine the pH of an unknown solution Calibrate an electronic balance using standard weights and an SOP Use an electronic balance to obtain a desired mass of a substance Compare the measuring accuracy of glassware using an electronic balance LEAVE A CLEAN LAB AREA
Introduction
Different pieces of lab equipment are designed to measure properties such as temperature, pH, mass, and volume to varying degrees of accuracy. If the temperature markings on the side of a thermometer are not set accurately, the instrument’s measurements will not be accurate. The accuracy of these markings is due to the calibration or standardization of the thermometer. The standards used to calibrate a thermometer are freezing and boiling water.
Some equipment must be periodically recalibrated because the settings are not as immovable as lines on a graduated cylinder or thermometer. The calibration of instruments such as pH meters, electronic balances, and micropipetters can be rendered inaccurate by factors such as movement, humidity, electrical field changes, and many others.
In this lab, you will calibrate and use pH meters and electronic balances. Both of these instruments should be calibrated each time they are turned on. If they are left on for long periods of time or used frequently during a day, they should be periodically recalibrated during that time as well.
Materials
Each group: Class shares:large waste beaker pH meter with SOP25 mL of a solution of unknown pH electronic balance with SOP10 mL graduated cylinder 200 g standard mass for balance calibration50-mL beaker with 10-mL graduations pH standard buffers for meter calibration100- or 150-mL beaker5 mL pipette 10 mL pipettePipette bulb or fillerBeral pipettes
Procedure
A. Calibrating a pH meter
Several factors may affect the accuracy of a pH meter. First, most meters will only give accurate readings for solutions between -5 and 60 degrees Celsius. Second, a pH meter usually cannot measure a pH of 12 or greater accurately, and these high pH solutions can sometimes damage the electrode. Finally, solutions that have high sodium ion concentrations generally give erroneous results. While an electrode is designed to allow H+ ions to pass through its walls, Na+ ions may also pass through. The Na+ ions affect the electrical potential measured by the electrode, which causes inaccurate pH readings.
1. Select a pH meter to calibrate and record its model number. Turn on and calibrate the pH meter using the SOP provided. You will be using pH 7, pH 10 and pH 4 standard buffers. The manufacturer often adds color to help identify the solutions; become familiar with these characteristic colors. Buffers are used because they have very stable pH value. Remember to always rinse the pH electrode with a wash bottle of distilled water or with the next
33

BIOL1414 Lab Manual Austin Community College 10th Edition, Spring 2011
solution before using it, catching the rinse liquid in a waste beaker labeled as such. Never rinse into the electrode storage solution or buffer.
2. After calibration is complete, use the meter to measure the pH of an unknown solution. Swirl the solution slightly to ensure that it makes good contact with the electrode before recording a reading. Record the pH in your notebook and have the instructor check your answer before going to the next section.
B. Calibrating and Using an Electronic Balance
The standards used to calibrate electronic balances are objects of known mass. For balances that measure to ± 0.01g, the standard is usually a 200-gram weight. These balances are used to measure amounts over 0.05 g. When you place the 200-gram weight on the balance in calibration mode, the balance recognizes the weight as 200 grams, and will then use that information to measure other masses.
1. Dispense 50 mL of orange stock solution into a 100- or 150-mL beaker.
GLP Tip: Never pipet from a stock solution. Rather, pour the approximate amount that you plan to use from a stock solution, and never return unused portions to the stock solution. This will prevent contamination.
2. Select a balance and record the model number. Follow the instructions in the SOP provided for the balance model to calibrate the balance. Have the instructor look at the live readout with the 200-gram weight on the balance before moving to the next section.
3. Place a weigh boat on the balance pan and press the tare button. This subtracts the weight of the weigh boat so that you are only weighing what is put inside it.
4. Draw up 4 mL of orange water using a 5 mL pipette and pipette filler or bulb and deliver it into the weigh boat. You might need to practice drawing up and delivering the liquid back into the flask until you can do it smoothly. If these are blowout pipets, to get the most accurate measure you must blow out the last drop (see the lab equipment exercise for ways to distinguish between blowout and to deliver pipettes). If you have a pipette filler, roll the wheel up and down quickly several times; if you have a pipette bulb, squeeze the bulb after emptying the pipette. Another option is to measure 5 mL and then deliver only down to the 1 mL mark. Remember to discard the remaining liquid in your waste beaker, not back into the stock solution.
GLP Tip: When adjusting the volume of a pipette, the bottom of the meniscus should be even with the marking to which you are adjusting. Make sure that your eye is level with the marking and meniscus in order to make sure that they are lined up correctly. Keep your pipet perpendicular to the benchtop. Make sure that there are no droplets of liquid on the outside of the pipet before you transfer it, and touch the pipet tip to the side wall of the container as you are dispensing the liquid.
5. Record the mass of the orange water in your notebook and in the analysis section. At sea level, 1.00 mL of water weighs 1.00 g. This should help you decide if your measurement was accurate.
6. Have each member of the group repeat step 4 and add 4 mL of orange water to the weigh boat (do not empty the weigh boat between measurements). Divide the total mass by the number of people in the group to find the average mass. Show calculations in your notebook.
C. Measuring Accuracy of Glassware
GLP Tip: Always inspect glassware before use. This is especially important if you are handling hazardous materials or heating the glassware. Discard chipped or cracked glassware in a specially designated glass disposal box. Never throw away glassware in the trash, and never dispose of plastic pipettes or other non-glass items in the glass disposal box.
34
BIOL1414 Lab Manual Austin Community College 10th Edition, Spring 2011
1. Measure 10 mL of water in a 50 mL beaker using the lines on the beaker for your measurement. Tare a weigh boat on the balance. Pour the water in the weigh boat and record the mass in your lab notebook and on the analysis page. Each member of the group should repeat this step and record each measurement. Calculate the average mass of 10 mL of water measured with a beaker.
2. Repeat step 1 using a 10 mL graduated cylinder and repeat step 1 again with a 50 mL graduated Cylinder.
3. Repeat step 1 using a 10 mL pipette.
4. Repeat step 1 using a 50 mL flask.
5. Clean up your lab station. Pour the contents of the waste beaker down the sink with plenty of water, and return dirty glassware to the cart. Wipe off your lab bench with a wet paper towel. Make sure that the balances, pH meters, and the areas around them are clean and dry, and turn off the equipment.
35

BIOL1414 Lab Manual Austin Community College 10th Edition, Spring 2011
Calibrating of Instruments
Analysis Name__________________________________
Part A:
1. If you were given an uncalibrated thermometer, how could you use boiling water and ice to calibrate it in degrees Celsius?
2. Why shouldn’t you measure the pH of 12 M NaOH with a pH meter (12 M is very concentrated and has a pH of about 14)? Give 2 reasons.
3. Based on what you know about the pH scale, why do you think the meter was calibrated with both pH 7 and pH 4 buffers?
Part B:
4. What does it mean to “tare” a balance?
5. What is a blowout, or serological pipet? How does this compare with a Mohr, or to-deliver, pipet?
6. The definition of a gram is the mass of 1 mL of pure water at 20˚C (about room temperature) and 1 atmosphere
of pressure.
a) What should be the average mass of the water measured? Show your calculations. ______ g
b) What was the average mass of the water your group measured? Show your calculations. _______ g
c) If there is a difference between the predicted mass (A) and the observed mass (B), how can you account for it?
36

BIOL1414 Lab Manual Austin Community College 10th Edition, Spring 2011
Part C:
7. Record the average mass of the water you measured (include units):
a) 50 mL Beaker _______________ 10 mL graduated cylinder __________
50 mL graduated cylinder _____________ 10 mL pipet ______________
50 mL Flask _______________
b) Which of these measures most accurately?
c) Will it probably always be more accurate? ______ Why or why not?
37

BIOL1414 Lab Manual Austin Community College 10th Edition, Spring 2011
Making Molar Solutions and Dilutions
Objectives
Your performance will be satisfactory when you are able to:
Correctly prepare a solution of a given molarity leaving a CLEAN lab area Do parallel and serial dilutions and distinguish between the two Determine whether to use a parallel or serial dilution in a given situation Use a microcentrifuge to pellet a precipitate
Introduction
A common task for any biotechnician is solution preparation. What is a solution? It is defined as a solute (smaller amount) dissolved in a solvent (larger amount). The concentration of a solution frequently must be known to a high degree of accuracy. An incorrectly prepared solution can destroy months of hard work or cost companies thousands of dollars. Therefore, companies usually have an SOP (Standard Operating Procedure) for the preparation of each solution to minimize mistakes. All calculations are recorded in the lab notebook, even if a calculator is used. Important calculations are double-checked by another person (and sometimes triple-checked). The exact mass and volume of reagents used is recorded in the notebook. This information, along with the date and the preparer’s name or initials, is recorded on a preparation form and on a label on the bottle itself; these forms are provided in Appendix C.
Units of Concentration
Percent concentrations may be expressed as:1) weight per volume (wt/vol or w/v), which indicates the weight (in grams) of solute per 100 mL of solution
(used to indicate the concentration of a solid in a liquid)
2) volume per volume (v/v), which indicates the volume (in mL) of solute per 100 mL of solution (used to indicate the concentration of a liquid dissolved in liquid)
3) weight per weight (w/w), which indicates the weight (in grams) of solute per 100 g solution (used to indicate the concentration of a solid mixed in another solid)
Note that in all cases a 100 mL (or 100 g) solution is used since percent means “out of 100”.
Weight per volume is a common unit of concentration in the biotechnology lab. This is often used for small amounts of chemicals and specialized biological reagents. For example, enzyme and nucleic acid concentrations are often given as weight per volume (for example, 1 µg/mL DNA).
Molarity is the most common unit of concentration in the biotechnology lab. The molarity of a solution is defined as the number of moles of solute per liter of solution. The symbol for molarity is M, but it can also be written as moles/Liter, or mol/L. A mole of any element always contains 6.02 X 10²³ (Avogadro’s number) atoms. Because some atoms are heavier than others, a mole of one element weighs a different amount than a mole of another element. The weight of a mole of a given element is equal to its atomic weight in grams. Consult a periodic table of elements to find the atomic weight of an element. For example, one mole of the element carbon weighs 12.0 g.
Example:Using a periodic table, calculate the molar mass of chromium oxide (CrO2).The atomic weight of chromium is 52.00, and that of oxygen is 16.00. You must count the oxygen twice because there are two per formula unit of chromium oxide.52.00 + 2(16.00) = 84.00 g/mol
Practice:Using a periodic table, calculate the molar mass of potassium sulfate (K2SO4).
38
BIOL1414 Lab Manual Austin Community College 10th Edition, Spring 2011
PART A: MAKING MOLAR SOLUTIONS
We can’t directly measure moles, but we can measure mass. To calculate the mass of a chemical needed to prepare a given volume of a solution of desired molarity, you must convert number of moles to mass, using the chemical’s molar mass as a conversion factor.
Mass = molarity x volume x molar mass
? g = moles/liter x L x g/mole
Don’t forget to convert mL to L, if necessary. Example: To prepare 100 mL of 1 M NaOH (FW 40.0),
g = 40 g/mol x 1.0 mol/L x 0.1 Lg = 4 (dissolve 4 g of NaOH in 100 mL water)
Practice:How many grams of NaCl would you need to prepare 0.5 L of a 0.10 M solution? The molar mass of sodium chloride is 58.44 g/mol.
In this exercise, you will prepare two solutions of given molarity.
Materials
Each group Class Shares150-mL beaker 10 mL graduated cylinder 100-mL graduated cylinder or volumetric flaskglass stirring rodmasking tape or labeling tapepermanent markergoggles
Calcium chloride – CaCl2 • 2H20Magnesium sulfate – MgSO4 • 7H2Obalances with SOPsspatulasweigh boatsparafilmscissors stir plate or stirring hot platestir barsglovesperiodic table
Procedure *denotes a step that must be checked by instructor before continuing
1. *Calculate the number of grams needed to make 100 mL of a 2.00 M solution of calcium chloride. Use the formula in the introduction. Show your calculations in the prelab notes section. Refer to Appendix C for information on labeling solutions and filling out the appropriate solution prep forms.
2. Calibrate and use a balance to measure this amount of calcium chloride in a weigh boat or on weighing paper; leave the balance clean. Unless each group has its own stock of chemical, leave the container at the balance for other groups to use. If you are the last to use the chemical, close the container and return it to the cart.
39

BIOL1414 Lab Manual Austin Community College 10th Edition, Spring 2011
3. Measure 50.0 mL of dH20 (deionized water) with a 100-mL graduated cylinder and add it to a 150-mL beaker. Label the beaker “CaCl2” with labeling tape and a Sharpie. Add the calcium chloride you weighed out in step 2. You will dissolve the solute (calcium chloride) in less than the final amount of solvent (water) because the solute may displace some water. If you had started with 20 g of water, after dissolving the calcium chloride you would probably have had slightly more than 20 g of solution, making your molar concentration slightly lower than 2.00 M.
4. Stir the solution with a glass-stirring rod or add a stir bar and place the solution on a stir plate until the entire solid has dissolved. If the solution you are making is nearly saturated, you may not be able to dissolve all of the solute in half the final volume of water as instructed. If this happens, you may want to add more water. Try not to add more than 80% of the final volume (i.e. if your final volume is 100 mL, try not to use more than 80 mL to dissolve the solute) before the solute dissolves.
5. Bring the solution to its final volume by returning the solution to a 100-mL graduated cylinder or 100 mL volumetric flask (labeled with the name of the chemical and the concentration, and your initials and the date). When the volume approaches 100 mL, slowly and carefully add more water with a wash bottle, watching the meniscus (the rounded top surface of the water). The lowest part of the meniscus should line up with the 100-mL mark. This step is often abbreviated BTV (bring to volume). The beaker used to dissolve the solution does not measure accurately enough to be used for bringing the solution to volume.
6. *Transfer the solution to a labeled, 150-mL Erlenmeyer flask. You can transfer the label from the graduated cylinder or volumetric flask if you wish. Never put a solution into an unlabeled container, and always label legibly. Cover the Erlenmeyer flask with parafilm. Cut a square of parafilm with scissors, center it over the mouth of the flask, and stretch and wrap the film around the mouth. Make sure there are no holes in the film.
7. *Repeat steps 1 – 6 to make 100 mL of a 2.00 M solution of magnesium sulfate.
PART B: PARALLEL DILUTIONS
Dilution consists of adding additional solvent (usually water) to a solution to reduce its concentration. There are many ways of expressing dilution factors.
a) Combining one part food coloring with 9 parts water dilutes the food coloring to 1/10. This means that there is one part food coloring in 10 parts total volume. The denominator an expression such as 1/10 is the total volume of the solution.
b) The food coloring dilution in part (a) can also be referred to as 1:9 food coloring to water. The colon (:) means “to.” A 1:10 food coloring to water dilution would be 1/11, not 1/10, because the total number of parts is 11.
c) Frequently, stock solutions in biotechnology labs are concentrated and must be diluted before using. A buffer that is ten-fold more concentrated than the usable concentration is referred to as a 10X solution. One must dilute a 10X solution by a factor of 10 (by adding 1 part of the 10X stock to 9 parts of solvent) before using.
d) In dilutions, parts can be of any unit. If you combine 1 mL food coloring with 1mL water, you are using the same dilution factor (1:1, or ½) as the person who combines 1 ounce of food coloring with 1 ounce of water. If you combine one ounce of food coloring with one liter of water, the dilution factor is not 1:1, because the units are not the same.
To dilute a more concentrated stock solution to a less concentrated solution, the following formula is used:
C1V1 = C2V2 C1 = original concentration (of stock solution)C2 = final concentration (of diluted solution)V1 = original volume (to be taken from stock solution)V2 = final volume (of diluted solution)
Example: Calculate how many mL of a 1.0 M stock solution of NaCl are needed to prepare100 mL of a 0.050 M solution (also referred to as 50 mM).
40
BIOL1414 Lab Manual Austin Community College 10th Edition, Spring 2011
C1V1 = C2V2
(1.0 M)( ? mL) = (0.050 M)(100 mL)mL = (5.0 M)(mL)
1.0 MmL = 5.0
The original volume (V1) is almost always the quantity you must calculate, since you usually know the stock concentration and the final volume and concentration desired (if the final volume is not given, you should estimate how much you will need for the task at hand). It is not necessary for the volume to be measured in Liters in this formula, but the units for V1 and V2 must be the same.
In this part of the lab, you will first make dilutions of the calcium chloride solution you prepared in Part A. Then you will combine small amounts of these dilutions with the stock magnesium sulfate to precipitate calcium sulfate. The mass of precipitate formed in each case can be plotted on a graph, which, if linear, will show that your dilutions were accurately prepared.
Materials
Each group Class Shares10 mL graduated cylinder 5 mL pipette10 mL pipette100 – 1000 µl micropipet (or 1 mL pipet)glass stirring rodtest tube rackpipette bulb or fillermicrofuge tubes (3)microfuge tube rackmasking tape or labeling tapepermanent markergogglesgraph papertest tubes (2)Pasteur pipettes and bulbs, or beral pipettes250 mL beaker
Magnesium sulfate – MgSO4 • 7H2O1.00 M HClbalances with SOPsspatulasweigh boatsvortexerpH meters with SOPspH standard buffersparafilmscissors stir plate or stirring hot platestir barsgloves
Procedure
1. *Calculate the volume of the calcium chloride stock solution made in Part A needed to make 10.0 mL of a 1.50 M solution. Show the calculations in your notebook.
2. Measure 10 mL of deionized water in a graduated cylinder and transfer to a test tube. Mark the test tube at the meniscus and then pour the water out. You have just created a volumetric device. Label the test tube appropriately and prepare the 1.50 M solution in it, mixing with a glass rod or vortexer.
3. *Repeat steps 1 and 2 to make 10.0 mL of a 0.50 M solution of calcium chloride.
4. Label 3 microcentrifuge tubes 1, 2, and 3. Use the same labeling system as you did in the micropipetting lab.
5. Weigh each tube and record the empty weight in a data table in your notebook. This will be subtracted from the mass of the tube when it contains a pellet of calcium sulfate to obtain the mass of the pellet.
6. Pipette 500 µl of 2 M magnesium sulfate stock solution into each tube.
41

BIOL1414 Lab Manual Austin Community College 10th Edition, Spring 2011
7. Add the following to the indicated tubes:Tube 1—500 µl of 2 M CaCl2
Tube 2—500 µl of 1.5 M CaCl2
Tube 3—500 µl of 0.5 M CaCl2
8. Spin the tubes in a microcentrifuge for 5 minutes or until a solid pellet is formed which does not dislodge when the tube is turned upside down. Don’t forget to balance the tubes by placing them across from each other and filling a tube with an equal amount of water to balance uneven numbers of tubes. If you are spinning your tubes with those of another group, be sure to mark them so you can distinguish your tubes from theirs. A simple dot or line will suffice, but your initials are better.
9. Discard the water by turning the tube upside down over the sink and then lightly tapping the tube against the edge of the sink to remove more water. If the pellet is well compacted, this should not dislodge it.
10. Weigh the tubes with pellets and subtract the weight of the empty tube to obtain the mass of precipitate formed. Record this information in your data table. The measure is not entirely accurate because there will be some water clinging to the pellet and tube even after most of it is poured off. Leaving the tubes upside down to dry overnight, or drying them in an oven, would produce more accurate results. This mass should be proportional to the concentration of calcium chloride. In the most dilute solution, there are fewest calcium ions to react with the sulfate ions in the other solution. Therefore, the smallest mass of insoluble calcium sulfate should be formed from this dilution.
11. Discard the stock solutions down the sink with plenty of water unless your instructor asks you to save them.
PART C: SERIAL DILUTIONS
Serial dilutions are dilutions made from dilutions. They are made for one of the following reasons:1) a number of dilutions of the same dilution factor are desired
Example: You want to make a series of solutions with a repeating dilution factor of 2; in other words, the concentration of each diluted solution should be half that of the dilution before it (such as 2 M, 1 M, 0.5 M, 0.25 M).
2) the final concentration desired is so small that the original volume (C1) cannot be accurately measured
Example: You want to prepare 1 mL of a 5 mM solution from a 10 M stock solution.
To find C1, you would first convert millimolar to molar so that the concentration is the same on both sides of the equal sign. 5 mM = 0.005 MThen you would use C1V1 = C2V2.
(10 M)( ? mL) = (0.005 M)(1 mL)? mL = (0.005 M)(mL) 10 MmL = 0.0005 mL (or 0.5 µl)
There are micropipetters that will measure 0.5 µl, but they are not available in every lab. Moreover, this small a volume is hard to measure accurately, since it is far smaller than a single drop of liquid. It is far more accurate to make a series of 1/100 or even 1/10 dilutions from a highly concentrated stock.
For serial dilutions:Dilution factor = (V1 + V2 ) / V1
Where V1 is the volume of the solution being diluted V2 is the volume of solvent used to dilute the solution
(Note: V2 is also the ending volume of the diluted solution)
42
BIOL1414 Lab Manual Austin Community College 10th Edition, Spring 2011
Example: You want to do a series of 5-fold dilutions, each with an end volume of 40 mL.
Dilution factor = (V1 + V2 ) / V1
5 = (V1 + 40 mL) / V1
5 V1 = (V1 + 40 mL )
4 V1 = 40 mL
V1 = 10 mLV2 is both the volume of solvent used in each dilution and the final volume of that dilution. Why? Once you have made a dilution by adding V1 mL of solution to V2 mL of water, you remove V1 mL of that dilution to make the next one. Thus, you always end up with V2 mL in each dilution but the very last one.
In this part of the lab, you will serially dilute a hydrochloric acid solution and check the accuracy of your preparations with pH measurements.
Materials
Each group Class SharesFour 100-mL beakers10- and 50-mL graduated cylinders5- and 10-mL pipettes100 – 1000 µl micropipetterpipette bulb or filler glass stirring rodlabeling tapepermanent markergoggles
1.00 M HClpH meters with SOPspH standard buffers and three 50-mL beakers250-mL waste beakergloves
Procedure
1. Pour 20 mL of a 1 M solution of hydrochloric acid (HCl) into a labeled 50-mL beaker. Always wear goggles and gloves when working with acids. You may reuse beakers from Part A, but be sure to clean them thoroughly with soap solution rather than just rinsing.
2. *Calculate the volumes of acid and water needed to prepare 50 mL each of a 0.1 M solution, a 0.01 M solution and a 0.001 M solution through serial dilution. Show the calculations in your notebook.
3. Label 3 small beakers with the concentrations from step 2 and add the correct amount of water to each one, using the appropriate measuring device. Remember the AAA rule (always add acid) when working with acids. Never add water to acid, always add acid to water.
4. Add the correct amount of acid to each beaker and stir with a stirring rod.
5. Measure the pH of each solution using the pH meter. Before you use the pH meter, calibrate it using the buffers and SOP provided.
6. Pour your acid solutions into a properly labeled waste container. Clean up your work area and the area around the pH meters.
43

BIOL1414 Lab Manual Austin Community College 10th Edition, Spring 2011
Making Molar Solutions and DilutionsAnalysis Name______________________________
In part C, the last dilution made was the 0.001 M solution. How many mM is this? ____________If you had made this solution from the 1 M stock instead of the 0.01 M, how much stock would you have had to use?
Describe how to make 100 mL each of 0.4 M, 0.2 M and 0.1 M solution from a stock of 0.8 M. Would you use parallel or serial dilution for this?
Describe how to make 20 mL each of 1.0 M, 400 mM and 100 mM from a 2 M stock solution. Would you use parallel or serial dilution for this?
Draw a graph to compare molar concentration of CaCl2 to amount of precipitate produced (ppt) as shown by the weight of your pellet. Use a separate sheet of graph paper, and refer to the Appendix E for graphing guidelines. Draw a best-fit line and calculate the slope of the line.
Use double-log paper to draw a graph to compare molar concentration of HCl to pH. The log grid is on the Y-axis (pH) and the linear grid is on the X –axis (1/10 dilutions). See Appendix E for guidelines for graphing with a semilog plot and for using Microsoft Excel to plot a graph.
AT this point it is assumed that you know it is extremely important to keep all equipment clean, report when it is not working, and to clean up after yourself. A laboratory technician that does not take care of equipment will not last long on the job, or that matter, in this program. “Cleaning up after yourself” will not be listed as an objective in future labs.
44
BIOL1414 Lab Manual Austin Community College 10th Edition, Spring 2011
Total RNA Isolation From Alfalfa Sprouts(adapted from Ambion’s RNAqueous RNA isolation kit)
Objectives
Your performance will be satisfactory when you are able to: Understand basic structure and function of RNA Investigate the central role of RNA in gene expression and regulation Appreciate the importance of RNA in research and in the biotechnology and diagnostic/therapeutic industries Demonstrate safe and proper lab skills including preparation, careful attention to detail, record keeping, and
teamwork Demonstrate safe and proper use of lab equipment including micropipettors, microcentrifuge, and
electrophoresis equipment Isolate RNA from fresh alfalfa sprouts using Ambion’s RNAqueous kit Analyze RNA samples prepared in the lab by comparing their appearance in a denaturing agarose gel to known
RNA samples from different species and to molecular size markers
Introduction
Importance of RNA
RNA provides the link between the genetic information stored in DNA and the expression of that information through protein synthesis. It is the central piece of the central dogma. The central dogma is often written as DNA RNA protein and represents the flow of genetic information in cells. All cells store their genetic information as a sequence of nucleotides in long double strands of DNA. RNA molecules serve as intermediates to transport, regulate and translate the information from a sequence of DNA nucleotides to a sequence of amino acids. The chains of amino acids formed by the process of translation are proteins, and they are not only the building blocks of cells and organisms, but are also the regulators of almost every cellular and bodily function. In the narrowest sense, the segment of DNA that codes for a specific protein is called a gene.
Think of all the different types of cells in your body; long, branching nerve cells, bone cells in their hard matrix, muscle cells that can contract to cause movement, and many other cell types. Think of all the ways your cells have changed from the time before you were born to the present. You might not expect all these different types of cells, with all their different needs, in all their stages of development, to carry the same genetic information, but they do. All your cells have the same DNA and the same genes. The reason that cells can differentiate into various types of cells with wide ranging functions is that they can regulate the expression of their genes. Only the genes that are required by a particular cell, at a particular time, are transcribed into RNA and translated into functional proteins.
In theory, gene expression can be controlled at any stage in the path from DNA to RNA to protein. For example, there are stretches of regulatory DNA (e.g. promoters and enhancers) that act as switches to control the expression of nearby genes. The presence or absence of a particular protein(s) will turn the switch on or off. RNA also regulates gene expression in many ways. It can be modified in ways that affect its ability to make proteins. It can be spliced, edited, or have parts added to it. Its transport and localization in the cell can be controlled. Even the rate of RNA formation and degradation can be regulated. These RNA control processes generally require regulatory proteins and/or regulatory RNA molecules, and they can be very simple or very complex.
Basic Structure and Function of RNA
All of the RNA from a cell is referred to as “total RNA”. Total RNA mainly contains three types of specialized RNA molecules. They are messenger RNA (mRNA), transfer RNA (tRNA), and ribosomal RNA (rRNA). Each of these RNA types has a unique structure related to its function.
mRNA is copied or transcribed as a single strand from a portion of DNA that represents a gene. It is essentially a copy of that gene, containing the same nucleotide sequence as the DNA, except that ribonucleotides (rNTPs) are used instead of deoxyribonucleotides (dNTPs). The mRNA then carries the genetic information for that particular gene to the
45

BIOL1414 Lab Manual Austin Community College 10th Edition, Spring 2011
ribosomes where the information will be translated into protein. The genetic code is made up of sets of three nucleotides called codons. Each codon corresponds to an amino acid, or to a translation start or stop signal. mRNA is often modified greatly during or after transcription, especially in eukaryotic cells (e.g. splicing, capping, polyadenylation). The size of mRNA will vary depending on the size of the gene and on any modifications to the RNA that take place after transcription.
tRNA is also involved in protein synthesis in the ribosomes. It takes the genetic message from mRNA (the sequence of codons) and translates it into the corresponding amino acid sequence. It is a small (65-110 nucleotides), highly structured molecule with a set of three nucleotides on one end that represent an anticodon. Each tRNA anticodon is complementary to an mRNA codon. The other end of tRNA molecules is designed to carry the amino acid that corresponds to its anticodon. A good animation of the process of translation can be found at:
www.bioweb.uwlax.edu/GenWeb/Molecular/Theory/Translation/translation.htm
Table I. rNRA Sizes in Various SpeciesSpecies rRNA Size (kb)
Human 18S28S
1.95.0
Mouse 18S28S
1.94.7
Drosophila melanogaster*
18S28S
2.22.8
Tobacco Leaf 16S18S23S25S
1.51.92.93.7
Yeast 18S26S
2.03.8
E. coli 16S23S
1.52.9
* D. melanogaster RNA bands tend to run at approximately 1.7 and 2.0 kb instead of at their true sizes in a denaturing gel. This is because the 28S component is split in two by the denaturing process. One of the pieces runs with the 18S component (they form one band), and the other runs by itself at a slightly faster rate.
Applications of RNA Technology
Isolation of total RNA is typically a preliminary step in many research settings. Since each mRNA molecule carries the information from a gene, the mRNA component of total RNA is often the focus of studies involving RNA. Several techniques are commonly used to analyze mRNA. The earliest technique, which is still widely used today, is Northern blotting. It consists of separating mRNA on a denaturing agarose gel and transferring it to a membrane. Specific sequences can then be hybridized to radioactive or fluorescent probes to reveal the presence and size of specific mRNAs. A technique called reverse transcription (RT) is used to copy mRNA into DNA; DNA produced this way is known as complementary DNA (cDNA). cDNA represents all of the genes actively expressed in the sample being
46
Ribosomes are small organelles made of proteins and rRNA. The ribosomes are complex molecular machines that catalyze the creation of a polypeptide chain on a mRNA template, using tRNAs and various protein co-factors. The proteins they produce then carry out the actual expression of the genetic trait (the phenotype). The ribosomes of both eukaryotic and prokaryotic cells consist of two subunits. The rRNA components of these two subunits vary in number and size from species to species and thus migrate at different speeds in a denaturing agarose gel.

BIOL1414 Lab Manual Austin Community College 10th Edition, Spring 2011
studied. cDNA can be amplified by Polymerase Chain Reaction (PCR) or it can be cloned into cells to create a “library” of expressed genes. This procedure is used to discover genes. Alternatively, cDNA can be labeled with fluorescent or radioactive tags, and then hybridized to an array of thousands of gene-specific DNA sequences that have been immobilized in a grid pattern (a DNA microarray). Comparison of the hybridization patterns of labeled cDNA probes from different RNA sources (for example drug-treated vs. normal tissue) can reveal which genes are expressed differently in the two samples.
Imagine the possibilities when RNA analysis techniques are applied to humans. Just as genetic screening is used to search for abnormal gene sequences, RNA analysis allows researchers to look for abnormal gene expression. These techniques are the foundation for understanding gene expression and its regulation, and lead the way towards novel diagnostic and therapeutic technologies.
Isolation of RNA: Precautions and Expected Results
The chemical structure of RNA is very similar to that of DNA, but the minor differences between the two result in a great difference in their behavior. RNA has an extra –OH group in the ring of its ribose sugar that makes it more sensitive to base catalysis (abstraction of hydroxyl proton). Because of this, RNA is less stable and more easily degraded than DNA. Also, because RNA is not double-stranded like DNA, its nucleotide bases are more exposed than in DNA. RNase enzymes, which degrade RNA, are very common in the environment, so special care must be taken to avoid them when working with RNA. Precautions include using fresh laboratory gloves to protect the RNA from nucleases present on the skin and using RNase-free reagents. RNaseZap, an RNase decontamination solution, is ideal for cleaning work surfaces, pipetters, and equipment. RNases are also found in living cells, so when working with biological samples it is important to inactivate RNases before they have a chance to degrade the RNA in the sample. To do this, samples should be either disrupted rapidly and thoroughly in a lysis solution especially formulated for RNA isolation, or they should be frozen or collected in RNAlater, a RNA stabilization solution, as quickly as possible after they are obtained from the source.
The vast majority (~85%) of RNA in the cell is ribosomal RNA, and this is what can be seen on a gel after size separation by denaturing gel electrophoresis. The main rRNA components of the two ribosomal subunits form the bands that are usually predominant in the gel. mRNA is present, but it appears as a hazy background smear because of its variable size (0.5-10 kb) and its relatively small representation (~2%) in the total RNA. tRNA and other small RNA molecules makes up 10-15% of total RNA but are not efficiently resolved on denaturing agarose gels.
Intact total RNA run on a denaturing gel will have sharp, clear rRNA bands (e.g. 28S and 18S in mouse and rat). Although they are present in equimolar amounts, the 28S rRNA band is twice the size of the 18S rRNA band. Thus it will be approximately twice as intense as the 18S rRNA band when stained with ethidium bromide. This 2:1 ratio (28S:18S) is a good indication that the RNA sample is completely intact. Partially degraded RNA will have a smeared appearance, will lack the sharp rRNA bands, or will not exhibit the 2:1 ratio of high quality RNA. Completely degraded RNA will appear as a very low molecular weight smear. Inclusion of RNA size markers on the gel makes it possible to determine the size of any bands or smears to be determined and will also serve as a good control to ensure the gel was run properly.
47
BIOL1414 Lab Manual Austin Community College 10th Edition, Spring 2011
Extract and Purify RNAThe first step in RNA extraction is to break down cells or tissue so that the nucleic acids are released from the cells. We will use a Lysis/Binding solution that chemically disrupts cells without destroying their nucleic acids. The Lysis/Binding solution contains a detergent, a chaotrope, and a reductant. The detergent breaks down the hydrophobic membranes that surround cells and some cellular organelles. Its action is similar to that of dishwashing detergent on greasy and oily foods. The chaotrope causes “chaos” in the cell by unfolding and deactivating proteins and other biomolecules. The reductant binds to and inactivates RNases, thus preserving RNA during the tissue disruption process. The cellular breakdown is aided by grinding or homogenizing the tissue with a small pestle that fits in a microcentrifuge tube.
The next step involves the addition of ethanol to the lysate. Nucleic acids (both DNA and RNA) are insoluble in 100% ethanol. At a concentration of 64% ethanol, RNA is most soluble and the diluted ethanol is used to maximize the ratio of RNA to DNA that will bind to the filter.
The final step in the procedure purifies the RNA away from all of the other components of the cell. This protocol uses small filter made of glass fibers to adsorb RNA molecules. The lysate/ethanol mixture is passed through the filter by centrifugation. The filter is washed with different solutions that remove unwanted components of the cell lysate from the filter. Finally, the purified RNA is eluted from the filter using a buffer solution (Elution Solution) in which the RNA is soluble. The elution solution also contains ingredients to protect and preserve the purified RNA in solution.
Agarose Gel Electrophoresis
One of the most powerful techniques for separating biomolecules is gel electrophoresis. Any separation technique that involves the migration, under the influence of an electric field, of a charged particle through a matrix is considered electrophoresis. Charged particles are attracted towards the electric pole of opposite charge. In gel electrophoresis, the matrix is a solid gel, which controls the rate of migration of particles. The rate of migration is decreases with increasing size of particles and concentration of the gel. In other words, if a particle is large and the concentration of the gel is high, its migration will be slow. Thus, one can separate uniformly charged molecules on the basis of size. RNA comes in many different three-dimensional shapes caused by intramolecular bonding interaction. Some shapes may have an advantage in moving through the agarose obstacle course. In order to accurately compare RNA sized in the gel, these intramolecular bonds must be broken (or denatured) so that the RNA takes on a random coil shape. This allows us to compare the sizes more accurately, because all the molecules now have the same shape. There are many denaturing agents, but the most common for RNA are formaldehyde and glyoxal.
The gel used to separate large molecules of nucleic acids is agarose, a complex polysaccharide isolated from seaweed. A buffer, usually consisting of an aqueous solution of organic and inorganic salts, conducts the electrical current between the positive and negative terminals.
48

BIOL1414 Lab Manual Austin Community College 10th Edition, Spring 2011
Stains, such as methylene blue, can be added to visualize the bands of DNA or RNA that form on the gel after electrophoresis. In this experiment, we will use ethidium bromide, a stain that causes the RNA bands to fluoresce when excited with ultraviolet light.
Materials
RNaseZapRNAqueous kit, including:
Lysis/binding solution64% ethanolWash solution #1Wash solution #2/3Filter cartridges and collection tubesElution solutionFormaldehyde loading dye
Plant RNA Isolation Aid (Ambion)Alfalfa sprouts
Heat block set at 70-80°CIce bath100% ethanolRNase-free microcentrifuge with pestleRNase-free microcentrifuge tubes MicrocentrifugeMicropipettors and RNAse-free filter tips
DEPC-treated waterHorizontal electrophoresis chamberGel casting trays, bumpers and combsAgaroseMOPS buffer, 10X
49

BIOL1414 Lab Manual Austin Community College 10th Edition, Spring 2011
Formaldehyde, 37%Ethidium bromideTotal RNA standards or samplesRNA size marker
Procedure
NOTES: Use RNAse Zap to deactivate RNAses on your lab bench, gloves, tube racks, micropipettors, and other materials.
RNA is unstable and degrades rapidly. Work quickly.
Part I: Extraction of RNA from Drosophila
1. Add 80 μL of Elution solution to a microcentrifuge tube and place in a heat block set at 70-80°C (to be used in a later step).
2. Obtain a sample of sprouts and determine its mass (should be approximately 20 mg).
3. Add 10-12 volumes (or at least 200 μL) of Lysis/Binding solution to the sample. For example, if the sprout sample weighs 20 mg, then use 240 μL of the solution.
4. Add a volume (in uL) of Plant RNA Isolation Aid equal to the number of milligrams of your sample. For example, if your sample weighs 20 mg, then use 20 uL of Isolation Aid.
5. Homogenize by grinding the microfuge pestle into the sample tube using a twisting motion. Process until very little particulate matter is visible.
6. Remove and discard the pestle and close the tube. Centrifuge for 5 minutes at top speed (at least 10,000 x g) to pellet cellular debris.
7. Carefully pipette the supernatant out of the tube, being sure not to pipette any solids out. Dispense the supernatant into a fresh tube and discard the pellet.
8. Add an equal volume of 64% ethanol to the lysate and mix gently by inverting several times.
9. Apply the mixture from the previous step to a filter cartridge inside a collection tube. Do not apply more than 700 μL to the filter.
10. Centrifuge at RCF 10,000 x g for one minute. Discard the flow-through but reserve the collection tube for the washing steps.
11. Apply 700 μL Wash solution #1 to the filter cartridge. Centrifuge at RCF 10,000 x g for one minute. Discard the flow-through but reserve the collection tube.
12. Apply 500 μL Wash solution #2/3 to the filter cartridge. Centrifuge at RCF 10,000 x g for one minute. Discard the flow-through but reserve the collection tube.
13. Repeat with a second 500 μL aliquot of Wash solution #2/3.
14. After discarding the flow-through, centrifuge for 10-30 seconds to remove the last traces of wash solution.
15. Place the filter cartridge into a fresh collection tube. Apply half of the preheated Elution solution (40 μL) to the center of the filter and close the cap of the tube.
16. Centifuge at RCF 10,000 x g for 30 seconds at room temperature.
17. Add another 20 μL of Elution solution and repeat the previous centrifugation step in the same tube.
50

BIOL1414 Lab Manual Austin Community College 10th Edition, Spring 2011
Part II: RNA Electrophoresis
1. Heat 1.0 g agarose in 72 mL DEPC-treated water until dissolved, then cool to 60°C.
2. Add 10 mL 10X MOPS running buffer and 18 mL 37% formaldehyde.
3. Pour the agarose solution into a 7cmx7cm casting tray containing a comb with 25 μL wells (or larger). Allow to set at room temperature for 20 minutes.
4. Add 20 μL of RNA prep into a microcentrifuge tube and add formaldehyde loading dye (containing 10 μg/mL ethidium bromide) to a concentration of 0.5X. Pipette up and down to mix and pulse spin to collect liquids in the bottom of the tube.
5. Heat all samples, standards, and markers at 65-70°C for 5 minutes in a heat block. If heating in a water bath, make sure the tube caps stay above water in a floating tube holder to avoid contamination.
6. Remove comb and bumpers from the gel and place in the electrophoresis tank. Add 1X MOPS buffer to cover the gel by a few millimeters.
7. Load prepared RNA samples into the gel, noting each sample’s location. Each gel must also contain at least one lane with Millenium markers and one lane with a RNA control (standard solution or previously analyzed sample).
8. Place the cover on the chamber in the correct orientation and connect leads to a power supply. Set the power supply at 125 volts and allow to run for about 25 minutes, or until the bromophenol blue tracking dye is about 2/3 of the way down the gels. Watch the gels carefully after about 10 minutes to ensure that it does not run too long.
9. Visualize RNA bands by placing gels on a UV transilluminator. Photograph gels using the gel documentation system.
51

BIOL1414 Lab Manual Austin Community College 10th Edition, Spring 2011
RNA Isolation
Analysis Questions Name____________________________
1. Describe at least two things that you did to improve your accuracy or efficiency in the lab. You may include things that you did to prepare for the lab, how you set up or handled your materials, or anything else that you can think of.
2. What is the function of the Lysis Solution?
3. What effect does ethanol have on nucleic acids? How is this helpful when we are trying to isolate them?
4. List any problems or questions that you had with the RNA isolation.
5. Describe your results. Include a neat, labeled scale drawing of your gel. Your description should include how many bands you see for each sample, the relative intensity of the bands (which ones were darker or lighter), and the relative location of the bands in the gel.
6. Use the RNA marker lane and figure 2 from the background information to estimate the sizes (in kilobases) of the RNA in the bands of the sample you prepared. Do they match the any of the three known samples?
7. Write two ways that you can modify the lab to test a variable.
8. Briefly describe the processes involved in expressing the information found on a gene (the steps from DNA genotype to phenotypic trait).
9. Explain how your body can have different cell types with different functions when all the cells have the same DNA.
10. What is the relationship between an mRNA codon and a tRNA anticodon? How are they related to amino acids?
11. Describe the general structure of tRNA.
12. What is the function of ribosomes?
13. In this lab, you learned that RNA is a much more fragile molecule than DNA. What is the chemical basis for this? Why does it make sense for cells to have very stable DNA and less stable RNA?
52

BIOL1414 Lab Manual Austin Community College 10th Edition, Spring 2011
Transformation of E. coli with a Recombinant Plasmid(adapted from Bio-Rad’s pGLO Transformation Kit)
Objectives
Your performance will be satisfactory when you are able to: use sterile technique make E. coli cells competent for transformation transform E. coli with plasmid DNA select for recombinant clones on antibiotic selection plates analyze and troubleshoot the results of a transformation experiment
Introduction
DNA recombination or molecular cloning consists of the insertion of DNA fragments from one type of cell or organism into replicating DNA of another type of cell. The cell is said to be transformed, and many copies of the inserted DNA can be made in the cell. If the inserted fragment is a functional gene coding for a specific protein, many copies of that gene and translated protein could be produced in the host cell if there is a promoter preceding the site of insertion. This process has become important for the large-scale production of proteins (Bacillus thurengiensis toxin, insulin, human growth hormone, Factor VIII, etc.) that are of value in agriculture, medicine, and other sciences.
While transformation is a relatively rare event under natural conditions, it is possible to manipulate conditions to make transformation frequencies higher in the laboratory. For example, plasmids can be used as vectors to carry fragments of DNA into bacterial cells. Plasmids are closed, circular DNA molecules that are capable of autonomous replication within a host cell. There are many naturally occurring plasmids, but the plasmids used in the biotechnology laboratory are generally those that have a high copy number in host cells. After the host cell has been transformed with a high copy number plasmid, the plasmid will multiply and be maintained at levels of hundreds to thousands of copies within each cell.
Plasmids have been genetically engineered to contain a cluster of restriction enzyme sites within a short region of the plasmid called a multiple cloning site, or MCS. This allows for insertion of DNA fragments produced from a restriction digest to be incorporated into plasmid DNA at its multiple cloning site after digestion with the same restriction enzyme. After allowing the sticky ends of fragments of target DNA to anneal to the complementary sticky ends of the plasmid, the DNA insert is fixed in place with covalent bonds by DNA ligase, forming a recombinant DNA (rDNA) plasmid. In this experiment, the plasmid contains a gene coding for green fluorescent protein (GFP) isolated from a bioluminescent jellyfish (Aequorea victoria).
The plasmids used to transform bacterial cells also have a selectable marker gene. This gene codes for a protein that allows the scientist to distinguish cells that have been successfully transformed by plasmid DNA from those that have not. The most common selectable markers are antibiotic resistance genes, which allow for selection of transformants by growth on media containing the antibiotic. Non-transformed cells will die and transformed cells will survive under these conditions. In this lab exercise, a plasmid with an antibiotic resistance gene for ampicillin (amp) is used; the ampicillin resistance gene codes for an enzyme that destroys the ampicillin in the surrounding growth media.
Bioluminescence by Green Fluorescent Protein (GFP)
Bioluminescence due to microorganisms can be observed walking on the beach at night, when flashes of light originating from glowing plankton can be seen in the waves. Bioluminescent molecules are also found in some jellyfish (such as A. victoria) that have a specialized photogenic cell located in the base of the jellyfish umbrella. A bioluminescent protein called green fluorescent protein (GFP) found in the cell causes the luminescence. This protein does not require substrates, other gene products, or cofactors to produce light. When exposed to ultraviolet light, GFP will emit a bright green light.
53

BIOL1414 Lab Manual Austin Community College 10th Edition, Spring 2011
GFP contains 238 amino acids and has a molecular weight of approximately 40,000 daltons. The chromophore, the section of the protein that actually fluoresces, is part of the primary structure of the protein. It is a tripeptide occupying positions 65 to 67 in the protein sequence, is cyclic, and is composed of the amino acids serine, tyrosine, and glycine. The importance of protein folding is clearly demonstrated with GFP, since the protein is fluorescent only when in its natural folding conformation.
Making bacterial cells competent for uptake of DNA
The efficiency of transformation can be improved by carefully managing conditions before and during the transformation. For example, the choice of bacteria and plasmid can affect the efficiency of transformation, because many plasmids have a narrow host cell range and will only transform bacterial cells of a single species. Transformation frequencies are considerably higher when using fresh bacterial cells taken from actively growing cultures. In addition, bacterial cells can be made competent for DNA uptake by pretreatment with chloride salts of divalent cations such as calcium, followed by a cold-shock and a heat-shock step. The metal ions and temperature changes affect the structure and permeability of the cell wall and cell membranes such that DNA molecules are able to pass through. Cells that are allowed to recover in non-selective growth media and at their optimal growth temperature following transformation also have higher transformation frequencies. The recovery time allows the transformed cell to amplify the plasmids and to express the antibiotic resistance gene required for survival on the antibiotic-containing selection medium.
LABORATORY SAFETY
The Escherichia coli used in this experiment is not considered a pathogen, but E. coli bacteria colonize the intestinal tracts of animals. Although it is rarely associated with any illness in healthy individuals, it is good practice to follow simple safety guidelines in handling and disposal:
1. Gloves and goggles should be worn at all times.2. Wipe down the lab bench with 10% bleach before starting the lab and before leaving the laboratory.3. All materials, including plates, pipettes, loops and tubes that come in contact with bacteria should be autoclaved or
disinfected with bleach before disposal in the garbage.4. Wash hands thoroughly with soap and water after removing gloves.
Materials
Each group: Class shares:Micropipettors and sterile tipsSterile microcentrifuge tubesMicrocentrifuge tube racksFloating microcentrifuge racksGlovesSterile inoculating loopsIce water bath1 LB petri plate2 LB/amp petri plates1 LB/amp/ara plate
37˚ C incubator42˚ C water bathHot glovesLong wave UV light sourcepGLO plasmid solutionLB brothSterile 10 mM CaCl2 in distilled water (on ice)10% bleach in a bucket or beaker, or autoclave10% bleach in a wash bottleBiohazard bags and standsOvernight culture of E. coli, grown at 34oC on LB plates
Procedure
A. Transformation of E. coli 1. Label one closed microcentrifuge tube “+pGLO” and another “–pGLO”. Label both tubes with your group’s
name. Place them in a tube rack.
2. Open the tubes and add 250 μL of transformation solution (CaCl2). Place the tubes on ice.
54

BIOL1414 Lab Manual Austin Community College 10th Edition, Spring 2011
3. Use a sterile loop to pick up a single colony of bacteria from the starter plate. Pick up the +pGLO tube and immerse the loop into the transformation solution at the bottom of the tube. Spin the loop between your index finger and thumb until the entire colony is dispersed in the transformation solution. Place the tube back in the tube rack in the ice. Using a new sterile loop, repeat for the –pGLO tube.
4. Examine the pGLO plasmid DNA solution with the UV lamp. Note your observations. Immerse a new sterile loop into the plasmid DNA stock tube. Withdraw a loopful. There should be a film of plasmid solution across the ring. This is similar to seeing a soapy film across a ring for blowing soap bubbles. Mix the loopful into the cell suspension of the +pGLO tube. Close the tube and return it to the rack on ice. Also close the –pGLO tube. Do not add plasmid DNA to the –pGLO tube because it is a negative control tube.
5. Incubate the tubes on ice for 10 minutes.
6. While the tubes are sitting on ice, label your four agar plates on the edge of the bottom (not the lid) as follows: Label one LB/amp plate: +pGLO Label the LB/amp/ara plate: +pGLO Label the other LB/amp plate: -pGLO Label the LB plate: -pGLO
7. Heat shock the sample by transferring both the +pGLO and –pGLO tubes into the 42C water bath for exactly 50 seconds. Make sure the tubes make contact with the warm water. After 50 seconds, place both tubes back on ice. For the best transformation results, the change from the ice (0C) to 42C and then back to the ice must be rapid. Incubate tubes on ice for 2 minutes.
8. Remove the rack containing the tubes from the ice and place on the bench top. Open a tube and, using a new sterile pipet, add 250 μL of LB nutrient broth to the tube, pipet up and down to mix, and reclose the tube. Repeat with the second tube, using a new pipet tip. Incubate the tubes for 10 minutes at room temperature.
9. Tap the closed tubes with your finger to mix. Using a new sterile pipet for each tube, pipet 100 μL of the transformation and control suspensions onto the appropriate plates.
10. Use a new sterile loop for each plate. Spread the suspensions evenly around the surface of the agar by quickly skating the flat surface of a new sterile loop back and forth across the plate surface.
11. Stack up your plates and tape them together. Put your group name and class period on the bottom of the stack and place the stack upside down on the 37C incubator overnight. The plates should be removed after approximately 24 hours and refrigerated until the next class period.
B. Analysis of transformants
1. Count the number of colonies on each plate. A convenient method to keep track of counted colonies is to mark the colony with a marking pen on the outside of the plate as you count it. Observe the plates with the UV lamp and record results.
2. Determine the transformation efficiency using the formula:number of number oftransformants X total volume of cells in L = transformants 100 L of cells total DNA added in g g plasmid DNA
55

BIOL1414 Lab Manual Austin Community College 10th Edition, Spring 2011
Transformation of E. coli with a Recombinant PlasmidAnalysis Questions Name____________________________
1. Exogenous DNA does not passively enter E. coli cells that are not competent. What treatment do cells require to be competent?
2. The recovery broth used in this experiment does not contain ampicillin. Why?
3. Fill out the following table with observations from your experiment: Show your calculations.
Identity of # of colonies transformation appearance of colonies appearance plate per plate frequency / g DNA under white light under UV light
+pGLO on LB/amp
+pGLO on LB/amp/ara
-pGLO on LB/amp
-pGLO on LB
4. Were there any differences between the two +pGLO plates? If so, how can you account for these differences?
5. Were there any colonies on the –pGLO on LB/amp plates? If there were any colonies, how would this change your interpretation of the results that you found on the +pGLO plates?
6. Were there any colonies on the –pGLO on LB plate? If there were no colonies, how would this change the way that you interpret the results that you found on the +pGLO plates?
56

BIOL1414 Lab Manual Austin Community College 10th Edition, Spring 2011
Plasmid Isolation(Adapted from Bio-Rad’s Aurum Plasmid Miniprep Kit)
Objectives
Your performance will be satisfactory when you are able to: understand the structure and function of plasmid DNA demonstrate safe and proper lab skills including preparation, careful attention to detail, record keeping, and
teamwork demonstrate safe and proper use of lab equipment including micropipettors, microcentrifuge, and
electrophoresis equipment demonstrate knowledge of DNA isolation techniques from live organisms make an agarose gel of a specified concentration prepare and load samples onto an agarose gel analyze electrophoretic results
Introduction
The original alkaline lysis method for purifying plasmid DNA from bacterial cultures requires organic reagents and time-consuming steps to obtain high quality DNA. The Aurum plasmid miniprep kit has been optimized for the rapid purification of high-quality, high-yield plasmid DNA. This kit uses the silicon dioxide exoskeleton of diatoms as the DNA binding matrix. This matrix carries a partially positive charge and therefore binds negatively charged nucleic acids. The advantages of this porous substrate include ease of resuspension, high affinity for DNA, simple and efficient processing, elution in an aqueous buffer, and an inherently large surface-to-volume ratio. All of these properties contribute to the highest purity and yields of DNA. Plasmid DNA purified with the Aurum plasmid miniprep kit can be used directly for fluorescent sequencing, cell transfection, electroporation, and enzymatic restriction and modification.
Agarose Gel Electrophoresis
One of the most powerful techniques for separating biomolecules is gel electrophoresis. Any separation technique that involves the migration, under the influence of an electric field, of a charged particle through a matrix is considered electrophoresis. Charged particles are attracted towards the electric pole of opposite charge. In gel electrophoresis, the matrix is a solid gel, which controls the rate of migration of particles. The rate of migration is decreases with increasing size of particles and concentration of the gel. In other words, if a particle is large and the concentration of the gel is high, its migration will be slow. Thus, one can separate uniformly charged molecules (such as DNA) on the basis of size. The gel used to separate large molecules of nucleic acids is agarose, a complex polysaccharide isolated from seaweed. A buffer, usually consisting of an aqueous solution of organic and inorganic salts, conducts the electrical current between the positive and negative terminals. Stains, such as methylene blue, can be added to visualize the bands of DNA that form on the gel after electrophoresis. In this experiment, we will use ethidium bromide, a stain that causes the DNA bands to fluoresce when excited with ultraviolet light. A successful plasmid preparation should appear as a dense band close to the well where it was loaded; a plasmid will not migrate far in a gel due to its large size.
57

BIOL1414 Lab Manual Austin Community College 10th Edition, Spring 2011
Protocol
Day 1: Overnight cultures (to be prepared by instructor or lab assistant)1. Obtain a plate of E. coli pGLO transformants and a labeled tube containing 3 mL Luria broth (LB).
2. Use a sterile inoculating loop to pick up a single transformant colony.
3. Place the loop into the LB and swirl to completely transfer the bacteria.
4. Place in a 37C, vigorously shaking incubator overnight.
Day 2: Isolation of plasmid DNA from bacterial host1. Transfer up to 12 OD•mL of liquid culture to a labeled microcentrifuge tube. Pellet the cells by centrifuging
for one minute at 12,000 rpm. Pour off all of the supernatant.
2. Add 250 μL of the Resuspension Solution and vortex until the cell pellet is completely resuspended.
3. Add 250 μL of the Lysis Solution and mix by GENTLY inverting the capped tube 6-8 times. The solution should become viscous and slightly clear if the cell lysis has occurred.
4. Add 350 μL of the Neutralization Solution and mix by GENTLY inverting the capped tube 6-8 times. A visible precipitate (consisting of cellular debris) should form.
5. Pellet the cell debris for five minutes at 12,000 rpm in a microcentrifuge. A compact white pellet will form along the side or bottom of the tube. The clear supernatant in this step contains the plasmid DNA.
6. Insert a plasmid mini column into one of the 2 ml capless wash tubes supplied. Transfer the supernatant from step 5 to the column. Centrifuge at 12,000 rpm for one minute. The purpose of this step is to bind the plasmid DNA to the column.
7. Remove the spin column from the wash tube, discard the filtrate at the bottom of the wash tube, and replace the column in the same wash tube. Add 750 μL of Wash Buffer and centrifuge at 12,000 rpm for one minute. The wash buffer contains ethanol and washes away impurities from your sample.
8. Remove the spin column from the wash tube, discard the filtrate at the bottom of the wash tube and replace the column in the same wash tube. Centrifuge for an additional minute. It is important to spin twice in order to remove residual traces of ethanol. This residual ethanol will cause your samples to float out of the wells of an agarose gel and may hinder enzyme activity in future experiments.
9. Remove the spin column and discard the wash tube. Place the column in a clean wash tube. Add 50 μL of elution solution. Be sure you are covering the membrane with the solution. Let sit at room temperature for one minute to saturate the membranes on the column. Elute the plasmid DNA from the membrane by centrifuging at 12,000 rpm for one minute.
10. Discard the spin column and determine the concentration of your eluted DNA on the nanodrop.
11. At any time during this experiment, while you are waiting on an incubation or centrifugation, pour a 0.8% agarose gel with 1 μg/mL ethidium bromide. See Appendix F for instructions on preparing, electrophoresing, and analyzing agarose gels.
Loading the agarose gel1. Pipet 20 ul of your eluted DNA into a new microcentrifuge tube and add 10 ul loading dye. Save the
remaining 30 ul of eluted DNA in a labeled microcentrifuge tube.
2. Load 30 μL of sample into one well and 10 μL of a DNA ladder into another well.
3. Run at 100 volts for 30 minutes. Label in your notebook the location of each sample on the gel and the tray #.
58

BIOL1414 Lab Manual Austin Community College 10th Edition, Spring 2011
Analyzing the Gel1. Place your gel on a UV transilluminator. Ethidium bromide intercalates in between the DNA bases and
fluoresces under UV light. Therefore, you will be able to visualize the bands representing the plasmid DNA you isolated.
2. Make observations and draw the results in your notebook.
Analysis Questions
1. Define a plasmid and describe in detail how the plasmid is inserted into a bacterial host.
2. In step 3, you added Cell Lysis solution. What is the purpose of this solution and what do you think would happen to the results of your experiment if you left out this step?
3. What is the purpose of the spin filter? How do you think DNA binds to it, and how and why does it come off of the filter?
4. Analyze your data.
59
BIOL1414 Lab Manual Austin Community College 10th Edition, Spring 2011
Restriction Enzyme Mapping of DNAObjectives
Your performance will be satisfactory when you are able to: work with enzymes without degrading them measure microliter amounts make an agarose gel of a specified concentration prepare and load samples onto an agarose gel analyze electrophoresis results to determine the size of DNA fragments
Restriction Nuclease Mapping of DNA
Viruses form a unique group of parasitic organisms that grow only in the cells of bacteria, plants and animals. A virus that infects bacteria is called a bacteriophage or simply a phage. Viruses are valuable tools in molecular biology because they possess some essential properties of living organisms (they contain proteins and nucleic acids), yet are simpler in structure and life cycle than bacteria or eukaryotic cells.
Bacteriophage lambda, which infects E. coli, is probably the most studied and well understood of the double-stranded DNA phages. The protein component of this phage consists of a protective coat that forms the tail assembly and the outer shell of the head. A single molecule of double-stranded DNA is located in the core of the phage head. The DNA molecule contains 48,502 base-pairs (molecular weight ≈ 3 x 10⁷ g/mol) that code for approximately 50 different proteins. The entire sequence of nucleotides in the lambda genome is known and the sequences that comprise the major control regions for transcription and translation have been identified. Because of the vast amount of information about the biochemistry of this phage, lambda is a popular cloning vector in genetic engineering.
In addition to agarose concentration and molecular weight, mobility of nucleic acids in agarose gels is also influenced by the molecular conformation of the nucleic acid. The 3 forms of circular DNA (plasmid) and some viral DNA are:
Form I: Closed, circular, negatively supercoiled DNA Form II: “Nicked” DNA, which has been partially cut through one strand of the DNA, causing it to
unwind Form III: Linear DNA, which has been cut by endonucleases (restriction enzymes)
Form I usually has the greatest electrophoretic mobility of all DNA forms because supercoiled DNA molecules tend to be compact. Think of it as a bullet moving through the agarose gel. Form III has decreased mobility because the linear DNA is like a long string or rod that can drag. The slowest moving of all is Form II because it is an open circle with a partially unwound strand, which causes it to drag in the gel. While the linear DNA can snake through the agarose particles, reducing drag, the circular, unwound plasmid cannot. Unlike the other forms of DNA, linear DNA migrates through a gel at a rate that is inversely proportional to the logarithm of its molecular weight. Therefore, the molecular weight of linear DNA can be estimated from a gel if compared to DNA fragments of known molecular weight (markers).
When isolating plasmid DNA, it is important to determine the relative amounts of the three forms of DNA in your sample. These can be estimated qualitatively by the relative darkness of the bands. Rough handling of the DNA or endogenous endonuclease action can result in nicking of the plasmid and linearization. Long-term storage of plasmids will result in increased amounts of Forms II and III due to the presence of endogenous endonucleases (see below). Uncut plasmid should be stored in the refrigerator to avoid the risk of ice crystals shearing, or damaging, the supercoiled DNA molecule. A cut plasmid can be kept in the freezer with no risk of damage.
Restriction Enzymes
Restriction enzymes (endonucleases) are proteins found in nature that cut DNA at specific locations. They have many applications in the biotechnology lab, and you will encounter them several times in this program. A restriction map shows the locations at which a restriction enzyme cuts DNA (see figures 1 and 2). Purified enzymes are especially susceptible to degradation by heat, pH changes, and other factors, and must be kept under stable conditions. This
60

BIOL1414 Lab Manual Austin Community College 10th Edition, Spring 2011
instability can make it a challenge to work successfully with them. Restriction enzymes should be kept on ice at all times, and solutions containing them should be buffered at the proper pH. The concentration of a restriction enzyme is usually expressed in enzyme units per volume. One unit of restriction enzyme is defined as the amount of enzyme needed to digest 1 µg of DNA in 1 hour. One might purchase EcoRI at a concentration of 1EU/µL. Endogenous endonucleases are contaminants found in a preparation of DNA, and can degrade such samples.
Figure 1: Restriction Map of Lambda DNA – EcoR1Arrows indicate the position of restriction sites for EcoR1. Sites are counted in number of base pairs (bp) from the left end of the phage DNA. Lambda DNA is 48,502 base-pairs long. The dark horizontal line represents lambda genomic DNA and the smaller vertical lines represent the cut sites for the respective restriction enzymes. The numbers above the line represent the size of the fragments generated by a digestion with each restriction enzyme and the numbers below represent the distance from the origin.
Size of EcoR1 Restriction Fragments
23,100 4,600 4,700 6,500 5,100 3,800
23,100 27,700 32,400 38,900 44,000 Nucleotide position of EcoRI Restriction Sites in the phage DNA
Figure 2: Restriction Map of Lambda DNA – HindIIIArrows indicate the position of restriction sites for HindIII. Sites are counted in number base-pairs (bp) from the left end of the phage DNA.
Size of Hind III Restriction Fragments
23,100 2000 2,300 9,400 6,600 4,400
23,100 25,100 27,400 36,800 43,400
Nucleotide position of HindIII Restriction Sites in the phage DNA
EcoRI recognition site = G|AATT C HindIII recognition site = A |AGCT T C TTAA |G T T CGA|A
You can find this information in many company catalogs, such as Promega and Stratagene. Look at these catalogs in the lab and try to find these maps.
61

BIOL1414 Lab Manual Austin Community College 10th Edition, Spring 2011
Procedure
1. Cut and paste or copy the following charts in your prelab.
Lambda Digest Volume to add
Component Concentration Mass or Conc. required
Tube 1 (control)
Tube 2 (EcoRI, HindIII)
Tube 3(EcoRI)
Tube 4 (HindIII)
DNA 0.5 μg/μL 1 µg
Universal buffer 10X 1X
Water
EcoRI0.5 units/μL 1 unit
Hind III0.5 units/μL 1 unit
TOTAL 20 µL 20 µL 20 µL
pGLO digest Volume to add
Component Concentration Mass or Conc. required
Tube 1 (negative control)
Tube 2(EcoRI, HindIII)
Tube 3(EcoRI)
Tube 4 (HindIII)
DNA unknown 1 µg
Universal buffer 10X 1X
Water
EcoRI0.5 units/μL 1 unit
Hind III0.5 units/μL 1 unit
TOTAL 20 µL 20 µL 20 µL
Part A: Restriction Digests
2. We want to digest 1 µg of DNA in these reactions. Using the concentration of the lambda DNA, calculate how many microliters need to be added to each tube to have 1 µg in each tube. The final volume in each tube after every reagent is added should be 20 µL. Using the concentration of the buffer (usually 10X), calculate how much should be added so that when the final volume is 20 µL, the buffer concentration is 1X. Using the concentrations of the two enzymes, calculate how much should be added to each to tube if you want one enzyme unit per tube. Enzyme concentrations are usually in enzyme units (U) per volume (for example, 1 U/µL). Calculate the amount of water needed in each tube, after accounting for the volumes of the other reagents, to make a final volume of 20 µL.
3. We do not know the concentration of the pGLO DNA, so instead of diluting with water, we will add it to the reaction mixture at full strength. Determine how much enzyme and buffer should be in these reaction tubes and add enough pGLO plasmid prep solution to the tubes to achieve a final volume of 20 µL.
4. Number three microcentrifuge tubes 1 – 3 and mark tube 1 with the notebook location of the charts you made in step 1. Place the tubes in ice.
62

BIOL1414 Lab Manual Austin Community College 10th Edition, Spring 2011
5. Add the reagents to the tubes in the order listed in the chart. Keep DNA and enzymes on ice. Use a new tip for each solution. Tube 1 is the control, and will contain only DNA, buffer, and water. You will add EcoRI to tube 3, HindIII to tube 4, and both enzymes to tube 2. DNA should be added first to the tubes; you may keep the same tip on the micropipette without contaminating the stock solution of DNA. The buffer, which should be added second, maintains the proper pH for enzymatic activity. Water should be added next so that the buffer is the correct concentration when you add the enzyme (last). Pipet directly into the solution at the bottom of the microcentrifuge tube, and pipet up and down to mix. Avoid making bubbles, which can degrade the enzyme activity. After adding the enzymes to tubes 2 and 3, pipette up and down to mix.
6. Pop spin all the tubes in a microcentrifuge to ensure all components are condensed in the bottom of the tube and able to react.
7. Place all tubes, with lids closed, (in a floating tube rack) in a 37˚ C water bath to incubate for at least 50 minutes and up to 3 hours; the DNA should be specifically digested after 50 minutes and any longer than 3 hours may result in unspecific cutting of the DNA.
Part B: Agarose Gel Electrophoresis
8. While the tubes are incubating, the class should prepare 1.0% agarose gels in 1X TAE with 1 μg/mL ethidium bromide. See Appendix F for instructions on preparing, electrophoresing, and analyzing agarose gels.
9. When the incubation of your reaction tubes is over, remove the tubes from the water bath, and add 10 µl of 10X gel loading solution to each. Pipette up and down to mix and spin the contents down by microcentrifuging for a few seconds.
10. Remove the bumpers and comb from a gel and place the casting tray with gel into the electrophoresis chamber. Wait until each group has put their tray in, then have one person add enough 1X TAE buffer to cover the gels. Make sure that every well is full of buffer and completely submerged. Draw a picture of the chamber and label the position of each group’s gel relative to the positive and negative terminals.
11. Load 30 ul each sample into a separate well of your gel. If you have enough wells, leave the first and last empty, as they tend to be more distorted then the other wells. Record in your notebook, which sample was loaded into which well (always number from left to right).
12. Electrophorese at 80 volts for 1.5 hours or until the dye has migrated to within a few mm of the end of the gel (the end nearest the positive terminal). If the loading dye has more than one color, use the aqua color as a guide. Turn off the power supply and disconnect the leads before removing the cover of the chamber. Remove your gel in its casting tray.
13. Position the gel on a UV transilluminator (under the plastic UV screen). You must wear goggles that filter UV light during this step. Photograph the gel with a camera using an ethidium bromide filter on the lens. Place a ruler beside the gel when photographing. Include a copy of the photo with your analysis questions.
14. Place your gel in the waste beaker labeled “ethidium bromide gels.” Pour the electrophoresis buffer down the sink with plenty of water, rinse the electrophoresis chamber and casting assemblies with deionized water, and place upside down over paper towels to dry. Turn off the power supply and transilluminator.
63

BIOL1414 Lab Manual Austin Community College 10th Edition, Spring 2011
Restriction Enzyme Mapping of DNA
Analysis Questions Name____________________________
1. Maps of the restriction sites for EcoRI and HindIII in lambda DNA are given in Figures 1 and 2. Using this information, list the size (in bp) of each of the bands you should see on the gel. Write the bands in the order you would see them on the gel (longest to shortest).
EcoRI HindIII
1. ___________________ 1. ___________________
2. ___________________ 2. ___________________
3. ___________________ 3. ___________________
4. ___________________ 4. ___________________
5. ___________________ 5. ___________________
6. ___________________ 6. ___________________
2. When you cut lambda DNA with both EcoRI and BamHI, the DNA is cut into twice as many fragments. Use the maps in Figures 1 and 2 to determine the length of the bands and write them in the order they should appear on a gel.
DNA Fragment Length (EcoRI + Hind III)(base-pairs)
1. _____________________________
2. _____________________________
3. _____________________________
4. _____________________________
5. _____________________________
6. _____________________________
7. _____________________________
8. _____________________________
9. _____________________________
10. _____________________________
11. _____________________________
3. Since there were no enzymes in tube 1, the DNA should have been uncut and appeared in one thick band. If you saw more than one band, what could it have caused this (see introduction)? What would finding more than one band say about the DNA sample that you used?
64

BIOL1414 Lab Manual Austin Community College 10th Edition, Spring 2011
4. Plasmid DNA should be stored at 4˚ C (refrigerated) unless it has been cut, and then it can be stored at –20˚ C (freezer). Why (i.e. what might happen to it in the freezer)?
5. Did you see all 6 bands in each lane of lambda DNA cut with endonucleases? If you didn’t, which bands (short or long) were not visible, and why?
6. Below is a restriction map of the pGLO plasmid:
Determine the identity of each band on the gel containing your pGLO plasmid digest. Use the molecular weight of each band and the information on this restriction map to determine your answers.
65
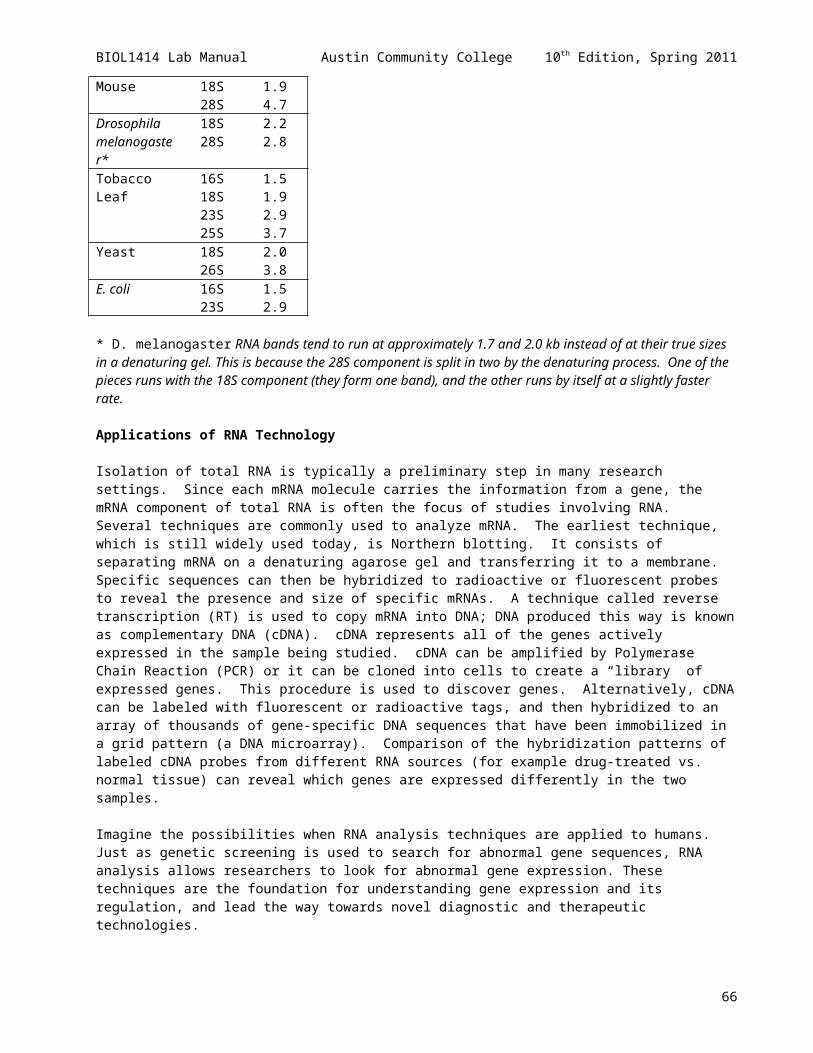
BIOL1414 Lab Manual Austin Community College 10th Edition, Spring 2011
7. Using semilog paper, plot band size (kb) on the y-axis versus distance migrated on the x-axis for the ladder. If the DNA bands migrated properly, you should be able to draw a straight line through the points. Can you? Are there any points associated with bands that do not fall on the line? If so, which ones?
66
BIOL1414 Lab Manual Austin Community College 10th Edition, Spring 2011
Green Fluorescent Protein (GFP) Purification(adapted from BioRad’s GFP Chromatography kit)
Objectives
Your performance will be satisfactory when you are able to extract proteins from cells set up a hydrophobic interaction chromatography column load a protein extract onto a column and collect fractions analyze the results of chromatographic separations distinguish between various chromatographic interactions and their uses discuss the role of green fluorescent protein
Introduction Chromatography is a very powerful method of separating complex mixtures of biomolecules into separate components. There are many types of chromatography, but in each case the separation of components of a mixture is based on differences in chemical and physical properties of the components. In all types of chromatography, the separation takes place between two different phases: the stationary phase that does not move, and the mobile phase that moves steadily past the stationary phase. Different components of a solution will separate due to their differential affinity for the stationary, compared with the mobile, phase. The stationary phase can be a flat sheet (as in paper or thin layer chromatography) or a column of material (as in liquid or gas chromatography). The separations can be based on molecule size (as in size exclusion or gel permeation chromatography), by charge and polarity (as in ion exchange chromatography), or by specific binding (as in affinity chromatography). This lab exercise involves hydrophobic interaction chromatography, in which components bind, or adsorb, to the stationary phase due to hydrophobicity. The stationary phase is made of insoluble particles, also called a resin, of polysaccharide beads called Sepharose. These beads are small (40 to 165 m diameter), and made of agarose that has been chemically cross linked to make the beads less likely to be crushed in a large column. While Sepharose is hydrophilic, cross linking phenyl groups make it into the hydrophobic phenyl sepharose. Proteins with patches of hydrophobic (literally, “water-hating”) amino acids on their surfaces will be attracted to the phenyl groups on the resin. Higher salt concentrations and higher temperatures strengthen these hydrophobic attractions. Under high salt conditions, even the least hydrophobic proteins will bind to the phenyl sepharose beads, but at low salt conditions only the most highly hydrophobic proteins will remain bound to the phenyl sepharose beads. You may use an equilibration buffer with high salt concentration to bind the proteins in a mixture to phenyl sepharose and use elution buffers with successively lower concentrations of salt to separate them from each other according to their relative hydrophobicity.
Your goal in this lab is to use hydrophobic interaction chromatography to purify GFP from a bacterial cell lysate. Proteins are long chains of amino acids, some of which are very hydrophobic or "water-hating". GFP has many patches of hydrophobic amino acids, which collectively make the entire protein hydrophobic. Moreover, GFP is much more hydrophobic than most other bacterial proteins. We can take advantage of the hydrophobic properties of GFP to purify it from the other, less hydrophobic (more hydrophilic or "water-loving") proteins.
First, you will obtain a liquid bacterial culture that was prepared by isolating a single green transformant E. coli colony, adding it to a tube of liquid medium, and then incubating with vigorous shaking overnight. You will process this culture in order to lyse the cells and release the proteins contained therein. You will load the cell lysate onto an HIC column in a high salt buffer. The salt causes the three-dimensional structure of proteins to change so that the hydrophobic regions of the protein move to the exterior of the protein and the hydrophilic ("water-loving") regions move to the interior of the protein. This will cause most, if not all, proteins, to adsorb to the column. As the salt concentration of the buffer is decreased, the three-dimensional structure of proteins change again so that the hydrophobic regions of the proteins move back into the interior and the hydrophilic ("water-loving") regions move to the exterior.
These four buffers comprise the separation scheme:
Equilibration Buffer—A high salt buffer (2 M (NH4)2SO4)
67

BIOL1414 Lab Manual Austin Community College 10th Edition, Spring 2011
Binding Buffer—A very high salt buffer (4 M (NH4)2SO4)
Wash Buffer—A medium salt buffer (1.3 M (NH4)2SO4)
Elution Buffer—A very low salt buffer (10 mM Tris/EDTA)
Procedure
Day One (to be performed by instructor or lab tech)1. Examine your LB/AMP and LB/AMP/ARA plates from the transformation lab. First use
normal room lighting, then use an ultraviolet light in a darkened area of your laboratory. Note your observations. To prevent damage to your skin or eyes, avoid exposure to the UV light. Never look directly into the UV lamp. Wear safety glasses whenever possible.
2. Identify several green colonies that are not touching other colonies on the LB/amp/ara plate. Turn the plate over and circle several of these green colonies. On the other LB/amp plate identify and circle several white colonies that are also well isolated from other colonies on the plate.
3. Obtain two 50-mL culture tubes containing 2 mL of sterile LB/AMP/ARA medium and label one tube "+" and one tube "-". Using a sterile inoculation loop, lightly touch the "loop" end to a circled single green colony and gently scoop up the cells without gouging the agar. Immerse the loop in the "+" tube. Spin the loop between your index finger and thumb to disperse the entire colony. Using a new sterile loop, repeat for a single white colony and immerse it in the "-" tube. It is very important to pick cells from a single bacterial colony.
4. Cap your tubes and shake them vigorously, like you would shake a can of spray paint, for about 30 seconds. Then place them in a 37° C incubator with vigorous shaking for 24 hours.
Day Two1. Remove your two liquid cultures from the incubator and observe them in normal room lighting and then with
the UV light. Note any color differences that you observe. Transfer the entire contents of the (+) liquid culture by pipet into a microcentrifuge tube also labeled (+). You may now set aside your (-) culture for disposal.
2. Centrifuge the (+) tube for 5 minutes at 12,000 rpm. Be sure to balance the tubes in the machine. If you do not know how to balance the tubes, do not operate the centrifuge.
3. After centrifugation, open the tube and slowly pour off the liquid supernatant. After the supernatant has been discarded, there should be a large pellet remaining in the tube.
4. Observe the pellet under UV light. Note your observations.
5. Add 250 µl of TE Solution to the tube. Resuspend the bacterial pellet thoroughly by vortexing.
6. Add 1 drop of lysozyme by pipet to the resuspended pellet. Cap and mix the contents by flicking the tube with your index finger. The lysozyme will start digesting the bacterial cell wall. Observe the tube under the UV light. Place the microtube in the -80 ºC freezer for 30 minutes. The freezing will cause the cells to rupture completely.
7. Remove your tube from the freezer and thaw using hand warmth. Place the tube in the centrifuge and pellet the insoluble cell debris by spinning for 10 minutes at 12,000 rpm. Label a new microcentrifuge tube.
8. While centrifuging, prepare the chromatography column. Shake the column vigorously to resuspend the beads. Then shake the column down one final time to consolidate the beads. Remove the top cap and snap off the tab bottom of the chromatography column. Allow all of the liquid buffer to drain from the column into a beaker (this will take 3–5 minutes).
68
BIOL1414 Lab Manual Austin Community College 10th Edition, Spring 2011
9. Equilibrate the column by adding 2 mL of Equilibration Buffer to the top of the column, 1 mL at a time. Drain the buffer.
10. After the 10 minute centrifugation, immediately remove the microcentrifuge tube from the centrifuge. Examine the tube with the UV light. The cell debris should be visible as a pellet at the bottom of the tube. The liquid that is present above the pellet is called the supernatant. Note the color of the pellet and the supernatant. Transfer 250 µl of the supernatant into a new tube.
11. Transfer 250 µl of Binding Buffer to the tube containing the supernatant.
12. Obtain 3 collection tubes and label them 1, 2, and 3. When the last of the equilibration buffer has drained from the HIC column bed, gently place the column on collection tube 1. Do not force the column tightly into the collection tubes—the column will not drip.
13. Include the following data table in your lab notebook:
Collection Tube Number Prediction Observations Under UV Light(column and collection tube)
Tube 1Sample in Binding Buffer
Tube 2Sample with Wash Buffer
Tube 2Sample with Elution Buffer
14. Carefully load 250 µl of the supernatant (in Binding Buffer) into the top of the column by resting the pipette tip against the side of the column and letting the supernatant drip down the side of the column wall. Examine the column using the UV light. Note your observations in the data table. Let the entire volume of supernatant flow into tube 1.
15. Transfer the column to collection tube 2. Add 250 µl of Wash Buffer and let the entire volume flow into the column. As you wait, predict the results you might see with this buffer. Examine the column using the UV light and record your results.
16. Transfer the column to tube 3. Add 750 µl of TE buffer (Elution Buffer) and let the entire volume flow into the column. Again, make a prediction and then examine the column using the UV light. List the results in the data table.
17. Examine all of the collection tubes using the UV lamp and note any differences in color between the tubes. Cover the tubes with Parafilm and place in the refrigerator until the next laboratory period.
69

BIOL1414 Lab Manual Austin Community College 10th Edition, Spring 2011
GFP Column Chromatography Analysis Questions
1. In the Transformation lab, you transformed E. coli cells with the pGLO plasmid. The results of this procedure were colonies of cells that fluoresced when exposed to ultraviolet light. This is not a normal phenotype (characteristic) for E.coli. You were then asked to figure out a way to determine which molecule was becoming fluorescent under UV light. After determining that the pGLO plasmid DNA was not responsible for the fluorescence under the UV light, you concluded that it was not the plasmid DNA that was fluorescing in response to the ultraviolet light within the cells. This then led to the next hypothesis that if it is not the DNA fluorescing when exposed to the UV light, then it must be a protein that the new DNA produces within the cells.
a. What is a protein? b. List three examples of proteins found in your body.
c. Explain the relationship between genes and proteins.
2. Using your own words, describe gene cloning.
3. How were these items helpful in this cloning experiment?a. UV lightb. Incubator
4. Explain how placing cloned cells in nutrient broth to multiply relates to your overall goal of purifying the fluorescent proteins.
5. You have used a bacterium to propagate a gene that produces a green fluorescent protein. Identify the function of these items:
a. centrifugeb. lysozymec. freezer
6. Why did you discard the supernatant in step 3 of day two?
7. Explain why the bacterial cells’ outer membrane ruptures when the cells are frozen (what happens to an unopened soft drink when it freezes)?
8. What was the purpose of lysing the bacteria?
9. What color was the pellet in step 10 of day two? What color was the supernatant? What does this tell you?
10. Why did you discard the pellet in this part of the protein purification procedure?
11. Briefly describe hydrophobic interaction chromatography and identify its purpose in this lab.
12. Using your data table, compare how your predictions matched up with your observations for each buffer.
13. Based on your results, explain the functions of each buffer: a. equilibration bufferb. binding bufferc. wash bufferd. TE (elution) buffer
14. Were you successful in isolating and purifying GFP from the cell lysate? Identify evidence to support your answer.
70
BIOL1414 Lab Manual Austin Community College 10th Edition, Spring 2011
SDS-PAGE of Green Fluorescent Protein(adapted from BioRad’s pGLO SDS-PAGE extension)
Objectives
Your performance will be satisfactory when you are able to: Explain how polyacrylamide gel electrophoresis can be used to analyze proteins Load, run and stain a polyacrylamide gel Analyze and interpret the results of an electrophoretic run
Background Information
General Principles of Protein Electrophoresis and SDS-PAGE
Electrophoresis (“to carry with electricity”) is the migration of charged molecules in an electric field toward the electrode with the opposite charge. This technique is widely used in molecular biology research to examine proteins to answer a variety of questions. For example:
← What proteins are in my sample? ← What are the molecular weights of the proteins? ← What differences are there in the proteins from different sources? ← How pure is my protein of interest? ← How much protein do I have? ←Laemmli developed his system of polyacrylamide gel electrophoresis with two gel phases, so that all of the proteins in a gel begin separating, or resolving, at the same time. Since sample volumes can vary from lane to lane, forming vertically narrow or broad bands in the wells, all of the proteins in a sample do not enter the stacking gel zone simultaneously. However, the low percentage (4%) of the stacking gel allows the proteins to migrate rapidly and accumulate at the edge of the denser resolving gel, regardless of their sizes. The samples of mixed proteins are thus concentrated into uniformly thin bands in each lane, before they move into the denser (5-20%) resolving gel and begin to separate according to their weights.
There is no obvious visual border between the stacking and resolving zones of a commercially prepared gel, but if you watch your samples immediately after turning on the power supply, you will see the protein samples being focused into a narrow band at the interface. Prestained protein markers first stack into a tight band, and then the individual prestained proteins become distinct as the proteins begin to separate according to their molecular weights.
Figure 5. Bio-Rad’s Ready Gel precast gels are very thin polyacrylamide gels sandwiched between clear plates. Each gel has two separate zones, the stacking gel and the separating gel, which is also known as the resolving gel. In polyacrylamide gel electrophoresis, samples are loaded into wells at the top of the stacking gel, and the proteins move downward toward the positively charged electrode.
71

BIOL1414 Lab Manual Austin Community College 10th Edition, Spring 2011
Why Are We Using Polyacrylamide, Not Agarose Gels, to Analyze Proteins?
The gel matrix formed by polyacrylamide is much tighter and able to resolve much smaller molecules than agarose gels. Polyacrylamide gels have pore sizes similar to the sizes of proteins. Nucleic acids are orders of magnitude larger than proteins, and agarose is usually the preferred medium. However, when separating very small fragments of DNA, for example during DNA sequencing, polyacrylamide is the matrix of choice.
The Chemistry and Physics behind Electrophoresis
The size of biomolecules is expressed in Daltons (D), a measure of molecular weight. One dalton equals the mass of a hydrogen atom, which weighs 1.66 x 10⁻²⁴ gram. Most proteins have masses on the order of thousands of daltons, so the term kilodalton (kD) is used for protein molecular weights. Proteins range in size from several kilodaltons to thousands of kilodaltons. In contrast, the nucleic acids we study are often larger than 1000 base pairs, or 1 kilobase (kb), and each kilobase pair has a mass of approximately 660 kD. For example, when cloning DNA, a 2 kb fragment of DNA can be inserted into a plasmid vector of 3 kb, giving a total plasmid length of 5 kb. The mass of this 5 kb plasmid would be approximately 3.3 million daltons or 3,300 kD, much larger than the average protein!
A molecule’s electrical charge and its mass affect its mobility through a gel during electrophoresis. The ratio of charge to mass is called charge density. Since every protein is made of a unique combination of amino acids, each of which may have a positive, negative, or neutral charge, the net charge of each protein is naturally different. The inherent charges of proteins must be removed as a factor affecting migration in order for polyacrylamide electrophoresis to be effective as a method of protein molecular weight determination.
The intrinsic charges of proteins are obscured by placing a strongly anionic (negatively charged) detergent, SDS, in both the sample buffer and the gel running buffer. SDS coats the proteins with negative charges and also keeps them denatured as linear chains. In this form, proteins migrate in a polyacrylamide gel as if they have equivalent negative charge densities, and mass becomes the only variable affecting the migration rate of each protein. This technique is called SDS-PAGE.
Polyacrylamide Acts As a Molecular Sieve
The degree of sieving within a gel can be controlled by adjusting the polyacrylamide concentration. Higher concentrations of polyacrylamide resolve smaller molecular weight ranges. For example, a 5% polyacrylamide gel separates large proteins of 100 to 300 kD, while an 18% polyacrylamide gel is better for separating smaller proteins in the range of 5 to 30 kD.
For this lab we will use 12% polyacrylamide gels, which provide excellent separation for proteins in the range of 10 to 100 kD. Our attention will be focused on variations among the smaller proteins, in the range of 15 to 50 kD, since it is easier to discern differences among these proteins. Smaller proteins migrate further through the gel and are better resolved than proteins of high molecular weights.
Running a Polyacrylamide Gel
Polyacrylamide gels are pre-cast in a plastic cassette. The gel cassette is inserted into a vertical electrophoresis apparatus and the running buffer is added until each well is covered with buffer. Samples, controls, and molecular weight markers are loaded into the wells. A lid is placed on the apparatus, and leads are plugged into a power supply. A current is applied at constant voltage, bubbles rise from the electrodes, and the loading dye and proteins in the samples begin to enter the gel.
72

BIOL1414 Lab Manual Austin Community College 10th Edition, Spring 2011
Sample Preparation – Disrupting Protein Structure
To effectively determine the molecular weights of proteins, the secondary (2°), tertiary (3°), and quaternary (4°) structures of the protein complexes within a protein extract are disrupted prior to electrophoresis. This process of structural disruption is called denaturation. ← Primary structure = linear chain of amino acids ← Secondary structure = domains of repeating structures, such as β-pleated sheets and α-helices as a result of H
bonding between peptide bonds← Tertiary structure = 3-dimensional shape of a folded polypeptide, maintained by disulfide bonds, electrostatic
interactions, hydrophobic effects, H bonding← Quaternary structure = several polypeptide chains associated together to form a functional protein
Secondary, tertiary, and quaternary structures are disrupted by the combination of heat and SDS. A reducing agent, such as β-mercaptoethanol (BME) or dithiothreitol (DTT), may be added to ensure complete breakage of disulfide bonds. These three factors – heat, ionic detergent, and reducing agent – completely disrupt the 2°, 3°, and 4° structures of proteins and protein complexes, resulting in linear chains of amino acids. These molecules snake through the gel at rates proportional to their molecular masses.
Figure 8. The combination of heat and the detergent SDS denatures proteins for SDS-PAGE analysis.
73

BIOL1414 Lab Manual Austin Community College 10th Edition, Spring 2011
Visualizing the Proteins
After electrophoresis is complete, the gel is stained so that blue-colored protein bands appear against a clear background.
Molecular Weight Standards
Electrophoresis protein standards, or molecular weight markers, consist of a mixture of proteins of known molecular weight. They are available in a number of protein size ranges. The markers to be used should correspond to the sizes of the proteins of interest. Molecular weight standards are available either prestained or unstained. Unstained markers are not visible until the gel is stained with a protein stain, such as Bio-Safe™ Coomassie stain. The prestained Kaleidoscope standards used in this lab are visible as they separate on the gel. The dyes bound to the Kaleidoscope marker proteins affect the migrations of the proteins, and the actual sizes of the dyed molecules differ slightly from batch to batch. Please refer to the size chart that comes with each vial of Kaleidoscope prestained standards for the calibrated molecular weights of each of the dyed proteins.
Identifying Proteins in Polyacrylamide Gel
It is not possible to definitively identify unknown proteins in an SDS-PAGE gel without additional confirming information. In an experiment like this one, each protein extract contains a complex mixture of proteins. The different proteins appear as distinct blue-stained bands on the gel. From the positions and intensities of these bands, we can determine the size and relative abundance of the proteins, but we can only make educated guesses about the identity of each protein, based on available references. Even when the molecular weight of a protein is known, and used as a criterion for identification, there are two possible sources of error. First, bands that migrate almost identically on a gel may actually be different proteins of very similar sizes. Second, proteins of very similar composition, function, and evolutionary origin may be different in molecular weight, because of variations acquired as they evolved. Definitive
74
BIOL1414 Lab Manual Austin Community College 10th Edition, Spring 2011
identification of a protein requires mass spectrometry, sequencing, or immunodetection. Immunodetection methods, such as western blotting, use antibodies that specifically recognize the proteins of interest. Such antibodies can provide positive identification when bands cannot be identified by molecular weight alone.
Procedure1. Label 3 microcentrifuge tubes to match the three fractions you collected from the column chromatography lab.
2. Add 50 l of Laemmli sample buffer to each of the tubes you just labeled. Laemmli buffer contains SDS to denature the proteins in your sample as well as tracking dye and glycerol to weigh the samples down when you load them on the gel.
3. Add 50 µl of each fraction to the corresponding tube you labeled in step 1.
4. Heat all three tubes for 5 minutes at 95 C. During this incubation, the disulfide linkages will be broken to denature your protein and SDS will coat the proteins with negative charges so that the proteins will run on the polyacrylamide gel based solely on molecular weight.
5. Remove the comb and tape along the bottom of the pre-made 15% polyacrylamide gels and place your gel in the chamber with the short plates facing inside.
6. Pour about 200 ml of 1X TGS electrophoresis buffer into the chamber (enough to cover each well).
7. Load 10 µl of the Kaleidescope prestained standard. The band sizes are 250, 150, 100, 75, 50, 37, and 25, 20, 15, 10.
8. Load 30 μl of each denatured protein sample into a separate well.
9. Put the lid on the tank and insert leads into the power supply, matching red to red and black to black.
10. Electophorese for 30 minutes at a constant voltage of 200 V.
11. When the loading dye has almost reached the bottom of the gels, stop the power supply and disconnect the leads. Remove the gel cassettes. Lay a gel cassette flat on the bench with the short plate facing up. Carefully pry apart the gel plates using your fingertips or a spatula. The gel will adhere to one of the plates. Transfer the plate with the gel adhering to it to a staining tray and cover with Coomassie blue stain.
12. Stain the gels for one hour. For best results, occasionally agitate the staining tray gently, or place on a rotary shaker.
13. After the gels have been stained, pour off the stain and discard in the flammable organic waste (it contains methanol). Cover the gel with destaining solution, changing several times until most of the blue background disappears and you are able to visualize discrete bands on the gel. The GFP protein is approximately 27 kilodaltons. Do you see a band in this range for any of your samples?
75
BIOL1414 Lab Manual Austin Community College 10th Edition, Spring 2011
Protein Electrophoresis of GFP SamplesResults and Analysis Name_________________________________
1. Why did you use polyacrylamide gels to analyze your protein fractions rather than agarose gels?
2. Explain the purpose of heating the samples with an SDS buffer.
3. Distinguish between the primary, secondary, tertiary and quaternary structure of a protein.
4. Assume you work in a lab responsible for large scale production of GFP protein. Describe the process that we used to produce this protein. Include a discussion of the method we used to express the protein, purify the protein, and verify that the target protein is present in the sample.
5. Was the protein purification successful? Provide evidence to support your answer.
76

BIOL1414 Lab Manual Austin Community College 10th Edition, Spring 2011
Amplification of D1S80 VNTR loci by PCR(adapted from Edvotek’s PCR-based VNTR Human DNA Typing)
Objectives
Your performance will be satisfactory when you are able to extract DNA from your own cells set up a PCR reaction tube with all required components operate a thermal cycler make and load an agarose gel interpret the finished gel and evaluate the quality of amplification
Introduction
Although human DNA from separate individuals is identical in more places than it is unique, many regions of the human genome exhibit a great deal of diversity. Such sequences are termed polymorphic (having many forms) and are used for diagnosis of genetic disease, forensic identification, and paternity testing. Many polymorphisms are located in the estimated 98% of the human genome that does not code for proteins. Since no genes that encode proteins are found in these regions, changes, or mutations, in these regions do not generally have an effect on the individual and are more likely to be passed on to offspring. Mutations in protein coding regions are far more likely to be detrimental to the health and longevity of the individual with such mutations.
In 1990, the Federal Bureau of Investigation (FBI) established the Combined DNA Index System (CODIS), a system which allows comparison of crime scene DNA to DNA profiles in a convicted offender and a forensic (crime scene) index. A match of crime scene DNA to a profile in the convicted offender index indicates a suspect for the crime, whereas a match of crime scene DNA to the forensic index (a different crime scene) indicates a serial offender. CODIS has now been used to solve dozens of cases where authorities had not been able to identify a suspect for the crime under investigation.
The first step in forensic DNA fingerprinting is the collection of human tissue from the crime scene or victim. Thesetissues include blood, hair, skin, and body fluids. The sample, often present as a stain, is treated with a detergent to rupture (lyse) cell membranes and obtain DNA for further analysis. In forensics, the polymerase chain reaction (PCR) is now used to amplify and examine highly polymorphic DNA regions. These are regions that vary in length from individual to individual and fall into two categories: 1) Variable Number of Tandem Repeats (VNTR) and 2) ShortTandem Repeats (STR). A VNTR is a region that is variably composed of a 15-70 base pair sequence, typically repeated 5-100 times. An STR is similar to a VNTR except that the repeated unit is only 2-4 nucleotides in length. By examining several different VNTRs or STRs from the same individual, investigators obtain a unique DNA fingerprint for that individual which is unlike that of any other person (except for an identical twin).
One VNTR known as D1S80, is present on chromosome 1 and contains a 16-nucleotide sequence which is variably repeated between 16 and 40 times. An individual who is homozygous for the D1S80 genotype will have equal repeat numbers on both homologues of chromosome 1, displaying a single PCR product following gel analysis. Morecommonly, a person will be heterozygous, with differing D1S80 repeat numbers. Amplification of DNA fromheterozygous individuals will result in two distinct PCR products.
PCR Analysis of Alu Insertions
In this experiment, polymerase chain reaction (PCR) will be used to amplify (make copies of) a short DNA sequence from human chromosome 1 at a point called the D1S80 locus that is a variable insertion. The primers used to start the amplification were designed to flank the DNA region of the D1S80 insertion site. The amplicon size (position on the gel after electrophoresis) will reveal the length of the insertion.
77

BIOL1414 Lab Manual Austin Community College 10th Edition, Spring 2011
Procedure
A. Isolating DNAYou will isolate your own cheek cell DNA by extracting a sample and boiling it. Since DNAses naturally occur in
your saliva, you must protect your DNA from digestion. Addition of a chelating agent will remove divalent cations, which are necessary cofactors for DNAses, and thereby inactivate these enzymes. Also, the concentration of magnesium ion must be exactly 25 mM for the PCR reaction to work, so removing magnesium from the DNA in advance ensures that final concentration.
1. Label a 15 mL tube containing 2 ml of phosphate buffered saline (PBS) with your name.
2. Using a sterile cotton swab, rub the inside of your cheeks gently. Twirl the applicator while vigorously swabbing both cheeks, between the gum line and under the tongue. You are harvesting squamous cells, which are removed easily and regenerate very quickly. Submerge the swab in the saline tube and twist it vigorously for 30 seconds to dislodge the cells. Press the cotton head against the walls of the conical tube to squeeze out as much liquid as possible. Repeat with another swab. Place the used swabs in a biohazard bag or in a 15% bleach solution.
3. Transfer the cell suspension to a screw-cap microcentrifuge tube. Centrifuge the tube at 10,000 rpm for one minute. Be sure you have a balanced configuration in the centrifuge before spinning. The cells should form a white pellet and the buffer should be clear. If the buffer is cloudy with little or no pellet, spin the tube for an additional minute. If the buffer is clear with little or no pellet, obtain another swab and repeat the above steps.
4. The pellet formed will contain cheek cells. Carefully pipet off the supernatant, using care not to disturb the pellet. The cheek cells in your pellet may contain some food or bacteria. This shouldn’t interfere with the amplification because the primers used only recognize sites on human DNA. The DNA from food or bacteria will not be amplified.
5. Mix the tube of lysis solution (containing 25mM Tris HCl, 5% chelating agent, 50 ug/ml proteinase K) by pipetting up and down several times. Transfer 150 µl of the lysis solution to the tube containing the pellet. Resuspend the pellet in the lysis solution by vortexing gently. Check to see that the pellet is fully resuspended.
6. Place the tube in a float and place it in a 56°C waterbath for 15 minutes.
7. Remove the tube from the waterbath and cool for 30 seconds. Vortex the tube for 15 seconds.
8. Lyse the cells completely by placing the tube in float in a boiling water bath for 10 minutes. Do not submerge or drop the tube into the water.
9. Allow the tube to cool for 2 minutes. Vortex for 10 seconds.
10. Place tubes in a balanced configuration in a microcentrifuge and spin for 2 minutes or until the cell debris is settled at the bottom of the tubes. Transfer 30 µl of the supernatant into a clean microcentrifuge tube, using care to avoid disturbing the pellet. Hold the tube up to a light source to look for chelex beads. It is very important to make sure that no Chelex beads are transferred into the clean tube, as they can easily chelate (trap) the Mg required by the Taq polymerase. Any carryover of the chelex to the PCR reaction will not yield results.
11. Place the sample on ice while you set up your PCR reaction.
B. Set Up PCR ReactionsThe primer mixture you will use contains a 25 bp forward primer that starts copying one strand and a 26 bp reverse primer that starts copying the complementary strand. These primers match only one site on human DNA so only the DNA fragment between the two primers is copied. You also need Taq DNA polymerase, buffer, KCl, MgCl2, and dNTP (nucleotides with each of the four bases – A, T, C, and G) in your reaction mixture to achieve amplification. All of these are supplied in a single-use, solid bead or pellet. These components, your DNA and the primers are all of the
78

BIOL1414 Lab Manual Austin Community College 10th Edition, Spring 2011
ingredients needed to perform the amplification. PCR beads must be stored desiccated at room temperature, or they will absorb water from the air and the enzyme will be degraded.
The thermal cycler must be programmed so that it is preheated and ready to run when your samples are ready. The program will begin with an initial 5 minute cycle at 94˚C, which makes sure that all of the DNA completely denatures (the complementary strands pull apart). Three minutes is enough time for the 3 billion base pairs in the human genome to denature. Then the machine will cycle through the steps below 32 times. Each cycle doubles the amount of DNA that was produced in the previous cycle.
94˚ C –denatures DNA enough to allow primer to attach time at that temp: 30 seconds65˚ C – primer anneals to complementary sequence of DNA time at that temp: 30 seconds72˚ C – DNA polymerase attaches and begins synthesizing new DNA time at that temp: 30 seconds
After 32 cycles, the temperature is held at 72˚ C for 4 minutes to allow the polymerase to back-fill any amplicons that were not amplified clear to the end. Then the program is held at 4˚C until it is stopped. This allows the user to leave the thermal cycler running and take the samples out the next day if necessary.After programming, make sure the thermal cycler is preheating so that it will be warm enough to start the cycles immediately.
1. Obtain a PCR tube containing a Ready-to-Go PCR bead. Add 20 uL D1S80 primer mix to the bead.
2. Add 5 uL of DNA isolate from Part A to the PCR reaction mixture and pipette up and down gently to mix. Store on ice until the class is ready to begin the PCR cycle. Add the DNA only when you are ready to put the sample in the thermal cycler, or keep the reaction tube on ice until you are ready. At room temperature, the primer may bind non-specifically (to sequences that are almost, but not exactly, complementary).
3. Make sure the bead is completely dissolved and pop spin your sample before loading in the thermal cycler.
4. When everyone is ready, load tubes into a thermal cycler.
OPTIONAL STOPPING POINT: When the program has completed, store tubes at 20ºC until ready to begin the next step.
C. Casting Agarose Gels
Prepare a 1% agarose gel in 1X TAE buffer. See Appendix G for instructions on preparing agarose gels with ethidium bromide. Use a 7cm x 7cm tray which will hold 30 ml per gel. Ask your instructor which trays are available .
D. Electrophoresis of PCR Products
1. Place the gel in an electrophoresis chamber and cover the gel with 1X TAE buffer. The buffer level should be about one millimeter above the top of your gel, and it should fill all the wells.
2. Add 5 ul of 10x Gel Loading solution to the PCR amplicon from part B. Load gels with 30 uL of PCR amplicons, taking note of where each sample is loaded. Load at least one well per gel with 30 uL of 200 bp ladder.
3. Place the cover on the chamber in the correct orientation and connect leads to a power supply. Set the power supply at approximately 75 volts and allow to run until the tracking dye almost reaches the bottom of the gels.
4. Visualize DNA bands by placing gels on a UV transilluminator and photograph gels using the gel doc. system.
79

BIOL1414 Lab Manual Austin Community College 10th Edition, Spring 2011
Amplification of D1S80 VNTR loci by PCRResults and Analysis Name_________________________________
1. Analyze your data. Compare the migration of your bands relative to the ladder. Compare your D1S80 PCR product with those of the rest of the class. Did any students have genotypes similar to yours? How could you explain such similarities?
2. It is common to see additional, fuzzy bands low on the gel. This is a “primer dimer,” resulting from the primers overlapping and amplifying themselves. These are about 50 bp long and should be lower than the lowest marker position. How would you interpret a lane in which you observe primer dimer, but no other bands?
3. What is polymorphic DNA? How is it used for identification purposes?
4. What is CODIS? How is it used to solve crimes?
5. The D1S80 primer set was used to amplify your total genomic DNA. How many bands were present in your sample? Explain how one primer set can generate data with two bands on a gel.
80

BIOL1414 Lab Manual Austin Community College 10th Edition, Spring 2011
Microbes in the EnvironmentBioremediation: Environmental Clean-Up
ObjectivesYour performance will be satisfactory when you are able to
discuss the uses of microbial ecology in bioremediation describe the nutritional requirements of microorganisms demonstrate proficiency at recording data and observations use sterile technique when establishing liquid cultures fix and stain a slide with a simple or complex stain
Introduction Pollution comes in many forms, the most visible forms being consumer-generated trash such as paper and
plastic food containers. Other pollutants that are harder to see include oil, industrial chemicals, greenhouse gasses, pesticides, fertilizers, detergents and soaps. These can be found in air, water, and soil, and often have a detrimental effect on organisms and sometimes-entire ecosystems. They can also enter our bodies as we eat, drink and breathe. Thus, pollution is a problem that must be addressed if we are to maintain the quality of life we now enjoy. Over the past twenty years, the pollution remediation business has grown significantly due to increasing levels of pollution and higher demand for clean air, water, and soil. Some of these companies specialize in microbe-based environmental clean up, also known as bioremediation. Certain microorganisms, including bacteria, fungi, and algae, and sometimes higher organisms such as plants, can use compounds that we consider pollutants as a food source. Thus, they consume these compounds and excrete less harmful substances.
Many bioremediation companies specialize in the cleanup of sites contaminated with a particular type of waste, such as spilled oil. If spilled in the ocean, oil clings to marine organisms, killing birds, fish, sea lions, and other species, upsetting the food chain and, therefore, the natural balance of the ecosystem. A single gallon of spilled oil can spread to cover 4 acres of water. Imagine the acreage that a damaged supertanker would cover! An oil spill of that magnitude would be an ecological disaster. However, after 3 months, 85% of the oil will be degraded by a variety of microorganisms and radiant energy from the sun (weathering). The most volatile of the components of oil will evaporate into the atmosphere, and some of the components, such as asphalt, which cannot be degraded by microorganisms, will form tar balls.
Sometimes a company will be hired to simply monitor the site of an oil spill or other polluted area. Microbes naturally present in the soil, sand or water of the site will slowly consume or absorb the pollutant, and the contamination will eventually be cleaned up. This is known as natural attenuation. This approach can work well in some situations, but in other cases, too much time is required for indigenous microbes to degrade the pollutant. In the interim, the pollutant is killing off other species. Thus, many bioremediation companies speed up the degradation process to minimize damage to the environment. There are two approaches used by these companies, biostimulation and bioaugmentation. Biostimulation is the addition of vitamins, minerals, oxygen and other compounds to a contaminated site to speed microbial growth and enhance their activity. A simple example of biostimulation would be the addition of fertilizer to the water around an oil spill. The concentration of nutrients, such as nitrogen and phosphorous, in the soil or water of a site limits the growth of microorganisms. With higher concentrations of these nutrients, the organisms can reproduce more quickly; building a larger population that can degrade more of the pollutant. A drawback to this approach is that a variety of organisms are stimulated, which could result in the growth of undesirable or competitive microbes. Alternatively, bioaugmentation is the addition of microorganisms that specifically degrade the contaminant. Companies that use this approach have collected these organisms from other sites and commercially cultivated them, and one of the first examples of an organism genetically altered to benefit mankind, was a bacteria specifically designed to degrade oil spills very rapidly and then expire once the oil was degraded.
Selection of OrganismsOrganisms are selected or designed to withstand harsh environmental conditions such as high salt and wave
action, as well as selected to thrive on the specific contaminant that must be removed. This makes them better suited to survive in the site than the indigenous microorganisms, reducing competition. Once the contaminant has been degraded, the foreign organisms have fewer advantages over the native microorganisms, so they will not survive the competition and eventually will die out. This is still being hotly debated, since many scientists think it is unwise to introduce new
81

BIOL1414 Lab Manual Austin Community College 10th Edition, Spring 2011
organisms into the environment, even if they are suppose to die once the substrate is gone, especially since there are several examples of where this action negatively impacted the environment (for example, rabbits in Australia).
Parameters for SelectionTo isolate and select for these organisms, the scientist must understand their growth requirements. What are the
nutritional requirements of microorganisms? Are these nutrients naturally available at the contaminated site? If cleaning up an oil spill in the ocean, media is required that duplicates the available nutrients in the ocean. Nitrogen, phosphorous, and iron are limiting nutrients in fresh and seawater environments. Bioremediation experts optimize degradation of pollution by providing elevated levels of nutrients that induce the microorganisms to degrade the pollutant or increase its metabolic rate, thereby degrading the pollutant faster. Environmental conditions such as wave action, sun and wind exposure, and temperature must also be accounted for.
Oil is a good carbon (energy) source for a variety of aerobic microorganisms. However, not all parts of crude oil are good substrates. The asphalt portion cannot be degraded and eventually forms tar balls, as mentioned above. It is important to determine what fractions of the crude oil are degraded and what parts are not degraded by microorganisms if one is going to use them to clean up oil spills.
Composition of Crude OilCrude oil is a complex substance made of many different components. When crude oil is refined by fractional
distillation, these components are separated as they evaporate based on their boiling points. The table below lists all the constituents of crude oil and the temperatures at which they vaporize.
Fraction Boiling Point (oC)Gas <20Petroleum ether 20-60Naphtha 60-100Gasoline 40-205Kerosene 175-325Lubricating oil Not available (liquid)Asphalt Not available (solid)
Degraders of Oil in NatureOil is a substance found in nature, and there are microorganisms that exist already to digest it. (Bacillus sp,
Pseudomonas sp. Nocardia sp. Rhodococcus sp. and certain fungi like Cladosporium) However, manmade substances, such as plastics, are not easily degraded, as nature has not had sufficient time to evolve or develop the enzyme systems to degrade them. The rule of thumb is that “what is made by nature is degraded by nature”. And yet many plastics are major pollutants. The problem, then, becomes how to deal with these man-made pollutants in our environment.
Bacterial Strains Designed To “EAT” Oil Ananda Chakrabarty and his colleagues generated the first engineered microorganisms with advanced
degradative properties in the 1970s. Plasmids were transferred into a bacterial strain that could degrade several compounds in petroleum. He was also the first person to receive a U.S. patent for a genetically engineered microorganism. Although this bacterial strain never was used to clean up oil spills, the development of an “oil-eating” microbe was a significant achievement.
Lab ScenarioYou work at a bioremediation company. The scientists at your company have gone to an oil-polluted site and
collected soil samples. After returning to the lab, they select the desired oil-degrading bacteria. They want to develop a strain of bacteria that will degrade the oil that spills from boats at freshwater marinas. This oil pollutes both the area immediately around the marina and further out in the body of water. This affects the fish, birds and other wildlife living in the area. As a biotechnician, you have been asked to assess the ability of the bacteria to degrade motor oil spilled in fresh water. You will also need to determine if the addition of fertilizers or other nutrients (not containing a carbon source) will stimulate the degradation of the oil under the appropriate environmental conditions. You need to design an experiment to evaluate the activity of the bacteria in fresh water. Questions you need to answer are:
What environmental conditions are going to effect oil degradation by the bacteria, and how can you simulate those conditions in the experiment?
What are the controls for the experiment and why are they important?
82
BIOL1414 Lab Manual Austin Community College 10th Edition, Spring 2011
What biostimulants do we want to try, why, and at what concentration? How are you going to determine if the oil is being degraded or not, and if the addition of biostimulants is
increasing the rate of oil degradation? Can you see the oil being eaten? What compound(s) is oil converted to when it is degraded? Can you detect the metabolic products of oil degradation? Can you think of any other questions you need to answer before starting the experiment?
Write up your experiment, including materials and procedure sections. An example of a possible write up is included below. You can utilize this approach but do NOT COPY it word for word.To keep track of your experiment, it is recommended that you create a table similar to the one below, which gives the details of each tube. This particular table includes five variables, but you only need about three to have plenty of experimental data. Be sure to include enough negative controls to be able to determine the effects of each variable.
Tube no. Biostimulant concentration Temperature Agitation Light or dark
oil degradation
Based on the data you collected during your simulated oil spill, what conditions does your lab recommend to degrade oil at a polluted site?
83
BIOL1414 Lab Manual Austin Community College 10th Edition, Spring 2011
EXAMPLE: Method for Evaluating the Efficacy of Oil-Eating Microbes
MaterialsSpatulaTap waterGraduated culture tube with capCrude oilOil-degrading microbe culturePaper towelsLiquid fertilizer
Procedure
1. Add 5 mL of water to the required number of culture tubes. Add biostimulant to the appropriate tubes. Add oil-degrading microbe culture to the appropriate tubes. Add 3 drops of oil to each tube of water. The oil should form a thin layer on top of the water.
2. Cap the culture tube and invert them several times to ensure good mixing and to simulate wave intermixing. Loosen the cap of the tube and incubate it vertically under predetermined conditions (i.e. room temperature, in the refrigerator, in the incubator at 37 C, shaking, not shaking, outside, in the dark).
3. Illustrate and describe the original oil layers in your lab notebook.
4. Continue to observe the tube every day for several weeks. If possible, invert the tubes 2 to 3 times each day to simulate wave action and promote intermixing. Compare the inoculated tubes to the non-inoculated controls under different conditions.
5. Carefully note changes in your lab notebook. How do you know when the oil is being degraded? How long does it take to degrade the oil sample?
84

BIOL1414 Lab Manual Austin Community College 10th Edition, Spring 2011
DNA Fingerprinting by Southern Blot AnalysisBackground InformationDNA fingerprinting (also called DNA typing) is a recently developed method that allows for the identification of the source of unknown DNA samples. DNA fingerprinting involves the electrophoretic analysis of DNA fragments generated by restriction enzymes. No two individuals have exactly the same pattern of restriction enzyme recognition sites. There are several reasons for this fact. A large number of alleles exist in the population. Alleles are alternative forms of a gene. Alleles result in alternative expression of genetic traits which can be dominant or recessive. Chromosomes occur in matching pairs, one of maternal and the other of paternal origin. The two copies of a gene (alleles) at a given chromosomal locus constitute an individual’s unique genotype. It follows that alleles have differences in their base sequences which consequently creates differences in the distribution and frequency of restriction enzyme recognition sites. Other differences in base sequences between individuals can occur because of mutations and deletions. Such changes can create or eliminate a recognition site. Variations in the lengths between these recognition sites are known as restriction fragment length polymorphism (RFLP). RFLP’s are a manifestation of the unique molecular genetic profile, or “fingerprint”, of an individual’s DNA.
RFLP analysis of complex DNA is facilitated by Southern blot analysis. A replica of the electrophoretic pattern of DNA fragments in the gel is made by transferring (blotting) to nylon membrane. This is done by placing the nylon membrane on top of the gel after electrophoresis and transferring the fragments to the membrane by capillary action. The DNA becomes permanently adsorbed to the membrane, which can be manipulated much more easily than the agarose gel.
Visualization of DNA samples is accomplished through the use of well-defined probes. Probes are single stranded fragments of DNA commonly used for genetic identification at a specific chromosomal locus. Multiple probes detect multiple sequences and can yield 20 to 30 bands. Using multiple probes means the chances of two people chosen at random showing the same banding pattern is enormously remote. For example, it is calculated that two unrelated individuals having the identical DNA pattern detected by two probes is 1 in 30 billion. It should be noted that the total human population on earth is only between 5-6 billion.
This experiment demonstrates the use of Southern Blot Analysis to determine paternity identification. In such a determination, DNA samples obtained from the mother, the child and possible fathers are fingerprinted. A child’s DNA is a composite of its parents’ DNA. Therefore, comparison of DNA fragmentation patterns obtained from the mother and child will give a partial match. Bands in the child’s fingerprint that are not present in the mother’s must have been contributed by the father.
In this hypothetical case, DNA was extracted from samples obtained from two possible fathers of a child. Their DNA was cleaved with the same restriction enzyme in separate reactions. The objective is to analyze and match the DNA fragmentation patterns after agarose gel electrophoresis and determine if Father 1 or Father 2 is the biological parent of the child.
To avoid hazards and special techniques associated with radioactive analysis, this experiment employs a non-isotopic DNA detection system (Edvotek Blue Blot) specifically designed for classroom use.
85

BIOL1414 Lab Manual Austin Community College 10th Edition, Spring 2011
Procedure
DAY ONE RUNNING THE GEL
1. Pour a 0.8% agarose gel in 1X TAE in a 7 x 7cm tray (takes 30 ml agarose). Use the 10 well comb. Refer to Appendix G for instructions on making agarose gels. Do not add ethidium bromide to the gel solution.
2. While the gel is cooling, heat DNA samples for two minutes at 65C. Allow the samples to cool for a few minutes.
3. Load 35 µl of each sample in tubes A-I into the wells in consecutive order. Record the order in which you loaded. The samples are DNA that has been cut with restriction enzymes and labeled with biotin in order to aid in the detection of the DNA samples.
A. StandardB. Mother Cut with enzyme 1C. Mother cut with enzyme 2D. Child cut with enzyme 1E. Child cut with enzyme 2F. Father 1 cut with enzyme 1G. Father 1 cut with enzyme 2H. Father 2 cut with enzyme 1I. Father 2 cut with enzyme 2
4. Run samples for one hour at 100 volts.
PREPARING THE BLOTAfter electrophoresis, the gel is sequentially treated in HCl and NaOH. The HCl treatment introduces apurinic sites in DNA which makes phosphodiester bonds at these sites labile and therefore introduces nicks in double stranded DNA. The NaOH treatment disrupts the interstrand hydrogen bonds between the base pairs. This procedure causes double stranded DNA restriction fragments to be converted into single stranded form. DURING THESE STEPS YOU MUST WEAR GLOVES. DO NOT TOUCH THE NYLON MEMBRANE WITH YOUR BARE HANDS.
1. Depurinate the agarose gel by placing it in a small tray containing 100 ml of 0.25M HCl.a. Incubate at room temperature for NO MORE THAN 8 minutes. Make sure the gel is immersed in the
liquid and agitate periodically. Stop depurination if the dye becomes completely yellow.b. Carefully discard the HCl solution down the sink.c. Rinse the gel with several changes of 100 ml of distilled water.
2. Soak agarose gel 15 minutes in 100 ml of DNA Denaturation Solution (0.5M NaOH/0.6M NaCl). Make sure the gel is immersed in the liquid.
a. Because of the density of the solution, the gel will float, so periodically shake the tray to immerse the gel.b. Discard the solution.
3. Soak gel in a second 100 ml of DNA Denaturation Solution for 15 minutes.
4. Place a sheet of plastic wrap (such as Saran Wrap) on a flat level lab bench.a. Remove the gel from the tray and place it (well side DOWN) directly onto the plastic wrap. Inverting the
gel places the smooth surface on top for contact with the membrane.b. Do not discard the DNA Denaturation Solution. Save it for step 6.
5. Wearing gloves and using forceps and scissors, trim the nylon membrane to the size of the gel. Note that the membrane is very smooth and thin and has the appearance of plastic. DO NOT confuse the membrane with the filter paper or with the paper separators also found in the packet of membranes. Ask your instructor if you are not sure which piece is the membrane.
86

BIOL1414 Lab Manual Austin Community College 10th Edition, Spring 2011
6. Carefully pick up the membrane at edges with two clean forceps. Slightly bend the membrane in the middle and slowly wet (from the middle out) in the DNA Denaturation Solution you saved from step 4.
7. Release the membrane and gently submerge it for 5 minutes until it is thoroughly saturated with DNA Denaturation Solution.
a. Use forceps to remove saturated membrane from DNA Denaturation Solution and place it on top of the inverted agarose gel.
8. Trim the blotting filter paper to the same size as the gel and the membrane. Place the filter paper on top of the membrane.
a. Roll a 10 ml pipet across filter paper to remove air bubbles.b. Carefully place a stack of paper towels approximately 4-5 cm on top of the filter paper.c. Place an empty tray on top of the paper towels. Put an empty 400 ml beaker inside the tray for weight.d. Clearly label some part of this setup with your full name (or group name). The gels and membranes appear
to be identical.
9. Allow the blot to progress overnight.
10. Remove the tray, beaker, and all the paper towels.
11. Wearing rinsed gloves and using forceps, flip the stack (gel-nylon membrane-filter paper) over to lie on the filter paper.
12. Using a blue ink pen, draw through the six sample wells and trace their positions on the nylon membrane.
13. Using forceps, remove the gel from the membrane. Note the thickness and consistency of the now dehydrated gel. The gel can now be discarded since all further processing takes place with the nylon membrane.
14. Lay the membrane on a dry paper towel with the DNA side up (the side which was in direct contact with the gel). The bromophenol blue dye can be seen on the membrane. This is NOT the location of the DNA.
15. Using a blue ink pen, label the DNA side of the membrane with your lab group number or initials.
16. Place the membrane between two sheets of filter paper. Place in an 80C incubator for 30 minutes.
DAY TWO MEMBRANE SHIELDING
1. Rehydrate the baked membrane for 5 minutes in 100 ml of diluted Detection Buffer. Keep the DNA side of the membrane UP. While the membrane is rehydrating, warm 50 ml of Membrane Shielding Buffer to 65°C.
2. While holding the membrane down with forceps, pour the Detection Buffer out of the tray.
3. Add 50 ml of the warmed Membrane Shielding Buffer to the tray. The membrane should still have the DNA side facing up.
4. Cover the tray with the lid and place in a 65°C incubator for one hour.
5. Turn the incubator down to 37C and carefully pour off the Shielding Buffer. Set the membrane aside (on the tray lid) and rinse out the tray with distilled water. Shake out the tray to remove excess water, but do not dry with paper towels because lint may increase the background.
6. Place the membrane back in the tray, DNA side up. Add 8 ul of SAAP to 10 ml diluted Detection Buffer. Mix well and pour over the membrane in the tray. Incubate the tray at room temperature for 10 minutes with gentle rocking to ensure that the membrane is covered with the solution. The streptavidin-alkaline phosphatase (SAAP) will bind to the biotinylated DNA during this incubation.
87

BIOL1414 Lab Manual Austin Community College 10th Edition, Spring 2011
7. Remove the membrane from the tray and place it on the lid, as before. Wash out the tray with distilled water and shake out excess water. Place the membrane back in the tray, DNA side up. Rinse off the lid with distilled water.
8. Wash the membrane in 400 ml of diluted Detection Buffer for 20 minutes with gentle rocking to wash off non-specifically bound SAAP.
9. Discard the solution and wash a second time in 200 ml of diluted Detection Buffer for 15 minutes.
10. Discard the solution and wash a third time in 200 ml of diluted Detection Buffer for 15mintues.
11. Carefully remove the membrane from the tray and place it on the tray lid. Add 8 ml of Color Development solution. Place the membrane DNA side DOWN into the tray and cover with the lid. Place in a 37°C incubator for 30-60 minutes. The color development solution contains a mixture of 5-Bromo-4-chloro-3-indolyl phosphate (BCIP) and blue tetrazolium (NBT). BCIP is a substrate for SAAP and will therefore bind to the DNA. In the presence of BCIP, NBT becomes reduced. Upon reduction NBT isconverted into an insoluble blue product that precipitates on the nylon membrane indicating the position of the transferred DNA.
12. Place the membrane on the tray lid. Completely discard the color development solution and rinse the tray with distilled water.
13. Soak the membrane in 100 ml of Termination solution for 5 minutes. Protect the membrane from strong direct light.
14. Allow the membrane to dry in the dark between 2 sheets of filter paper. Prolonged exposure to brigh light will increase the background.
88

BIOL1414 Lab Manual Austin Community College 10th Edition, Spring 2011
89

BIOL1414 Lab Manual Austin Community College 10th Edition, Spring 2011
DNA Fingerprinting by Southern BlotResults and Analysis Name_________________________________
1. Why do different individuals, even siblings, have different restriction enzyme recognition sites?
2. What is the function of probes in DNA paternity tests? Why are multiple probes used?
3. Why is a Southern Blot required for forensic and paternity DNA fingerprinting testing?
4. What was the purpose of soaking the membrane in HCl and the DNA denaturation Solution? What would you suspect might happen to your results if you left this step out?
5. Who is the father of this child? How can you tell?
90

BIOL1414 Lab Manual Austin Community College 10th Edition, Spring 2011
An Indirect ELISA Test for HIVObjectivesYour performance will be satisfactory when you are able to:
Understand the molecular basis of the human immunodeficiency virus and the pathogenesis of acquired immune deficiency syndrome
Perform and enzyme linked immunoassay (ELISA) in the context of clinical screening of serum samples for antibodies to the virus
Introduction
Mechanism of HIV Infection
An individual can be infected with HIV through an abrasion in a mucosal surface (e.g. vaginal and rectal walls), a blood transfusion or by intravenous injection with a contaminated needle. Virus or virally infected cells are found in bodily fluids such as semen and blood. During the early stages of infection in an immunocompetent person the HIV virus elicits humoral and cellular immunity responses that result in a variety of circulating IgG molecules directed at several viral epitopes. However, since the virus has a high mutation rate the variants survive and produce progeny having a similar capacity to escape immunosurveillance.
Unlike other cellular DNA polymerases, HIV DNA polymerase (reverse transcriptase) has a high error rate (1 in 104). These frequent mutations continually change the viral protein epitopes. This is believed to be the main mechanism of HIV immunoevasion. The most important target for the virus are hematopoietic cells such as bone marrow derived monocytes, myelocytes and immune system lymphocytes. Infection of immune system effector cells such as T cells and macrophages ultimately produce the most profound clinical consequences. gp 120 binds to the CD4 receptors on the surface of T helper (TH) cells. These receptors are membrane bound glycoproteins involved in T cell maturation from precursor cells. TH cells are required for the body's overall immunological responses. The viral lipid bilayer fuses with that of the cell's membranes and the viral protein capsid becomes internalized via receptor mediated endocytosis. Subsequently, the rest of the CD4 receptors are internalized and gp 120 appears on the T cell surface.
HIV Replication and Transcription
Through a complex mechanism involving several events, the reverse transcriptase synthesizes a double stranded DNA copy of the genomic RNA template. The tRNA molecule acts as the primer for the first strand synthesis. The reverse transcriptase, RNase H activity, degrades the RNA strand of the RNA-DNA duplex and the polymerase activity synthesizes a complementary DNA strand. The DNA reverse transcripts (copy DNA) migrate into the cell nucleus where they become covalently integrated into the cellular genomic DNA. The integration is catalyzed by the HIV integrase. The copy DNA integrates via specific, self-complimentary sequences at both ends called long terminal repeats (LTRs). These sequences also have important functions in viral transcription. The integrated copy DNA is called proviral DNA or the provirus. The provirus enters a period of latency that can last for several years. The proviral DNA is replicated along with the cellular DNA and can be inherited through many generations. The HIV proviral DNA contains the major genes common to all non-transducing retroviruses. These genes are gag, pol and env. HIV also contains five or six other genes that are much smaller. Retroviral transcription is a complex process producing a variety of RNAs. Promotion of transcripts is controlled in the LTR and transcriptional termination signals are located in each major gene. Those RNA transcripts that remain unspliced become packaged in the new viral particles. The gag gene is translated into a polypeptide that is cleaved by a viral protease into four proteins that form the inner shells. Specific protease inhibitors are clinically being used to inhibit protein processing and control the further spread of the HIV virus in patients suffering from AIDS. The pol gene encodes the reverse transcriptase and the integrase which is responsible for the genomic incorporation of copy DNA. The env gene en-codes the surface glycoproteins the viral particles acquire as they bud from the cells.
Immunological Response
91

BIOL1414 Lab Manual Austin Community College 10th Edition, Spring 2011
Macrophages are circulating monocytes and are involved in the non-specific engulfment of foreign material and normal cellular debris. These materials are degraded in the lysosomes of the cells. Peptides from foreign degraded proteins are transported to the macrophage surface where they remain bound by specialized receptors. Immunologically inactive TH
cells interact with these surface bound antigen-receptor complexes which enables them to become fully activated. HIV infects macrophages by binding to the cells' CD4 receptors. Fully activated TH cells secrete several types of protein factors collectively known as lymphokines. Several of these factors are the interleukins which stimulate antibody secretions from B cells enable macrophage activation, stimulate general T cell growth and activate cytotoxic T cells. Cytotoxic T cells are involved in the actual destruction of foreign cells and body cells infected with different viruses. Inactive TH cells that have been infected by HIV remain in a relatively quiescent state similar to uninfected cells. When a TH cell containing provirus undergoes antigenic activation the integrated copy DNA becomes open to the transcription of viral RNA. Viral replication causes the destruction of the TH cells. Infected TH cells also form syncytia, i.e. fused cells. Syncytia occur since the gp 120 on the infected T cell surface binds to CD4 receptors on other TH cells. Cell to cell transmission of virus can occur in syncytia without the need for a free viral intermediate. Replication of virus also proceeds in activated macrophages which causes cell death and release of infectious viral particles. These and other events ultimately cause complete immune system collapse. The long latency period after HIV infection can be understood in terms of TH cell activation. Only certain TH cells are capable of responding to a particular antigen. HIV infected but asymptomatic individuals will experience the usual exposure to chemicals, viruses and bacteria. Each infection activates a subpopulation TH cells containing the provirus which eventually leads to the death of these cells. After successive waves of infections the population of TH and macrophage cells become depleted and clinical AIDS develops. There are a very small number of individuals who have coexisted with HIV for over 15 years. Although the reasons for this coexistence with HIV is not understood, the immune system appears to remain intact. Such individuals tend to eat well, exercise and practice stress reduction techniques. Genetic analysis may determine whether or not subtle genetic differences in the immune system are significant factors.
Description of the HIV Screening Simulation
Enzyme linked immunosorbent assay (ELISA) tests were originally developed for antibody measurement. These immunoassays have also been adapted to successfully detect samples that contain antigens. This ELISA simulation experiment has been designed to detect a hypothetical patient's circulating IgG directed towards the viral (HIV) antigen. ELISAs are done in microtiter plates which are generally made of polystyrene or polyvinyl chloride. The plates are somewhat transparent and contain many small wells, in which liquid samples are deposited. First, the antigens are added to the wells where some remain adsorbed by hydrophobic association to the walls after washing away the excess. The antigens can be the whole HIV lysate, specific HIV proteins, or a mixture of the two. There is no specificity involved with the adsorption process although some substances may exhibit low binding to the walls. In certain cases the antigens can be covalently cross-linked to the plastic using UV light. After washing away unadsorbed material, the unoccupied sites on the walls of the plastic wells are blocked with proteins, typically gelatin or bovine serum albumin.
Infection by HIV-1 causes the individual to mount an antibody response which eventually results in plasma IgG molecules that bind to different HIV proteins (and/ or different areas or the same polypeptide). In this experiment, if these antibodies are present in the plasma sample they will bind to the adsorbed antigens in the well and remain there after washing.
A solution containing the IgG antibody that binds to any kind of human IgG, is then added to the wells. If the primary antibody has remained in a well, then the secondary antibody will bind to it and also remain attached after washing. These secondary antibodies are usually raised in rabbits and goats immunized with human IgG fractions. The second IgG antibodies are purified and covalently cross linked to horseradish peroxidase. This modification does not significantly affect the binding specificity and affinity of the antibody or the enzymatic activity of the peroxidase.
After washing, a solution containing hydrogen peroxide and aminosalicylate is added to each well. Peroxidase possesses a high catalytic activity and can exceed turnover rates of 106 per second. Consequently, amplification of a positive sample can occur over several orders of magnitude. Many hydrogen donor co-substrates can be used by peroxidase. These co-substrates include o-diansidine, aminoantipyrine, aminosalicylic acid and numerous phenolic compounds that develop color upon oxidation. The substrate solution added is nearly colorless. Peroxidase converts the peroxide to H2O + O2 using the salicylate as the hydrogen donor. The
92

BIOL1414 Lab Manual Austin Community College 10th Edition, Spring 2011
oxidized salicylate is brown and can be easily observed in wells containing anti-HIV-1 IgG (positive plasma). It should be noted that polyclonal antibody preparations to a given antigen can have variable binding affinities due to differences in the immunological responses between animals. Different immunizations with the same antigen in the same animal can also produce variable binding affinities. The use of monoclonal antibodies directed against a single epitope eliminates this variability. Western blot analysis of positive samples are used to confirm infection by HIV.
Procedure1. Place the microtiter plate vertically and label as follows:
93
Steps in the INDIRECT ELISA: Antigens are bound to ELISA
plate directly or via an antibody (this has already been done in your plates).
Serum is added to the wells. If the serum contains the antibodies for the HIV virus, they will attach to the antigens bound to the wells.
Wells are washed thoroughly so that when a test is performed to determine the presence of antibodies, only those that attached to antigens, which were attached to the plate bottom, will be left.
A color-changing agent is added which will react with an enzyme that was artificially attached to the antibody to produce a colored reaction.
Wells that changed color have an antibody present attached to the antigen for which you are testing.

BIOL1414 Lab Manual Austin Community College 10th Edition, Spring 2011
Row 1 (- control) Row 2 (+ control) Row 3 (Donor Serum 1) Row 4 (Donor Serum 2)
2. Label 4 transfer pipets -, +, DS1, and DS2 to correspond with the wells. When instructed to remove liquids in the experimental procedure, be sure to use the appropriately labeled pipet.
3. To all 12 wells, add 100 ul of “HIV” (viral antigens).
4. Incubate for 5 minutes at room temperature.
5. Remove all the liquid (viral antigens) with the appropriate transfer pipet.
6. Wash each well with Phosphate Buffered Saline solution (PBS) by adding 200 ul to each well and then removing all of the liquid from each well with the appropriately labeled transfer pipet.
NOTE: In research labs, following this step, all sites on the microtiter plate are saturated with a blocking solution consisting of a protein mixture, such as BSA. This experiment has been designed to eliminate this step and save time.
7. Add reagents as outlined below, remembering to change tips for each reagent: Add 100 ul of PBS to the three wells in Row 1. (This is the negative control.) Add 100 ul of “+” (positive) to the three wells in Row 2. (This is the positive control.) Add 100 ul of Donor Serum “DS1”to the three wells in Row 3. Add 100 ul of Donor Serum “DS2” to the three wells in Row 4.
8. Incubate at 37C for 15 minutes.
9. Remove all the liquid from each well with the appropriately labeled transfer pipet.
10. Wash each well with PBS by adding 200 µl to each well and then removing all of the liquid from each well with the appropriately labeled transfer pipet.
11. Add 100 µl of the anti-IgG peroxidase conjugate (2Ab) to all 12 wells.
12. Incubate at 37C for 15 minutes.
13. Remove all the liquid from each well with the appropriately labeled transfer pipet.
14. Wash each well with PBS by adding 200 µl to each well and then removing all of the liquid from each well with the appropriately labeled transfer pipet.
15. All 100 µl of the substrate to all 12 wells.
16. Incubate at 37C for 5 minutes.
17. Remove the plate for analysis.
18. If color is not fully developed after 5 minutes, incubate at 37C for a longer period of time.
94

BIOL1414 Lab Manual Austin Community College 10th Edition, Spring 2011
ELISA for HIVResults and Analysis Name _______________________________
1. What do the terms below mean?a. AIDS
b. HIV
c. ELISA
d. Opportunistic Infection
3. What is the incubation period for AIDS (the time between exposure and demonstration of symptoms of AIDS).
4. What does the body's immune system produce against viral infections? What does this product do in the HIV test?
5. What are the characteristic ways that a person can get HIV?
6. How can a person avoid getting HIV?
7. Name an opportunistic infection associated with AIDS.
95

BIOL1414 Lab Manual Austin Community College 10th Edition, Spring 2011
Mining Biological Databases on the InternetObjectives
Your performance will be satisfactory when you are able to Locate scientific publications and biological databases of DNA and protein sequences on the Internet Retrieve and compare sequence information from databases Compare evolutionary relatedness and draw phylogenetic trees from sequence comparisons Study protein structure and function from database comparisons
Introduction
One of the goals of the Human Genome Project is to sequence the entire human genome. This includes all 22 somatic chromosomes and the X and Y chromosomes. Since there are 3.2 billion base pairs in the human genome, this is quite an ambitious goal. Sequencing began in 1990 and by February 2001 (four years earlier than the target date), over 90% of the genome had been sequenced. The only sequences not completed at this point had been highly repetitive regions such as the centromere and telomere regions of the chromosomes, which resist cloning by the host and vector systems that are currently used. Another goal of the Human Genome Project is to sequence the genomes of other species of interest, such as model organisms used by biologists, pathogens of medical importance, and crop plants of agricultural importance. This goal has also been exceeded, and today the genomes of over 900 species have been at least partially sequenced.
This large international project has not only collected enormous databanks of DNA sequence information from the genomes of dozens of species, it has also promoted the development of highly automated strategies for studying nucleic acids and proteins. Much of the reason for the success of the Human Genome Project comes from the introduction of new high throughput technologies for DNA sequencing that can use automation and robotics.
The Human Genome Project has been a catalyst for change in the way biologists approach the study of living things. Biologists today using the sophisticated laboratory technology for sequencing DNA are collecting data faster than they can interpret it. A new field called bioinformatics is developing for the storage and management of the data stored in these rapidly growing databases, as well as for the use of a computer as a general tool for discovering how living things work.
For example of how this can work, when a scientist sequences a new stretch of DNA, this information becomes meaningful when a new gene can be discovered in the sequence. Often these genes are hard to spot, especially in eukaryotic genomes, since the majority of DNA in these organisms does not code for genes; in the human genome, genes account for less than 2% of the DNA sequence. A computer program can search the sequence for tell-tale signs of a gene from sequence data, by searching for DNA consensus sequences for translational start and stop codons, a ribosome binding site, intron splicing sites, and a promoter. In eukaryotes, a region of high guanosine and cytosine (G and C) content is frequently found near clusters of genes, so mapping GC content along a chromosome can also help to locate the presence of a gene in the DNA sequence. Since gene sequences can be highly conserved between different species, an especially powerful approach for identification of a gene in sequence data is to search databases of DNA sequences looking for sequence similarities. Due to these so-called in silico (in a computer program) tools and the dramatic growth of DNA sequence databases, the rate of gene discovery has increased exponentially.
The power of bioinformatic approach for the discovery of genes has been proven with the completion of the yeast genomic sequencing project in 1996. Once the genome was fully sequenced, bioinformatic approaches could be used to scan for and identify genes. The genes discovered this way could be compared with the large number of genes that had already been discovered through more classical molecular genetic techniques. The results were remarkable. Before the yeast genome was sequenced in 1996, an international collaboration of scientists studying the genetics of this model organism had identified an impressive 2,000 genes by conventional genetic analysis. When the yeast genome sequencing was completed, bioinformatic searches for similarities of DNA sequences from other organisms were able to locate an additional 2,000 genes. This means in less than one year, a single laboratory using
96

BIOL1414 Lab Manual Austin Community College 10th Edition, Spring 2011
DNA sequencing and computer searches of sequence data could both duplicate and double the gene discovery of a 20-year international effort.
Once a gene has been identified, many new questions can be asked: what kind of protein does it code for and what is its function? How does it interact with other biomolecules of the cell? Is it expressed at all times as a so-called “housekeeping gene”, or is it a developmentally regulated gene? Is its expression tissue-specific? Is it expressed in response to an environmental factor? These questions are the same questions that have been asked by molecular and cell biologists for decades, usually by studying one gene, and its protein or proteins, at a time. With the copious amounts of information coming from the genomics project, however, biologists can ask the same questions about more complex systems. Instead of asking about one protein at a time, biologists can now ask questions about hundreds of proteins at a time, looking for patterns of structure and patterns of expression. Looking at the proteins on a genomic scale is a new field now called proteomics. When a new gene has a sequence that has been found to be homologous to a gene in a database that has already been characterized, sometimes many of these questions about protein structure and function can be answered quickly by the bioinformatic approach. For example, the 2,000 new genes discovered by the yeast genomic sequencing project, discussed above, matched genes of other organisms whose function had already been determined.
Bioinformatic approaches are playing an increasingly important role in protein structure studies. Although the final conformation of a protein is determined by the amino acid sequence of that protein, we have yet to model the correct folding of a protein by its amino acid sequence by computer. There is progress, however, in achieving this so-called “holy grail” of proteomics. As our database of protein structures grows, it is easier to predict protein structures based on similarities in amino acid sequence. In addition, we have discovered by analysis of sequence databases that there are certain conserved protein families with high sequence homology in part, if not all of the amino acid sequence. Computer programs can currently predict protein structures by homology modeling when the sequence homology is as low as 25%. This means that if the amino acid sequences agree by more than 25%, the computer program can accurately predict the secondary and tertiary structure of the amino acid sequences.
Questions about how genes are regulated are rapidly being answered by new devices called DNA chips or microarrays. These devices are designed to allow many hybridization experiments to be performed in parallel. Oligonucleotides are synthesized on a glass surface similar to a microscope slide. Using photolithography technology used to etch semiconductor circuits into silicon for chips used in the computer industry, arrays of oligonucleotides can be laid out at a density of up to one million different oligonucleotides per square centimeter. By judicious selection of oligonucleotide sequences, complementary DNA for of all the genes expressed in an organism can be assigned at specific positions on a given microarray. A microarray can be used to easily determine which genes are being expressed in a cell. This involves harvesting the mRNA from a cell, labeling the mRNA by covalent linkage to a colored molecule, and allowing the labeled mRNA to hybridize with the oligonucleotides on the microarray. The microarray is said to be “interrogated” in this way by the labeled mRNA. The genes that are actively being transcribed into mRNA by the cell are then identified by viewing the microarray under a microscope to see which oligonucleotides were hybridized with the labeled mRNA. Although there are many variations in the design and hybridization of microarrays, they all produce massive amounts of data from single experiments, requiring computer-assisted analysis and archiving of the results.
The power of these techniques is having a major impact in medical research. For example, a biotechnology company called Sagres Discovery in Davis, California, announced in 2002 that it has identified over 1000 new oncogenes in the mouse genome after just one year of research using this approach. The practical applications of database information and new bioinformatics tools are far-reaching. For example, with the discovery of a new oncogene and its structure and function comes the possibility of a new anti-cancer drug or treatment strategy. The discovery of disease-causing genes can lead to diagnostic techniques for inherited diseases. Plant geneticists are using the detailed information coming from genomics to identify DNA markers to speed the breeding of new traits in our crop plants. With the discovery of DNA sequence polymorphisms (variations in allele frequencies within populations) comes DNA fingerprinting strategies for identity testing in forensics. DNA fingerprinting is currently revolutionizing the criminal justice system.
In this exercise, you will use a computer to access GenBank, the database repository of all DNA and protein sequences housed at the National Center for Biotechnology Information (NCBI) at the National Institutes of Health (NIH).
97

BIOL1414 Lab Manual Austin Community College 10th Edition, Spring 2011
In Exercise A you will compare amino acid sequences of proteins from different organisms to study their evolutionary relatedness. In Exercise B you will use a DNA sequence to find a protein translational sequence (ORF for open reading frame) of a plant defensin and study the function of this protein by finding homologous sequences in the protein database. In Exercise C you will use databases of the biological literature, available online through the National Library of Medicine, to discover what researchers are reporting for the structures and functions of plant defensin proteins.
Procedure
Part A: Determine the evolutionary relatedness of species through comparisons of protein sequences
1. You will compare the sequences of the protein hemoglobin from bats, birds, and mammals. Decide whether you want to do your work with -hemoglobin or with -hemoglobin. These are the two protein chains that carry oxygen in the circulatory systems of animals. Both of these proteins have been studied extensively in a large number of species and should work equally well. Alternatively, you may want to collaborate with a partner and do companion searches, one doing searches with -hemoglobin, and one doing searches with -hemoglobin. At the end of the exercise, you can compare your results with each other to determine whether your different proteins showed the same evolutionary relationships between species of bats, birds, and mammals.
2. Go to http://expasy.ch/sprot/sprot-top.html. If you have problems accessing the site because the URL has changed, your instructor will help you find the new URL.
3. Go about 40% of the way down the page to the section titled Access to Swiss-Prot and TrEMBL. Click on the link by description or identification.
4. In Enter search key work, type “alpha hemoglobin” and click submit. The results of this search will come up on your screen. How many protein sequences were reported to you from this query?
5. You may scroll down and look through this long list of -hemoglobin sequences for one from a bat species, but it may be faster to narrow your search. Go back to the Enter search key work and type “bat alpha hemoglobin” and click submit. When you get the results of this search, how many sequences of alpha hemoglobin did you get for bat species?
NOTE: Check the species names and common names for each of the -hemoglobins in this sequence report to make sure that they are bat sequences. Sometimes a search won’t recognize the difference, for example, between “bat” and some other word, such as “wombat”!
6. Select one bat -hemoglobin sequence to save to a floppy disk by clicking on the color-highlighted and underlined accession code for that protein sequence. An accession code is how protein sequences are identified and archived in databases. In the case of -hemoglobin sequences, this accession code will start with the letters “HBA.” The symbols for all -hemoglobins will begin with “HBA.”
NOTE: If you are working with a partner who is doing a companion study with -hemoglobin, you will have to collaborate on your selection of which bat -hemoglobin sequences to save.
7. The page that opens will contain information about the sequence, such as the taxonomy of the organism from which it came. At the bottom of the page, you will see the protein sequence written with single-letter designations of the amino acids. To the right at the bottom of the page, you will see the link FASTA format. This is the best way to save sequence information on your disk, because it is a sequence format that all computer search programs can understand. Click the link and this will bring up a page containing the sequence.
8. Copy the amino acid sequence to a disk: a. Highlight the amino acid sequence (the entire script on your FASTA formatted page) b. copy it using the “Edit” pull-own menu
98

BIOL1414 Lab Manual Austin Community College 10th Edition, Spring 2011
c. open Notepad (use your mouse to go from “START” in the lower left corner of your computer screen to “PROGRAMS” to “ACCESSORIES” to “NOTEPAD”)
d. paste it into Notepade. name your Notepad filef. save it to your floppy disk (drive A)
NOTE: It is OK to copy and save your FASTA-formatted sequence using a word processor program, rather than Notepad, if you wish.
9. Return to the web page with the list of bat alpha hemoglobin sequences (clicking twice on the Back button on the web browser will get you there). Identify another sequence for a bat -hemoglobin and repeat the process of highlighting the FASTA formatted amino acid sequence to your Notepad file. Save all your FASTA formatted -hemoglobin sequences together in one file on your disk.
10. When you have saved two -hemoglobin sequences from two bat species, repeat steps 3-9 to get 2 sequences from bird species and 2 sequences from mammalian species. It doesn’t matter which species you choose, as long as 2 are from birds and 2 are from mammals. You might want to choose species that you think are related to bats. If you are collaborating with a partner searching for -hemoglobin sequences, your partner should search for the same species that you have chosen.
=> IMPORTANT: Be aware that if you are limiting your search for bird -hemoglobin sequences with the keyword “bird,” the search will only locate protein entries where the word “bird” appears. If the entry was archived under other descriptions such as “hawk” or “eagle” or “penguin,” you will not find entries using the keyword “bird.”
11. When you have saved six -hemoglobin sequences to your floppy disk (two from bats, two from birds, and two from mammals), go to http://clustalw.genome.ad.jp. CLUSTALW is a computer program that you can use to search for sequence similarities between many sequences at a time and display regions of alignment.
12. Copy your entire file of sequences saved on your floppy disk into the textbox and click Submit. Note that the sequence descriptions preceded by the “>” mark will be copied in with the protein sequences. This will not be a problem with your search. Without changing any of the default settings on your search, click on the blue colored Execute Multiple Alignment bar.
13. The next page will show the alignment of amino acid sequences for the 6 proteins that you have retrieved from the SWISSPROT database, using the single-letter designations for amino acids. An asterisk will appear along the bottom row of amino acid alignment at positions where there is an amino acid that is found in all 6 proteins. These amino acids are said to be highly conserved, since they haven’t changed since these species diverged from a common ancestor.
a. How many of the amino acids are found to be the same in all of the 6 -hemoglobin sequences in your alignment?
b. What percentage of all the -hemoglobin amino acids are conserved in all 6 proteins?
c. Are there any specific regions of the -hemoglobin sequences that are especially conserved?Is one end of the molecule more conserved than the other? Describe your observations.
d. Are there any amino acids that appear more frequently in conserved regions of the protein than in the nonconserved regions? If so, which amino acids are they? Go to the table at the end of this Lab Exercise to decode the single-letter designation for amino acids.
99

BIOL1414 Lab Manual Austin Community College 10th Edition, Spring 2011
e. If you did find amino acids that were more frequently conserved in your alignment report, were they ones with side groups that were nonpolar, polar, or charged?
14. At the top of your CLUSTALW report, you will find the exact percentages of amino acids in the sequence alignment that are identical when comparing only two sequences at a time. For example, if your report says “Sequences (1:2) Aligned. Score: 87.2”, this means that when the first two sequences saved on your disk were aligned, 87.2% of the amino acids were identical in both sequences. Transfer these percentages into a table format, in which the species whose sequences you have aligned are headers for both the columns and the rows. Your table should look similar to this:
Table 1: Percent identity in amino acid alignment for α-hemoglobins
Notice that you need not fill out both halves of this table since the information is redundant.
From this table, can you see whether the -hemoglobin sequences are more similar for bats and birds, compared with bats and mammals? What does this suggest about the evolutionary relatedness of these species? Which species diverged from each other the most recently and have the most recent common ancestor? Which species have been divergent from each other the longest and have the most ancient common ancestor? From the information in this you should be able to predict that bats are more closely related to either birds or mammals.
15. A phylogenetic tree can present the relatedness of species from sequence similarity data such as your Table 1. These trees link species that are more closely related in branches, and the length of the branches is their evolutionary distance. You can draw a phylogenetic tree from your amino acid alignment report by pairing species that have the most sequence similarities to make short branches. Species who have fewer sequence similarities will branch from each other on the tree farther apart.
The CLUSTALW on the page that your report appears on will automatically draw a phylogenetic tree for you. At the bottom of the page, click on either the blue-colored NJ-tree or Rooted Dendrogram. Print out the tree
SPECIES (bat #1 name)
(bat #2 name)
(bird #1 name)
(bird #2 name)
(mammal #1 name)
(mammal #2 name)
(bat #1 name)
100 87.2
(bat#2Name)
100
(bird #1 name)
100
(bird #2 name)
100
(mammal #1 name)
100
(mammal #2 name)
100
100

BIOL1414 Lab Manual Austin Community College 10th Edition, Spring 2011
that appears on the screen. Does the information on this tree agree with your analysis above of the Percent identity in amino acid alignment for -hemoglobins table? Explain.
16. One way to evaluate the validity of the phylogenetic tree that you drew for bats, birds, and mammals is to compare it with trees constructed from sequences of other proteins. Compare your tree with a tree constructed by your partner searching for -hemoglobin sequences. Does your tree derived from -hemoglobin sequences agree with one drawn from -hemoglobin sequences? Are the relative lengths of the branches the same?
17. (OPTIONAL) Repeat the comparisons that you made (steps 1-16 above) with other species such as the following:a. Compare whales to mammals and fish.b. Compare reptiles to birds and mammals.
B. Investigating proteins from DNA sequences
1. Go to http://www.ncbi.nlm.nih.gov.
2. The Entrez menu allows you to do searches based on the type of protein that you are interested in. Type “plant defensins” in the search box, and click on Go.
3. The page that comes up will report to you how many plant defensin DNA sequences have been deposited in GenBank. How many sequences did your search report?
4. The most recently submitted sequences are reported at the top of the list. Scroll down to the end of the list to the first sequences that were submitted for plant defensins. There will be a series of sequences that were submitted at the same time that are listed separately. You can access more information about these sequences by clicking on the colored identifier for the sequence. The identifier number is called an accession code, and is assigned by NCBI when a DNA sequence is submitted, for the purposes of archiving the information. In the case of these plant defensin proteins, the accession codes should be something like AX046743.
5. When you click on the accession code for a sequence, a page will come up that gives a more complete description of the sequence. It will contain information such as who submitted the sequence, the type of organism that it came from, whether the sequence was reported in a scientific journal or not, and some information about the sequence itself. Click on a few of the earliest plant defensins and answer the following questions.
a. Who submitted these sequences?
b. When were these sequences submitted?
c. Most scientific journals and the U.S. Patent Office now required that newly sequenced DNA that is being reported must be submitted to GenBank at the time the journal article is published or the patent is granted. Are the first plant defensins submitted to GenBank linked to a journal article or to a patent?
6. The nucleotide sequence appears at the bottom of the page that comes up when you click on the accession code. The DNA sequence is numbered from the 5’ to the 3’ end of the sequence. If the start codon for translation of the nucleotide sequence is known, that information will be given under the category Features and will be given as “CDS” for “coding sequence”. When the coding sequence is known, the amino acid sequence that is translated from the nucleotide sequence will be given in the single-letter amino acid designation.
101

BIOL1414 Lab Manual Austin Community College 10th Edition, Spring 2011
Are any the coding sequences known for the first plant defensins that were submitted to GenBank?
7. This first submission of plant defensin sequence data included sequences from four different species: Dimorphotheca sinuata, Picramnia pentandra, Parthenium argetatum, and Nicotiana benthamiana. Click on the accession codes until you have located sequences for a plant defensin from each of these species.
8. Copy four nucleotide sequences from this earliest submission of plant defensins, one from each of the four species, to a floppy disk. Since you will want to use this data for searches, save the sequences in FASTA format. For each sequence, do the following:
a. click on the colored accession code AX046743b. highlight the nucleotide sequence that appears at the bottom of next pagec. use the pull-down menu at the top of the page under “Summary” to select “FASTA”d. copy the sequence (click on “Copy” from the “Edit” pull-own menu)e. open Notepad (use your mouse to go from “START” in the lower left corner of your computer screen to
“PROGRAMS” to “ACCESSORIES” to “NOTEPAD”)f. paste the sequence into Notepad, name the file, and save it to your floppy disk (Drive A)
NOTE: It is OK to copy and save your FASTA-formatted sequence using a word processor program rather than Notepad.
Repeat steps a-f for three other accession codes: AX046747, AX046751, and AX046767.
9. Since there was no journal article to read about these plant defensin proteins, we don’t know anything about them except their name, where they were found, and what their DNA sequence is. If someone else has sequenced a homologous gene and reported the function of the gene product, you may be able to deduce some information about the plant defensins that you have selected.
To search GenBank for a DNA sequence that is homologous to the four sequences that you have saved, click the Back button until you have returned to the NCBI page that you began with, or go to http://www.ncbi.nlm.nih.gov again. Click on BLAST at the top of the page and select the blue-colored Standard nucleotide-nucleotide BLAST. Copy one of your nucleotide sequences from your disc to the text box of BLASTN by highlighting the sequence and pasting it in. Click on BLAST! and on the next page click on Format.
NOTE: There is an excellent and easy-to-follow tutorial on how to perform BLAST searches of GenBank at this site: www.geospiza.com. Click on the Education button.
GenBank is an enormous database, so this search may take a few minutes to complete, especially during busy times of the day. When your BLASTN report comes up, it will show a Distribution of Hits on the Query Sequence that displays in a figure the length of sequence that matched or hit the sequence that you did your search on (your “query” sequence). The alignment is scored by color code for how well the sequences aligned: red is the best agreement of sequences. If you roll the mouse over these color-coded lines, information about the sequence represented in the line will appear in the information box above the figure.
Below the figure, an alignment report will appear that includes some information about the species from which the sequence was taken and a score for how well the sequence aligned with your query sequence. This score is based on a statistical calculation, where a high score indicates a high level of agreement. An E value is also listed for each sequence in the report. This is another statistical calculation that estimates the probability that the sequences matched just due to chance. The shorter the stretch of sequence that aligned, the higher the E value, since it is more likely that a short sequence aligned due to chance.
Conduct a BLASTN search for each of your 4 saved plant defensin nucleotide sequences one at a time. If a search using these DNA sequences of plant defensins saved on your floppy disk does not result in a high level of sequence identity, discontinue any future searches with these. You can tell whether your search has found a good “hit” either visually by looking at the color-coded figure that shows regions of sequence homologies, or by
102

BIOL1414 Lab Manual Austin Community College 10th Edition, Spring 2011
reading the score and E values below this figure. If your search results in a long stretch of sequence homology, continue on and answer the following questions.
a. What is the name of the gene that gave you a good BLASTN hit (i.e. align well in a long stretch of sequence homology and has a Score of >100 and an E value of less than e-20)? What is the species and genus that this sequence came from?
b. Scroll down below the color-coded alignment figure and below the blue-coded sequence alignment report. Look for a green Alignments header on the right side of the screen and look at the first aligned sequence. The first sequence alignment in this list will be the sequence that gave you the best hit for your query sequence. Of the 142 residues in your query sequence, how many are identical in the best hit sequence?
c. Click on the color-coded accession code for this “best hitting” nucleotide sequence. The page that comes up will give you information about this DNA sequence. This sequence was published in a journal. What was the title of the journal article?
If this article has been archived in the PubMed or Medline database of scientific journals, there will be a blue-colored number to the right of Medline or PubMed that will link you to these databases. If you click one of these numbers, you find more information about the journal article in which this DNA sequence was first reported. Frequently an abstract of the article is archived here. Could you find an abstract of this article in Medline or PubMed?
The page with information about the best hitting nucleotide sequence will give the nucleotide sequence at the bottom of the page, and the amino acid sequence higher on the page. Find the amino acid sequence for this protein and copy it to your floppy disk. Follow the same procedure above for saving sequences to Notepad first in order to create this file. You will use this file to search GenBank for matching protein sequences in the next step of this exercise.
10. Our “data mining” for information about plant defensins similar to the ones patented by DuPont has not been very fruitful so far, but there are other strategies that we can try. To expand your search for homologous proteins, you can switch from nucleotide searches to a protein search, using the protein sequence that you found to be homologous to some of the DuPont plant defensins. Nucleotide sequences of homologous genes aren’t as highly conserved as amino acid sequences of the proteins that they code for, so sometimes a protein sequence search yields more sequence matches than a DNA search.
Go back to the NCBI page at http://www.ncbi.nlm.nih.gov again and select BLAST. From the BLAST page, select the blue-colored Standard protein-protein BLAST. Copy the amino acid sequence that you copied on your floppy disk into the query box and click on BLAST!. Click on format when the next page comes up and wait for your protein search results.
On your BLASTP results page, you will notice a figure showing a red-colored bar designating a conserved domain. Click on Gamma-thionin to investigate the amino acid sequence that is conserved in a number of proteins.
Conserved domains are amino acid sequences that have been found in a number of protein sequences that have been submitted to GenBank. A conserved domain is annotated with a PFAM number (for “protein family”) to cross reference the proteins that have this conserved domain. What is the PFAM number and the name for the conserved domain of your BLASTP search?
103

BIOL1414 Lab Manual Austin Community College 10th Edition, Spring 2011
a. Click on this PFAM number to get an alignment report for this conserved domain. How many amino acid sequences are there in this alignment report, including your query sequence?
b. At the top of the alignment report is a consensus sequence that shows the sequence of amino acids that are most often found in the alignment. How many amino acids are there in this consensus sequence?
c. The alignment report is color-coded according to how well the amino acids are conserved in the consensus sequence. Red is the most highly conserved residues. To determine which positions are absolutely conserved (found 100% of the time in the alignment), we need to make our color code more stringent. Do this by clicking on the View Alignment pull-down menu and select identity. How many amino acids in the consensus sequence are absolutely conserved?
d. The conserved amino acids are cysteine (C), glutamic acid (E), and glycine (G). How often do each of these amino acids appear in the absolutely conserved consensus sequence?
Cysteine glutamic acid glycine
e. To see the 3-dimensional structure of these conserved proteins, click on View 3D Structure in the gray box. A colorful graphic of the 3-dimensional structure of the consensus protein will appear in the upper left side of the screen. If you can’t download this graphic, you may need to download a Cn3D program from NCBI. Consult the Geospiza website at www.geospiza.com and select their education button for help.
The sticks in the structure that will appear on your screen represent the polypeptide backbone and 4 disulfide bridges between 8 cysteines. Notice that if you click and drag on this structure, it will rotate. Click on the Style pull-down menu to select Rendering Shortcuts for Worms. This will change the appearance of your structure to show an alpha helix wrapped around a nail and beta-sheets represented by flat arrows. How many of each of these structures are present in these conserved proteins?
_____________________________
You can change the color coding on this 3-dimensional protein structure to display the degree of hydrophobicity of the amino acid residues. Click on the Style pull-down menu to select Coloring shortcuts for Hydrophobicity. The blue color that appears on your structure represents amino acids that are hydrophilic and the red color represents amino acids that are hydrophobic. Click on the structure and rotate it so that you can see where the hydrophilic and the hydrophobic residues lie in the 3-dimensional structure. Do you see any asymmetry in the placement of these residues, so that one side of the molecule is clustered with hydrophilic residues and the other side is clustered with hydrophobic residues? Which side of the molecule would you predict to be associated with other proteins or biological membranes?______________________________________________________________________________________ ____________________________________________________________________________________________________________________________________________________________________________
f. To study the biological action of this gamma-thionin protein family, go back to the Conserved Domain Database page and click on the Proteins: Click here for CDART summary of Proteins… bar. The next page will show that there are two types of proteins that overlap the consensus sequence. What are they called?
g. Click on the conserved domain with the longest stretch of similar sequences. What types of proteins are there with this conserved domain?
104

BIOL1414 Lab Manual Austin Community College 10th Edition, Spring 2011
What is the mechanism of action of some of these toxins?
C. Searching databases for scientific literature
Although we have inferred a lot about the plant defensins by simply searching for sequence homologies, we still don’t have a clear picture of what plant defensins are doing in plants, which sorts of plants make them, whether their expression is tissue-specific or developmentally regulated, etc. You can use online databases of the scientific literature to search for answers to these and other questions. We will continue our investigation of plant defensins by searching the database called PubMed maintained at NCBI by the National Library of Medicine.
1. Go to http://www.ncbi.nlm.nih.gov again, and click on PubMed. Type “plant defensins” into the query box and click Go. How many hits did you get for this query?
2. It would probably be more convenient to narrow our search to get meaningful information more efficiently. You will notice that many of the articles listed are not in English. To limit your search to articles written in English, go back to your query page and click on Limits at the top of the page. On the next page, click on the Language Types pull-down menu to select English. Click on Go again. How many hits did you get for your query this time?
3. You can peruse the abstracts of the listed articles by simply clicking on them. Select some titles that look informative and search the abstracts for general information about what plant defensins are, what they are good for, how they work, and where they are found in nature. Not all authors include this general information in their abstracts, but some do, so don’t get discouraged if the articles are too detailed. You will notice that some of the articles on the list have a colored box saying beside them saying free in PMC to notify you that the full length article is available for your viewing from PubMed Central without cost to you. Take advantage of the online availability of these articles by clicking on the free in PMC box. You will notice that most authors begin the introduction of their articles with the general information that we are interested in. General information often appears in the Conclusions section of scientific articles.
How many full-length articles were you able to find in you PubMed search for protein defensins?
4. Write a short report discussing what you have learned from the literature about plant defensins about their biological role in plants. Include what you have learned in Part II (above) about the patented plant defensins that were patented by DuPont, and suggest a reason that DuPont might have gone to the expense of patenting them. Of what interest are plant defensins to the biotechnology industry?
References
1. Brown, T.A. Genomes. Wiley-Liss. 1999.2. Gibas, C. & Jambeck, P. Developing Bioinformatics Computer Skills. O’Reilly. 2001.3. Puterbaugh, M.N. & Burleigh, J.G. Investigating Evolutionary Questions Using Molecular Databases. Am. Biol.
Teacher. 63:422-431. 2001.
105

BIOL1414 Lab Manual Austin Community College 10th Edition, Spring 2011
Amino Acid Designations
Nonpolar side groups Polar side groups Charged side groups
Alanine A or Ala Aspargine N or Asn Arginine R or ArgIsoleucine I or Ilu Cysteine C or Cys Aspartic acid D or AspLeucine L or Leu Glutamine Q or Gln Glutamic acid E or GluMethionine M or Met Glycine G or Gly Histidine H or HisPhenylalanine F or Phe Serine S or Ser Lysine K or LysProline P or Pro Threonine T or ThrTryptophan W or Trp Tyrosine Y or TyrValine V or Val
106

BIOL1414 Lab Manual Austin Community College 10th Edition, Spring 2011
Label:>”normal -hemoglobin”
Sequence:ACATTTGCTTCTGACACAACTGTGTTCACTAGCAACCTCAAACAGACACCATGGTGCACCTGACTCCTGAGGAGAAGTCTGCGGTTACTGCCCTGTGGGGCAAGGTGAACGTGGATGAAGTTGGTGGTGAGGCCCTGGGCAGGCTGCTGGTGGTCTACCCTTGGACCCAGAGGTTCTTTGAGTCCTTTGGGGATCTGTCCACTCCTGATGCAGTTATGGGCAACCCTAAGGTGAAGGCTCATGGCAAGAAAGTGCTCGGTGCCTTTAGTGATGGCCTGGCTCACCTGGACAACCTCAAGGGCACCTTTGCCACACTGAGTGAGCTGCACTGTGACAAGCTGCACGTGGATCCTGAGAACTTCAGGCTCCTGGGCAACGTGCTGGTCTGTGTGCTGGCCCATCACTTTGGCAAAGAATTCACCCCACCAGTGCAGGCTGCCTATCAGAAAGTGGTGGCTGGTGTGGCTAATGCCCTGGCCCACAAGTATCACTAAGCTCGCTTTCTTGCTGTCCAATTTCTATTAAAGGTTCCTTTGTTCCCTAAGTCCAACTACTAAACTGGGGGATATTATGAAGGGCCTTGAGCATCTGGATTCTGCCTAATAAAAAACATTTATTTTCATTGC
Label:>”sickle-cell -hemoglobin”
Sequence:ACATTTGCTTCTGACACAACTGTGTTCACTAGCAACCTCAAACAGACACCATGGTGCACCTGACTCCTGTGGAGAAGTCTGCGGTTACTGCCCTGTGGGGCAAGGTGAACGTGGATGAAGTTGGTGGTGAGGCCCTGGGCAGGCTGCTGGTGGTCTACCCTTGGACCCAGAGGTTCTTTGAGTCCTTTGGGGATCTGTCCACTCCTGATGCAGTTATGGGCAACCCTAAGGTGAAGGCTCATGGCAAGAAAGTGCTCGGTGCCTTTAGTGATGGCCTGGCTCACCTGGACAACCTCAAGGGCACCTTTGCCACACTGAGTGAGCTGCACTGTGACAAGCTGCACGTGGATCCTGAGAACTTCAGGCTCCTGGGCAACGTGCTGGTCTGTGTGCTGGCCCATCACTTTGGCAAAGAATTCACCCCACCAGTGCAGGCTGCCTATCAGAAAGTGGTGGCTGGTGTGGCTAATGCCCTGGCCCACAAGTATCACTAAGCTCGCTTTCTTGCTGTCCAATTTCTATTAAAGGTTCCTTTGTTCCCTAAGTCCAACTACTAAACTGGGGGATATTATGAAGGGCCTTGAGCATCTGGATTCTGCCTAATAAAAAACATTTATTTTCATTGC
107

BIOL1414 Lab Manual Austin Community College 10th Edition, Spring 2011
Bioinformatics Translation ExercisePurpose
The following activity is an introduction to the Biology Workbench, a site that allows users to make use of the growing number of tools for bioinformatics analysis. It is also a review of translation, mutation, and restriction analysis.
You will be working with the cDNA sequences for human hemoglobin, comparing the sequence found in normal individuals with the sequence found in those with sickle cell anemia. The software available on Biology Workbench will allow you to quickly locate the specific defect found in the sickle cell DNA by aligning the two sequences and looking for a mismatch. You will go on to use other software on Biology Workbench to discover the correct frame for the coding sequences in the cDNAs by searching for start codons and stop codons, and by aligning the two translations of amino acid sequences, you will be able to locate the exact amino acid change that appears in sickle cell -hemoglobin. Other tools found at the Biology Workbench site will allow you to further analyze these sequences.
Procedure
Using Netscape as your web browser, go to the Biology Workbench page (http://workbench.sdsc.edu/ ) and sign in. If you have not signed in before you will have to register at the site.
A. Set up your session
NOTE: These directions may no longer be correct if the site has been modified, but your instructor will help you if that is the case. To start the exercise, choose SESSION TOOLS and input the DNA sequences that you want to work with.
1. Select START NEW SESSION and click RUN. Name the session sickle cell (or something similar). Select START NEW SESSION.
2. Go to Nucleic Tools and choose ADD NUCLEIC SEQUENCES and click RUN.
3. Open the file containing this exercise in Microsoft Word, as you will need access to the sequences.
4. Copy and paste the normal human -hemoglobin cDNA sequence (below) into the Biology Workbench sequence box. You can browse for a file instead of cutting and pasting, but only if the document contains nothing but the sequence. Make sure the text you have copied into the Biology Workbench contains only the DNA sequence, and delete any extraneous text. Go above the sequence box, type in a title for the sequence you have copied, and select SAVE.
Label:>”normal -hemoglobin”
Sequence:ACATTTGCTTCTGACACAACTGTGTTCACTAGCAACCTCAAACAGACACCATGGTGCACCTGACTCCTGAGGAGAAGTCTGCGGTTACTGCCCTGTGGGGCAAGGTGAACGTGGATGAAGTTGGTGGTGAGGCCCTGGGCAGGCTGCTGGTGGTCTACCCTTGGACCCAGAGGTTCTTTGAGTCCTTTGGGGATCTGTCCACTCCTGATGCAGTTATGGGCAACCCTAAGGTGAAGGCTCATGGCAAGAAAGTGCTCGGTGCCTTTAGTGATGGCCTGGCTCACCTGGACAACCTCAAGGGCACCTTTGCCACACTGAGTGAGCTGCACTGTGACAAGCTGCACGTGGATCCTGAGAACTTCAGGCTCCTGGGCAACGTGCTGGTCTGTGTGCTGGCCCATCACTTTGGCAAAGAATTCACCCCACCAGTGCAGGCTGCCTATCAGAAAGTGGTGGCTGGTGTGGCTAATGCCCTGGCCCACAAGTATCACTAAGCTCGCTTTCTTGCTGTCCAATTTCTATTAAAGGTTCCTTTGTTCCCTAAGTCCAACTACTAAACTGGGGGATATTATGAAGGGCCTTGAGCATCTGGATTCTGCCTAATAAAAAACATTTATTTTCATTGC
108

BIOL1414 Lab Manual Austin Community College 10th Edition, Spring 2011
5. Repeat the process of copying, naming, and saving the sickle cell -hemoglobin cDNA sequence, found below.
Label:>”sickle-cell -hemoglobin”
Sequence:ACATTTGCTTCTGACACAACTGTGTTCACTAGCAACCTCAAACAGACACCATGGTGCACCTGACTCCTGTGGAGAAGTCTGCGGTTACTGCCCTGTGGGGCAAGGTGAACGTGGATGAAGTTGGTGGTGAGGCCCTGGGCAGGCTGCTGGTGGTCTACCCTTGGACCCAGAGGTTCTTTGAGTCCTTTGGGGATCTGTCCACTCCTGATGCAGTTATGGGCAACCCTAAGGTGAAGGCTCATGGCAAGAAAGTGCTCGGTGCCTTTAGTGATGGCCTGGCTCACCTGGACAACCTCAAGGGCACCTTTGCCACACTGAGTGAGCTGCACTGTGACAAGCTGCACGTGGATCCTGAGAACTTCAGGCTCCTGGGCAACGTGCTGGTCTGTGTGCTGGCCCATCACTTTGGCAAAGAATTCACCCCACCAGTGCAGGCTGCCTATCAGAAAGTGGTGGCTGGTGTGGCTAATGCCCTGGCCCACAAGTATCACTAAGCTCGCTTTCTTGCTGTCCAATTTCTATTAAAGGTTCCTTTGTTCCCTAAGTCCAACTACTAAACTGGGGGATATTATGAAGGGCCTTGAGCATCTGGATTCTGCCTAATAAAAAACATTTATTTTCATTGC
6. Check the box beside the normal -hemoglobin and select VIEW NUCLEIC SEQUENCE(S) in the scroll-down menu. Click RUN.
7. How large is it (how many base pairs)?
8. Calculate how large a protein this sequence could encode (how many amino acids).
B. Find the mutation
An alignment program called CLUSTALW will align the DNA sequences that you select, and locate matching and mismatching sequences.
9. Click on RETURN to go back to Nucleic Tools and check the boxes in front of both the normal -hemoglobin and the sickle-cell -hemoglobin.
10. CLUSTALW is a program that aligns DNA or protein sequences and compares them to find differences. We can use it to find the mutation in the sickle-cell DNA. Select CLUSTALW from the window of applications and click RUN. Leave all default settings and click SUBMIT.
11. Is this a point mutation or a frameshift mutation? Describe the exact mutation in the sickle cell DNA.
C. Translate the cDNA
A Six Frame program can quickly translate a DNA sequence into an amino acid sequence. By comparing translations for all six possible frames, you will be able to look at every possible protein sequence that can result from the DNA sequence. The most plausible amino acid sequence from all possible sequences is the longest one.
12. Click on RETURN to go back to Nucleic Tools and deselect the box next to sickle-cell β-hemoglobin cDNA. Choose the application SIXFRAME from the window of tools (you may have to scroll down). Click on RUN.
13. Leave the default settings as they are and hit SUBMIT.
14. Scroll down to analyze the results. Blue M’s represent possible start codons (methionine) and red *s represent stop codons (code for no amino acid).
a. Which reading frame gave the longest protein (scroll to the bottom of the screen and look for the longest ORF(Open Reading Frame)?
109

BIOL1414 Lab Manual Austin Community College 10th Edition, Spring 2011
b. Frame 4 is fairly long, but is not considered the longest protein. Why not?
c. About how long are the shorter proteins (look at a few sections from start codon to stop codon and estimate the average)?
d. Why should we choose the longest open reading frame as the correct translation?
e. The longest protein is not 208 amino acids long (as predicted earlier). Why not?
15. Import the longest open reading frame at the bottom of the page by checking the box in front of it and clicking the IMPORT SEQUENCES button. It will be imported into your Protein Tools section. If your Protein Tools is empty you forgot to check the box before you imported.
16. Repeat this procedure by translating all six frames with the sickle cell -hemoglobin DNA. Find the longest ORF and click on IMPORT SEQUENCES.
D. Create a deletion mutation
To see the effect of a deletion mutation, you will edit the normal -hemoglobin cDNA sequence by deleting one of its nucleotides.
17. Go to Protein Tools and select both the normal and sickle cell cDNA by clicking on the boxes in front of those names.
18. Select the application CLUSTALW from the tools window to align the two protein sequences. Click RUN.
19. Leave the default preferences as they are and hit the SUBMIT button.
20. Scroll down and look for the mutated amino acid(s). Describe the mutation. To find out what the single letter amino acid designation means go to the chart at the end of this activity.
21. In Nucleic Tools, select the normal β-hemoglobin sequence and select Edit Nucleic Sequences. Add or delete a nucleotide somewhere in the first half of the sequence and click on SAVE. It will be saved with “edited” after the name.
22. Select the newly edited file and translate it using SIXFRAME.
23. Import the longest open reading frame at the bottom of the page by checking the box in front of it and clicking the IMPORT SEQUENCES button.
110
BIOL1414 Lab Manual Austin Community College 10th Edition, Spring 2011
E. Align proteins for comparison
You will find the exact amino acid that is changed in the sickle cell -hemoglobin.
24. Go to Protein tools and check the original -hemoglobin, the sickle cell -hemoglobin, and the edited -hemoglobin with the deletion, and run CLUSTALW to compare the three.
25. What amino acid change did you find in the sickle cell -hemoglobin sequence?
26. What impact did the deletion have on -hemoglobin? Is it still 147 amino acids long?
Was there only one amino acid affected as in the sickle-cell -hemoglobin?
27. Did you introduce a point mutation or a frameshift mutation?
28. What impact might this have on the function of the protein? Would it probably have no impact on the function, change the function, or make the protein completely non-functional?
F. Simulated Restriction AnalysisYou will do a restriction enzyme digest in silico (by computer), using a TACG program. Restriction enzymes are like spell-checking enzymes; they look for specific “words” in the DNA and then cut them. If the “word” is misspelled, then the enzyme will not cut the DNA. We will use the enzyme DdeI. It cuts DNA at the sequence CTGAG, but the sickle cell -hemoglobin cDNA is missing one of these sites found in the cDNA coding for normal -hemoglobin. This means that the DdeI restriction digest of sickle cell -hemoglobin cDNA will have fewer DNA fragments than the DdeI restriction digest of the normal -hemoglobin cDNA. This difference could be observed by gel electrophoresis of the two digests.
29. Go to Nucleic Tools, select the normal -hemoglobin and then select the application TACG from the tools window. This program will allow you to digest the DNA with different enzymes.
30. Scroll down to User Specified Enzymes and type in DdeI. Make sure you type “I” and not “1.” This enzyme will cut the normal cDNA at the sequence CTNAG (N can be any nucleotide and it will still be cut) but not the sickle cell mutant. Scroll down to Smallest Fragment Cutoff Size for Simulated Gel Map and change it to 10 (our smallest segments will be smaller than the default of 100 base pairs). Select SUBMIT.
31. What was the output of Fragment Sites by Enzyme (how many fragments at what lengths)?
32. Repeat the above steps with the sickle cell sequence. What was the output?
33. Notice that the lengths of the two missing fragments add up to the length of the new fragment. Why?
111

BIOL1414 Lab Manual Austin Community College 10th Edition, Spring 2011
34. Use the fragment size output from steps 31 and 32 to label the bands on the gel diagram at the end of this exercise (remember that the smallest bands travel the most quickly through the gel).
35. From banding patterns on the gels and the pedigree chart, indicate whether the person on the pedigree is SS (has 2 normal genes or homozygous dominant), Ss (has one normal and one sickle-cell gene or heterozygous), or ss (has two sickle-cell genes or homozygous recessive).
Parents Offspring
1.
2.
3.
4.
5.
6.
36. Explain how the banding pattern helped you to determine the genotype (normal, sickle-cell anemia, or sickle-cell disease) of each individual.
PEDIGREE
Parents
Offspring
112
1 2 3 4 5 6 6 Fragment length
bp
1 2
3 4 5 6

BIOL1414 Lab Manual Austin Community College 10th Edition, Spring 2011
Extension ActivityObjective In this exercise, you will find DNA sequences via the database links given in Biology Workbench.
A. Using the Ndjinn database1. Go to Nucleic Acid Tools and go to the scrollable textbox.
2. Highlight “Ndjinn- Multiple Database Search” and click RUN.
3. The next screen lists the different databases that you can search. In the search box type “beta globin”. Indicate that you want to see all of the sequences, so select “SHOW ALL HITS.” Since you are looking for a human gene, click on the box that is next to the GBPRI database. This is the GenBank Primate Sequence database. This database contains DNA sequences that are specific to primates only, and therefore humans are included.
4. Click on SEARCH. You will be sent to a page that contains the results of your search. From the descriptions of the search results, you need to determine which one is the wild type for beta globin. The sequence you want is “gbpri:29436- human messenger RNA for beta-globin”. Select this sequence and click on the IMPORT SEQUENCE(S) button. Your sequence will be transferred to the Nucleic Tools homepage.
B. Finding the Mutant Sequence Using BLAST1. Scroll down the text box and look for the tool called BLASTN. Compare a NS to a NS DB. This is an
abbreviation for “Compare a Nucleic Acid Sequence to a Nucleic Acid Sequence Database”.
2. Select this tool and ensure that your GBPRI:29436 beta globin sequence has a checkmark in the box next to it.
3. Select the GenBank primates databases to do your search in. Click on RUN.
4. Notice that the first result listed is the wt sequence. If you look over to “Score (bits)” column, you will see that the first few sequences have very high Score values. A Score above 400 means that the sequence has high homology with the sequence you are comparing it to. You can be certain of the degree of homology by looking at the “E value”. The smaller the E-value, the more homologous the sequence is to the original sequence BLASTED. An E-value of zero indicates that no matches would be expected by chance- this would represent a perfect or near perfect match.
5. Since you know that the mutation is a small one (point mutation) this means the wt and mutant sequences should be nearly identical. Using this information, find sequence(s) that matches the required parameters (low E value) and click on SHOW RECORD(s) button to get more information about the sequence(s) that you have highlighted.
6. Scroll down the “Records” window until you find the beta-globin mutant sequence. The description should have the word “sickle” in it since you are looking for sickle-cell anemia. The sequence you are looking for will be GBPRI:183944.
7. Import this sequence just as you did the normal sequence for beta-hemoglobin.
113

BIOL1414 Lab Manual Austin Community College 10th Edition, Spring 2011
References
Biology Student Workbench (http://peptide.ncsa.uiuc.edu/) Sickle Cell Anemia—Understanding the Molecular Biology
DNA Science A First Course by David A. Micklos, Greg A. Freyer (second edition) CSHL Press
Amino Acid Abbreviation Amino Acid Abbreviation Amino Acid AbbreviationAlanine A Glycine G Proline PArginine R Histidine H Serine SAsparagine N Isoleucine I Threonine TAspartic Acid D Leucine L Tryptophan WCysteine C Lysine K Tyrosine YGlutamine Q Methionine M Valine VGlutamic Acid E Phenylalanine F
114
BIOL1414 Lab Manual Austin Community College 10th Edition, Spring 2011
Appendix A: Mandatory laboratory safety rulesModern laboratories are equipped with supplies and equipment that may pose a hazard if used carelessly.
Following safety rules, paying attention to what you are doing, and using common sense is the best way to make your experience in this course a safe one. Health and safety are paramount values in science classrooms, laboratories and field activities. You are expected to learn, understand and comply with ACC environmental, health and safety procedures and agree to follow the ACC science safety policy. You are expected to conduct yourself professionally with respect and courtesy to all. Anyone who thoughtlessly or intentionally jeopardizes the health or safety of another individual will be immediately dismissed from the day’s activity, may be withdrawn from the class, and/or prohibited from participating in future activities. Specific safety training will take place before most activities. If you are late and miss this training, you will not be able to participate in the activity. You can read the complete ACC science safety policy at http://www2.austincc.edu/sci_safe/
General laboratory safety rules
1. Never eat or drink in the lab. Do not bring food or drinks into the lab.2. Avoid wearing contact lenses in the laboratory. Chemical vapors can permeate lenses or become trapped behind
them, potentially damaging your lenses or eyes.3. Do not come into contact with another’s body fluids (blood, saliva, urine). Assume all body fluids are infectious.4. Wear UV-rated safety glasses or goggles and gloves at all times while in the lab. Change your gloves often, and
while wearing gloves, do not touch door handles, water taps, computers, telephones or other objects that may be touched by people not wearing gloves. Gloves will be provided, but students should provide their own UV-rated safety glasses.
5. Remove your gloves and wash your hands immediately after handling animals or body fluids.6. Keep book bags and other personal items off the tables and floor during lab. You can store your personal items in
the labeled cupboards or on empty chairs so that they are out of the way. 7. Do not wear loose or flowing clothing or dangling jewelry in the laboratory. Pin up long hair or confine it under a
hat. Some of the substances used in the lab may stain or damage clothing. You may wish to wear a lab coat or apron for protection, or wear clothing that you don’t mind being stained or damaged.
8. Do not wear sandals or open-toed shoes. Flat-heeled, full-coverage shoes of leather or other impermeable material are best.
9. Report broken glass immediately to your instructor, and always dispose of broken glass in its designated container. Do not place non-glass items in these containers.
10. Clean up your work stations, wipe your lab bench and wash your hands before leaving the lab room.
General safety procedures
1. Each student should know the location and proper use of each of the following: gloves, goggles, safety shower, eyewash station, biohazard container, broken glass disposal box, fire extinguisher, first aid kit, and hazardous material spill cleanup kit.
2. If you have any doubt about a proper safety procedure in a specific instance, ask your instructor.
Handling chemicals
1. Wear gloves and goggles when handling potentially hazardous chemicals. 2. Read the label completely before opening a chemical bottle (pay special attention to warning labels).3. Open volatile organic solvents only in a fume hood.4. Close all containers immediately after using.5. Always handle chemicals with care to avoid spills. Clean up and dispose of if not hazardous.6. Report any spills of a potentially hazardous chemical immediately to your instructor.7. Follow your instructor’s directions on how and when to mix chemicals.8. Don’t taste chemicals or smell fumes directly.9. Don’t use your mouth to pull liquid into a pipette.10. Always use clean glassware to prevent contamination.
115

BIOL1414 Lab Manual Austin Community College 10th Edition, Spring 2011
11. Don’t pour unused chemicals back into storage containers where it may contaminate the rest of the reagent. Dispose of unused chemicals in proper waste containers.
12. Do not flush chemicals or cleanup materials down the drain without instructor’s consent.13. Consult with your doctor about any special health conditions that you may have, such as asthma, allergies, or
pregnancy.14. Clean up work areas thoroughly when you are finished. Always clean up shared areas such as balances and stir
plates. Never leave spilled chemicals sitting on a balance, even if you did not spill it. They can corrode the instrument.
15. Wash hands prior to leaving the laboratory.
Handling biohazards
1. When working with microbes, always assume they are infectious. Avoid touching contaminated objects to any other objects, even the floor and counters, and avoid direct contact, especially around broken skin.
2. Always wear gloves and goggles when working with microbes or body fluids.3. Dispose of all potentially contaminated objects in a biohazard bag or a container filled with a 10% bleach solution,
or follow your instructor’s directions.4. Spray and wipe the work areas with 10% chlorine bleach solution before and after lab.5. Wash hands immediately after handling a biohazard.
Handling mechanical hazards
1. Never touch a rapidly moving machine, such as a centrifuge, while it is moving.2. Distribute weights evenly in a centrifuge to prevent vibrations and breakage.3. Do not leave a running centrifuge unsupervised.4. If the centrifuge is vibrating excessively or “walking” across the tabletop, turn it off immediately.
Handling electrical hazards
1. Do not use equipment that has any frayed or damaged wiring or plugs. Report any uninsulated wires to your instructor.
2. Always make sure the area around all electrically powered equipment is dry before turning on the power.3. Gel electrophoresis poses a high risk for electrocution. When assembling or disassembling the gel apparatus,
always be sure that it is unplugged. Connect the power supply and turn on the power supply only under the supervision of your instructor.
Handling glassware
1. Dispose of disposable glass items such as capillary tubes and cover slips in a hard-sided box labeled “Glass Disposal”.
2. Do not use broken or cracked glassware. If you break a glass item, report the incident to your instructor and dispose of it in the “Glass Disposal” box.
3. NEVER put broken glass or disposable glass items with sharp edges in the ordinary trash can. This poses a serious hazard to the person who must empty the trash.
4. Avoid rapid temperature changes of any glassware, as this will often cause the glass to break. Do not place a cool glass container on a hot surface (such as a hot plate), and do not place a hot glass container on a cold surface or in a cold environment (such as a refrigerator).
5. Report any cuts immediately to your instructor, and wash the wound thoroughly in running water. Check for glass in the wound, remove if necessary, dry the skin, and apply a bandage.
6. Do not shake glass thermometers, and lay thermometers away from the edge of a bench on a towel or screen to avoid dropping it on the floor. If a thermometer breaks, immediately inform your instructor.
Handling Bunsen burners
1. Check gas hose for cracks every time before using.
116

BIOL1414 Lab Manual Austin Community College 10th Edition, Spring 2011
2. Make sure hose fits securely.3. Make sure the striker produces sparks before turning on the gas.4. Stand back, open gas, use striker, and adjust flame.5. Flame should be blue. Adjust oxygen intake if you have a yellow flame.6. If the flame sputters or goes out, immediately turn off gas and inform instructor.7. If you smell gas, turn off gas and immediately inform instructor.8. If you are going to heat a glass container, check container closely for cracks or stars. Do not use glass that is
cracked or starred. 9. Glass containers must have an opening for vapors and heat to escape when heated.10. Use beaker tongs, hot hands, insulated gloves or test tube holders when handling hot glass.11. Remember: hot metal and glassware can look just like cool metal and glassware. Be aware of hot materials and
make sure no one handles them. Don’t leave a hot object unattended without notifying every person in the room.12. When heating test tubes over a flame, move the tube back and forth at an angle to avoid splattering, and point it
away from others and yourself to avoid being burned by splattered liquids.
Disposal procedures
1. Treat all biological and chemical materials as if it were hazardous waste, unless notified otherwise by your instructor.
2. Do not pour chemicals, solutions, or biologicals down the drain without permission by your instructor.3. Dispose of wastes in the proper labeled waste containers, as indicated by your instructor. Chemicals should be
poured by funnel into a labeled chemical waste bottle. Biohazards should be placed into a biohazard bag (do not overfill), sealed with autoclave tape, and autoclaved until sterile. Glass should go into a labeled glass disposal box.
Accident procedures
1. Try to contain any spills without endangering yourself and others. Spill socks and pillows, or paper towels if necessary, can be used to contain a spill and keep it from spreading. Notify the instructor immediately when a spill has occurred.
2. If a caustic chemical is splashed into your eyes, notify the instructor or another student immediately so that you can be assisted to the nearest eyewash station as quickly as possible. Continue to wash your eyes for at least 20 minutes while emergency personnel are being called.
3. If caustic chemicals are spilled on your skin, wash the contaminated area for at least 15 minutes. If it is a major spill, immediately remove contaminated clothing and wash for at least 15 minutes in a safety shower.
4. Quickly shout an immediate warning to all your neighbors in case of a fire. It is very important that everyone in the room know as quickly as possible when there is a fire.
5. All students should exit a lab in case of a fire. The lab instructor will call the Campus Police Dispatch at 222 (from any ACC phone) or 223-7999 (from an outside or mobile phone).
6. Speed is the most important aspect of helping a person who is on fire. Your nearest neighbors must respond quickly by smothering the fire with a fire blanket as soon as it appears.
7. Do not allow a person whose clothing or hair is on fire to move. Stop the person and quickly push them to the floor and smother the flames immediately with a fire blanket.
8. The student nearest a fire blanket should bring the blanket to a person who is on fire, and once the flames are quenched, that person should be taken immediately to the safety shower.
Violations of safety rules
Failure to follow the lab safety procedures may have consequences for your grade in this course. Major infractions that endanger anyone working in the lab (including yourself) may result in a grade of “F” for the laboratory portion of the
course and/or being prohibited from participation in future lab courses at ACC, at the discretion of the instructor.
117
BIOL1414 Lab Manual Austin Community College 10th Edition, Spring 2011
Biology Lab Safety Rules Worksheet and InformationReview the safety rules listed above, and answer the following questions for your laboratory room. You can read the complete ACC science safety policy at http://www2.austincc.edu/sci_safe/
Emergencies If there is a fire, major chemical spill or other emergency call the ACC Police Dispatch as soon as possible.
Tell the officer your campus and exact location in the building.
Location of nearest ACC phone: __________________________________________________________ACC POLICE DISPATCH: 222 (from an ACC phone)
223-7999 (from a mobile or other phone)
If evacuation is necessary, go to the designated rally point away from this building.
Directions to nearest exit: ___________________________________________________________
Location of rally point: _____________________________________________________________
Safety Equipment and Information: Information about chemicals used in this laboratory can be found in Material Safety Data Sheets (MSDSs) and
in a chemical inventory located ______________________________________________________________
The emergency gas shut-off for this lab is located ___________________________________________Shut off the gas immediately if gas nozzles or valves are damaged, or if there is a fire.
Fire extinguishers are located (1) ____________________________________________________
(2) ____________________________________________________
To use a fire extinguisher, pull the pin in the handle and squeeze the handle while pointing the nozzle at the base of the flame.
Fire blankets are located (1)_____________________________________________________
(2)_____________________________________________________
If you are on fire, stop, drop and roll. Let someone else get the fire blanket.
A safety shower is located ______________________________________________________________If you spill a significant quantity of chemical, especially an acid or base, on yourself, immediately stand under the shower and pull the handle. Disrobe. The instructor will evacuate the room and close the doors for your privacy. Someone of your gender will stay to help you. Stand under the shower for at least 20 minutes. You will be given clothing after the shower.
An eyewash is located __________________________________________________________________ If a chemical is splashed or rubbed into your eyes, you must use the eyewash for at least 20 minutes. Put your face close to the basin with your eyes held open and press the lever to start the spray. Someone will help you with this.
If a person is experiencing electrical shock from touching wires or equipment, use a belt, apron, lab coat or other non-conducting material to pull them away from the electrical source.
First aid kits are located (1) _____________________________________________________________
(2) ______________________________________________________
118

BIOL1414 Lab Manual Austin Community College 10th Edition, Spring 2011
Only minor cuts and burns will be treated in the lab. Serious injuries must be treated in a medical facility. Emergency Medical Services (EMS) will be called if you are injured and are unable to take yourself to a medical facility.
Dress code and personal protective equipment (PPE) While in the lab you must wear closed-toed shoes.
In lab activities involving chemicals, you must wear long pants or skirts (below the knee) or a lab apron/coat (provided).
You must wear goggles or safety glasses marked ANSI Z87.1 when directed to do so by the lab instructor or lab safety instructions. You must bring your protective eyewear with you to every lab class. If you forget your eyewear and the lab room does not have a pair to loan to you, you will not be able to participate in the lab and may forfeit your lab grade for that day. ACC cannot guarantee that loaned safety glasses or safety goggles are uncontaminated by microbes or chemicals.
Wearing contact lenses in the lab is strongly discouraged. Students wearing contact lenses must wear safety goggles instead of safety glasses.
You must tie back any long hair in labs involving open flames, and it is recommended you do so for any lab.
Gloves are provided and should be worn for any lab activity. Your instructor will inform you when gloves are required rather than optional.
For your safety, we recommend that you:o avoid wearing very loose clothing, especially long, loose sleeves.o wear natural fiber clothing (such as cotton or wool) because synthetic material (such as polyester) can melt
onto skin in a fire.o remove watches, rings, and bracelets during lab activities involving chemicals.
Waste disposal For chemical wastes, there are (i) flammable organic, (ii) inorganic, and (iii) organic waste containers located
_____________________________________________________________________________________
For other wastes, there are containers for o biohazards – located _____________________________________________________________
o glass – located __________________________________________________________________
o other trash – located _____________________________________________________________
You must precisely follow the waste disposal procedures. Never dispose of anything in lab without prior direction from the instructor.
Lab conduct
DO NOTo horse around or perform unauthorized experimentso eat, drink, or chew (tobacco or gum)o bring drinks or food (even in closed containers) into the labo pipet by moutho taste chemicals, or directly smell chemical fumes
You must follow all procedures in manuals, in handouts, and as given by the instructor.
119

BIOL1414 Lab Manual Austin Community College 10th Edition, Spring 2011
You must store backpacks, coats, and other personal items _______________________________________. We recommend that you bring as few items to lab as possible.
Report broken glass and chemical spills to your instructor immediately.
Lab hygiene
You must clean up your individual work area/equipment and community work areas/equipment (such as sinks and balances).
You must put lids back on bottles and containers immediately after use. Do not put excess chemicals back into original containers. Only dispose of chemicals and waste as directed by the instructor. Wash hands prior to leaving lab. Always assume the chemicals used in lab are corrosive or irritating. Any time chemicals come in contact with
your skin, wash the affected area immediately.
Labeling
You must label containers/test tubes if you are using more than one container per lab. Inform your instructor immediately if a label is damaged in any way. Read all labels and pay special attention to hazard information.
Disease
Blood-borne diseases, such as HIV and hepatitis, can be transmitted from person to person through contact with human blood. Follow the Universal Precautions whenever exposure to human body fluids is possible.
Consider all body fluids (saliva, blood, urine, feces, vomit) as potentially infected. Do not come into contact with anyone else's body fluids.
120

BIOL1414 Lab Manual Austin Community College 10th Edition, Spring 2011
Appendix B: Hints for solving numerical problemsCalculations are often necessary to turn raw data into meaningful information. Sometimes these calculations simply
involve knowing the right numbers to plug into formulas. Other times, dimensional analysis must be employed to solve a problem that has no specific formula for its solution. At all times, units of measurement should be accompany all numbers in calculations. The final answer must also have the correct number of significant figures that reflects the accuracy of the measurements used to obtain the answer (see Lab Exercise 1, Math Skills for the Laboratory).
You should fully record any calculations in your lab notebook so that you can check your work and quickly locate the source of any errors. When checking your work, you should ask yourself the following questions:
Is the final answer of a realistic magnitude? Try rounding the raw data off into simpler numbers and do the calculation in your head.
Are the units of the final answer correct or expected? Manipulate your units of measurement algebraically (multiply and divide units as if they were numbers) to ensure that the final answer has the appropriate units of measurement.
Do you get the same answer if you calculate the problem another way? Sometimes an error in the way you input data into your calculator or a mistake in order of operations can be discovered in this way.
The following sections include mathematical definitions and algebraic processes that you may routinely encounter in the laboratory.
A. Definitions
numerator The number written above the line in a fraction
denominator The number written below the line in a fraction
ratio The relationship between two quantities (i.e. “x per y” or “x/y”)
percent A fraction whose denominator is 100 (i.e. “per 100”)
reciprocal The reciprocal of a real number a is 1/a (a 0); also referred to as the inverse
power an , i.e. “a to the power of n” or “a to the nth power”; means a times itself n times (e.g. a2 = a x a = a squared)
logarithm The common logarithm (log) of any number x is the power to which 10 would have to be raised to give x (i.e. log 100 = 2; log 10 = 1; log 1 = 0; log 5 = 0.699 which means that 100.699 = 5)
linear relationship Two variables are linearly related if a plot of the two yields a straight line: y = mx + b where m is the slope and b is the y-intercept of the line
exponential relationship Two variables are exponentially related if a plot of the two leads to a straight line only if using semilog paper (e.g. y = 10x ). Also, a plot of the log of one variable against the other will give a straight line: log y = mx + b where m is the slope and b is the y-intercept
least squares method A statistical method used to calculate the equation for the line of best fit for a series of points
121

BIOL1414 Lab Manual Austin Community College 10th Edition, Spring 2011
best-fit line A line connecting a series of data points on a graph in such a way that thepoints are collectively as close as possible to the line
B. Simple algebra: rules for manipulating equations
If a = b + c, then b = a - c and c = a - b
If a = b x c, then b = a/c and c = a/b
If a = bc , then b = a1/c and c = log a/log b
n___ a1/n = a
a-n = 1/an
ab x ac = a(b+c) and ab/ac = a(b-c)
(ab)c = a(bxc)
a x b = antilog (log a + log b)
C. Descriptive Statistics
mean The average value of a set of data; the best estimate of the true value the data is measuring when the data is equally distributed at either side of the mean.
median The midpoint of data points when ranked in increasing order; the data point in which half of the measurements were higher and half of the measurements were lower values; the best estimate of the true value the data is measuring when the data is skewed to one side or other of the median.
range The difference between the largest and smallest data values; a measure of how variable the data measurements were.
standard deviation For symmetrical distributions of data measurements, this is a measure of the average deviation of the data from the mean; this is an indication of the degree of precision in the measurement (low standard deviation means high precision).
122

BIOL1414 Lab Manual Austin Community College 10th Edition, Spring 2011
Appendix C: Summary of Chemical Hazards and Material Safety Data Sheets (MSDS)
All chemicals stored or used in the laboratory must have a MSDS on file which describes any special chemical hazards that a chemical may pose. The MSDS is also the ultimate source of information about special protective equipment and measures that must be taken to avoid health hazards while using a chemical. The information in this appendix summarizes MSDS information for different categories of chemicals. Also included is a translation of some of the language used in MSDS literature. Keep these documents in your notebook for quick reference.
(Becky Cole’s table of general characteristics, use & storage, health hazards, 1st aid, and PPE for general types of hazardous chemicals)
(Safety Training Program #2 MSDS for compliance of 29 CFR 1910.1200)
123
BIOL1414 Lab Manual Austin Community College 10th Edition, Spring 2011
Austin Community College Biotechnology Program SOP
SOP SOL-001LABELING SOLUTIONS
Updated April 26, 2006Title: Labeling Prepared Solutions
1.0 SCOPE AND APPLICATION:
This SOP outlines the policy and procedure for labeling solutions prepared by students, faculty and staff. 2.0 SUMMARY OF METHOD
1. Obtain a solution prep form from the instructor or from the folder next to the back door of the prep room.
2. Complete any calculations and enter them at the bottom of the solution prep form (or reference a page in your lab protocol).
3. Obtain all chemicals, glassware, and equipment needed to prepare the solution and assemble so they are all within reach.
4. Make a label for the vessel in which you will prepare the solution; use whatever name you would usually call the solution (for example, “1X TAE buffer”). Leave plenty of room for information that will be added later. Affix the label to the vessel before adding any chemical.
5. Think of a unique ID number (control number) for the solution. The format of control numbers in our labs must follow the following example:TAE-EG-041106The first three letters are an abbreviation of the common name of the solution (in this example, Tris-Acetate-EDTA buffer). The second two letters are the initials of the person (or one of the people) who prepared the solution (Evelyn Goss). The last six digits are the date (always MMDDYY; in this example, April 11, 2006).
6. Fill out all sections of the solution prep form (see Appendix A for an example). If a field contains
COMMENTS
Federal law mandates that any solution or chemical must be labeled with its identity if it is removed from its primary container (i.e. the stock bottle).
The purpose of control numbers is for any person working in the lab to discriminate between any two solutions, regardless of how similar they are, by the control number.
In the unusual case that one individual makes the same solution more than once in one day, simply insert numbers after the first three letters to indicate the order in which they were made.For example, the second batch of TAE buffer that Evelyn Goss made on April 11, 2006 would have the control number:
TAE-2-EG-041106.
124

BIOL1414 Lab Manual Austin Community College 10th Edition, Spring 2011
information that is not applicable, enter “N/A” in that field. Enter all information (except the amount of each chemical used) before preparing the solution. Enter the amounts used after weighing and delivering the chemical(s) to the preparation vessel.
7. After preparing the solution and transferring solution and label to the storage vessel (if necessary), complete the label by including the following information:Solution prep control numberAny special instructions, such as expiration date or storage conditionsSafety warnings if the solution contains hazardous materialsCourse number and semester (if applicable)
8. File the solution prep form alphabetically in the top drawer of the black file cabinet. If you are a student taking a course, hand into your instructor, who will make copies as needed and give the original back to you for your lab report. The instructor should always keep a copy on file in the lab.
Never enter the amount of a chemical used until you have actually measured and added the quantity. Do not enter the calculated mass or volume; only enter the actual, measured quantity.
125

BIOL1414 Lab Manual Austin Community College 10th Edition, Spring 2011
Appendix ASOLUTION PREP FORM Control # TAE-EG-041106
Name of Solution/Media: 50X TAE Buffer
Amount prepared: 1 L Preparation Date: April 11, 2006
Preparer(s): Evelyn Goss
Component Brand/lot #(Vendor)
Storage conditions/ date received
FW or initial concentration
Amount used
Final concentration
Trizma base Sigma/022385 RT/031505 121.1 g/mol 242 g 2 M
Glacial acetic acid EMD/43DBB31 RT/053099 60.05 g/mol 57.1 mL 5.71%
EDTA Fisher/ 960654A
RT/012502 372.24 g/mol 37.2 g 100 mM
Balance used#5
Calibration statusOK
pH meter usedN/A
Calibration statusN/A
Initial pH8.5
Final pH8.5
Adjusted pH withN/A
Prep temperatureRT
Sterilization procedure/ sterility testingN/A
Storage conditionsRT
Calculations/Comments:
See protocol on page A1-31 of Short Protocols in Molecular Biology, Vol.2, 5th Ed., Ausubel, et al.
126

BIOL1414 Lab Manual Austin Community College 10th Edition, Spring 2011
127

BIOL1414 Lab Manual Austin Community College 10th Edition, Spring 2011
128
BIOL1414 Lab Manual Austin Community College 10th Edition, Spring 2011
Appendix D: Graphing DataYou will often make scatter diagrams and line graphs to illustrate the data that you collect. Scatter diagrams are
often used to show the relationship between two variables. For example, in an absorbance spectrum, the variables would be the wavelength of light and the amount of light absorbed. Although this data is recorded in a table, a scatter diagram can illustrate in a more visual way the relationship between the two data sets: absorbance and wavelength.
A. Setting up a graphTo make a scatter diagram, simply plot ordered pairs of number on graph paper. The horizontal line on the graph
paper is identified as the x-axis (or abscissa) and the vertical line is the y-axis (or ordinate). Each axis is labeled with an appropriate unit of measurement. Each increment of these lines represents the same amount of the measurement. For example, if you are drawing a scatter diagram of an absorbance spectrum and if one square of the x-axis represents 10 nm of wavelength of light, every other square also represents 10 nm of the wavelength of light along the x-axis. This is called a “linear scale”. Similarly, if each square of the y-axis represents 0.010 absorbance units of light absorbed, each other square also represents 0.010 absorbance units along the y-axis. In other words, each axis has a consistent scale, even though the two axes may not use the same linear scale.
How do you know which variable is to be on the x-axis, and which is to be on the y-axis? The x-axis should be the independent variable, or the parameter that you selected to vary. In an absorbance spectrum, it would be the wavelengths across which you measured absorbance. The y-axis should be the dependent variable, or the data that you obtained from your measurement. In an absorbance spectrum, the dependent variable would be the absorbance that was measured over a variety of wavelengths. You can think of it as the values for dependent variables measured in your data sets depend on which independent variables you chose.
B. Approximating a “best fit” line for a scatter diagramIf you look at your scatter plot and the middle points on the graph are close to forming a straight line, it is
reasonable to conclude that the relationship between the independent and dependent variables is linear. The straight line defines this linear relationship. If, for example, you have studied the effects of a particular fertilizer on fruit production in apple trees, your independent variable is the amount of fertilizer applied, while your dependent variable is the weight of apples harvested at each level of fertilizer application. If the relationship between amount of fertilizer and weight of apples harvested is linear, and you decided to plot these two sets of values, you would have a line that tells you exactly how much fruit you could expect from apple trees at a given level of fertilizer application.
It is unlikely that your data points in the apple experiment described above would all lie on a perfect line, due to variation in conditions such as sunlight and water. To get the best approximation of expected fruit yield as it relates to fertilizer application, you would draw a best-fit line though your scatter plot. The most valid best-fit straight lines that illustrate a linear relationship are determined using a type of statistical analysis, called linear regression analysis. However, you can approximate a best-fit line in the following way:
If your data points seem to form a basically straight line after you have made a scatter diagram illustrating your data, place a straight edge on your graph along the data points. Move the straight edge until it is as close as possible to as many points as possible, and draw a line along the straight edge. This is easiest to do if your straight edge is transparent, such as a clear plastic ruler. There should be approximately the same number of data points on each side of your line, and the line should minimize the distance of the data points from the line as possible. Notice that your line may or may not pass through any particular plotted data point.
If your data points seem to form a curve rather than a straight line, there is probably a nonlinear relationship between your dependent and independent variables. You will have to approximate your line by drawing the curve freehand rather than by using a straightedge. Try for the same effect, however–do not connect-the-dots. The line should be a smooth curve, which may or may not pass through any particular data point.
Often, you will be graphing data that illustrates a relationship that is generally linear, but the linearity breaks down at the extremes of changing conditions. In this case, some of the data points on your graph will form a nearly straight line. This is an indication that at a certain point, the data that you collected no longer had a linear relationship to the independent variable. However, the information in the linear part of the graph may
129

BIOL1414 Lab Manual Austin Community College 10th Edition, Spring 2011
still be valuable. Place a straight edge so that it is as close as possible to as many points that lie along the linear part of your graph as possible.
Always follow these guidelines when preparing a graph showing experimental data:1. Your graph should always be given a brief title to explain what relationship you are studying.2. Plan how to mark off the units of measurement on each axis so that your completed graph will nearly fill
the page. 3. Both axes should be clearly labeled and marked with appropriate units of measurement. 4. Both axes should have a linear scale, meaning that the same increments are consistently the same distance
apart. The size of the increments on one axis does not have to be the same as that of the other, but they must both be a linear scale.
5. The x-axis should show the independent variable. This is the variable that the experimenter chooses and can change. The y-axis should show the dependent variable (the one that the experimenter observes as he or she varies the independent variable).
6. You may draw a line on your scatter plot to better illustrate any pattern that is revealed. If you find a linear relationship between your independent and dependent variable, draw a best-fit straight line through the points that are consistent with the linear relationship. If there is no linear relationship, you can leave your scatter plot as is, or draw curved lines between your data if you wish.
C. Graphing a semilog plotYour variables may not have a linear relationship, in which case a straight line cannot represent your data. In the
biological sciences, the relationship is often exponential rather than linear. This means one value doubles for each single-unit increase in the other value. For example, each time a cell divides, the number of cells is doubled. This means that if you repeatedly count the number of cells in a culture over a given interval of time, the cell count will not rise linearly with time, but rather exponentially with time. If you graph this relationship on semilog paper, the line will be linear.
On semilog paper, the X-axis is linear (each increment is spaced equally and represents an equal unit of measurement), but the Y-axis is exponential (each increment is NOT spaced equally and does NOT equal the same unit of measurement). The hard part of using semilog paper is deciding what units belong on the Y-axis.
You will notice that there are heavier tracings and lighter tracings of the Y-axis grids on semilog paper. The heavy tracing represents a “decade,” while the light tracings within the decade are assigned numbers that are equally spaced. For example, the lines within one decade might represent 1, 2, 3, 4, 5, 6, 7, 8, 9, and 10. Depending on your data, the lines within a decade might also represent 100, 200, 300, 400, 500, 600, 700, 800, 900, and 1,000. The important thing to notice is that the decade ABOVE the first decade represents values 10 times that of the previous decade. For example, if the first decade includes the values 1 to 10, the second decade includes the values 10 to 100, and the third decade includes the values 100 to 1,000.
130

BIOL1414 Lab Manual Austin Community College 10th Edition, Spring 2011
Graphing with Microsoft ExcelYou may find an excellent animated tutorial for the use of Microsoft Excel spreadsheets and graphing at the
website www.geospiza.com. Click on “Education” at the top left and follow the menu. The steps used to graph with Excel are listed here for your quick reference:
1. Enter data in a table. Select the values you want in your graph.2. Select the CHART ICON (upper right, tricolor bar graph).3. Select the XY(SCATTER) Chart Type. Select the first Chart Subtype (no lines). Click NEXT.4. Make sure that the correct data appear in the data range box. Under SERIES, make sure that the X and Y value(s)
correspond to the correct columns. Click NEXT.5. Under TITLES, add a title for the chart and titles for the X and Y axes. Be sure to add the correct units of
measurement. You can add gridlines to your graph by clicking on the GRIDLINES tab. Make your selections and click OK. There are some other labeling options under the other tabs that you may choose if you wish. Make your selections and click NEXT.
6. Under Chart Location, you can select AS NEW SHEET if you want the graph to appear on a new page, and AS OBJECT IN if you want the graph to appear on the same page as your data table (“Sheet 1”). Click FINISH.
7. If you want, you can format the titles. Double-click the graph title or the titles for the X or Y axes. Choose the font and alignment and click OK.
8. You can also change the range of your X and Y axes by double-clicking on the axis line. Under SCALE, you can set the minimum value so that it is closer to the lowest data point and set the maximum so that it is closer to the greatest data point. Change the value at which the axes cross to be consistent with the minimum value. Click OK.
Semilog plots with Microsoft Excel
Follow the instructions for “Graphing with Microsoft Excel” (above). After Step 6, you will need to edit the scale for the Y axis to change it to log scale. Double click on the Y-axis of your graph. Under Scale, set your minimum and maximum units. Set the “Major unit” and “Minor unit” to 10, and set the value at which the X-axis crosses to 1. Select the logarithmic scale and click OK.
Linear regression with Microsoft Excel
In the biotechnology lab, you will often need to plot standard curves which will be used later to analyze data. You can do your extrapolation manually from a graph, or you may find the equation of a best-fit straight line and use that equation. The equation
y = mx + b, where m is the slope and b is the Y-intercept
can be determined for any line, simply by finding the y-intercept on the graph and calculating the slope (using “rise over run”). Alternatively, you can use a scientific calculator or a spreadsheet program (such as Excel) to derive the equation automatically. This is called linear regression. The following instructions show you how to use Microsoft Excel to derive an equation from your data.
1. Make a graph, following instructions above.2. Select the data set by clicking one of the data points.3. Select Add Trendline from the Chart menu.4. Select Linear under the Type tab. Under the Options tab, you may wish to check the box next to Set y-intercept
Value and set it at zero (but first think about what a baseline value for your independent variable would be). Select both the Display Equation on Chart option and the Display R-squared Value on Chart option. Click OK.
5. The Correlation Coefficient or “R” value is a measure of how well your data agrees with a linear relationship. The closer the number is to 1, the more linear the relationship between your variables.
131

BIOL1414 Lab Manual Austin Community College 10th Edition, Spring 2011
Appendix E: Summary of Good Laboratory Practices
Molecular Biology Problem Solver edited by Alan S. Gerstein ISBN 0-471-37972-7
To solve problems you need to understand the role of the reagent and also the physical and chemical properties of the macromolecules you are working with in your protocol.
BuffersRole of buffers:
Control pHControl Ionic StrengthSolvating Species
Generally NOT a good idea to substitute unless the buffer is only controlling pH
Chemical CompatibilityAnticipate problems due to interaction of your buffer component with other solution components. For example, if Ca2+ is a necessary cofactor do not use a phosphate buffer as Ca2+ and phosphate form an insoluble precipitate making the Ca2+ unavailable.
NOTE: Always dissolve reagent one at a time or dissolve them separately and then add together.
Buffers from Stock SolutionsStock solutions are a quick way to store “buffer precursors.” Concentrated solutions also retard bacterial growth, extending almost indefinitely the shelf stability of the solutions. Dilution of a stock solution always results in a pH change. Adjust the pH after the solution has been diluted UNLESS indicated not needed as in the case with some hybridization and electrophoresis buffers.
Filtration is a good approach to sterilizing solutions except when the filter binds components of the solution (e.g. riboflavin).
Quality of the Reagents A good rule of thumb is that it is safer to substitute a higher grade of reagent for a lower grade, rather than vice versa. If you want to apply a lower grade reagent, test the substitution against the validated grade in parallel experiments. AND it is a good idea to ALWAYS keep a small portion of a try and true reagent before switching to a new batch! (e.g. Taq, restriction enzymes, Tris).
Quality of the WaterTap water is generally unsuitable for experiments. If you use it to wash dishes, follow with a distilled water rinse. Distillation generally eliminates much of the inorganic contamination and particularly sediments. It does not remove organics or all of the inorganic contaminants. Deionized water varies greatly in quality depending on the type and the cartridge used. Laboratory deionization cartridges are generally designed to remove both anions and cations. The highest quality water is prepared by reverse-osmosis. Reverse-osmosis is defined as
What Is the Storage Lifetime of a Buffer?The most common causes of buffer failure are pH changes due to absorption of basic (or acidic) materials in the storage environment, and bacterial growth. For example, long-term storage of a base in glass leads to neutralization of the base and etching of the glass. Common indicators of bacterial contamination are cloudiness of the solution. Strategies for avoiding microbial contamination includes sterilizing buffers, manipulating them using sterile technique, refrigerated storage, and maintaining stock solutions of sufficiently high ionic concentration. Always store chemicals, reagents, and solutions as indicated by the manufacturer.
Proper documentation concerning the preparation of the buffer cannot be overemphasized.
132

BIOL1414 Lab Manual Austin Community College 10th Edition, Spring 2011
DNA IsolationNucleases are a major problem when working with DNA and RNA. As soon as cells are broken open, nucleases are released. Samples must be lysed fast and completely and lysis buffers must inactivate nucleases to prevent nuclease degradation. If yield is important, all materials should be autoclaved or baked four hours at 300 F to inactivate the nucleases or you should use disposable materials. Where appropriate, work on ice or in the cold to slow down potential nuclease activity. Smears and failure to amplify by PCR are indicative of contamination.
Large DNA molecules, such as genomic DNA, can be easily sheared during purification. Avoid vortexing, repeated pipetting, and any other form of mechanical stress.
What Practices Will Maximize the Quality of DNA Purification?Starting Material:
The success of DNA purification depends on the initial quality of the sample and its preparation; start with afresh sample. Process your sample as fast as possible. If you cannot process, snap freeze in liquid nitrogen or hexane on dry ice or store at –80oC OR use commercial products such as those that can be purchased from Ambion, Inc.
Use only the appropriate amount of sample. Nothing will impair the quality and yield of a purification strategy more than overloading the system. Too much sample can cause an increase in the viscosity of the DNA preparation and lead to shearing of genomic DNA. Of course if you are only want to show the presence the DNA by an increase in viscous material, then overloading the system may be appropriate.
Lysis:Procedures for lysing cells and isolating the nucleic acids from cellular components differs depending on the starting material (i.e. plants require high pressure because of the rigid cell wall, bacteria contain lipopolysaccharides that interfere with purification and cause downstream toxicity problems, fibrous tissues such as heart and skeletal muscle are tough to homogenize)
Detergents are used to solubilize the cell membranes. Enzymes that attack cellular components are added to the lysis buffers. Lysozyme digests cell walls of gram + bacteria and Proteinase K cleaves glycoproteins and inactivates to some extent, RNases/DNnases. Techniques for lysing include sonication, homogenization, and grinding in liquid nitrogen.
DNA Precipitation:To concentrate nucleic acids for resuspension in a more suitable, solvents such as ethanol (75-80%) or isopropanol (40-50%) are commonly used in the presence of salt to precipitate nucleic acids. If volume is not an issue, ethanol is preferred because less salt will coprecipitate and the pellet is more easily dried. Salt is essential for DNA precipitation because its cations counteract the repulsion caused by the negative charges of the phosphate backbone. Temperature and time are crucial for nucleic acids at low concentrations, but above 0.25 mg/ml, precipitation may be carried out at room temperature.
Storage:Long term storage is best in TE (10 mM Tris, 1mM EDTA pH 7-8) at low temperature (-80C). Repeated freeze/thaw will damage nucleic acids so either store in no frost free freezer or put in a storage box so that the samples are not subjected to repeated freeze/thaw. Freeze-dried DNA (but not RNA) is stable for 6 months. Commercial products, such as those from Ambion, Inc, that prevents degradation of nucleic acids, added to the product either before or after processing work very well.
Restriction enzymesUsually class II enzymes are used. These enzymes recognize specific DNA sequences and cleave each DNA strand to generate termini with 5’ phosphate and 3’ hydroxyl groups. The recognition sequence is normally 4 to 8 base pairs in length and a palindrome. The point of cleavage is within the recognition sequence. A listing of restriction enzymes can be found at: http://rebase.neb.com. The role of these enzymes is to protect the bacteria against bacteriophage DNA. Nomenclature for restriction enzymes is based on a convention using the first letter of the genus and the first two letters of the species name of the bacteria of origin. For example, SacI are derived from Streptomyces achromogenes. (What is an isoschizomer?- restriction enzymes isolated from distinct bacterial strains having the same recognition specificity).
133

BIOL1414 Lab Manual Austin Community College 10th Edition, Spring 2011
Enzymes of high purity are often stable for many years when stored at-20C. The greatest problem is contamination when students go into the stock tube, repeated freeze/thaw, or repeated changes of temperature. It is suggested that the stock tube be aliquoted when it is received.
For most applications 1ul is used to digest 250 ng to 1 ug of DNA. (A final dilution range of 2000 to 5000 Umits/ml is recommended when using the enzyme. The diluted enzyme is stable for long periods of time if stored at –20C). You can extend the time of incubation if you do not have enough enzyme. Always make sure that the final glycerol concentration is below 5% in the reaction otherwise you may get star activity. (Restriction enzymes are sent in glycerol –read the tube and/or C of A for this information).
You can incubate the reaction overnight (typically for 16 hours) in the recommended buffer (they usually require Mg) with 1 ug of substrate DNA in a volume of 50 ul; the only problem being contaminating endonuclease activity (you’ll see this on a gel).
ElectrophoresisThe choice of constant current or constant voltage depends on the buffer system and the size of the gel. Generally speaking, constant current provides better resolution because the heat in the cell can be controlled more precisely, however these runs will take longer to run. The only time constant voltage is recommended is in a native PAGE gel as there is no advantage to constant current; cooling recommended for good resolution.
134

BIOL1414 Lab Manual Austin Community College 10th Edition, Spring 2011
Appendix F: Agarose Gel Electrophoresis with Ethidium BromideEthidium bromide is the most convenient dye for detecting nucleic fragments in agarose gels, as it intercalates between stacked bases and emits fluorescent radiation on UV illumination. There is a minimum of background fluorescence, so destaining of gels is normally unnecessary, and ethidium bromide staining provides an extremely sensitive stain for bands that are very faint (as little as 10 ng). Although nucleic acid migration is reduced by the presence of ethidium bromide in the agarose gel (by 10-15%), it is very convenient to include the dye directly in the gel. This saves the extra time required to stain the gel in staining solution after electrophoresis. Also, since ethidium bromide is a mutagen and suspected carcinogen, it is better to directly incorporate dye in the gel to minimize the amount of dye used and to reduce the possibility of a toxic spill.
When preparing an ethidium bromide-containing gel, use a stock solution of ethidium bromide (10 mg/mL in water). The final concentration of dye in the gel should be 0.5 g/mL, requiring a 20,000-fold dilution from the stock. Ethidium bromide stock should be added to the dissolved agarose after cooling, just prior to casting the gel. Always wear gloves when manipulating gels and solutions containing ethidium bromide. Do not dispose of solutions containing ethidium bromide in the sink. Keep ethidium bromide solutions away from the light by wrapping bottles in aluminum foil or by using dark brown containers or by keeping them in the dark.
To photograph gels stained by ethidium bromide, an ultraviolet transilluminator must be used. UV-absorbing protective eyewear is necessary when working with ultraviolet light, and exposure to this high-energy light should be kept to a minimum.
Two buffers are commonly used when preparing agarose gels for separating DNA fragments:
TAE buffer: TBE buffer: 40 mM Tris-base 80 mM Tris-base 5 mM Sodium acetate 80 mM boric acid 1 mM EDTA 2 mM EDTApH 8.0 pH 8.0
Both buffers are generally prepared from 10X or 50X stocks, which can be stored at room temperature. The 1X working solutions can be also stored at room temperature, but only for a few days. Longer storage of these solutions should be under refrigeration. Since the buffering capacity of TBE is higher, this buffer is preferred when separating smaller-sized DNA fragments due to the longer electrophoresis times required. TAE is used when one wants to isolate the DNA fragments from the gel.Sometimes a modified version of TAE or TBE is used to separate RNA fragments. The application will determine which buffer is appropriate. If not specified, always check with your instructor before choosing a gel running buffer.
GENERAL PROCEDURE:
Materials required:Agarose Balance, weigh boats1X gel running buffer Ethidium bromide stock solution, 10 mg/mLGel-casting apparatus Camera with yellow or red filterGel electrophoresis box Type 57 film (3000ASA) (if using Polaroid)Power supply Saran WrapMicrowave oven or hot plate Ultraviolet (UV) light boxMicropipettors and tips Erlenmeyer flaskMolecular weight standards
1. Set up a gel casting apparatus. Place a black rubber bumper on a lab bench with the slit facing upwards. Press the clear plastic casting tray into the slit, pushing down towards the bench with the palm of your hand. Repeat with a second bumper. Insert a comb into the tray, choosing a comb by the size and number of wells it will create.
135

BIOL1414 Lab Manual Austin Community College 10th Edition, Spring 2011
2. Determine the volume of agarose solution needed to accomplish your given task (approximately 30 mL are needed per gel), and calculate the mass of solid agarose needed to achieve the desired concentration.
3. Weigh out the required amount of agarose and add it to the appropriate amount of 1X gel running buffer in an Erlenmeyer flask that is at least twice the volume of the buffer contained therein. For example, to prepare 100 mL of a 1% agarose gel, add 1.0 g of agarose to 100 mL of buffer in a 250-mL flask.
NOTE: The volume of buffer and agarose should not exceed half the volume of the container. NOTE: A casting tray measuring 7cm x 7 cm usually requires approximately 30 mL of agarose solution.
4. Add a stir bar to the mixture. Place the flask on a level surface and carefully mark the glass at the fluid level with a permanent marker (DO NOT mark the white marking area with a permanent marker! It cannot be removed).
5. Heat the mixture until all agarose has dissolved. A hot plate or microwave oven can be used; using a hot plate will take more time. Interrupt the heating at regular intervals and swirl the container to mix the contents. The solution should be brought to a boil, but do not allow the solution to boil over.
6. When the agarose is completely dissolved, the solution will be completely clear and homogeneous; that is, you will not observe any granules or threads of non-dissolved agarose in the solution. Observe the fluid level in relation to the mark you made in step 4. If a significant amount of water has evaporated, carefully add water to return to the level of the mark and swirl the solution. Heat again until a homogeneous mixture is obtained (this should only require a minute or two of heating).
CAUTION: The container and contents will be hot! Use adequate precautions; handle flask with Hot Hands or an insulated glove.
7. Cool the solution to 50 – 60oC. For best results, cool the flask in a 55 oC water bath. This will cool it more quickly and prevent the temperature from dropping low enough for the gel to solidify before pouring. The solution must be cooled to below 60 oC to prevent damage to the plastic casting trays and to prevent the heat degradation of ethidium bromide.
8. Add ethidium bromide stock solution (10 mg/mL) to a final concentration of 0.5 g/mL. This is a 20,000-fold dilution, so for each 100 mL of agarose solution, add 5 L of stock ethidium bromide solution.
9. Pour the gel immediately into a level gel casting stand. Allow the gel to form completely; typically, 30 minutes at room temperature is sufficient. Remove the comb and bumpers from the gel, place the gel in the electrophoresis chamber, and add a sufficient volume 1X gel running buffer to just cover the surface of the gel.
NOTE: Any leftover agarose may be stored in the refrigerator for later use. Containers should be carefully labeled and covered with aluminum foil or kept in the dark.
10. Load samples into the wells and record the order of samples in your notebook. You should also load an equal amount of molecular weight marker (or “ladder”). A marker is a solution consisting of predigested nucleic acids (either DNA or RNA) that appear as a series of bands. Each band corresponds to a molecular weight, and the molecular weight of unknown samples can be approximated by comparing their migration distance to that of the marker. Each sample and marker loaded into the gel should contain loading dye to a final concentration of 1X. Gel loading solution is usually supplied at a 10X concentration, and contains several substances. Glycerol makes loaded samples heavier than the buffer, allowing them to sink more quickly into the wells and prevents them floating away. The solution is buffered to prevent degradation of the nucleic acids it is mixed with. Finally, a visible tracking dye (usually blue, green, or orange) is present to allow the technician to monitor the progress of electrophoresis without removing the gels and observing with UV light.
11. Cover the gel box with its lid, making sure to keep the black lead at the negative electrode (black) and the red lead at the positive electrode (red). Connect the gel apparatus to an electrical power supply. Match the two leads to the two contacts on the power supply by their colors (black and red). Apply an appropriate voltage to the gel; depending on the application, this can be between 50 and 200 volts. Usually, DNA and RNA agarose gels should be run at 100-125 volts. Higher voltages and shorter runs will decrease the resolution of the gel and may also cause overheating which may melt the agarose.
136

BIOL1414 Lab Manual Austin Community College 10th Edition, Spring 2011
12. After the electrophoresis is complete (when the tracking dye is within 1 cm of the end of the gel), turn off the power supply, unplug the leads, and remove the lid from the apparatus. Wearing gloves, remove the gel. If you have run more than one gel, it is very important to label the gels because they are identical. Place them in labeled weigh boats, plastic wrap, or baggies to prevent confusion about their identity.
13. Obtain a UV transilluminator (light box). There is usually a hard plastic cover that flips up. The gel should be placed directly on the glass surface of the box and under the plastic cover. The cover does not allow UV rays to pass through, so you may observe the gel through it without damaging your eyes. Cover the glass plate with plastic wrap and place the gel on top. Flip the plastic cover down and turn on the light. Nucleic acid bands stained with EtBr should fluoresce in orange.
CAUTION: Use protective eyewear when working with a UV light source, and keep your exposure time to a minimum.
14. Photograph the gel according to the instructions specified for your camera and film type. The most convenient
system for photography of gels is the Polaroid MP4 system. The best pictures can be obtained using type 57 film (3000 ASA) with exposures of a few seconds at f4.5. A red or yellow UV-blocking filter is necessary to block background fluorescence by the gel.
ALTERNATIVE PROCEDURES:
1. If you have no gel casting apparatus, a gel can be made from a large microscope slide by pipetting agarose solution onto it. If you do not exceed 7 mL of agarose, the agarose will “bead up” and not spill off of the microscope slide. While cooling, a gel comb held between two small binder clips can be adjusted to leave wells in the agarose as it gels.
2. Instead of adding ethidium bromide directly to the agarose, you may add the ethidium bromide to the 1X gel running buffer in the gel box. Alternatively, you may stain your gel after electrophoresis for 20 minutes on a shaker in a closed container containing 1X buffer with 1 g/mL ethidium bromide.
137