biotechnology explorer nucleic acid extraction module ... · † dna structure, function, ......
TRANSCRIPT

BiotechnologyExplorer™
Nucleic Acid ExtractionModule
Instruction Manual
Catalog #166-5005EDU
explorer.bio-rad.com
For technical support, call your local Bio-Rad office or, in the U.S., call 1-800-424-6723
The kit is shipped at room temperature. Open immediately upon arrival and storereagents at the recommended temperature within 2 weeks of receipt.
Duplication of any part of this document is permitted for classroom use only. Pleasevisit explorer.bio-rad.com to access our selection of language translations for
Biotechnology Explorer™ kit curricula.

Dear Educator:
The foundation of molecular biology
The modern revolution in genetic engineering and molecular biologydepends on obtaining pure DNA. We must be able to isolate DNA awayfrom the nucleases, contaminants, and inhibitors that would destroy DNAor prevent us from working with it. Advances in agriculture, genetics andmedicine would not be possible without the ability to obtain pure DNA.
In the Nucleic Acid Extraction Module students will extract genomic DNA(gDNA) from plants using a simple and powerful silica-binding columntechnique. Methods are given for measuring DNA concentration, yield andpurity. The DNA is ready for applications such as cloning, PCR (polymerasechain reaction) and southern blotting.
The Nucleic Acid Extraction Module is part of the Bio-Rad Cloning andSequencing Explorer Series (catalog #166-5000EDU) and can also beused as a stand alone kit for extracting high quality plant DNA for any use.
For more biotechnology curricula and DNA extraction kits visit explorer.bio-rad.com and look for other BioEducation instruction manuals.The Genes in a Bottle kit (catalog #166-2300EDU) is used for a classroomDNA visualization activity. The GMO Investigator kit (catalog #166-2500EDU)is used to isolate plant DNA for PCR. The Aurum™ Plasmid MiniPurification Module (catalog #732-6400EDU) is a general tool used to isolate bacterial plasmid DNA. The PCR Kleen™ Spin Purification Module(catalog #732-6300EDU) is a general tool used to isolate PCR productDNA.
Biotechnology Explorer TeamBio-Rad Laboratories6000 James Watson Dr.Hercules, CA [email protected]

Create context. Reinforce learning. Stay current.New scientific discoveries and technologiescreate more content for you to teach,but not more time. BiotechnologyExplorer kits help you teach moreeffectively by integrating multiplecore content subjects into a single lab. Connect conceptswith techniques and putthem into context with real-world scenarios.
Nucleic AcidExtraction
Module
Environmental and
Health Science
• Botany• Agricultural science• Genetic testing
• Plant physiology• Structure of plant cells• Organelles and cell walls
• DNA extraction procedures as first step in understanding or manipulating DNA
• Quantifying DNA• Preserving DNA
• Genetic information stored in DNA• DNA location, structure, and function• Plant genome structure
• DNA extraction techniques• DNA structure, function,
and chemistry• Chemical properties of
biological molecules
• Genetic variation in plants• Genetic inheritance• Gene conservation
ScientificInquiry
Chemistryof Life
GeneticsCell and
MolecularBiology
Evolution


Table of Contents
Introduction ..................................................................................1
Kit Inventory Checklist ................................................................2
Safety Issues ................................................................................4
Background ..................................................................................5
Genomic DNA Isolation – Quick Guide ....................................15
Starting the Laboratory..............................................................18
Detailed Protocol for Genomic DNA Extraction ......................21
Focus Questions ........................................................................26
Appendix A Optional Activities ..............................................27
Appendix B Other Cellular DNA..............................................29
Appendix C Instructor’s Answer Guide..................................31

IntroductionGenomic DNA extraction is a crucial technique in molecular biology and isan essential step in many downstream procedures such as cloning, polymerase chain reaction (PCR), and restriction enzyme digestions.These applications require high quality genomic DNA.
This Nucleic Acid Extraction Module utilizes a simple protocol for extractingup to 5 µg of genomic DNA from a variety of plant species using silicamembrane technology and optimized aqueous reagents. In this laboratoryactivity, DNA is extracted from approximately 50–100 mg of plant material,and is ready for downstream applications without further manipulation,such as ethanol precipitation.
The first step in this activity is to choose an interesting plant species fromwhich genomic DNA is extracted. Students may choose model species thatplant biologists have extensively studied, such as Arabidopsis thaliana, thegreen alga Chlamydomonas, crop plants like rice (Oryza species), orwheat (Triticum species). Alternatively they may choose a species that hasbeen studied less. There are over 250,000 plant species known to exist onthe planet, providing plenty of options for this activity.
What Skills Do Students Need to Perform This Laboratory Activity?
This laboratory activity assumes that students and instructors have basicmolecular biology skills, such as proper pipeting techniques and knowledgeof molarity calculations. Bio-Rad’s Biotechnology Explorer program has afull range of kits to help teach basic skills in individual laboratories.
What Is the Time-Line for Completing the DNA Extraction Protocol?
This depends greatly on the level of your students and whether additional/optional techniques and analyses are performed in addition tothe basic protocol. It takes approximately 2 hr to complete the genomicDNA extraction.
1

Kit Inventory ChecklistThis section lists equipment and reagents necessary to extract genomicDNA isolation in your classroom or teaching laboratory. Each kit containssufficient materials for 12 student workstations, or 25 genomic DNA extractions. We recommend that students be teamed up – two to four students per workstation. Please use the checklist below to confirm inventory.
Kit Components Quantity (✔)
Lysis buffer, 20 ml 1 ❐
DTT (Dithiothreitol), 0.3 g 1 ❐
Wash buffer, low stringency 1 ❐(5x concentrate), 20 ml
Sterile water, 2.5 ml 1 ❐
Micropestles 25 ❐
Aurum Mini columns, purple 25 ❐
Capless collection tubes, 2.0 ml 25 ❐
Microcentrifuge tubes, 1.5 ml 30 ❐
Microcentrifuge tube, multicolor, 2.0 ml 60 ❐
Instruction manual 1 ❐
Required Accessories (not provided) Quantity (✔)
• 95–100% ethanol, molecular 300 ml ❐biology grade
• Distilled/deionized water 14 ml ❐
• Water bath (set at 70°C) 1 ❐(Catalog #166-0504EDU)
• Balance with weigh paper or weigh boats 1 box ❐
2

Required Accessories (Not Provided) Quantity (✔)
• Microcentrifuge with variable-speedsetting >12,000 x g 2 ❐(catalog #166-0602EDU)
• 20–200 µl adjustable-volume micropipet 12 ❐(catalog #166-0507EDU)
• 20–200 µl pipet tips, aerosol barrier 1 box ❐(catalog #211-2016EDU)
• 100–1,000 µl adjustable-volume micropipet 12 ❐(catalog #166-0508EDU)
• 100–1,000 µl pipet tips, aerosol barrier 1 box ❐(catalog #211-2021EDU)
• Green racks, set of 5 12 ❐(catalog #166-0481EDU)
• Marking pens 12 ❐
• Tubes for aliquoting (optional) 36 ❐
• Razor blades or scalpels 24 ❐
• –20°C freezer 1 ❐
• Plants for DNA extraction 2 ❐(50–100 mg per plant)*
* See section: Selecting Plant Species for Genomic DNA Isolation for tips on plant selection.
Refills Available Separately
Nucleic acid extraction kit refill, (catalog #166-5006EDU)Includes DTT (0.3 g), lysis buffer (20 ml), low-stringency wash buffer (20 ml),sterile water (2 ml)
Aurum mini columns, 50 (catalog #732-6826EDU)
3

Safety IssuesEating, drinking, smoking, and applying cosmetics are not permitted in thework area. Wearing protective personal equipment such as eyewear,gloves, and labcoats should be standard laboratory practice. The lysisbuffer in this product contains guanidine thiocyanate (CAS# 593-84-0) insolution. Basic laboratory practices should be followed to avoid contactwith eyes, skin and clothing. Wash your hands with soap and water beforeand after this exercise. If any of the solution gets into eyes, flush withwater for 15 minutes. If these buffers are spilled, clean with a suitable laboratory detergent and water. Avoid contact with acids or bleach asthese will liberate toxic gas. Please refer to material safety data sheet forcomplete safety information.
4

BackgroundWhy Extract Genomic DNA?
Genomic DNA isolation is the first step for many downstream proceduressuch as cloning, PCR, and restriction endonuclease digestions. Theseapplications require the isolation of high quality genomic DNA.
Genomic DNA (gDNA) is found in prokaryotic (bacteria) and eukaryotic(animal, plant, and yeast) cells. In eukaryotic cells gDNA is closely associated with DNA binding proteins (histones). Therefore, when isolatingDNA, one would have to separate the DNA from proteins and other components that are also found inside the cell. In addition, the DNA mustbe extracted carefully to ensure that it remains intact during the purificationprocess.
The basic steps in DNA extraction are:
1. Grow (or collect) cells/tissues from which genomic DNA is to beextracted.
2. Lyse or break open cell membranes and cell walls (if applicable) bychemical or physical means.
3. Remove cellular debris.
4. Remove remaining cellular proteins.
5. Purify DNA.
All of the steps listed above have variations depending on the cell type andthe purity of the DNA needed.
5
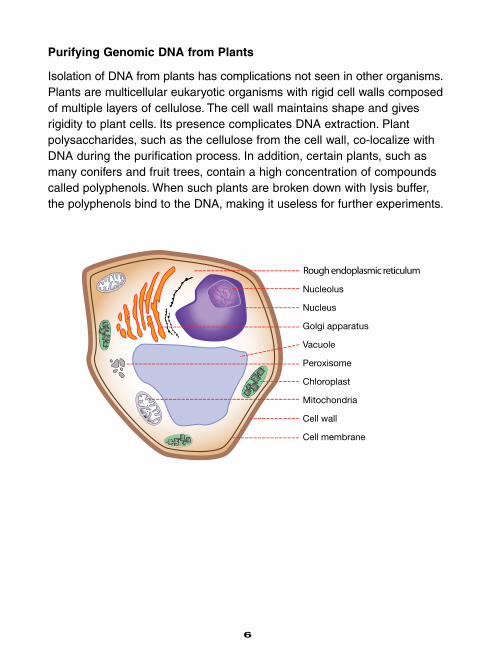
Purifying Genomic DNA from Plants
Isolation of DNA from plants has complications not seen in other organisms.Plants are multicellular eukaryotic organisms with rigid cell walls composedof multiple layers of cellulose. The cell wall maintains shape and givesrigidity to plant cells. Its presence complicates DNA extraction. Plant polysaccharides, such as the cellulose from the cell wall, co-localize withDNA during the purification process. In addition, certain plants, such asmany conifers and fruit trees, contain a high concentration of compoundscalled polyphenols. When such plants are broken down with lysis buffer,the polyphenols bind to the DNA, making it useless for further experiments.
Rough endoplasmic reticulum
6
DNA extraction from plant cells also poses the same challenges facedwhen extracting DNA from other cell types. Cells contain enzymes that candigest and break down the DNA during the extraction process. Membrane-bound compartments within cells have acidic contents that can also damageDNA when the contents are spilled into the cytosol during the lysis step.
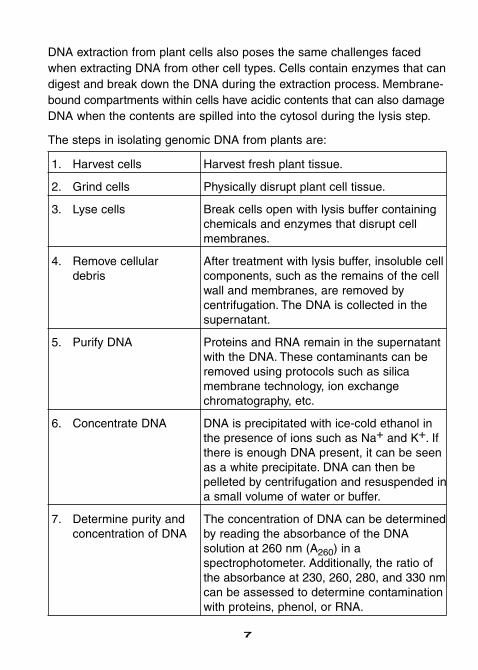
The steps in isolating genomic DNA from plants are:
1. Harvest cells Harvest fresh plant tissue.
2. Grind cells Physically disrupt plant cell tissue.
3. Lyse cells Break cells open with lysis buffer containingchemicals and enzymes that disrupt cellmembranes.
4. Remove cellular After treatment with lysis buffer, insoluble cell debris components, such as the remains of the cell
wall and membranes, are removed by centrifugation. The DNA is collected in thesupernatant.
5. Purify DNA Proteins and RNA remain in the supernatantwith the DNA. These contaminants can beremoved using protocols such as silica membrane technology, ion exchange chromatography, etc.
6. Concentrate DNA DNA is precipitated with ice-cold ethanol in the presence of ions such as Na+ and K+. Ifthere is enough DNA present, it can be seenas a white precipitate. DNA can then be pelleted by centrifugation and resuspended ina small volume of water or buffer.
7. Determine purity and The concentration of DNA can be determined concentration of DNA by reading the absorbance of the DNA
solution at 260 nm (A260) in a spectrophotometer. Additionally, the ratio ofthe absorbance at 230, 260, 280, and 330 nmcan be assessed to determine contaminationwith proteins, phenol, or RNA.
7
Selecting Plant Species for Genomic DNA Isolation
There are many techniques for extracting genomic DNA from plants, someof which are specific to a single plant type. Although every attempt hasbeen made to make this laboratory as universal as possible, there aresome plants for which this DNA extraction kit does not work. Plants withvery tough extracellular matrices or cell walls, or plants with some othercharacteristics, may make it difficult to extract DNA using this kit.
The DNA from different species of plants may vary in quantity and in suitability for downstream applications. For example, plants that yield verylittle genomic DNA may amplify successfully with PCR technology, whileplants that yield a lot of genomic DNA may amplify poorly.
For best results, use the following guidelines to select plants for this activity:
• Young leaves are the best source for genomic DNA. Because they arestill growing, they have a greater ratio of nuclear to cytoplasmic volumeand contain fewer chemicals that interfere with DNA isolation
• Fresh samples have higher yields of DNA than preserved or driedleaves
• While fresh tissue is best, if necessary, plant tissue can be stored for2–3 days at 4°C in a sealed bag or tube. Do not put tissue samplesinto the –20°C or –80°C freezer for storage – slow freezing of tissuewill disrupt cells, release DNases and may degrade the genomic DNA
• If the plant can be moved, place it in the dark for 1–2 days before harvesting tissue to reduce the amount of polysaccharides in the sample
8

List of Plants That Can Be Used for Genomic DNA Extraction andHow They Perform When Used for PCR
Plants Known to Amplify by PCR Plants That Do Not Amplify Well by PCR
Aluminum plant, leaves (Pilea cadierei) Fern, leaves
Cabbage, leaves (Brassica oleracea) Ivy, leaves (Hedera helix)
Carrot, root (Daucus carota) Lily of the valley, leaves (Convallaria major)
Common sage, leaves (Salvia officinalis) (Iris douglasiana)
Croton, leaves (Codiaeum variegatum) Pacific Coast Iris, petals and leaves
Eyelash begonia, leaves Pine, needles (Pinus spp.)
(Begonia bowerae hybrid) Spider plant, leaves
Green bean, seed case and bean (Chlorophytum comosum)
(Phaseolus vulgaris)
Jade pothos, leaves (Epipremnum aureum)
Lambs ear, leaves (Stachys byzantina)
Lawn grass, leaves
Parsley, leaves (Petroselinum crispum)
Petunia, leaves and petals
(Petunia hybrida)
Pineapple sage, leaves (Salvia elegans)
Sow thistle, leaves (Sonchus oleraceus L.)
Spinach, leaves (Spinacia oleracea)
Sugar cane, leaves (Saccharum officinarum)
Sweet potato, tuber (Ipomoea batatas)
Thyme, leaves (Thymus vulgaris)
Umbrella plant, leaves (Cyperus involucratus)
Wheatgrass, leaves (Triticum aestivum)
9

Grinding and Lysing Plant Tissue
Because of their rigid cell walls, plant samples must be physically brokenup or crushed prior to DNA isolation. Typically a mortar and pestle is used,though blenders and mechanical tissue grinders may also be used withsome plant species. A range of tools are available for crushing differentamounts of plant tissue, ranging from large porcelain mortars and pestlesto small microtube grinders.
Grinding of plant tissue is frequently performed in the presence of lysisbuffer as in this protocol. Alternatively, tissue can be flash frozen andground in liquid nitrogen. If the tissue is frozen, the ground plant materialmust be added to lysis buffer before it can thaw. The lysis buffer normallycontains a chemical called EDTA (ethylenediamine tetraacetate) thatserves a dual function: it removes (chelates) magnesium ions, destabilizingthe cell wall and the cell membrane, and also inhibits nucleases, enzymesthat could digest the DNA.
Lysis buffer must have buffering capacity to maintain the overall pH of thelysate in the presence of the acidic compounds that are released fromsubcellular organelles. Most lysis buffers are prepared at pH 8.0 using Tris(hydroxymethyl aminomethane), a commonly used buffer in molecular biology protocols.
10

The plant cell membrane is a selectively permeable plasma membrane,allowing some molecules to pass through and blocking others. The plasmamembrane is composed of phospholipids and proteins. The cell membranesneed to be disrupted, and this can be done with detergents or chaotropicagents. Detergent breaks up cell membranes by removing lipid moleculesfrom the membranes. The choice of detergent depends on the application.Ionic detergents, such as SDS (sodium dodecyl sulfate) or Sarkosyl (N-Laurylsarcosine), are commonly used, but non-ionic detergents such asTriton X-100 may also be used. Non-ionic detergents are milder than ionicdetergents and usually leave proteins intact and functional. Chaotropicagents disrupt proteins and membranes by destabilizing their three dimensional structure. Frequently the lysis buffer also contains a reducingagent such as DTT or b-mercaptoethanol to further denature proteins byreducing disulfide bonds.
The classical method of DNA extraction from plants uses a non-ionicdetergent called CTAB (cetyl trimethyl ammonium bromide) to lyse theplant cells and precipitate the DNA, leaving most polysaccharides in solution.
Specialized techniques have been developed to overcome the challengesfaced when isolating genomic DNA from some plants. Lysis buffer containing PVP (polyvinylpyrrolidone) and a high concentration of saltworks best for isolating DNA from plants with high levels of polyphenols,including grape species, many fruit trees, and conifers. PVP binds to thepolyphenols, preventing them from complexing with the DNA, and the highsalt reduces the co-precipitation of polysaccharides with the DNA.
Common Methods of DNA Extraction
After cell lysis and centrifugation to remove cellular debris, proteins andRNA are still present in the supernatant along with the DNA. There areseveral methods to remove these contaminants. It is important to rememberthat during the purification process, the lysate should never be vortexed ormixed vigorously, since this would result in breaking or shearing of thelarge molecules of genomic DNA into smaller pieces. Intact, full-lengthDNA molecules are required for subsequent steps, such as PCR. If DNA
11
becomes sheared, the gene of interest may be broken into multiple pieces,and therefore may not be amplifiable.
The following are examples of common techniques that are used for purifyinggenomic DNA:
• Silica-binding-based purification — DNA binds strongly to silica inthe presence of high concentrations of chaotropic salts, such as guanidine, that disrupt hydrophobic interactions. The mechanism ofbinding is not fully understood. However, one theory is that binding isdue to the exposure of anions on the DNA and silica as a result ofdehydration by the salts. The phosphates on the DNA bind to the silicathrough the formation of a cation bridge formed by the salt. The DNAcan be released from the silica by reducing the salt concentration. This chemistry is the basis for many of the commercially available kits forDNA purification, including the Nucleic Acid Extraction Module usedfor this activity.
• Ion exchange chromatography — Purification of DNA with ionexchange chromatography uses a positively-charged resin or othermatrix, usually in a glass or plastic chromatography column. DNA andRNA are both negatively charged and bind to the positively chargedmatrix through ionic interactions. Components of the cell lysate thatare not negatively charged do not bind to the matrix and are discarded.
Molecules bound to the matrix can be removed (eluted) by increasingthe salt concentration of the solution on the column. Molecules areeluted based on the strength of their binding to the column, with moreweakly bound molecules eluting at a lower salt concentration thanmore strongly bound molecules. Using this differential elution, DNAcan be separated from proteins and RNA.
12

• Organic extraction — DNA can be purified in a two-step process ofenzyme treatment and organic extraction. Proteins in the cell lysateare degraded by treatment with proteases, enzymes that break proteinsinto small pieces. Besides getting rid of protein contaminants, this stepalso degrades enzymes called nucleases that might destroy the targetDNA. Proteinase K is one of the most commonly used proteases,degrading most proteins and inactivating enzymes under a broadrange of conditions.
After cellular proteins have been degraded, organic extraction is usedto precipitate proteins in the lysate. Phenol or a combination of phenoland chloroform causes proteins to coagulate at the interface of theorganic and the aqueous solutions. The proteins are then removed bycentrifugation, leaving RNA and DNA in the aqueous solution.
• RNA Removal — RNA is often removed from gDNA preparations bytreating the sample with enzymes called ribonucleases (RNases) thatselectively degrade RNA without damaging the DNA. Ribonuclease A,a nuclease that cleaves only single-stranded RNA molecules, is commonly used.
Concentrating the Extracted DNA
Many protocols result in a DNA solution that is too dilute for experimentalpurposes, thereby requiring further concentration of the DNA. The mostcommon methods use either ethanol or isopropanol in the presence of ahigh salt concentration. DNA precipitates in the presence of high salt concentrations (for example, NaCl) and either ethanol or isopropanol. Thecations in the salt neutralize the charge on the phosphate backbone of theDNA and allow DNA molecules to come close together. Normally, in aqueous solution, the strong negative charges of DNA molecules repulseeach other. The ions do not bind strongly to DNA in aqueous solution, butin the presence of an organic solvent, such as an alcohol, DNA-cationsform a tight complex and precipitate out of solution. If there is enough DNA present, a white precipitate should be visible, but DNA may very well bepresent even if a precipitate is not observed.
13

The precipitated DNA is pelleted by centrifugation, after which the pellet iswashed at least once with 70–80% ethanol to remove any remaining salt.Note that 100% ethanol cannot be used for the wash because salt will notdissolve in pure ethanol. Nor can the ethanol concentration be <70%, asthe DNA might become resuspended with the salt and be lost. After thewashes, the DNA pellet is dried to evaporate any remaining ethanol andthen resuspended either in water or the desired buffer.
Measuring DNA Concentration, Yield, and Purity
Once purified, the concentration, yield, and purity of DNA can be determinedby measuring the absorbance of the DNA solution at 260 nm (optical density)or OD260 (also referred to as A260) using a spectrophotometer. A solutionwith an OD260 of 1 contains approximately 50 µg/ml of DNA.
The purity of the DNA can also be estimated with spectroscopy.
• A pure preparation of DNA has a ratio of OD260: OD280 of 1.8. If theOD260:OD280 is <1.8, the DNA is probably contaminated with protein(if the ratio is >1.8, the DNA may be contaminated with RNA)
• A ratio of OD230: OD260 >0.5 indicates contamination with phenol
• Absorbance at 330 nm is caused by light scattering and indicates thepresence of particulate matter in the sample
Note that the genomic DNA isolated using the nucleic acid extraction modulecontains RNA. Therefore, reading the absorbance at 260 nm using spectrometry does not provide an accurate concentration value. In order toget a reliable concentration measurement, contaminating RNA can be firstremoved by treating with RNase A. Alternatively, a fluorometer, whichspecifically quantifies double stranded nucleic acids, can be used to accurately measure the concentration of the genomic DNA that is obtained(see Appendix A).
Other Cellular DNA in Plants
In addition to genomic DNA, plant cells contain DNA in their mitochondria(referred to as mtDNA for mitochondrial DNA). Green plants also haveDNA within their chloroplasts called cpDNA (for chloroplast DNA; alsoabbreviated ctDNA). Refer to Appendix B for detailed information on non-genomic DNA found inside plants.
14
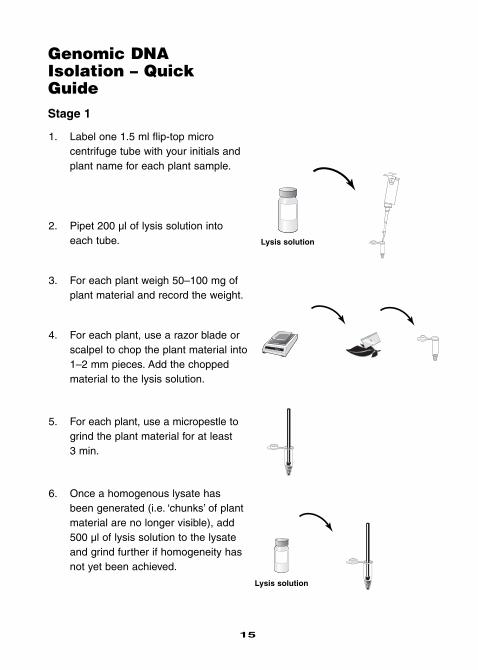
Genomic DNAIsolation – QuickGuideStage 1
1. Label one 1.5 ml flip-top micro centrifuge tube with your initials andplant name for each plant sample.
2. Pipet 200 µl of lysis solution intoeach tube.
3. For each plant weigh 50–100 mg ofplant material and record the weight.
4. For each plant, use a razor blade orscalpel to chop the plant material into1–2 mm pieces. Add the choppedmaterial to the lysis solution.
5. For each plant, use a micropestle togrind the plant material for at least 3 min.
6. Once a homogenous lysate hasbeen generated (i.e. ‘chunks’ of plantmaterial are no longer visible), add500 µl of lysis solution to the lysateand grind further if homogeneity hasnot yet been achieved.
15
Lysis solution
Lysis solution

7. Cap microcentrifuge tube and centrifuge 5 min at top speed.
8. For each plant sample label a newflip-top microcentrifuge tube withyour initials and plant name. Add 500 µl of 70% ethanol into each tube.
9. Retrieve samples from microcentrifugeand add 400 µl of the supernatant tothe 70% ethanol in the appropriatelylabeled tube, taking care not to disturb the pellet. Pipet up and downto mix lysate and ethanol.
10. Label the top edge of a mini-columnfor each plant and place columns in2 ml capless collection tubes.
11. For each sample, pipet 800 µl ofcleared plant lysate into the appropriatecolumn.
12. Centrifuge columns for 1 min. Discardflow-through from collection tube andreplace column in collection tube.
16
70% ethanol
70% ethanol
Supernatant
Pellet
Lysate

13. Add 700 µl of wash buffer to eachcolumn. Spin full speed for 1 min.Discard flow-through. Repeat for twomore times for a total of 3 washes.
14. After final wash step, discard flow-through and replace columns incapless collection tubes and drycolumns by spinning for 2 min at fullspeed in microcentrifuge.
15. Transfer each column to a fresh,appropriately labeled, capped microcentrifuge tube.
16. Add 80 µl of 70°C sterile water to thebed of each column. Let sit for 1 min.
17. Spin column in tube for 2 min.
18. Discard column, cap labeled tube
containing purified nucleic acid and
store at –20°C.
17
Wash solutionX3
70°C SterileWater
Purified nucleic acid

Starting the Laboratory
Timeline
Day 1. Estimated preparation time: 1 hour
Read through protocol.
Obtain plant samples (see suggested plant samples in Background section).
Day 2. Estimated preparation time: 2 hours
Perform genomic DNA isolation.
Day 3. (Optional)
Determine DNA concentration, yield, and purity using a spectrophotometer.If desired, analyze genomic DNA samples on agarose gel. See Appendix Afor more detail on optional activities.
Materials Required
Listed are materials and reagents required at the workstations prior tobeginning the exercise.
Common Equipment Required Quantity (✔)
• Balance 1 ❐
• Weigh paper/boats 1 per plant sample ❐
• Water bath at 70°C (for warming the 1 ❐sterile water used for DNA elution)
• Microcentrifuge 1 ❐
18
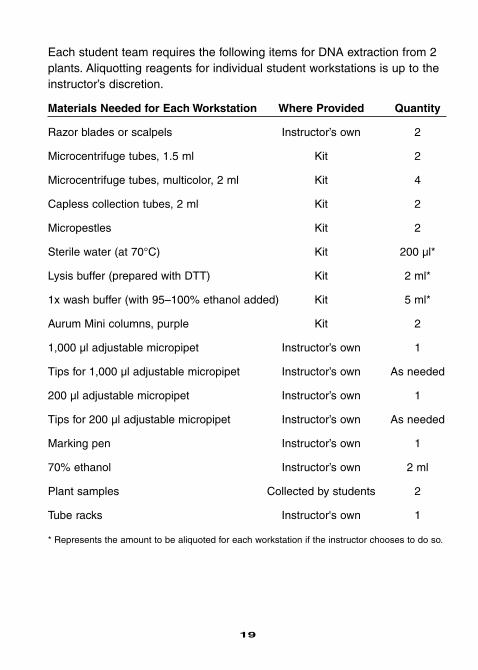
Each student team requires the following items for DNA extraction from 2plants. Aliquotting reagents for individual student workstations is up to theinstructor’s discretion.
Materials Needed for Each Workstation Where Provided Quantity
Razor blades or scalpels Instructor’s own 2
Microcentrifuge tubes, 1.5 ml Kit 2
Microcentrifuge tubes, multicolor, 2 ml Kit 4
Capless collection tubes, 2 ml Kit 2
Micropestles Kit 2
Sterile water (at 70°C) Kit 200 µl*
Lysis buffer (prepared with DTT) Kit 2 ml*
1x wash buffer (with 95–100% ethanol added) Kit 5 ml*
Aurum Mini columns, purple Kit 2
1,000 µl adjustable micropipet Instructor’s own 1
Tips for 1,000 µl adjustable micropipet Instructor’s own As needed
200 µl adjustable micropipet Instructor’s own 1
Tips for 200 µl adjustable micropipet Instructor’s own As needed
Marking pen Instructor’s own 1
70% ethanol Instructor’s own 2 ml
Plant samples Collected by students 2
Tube racks Instructor's own 1
* Represents the amount to be aliquoted for each workstation if the instructor chooses to do so.
19
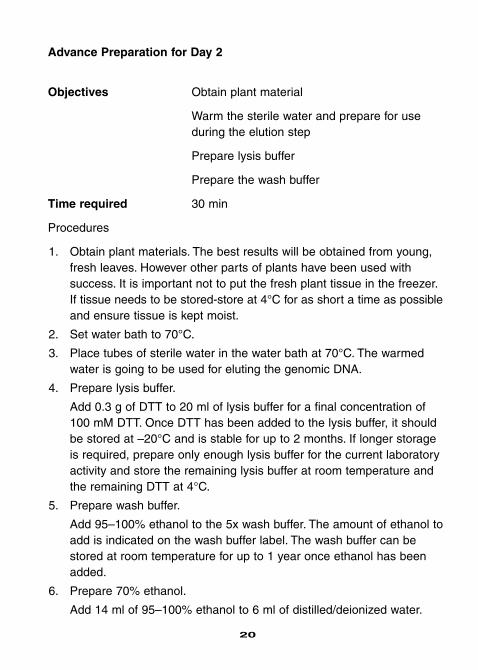
Advance Preparation for Day 2
Objectives Obtain plant material
Warm the sterile water and prepare for use during the elution step
Prepare lysis buffer
Prepare the wash buffer
Time required 30 min
Procedures
1. Obtain plant materials. The best results will be obtained from young,fresh leaves. However other parts of plants have been used with success. It is important not to put the fresh plant tissue in the freezer.If tissue needs to be stored-store at 4°C for as short a time as possibleand ensure tissue is kept moist.
2. Set water bath to 70°C.
3. Place tubes of sterile water in the water bath at 70°C. The warmedwater is going to be used for eluting the genomic DNA.
4. Prepare lysis buffer.
Add 0.3 g of DTT to 20 ml of lysis buffer for a final concentration of100 mM DTT. Once DTT has been added to the lysis buffer, it shouldbe stored at –20°C and is stable for up to 2 months. If longer storageis required, prepare only enough lysis buffer for the current laboratoryactivity and store the remaining lysis buffer at room temperature andthe remaining DTT at 4°C.
5. Prepare wash buffer.
Add 95–100% ethanol to the 5x wash buffer. The amount of ethanol toadd is indicated on the wash buffer label. The wash buffer can bestored at room temperature for up to 1 year once ethanol has beenadded.
6. Prepare 70% ethanol.
Add 14 ml of 95–100% ethanol to 6 ml of distilled/deionized water.
20

Detailed Protocol for Genomic DNAExtractionSafety – Protective eye goggles, gloves, and lab coats should be worn inthe laboratory at all times. Proper safety precautions, including no eatingor drinking in the lab, should always be practiced. Refer to the Safety sec-tion for more information.
Ensure that sterile water for elution of DNA is at 70°C.
Select 1 or 2 plants from which DNA will be extracted. The younger theplant material, the better the DNA yield will be. If necessary, clean plantmaterial to remove soil or debris.
1. Label each 1.5 ml microcentrifuge tube with your initials and plantname.
2. Pipet 200 µl of lysis buffer into each 1.5 ml microcentrifuge tube.
3. Weigh 50–100 mg of each plant material. Record the weight of eachplant material.
Note: For most leaves 50–75 mg of tissue is sufficient. For plant tissuethat is high in water content such as cabbage leaves, use 75–100 mg.
Name of Plant Part of Plant Used Weight (mg)(Leaf, Root, etc)
4. For each plant, use a razor blade or scalpel to cut the material intosmall pieces (less than 1–2 mm in diameter).
Note: Use a new razor blade or scalpel for each plant type used toavoid contaminating samples. Add the chopped plant material into amicrocentrifuge tube containing 200 µl of lysis buffer.
21

5. For each plant, use a clean micropestle to grind the plant material forat least 3 minutes. Be careful not to let lysis buffer spill over the side ofthe tube, which would result in loss of sample. Move the pestle up anddown and twist it to ensure thorough grinding of the plant sample. If theplant material compacts at the bottom of the tube, use a clean pipet tipto dislodge it and continue grinding. Check to make sure that thematerial has been ground to very fine particles (that is, particles difficultto see by eye, rather than in visible chunks), even if this requires furthergrinding.
6. Once a homogeneous lysate has been generated, add an additional500 µl of lysis buffer. Continue grinding using the micropestle until thelysate is homogeneous.
7. Cap (close) the microcentrifuge tube and place it in a microcentrifuge.Make sure all the tubes are in a balanced arrangement in the rotor. Ifsharing with other students, accommodate classmates’ tubes toensure economic use of the microcentrifuge. Centrifuge at full speedfor 5 minutes at room temperature.
22
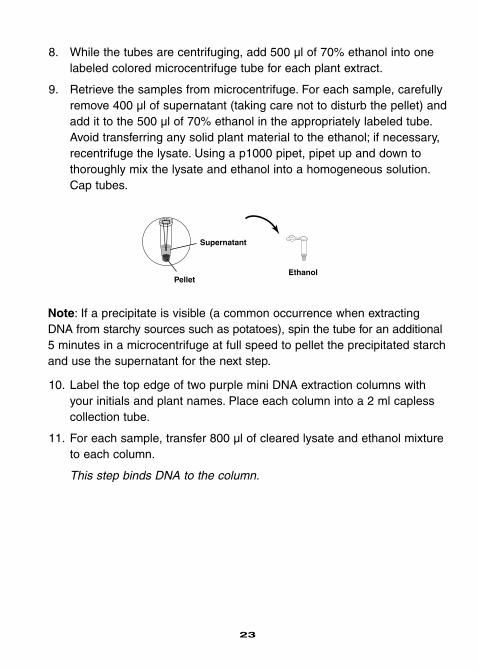
8. While the tubes are centrifuging, add 500 µl of 70% ethanol into onelabeled colored microcentrifuge tube for each plant extract.
9. Retrieve the samples from microcentrifuge. For each sample, carefullyremove 400 µl of supernatant (taking care not to disturb the pellet) andadd it to the 500 µl of 70% ethanol in the appropriately labeled tube.Avoid transferring any solid plant material to the ethanol; if necessary,recentrifuge the lysate. Using a p1000 pipet, pipet up and down tothoroughly mix the lysate and ethanol into a homogeneous solution.Cap tubes.
Note: If a precipitate is visible (a common occurrence when extractingDNA from starchy sources such as potatoes), spin the tube for an additional5 minutes in a microcentrifuge at full speed to pellet the precipitated starchand use the supernatant for the next step.
10. Label the top edge of two purple mini DNA extraction columns withyour initials and plant names. Place each column into a 2 ml caplesscollection tube.
11. For each sample, transfer 800 µl of cleared lysate and ethanol mixtureto each column.
This step binds DNA to the column.
23
Ethanol
Supernatant
Pellet

Note: Be sure that there is no plant material in the lysate that is added tothe column. If necessary, centrifuge the tube again to pellet any plantmaterial prior to loading the supernatant on the column.
12. Place the capless collection tube containing the column into the microcentrifuge. Make sure that the microcentrifuge is balanced.Centrifuge for 1 minute at full speed at room temperature. Discard theflow-through from the collection tubes.
Note: If some of the supernatant does not pass through column, centrifugeagain for 1 minute. If there is still supernatant remaining in the column,carefully remove the excess supernatant with a pipet and discard it, takingcare not to disrupt the column bed. Further centrifugation will not help.Some plant samples can block the column with either carbohydrate or pigments. Even when blockage occurs, it is likely that some of the DNAhas bound to the column matrix and is sufficient for the rest of the experiment.
24

13. Add 700 µl of wash buffer to each column. Centrifuge at full speed atroom temperature for 1 minute. Discard the flow-through. Repeat thewash step two more times for a total of 3 washes. Check the appropriatebox after completing each wash step.
❐ Wash 1
❐ Wash 2
❐ Wash 3
14. After the final wash step, discard the flow-through and place eachDNA extraction column back in its capless collection tube. Dry columnsby centrifuging for 2 minutes at full speed at room temperature. Thisstep is vital to ensure that none of the wash buffer contaminates theDNA sample.
❐ Final spin
15. Transfer each DNA extraction column to a clean, appropriately labeled,colored microcentrifuge tube.
16. Obtain the sterile water from the 70°C water bath. Immediately pipet80 µl of the warmed sterile water onto the membrane at the bottom ofeach column, making sure that the water wets the column bed. Leavefor 1 minute at room temperature to allow the water to saturate themembranes in the column.
17. Place the column, still in the microcentrifuge tube, into the microcen-trifuge. Orient the loose cap of the microcentrifuge tube downwards,towards the center of the rotor, to minimize friction and damage to thecap during centrifugation. Centrifuge at full speed at room temperaturefor 2 minutes.
This step elutes DNA from the column.
18. Remove the column from the microcentrifuge. Cap microcentrifugetube containing the gDNA and store at –20°C. Be sure that your tubesare labeled as gDNA with your initial, plant name, and date.
25

Focus Questions for DNA Extraction1. Where is DNA found in eukaryotic cells?
(Hint: think of different kinds of cells.)
2. What parts of the cell must be broken down to extract DNA? (Hint: think about cell structure.)
3. Why is it more difficult to extract DNA from plants?
4. Why are young plants the best source for DNA?
5. Briefly explain how you will achieve the basic steps in the DNA extraction.
26
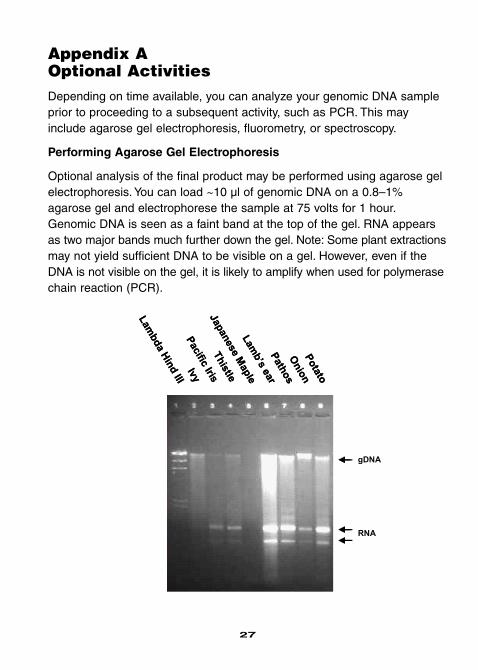
Appendix AOptional ActivitiesDepending on time available, you can analyze your genomic DNA sampleprior to proceeding to a subsequent activity, such as PCR. This mayinclude agarose gel electrophoresis, fluorometry, or spectroscopy.
Performing Agarose Gel Electrophoresis
Optional analysis of the final product may be performed using agarose gelelectrophoresis. You can load ~10 µl of genomic DNA on a 0.8–1%agarose gel and electrophorese the sample at 75 volts for 1 hour.Genomic DNA is seen as a faint band at the top of the gel. RNA appearsas two major bands much further down the gel. Note: Some plant extractionsmay not yield sufficient DNA to be visible on a gel. However, even if theDNA is not visible on the gel, it is likely to amplify when used for polymerasechain reaction (PCR).
Lambda Hind III
IvyPacific Iris
Thistle
Japanese Maple
Lamb’s earPathosOnionPotato
gDNA
RNA
Lambda Hind III
IvyPacific Iris
Thistle
Japanese Maple
Lamb’s earPathosOnionPotato
gDNA
RNA
Lambda Hind III
IvyPacific Iris
Thistle
Japanese Maple
Lamb’s earPathosOnionPotato
gDNA
RNA
27

Measuring DNA Concentration, Yield, and Purity by Fluorometry
A fluorometer, which specifically quantifies double stranded nucleic acids,can be used to accurately quantify the DNA. DNA concentrations can alsobe assessed by reading the absorbance at 260 nm (A260) using spectrophotometer; however, because RNA is present in the sample, aspectrophotometer does not provide an accurate reading of DNA concentration. To get a more accurate reading, the contaminating RNA canbe removed using RNase I, followed by ethanol precipitation to removenucleotides. Bio-Rad’s VersaFluor™ fluorometer (catalog #170-2402EDU)and DNA Quantitation Kit (catalog #170-2480EDU) can be used to accurately quantify DNA concentrations.
Set Up PCR Reactions
Genomic DNA can be used for PCR reactions. The exact quantity of gDNAper reaction should be optimized for each particular application. A goodstarting point is 25 ng of gDNA or, if the gDNA concentration has not beenquantified, 5 µl per reaction.
Bio-Rad’s GAPDH PCR Module (catalog #166-5010EDU) contains all thereagents and instructions required to perform a 2 step nested PCR toamplify a portion of the glyceraldehyde 3’ phosphate dehydrogenase genefrom plant genomic DNA derived using this Nucleic Acid ExtractionModule.
28

Appendix BOther Cellular DNABesides genomic DNA, plant cells contain DNA in their mitochondria(referred to as mtDNA for mitochondrial DNA). Green plants also haveDNA within their chloroplasts called cpDNA (for chloroplast DNA; alsoabbreviated ctDNA). When genomic DNA is isolated from plant samplesusing the DNA Extraction Module, the purified sample also containsmtDNA and cpDNA.
Mitochondria are subcellular organelles, the number of which is directlyrelated to the metabolic activity of the cell, i.e., the higher the metabolicactivity, the more mitochondria are present. Mitochondria are the cell’s“power plants,” producing ATP to energize cellular activities. Mitochondriahave two membranes, an outer membrane that is freely permeable tosmall molecules and an inner membrane that acts as a permeability barrier.
29

The inner mitochondrial membrane is the site of many of the mitochondrialmetabolic reactions. Within the inner membrane is the matrix that containsribosomes and mtDNA. Plant mtDNA is variable in size and ranges from200,000 to 2,500,000 base pairs! The proteins synthesized in the mitochondria are only a small number of those needed for the metabolicactivities of the mitochondria. Therefore, most proteins used in mitochondriaare encoded on the nuclear DNA, synthesized in the cytosol, and importedinto the mitochondria.
In addition to mtDNA, cpDNA is found in chloroplasts in green plants.Chloroplasts have a number of similarities to mitochondria. They have twoouter membranes, the inner of which acts as a permeability barrier. Withinthe outer membranes is a fluid-filled compartment called the stroma thatcontains the thylakoid membrane, ribosomes, starch granules, and the circular molecules of cpDNA. The thylakoid membrane forms a separatemembrane-bound compartment within the chloroplast, a series of flattenedstacks of interconnected vesicles. The stacks are called grana and are thesite of photosynthesis. The cpDNA molecules average in size from120,000–200,000 base pairs and contain over 100 genes; however, theydo not produce many of the proteins needed in the chloroplast. Similar tothe mitochondria, chloroplasts import many proteins that are encoded bynuclear DNA and synthesized in the cytosol. Interestingly, the enzymesneeded for replication of cpDNA must themselves be imported from thecytosol into the chloroplast.
30

Appendix CInstructor’s Answer Guide1. Where is DNA found in eukaryotic cells? (Hint: think of different kinds
of cells.)
DNA is found in the nucleus and in the mitochondria of all eukaryotesand also in plant plastids, including chloroplasts.
2. What parts of the cell must be broken down to extract DNA? (Hint: think about cell structure.)
The cell, nuclear, and organelle membranes must be ruptured and cellular enzymes that would destroy DNA or bind DNA must be denatured. (There is no nuclear membrane in prokaryotes.)
3. Why is it more difficult to extract DNA from plants?
Plants have a rigid cell wall that is difficult to break down, they havelarge vaculoles containing acids that could damage DNA, and maycontain polyphenols and other inhibitory compounds that can bindDNA, preventing its use downstream.
4. Why are young plants the best source for DNA?
Young plant leaves are still growing, have a greater nuclear to cellularvolume, and have fewer chemicals that interfere with DNA isolation.
5. Briefly explain how you will achieve the basic steps in the DNA extraction.
Students may purchase plant material from the store or collect samplesfrom the field. Cell membranes and cell walls will be disrupted bygrinding with micropestles and disrupted chemically by lysis buffer.Lysis buffer will also denature cellular proteins. Centrifugation willremove cellular debris and silica columns will be used to purify DNA.
Copyright© 2008 Bio-Rad Laboratories, Inc.
31


1665007 Rev A
Life ScienceGroup
00-0000 0000 Sig 0211Bulletin 0000 Rev A US/EG
Bio-Rad Laboratories, Inc.
Web site www.bio-rad.com USA 800 424 6723 Australia 61 2 9914 2800 Austria 01 877 89 01 Belgium 09 385 55 11 Brazil 55 31 3689 6600 Canada 905 364 3435 China 86 21 6169 8500 Czech Republic 420 241 430 532 Denmark 44 52 10 00 Finland 09 804 22 00 France 01 47 95 69 65 Germany 089 31 884 0 Greece 30 210 777 4396 Hong Kong 852 2789 3300 Hungary 36 1 459 6100 India 91 124 4029300 Israel 03 963 6050 Italy 39 02 216091 Japan 03 6361 7000 Korea 82 2 3473 4460 Malaysia 60 3 2117 5260 Mexico 52 555 488 7670 The Netherlands 0318 540666 New Zealand 64 9 415 2280 Norway 23 38 41 30 Poland 48 22 331 99 99 Portugal 351 21 472 7700 Russia 7 495 721 14 04 Singapore 65 6415 3170 South Africa 27 861 246 723 Spain 34 91 590 5200 Sweden 08 555 12700 Switzerland 061 717 95 55 Taiwan 886 2 2578 7189 Thailand 66 2 6518311 United Kingdom 020 8328 2000