biostar integration for nedap setup guide · 2 enter ipconfig/all in the command prompt window and...
TRANSCRIPT

BioStar Integration for NedapSETUP GUIDE
Version 1.10English
2
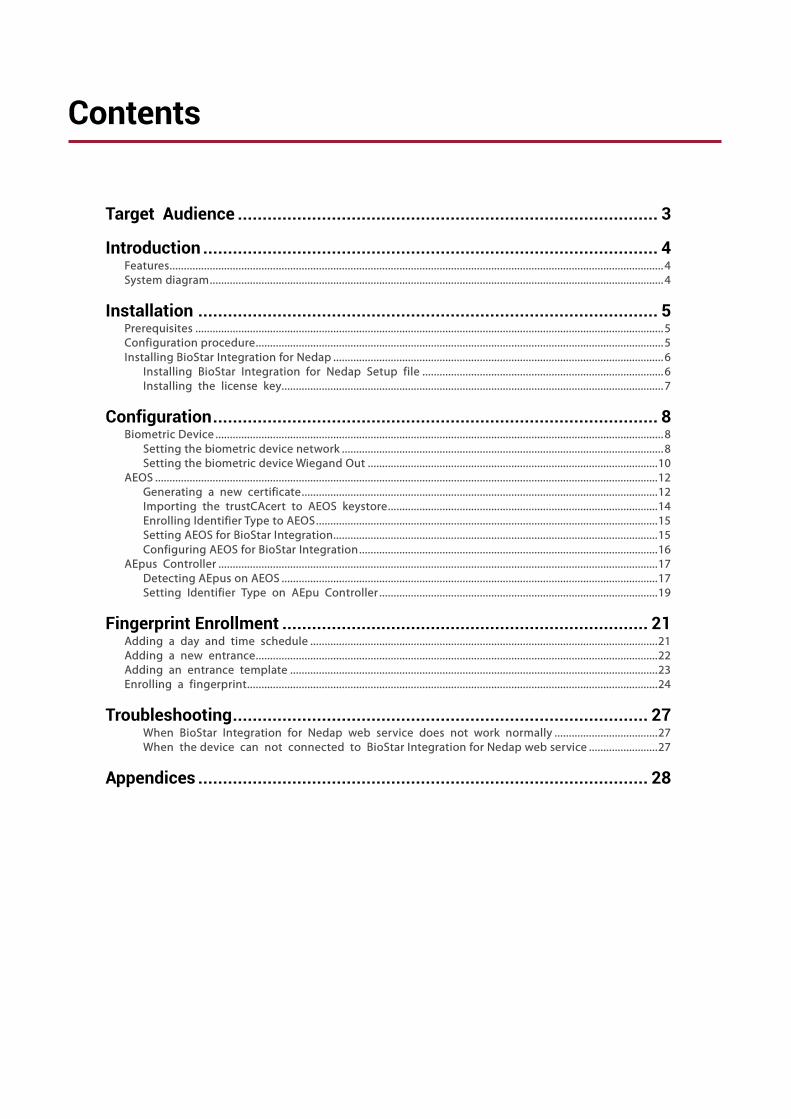
Contents
Target Audience ..................................................................................... 3
Introduction ............................................................................................ 4 Features ............................................................................................................................................................................ 4 System diagram .............................................................................................................................................................. 4
Installation ............................................................................................. 5 Prerequisites ................................................................................................................................................................... 5 Configuration procedure .............................................................................................................................................. 5 Installing BioStar Integration for Nedap ................................................................................................................... 6
Installing BioStar Integration for Nedap Setup file .................................................................................... 6 Installing the license key..................................................................................................................................... 7
Configuration .......................................................................................... 8 Biometric Device ............................................................................................................................................................ 8
Setting the biometric device network ................................................................................................................ 8 Setting the biometric device Wiegand Out ..................................................................................................... 10
AEOS ............................................................................................................................................................................... 12 Generating a new certificate ............................................................................................................................ 12 Importing the trustCAcert to AEOS keystore .............................................................................................. 14 Enrolling Identifier Type to AEOS ....................................................................................................................... 15 Setting AEOS for BioStar Integration ................................................................................................................. 15 Configuring AEOS for BioStar Integration ........................................................................................................ 16
AEpus Controller ......................................................................................................................................................... 17 Detecting AEpus on AEOS ................................................................................................................................... 17 Setting Identifier Type on AEpu Controller ................................................................................................. 19
Fingerprint Enrollment .......................................................................... 21 Adding a day and time schedule ......................................................................................................................... 21 Adding a new entrance ............................................................................................................................................ 22 Adding an entrance template ................................................................................................................................ 23 Enrolling a fingerprint ............................................................................................................................................... 24
Troubleshooting .................................................................................... 27 When BioStar Integration for Nedap web service does not work normally .................................... 27 When the device can not connected to BioStar Integration for Nedap web service ........................ 27
Appendices ........................................................................................... 28

Target Audience
3
Target Audience This document describes the integration between Suprema biometric devices and Nedap AEOS using BioStar Integration for Nedap. This document is intended for system operators as well as system administrators. The system operators/administrators require basic knowledge of the Nedap AEOS system and Suprema biometric devices.
Introduction
4
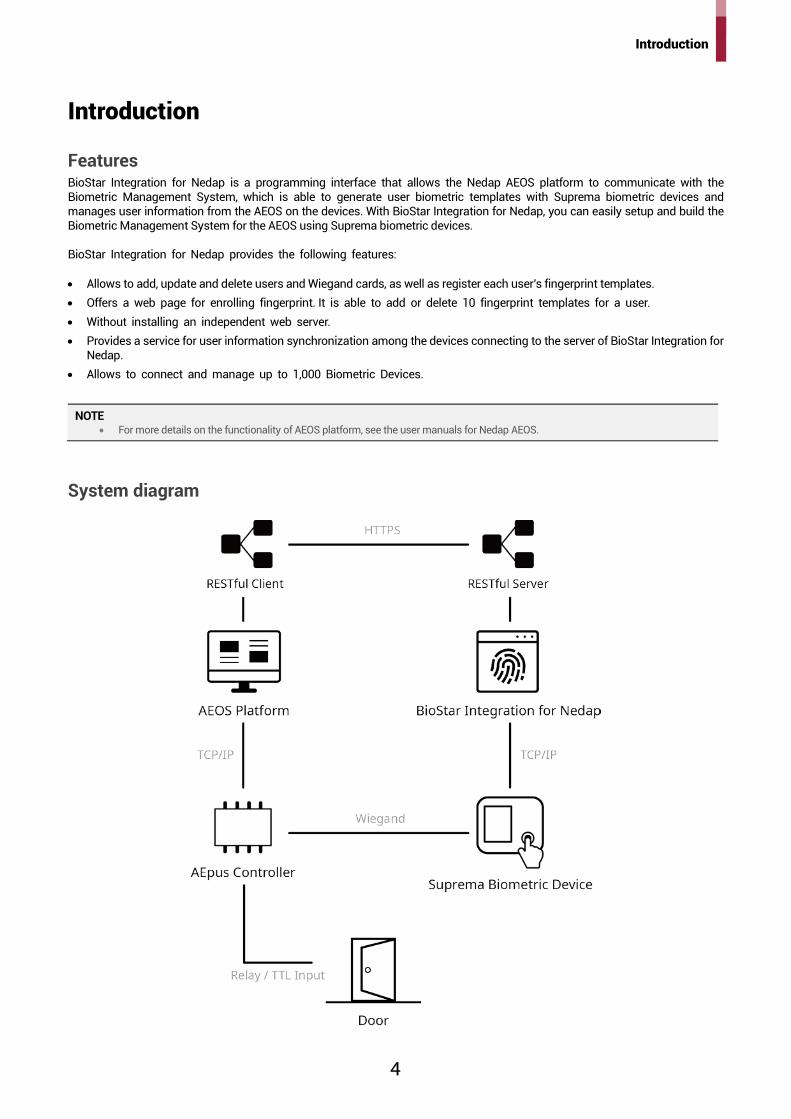
Introduction
Features BioStar Integration for Nedap is a programming interface that allows the Nedap AEOS platform to communicate with the Biometric Management System, which is able to generate user biometric templates with Suprema biometric devices and manages user information from the AEOS on the devices. With BioStar Integration for Nedap, you can easily setup and build the Biometric Management System for the AEOS using Suprema biometric devices. BioStar Integration for Nedap provides the following features: • Allows to add, update and delete users and Wiegand cards, as well as register each user's fingerprint templates. • Offers a web page for enrolling fingerprint. It is able to add or delete 10 fingerprint templates for a user. • Without installing an independent web server. • Provides a service for user information synchronization among the devices connecting to the server of BioStar Integration for
Nedap. • Allows to connect and manage up to 1,000 Biometric Devices.
NOTE • For more details on the functionality of AEOS platform, see the user manuals for Nedap AEOS.
System diagram

Installation
5
Installation
Prerequisites The following prerequisites are required to use BioStar integration for Nedap. Check the support conditions before installing the BioStar integration for Nedap. • Operating system
− Microsoft Windows 7(x86 / x64), Microsoft Windows 10(x64), Microsoft Windows Server 2012 • Web browsers
− Chrome 6x, IE10 / IE11 • AEOS
− AEOS 3.2.x, AEOS 3.3.1, AEOS 3.3.2 • Biometric Device
− BioStation 2, BioStation A2, BioStation L2, BioEntry W2 • BS_SDK_V2
− 2.5.0
NOTE • BS_SDK_V2 is included in BioStar Integration for Nedap installation file.
Configuration procedure

Installation
6
Installing BioStar Integration for Nedap
Installing BioStar Integration for Nedap Setup file
1 Run the BioStar Integration for Nedap 1.04 setup file.
2 Click Install to continue. BioStar Integration for Nedap requires some items to be installed.
3 To continue the installation, click Next.
4 Enter the customer information and then click Next.
5 If ready to install, click Install.
6 Click Finish to complete installing BioStar Integration for Nedap.
7
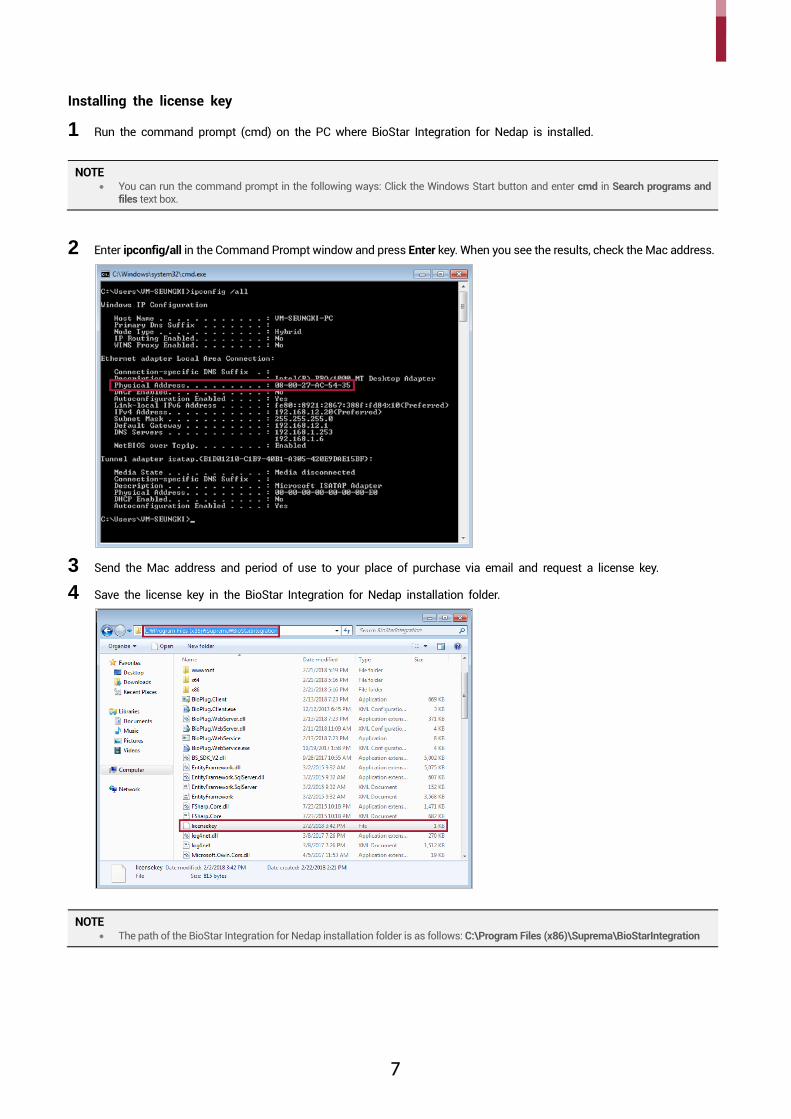
Installing the license key
1 Run the command prompt (cmd) on the PC where BioStar Integration for Nedap is installed.
NOTE • You can run the command prompt in the following ways: Click the Windows Start button and enter cmd in Search programs and
files text box.
2 Enter ipconfig/all in the Command Prompt window and press Enter key. When you see the results, check the Mac address.
3 Send the Mac address and period of use to your place of purchase via email and request a license key.
4 Save the license key in the BioStar Integration for Nedap installation folder.
NOTE • The path of the BioStar Integration for Nedap installation folder is as follows: C:\Program Files (x86)\Suprema\BioStarIntegration
Configuration
8
Configuration
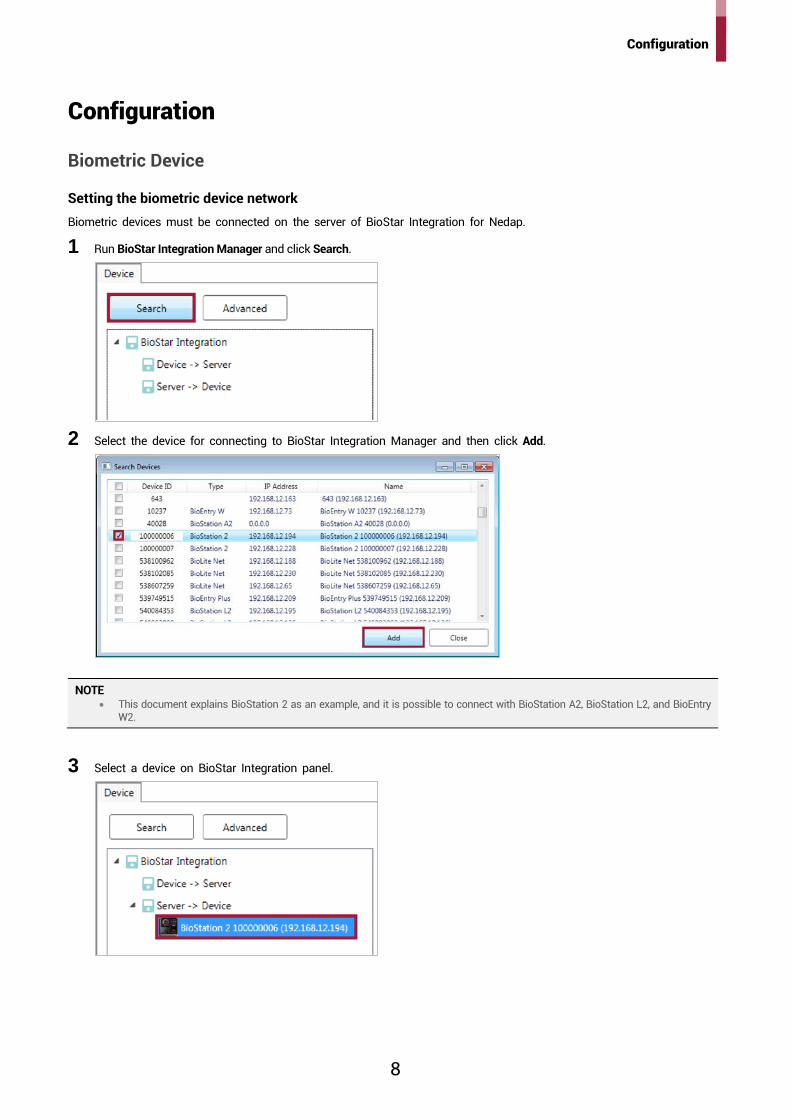
Biometric Device
Setting the biometric device network Biometric devices must be connected on the server of BioStar Integration for Nedap.
1 Run BioStar Integration Manager and click Search.
2 Select the device for connecting to BioStar Integration Manager and then click Add.
NOTE • This document explains BioStation 2 as an example, and it is possible to connect with BioStation A2, BioStation L2, and BioEntry
W2.
3 Select a device on BioStar Integration panel.

Configuration
9
4 In Network tab, click Device -> Server Connection and then fill in Server IP and Server Port.
5 The connected device will be displayed on Device -> Server.
NOTE • If the connected device is not displayed on the panel, reboot BioStar Integration Manager.

Configuration
10
Setting the biometric device Wiegand Out Biometric devices and AEpus Controller are connected by a Wiegand protocol.
1 Run BioStar Integration Manager and click Search.
2 Select the device for connecting to BioStar Integration Manager and then click Add.
NOTE • This document explains BioStation 2 as an example, and it is possible to connect with BioStation A2, BioStation L2, and BioEntry
W2.
3 Select a device on BioStar Integration panel.
Configuration
11
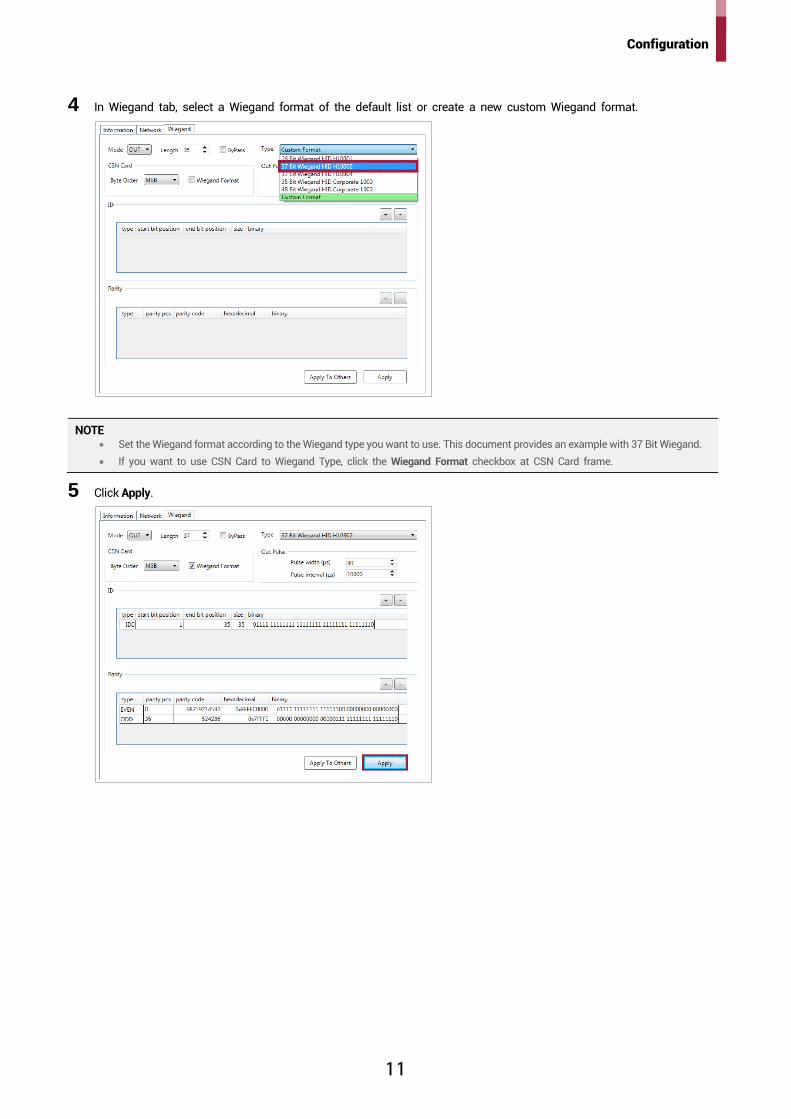
4 In Wiegand tab, select a Wiegand format of the default list or create a new custom Wiegand format.
NOTE • Set the Wiegand format according to the Wiegand type you want to use. This document provides an example with 37 Bit Wiegand. • If you want to use CSN Card to Wiegand Type, click the Wiegand Format checkbox at CSN Card frame.
5 Click Apply.
Configuration
12
AEOS
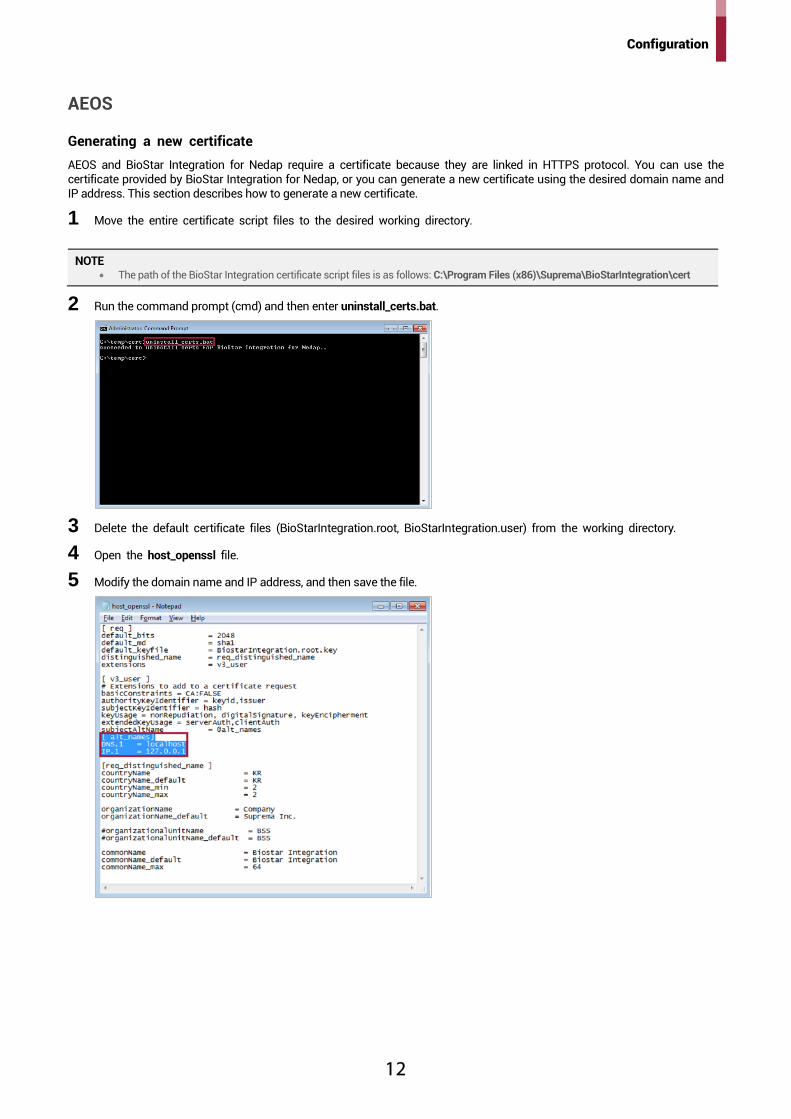
Generating a new certificate AEOS and BioStar Integration for Nedap require a certificate because they are linked in HTTPS protocol. You can use the certificate provided by BioStar Integration for Nedap, or you can generate a new certificate using the desired domain name and IP address. This section describes how to generate a new certificate.
1 Move the entire certificate script files to the desired working directory.
NOTE • The path of the BioStar Integration certificate script files is as follows: C:\Program Files (x86)\Suprema\BioStarIntegration\cert
2 Run the command prompt (cmd) and then enter uninstall_certs.bat.
3 Delete the default certificate files (BioStarIntegration.root, BioStarIntegration.user) from the working directory.
4 Open the host_openssl file.
5 Modify the domain name and IP address, and then save the file.

Configuration
13
6 Run the command prompt and then enter default_cert.sh.
NOTE • default_cert.sh is a script that can be run without any extra parameters. • default_cert.sh is a bash shell script. To run this script, win-bash must be installed on your PC. Install win-bash and then add the
install path to the System PATH variable in Windows.
7 Set the export password for the new certificate to suprema123. The new certificate file will be generated at the working directory.
8 Enter Install_cert.bat at the command prompt to install the new certificate.
9 Move the new certificate file (BioStarIntegration.root) to the AEOS certificate directory.

Configuration
14
Importing the trustCAcert to AEOS keystore AEOS and BioStar Integration for Nedap require a certificate because they are linked in HTTPS protocol. You can use the certificate provided by BioStar Integration for Nedap, or you can generate a new certificate using the desired domain name and IP address. This section describes how to import the certificate provided by BioStar Integration for Nedap.
1 Move the BioStar Integration root certificate file (BioStarIntegration.root) to the AEOS certificate directory.
NOTE • The path of the BioStar Integration root certificate file is as follows: C:\Program Files (x86)\Suprema\BioStarIntegration\cert
2 Open server.jks file in the AEOS certificate directory.
3 Enter the password as shown below. • Keystore password: nedap123
4 Answer the following a question. • Trust this certificate? [no]: y

Configuration
15
Enrolling Identifier Type to AEOS
1 Run AEOS and click Administration > Maintenance > Identifiers > Identifier types.
2 Select the identifier type Generic and then click New.
3 Enter the identifier type information and then OK.
Setting AEOS for BioStar Integration To launch the fingerprint enrollment page in AEOS platform, you must configure BioStar Integration for Nedap in AEOS.
1 Open the AEOS folder and click AEserver > jboss > standalone > configuration.
2 Open aeos.properties file.
3 Set the Suprema Identifier type and the BioStar Integration web server URL as shown below. • bioapi.settings.server.bms1.id = 1 • bioapi.settings.server.bms1.name=Suprema • bioapi.settings.server.bms1.uri=https://192.168.12.20:44301/bioapi • bioapi.settings.server.bms1.optional.carrierName = true • bioapi.settings.server.bms1.optional.cards=true • bioapi.settings.server.bms1.optional.PIN=true
NOTE • If you are using AEOS 3.3.2 or later, please make the following additional settings for added security:
- bioapi.settings.server.bms1.Content-Security-Policy=default-src 'self' https://127.0.0.1:44301 https://127.0.0.1:44301/WECClient 'unsafe-inline' 'unsafe-eval'; script-src 'self' https://127.0.0.1:44301 https://127.0.0.1:44301/WECClient https://127.0.0.1:44301/bioapi/cmdfingers/scan 'unsafe-inline' 'unsafe-eval'; object-src 'self' https://127.0.0.1:44301 https://127.0.0.1:44301/WECClient 'unsafe-inline' 'unsafe-eval'; img-src 'self' data

Configuration
16
Configuring AEOS for BioStar Integration You can configure BioStar Integration on the Administration menu.
1 Run AEOS and click Administration > Maintenance > Settings > System Properties.
2 Click Verification PIN-code and Enable biometric API.
3 Select the biometric server name for the default identifier type.
4 Select the biometric server name for the default verification type, then click OK.
5 Click Management > Maintain user role and select Administrator.
6 Set Employee - Verification to Read / Write and click OK.
7 Restart AEOS Application Server.

Configuration
17
AEpus Controller The AEpus Controller matches information that read from the device with user information and controls the door. This section describes how to connect the AEpus Controller to the AEOS and set the Identifier type.
Detecting AEpus on AEOS
1 Open AEOS IP Utility on AEOS folder and check the AEpu host name.
2 Enroll AEpu host name on hosts for IP mapping.
NOTE • The path of the hosts file is as follows: C:\Windows\System32\drivers\etc.
3 Run AEconf and click AEpu host table....

Configuration
18
4 Select the host and click OK.
5 Click and to save and set AEpu IP settings.
6 Click to synchronize the time of the AEpu from NTP server.
7 Connect to AEOS and check if AEpus is connected.
Configuration
19
Setting Identifier Type on AEpu Controller
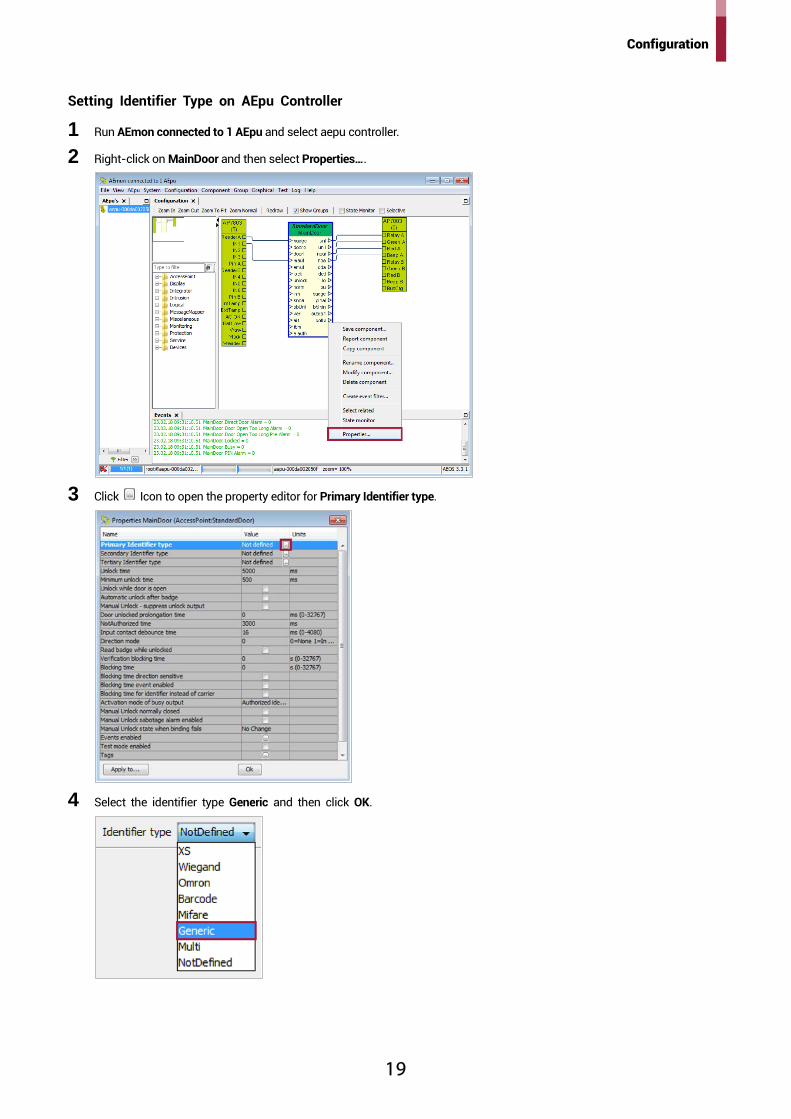
1 Run AEmon connected to 1 AEpu and select aepu controller.
2 Right-click on MainDoor and then select Properties….
3 Click Icon to open the property editor for Primary Identifier type.
4 Select the identifier type Generic and then click OK.

Configuration
20
5 Enter the Sub type, Format, Bit position and Length information and click OK.
NOTE • The Identifier Type of the AEpu controller must be set the same as the Suprema Identifier Type set in AEOS.
- Set Sub type to 1. - Set Length to 32 bits (4 bytes). - Set Bit position to 15.
• Contact Nedap for details on setting up AEpus Controller.
Fingerprint Enrollment
21
Fingerprint Enrollment NOTE
• In order to enroll fingerprints on AEOS, users to enroll fingerprints, entrances and time schedules must be set in AEOS. This document describes how to set these conditions. For more information, refer to the AEOS manual.
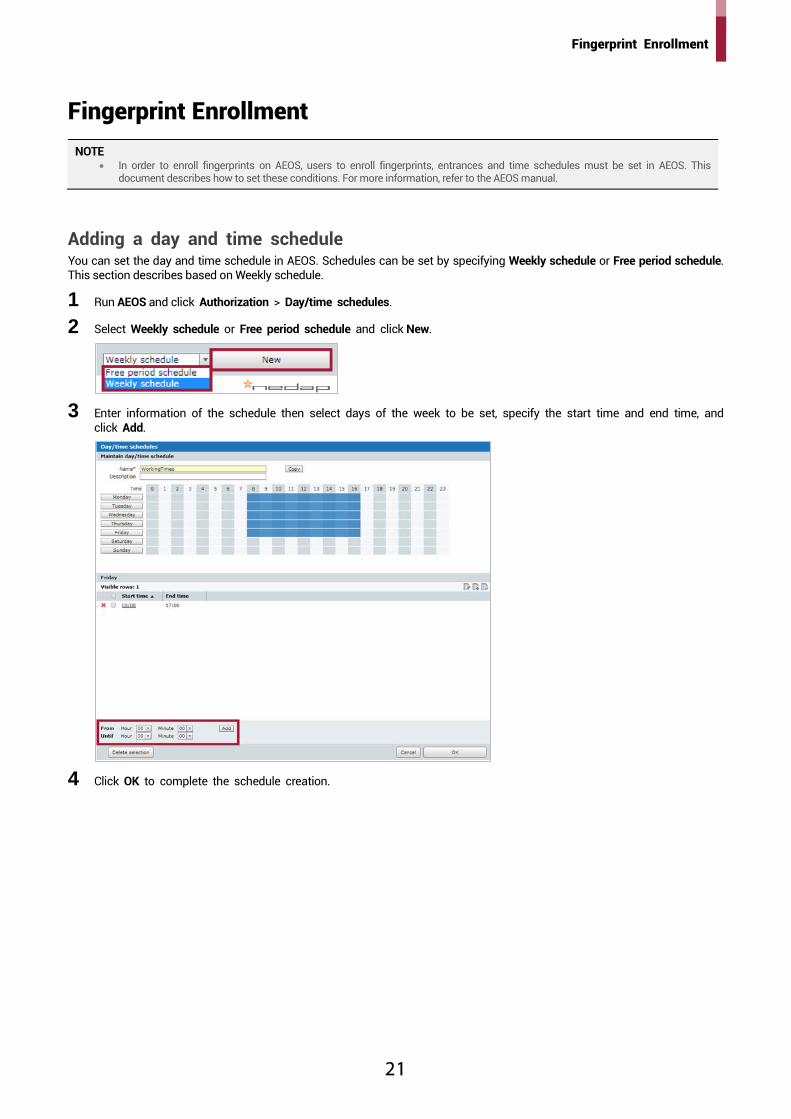
Adding a day and time schedule You can set the day and time schedule in AEOS. Schedules can be set by specifying Weekly schedule or Free period schedule. This section describes based on Weekly schedule.
1 Run AEOS and click Authorization > Day/time schedules.
2 Select Weekly schedule or Free period schedule and click New.
3 Enter information of the schedule then select days of the week to be set, specify the start time and end time, and click Add.
4 Click OK to complete the schedule creation.
Fingerprint Enrollment
22
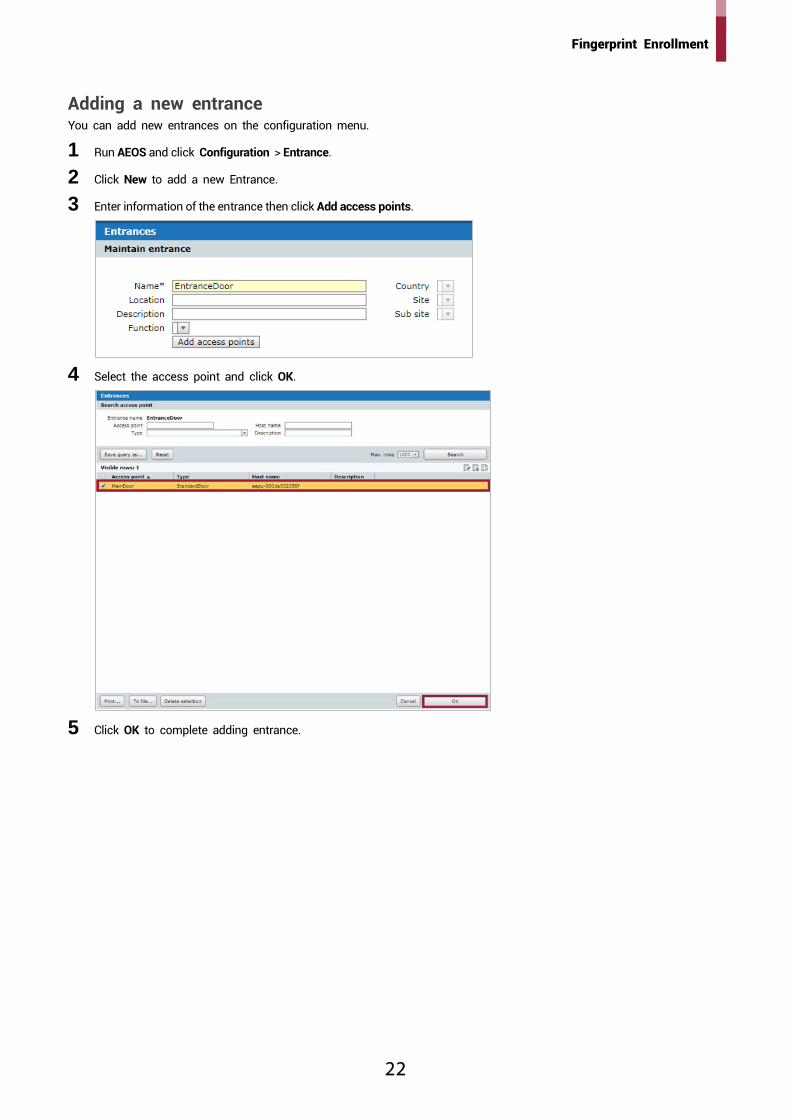
Adding a new entrance You can add new entrances on the configuration menu.
1 Run AEOS and click Configuration > Entrance.
2 Click New to add a new Entrance.
3 Enter information of the entrance then click Add access points.
4 Select the access point and click OK.
5 Click OK to complete adding entrance.
Fingerprint Enrollment
23
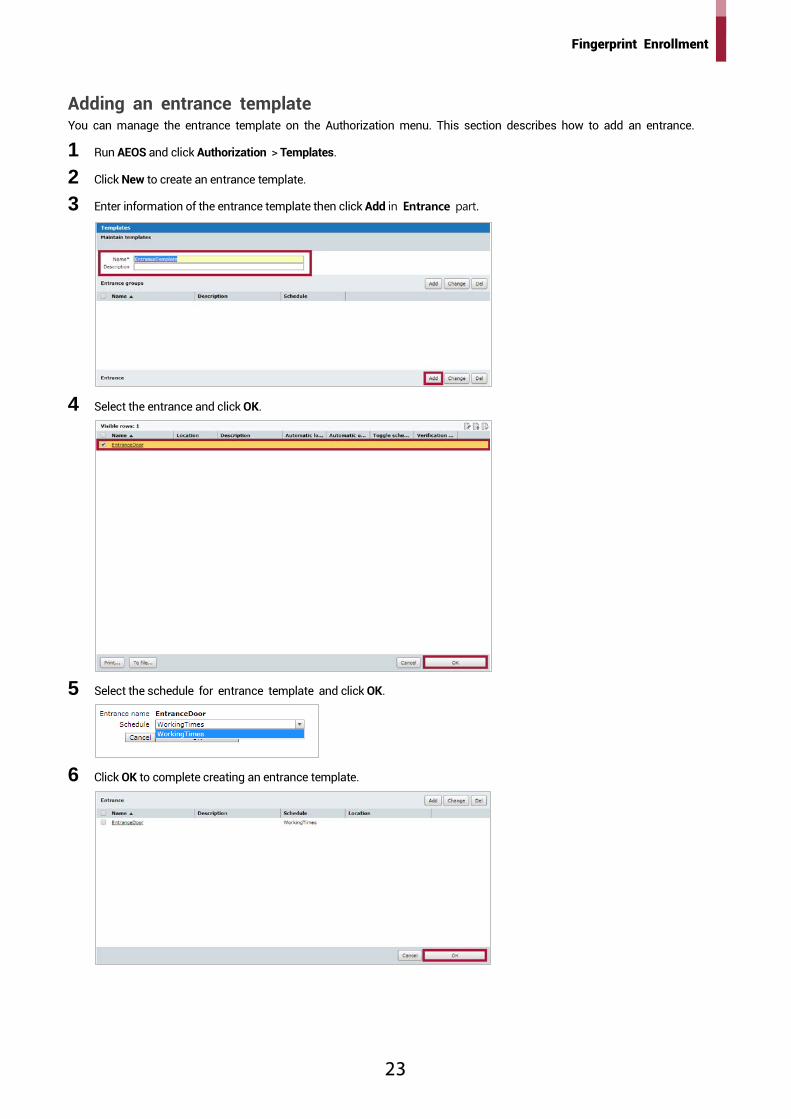
Adding an entrance template You can manage the entrance template on the Authorization menu. This section describes how to add an entrance.
1 Run AEOS and click Authorization > Templates.
2 Click New to create an entrance template.
3 Enter information of the entrance template then click Add in Entrance part.
4 Select the entrance and click OK.
5 Select the schedule for entrance template and click OK.
6 Click OK to complete creating an entrance template.
Fingerprint Enrollment
24
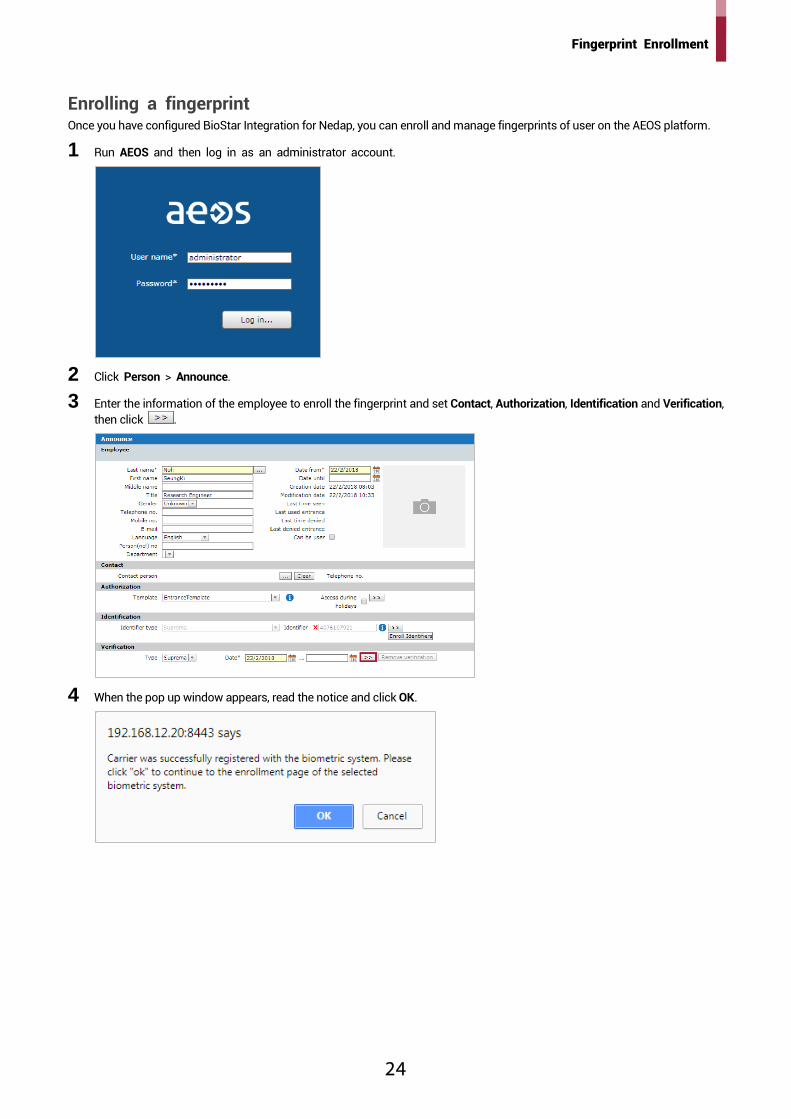
Enrolling a fingerprint Once you have configured BioStar Integration for Nedap, you can enroll and manage fingerprints of user on the AEOS platform.
1 Run AEOS and then log in as an administrator account.
2 Click Person > Announce.
3 Enter the information of the employee to enroll the fingerprint and set Contact, Authorization, Identification and Verification, then click .
4 When the pop up window appears, read the notice and click OK.

Fingerprint Enrollment
25
5 Select the device to enroll the fingerprint.
6 Select the finger to enroll the fingerprint in the Not Enrolled list and click . When the selected item appears in the Enrolled list, press Scan.
7 When a message saying “Please place the finger on the sensor.” is displayed on the page, place the finger with the fingerprint you wish to enroll on the fingerprint authentication unit of the device and press the finger gently for better authentication.
8 When the re-input screen is displayed on the device after a beep sound, scan the fingerprint of the enrolled finger again (scan the fingerprint of a finger to be enrolled twice).
NOTE • For more information on fingerprint enrollment, refer to the manual for the Suprema biometric device.
Fingerprint Enrollment
26
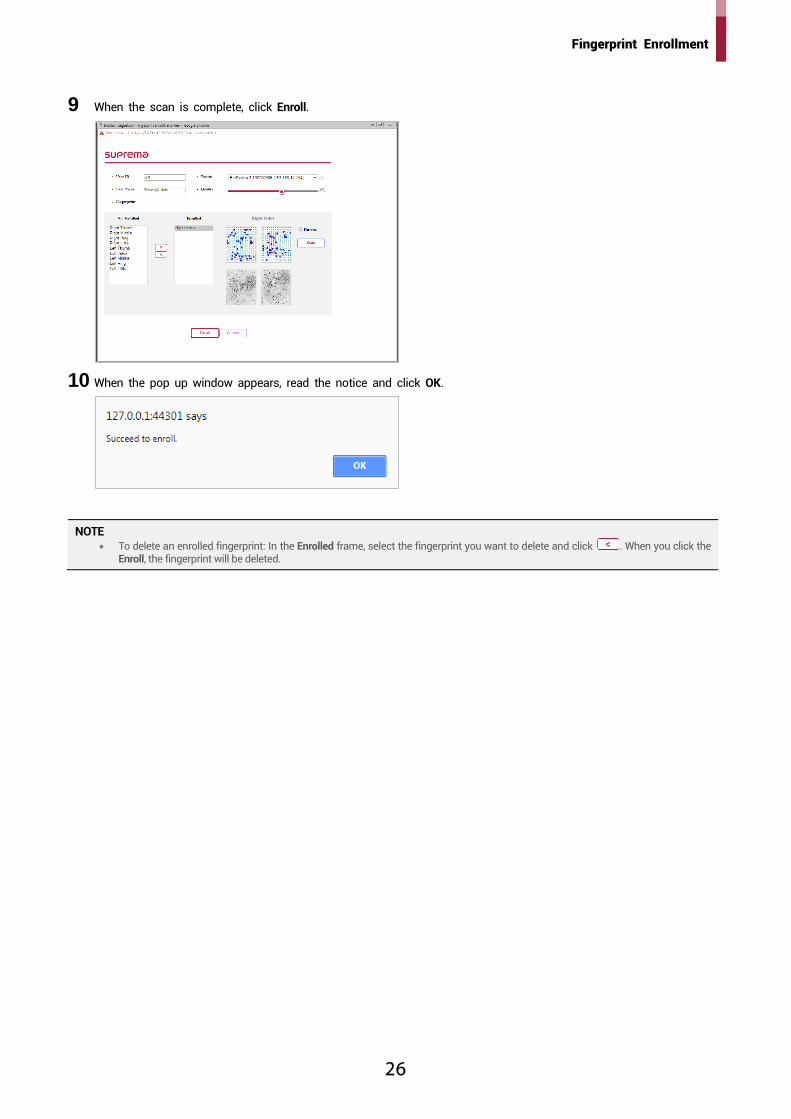
9 When the scan is complete, click Enroll.
10 When the pop up window appears, read the notice and click OK.
NOTE
• To delete an enrolled fingerprint: In the Enrolled frame, select the fingerprint you want to delete and click . When you click the Enroll, the fingerprint will be deleted.

Troubleshooting
27
Troubleshooting When BioStar Integration for Nedap web service does not work normally
• Make sure the database (BioStarIntegration.sqlite) is in the correct path. If the database has been deleted, delete BioStarIntegration.DbServerConfig.ini file and rerun the server to create a new database.
• Check the version of OpenSSL installed. OpenSSL version 1.0.2I or later that supports the TLS 1.2 protocol must be installed.
When the device can not connected to BioStar Integration for Nedap web service
• If you have BioStar 2 installed on your PC, make sure the BioStar 2 server is running. The device can be connected to the BioStar 2 server first when the window is restarted. If possible, use BioStar 2 and BioStar Integration for Nedap on different PCs.

Appendices
28
Appendices • Identifier type of Identification is supported only for NedapTest, test type, Suprema, CSN, Secure, Access, and Wiegand.
Supported Identifier types can be updated at a later date. • If you delete the BioStar Integration.DbServerConfig.ini configuration file, a new database will be created. • The path of the configuration file is shown below.
− Configuration file: (C:\Windows\ BioStar Integration.DbServerConfig.ini, BioStar Integration.WebServerConfig.ini) − Database: (C:\ProgramData\Suprema\BioStarIntegration\db\BioStarIntegration.sqlite)
• Configuration files and databases are not deleted through the Uninstaller of BioStar Integration for Nedap.

Suprema Inc.16F Parkview Tower, 248, Jeongjail-ro, Bundang- gu, Seongnam-si, Gyeonggi-do, 13554, Rep. of KOREATel: +82 31 783 4502 I Fax: +82 31 783 4503 I Inquiry: [email protected]©2018 Suprema Inc. Suprema and identifying product names and numbers herein are registered trade marks of Suprema, Inc. All non-Suprema brands and product names are trademarks or registered trademarks of their respective companies. Product appearance, build status and/or specifications are subject to change without notice.