bioneer - bq-042-101-01 exiprep16 plus user guide …...exipreptm16 plus / fully automated nucleic...
TRANSCRIPT
ExiPrepTM16 Plus Fully Automated Nucleic Acid Extraction System
A-5030
Fully Automated Nucleic Acid Extraction System
User’s Guide

ExiPrepTM16 Plus / Fully Automated Nucleic Acid Extraction System
www.bioneer.com
BQ-042-101-01
Revision : 0(2012-12-07)
ExiPrepTM16 Plus Fully Automated Nucleic Acid Extraction System
User’s Guide
Version No.: 1.2 (2013-12)
Please read all the information in booklet before using the instrument
Bioneer8-11, Munpyeongseo-ro, Daedeok-gu,Daejeon, 306-220, Republic of Korea Tel: +82-42-930-8777 Fax: +82-42-930-8600 Email: [email protected] www.bioneer.com

ExiPrepTM16 Plus / Fully Automated Nucleic Acid Extraction System
www.bioneer.com
BQ-042-101-01
Revision : 0(2012-12-07)
MANUFACTURER
: Bioneer Corporation 8-11, Munpyeongseo-ro, Daedeok-gu, Daejeon, 306-220 Republic of Korea
EUROPEAN REPRESENTATIVE
: MT Promedt Consulting GmbH Altenhofstr. 80 D-66386 St. Ingbert, Germany
PRODUCT : ExiPrep™16 Plus, Fully Automated Nucleic Acid Extraction System
CATALOG NO.
A-5030
ExiPrepTM16 Plus / Fully Automated Nucleic Acid Extraction System
www.bioneer.com
BQ-042-101-01
Revision : 0(2012-12-07)
Contents
I. Getting Started .............................................................................................................................................. 1
II. Safety Warnings and Precautions ............................................................................................................... 2
III. Waste Safety Warnings ................................................................................................................................ 5
IV. System Components and Specifications ................................................................................................... 6
1. System Components ............................................................................................................................................................. 6
2. Specifications ........................................................................................................................................................................... 7
3. System Views ............................................................................................................................................................................ 7
V. Installing the ExiPrep™16 Plus .................................................................................................................... 8
VI. DNA/RNA Extraction ................................................................................................................................... 10
1. Contamination shield installation ................................................................................................................................. 10
2. Sample Preparation ............................................................................................................................................................ 11
3. RUN ............................................................................................................................................................................................ 13
VII. ExiPrep™16 Plus Setup .............................................................................................................................. 16
1. Main Menu ............................................................................................................................................................................... 16
2. Registering a New User ..................................................................................................................................................... 20
3. Viewing Run History ............................................................................................................................................................ 21
4. Managing the Login Mode ............................................................................................................................................... 22
5. Managing the Automatic UV-Sterilization Mode ................................................................................................... 23
6. Controlling System Configuration ................................................................................................................................. 24
7. Administrator Management ............................................................................................................................................. 25
VIII. Updating the ExiPrepTM16 Plus .................................................................................................................. 27
IX. DNA/RNA Extraction Program Number List ............................................................................................. 30
X. Troubleshooting ........................................................................................................................................... 34
XI. Warranty ....................................................................................................................................................... 37
ExiPrepTM16 Plus / Fully Automated Nucleic Acid Extraction System
1
www.bioneer.com
BQ-042-101-01
Revision : 0(2012-12-07)
I. Getting Started
Thank you for purchasing this Bioneer product.
We will try our best to provide satisfactory results to our customers.
This manual contains practical guidelines and cautions to be taken regarding the instrument.
Please read this manual carefully and thoroughly before using the instrument.
Website
Please visit us online at http://www.bioneer.com to obtain more information about ExiPrepTM16
Plus. You can download up-to-date product information and new protocols.
General information
ExiPrep™16 Plus is a trademark of Bioneer Corporation.
The information contained in this manual is under copyright protection. It is unlawful to
reproduce part or all of the contents of this manual without the expressed written consent
of Bioneer Corporation.
Bioneer Corporation reserves the right to alter, modify and otherwise make changes to the
instrument and manuals without prior notice.
You must be used carefully UV Lamp. Detail can be found in Safety warning and
Precautions.
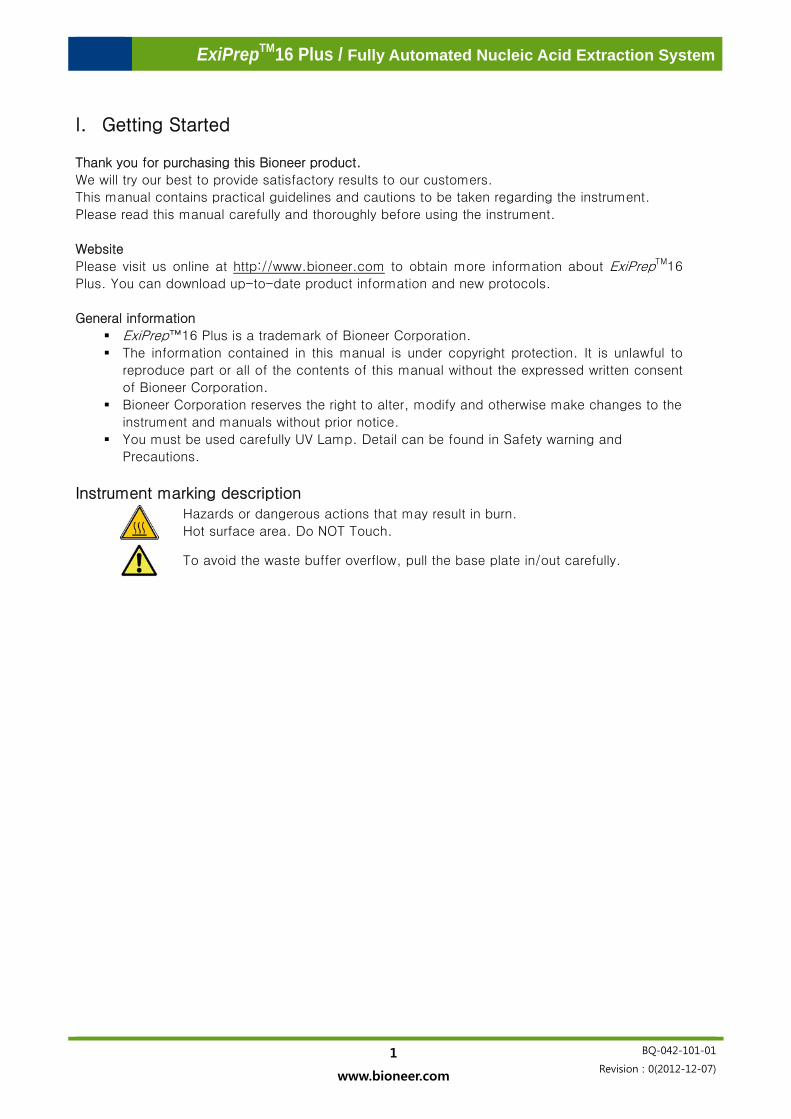
Instrument marking description
Hazards or dangerous actions that may result in burn.
Hot surface area. Do NOT Touch.
To avoid the waste buffer overflow, pull the base plate in/out carefully.
ExiPrepTM16 Plus / Fully Automated Nucleic Acid Extraction System
2
www.bioneer.com
BQ-042-101-01
Revision : 0(2012-12-07)
II. Safety Warnings and Precautions
The warnings and precautions stated below are for the correct and safe operation of the instrument.
Please heed all information for your safety. Bioneer Corporation does not assume responsibility for
non-compliance with the safety warnings and precautions stated below.
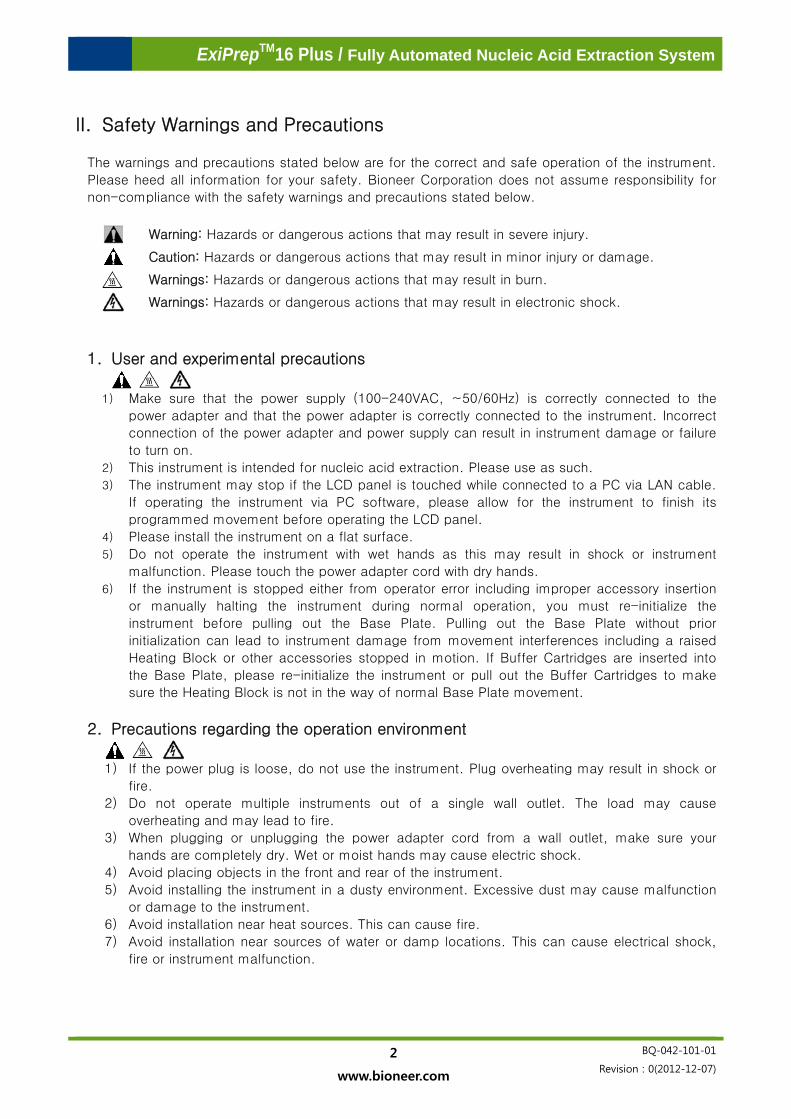
Warning: Hazards or dangerous actions that may result in severe injury.
Caution: Hazards or dangerous actions that may result in minor injury or damage.
Warnings: Hazards or dangerous actions that may result in burn.
Warnings: Hazards or dangerous actions that may result in electronic shock.
1. User and experimental precautions
1) Make sure that the power supply (100-240VAC, ~50/60Hz) is correctly connected to the
power adapter and that the power adapter is correctly connected to the instrument. Incorrect
connection of the power adapter and power supply can result in instrument damage or failure
to turn on.
2) This instrument is intended for nucleic acid extraction. Please use as such.
3) The instrument may stop if the LCD panel is touched while connected to a PC via LAN cable.
If operating the instrument via PC software, please allow for the instrument to finish its
programmed movement before operating the LCD panel.
4) Please install the instrument on a flat surface.
5) Do not operate the instrument with wet hands as this may result in shock or instrument
malfunction. Please touch the power adapter cord with dry hands.
6) If the instrument is stopped either from operator error including improper accessory insertion
or manually halting the instrument during normal operation, you must re-initialize the
instrument before pulling out the Base Plate. Pulling out the Base Plate without prior
initialization can lead to instrument damage from movement interferences including a raised
Heating Block or other accessories stopped in motion. If Buffer Cartridges are inserted into
the Base Plate, please re-initialize the instrument or pull out the Buffer Cartridges to make
sure the Heating Block is not in the way of normal Base Plate movement.
2. Precautions regarding the operation environment
1) If the power plug is loose, do not use the instrument. Plug overheating may result in shock or
fire.
2) Do not operate multiple instruments out of a single wall outlet. The load may cause
overheating and may lead to fire.
3) When plugging or unplugging the power adapter cord from a wall outlet, make sure your
hands are completely dry. Wet or moist hands may cause electric shock.
4) Avoid placing objects in the front and rear of the instrument.
5) Avoid installing the instrument in a dusty environment. Excessive dust may cause malfunction
or damage to the instrument.
6) Avoid installation near heat sources. This can cause fire.
7) Avoid installation near sources of water or damp locations. This can cause electrical shock,
fire or instrument malfunction.
ExiPrepTM16 Plus / Fully Automated Nucleic Acid Extraction System
3
www.bioneer.com
BQ-042-101-01
Revision : 0(2012-12-07)
8) Do not install near sources of flammable or corrosive gas. If there is a gas leak, do not touch
the power plug but open a window to circulate fresh air. Sparks from the power plug can
cause fire and explosions.
9) Do not disassemble or modify the instrument in any way. This can result in fire, electrical
shock or malfunction, and also voids your warranty.
3. Precautions and warnings regarding instrument installation 1) This is a precision instrument. Do not install in a location exposed to direct sunlight.
2) Install the instrument on a flat, solid surface that is flat and does not move.
3) When installing the instrument, make sure at least 15 cm separate the instrument from the
nearest wall.
4) Take caution not to damage the cooling fan mesh (located on the front-bottom) while
installing.
4. Precautions and warnings regarding instrument operation
1) Dust off the power plug and insert the plug so that the connection is firm and does not wiggle.
Incomplete electrical contacts may cause fire.
2) Operate the instrument in an ambient temperature range of 15℃~30℃. Excessive exposure to
heat may affect the instrument and yield inexact results.
3) Operate the instrument within the recommended humidity range (20~80%, no condensation).
Humid conditions may cause corrosion or malfunction.
4) Do not place any objects next to or behind the instrument. The instrument may malfunction.
5) This instrument contains precision machined parts. Do not drop or severely agitate the
instrument. This can break the instrument and compromise the safety of the product.
6) When not using the instrument for a long period of time, turn the instrument off and unplug
from the wall outlet. Overheating and fire may occur.
7) The instrument automatically turns off the UV lamp and its operation when the instrument’s
door is open. However, just in case it does NOT turns off when the door is open, please make
sure the UV light does not directly expose to your eyes and skin.
5. Precautions and warnings regarding product usage and maintenance
1) This product must only be used for nucleic acid extraction and automatic aliquot. Do not use
the instrument for any use other than explicitly stated in the User Manual.
2) Do not modify or delete instrument-related information installed within the instrument.
3) Operate the LCD touch-screen using a non-sharp object. Nails and other sharp objects may
damage the product.
4) The instrument UV lamp will only operate if the door is completely shut. Make sure the door
sensor is free of foreign materials or obstructions.
5) Do not use powerful detergents or solvents to clean the outside of the instrument as this may
cause discoloration. If such chemicals are spilled on the instrument, immediately clean with a
soft cloth.
6) Do not keep the instrument in an environment with high humidity. Damage from storage in
these conditions is classified as water damage and is not covered by warranty. Also, damage
arising from this type of exposure may be irreparable.
7) Disassembly and/or modification of the instrument voids the warranty and may be refused
service.
8) Do not unplug the power adapter from the instrument while the instrument is in use. This may
cause the instrument to break.
ExiPrepTM16 Plus / Fully Automated Nucleic Acid Extraction System
4
www.bioneer.com
BQ-042-101-01
Revision : 0(2012-12-07)
9) If a burning smell is detected or the instrument seems to be excessively hot during operation,
immediately stop using the instrument and call your service representative.
10) Do not drop or impact the instrument. This is a direct cause of instrument damage and may
void the warranty.
11) Always verify that the Heating Block is in normal position before pulling out the Base Plate. If
the Base Plate is pulled out while the Heating Block is not in its normal, initialized position, the
interference in movement can cause Heating Block and other internal component damage and
lead to instrument malfunction. Since installed Buffer Cartridges obscure the view, re-initialize
the instrument or take out the Buffer Cartridges and visually inspect the position of the Heating
Block before pulling out the Base Plate.
12) The instrument automatically turns off the UV lamp and its operation when the instrument’s
door is open. However, just in case it does NOT turns off when the door is open, please make
sure the UV light does not directly expose to your eyes and skin.
13) When there is liquid in the Waste Tray in the equipment, take extra caution to push-in or pull-
out the base plate so the liquid does NOT overflow to the instrument inside. If the liquid
overflows inside the instrument, it may damage the instrument or cause the electrocution.
6. UV Lamp
1) UV lamp operation may create Ozone molecules. For the safety issue, the instrument is pre-
programmed the UV lamp operation for 15 minutes only. Please do NOT extensively use UV
lamp operations.
2) The Ultraviolet (UV) ray can seriously damage your eyes and skin when exposed directly (even
through indirectly). When you deal with UV lamp, make sure you are wearing proper protective
equipment.

ExiPrepTM16 Plus / Fully Automated Nucleic Acid Extraction System
5
www.bioneer.com
BQ-042-101-01
Revision : 0(2012-12-07)
III. Waste Safety Warnings
This instrument is used with a special kit that contains large amounts of chlorine compounds for the
purpose of extracting a nucleic acid. Furthermore, the nucleic acids extracted through this instrument
have a shelf life about their sequence information. So, the residual nucleic acid can give a bad effect
to the performance of the instrument. Minimizing this kind of risk, it is strongly recommended to follow
the appropriate procedures for the prevention and progression themselves after referring the below.
1. Notice after using the instrument immediately
Caution
After using the instrument, do pay attention about the base plate because its Waste Tray contains
large amounts of waste reagent which could be spilled over if you don’t have particular attention
to the operation.
1) If you operate the base plate rapidly, the overflow of waste reagent will contaminate inside of
the instrument, so that the false positives will appear from the next experiment.
2) The waste is corrosive to stainless steel and other metals because the waste contains large
amount of chlorine compounds.
3) Accidental happening an overflow, request A/S to clean it because the disassembly of the
base plate is required to remove the inside pollution in it.
2. Cleaning solution for internal and external space of the instrument
1) Use distilled Water (DW), 70% ethanol, nucleic acid digestion solution (5% nitric acid, 1% lox
blancher, DNAzap), and a dual lox blancher as a cleaning solutions. But be careful with
DNAzap because it corrodes the metal. When you are using a lint free cloth and paper towel
to soak in the cleaning solution, keep them wet or moist but not to drop the solution onto the
equipment. Also, do not spray the cleaning solution directly onto the equipment.
3. Case of contamination
Note
When a contamination occurs, take appropriate action immediately to prevent accumulative
pollution and damage possibly being happened.
1) For cleaning the accessory, refer to the Accessory cleaning equipment.
2) If a waste solution did not go into the base plate, clean it using a paper towel treated with
nucleic acid digestion solution. After that, clean it again using a wet a paper towel with DW,
dry it using a dry paper towel, and sterilize the inside of instrument with UV lamp immediately.
3) If the waste went into the base plate, you have to request A/S to clean it because the
disassembly of the base plate is required.
4. Waste Treatment
All the wastes and the remaining reagents must be disposed in accordance with legal procedures.
ExiPrepTM16 Plus / Fully Automated Nucleic Acid Extraction System
6
www.bioneer.com
BQ-042-101-01
Revision : 0(2012-12-07)
IV. System Components and Specifications
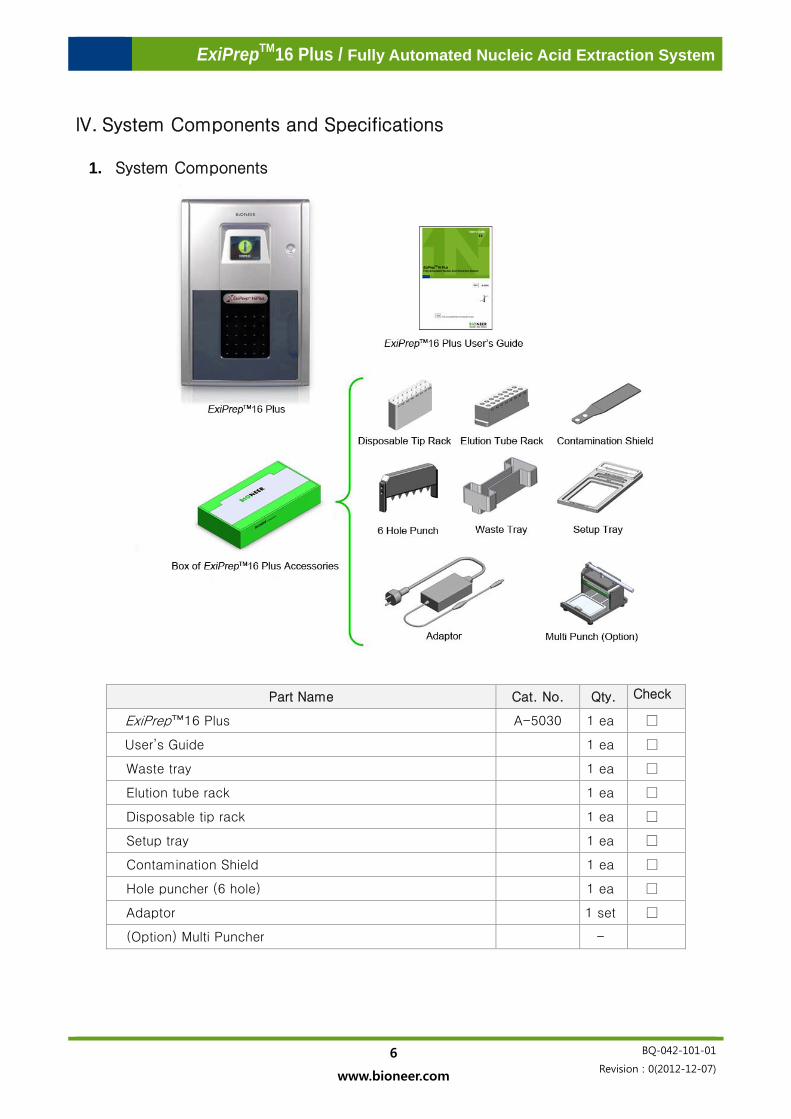
1. System Components
Part Name Cat. No. Qty. Check
ExiPrep™16 Plus A-5030 1 ea □
User’s Guide 1 ea □
Waste tray 1 ea □
Elution tube rack 1 ea □
Disposable tip rack 1 ea □
Setup tray 1 ea □
Contamination Shield 1 ea □
Hole puncher (6 hole) 1 ea □
Adaptor 1 set □
(Option) Multi Puncher -

ExiPrepTM16 Plus / Fully Automated Nucleic Acid Extraction System
7
www.bioneer.com
BQ-042-101-01
Revision : 0(2012-12-07)
2. Specifications
Dimensions (mm) 320 (W) x 487 (H) x 535 (D)
Weight 22 kg
Operating temperature 15 – 30°C
Operating humidity 20 - 80%, no condensation
Operating system Stand-alone
Electrical (Voltage / Frequency) 100 - 240VAC, 50/60Hz
Network support TCP/IP protocol
User interface 320 x 240 touch screen graphic LCD, 18 bit color
3. System Views

ExiPrepTM16 Plus / Fully Automated Nucleic Acid Extraction System
8
www.bioneer.com
BQ-042-101-01
Revision : 0(2012-12-07)
V. Installing the ExiPrep™16 Plus
- Clean the area where the ExiPrep™16 Plus will be installed.
- Open the instrument door and remove the tie wrap from the belt.
- Make sure that all components are included. Refer to the list of components on page 6.
1. Open the door and remove the Screw (A) from the rail.
2. Remove the Holding Plate (B) from the rail and the Syringe
Block.
3. Remove the Screw (C) from the locking block which
immobilizes the belt.
4. Separate the Holding block (D, E) from the belt and
remove it.

ExiPrepTM16 Plus / Fully Automated Nucleic Acid Extraction System
9
www.bioneer.com
BQ-042-101-01
Revision : 0(2012-12-07)
IV. Installing the ExiPrep™16 Plus (continued)
5. Connect the power cable to the rear of the instrument.
6. Turn on the instrument. A power button will display on
the LCD touch screen to indicate normal power on.
7. Press the power button on the LCD screen to initialize the
instrument. A progress bar on the lower portion of the
LCD touch-screen will indicate initialization progress.
8. Open the door and remove the Sponge block (F) from the
Base Plate after initialization.
※ If the instrument does not start even when power was supplied properly but initialization does not
complete in approximately 5 minutes, please contact Customer Service or your local Bioneer
distributor immediately.

ExiPrepTM16 Plus / Fully Automated Nucleic Acid Extraction System
10
www.bioneer.com
BQ-042-101-01
Revision : 0(2012-12-07)
VI. DNA/RNA Extraction
1. Contamination shield installation
1. From the ‘Menu’ screen, click ‘MISC SET’.
Pull out the Syringe block all the way front (outside)
Contamination shield.
CAUTION: In order to use contamination shield, this must be
installed on the Base plate accessory.
2. Place the contamination shield on the lower-right side of
the Syringe block.
Contamination shield has a magnet which means if
you place on the upside-down right, it will stick to the
holding bar.
3. From the ‘Menu’ screen, click ‘MISC SET’.
The base plate moves back to the initialization
position (inside the instrument).
ExiPrepTM16 Plus / Fully Automated Nucleic Acid Extraction System
11
www.bioneer.com
BQ-042-101-01
Revision : 0(2012-12-07)
V. DNA/RNA Extraction (continued)
2. Sample Preparation
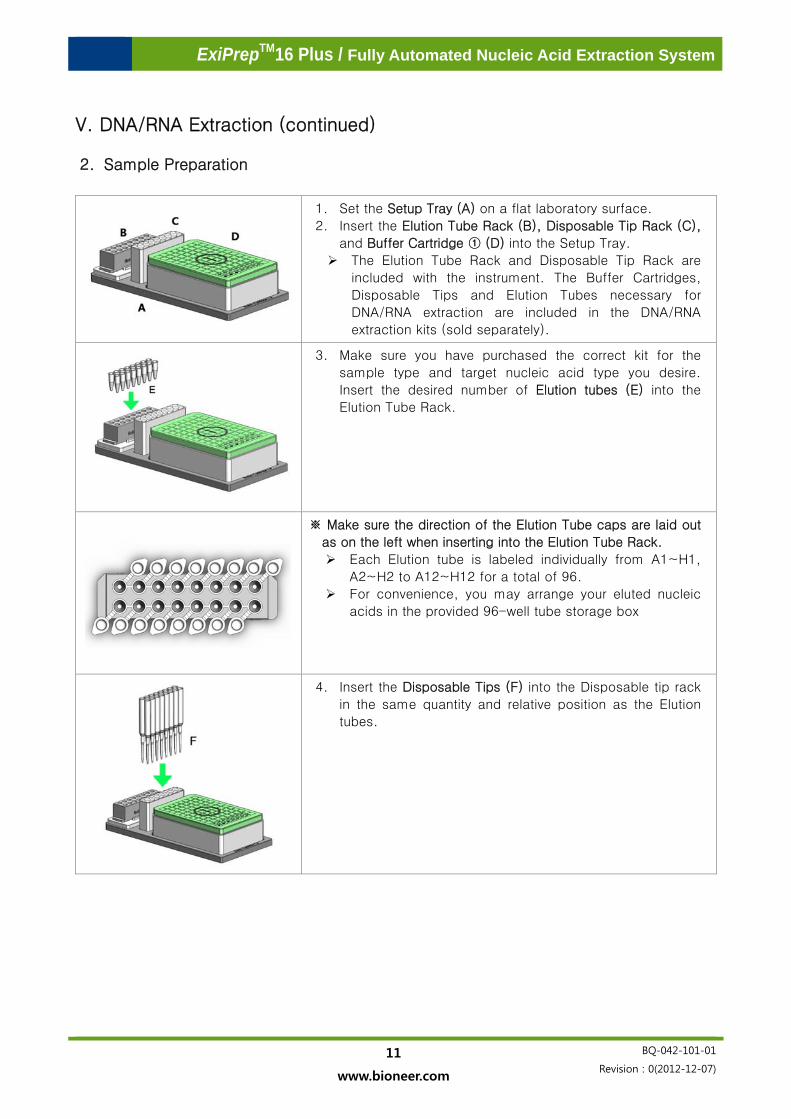
1. Set the Setup Tray (A) on a flat laboratory surface.
2. Insert the Elution Tube Rack (B), Disposable Tip Rack (C),
and Buffer Cartridge ① (D) into the Setup Tray.
The Elution Tube Rack and Disposable Tip Rack are
included with the instrument. The Buffer Cartridges,
Disposable Tips and Elution Tubes necessary for
DNA/RNA extraction are included in the DNA/RNA
extraction kits (sold separately).
3. Make sure you have purchased the correct kit for the
sample type and target nucleic acid type you desire.
Insert the desired number of Elution tubes (E) into the
Elution Tube Rack.
※ Make sure the direction of the Elution Tube caps are laid out
as on the left when inserting into the Elution Tube Rack.
Each Elution tube is labeled individually from A1~H1,
A2~H2 to A12~H12 for a total of 96.
For convenience, you may arrange your eluted nucleic
acids in the provided 96-well tube storage box
4. Insert the Disposable Tips (F) into the Disposable tip rack
in the same quantity and relative position as the Elution
tubes.
ExiPrepTM16 Plus / Fully Automated Nucleic Acid Extraction System
12
www.bioneer.com
BQ-042-101-01
Revision : 0(2012-12-07)
V. DNA/RNA Extraction (continued)
2. Sample Preparation (continued)
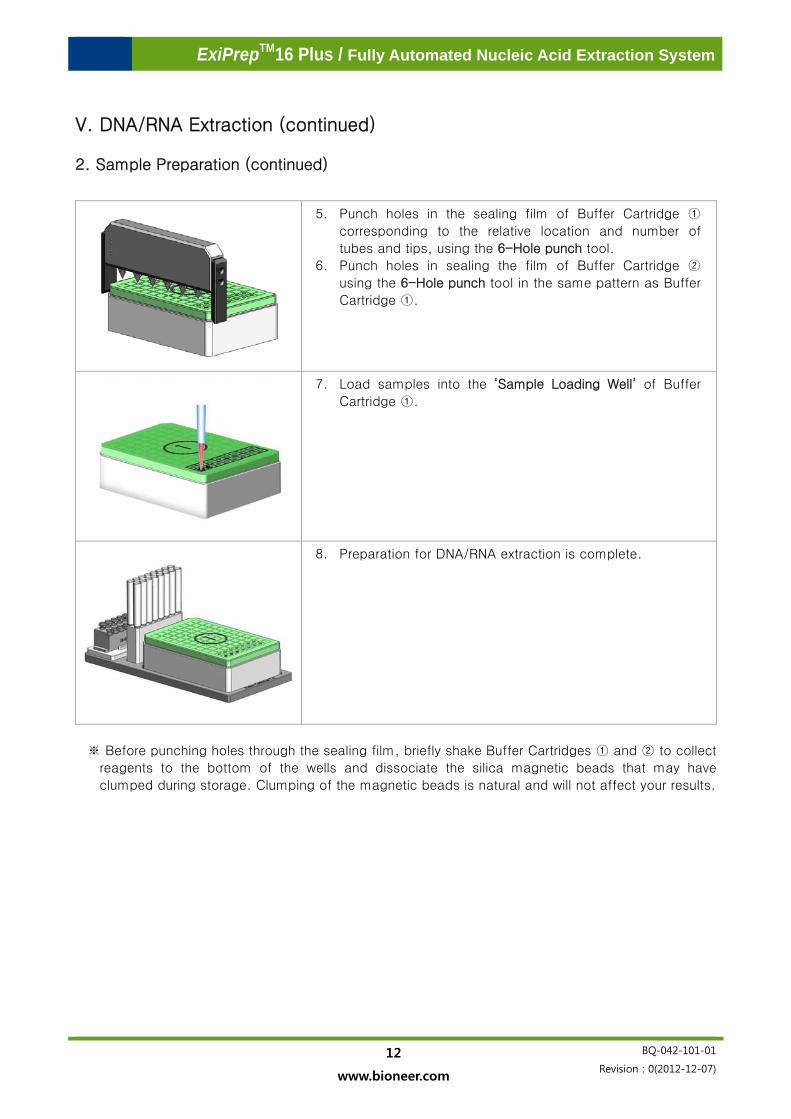
5. Punch holes in the sealing film of Buffer Cartridge ①
corresponding to the relative location and number of
tubes and tips, using the 6-Hole punch tool.
6. Punch holes in sealing the film of Buffer Cartridge ②
using the 6-Hole punch tool in the same pattern as Buffer
Cartridge ①.
7. Load samples into the ‘Sample Loading Well’ of Buffer
Cartridge ①.
8. Preparation for DNA/RNA extraction is complete.
※ Before punching holes through the sealing film, briefly shake Buffer Cartridges ① and ② to collect
reagents to the bottom of the wells and dissociate the silica magnetic beads that may have
clumped during storage. Clumping of the magnetic beads is natural and will not affect your results.

ExiPrepTM16 Plus / Fully Automated Nucleic Acid Extraction System
13
www.bioneer.com
BQ-042-101-01
Revision : 0(2012-12-07)
V. DNA/RNA Extraction (continued)
3. RUN
1. Press the ‘START’ button to access the PREP SETUP
screen.
2. Refer to the code list within this Manual or purchased Kit
Manual to select the three-digit code applicable to your
desired nucleic acid and sample source type.
3. Verify the ‘Prep Type’ and ‘Sample SRC’ of the three-
digit code you have entered.
4. Press the ‘Enter’ button to access the ‘elution volume’
selection menu.
5. Select the ‘elution volume’ from the LCD touch-screen.
6. After selecting the desired ‘elution volume’ press ‘ok’ to
complete PREP SETUP.
7. Open the instrument door and pull out the Base Plate.
8. Place all racks and Buffer Cartridges in their respective
locations on the Base Plate according to the CHECK
LIST on the LCD touch-screen.

ExiPrepTM16 Plus / Fully Automated Nucleic Acid Extraction System
14
www.bioneer.com
BQ-042-101-01
Revision : 0(2012-12-07)
※ Setup process according to the CHECK LIST
8a. Insert Buffer Cartridge ② on the Base plate.
Make sure the Buffer Cartridge fits snugly and exactly into its
place. Misplacement of the Buffer Cartridge may result in
instrument break down and malfunction.
8b. Insert Buffer Cartridge ① on the Base plate.
Make sure the Buffer Cartridge fits snugly and exactly into its
place. Misplacement of the Buffer Cartridge may result in
instrument break down and malfunction.
8c. Place the Elution tube rack on the Base plate.
Make sure the direction and location of the Elution tube rack is
correct.
8d. Place the Disposable tip rack on the Base plate.
Make sure the direction and location of the Disposable tip rack is
correct.
8e. Place the Waste tray into the gap between Buffer Cartridges ① and
②.
8f. Push the Base Plate in completely and close the door.
Press the ‘ok’ button to complete.

ExiPrepTM16 Plus / Fully Automated Nucleic Acid Extraction System
15
www.bioneer.com
BQ-042-101-01
Revision : 0(2012-12-07)
V. DNA/RNA Extraction (continued)
3. RUN (continued)
9. Verify the name of the target nucleic acid type and
sample source type on the Running Mode screen, and
press the ‘RUN’ button.
Progress of the extraction run can be checked through
the progress bar on the lower portion of the LCD
touch-screen.
10. You may press the ‘STOP’ button during the run to
terminate the extraction.
If you press ‘STOP’ during an extraction run, a popup
prompt asking you whether you are sure (‘Are you
sure?’) will appear. Select ‘Yes’ to terminate the run, or
‘No’ to cancel the stop and proceed with the extraction
run.
You may select ‘PAUSE’ to temporarily stop the run
and ‘RUN’ to resume.
11. After the extraction run is complete, pull out the Base
Plate and remove the Elution tubes, Buffer Cartridges
and all racks from the Base Plate. After removing all
accessories, push the Base Plate back in completely
and close the door.
12. You are given three options at this point:
Still remains same work: Repeat the current protocol.
Do other work: Perform an extraction run using a
different protocol for another nucleic acid and sample
source type.
Finish: Finish and exit.
13. If the automatic UV-sterilization option is enabled, a
popup prompt will appear warning you not to open the
door as UV-sterilization is in progress. Refer to page 23
for details on enabling automatic UV-sterilization.
14. Press the ‘START’ button to initiate sterilization
Select ‘SKIP’ if you wish to pass sterilization.
15. The sterilization process takes 15 minutes. Progress can
be checked through the progress bar.
※ Upon completion of the extraction run, immediately close the Elution tube caps to prevent spillage
and label the tubes to avoid confusion later on.

ExiPrepTM16 Plus / Fully Automated Nucleic Acid Extraction System
16
www.bioneer.com
BQ-042-101-01
Revision : 0(2012-12-07)
VII. ExiPrep™16 Plus Setup
1. Main Menu
Main Menu
Once the initialization has completed successfully,
the LCD touch-screen will display the MENU as
shown below.
Please contact Bioneer Customer Service or your
local sales representative if the initialization
progress bar does not change for over 5 minutes
during initialization or if the MENU screen does not
appear after initialization.
Icon Details
DNA/RNA extraction setting menu Extract nucleic acids with ExiPrepTM16 Plus.
UV lamp ON/ OFF selection menu
Sterilize the internal cavity with the built-in UV lamp. Press the
‘UV lamp’ button to begin sterilization. The sterilization runs for
15 minutes. To cancel, press the ‘UV lamp’ button again.
ExiPrepTM16 Plus provides an automatic UV sterilization option to
run after every DNA/RNA extraction run. Details are described in
page 23.
System setting menu
Set up or cancel the system. You could check out user
registration or cancelation, the setup of user restricted menu,
password, and system, and history easily. More detailed
information is described in page 19.
Contamination protection accessory installation
This icon is to determine the status of the syringe block for
setting the contamination shield.
Power OFF button

ExiPrepTM16 Plus / Fully Automated Nucleic Acid Extraction System
17
www.bioneer.com
BQ-042-101-01
Revision : 0(2012-12-07)
VI. ExiPrepTM16 Plus Setup (continued)
1. Main Menu (continued)
1) PREP SETUP
MENU screen PREP SETUP screen
Selecting ‘Start’ from the Main Menu will bring up the ‘PREP SETUP’ screen where
you can enter the three-digit code for the extraction and sample source type.
Refer to the code list within this Manual to select the three-digit code(page 30)
applicable to your desired nucleic acid and sample source type.

ExiPrepTM16 Plus / Fully Automated Nucleic Acid Extraction System
18
www.bioneer.com
BQ-042-101-01
Revision : 0(2012-12-07)
VI. ExiPrepTM16 Plus Setup (continued)
1. Main Menu (continued)
2) UV sterilization (UV lamp)
Main Menu screen UV Sterilization screen
Use the built-in UV-lamp to sterilize the internal cavity of the instrument.
Press the ‘UV lamp’ icon to initiate the UV sterilization process. The icon will turn
yellow as UV sterilization proceeds.
The sterilization runs for 15 minutes. The progress can be tracked through the
progress bar displayed on the bottom portion of the LCD touch-screen. To
cancel the sterilization process, press the ‘UV lamp’ button again.
ExiPrepTM16 Plus provides an automatic UV sterilization after every DNA/RNA
extraction run. Details on this function are described in page 23.

ExiPrepTM16 Plus / Fully Automated Nucleic Acid Extraction System
19
www.bioneer.com
BQ-042-101-01
Revision : 0(2012-12-07)
VI. ExiPrepTM16 Plus Setup (continued)
1. Main Menu (continued)
3) System setup menu (SETUP)
Main Menu Screen Setup Screen
Icon Description
User registration menu You may create new accounts through this menu. Details on
account creation can be found in page 20.
System configuration menu
Allows you to restrict non-registered users from accessing
features such as UV sterilization and system preferences.
Details on system configuration can be found in page 24.
History
Enabled by selecting the user login option.
Allows you to audit up to 99 most recent runs by displaying
information such as user ID, operation record and the
instrument status (successful, cancelled) of a particular run.
Details can be found in page 21.
Self Test
This icon is for testing each motor initialization and heater
block Temperature.
Tip Out
This icon is for removing the Disposable Tips from the
instrument Syringe Block. Pressing this icon will release the
tips immediately.
ExiPrepTM16 Plus / Fully Automated Nucleic Acid Extraction System
20
www.bioneer.com
BQ-042-101-01
Revision : 0(2012-12-07)
VI. ExiPrepTM16 Plus Setup (continued)
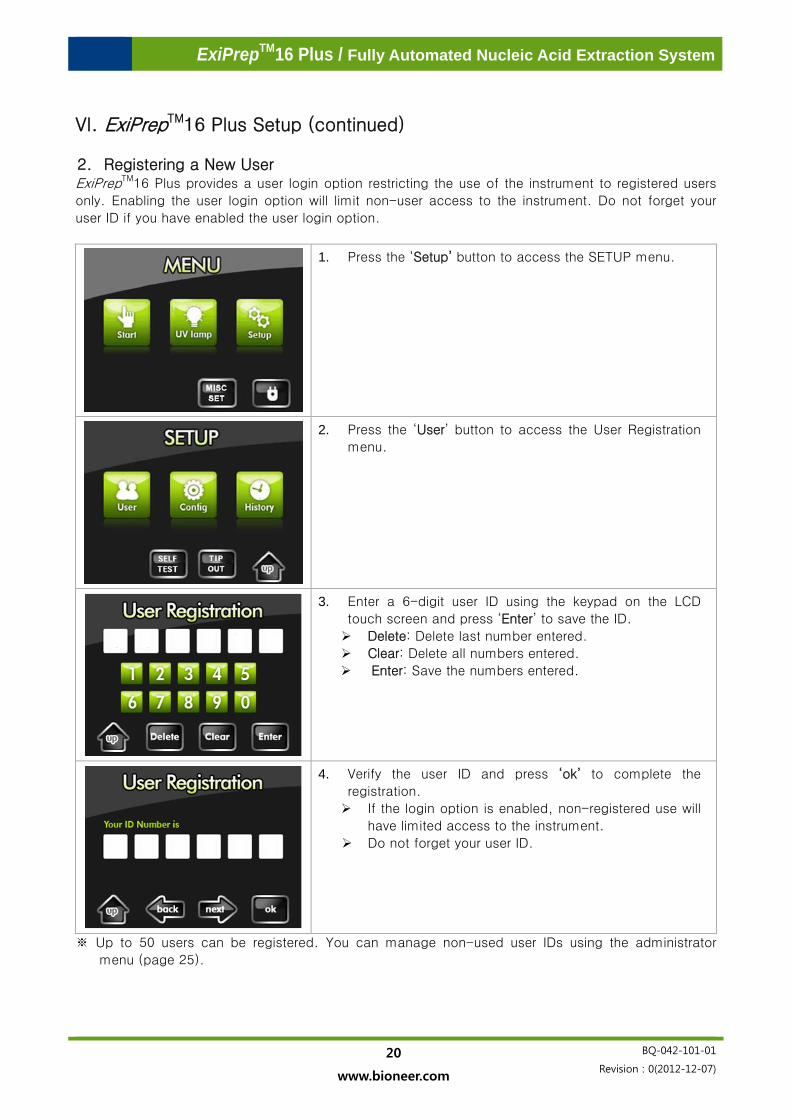
2. Registering a New User ExiPrepTM16 Plus provides a user login option restricting the use of the instrument to registered users
only. Enabling the user login option will limit non-user access to the instrument. Do not forget your
user ID if you have enabled the user login option.
1. Press the ‘Setup’ button to access the SETUP menu.
2. Press the ‘User’ button to access the User Registration
menu.
3. Enter a 6-digit user ID using the keypad on the LCD
touch screen and press ‘Enter’ to save the ID.
Delete: Delete last number entered.
Clear: Delete all numbers entered.
Enter: Save the numbers entered.
4. Verify the user ID and press ‘ok’ to complete the
registration.
If the login option is enabled, non-registered use will
have limited access to the instrument.
Do not forget your user ID.
※ Up to 50 users can be registered. You can manage non-used user IDs using the administrator
menu (page 25).
ExiPrepTM16 Plus / Fully Automated Nucleic Acid Extraction System
21
www.bioneer.com
BQ-042-101-01
Revision : 0(2012-12-07)
VI. ExiPrepTM16 Plus Setup (continued)
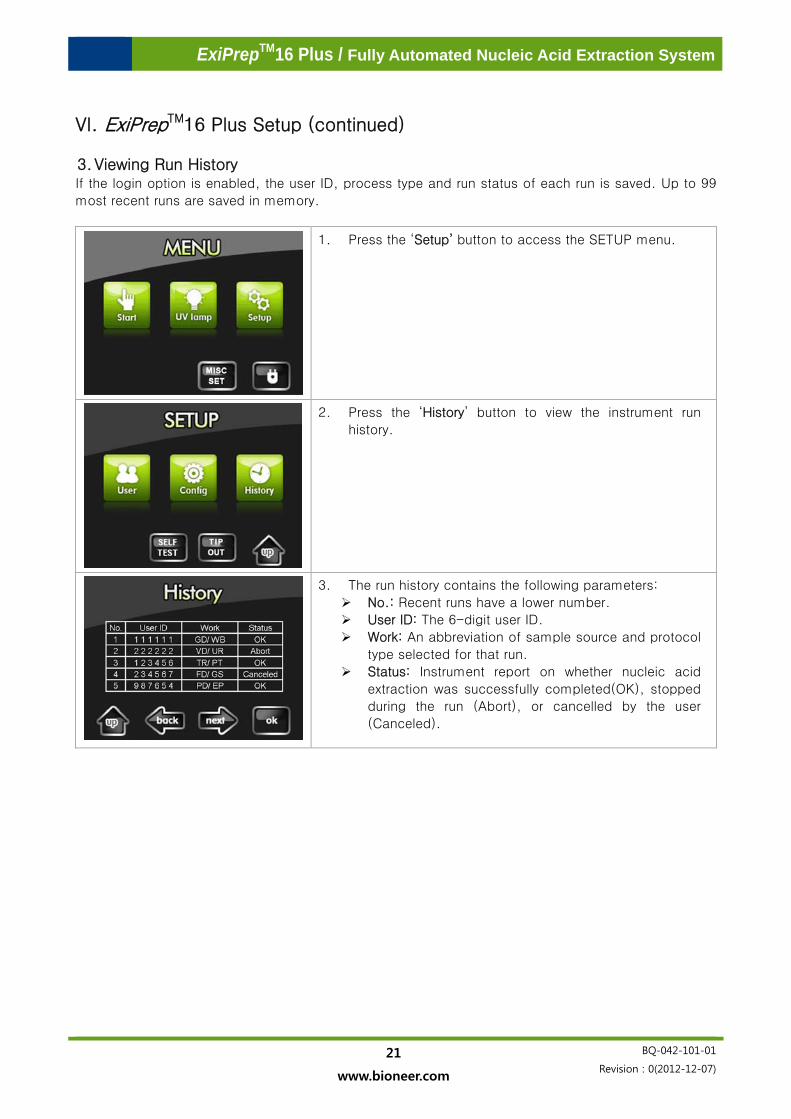
3. Viewing Run History If the login option is enabled, the user ID, process type and run status of each run is saved. Up to 99
most recent runs are saved in memory.
1. Press the ‘Setup’ button to access the SETUP menu.
2. Press the ‘History’ button to view the instrument run
history.
3. The run history contains the following parameters:
No.: Recent runs have a lower number.
User ID: The 6-digit user ID.
Work: An abbreviation of sample source and protocol
type selected for that run.
Status: Instrument report on whether nucleic acid
extraction was successfully completed(OK), stopped
during the run (Abort), or cancelled by the user
(Canceled).

ExiPrepTM16 Plus / Fully Automated Nucleic Acid Extraction System
22
www.bioneer.com
BQ-042-101-01
Revision : 0(2012-12-07)
VI. ExiPrepTM16 Plus Setup (continued)
4. Managing the Login Mode The instrument provides a login mode for restricting non-registered use. Without a user ID, you would
have limited access to instrument functions. Do not forget your user ID.
1. Press the ‘Setup’ button to access the SETUP menu.
2. Press the ‘Config’ button to access the System Setup
menu.
3. Press the ‘User’ button to enable login mode.
If the login mode is enabled, a popup prompt (User
Mode ON) appears and the user icon will turn blue.
Press the ‘User’ button again to disable user login
mode. A popup prompt (User Mode OFF) appears
and the user icon will turn white.
※ Entering an invalid user ID three consecutive times with user login mode enabled will shut down the
system. Press the ‘Power’ icon on the LCD touch-screen to restart.

ExiPrepTM16 Plus / Fully Automated Nucleic Acid Extraction System
23
www.bioneer.com
BQ-042-101-01
Revision : 0(2012-12-07)
VI. ExiPrepTM16 Plus Setup (continued)
5. Managing the Automatic UV-Sterilization Mode The instrument provides an automatic UV-Sterilization mode to sterilize the instrument after every DNA/
RNA extraction run.
1. Press the ‘Setup’ button to access the SETUP menu.
2. Press the ‘Config’ button to access the System Setup
menu.
3. Press the ‘UV lamp’ button to enable automatic UV
sterilization.
If automatic UV-sterilization is enabled, a popup
prompt (UV Mode ON) appears and the UV lamp icon
will turn yellow.
Press the ‘UV lamp’ button again to disable the
mode. A popup prompt (UV Mode OFF) appears and
the UV Lamp icon will turn white.
ExiPrepTM16 Plus / Fully Automated Nucleic Acid Extraction System
24
www.bioneer.com
BQ-042-101-01
Revision : 0(2012-12-07)
VI. ExiPrepTM16 Plus SETUP (Continued)
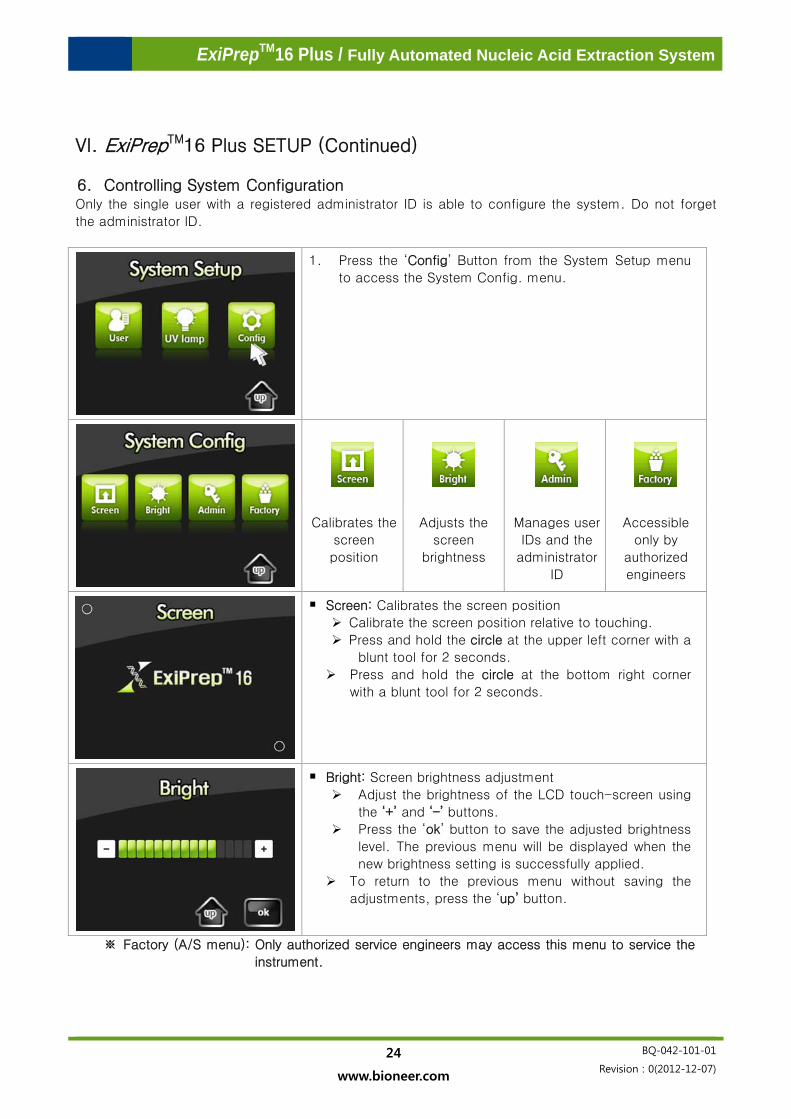
6. Controlling System Configuration Only the single user with a registered administrator ID is able to configure the system. Do not forget
the administrator ID.
1. Press the ‘Config’ Button from the System Setup menu
to access the System Config. menu.
Calibrates the
screen
position
Adjusts the
screen
brightness
Manages user
IDs and the
administrator
ID
Accessible
only by
authorized
engineers
Screen: Calibrates the screen position
Calibrate the screen position relative to touching.
Press and hold the circle at the upper left corner with a
blunt tool for 2 seconds.
Press and hold the circle at the bottom right corner
with a blunt tool for 2 seconds.
Bright: Screen brightness adjustment
Adjust the brightness of the LCD touch-screen using
the ‘+’ and ‘–’ buttons.
Press the ‘ok’ button to save the adjusted brightness
level. The previous menu will be displayed when the
new brightness setting is successfully applied.
To return to the previous menu without saving the
adjustments, press the ‘up’ button.
※ Factory (A/S menu): Only authorized service engineers may access this menu to service the
instrument.

ExiPrepTM16 Plus / Fully Automated Nucleic Acid Extraction System
25
www.bioneer.com
BQ-042-101-01
Revision : 0(2012-12-07)
VI. ExiPrepTM16 Plus Setup (continued)
7. Administrator Management
1. Press the ‘Admin’ button from the System Config. menu
to access the Admin Access menu.
2. Enter the 6-digit administrator ID using the keypad on
the LCD touch-screen.
3. Press the ‘Enter’ button.
4. The Admin Menu screen includes an option to delete
user IDs or change the administrator ID.
Select ‘User list delete (1)’ to delete unused IDs.
Select ‘Administrator password change (2)’ to change
the factory default administrator ID.
User list delete menu (User List)
Registered User: Displays the number of registered
users.
Select the user ID you wish to delete and press ‘ok’ to
confirm deletion.
Use the ‘back’ or ‘next’ buttons to navigate the
pages.
ExiPrepTM16 Plus / Fully Automated Nucleic Acid Extraction System
26
www.bioneer.com
BQ-042-101-01
Revision : 0(2012-12-07)
VI. ExiPrepTM16 Plus Setup (continued)
7. Administrator Management (continued)
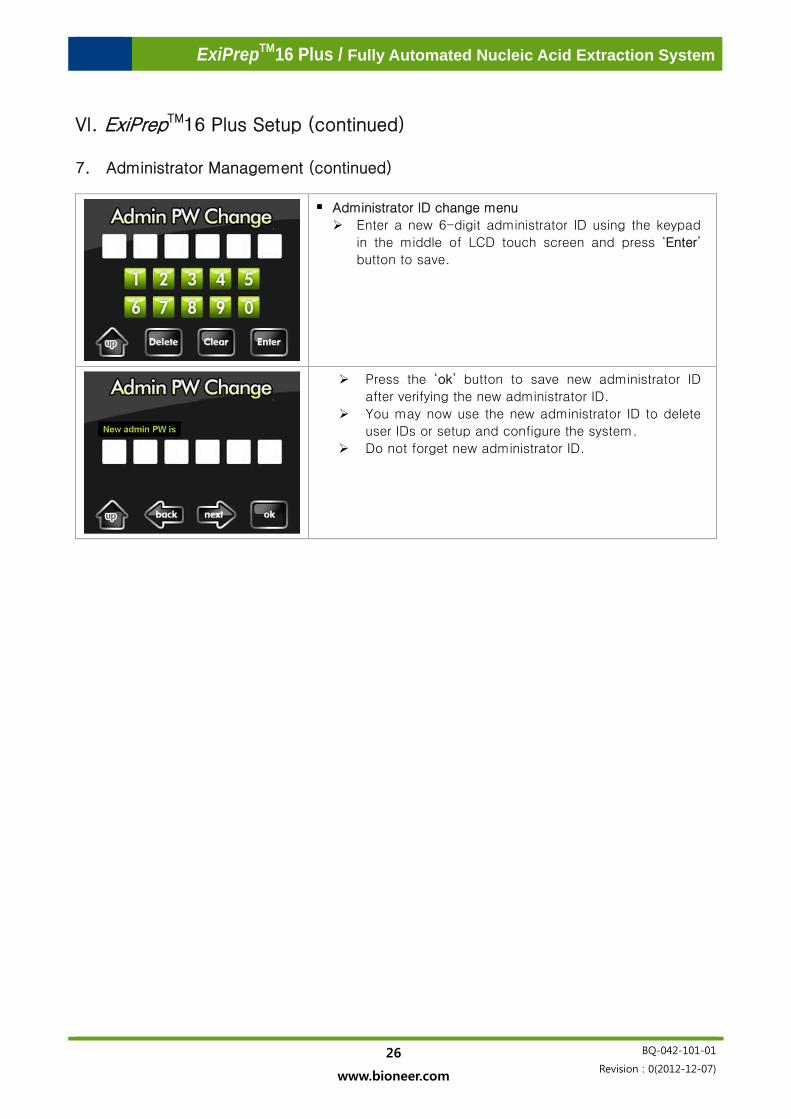
Administrator ID change menu
Enter a new 6-digit administrator ID using the keypad
in the middle of LCD touch screen and press ‘Enter’
button to save.
Press the ‘ok’ button to save new administrator ID
after verifying the new administrator ID.
You may now use the new administrator ID to delete
user IDs or setup and configure the system.
Do not forget new administrator ID.

ExiPrepTM16 Plus / Fully Automated Nucleic Acid Extraction System
27
www.bioneer.com
BQ-042-101-01
Revision : 0(2012-12-07)
VIII. Updating the ExiPrepTM16 Plus Improve the functions of the instrument or install the up-to-date protocol for DNA/RNA
extraction.
Please refer to the FAQ in Bioneer homepage or contact Bioneer Service Center if updating
does not progress or you have the questions.
NOTE: This program NOT included with the instrument. If you want to the program, you have to
request to us.
1. Connect ExiPrep™16 Plus to your computer using cross-type LAN cable(sold separately).
2. Start the installation of the downloaded program below.
The default IP address for ExiPrepTM16 Plus is 10. 10. 104. 88.
1. Execute the program.
2. Click the ‘IP & Select’ button on the lower left
corner.
3. A new window ‘IP & Machine Select’ will
appear with two boxes: IP and ID.
4. There are two ways of connecting to the
instrument network.
Directly enter the IP address into the IP
box (1) and select the instrument ID (2).
For example, if the IP address is
‘10.10.104.88’, select ID ‘1’ and click
‘OK’.
5. Clicking on the small down arrow (blue arrow)
will enable you to select several instrument IDs
with corresponding IP addresses. Click ‘OK’ to
finish connecting to the instrument.
6. If the connection succeeds, the ‘Connect
Succeeded’ prompt will be displayed.
ExiPrepTM16 Plus / Fully Automated Nucleic Acid Extraction System
28
www.bioneer.com
BQ-042-101-01
Revision : 0(2012-12-07)
VII. Updating the ExiPrepTM16 Plus (continued)
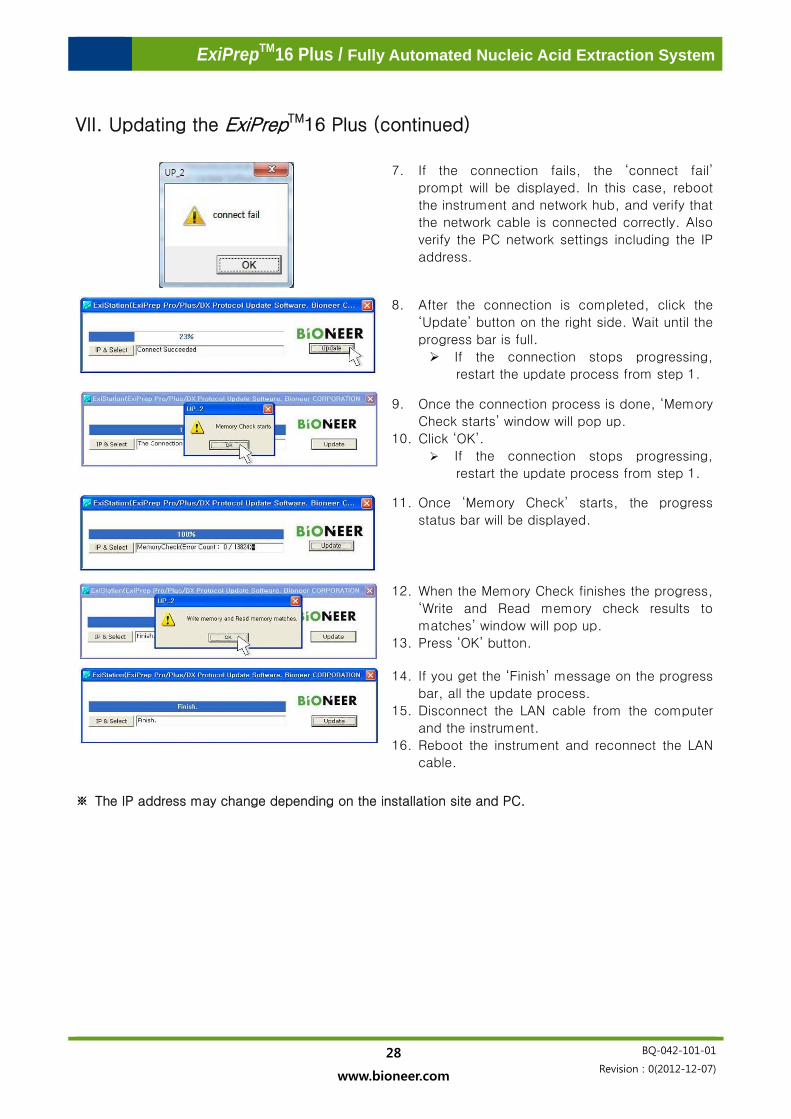
※ The IP address may change depending on the installation site and PC.
7. If the connection fails, the ‘connect fail’
prompt will be displayed. In this case, reboot
the instrument and network hub, and verify that
the network cable is connected correctly. Also
verify the PC network settings including the IP
address.
8. After the connection is completed, click the
‘Update’ button on the right side. Wait until the
progress bar is full.
If the connection stops progressing,
restart the update process from step 1.
9. Once the connection process is done, ‘Memory
Check starts’ window will pop up.
10. Click ‘OK’.
If the connection stops progressing,
restart the update process from step 1.
11. Once ‘Memory Check’ starts, the progress
status bar will be displayed.
12. When the Memory Check finishes the progress,
‘Write and Read memory check results to
matches’ window will pop up.
13. Press ‘OK’ button.
14. If you get the ‘Finish’ message on the progress
bar, all the update process.
15. Disconnect the LAN cable from the computer
and the instrument.
16. Reboot the instrument and reconnect the LAN
cable.

ExiPrepTM16 Plus / Fully Automated Nucleic Acid Extraction System
29
www.bioneer.com
BQ-042-101-01
Revision : 0(2012-12-07)
※ If the PC fails to connect to the instrument, try the following steps.
1. Select ‘Local Area Connection’ from the control panel.
2. Right-click the connection and select ‘Properties’.
3. Select ‘Internet Protocol (TCP/IP)’.
4. Select ‘Use the following IP address’.
5. Enter the IP address, subnet mask, Default gateway and DNS
server address information below:
IP address: 10. 10. 104. 38
Subnet mask: 255. 255. 192. 0
Default gateway: 10. 10. 100. 1
Preferred DNS server: 10. 10. 111. 3
(Alternate DNS server: 10. 10. 111. 4)
6. Click the ‘OK’ button commit the network changes.

ExiPrepTM16 Plus / Fully Automated Nucleic Acid Extraction System
30
www.bioneer.com
BQ-042-101-01
Revision : 0(2012-12-07)
IX. DNA/RNA Extraction Program Number List
No. Target Sample source No. Target Sample source
1 01 Genomic DNA Whole blood 2 01 Total RNA Whole blood
1 02 Genomic DNA Animal tissue 2 02 Total RNA Animal tissue
1 03 Genomic DNA FFPE tissue 2 03 Total RNA FFPE tissue
1 04 Genomic DNA Plant tissue 2 04 Total RNA Plant tissue
1 05 Genomic DNA Plant seed 2 05 Total RNA Plant seed
1 06 Genomic DNA Rice 2 06 Total RNA Rice
1 07 Genomic DNA Cultured cell 2 07 Total RNA Cultured cell
1 08 Genomic DNA Gram (+) bacteria 2 08 Total RNA Gram (+) bacteria
1 09 Genomic DNA Gram (-) bacteria 2 09 Total RNA Gram (-) bacteria
1 10 Genomic DNA Yeast 2 10 Total RNA Yeast
1 11 Genomic DNA Fungi 2 11 Total RNA Fungi
1 12 Genomic DNA Plasma 2 12 Total RNA Plasma
1 13 Genomic DNA Serum 2 13 Total RNA Serum
1 14 Genomic DNA Buffy coat 2 14 Total RNA Buffy coat
1 15 Genomic DNA Sputum 2 15 Total RNA Sputum
1 16 Genomic DNA BAL 2 16 Total RNA BAL
1 17 Genomic DNA Saliva 2 17 Total RNA Saliva
1 18 Genomic DNA Swab 2 18 Total RNA Swab
1 19 Genomic DNA Urine 2 19 Total RNA Urine
1 20 Genomic DNA Stool 2 20 Total RNA Stool
1 21 Genomic DNA Cell free body fluid 2 21 Total RNA Cell free body fluid
1 22 Genomic DNA Pleural fluid 2 22 Total RNA Pleural fluid
1 23 Genomic DNA CSF 2 23 Total RNA CSF
1 24 Genomic DNA EPS 2 24 Total RNA EPS
1 25 Genomic DNA Respiratory sample 2 25 Total RNA Respiratory sample
1 26 Genomic DNA Amniotic fluid 2 26 Total RNA Amniotic fluid
1 27 Genomic DNA Forensic sample 2 27 Total RNA Forensic sample
1 28 Genomic DNA Bone marrow 2 28 Total RNA Bone marrow
1 29 Genomic DNA Bone 2 29 Total RNA Bone
1 30 Genomic DNA Dried blood spot 2 30 Total RNA Dried blood spot
1 31 Genomic DNA Soil 2 31 Total RNA Soil
1 32 Genomic DNA Hair 2 32 Total RNA Hair
1 33 Genomic DNA Cell supernatant 2 33 Total RNA Cell supernatant
<continued>

ExiPrepTM16 Plus / Fully Automated Nucleic Acid Extraction System
31
www.bioneer.com
BQ-042-101-01
Revision : 0(2012-12-07)
No. Target Sample source No. Target Sample source
3 01 mRNA Whole blood 4 01 viral DNA Whole blood
3 02 mRNA Animal tissue 4 02 viral DNA Animal tissue
3 03 mRNA FFPE tissue 4 03 viral DNA FFPE tissue
3 04 mRNA Plant tissue 4 04 viral DNA Plant tissue
3 05 mRNA Plant seed 4 05 viral DNA Plant seed
3 06 mRNA Rice 4 06 viral DNA Rice
3 07 mRNA Cultured cell 4 07 viral DNA Cultured cell
3 08 mRNA Gram (+) bacteria 4 08 viral DNA Gram (+) bacteria
3 09 mRNA Gram (-) bacteria 4 09 viral DNA Gram (-) bacteria
3 10 mRNA Yeast 4 10 viral DNA Yeast
3 11 mRNA Fungi 4 11 viral DNA Fungi
3 12 mRNA Plasma 4 12 viral DNA Plasma
3 13 mRNA Serum 4 13 viral DNA Serum
3 14 mRNA Buffy coat 4 14 viral DNA Buffy coat
3 15 mRNA Sputum 4 15 viral DNA Sputum
3 16 mRNA BAL 4 16 viral DNA BAL
3 17 mRNA Saliva 4 17 viral DNA Saliva
3 18 mRNA Swab 4 18 viral DNA Swab
3 19 mRNA Urine 4 19 viral DNA Urine
3 20 mRNA Stool 4 20 viral DNA Stool
3 21 mRNA Cell free body fluid 4 21 viral DNA Cell free body fluid
3 22 mRNA Pleural fluid 4 22 viral DNA Pleural fluid
3 23 mRNA CSF 4 23 viral DNA CSF
3 24 mRNA EPS 4 24 viral DNA EPS
3 25 mRNA Respiratory sample 4 25 viral DNA Respiratory sample
3 26 mRNA Amniotic fluid 4 26 viral DNA Amniotic fluid
3 27 mRNA Forensic sample 4 27 viral DNA Forensic sample
3 28 mRNA Bone marrow 4 28 viral DNA Bone marrow
3 29 mRNA Bone 4 29 viral DNA Bone
3 30 mRNA Dried blood spot 4 30 viral DNA Dried blood spot
3 31 mRNA Soil 4 31 viral DNA Soil
3 32 mRNA Hair 4 32 viral DNA Hair
3 33 mRNA Cell supernatant 4 33 viral DNA Cell supernatant
<continued>
ExiPrepTM16 Plus / Fully Automated Nucleic Acid Extraction System
32
www.bioneer.com
BQ-042-101-01
Revision : 0(2012-12-07)
No. Target Sample source No. Target Sample source
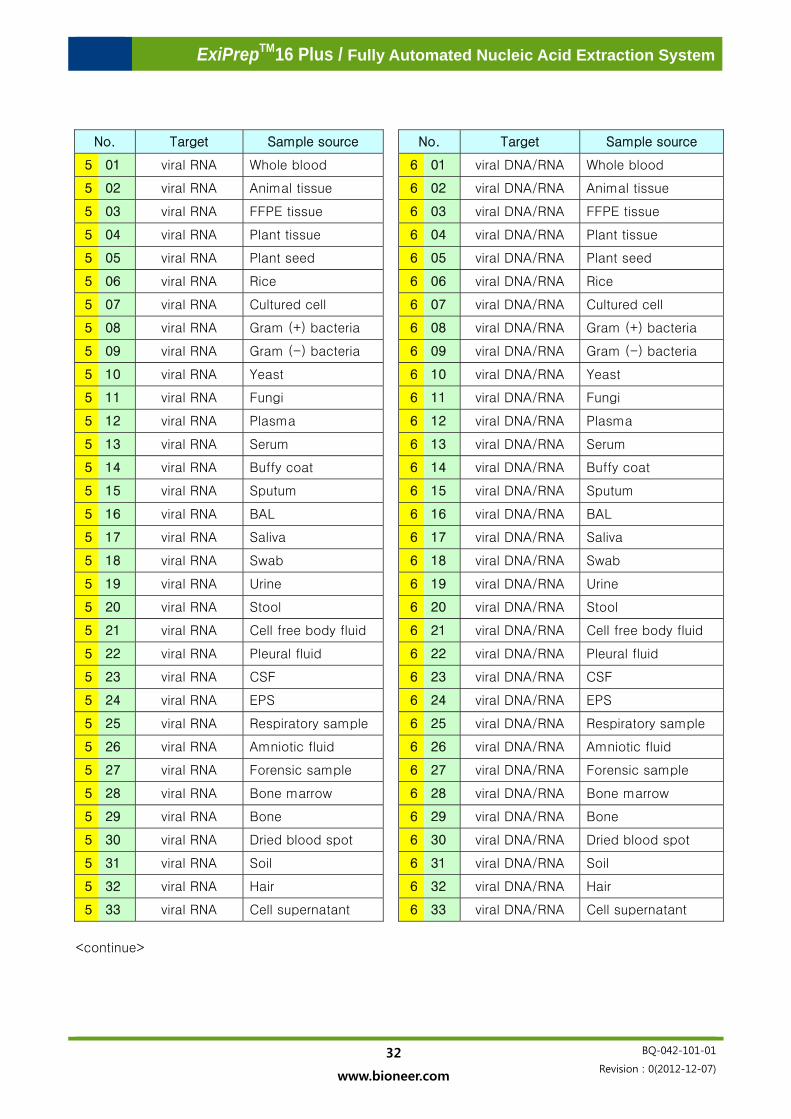
5 01 viral RNA Whole blood 6 01 viral DNA/RNA Whole blood
5 02 viral RNA Animal tissue 6 02 viral DNA/RNA Animal tissue
5 03 viral RNA FFPE tissue 6 03 viral DNA/RNA FFPE tissue
5 04 viral RNA Plant tissue 6 04 viral DNA/RNA Plant tissue
5 05 viral RNA Plant seed 6 05 viral DNA/RNA Plant seed
5 06 viral RNA Rice 6 06 viral DNA/RNA Rice
5 07 viral RNA Cultured cell 6 07 viral DNA/RNA Cultured cell
5 08 viral RNA Gram (+) bacteria 6 08 viral DNA/RNA Gram (+) bacteria
5 09 viral RNA Gram (-) bacteria 6 09 viral DNA/RNA Gram (-) bacteria
5 10 viral RNA Yeast 6 10 viral DNA/RNA Yeast
5 11 viral RNA Fungi 6 11 viral DNA/RNA Fungi
5 12 viral RNA Plasma 6 12 viral DNA/RNA Plasma
5 13 viral RNA Serum 6 13 viral DNA/RNA Serum
5 14 viral RNA Buffy coat 6 14 viral DNA/RNA Buffy coat
5 15 viral RNA Sputum 6 15 viral DNA/RNA Sputum
5 16 viral RNA BAL 6 16 viral DNA/RNA BAL
5 17 viral RNA Saliva 6 17 viral DNA/RNA Saliva
5 18 viral RNA Swab 6 18 viral DNA/RNA Swab
5 19 viral RNA Urine 6 19 viral DNA/RNA Urine
5 20 viral RNA Stool 6 20 viral DNA/RNA Stool
5 21 viral RNA Cell free body fluid 6 21 viral DNA/RNA Cell free body fluid
5 22 viral RNA Pleural fluid 6 22 viral DNA/RNA Pleural fluid
5 23 viral RNA CSF 6 23 viral DNA/RNA CSF
5 24 viral RNA EPS 6 24 viral DNA/RNA EPS
5 25 viral RNA Respiratory sample 6 25 viral DNA/RNA Respiratory sample
5 26 viral RNA Amniotic fluid 6 26 viral DNA/RNA Amniotic fluid
5 27 viral RNA Forensic sample 6 27 viral DNA/RNA Forensic sample
5 28 viral RNA Bone marrow 6 28 viral DNA/RNA Bone marrow
5 29 viral RNA Bone 6 29 viral DNA/RNA Bone
5 30 viral RNA Dried blood spot 6 30 viral DNA/RNA Dried blood spot
5 31 viral RNA Soil 6 31 viral DNA/RNA Soil
5 32 viral RNA Hair 6 32 viral DNA/RNA Hair
5 33 viral RNA Cell supernatant 6 33 viral DNA/RNA Cell supernatant
<continue>
ExiPrepTM16 Plus / Fully Automated Nucleic Acid Extraction System
33
www.bioneer.com
BQ-042-101-01
Revision : 0(2012-12-07)
No. Target Sample source
No. Target Sample source
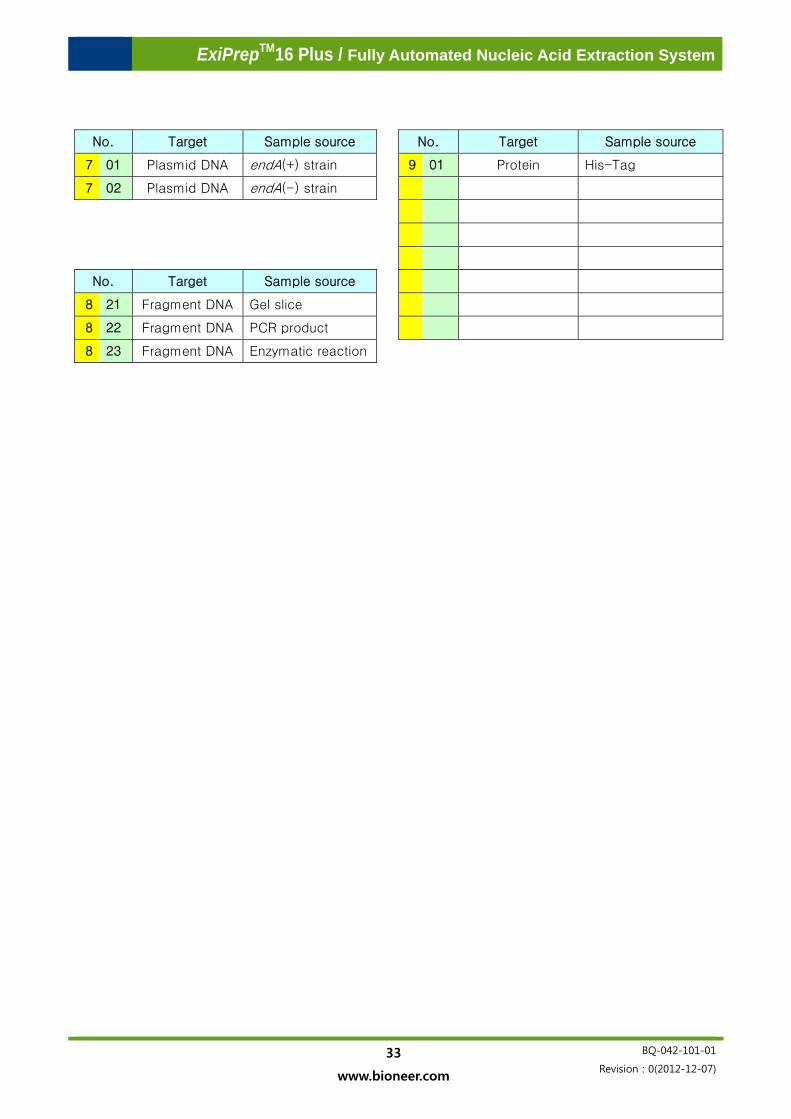
7 01 Plasmid DNA endA(+) strain 9 01 Protein His-Tag
7 02 Plasmid DNA endA(-) strain
No. Target Sample source
8 21 Fragment DNA Gel slice
8 22 Fragment DNA PCR product
8 23 Fragment DNA Enzymatic reaction

ExiPrepTM16 Plus / Fully Automated Nucleic Acid Extraction System
34
www.bioneer.com
BQ-042-101-01
Revision : 0(2012-12-07)
X. Troubleshooting
Error Solution
Instrument does not turn on. 1. Verify that the power connector is inserted into a power
socket.
2. Verify that the power adapter line is connected to the
instrument.
3. Verify that the power button (front) is pressed.
4. Request service from your dealer.
Power turns on but instrument
does not initialize.
1. Press the power button to cut power.
2. Check to see if the previous run was abnormally aborted.
3. In the case of an abnormal run abort, visually inspect inside
the instrument for leftover accessories and tips.
4. Remove leftover accessories that may interfere with normal
instrument movement.
5. Manually move the syringe block within the instrument to the
middle.
6. Press the power button to turn the instrument on and check
initialization status.
7. Request service from your dealer.
Power turns on but the LCD
screen is black.
1. Since it is most likely an instrument issue, request service
from your dealer.
Pressing the ‘RUN’ button fails
to start instrument operation.
1. Make sure the fixture brackets used for shipping are removed.
2. Verify that instrument initialization is correctly completed.
3. Visually inspect inside the instrument for leftover accessories
and/or foreign materials that may interfere with normal
instrument movement.
4. Verify that all accessories are installed in their appropriate
locations within the instrument.
5. Check to see if the other buttons on the LCD screen operate
normally when pressed.
6. Request service from your dealer.
The instrument moves, but does
not operate normally.
1. Verify that the Base Plate is correctly secured.
2. Visually inspect inside the instrument for leftover accessories
and/or foreign materials that may interfere with normal
instrument movement.
3. Verify that all accessories are installed in their appropriate
locations within the instrument.
4. Request service from your dealer.
The front door does not close. 1. Verify that the Base Plate is correctly secured.
2. Open the door and let go to verify that the door closes by the
door spring.
3. Request service from your dealer.

ExiPrepTM16 Plus / Fully Automated Nucleic Acid Extraction System
35
www.bioneer.com
BQ-042-101-01
Revision : 0(2012-12-07)
Error Solution
The Base Plate does not
correctly secure.
1. Visually inspect inside the instrument for leftover accessories
and/or foreign materials that may interfere with normal Base
Plate movement.
2. Verify that all accessories are installed in their appropriate
locations within the instrument.
3. Request service from your dealer.
The instrument does not operate
even though the front door is
closed.
1. Verify that the Base Plate is correctly secured.
2. Verify that the front door magnets (top and bottom: total of 2)
are installed correctly.
3. Open the front door and completely pull out the Base Plate.
Visually inspect inside the instrument for damage to the
sensor (microswitch) located at the end of the Base Plate
Slide Rail.
4. Request service from your dealer.
The Base Plate does not slide
out completely.
1. Visually inspect inside the instrument for accessories and/or
foreign materials that may interfere with normal Base Plate
movement.
2. Visually inspect the front of the instrument for accessories
and/or foreign materials that may interfere with normal Base
Plate movement.
3. Request service from your dealer.
The accessories do not sit as
normal.
1. Verify that each accessory is in its correct position.
2. Visually inspect for foreign materials on the accessories,
racks etc.
3. Inspect for damage on the accessory and rack fixture pins.
4. Request service from your dealer.
The Syringe Block fails to pick
up the tips.
1. Verify that the front door is completely closed.
2. Verify that the Tips and Tip Rack are correctly installed.
3. Visually inspect the Tip insertion process and verify the
absence of foreign materials or accessories that may interfere
with Tip insertion.
4. Check to see if the ‘Stop’ or ‘Pause’ buttons are selected.
5. Check to see if the tips are for instrument use.
6. Inspect the Tips for damage or deformation.
7. Request service from your dealer.
The Syringe Block inserted the
tips as expected but does not
move.
1. Verify that the front door is completely closed.
2. Visually inspect the Syringe Block to verify the absence of
foreign materials or accessories that may interfere with
normal movement.
3. Verify that the Buffer Cartridges are installed correctly.
4. Check to see if the ‘Stop’ or ‘Pause’ buttons are selected.
5. Request service from your dealer.

ExiPrepTM16 Plus / Fully Automated Nucleic Acid Extraction System
36
www.bioneer.com
BQ-042-101-01
Revision : 0(2012-12-07)
Error Solution
The instrument stops during
operation.
1. Verify that the power source is connected.
2. Verify that the power switch is pressed (ON position).
3. Check the LCD screen to verify that the blue progress bar
(bottom portion; indicates delays) is moving.
4. Check to see if the ‘Stop’ or ‘Pause’ buttons are selected.
5. Request service from your dealer.
The instrument is
malfunctioning.
1. Check to see if the correct protocol was selected.
2. Inspect the instrument for foreign materials or accessories
impeding normal movement of the Syringe Block (which
causes motor malfunction).
3. Repeat the same protocol and verify normal operation.
4. Request service from your dealer.
The instrument operates
normally but does not elute.
1. Verify that the Elution Tube Rack and Elution Tubes are
installed correctly.
2. Check to see if the Tips are completely inserted.
3. Inspect the Tips for clogging.
4. Verify that the Buffer Cartridges contains sample.
5. Inspect the Syringe Block for leakage.
6. Request service from your dealer.
The Syringe Block is leaking. 1. Stop using the malfunctioning well and request service from
your dealer.
Liquid is dripping inside the
instrument.
1. Make sure the Rack and Contamination Shield are installed
correctly.
2. Inspect the Syringe Block for leakage.
3. Request service from your dealer.
The heater does not work. 1. Make sure the Rack and Contamination Shield are installed
correctly.
2. Inspect the Base Plate for signs of leakage.
3. Request service from your dealer.
The instrument smells like its
burning.
1. Immediately disconnect the power and stop usage of the
instrument.
2. Request service from your dealer.
The UV Lamp does not work. 1. Verify that the front door is completely closed.
2. Request service from your dealer.
Protocol dose not update. 1. Check if the computer and the instrument are connected with
LAN cable.
2. Restart the computer and instrument.
3. Update protocol
4. Re-update protocol

ExiPrepTM16 Plus / Fully Automated Nucleic Acid Extraction System
37
www.bioneer.com
BQ-042-101-01
Revision : 0(2012-12-07)
XI. Warranty
ExiPrep™16 Plus is warranted by Bioneer against manufacturing defects in materials and workmanship
for a limited warranty period of one year from the date you received your product. Bioneer will either
(1) repair the product at no charge if a hardware defect arises or (2) exchange the product if the same
hardware defect arises more than three times during the limited warranty period. Any other accessories
other than the instrument itself are considered as consumables and warranted for three months. Spare
parts for the instrument will be available for five years from the release date. If a defect arises after the
limited warranty period, shipping and handling charge may apply to any repair or exchange of the
product undertaken by Bioneer.
Exclusions and limitations
This warranty does not apply: (a) to cosmetic damage, including but not limited to scratches, dents,
and broken plastic on ports: (b) to damage caused by accident, abuse, misuse, flood, fire,
earthquake or other external causes: (c) to a product or part that has been modified in any way without
written permission of Bioneer; or (d) to damage cause by any services performed by unauthorized
engineer or service provider.
Obtaining Warranty Service
Please review this User’s Manual and access the online support referred to in the manual
accompanying this product before requesting warranty service.
