biolab table guide by shoryukentothechin -...
TRANSCRIPT
Page 1 of 19
BioLab Table Guide By ShoryukenToTheChin
6
9
5
1 2
4
3 7
10
8
Page 2 of 19
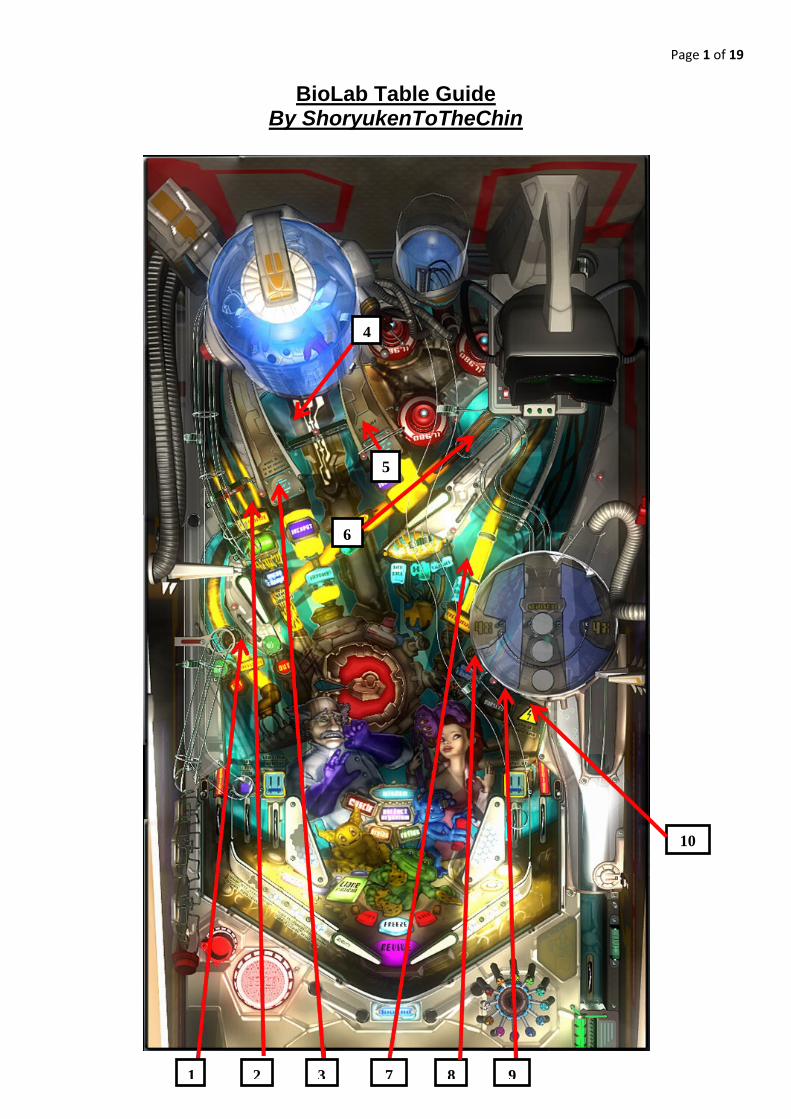
Key to Table Image Above *Thanks to Community Member - Cloda for the Overhead Image*
1. Escape Mini - Orbit 2. Left Orbit 3. Left Ramp 4. Upgrade Sink Hole 5. Right Ramp 6. Upper Right Mini - Orbit 7. Lower Right Mini - Orbit 8. Right Orbit 9. Mutation Sink Hole 10. Magna Save Target
In this Guide when I mention a Ramp etc. I will put a number in brackets which will correspond to the Key above, so that you know where on the Table that particular feature is located.
TABLE SPECIFICS
Introduction This Table was one of the first 4 Tables which were made available for Pinball FX2. It was and still is one of Zen Studios best works when it comes to original Table ideas; as it blends its Artwork and Music with the overall Theme perfectly. I will try to explain the ins and outs of this Table, as with every Table it becomes more fun if you know what it is you are actually doing Make sure to try out the other classic Tables from Pinball FX 1, as well as the Tables from Pinball FX2 & Marvel Pinball.
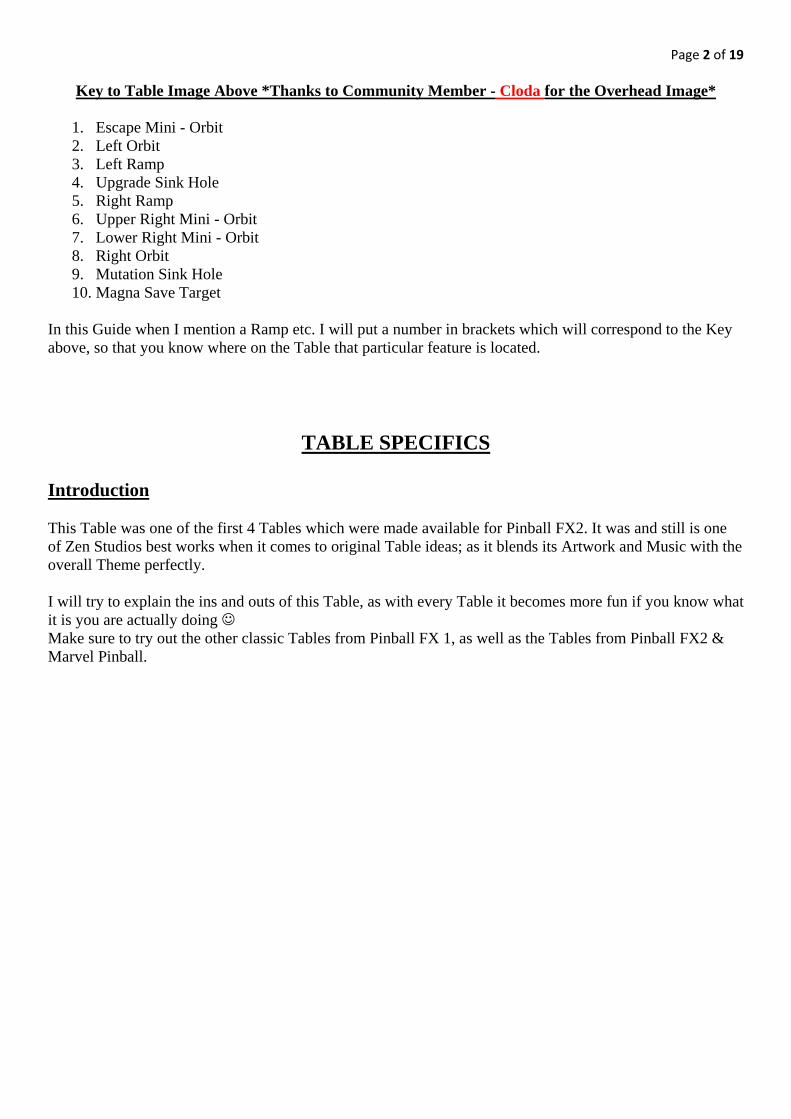
Page 3 of 19 Skill Shot & Super Skill Shot A Skill Shot award is attained by pulling down the Plunger to have the Ball release with just the Right amount of power. Shown below –
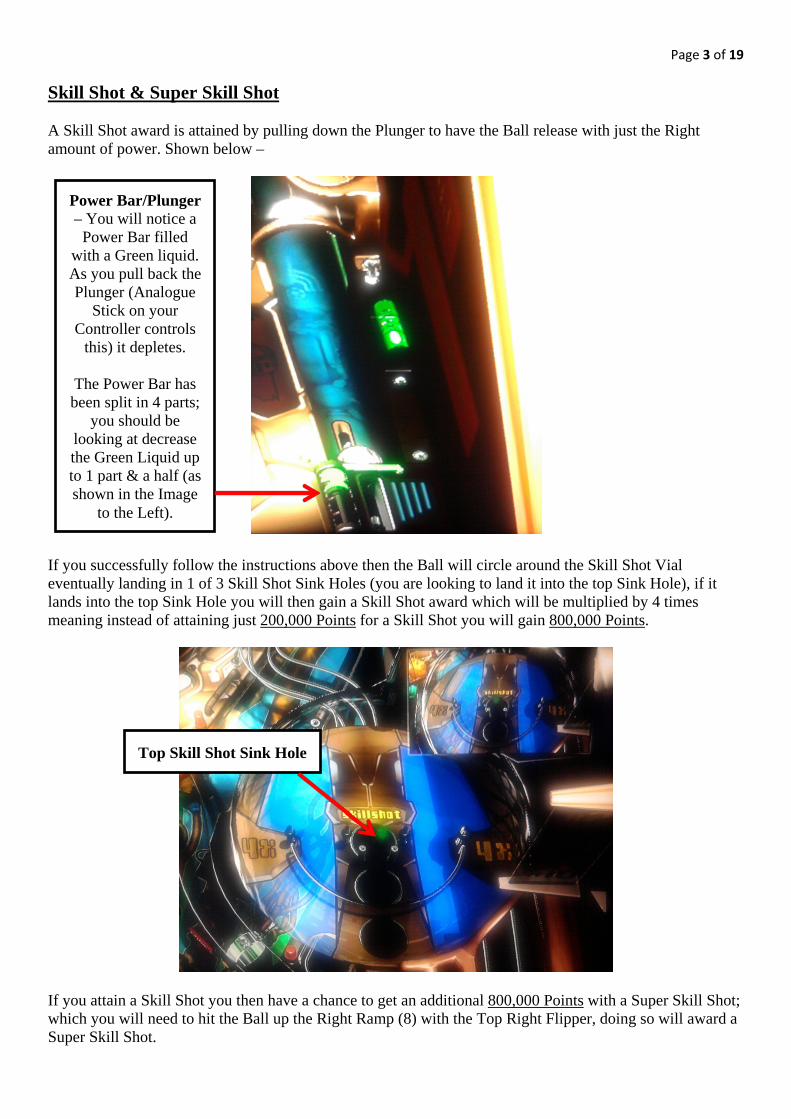
If you successfully follow the instructions above then the Ball will circle around the Skill Shot Vial eventually landing in 1 of 3 Skill Shot Sink Holes (you are looking to land it into the top Sink Hole), if it lands into the top Sink Hole you will then gain a Skill Shot award which will be multiplied by 4 times meaning instead of attaining just 200,000 Points for a Skill Shot you will gain 800,000 Points.
If you attain a Skill Shot you then have a chance to get an additional 800,000 Points with a Super Skill Shot; which you will need to hit the Ball up the Right Ramp (8) with the Top Right Flipper, doing so will award a Super Skill Shot.
Power Bar/Plunger – You will notice a
Power Bar filled with a Green liquid. As you pull back the Plunger (Analogue
Stick on your Controller controls
this) it depletes.
The Power Bar has been split in 4 parts;
you should be looking at decrease the Green Liquid up to 1 part & a half (as shown in the Image
to the Left).
Top Skill Shot Sink Hole
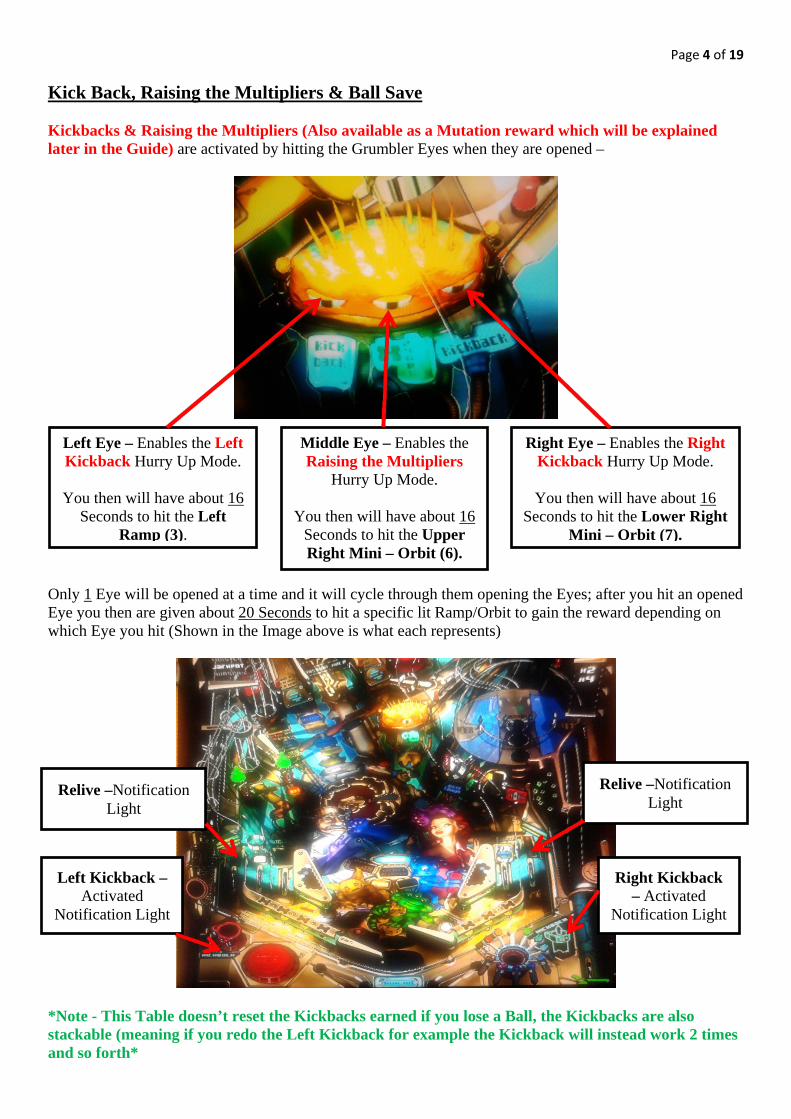
Page 4 of 19 Kick Back, Raising the Multipliers & Ball Save Kickbacks & Raising the Multipliers (Also available as a Mutation reward which will be explained later in the Guide) are activated by hitting the Grumbler Eyes when they are opened –
Only 1 Eye will be opened at a time and it will cycle through them opening the Eyes; after you hit an opened Eye you then are given about 20 Seconds to hit a specific lit Ramp/Orbit to gain the reward depending on which Eye you hit (Shown in the Image above is what each represents)
*Note - This Table doesn’t reset the Kickbacks earned if you lose a Ball, the Kickbacks are also stackable (meaning if you redo the Left Kickback for example the Kickback will instead work 2 times and so forth*
Left Eye – Enables the Left Kickback Hurry Up Mode.
You then will have about 16
Seconds to hit the Left Ramp (3).
Middle Eye – Enables the Raising the Multipliers
Hurry Up Mode.
You then will have about 16 Seconds to hit the Upper Right Mini – Orbit (6).
Right Eye – Enables the Right Kickback Hurry Up Mode.
You then will have about 16
Seconds to hit the Lower Right Mini – Orbit (7).
Left Kickback – Activated
Notification Light
Right Kickback – Activated
Notification Light
Relive –Notification Light
Relive –Notification Light
Page 5 of 19 Ball Save (Relive) – this is automatically activated in some Modes such as Clone Multiball etc.or whenever the Ball it is ejected from the Skill Shot Vial after a successful Skill Shot. You can also activate it by hitting the Ball 4 times up the Left Ramp (3) which will in turn light ‘Relive’ on one of the 2 Outlanes (Hitting any of the 2 Slingshots will cause the ‘Relive’ to light on the corressponding Slingshot hit i.e hit the Left Slingshot and the Left Outlane will have ‘Relive’ lit.) You will then activate it upon the Ball going down that Outlane if its Revive light is lit on that Outlane.– *Note –Ball Save remains active until you lose the Ball or the Ball Save time limit runs out!* Magna Save You can activate the Magna Save of this Table by hitting the Magna Save Target (10); This will activate Magna Save for a few Seconds, then to activate the Magna Save Magnet - which will magnetise the Ball which can result in saving the Ball from draining down the centre etc. press the ‘Launch’ Button on your Controller. Extra Balls The 4 Ways to achieve an Extra Ball –
• Light the 4 Lights on the Get Away Mini - Playfield – Then hit the Ball into the Mutation Sink Hole (9), This will be explained later in the Guide under the ‘Mini – Games Get Away’ section.
• Complete the Mutation Mini – Game 3 times - This will be explained later in the Guide under the ‘Mini – Games Mutation’ section.
• Complete the Nursery Mini – Game 3 times - This will be explained later in the Guide under the ‘Left Ramp (3) Rewards…’ section.
• Complete the Flux Wheel Hurry Up Mode - This will be explained later in the Guide under the ‘Multiball Modes’ section.
Cookies Each time you hit any of the 2 Slingshots you will gain a piece/crumb of a Cookie, 10 Slingshot hits will award you with a Cookie Bonus with starts at 10,000 Points and increases each time you earn another Cookie by 10,000 Points i.e. 10,000 Points than 20,000 Points etc. Completing the Tables Wizard Mode (Final Mission) will make the Cookie Bonus award 1 Million Points each time until ‘GAME OVER!’ Hidden Room There is a hidden Sink Hole located just under the Skill Shot Vial; there is no real way to get into it, but when you do get it in there the Game will take you to the Launch Lane and objective here is to attain a Skill Shot award. Just follow the instructions detailed in the ‘Skill Shot’ section earlier in the Guide.
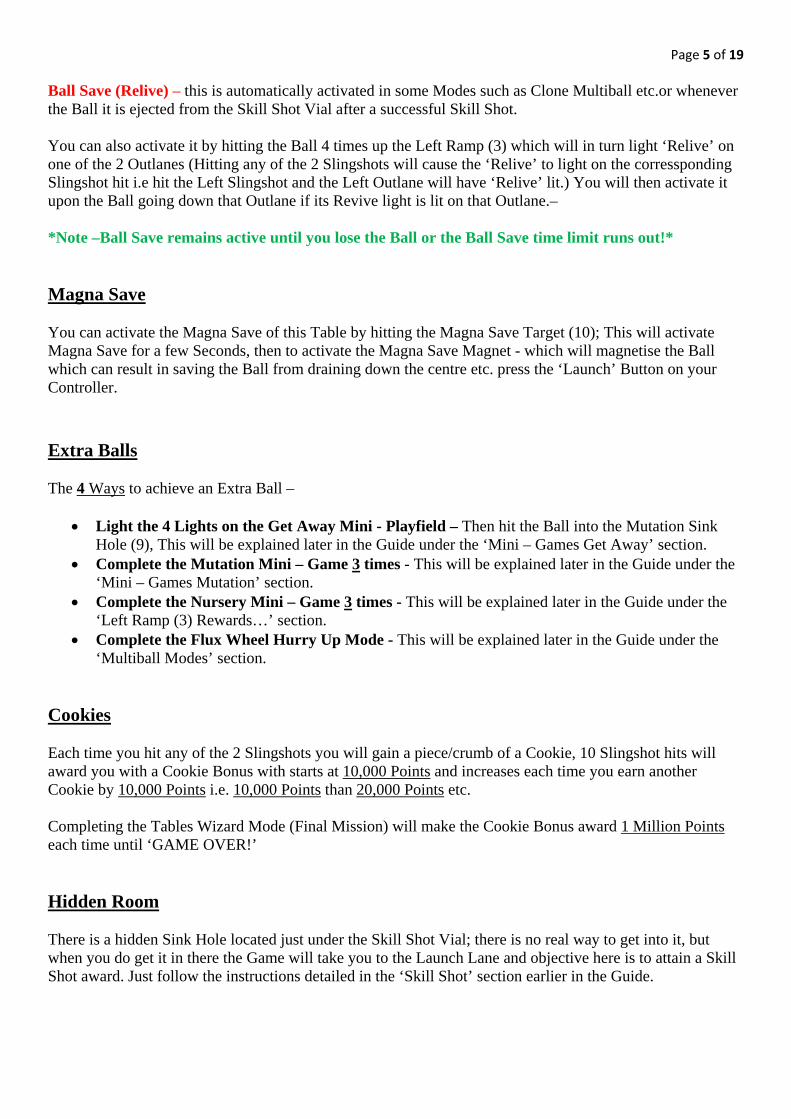
Page 6 of 19 Left Ramp (3) Rewards – Twister, Jackpot & Nursery Video Mode Hitting the Left Ramp (3) will cause the Circle light on the far Left Inlane to change Colour each time you hit the Ball up that ramp – Purple, White & Yellow – After which hitting the Left Ramp (3) again while the far Left Inlane is showing one of the 3 Colours which correspond to the below rewards, will then award said rewards – Hitting the Left Ramp (3) once will make the far Left Inlane light turn Purple then again to award the reward – Purple Light = Twister –
This Twister is nothing more than a random Bonus award which after each time you change the light to Purple etc. it will increase eventually maxing out to 1 Million Points and then it will reset.
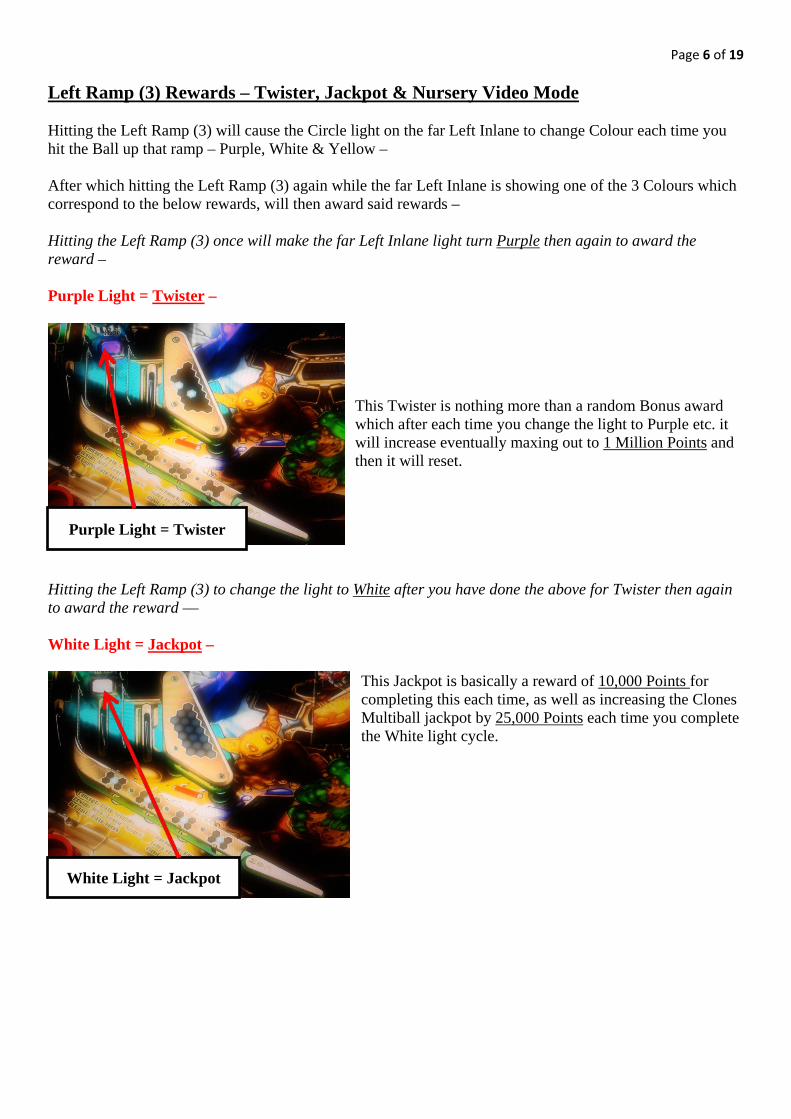
Hitting the Left Ramp (3) to change the light to White after you have done the above for Twister then again to award the reward –– White Light = Jackpot –
This Jackpot is basically a reward of 10,000 Points for completing this each time, as well as increasing the Clones Multiball jackpot by 25,000 Points each time you complete the White light cycle.
Purple Light = Twister
White Light = Jackpot
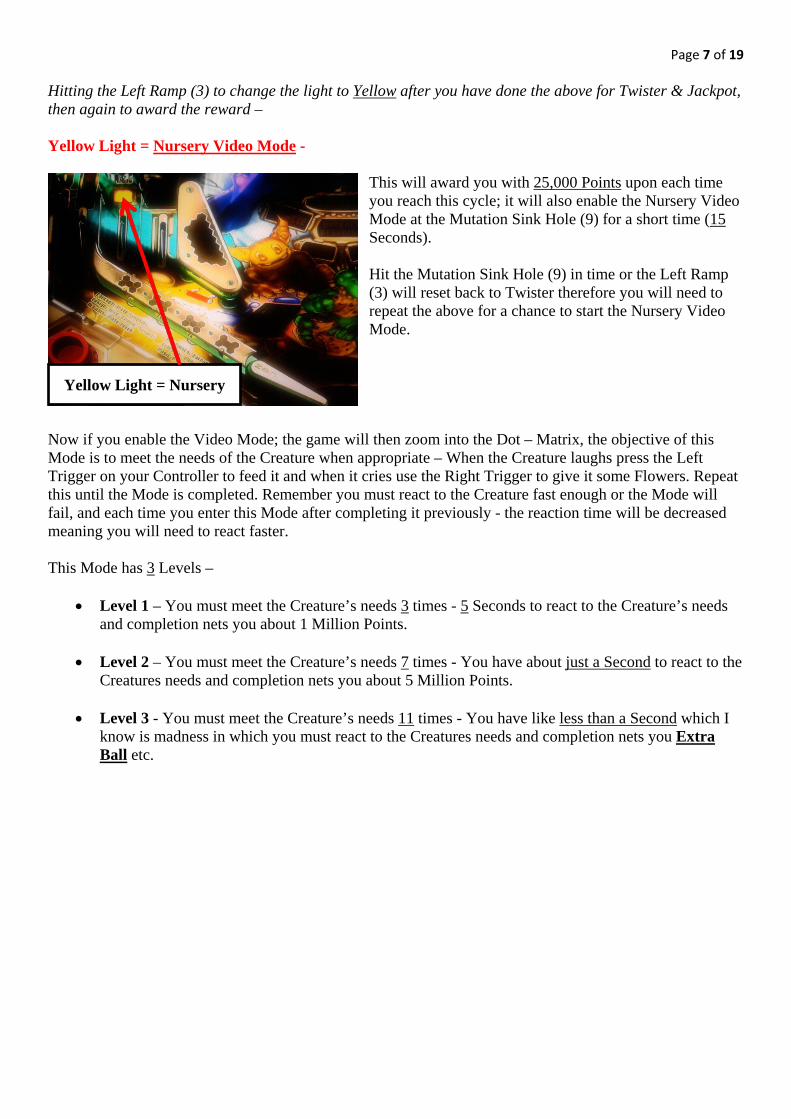
Page 7 of 19 Hitting the Left Ramp (3) to change the light to Yellow after you have done the above for Twister & Jackpot, then again to award the reward – Yellow Light = Nursery Video Mode -
This will award you with 25,000 Points upon each time you reach this cycle; it will also enable the Nursery Video Mode at the Mutation Sink Hole (9) for a short time (15 Seconds). Hit the Mutation Sink Hole (9) in time or the Left Ramp (3) will reset back to Twister therefore you will need to repeat the above for a chance to start the Nursery Video Mode.
Now if you enable the Video Mode; the game will then zoom into the Dot – Matrix, the objective of this Mode is to meet the needs of the Creature when appropriate – When the Creature laughs press the Left Trigger on your Controller to feed it and when it cries use the Right Trigger to give it some Flowers. Repeat this until the Mode is completed. Remember you must react to the Creature fast enough or the Mode will fail, and each time you enter this Mode after completing it previously - the reaction time will be decreased meaning you will need to react faster. This Mode has 3 Levels –
• Level 1 – You must meet the Creature’s needs 3 times - 5 Seconds to react to the Creature’s needs and completion nets you about 1 Million Points.
• Level 2 – You must meet the Creature’s needs 7 times - You have about just a Second to react to the Creatures needs and completion nets you about 5 Million Points.
• Level 3 - You must meet the Creature’s needs 11 times - You have like less than a Second which I
know is madness in which you must react to the Creatures needs and completion nets you Extra Ball etc.
Yellow Light = Nursery
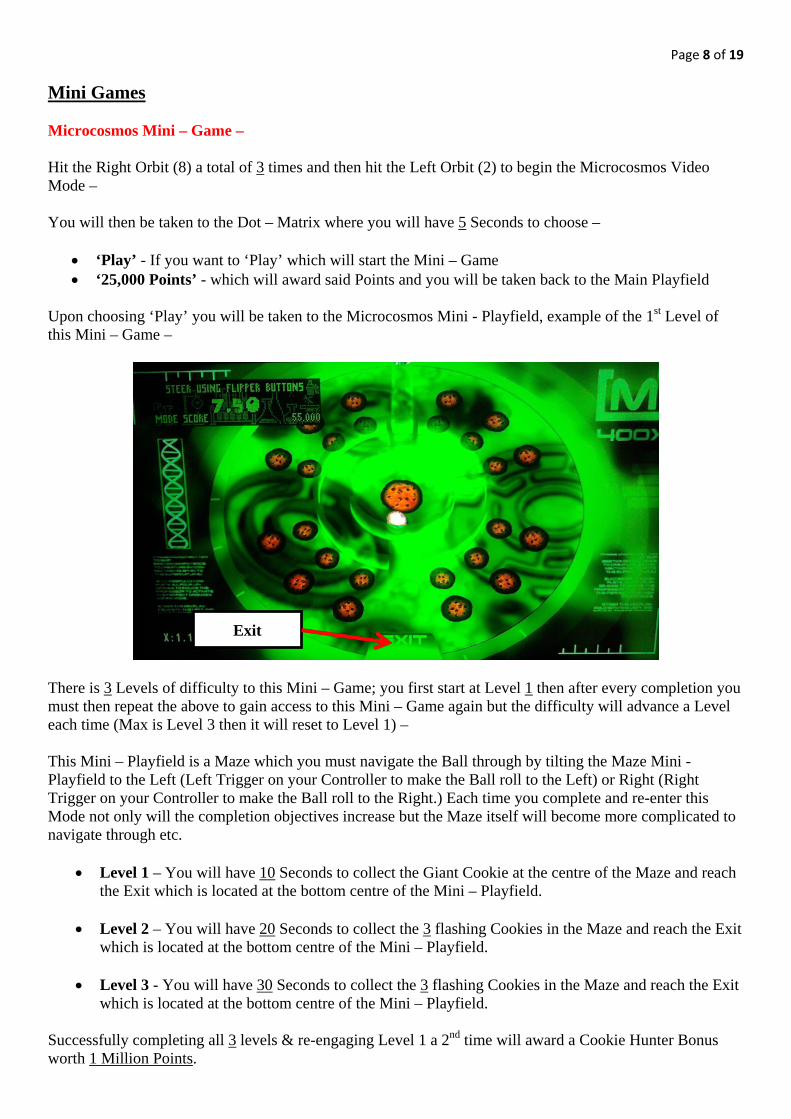
Page 8 of 19 Mini Games Microcosmos Mini – Game – Hit the Right Orbit (8) a total of 3 times and then hit the Left Orbit (2) to begin the Microcosmos Video Mode – You will then be taken to the Dot – Matrix where you will have 5 Seconds to choose –
• ‘Play’ - If you want to ‘Play’ which will start the Mini – Game • ‘25,000 Points’ - which will award said Points and you will be taken back to the Main Playfield
Upon choosing ‘Play’ you will be taken to the Microcosmos Mini - Playfield, example of the 1st Level of this Mini – Game –
There is 3 Levels of difficulty to this Mini – Game; you first start at Level 1 then after every completion you must then repeat the above to gain access to this Mini – Game again but the difficulty will advance a Level each time (Max is Level 3 then it will reset to Level 1) – This Mini – Playfield is a Maze which you must navigate the Ball through by tilting the Maze Mini - Playfield to the Left (Left Trigger on your Controller to make the Ball roll to the Left) or Right (Right Trigger on your Controller to make the Ball roll to the Right.) Each time you complete and re-enter this Mode not only will the completion objectives increase but the Maze itself will become more complicated to navigate through etc.
• Level 1 – You will have 10 Seconds to collect the Giant Cookie at the centre of the Maze and reach the Exit which is located at the bottom centre of the Mini – Playfield.
• Level 2 – You will have 20 Seconds to collect the 3 flashing Cookies in the Maze and reach the Exit which is located at the bottom centre of the Mini – Playfield.
• Level 3 - You will have 30 Seconds to collect the 3 flashing Cookies in the Maze and reach the Exit
which is located at the bottom centre of the Mini – Playfield. Successfully completing all 3 levels & re-engaging Level 1 a 2nd time will award a Cookie Hunter Bonus worth 1 Million Points.
Exit
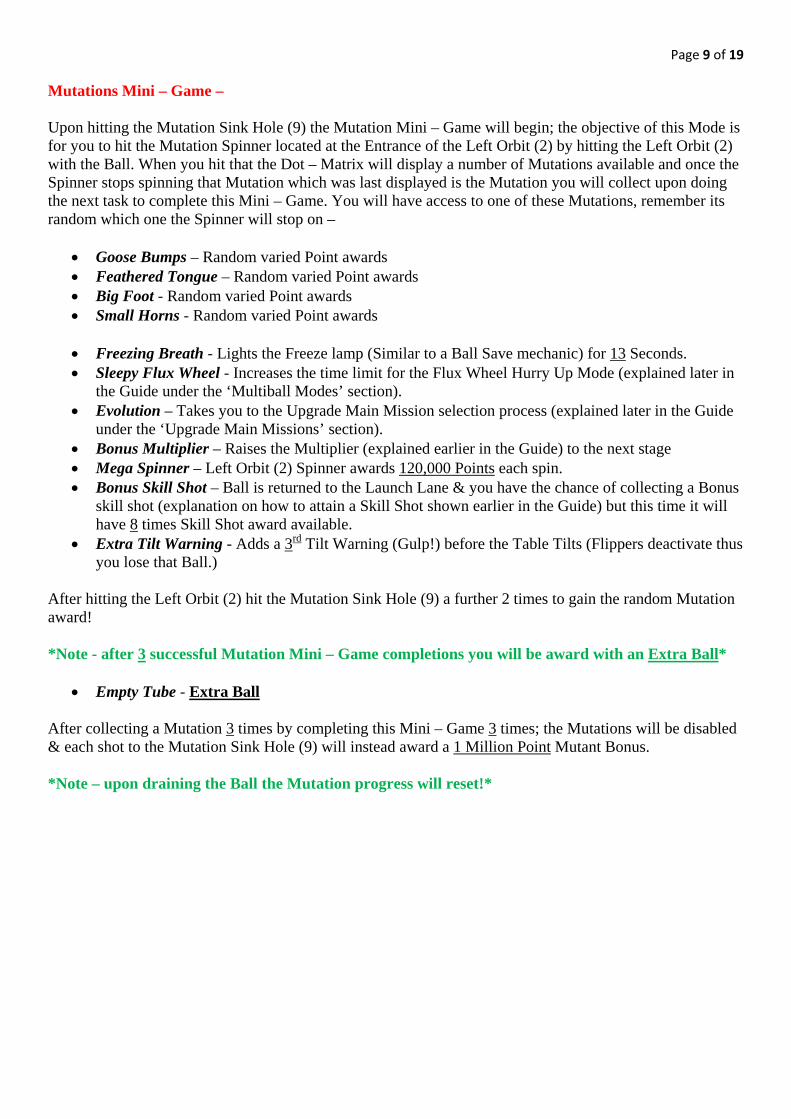
Page 9 of 19 Mutations Mini – Game – Upon hitting the Mutation Sink Hole (9) the Mutation Mini – Game will begin; the objective of this Mode is for you to hit the Mutation Spinner located at the Entrance of the Left Orbit (2) by hitting the Left Orbit (2) with the Ball. When you hit that the Dot – Matrix will display a number of Mutations available and once the Spinner stops spinning that Mutation which was last displayed is the Mutation you will collect upon doing the next task to complete this Mini – Game. You will have access to one of these Mutations, remember its random which one the Spinner will stop on –
• Goose Bumps – Random varied Point awards • Feathered Tongue – Random varied Point awards • Big Foot - Random varied Point awards • Small Horns - Random varied Point awards
• Freezing Breath - Lights the Freeze lamp (Similar to a Ball Save mechanic) for 13 Seconds. • Sleepy Flux Wheel - Increases the time limit for the Flux Wheel Hurry Up Mode (explained later in
the Guide under the ‘Multiball Modes’ section). • Evolution – Takes you to the Upgrade Main Mission selection process (explained later in the Guide
under the ‘Upgrade Main Missions’ section). • Bonus Multiplier – Raises the Multiplier (explained earlier in the Guide) to the next stage • Mega Spinner – Left Orbit (2) Spinner awards 120,000 Points each spin. • Bonus Skill Shot – Ball is returned to the Launch Lane & you have the chance of collecting a Bonus
skill shot (explanation on how to attain a Skill Shot shown earlier in the Guide) but this time it will have 8 times Skill Shot award available.
• Extra Tilt Warning - Adds a 3rd Tilt Warning (Gulp!) before the Table Tilts (Flippers deactivate thus you lose that Ball.)
After hitting the Left Orbit (2) hit the Mutation Sink Hole (9) a further 2 times to gain the random Mutation award! *Note - after 3 successful Mutation Mini – Game completions you will be award with an Extra Ball*
• Empty Tube - Extra Ball After collecting a Mutation 3 times by completing this Mini – Game 3 times; the Mutations will be disabled & each shot to the Mutation Sink Hole (9) will instead award a 1 Million Point Mutant Bonus. *Note – upon draining the Ball the Mutation progress will reset!*
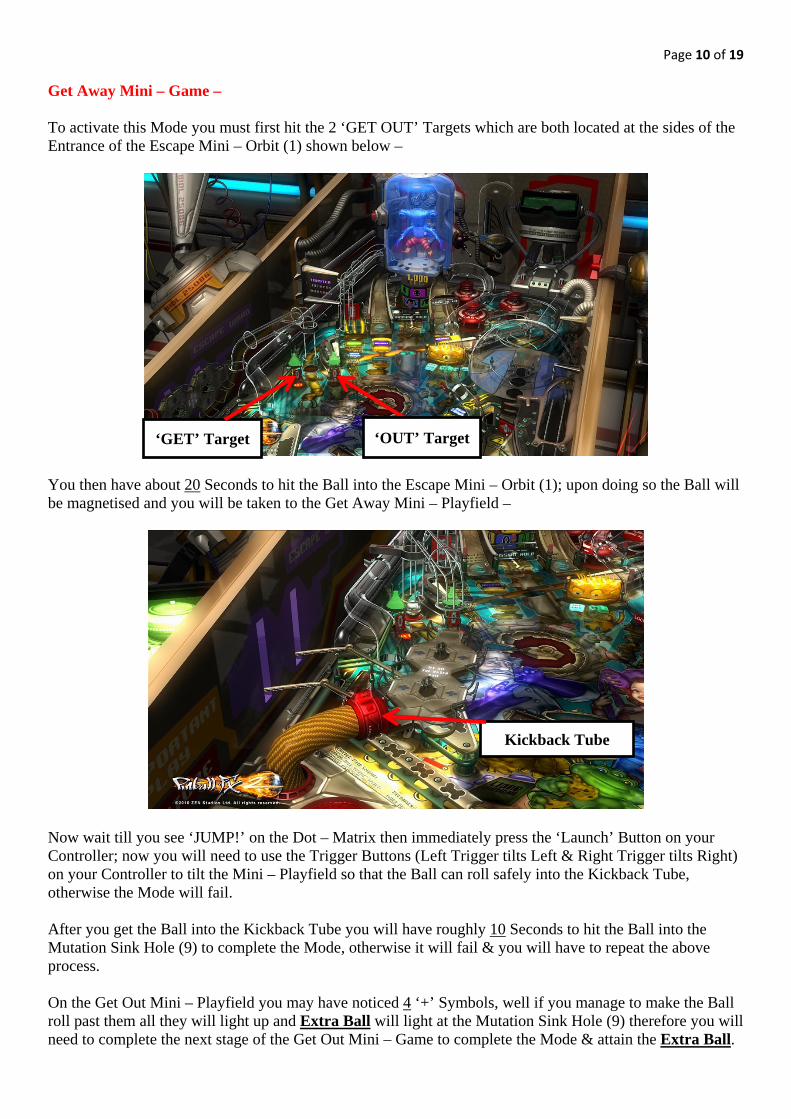
Page 10 of 19 Get Away Mini – Game – To activate this Mode you must first hit the 2 ‘GET OUT’ Targets which are both located at the sides of the Entrance of the Escape Mini – Orbit (1) shown below –
You then have about 20 Seconds to hit the Ball into the Escape Mini – Orbit (1); upon doing so the Ball will be magnetised and you will be taken to the Get Away Mini – Playfield –
Now wait till you see ‘JUMP!’ on the Dot – Matrix then immediately press the ‘Launch’ Button on your Controller; now you will need to use the Trigger Buttons (Left Trigger tilts Left & Right Trigger tilts Right) on your Controller to tilt the Mini – Playfield so that the Ball can roll safely into the Kickback Tube, otherwise the Mode will fail. After you get the Ball into the Kickback Tube you will have roughly 10 Seconds to hit the Ball into the Mutation Sink Hole (9) to complete the Mode, otherwise it will fail & you will have to repeat the above process. On the Get Out Mini – Playfield you may have noticed 4 ‘+’ Symbols, well if you manage to make the Ball roll past them all they will light up and Extra Ball will light at the Mutation Sink Hole (9) therefore you will need to complete the next stage of the Get Out Mini – Game to complete the Mode & attain the Extra Ball.
‘GET’ Target ‘OUT’ Target
Kickback Tube
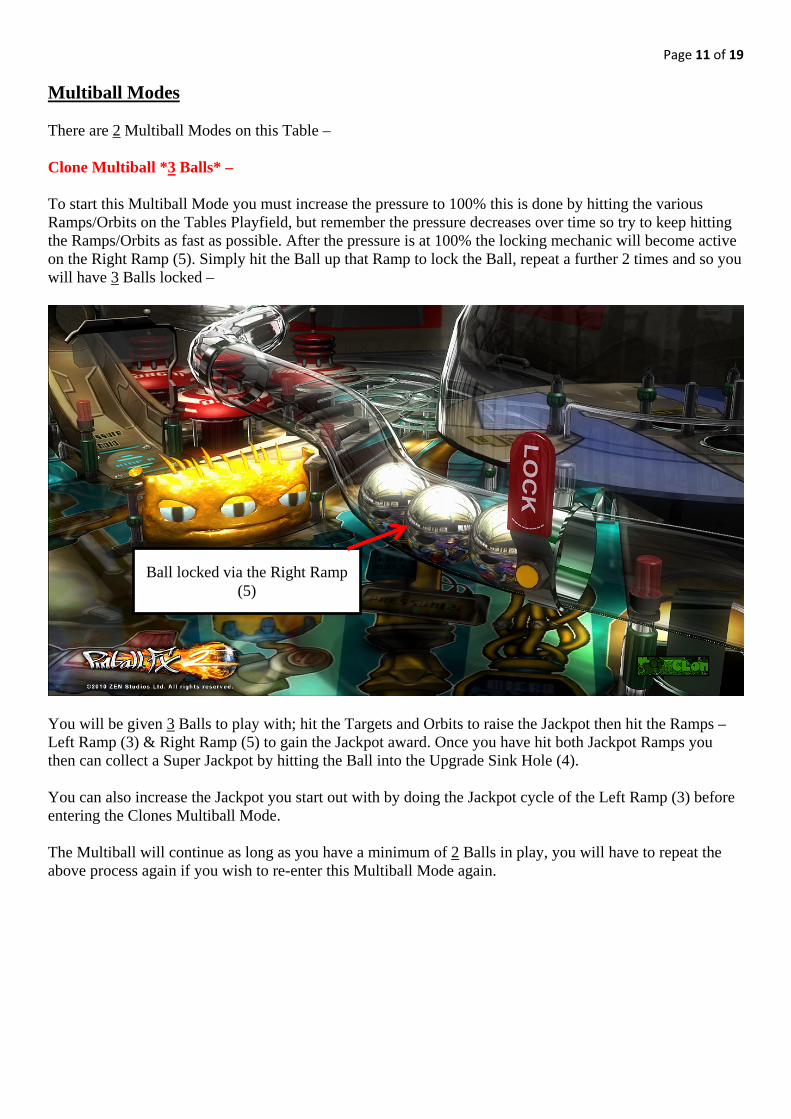
Page 11 of 19 Multiball Modes There are 2 Multiball Modes on this Table – Clone Multiball *3 Balls* – To start this Multiball Mode you must increase the pressure to 100% this is done by hitting the various Ramps/Orbits on the Tables Playfield, but remember the pressure decreases over time so try to keep hitting the Ramps/Orbits as fast as possible. After the pressure is at 100% the locking mechanic will become active on the Right Ramp (5). Simply hit the Ball up that Ramp to lock the Ball, repeat a further 2 times and so you will have 3 Balls locked –
You will be given 3 Balls to play with; hit the Targets and Orbits to raise the Jackpot then hit the Ramps – Left Ramp (3) & Right Ramp (5) to gain the Jackpot award. Once you have hit both Jackpot Ramps you then can collect a Super Jackpot by hitting the Ball into the Upgrade Sink Hole (4). You can also increase the Jackpot you start out with by doing the Jackpot cycle of the Left Ramp (3) before entering the Clones Multiball Mode. The Multiball will continue as long as you have a minimum of 2 Balls in play, you will have to repeat the above process again if you wish to re-enter this Multiball Mode again.
Ball locked via the Right Ramp (5)
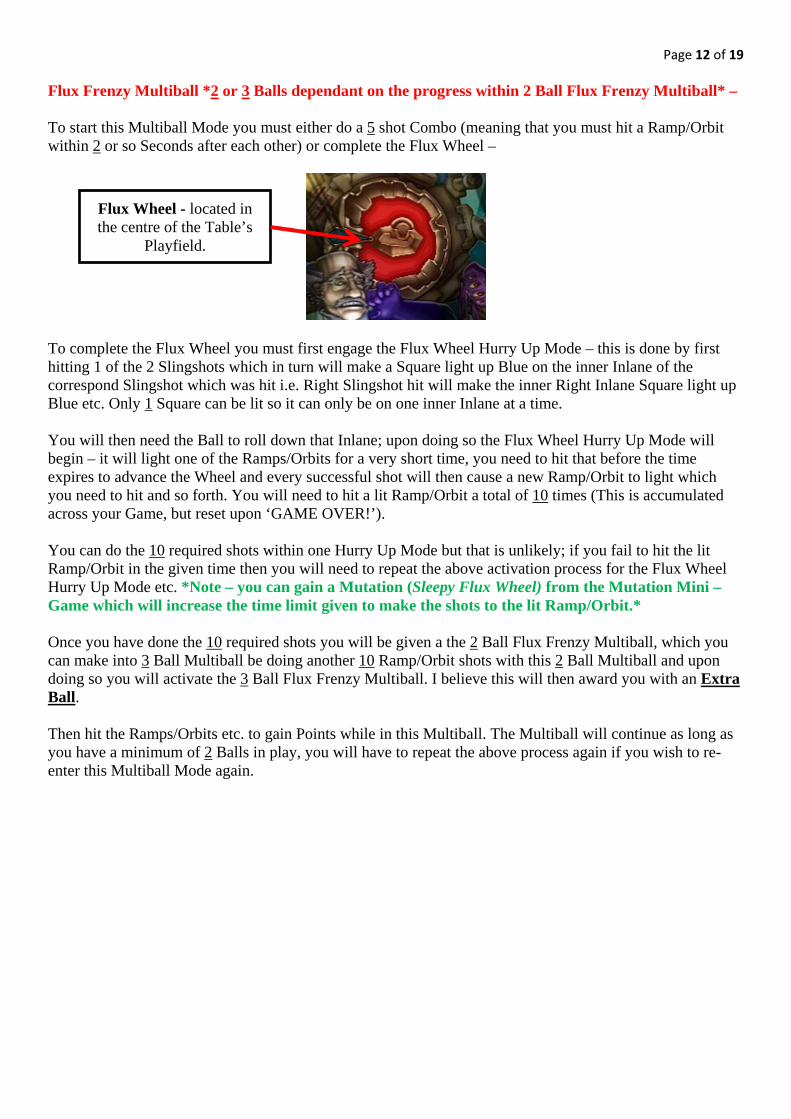
Page 12 of 19 Flux Frenzy Multiball *2 or 3 Balls dependant on the progress within 2 Ball Flux Frenzy Multiball* – To start this Multiball Mode you must either do a 5 shot Combo (meaning that you must hit a Ramp/Orbit within 2 or so Seconds after each other) or complete the Flux Wheel –
To complete the Flux Wheel you must first engage the Flux Wheel Hurry Up Mode – this is done by first hitting 1 of the 2 Slingshots which in turn will make a Square light up Blue on the inner Inlane of the correspond Slingshot which was hit i.e. Right Slingshot hit will make the inner Right Inlane Square light up Blue etc. Only 1 Square can be lit so it can only be on one inner Inlane at a time. You will then need the Ball to roll down that Inlane; upon doing so the Flux Wheel Hurry Up Mode will begin – it will light one of the Ramps/Orbits for a very short time, you need to hit that before the time expires to advance the Wheel and every successful shot will then cause a new Ramp/Orbit to light which you need to hit and so forth. You will need to hit a lit Ramp/Orbit a total of 10 times (This is accumulated across your Game, but reset upon ‘GAME OVER!’). You can do the 10 required shots within one Hurry Up Mode but that is unlikely; if you fail to hit the lit Ramp/Orbit in the given time then you will need to repeat the above activation process for the Flux Wheel Hurry Up Mode etc. *Note – you can gain a Mutation (Sleepy Flux Wheel) from the Mutation Mini – Game which will increase the time limit given to make the shots to the lit Ramp/Orbit.* Once you have done the 10 required shots you will be given a the 2 Ball Flux Frenzy Multiball, which you can make into 3 Ball Multiball be doing another 10 Ramp/Orbit shots with this 2 Ball Multiball and upon doing so you will activate the 3 Ball Flux Frenzy Multiball. I believe this will then award you with an Extra Ball. Then hit the Ramps/Orbits etc. to gain Points while in this Multiball. The Multiball will continue as long as you have a minimum of 2 Balls in play, you will have to repeat the above process again if you wish to re-enter this Multiball Mode again.
Flux Wheel - located in the centre of the Table’s
Playfield.
Page 13 of 19
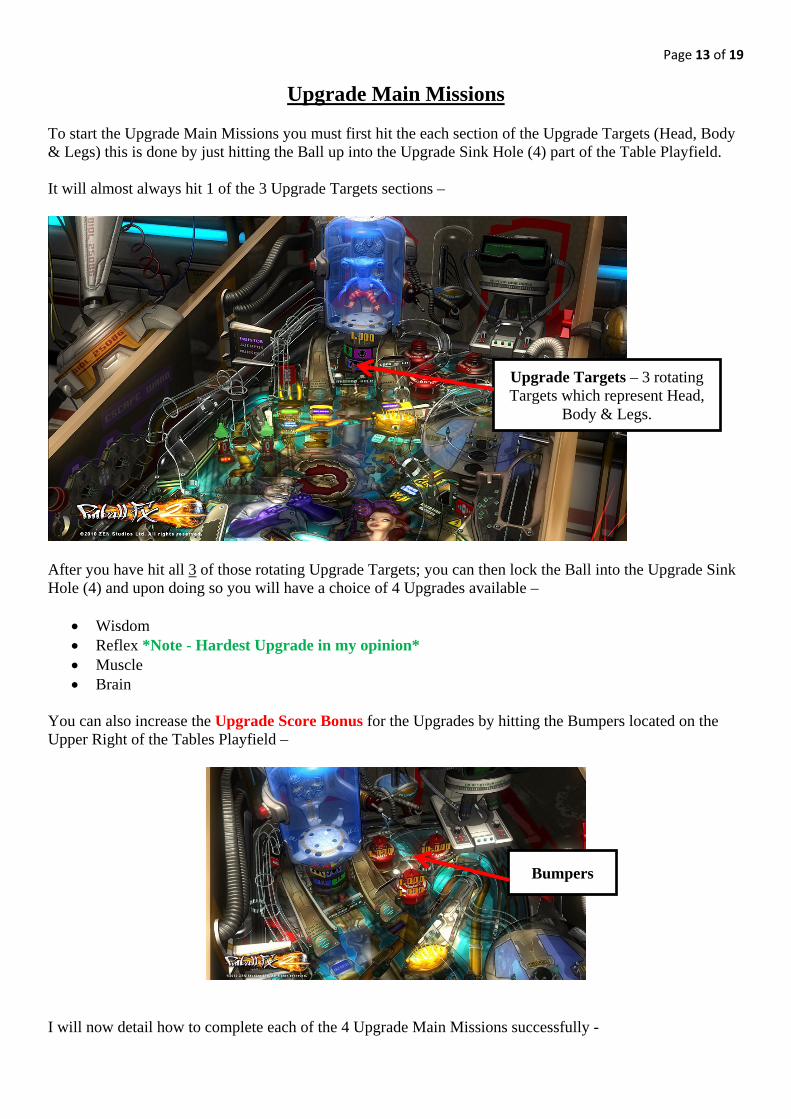
Upgrade Main Missions To start the Upgrade Main Missions you must first hit the each section of the Upgrade Targets (Head, Body & Legs) this is done by just hitting the Ball up into the Upgrade Sink Hole (4) part of the Table Playfield. It will almost always hit 1 of the 3 Upgrade Targets sections –
After you have hit all 3 of those rotating Upgrade Targets; you can then lock the Ball into the Upgrade Sink Hole (4) and upon doing so you will have a choice of 4 Upgrades available –
• Wisdom • Reflex *Note - Hardest Upgrade in my opinion* • Muscle • Brain
You can also increase the Upgrade Score Bonus for the Upgrades by hitting the Bumpers located on the Upper Right of the Tables Playfield –
I will now detail how to complete each of the 4 Upgrade Main Missions successfully -
Upgrade Targets – 3 rotating Targets which represent Head,
Body & Legs.
Bumpers
Page 14 of 19 Wisdom
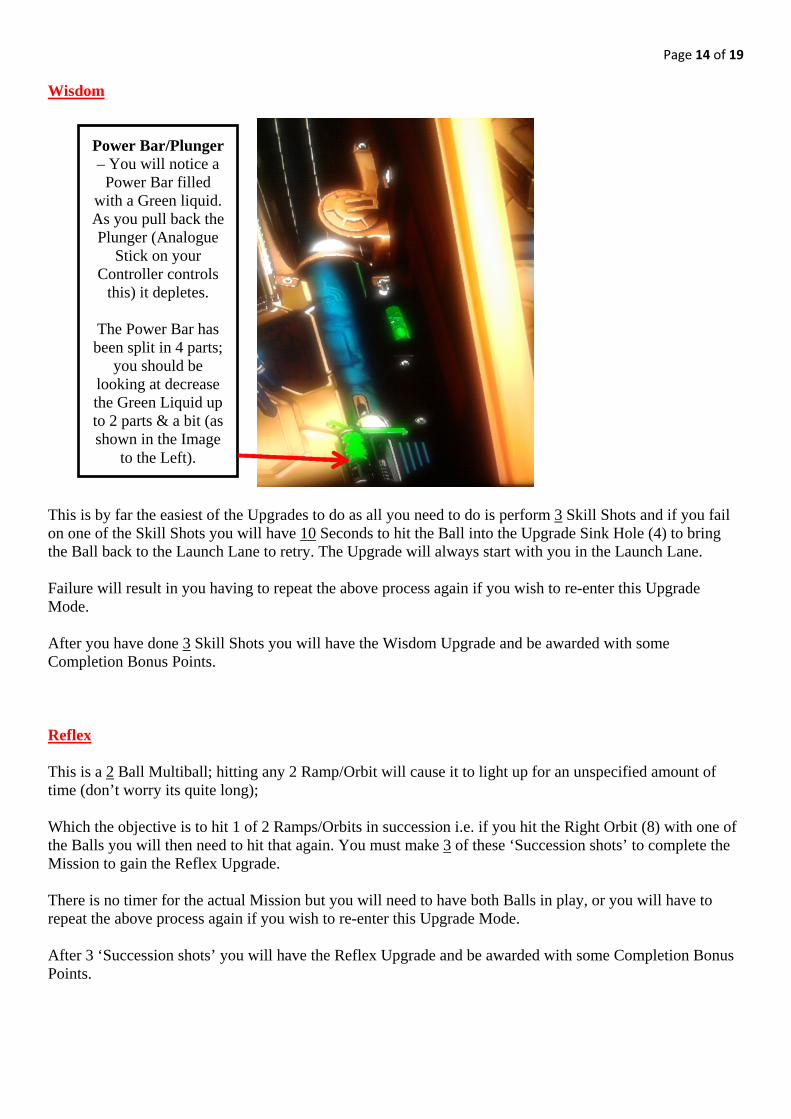
This is by far the easiest of the Upgrades to do as all you need to do is perform 3 Skill Shots and if you fail on one of the Skill Shots you will have 10 Seconds to hit the Ball into the Upgrade Sink Hole (4) to bring the Ball back to the Launch Lane to retry. The Upgrade will always start with you in the Launch Lane. Failure will result in you having to repeat the above process again if you wish to re-enter this Upgrade Mode. After you have done 3 Skill Shots you will have the Wisdom Upgrade and be awarded with some Completion Bonus Points. Reflex This is a 2 Ball Multiball; hitting any 2 Ramp/Orbit will cause it to light up for an unspecified amount of time (don’t worry its quite long); Which the objective is to hit 1 of 2 Ramps/Orbits in succession i.e. if you hit the Right Orbit (8) with one of the Balls you will then need to hit that again. You must make 3 of these ‘Succession shots’ to complete the Mission to gain the Reflex Upgrade. There is no timer for the actual Mission but you will need to have both Balls in play, or you will have to repeat the above process again if you wish to re-enter this Upgrade Mode. After 3 ‘Succession shots’ you will have the Reflex Upgrade and be awarded with some Completion Bonus Points.
Power Bar/Plunger – You will notice a
Power Bar filled with a Green liquid. As you pull back the Plunger (Analogue
Stick on your Controller controls
this) it depletes.
The Power Bar has been split in 4 parts;
you should be looking at decrease the Green Liquid up to 2 parts & a bit (as shown in the Image
to the Left).
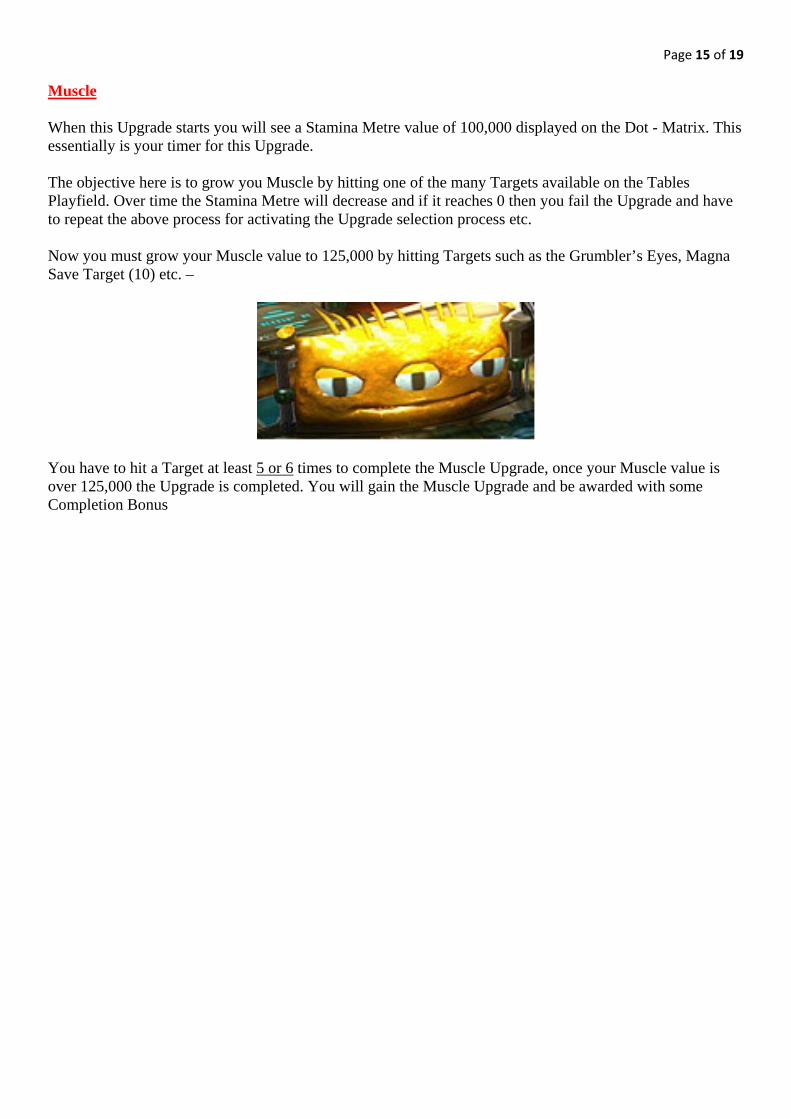
Page 15 of 19 Muscle When this Upgrade starts you will see a Stamina Metre value of 100,000 displayed on the Dot - Matrix. This essentially is your timer for this Upgrade. The objective here is to grow you Muscle by hitting one of the many Targets available on the Tables Playfield. Over time the Stamina Metre will decrease and if it reaches 0 then you fail the Upgrade and have to repeat the above process for activating the Upgrade selection process etc. Now you must grow your Muscle value to 125,000 by hitting Targets such as the Grumbler’s Eyes, Magna Save Target (10) etc. –
You have to hit a Target at least 5 or 6 times to complete the Muscle Upgrade, once your Muscle value is over 125,000 the Upgrade is completed. You will gain the Muscle Upgrade and be awarded with some Completion Bonus
Page 16 of 19 Brains
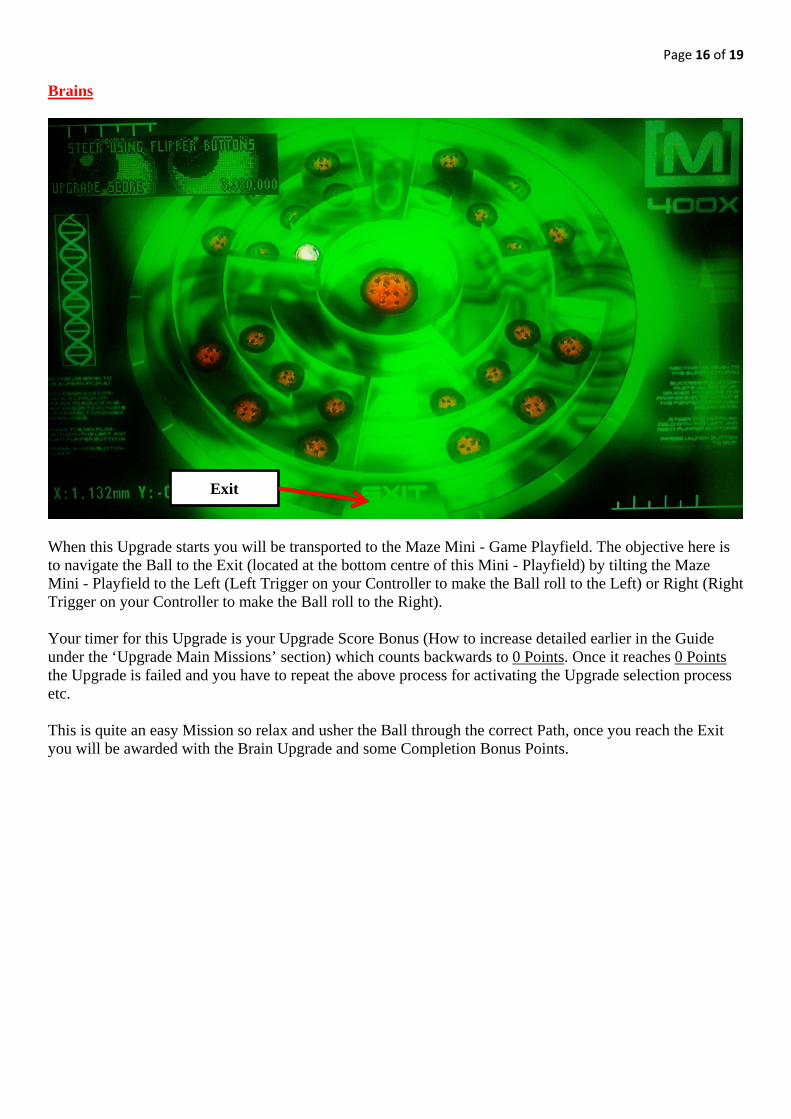
When this Upgrade starts you will be transported to the Maze Mini - Game Playfield. The objective here is to navigate the Ball to the Exit (located at the bottom centre of this Mini - Playfield) by tilting the Maze Mini - Playfield to the Left (Left Trigger on your Controller to make the Ball roll to the Left) or Right (Right Trigger on your Controller to make the Ball roll to the Right). Your timer for this Upgrade is your Upgrade Score Bonus (How to increase detailed earlier in the Guide under the ‘Upgrade Main Missions’ section) which counts backwards to 0 Points. Once it reaches 0 Points the Upgrade is failed and you have to repeat the above process for activating the Upgrade selection process etc. This is quite an easy Mission so relax and usher the Ball through the correct Path, once you reach the Exit you will be awarded with the Brain Upgrade and some Completion Bonus Points.
Exit
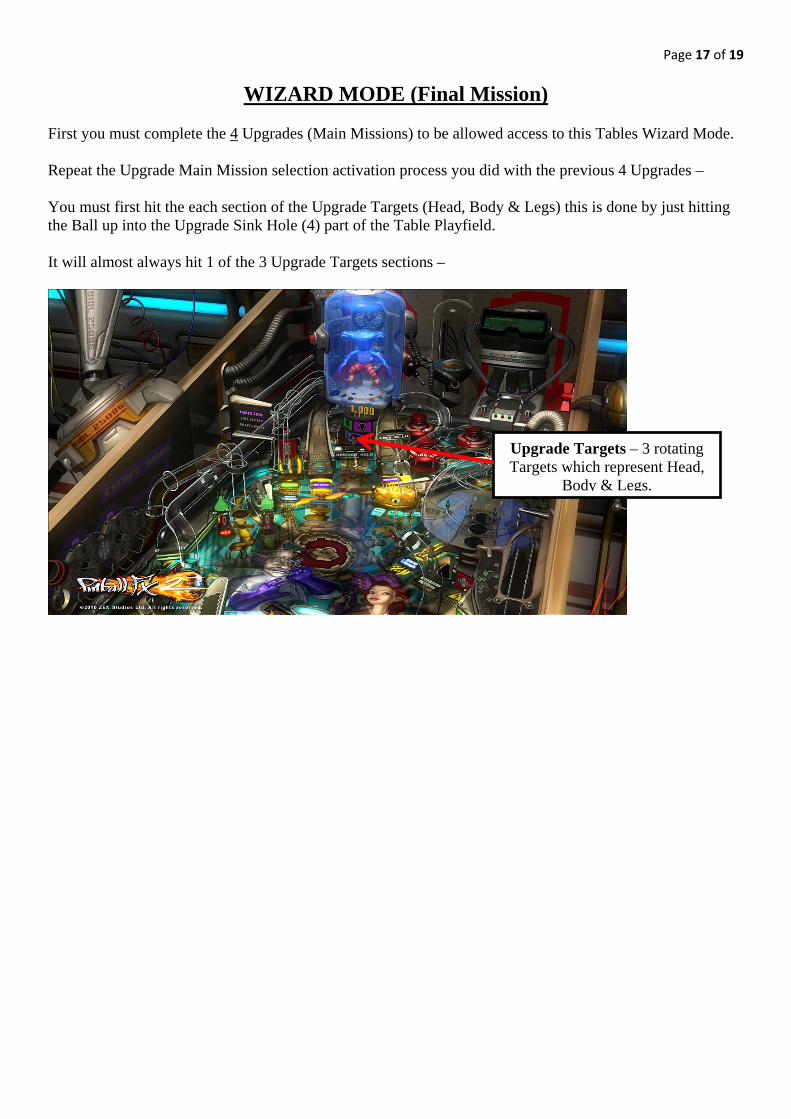
Page 17 of 19
WIZARD MODE (Final Mission) First you must complete the 4 Upgrades (Main Missions) to be allowed access to this Tables Wizard Mode. Repeat the Upgrade Main Mission selection activation process you did with the previous 4 Upgrades – You must first hit the each section of the Upgrade Targets (Head, Body & Legs) this is done by just hitting the Ball up into the Upgrade Sink Hole (4) part of the Table Playfield. It will almost always hit 1 of the 3 Upgrade Targets sections –
Upgrade Targets – 3 rotating Targets which represent Head,
Body & Legs.
Page 18 of 19 Perfect Organism (Wizard Mode) – This Wizard Mode has 4 Stages; which must be completed in this order –
• Stage 1 – System Overload For this Stage you must hit all these Orbits in any order: • Escape Mini - Orbit (1) • Left orbit (2) • Upper Right Mini – Orbit (6) • Lower Right Mini - Orbit (7) • Right orbit (8) Be Careful! As every 10 Seconds the Flux Wheel will glow Red which will cause a Magnet to become active and that will pull the Ball towards the centre of the Table which can result in unwanted drains.
• Stage 2 - System Rebooted, Jar Vulnerable
You must hit the Mutation Sink Hole (9).
• Stage 3 - Get to Window, Dodge the Staff!
You must hit the Left Ramp (3) to remove the Professor & then Right Ramp (5) to remove the Nurse. Be Careful! As if you hit any of the Ramps and it doesn’t go through all the way to the Inlanes then a Magnet will activate and pull it out of the Inlane.
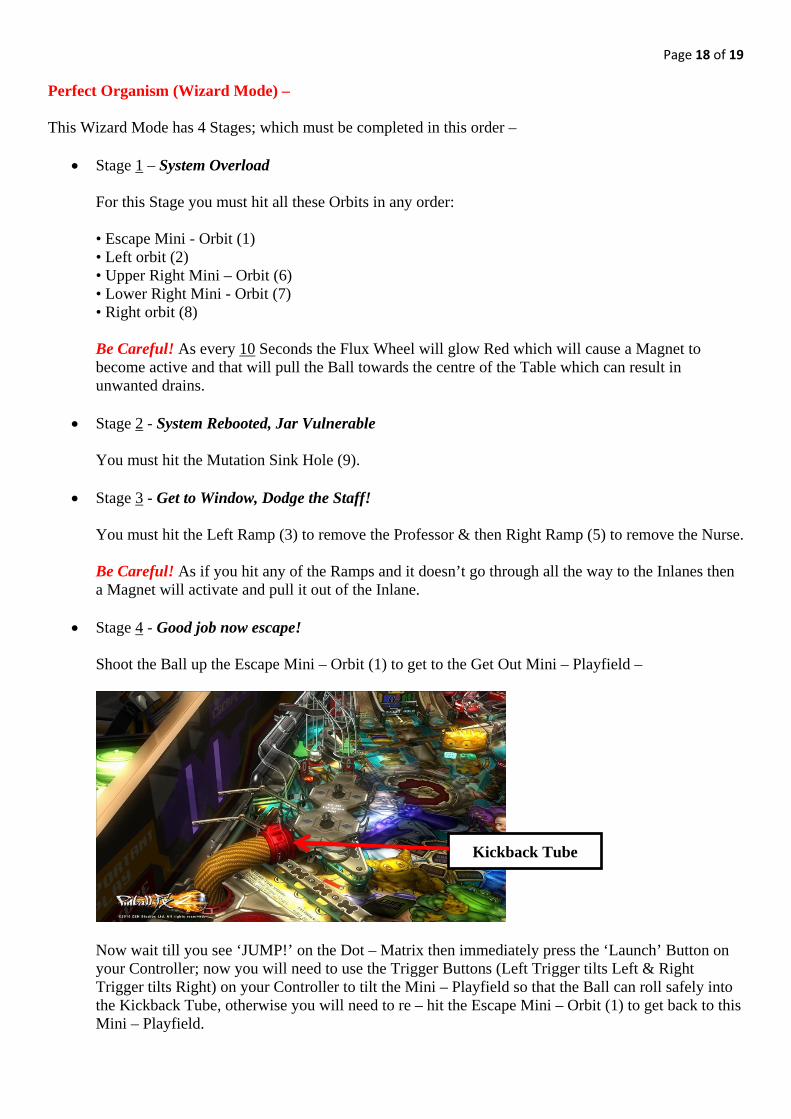
• Stage 4 - Good job now escape!
Shoot the Ball up the Escape Mini – Orbit (1) to get to the Get Out Mini – Playfield –
Now wait till you see ‘JUMP!’ on the Dot – Matrix then immediately press the ‘Launch’ Button on your Controller; now you will need to use the Trigger Buttons (Left Trigger tilts Left & Right Trigger tilts Right) on your Controller to tilt the Mini – Playfield so that the Ball can roll safely into the Kickback Tube, otherwise you will need to re – hit the Escape Mini – Orbit (1) to get back to this Mini – Playfield.
Kickback Tube
Page 19 of 19 After you complete Stage 4 of the Wizard Mode you will gain a 50 Million Points Completion Bonus; depending on the amount of Cookies (detailed earlier in the Guide in the ‘Cookies’ section of the Guide) you have attained while playing through to the Wizard Mode will increase the Wizard Mode Completion Bonus. Also if you fail any Stage of the Wizard Mode; you will have to repeat the above process of activating one of the Upgrade Main Missions but you will instead re-activate the Wizard Mode from Stage 1. After completion, the progress of the Table will be reset thus Table Reset!
Special Thanks to all the Zen Studios Forum Community! Members such as Cloda, Blue, Logic_FTW, Flynn74 & E113 I couldn’t have completed the Guide without your help either directly or indirectly - you are all awesome!!!
In closing I hope you enjoyed this Table, I certainly have and I hope by using this Guide it increases that Fun factor for you and everyone else who plays with you etc.
Check out the other Tables available, they are all available to download on the Xbox Live Marketplace in Add-Ons section or download it straight from the PFX2 Platform itself. Zen Pinball on PlayStation Network, Zen Pinball on the Apple AppStore, Zen Pinball 3D on Nintendo 3DS and Zen Pinball THD on Android Marketplace. Thanks for viewing my Guide, “It’s alive, IT ALIVE!!!”
Yours
ShoryukenToTheChin