biofield viewer 2.0 release
DESCRIPTION
Biofield Viewer is an internationally recognized biofield imaging system and is at the forefront of research investigating the efficacy of energy medicine modalities, devices and electromagnetic field shielding and enhancement technologies. The first study conducted to assess the effects of an intervention screened all the participants in the study with the Biofield Viewer at intervals throughout so that this intervention could be assessed statistically and yet from an energetic biofield perspective.TRANSCRIPT

Biofield Viewer 2.0 Upgrade
© Biofield Viewer 2014

Biofield Viewer 2.0 Upgrade
• What is the Biofield Viewer?
• Biofield Viewer Approved Accessories
• Sample Biofield Environments
• Installing/Navigating the Software Upgrade
• New Drop Down Menu
• Environment Calibration
• Taking and Saving a Set of Images
• Analysis with Biofield Viewer and Image J
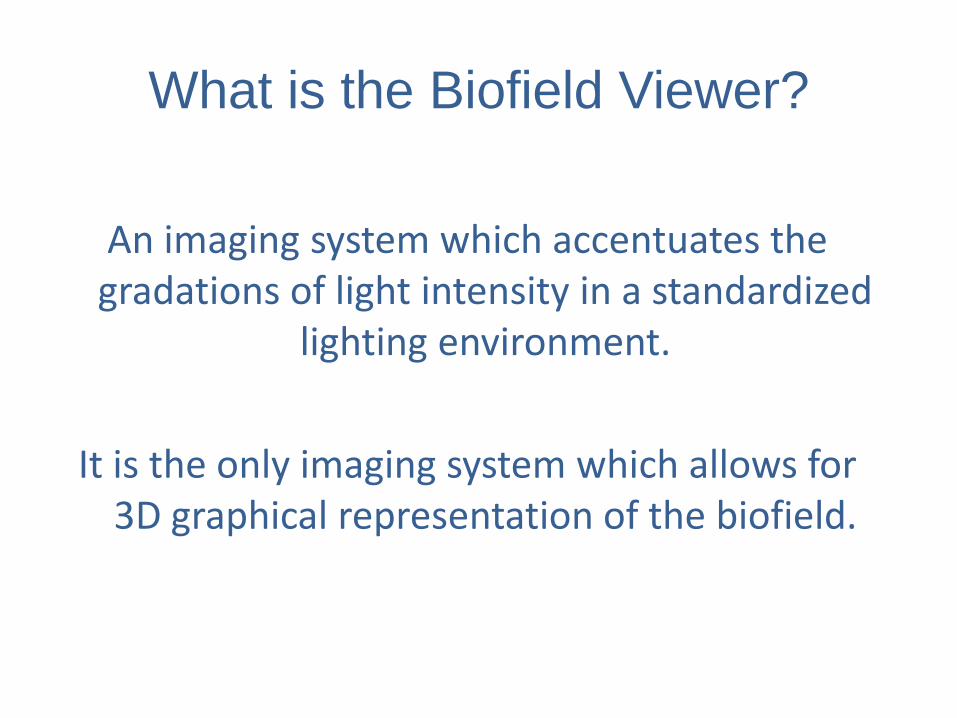
What is the Biofield Viewer?
An imaging system which accentuates the gradations of light intensity in a standardized
lighting environment.
It is the only imaging system which allows for 3D graphical representation of the biofield.

What the Biofield Viewer is NOT
It has not been evaluated by international medical authorities and is not intended to
diagnose, treat, cure, or prevent disease. It is for research purposes only.
It is not an infrared, ultraviolet, or aura camera.
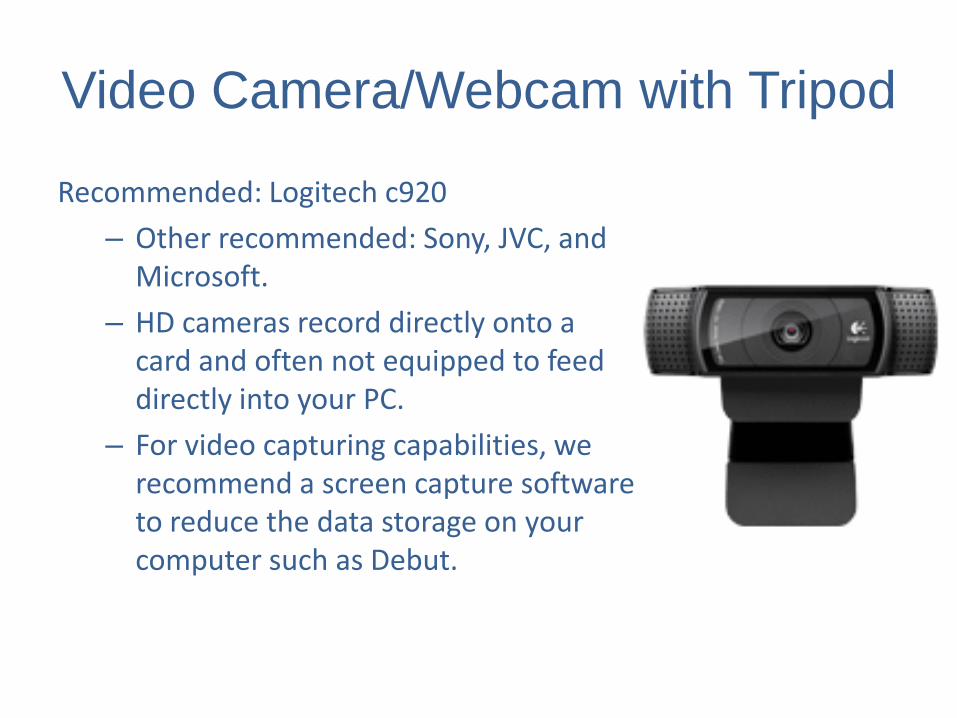
Video Camera/Webcam with Tripod
Recommended: Logitech c920
– Other recommended: Sony, JVC, and Microsoft.
– HD cameras record directly onto a card and often not equipped to feed directly into your PC.
– For video capturing capabilities, we recommend a screen capture software to reduce the data storage on your computer such as Debut.

Webcam Software
If using Logitech c920 webcam, go to:
www.logitech.com
Download driver for c920 camera to remote
control camera and change exposure/focus.

Standardized research clinic:
We recommend a double 4ft/48”
fluorescent ‘Full Spectrum Lighting
system’ as this maintains
standards and variables within
research facility.
Mobile screening:
We recommend a Husky 5ft 2500
Lumen LED worklight.
Full Spectrum Lighting (FSL)/ High Lumen LED
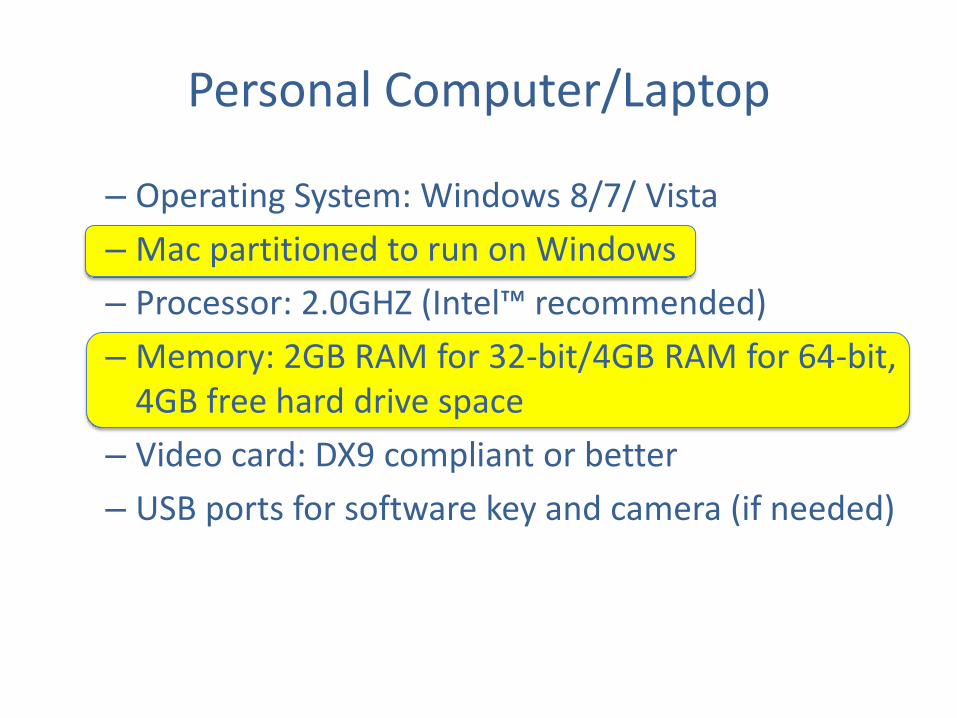
Personal Computer/Laptop
– Operating System: Windows 8/7/ Vista
– Mac partitioned to run on Windows
– Processor: 2.0GHZ (Intel™ recommended)
– Memory: 2GB RAM for 32-bit/4GB RAM for 64-bit, 4GB free hard drive space
– Video card: DX9 compliant or better
– USB ports for software key and camera (if needed)
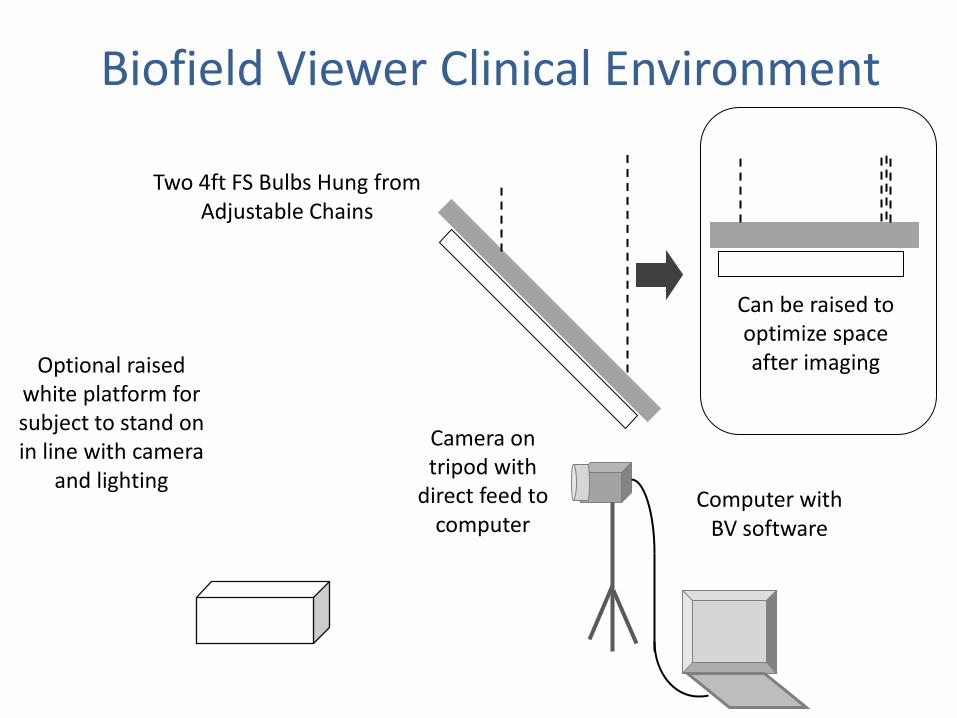
Biofield Viewer Clinical Environment
Two 4ft FS Bulbs Hung from Adjustable Chains
Optional raised white platform for subject to stand on in line with camera
and lighting Computer with
BV software
Camera on tripod with
direct feed to computer
Can be raised to optimize space after imaging
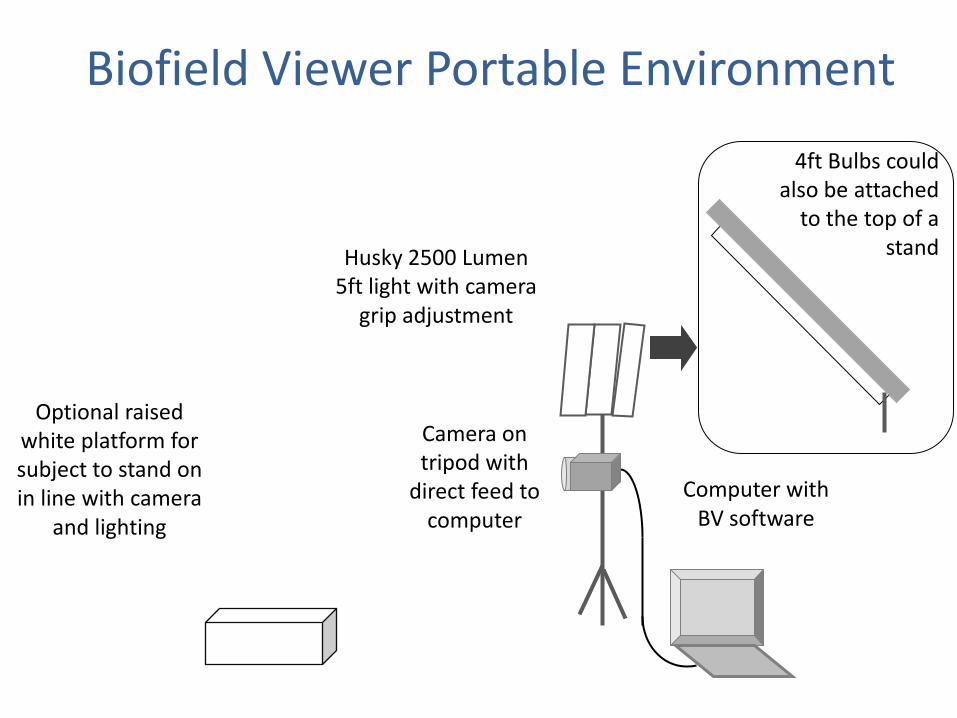
Biofield Viewer Portable Environment
Optional raised white platform for subject to stand on in line with camera
and lighting
Computer with BV software
Camera on tripod with
direct feed to computer
Husky 2500 Lumen 5ft light with camera
grip adjustment
4ft Bulbs could also be attached
to the top of a stand

Installing Biofield Viewer 2.0
Software Update
Hugeaura will email the update through a link
to an activation file named ‘Auramancy.exe’
Save to Program Folder

Downloading Manual
Hugeaura will also attach the manual in the email as “Biofield Viewer Manual.pdf”
Save to Program Folder
Software update should be complete.

The shortcut “O” opens a new image file.
Esc closes the file.
“Open image folder” opens a currently active saving folder.
Shortcut ‘I’
Import image… allows user to analyze any .jpg image previously
taken, for example, with a SLR high definition camera, in the Biofield
Viewer mode.
The button “E” allows users to “Export image…” into a file format
usable by other software.
If “Auto Export” is activated, the program will automatically create a
new subject folder the ensuing images will be placed in that
folderstore images in both internal and external formats.
Exit leaves the program
New Drop Down: File
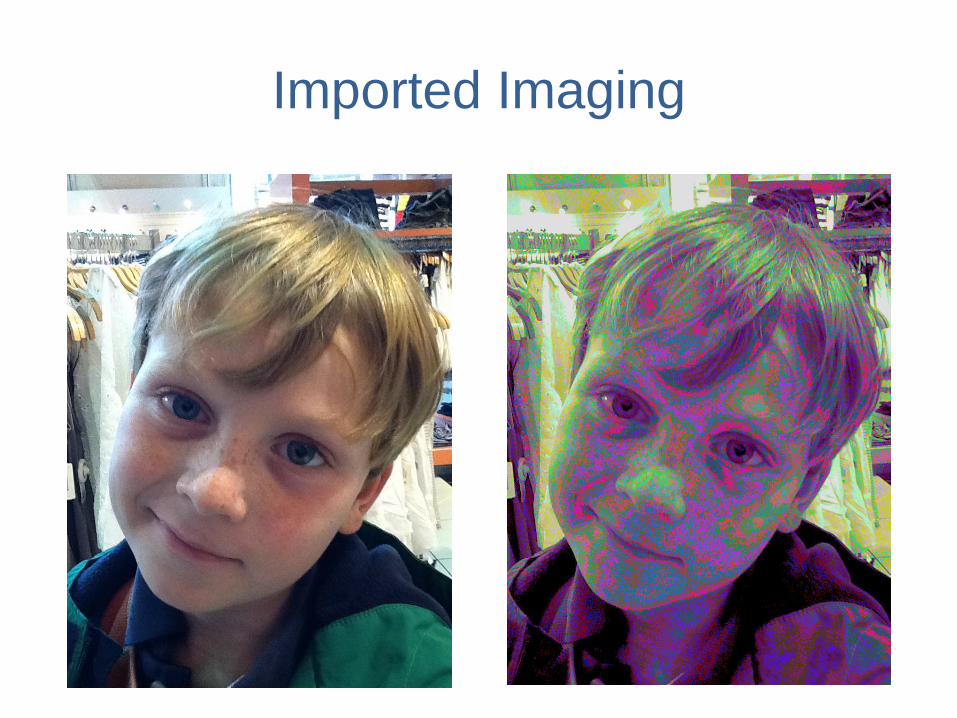
Imported Imaging
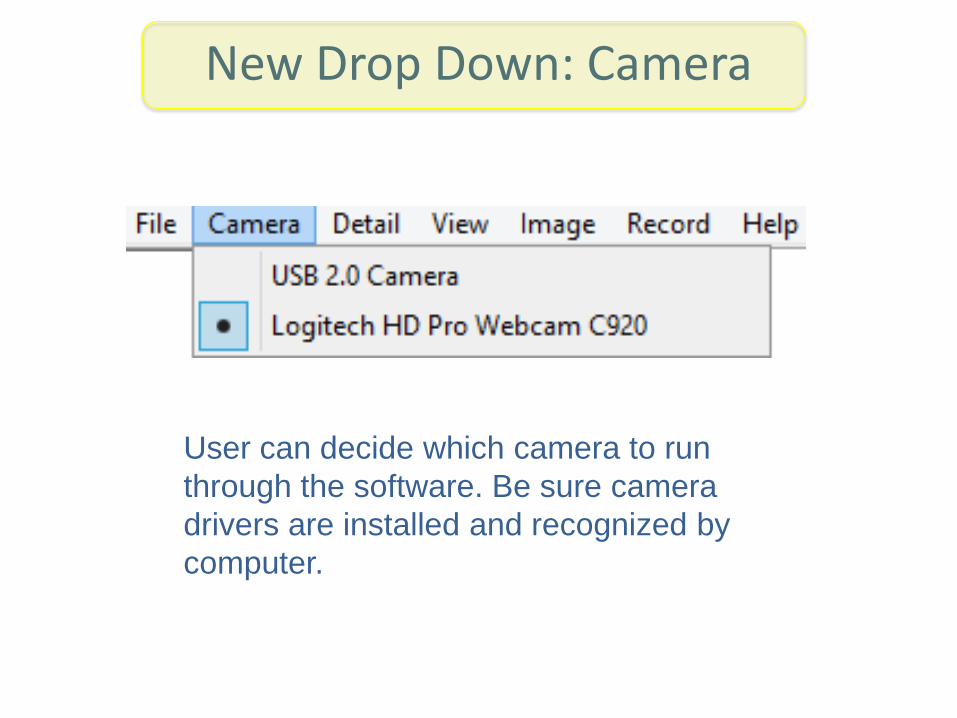
New Drop Down: Camera
User can decide which camera to run
through the software. Be sure camera
drivers are installed and recognized by
computer.
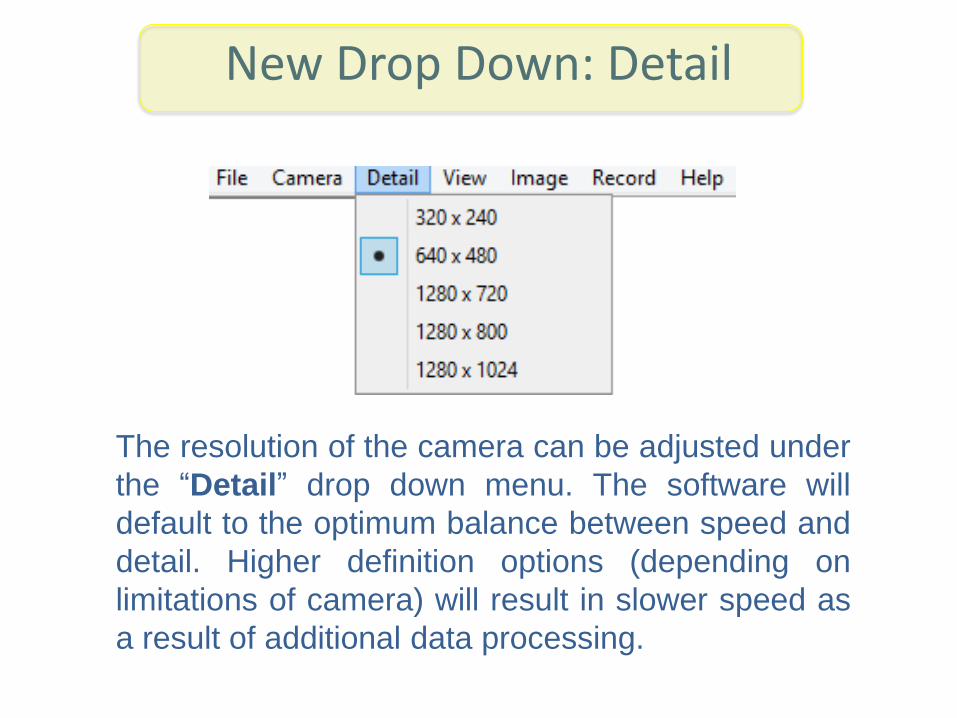
New Drop Down: Detail
The resolution of the camera can be adjusted under
the “Detail” drop down menu. The software will
default to the optimum balance between speed and
detail. Higher definition options (depending on
limitations of camera) will result in slower speed as
a result of additional data processing.

New Drop Down: View
“Biofield Viewer” option gives access to the 2D programs: the –
Biofield Viewer (shortcut ‘B’) and Chakra Viewer (shortcut ‘C’).
“Auramancy” (shortcut ‘A’) gives access to the 3D Biofield
program.
“Start display” and “Stop” display” allows users to turn on and
off the visual real-time image on the screen.
The various palette, subtle energy and quality options are only
activated in 3D Biofield or Auramancy mode.
“Biofield” and “Normal” video (shortcut ‘N’) allow the researcher
to switch between normal video and the Biofield Viewer/Chakra
Viewer assessment which helps in analyzing artifactsshadow.
“Background black” and “Background white” are used for
choosing the background color of 3D images. Black is best used
for low lighting.
“Fit to window” and “Fill window” affects the scaling of the
original image. Fill stretches data and less accurate to use in
research but useful for large screen displays.
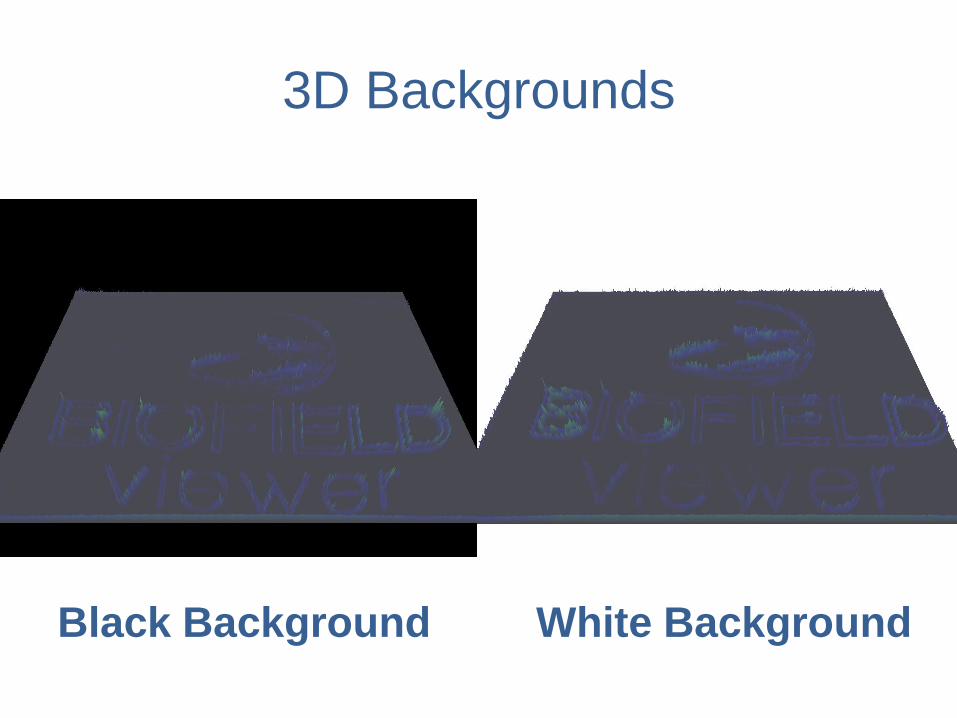
3D Backgrounds
Black Background White Background

New Drop Down: View (Continued)
“Alignment line” (shortcut ‘L’) allows
users to center the subject and helps
standardize the imaging process.
Press multiple times for a vertical,
horizontal crosshairs, and again to
remove.
“Invert” changes the palette to the
inverse of what is shown in default.
“Mirror” (shortcut ‘R’) flips the image
to observe subject’s correct right and
left side.
“Toolbar” adds and removes the
toolbar from the bottom of the screen.
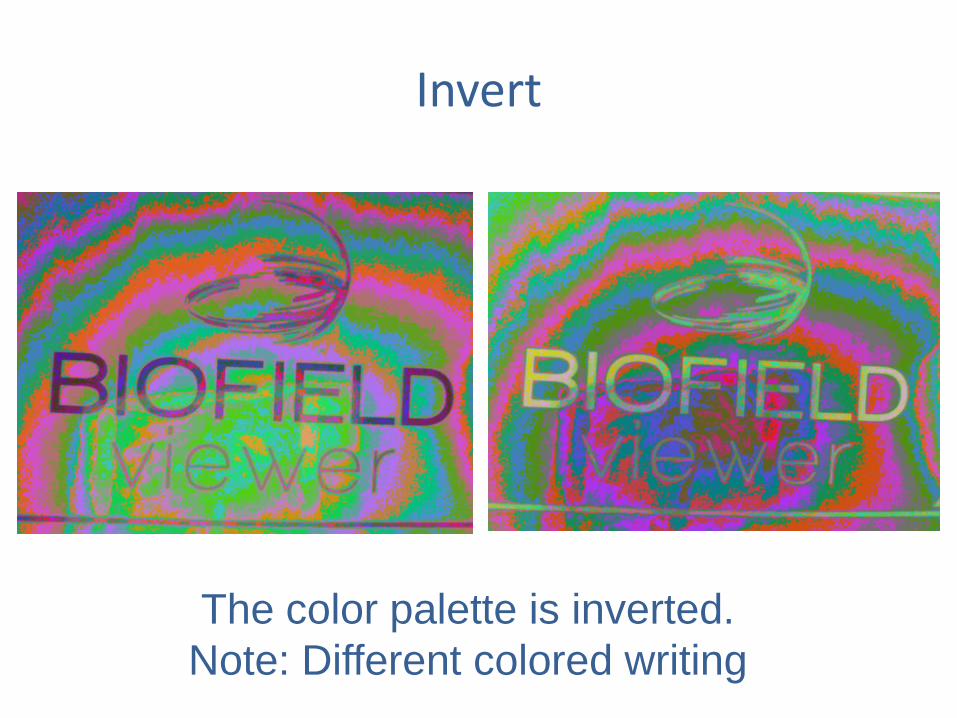
Invert
The color palette is inverted.
Note: Different colored writing
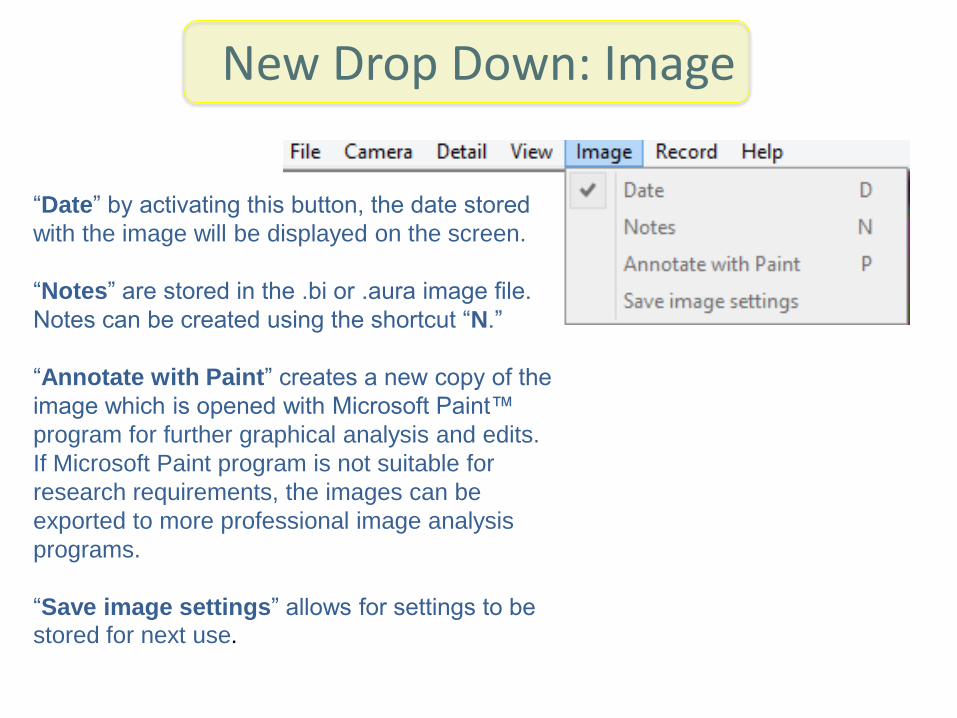
New Drop Down: Image
“Date” by activating this button, the date stored
with the image will be displayed on the screen.
“Notes” are stored in the .bi or .aura image file.
Notes can be created using the shortcut “N.”
“Annotate with Paint” creates a new copy of the
image which is opened with Microsoft Paint™
program for further graphical analysis and edits.
If Microsoft Paint program is not suitable for
research requirements, the images can be
exported to more professional image analysis
programs.
“Save image settings” allows for settings to be
stored for next use.
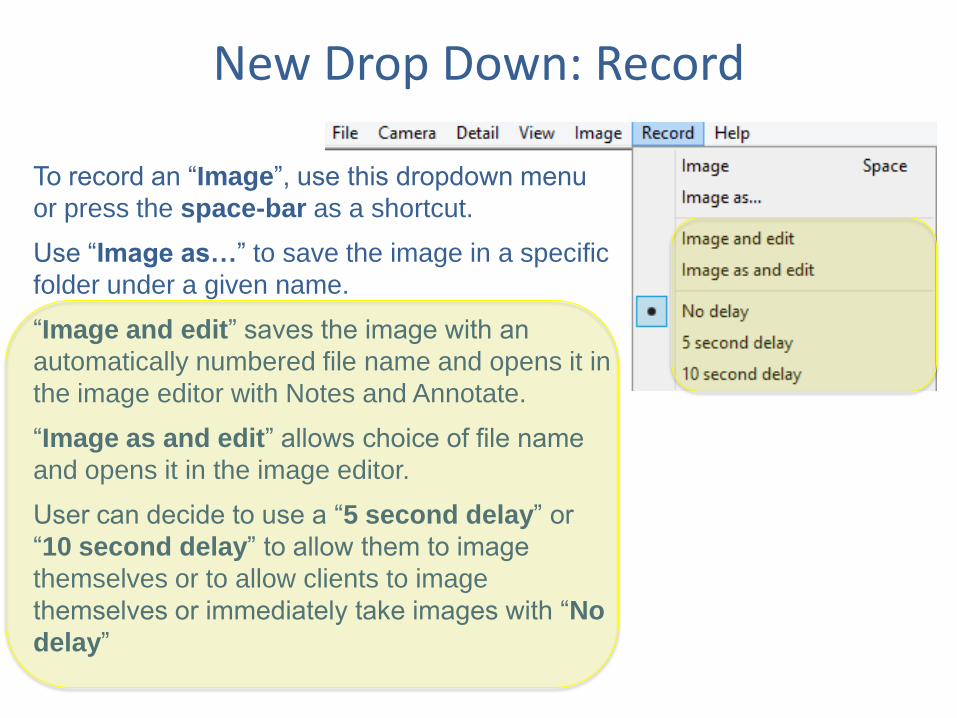
New Drop Down: Record
To record an “Image”, use this dropdown menu
or press the space-bar as a shortcut.
Use “Image as…” to save the image in a specific
folder under a given name.
“Image and edit” saves the image with an
automatically numbered file name and opens it in
the image editor with Notes and Annotate.
“Image as and edit” allows choice of file name
and opens it in the image editor.
User can decide to use a “5 second delay” or
“10 second delay” to allow them to image
themselves or to allow clients to image
themselves or immediately take images with “No
delay”

“Image and edit”
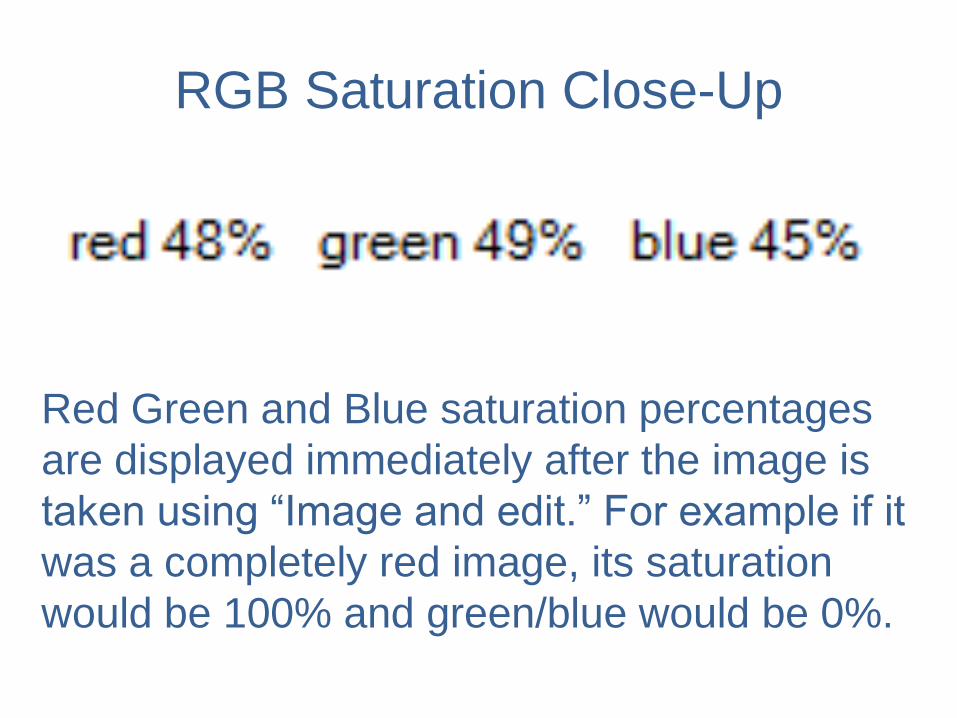
RGB Saturation Close-Up
Red Green and Blue saturation percentages
are displayed immediately after the image is
taken using “Image and edit.” For example if it
was a completely red image, its saturation
would be 100% and green/blue would be 0%.
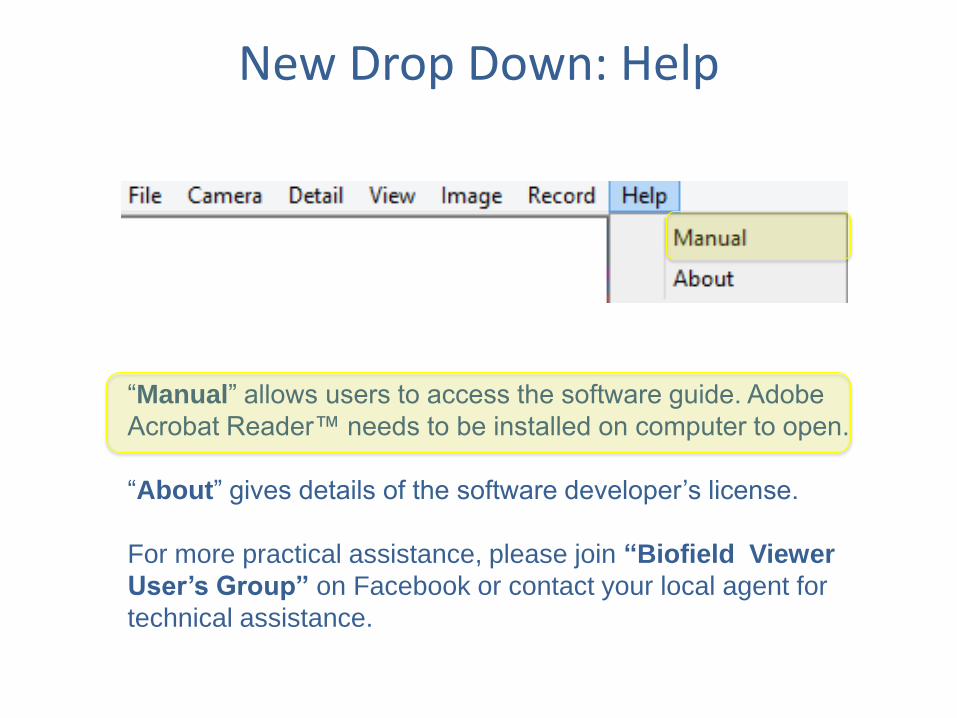
New Drop Down: Help
“Manual” allows users to access the software guide. Adobe
Acrobat Reader™ needs to be installed on computer to open.
“About” gives details of the software developer’s license.
For more practical assistance, please join “Biofield Viewer
User’s Group” on Facebook or contact your local agent for
technical assistance.
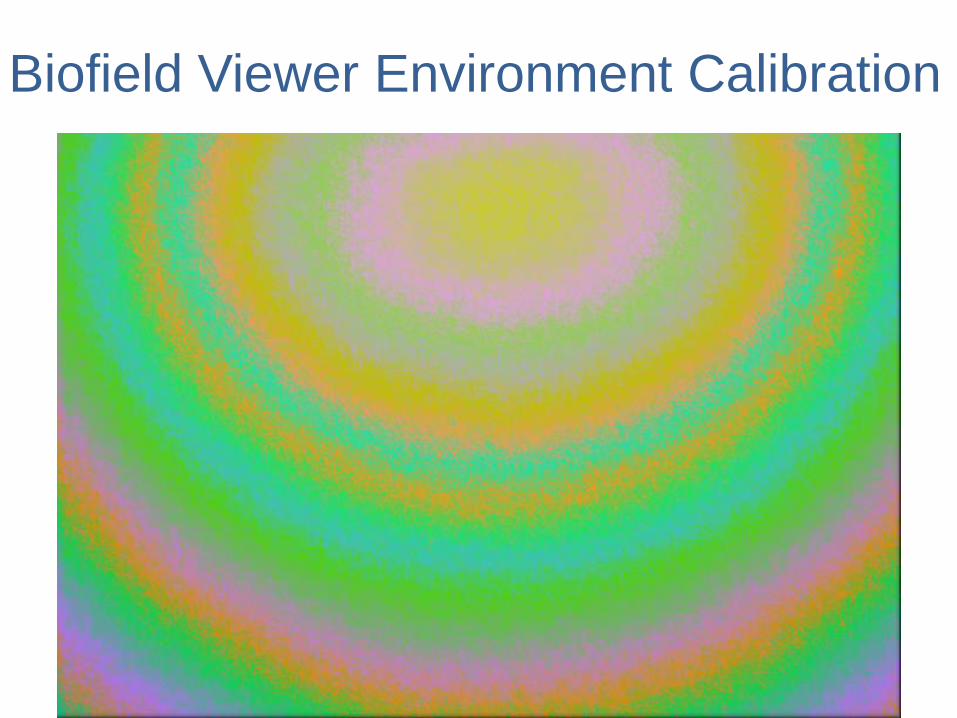
Biofield Viewer Environment Calibration

Taking a Set of Images
Click on Record: “Image As”

Taking a Set of Images
Click on “Create New Folder” icon or right-click
and Rename as you choose

Taking a Set of Images
Open the folder you just created and renamed.
Give the file a
name to begin
saving images.
Subsequent
images will be
saved
numerically.

Image Enhancement with Image J
Increase contrast and brightness

Image analysis with Image J

Repeatability: 3 separate scans on 3 days a week apart
Thank you for your support!
If you have any troubles with
installing the update, please email:
Gaurav Kakade