bigip apache server
TRANSCRIPT
Deploying F5 with Apache Web Servers
DEPLOYMENT GUIDEVersion 1.0

Table of Contents
F5 Deployment Guide i
Table of Contents
Deploying the BIG-IP LTM with the Apache web server Prerequisites and configuration notes ................................................................................. 1Product versions and revision history ................................................................................. 1Configuration example ............................................................................................................ 2
Configuring Apache Web Server for high performance environmentsUsing a statically linked binary or a dynamically loaded module ................................... 3Using a worker module or a pre-fork module .................................................................. 4Using the Pre-Fork model ...................................................................................................... 4Using the Threaded (worker) model ................................................................................... 8Windows tuning ...................................................................................................................... 11
Configuring the ServerName and CanonicalName .................................................................. 12Turning down KeepAlive and Failed Request timeouts ................................................. 13
Configuring the BIG-IP LTM system Creating the HTTP health monitor .................................................................................... 15Creating the pool .................................................................................................................... 16Creating profiles ...................................................................................................................... 18Creating the virtual server ................................................................................................... 22
Appendix A: Configuring the BIG-IP LTM to offload SSLUsing SSL certificates and keys ............................................................................................ 25Creating a Client SSL profile ................................................................................................ 26Creating the Redirect iRule .................................................................................................. 26Modifying the HTTP virtual server ..................................................................................... 27Creating the HTTPS virtual server ..................................................................................... 28
Appendix B: Configuring the F5 WebAccelerator module with Apache web serversPrerequisites and configuration notes ............................................................................... 30Configuration example .......................................................................................................... 30Configuring the WebAccelerator module ........................................................................ 31Creating an HTTP Class profile .......................................................................................... 31Modifying the Virtual Server to use the Class profile .................................................... 32Creating a Policy ..................................................................................................................... 33Creating an Application ......................................................................................................... 34

Deploying the BIG-IP LTM with the Apache web server
This deployment guide provides step by step procedures for configuring the F5 devices with Apache web servers. It also contains information on how to best configure the Apache devices for high performance environments.For more information on the Apache web server or the Apache Software Foundation, see http://httpd.apache.org/. For more information on F5 devices described in this guide, see http://www.f5.com/products/big-ip/.
To provide feedback on this deployment guide or other F5 solution documents, contact us at [email protected].
Prerequisites and configuration notesThe following are prerequisites and configuration notes about this deployment:
◆ The Apache server must be on version 2.0 or later
◆ BIG-IP LTM v9.4.x or later (including v10.x)
◆ In this deployment guide, compression is configured on the F5 device (either on the BIG-IP LTM or the WebAccelerator module). This reduces the burden on the Apache servers, as you do not need to use a compression module such as mod_gzip.
◆ Persistence is typically not needed in a static web server setup, however we include optional procedures for configuring cookie persistence with back-up IP persistence, which can be implemented if applicable to your environment.
Product versions and revision historyProduct and versions tested for this deployment guide:
Revision history:
Product Tested Version Tested
BIG-IP System (LTM and WebAccelerator) 9.4.7 (applicable to 9.4.x and later)
Apache Server 2.0.63
Document Version Description
1.0 New deployment guide
1
Deploying F5 with Apache Web Servers
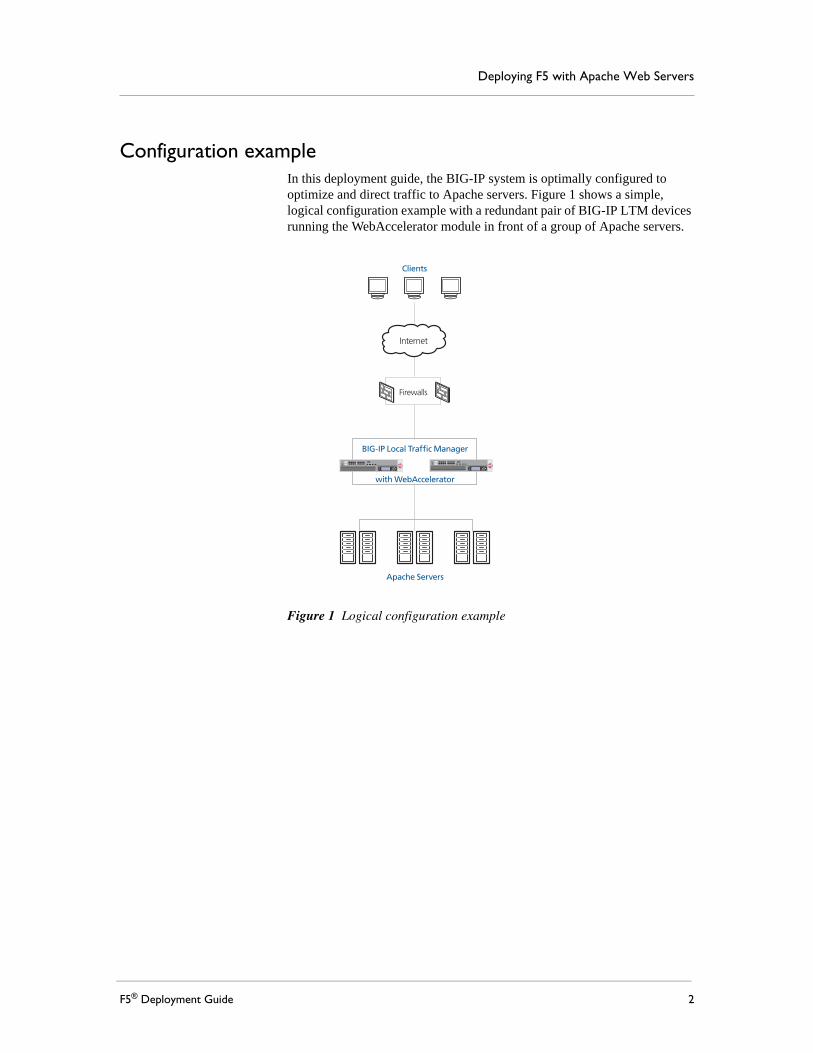
Configuration exampleIn this deployment guide, the BIG-IP system is optimally configured to optimize and direct traffic to Apache servers. Figure 1 shows a simple, logical configuration example with a redundant pair of BIG-IP LTM devices running the WebAccelerator module in front of a group of Apache servers.
Figure 1 Logical configuration example
Firewalls
Internet
BIG-IP Local Traffic Manager
Apache Servers
with WebAccelerator
Clients
F5® Deployment Guide 2

Configuring Apache Web Server for high performance environments
This document covers the configuration and tuning of both the Apache HTTP Web Server and the BIG-IP system. The purpose of this guide is to help install an architecture that can deliver the highest performance, in the most optimized manner (both at the network and application layer) and with the least amount of bandwidth.For sites that anticipate many hundreds or thousands of requests per second to the Apache front-end servers, tuning and optimizing Apache (as well as following the recommendations for the BIG-IP system in this deployment guide), help deliver the fastest response times possible. For sites with fewer requests per second, or no foreseeable performance issues, stock Apache installations downloaded or compiled from source are most likely sufficient, however the recommendations for BIG-IP still apply.The following guidelines are intended to deliver optimum performance for Apache and the BIG-IP LTM. The recommendations below are the most critical optimizations for Apache. For detailed information on Apache performance tuning, see: http://httpd.apache.org/docs/2.0/misc/perf-tuning.html
Using a statically linked binary or a dynamically loaded moduleThe first decision in building an Apache environment is whether to compile a statically linked Apache binary or a dynamic module loading Apache binary. Dynamic module loading presents the convenience of adding and removing modules as needed, but for sites that need maximum performance, statically linked modules are a better choice.One benefit of a statically built Apache server is that at compile time users have to examine all modules needed. This insures the smallest memory footprint for the Apache binary, and can also result in a more secure server by limiting exposure to loaded modules. Once you build and run your Apache binary, you will know exactly the memory footprint of each child or worker (this is discussed in detail later in this guide).If you are choosing a statically linked Apache binary, compile the Apache binary by listing every module you need. For example, the compile line for statically linked Apache Binary may look like the following:
./configure --prefix=/opt/http/apache --enable-module=rewrite --enable-module=proxy
If you are choosing a dynamically linked Apache binary, only load modules that you think are necessary. Note that execution time is slightly longer with dynamic loading, as the modules are executed the first time they are needed. Specifying which modules need to be loaded is done in the http.conf instead of at compile time, with a dynamically linked Apache binary.To compile Apache for dynamic loading, the compile line may look like the following:
./configure --prefix=/opt/http/apache --enable-so
3

Deploying F5 with Apache Web Servers
Using a worker module or a pre-fork moduleThe next decision to make before compiling is whether to use a worker (threaded) Apache model or a pre-fork (children) model. This is a compile time decision and can not be changed without re-compiling Apache.There are inherent advantages to each model and it is up to each administrator to weigh the pros-and-cons of this decision.In the pre-fork model, there is one thread per process and each process handles one request. The advantages of the pre-fork model are:• The number of children is always a known quantity, making
troubleshooting easier. • Each request is served by a unique process on the system, which adds to
security.• The pre-fork model has been in use for more than 10 years, making it
very well-known and stable.
In the threaded model, each worker process has multiple threads that receive requests. Keep in mind the following if using the threaded model:• The worker system uses less memory, but can be more difficult to
troubleshoot and more difficult to configure for scalability. • Because each process handles multiple requests, there may be some
security issues for the extremely security conscious.
During compile time, you choose either pre-fork or worker. We address performance tuning options below for each option. Under Microsoft Windows, Apache operates with one child process with many requests. On Windows only mpm_winnt can be used.
Using the Pre-Fork modelIn this section, we show tuning options for the Pre-Fork model. As a point of reference, the following is an example of out-of-the box Apache pre-fork tuning from the Apache http.conf file:<IfModule prefork.c>
ServerLimit 256
StartServers 8
MinSpareServers 5
MaxSpareServers 20
MaxClients 150
MaxRequestsPerChild 1000
</IfModule>
In the following procedures, we analyze these settings, and provide guidance for adjusting them for maximum performance.
F5® Deployment Guide 4

Setting the MaxClients and ServerLimit valuesThe most important setting for the Pre-Fork model is MaxClients, and tuning should begin there. One of the benefits of running a statically linked pre-fork model is that calculating MaxClients (and the corresponding setting of ServerLimit) can be easy to calculate. No matter whether you are running static or dynamic, calculating MaxClients is very similar.
To calculate and set the MaxClients and ServerLimit values
1. Start the Apache instance that you have compiled, using apachectl start or your own start script.
2. Send a few requests to Apache from a web browser or a utility such as Apache Bench (ab, compiled during Apache compilation or downloadable in binary format). Make sure to exercise any optional modules you are dynamically linking in order to account for their memory usage as well.
3. Determine the memory size of each pre-fork process. You may use a command such ps or the top application to gather this data. Be sure to collect the resident memory size and not the virtual size, and collect the data from the children, not the parent. The child processes are identifiable by the fact that their resident memory size should be identical and their parent process are all identical.
4. Figure out the available memory available on the box (using a tool such as free or top) and then divide the size of the Apache process by the available RAM. This number is a very good approximation of how many children can service requests on a box.
For example, let’s say we have statically compiled a very small Apache binary, with just the needed modules, and each process takes up 8 megabytes. Our server has 8 gigabytes of RAM, of which 6 are available (after the OS and other running applications are accounted for). Using our formula, we find that this box can safely handle 768 children at a time (6,144Mb / 8Mb = 768). So we set MaxClients to 768.
5. Next, we want to add a ServerLimit directive, and also set it to 768. If it is not present, ServerLimit must be added to this section of the http.conf file, and it must go before the MaxClients value (see the final example at the end of this section).
With this example box, we know that we can service up to 768 simultaneous users (provided that there is enough CPU power). If each request takes less than 2 seconds to complete, for example, we can calculate this box being able to handle approximately 384 requests per second at its maximum. Note that 2 seconds is an extremely conservative estimate of how long it should take an Apache child to return a result. Calculating the actual response time will vary from environment to environment and determining the requests per second must be tested using tools such as Apache Bench.
5

Deploying F5 with Apache Web Servers
Setting the StartServers valueThe next task is to set the StartServers option. StartServers indicates how many children will be started when Apache is first loaded. The pre-fork model is designed to stop running children if there are no requests, in order to conserve resources. However, the startup and shutdown of instances is itself resource expensive. The recommendation here is to find a good middle ground between the maximum number of requests the box will be expected to handle, and the amount of resources available.This guide also covers the BIG-IP LTM Slow Ramp Time feature which can help individual servers from being flooded by requests the moment they come back online. In short, the idea with StartServers is to pre-start enough children to service requests immediately, without having to spin up a large number of children as requests come in, but not too many children to immediately overwhelm the box before the kernel has a chance to react to all of the new processes.For a box that runs a maximum of 768 clients, if the traffic pattern of the site is one in which the site is usually busy, it would be a good idea to set StartServers to a number such a 512, and then adjust the Slow Ramp Time setting on the BIG-IP LTM to ramp up connections. In our example, we set StartServers at 512. See Step 6 of Creating the pool, on page 16 for our Slow Ramp Time setting.
Setting the MinSpareServers and MaxSpareServers valueFor the minimum and maximum number of spare servers, we recommend tuning based on the traffic patterns on the box. For boxes with unpredictable levels of traffic throughout the day, it's a good idea to set MinSpareServers and MaxSpareServers to a higher number, with the goal of maintaining a consistent number of processes. The forking and execution of new children consumes memory and CPU resources and reduces the ability to service bursts of traffic effectively. In our example, we recommend the following settings, but each installation should be examined and tuned based on the most common traffic patterns:MinSpareServers 50
MaxSpareServers 100
Setting MaxRequestsPerChildFinally, setting a maximum number of requests per child is a good idea to deal with any potential memory leaks. The more requests per second received, the higher this setting can be set, with the goal of not recycling children too often. For example, setting the MaxRequestsPerChild to 10,000 on a box where each child serves a request ever 2 seconds means that a child will be recycled on average every 83 minutes. Tune this number higher as the number of requests go up. MaxRequestsPerChild should also be dictated by the administrator’s comfort with the stability of the applications. Newer implementations should start by setting
F5® Deployment Guide 6

MaxRequestsPerChild at a lower value, but after the application has been stable in production for a while and there is certainty that there are no memory leaks, this number can be increased.
Reviewing the Pre-Fork tuning optionsUsing the preceding recommendations, the section of our http.conf file would look like the following:<IfModule prefork.c>
ServerLimit 768
StartServers 512
MinSpareServers 50
MaxSpareServers 100
MaxClients 768
MaxRequestsPerChild 10000
</IfModule>
7

Deploying F5 with Apache Web Servers
Using the Threaded (worker) modelIn this section, we show tuning options for the Threaded (Worker) model. As a point of reference, the following is an example of out-of-the box Apache pre-fork tuning from the Apache http.conf file:<IfModule worker.c>
StartServers 2
MaxClients 150
MinSpareThreads 25
MaxSpareThreads 75
ThreadsPerChild 25
MaxRequestsPerChild 0
</IfModule>
Setting the MaxClients and ServerLimit valuesThe most important setting for the Worker model is also MaxClients, and tuning should begin there.
To calculate and set the MaxClients and ServerLimit values
1. Start the Apache instance that you have compiled, using apachectl start or your own start script.
2. Send a few requests to Apache from a web browser or a utility such as Apache Bench (ab, compiled during Apache compilation or downloadable in binary format). Make sure to exercise any optional modules you are dynamically linking in order to account for their memory usage as well.
3. Next, determine the memory size of each worker process. You may use a command such ps or the top application to gather this data. Be sure to collect the resident memory size and not the virtual size.
4. Take the available memory available on the box (using a tool such as free or top) and then divide the size of the apache process by the available RAM. This number will be a very good approximation of how many children can service requests on a box.
For example, let us say we have a default worker setup with 150 clients (each with 25 threads) and each process takes up 20 megabytes. Let us say we have a server with 8 gigabytes of RAM of which 6 is available (after the OS and other running applications are accounted for), using our formula, we find that this box can safely handle about 307 workers at a time (6,144 / 20 = ~307 workers). We set MaxClients to 307 and adjust ServerLimit to be 307.
With this example box, we know that we can service up to 7675 (307 workers * 25 threads) simultaneous requests (provided that there is enough CPU power). If each request takes less than 2 seconds to complete, for example, we can calculate this box being able to handle approximately 3,837 requests per second at its
F5® Deployment Guide 8

maximum. Note that 2 seconds is an extremely conservative estimate of how long it should take an Apache child to return a result. Calculating the actual response time will vary from environment to environment and determining the requests per second must be tested using tools such as Apache Bench.
We can see that the worker model presents quite a performance benefit over the child model.
Setting the StartServers valueThe next task is to set the StartServers option. StartServers indicates how many children will be started when Apache is first loaded. The worker model is designed to stop running children if there are no requests, in order to conserve resources. However, the startup and shutdown of instances is itself resource expensive. The recommendation here is to find a good middle ground between the maximum number of requests the box will be expected to handle, and the amount of resources available.This guide also covers the BIG-IP LTM Slow Ramp Time feature which can help individual servers from being flooded by requests the moment they come back online. In short, the idea with StartServers is to pre-start enough children to service requests immediately, without having to spin up a large number of children as requests come in, but not too many children to immediately overwhelm the box before the kernel has a chance to react to all of the new processes.For a box that runs a maximum of 307 clients, if the traffic pattern of the site is one in which the site is usually busy, it would be a good idea to set StartServers to a number such a 100, and then adjust the Slow Ramp Time setting on the BIG-IP LTM to ramp up connections. In our example, we set StartServers at 100. See Step 6 of Creating the pool, on page 16 for our Slow Ramp Time setting.
Setting Min and Max SpareServersFor the minimum and maximum number of spare servers, we recommend tuning based on the traffic patterns on the box. For boxes with unpredictable levels of traffic throughout the day, it's a good idea to set MinSpareServers and MaxSpareServers to a higher number, with the goal of maintaining a consistent number of processes. The forking and execution of new children consumes memory and CPU resources and reduces the ability to service bursts of traffic effectively. In our example, we recommend the following settings, but each installation should be examined and tuned based on the most common traffic patterns: MinSpareServers 25MaxSpareServers 75
9

Deploying F5 with Apache Web Servers
Setting MaxRequestsPerChildFinally, setting a maximum number of requests per child is a good idea to deal with any potential memory leaks. The more requests per second received, the higher this setting can be set, with the goal of not recycling children too often. For example, setting the MaxRequestsPerChild to 10,000 on a box where each child serves a request ever 2 seconds means that a child will be recycled on average every 83 minutes. Tune this number higher as the number of requests go up. In our example, we are setting this to 100,000 to recycle processes less frequently. MaxRequestsPerChild should also be dictated by the administrator’s comfort with the stability of the applications. Newer implementations should start by setting MaxRequestsPerChild at a lower value, but after the application has been stable in production for a while and there is certainty that there are no memory leaks, this number can be increased.
After the analysis, in our hypothetical box we can recommend the following settings:
<IfModule worker.c>
ServerLimit 307
StartServers 100
MaxClients 307
MinSpareThreads 25
MaxSpareThreads 75
ThreadsPerChild 25
MaxRequestsPerChild 100000
</IfModule>
F5® Deployment Guide 10

Windows tuningFor Windows tuning, mpm_winnt is the only choice. The running processes are one parent process and one child process with threads. The following is the default Apache tuning:<IfModule mpm_winnt.c>
ThreadsPerChild 250
MaxRequestsPerChild 0
</IfModule>
To properly tune Windows Apache, adjust the numbers of ThreadsPerChild and monitor memory using task manager. Adjust the threads per child according to the anticipated load and available memory.After the analysis, in our hypothetical box we can recommend the following settings:<IfModule mpm_winnt.c>
ThreadsPerChild 500
MaxRequestsPerChild 10000
</IfModule>
11

Deploying F5 with Apache Web Servers
Configuring the ServerName and CanonicalNameNo matter whether you are configuring a threaded or pre-fork model, the next task is to find your ServerName directive and change it to match the BIG-IP virtual server: <BIG-IPVirtualServerHostName:Port>. In our example, we are using MyVirtualHostName and Port 80 is the external listening port. The directive will look like this:ServerName MyVirtualHostName:80
For CanonincalName, in some cases either CGIs, JavaScript or HTML create situations where Apache must construct a URL (a redirect for example). If you would like to trust the HostName value supplied by the browser, leave CanonincalName to off, otherwise, if you would like to control the environment more strictly, users should always be presented with the external address (MyVirtualHostName), therefore, the setting should be set to:CanonicalName On
Designing your logs properlyLog formats in Apache's httpd.conf specify how logs should be formatted. For BIG-IP LTM systems running SNAT or for many architectures with tiered access, origin IP addresses of users may be lost. For this reason, we recommend creating a custom log format and including the X-Forwarded-For header. Later in this deployment guide we cover how to enable this feature in BIG-IP LTM. To log the X-Forwarded-For header, begin by editing httpd.conf and creating a combined log type that includes at least the following X-Forwarded-For string: LogFormat "%h %l %u %t \"%r\" %>s %b \"%{Referer}i\" \"%{User-Agent}i\" \"%{X-Forwarded-For}i\"" combined
We recommend copying and editing an existing LogFormat directive from your Apache installation. The name for the LogFormat directive, in this case combined, must be unique.Be sure that the LogFormat directive appears on one line in your httpd.conf and that there is no line break.In this example, the LogFormat directive is setup to log all of the standard information such as IP address, time, url, referrer and user-agent, but we have appended the X-Forwarded-For header. We have called this the combined format, however, you are free to name it whatever you like.In the following section about log rotation, you see that we call combined in the CustomLog directive. Without a CustomLog directive, modifying or adding a LogFormat directive alone does not cause logging to begin.
F5® Deployment Guide 12

Rotating the logsLog rotation and log size maintenance are critical to the ability of Apache web server to perform at its peak ability. There are several strategies to log rotation. We present several options here but it is up to each administrator to design a solution that fits the needs of the specific installation.
◆ Piped logsBy outputting logs to a log rotation program, such as rotatelogs, log rotation and manipulation is handed off to this program. For example, configure your CustomLog directive by adding the following directive in httpd.conf. Note that the CustomLog directive references the LogFormat directive created earlier, in this case named combined:CustomLog "|/path/to/rotateplogsprogram /path/to/logfilename 86400" combined
In this example, log output is sent to a program called rotatelogsprogram in the /path/to directory. The main log is named logfilename and is located in /path/to directory. The log file is rotated every 86,400 seconds (24 hours) and it is in the combined format (defined elsewhere in httpd.conf and explained below).
◆ Syslog outputAnother option is to send logs to a syslog facility for collection and storage. For Error logs, Apache has the built-in ability to send logs to a configured syslog facility. For example, in httpd.conf you would configure your Error Log as follows:ErrorLog syslog:local
In this example all errors would be sent to a defined syslog facility called local. To define syslog facility consult your system's man page.
For access logs, streaming output to syslog is identical to method one. Instead of using a log rotation program however, you would send the output to a script that would in turn send the information to syslog.
◆ A nightly log rotation programThis is a final option for systems where streaming or piped output will not work for some reason. For this option to work, a nightly restart of Apache is likely necessary. One recommendation is to create a cron operation on your system to call a script that rotates the logs and restarts Apache. BIG-LTM health monitors will detect if the Apache instance is down longer than the monitor period and traffic will not be sent to an instance that does not respond.
Turning down KeepAlive and Failed Request timeoutsWhile KeepAlives should be on, the KeepAlive timeout should be set down to prevent idle connections from holding open children with no activity. We recommend the following settings in httpd.conf:Pre-fork model:KeepAlive On
13

Deploying F5 with Apache Web Servers
KeepAliveTimeout 2
MaxKeepAliveRequests 100
Worker and mpm_winnt model:KeepAlive On
KeepAliveTimeout 15
MaxKeepAliveRequests 100
For the Failed Request setting, we recommend turning down the connection timeout:Timeout 20
For some slower international connections there may be problems with the Timeout set too low because Apache closes the connection from the server side before the browser's requests reach the server after the TCP socket is opened. Therefore, we recommend adjusting the Timeout value upwards if this is identified as a potential problem in your traffic patterns.
F5® Deployment Guide 14

Configuring the BIG-IP LTM systemIn this section, we configure the BIG-IP LTM system for Apache Web Servers. This section also includes optional configuration for offloading SSL on the BIG-IP LTM.
Creating the HTTP health monitorThe first step is to set up a health monitors for the Apache devices. This procedure is optional, but very strongly recommended. In our example, we create a basic HTTP health monitor. Although the monitor in the following example is quite simple, you can configure optional settings such as Send and Receive Strings to make the monitor much more specific.
To create a health monitor
1. On the Main tab, expand Local Traffic, and then click Monitors.
2. Click the Create button. The New Monitor screen opens.
3. In the Name box, type a name for the Monitor.In our example, we type apache-http-monitor.
4. From the Type list, select http.
5. In the Configuration section, in the Interval and Timeout boxes, type an Interval and Timeout. We recommend at least a (1:3) +1 ratio between the interval and the timeout (for example, the default setting has an interval of 5 and an timeout of 16). In our example, we use a Interval of 30 and a Timeout of 91 (see Figure 2).
6. In the Send String and Receive Rule sections, you can add a Send String and Receive Rule specific to the device being checked.
7. Click the Finished button.The new monitor is added to the Monitor list.
15

Deploying F5 with Apache Web Servers
Figure 2 Creating the HTTP Monitor
Creating the poolThe next step is to define a load balancing pool for the Apache servers. A BIG-IP pool is a set of devices grouped together to receive traffic according to a load balancing method. This pool uses the monitor you just created. This pool contains the Slow Ramp Time setting discussed previously in this guide (see Step 6).
To create the Apache pool
1. On the Main tab, expand Local Traffic, and then click Pools.The Pool screen opens.
2. In the upper right portion of the screen, click the Create button. The New Pool screen opens.
3. From the Configuration list, select Advanced.
4. In the Name box, type a name for your pool. In our example, we use apache-http-pool.
5. In the Health Monitors section, select the name of the monitor you created in Creating the HTTP health monitor, and click the Add (<<) button. In our example, we select apache-http-monitor.
6. In the Slow Ramp Time box, type a number of seconds that corresponds to the expected number of requests per second. For example, if the server farm is receiving 2000 requests per second, and there are 5 servers, each device receives approximately 400 requests per second (using the round robin load balancing
F5® Deployment Guide 16

method). When a server that has been offline comes back online, we don't want the BIG-IP to immediately send 400 requests to that device. In our example, we set the Slow Ramp Time to 30 seconds.
Note: The Slow Ramp Time option does not appear unless you have selected Advanced from the Configuration list.
7. From the Load Balancing Method list, choose your preferred load balancing method (different load balancing methods may yield optimal results for a particular network).In our example, we select Round Robin.
8. In this pool, we leave the Priority Group Activation Disabled.
9. In the New Members section, make sure the New Address option button is selected.
10. In the Address box, add the first Apache server to the pool. In our example, we type 10.132.81.100.
11. In the Service Port box, type 80 or select HTTP from the list.
12. Click the Add button to add the member to the list.
13. Repeat steps 8-10 for each server you want to add to the pool. In our example, we repeat these steps five times for the remaining servers, 10.132.81.101 - .105.
14. Click the Finished button (see Figure 3).
17

Deploying F5 with Apache Web Servers
Figure 3 Creating the pool for the Apache servers
Creating profilesThe BIG-IP system use configuration objects called profiles. A profile is an object that contains user-configurable settings for controlling the behavior of a particular type of network traffic, such as HTTP connections. Using profiles enhances your control over managing network traffic, and makes traffic-management tasks easier and more efficient. Although it is possible to use the default profiles, we strongly recommend you create new profiles based on the default parent profiles, even if you do not change any of the settings initially. Creating new profiles allows you to easily modify the profile settings specific to this deployment, and ensures you do not accidentally overwrite the default profile.
F5® Deployment Guide 18

Creating an HTTP profile
The first new profile we create is an HTTP profile. The HTTP profile contains numerous configuration options for how the BIG-IP LTM system handles HTTP traffic. In the following example, we base our HTTP profile off of the http-acceleration parent profile, as we are using the WebAccelerator. If you are not using the WebAccelerator, we recommend using the http-wan-optimized-compression-caching parent.
To create a new HTTP profile
1. On the Main tab, expand Local Traffic, and then click Profiles.The HTTP Profiles screen opens.
2. In the upper right portion of the screen, click the Create button. The New HTTP Profile screen opens.
3. In the Name box, type a name for this profile. In our example, we type apache-http-opt.
4. From the Parent Profile list, select http-wan-optimized-compression-caching.If you are using the WebAccelerator module, select http-acceleration.
5. Optional: If you using the BIG-IP LTM to offload SSL, in the Settings section, check the Custom box for Redirect Rewrite, and from the Redirect Rewrite list, select Match. See Appendix A: Configuring the BIG-IP LTM to offload SSL, on page 1-25 for more information.
6. Modify any of the other settings as applicable for your network. In our example, we leave the settings at their default levels.
7. Click the Finished button.
Creating the TCP profilesThe next profiles we create are the TCP profiles. If most of the Microsoft Apache users are accessing the devices via a Local Area Network, we recommend using the tcp-lan-optimized (for server-side TCP connections) parent profile. If the majority of the users are accessing the system from remote or home offices, we recommend using an additional TCP profile, called tcp-wan-optimized (for client side TCP connections). In our example, we leave these profiles at their default levels; you can configure any of the options as applicable for your network.
Creating the LAN optimized TCP profileFirst we configure the LAN optimized profile. If you do not want to use this optimized profile, you can choose the default TCP parent profile.
19

Deploying F5 with Apache Web Servers
To create a new TCP profile
1. On the Main tab, expand Local Traffic, and then click Profiles.The HTTP Profiles screen opens.
2. On the Menu bar, from the Protocol menu, click tcp.
3. In the upper right portion of the screen, click the Create button. The New TCP Profile screen opens.
4. In the Name box, type a name for this profile. In our example, we type apache-tcp-lan.
5. From the Parent Profile list, select tcp-lan-optimized.
6. Modify any of the settings as applicable for your network. In our example, we leave the settings at their default levels.
7. Click the Finished button.
Creating the WAN optimized TCP profileNow we configure the WAN optimized profile. Remember, if most of the users are accessing the system over the LAN or other low latency links, you do not need to create this profile.
To create a new TCP WAN optimized profile
1. On the Main tab, expand Local Traffic, and then click Profiles.The HTTP Profiles screen opens.
2. On the Menu bar, from the Protocol menu, click tcp.
3. In the upper right portion of the screen, click the Create button. The New TCP Profile screen opens.
4. In the Name box, type a name for this profile. In our example, we type apache-tcp-wan.
5. From the Parent Profile list, select tcp-wan-optimized.
6. Modify any of the settings as applicable for your network. In our example, we leave the settings at their default levels.
7. Click the Finished button.
Optional: Creating persistence profileAs noted previously, Persistence is typically not needed in a static web server setup, but cookie persistence with a back-up IP persistence can be setup if your environment calls for it. In the following example, we show how to create a cookie persistence profile.
To create a new cookie persistence profile
1. On the Main tab, expand Local Traffic, and then click Profiles.The HTTP Profiles screen opens.
F5® Deployment Guide 20

2. On the Menu bar, click Persistence.The Persistence Profiles screen opens.
3. In the upper right portion of the screen, click the Create button. The New Persistence Profile screen opens.
4. In the Name box, type a name for this profile. In our example, we type apache-cookie.
5. From the Persistence Type list, select Cookie.The configuration options for cookie persistence appear.
6. Modify any of the settings as applicable for your network. In our example, we leave the settings at their default levels.
7. Click the Finished button.
Figure 4 Creating the cookie persistence profile
If using persistence, it is a good idea to have a backup persistence method. In this example, we use Source Address Affinity.
To create a Source Address Affinity persistence profile
1. On the Main tab, expand Local Traffic, and then click Profiles.The HTTP Profiles screen opens.
2. On the Menu bar, click Persistence.The Persistence Profiles screen opens.
3. In the upper right portion of the screen, click the Create button. The New Persistence Profile screen opens.
4. In the Name box, type a name for this profile. In our example, we type apache-source.
5. From the Persistence Type list, select Source Address Affinity.The configuration options appear.
21

Deploying F5 with Apache Web Servers
6. Modify any of the settings as applicable for your network. In our example, we leave the settings at their default levels.
1. Click the Finished button
Creating a OneConnect profileThe final profile we create is a OneConnect profile. With OneConnect enabled, client requests can utilize existing, server-side connections, thus reducing the number of server-side connections that a server must negotiate to service those requests. This can provide significant performance improvements for Apache implementations. For more information on OneConnect, see the BIG-IP LTM documentation. In our example, we leave all the options at their default settings. You can configure these options as appropriate for your network.
To create a new OneConnect profile
1. On the Main tab, expand Local Traffic, and then click Profiles.The HTTP Profiles screen opens.
2. On the Menu bar, from the Other menu, click OneConnect.The Persistence Profiles screen opens.
3. In the upper right portion of the screen, click the Create button. The New HTTP Profile screen opens.
4. In the Name box, type a name for this profile. In our example, we type apache-oneconnect.
5. From the Parent Profile list, ensure that oneconnect is selected.
6. Modify any of the other settings as applicable for your network. In our example, we leave the settings at their default levels.
7. Click the Finished button.
Creating the virtual serverNext, we configure a virtual server that references the profiles and pool you created in the preceding procedures.
To create the virtual server
1. On the Main tab, expand Local Traffic, and then click Virtual Servers.The Virtual Servers screen opens.
2. In the upper right portion of the screen, click the Create button. The New Virtual Server screen opens.
3. In the Name box, type a name for this virtual server. In our example, we type apache-http-vs.
4. In the Destination section, select the Host option button.
F5® Deployment Guide 22
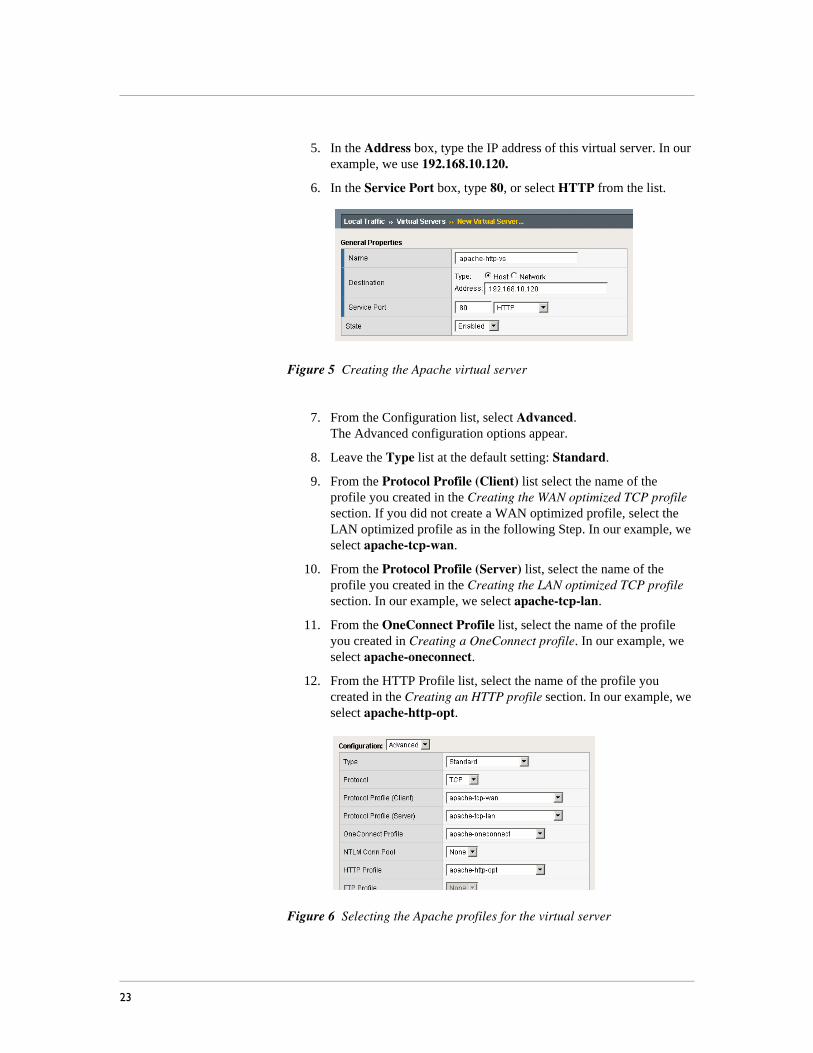
5. In the Address box, type the IP address of this virtual server. In our example, we use 192.168.10.120.
6. In the Service Port box, type 80, or select HTTP from the list.
Figure 5 Creating the Apache virtual server
7. From the Configuration list, select Advanced.The Advanced configuration options appear.
8. Leave the Type list at the default setting: Standard.
9. From the Protocol Profile (Client) list select the name of the profile you created in the Creating the WAN optimized TCP profile section. If you did not create a WAN optimized profile, select the LAN optimized profile as in the following Step. In our example, we select apache-tcp-wan.
10. From the Protocol Profile (Server) list, select the name of the profile you created in the Creating the LAN optimized TCP profile section. In our example, we select apache-tcp-lan.
11. From the OneConnect Profile list, select the name of the profile you created in Creating a OneConnect profile. In our example, we select apache-oneconnect.
12. From the HTTP Profile list, select the name of the profile you created in the Creating an HTTP profile section. In our example, we select apache-http-opt.
Figure 6 Selecting the Apache profiles for the virtual server
23
Deploying F5 with Apache Web Servers
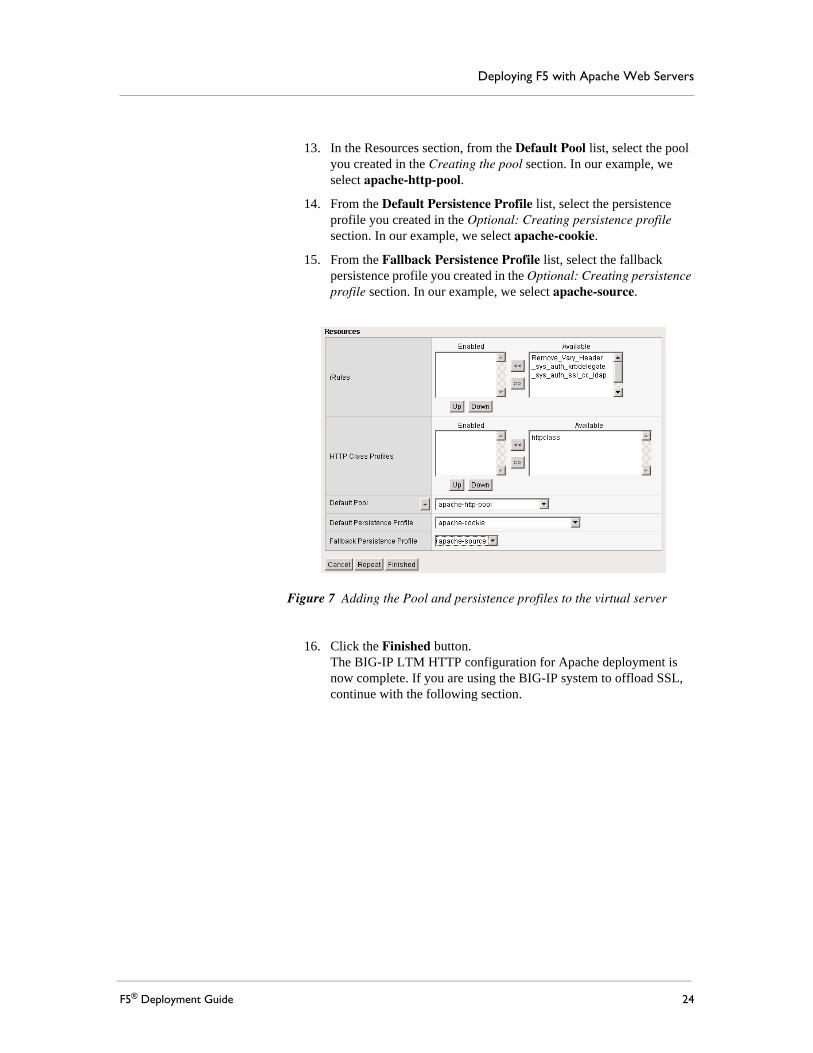
13. In the Resources section, from the Default Pool list, select the pool you created in the Creating the pool section. In our example, we select apache-http-pool.
14. From the Default Persistence Profile list, select the persistence profile you created in the Optional: Creating persistence profile section. In our example, we select apache-cookie.
15. From the Fallback Persistence Profile list, select the fallback persistence profile you created in the Optional: Creating persistence profile section. In our example, we select apache-source.
Figure 7 Adding the Pool and persistence profiles to the virtual server
16. Click the Finished button.The BIG-IP LTM HTTP configuration for Apache deployment is now complete. If you are using the BIG-IP system to offload SSL, continue with the following section.
F5® Deployment Guide 24

Appendix A: Configuring the BIG-IP LTM to offload SSL
If you are using the BIG-IP LTM system to offload SSL from the Apache devices, there are additional configuration procedures you must perform on the BIG-IP LTM system. In the following configuration, the BIG-IP LTM redirects all incoming traffic to the HTTP virtual server to the HTTPS virtual server. This is useful if a user types a URL in a browser, but forgets to change the protocol to HTTPS.If your deployment does not require all traffic to be redirected to HTTPS, you do not need to configure the iRule or modify the HTTP virtual server as described below, nor configure the Rewrite Redirect setting in the HTTP profile in Step 5 of Creating an HTTP profile. You can have both an HTTP and HTTPS virtual server on the same address with the appropriate ports.
Important
This section is optional, and only necessary if you are using the BIG-IP LTM system for offloading SSL.
Using SSL certificates and keysBefore you can enable the BIG-IP LTM system to act as an SSL proxy, you must install a SSL certificate on the virtual server that you wish to use for Apache connections on the BIG-IP LTM device. For this Deployment Guide, we assume that you already have obtained an SSL certificate, but it is not yet installed on the BIG-IP LTM system. For information on generating certificates, or using the BIG-IP LTM to generate a request for a new certificate and key from a certificate authority, see the Managing SSL Traffic chapter in the Configuration Guide for Local Traffic Management.
Importing keys and certificatesOnce you have obtained a certificate, you can import this certificate into the BIG-IP LTM system using the Configuration utility. By importing a certificate or archive into the Configuration utility, you ease the task of managing that certificate or archive. You can use the Import SSL Certificates and Keys screen only when the certificate you are importing is in Privacy Enhanced Mail (PEM) format.
To import a key or certificate
1. On the Main tab, expand Local Traffic.
2. Click SSL Certificates. The list of existing certificates displays.
3. In the upper right corner of the screen, click Import.
4. From the Import Type list, select the type of import (Certificate or Key).
25

Deploying F5 with Apache Web Servers
5. In the Certificate (or Key) Name box, type a unique name for the certificate or key.
6. In the Certificate (or Key) Source box, choose to either upload the file or paste the text.
7. Click Import.If you imported the certificate, repeat this procedure for the key.
Creating a Client SSL profileThe next step in this configuration is to create a Client SSL profile. This profile contains the SSL certificate and Key information for decrypting the SSL traffic on behalf of the servers.
To create a new Client SSL profile
1. On the Main tab, expand Local Traffic, and then click Profiles.The HTTP Profiles screen opens.
2. On the Menu bar, from the SSL menu, select Client.The Client SSL Profiles screen opens.
3. In the upper right portion of the screen, click the Create button.The New Client SSL Profile screen opens.
4. In the Name box, type a name for this profile. In our example, we type apache-clientssl.
5. In the Configuration section, check the Certificate and Key Custom boxes.
6. From the Certificate list, select the name of the Certificate you imported in the Importing keys and certificates section.
7. From the Key list, select the key you imported in the Importing keys and certificates section.
8. Click the Finished button.
Creating the Redirect iRuleThe Redirect iRule takes incoming HTTP requests (non-secure) and redirects them to the correct HTTPS (secure) virtual server, without user interaction.
To create the Redirect iRule
1. On the Main tab, expand Local Traffic, and then click iRules.The iRule screen opens.
2. In the upper right portion of the screen, click the Create button. The New iRule screen opens.
F5® Deployment Guide 26

3. In the Name box, enter a name for your iRule. In our example, we use apache-httptohttps.
4. In the Definition section, copy and paste the following iRule:when HTTP_REQUEST {
HTTP::redirect https://[HTTP::host][HTTP::uri]
}
5. Click the Finished button (see Figure 8).
Figure 8 Creating the iRule
Modifying the HTTP virtual serverThe next task is to modify the HTTP virtual server you created in Creating the virtual server, on page 1-22 to use the iRule you just created.
To modify the existing Apache virtual server
1. On the Main tab, expand Local Traffic, and then click Virtual Servers. The Virtual Servers screen opens.
2. From the Virtual Server list, click the Apache virtual server you created in the Creating the virtual server section. In our example, we click apache-http-vs.
3. On the menu bar, click Resources.
4. From the Default Pool list, select None. This virtual server no longer requires the load balancing pool, as traffic is redirected to the HTTPS virtual server we create in the following procedure.
5. Click the Update button.
6. In the iRules section, click the Manage button.The Resource Management screen opens.
7. From the Available list, select the iRule you created in the Creating the Redirect iRule section, and click the Add (<<) button.In our example, we select apache-httptohttps.
8. Click the Finished button.
27

Deploying F5 with Apache Web Servers
Creating the HTTPS virtual serverThe final task in this section is to create a HTTPS virtual server.
To create a new HTTPS virtual server
1. On the Main tab, expand Local Traffic, and then click Virtual Servers. The Virtual Servers screen opens.
2. In the upper right portion of the screen, click the Create button.
3. In the Name box, type a name for this virtual server. In our example, we type apache-https-vs.
4. In the Destination section, select the Host option button.
5. In the Address box, type the IP address of this virtual server. In our example, we use 192.168.104.146.
6. In the Service Port box, type 443 or select HTTPS from the list.
7. From the Configuration list, select Advanced.
8. Leave the Type list at the default setting: Standard.
9. From the Protocol Profile (Client) list select the name of the profile you created in the Creating the WAN optimized TCP profile section. If you did not create a WAN optimized profile, select the LAN optimized profile as in the following Step. In our example, we select apache-tcp-wan.
10. From the Protocol Profile (Server) list, select the name of the profile you created in the Creating the LAN optimized TCP profile section. In our example, we select apache-tcp-lan.
11. From the OneConnect Profile list, select the name of the profile you created in Creating a OneConnect profile. In our example, we select apache-oneconnect.
12. From the HTTP Profile list, select the name of the profile you created in the Creating an HTTP profile section. In our example, we select apache-http-opt. Make sure you have the Rewrite Redirect box checked in the HTTP profile as described in Step 5 of Creating an HTTP profile.
13. From the SSL Profile (Client) list, select the name of the SSL profile you created in the Creating a Client SSL profile section. In our example, we select apache-clientssl.
14. From the Default Pool list, select the pool you created in the Creating the pool section. In our example, we select apache-http-pool.
15. From the Default Persistence Profile list, select the persistence profile you created in the Optional: Creating persistence profile. In our example, we select apache-cookie.
F5® Deployment Guide 28

16. From the Fallback Persistence Profile list, select the fallback persistence profile you created in the Optional: Creating persistence profile. In our example, we select apache-source.
17. Click the Finished button.
This completes the BIG-IP LTM configuration.
29

Deploying F5 with Apache Web Servers
Appendix B: Configuring the F5 WebAccelerator module with Apache web servers
In this chapter, we configure the WebAccelerator module for the Apache devices to increase performance for end users. The BIG-IP WebAccelerator is an advanced web application delivery solution that provides a series of intelligent technologies designed to overcome problems with browsers, web application platforms and WAN latency issues which impact user performance.
For more information on the F5 WebAccelerator, see www.f5.com/products/big-ip/product-modules/webaccelerator.html.
Prerequisites and configuration notesThe following are prerequisites for this section:
◆ We assume that you have already configured the BIG-IP LTM system for directing traffic to the Apache deployment as described in this Deployment Guide.
◆ You must have purchased and licensed the WebAccelerator module on the BIG-IP LTM system, version 9.4 or later.
◆ This document is written with the assumption that you are familiar with the BIG-IP LTM system, WebAccelerator and Apache Web server. Consult the appropriate documentation for detailed information.
Configuration exampleUsing the configuration in this section, the BIG-IP LTM system with WebAccelerator module is optimally configured to accelerate traffic to Apache devices. The BIG-IP LTM with WebAccelerator module both increases end user performance as well as offloads the servers from serving repetitive and duplicate content.
In this configuration, a remote client with WAN latency accesses an Apache server via the WebAccelerator. The user’s request is accelerated on repeat visits by the WebAccelerator instructing the browser to use the dynamic or static object that is stored in its local cache. Additionally, dynamic and static objects are cached at the WebAccelerator so that they can be served quickly without requiring the server to re-serve the same objects.
F5® Deployment Guide 30

Configuring the WebAccelerator moduleConfiguring the WebAccelerator module requires creating an HTTP class profile and creating an Application. The WebAccelerator device has a large number of other features and options for fine tuning performance gains, see the WebAccelerator Administrator Guide for more information.
Creating an HTTP Class profileThe first procedure is to create an HTTP class profile. When incoming HTTP traffic matches the criteria you specify in the WebAccelerator class, the system diverts the traffic through this class. In the following example, we create a new HTTP class profile, based on the default profile.
To create a new HTTP class profile
1. On the Main tab, expand WebAccelerator, and then click Class Profiles.The HTTP Class Profiles screen opens.
2. In the upper right portion of the screen, click the Create button. The New HTTP Class Profile screen opens.
3. In the Name box, type a name for this Class. In our example, we type apache-class.
4. From the Parent Profile list, make sure httpclass is selected.
5. In the Configuration section, from the WebAccelerator row, make sure Enabled is selected.
6. In the Hosts row, from the list select Match Only. The Host List options appear.
a) In the Host box, type the host name that your end users use to access the Apache devices. In our example, we type apache-application.siterequest.com (see Figure 9).
b) Leave the Entry Type at Pattern String.
c) Click the Add button.
d) Repeat these sub-steps for any other host names users might use to access the Apache deployment.
7. The rest of the settings are optional, configure them as applicable for your deployment.
8. Click the Finished button. The new HTTP class is added to the list.
31

Deploying F5 with Apache Web Servers
Figure 9 Creating a new HTTP Class profile
Modifying the Virtual Server to use the Class profileThe next step is to modify the virtual server for your Apache deployment on the BIG-IP LTM system to use the HTTP Class profile you just created.
To modify the Virtual Server to use the Class profile
1. On the Main tab, expand Local Traffic, and then click Virtual Servers. The Virtual Servers screen opens.
2. From the Virtual Server list, click the name of the virtual server you created for the Apache servers. Creating the virtual server, on page 22In our example, we click apache-http-vs.The General Properties screen for the Virtual Server opens.
3. On the Menu bar, click Resources.The Resources screen for the Virtual Server opens.
4. In the HTTP Class Profiles section, click the Manage button.
5. From the Available list, select the name of the HTTP Class Profile you created in the preceding procedure, and click the Add (<<) button to move it to the Enabled box. In our example, we select apache-class.
F5® Deployment Guide 32

6. Click the Finished button. The HTTP Class Profile is now associated with the Virtual Server.r
Important
If you are using the BIG-IP LTM version 9.4.2 or later, you must have created an HTTP profile on the BIG-IP LTM system that has RAM Cache enabled. In our example (Creating an HTTP Class profile, on page 31) we use a parent profile that includes RAM Cache. If you did not create an HTTP profile with RAM Cache enabled, you must create a new HTTP profile, based on a parent profile that uses RAM Cache (such as HTTP Acceleration), and modify the virtual server to use this new profile. This is only required for BIG-IP LTM version 9.4.2 and later.
To create the HTTP profile, use Creating an HTTP Class profile, on page 31, selecting the HTTP Acceleration parent profile. You must leave RAM Cache enabled; all other settings are optional. To modify the virtual server, follow Steps 1 and 2 from the preceding procedure to access the virtual server, and then from the HTTP Profile list, select the name of the new profile you just created and click Update.
Creating a PolicyThe next task is to create a new WebAccelerator policy for the Apache deployment. In our example, we base the policy off of the Layer 2 Delivery policy. If you are an advanced user, you can also create a brand new policy from scratch.
To create a new Policy
1. On the Main tab, expand WebAccelerator, and then click Policies. The WebAccelerator UI opens in a new window.
2. In the Pre-defined Acceleration Policies table, from the Layer 2 Delivery row, click Copy. The Copy Policy screen opens.
3. In the Name box, type a name for this policy. In our example, we type Apache-Policy. You can optionally type a description.
4. Click the Copy button.The new policy appears in the User-defined Accelerator Policies list.
5. Locate the new policy in the User-defined Accelerator Policies list, and click the Publish link.The box expands with a warning and a comment box. You can optionally type a comment (see Figure 10).
6. Click the Publish Now button.
33

Deploying F5 with Apache Web Servers
Figure 10 Creating the Apache policy in WebAccelerator
Creating an ApplicationThe next procedure is to create a WebAccelerator Application. The Application provides key information to the WebAccelerator so that it can handle requests to your application appropriately.
To create a new Application
1. On the Main tab, expand WebAccelerator, and then click Applications. The WebAccelerator UI opens in a new window.
2. Click the Create button.
3. In the Application Name box, type a name for your application. In our example, we type Apache-WA.
4. In the Description box, you can optionally type a description for this application.
5. From the Central Policy list, select the name of the policy you created in the preceding procedure. In our example, we select Apache-Policy (see Figure 11).
6. In the Requested Host box, type the host name that your end users use to access the Apache deployment. This should be the same host name you used in Step 6a of Creating an HTTP Class profile, on page 1-31. In our example, we type apache-application.siterequest.com.If you have additional host names, click the Add Host button and enter the host name(s).
7. Click the Save button.
F5® Deployment Guide 34

Figure 11 Configuring an Application on the WebAccelerator
The rest of the configuration options on the WebAccelerator are optional, configure these as applicable for your network. With this base configuration, your end users will notice an marked improvement in performance after their first visit.
35