bicycle rodeo program bike smart - highway safety · bicycle rodeo program . bike smart . course...
TRANSCRIPT
UTAH EMERGENCY MEDICAL SERVICES FOR CHILDREN AND
UTAH HIGHWAY SAFETY OFFICE
BICYCLE RODEO PROGRAM BIKE SMART
Contact Information:
Keri Gibson: 801-243-7571
2
INDEX Goals and Functions ....................................................................................................................................................3 Preparing for the Rodeo.............................................................................................................................................4 Instructions .....................................................................................................................................................................6 Course Diagram 1 .........................................................................................................................................................8 Course Diagram 1 Skill Stations ..............................................................................................................................9 Course Diagram 1 Skill Station Clips .....................................................................................................................12 Course Diagram 2 .........................................................................................................................................................19 Course Diagram 2 Skill Stations ..............................................................................................................................20 Course Diagram 2 Skill Station Clips .....................................................................................................................23 Fitting Bicycle Helmets ...............................................................................................................................................31 Five-Step Helmet Fit Test...........................................................................................................................................32 Scooter Safety Program .............................................................................................................................................33 Trailer Towing & Checkout Information Sheet ..................................................................................................34

3
BICYCLE RODEO PROGRAM BIKE SMART
One of the functions of the Utah EMSC program is to increase injury prevention efforts
among EMS agencies and providers. In order to better serve the EMS community, the Utah EMSC Program is currently developing injury prevention modules for EMS agencies. The bicycle rodeo trailer is one such module.
This injury prevention program has three specific goals to improve injury prevention efforts within Utah.
The first goal is to promote and increase injury prevention efforts by EMS agencies. In order to checkout it is recommended that the request come through the EMS agencies within the area or from the local Safe Kids Coalition or Chapter. This will increase involvement of EMS and create new partnerships for injury prevention efforts.
The second goal is to increase bicycle helmet use, specifically for elementary school age children. Studies have proven increasing bicycle helmet usage has reduced the severity of head injuries resulting from bicycle crashes.
The third goal is to teach bicycle street safety such as riding with traffic, obeying traffic signs, and using hand signals.
The Utah EMSC Program currently has two bicycle rodeo trailers. The organization checking out the trailer is responsible for towing the trailer to their event and returning it back to the EMSC program. There is no charge for the trailer. Each trailer also contains new bicycle helmets, which can be given away. However limit the number you give away to 3 helmets per event. Upon returning the trailer please let the person that helps you with the trailer know the number of helmets that were given away and how many participants you had go through the rodeo.
To schedule the bicycle rodeo trailer, call Keri Gibson at the Utah Highway Safety Office at 801-243-7571.

4
UTAH EMERGENCY MEDICAL SERVICES FOR CHILDREN
AND UTAH HIGHWAY SAFETY OFFICE
BICYCLE RODEO PROGRAM BIKE SMART
Preparing for the Rodeo
INTRODUCTION The bicycle rodeo program is
designed to provide a tool for public safety to increase helmet usage and to teach children how to ride safely. The target audience is elementary school age children 2nd through 6th grade. This program may be used for younger children, however, the two teaching points include: wear your helmet and not to ride in the road without your parents.
The bicycles in the trailer are designed for those children who are between 2nd and 6th grade who can ride without training wheels. If your audience is younger than second grade you will need to supply smaller bikes with training wheels, or have each person bring their own bike.
PREPARATION Select dates and times for your
bicycle rodeo program. Reserve the bicycle rodeo trailer by calling Highway Safety 801.243.7571
You will need at least seven to ten people to run the Bike Smart program. PTA, teachers, EMS, fire departments, police departments, department stores or Sake Kids coalitions, are a few organizations than may provide additional personnel to help with the event.
One suggestion is to use older teenagers to help with the bicycle rodeo. Make sure that all helpers are trained on basic bicycle skills, laws and rodeo procedures. They should know which skill they will be monitoring and exactly what they are supposed to teach. Helpers should be distinguished from observers and participants, if possible. Suggestions are to wear matching tee shirts, hats, stickers, vests or uniforms.
5
FACILITY OR COURSE AREA The course area should be level and
hard surfaced. School playgrounds or parking lots are the best area. Do not use dirt or grass areas for riding.
Arrange for the facility or course area before the course. The bicycle course is approximately 120 feet by 120 feet and there should be no playground equipment or cars parked in the bicycle rodeo area. Please make sure that the owner of the parking lot or school principal is aware of these needs.
Marking lines for maneuvers are done with dry or wet lime. A chalker for the lime is provided in the trailer. You will need to purchase the lime or baseball chalk from your local hardware store before the event.
Lime will wash off with the next rainstorm or you may be required to wash it off after the course. Make arrangements with your local fire department. The lime will not hurt the environment. Please check with the parking lot owner or school principal to make sure it is okay to use lime. If not, you can use sidewalk chalk, which can be purchased at toy stores.
ADVERTISEMENT For the best participation you will
need to develop a flyer to inform people of your event. If you are doing individual schools, you will need to send home a flyer with the children describing the event. Flyers may be posted at schools, stores, or community buildings. Radio advertising will also help promote a community bicycle rodeo event.
INSPECTION Bicycle inspections provide a great
service but must be done by an expert. Check with bicycle shops or law
enforcement.
REGISTRATION Contact the agency that is in charge
of registering bicycles (police, fire department, etc.) and see if they will provide this service.
ACHIEVEMENT CERTIFICATE If you are providing a certificate,
card completion, or bicycle driver license, you will need to make these up before the event.
ITEMS TO PURCHASE You will need to purchase the
following items before the event: lime or baseball chalk for the lines; water or drinks for those who are assisting with the event. There is a container in the trailer for extra lime. It usually takes one bag of lime or baseball chalk per course. If you are not using lime, you will need sidewalk chalk.
The red air tank in the trailer will need to be filled before the event. It can be filled at any gas station, which provides air service or a tire store. Please do not overfill. The red tank will fill about 30 tires. To turn the tank on, twist a red washer one turn at the end of hose.
HELMETS Helmets are required to ride on the
course. If the child does not have a helmet, he or she may borrow one. Please use surgical caps when using EMSC helmets. It is important that each child has a proper fitting helmet. Please take time to make sure that each helmet is fitted on every child or participant. Most children or participants will bring their own helmet.
This is a great time to teach the child and parents the importance of wearing their helmet each time they ride.

6
BICYCLE RODEO PROGRAM BIKE SMART
Instructions
PREPARATION
BASIC SKILLS to be taught:
hand signaling braking balancing weaving turning learning traffic signs checking for traffic
BICYCLES should be the right size. To make sure the bicycle fits, have child straddle the bike holding onto the handle bars. If their feet can touch the ground flat, the bike should be fine. HELMETS are required to ride on the course. If the child does not have a helmet he/she may borrow one. Please use
surgical caps when using EMSC helmets. Make sure they are wearing them correctly. (They should fit level on top of the head, with the front low on forehead B about one inch above eyebrows. Chin straps should be tight. See, Five - Step Helmet Fit Test) Note: EMSC helmets should be disinfectant after each event with spray. Surgical caps should be thrown away. ENCOURAGE CHILDREN to practice skills they have difficulty with. If time permits, have them repeat each problem area. WORKERS/HELPERS should be trained on basic bicycle skills, laws, and rodeo procedures. They should know which skill they will be monitoring and

7exactly what they are supposed to teach. One person may monitor no more than two skill stations. Workers/helpers should be distinguished from observers and participants, if possible. Suggestions: wear matching tee shirts, hats, stickers, vests or uniforms.
SETTING UP COURSE SAMPLE COURSE LAYOUT is attached to trailer door. Skill stations can be switched around to accommodate areas that are different in shape and size, or some stations may have to be eliminated if space is limited. COURSE AREA should be level and hard-surfaced. School playgrounds, parking lots, or seldom used streets that can be blocked off for several hours are suitable. MARK LINES for maneuvers with chalk, dry or wet lime, duct (or masking) tape, or spray paint that washes off. Traffic cones can be used to mark off rodeo area and used in lieu of chalk or tape with some of the skills. Note: Sidewalk chalk can be purchased at toy stores. Lime can be purchased at hardware/lumbar stores. Check with local road maintenance departments for spray paint, lime, and cones.
SPACING IS VERY IMPORTANT. Make sure there is enough space allowed at each station so maneuvers can be completed easily (weaving around cones, circling, balancing, etc.) Make sure there is enough space between stations to accommodate waiting children. (See course map for suggested measurements.) WINDY CONDITIONS can cause signs to blow over and break off. To prevent this place brick on wooden stand to anchor.
OPTIONAL COMPONENTS REGISTRATION: Contact the agency who is in charge of registering bicycles (police, fire department, etc.) And see if they will provide this service. Offer to assist. (Works best if done after skill training.) INSPECTION: Bicycle inspections provide a great service but must be done by an expert. Check with bicycle shops or law enforcement. (Works best if done at the very beginning.) ACHIEVMENT CERTIFICATE OR BICYCLE DRIVER LICENSE: These can be made up in any form you like.

8
9
UTAH EMERGENCY MEDICAL SERVICES FOR CHILDREN AND
The Utah Highway Safety Office
BICYCLE RODEO PROGRAM BIKE SMART
Course Diagram 1 - Skill Stations
INSTRUCTION AREA Before starting it is important that children understand exactly what is expected of them.
Explain the rules you have set up. Explain each skill and what they will
need to accomplish. Demonstrate hand signals and have
the children practice with you. Make sure they understand the
meaning of all traffic signs (yield, stop, etc.).
Read regulatory signs (RIDE BICYCLES on RIGHT with traffic and WALK on LEFT facing traffic) and explain meaning.
Make sure helmets are worn correctly. (They should fit snug and sit level on top of head. The front of the helmet should be low, about 1" from eyebrows. Chin straps should
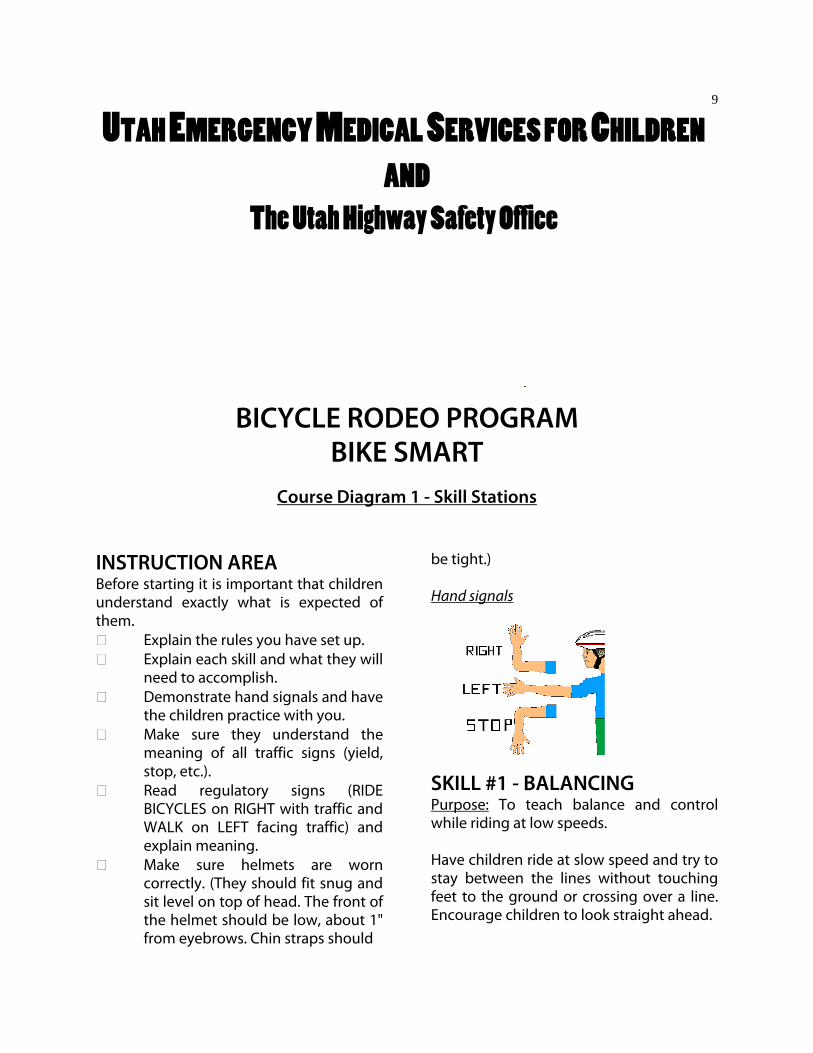
be tight.) Hand signals SKILL #1 - BALANCING Purpose: To teach balance and control while riding at low speeds. Have children ride at slow speed and try to stay between the lines without touching feet to the ground or crossing over a line. Encourage children to look straight ahead.
10At STOP sign have children stop, look left, right, and left again before going to the next skill station. SKILL #2 - CONTROL (Weaving) Purpose: To Teach control, coordination, and ability to maneuver. Before starting explain what CURVED sign means. (There is a curved road ahead.) Have children weave around the cones (or obstacles) in a zigzag fashion without touching them. At STOP sign have children stop and give proper hand signal and turn left to next skill station. SKILL #3 - BRAKING Purpose: To teach how to stop quickly and how to judge stopping distance. Have children ride at normal speed, at the first line apply brakes to stop with their front tire ending at the second line. Neither foot can touch the ground until they stop, and they should not skid or wobble. NOTE: Explain if they go past the line they should apply their brakes harder; if they stop before the line, they should apply their brakes lighter. If time permits, have then try it again if they missed the mark. At STOP sign have children stop, look left, right, and left again before going to the next skill station. SKILL #4 - CIRCLING Purpose: To teach balance, ability to circle and change direction. Have children ride at slow speed between the double lines in the circles or figure
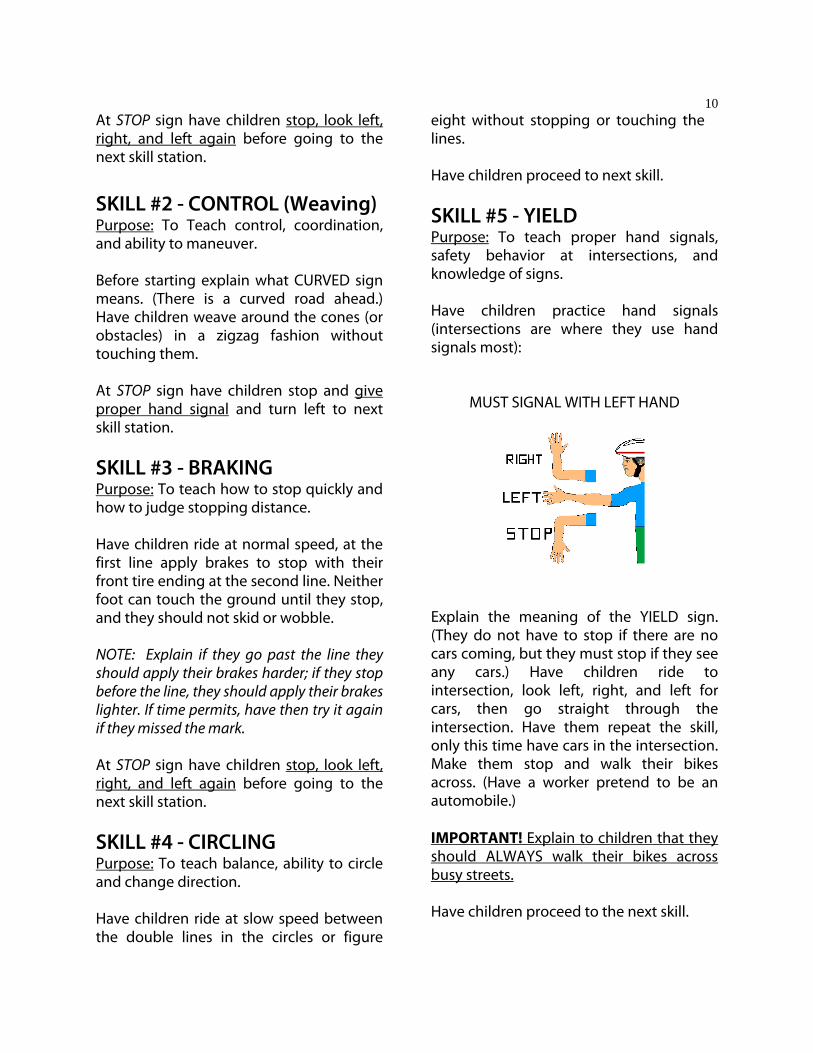
eight without stopping or touching the lines. Have children proceed to next skill. SKILL #5 - YIELD Purpose: To teach proper hand signals, safety behavior at intersections, and knowledge of signs. Have children practice hand signals (intersections are where they use hand signals most):
MUST SIGNAL WITH LEFT HAND
Explain the meaning of the YIELD sign. (They do not have to stop if there are no cars coming, but they must stop if they see any cars.) Have children ride to intersection, look left, right, and left for cars, then go straight through the intersection. Have them repeat the skill, only this time have cars in the intersection. Make them stop and walk their bikes across. (Have a worker pretend to be an automobile.) IMPORTANT! Explain to children that they should ALWAYS walk their bikes across busy streets. Have children proceed to the next skill.

11
SKILL #6 - CHECKING FOR TRAFFIC, STOP AND NO LEFT TURN SIGN. Purpose: To teach balance, ability to react quickly, and proper hand signals. Have children ride at slow speed, look over their left shoulder (for traffic) before maneuvering around object placed in the path. Explain the meaning of the STOP and NO LEFT TURN sign. Have children ride to intersection and stop and move to the cross walk, look left, right, and left for cars. Make sure they walk their bikes across the intersection. Have children proceed to the next skill.
SKILL #7 - RAILROAD CROSSING AND SCHOOL CROSSING. Purpose: To teach how to cross a railroad crossing and to teach correct behavior toward pedestrians. Have children stop at railroad crossing and get off their bikes. Explain what RAILROAD sign means, (Railroad crossing ahead.) Before crossing make sure they look both ways and walk their bicycles across the tracks. Have children stop at crosswalk. Explain what SCHOOL CROSSING sign means. ( A place where school children and others can cross.) Tell them they must always stop for people crossing the street. (If possible, have someone in the crosswalk to make it more realistic.) Explain that this rule also applies when riding on the sidewalk. They must always stop for people using the sidewalk. Have children ride to the end. This concludes the skill training. Have children proceed to the exit area.
12
BIKE SMART SKILL STATIONS 1
SKILL #1 - BALANCING Purpose: To teach balance and control while riding at low speeds. Have children ride at slow speed and try to stay between the lines without touching feet to the ground or crossing over a line. Encourage children to look straight ahead. At STOP sign have children stop, look left, right, and left again before going to the next skill station.
13
BIKE SMART SKILL STATIONS 1
SKILL #2 - CONTROL (Weaving) Purpose: To Teach control, coordination, and ability to maneuver. Before starting explain what CURVED sign means. (There is a curved road ahead.) Have children weave around the cones (or obstacles) in a zigzag fashion without touching them. At STOP sign have children stop and give proper hand signal and turn left to next skill station.

14
BIKE SMART SKILL STATIONS 1
SKILL #3 - BRAKING Purpose: To teach how to stop quickly and how to judge stopping distance. Have children ride at normal speed, at the first line apply brakes to stop with their front tire ending at the second line. Neither foot can touch the ground until they stop, and they should not skid or wobble. NOTE: Explain if they go past the line they should apply their brakes harder; if they stop before the line, they should apply their brakes lighter. If time permits, have then try it again if they missed the mark. At STOP sign have children stop, look left, right, and left again before going to the next skill station.

15
BIKE SMART SKILL STATIONS 1
SKILL #4 - CIRCLING Purpose: To teach balance, ability to circle and change direction. Have children ride at slow speed between the double lines in the circles or figure eight without stopping or touching the lines. Have children proceed to the next skill.

16
BIKE SMART SKILL STATIONS 1
SKILL #5 - YIELD Purpose: To teach proper hand signals, safety behavior at intersections, and knowledge of signs. Have children practice hand signals (intersections are where they use hand signals most):
MUST SIGNAL WITH LEFT HAND
Explain the meaning of the YIELD sign. (They do not have to stop if there are no cars coming, but they must stop if they see any cars.) Have children ride to intersection, look left, right, and left for cars, then go straight through the intersection. Have them repeat the skill, only this time have cars in the intersection. Make them stop and walk their bikes across. (Have a worker pretend to be an automobile.) IMPORTANT! Explain to children that they should ALWAYS walk their bikes across busy streets. Have children proceed to the next skill.

17
BIKE SMART SKILL STATIONS 1
SKILL #6 - CHECKING FOR TRAFFIC, STOP AND NO LEFT TURN SIGN. Purpose: To teach balance, ability to react quickly, and proper hand signals. Have children ride at slow speed, look over their left shoulder (for traffic) before maneuvering around object placed in the path. Explain the meaning of the STOP and NO LEFT TURN sign. Have children ride to intersection and stop and move to the cross walk, look left, right, and left for cars. Make sure they walk their bikes across the intersection. Have children proceed to the next skill.
18
BIKE SMART SKILL STATIONS 1
SKILL #7 - RAILROAD CROSSING AND SCHOOL CROSSING. Purpose: To teach how to cross a railroad crossing and to teach correct behavior toward pedestrians. Have children stop at railroad crossing and get off their bikes. Explain what RAILROAD sign means, (Railroad crossing ahead.) Before crossing make sure they look both ways and walk their bicycles across the tracks. Have children stop at crosswalk. Explain what SCHOOL CROSSING sign means. (A place where school children and others can cross.) Tell them they must always stop for people crossing the street. (If possible, have someone in the crosswalk to make it more realistic.) Explain that this rule also applies when riding on the sidewalk. They must always stop for people using the sidewalk. Have children ride to the end. This concludes the skill training. Have children proceed to the exit area.

19
20
BICYCLE RODEO PROGRAM BIKE SMART
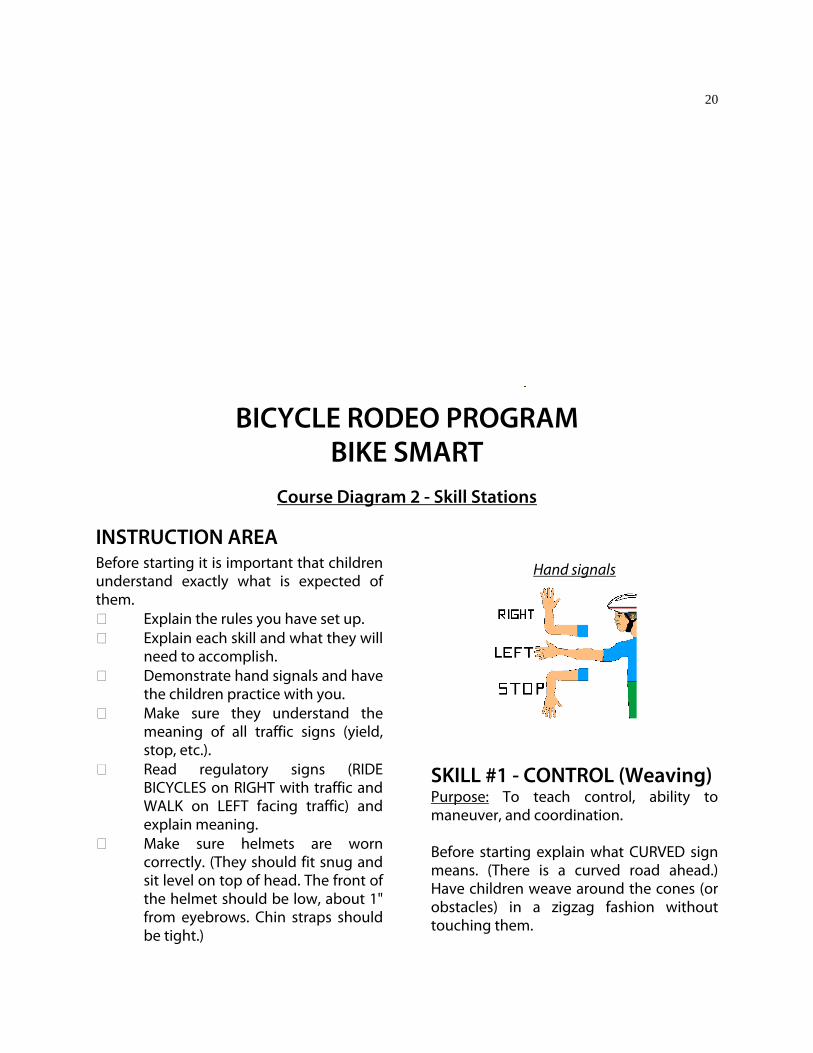
Course Diagram 2 - Skill Stations
INSTRUCTION AREA Before starting it is important that children understand exactly what is expected of them.
Explain the rules you have set up. Explain each skill and what they will
need to accomplish. Demonstrate hand signals and have
the children practice with you. Make sure they understand the
meaning of all traffic signs (yield, stop, etc.).
Read regulatory signs (RIDE BICYCLES on RIGHT with traffic and WALK on LEFT facing traffic) and explain meaning.
Make sure helmets are worn correctly. (They should fit snug and sit level on top of head. The front of the helmet should be low, about 1" from eyebrows. Chin straps should be tight.)
Hand signals SKILL #1 - CONTROL (Weaving) Purpose: To teach control, ability to maneuver, and coordination. Before starting explain what CURVED sign means. (There is a curved road ahead.) Have children weave around the cones (or obstacles) in a zigzag fashion without touching them.

21At STOP sign have children stop and give proper hand signal and turn left to next skill station. SKILL #2 - PEDESTRIAN CROSSING Purpose: To teach correct behavior toward pedestrians and teach proper hand signals. Have children stop at crosswalk. Tell them they must always stop for people crossing the street. (If possible, have someone in the crosswalk to make it more realistic.) Explain that this rule also applies when riding on the sidewalk. They must always stop for people using the sidewalk. Explain meaning of ONE-WAY sign. Have children give proper hand signal before turning right to next skill area. (If ONE-WAY sign points left, use a STOP sign here and the ONE-WAY sign after skill #4.) SKILL #3 - BALANCING Purpose: To teach balance and control while riding at low speeds. Have children ride at slow speed and try to stay between the lines without touching feet to the ground or crossing over a line. Encourage children to look straight ahead. Have children go to next skill test area. SKILL #4 - CIRCLING Purpose: To teach balance, ability to circle and change direction, and use proper hand signals. Have children ride at slow speed between the double lines in the circles or figure eight without stopping or touching the
lines. At the STOP sign, have children stop and give proper hand signal and turn left to next skill area. (If the ONE-WAY sign points left, use it here instead of Skill #2 and use STOP sign there.) SKILL #5 - RAILROAD CROSSING Purpose: To teach railroad crossing safety. Have children stop at railroad crossing. Explain what RAILROAD sign means. (Railroad crossing ahead.) Before crossing make sure they look both ways and walk their bicycles across the tracks. Have children go to next skill area. SKILL #6 - CHECKING FOR TRAFFIC Purpose: To teach balance, ability to react quickly, and proper hand signals. Have children ride at slow speed, look over their left shoulder (for traffic) before maneuvering around object placed in the path. Explain the meaning of NO LEFT TURN sign. Have children give proper hand signal before turning right to next skill area. SKILL #7 - YIELD Purpose: To teach safety behavior at intersections, and knowledge of signs, and proper hand signals. Have children practice hand signals (intersections are where they use hand signals most):

22
MUST SIGNAL WITH LEFT HAND
First, explain the meaning of the YIELD sign. (They do not have to stop if there are no cars coming, but they must stop if they see any cars.) Have children ride to intersection, look left, right, and left for cars, then go straight through the intersection. Have them repeat the skill, only this time have cars in the intersection. Make them stop and walk their bikes across. (Have a worker pretend to be an automobile.) IMPORTANT! Explain to children that they should ALWAYS walk their bikes across
busy streets. Have children proceed to next skill area. SKILL #8 - BRAKING Purpose: To teach how to stop quickly and how to judge stopping distance. Have children ride at normal speed to the STOP sign and stop with their front tire in the square. Neither foot can touch the ground until they stop, and they should not skid or wobble. NOTE: Explain if they go past the square they should apply their brakes sooner; if they stop before the square, they should apply their brakes later. If time permits, have then try it again if they missed the mark. At STOP sign have children stop, look left, right, and left again before going to the next skill station. This concludes the skill training. Have children proceed to the exit area.

23
BIKE SMART SKILL STATIONS 2
SKILL #1 - CONTROL (Weaving) Purpose: To teach control, ability to maneuver, and coordination. Before starting explain what CURVED sign means. (There is a curved road ahead.) Have children weave around the cones (or obstacles) in a zigzag fashion without touching them. At STOP sign have children stop and give proper hand signal and turn left to next skill station.
24
BIKE SMART SKILL STATIONS 2
SKILL #2 - PEDESTRIAN CROSSING Purpose: To teach correct behavior toward pedestrians and teach proper hand signals. Have children stop at crosswalk. Tell them they must always stop for people crossing the street. (If possible, have someone in the crosswalk to make it more realistic.) Explain that this rule also applies when riding on the sidewalk. They must always stop for people using the sidewalk. Explain meaning of ONE-WAY sign. Have children give proper hand signal before turning right to next skill area. (If ONE-WAY sign points left, use a STOP sign here and the ONE-WAY sign after skill #4.)
25
BIKE SMART SKILL STATIONS 2
SKILL #3 - BALANCING Purpose: To teach balance and control while riding at low speeds. Have children ride at slow speed and try to stay between the lines without touching feet to the ground or crossing over a line. Encourage children to look straight ahead. Have children go to next skill test area.

26
BIKE SMART SKILL STATIONS 2
SKILL #4 - CIRCLING Purpose: To teach balance, ability to circle and change direction, and use proper hand signals. Have children ride at slow speed between the double lines in the circles or figure eight without stopping or touching the lines. At the STOP sign, have children stop and give proper hand signal and turn left to next skill area. (If the ONE-WAY sign points left, use it here instead of Skill #2 and use STOP sign there.)
27
BIKE SMART SKILL STATIONS 2
SKILL #5 - RAILROAD CROSSING Purpose: To teach railroad crossing safety. Have children stop at railroad crossing. Explain what RAILROAD sign means (Railroad crossing ahead). Before crossing make sure they look both ways and walk their bicycles across the tracks. Have children go to next skill area.
28
BIKE SMART SKILL STATIONS 2
SKILL #6 - CHECKING FOR TRAFFIC Purpose: To teach balance, ability to react quickly, and proper hand signals. Have children ride at slow speed, look over their left shoulder (for traffic) before maneuvering around object placed in the path. Explain the meaning of NO LEFT TURN sign. Have children give proper hand signal before turning right to next skill area.

29
BIKE SMART SKILL STATIONS 2
SKILL #7 - YIELD Purpose: To teach safety behavior at intersections, and knowledge of signs, and proper hand signals. Have children practice hand signals (intersections are where they use hand signals most):
MUST SIGNAL WITH LEFT HAND
First, explain the meaning of the YIELD sign. (They do not have to stop if there are no cars coming, but they must stop if they see any cars.) Have children ride to intersection, look left, right, and left for cars, then go straight through the intersection. Have them repeat the skill, only this time have cars in the intersection. Make them stop and walk their bikes across. (Have a worker pretend to be an automobile.) IMPORTANT! Explain to children that they should ALWAYS walk their bikes across busy streets. Have children proceed to next skill area.
30
BIKE SMART SKILL STATIONS 2
SKILL #8 - BRAKING Purpose: To teach how to stop quickly and how to judge stopping distance. Have children ride at normal speed to the STOP sign and stop with their front tire in the square. Neither foot can touch the ground until they stop, and they should not skid or wobble. NOTE: Explain if they go past the square they should apply their brakes sooner; if they stop before the square, they should apply their brakes later. If time permits, have then try it again if they missed the mark. At STOP sign have children stop, look left, right, and left again before going to the next skill station. This concludes the skill training. Have children proceed to the exit area.

31
UTAH EMERGENCY MEDICAL SERVICES FOR CHILDREN AND
The Utah Highway Safety Office
BICYCLE RODEO PROGRAM BIKE SMART
FITTING BICYCLE HELMETS
A bicycle helmet reduces the risk of serious head injury by 85 percent. It is not enough to simply buy and wear one – you need to make sure it fits properly.
POSITION: Put the helmet on the child’s head so it sits evenly between the ears and rests low on the forehead – it should only be about 1-2 finger widths above the eyebrow.
PADS: Put foam pads inside the helmet so it feels comfortable but really snug. Usually, the helmet includes more than one size of foam pads that can be velcroed inside the helmet for a better fits.
STRAPS: Tighten the chin strap as snugly as possible. Adjust the junction of front and back straps just under the ears and secure back strap.
FIVE – STEP HELMET FIT TEST: PAGE 2
Buying a bike helmet:
1. Buy one that has been tested and “approved” for protection. All bicycle helmets sold in the U.S. must meet Consumer Product Safety Commission (CPSC) safety standards. Look inside the helmet for the CPSC safety standard sticker.
2. There are many different brands and sizes. Select one that fits well prior to any adjustments. Many offer adjustable sizing pads to help ensure a better fit. Buy the one that’s most comfortable and attractive to you. You’ll be more likely to wear it.
3. Any helmet that has been involved in a crash has done its job. Replace it!
4. Buy one to fit the rider now, not one to grow into.

32
FIVE – STEP HELMET FIT TEST STEP PROBLEM SOLUTION
1. By pressing or pushing front of helmet Helmet moves Tighten front strap to with heel of hand can lift the back of back to uncover junction. Also, adjust the helmet up and forward. the forehead. padding, especially in back. Make sure chin strap is snug. If this doesn’t work, the helmet may be too big.
2. By pressing or pushing back of helmet Helmet moves Tighten back strap. Make with heel of hand can lift the back of forward to cover sure chin strap is snug. Also, the helmet up and forward. the eyes. adjust padding thickness and/or position, especially in front.
3. Put a hand on each side of the helmet Helmet slips from Check padding on sides and and rock from side to side. Have child side to side. make sure straps are evenly shake head “no” as hard as possible. adjusted.
4. Have child open mouth (lower jaw) as Helmet does not Tighten chin strap. Make wide as possible, without moving his/her pull down when sure the front and back head. The top of the helmet should opening your strap junction is under each pull down. mouth. ear.
5. Check to see if the front edge of Helmet does not Position helmet no more than helmet covers the forehead. The cover the forehead. one to two finger widths front edge of the helmet should not be above eyebrows. Tighten more than one to two fingerw idths and loose straps. Make from the eyebrows. adjustments so the helmet stays over the forehead.

33
UTAH EMERGENCY MEDICAL SERVICES FOR CHILDREN AND
UTAH HIGHWAY SAFETY OFFICE
BICYCLE RODEO PROGRAM BIKE SMART
Scooter Safety Program
A new component to the bicycle rodeo trailers is “Scooter Safety.” Each bicycle rodeo trailer is equipped with ten scooters.
Scooter safety may be setup in conjunction with the bicycle rodeo program or as a stand alone injury prevention program.
The goal of the Scooter Safety Program contains the following objectives:
1) Teach children not to ride scooter in
the road. Current laws and city ordnances prohibit individuals to ride scooter on the road. Scooters should be ridden in an approved park or on
the sidewalk. Individuals walking on the sidewalk have the right-of-way.
2) Increase sport helmet usage. Studies have proven increasing helmet usage has reduced the severity of head injuries.
3) Increase and promote safety devices such as elbow and knee pads. Through the promotion of injury prevention devices there will be a reduction in the severity of injuries.
To schedule the Scooter Safety Program, call the Utah Highway Safety Office, Keri Gibson 801.243.7571

34
Bicycle Rodeo Trailer Towing & Check-Out Information Sheet
During the spring, summer and early fall, the bicycle rodeo trailers are used frequently. Therefore it is important that trailer be picked up and returned on time. If you have any questions at all please contact the Utah Highway Safety Office, Keri Gibson at 801-243-7571 or the Emergency Medical Services for Children Program at 801-273-6676.
It is the responsibility of the group reserving the trailer to tow the trailer to their event and to return it to the Utah Highway Safety Office located at 5500 Amelia Earhart Drive #155 in Salt Lake City, Utah. Our office is located at the corner of 5600 West and Amelia Earhart Drive, behind the Wells Fargo bank.
The bike rodeo trailers are located in the northwest corner of the lot.
Vehicle Requirements for Towing the Trailer The bike rodeo trailer is a large trailer and it is highly recommend that the individual towing the trailer have some previous experience with hooking up and towing a trailer.
The bike rodeo trailer is an 18' enclosed cargo trailer and weighs approximately 4500 lbs. The trailer is equipped with electric trailer brakes.
The following are requirements for towing the trailers: 1/2 ton full wheel base vehicle with sufficient factory rated towing ability. Mid-size and larger SUVs with sufficient factory rated towing ability. Class III or IV trailer hitch with 2 inch receiver slot The trailer comes with a 2” adjustable receiver with a 2 5/16” ball to pull the trailer. Seven-way slotted trailer plug
Recommendations for the towing vehicle: Electronic trailer brake controller Extended mirrors
Instructions for hooking up the trailer and returning the trailer Hooking up the trailer:
The group or individual taking the trailer should arrange a time to come to the HealthDepartment to pick up the trailer.
The group picking up the trailer should come with a minimum of two people. One for backingthe vehicle and one for guiding the driver back to the trailer.
If the vehicle towing the trailer is not equipped with a 2 5/16” ball use the ball and receiverinside the trailer.
Remove the pad-lock from the hit mount latch (HSO staff will have the combination.

35 Using the trailer jack (the handle is kept inside the trailer) lower the trailer hitch mount onto
the ball of the towing vehicle. Make sure the hitch mount latch is in the “up” or “open” position before lowering it onto the
ball. Once the hitch mount is lowered onto the ball, turn the latch (this secures it to the ball). Replace the pad-lock on the hitch mount latch. Connect the safety chains to the vehicle (if the chains hang down low enough that they will
drag on the road, twist them around a few times before connecting to the vehicle). Connect the trailer electrical plug up to the vehicle. Remove the wheel blocks from the trailer’s wheels. Place them inside the trailer. Check to make sure the brake lights, taillights and turn signals are functioning on the trailer. Ensure that all equipment inside the trailer is securely fastened. Ensure both trailer doors (rear and side) are closed, latched and all pad-locks are locked. Do one final quick inspection to ensure that everything is ready to go.
Unhooking the trailer:
The group or individual with the trailer should arrange a time to bring the trailer back to the Highway Safety Office.
The group brining the trailer back should come with a minimum of two people. One for backing the trailer and one for guiding.
Back the trailer into the spot where it was parked before. Place tire-blocks under each tire on the trailer. Undo the latch on the hitch mount. Place bricks under the trailer jack (stacked at least two high and two side-by-side). Extend the trailer jack to the point where the trailer hitch mount releases from the ball (this
may require jumping on the rear bumper of the vehicle to get it to release from the ball). If the receiver and the ball belong to the trailer, remove them from the tow vehicle and put
them inside the trailer. Do a quick inventory of the trailer and its contents (an inventory list titled “Inventory Checklist
– Participant Information Form” can be found in the back of the 3-ring binder). If there are any broken bikes or other equipment (i.e. signs, etc.) place a fix-it tag on the item
so it can be reported to the EMSC program. Any broken equipment should be fixed quickly. Please report any problems to the Highway Safety Office Pedestrian and Bicycle Safety
Coordinator as well as an estimate of the number of bicycle rodeo participants and whether or not any new helmets were given away.